Transcripts
1. Drawing for Painters Intro: Welcome to oil painting
with Steve Simon. This is the second class in Steve's ten oil
painting curriculum. Behind every good oil painting
is firstly a good drawing. In this class, we're going to be learning how to efficiently and accurately render anything it is that you want
to be able to paint. This includes things as complicated as this
composition behind me. Now, there's probably some of you out there that
are saying right now, but Steve, I can't even
draw stick figures. Well, the good news
is, you don't have to draw stick figures
in this class. You do, however, have to
draw geometric shapes and just basic geometric shapes like ovals and rectangles
and triangles. And we're going to be
using those shapes to broadly define
our composition. And then to continue tone down those shapes to
add details to them to the point where we start to develop the actual image that it is that we
would like to render. Now I think you're going to
be amazed at this process. The idea is to basically look at what it is that you're
trying to paint. Or in this case, draw first in the aggregate to
see the big picture, and then to see these
large geometric shapes in that composition. And then to properly proportion
again the large shapes, properly position them
and properly orient them. Then we take a step
back and we say, hey, are those big pieces
in the right place? If they are, we move on. As we move on, we
continue to refine these shapes to the point that fall up have
our composition. I think you're
going to be amazed at this process and
you're going to surprise yourself with
how well you can draw. Now the drawing we're
talking about in this class is referred
to as contour drawing. I'm not going to be teaching the drawing that is
in and of itself, a final piece of art that includes shading and
that sort of thing. We're just looking to put
together the contours of what it is that eventually
it is that we're going to be painting
in this class, we're going to be
using pencil on paper to render what it
is that we want to draw. Then in future classes
in this curriculum, we'll be using
charcoal on canvas, on a canvas like this to prepare ourselves for actually painting that image on canvas. Then in another class, we're also going to
be using paint on a paintbrush to draw and playing around with the
differences in those two things. I think you're really going
to enjoy this course. As I say, I think you're
going to be quite surprised at how much better you are at drawing than you
think you currently are.
2. Simple Circle Exercise: If most of us were presented with the challenge of drawing a circle such that the circle
was centered vertically, centered horizontally, and took up half of the vertical space. I think most of us
would go about doing that by just trying
to draw it like that. That's a reasonable
result, reasonably close. But you can see this distance and this distance
are not the same. Maybe this is pretty close. I'm not sure that that is
half of the full amount. In other words, in some cases and I got
the shape pretty good, but in most cases
not going to get the proportion correct
and the location correct. And further complicating
matter if this weren't circle. If there were a
triangle or something, we might not even get
the orientation correct. The way we're going to
be tackling this problem is the proper way to
do contour drawing, that we, as oil painters would
approach this situation. Contour drawing really focuses the mind on trying to
achieve what I call PPO, that is proportion,
position and orientation. Orientation won't make a lot of sense until we get to
the next exercise, because we're doing
a circle now. To achieve this, going to be using three different
kinds of lines. One is a construction line, which is really lines
that are really just helping us with positioning
things and orienting them. But they're not
really the lines that we're going to use for
the final drawing. There's the gesture lines
that we'll be doing that are a first crack
estimation of what we're doing. Then finally, the last lines are what we're going to
call our contour lines. Now if I'm doing that
challenge that I just explained where I'm
trying to center that circle, I would go about creating
this construction line first, which is just
centering vertically. And then this construction line which is centering horizontally. Okay? And then I would start
to make guesses as to what's half of, half of the vertical. And if we get rat, right, we can get the
horizontal. All right? So here's my construction lines. And now I can start doing my gesture
lines. Gesture lines. As I say, I just these
rough estimations, by doing these construction
lines and gesture lines, I've got the proportion correct. All right. And I've got the placement correct.
I've centered it. And as I say, there's not a lot of orienting going on just yet. But we'll do that in the, in the next exercise. Now I'm going to go ahead
and just add those cons, lines using the gesture. Lines that are construction
lines help to establish. Now you can see we have her circle with the
right proportions in the right placement. The next exercise
will take a look at a more complicated geometric
set up and go from there.
3. Contour Drawing Exercise: To begin this exercise, begin by drawing a frame with the same width and height
as the image on the left. This is not our project, but rather an exercise to reinforce some of the
concepts of contour drawing. Namely, we're going
to be focusing on, firstly, the reasons for lines, which would be our edges, right shadows, where
shadows are created, and then where there's
a change in color. So those are the three reasons that a line gets established
in contour drawing. We're not worried, as we say, about shading these areas, just the shapes are the contours that
are made with edges, shadows, and changes of color. Then again, the three kinds
of lines we're going to be focusing on are
construction lines, gesture lines, and then finally, the actual contour lines. If I'm going to take a
look at this composition, we would start with
construction lines. The first and most
obvious one is this line. Let's call it the table
line that really just bisects the image, right? Another construction
line that's fairly obvious is the line that's coming straight
down the middle. We can see that this composition really is squared off in these quadrants. Now we can also start to
generate some construction lines for the clock where that
clock is going to land. Okay, now maybe
another construction line for the bottom of our
cube, somewhere around there. And then the top of this cube is just shy of the
middle of that clock. Let's say it's
right about there. That gives us a
pretty good start in terms of constructing
this whole thing. As we go forward, ester lines may make things
move around a little bit, like I'm looking over here. This space over here is maybe a little bit
bigger than that, but that's going to
come out in the wash as we start working
with our Chester line. Let's work with some gesture
lines first on the clock. Here's a gesture line
for that circle. Okay, let's bring the
Chester line in here. Now, this is already
getting interesting because we're about this clock here. We're talking about
proportion, right? How big is this versus the space that I'm
putting it in right now? It's a little bit
small actually, So let's start to
large it a little bit. So we're trying to get
the proportion correct, We're also trying to
get the second correct, in other words, the
placement of it. Right. And I can see that that distance is a little bit
smaller than that distance. So I'm probably
going to want this bigger and maybe a
little bit higher. That's good enough for now
in terms of its orientation. The two piece that we're working on is proportion placement. Right now, we don't
have a lot of orientation going on because, well, it's just a circle, right? However, the orientation
starts to come in. Now as we start drawing lines, that line has to be oriented
at a similar angle. Now that looks like not
quite the same angle. Let's start to work
on that orientation. And that are starting to look
a little closer. All right. Now we can start to work on the proportion and placement of this line and also
its orientation. How's that orientation look? Fairly good. And we can
see that this line, this part of the line in
this part of the line, are pretty close to
the same length. It's maybe a bit taller, a little bit longer on this
side than it is on this side. So we're establishing that. Now we can start to
work on the placement, proportion, and
orientation of this line. Again, just gestures. All right, Feeling pretty good. And we're just
going to duplicate the same thing on this side. Now let's start to pay
a little attention that orientation feels pretty good. Then we'll do the same
thing on the top. Our cube is in perspective, which is pretty interesting. Let's say that distance
is pretty close. That distance has got to come
to about there, let's say. And then it's got to
orient symmetrically. Okay. We have our
construction lines, our gesture lines
are coming together. This is a fairly easy one
because it's going just from vertex to vertex. And this one just draws itself. Now as I look at this, I can already tell that my
cube is what, to squat. This guy look a
little bit squat. But I don't have a lot invested in this drawing yet, right? I'm not concerned if I have
to do a little bit of acing. It feels to me like I just need to elongate this a little bit. Let's do that. As you can see now things
are coming together. I feel like we've got a pretty
good PPO going on here, the proportion going on here, the placement going
on with the cube. And the clock is really quite good then the orientation
is looking pretty good. Let's work a little bit now on the inner inner circle and these are just course
concentric circles. Gesture lines for the shadow. And we're going to have
gesture lines for this shadow. We can see here again
that shadow line. And this line, that's pretty close to right
in the midpoint. Let's say we're
right about there. This line comes
down at an angle. It looks to me to
be about like that. Go ahead and make a statement
and then see if it's true. You can see the shadow comes
beneath that vertex, right? And that are going at
this angle, right? It's got to be somewhere
around out here. And even measure a little bit. Again, let's get
the orientation, another orientation here. That feels pretty good. The only thing we have to add
now is hands of the clock. Looks like about 04:00 goes through the
middle of the clock. Of course, that hand
and that line are pretty much parallel. Here. We have our, our construction
lines or gesture lines. Now we can get in there and
work on our contour lines. Let's just finish that off again. This is to be able to work on a composition
that we're going to paint. We're not doing a final
piece of art here. We're just establishing contours to work on a painting
going forward. When we do that, when we start painting using
the two different methods, the classical academic
painting method, we'll be using charcoal
to draw on canvas, which will be really exciting. Then when we go to all prima, it's going to get
even more exciting because we're going
to be doing this with a paintbrush instead of a pencil or
piece of charcoal. There's our exercise,
our contour drawing of forgot about the triangle. Triangle is going to be
bisecting that line, right, And then just goes from the vertex to that midpoint. And then we'll just kind
of finish it off here. And there you go. So there's our second exercise, and now let's move
on to the project.
4. Drawing Project - Part 1: For this project, you
will need a pencil. I'm using a four B pencil, a drawing pad, an eraser, preferably a needed eraser. And you'll need to
download the source image. The source image is available in the Project and
Resources section of your class and is
titled Cardinal. The project is
presented in two parts. When you're finished
with the project, please upload it to the My
project section of your class. This enables me to
provide you feedback and allows other students to learn
from your example as well. We're going to be focusing as we have been on what I've
been calling PPO. That is the proportion, the position or placement, and orientation of the
subject matter that we're trying to draw in preparation for our
eventual paintings. Again, the three
things that create contour lines in
our contour drawing are edges change of color, where his face is going
into his or breast. Then lastly, shadows. There's not a lot of
shadows going on here, but we see a little
shadow there and we could maybe render this area as well. Now what we want to
do is start off by framing your paper to the same aspect ratio of
your source material. In this case, we're
fortunate enough to have actually not just the same aspect ratio but the same size. Please go ahead and set up the project as shown and
then join us for part two.
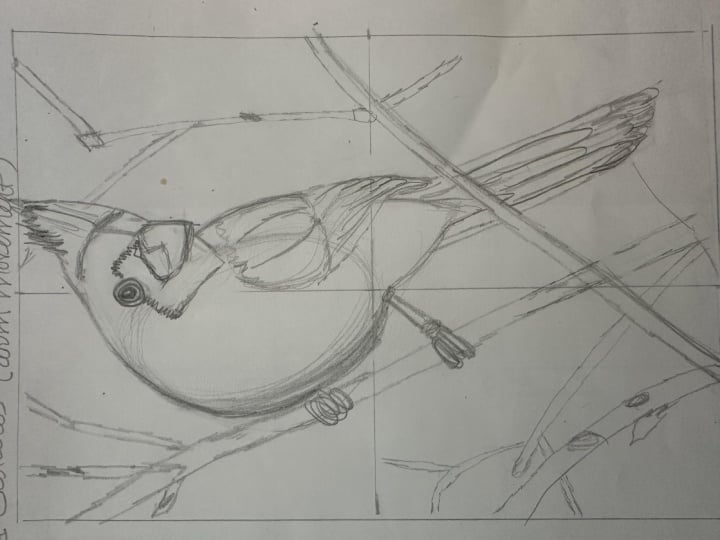
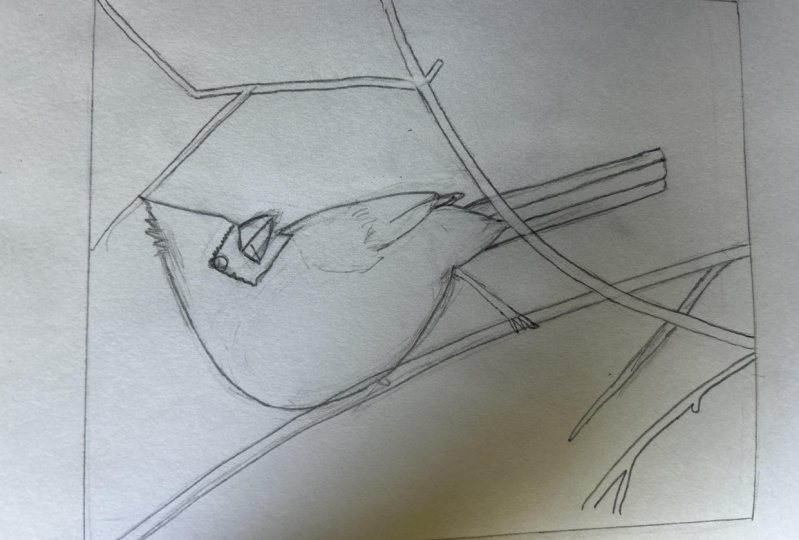
5. Drawing Project - Part 2: The first thing
we're going to do is establish some
construction lines. I'm going to want to do a
little bit of measuring, and we're doing that
with our pencil. I'm going to try to figure
out this is a key spot. I'm going to try to figure out where that intersection of
the leg intersects with the abdomen and where
that is relative to the center of our composition. I'm just measuring that. I'm seeing it's a
little bit lower than the middle and it's going to
be a little left of middle. If I can estimate
where my center is, I'm going to establish
a center there. Said it's a little bit lower and it's a little
bit to the left, we're going to say
right about there, um, is the height. And we're going to
say right about there is where it
is left to right. So if we can now establish some, some lines to just define where our bird
is going to fall. That's going to
help us already to establish our
gesture lines, okay? Could also do something
similar coming from that spot, coming down, and
something like that. Now one of the things that's interesting about this
composition is we have this branch that can really help us with
positioning everything. We can actually use this as one of our
construction lines. Again, helping just to establish something that allows
us the ability to start creating our
gesture lines relative to the exact placement of where
everything needs to be. Let's take a look at
just drawing shapes. Let's see, this is
an oval right here. I'm needing to this oval in
within my construction lines. Simplify gesture lines as
basic geometric shapes. Ovals, rectangles, triangles. Now his head is more
or less this triangle. It's going something like that. We have another triangle here, then we have something
of a rectangle coming. Let's try to get
the orientation. My original construction
line is already pretty inaccurate, but again, we can use this
relative space with that twig to start to define
that a little bit better. There's gesture
lines for the tail. I see another triangle here. That triangle originates there. And it's coming
something like that. Now we're going to
go up to his face and I'd like to know
where that eyeball is. That's feeling
pretty much center, but a little bit to left of
center, there's our center. So we can say eyeball
more or less there, which is going to mean his face, which is a square, is going to be
something like that. As you can see, this is looking nothing like a cardinal
at the moment. But you can see how
our gesture lines are really helping to
define the spaces in. We'd much rather do
this then really start drawing a whole bunch of details that might not be the
right proportion, might not be the
right placement, and might not be the
right orientation. This is helping us
with all of those. We can take a look
at this now and say, hey, I headed in the
right direction. This proportion the same
is placement of this guy, he's off to the left a
little bit, is that right? Is the angle, the orientation. Is that correct? If I'm to evaluate
all those things, I feel like we're heading
in the right direction, except he's a little plumper. Then I have him going here, we're going to make him first, a little plumper on that side. Going to refine this
a little upward, Our triangle is more like that. We're going to see if
that starts to make him feel a little more like
the source material. I think even just those
subtle adjustments have helped to put the necessary weight
onto him as we need a little thicker. I also feel like that spot needs to come out a little
bit more as well. Just a series of adjustments. At this point we want to think of this drawing is just
a series of adjustments. We don't want to
be so invested in what we've already drawn that we can't erase it without surrendering a whole bunch of effort that we've
already put into. We're going to add another
triangle for the beak. And if I had to draw
it just as a triangle, I think it would look
something like that. And then we'll just
refine it slightly. It's kind of a triangle
and another triangle, so to speak, eyeball in place. And I think we can have this branch that's
going behind the cardinal. I'm starting to
recognize also that if I tried to put
this leg in here, this little triangle
here is turning out to be too small, right? That means one of two things. Either this branch
isn't the right spot or that the underbelly here, the abdomen, isn't
the right spot. I think frankly it's
a little bit of both. I'm going to make that
adjustment again, no problem. When things are incorrect. We haven't invested a lot
and this is a series of adjustments and not perfect, but we're closer circle for the other claw, okay? This area here also
feels like it needs to be a little bit
longer like this. I think we can also add this
branch which if I'm going to plumb a line from the claw, intersects with the bottom
of our image right there. And then just below that
triangle of the tail feather, or just below the claw. Say the claw is more like that, the tail feather,
it's more like that. This reveals a few things. Number one that this wing
feather is too long. That real subtle
curve right there is. Even with the abdomen and evaluating everything, it feels pretty much like
it's in the right place. Now we're able to go in, we could continue on
with these branches. Frankly the branches, they could really be anywhere.
So we're going to do those. After we've put the contour
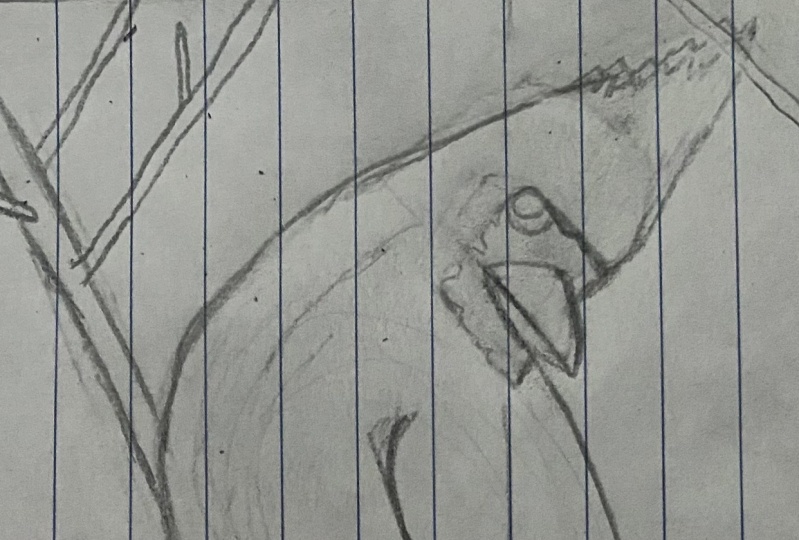
lines in for the Cardinal, let's go up to his crown up here and start adding his funny hair. Do now we're into
our contour lines. Just constantly referencing
my source material, adding our contour
lines in a way that uses our gesture lines as reference for making
these final adjustments. The level of detail
that you want to get into in these wings,
it really up to you, if I'm going to
be painting this, I'm not going to want
every feather in there because frankly that's got to
be painted with the brush. If I start getting
excessive with the details, it really just becomes an annoyance at the
time of painting. In the interests of time,
we're just going to fast forward through the
rendering of the twigs. And I mentioned at the outset we might add a little bit of a contour line for this shadow. It's going to help the
painter to say, okay, I see that there's some shadow
going on here and probably even this extra set
of feathers in here. You can see these guys, It's going to look
something like that. There you have a wonderful
contour drawing. I hope you've enjoyed drawing
along with this project. Please upload your samples and we'll have a
look. Thank you.
6. Closing Thoughts: To summarize, when creating our contour drawings for
our eventual paintings, we want to do is take a look
at our source material. In our case, it
was a photograph, but it could have just
as well been real life. What we want to do is take a look at that source material, try to see the large geometric
shapes in that design. And then use our PPO, our
proportion, placement, and orientation to drop those geometric shapes
into our drawing. And then to continually refine them to the point
where we feel like we're confident that we
have a contour drawing that can then be used as a
painting along the way. We're using three different
lines to do that, PPO, and those three different
lines are construction lines, which are really just helping us to measure and place things. Then are gesture lines. Gesture lines, by the way, really come more
from the shoulder, the sweeps than they
do from the wrist. It's really when we're holding down those contour lines that we're really using fingers and wrists the way we're
traditionally using pencil. I hope it went well
with the Cardinal, Of course, it's
just a first whack. Naturally, you will
get better at this. With more practice. I encourage you to take a look at some
things that you find interesting to draw
and try to use this process and try
to develop that skill. This will come in really handy once we really
get into painting, because the one thing
you don't want to do is get frustrated with your drawing when
you're trying to paint, it just gets in the way
of the creative process. I hope this helps
and happy painting.
 Steve Simon, Simon Fine Art