Transcripts
1. Course Introduction: Get ready to turn. I can't draw anything into, I can draw almost anything
that I want confidently. In this course, we are going
to be taking you through a step-by-step process for how to get started drawing
as a total beginner, by the end of this class, you'll be able to
Confidently Draw three Simple Images
and have the skills necessary to teach yourself how to draw them with anything else. We specialize in
the visual language and we know how
important it can be. Plenty time to
draw Simple Images can aggregate value and
explaining constant. Your notes, presentations, Projects, forms
of communication. In much more. We're going to start
off by talking about some simple shapes like
triangles, squares, and circles. And then we'll be moving
into some more exercises that help you see these shapes
a little bit differently. And finally, you will build a three Simple Images and using these simple shapes
as our final project. All you will need
for this course is something to draw with and something to draw on
a pen and paper work, or even a marker and Post-it. You can use a whiteboard,
sidewalk chalk, a drawing tablet, anything
that allows you to make. When you're ready, let's
start your drawing journey.
2. Your Project: Confidently Draw 3 Simple Shapes: For your class project, you will be creating three
Simple Images that you can Confidently Draw
without using pencil. You can use a three example
images that will be creating or you can challenge yourself
and create your own. After creating these images, you are opening up the door to draw almost anything you want. These three images will start what we call your
visual library. They are three
things that you can draw quickly and confidently anytime as you
continue to develop your skills and use everything we teach
you in this course. You can also build up
your visual library. The more you add to
that visual library in the more images
you are confident in drawing and more versatile you are with the
visual communications. We will be focusing on the three simple shapes that
we present in this course, triangle, square, and circle, and create Simple
Images based on those. We will start this
by sketching it out and Simple Shapes
in details with pencil and then going over the final image with
a pen or marker. In the end, the goal
is to be able to draw these three images without
console as a guide. This can be accomplished through
repetition and practice. We'll be going into that
further during the lessons. When you complete
your final project. Three images drawing
Without Pencil. Don't forget to upload a photo of them to the Projects tab. We can see what you
created and you can show off your new Drawing
Skills to the world. As always, if you
have any questions, feel free to post
in our discussions or reach out to us
on social media. Now that we know the
angle of this class, we're going to turn it over
to one of our co-founders and Chief visioning Officer
at ink Factory. Does the force me to help you get over
your views of drawing?
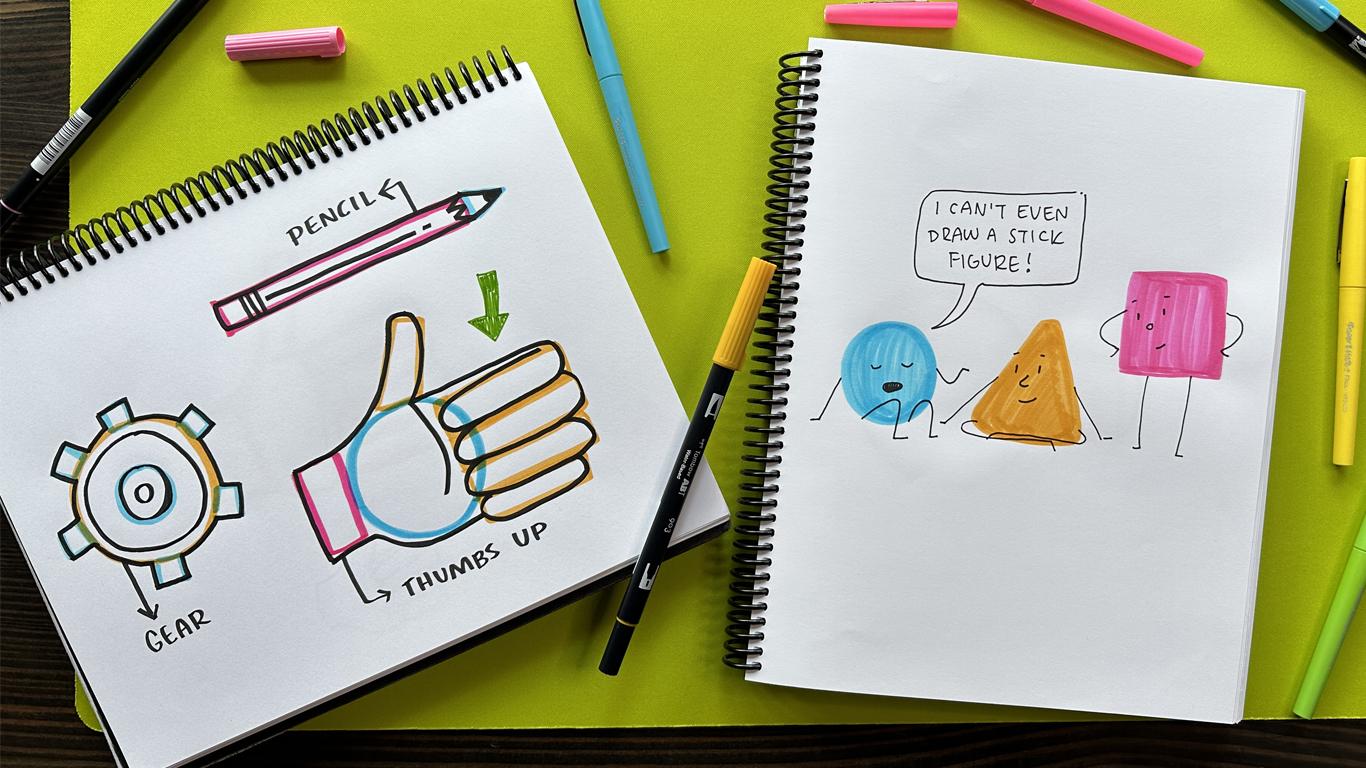
3. "I Can't Even Draw a Stick Figure" - Busting Myths of What You Think You Can't Draw: Hi there. My name is Dusty for
larceny and I am the Chief Vision Officer and
co-founder at in factories. And today I'm here to give
you a pep talk on Drawings. That's because it's one of
my favorite things to do. I do it every day at work
and through the years, I've gotten really
good at it like this. And I think you're here because maybe you want to get
really good at it too. Sometimes when you're
starting a new skill, some of that
self-doubt can deepen or maybe you compare
yourself to someone else. And I don't want you to think that you have
to draw like this. I'm right away because it
takes years of practice. I've been doing this since 2006. If you're thinking
yourself, Jeez, I Can't Even Draw
a Stick Figure. I just want to switch that to. You can Draw a Stick Figure and we can teach you
as simple shapes. And also just say that you can, because that helps
with your mindset when you're learning
something new. You know, whenever you're
sending a text message or maybe you're journaling or
writing an email. I'm guessing that you're
not thinking to yourself. Gosh, I'm not a
published author, so I probably am not
qualified to send this. But for some reason we
get that withdrawing. I want to dispel that myth with you and my team is here to help you break things down into simple shapes that you feel
a little bit more competent. I believe in you, my whole
team believes in you. And we really believe that drawing is one of the
best ways to communicate because visuals can help engage people in your
content and also inspire people and also make anything you want to
say more accessible. So we'll start by drawing
with some Simple Shapes. And then we turn it over
to you to practice, practice, practice, so that
you can get closer to that. Thank you. And I believe in you got this
4. Drawing Simple Shapes fixed: We're going to start
the process off by drawing simple shapes. And if that seems a little
bit intimidating right now, just stay tuned
and we'll give you some tips and
tricks to make them a little bit more approachable. You already draw these shapes
in life if you hand-drawn and an OH as a circle. And capital a is
basically a triangle. And an uppercase E is
a three-sided square. A square is also
just extract circle. If you find that you
are getting shaky lines will try to draw these shapes. You are probably
focusing too hard. Drive faster and more Confidently actually
improves your linework. A great tip is to draw an up from your wrist, but
from your shoulder. Your shoulder is much stronger
than your wrist and that creates steady or lines
as you draw these shapes. So go ahead and get a piece of paper or something to drawn and start trying out drawing
each of these shapes as we talked through a
few more tips with you, it is helpful to draw
different sizes of each shape to see what works
best for you on the page. Sometimes people Draw
way too large for the Canvas they're drawing on and it takes up too much space. Sometimes people
draw super small, which makes it harder to
have stronger linework. When you're drawing Simple
Shapes with the intention of turning them into slightly
more developed Images. Make sure that you leave
enough space around the image to fit on the
space that is being drawn. At the same time, make
sure you don't drive too small that it actually makes it harder for
you to work with. Try practicing drawing these
shapes in different sizes, since it will help you find
what is most comfortable, it makes most sense to you, depending on where you will
be Drawing the most can also dictate what sizes
of Shapes make sense. For example, if you
are a teacher or plan to use Drawings on the
whiteboard in front of the room. It will feel different
and you will have to draw a larger shapes
for people to see. Then if you were drawing in a small sketchbook
and on a table. So go ahead and practice
each shape on whichever surface is most useful to
you and see in the next time
5. Using Simple Shapes to Draw Stick Figures: In this lesson, we're
gonna teach you how to use the three simple shapes
we just learned to create more versatile
Stick Figures. Follow along with me as I draw three different Stick Figures
and explain the process. You can get a fresh sheet of
paper to draw along with me, or you can draw your own
at the end of this video. So first, we are going to
draw a circle for the head. Not too big, not too small. Just right and right under that I wanted to draw a square, but I ended up deciding
to elongate it a little bit for the torso
of the Stick Figures. After that, I drew some arms. Now, I'd like to
think of arms as like little noodles sticking
out from the body. So yeah, if you draw
the arms at the top of the torso shape and then add little lines for the hands. I like to follow and do
that for the legs as well. So I'll draw two
lines for the legs and then thick
lines at the bottom of the legs to show that the character could
be wearing shoes. This is a really basic way
to Draw a Stick Figure, but I will draw two different
variations of it to kinda show you can create diversity when you
make Stick Figures. In this second one, I decided to start out with a triangle for the
shape of the head, and followed that with a
triangle for the torso as well, facing in the
opposite direction. This kinda looks like the
character might be wearing a dress or a different
type of clothing. Then I started with the legs and then created that thick
line to show shoe. Did the same for the other way. And you can switch it up
with different poses. I just decided to
keep mine standing, face forward and
then follow up with some arms coming out at
the top of the shape. After that, I decided to follow with a shape
for the hair. So now the character looks
like it might have a ponytail or certain special
hair, hairstyle. You can use a circle for fund or any other shape to kinda
show a different hairstyle. And for the bird Stick Figure, I decided to start the
head shape with a squared. And under that, I drew
a circle for the body. Now, following obviously
the noodles noodle method, the arm is going
up into the air. And then after that, I drew the other arm on the
other side of the body, followed by the first leg. And obviously the after that, I decided to make it small
line to symbolize a knows. This is really good to do
when you want to show that you're a Stick Figure is
looking in a certain direction. Next you see me emphasize
shoes on the stick figure, and then emphasize the
arms again and the hands. And here are three different
examples of how you can use simple shapes to create
different Stick Figures. Now, you can draw
the same ones I did, or you can draw your own
combination of different shapes. Now You Can't Draw Stick Figures and draw them in different ways. In the next lesson, we'll be diving into the
Simple Shapes to see the other ways we can
create interesting images. See you there.
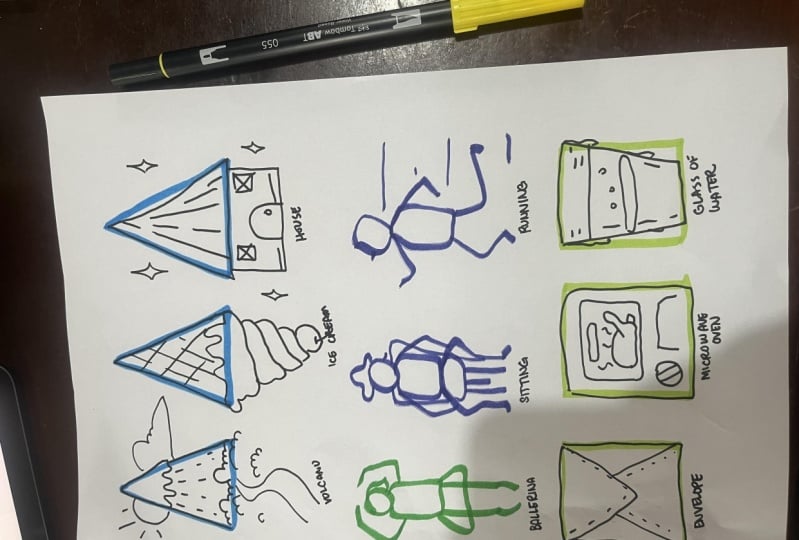
6. Simple Shapes Exercise: We will be doing an exercise in this lesson that we do in
almost all of our workshops. It's an exercise that we do
over and over because it can continue to help inspire you to think of Simple
Shapes differently. So go ahead and grab something that you are able to draw on. Also get something that you
can write with or draw with, which would be markers, a pen, a pencil. And we are going to follow
along this exercise with you. You'll see that
there is actually a timer on the screen because this exercise is going
to be timed and we're going to do it three times
a three different shapes. We also recommend that you keep the final product from this exercise until the
end of this course, because you can use some of the creations from
this exercise as inspiration for what
your final project for this whole course can be. So let's go ahead
and get started. So to start this exercise, you are going to draw three triangles on
your page that can be with the same
marker that you are using to draw on top
of these shapes. Or you can choose to use a different color to draw
the basic shapes themselves. So that's three triangles
that are evenly spaced, about the same size. They don't have to be
perfect as you can see here. Then you're going to grab either a black marker or whatever marker you
would like to choose. And now I would like for you
to start a timer for 2 min. We're going to do this whole
exercise in just 2 min. And within those 2 min, you are going to turn these
three basic triangles into three different objects
or images using your imagination and
drawing pretty quickly, we have 2 min to turn all three of these triangles into image. Let's go. Alright, you can go ahead and follow me if you're
out of ideas. Triangles can actually be a
little bit difficult to come up with some concepts and
ideas to turn it into. But I'm starting here
with a pizza and adding a little bit of
pepperoni there at a couple of dots to
give it some texture. For the second shape. I'm thinking maybe I'll actually do something
upside down, which is at heart because triangles basically
a heart if you just curve the bottom sides in. And then I'm going to
add a little arrow to signify it even further. If you'd look at it upside down, it makes a little bit more
sense, but that's okay. I'm using my imagination. Alright, this last shape here, I think I'm actually going to go a little more complex and out of the box are
trying goal or whatever. And draw a box into it with another circle and turn this
into a little rocket ship. Going to add a little bit
of movement for it at the bottom because I still have some time to play
around with things. So if you're done drawing Your
three objects, this point, It's a great time to go
ahead and try to add a little bit of embellishment
into the shades. I'm adding some stars around this rocket or
continue working and trying to come up
with some concepts to turn the other shapes into. And if you have a lot
of time leftover, you can go ahead and reinforce the outlines which I did
there with the rocket. Add some more details in. I'm going to go ahead
and outline the pizza. I was thinking of adding some cheese like
melting off of it, but I don't think that's
going to look so good. So just going to finish it up. And we're done. Awesome job. Here's a little bit
of a closer look as you see if I turn
it upside down, the heart makes a
little bit more sense, and the other Shapes
work as well. Alright, so now you can
get a fresh sheet of paper or flip the page in your sketchbook or
erase the whiteboard, whatever you're working with. And we are going to move
on to the next shapes. So this time we will be
working with squares. So go ahead and get a marker out and you are going to
draw on this page, three evenly shaped squares, just like you did
with the triangles. So when drawing squares, I always try to eyeball it
as well as I can to keep the sides about Even
sizes from each other. And here we've got roughly
three even squares. Once you've got
the squares ready, we're actually going
to have less time this time around just
1 min and a half. And let's go. Alright, so starting
with this square, I am immediately drawn
to create a building, no pun intended there. And the reason is because I live in a city and we're
surrounded by buildings, and most buildings are just blocks that are
often rectangles, but square is just another
type of rectangle. Which inspired me to move onto the next one and create
an old school television, which used to have all
the friend little Fun, little knobs on it. And so I'm going to
draw those and then add a little bit of a screen glare. I wanted to keep it
simple for this last one. So I'm just going
to draw a couple of lines that turns it
into an envelope. And now that I'm
done, I'm trying to think of other
things I can add. So an at sign makes it into maybe an e-mail instead of
just a normal piece of mail. Then I'm going to see
if I can embellish any of the other images
that I have drawn here, which you can do the same
or continue to work on your shapes as we come close to the end
for this exercise. And that is time. Alright, well, I'm going
to finish that one. Great job on the squares. And you guessed it, we are moving on
to the last shape, which is going to be a circle. Alright, go ahead and flip to fresh sheet of
paper one more time. And this time we will be Drawing Three circles about
evenly spaced from each other
across your page. So draw three circles about enough space to draw inside
and outside of them. And for this one, I'm
going to challenge you to do the whole thing
and just 1 min. So fill all three circles
in just 1 min of time. All right, Ready, set, go. This morning, I bought some donuts for my
friends at work. So I'm gonna go ahead and turn this first circle
into a doughnut. And for the next one, the doughnut made me think
of another thing that has a small circle
in the center, which would be like a
wheel of a bicycle. So I'm actually going to draw the circle on the outside and another one a little
bit smaller than it to signify the tire of the wheel. And then going to
add in a bunch of spokes for the wheel as well. And then I'm the last
one keeping it simple. A lot of emojis
are just circles. So I'm going to draw
a happy face with a little bit of blush on its
cheeks and some eyebrows. And a couple of lines to show
how happy it is. Nothing. There you go, 1 min
and you've created three whole different
images with circles. Here's a little close up look. And because some of
them don't make sense, if this happened throughout
any of the exercises for you, All you have to do
is just label it. So that's a doughnut. And if I write the
word wheel here, then I'm like, Oh yeah, that totally makes sense. And this one is a happy face. So this is option for
you to go ahead and do now so that once we get to
the end of this course, you'll remember what it
was that you were drawing. Awesome job everyone, you now have through three
pages worth of images. That's nine different
images that you can use as great references for what your final project will
be in this course. And now that we have warmed up our Drawing Skills and
imagination Skills, we are ready to move
on to the next lesson, which is how to combine so the Simple Shapes standing
slightly more complex images
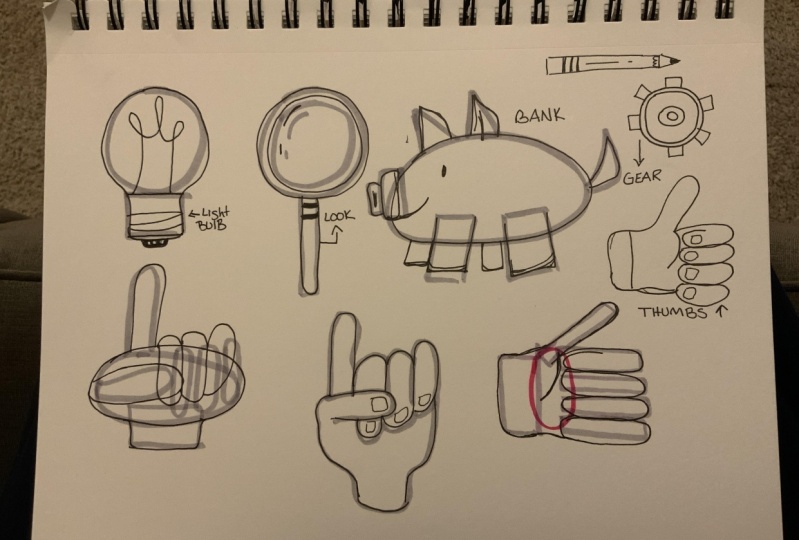
7. Combining Simple Shapes: Just like we were able to turn Simple Shapes into images
in the last exercise, we are now going to
use these shapes, combine them together and create slightly more complex imagery. Here is a way to draw
a light bulb when you just have a circle as
the main part of the bowl, and then you add a
rectangle underneath it. That's basically a light bulb. All you have to do
is trace around those shapes as if it
was one shape and leave a little bit of a curve
between the rectangle in the circle that makes it
more of a light bulb shape. And you can even add a little bump at the
bottom if you would like. Then a couple of lines to signify the part where you
screw the light bulb in and then a little loopy thing in the middle to signify the
filament of the light bulb. So by just adding a
couple of details, you just turned a circle and a rectangle
into a light bulb. And here's some more examples, some of them getting a
little bit more complex. So a magnifying glass is two circles that are one
inside of the other, concentric and then a very long, thin rectangle right
underneath it. It's kind of similar
to the light bulb, except you don't
really need as much of a curve that connects
the two shapes together. The piggy bank that you can see here is a little
bit more complex. If you start with
the main shape, it's just a giant oval. That's the shape of
the PD bags body. And then all of the legs are little squares or rectangles
as well as the snout. This now can be a rectangle
with a circle attached to it. And then the ears are
just two triangles. So what I did here was first
drew the piggy bank and then went in and traced as
many shapes as I could see. Just with a naked eye looking at the image to help
break it down for you. And last but not least,
is this hand on the side, which is a combination of an oval as the center
part of the hand. Long rectangles to
signify the wrist. And then at long
individual rectangles that show where the
fingers will be. And all the changes that
were made was curving the edges of the
different rectangles and connecting
everything together. So it might look
complex, but in reality, these are just using the three images and this three simple
shapes that we went through in all of the
exercises leading up to this this lesson, we are going to walk you through a step-by-step process of
drawing this image here, I am going to draw a circle. But the circle can be
a little bit more like an oval and it would
be a tall oval. Then I'm going to the
right-hand side of this circle and I'm starting just underneath the
top of the oval. And I know in my
mind that I'll be ending at the
bottom of the oval. And so when I'm creating each of these individual rectangles, I try to visualize how
thick they should be to be about the same size
going between each finger. If it helps you, you
can even make a mark at the bottom to know where
you're going to end. To make it easier to draw these four rectangles within
the space that you have. Once you're done with
those rectangles, I'm going to go to the
left-hand side of the oval. And I'll be drawing
a vertical rectangle that's a little bit wider. And this is going
to be the wrist. It's not quite as
tall as the oval. And it says wide as
you'd like it to be. But I tried to keep it
thinner than the oval itself. It makes sense if you
look at the shapes in comparison to each
other right here. Finally, we're going
to draw the thumb. So starting pretty much
at the top of the oval, I'll draw about a
45-degree angle, maybe a little bit less. And that's going to be the
angle of my rectangle. So once I draw that
angle and make it about the same length
as the other fingers, maybe slightly smaller,
then I can complete that rectangle and it's okay if it overlaps onto this circle. So now we have the basic
skeleton of this hand. And what I want to do is turn
this into the final image. I'm going to use a marker or a black pen in order to show you what the final
image will look like. But if you're using the same marker pen pencil for all of these parts,
that's okay too. So I start at the very
top of the wrist. Basically what I'm
doing is helping to smooth out all of the points where the
shapes meet each other. With the pen, I'm slowly coming
in and right as I come to the crease between the wrist
and the palm of the hand, I'm going to make it
into a nice arch. Instead of hitting the
two different shapes. I'm going to continue that
arch up to the rectangle, that is the thumb. And once I get to the
top of the thumb, I want to round out that rectangle so that
it's no longer a squared. And I come all the way
down back to the oval. So right now we've got a
sloping line up with a curve around the top and we're
hitting the oval once again. Here I still haven't
taken my pen up because I like
to add the line for the thumb joint
from the way to do that is to create an arch that is in the same direction as the arch of the right-hand
side of the oval, but can be a little
bit flatter than that. And it's going to come
are about halfway or three-quarters of the
way through the oval. You don't want it
to go all the way because the thumb joint does not extend all the way to the
other side of the hand. So we've got our
thumb going here and now we'll draw
each of the fingers. So I'll start at that crease right where the thumb
meets the oval. And I'm going to start to create these fingers by rounding each of these rectangles
so they become rounded rectangles
go a long ovals. But when I round the first one and I come
all the way to the bottom, I continue as if I'm going to close it off by
touching that top line. But I don't actually
touch the top line. I leave a little
bit of space and I draw a line that comes
almost to the top, but again, does not touch the
top of that thin rectangle. Or if poor finger and
leaves what looks like a little crease that indicates
that the finger is bent. Once that one is done, the rest of them are
a little bit easier, where each of the fingers
are just going to be rounded rectangles
or long oval. So I'm gonna go ahead
and complete those. And then I want to go back
to where the wrist is. So I'm going to start at the other end of the first
line that I created. So the top of the wrist. And as I draw a line down, sometimes I like to curve that
line a little more just to give it a bit more of
an organic shape to it. So as I do that, I'm also going to round the edge of this rectangle
coming to the bottom. And it'll be the
same thing like we did at the top of the hand. I'm smoothing out the scene
between two different shapes. And then I finished that line, right when it hits the
base of the pinky finger. There you go. There is how you
draw a thumbs up. A great exercise to
further the skills that you learned in
this lesson would be to try to create these
last two images all on your own using a combination
of Simple Shapes. Feel free to share in
the Projects tab for this course so that we can see all the progress
that you have made. And in the next lesson
we're finally going to get to the final project
for this course. And we think that you are
definitely ready for it. So let's see
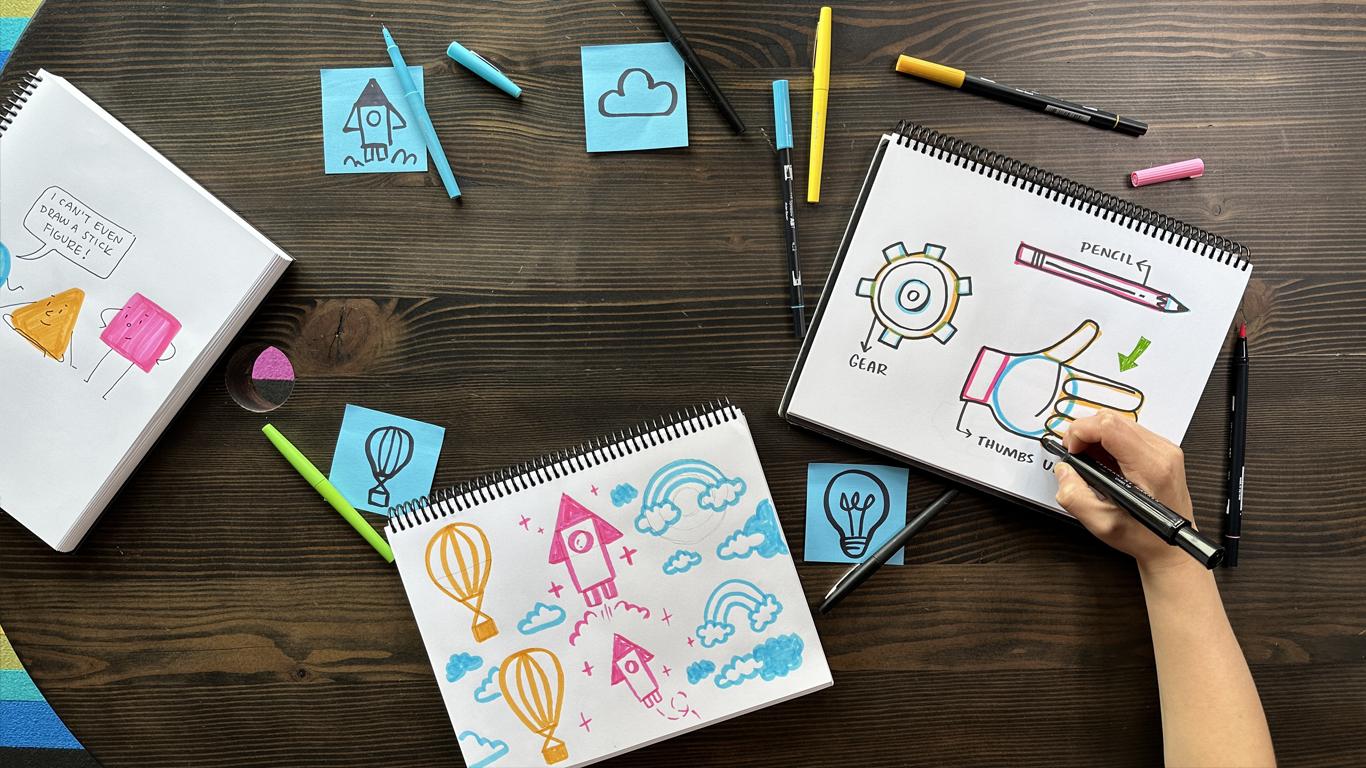
8. Drawing Your 3 Simple Images: Now it's time for you to
start your final project. That means you'll be drawing
three images quickly and competently and without
pencil to guide you. In this lesson, we'll take
you through step-by-step on how to draw each of
these using Pencil. But in the next lesson, you're gonna do it with that. You can follow
along with us here step-by-step to create
these three images. Or you can see how we break it down and you can create
three of your own. I'm going to use my
phone to look up a reference image for
a hot air balloon. I like this one. I'm
going to print it out. Now that I got it printed out, I'm going to use
a marker to find the Simple Shapes hidden
within the drawing. Right now I see a big circle. And also this little square
down here at the bottom. Then I'm going to
add a triangle. Now if my pencil, I'm going to draw a
circle, a triangle. And then the small
square at the bottom to match the Shapes
I drew overview. Now that I have all
of those in place, I'm gonna go ahead
and add some details. Now I'm going to draw over my
pencil lines with a marker, but I'm only going to ink the
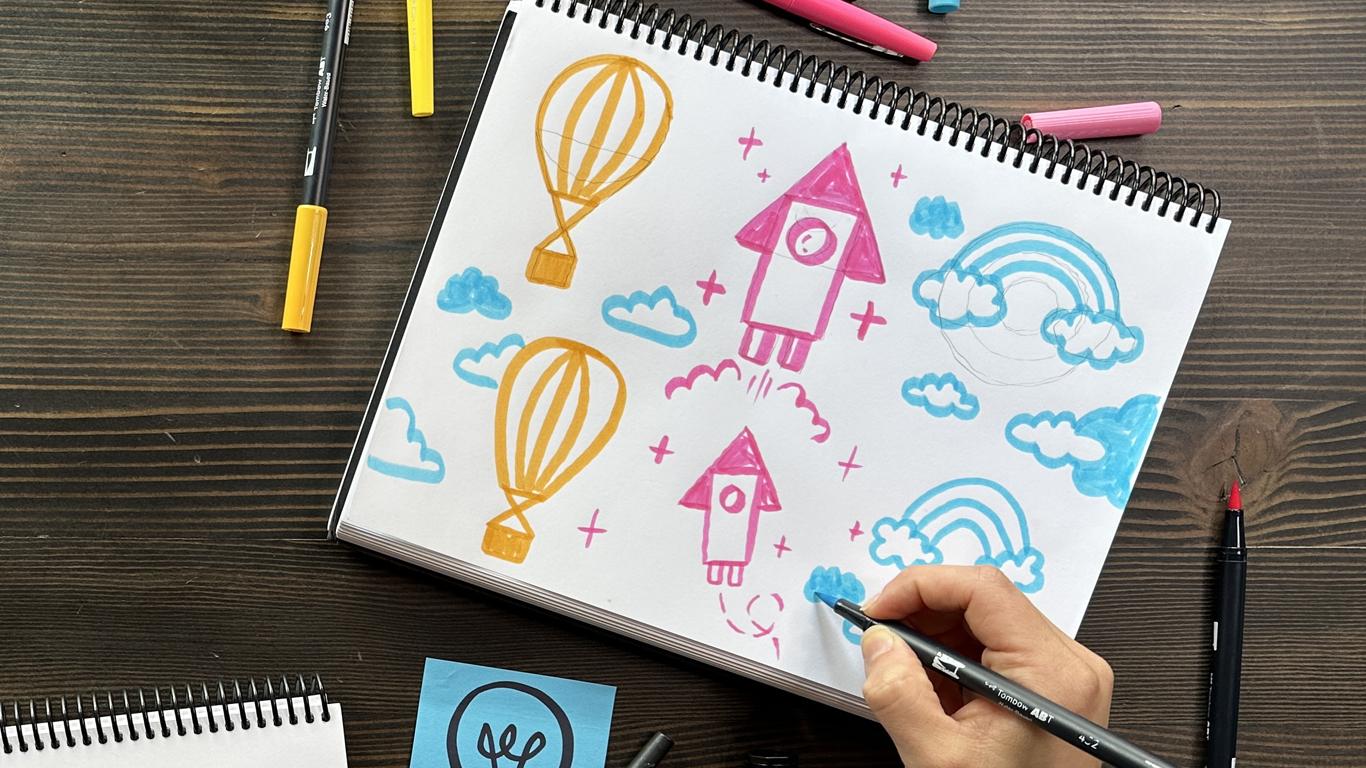
lines that are necessary. Now I'm willing to draw a rainbow using the
reference image. I'm going to draw some
circles inside of circles getting
smaller each time, and then two ovals
for the clouds. Now that I have that
drawn in pencil, I'm gonna go ahead and ink it. I'll start by drawing
the curved lines of a semicircle to
mimic the rainbow. Now I'll add the
clouds by drawing even more semi-circles
around the edge of the locals to create
the fluffy clouds. Remember that speech
with this and the simple Shapes Exercise. Let's try our hand, is it again? But using pencil. Here
we got a big triangle, a long rectangle, circle, and then a couple of squares. Once that's penciled in, you can take your marker and go over the lines
that are necessary. You can even color
it in if you want. Now if you wanted, you could
even add little details. You learned how to draw people. So maybe there
could be in-person in this hot air balloon. Or maybe this rocket
ships taking up. Or maybe there's some birds flying high in the sky
around this rainbow. And we can't forget stars if
the rocket ships and space. The simple lines can
make stars or you can try your hand and
trying these ones. There you have it. You just drew three different
images using Simple Shapes. Now if you want to
try your hand at some more images
or different ones, and now it'd be a
great time to start. I would get out any reference
images you might need. And then all along with the same steps, in
the next lesson, we will say you have to move
away from using pencil as a reference and boost your
confidence with drawing
9. Drawing Without Pencil (Building Your Confidence, YOU GOT THIS!): So now you've drawn
these three images using pencil as a guide. Let's talk about Building
Your Confidence that you can draw these without
using a reference. We can start by drawing
each image again using pencil to draw the
simple shapes as reference. Then we will try to draw
the image over this without making reference marks for other parts of the image. Remember what we've
talked about earlier. Of course, using your
shoulder and making bold deliberate movements
make your lines less shaky. And if it doesn't look right the first time, just do it again. The most important thing here is practice, practice, practice. That's the pro tip and something
there's no way around. You have to practice over
and over to be able to build the muscle memory and
be able to draw these images. So draw this as many times
as you can until you feel competent enough to try it without any pencil guides. Another way to build
competence with a little more guidance is if you have
access to grab paper, tracing paper, or
even just holding up your piece of paper
to a window or light. Once you draw the image and
it looks how you want it to go ahead and trace over it without drawing the
guides as well. Practicing this
over and over will help build the muscle
memory as well. With graph paper, you can use a little boxes as references. He exactly where everything is. Follow along with me as I
draw this hot air balloon, just start off, I'm
going to draw a circle. Then I'm going to
split that circle and asks if a vertical line. Then I'm going to find
the middle point, that line and circle
on both sides. And start my next, I'm going to draw the basket, which is just going to
be a small square. Them. Then I'm going to connect
the two triangles are. Then I'm going to continue
adding these last few. Once I have all that in place, I'm going to draw
over these lines. You see my marker, but
only the ones that are. Now that we have that form, Let's use it as a reference
to draw without using pencil. Here I am making the
middle vertical line and then finding the sides of the circle in the bottom of the
hot air balloon is also just a straight line. I'm going to connect
them all using curves to match
the one on there. I'm going to make that X
again or to triangles. And the best. All that's left now is to add those last few
details that split on each. Now you can use these
simple tips and tricks to do your last two images
and complete your final
10. Conclude with Confidence!: Great job. Now you can
draw and can let go. The idea that you don't even know how to Draw Stick Figure. Thank you so much for taking this class and trusting us to take you from just a
few drawing skills to a confident draw. Here's a recap of what you've learned in this
course and some key takeaways so you can continue to improve your drawing skills. How to draw simple shapes, how to Draw Stick Figures
using Simple Shapes in lines. How to transform a
simple shape into an image through
a timed exercise. How to combine simple shapes
into more complex images. How to draw your own
images with pencil and marker by breaking them
down into simple shapes. And how to practice
to competently draw these images without even
using a pencil as a guide. Don't forget to share
your final project in the Projects tab
of this course. If you enjoyed this course, we would love it if you left us a review under the reviews tab. This is a great way to
help other people find us, which means that more
people will be able to draw and communicate using visual language if you want to take it a step further
and haven't taken, are to draw your notes, intro to visual
note-taking course yet, you can take the skills
that you learned here and take your notes
to the next level by checking that course out. Thanks again for joining
us and happy drawing
 Ink Factory Studio, Think In Ink