Transcripts
1. Drawing Faces with Symmetry Tool in Procreate: Hey, what's up,
guys? Welcome back. My name is Dave Reed,
aka drug-free Dave, you may know me from
Instagram or YouTube or I do a lot of 2D
and 3D tutorials. I'm glad that you're here joining me in
Brooklyn, New York. I have a really fun class today. This is a 2D drawing class. It's all about the
symmetry tool. So if you've never used the
symmetry tool, It's very fun. There's so much you
can do with it. You can actually use
the symmetry tool to do like Mandela's
and things like that. So the symmetry tool
is very useful. And today we're
going to do faces. We're gonna do a more
male masculine type face. We're gonna do more
feminine typeface. And then we're just gonna
do a fun whatever mask, which is what I really,
really enjoy doing. Just like, kinda like out there, weird, fun, crazy masks. You can do all of that. And I really like
African masks too. So some of my
inspiration does come from when I studied African mask and I love going to the
museum and I'll just take pictures of things and then I'll just come
home and draw them. The thing about symmetry, obviously, everything is
going to be symmetrical. So it does take some
getting used to, but once you do get used
to it and once you get used to join that way
and thinking that way, creating that way,
it's a lot of fun. And the best part
about it is it forces you to sort of think
outside the box. So you're not gonna be
thinking about drawing characters the same way
that you always do. Because you'll let, you let the technology do a lot
of the work for you. So yeah, I think it's
a lot of fun and I think that you'll
really enjoy once we could go in and
once you kinda see the endless possibilities that you can do with
the symmetry tool. So I'm gonna be using the
iPad Pro 2021 procreate, which I love using Procreate as my favorite drawing app. So that's what
we're going to use. But if you're using
another application, as long as it has symmetry, then you can follow
and you can do the same things that I'm doing. Also be sure to download my
free brushes with this class. That's only if you're
using Procreate my Disney style brushes,
they are included. I'll include it, my
finished images too, if you want to look at
those and see how they are, Just make sure you download
those in the class resources. But I think that's enough
for the intro video. Let's move on to the next video. This will be the class project. I'll see you there.
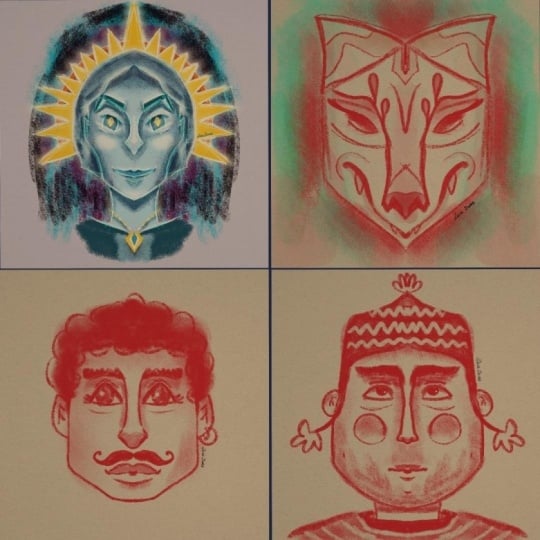
2. Class Project: Okay guys, welcome to
the class project. For this class, I just
want you to create three or four through
four phases are masks. We're gonna do three
different phases. We're going to do
male, feminine. We're just gonna do
a fun whatever mask. And I'm gonna do some
work, some extra things at the ends of class just so
you can have a bunch of examples of different things in different ways that you can make facial features
and things like that. But mainly for the
class project, I just wanted to
see what you do. I want to see your work. You can follow me along
to the t, but of course, you can change things and you can make it as big or as little. E can have big nose, little nose, big ears. You can make horns. You can have, you can
have anything you want. So just go crazy.
Don't feel that you have to follow
everything to the t. Of course, this
artwork is for you. So I want you to
be happy with it. I want you to love it and
I want you to have fun designing and creating
using the symmetry tool. I'd love to see your
work here and also if you just play around with it after you're done with class, I'd love to see that,
to please post it to the class so
everyone can see it. Because I love to see your work. I think that's about it
for the class project. Of course, this is a, this, this is a fun class, this is a creative class. And I want you to
make sure that you're being as creative as you want, because there's no right
and there's no wrong. And if you need any
help or assistance, be sure to reach out to me.
I'm always here to help. I'm happy to help. All right, so let's move
on to the next video. This will be getting started. And we're also going
to draw in this next one. We're going
to start drawing. But I think video number three is always going
to be getting started. Maybe I should change the name. I don't know. I don't know. I should read you that. Okay. So let's move on to the next video, getting started. Alright, so let's move on to the next video, Getting Started.
3. Getting Started: Alright, getting started. So first things first, make sure that you download the extras that I've
added with the class. You just want to go
to Project Resources and then you'll see it
here under resources, it won't be Hero, it'll be some other things
including the background. Make sure you download the background that
way you can just export it, right to procreate. And I will show you
what that looks like. So let's say you downloaded the background and it shows up here and your images,
you just tap on that. Disregard the lion,
he won't be there. And you press this and this one is checked to make
sure you go to Procreate. So cent Procreate, go back to Home Screen, open Procreate. And then it will be
on the top-left. So then you can tap it. And now you have
your canvas is here. It's the same size as mine, three thousand, three
thousand pixels. As you can see, easy-peasy. So the next thing, if you, if you're already in Procreate and you just want to import it, you just go to the
wrench and then you go Add, insert a photo. Then you can insert a photo. And now we have two
of the same thing. Okay? And also feel free
to work in white. I'm just using this
because There's less glare on the camera screen, so it's not so blown out. So it doesn't look like this because that's a
little too bright. But feel free to use
white if you like. So we're going to use, oh, I forgot about this thing. Let me get rid of him.
Let me get rid of him. Okay, so now we have
our blank canvas and we can start making some really
cool stuff with symmetry. So let's go back to the wrench. And now we want to go to Canvas. And we wouldn't be able to
use symmetry on this canvas. So symmetry is through
the drawing guide. You turn on Drawing Guide. You might see a grid or
something like that. That's fine. Once you turn that on, go
to Edit Drawing Guide. Now we go to symmetry. I don t think this
makes a difference. This is just the opacity of
the lines. You can't see it. I usually have it
around 50 thickness. Same thing just
makes it thicker. I usually have it
around 50 is fine. And that's it. So
this is our symmetry. And I think can you
change the color? I think you could change
the color of the line to just keep mine
on black or dark? I guess dark blue. So then just hit Done. And now you see you'll have
your line here, you hit done. And you'll see
this faint line in the middle of your screen. Let me just make my darker
actually thickness. Turn the opacity up. And I think that's good. Oops. Get dark. There we go. I
like, I like black. I like to be able to
see the symmetry line. Alright, so layer-2 assisted. So when you make a new layer C, it doesn't say assisted. So if it doesn't say Assisted, then it'll, it
won't be symmetry. If it says Assisted, then it'll be symmetry. We don't want to draw on
the background layer. So you can go ahead
and lock this layer. That's fine because we never want to draw
on the background. So now this layer, tap on this layer, tap on it, drawing assist, and
now it says assisted. So now you have your symmetry. Okay, so now that we have that, we can start on faces. And this takes a little
bit of getting used to. But once you kinda get the
hang of it, it's really fun. And it looks really, your images look really
premium because they're very clean and everything
is very matching. So as much as you have to be careful that
things look to matching, matching and maybe
like eyes are a little far apart and
things like that. It's also a look,
it's also a style. So just keep that in mind
when you're drawing. I'm going to keep it in
mind while I'm drawing. And let's see how many
times I have to undo when I'm trying to get
my this first face. So I'm going to use
Disney sketch light because that's just a fun brush that I love to sketch with. And this one is also
downloaded in the resources, my Disney style brushes. Let's do them like a wider, more masculine face first. So I like to come off
the top like this. Come down. And then maybe
even come out a little bit more. And then like that. So we'll do something like that. So it's essentially just
one line coming out. Little bit of a curve
doesn't have to be straight. And then a little bit of
a curve here for his sort of bigger, bigger chin. So now we have to
figure out where we want the eyes to go, which is probably
the most important. Aspect. These, if the eyes look weird and the whole
thing looks weird. So I like to do the
ears around here. So let's say this is the
halfway point of the head. I like to do the
eyes a little bit further up than
the halfway point. So if this is the halfway point, I'm gonna do a little
bit further up. And just pretty straight line doesn't have to be
super, super straight. And now I'm just going to
make some, make an arch. So that's gonna be like the
eye socket area, pretty much. Alright, So the nose. So for the nose, I'm
actually going to start way up here for the
bridge of the nose. Almost like not in the
middle of this wedge. A little bit over
towards the middle. So route right here. I'm going to make a
line coming down, almost touching the middle line and then it's going to come out. And then it's going to
come down like that. So now let's make another line
coming off of this curve. So it's going to come
up with this curve. Then it can be, Let's will
make it, will make it round. Then a little bit of a
nostril type thing in there. That's interesting. Maybe I want to do it. I just did so many
of these noses. You can also come from above. Do something like that. Let's see what else can we do? Come out a little bit more
than come down like that. So there's lots of
different ways. There's lots of different
nodes is that you can do, you can actually make
the nose really wide to, you can make the
nose really wide. Like so. I like to do this little
line coming over. That sort of gives it the
bottom part of the nose. A little love. So there's tons and tons and tons of noses that you can do. So just pick whichever
one you want. I'm gonna go with. I'm gonna go with
a thinner nose. So I'm gonna come down and I'm going to
make the nostrils. Okay. Maybe something like that. And I always do this line that I go when I go across like that. The reason I do this line here, it sort of shows the
underside of the nose. So let's make, if I make
some dark nostrils here. And then I take Disney brush and then I just
darken this under here. So that's like the
underside of the nose. So that's why I do that
little line there. Because if you're
gonna make a nose, there's really no
lines in our load. In our nose, it's all
shadows which all shapes. There's no hard lines. So when I make this
line is just to show the separation between
the front part of the nose and the
underside of the nose, which always just gives it
a little, a little extra. Okay, so for eyes, we have our little
eye sockets here. I'm going to use this line. I'm going to make a curved
line right above it. Sort of sort of
going down into it. There's thousands
of shapes of eyes. If you want to do a
different shape, go forward. I'm just going to
do is sort of a simple almond shaped by. And notice I make the
top really thick. I usually do the wing tip thing, but I want to try to keep
this face masculine. It's hard for me. I
love doing that little. I'm so used to doing
cute characters. So here are the eyes. Just be careful you
don't make them too, too close together. Just undo and just redo them until they look,
until they look good. But of course, faces have all different lengths in-between the in-between the eyes and bigger eyes
and bigger shapes. So there's no really
wrong way to do it. So let's make another
little line here. Okay, I think that
looks pretty good.
4. Wider Face 2: So now for the mouth. So we're going to
start from this line. And I'm gonna do it
right in the middle. It doesn't have too
much chin room, so he's going to have a
sort of a smaller mouth. So one way to do the lips, you can go up a little bit. And then down, then up again. And then we're
gonna come up top. And we'll meet a little bit of a curve and we'll meet
right at that center line. And then we're going to
make a darker bit here. Sometimes I do go over
to the other side, even though it's a, even though it's symmetry, my brain still thinks
I need to go back over to either side. It happens. So now for the lip, Let's start down here
and then just do a line. Sort of going across. It makes it made his
lips fairly big. In the middle, we're going
to do another darker pass. Just tricks I learned. An mouth. When you're
drawing mouse. Darker here and the corners and increases and then darker
in the very middle. Okay? So I think symmetry works too. So I mean, liquefy. If you go to adjustments
and go to liquefy, I'm pretty sure that you can liquefy and it will
move both of them like let's say I wanted to the nostrils to be a bit wider, which I like that a
little bit better. You can do that. And
also let's say you wanted to change the lips. You can use you can use
the little ribbon here. Free hand. You can select it that way. Once you can tap it or leave it. You go back to adjustments, go to liquefy, and just
adjust your brush. And then you can, you can
sort of mess with that too. You know, something just
like minor changes. Liquify is great for that. I use liquefy all the time. And here are my options, but you can mess around with the options until
it's right for you. I love liquefy. Okay, so
let's get out of here. So back to Disney sketch
light, our regular brush. Okay, so let's just make, let's just give him some eyes. Okay, so now he's got some eyes. And notice that I
I sort of but the eyes a little bit
towards the middle. You don't, you never
want to put eyes and in the center and the
center of the eyeball, you always want to
air more towards the end where it's not too much because then they
look kinda funny, but just err towards going
in rather than going out, because then it looks
really, really weird. Okay, So now for eyebrows, we're going to try
to use this line here and just make one line up, one line over, one line down. And then we're just going to
frame that out a little bit. So something like that. For eyebrows, ears. I usually like to start my
ear right where the eye is. So I'm just going to come up. I feel like he would
have more boxy ears, curb around down and
then come out like that. Make a little thing
like that inside. This line comes up, sort of goes towards this back,
this back line. And then we're right in the middle of this
line comes down. So I do all my ears this way. I just kinda like that shape. Just it works for me. Okay. So I think that's pretty good. I suppose we should
give him some hair. So let's do this. Let's make an estimate. A harder line going across here. Something like this. Sort of like a little
hairline that everyone has. Maybe we'll give
them a beer too. So how do we want
to make his hair? One thing I like to do the hair is usually never
that symmetrical. So we can do a symmetrical hair like let's say we give them like let's say you do
something like this. So you can do symmetrical
and it kinda works. But usually I'll just
go back to the layer, tap it, and take
off drawing assist. And that way you can sort of like just be more
free-flowing with the hair. I just think it'll
look a little bit more natural if you're more fruit
free flowing with the hair. And it's not symmetrical
because hair is rarely ever symmetrical unless it's like part of
down the front. And last thing, let's just finish this guy
really quick. Eye sockets. I like to sort of bring a
light line sort of underneath. Just sort of just sort
of matching this line. I like to bring this out. Just to sort of open
up that eye socket. If you want, you can go
ahead and erase these lines. You don't really need
those lines in there. And I appreciate it
turns symmetry back on to do those lines underneath. Well, that's okay. Alright, So I think we're looking good. We can I'll go ahead and
turn drawing assist back on. I guess it's good for you
to go back and forth so you Remember where it is because sometimes it's
hard to keep track of. I will just erase these. Okay. So that's pretty much
like the male face. You can always adjust it. Like maybe he needs
a little bit more chin, something like that. Or even I feel like
this guy would be good. I erase this and I
didn't make it so, so boxy at the bottom. So I think now it
looks a little bit better just to polish this off. Before we move on to
a different face. Let's go to our
brushes and go to Disney brush to make
it as big as we can. And if you're
nervous about this, you can always do it
on a layer underneath. Just add another layer
underneath our hero layer. Tap it, makes your
drawing assist is on. But remember, the hair isn't, the hair doesn't
need Drawing Assist, so let's turn it back off. The hair is its own thing. So let's color in the hair. And the way that Disney
brushes, if you don't, if you don't take
it off the screen, then it will be even. If you do lift it up, it'll get darker.
So that looks good. Maybe we can do a little bit of, uh, oops, let's turn
drawing assist on. So we'll tap on the
layer drawing assist. And we'll just color in the
back of this year like this. And we'll color in the
inside of this eye socket. Because that's like
underneath their eyes where it's a little
it's a little darker. We've already colored
underneath the nose. Maybe we can make it a
little darker just for fun. Maybe we'll do a
little bit of this. And then we'll cover
in the upper lip. And maybe we'll do
the upper lip twice. Let's do one pass underneath. Here we go. I forgot about the eyebrows
and let's do the eyebrows. Eyebrows can be very, very dark. So we can do multiple
runs across the eyebrows. And if you want
to do some extra, you can go around the eye. But that looks kinda weird. But it might look good if
you add a line around it. But let's make it smaller. And let's just do a shadow from the eye lid on the eyeball. I always do this in all of my
drawings. Shadow in there. And let's take erase. Let's turn Let's turn
drawing assist off. So we'll turn it off. We'll go back to
erase and we can use Disney butter at around 17. And let's just, let's go
back to this main layer. And we'll turn
drawing assist off. So now it's off on
all the layers. And that way we can
just do these little pups with the eraser. And another option is if you want to be
really fancy with it, you can choose
white layer above. And we use Disney butter again. So now we're using white. You can just kinda draw in a little pop of
light like that, depending on how fancy
you want to get. You can also just
make a little dot or something like that. I think I like the erase more. Let's try it out. I like I think I like the erase. So that is our male face. And It's hard to draw these
without using symmetry. It is very difficult
to draw faces, and it's also very difficult. I feel like symmetry
makes it easy to make bigger noses
and bigger lips, and just keep everything symmetrical so you
can concentrate on the proportions and doing
different proportions and doing cool and
interesting proportions. So this was the male face. I think the next
one we'll do like a bit of a softer face, a bit of a more feminine face. So that's it for this one. The, we'll move on
to that one next. And I'm excited about it.
This one turned out good. Alright, I'll see you
guys in the next video.
5. Feminine Face: Okay, so let's do a
more feminine face. And I just want to show
you exactly what I do with my files as I'm working. Because I realized this
might be useful as well. So we'll bring back our, the last pace that we worked on. I added a new layer. So these are the, this is
the last place I worked on. And I didn't merge
them because I might want to change this. Once I'm finished
with the drawing, I always wind up changing
things and adjusting things. So I like to keep them separate. So what I like to do is write swipe on both of them so they're both blue. And then group them. And then I'll name
them male, male face. So now we have a group that
I can just minimize or hide. So now I hit plus and we can
name this feminine face. We have this, but remember, the first thing that
we need to do is turn on drawing assist. And remembering you
can turn it on here. Drawing Assist, it stays on, the Toggle remains on here. So literally it's just turning
it on within the layer. So now for the more
feminine face, we'll just sort of keep
it rounder and will maybe make the bottom part of the
jaw a little bit thinner. So we'll go back up to
Disney sketch light. So for here, let's
start out with more of a rounder shape. Just started out with
more of a rounder face. And then we can go
maybe straight down. And for the bottom, we want
to make just a nice oval. So very simple. It's just like a simple oval with the top being
a little rounder, like wider than than,
you know, the chin. So I think that looks
pretty good to start. And of course,
like I was saying, you can make it a little bit, you can make it even wider. You know, you can
make a wider face. I'm more of a heart-shaped face. So many different
kinds of faces, so feel free to
have fun with that. Okay, so now EIS was going
to do the same thing. Let's imagine that
this is the center. So I want to do it a
little bit above center. And I'll just do my
straightest line. That was like not
straight at all. So we'll do a straightest line. And then we'll do
our little arch. So that will show us, that'll give us a guide
as to where the eyes are. Okay, so these eyes, I think I'm going to last
time I did the nose first, I think I'm going to
do the eyes first. I'm going to make
sure that they're out there wide enough. And I'm going to do a
similar type of eye, but I'm gonna make
it maybe a little bigger and a little thinner. Like this. Make sure that top one is nice and
thick because I can do my nice little wing
tips that I like to do. Maybe we'll come up a little
bit higher on that line. So slow to undo sometimes. Let's make a little line here, and let's make another one here. So something like that. So now for the nose, we'll start up here again
and we're just going to go straight towards
the middle line. Then will come out. And we'll
do a little nose like that. Which I don't really like. Let's see, let's
make a note is that I make a knows that I like I kinda like that knows
Let's put some nostrils on. So same thing like
we did before. I'm just gonna kinda come
out sort of like that. And this time let's
just erase these. To erase this. Just so we have
just straight nose. So dark and under here. That'll be like
the nostril area. And you know, I do my
line that meets up. This shows the under
part of the nose. It's my favorite, my favorite
part of the nose to draw, by the way, if you didn't know, Let's darken this up. Darken up those like the eye, the eyelashes
underneath as well. Okay. So it's looking okay. So far. So let's give her
some let's give her some, some, some bigger lips. So let's start here
about halfway. And I'm just gonna go straight with a little bit of a
bend in it like that. And I think I'm just going
to add just going to come up and make it almost a dome, almost a half dome. So remember the other things I was telling you with the lips? Darker in the middle and then darker in these
like little creases. Now for the bottom. Same thing. But we'll make it come in right before that
little darker crease. And we'll start it will
start to curve the lip, the leptin. Okay. It almost looks like, it
almost looks like a mask, like an African mask because
those master Beautiful. So we're gonna do, I think
we'll do a mask after this. We'll just do something for fun. It might be a little
creepy, but we'll see. Okay, So this is looking good. Let me go ahead and just make this a little more powerful. Okay, So now what do
we wanna do next? So I think the shape of the
face is looking pretty good. So I'm just making darker lines just to sort of solidify
it up a little bit. And we can make the eyebrows. So let's see, maybe we want to, maybe we want to bring this up. So bring that up a little bit. Let's erase this, erase this. Maybe they don't
go that far over. They just go up a little bit. We'll keep it interesting. And now we'll make the eyebrows. So let's come up like that. And we'll follow this will
follow this bridge line. Then we'll just sharply
just come off like that. Same thing on the bottom. We're just going
to use that line that we made earlier as a guide. And we can do
something like that. So that could work. And you would color them in. That could work. But let's do some
other examples. Let's do some other
types of eyebrows. So maybe, maybe we'll make
openings in the wrong brush. Let's go back to
decent sketch light. So maybe we'll do one like this. This is more putting a little
more angle in it like that. And then from here, you
just come off in a curve. Let's see how that looks. We'll just do a
quick color in here. See which one looks better. I like that better. But she might even need
some thicker eyebrows. So maybe let's see what happens if I do some lower eyebrows. And the more you do eyebrows, the more you'll just
get that shape. I do my eyebrows really, really quickly because I do mostly the same shape
which is coming up, going over and then coming down. And then I sort of follow
that on the other side. So I think I like
these the best. I'll color them in with. What is this? Disney brush. Sometimes I forget my brushes
even though I made them.
6. Feminine Face 2: So I'll color them in. I think it looks
pretty cool. I'll go back to Disney sketch light. And let's do some ears. So we'll make the ears
tad bit lower than the, than the edge of the eye, will make them
softer and rounder. So a little bit more
round on top and then just sort of coming in close like
that on the bottom. Not, not so much of
a rounder bottom. Same thing we do the
little squiggle here. This line sort of
comes off and the soft and goes towards
that back line. This one, this one curves around like so I
love that shape. Alright, This looks good. Just looking, looking very nice. Okay, so let's go ahead and color this in and
then we'll do the hair. Notice on living dangerously. There's one thing that
I did forget to do, which is obviously
not essential, but I like to make this
bottom, this bottom part. I like to do that. So I'm actually going to erase this line, erase this line. Hopefully you can
see that clearly. I'm just erasing some of these some of these sketch marks. She doesn't need a line across her forehead or
across the bridge of her nose or along the
edge of her eyes. So that looks good. So we'll go back
to Disney brush. And I'm making it 50%. So I dropped Disney brush, the opacity just to
color in this part. Alright, that looks
good. Bring it back up for the
lip, the upper lip. And I'll do another
pass and the upper lip, just one below the lower lip, and maybe one here too. So now we're going to color in the bottom part of the nose. So look at that a
couple of times. Make sure that's nice and dark. Maybe one over the top
to live dangerously. So we'll make this a
little bit of a shadow in the ear. Looking
good, looking good. Maybe a little bit of shadow
on the bridge of the nose. And maybe a little bit
of a shadow here, even. And eyes. So do we want, let's make the eyes,
Let's keep them, will keep your eyes straight. Let's go to Disney sketch light, not Disney and going to
know why, how I chose that. Nice around. We'll give her a little bit bigger eyes
and we did the guy. And then maybe we'll
do a line around them. Something like that. Okay, so now let's do the same thing
like we did with the hair. So I'll tap it would
turn off drawing assist and what kind of
haired we want her to have. So let's start from here. We will start from inside, inside the ear and come up, I think can come over
and then come in. Hey, let's try it. So we'll come up, come over. And maybe we'll bring
this back around. And then here, maybe we'll
start right here at this edge. Come out and bring this down. Maybe meet up like that. And maybe we can do to continue just another
few pops just to sort of make it look
like the hair is moving. We're doing something.
And then we'll come down here like that and we'll make some straight lines
coming down just to sort of match up the hair and
maybe we'll even do a nick. I feel like she would
have a very thin neck. So again, there's a million
different ways that you can do the hair,
play around with it. If you wanted to do
something with symmetry, you can do that. Let's do another
hairstyle for her. Maybe, maybe we wanted to bangs. So for bangs, Let's turn
back on Drawing Assist. And let's just make a
straight line here. And we'll make the bangs
sort of like that. And maybe we can do
something like this. We'll do something like this. You know, there's
so many different, there's so many different
things you can do. And it just becomes, becomes fun at some
point in time. I enjoy it and maybe we'll
turn drawing assist off. And you can actually,
What about this? What if you go across
even what we've drawn? Something like that. Something like that. I think
it looks pretty interesting. We turn drawing assist back on. So I'm making neck
will make it straight down. So something like this. I could've made
her ears smaller. There's a lot of
things to adjust. But again, I'm just kinda
showing some some samples, some examples of
what you can do. Whoops, turn Drawing
Assist backoff. And if this has hair, then we erase all
of that detail. And then we can
erase this line two. Then we can leave
drawing assist off. And then we can bring the hair. Something like that. Alright. That was fun too. And again, like it's definitely like, it's
definitely a look. And the more you develop and the more you get used to how to get certain looks
using symmetry, then you can do all
sorts of different characters with all sorts of different facial features. And it's a good way to practice that's outside of the box and I think is
really, really fun. So that's the more
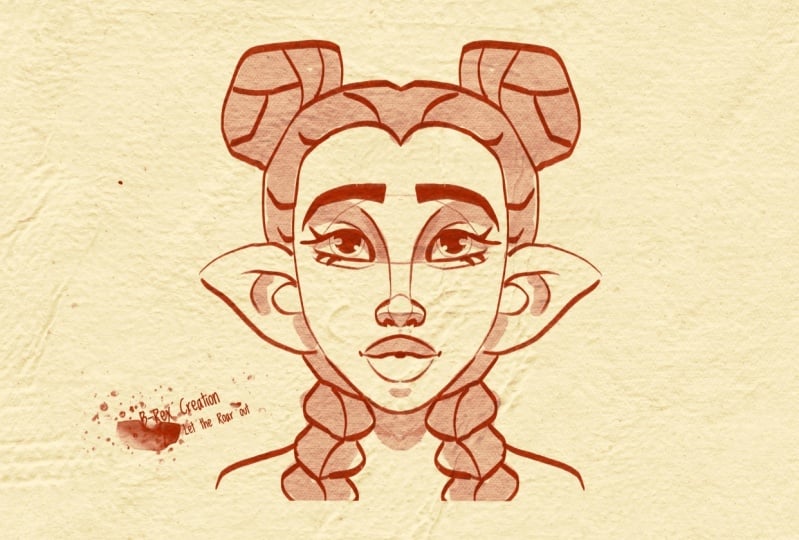
feminine face, a little bit more of a
round Earth interface. I think I'm gonna do a mask and x now this one will just be more of just for
fun off the cuff. And let's see what we get. So I'll see you guys
in the next video.
7. Mask: Okay, so let's do
a mask typeface. And I don t know what I'm
gonna do for the mask, so we're just going
to fill it out. But there's endless
possibilities. And let's see if we can
make something really cool. So new layer drawing assist
is on, it says assisted. And now I'm going to
use Disney sketch light to sort of make this
mask type type shape. So I'll make this
a little bigger. Okay, So let's think I want to make like
sort of like a shield. That's why I want to
think of the face starting out sort
of like a shield. Okay, So far so good. All right. So Let's see for the
eyes, I wanna do, I'm going to pretty much do the same as I would
do with the face, is just this is very angular. So that sort of gives
it a mask type look. So let's start
with that eyeline. Make it here. And we'll do this arch
for the, for the eyes. Now since it's a,
since it's a mask, you can really,
really go extreme. So I'm going to go
really extreme. Make the eyes very long. Something like that. Okay, So we're going to come down
with the nose bridge. So I'm going to start up here. We'll come down
towards the middle. And we want the bottom
of the nose to be. So let's maybe come out and
will come down and then will. So just like a shape like that. So let's try that again just
so you can see what I did. Sometimes I do things
sort of fast because I like to really kind of get in the flow. Let's try that again. So I came down and I'm going
to come out to a point. Then I'm going to come down.
Then I'm gonna come back up. And maybe we'll come down and then meet at
that middle point. So it's a little different,
but I still like it. So we'll make that one line to have the under
part of the nose. Maybe we'll make
another line here. Just to kinda give the
nose a little more of an interesting detail. I don't know. Alright, I think this
is looking good. So let's see, what
else do we want to do? So let's start here. Let's go up a little bit from the center point down,
and then maybe up. Let's make this
really dark here. Now let's come down
to the middle. And I might need to make
this mask a little bigger. Well, let's see. Maybe I'll just
come off like this. Come down like that. Let's keep it the way it is. Let's give it the
way it is for now. Okay, so let's do
another lip type shape. Does it need a lip? Maybe it doesn't need a
lip. I think I like this. And if we want to put
some teeth in there, you can do some teeth
like that. For the eyes. With the eyes smaller. Where we can put
the eyes like on the k, we can have
them like that. Or honestly, we could also
just have them like dark. Because if it's a mask, then maybe we'll make it so
that it's hollow behind it. We could even do the same
thing for the mouth. Okay, so, so maybe we'll put some ornaments here for his
sort of like how Lions, lions have it come
out like that. That's a cool shape. I do that with like lions
and cats and stuff like that they stay tend to
have this little round. And I just think it looks
really, really cool. Okay, so maybe it will come up like this and we
can do an eyebrow. So maybe something like that. And notice how I
press a little bit harder so that the
brush gets a little bit thicker there and even more
thicker, even more thick. So I think that
looks pretty good. So let's erase all of
these sketch lines, loops, make the brush
a little bit smaller. I think I'm just using
graffiti G brush. Let's just erase this line. Will erase this one, this one. We don't really need it. Okay? So we just sort of
clean it up a little bit. Alright, so let's make, so we'll make that line there. You can play around with this. You don't have to actually
follow what I'm doing. Because a lot of this has just, a lot of this is
just making shapes and making, making lines. And just, just sort of
having fun with it. You can, you can practice. Maybe you want to
put like a diamond here or a diamond type shape. And I think I want a
diamond diamond desk. It's more like an arrowhead, actually. Something like that. Okay. Do I want to do anything
else over here? Maybe maybe just a
little mark like that. And maybe maybe
something like that. That looks pretty nice. So let's make another line
coming out here, like so. And let's do like a nice
little curly like ram horns. So it will come off. I'm just make like a swirl
and then bring it back in. Let's do some little round pops. Then maybe some smaller ones. Then maybe we'll make a
little loop at the bottom. Almost like it's like it's
a decoration or something. And maybe it will make
some darker some darker pops in-between In-between
those I don't know why. I don't know what they are. But that's the beauty of
doing stuff like this. You can just kinda
have fun with it. So now let's take Disney
brush and wherever, whatever kind of knows you made, maybe color in the
bottom of the nose. And maybe color in here. And maybe we can color
in maybe this line. Maybe this. And then maybe
these little ram horns, rounded, puffy kings
who could be as HER2. So something like that. As you can see, there's
endless possibilities. And it really opens you up to just doing some really,
really cool stuff. So I hope that you had fun doing this and
learning how to use symmetry and learning the tips
and tricks with symmetry. Just work, work at it and
make a bunch of faces. Because it can really, really help you to
think outside the box, especially when you're
stuck, when you're trying to draw a character and it's
just not coming out, right. Try this, do like a
square shape face. Do like a triangle shape, face to a heart-shaped face. Do an oval shape phase
two bigger noses, smaller noses, bigger eyes,
smaller eyes slanted. You can slant them
the other way. Do different expressions. Do a mixture of symmetry
and then not symmetry? And you will continue to get better because it'll
just open up your mind. Alright, before I get too deep. So let's call this one. I will see you guys
in the next video.
8. More Examples & Tips: This is just a little bit extra. I feel like I just
want to change this. Because like I said,
every time I finished anything that's like I want to like reduce tough kind of
mouth where I want to make we've been darken up this. And what else is there anything
else that I wanted to do? I don't know how at some
point in time it started to become like a more
feminine face. Which is interesting because
I really wasn't trying to go for that. But I guess it is what it is. It's kind of interesting.
I'm going to select this. And then I'm going to undo that. I really liked that. I really
like those, those lips. But I want to undo because I don't think I took a
screenshot or anything of the one that I actually
finished with and lips. So since I didn't
take a screenshot, I think I need to recreate
recreate that face. See you and just never stops. Didn't literally never stops. Take g brush. If it's a mask, we can
color it all in dark. And then we can take the
eraser with, let's see. Let's take the eraser
with Disney brush. And we'll create a
better brush than that. Let's use Sketch master to. So we use the eraser and do some cool stuff on there
is so much stuff you can do. Okay, so I was going
to enter it there, but I do want to do one more with a
different type of eyes. Just because. So let's make a, another round, the round
face, which is round. And then coming
to a point source of an oval but
more like a point. So something like that. And let's say we want to do
some different kinds of eyes. So I'm going to start out here and I'm just going
to start with that, that line that I use for the
eyes, sort of like that. So let's, let's just
pencil in a circle. So let's say we want
the eyes wider. So now I'm just going
to use that circle as a guide and create the dark, the dark line that I
always do on the top. And can darken this up to n. Let's draw this, let's
draw the eyeballs. And notice again, It's very
close to this part of the, you know, the inside of the eye. You don't want them
to be in the middle. Okay. So let's do a nose. Feel like she would
have fairly small nose. So maybe we want to
just make a little bit darker on the underside. And let's see if we can get
her smiling a little bit. I might have to
erase a little bit of leaves, Disney butter. Make it a little bit straighter. Like that. Maybe we want these, maybe we want that the bridge
of the nose to just come up and then wrap around. And then a line underneath
like I always do. So wrapping around like that will do this line here
that I always do. And then maybe
another one up here. And then we can do the eyebrow. Same sort of shapes. All this is pretty much
the same as the other one. For the more masculine face, I just make them thicker. But I just wanted to
show you quickly. You can do eyes that are, that are opened, that
are opened wider. If you wanted to do like
a different expression, Let's use G brush. If you wanted to
do like, you know, you could do an
expression like this to something like that. Can give her like
a rounder nose, Something like that. So he did wider eyes. What if we wanted to do can
do something like this? You want to make them closed. Can just do something like that. You know, something
with closed eyes. Super, super small nose. I can just call them kind
of diamond D. Pig nose. A lot of space
underneath the nose. All of these little
things really, really affect the look
of your character. So yeah, just keep practicing. Practice to fund the eyes maybe a little close
together on that one. But that's okay.
You get the idea. There's a lot you can do. Let's see if we can
make them a little bit further around. I don't want to end on image with eyes super,
super close together. You don't even have
to do this hole. You can see if you
wanted to skip this. Just make this round. Do that too. And it gets really fun when
you can just go faster and faster and faster. And this will not be symmetry, but you can make the eyes, if I wanted to
make them smaller. And I'll just have
to find the middle. Middle point. Nash, Nash looks like a clown. Alright. So I just
wanted to show you some more stuff
because like I said, I can just keep going forever. Alright. Appreciate
all you guys.
9. Thank You!: Alright, We did it. Welcome to the end of class. I hope that you had a fun time creating with the symmetry tool. I really, really love using the symmetry
tool and I get carried away using the symmetry tool just forces me to think
in a different way. And it actually sort of helps
me with my 3D work too. Because when I work in 3D, I'm using symmetry all the time. It's the same thing with 2D. It just kinda makes
your work easier. And then when you can just
turn it off and if you want to make certain things
asymmetrical, then it's no brainer. So I hope that you enjoyed it. And I hope that you keep
playing around with the symmetry tool and making
things and change the, you can change some
of the options in the symmetry tool
so that it'll be like going out like four
ways instead of just two. Like it won't just be
two-halves, there'll be more. There's so much with
the symmetry tool that I just want to
take it step-by-step. And if you want, let me know. Maybe I'll do like a class using some more options
with the symmetry tool. But today I just wanted
to focus on faces. There's a lot of stuff going
on with faces and symmetry. So I could go on forever, but then the class
will take forever. I don't know. Anyway, It's always a pleasure. I really, really enjoy teaching
and I'm really glad that you guys like taking these classes because I
really, really enjoy. I really like teaching you. And I really loved
seeing what you make and just inspiring. That's what inspire,
inspiring other people, actually inspires me to
do more, to make more, to do more classes, and to just keep teaching. And it's grown to be
something that I loved to do. So thank you so much for being here and spending
your time with me. I really appreciate it. Even with my cheesy
and chosen outros, that I don't really,
I don't write these by the way. Obviously. I just like going off the cuff. All of this stuff is stuff
that I'm passionate about. So I feel like I don't know, I just want it to be authentic. So anyway, again, I'll
just say thank you. And as always, keep
drawing, keep sculpting. I'll see you all
in the next video. I'll add my socials after this. And usually I yap about it, but I'll just add
them after this. Feel free to go find
me on social media, TikTok, Instagram,
YouTube, all that stuff. We will continue the
conversation there. Alright, peace.
 Dave Reed, 2D & 3D Illustrator - Brooklyn, NY