Transcripts
1. Introduction: So a couple of months ago, I put out a class called think visually, communicate
your ideas. So a simple drawing. And it had taken me
down several avenues since I went from helping
a group of entrepreneurs. You buys their business ideas, potentially communicating it to future investors or clients. To guiding a group of hotel managers,
brainstorm visually, come up with ideas
and communicate with each other to them working on starting a local society here next to your peer that
would help people from different walks of life be able to identify and then solve problems more effectively and communicate among each
other more efficiently. And then tying that society to the community of visual
thinkers worldwide. And then that class has led
me to this high and winter, pronounced the way British
people say winter. And I'm a Saudi born
Ethiopia architect, Illustrator and
storyteller, following the release of big visual
and communicate your ideas. So a simple drawing, I
received several responses online and smooth or in-person trainings that are conducted. And those inputs are
what's forming this class. So in this one, we'll
first go through an exercise to help you visually capture something from
your surroundings in the most efficient,
effective way possible. So you'll be capturing
just enough detail to communicate what it is you're trying to show in this exercise could inform what we'll be
doing in the class project, where you will be
creating your persona. So you'll be drawing an
illustration of yourself along with several characteristics or qualities or hobbies
that you're known for. Possibly the things that
your friends would use to describe you when introducing
you to someone new. And finally, in
our bonus lesson, I'm gonna be showing you
a few books that you can then use as guides
or inspirations. Who knows journey
to becoming very comfortable with
visual communication. But in the end of all of this, my hope and my goal for you is that after you've
picked up on some of the elements
that are commonly used in the visual
communication world. Probably seen some of the
books that I'll be sharing with you and exercises that we'll go through
in this class. I hope that you're able to
develop this further and have your own style whenever
you express your ideas. So you'd have your touch whenever you are
communicating or concept. So let's get to it.
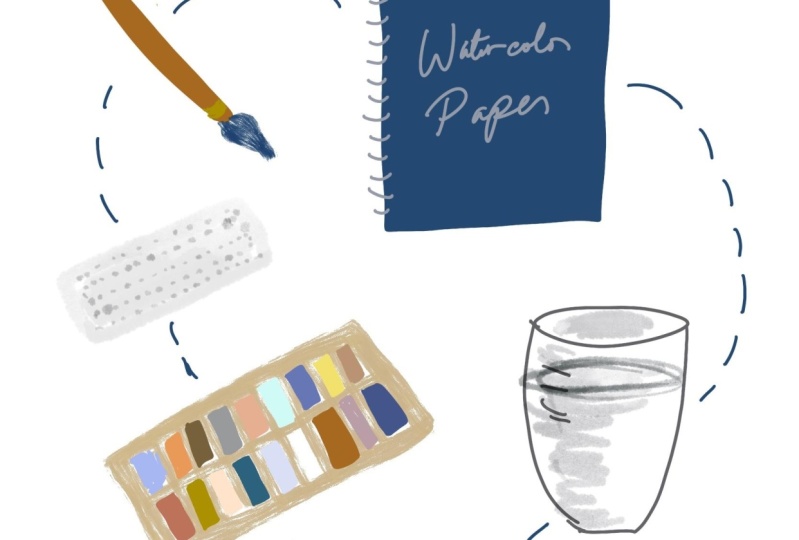
2. Class Materials: So all you'll need with this one is something
to draw with. So either a pen or a marker, something to do on any kind of paper that you
are comfortable using, and possibly a
coloring medium like a marker or a color
pencil that can add that pop to your drawings for the coloring
mediums, very flexible. You can use anything from markers, water-based
or alcohol-based. Two watercolor
paints and pastels, crayons, anything that
you're comfortable with, anything that you have
available to you. If I had markers, I would have used
those instead of the color pencils that I'll
be using in this exercise, the next lesson is an exercise
called draw from life. And I'll be trying to
capture a few things from my surroundings here
and I hope that you'll be doing the same. See
you in the next one.
3. Exercise: Draw From Life: So I hope you have
your drawing medium, probably coloring medium and piece of paper or
sketchbook ready. We'll be drawing something, anything from your surroundings. So the thing about this exercise is that
I want you to be able to train your eye to visually capture anything that
you do want to draw, no matter how many visual communication or growing related books you go through and how many exercises
you follow online, there will always be things in your immediate surroundings that are unique to you and
unique to your context. So it would be great skill to have to be able to look
at anything and be like, I want to be able to draw
that in a very simple way, in a way that would
capture its essence to show what it is and how
the visual record of this thing that I want to
either show to someone else or keep for myself, right? So for this exercise, I'm going to be using
the sketchbook which was made by my friends at the bulb. And it has these really
beautiful pages that I just, I just love how this feels, how it looks, the color. So I'm going to
be using that for my exercise and I think
also for my class project actually a page and get to it. I want this to be spontaneous. I'm going to be
swatching what I have. I have this pen. I want you to just
be comfortable with the tool that you're
gonna be using first. Because I'm always a
fan of visual warm-ups. It's just fun and it kinda
hurts. You get loose. And once you have that loose
feel to your drawings, you can really create some really dynamic
illustrations diagram, since it's cool, I
recommend you do it. Test your lines. Like don't be precious about
the page just to do it over. I'm literally just
scribbling like I hope you just encourage
to do the same. You know, just all about
loosening up your hand. This one looks now. So I'll just be
writing exercise one. This marker is very
extra for that, but just be calling it exercise. I'm gonna be getting right into it with
a pen because yeah, I want you to be
brave with this. I want you to be able to
do this live in public, in front of your friends,
just by yourself. I don't want you to
be very precious with over planning what, what's
gonna be happening. So I'm gonna be starting with the first item that I see
that I want to capture. Maybe it's gonna be something
in my pouch or something that I already have it here. If I can, I can just
draw this marker. I can just start with that. I can do my warm-up. I just want to
reduce every shape that I have in mind to
its most basic shapes, every item that I have in mind. So I'm just going to
do that to the marker and write little chisel end. And I'm just going to add
few more details here. We can look at something
that is written here. Something is written
here. And that's it. I have my marker with its slit. That's it. This is the marker. Maybe I'm just
going to be filling in the inside
because it's black. I'll just get right into it
with the same pen I used. I'm gonna be picking
a color to bring all of these elements
together in the end. But for now I just want to
stick with black and white, so I have my marker and now I want to draw something
that I use commonly. So I have these brush debt my
mom used to use to map down my baby here back when I was a kid and I still
use it to this day. So I think I just saw it on
my way back into my room. So you actually draw that here. I'll try to respect
the scale because the brush is kind of the
same size as this marker. So I'm just going to which
perspective do I want? Okay, it's there. It has a round head and I'm just going
to have the brushes. And this tiny handle. Then it has these
little bristles. Want to be able to
capture those bristles, not all of them
obviously because I just I don't want to waste time. So I'm just going to call
that leave that as it is. And another item that
maybe I use a lot and I love using with probably
be at this point, I want you to look around you and pick something
that you can go. I can draw that. Let me try. I'm just going to go
for my is this plant. I'm just going to leave a gap here or should I
leave the gap here, I think, yeah, kinda do this. And I'm going to draw the pot and be very
deliberate with my strokes. Like, I don't want
to be precious about like Cusco very slowly. I feel like that's what
creates the dynamism. To be able to just go, oop. If I mess up, I must see
this one is very thick, but what can you do about it? Now just to match that, I'm going to make this
one also very thick. It doesn't have to be
very true to life only I know exactly how
this plant looks, so that goes that way
and I'm just going to try to capture the
foliage around. It's not really foliage
is just leaves, but I don't want to
draw them individually. Feel like when you do this, it shows enough detail
that that's a plant. Okay, we get it. I'm going to add a few details
to this and maybe just add some this to show
that there's the, there's movement in the leaves and plants are going to
be coloring in the pot. Okay. So what's something
else I want to draw? I want to draw, I want to draw. I want to draw this Giovanna. And remember how I said I
want to respect to scale. I changed my mind. I'm just going to be twisting it this way and going, Okay, I have this, I have this, I have this, I have this. Remember, I have
the biggest parts, so not very accurate at all, but just include enough
detail right here. So this is something that
we use a lot in Ethiopia. This is where how we boil
our coffee and it's part of this entire elaborate
ceremony for drinking coffee. The coffee boils down here, the heat source is here, and then smoke comes out. And then at some point you
got to pour the coffee. So finally, I'm just going to be doing something to fill up
whatever is left here. So what can I what can I do? Something that I use to some extent would probably
be my drawing tablet. I want to draw something
more geometric. So not the circled
part is here, I think. And then there's a line here. And then there's
buttons on here. Draw the walk on pen beside it. I don't know how much of
the walk home I should color should I color
anything at all? Maybe it's gonna be
overwhelming on the page. But this is about making very quick decisions and
being able to just go again. If it's, if it works, it works. If it doesn't, it's
just an exercise. So I'm going to use a
colored pencil for this one. It's going to be lighter gray. Then I'm going to have a
lighter gray one here. Just going to add a
frame right here. And I want to add
just a touch off a glue throw from like, I want you to use this as
probably just a chance to just practice your lettering. That's generally a cool skill to have to just be able to write in a way that will be
legible from far away or in a way that it look
consistent throughout the page. Whether the page is Kanye
or it's gonna be on a larger sheet of paper
in a team setting, e.g. so I'm gonna be adding
colors here now, I don't know what
I should be doing. We should I go for a green or brown or maybe I should
just go for the brown eyed, just color the parts
that are brown. Leave the rest. I don't want
to color all these leaves. I just want to pop of color. I don't want to go into
a coloring exercise. I kinda just want to be able to color parts and leave some. Like I don't want to
color everything either. If you'd like to add some
more dynamism that way, the marker to be
brown, the marker tip. And this was brown. Brown. I think they
should be brown. Black somehow. I'm going to make this gray just so the bristles
part stands out. And I'm gonna make this
a darker gray or black. I just want to add these
fun little touches that can make it look more
sketchy and dynamics. So I'm just gonna do this. Do this with the brush. Kinda helps fill up the
page a bit more and make it really unfinished
and have this cool. Sign off, whatever you do. And I think we're
done with this one. Yeah, this is it. I drew my marker, my hair brush as if I know that my
grandma gave my mom the Wacom tablet
that I tend to use in a plant that I
have in my room. So you can draw anything
from around your life, from your surroundings, from your workplace or
something from memory. But I think it's really helps to have that thing in front of you and to be able to just
use that as an exercise. But instead of it being a real life or a
still-life drawing, like a very accurate one. This is more sketchy, more fun and just about capturing the essence of that
item that you want to show. Now that we're done
with this exercise, we're gonna be moving on
to our main class project. This is again going to
be a very simple one. So I hope that you have
your sketch book and you're probably
the same material to use for the exercise. And let's get to it.
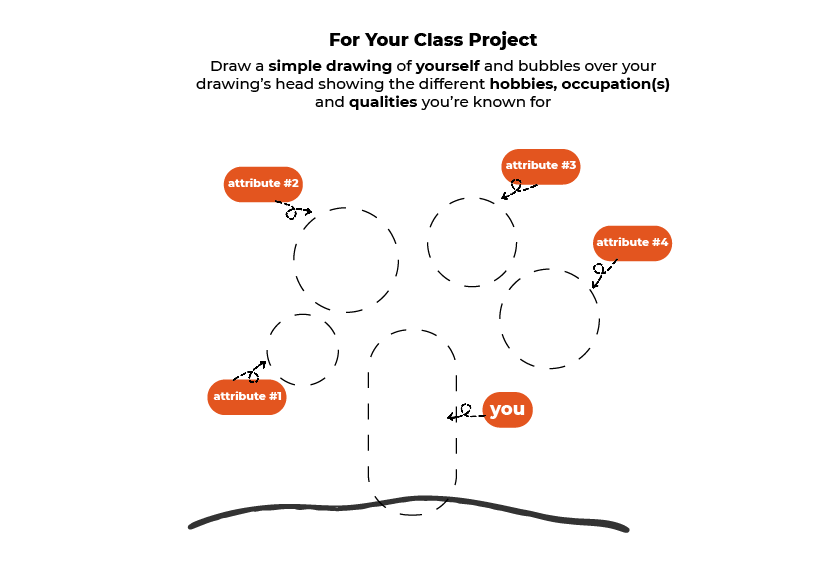
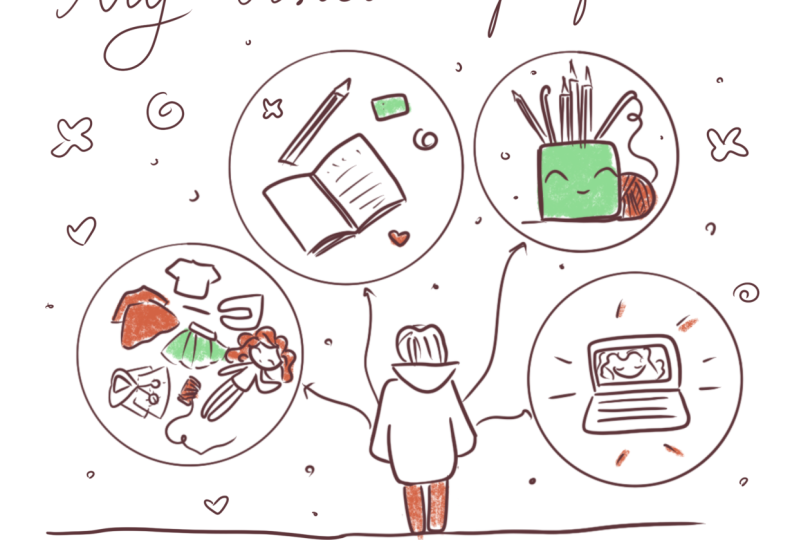
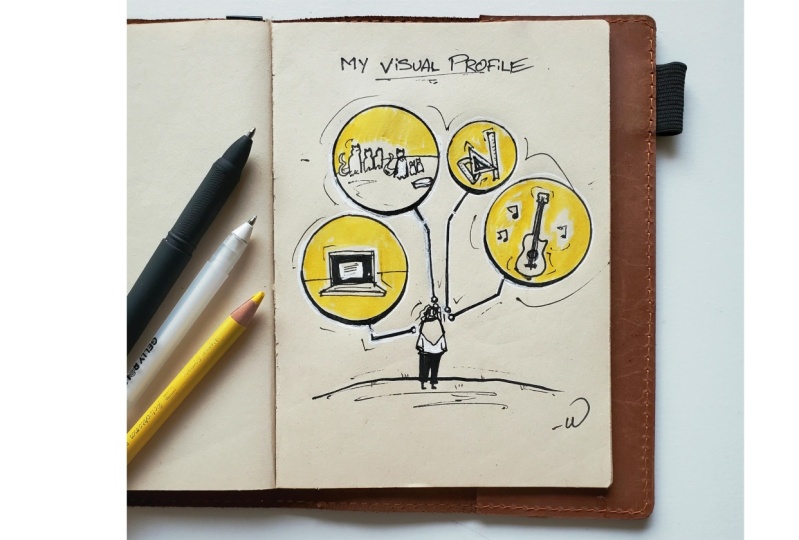
4. Class Project: Create Your Visual Profile: So this is gonna be the
meat of this class. This is where you're
gonna be drawing an illustrated
profile of yourself. And I hope that you
have the same materials that are used in the
previous exercise. I'll be using my sketchbook and let's just dive
right into it. So for the visual profile, I want us to be able to
capture ourselves on paper in the most simple,
cliche way possible. So your hobbies, your
family structure, the things that you love doing, and possibly your
pets, your profession. It can be anything that your friends would
use to describe you to someone you're
introducing you to? My case. I'm probably just going
to start with myself. So I want you to be able
to draw yourself in your favorite outfit or
something that looks like it. So again, minimal details. Usually in pants at home. And so I get this
structured is to show my body and my head
would be right here. Usually I have my hair
all over the place. But my hair can be wild. So I just I did this for
my hairstyle and I'm gonna be adding just a few details inside where my
parents would end. So usually wear layers of clothing at home because
I get cold very easily. So I'm probably just in
a shower or a poncho. Be drawing the ground
underneath me. For that, I'm gonna be
using a thicker marker because I want to be able
to ground myself here. I suggest drawing
the ground after you draw the person or whatever
subject that you have, because you don't
really know when you're drawing very fast where
your feet will land. So I don't want to slide
to put the ground, say, okay, the ground
is here and then, then I don't reach it
when I'm drawing quickly. So just wanted to do that. And I probably also, I love the color black, so I'm probably just going
to cut off my pants black. This is also a way of hiding
any flaws that you find. Like let's say I want to know what to call the Saudis
bell bottoms like this. My hands in my pockets. And now I'm going to get to the different things that
describe me as a person. So probably just want to add a little grass
here and there. And why I'm out in the grass. I like the hippie vibe. I have probably going to
be using this right here. You can either draw
the circle by hand. It doesn't have to
be perfect or find any circular objects that
you can draw with me. Do that right here. I'm going
to have one right here. You can use certain templates
to add that contrast. So you have some very accurate
looking geometric shapes, and then you have more blobby, more fun whimsical
shapes along with it. So that creates a nice
interesting contrast or place where you have frame
or some kind of outline. And then you can go crazy with it or have your drawings fit into that outline
in a way I feel like for me this is
the purpose of this. He made a mistake.
This is the purpose of this tracing right here where
I'm not doing it by hand. Sometimes I like
to do it by hand, but right now I want it
template. Should I do? Should I use a
stamp like another? Hey, I think I should use this. Alright, I have this stamp
thing that I bought. And then I want to, I
don't want it to be very uniform and symmetrical to this. I'm just going to play with placements until
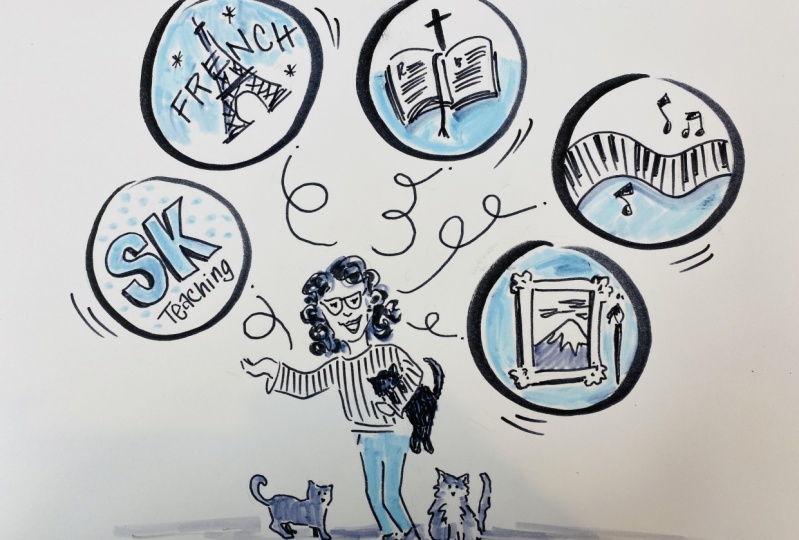
I'm happy with it. Now I'm gonna be getting to drawing the different
aspects of myself that I think people
would describe me, used to describe me. So I'd probably start
with what I usually do, which is either writing, editing videos, and
planning scripts. So I think all of that can
be encompassed in a laptop. So I'm probably just going
to have a laptop right here. I want you to be able to draw very confident lines
whenever you are doing any geometric shapes and
overlap the ends of each line. Usually it doesn't show
confidence when you are drawing feathered
lines like you're not really sure what
you want to do. So even if you're not
sure what he wanted, which is risk messing up. Just go ahead and do it. And even if it's a
wiggly weird shape, try to have one continuous line that begins at a certain point and then the end point
overlaps that beginning point. So that really shows confidence
even in geometric shapes, it's really shows confidence
when you do this. And this set of two just, you know, your, your box
really doesn't overlap. There are little gaps here. The show us more confidence. So I think that when you're
drawing any kind of flights, it really helps to connect
them to each other. And two As much as possible reduce the number of lines
you're using. So more continuous lines instead of unless you're drawing
in a different direction. So let's say for this box, I could have done this. But doing this also makes sense because it's more comfortable
for my hand movement twice. But whatever you do, your stroke should
have some kind of intentionality or should show that for it to look more dynamic and for it to
actually look like a very, have that fresh quality to it. So I suggest that you practice
this in your warm-up. So I'm just gonna do
this and laptop is open. I want to draw the frame inside. Also probably want to have
like a document that is open. Color the inside black. Play with just a pen and
paper in the contrast, I feel like it's really
develops your muscle, your drawing muscle actually
helped me a lot to be able to block things immediately to not eat color in
the first place. Another thing that
I have probably known for is I'm a cat lady. So I have like six cats now. Have the ginger capture their tail. I love their tail and how? Philosophy? Okay, so I have
these three cats and then I have She's a stray that
we adopted some time ago. When I have a little
three of milk. Again, I want to be able to reduce anything that I
draw into its simplest, most easy to grasp shapes. So this is literally
just an oval with another upside down
oval with the cat ears. And then for the
tail is just like an S shape and that's it. It's a tail. And since you had a few black marks on her and probably just going to
add that here in there. Then the next one will probably
be that I graduated from architecture school and I have been doing some
architectural works. So maybe something engineers and architects are known for
is using these tools. Then just how something inside, just like lines inside. It's easy to add. It takes you less than 5 min. I suggest you add a few
details here and there. But if it's going to take a
bit too long and it's just not making it fun anymore than I suggest that
you don't do it. Another thing that I do
is I play the guitar. So I'm just especially
during quarantine, I really sat down
dedicated hours writing music and it was just this
really relaxing thing for me. Really cool. And just like my little secret, I heard my friends who
I shared my work with, but I don't really
share all of it online. So I think just going to add
these little musical notes. I'm going to be adding
my pop of color now. So I'm just going to add it
to the cat section here. Okay, So now this is, these are the things
that I'm known for and I'm just going to be
attributable to myself. So I'm going to be using
the same pen tool. Just draw a line like
this and pointed to me, I want you to have
fun with this can be an arrow that you
can go crazy with. We can go something like
this, something like this. You can make it like a
rigid line like this. I talked about adults and
about how to connect one idea or diagram to the next in my previous class
and think visual. I want to end it with a circle. Actually, I just decided
that I want to end it with a circus or have
a breaking line, and then it ended to the circle. Now, I want to darken
some of the edges, like especially the
ones on my left. So it's going to be adding that here. Okay. So I've gotten a bit obsessive over this one a bit
more than I would like. So I'm just going to add
a few more touches just to make it feel more
dynamic and stuff. So I'm just going to add
a grass or like sorry, like a ground thing here, just add some dimension. And then I'm going to be adding some shapes just to show more sketchiness so it doesn't look very
pressures or anything. I just want to add
that freshness to call this my visual proof. I'm just going to title it. I am using this piece of
paper so that I don't smudge what I already did, sign it off. So now that we're
done with this, I hope that you can take a
picture of whatever You mean, even if you think it's
incomplete or you can do more, I hope that you
can take a picture of what you've done so far and upload it in the projects
and resources section. Again, this is about
visual communication. So I really hope that you
don't have the pressure to create something that
is perfect or pretty, or something that is
artistically exceptional. That's not the point here. We're trying to communicate
a few ideas and I hope that you're able to do
that through this project. In the next lesson,
I'm going to be sharing a few books
that I really think would show you how
different elements and ideas, abstract ideas,
even in our world, can be captured in a
very simple visual way that is very easy
to communicate. Seeing the next one.
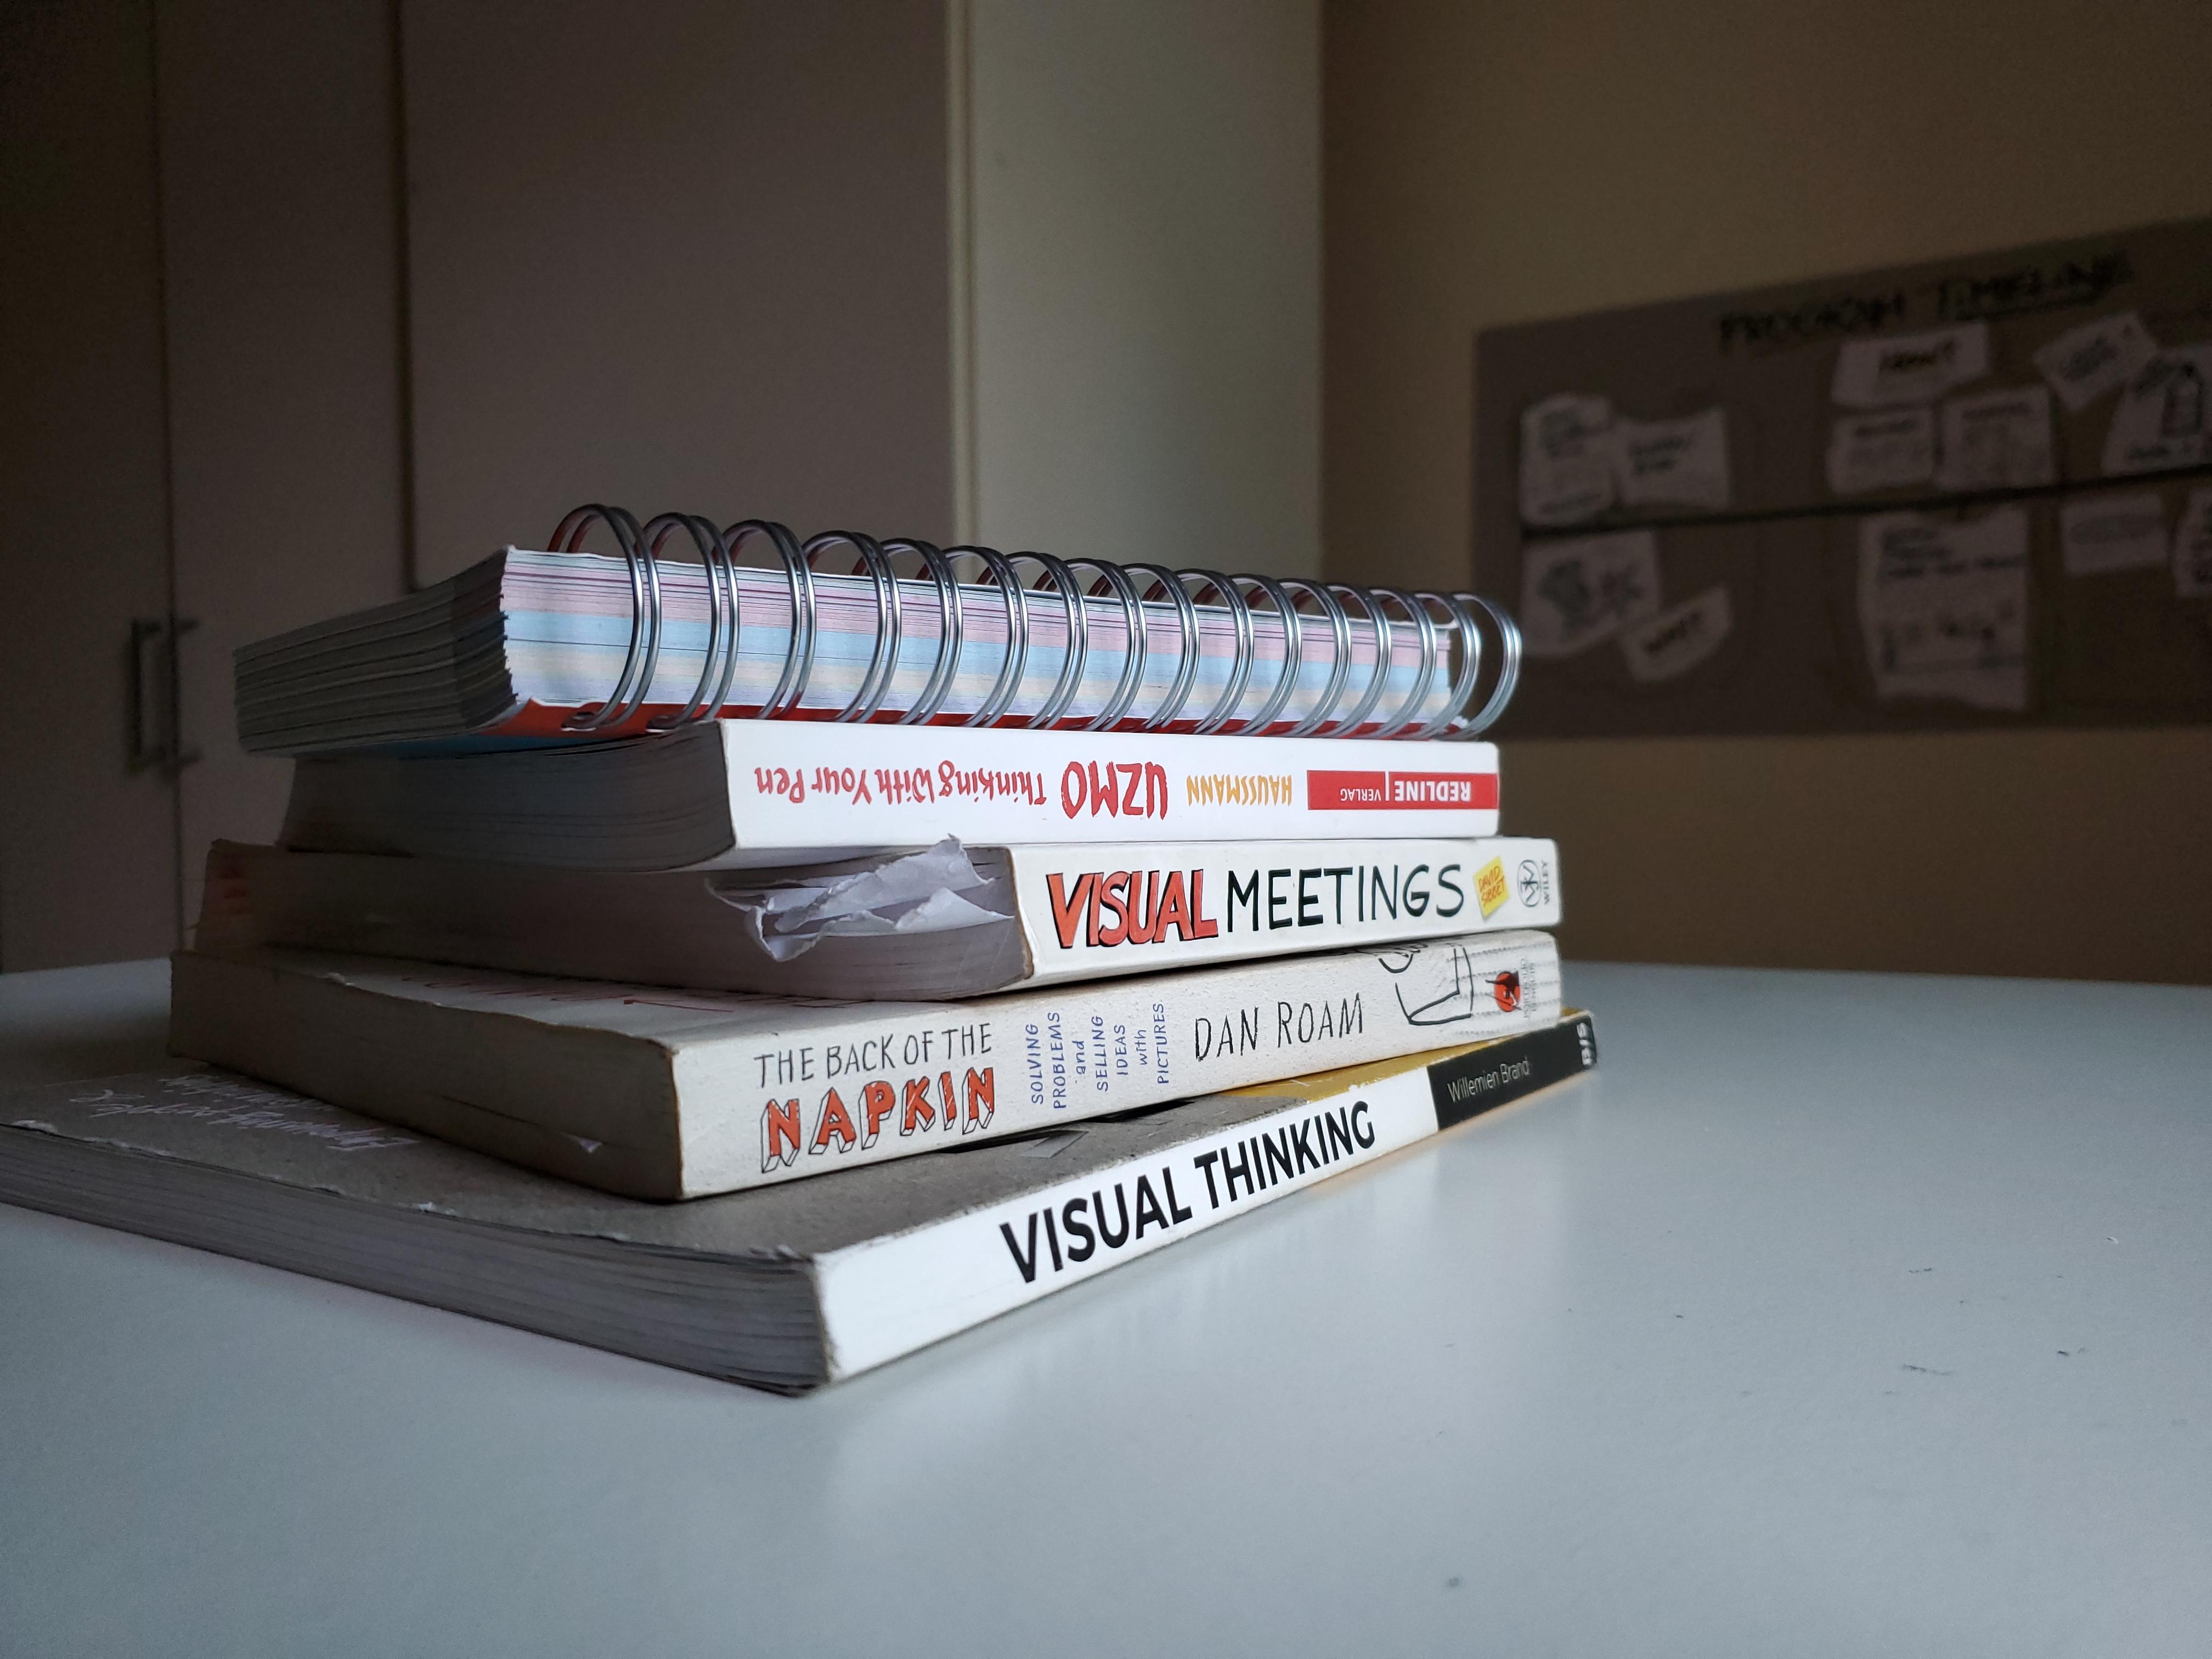
5. Bonus Lesson: Book Recommendations: So I'm gonna be showing you a few books that I think
would be good examples of how visual
communication works and the different
elements that go into it. And I hope that you don't
treat these books the way you would read any book
that is non-visual. I hope that you'll
have a sketchbook or a piece of paper
in hand that you can draw examples
from here as you go. So it's not just going
through the pages like a magazine catalog or
like a regular book, it's going to be packaged
for you as well as this one is Bye, David submit. This guy is a very
highly held figure in the visual communication,
visual facilitation world. And he lists some
very good examples of how visual communication
can work among team members, small or big, how teams can
brainstorm effectively. There are several
templates here. David Silva found a group of consultants and with a lot of
these books you can Google. The authors are
the people behind this work and you'll see that they're very active
on their websites. They have services
that they provide, and it's pretty cool. This was really,
really helpful for me for the last
training that are conducted in a hotel
here in Sabah, it gave me a lot of guidance
and a lot of inspiration for how systems can be
really understood. And brainstorming
sessions can be held in a very effective way where there is a certain element
of looseness or a certain element of
serendipity and just letting whatever happens happen and letting ideas flow seamlessly. But there's also some kind of structure or outline
that we will be getting the
takeaway from all of these ideas into by
the end of the day. So that we have some
results from all of this brainstorming and all
of this ideation in a team. So it's not just about
creating beautiful visuals by the end of
brainstorming sessions or by the end of meetings, or any kind of event
where you have a group of people in
your relaying ideas. It's also about communicating
very effectively and communicating in
a way that would make sense to everyone on board. So there aren't as
many misunderstandings or misinterpretations of
what someone proposed. This one is a very fun book. This is called the backup
load visual dictionary. Basically it's a bilingual
book and its features, this magical marker, I think it's called an
oil gland marker. It's pretty cool. I tried it out the other day and Q. Brook
or someone who I met after my first
class and he's the one who had given me
a lot of these books. This is the, basically a really good visual vocabulary for if you really just want to say, okay, you know what today, I
want to add this up and be able to draw
something from here, whether it's from a template
or one of the figures that they have or the different interpretations
of abstractions, whether it is t moving
forward through a phase or a restructuring
of a company, or abstract things
that you think, How can this be visualized? They will have ideas for that. It's pretty cool actually, and I love that, Dave, if you can see these colors, they've kind of divided each
section into a color theme. You can look for this by
theme and be level one day. It can be like,
okay, my meeting is gonna be about methods, or about technology, or about company structures,
about finances. So I want to be able to have
a few ideas of how I can portray ideas that
we'll commonly used in the field that
I'm trying to get into, the field that I'm
trying to communicate. And x1 would be like seminars
and conferences related. So they would have these
very simple drawings. I love that they use markers. It has that hand-drawn
touch to it that I believed that can be translated
digitally sometimes. But something is when
it's really done by hand. And again, there's
leaning into cliches, are leaning into
visual vocabulary that we're already
familiar with, whether in science that we
encounter in daily life or in the different
media that we consume, our phones, emojis that we have. So it's all things that
are already familiar with. You don't want to be
very different when trying to portray something
that you want to communicate. That is your primary purpose. You want to communicate something that you
both understand, but you want to capture
it visually and share it. When you do that,
you try to lean to the thing that is most
familiar to people. So I think that's what they
are leaning into here. You can see the
different name badges. You can see the registration
person just standing here. You can see the sound
system over here. So there's English section and there's this one in German,
I think it's in German. So the black one would
be in German in there, green one would be in English. I think this would also be
a way to permit practice. Some German, I don't know
any German by the way, so it's just the same. So there are several
examples like that. So now this one is called visual thinking
by Willoughby and brand, and she's the founder
of the Buddha brand. I suggest that you go online
and you check them out, check out the work
that she has on there and on her person
and Instagram too. So this is a really huge fan of the cupboard and how
everything is laid out. Now a lot of the drawings
here are kind of familiar to the ones that I've
been doing for some time, but it was really cool to see. It's done with a
different twist. Like I said. The more you do this, you're going to have
style of your own. You're going to have
your own touch that these books would be a
very good guide for, like the visual meeting spoke. There are some templates
on here that you can use as a team or in a
corporate setting. A lot of these books are
targeted at the corporate world. So it's about
sharing information among team members very effectively and recording
that information. And also about really listening
to what's being said and being able to record that
information life visually. So as you can see, there's some beautiful
graphics on here. She uses minimal
number of colors. I really like that. They don't use that many
colors in most of these books. They're very intentional
with the kind of fiber that they're going for in that it shouldn't be
very overwhelming, shouldn't feel very chaotic. So she has been individually facilitation visual
communication world for years now and she
has experienced with different methods that
work determining cause and effect or an cataloging
information in a very effective, very easy to grasp way. And it's just such
a beautiful book. I have to say it's, if you're going to dive
into this rabbit hole, you might as well
do it well, right. This one is called back
of a napkin by Dan Roam, is that the coverage is
pretty this book I've heard of and started reading
a long, long time ago. Actually, I ever read the
story or Dan Roam how he was in the meeting room with the
penguins book publishers. And he's just supposed to, he was pitching
this idea that he had and they told him
that was too expensive. So he came up with this idea right there in
front of those people. So it was just, you
know, being able to draw on the back
of the napkin, being able to do
something very quickly and taking advantage of drawing to really be able to break the barriers of
culture and language. One of the main
takeaways I took from here is that it might actually be harder for people who
are in the design industry. So let's say architects,
graphic designers, people who already draw professionally do more
graphics related work. He actually argues in parts of the book
that it's actually harder for these people
to be able to go, you know what, I'm just going to be drawing to communicate. Well, I'm just going
to make this as simple as possible and not worry about making it pretty
or professional or whatever. So he was kind of talking
about that kind of being a hurdle of sorts and that really resonated
with me and with my experience
being able to, being known as a
person who's been drawing for her whole life and drawing with sand being paid for my illustration,
my animation work. And it can be kinda
hard to be like, Okay, now, I can just do something and be judged
for it right now. Just draw something and even if it doesn't look good,
I'll be okay with it. Do you know it's hard
to get to that level if you are someone who's
known for your drawings. So I kinda, yeah, I would
recommend this book. It has gone very
far with this book. And yeah, then we have Guzman thinking with your
pen by Martin Hoffman. We kinda get into
the technique aspect and the explanations
morning shows you why he does certain diagrams or restrictions
the way that he does. He explains the colors, how colors would be
harmonious with each other, especially when you're
going to be drawing on a large piece of paper
or a large board. You have to be very careful with not having too many
colors on there to kind of visually disturb the person who's going to be
perceiving this information. And so he talks about the very basics of
what colors should be harmonious and being very intentional with them
and how you use them. And then you kinda talks
about relationships, how to portray those in the most effective,
simple way possible. I really like his
illustration style. If you like, there's a, he
has a nice touch to his work. I really like when
people use these kind of visuals to portray
layers and layers of information and seeing how far it can go
without it looking too jumbled or needing a more refined technique
off Recording. And then he talks
about lettering. And he talks about how
it's important to have your own lettering style
and being able to write in a way that's very clear and
legible and easy to grasp. This is something that I did in a training that I
conducted some time ago. And this was where
I asked people to write each other's names. So I had the names
of everybody in the training and I wrote
each of their names, cut it into different pieces of paper right before the meeting. I will read those
papers containing these names and I put them
under everybody's chairs Randomly and the name that they got was the name
that they have to write on a piece of paper with no line and with different
pens and markers types. So that was just then practicing
their lettering style. And I try to
encourage them to use more capitalisation and
to be able to write in a straight line and very
consistent where there isn't an odd spacing
between each letters. So maybe they felt
like they were in primary school again,
maybe they went, Oh, why are we writing these
simple words like this again, like, you know,
like are we kids? But I really think
that being able to produce really large
handwriting and being able to write in
straight lines or in whatever shape that you like
is really going to help if we're going to take this visual communication
brainstorming thing into the team level and
being able to write live. Now, this is
generated describing a social art of
the 21st century. It's by CalliBird
and I suggest that you go to her website
or website is amazing. She has some gorgeous
examples of graphic recording such as they can in
meetings worldwide. And this book is more deep in the theory aspect
into how drawing isn't just a method of
showing what you're thinking, but it's also a method
of thinking itself. A few of these books
have gotten to that, but I think that she really
gets deep into that, into the psychological
aspect of it and how it works and what visualization
does to us and for us. Yeah, So if you get a chance, I hope that you get into one or two or more of these books. And I hope that you always
have a piece of paper, use it even as a
bookmark and draw while you're seeing the examples
right there on the page, try to capture what you see. And that application
is usually how we get good and comfortable
with any technique. So I hope that you get
to it and have fun.
6. Closing: Okay, Now that we are done, I'm really grateful
that you spent these precious minutes
of yours with me and I hope that this bite-sized class has
nudged you to pick up a pen, any medium that you have around you and just start drawing. The whole point of
visual is to use the human bias to visual
information to your advantage. So this would be a way for you to be able to
express your ideas in a way that is very easy for most of the population
to understand this. I hope it would be a lot more comfortable with
a pen and paper, even transfer those skills
to digital drawing. You can watch my
first think visually, communicate your ideas through a simple drawing right here on Skillshare from my profile and you can follow me on social. So the Instagram,
Facebook, media, YouTube, all the links are right down
here in the description box. If you do create any drawings, whether in the exercise section or the class project section, I hope that you can
upload whatever you make in the projects
and resources section. I would love to see that, or if you want to share
it on social media, I hope that you use the hashtag, think visual with
winter on Instagram. Be sure to check those out. I hope you have a wonderful
day or night or evening, whatever time it is where you
are and see you next time. Hi.
 Winta Assefa, Architect & Visual Communicator