Transcripts
1. Introduction to Recording Technique and Room Acoustics: congratulations on enrolling in the course. My name's Rob. It's a pleasure to meet you, and I can't wait to spend the next hour and 1/2 with you Now why is professional looking video so important? A lot of people say content is king, I say. Another say that design is king because without good design, you leave the interests of the viewer before you even get a chance that deliver your content. They lose trust in your brand or your product because it looks amateur average. You need professional looking video to engage your viewer to build trust in your viewer. On lighting is the key thing creating professional video. So that's the main focus of this course. We'll also talk about backdrop and framing a talking head higher merrily. It's lighting and assumed. You start to think about lighting. Everything falls into place and your video starts look amazing. Now, this course is for people that create online courses like myself, whether that's onions, me or outside of you. To me, it's also for small business owners that might want to create a promotional video for That's my Business or YouTube Video creators. Maybe you interview people you need to like them like this for a talking head video, Any situation where you're delivering a video of someone talking to the camera or even two people talking to the camera, this course is for you. Maybe you film yourself during presentations to send to other people in your business and educate your peers. It doesn't matter any situation where you're filming on a budget or at home, this course will benefit you. This will not benefit you on this course is not for you. If you like to film on a professional film set or you want to learn about all the techniques for professional lighting. No, this is for people that want to film on a budget, build their own D I Y lighting rig because you don't need or those professional lives. Sure, if you want a film a multi £1,000,000 film, of course you need it. But for our purposes, you really don't by the end. For this course, you'll be out of build your very own lighting rig, and you'll know exactly how to use it. How toe upgraded in the future and how to make your videos Look. Also, I created my first course with a very average amateur looking promotional video. Andi enrollments were okay, but I just didn't see why people weren't enrolling in the course. I thought content was king. There was such great content, and I thought that would be enough because that's why people were there. It turns out people were clicking off the introduction in the promotional video before even got charts to tell them about whatever it was always teaching a Sooners. I changed that video built this lighting. Greek started concentrating on video quality just as much as content. My enrollments went up by 223% over twice as many people were enrolled in the course just because my promotional video looked so much better built trust and engaged of viewers. So you can do the same by name this course. You'll be so confident and I'm gonna take you through step by step. Anyone could do it. It's really easy to follow. You might not know anything about lighting a tool, but that's fine. We need to know his house. Use your camera. Each section builds on the last and progressively, you'll have an overall image of how to light your videos and how to frame them. How to make awesome looking, talking head videos. Trust me, it's really easy. I'll take you for it, step by step, and by the end you'll be a complete master of home lighting. Now, who might to teach this? Well, I used to do a lot of life in design for live events. I still do sometimes. And I took those same lighting principles and applied them to my d i Y home studio. Since then, people always ask me about my lighting rig on. Always ask me how I create my videos at home and make them look so professional. I got sick of telling everyone over and over again the same thing that I decided to make a court. And I want to pass that information on to you so that you can do exactly the same. Don't waste hours of learning from your mistakes. Don't waste hours resection on the Internet in just over now I'm gonna teach you absolutely everything you need to know when to give you a quick summary of the curriculum. Of course, before we crack on, first of all, we're gonna go over talking head videos on how to frame your videos and how to select your backdrop and some general best practices. Next, we'll go over lighting basic so that you understand fully exactly what we do with our lighting rig. Then we'll go over lighting technique, and I'll tell you the exact set up that I use and the exact set up that I recommend you used to. When you're lighting, you're talking head videos. Then I'll show you how to build this rig, how to use it, House upgraded in the future on how to make your videos look the best they can. And finally, we'll wrap it all up with a conclusion. Now, before we continue, I do have a challenge for you, so keep watching.
2. Course Challenge!: This is an intensive short course signed to take you from a to B in the smallest amount of time possible to my challenge to you is to take this course all in one city. Set aside an hour and 1/2. Grab your note pad in your pen to jot notes along the way. Press start on the video on, maybe take a break halfway. If that's how you like to work, watch the whole way for by the and you'll feel so much more comfortable. You can start put into action everything that you'll learn over the next hour and 1/2 and you can start instantly making your videos. Better order the stuff you need or find it around your home and get going. So that's my challenge. I really hope you accept it. Let's continue. Let's get going
3. Understand Talking Head Videos: now the first thing I want to talk about is talking head videos and what is a talking head video? It sounds quite specific, but really all it is is a video where the main focus is a subject person talking. It's that simple. It doesn't have to be with a plain backdrop on one and talk to you about backdrops later on . It could be with a background. It could be outdoors. But as long as the main focus of the video is one or two or however many people talking, that's a talking head video. Now we are talking mawr. We're concerning ourselves more with single or two passing videos because it seems we have more people. We obviously have to start thinking about lighting differently because we want to like every single person. So the techniques outlined in this course are specific, more to smaller numbers of people. But that's still a talking head. You might have an interview of two people. If you can have a camera on each person, then you can have a life simmering on each person
4. Perfect Framing: But I also want to talk to you about framing menu Shoot. You're talking head Harrison. General guidelines. Don't cut off the top of the hair It's tempting to do. I've done it before to get cool, edgy, kind of shot zoomed in really close on the face. And if you're doing a documentary or it's a short film, that can be really interesting. But if you're doing something that's informative, something like an online course or promotional video, you want to keep it professional, so keep the hair in the shop. Unless they've got wacky has it's impossible to even the shot. But also try and include at least a bit of shoulder. You can go as low down on the torso as you want. If you have someone that just stick, your weight's quite a lot like I tend to do. You might wanna have their hands in the focus on bringing the shot down, but I like to have it a few inches below the shoulder line, and this is my idol framing. This is how I like to do it
5. Master the Performance: next. We need to think about the performance because without a good performance, even without cool lighting. Reagan, our camera of running and audio is ready to record, and we've got a nice microphone. If we don't have a good performance, we don't have a video. So when you're delivering your talking had video, Try and vary your pitch in your voice. Vary the speed it makes it more engaging makes it more interesting. I once read that people lose attention when they're viewing a video around every 90 seconds . If you continue talking at the same pace and the same pitch, we were gonna get bored. But if you vary and you pause for long times, occasionally it draws their attention back in. So make sure you really perform of your voice, but also think about hair and makeup and look presentable. Try not to wear anything too offensive or anything that might detract from the shop or detracts from the content that's being delivered. And also try and think about. If there's two people, how they interact and how they're positioned with each other, you wanna be facing the camera. You don't want one of them facing the other or facing away from the camera. So you think about the performance just as much as where you're shooting, which we're gonna talk about next. But make it interesting, very gesticulating. Show your personality, vary your pitching your speed and just make it interesting.
6. Choose the Backdrop: one of the most important considerations when we pick our filming location is the backdrop , and we've got a good background. We can really make her video look poor. And this is one of the key elements in creating a professional looking video. And it's important to remember when in doubt that plane color always works. If you can't find a nice background or you're not sure if the backgrounds too busy or clustered go for a plane color and doesn't have to be white, that's common. Plain white can look really nice and sleek and simple and professional, but the same time blue can look really nice green. I try to avoid cause that would just look like a green screen. But you can create some really nice interest in back drugs, just with playing color on a bit of lighting. Which, of course, will go over later if you're not picking a plain colored backdrop and you have a background to this, even the room or maybe you're outdoors. Putting the IT background out of focus, I think looked really awesome. And this is that kind of typical blurry background effects that you'll see quite often on professional video, and you can see this effect in the promo for this course on my over courses. And I think this really separates the subject from the background, especially where you don't have a plain background. It can sometimes be too distracting, but it seems you put the background out of focus. It really brings the attention back to the subject. It looks really nice, it looks professional, and it gives off that feel off high quality. So when you want to achieve this, here's a couple of quick tips for getting a blurrier background. One of them is to move farther away from the subject. I moved the camera away from subjects and then zoom in. This will allow you to get a shallow depth of field on. Put the apertures lo zero. OK, As I said, we're not going to go over camera basics in this course. So if you're not sure about aperture, oh, drop a link in the section on right? That will help you to understand that. But basically the premise here is if we want to achieve a blurry background, we want the after to be as low as possible. That where a low number is actually a wider aperture. The lens is open more on with this. We achieve a shallower depth off field, which is what D. O. F stands for on with a shallow depth fulfilled, we put the focus on the subject on then that's the only thing that's in focus. Everything else becomes blurry. I either background and this is how we get this really nice effect. If you aren't using a plane color back drop, it's also important to remember to keep it simple. You don't want too much movement, and you don't want to be distracting the viewer from the subjects with the background. So maybe a small light would look quite good. And lights in the background really kind of make an interesting scene. But the same time you don't watch too much movement, you don't want anything too distracting. You especially don't want other people in the background unless that's kind of part of the video and you're in a busy environment. You want to keep it as simple as possible with this few distractions as possible. If you're using a flat background, a good little tip is to move the subject on the camera all further away from the background and this will help to separate the subject from the background, especially if it's flat on when we start having a bit of lighting as well, which will go over later. This will really help moving everything away from the background to give a bit more separation. If you don't want separation on, do you've got a white background, for example. That's absolutely fine. You don't need to consider this.
7. Section Summary: So to summarize this section, make sure you really carefully consider the backdrop or background when you pick your filming location. Because this is the thing that can make or break the look of your video with a nice blood background or really nice flat color background. You can make your video look really professional, but we have a cluttered or messy or under stinks background. It's gonna look amateur, make the performance exciting, because without a good performance on an interesting subject, you're not gonna have a good video, no matter how high quality is. And no matter how could the resolution is and how great the shot looks. If your subject is boring, it's gonna be a boring video, and I'll see with interviews. This is a bit more difficult, but if it's you, yourself or an actor delivering the talking head or promotional video trying justification late. Move around a bit. Get passionate. Make it exciting and interesting for the viewer to watch when framing your shot. A good rule of fund is to make sure the top of the hair is in frame. Onda also some of the shoulders you can, of course, play of this quite a lot. I wouldn't zoom in enough to cut the top of the hair off. But you could, of course, is the amount more and have more of the torso in the frame, especially if you're subject gesticulating a lot and you want to get their hand movements in. But in general, this is a good starting point.
8. Why Lighting Is so Important: Now I want to talk to you about why lighting is so important and why it's the difference between amateur and professional looking video. Low light simply looks amateur. When you can't clearly see the subjects or everything's really flat lighted. There's anyone lighting source. It really just doesn't look good. And there's and there's nothing more to it to get a professional look. You need some kind of lighting rig and you need to consider lighting. And it's not the camera that makes the difference. You could have an amazing camera, but without good lighting it would look awful. And it works the other way around. With a poor camera and good lighting, you can get an amazing looking video. So just remember, low light looks. Amateur. When you have more lights in your scene, allows your camera on this in in most cases will be done automatically to select a lower. I see now what I say. It's away. Essentially is a way that a camera digitally adds more light to the image on when we have high Isis. If you were taking a photo or video at night, that's where you get that really grainy look and it starts to reduce the quality. It doesn't look a sharp, and it looks kind of awful. And you want your I say to be below 400 in most cases. Now, don't worry if you're using a DSLR or your phone cama or even a normal video camera. This in most cases will be automatic. But if you're using a DSLR or manual mode, a good rule of farmers you want to have your ice able a 400. But just remember tohave as much light in the scene as possible to allow your camera to automatically select a lower. I say intentional shadows can create interest, and, of course, you can only create intentional shadows. When you start to think about lighting on, make your own lighting rig. In general, we wanna like everything as much as possible. Like I said, you wanna like the subject so they're really clear, and you can clearly see all their features. But you can also create intentional shadows, especially a small shadow across someone's face can look really interesting and adds a bit more drama to the scene for a online course. I wouldn't really recommend this. You want it to look fat and you want it to look simple and clean. But if you are doing an interview, for example, or something a bit more dramatic, maybe it's a storytelling. Intentional shadows come really create interest in drama in your shop. And, of course, you can only do this when you think about lighting and when you start to create your own lighting rigs.
9. Shadows: So when we talk about lighting one of our key considerations, one of the main areas that we need to think about is, of course, shadows. And in general I'll go is to eliminate all natural shadows. I know I just said that shadows can look interesting, but normally it's the shadows that we create in intentionally that look interesting. Accidental shadows and natural shadows say from sunlight from a window generally look poor or natural shadows, even from the normal light in the room. And I'll go in general if you follow their CEO, you can never go wrong is to eliminate all shadows, especially natural shadows. So you want to have no background. Shadows, I e. If you had a light pointing at subjects and you could see their shadow in the background that would look quite amateur on, you'd want to avoid that. And at the same time, you don't want lighting gaps. So if you're lighting a subject from due to different sides but too much of an angle, it would create a shadow down the middle of their face, and this is also something we want to avoid, but more on that later. Don't worry I'm going to show you exactly how to set up your lighting rig. But this is just another rule of thumb when it comes to lighting and shadows. And as I said before, a slight shadow across the face can create drama. As long as this shadow is intentional or considered, you could, of course, use sunlight from the window to create a shadow. But like I said, with an online course or some kind of business promotional video, you'd want Teoh get rid of all shadows on the face and make them fully let. But if you're doing something a bit more dramatic, a slight shadow across the face really work and make it look more interesting.
10. Diffusion: one of the other topics that we need to think about when it comes. Lighting is diffusion, and you might have heard this time before on all diffusion is is a way of softening light. So, for example, if you took a a normal light bulb and shown it at someone you can imagine it would have a perimeter. Almost. It would be like a circle on when we say a sharp light. It would be a very clear defined circle, but with diffusion weaken, soften that circling, blur it so that it kind of gradually goes from light to nothing. So when we talk about diffusion, we call it softening light, and this could be diffusing and spreading the light from a light source around the room when we use diffusion also reduces brightness, so generally t achieve diffusion. A good example would be, say, even a bit of paper over a light. If you can imagine putting a bit of a four computer paper over a lamp, it would diffuse the light and make it more diffuse and soft, and it wouldn't be as direct, but it would also reduce the light a bit. So whenever we add diffusion. We also need to consider that we're reducing the brightness off the light, and the reason we're doing all this and thinking about diffusion is because direct light is harsh and shop. It looks poor, you know you don't get as much spread from in diffuse light. It will just concentrate on one spot, and that can bring out bad skin tones and look quite ugly sometimes. So we want to really diffuse the light to make it look really pleasant, soft and spread about the subject's face.
11. The Ultimate Technique for Lighting Talking Head Videos: Now I'm going to tell you the exact technique that I use on all of my online courses and talking head videos on, because most of what I do is online courses and interviews and kind of business promotional videos I always go flat on. I really think you should, too. Like I said, I have said many times you can you shadows to create drama and interest, but where you're trying to relay information, you don't really want to create too much drama. So goes flats possible and just make sure the subject is flatly lighted and there's no shadow on their face. And you can do this quite easily, as well as creating a nice backdrop separation on making a really nice system with a three point lighting system. It's really simple urine. Any three light sources on this is what I use every time without fail. And, of course, that third light, which I'll show you in a second, is to separate the subject from the background. And I always do this. Whether that's with a light or with out of focus backgrounds, you always want to try and separate the subject from the background
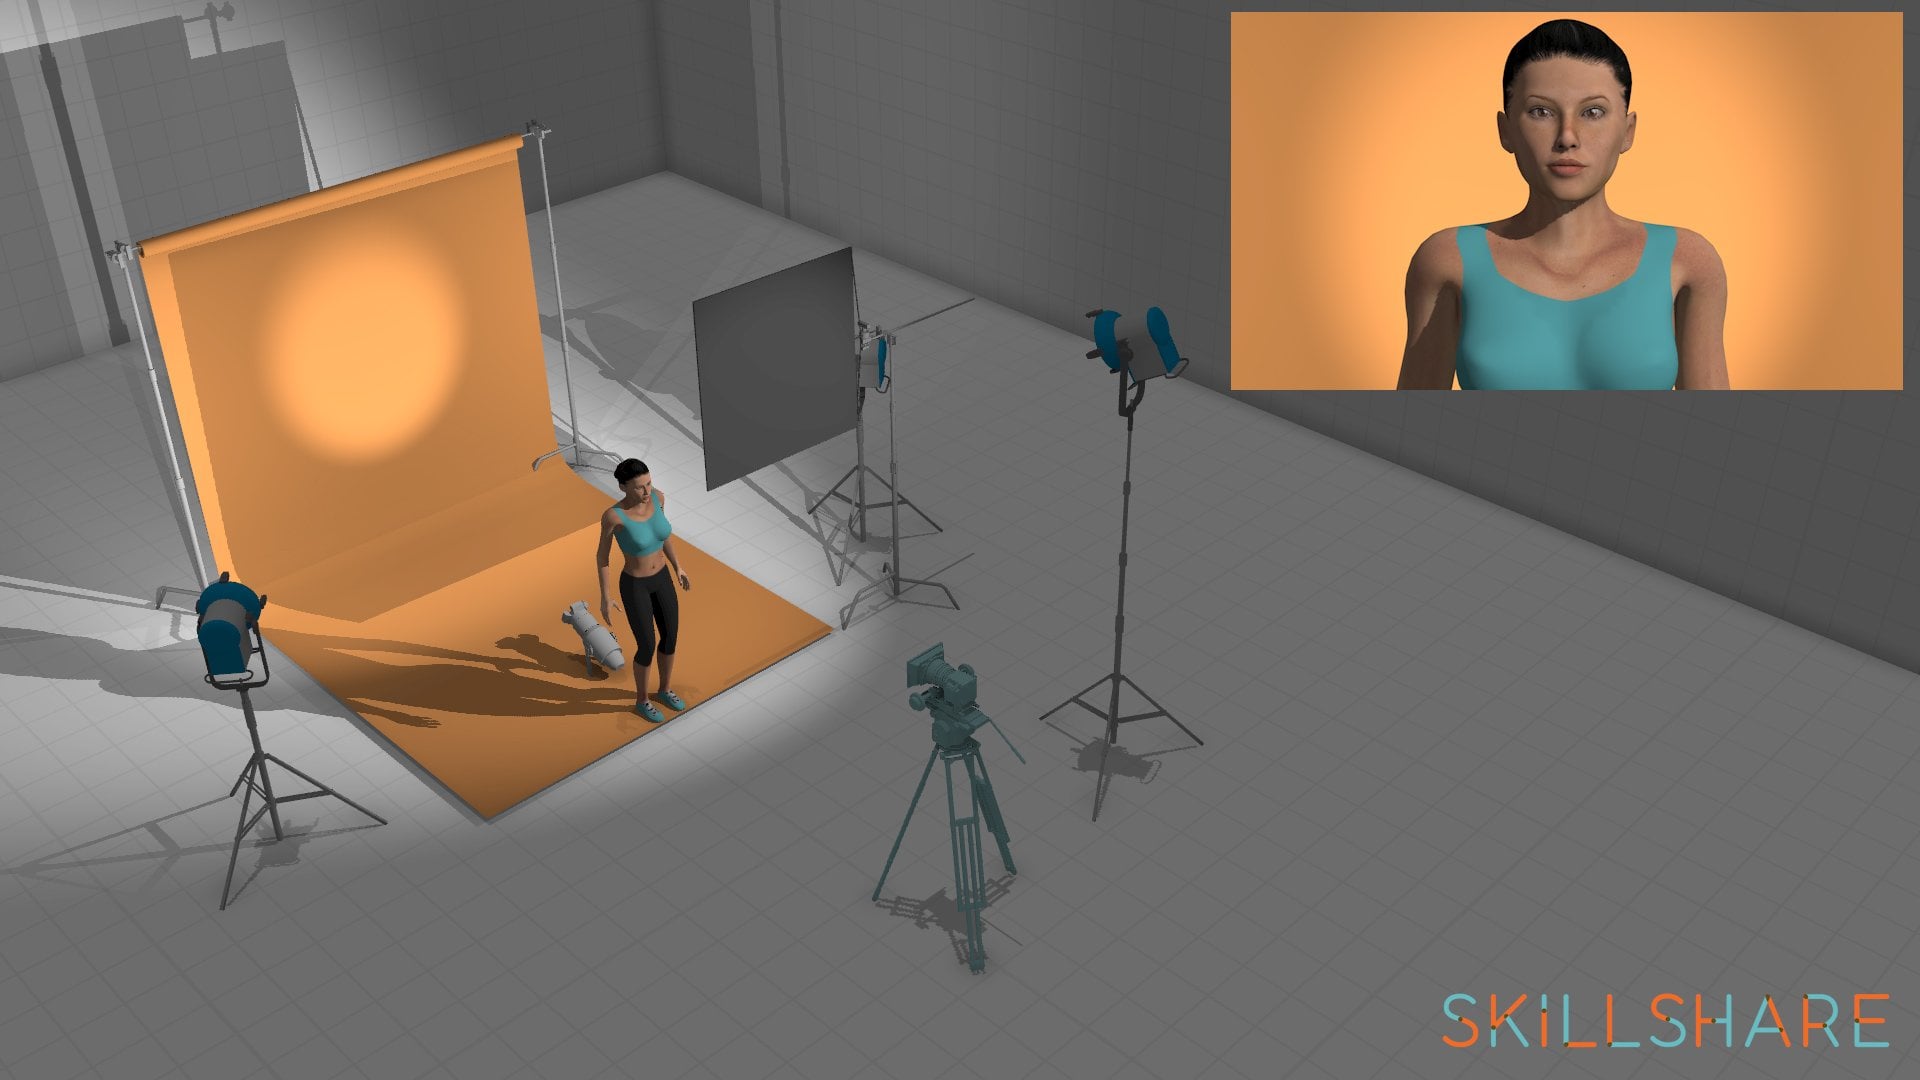
12. Technique Breakdown and Light Positioning: So here's a diagram. You can see a room with a camera. Andi, Imagine that belief circles the top of subjects. Had I hear white to blue less pretend we've got a smart there that were videoing this math , but that's not important. The important thing is we've got our camera on our subject now. How do we light? It lets First of all imagine that we've closed all the curtains and there's no natural light in this room at all. The first place we'd want to put lights. Two lights are subject, and these are our two main lights are either side of the camera pointing directly at the subject, and I fed light is gonna be behind the subjects, pointing up at them to separate them from the background. Now, with these front two lights by the camera, we want to try and be at least or around free feet between the front lights on. If you want to get into professional lighting times, we're actually using a key light. Onda feel like, right next to each other, kind of having the same purpose. Neumann Udi's a key light is your main light in a field like from more of an angle toe like this subject and create shadows. But like I said, we're trying to go flat, so we just can use to lights as no shadows, both pointing directly at the subject. And if you can remember Aaliyah, our intention is to not have any shadows in the background and to not have any shadow gaps . So if these lights were too far apart, we'd have a gap down the middle of our subject's face on. If they were to close, you'd be out to see the shadow of the subjects in the background on, especially if you had a flat wall on the backdrop. So around free fee is a good starting point. You can experiment with this a bit, generally about free feet between the front lights and in terms of heights, you wanna have them just above eye level. Another option for your backlight behind the subject is to actually point in the back lot at the wall on this creates a really nice effect, if especially if you have a colored or even a white flat backdrop. This lights up the backdrop and creates this circular effects on. It will really separate again the subject from the backdrop just in a different way with our previous lighting, with the backdrop pointing up at the back of the subjects, we create kind of a halo below, around the subjects which can look really nice. But this is an alternative way of getting separation between the subjects in the background By lighting the back door, you can see here just added in and window behind the subject. And this is a great alternative to using a backlight. So you could actually do a three point lighting system with only two lights. If you could harness the sun lights your advantage and hit. This is what I've done before. And here we can see the sunlight shining on the back of the subjects. And this will create that nice glow that halo effect around the subject. And this eliminates the need for 1/3 light behind them to separate them from the background . I'm gonna show you an example of this in the next video
13. Sunlight Back Light Example: I just want to quickly show you now an example of using sunlight as a backlight. And it is one of my other You demean courses about recording audio for your videos. Of course, that's a really important part of achieving that professional look and sound. Your audio needs to be spot on as well, but I'll tell you more about this later on. Make sure you check out the fine. Of course, the electrics. It's got a brilliant offer on this course, but for now, I just want to quickly show you my permission video. And this is using exactly the same front lighting set up that just gone over. Imagine were inside the camera. Now I've got a light just to the right of the camera and a light just to the left free feet apart, pointing directly at my face just above eye level, using exactly the same lighting brick that I'm about to show you in the next section. But here, instead of using an electric light or a lump as a back light, you can see him that she using sunlight from this window. It was a really nice, sunny day in the middle of summer, then that's essential. You can't do this without some nice sunlight. You can see how effectively it shines on the back of my head and my torso and gives me a really nice outline that separates me nicely from the background. You can see this glow here on a round of sea is very glowed there. But then around decide my face and then around the pop filter. And around this, on that glow around my silhouette is what I'm talking about when I say separation from the background. And without that, it would look knowing here is interesting. I'd be kind of part of the background that helps make it look really Freedy and adds depth to the shop having this glow all around me. If I went back and did it again, I'd probably use a bit of foil just off shot here, too. Like this little section a bit more. You can still see him really clearly separated from the black desk behind me. This is what we want to achieve. And this just shows you that how effectively he knew sunlight. When you start to think about lighting on lighting design on starts to think about how you can use lights. Your advantage. You don't need to spend those money. You don't need professional like something this simple sunlight and have a really nice effects and positive impact on your video.
14. Completely Free Lighting Technique (Harness the Power of the Sun): Here's another situation where we could harness the sun as our lighting source. And if we take the same room here but moved the window to the side wall, we could then move our subject and use this light source as our field light. So this would be our mean source of light, the sun coming through this window. But of course, it's only lighting the face from this side, so we would need it. So light it from Hera's Well, so to do that, we could use tinfoil, a big square tinfoil, maybe wrapped around a bit of cardboard and suspended just above eye level. Whether with a tripod or I'm hanging it from the ceiling or some other way of suspending it , you actually reflect the sunlight to fill the other side of the subject's face and create that flat lighting. Of course, you could then add another light behind them for a backdrop to separate them from the background. But this is just quick set up to get you thinking about how you could use sunlight to your advantage, and this is without any lighting at all. So this is when we start to think about lighting design outside of the box. We don't necessarily need lights. As in light bulbs, we can use the sunlight on reflective surfaces to our advantage to create a similar effect . Obviously, this isn't gonna look as good as using proper lights, and we're gonna have no near as much control If a cloud comes over, our show is ruined, and you would need it to be quite sunny for this to work and get sufficient light. But it's just something to think about. I've included a link in the section on the right to a YouTube video, which gives a great demonstration of how you can use sunlight as your key light on DFO oil as your fill light, which is just replacing our lights either side of the camera from the previous section.
15. Section Summary: to summarize this section. When in doubt, go flat When you doing a drama piece or maybe a quite an emotional interview, you can use intentional shadows, but generally for informational products, online courses, promotional videos, talking head videos. We want the subject to be flatly lit, and this is just a great rule. Find you can't go wrong if you go flat and you want to use it least free light sources. And one of those could be sunlight. But generally you wanna have at least two light sources pointed at the subject's face to create that flat light or a bit more of an angle to create drama in some shadows on a light behind the subject to separate from them from the background. Onda out a bit more interest. And as I just said, one of our important things, always remember, is to separate the subject from the background on you. Sunlight where possible. You don't always have to use light bulbs. You canoe sunlight as your backlight or your field light with a reflective surface. Just starts think outside the box and start to use the environment to your advantage.
16. Source These Parts: Now I'm gonna show you exactly what to buy to set up this D I Y lighting rig, and it's all on Amazon. If you outside of the US, I'm sure you'll be asked to source this stuff or for your local AM zone or a slightly different store. You can get this this kind of stuff all over the place. I've just picked Amazon because it's a really easy place to or from weaken, get all in one place. But I'm sure you'll be out to find alternatives on other online stores or even in hardware stores. You can pick up a lot of this stuff as well. First of all, the most important thing is our lamp. Of course we're setting have a lighting rig, we need lamps. And the great thing about this is it's gotta clamp and it's literally called a clamp. So with this weaken, clamp this this light onto anything you know we're gonna get some stands. But if you already have some stuff lying around your home, you could clamp these onto brilliant. I mean, I use Mike stands. I just point the mic stands up and clamp, please. On. You can use all sorts of stuff. You might have shelves that are in the ideal position already for your kind of camera set up. Or you might have a light that's hanging quite low. You could even clamber onto a ceiling light. The limits. Arrendel iss the possibilities air unless you could clamber anywhere. So for positioning, it's just so easy. And we've also got an 8.5 inch reflector on the benefit of this is we can add out diffusion materials to this room quite easily, just using some clothing pegs. We can clip our material one, and we have our diffusion, like Both just goes inside. There. You can see here on the large one during any 10 inch, 8.5 inch is plenty to reflects the light and kind of aim it. We don't want it to be too hard evil, which is why we've got a nice, big open lump. These are $8.58 each, so I'd say by two of thes, So that's how we start. We get two of these and there are two front lights that we should point towards the subject . Remember, from the previous section, money decided to come or about free feet apart, just above eye level, pointing at the subjects on. If you don't have anything in your home that you could use the company's onto, um, and anyway, I would recommend buying these because you can use them in the future with professional lights, and it makes positioning all a teacher so we can get to tripod Light stands there really professional light stands. You can use them with over lights in the future like this, but this just makes it really easy to change the height of our lamp. We just clamp it on. Once you've extended it, clamp it on anywhere we want, and then we can move from around. Position them on. We have complete control over where we have our lamp, so that's $22. 95. Again, you'll be out of finding equivalent. You might be able to save in that altogether if you've got a couple of mike stands or if you got something else that you could come these lights on just above eye level. If you're subject sitting, it makes it even easier because you could use the back of a chair, perhaps, or something like that but this is I still recommend it because then you have complete control of positioning on. Finally, we need our light bulbs to put in those lamps. Our clamp lamps. They don't come with light bulbs. We need light bulbs on the best kind of like both to use for your dear while lighting Meg is daylight temperature, which you can see here is 5000 on. This would just give a nice even tone. We're not gonna struggle of our white balance. If we using daylight as well as a backlight or something else, this will match it perfectly. So we want to use daylight temperature when using CFLs, which is this this type of like boat stands for compact fluorescent. And we using these because they don't get that hot, they get no nearest hearts, halogen and incandescent bulbs. So we don't have to worry as much about the diffusion material we're using. Because if you had really hot bulbs and you started printing paper a few centimeters or inches away, there is a risk that you know that papers flammable. And if the bulls get too hot, yes, think about it. Also, it heats up the room a lot more if we're in a small room are in little home studios. We don't want to get too hot. So if compact floor actions, I thoroughly recommend, and here we can pick up two of them for $6.99 you want to make sure to get 100 watt equivalent. We need enough brightness. The lamp that she supports up so 150 watts. The boat's themselves aren't even 100. What's their 23 watts? But because their compact fluorescence there the equivalent of 100 watt halogen bulb, for example. So there we go. That's all the parts for your backlight, though, because, you know, with this set up, we've only got two lights. You can Eve use sunlight or any lamp that you've got lying around your home. And I even include this because most people have some kind of desk lamp or some kind of movable light that they can just put behind the subjects. And Eva shine at the back of the head of the subjects like we just discussed Ah, at the back drop at the wall itself. Just use something like this. If you don't have one. I'm sure you'll be out to pick one up for a few bucks or any any convenience store online as well, these ones who looked pretty pricey. But I'm sure you've probably got one line around your home. You just need any kind of lamp that you can ideally point on a MMA bit so that you can point at the back of the head or at the wall. ANDI. If you've got quite a dim bulb in them, it might be worth just getting a replacement bowl. Just the cheap one doesn't necessarily after much the color you can just use a normal halogen bulb. Just get brought both. So I had a bit more like and that's it. That's your complete set up Just to go over that quickly again, we've got to clamp lamps 8.5 inches. You We have to get them online in most places and even hardware stores to try food stands. But you could use the mic stand or something else to raise your clumps to save even more money on. Of course, our light boats are going out. Compliments use compact fluorescent so they don't get too hot. 100. What equivalent? So we've got enough light on daylight temperature and that's it. That's our D I Y lighting rig
17. Get Free Diffusion: The next thing we need to add to our lighting rig is diffusion material, and it's actually loads of stuff lying around your home that you can use for diffusion. But just remember when you're experimenting to be aware of flammable materials. If we're dealing with hot light bulbs, you've got your clamp. Now you've got your light bulb. They get really hot, depending on what, like Bob you've picked. You still need to be really careful they because if you start putting tissue paper and stuff like that in front of a light for too long, it could catch on fire quite literally. So be aware of flammable materials and remember that light bulbs get extremely hot, especially when left on for a long time. So here's a few things you could try using on. Ideally looking for something that diffuses the light nicely and spreads it and makes it really soft, but isn't too dark and doesn't defuse it too much. You still want to be out to see the light on the subject, so you try thin white shuts on T shirts. Generally thick white T shirts reduced the light too much, but it's worth trying, especially thin white T shirts. You could also use netting ie curtain netting again. Be careful with leaving it over your life for too long periods because it could be slightly flammable. You don't believe it on there for hours with the light on. But another great thing about netting is you can tape laser netting to the top of the clamp . Andi uses many lasers. You want to control the amount of diffusion and light reduction. You can also use tracing paper, and this works really well. Just clamp it onto your the front of your boat. Your light, um surround with Cem Margie McQuillan Clothing bags. That's the one. You could also use computer paper and fasten it onto the the surrounding the same manner, although this normally makes it a bit too dark and blocks the light a bit too much. But it's worth a try on. Of course, the ideal thing you can use if you can't find anything in your house that works. You could buy some professional diffusion paper, and you can get this on Amazon and online and in some shops as well. When she found the material that works, you can use multiple layers to reduce brightness. I'd recommend getting as bright a light bulb as you can, because you can always reduce the brightness of it with diffusion tells you can't increase the brightness. You'd have to buy a new boat, so always go break, and then you can use multiple layers off diffuse IT material to reduce the brightness.
18. How To Set Up Your Rig: And then this is Hyo goes together. You can see here I'm actually using a mike friend stand and, of course, feel free to improvise and be resourceful. If you've got stuff right lying around your home that you can use instead can be on an even smaller budget. You can see the camp flight that simple. Clampett owned the bulbs on the inside, and then I'm using a thin white plastic, which is actually packaging, that I got with something taped over. Make sure it's lesson told, so there's no increases, but that's just takes over the front of the lamp for my diffusion and that's it. It's that simple. And then, of course, we just have to a fairy of thes, depending on your set up. Normally, just go for two of these and then normal desk, lamp or bed like land for your back flight
19. Upgrade Your Rig to Pefection: There's lots of ways you could update an upgrade. This very basic lighting rig. If you haven't already, you could purchase professional diffusion. Paper is always going to look better than household Dyson's, and it's really no expensive. So this is an easy way to upgrade your lighting rig. If you haven't already, you could get 1/3 clamp light to uses your backlight. Say when we talk about sex out the rig, I said that you could use a standard desk lamp or some kind of other movable lamp. Is your back likes? It's not as important. You don't need it to be as light or diffuse is your front lights. But obviously, if you have an extra clamp like you have more control, you've got 1/3 light in case anything goes wrong, you can move it around a bit more. You can add your diffusion. So if you haven't already, another easy way to upgrade your rig is to buy that third clamp light to use for backlighting. You could also purchase um, different temperature and brightness bulbs. You can experiment with what works best in your with your backdrop if you want it to have a slightly cooler look. You could use a blue a temperature above, or you could make it look warmer. Depending on the temperature. Bobby's It's gonna have a big effect on your white balance and the overall look of your image in your video. They could experiment with different temperature bulbs, and, of course, you can experiment with brightness as well. Somewhere is this section on the lighting rig. There's no need to spend a fortune again. Once you start thinking outside the box with lighting, you don't need to spend hundreds of dollars on big lighting boxes and professional setups. You can achieve exactly the same effect with stuff lying around your home on some simple clamp lights. Try different diffusion materials. Experiment with this a lot because the different material that used for diffusion will have a huge impact on the overall Look off your video so you try a few different out on. Like I said, if you can't find anything that works or anything that you're comfortable with, go out and get some diffusion paper is really not expensive. You can easily upgrade your rig over time, and that's another thing to remember. You might be hesitant about jumping in and get in this kind of D i Y break because you want to have a professional set up Eventually. That's great because it stands that you've just purchased or are going to purchase could be used with professional lives on. These could be back up lights. If you decide to get a proper lighting box, you could use these as your field, like you could use him as a backlight. You can use more than three lights as well. If you want to create more drama shadows or if you've got gaps or you wanna like the backdrop differently, you can always add more lights and upgrade these ones over time.
20. Video Examples & Camera Demonstrations: Well, okay.
21. A Wide Angle Look at My Latest Lighting Setup: Now let me give you a demonstration of how my lighting set up looks in her life. So you can see here my two lights. There's my marker Fine on his my seating position and then pine, that is my back like and you see here on my life's I've got a white plastic that I'm using as diffusion. My crane is as close as possible, as I could get without being in the frame. And then my camera would go right there on my tripod. But of course I'm using it. So when I'm sitting down most of central lights a pointing directly at me
22. ....and here is how it looks from the camera: here is an example of the set up. You just so slightly different to the rest of the course of changed it around my room slightly. So now the lights of Father back Andi slowly over time, I hope Grady in my lifetime, Rick, as you should be, too, and could see now it's looking even better than it did before.
23. [Activity] Buy or find the parts you need, and assemble your DIY lighting rig!: Now, this is a really exciting task, and this is always my favorite bit for this section. Your activity is toe. Order this stuff or find replacements around your home or even go out to a Hard West. Or if you want to get started straight away and get all this stuff, sources bring it all together and then assemble it. And that's the most exciting bit cause you've already got your plan. You already know about lighting, so now you compare all interaction, put it all together and set up your D i Y lighting rig.
24. Course Summary: fortunate we're coming to the end of the course. But before we finish, I just want to go over some of the key points again so that they clear in your mind. First of all, remember when you're setting up your rig, where of you are to consider the backdrop? Secondly, framed the shot with the top of the hair on at least some of the shoulders in the frame. And don't forget to make the performance exciting, because without a good performance, we don't have a good talking head video, generally with lighting. Our first aim is to eliminate all shadows. And remember, when in doubt, go flap, especially if you're delivering something informative, as opposed to something drama size, such as a short film, in which case we might wanna create shadows across the face but generally with online courses, promotional videos, talking head interviews, etcetera, go flap. Secondly, I think a lot about diffusion and try lots of different diffusion materials. Remember that harsh light looked amateur on. If you're not sure, upgrade to some professional diffusion paper is really not lie expensive. We also need to have free light sources, at least in every shot, so we have a backlight in two lights on the front to eliminate shadows. You so want to remember to try and separate the subject from the background. You never want the subject to blend into the background. You want them to be separated by a backlight. With that back light is shining on the background like it is here to create that nice Grady int from light too dark or, if you have a light on the back of the subjects to give them hey loan to give a ring of light around them that separates him from the background. Now they're the key points. Of course, one of the main things as well is to build your own lighting rig out of all the stuff that I've shown you without that you can't do any of this or pet any of it into practice. And before we finish just quickly, I want to mention audio, because audio is just as important in the creation off high quality professional video, make sure you use the right microphone for the job. Get rid of background noise, make sure there's not too much reverb in the room. I covered this in a lot more depth in one of my other courses. And there's a nice little treat for you in the final electricity if you're interested in really creating professional videos, which I know you are, and I like you for that. So go to that last lecture on There's a nice your gift in there for you. But that's it for me. Thank you so much for joining me. I really hope this has helped, and I know it will make your videos look so much better on you can email me passengers while rob at home studio center dot com, with any questions that you might have about the course. Good luck and share your videos. I'd love to see them.
25. [Activity] Record a talking head video, upload it to YouTube and share.: Now, before we finish, I do have one more final activity for you. And this is quite a big one. I want you to film a video with your lighting rig with your backdrop that you thought about with your lighting plan that you created in the previous sections. I want you to film a video. I want you to upload it to YouTube. And then I went to you to share it with me on all of your peers on this course by posting in the discussion section. And then we can give you feedback. We can complement your in your lighting rig on. Everyone can have a look at how successful you've been.
 Rob M., audio-visual engineer, musician and video creator.