Transcripts
1. Introduction: Hi, my name is Will, and I've done a lot of engineering and the studio. I've taken a lot of recordings from the stage of setting up mix all the way through to premaster. What I want to show you in this section is how do you do a pre-master with isotope ozone? So we're gonna talk about specific features of ozone. Sure, but we're gonna talk about principles behind a good premaster. Things like loudness. How does it translate once it gets translated into an MP3 or they're going to be artifacts, digital, digital breakdown. That's going to change the tonal quality, your mix. We're going to talk about all of that sort of stuff, as well as how to get it allowed enough. That's one of the biggest challenges for folks who don't have a lot of mastering or engineering experience. We can talk about all of that. And by the end of the course, you'll know how to do a good, reasonable master of your material or other people's. How to use the features within ozone including their automatic master assistant software, which is based on machine learning. And then we're going to have a project at the end when it's who's gonna help you sort of incorporate what you learn in this section more into your workflow. So without any further ado, let's move on. I look forward to seeing you in the upcoming lessons.
2. Overview & Goals: Let's talk a little bit about the goals for the section. We are going to be focussing pretty much entirely on ozone here because it is the isotope mastering package. And if you're doing some kind of DIY pre-master, it just makes sense to use this, especially if you are also using other isotope products like neutron and so on, so forth. The goals for this section is to talk about why we premaster. Basically a pre-master is not taking accountability for the full mastering job, but taking some steps to ensure that the mastering engineer has a very clear idea of what you're trying to get out of your, out of your track. That's really the goal of a pre-master. So we're gonna talk about why in the next lesson a bit more. I'm also going to demonstrate the master assistant that comes with ozone, which is really helpful. We're gonna talk about loudness translation, which is basically how does this sound when you put it in a car or on an iPad or some other device, if you're listening to it on a super nice stereo, it's going to sound different when you put headphones on or when it's in mono. So talking about translation is important. We're gonna talk about using some of the more advanced features of those zone. Here I'm using ozone nine. And some of those advanced features in addition to the master assistant, includes things like using a reference track to do your mastering. I also want to talk about using features like gain match and tonal balance. We're going to talk about things like what is crest factor? How to use low-end focus, which is a feature within ozone nine. And then also, I'm actually going to use isotopes insight to do some sort of evaluations on our levels and loudness at the end of this section. So these are all oriented, going to be lessons oriented around loudness, translation, and distribution concerns and how to figure that into your pre mastering phase. So let's get started.
3. Why Pre-Master?: Why do you want to do a pre-master? Okay, well, first of all, the most common reason you want to master is loudness, translation, and distribution. But if you leave that entirely up to your mastering engineer as much as they probably have better ears than you and probably have better equipment than you. A pre-master gives you an opportunity to have a say in that process by sort of directing their ears and pinpointing your goals with the, with the music. Pretty masters are not really necessary, but they are a nice option apps. So we're going to talk about things like using dynamic range because the loudness, what we talk about as loudness really comes down to dynamic range. What's the difference between that allowed us and the quietest signal in your recording. And that helps. In other words, if you have the right dynamic range, then the listener's ear can track all of the components and elements within your mix. If your dynamic ranges is too extreme, then sometimes things get lost. And if your dynamic range is minimized too much, or in the case of using a maximize, maximize too much, overcome breast is what I mean, then that kind of dynamic range can make an otherwise promising mix sound really flat and sort of two-dimensional because there's no dynamic range at all. Now talking about tonal balance and crest factor is going to come into this in an important way, but also distribution and translation concerns. So you may not know if you are mixing this for streaming. You're gonna wanna make sure you have an extra decimal for translation so that it doesn't clip when it gets processed into streaming medias. If you are mixing this for MP3 is you're going to want around, say 0.6 to 0.8 dB of extra headroom. And we're gonna talk about how you can use the codec feature in ozone so that you can track down what the artifacts are that are being introduced when you try translating to MP3 or a C formats, that sort of thing. So being aware of all that and knowing how it's gonna play out in your mix is something you should make a decision about if you're interested in making those decisions. Of course, a promising and quality mastering engineer will make good decisions about those things, but they may not be the same decisions that you'd make. So that's why we wanna do this. And the next lesson, I'm actually going to start it and we're going to do a quick master it using ozone, master, assistant.
4. Master Assistant: In this lesson we are going to run a quick master. So I'm going to pull up ozone nine, and I'm going to pull up basically the full app here, not just one of its components. And in the middle we've got this button says Master assistant. So what are we gonna do here is we're gonna select Master System. We have two choices. Modern, Vintage. Now, modern is going to be sort of cleaner, more solid state type equipment. And ozone nine contains a bunch of modules, pressers, EQ, that sort of thing that are designed around modern circuitry. It's, it's modelling market modern equipment. Whereas the vintage is modelling vintage equipment, which is usually more oriented around saturation and tube distortion, those sorts of things. So basically this is a choice telling ozone, I want you to do my master using one of these kinds of flavors, either a modern equipment, orange equipment, loudness, and EQ, low, medium and high. This really just has to do with how exaggerated, how extreme, how intense Do you want the loudness to be? And you have two choices. You can have manual, you can have a reference. So if you choose reference, which we'll do later on in this section, you can actually say, well, I want the loudness and EQ to kind of be informed by one of my favorite songs. And I'm going to use in your eyes by Peter Gabriel for this example. Finally, you're gonna choose destination streaming or CD. And this basically has to do with headroom. So if it, if you choose c, d, then it's going to really push the maximizing all the way up to 0 dB, full-scale dBFS. If you'd use streaming, then the program's going to take into account that you actually need extra headroom in order to avoid distortion and clipping problems that are just inherent all streaming and high compression type audio formats. So you can make these decisions. I'm gonna go ahead and select modern. And I'm gonna leave it on manual for now. And I'm just gonna leave intensity on Medium and we hit Next. And it's going to start listening and I'm going to actually play. Okay, so that didn't take very long, right? Maybe 2025 seconds, something like that. I'm going to go ahead and hit except one note I'll make is that usually when it gets this dynamics phase, the volume can change pretty suddenly, which I'm sure you heard. So sometimes if you're doing this at home or in your studio, you might want to just turn your speakers down so it and scare, Yeah. I'm gonna go ahead and hit Accept and we can see now what the master systems come up with. So it's come up with a basic EQ curve and it's come up with some dynamics really refers to compression. It's come up with some compression settings. Dynamic EQ here, maximizer of course, for volume. So that gives us this nice gain trace. So if we look at this dynamic EQ, for example, we can see how the nodes are actually being changed based on dynamic variables. So it's pretty simple. You know, it's come up with an EQ, some compression, and then some dynamic EQ does to a team some spots that it thinks are potentially problematic. And then a maximizer in order to push up the volume. So it's really that easy. Now one thing I'm often curious about is the modern or the vintage gonna sound better, right? So I can go ahead and I can save a preset here. And I'm gonna call this my modern course. You might want to call it something a little more interesting if you're really going to organize a lot of presets, but I'm just doing this for a demo. Then I'm gonna go back to Master system this time and we leave everything the same, but I'm going to choose a vintage. Okay? And then I'll play again. Alright, so I'm going to hit Accept and see what they came up with. So now we've got an EQ of vintage EQ, right? So it's just using different models of vintage compressor, vintage limiter, and then of course the maximizer. So it's just using different elements. And now I can save this. I'm gonna go ahead and add this to my vintage. And I'm gonna go ahead and listen to how these both sound and kind of choose the one I like the best. May actually go back to the beginning because I'm kind of curious how the beginning sound. These different chances. Alright, there's a lot more distortion and saturation going on in the my vintage setting. But I actually kind of prefer that because I think it's sort of suits this more traditional tuned, right? So I'm gonna stick with my vintage setting here as my master. And that's just an example of master assistance. So of course you can go through and you can tweak these elements. You can disable, you can solo them, you can explore different paths and then make up your own mind. Now in the next lesson, I want to talk about loudness, metering, and some of the tips that I can give you for improving how that aids your workflow.
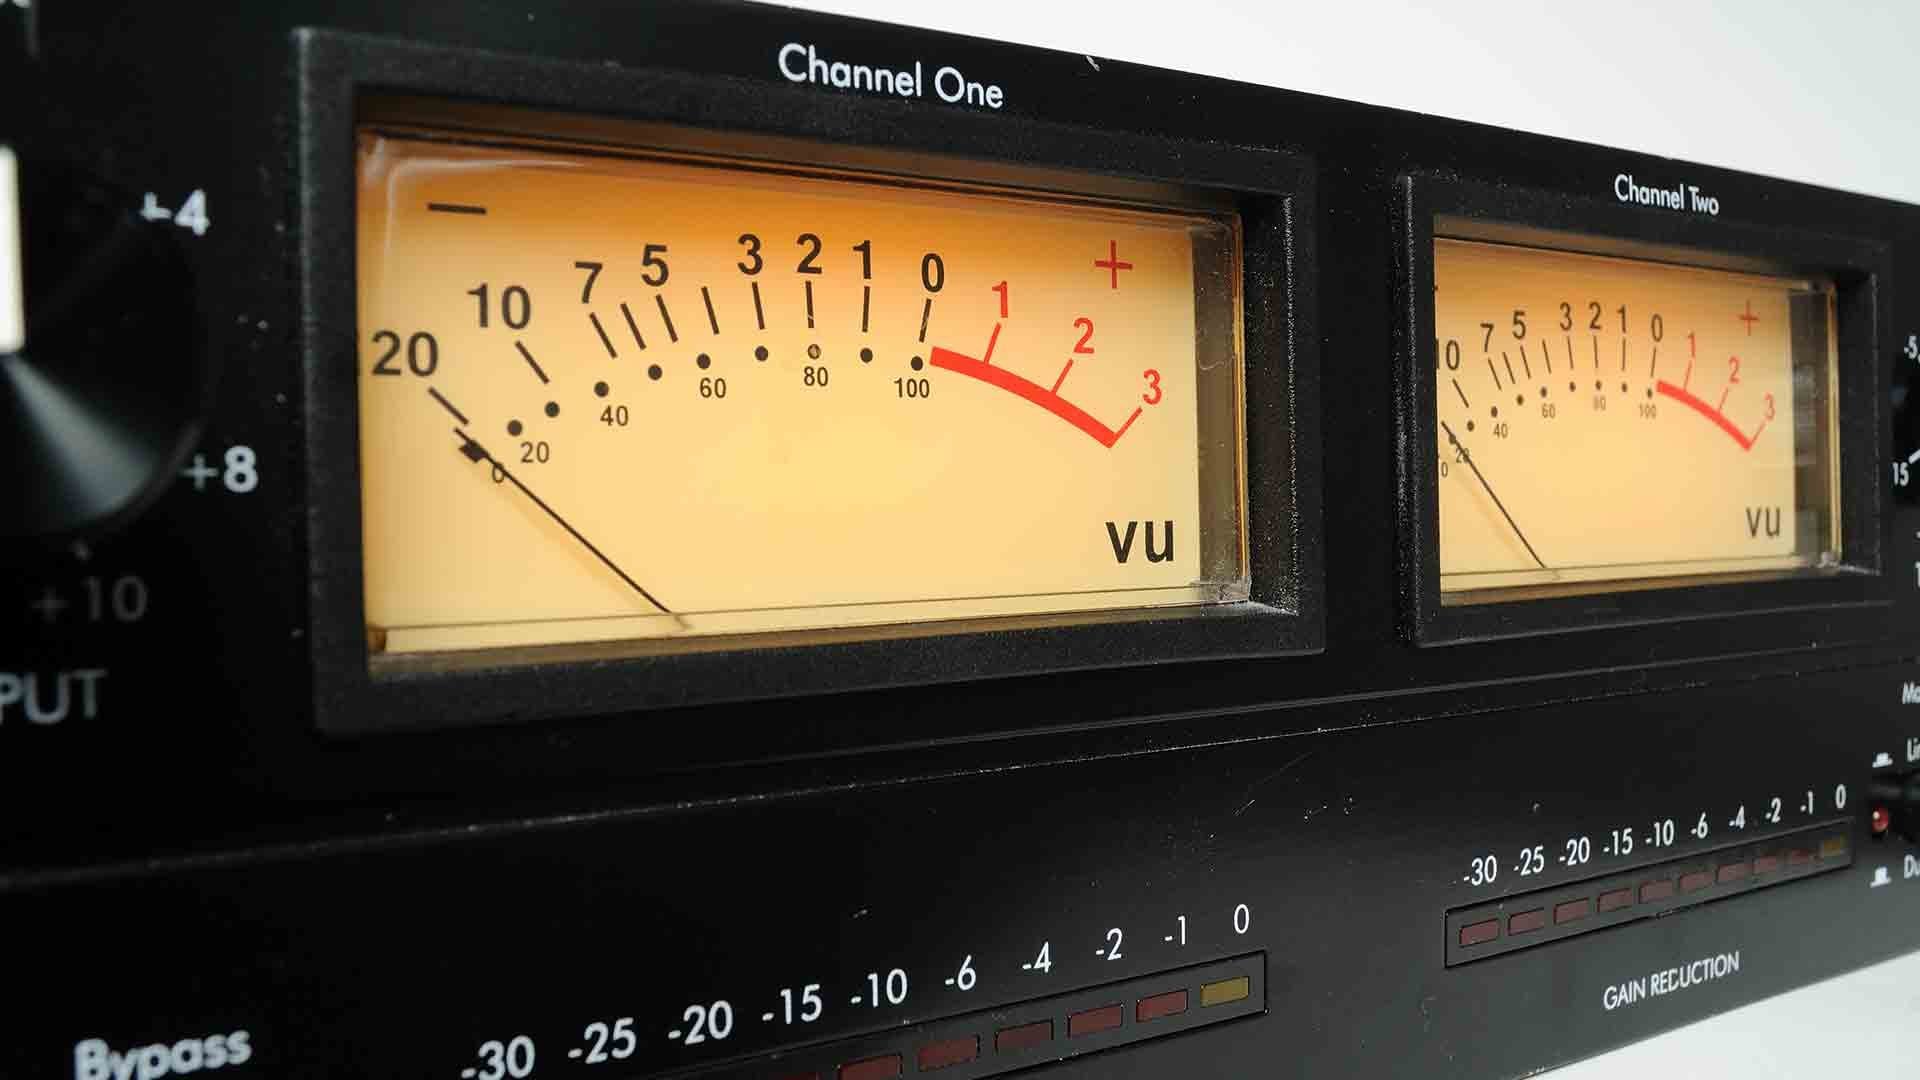
5. Loudness Metering: Now I wanna talk about loudness metering because I find that one of my favorite features of ozone is it gives me a really good sounding way to hit a target. Loudness. And loudness is such an obscure thing. I think for a lot of engineers, especially home engineers, it's kind of confusing and you may have read articles or you have information or people in your circle have told you that, you know, you're aiming for a specific loudness minus 16 dB or something, you don't really know what that means. It's nice to just be able to target it and know that you have professional product like ozone managing it for you. So if we go to the maximizer here, we'll notice in the lower left there is learn threshold and target minus 14. Right now if we wanted to set that target to, let's say minus 60 and I'm just going to type it in. Then you can say learn threshold while it's playing. And there we go. It's basically learned a threshold based on that target. And if you want to confirm that that target is really happening, what you wanna do is you want to go up here to the IO meter options and you're going to want to select integrated. Make sure integrated is selected. Now when you click out of that, which you'll see, is that the LU F S reading here is telling you the output currently that because bn minus 15.3, if you set the metering correctly, then you can use this learn threshold and you can make sure you are getting exactly the loudness that you want. I just want to explain for a quick second what true peak is and what this ceiling means. Because I had run this ozone master assistant set for streaming, it has created a ceiling of minus one dB. What that means is I have minus1 BB headroom before I actually have clipping above full-scale, meaning that I reached the digital limitations of how loud the audio can be. True peak enables us to understand, okay, maybe it's not clipping digitally while it's in the computer, while it's in circuit boards. But when it gets manifested in an actual analog system into a speaker and it's actually coming out into space and creating sound pressure waves. What then true peak sort of allows us to figure out whether or not our digital measurements are also going to translate without distortion once it becomes actual sound in the air. In short, using true peak means that once this actually becomes real sound and the real-world delimiters considering what it'll sound like under those circumstances, not just what it is on the circuit board. So in the next lesson, I want to talk about translation and some of the considerations for bouncing at your tracks to MP3 or AAC, other compressed codecs.
6. Lossy Translation: So let's talk about translation. What is translation, right? So basically translation is, how is this audio going to translate once it goes into different playback settings? Of course, if you're playing it in a really nice studio with nice power amps and great speakers, then the translation will sound really nice, especially if it was mixed and mastered in that kind of environment. But the truth of the modern music industry is that this will probably be somehow compressed into MP3 or AAC. Maybe it'll be part of a YouTube video, something like that. And those audio codecs, Yeah, they have real problems. They, they're compressed because they're throwing out valuable data. And we want to know how is this going to sound once we throw out that valuable data in ozone, if we go down here to codec, we can enable it or disable it. I'm going to enable it for this example. Now let's say that we are going to target this track as an MP3. And I'm thinking that a lot of people are going to be listening to this at a 128 kilobits per second, right? So that's gonna be the bit rate. Now if I play it, maybe I'm not really hearing any significant change, but if I use this solo artifacts, so this is really a game changer. This is just gonna play basically the artifacts that digital artifacts are, are going to be produced by taking this and translating it into 0120 KV GPS, MP3. I don't know if any other tool that gives you quite as ready access to hearing exactly how much artifacts and digital garbage is going to be introduced into your track. Whence it is bounced out to some kinda streaming format. But I find this incredibly valuable. It enables me to know what is going to be going on with my track. Once it goes out into the modern music landscape with Apple, iTunes or YouTube audio, Something like that. Alright, in the next lesson, I am going to use master assistant, but this time with a reference track.
7. Using Reference Tracks: Let's look at using Peter Gabriel song in your eyes as a reference track. So I'm gonna go back to master assistant here. I'm gonna stay on vintage and I'm gonna choose reference track. I'm gonna load a reference track here from my desktop. Peter Gabriel in your eyes. And it's going to load that. And you know, it's going to make pretty quick work of it. Go and it gets saved as presets so that, you know, over time, I can actually create a collection and I can just choose the one that I want to use as a reference track. So what this is gonna do is instead of setting the loudness any queue based on sort of an intensity setting, it's going to be trying to be informed. It's not necessarily going to mimic in your eyes. It's just gonna be informed by what the EQ and the spectral response of in your eyes is, and it's going to inform the loudness. Any q with that, I'm gonna leave this on streaming for now and hit next. I'm going to play back. Alright, sounds good. I'm going to hit accept. And I'm gonna save this preset as my in your eyes. So now I've got three presets. My vintage, my modern, and then in your eyes, master assistant using that song as reference track. So let's look at the differences. So in your eyes I can see there's a pretty high health up here. If I switch to my modernist still high shelf, vintage, yeah, there's always a high shelf and there's always a low shelf happening here. But in your eyes is really cutting out a lot of stuff in the mid-range. There's something a little bit more dynamic happening there and modern. And then it's very smooth. It vintage. So this mid cutout from in your eyes is probably being informed by the reference track. As we move through the vintage GQ, vintage com, limiter maximizer. Let's see what the maximizer values look like. So there's a little bit of a lower threshold on the modern and same lower threshold. So the threshold actually on my, in your eyes, in the maximizer. It's actually a little bit more tame. And that may be because I have the target set at minus 16 LU fs. But I actually always, always, always defer to less compression, especially since this is a pre-master. I'm not really trying to master it. I want to give some head room. In fact, I want to give ample headroom to my mastering engineer. So let's hear how these different ones sound together. And this is based on the inner eyes reference track. And actually I'm gonna go back to the beginning of the track, will just listen to it. I'm going to create a folder called demo. And I'm going to put in your eyes in a demo. And I'm gonna put vintage in there too, because I'm not really that crazy about what's happening with my modern and I just want to AB between your eyes and vintage. So let's listen to this. I really like the way that this dip in the midrange is actually sort of making my overall tracks and less brash. So I think actually using the in your eyes is now becoming my favorite. I did use the vintage settings, so it's using the vintage components which I never liked from the other vintage take. But it's got this more mellow EQ curve that I like. And the maximizer, I actually might make a couple of tweaks here. I'm certainly going to leave the ceiling there because I want to make sure I have that head room for BI streaming audience. But I'm actually going to loosen up a threshold here and just bring in a more dynamic range. I want the dynamic range to be a bit more like say minus, minus 20 3dB, something like that. Now, that's not saying I'm setting my threshold at minus 23. It means I'm looking for this LU fs meter over here to be about minus 23. Now I could go ahead and eyeball it like that over and over again. But I could also go to my target here. And I could just type in minus 23. Learn threshold. Here we go. So now I'm basically in that ballpark. I mainly wanted to provide a more dynamic range to my mastering engineer because it's very important. They have something to work with. If you give them something that is squashed and has less dynamic range, they basically haven't less that they can do with your mix. I think minus 23, which is a standard dynamic range for television broadcasts, is a pretty good middle of the road because it gives them quite a bit of range. But I still basically get to hear what it sounds like when it's mastered. In the next couple of lessons, going to talk about the maximizer plug-in, where to place it. And then we're also going to be talking about using the API with gain match. So that's coming up.
8. Maximizer Placement: A quick word on the maximizer and where to place it. The maximizer must always be the very last module in your chain within ozone and really within any mastering or pretty mastering effects chain. The reason for this is that first of all, you want to make sure that the maximizer is informed about all the effects that are on your master bus before the maximizer attempts to do it's maximizing. Otherwise you're going to be undercutting its effect. The purpose of the maximizer is one thing and one thing only. And that is to maximize the volume. It should not be used as a way to change the Tonal substance of your production. It's just about getting the volume to the suitable level that you need for your distribution. Okay, in the next lesson, let's talk about using the AB with game match.
9. A/B & Gain Match: So down here in the right-hand corner is a gain match button. And gain match basically means that ozone is going to match the overall volume or level of the mix. Even if I disable everything within ozone. So I can hear with gain match what it sounds like when it's bypassed. So basically this bypass button here, I don't want to use the main bypass button because that'll bypass my gain match. But this bypass button here is basically saying, I'm going to bypass the EQ, the vintage EQ, all of these modules. But the gain matches kind of maintaining more or less the volume that is the result of all of those modules. That way it's easier for my ear to judge what's it actually doing because, you know, if your audio gets louder and quiet or every time you disable your mastering a pre mastering plugin, then it's really distracting because Lauder always sounds better. You can't really tell what the mastering is doing, how it's changing the overall tonal balance and spectral response, unless it's actually at a matched gain. Okay, so I'm gonna do a little bypass here and you'll hear that when it's bypassed, it sounds more flat, more two-dimensional. When it's not bypassed, it sounds a little more alive. So it sounds a little more and all their sounds a little more by being able to AB like that with the gain match is also one of my very, very favorite tools of ozone. So you wanna make sure that you're using that when you think you've arrived at a pre-master that you're happy with. And you just want to sort of confirm it with your ears that makes sure that you're not making any snap judgments. And sometimes you know when you're working on audio, you're staring at your screen for long enough, your ears can get kinda confused. Gain match really helps to give you clarity on exactly what you're hearing.
10. Tonal Balance: So far, I'm really happy with my premaster. I've got a good amount of dynamic range set at minus 23 LU FS. I'm happy with this vintage sound and of course I enjoyed the fact that my master assistant use the in your eyes reference track by Peter Gabriel. And I really like the effect of that. Now I'm going to use an isotope product called tonal balance. So I'm gonna switch back to my mixture here. It's very important that tonal balance is added after you're mastering chain. Okay, so in this case, after ozone, I'm gonna look for tonal balance. And we're gonna go ahead and load that up. So what is tonal balance? Tonal balance enables me to see visually how well suited my current mix is based on my, in this case, my reference track. Now your reference track could be at one of these Factory Presets. These are basically factories spectral curves. And if you know how sculptor works in isotopes neutron, which is a tool for assigning a target spectral curve to a track and then achieving that. This is more of a reference tool. It's saying based on these spectral curves, these spectral target curves, how close is this track currently coming? Now, ultimately, you, you're gonna see when I start playing audio that align sort of shows up and floats around in each one of these multiband sections. And more or less you want that line does sort of hang around the middle and hang around in these ranges. And I'm gonna show you how to make corrections if it's not. One quick tip I wanna give you is down here. It's showing me the spectral range in terms of frequency. You can right-click, can choose flat log, which is basically spacing it out evenly. Piano roll, which is telling you notes and like C7, C8, where the octaves are, that's not really very helpful. I prefer the sort of standard logarithmic view of frequency. So let's listen and see where our tonal balance has shown up. Alright, that's looking pretty good. Now, if I wanted to use a target, I could use in your eyes again. Alright, so I'm gonna open that up and it's going to make that determination. So I've got custom here and I'm using in your eyes, you'll notice now that these targets have actually closed in a little bit. Let's see how it looks. Now it's really important with tonal bounce that you'd give it a little bit of time. What I'm noticing is that this one's, the high end is a little low and a low mids are a little on the high end. Fixing it's super easy. I am actually going to rename my ozone instance. Alright, so I'm gonna just open up and I'm going to call this pre-master. That's so that it can look it up in here. And I'm going to look somewhere in this list is going to be premaster. Here it is. And I can just choose premaster, ie Q1, and I can see the same EQ that's here, right? So what I see down here in the bottom, that bottom of tonal balance is my premaster EQ. And I can actually make tweaks to this until my Indicators here in tonal balance are showing up correctly. So I knew I had problems in the low mid and the high mid. Now this is still based on my reference track. So I know that I'm still working towards my targeted making this loudness in IQ you sound a bit more like in your eyes. So I'm gonna make some adjustments here to try to bring these lines a bit more in order, especially in low, mids and the highs. Alright, so it's that easy because it's all visual. I don't have to switch back and forth between them. I love it. One thing I wanna point out down here is crest factor, because this is really important way to determine whether or not your base is responding ideally. So what is Chris factor? Chris factor is basically the relative relationship between the peak and the average, which is typically also called RMS. So the relationship between the peaks and the RMS. And so basically what this comes down to is that if you're in the lower region of Chris factor, if this little sort of ball is floating down in the lower range, since it probably means there's too much dynamic range in your base. If it's floating in the upper region, it probably means it's over compressed. It's too flat. So you want to be floating around in the middle. So what I'm seeing here is that I need a little bit more compression actually in my low end. So I could try to modify my vintage compressor. But what I'm going to do actually is just bring in dynamics. I'm gonna drag that back here. Let's say after everything except to my maximizer, it's always important. Maximize the very last thing. So I'm gonna go ahead and I'm going to add in three crossovers are gonna hit Learn and playback. And it's going to set these crossovers for my multi-band compression on its own. Now I'm just going to basically be using the low end here. And I'm going to bring in a little bit of compression. And I'm trying to move that cress factor just a bit to the right. I'm not really looking to move it all the way into the center just a little bit to the right. So that was successful, but I'm also going to be using low and focus in the next lesson to improve this Chris factor even further.
11. Low End Focus: Now let's look at using low-end focus. I'm going to open that up here, live in focus. Now lo and focus is a bit like what I did here in dynamics, where I created a multiband compressor, but I only used the lowest band low and focus on the enables you to have this low band and it can only have a specific range. You have some options here, punchy and smooth. Punchy is going to be more transient, which is more dynamic range. Now since crest factors saying there's a lot of dynamic range here, I'm gonna go with smooth, which is basically less dynamic range. And I'm mostly going to be using contrasts. So contrast is basically going to be creating contrast between what's happening in the low end and what's happening everywhere else. So I can boost that contrast or reduce that contrast. So let's see how this affects crest vector. Now I wouldn't recommend doing anything with gain here for the time being. But I am seeing now that my crust factor has moved a little bit further to the right, I'm going to leave the rest of that crest factor concern for my actual mastering engineer. But this low-end focus tool is really a great way to work on this. Now you can also use the mid-side feature here. Another reason I would use mid-side here is basically so that I can focus on mid. And I can make sure that my low-end focus is actually being applied to whatever's center, whatever is common to my left and right channel. But being able to churn the mid feature on, on low and focus makes perfect sense. Good. So I achieved what I wanted to achieve, which is to move that crest factor a little closer to the middle. But I'm confident that my mastering engineer will realize that there's a problem there. They'll want to bring up the bass, but I don't really want to make all of their decisions for them because base is really a strong sauce if you get into trying to be too precise or exact with it. And you don't have expert Mastering tools and knowledge, and ears and monitors and all the rest. You're probably going to be undercutting the value you can get from a good mastering engineer. In the next lesson, we're gonna talk about using insight isotope insight to look at the level. And this is just a tool I think a lot of ozone users might have, but it's not actually part of those. I'm just gonna touch on it quickly in a lesson. And then we'll wrap up this section with a project.
12. 2nd Opinion (Insight): Great, so we've done a nice master here. I feel pretty good about it. We used master assistant, we've used a lot of the more advanced features within ozone. We've used tonal balance. It sounding really nice. But let's go ahead and just hear what it sounds like without all of our Mastering. Alright, so it's definitely a lot better. You know, we did our mix fine, but the overall mastering effects that we put on here have definitely improved at just the ozone by itself and tonal balance. We can hear how ozone has kind of given it more depth. And tonal balance has just helped us to tweak the EQ within Ozone, right? So it's given us a nice visual tool to speaking of other great visual tools, let's talk about using insight, which is another great tool from isotope. So one of my favorite things to do with insight is to look at this history meter. So let's just see what this presents us with here. Now I'm gonna go ahead and I'm gonna set my targets. I'm going to set my loudness. Yeah, my loudness is already set at minus 23. I'm very happy with that. And you can actually choose different settings here. This EBU R12 eight is basically minus 23, and then it has this peak of minus one. So it's very close to what I had been setting. I do this for most of my productions. Here I see three numbers indicating my loudness. Short-term is three seconds. Integrated is basically the entire playable track. And momentary is less than 2.5th on the 400 milliseconds. So these are just standard mathematical values. So momentary basically tells us like, is anything shooting out at us in an offensive way at any point in time, suddenly a spike short-term is sort of just something in-between, integrated momentary and integrated. This is often what I use in order to figure out what the overall dynamic range of my track is going to be. But this red line here is my target. My target LU fs right now, based on EB are one to eight. I can see my target is minus twenty-three. Am I peak is minus one. So when I go ahead and play this, I get these three values coming up in my history meter and I'm going to zoom in here so we can really look at them and identify what they are. So the white line, the bright white line here is short-term. The green line is integrated, and the gray line, which moves more than anything, is momentary. And as I move through this, there's a sort of little tool tip floating over my cursor that's constantly giving me these values. What momentary, short-term and integrated r at any point in time. And that's all relevant for me to see against this red dotted line which is my target. Generally green is good. So this is all looking fine. It's, it's approaching that, but not really exceeding it. So let's go ahead and let's play it all the way through. Alright, I know I have it on a loop, so there's not really a point on letting it run forever. But using this particular level history meter, that is part of insight, is a really constructive way for me to identify that my levels are great. They quickly approach my goal and they always stay beneath my absolute limit. So I'm really happy with the way that this is turning out insights, just basically confirming that my premaster has the loudness that I want. Any further loudness, I'm going to expect the mastering engineer to work all that out. Now in the next and final lesson in this section, I'm going to make some recommendations for project as well as just do a review.
13. Wrap-Up & Project: So good job for getting through all these lessons as a lot covered in this section, I'm hoping that you now fully understand the how feature-rich ozone is. But we want to actually have a project we can work on. So we can use ozone due, do the AB gain switching. We wanna try to do some low end control, right? Look at how is our tune gonna translate when we launch it, bounce it out to MP3 or something like that. How loud is it? Is it going to meet the minus 16 decimal LU fs standard, right? So you want to get some kind of a mix. If you don't have one that you're working on, then you can grab the master track that I made available along with along with the resources for this section. But if you have your own MASTER_TRACK or even if you have something you've downloaded on the internet, that's fine. It's just a matter of having something that you can try out the tools in ozone on a live recording. Okay, now please, if you're willing to, I would love it if you would share the product of your work here for me to hear and for other students to hear. If you have questions that come up as you're revisiting the lessons in this section, please let me know. I'm happy to answer them personally. Or if it's a matter of doing, doing deeper and better explanations within the course. If you think there's an element of the course needs improvement, please let me know. So thanks so much for joining me in this course. I look forward to hearing your projects. Look forward to hearing from you. And I look forward to seeing you in some of my other courses. Thanks so much.
 Will Edwards, Artist. Creative Problem Solver. Musician