Transcripts
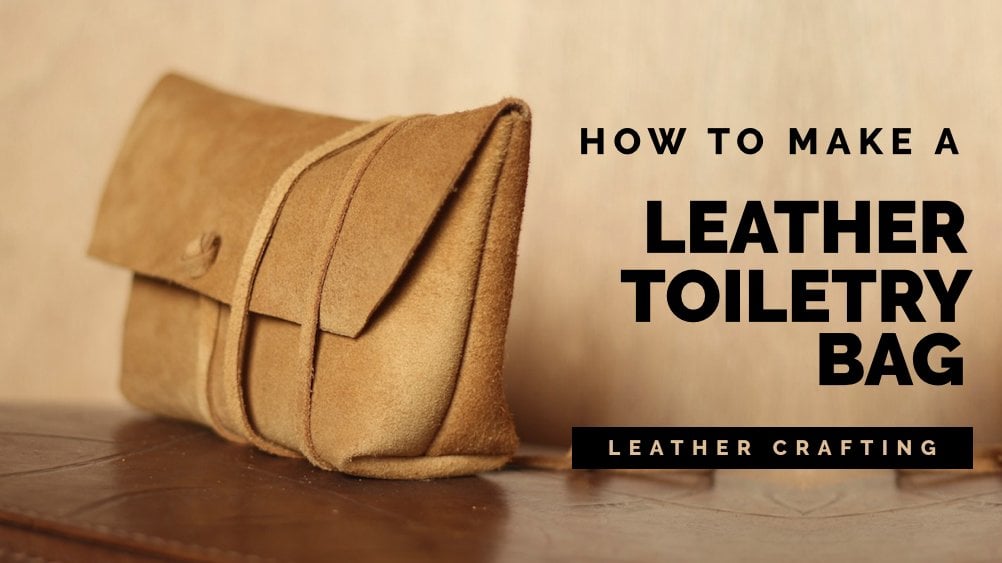
1. Introduction : Hello, I'm yield out. I am a Dutch fashion designer with a passion for sustainable products. A few years ago, I started a brand school. People focus on up cycle fashion into timeless designs. Nowadays, a lot of attention and loves just thrown away because they are broken or not trendy enough to people made me. I've made a lot of products out of old, like tickets for lead of furniture. I also made this letter laptop sleep upside bill out of my parent's old catch. I love working with letter because it's a natural material you can use forever, and it's really easy to work with. It's so much fun to make out of something that is old and broken and new and timeless design that lasts forever in this class. I teach you step by step, how to make this left obsolete. It is not hard at all. If you know how to doing so. Welcome to our you can do it yourself. Siri's
2. Tools and materials: tills and materials. Before we start making this laptop sleeve, you need a few specialties and materials you can buy at a local craft field. You don't need a suing machine, but what you need is a three cutting Mets a one millimetre double or triple per freighter, one single to Meena Meena, Proof Rada, a hammer rotary cutter, a utility knife. What's cotton strings? A large. I'd hand needle, good strong sisters, a ruler and marker and, of course, who'd strong letter. I usually use strong calls. Letter from one millimeters thick. This letter issues calf's leather out off letter furniture, and at the end you need olive oil to treat the letter. Yes, olive oil, the stuff you cook it. I use it because it's very good for letter care.
3. Making your own pattern: making the bed earn the dimensions of few pattern depends on the size of your little. I have a Mac book 13 inch, but if you have another leapt up with other dimensions that it's not a problem, take your left off and lay it on the letter. First we draw the length you need the length off your left off, plus the highs off your letter, plus once and meter off. Stating one centimeter is 0.4 inches. You draw the with off your lap, so plus two times the highs off your left up, plus one centimeters for stitching and one centimeter off bigger room. One centimeter is syrup orange four inches. Make sure you draw 50 centimeters extra, so this is 59 inches. This is for the flap to close a sleeve and for protecting your little so drug. Carefully the pattern on the letter and make sure you can easily wasit off
4. Cutting out the leather: cutting ants. Now it's time to cut out letter This that may not seem like a difficult step after all, you're just getting out of square. But mistakes made at this point will hunt you for the rest off your projects. I always use my ruler and the letter working knife to cut it out. Make sure your knife is sharpens and ready to go or use your strong sisters. But make sure you could straight, so started cutting out the whole piece. You draw on the letter mark the place where you wiggle the letter, throws two centimeters and make around to the edge. Two centimeters is syrup 20.8 inches. Pay attention on how I do this and cut this out carefully. - Also cut out two times a string with the dimensions off, 50 by one centimeters. So this is 20 by 0.4 inches. You need this ring at the end so you can close a laptop sleep
5. Punching : punching. We need to punch the stitching holes in the letter. So for punching, you need a one millimetre double or treble Perforate. Er you syrup on five centimeters, 0.2 inches from the edges. Make sure that the curves are exactly in lines. This will make a line from the start off the curve at the bottom, off the sleeve to where the flood begins on both sides off the sleeve. This means that you make double holes through two layers off letter. Once these lines have been marked used to perforated to make the stitching holes. When pinching out the holes, make sure that the perforated is perfect perpendicular to the letter. If it's not the stating on the backside off, the letter will turn out ugly so you can use clips too fast on the letter. Finally, when you get to the curse, work you right around them with the two millimeters single perforate er
6. Stitching: stitching. Now it's time to states. Take your coven strings and a needle. It's better to start your stitching at the top instead of the bottom. Need a curve? The most pull from use will be at the top cornice, and it's always best to finish stitching lines where there will be little to no pool. Make sure you make the stitches sites. Once you have finished the stating line, be sure to back states to back state simply states in the opposite direction. Once you have got the end off your states in line, then cut off the string in the corners. You made separate stitches. It's hard to explain, so pay attention on how I do this in the video.
7. Making the flap: making the flip. Now we are gonna make the flip so you can close a sleeve, and it's protecting your little. I show you how I like the flap, but you can also choose for another shape. Take your ruler and the marker. Draw six centimeters, 2.4 inches at the point where you stop with the stitching holes and 10 centimeters four inches at the top. Draw a line to each other in a little round. I use my plate so I make sure the corners are in the same shape. Cut this out very carefully.
8. Finishing touch: finishing touch. Take the two strings from 50 centimeters. That is 20 inches you could out in beginning. Also, take your double or triple per freighter for printing two holes in the letter. Pay attention on how I do this. Now you take the culture strengths and the needle to attach them to each other. Start in the middle so you can see the start and end off your threats and cut off the ends . No, take your ruler apart a dot in the middle off the flat. Two centimeters from the EDS plus one centimeters. Syrah port four inches above this. - Take your utility knife and your ruler and cut this one centimeters. Who syrup point for inches in the middle. Take your string and inserted from back to forth through the upper hole and put it back through the bottom hole. Thank the end off both shrinks and make the and smaller by cutting its. You can decide what size who wants make a note at the end off the strings to finish it
9. Leather care: leather care. Now your laptop sleeve is almost ready. The perfect treatment for your letter is using some natural or life oil. Be aware that your leather is getting darker, so if you don't like that, you better can't use it. Apply it with some paper towels, toppers, fingers or whatever gives an even coat.
10. Classproject: class project. You have made your own letter. Laptop sleep. How awesome is that? This is also your close friend. Make your outlet belief. And she had this one with me. If you need help, ask me for your questions. If you have any suggestions for our you can do it yourself. Siri's Please let me know and I really hope you're loved and enjoy this class. And I hope to see you next time.
 Auke & Jildou, Designer & Maker Architecture & Interior