Transcripts
1. Introduction: Hey friends, Welcome
to my class, which is all about digital
painting in Photoshop. This class comes with all the
information pack that you need to still to start
painting in digital medium. All I cover in this
class is about how to use Photoshop as
digital painting medium. Plus all about how to be
anything using Brush tool and also the basic general
brushes that are right into there in
your default Photoshop. Worsen any words in the URL. This class is easy to follow, even for beginners, are even if you don't know
anything about Photoshop, you will be very easy to
grasp and follow up with me step-by-step in this complete
class from this lesson one, this is perfect
for you if you are interested to learn and
scale up your career. Are you want to
learn something new, explore something new
ways regarding Photoshop. You are new to the Photoshop, you're new to digital painting and want to learn it
from the beginning. All you need for this class is Photoshop on your
device and pen tablet. For having my Wacom tablet, very, very basic
one to start with. You can grab yours and
follow up with me. Join me now in my next lesson
and let's get started.
2. Learn the basics: So let's get started
with the Photoshop. Right now. I'm in my Photoshop
screen. Here. Go to File, click new. Or you can also hit Control and the shortcut for
making a new document. Here, you can see this
pop-up and select different custom sizes are the preset sizes that
is already here. You can also change
it from pixels to inches centimeter.
It's up to you. Make sure it is
300 and solution. Anything I refer to
it for anything, whether it is digital
for the printing. And also make sure that you are having RGB for making
any digital medium are having CMYK if you are making something
for the print, hit Create, to
create the document. Once it is green, It's a hair-like this. And turn off your
screen in the center. This is the basic workspace
of the Photoshop window. And even see different
panels here and there. So you can just switch
to any of them. They're not right
now on the screen. You can switch to
them from going to do a Windows windows tab, you can just see
how many panels are there that can be opened
up whenever you need them. And also there is a
layer of random that is very interesting and very needful are making
the things work. And also here you can just
make a new layer from below to add it and just paint
your next thing. Rather than just painting
directly on the background. Because this will be nice and clear understanding to the system that this is the background and this
is the art of peace. And both up, totally different. Easy to edit further, you can see, understand
when I will be painting it. And also, the most used tool for painting is obviously
the brush tool, shortcut V. And about this, I will
be talking to about this in more detail
in the next lesson.
3. Practice the Brushes: Now I'm with the brush tool. You can switch to any
of the tools from the color mixer, brush
color replacement. So many more use
simple brush tool here in the brush panel on the side of having
the brush panel. Or you can go to Windows and
check for the brush panel. This will be here like this. And you can see here
is hard, round, soft round pressure,
brush opacity. And so much more. We will be using these
general refuse only. Starting from the hard round, just click on select it. I will painting in that new
layer that I've already made because this will help me
keep my background clean. And only one article will be painting one layer. Here it is. I'm having all the settings as clear and having the color in the foreground as black color. If I just stop once. Like this, you can see it is a very clean thing,
having sharp edges. And if I just hold on the
Pen and just move it around, you can see it is painting. It is making a different block
color band kind of thing. And painting in a randomly. Now it's just
switching the brush to another one that
is a soft ground. And clicking once you
can see it is having it not that sharp
outline outer edges. It is very blurred one. This is how resulting. If I hold and click on the
right rectangular brackets, it increases the burst size. And you can see the
different effects under the left
rectangle bracket. When I tap on the left
rectangle bracket, the size of brush goes
down, it decreases. There's different result. Now, the target, the most
interesting brush that I personally prefer for
value sketching or painting. The heart from preferred size. Very basic one. But really, really interesting
to practice on. It works exactly like a
pen or a brush in hand. As Lord pressure on your phone when you are
having on the tablet, the vent is as a
lowered inspiration. The thinner line it will make, and the pressure room darker or thicker than
the thicker lines. You can just practice
in the form of S. You can see the
thinner than bolder. And then again back
within arrays. You can also make a definite
stroke kind of thing from 1 to another and
understand how the brain works. It could be horizontal
strokes, vertical strokes. It's up to you.
You have to go on practicing it and you
will be having a, getting a better
understanding of how to correctly pressure size and
use it according to yourself. Another very interesting
way is to make these, you find a pattern
with a thinner line, then turn things up and
it really bolder line. You can also make
the border kind of pattern here that I'm making. Applying pressure on the tablet. I'm using the Wacom
tablet for right now and which is
a very basic one. You can also go ahead if
you are having one of that, even just go ahead
and practice it. You can just purchase one.
4. Blending Colors: Now it's time to understand how the collaboration or mixing of different colors
from one should do another can be done easily. Very simple way by
using two methods. Vulnerability brush
method and another will be mic mixer brush method. I'm having hard round brush and painting in a new layer so that, that thing is very different. They do not mess up with the other thing that
I have done earlier. Just painting with the
right codon, one stroke. I'm having a bigger
size brush painting it in one stroke horizontally. Just hold Control
from the keyboard and click on the
layer thumbnail. You can see this layer. Whatever thing is
there in the layer, it gets activated selected. That's why I asked you to print it in a new layer so that
things get very, very clear. Now use the black
color and paint it with the soft round
brush on the other side. I'm going to use this
soft round brush only and use the eye
picker tool shortcut. And just pick the color from the in-between here and painted. Again. Select the color. I'm going to select this until
it looks like it's just getting any normal shade, lighter to darker in a very, very normal space
so that it looks very interesting and
relaxing to the eyes. Normal grayscale that
I'm going to range from white and black color using eyedropper tool and
the soft round brush, you can see how nicely the
things are getting clear. Isn't it? Looking very, very natural, painted very well
using watercolor, you can say it is like that. So well-mixed. Once I'm happy like this, I'm just gonna do Control
V for the selection. And it's done. Now it's time to understand the same thing but
with different colors. So again, switch to
the hard round brush. This time I'm gonna select
all brighter red color. It could be anything just
randomly from the color panel. And make a same
horizontal stroke. Control Z. And do
it again like this. Again, go to the
layer thumbnail, make the selection
active as I did earlier. Use the darker color, just painted from another side. You can also use the
hard round brush again to paint it or you
can use the soft round. There's a different app to you. Because this second
method can be worked well with
both of the things. You may use a soft
round brush or you use the hard round brush painting. Once I'm happy I printed it
here half of halfway out. Now select right-click
from the brush tool and select mixer brush just to make sure that the brush after
each stroke is unchecked. This one should be unchecked. Now use the soft round
brush and paint it. Stroke lines form. You can see how when this
is getting mixed up. I'm going to paint it 23
times that it is relevant, mixed to look very natural. I hope you are clear on how to use brush and also
mix the colors this way so that it looks like exactly they're hand painted.
5. Painting a Shape : warm up I: Yes, So now it's time
to paint bushes here, pretty much already having
a three color scheme. One fall. Votes N14, the bushes, starting
with the bushes thing, I'm using the hard round
brush and simply place your click once and drag it until you complete
the shape like this. It could be any
random shape that should look like a bush. And use the G, shortcut, fall, color bucket fill, double-click inside to make
it fill up the entire thing. You can see it's ten. You can paint like basic thing is how to paint different shapes
using the restroom. You can just go ahead
and lower the brush size and play around
making different, different shapes for different, different kinds
of bushes things. Here. Again, I'm going to fill
up it in a similar way. Are you going to
use the brush tool also to fill it up on its own? Otherwise, just
double-click using the color bucket fill tool. And it will written. The third way I'm
gonna meet is, yes, my paintings making smaller
brushes and painting it all inside out using
single brush stroke. Also. Few bushes kind of thing collectively
placed close to each other. You can just paint
it around like this. Vnet up inside. Also, there is another way of making a bush like
closer to the earth. If it is, then it could be
having a flat line for below. And only the random shapes for
the above thing like this. Just painted around
and fill it up. I hope you have pretty much got the exercise
dendrite for making different kinds of bushes
and different kinds of shapes from using the
simple hard round brush. And let's move to another warm up activity
of painting volts.
6. Painting Branches : Warm up II: Here I'm back again with
the other color scheme. Just select that center color using the same hard round brush. I'm gonna paint darker. Like this. You can see these are
three branches of it. And the centerpiece fill it up as I did in
the last lesson. One of the kind is pretty here. Now let's switch to the brush mode that is the hard from
preferred size brush. Let us see how it will
create different strokes. These strokes, everybody
thinner than the before one because I'm using
a normal pressure, not too much or not too light. Making more than three
branches, three main branches. Or you can just go ahead and make more branches
if you'd like to. Show all the branches are
closed from above like this. That's why the color fill up. Go beyond that thing. Here it is. It's having a different texture. Somebody thinner branch team. So you can just go ahead
and take out different, different shapes, different,
different kind of words.
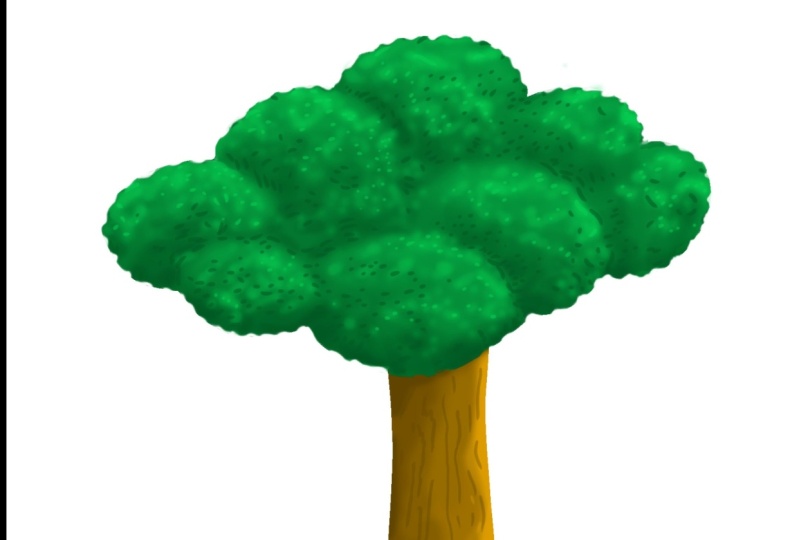
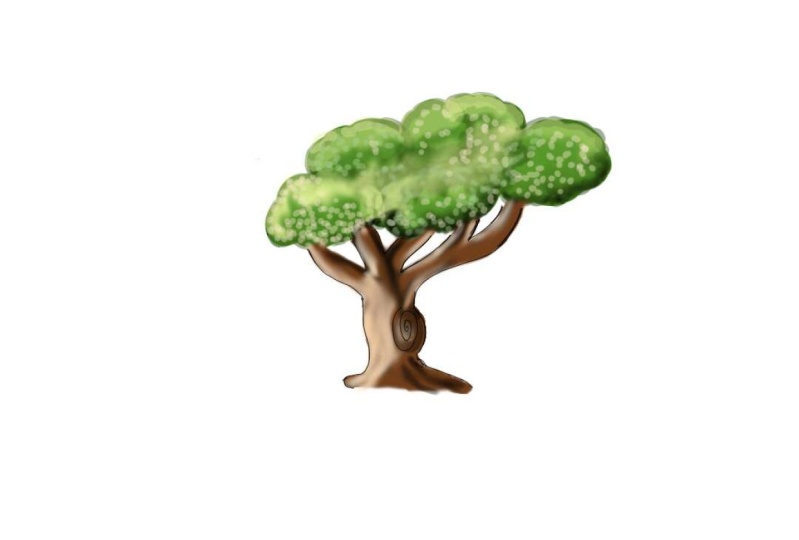
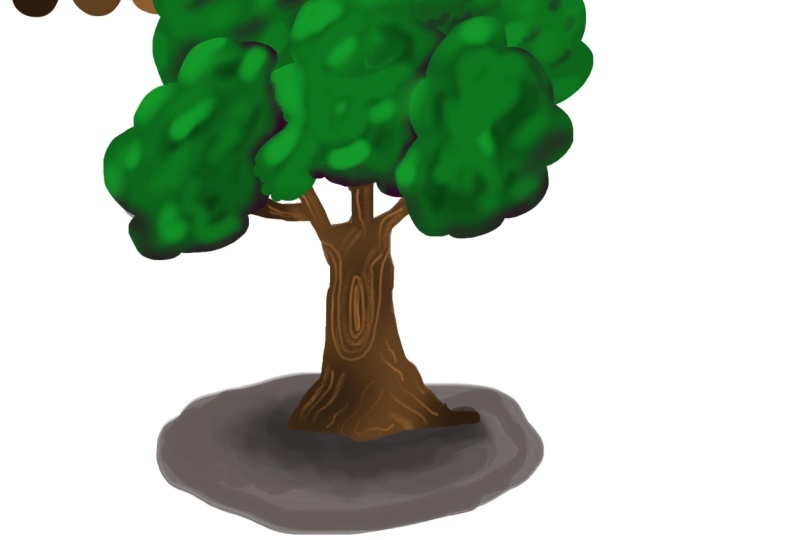
7. Painting a Tree : THE CLASS PROJECT: Now it's time for the whole class assignment
that is making our tree, starting with making particular
shapes for the words. Using all the practices that I did for the
warm-up session. You can just paint structure using the hard round
pressure size brush. You can just go ahead and create different more and
more branches to it. You can also switch to the hard round normal
brush that is, give a boulder path like this. And just go ahead. I'm pretty happy with
what I'm having. Just fill it up inside. There. I will be painting
with the bushes, the branches, the
greenery of the tree. Again using the same
thing the way that I created the shifts in
earlier warm up exercise. Bigger than the smaller
shapes like this. Fill it up all one-by-one. We're pretty much ready
when the flat color. Now, time to add the details. The details, I'm going to
use the darker color for the shadows and the lighter
for the highlights. All I'm gonna do using
the soft round brush. First of all, just select
that particular Leo colored piece as I did earlier using Control and click
the layer thumbnail. And the layer
selection is active. Just use the soft round
brush and paint it from below for the shadow
Barb for the darker color. You can also in-between place different colors
wherever it is needed. You can see little violet
and the tanks are getting, it's in a structure. Now you're simply switch the color back to a
lighter color from the color palette
and paint it above. Just undo it anytime
using Control Z. Otherwise, if it's
not looking nice. So just control Z and rebind it. Go ahead, I'm making
smaller details also highlight the sunlight is falling on it kind of thing. And also, these are particularly
three different colors. What about the in-between ten? For that, just use
the eyedropper tool. Select in-between color from very like in-between the
highlight and the midwife. Yes. This kind of
color is good enough, just painted here
and there with that, that it will give to the tree. This will look more
attractive and interesting. I'm pretty much done with
detailing the bushes, the greenery are
part of the thing. Now it's time to add
details to the words. Again, re-select the
area of three branches. As we did for the bushes. The stem, I'm having those
two colors are there. Just select the darker one and painted the bigger
side, soft round. I'm painting the shadow bar. Now switch the color
to the lighter one and use the hard
round preferred size. Make a few details of
woodcarving kind of things. You can switch the
color anytime. I have a few tries, you just keep on adding details. Now getting a final touch is the base of the tree
and the shadow bar. Make it a complete natural. Just paint a random base thing
with the hard round brush. Go to a darker shadow kind of thing below the
main trunk area. Now use the mixer
brush tool and use the color mixing
thing that I used, a mixture of brush tool for mixing the colors
in that activity. Just use that same process
and use a soft round brush. You can depend on the
size as per your choice. Just mix it up. Here it is. We are done with the class
assignment of making a tree, painting a tree from nothing, just the different
colors and the simple general brushes
from Photoshop. I hope you guys got very,
very helpfully idea. Interesting part of painting. Anything from your imagination, from the basic objects, using the simple brushes
and getting such results. If you liked this class,
make sure you show your class projects here with me and I'm
excited to see them. Anything, any question or query just posted to the
Discussion tab.
 Shivangi Dubey, Graphic Designer | Web Designer | Artist