Transcripts
1. Intro: Hi, my name is definitely room. I am a character designer and an illustrator. Recently, I did an intensive course about lacked, where I showed you how to create a simple light setting and explain it in general, what's going on with all those different types of light and shadow. After that, I received a lot of ministers from you guys. What is, I think, for example, that S1. Thank you so much. Good stuff. Finally, could understand light and feel less intimidated by it. This is really great. This is, I'm very happy to read this. I would love a course where you paint a character in a setting and how you apply light settings to it. Okay, this is great. And I would say Then let's start with. In this demo video, I want to show you how to create different moods based on the knowledge and technique I shared with you in my life theory video. If you're smart, adjustments can completely changed daytime and weather. And if it their storytelling in your image. If this sounds nice for you to notice, quickie prepare some snacks and coffee for us so we can begin our traveling together.
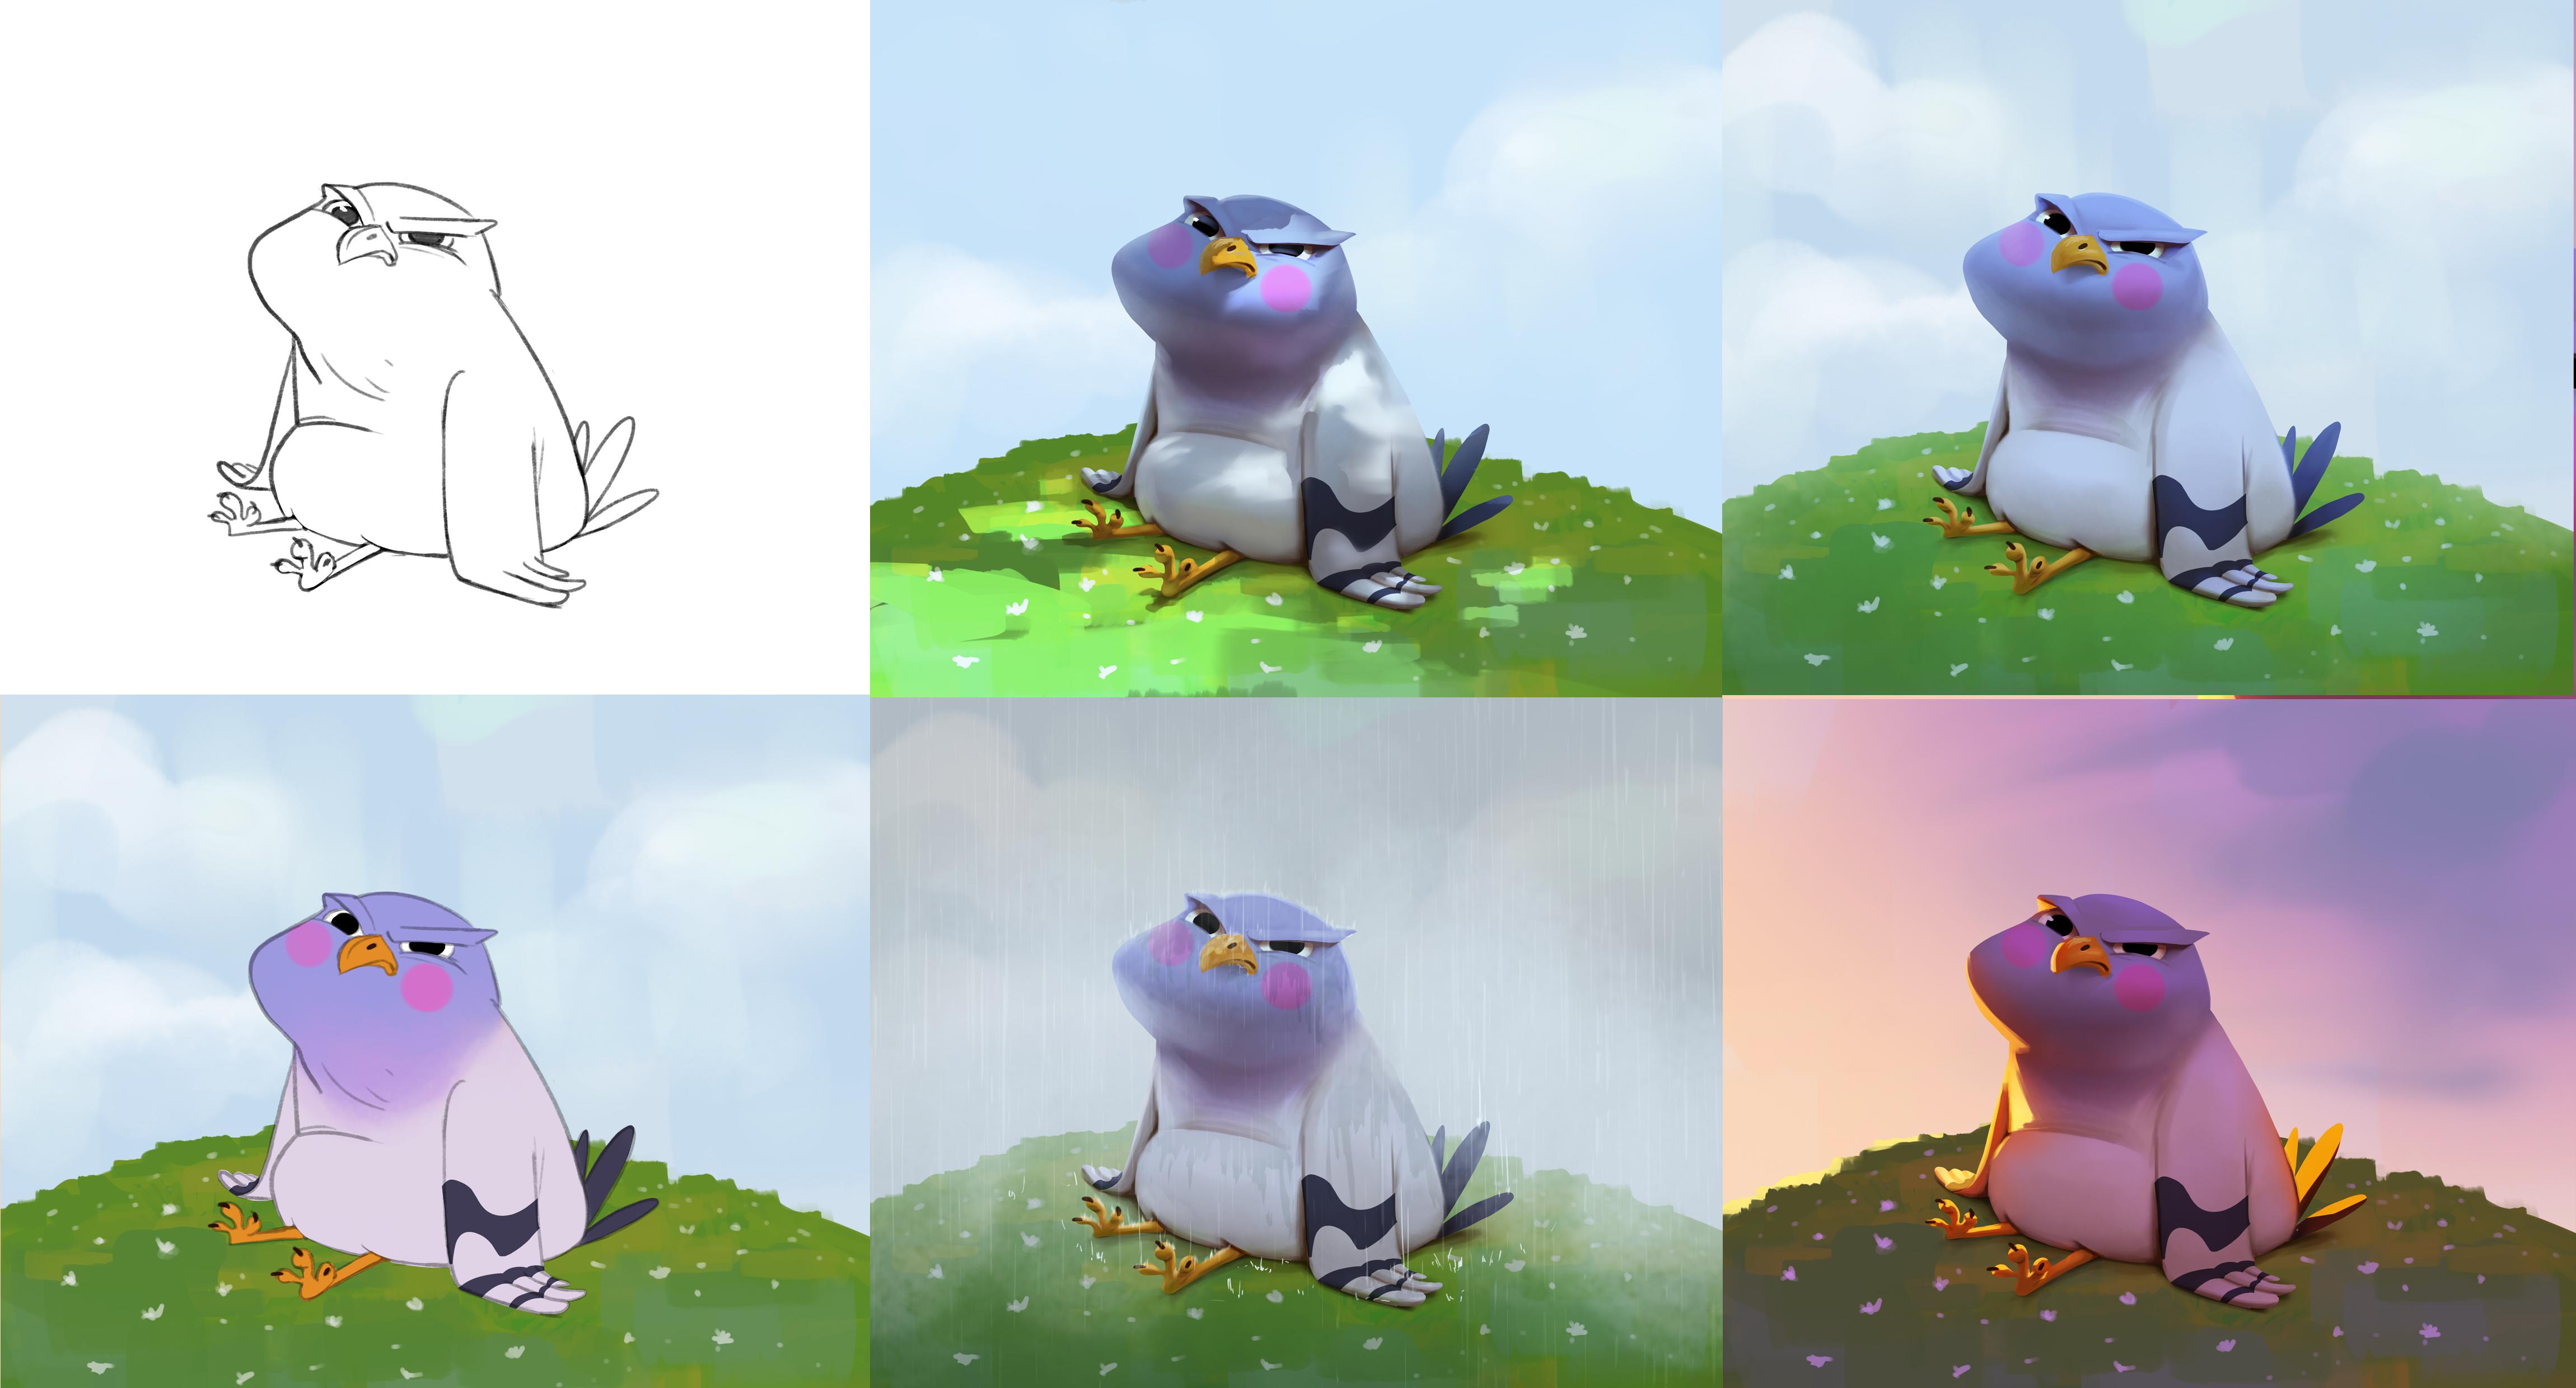
2. Color : Over the next days, at least, I will record this on different days to you and whatever your rate will apply different day light situations to this guy here. And you can download this drawing and the resources to follow along. Or you are using your own sketch to be able to try out different light settings as flexibly as possible. It is useful to create a foundation. It is the same for all versions. This consists of base color and shadow. We will lay this foundation during the first two sessions and try different light situations in the following chapters in which we then only apply light adjustments. Yeah. As a side note, if you don't feel comfortable with light yet, then I highly recommend to watch my video about life theory. First. Maybe one last word about precious. Use whatever you've got. But if you want to use the same as me, you can download them under resources. So I have two fancy pressures and two regular brushes. And the regular you will find everywhere. And so I will not put them in the download. Thank you for all you do to fancy ones. Sadly, I can't remember where I got them, so it's not me who then I downloaded them somewhere. I don't remember where it was and which artists made them. So therefore here and explainer, the lovely artists who made those precious. I appreciate your rogue very much and shower you have credit. Okay. And Okay. We have brushless, we have this yeah, I would say than readapt and I will give you a moment to download and prepare everything. And it's also a good moment if you want to go to toilet. Maybe I should do the same to you. Yeah, that's a good idea. And rhinorrhea them then I would say, let's begin with our first session. Foods. I want to add my base color, and therefore I will make now selection as a base color, you can use whatever you want. Maybe you want to go with a baby chicken. I will put chicken. I'm living in survival in a new city. It is famous. They had chicken people here are extremely proud about them. And you can find them everywhere. Pictures, they do it everywhere. You have hidden chickens in the city. It's really fun. It's like a searching picture where you have to find them all. And maybe in the end gate is opening and the golden ticket, this array, I don't know. But it's actually quite cute and a bit strange though. But yeah, that's nice. Even though I told you this fancy, just because I think it's a little bit more interesting. Now I will give my carried a crumb spectrum as something simple, modest, but yet expressive. The dozens of a background. If you could ask a five-year-old a hill and this guy, that's it. Yep. I I guess there are so much better raised to paint grass. Chris, cause I already forgot the writer in English. But yeah, it just to explain the environment a little bit. So I will not do something right here. It's a general, more like a place holder and real environment, but yeah, just a few different tones of greens. And that's it for me. I don't want to target your masterpiece in any way. This is just an exercise to demonstrate your some principles that you could use as a base to make your illustrations a masterpiece. Of course, we also need this guy. You can also paint some more interesting, of course, spaceships. Whatever you feel like. At least some clouds. At least. What you could already do is edit our therefore I will pick the cutoff, this guy new layer, set it to multiply and fill it. And I will clip mask it to my character and make a second copy that I clip mask to my free to adjust if necessary. We are not done yet with our foundation on where we can apply different laxatives. Because therefore, we would also need to add form shadow and occlusion shadow met this would take too long for office session, so I will continue doing this tomorrow. Certain look out for chickens and user humbling. Take care and see you tomorrow. Bye.
3. Shadows: Hello back and let's continue the hour. Yeah. Our second Excel sons, then we need a title. But anyway, okay. Today we will continue with shadow, especially occlusion and form shadow. And I want to make this a little bit easier on our eyes separated each shadow on an underlayer. Today I want to do this a bit simpler and combine them all on one layer. So therefore, I add a new layer, put it on multiply. And I would like to go over for warm color for my shadow. Too saturated with Rama. Let's see how this is looking like. Or you could work. I want to start with this big shadow under his hat that is describing and nice big volume. Also the lower part of his belly. It's always my eyes to use the Lasso tool for creating sharp or heart, which is the darker my shadow should be, the higher I also go with saturation. For the moment. I still have my outlines, but I want to replace them later on completely. If my occlusion shadow be used in many situations, you have the lines in places where you would also try occlusion shadow. Be careful to use this dark shadows really for areas where no light can come in between. If you use too much of them, your picture will look quite flat and will not create a three dimensionality and depth that you want to create a fit. I want to keep my shadow situation as neutral as possible so it can fit flexible to all my different light situations. So don't overdo this face to match. Just make the overall form readable. I mainly use the color picker here in coolant layer mode, which means that I pick the color that it's actually there and not as I see you change by a multiply layer. I mostly stay in a similar color range. Might I make small adjustments, brightness, saturation, and even you, for example, when painting occlusion shadow, which is darker, warmer and more saturated and form shadow for this. And it's where we have the total effect color were not open to be able to quickly change the value. I want to have Dan. So therefore I will use noun and thus tool to make my sketches more pronounced. I should've done this one. I like a lot to use the Lasso tool to make a nice transition between hard and soft edges, even alike to use big soft brushes. If you only use the no hard lines, you picture will be really muddy. You will miss the finance sharpness, crispiness. So therefore, it is good to always keep your heart edges in mind. And also you can use it to set focal points. The more area has sharp lines, the more it takes our attention. So areas that should be in focus, you can provide with a lot of hard edge shadows and other areas that are not so important, give them softer edges and less information. So I guess we have everything about him and now we can add a shadow under him. I only concentrate here. Occlusion shadow. So I only paint the shadow directly under him. His body is touching the ground, not as shadow net he would cast on the ground because this would ask for light source. Med is giving a direction. That is, we are done for today. Now we are truly our base on which we can add different light settings. Tomorrow we will contain the cost. They have a nice day and see you tomorrow.
4. Overcast day: Welcome back to our light exercise. Lay we want to paint over cost. Net mean, no direct light source. It's hitting it, but reflections from this guy and from the surrounding. So I want to start MOOC reflections from the sky. I will put my layer overlay and choose bluish color and paint his light in rare ever hits our character. Be careful to not make your life too strong. We don't have a direct light source here, like sunlight, bad light. It has been reflected several times and has lost most of its luminosity. Similar to form shadow. Out, more subtle and less is more. I don't speak so much. So just painting in collide. And I hope you like my soft counts sitting wise. A clear, calm record where I know doing today because we have Henry Street works in our street generation for a shop and it's it's impossible to make sound recordings during the day. So I have to wait till it is night and everyone is sleeping. Yeah. This is why my y's is to come. I want to be well organized. Just a name, layers. Well, after we add some light from the top now we have also more lights that can reflect around. So for example, lie that is illuminating the top from his belly is narrow, reflecting back on his chin. And for sure the light is coming from the sky is very strong. Saw our reflection will also not be very strong. Beside the fact that my Charaka also not strong, reflective. Maybe we have also kind of green on the lower part of his belly. We don't have direct strong light sources illuminating their ground. So it's just an idea of curry. And I also want to make a highlight reflection in his eye. And there were also amplifies a bit of reflection on reduced learned this word. I just learned this word. What would it be, right? So I also want to amplify a bit of reflection on her speak just because there's a bit stronger reflective. Maybe I can even duplicate my shadow layer. For sure I will not use full opacity, but they're reduced capacity. And now I want to add some NBN. So I replaying some of this light bluish tones into him. One benefit from this is for sure to empathize more colors of the environment on him. At especially using this on the outer actions. Flag is slightly polar. Things that we said in focus receive sharp. And the more things are going out of this for cause Reye's he pillared. So in this way, our tie lines that are more far away for my vocals, I can color them this way of it. For sure. I want to bring some hint of green relax and in the lower part of his body. And it's looking a bit more three-dimensional. And let's name it ambient light. And now let's take care about the background. So the same reflection from this guy and they, they painted on my bird. I will now empathize on my ground too much for the area directly around him. I also eliminate slightly. Okay. This was our first version of an overcast day. Tomorrow, we will push the situation even further in the gray and rainy day. Till then, take care and have a nice day.
5. Rainy day: Hey, how are you today? Welcome back. Yesterday we painted an indirect light situation, and today we want to continue and push it even further into a cloudy, rainy day. Conveniently, you can just continue from the same point we left off yesterday because we can leave everything we've done so far. But just reduce saturation because we have a cloudy day, we have agree the right, so we have to saturate colors. So ID's at rate, my sky, I ambient shadows, my reflections just more or less, everything light related to x1 is even more obscured by clouds. That means we have less light burned, scattered more around. So they are hardly areas in which light does not enter. Therefore, it will reduce the intensity of my shadow. Okay, and now to my character, I will do the same thing that, that, um, if the background for sure also of f my character. So I will continue with desaturating and reduce SKY reflections. The further like this to humanity this higher, which means that they are more water particles in the air and the light bounce back and forth between them. This creates more ambient light. So I will add a new layer, leave it on normal, and paint a bit of gray on the outside edge of my hill. So my foreground can fade more into the background, like it is disappearing. And folk, by the rate, the higher the water vapor concentration of air, the moody blue color chase too dark wide. And finally Craig age. The air also gets less transparent and more hazy. And now that I've added more hastily background, I want to add more to my characters and it doesn't stand out too much despite being closer. We could leave our picture like this right now, or we could go one step further. And at some rate. And I almost forgot one thing. Since there is no longer a light source to see, of course the highlight should be removed from his eyes. Okay. Now we'll begin at some rate. I just randomly, I want to add to it. I chose. In addition to just a tiny bit, I add some water, hits his body directly. Strongest time. I meant or any soft and some more areas. Just in general, try different. Well, it's pretty much ever hi. Yeah. And also on some water that hits the ground law that the big one is very believable in any way. But at least it right. Until we all know what a paint here, believable background. It would really take too long. And this is multiple poles in this lesson. Okay? Now I want to add more witness to him. You know, how things looks darker when they are wet. Cloth, for example. I would like to add this effect to him too. I add an adjustment layer on top related and set the lightness bar lower. Now I fill the mask but plank and with white paint into areas that should be especially. I could also add such an adjustment layer to the background, too dark in the scene and this makes them even heavier. I forgot to say. Yes. The Cray pay, at least now headspace expression is fitting. Tomorrow we will start again with our regular bays and paint in some direct light. Till then, have a great day and see you here, whatever, tomorrow. Bye bye.
6. Sunny day: Well, hello to another session today, RE1 to paint in some direct sunlight. We already painted a direct light setting if our lemon, so we will not repeat exactly the same thing, but something similar. So first of all, I want to have a little bit more color and brightness in my sky. I also would like to reduce the amount of clouds so it really looks more like a sunny day. But yeah, I guess we can keep this line just it's not looking so empty. So in an ever greater new layer, set it on overlay. Okay, now I try to paint, aim to some light. And you see this looks now a bit strange. It looks too bright. So instead of trying to make my light brighter, I will make my shadow darker. So I keep a nice contrast between light and shadow. It is moment. You can also change the color if you feel like it's iteration. So when I think of keeping things separated, okay, and now my light looks directly whether I could even see if I want to change the brightness of my form and occlusion shadow, giving it a little bit more saturation. And artists drugs again. All right. I'm sorry for the sounds in the background. Okay. What I would like to do is painting a situation like this bird is sitting under a tree and just freckles of light, Our hitting him. It works very well. If you use a combination of hard lines and soft lines, especially leaders much told here is very helpful. You want to keep some hard edges that are representing the cast shadows from the leaves, but also some soft edges because they are moving into her, love each other. Maybe you're wondering why I make honest so small. When painting in light, it is very important to keep the overall picture instead of zooming too far in and getting lost in details. So I prefer to be very small, but oversee everything. And when I'm happy with what I've done, then I can zoom in and continue working on details. But in this course it's not how to make something look clean and shiny. The main propose here is to learn how to create light setting. Now we want to paint into some light on the ground. The base color of the underground is much darker than the one from the Gert. So here it is not necessary. Net i dark condition where before it already brings enough contrast with it. You can just free study here a bit around what looks nice for your composition. I can now also saying if I would like to have a bit more in my shadow, IT personnel a bit more dissolution and summer or even out on, maybe it's also nice to make. And also the shadow of my bird. If it's warmer. Already with those changes, you can create the illusion of another day, time or season. But I guess I want to stay with this leg as Boolean sounds or the light there should be a bit stronger and I was a bit too much shadow. Now I want to take care about the reflections that those light freckles, greenback in areas of shadow. We have your direct sunlight so I can go a bit stronger. My reflection, my character is not made out of a very strong reflective material, so I want to be careful to not overdo it, to not create the illusion for raw material. Yeah, for sure. Reflections. And then directly facing surfaces of DOS like freckles as a tiny baby. His belly from the grass. Too much, so it's just a bit lighter in a bit warmer. I like to paint in such reflections. And the classical method sound one formulae Ahmadi, but just changing the, changing the brightness. It gives me more control about the actual tone that I want to see. On the left side, we have a stronger illumination. So I also want to have my reflection, strong and brighter. Epic reflection on their feet. A strong push for here, because this pietas more facing shadow. His B is already quite far away from the ground, so there is only a hint of reflection if you have the left eye is open. So I would also see a bit more reflection from this guy. On the right side. I can bring in some refraction from space. Let's be good people and name it. And what I want to bring in now, reflection from the sky. What I want to bring in now is ambient light. Again, be careful to not overdo this stress to unite our object a bit more on that because surrounding. And it will also help us to understand and read the shapes and Bellare and take some attention away from the areas that are less important parts. Maybe also just a hint on his beak. Therefore, it's very practical that I can just select this color on my fled color layer so I can make a rarely saw radiation homicide. And I forgot I forgot. Cast shadow from his feet. Well, we are done with our direct light setting under a tree tomorrow, reborn to evenly when sun is going down. So then take care and see you tomorrow.
7. Sunset: Welcome to our last day. This will be our last theme that we want to paint. At evening theme, maybe something like golden hour or later, just a moment when sun is going down. Okay, therefore, I want to change the color of my MBA and shadow. So I have this more reddish orange evening light or you go with the dark wireless. So we have only hints from some left. The dark evening sky is already taking our law. So I will paint into, according to show this dark evening sky. Also paint some clouds, just give it a bit more texture and inflammation. I want to change the ambient shut off my bird and make it had been Walmart. So now I want to paint into light from the sun than as just going down, uh, to, uh, create a rim light on the site. So I set my layer on Linear Dodge. Do you have to try a bit around what could be the right color for you because you have to consider to pick a way darker color. Then you see you then and you picture. You can also just take a starting color and then change it. I imagined that he is sitting on the hills. Some light would hit him in a very know the angle. And yeah, I don't claim that I painted light. It's correct. I guess if you think about it, can't be truly Lincoln's at. This is okay because this is a picture and you really want to aim reality. We are also still creators, as long as it does not look totally wrong. You can just try around and find shapes that are looking interesting. Now I want to paint this radish. We have this kind of light situations. Good. I just go a bit back and forth to adjust my light chain. Now I want to add some reflections from the sky. Areas that are facing this guy more directly. Good. And I see you again if I want to make my Ambien shadow darker and darker, I make my shadow later in the time that sunlight is down as well. So you can just decide which time you want to present here. I can now even see if it makes sense to eliminate edge of this line is total. We made a chromosome. I mean, why not? I'm really not good at those kinds. And bush or we can have some reflection on the login again and on other areas that are facing more illuminated areas. Like the boy is it on this picture? And the more time is passing them more times also passing in this theme and I want to make a.com dot com. But yeah, I think that's it said not. Oops. And that was it. Thank you very much for watching. I hope you enjoyed our date. And by the way, if you liked this video and maybe we can make another one. Very concentrate on indoor lightning and storytelling. I guess it would be great. So, yeah, Tell me what you think. Anyway. I always love to see your rook and brokers and final images. So please upload them in the project gallery or posting on Instagram and tag me in the comments. We are, by the way, you can also follow me messages if you have any questions or suggestions, and nearly have also an own hashtag. So you can connect with others from our super sweet group. Okay, Then that's it. Beautiful day. Take care and see you next time.
 Stephanie Böhm, i'm a Illustrator in the Games industry