Transcripts
1. Intro: Hi, I'm Diana. I am a freelance illustrator
in Austin, Texas. I specialize in children's
book Illustration, but I also really love
all things crafty. Today, I'm going to show
you how you can make your own holographic
stickers right at home. Let's dive in.
2. Supplies: Here are the supplies you
need for the class today. Look at your supply list
that I've included in the PDF document
for the links to these products that I recommend
when making my stickers. We'll need some holographic
printable vinyl. This is the koala brand, and it's this really
pretty sorry vinyl that you can print directly on. I also have royal elements,
holographic printable vinyl, and this is more of a full
sheet of just solid hologram. It also work really
well depending what effect you are going for. I like this royal elements brand for making stickers and I've had good
experience with them. Anytime I can go
with them, I do. I also have this white
vinyl by royal elements, and this one would
be one that you would add lamination
over top of. If you don't have this
holographic vinyl, it's okay. We can make stickers using white sticker paper
or sticker vinyl, either mat or glossy. I have these two prions. This one is slightly thinner
than the royal elements. This one's nice and thick and I feel like it's very durable. This one is durable too, but
it's a little bit thinner. When you're shopping
for your vinyl, you might want to take a look
and see how thick it is. This one says it's
100 microns thick. I'm not sure how
thick this one is, but just look at the specs
when you're buying your vinyl and see if there's one that's a little bit more
durable than the other. It doesn't really matter
in the end too much because we're going to add
this lamination overtop. So this is self stick lamination and it's really
easy to work with. You can get a pack
like this with lots of different designs in here
on Amazon for pretty cheap, and then you just
stick it over top of your plain vinyl and it makes your stickers look
glittery or holographic. This particular bundle came
with a few different designs, we have just this
glittery type of design. It also came with this
shattered glass type of effect. There's a sheet that's stars. It's hard to see on the
camera, but it's starry, like this koala brand
printable vinyl, but maybe not as drastic. This is pretty subtle, it would look more like an overlay
over top of your design. But it's really pretty,
especially in the sunlight. And then we have this
one that's an oil slick, I think is what they
usually call it, and it just adds a subtle holographic shem
to your stickers. So depending what materials you have on hand or what
effect you're going for, you can use a variety of different materials
to make these, and I'll show you
how to do each one. If you're using plain white
vinyl or sticker paper, and you need to add lamination to make it sparkly
or holographic, you could also use heat transfer lamination
where you need an actual laminating machine to put it through for it to adhere. But for today,
we're going to use the self stick
option because it's a little bit more convenient. If you would like to learn how to use the heat
transfer lamination, I have videos on my
YouTube channel where I explain that
pretty thoroughly. So you could head over there to watch that if you'd like to
learn another technique. You also need a printer. I use the Cannon Pixma IC 68 20 and the cricket Explorer Air two for
my cutting machine. You'll also need a pair of sharp craft scissors and I have this tool
called a Gyro cut, which is a craft knife
with a swiveling head, which I'll be using
in today's class.
3. File Set Up: In the PDF document you downloaded for the
class on page one, our sticker supplies and on page two is a free sticker file. You can use this
file right here with the five stickers to upload directly into cricket
design space, and if you are wning a
really fast shortcut, I also have a cricket project right here that you could click and you can just
click Make it and it's already pre loaded onto
the canvas and everything. But if you wanted to
print and cut by hand, you can fit more stickers on
a page than just these five. I'll show you how to set something like
that up right now. I'm going to use Procreate
to set up my document. My canvas is going to
be US letter size, which is 8.5 by 11 ", and I'll go ahead
and import my images into this document and
place them on the canvas. I have each of these in
their own individual layer. The sticker file
that you downloaded, they're all in one layer, so you could just crop
them and separate them, so they're all in their
individual layers if you'd like to do more stickers on a
page than just those five. And what I am doing
is just going through and duplicating them and just arranging them
on the canvas so I can squeeze as many
as possible in here without going too close
to the margins or the edges because I don't want anything to get cut
off when printing. So I'm just going to
arrange them here, see how many I can fit
onto this page so I can really maximize the space and not waste any sticker paper. And of course, you can
also use your own images. You can just import
them into your canvas. And then if you're using
a cutting machine, you'll have to draw a
border around it so that the cricket or the cutting
machine knows where to cut. So I just use a mon line brush and draw a pretty thick
white border all around, trying to keep it
uniform and leave a nice margin so that if the
cut line is slightly off, it's not going to cut into the colored portion
of my sticker. So here is my cricket file, and here is my cut by hand file. So now let's briefly
talk about how to set up files in
cricket design space. I'm just going to
press the green plus sign and make a new canvas and then the upload button and choose from my Photolibrary, and input the file that
I shared for this class. So this will pop open box where you can do
different things like remove the background
and things like that. If you have cricket access, you don't need to
do any of that. You can just click
Continue and then go over here and
make sure you set it up as a print then cut image and you can name it so you
can easily find it later. And then press upload. It's worth noting that
on the desktop app, you'll have more options, and you should choose
Complex as the image type to make sure all of the colors come through properly
when you print it, and then you can name
it and choose print and cut just like you would
do on the iPad app. If your image is too large, cricket will alert you, so it will tell you that it can print this large when you
click the make it button, you'll see the red
exclamation point. You can click it over there and it'll tell you what
size it can print. Now there's this feature
that says auto resize, so you can just click
that and it will make it the appropriate size that
it can print and cut. If you're uploading your
own individual elements and you arrange them on the
page and click Make it, they will try to split out
into the most logical format for it to print and
that sometimes puts it on separate mats
and separate pages. You'll want to make
sure that these are attached before you click Make it by selecting them and then pushing attach with this
paperclip icon down here. Then when you click Make it, it will keep it grouped up
nicely all on one page.
4. Cut by Hand: One advantage of printing and cutting by hand is
that you can see you could fit way more
stickers on a sheet of sticker vinyl than when
you use a cutting machine. So your money goes
a little farther as far as the price per sheet of vinyl if you're selling these and also just
not to be wasteful. So it's a little bit of pain
or a little bit harder. It's cutting by hand,
but it's not that bad, and you can get so many
stickers on this sheet that I think it's worthwhile
option to consider. Even if you're selling
them, if you're able to cut them out and make
it look professional. I'll show you some tips on how to get the best
cut with scissors. Also a little tool I discovered that it's like a handheld
cricket machine. Now let's cut our
stickers by hand. I have a nice sharp pair of craft scissors that
I'll use for cutting. I also recently discovered this handy tool
called a gyro cut, and this head swivels
as you're cutting. It's a little bit easier
to cut curves and smooth curves and lines than with an exacto
knife or a craft knife. Oh, I thought this
was kind of handy. There is a bit of a learning
curve with this one. So I would advise practicing
on some junkie material, not your nice sticker vinyl
when you first use this one. But if you wanted to try
it, I have a link in the PDF doc with all the supplies and tools
I used for this class, and it's called a gyro Cut. Since most of you will
be using scissors, let's start with that and cut out some of these
sticker shapes. I'll go ahead and start with
these little mugs up here. First, I just want to cut
out the shapes messy, just to get them
separated from each other and then we'll
go and cut it a little more precise
so that it has nice curved edges and looks
like a die cut sticker. What you want to do when you're cutting with scissors
is make sure that you're going to cut curves
versus really sharp corners. If you keep it curved, it keeps your sticker from lifting
a little bit better when it's placed on the water bottle or laptop or
wherever you're placing it. It's nice to have curved
edges and it also helps keep it from splitting
when the person peels it off of the paper. You just want to try to cut curved edges
the best you can. It's a little trickier
with scissors, but if your design
isn't really intricate, then it's not too bad. You can always simplify
the border too. So I'm trying to do just, like, long strokes and just gently curving the material around as I'm cutting so that I
get nice smooth curves. You don't want to do, short, choppy strokes because you'll get kind of, like,
jaggedy edges. If you just take your time and keep an eye on the
edge of your design, trying to leave
the same width of the margin or the sticker paper here around the whole way, then it makes it look
really nice and more like a die cut sticker that was printed professionally
and not cut by hand. I'll go through and do a
few like this and just cut out these little mugs
using the same technique. It's helpful when you're
setting up your sheet if you don't place them
so close together. It's a tiny bit close, but because this is straight, I'm able to just cut straight
up in between the two here. But it does leave
a really little margin here around the handle. Just keep it in mind
when you're making your document for your stickers, you want to leave a
little bit more space. I'm just going to look over
here and just try to keep this little margin consistent
the whole way around the design so that it looks nice and uniform
when it's cut out. So you can see how it's fairly simple to just cut
with scissors if you wanted to maximize the amount of stickers you can fit on a sheet or if you don't have
a cutting machine, so it's not bad to
do with scissors. Now let's try the gyrocut tool and see how this works
for cutting our stickers. I would definitely practice
on some scrap material. You could even use
these little bits left from the edges of the
stickers you're cutting out. I'll practice on something else first before you go straight to your sticker sheet and just
to show you how it works, I'm going to use
this scrap paper that's from the back
of my elimination. And so this head on this
tool swivels and that makes it easy to go around
curves with a little practice. It's a little tricky sometimes, so you just need to practice
using it first and see if it's something you like where if you want to stick
with scissors. You need to press with the tip, and then as you're cutting, you just use a pencil
and you just swivel. And it'll automatically
cut the curves for you. If it starts to get hung up, I just pause for a second and
get myself situated again, make sure it's facing the right
direction to continue on. It is easier to drag it towards
you than away from you. You could swivel your design so that you're pulling
the tool towards you. I found that makes
it a little bit easier, watch your fingers. Okay, so this is just, like, a completely random,
bubbly shape, but you can see how it makes it kind of easy
to do the curves. And you might also have to practice with how hard
to push to get it to cut the whole way
through because you can see this part cut
through and this part, I can't get it to pop out. So it's not cut deep
enough to punch out. So I would just
practice with it, practice on your material, and you definitely want
to use a cutting mat for this or maybe a piece of cardboard underneath
or something. I just like this
self healing mat because it's
convenient and it has these grid lines
on it and stuff. Okay, so let's just practice
it on our material, and then you can kind of see how much pressure
you'll need. In order for it to cut
the whole way through. So that was quite a bit of pressure, but it went
the way through. So let's just try it out
on our stickers now. I left these attached because I want to be able
to go around this handle, and I thought it
would be easier if I had a bigger
area to work with. And I'd like to start
in a straight area. So maybe I'll start
over on this side.
5. Cricut: So we're ready to go ahead and print this out to be
cut on the cricket. Be sure to turn off this bleed because we already added the
bleed with the white border, so you can go ahead
and turn that off, and then just check your
other details over here, make sure it's the
right material size, and everything else
can be left as is. We're just going
to print and cut. We're having a material
loaded on the map. Material size looks good, and we're not
mirroring it because it's just a sticker,
it's not an iron on. So when you're ready, you
can go ahead and click next. This is better to do
from the desktop. If you can, the app is a
little bit more limited. On your desktop, you can use your print dialog box instead of the cricket
print settings here. And on the app, you have to push here and you can adjust your settings and choose the print quality and the paper size and
all of those things. On the computer, you can choose, I think, even more
settings than this. So it's a little better if you can do
it from the computer. I'm going to push the quality here and just leave
it at normal. You can put it up to
best if you want to and it will print a little bit darker and it will print better, but it uses a lot more ink
for what I'm doing here. I'm okay with leaving it at
normal and the media type. You want to set it
to photo paper. And everything else
should be good. We printing in color,
paper sizes letter. Everything else looks good here. Then I'll go ahead and send
it over to my printer. I printed out my design
on the koala vinyl first. It's the sparkly holographic vinyl and the colors came out really vibrant and
they look really pretty and the stars look really nice with
this design too. The only problem is that the
cricket is not going to read these guidelines because
this is really shiny. There's some things
you can do to help with that and to help your
cricket find those guidelines. So what I usually do is I reprint it on plain
printer paper, so I have another copy and I can use the guidelines
from that copy. It says printed here.
I'm just going to push edit and I need to print it again up here where it says send a printer is where
I can adjust my settings. I don't want to waste
my color ink because I only need this outside
border for this. I'm going to turn off print and color and you can see
it went to grayscale. I also don't want to waste ink, so I'm going to go to
Media and quality and push draft and media type
is just plain paper. And then that conserves my resources and since I
have to do this work around, it's a waste of paper and ink, but I try to minimize it
as much as possible by at least not wasting so much ink and then using the paper
for something else. I'll go ahead and
I will print this out in black and white,
and here's when I get. It's an exact duplicate
of my stickers, but I only need this border. Now I just cut out the corners and I stick them
on here so that my cricket can read the guidelines
from this paper and it should line up close enough that it will cut these
out on the right spot. It's also a good reason to add those white
borders that we added and make them pretty
thick so that you have some leeway
when it's cutting, especially on glossy material because you have to
do things like this. I've also tried in
the past to put Scotch tape over this area here so that it can read
the black guidelines, and it's hit or miss. Sometimes it works,
sometimes it doesn't. So I have switched
over to this method of just reprinting it in gray scale and using
this for my guidelines. Okay, so now I just
attach it with some washi tape and just line up the lines
the best you can now we're ready to cut.
You'll have to go through that same rigamarole anytime
you use glossy material. You'll also need to do it
with your holographic vinyl. That's just solid
because you can't read on glossy or if you're
using glossy sticker vinyl, you'll need to do
the same thing so the cricket can see
the guidelines. Go. Just make sure everything
is stick down real good. And you can usually
use a light grip mat. Mine isn't as sticky anymore, so I'm just using this
standard grip mat, just make sure you have it pressed down on there real good. Now let's load it
into the machine. I have my dial set
on Vinyl plus, before I begin, I always like to check to make sure that
this blade is clean. You can clean it off by pressing it into
a bottle of foil, which I keep right here in
the holder on my cricket, and I just poke the blade into the foil a few
times and it cleans it off so that there's no funky stuff or old sticker
material left on the blade. Load your blade and then we'll just press the
button to load the mat This is finished cutting
before unloading the mat here, make sure that it has cut all the way through
your stickers, so you want to check a corner. I can see that this has not
cut the whole way through, it would be great for
kiss cut stickers, but for die cut stickers, it is not cut through
the paper on the back. I'm going to go up here and press the cricket
button again. Without unloading the mat, just push the cricket
button again. I will cut on the exact
same cut lines as it did before so that it
will go the whole way through the material
before you press it, you might also want
to dust off some of these bits because there is little stickery
bits left behind. So if you just want
to wipe it with a soft cloth real
quick before you push the repeat button or the cricket button
to repeat the process, then that might help
the blade, too. We just did our
second pass and now I can see that this did cut
the whole way through. If you bend the corner
down a little bit, you can see if it's lifting and it looks like
it went through the paper or enough where
you can punch it out. If you want to do another pass, you can do as many as you need until it
goes the whole way through. Just keep pressing
the cricket button. This looks like it's good enough for me and I can probably just punch these
out where they're still attached in a few spots. I'll go ahead and press
the unload button. When removing your
stickers from your mat, you don't want to peel
your paper upwards. You want to flip
your mat over and peel your mat away
from your material. That way, it won't
curl up as much. These are coming
off pretty easily. It might not matter so
much for little items, but if your mat is super sticky, then you need to be careful
that it doesn't curl your material when you
take the paper back off. Some of these you might have to help pop them out a little bit. If your blade can't seem to get through it with several passes. It comes out pretty easily, so it's not a huge deal. You can see how cute these
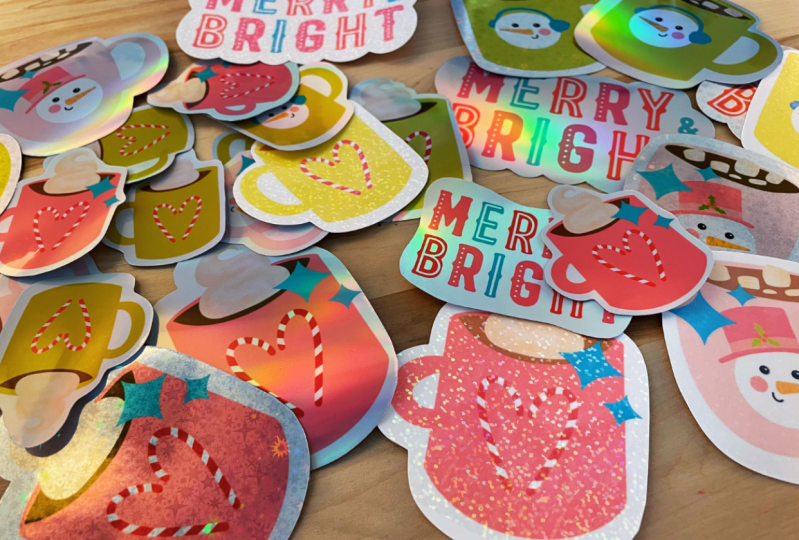
stickers came out and the areas that we
left white really have a nice opportunity to be super sparkly and to
shine the snowmans little face there and some of the areas
here on the letters. So there are fun stickers. You can see on this material, there's a lot left behind, so this is pretty wasteful
to throw this away. Usually, I would add in other shapes like I'd put in
maybe hearts or snowflakes or stars or something just with my cricket shape tool
and just add it all to my canvas or just squish
more stickers in there as many as possible where I
still do the print and cut. Or at least some shapes in
here to fill up more space. But I didn't want
to give you guys a super messy crooked
file to upload, so I just left it with
these stickers here. But I think you could find
a lot of ways to use this and to utilize every last space or even with a paper puncher. Like if you have
craft supplies that are craft punches for snowflakes or different shapes that are fun for
glittery material, you could use the rest of this to make
something fun out of. So don't throw it away.
Find a good way to use it. So I will follow the
same exact process as this for the
holographic sticker vinyl. That was just like
the oil slick sheet. It's going to follow
the same method, including printing the
white paper borders here to attach to
your sticker vinyl. So you can see an example here, I thought that it had cut the whole way through,
and it did not. So now I have kiss cut stickers, like a giant sheet of
kiss cut stickers. So what you could do
in this case is go through with your scissors and carefully cut on the lines. It's pretty easy to cut because it's already been kind
of pre cut for you. It usually just pops right out. Or you could cut the border, a little bit bigger
around the designs, or if these are
just for yourself, then you could just leave
it on the sheet like this and just peel them from
the sheet as you need them. But if you are planning to sell then you probably need to get them cut out a
little better than this, and you can see how it
almost came through, but I should have
checked a little bit closer and run it through
the cricket one more time. I can probably work with
this and punch it out or use the scissors to cut out the shapes so that they
become die cut stickers. For our last set of
cricket stickers, we're going to use
this MT final and I'm going to use
the same settings that I used previously, and change the media and the quality, you can
change it up the best. I actually kept mine at normal. But I did change the media type to photo paper just so that it prints a little bit more crisp and you can play around
with your settings to see what settings you like. But those are the ones
I use for my stickers, and then I have the
lamination material that we will apply after we
print on the final gear. One thing to note
is make sure you're printing on the correct
side of your final. One side should look a little bit whiter than the other side. But if you can't tell, just pull up a corner here and check to see which side is sticky and then make sure that you're printing
on that side. Here's our printout, but before we load it onto
our mat this time, we want to add our
sticker lamination. So you'll need to
make sure you measure it so that it doesn't
cover these black lines or else you'll
have to go through that whole annoying
process with printing out the white paper
and adding it back on. So you don't want this to
cover your guidelines. So you'll need to
cut it down to size, and you can either just cut it within
the boundaries here, or you could try to cut if you have stickers that
are really spread out, you could cut pieces that'll just go over
top of the sticker, but make sure that you allow room for that buffer zone
so that it cuts out, and the whole thing is glittery. But because these are
so close together, I'm just going to put it
over the whole thing. I'm just going to
go ahead and kind of mark mine so I
know where to cut it, and it doesn't end up covering
any of those black lines. So I have a sharpie here, and I'll just make a little
mark where I need to cut it. It also has grid
lines on the back. So I guess maybe that would
be a better method to flip it over and mark it on the back and not
on the shiny side. So I just want to
line it up here and then just make sure
it has enough leeway. It doesn't touch those borders. Now I'll just go
ahead and stick it over top of my design, making sure that it doesn't cover over any of these corners. And if it's going to come close, I'm just going to cut it
with scissors so that it doesn't go anywhere
near those guidelines. A And so now we'll run this through the cricket
and you might have to do a few passes because it has
this extra layer on the top, which makes it a
little bit thicker, so it's not going to be
able to cut through on the same setting that you would normally cut
your vinyl on. I'm going ahead and set my dial for poster booardPlus
because I know that it's going to
take several passes if I just have it on
card stock or vinyl. So I'm just going to put it
on the strongest setting I have without going
through the custom options, and I might have to do one
or two passes on this. So here are the stickers
that are laminated, and they came out really cute
and they're super glittery. They feel really durable because of the
extra layer on top, and they'll be waterproof
because of the lamination. The sticker vinyl I use
is waterproof anyway. But if you're using
sticker paper, then this could be
a nice option to make them more adorable
and waterproof them. Drawbacks of laminating them yourself is that sometimes
you have errors. If you can see here on the edge, the glitter doesn't go
all the way to the edge. I missed the cut line
by just a little bit, and if I were selling these, I wouldn't want to sell
this dough customer where the lamination stops before
the edge of the sticker. You'll need to come
back in here with scissors and fix it up yourself, or if it's just for personal use, then
it might not matter. But if you're selling them, then you need to
be careful about making sure the
lamination is going to go all the way to the cut line. And that can sometimes
be tricky to know where it's
actually going to cut because it's just like a border that you drew
in with a buffer zone, but it's not extremely precise, especially when it reads the guidelines
differently each time. But overall, it
looks really nice. I think they came
out really cute, and this is a nice option if
you just have plain white, sticker, vinyl or sticker paper that
you want to dress up. Here are all of our stickers that we cut on our
cricket today, and they came out really nice. There's a lot of cute options
here if you would like to see a comparison of
different materials. This is a good overview. So this was the
holographic vinyl that was glittery
that we printed on. And then this was just like the oil slick holographic vinyl. This is lamination,
and you can see how it looks a little bit more
muted as far as the colors. It might not pick up on
the camera that well, but it's just slightly
more muted because of the extra layer of material
on top of the ink here, but it still looks pretty
and it still looks super sparkly and
feels really durable. And this was our cut
by hand sticker. There are lots of
methods here that you can utilize to make
your own stickers at home. You don't have to
use a print shop, you can make them yourself. I hope this was helpful for you.
6. Thank You and Free Gift: I hope this class was helpful
and fun for you today. If you want to download
some fun free goodies, you can head over to my
website and review the class. If you submit your
review, it's so helpful for me to hear
feedback and to know what I can improve for future
classes to make sure that I am helping people and making the class as much
fun as it can be. Thanks so much for watching. I hope you enjoy the class.
 Diana McDermott, Children's Book Illustrator