Transcripts
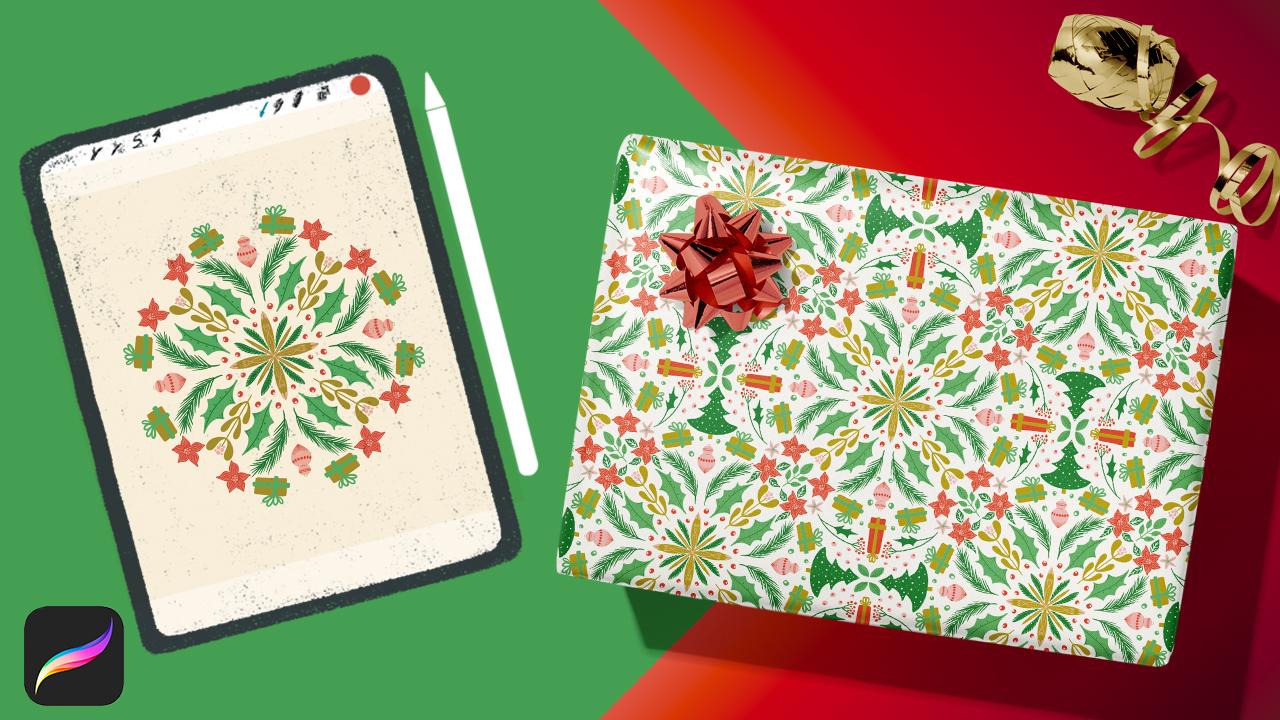
1. Intro: The special time of the
year is coming closer and closer. As the holiday
season approaches what better way to get into
the festive spirit than by creating our very own personalized Christmas
wrapping paper? Today I'm going to
guide you through the wonderful world of
symmetrical drawing in procreate, and show you how to craft a stunning and unique
wrapping paper that will make your gift
stand out under the tree. Hello and welcome
to this class about designing a Christmas Mandala wrapping paper in procreate. I'm Nicole, and I'm thrilled
to have you here today. Now you might be wondering
what's the secret to creating a beautiful Christmas wrapping paper like this one? It's all about understanding
the art of mandala design. Mandalas are intricate, symmetrical patterns
that have been used for centuries to inspire creativity and
promote inner peace. Today, we'll be applying
these principles to design your very own Christmas themed Mandala wrapping paper. All you need for this class is your ipad with the procreate app and the Apple pencil or any similar stylus. To set up
the file for the printer, you will need any
graphic program. I'll show you my
process in Photoshop. We'll start by setting
up our canvas and understanding the basic tools and techniques within procreate. Then we'll delve into
the magic of Mandalas, creating a central
Christmas themed item and building intricate
elements around it, all with perfect symmetry. Finally, we'll make
a repeating pattern out of this Mandala. Whether you are a seasoned
artist or a complete beginner, this class is designed
for all levels. Though basic procreate
skills might be helpful, I'll walk you step by step
through the whole process. By the end of this class, you will have a
gorgeous one of a kind Christmas wrapping paper
to use for your gifts. I can't wait to embark on
this creative journey with you and help you with
every step of this way. Grab your equipment
and let's get started.
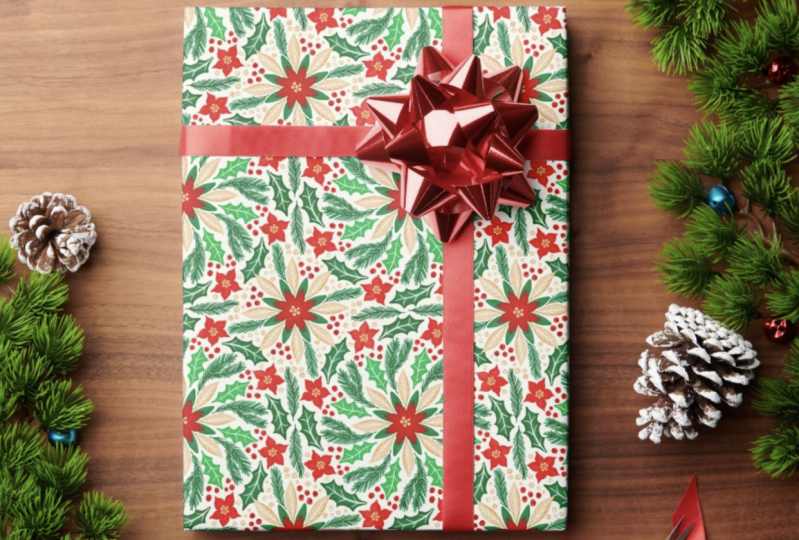
2. Your Project: In this class, we
are going to create a Mandala repeat pattern for
a Christmas wrapping paper. Your project is this
repeating pattern. Please upload your
finished design to the project gallery by clicking the Submit
Project button under Projects and Resources. If you like, you can also create a mock up for your
wrapping paper, and I'm looking forward to see and comment
on your projects. If you have any questions, please reach out in the discussion section.
I'm here for you.
3. Setting Up the Canvas: Before we start
with the Mandala, I'd like to demonstrate you how our pattern
will be arranged later on. We will draw a mandala, I demonstrate it with a flower. You can repeat this
tile in that way, one beside the others, then the same on top, the same on bottom. But you have one and the next. I think this is the bottom
and this is the top. Or you could take every second row and shift
it halfway to the side. You have a half drop
repeat pattern. This is what I like
to create with you. I change my color.
For this inner tile, I would like to create it in the size 25 by 25 centimeters. This is about 10 by 10 ". If you'd like to work in
inches. Or centimeters. I'd like to create with the little plus icon
on the top right, a new canvas. With the plus icon. I go to centimeters
and choose 25 by 25. Or as said you can go to inches
and type 10 by 10. You have 55 layers. 25, 25. I have 57. This depends
on the ipad you use. You may have a different
amount of layers, but it will be enough. The DPI we leave it at
300 to have a good quality. What's else important? We go to the color profile. Normally, I work in RGB, but this time the wrapping paper is going to be
printed out on paper. So we have to choose CMYK. I suggest taking the generic CMYK profile and create. Okay. Now let's talk about the
colors we would like to use. So, if you like to have it
in classic Christmas colors, you can take a red, I make dots and drop it later
on in my color palette. And maybe some light
peach as a contrast, or some more, a light pink. I think I take it lighter. Classic. Okay, I think that's good
and we need some greens. Let's choose a dark green. And maybe a lighter hue of that. Yes. And maybe some brown. Some lighter brown. Some olive. Yes. That's a nice one. Now let's go to
this dot and select palettes and the plus icon on the
top right, create a new palette. This is on the very top of all. Now you can, with a long
press on that color, you have it selected, click it in the New Color Palette. I link you my palette
in the Resources tab, if you'd like to work with
exactly the same colors. Okay, that's it. We can delete, clear
this layer again, we have our colors in
the palette saved. Now let's turn on the magic to create the
mandala in perfect symmetry. We can work with
the drawing assist. Go to this little
wrench icon on the top left and click to canvas. And then turn on
the drawing guide. Edit drawing guide and here, you can choose on
the bottom layer, the symmetry, on the right. The options, here you have
the symmetry, vertical, you could choose
horizontal, quadrant, but I like to choose radial, which means that the canvas
is divided in eight parts. When I draw in one part, it is automatically mirrored
in the other eight parts. Let's choose radial and leave
the rotational symmetry off and the assisted drawing
on, then click Done. Let's meet in the next
video to draw the Mandala.
4. Drawing the Mandala: For the background
color, I'd like to, I'd like to stay with a
very light color, white, but I don't like the pure white. I'd like to go to this navy green or olive green and
shift the dot to the top left, quite to the top, and quite to
the right, but not fully. We have a lighter, very light version
of this olive green. I think this might be
a great background. Okay, we have the wording
assisted here under layer 1, which means that the
assisted drawing is on on this layer one. When we create another
layer, it's not assisted, but we can also turn it on here, by clicking in
this little square and then drawing assist on. We have it also here activated. You have to activate it in every single layer you
would like to have it. Okay, let's stay with layer one. I'd like for my center element, I'd like to create a
star or snowflake. I choose the studio pen. This is my favorite
pencil when I like to illustrate with
straight edges and without any texture. But you can choose
whatever brush you like as well as every
color you would like. You don't have to
follow me 100%. Okay. The studio pen and I stay
with this olive color. Yes. Okay. I'd like to create a star. So I go from the center and
make a leafy shape and fill it in. Here again, but make it smaller to
make it more interesting. Between this here
and here and here, I'd like to change the
color to the dark green. If you like to change
your colors on it it's better to work in
different layers. I suggest to take a new layer, when you choose to work with
a different color. Every layer is one color. You can change the colors
later on very easy. I don't go from this shape, but leave a bit of a gap. Make it in this way. When you drop the color in, sometimes when you
have some sharp edges, it doesn't fill the
color in totally. You have to go in and check all of your
edges and corners. If there are some
dots left like here. I go back to that, choose
my olive and correct that. It depends on your style. You can leave it as it
is or you can go in, take the eraser studio
pen and make it a bit sharp the edges and
make a nice sharp tip. On that star. Okay, You can create some
details in this star, but I leave it as it is. Maybe we can go in another step at the end of the drawings, we can refine all the details. Okay, what can we do next? I'd like to have some leafy shapes,
maybe from a Christmas Holly. I stay on this dark green layer. No, I take another layer,
create another layer, and go with this lighter green, make a kind of Christmas Holly
leaf shape here. Oh, I forgot to activate
the drawing assist on that layer. Okay. Once again and I refine it. Okay. And in the gaps between, I'd like to go back to my dark green and create a twig of a fir tree, the needles of the twig. You can work exact, but I'd like to make it random. And different in the size of
the needles and thickness. Follow your style. Okay. And here in the middle, I'd like to make
another leafy shape. So I go back to this olive and I make it right on that guideline. Okay. Now I make some mistletoe
leaves in this kind, okay, drop the color in, refine it, and here on the top I'd like to go with, let's see if the contrast
is enough with the light pink. So another layer and activate the drawing
assist and make, yes, I think it's good. And one in the middle, it mustn't be exact round but without
edges or corners, maybe add some smaller
ones here and there. Yes.
5. Adding more Elements: I'd like to have a winter
rose with this red color. Create another layer,
activate drawing assist, make it here. The winter rose has leaves like this, a bit like a flame, and they are overlapping. I'd like to make five leaves. No, I don't like it here. I'd like to not touch this. Okay, drop the color in. In the center of this flower you can select this rose pink. Create another layer,
activate assisted drawing, and make some dots. Vary in sizes to
make it interesting. Okay, I think I take this darker
pink here in also. This is too soft and too
subtle. I don't like that. It's that. We can go up with that and reduce
this two to one layer. Make it alphalock by swiping with two fingers on the
layer to the right. You have the checkered pattern here, we have this pink selected. And you can tip in here in this checkered pattern
and choose fill layer. Everything that's on that
layer has this color now. Okay, we can turn
off the alphalock again by swiping again with
two fingers to the right. The checkered pattern is gone. Okay, let's go further
in that region, we can create a
Christmas bauble here, I stay with this pink and I'd like to have the bauble in a kind of...
one circle on top and, I don't know how
you call this shape, like a flame again
like in this flower. Okay. I make a flame again here, make it nice in the corner. A nice tip. Okay? And then make a circle on top. A kind of circle. Mustn't be perfect round
but nice in the shape. Okay? To make it a nice bauble, let's make some
patterns on that. Let's shift the red over this pink, go to the red layer, and choose the red color, and create some dots here. And maybe a stripe, a border here, make it smaller the size of the brush. Some diamond shapes here. You can fill it with the color, make it also here. Just try to follow the
curve the bauble makes and do some smaller dots here and get smaller, make some stripes
from here to the top. Okay, let's make a
little hook on the top. We lost our dots in the center because we shifted
the pink under the red. When we shift it back again, we have the dots again
but lose our patterns here. We have to make
it a separate layer. Go to this pink layer
and choose the wrapping. Wrap that around. Shift with three fingers. Now you have the
copy and paste menu. You can say cut and paste. You have the two selected from
here on a separate layer. And I go back to
that layer and do this and these two also. Okay, so we have this four
layers with the dots in the winter rose. I can merge it to one layer. Okay, then I shift the other layer with the
pinks behind the red layer. We have one pink layer behind the red and one pink
layer on top of the red. We can turn on the
drawing assist here also. If you like, you can name the layers with the
colors to stay organized. But I can see it clear enough here in this preview squares. Okay, then I go back to this olive
layer. Choose my olive. As said, I'd like to have
a little hook on that, maybe in a square shape. Okay. To define it clear
enough as a Christmas bauble. Okay. What else can we try to evoke more of
a Christmas feel? We can create a parcel, a gift. Let's make it here. In what color? I stay with this olive.
Let's try this. Make it a bit bigger. I make a square shape, but not in a right angle, a bit shifted to the side to
make it more interesting. And it mustn't be perfect with all the angles and corners. It's okay to have a
hand draw look on that. Maybe it's too close
to that fir tree. I erase here from the bottom and make the edges
a bit more round. So it's like here and there. Okay, And let's make a
bow around the gift. And I'd like to have it
with this light green. Maybe we don't need
this light pink. Let's see if, if it's enough
to have these five colors. Let's try, I make a bit of a cross and then create a bow here on top. That's nice.
6. Adding Details: Let's add some details here in the star
and on the leaves to make it a bit more
interesting then, let's try out our repeating. For now, let's add some details. I go to the dark green. I'd like to make some
details in this leave. It's the top
layer, the green. Maybe I can shift it
behind the dark green. Yes, it's okay. We can go to the
dark green layer and add some veins here. Don't make it straight. It's nicer to have a bit
of a curve in this vein. You can make some veins to the site or, to
make it different, we can add some dots here and there besides the veins. And make some kind of veins here in
the, in the corners. Also a dot. Yes, that's nice. Okay, and here in the star, we can make some ornaments. Let's see if this pink is good on top of this
olive. Yes, it is. So we can go from the center, in that way. So, start in the
center, make a bow, cross it over this guideline, and make this curvy
shape on top. And here, make a kind of a heart in a mistletoe shape, maybe. Yes, and here you
can add some dots. Here also a dot. Yeah, I like it. And make only a thin line here. And in the dark green shapes, the dark green layer is on top. We can go here to the green. And why not erase some parts
of that to create a pattern? We can make some veins, or is it too tropical? No, I think it's good as it is. And I make it only on one side. And on the other side
I add some dots. Irregular dots. Yes, that's fine. What else can we do to have
more of this red color? We have the red only in the winter rose
and in the bauble, but not in the very center. Go to the red layer,
choose the red. Why not add some simple dots here and also here? Maybe If you like, you can draw a perfect circle by holding and tipping with one finger
so the circle is perfect. But I don't like to
make it perfect. I like to have a bit of a hand drawn look in this also. Why not erase a dot? It looks a bit like the fruit of the
Christmas holly, maybe? Yes, we have all the colors in all the parts of that. Okay, let's define this winter rose. I go to this layer
over the red layer, the pink layer over
the red layer, go to the pink and then add stripes here to define the flower a bit more. Try to follow your
original shapes and it's okay to make every
leaf different from the next. Yes, that's good. I think we are done with
our center elements. Let's care about the
repeat in the next video.
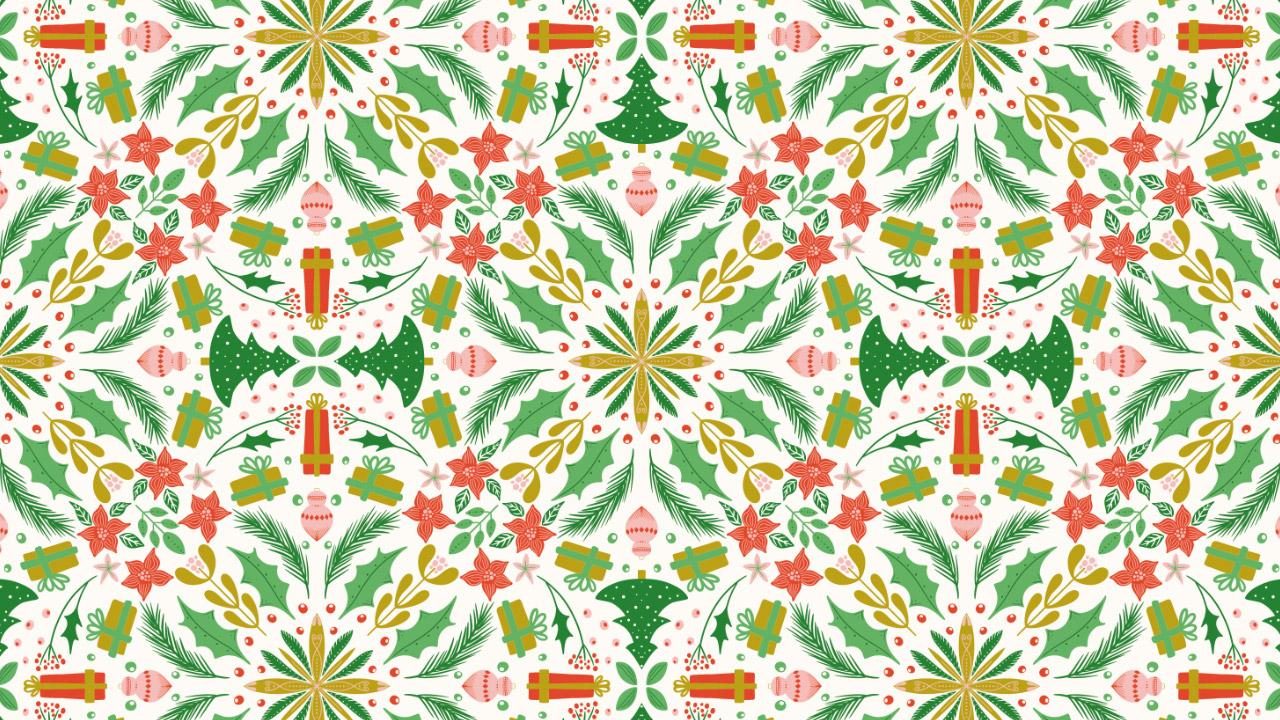
7. Making the Repeat: Okay, let's care for
our repeat pattern. For that, I'd like to group all my layers except the
background layer, group it. The repeat is going
to be this one. We move the center of
the star to the corners, to the outer corners to
have it half drop repeated. And for that, I think our
pattern is a bit too big. Because when we shift, when we copy these elements to the corners,
they would overlap. I select my group, click the move tool, select Uniform and
make it a bit smaller. Shift the blue dot
to 2,100 about. Then move it again
to the center. Make sure your snapping
tool and magnetics is on. Then you can move it till it has this yellow lines
here and there. It's in the perfect center. Now we can duplicate this group. Click the move tool again. And shift the whole group till the center of the
star is in the corner. Which means that these blue dots are on the very
edge of the canvas. Okay, then repeat this for the other
corner elements. Yellow and yellow perfect. And again, make sure to always
copy the inner element. The inner group, duplicate. Go down, perfect. And once again, okay, now we have a lot of groups
with a lot of layers. I'd like to reduce all to
have it nicely organized. This is the inner element
with our colored layers. We have the colors in the
other groups as well. SonI'd like to select all my dark green layers
and merge them to one layer and all the
light green layers and merge them to one
layer. At the end, we have six layers again. Okay. I select this
green, this green and from that group this and this
and take it and shift it to the very
top and we can merge it. We have all our dark
greens on this top layer. And do this again
with all the others, with all the other colors. Make sure to leave the correct order of all
your colored layers. For the last one, the olive, you can merge all groups and
you have it on one layer. Fine. Now let's care about
our gaps in between. We stay with the same method as we've drawn in
the center element. I draw more elements with the same management
of the layered colors. First, I'd like to draw a little fir tree
here in the top. For that, select the
dark green layer and dark green color
with the studio pen. Then I'd like to
make it in that way, so like a bit of
a, a round shape. I'd like to take the
eraser and erase some dots in the tree to simulate a kind of lights or baubles. To make it more interesting. The stem, I'd like
to make it olive. Go to the olive layer
and draw a simple stem. And here between the two gifts, I'd like to draw a
Christmas holly twig. I go back to my dark green with the leaf and on the top, smaller twigs, and make some fruits. I choose the red, go to
the red layer and make simple dots in different sizes. Okay. Here between the
tree and the holly, I think there's nothing wrong with drawing
some more pinks. I take the pink, go to the bottom pink. I'd like to draw some
dots again, like here. And erase the dot, one dot out of the dot, I go to the, to the red
layer and make this dot with the red dot in the dot. This part, this is too much
of a big gap in the repeat. I'd like to draw
another gift here, half of the gift, because it is, the other half of the
gift would be here. I stay with the red, I make a red gift, draw it here. You can see it is here. And also here, we draw the half. Make it a bit bigger. And again, it mustn't be in
perfect geometric shape. Follow your style. Okay, in the bow, I'd like
to make it with the olive. Okay, I have to
create another layer, because the olive layer
is behind the red. So I create one layer on top and draw the bow at
the edge of the canvas. Oh, I have forgotten to
turn on my drawing assist. And again, okay, here is the other
part of the bow, and we can make a bow on top. So make sure to draw it on the edge so that the mirroring makes sense here. Also a small one. I think that's nice. Okay, we have a gap
here between the roses. I like to go to the light green. Choose the light green And make another twig
with leaves here. Don't overthink it, I
make it on the mirror axis, the line, here. Then make simple leaf shapes. There are still some
gaps here in between. And I go back to the
dark green layer, choose the dark green and
make leaves to the rose. Okay, I think I'd like to have this green
leaf a bit bigger. So, to close that gap here, go back to the light
green, make it bigger. This one. Okay? And I decorate that light green with some dots
again in the leave. Okay, I think these leaves
need some more interest. So I go back, oh, I am on my dark green layer, and I'd like to erase
some veins out of that. Okay, and I think we are nearly done, but some little gaps. I have one gap here. Maybe I go to the pink and make a
little star shape. Flowery star shape. Okay. And decorate the star. Go to the light green and make some stripes here. There. Okay, the gap is closed. I think we need some thing here. On the very top, I draw a simple leaf. Okay, And go to the dark green decorate it a bit. Is there still a gap somewhere? Maybe here this
bauble is a bit free. I stay with, no, I go to the light green again and make here a green dot
and there a green dot. And to make it in the same
way like these two dots, I erase a dot. Okay, now I think we are
done with the repeat. Let's test it out.
8. Testing the Repeat: For that, I'd like to
group all my layers. This is my original repeat. I duplicate this layer
and flatten it down. I turn off my original, don't make any mistakes
on that anymore. This is my repeating tile. And to test it out, simply duplicate it four times and go from layer to
layer and reduce it halfway. Take the first layer, take the move tool and take
this little blue dot and shift it till it
snaps with the two, the two yellow lines. Okay? The next one, take the blue dot till it snaps, And the next one go
to the bottom. Okay? And the last one
go to the bottom. Oh, it's a nice one. The only thing that catches my eye is we have this green
dots here around the bauble, but we don't have it here. I think we can draw some green
dots also here. I go back, I delete this testing and
go back to my original. We have this light green
here on that bauble, but we don't have it here. I go back to the light green and draw a dot here. It mustn’t be in the same like here. Make a second one here, maybe a smaller one here also. I sometimes tend to overdo my illustrations
and patterns. I have a bit of a problem
to let things go. You mustn't follow that
last finishing elements, but I think I have to do it in some way to make
it perfect for me. Okay, now I'm satisfied. I test
again by duplicating this group. Turn the original off. I flatten that
down and duplicate it till I have four
layers of that. And then shift it again. Whoops. Okay. And now my inner
critics are silent.
9. Exporting the File: Okay, we have to switch
to the computer now because procreate is limited
to the size of the canvas. In my case, I would like
to print this pattern on a wrapping paper that is sized 70 centimeters to
100 centimeters. I can't create that
file in procreate, so I have to use
Photoshop for that. But I'm sure if you
have a local printer, it's possible to send the
printer your repeat tile. He will set up for you to create another size
if you don't have Photoshop and can't set this
document up for the printer. So for that I'd like to go to the wrapping icon and say share and share
the image as a PSD. I save it to files, I have an order in my cloud where I save
all my procreate files. I name it Christmas wrapping and save. Let's meet. In the
next class on my Mac, I will show you how to set
up the file for the printer.
10. Setting up for the Printer: Welcome to my Mac. We have our Christmas
wrapping PSD file. Let's open it in Photoshop. Here in the layers menu, you can see these four layers
where we tested our repeat. We can delete this because we
don't need to test anymore. Let's turn on the group with
the original repeat tile. Then simply go to Edit. Down the list, you can
find Define pattern, here you can choose a name. I say Christmas wrapping. Click Okay, I have on the top right my
patterns window opened. If you don't have
it, you can go to Window and Patterns
and activate it here. Now let's create a new
file with our measurements of centimeters and
70 to 100, 300 DPI. And the color mode
should be CMYK. Then create this document
here down the layers. Please click on this
little lock item to unlock the layer, then go to the patterns. Simply click on that, you have to repeat
in your layer. When you double click in this little preview
down in the layers, you can scale your pattern. I stay with 100%. Then
I shift it a bit, till I have it centered, and then click Okay. Now we can go to
File and export it. And export, it's asleep. Please choose PNG. Here the scale is 100%
of the image size. And then click Export. I save it in my cloud and name it Christmas Wrapping Final. And then click Save, And you have it saved, and it is ready to
send to the printer.
11. Final Thoughts: Thank you so much for watching and for letting me inspire you. Please share your project in the gallery and inspire
your fellow artists. If you post your Christmas
pattern on Instagram, feel free to take me
@nicigabrieldesigns . I would be very happy if
you could leave a review on this class so I can make improvements and help you
with further questions. If you like this class, feel free to hit the
follow button by my name or check out my
other procreate classes. That‘s all for now, I hope you have a wonderful Christmas party with your beloved ones and
your well packed gifts. Thanks again and
see your next time.
 Nicole Gabriel, Procreate Artist