Transcripts
1. Welcome to Fusion - Course Overview!: Hello, everyone, and welcome to the introductory video for my defence. The result. Fusion effects course Fusion page allows you to create a wide variety of custom effects by using the fusion Note Editor in this course will start with a detailed explanation of how building effects with notes works and then move into many examples of the effects that you can create. Look forward to learning how to make custom titles from scratch, looking with mass protocol effects and more. This course is particularly targeted towards students who already have basic video editing skills but haven't yet used the fusion page from making video effects. And this guide will have a pinpoint focus on the fusion page so the other parts of DaVinci resolve for mostly skipping over for the sake of time. So if you're looking forward to making some fun effects for your videos on the fusion page , then I hope that you'll continue watching the course for a fusion editing and DaVinci result. Thanks for watching this video preview, and I'll see you all in the course lessons
2. What is Fusion Explained!: Hello, everybody, Christer. And in this video, I want to give you guys a introduction to the fusion page off DaVinci Resolve Port beginners. So before we move over to the fusion page, I want to explain what you do on it first. So generally the fusion pages used when you want to create effects on your clips or independence of the eclipse. That can include things like titles, blur effects, particle effects or three D related activities, such as importing a three D model, rendering that inside of the fusion editor and then rendering that out to a two D image so they can use the inside of your final video. So generally there's going to be too common setups you use before you go. Move into the fusion page and you start using notes to edit your effects. One option is that you have a video clip in your timeline, and you want to apply an effect to it that does not already exist. Inside of the effects library top left and then scrolling through the tool box, you can see some of the default facts so out of the box and DaVinci resolve you have many video transitions and three D titles, which you can use just by dragging and dropping onto your clips or onto your timeline. But with the fusion page, you're able to create similar effects with pretty much unlimited customization or two weapons stuff that doesn't really exist out of the box and results. So when you want to create an effect for a timeline clip, you would first do the basic editing of your timeline clip. And then you can select that and move over to the fusion page, where this will be your media endpoint, and you do stuff to it on Fusion Page to get that clip with the edited effects and push that to your out. Put the second option when you want to start completely from scratch is to use a fusion composition. So in the effects library you confined under effects, there is fusion composition here. So whenever you want to put effusion composition, which could really just be thought of as any three D or special effect, you can drag this on T you timeline as a completely blank video clip. So if I push this onto video track one in front of this first clip, and reposition the time linker. So you'll see it's just a peer black output. So when you want to start from scratch, use diffusion composition. But if you want to edit and nobody existing clip, it can be easier to just put the clip in the timeline, cut it to the parts you want to keep in your final product and then edit that instead of starting from scratch.
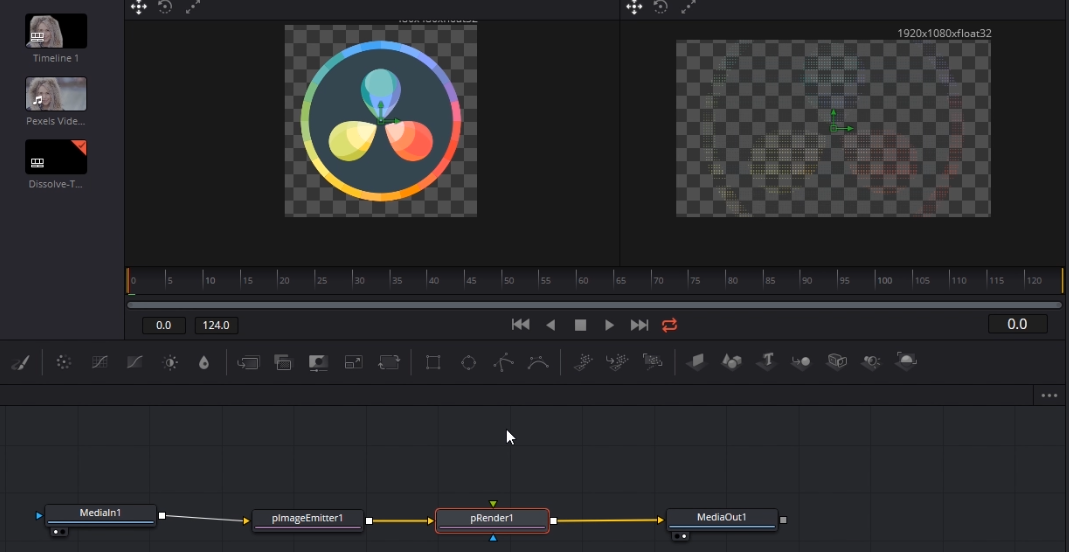
3. Nodes & Connectors: So when you have a clip for fusion composition selected, you can go over to the fusion page, which is on the middle at the bottom. If you have over, it'll say fusion. And when we get to this page, you'll probably notice a few distinct section, notably at the bottom of this section called notes. This is where you'll set up the bulk of your effects inside of fusion, and the idea of these notes is that they will have inputs and outputs connecting with each other and order to create. You're more complicated special effect. So you can see here that by default with a basic video clip, you have a media in which in this case, is the clip that you put on your timeline and it's connected with this out. Put pen to the end, put pen for media out. So basically, we're taking the import clip, and we're pushing that Ford to media out so that it can be rendered in the final product. If you looked at any regular clip inside of defense yourself, this is what you would see by default. So the idea is that in order to add an effect, we would have to add extra notes that go somewhere between media and and media out. So a lot of you commonly used notes they're gonna be located and the toolbar right above where it says notes. So you can see things here like bringing in a background image, adding a text plus element basically a basic title that you can add it. The settings on in the inspector over on the right side, things like a color corrector note, giving you another place to modify the color in your video. Other than the color page, which is over to the right of the fusion attempt, notes like Blur, which could be used to blow out the entire image. Or a section of the video transform nodes, which can be used to adjust the positioning or the rotation of any import notes that feed into it. So, for instance, if you selected media in here and then click down transform, that would add a transformed note between media and and media out, and then you'd be able to adjust the import media, end the video clip in certain ways, such as changing thebe positioning or the rotation off that clip. So I could take the center X of the transform, move that over to the right, and then that's actually going to adjust the positioning of the video clip So you can see in this right preview area. It says, Media out one up here. So that is basically what you would be seeing at the step of media out the final part off the note page. And you know that that note is being selected for the preview window because there's a little section right below the media out node. You'll see two dots here for the two preview windows left view in right view. So if you want to see how the clip would look at any point during your node set up, then you can put that up on a preview window so I can take media in and left. Click on left few to see how it would look at the stage of media and so before actually add any effects to the media. And this is how it looks. And somewhere in between media and in media out, we get that transform effect where we're basically just shifting the position over to the right. Now, generally couldn't do something that point. Mr Simple both really can see how these nodes or what makes the adjustment to your video clip and then are able to give you that edited result.
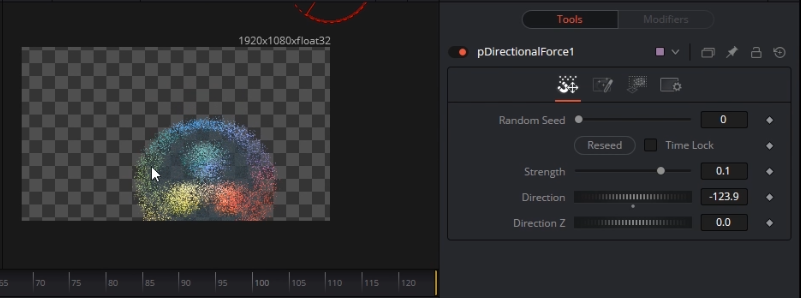
4. Masking a Blur Multiple Inputs & Outputs: Okay, So another thing I want to point out is that the effects here don't have to be completely linear, and that can be multiple inputs and outputs for many of the notes. So if you look at the Blur note here. So if you look at the blur effect here, you also notice that there is a blue pin on the topside and if we ever over it says Effect mask. So a mask is where you define part of your image or a video clip where you want, in effect to take place or the opposite. You can invert it, and you can define which part of the image do you want to not apply at the effect to in Generally for mask, you'll use a shape. No, no, I'm not talking about the Shape three D note over here. That's something different when you actually doing three D effects, which we'll get to in a second. But if you want to add a two D shape than you can right click, go to add tool. Go down to mask and you can choose something like ellipse. If you want a circle or an oval shape or a rectangle if you want a square or just any rectangle in general. And by the way, this is also how you would get Teoh all of the notes that you don't actually see on the tool bar up there. You can see if you go through this a little bit that there's actually quite a lot of notes , so you can get really in depth with the fusion page if you want to. So let's go ahead and add in a lips mask. Actually, let's make it a rectangle mask, and you can see when we have this rectangle note added here and selected that there is the guest most for this mask. Second, see the boundaries at which this mask would apply if we connect it to the Effect mask of the Blur. So basically defined the regions of where you want the blur to take place or not to take place. So let's stretch these edges here, and when we do that, you'll notice that the values and the inspector change, so you could also edit the values and the inspector as well if you want to. Generally, the gizmos make it a little bit more visual, so I had said That's the preferred way to go. So now we can take the output of this mask and connect it to the effect mask pen of the blur note. And ah, well, we can't see it right now because what frame? Zero. But if we go into the timeline where the Blur actually is there such as anything past frame 40 then you can see that the mask is now applying. The blur only takes place inside of that mask. Now, as I mentioned before, you can invert that basically make it so that the inside of the rectangle is where it won't apply So we can check this invert setting on the inspector. And then the only thing that gets blurred is everything on the outside. We could also add a little bit of a soft edge to the mask itself so that the boundary between the blur and the number area isn't so sharp. Like a picture frame. We can make it a little bit softer by adding in the soft edge. And when we do that, it becomes a lot less obvious where the boundaries of that blur actually is, Um, and if you ever need to. You can always go back to the rectangle and adjust the boundaries for that blur mask. So something I want to point out with the node section here is that you can make them quite complicated and you can actually merge different effects together on the same fusion composition or video clip. So, for instance, I could create a three D text effect, and I'm just gonna go through this really quickly here by clicking on text. Three D. So you get a text three D note not seen on screen right now, and when you're dealing with anything three D and defense, she resolves Fusion page. You'll eventually need to vendor that out to a two D image before you can actually feed it to media out, because everything that's in media out requires it to be too t. So we'll need a vendor. A three D note connected to that text. Three D note. And then when we have this text rendering, we can actually combine that with the basic clip here. So these will basically be two separate entities. The base clip with the Blur and a three D tax that's been rendered to two D and Weaken. Merge those together with Emerge. Note. So if I right click, go to add tool do composite and then merge, you'll get this merge note. So now if you hover over the pins here, you'll see that for Emerge. Note. The orange one is the background, which is generally going to be your based video clip, and you can see that the green connector is the foreground, which is what's gonna go in front of your video clips. So if we have a title, we want the title to be the foreground. So I'm gonna click on this media out nodes connector between Blur and cut that for a second we're going to take the blurred media clip output and make that the background and then we're gonna take the rendered three D taxed, which we haven't created anything of yet, Really? And we're gonna connect that to the foreground, the green pin. So now we have two nodes merged together inside of one. If I previewed this on the right screen, you'll see that all of the notes up to this point we'll show on screen. So if we actually type something into the text, three denotes selecting that and say Tutorial here now we have all of the notes, merge together under one, and you can actually see both the rendered three D text effect and the blurred video clip. So now we just need to take this merged note and connect it to media out. And then that's how we can get our final results. So if you take a look at this, you can see it's not completely linear, although we start with the media and the media end can go to a blur effect. But this blur might not also apply to the Tax three D that we set up up here.
5. Grouping Nodes & Splitting Effects into Fusion Compositions: So the fact that you can have you knowed set up like this makes it both very powerful and also increases the possibility of making it extremely complicated. So one of the things you can dio, if you know set up, becomes a sprawling web of nodes and is confusing to look at is you can actually group your notes so we can take this three D stuff up here and we can right click it and then go to group in order to make it its own thing. Where if we have a need to edit the three D stuff, we know where to go for it, cause it's all located inside of this group. We gonna have to to rename it with its selected and then call it text effect. And any time we want to dive into that group of notes, we just double click on it and it will open it up here. So while it's not open, it's easier to understand. All we need to know is what it's supposed to do. But if we ever need to go back in at it, the details we have it grouped in it's own separate area and In that sense, you can kind of encapsulate the different areas that you're working on so that you don't confuse yourself too much. Likewise, we could take this stuff over here, right Click it, Go to Group and Control G with all your stuff. Selected is a shortcut which could do the same thing, and we could say edited video clip here. And so now we can kind of double click on them anytime we want to work on them independently and do the changes we need to. And if you have a group open nobody. You can just click on the X in the top left to close it up again, and this will make it look a little bit Niedere for you know it's grouping now when you only have two or three notes in each group, it's not that useful. But if you have, let's say 20 or 30. Hopefully, you can see how that would be a bigger deal. Now I do want to go touch on the fusion composition effect that we dragged into the timeline, so I'm actually going to just cut away this text effect entirely, and we'll make that a separate fusion composition. So if you want to take your facts and make them independent of each other, using fusion composition notes would be one way you can do that, where you have effects layered on top of each other, using the fusion composition notes, and each one does a certain thing rather than combining all your notes on the same fusion page. So if we go back over to the edit tab, we can take this fusion composition. And if we wanted that to be a title for our video clip, then we can just drag that over it in the timeline, control the duration to how long it should be. So what? We could just make it the length of the clip under it. Then we can click on it and go into the fusion page once again. So back on the fusion page for the fusion composition, let's go ahead and add another title sequence into our video. So we have two different ways of adding a title. So we have text three D, and we have text plus, so if you want a text element to basically be a true three D object and able to be modified by something like a spotlight inside of a three d scene where you can have lighting and materials and all of that stuff. Then you probably want a text three D element. But if you don't really need that stuff, you can still do three D vocations. But, um, not really have it be in a three D sing. Then you can go ahead and use text plus elements. So if you're just keeping it simple, text plus is probably the way to go over here. So by clicking on the text plus node, we add that into our node composition, and we can click on left view in order to have that pop open on the top left preview window So you can see here by default. We have just a transparent background. The resolution is the same as in our video timeline, and we can start typing in text. So reporting here, fusion for beginners and obviously we can change any of the properties for that tax. There's an awful lot to go through here, and by the way, this would be the same as dropping in a tax plus title directly onto the timeline. In the ad it page by default. The difference here is that with this text post note, you can connect that into other nodes infusion in order to create more complicated effects so we can go ahead and increase the size of this fusion title by dragging on the properties in the inspector. So I'll increase the size here. What you'll notice if you look at the preview window and let's zoom in a bit here with control. Middle mouse wheel All right, just against my size doesn't really change. But if you look closely, there is a green dotted line around the center of the text, and there is up and right arrows at the center point. So if you want to drag the position, you can do that using these gizmos, So click on the arrow and drag that left and right. Or click on the up arrow and drag that up and down. If you click on the dotted circle, that will allow you to rotate it. And this gives most basically control the same properties you would see over on the layout tab of the inspector. So if you click on Leo, you can see the Center X, which is controlled by the up, down left right adjustments. And if you click on rotation of the rotation that this circle gives most is doing is the Z rotation. But just like a three D text, you can also do Why an ex rotation? So you can kind of get that three d look here as well. So for this tutorial, we're not really going to go much further than this because this is a text plus element Weaken directly connected to media out. And we don't actually need a three D fusion vendor to take it from three D into tooty. Feel free to add in some basic animation, such as going to frame 30 or so and keep framing at the center point, going to frame zero and changing it's starting location. So if you wanted it to be, let's say, top to bottom. You can control the position, making it appear off screen by default. And then over those 30 frames, your title can slide into position just as one simple example. And now, if we go over to the edit page, we'll be able to see that the two clips layered on top of each other can create your final video effects. So even though we did two different things inside off the fusion page, we separated them, which can be a good idea at times, and now they can kind of play together. So over those 40 frames or so, we both have the title slide into position, and we also have the blur for the edges of the video clip start to fade in. And by the way, if you run into this common issue of the tax not being very clear against background, you could add drop shadow into it. So let's do that really quick for phone back on the fusion page for the fusion composition , click on the text, go over to the fourth tab Over here. It's called Shading, and I think the default is number three here for Black Shadow, so we can just enable that, and it will create a decent black drop shadow for the text. Every go back over to the edit page will be able to see that that makes your tax appear a little bit cleaner. One last thing to point out, you can actually shift between your timeline clips on the fusion page by clicking on the clips dialogue up here on the top left hand corner so you can go between video track one and video trek to while you're editing them in diffusion page.
6. Blur through Nodes Basic Example: so I could change this transform node by hitting control X on it. And I could also port a blur node between media and in media out by clicking on blur on the hot bar. You know that when you have a note selected in your timeline and you click on one of the toolbar shortcuts, it's going Teoh ad and automatically connect the note right after the one you currently have selected. So you can see here. It already did the connections between Media and Blur and then blur to media out. But if I didn't have that selected and I just clicked cooler, then it would be its own independent note. So at some point, you probably need to manually do the connections between your notes for one reason or another. If you want to break a note connection, then go to the right side of that and then double click on the line, and then that should break the connection. And if you want to connect one note to another note, then take Let's say, the output of media one. This pain here drag that into the import, which is always going to be the Orange Pen And then that makes a connection. The out port feeds into the import for blur, and then the blur takes over and applies and effect or whatever is the input. And so we can take the media out of the Blur, basically, whatever the input was now with the Blur, effect added, and connect that to the media out. So now, with this blur note, let's actually blur the image out a little bit. I'll just take this blur size in the inspector, By the way, if you don't have it open, it's in the top right hand corner. So just click Inspector to make sure it pops open here. But we'll take the blow size and increase it. So the more blur you want, the more you increase the size. And just like on the edit page, you can actually animate pretty much all of these properties by clicking on these key frame diamonds over on the right side. So if I go to frame 40 here and I check the key frame diamond, then that would mean at that point frame 40 of this video clip. It's gonna have a blur size of 33.9 and Obviously that looks quite blurry. But if we go to frame zero and we change the blur size 20 it's going to key frame that as well. And now it's gonna animate between the blur size of cereal, which I just said it to to the 33.9 at the second key frame. And you can click on the left and right arrows to see how it transforms between those two key frames. So keep framing works just like it does on the edit tab, which is very important for refuge in if you want to create animated effects.
7. Exporting Titles as Macro or Settings File: So once you've made some changes to a fusion title or created one for yourself, you may want to export it. So there's really two ways you can go about doing it. One way is to create a macro, and a macro allows you to customize which settings they're going to be edible. And you can take that macro settings file and give it to someone who can insult in there. Peter. So they can. Just Dragon dropped the new Fusion title into the timeline in the same way that we did before. So if you start to the right title supporter, they will show up here in the list. The second way is to export a node group as a settings file. As far as I've been able to figure out with stunning files, you can't actually expose settings over here. So it's settings files. They weren't pretty much load in the node group, and everything would be edible what you may prefer. But I haven't been able to find a way yet when you can manually expose the nodes to appear here as controls where you can edit and the edit mode, inspector. So anyway, if you want to create a macro where you can actually push some of these controls to be edible in the inspector. But then the person using the mackerel won't be able to add it These notes directly. You can do that by selecting all of your notes, right, Clicking, going to macro, create macro and then you'll get this box for the macro editor way. You give it a name so you could call it like custom title one or something like that. And then you simply expand the different notes that you see down here below. So, for instance, you can go to the background effect, and then you check any box for export where you want that setting to be edible and the future. So, for instance, you could come down here and check everything color if you want to make sure that the background color should be edible and all the settings inside of that part of the note So you just repeat that for all the settings, you want to allow someone in the future to be able to add it. And once you've done that, you hit close. You hit yes. To save changes to macro tool and then you can save that on your computer so it will give you this default folder in your APP data. But if you want to export, this is a title that will show up in the effects library that you're actually going to want to save the settings, file into the DaVinci Resolve install folder, go into fusion templates at it and then titles, and you see all of the titles that are installed to DaVinci resolve here so we can select the path here copier and in the safe box. I'm going to pay Staten. So we just need to give it the name here for the macro. So custom title one dot setting. So if we would have hit save there, you may run into this issue of not having administrative permission. So you might need to restart bench yourself ran as an administrator. Or you could say this to the desktop and move it later on. Anyway, once you're able to move it into that folder, the new new macro titles should show up in the edit mode effects library. So if we go over here, I already did that in advance. So, for instance, I can take this test title, drag it into the timeline. So if I click on it, we can see the in the inspector that the fusion macro settings are actually enabled here so we can customize the type of color, the color, the red green, blue values and the Alfa. So obviously, if you want to allow people to customize things like the top text of the bottom text, then you'll need to expose those settings and the macro, and that can be a little bit of a pain. So the other option is to export it as a settings file directly rather than a macro. So if we click on the horizontal line reveal title that we were working with, go back to the Fusion tab and then we select all of the notes, we can export it at a standard settings file by right clicking, going Teoh settings save as. And then you would just save that somewhere on the computer so you could call this title horizontal line, reveal modified and then, just like before. If you want to be able to use it as a title, you put that into the fusion templates at it. Titles folder and save that in here. So likewise, I created the custom setting title in advance as well, so we can drag that onto the timeline. If we click on it, you can see that the same controls that were exposed in the original title still exist there. And if we take this and go over to the fusion tab, you'll be able to see that the notes are exactly how they wore in the original set up. Now, when it was exporting this, I made a mistake, which is that the title horizontal line reveals shouldn't be going to media out. It should actually be the merge, so I'd probably want Teoh re export that setting and override it if it was going to actually use it. But the advantage of doing it this way is that they're nodes will be completely edible, like it wasn't your original project. Now there's also a secondary way to use a settings file, which is to drag it straight into any node editor so you could create a blank fusion composition if you wanted by going over to believe its effects and then fusion composition . Drop that onto the timeline. So a fusion composition is a blank canvas for you to be able to work from. So if we go over to the fusion tab with fusion composition selected, you'll see that only the media out exists here so I can actually drag any settings file in here. Two abs. The notes from the Settings file straight into this fusion composition. You could also drag in a settings file to a already default three D title template. So anything that is a set up inside of the fusion tab you can add any settings file to. That would also work with Mac Rose, except that you can't go into the macro and edit it except for any something that has already been exposed. So I could give it to this extra media out and drag this merge to the media out there, and that would just be another way of using a settings file.
8. Tracker Face Blur Effect: Hello, everybody. Christer. And in this video, I'm gonna be showing you guys how to do a face blur effect using the tracker note on the fusion page of DaVinci results. So we have this clip here where a woman's doing yoga and if we play back the clip in the timeline, you can see that the face moves over time. So let's say hypothetically, we wanted to go ahead and Blair that out. So what we need to do is take the slip and go over to the fusion page. So the first thing we're gonna need to do is get the data for the track position off the face. And we're going to do that with a tracker notes after media. And we're going to want to bite, click on the line and go down to add tool, and then do tracking and tracker. So this should connect media in to track of one doesn't need to feed under media out, but we can leave it there for now. Now, if we look onto one of the preview screens, we should see the tracker pop open as long as we have the tracker selected and the bottom node selection. So what we're gonna do is go to frame zero on the timeline. To use is the starting position for the tracking, and then we need Teoh drag the tracker into position. So in the top left hand corner, they'll be a tiny box, so you can click on that to drag it to where it needs to be and find where it is more or less zoomed in on the person's face. We can also control and Middle mouse wheel in in order to zoom in a little bit more and see exactly what we're targeting here. So to get a little bit more accuracy on this tracking, I will increase the range for the search with and height just in case. And I'll also change the bounds for the target area, so I don't want any of that sky background to be track it all, so we want to make sure that this is focusing on the person's face and pretty much solely that next we can also change adaptive mode from none to best match, so changing it the best match will have the tracker. We acquire the pattern as lighting changes on the face may shift a bit over time. So with those set up, we can go ahead and start tracking. And since we're doing it from frames evil, we want to track in the floor direction. So we just need to track forward from current time. And hopefully what should happen is that the tracker should stay centered on the person's face for the entire duration of the shot. It works really well with this particular clip because the movement is relatively slow and the object we're trying to track is large and nothing gets in its way as well. So it's a really good candidate for this kind of trek. So with all that, we have the tracking data for the person's face. So we need to create a blur now and then applied the tracking data to adjust the position of that color shape. So let's move the timeline back to frame zero so that we can see the clip and then also gonna disconnect tracker to media out. Since that's not going to be the final connector note. Rather, we're going to create a blur note, and then that will feed into media out using media and as the input So let's right click and you add tool, go to blur. And then we could just choose lawyer from the drop down. So let's connect immediate end to blur and then blur to media out. Now, if you take the blur size in the inspector and we increase it beyond one, it's going to blow out the entire clip. So how we blur out specifically the face and not the entire clip is that we apply a shape mask to the blur, and then that will connect. Is this blue connector here so we can do right? Click and add tool. Go down to the mask notes and find the shape you want to use. Generally will use the lips for face since its relative, since it's roughly an oval shape. And then we need to take this ellipse note and connect it to the blur. So when we do that, you can see that everything outside of this ellipse shaped is no longer blurred. So we just need to position and size the ellipse shaped on the person's face now, so I will attract that up there so it is centered on the face and we can shrink the size of this ellipse until it pretty much covers just the person's face. We can just that position and a little bit more if we so choose, could also go to the blur and maybe decreased the blur amount of it. It doesn't need to be that extreme. So the final step is that we need to apply the tracking data to this face shape. As you can see, right now, it doesn't move across time with the person's movement so we can apply that tracker data to a property of the lips and the one we want to target is the center position. So that would be what you control with this, uh, Brad gizmo, the up to bottom in left, right arrows. And so we can just apply the data directly to that property by right clicking on the property, going down to connect to choosing tracker one and then choosing offset position. And if when you do that, you wanted to be more clear, which tracker you're actually using the data from you can go over to the tracker note, select the tracker and then double click on the tracker name in order to rename it so you could call it face. And then when you actually click on the property, Andy, that you right click and let's go ahead and remove it really quick. And then right Click on it and you connect to Tracker one. You'll see the name of the tracker Pop in here. So face offset position would be a little bit clearer of a name than tracker one if you happen to be using multiple trackers in your project. So anyway, once you've applied the tracker data the offset position, then when hit play on the timeline, it should move in line with the tracker data that we got earlier. So when we hit play, you can see the person's face is moving and the lips is also moving along with the face, which is exactly what we want. And that is basically how you can blur out and moving face using trackers inside of DaVinci results. So that's gonna be it for this video. I hope you guys enjoyed this tutorial. I've been Chris. Thanks for watching. And also you guys in my future video content
9. Put Text on a Moving Object with Planar Tracking: Hello, everybody. Christer. And in this video, I'm going to be showing you guys how you convert text on the side of her building even in moving shot, using a combination of three D text tools and the planner tracker note. So, in order to use these fancy three D effects, we should go over to the fusion tab. Make sure that you already have a clip dropped onto the timeline that you want to add it from. So on the fusion tab you're going to see two notes by default for your clip media and and media out. So media end is going to be the base clip that you are trying to add it and the media out is the final output. So in between there, we need to add in ah bunch of notes in order to generate the effect of having three D taxed track on the side of the building. So the first thing we're going to need to do is to use a plan, our tracker, in order to find what position the building is at any given frame during the script. So if I right click on the line between media and and media out. And then I go to add tool tracking and playing our tracker. It will add in a planet tracker between media in and media out at the very minimum, you need media in defeat into Pineau tracker to uses the data, since the trekker needs to be able to see the building in a sense, in order to track across the screen next, we need to zoom in, find whatever building you want. Like your your shop might just have the side of one building, or it might be a city view like this. So I'm going to use this midsized skyscraper over here and while having the planner tractor notes selected in media out. We have access to these pen tools in order to create this shape that we are trying to track . So the shape is obviously going to be the HVAC tango are roughly of this building, so I'm going to select the area I'm gonna put the text on. So that's gonna be this blue box here, So I'm gonna left click to set one point. You notice that there are busier, curved handles if you need to make these points curve, but because this is a rectangle shape. I'm not gonna bother with that. So I'm gonna left click to kind of set the edge of the blue over here. I'm going to go down here said another point. Go to the left, set one more point. And then up here, I'm going to close the loop by clicking on the first survey, a play you be able to see in this shot that, for the most part, is a very simple movement, just the drone going down in the sky. So the main thing we want to track here is just the translation of the building. As it moves in a justice position, you can adjust the motion type if you need to track more than that. But the more complicated your motion type is, um, can I would say, the more Arab prone it is. So if you do a simple translation, you're more likely to get consistently good results the first time. If you need rotation or scale of things like that, you can bump up the motion type, but you may have to, um, but you may have to play around with it a little bit more in order to get good looking final results. So for now, I'm going to change the motion Type two. Translation. Since this is a really simple movement, the next if you are referencing, I created this box for the tracker on Frame zero. If you created it on a different frame, then you should go to that frame and set the reference time to that frame. It's but it's already set two frames every by default. So I really need to do at this point is go to the reference times of a frame and track to the end, so that's gonna be creating a key frame for every frame here, and hopefully this box should be able to stay relatively centered on this building. So let's go ahead and hit track to end, and you can see the using computer magic. It's able to stay on top of that box, so this is going to create the data we need to feed into the three D text note. Teoh, adjust its position across time if you notice that anything weird happens at the end or the start of your tracking, and that could happen for reasons like it already fading to black four phases. Someone jump cut what you can do if the ending frames that kind of bad is, you can use the trim to end tool to remove some of the bad data. So if you do that, ah, it will remove the key frames that come after this point. Which means after hitting frame 3 19 here, it's just going to stay in that position for the last eight frames. That might be preferable if you notice that there's some random jump. Another case where that happens is if the object actually leaves the screen. You might want to trim the end key firms there, but overall, this is looking pretty good. If I play it back one more time, it stays on top of things. So the next thing we need to do is create a plane or transform. You could do that with one button click. You just need to hit, create plan or transforming the inspector, And then this is going to actually be the data that we use in conjunction with the three D Tex note. So we need to create a three D text here, but so I can click that on the shortcut bar and anything that is a three D generated effect needs to be connected to a three d vendor so it can be rendered out to the Tuti. That video actually is with the Render three D. No. Now we want to connect that to the plane or transform the planet, transform war just that rendered result. And then we need to combine this with the original media clip. So I'm gonna right click add Tool Composite merge. And this is important. We need to connect either the media and or the planet tracker to the merge. The planet tracker isn't actually needed once you have got the plane or transform notes. So I just disconnected there. And the media and note importantly, needs to be the 1st 1 to connected Emerge Note. Um, what whichever is the orange one is going to be the for this in the back layer. So the text needs to layer on top of the video because we wanted to show in front of the video. So this should be the green connector here. And then with these two connected and the merge, we need to feed that final media out. That's how a note set up. So the next thing we need to do is edit the three D text. So I'm going to open that up as the left preview window up here and ah, let's go ahead and write some depot Texan are caught. Hello, here. So the next thing we're going to want to do is to roughly center this text on the plane or tracker area. So we've gotta move this text over there and we can do that in the three d tax preview window by using this transformed gizmo. So I'm goingto bring that over there and I will move it up as well. Okay, so obviously the text is too big right now, but I want to make sure that the tracking is actually working. So let's go ahead and hit play to make sure that the text is roughly moving with the building as well, which it should because the pineau transform notice adjusting it. Okay. And it seems to be because although the buildings and moving up the l, there is still kind of being aligned with the bomb of that building, so that seems to be a good sign. Their next we can go ahead and lowered the size. So I'll go over to the layout tab here and we'll take the size and scale it way down to something like 0.1. I suppose maybe 0.1 Fife and then is just the transform a little bit more in the three D preview window. Okay, and let's hit play and see if it's still good. Okay, that's good. It's still staying centered. And that section of the building you notice it's not dropping down or it's not raising up because it's moving in the same passion that the building is. So that's exactly what we're looking for next. If we want, we can make these text characters vertical. That might make more sense on a vertical building like this. So I'm gonna take the direction and make it top down and just the transform one more time. So if we want to make the text appeared top down instead of left to fight, we could change the direction and make that top down here. I also found it works pretty well if you just manually do it with the text so we can create new lines for the text characters here by typing it like this and then moving it down here , whichever you prefer. So if we want to make the text vertical now for a vertical building, you can do it by changing the direction from automatic to top down and with the text will need to be center it on the building. Of course. Okay, so when the text is made vertical like this, you may still want to lower the size down a little bit. Note that if you go to crazily far, you might get some clippings to just be a little careful about that. So size Ah ah! 0.11. They work here, and I can move it up here with the building. If you make your text too small, though, it does give you a little bit of clipping. So it seems like the limit is about 0.8 there. So not sure if there's a way to work around that. So if you are trying to make really, really tiny text on your video, you may want to limit it to a few characters. If you made it so small anyway, it would be impossible to see it again. with. So I'm gonna bump that up a little bit more. And maybe we limited to a few characters so we could say e l l maybe like the company name . And then increase the size back up a bit, reposition it and, uh, bump the size up a little more. So it's still actually, she was there. Okay, so at this point, we're pretty much done so we can zoom back out, play it and make sure that the text characters air tracking across time so we can go back to frame zero, play it back and make sure that the text is staying on the building like it should. And it seems to be tracking pretty well. So at a very basic level, that'll do you notice at the end that the text won't fade with the original video clips. So if you want it to fade out there, you have to make an adjustment in the notes in order to lower the text capacity to lower with that so we can play it back one more time and make sure that the text is staying up there on the building like it's supposed to. And at a very basic level that seems to be working. So, for instance, if you wanted to use Asian characters rather than English, you could either change the font or installer language pack on your computer. So this isn't actually typing in Japanese. I mean those maybe Japanese characters. But really, this is just a dingbat sponte, so it is completely meaningless. Alternatively, you could add in a language back to your computer and just type in a different language from the beginning. So if we want this year, we can take it, scale it down. We could see that this font doesn't have the same clipping as the other one did, which is good. Now, what I was finding with this particular fund was that a better way of controlling the direction that we've been using top down was actually to make this automatic and then use enter to create lines for each character in the text. And then we can increase the line spacing to get them to be as far spread apart as we need them to be recent to them on the building and maybe lowered the size down of it as well. Okay, that looks pretty good. there. And now we've changed the characters there. Maybe if we want three different characters, we can just take the text there and take it. E l o looks a bit cooler. So finally, to make the text stand out, you may want to add in some lighting effects, so one you can add in is light race. So you can do that using notes as well. So I'm going to right click. Actually, I'll have the plane or transform selected right click on the line, and then I'll add tool and go to effect and race. And because we had it selected like that, it pops right in there between transform and merge. You can see that light rays are admitting from the text on the side of the building so it can you looks like someone actually put lights up there. And with this weekend, control the direction we want these light rays to go. So they will be this transform adjuster. We can move this to control the position with the light rays are coming from. Maybe you kind of sent to them on the building. So now we can go ahead and hit, play and see the video playback with the lighting effect on their note that we don't really need to adjust the position of the race, transform the center point for the light because as the light sources change their position , the rays will be generated based on the position relative to this source point. That creates a pretty fun effect for us. We can ramp it up if we want, so if we want more weight, we can do that. Control the decay. But if you want it to be more concise, less short, like Shorter Raise, and we could ramp up the exposure if we want the effects to be way overkill. But I think would be better to make it a little bit more normal. So we just leave that as an exposure of one point out. So in a nutshell, that's how we can take an object in a moving shot, add text to it and make sure that that text tracks the object across time. So it actually looks a lot more like the text is actually Gretchen on that object. So I've been Chris, thanks for watching and also you guys in my future DaVinci Resolve 16 Content
10. Manually Track a Shot with Transform: Hello, everybody. Chris here and in this video, I want to show you guys how you can do some manual panning inside of Divinci results 16. So there are gonna be cases where using a tracker note on the fusion page won't actually necessarily get you great results because the object you're trying to track is either too small goes off camera or something moves in the shot to block it. As a result, if the motion you wanted to create in the camera was something a simple as panning the shot from left to right and top to bottom in order to follow, say, chicken set, then it may actually be easier to do that using a transformed note, which you can set up on the fusion page as well. Okay, So safe with the shot. We wanted to zoom in on the chickens face and to have the shot followed the chicken's head , keeping it relatively centered wherever it goes during this video clip. So we can go over to the fusion page with the clip in the timeline and add in a transformed note in order to make that happen. So I'm going to move the spine out of the way because we don't need it. And then I'm going to select media in right click on the connector line, go to your ad tool, and then do you transform and transform? So with this transform note, we can adjust the panning of the shot using a key framed center X, and in this case, we need to increase. The size is, well, basically zooming in. Since the video clip is over the the same dimensions of the final export, I have remove it without zooming in. First, we would get some blank areas on the site, so we can either use a higher definition shot or zoom in in order to have some buffer room for us to pan around and then go to the frame in this case for me frame zero where you want to set the initial position of the centre X. So first time frame zero, we'll get that chicken said centered on the screen. So I'm gonna increase the center y position in till it pans the shot upwards, and then I'm gonna click on the key frame diamond on the right side. In order to make that the initial key frame point. We can actually bring it down a little bit more. Now that the Cosmo is showing for the key frame, we can get that centered exactly where we want it. Maybe we even want to zoom in on the shot a little bit more, just in case we need the buffer that's know what that key frame we can. It play on the timeline and let's drag this note section down because we're not going to need it and weaken. Also, zoom in on the video itself, and we could actually hit, play and find the next point in time where this transform should re center on the chickens . So let's it play a bit and find that frame where things change. So I'm going Teoh, send it over here. Since the hat is right behind that part of the chicken, I don't keep going forward in the timeline. I guess we could do it frame by frame by hitting left and right on the Iraqis, and that should make it easier to find the points where you should use for key frames. They're going to go down here to the chicken, said one more time. Hit right on the key framing again. And let's get that next point. Increase the size of the shot since we want that bottom to not get cut away and keep going so once again, manually setting it for the position wherever the chicken said is let's go up one more time here, creating another key frame point every time we move. And note that the key framing is automatic assed long as you have the 1st 1 set. So as long as you keep following this process, eventually you'll get keep frames, which will work for all of the movement and side of your video clip. If you have a period of time where there's not much movement, you can go to the last frame of that no movement area and then manually click on the key frame button. So between those two key frames, the transform doesn't move at all. But that will make it so that when you do set the movement, it'll only move from the latest key frame, and that will give you a more accurate results. So let's move it there. So, of course, just kind of repeat this until you get to the end of your clip, however long you want that to be. We can go back to the start and see how it looks right now hitting play on the timeline. And hopefully the movement should be relatively in line with the chicken step. If there's any periods where it's not matching exactly, then you can create additional key frames to make it a little bit more accurate. So, for instance, right here it's a little bit off center. So if I just just the position there and play back one more time with that additional key frame, the movement should be much more accurate. One more tip I want to point out for this is that since we're talking about movement here, the transform key frames currently have no curve. They move in a linear fashion, so the velocity is constant between two points. But real movement doesn't normally look like that. So instead, what we can add to it is an ease curve so that I will start an end slow and look more natural in terms of its movement. So with this clip that we've already gone ahead and keep framed, we can just take all of the key frames and apply the curve to it. To do that, we open up the spine and let's expand this a bit so we can see it. I'm going to taco transform center path, one displacement over here so that we can adjust it and assuming you have all of their points created and what we can do with obvious key frames is to right click and go to ease the drop down menu. And then we can choose and out cubic as the easing, which will make the bulk of the velocity and the centre between two key frames and then towards the edges, where it almost reaches those key frame points. It slows down a bit, so it speeds up in the middle and slows down at the edges. And doing that will make it look a little bit smoother and more nap. So let's go out and play this back now, with the cubic easing added. Now, of course, we can go in and add a couple more key frames and remember to set them all to the same easing, but more or less. We've done a pretty decent manual job of tracking the chickens face across time, so if you want into a situation where the tracker tools don't work. For instance, if some object goes behind another object and the tracker would normally lose sight of that , then you can always get around it by using a manual panning, transform and doing it by hand. So just to point out with this transform adjustment, we can also apply that to any other effects that come after that inside of our node set up . So, for instance, if I was to set up a blur over here, and this blur is already centered on, the chickens had using this ellipse tool. But we feed the transform into that blur. Then it's going to adjust the position of the blur across time as well with the same movements. So if I hit play here, you can see that the blur also follows, the chicken said around as the shot continues. So there's more than one use for the transform. Obviously, if you control it like this, just know that you probably need to do a little bit of trouble shooting, going back and fixing key frames like right here in order to make it just right for your video. clip, but with a little bit of time, you should be able to get a pretty good manual result. So that's pretty much gonna be it for this video on During manual transformed handing inside of defensive itself, I've been Chris, Thanks for watching, and I wish you guys in my future video company.
11. Creating a Custom Fusion Title from Scratch: So let's go ahead and create a completely from scratch title, using a fusion composition as the base. And then we'll add a bunch of nodes to make everything come together and show a couple ways . You can customize that after you have that created when we want to create a completely custom title from scratch. We could use a fusion composition, which is just gonna have a media out and then start building notes into that for creating the title. But instead, for I'm going to Dio is we're going to take our original based clip and then go over to the Fusion tab with the base clip here. If we start making changes and merge everything together, then we're going to have the media in here as a background note by default. So what we can do is build the title inside of this fusion tab and then later export everything except for the media and as a Settings file, which can be pulled into anyone's DaVinci resolve editor about having the media and to work with on this tap so we can see it. Basically previewing it before we go back to the at a tab is going to help our workflow a little bit. So when we're ready to get started on making our custom title, we can either add in a text plus element or a three D text. So three D text is going to have to be rendered. So it's gonna need a three D render before you merge it with other nodes, such as the media end. Before you beat into the media out text Plus is going to have more or less the same settings, except I don't think it can actually be a three D object. But the advantage? Maybe that a text plus element would render faster, not needing to exist in three D space before being rendered out to a two d so you can select whichever one you want. We'll go ahead and do some three D text here. We'll also include three D shapes later on to make things a little interesting. So with this text three D element, I'm going to add a merged three D note. Note that I have the A text three D selected, so click on merge and then it will automatically link the two notes and then we can add a three D render after the merge to convert everything that comes before into a two D image. And with that, we can right click into you, add Tool and then go to composite and merge to create Emerge Note for the media in and the three D render. So I'm going to take the media in and put it to the merge node as the background that is the yellow connection here and then anything we want to show on top of that, like the three D text title will go as the foreground, which is the green connector. So once we have all of this merge together, we feed it to the media out and then that would generate the final image of this video clip . So next I'm gonna add some tax toothy three D text note. So if we go in here and we say title, then you should see something appear on the screen. You can also preview the three D text note by clicking on the circle boxes that warp here. Be low. Any note? So if I click on the left circle toggle, then you'll see the title appear in three D space here. So now this left preview window is previewing specifically the text three D note and the right preview window is reviewing media out, which is the final result. So you have to preview windows at once, which allows you to see how things look at different stages along this node process. So I might decide that this title is too big, so I can lower the size down to something a little bit more manageable, like 0.5 and leave it alone. So next we might decide that we want an additional tax three d for a subtitle. So I think if we have the merge three denotes selected and we click on text Me D, it'll automatically link the new text led to the mooch note. So now we have two titles feeding into one bird three D note, which goes to the vendor which goes to the final two D merge and the media out. So what? This I can say some title, which is clearly way too big, and we'll need to decrease the size using the controls and the inspector, so lowering it down to something like in 7.33 years, 0.36 is gonna be just fine. You may want to adjust the position of these titles, and we could see both of them at once if we showed the Merge three D as the preview. So I'll add that to the left view. And now we can see both of the titles in three D space there so you can left click on either of the titles to select them. Note that when you do, the node selection will reflect that, so you could also select it in the notes first as well. Let's take the subtitle and lower that down by clicking on the position Gives Mill and I'll take the top title and I'll increase the position of that by clicking on the green y position. Get smell. So now we can just kind of position that where it makes sense for our video clip. So next we could add in a three D shape to be rendered as part of this title sequence. So if I click on Merge three D and I click on shaped three D, that will create a new shape that we can use now. Ah, plane is going to be pretty terrible. So I might want to change that to something more like a tourist, which is actually a doughnut shape. If you zoom out and emerge three D, you can kind of see that, Um, it's a very thick Dona at this point in time, so I might want to rotate that so that the middle whole part is actually facing the camera . If I go over to the transform settings of the Shape three d Convert ate the tourists and I think we want the X axis year making that something like 90 degrees there and over on the controls tab. We can make it a lot smaller. So if we take their radius and shrink that it will make it a smaller force, and then we can drop this section value to make it look a lot more like a hollowed out circle. So if you said that to something like 0.39 now he gets something that resembles a circle shape for our title, and then next we can go over to the material tab if we want to set a color for the shape so we could make it anything we want something like a darker color, like a deep blue or deep red, would help keep the focus on the title and the subtitle itself so we could leave that there . So one fund effect we could use on the title and subtitle for it to appear onto the screen would be right on and write off. So if you have one of these three D text titles selected, you'll notice that there's a setting in the first tab for right on and you can key frame it . So will happen is if I pull the end of the right on backwards. General start making letters disappear in the ratio off the surface at 0.2. That means that the other 80% of that title, beyond the end point for this right is going to hide so you can animate this setting over time. In order to make the letters appear so below the preview windows, you can see the timeline for the clip that we are working on, which could also be a fusion composition, and we can go to a frame where we want to keep from. If I select in the timeline 50 frames, you'll see that appear year and we can check the key frame diamond for my on in order to have it be fully faded and for the right on effect at that point in time. And then we go back to frame zero and we decreased the right on at the end. Value to zero and not between those two frames. The right on effect is going to be appearing. So if I go to frame zero now and hit the play button for the fusion title, the text characters will appear soon after Goethe frame zero and hit the play button. Those text characters will appear over 50 francs. Now that might be too fast for you might be too slow as long as you later export this custom title as a settings file or you exported as a macro where that right on values would be able to be customized. Then other people will be able to change it so that they can get the values they want for their project in the future. So as long as we get the base how we like it, that should be good enough for right now. Now we might also want to do that with the top title. So, for instance, I can type in frame 50 here in the frame counter. And so this time maybe we take the top and we have it right on in the reverse direction. So at 50 frames, I'm going to keep frame it. And then at the beginning, instead of moving the end to the start, I'm gonna move the start to the end, which will automatically curate a key frame there. So when we hit play, it seems like the right on effect for the top is going a little bit slower. And I think that's just based on how it the right on effect determines at what point a ladder should appear or when it shut it. We may need to play around with those settings a little bit if we want to make them appear at the screen at the same time. One easy fix we could do would just be to move the key frames of the bottom so that it appears a little bit later so we could take the key frame value at Frame 50 and move that to frame 60. So I'll go here frame 60 key frame. I'll hit the back button to jump to frame 50 and one key, frame it and then also move the zero key frame of 00 right on values to frame 10. And I'll make that zero there as well. I had the back button and remove it at frame zero. So now the key frames are 10 and 60. You can see the little indicator below the preview window for where as setting his key friend. And now, if we have play, it should match up a little bit closer, so that's pretty close. We could just take a second and make it go five frames more, so why not and remove the old key frames and then hit play one more time? So with that, it seems to be a little bit more synchronized. We could always spend a little more time on that if we want. I think what I also do here is the lower this subtitle a little bit so that the title and the subtitle arm or equally distanced from the center of the screen there next, we could take the tour shape and have it rotate over time. I'm going to assume that when you pull end this template, you always want the tours to be rotating. So I'm actually going to just set the key frames at zero and something like 300. So that depending if someone stretches the title to be 150 frames that 300 it's still going to animate over that time. And I'm just going tohave the tourists having rotations. So on the Transform tab at Frame zero for the tourists we can keep framed the Z rotation, which is going to be the rotation facing the camera and then at 300 weaken go put a value for that see rotation. So this could be increments of 360 degrees if we want it to be, ah, full span or multiple false pens, so I might do something like 720. We could also take that 7 20 do times to right inside of the import box, with the rotation to double it to 14 40 degrees, which means four rotations over 300 frames. So you can do math in these input boxes, which is kind of nice. So now if we go back to the start here and we hit play. The Tour should animate a little bit over time. Now it's kind of junky. They're probably cause the tours doesn't really have as many segments as we would like. Or maybe we actually want to decrease the amount of segments Soviet stop. We can go over to the control section and set the number of divisions, so I might drop that to something like eight if I want to make the rotation a little more obvious. So now, if we play it back again from frame zero, it's got a little bit more of a interesting shape. So now if we go to frame zero and we let it play back, we're going to have that rotation occur over the 300 frames. And it's a lot more obvious when it looks less like a circle and more like Octagon. Note that when it does get to frame 300 it's going to stop by default there so we can have almost any property animate during this title. So if I want the shape to start out faded out, I could go to frame zero and set the outfit 20 to make it completely transparent. What should be invisible and then go to something like frame 15 or so and then set the Alfred to one, which means over those 15 frames were going to go from completely transparent to visible Soviet play. Here, we'll see it fading in the reason why you can still see it there, even though the diffuse color accepted zero there is that there's also the speculum color so we can take almost any property that exists within these notes and animated for our title. So, for instance, if we want this octagon to appear invisible at the start, then we want to set the opacity at frame zero to something like zero so key, frame it and then dragged the opacity of zero and then just type in the frame over here and the frame selector where you want the opacity of be faded in So I could make that one point opacity now, which will be fully visible. And now we go to frame zero and hit play. And now the octagon is gonna fade in during those 1st 15 frames. Okay, so another good thing to know about individual yourself for any of these three D objects you can actually turn on lighting for them. So if you want objects to have to be lit by a light rather than always, being fully visible we can do is you can go to the three D renderers here and then taco lighting and actually shadows as well. If you had something like a plane in three D down below, you could have your three D objects cast a shadow on to those other objects. But for now, we're just gonna enable lighting here, which will turn the colors of everything black because it has no lighting. So in order to bring back the color, we're going to need to add in some lights so you can see a spotlight as the default option on the toolbar. You can also right click, add tool, go to three D and light. And there's three other options. Ambient lights, which are gonna basically light up the entire scene. Directional light, which is kind of like a son where it will push light in a direction, but equally across everything in the entire scene. Point lights, which will have light emitting from a point in three D space and then spotlight, which has a point with the light existent, and then that light is angled towards some area and your three D seen much like a flashlight. So a point light would end up being more like a lamp that just happens to exist in your three D C. So we'll start with ambient light here, and we'll add it to the merge three D. So when we do that, you should see a little bit of color. Come back to all of your three D objects if you want the ambient light to bring back more of it than just increase the intensity, and then that can end up being the base level for the lighting in your scene. So next you could add in something like a spotlight. So let's click on the toolbar option for that and add it to the merge three D. So with all these objects that exist in the merged CD if you're emerged three DS start the preview window. You should be able to see them over here and that Merge three D preview. If you want to rotate around, hold ought down while holding the middle mouse real, and you can drag that to see everything inside of your scene, and that could give you a different perspective on what's actually occurring there. So you can see that the spotlight is at the zero ax zero wiser Z origin, but we actually need it. Teoh aim towards thes objects if we want to light up the front of it, which will be seen in the video. So in order for the spotlight to light up our object, we're going to need Teoh. Move it on the easy access until it can light up everything inside of our seen. So you see it this distance. It's actually lighting up the objects there, and you can see a different type of lighting The speculator lighting on that three D tour. So you have the diffuse color, which is the base color of the object, more less and in the speculative color will show up at the areas where the light rays air hitting it directly. So in this case, the lines here that you're actually seeing is the speculator lighting the white lines there , which are the most outward sticking point of the three D object. Think of a doughnut, so it would be the closest to the spotlight and then those other outer areas, the ones that are kind of blue. That's showing mostly diffused lighting right there. So where one cool, easy effect we could do here is to make the spotlights position animate over, say, the 1st 2030 frames. So I'm gonna hit control C to reset the position to the 000 Initially, I'm going to go to the Transform for the spotlight, and I'm going to keep frame dizzy translation, which is the position. So next I'm going to click on Frame 30 or so and then I'm going Teoh, take the spotlight once again and pull out to the position I wanted to move to at the end, which is going to basically have the light hit all areas of our three D scene, including the outer tourists. You can actually see a red line now for the path that it's going to travel this light. Four. There's 30 frames, and if I go to frame zero and hit play, we can see the spotlight moving its position during those frames for the three d sing. So once again going back to frame zero, it's at positions, reserves room and then over 30 seconds. Then dizzy translation moves to units and the three D space. And it goes from not lighting up this scene at all to lighting up everything. Now, one more thing. You may actually want to change the speculum lighting of the three detours as well, so we can click on the three D shape there, click on Speculate Color and then change that two different value. So whatever color we wanted to show at those areas where the light rays hit it directly, we can customize that so we may want it to be something like a lighter blue. So given that the text three DS are actually through the objects as well, we can take these three D texts and extrude them outwards to make them a three object kind of like a building block. So if you click on one of the text three D elements and you go to the text control on the left, extrusion will be in a option there, and you can take the extrusion depth and increase that which you'll see that the tax now becomes a three D representation of those text carriers. We can also do that for the subtitle as well if we want. So I'm gonna go over to the text tab extrusion, give it an extrusion depth can also see and the final media out that that blocking this is going to show a little bit. It would show a lot more if you actually angle the texts. So if I was to say go to the Transform tab and add some rotation, you would be able to see the three D effect a lot more there. And just like with the three D tourists you can actually set at base color and also a speculum color. So the base color here is gonna be the diffused color that's the main one. And then the speculator color will be the color that shows where the light rays air hitting it more or less directly. So in this case, once we're past frame 30 you can kind of imagine that the light ray is going straight in the center here, and that's why you get more speculative color in those areas of the subtitle that are actually closer to that center. Alternatively, you can just leave both as a basic white and keep it simple. I think that's plenty fine for most cases. If you keep playing around with three D titles and venture resolve, you may also find in the ad tools menu other useful notes so you can come in here and play around with the other three D notes. If you need to add in a material to a three D object, make your titles look metallic in nature, which can change how light will reflect off of them. You can apply a greedy in texture. Note. If you want to apply ingredient as the color import for a note, and you also have access to all of the resolve effects that you can apply to based video clips. So if you added another merge note in here, you could add in something like a Gaussian blur, which, depending on what stop you do The merge. Two could apply to the base original cook, or it could apply to the effect that you generate from your three d vendor. The main thing I'm trying to illustrate here is the using notes on the fusion tab. There's a lot you can actually create inside often when she was off, 16 fit includes, but isn't limited to, just simple title effects. Well, hopefully this example of creating a title and Venturi's off gives you some ideas about what you can create in your own three D titles. All include the settings file exactly as it shows in this video. If you want to use this as a template or to look at it to learn from, so once again, if you want to install a title and you want it to show up whenever you restart DaVinci resolve, make sure you put it in your program files. Black Magic designed Vinci resolved fusion templates at It Titles Directory or the equivalent on Mac or the next.
12. Text Reveal Effect Title in DaVinci Resolve 16: Hello, everybody. Chris here and in this video, I want to show you guys how we can create a revealed text title effect in sight of DaVinci resolves fusion editor. So for this video, I'm going to make the title effect separate from the video clip. So what we're actually going to do is drag a fusion composition above our clip in the timeline and by making it a fusion composition, will be able to add it and move it around as its own separate entity. So if you go to the effects library, you confined fusion composition and effects and then fusion composition. So drag that above you Video clip on the timeline, and you may also want to trim or expand the duration of the fusion composition to match the video clip a little bit better, basically, stretch it to the duration. You want the title to be so next with fusion compositions selected, go over to the fusion tab. You should see only one note inside of the notes section at the bottom, which is going to be media out, so we're going to need to build our title pretty much from scratch. So start by clicking on text duty on the toolbar buff nodes, and that will add a text. Three D note. Next with the text. Three D node selected Click Merge, and we'll use this. Merge No to combine it with the three D shape will create later. And then a Render three d note to take the three D scene and render it to a two D image and then connect the vendor three d toothy media out. And then that will include the rendered result in the video export. Okay, so next I'm going to drag the notes section down so that the preview window is a little bit bigger and we could go into the inspector for the text. Three D note. So we're gonna want to change the text there. We can make it tutorial or just put whatever you want. There. You can do multiple lines if you want, by hitting enter on your keyboard to make it perfectly centered on the screen. By default, I'm gonna go down to where it says vertical anchor and click on the centering justification so that will make half of the tax appear above an invisible center line and half of it below it, which is what we want here. Next. Also decrease the size of it because it's quite large compared to the frame at the moment. And you may also want to change the font. So one that I like to use is God. Baby is no way I find it pretty good for titles. But when we switch it to that, the title shrinks a little bit. So we might bump it up again. Just size that however big you wanted to be, OK, next. You need to find the frame in this timeline where the title should be fully revealed and set a key frame there. So for this clip, I will say frame 30. What should be about a second of run time if you doing standard 30 frames per second. And for that frame, we're gonna go on to go over to the transform tab in the Inspector. So make sure texted you select it and click on Transform. And then we're going to take the translation for why, or whatever direction we want to adjust the position on and set a key thing. So with white transformed, we can go up and down and x you can go left and right, so just choose the property you need for that and set a key frame. You can also do both if you want diagonal, so that kind of thing. Next, we're gonna want to set the starting position for our animation, so I'll go to frame zero, and I'll control the position of the title text. Where should it be starting before it reveals onto the screen so I will drop it down here to somewhere below the video frame. Now, of course, where it's actually going to reveal will be some line right about there in the middle of the screen. But how it's gonna reveal their and not at the bottom of the screen is going to be by using a mask to block out the bottom sections so that nothing can show on the screen, even if it's technically there. So next someone between text treaty and media out, we're going to need to create a effect mask and connect that into one of the notes so we can do that on the three D render here. If you ever over the little blue icon, usually a blue pen is going to be for effect masks. So if we right click and go to add tool, we can choose mask here and we can do a rectangle so rectangle shape will work Great, because all of the characters will reveal at exactly the same time if we're moving directly upwards in a vertical fashion. So we just need to position this mask as basically an area where the text cannot display and you can click on the gizmos to drag it up and down. And you can also click on the box bounds to stretch how big this mask should be. And in this case, we're gonna want it to block out everything below roughly the middle line. So my rectangle is gonna be bigger than the with of the frame so we can take this and connect it to render a three d Here And now if we go on our timeline to somewhere like frame 15 we can see here that that's where we're going to want to be blocked out. So right now, the mask is actually allowing anything in that area to show. But we wanted to block instead. So all we need to do is click on the invert property inside of the inspector for that, um, asking rectangle. And when we do that, all of a sudden, anything that's being rendered will not actually show due to the masking rectangle. And now, if we go further in the timeline, when that text actually reaches the middle point, you can see it starts to reveal, because the tax has actually gone above. That masking threshold is the next. You should go to where the movement is complete and adjust the mask a little bit more. So I'm going to make sure that this mask does not actually lock it out once it's stopped in place in the center of the screen. So you need to do for that is just drag the bounds until it is fully scene, and you can kind of scrub through your frames and see how it's going to review onto the screen. Now. I mentioned earlier that we want to put a line below the tutorial that is kind of going to be that reveal line where everything that goes above it will show on everything that I go below. It is gonna be hidden now because we're attaching the vector angular mask to the Render three d. We're actually gonna have a separate render three D and combined those after the rendering rather than before, so that the mass doesn't affect the three D shape off the line in any way, so we can actually take the Merge. Three D Note and cut that with Control X and then after the vendor three D note. We're actually going to want to select Render three D and then right click on the line in front of it. Goto, add tool and then do composite and merge. We can also copy the render. Three. Do you note with selecting it? Control C and Control V. Now note that I'm not including the rectangular mask in that, and then we can feed this second render into the merge note. Now. No. One more thing on the merge note. The Green Line is the foreground, which is what is going to show in front because we're going to want the line toe. Always cover the text. The render that you have attached to the Shape three D should be the Green Line and the render three D that has the text should be the orange line for the background. So next we just need to click on, add a three D shape note and then connect that into the vendor of three d. Ah, When you do that, you should see a square plane. Technically speaking, this is a three D object. So if you hit the little preview icon to show the shape three D on the left few, you can see that this actually exists in three D space before it gets rendered. Since everything's facing the camera, we only really need a plane here. We don't need a cube or any other three D shape, so we can just adjust the dimensions of the plane in order for it to look more like a line that goes right under the tutorial. So I'm gonna go over to the transform tab for this, and we'll just the scale. But we're going to unlock X, y and Z so that we can control the dimensions of each side individually, and so I'm going to take the Y scale and shrink that until it looks a lot more like a line , and we can also take the easy scale and stretch that until it's wide enough that it goes beyond the bounds of our text. Then we can use the translation gizmos on the preview window or the properties in the inspector to adjust its position. So I'm just gonna move it down using the gizmo a little bit and will probably shrink the line a little bit more in its why Scale? Cause it's pretty big right now, So I'm gonna just click on the property and shrink that until it is as big as we want it to be, just the position a little bit more. And then we're pretty much good to go back to that thing with Emerge where I was talking about the foreground and the background. If it was to change the color of the line, going over to the material tab to something like a red and I go back into the earlier frames inside of the timeline, you'll see that if the mask wasn't there so we can just hide the masked by disconnecting it . You can see that the line would show in front so you can see how the ordering matters with the merge notes. So I'm gonna add the merge back in this case the mask is already technically above the bounds of the line, so the line isn't actually ever gonna cover it cause it never gets rendered in the first place. So right now, that doesn't matter yet. But as you can see, the positioning of the mask is right above the line. I think what we're actually gonna want is for the text to review as it gets above that line . So we're going to need to adjust the mask a little bit more. So with vic tingle selected, adjust the gizmos until it is right in the middle of the line and also double check your properties on the inspector for that rectangle you can see here. I accidentally set a little bit of a of a angle. I don't actually want that rotated. I want it to be a perfect rectangle. So I'm gonna manually set that to zero again. And then the line should be perfectly across. That's what you want. So as long as this top mask line is below the top of the plane, your text will reveal as it gets above that line. So if we play this back from the start, this is what it's gonna look like right now. It reveals as soon as it gets on top of the line. But any time that it is below the line in that mask area, it's completely invisible, even though it is technically there in terms of screen position. So now if I go to a later frame like 120 I want to reverse that effect, it's pretty simple. We were just click on the text three D key frame the position at the frame. We want to start moving it again. Go to the end frame or wherever you want the animation to stop. We could just say frame 1 45 out of 1 47 there and then drag it back below the line. Now you don't have to go further than where you can't see it, but the further you dropped the position below the screen, the faster it's going to actually play that animation. Alternatively, you could have the key frames occur over last frames, and that would also speed up the animation. Likewise, you can spread the key frames further part if you want it to be slowed down. So without too many steps, this is the effect of going to get being able to have text reveal after it goes above or below a certain masks line inside of your fusion composition. Siphon, Chris. Hopefully you guys have enjoyed this title tutorial inside of the Fusion page for defense. She resolved, and I was you guys in my future video content.
13. Video Inside Text Fusion DaVinci Resolve Tutorial: Hello, everybody. Christer. And in this video, I'm gonna be showing you guys how you comport video inside of text inside of DaVinci results. So the first thing that you should do is to take the clip that you want to be the video information for the text and drag that onto the timeline. After you've done that, select the clip in the timeline by left clicking on it and go over to the fusion page. So that's gonna be the one in the middle off the bottom, if you ever over it says fusion. So in order to create this effect, we're going to need a series of nodes to modify the clip before it goes to its final output over here. So the 1st 1 I like to add in is going to be a transformed note so that we can adjust the position off the base clip if we want different parts of the video clip to be showing for the text. So I'm going to right click here and go to add tool and then down to transform and then transform. So this allows us to change properties such as the position and the rotation in size of the video clip so later, when we actually have a text, will be able to adjust the position with this transform note. But for right now, we'll leave that set to its default values. Next, we're going to need to right click and go down to you Add tool. And then Matt and Matt control. So in a minute here, this Matt control note is basically going to serve as a mask for the import video clip. And in order for that to work, we're going to need to have a text note feed into the mat control. So I'm gonna go ahead and click on Text Plus, which is the third from the left on the tool bar over here, above the node section, and that will give us our text information in order to see what we're dealing with before we have our final result. Over here, I'm gonna left click on the preview circle. Whenever you hold her over a node, you'll be able to see it on the bottom left hand section. So click on the left circle to make that they left preview window over here, and then we can type in the text that we want to display. So, for instance, I could type in the word ocean, change the font to something of your choosing. I like to use this big noodle titling front for title screens a lot. And then we can increase the size, of course. So we're gonna want it to be much bigger than that on the frame. So I'm gonna take the size and just ramp that up all the way. So I 0.5 that's the Max Recon set here. But you can actually make it appear even bigger than that. There's many ways you can do that. One way would be to go over to the layout tab in the Inspector, and when you're there, you can reduce this center Z value to make the text appear closer to the camera so you can see with a negative 10.2 centres. E. It is really, really huge on the video frame now, So when you're talking about colors with respect to masks, white usually means an Alfa of one point. Oh, and black would be 0.0, I would recommend going ahead and using just plain white as the base color, which is the default color anyway, so there's really no reason to play around with the color there anyway, because it's going to be replaced with the video clip. So just leave it plain white, and we need to take the out port pin for this text note and connect it down to the solid Matt Henne so you can over over a pin to see which one you're talking about. It's one of the gray ones, so I'm going to connect it down there and you'll still see pretty much nothing on the final media out. We need to add a series of settings to the map control in order for it actually work. So clicking on the mat control up in the inspector. We're going to need to take the combine and change that to combine Alfa the combined operation and change that to subtract. And there's a check box down here at the bottom of the mat section for invert Matt. Check that, and in order to take this and make it so that only the areas where has text will show any information at this particular note, go ahead and check post multiply image as well and then the result of this note will be that it will only show video information in the areas where actually has text, which is probably what you want. Um, one other note he can add in addition to this, if you want to be able to play around with the brightness or the contrast, is going to be a brightness contrast note. So with Matt Control selected, I can right click on the line in front of it and go to add tool color and then brightness contrast. So with this note, if you want to make it look a little different here, you can do something like increase the gain or increase the contrast or decrease it depending on how you want it to appear in the final result, and at this point you would have your basic results. So if we go back over to the edit page, what you should see, assuming there's only one video in the timeline is that you'll have a black background wherever this transparency. It gets replaced with black by default, but you'll be able to see your moving text there, and you can hit play in order to have it play back, so hopefully have some cool, moving images in the background, and that should look pretty good if it's a little slow While it's rendering, don't worry about that. That's just how fusion effects look until they get fully rendered. And you can see that with the blue and red bar at the top of the timeline there. Now, if you just want to replace the background here with any video clip or an image, you're welcome. To do that, are you would need to do is to move video, track 1 to 2 and then drag your secondary video clip as the background to video Track one. So that could be a J peg image like this. Or could be any video clip really up to you what you want the background to be Now there's another way. We could handle this by bringing back some of the video information to this background here , and there's a couple more things I want to show you on the fusion tapas. Well, so let's continue by going back over to the fusion tap. Okay, so first off, if your text is a little off center and you want to adjust the position. You can click on the text note and they'll be gizmos in the preview windows. But you can also adjust the center of values for X and Y and the layout tab, so get it to the position you actually want it to be in. And then, if you want to adjust the position of the background clip, that's what the transformed have we created earlier was about. So you could, for instance, take the white position and move that upwards. And you can see that that makes the video that shows in the tax a different part of the original clip. Now, if you plan to actually have the original background show through, you can see here that the video clip no longer fits the frame. So one way you can handle that is to increase the size so that the video clip still covers the full final out port frame so you can take the size and increase that a little bit if you happen to be getting those edges where there's no video information. So if we want to take this video clip and half part of it show through in the Alfa areas, basically wherever there's a checkered background, then we're going to need to create a new brightness contrast node and split that off of the transform and then re combine them with emerged. So I'm going to right click here, go to add tool and do a color brightness contrast note. I'm going to connect the transform to the brightness contrast and then I'm going to right click and create a merge note. So that is under composite. Okay, now this part is going to be important. There is a orange connector for background, and there is a green pen for the foreground, so we want the text to show on top of any background clip. So that means that the top brightness contrast, which has the text portion of this effect, needs to be the green connector, the foreground, so that it shows in front of the background. So first connect the bottom brightness, contrast note, which we could rename background adjustment or something like that just to make it more clear. And I'm gonna take the out port and connect that to the orange background pen, and then we're going to take the brightness contrast on top. We could call this text adjustment and connect that into the green marriage pen. Also left click on the line connector between the text adjustment and the media out because we're gonna want the merge Noto actually combine. And then that beat the final media out. So take merge one and connect that to media out, and at this point, you should see the background come back in. Ah, you will be able to see the text a little bit there if you have any adjusted values in the text adjustment. So basically the background clip is fully visible here, but the part that had text has additional gain, and that's why it's a little brighter in those areas. So now we just take the text adjustment and background adjustment, the brightness, contrast nodes and play around with the settings until we get them where they need to be. And because we brought the background in, there should be no transparency and the final out port anymore. So this whole effect will cover anything that is below in the timeline. So I'm gonna take the background adjustment and let's just play around with settings a little bit. So maybe we lowered the gain too dark in it. If we wanted to make it black and white or something like that, you can take the saturation and drop that 20 That seems a little extreme. So let's so just go ahead and undo that. Maybe we want the brightness to be down because I really want this tax to show through. So I think that the text should be brighter. We convict the text adjustment and increase the brightness here. But something I've realized just now is that because the text adjustment is actually coming after the Mac control, it's applying to the full video clips. So I think what we want is for this to actually be moved behind the mat control. So I'm going to select this hit control acts and then hit Control V to paste it back in. And let's make this the in between connector between Mac control and the transform so text adjustment goes into Matt control. And when we do this in adjust the brightness, so now it's only affecting the areas which are getting masked out with the mat control. So that's actually what we want. So just go ahead and preview it by selecting the starting frame and hitting play in the Fusion time Ling. Of course, if everything hasn't prevented, it's gonna play back a little slow. But you should be able to get an idea of how the final rendering is going to look. So that's pretty much it for how you can put video inside of text inside of DaVinci Resolve . I hope you guys found this tutorial helpful. I've been Chris, thanks for watching, and I will see you guys in my future video content.
14. Black and White Threshold Effect: Hello, everybody. Chris here and in this video, I want to show you guys how we can create a two color black and white threshold on the fusion tab using notes and eventually result. 16. So to do this, start with any clip you want and jump over to the fusion cab in the middle. So at the bottom here we have the media and the media out. We're going to need to add a total of five nodes in order to get this effect to work. So the 1st 1 we need is going to be an right click add tool and then do Matt and choose Loomer Kier after we get our key or settings right for one color. Whether that's black, white or whatever you want to change the color to, we're going to duplicate this, an inverted addition that the two Lou McTeer's we're going to need to brightness contrast notes so we can find that in ad tool and go to color brightness contrast. So we need two of these one to adjust the color two white and one to adjust the color to black. So all right, click thes and renamed them. I'll call the one on top Thebe for black contrast Note. And then the one on bottom I will call the W for white. So next I'm gonna connect the media into the Lumen Kier notes so we can see what it is allowing and not allowing to pass through. So on that loom, Akira, everything that you see allowed through here is going to be up for colorizing with one of these two brightness contrast notes. So what we'll do first is find the settings re like for what should turn into a white color , and they make a copy of the note and inverted and feed that into the black brightness contrast note so to control what is and isn't being keyed out, you can use the slider bar at the top if you click on the low ends. That's going to be the very bright areas that you're filtering out. And if you click on the high end of the slider, you can reduce the number of dark areas which are being filtered out by the Lumet here for me. I'm going to want to turn this guy completely black, so I'm going to want to make sure that still gets kita out and I'll drag this over to where I think it's pretty good. So right around there looks good. You can still see the lighting effects going through the Keir. Most of the buildings, they're still visible. So I will feed this to the white Brightness contrast note and put that in the right preview window for now. So with the white brightness contrast note in order to make the collar here turned white, I believe how it was is we need to turn the gain up to five and then the saturation down to zero, which will make everything black and white. So next we need to take the Lumet here and duplicated here and then just Teoh invert. So if I previewed this on the left side, nothing will show you because media and isn't feeding into that. So we need to bring media into the top Bloom Akira again. But as soon as I invert, you're going opposite of what was keyed out on the bottom note. So we feed this to the black brightness contrast which are preview over here on the right, and then to turn this black, we just need to take the gain and turn that to zero. So now we can merge these two notes together for the final media out To do that right click add tool composite merge and feed the white brightness Note into the bottom and the black brightness note as Thebe Rinne line there. So now we take this and we put it to media out. And if we preview this on the right side now we can see that everything in the shot has been turned to either white or black. Once you have the set up, your pretty much there. One thing you can do, though, if you want to make the threshold effect as powerful as possible and not have any of these in between kind of black kind of white areas. What you can do to eliminate those areas is to go to the loo, mark here on top for the black brightness contrast, and rent the gamma down to zero. So that will give you those incredibly hard edges. And at this point, everything is either Pierre white or peer black. So if you want that appear to color threshold, where everything is either hard, white are hard black that's gonna be about as close as you can get it and eventually result . You may decide that you want to raise the Gamma a little bit more past that so that it's more blurred and that there is a little bit of in between. It's kind of up to you on exactly what you want. Okay, so just really quickly before we wrap up this video, I did decide I was going to increase the luminous range on the top half over here. So if you wanted to make a bit more of that street area than buildings, black rather than white think this adds a lot of cool more detail back into the shot. So that's how I'm gonna leave it for my final results. But that's pretty much gonna be it for how you can create the two color threshold effect inside of DaVinci resolve using fusion notes. So I've been Chris. I hope you found this video to be useful, and I will see you guys in my future video content
15. Particle Effects in Fusion Titles: Hello, everybody, Christer. And in this video, I want to show you guys how we can add a particle emitter to any title in DaVinci Resolve. 15. So the idea here is that you'll be able to take any of the titles from the effects library and add in a particle emitter in whatever fashion you want. So it could give you a result that looks something like this, though if you want to get a bit more complex, it's certainly possible to do that as well. So in order to modify your title with a particle emitter, you're gonna have to work on the Fusion tab. But first, let's get started by adding a title to our timeline so the titles could be found in the effects library top left hand corner of the added tab, and then you scroll down to titles down here. We can take any of thes and modify it. So let's do this one title square line tilting text, which have we select and zoom out here a little bit, looks something like this by default. So we already have some controls from modifying this title in the Inspector, such as changing the text inside of the title and the color that it's displaying in. But to modify it further, we need to go over to the fusion tab. So at the bottom, fusion is right next to the edit tab. And when we open up the view Shin Tab with that title clip selected, you're going to see media out and you're going to see a group with the same name off the title that we just added to the timeline. So if we double click on this group, you'll see a whole bunch of thes nodes which connect to each other to generate the title effect that we already see there. So these nodes, when combined, give us the boxes that you see in the title of the text areas, and they all merge together into one final effect. Now, rather than messing with what's going on inside of there, I'm simply going to take this pre generated effect and merge that with a particle emitter. So to create a protocol, a matter don't have anything selected, and then you go over here to wear. You see a lot of these little dots. There's three particle related components or notes here, particle emitter, particle merge and particle vendor. So particle merge will allow you to combine multiple particle emitters into one note, and then particle vendor will take those effects and be able to spit out an image that can be output to your timeline. So we're just going to use one particle emitter here in combination with a particle vendor . So when you have one node selected and then you click on another note, if they're compatible, you'll get an automatic linking between them. Alternatively, you can click on the square here and drag it into the particle vendor to connect the notes . And then next we're going to need one more notes. I'm gonna right click and do you add tool and then composite emerge. So with this merge, we want to combine the original title effect, and we want to combine the particle vendor so this combines them into one note, which can become our media output. So this is roughly what you note. Composition should look like a particle emitter, a particle vendor emerge note, and then you tie in your three d title effect into that merge note, and you output that to media out one so Now, if we take a look at the preview window here and note that media out is the note that selected in this preview window at the top, we can see that there are, in fact, some particles showing in here. And if I was to play it back, it would look something like this. They just kind of pop up on screen by default with no velocity. And they're just a tiny little white dot. So you probably want something a bit more interesting than that, so we can modify how the particles they're gonna look on the screen by clicking on the particle emitter and playing around with some of the settings. So when we have the protocol emitter selected, you'll notice that some controls air handles pop up here that we can manipulate our particle emitter with. So the first thing I'm gonna do is click on the Green Arrows and drag this down here to the bottom because I want the particles to admit from the bottom, not the center of the screen. Next, I'm going to change the number of particles that are being admitted from 10 to 2. That doesn't mean to particles. It's kind of more arbitrary number, but at least what we're testing this effect. I want it to vendor quicker. So the less number of particles that are currently being admitted, the faster it's gonna mount on your computer. If you have a supercomputer, feel free to leave that number higher before you go into your final effect. So next. If we want these protocols to move over time, we're going to want a set of velocity. So in the Inspector with particle emitters selected, I'm expanding the velocity menu here, and then I'm going to set a default velocity. So I'll set it to something like 0.15 for right now and also dragged this a little bit up so we can see exactly what direction it's traveling in by default that goes to the right. But we can change which direction, but we can change the direction which these particles have a velocity by controlling the angle. So if I change the angle here from 0 to 90 degrees, that should make the particles upwards and set of to the right, so we should be able to play this back a bit and see the particles get admitted upwards over time, so that's a start. But obviously we have a bunch more controls to play around with you. For instance, if we go over to the fourth tab, we can change the emission region from a sphere to something more like a line. So with the line region selected, we can have the particles emit from a line, so that could be an angle direction. Or it can be a flat horizontal line or vertical line. So we'll change this to a vertical line that starts at the bottom here. So I'm gonna control the start and end points here for the line until we can adjust it to basically be at the bottom, left corner and the bottom right corner. So that's a reasonably straight line. But we're gonna want to change the values to be a little bit more on point. So whatever the start, why offset is I'm also going to make the end. Why offset? So there's still vertically the same distance from the center of the screen. So I'm going to do negative 0.28 and I'm gonna set that for both of them. Negative. 0.28 Okay, So now if we play it back, we'll get an even distribution of particles being emitted on this line and the upwards direction. So let's zoom in a bit so we can see it. And you screwed to see a couple of little white dots here to make these white dots a lot more visible. Though what we should do is go to the third tab over here and change the style of these points from point to blob. So when we have our emission particles set to a blob will be able to control the size of those blobs. So I'm gonna bump this up to something like, Is there a point 15 point 17? And now when we hit play and we look at those blobs, they should be a little bit bigger. We can always make them larger, though. So 0.33 and the blobs should become very large. Easy to see here. Every zoom out a bit. I can still see him a little. Maybe we want them to be very large, though, so we can set it to 0.5. We can also add in some size variants to make it a little bit more interesting, and we can set a size over life's. So if you drag the left side of this curve upwards, it's gonna be larger at the start and a free drag it downwards at the end point. It's going to shrink over time. So by doing that, the blob should be big at the start, and over time they get smaller and smaller, so that's kind of a cool effect there. Okay, so another cool thing we can do is have the colors of these blobs change as there as that particle lifetime ends. So I'm opening up the color controls in the particle of matter for in The Inspector, of course, and going to color over life. So I want this to start as a white color. But Teoh add another color that it will change to overtime. I need to click somewhere on this life span timeline. Move the little white triangle towards the end, basically setting like a color key frame innocents. And then I'll set a nice blue color that the particles were changed to overtime. It's enough. Resume in and take another look at the particles rendering. We should be able to see the colors change a bit over time, and I think I see that. But it's not going very fast, so that probably means that the particles have too much of life span at the moment. So if we go back over to the controls tab of the particle emitter, well, you will see one for lifespan here, and we want to show it in that down so that the colors can fully change as thebe particles fade out while they're still on screen. So now if we take a look at this, it should be something like this. So eventually these particles should fade out and you want to time the life span so that basically the protocols fade out at the point of the screen you want maybe you want. We want the particles to be able to admit halfway up the screen, maybe you want them to admit all the way to the top. So you need some combination of life span and velocity to make that happen. And we can also add in some life span variants so that it looks a little more interesting. Some of them will fade out faster than others and overall, that basically gives you your effect. So what? That combination of settings were able to get a pretty cool particle and mission going on in the fusion tab of DaVinci Resolve. Let's take a look at how actually looks on the edit tab you before we wrap things up. Of course, it'll vendor at full speed when you actually export it. So keep that in mind. It's going way slower than it ward in the final product, so we can see here in this section that is being fully vendor did. That's how fast it's actually going to go when you're video title is playing, so you may want to slow that down in the end, and you can do that by controlling the velocity. So obviously there's a lot more things you can do with your particle effects. Play around with them. There's a lot of settings. You can also add some key framing if you want the velocity to start slow. But then as the title progresses, the velocity of the particles gets faster. Things like that are all within your grasp, using the Fusion Note Editor and DaVinci Resolve. So hopefully this video has helped you guys to understand particle emission inside of DaVinci Resolve 15. Using the note editor so you can combine it with titles of really any video that you want to add protocols on top of. But that's gonna be it for this video on using cocoa effects and Venturi's all 15. So I will see you guys in my future video content.
16. Logo or Image Particle Dissolve: Hello, everybody, Christer. And in this video, I want to show you guys how we can take a logo or image inside bench result and have it dissolved into a 1,000,000 partners. So the first thing that we're going to need to do to be great. This is to go into the effects library and drag a fusion composition onto the time I So you find this in effects library, toolbox affects and infusion composition. The reason we do this, rather than dragging a image directly under the timeline, is that sometimes the image won't have the same pixel resolution as your video, and therefore you can run into issues like having the sites cut away. But if we bring in a fusion composition quipped, than it will always match the whole size of your screen. But you can still be sized the image inside of the fusion cap. So over on the fusion tab, we're gonna want to drag the image. We want to dissolve from our media pool onto the nodes area, so if you don't already have it open, you can open the Acorn top 10 corner and then find the image in the year pool. If you don't already have a pair of Drag it into the meatball from somewhere on your computer into, but you can also drag any image from your computer straight into the notes section of The Vinci Result, and it will automatically added to both the media pool and create a media end note for your Asian composition. So let's make sure that the images there by left clicking on the preview circle and then media out will be our right three. So next what we're going to need to do is create a image particle emitter. So with media in selected, so I'm going to right click go to add tool particles and then buying particle image emitter here, left, click the add it and drag the media in to the particle image emitter and then with the particle image emitter, I'll click up here to add a particle vendor. Note that's necessary before can connect your media out so I'll connect particle render to media out, which should give us some kind of particle preview over on the right side. Now you'll notice here that the image I brought in is actually too large for the screen. So what I'm going to add Is that transformed? No, Between n and particle image emitter in order to control the initial size of the look. So I'm going to right click on the line right after the year end, build your ab tool and then down that transform, we're going to juice a transform. No. So, inside of the inspector, with this transform notes selected, we can control the size and the positioning off the image. So I'm just gonna take the sizer and lower it down till the end result. Blogger. There is quite a bit smaller Anakin, more less fit on the screen. Now, you also notice that the particles here are really tiny and we'd like to have the effect start with shape initially intact and very visible. So I'm gonna go over to particle image of middle here and find the style tab, and I'm gonna change the style from point to blob. By doing this, we can have control over the size of those particles, and I'm going to ramp that way up until we can pretty much see the entire DaVinci Resolve logo as it originally was. I'll just put it at the max size of 0.5. So that takes our logo and has essentially whole reforms there at the start of our act. And now we need to apply some forces to those particles over time in order to get that dissolve look. So if you want to keep things simple and the protocol image emitter, you can go over to the control section, which is the far left one, and go down to velocity. And you just need to give it a velocity, some velocity variants so that the particles don't move at the same rate. And you may also want to change the angle Z by default. If you had velocity, the particles are gonna be pushed to the might, but you may prefer for them to be towards the camera and step. You could also have it at a diagonal angle and whatever you like. So let's start by increasing the velocity of it and add some velocity variance and taking a look at how this looks. We can also play it back in the timeline, of course, since it needs to render in real time, it may go kind of slowly while you're doing this, depending on how fast you computers after it's got the chance to cash the vendor. It'll play back a lot faster so they can give you a really basic looking effect there. But you may want to make it a little bit more interesting so we can add in a little bit of angle variants, a little bit of angles, e variance, and that'll make the particles go off in slightly different directions from each other. And like so, if you'd like, you can also add in a directional force notes so that I right click here and you add tool and go down the particles and directional force. We can have it accelerate the particles any direction over time. Kind of like having wind in the scene. Do you may want this and you may not want this. You'll notice that with the directional force node selected, we can see the direction that the course is aiming at with this line here, and we can drink that amount to control the angle. So So with that directional force, it might look a little bit more like this so you can see over time the particles actually changing their direction. So that's just one other way. You can kind of modify the vaccinated a little bit more interesting, but for now I'm actually going to remove that directional force note, and we're going to aim the angle towards the camera and step. So remove your directional force, noted Gavin. Nobody and then click back on particle image of bitter. We're going to take the angle here and make it negative 90 degrees. So which it? So we basically just rotating on the main direction that it's going to be aiming our effects towards. In this case, it's changing it from the right to towards the camera, so you could also make it 90 degrees. You wanted to make it away from the family, for instance. So now, if we go back to frame zero and play our effect, we get this really cool. Dissolve off the logo into a 1,000,000 different solid particles, so this ends up being really need a fact that you can play around with, and there's a lot of ways you can customize it. For instance, just by changing the velocity, the velocity variants or the angle, you can make it look like a completely different fact. One more thing that you may want to customize is the lifespan off your particles. If you stick with the default lifespan, which you confined under the particle image emitter note, then the life span is gonna be set to 100. And that means the after frame 100 that all of the particles are just gonna disappear. So if you need the effects to go on longer than 100 frames, then you should increase the life span. So I'm gonna rent that way up, said it will basically go as long as it needs to. And what you can do to make sure that all of these particles stop rendering as soon as they have left the screen is to go over to the particle render and click on the first tab. Over here, the controls note. There's a check box called kill particles that need the view so Oprah particles that are never gonna be entered the screen. This will help save your GP use and processing time, because all of this particles that need the screen are just gonna be destroyed immediately , which means less objects for your computer, the happen process. So it's a good idea to check this if you're effect is gonna be similar to mine. But that's a basic set of how you can dissolve any joy logo inside of avenging zone using particle image emitters. So I've been Chris. Thanks for watching and also you guys in the future video conference.
17. Importing 2D Animations to Fusion: Hello, everybody, Chris here and in this body. I want to show you guys how we can import a two D animation sequence into DaVinci Resolve 16 so that we could use it for a title sequences and the like inside of a fusion composition. So one example I've gone ahead and done is brought in a Pixar character, which is just going to be a series of Sprite images and loaded that into our fusion compositions. So by now it looks something like this, where our characters able to walk onto the screen with one animation idol with another animation and then walk off the screen with 1/3 animation. And you might notice I have this split into separate fusion composition clips. So when you have multiple animations that you want to use, I found two decent ways in order to do that. One is toe have separate fusion compositions, wherein each one you define the exact frames that you want to use for that animation, whether it's a loop or not, and the other option is to from the start have the correct sequence of images loaded into divinci results so that you only need to use one fusion composition. Other words already having the exact animation you want to occur and to bend to resolve created before you loaded it. So though you can see here that I included both the animation and the title that flies onto the screen in the same fusion composition I would recommend in practice, you actually separate them in two separate clips so that they can be edited individually and moved around as you need them. So if you want to load in an animation to effusion composition, open up your effects library and bring a fusion composition to the timeline. By default, this will be five seconds in duration. So now you can click on the fusion composition and go over to the fusion page of DaVinci Resolve. And you should have nothing but a media out here. So if you look at my media for you can see that I've already gone ahead and imported an animation as one item inside of the media pool. So let me go over to the list view so you can kind of see that when you import a series of images that all have the same name and they're numbered. So in this case animation girl underscore 0 to 15 that be combined into one media pool item . So basically, what we're looking at here is a series of 16 frames that is our animation. And when we bring this into our fusion composition, weaken define which frames we want to actually use when it's playing back as thieve video effect. Another way would be to have each of your animation clip separated into their own individual frame groups. So, for instance, we could have animation girl right and then underscore 033 and then that would be a walking right animation. So if we look at my desktop in the folder, where have all of these animation frames? You can see that for this girl there is a walk down walk, laughed, walk right and walk up animation. So in this particular case, they're not separated into their own animations. Better option. If you wanted to use this kind of thing and Vince resolve would be two separate each animation into their own frame groups. So here you can see I've brought an animation girl right? 123 and four. So if you group them like this, they'll never be any confusion for what the animation is, and you won't have to define which frames you want out of the animation group, because each group is one action or animation. So in the media pool, I'm gonna go back to Thumbnail Melt, and then I'm going to drag these four frames into the media pool. So when I do that, it creates one image group we can see going into the list view again. We have animation girl, right? 01304 So now I can show you the advantage. If you don't have your animations grouped into their own individual actions, then when you add it as immediate in, you'll have to define which frames you actually want to use for the video clip you're trying to create. Now, if I take the media and I can feed that to media out here and what you'll notice if I play through the frames and I'm gonna check loop here so that we can see it on repeat is that it's going to cycle through every single frame in that group so you can see here. It's doing all of the animations at once, and that's probably not going to be what you want. Now, if instead of importing Sprite actions like walking or attacking you were importing an actual full animation already created, then this would be fine. You would just import all the frames from another program like Adobe animate and load that into defense. The result like this. And then if it needs to play back in that exact sequence, you're good. But in this case, we might want to use only one of these actions, such as move right. So you can see here if I go through the frames that move right, starts at frame eight and goes from nine from 10 from 11 and then stops at 12. So I need to use the trim function over here for media and to cut away the frames that aren't moved. Right? So that would be everything after frame 12 here and everything before eight. So actually, the out should be set to 11 and then you can see the account for the frames that are actually being included. Here is four. So each of their was animations have foreign. That should be correct. And we contest this now by going back to frame zero hitting space and watching the loop, so that does technically work. But it would have been much easier if we had just pulled in animation girl right over here , which already has the exact frames that we want. And we don't have to mess around with trim, so I could just feed that into media out here, go back to frame zero hit loop so that it cycles and then go ahead and hit space and we're already done. We don't need to do any trimming. So more than likely, if you're importing an animation from Pixar s Sprite or Adobe animate, then you probably don't have one frame off actions for every frame of video that's going to be occurring we can do. To get it to its proper speed is to add in a time speed note so we can find that by right clicking, going Teoh, add tool, miscellaneous and time speed. So now we just need to move this time speed note between the media and in the media out so that we can adjust the speed at which the frames of being fed to the media out so you can obviously see the speed function here. If we want to slow the rate down, so let's say 1/4 speed, then we can do 0.25 and then it should be four times slower. So let's go back to frames over and hit space, and what you'll notice is that by default, there's a little bit of ah, ghosting effect or a blend for the interpellation mode, so that can be a desirable effect. I think it does look sort of cool. But if you just wanted to play the exact image, um, for that frame rather than kind of ghosting the previous frames, then you can change the interpolation mode from blend to nearest. And then that will be playing the animation only with the exact frame that the video is currently on. So if you hit space now, we have a normal walk cycle animation here. And one thing you may notice every so often that when you are testing the playback of your animation in the fusion tab that sometimes it'll skip a frame every now and then. That's partially due to result, kind of being slow in the processing. So if you want to make sure it's OK, then you can go over to the edit tab and play it back for part of the animation, where this blue line up here at the top, indicating that it's completely pre rendered. And it should playback correctly so you can see here that the animations actually find, even though it may have given you the indication that it was a little off before. So one more thing, I want to point out is that when you're working with low resolution Pixar or similar low vis Revolution files, that you may notice that when you go over to the edit mode, textually view your video that it starts to look quite bad. Unlike the original image, usually in programs like resolve or Unity, this is due to how it processes the image and adds filtering on top of it. So if you're working specifically with ah, low resolution Pixar image, then it's probably a good idea to take refuge in composition and for the media and actually feed that into a three D image plane before modifying it with time, speed and media out. And when you have it on a plane, you can change the settings up that image plane in order to make it look better in the final output. Also, instead of the final media out being thesis eyes of the original media end, it will actually be the size of the video frame. So the media out will actually look more like the frame of the final video. So if we want to add a image plane, we can right click, do add tool, go to three D and then image plane. Whenever we have a three d note, we're going to need to render that with a three D vendor. So I'm gonna click render three D over here on the toolbar and then with render three d, we're gonna want to feed that into the media out. So now for the data that's feeding into image plane, I believe we can just take the time speed and put that in there. And now we need to scroll out so that we can see the full frame because we're no longer looking at a 32 picks. Hold by 48 picks so frame. But we're looking at the final video output, which is 1920 pixels by 1080 and you can see that the image has basically been scaled up to that size. If you go to the edit mode, you can see that it is a lot cleaner now. So, generally speaking, I would think that you would not want a Pixar character like this to be taking up that much of your screen. So an easy fix if you want it to be shrunken down for your purposes, is you can go into the image plane, and you can take the scale over here on the transform temp and shrink it down. So I'm going to make it a scale of, let's say, 0.25 So moving on you can have this character actually move across the screen rather than just being an animation loop by adjusting the transform of the image plane or any other location where you may want to adjust that transform. So what we can do to start is pick a frame where we want the character to be in the middle of the screen like it is now, and out of key frames for X y Z translation. So now everyone, the character to walk onto the screen we go back to frame zero and adjust the Translation X , which automatically Southern New Key from um, and then between frame zero and 30. It's gonna walk onto the screen kind of like so now. After that, we'd still have an animation loop here. So what we can do on the Edit tab is to go to the frame where the character has stopped completely after moving onto the screen. So that would be somewhere around this frame here and then to use the slice tool with be in order to cut the fusion composition into two parts. So now I can click on the second part of the fusion composition, come in here and change the media end to a new animation. So what I'll do here is go back to the folder with all of the frames for this character, and I just bring in animation Girl frame 00 which is just the character standing straight looking down. And then I'll drag that into the fusion composition notes as a new media in, uh, cut out the old ones and I'll put the new one connected to time speed and leaving everything else the same. So Now, if we go and play through this fusion composition, we have the first part. Now, if they have played back on the Edit tab, the first part has the character moving onto the screen. And then after that, the character just stands there, and now we might want the character to walk off the screen as well. So I'm gonna pick arbitrary point in time, used the slice tool with B again and cut that Inter new fusion composition clip. So now we'll go into this last part of the fusion composition and load in another animation . Oh, in this case, I guess we just want the character to move right again so I'll bring back this animation, put that into the bottom, cut the media in three out for the facing down animation and feed this into time speed. So right now, it doesn't seem to be reading it. So let's try that one more time and make sure girl over here feed that into time. Speed. Okay, so the reason that the animation isn't playing is we need to actually set the global and out for the media and on make sure that the frames listed here are actually included on the frames that we're trying to play, so that needs to go up to 119. At least now. The reason it's starting from Frame 87 instead of zero is because we made a cut from the original fusion composition, so it was still expected to have earlier frames. But those aren't being shown in the final timeline. And as far as the fusion composition clip is concerned, we cut away the frames that come before 87. So technically, this should be fine, but I just keep an eye on that global and out. So now if we go back to frame 87 here and play space through the loop here, it should be playing properly. Now we just need to set a transform Animation said that the character can actually walk off the screen during these last 30 frames or so. So I'm gonna go to frame 87 here and on the transform tab of the Image plane. Note where you need to set X translation. Why translation and see translation toe have key frames by checking the diamond and now on frame 1 19 will have the character be fully offscreen, and you may not see the character move up here in the preview window. If you have read notes down here below I'm see may need actually hit play in order for the animation to re vendor up here. But the position that we're gonna want for the final X translation is gonna be way off the screen. So I'm gonna make it something like 1.7. Okay, So if you're global in out is set properly and you hit play and seems to be working, all right. And note that with these nodes down here, the time speed image plane render three D and media out that those should not be read. If they are bad, then it may not be currently rendering the actual animation properly up there. So what you could do is try changing a setting real quick, like interpellation mode to flow and then back to nearest in order to get it to re trigger rendering the animation up here on, just make sure that it is actually playing through right. So hopefully we should have something like this where we have the walking animation going and it looks smooth, but in order to make the character move offscreen again. We're going to need to go Teoh frame 87 enable the ex translation at the bare minimum for key framing and then go to the final frame where we actually want to set our value. And we're gonna take the X and move that off the screen once again. If it's not immediately rendering this and the preview, then check down below. Some of you nodes may have not rendered yet, so it might just have the character stuck in the middle, even though we're moving the character off screen here. So I'm gonna move the value to something like 1.75 in order to mirror how it was that frame zero in the negative direction for the first fusion composition clip. So now the character should be able to walk off the screen is the idea here, so that should be occurring. And if all is gone well so far, then we can go over to our edit mode and watch the whole animation. So three technically separate fusion composition clips. But the only real difference is that we change the animation out on each of these clips, though each of them have the same note composition. So let's go ahead and hit play here. I know it may have been there 100% smoothly and the timeline playback, especially if the blue bar for pre vending isn't there yet. But you can hit play. Give it a couple shots. You should be able to basically get an idea of how it will look when you finally deliver your project to a MP four dot move project when you render it. So the basic idea is there. The character walks onto the screen, looks at the camera for a couple seconds and then walks off the screen. So really simple. But you have. We should have the basic idea Here in place. The character walks on the screen, looks the camera for a couple seconds, walks off the screen. You could basically use this with any animation. As long as you can turn that animation into a series of PNG images, you should be able to import them into DaVinci Resolve straight up. And if you need them to look good, try feeding the media in into an image plane like we didn't this tutorial so That's pretty much going to be it for loading in an external animation into DaVinci Resolve. Pixar or not. So I think, Chris, thanks for watching and I'll see you guys in my future video content.
18. How to Use 3D Models in DaVinci Resolve 16: Hello, everybody. Christer. And in this video, I'm going to be showing you guys how we can load up a three D model into DaVinci resolves fusion page and order to use that within a video. So because we're using a three D model, everything three d is usually done and diffusion tab for divinci results. So I'm going to load and a new fusion composition into the timeline and to do that in the edit page, but going to the effects, library effects and infusion composition so I would drag this right in here. I'll go over to this new fusion composition, go over to the fusion tab, and now we're going to want to load up the model. So there are several supported formats for DaVinci resolve, such as O, B, J and F B X and Olympic files as well. If you want to import one of those, you go up to the fusion menu at the top. We're gonna be doing it. Oh, BJ filed. But we're going to use the F B vaccine imported to load that end. So with that, I have this o. B J file on my computer, so I'm going to load that in here. Open it up and we'll get a pop up window showing the things that we want to import. If you have any animations for the model, those would show in here. In this case, there's no cameras in the O B J fire or lights. So I have There's unchecked. The only thing I'm gonna be loading in here is the measures and the material note, though if you were loading in a complete scene that also had cameras and lights, you could import those really quickly there as well. So I'm gonna hit okay here, and we're gonna get three notes. We have the mash node over here, and we can over over a note to see what type of notice. So fbx mash three D. And over here we have the blend material note. So how hovering over it, you can see it's a blend, and then a transformed three d A. Just note, as well that we can use to control the positioning and the rotation off the character. So if I load this into the preview window, the transform three d note and resume out, we can see where the model is located and its size and rotation. We can see that it's not really in the right rotation here. So I'm going to take the exhortation for the Transform three D note and Port Negative 90 as the value for that note so that the character is standing upright and side of the three D scene. And then you may find that the characters also way too large for the scene. It really depends on how far out you want the camera to be and the size of the other models . You may be loading in. We'll take the scale, and I'll lower that down to 0.1 said that the size of the model is more reasonable compared to the three D grid that you see down there as the base. Now the character is right now completely white because we don't have any of the image textures applied properly to material. So have it render all the facial features in that kind of thing, We're going to need to grab in the texture materials. So in this case, I'm going to just drag these three image files into the node section of DaVinci Resolve right there, and I'll delete the merge notes because we don't actually want those. But for each of these notes, I'm going to rename them based on which image file the half So underscored. G in this case is referring to the glossy nous. So I will call this just G. And the next one is D for diffused color. Um, so I would call that just d And then the 3rd 1 is in for normal mapping, So I'll call that just in, and we need to feed all of these into this Glenn note. So the order for that is gonna be the diffuse note, followed by the glossy nous node and the normal mapping note. So diffuse goes in first. And when we do that, you'll notice that the color of the person shows immediately. So that's good. And next one and the glossy nous and the normal mapping. Now the glass sickness and the normal mapping isn't going to show anything right now because the scene doesn't have any lighting. So the next thing we can do is take the Transform three d node, feed that into a merged three D note, which will have cameras and lights attached to it. And then this merged three D node will be rendered with a rendered three d and then that will be feeding into the final media out. And this will give us the image that we can actually use on our addict page for building our actual video and results. But for this three d note, we're going to need some lights, so I'm going to right click and add a tool. Do three D light ambient light, and I'm gonna link that up to emerge. Three D Once again, you'll see nothing here because lighting and shadows I enabled. So to have that enabled, we need to go over to the Render three D note and check lighting and shadows. And we can also make this render three D The preview on the left. Okay, and now the characters receiving some lighting and weaken V the and the render three D or the media out preview rather. But in order for us to really see the person and the lighting properly on it, we're going to want to add a camera note an angle that at the person. So let's at a camera three D note to the merge three d and will adjust the position until we can see the full body and view. So adjusting the gizmos we consume out get the woman fully in the middle of the frame. And then let's just sees things a lot better now with just the ambient light. That means everything in this scene is gonna be receiving just a little bit of light, but evenly applied across everything. So what we can also add in is a directional light, which will have a light coming in at a certain angle. Also applied evenly across the scene. So let's do a directional light and drag that into the merge. Three D. When we do that, you can start to see some of the crevices and the areas that are receiving less light on the person's body. But right now the light is angled straight in front, which isn't very interesting. So what we'll actually do here is change the rotation of the directional light. Note that the actual position we put this in the scene doesn't matter at all. It's only the rotation, so we'll take the rotation on the transform tab of that angle it down or up a little bit if we wanted to look like or movie. Ah, and going out of it, that's Ah, Let's make that something a little bit more normal there, though. Something like negative 15 degrees more like a sun from the sky. So this gives us the basic set up of our seen. If we went over to the edit page now, we'd be able to see the model being vendor Daza, TD image, which we could use as part of our video a title screen or something like that, Um, to make it a little bit more interesting and actually render something more than just a purely static image over this fusion composition, we could have the cameras position just based on the timing and the scene. So from zero, we can key frame all off the rotation and translation properties on. What I'm going to do is use a target so that the camera is always focused at the woman, regardless of its position across the scene. So I'm going Teoh hit used target, and I'm gonna pick a target, um, somewhere on their woman's body, kind of sending her on the shot. So let's put it around there and I could go to the final frame of the video and I'll just reverse the sea physician. So I'll do negative 600. And this will set a new Z translation key frame at the final frame of this fusion composition. So if I was to play it now, the camera will always be looking at the person. But they came. His position will be moving through the person, and, uh, this might be something a little more interesting that we can render out. So just the position up here, so that is more of, Ah, overhead shot. And the target tool is really useful because it will always keep track of that position that we're trying to focus on with very, very little effort. So now we'd be able to take this fusion composition scene and have all of it render out as a clip that we can use inside of our edit page timeline. So over here, everything in the fusion tapas. Now this fusion composition clip, and we can use that in our video. However we wish. So that's pretty much gonna be it for how you can load in a three D model to davinci resolve at in off the material texture images so that it will render properly and to use it within your fusion composition clips. So I've been Chris. Thanks for watching. And I was you guys in my future video content.
 Chris Tutorials, Game Developer