Transcripts
1. Introduction: The great thing about making
a crocheted stuffed animal is that when you
give it to somebody, they know that it was
handmade with love and it is thoroughly enjoyed no
matter what it looks like. My name is Sartre from
Coco Crochet Lee. I'm a crochet designer. I love making garments
and amigarumi, and I love making
characters come to life. You may have seen my work on Annie's Creative
Studio as well as the PBS and create TV television
show, Knit and Crochet. Now I think the thing that
makes people the most excited about amigarumi
is the cuteness factor. And there's so many great
ways to customize them. If you have an idea, you can make an
Amigarumi for it. Today you're going
to learn how to take the basics of amigarumi
and elevate them. So we're going to learn how
to do an invisible decrease, which is a super polished way of decreasing your stitches. And we're also going to
learn a really cool texture which is the popcorn stitch. There's also going
to be some really interesting color
changes happening. There's so many techniques in an Amiga Rumi that
you can transfer onto larger projects and get those fine details in where you may have
missed them in the past. This class is perfect if you've always wanted
to make an Amiga Rumi, or maybe you've made
one in the past, but you wanted to
make something that's maybe a little bit next level. At the end of this class, I
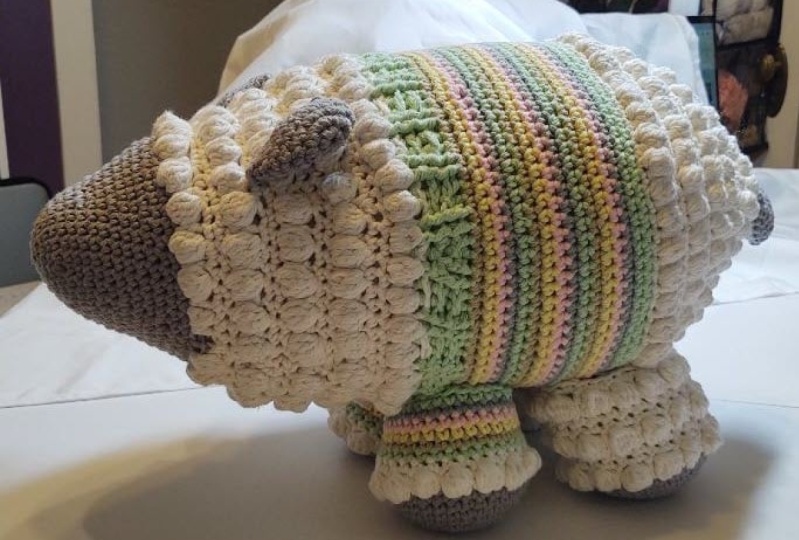
hope that you'll walk away with an adorable sheep
dressed up in a sweater. You can really customize
it and make it your own. He's gonna look great
no matter what. I'm so excited to begin
this class with you. Let's get started on our Amiga
Rumi, Sheep in a sweater.
2. Choose Your Materials : With this Amigarumi,
and with all Amigarumi, you have a few options
Before beginning, you can make a different
looking Amigarumi based on the yarn and the
hook that you choose for your specific
sheep in a sweater. Our Amigarumi, sheep in a sweater is made using
medium weight yarn. You can see here that this is the beginning of his
little face, his nose. And it's using the
hook recommended in our pattern as well as the yarn recommended
in our pattern. So you can see the
difference when I show you what it looks like, if you use a bulky weight yarn, you end up with the same amount of stitches as the Swatch
I just showed you. The hook size has increased. The yarn has
increased, and so has the actual size of
the piece itself. And if you were to continue in this pattern with this yarn, you're going to end up with
an enormous chunky sheep, which would be so cute. If you have this
yarn on hand and you feel like making
a mega sheep, you can use a bulky weight yarn. You will have a
little bit of texture going on with the popcorn
stitch in the sheet body. But you can do it.
It's something that the choice is obviously
there for you, like. Similarly to that,
you can even go to a smaller weight yarn such
as a fingering weight yarn. So again, this is the
exact same pattern, same number of stitches in a different yarn with a 1.5
millimeter crochet hook. And the size
difference is drastic. It really just depends on what kind of amigirumi
you're looking for. You can make a micro sheep with a fingering weight yarn
and a very small hook. You can make the same size sheep as the one I have
as an example here. Or you can make a
bulky weight sheep and have a chunky sheep
in your possession. Now that you have
chosen your material, and again you can
find a full list of the materials in the
resources tab for this class. You can move ahead with me to the beginning of our
amigerumi sheep, where we're going
to start working in continuous rounds to start
the body of the sheep itself.
3. Start Your Amigurumi: I'm so excited to begin
this amgarumi with you. Amkarumi is the Japanese term
for working in the round. And that's what we're
going to be doing here for the first part of the
body of our sheep. Now, there are two
different ways to begin. I'm going to show you both of them and you can
decide which one you'd like to use in the
progression of your piece. The first one is
called the magic loop. You also may see it
listed as a magic ring. It's just basically
a tension knot. It builds your stitches into the knot and you can
adjust the tension of it to tighten the beginning knot in order to make
it extremely tiny. For the magic loop, you're
going to take the cut end of your yarn and hold it between your thumb and
your pinky finger. You're going to wrap
the working yarn around your two middle
fingers from back to front, and over your index finger. You're going to insert your
hook underneath the ring, around your two
middle fingers and draw your working yarn
through that ring, creating a loop that you can
build your stitches into. At the end, we're
going to be able to pull the cut end of yarn to cinch the ring and make
it close really tight. For this method, you
start with a chain, one just like normal, and you do your six single
crochets into the ring. 123456. You're going to pause here
with your end of your, your yarn tail if you
pull that gently. Also, I like to pinch
the crochet stitches that we just made
just to secure them. If you pinch those and
your cut end of yarn, you can see that the
yarn loop is closing. I like to do this
without joining the six crochet stitches
together because we are working in continuous
rounds or spiral rounds, so you don't want to
join them, not yet. You can see that you've
pulled that tail really tight and it
really minimizes the hole that we start with and gives you a
really polished look. The one drawback of the magic
loop, or the magic ring, is that this tail can just as easily expand
as it did cinch. Basically, that means that
you really have to secure it. You can secure it
at the beginning or you can secure it at
the end of your work. But it does need to be
secured in some way, or your magic ring
will come undone. The second way that you can
begin your Amigarumi is with a secured knot and just a
chain stitch basically. And that's the method that I
usually use on my Amigarumi because it's just as good as a magic loop and it's also
secure right off the bat, so there's no risk of it
becoming loose or coming undone. So I'm going to continue with that method throughout
this pattern. Now that you know the
magic loop method, you can use that
if you'd like to. And it's a really
great way to continue. For this Amiga Rumi pattern, we are going to start with
a chain two on a slip knot, just a regular slip knot. To begin, you're going to chain two working in the second
chain from the hook. We're going to do the same
thing as the magic loop. We're going to do our
six single crochets into that specific space. It takes the place of
that magic ring method, inserting your hook into
that chain two space, you're going to single
crochet six times. That's 12,345.6 Again, it gives you a similar
finish as the magic ring. You can tug on that initial yarn tail to make that hole a
little bit tighter. You can even weave that end in and close that little
gap if you'd like to, but I just find it a little
bit more secure than a magic ring and I just
prefer that method. It's up to you though, Either way, they're both really great.
4. Stitch Continuous Rounds: So we're going to begin
doing continuous rounds, which is also called
spiral rounds. If you've ever seen an
Amiga Rumi pattern and you're thinking what
is a continuous round? What is a spiral round? They're both the same, It just means that we're
working in the round. So working in circles
without joining, you will find joined rounds
in the Amari pattern, specifically in
the bauble rounds where the sheep texture comes in and in the sweater to get crisp edges on those
color changes. But for the face,
the ears, the tail, and the bottoms of
the sheep feet, those are all spiral rounds. It's a great way to
learn both methods. You'll need a locking
stitch marker for this portion of the pattern. I'm working in an
alternate color from the face of our sheep, but you're going
to be working in that dark gray
pattern for his face. Now that we have our six
single crochets into the ring, we're going to
continue in round, spiral rounds by doing
two single crochets. In the first stitch, 1.2 you're going to use your
locking stitch marker to mark the first of
those two stitches. As your work progresses, you're going to move
that stitch marker up to the very first
stitch of every new round. Continuing on, we're going to do two single crochets in
every stitch round. That would make 45.6 7.8 9.10 and 11.12 You can see we made it
all the way back around to our locked
stitch marker. You can pause here and count your stitches by looking at
the tops of the stitches. There should be
two sideways bars at the top of every
single stitch. You can see them here,
they look like sideways. You can count your
stitches at the top of each stitch to make sure that you have the correct amount
of stitches per round. That's a great tip
going forward, just to make sure that you have the right amount of stitches for every row before progressing
to the next one, we're going to unlock
the stitch marker. In the next stitch
we're doing round three which is two single crochet
in the first stitch, pick up that locking
stitch marker and put it in the first stitch
of the two to mark the beginning of your
round so you know where to stop when you go all the
way around in a circle. The repeat on this is two single crochet
in the first stitch, single crochet in the next, we're going from 12
stitches around to 18. This is multiplying
in multiples of 62 single crochet
in the next stitch, single crochet in the next, two single crochets
in the next stitch, and single crochet in the next. We're repeating that
all the way around. Now that you know how the
face piece progresses. It's the exact same beginning as the ear and the bottom of
the feet and the tail. They're all the same
method and they all start in the exact
same amount of stitches. They will end in different
amounts of stitches. Though at this point though, I would really love
to show you a couple of my favorite
methods to decrease. Because there is a little bit of decreasing happening
in this pattern. There are two really
great ways to decrease. One of them is the
standard decrease, which is called a single
crochet two together. Now what does that mean? It basically just
means you're taking two single crochets and joining them together
into one stitch. And it's a decreased method to reduce your
stitch count by one. The way that works is you're
going to next two stitches. You can see the tops of them. Here you're going
to insert your hook into the first and
draw up a loop. You're going to insert your
hook into the next and draw up another loop so that you have three
loops on your hook. You're going to yarn over and draw that through all
three loops on your hook, and you've decreased your
stitch count by one, creating one stitch top. I'm going to take that
out and I'm going to show you a different
method which I love, which is called the
invisible decrease, where the single crochet
two together leaves a little bit of a visible
texture on your crochet. An invisible decrease
is just that, it's very hard to see. It creates more of
a polished fabric and is great for Amiga Mi. The way that that works is we're going to be working
in the front loops only if you tilt your stitches towards your face, you'll notice that again, there's those two sideways
V's of the next two stitches, they're almost like 2 bars at the top of every single
stitch that look like a V. We're going to be working
in just the front loop on of each of the
next two stitches. Again, we're taking
these two stitches and turning them into just one. An invisible decrease
works like this. You're going to insert your hook into just
the front loop, only through the front of the first stitch piercing
from the front to the back. You're also going to do the
same in the next stitch. Rotate your hook down and punch through the front loop
only of the next stitch, just like So you can see the front loop only of both of these single crochets
are on my hook. You're going to yarn
over and draw through just those front loop stitches and finish your single crochet. It's just a really
great method to join those two crochet
stitches together without leaving as much of a
bump in your decrease. Now that you've learned how to use two different
starting methods, you've learned how
to increase how to work in continuous
rounds or spiral rounds, use a stitch marker to
keep track of your rounds, and you've learned two
different decrease methods. You are good to go for the
remainder of the sheet.
5. Create a Flat Edge: Now that we've talked about
the face of our Amigarumi and working in spiral rounds
or continuous rounds, the face, the ears, the bottom of the
feet, and the tail are all constructed
very similarly. The only difference
between them is that the ears have a final round that creates a bit of a flat texture that makes
it easier for sewing. I'm going to show
you that right now it's easier when
you have this done, to sew the ear to the
body of the sheep. This is why we're
going to take a look. You can see here that I have an ear ready to go up
until the final round. Going to do the final
18 single crochets. Around the first single crochet, you're going to take your locking stitch marker
and mark that stitch. We have our first single crochet done and we're just
going to single crochet around the ears of our sheep. And the tail of our sheep
are worked in the round. And they do have a little
bit of proof to them, but they actually don't
have any stuffing inside. They're meant to
be squished flat. That's what this final round
is going to facilitate, along with an easier
edge for sewing. We're crocheting
all the way around our ear to the final part. When we get to our
locking stitch marker, we're going to remove that. There's our final
single crochet. Remove our locking stitch marker and just set that aside.
We won't need it again. Here's where we're going
to take something that is an open circle and turn
it into a flat top. You're going to slip stitch in the next stitch you're
going to chain one, then you're going to rotate so that your slip stitch and
chain one are off to the side. Pinch your piece shut evenly. This is where we're going
to single crochet through both thicknesses to create a flat edge on the
top of the ear. That means that you're going to single crochet nine stitches. We have 18 around in this round, but we're going to turn
this into a row of nine. You're going to
insert your hook into the first single crochet all
the way to the other side. If you rotate your work to face your face through to the other single crochet
on the other side, almost acting as if we're
joining two pieces together. We're going to single
crochet through both of those thicknesses to create a
single crochet raised edge. That was the first
we're going to do that. Again, punching through
both thicknesses of each of those
single crochets, bringing the yarn through, and single crocheting,
we're going to do that nine times
through both thicknesses, all the way across.
That is 345678, And when you get
to the final one, it's hard to see, but you can insert your
hook at the side of the single crochet just to give that last
single crochet an edge. And that's nine. Here's
where you would fasten off, so you would slip stitch and
draw that loop really high, and fasten off and leave
a yarn tail for sewing, because we're going
to use this yarn tail to sew our ear to the sheep. Now that we've
learned how to create that flat edge for
the ear and the tail, we're ready to
begin the fun part which is the body of our sheep. There are popcorn stitches. There's post stitches
where his sweater begins and there's also color
changes. So let's get started.
6. Add the Popcorn Texture: This is my favorite part
of this Amigarumi sheep. The body of the sheep is
made with popcorn stitches, which is one, a really fun name, but two, an excellent
texture for a sheep. The rounds are worked
in joined rounds, so that means that
we're going to be slip stitching at the end of
every round and chaining one to be in a new
round that's to create an even change because we're using so much
texture in this round. And also it leads into the sweater which is
worked in color changes. Again, it makes for
just a crisp bird. Look, the spiral ends now
and the joint rounds begin. You can see here
on my sheep face, I've worked the beginning
part of his nose and I've done the first round
of our second color. Normally for the rounds we would have been continuous spiral. We would be working on top
of the next single crochet. Instead, we're going to
be joining this round. You're going to insert your hook and slip stitch this round shut. Once you've slip stitched, we're going to begin
our popcorn stitches. We're going to chain one half double crochet in
the first stitch. Just as a reminder, the chain one at
the beginning of this round does not
count as a stitch here. And throughout next we're going to learn how to
do the popcorn stitch. The popcorn stitch is
really fun because it's just five double
crochets that are cinched together to
create a massive texture. We're going to do five
double crochets in the next stitch, that's 1,234.5 Here's the weird part
about a popcorn stitch, you actually have to
remove your crochet hook. Now you're going
to draw your loop. Your working loop up high enough where it's safe and
you won't lose it. We're going to count back to
our first double crochet. You can see here the tops
of our crochet stitches, there's 1,234.5 You want to insert your hook into the first of our five
double crochets. You can count backwards from
the last one that you did. You're inserting your
hook from the front to the back and picking
up your dropped loop. Once you have your drop loop secured on your crochet hook, you're going to draw it through that first double crochet
and pull it tight. What happens is all of
those double crochets singe together to create that
wonderful popcorn texture. Let's take a look at that again. We're half double crocheting in the next stitch and doing a popcorn in the
next popcorn is five, double crochets all worked
into the same stitch, that's 34.5 Draw your working loop up really high so that you don't
mistakenly pull it out. Count back to the first
double crochet. That's one. Again, when you're counting the one where your
yarn is coming out of, that's your first one
to start counting from 1,234.5 Insert your hook into the first double crochet
from the front to the back. Pick up your dropped working
loop onto your crochet hook and bring that through your first double crochet and pull that type, you
see that texture. It's amazing and it does look like a popcorn
in this color. You're going to continue doing the amigarumi sheep
popcorn stitches all the way around
for several rows. It does seem like a lot
of crochet stitches, especially when it is five
double crochets per popcorn. Just take your time,
enjoy the process. When you are done all
of your popcorns for this little section
of his face body, you get a break because we're
going to start the sweater. And the sweater portion of our sheep body begins
with some post stitches.
7. Start the Sweater: I'm going to show you,
on this little sample of our sheep here, how to do the post stitches for the collar of our sheep sweater. It has a ribbed texture
and it's made using front post half double crochets and back post half
double crochets. So on my little sample here, you'll notice that
there's only one round of popcorn stitches. And again, that's just
because it's a sample, you will have done
several rounds of popcorn stitches and you'll become very familiar
with them by now. So we've joined our round of our first color here
of our sweater. And this is the color that
the color is going to be. So whatever colors you're making your Amigerumi sweater pattern in this one is going to
be the most dominant. It lasts for the longest
on our sweater pattern. So we're going to, again, we change our one and that
doesn't count as a stitch. We're going to be working
in post stitches and it begins with front post
half double crochet two. So here's what that looks like. You're going to yarn over. Insert your hook from the
front to the back around the post of the first
stitch yarn over. And draw up your
loop and yarn over. And draw through all three.
And we're going to do that again for the second front
post, half double crochet. The post is popping
forward as you're bringing that hook under it from
the front to the back. That's front post half,
double crochet to. Now let's do the back post
half, double crochet two. Rather than putting our hook in from the front to the back, we're putting our hook in
from the back to the front. Bumping that post backwards,
you're yarning over. We're going from the back of our work through
to the front. Punching that post backwards, or bumping it backwards. Yearning over and
drawing up your loop. And then yearning over and
drawing through all three. Let's do that again.
We're yarning over for our half
double crochet, Inserting from the
back to the front, then to the back again,
yearning over and drawing up that loop and yearning over and drawing
through all three. It's a little bit hard to
see in the first round, but as these rounds build
on top of each other, that rib texture
really begins to show. Let's do a few more. It's front post half
double crochet two, then back post half
double crochet two. You can really see those
front post stitches pop forward because the
back post stitches are really bumped backwards. If we take a look at our
amigarumi sheep here, those post stitches become more evident the more rounds of
his collar that you do. Our postages are ready to go and we're ready to work
on the join stripes where there are some color
changes happening and some really fun methods to avoid attaching your yarn several times. I'm going to
show you that now.
8. Create the Stripes: On my sample here
you'll notice that I have his little
beginning of his face, one round of popcorn stitches, and his collar has
magically disappeared. With the magic of technology. The post stitches are gone. But this is to show you that the color change
section is about to begin. I'm going to be
doing two colors, the actual sweater
has more colors. And I'm going to just show you the different
joining methods and pickups for how to progress
in all of those colors. On the sweater
portion, I've done a round of this red color in his sweater body and
I'd like to join a new color and work in this gold color for the
next stripe of my sweater, I'm going to get my
yarn at the ready to crochet and simply
draw it through. Join my slip stitch
and chain one with it. I'll show you that
again, without having a slip knot on your hook. You're going to insert your hook into your
slip stitch loop, your joining loop from
the previous round. And just simply draw through the new color like
so and chain one with it and that'll secure it on when you've done
your chain one, you can pull on the
unused drop color to tighten it back up. Then I like to
single crochet over those two ends for the
very first stitch. The very first stitch
of our new color is going to be here. You can see that I'm putting the two tails over top
of my hook in the back. That's just to secure
them a little bit better. The red color will be
available to pick up again. When I want to change colors, I haven't fastened it
off, I haven't cut it. I'm ready to work my next color. When this round is over, I can pick the red
back up again. When you do your
first single crochet, you can pull those
two ends again, it becomes almost like
a seamless color join. You can't really tell that
there was a jog there at all. You're going to work
your new color. You don't have to crochet
over the ends anymore, you would just work your
regular single crochets around. Again, my sample is a
lot smaller than yours. Your body of your sheep is
going to be a lot bigger. You can use as many striped
pattern colors as you like. You could even do the sweater
in one color if you're not interested in having all of these different jogs of colors, or you could even
do boulder stripes. You could do one or two
rows of the same color, just pretty much
have fun with it. The sweater is the funnest
part of this sheep. You can really make it your own, and I'd love to see what colors and striped patterns you choose. We're going all the way
around with our second color. When you get to the end, you can drop this
color and pick up your unused color without having to cut anything off so that you can use it again
if you'd like to. When you get to the end
of one of these rounds, you can see here, this
is my last stitch. It's very easy in joined
rounds in single crochet to mistake the final slip
stitch join as a stitch. Don't confuse the slip stitch join as a final stitch
space to go into. Whenever you're in doubt,
count your stitches around in that round
and make sure that you have the right amount
so that you don't add an extra stitch by going into that slip
stitch mistakenly. I have one single
crochet left to do. I'm going to join my
round with a slip stitch. Here's where you can pick
up your unused color, you can drop the gold, pick up the red, draw it
through and chain one, just like we did
when we were adding the gold in in the first place. Once you have that joined on, you can pull the gold tighter when you do your
first single crochet, single crochet over
the dropped gold color to secure it a
little bit better. You can see here that it's over top of my hook in the back. And you're going to single
crochet over top of it with your new color and pull it tight just to make it a
little bit more secure. So I'm going to show
you what all these color changes look
like on our sheep. They're not invisible,
unfortunately, but they are a lot cleaner. The reason that we
work in joined rows for the popcorn stitches
and the sweater is because although
these rows are nice and straight around
the tops of the sheep, if you turn the sheep over, there's still a
really visible seam that runs along the first stitch and the last stitch
of the sweater. And you can see
this little bit of a raised edge along
the sweater rows. We're going to make sure that that's at the bottom
of our sheep, hidden between the legs of
the sheep the entire time. Now that you have
all of those pieces, let's work on sewing everything together and finishing
up our sweater sheep.
9. Assemble Your Amigurumi: Now that you have
all of the pieces ready for your sweater sheep, it's time to figure
out how to add those pieces onto the
outside of the sheep. The ears, the tail, and the feet are all hand sewn to put the
amigerrumi together. So let's take a look at how to sew those on using
surface stitches. So we have the ear, for example, and it's ready to sew with
the long yarn tail that we left at the end of the seeming row here to
make this piece flat. We made it flat so that
it's easier to sew on. We have our yarn needle ready to go when you're sewing
the ear onto the sheep, and we'll bring the
sheep back here. You can see that the ear
is going to be sewn onto those popcorn stitches and
it's not a flat surface. How would you sew that on? It's basically just using
a surface whip stitch and using those popcorn stitch textures to attach the yarn
as cleanly as possible. There's no really
rhyme or reason to it other than just
getting secure and trying to make the stitches
as invisible as you can with your yarn needle and
lining it up across the appropriate popcorn stitches indicated in the pattern. You're going to be
sewing your ear on an angle across
a number of rows. And I'll just be
showing the demo across one row of popcorn stitches here just to show
you how it's done, you're going to insert
your yarn needle through the bulk of one of the stitches and pull
it as tight as you can. Go through a single
crochet of the ear. Again, go through the
top of a popcorn stitch. You're just going to
do this as many times as you need to along all of the single crochets
to secure the ear on. It's more about securing the ear across each one
of these single crochets, Then worrying about where you're punching in on
the popcorn stitches. The popcorn stitches
aren't really the important part as you, So you'll notice that small flex of white from
the popcorn stitch, we'll jet out a little bit. But that's unavoidable
when you're sewing a flat surface
to a bumpy surface. When you are sewing the feet
to the bottom of the sheep, or even the tail to
the back of the sheep, you'll be able to sew
to a flat surface and it's a little bit
cleaner of a join. You can take a look here
that the tail is sewn to the flattest part of the back of the
sheep where there's no more popcorn stitches left. The join is a
little bit crisper, especially when you join the feet to the bottom
of the sweater. You're sewing a flat
edge to a flat edge. Still using that exact
same technique of punching into the fabric
from the surface and whip, stitching those seams shut. Once you have gone
all the way around your piece or across
the ear or tail, you're going to make a
knot and then simply punch your yarn needle
into the fabric. You can go through
just the middle, or you can even punch all the way through the
body of the sheep and give it some space to be left behind inside
the body of the sheep, and you're going to
snip the yarn tail to get rid of that end. The longer that
you leave the end, the less likely it
will be to come out in any cuddling or
anything like that. Hiding the tails inside the body is a great
way to secure them. Your sheep will be all sewn together and he's ready
for a good squeeze.
10. Final Thoughts: I am so excited for you to make your own sheep in a sweater and see all the
amazing colors that you choose. We learned how to work in
continuous spiral rounds with a join of the magic loop
method, or a chain method. To begin, we learned
the popcorn stitch, which has a tremendous
amount of texture. We learned the post stitches on his adorable sweater collar. And we learned how
to make beautiful joined for these color changes. And how to pick up and
drop unused colors. And how to put everything all together in a nice
finished, polished piece. This sheet looks a little
bit more intimidating, and if you have any
questions at all, this is a great
community to ask. So be sure to drop your questions in our
discussion board attached to this class and we'll
help each other out and make sure that everyone ends up with a beautiful sheep. I can't wait to see yours. So be sure to share it in our project gallery
attached to this class. And if you'd like
to share it with me on my social media,
you can tag me. I would absolutely love to
see your sheep in a sweater. Thank you so much
for joining me for this class. Happy crocheting.
 Lee Sartori, Crochet Designer