Transcripts
1. Intro and Class Project: Hi, my name is Jennifer Rice. I'm an artist and illustrator here in the Pacific Northwest. My love of mushrooms started
when I was a kid and my dad would take me mushroom hiking in the
foothills of the cascades. Every fall we would go out
and hunt for shock trousers. I continue this tradition
with my children and these times are some
of my fondest memories. I love mushrooms so much. I even have an entire
sketchbook dedicated to them. In this class, I show you how
I break down the parts of a mushroom composition
into Easy Pieces with this unique creative
sketchbook technique, it's easy to create compelling
artwork and sketches. I've created a
workbook that walks you through each
step of the process. You will learn each part of the mushroom and all of the
different characteristics. You'll practice brainstorming
and adding fun details and work on composition for
your final project. I want you to put it
all together and create a finished sketch using everything that you've
learned about mushrooms. For this class,
all you will need is a piece of paper
and a pencil. You don't have to have
a dedicated sketchbook, but you can, if you'd like. You can also download and print out the workbook and
work directly in that. Or you can leave it online
and use it as your reference. Come join me as we explore different combinations of
mushroom compositions.
2. Mushroom Anatomy: We're gonna be going over the mushroom anatomy and the
structure of the mushroom. I'm going to break down the mushroom into
all of its parts. Not every mushroom
has these parts, but it's helpful to be able
to recognize all of these so that when you are identifying mushrooms or you're
drawing mushrooms, you know what parts
you want to add. We're gonna get the general
outline of the mushroom here, and we're gonna start
here with the cap. This is the part of the
mushroom and we're gonna be going over the different
shapes later on, I have a very handy diagram
that will cover all of this. But for now I'm going to do the universal mushroom shape
on top of the mushroom cap. Sometimes we'll have
ports or scales, and these can be created as the mushroom is opening
up and expanding, it creates these really
fun little spots here that are really fun to add. In the typical mushrooms
sketch that you see everywhere with the red top
and white spots. That's what goes on top. Every mushroom
down below the cap is gonna have some
type of scale. So we're gonna add
that in right here. And these are the gills. We have the ring skirt. This can go either up or down. You're going to
draw it down here. It is actually a remnant from a partial veil that once covered the mushroom skills in it
pops off and hangs out there. We have the stock, sometimes it's called the
stem or the style of. These can be all different
sizes and shapes and textures. I do have a diagram that breaks
all of this down for you. Below that we have a vulva. It's the remnants of
a universal veil. And not every mushroom has them. Sometimes it's fun to
draw the little roots that are attached to the
mushrooms when you pick them, sometimes you'll still
see the mycelium. Those are just the little roots. This diagram is helpful for recognizing all the
parts of the mushrooms. You can practice drawing it, or you can keep it handy
for yourself as a reference so that you understand
the anatomy and the structure of the
mushroom moving forward, neck, the shapes of
the mushroom caps.
3. Mushroom Caps: The first thing that
we're gonna cover as we break down the
mushroom anatomy and I give you all the parts and pieces to create
your own Mushrooms, is we're going to cover the variety of shapes that
mushroom tops come in. The first mushroom
we're going to cover is the typical mushroom that you see when people sit
down to draw mushroom, It's the convict shape. The next shape is the
hemispherical shape, and it's more round. And that makes the mushroom
a little bit thicker. We have the spherical shape, like a little ball on
the end of the stem. This next shape is really interesting. It's
called umbilicus. If you think of an umbilical
cord and your belly button, There's a little
divot in the top. You want to make sure that
you get that in the shape. We have an ovoid shape. After that we have an uplifted. This means that you
can see the gills, the top can be flat with
the uplift to cheat, it can be funneled, which we'll
go over in just a moment. We have an unbind eight next, which is kind of
like a little hat. Love these little
mushrooms and make these a lot in my sketches. And you'll find your
favorite shapes as well. As you practice all of these
two out into your sketches. We have the flat shape up next, which is a thick flat cap. Next we have the funnel
shape and that is uplifted, but it also goes
down in the middle. So if you've ever it looked
at Sean trails are eaten, John Charles, you'll see that
they are the funnel shape. Then we have the depressed
shape which is like flat, which is kind of in-between
a funnel and uplifted. It's not totally funneled in, but it has a divot in the top. The companionate. Love these little mushrooms. They look like little
mushrooms to me. We have this really
ruffled edge here. We have the soul injury, which is like a bullet shape. Then we have conical shape, which reminds me
a lot of cardiac. Up next we're gonna cover words, scales, different types of
gills, and linked skirt.
4. Gills and Ringskirt: The next portion of this chart is the warts or the scales. We can choose to add
these or leave them off. And I'm going to show
you what they look like. Warts are more raised and they
are a kind of a 3D shape. They have a little
bit of a shadow and they're just
a little oblong. Scales on the other
hand only lift up off the mushroom
on the bottom side. So you're not going to
want to draw the top mark, this little squiggly
lines just like this. In mushrooms, you'll see three
different types of guilds. I'm going to cover two here. Toothy Gil is not as common. When we're looking at
the shapes of the gills. There are a variety of
ways to draw the lines. When we look at the underside
of many types of mushrooms, there's a variety from very far apart to very fine and tiny. Let's draw those out. In this first section. We have gills that are
similar to Sean trials. They're very far apart and
they're a little bit forked. The second section here, they are a bit closer together. The third section, they're
even closer together. And this last section, they're tiny, they're so fine, you can barely even draw them. Then when we look at the
underside of some mushrooms, we see pores instead of gills. There are three distinct
types of pores. We have larger pores. We have medium-size, and
then we have very fine. Again, let's take a
look at the chart here. As far as the ring skirts go, There's a wide variety
of ways to draw these, but we're going to focus
on the direction today. I'm going to draw one of
these rings group is pointing down and one of these
rings skirts pointing up. I've included all of these
things in the chart. And when you go through it, it will be really
easy to pick and find the features that
you want to add to your mushrooms can be pointing in any
different direction. So let's look at what
that looks like. When we have our
gills pointing down. We want to start our Gil lines from the middle and
point them down. You can see they're radiating
out from the center. And it really gives
that illusion of depth going up into
that mushroom cap. When we have the
gills pointing up, you're going to want
to leave a little semicircle at the
top of the stem right here and point the gills up from that
to the mushroom cap. I've also included
the flatness in here, which is in-between down and up, and has the same
concept as well. Next, we'll cover all
the different textures and shapes of the stamp.
5. Stems: Alright, so I have your chart
here that I created for you and we're now in the
stem size section. I'm not going to draw those out. You know how to draw small, medium, and large stems. Let's work on the stem textures. The first kind of texture that is very predominant
in mushrooms. We're gonna be looking at
the scales on these stems. They can come in small, medium, large,
anywhere in-between. I'm going to show you
what that looks like. They point up and
they point down, choose which way you
want them to go. There's a variety of
ways to draw them. Here's the small ones
pointing up and down. Then we've got medium. With this one, I'm gonna grab my pencil here and show you, it's easier to sketch
these out with a pencil first if you're going to
be adding these scales in, because the edge of the
scale is going to overlap the edge of the stem to create the look of depth that
we're looking for. Drivers scales first. Then you can draw out
your edges right here, like how I'm doing. This gives just a little bit of extra volume and depth
to your sketches. Let's try pointing down. Same technique here. I've got my pencil
doing the edges, little squiggly lines here. And then what I'm gonna go, I'm gonna go back
over it with my pen and just really
define these skills. Last one, we've
got large scales. Same idea as before. I'm going to get my pencil and I'm going to
sketch out my scales, really sticking them out from the edge so they look
like They're flaring out, kind of peeling off the
edge of the mushroom. Then again, I'm going
to go back over with my pen and define. Is there a little bit better so you can see what's going on. Moving onto some of the other
stem textures in the chart, we've got our vertical lines. When I'm drawing my
vertical lines here, I like to leave a
little spots where the line doesn't continue on. It gives variety and texture to the stem that you wouldn't get if you were just drawing straight
lines up and down. Try to be random as I'm leaving these little gaps and just
really adds something extra. Next one you can do
something similar but make the chunks a
little bit shorter. This kinda keep gives it
more of a scaly look, just a different look to your mushroom so you
can mix it up and make the stems look
different and not do the same texture on
all of the stems. This one here, I've got curving, the contour lines a little
bit around the stem. This works really well
on the skinny stems. I liked putting them on there. I don't have a lot of
room for other texture, but this still gives you
an idea of the shape of the stem and gives it some
form, texture and variety. Then this last one here is
more stylized version of maybe skills or just
a way to fill in the stem without having to think about what attributes are doing. Next. When we look at the chart, we have our stem shapes. So let's go over them. We have our tapered stems. A good majority of mushroom
stems are going to taper off. There gonna be a
little bit wider at the bottom and they
are at the top. If you're ever in doubt, draw a tapered up with the
bottom pattern than the top. However, they do taper down with the top being
fatter than the bottom. There's also a stem type
that's routing that tapers down and actually
goes down to a little root. Next we have the bulbous shape, which comes down
and then widened significantly at the
bottom like a bulb. Then we have the club shape, which is similar to
the bulbous shape. Finally, we have the equal stem, which doesn't change in
width on its way down. It is the same as the top as
it is down at the bottom. There's a lot of
variety you can add to your stems that creates a
lot of wonderful mushrooms. Up next we're going to cover
the vulva and the mycelium, which finishes the very
bottom of your mushroom.
6. Volva and Mycelium: We've got our full vi here, which some mushrooms have
in some mushrooms down, I've often is a remnant
of the universal veils. But when it was opening up, part of that covered
the whole mushroom. And as it opened up
fruiting, it split. And when it's sitting
down there at the base, That's what that is. Not all mushrooms have them. It's a little cup down there at the bottom
of the mushroom. You can also choose
to add the mycelium, which are the little roots. Sometimes when you are out
mushroom hunting or you pick some muffins that they still have those fine little
roots attached. Now that we've covered each
part of the insurance, I hope you have a good
working understanding of how to put together
each of these shapes. Don't forget to
download the workbook and practice in the areas
that I have created for you. Up next, we're going to go over some added details
that you can add to your mushroom sketches
to add interest and details to your
final composition.
7. Adding Fun Details: I put together a
sheet of some of my favorite details that I like adding to my
mushroom sketches. I'm going to go
over a few of them, but absolutely come up with your own doodles and details
that you like adding. Feel free to create
your own page that has your own design elements that you can refer to
again and again. I'm gonna go over a few of my favorite elements and
give you a few examples. I like drawing leaves and
grass and little flowers. I like drawing little branches. You can have your leaves
opposite each other, or you can alternate
them on the stem. For added interest. When you're drawing your leaves, you can make some
leaves go up behind. Some other leaves. Make little acorns, grass, or even this little pine branch. Some animals are also fun to
add into some compositions. I'll show you my favorite
easy way to add a fraud. Of course, you can
also add snails. And I like adding bugs. Remember that your
sketches don't have to look perfect when
you first sketch them out. But the whole point of
having a sketchbook, crystals are really
fun to add in. And when I add a crystal
in to a composition, I like to tuck it back
behind the mushroom. The mushroom is the main
part of the composition. So I'll stick it off of
the edge of the mushroom, kind of like this and then add my additional
elements around it. Another thing that's really fun and pretty important to know how to draw when you're
doing mushrooms is Moss. There's a high
chance that you're going to want to add Moss At some point to some of
your mushroom compositions. Here's some of my favorite
ways of drawing moss. Last what I want
to go over because it can be a little bit more
of a complicated shape. Or some feathers. Feathers are really fun
to add in the background. Down on the ground. They're just a really
great design element that really catches the eye. So when you're
drawing a feather, it can be easier to
draw it in with pencil first to get the general shape
and then add your details. And then with my
pencil we're going to draw a V from the bottom. We're going to come up
and then taper and then do another inverted
V at the top. This is going to be our
general feather shape. Then when we go
back in with pen, we can add the extra details. Let me show you that again. You can have the feather V up from the shaft and
B flat on the top. One more shape
that's really fun, is kind of a more
downy feathers. Again, we're going to start with the shaft and we're going to get the shape of the feather again with
the V at the bottom, coming straight up
and a long tapering down and then coming
to a point at the top. Then when I go over
it with my pen, I can add all sorts of feathery light details in there that I know exactly
where my pen needs to go. On the sheet of paper that
I've provided in the workbook, I want you to fill up
your page with all of the elements
you would like to add to your mushroom drawings. This gives your brain
and easy reference for when you're sketching
out your composition. Sometimes it's easier to
just pick and choose, but we've already drawn
what we already know, been trained to come
up with something from scratch every time. Up next, let's take
a closer look at perspective and cross
contouring of the cats.
8. Cross Contour and Perspective: Let's take a look at
perspective and cross contour. Here I have in front of me
piece of paper that I've drawn some of these
ovals and circles. Now they're identical
on each side. And I'm going to show
you how we can do two different perspectives
with the same shapes. I've drawn the arc for the
mushroom on both sides here. But the key is where
I draw the stem. If I start the stand from
the bottom part of the oval, it looks like the cap is
pointing more towards me. Whereas on the left-hand side, if I start the stem on the
upper part of the oval, it looks like we
can see underneath the gills and this is an
important distinction. And I have a whole page
that you can practice this. I'm gonna make the same marks on each side for the
top of the mushroom. But again on the left
side we are rotating it up so we're looking
underneath at the gills. And on the right side we
are rotating it down. So we're looking more
at the top of the cap. So these stems on both sides are starting
from the same point, but when it's underneath
and one is on top. Accreted this handy cutoff
for you to help you see the perspective of
where the lines need to go. So I have this one
cut out right here. And I'm going to show
you how you can do this. You can make the gills pointing down or you can make
the gills pointing up. I'm going to fold
it over like this. And I'm going to take
the back this way. Whenever I rotate it. I can see how the gills are radiating out underneath
the mushroom. This can help me reorient my perspective of where
those skills needed to go. For those uplifted mushrooms. You can flip it inside out. You can see the same thing. So if we get this taped right
here and I fold it over, you can see how the gills
would be going radiating out. And right here is where
the stem would be. As I rotate it, the
lines change in. This can help me get the correct perspective on the mushroom I'm trying to draw. So don't forget to
print that out and cut it out and use it
as your reference. Okay, so back here, we've got our gills thinking about the cutoff that
we just looked at. We can start our girls
depending on how deep our mushroom cap is, we can start him from one
of these center points. Now this is a deep mushroom. So we're gonna be starting
this from up here. You can curve your lines or you can have
them be straight. Okay, now down below it's rotated it up a little bit more. We're gonna be seeing
more of these gills. So the starting point is right here in the
middle of the stem. You're going to want to radiate your Gil lines out from
this invisible point. In creating some
guidelines for myself to keep myself on track as I go around and create these gills. And down here, again,
it's the same thing. If we were drawing the semicircle and the
inside of the stem, there's the middle of
the stem right there. We're going to radiate, are
gills out from that point. Again, I'm drawing
these guidelines to keep myself on track. Now this is just flat, looking straight up at us, like the stem is cut here. So these are all
going to radiate out from the center again. If we're looking at the cap and we're having it pointed down, Let's imagine that there's some marks right
here at the top. As it rotates down towards us, those marks are going to move. Let's imagine the stem is ending right here in the middle. I'm sketching it
in here so I can reorient myself
where the center of this cafes and this is
where those marks would go. Don't forget to practice
in your worksheet. You can copy these lines. I also have a blank sheet
that you can work on. Now we're moving on
to cross contouring, little bit of a
crash course here I have a template that
you can take a look at. Let me quickly show you
how to practice cross contouring so you can define
the shape of your mushroom. If you can imagine these lines when you're painting or drawing, if you've practiced them enough, then you know that's where you can paint along these lines and draw along these lines to give your shape more volume. When you print this page
off from your worksheet, go ahead and draw right
on it to practice. My lines are following the shape of the cap
as it goes down, as well as the stem. It's important to note
that when you get to the edge of a shape
on the elevation or the edge starts to
change dramatically that your lines are going
to get closer together. If I wanted to show the edge of this mushroom changing more
dramatically than it is, I would have my
lines a lot closer together, kind of like this. Okay, moving on to this section. This is very similar
to a sphere, like a half a sphere, a draw my line down the
middle and then I draw my curving lines
radiating away from that. If I want to show
elevation change, I'm going to put my contour
lines closer together. Now across the top of the cap. Again, I'm showing the shape of that cap with these
curved lines. So go ahead and practice on
these contour drawing is definitely something
to practice and learn. This is a crash course in some of these shapes that
you'll find in mushrooms. But it only takes a
little bit of practice to get a solid understanding of
how to make these shapes. Up. Next, let's take a look
at some easy ways to use simple shapes to create
eye-catching composition.
9. Composition Practice : This section is all
about composition. In your workbook, you'll find a page with empty templates. You can practice adding
in your elements there. Let's walk through
each of these shapes. Let's take a look at this oval. It's important to remember
that with these shapes, these are just guiding
where you're putting the major elements and you don't have to keep
everything within the sheet. It's a good idea to point elements of your design
pack towards each other so the viewer's eye follows the direction
of the shape. I love adding small
surprises like this frog. We have an inverted triangle, and we have a regular triangle. Mushroom compositions are
frequently found in the shape. As I'm building out
my composition, I'm trying to keep the main
elements within my shape, but they can go over the
edge, as you can see here. The diamond shape is more
common than you think. Circles are also really
common, as you can see here. Look at those cute snails. Each time I build
up my composition, I placed my larger shapes in first and then I add my
details in around it. Here's a teardrop shape which can point in
either direction. Use these shapes as your guide to easily
create your compositions. Up. Next, I'll walk you through how easy it is to
put it all together.
10. Class Project Part 1 - Using the Chart: Now that we have gone through all the different
parts of the mushroom, I'm going to show
you how to put it all together in
your sketch book. By now, you should
have practiced all of the shapes
of the mushroom. So let's move on to putting it all together and
your sketchbook. I love mushrooms so much that I have a dedicated
sketchbook to them. You don't have to have
your own sketchbook. A piece of paper will do
just fine for this project. I have my sketchbook set up
with the disk bound system because I can swap out
pages. As I need to. I really like working
with this type of system. It can be organized
without having to actually be organized
to begin with. I also like this
system because I can cut out sketches and tape them in some watercolors
that I've done. And I got, had some
stickers here. Like I'm pretty excited and
stuck them off, you're out. These are really nice because my watercolor I can take out, I can take down, and
then they can put back into my sketchbook so that I keep everything together. When practicing
mushrooms, It's nice to have some source photographs. Will frequently
check out books from the library that have
really clear pictures. So I can look at how
mushrooms are grouped and how the colorings are on
different types of mushrooms. That's a really
great inspiration. I also like using my own
photographs of mushrooms. And I will frequently
look on Pixabay, which is a good place
for free source images. We have our chart here
and I'm going to show you a fun way to randomly
pick some of these shapes to create some unique and
dynamic combinations that you might not
have come up together. So starting here at the caps, we have 13 different
combinations. Could use dice to
choose a number. Let's get back here. We have 6123456 up with
I'll make a mark there. We could do words. No or yes. Heads or tails. Tails. Yes. Right. See what this mushroom
is going to look like? We're going to do. Her mushroom shape here. Works on the inside here. Ring skirt pointing up. Let's get that down here. Just going to sketch
that in really quick. I made my mushroom big
guilt directions up here. This is just a rough sketch, O and then we have a small stem. This used to be smaller
and it's tapered. That's actually going
to go like this. We have mycelium. We probably could have
started this one's not. This is very rough, like this just looks
like a scribble, which is how a good portion
of my sketches start out. So let's start refining this. So if we have our
uplifted and then we have rings skirt there. Let's bring this in a little
bit more here. Edges. This is a completely
random made-up mushroom. Just using this little recipe. We had enough first
stem texture. Not a goofy looking guy. This is a fun way of
just loosening up, creating new combinations that you just never would
have thought of before. Some of them will work,
and some of them will not. So let's do it again. Got my crazy dice
here. We have three. So let's try. This guy will put them up
here in this corner here. We have a sphere. Remember to leave room for
guests. Spring skirt, Yes. Stem size, medium or stems? You need to leave room for
real skirt, little rain skirt. We really can't see
the pores of this, so we're going to
leave that out. Stem texture and taper down. It looks like you should
have a little faith. Floating ghost E here. Alright, so that's one way. I'm using the chart.
11. Class Project Part 2 - Creating the Composition: Another way is to take a look
at the chart and just to remember each section of the mushroom that you
can or can't add, all of the different
combinations. And it might inspire you
to create something new. So now we're going
to use it like a choose your own
adventure mushroom. I'm going to pick the
conical shape here. And no words, no ring, skirt. And I'm not going to be
able to see the gills, so we're going to skip all
the way down to the stem. I'm going to do medium stem. I'm gonna do slightly
bulbous at the bottom. But I think I'm going to
make him with scales. So now I'm just kind of
picking what I wanna do here. It's a wonky line. So I got one little
mushroom here. So let's give him
a little friend. Ovoid mushrooms. Skinny stems here. Do these little marks here. We've got maybe one more guys back there. Let's put another mushroom
on this other side. Let's see what let's do. One of these guys,
just kinda big, he's gonna stick out
from behind here. Alright, so now we have
a couple of mushrooms. Just by looking at the chart, reminded me of all the
different combinations that we could use to make
these mushrooms. Now that we've practiced doing the mushrooms using the chart, let's work on making
our composition. So here we have our doodles. A little extra details
that we can add. Here is we have our shapes. So let's think about what
shape do we want to do today? Let's do a circle. Like circles. So I'm going to roughly
draw my circle in. Just to remember
that this is where my mushroom shapes are gonna be. I'm going to think
about what details I might want to add. I like adding bugs. They're fun. Little tiny mushrooms, plants. So now that I've looked
over all my elements, I can start choosing what
I want to have in here. When making a composition. Odd numbers are your best bet. So you're going to want to
have 357 groups of mushrooms, human eyes like looking
at odd numbers. I don't know why. It just is, Let's
do three spheres. And I'm going to do
kind of like this, getting them kinda a little
crazy, but that's okay. We can adjust that. I got three of these and maybe let's do two hats. Remember, these
are just sketches. My sketches, my initial
sketches are very scribbly. I reiterate them
multiple times before I get them to a
final composition. Alright, we got our
mushrooms here. These are cylindrical,
these are cylindrical. Let's think about how
we want to add in. I think I'm going
to add some more. I want one right here. One right here. I think I want another
one right here. Have a little tool,
little family here. So I'm thinking about what
we can add it over here. Kinda continue this shape,
continue this shape. This is a pretty big, this is our eye
is gonna go here. So maybe we should
have something pointing this direction. And maybe we can have
something just kind of here. Okay. Like in that. So
right now my eye is kinda going down like
this over and around. Feel like we need to have some
point of focus over here. We can put little
tiny butterfly here. We're kind of looking over there and things kinda
pointing at that. I can get some mass. Maybe this is the base
of my mask down here. And I think I'm going to
make some of these flowers. We've got this here. I
think I'm going to make these different
leaves than these. Almost like a firm, but not really just to
fill up that space. And here. And these guys, Let's
make these round. Know. You've already got round
shapes here. Let's do. I almost feel like we need
one more mushroom here. So we're going to
just get that guy in my eyes having a hard time
with those just those two. I think we're good here. There. That looks better. If I am just sketching
for fun in my sketchbook. I wouldn't leave
it at this point and come back to it later. However, if I decided I didn't like it and I want
it to continue it further. Now it'd be the time that I
would go start going over it. And during this stage,
I would refine it. But I would also be
remembering that this is still just my sketchbook. This is not a completed
piece of artwork. I can take this further and use it as a base
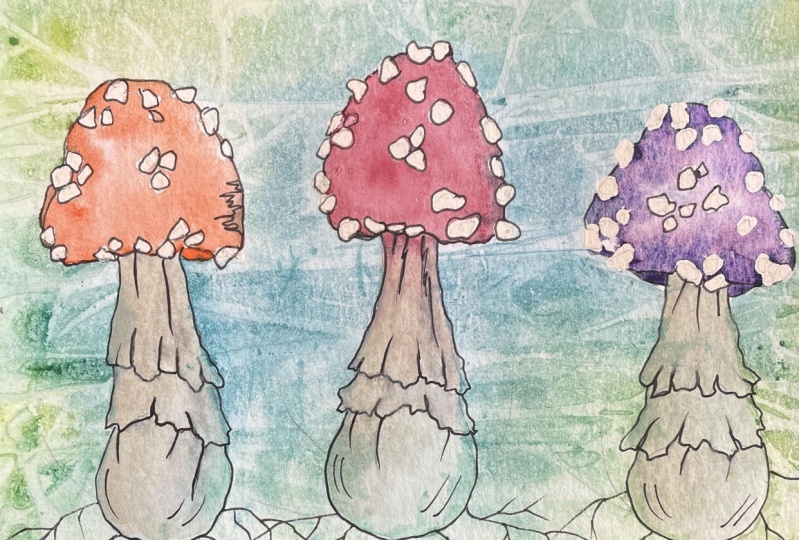
for a watercolor. Similar to what I did for here. This one was drawn, I don't know, four or
five times before I. This is the final version, but it's still in my sketchbook. This is still an idea
that I'm thinking. If I wanted to paint it later, I would again transfer
it and painted again. This one. Same idea. Did it in pencil,
went over with Penn, went in with colored pencils
to work on some color ideas, especially down in here, I really like this gray and
pink next to each other. And so if I ever
transferred this into a painting,
I would remember. I really like this section and that's what your
sketch books are about, is going, Wow, I really like it when they're
clumped up like this, that was really cool what I did or that maybe that
didn't work as well. Don't put that in
the composition. So this is how I
use my sketchbook. Sometimes I just use
it for practice. Sometimes I use it to remember
how composition looks. Lots of different ways
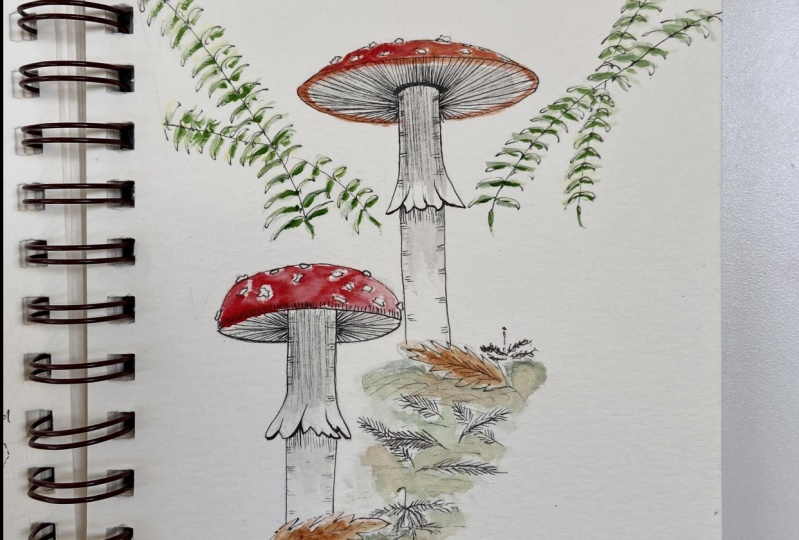
to use your sketchbook. This is, this is how I use mine. This I was just sketching from these cute little
mushrooms that were just out on this log trying to get the general idea of
them poking off there. So back to this one. Again. If you liked your composition. Come back in with pen and refined some of these
shapes that are happening. I have these, these in pen. I don't have these in pen yet. But I do want to show you
this is my favorite eraser. It doesn't tear up your paper. It's a kneadable eraser. You can get them
at any art store. There's three ways
I like using them. You can press down and just
gently lift up the graphite. You can drag it and
pull the graphite up. Or what I like using
on watercolor paper so that I don't rub
the paper at all is I actually just roll
it over the top and it will gently lift
up that graphite. This paper. I'm not
worried about it rolling. So here I am taking up
that I can still see my little more sketches
there, that layer. And then we can
continue refining this. Okay, so now we have a completed sketch
and our sketchbook. And when I go to do a painting, I can refer back to this. And I can look at all the elements that I
like and maybe continue to refine it as I go once I get to the painting
or sketching stage, now it's your turn to
use everything you've learned to create a
completed composition. I can't wait to see it.
12. Conclusion: Thank you for joining me
on this mushroom journey. I hope you have a
better understanding of all of the different shapes of mushrooms and the different combinations
that you can create. Keep using these
techniques to easily elevate your mushroom doodle
sketches and artwork. Please leave a review
so you can help other mushroom lovers
find this class. If you post your artwork on social media, I'd
love to see it. Please tag me at Jennifer rice studio
across all platforms. Don't forget to follow
me here on Skillshare. So you will be the first to know when I have
a new class out. Thank you and happy sketching.
 Jennifer Rice, Artist and Illustrator