Transcripts
1. Introduction: Hello, everyone, and welcome
to creative collage cards, exploring layers
and vintage charm. If you love mixed media, layering and working
with textures, you're going to love this class. We'll explore how to create
beautiful three inch by four inch collage cards that are full of color,
personality, and charm. These mini masterpieces
are perfect for sharing, swapping, gifting or simply keeping as unique works of art. In this class, we'll cover techniques for making custom
collage papers with paint, stencil stamps and texture, how to create a
master collage sheet. Using painted layers,
vintage papers or scrapbook designs and tips
for cutting your master sheet into three by four cards
and enhancing them with special embellishments like
fabric, ribbons and buttons. I'm Denise Love, an artist
and creative educator, and I'm excited to
bring you the fun and exciting dive into
creative collage cards. By the end of this class, you'll have a collection of
handmade cards that reflect your unique creativity
and you'll gain techniques you can apply to
countless future projects. So grab your materials, clear some space to
create, and let's dive in. I can't wait to
see what you make.
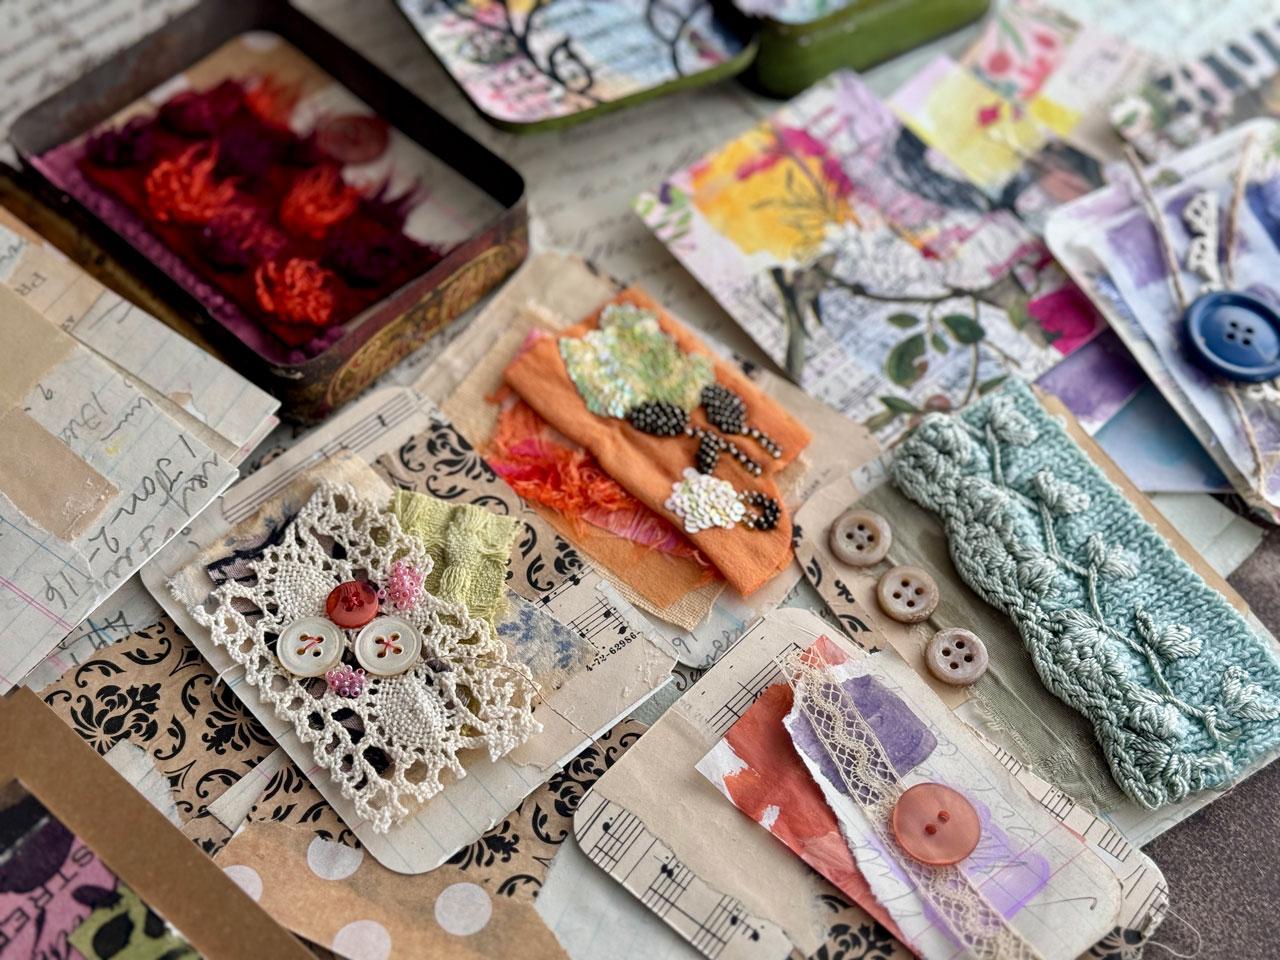
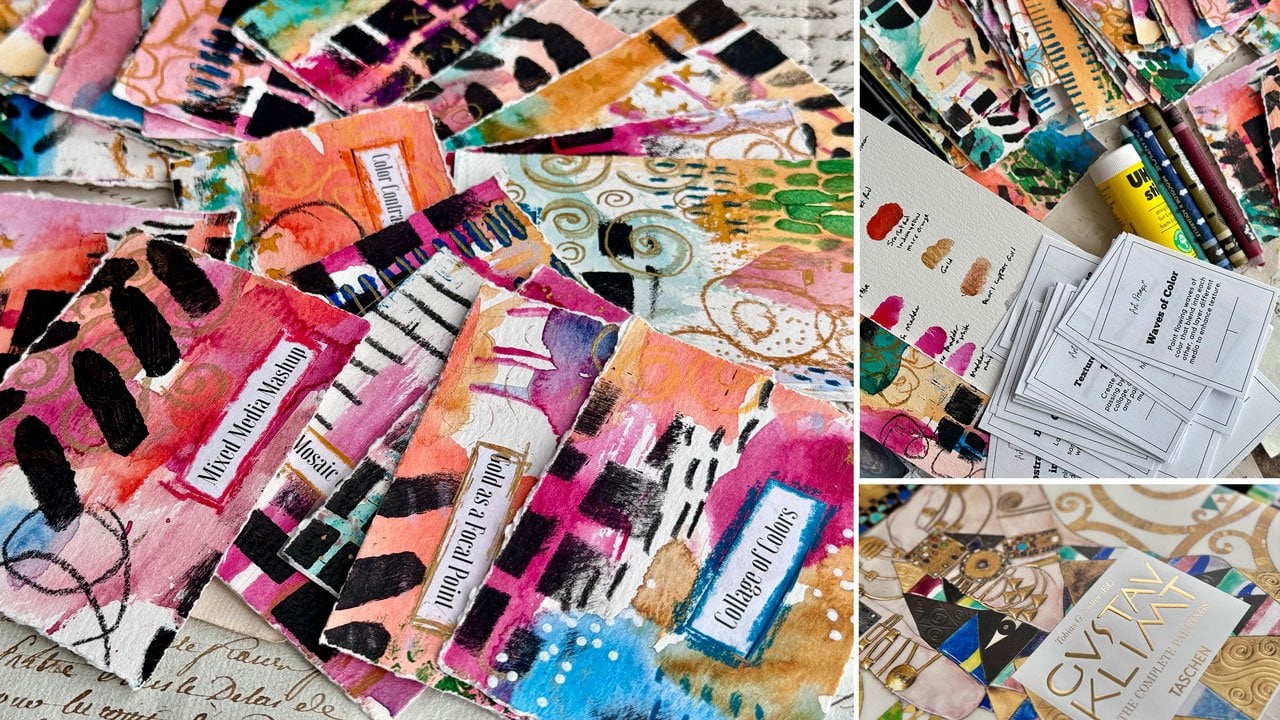
2. Class Project: Class project, you'll
create a set of three by four inch collage cards that showcase your unique
style and creativity. These cards will be
crafted using techniques from the class including
custom collage papers, a master collage sheet and embellishments like fabrics,
buttons, or ribbons. Share your work.
Pick two to four of your favorite cards
from your collection to share in the project gallery. Include a brief description of your color palette,
the materials, and anything that you enjoyed about the process. And
3. Supplies: Take a look at the supplies
that I'll be using in class, and you can take and pull
from what inspires you. You don't have to use the
same things that I do. These are definitely wide open on the selections of things that you could use
and the way that you decide to interpret
these projects. So I'm going to be using large piece of this
Canson watercolor paper. I'm using the 12 by 18. You can go larger and
use the 18 by 24 paper. If you've got it on hand, you can certainly do that. And if you've got the big
paper and you want to do a couple of different um, projects, the way
I'm doing in class, you could cut that in
half and go that route. But I'm going to use 18 by 24 because that's what
I have on hand and I'm going to be doing three
different collage papers for the different
projects in class, so that'll give me a chance
to do some different options for the way that I
collage and the way that I paint and the embellishments
that I add to it. I'm using three of
those for class. Then once you've got your paper, you can use any paper
that you want, really. That just happened
to be the paper that I decided to go
with when I got started. Now, you also need some paint. I'm using acrylic and the
color palette that I selected. I did start off with a color palette that I
liked from the color cube. Card 255 was my inspiration. I like starting out with
a chosen color palette. Before I get started and that's whether I choose
it from something like a color palette card or my own color palette
cards or the color wheel. I do like to have an
idea going into it, what's going to be
my color theme. That was the start
of my inspiration. Then I pulled my paints
and my watercolors. I did pull some
kerataki watercolors, the Ganzi Tambi from
the 48 piece set and the art nouveau set that
matched in my color range. That gave me some ideas
and got me started. And then you'll also need
something to collage on. And so I do go over several different types of collage papers that
you could use, and that includes
watercolor paper. It includes mixed media
paper, wax paper, which is my preferred
method for collaging stuff. I like the dry wax paper. We do make a bunch
of collage papers in class which we will then use in our pieces and our decorations depending
on what inspires you. This will just add to
your collage stash. Also like um, making collage papers out of old
papers and book pages. So if you've got any of
those, that would be handy. These are some
watercolor papers. I also have some of
my favorite stencils that I stenciled on to make
some of these collage papers. So if you've got some
favorite stencils, get those out, but you
don't have to have them. Some of my very
favorite collage papers are the ones where
we just paint with a brush on the dry wax
paper in a black paint. That's some of my very favorite
kinds of collage paper. It adds elements of
contrast where maybe you didn't get that element
of contrast on your piece. So the other thing I like about the dry wax paper or
vellum or some type of paper like that that's kind of a tracing paper,
any of those. T bag paper is that when
you collage them down, the paper tends to sink into the background and
doesn't really stand out. So it's almost translucent, and it lets the elements
on top really pop. So we're going to make
some collage papers. So your favorite paints, pick a color palette
or just the black and do a whole bunch of the
collage papers in class. We'll also need to decide after we're going what
is our theme here? I did one whole sheet where I
used old papers to collage. I did one whole sheet
where I painted, and then I used some of our handmade collage papers on top and I did one whole sheet where I had some
scrapbook papers and stuff that I glued down
in large collage pieces. Um, and some of these are
just super duper cool. Like, that one
right there is like a little finished piece to me. So I do three different ways
with commercial papers, painting in our own papers
and vintage papers. So you want a selection
of some old papers or old book pages or some that you've printed
out that look old, or you can do some
commercial papers or we can paint our
papers and paint. So there's a couple
of different options that we're doing in class today. So you might want
some old papers. And scrap papers
that you've got. Then as we were going and I decided what I wanted
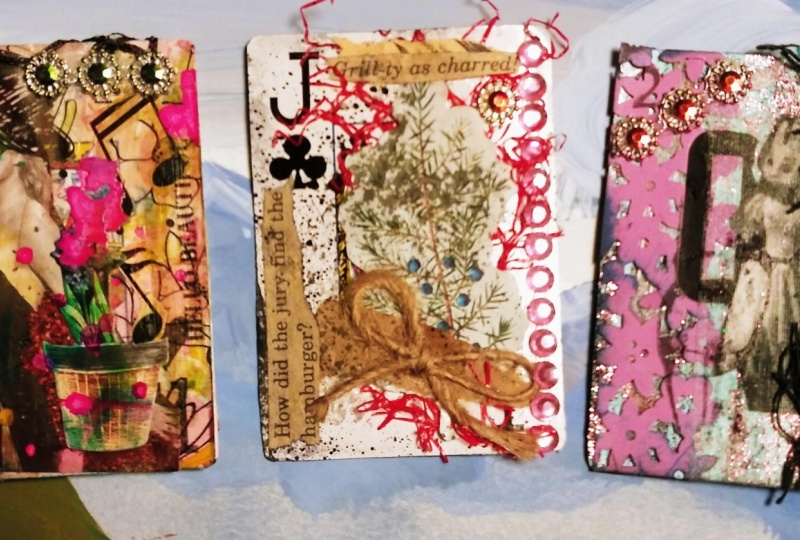
to do with these, I started off thinking
artist trading cards, and these are some I've made
in projects in the past. Artist trading cards
are 2.5 " by 3.5 ", I love these because when you cut these out of your paper, you just don't know
what you're going to get and they're amazing and they're little finished pieces
of art just like they are. You could make little
artist trading cards. I've done several
different types of these. I also use these
as prompt cards. Some of these have
little prompts and words glued onto it. That's some options there as you're going that you
could think about doing. These have a lot of drawing and mark making and stuff
like that on top, whereas the ones I
ended up doing in class don't have as much
drawing and painting on. That is an option. So just keep all of
your supplies and your stencils and optional
mark making things. Keep all those in mind as you're going because maybe you
would like some that look like this instead of some that look like what
I ended up making in class because these are fun and these are
basically finished. They're so gorgeous,
the way they are. I could definitely trade these. What can
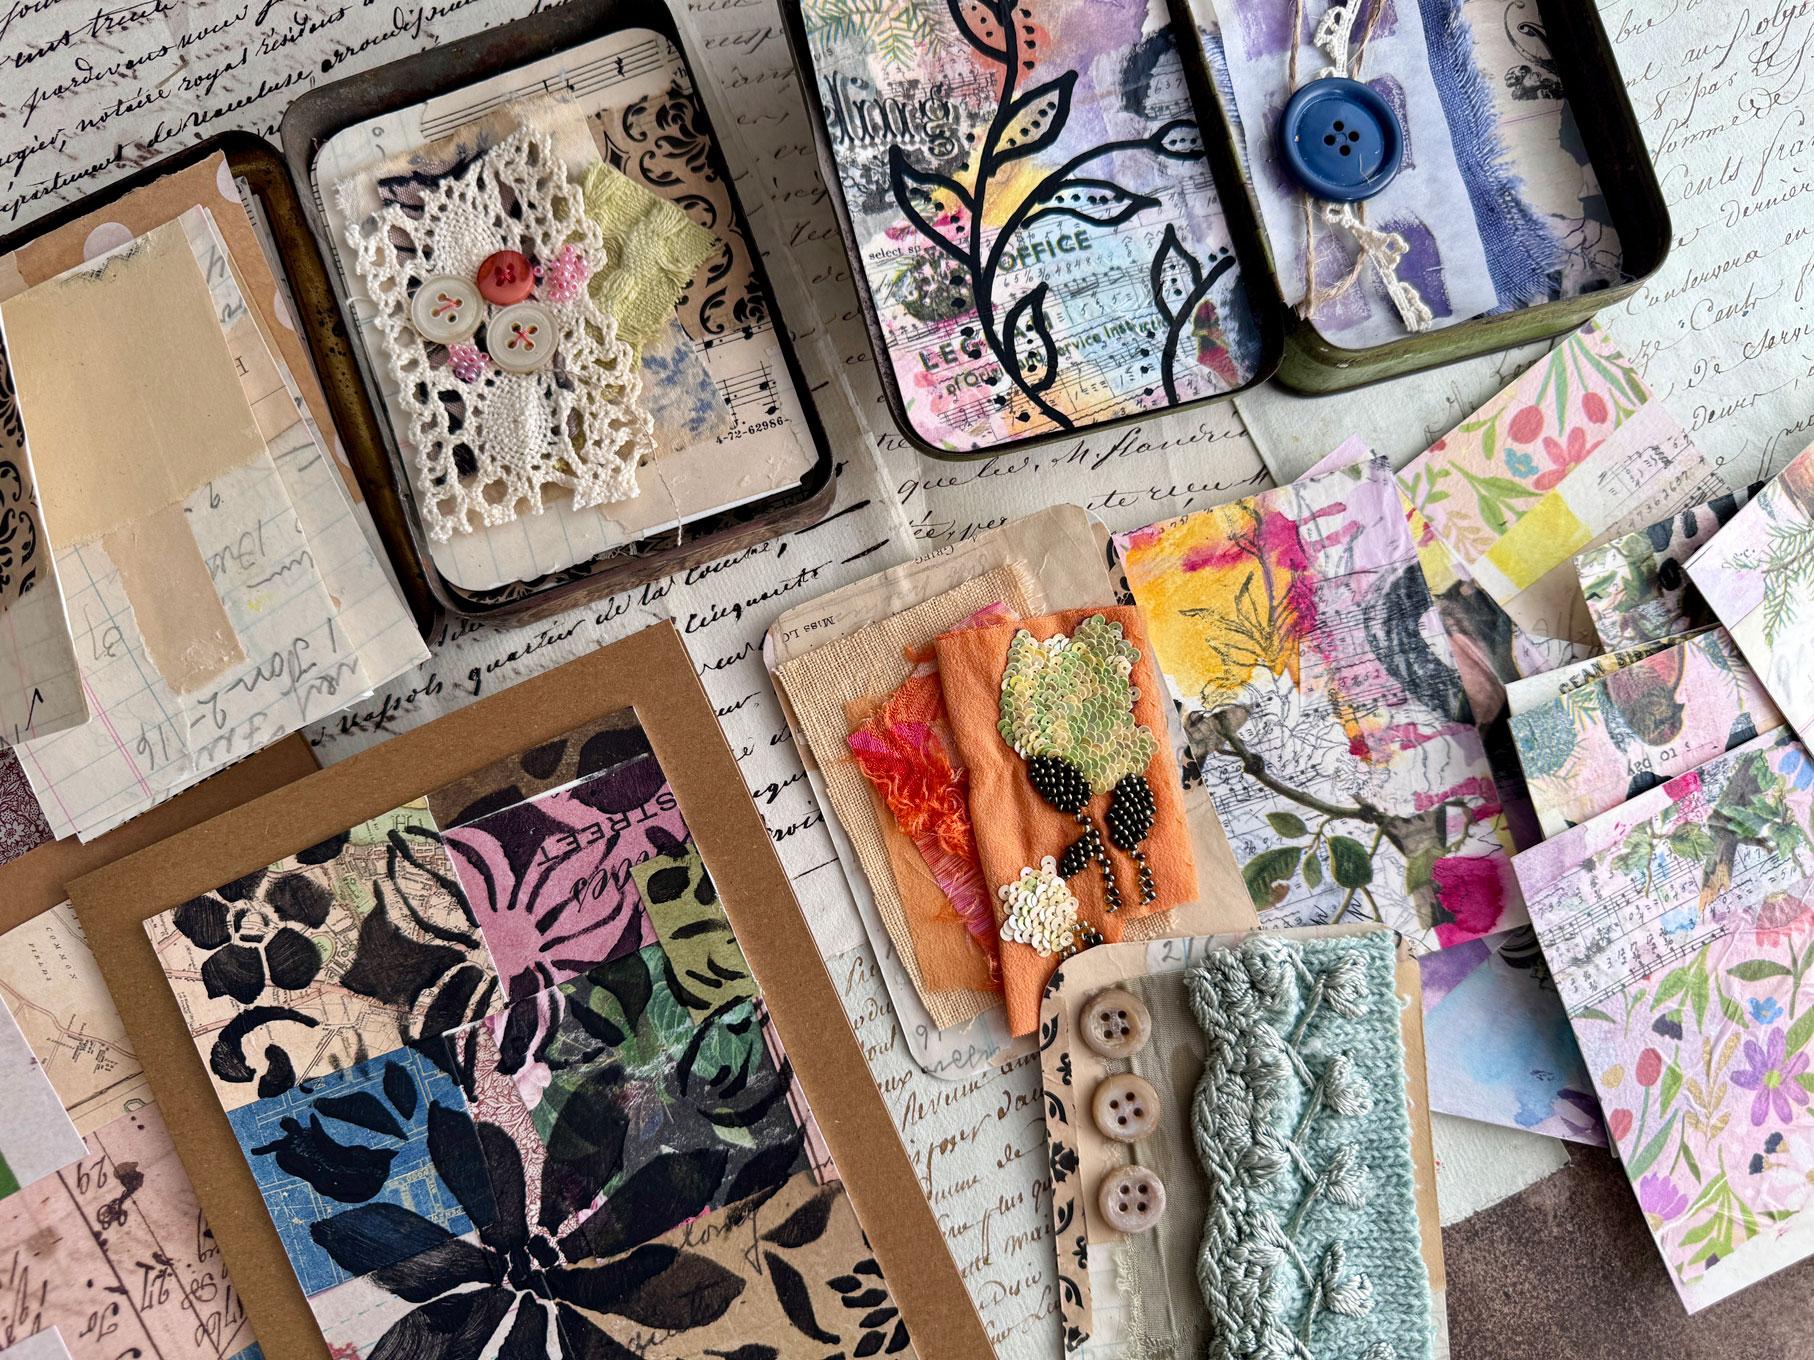
you do with these? You can trade these. You
can make art projects. You can use these in
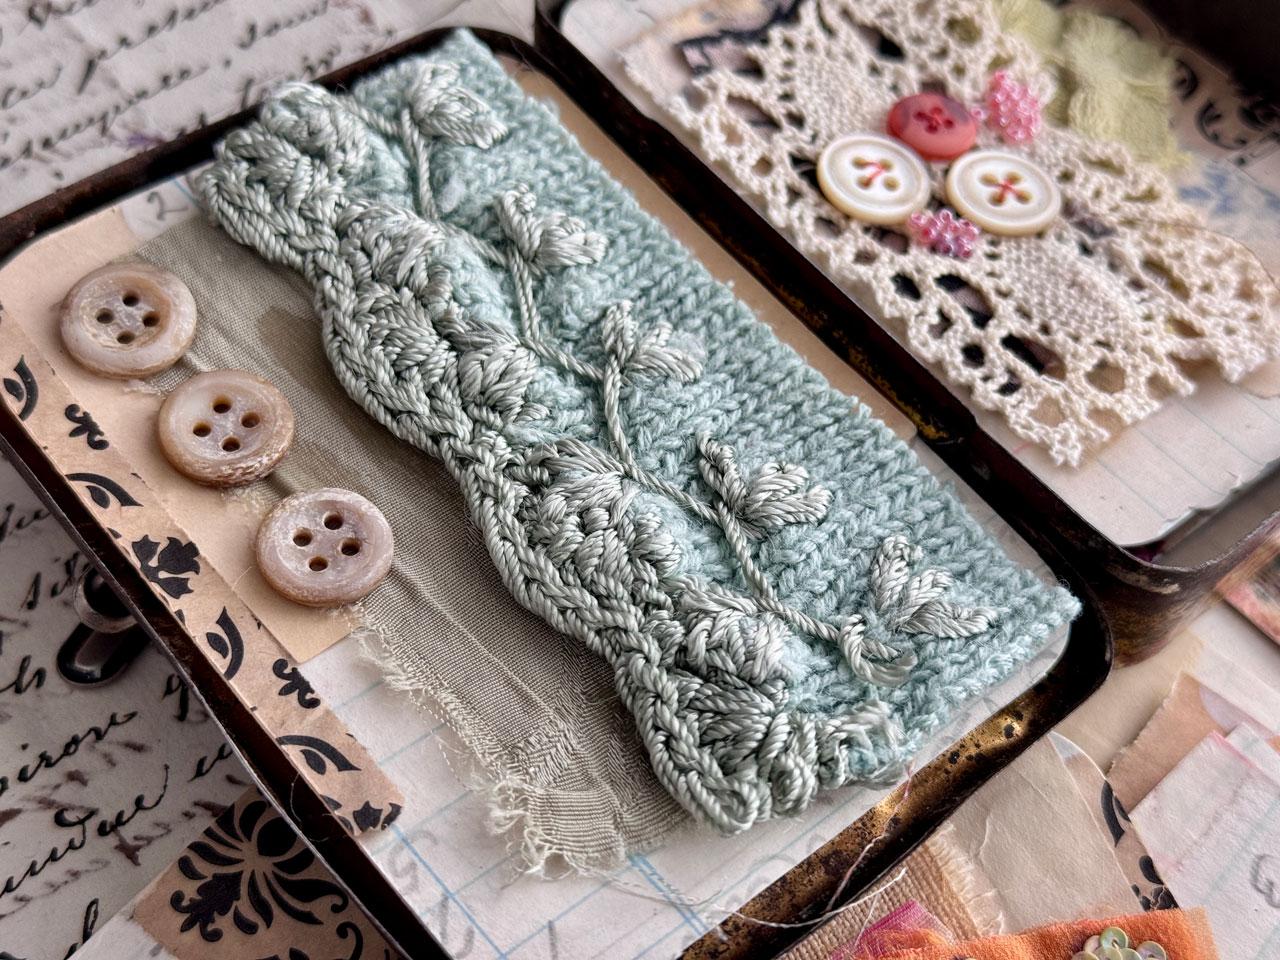
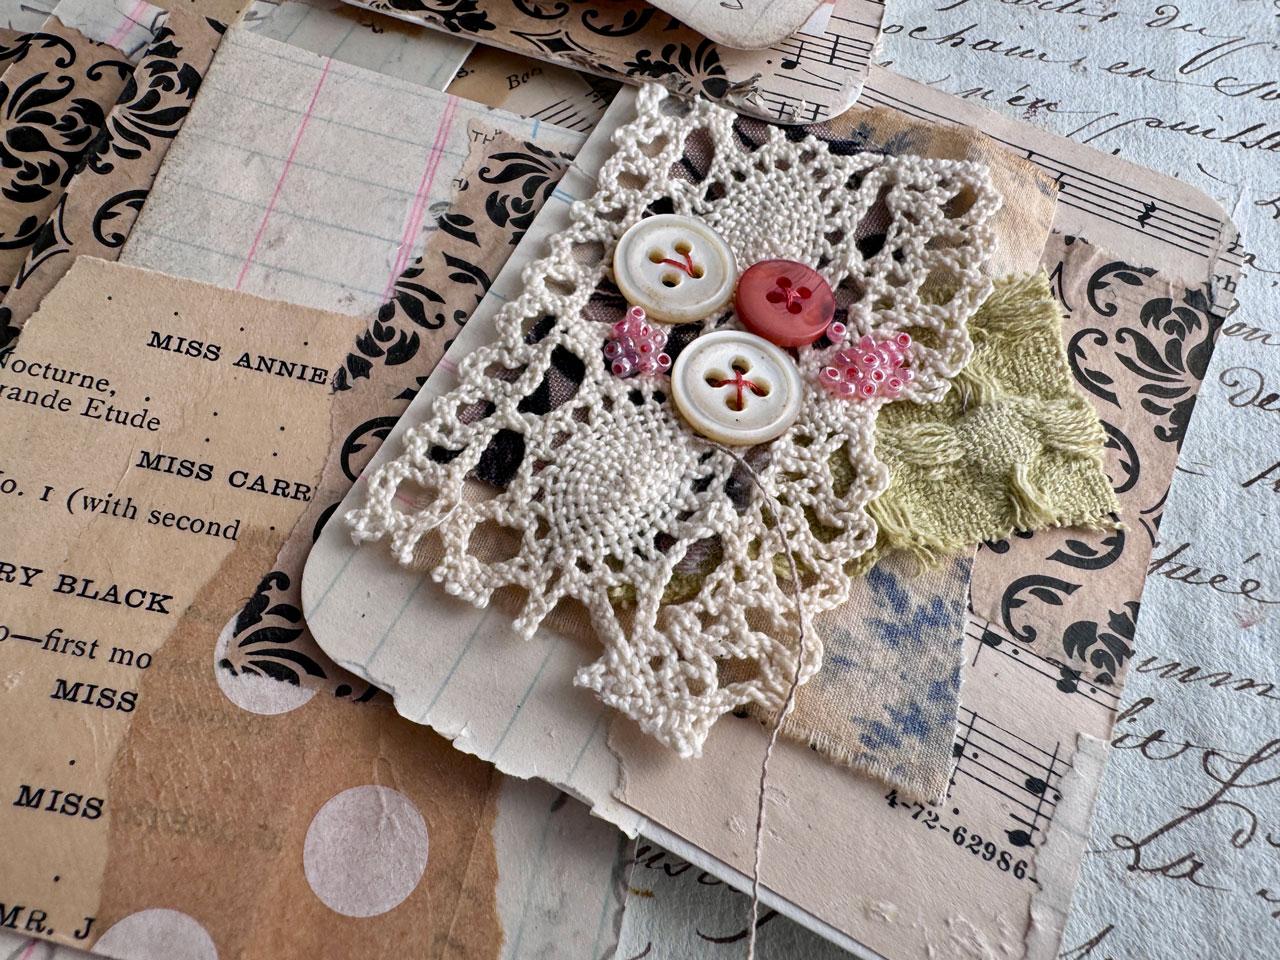
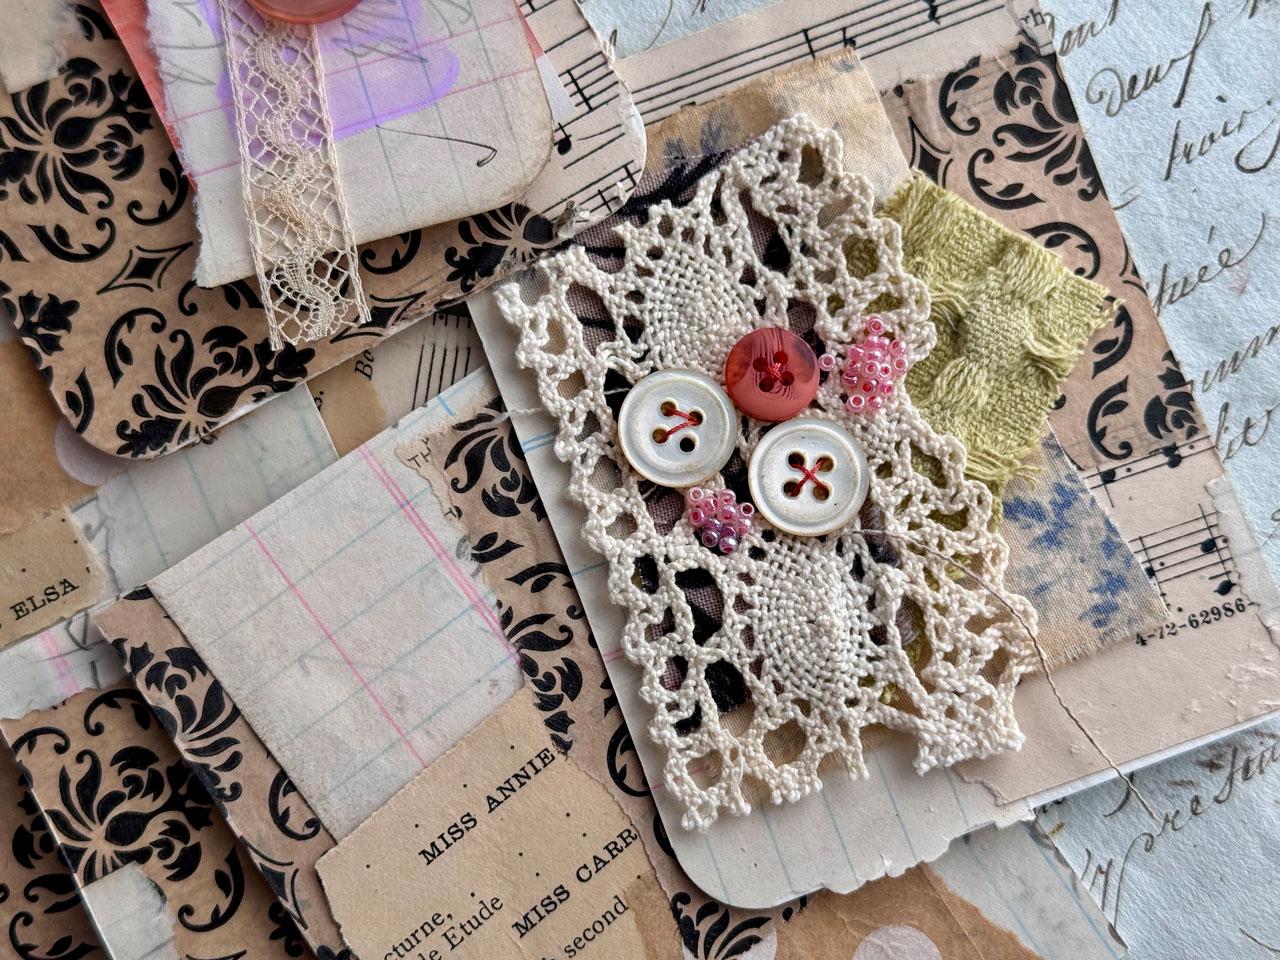
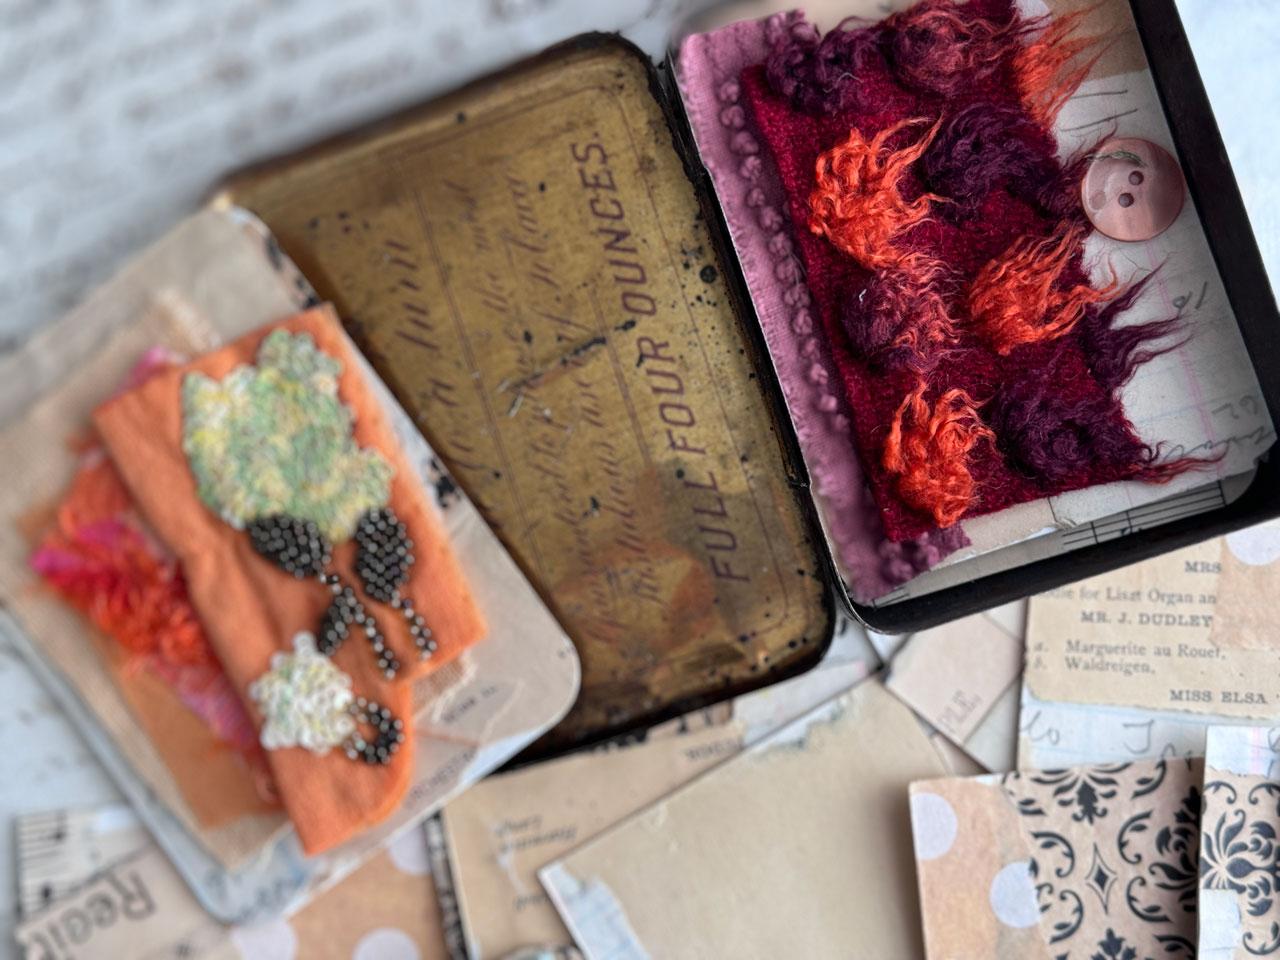
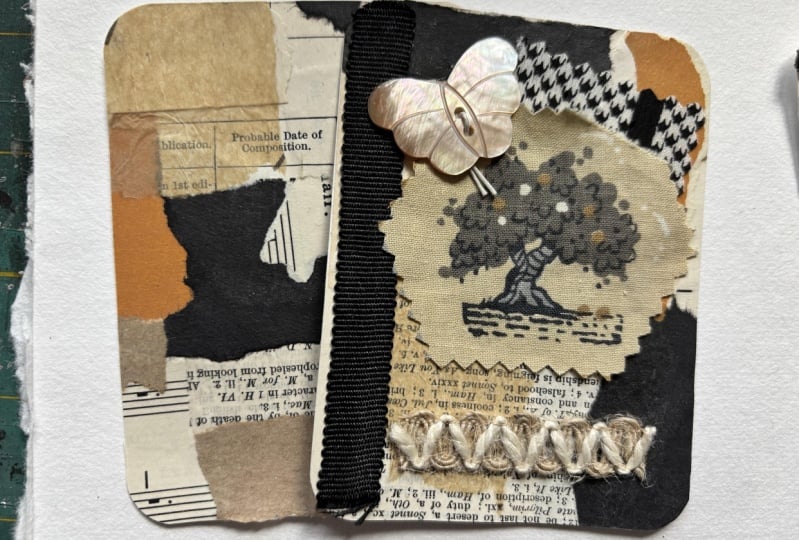
your art journals. You can do what I did and make what I would almost
consider some assemblage, collage assemblage
where you actually layer pieces on top of
what you cut in class. I've cut these out
of a big sheet, and then I have added
lovely decorations on top of some of our papers and some fabrics and
some old buttons. I think those make really
beautiful assembled pieces that we can then put
into an antique tin. This right here is now
my favorite thing in this whole package is this antique tin and I
could even glue one of these in the top and
the bottom to finish those as we were pulling these out now that I'm
thinking about it. But look how
beautiful that is as a finished piece of
art in a box of tin. This could be memories. You could put some old
photos on some of these and have these as some
lovely memory cards. In addition to the elements of fabric and such that
I ended up liking. Then I also did another
one I liked it so much. These are tins that I already
had that I put stuff in. But now I want to go to the Antique Store and
look for more tins. You can go to antique markets. You can search Etsy,
you can search Ebay, just look for vintage tins. This size is a little bit
bigger than an Altoid tin. You could also use Altoid tins. And there's also tins that
you could get off of Amazon. If you just can't find any tins, you can order tins in
different size off of Amazon and decorate the
cover with a piece of, you know, whatever
that's the same. If you got this size, you could put that on
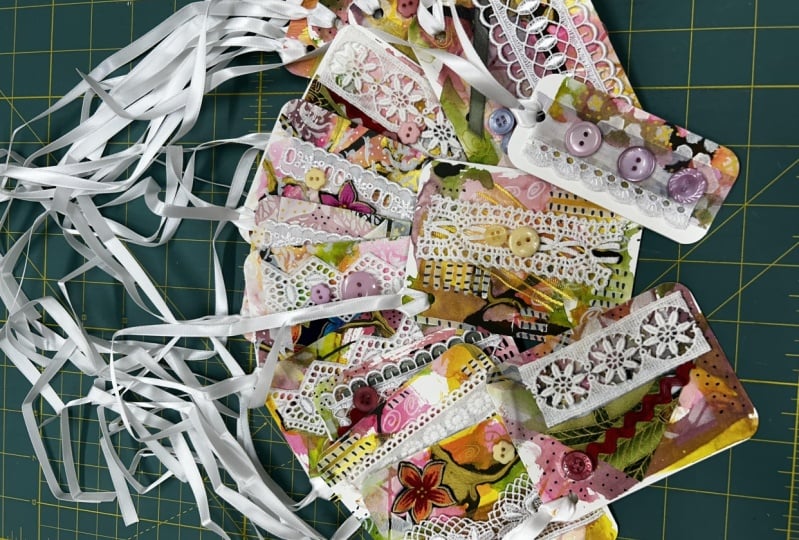
the cover and paint it. So lots of options there, but I did end up really loving doing a memory box in a tin. With my pieces today. These are cut three by four, so they are a little bit larger than my artist
trading card size. Then the other because
these are 2.5 by 3.5 is a true artist
trading card size. Then I also had a couple
bigger pieces that I stenciled on and used as card front and now I can
have a card to send out. That's another thing that
you can do with these. You could also cut these up into the artists trading
cards and they're cool and ready to trade or you
can further embellish them. These could also
be collage strips, which are very popular to use in other collage pieces
in your art journal, in your junk journal,
all kinds of lovely things that you could do with the pieces
that we make in class. So you'll need paint, you'll need some of your
favorite papers to collage on, maybe some bits and
scraps of old paper and embellishments and fabrics and buttons if you
happen to have that. Otherwise, you can just
embellish and collage with the collage things
that we create in class. Then MP medium is
my glue of choice with collage and
Eileen's tacky glue, the quick drying one is what I ended up using on these
because it dried quick and I didn't have to worry too much about moving them around and throwing something
accidentally off before it was dry. And ohuGlutick is
another good choice. Then if you want to
finish them off, which you can't finish these with the
fabric bits on them, but you could if it
was just collage bits. You could use a Kamar varnish, some type of art varnish, non yellowing,
archival acid free. That's what you're looking
for. You could use that. I am not going to
varnish any of these. That's not the purpose
of my pieces and the ones that have
fabric on top. More like fiber arts and stuff. You can't really spray
those fabrics anyway. I think that's most of
what I'm using in class. I do have a few favorite
stencils I could pull out and stencil stuff. Um, paint pins. You might consider
having some paint pens available for extra
mark making and stuff. These have turned out to be my very favorite out of here and that's the Vintage papers
and things put on top. I can't wait to see what
you gather and assemble and put together for
your collage pieces and what cards you
end up creating. I'll see you guys back in class.
4. Collage Paper Options: I thought we could take
a look at what you could consider for some of your
options for your collage work. And we're going to make some
of our own collage papers, but I want to show you what
you could make those out of or what you can consider or what you could look around,
maybe you already have. Some of the stuff
that I love to do collage work with is
old pieces of art. So if you've got any pieces
that you've cut stuff off of or you've cut up
into other pieces of art and you have some
pieces left over. Those are amazing
collage pieces. You could use old art or you could just use pieces
of art you don't like, and you can turn those into collage pieces
and cut them up. I love to cut art up,
doesn't bother me a bit. If I didn't like the art, cut it up into something better. Another thing that you can
use is commercial papers. This is a commercial
tissue paper from Tim Holtz that looks
like color palettes, which I absolutely
fell in love with. And so that's something
that you could use. I've got one of these open. Here's one with birds on it, but it's basically
transparent tissue paper. You could use something
like that if you like some vintage papers or
that look in your pieces, but maybe you don't want
to use real old papers. This is another fun option. So I've got several
of those, and I never end up using them,
but I sure do love them. And so I just kind of collect some of this stuff
to look at, I guess. You'd also get some
commercial collage pieces. These are little types
of paper that you can use in junk journaling and collage and anything that
you want to do there. These are Tim Holt's ideology, and they kind of
change up every year. But they're just again,
the color palettes. I was obsessed with
that for a minute. I'm still obsessed
with color palette, but these vintage
ones that come out of an old book I absolutely love. And so this is a way to get some fun collage elements for your art is to go check
out the craft store. Hobby Lobby, Michaels, anywhere
that carries any kind of supplies for collage and junk journaling and stuff
like that is super fun. I got these at Hobby Lobby
when they were running a sale. So maybe it said 499, but maybe I paid 250 for it because they always run
sales. Look for that. So this would be in place
of real vintage things, which I also like to collect real vintage things personally. So I find at the antique
market, old patterns. That's a really nice
thing that you could collage with if you don't mind sacrificing something
like that or make a scan of it and print a copy
of that and use the copies. That's an excellent
way to preserve your vintage item and still be able to use it in
your art, make a copy of it. I going along with that, I collect just old papers and things you can find these
at the antique market. You can find these on Etsy. You can find these on Ebay,
vintage paper things. You could also find people
selling downloads of paper packs that you could print out of ones that
they've collected. You could go buy a
couple old books at the thrift store or the
antique market and just spend a couple dollars for it and then go ahead and
use those items. Here's some tissue
paper that I have saved from some
packages that I got. That's a good thing to save any kind of packaging you get. There's also on Etsy, I've seen as I've looked
around people selling packs of vintage paper for junk
journals and collage. You could Google go onto Etsy
or Ebay or Google that like a junk journal collage
kit or package or vintage paper kit or something
like that and come up with something like this
for vintage papers. I also like using the
vintage papers to paint on and further turn
into collage stuff, which we'll do some
of that in class. And then paper bags when you go buy something and they put
it in a pretty little bag. Save that in an old envelope
from the office store. Some other paper bags that random things have come in that I've saved
that I thought, oh, these would be nice glued into my art journal as envelopes, but they would also be
lovely collage papers if it was something
pretty like that. So keep all of that. Those are all options for your collage work and packaging. I think this was the
package of some soap. Something botanically lush hand cream with
rich ingredients. So this must have been the lotion that
went with the soap. But this is the most
gorgeous packaging. I'm like, Yeah, we're saving that and we're using
that in something. You could also use
commercial papers, scrapbook papers and
stuff like that. These are little
miniature pieces of scrapbook paper of some
William Morris designs that I had found these
little packages on Amazon because I like the
William Morris designs. They're beautiful,
they're intricate. I liked these colors. I thought these would be
beautiful in some collage, something that I
do at some point. And so pretty papers are an
option for your collage work. And to go along with that,
some Tim Holt's pretty papers. This is, you know, one of his sets where
they're kind of made on some vintage papers, like book pages and stuff. So this is another good option if you don't want
to tear up papers. But, you know, if you
have some originals, you could scan those in and print these out and
make them yourself. The only drawback to
this when they're two sided what if
I like both sides? So then I'd have to,
like, I don't know, make a scan of it
and print it out. But this is another fun
option for collage paper. A lot of this looks
like the type of stuff that I did
with my photography, where I mixed in textures
with the photos. So I thought that was
kind of interesting. And this looks like
photos I would have taken at the junkyard. So commercial papers,
whether they be scrapbook paper designs
or vintage papers, this is the Tim Holtz
ideology line again, some of these I collected
because I thought, I'm going to do
something with those, and I haven't knows what volume they're on
now? This is Volume one. It could be on
volume ten by now. I don't know because I
just pulled these out of my drawer trying to give
you some fun options. Another fun tissue
paper that was some packaging that I
got, always a fun option. Another thing that
you could use in collage work and we
might even use these as details on top after
we're done collaging and cutting up our pieces is fabric. Some of these are u pieces I got off of Etsy for junk journaling
and stuff like that. But this is a good option, fabric pieces, lace pieces. This is some vintage lace that I'd gotten at
the antique market. These are excellent options for collage work for doing
our finished cards, twine, anything like that. It'll give us a textural
element, a three D element. Burlap is a nice
choice for that. These are all some choices for what we might do on
top of our collages. Then for the actual and
here's some cheesecloth, that's an excellent
textural item, and we can paint in different
colors. I really love that. This I just got at
the fabric store. I zoology, cheesecloth, but that's what the hobby
lobby happened to have. I guess zoology is the
new brand that's making all the different
components and stuff now. So here's things I like to
make collage papers out of. I like to make collage papers
out of watercolor paper. I also like to make it
out of mixed media paper. The mixed media paper is smooth, whereas the watercolor paper
probably has a texture. So inexpensive mixed
media paper is a good choice because we're just going to be painting
and cutting those out. I do find this thick. I tend to like thinner
papers for collage work. You might consider
something like a rice paper for
your collage work. It's thinner, it's
semi transparent. This one actually has a
lovely texture in it, so that would be a
nice textural item to work with.
That's a fun thing. Another thing that
you could consider, let's set this right
there are food service, dry paper, dry wax paper. So I got this big one at
the Sam's or the Costco. Both of them carry
something like this, and it's basically dry wax paper that you wrap up
sandwiches and stuff with. This is my favorite art
tool, and it lasts forever. If you get a big box of this, you can also get something
like this at the grocery store over there in your wax
papers and stuff like that. So that's a good option. And I use this is
the dry wax paper. I use the dry wax
paper on my art table. Like, you'll see me
separate pages with this and like what I'm
painting in my book, I'll protect other pages by slipping this in
between the pages. And then we end up with some fun paint and stuff on these. So I never throw these away. I keep the dry wax paper
that I've painted on. You could also use this as
a disposable palette paper. That's a nice way to
have a palette paper. So I love this stuff. It's probably my favorite. Because it's semi transparent. And when you glue it down,
that paper kind of disappears. So I really love
the dry wax paper. You could also use tissue paper. This is tissue
paper like you wrap a gift with. So I
have a lot of that. And here's the dry wax paper that I played painted as a
clean off for my brayer, but look how cool
that is and that would make a great
collage paper. So any kind of clean off sheets that you use for your bra
or anything like that, always save that because
it will make a great collage paper when we're done. You could also just
use regular paper. I have done that. It is
thinner than the other paper, which I like thinner than the mixed media and
the watercolor paper. So that's an option. You could also use something like
an onion skin paper, which is a little bit thicker, but like a tracing paper. That's a good option also. And some of these things I just got to try out
because I thought, Oh, that's interesting.
I'd like to try it. One of the more
popular things that people use, especially in, like, jelly plate printing when you're creating collage papers
on your jelly plate is carnival wet
strength tissue paper. And this is kind of
like tissue paper, like the other one
that we just looked at paper for wrapping gifts, but it's a little bit tiny bit thicker than
a normal tissue paper, and it resists tearing. It resists, you know, when you're pulling this
off of a jelly plate, it resists tearing like a regular tissue paper tends to almost disintegrate on you. And this kind of what strength
tissue paper resists that. So I have some of this because I wanted to experiment
with it at some point, and I just kind of
keep it on hand. And then that is most of my stock here of ideas
and options for you. Things to look around for and consider using as
your collage papers. And we're going to be
making some collage papers out of some of these items. I'm leaning towards the book
pages, old book papers, so you could buy
an old music book or just old textbooks, really, anything, old ledgers, anything
like that that you might come across that
you can get super cheap would be great
collage papers. I'm going to be using
some of those and the wet sorry, the
dry wax papers. This is probably my
most favorite selection for making collage papers because it's inexpensive and
you can get a gigantic box that lasts forever,
500 of these. I've had this for
a couple of years and I hadn't even made my way, a quarter way down the box. So if you get into where
you're making a whole lot of collage papers and
you're making yourself a whole stash and you want to
work on these for a while, get a box of this.
This stuff is amazing. All right, so hope that gives you lots of things
to think about and start looking around
for and to start gathering for the collage papers that we are going
to be considering and making for our piece. I'll see you back in class.
5. Choosing Your Color Palette: Talk about picking a color
palette for our piece. So I am personally going to pick a color palette
out of the color cube, and I've got color
Cube Volume two here, and I've also got Volume one. This is my very
favorite art tool. And if you've been
on my YouTube or any of my channels for
any length of time, you'll have seen
me pull this out time and time again
because I absolutely love getting rid of what I consider the first
barrier to my art making, and that's picking the colors. Where do you even start?
What are we going to use? By narrowing down right up front the color palette
that I'm going to pick, I have just eliminated the
first barrier to me creating. I've got a lot of colors that color palettes
that I have now done, that the pieces have
been kind of crazy. The colors were way
outside my comfort zone. But the pieces that we created
were insanely gorgeous. And now I like picking the
weirdo color palettes. The color palettes that I
never would have considered. I'm going to show you that
one if I can find it. This is my great big art journal that I'm working my way through and pull a color palette on just about all of these
and this one right here. I never ever would have used these colors or pulled them out and created a piece
of artwork with that. Yet now that it's finished
and I can see it, it's one of my very favorite. So you just never know until you start experimenting
and making it your goal to work with colors outside your comfort zone or to
pull something and say, Okay, I'm afraid of this, but I'm going to do something
cool with that today. What's it going to be? What kind of abstract am I
going to create? This, I'm thinking might be my color palette
inspiration for a piece. But just to show you some others that this was a blue
green color palette, so that's same side of the
color wheel and then what? Crazy color palette again with the greens and
the yellows and the oranges that if you're
looking at the color wheel, the greens and the oranges and the yellows fall right
next to each other. That would be more of an
analogous color scheme where they're right
in there together. Was I don't know, this one's all and these are next to each
other, blue green. So if we're looking at
our color wheel again, we've got the blues and the greens that sit right
next to each other. Then I consider white
and black and gold. A neutral to add pops of interest and
mark making and stuff. That works really well
in pieces like this. Again, op, blue and orange. Blue and orange fall opposite of each other
on the color wheel. That would be your contrasting, your complimentary colors
if we look here at this color triangle.
Blue and orange. Great color plot to go with. I'm just trying to
show you some things I've experimented with
purple, orange, and pink. Those are all over here next to each other
on the color wheel. Blue and brown, that's
just a nice color combo. Shades of green and blue, that's next to each other
on the color wheel, pink and yellow,
for some reason, I really love pink and ochre. Those fall again next to each
other on the color wheel. We could have turned that into a split complimentary a
little bit by adding in some blue or even a
triad set of colors by maybe putting in some blue with the red and the
yellow and some blue. I did a little bit
of green in here, so I was a little bit over here, but I could have
made it a tetrad set by adding in some purple. You can see how we can look at the color wheel and
see how the colors interact with each
other when we're actually looking at
a piece and going, aha. Now I see it. This is the blue and orange and gold with a little
bit of red in there. Again, we're complimentary,
blue, orange, and a little bit of gold
that could almost even be yellow, gold, and blue. Split complimentary if you want to stretch
that a little bit. Crazy crazy colors. You can see if you start experimenting with
some color palettes. Here, favorite combo, blue and orange with a little
bit of the red again. Start looking around
and thinking, Okay, what colors am I interested in shades of green and yellow, shades of blue and white. What do I think is
going to pink orange, that color palette, which
I particularly love? What are you thinking?
What are you thinking are going to be your colors? This is more like ochre and the pink in that family again, which I love. This
was super fun. It was in the blue
and orange family. Purple pink colors
next to each other. This is a passion for me is experimenting with
colors and color palettes. What I like about
a colored card, which you don't have
to have these cards, you can get on Pintrist
and you can pick out put in the search
bar color palettes and 1 million options come up, so you don't have
to be limited to just a few that you might have pulled out from a color card or if you
didn't want to buy those, you can find hundreds of them on Pintrist you can make
some of your own. I've made some of my own colors cards out of my own photos, and that was super cool
because my photos tend to be a little darker and moodier
and lots of deep shadows. The colors that come out of, my own photos are
going to be a lot darker than the colors that came out of some other sources like the color cube or Pintrist
um or something like that. That's another option is to
look at your own photography or your own photos or pictures that you
really love and say, Okay, what colors are in that? Oh, I've got an ivory,
a pink, a maroon, I've got some black,
maybe some gray, and then you've got
your color palette. You can use a color
wheel like we just did and do some
traditional color making. The reason why I like pulling a palette from
online or the card, I think I lost my train
of thought there is because when I pull
from the color wheel, let's say I'm pulling some oranges and pinks
and reds in that family, what other color could
you put with that? Are you just stuck
with those colors? How could I make that color palette even more interesting? Well, if you go with a color
harmony wheel like this one, it'll tell you that you
could complement it with blue and then you could add some discord with some
purple and green, which would give it some extra little angst or energy in there that maybe you're not getting with just the colors
that you've picked here. What I like about using something like this
is it helps me get a more complicated color
palette much easier. It's just like some
of the work is done for you rather
than you being like, what am I going to use here
and trying to figure it out. This is like, oh,
I never would have thought to put all
these colors together, but you saw in that piece of art how amazing that ended up. It helps me make that color
palette more complete, more complicated,
more interesting, and I really enjoy
pulling colors like that. Another option for you would be if you save
color palettes. If you've done pieces of art
in the past and you're like, I love these like this one, I love this piece of art, take a piece of that
art and cut it up or maybe do a little
extra piece and then put all the colors in a little color palette book that you can then refer
back to and be like, I loved this color palette,
let me go back to it. This is a really nice way to
keep a record of some things that maybe you don't remember how you got there
because let me tell you, after I paint something and
then I paint something else, and then I'm a month out from
all the things I've done, I'll go back and
look at something and think, how'd
I even make that? I'm really glad most of the
stuff I paint is on video. I can go back and look. I just forget what I use
and how I got it. Whereas now in a color
palette book like this, and this is just an old hymnal, that I staple a couple pages too so that it's got some strength because these pages
are very delicate. Then I prime that page
with some clear gesso. It looks just like
this, but it's the clear one by liquitex, clear gesso and then I can see what's underneath showing
through my color palettes. I just think it's
more interesting. And so I save lots of color palettes early on when I was painting and
making some stuff. And some of these,
I love love like this brown ochre pink palette.
I absolutely love it. And so now I have a
record of what that was, and I could go back to it and if you want to be more
organized than me, you could actually
write what that was, what kind of paint this was, what color you used, what
mark making tools you used. You can make a complete
record of that. It may be easier for you to make a complete
record of that in a a sketchbook instead of
an old book like this, but I liked it, so thought it was fun and did give me at
least a direction like, Oh, I need some orange, red, pink and white paint. I need my Pasca pen and maybe some pastels in those
colors and some pencils. I can see what all I did. I can go back and think,
oh yeah, yeah. Now I remember. So
that's another option, color palettes that you
have saved or you can start saving going
forward. That's fun. But you can always
use the color wheel. You could also pull things
out of a piece that you like. So if you decided, oh, I'm going to use this piece of tissue paper in my piece of art, you could pull colors out
of that that you're already going to be working into the art and go with that
kind of color palette. I just wanted to give
you some options there. On how you can pick colors and the way to give yourself
some direction. You could also just pick
out your favorite colors. You could look in your
closet and pick out your favorite shirt and
go with those colors. You could look online for
interesting color palettes, or if you've got an
artist that you admire, I like picking color palettes
from the old masters. So if you've got an old
master that you love, look at his paintings
and say, Oh, let's go with this
color palette from Gustaf Clem or let's go with this color palette
from uh, Monet. You can pick out any
of the old masters and just take a look at their
piece of art and say, Oh, there's some orange
and some purple and that looks like a
white or a light blue and start pulling
out some colors from the pieces that
you love and admire. That's a great way
to pick out colors. I just wanted to give you some options and things
to think about. You could also use
the color wheel and just do some traditional
color picking. I like this one because it
gives you the different um, color options, complimentary
complementary triad. Colors that are together
here are analogous. You could also pick one color
and it be monochromatic. It explains what all those
are on the backside, it gives you some tips and
stuff here on how to use that. This one I like because
you can be like, Okay, I'm right in here. What could I use
to add that pop in that extra bit of contrast and it'll give
you some of those. I do like this
little color wheel called the color harmony wheel. So different options there. I'm going to be probably just pulling some color cards here
from pieces that I loved. I really loved that
piece I painted, and so I may just go ahead and create from color
cube two, card 255. But I had these out
because these were some other color
palettes that in the past I have
particularly loved and they were wild and they were
colors I wouldn't pick. And put together. Those were two other ones that were
crazy that I really loved. I just wanted to give
you an option there on picking your colors and
finding a direction and maybe giving you a hint on how to maybe get in that
direction a little bit easier than just starting with a bunch of paints and
going, Okay, where do I go? All right. I'll see you
guys back in class.
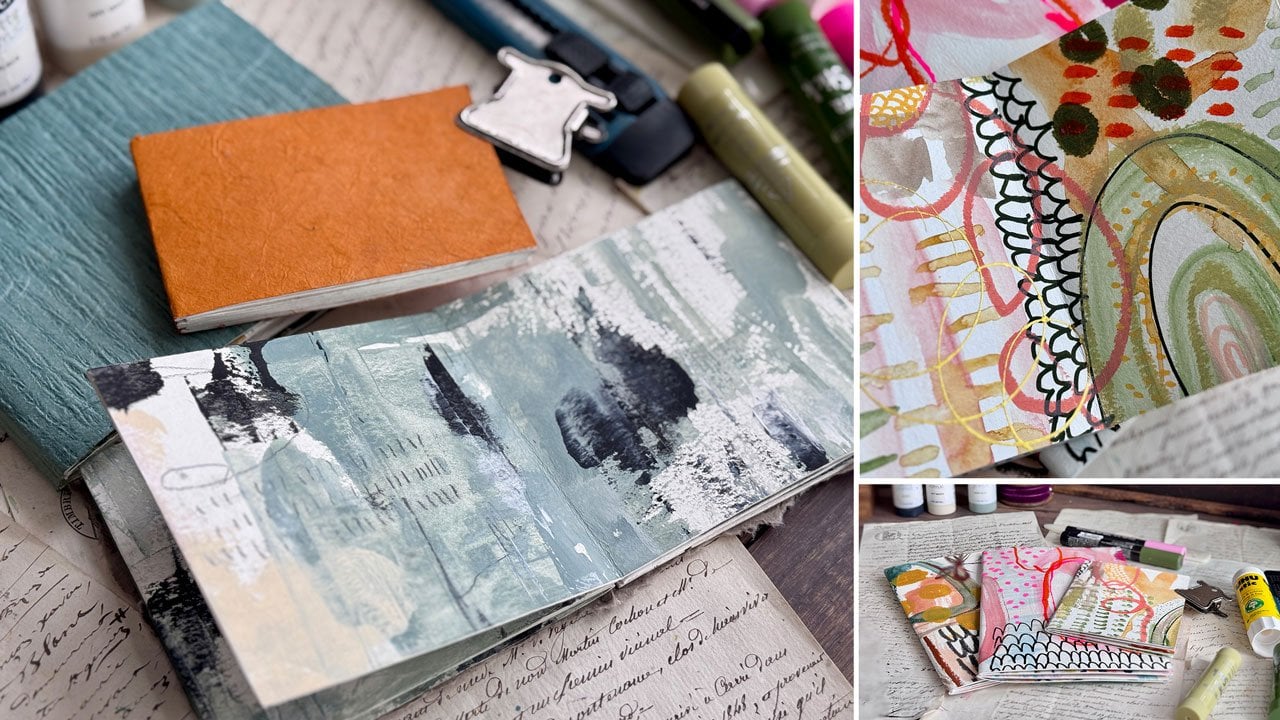
6. Making Collage Papers: Video, let's start making
some collage papers. So I have pulled out a bunch
of the dry wax papers. That's what I'm going to use for a lot of the collage papers
that I want to make first. And then I want you to use every skill technique thing you've ever seen to make
your collage papers. Don't feel hemmed in to do
things the way that I do it. Feel free to use
your jelly plate. If you want to play
on the jelly plate to make some collage papers, the goal here is just to
make yourself a variety with different marks and
different colors and give yourself some choices. I'm going to start off.
I've just got some of this Blick mat pat in black, and I want to make
some bold black pieces that I can then use later. I might just start off. I've got a Princeton
Filbert brush here. I think this is the
Princeton Filbert number six. It's a half inch. Yeah, half inch number six, and I want bold marks and
things that I can tear into little pieces and then
maybe add them to my art. I'm going to just start off
with maybe some brushstroke. Pieces, these are
pretty large sizes. Is a large enough
size. How big is this? At least 12 by 12. Yeah, it's 12 " by 12
", they're square. So you don't have to do a
whole sheet of the same thing. You might do a couple rows
of one design and then switch that up and do a couple
rows of another design. I'm not looking for
perfection here. I'm looking for interest, boldness, stuff like that. Let's say if I move to a Princeton Umbria
number ten round brush, I could do a different
brush stroke on this piece. You don't have to do
all acrylic paint. You can do watercolor paint, you can do whatever
acrylic inks, whatever strikes
your fancy there. You can get creative in
the different things that you use in some mark
making and in color. I specifically wanted
some bold black marks and so that's where I'm starting because I
already knew I wanted that. You can use your stencils if you want to stencil all over one of these and make that
collage piece, you can. That would also be super interesting to have some
lovely collage work, which I'm considering myself. I also thinking, let me move
this a little bit this way. I feel like I need
some like little dots. These aren't going to
be perfect because of the brush I've picked,
but it could be perfect. I could pick a different item, but I want choices here. My goal is to just make a
bunch of different choices. I like this mark. Round brush on its side for
the wind on that right there. Okay. I got one filled up and then I'm just
going to throw this on the floor and let it be
drying while I go to do the next piece and then go
to paint the next piece. I want as many of
these as I can do in a couple of settings
is where I'm thinking. Maybe different color ways, build up my stash of
things that I could use. See, that first
ones too perfect. Let's go back and make it
less perfect. There we go. I've got a bunch
of jogle stencils, so what I might do has
pulled some of these out. This one is along the river. What do we go. What I like about it is all the different layers and
lines that we've got here, and I could do it in a color. But my first dash that I
wanted to make is black. So kind of thinking,
I'll go ahead. The best way to get the
stencils to look good is a dry sponge and a dry paint, not super duper wet. Less paint is better
with stencils. Sometimes, even
though I know this, I'm not as good at following
that, but I do know it. And I don't mind rubbing
my paint around two. If you've got less paint on your sponge when you do
this, rub it around, you're less likely
to get it up under the stencil, definitely
lighter paint. Then if we peek at
this, yeah, perfect. That's exactly what
I wanted. Good deal. Get out your stencils and maybe
do some stencil work too. Doesn't all have to be
free hand brush work. And you can do this
on a white page. You could do it on
a painted page. I mean, your collage
pieces could be pieces of art that just didn't work out
and so they could be just as elaborate or
simple as you wanted. I personally had in my
mind that I wanted to use color on one of my
sheets that I paint. Then these as pops of black
and graphicy elements on my collage sew if you have something
like that in your mind, start building up the
elements that you're thinking of for your stash. There's that. Let me set that to the side so we can let that dry. Then let's see what else we got. If you get paint on
something, not a big deal. It's not a spot you have to use. But that's exactly another yummy graphiy one that I wanted. Then I really like
some of these. This one is a stencil club
stencil from stencil girl, it's one of my favorite
actually. It's weird. It looks like an
onion or some type of graphic flour
in my sketchbook, it has turned out to
be a real favorite for me for the design just
because it's cool. So might like to have this
as a graphic element. What? That's exactly
what I wanted. Alright, so let's put
that one down to dry. And we'll put this
one over here to dry. Then doesn't have
to be all black, so let me throw my brushes
in some water for a moment. And I've got colored
paints out here. So I've pulled out to start
with to get me going. I've pulled out paint colors that go with our
color card that I was showing you in the color
video, because I love these. I love the colors
that are in here, the piece that I painted has turned out to be a
real favorite for me, so just thinking, how about using this one in
some different work. Another thing that we can do
is we can do some painting and I've got a palette knife here and I've just put
white acrylic paint. This is sage blue, which
is my favorite color. Then I've put out
some yellow oxide because it's a yellow
ochre color that I like. I'm just going to make
some lovely texture with my palette knife on here that I could use as a collage element or something
that I tear out and use. This is like gore J. I mean, right there is a
painting, Holy moles. That's gorgeous. Okay, that
was a good good decision. Look how gorgeous that is. I mean, just scrapping
that back and forth to get all that texture. Lo at all that texture. Like Wow, wow. I might do that over
here with the yellow because I like yellow,
I like yellow ochre. I don't like yellow per se. When you put that white in, it just really Holy moly creates some amazing
texture elements there. Then when we glue these down, what we'll get is this
background will disappear and we'll be left with
this delicious paint. All right, so there's
a good one. Good one. I think what I'll do
is get this paint off of here and then we'll set this to the
side and let it dry. At this point, you're not trying to create whole paintings. You're trying to just create scraps of things that later you can cut apart and tear apart and create your
big piece out of. I want you to get
creative there. Let's put that in the
floor so it can dry and just get creative here on some of these things
that you try out. Let's put this purple.
Let's do some more. Let's do the purple. What did I do with that palette
knife? There it is. It seems to be super good
when you get the purple, when you get the white mixed in. Whoa. Oh, my gosh, want to keep that
texture right there. Look at that texture. Right there, right there. Holy mollies. That is gorgeous. Now I'm totally in an abstract
painting mood. Now I want to paint some
palette knife paintings and get all this
delicious texture. It's funny how you'll get
to be making something and you'll get inspired by just
the most random thing. And today, it is
the palette knife. Maybe if we mix some of this blue and purple,
let's see what we get. I don't like that as much. Oh, I do like it there, though. Yo. I'm holding the palette
knife basically flat to the paper there and spreading that paint around to
get that texture. So it's just all about
experimenting and playing here. Oh, let's do some orange. Look at that orange. That's some good color. All right. I feel like we'll do
one more maybe with some orange for myself. Or maybe that's enough. You could just kind of decide. That's what we can do
with a pilot knife. Then I think what I'll do
is with a paint brush, do with the colors I've got out. We don't want to
waste any paint, so I'm going to put this to the floor and let it be drying. Then I've got another
Filbert here. Let me just get that wet. Then we can come here and do some little abstract pieces and just see what
we can end up with. Not trying to get
anything specific, we're just playing
here in the paint, and then we will be able
to tear bits and pieces of this to create some cool, who knows what as we're going. I need some more of that
white. So get all of your. That was too much. Get
all of your ideas out. All the different
things you want to play and experiment with. I mean, I'd like it
if you had a goal of, say, you know, some
painted pieces, and then some pieces with some pallet
knife like we just did, some stenciled pieces. Maybe some jelly plate pieces. If you've got the
jelly plate and you're already playing with
that and making some, I want you to do them in
lots of different colors. There's no reason why we
had to just only do black. We could have certainly had sheets of colored
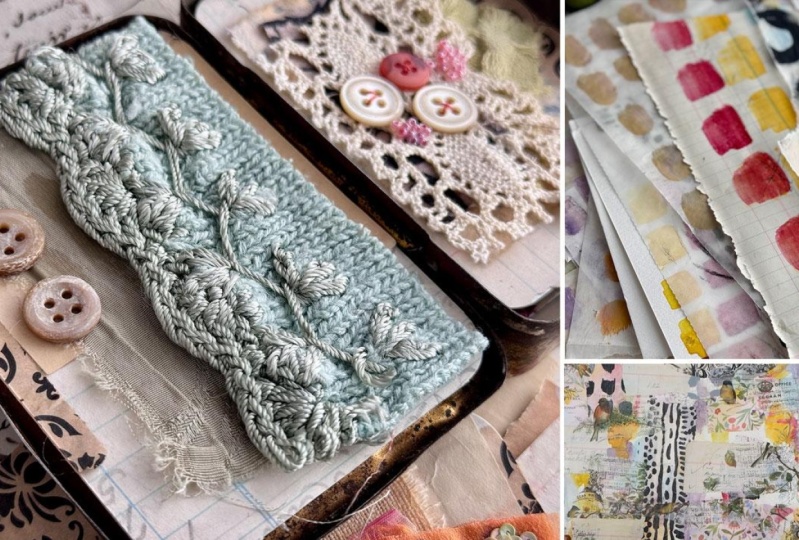
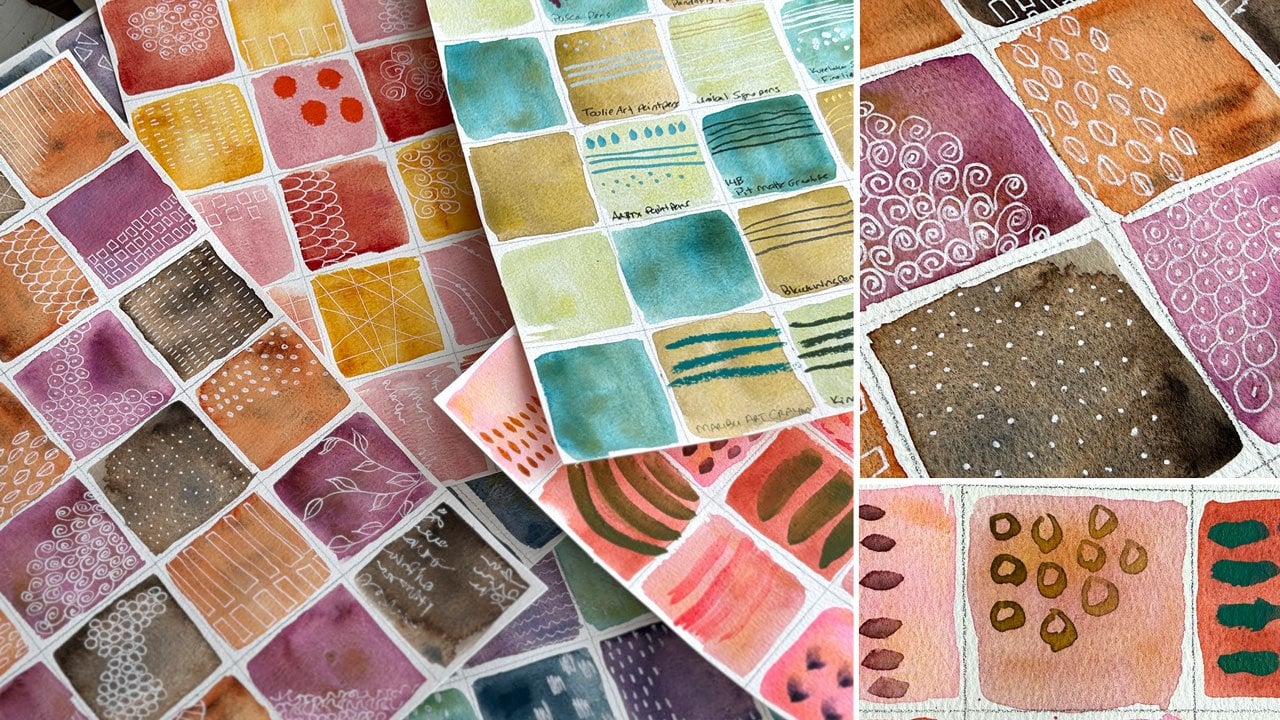
marks like this. Oh my goodness. I love that. Another thing that I
love is sheets of um, Color mixing, like
a color chart, where you got squares of
different colors you're doing. Let's do one of
those. Look at that. That is gorgeous. I like
that bit right there. Maybe we'll cover up a
little more up here. These are just pieces to layer. They're not supposed
to look perfect. They're just pieces that we can layer into
some other things. Look at that. Super fun. Oh, my gosh, I love that one. Hey, throw that in the floor. Then let's play with
some color mixing. You know, we could have
ourself little squares. Minor little crook,
mine aren't perfect. But I'm just giving you an idea here and you can start with
one color and mix it with white and keep on going and
see where that gets you and then you can mix
that color in with another color and see
what that gets you. Maybe we'll mix that
orange with the blue and maybe we'll get maybe a
little in with the purple. But squares of color charts
like color charting. I like that that
inspiration here with this. I just threw the thing on
the floor, the tissue paper. But these color charts squares, I'm super fascinated with those, so we can make some of those
here on our grid pieces. That'd be really
good if you were wanting to experiment with a whole color series and play with mixing
colors, mixing colors. I do that a lot. I actually
want to incorporate color mixing squares somehow into some of my work because I haven't
done enough and it's one of those
things where I think, I need to do that, and
then I just forget about it and this reminds me again that
I want to do that. These are fun too, just as some random colory mark making. Goodness. These are fun also. Let's just go ahead with some
other marks here because I got paint in my brush
that I want to not waste. This whole collection of color that's wound up in
my brush is super cool. Super duper cool. That's cool. Now, I've been doing
these with acrylic paint, but I do have some
water colors out, and I'm kind of thinking what if we call it this watercolors, would those turn out? Let me grab a water
back here that I don't have all the
brushes thrown in and maybe a paint brush, preferably a square one. Well, it's close enough. I might water some
of these down and just see would these work? These now that I've done that on this paper,
these do work, but they beat up a little bit before they settle down. That's very interesting. So they will I bet that means because
this is a wax paper. It's not meant for
stuff to soak in. In this case, in my desire
to have color grids, I might actually move
to a watercolor paper. We need to go grab
a watercolor paper. All right. I have grabbed some
watercolor paper that I got a long time ago
from Choosing Keeping. What I like about this paper is it's not as thick as
normal watercolor paper, and they are little sheets. So I could do a couple
little things on it and not have to get out
a whole thing of paper, like a whole big sheet
of watercolor paper, then what I was also thinking, and these are already drying. So we can steal
watercolor on top of this paper now that I can see that these are actually
drying really easily, and it makes the
paint translucent. So give that a go
for the watercolor. I do like that a lot. It's a little bit
lighter than, say, the acrylic paint,
but it's translucent and it actually is
drying and works great. Glad that we let
that dry a little. On this, what I'm
thinking is you could do painting on an old book page or
watercolor paper. However, you're inspired
to do some stuff. Let me just wet these down. You can make little color charts or grids or what have you. You could start off with
one color and then mix that one color with
the next color and then have a whole little
color thing going like that. I can be a little neater
and then all the same size. Be a little careful as you're painting so that you get lovely, pretty perfect little
squares or rectangles there. But I do like the thought of mixing a little of each color in with the last color
because in color mixing, that's pulling together the
thread of colors that you've got here so that they all blend without being exactly
in the same family. It's just a fun little
trick that you can use making fun color charts. But they can all be solid color. You just choose
What's interesting? I'm just grabbing a little
each color here and playing. Varying the shades
up and just seeing, what can we make into this? It doesn't have to
be perfect now. We're just making something
that we're going to tear up as maybe a piece
for collaging. I'm not trying to go
for perfect squares. I'm not trying at
this point to create some amazing piece of art. I just want pieces that I can tear and include in a piece. But I'm now thinking
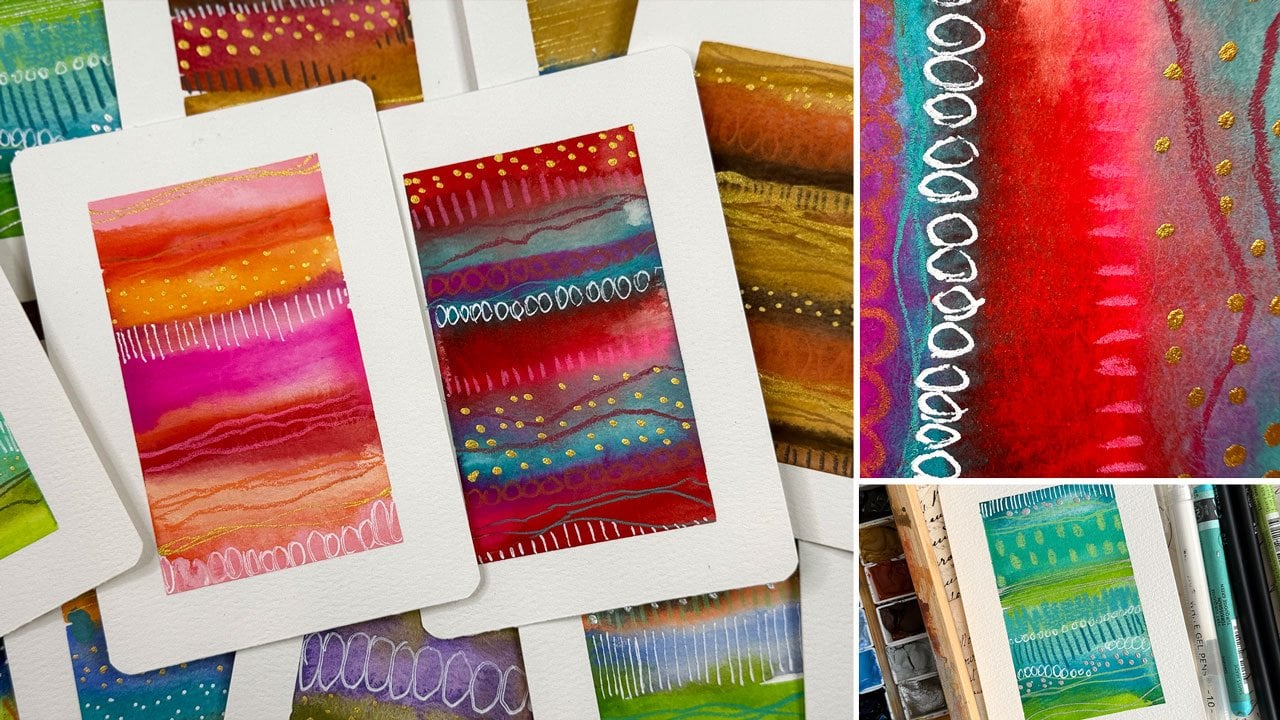
now that I did that, I'm thinking that I
might like a couple rows of really pretty color because the way I've
mixed some of these, they've turned into
a brown because that yellow and browns
them up a little bit. That's fun. Now I'm thinking, let's keep the colors pretty. We could actually just create some rows of color if we wanted. That would be fun. If we did a different color
on each little spot here, then we could tear
these like this and have interesting
rows of colors. I ont you to start thinking of color palettes
that you're interested in, that could be your
favorite colors. That could be colors off
of the color wheel and some traditional color ways like complimentary and split
complimentary and analogous, things that are
sitting side by side, different color
palettes and such. Then we could make some
color palette squares too, you could save one line of this in your color palette book, like I showed you that I
kept in an old songbook. Those are super fun. For remembering what you used and making some notes
and having maybe a piece of the art stuck to
it because after we make these collage pieces
out of these, we would then have something to stick beside these colors. Excellent way to do some color remembering
for what you use. Because most of the time when I make a piece when I'm done, later I have no
memory of how I made it and I don't remember
the colors that I used. It's crazy how that works. Let's put this yellow over here. So that's super fun. And you could do
something like that, you know, on a piece
of paper here. You don't have to do it on a
piece of watercolor paper. Now the thing I like
about this and I did not just sew this page paper. If your paper is
thin and delicate, you might consider clear gesso on this paper first
and then that will keep the paint
sitting on top. Whereas the way I'm doing it, the paint is probably going
to soak down in there, but I'm not overly concerned
that it's going to do that because this is not
like a finished piece. In the book that
color palette book, I do make I consider those color palette pages like finished pieces and the
papers extra delicate. I did just sew the
paper in those, but I did not just sew this and it's interesting to
see how it works out. If your papers too delicate, it might thread with the water, and then you'll know, haha,
I need to just sew that. And if you just got
the extra time, you might do it
just because, but I'm not going to do it on this. I was thinking of different
things that I could do and I just picked it
up and thought, Oh, fun. Oh, I did not want the yellow. I want the orange. You could do this with black
marks on the book pages. Those would have
been gorgeous if we had done the I meant
to do those red. If I had done the black marks, that would have been gorgeous to have black marks on a page. So now that I've thought
about it, let's do that. Now we've got some painted
little color things to play with throwing those
in the floor to dry. Here we go. Throwing those
on the floor to dry. Now that we can see too that the watercolor worked
really good on this. Now I'm wanting to go ahead
and do the squares on here because even if it's got water where it
repels on the page, it dried really cool. That would just be interesting. Less water seems to be
less repelling too, just as a side observation. I've got black watercolor, I could do some
interesting mark making. These are my art nouveau paints that I've pulled
out that I'm using. I think this is black. Yes. I could make some interesting bold black
whatever's on here, different marks because
they will dry and just give me a completely
different texture than what the acrylic did. Oh, yeah, yeah, yeah. Mark making for the
win. Look at that. I like that. Pick out your
different brushes and see what different kinds
of marks will those make. This one is the half inch Robert Simmons dagger, or wedge. What is this angle shader. I have another stencil here
too while I've got the Ooh, let's just do the punchinela. I've got the half tone
Dorothy stencil here from jogles which is
basically punchinella. But because it's in the package, I actually got
punchinella right here. So I'm kind of thinking for
this last little corner, we could do some dots to have just kind of finish off I like this pattern, so I definitely feel like
I'm going to be using that. Then we could always
come over here and just kind of paint through
the dots and see what we get. You could do it like a
regular stencil too, but I just happened
to have it on the brush and I thought,
let's just give it a try. Might not look good, but it's just a collage
piece that we're doing, so it's not important.
That's still fun though. I would like that in a I would like this pattern
on my finished piece, I think, so I may do some stencil work on the
finished piece. There we go. There's
that one also. So I want you to get creative and start making yourself some collage elements with different
colors, different papers. I like thinner
watercolor papers. I like old papers. I like this wax paper, dry wax paper, and it's matt on both sides.
It's not shiny. So this is when it's dry, these are coming out very matte, but I'm also using a matte paint because I like the matte paint. So these are super cool
when they start to dry. I want you to start creating
yourself a little stash in whatever color way that
you've decided to work in. Then once you've got a
collection of those, we're going to start working on our larger sheet
of paper and doing some collage work and
some paint work and seeing what we can do
here in the next steps. I'll see you guys back in class.
7. Paint & Collage: So in this next part
of the project, I'm going to be using
very large sheets of watercolor paper. So I have some Canson XL paper. This is the 12 by
18 pad right here. And then if you happen to
have the 18 by 24 pad and you want to really go big,
you can use that too. I'm going to do the 12 by 18, so it kind of fits in
frame what I'm filming. And I want to do a couple
of different types of them. So I'm going to stick to
the 12 by 18 inch piece, and that is the paper that
I will be working on. You can certainly work on
any paper that you want. For the first piece
that I want to paint, I want to use the colors I was inspired to use
with my color card, and then I'm using
the Kurataki paints. This is the art nouveau
set and the 48 piece set. I've pulled colors
out of both of those, and I'm going to
put the black back. But I have pulled
out 13 lilac three oh one old Mav and
these are coming directly off of
matching piece here. Then I've also pulled
out 15 pale aqua and 42 erlean and 33 cadmium orange
and 36 rose matter deep. You see we fit right in our color palette
and then I want to do some black punches of color. I want to do some other collage elements and pieces on here, but I thought for this one that I would start
with some color. I'm going to grab my
Princeton Neptune a set because I like
this big wash brush. It's a three quarter inch Princeton Neptune
square wash brush. If I just wet these down, I could at least get started. Then to do the collage part, you're going to want to have
some type of glue available. You can either use a glue
stick or matte medium. I think I'll probably
be using both. I've got some matte medium and some heavy gel mat by golden. Liquitex is called Mt medium. Golden is heavy gel mat. I like that this is in a tub that I could
dip my brush in. Either way, though,
this is very thin. This one's a little bit thicker, if you're using
really thin papers, like the dry wax paper
that we were using, then you could use
a really thin glue. If you're using
watercolor papers like some of those
that I created, you do need a heavier glue. And then if you're
doing really heavy, then you might even
need to move up to something like a yes paste because the thin
glues aren't going to hold the real thick paper. I'm going to start off I'm thinking in my
mind in the end, I'm thinking of end product. Artists trading cards
are 2.5 " by 3.5 ". And so let me grab one of those. They're about this size. This is another project
that I had done. But that's the size of
an artist trading card, 2.5 ", by 3.5 ". I almost feel like
for this project, maybe I want to do 3 " by 3 " by 4 " and let them be just
slightly larger than that. So I'm thinking in my mind, I don't want gigantic swashes of color because I'm going to be cutting these
into little pieces. Maybe I want little
swishes of color, so that there's a little bit
of that color on a lot of pieces rather than one
piece being all one color. That's my point.
Even going there, I want you to think about
not doing huge areas of the same color because we're going to
be cutting this up. So this is the first
one that I'm doing. The next one I'm
doing, I'm thinking, I'll glue everything down first and then maybe
come back and add color. Then the third one I'm thinking because I want
to do three of these. Third one I'm thinking
that I could do all vintage stuff with laces
and book pages and stuff. I don't know. I'm just
throwing some ideas out there because if I throw a
bunch of ideas out there, it might spark your
imagination for something that you've already got and
you could be like, Aha, maybe I could do this
thing that I already have. I'm just going to
go down the line here and trust when
it's all done, these are look good
because on the piece in my art journal
that I showed you, it looked good crazily enough. I want you to consider
using any and all of the art supplies that you have
to do any of your pieces. I like to mix my supplies. That's why I like doing mixed media because
I'm mixing my mediums. And on the final layers, on top of the paint, we'll have collage and on top
of the collage, we might have mark making
in acrylic paint pens, stenciling, we might have um, pastels, anything
that you love to use, we get that out and be considering
that for upper layers. This is just the first layer. Even though the yellow
and the orange scare me, even though I know it worked on the other piece, it
still scares me. I'm still jumping in and using that color because
I know it worked in the other piece
that I did and the whole time I was painting
that piece, I was scared. That's why I love
experimenting with color palettes because
it gets you outside of your comfort zone and you pick colors that
you honestly would never even put together
or try or consider. Um, and you don't have to cover the whole page because remember, we have collage that we
want to put on top of this. I'm just getting a first
layer, some color down. We may cover all the color up. Who knows? I mean,
anything goes. It's all about the
yummy different layers. And just seeing where we
can arrive when we're done. We could always paint more
on top when we're done. Nothing saying that
we can't continue adding to it after
we've collaged on top. So if you want to not
overdo the color, when you get started here
and you're like, oh, let me save that for later. I
don't know where I'm going. You can do that. So it's really just what inspires
you as you're going. I like the pop of
this pinky one. I like those pops of that color. I'm going to go and I'm
going to let this dry. We're going to come and glue
some stuff back on top of this and then we
can let that dry. I need this first
layer to dry first, so I will be back. All right. I'm still waiting
on this to dry, but I'm thinking
that we could do some underlayers of some writing or some mark making before
it completely dries. It doesn't really matter.
This is something we can do to fill in some things. If you've got some
stamps that you like, you might stamp some
layers on here. I do have some stamps that I like. I might pull those out. But for a moment,
I'm thinking of just some little areas
of implied sinc writing. It scribble. It's not really saying anything, you look at it and you think, oh, it could say something. What does that say? It allows each person to imagine in their
mind what that could say. My neighbors a teacher. And she's under 30-years-old, and she told me that
they quit teaching cursive in school and
she cannot read cursive. And so she might look
at this and be like, I don't know what that
says, but it's pretty. When and what genius
thought it was a good idea to quit teaching
a basic skill like cursive. I asked her one time, I'm like, how do you sign your name? She's like, Oh, well, they teach you how
to sign your name, not how to write and
cursive and read it. I thought, That's a shame. It's like this weird old
math that they're teaching. Let's go back to memorizing multiple tables and
flashcards and stuff. I saw this article too, totally getting
off on a tangent. But I saw this article
that they quit teaching how to read words, they quit teaching children how to read those phonetically. And it was some philosophy
whereas if you like to read, if you teach children
a love of reading, then they'll just, I don't
know, magically figure it out. I'm not quite sure
how that worked out. But now we have a whole
generation coming up of people that just don't read at a level they
should be reading at and so they're blaming that educational uh, thought on that. And I thought, some of these ideas that people have come out with have been crazy. We need to go back
to some basics. But my point with the cursive, it could be saying
something somebody might imagine in their
mind what that says. I think I'm going to
get out a few stamps, so I'm gonna let this continue drying for a moment,
and I'll be right back. Alright. I got lots of stamps. I've collected them
throughout the years, but this is a set that I
haven't had very long, and I like it. See if I can hold this
sticky thing underneath. It's a stampers anonymous stamp by Tim Holtz, floral outlines. Oh, good, that's on the paper. But I like the way it looks like some drawing flowers if you are not interested
in drawing. I like the ranger archival ink, acid free, permanent waterproof. Once this dries, it will not smear with whatever
we put on top of this. I'm going to I'm going to
do some little sketching. If you like to draw and sketch, which I like to draw
and sketch too, you could draw botanicals
on your piece. But because I have
these and I never use them, let's put them to use. I do have some blocks also somewhere that I
could stick these to. Oh, look how pretty that is. But I'm not going to bother
sticking them to blocks, because these are larger and I want to go a little faster. Let's pull these
right over here. If it's not perfect,
it's not important. It's not like this is
super important for the sections because we're doing collage on top maybe
and different things. But I'm just again trying to get your creative mind thinking, I have this or I love that,
and how can I use it? That's where we're going
here. Look at that. Lovely. And we're gonna
cut this into pieces, so just kind of keep in mind that we'll
be cutting this up. Okay, so that's super fun. And then some other things
that I thought, you know, 'cause I got lots of
different stamps there. But like little bird
little bird might be fun to do as a fussy cut. Like, we could do the
bird on a white piece of paper and kind of cut it out, and then that could stick
on top of something. This is rubbernecker.com, acrylic cushioned
die bird with Twig. Um this one I thought
was super fun, exclusive designs for aaalL all and create all
and create.com. I think I might have
got that on Etsy, but I liked it because it
was a cute little house. That could be another thing. We could stamp on white paper and we could fussy cut it out. That would be super fun. Just look around
at the stamps you have and things that you
could be creative with. I really love this ink. By Ranger, archival,
acid free, waterproof. Once it's dry, will be set and it won't be
smudging around. Get a waterproof ink.
If you don't have one. That one is the one that I like. I've still got a little
bit of wet stuff in here, but I think I'm going to start collaging some stuff on here. I have picked up all our collage
pieces off of the floor. I'm almost feeling
like these would be lovely focal points when
we cut the cards down. So I don't know that
I'll collage those. I do kind of feel like some of these black ones are
calling to be put on here, and then we may, too, paint more on top of this
after we get going. I'm going to use the mat medium. Let me put some of this up. And once we get some
of this stuck on here, we can always paint some more. So don't feel like
you're done when you get it all glued down. Look at it and think, am I
done? Could it use more? I'm going to tear these rather
than cut them because I want lovely pieces that
aren't perfect and straight. And then I might just start
laying these in here and deciding where do I want
some of this to be? Um, I really liked
the great big. I really like these. I'm kind of thinking something. Maybe I'll even get a
little better than that. Kind of thinking, you know, a few of those around
would be really nice. Maybe that there. I'm gonna start
gluing some of these down cause they don't
have to be perfect. I think I'm going
to use the one. That's thick, but I'm going
to use that one anyway, and I just stuck the
wrong brush in there. That is not the brush I
want to stick in there. Let me wash that out. I want my cheap brush. That's my good watercolor brush. I'm going to make sure
I clean that out. Good. I got a cheap
brush here by Simply Simmons that I get at Michael's and
I use these for glue. But now, this is watercolor, so if you're putting glue
on watercolor like that, you're going to maybe
move the color around. But the stamp shouldn't move. I'm just putting a little glue underneath and then
glue right on top, and that'll seal that down. Now, if you've got papers that
are wrinkling a whole lot, what you might
consider actually feel like the thinner glue
might be better. If you've got papers that
do a lot of wrinkling, like a little thicker
paper but not super thick, what you might do on those is slightly wet
the paper on the back. And that tends to
maybe stop that s, wet the back and
then right on top. That's another option. This is matte medium, so it
just dries clear. This is the liquitex
liquid mate medium. This paper is so thin
that we can do thin glue. And if I'm making art pieces, I tend to use art
glues, but, you know, if you've got mod podge,
that's fine, too. So I'm gonna keep
on keeping on here. We're gonna glue some more. See, I kind of want
to save these as upper elements now that I've done these
lovely colored ones. I don't know. Oh, I
tore that one weird, but I could get it
kind of in here just And I have an old catalog that I use a lot of times
as a glue book that you could save an old catalog and use that as your glue if you're doing glue
like I'm doing here. You can do that with
an old catalog. That might be a use for old catalog so that you
don't just throw them away. Like this one. And, too, we could get some
old book papers and stuff and add the old book
pages on top of here. It doesn't have to all be
papers that we painted. We can go ahead and
start mixing in some old pages that paper
pages that we've got. Oh, I thought that
was awful thick. And then I might come back
and paint on top of those. Keep in mind, we're not
looking for perfection. We'll be cutting these
into little pieces. So I'm just kind of spreading around the different
elements at this point, I know that it's
not all going to be part of the same larger
piece when I'm done. And then if you've
got old artwork, any pieces that you
wanted to consider including any scrapbook
or tissue paper, now could be the time to
get those out include them. I don't think I want that one. I kind of want that one with the birds. What did
I do with that? Or if you've got tissue paper, you know, I had some of those
really pretty tissue paper. I could have torn off
some of that to use. Ooh, that's pretty.
Let's do that. Napkins are a good thing
to use if you've got napkins. Those are good. The pretty patterns on it. Like you could use
the top layer of a napkin in the same way that I'm doing
this tissue paper, so that's super fun.
Pretty bird paper. Oh, here we go. I like sticking my brush into
that for some reason. Probably would have
been good if I just got a little round bowl to
put this mate medium in, and then I could
dip my brush in it. All right, there we go.
Mate medium's water based, so I'll just be able to take
that to the sink and wash it right off. Oh, that's pretty. So, you know, this is the fun
part. Don't get in a hurry. Enjoy the process of gluing
stuff down and just seeing, you know, what can
you end up with? I like the bird. We want just a big mess basically
when we're done. I do like the Tim
Holtz tissue papers. If you can get ahold of some of that. These are super fun. Especially because it
looks like old papers, but the background
disappears into your piece. They're not standing
out super bold. The background of the
tissue paper just melts right into
your piece and you can see the colors
underneath them. That's super cool. This bird
one is collage paper aviary. So if you can find any of these little 'cause I've had this for a while. These
are not new this year. But if you can find any of
these, they're super cool, and they're fun for adding just more element
into our piece here. And I'm just doing layers
on top of the layers. I'm not worried about what
I've already stuck down. I'm just going right
on top of that as an additional
interesting something. Alright, once you've got
enough collage elements for a bit and you're thinking, Alright, let's let
this dry a moment as we think about what the
next layer is gonna be. That's kind of where I'm
at. I'm like, Alright, let's think about
this for a moment as I let these glues dry. Super quan. I do love this little bird motif
I've ended up with here. All right, tissue paper is super fun and the cold
wax paper, super fun, vintage papers
worked in super fun, stamp work in there, the stamp works
underneath stuff, but it is adding to our layers. I do feel like I'm missing
something right across there because let's do this. I'm not trying to
tear these perfect. You can be much more
careful than I am. I'm thinking like
this right up here. Again, this medium dry is clear, so I'm just not even
worried about glue on it. We look at that. Then
just look around. Did you leave any glaring
spots that are going to be odd that you need to fill in? Then we're going
to let this dry. We could always add
paint on top of this. We're going to let it dry and think about it for a moment, so I'll be back in a bit.
8. Vintage Papers Collage: I thought while we let
our other piece dry that I could go ahead and
start a second page here. And this time, I'm going to glue the whole paper
with vintage pages, vintage book pages and stuff. So I've already torn all these a couple sheets of
paper into little pieces. And so I want to go ahead and I don't want to do the
whole sheet at one time, but maybe a large area at one time so that I can
just come back and start sticking these
down strategically without too much effort
and thought, go for it. The goal is to cover this whole thing
with these old papers. And I'm just using the
thicker gel medium and it's mat so it's not shiny, by golden so that I can just
keep layering stuff on top. And I'm not worried
about if they're overlapping the
paper at the moment, because I can come back
and cut that off later. I want to cover the edges, so I'm trying to go ahead
and get it on the edges. And this was a couple of pieces
of paper that I'm using, but I may go grab some
more just to continue letting me have some
variety in the papers. Some of them I'm flipping over so we can get the backside. But they're similar. Now that I'm getting them stuck down, are they too similar? Maybe they might be too similar, maybe I want some more variety. I also have this
super level paper bag that we're going to tear
before I can change my mind. Totally what I wanted. And you can make this with a stencil and some craft
paper. That was another thing. You can make craft paper makes
great paper for stencils. If you've got some craft paper, that's a good choice for doing
some black stencil on top. You can use a glue stick too, but I'm gluing so much down that I thought a glue stick
might be a pain. That's why I'm not
using my glue stick. But if you want a
glue stick option, hu glue stick is a great option. I do Super Love
love the paper bag. I also have this one with dots. Let's use it too. This one's got a
shiny surface on the inside of it. This
other one did not. I don't think that'll affect
its sticking down though, so I'm not worried about it. I do love that. I
love that bag a lot. Like, that could be
the favorite element out of this. All right. Get a little water on that and get it moving around, some. And again, I'm just going
to go off the top there, not worried about
that at the moment. You could do this.
I'm doing it with shades of brown and
black and stuff. You could totally do this
with bright colored squares, like a Moroccan feel or
something like that. That would be really cool if
you wanted something bright or more like a Indian said feel, the lovely said fabrics, quilting, that kind of feel. You could definitely
do a whole lot with this kind of technique. Filling the whole page with
whatever inspires you. All right. So on this one, now that I'm sure I've got
all the spaces covered, and I may not have everything
glued down perfectly, but if I've got an edge
that's sticking up, I can come back and grab
it with my uhutick. If I come back later
and it's not all dry, I could just come back and catch any little ledges
that are sticking up with a little bit of
glue stick because I do feel like in a couple spots I might not have got
it all glued down. But that's how I can come
back and catch those. I'm going to let this dry along with the other
one that we've got drying and then we've got a second one that we
can work with in class. This is super fun. The first one we painted and collage on top. This one, all old papers, just collage the whole
thing and then we'll do stuff on top of that.
I'll see you in a bit.
9. Pretty Paper Collage: Right, I thought I'd
do one more with some commercial
papers so that we can see how those would work. I like that these have
vintage papers in them. This is the Tim Holtz may
not be available anymore, but it's a Tim Holtz volume one ideology double
sided papers. And I'm only using it
because I have it, and it's a nice way to use different things
than vintage sources. If you don't have the vintage sources and you just want to buy a pack of scrapbook paper
or art journaling paper, I also had some
tissue paper that I thought was cool that
came in a package. I was wrapped around a package. Never seen this tissue paper in a store, but I just
thought it was cool. There's a little thank
you. Somebody wrapped a package I got in some pretty tissue paper.
So I may use that. I may not. I just pulled
it out because I have it. I set that to the side. And I thought I would
use little pieces of commercial paper to do a
whole big collage page. And then, um, and maybe I'll
cut these with a scissor 'cause that'd be kind of fun and just different sizes and shapes to
work into my piece. So I'm not thinking
at this point of any particular color palette. I'm simply using whatever
these papersh on them, and then we'll use that as our inspiration as
we glue these down. And so I'm just going to cut these up and cover the
whole page in these papers. And then we'll let that dry
with the other two that I have drying so that
when we get to the next stage, we got choices. That's what I like choices. Oh, I like that. I
don't want them to be samo though, but I do Ooh. Oh, that's a fun. If there's anything
that's precious on your pages that you want to
save and make sure you use, then be careful about
the way you cut them up. I'm not too worried about it. I'm looking at color,
texture, pattern. This is going to guide us later. Oh, look at the flowers. Give me the flowers. This will guide us
later in some choices. I'm not being real
specific on how I cut these up either, I'm just going. And trimming, and then I
will glue all these down overlapping some maybe and
just see what we end up with. It doesn't have to be perfect, but I do want enough
that will at least mostly cover our page
and you can start to eyeball what you want to do as you're seeing,
do you have enough? You can eyeball how
much paper you've cut by spreading it
out a little bit. I'm going to keep cutting up this packet of paper and
glue these down with my gel mat medium there from golden and we'll just
see what we end up with. Okay, I'm getting down to the very end of what
we had going on here. I like that page. Look at that. They put the best page of
butterflies on the side of some really lovely
green. Darn it. I'm going to say that one.
I like it. Let's use this. I'm getting down
to the very edge. I'm making the last
few decisions here. My goal was not to think too hard about
where stuff was going. The goal here was just
to fill the paper. With collage pieces because
when we cut these up, it's going to be
a lovely surprise what we actually end up with. I didn't want to think too hard about where
anything was going. I would just fill
it up and just see where we got was my goal there. Let's use this green here. It's on the back
of a book cover. See, it's nice when
you don't have to be afraid of using all
your vintage supplies in something that you
may or may not love. So I do like that there
are sources out there that give us prints of
the vintage things. If you've got some
lovely vintage things, scan them in to your
computer and print them out. Let's use this map.
Print them out on some paper and use that paper and save
your vintage items. If you're just reluctant
to use your real items, make a collection of
vintage papers and stuff and use those prints
and scans of those, which I do have a collection of vintage papers that I collected
for photography stuff. So could definitely pull
those out and make a copy. That would be fun. So I'm just gonna finish
the last little bits here, and then we will be ready to set this aside and dry
with our other two pieces. So you could do quite a few of these in one go.
Well, I like these. Like a whole bunch of pages
and then just be ready for the next time you're ready
to sit and make stuff. You could do a bunch
of these for that. So that's what I'm thinking. We're going to do all these, and then it'll be
perfect time to take a break and go eat lunch. And then you could
come back later after everything's dry, so you're not sitting
there tapping your foot, waiting on something to dry. I know you do it
because I do it too. Let's use this
little piece here. I need something big enough
for that hole right there. There we go. All right. Now, got a whole
page of vintage. You can use vintage. You
can use scrapbook paper. You can do some of
these Tim Holtz papers. You can use anything
that you've got on hand. The goal here is to fill the page because
when we cut this up, then we can add some paint. We can add some fabric snippets and we can add some marks. We could add some
stencils, so many choices. But I did think it would be
fun if we did one that we painted our own collage papers and painted it and added
our collage papers, if we did one that
was all vintage, in monochromatic colors, and then one that
was Los vintage, but it's new and just to
give us some choices. We're going to set
this one aside to dry and I'll see
you back in class.
10. Cutting Our Cards: All of our master
sheets have dried. And now we got to decide, what are we going to do with
these before we cut them up? If we're going to make true
artist trading card size, and I make a lot of these
because I like them, then we need to make them
2.5 " wide and 3.5 " tall. Then that would be
about the size of a playing card that
then you could do lots of different things
with and maybe trade and play and experiment, make cards out of them, whatever you'd like to do with these. Other collage material,
save all your pieces. But I really love doing
these because they're all pretty and I do lots
of different things. I make art inspiration prompt cards with them and there's all kinds of fun stuff you
can do. That's one choice. Make them into true
artist trading card size, and you would cut those into strips and then cut them
into the right height, and 2.5 by 3.5 is our size. Another thing that we could do with it is make
them a little bit larger and make other
plans for them. Like if you like to make cards, you could decide on
what card you like to make and then measure out a size for the pieces that
you'd want to put on the front of each
card and if you wanted to go the whole card, or if you wanted to
go three quarters of the card and leave
some room for writing. So that's another option and you would just
need to decide, is that what you're doing
with these? Cards are fun. Another super fun thing that
I'm thinking is that we could make a little tin of
art. That's another choice. For that, you can get a little
silver tins off of Amazon in different sizes and some
of them are toy box size, some of them are
larger size like this. I actually think I
have some toy boxes. Oh, yeah, I do right here. This size would be pretty similar to the
artist trading card size, maybe just a hair smaller. You need to know what box
are you putting those in. If it's going to be
a box like this, you'd also want a quarter
rounder to round your corners. I actually think I have one of these that's a
little skinnier. Perhaps. Maybe not.
I thought I did. But decide right up front, what are we using these for? Are we making a
little box of art? Are we making cards? Are we making a little
artist trading size? Do we want them to be a
little bit bigger pieces of art that we could frame? So I'm thinking ten of art would be fun because I
have some vintage tins. I like to look at them.
I like to collect them. They're already
decorative, and you could very easily put the art in these a little
bit larger round the corners and then you'd
have a fun little box of art. I'm going to make
one of these into a fun box of art using
this tin that I have. But you can use an Altoid tin. You can get some of these off of Amazon that are just silver, and then you could
actually attach a piece of art to the front of it or paint it and then decorate it. There's also I randomly have a little round tin that had some watercolor
that came in it, so that would be very
interesting to pick unusual size to make
your pieces out of. Basically, I would trace that onto my paper and then cut just inside the line so
that I accounted for the lip here of this tin. That's another choice, too, and then you could put a piece of art or decorate the top. I'm going to do one of
these for one of these. I got my little punch here. That's another choice.
You want to decide. What you're going
to do with these before we start cutting. One of these I already know
is going to be this tin, and you also need to decide, are these finished
for the moment? I say for the moment because
once we cut these up, we can continue
to decorate them. But we could continue decorating them now
if we felt like, oh, it needs something else. I actually considered
on this one, gluing down pieces of fabric and lace on top of it to be
part of the collage. And then when we cut that out, that would be unusual pieces of the fabric that
we've used on top. That's a consideration. Do you want to do that
before you cut stuff up and then let the pieces
fall where they may? That's a fun choice. I could glue those down first. Now, if I'm going to
glue these down first, then just cutting these
with an exacto knife, is not going to really work. We're going to
need to maybe mark off these and cut
them with scissors. I think the easiest
way to do that would be glue everything
down and let it dry and then flip it over to the
backside and mark and cut it from the back so that you're not fighting with everything
that's on the front. That's another consideration. Do I want to strategically glue things down now
or wait till they're done and strategically
place littler pieces onto our cut piece?
Choices choices. Just think about the
different options there, and I think what I'm going to do for this
is I'm going to go ahead and cut these down to the size that maybe I want and
then glue stuff to it. What do we want to
put in our tin? I am almost interested in
putting this in our tin. And then when I get it cut
up into pieces of art, then I can add some
other yummy bits to it or paint on top of it.
Or, you know what? Do we want to do this
one in our tin because it's true vintage pieces mostly, and I can add some pieces to it and put it in our tin.
I'm thinking that. For this piece, I do
want to determine the size before I cut. These are I'm going to
cut these about 3 " it's four and a quarter tall and I'd already wanted
to cut some of these in a slightly larger size than our artist trading card, which was 2.5 by 3.5. I was already thinking
three by four. I think I'm going to go
ahead and stick with my initial three by four thought on all of these because
that'll fit this ten. If I wanted to put it on a card, that would be 3 " by 4 ". We really I could
do four and then three and it could be the
top of a card if I wanted. I'm going to cut
this one first into our three by four size. I've just got a cutting mat here and I'm going to move it
where I can see the inches. And this way, I can
just line the edge up hopefully because
I've actually got stuff. I can actually go ahead and just cut the stuff off of here. I've got a big
metal ruler that I had gotten years ago
at the arch store. So just hit the
arch store if you need a nice large metal ruler. I'm just going to cut
this off of here. If your knife is dull, I like having these knives with the blades that split
because this one is dull. I took apart a box with it. But these usually
pull the tip out here on the smaller ones
and then you can cut it. Snap it, but it looks
like I don't see the little snap bit on that. So I'm just going to snap it. I actually face it down and I snap it off, and
then we're ready. You have to be very
careful with that, but I do like the
snap off blades personally because of that. I could go ahead and just do
this from the bottom side, which would definitely
make it easier to see if I'm straight. Let's see. I want to
do three by four. What size is my paper here? Let's see. This is 12, so I could do four, eight, 12. And it's by 18, so I can
do three, six, nine, 15, three, six,
nine, 12, 15, 18. I think that's where we're
going to go and I may end up with a little cut off
piece just depending. I need this mat to be
a tiny bit larger. I think now that I'm doing that, I'm going to use
my quilters knife, my quilters ruler because it's easier to mark off 3 " and I might just mark
it off with a pen. How about that or a pencil? Because this is 3
", one, two, three, and then we're there rather than trying to eyeball
it with the cutting mat. If they're not
perfect, that's fine. They're pieces of art, they can be a little wonky
and I'm not upset, but I don't want
them to be super crooked, obviously crooked. Gonna be just a sid
short, but that's okay. Now I got 4 ". Okay,
I'm gonna cut those. I'll cut that in a minute. Alright, so let's just go ahead. I'm gonna use my metal ruler. I find it easier to lean on. And I'm going to do
a couple of swipes. It doesn't have to be all in one cut because
there's several layers. And so, especially if you add
fabrics and things on top, if you just go very carefully, very slowly, and cut
through the layers, you'll see when it
finally releases, and that way you don't
tear anything up. You can see, I'm
just testing it out. When I round those corners, that'll fit right into
that tin. That's my goal. It's really cool when you
actually look to see what is left after you cut it and then flip it
over and look at it. That's the most fun, what
did you end up with? I'm cutting these three by 44 to match my tin that I have. Now I've got them all cut out. I cut out these in the
three by four size. I just want to take a look at how each of these turned out. You do want to make
sure that you've got a sharp blade and if you have any pieces that came up or tore, you can just go ahead
and either tear those off or glue them down, not a big deal when it's
old papers like this, but look how cool these are. So these we can now further
embellish and decorate, or we can leave them like
they are if we find one that looks super good because some of these do
look super good. So we're going to look
at some different ways that we could further
embellish these, but I thought we would
take a look at the pieces. I love this bag. I only had one of that bag, and now I need more of that bag. Those are super gorgeous. Then I also went ahead
with the second one and I cut it into the same size because I want
to work with this size. Artis Artist trading card
size is a smidge smaller. So you can do 2.5 by 3.5. These are three by four, which I really love
because they're big enough to be a piece of art that you can see and look at and
ponder and think about. I love how some of these have writing on them and
different color. Oh, I got a bird in there. Some of these are plainer,
so that's something that I would consider
further embellishing. It's really interesting to
see when you cut them out, especially from the bottom side, you can't see what
you end up getting. It's very interesting to see how the collage
pieces work out. Those are super cool. I've
enjoyed all of these. Those are exciting. And
then on this last one here, I've actually cut a couple
of different sizes out. I went ahead and thought, I want to make a couple cards. I made them an inch smaller than the size of the card
so that I could center it there and that could be the card or I could
further embellish on top of it with maybe
some ink drawings of botanicals or maybe
some stencil work. We'll have to just look
at that and decide. I made two of those that I can do something
else with on a card. And then I had some
leftover scraps, so keep the scraps. I made a couple of the artist three by four size
that I decided to do. Look how cool that is.
These are super cool. I can see doing lots of stuff
with these in collage work, just kind of framing some
up as a piece of art. I also cut a couple
out that were longer, skinnier strips because
these remind me of some of these
commercial collage strips that Tim Holtz made. And it's very much
along the line of snippet rolls for the fabric.
There's a couple in here. And I like this kind of look. These are just ideology
collage strips. And I think when you
ever ordered these, I ordered a whole bunch
of stuff a few years back cause I just got
obsessed all of a sudden. And I don't think
they rename them. I think you just get whatever
is the strip for that year. But look how pretty, you know, these little vintage
collage strips are, and they're basically using
a whole big sheet like we did and cutting them into
this kind of strips. These would be perfect for junk journaling, art journaling, a bookmark, small gifts that you can include
inside a card, lots of things that
you can do with these. I just thought, looking at
a few of these examples, was cool to see give
you some ideas in what you maybe consider doing with those or if you like
the Tim Holtz ones, those are collage strips. So consider making yourself some collage strips with these too because I think
that would be super fun. Then
they're ready to go. You wouldn't have to do anything else to it
if you didn't want. So these are little
mini collage strips, so don't throw any
little pieces away. So now we have three sets of
something that we can do. And then let's go ahead and I'm going to
do a tin project, and I might do a second ten project today
I'm really inspired. I actually dug out
this other tin that I have that's really pretty. It's full of little
rubber bands, so I might go get a plastic bag and put those little
rubber bands in there, but perfect size again for
a set of lovely cards. And so this might be for me, a artists interesting
art boxes. So super fun. All right, so I will
see you back in class. You decide if you're
going to go and look for some tins artists at the antique store before you cut these up, then
go ahead and do that. These are usually pretty cheap. I don't pay any more than
three or four or $5 for those. They're not in good shape. I like them when
they're beat up. I do want the top
to steal clothes. I put a rubber band on this one, so all the little rubber bands didn't slip out accidentally. But the decorative boxes make particularly beautiful
little pieces to put art in. So that's what I'm going
to do in my projects next. I'll see you guys back in class.
11. Embellishing Your Cards: Let's take a look at what we're going to do
with some of these. So I'd already decided on
some of this being a card. And so then I just need
to look at it and decide, is there anything else
I want on the card? I can go ahead and glue
this piece to the card, and I'm just going to do
that with an Uhu stick. And I don't necessarily
want to get these with glue on it, so maybe I'll pick one of these other pieces that I had already used as a trash piece. But just a nice heavy
layer of glue on there. You don't want it
to be too thin, you want it to go ahead
and stick to the paper. Hu sticks dry clear,
so it's perfect. You could use yes paste
if you've got that. Matt medium is probably
not heavy enough. Then once I get that stuck down, then I'll probably set
it underneath something heavy for a few minutes to
really make sure it stays. I might even flip that over and just really get that adhered. It doesn't take that
long to get stuck, but it's really
super thick paper. So we're gonna let that
kind of be drying. I think I'm going to
stick them both down. And we could look
at that and decide, do we need something
else on that? I need a book. Where
is a book? Here we go. Let me just set that
underneath this box of markers for a moment
while it's drying. And so do we want some kind of stencil work on there
or maybe some flowers? Kind of thinking like some of my stencils that I have
that have flowers on them might be fun to do a little bit of
stencil work on there. I was kind of thinking
something like I just saw it. Maybe I imagined I saw it.
Oh, no, it's in this one. This is just a little
skirt hanger and some lovely music sheet holders that I get to hold
these stencils, and I hang them over
here beside me so I can just easily grab them. Some kind of thinking
with some black paint, and then we'll have to set it
to the side and let it dry. But I'm thinking flower
pattern on top of this, or you can draw some if you like to if you want to
draw, you can do that. Pen and ink drawing
would be just fine. I'm going to grab a
little tiny bit of black paint and do a little
tiny extra stenciling. Anyway that you
want to embellish your pieces would be great. Just trying to give
you a few ideas on what we could do here. I'm thinking that I'm going to stencil this in
the black and then that will allow the different layers to peek through on the edges and stuff which might be cool. I've got one that I
didn't stencil at all, I'm just going to let it
do its thing. I like it. Then one that I'm
going to stencil just to see, do we like it? Do we not like it? You know, I don't get precious with stuff like this because it's play. It's experiment, totally. Alright. That was
definitely the way to go. Let me stick my sponge
and some water. That was totally the way to go. So a little bit of stencil work. I could continue embellishing
that with some markers. Acrylic markers is
great, maybe some dots. But I do think that
has a lot going on with the underneath
pattern showing through. So I'm not going to further
do anything else with that. And then once that's dry, I can glue that down and
we can see the difference in further embellishing a
piece and not embellishing it. We're going to let that one
dry. I'm going to set it to the side while it's
doing its thing. We'll come back to that and
glue it down to the cards. Now I got two cards, and then I can write
on the inside, and I'll set this one
down to the side. I may revisit that.
I don't know. I want to work on
something for the tin. Do we want the green tin for the colored
pieces? I think I do. And maybe the red tin for the other pieces?
Yes, I think so. And it's not necessarily
that all of these pieces are going to go in to the tin, but we could pick a
selection of them and we could have several
tens worth of stuff. I'm going to go and look at the prettiest ones, which one? That one's pretty,
just like it is. I really like this one, and
there's a bird here too. This could be the bird theme. Since I used those,
I really liked the big circles so
we can look and see, which one of these mostly
look finished as they are. See, I like that too. These I definitely
think look finished. What I would go
ahead with this and do is punch the corners. Let's just take a look
at what that corner looks like here on
the corner punch. It looks like this R ten
millimeter. Let's just do it. Basically, you just have to
pop it in and cut the corner. And these could just be
a little tin of art, which is kind of
what I'm wanting. And then, look,
they fit right in. So this is just the
perfect little tin to look at the
pieces and admire, which is my intention
for the art could also be a little art prompt deck where you put prompts on
the backside of these. I do that a lot. I'm all
about the art prompts. These are the ones. I go through and pick out
the ones that I think, Okay, I think that's finished. I don't need to do
anything else to that. I do those first
because then that gets those out of my
attention span here. Then I look at the next pieces
and think, look at that. Look at that. All the pretty art that just goes right
down in there. These apparently just
come out on the backside. Oh, my gosh, I'm
already excited. And if it weren't
already so pretty, you could put one of these
outside if you wanted to. That's something you could
just glue that down with some tacky glue or
some yes paste and then maybe a layer of varnish
perhaps to protect it. So that's super cool in there. Now I'm looking at these and
I'm thinking, are they done? Do they need something else? Do I need to stencil
on top of them, draw on top of them, add any little embellishments. I like making little
snippet pieces which are just a
layer of fabric, couple layers of little fabrics, and then piece of lace
and some buttons. So I like snippet pieces
and snippet rolls. I pulled over a snippet roll, and these are just a
strip of fabric with other fabrics sewed on minor sewed, but
you can glue them. You could just have
yourself up on Snippet roll or
little snippet bits. And I like these, and I'm kind of looking over
here at this other one. Let's just work on both of
these. I'm looking up here. I like little
embellishments like this, but if you put too
many of those in here, that might be too much. Let's look at these real quick. As I'm thinking and see which ones do I like
just like they are? Which ones, I love
these with that bag. I need more of that bag. Something we could do is I
really like the black on top of the papers with
the bag doing that. I really love that that might be something to consider when you're looking
through and thinking, does this need anything else? You might consider the black as an accent in whatever you do. I really like these three. I'm going to go ahead and
cut the corners out of that. I actually love this little
snippet roll right here, Snippet roll, the
little snippet piece. Again, that's just a couple of little snips of fabric
glued together, which we could make one of these since I've pulled this
out to show it to you because I'm thinking
right there, beautiful. I do have some fabric over here. We look at that one.
We could look at these on a piece. All right. I'm telling you right now, this one's going to
live on this one. I'm going to go ahead
before I get too far and I'm going to get
some quick dry tacky glue. This is the eleens tacky glue. I like the elenes
regular tacky glue, but this one says quick dry. I got a little sampler
set off of Amazon. I use the tacky glues
in my journal making. I'm not going to glue
the whole thing. I'm just going to glue
a spot and this is now going to be
attached to this one, and I particularly love That we've got the
black bag that I love so much hanging out and
we'll call that piece set. Look at that? Girl.
Pretty pretty. Okay, let's just pull out
some little pieces of fiber. I've got my little box
of fabric stashes over here and we'll just start
pulling some stuff out. I just need little
tiny pieces of these. I've got some scissors and
a little bit of tacky glue. Look at how pretty that
is. I love that one. I'm going to cut
a little piece of this for something
might be that one. Oh, that's actually
really cool right there with this flower thing. Alright, I'm gonna commit
this to something. I don't know if this is
what I'm committing it to, but I'm committing
it to something. Maybe it'll be its own
little thing over here. Maybe. Oh, like we could
do something like that. And then going to go ahead
and I just want that. I just want that part of it. Maybe this piece could be
the underneath right there, and then that is pretty cool
with the different pieces. I'm liking that. I might
come back to that. I really like this
bit right here. I might actually go ahead
and just say, Commit it. Committed. Oh,
see, look at that. It almost needs to not be
completely covered though, if I just cover it up, it
wastes it, doesn't it? Maybe we'll save that
one right there. Maybe we'll have
that piece of yellow there and these little
pieces here peeking out. And maybe this piece here. I'm containing them mostly to the card because I'm
putting them in a tin. I'm liking that one, so we'll
think of that right there. I love this piece right here. I'm almost thinking
that might be it. Maybe with a little
piece of this stuff. I like things that have texture and these all come from my favorite little
Etsy fabric store, the 1924 Linens and More. Oh, look at that.
Look at that one. Okay. I like that. And so I like them because these are little
curated bundles of lace and fabric and they're in different color ways
and you can buy a whole little set for
not very much compared to hunting these out and
sourcing your own fabrics. Look at that pretty
piece of burlap. So if you need a fabric source, that is one of my
favorite because of all the yummy fabrics that are included
in a little bundle, it's like you got to go shop it in your
grandmother's sewing room, which if your grandma
didn't have a sewing room, that's a really fun thing to do. My grandmother had a
little sewing room. I like those. Okay, so let's commit to some of these. I'm committing
to this one. I'm just going to
glue these down. I don't have to glue
the whole thing. I just need to glue it enough
where it will stay put. Just like a little tiny
bit of glue in here and then let them dry and I
think we will be good. I love this piece. Again, with the buttons because we're doing collage pieces. If you want to include
buttons on yours, I just glue the buttons too. Oh, look at that. Perfect. Okay. I might go ahead and
touch this one in a couple of places just to make sure that that lovely
applique doesn't come off, but oh my goodness. Oh, my goodness. Feeling good about these. I'm also loving the
texture on this one, and I might go grab
a couple buttons. Let's just go ahead and commit. Do I like this one like it is? Am I using the ones I
already loved? Let's see. I do like the black hanging
off of this one, though. But I don't want to cover the
blacku let's save that one. Let's do this one.
This one's plain. I definitely feel like it
needs some spiffing up. I'm going to put that
right there. And then this, I don't know what this is. It's like an old sweater, I bet. That's another thing I like
about the little Etsy store. You can search junk
journal fabrics and stuff like that
and come up with all kinds of little
interesting bundles that people have made out
of their fabric staches. But she uses old
linens and clothing, so you might even look at
the thrift store to see, is there anything interesting at the thrift store
that you can cut up? This is my grandmother's
button box. 1940s bake light box, but I've also got some
newer buttons that I found. But what I like
about old buttons is we can just kind of come in here and add a little tiny
bit of interest if we want. Do oh, look at that right
there. That's kind of fun. Maybe a button
there on the edge. Caesar button that
would be better than that button. Nope. And if you don't
have a button stash, you can go looking at
the antique stores. Sometimes you can find jars of buttons and then just
start saving your buttons. Or you can visit the Hobby
Lobby for some buttons. They usually have a
really good inexpensive. That's a fun button. I really
like that one, though. Let's just use that one.
Hobby Lobby usually has a very inexpensive selection or when they're running a
sale of buttons and stuff, hit the hobby lobby. All right, I'm just going
to put a glue dot there. And we're going to
just glue the button. And that's pretty fun. Okay, so now we have one that I stuck down in there that
I didn't mean to because I have not
cut the edges. So I should have
already cut the edges. That's okay. Lovely.
Look at that. See how beautiful
something like this could be especially if
you like fiber arts. We can call this a fiber
art project because it's basically using fabrics on
top of different stuff. So we're right in there with the fiber arts if you
wanted to make yourself a little treasure box of pieces of art with different
fabric treasures. I call them treasures
because they really are. If you've got any clothing
that you love that is not giveaway weighable to
the goodwill or whatever, look at those. Look at those. You totally need to
make some of these. Then definitely any fabric is subject to my stash box now, but I do like just buying some lovely fabrics from
somebody that's already curated a stash if you don't have a stash for yourself
because it's not expensive and you can get lots of yummy
different options. Let's just show you
a few of these. Some have a little napkin. I like textured fabrics. I like little bits like this and if you buy it
already cut up. Look at this. I feel like we
need to use some of this. Oh, my gosh, if you buy it,
look at that right there. I love little pieces of lace. If you buy it already cut up, you don't feel guilty about
cutting something up. Look at that. It's a sweater. This is so beautiful. Oh, my gosh, look at that.
Totally going to use that. Now I've got all these
lovely little pieces of beautiful art. Oh, I'm totally using this. I don't know if there's anything better that that
would have gone on, but it's getting
claimed right here. Kind of like it with that
little bit of blue right there. Look at that right there.
It's getting claimed. I wish I had this
sweater, I would totally. It's my favorite color. My favorite color is aqua. Love it. Now I can just use
this bit for something else. You can see if it's
something that's already look at that. We could totally use
that on something. Let's put that over
there to the side. I could have used it
on this right here. What do you say about
that? Do we want that? Then that? No, I
like it like this. You can see if it's
already cut up, if that were a sweater
and I had to cut it up, I would maybe not be brave enough to do that.
Look at this piece of lace. But somebody else
has already cut it up and now I don't
feel attached to it. I feel like I can go ahead and further cut things
up and not feel bad. Oh, look at that
green. That green. Oh, my gosh, loving the green. I've got lots of little bundles because I just went
crazy. I like that. Let's see here. Okay. So if you don't have a little fiber
stash, you can look at the Antique market or the thrift
store or the fabric store, and you can collect some things. Or if your grandma's got
a sewing room still, definitely go for that. My grandmother passed
away ten years ago, so I don't have
that option, man, I would definitely love when
I was a kid digging through her room and picking out beautiful stuff for her to make me some doll
clothes out of. I love this piece right here, but I don't want to go
ahead and use that, but I like this
texture right here. So I'm going to go
ahead and grab that. Maybe you have a little
texture hanging out. Oh, yes, yes. All right. I also love
this bit of velvet. I don't know if I want to
sacrifice the velvet yet. Do I want to sacrifice, maybe? But then we've missed out on
the underneath collage work. You just got to play with
these things until you get oh, I'm kind of feeling that
or even on that side. Let's just start. We're going to commit
to something here. A little bit of the glue. Again, I'm not looking to tack the whole piece of fabric down. I don't mind there being
movement in my piece, but I do want it tacked down enough that it's
not going to come off when we're looking and appreciating all
the stuff going on. This I love love,
like crazy love. That would have been the
most beautiful sweater. Is there a button that
we can put on here? I've got my own
little button box of little treasure buttons that I found at the hobby lobby. These are all on Supercell
for $0.99 and $1.99. Ooh. I forgot I put these in here. These are like little bone
buttons, like real bone. Might just use that. So I pulled out my
fancy little box, but I'm thinking the lovely
little real bone buttons. But, yeah, see how
lovely these are. I could totally put a piece of these were on sale at
Hobby Lobby for $1.99. And these little ones some of these little ones were
on sale for $0.99, and there's like two
buttons on each one, so it's more than one
button, but look at that. Oh, my gosh, look at that. It's like, looks
like an old earring, but it's a little button.
Totally gorgeous. If I put that on a piece, maybe I feel like I want to keep with the little
antique bone buttons. Those came out of my grandmother's
button box and I must have been planning to
use it and then thought, let me put those in the box and consider them
for something later. It's probably what I did
cause why would they be in the jewelry button box? Let me glue this down here. If I'm going to put
buttons right there. I need them to stay
where I put them. Oh, no. Totally flipped it over. All right. So lots of ideas.
You don't have to do fabric pieces for
yours because I am loving the fiber arts and the fabric pieces
and the junk journals, the art journals that I make. I've got all these fabric pieces that tends to be where
my mind is going. This just a baby wipe. I'm just getting the glue. It's going to dry clear, but I want it to not
make a big mess. Let's get that right
there. There we go. But you can do all of yours as drawing and painting
and stencil work. I just had an idea
and went with it. Look how gorgeous that is. Oh, my gosh. Oh, my goodness.
I didn't clip the edges. Why did I not clip the edges? Somebody should have
said, Clip those edges. Oh, no. All right, we may have to I may have
to cut that with a scissor. Why did I do that? Uh. So you don't have to
have a corner rounder. It's just convenient, but look how easy I just cut that corner, and it looks just as
good as the others. So here's what you have. You don't have to have
all the bits and pieces. That's fine. I squeeze
some glue out, so I don't want I don't want
there to be a big glue line, even though it's going
to be clear just going to make it a little bit of glue, and then we'll let that
sit to the side and dry. So these are super fun, and that's exactly how
I'm going to continue on with my paper
ones that I did. I like the fabric parts of them. I like gluing little layers of fabrics and then
buttons on top of them. This even has some
little seed beads. So it's just some little
squares of fabric all glued down with some
buttons stuck on the top, or like these, you
can just collage it onto your piece and then let's set them to the
side and let them dry. That's super cool. I love all the super fancy
pieces on these. Now I'm going to get
excited about opening this box and seeing what
treasures we've got in there. I could cut in a few
extras of these. Obviously, if you're
going to put things with this many
lovely layers on it. It's not going to
fit all your pieces. This would make a gorgeous gift. If you wanted to
give somebody a gift of your little pieces of
treasures in a box like this, they would make a good gift. I would say four to five at the max or what's
going to fit in here. You could also at the bottom, just include a few,
I love this one, go ahead and round the
corners and have a few at the bottom that could then later be embellished
and decorated. So, yeah, you could just
have a few at the bottom, ready to go, which I like. So that is one box. And then we will do
another one. Look at that. Mm. There we go. A couple at the bottom,
and then layered in here. We're going to let those do their thing and dry because
they do need to dry, but that's enough to
now shut the lid, and it's full. Look at that. Oh, my goodness. All right, so there's one fun choice. Also, I like how we have included a few of
these at the bottom, and then we can decorate
on top of that. I've got those pieces over here, and what you could
do with those is some of our painted
collage pieces that we did can become
layers on top of this. So I really was thinking in my mind about these
that I painted, but we didn't do anything
with yet. I love them. We could go ahead and tear some of these or cut
them with scissors if you're afraid to rip apart
that you didn't want to rip. But I like all of these. I mean, I'm even
kind of thinking, like this one right
here is extra fun. So then I'm gonna look
on here and see, like, which one I oh, could I kind of embellish further that wasn't
quite what I wanted. Like, I kind of like this one. And I could go ahead and just I could tear them.
I could cut them. I could treat them like
the pieces of fabric, and now we've got
some little bits and pieces that we can
add and glue on here. Keep all your pieces because if you liked
something like that, would be really pretty
on top of another piece. Don't get rid of your
pieces yet or even, I say yet, but don't
get rid of them. Ever. They're fantastic
for stuff like this. I'm actually king
this here also. Going to go ahead and
just tear a bit of this. Then it could be up
underneath this. I need a smaller. You could layer these until you've got something
that you're like, look at that super cool. That's one option.
Like we're making a little paper snippet
things, which I love. See, actually I like
that right there. So don't throw these
little pieces. You might like that as
a little piece on top. Then we could secure
that with a staple, maybe a little piece of ribbon. Little piece of
ribbon might be nice. Little piece of something
like that, and a button. So twine might be nice as a little bit of some decoration
on one of these pieces. I feel like these are still too big for what I want
to do with them. So, now, these almost
be better on this. So I could kind of mix
and match my box also. If I see some pieces
on here that I want to layer into a piece instead
of it being all one, I could layer these pieces. I got a little
piece of lace here. I could put a little
button in there. I do like including
fun stuff layers. I could put some little
seed beads on here. These are the little
fabric snippet thing that I showed you in
the other box there. Oh, that's fun. So that could be decorated with some
pieces that we have cut and added.
Cami in that. Let me cut these corners. Before, I glue stuff down. I'm just gonna use that
same glue since I've got it out. There we go. I like that one. Okay, so we can put that in our original one or we can add
it to that one. That's one kind of choice. Another choice might be to
draw on top of these if you want to draw
with a pasca marker, some flowers or some
type of decoration. Let me get that started. I'm gonna do it on this one.
Let me cut these edges. Look at all this
fun, pretty stuff. So I could do I'll go
ahead and do, like, a um lovely little
vine, and we'll do some There was a little
bit bigger tip on this paska than I might
have even wanted. Because I could have done even
a finer little leaf there, and then we could
decorate in those leaves. That's one choice. You can draw some botanical art on
top of your pieces. Then if you're doing it in a bold color like
say, the black, it makes the background
sink back a little bit and let your
botanical item stand out. That's a super fun
option there on that. We could also on our different pieces
come back and just add some extra embellishment if I'm looking at a
piece and I'm like, I could use a little
bit more, whatever. We could do that. We
could stencil on these. I do like this color palette
stuff that we did here. I could very easily add a little color palette
element to our top of this. And then that would be
really pretty, I think. And then we could
draw on top of that with almost wanting that
to be like one less. Then we could draw
on top of that with some more botanical work. We could also take this
tissue paper stuff and add some more
botanical stuff. Okay, I like that. Almost thinking like, could use a little bit of a purple pop. Do I have any purple
fabric pieces over here? Or purple anything. I have fabric on my mind because I have a
big box of fabric. Well see if we can find a little bit of
purple in our box. This is my little stash box. Oh, yeah, we do have some
purple over here. Look at that. Maybe this pretty
little lavenders. Let's just see what these are. Um, I don't have a whole sewing
room like my grandmother, but I do have a little
fun box to dig in. Okay, so these oh, I actually like this right here. Look at that. Look at that. Okay. I like this frayed edge. I'm almost thinking that right
there. Okay, let's do it. I could just snip and tear. Let's see if I snip and
tear how this will tear. Sometimes it'll tear and
sometimes Oh, that one tore. Snip and tear gives you
some pretty phrase. I'm thinking right here. So
let's just snip it and Whoa. There we go. Okay. There we go. Sometimes that works.
Sometimes that doesn't. With a lovely piece
on top and then haha. Guess what we could do. Not
everything has to be glued. What if you had a stapler and you wanted to
staple some bits? I'm feeling like
some staple bits, maybe a little piece
of two or this twine. And maybe a piece of lace. 'cause these bits of lace, I'm kind of obsessed
with. I love them. Did I cut the edges of that? No, I did not. Let's remember to do that before
we glue stuff down. Okay, so I like this piece. That's the piece I'm trying
to not completely cover, but it does look like I'm gonna cover it now
that I said that. Oh, my goodness. Okay, so we could do all that and we could staple
that in there, and then we don't even have
to glue everything down. So just a fun little option. Then if you see that
and you think, Oh, I don't want to see the staple, now we can just glue a little tap of
something right there. Like a button or
piece of ribbon. Oh, I like that
little blue button. Like I kind of wonder, like, what did all these
buttons come off of? Because the majority of
buttons in here are singles. Ooh, as I throw
everything around. The majority of
buttons are singles. And so, you know, they came
off a piece of clothing, like if you had a sweater or something that got Ooh, let's
do that one right there. If you have a sweater
or something that had like one extra
button, you know, I think that's what
these are like, or if she made an outfit and only needed three of
the four buttons, I do kind of wonder like
what these came off of? What did my grandmother
sew or get that off of to have this big stash
of random buttons? From who knows what
era or decade because my grandmother was 90 in her
90s when she finally passed. So she was born in
1919 199 let's see. I think she was born in 1919. So anything from, say, 1940 on was fair game for her sewing and
buttons, probably. So wonder like, how old are these buttons and what
did they come off of? Okay, so that was super
fun there on these pieces, which oop that one was not dry. I was kind of
thinking in my mind, which did I glue that down to, but I glued it down to the
one that goes in this box. I like that. So some
different options there. Might set that one over there on how we can finish these out. You could also paint a picture on top of these
like a bird or something if you go with this
bird thing like I did to finish some of these out. That would be pretty if you
had some bits painted on top of here if you
like to paint. So that is some super
fun stuff there that we can do to kind of finish
off our collages. Definitely use some of the
collage paper that we made. Maybe some vintage buttons and fabric and scraps
that you have, draw on top of the pieces, collect a few of the pieces that already had bits that you
liked that you were like, oh, I like that just like that. You can add further paint
and embellishments on top of these with your paint
pins and your paint colors. If you picked a color palette and you've got some paint out, you could definitely continue to paint on top of these scraps. Some of these could use
a little extra paint. I could definitely see painting the way we did these
palette knife paintings, painting a little more on top of here with a palette
knife painting. I can't wait to see what
you come up with for your little artist card sized pieces, your collage papers. And if you cut through
any larger pieces and make cards out of them,
I'd like to see that. You could also cut a lot of these larger pieces out and just have larger
pieces of art. I've chosen to do many pieces of art because they're fun
and exciting and you can do something like
an art ten like this and have a lot of
beautiful pieces to then pull out
and look through. You could also do these
in your art journal. I could very easily
pull some of these out and include these
in my art journal. That's going to be super fun to maybe consider doing that. I can't wait to see what size you cut out and how
you embellish them. If you decide to do a fun tin and do a little art
tin like I did, I want to see your tin and what you've decided to
go along with that. I will see you guys
back in class.
12. Finishing Your Pieces: Talk about how you
would finish these if you wanted to finish the
surface for any reason. So to be honest, I am not going to add any
further pectective finishes to these beyond what it already has on it because the mat
medium is a protective finish, and so most of these I glued down with map medium
underneath and on top, and so it's already
mostly protected. And as far as the things where I've glued
pieces on top of these, you couldn't really spray these with things
glued on it like that without it just really not doing good things to
the fabric pieces on top. I wouldn't even do anything further to
these to finish them. That to me is
considered finished unless you're framing it
behind a piece of glass. I love making these
for these tins. I do feel like this is
definitely a project that I'm going to do some more of because these are gorgeous. I feel like now I need to go to the antique market and look
for pretty little tins and see what else I could put in a tin because I still got
more cards I can finish. Again, same thing with these. If I draw on these with acrylic marker or add
more paint to it, I would not add any
finishing touch. Now, if you decided to get crazy with these and add oil
pastels or soft pastels, then you're definitely going to need to finish those pastels. In that case, I would
finish the pastels with the pastel fixative or they
don't stay the powder ones, the soft pastels, you
could still smear them, and that's a chalky substance and it would still flake off. The oil pastels, they don't dry. If you don't put
the fixative on it. I would hit the oil pastels with the oil fixative so that those would then harden
up and dry for us. If you just have to have
something to spray on them for whatever reason that you want the
extra protection, you're going to
put it in a frame, but maybe you're not going
to put glass on top of it and it's just got the
paper in the paint bits. You could do a varnish. I like the crylonKamar
varnishes. That's nice. Non
yellowing, acid free. These are made for art, and so light coats of this
will protect the surface. That's only if you
just absolutely have to then some
type of varnish, an art varnish would be good. Like I said, I'm not going to be adding extra
finishes to these. The matte medium is a
finish. I'm happy with that. You could do a layer of coal wax on these if you
wanted the wax finish. A layer of coal wax would
just be a real thin layer, a protective coating
which you can then buff. That's another option. There's a couple of
different brands of the cold wax that you could get. Um, I use the coal
wax in painting, so I do keep that on hand. Um, but that probably
would be it. Mostly, I'm just not even
going to finish these at all. I like the different elements
that I can put on top and that's not going
to lend itself to having some type of
finish on top of it. These were super fun
to make and I hope you definitely come back and
show me what you've created. These I might do
some drawing on, like we did here, just some botanical
pieces, that would be fun. I can't wait to see
what you create, come back and share those and I'll see you
guys back in class.
13. Final Thoughts: Thank you so much for
joining me in this class. I hope you've enjoyed
experimenting with color, texture, and layering as much as I've enjoyed sharing
these techniques with you. Creating collage cards are
such a rewarding process. It's all about embracing
imperfections, exploring materials, and letting your
creativity lead the way. Remember, every card you create is a mini
piece of artwork. No tool will ever be the same. That's the magic
of this process. As you continue to make
your own collage cards, I encourage you to experiment with new
materials and techniques, try out different themes
or color palettes, use your cards in creative ways, whether you swap
them, gift them, or incorporate them
into other projects. I'd love to see
what you created. So don't forget to share your work in
the project gallery, whether it's a single card
or a whole collection. Your creativity will inspire
others in our community. Finally, remember
that the process is just as important
as the outcome. Collage is about discovery, play, finding joy in
the act of making. So keep creating. Stay curious. And most importantly, have fun. Thank you again for taking
this journey with me, and I can't wait to see where your creative explorations
take you next.
 DENISE LOVE, Artist & Creative Educator