Transcripts
1. Intro: welcome everyone. And welcome to my course on how to create an RPG in the gado engine or Goudeau or go down. However you prefer to say is up to you and this course we're going to go through a lot of different techniques and you're gonna learn a lot of different things in here from the simple things, like creating or adding an audio tour game and simple things like some animations and collisions to some more complicated things that's gonna evolve a lot more scripting, such as an inventory system, separate systems for our consumables, our quest and even an equipped system. You're gonna learn how to save and load information so you can then take that knowledge and create your own save and load games or saving and loading your settings. However, I'm gonna show you how to create options when you, including a few small graphic changes, graphic options, some volume sliders and separating all of our audio into different channels. So we have sound effects, and music is their own separate things and a lot more throughout this course. So if any of that sounds interesting or you you don't know how to do any of that and schlepping and let's get ready to start our journey
2. How To Get Godot: All right, everyone in this field, I'm gonna show you just other different ways that we can actually get our go down engines, that we can begin our project now. One way to do this is to actually go to the website here, go down engine dot org's I didn't just head on over to the download tab and just give that a moment to load up. Strange that it's actually ah, taking the sign. It's usually pretty instant, but there we go. You're gonna select your last year of the top Mac Windows or Linux, obviously, on Windows you slept between 64 or 32 bit Mac 64 but only and Lennox against 64 or 32. Now, for this course, the standard versatile do just fine, because we will be doing the same G d script I'm. But if you know C Sharp and you plan to use that, maybe in the future, or maybe that's something you want to learn in the future, um, then you'll have to use the mono version, which does allow for GED script but also allows you to do your projects in C sharp. So just go ahead and pick up the standard First, if you want to get it from the website and then come on down. And if you choose to get your export templates from here and you want a fiscal file of your templates, then you can get them right here. Just click on that, and they'll begin your download for that now. Alternatively, you could pick up, go down over on steam and use this, of course, hit, play or free or whatever the button says on your screen when you're logged in on your steam client. And that's not only going to download and install Goto and also got new install the templates for you as well as install Ah, bunch of the what is templates or demos, brother for you as well, which the demos on Lee come in GED. Scripture is no C sharp version of those Another way that we can go ahead and pick this up is right off of its dot io. They have it up there as well. Um, the differences here is just like on the website. You enough to come here and update it manually. Always get the newest one where I steam is going to unwrap the update you to the newest one . Now there's pros and cons to both sides. Of course. Ah, steam is gonna when it updates that may or may not ruin your project or you may or may not have to go back and change a bunch of things in the future. So that could be a downside to that. However, the, um using the Sony major updates and the smaller updates, it would be just fine. So depending on when you're doing your project and how willing you are to go back and edit anything or whatever for any changes, you might want to just go this route like it. You're directly from the website just so you can get it and stay at whatever version you want or have multiple version installed, whatever. But that's gonna be completely up to you and how you want to get that. Our third way is this is actually on. Get humpuss Well, so if you wanted to build your own, you can definitely do it that way. However, at the current state, the master branch is being worked on as it is getting it ready and prepared for the four point over lease. So personally, I don't use get hub to build up my projects. But in this instance, I would say if you're not comfortable doing that or if you can't figure out what branch you need to go ahead and grab, then just go ahead and pick it up right off the website here or right off of their website here. Now for the course here, you can see we'll be using 3.2 point one during this. So, in the future, if this is war 0.0, there is gonna be a few changes. Hopefully not too many, but we'll find out when whatever four point comes out. But for now, that's how you get your project. You just go ahead and download it if you get it from the Web site or it. Sure, wherever you just unzip it and you can start running the executable on steam a sin. Insist on downloading. You'll be able to just hit launch
3. Quick UI and Used Shortcuts: All right, everyone. So that's just gonna be a quick video. Just ah, show you some of the keyboard shortcuts that I'll be using and help you navigate around the U. S. A little bit. Now, you're not going in completely blind, assuming you've never used in this program before. So on the right hand side, we've got our inspector and are nodes here. Now, if we were to have something selected are seen, they see under node. That's where we have signals. And we can easily connect something by just double clicking and selecting a script basically and just heading connect. And that's it. And now whatever on this signal is admitted, this is something that will happen. And you can collect as many as you would like at your script was probably fine. We got groups here which can simply just go ahead and add something in, like call his tester and add. And now this note is in a tester group. You can always put things in multiple groups, so guilting home mounted multiple groups. Personally, I add things to group sushi through script. But you can also do it. They're perfectly fine. If you're confused. What something may dio that's on the right hand side of your nose. Just hold your mouse over it and you can see model clothes. Uh, yeah, I admitted when the control is closed, pretty straight board resize emitted whenever the control change size. So in this case, they were to resize it. Then the signal would be admitted. And then whatever we put in our script, at that point, I will happen. And every node is gonna have different signals. So if we come over and hit the plus button up here on the left side, under scene well, actually, add a new note. So let's say, for example, we get a spray, this spray is gonna have different signals and then a note and groups again, groups do not carry over. So whatever you have in the control room isn't gonna be the same as something in spray group here, so they can have their own groups on the Inspector. Of course, he's gonna be different between East them because you are gonna have their own properties. In this case, we have textures, verse, right, And to assign that, you can just go and click that and come down to load. Or you can select one of your options here, but that cannot brand on what you're doing. Ah, what you can do those you just click on icon dot PNG. It's a default image that comes with thesis oft where and just dragged on over and drop it into the empty texture field. And that's easy way that you can put a texture on. Well, I would have to go through a bunch of menus. All right, now, back on our left side, here on the scene, we can click this little script here looks like a little paper with a plus sign. And that will add a script to something of where you can slick language, what it inherits from a template and the path and name. And then he has gotten hit. Create when you have that, and this is what a standard script is gonna look like when we have comments in year, you can opt in to not have any comments If you choose. Ah, and you can see on to the left of that. We can see all of our scripts as well as a help section now in this help section. If you don't have this with you. Probably want at first you can just hit thes search help here. And you could just look for something like we could look up. Move. Hey, we got things like moved toward our, uh, yeah, I moved toward which is gonna be a function. Remove points, remove tracks, remove part of service. Remove blend sheeps modes. So you see, you got a lot of things that comes to the more specific you are, the better. But it you see all the different things here and tells you whether it's a method or a constant or a class etcetera. So in this case, I've clicked on OS and this is the OS class, and it'll show me all the different properties here and then all of our different methods that I can call on this class. Um, okay, now, another way that we can actually access. This is if we hold control, we can click on by default a classes green, so I can click on that, and I would take us to it, or in this case, we have alert. And if I were to click on that part of the function in this case is not going to go anywhere, but plenty of times it'll actually take you into in this case are OS class and would take us to alert here. So would lunch to a page like this all the way down and jumped to this section so you can see what the arguments are and what it does right now. As for some shortcuts here, as long as you have a line side, just you could just be on a line so I could be in the middle here. He just hold on Windows. It's Control K on Mac and Linux is I'm not sure what the button is. What this Halligan quickly comment an uncommon tow line when a line is commented that basically telling the script to ignore this as on Ignore this in the gold like you can see out here right above the ready, function on and programming. We use comments to write little notes or to describe what something does. This wave, where to come back to the script, maybe in the future or if you're on a team and another programmer was to take a look at it , they can easily see what is being done. Or maybe why you chose to do a certain thing. All right, Another easy one, Uh, will note that you can have multiple lines selected like so when it comes to commenting perfectly possible. Um, yeah, some that you can dio is again control, See, and control. The simple copy paste happens all the time. Very simple. You probably used to that already. So I'm just gonna go ahead and select this function with the past. So what in here? And another thing that we're makes you could be used to years Hold all and use the arrow keys up and down and you can move the entire piece that you have selected. What could be nice for reorganizing or whatever? And of course you know you can control XTO Got something if you need. Now, this little symbol on the left side here tells us that we have a signal. And if we click on it, you see that that's from the control node as the Recife's signal and the target well, that once what is connected to is control so that all that information there once you have multiple functions and your scripts because you're becoming like hundreds of lines long. You can just use the filter. My method here to quickly find something. And you can just click on and you see you can jump right to it in your script. What should be handy? We have a lot of things going on so you don't have to keep scrolling up and down or using our scroll er on the side here. All right. Um, I think that wrote covers most of saving things. It's just control s pretty standard project. You know, the project project settings. In this way, you'll find all of your options were laid to your project Auto load here disappeared for your global scripts plug ins. If you had any and invite this, we set up controls for your game or project editor and editor setting. Since that's its own thing to this affects your editor. So So you got your file system saves dialogue directories. You got a lot of things that you can go through and you can edit. You got the text year for themes highlights. If you want to change all the colors, you're in dense. So Tavis workhorse spaces convert in dent on save. Yes, trough spaces. You're running window placements. A lot of things air down here. And if you ever wanted to export for Android, it's going to be down here. This we're going to set up all your jar signers and everything. Key store. And you got your windows store here. If you want to set that stuff up and all that stuff is down here, which is great. And that pretty much leaves us with our deep bugger, which you could turn on collision shapes. Or if you got a call, maybe a collision bro problem. You can turn that on and you'll be able to see all of the collision shapes when that are within your game. But I think that about covers it. That's Ah, a quick, brief look around, um, this engine as well as some shortcuts that you're gonna see me using in ear. In case you're ever wondering, those are the main things that I'm gonna that I tend to use constantly copy, paste cut and just using oh, on comment uncommon. And just as we did here with the all moving things around, all right, I think that about does it. Who? So that's it. See, in the next one where we'll actually get started in creating our project
4. Setup and Export Templates: fire and everyone. So however you downloaded your go down engine, go ahead and open that up to run the excusable. Or if you got on steam, go ahead and hit. Launch. No, you aceto, go ahead and open up. You probably won't have all these projects unless you've got it through steam as thes are all a bunch of demos and stuff. If you could just find here in the templates section if you needed. But from here is go ahead and just create a new project. You could name whatever you want. We can change this later. If you want. I'm gonna go and just call mine my RPG for your project path. You can go ahead and put this anywhere on your computer documents is the default location. And I'm just gonna leave mine here and I'm just gonna hit create folder. Now the render here we have the option of using open Geo 3.0, and or two point. Oh, here There are some differences between them, such as two point. Oh, can't have as many lights, however, but if you're watching this in the future with 4.0, or later, then you're gonna be seeing ah Volkan as one of these options as well as either to point out or three point whichever one they decided to keep in. But for this, I'm gonna go ahead and just use three point. Oh, but in the future, if we don't have 3.0, you could always just use to point out if you wanted to stay as close as possible. And I'm just gonna go heading, hit, create and edit. All right, so now we have our project here completely empty. On the left side, we have our seen tree here, which is currently asking us for what? What we want to use for root note below that, we have our file system and on the right, we have our inspector. We're gonna start by going up top too. The editor. Good under manage export templates. And then from here, if you got this through steam, this should already be installed for you. But if you did not, then we'll go over both ways here. If you downloaded the physical templates file, then you just hit install from file and then navigate to wherever you have your TPC or TP said, Ah, file and just like that, you to begin installing. If you did not download a template file, then you can go ahead and just said this one right here, which should be downloads it, that we'll be right here to look for a mirror. Click your link here. Then I show up here this link and it will begin downloading your templates for you. And we're gonna need those in our to export your game. So go ahead. And you composites video if you want. And wait for your templates to finish downloading and installing. And when you're ready, we'll go ahead and move on. We're going to go up to project and go to project Settings On the left hand side, we're going to go down to the display section and go toe window. I'm gonna set my wit to 12. 80 and my height 7 20 And then I'm going to come down here to the stretch section of the very bottom. I'm gonna set it to two D and the aspect you can set it to ignore, or you can set it to keep That is completely up to you. I expand would also work, but again, that's gonna be your choice on what you want to select you. The important thing is that we saw a moat to D here. So once you've selected what you want to pick there we go ahead it close, and our project is now set up and ready to start importing assets and to start creating our game.
5. Importing Assets: All right. Welcome, everyone. In this video, we're gonna go ahead and import the assets that we're going to start using. And to start with, we're using these assets here out for some RPG icons. They're going to cover a bunch of different status effects body icons, buff steeb, US special moves, non combat actions, weapons, clothing, armor healing on general food, fishing items and a lot more eso There's gonna be a lot. As you see, there's gonna be over 200. They say to 84 I counted to 85 but these are these are what we're gonna be using an accord who always want to give credit whenever we get assets that we can use that we did not create ourselves. And in this case, we're going to give credit to obviously she Kashi all I'm saying that right? And right here they say, Give credit Shikaki and game Dash. Icahn's dot net. So it's always nice to give credit to whoever created anything for your project. Now, for our player, we're going to use Jeremy and Martha here, which is an animated scrape you see, comes in both a male and female variant, one being Jeremy and the other Martha as well as three hair color variants. So we could go with red or pink blonde or agree. And for this we're going to give credit. We should Euro to catch Serling's and we have more info. We can see the author right here so we can give our thanks to them for these assets that we're gonna be able to use in our project now to start importing them. We're just going to go to you're a jerk in a unzip. The project are not the project out our asset, and you're gonna see all these holders, possibly Maura's. We get move along since I'll of course, that set them up at the end. But where are we going to? It's just gonna copy these and then over in our go down engine, which is going to go to our if I owe system right clicking, do open in file manager and then we're just gonna paste are folders in there that'll take a minute and then click back into goto and it will begin importing everything. Just give it a moment, Aereo and you find under you I we've got resources. Sorry, that's utilities who are textures. You are Icahn's. And then these are where all the icons I I've gone ahead and named all of them to make it easier to find things. Now we may need and under player, you're fine. Jeremy and Martha split into its sections here seeking Decided what you want to use a male , a female, and then with hair color. You want to go with now? Something we didn't mention is we do have this. A map on the score. Tyler, stop PNG. We're gonna use this for creating an auto tile man, which, if you've used RPG maker, you would have a pretty good idea of what this is. I go and demonstrate that here a moment. Um and I'm personally I don't remember where I got this room. I just always completely free to use. All right, so this is RPG maker, and if we were to just takes 80 this tile here on we go. So So I guess that was already in use. Because if we draw a line, everything connection, if you have one thing like this, we've got a dirt road all the way around. But if we have tiles beside or under. It knows where to place things and how to connect everything. Of course, that goes the same for things like this water Here. Is this a little dot If you start connecting, we start getting a water flow. If we put him out again, like so we can start getting a little pond. So this is the kind of thing that we're gonna have set up in our game That way we can easily, um, create our little maps here for our ground and whatever else this symbol is that for auto tiles. So we're going to set that up and a in a pretty early video here, Maybe we'll even do that before we set up our player.
6. AutoTiles: All right, everyone, in this year, we're going to go over how to take a tile set and create an auto tile with it, so that whenever you're drawing is gonna automatically connect all your tiles together the way you expect him to be and need to be. So to do this, we're gonna start out with R two D Seen. Don't click that over here in the scene staff, and that's going to give us a No t D. That's perfectly fine. We don't have to name it anything fancy. And let's click this plus icon here to add a child note and go ahead in the search. Type out tile map and you'll see the note pop up here. Go ahead and create one of those. Now you noticed some options popped up on the right side here on our inspector. The only one we need to worry about right now is the one that says tile set, and it says empty. Go ahead and click on that and hit new tile set and then click on that again. So open up this menu now, yours might be all the way down here, but you can go ahead and just grab that and pull that up. Then over in our file system, navigate over to your textures folder and you'll see map underscore tiles dot p and G Go ahead and just drag that in or didn't hit this little Plus spotting down here at the bottom and you can navigate to it textures, map, tiles, PNG and locate it that way. All right, so this is our simple little tiles that that we're gonna create an auto title with it. After that, all we have to do from here is go ahead and hit this new auto title button with a blue plus Beside it in, the first thing we need is a region. Now we're not gonna select everything. We're just gonna select one area. And for this I'm gonna go ahead and select this dirt square area here. Thanks. So and now you see, we have a bunch of object on the sides. Now 32 by 32 is fine in this instance. However, depending on your tile set, you might need to come over here to the subtitle size here, and you might need change that too. 16 by 16 or 64 by 64. Whatever. But that might are sorry. That will depend on the tile set that you're working with in this case, 32 by 32. The default is perfectly fine for us. Now, To get this to work, first thing we need to do is add a bit mask. So we just come on up here and hit it. Mask here at the top. And now you'll notice because human here, Once we click, we get red squares. Now, this square is basically telling the program how to connect our times together within our region. So if we select this one and then this one, if we have our two tiles together, it's gonna no to pull it that round one there, that round corner next to that straight away. Now we do have to have a two by two minimum. So we would at very least you something like that in order for this to work. However, since we do want to use this entire thing, we're just gonna completely cover the outer edge there and just fill in the middle square just like this. And we don't need any collision because this is wrote this is what we would want the player to walk on. Well, really, it and the inclusion on this er navigation doctor, where a priority. Icahn, This is the icon that is gonna show up in your title selection when you're picking a tile to use. So you can use any of these corners for any of these squares here. It doesn't matter which one. It's not gonna affect anything. And I think I'm going to select just this top one here, just like so. I think that's what I'm going to use now. If we just come over to our seen tree on the left and to click on tile map, you're noticed. We have our image here and it's popped up. But we have all this extra space around it. We don't want that, and the recently have it is because our block are cell sized, does not match our titles. So we just come to the inspector on our right hand side into these cell section and the default of 64 by 64. But our tiles we're working with 32 by 32. Let's go ahead and type that in with the size and you notice Now it fits perfectly. So you go ahead and just started drawing. And remember, we need at least two by two for minimum. So going through like that isn't gonna give us much if we do our two by two. You see, now we've got this road, and it's automatically going to title in. It's on, Matthew. Just gonna go ahead and connect up together, no matter which way we're going with a ruin, horizontal or vertical. That's our basics year of creating this tile map. Um, something that we could do with time maps also is if you don't need to auto tile. You know, maybe we have something weird like this. No one, this little road to come up. You could actually click this disabled auto title button here, and you'll have access to all of your titles if you had here. So we could then just come in like this. Thanks. So or are middle piece here just like that? And you could have your little path coming up if you don't want to do any honor tiling. So you have that option whether you want it on or off. I was gonna go ahead and turn that off so we'd have auto tiles again. Now to get back to our tile map. If something doesn't quite look right or you want to change something, just click on tile map in your instructor for the title set on the town said again, we can go ahead and hit at it or click on the title map that we have selective here on the side. Just click into this selection that we were doing, and now you're free to come in here, change a region, or if you need to give it a collision or change your bit mask. You do all that stuff right on in here again. All right, So now what I'm going to challenge you to do, it's I'm just gonna stop here. I'm going to challenge you to positive video and go ahead and create a new auto tile of our water area right down here. All right. So go ahead, do that and I'll see you back here in a moment. All right? Welcome back. Now we're gonna start off the same here. We're gonna click new auto tile with the blue plus here. We're then gonna select our region just pull it on in here 32 by 32. That works. It's perfectly fine. That should work for this entire pile set. We shouldn't have to change that. And we're gonna select our bit mask, select right around our edge here and just fill in our center square. Now, here's the difference. Because this is water. We don't want the player to be able to step on this. So this is where our collision is going to come into play. Now, for some things, you can just use a basic rectangle. We just assume in here and come down, for example. Just go right around our edge here. Looks what This time it's like a rectangle just come in like so And in that way, our player can walk up to the edge here, and they wouldn't be able to walk into the water. Now for some, um, sections. This is great. However, for around corners here are actually gonna have to select the home button here beside it which says create new polygon. And for that we're pretty much just gonna trace in roughly our end here, like so. And every time you click, that's going to make a point. And remember, you don't have to come in to the corner and then back up so we can close that polygon up. Now, at any point, if you need to change this, you can go ahead and just grab any of these orange dots and adjust them and do your best to actually line these up asbestos again so that our player doesn't get stuck when he watched from side to sign. So for the corners, we can use the polygon and for the rest of the areas for this water, I think we'll be fine. Just using the rectangle. I was gonna go down in that corner this once up in that one. This one Come run on up here. We need trying to line that up, and this one will come right down here and that up as best as we can. Here we go for the middle. We don't really need to put anything because our players should never be in the middle. We need to decide and the bottom onto skin rectangles in and then start pulling up and where they need to be it down here at the bottom. Then, of course, up here on the side right now. I just gotta finish off my edges. I seem to have made an accident here. - All right. Once you've gone ahead and gotten all your collision in there, are you Collision place is set. We have completed our water. So that is the one difference between, Of course, doing the water and doing our road is we have to do collision, whether it's just the basic square or if we have to use the polygon to create our own sheet . And on this tile said that's mainly all we would need the polygon four just go ahead and to our tile met and make sure everything works. So we have our dirt here, which is working great, and we have our water, which is also working well. Now you notice what we had things like this and you might not want that. But you might want that curve in there. That's where that's a situation where disabled auto title will come in handy and then gets a selector one time like so. So that's just one example where disabling the audio file is useful for you and not just relying on the Otto tile every time. Personally, I like doing my single tiles like this, and it's coming along in doing my But the other tiles are definitely useful, and they can save you a lot of time when quickly creating a level. So there's another thing that we can do in this. If we go into our town map and that is not everything in here will be an auto tile. What we can use is also single tiles. So in this case, I'm just gonna go ahead and select. We go this green patch here, I want to get that as even as we can should be something like this. And for a single tile, that's all we have to dio and in our trial map. We just select that and we just start adding our grass all around the edge here. Now you notice I have this empty space year at the end. We can fix that. That just means my selection for the region isn't exactly the way it should be. Come up here for a region that that's not right. As you can see this adjust live Siegen easily. You'll easily be able to tell and there we go there's a selection networks for this. Now you can go ahead. If you want to use these flowers, you can go ahead and select a new single tile. Come in here and just come on in. Create that tile map and there's your flowers. It's that easy. Do this to start creating these room boom and just start piling them on until you can eventually create a map. Now, when you have something with a transparent background such as our tree, so I'm just gonna come in here and show you If we were to create a new tile or our tree, we would have a problem. Here is when I go in place the tree here, it's perfectly fine. But say we want to put it on this grass boom. We obviously don't want something like that to happen because we want to try to be on the ground. Who wants to be on the grass and not ruining anything that's behind it. Like we like what happened there? I was gonna go back into my title, said here real quick. So, like this one in just it, this really gotten to see it right of that tree. So What I'm going to do is I'm going to actually add a second time out. We call this 1st 1 ground and the 2nd 1 objects. Now, on this objects, we will create a new tile set. I'm going to use the same title now. Only now I'm just going to select the single tile and I'm going to select our tree here. Now when we come in here will be able to. We came to sell on this one. Still 32 by 32. Now when I placed my tree, it's gonna work perfectly fine, just as you would expect when placing them. And what's nice is with the way that this works power to place another one right here that's actually gonna be on top of the tree. So the one that we placed first there is in front of it. So we don't have to make sure that we put everything or place trees in a specific order. This section that's in the orange boxes always apart that's going to be shown, and the part that's underneath is not. That's the one part that will be hidden by whatever new object. Obviously, something like there isn't gonna make any sense. There you go. And now we could just start placing trees around Now, obviously, we have other objects in here. So for the sake of consistency, this is where I would also firstly do my rocks here. I want a new So I just added this one. Now, in our objects, we can grab other items. Obviously this one's meant to be on a road. But you can always come in here if you want. And at it this tile set. And if you want, you can erase the ground that is around the object. That way you can place it wherever you want. So you don't have to go like that to make it look right. And then, of course, this allow you to inflation lemongrass. But this title set does have the grass version here. Of course. Instead, I don't know why the creator decided to do it that way, but that was their choice. And that definitely works here. I'm gonna go ahead. And also add in this little bush and tree stumps. There you go. I got a tree stump. Weaken. Drop in. We've got our push, and they're really start placing things around and we have our two sets ready to just start building. Now, in case you need to do this for multiple maps and you're not gonna have, like, one big map, then you might want to come in here to your trial set, click on it here, and click on this floppy disk here at the top. Right That way you can actually save your set. So in this case, you could come into all right, let's say utilities resource is and then named this way. Um, let's call it ground auto tiles. We can just leave our extension. As for you could do the same thing for the objects one, if you would like. And basically this is going to allow us so that whatever we bring a tile map into a brand new scene, we just click on tiles that here and instead of clicking new little load utilities resources and just click on that and we're ready to start going, it seems we're also gonna have to remember to you change our cell size when we do this. But there you go. Now you know how to create an auto title map. You know how to create your objects on a separate section so that you can actually place those on top of your ground tile map. And as you can see, we have a little trick here by using too Title match for the ground. We have this green patch going in between, which again you could just disable your maps and you could always just come up here like this. And you can always place them individually if you wanted to. To get that same kind of effect. Which person is what I would deal with using one time map instead of two? But that's another way that you could go about that. But there you go. You know how to create tile sets now? Ah, that auto tile for your map for your levels. And I think I think we'll jump into. Maybe we'll do the start with our player next in the next video. With that take care. I hope you had fun. Hope you learned a lot during this. And I hope doing hollow tiles wasn't too difficult for you guys. See you guys the next one
7. Godot 4 AutoTiles and Collision: Alright, so it's been brought
up to me that in Got 04. There's the auto auto tiles for the tile map and that
have completely changed. And some of you may have some problems
trying to figure it out. So I'm just going to put a little update video
here just to show you how to do the auto tile setup and how to set up the collisions
for your tile map. All right. So I've
brought in the same map here that you're
using in the course. So the difference is
here, if you're in four, 4.1, or 4.2, you can
still use tile map. And the difference
here is in tile map, you have to drop down
for all of your layers. Every time you add a new layer, they're going to appear here. And I believe in this course, we only use the
one layer anyway, so it's not that big of a deal. But in 4.3, these layers
are now individual. Let's see if I can
go ahead and select. So if I hit extract
tile map layers, and we're not going to
get anything there. Okay? Just give me 1 second. Let me select new tile set. Open that up. And I'll
just throw this in, I'll say, yes, whatever, it
doesn't matter right now. And if I were to hit extract, you would see we get this
new node called layer zero, and I can drag it out of the
tile map and delete that. All this did is this is a
conversion from 4.2 to 4.3. And all that is is because each layer
now has its own node. So instead of having one map with a bunch of layers
and the drop down, that was apparently too complicated and confusing
for some people. So you now have
this tile map layer now that we're using
in 4.3 and forward. Now, the method that you use is going to be exactly the same
for both of these. The only difference is, again, tile map has that drop
down for other layers, and in 4.3, going forward, we want to create the
layer as its own node. So I'll just leave this
as tile map layer. I'm going to go into
the inspector and do a new tile set. Open that up. Tile size. If I
remember correctly, these are 32 by 32. It's been quite a while here. I'm going to select
tile set at the bottom. And I'm just going to drag
in my tile set image. I'm going to hit yes
to allow to create the tiles for me. All right. So now we have all these
tiles, and if we wanted to, we could just click on Tile Map, select a tile and
just start drawing. Ret. Whatever we
wanted to do. Cool. It's neat, but not exactly
what we're looking for. Right? So we can just
start drawing with it. But what we want is
to have auto tiles and have collision set up
for things like our water. Well, in order to set this up with my tile map layer selected. I'm going to go over to the right hand side
to the inspector. Come on down to terrain sets. I'm going to add an element, and I'm going to
open up that rain. I'm going to add an element
to that, and I can go ahead. I can give this any name I want. For example, I'll call it Road. And the color, again, I can
give it anything I want. This is just a visual thing. I'm going to give it a purple. Here we go. Something like
that. Nice light purple. And now, in order for us
to create an auto tile, now that we have a train set up, we're going to click on
Tile set at the bottom. We're going to click
on the paint tab here. Give that a second to. Just give me a second
that crash this. Add a tile map
layer to my scene, new tile set, open
that up terrain. Add element, open my terrains, add element, give this a
nice light purple to see. And I will rename
this to say Road. Okay, let's try this again. All right. So tile sets, drag my image in. Oops. I want to automatically
set the 32 by 32. Drag my image in. Yes. Okay,
so we're back where we were. So we click paint. And you see we got select a property editor here. We're going to open that. We're going to select terrains. From the terrain set, we're
going to go a set zero, which is our first terrain here, right? This whole item. And for the terrain,
we're going to select the road terrain. All right. So the first thing
we need to do is actually select our tiles. So I'm going to say, Hey, we want to use all
of these tiles here. And now that we've done
that, you can see we have these tiny squares. Right. And I believe in the original video I'm going to try and set
this up the same. All we did is come
across like this, stay on the inside, and then
we filled in the center. I believe that is what we
did in the original video. Now if we can go to tile map. And if we go to
just draw ours out. You might go like this,
you might be a little confused because it's like,
Hey, it's not working. And for that, that's simply because we
actually have to click on the terrains tab here.
Select our road. And now all of this is going
to connect for our road. So you can see you can connect based on the surrounding tiles. We can connect based off
of the previous tile or we can place our
individual full sets. So if I click on the default option here,
which is connect mode. You see I can just come
along, do whatever. Maybe take this
rectangle tool. Boom. Boom. You can see
this gets us pretty much exactly what you saw in the previous or in the old video. I mean you just have
to kind of come in and clean up some
of these corners. But that's how the
auto tiles work now. You can go ahead
and set those up. Right. Now for
setting up collision. Well, similarly,
we're going to go into with our tile map
layer or tile map selected. We can go to the inspector. We can look at physics
layers, add an element. Here, we can select the
collision and mask layer. So remember, the collision
layer is what it is on, and the mask or are the layers
that it will collide with. And I believe in this course, we just leave everything to be simple and just
leave it as 11. But you'll see underneath
both of those, we have this physics material. And if we open that, we can
say new physics material. And here's where you could
tweak the things like friction, roughness,
bounce, absorption. So if you want to have
anything neat like that, friction, for example, so you can tweak how much friction. So if you wanted to create ice in your tile set,
you can lower that down. They have even less
friction going on. However, I don't believe we actually need the
physics material. We just need the
physics layer here. And likewise, under tile set in the paint tab for
the paint properties. We can take the drop down, select the physics layer. And now you have that
familiarity that you saw in the previous or that you would have saw on
the previous video. So I can come down and I'll
select this water body. Now we can just leave it as
a full block. That's fine. I'm going to select
this top one above it, and that's not fine because we want to come all the
way up to the edge. So I'm just going to grab
this dot, bring it down. I'm just going to
click on that square again. There we go. And now I can click on
the one beside it and adjust my nodes here. Little points, click it again, and now we have that set
up for our new water, and we can just continue
going all around for that. So the red one is going
to delete sections. The blue one should allow
us to move these points. And green will allow us to
add new points in there. So if you want to
go ahead and draw a completely custom
shape in there, you can. Go ahead and delete.
Sa. For example, we could click down
here in the bottom. We could use the green here. The power delete those and
select the green section. I could come in and just draw my points out. For all of these. You use
the blue one to tweak it, green one to create
your new nodes. You can move them around
and red to delete them. But in the majority cases, I prefer just using
the blue section here, just clicking on a tile and
just going off of the thing. All right, clear and I can
reset to default shape. And now I can just
bring them back in. And then click the
bottom. Bring these in. Click that again,
and we can just continue along. All right. So hopefully that
clears up how to do these new tiles or how to set up collision and the auto tile in this newer version
of the engine. C we just finish up here? Whoops. And our last top corner. Just like that. And there we go. Now we have collision set up around the water for
all of these tiles. And just like before to use
them, we can just come on in. We don't need to set up terrain unless you set up
auto tiles on them. But if you did not, then you could come in and you could just select it
and there you go. Or, of course, you
can come in and select any individual part. There you go. Hopefully
that clears up any confusion for the auto
tiles and the collision. Go with that. There you go. Take care, and hopefully that makes
things easier for you guys. So just to be a little
extra clear here, I do want to make sure that
you understand the layers. So I tile map, you
have to drop down. Again, this Sony applies
for using 4.1 of 4.2. But you can open up the layers
for the tile map itself. Add element so you
can have a new layer, and then you can draw
trees on top of that. All right. So let's
say I have this all set up, like a tile map. All right, I'll just
select these, right? I'll go boom. Let's say
we have that there. And an tile map. If
you're using again, 44.1 to 4.2, you can select
from the drop down layer one. You'll see everything go dark, then you can select your
tree and place it on top. So that's how you
would do that with a normal tile map if you're in. Again, 4.1, 4.2 or 4.0. But for here with
the new system, we have the top Map layer node, and you want to create basically the exact same thing again, or in my case, I'm just going to hit control D to duplicate it. And now I can go
ahead and just create a tree to go on top. Like that. All right. So if you want to do layers, you just need to create
more tile map layer nodes, if you're using 4.3 and later. If you're using 4.04 0.14 0.2, you have to go into
the inspector and create a new layer and then
select it in your drop down. All right I just wanted
to toss that in there. Just in case anyone wants
to work with layers.
8. AutoTiles Snapping: All right, welcome everyone. I just wanted to make a quick video since some people have brought it up is something that I probably should have at least mentioned. And that is when doing your tile sit here. And if we just zoom in, I'm just going to enter a question and post your, you guys at the same time. And that is when creating your tile. Instead of creating a thing like this, if you can't get it or you're just not good at estimating your region area. Then what you can do as you can actually turn on snap, you have to create a single tile or we can click on little magnets here for auto snapping that you could just click in and select basically the space that's in there. Now, that is something you can't create, of course, completely up to you. But yes, so you can use the magnet there. And if you don't really need to change this, you can actually come into your ground here and you can adjust your sizes in that here. Which I believe we did go over. But one of the reasons why I didn't use it is depending on what kind of tile sets you using here. If you're using something that's made to be a tile, then of course, yeah, the magnet can help as long as everything can be equally separated, which most tile sets are. But I have seen a few odd ones where things don't work out and sizes where maybe everything works within one or two items. There's just a little off or something. And answer the question as to why I didn't use one. We see if we just zoom in here, I didn't really need on just based off of my own experience. Bci got it. Pretty dang close on. These are just a tiny bit off. But yes. If you're having problems getting the right size, you're getting everything right, you can go ahead and just use the magnet there to snap it in. So again, that is, you can go to new single tile, turn the magnet ion, and you have your blue grid and you get this click in. Or if you are creating an auto tile, you can again turn it on with their the mega button up here and select your area. And for auto towel you would just click and drag. So if you click, once you get one area, you click and drag, he can highlight multiples. So since a few people have brought up the snapping about not using it or probably not using it, or asking why I didn't use it. I hope that answers the questions. And if you're having trouble with your area or you just want to make sure that you've got the right section, whatever. That's how you can go about doing that. She just wanted to clean up your Kyle said a little.
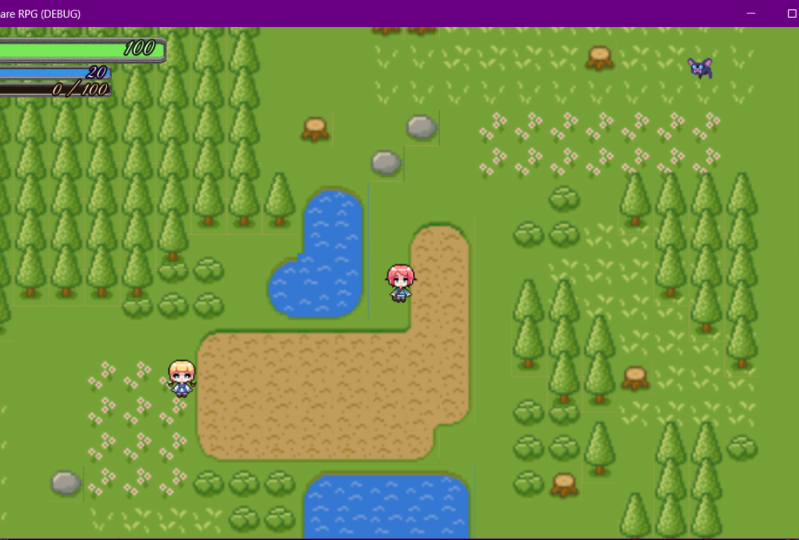
9. Player and Movement: All right. Welcome, everyone in this video, we're gonna create our player and get them moving around on our map. As you can see here, I've gone ahead and used our tile map that we created last time. And I just went ahead and laid out a basic a little map here. We had a little bit of ponds around. We got some roads, trees, flowers and a grass. A bit of rocks laying around. I've got something that I'm having with four our for our usage. I guess you could say so to start off running taxi critter players. So come up to the top here and click this plus to create a new scene. And we're gonna go ahead and you can hit other note what we're gonna do a Kinnah Matic body to denote and they create. You're gonna see this little yellow triangle here, and that's telling us that this particular node needs to have a collision on of some sort. So that means have to be a collision shape or a collision polygon in this case, two D, because the body is a two d object. So let's go ahead and add in a collision shape to D. And now that is telling us that we still need to assign as shape to our collision shape here. And you can do that Just over here. And the instructor, you go ahead. It's like box. Or you can select a capsule. Either one is fine. I'm going to select a capsule personally. Now we need to add one more thing to our Kinnah Matic body year. We're gonna go ahead and add in as a child a scrape. Now, for the time being, if we have spry slick and look over to the right side at our inspector, we're see, textures is empty. You can go ahead and pick whichever player you would like to use and just go ahead and drag one in there. Don't worry about which one you select were worry about adding animations in a future video . I'm gonna go ahead and use Jeremy and I'm going to use the pink version. I'm just gonna go ahead and drag one of my pink ones in here and bring it in. And now if I zoom in, I can see my collision shape is a little too big. Someone's gonna go ahead and shrink it down a bit, be a little more fitting. Click. So All right, let's go ahead and save our scene. I'm gonna save mine inside of utilities resources, and then I'm gonna go ahead and name it player. All right, so we have our player, but at the moment, it can't do anything. And why is that? Because we need a script still attached to it to tell it what to do. But before doing that, let's jump up into our project settings, go to input map, which is our second tab at the top. And you might want to go ahead and set your control so that you can actually move around. I'm just gonna go ahead and lows all these down, right? So if you haven't done this before than up here in action in our blank bar, I'm just gonna go ahead and tie all right, down left and right. And I'm going to click on our that we just created here. When I click the plus over on the right hand side and I'm gonna key. And I'm just gonna press whatever button I want the up button to be for moving around. I'm going to use W A S D so w for up? Yes, for down a for left and then d for right. And now we can move around. So once you got that, you can go ahead in close that. Go ahead and save that. And let's go ahead and add our script onto our sprint, and I'm gonna go ahead and rename it player. We're gonna add that onto our kingdom attic body to D. I'm gonna go ahead and do one without our count. Any comments? And we're gonna put this We're gonna put this inside of our script shoulder, and I'm just going to leave my name to Claire and hit create. So in order to you start moving, we're gonna need a couple of variables. Ra need our velocity, which is gonna be a vector to, and we're going to need a speed at which we're moving. And I'm gonna set this to I don't know. Let's try 50. We can always adjust it later, and that's why we're gonna need for our variables here. We're not going to need a ready function, but we are going to need a process. Delta function here and inside of that we're just gonna do. We're under the move function, which we have not created. But we were. Go ahead and do so now. So create a new function, move like so and you'll see our error. Go ahead and disappear. So now we can go ahead and pick up our controls, check for input and make certain things happen. So we're going to start with left and right. I'm gonna go ahead and said Our velocity equals to vector Just empty vector to just to make sure we don't have any weird issues. And now let's go ahead and do a check. So if input is action fresh because we want to use presses it of just pressed because just Christ, he's going to do it once but is actually, press is going to continue moving as long as we're holding the button down. So let's go ahead and start with going left. So good. Just go ahead. It's like left their out of your options. Your action. I don't end with Colin Now, the next line we're going to have whatever happened happened whenever when we press this one in this case, we want to adjust that were velocity so that we actually move. And to do that, we're just gonna do our take the velocity. But we only want to adjust the x so velocity dot exe equals minus speed because if to go left will be going in the negative direction, and that's all we have to do to move left. So we're gonna go ahead and add one to turn right, or rather, to move right. So if input dot is action crash right, velocity dot x equals speed. I was just saying speed because our numbers positive and to go right will be moving in the positive direction. We do have to add one more thing up here in our process function to allow this to work. That's just gonna be a move and slide, and we're gonna pass in the argument. As you see, our first argument is going to be a vector to it is our velocity, and that's all we're going to need for this. So that saved that go into our world and we're gonna click this little link here in our world scene two instance in our player scene. Now you can go ahead and just move them right over here on our screen and we can hit play. As you see, we can move left and right. Although it is pretty slow. So I think I'm gonna go ahead and adjust my speed here. Wanna go into our scripts? Adjust this to you 100. Let's go ahead And Ah, Shicoff here in again for best practices. Come here in and define What are what type of air, boys, You don't have to, but it is good practice. Do you do that? I don't do that enough. Admittedly. Um so But we'll go ahead and put that of up my speed to 100 from 50 you know, Let's go 1 50 But you saw we can now move left and right. Let's take a look at that. Now, if you have an NVIDIA graphics card and if your map here is flashing around, then that is an issue, not with your graphics card. It is with ah, actually an issue within the engine at the moment. And to fix that, you just go up here to project settings under General, I'm not here to rendering and quality, and you see, in the depth section we have hdr just go ahead and turn that off if it's causing your map to start flashing for me right now is fine for me. So I'm just gonna leave it alone. But it comes to it. I'll turn it off. Also, you might notice that your window is wider than mine. And that's just because as I was creating or building into the mat, I felt it was a little two big, which would've made everything a little too far from the player as far as they can produce . So I've actually adjusted my screen size of 7 20 by 5 40 at a personal preference here. All right, so we can move left and we can move. Right? What I want you to do is go ahead and positive video here, and I want you to go ahead and try to make our player move up and down. All right, let's go ahead and our player to move up and down. We're just going to create two more inputs here. If input Dr is Action CREF, then we're gonna take our velocity, but not extra. And ticket are why this? I'm some philosophy dot Why and that all equal our speed And then if input, it is action fresh down velocity dot y equals minus need. Let's go ahead and jump in. Take a look at that and we could have left, right? Oh, I've got my up and down clip here. Well, that won't do it all that always cause confusion so that just means down it's gonna be positive and up will be negative. We go The area now up is up, Down is down. Perfect. Now you'll notice something as you're moving around when you're going left right up and down It's all the same speed. However, if you go on an angle So if you were to hold right and up you're gonna go on that 45 degree angle there and you notice you're gonna be going quicker in normal to fix that, we can just normalize our motion. Uh, movement here. The velocity. What if if you like that and want to keep that that's completely up to you, you can, or if you don't want to be able to move diagnosed all you can just check that the player is not pushing another button. Let's just go ahead and normalize that here. Yes, it's going to be Velocity equals velocity dot Normalized times speed. Now, if we go in your notice if we go on an angle traveling the same speed at all times And if you haven't given it a try When we had our collision boxes and Artiles for I think such star water the notice We can't go into it because of those boxes. Of course, same thing goes for our objects if you added collision to those. Oh, so you see here that I'm going actually on top of my trees we could just grab our player and just move that up so that our objects is below. I don't want him in behind the ground. We just wanted behind the objects, you know, on a C we could go right behind the tree. We still run into it, Dario. Now it doesn't look as weird and as awkward. There you go. Credit a player. We've given him some movement and you've got your little map. You ready? Ready to continue on. All right, We have our We are our basic set here. And but that I would see you guys on the next video
10. Animated Movement: All right, everyone in this video, we're gonna take our player and animate, um, as they walk around. So to do this, go ahead and open up your player scene and the first ever reduce. We're gonna take our spray. We're gonna change the type into an animated sprites. Since it's right, click on it. Gonna change tight animated Sprite, You see, Little yellow triangle That's just telling us we have no Sprite frames and this note and we need to have some. Well, if we look over to the inspector on the right, you will see frames and this is empty. Go ahead and click that. Go to new Sprite brains. Click it again and your little many animation menu down here at the bottom of pop up. I'm gonna go ahead and rename mine too down I'm left and right. So for the east, you'll see your inside of your folders, You player, choose which player you want to use. And then which version? Twenties? I'm using Jeremy and paint. So for I was going to take three downs right here and placed them to drag them in with my down animation selected I'm gonna do the same with left with left selected with the right selected, I'll drink those three in and then the same with up. All right, Now you can change your speed here to whatever you would like. Five frames is generally fine. You go ahead and hit playing in the inspector to preview that. Um, Now, this is gonna be complete dependent on your speed as to what looks right for me. I'm going to change mine too. Maybe a seven or even eight. It might look better. I don't know. I won't know until we get in game. I'm gonna go ahead and also rename nice bright note here just for my sake. Two animated. That's right. And we'll head right on into her script. No, we don't need to add any additional things here. However, work we are going to add in some code for our movement. So after we said our velocity, we're going to go ahead and get node, and the note we're going to get is our animated scrape or whatever yours is named. And we're going to dot Flay and for the argument here, As you see by the pop up, it's gonna take an animation in the form of a string. So in this case, put our string and we're going left. So I'm gonna put in my animation that I named left. Now make sure you get your capitalization correct. As the animation is wrong, either nothing's gonna happen or you cause a crash. Now, instead of going the long way with get underscore node, here's a shorthand variant of doing this and that is doing the dollar sign. And then then name of your nose. So dollars signed, animated straight would be the same as get underscore node animated. Right. So he's going to do God play and then the name of our animation, which is right. And then we'll do the same thing for up and down here. All right, so we have all of our animation set there. Now, if we go to play, we'll be able to move. Laugh right up and down, and you can see we're playing. Now if you notice that when we started and whenever we stop, our animations continue to play. Now we don't want that stab. It always looks like they're moving in place and we don't really need that. It looks a little weird and we can fix that easily. So to do this, we're just gonna go down and make an else statement. And I want you to go ahead and see if you can figure out how to do this. How to create this year, how to stop our animation from playing whenever our player stops moving. Let's go ahead and take a minute and I'll see you in a moment. All right, Now, here's something that you guys might have tried, which would just be taking our animated strike and doing Don't stop. And in some cases this may work. However, as you see, we're not actually moving. Well, we're moving, but nothing is playing. See down this claim, but nothing else is now. In order to to fix that, we could just change these if statements into an house if and that's perfectly fine. Now, you see, all four directions are working only well. You can't really go on diagnose anymore. You may like that you may not, but if you notice when we stop, we're kind of stopping with one foot in front of the other or just stopping wherever where were set, at which it might be a little awkward to stop with one foot in front of you instead of both feet at the side. So if you want to use our stuff here to stop you from going in diagonals going in diagonally, you wouldn't do that if you have like, But what we actually want to do in this case is take our animated straight dot frame and we're gonna set that equal to one. Now, how do we know we want to set this toe one? You might be wondering if we take a look at our animated Sprite. You notice that no matter which of these animations we look at, the foot is Ford in the left or right foot on a frame, zero into. But on frame one on all of these, both feet are perfectly lined up so that they're just standing there. So no matter which direction we're moving, our player is going to stop with both feet beside them. So if we take a look now so you go left. Stop with both feet, go right who stop with both feet down something both feet. And so now we can move in all four directions and our animations play just right. And they stop right where they should. Now, myself, I noticed when I'm going left and right, um, more that I feel like my animation isn't quick enough. So I feel I feel like my players a little floating. So I'm gonna go ahead and adjust my frames on all of these two being five, some animations gonna play twice as quick. And now I feel if that is more appropriate for this speed I'm using, I might tweet that a little bit. But that's that feels a lot closer to what seems appropriate. That's it. We've got our animations going for all our directions and our animation stop as they should . It was all working perfectly fine, right. I'll see you guys in the next one.
11. Camera Customization: All right, everyone, welcome back. And in this video, I'm going to show you how to I know you are camera to follow the player for those of you that might be making large maps. Whereas in my case, you see, I just have one small map that I can just go from one location, two loading in another one in the future. But maybe not In your case, maybe you are just creating one big giant map or big town or big over world, etcetera, that you want to dio. Well, for that, we just got to do one very simple thing for this and that is going into our player scene, and we're gonna go ahead and add in who's gonna stop this animation here? Uh oh. So for the player, we're just gonna go ahead and add it a camera to D. And we're gonna set that to current. And now you can go ahead and just zoom if you wanted, which we I don't think we really need to. But smoothing you go ahead and set smoothing and the speed which you can adjust this stuff in name if you just hold your mouse over you see on the properties got smoothing speed and its speed in pixels per second of the camera smoothing effect when smoothing is anything. So if we go ahead and start this, you see, we kind of have that, like, little drift off. And if we had that off, it would be moving perfectly with us. So it's up to you if you feel you want to have smoothie on and to what degree you want to adjust them to. Now just keep in mind if you do have it like this. Now, again, this is went for bigger maps, obviously, because I could just walk off the map and just keep on walking with no consequences here. So that's going to be up to you and how you're doing your game on if you're doing a big map , or maybe if you don't even want a camera and you're seeing it all, I don't know why I hate that you come down if you want. Have an offset to your camera again. You got the smoothing. If you want to have a limit as to heart, how far down it goes. As you see, the default here is absolutely insane. being a some 10 million or so positive and negative for 10 billion in each direction, which is absolutely insane. Which means it's coming here. Go ahead at it. Any of these? For example, If I take this, copy that and will say 400 to the right, the camera won't go any further. Then the 400 pictures. Obviously, I can't see over here what's going on? Because the camera won't go over any further than that. We set that, too. 1000. We're gonna be able to see everything and cameras gonna move. I want to get so far over to the right. It's just gonna stop moving. We could so go up and down because we don't have that limit. Or, of course, go left and the camera will eventually follow us again. So that's that kind of camera. Customization is gonna be up to you whether you want smoothing. Whether you want limiting, um, are offsets anything else that's going in your options there, it's up to you to decide. All right, so that's how you go ahead and make the camera follow the player. If that's something that you would like, uh, I'll show you. Zoom here for a moment as well. Why not? So if we come in here and changes to se three on our zoom when we take a look, you see our cameras way out here. If we change this to it's a minus three, you're wrong way out. So you see right there to give you a few different numbers there that you can take a look at. So 0.5, this will be for a two time zoo. Let's go ahead and set that. And here we are. Now, we're much closer to our game, man, who were previously and again. This might be something you want yours. But that's up to you to go through customs. Asians decide what you do and don't want, and that'll do it for this video.
12. Invisible Barricades: Alright. If one in this video, we're gonna go over creating some barricades here where our player as you see where I want to just walk out of areas or if you have your edge is completely blocked off, we're going to be able to use this to save block off an area, for example. Say we can't go this way. We can complete block this area off and then stop blocking in the future when we want our player to be able to go that way. There's quite a few different reasons as to why you might want to block something off, and I'm gonna agree the quick way to simply do that. All we need to do is we're gonna go ahead in our world, and I'm just gonna add a bass note here so I can keep everything together. And I'm just gonna call this bear kids. And inside of that, I'm gonna add a collision I'm gonna add. We turn this into a rectangle shape and only his child of an area static or Bridget body. All right, So go ahead and add in a static body and the collision ship will be a child of that. Here we go. That'll fix what is complaining about. And I'll just go ahead and resize this and I'm gonna use it to block down here, for example. We're just gonna set it here, and I don't have to extend any further there on the other side because of water there. But in this case is we can walk all the way around instead of doing two separate ones. I just have one that's just pulled all the way across. Now, I could just take this and do the same thing over there on this side. So I take the static body right, click and duplicate. Now I can move it over here now just squeeze it back Europe's and I'll just go like that. There we go, since in this case it doesn't matter something like this. Now, the reason why these air affected on both of them is because I duplicated. So if you didn't need that or you really need only a small location in a few spots, I think it just come back in here. Add another static body with a collision sheet, and then they won't both be affected by the same here. Now that we go in now. A written a collision shape is just going to give us the shape of thanks to be that Clyde with it, of course. And a static body is a physical body that does not move. So no matter how much we push it, that object will never move. And that's perfect for this because now we got a static body that won't move, and it's going to constantly block us here. As you see, you can't go any further in this, no matter how much we try on the same thing. If we were to go down here, we can't go any further here. And if words you take this and move it down more and go back into our game, you notice now we can move down a bit more, but we're still blocked and same went on the other side. Over here, we would still be blocked room perfect. So everything's working just as we need it to you, which is a wonderful and, of course invisible. So we don't have to see it, what it does its job, just like we need perfect. And for the most word, that's all we really need to do to create our invisible, invisible bear cage to lock herself anywhere. Actually, I don't have one over here. Some still would walk out of the mouth, all right, but that that's what all you got to do there room blocks off, just like we need. And that's It's a simple is that for creating little areas that are blocked off or for blocking off specific areas from a player. And obviously, if you have something happen, um, then at that point you would just disable the collision shape in code, which would just be the name of it dot disabled, were you? If that's really it, So they go easy. Collision Easy Collision shapes toe for blocking off our player, Invisible Bear kids.
13. Action Based System: All right, everyone in this video, we're gonna go ahead and create our Maley attack with our sword in all four different directions. And then after our attack is done, we will return to our Idol state. You're that way without facing in the wrong direction. We're always re facing in the correct direction. So to start up with scoped the project project settings and input map, go ahead and create action for attack. And a sign that a button I'm choosing to use about E and inside of your animated scraped go ahead and create few animations here for attack left, right, attack up an attack down. Make sure these are not looping, and then just go ahead and dragon the corresponding animation. So up strike would be your up attack. Right? Strike would be your red attack left striking your left and down being down and on the right hand side of nor inspect. I'm just going to say that to down that way, when we start to actually start our game facing down, not with a weapon drum. Let's head on into her script and we're gonna need two more variables here. Run a need direction which is a string and was set our default being down and then we're gonna need a variable attack. And this is a bull with the deep, all being false. All right, so we'll start with our move function here. We're gonna need Teoh and then everything cause we need to move, but only when we're not attacking. So before we check for input, we're going to do if attack to equal signs false Because we want to do a comparison. We want to check to see if this is false. And now let's go ahead and just highlight all of our if and else statements here and just hit the tab button to just invent everything in by one just I'm switched this. There we go. That's what you should have. All right. And then we need to do one more thing. We need to set our direction whenever we press our buttons. So when we pressure left button, we need to set direction equals left. And of course, when we pressed the right button, we need it. Our direction equal right, press up direction will equal. Uh, and down will equal down Quite simple. And now we can move on to creating our actual attack animation here, rather our function. So let's go funk attack. And now, to do this, we need to first of all, yeah, if our input is action Pref the attack button and let's go up into our process function and make sure you put attack in there truth and we're actually run our attack function. Now what I want you to do is go ahead and see if you can figure out how to play our specific attack animation based off of what direction we're facing. So go ahead and do that. And once you've done that, come back a NPAs video and we'll take a look at it. All right. Welcome back. So the first thing we're gonna do is we're gonna check if direction is equal to left because we're just gonna do this in order. We don't need to go out of order here. Then we're going to play. We want the animated scrape, not play, and we're going to play the attack left. And we're basically just gonna copy this down and do it for right attack, right? And the same things for up and down. All right. Now, if we go ahead and see. Dont move. Attack is false. So we also once you press the attack button is what you just said. Attack too true. And then after we play, our animation attack equals both. That way we could move again afterwards. And let's take a look at how that looks in game. Let's see what we got so we can move left and right. But, you see, our animation isn't really playing except for down. Now we can fix that really easily here in just a second and let's try attacking. They see we attack. However, we seem to stop on an animation if you actually take a look down here. And our animations were stopping on frame one. So we're gonna need to fix our idol, and we're gonna need to fix our animations for moving around. All right, let's start with moving around. It's gonna be very easy. We're just going to change our if statement here, we're input to be else F So this is e l I f. LF input is action Greste have you? Here we go. And for else, we're going to change that to idle, and we're just gonna create a function from that going to create a funk idol. And this is where we're going to store our idol information. So if we go ahead and start this up, you see our animations now play in all directions. It was just a very, very simple fix. However, of course it's our idol doesn't have any information, our animation just going to continue playing, no matter what direction we walk in. And you see, when we attack, it's actually gonna go off, play fully through our animation. Of course, it stops on our last three. So this is good. So the only thing we're really missing is our idol, so we can return to just standing here without walking in place or without just holding the start out like that. So to do this, we're gonna do some checks. We're going to check if Attack IHS false and direction equals left. They were gonna goto animations, right? And we're gonna actually play left. But as soon as we start playing it, we're actually gonna stop it on our frame. One, right? Go ahead and use Teoh creature the same things here. Four right up and down. And I'll see in a moment. - All right. If you get you had any problems figuring that one out or you want to just double check your code? Here's what I've got going on for my idol. Here. You can see it on screen. We're checking. If our attack is false and our direction equals left, we're gonna play the left animation where we're gonna have it. We're going to stop it on frame one. We're gonna check else if our attack is false and our direction was right. We're gonna play the right animation and stop it on frame one. Then we're going to the same thing for up and for down sounds. Take a look jumping and see how that looks. So we move left right up and down. Everything's working. Fight our animation. You're playing. We're stopping. That's good. Now let's try attacking. We talked to our right and nothing happens Now when we attack, why is this? Well, let's take a look at it now. Why this is is because we're immediately stopping now. Were immediately stopping as soon as we start playing our animation we changed, attacked a false immediately. And because we're doing that and we're not pressing any buttons, it's automatically changing us to idle and triggering this. So we need to put a little pause in here so that we have enough time for our animation to go through to do this, we're gonna use the an inbuilt function here called Yield. And inside of this for an argument we're gonna use Get tree that's going to get the tree on our right hands are on the left hand side here for our scenes. We're going to get the entire tree dot and we're gonna create a timer and argument. Here is basically how long we want to wait now for these attacks. You can try and Sarah 0.2 or 0.3 in the ones should be fine. And it would do a comma and you'll see it's gonna public script changed or time out. And we want to continue our script when we went our time or times out. And it's the same thing that we're gonna use after every animation before we change it False for attacks. And now we can jump in. She right, left up, down, everything still working. Nothing broke. That's great. And now we can actually do an attack in all four directions, and we returned to our animal, her standing animation. Now, if you want, you can adjust this. We can take a look at maybe Sarah 0.4 c. If you feel that works better, looks better for you. Course, every animation is going to be different. So you might like SharePoint for better. And personally, I think I like 0.4 better myself. All right, so there we go. We have attacks in all directions and next time we'll go ahead and add in our hip boxes so that when we swing our weapon, we can actually hit something that's in front of us.
14. Weapon Hit Detection: All right. Welcome, everyone. In this video, we're going to go in and hit detection for whatever we attack with our weapon. And as you see, I've gone ahead. And I decided to shrink my player collision shape here down. So that was just covering the body. If you want to go ahead and do that, you can go ahead and feel free to. But that was just ah, personal choice. I decided to make their all right now, Gettinto, not our script yet. For a player, we need to add two things. Who needs that area to D. And we need to give that area to D A collision sheet for our shape. We can just do a Yeah, if you like, but also do a capsule he wanted. Teoh comes completely up to you. So what does he catch House the capital here? Um, new research can't really squished Circle one. So I think I'm just gonna go with the rectangle who's gonna change my size here, And I'm just gonna go ahead and move my collision shape and not the area to D. Now that I am just gonna kind of line this up here with our weapon. Yes, we got about that in length. And since where you described, I'm just gonna come a little ahead here. As you see, I'm going a little lower than where this cried ends just so that we have a little room. Otherwise, they can get very hard to hit enemies and this situation. All right, so we have that. I'm going to change that to from weapon hit box. And I'm going to rename Area two D two attack and that we can go ahead and jump into our screen. And for this, I'm going to make things a little easier and create two variables here, one being our attack and one being our weapon hit box. And I'm just going to sign these two our nodes here. You want to use on ready? Okay, we can do that on ready bar. Yeah. Here, you and they're gonna want the same here. So on ready of our this could be our weapon hit box. There we go. That just made a little easier for typing out so would come down to our attack section here . Well, you know, first up in our we don't have a ready for action Let's go ahead and create a ready function here. And in that ready function, we're going to take our hit box. I don't think our weapon hit box everyone do dot Disabled equals true. This way we're not hitting something or checking for any collisions in the background. I'm before we've even swung our weapon. So that's all we need to do in there, and we'll come right on down to our attacks year. So after each animation, we're gonna take our weapon hip box. Where have you got disabled? Equals False? Because now we want to swing. And then after we wait for a time out, we're gonna send our weapon hit box back to being disabled, and we're just going to do that each time. So animation set the disabled the false wait for a timer and then set disabled back to truth. And go ahead. Set that for all of them. All four direction attacks. Okay, now we can go ahead and take a look, but we're gonna have one issue we can see. Um, sure. Sure. Tell you here I'm up in the debug menu. Um, you can actually turn visible collision shapes on this way you can see we can actually see it working, whether or not it's working or not. And you'll see our player are box here that we made is actually to be great a light gray that means in his disabled. And when it is glue, that means it's working to see if we attack on our right. It works, It works down. It works and left. It works. Now we do have one issue here which glaringly obvious. No matter what directionally attacked room. We're always only dealing damage from one side. But we of course, need to be able to change that so we can actually deal damage on our left, right and up as well Asare down. So let's go ahead and get that rotated. Now, this is where our points come in. So on our left attack, we're gonna play our attack left animation. We're gonna set disabled too false for a weapon hit box. And then do you know what we're doing before that? So in between our animation and, um, setting our hip box disabled to false, we're going to go to our attack pivot dot rotation degrees and we're just gonna set that equal to what is left said Do I think left is 90 and down is exactly where it currently is So far down attack simply to set the rotation degrees zero up There's gonna be completely on the other side, so we know that is gonna be 1 80 Our attack Privett. And what do you think attack right is gonna be If we're only going in 90 degree increments ? We only really have one option left on that is going to be to 70. Take degrees equals to 70 and I wouldn't go ahead, jump in and see if we got all of our directions and our rotations Set robber. So for your left, an attack that's showing up in the right spot. That's perfect. Down showing up down there. No shows up up there and right, It's showing out her through that on the right, we can see our hit box. It's not exactly the right spot. However, down is good. And to the left is good cover up. We could always we can make adjustments there and to the right. We definitely need to make an adjustment. Okay, so we're gonna jump into that. Let's see, are intact Privett. Here we go. Transform! We rotate this too to 70 of their. See. So for that come down. Which means more to the left. We just shift this over here. Bigger, slightly bigger box. Here, let's take a look and see how that is. That is. Ah, little more passable. Now, if you would like to adjust this her swing basis after the exact position, Um, then you can move your attack. Pivot here because, as you see, if we move that are box is gonna move with it. So for that, and since our left and down attacks are perfectly fine, I'm just gonna get that and do a transform on it to move it. And in the case of down and left, since those are perfectly fine, those positions will be 00 Going to attack, Pivot, uh, transform equals a vector to of zero zero. And I'm just gonna copy that for our left here because left is perfectly fine and then something like are right. We needed to move that down on our why Why is gonna be our second number here in our vector to now, I always mix them up, whether positive or negative is up or down. But we can't You take a look at that in our movement. When we go down, we're in positive and we need to move our sound. So let's move this down. Tried 10. So when we attack right, we're gonna move our pivot down on the Y axis 10 and we'll go ahead and do that when we attack up a swell. Now, let's take a look at that. If we not transform position. My apologies. There. So we're doing attack private dot Position just changed all those transformers Two hold position. That was my mistake on that one. You see, we tracked down its fine left. Still find. Now, when we go on the right, we see that our box has completely moved and say, when we're up, our boxes come a lot closer to us so you can go ahead and tweak these numbers to what you feel fits and tweak your box size. It's obviously not that we move this down. Our box is too big mats up to you. If you feel like you really need to adjust your boxes any further and you go and place this obviously I feel that 10 is too much there. So, personally, I might change this to maybe five. For both of these, I feel five is a little better. So I think I'm going to go with five myself for my and my right, and I'll leave my left and down at 00 All right. And there we go. We have our attacks on all sides. Hold up now to make sure that this works. If you really want to find out, then we can just go into our world here. And I'm just going to create a static body to d will give a collision collision shape. We'll give it a capsule. This will emulate our enemy. Pull that down here. We'll give it a name, and to me and then for a player script are attacked. Pivot for action. And I go to note on the right. We're going to send a signal or body entered. That's gonna check whenever a physics body enters our weapon hit box area. Connect that to our player and we can just do a simple check if body got a name is equal to enemy. Now, make sure you get the right capitalization here and we're just gonna print. Ouch. So now you see down here in the output Council, when we're attacking, it's completely empty. Nothing's happening when we're not attacking. I'm sorry. Our boxes disabled. And when we attacked them out, there we go, a c We just barely getting in on that box. But that's all we need. So they Rio, if you wanted to make sure your weapon is actually working for your collision. There you go. We've made a fake little enemy just for this simple testing purposes. And if that's coming out, is printing. Got your box? Move around the way you want it. You got the rotations, right? You got your position, right, court, Then we're all set up. We've got our basic attack created. We've got our collision detection working on it, and that would do it for this video.
15. Detection Tweaks: All right, everyone in this video, we're just gonna make some very slight changes here to our script. Just a note. We don't have to worry about making these changes later in our game. So in our script for a player, if we come all the way down to the body entered function down here Russian, the changes from Body dot name to body dot is underscore in Underscore group and then inside of our parentheses. That's what we'll put our string of enemy this way. In the future, Whenever we create an enemy, we don't have to name it enemy. But we just have our enemies within a group called Enemy. This will help keep things a little cleaner for the future. And then the next thing we're going to dio is let's actually grab our attack pivot dot rotation and position here, and we're gonna move that up too. Actually, not our idol, but our move, So we're just gonna take, aren't down here and we'll stick that in down. That's a non not idle right down here. Boom. Now it doesn't matter exactly where is. That's probably fine. That and we're going to grab their again. The same to from up and put it inside of our up section. So and here we go, right, we'll put right on in. And then we need our left print here home that now this should still work. Only now you'll see our box moves when we move instead of waiting for us to attack. And when we attack, it still lights up glue indicating it's still activates and and deactivates again. Our box we had is in group I don't know because that Oh, I had a title in there. My mistake. There we go. So you can swing down, right, left and have we hit this rock? Nothing's gonna happen And the water, nothing happens So everything's working just as it did before. Now it's a little cleaner and our box actually moves with us, which we can use if would like as a also. And, um, we say an interaction area. We're interacting with anything in front of you instead of creating new collision boxes or new areas in order to keep keep the calculations down. All right, so that'll do it for this video. Just wantedto make those quick changes here. Now, instead of a few videos down blind
16. NPCs: All right, everyone in this video, we're gonna go ahead and create ourselves our first NPC. We're not going to get any dialogue ready yet, but we're gonna get the NBC created and set up so that we can start doing dialogue and our next video. So to start, for any need, a new scene, we're gonna use a static body for this because we don't want the player to be able to push our NBC around. And we don't need our NBC to get just knocked around as if they were, like a bowl or a ball or something. So we're gonna use a static body at our NBC's is going to stand in place. So we have a static body. I'm gonna name this NPC. If we look at the Yellow Triangle. Hey, static body like this needs a collision shape as a child. So let's go ahead and add a collision shape in there and rush. You're gonna need a scrape. She was an animated scrape for this, and we can go ahead. And since I'm using Jeremy as my player, I'm gonna use Martha for the NPC, and I'm gonna use the blond version that since We're using the animated straight over an hour, Inspector. We will need Teoh Goto frames and do a new script frames. And I'm just gonna name this. I don't and I'm gonna put see, I want to do down to We're going to down off left, right down, two up to left to and then a right to. And now this way we can instead of switching animations, just you change what direction she's facing. We could actually just pick the frame that we want to show. Now that we have a scrape, though we can add in our collision shape this is gonna be a rectangle, and we want to make sure it covers our entire character here. It's okay to go a little bit over. Just don't go ridiculous. Like we don't want anything like this, for example, but something, you know, close to this is going to be fine. Here we go. I'm gonna go with something like that. All right. Next up, we can go ahead and add, actually. Well, before we add a script, let's go ahead and save our theme. We're gonna save it into utilities, and it resource is I want to call this NPC. Martha, we're gonna need this NPC, Martha, and let's go ahead and add a script. You are static body. We're going to save that into our scripts folder and PC Martha and hate create. Now the only thing we need to do here at the moment is we're gonna add Martha into a group . And for that we just got yourself ad to green and we'll call this group NPC. That makes sense. Three. And there we go. Save that. Let's go back over to our world and two D analysts instance in our NPC, hold them into view here and let's jump in the game. So here we go, got our box moving around with us, and we walk up and here we go. We're colliding into her in the front, and that looks good to me for being able to have a conversation. We're not too high or too low. I'm being at the sides. It looks fine for me coming in from the top. Yeah, that'll work. It's not too not too high up there, and from the other side is just fine. And you noticed, since we put them it, put her in the NPC Group. When we swing, nothing's gonna happen because they're not in the enemy group. So we can try attacking our entry. See? But nothing will ever happen. Of course, unless you tell it toe do something. Now a group is kind of like a tag. It's like tagging three character. So, for example, if we look at Martha here, if we put her in the enemy giver, the enemy tag, then whenever we hit her, we're going to see ouch happen down there in our output because that's what we told it to happen. When a physics body enters our area when we attack, if they have the enemy tag, then we're gonna print out. Now you can have multiple tags on what items. So we've come down like this, she could be in the entry. See, Still, however, we're still gonna print the Alice because they're also in the enemy. I'm group, so they start that enemy tag even if they have the NPC. So that's something to keep in mind. And I hope that clears up any confusion you may have had about what a group is in here. They just kind of kind of act like a tag that you can put on the character. So I'm gonna go ahead and obviously remove enemy. Because Martha is just an NPC, she is not an enemy. And now for future reference. Aside from, um, adding it through script like this, we could have just clicked on the body and then clicked on note over here, next to the inspector and then groups. And you could just go ahead and type in here and PC, and you can add it that way. I'm pretty personally, I like adding it in through the script. That way I can visually see what group on putting them in that way. In case I forget, I can just take a look at the screen that'll do it. For now, we have our NPC and we're ready to jump into our dialogue next so that our increased he could actually do something
17. NPCInteraction: All right, everyone in this video, we're gonna go ahead and add some interactivity to our NPC We're gonna make So whenever we press our interact button, our NBC is going to turn and face our player. So let's go ahead. Or gonna need a variable called direction. We're gonna That's gonna be an integer and default is zero now are for zero. Here. I'm getting this from our sprite frames here, so zero will face down, one will face up, two will face left and three will face right. Whichever direction you want, your NPC, the face by default. This isn't where you would change it right up here. We have a process function, and then we're also going to need few more functions. Funk face down, funk face up, funk Face left and funk face Right now in all of these are we're gonna do a is we're gonna set direction equal to our number. So direction is equal to zero for down direction is frame One left will be framed too. And last direction to face right is frame three. Now, in our process function here, I want you to try and figure out how we do this. We're going to go ahead and set our spreads frame to be equal to whatever our direction is . Go ahead and give that a try and I'll see in a moment. All right, so let's go ahead and sort this. All we need to do is get our note so we can use dollar sign or get node animated straight dot frame equals direction. All we have to put now, whenever we change the direction variable our stride is automatically gonna change what direction it they're actually facing. So it's gonna update every time. Now if you don't already go up in a project project settings and create new action. I called mine interact and assigned at thes space bar. And then you can head on over to our player and I liked where my attack within my weapon hit marks. I like the size of that in the way it was moving. So I went ahead and just right click my intact pivot and duplicated it and renamed that to Interact area and the weapon hit box to I renamed that to the interaction box here Now for interact area. You're noticed that when you duplicated it, the signal also change or duplicated. So it's just right. Click over on it and hit, Disconnect. And then when I connect a body entered to our flair which is of course, will be on interact area Body entered now And for this we're just gonna we really we're gonna check if body God is in Greek and a group we want to check for is NPC and then we'll check if our players direction is equal to left. That ever showed clear out that Rio of her players direction is equal toe left. Then we need to get color function body dot That's gonna be our NPC. Then we have the dot and then we can call any function that is on that screen. So if we're facing left, we need our NPC to face. Right? So if we look at our script, we just called it face right, so we could do body dot face right, opening close parentheses and that's it. Now we just have to go ahead and set that for the other directions so you can go ahead and do that. Set one for if our direction is right. If our direction is up, and if our direction is down. - All right, So once you're done, if you look something like this and I've made mine LF statements as you can see here, it shouldn't matter if it's an f statement or LF but just so you're aware, if for some reason George isn't working, you can try changing Earth to announce it. So we have that connected. The problem is, we don't have any interaction actually going on. So I'm gonna go ahead and create a funk interact so creating interact function. I would go in, hit, pass on that for a moment because we're going to create two variables up here to make this a little easier on ready var our interact area. Of course, that's going to be equal to our interact area. And we're gonna make one again for interaction box and are ready function ruin to disable our box. Just like with our weapon interaction box dot disabled equals true. Now down our interact function, we can get our interaction box not disabled, said that it's false because now we wanted to show up only we only wanted to show for a limited time. She just like with our weapon hit box we're going to yield on and get tree. Great timer. I'm gonna set mind to 0.2 and we're gonna get the signal time out, and then we're just gonna disable it again, just like that. Now, remember to add interact to your process that that can work. And now the only thing we're missing is our button in what? We just got an interact. So where do if input is action fresh, interact, and we're gonna take our disabled and timer here. Just highlight all three of those lines and press tab. I would just take that inside of our if statement, Right. Let's go ahead and start up. And if we walk over now, notice this is going to be Are the boxes down at the moment? Because we have not changed its rotation or anything yet, So we're gonna come down. And if we hit our contract button, you see, they turn and they face up now. Perfect. So we know that that's working. Let's now change what direction our boxes facing. Now, to do that, we're simply going to do exactly what we do with our our box itself. We're gonna take these same two commands only one. Apply them to our interaction area or interact area dot rotation degrees the unequal 90. Whatever. We're moving left and our interact area Uh, position well equal a vector to, um 00 And they were to do the same thing for right Only with a set degrees 2 to 70 our vector tude at zero and five or whatever you're using previously room and then up and down . Here we go. And now if we say that and run it, it should be moving with our player just like our normal box was were hit box. If we hit our attack button that lights up if we press our interact button that one lights up. And now, no matter what side when you talk to our NBC on they should turn and always face Our player whom were on the right Turns left we're on the bottom, she turns down, Run her were facing right. She turns left and we're up top and she turns up perfect. So now she's always turning and facing our flair, so that's perfect. So now when we put dialogue in, there was gonna be facing each other and it's not gonna be some kind of weird dialogue were like talking into the person's ear. We're talking to the back of their head. We're always going to be talking face to face now.
18. Dialog Part 1: All right, everyone in this video, we're going to go ahead and add in our dialogue. Now, that way, our NBC can actually speak to us instead of just awkwardly turning and facing us. So to start with this, we'll go ahead and just right click into our vital system down here, Just right. Click anywhere and flicked new script, and we're gonna change our path to this and put this inside of our scripts, holder. And we're going to call this NPC how NPC dialogue and go ahead and hit the create button. Awesome. Now nothing's gonna show up because we don't have it attached to anything. But we're not going to attach it anything. We're going to use this in what we call a global script and a global script is actually a script that's always loaded in your game, and you can access variables and whatever else is within it at any time from any script. So it's a scope to project project settings and go to the auto low tab, select this little folder here to pick up half, go into our scripts and select NPC dialogue and hit open for the name. I'm gonna go ahead and just want us N d Now this is basically be like the shortcut to access the script. In order to get information from it, I'm going to use nd to be sure for NPC dialogue. I know he's gonna hit ad Awesome. I'm gonna go ahead and open up that script just by double clicking it and we can get rid of the ready function. We don't need it. The only thing we're going to need in here for now is gonna be a variable, cold NPC dialogue. That's all we're gonna need. Save that. And we have our global script. You're done. Now, we'll be able to use this for pretty well, any dialogue we have in our game, which is going to be great and let's move on to, um, we're gonna need to create a a little bit of ah g wide to get us started here. So this be the start of RG ey. Go ahead and create a new scene. And at a canvas layer for our route notes you gonna cite custom and canvas lier. I didn't come up here and add a child to it at a control note, and I've renamed Mind to Dialogue and my G Uh, sir, I've renamed my Control No to dialogue and my canvas layer to G u I. And for my dialogue or the control note, I've added to Children to a texture rectangle and a dialogue text text your rectangle I've gone ahead and inside of its texture slot on the inspector If you look inside of your file system under textures you I text window, you notice a window skin p and G go ahead and dragged that in to the texture and dialogue. Text is a rich text label. Just bring that in and put nice that on top of your window skin here. That way we can actually have our text appear in our window Now our window skin here. I just went ahead and created that simple here. Um, if you wanna go ahead and tweet this or change the color of it or even create your own, you can perfectly do that that completely up to you. But I'll include this file as well. In our resource is that way again. You can come in. You can change the color of the window or make any changes. You would like to it. All right, so once you have that set up, so you're followed. She looks like this. And I renamed my textile able to be in dialogue, text in, going at and save your scene under utilities resources. And I just need mind g y and then we can go into our world and instance RG ey into it and it should look something like this. All right, now back into our scene selector, rich text label. Look at the inspector and click where it says BB code and make sure you turn that on. So that's enabled because we're gonna use BB code instead of just text. That way, we can actually get some mawr. We could make our text a lot more interesting, more visually appealing. Catch the players. I make them focus in on keywords, things like that. So, in our dialogue, we're gonna add our script there. It's not on their canvas layer, but on our control. Note that we name dialogue at a script. We're gonna put this in our script shoulder going to call this dialogue and create. All right, so we're gonna need quite a few things for this. Come on right down here. We're going to create two variables here, one that's called dialogue, and that's going to give us an array. And we just put anything in here. So it is just tests so that it doesn't error out as soon as we launch. And we need another variable called Page, which would be equal to zero by default. Now, we're gonna go ahead and also make two on ready variables just to make our lives just a little bit easier when it comes to typing dialogue, text. And that's of course is gonna be our dialogue, text and our background. It is gonna be our texture rectangle perfect. That's all we're gonna need for our variables. During this. We can keep our ready function because we're gonna need that. Um, do need Yeah, we can go out and fill out, are ready. Section first with your dialogue text dot Visible equals false because we don't want to see this as soon as our game loads, we only want to see it when when we're talking to someone. So by default, it's gonna be off, and the same is gonna be with our background here. That makes sense We're also going to add this to a group. We're going to call this group. Gee, why or should we go? Gee, why? Because we have Who could have other instances here. I put a common there instead of Ah, period. Here we go. Um, let's not go with you. You are. Let's go with. Mm. What should we go? Do you I Yeah. Let's just go, Aggie. Why dialogue? And of course. Oh, go with the underscore there in programming. Try to avoid doing spaces at any time that you can. We're naming anything. Let's go ahead and to our dialogue text. And we're gonna set the BB code underscored text because we've already got it enabled. And we're gonna set that, too. Dialogue and page is gonna be our index for this. So by default, it's gonna come up, and it's gonna say test. So what we would know that is working right off the bat. And we could actually test that if we just comment out our 1st 2 lines that hide it and click this button here in the top. Right. And this will lead us to Onley preview this current scene that we've got open up. If we do, we can see it comes up. Says tests. Perfect. Now I should note here before we go any further. If you did not see any text, then you may need to put in a custom font. So to do that, the select your rich text label go down in your properties and you'll see farms and to select new dynamic launch. So I'll show you a quick with this. I just select a rich text label. Come on down. You see where we have, uh, your custom thoughts like that or normal font Select and slick, new dynamic funked. And then click it again. Open up the font section and that is where you can actually select your font Or if you have a font on the computer, if you need the actual file and just drag it in there if you notice in our assets folder actually included a couple of funds here that you can use, I am using the Morris Roman for my funds. At the moment on that comes in two variants here, the original black end annul Trinite variation. So you would do is just grab that and regulated and then If you want to change your font spacing or your settings for the size of that, it's all right there for you. So if your father wasn't showing up when quickly did that test, then that's why just go ahead and add a custom front in there. All right, So that'll do it for our ready function. We can now move on to our input bunk input event. So we're gonna go through our dialogue by clicking our mouse. So when we interact with the NBC that's gonna pop up art are our dialogue, and then we're gonna click through to go through it. So to do this, we're gonna do if event is input event mouse button. So that's gonna be your left clip and event. Dot is crest. So if our left button is pressed on our mouth, then what we're gonna do is we're going to check if the page is less than our dialogue size . I logged out size. So basically, if this number is lower than our total indexes here in our array, then we're DuPage plus equals one. So we'll increase our page by one, and then we will take our dialogue texts. Bebe code underscore text and we'll set that to our new here. So dialogue and page, just like we did and already function else. So if Page it was equal to or somehow gets higher than it In other words, we've run out of dialogue to read to our flair. Then we will take our dialogue. I forgot a square bracket. We take our dialogue, text, take our visibility and set it to fall because now we're gonna hide it. I love background visible and false. We're gonna hide that again. And that, for the most part, is our dialogue system. We're gonna add one more thing here, One more function which is actually gonna begin our entire cycle here to trick or everything. That's gonna be a function that we're gonna call it reset on simple we're gonna have Our dialogue is equal to now. This is where we're going to use our global script here. So remember I named mine put the name is N. D. Because I thought that works well. Be sure for NPC dialogue, so and d you dot And then we can access any variable or function that is within it. In our case, we only have one variable that is NPC. And as you see, it pops up there. Dialogue. So we're gonna set this variable here. Our dialogue that we're using in that showing up is going to be equal to are variable here . So whatever we set, there will become our text. We're gonna set page 20 so that we can start our text over from the beginning, we get our dialogue text visible because now we need Teoh. Show them when we start displaying our text, it'll be nice. Weaken disc Wait so that people can actually see what's going on. What's not this way? Dialogue, background. He was true. And then just like we did before we do our BB code text equals. I like Page. All right, that is our entire dialogue script that we need. And now all we need to do is actually set our NBC dialogue variable and trigger it. That's it. So as head into our NPC here and go ahead and get that sent up. So for this, we're just gonna need a variable four hour dialogue. Now, of course, you can set this to you can have as many different types of dialogue here if you want. So you could have random dialogue here and then maybe, you know, have a a quest dialogue here and then maybe have a reaction on the next one. So you can just stack in your different dialogues up here For now, I'm just gonna call this dialogue and will make our 1st 1 Hi. It's nice to meet you. And so that will be one page of our dialogue. And we do comma space and we do another set of strings and this will be on page two of our dialogue, So I hope we can become friends. So we have two pages of dialogue and now for this, we're gonna need a function, one new function, Cold dialogue start. And this is how we're going to trigger our dialogue. Let's go with Andy dot and PC. Dialogue equals dialogue because that's the first thing we need to dio is we need to set our NBC dialogue variable equal to the dialogue we want to use. So if you wanted this to be I, I like here. You can set it there if you want to be another another set of dialogue here. But you have. Maybe it's just random venter. You would set this to Random Venter or, if you have a set to a quest, specific dialogue. He consented to that. So this is whatever you want, Toe said it. Whatever array of text you want, well, said it here and the next would you get free. So we're going to get the entire tree that we have in our world and we're going to call group and inside of this you need to add in a you need to pass in a string. So I'm just going to go back into my dialogue here and make sure I get the correct Shelly of GeoEye dialogues going to copy it and paste it in that way. I know I've got that right. Then we do a comma space and then we take another string, which is going to be the function we want to call from that group. In our case, it's going to be reset. So we're going to get we're gonna ask for everything in the G Y dialogue group to do the reset function and our reset function. It's gonna set the dialogue we use or dialogue that we're going to display to our NPC dialogue in our global script, we're gonna reset it so that we're on our first page and then we're going to display it this way, all of our windows, and they would just set our BB code. All right, Hopefully that wasn't too confusing for you. If you have any questions, by all means, go ahead and Aslam. And I'll do my best to clarify if I need Teoh on how some of this is working. But we need to set up our trigger. Now we have this going. We have a way for the stuff that we need our player to trigger it. And then we're pretty much good to go now. Show you some of the neat things we do it BB code and why we're using that instead of regular text. So if we go into our player and just come on down, you see, every time they change direction, we're asking them to while update their stripes, they face another direction. But what we need to do now is hey, I've named my function. Dialogues are so we're just going to do body dot dialogue start. I was gonna copy that in in the area there. And if we save that and jump into our game, we can now hit our interact button. Oh, we seem to have an issue area. I have two D's in there for some strange reason. There we go. Try that again. So we've now interact with Martha here and our dialogue pops up. Our window pops up, our text pops up and we could see its updated. It's no longer saying test. It's actually typing what we said that our dialogue is for Martha. We see high. It's nice to meet you. We go ahead and click our mouth. And I would say for the next page, I hope we can become friends if we click again. No. Ah! What we got here? Invalid. Get in next too. Okay. Eso is coming here. Let's at a minus one here and let's give that another try. So dialogue got size minus one. Boom, boom! And there we go. We just fixed or error that no longer is coming up. Well, space far or interact comes up Not touched. Click. We changed your next window. Quick again. Perfect. So now we know are based concept here works That's great. Now we also have an arrow here, which we can I can show you how we can actually animate that and make that a little more, I guess to say, appealing cortex. So it's not as empty. But of course, if you don't want the arrow, you don't have to. Um, But our next what we're gonna do is I'm actually gonna put some text. Might be cold here, and I'm gonna change the size of my father settings C 25. I think 25 would be good for this. I'm gonna go 25 for my font size. All right, So once you guys have that set, man, we can continue on and inside of our NBC here. Martha, I'm going to show you some something called that Weaken dio So far. First argument here, coming here. I'm gonna go ahead and put my Texas something like, um hey, have you seen my ambulance? And then outside of our strength? No, inside of our string. Sorry. Um, we can use of BB code like this. One more down there. Are you? So we need to be because like this where he used I m g equals and then passing a dimension and then get the directory of an image such as any of our icons in our Icons folder, and then we end that we are square brackets slash i m g. And once we do that, you'll see been coming here, and we can actually add icons into our text. So if you want to do something like that for key item or if you just want to do that every time the player receives an item or something, now that is something that you can dio. So it's very easy to do that. If you need to adjust the size of the image, then you would just change. Ah, these 25 year or they width and height. Now something else that a school that we can do as well it's gonna add this onto a new line is we could actually use um, color. We can change color of text so I can dio something like this and Dio color equals yellow. And then I will give a name like, um Marlon, because that's that's who's talking here. And then we close this off with color again. That was on the inside. Do you want to do it here and then we can actually use a slash end to cause a line break line break in our text and we continue talking so we can be like, How is the ah, let's talk about the weather. Um, here have my what potion? You're half my potion. And then let's go ahead and at in our image, that is not what I was looking for. It's a little more than I wanted. Fix your icons s go to our icons and let's look for a potion. Bottle potions. Let's go a bottle red underscore to so battle Read Underscore to make sure your taxes exactly the same. Now we can go in and you're seeing a pretty neat result that we can get now. Um, yes. Hey, have you seen my ambulance? That's cool. If we click now, you can see it appears line breaks are working with BB code. Just interesting. Oh, that's why I use the wrong slash. I want to go this way with our end. There we go. Boom, activate. And now you can see being do put a name in one color of who's talking. We have our text in a different color. We can play a little icon with an item and say, Let's say, for example, you wanted to highlight certain key locations or code. Yeah, that's like or not Continue here. Um, you can get, Say, you can't get more from the shop and we can use color here and then color around shop again . Color equals and I don't know, What do you want to use? Um, we don't clash with the background. Um, green exclamation point at the end. Actually, now we've gotten What did I miss Something there? We're just messing up the color code all over. No slashes at the beginning. There we go Now. Unfortunately, Green was a bad choice because now it's kind of blending in with her background tile, making it a little hard to see. But you get the idea. We can have the name and one color of whoever's talking. We can have our text going in a different color. We can highlight key words or items or something that you want to player, too. Pay attention to and remember as another color, and we could put icons into our text to make things more. Um, how could we say? Enjoyable? Look, Atmore, I don't want to say interactive, but mawr engaging for the player. Now, if we were using just plain text, we would not be able to do this. Which is why, whenever we can do text like this, we should always use BB code. But that'll do it for our dialogue there. So that is all completely finished. You know, should now have a working dialogue system. And just to show you or should we do need to Yes. Um, just to show you a change here, um, just to show you that have dialogue will change. I'm depending on something you may have. So it's a variable quest. Dialogue, for example on will say, I need your help to play the monster, and then we obviously don't need it here, but I'm just gonna stick it here for now. You don't have to do this at all. This is just I'm just showing you an example. We're gonna set this to false You know what was said it Too true. We could have dialogue down here. U f and d effendi, don't start quest equals true. You're literally gonna do this same thing here. Only we're gonna set this instead of two. Aren't dialog. We're gonna set it to quest dialogue. Let's go ahead and jump in room. I need your help to slay the monster so we can use outside sections to trigger or change what tax is going to be seen here. And that's always what's gonna be there. And of course, if this was, uh, then we would have our other texture. Have you seen my amulet? And then we go into this. So there you go. That wraps everything up that we need for dialogue here. I'm just gonna go ahead and remove this as we do not need it at the current time. And I'll just remove this section here. So that's a little bit of the BB code and what you can dio. You can also use RGB for getting some of the colors years. However, these are the colors that are currently available. I'm just white typing in the color name. So you do have quite a bit of variety in there that'll do it again. If you have any questions, go ahead and ask them. I'll clarify and clear up anything as best I can. And that'll wrap us up here for dialogue
19. Dialog Part 2: All right, everyone in this video, we're gonna continue with our dialogue. We wanna make this look just a little better. We're gonna clean a little bit off it up right now. If you remember, we jump in, we talk, and this is what we have so far. So we have some dialogue here. We're gonna icons or window pops up messages, pop up everything works like it should. And technically, this is all we really need to have our dialogue system. However, in this video, we're gonna make a few changes such as we're gonna have in our little arrow on there, animated, bouncing up and down when it's time or when it's reached the end of this page. And we're also gonna have each text character appear one by one, as if it's typing itself out rather than the entire message just appearing on the screen. I said, to do that, you can start off with Let's go to our dialogue. Here are note. Well, you start by adding a few things we can add in a timer which we can call character timer. We can connect our signal here on our right hand side, time out and I got to our script and then in the inspector with you said the wait time. This, Sarah, 0.5 again if you want. If you want the sweet faster, then you have to is lower this number. But I wouldn't really recommend going higher than this, but there's gonna be up to you and your choice. One to turn auto. Start on. And now we're gonna go ahead and add a sprite. We'll call it hero, and we'll drag in our arrow texture to it. Pull it on in. Not for recommended sizes. I would. You see there the default here as the highest and 0.5 on the size for these smallest. If we're coming here and going a 0.5 on transform and scale, this would be the smallest I would recommend. So that's gonna be up to you and how you want to do it. You can either stick it in the middle here, classically, you can stick it right over here on the side. Really gonna be completely up to you where you want to put it. Everything. I want to stick mind in the bottom, right? Ah, yes. Oh, no. I'm going to stick mind more towards the middle. They're gonna stick my right there. If you care, show up the position. There it is that they're 3 59 x and 505 y and let's go add one more thing that's gonna be an animation player. Now an animation player can actually animate multiple things in one animation, whereas something like an animated break and Onley enemy to spray. So there are certain situations where you might want to use one over the other. Not to mention animation's great um, weaken. Put in each frame individually wears an emission player when he just simply adjust our position to get the same effect, and it will be much mother. So with animation players selected, go ahead and go over to the not right hand side. Let's go down to the bottom select animation In this box down here, it's like new, and we'll go ahead and tell this arrow about cool. Now if you go ahead and select anything here, so we're gonna select a roast, right? And you know, everything has a key frame now, So all we have to do is just go ahead and click this key next to position and create. And I was just move this up 2.5 year and we can go ahead and lower this. So click the key again and then that point I will bring it back up. So we want to make sure it's looping. So that's just gonna be over here at the timeline. Here is go to the far right and you'll see it. Click that and enable it. And now, if we hit play, you can see how it bounces there. And if you want to make it quicker, then you can certainly do so obviously, just make that time in between key frames shorter and it's gonna bounce quicker. But for me, I think that's fine. I'm happy with this. And do we have actual? Yes. So we're gonna like this item here right next to the name of our animation so that this animation will automatically start playing perfect. Now, the rest of what we need to do is all gonna be within our script. Let's go ahead and hit head on in there. We're gonna need a few more variables. We're going to need a finished variable and a talking variable Of course, that's gonna be a bullion and false. My default and we'll have one for talking again. False by depot, Unready to running to set anything? No, I don't believe we dio currently. So take a look at our event. Here are, if else a statement here for input and under the if we're going to just add in here dialogue tax dot Visible characters equal zero and finished equals false. Now for else here we're also just gonna set finished two false finished equals False Because we want whenever we're gonna be using finish here to determine if we've gathered all of our characters If the counter has been total So if all of our characters have been revealed which will be getting into Actually this section here is going to stick it right down here to do funk and we call check. Length is what we call it. So do if talking it's true this way we don't have it constantly running will only have this part running if it's recognized that we are talking with an NPC. So if talking equals true man f dialogue text got visible characters is equal to dialogue text yet total character count. So if we're showing all of the characters is Russia What this line is saying we're gonna set finished, too true. All right, They'll have a function for our arrow. And simply with this, we're just gonna take our scrape. So we're gonna take the arrow node invisible equals True. We're gonna said that so sending it to true would just set it to finish that we don't have toe update it all the time. So basically, if dialogue is not finished, our era will be hidden. And if it is finished than our era will be visible. And just for safety, reason kind of thing. Uh, do animation player, uh, play Aero Bounce just to make sure that there's no errors, that it is actually to be playing and we just turn this off. My default are a roast. Right? Or hide it. We're not done yet. We're almost done. We've got to come down here into our reset. And where should we put this? My reality doesn't really matter. Let's set it here. Dialogue text dot Visible characters equals zero. So when we start a conversation, all the characters are gonna be hidden, okay? And of course when we started finish will be set false because we're just starting and talking will be set to true. Remember, we're calling this reset function once we begin our conversation. Um, yes, we're not much. We just have to do Add one more function in here and address our timer here. So whenever our timer times out, we're simply just going to take our dialogue text got visible characters plus equals one. So every time the timer times out, we're gonna show one extra character. So every 0.5 seconds will show one character. And now the only thing we have to do is just stick this inside of a process function. So that is currently running function process Delta. And we just got put in our check length and our aero. Now we go ahead and run. This should you re Our characters were showing up one by one. And when it finished, our arrow popped up and it is bouncing, indicating our characters were completed. Perfect. And that is all we really have to do here. You do. So now we have some dialogue that looks better. Our window is more animated. A little more pleasing to the eye, and it's a lot closer to what we need or to what we should have in an RPG. Now again, if you feel the characters there are too slow, we can just go into our character timer. Change this, I said. This is their 0.2 I want to see that at roughly twice the speed of character Rubio, so this can go quite fast. But I wouldn't recommend going any slower than Sarah points your five. And at this point, I think, Is there a 0.0.2 is crying. My quickest, I would have. So that's gonna be completely up to you. Just adjust that wait Time to change the speed if you want your characters to be appearing and let's just quickly go over what we've done here. So we have two variables here. Want to check if we're talking and one to check if our characters are finished showing we have our process function, we added, which is just going to run our two functions. That's all in port. Every time we go to a new page, we're gonna set our veritable characters to zero if you want to hide them all in our check length. We're gonna check if we're talking with an NPC. And if so, we're gonna take our characters. We're going to check if our total if are shown characters is equal to our total amount of characters on that page. So if we're showing all characters the entire message, we're going to turn finished to being true. And then in our arrow function, it finishes true. Are Arrow is going to show up and appear on screen? And we probably don't need this line here for the animation player, But to be safe, we can put it there anyway, just to avoid any chance of some bug of it, not playing. And, of course, in our reset, we're gonna turn finished two. False because we're just starting the conversation. It's not finished. American turned talking to true because we are now talking with our NPC. It's the beginning of the conversation. That's all we need to do here. That's all we gotta put in here chances here once your four that'll do it. That's dialogue part two here and really all we need for an entire dialogue system. If you have any questions again, feel free to go ahead and ask them. I'll try to clear anything up as best as I can that you may have had a problem with. But from here out, we've got a dialogue system that's ready. Oh, just put in and start using in our game. All right, So you got to the next one.
20. Player Stats: all right, welcoming in this video. We're gonna create some staff for a player. You just come down here to our script folder, right click, and do new script. We just call this player that's create Go ahead and open that up. Now. From here, you can go ahead and pretty much create any statue of light. This is all gonna be in the form of variables. So, for example, can come in here and going variable health. We're gonna declare that as an intern here, and then you would just say equals whatever you want it to be. So, 100. Don't you also wanna have our level starting at one. You're gonna want your current experience to be equal to zero as we start. And you're gonna want the Maxus experience for every time we love a lot. You need to fill go from zero up to this amount, and then you'll level up. And of course, your staffs and that'll increase. So these are the base stats that you're gonna want to put in Anything else that you put on from here down is up to you. Some that I would recommend is like attack defense, speed might leave part in your game. A magic may or may not up to you. Um, some games take advantage of things like luck and accuracy again. All that's going to come up to you what kind of stats you are going to need or to use in order to determine certain things. So I'm gonna go ahead and just pasted in all of mine here, and you can see I'm including attack, defense, speed, magic, attack, magic, defense, willpower, luck and accuracy. So those are all the ones I'm gonna go ahead include. And when you've decided on your set of stats, you go ahead and save that. I'm going to head up to project Krasic settings and in our auto load tab so we can get our stats actually in the game so we can start accessing them. We're gonna open up here at the path player stats for the name. I'm just going to leave it the same player stats and hit at now. Make sure it is enabled, and then we're able to start accessing this within game. So I'm just gonna go over to my player stats, and I created this dummy function here. That's just gonna print a string called Players Current Health is. And then we got to convert our stats into a string because we cannot print in interfere. And I'm just doing player stats. That's what we named it dot our variable name Health. Now, when we print this players, current health is 100. That's good, because that's how we said it. It's exactly what we said that that's it. That's all we really need to do. Toe get a list of stats for a player into put into our game. And then, of course, each enemy. You will have his own set of stats that could be manipulated and used to calculate damage. All right, so that will do it for our player stature. It's very simple, very easy to do and a nice little break after the dialogue section, which was, he took quite a while. It was probably fairly complex, especially if you're pretty new to doing coating You have any questions? Feel free to ask him onto my best to clarify anything, and that will do it for this video
21. Health Bar: All right, So to start off, we're gonna have to head on into RG ey seen here because we're going to create our health bar, and we're gonna have animated so that whenever we take damage, not only is our house gonna move, of course, adjust, but we're also gonna have have it so that we have it slowly moved down at the same time. I don't know it. Uh huh. If you know exactly on time, but you'll see at the end is gonna look nice and be a lot more. I just use your professional looking or polished tweet. Do you get the idea? So, in our G, I hear we're gonna go ahead and add in a control note and we're just going to call this health back in spell. There we go. And inside of that, we're going to get a to texture progress bars here, and we're also going to need a Tween for this now. Texture Progress bar. We're gonna go ahead, name this name Our top one health bar under and in our 2nd 1 and just health bar. Now you'll see that these take textures and under and over and a progress under is gonna normally be like the back plate of a health wire while over is more like the border that goes around it, or the container that you're holding in the health in in your game. And progress is your bar that's gonna be moving up and down to represent your house. So to do this, we'll start with our health bar will go down into our textures, do I stats and we're gonna add in the bar color to our progress. We're gonna change our men value here in our range to 100 then back to zero it that way it pops up. I'm not sure why it doesn't show up by default, but just change that and then put it back to zero and you'll be good. And for that So we're gonna eat therefore our under week at the back. And then I mean for a show. Regular bar will go ahead at our border on this one. So for over pulling the bar border texture and then for health bar under, go ahead and pull in our bar back or our under texture. All right, so if we hide our health bar, we'll see are under texture. We're gonna go ahead and go to tent and just tweak our under. Not under. We want progress. That's far pulled bar color into the progress on that one. And lift tint that progress too. A nice dark red. And again, if it doesn't show up like a change here, we'll change it back to zero. There we go. And then in our health bar, Well, tent it and make our progress more of a green Green is good for showing us health. If you see something that the player can identify as health immediately green is You see, I'm show something good. Red shows something bad, such as being hurt, taking damage reduction in health De buffs Uh, what's gonna put in there? I'm all different things that are along that kind of line. So red is always associated to negative things. While I was suddenly green, Um, for a player always is disassociated Teoh Good things. Eso What we're gonna need from here is rational Need a script. So we just quickly go over that just in case there was any confusion in there for health bar under. We're using our in the under texture. We're using the bar back image for over. We're using nothing for progress. We're using the bar color and then for a tent we tended our progress to be a red for the health bar we're using for our cover texture D bar, border and progress wheezing, bar, color. And then we tent our progress to be agreeing. Now these are just noticed our bars extremely huge year, and we don't need it to go all the way across the top. Let's just go ahead and we can shrink that in If we just look at right here under texture progress on the right hand side and inspector, we turn nine patch on will be able to resize this. We just drag the sin scroll in. Uh uh. Actually, for games like that, yeah, I think that is good through into the ST or bar under. We could just come in and take a look at under direct and get the exact numbers 1 60 Buy 161 60 by 16 or size. It would seem, Let's go in here and make a Jeff 1 60 16 doesn't seem to change. So, uh, it's because we don't have the Rio nine patch turned on. And now we're just 1 60 16. All right, so those should both be in the really good spot. I'm just gonna move my health bar to the right a bit. I'm gonna go 1234 to the right. And 1234 down. I would do the same for under that way. It should lined up perfectly. All right, so now let's go ahead and add our script to our health. So new script put into our scripts directory. We call this health far got GT, and it creates how are right now. What we're gonna need for this is I'm gonna create two already variables just so that we can get our We can get our No, it's just a little easier and took my typing out Just a variable. So it's on ready there. Health bar equals our house bar. We're gonna have one for health Tween, cause this is the one that's gonna between. And if you don't know what tweeting is, is based gonna be a smooth Adam ation from point A to point B. So we just said that as our health bar under and then we'll grab one for our Tween this rails on ready bar date between and that was SPR Tween perfect. So for this, we can go ahead and set a I'm gonna create a ready function here for now, and I'm going to create a process function here and we could pass on that. And here's where we get to the actual script for adjusting our bars. So we're gonna have one on on health Updated. Sure showed that, right? Yes. And we're gonna have one for on backs. Health dated. It's not in on a radio, so we're going to start with our health update. So the first thing we need to do is we need to get our our health bar don't value. That's gonna adjust how awful our bar is. And we're going to set that too. Player stats, Because that's the name we give our global script that's holding out of our stats players. That's current health. If you don't have this, you might have just named yours health, so you can go ahead and just use that if you don't already make sure you have a max health in there as well, and you play fats and the next we're gonna update Tween and terribly property. And I don't see this going to take a lot of variables here or a lot of arguments. Rather. So the first thing we're gonna do is we're going to get our health Tween note here. We're gonna take our value, make sure that's a string. Then we're gonna take our health Tween value pressing health. How this Ah, an argument there for our function would do 0.0 five. You can go ahead and justice if you would like, but I feel that this number works well for me. We're going to use Tween if you're not Tween um, trance sign Then for our last argument here, you can go ahead and use whatever you would like here. We're just gonna use Tween dot You've and use season. He's out, he's an out or he's out in. I'm going to use these and out. But you can use whichever one here that you would like. If you want to experiment on them, see how they all look. Make a decision perfectly fine. But I'm going to use an out and then last but not least, we just got ta Take our update Tween start. We just got to start our tweet. And now the health section is done for our max. Certainly for our max l was going take our health bar dot max value and said that equal to our player stats Max health. And just to make sure this stays up with no issues, we take our health between Max Value and Ross gonna set that to the same you are, Max l just to make sure that it stays and grows up whenever we level up and increase our health. So, in our health update on Max Health Update we're just setting our values. And then on the health update, that's where we're adjusting visually, moving our bar and the Tween is allowing us to move our underside. So the red bar, allowing us to move that smoothly, so unready personally, I like to take my health bar, got value and set that to my current health. And then just Well, if if she had a typo down here, I'll go ahead and set my Mac shelters wall. The process is simple. We just get our We just go through our health updated script are our health updated function and pass in a health argument, which is going to be our player stats current health. All right, That should be good going on up there. Why is our script named this? What happened there? Who's that? Bring that up. No world happened there. It is very strange. There we go. We have our health bar script, and now we head on over into our player to test this. I've actually got into our dummy script and I'm just printing are Max Health and current health. And then I'm waiting two seconds, and then I'm simulating damage by adjusting our players current health by subtracting 10 from them. And then I'm printing What are new? Health is so I'm just doing that a couple of times with our dummy function being called and are ready still. So when I go ahead and open this, huh? All right, since ah, patient And indeed the issues coming? Sure. All the spelling is correct. So that's what I was just coming up with an issue there. There we go. And they were to second of a look in the top left. We start health bar functioning are green bar moves instantly, and then our red bar behind it. Um, smoothly, Adami's down from where it was down to where it should be. And once we stop taking damage trying to stop moving and you can see every 10 it moved. And if we were to have that for a full 10. Since we currently have 100 house with a max of 100 there's come down here. And if we add that two more times here, I'm gonna be 10 times what we're calling it, dealing 10 damage at a time, which is 100 health. So our bar should be completely empty now, at the end of this one, 40 30 20 10 health left and zero. So of course it was zero. Now we'd be calling, of course, our game over function. But there we go. We have a house bar that works whenever we take damage. Now, if you wanted to do a magic bar, you would typically do the same thing. Only instead of green for the health bar, we're gonna use a blue and instead of, of course, whatever you take damage, we're going to change that to whatever you using attack Well, I'm not doing the health bar and mask a bar or a man of our magic pool. Whatever is essentially the exact same thing. Just remember to if you're doing a magic bar member to swap your current health and Max Oh , with your current magic or current current manner and your magic ass are your Max Magic or Max Mana. But either way, that's it. That's all we have to do. Do you create a health bar or man of our here? So it's very simple. Now, if you want to take this one step further, we could also add some text up there. If we jump into R two d, seen here inside of our health, we can add some text, see a label. Let's go with a label and we do hp over each p. Just get an idea. Well, the sin grab our phones compliant on dynamic Drega font into our data. Want Saif do something like that? That's ah for moving on. Take a look and see on that election game. It's pretty small, but it fits in our bar and it works. Of course, if you want to make your bar bigger, you can certainly do that. We sure there will call the HP And to have this adjust would do an unready bar. H p equals our HP note here. And, uh, let's go ahead and come in here and do hp dot equals. And that's where we could use some strings so we can go. Are str going to convert toe a string? Our current health plus HP flash worth FDR that and we get our max l stick it in there, plus another string. Um, extreme. Those two capitals, we could do capital you could do lower case completely up to you. And, of course, what depend on your father. Now, if we go, go ahead, open it. We take a look, we can see our numbers and everything is updating up there in our health bar. So if you wanna have text up there displaying how much health you have, you can certainly do it. And it's a simple is that to throw that in there, But that's completely up to you and how you wanna go ahead and go about that So that'll do it for this video right now that now you have a functioning health bar and I challenge you , and between videos here to go ahead and create a magic or mana bar for yourself that functions.
22. Experience Bar: already one in this video. We're gonna go ahead and create an experience. Barto, add in to our You are here. Now you can see I went ahead and added in second bar here for manner so you can see it's exactly the same. I'll even open script and open the tree here. You see, our man is exactly the same as our health. And the only difference here is gonna be our terminology. Other than that, everything is a matter bars exactly the same as your health bar. Now, the difference is, of course, the terminology and it's blue instead. Agree? All right, so jumping in, we can go ahead and create a add in a control note here, we're gonna create Ah, little experience Bar. Who got XP inside of that? Of course, we're gonna have our text. Your progress? Yes. Um, we'll go ahead and retain that to the XP bar. We can go ahead and at in and textures at Indy Bar Border on our cover. He bar back our under turned into a nine patch, right? And just our size, the 1 60 by 16. Just lower that straight down. See? 1234 was it? Guess. 1234 Here we go. We can go ahead at in a label life for keeping safe here. I'll go ahead and just duplicate this one. This one x three, no word down our text will be. We'll start XP over X tree. There we go. All right. So what do we need here? Well, most for our experience. Where That just We need a color still, uh, progress where color on began. For whatever reason, edit this home 10. I'm gonna make our progress. I'm gonna make it more for yellow. It will kind of make it hard to see our text on there. So maybe you don't want text on there, or you could arrange this another way so you can have, like, maybe your text off to the side here and then your bar on to the right of it if you wanted to do it that way. If you want to have text which if you wanted to separate from the bar, I'll show you for example Here, for example, if you wanted your information put there and then your bar off to decide like that, you could go ahead and do that with these as well. If you want to do it that way, it's personal preference. Personally, I like having everything relatively the same. Let's go ahead and get ah, position here. Position for four. How might? All the way up there. Those are second. You know what? 0 18 We do this one zero 36. If we take our bar or wrecked, we do. 44 What is our text? 71 8 71? No, I think I just have just the one. And we won't do it over. Like, I think that's what we do. Perfect. Okay, so now what we need is a script. It's obviously gonna go into our script shoulder. It's just gonna be XP bar, and we're Open that up. Green it. All right, so we're just going to stop here, and I challenge you to go ahead and create the experience. Where are I want you to create the go ahead and do the script here for the experience bar that we think you figure it out, come right back, and I'll show you the way I did it. And it's gonna be very like our health bar here again. So just grab these. We'll start off where you're gonna need We're not gonna do you between. And we don't have a lower bar, and we'll call this and e x p bar. And we need this e x p barge asleep. Perfect. And take our functions here. Whom? Of course, he's going to do that. Would you current experience, player do our XP bar and are ready function XP Bardot Value equals players that stop current experience Send down here will pass in that And let's create our function on the XP Updated passing the argument of XP appearance boom past. And that was stopped. Update our name go. Okay. And all we're gonna need from here is our top one here. So where's his health bar? That value equals clear stats out current health. That's all we need to take from here. Oh, we can use the years our text as well, but we're gonna have different tax there. So I'm just going to take our top one here. Jesus from health bar to the XP Bar and change it from current health. The current experience, Then we'll take our XP dot text equals as a string player stats. Current experience. Um, plus from extreme. Yeah, we do it like that. So if you wanted to further do this and do like what we had before, we have it over our player stats Stop, Max. Or is it Max? What do we call it? I think we just got Max XP. Yeah, Max experiences what we label. That s perfect. Go ahead and save that. And now we need 14 hour max experience. So, funk on Max the XP updated boom. And just like our health bar, what is gonna set this to our experience? E x p Bardot, Max value player stats, flash max experience. And make sure we have that in our ready bar. And we will technically be finished with this. Although I'm gonna go into my player script, I'm gonna make sure this works. Um, in my dummy script, just gonna go ahead and do player stats dot Current experience equals, would you tend? And I'm just gonna add that into our timers here. Boom, boom, boom. Right now, if we take a look, we've got our experience by filling up. And, of course, our house and mana is going down in the other direction. So there we go. We have an experience bar that works, and we have a health bar and a magic car or a man of our. So the only thing we need, however, these to be fully operational is just something to trigger it. So killing an enemy completely inquest. Whatever. Whoa! Give us our experience using anything that's going to cost match hermana in your game to drain your bar. And whenever you get hit toe a gesture hp There we go. We have are three bars, all set up for health, magic and experience. All right, so that'll do it for this and I'll see in the next one.
23. Pause Menu: All right, everyone, let's go ahead. And in this video, let's go and create a pause screen. So we're gonna create our pasta menu. We're not gonna get all the menu working today, but we're gonna at least give us the ability to pause every game and on positive. So the first thing we're going to need to do is go up into project and input and create a pause button. So pause at it. And pretty standard key on the computer defies your game is the escape button. So go ahead and set that and go to close. Then we're gonna open up our g u I seen here. We're gonna create a new note. We're gonna add a control. We're gonna call it eyes. And inside of that, let's add a Oops, a color wrecked. Here we go. And I'm just going to use that to cover our entire screen and on the right side. And our inspector, I'm gonna change that to not a solid black Ah, but maybe, uh, color like a purple. Or maybe even a blue would work, you know, something like this. And then I'm just gonna take the Alfa. I'm gonna drop it down, maybe halfway so that we we just have ourselves a clear indicator that our game is paused aside from everything just stopped working. All right, on our positive, make sure we go into we click on our control, know that we need pause. And in our inspector, we need to make sure we come down here to pause, go to the mode and change it from inherit to process. Otherwise, if we don't, then it's gonna inherit from the rest of our tree, which will be punished, which means we'll be able to pause our game. But we won't be able to a NPAs it. All right, so let's go ahead and add a script to our PAS note. Make sure we have it in our scripts folder. It's kind of pause. That's fine. Create. And what we're gonna need here is we need a process function. So funk process Delta. And now this is where we need to. Yeah, Yeah. We've gotten input from our player Sony check. If, um, if the possible expressed and then if so, we're gonna pasta screen or not about screwing paused the entire a game. So to do this, I'm gonna let you guys go ahead and try and figure that out. But, um, if we don't, we also have to adjust our visibility here because if you see if it's not visible, that's fine. But if we just leave it like this and we posit, nothing's gonna happen, and if we leave it like this the way you want it to look when it is caused, the problem is we're gonna have this overlaying our game the entire time. So if we were to take a look at it, everything is dark now, and if we do it this way, everything would be light. But when he paused, nothing would darken up. So go ahead and in the script, go ahead and see if you can figure out how to get input. So what we need to do here first is check here. Pause button pressed. That's a dollar sign. Check if possible, impressed and then, if so, pas the tree. And then, since we need to adjust our visibility here, fame's visibility, uh, pause menu. So this is the three things here that you guys going to need to do. So go ahead, take a moment and see if you can figure that out. And when you come back, I'll show you how I go about doing this. All right, welcome back. So let's go ahead and and jump in and weaken. Simply check. Check our possibilities fresh. So if input is action press, we want our pause button. Then we can go ahead and use get tree because that's what I want to cause the entire tree dot Pause equals, not get tree cause So basically, what we're saying here is if our game is paused a NPAs it and if it's a NPAs positive So we're gonna basically set this to whatever the opposite is And that also takes care of our if so, posit section here as we just go ahead and go like this and then we still need to change the visibility of our screen so we can go ahead and set. Ah would have got. We can dio visible. Personally, I like doing I'm making sure I just said it yourself visible. That's what her personal permits he could just set just visible on. We'll set that too. Get tree, Don't paused. So basically, to send our visibility t the being true or false, depending on if exposed or not pause. So we just hide that for now. Now, instead doing that in a process. I'm Delta. There is another way we could have actually done this as well. In a an input event, which is just another way of getting input from our player. You only have to do it one of these ways. But if you did go the event around, then the only thing that would really be different here, as we would do if event dot is, um action pressed Waas and that's it, the other two lines would be exactly the same. So that's just another way that you can do it for getting some input, either using if input or doing looking for If the event is input that you're looking for, let's go ahead. Let's take a look to see if this works were in game moving around, we had escape, and we seem to have run into an issue. Oh, I have a typo there they were. You paused. Only has one s not too so moving around. It works pas game, you see our screen dimmed, We can't move around anymore. And if we had escape again. Our game a NPAs is and we can continue. So that's working perfectly. Be beautiful and pause. Now you see stunners when I hit it, or if I hold it, it starts flashing. We can change that from big. Is that compressed to is action? Ah, say just who will change this to just relief? Uh, today. And do we not have that in here? We have to underscores out. There we go. So now that is on just released. Its basically gonna only trigger When I looked for my finger up off of the button if I were to hold it down. But still it wouldn't cause until again, I released off of it. Let's set this up as a V box container. We're gonna set the layout to that is our anchor. Okay, we go. And which has said it somewhere around here. Good. I wrecked. Now I, like set my minimum size the same as my regular size here. That way it cannot jump around. That's in my case to 82 3 52 But now a V box container is a vertical box and allows you to put items in it and no place it in a vertical, a vertical line up. So it's going to be lined up from top to bottom, and it's going to be an equal, ah, distance space between them all. So we can come in here. We can go ahead and at in a button, and when coming here, we can add another button and another one. So now we've got three buttons in here. And as you can see in RV box container, we can actually come down here to custom constraints inside of our inspector. Turn separation on. Now we can adjust how much space you want in between each in between each item here, I'm gonna go ahead and just my margin from the top. Ah, yeah, probably Somewhere around there, 300. Would that be for this? Yeah, I think that we find who shouldn't have our dialogue up at the same time either. I said this in the center said our buttons pop up in the middle and perfect, and I would go ahead and rename our buttons. So it's a resume. We'll make our last one exit, and for now, we'll just call this one options and go ahead and the instructor and give him there Correct names here. Now you're noticed. These go all the way from one end to the other. And for that we could also just we could adjust our X on our buttons years. Well, um, that's of course, we just changed our minimum here. So we say maybe 2 50 See how small that goes and just think her size. That does go too much smaller, maybe even 200. So we could go with something like that for now, and we'll go ahead and we just connect these. We're going to note with Brazil selected on press fact that two hour pause menu here connect. And if the player presses this button, we're simply going to take our We're simply just gone to a NPAs. So we simply said it falls. That's all it needs to do. It doesn't need toe flip back and forth at all. And for exit that is pressed looks. First, we have to connect it to the right thing. I connected it to the wrong script. Connect So connect press to my pause and to do this it's extremely simple. We just get tree quit. That's it. Now if we go ahead and take a look I haven't set on by default. We need to hide it again. So we don't see it when we start a game. Now we can run around player game, pause our game, and now we can't move. We have our buttons. And now when we hit resume, that should allow us to continue playing. It does. However, we did not hide it again. So we gotta make sure to do that. And exit should allow us to quit. There we go. So, on our resume button pressure, we need to change our visible. Yeah, to also full force. There we go. Now, when we pause, we have that when you hit resume, we can move again and our screen is gone. And then exit. Quit your game. So we have ah, basic possible you set up. We don't have any options to call in for our options menu yet, but we'll get to that in a future video. And for now we have a basic a basic positive. You If you want to customize it further, you definitely could. I'm not sure you today just come into he just like your button or even I the control itself . That way, when you apply the theme to that, it will apply it to all your buttons. But you would just come down here to seen here. You can do click here, hit new theme. Open that up and then you have all different sections down here. See that you can change so you can see like the button. Here you can change the font. You can change the way it looks completely taco, but it's all in there. Um edit theme. Get add or removed with things all from your thing here where you can just come in here. You can mess with it here. If you would like so with that, take care and I'll see you guys in the next video.
24. Projectiles: All right, everyone, welcome. In this video, we're gonna go ahead and create a projectile that happens whenever we attack. And you can use this same principle for if you want an enemy to throw a project out or if you want, maybe just a random projectile to go across the screen. If you creating a major if you're using or if you have a script that's will be using a bow and arrow, you could just, of course, change our projectile from in this case of fire mall into on a row instead. But we're gonna use in the fireball right here, created by K. V s. Are, as you can see, um, down here And if we come on down when you see a bunch more things that they have created a bunch more credit things here, I'm pretty sure they created it. If not, well, you're seeing on their page, but we're just We're gonna be using the fireball here if you want to get different one. You can certainly do that. Now, over into our game here, we're gonna need to add one thing to our player. And for that we're just gonna add in a node called position to D, and I'm just gonna name it position. And I'm gonna place mine at zero on the X and 14 on the Why, that's where I wouldn't police mine. Now, for a player for the players scene, we're done. We can get the player script later, But before we could do that, we need to actually create our project on to use. So come on up and create a new scene Pretty to de scene. We just call this projectile and put in here. We're gonna add to our scene and animated straight frames and new frame here in the instructor. And you know what to do here. We're just gonna go in navigate to our texture and just pulled them all in. Okay, Su mano, that is pretty big. In fact, I think that's gonna be a little too big for are games. I was going to shrink it down a bit. Now, you can always come in here and tweet the size of it later if you need, um, I'm gonna set mine to 10 frames and in The inspector will just tick playing on this way. It's just gonna constantly play whenever we bring it into are seen as have automatic replay for us. All right. So in our projectile note here, we're gonna need a few more things. We're gonna need a timer, and we're going to need an area to D. And every area needs a collision shape. In this case, are shape. Could be a circle since we're using a fireball, man, they're ago. Something like that will do just fine for us. Perfect. Now our projectile, we're gonna need to add a script to it. And, of course, pour that into our script folder. Scripts, projectile open. Here we go. Create. We're going to connect our go to our timer. Go to the node section right beside the Inspector, and we're going to connect the time out signal. Do it. And for area to D, we're going to connect a body entered signal. Okay, I know that was a lot to take in all at one time, but our project, how is just about completely done here? Because the only thing we really need to do is reject our needs to move in a direction, and that's really it. We need toe. Remove it afterwards as well, though otherwise, if we don't delete the object will just cause a memory leak. Which course will be really bad for your game and eventually was slow down any computer. So let's go ahead and create our variable. We just call it motion. We don't have to assign it here cause we're gonna assign it later on. Let's create a physics for a process here. Now, I want you to do two things here. I want you to try and in our process function here. I want you to curry create our movement. So we want to move our object over time so you can go ahead and take a shot at that. And on our time ELT we just want to delete our object. So go ahead and give them try sieving and figure that out. We have not moved an object over time before, so this is gonna be something new. So if you can't figure it out, don't feel too bad, because it just means you've got something new to learn here. All right, welcome back. So, in order to move an object, we do what's called Trans Lee. And as you can see that we're going to take um, an argument here would just go and tell us obviously where we're translating Teoh and what we're doing is we're going to translate Motion times, Delta. Now what? This thing is we're gonna move. Whatever our motion is, which will be a vector to is basically gonna be like our sweet that we're moving And the direction that we're moving is pretty much what the motion is going to tell us. And when we multiply that by doubt, it's gonna move that much over time. It is going to continuously move in that direction at that speed and then on our time, our time out here. It's very simple queens to self que free. That's it for the area to d entered. We don't really have to worry about this at this moment. However, if you want to do this right now, then we can easily do just ourself got cute for here as well. Now, A whenever it hits an object or an NPC are fireball would just disappear. Now I wanna first thing. I'm gonna set my timer down to zero point three. Sounds good. And make sure you set it to auto start. You could even try. Maybe even 0.5 could even be good for this. Let's go ahead and do that. Go ahead and save your scene. Se wsi does put into our scenes are not scenes. We're gonna put this into our utilities resources, and we just put it on in here project we call Fireball Projectile. All right. No, for this. We're pretty well done. We just got ah, actually spawned this in with our player now. So to do this, as you can see here, we're going to create a constant I'm gonna call mine projectile, and we're gonna set that equal to pre load and inside of our Brent sees is going to take an argument, and that argument is going to be your scene. So just look for Fireball Project housing here and just drag it in, like so. All right, so here we're gonna go ahead and create our A function that will create our pride, our project out, and place it into our scene. So we're just gonna go ahead and do funk and call it create projectile not to do this. We're gonna need We can create a variable. We'll just call it project out with a lower case, p and that will be equal to that. She was we had appear a capital P projectile for a constant god instance. I think so. So now that we have this, we're going to set its position. So project out dot What position? We're gonna shut to the position to pls with. I didn't put in here, but it is going to be an argument for our create projectile function. All right, Next up, we have to tell our function where to put it and our list. Now we can't just add it to our player. Otherwise, whenever our player moves are projected, I was gonna move. So if we were to shoot this, uh, and then we moved to the right. Our entire projector will continue moving up, but it will also move to the right with us. So we need to get parents so that we can actually add this to the scene and not our player who knew? Get parent dot ad child. And what are we gonna add to the shop owner, sir? What child? And we're gonna add projectile with our little p. All right. And so we have that go ahead and just said I return Projectile Um, so we have our function, Although it's not doing anything yet in our attack, We sure in dense is exactly what we need here. So at the end of our attack function here, we're just gonna hit enter for a new line and hit one backspace, and then in here will do create projectile, and it's right in easy position which will be will create a variable composition, spawn this and what that is. Where you're gonna be is that's going to get our position Sure of which is called here. We're going to take the position about two D the position to denote that we added into our player, and we're going to use that as our position to spawn the sin. So if we just grab that note and you got global position and that is where we're going to spawn this out. So if we were to take a look at it now, it's not actually gonna go anywhere. Oh, in fact, it completely crash right now, Um, that's going to be doing that. So let's go ahead and just set a default for now. A default vector to I said to zero and 100 that way This goes there on the actual 100 on the Why now, As we can see, our fireball is huge. So let's go in to R two d. Seen add Shrink it down more course in pushing that down, we should adjust our collision down as well. Now that's still pretty big. Shrink it down further shrinker collision That would give that a shot. That's, Ah, better size. But as you see, it's not moving anywhere. So we're pretty much just flashing it into screen, and then it frees itself right away. So we need to fix that. We need this to actually get some movement going. So in our player, we can go ahead and change our position. Ums. I start here. Um, this is the section that's causing this at the moment. So I just comment that out, and the reason that's happening is because the size of the fireball on my side still is big enough to the point where it's still colliding with my player. Please see if we don't have it colliding, it's actually gonna move. So to fix that, for now, I'm just going to do if body earn stupid body name equals player Do nothing else Que free area now It shouldn't delete itself when it touches the player aereo. But if we were to touch her NPC here, look what it doesn't cause it's still going in that direction. It's gonna instantly stop and described So So that's good now as you would have seen in there. The problem is, whenever we turn, we're still shooting the fireball down. We're not shooting it up to left or to the right. It is always going down. So now that we know it works, this is what we need to fix. We need to change its motion after we responded. In that way, we can change the direction it's going not necessarily speed myself. I'm going to use 500 Ah, in the end. But we need to this what we need to adjust year. That way we can change. The direction was, but not only that. We need to move our position two d note here, remember, it's spawning wherever that is. So if we come up to wish me But this not in our attack well, yes, we do it right on up here what we have movement. So whenever we press left, or we could go with down for now, whatever we pressed the down key, our direction is gonna update to being down. And when that happens, we also need to get our position, which is our position to denote here. Try not to confuse you with that there dot position. So we're gonna take that and we're gonna set that equal to a vector shoe. And right now, the position that is that is fine for down. So 0 14 Obviously, if you wanna move that a little further away, you can go ahead and adjust that as you see fit. But that's all we have to do to adjust our position. So go ahead, posit video here and go ahead and change the position, just like we did here. Half for up, left and right. All right. Welcome back. So very simple. Same thing here. Only up is gonna be negative. 14 to the left. I believe it's gonna be negative. 14 0 And to the right, it would be positive. 14 0 I'm pretty sure we can go ahead and double check that just by running our game. If we're looking down, spawns down, flies down, Perfect. We look out, we noticed we can see where it's spotting, which is a little higher up, which is great changing by our position. If you look right, it's spotting on the correct side and left responding on that side. So now we have our projectiles spawning in the correct position. We just now have to edit the direction that it's moving in. So to do that, we can. Actually, instead of putting it up here with our actions, we can actually just leave that right down into our projectile creation script here. And we can easily do that using the same if statements here for direction. Here we go. So if you just come on in, pass on all these no. So would do would do this in order against that's gonna be left right up down of it. Laugh right up and down. So, based on our direction of our player here, this is going to determine our motion. So just remember where we're adding a shout, too. This is on our player, and we're getting the parent of our player, which is going to be our world up here Here's our player and we're getting world and then replacing a projectile as a child of this. So we're gonna need to get parents. We're gonna have to get our players parent here, and then we'll get no. And that note is going to be called projectile if you forget what it is. It's just the name of your know to be here that is holding our script. So we're gonna take that. And now, now that we have that note, we can access that variable. What's gonna be motion? And to do that to set it? We said it just like any other variable equals a vector to with some arguments. And since we're gonna use 500 for speed here, of course, if you want a slow years down to use a smaller number, we're 500 comma zero because positive actions going to send us in are in the left in the right direction. We're edging left. You want minus 500 here. Now go ahead. Take this. What we've done here to the left and go ahead and set our right direction. Motion are up and our down. All right, welcome. Now we just come onto here. Go ahead. And this would be a positive 500 X for our motion for going right. This will be zero for the X to go up and a minus 500 for the why and then down is exactly like we have in our projectile script zero and then a positive number in this case 500. Now, if you go ahead and test in game, you see if we look down, it's gonna fling down from the to the right. That's gonna fly in that direction to the left That will fly that way. And if you look up, you don't fly that way. And, of course, if we hit our NPC, he's gonna instantly disintegrate and not wait for our timer. So there you go. We've created a projectile that we can spawn into our scene with our player. It's ready to start being used against whatever it ah hits runs into whether it's an enemy or in this case on NBC. It just discouraged. So we've used a position to d to spot it into a specific location when based on the direction our players looking and we've adjusted its motion to fly in different directions as well. So there you go. We've created a fully functioning projectile, and you can use the same pattern here in your project or other projects. Future projects for not only magic but arranged weapons such as a bow and arrow or boomerang, or even if you just want a game where you can just throwing objects. So if you want to a ninja game, you do a Sherrick in like this as well. So there's a lot of different uses you could use this for, but that is how we create a projectile in a game.
25. The Enemy: All right, everyone in this video, we're gonna go ahead and start creating our enemy. We're going to create a new enemy that'll eventually follow the player an attack to flare. But we'll handle that part in our AI. In this video, we're just gonna go ahead and get our enemy all set up. So to do this would have to create a new scene. We'll use other note because we're going to select a kingdom attic body to D. And if we look are yellow Triangle says that in the same a collision. So we'll go ahead and add a collision shape. And this says our shape needs a shape assigned to it. Currently it has done, but that's fine because we don't know the size of our enemy, so we don't know what we need. So it's also go ahead and add in and animated scrape because we are enemy will be animated and we'll go ahead and at in in our inspector are frames new sprite frames. Open that up. And now we can drag our bat in here under textures. Enemy destroyed all of them in here. And I'm gonna set my animation FBs here to seven and an inspector upturn playing on Now you can go ahead and tweak this. If you want to run a slower or faster, that's gonna be completely up to you. The name of our animation. We don't really need to change, but I'm gonna go ahead and just name it flying just to stay consistent and not leave anything. Default. I'll just rename my route here to enemy. And now that we actually have something on screen, we can add a collision sheet. It should be a rectangle to our bat. And if we take a look, that's almost the perfect size already. Just make it a little bit wider, make it a little taller. Something like that will be good. And now, if we go ahead and put our back into our world, you'll noticed we can actually collide into him. Now he's not gonna do anything. He's just gonna stand there and fly. It's going to save this safe. Seen as utilities, resource is and looks what's Go ahead. Name this bat. If we go into our world and instance him in, we go ahead. Just place him right over here and jump on in to the game. You notice we can run right into him and collide, which is perfect. Of course he doesn't do anything when we swing. He was completely our sprite here. Just affair, not straight. Our project out disappears just like it does when we swing at Ire, NBC over here. So we know that so far everything's working. All right, now, from here, we're gonna need to actually create a new script. And this one is going to be four our bats. That's so if we just come in and right click in our files here, select new script, we'll call this that. That template will need one. We don't need to inherit anything. Let's go ahead and create. And now when we come on in, should have that here on the side somewhere. If not, then we'll just go to our file system and double click on that. And now we can start developing, um, the stats for bad. So just like our player, you can go ahead and add some stats in. You can take a moment to go ahead and start adding that in, and when you come back, I'll show you the stats that I'm gonna be using for my back. All right, let's go ahead and jump into it. Web are first variable, which is gonna be health. It's gonna be an integer. And I said that too. Say 20. And what else we're gonna need. We're gonna need a speed stat speed. And and we'll make that. I don't know, 35 45. The bats are fairly quick. Now, do we really need anything else? Car bat does not do any That isn't really casting magic. It's bad. Unless you want us to. Of course, um, we're gonna need some kind of attacks that either physical or a magic. I think I'm gonna go with a physical for my back. So just deal, attack and and we'll make that 30. Let's say she. What do we have for players? That defense 10. Okay. Yeah, that'll be fine. All right. No break equals 30. There you go. Now, I think that's all we're going to need a t least at the moment. I really need any more than that. Uh, no, I don't believe so. Um, if you wanted to add health bars onto your back, then we would do the same. Like you did with our player setting a max health in the current health. And then you would literally do the exact same thing that we did with our player for our u I only you'd add it right above are bad here. So that's up to you. If you want to have a health bar being present on your enemy, I don't think I'm gonna add any health bars myself. But that is an option. And in order to do that, just go ahead and reference what we did in the past. But I think that'll about do it for this video. We got our bat set up. We have some stats here that already are. Bat is in our world. We can run right into him. And in the next video, we'll go ahead and set up his A. I were allowed to get hurt. Ah, and we'll have him be able to hurt us. All right, So see, in the next one
26. Enemy AI: All right. Welcome. Everyone in this, Peter, we're gonna go ahead and set up our bats, ai, to get a moving So in here, you'll notice that I added defense that that we didn't have in the end, the other video. That's just because I forgot about it for the way I decided. Teoh, calculate our damage. So the first thing we're gonna need here is we're gonna go into Project project Settings auto load and go ahead at the bat stats script into here. I just left. Name is bat steps, and once we've got that, well, we can now do is go ahead and start adding adding our script into our enemy. Start making things work here. So I'm gonna go ahead and add script. This is going to go under, Of course, our scripts. Yes, we are bad, and we'll create who need in. Yes, we don't really need one, but let's do him no comments just to save a little bit of time here, and it's very, very minimal time. It's once Arbat is loaded in. We want to add them to a group con enemy. That way, this bat will have the enemy tag. So We know that we can hurt this with our attack. So we're gonna need to set up some variables here. We need one for health. Ah, what's that? Went up for speed and we'll set one up for velocity. So I want you to go ahead and, um, a sign our speed of our back and the health Barbat. And then take a stab at setting up the velocity what you think it should be, and I'll let you know here in a moment. But go ahead. Set that up. Add the stats into our bet, and well, see in a moment. All right. Welcome back. Let's see if, uh, if you guys were able to get this one, so for a health were simply just gonna call our that stats, not health. I didn't speed. We can go ahead and set that too. Our bat speed. So that stats done speed. And for bonus points here, velocity, if you got it, Great. If not, it's just gonna be a vector to does here, which is the same as doing a convict er to. That's just zero fear. Like so. Those are just two ways to write the exact same thing. So we get rid of that and our velocity will handle that. And a little later, we're gonna need the process function here so that we can have things happening in our game rather than I'm not changing or updating. And of course, since we have velocity would know that we're gonna have a move and flied with velocity as our argument Now for our back here, it's an enemy. And when we hit, our enemy really needed to get hurt. So we're gonna need a hurt function and we're gonna actually passing an argument here of DMG. And for now, we're gonna go ahead and pass on that and we're also gonna get another function Cohn anime so that we can get it. Teoh change will get to the part where at fault, when it follows us for now, that's all we're gonna do. We're not gonna jump into the other part spot for her. Let's see for her. We need to determine if we can hurt the enemy here, and if so, how much? So where's the first thing we have to do? Is we need to check if our health on Arbat is greater than zero because that would mean that are bad is alive. And if so, it would do health minus equals, whatever our damages. And likewise, we need to check if our health is less than or equal to zero. So zero or below. Then we need Teoh basically deleted. So cue free. Now that this is good, we've got some damage to happen. But we need to actually go into our projectile. Or if you don't want to get a project, I would go into the collision for a sore back on our players script. But I'm going to use a project out for this. All right, so here in our project Oh, we actually have to go look for another check now. So if body God is in and group and that group is enemy because that's what we assigned are back to you right at the beginning, during already function. So if I bat is in the enemy, we're just gonna call body, which is whatever physics body collided with it got Hello. Now we also need to you que it free so that it still disappears. Now remember how we put DMG and for her argument? So we need to provide something here. A number here. Otherwise this is not going to work. It's going to crash. A scene is our projectile or since our attack hits the back. So just to see this, I'm gonna go ahead and put in 10 for how much? We're gonna hurt the bat. And if we just come back up here to work that just to make sure that this is updating, I'm gonna go ahead and just print out our health. What is our issue here? - Here we go. Would just move our print function down here like so that we print it, no matter what, how much house we have. There we go. And that will get rid of that little error. So that we have are a little bit the attack. We see the baton has 10 health. Now it has zero health and it's deleted itself so we can no longer run into it. So awesome. Arbat started with 20 and dropped to 10 and then it dropped zero. So our damage is working. Our bat is erasing itself when it dies. That's perfect. So we know that this is working. So now we can actually get into a little more complicated for damage, which I'd like to go ahead and jump into doing that part now. So if it's our enemy, I'm actually going to call and make a new variable here called, which is going to our calculations. And to do that with the way I'm going to do it is first up, we're gonna have two sets of parentheses and or to do this math, I'm going to get the player stats, stopped attacks. I'm going to get our players attacks that. And for that, I'm gonna stop track the backs, defense that. And then once we have that outside of that prophecy, I'm gonna go ahead and ad five to it this way, in case it's ever zero. We're going to add more to us that we can at least do some type of damage at five and multiply that by two at the end. So this is what's going to get our total damage. So now in, instead of putting 10 into our heart function, which actually just call our couch. But of course this this will have its own bug, and I'll see what that issue is. But for now, within the way our staffs are. If we go in, you see we're doing the same thing. We're still getting 10 which is great. And when our sights changed, that's gonna change as well. Now, if our back has SATs of, like 50 for example, which is obviously higher than what we needed if we come in here. So if this is now 50 and our player stats here are basic attack is 20. We're gonna do 20 minus 50 plus five times two that's going to give us a negative number. And when we minus a negative number and math, we actually get a positive. So from doing that, our instead of are bad losing L He's actually gonna gain house, as you see here. So you went from 20. He went up to 70 and they're so we do it again. Now its upto 1 20 1 70 This bat is just getting stronger and absorbing our attacks. So this is one little bug. That may happen that we need to address to prevent this from ever being a possibility. So to do that after we get our calculations were actually perform an if statement here. So if talc is greater than zero. So if we're doing damage, if we're able to do damage, we're simply going to do that. But he got hurt Coke and Q free elf. Which means if we dio, if we're doing zero damage or less, which would heal him, we're gonna do body dot And we're going to dio one that we can at least see one damage to them, even if word too weak, we're doing something. Then again, of course, self que free. So now if his stats, if his defense is too high, you see, we're going to do one damage to him, and it's gonna take a lot of attacks before we can kill him. And if it's stats are normal, they're going to get that same outcome. When we just did ted to him and we did another 10 and he's gone in two shots instead of 20 shots. So that will prevent our enemy from actually being able to heal from our tax. Uh, if our damages zero Herbie. Uh, Okay. So now where we're at, we have our little enemy are beautiful. Little bad here. Who can attack us? Well, I'm sorry he can't attack us yet. but he's in here. We can bump into him. We can attack him. Weaken deal, damage his stats, chains change. And when he dies, he removed himself to free up some space. So we don't cause any type of memory leaks in the future by having a lot of bodies piled up . Perfect. Now let's go ahead and jump into the part that is going to cause Arbat too. Follow our player when they get within range. So into our bat this where velocity is going to come into play. And for doing this, we will dio Ah, we will need It's called follow players. We need funk follow player and we're also going to at an area to our bet. So in our enemy, that's at an area to D. This will be our detection area. And every area to D needs a collision shape. This shape could be a box. That's perfectly fine. I don't know how big this is. Take a look on the world. Mm. Is that? Yeah, I think that would be fine for this. All right. Is there anything we almost anything else we need here on Arbat? I think that's it. We have our detection range. We have a collision, but we have our animated spray. Okay, so we've got everything we need there. So in order to follow our player, we're gonna need another variable here, which is going to be an on ready bar. And this is basically just gonna be our object, which for us is gonna be our player. So when we put our bat into our world, we need to get the parent, which will be our world note here. And then we're gonna tell that to get the player note. So justice we said it get parent, and then get note and what? No, do we want our player? So that's gonna be our object now for fall for follow player run to do said our velocity of our character that is going to be is gonna be our position dot direction. No action to. So we're going to get the, um, the direction towards our object here or whatever. We put into our argument what's gonna b r o b j, which is our player here that we assigned for the variable, not position. So we're going to get the direction towards our objects position and what? Fly that by our speed. And simply put, that should happened. So if you go to a process and add in our follow player, it should now follow us. And as you see it does, no matter where we're going here. Now, of course, when we're on this side, he's flying backwards. So we're gonna need to change that. And if you want to use that area here for detection rates or if you want the enemy to detect a player or see the player first, um then we're also gonna need to make a change there. So if we go ahead, come back on in. And what should make one change into our follow player? And we're deal if follow equals? True, so that if we have followed, turned on, then Arbat will follow so energy that we need a variable called Follow and we'll set that to false by default. So now when we jump in, he's not gonna follow us. And there's nothing to change following to true. So until we have something to do that he won't never follow us. And to do that we can go to our detection area and at a signal for body entered. And let's see. I want to go ahead and let you guys try and figure this one out. What we need to do here is check Check. If body is our player and if so what? Set? Follow. Too true. Go ahead and take a moment and see if you can do that. And then I will see you right back here and I'll show you how I went ahead. Did that. All right. Welcome back, for the first thing we gotta do is check our player. So if embody, not name equals player. Another way of doing this would be if player tap that in in body dot name. So there are two ways either of these two lines here are both acceptable. They won't accomplish the exact same thing in our situation. But for this, I'm going to do a body dot name is equal to player. That way I can't have. There's no misunderstandings when it comes to our players name or the body. So if it is, we need to set follow the truth. So is he enough follow equals true. And to demonstrate this, I think I'm gonna actually turn on the collision shapes that will start this up now. Once we enter that square, our detection range, the bat will then turn followed to true and begin following us. Until then, he will not follow no matter where we are. Once we enter, there he goes following us. Now, if you want to move quicker, of course, you just gotta add this speed. Here we go. It was hitting The rock show wasn't really Harding him. Um, but there we go. If you want to be faster, just change your bat stats to be quicker. A nice a quick speed. What I found is 100. So, personally, I want to go any higher than that for my bat stats mean? But now we have This may follow, however, he still goes backwards. And this is where our animate is gonna come into play. So I want you, Teoh. See if you can figure out how do flip hours that to make a fly in the other direction when he's moving to the right and when he's moving left, keep him facing the direction he current he is currently facing. Go ahead, take a moment. See Vegan, get that. And when you come back, I'll walk you through how I accomplishes. All right, Welcome back. So to do this when you can simply just get if velocity dot x is greater, then zero then that means are bad is going to the right so we can just go ahead and Teoh get our animated Sprite. And of course, when you flip it horizontally and we got to set to True Otherwise it's not and we flipped. Now it should be facing the right When we go that way, only if we don't a justice Now we just leave it the way it is. You'll notice when turns right? Oh, have I'm not calling it here often. Our process There we go. Enemy. I notice he flips to the right, which is great, but he doesn't flip back to the left. Now he's going backwards that way. So we have to take that part into consideration as well. So if Velocity X is less than zero, do we get our sprite flip on the horizontal equals false And now he should flip back and forth depending on which direction it was going to the right, you know, Flip that way he's going left conflict that way and we're up in the corner here, is gonna flip so it doesn't matter if he's going up or down. All this really gonna matter is whether he's going left at all or right at all. And that's perfect. So at the moment, we now have an enemy that can follow our player and can take damage. However, there are two things that would be ideal for this. We want our enemy to give us experience when we kill it in our RPG. That way we can level up and we want our bat to be able to hurt us, right? So to do this for experience is easy. If our health is lower than zero and we just take our player stats stop current experience plus equals whatever amount you want, the bad to give us. So I'm going to say 20 so the bat will give us 20 experience for defeating it. It's now when we play, we take a look at our experience bar up here. When we kill it, it disappears and we gain some experience. I'll go ahead and do that again with the whole screen. Make that little easier for you to see so you can follow us. Boom, boom! And we've gained 20 experience. All right, so now we have the experience part working. Now we need the back to be able to hurt us. So we take a look at our player function here. We don't really have anything to go off of for variables we don't need. But we're gonna need a function that can hurt us. The dummy function we don't need anymore. Maybe we'll get it in the future if we needed to test anything, but for now would delete all that. And let's go ahead and add in our our heart function function. And I'm just gonna move this down, give a little bit of spacing in there. So when we get her, we will also take a damage argument And what you are. Player stats done. Current health minus equals our argument of damage. Now we're gonna have to do a similar thing that we did with our bat down here. Where is it? I'm sorry. Not there in our projectile. So we're gonna have to do a calculation and then determine our damage. But we can do that with we can do that part on our bad itself. And to do that if we need an area to hurt the player, which, of course, we dio we'll add an area to D. We'll name it damage. Just call it damage in successive area. It needs a collision shape. We're gonna set this to also being a box. Now we need this larger than our bats collision. Otherwise you won't be able to hurt the player, but smaller than our detection range. So we just need to go a little bigger. Since this is a bat, something like that will be just fine. Now, if you have an enemy that is doing a ranged attack, of course, the part that's going to deal damage is the part is the projectile from you're out of me or if your enemy has a physical attack, I'm like our player. It's gonna have its own collision box when they swing. All right, on damage. We need to send a signal or body enter on damage body entered. If body dot name equals player. So it's a player enters this area just like we did before you. A new body done her and pass in a damaged argument. So I'm just gonna go over twice projectile here and pretty much copy this section and just place that in. So the difference years we're gonna take our That's that. And our player, it's that So we're going to go. Arbat sets attack in our player stats defense This for us in the capital H And there we go . Ah, we do not want toe cute free so you can remove that. And there we go. So now when we step into this area, we should get hurt. And if our stats are two of our defenses to I, we'll take one damaged, just like with the bat their defenses to I don't take one damage, so I'm just gonna go ahead and do a print here. Player stats, done current health and listing look. So when he step in right up next to the bat here, we should take damage. Oh, and we did. And technically, we should be dead now because that bat actually doing a lot of damage. We have, ah 100 health to start off, and it's doing 50. So this is where balancing comes in and you can come in. You see 30. Let's seems that to maybe 10 jump in, take a look. Now the bat touches us. We now lost somehow if we lost their go with that 10 are bad is actually only able to do tend to us because our defenses, um too high for the subtraction alone so are adding five and multiplying by two from our equation and getting 10. However, if again, if our bats attack was so low, our players defenses were to I Let's go to our players defense, and we'll change this to 30. So it's too high. I'm you noticed we won't get We won't. I'm hell. Well, actually one damage, just like our bat if our bass defenses or two I So every time he touches us and we can still take about All right, I'm just gonna go ahead and change this back 20. Rio 10. That's what we had. All right, so now we have a back that can hurt us and a player that could hurt the bat. The bat follows us, and that is a lot to take in in one sitting. Let's see anything where you are forgetting here. Uh, no, I think that's all we really need to dio. All right, so that would do it for this video. If we just turn our visible collisions off, we can see what our game would normally look like. Home. She, um They're following us. Boom. He's heard us. We can take about. And now everything's fine. We gain some experience, go around. We can talk to our NPC, never go. Everything's working just fine now. All right, that'll do it for this video. I'll see you in the next room.
27. GameOver: All right, everyone in this video, we're gonna go ahead and create our game overseen so that when we die, we can trigger the game over. And when the enemy dies, of course, we've already got that set up, so we can our experience. So go ahead, create a new scene that's going to be a user interface tight and just go ahead and rename to game over and save your scene inside of utilities and resource is all right. Once you got that set, we're gonna go ahead and add in a texture wrecked. This gonna service aren't background. So for the texture we show ad game over BG And there we go. Now, this isn't all were us gonna need a another. We could go with a texture wreck Or we could go with ace, right? Um, with a texture shouldn't making the director will pulled in our give overtaxed. And that is just gonna go read on our tombstone here right underneath of it, for we can go ahead and change these two text and b g. We're gonna add and animation player so that all of this can enemy once he comes in, Andi, we'll go ahead and create a new one here. If you look down at the bottom, got animation quick that select new, we'll just call this animation game over. And now you notice we have keys next to everything. So first thing running do is we're gonna have to change the length of this. Let's see where we do it right here at the end Here. Um, so we can set it to what, five seconds? Maybe that might be a little too loan, but we're go start with our background will hide the text. Look on there. Modulate here under visible. Actually, I think I think what we could just do here, just turn it off and then put a key here. And then if we're to set this not only down to two seconds in and turn it on it, Do what I wanted to do here. No, that's gonna be instant yet, so that's what I thought. So we won't be able to do it that way, which is fine. We'll just use the modulation here. We'll turn Alfa all the way down, make a key of the color come up to about two seconds. Reset that. So the Alphas ugly. Back up, Make another key. And now I have that gradual fade in for came over. Now, up to this point, our text should be completely empty. Go create empty this whole time. And then how long is the state? They will stop the step. Four seconds. 75 And we have our text fade in there. Now, if we play this whom ever game overseen fade in and then our game. Overtaxed. All right, so that should do for a game over. Obviously, if you would like in going create your own, you can modify these images or you could do something completely different. I'm just going to go with this simple fade in here for mine, and we'll save that. And now all we have to do is when we die. We need to instance this in to our scene. So let's see. We could do a script here. No, we could add a script on to our do. You I This should be automatically playing. I don't play on load where we go. Why is why was that? I was weird. That was showing up. Okay, So that will automatically play as soon as it loads. Perfect. So we don't need any script there, but on RG Why here? We can actually add in a script. Now, put that into our script section and set it up. We need no comments, we find. And basically we just need Teoh have a process function which will call a game over function from all right. Like so Now we need our game over function actually do something on. What that is going to do is we're gonna check if our players current health is zero. And if so, then we're gonna pause the entire tree and instance in our game overseen. So that is what I would like you to dio. So we're going to need and I'm ready. Variable here of some sort will call this game over. So you're gonna have to use you don't have to assign this variable. And then we're gonna instance this in to our g y here. Now we've done instance ing before we've done our already variables in the past, we've seen us do this, so I want you to go ahead and take a minute and see if you can figure this out, using our knowledge. So far, And once you're done with that, I will see you back in a moment. All right. Welcome back. So what we're gonna do here's were first gonna sign are variable to a pre load because we want to pre load this scene. We just gotta located here utility resources game over. Here we go. And we could instant do a instance later. But I'm gonna go and just do mine right here. And let's see if we take a look at what we've done before. See, where did we do this? We did this with our player. If we take a look, it right here with our projectile. So I just went ahead and did this. If you didn't do it up in your variable, then you can go ahead and create a new one here in our game. Overseen two instance it. And now you see, we just supposition which we don't need to dio. So all we really need to do here is at it as a child and since we're adding it just straight to our G y, we simply just have to dio we simply just to self done bad child game over. So that should instance, this in tow, our game overseen, which, if we go ahead and play, it should happen immediately, which is good. That's great. However, we don't want this toe happen as soon as our game starts. What we want is we want this to happen. If player stats stuff current health is what is less than or equal to zero. Now we say less than or equal to, just in case of bug happens and our health somehow be, goes into negative, then this waffle trigger. Otherwise, if we don't and it hits negative, then it's not zero and it won't trigger game over. So if our current health of our player is less than or equal to zero, we just have that in. Then we're gonna add our game overseeing, and that's always gonna check. So if we're weaken, test this easy, we just go to our player stats in for now. I'll set my current health down to 10 that when the back can finishes off real quick moments that it hits us and they gave over starts. That's great. However, if you try to move boom, you know, So we still just run away and everything's normal So what we need to do there is actually pause our entire tree. We've done pausing inside of our pas script here, if you remember, get tree dot Pause. And we just said it. Now, we don't worry, really worry about a NPAs ing right now, so we just come in. And before we even instance that would you get tree paused equals true. All right, now, we should not be able to run around as soon as we die room, and we cannot. In fact, the whole thing is paused. Oh, we do not have this triggering. Okay, so it instance, But it did not activate in the reason for that is because we didn't send our pas mode. So in our game overseen was select our game over node pause and change that to process and just to be safe, I'm gonna go ahead and go to my g Y no, dear at our top. And I'm also gonna set that process is well just to be on the safe side. So we go in, we get runaway. Ah, get killed, Can't move and our game overseen starts. All right, so at this point, we're just missing away to either continue or return back to our main menu, which we do not have yet. So we could just put in an exit button for now just by going into our game overseen. Go to our animation. We just pull everything quips forward. So we know where everything is placed. We'll add a button, and this will simply say exit. We just put this in the bottom right corner, and now we're actually have to change our visibility of it as well. Otherwise, you see that will just pop up while everything else fades in. So when are tax fades? And I think that's where I'm gonna have our button feed. Visibility is the exact same thing. Ma. Julie Alfa, all the way down key. Frame it, move it up to the end. Reset it. Key frame. Now button will fade in as well. Perfect. Call This exit button will send a signal. So exit button and then no press connect that up to our seen does not contain any scripts. Oh, that is right. All right, so we're gonna have to add one on to our game over here, then add one. Put this in. Scripts game over seen is what we call this. We already have a game over script. Not we do not. OK, so we just call it Game over Perfect. And now we'll connect are pressed button to it. And when it's pressed, get tree dot quick Perfect. We don't need a ready function. No variables will go ahead and check. So when now when we die, everything fades in. Oh, that's an important thing. Make sure when you're done you've reset the animation here, back down to zero to avoid that little issue there. Now we die. Everything fades in and when we had exit are getting close. Now when we add in a main menu, then we can go ahead and add in a main menu button here or when we get to saving and loading. If you want. Add a load button there. You can certainly do that as well, but all right, that'll do it for this. We now have a game overseen that we instance in, and the reason why we instance it in instead of just adding it to RG lie at all times in case you're wondering, is for performance reasons and this is some I want you to rather get used to doing for our your games. I don't have anything there that we don't need to have at all times. For something like our health man experience, things like that, you'd probably want to have their pretty much at all times I'm dialogue boxes and an RPG. You're gonna have a lot of talking, whether it was random, NBC's or story. Most likely. So we're just gonna keep that box there. But the game overseen. We only need to bring that in whenever our player actually dies. But all right, and that will do it and I'll see you guys in the next video.
28. Quests part 1: All right. Welcome, everyone in this video, we're going to go ahead and start adding inquest. So I'm gonna show you how we can create a questioner or have our NBC give us a quest how we can add it to a Quest log and then, of course, show a description of what the question is. And then, of course, at the end, remove the quest from our log once it's been completed. So I go ahead and jump in right now. You notice I changed my dialogue with Martha here to say I'm scared. Can you kill that bat over there? So that's gonna be our little question. So we're gonna talk to Martha. She's gonna give us our quest, and then we're going to come over. I would just kill the better before he kills us. We will talk to Martha again in that old finish. Our question, Of course, we're gonna need to change dialogue here again. What? We'll see that at the end as we get this done with. So the first thing we're gonna need to dio is we're gonna come down here into our scripts folder on our file system, and we're going to create a new script. We'll call it Quest manager and hit create. And then let's go ahead and open that up. All right, Now, what are we gonna need from this question manager? Well, we're not gonna need a ready function. In fact, at the moment are really gonna need is one variable, which is where we're going to get our quest information from. And then we'll need a variable for determining whether or not our question is complete. Marry so I wouldn't have a variable called quest. And if you want, you can. If you want to classify it, it's gonna be a that binary If you wanted to class, right? If not, that's fun again. That's up to you. Best practice is to always do that. We're going to say equals and everybody who's curly braces here. Now, a dictionary uses curly braces and that can hold and, ah, vast array of different types of data. So a dictionary could hold integers, floats, strings, arrays, Um, pretty much anything. Any type of data, all at the same time, all in one variable. So we're just gonna go down to the next one and the first thing we need and a dictionary is we need our section, which is always going to be in the form of a string. So I'm gonna name this active quest like so and then put a colon and then whatever you want your keys to be, in my case, they're gonna be an array. I'm just going to our square brackets. Now I want another section in my dictionary. So in order to put that without getting an error, we have to put a comma and then to stay organized will go down to the next line, and I call this one quest description and the same thing That's just going to be an empty arrays. Well, so this is gonna handle where we get our information for adding question and where we remove them from, All right, and then next, we're just gonna need We don't have to put one in here it now. But for now, we're gonna say we're gonna go ahead and just put it in for Martha Quest. And this is basically just gonna tell us we go whether or not the questions complete, so that's gonna be our trigger. Basically, whenever we want our question complete, that's when we'll flip the switch to saying true instead of false. Now you can always name these where you want Martha Quest, complete, completed. Martha Quest Or, um, of course, if you're creating your own game here, you can name these however you would like for now, that's all we need in our question Manager already. What we're gonna need next is an actual scene for Quest. So outside of our g Y here, we're not gonna add it directly in here. But we are gonna instance it in. But I do want to go ahead, just add in our button here. So just go ahead, make your pause menu visible and inside of our container here, we're going to go ahead and add in another button. And this would just call this one quest. Of course, we don't want toe under exit. Want that the bottom? And then it makes sense to have quest before options. So we just go ahead and set it like that. We call this with and we'll go ahead and send a signal or whatever expressed, and that's what we'll bring out now. Remember to you connected to the correct script, which will be our PAS script here. Now that's ready for us to go ahead and instance in our scene. But for now, we can't instance in a scene if we don't have one, so it's created new scene gonna be a user interface. I would call this quest log. Now, you can go and design this. However you want yours to Look, if you want to make yours like mine, feel free to copy the look. If not, then again, feel free. Teoh. Create your own images If you wanna have some kind of fancy borders or however you want here, So to start off, I'm just going to do a color. So we have ah, screen behind us to make it easy to read and differentiate from our pas when you, for my color we're gonna come down here and now you don't want to do solid black pretty much ever. Just because it is a solid color like solid weight sovereign, solid black are a little harsh on the eyes. So what you rather do is rather set it to more of a blue or purple 10 even if it's just slightly like that, that it might even be like unnoticeable to you with something like that would be fine. And I'm just gonna lower my Alfa just a little bit. Perfect. So if you want to do that, you can. But what we're gonna need mostly out of this is we're going to take an item list. This will be our quest lift and bring us down. Why not? Because we don't know how long are quest. Names are going to be what we just said. It's something like that because we never know how long the name of our question going to be sure you want to have enough wit in there And then we never know how many questions players going to get at one time, and we wouldn't want them to. I'm scroll and scroll and scroll and scroll. We want to shove means many of their quest at one time. So I'm just gonna go like something like that for my list. And if you want, you can come into 10. Do some customers ations here, if you would like, um, custom colors is the one I'd like to point you to. And I'll just show you what all of these dio So our guide color like that red font here will go green. And then here we go like a pig. So we'll go like that. And I'm just gonna add a few items in and you can already see how this is working. I'll go ahead and play this scene. Sheens by mistake. Gonna be utilities, resources, quest, log name of our scene and you'll see what each of these are here. So if you want to go and customize used to be, however you would like you can. And if I were to click on one, are the fund is going to change to being green. So I think I'm going to keep the pink and green for this log just for something different. Classic would be kind of white. I'm going to change this to being not a not a solid way, of course, but more monopoly. And now, when I just opened that back up, Here we go. So that's gonna be completely up to you if you want toe customize that or not. Obviously we have our custom constraints, so if you want spread them out a little bit, you definitely can do that. But now that I have an idea of my colors and that I'm just gonna go ahead and delete my items. Now, we have an empty last year. All right, so we've got Quest Year that we can add. We have our list year. We can have a question, too. However, we need a quest description. So I'm gonna actually add in another color rectangle, and we do something like that. Doesn't have to be as long as our quests and for color, something like that should be good. If you want to go ahead and get that color. There you go. There's all the numbers. Feel free to use it. So that will cover our backgrounds here. And I'm just gonna add in a rich text label and call this quest description, and then we'll just go ahead and move it on over. I'm going to use a rich text label here. Go ahead and see anything. We have to adjust you. I do not believe so. So we just come in. It's going. It's going to go into a new line on its own. Perfect. So we're going to leave that we don't need any BB code for this because we just need to put some tax out there. So if you want to do custom colors and change that are you want to change your font right now? You definitely can. I'm gonna touch my fund at the end for the main thing. I just want to get my quest set up, and I can adjust it later. All right, So we have our question e think would add one more thing. I'm just gonna put a label of at the top bacon spell that this is active quests. All right, so that's gonna be my question. You It's very simple. It's basic. Why, that's all we really need to get the to get it across. So what I want you to do before we dive into start adding things into our quest? What I want you to do is go ahead and said it so that when we hit our question, you hear request button that we instance in our question you to go ahead, take a moment and set that up. And when you think you've got it, come on back when I show you how I did it. All right? Welcome back. So we're gonna go ahead and I'm going to create a variable can create this in the function itself as well. If you wanted to do it down there and I'm going to call this quest seen or holy Quest log equals Cree Load and I would just pull the scene in. It's gonna be under utilities. Resource is question, and I'm going to dot instance and then simple will do get parent yet because we're on our PAS menu, so do get parents ad Child Quest log. All right, now, let's take a look. See how that works. Remember to hide your possibly before we go back in game, we pause. We hit quest, and there's our log. Perfect. No. One issue here, if you may see, is it doesn't go away. So we should add an exit bought into our quest log. So let's go ahead and I that row quick, just make a simple button exit right down here. And, of course, when that means we have to give her a question, log a script. What should go into our scripts? Water. Great. That way we can add a signal from our exit button when pressed, connected to our quest Lord and simple, we just cute. Furry right now. We test that. You can pause. We have the quest button, it brings it up. We hit exit and it disappears. Perfect and resume. We can play again. All right, so now we've got it set up. That's where we can start. I'm creating our quest and having our quest get added right to our log. All right, so we'll go ahead and talk with that part of this in the next video.
29. Quests Part 2: All right, welcome back. And in this video, we're going to go ahead and start adding in our quest logs, functionality, add and remove quest. And we'll add our quest to our NBC so that we can actually start it. So starting a side of our quest log here, we're gonna need to do a few things were in a need for now, just one variable. We're gonna call it Quest Act, and that's gonna be an interfere. And that's just gonna be syrah by default. So this is basically just gonna keep track of, um, where we're placing requests when we add them, which will also come in handy later when we load them up. All right, in our ready function, we can. Here we go. We can go ahead and do add it to a group. So add two groups and we'll call this group quest. Next, we can go ahead and select our item lists, so get note or use your dollar sign and weaken. Set the re select to be true. If you don't want to do it through code here, you can easily select your question last year and just turned it. Allow Reese Electorate here. Just turn that on. You can simply do it right there. I'm just gonna go ahead and add it through the script. But that's good. That's up to you on how you want to go ahead, Do that that broken and do the exact same thing. Request list dot Uh, set, allow, re select and taken argument of true. Alright, awesome. Now, next, we're gonna need a few functions here. We're gonna call this one add quest, and we have one cold remove quest. Simple enough. All right, So to add a quest, what we're gonna dio hooks is we're going to check if and quest, that is. Oh, we won't be able to add this because we haven't loaded our script yet. So it's coming to project out a load and go ahead and add in our quest manager. We have not added that in yet, so let's at that. And I'm gonna name mine as q m my shortcut here and just hit ad. They're so now we can access our quest manager. Ah, information there. That's gonna be very important. Otherwise we can't continue from here and just make sure that is enabled. So if quest act is smaller then, um, cause after a shortcut here, go and save that real quick. Rio que em? And we called this quest because if we take a look at our manager, there are variables called question. And then to access the next section, we just do a dot and then the name of our section here. It's in our case, active quests. So we do quest dot active quest. So and you got to make sure your capitalization is correct And to avoid any issues, make sure you have no spaces. I would dot sighs aereo. So that's basically going to check if this number here is smaller than the amount of question that we have active. If so, do this, which is going to be adding a quest. So we'll take our west lift. And what do you die? Ad item looks at item, and then we take our parentheses and argument is going to be what we add. So in this case, it's going to be, um, cause want access our quest manager quests because you want to act access to quest variable active quests because we want that section that key. Yeah, that section and then we want to get information from there. So to get information from there, we just stick that inside of a square bracket, and that information is just gonna be our request act variable. So normally, if you didn't have this, this would be, ah, index position, which is what we're using Our number four for this variable. Now, to avoid always adding the same question over and over and over to our list. We simply need to do quest. What that would be just plus equals. One said, I'll move our index up one. So if we have to quests in our dictionary here, too active quests, then it's gonna be we're going to start with zero say, yet that's smaller, then one, because they swallow them, too. Do you want to start with index zero? What? That we'll add once. Now our quest act is going to say one. So now we're go back around. We'll go right back around and will say, Okay. And is one Is this smaller than the amount of quest? Oh, our sizes to We have to active and I'm only a one. Okay, let's go through. And let's add another one. The next question into our list, and then we'll add one it will say to you will come back around again. Oh, is this the same is my number's too. I have to quest. Is that less than the total number of active quest? No, it's not okay, we're fine. We have all of our question, especially what we're gonna go through here and then just to be safe for anything else. I'm just gonna say else and we're just gonna return. All right? So for now, that's all we need. So we can add our quest. We can worry about removing our quest here in a bit, but, ah, once we spot us in, we need to actually call our ad quest function otherwise will never actually add these into our lists. All right, so worry about removing quests later. Once we once we get this up and running and that we can add quest. Well, take a look at how to remove them when they're completed. The next thing we're gonna need to dio IHS we actually Should we? Yes, we'll do it now. So in our quest list, we're gonna connect one signal before we move on and that is gonna be item selected. What, you gonna take an argument of an integer, Of course, with an index to go ahead and connect that signal to our quest log script. And I'm just gonna go ahead and move mine up here. There you go. So when this is selected So whenever we select a quest in our list, you know where I clicked on and it was highlighting and changing my text from red to green or from pink to green, Rather, that's what we're talking about here. So when I click on a quest, so one item in our list I want this to happen. What I want you to do is take a shot here, see if you can figure out whenever a quest item is selected based off of its index. Of course, I want you to set our description to grab our description right here from our dictionary. And of course, we wanted to be the same that way we don't get like quest to, but we got description of Quest five or something. We want those to be the same to go ahead, see if you can figure out how to set our text or a quest description to what we have in our quest manager. Go ahead, take a moment, see if you can figure that out. And once you've got that, come on back and I'll show you how I do this. All right? Welcome back. This is actually very simple here, says one line of code, and that's just going to take our quest descriptions, uh, text because you want to change the text. Property of it equals because we want to set it something. And what we setting it, too? Our quest manager got less done. Question description. You go make sure I got that right. And this, of course, is going to be index argument here. All right, so for now, that's for now. That's all for a request like, let's move on to our NBC here. So I've gone ahead and change my dog dialogue like I've shown you. I'm scared. Can you kill that scary bat? And I've created another variable here for comp dialogue. For when our questions completed, she's going to say thank you for helping me. Now we are also going to need a few variables added into this. Now just take a Look, we're gonna need to provide a quest. It'll be a string, of course. So we could changes to quest name if wanted. Teoh keep it that way. But this is gonna be the name of your question. This is gonna be the name that shows up in our quest log in our list. So I'm going to call it, um I don't know, vampire delight. I don't know. And the more next we're gonna have a quest death, which is gonna be our quest description, which, of course, is also going to be a spring. And this would be the description of whatever our quest is in this case killing the bat. So I'm just gonna say, um, set forth set forth to the forest and kill the bad that is terrorizing Marsa and return. Cool. So we take a look at that and you know what I'll do. We do another one just cause I wanna have or do I want to have an extra one in there? No, I won't have another one in there. Well, just stick with that for now. All right? So down in our dialogue start Don't know. We won't need another one because we need to know whether or not she's given us our question quest given and will make that a board which will be equal to false by default. So say if question given equals both right, then we'll set this dialogue. So we're just gonna index what we already have in here in so that we can start our dialogue like normal. Which should we say, I'm scared. Can you kill the that which is great. But now we actually need Teoh. Add our quests, right? We're going to say que em got quest, active quest. And now, at this point, what we've gathered, if we take a look, is active. Quest is an array, right? So we're just gonna add on to that. And how we add onto an array is using dot upend Sorry, parentheses. They're not brackets. And inside of here is what we're adding onto this array. So in this case, it's going to be our wife. You know, I'm gonna change this to quest name just so we don't get confused, so I'll change that to questioning. That's not the only thing we need to do. We also need to add our description in there. So it's gonna be very similar. Q m dot quest, quest description dot Upend. And what are we adding? Our quest? Death? All right, and weaken that. Now Turnquest given set to true, because now Martha has given us our request. All right, let's take a look and see what happens. So if we pause and open up our quest green, that's empty. Exit on caused, Dr. Martha, I'm scared. Can you kill that bad over there? Let's take a look at your screen now. Okay? Are it just costed to crash? Interesting. Interesting, indeed. Well, let's see if we where we force the load here. So we just do get tree? Yeah. Call group. Now we'll call the group that we put it in, which is question. And the next argument is going to be the name of the function. We want a quest we wanna call, which is ad question, and I'll just ah, take a look at that again. Um, yes. Quest. You can add quest. All right, so let's take a look. Try that again. Question nothing. We talk to Martha, I should add it. Take a look. All right, So to avoid this weird issue that's good. That's coming on. Instead of adding it to adding a child, let's just go up on selected input going create one called Quest Hide Request Journal. Whatever you want to call it angle and said a key for I'll just set. My name is Jay for journal and OK, close. And then in our Geo instead, of instance, ing it, Yeah, instead, of instance, ing it or we're gonna do is where you can Dio said it for that on input. What you need to add it towards you, I Where is it? Question lard. So we just say, um, if our quest Haider question whatever you call it. But this press, then their quest logged on visible equals, not Quest log dot visible. So we just do what, that way instead, to avoid the issue that century popping up at the moment. Um, and that means we can get rid of. We're not going to need an exit button anymore. And is that the only thing we need to change? Or could we use? We'll keep our exit button only instead of bringing itself what we're just do as we do so visible equals force and on our pasta menu instead of adding the question or child, Is that adding the question? Aren't you I as a child? What's this? Gonna go ahead and grab it Would be Get parent dot Get get child for not good job. Um, yes. No doubt. We're going to get our scroll all the way down. We're gonna grammar question log not visible. Equals. Sure. Let's go ahead and test that row. Quit. So free press J, our question pops up, press it again. It disappears. We had the exit button. It disappears if we use our quest button here, pops up, exit disappears and we compress again. It shows up just fine. Okay, so we just do our question this way. I have it show up this way instead of the issue that we were having. So if we're to talk to Martha, I'm scared. Can you kill that scary bad over there? You look at our quest, it pops up. If we select it, there's our description that we set set forth in the forest and killed about that is terrorising Martha and return. All right. Now, I'm gonna go ahead and set some new dialogue here, so that when I talked to her after she's already given me the quest, she'll say something else instead of as you see, she won't talk to me at all because she's already given me the quest. So instead of her ignoring me over an hour, Martha script here going to go ahead and put another, if statement inside of our dialogue. So if question given is equal to true, Were you that same 1st 2 things here only instead of regular dialogue, we're gonna have a new So the dialogue here, I don't know what will cause we just call this quest dialogue for now and for the text was dio you killed the back yet I've just got to go ahead and grab my color here on that for bat Now even keep these same we go then, of course, we gotta set are thing down here to the correct dialogue. And that's all she's going to Dio is she's just going to go ahead and point that out room. Have you killed the bat yet? Oh, my mistake should not be in help on every should be in l f. Let's see. Also do seven there Another variable for a quest complete, which is a bull equals false until accepted. So if the question is given and quest complete equals false. So if we've been given a quest, but the questions not completed, give us this dialogue. So we'll talk to Martha. I'm scared. Can you kill that scary bad over there? We take a look at our quest. We now have it. It works. We have our description. We talk to her again. Have you killed that bat yet? And it's also going to say consistently until we've completed our quest. Hari Now, for our quest to be completed. No, we didn't. It wouldn't have to use Quest comp here. We could have just said it as what we have inside of our quest manager that said that which is Martha question. So we can just do that? I would have made a lot more sense. Um duh, Martha Quest, Equal Smalls. And that way. And then we just removed that variable together here for question. Who don't need it. It's useless. All right. That leaves us with one more else statement here. All right, LF who would you just pretty much take this line for line So if the quest giving us true in that request are completed, Quest Year is equal to true from our quest manager do this, which for now would just be our dialogue, which is com underscore dialogue. So I haven't just like that for now. Now we have this, but we have no way of our question actually being flagged as being true for being completed . So what we can do for that is, since we have to kill our back for that, we'll go to our bat script and right here. If the bats health is less than or equal to zero before it frees itself, we're going to go ahead in. Go to our question manager Martha. Quest and set. That's true. All right, so now we have nothing here. We talked to her. This brings up a dialog. This adds our quest and the question scrip Shin to our request Log page as well as turns on Quest. Given which we can see here the way our vampire delay, what's the name of our quest? A quest description. And if we talk to her now, then we have quest given, however, it has not been completed yet So Martha Quest is false. So she's going to go and tell us, Have you killed the bat yet? And that's all she going to say every time. And now if we were to kill the bat, it would flip. Are Martha Quest the variable that we're using? Teoh. Check if our questions completed. Is that true? There's gonna market as complete once you kill about. Now we get closer, obviously, and he'll start chasing us. What? I'm gonna do it from a distance. And now that that is done, you can talk to her. It says, Thank you for helping me. So say and recognise Quest is completed. Of course, at this point, this is where you can go ahead and you can add any. Add whatever you want as your question award. So would come in and be like I do player stats, stock, current experience plus equals, I don't know, maybe 30 for doing it, and that should increase our experience for completing the question. And as you can see, bring this up. We got 50 so we got 20 from our batting, the 30 from our experience, So that's working. However, it was still added into our journal. You should have shown that first home. Obviously. Ideally, you wouldn't want the back there until the questions active. That what? You couldn't get any loopholes being given there? Um, but if we killed the baton, then talk to her. Sit still, trigger in order. Let's just think for helping me. But we still have our questionnaire. Flagged is active. So what we need to dio from here is now go ahead and changed our removed quest function. All right, so for that, we're going to go back into our quest log, and now we can remove our quests. So you see how we add a quest and which is fairly simple. We simply just add item and get the quest for Amar info. That's how we added to our list. And well, if we look at Martha, you can see right here. Here's how we're adding it to our lists. So now we need to remove this stuff from our last year. So how should go ahead and take a look? Take a guess here on how to do this, and I'll give you a hint. This is actually take two arguments. Quest and quest death. So it's going to take the question the question script in as arguments. I'm not sure what yelling at me here. Oh, because we have a spacer. Here we go. Underscore. There we go. So there's your hint We're going to use both of those arguments here to remove them from our quest manager list. Now he gets removed from our quest log. All right, go ahead and see if you can figure this one out. And once you think you've got it or you get stuck, go ahead and come back and I'll show you how we do this. All right? Welcome back. So to do this, we simply gotta check if quest. So if whatever our question argument is which will passion from Martha. So if quest in, um, Quest manager dot quests got active Chlef. You're basically checking if our quest is indeed in our list year now, we don't remove anything accidentally. So if it isn't here, what we want to dio well, to avoid any type of confusion, I'm just gonna create a new variable here, card removed, quest, And that's just gonna be equal. Teoh, our question manager not question active quests, and of course, that needs to get whatever it's looking for in this case, what it's looking for, um is gonna be quest. So would you dot find And instead of our premises, what we're looking for, which is quest so removed Quest is basically going to be finding our quest that we want to remove. And now that we have the quest that we're looking for looking to remove, we can go ahead. And do you know our quest log? Our question lists is what we caught. It got removed item and I don't want to remove is removed Quest. So it's gonna be that name that we're looking for so that removing from our list, But it's still gonna be inside of our quest manager. So we need to remove it from there as well. Or rather, in this case, we don't use remove. We're actually gonna be using erase. So que em quest, Active quest. I got the race. And what do we erasing here? The question. So we're using the removed quest I got here in order to get the name of it so we can remove from our list. And then we're using our quest argument to remove it from our list of active quests that's in our Quest manager. And then we're gonna do a similar thing only not for active quest. We're gonna do it for Quest description. And when he raced, Quest underscore deaths. And so there's no confusion. Was his empty out Our text field here for our description, Simple is empty. And then our question since we've lowered our account, um, we need to actually subtract one because we've removed one quest so minus equals one. Harry. So that's how we remove a question. Now we actually need to call this quest once our questions completed. Otherwise, it's not going to do anything. So on our NPC, when our quest has been given and when it's been flagged here as complete then right here at the end. Yet here we go. We can simply check, uh, get tree no call group and remember the group. We put it in its quest. And then the function we want Teoh call, which is called Removed Quest and now remember, removed Question has to arguments, and we need to go in order so comma space. And then our first argument could be whatever questions which in our case is just in our case is going to be called questioning Quest name. And then our second argument is it wants something for the description, which is quest, Yes. So Quest, Death. And there we go. That'll call our function here inside of request log to remove it from our list of Active Quest and remove it from our list so that our player can't see it. All right, let's take a look. Nothing is here. Talk to Martha. We'll pull up our quest log. Here it is. We click on it. We have our description. It's here in our log. You know, We're getting chased by the bad, even kill the bat, Complete our question. Take a look and it's completely empty. All right, so it's everything. C three functioning perfectly well, but just to make sure we don't have any weird issues going on, I go on ahead and created a fake Martha here. That'll give me a fake quest. So this is where I can make sure things work. I have to quest active at the same time, I make sure there's no issue with with, uh, with descriptions, get mixed up or quest names getting mixed up. So if we just take a look, we're going to see this is going to be called. Yeah, Fake Martha. It's going to be called fake news is the name of this quest. And this description is just I am fake, Martha. And let's see what we check Fake Martha Quest as we set to true here. So I'm just going to my quest manager and create this real quick. The bad action doesn't change that. Where is she? So in order to test this said it true said that she was our badness will. Now you don't have to do this. Of course, I'm just doing this as a test to make sure that we don't have any bugs with our question. All right, so I'm going. We talked to Martha Fee after us for help. We have Empire Delight. We have our description. Perfect. Which doctor? Fake Martha here. No, back over there. Check. And we don't seem to have added why is that right there? Because missus was a car ad question So stranded again. Marsa, check Ben Hardy. Light description. Check with Mars. There fake one Never go Fake news. I am big Martha description works Kill the bat. And now we're turned in vampire delight. First that we could we could make sure that everything subtraction, removes and fake news should still say I am bake Martha. All right, Mr Missile Men. Thanks for helping fake news. I am Big Martha. Okay, so you see, this is working just as it should. And of course, she says, thanks for helping me. And that removes it from our list. All right, now we have a quest. Love that works. We have a I guess you can say a template here. We can just take this all of this and just copy and paste this into any NPC. Let's go back to Martha here for the one that we're using. So we could just copy and paste this into any NPC and then add in a questioning variable on a quest description. And then, of course, you can set up your dialogue and you'll be Oto have an NPC, give you a quest. Any NPC, give your player requests. So this is now simple enough and generic enough that we can just give it to anybody and it'll just work. All right, so that'll do it for this video. And now you know how to create request slug And how we can create a quest system. Have quest added to our log. Have them removed once they've been completed. That'll do it for now. And I'll see you guys in the next one.
30. Script Changes: All right. Welcome, everyone. And in this video, we're actually just gonna make a few changes to some of our scripts as well as, um, patch of bug that we have going on. So it's not so much a bug as an exploit at the moment. If a player where to find this, they could easy just Chief Street to the game right up here, Max level if they wanted to. So if we were to come in here, we talk to Martha. We get our question, wants us to kill the bat. We take a look. There's our bat. You show you to put a Nikon there. If you would like to put icons with your quest, I show you how to do that real quick as well. But for now, we have our question, and you see, we can kill our bat. We win the back. Gave it some experience. We talked to Martha. She gave us some experience. Now this would the exploit is when continuously, just do this and just let our experiences continuously go up, and we'll be able to just keep leveling up off of that. And we don't want a player to be able to do that. So what we're going to need to do is in our where we have a question manager just to keep things safe here, we're actually gonna change. Add in a, um would do. Martha claimed that would be a bowl that is false as well. And I would just add another I left down here and our NBC only just looking at claimed right, That's what it was. Yeah, it's just cause we haven't saved that hasn't updated that if that equals true, which after, as we see here, after we claim our reward and get our experience, we're actually gonna go ahead and set that to being true. So and now we just remove this the experience given here and we don't need to remove the quest cause it's already removed. So all we need is are completed dialogue that they say and to start our die luxury Seville hand jump in Boom! We talked. Can you help me? Yes. Yes, I can take a look. We have our quest for the bad. Now, if we talk to her, we get our experience. That is why we need to add in this being false as a condition up here and there. This It's false claim this false. There we go. So what? I have to get our question. Kill a bat, talk to Martha. And they were go. We could no longer to spam allow and exploit the experience export here. So now she has say it without constantly giving us experience. All right, so I'm just gonna dip into see, um, Lear's Where's our quest? Hey, we go Your quest look. So if you wanted toe adding an icon, ever see here we were just adding, Are questioning right after that we just do a comma, and then we put in the icon that we want, which in my case, is ah, very well, conquest icon. And I'm just pre loading. Ah, and I cant in with so and that's all you have to do is just go ahead and add that one extra argument in. If you wanted Teoh have a Nikon next year quests. All right, so next changes. Um, I change this to magic attack and magic defense. My player and bat stats here on our project out since it should be magic and not physical. Everything else remained the same however, we're gonna need to actually make some changes that because the big change that we're going to do in this video is to make things easier to save. I'm going to take all these variables and actually add them into a dictionary for this. So we're just gonna do variable and we'll call this with Scott. Stats equals curly braces. Open up for the most part. Will be able to just copy and paste all this in. So it delete the word variable off of all these. What? 1234 Boom. 1234 Boom. 1234 Tab 1234 Tab, 1234 Tab, 1234 Tab. And all the way down for our statutes that the bottom one of these right now these have to be we Go ahead. Just remove these after the end of Well, because we're not going to need them. And of course, we're gonna have to make a change as to how we're gathering this info and actually accessing the correct involved. Now that we're putting it into a dictionary, we easier later on. When it comes to saving, um, and for these. We just go ahead and go. What? A comma After each one. And these should we're gonna go ahead and make thes You need to make strength. Please. I do not believe so. I believe we're fine just having it like this. So we go ahead and save that Now, obviously this gonna break some things. So that's what we're gonna have to come in and start making some of our changes for a player. We start with our player. What do we need here? Let's see. Idle. No positions. No, no and no. Ah, here we go. So are hurt here, so we're gonna have to change this. So our player stats is now going to be player stats and then going to be stats and then the set that we're looking for. So we do player stats, stats dot curtain health. I believe that. Should we always have to do here on? We can find out it easy coming in here, and we see our health is displaying properly. However, of course, it's not updating, but And are you are. But since we're printing it out here, that's perfect. I believe that's everything in here. So let's go ahead and jump into. Are you? I We're looking at here. We want our health bar, so we just go ahead and add in dot That, uh, steps We go did it again there. So we're just gonna go ahead and just make oh, these little changes. Very simple course to make these changes. So I want to do with this way that we can keep it. I know we could make it easier to save later and very simple for us to may to just update all this stuff. Do we could do the same thing to our experience. All right. And then our man a bar there we go. Would need to do the same here two more times here. So if we test that now, are you? I should update up here when we get hurt. Boom. Perfect. Now we're not calling. Game over. Now. Why is that? Let's see. Game over and just triggers that. That must be Are you I Yep. Stat. So we have to add in this the one thing there we could make sure that works room perfect. Game over Still works. Health bar mata bar game Over experience. We can test our experience. Make sure it works easy. Just that. So we have to update the one on her back and NBC still So bat stats stopped. Current experience, Fan. Um, And Martha NPC. Let's see. Where is it? You're right here. Stats. Perfect. And now those things should give us experience. An update. The creeks that you should see Our update. Perfect. Excellent class Working. Fine. Is there anything else that would be here for? Go through here. Question Manager. No quests. No, that's not gonna affect anything. Projectile. We changed to magic. Um, player stash. Everything's put it there, player. I'm The only thing involved here was giving our projectile moving, moving our stuff and yet just player damage. OK, pause screen isn't calling anything at the moment. Martha's only change our periods do. I has our health game over. We update our bars statute want to change. And Arbat does are correct stats here. Oh, no, it doesn't. We need to affect it here. So this is now stats, doc. Defense. Every go. That's why it's always got to double check your stuff. All right, Now, if we save all that, everything should be converted over which means we should be able to just delete everything up here, which I'm just gonna comment it out just to make sure everything works. They would go around, talk to Martha. Okay, Sure. That bad Over there. We have a question that highlights come over here. He chases us. We hit him. And what happened here? Because we commented out. See? Now, weaken. We wouldn't have noticed this. Our calculation, you know, do stats stop. Magic attack now. Okay, that's rerun. That make sure. Boom. We got our question perfect. That chases us. We can hurt him. Beautiful. He died. Talk to her. We all get our experience, That's all. Updating. We can't go through with our exploit. Perfect. All right, so it looks like we got everything set up and everything has been transferred over nicely. So now I'm just gonna go ahead and delete all of these. Now that we have our dictionary working for stance here, I believe that that's all the change. We really need to make it the moment for this. Let's see. All right, so that'll do it for this video. I just wanted to address that exploit and change our stature. Said it will be easier for us to save. I don't think there's anything else that we need to save. Bar is going to be dependent on her stats. Um, question manager. No, we can chase us as well in order to you just this and make it a little easier at the same time. So what I would do is we do like this and would Dio it was kind of separate this out of it . So the same would do. Martha, you're Yeah. For now. We'll just do Martha Boom. And then inside, we'll have our own set And as where we're put these in here, I don't need these. Put a comma there to split them up, Um, that into our string. Perfect that we can make a change here. And we can go ahead update that that way we can keep track of our quest information. What? What's been completed? What's not as well. So if we just come in, the only thing we have to change here Martha s O, um what we updating here? That right here. So this will be this to go into What did we name it? Uh, quest. And then Martha Yeah, quest, Martha. Yeah, Martha Quest. And I'm just gonna go ahead and copy that section. I will go like that inquest you flamed here. Quest. Martha, stop! Martha claimed, um, Looks like that's everything. So go ahead and test that which, of course, to test that good that we'll talk to her. Kind of scary bad over there. Okay, that's activating. Perfect. Boom. Oh, right here it'll be Quest. Not Martha, not Martha. Quest. Jump back in. Take a look. See if we run into another error kind of scary bat. Have you killed it yet? No killer bet. See? Some triggered. Fine. Boom. Thank you for helping. And we ran into an issue right here. Where is it? And found an extra Martha claim for based? No. Where? You're pointing me right here. So what do you mean, - invalid index? Positively. Well, let's take a look. Marsa claimed. Yeah, right here. Here it is, Not stats Quest. Martha, go. There was our issue. It's a little weird that it was telling us it was up here. Let's go ahead. Whom have you killed? No killer bat in our experience. And there we go to the exploits gone and our information is gonna be a little easier to save I in the future when we get to that point. All right. There you go. I don't know why I pressed the hide my butt in there, but there you go. We've made a few changes. It wasn't too difficult. Move everything over. I just took a little bit of time. Like there you go with that. I'll see you guys in the next one.
31. Custom Cursor: All right, everyone in this video, we're just gonna show you something real simple on that's what's gonna be having a custom cursor for your game. So when you go ahead and play your game, you know we have our little mouse here. When pause, our mouse is still the same. It's, you know, explain. It's boring. A lot of games does have a basic mouse like this. However, some games actually have a custom mouse cursor within their game. I'm gonna show you how to go ahead and do this real quick. It's very simple to Dio if you take a look into your files under you. I are not. You are textures. You are. You see, I have a photo here called Mouse. I've included two images here that you can use if you want to. You can feel free to create your own. Just keep in mind. The bigger you make it, the bigger your cursor is actually gonna be. So if we just go in the project project settings on let's see where display mouse cursor, You can actually select an image here, which we're gonna go into textures. You I mouse and you see, I've got a little staff here have included and a sword. I'm gonna go ahead with the sword personally. And if you need Teoh, change the hot spot of your mouse or offset the position. You can definitely do that right here. But North usually has 00 You basically just have the the pointer. If you want to be where the player clicks and the top left corner and just make sure it's up there and you don't have to touch anything else here. So now when we open this up, you see, we have our normal mouse, blah, blah assumes we come in, we have our new custom mouse here. And of course, you know, everything still works. Says it. Should we just have a new mouths to do? So All right. So putting a new cursor into your game is that simple? Go ahead, tree. The other one Now describe the other one and go ahead and jump in. So, as you see, it's very simple. There you're chasing us and we remove him. Of course, now we've already completed that. So but of being but a boom, everything works just as it is again out of these two. My personal preference is gonna be the sword, but that's up to you. If you want to use either of these two or maybe create your own, is there something that you can give to your game to add? Just that little more uniqueness, just at something a little different to your game. All right, so that'll do it for this video.
32. LevelUp: what? We have one in this video. We're gonna go ahead and set up our level up functions so that all of our level can increase our StatsCan increase every time our experience bar actually fills up. Now to do this level up, I'm going to do it a inside of our stats, the script as well as we're going. Teoh, we're gonna have a little animation flash, letting our player know that our character has leveled off. All right, so let's go ahead and inside of our script for player stats, we're gonna create a function called Process. Of course, Now we're gonna stick an XP check and level up function, But let's go ahead and jump into those. And if you haven't added those, I remind you to add those when we're done here, function a level up, we're going to check if stats are current Experience is greater than or equal to our Max experience, and if so now, you don't have to check for levels here. If you want to have your stats and everything increased the exact same amount, every level you don't need to check for your level, but if you want them to increase based off of your level. So, for example, we have got this set up. Is if our player is less than level 10 or level tenant under. Then everything started increases. She Maxwell is going to increase by five every level and then on our next one. I'm using an LF statement. Then we're checking if we're less than or equal to level 20 but greater than 10 suggested the levels 11 2 20 Our max out is now going to go up by six every level instead of five and so on and so on. I've got all the way up to, um, Level 50 was are two conditions here, and then I just check if our players over level 50 so you can go ahead and set it up. How ever you would like there how much you want all your staff to increase now, when it comes to our current experience here and current health, this is Theseus. Stature is where you have an option for your health. If you if we do it like this, current health equals r max shelf, then that means after we of course, increase our max l Then when we love, love our players gonna go back up to full health. If you do not want that, then you can remove this line altogether. And experience does a few ways. We can do it here begins. If we've said it like this, then our players going to keep some of this experience. Well, not all of it. So if you were to go say if we had 90 health, or certainly if we had 300 experiences are total, right? And if we got 20 from our back, and then if we got 300 from heading in the question now, we give us a total of 320. Right now, we're going to subtract our max experience, which is what we need to love. Love, which 300. So we're gonna minus 300 off of that. So our characters still has 20 experience that way. Nothing. None of our experience gets wasted, if that makes sense. So it's like having 90 experience and you need 100 to level up and then you get 20. That would give you 1 10 But instead of just wiping it clean all the way down to zero and wasting that extra 10. We're now taking that extra 10 and putting it towards the next level, so that's what this line right here is doing now. If you don't want that, if you want it the other way, we can do it, Thatcher said. To equal zero. And then it will always reset our current experience down to zero. And if there's any experience that goes past the max, it's just too bad it doesn't count. That's going to be completely up to you, on which way he want to have your game set up with this. I want to leave mine like this as Max experience. Um, just because if we're doing it this way, then that's where our experience check bunks and it's gonna come in down here. And that's where she just going to check. If our current experiences less than zero, we're gonna set it to zero just to avoid a bug of our experience becoming negative. Now, if you're setting your experience 20 up here instead of subtracting your max, then you do not need this at all. This right here is essentially doing the same thing. Onley. We're checking if our experiences negative or not. So again, if you're gonna subtract your max experience from your current or you don't take your current, you're gonna subtract Max out of it so that all experience gets used and not because wasted . Then we need that XP check function down there. If you're gonna set it to zero, set your current experience to zero on every level up, then you do not need the XP check. Okay, Now, with Martha here, I've got ahead and just given ourselves and exploiting here. All right. So you can see, um I've got my little exploit here, but in the Martha so that we can keep gaining experience after we've turned in the quest. Just so we contest this, Let's go ahead and take a look. I didn't kill our bat. It's fine, Dr Martin. We get the quest would turn it in. We have no experience. We turned it in. We got 300. Our staff have obviously increased. So as you see, our max experiences 3 50 So if it's at 3 50 then and she gives us 300 at a time, we should have 250 left when she gives us another 3 50 Well, or was it higher? Oh, the match was 400. Okay, I see. We keep going, uh, skipping one as we go when it's printing out, which is weird. Did you see we still have experienced left over every time we level up so that nothing goes to waste. And again, if you wanted to set that, too, to set it to zero every time. Those, of course, Who wouldn't subtracts here? We said it equal to zero. Can the bat. We talked to her C zero. We have experience, and it goes straight to zero. So you see, we got 200 experience at this point that is completely wasted and thrown out the window. So that's up to you. How you wanna do your experience system there on If you want the player to keep that experience past the level of or if you want them to lose everything and start back over at zero Now, there are games I caught these days that still do both ways. Both systems. So that's gonna re completely up to you and which route you would like to go with this now for myself. I'd rather just do it this way. So we subtract our match from our courage. And, um, I'll keep the exploit there for now. So let's go to our player seen and we're gonna add an animation player. Now an animation player allows you to animate all different trait for values that's in the inspector for a note. So it's got a player and we'll add in a label. And this we are level up. We're gonna set our text to level up Exclamation point. Come down to custom Lots enable new dynamic who are font. We're just going to use our Morris Roman black. I'm gonna do custom colors Run to a nice golden yellow Here we're gonna dio a shadow that's black just to make it easy to see It's not what I wanted that wanted to move it Here we go right on over here And whenever our player levels up, we're gonna have it animate and move up and down We're going to move it up and it's gonna flash. So animation players selected down here at the bottom flecked animation New we'll call level up and now we can select our label and you'll see next to everything here which would skinnies visibility and wrecked to get our position. You see everything as keys. Now that allows us to set key frames here. And I was gonna extend the length of this to 1.2, and we basically just hit key to put it in. So visibility, I'm gonna go key frame, and then we're gonna 12 So, what is your point to now on and do another key? One twos. Where's your 10.4? I'll turn it off key. And I'm just going to that right to the end here. All right, now, starting at the end here. I don't know. It might be hard to. She was gone. Turned on. I'm not gonna hit a key frame. I just want to be able to see it, and we're gonna adjust the position now of hearing right. So I'm gonna press are key for him here at the start. I'm just gonna go right to the end, make it visible again so I can see it. And I'm just gonna move it straight up about that Martians Good and had a key frame core position again. And now when we play it, you see, we got something like that so you can change that. You can make it. However you would like if you want tosel flash, different colors. Um, you can also do that as well. As you see, we can change the font color here. So if you wanted to just flash colors instead of flashing visibility, you can do that. Or if you wanted to take this up to another level, you can definitely do that as well. So make sure to just set that all the way back to beginning and now inside of our player script, we're going to do a function for this cone levelling. And this is basically just gonna basically just gonna play our animation. So we're going to get our label note or whatever. You decided to name it for your tax year. Find out that we're gonna get our animation player dot 20 level up and we need this toe Onley trigger when we're actually leveling up. So in our stats here, I'm actually just gonna create a variable called Leveling Up. It's a boolean and it'll be false by default now in our player script during leveling up. Really going Teoh check if all right, if we're our animation here. So if stat not that if players that stop leveling up is equal Teoh true, do we play this animation? And in this case, we could just yield because we know how long the stakes get. Tree Great timer. 1.2. Would you send the time out signal and we turn it false player stats, stock levelling that set the force. Now instead of doing that? What you could do is you could also come over here and send a signal of animation finished . And when it's finished, you'll just set leveling up equal to false here. So that's your short sound. Which route you want to go with. That two solutions for the same in issue or the same result in this out of our process, we'll go ahead and add leveling up. And now, since we in order for that to trigger, we need levelling up, we set to True. So to fix that whenever we level up would check if our stats, if our current experience is equal to or greater than our Max scripts and then before changing our stats, will set leveling up equal to true. So now, when our experience bar. It's full. It'll turn leveling up on we're set that to true, you know, update all of our stats and then because leveling up is true room in a flash, our level up tex with our player and have a nice little animation alarm player. No. Hey, you have leveled up, and then we're gonna set it to false, that leveling up back to false Let's go and take a look. Killer back, Dr Her boom. We got level up. There goes our text and when we level up again because we're using exploit here we can see it plays again. So there's no issue and it happens every time we level up. All right, so now that happens, and we have a level of function, um, working here. So our player stats are changing every time we'll have a look, level is increasing, and we have a little animation on screen that lets our player no. Hey, you've leveled up your character, and he's now become a little stronger. All right, so I'm just gonna go ahead and remove this exploit from Martha, and I'm gonna go and say that and that will do it for this video here. We've now got a level up fully working. All right. See, in the next one
33. Inventory: All right, everyone in this video, we're gonna go ahead and create our inventory and start creating our script for it. So that's gonna be a lot once a go ahead, take a seat, get ready. And let's let's talk with this big object here. So the first thing we're going to need to do is create a new scene for creating new scene. There's gonna be a user interfacing. And I was gonna rename my control No to inventory, and we're gonna need to add some child notes. Now, you can make this look visually however you want. I am gonna go ahead and put in a color red, not a color picker. I'm going to get a color wrecked here when the change that color up to something down here a little more this something like that we're gonna add in a tab container. So you're gonna learn about tab containers, how they work, and we're gonna use this, actually keep our inventory clean. And as the CIA tab container is simply something container that we put tabs in. And a tab is exactly what you would think. That kind of like a tab in your browser. All right. So here's our tab container and inside of it, let's go ahead and put our first tab. And I'm gonna name this consumables. Go with support across now. So my found make a little bigger for my color wreck. And am I got and the actually don't think I'm gonna need choleric now that I think about it , so I'll just delete that. Great. Now, the name of your tab here is gonna be whatever pops up for the name here. So if we go ahead and add another tab and we don't name, it's just gonna be named tabs. So we have to rename it to something like quest items, for example, and then that's exactly what it becomes. So the name of your tab node is gonna be the name of your tab in game. I'm just gonna go ahead and extend this out to be white larger here. I don't know how many tabs I'm gonna want and my final product, and I don't know how many you're gonna want for your final product. You might just have all of your inventory in one item and then questionably things in the several on or you might break them down to consumables. Magic physical equipment? Um, I don't know. Key items, whatever. So that's gonna be up to you and how many tabs you do here. But we're just gonna show you how to create one, and then all of them, well, effectively work the same way. So for consumable tab here, if we go ahead, it's like that. I'm gonna need two things. I'm gonna need an item list. We're gonna use this in a slightly different way. I was gonna extend it out and bring down over a bit. It's kind of lining up a little better. I feels good. Ah, eyeball you. I'm all it's somewhere out there. And I'm also gonna add a but in here because this is gonna be our consumables. So this is gonna be our use button. Of course. Our text is going to say use. Let's go ahead and put that down here. That now readjust consumable area for the inventory there. All right, so we have a base line set out here, I'm gonna go ahead and save my scene. So whenever you got your set, go ahead and yeah, because the inventory sheen All right, so Now that we have this set, let's see, we can go to what can we do with you? Let's start off with. Let's start off with our global script. That makes easier. So inside of script folder here, go ahead. Just right. Click and create a new script. And we're just gonna name this is this is just gonna hold our list of items within it. So let's go ahead and name this something like, I don't know, item list or game items. I'm gonna call my in game items. All right, so we're going up to our project settings auto load. And of course, we have to enable this. So one in scripts, game items. Um, I'm just gonna change this name to item and add. Make sure it's enabled and clothes. So we have our set here, and we're ready to start jumping into our big scripts here, so I'm gonna show you how to do the how. Where is it? Here. It's a game. Items. Here we go. I want to show you how to add our items in here into our global script, and you can go ahead and you can go through forest. Many items as you want. I'm only going to do a couple of them, so I'm gonna make this an on ready variable. We'll call this. I call this one. How's potion? And we simply make equal to pre load and inside of our parentheses. Here, you just drag in our icon here. So textures you I Icahn's and I'm gonna look for a healing potion here. Someone look for bottle read that looks good. And I'll drive that right on in there. So it looks something like this. Now, you can go through here and it'll be the exact same process on ready bar. Um, I don't know. Let's go where only one for a cake equals freeload on the inside of here. I'm gonna get my cake icon and just drop it in there. Now, you can go through these and add as many items as you want. I'm gonna go ahead and just leave it as thes two items here for now. But if you wanna add a bunch of items in here, do you really get your game going? Go ahead, feel free, positive video and just come back to this when you feel like you have enough items already . Now we need a script on our inventory. Go and add one utilities resource is no. This is going to our scripts water and create. Now, we're gonna need to link a few things here because we have few signals. Our tab container. It's gonna need to send a signal. So Tab container and then go to our note signals and tab selected and connect that to our inventory. Note that is boarding our script. We're gonna need a signal from our button for when it gets pressed and our items list. We're gonna need a signal or when we have an item that gets select perfect. Now for our item list. I do recommend changing your columns here. I'm gonna change 1 to 9. I'll see how that looks when I'm ready. In fact, you know what? I'm gonna come up here items and I'm just gonna count across here. Okay? So I know about seven items, maybe a All right. So you like that and changes to just change it to seven. For now. Now we're gonna be using icons for this. So we're gonna have an image that shows up in your inventory. And when you mouse over it, we'll have a pop up. Matt tells you what the item is and what it does. Kind of like how we have our Icahn there of our box showing up saying property, same column way it and tells us what it does. We're gonna have a similar thing like that. Now, if you're dealing with icons of all different sizes and a future game in this one off from already the same size have done all that for you, then you could come in here and you can specify what size the icons are gonna be. All right, So let's save that and go ahead and jump on into our inventory script. Now, this is gonna be why, uh, quite the adventure here to get this going. So let's start out with some variables. So I'm gonna need one for selected item. This is gonna be I agree. Uh oh. I did were So we're gonna create our first variable here, and it's gonna be selected item. And this is a string not a from and right now is not equal to anything. Would you set it to a blank string for now and we're going to need a dictionary here for inventory. That's what a little spacing in there for house inventory, Or should we have him in here? Should he put that in our global script? Um, yeah, let's go ahead and do that. It's on our game. Items were gonna variable inventory, So me a dictionary. So we need the squiggly brackets inside here. We would have our first section, which I'm gonna call consumables, because this will be everything that goes in our consumable tab. So I'm gonna keep things organized this way, then inside of here. We have squiggly brackets, and I'm just calling and called this hour inventory. And that would be an empty array car. Ready. So save that up. We can access and easy. So that will keep our inventory script here. A little cleaner just by putting that inside of our game items. All right, let's see what we're going to need to do here. Let's see, first up tab selection, we start here, so if tab equals zero, so if you don't know what this is, this is basically the index to equal signs there. So Tab is what we take this argument here for our tab selected, which is just gonna be a tab. So tab equals zero. This is what we dio and how we know what these are is the's just go in order, just like anything else. So first half is gonna be zero, And this would be 1234 us. We keep adding tabs into it. So first up is zero will be the idea of it. And we can see that here. Current tab zero and her tab zero. So that's not gonna be active. Were to change this to, uh, she were won't actually change that. There, there we go. So we see if we change this Our i. D s current champ. One we see quest items is what has the idea of one. We'll bring it down. It has an idea of zero for consumables. So that's how we could go ahead and get the idea that if you don't, if you're not completely sure what? The idea is off the tab you're looking for, but it's just gonna go from top to bottom and count out 01234 etcetera. So if our tabs I d. Is zero. So if this our consumable tab. Then right now, we can just set our things to be visible. So we'll go ahead and get our button. Not visible. Equals true. And I think I'm gonna clean this up here, and we just said it is used. Button is equal to this. Now, we can just come in here and just do. He's gotten here we go. Now, we can just keep our script looking a little cleaner. So if our consumable tab is selected, we're gonna show our button else. If our tap isn't selective, we're gonna take our used button visible and set it to false. So we only see it when our consumer about tab is selected. So if we just click up at the top to preview this scene when we slept, quest items are Button is gone. We slept. Consumables are button is there? All right? Um, used button We can't get into until we have an inventory. I was gonna select that holds all things. Just move that down items selected. They only work if we actually add an item in. Ah, boy. Let's see. Let's create another on ready of our because we're gonna be using this one a lot. And this one item list? Yes, you do. Items list of theater doesn't get confused there. And analysts. And can we get this information we can if we add an item in here. All right, So, um, for temporarily on ready, we're gonna go on at an item in here, and this is just gonna be item lift items list. There we go. We don't want to get confused. Have make sure you select the right thing there. I would do dot ad Icahn item and then for the argument here is gonna be the item we're looking for. So in this case, it's just gonna be whatever icon and we named hours how you don't Ah, health. We need a health potion. And our game. I was here. Yes. House potion? Uh, yes, I all lower case, I think. Is that what I did? There we go. Now we test the scene. We should see. There we go. We have a little health ocean here, and we can select it. Perfect. Now we can use that or testing our stuff here. So, on items selected, we are going to at sea. Let's get our item lift items list. Would you dot set item eyes that that we want to go set item to upset and label. Um, there you go. So this will take two arguments, and this is gonna be our index, which is getting from the function. And the second argument is gonna be the true or false we're gonna say true. So we in turn on the tool chip. And again, the tour tip is that little box that shows up there that tells you whatever information from what your mouse's hovered on. All right, so we're gonna do that regardless of what we have. So if items left dot get item, I can index. So we're going to get the icon that were clicked on, and we're gonna check if that item is the same as specific items. So in this case, we're gonna check This is our item, got health potion. And then if it is, do this. So, in our case, if it is, then we're going Teoh, get our items left. Set item tools on And this again with a two arguments. You think the index so it knows what item writing the tool tips you. And then the second argument is gonna be whatever the tool tip is. So my case, I'm going to do health now. I'm just going to do a line great followed by our face to Yeah, How? Potion. And then my line. Great. I wish that I put under it. Do this. I don't heels 20 h three Cool. And the last thing we need to do is set are selected item very top there. So selected item would now be a string of health potion. And we're gonna use this later when we actually use our use gotten. And just for the end, here, we're gonna print are selected button to make sure that this works. So, Sir Prince Selected item. Oh, all right, so let's go ahead and test that we have a potion in our inventory. If we click on it, click on it. You should get our So what's up here is going to pop up because we said it true, and it's gonna check if it is our health potion, which it is, then it's going to give us this tool tip seeing the healing potion and then a library item . He was 23 and we're going to set their selected I'm the health potion, and we should see that down here in our output. All right, so it's select it. And there we go are selected out of this health potion, and we've been able to select it. We hold our mouse over. It is our tour tip health potion. This item hell is 28 3 So there we go now have gone item in our inventory as well as our to attempt to tell a player what it does. And we're only using an icon to keep it, Uh, really simple without cluttering it up with text. Awesome. So you can go ahead and just repeat are just the if statement here. So if you wanted to do a another one eso I'll do one for my cakes or do l f items lift dot Yet I'm gonna put a space. Now, just keep this locally. Some group get item, Icahn Index equals item Got. So if cake is, why click on then we're going to do. We'll do items lift. Done. Set said item index And what everyone are too active to be. This is Kate line. Great. This is Kate. It is not a lie. And last but not least, change are selected item to Okay. All right, so let's go ahead, and I'll add this new item in. It's just think I would load it up. We have two arms in our inventory. Potion is selected or tool tip tells us a health potion. It heals 20 Health, 20 hp. And if we look at our cake and select it, it's gonna tell us that is. Kate, this is not a lie. And there you go. So you can go ahead and do this kind of l Some of this sorry. This else, if kind of scenario here for each individual item that will be within this inventory section. So this wife suggests breaking it down a little bit Here. Um, you could do this for all. Um, you could do af scripts for each individual one. What I'm do as just one here for the all of the inventory. So you can do this for all of your consumables if you're following along this way that you have in your game, Just doing all these checks so you can change the tour. Tips of the player knows what it is and they can hold their mouse over it, get as much information as they need. Whatever you feel the player needs, huh? OK, so we have items. Let's go ahead and add in our Where is it our button press year? All right, so let's go where? Do it for a potion. So if selected item is Health Potion and our player stats staff current AP set this one up myself, current health is less an hour player Stats Stone stat. Stop! Matt Cell. So far, Player has less than Max l It's gonna be our condition with our house motion selected. Then what we're gonna dio is when an increase our household player stats God stats, Jon Current Health plus equals 20. Now, if you want to heal your player by more than 20 with your health potion, you can definitely go ahead and do that. Now that we've done that, we need to actually do a check because we don't want our player to get more than our maximum amount of health, right? We don't want our player to be able to get 120 or 150. House went 100 is our maximum here. So we'll go ahead and just do if player stats, not stabs got current health is greater than our max. Oh, then which is simply set them equal at the same time, it's gonna slip them off and chases Teoh. There we go. So if our current health is higher than our Mac shells, then our current will be equal to or Max so would no longer be able to go toe 1 20 Well, instead, just reset. Toe 100 is great. And, ah, we can go ahead and let's see inside of our estimates of our you know what? Let's go ahead. And because I don't only be true if that right, Okay, so we shouldn't have to do anything there. All right. So added and and l if there you go, l a. If I were selected, item is equal. Health potions, Sophia, her health potion selected, and our health is equal. So I'm just gonna say, if we have there are potion selected and the players already at full health, we right, we need to check it here. Here we go to equals. So for if we have our health potions selected and our players full healthier for the moment . I'm just going to go ahead and French a statement here. It just says, Can't use this right now. Obviously, if you're doing, if you want a player to be able to see this pain, you're gonna use this with the dialogue box. If you want that to pop up or air, you want to create a completely different box year for the inventory that pops up and how square they can't use this and then maybe hides itself again. I'm That's where you're gonna do that in here. For now, I'm just gonna print it out to the council because that's all we're gonna need. Now, if you don't want to put anything here, you don't have to. And I'm gonna go ahead and at in another statements, right? Is that what I want to do? Ah, Now, well, let's just leave it like that. All right? So we contest this, we can go in. When you take a look, click it you can use. Nothing happens. But eventually our health I said full and you see it now it tells us we can't use it anymore. Awesome. So that's working. And since our health bar is getting that information from that script. It should update just fine. Now, the problem here is we're not removing the potion from our inventory after we use it. And to our just double check there have we select our cake. You should be spam it Nothing so unhappy because our cake doesn't do anything. Our bottom does nothing if the cake is selected. All right, let's take a look at how to remove the item so we'll create a new function called removed. I don't All right, So we do. We're gonna have to get the index of our item that we have selected here. All right, so we do a variable and will create one caught item index because we only need it for this one function we don't need anywhere else. So I just make one we're going to get for this is gonna be our items list dot Get selected items. And this is what this you're gonna dio if we take a look at it, you can hold control and click, and this is gonna return and array of indexes of the selected item. So if we weren't you print this out, it would give us an A Rams chemical up here. It would say something like, for example, So then imposition zero is gonna be the index of the item we have selected. What is great? Yes, that's what we need when you should know exactly which item, If we have, say, 12 different potions, we need to know which potion we can't just removed the potion. So first thing to Dio, we need to get that, um, do when you create another variable card removed item and this will be get item Icahn with arguments. 1st 1 it's gonna be It's something. Take one argument. Could be item index and in square brackets, and it's gonna be positioned zero an hour of Ray. All right, so we have our arguments here, and this will give us our icon for it, and now we just simply remove it. So items list dot Remove item item index zero. Now, you might be questioning why we have this remove item here, and that's because we're going to need it a little bit later when it comes to saving and loading our inventory that we weaken, update it whenever we removing item. But for now, this is all we need to put in, and we can go ahead and make sure that this works simply by looking for our button right here. All right, so we're gonna come in here, we're gonna check this, And if that's true, we'll reset our health, and then we will simply remove item. So simple is that now, let's go ahead and test that your cake. Nothing happens because we're not telling it to remove the item if we used to. Kate, when a potion, we'll use that. And now it's gone. Awesome. Now we have items that we put into our inventory, and we can remove the items as well. Next up, I think all we're really missing here is being able to add items, and then we can tackle being able to save and load our list of items. All right, so right above remove item, I'm actually create one called Add item. And let's see, Let's take a look. Where do I have this? Right here. Okay. Sell for our function here were actually taken argument. This argument is gonna be our icon. That's when our global script comes in. Because then we can just call to add item for any item that we have inside of our list. So we're simply going to get our items left, Got at icon just like we did up above. I can't item and it's gonna be the icon. Now we passed in us our arguments and for now, that's all we have to dio. So now you see that we can just stop using this. And whenever we wanna add an item to our game, once you add item open, close parentheses and we put in the our item here, that's it. So this will make it a little cleaner. And we can use add item anywhere in our script. Or if we need to call that function somewhere else saying NBC gives us an item, we'll be able to do that. So if we go ahead and load this up this scene, it should be exactly the same. And use it now, Um, before we go, I want to go ahead and make sure this is working in game. So I'm gonna go to RG ey scene. I'm gonna instance, in our inventory seen here, I was gonna be headed by default and inside of our g y script. I've got a head and just check for if I fresh my inventory button and inventory not visible equals, not inventory dot visible. So now when I press my inventory, but it's going to show and hide if you need a refresher on how to add a new button for your game, got a project settings and put mapper and named the action here, scroll down, click the plus press key and select any key on your keyboard. Just press the button. In my case, I first I and then I hit. OK, all right, let's jump into our game. I'm gonna press I That's my inventory. I have my potion selected. That's why your tip, my cake, everything. She's working fine. Nothing happens without used to Kate. And when I use my potion, we should see our health increase by 20 as well as our potion get used and removed from inventory. Perfect. Awesome. So that works. So next time we're going to go over how to you save and load our inventory here for a list . Now we whenever we open our game in the future and we can save all of our information, we can load it up for when the player continues their game without having to erase their inventory again. Right? That would do it for this video. I know there was a lot of information to take in. Inventories can get complicated and convoluted. So I hoped I kept this or I tried to keep this as simple as I could that would work in as many of your games. It's possible in the future well, leaving things open for you to redesign and recreate how you want yours to look. If you don't want it to look like this or if you want thanks to look at different way, you can certainly go ahead and link that stuff up in the future. But for now, this works. This what we got. We have items out of your inventory and what's this? Figure out how to save and load them Next time you guys the next one
34. Saving And Loading Inventory: All right. Welcome, everyone. And in this video, we're going to go over how to ad our items into our inventory here as well as removed them and save them as well as be able to load them for when our player closer game and opens him up later. All right, so let's jump into our inventory script here, and we're gonna start with our ad item function. So in here, we're going to We're going to get our inventory, um, from our dictionary here of game items. So this is we have this society's items, I believe yes, items are global. So item dot inventory suma balls. I believe I'm just double check inventory consumables inventory. OK, inventory dot consumables got inventory. And to make sure you get your capitalization correct, as this will make a huge difference between your script breaking and working. All right, so let's go ahead and hit dot upend and our arguments that we're gonna depend into this is gonna be our icon. Now, if we were to French, if but with take our section here. So print inventory dot com symbols dot inventory. We should see it in our output. Right? Perfectly. Oh, Yeah. Items got inventory dot consumables that Dario. So now this should print out and show an icon in here, so just, uh, show that before and after I'm gonna print it before we had the item. And then after. All right, so now where? Remember, we're already doing this right at the start, so we should see an empty one. And then we're see it printed with one item and imprinted with two items. Let's go ahead and then we go. We have are empty information here, and then we have are one. And then we show our one because we did that because it's not empty anymore. And then we added our 2nd 1 and printed again. So there you go. It's adding into our list chatting, reading tour list, just like we need. And now we just need to be able to remove it from our list when we remove our items. So was remove item right here. We can go ahead and do that section. All right? This is what we need are removed item variable for So I'm just willing to put a little space in here. Don't do it. Removed item if removed. Item in item. Got inventory, Super Bowls. Got inventory that. So basically gonna check if the item that we're going to remove your if this is inside of our dictionary, which it should be. Unless our game somehow bug and didn't add it, then what we're gonna do is go Item inventory dot syllables got en vin story. Fear small. That right? Got he race. And for argument, it's gonna be removed. Item How? What is this? Yeah, removed, we go. So if removed item is inside of our consumable inventory list, then we're going to erase it out of there. So basically, remove it from it. And then at this point, we would save it again. But we haven't looked at saving and loading yet, so let's go ahead and we'll print it. A swell. Now, we wouldn't kind of see a before and after, Let's take this whole thing here. And I put it before we were moving and after test it. Oh, wait, we're removing it. But we have to add that function in. And now we're doing that already. All right, let's go with our potion. We're gonna use it, and we should see it. Front out. our list of two items here and then remove it and we'll see it. Print out the list without our potion. So first item will be removed. There we go. Do you see 11. 89 with our cake and we still have that one with 11. 86 is now removed. Now you might wonder. What if we have multiples of these, right? Well, let's go ahead and take a look. We'll launch that now. We have two potions in two cakes. If we remove this one, our 1st 1 stays. Now. Why is that? Because we're what we're going for. That specific index, a specifically selected item, and we could do the sink. Where to remove that. All right, so if we're gonna try that inside of our game, open that up, select it. Use and share. Other one is still here. Is that home? So each individual slot is acting like its own. A separate thing? All right, so there we go. We have our adding and removing properly. Done. And all we need to do is we need to be able to save this now, save our inventory, and then, of course, loaded. And I think we'll do this inside of our global here. So for this one, you need a few more variables. So I just put in space in here, and I'll put this under all my items here. Now, you can always put these above all your items. If you wanted. It doesn't really matter. I'm trying to keep this little organized. So to save this, we're going to checks. Um, variables. Let's see, we're going. Want to just stick it inside of my inventory just to make it a little easier? - All right, let's go ahead and get this, sir, so we need a variable. We're gonna make one call loading, which is set to cough. If you want to go ahead and put that in, that's gonna be a boolean. We're going to create a variable for my index, which will be people zero. So if you want to go and set that, that'll be. And for an integer onda, we need this other. I don't think I do anymore. This set up all right? We need a variable for our save path, so that's gonna be our file. And I took my solution. Copy this over. So this is gonna be a strength and it's gonna be a directory that you want this file safety . So the use of directory is the safest one, as this will save, no matter what your platform. So if you're doing this for Mobile Mac Lennix Windows, it doesn't matter. It's always going to say in that OS is user area. So on Windows, this is gonna be side of the APP. Data and roaming folder on Windows are on Mac and Linux. I'm not 100% sure where this is, but you can easily look up that location if you need Teoh. So I was gonna call This are inventory consumables I and I file. And the only variable con fig underscore filed equals con fig file new just like this. And now we should have everything we need to actually save and load our file. So let's come on down and will do. Let's save our consumables first, the bunk save consumables. And for this, we do it before section in. I call this. I did inventory key years. So this is our inventory, and this would be our key flat settling for each section inside of them. Yeah. Yes, I wasn't calling up that it was just looking for our next section here, Um and then once we got that, we're gonna look for key in inventory section. All right, so we're looking so they're starting from the top. Look for section in the inventory keys. So he is our inventory. And then all of these are keys wouldn't for this section, which, if we had more sections, we'd go ahead and get all those as well. And then for each key inside of our section, which is going to be in here. We're gonna look at these. All right, so let's go with. I had lower cases, So conficker file are variable got set value. And if we were to take a look at this, begin set our values that not he's all for account. Big final serial set value. So our first argument is a strength and a key, and then the value and as you see it's gonna sign it. So this is basically how it's going to read it when it's all saved. So the way that we're going to save it and how it's gonna look inside of our text editor, for example, So we're gonna dio section and then our key and then inventory section King. I miss spelled right. There we go. And then last but not least, will back out to our 1st 4 loop here, and we do conficker file that save. Of course. Now we wanna actually save it here and where the argument here is, where we're gonna save it, which is our safe after. And now we're actually able to save our consumables. Perfect. So if we go into our inventory script now and whenever we add an item at the end, we'll go ahead and call item got save, Consumables. Now we have to do is just run this. And now we should have this section. So if you don't know where this is, I leave. We can also just come in here and will do someone wanted. Would you? Oh, f shall open. All right, so to do this, what's going to a last stop? Shell open and running? Lest I get user directory, use your data directly. So if we go ahead and run this now we can see Here's our directory. I just delete those. And here's our inventory consumables of something this up in a note pad for now. And we see we have our inventory is an array and years all of her items inside of our inventory right now, All four of them. If you wanted, you could print that out here and you would get the same. The same result here only, of course. And there is gonna be a stream texture. Brashear, we're printing out the resource. Was she? That's our red bottle cake. Who had another red bottle and then a cake again at the end so we can add into it and we can see it's working. Fine. Awesome. So now we know we can save items. And where would you call it? From here? Just fine. So for now, I'm gonna go ahead and move our directory. Or for now, I'm just gonna commented out books. You don't want that. That's the actual see. And now we can look at loading. So I just put about space down here to take that up. So what do load consumables? Here we go. And our consumables here. Now, the first thing you do would ever you load a file as you need to check for an error says So we need to make sure that there's actually loads properly when we started out. So that's gonna be var. Error equals conflict file God load. And the argument is gonna be our safe. Now we're gonna check if ever is not equal, okay? And we're gonna print this for a debug failed loading settings ever code. Whatever you want this to be, so I don't know. Error code 32. Sure, if you want to go with standard error cozy again. Look, these up yourself. And I'm sure you can find a huge list of what each error code means And use that to correspond with your game and then return. No, of course, Returned. Nothing. So if we have an error loading our game or loading our inventory, which could happen if we don't even have a file to load, for example, and we're just going to say that we failed loading it and return, So we're not actually gonna crash the game or cause any issues. Now, if we if its is OK, they were going to move on to our next section, which will be similar to our save, actually. So for for section and inventory keys for key in and Ben story section inventory section. He equals our convict file got yet value. And then, of course, we have to put in our arguments again what's going to be section King, And our third was just gonna be No, it's gonna be empty. You might be wondering what this is. This is Variant is equal to No, we don't have to put anything in there. We just need our section spring anarchy, and then the last thing could be empty. So if the default is not specified, were set to know Ah, never is raised. So even though we don't need, uh, need anything here for 1/3 1 we're putting No, just to avoid an error. But there were no never got. We have our consumables here nice and loaded. And this should work just fine for us. And if we run it were noticed. We're not going to see any difference year. So, um, as we're not one, we're not loading our icons and two, we can't actually see this. So what I'm gonna dio is I'm just gonna go into my inventory here and etc. He says it's adding, are right. The images. So let's see if we can print our inventory here. Inventory got consumables inventory. You see, we have everything here loaded up, which is perfect. So if we were to just remove these, we should still get this printed out, Which does? Not because it's not loading are right. We're not calling for a load first, so we'll just do item. Don't load consumables. And I see we loaded up just fine. And again, if you need to confirm that, we'll print it before and after four. We load it. And after we loaded So she was empty, and now it's filled with all of our inventories. Not a problem, Mrs. We don't have any icons here, however, these are still listed in our inventory. So what we need to do now is we need to get our items here, and we need to load them, load the icons into our inventory last year. So let's go ahead and do that so we won't need to print out anymore because they don't work . Let's go back to our game items script and let's do another function talking mode. Icahn's that is gonna be rather short and rather simple. We're gonna search if my my index is less than or equal to inventory dot Consumables inventory not size minus one unexpected sign. Where? Oh, I did equal, sir. U minus one. So we're going to check her index is less than or equal to the size of our inventory. Now, the reason why where your minus ing one off of this is gonna index started zero. And we just need Teoh. We're gonna subtract one off just to make sure that we always stay below it. Just what the way indexes work. So we have that now. The next thing we need to dio is you need to add the icon item into our inventory lists. Um, just wondering, maybe we should love this into our inventory, since this is more inventory related. So I think that's what I'm gonna do. So I'm gonna actually load the icons inside our inventory script, so I'm just gonna copy that Impatient over And of course, my nexus. We need to change to item dot my indexed out and All right, let's get our items list. Uh, add Icahn item and the item that is we're gonna load here is of course, going to be from our dictionary. So item got inventory consumables and new vant Ori and what I did, we're gonna add mind X I, adam dot my index. Here we go. They moved it over here, right? When you touch this change item dot inventory argument. There we go. And now so we don't add the same item over and over when to actually increase. So where do item my index and would you plus equals one that we can move up to the next one , and eventually we will run out of items to add. Now, this is going to give us a We can easily get ourselves into a permanent loop here, so we need to actually stop that. So we dio else. Sorry. Um, live item. My index is greater than our inventory here. That consumables, that inventory size minus one. So if our index is larger than the amount of things we have in here, we're just gonna turn loading to false. So item loading equals false. That's all we have to do for I cones. Now, after we load our consumables, this is where we're gonna want to load. I will say f item that loading is true. We will load that comes all right. So we haven't set to false by default. And then whenever we need to load our icons in, we're simply just going to change our loading to true something's gonna use it. Stick it in here. For now, loading equals true. So after we load our consumables into our list, then we'll turn loading true. And then we load our icons in. And when we have no more migrants add turn loading to false and we might actually need to move this into another section. Let's to see if it works with the ready. It does not. And this is why. Because in the ready function, this runs one time, and then that's it. So we actually need to move this down into our process function, and this is going to run on every frame. So stick that in there, and before we turn that true, we're actually going to wait and I a little bit, so we're gonna yield, get tree dot create timer, Louis, 0.3 seconds and then get our time out. Now, if you're watching this later on or using ah, the 4.0 version of this. This is actually gonna change a little bit and it's go instead of yield, it's gonna be a weight. But currently in the version three point on 3.13 point two, etcetera, it is yield. So just to clear up any possible confusion in the future when some of these scripts get changed So we're gonna on every frame, we're gonna go ahead and we're gonna wait for here. We're gonna turn loading true, and then we're gonna check if true load are icons. Now, I think I might actually take this and well down here since what the possible looking for is the actual loading here, Then we can just leave that up here to turn that true. After we're done voting that we that shouldn't cause any issue. So now that we run it, we should see all of our icons loaded up. Here we go. Do you do to do just Sodom all loaded? Obviously, when you start a game, you're not going to see your inventory. It's gonna be completely we're gonna load in, and it's like this, and then by the time the player actually opens it, we're not going to see each item, poppet, we're already gonna be there. Now, if you want to try this, get this even closer. Like we could try 0.1. See if that works and we see that's quick enough. That's long enough weight for everything else. Too low first, that's perfect. Well, we now know how to load our, um, icons into our inventory. And in our game item share, we now know how to save our list of consumables and load our consumables in. So that's really all we really need to know for this and to save and load information. Uh, such as our dictionaries like this in the future. This is all the same type of thing you need or confident while we need a safe path. And then these right here, The save and load controls are effectively gonna be the same thing. No matter what you're running. As long as you're saving information like this, there has sections and keys, such as a dictionary. All right. That'll do it for this video. We've saved consumables into a text file, weaken. Take a look at later and we can actually load it up. And then after we load that up. Remember to go ahead and load up our icons right down here, so we'll take a quick look through. So if our index is smaller than or equal to our inventory, the amount of items in our inventory, we're going to add the icon into our, um, inventory here of consumables at this index. So this index years the item that we're adding and we're gonna do, plus one to the index so we can move on to the next item. And once we have no more items left will turn loading false, and then we'll stop adding items. Enjoy inventory. All right. If you have any questions, feel free to ask him that'll do it for this video.
35. Example Use: All right, everyone. I just want to show you an example of how we've actually used this in game two. Actually, have our NBC's. Or maybe you have a chest or something. Give your player an item. So I just changed my diet, like a little bit here for Martha. Same thing for helping me. Here is a potion for you're trouble. All right. Now, in our inventory script need to do add to group, and then you can name this whatever you want. I'm gonna call the I'm just calling it inventory for now. And inside of Martha, once we complete our quest as you see down here and we removed the quest, the player against their experience, we're going to get Tree Cole Group. And now this takes a Siris of strings with the 1st 1 being the name of your group. So mine was named inventory, So that's what I'm gonna put it. The second argument is going to be the function you want to call. So in my case, it is ad item on any anything after that is your arguments. So if we look at our inventory here, it is called at item and it takes an argument of icon. So we need to pass in some quiet, some kind of argument here, some kind of item and what we're gonna do, we're just gonna item from our global script. And what we're gonna add is going to be the health potion. All right, Perfect. Now, if we come in, we load in now. I still have my items, so I'm gonna take that. So all I have is two cakes in my inventory. Now let's talk to her. Looks, I'm scared. Can you kill that scary bad over there? No more boom. Killed are bad. Talk to her again. Thank you for helping me. Here is a potion for your trouble. We check our inventory. There we go. There it is. And drink that as well. There we go. There we have it. So that's as simple as it is to actually use our functions here to add item into our players inventory. So it would be the exact same way if you want to do it with a chest so the player activates it, and then you add the item just like we did with Martha right here. So you would then just call this from your chest and change our last argument here to being whatever your item is. And that's it. It's a symbol of that to Dio. So I just want to make a side note there. So if anybody was actually wondering how to actually use it, there is an example of how we do it, but that'll do it for this video.
36. File Encryption: art. Welcome, everyone in this video, I'm just gonna show you how to give your game a little more security. So if we were to run this and go get our stuff and your c uh, we're actually open up our file, and if you look at it, you'll get something like this. Now, your inventory item, of course, may differ. And that's completely up to see. See, we only have one item here. I just pulled us aside here we had you see, we have one item, every loading to our game. We have one item. Now, if we were to come in here and say copy this comma space paste, comma space paste and save that load into our game Now you're seeing now we've just hacked our inventory and have three items. So there's nothing stopping your player from finding out what the O. P. Item is and just adding integer inventory doing that. So what we're going to dio is we're going to take this and turn it into this. Your player can't understand what's going on here. And your player cancers hack his own inventory to give him whatever he wants now. I don't know about you, but I can't look at this, okay? I need to copy and paste this section here and change this. No, I would need this to be decrypted before I could do something like that right now. So we're gonna add that little extra security for your player cannot cheat your game even though we have the files that are accessible here. So to do that, it's gonna be very simple. It's just going to our script into our game items script where we have our save and we're going to go into our save consumables function here was going to change my safe path. Year seems Teoh I don't know. Uh, you do got bin. Would you do that? I'm so we're going to go here. So we go to our conflict underscore filed, receive and where we have safe path. So we've got saved. And this I would do underscore encrypted underscore pass. And this takes two arguments. The 1st 1 is our path. And then our 2nd 1 is gonna be the password so you can put whatever you want for your password Here. I'm gonna put in. That's a teaching is great. Let's go ahead and we'll use that. So, of course, when we load, we need to come down here where we're loading. And we need to add this as well encrypted half CPAC and put a password in and I would recieve It'll become encrypted and you notice this is a bin file. So that's what we're gonna open. Let's go ahead and take a look. We have nothing. There's our file. Didn't exist. Looks, Let's go ahead. Talk to Martha. Get a request for the bat. Dr Her. Get our item, which gives us our item are file was created. It's a bin file. So treat here. Go ahead. Just open this up with no Pedro. Quick. And as you can see, our whole things encrypted and the player can't do it, do anything about it and make sure everything runs fine. Take a look. We have one Kocian. We love the game Back up. We still have it. Our inventory loads just perfectly. And if we use it, it was used here. We gained our health. And if we rerun it, that should have saved it. And our inventory is empty again. So there's how you can just add a little bit of security to your game to prevent someone from being able to hack their inventory and modify it in some way. But what? That will do it for this video and I'll see you guys the next one.
37. Currency: All right. Welcome, everyone. And in this video, we're gonna go ahead and set up our currency. And to do that, we're just gonna have our little numbers down here, the bottom showing how much our player has as well at having a little icon on down here to represent what our currency is. In this case, we're going to use a gold bar. But if you want to use something else, you can definitely do that. So I want this to be showing on all of my tabs so I can go ahead to stick into my inventory here, we're gonna get a Sprite, name that gold, and we need a rich text label, which I'm going to call currency. I'm out. All right. So, currency amount, I'm gonna go ahead to stop in 99,999,000 999 I think What changed that? Just 999,999. It's a pretty standard maximum amount in games, and it's gonna make sure my box is the right size to actually get this. And I'll just move it down here. All right. Now are Sprite would be a little hard to move without a texture. So we're gonna go ahead and add a texture in there just dragging the gold bar into our texture slot. Bring it down and let's take a look. I'm gonna put mine right on over. I'm sure in line the subject press. I can't look good. It will burn out. Text over. She were that lying? Yeah, I think I had a look line for this. Awesome s. So we have our gold. We now need our amount to be able to update, and we need to keep track of our amount. Also did this we could go into our scripts and inside of our game items here, we're actually going to go ahead and add a section into our inventory called currency and inside of here you can keep a list of all of your currencies in your game in our case, really have one, which it says gold. And of course, this is zero. It starts off with. And since we have another section above our consumables here, we actually need to put our common here a year ago. So if you want to put that below you definitely good, but I'm gonna predict appear now. If you ever wanted to add a new currency to your game, just got to come in and the new currency boom on your players amount by default, which is probably gonna be zero. And then, of course, it was common here. If you have a new item, well, you can just go ahead and do that whenever you want to add a new currency to your game. For now, all we need is gold. All right, so now that we have that, we actually get into our inventory script, come down and you see, I've just gotta hadn't done a commented dotted line here just to divide this up a little bit. I think he thinks a little separate two lines in, we're gonna create our function function, and we call this gold No, and all we're going to do and it's going to take our currency amount room, take the text property of it. And we're gonna set that, too. The data that in our new currency, sex inside of her inventory. So that's gonna be item dot inventory, uh, currency dot gold. Now, this is actually come up with an error because you can't set an integer into text the text property on Lee take string. We have to actually convert this to string. So do s t r and cover our directory here with parentheses. Now you can update this one of two ways you can set it in the process so that it's constantly updating your goals for your game, or you can set it ready and it'll only I said it once. You came loads, at which point you would then need to full of it every time your currency was changed. You'll have to update it and call the function again. So if you wanna fight, you'll have to add to it. If you have fine gold in the chest, you would have to then call the function again. If it NBC gave you money or you did shopping, this would then need you update again. So to avoid that, um so to avoid having to call that constantly, I think I'm just gonna stick minus out of the process here, which is gonna be gold counts. And now we run the game. You see, it updates to zero. All right, so we know that that is working it's getting our information. But what if we need to see if it's actually gonna update as it should? So to do that, I'm just gonna create a function girl scroll down here. Um and I'm just gonna create this call this gold increase in just to test this and the only thing it really needs to do is get our inventory, Adam items done. Inventory? Yeah, currency gold. So do plus equals. Um, I don't know, 10. And after that, we're gonna yield because we're gonna have a timer. Remember, if you're in gold out for instead of or gado for whatever you would like to call it instead of yield, this is gonna be a weight. Eso yield more weight. Get tree, create timer. Our amount would do it every three seconds, and then we'll wait for a time out, and then we're actually just gonna call its function within itself again. So gold increase right now, we can come on up to our top here with are ready and process function, and we had a gold count down here. Okay, so we just put gold increase years. Well, now, if we open this up and take a look, we'll see that it's working. And what this is doing is our increased function here. It's gonna add 10 to her gold. Wait three seconds, and then it's gonna run again. So this is crazy. Just gonna cause an infinite loop, constantly adding gold every time, every three seconds. Sorry. And then our gold count here should always needed ask, do the amount of gold. So we should see that visually constantly happening. Say, look, zero. Okay, so this is not updating, Which means since we didn't get an error here, must be having an issue here. So I think what I'm gonna do, and I'm gonna go ahead and print this and see what we get to make sure that it is updating that, of course, have to come out of the distraction. Free mode. 10. 20. Okay, so that is updating. So the problem is, is it's not updating visually, Never issue. Now, why isn't it updating visually? Oh, because we sweat it in if loading is true. What? There we go. The tabs are very important. Okay, so now we just pulled that out. So now that should basically always running. Oh, God. So that is consistently running, but we can see our goal is updating. Now. The count is going quite a bit faster than we would like. However, it's not really important. This gold increased Russian was just a test to make sure everything was working properly. It is, as you saw, it wasn't so We had a small issue. Do felt there. So I'm just gonna go ahead and delete that function now. We don't need it. And that was I couldn't remove it here from our process. And I just pulled that up above all. That's just so I don't get confused again, and that'll do it for this video we have. We now have our gold count here, and I'm just gonna go ahead and label these sections now. Gold. I call this our gold tracker. We should also actually add to this just because that way we can actually set a maximum amount of gold. If you want, I should. So I should address that. All right. So do you add in a maximum currency here? The internet, a little cleaner. Simply. We just get you item inventory done. Currency gold is greater than or equal to six nines. Here service. Here we go. So if our gold is greater than or equal to 999,999 then what we can do is we just We said it. So we do our item inventory currency gold is equal to that number. Then it will never go higher than this number now. So if you want to set a maximum gold, that's how you do it. Very simple to Dio. All right, that will do it for this video. And I'll see guys the next one where we will start tackling our equip menu so connected, Start equipping weapons and armor and change your stats.
38. Stat Display: All right, Have one in this video. We're gonna go ahead and create our equipment, menu, our equipment, you with our stats and everything. So to do that, we're going toward Tab Container and add in a new tab, and we'll call this equip, and I'm gonna put that above my quest items, but below my consumables. So this will be have the i d of one. And I could just hide the consumables and make the quip visible. Said I can see what I'm doing here now, inside of here. What we're gonna need Ah, let's see. Let's get our Hatem list que track over here. And I think I should want to make consumables visible certain get into about the same location This way won't be too jarring to the player when they switched tabs and down the bottom is done. Perfect. So we can hide that top again. So we have our item list we need I'm gonna put a label, and the text for this is going to be place. That's for keeping this equal. Will go ahead and get the the why of our item list. Inside of rex position are Y seven sword label right. Our Why seven, that we visually, it just looks a lot nicer. Next week, an ad in a rich text label underneath of our players. That's Fadel Probably should be big enough for us. And how long you make it will be depend on the amount of Statue have. And I'm gonna turn BB coat on in the properties rename. I've Rich text label, too. Players. That's our two stats here. What else we're gonna need? We're gonna need our equipment slots betweens. We're gonna need a couple of different spreads here. We need four scrapes for this Soto duplicate. That's does control de. If your note selected in this case, I have Sprite, and I'm perfectly fine. But in some cases, you might run into an issue. But our first right here, I'm gonna go ahead and changes to our weapons slot. Right to will be our head three. Well, the body and four will be boots. So if we now take a look into our textures You see, we have a section here now called in you. I you have equipped, and that's where we have our empty and filled boxes. So far, Weapon. I'm just gonna empty Maley. I'm just gonna pull that in court texture. Move that down our head. I'm going to do the same with helmet. Our body have the MP chest, then our boots will have the empty boots. All right, so we have all of our little slots here, and if we take a look, we can see that they're all kind of great out and look like they're empty. And then once we actually equipped and item, you see the change from there, and we'll change it like that. We're gonna do that whenever an item is actually quit. Way have our slots. Now, what I'm gonna do is I'm actually add some text in here so we can do this easily with just ah label. We don't need up in text. But that was my weapon here. And by default, it will say weapon and we'll have one for each. The positions will have one here, and this will be our head. A line that to simmer. So this is a PR head text. Come on now, from this one down and this one will be our body text. You know, I have this one for our boots. Text So what? We're also gonna have this change name so that it shows the name of the item that we have. You quit? No. If you don't want to put him here, if you want to put him along the bottom down here or something, you can definitely do that. That's completely up to you and how you want to organize this for myself. This is going to be or they should be fine, depending on how long thin names of our items get. Now that we have all our text set up, we have all of our slot set our labels here, we'll call this stats label. All right, now, we can actually get into, um, the scripting part of this now that we have this set up. So in this video, I think we'll just tackle the player stat section. And then in another video, will we'll tackle each section individually, just kind of break this up and not overload you with too much information. Because we've been doing pretty long sections here. Let's go ahead and come to our script. So work on this one equipment. I think I'll call this section. I just called this when players. That's and give that it's a confection. Alrighty. Now, to tackle this, it's going to be pretty simple. We'll do function players. That's and all we need to do is, of course, is update our text year with what our stats actually is. So what I think I'm going to do first is to make this simple or simplify this in this section here, I'll do that's sit down and would do on ready bar. Well, how this stats this way that is equal to dollar sign, uh, stats. So, Tab, container equipped stats, which just make sure you get the right one here. And I would just do that's this way. Text equals whatever we want to set this to. So I want you to go ahead positivity here and seeking and set this text. Ah, look right. We want one stat on each line. So if we were to come in here, we would want, like certainly hell, um, current over max. And then we go into our next line. We have manna current over Max. Um, our next that Ah, I don't know. Attack our stat there. Next one defense and there stat. Except her All the way through until we've gone through all of our stats here. All right, so I want you guys go ahead and in the script, go ahead and see if you can set this so that it looks just like that. And when you think you've got it or you're having an issue formatting it right, go ahead and come back to the video and I'll show you how I do this. All right, Welcome back. So we're gonna tackle this one line at a time, So to start out with this, we're going to get are gonna have our string health, Colin, and put a space because we don't want to stack up against it. So we have one string there and then we portion together using a plus sign. Now, remember, our stash, like health and all that are all integers and we have to have a string into our field. So it's str opening close parentheses. And in here what? We want to be a string that's gonna be our players. That's global script dot That's God curry health. And I would do. Plus, we have a string for just r slash year plus our next spring um, which again will be our max cells now? Player stats Don't stat. Stunt Mex health Looks I put one to any stats in there. Oh, no, I didn't. I just broke it up. What? That is my mistake. There were working. There we go. Now, You see, we've gone past this line here, and if you can, you want to avoid doing that. And we could actually do this. Ah, a few different ways. What? I think I'm just gonna leave this. I could leave this section here just to keep it on one line. Uh, do I want to do that? Um, yeah, I'll keep it there. And if you want to reorganize that, you can definitely do that. But we don't want to keep riding along here is gonna be very hard to read fresh. If you go like this, we can see the whole thing, but eventually there's going to trail off even on here. But we can't just come down here and continue FBI. Um, insert hours line, Greek, and then I don't know, Do mana boom. And for an ethnologist leave that. They're just so we can take a look at that. And you see, we can actually do that because it then doesn't know, necessarily know what? It's gonna really need to call this. So player stats put that into our process here. Our function and it never go. We take a look. You should get our house, but that's it because our text can only be on that one line. However, we don't want it on one line because it's gonna way too long for our case. So there's actually ah little I gone that we can use that tells the engineer to read this script, to read multiple lines as one line. And to do that, we just use our slash just like our line break. So now we have to do is just put our plus because we're gonna add this on the rest of our string. And then we have our line break and our man, we're ready to put our next statin. So let's take a look Now. You see now, since we put our slash in there, that's actually that's giving us a line break, and it is now reading this this one line. Now you can just go through and adding all of your stats and for every new line. You just put that slash at the end. So now that we have that we were then come in endure string player that's done. Stats dot current manner and in our are over here are slash before our string itself and then add in the last one for Max Player Fats. Not sad. Stop, Max Mana, Take a look and we have that set of it. It's working just fine. And now we reached the end of our line, would do this next line break we'll call it and then go down to our next line and do the same thing we do, plus into our next that and etcetera, etcetera until we've gotten through all of them. So to save myself a little bit of time, I was gonna paste in the ones that I had here just to save a little bit of time Here. Now what is this one? What is this going on? Oh, I place that in the wrong direction. That's why here we go. And now we take a look at it and you see you will have all of our sense. They're all listed out now myself. I think This is a little too much trouble. Should lower this data mint put little more space between our player stats and our actual staff here. Here we go. Now, if you wanted to change the tax of this, you know how to do that by now. You just go ahead and select your stats. Here are rich text label Note. Come on down. Going to our custom Fonts are colors. You can select your font here, or if you wanna get into the custom once again, you go down to custom thoughts. Motto Fine. Or they normal. Fun, new dynamic. Pull it in just like we've done a few times now. All right, so that'll do it for this video. That's how we display our stats. Since it's in our process function, it'll always update now. So whenever we modify, it went equipping items, you know, change will see it. Chains on the fly. All right, that'll do it. Here. Take care. And I see guys that the next one
39. Add Equipment: All right, Have one welcoming in this video. We're gonna go over how to add equipment and remove equipment from our list for our list of equipment that we're gonna have. All right, So to do this, I've got ad in creating equipment section here. However, we're going to need to go into our game items script here, and we're gonna create a We're gonna create a whole new variable here. A whole new dictionary so we're gonna create are variable. And I'm just gonna call this equip a bles and curly braces. Open it up. Now, I'd like you. I'd like you to come in here and create each section. So in total, right now, we're going to need three sections we're gonna want and a section for armor so we can get a list of each item that falls into each. I guess you could see almost like an armor type or not Airtight. So, one a list. Be able to have a list of what all of our helmets are what all of our body pieces are. But all of our boots are, and then we want another section where we can get our weapon types. So for example, we can have a section within that for all of our swords and a section for all of our stabs . And there may be a section for all of our daggers. And then our third and final section is when is be section four equipped and that will just have ah subsection in there for each slot we have available. So we need our armor section with everything inside of it. And then we need our weapon type section on our section for that'll show everything that we have a quick. So go ahead, take a moment and see if you can figure that out. If you're confused or you're not sure how to do that, then come back and I'll show you how I shows to organize this myself. All right, welcome back. So I'm gonna create my first section called Armor and then inside of here. Now, why is this? Oh, that's because I got to equals area. So inside of armor, I'm gonna have my sections, a helmet or had. You wanna go ahead and do it that way? You can. I was gonna call my helmet, and that's going to be an empty array next, we'll have a section for our body. She'll be another empty array. And our last section will be for our boots. Another empty array. Next will have our sex. And for weapon types, call this weapon type if you want. And inside of these curly braces will have a breakdown. So specifically learning this we only have swords. Actually, a sword is what I call it with our array. But of course, if you have more weapon types and you come in here and you can add in, say, a staff tight, I'm just going that you could keep going in and adding as many weapon types is you want, you know, in our last section is gonna be equipped and decided these curly braces would just have one for each weapons slot or Sorry, one for each slot in general. So we have helmet, body boots and a weapon. All right, if you got that, give you some pound back. What is these, right? You need a Hama here. Does he have sections inside here? Here we go. So if you got that congratulations, if you didn't Well, hopefully you learned how to do that here or learn what we're doing. So now we can actually go into our inventory script here and start tackling our equipment section. So we're gonna do this one step at a time, and we're going to need no Do not believe so. No, but we can make this a little easier. All right? So going up top to our we have a stat section. I'm gonna go ahead and station there and speak another section here. Oh, are equipment and we're going to create a and I'm ready for far. This will be our equipment lift. And this would just be the item list inside of our equipped tab eso that show we're gonna need from now to create our add and remove items. Uh, so, bunk ad equipment. Let's go to our distraction remote here for adding equipment. And we're actually gonna take two arguments, a name and an icon. So to do this would do equipment list ad item. I just want to have a name in here and what is to name and our second argument will be the icon. Now, our item dot inventory equipment, uh, inventory upend our icon. Now, what this is doing is this will add an item with a name and an icon into our list. And then what? You go right into here, We're then gonna add it into this section here, which is going to keep track of Vichy our inventory for our equipment here. Just like we have one here for consumables. We'll have one here for our equipment. All right, so at this point, we you might want to know how the same function here for which at the moment, just caught item, say, consumables, which I think I want to actually omit this section. And if you want to do that, you can definitely get right here item dot save consumables, and then that way to save our equipment once we had something to it. All right, Now we need a function to remove equipment, and this will take no arguments. But I want you to see if you notice a bit of powdered here and go ahead and take remove equipment here and see if you can figure out how to remove this now from our inventory. And, of course, from our screen that the player can't see it anymore. All right, take a moment. She could figure that out and when you're done and come on back and I'll show you how I do it. All right? Welcome back To do this, we're going to It's just like we have done before. We're going to do create our variable item index and our variable removed item. And just like before our item index will be our equipment list. Get selected items, and our removed item is going to be that specific slot and our ray, which will using in a moment and to get rid of this visually, we do equipment list. Remove item. Our argument will be the item index with the index of zero. No, absolutely. Yeah, you go. And now we get into our if statement. So this is just like when we moved our consumable. So if removed item is in our item done inventory, God equipment got inventory. So basically, we have this item inside of our inventory. Do this, which is gonna be item got inventoried. Equipments, inventory the race and the argument going in here will be our removed item. And then, of course, here we go ahead and safe item got save consumables again. Since that what we named it really should just save set this as, like save inventory. But for now, that's just the name That doesn't matter. There we go. Now we can add equipment and removed. And if we want to test this, we certainly can. However, we need to actually sure items are in our list. So to do that, I'm not to be in our game items here. So you see, at the top, I've already created three soared Scimitar and a helmet for that, you see, is just an unready variable. Whatever you want to name it, which my case is. I have one con sword and Adam called cemetery an item called Helmet. And we're gonna pre load that, um immature that I can't p and G. And then that's all we're doing. We're all three times here. And now we need to make sure these air actually inside of our sections. So, for example, soared this icon here. Want to make sure this is inside of our weapon One side of weapon type we're gonna so because they're big name and we'll have one for scimitar for helmets. Were we just call this item How may even cause whatever you want steel helmet, um, iron helmet, helmet of justice, whatever you want to call it, and that'll actually allows to remove, because that's what we're checking This got. Well, this what we're going to be checking when it comes there. Un equipping. And this we are equipped. We ask this world This right here is what will be adding into our inventory here. So make sure that you have your at least a couple items here that you contest with. Now if we go up to the top, So what are ready? Function were go ahead and would just add our items here. So on equipment. And she takes two variables a name and an icon. So this name will be a string, which will be, uh, were those the Scimitar here. And we need a second argument, which is gonna be item God Scimitar. Enough. We go ahead and run this Well, she was added it into our lists. I have a break points in here. For some reason, I might have to take a look. All right, let's leave distraction free mode invalid inventory on give items, inventory, etc. When I shoot us up, where did we and even toy I Rio Inventory Aereo. So add a spelling ever in there. There we go and we go to equipment will see it's been added with name Scimitar and the icon that we assigned it over here inside of her game items. So here's our icon, and the name is whatever we said it as which in most cases you're gonna set it to the same thing as you have. You're just not get confused with what you're adding and we see that works perfectly fine, which is great. Now we can go ahead and test our removed equipment here. Um, and we could do that described. We're gonna go ahead and just do a yield here. Get tree again. You don't have to do this, but if you want to test it, this is just a simple way to do it. For now. Secrete timer were, say, five seconds. After five seconds, we will. We'll do remove equipments and we'll see if that runs into an issue at the moment. What's actually Mike's? We don't have anything selected. Yeah, So if we were to have our items selected here, see spelling ever right there again have next year Ian there. Swilling is very important here. So, you see, we have the Scimitar we gotta selected, and we can remove it. Perfect. So the other thing we're actually gonna need here is what we are removing. Yes, Um, but we can take a look at that later. Celebrations getting are selective nor to get our index are restoring this in our selected items. So we can pretty much just make a decision on how to get this if you want to remove this in a different way, which wouldn't be too difficult, but would probably easier once we get the rest of our script together. But there we go. We don't have add and remove items. Something's gonna remove this section here. We don't need that. Um the only time you might want to remove equipment here is when maybe if you, if you have a shop, are you giving and giving maybe a sword to somebody. But at that point, this should be under your quest items. If it's quest related, or if you leave it this way, we get selected Macy prompter player to select an item, and you'd probably have to impress the button saying, Give or something to the NPC. But a lot of times you probably won't need this. The majority, and depending on your game, he may or may not need to be able to do this at all. But for now, I'm gonna do it for this video, and I'll see you guys in the next one where we shall start tackling are flocked here.
40. Equipping Items: All right. Welcome, everyone. This is gonna be a big one. Strapping, and let's get this started. So we're gonna need a few new variables up here instead of our equipment, including some on ready variables. So we need one for are empty weapon for empty weapon 1814 our empty helmet. And you would need these for your other seconds. Well, so the empty body and empty books. So you have this for every slot, and then we also need to have the equipped versions of these so quick. Uh, I am each there. Here we go. And all of these, of course, is gonna be a pre load for a texture. So the empty weapon this is gonna be our empty Malay amateur drag that in pre load We're equipped. Malay. That's going to be, of course, are equipped weapon here. And you get the idea that we're just going through these So empty helmet, then our equipped one. And these are all our textures that we're gonna be switching between the stairs are chest empty, then are equipped dinner books. So you see, if you want a different icon for each weapon so that it accurately displays the weapon. That's gonna be a lot that you have to do in here. A lot of the chapter making a lot that you have to set up. But in this case, we're doing it simple. We're just keeping what, empty slot, One equipped slot Hari. We've got that, but we shouldn't need to More variables. 14 equipped item and 14 14 e Quit movement item. And I got those backwards equipment item and are equipped. Item has to be a string. So if you want to go ahead and specify this as a string There you go. Okay. So that'll do it for our variables here. Now we start getting into the script for equipping our items. So to do this, we're actually neither start sending some signals and we still need to put in a two buttons here because the equipped button and this would be the un quick button. Both of these need to send a signal when press to our inventory. We need our item list. You send a signal when we have a night of selected, and I believe that's all we're gonna need here, so make sure you get those three signals all sent to the inventory scrip. Um, out here. You disconnect this because this is the same name. Here's something that reconnect this to afford in issues. And I'm gonna equipped item list. That's just the item list. Underscore. He quit. Ments selected. Here we go. All right, so we have all three of our signal sent here and ready. Ready and raring to go. So let's start tackling these one by one. Let's start with our selected here is gonna highlight a hold. All 10 used the up tab to move it up and we'll start here so we'll check if equipment lists yet. Item Icahn. And that would be the index argument that gets passed in is equal to item soared in this case. Here we go. Then our equipment list got set item tool tip. So this is just like we did before Luminess that the tool tip to index and then whatever want the tool tip to be, in this case, the sore Because the attack plus two. So this mission on tenor player that's going to increase our tax that by two points If we equipped sore and we do in l f or else if and have an extra space in there. Keep it little cleaner. And we're basically going to repeat thes but forgot one thing. We need to change the equipment item to soar. Here we go. All right, your basis copy patients in. But of course, if your news a coating definitely don't recommend this because you want to be able to remember this and really drilled this into your head. So in this case will change this. I'm not sore toe item, not Scimitar instead of plus two will say, give us a blustery and the equipped item wouldn't be Scimitar would be so I wouldn't be sort of the Scimitar, and we can create a another LCF here, and this one will be for our helmet. So item dot helmet, Our tool champ is not gonna be attack. It's gonna be defense. And that's gonna increase us by three and are equipped. Item is gonna be helmet. So you would put here whatever the name of your item is gonna be a slow And I believe that will do it for this. So if we go ahead and jump in, take a look similar. We selected This is Attack plus three. And if you wanna check this and make sure it's changed for each of them, and we can definitely do that, we just copy this. This would be soared. This one being helmet item four. I don't help. All right? When we take a look from the after on icons after text scimitars. This attack was three. The sword in the tack Bush to on our helmets. Says defense. Blustery. All right, so now we have our list here, working. We have our tour tips at in when our items were selected. Perfect. And I just noticed we didn't actually set any texture buttons. This whole quit next year, it's going to be, and we just put that right down here at the bottom. And, of course, honey, quit. Will say I quit. We need to actually see these buttons and our depress him, and you should make sure these are the same. Why value? Who's gonna eyeball it for myself here and roughly. I'm gonna put this one here on just lined this up with my grid. This month is a little more appealing to look at something like that. And this way, this What's enough? Space shuttle player doesn't accidentally click one instead of the other. All right, now we can tackle. Or when we press these buttons, we'll start with our equipped function here. So when we hit the quit button, we need to actually quit this item. Which means we need Teoh. Check what? The item is Modify our stats. So you know what? I think gonna go ahead and set this year. So would you pass here and what we need to do is he quit? Are what we need do is yeah. If the item is a weapon or armor, then we need Teoh Check. Um, what the weapon is. So what I mean by that is like, is it a sword or is a scimitar right? Or is it a helmet or our Sorry, Is it a leather helmet or is it a steel helmet? So we need to determine that difference there. Then we need to modify our stats to reflect that we have now equipped. Something means, um, slot texture, and it's that all we need to do here? I believe so. No, we need to send our text set. Uh, very quick text. And what I mean by equipped Text is our text year. So weapon had this was his head. It's a body and boots. So we're going to change that. Of course, if you don't want to, you don't have to. But this old help the player know what they have. Equip shins. Air icon isn't changing per weapon. Course if you have it changing for weapon and it's gonna be a little easier already. What's the re missing? Anything else? Yes, We need to actually add this on. So we need Teoh. What next line upend to he quit dictionary. All right, so these air everything that we need to dio. So if you want to take a moment positive video, see if you can figure this out. I know this got a lot of steps in here. That's why I decided right there. So because that is a lot for you. Toe attempt, all in one. Go here. Go ahead, sieving and figure it out. And if you get stuck or you think you've got it, come on back and I'll show you how I did this. All right, So the first thing we need to do is check if our item is a weapon or armor. So to do that, we're just gonna dio that with a simple if statement if equipment item cause. Remember, we're setting this up here whenever we selected item, so we and we have to select in order to equip it. So if equipment item in our item dot He Equitable's I believe you got a weapon tight the sword. So maybe checking if this is a sword. And I had, um, equip a bles equipped God weapon books sighs. I just double check that here when I got these right equipped. Yeah, we just got a weapon. So if you curious, this is what we're getting here. We're getting the size of this. Do you want to see if we have anything equipped or not? So if the size is less than or equal to zero now, we could just say equal to zero. Because if there's nothing in it, then obviously it would be zero wouldn't be any size. However, we are going to save its less than just in case our game somehow glitches out and goes into the negatives. And what is our ever throwing out this year? Oh, right here Adam Dunn, Old. There we go. Right. So if are selected, Adam here for equipment, items is an hour sword tight and we don't currently have anything equipped here. Then we can go ahead and start doing this. Are second check, which would be check if the weapons are we checked would be that we need to check what our weapon and armor is. So in this case, our weapons when he checked what the weapon is. So if equipment item is able to soared, then we do this. And then we'll also have He said that his past and also have a check for I left. So else if equipment item is equal to Scimitar do this, that's two equals because we want a check of its check it, not assign it. I'm sure you're basically to go through this for all of your everything inside of your sword category at this point. And then you have this exact same statement here through the whole thing. But then just change soared to staff if you wanted. And then you could make a run just like this through all of your staff items to see what it is. Well, we're just gonna go with sort here just to keep things short and concise is freshly since it would just be, um, copying and pasting the exact same thing over and over. So if our weapon is a sword, we're going to change equipped item. It's not equipment, but equipped Item is now gonna be soared, which I think we could just change that. Just do it equipped, equipped item is equal to equipments item, and then we just do that that way. It's a little more broader. That's less We have to change for each new item. And in the case of a sword, we're gonna do our guitar player sat stock. That's, uh, attack. Because we told our player if it's a sword, we're gonna modify our attacks. That I would do plus equals two. So we're gonna increase our attack by two. You don't want to lie to our player, and then we'll add this onto are equipped weapon. That way. This will see that Hey, you have a weapon equipped. So do item dot quick bulls equipment weapon dot Not a capital upend. And what are we adding on to this? Doesn't really matter, but we're gonna say sword just to keep it concise for again. We don't even have to do that. We could just put it equipped item now and now we only have one. We actually only have one number to change here. And that would just do copy paste throughout each individual item, which is great. That'll save us a little bit of development time. All right. But next we also need to actually change our text. So in this, we're gonna get our our text. So the city, our weapon text stop texts Was it that equal to our equipped item? And then we'll just change the texture of our scrape to receive. We've gotten in here. We check which weapon it is. We've checked it. It's a sore. We've modified our stats when the change, our texture here in a second, we sent our text and we've upended. So the only thing we have to do here is change our slot or graphic Here. Let's see what we got. We just call it it weapon Now. Why? I know we haven't covered Texas Year, but if you got this congratulations. If not, then this is. All we do is very someone dot texture. And then we set that equal to that texture. We created all the way up here and preloaded. So for equipping it item, then it's gonna be equipped. Weapon here. That's what we want. Because this is a weapon. So equipped weapons. All right, now let's take a look. And now, when we select our sword and hit equipped, this icon here should change and word weapon here. She changed the word sore. We've run into an issue. Quibbles equipment, Hillary Quibbles. Quit, You know. So she quipped. There. Now it's double. Check this swelling again. All right. Should be correct now. So sword and we hit equipped icons to change the text to change. Pham, there we go. Perfect. Now, obviously, this isn't gonna work with our Scimitar or anything because we've only shut up our sword at the moment. But we can see this is this works and that's perfect. That means we can easily transfer all of this into our next item. So if we just copy all of this or if you wanna write it out, which is always encouraged, it helps you remember things we can now put the sin so equipped Item becomes the quick equipped item becomes equipment item which were Scimitar is Whenever we select our scimitar we set are equipped item to that player staffs We said that we'd increase it by I agree not to As we can double check up here with a tortilla We're gonna I've had this on number Gonna you do this with the center text going to change our texture That's perfect, I Then let's see for now we can do an else statement here and we can just print it to our council. But if you want, you can go ahead and set a text and actually display this on screen for your player. Let's go ahead and print and say you must une quit. Ah, the item first the item in this slot first. All right, so we take a look now to our Scimitar and we could do our sword. What? You see it's not going to do anything here for us that it's not printing. Why is this? Because we do not where we have something equipped already, right? Which is why we had that miss right? Okay, um so if you want to be able to put this tip here, which would, of course, be useful for everyone. I was actually just gonna take our and branch here. I was gonna copy it and cut it out. And I'm just gonna add that onto our if statement here. So every equipment item is sore and our weapons sizes zero or lower that I would do the same thing here We're Scimitar section. Here we go now. Now that tech should work, you must unequipped the item in this slot first. So you see it won't let us equip it. Icon, of course, won't change. But the name won't change the shows that we've equipped anything else and we try the Scimitar. It's a little hard to see since I've already spend that button. What if we could keep trying toe you the Scimitar? You see, it's going to tell us that we can't which is great, cause I mean you can't exploit the system and keep hitting equipped to keep boosting up our stats here. He said that 23 it's not gonna change on beforehand if you didn't see it. Our attack is 20. The Scimitar adds three go. All right, so now that we have our weapons. Of course. Keep in mind. You're going to go through and keep adding an else. If statement here for each weapon that is in the sword type here and then you have this, of course, down here. I'm just gonna pull on this out now. So, in fact, we're just gonna take this right here now, And you'd have a next section here, and you would then change this from weapon type, sort of weapon tight, um, staff, for example. And then we'd run through the same if else if and else situation here, but for everything inside of our staffs to check if we have anything there now, in our case, we don't. So what we're gonna do is we actually check Not our weapon type, but our armor and check if it's in our helmets, so quit Will stop, farmer dot Helmet. I should helmet or home? Helmet. Okay, So we're going to check if the item we've got here is inside of the helmet. So we know what ago in our head slot and everything else will effectively be the same. Something pretty much just copy everything in. So our equipment item, if that is equal to helmet, which is what we named it up here. We just got a basic I mean, but you know what? It was called a steel helmet. So I'm gonna set equipment Adam to steel helmet, and just to not get confused when I add this to our list, I was going to do that. Change the name of it. All right, So the equipment is our steel helmet and are equal weapons size note. That's wrong, because this is our helmet, so we need are equipped helmets size. How much size is less than or equal to zero again? We Oh, we check for negatives as well, just in case our game glitches out and somehow goes below zero. We sent our equipped item to when our equipment item is player stats, not attack. No, We're changing our defense in this case. And how much did we tell the player? Plus three. So at 3 to 4. Defense stat ad Not too are equipped weapon. If we take a look, we want our equipped helmet gonna add under. There were going to change the text to me. Whatever our name is, what could be steel helmet and then we need to change your texture. However, it's not gonna be our weapon texture. It's gonna be our Fred seven texture to be our ahead. Text on our weapon text. And this wouldn't be quick weapon. It would be Quit helmet. All right, let's open up. And that should work just with those small changes there. So, steel helmet. Did you see? I renamed it to a tip. Still works. Equip it. Nothing is happening. Why is this? Oh, right. This in our helmet. Here. I need to steal helmet. I renamed still Helen, but I didn't change it here. So the reason nothing is happening And I'm glad it did this because now I can show you inside of our helmet. Here we have an item called helmet inside of what All of our helmets are, but we don't have is our steel helmet. I'm just gonna go ahead and add another helmet item Still helmet. Here we go. So if you don't want Adam to be equitable, but you still have it in this section for some reason, then you just wouldn't have it listed and anything. There you go. So, steel helmet. Now that it's listed there it will recognize it as a helmet. So the issue here is it was shaking. If the equipped item or get the equipment item, which was steel helmet, it's inside of our helmet section. Equitable Armour helmet. So it's checking if we have steel helmet in here, which we didn't. So obviously nothing happened with that. What now that we added in it should be fine equipment or helmet. Pam R name change our icon change and in this year's defense gained Blustery. Now we don't have an else check here, so nothing is gonna pop up telling us we're telling our player that they have unequipped something first. But you see, because we still check for our size where we can't glitch the system and keep increasing our defense, it's going to stay at that and not go any higher. All right, so we have that. And now again, you would just do the same thing. You do what else? If and check again If the equipment item is I know a leather helmet or something. But of course you gotta remember to come here and a leather helmet. Your list. Okay. So we know how to equip an item. But you know what? I think we're I think I'll go ahead and add our text in here just to make it a little more visible instead of printing out. You know, some of you course you're gonna want to do that on and for the player is good that they know. So by doing this, I'm just gonna pull this off screen here and add in a text label. And I say you must Aneke wit the item in this slot first. Here we go. That way we can see that. And if you want, you can change whatever you want about this. But I think I'm just gonna change this. And Deke Wall color. I think I'll changes to Would you read? This is how does not would have to a custom, which is fine. You know, maybe we do that they would go. So we have just a slight variation to our text to get our players attention. Now, of course, if you want to go in here, change your text to make it match Bond wife and I noticed head was a little off, so I'm gonna align that to the left Now do the same with the body and boots this size weapon. Keep on the left and I should hopefully address that. Let's take a look real quick. There we go. That fits a little better. Now we can take head. And with actually that over body, we could move it over. Boots will be moving over. Weapon that over a little bit. We're starting to get a little crowded. So if you wanted to make everything bigger certainly do that. Um Let's see our text. We don't need that visible all the time. So it's a une quit because une quit text we're set the visibility living off. We don't need to set our tax because we already did it there. Here we go. You do else Because I only have the one item we'll take our un He quit text visible. Yeah, are not visible equals True. Now just replace my print function of here instead of our weapons section. And when we actually quick a weapon or we equip anything will set this to close. All right, so let's take a look and quit. We are Scimitar whom we have no text. Perfect. If we try equipping something else, there's our tax challenges. We need to unequipped the item first, which of course, we can't dio and then we go to our steel helmet go like that perfect text disappears because we didn't have anything in that slot already. So that's perfect. Everything is adding up the way we need. Now we need to actually unequipped items because right now this doesn't do anything. So if you want to change our weapon, we can't. Which makes your text me makes zero sense. But this video has gone on long enough. So I think I'll actually set on the unequipped weapon and or the unequipped items and ah, the next video. All right, so take care. And I see guys on the next one.
41. Unequipping Items: welcome back if one and in this figure would go over how to un equip our weapons now, since we now know how to equip them. All right, so we're gonna be doing a similar thing here. We need to check check Here. Item is in is what weapon or armor piece. Just like we did up here when we checked what it was. And then we moved in. So we'll check that check. Um, I don't know. What? No, What? I said, what item is so what I mean by that is Of course, we're gonna check if the Adam is a weapon or armour. Should we're gonna check here If it's, ah, a weapon in our short group or if the armor in our helmet group, then we're gonna check what item it is, which is right here. So if this is still helmet, this is what we dio. If this a scimitar, this is what we dio sword. This is what we dio. So you need to do checks like that again. We need to modify stats. We need to set equipped item Nothing that's are equipped item, variable change, text and texture. All right, so if you want to go ahead and take a shot at this? Go for it. You've got all the information that we've got up here that we did last time. You can use that to help you with the unequipped process. And if you think you figure it out or you get too confused along the way, then come on back and our city high did it. All right. Welcome back. So we're going to check if equipped Item is in. Item equipped bulls dot He quipped weapon. So what we're doing here is we're gonna check it. The item that we have selected right are equipped. Item is inside of our equipped slot here. So if we have helmet, we're gonna check if steel helmet is inside of here. If we got our web here, but a check of scimitars in here or sword is in here. In this case, we're on weapons have are equipped weapons that were checking if sword or scimitars in here and then we can check if quit item is our sword. We said equipped item to being an empty string again and we change our player stats. Our global of course not. Our function we're sets out Stats stop attack minus equals to because we increase it by Jew up here when we equipped it. So let's take a look. Let's jump in began equip or sword. We try the Scimitar to yell at us. We have to unequipped the sword verse of the sword. It's unequipped and let's try adding our scimitar now. And it is not all right and racial tragic, of course, because we haven't modified or pulling anything else. However, did our staff change there? Yes, so you can see our staffs changed when we unequipped, which is far because we know are equipped but Irish are unequipped. Button is working there that's attracted to. And if we try that with our scimitar we equip, that'll be three were unequipped nothing. So we know that it is checking correctly for our sore and this is the same process want to go to because this is the only individual thing we need to do is modify stats so L f I live item is equal to he scimitar and again it quit. Adam equals an empty screen and then our player that attack well minus three because equipping it added three And now, since we are doing this with a weapon now, regardless of what weapon it is, so check your indentation here, regardless of the weapon. When we unequipped, we need to set our weapon text to just say weapon again, the name of our slot. And then we need to change your a texture. What weapon? Texture? And what's that? That too, our empty weapon. So what we're gonna do is we're gonna check if our equipped item here is inside of our equipped section here and weapons. So if we have a sword equipped, we're gonna check here if we have a sword in here. And if so, they were going to change the equipped item to being an empty array. And we're gonna modify our stats by removing, too. Now, we have to remember to what I didn't put in here. Um, but we need to actually clean out this array. No need to empty the cell. Make sure nothing is in here now. Otherwise, when you go to do a sort again or not, when we do a sort of yet, But, you know, I could just show you the bug that will run into a very short. Quick. We can unequipped. That's fine. Everything changes. We lost to our tax by 20. However, actually not avoiding actually not avoiding, But we're not running into that glitch, which is nice. However, increasing this over and over gives us unnecessary data increases file sizes for no reason . Um, and as a little bit of blow to your saves, who are all of our data here that we're saving? There's no reason for us to really do that. So just to keep things clean, Ross gonna clear this out and do that? Of course it's easy. Just item got he Equitable's that equipped weapon and we just do dot Clear How completely clear that out To make sure that we don't run into any possible bugs in the future by having this in here and reduced bloat. And this so prevented from having like, 12 things or maybe even 100 swords in our inventory at any given time or nine territory but equipped according to the game. Okay, so that would do it for our weapons. Of course. You continue with the, uh the LF down here, if you wanted, uh, are sorry. Not if you want But if you had more weapons and let's go ahead and we're going to check now for if equipped item in item. Equitable's army are not armors. Are you? Quit once you equip, not It's just allowed in the game equipped and we're going to go with helmet here. Then do this. And of course, you know we come in here and you also have one for not helmet, but should have one for your body. And then you have one for your boots, etcetera, just like when we equipped everything. So we're check if the item is a helmet and if so, we'll check if I already quit. Item is our steel helmet, and if so equipped, item becomes an empty string. And then, of course, we modify our player stats in this case, our defense, because we added three when we quit the elements of defense minus equals three and now, regardless year. As long as it's a helmet, we need to now change our textures and everything. So we're gonna do our head. Sex goes back to just saying head, we have our head texture which will go back to being empty, an empty helmet and then just like before we can clear this out. Item quip pulls down quits, uh, helmet and clear. All right. Now, if we run this, we take a look in your scimitar. You know, yellow doesn't trying to quit sword, so we unequipped Scimitar and we can equip for short now. And we have our steel helmet. Maybe quit texting. Everything changes when his unequipped. And that since backer icon changes are stats adjust, get stand this in any direction so we can't run into any of these bugs. Perfect. Oh, I hardly have to ask is in the word sort there that will cause an issue year ago. That's why we're having any quick problem there. Scimitar equipped Unequal sword Quit une quit perfect steel helmet equipped, Not equipped. And you can see our staffs modifying of aside appropriately and we can't have two of the same weapon are two of the same slots equipped at the same time. And she would just hit the unequipped button. So even though we have the cemetery quip, we just hit We have the helmet selected here and just unequipped because we're checking our slot. So we go well equipped. Both of these and we had on equipment. You see, I want a sword. So our helmet isn't gonna unequipped there. So this old help you? So if you ever have to scroll if your player has a lot of weapons, what is not gonna have to you like, scroll all the way back up to the top gun equipped, that weapon, go all the way back down? We can just be like, OK, we have a sore, but this scimitars better because this gives us plus three while the sword is on giving us plus two. So I just want to hit unequipped and I can Equipment secretary so that just a little quality of life that that happened as a result of the way we did this. But there ago would have equipping an un equipping with a little warning that tells our player you have to unequipped first and our help it. And of course, you'd also have things for your body, your boots, and you just continue adding on. So now we have this un equipping, completely working. So all you need to do now is whenever you want to add a new item, just remember to come down here into your unequipped and add another LCF here. If you're adding into the this weapon category and well, for your equipped weapons, when it comes to any quippy, if you're gonna unequipped from a helmet, add this in here and keep going with else if if you're gonna add in the next section here for your body that you're gonna have a need, a whole difference F statement here, this whole block, you add this whole new block here for the body and one for your boots and for equipping. If you add new weapon tight, remember to update and add your weapon type in here. Show your weapon types. If you add more weapons, remember toe. Add in to Alicia. If you had more swords, make sure to Adam and here. Otherwise, you'll run into an issue where nothing will happen. Continue adding your LCF year for each additional sword. If you have a new weapon type, then you have to create a whole new block here with the same kind of structure and set up, and that's it. I mean, aside from making sure that you set your tool tips and everything for each new item that you create everything else seems pretty much set and what we need. So that will do it for this video. You now have a system to equip an unequal weapon that changes your tax tells you, play the need to unequipped something that's in that slot first. Um, the tax changes are icon changers. We add items into our players inventory. We can remove them from the inventory of our equipment. We have our player stats on the side that constantly updates and reflects what we've got. All right, that's a very productive little segment here. And we've added a lot of code here. When we started, we only had about 90 lines. And now we're up to 219 2 20 if you want to count that last space in there. So we've added around 130 lines of code in this. Just doing this section here, so congratulations. Give yourself a pat on the back. That was a lot of work that we got through. All right, I'll see you guys in the next video.
42. More Saving And Loading: welcome everyone. And in this video, we're going to go over how to save our list of items here, and it's gonna be a little difference. We have a little more loading to Dio as we need not only icons, but also names. And we're also going to go over how to load up our sections here. All right, That way, if you end with a weapon equipped, it will still be equipped. Once you leave, are re opened the game. All right, so let's go ahead and jump into that. And the first thing we're gonna need is to go into our game items. Now, we're gonna need another safe half year before our equipped apples. We're need and equip index. That would be an interviewer without start out zero. And we need an equipment loading, which would be false by default. Similar to what? We had a talk with our safe path, my index and loading now inside of our inventory section here in our dictionary under equipment. Let's go ahead and add a section called Name and make that an empty array. All right, now that's we all we need to do there and are You need to do now is create two functions, one for save equip ALS and one for Load Equitable's. And there is going to be the exact same thing as with our consumables. So you can just copy that you can type it out again that help you remember it or to help you learn it, or you can copy and pasted. However you want to do it. It's good and just going, trying to be the exact same thing just, of course, with different. My name is Cruz, and here we're using the dictionary inventory and down here, losing our dictionary, Equitable's. So if you do copy paste got, make sure you have to make those changes. I would recommend that you actually type it out. If you're not used to actually saving files this way, you can get yourself used to it. And, of course, if you copy and pasted, make sure you change the safer Well, that will be everything that we need inside of our game items, and everything else will be handled inside of our inventory script already. So first things were going to do in the ready function windy to load our quibbles, so item dot load Equitable's we need to set are loading to true. So item dot equipment loading equals true. And for now we can leave our items being added. That way we can save them later. Okay, well, come on down and we don't need to touch our process yet, So let's go all the way down to the bottom. Oh, here ago. Eso on unequipped when we unequipped are ah helmet we can save so item not save Equitable's when unequipped a weapon. And of course, we also want to save when we equipped. Um so remember to put those in there and that old that will cover that section. All right, now, on our way down, we go ahead and for in our ad equipment function for name. Let's go ahead and add a default parameter, which would just be a string cold. Whatever you want, I just use the word default and for icon, we're going to set that equal to know. Now we've saved our icon, of course, but we also need to save the name of our item, though when we load it, we have a name that's just gonna be item inventory equipment dot name, not upend, and that's going to be our name arguments. All right, Now we can jump into creating our the last two functions that we're gonna need here. And those are going to be load equipment and the other one I'll touch on in a moment as this will be a little dependent on whether or not Ah, the A bug persists as to whether or not we need to change a few things. So let's go ahead, funk load equipment. Right now, I'm just gonna put some space down here so we could move our section up so that we can actually see what's going on here. So of course we're not gonna pass. What we need to do is check if item guy equip index. It is less than or equal to our item. Got inventory, God, equipment, inventory. What sighs minus one himself for a little review. If you don't remember, this remains You're gonna check Far Equipment Index is smaller than our equipment inventory . So if we take a look at our game items, we're gonna look and see if this number here it's smaller than or equal to the size of our items here. So the size being, of course, the amount of items that should be in our inventory, And if so, do this. And what is this that we want to dio? Well, it's gonna be equipment, list and item. And of course, I was sick to arguments. One for icon one for in our we're name and the name comes. First it goes name and then icon. So you item John Inventory? Yeah, equipment, uh, name. And the argument in here is, of course, gonna be our equipment extra item equipped index. Our second argument is gonna be our icon. So if we go ahead and we just have item inventory, uh, equipment dot inventory. This is quite a long one. And the argument, of course. Oh, five. To stay here, I'm using parentheses. Jennifer square brackets That would have thrown a huge error. Merry go. So it's a good thing I caught that. Remember, whenever we get, we're getting our index position on an array are a dictionary. We're using square brackets. There we go. I was wondering why that was looking just a little off there. Eso again. I don't die equipping next for our argument for in exposition and then of course. Item equip index plus equals one. And we go ahead and add Ah ah, Nelson. Here. So you pulled that bag. Bring it down. This will be just like our if statement. So if our equipped index is bigger, then our inventory five. And we're just gonna set item equipment loading two. False. All right, let's come on up to the top and inside it off our Croce f We'll go ahead and put in if equipment loading is true load equipment. All right, let's open up her seen here. And you see, we have a lot of items and in here, but hopefully these once that we did add save and do this, I actually I'm going to delete an old file. I had Blunden here. Just give me one moment between your AP data go dot app, user data and then the name of your game. And I'm just gonna delete both of mine there. So we start with a clean slate. Sometimes you can throw an error after we've added new information, and we can't actually get that info when loading, so just be safe. I'll completely remove everything. And I just moved it over to you my other screen and we can reopen this. We do that That ad in our items here and when we add equipment we're saving at the end. So that's perfect, cause when we look in here, we have our consumable list, which ah also has our items and them for equipment. So I could just close that and I'll just comment thes so we can no longer at those now the only items that should be in our inventory should be these three. What? The names Scimitar sword and steel helmet as well as their icons. And if we see it, that means everything has loaded correctly here. Quit. And there we go. And they are, as you can see, our tool tips here. Everything is still working just fine, just as it was. If we're had continued playing our game so perfect. And of course we can still equipped, Um, and unequal just fine. Now the problem is, if our player equips these and has if then weaken, go ahead and close it, start a game back up later, and all of a sudden nothing's equipped anymore. Obviously, we can't have that. You need us to actually stay equipped. Otherwise our players going to start getting annoyed. So we do have to do just a little more down here when we're loading. And that's gonna go right in between our if and else of statements here. So all of these air essentially gonna be the same type of thing just for different sections . So we're going to f Item got, he quipped. If item got Equitable's be quick helmet sighs is larger than zero. So we're checking is down here in this section here. So if this is zero families, there's no items in here. And if there's no items here, that was We have nothing equipped, and so it's bigger than zero. We have something equipped, So that's all we need to check for in this case. You know, if you wanted to make this more elaborate and have different icons for different items that were equipped than you'd have to, of course, do more checks than just this Now we can set everything correctly. But for a simple system here would seem to check if we have anything in here. So if we have anything equipped and if so and simple, we're going to take our text. We just come in. This is not auto filling out. Why not? Is it because we don't have the scene open that one really make any sense? But we'll take a look. I I guess. Okay, so we'll make our had text text equal to our item, uh, equipped bulls that he quit helmet. And that's repositioned zero in our index. Because we should only ever have one item equipped in this slot at a time, So that should never be an issue. And of course, the next thing we need to dio is center texture. So our head texture equals equipped helmet. All right, so let's go ahead and take a look. We'll open this up and there we go. Our helmet is still quit. Perfect. Of course, if we were to have the unequipped and we load it back up, we have no helmet. If we equip it and load it back up, we still have our helmet. He quit. And of course, our name is correct. Our icon has been displays showing we have something in this slot. Perfect. All right, so we know that works, and to do the rest looks we didn't open that to you? The rest year, you're just gonna respectively do the exact same thing just for on the other parts. So you're gonna do it for your body, your boots and your weapon. All right, So once you have that, you'll find you can very easily. Now, come in. And you Can you go. Your weapon will also equipped. Perfect. But now you see, we have this strange bug we can't un equip our weapon. Strangely enough, however we can. Unequipped or helmet. I'm not sure what this bug is a result of since our helmet works just fine and it's the exact same code. So it doesn't really make any sense why the weapon wouldn't work and the rest of it would. So what I would suggest year, at least temporarily. This might be fixed in a future version of Goethe. If you're using a newer version than I am or gado if you prefer, so you can go ahead and check that. And if you can't unequipped your weapon, then this continual on here and I'll show you what I did to we'll solve this. So if we just come into our scene here, I'm just going to show my equipped. I went ahead and created a button here. And I'm just gonna change this to say, I don't want to say, honey, quit or I could just put a You just, uh, cut down on space. And I just call this wet on or unwed. Rather. Go on. Well, Cariou, and that reminds unequipped button for my weapon so easily enough, I just sent a signal for pressure connected to my inventory script. We can really clean all this up. We don't need all this space in here anymore. Puts him down here. Just call that up just to make it a little easier for you guys, though. Pull this up. So now are unequipped for a weapon. I'm just gonna go up and take are unequipped button here, and we don't need to check if it's in our weapon because it's all we know what's in our weapon. So I'm just going to take this section here from if equipped weapon equals sword all the way down toe save consumables, and I'm just going to copy it and just place it down here. And, of course, always make sure that you have everything functioning as should. Here, you should come back one. Here we go. That looks right. So now if we load up, we should be able to hit our unequipped button here for a weapon and it un equips find. So, as you see, the code works. It's just for some reason eyes not firing when we're done equipping. So if we come back in you into a sword, you see, it works normally, but the bug appears once we've loaded the game, which is interesting, and again, I'm not sure why. So, you see, it doesn't work here with the exact same code here works strange, But I haven't tried this, of course, with body and boots, because I'm only showing you the weapon and head. But if you want, you can go and create this little unequipped button for the head to create one for your body and your boots. And then you could just get rid of this button altogether. That way, you just have some consistency across your entire equipped menu here. All right, So with that, you now know how to load and save data, whether you need names, icons, names and icons or you check things to see if things should We basically honor off sure balls so that you can now take that knowledge and apply that to any part of your game. So obviously, if we're loading up, it's something here and we have a weapon or something equipped. You're gonna need to save your player stats what you already know how to do now and then you need toe. Load up these new stats to reflect what you have equipped and you'll do the same thing for something like a saved game. You'll need to get the players position, which I'll show you. What that is real quick. We just come out of distraction. Going home will live in our player. That's right here inside of our transform. So if we were to move our why, you can see it's gonna move our players. So right here this section is where is the information you're gonna get for your players location? Ah, if you need rotation, cool. But we shouldn't need it in here. If you got some kind of something to make you bigger or smaller, you can adjust your scale or an invisibility in these visibility here, whatever it is you need your information will be here for you to save related to your player. But you've got all of that knowledge, so you can certainly apply that whenever you want on. One thing I will mention is, since we're saving these as we equipment unequipped things, this is working almost like an auto save feature. So if you don't want this to happen and you want to have an actual save button, then you can just take all of these. So, like our save equipped bulls saved and symbols and whatever else and we can just put that inside of I don't think we actually have a script for I was gonna say a global script. I'm just gonna come in here and just into my scripts water and just to show you guys in a new script on DA, I'll call this global settings. And they are So you want to have anything here and then you would just called like function save game and then even put end like item Equitable's item se consumables. And then, you know, again whatever things and you say, I don't know late, maybe you got like, maybe you have a clear stats, not save stats, and I don't know whatever else you created here that you need to save. So if you want to do something like that, you can. And then, of course, wherever. If you had a safe button in your GeoEye here, come here. So, for example, we'll have one for options when you yet. So we'll come in here. And what connects that for? Pause for an example and, you know, say, instead of options, let's say this is on safe for us, you know, because this were save button. Then we were just coming in. Whatever you name, your global Icahn or your global script so personally myself, I probably just be like G B for Global. And then, of course, it would just be saved game, and that's all you would have to do. And then it would go to run through all of your say functions. So if you are you a save button like that and so they're having your weapons and everything else auto save as you played the game, that's all. You would have to put everything into a safe function and credit save button that calls that one function to save everything All right. So that will do it for this video. And you're well on your ways. Where? Just about done with this course. We don't have all a lot left. And it's not much more for me to teach you that will be related to creating an RPG here.
43. Audio Settings: All right. Welcome, everyone in this video, we're going to go ahead and start going into our options for our game. Now, I just imported on audiophile just to show you that things are working. I cannot give you this specific audiophile, and I just haven't gone out and found some any music yet or sound effects that we're going to use. So for now, it was. Go ahead and create a new scene this week user interface. And this is gonna be our settings. So first up, what's the go ahead and I'll create a, I think where you can use a tab container for this. Then, of course, we gotta stick a tap. We just expand or size here of this whole thing. Merry go now, depending on how many options you have in here at the end is going to be up to you and really determine the size. Um, but let's see. We'll have one tab here. We have audio. Typical. We have more tabs such as this way or graphics is another one that you that sometimes disease instead of this way. If you have controls that could be re mapped, you'll put him in here as well. But for now, we're just going to take a look at our audio on inside of this tab. We're gonna have a few things, so let's get some labels here. We're gonna have some volume sliders for a game, So this will be our master volume. Of course. We go to our text. You can't have it. Go on. Cool in. What were you thinking, Riggio? Master of all, you maybe increased the size of this. Here we go. Something like that. Perfect. Let's just take a look at this. Yeah, this looks in game. So the utilities resources. Yeah, setting scene. All right. That doesn't look too bad. You can definitely work with that now. Obviously, you can go ahead and add more of these in. So I'm just going to duplicate this to save on time. And we'll call this one SFX. That's effects volume. Grab. Slide it down. Something like that. Perfect. Um, and then you could do one for we have one set up for music. Of course, you want to come and make sure everything is evenly spaced out, But just to give you an idea when we're Michigan are on the end there. There we go. So something like that. Cool. Now we need to actually get our slider certain side of our audio tab. We're gonna go ahead at in and a slider. We need a horizontal one, not a vertical one. And make sure it's edible. And for the minimum value set that to negative 80 and max volume. I think I'm just gonna set that at zero. Just that we can't go super high. And I just pulled the cell beside a good distance here. Maybe something like that. Yeah, that looks awesome. That'll do. Um, now, to get these different audio channels, um, that's just gonna be down here at the very bottom. Ah, goto and the audio, these are These are pretty much almost like your audio channels. All your audio, it's gonna go into the master and then your master, of course, we'll control everything. So in our case, we need sound effects and music. So we just add a new bus. We named this one. That's affects. And we need another one here for music. Let's get our last two sliders here. That one down and that one down this one will be our music volume This one's SFX volume Ashen. Uh, now, as you see, all of these will go out to master, which is perfect. That's all we need. Um, all of our audio zehr set their perfectly. Now I'm gonna show you here in for when you do have an audio. I know. Set up here, you see, in the bus. This is where you would direct us. So in this case, this would be music. So I stick it in my music tab. So I'm sure at this point you would have some audio Of course given to you, since the course would obviously be completed if you wanted Teoh just put something in here just to test it. It's inside of the g o. I seen that. I'm adding this and you're gonna add a note, and it's just got audio stream player, drag your audio in and just select auto play. That way, if you want to follow along and test, make sure yours is working as well. You can definitely do so. No back over in our settings as perfect. Everything set. So let's give our settings a script. Obviously this isn't gonna go in. Resource is going to go inside of our scripts and create. Now, for all of our sliders, we need to pass in a signal which is gonna be value changed. So we just connect all of those in already. Now, all these gonna have place the exact same coding in here. Just a different name is obviously gonna be passed through for a bus. So this is going to be audio shaver dot set bus volume DB. And our argument here is gonna want to know which audio bus in this case is for master volume. So I'm just gonna put Master, and that is going to be the name that you have right up here. Um oh, we have to get the index. That's sorry. Um, so it's get bus volume db on. Then we actually go back into our audio server, don't get bus index and then inside of the index argument here, this we're gonna put master all right. And then outside of that parentheses with inside of our the second pair, we're just going to put a comma, and there are second argument will be value. That's gonna be the exact same. And our other sections so sound effects is gonna be audio server dot set bus volume DP open parentheses, audio server yet bus index open parentheses and the argument Here we take a look at our name down here at the bottom is just S f X, and then we close our parentheses and at passing a second argument, which is of value and close our second pair. Now, of course, music will be the same thing, except the name is gonna be music. All right. Seems simple enough. So it's head on into our G I Let's go ahead and instance, in our settings setting scene, we can hide that and we can connect our options. But now, so when that is pressed, we're going to connect that to our pasta menu. And just like our previous our previous sections here, we're just going to you get parent, uh, get and we could go note here on a node we're looking for is settings three somewhere near the bottom aereo settings. And as you knew, dot visible equal shoe. Our new dot show. Either one should work here. I'm gonna go ahead to dot Show is what I'm going to use here. All right, so Now, when I open up the scene here with our possible you, our music is gonna start playing, of course, and we should be able to control. She wouldn't control it with our master switch. I look at this, Um, negative 80 might be a little too much for this. So it's up to you. If you feel like to change that, I think I'm just gonna leave my the way it is. So I'm just going to mind in the middle, and we should be able to adjust our music as well on its own, separate as we can. So we just our music and our master as to several volumes, Of course, if we had anything going into sound affects our sound effect, slider should affected as well. But there we go. We have our audio's audio settings set up. You now know how to make sliders to affect whatever different things in our case for our different volumes. So there's anything else that you want to stick in here in audio. You can go ahead and feel free to do that. And next time we'll go ahead and tackle the display section
44. Display Settings: All right. Welcome, everyone. And in this video, we're gonna go over the display section. So we're gonna go and just hide our audio section and make her display section visible. I'm gonna go ahead and just copy. Over are two labels now, we had here from audio its movement to display. That way. I don't have to reset our text or anything. So this one is gonna be our full screen, and our 2nd 1 will be our resolution. Oops. We don't need that. Cool. All right, Now we're gonna need two more things inside of artists. Elatab here. We're going to use an options button for our resolution control, and we're gonna need either. You can use either a check button here If you can talk, go on and off. Or you can use a check box. That's where just tick. So you could use either one of those for four screen. The choice is gonna be completely up to you. I think I'm just gonna have mine. I think I'll go with the the button so I'll delete my check box. All right, So either. Either way, um, no matter which one you pick, we're gonna be doing this exact same way. So one thing that's different is how it looks visually and again. You can adjust all of these by creating themes and applying them. All right, so we can start with full screen. That would be the easiest one. Should we create one for disquiet? Na? We'll be fine s over. Check what we're gonna do Set press and connected to our settings. Cool. So let's go ahead and create a variable. We call it Should we know we don't need Teoh? Eso were simply just change. This are full screen here and we'll say the last Ah, fancy window. Full screen equals And it was a not os dot window. Full screen already. Now, if we were to open this up now, I don't know, uh, this might turn black for a second on the recording, but when we talk about this, we turn it on. Okay, here we go. I should have gone full screen. And when we click it to try to back off, we're back toe windowed mode. So our full screen button works. It's a simple as that implement our full screen button. All right, so So our full screen works. Let's go ahead and do our resolution without this resolution options. And let's see, we will need selected. So items selected Fire Index, I d. We're gonna need that. But before we do to keep things simple, where we're gonna add in here is two variables. So we're gonna export a no path. So this is something new to you guys and this good before a variable called resolution choice. All right. Now, when we saved that and take a look in the inspector at our settings will see, we have an option here said resolution, choice. And since we set that as a node path, when we click a sign, we can select any node that is that we basically have access to here in the scene. So in this case, and when it's like my resolution options, all right. Next, we're gonna need an on ready variable. We'll call this resolution and then all equal get no doubt. Resolution Choice. Now, the benefit of doing this is I can change this My inspect here any time and not affect any of my code. All right, so now you have to decide what resolutions you want to support for your game. So I'm gonna go ahead and do create my variable s a rez. Options equals. And then we're just gonna create an array here, and in here is where you going to set your options. So with 1920 next 10. 80 would you 12 80 x 7 20 Ah, would you? 6 45 for 80 and you get the idea. You can come in here and you can constantly I just add in whatever resolution to would like and this elitist to our ready function. All right, so now we need to go into are ready function and we're actually going to create are we're gonna actually call a function called ad. Look, I don't wanna go without capitals. See ad resolutions and let's go ahead and create this function, funk and resolutions. And all this is is this is simply just gonna be four item in rest options. So this is going to say for every item that's that's in here. So 1921 10 80 I'll be one item 12 80 by 7 20 will be another item 6 40 by 40. Another item, etcetera for whatever about a resolution. If you have in there. So for each one in there, do this. And what do this is gonna be is our resolution. Don't ad item. And yet and we're gonna add is item. So what this basically saying is for everything in here? So our first item will be 1929 10 80 working. And take this, we're gonna add it into our resolution options. Then for the next item 7 20 resolution, we're going to take that. Add that to the items to our options. We're going to keep doing that all the way down until there's no more items on our list. And if we go ahead and run that and take a look. You see, we now have options here. Awesome. So what? I'm gonna go ahead and add here. Ah, Do we want to go with this? Um, uh, no, we could leave that. So now that's going to bring us down to our function down here of resolution option items selected. This is going by. Did I select the wrong one? Here? Hold on. No, this should work fine. So if if resolution options, uh, get I don't text, but we just ah, do that put a pass underneath there. So obviously gonna check if our resolution options item text is equal to in this case, will say 19 20 x 10 80. Do this now, What this is gonna be it's severally just changing our screen. So we're going to dio os dot set window sighs and that's going to take a vector to argument what should be an X and y. So this would be vector to open and closed parentheses and in here is basically gonna be our resolution. So 19 21st argument and 10 80 for a second argument. So if we were to open this up now and going to display and select 1920 10 80 we need to make that Seacon re select our new Not recently, but we should just at a default option in there. But for now, I'll just go ahead and select a different item now 10 80 Boom. You see our window change size, which is great. So we need to just basically copy the same thing for each resolution option that we put into our game. And if you want, you can create and pretty variable that holds these. So I'm just going to do that rez selected. Now, you can just shorten this down a bit, just like that. All right, so I'll copy this one down here. Yeah, we just put a bunch of lines of code down here. Just, uh, I felt come down like so change this to 12. 80 x 7 20 Change our numbers in here. 12. 80 ex 12. 80 and then 20. And I think the last one we had in here was 6 40 by for 80 like that. Okay. And if you have more options that you can just go ahead and keep adding them. Ah, What I would recommend, though, as well is changing. Ah, the position of your screen. So to do that, we just add in here os dot set window position and that will also take a vector to argument . And I just said it at 00 This is basically said it at the top corner of your screen. So now when we test it Oh, it's gotta be on ready. Okay. Um, already, There we go. You were in the action there. All right. We should be good now. Yeah. So we changed this to 7 20 you see, goes up to the corner on 10. 80 6 44 80 Now, there is a little bit of an offset here, so you can just adjust that by tweaking your window position. All right, so we should probably set a default option here. So to do this Ah, we simply just need Thio added an item before we had our resolutions. So we do. Resolution ad item. This item is just gonna be just send it to say things. Resolution was set Our default item here. So it's a resolution that item disabled, Mrs B. Zero Index is it will be the bursting on our list. We're set that to true, and that should automatically be our default selection. When we start up and it is and you see, it's all great outs, we can't select that again. It's a poem. Then we go going through our options. All right, so there you go. There you have it. We have resolution set up. We have our default options set up there to just letter player. No, they can change resolution, and we have our full screen button working perfectly. So if there's any other display options you want to put in there. You can feel free to do so. But for a two d game, those are probably all you're really going to need. Um, we could do you know what? Let's add one more option in here, just in case someone just in case. For some reason, our game is using a lot of CPU for someone, So this would just be a little bit of ah, performance improvement here. Uh, depending on you gave you may or may not even need this. Well, let's go for it. Will say low CPU mode would lower this down low CPU mode. We'll create another button calls to see if you button and crushed some of this up. And here we go. So for this, I was simply just gonna set our lo processor. Oh, I stopped. Set lo processor here. Usage Gonna wife. What capitals in here? There are none. Create a variable up here, you CPU mode equals And if you're curious, is going to be a ah Boolean equals will say false by default. And they're so equals CPU mode. Now, just a CPU mode equals not CPM our Right now you're not gonna notice anything you hear when testing it. This would be something that you would see in something like your tache manager. We can actually monitor your resources, but turning this on will drastically reduce um, the amount of CPU needed for a game, which is great. If you wanna try and keep your requirements three game lower or if you're developing your game for mobile, then this is going to keep the CPU usage down, which means it's going to drain the battery. Ah, lot less on mobile devices. All right, so and that'll do it. That's all we really need here and what that that'll do it for this video. We're just about done with this Siri's. It's been a long ride, and you've done a lot of coding. You've gotten a lot have things done here. And if you're experiencing ah ah, good. Oh, year for maybe your second or third project or a second or third time getting to know the software. Then you've learned a lot through this course, so you could give yourselves a pat on the back on that, and I'll see you guys in the next video
45. Main Menu: All right, everyone in this video, we're gonna go ahead and create our main menu for a game. So go ahead and just come up and create a new scene and it'll be a user interface. And I've gone ahead and renamed my control node to a main menu. And if you go ahead and save your seen already, you can use to shortcut control s, um And if we come on down into our folders, we're gonna textures you. I menu. This is where we're gonna have our background and all of our basic buttons that we're going to need for our menu here. So first up, let's go ahead and add a node, and this will be a texture wrecked and this will service our background. So we're gonna pull main menu background here right up into our texture slot, And there we go. We have a nice kind of fantasy castle going on here pretty standard for an RPG. It looks nice. And we could go and rename that too background, and we're gonna need some texture buttons here. So I'm gonna rename this to my play button, another one for options and we'll add one for quick. Now, if you want to go ahead and create one for your own credits here, If you want to save credits for the end of your game or whatever, you can certainly go ahead and do that. But you're gonna have to create your buttons for that as these Ardian, once that I've credit here to provide. All right. So play button, We're gonna look for the play image down here in our menus, and we're gonna pull that over into our texture section and there's her button Ever been applicable? Play underscore eight into our hover section. Now what? That is going to dio if we just play the scene is that a gun is gonna allow us to change the image when and our mouse hovers over, as you can see here. So that would tell the player that this is what they've got selected. And of course, they click on it. We'll make something happen. All right, So we do the same thing for options options into our texture into our normal options. H into her hover. And we could do the same thing for our quit button all that in and our hover awesome. All right. Next up, Weaken. Do we could do a text direct again. That'll work for this. We could do attacks direct again. That'll work for this will use this for our title. And we're just pulling our title PNG, into our texture year. And of course, you'll have to replace this with whatever title you want to be going on here, whatever the name of your game is. But with this, we can now position this wherever we would like. And I think I'm gonna put my title down here, and I think I'm gonna put my menu items actually up here at the top. So I'm just gonna pull that down there and then for my quit button down, something like that. And then I'll grab all three of them, move them down from the edge somewhere around there. Right now, if we test that out room, no player knows exactly what they have selected here. Perfect. Now you can go ahead, designed this putting whatever, um, place that you want. I'll go ahead and provide the files for this so you can modify the background or change the texture while keeping the steam. So if you want to keep the play options and quit, but in the way they are. But maybe just changed the title. You can certainly do that. So I'll include those files there for you. But now we have our basic main menu, and all we need now is to just hook everything up. So let's start with her. Let's to our quit. But not to be the easiest one here. So our main menu is gonna need a script. Of course, that goes into our scripts folder G D Script is fine for this. Using and quit was going connector button. So pressed. Quit tractor to our main menu. We'll go ahead and connect our options and our play button while we're at it. There we go. So for quit simple, we're just going to do it's just gonna be get tree. Yeah, quick. A simple is that Quit and make sure it works. We have her over it. We get the red behind it, we click and our game closes. All right. Our quit button works perfectly. So what I want you to do here is I want you to see if you can make our options when you have our pop up. So we're gonna have to You're gonna have toe create that in here. Creator. Instance it in when we click, options are little options. Menu pops up just like when we're in game. And I want you to create its that when we play. If the play button will jump right into our game, So go ahead, take a minute, see if you can do that. And when you think you figured it out where you get stuck, come on back. All right, welcome back. So we'll start with our options button here. So obviously, we're gonna need to bring in our options menu, So that would be our settings here. And we could just hide that. Then, in our script we've got once it's repressed, we'll have our options when you are settings. When you here, I'm going to create a variable for it settings when you and that's just gonna be equal to our settings. So settings menu Not right. I always forget in the sweet on ready variable There, right for setting the menu visible equals. If we take a look at that now, when we hit our options, there's our settings. We can go ahead and adjust that. Perfect. All righty. Let's see. Next up. We would need a play button here. All right, So far, play. But we just need to change our scene. So we're just going to get tree? Yeah. Change. Seen. And you see, we have all of our scenes here listed were just, of course, gonna select world. And now when we load up, come in within click on play And we're now inside of our game ready to start playing awesome. And I would come in, we can take her potion And we could just start playing our game. All right? Awesome. So we got all three of our buttons working on our main menu just as we need them to. Perfect. So now our menu is perfectly functional. I think what I'm gonna add in here into our settings button here is I think I'm actually gonna add a button for hiding this just so that it doesn't stay popped up the entire time. So let's go ahead and just add a simple button. I say exit. Let's move it down here where it won't be in the way. When it's pressed, it will send a signal to settings, and it'll just had our button. I shall not The button. Ah, it was just yourself. Hide. All right, so if we load up our main menu now, we open up our settings. We have that We click exit, it disappears. Here we go. Now we don't have to leave that stuck on our screen Woodward and play or anything. And of course, that'll since we did that in our settings that works. The same woman coming here, our heart out. When we're in there, we're not going to our menus. And we got options. We not so exited there. So one change and solved for both of our slight issues. I just figured that might actually bugs some people. So I thought I just throw that in real quick. All right? So in the next video, we'll go ahead and to start adding in some music and sound effects into our game and hooking him up into our into our our audio bus down here. But that'll do it for this video, and I'll see you guys in the next one
46. Audio: All right, one in this video, we're going to go through a variety of scenes here and start adding in some sound effects and music. So let's jump to it. We'll start with our main menu here, so let's take a look. We come on down, we've got audio. Got background music. We've got our main menu theme here, All right, so we'll go ahead and we're adding a node. We'll use audio stream player because direction doesn't matter. Two D would get left and right of the player and 30 we don't need in this game. But that would get pretty much sound in the three D space. Like how you would maybe listen to something in your headset and you know that something is behind you or to your back left or something. And that's where something three D would come in and two D would pretty much just let you know what the audio's come from the left or coming from the right. And our basic idea Stream player is basically just gonna play right in the center so it doesn't matter where anything is. Where doesn't matter. The player is there any of that, So it's called his B V m. I'm gonna go ahead and pull in our main theme books. We had come in here. Well, that in probably need to lower our volume here a bit. Go to minus 20. And I'm sorry if this blows years, but it's under one way to find out what you know. Change the minus 40 just received. Okay, so maybe minus 30. Yeah, I minus 30 is not too bad. S O minus 20 is definitely getting a little on the loud side there. But what I minus 40 just for the sake of for the sake of the video here. Uh huh. But you can see all of our our Dios coming in here. It's coming into our masters. Perfect. Well, not perfect, but we need to come down to our bus here, and we changed to music because that's gonna be our music audio. And we could set that to auto play on our screen. We can open our scene up and there's our music. And if we go in options, you see sound effects won't affect it. Of course, Master Wilkes had changed everything and you see in mute somewhere around here around 2/3 of halfway. Which is why you, of course, want this louder than like a minus 40. But again, just for demonstration purposes here and supporting it down there just so that it's not super over, Barry. And since we plugged into our music bus, our music is what we're gonna have to control it. All right, So that would do it for that. That will be playing at all times. We can add in another audio stream player, and it will be this. We are except sound. So we're going to sound effects. - Okay , So if we come into our sound effects, I'm not sure why they're labeled this way when they were downloaded, but that's just how it is. You can check the reference folder for assets if you want to see where everything came from . But candles here up to here is the one that we're looking for. And if we take a look at our buttons, come on in a script and during any of these, we can just go ahead and add in a You are except got play and we can pretty much is evident . Any of these sections here perfect. Just like So now when we click on any of our buttons, that is really loud, so we can go ahead and adjust that we'll set that for purposes with this probably minus 40 as well. Mm. Maybe we could get away with minus 20 on this one. You could probably get away with that for a box will pass into our sound effects. We turn that down, you see that Affected just as it should be. Now, of course, If you want toe, save your audio settings here, then you can just create a dictionary and for now, to hold each of these values and then, of course, save it just like we have been doing. And then when you'll actually low this in during your main menu here in this situation, I didn't just set all your sliders from there when you load it and you could do a similar thing for your display. All right, so we have that we have our except we have our music. I think that's all we're gonna need on our main menu as far as that goes. So let's go ahead and jump in. We can take a look at Ah, what's our next scene we can jump into our actual world seen here. Let's go ahead and add in an audio stream player. We'll call this pgm that this again probably down to minus 40 past this into our music bus and we're gonna use field old Luke Now. We need to actually reimport this since this is going to be looping. So we just go to the import tab at the top. Besides scene and with our field old loop selected, make sure loop is turned on and go ahead and hit reimport. And that's all we should need to dio. Now you just pull it in to the stream of our audio player auto play to being on. Check out this scene and there we go. We now have music while we go ahead and walk around. And of course, if you want to go and get like, what steps you can do that or whatever other sounds, Go ahead, Do that. You go ahead and do that and add to it. No problem. Now, even this this might be a little loud for background music, so maybe even minus 20. Sorry. Ah, 60. So I was thinking about 20 No. Do you want 50? But and this is all gonna be up to personal taste. And however you want to go about it. But we plugged that into our music. It's fine. Awesome. Now let's go into our player, I believe is where we have no our inventory. Rather, that's what I'm looking for. That's he wears our inventory scene. Here we go. So for inventory scene, we're going to go ahead at in two audio stream players want for our consumable, so we're gonna see consume, and we're going to see he quit now, in our sound effects. Here she Where are our consumables? Use bonuses for consumables. Yes. All right. So for our current thing here, Rubin. Ah, at 20. Of course. And when we do that, we're gonna play our consumable sound, So consume play, and you're going to apply that any time you're gonna fly that any time that you actually use an item, you can go ahead and apply that sound to it. So, in our case for our demonstration here, we only have our health potion set up. But if you had a stamina portion Ah, man, a potion And whatever else there that you have that your player can consume. Go ahead and add that in. Or if you want to go the extra mile, you can get different sound effects for different consumable types. And now let's go ahead and take a look down. We have our equipment. So when are equipped Button is pressed. We'll go ahead and play our equipped sound. So you quit dot play. And since we have this set up in multiple locations, we have to add this soared and the Scimitar. And here's our helmet. Perfect. All right, let's check out this scene if we go ahead and equipped. All right? Now, why doesn't it work? Let's see, Right, because we didn't actually assign any audio to it yet. And we go. So for both of these are bus were turned this into sound effects. And for consume, we can use not 100 century for equipment's this su B, sweetie 01 However you say that one and I'll just turn that down and just take a listen. Make sure yeah, that would be are equipped, sound and consume. I'm gonna assume maybe that's our items. Your A one here? No, Maybe. My understand we're all 15. Some of the middle again. You can make that louder in your game because the player will be able to adjust on the sliders what they want. They're ago. Let's test it now that we actually assign somebody or two. Let's see Scimitar Perfect sword. Awesome in our helmet. Cool. And if our consumable we contest that in game talk to Martha, get our quest, Kill the bat. And in game, we contest that. Talk to Martha. Get our question scared. Can you kill that scary bad over there? We kill the bat. Talk to Martha. Thanks for helping. Here's a potion. Now, when we take our potion, we should have our new sound. Perfect. That is all coming together beautifully here. All right, We have one for damage so we can go to our player. We can add an audio stream player here. We'll call this hurt. We'll bring damage in there. Adjust this again. We go toe like a minus 20 for depot to check it. Minus 40. That might be too much. 30. No, I think, uh, the hope go with 20 because again, player can adjust it, and it's just one. So it's not gonna be too intrusive on the recording here. Auto play. Now that is off our buses will be sound effects. And how we just need to find the function when we get hurt. This wouldn't just select on the side. When we get hurt, we lose health and we play or hurt her dark play already and well, we will test that in a moment. We have one more sound here that I provided for you and that'll be our game over. So we need to go to our game overseen, which will be a Where's that inside of our menu? A world. Where is our game? Over. Let's see resources game overseen. All right, in here, we're gonna add an audio stream player. Quinn, Collopy, GM, Hook this up to our music bus. Set this again? Probably minus 40 for this and drag in our game over music. Perfect. All right, So before I hit play, I'm just gonna go to project settings and we're gonna reset what our main menu is That's gonna be on run. So we share a world scene. We go and go ahead and back up when our utilities resources reflect our main menu It closed , and now we hit play. We have our menu, Got our buttons. We can select options. We're gonna just everything sound effects down a little bit. I kind of like the music about where it is. So I'm going to leave it like that. That's it. Play. We're in game and talk to Martha. Come that bad over there? I can let me just go and sugar question. We got her name, icon description. Everything's here. Perfect. And still come in and adjust my audio here. Which again, if you're gonna you're gonna set this where you can actually load this. You're gonna load it when you come into game as well. We'll kill the bat. We get our experience. Dr. Martha. Thanks for helping me. Here's a potion that works. Never equipped. We go ahead and put things a little protection going cool. Now let's go on the other side. Let's say we get killed. Play that chases us. We die. We don't have it set to auto play. OK, so game over background music auto plays on. This is wise. Good to test to make sure that everything is working the way it should boom attack Killed. All right. Perfect. Everything is working the way it should. Um I don't think I've missed anything there. I think that's all the audio that I provided for you. Ah, if you like some of this music and the sound effects, check out the resource file that I've included with this and you'll see where I've gotten these. And you can go and check out. See, what else are these people have gotten for their music and effects? Maybe you like some more of their things. Maybe you wanna change some of these up with alternatives that they have Or maybe just go out and find other from other locations as well. In other people, that's up to you. But there we go. We've got our music. We've got some sound effects we've got Are, uh, sir, have we've got our sound effects. We got on music. We've got our main menu, got things we got game over. We've got our menus all set up. We've got buttons said, uh, and at this point, it's whatever you guys want to do from here. I think that'll about cover it for the course year and be any of our final touches. All right, I'll see you in our and our final video here
47. Export Your Project: All right, everyone. So that will do it for this course. And we've got our main menu working. We've got game always working. We got our all of our mechanics working. You know how to save and load information so you can use that to create save games, load games or any other kind of information that you need to dio and all that through left is first to export our project. So if you did not get the export templates before then you can either get him from the website or download him straight from the engine here. Or, of course, if you got this crew, steam should already have this automatically for you. But if not, that would be under editor manage export templates and should have a button here. This is download or if you downloaded the file from the website, then you installed for violence. Select that and you'll be able to get the templates that way if you don't have them. All right, when you've got that just come up here to project, we'll go down export, and we can select add, and everything that you see here is supported with G D script. Here however, IOS enjoyed things like that is going to take a little more work, is gonna have to get other files and get all that stuff kind of set up. For now. Lennox, Mac OS X and Windows Desktop will be the easiest things for you to set up. So if we take a look at Matt, make sure it's run a ble selector export location. We don't need any custom templates for this. You can go ahead and fill it icon image that you want here for your game. You can put a signature. You can go through all your options here, which isn't a whole lot. And the other tax we don't really need to worry about on here. Ah, but again, if you want to take a look here, you can. But we don't really need to, especially if this is your first game. Then it's not that big a deal for you. And if we take a look over on Lennox again, you don't really need to touch anything here personally, I to embed my PC K, which I don't think Mac had the option of. No, Mac does not have that option, but Lennox does and what that would do the LBC pack everything into just execute herbal file instead of having an execute herbal and api ck. What the PC K file is is that basically has all your resource that's got all your audio are your images all your scenes. Everything is put into there. And personally, I like to just embed it together into just one file. Makes it easier for sharing around. What if you don't want to? Of course you don't have to. And then over on Windows Desktop again, just like the other two, we got a slick next four path goes through any options again. I like to embed my PC K. You can fill any of this information that you would like, and it really won't go through the other tabs, but they're not needed. And when you're done, you can go ahead and hit export project. We do not need to export with debug, but if you want this to be a debug version of your game, then you can certainly do that on what this is. This will bring up a debug council, um, similar to the one that you see in gado or condo here. I'm not seeing it down here, but is racially kind of like the command prompt. If you've seen, it's ah, black box in the window and it'll print off information just like we see in our output on the bottom here. So I'm just gonna turn that off and I think I'm going to stick that, You know, I just I just stick it here. That's perfectly fine for me. But you can go ahead and put this. I'd say not in this folder, but in a different on your desktop or wherever you plan to keep these And does it save? Give it a moment. Here we go. It's packing everything up. And just for a comparison, you can also it's the same way with lyrics export. Make sure that's off save, and that'll go string and the same with the Mac person here. Export. In this case, I think we're gonna create a folder here because I'm not sure how much stuff it's gonna put in here. Well, you don't need the debug and which is it saved? All right. And we're going through and out. We have an option here called export PC k slash zip and I see you do have ah options here. I'm gonna pick a zip and just Craig new folder. It's called zip file. Call it game and that we can take a look at what's all in there. All right, such That'll be everything will go ahead, open this up, come out to our game and we see we've got our execute herbal, but no PC K file here so we can just run that and it's see, we're ready to go and jump in and we could start playing I This is obviously a Windows machine, so I can't run the lyrics version here, but you should just be ableto open that up and get started. Let's take a look at what we have here. So in the Mac version, we actually get a zip file and inside of that contents and then your Mac alas, your resources, all your information this year. So inside of Mac os, we've got our file here and inside of the resource is is what we have our PC, K files and our icon. Now what's different between that and a zip export here inside of our zip? Let's take a look. This is all of our loose files. As you can see here, just all zipped up. So this is like all of our recent we could just open this up and dropped us into another project, and we would essentially have our game set up. So if you wanna I, like, maybe make a backup of your game here. You can just zip this up and stored away. But, I mean, that's all all we're getting in here and likewise, if we did the PC K version, which I can show you that real quick as well, he ck export. We do it that way. On inside of her, is it? We just have the PC k that has everything in it. So that's up to you. If you want to do happy scared PC K, or is it just to kind of store everything to store backup of all your files? Enough. But again, all you need is either the excusable weather without the PC K. You're Lennox version or your Mac version. However you choose to export, that is up to you. But that's all you have to do. And there we go. Our game is completely exported. You've got your templates. You've completed this course You've made your own little RPG. Maybe you advanced some of these features and you went off on your own, Experimented a little bit, uh, furthered some of these to make. Maybe you made the inventory more advanced because you have a little bit of coding experience or, you know, who knows who knows how how you went ahead and made changes to this game to make it your own and make it unique. But that's all I've got to show here. And, you know, how do you create yourself? Ah, an RPG here. And it's up to you on what you do with the information, how you use it.
 Michael Mcguire, Author | Programmer