Transcripts
1. Introduction Trailer: My name is Mario Stavil. I'm a character
artist working in the industry for
over seven years, working on franchises
such as Call of Duty, Mafia, Hitman, and many others. And I will be your
instructor in this course. In this course, you
will learn how to model a stylized knife using ebrus
and texture using painter. There is a lot that will
be covered in this course, but the main topics
are as followed. One, basics of C modular, two, moding the base of the high poly using exclusively C modular. Three, detailing the knife
using a variety of ibrsTolset. Four, creating the low
poly of the knife, using the high poly
as a base in zebras. Five, cleaning up
the low poly and creating Ubis and
wraps in three demc. Six, baking the knife in an organized manner
using marmoset tool wag. Seven, texturing a knife using clean and organized
workflow in substance painter. And eight presentation of the final work using different lighting
techniques in Marmoset. Now, as you can imagine, there will be so many more
things covering this course. Essentially, the way
that used to think about it is at the
end of this course, you will be able
to create exactly what you see in this trailer. As for the puns
that will be used, we will be using zebras for all the modeling of the
high poly and low poly, three D Max for cleanup of the low poly and UVs and
substance painter for texturing. Marmoset will be using alas stage for baking
and presentation. We will start by going
over our reference, and then we dive
right in and create the base of the Ni hi
poly with modular. Then we will detail it and
finish it up in zebras. After that, we will
continue to through the max to create the UVs
and smoothing groups. Once that's done,
we will bake in marmosetl pieces separately
to achieve a clean result. Next, we will proceed
to Substance Painter, where we will create
the stylist textures, mostly using the
output from the bakes. And lastly, we will do a cool presentation in
Marmoset for portfolios, using dramatic lighting to accentuate the
shapes of our model. With a total of nine plus
hours of video content, we will cover a wide set of essentials and
efficient tools in zebrus as well as an efficient and clean
workflow to produce assets. Almost the entire tutorial has been on in real time
with narration. We only include a few
small time lapses for a very repetitive
work close. Now, this course is
targeted more towards intermediate artists
who already have some basic understanding
of the programs mentioned. If you're an absolute
beginner artist, I do recommend you that you first view some
introduction courses. This course will also come with auto generated
subtitles in English, Chinese, Russian, and Spanish. I hope that you will
enjoy this course.
2. 01 Going Over The Zmodeler Tools: Okay, without further
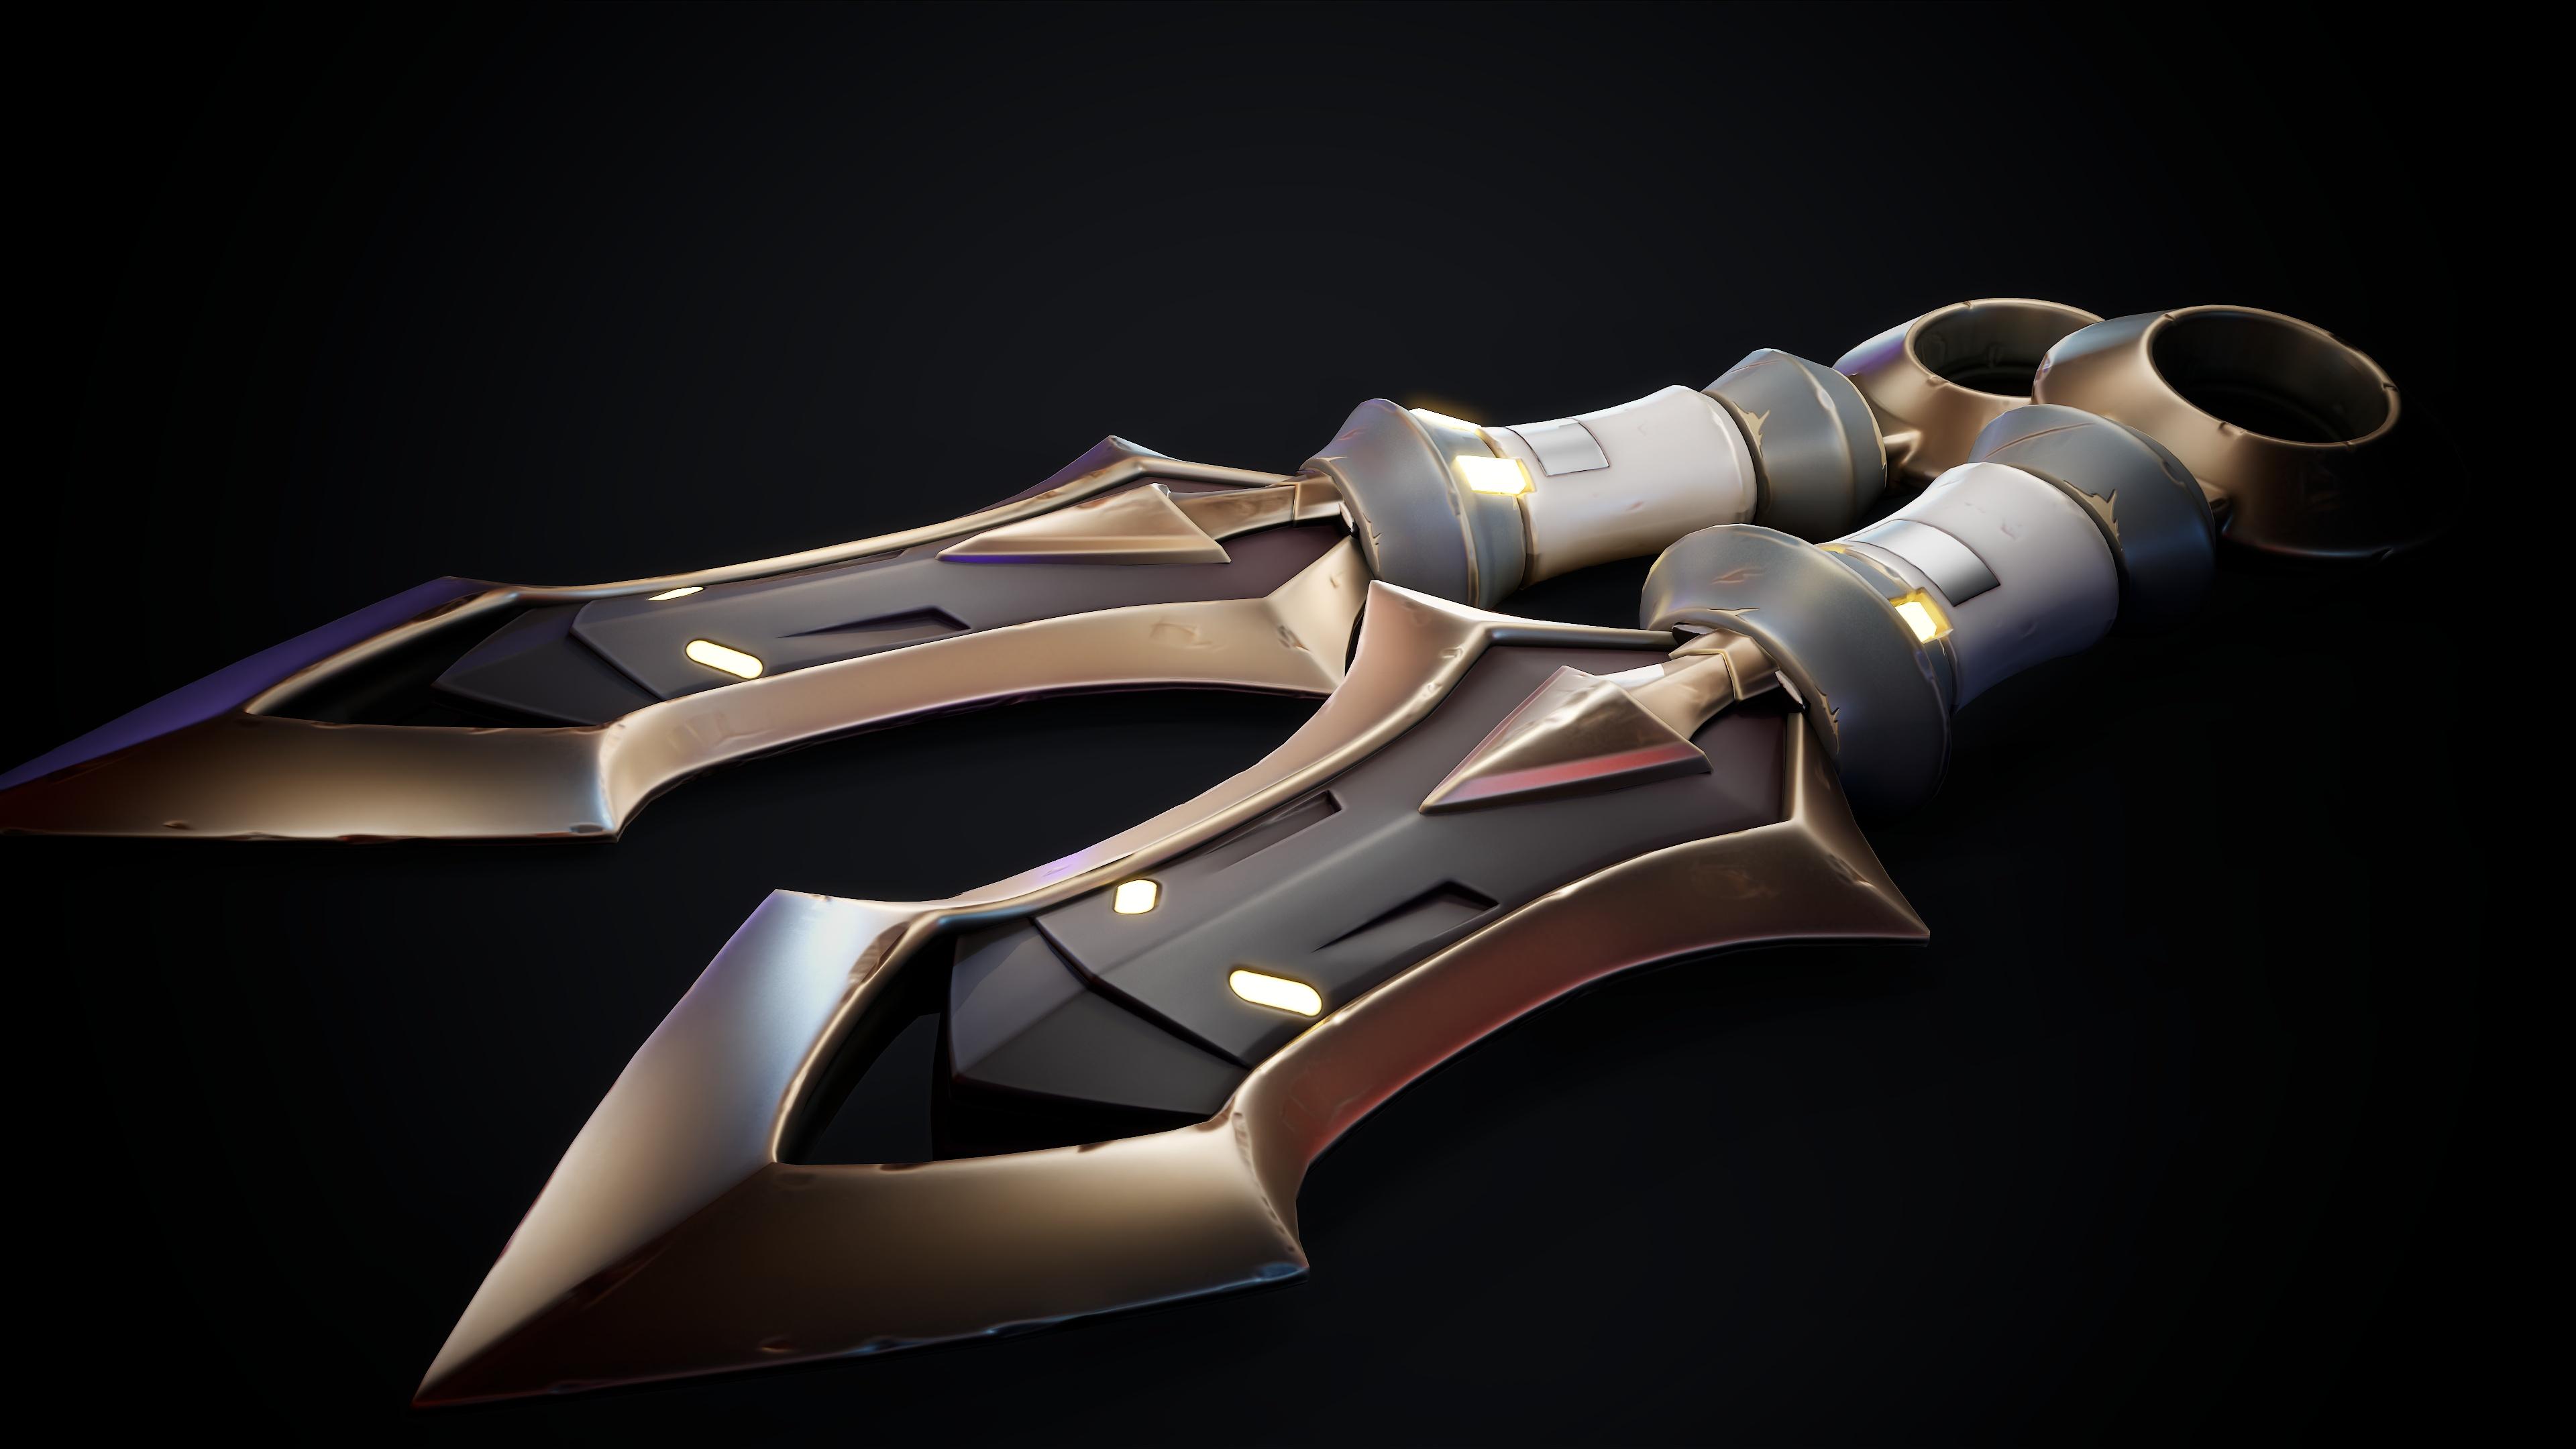
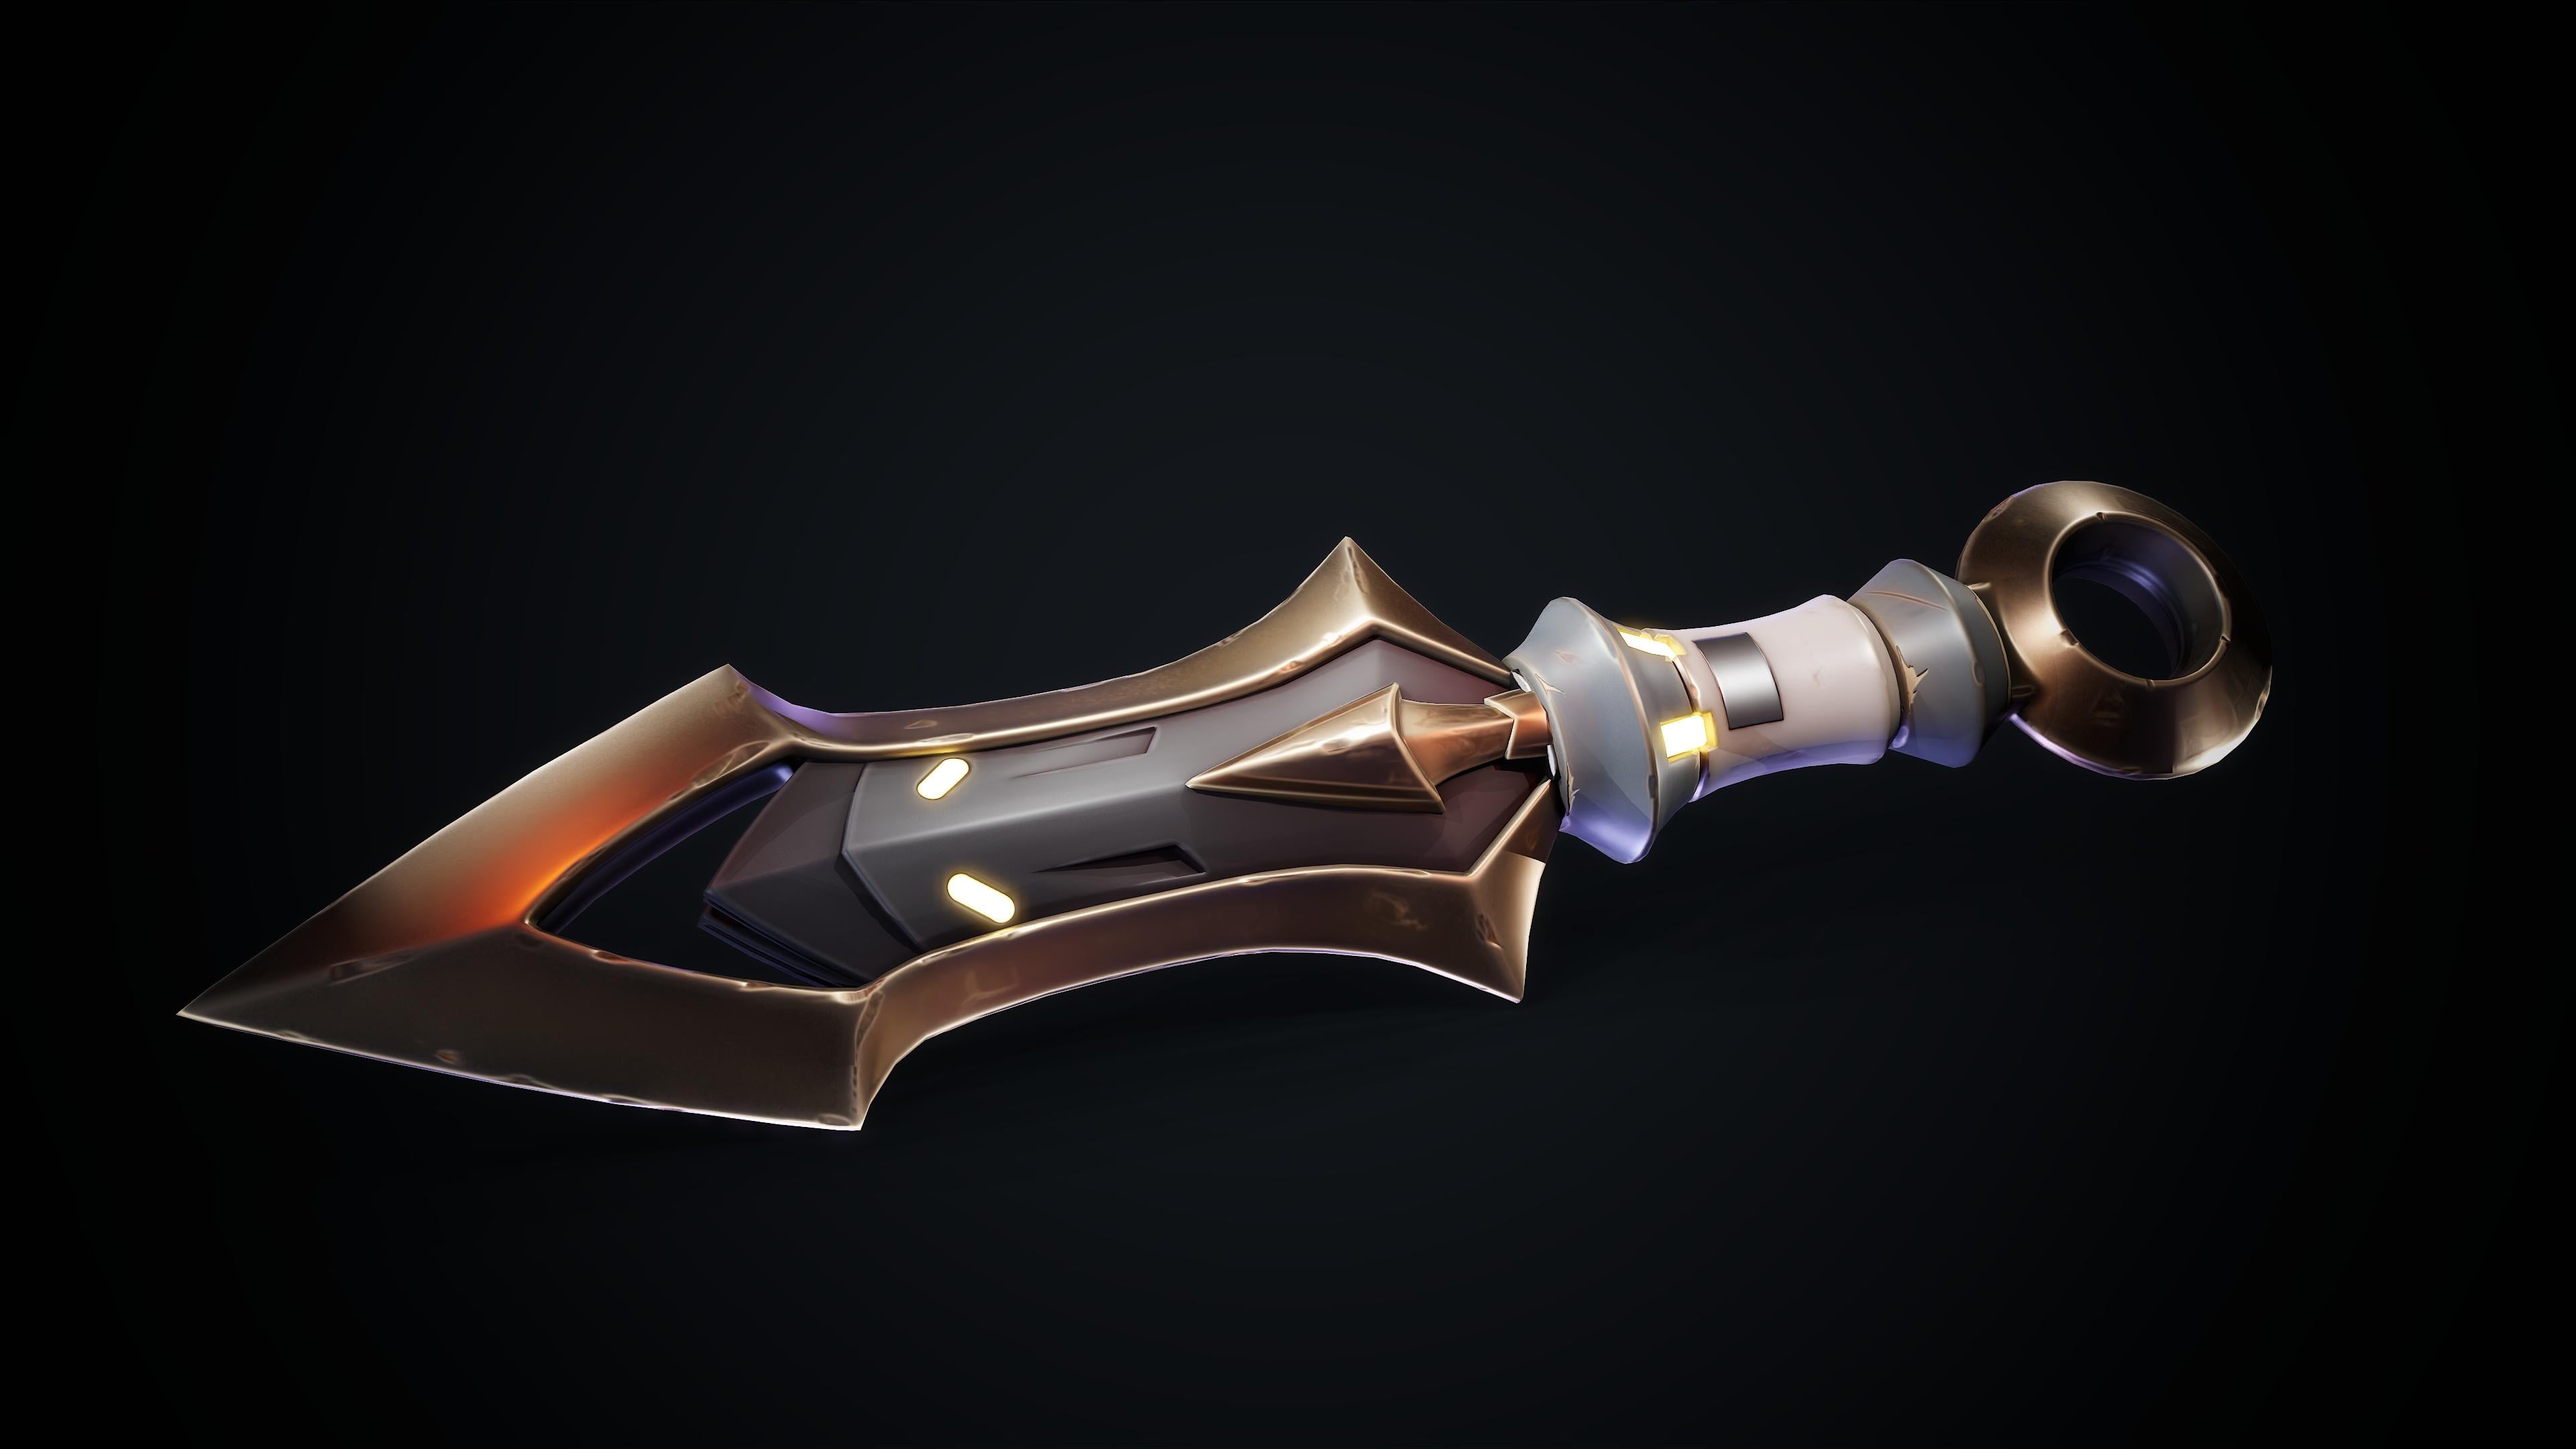
ado, let's get started. This is the concept we're
going to be working with. It's a simple knife, but very cool in
terms of design. We're going to be taking
it by different parts. On one side, we're going
to be modeling the blade, the yellow part that
you can see here. Then we're going to
do a separate piece, this gray interior
side, all these. So this will be piece
one, piece two. The third piece will be
the heart of the blade. So we will have then the plate block separated
on three parts, and then the handle is also going to be three to four parts. So even if all this has
the same silhouette, we're going to be slicing
this in one, two, and three. And lastly, the ring, which is going to
be the fourth part, which is a very simple one. So that's a basic slice of the piece. We're
going to be working. But first, we're going to see
some basics of C modular. C modular is a tool
for edit polymodeling, slightly different
than what you will normally see inside zebras. So you will normally
work with Move tool, standard brush,
maybe clay buildup, depending on how
you work on Zebras. But Cmdular is slightly
different and can also be worked together with
the traditional tools. Modeler can be found here on
the brush menu down here, but it has also circuit, which is B for opening
the brush menu, M, sorry, B set from C molar
and M from modular, okay? So it makes kind of sense. And when we have C modeler, we have a different
set of tools. At first, we will see
that if we click on the model, not much happens. It looks like we are moving it. And depending on where we click, we will see that we have
different messages popping up. Here we're having QMS and
suddenly it does this. If I click here, it will move. If I click here, we will see
that something's going on. Actually, we are subdividing it. So what's going on? As you can see, we also have indications of what
we're having everywhere. So here we have move
points by browser radius. Then here we have
Insert Edge loop. Then here we have QMS. And if you realize we also have different lines showing up. Okay, so let's go and
check what's all this. First of all, we need
to know that Cmdar has three main modeling menus. It's based on the kind of
selection we're working with. So if we go to a phase, like this is the case, we will have one set of tools. You can see that
everywhere on the phase, I'm getting the same message
which is QMS Epolyi. If I click here on the edge, we will be having a
different message, which is Insert edge loop. And if I go to the vertex, I will have move
points by brush. There's a reason for this.
So when I click here, right click, sorry, on the
edge, I will have some tools. These tools are only going to apply to edges, as
you can see here. So it says simular
edge actions, okay? Then we can select what we
want to do with that edge. Right now, the tool
selected is insert. So when we click on the edge, we will be inserting an
Edloop that's pretty simple. When we write click now
and we say, for example, QMS, that's going to
be extruding the edge. QMS is basically extrude
from any other software. If we click for example, MV, we're going to be able to
move that edge as a whole. And you realize that
here, I subdivided. That's why it's
moving differently. And we have many other tools. To be honest, most of them work very similarly to what you
will see in other softwares. But you see that
depending on where I click, it behaves differently. Sometimes the collapse goes up, sometimes it goes down.
That's the next point. So every kind of group has
different action points. For example, on the polis, you see that right now I
have here, the orange line. Right now it's up here, left, down on the edges is the same. If I have the mouse up, you'll see that the action
is going to change. So if I have it down, collapse will work giving priority to the bottom
edge to expand, so it will go up, and if you
have it up, it will go down. So you need to get familiar with all these tools because a lot of them have different
ways of behaving depending on where you select
and what are you selecting. So basically, I would recommend before jumping
into the tutorial to go and try all these so that you
get more used to them. Then we have some on
the polygon menu. The polygon one seems a
little bit more complex. It's nothing very crazy. The tools are mostly the same. They just behave differently
because it's polygons. And we have up here
similar polygons actions. Here again, on the upper menu is where we
have the actions. Then what's extra in here in the polygon menu is
that we have a target. We actually had that before on edges, as you
can see down here, but the only targets we have is the only edge that
we have selected, a hole if there is a hole near to the edge and
the polyloop that we will be affecting the
whole polyloop, sorry. So let's say I'm
selecting an edge. I go to, for example, MF and I have ops excuse me. I think with MV
it's not possible. Let's say, QMS, for example. Let's go to QMS. Now we have different
target options because different actions
have different options. In this case, let's
go to sloop complete. So now I will be
extruding the full sloop. Okay? If I have a different
set of selection, it's going to be, for
example, a polygroup island. So now that we have
different polygroups sorry, if I do it here, it
will only apply here. If I do it here, it
will apply to this one, if I do it here,
apply to this one. So it will be based
on polygroups. So go back again to
polygon actions. We have all these
targets that are more complex than
what we had in edges. So we have single
poly facing front. So for example, if
you would have a box, all the polygons on one
side will be selected. And affected by the action. Then we have island. If we have some floating
polygons, flat border. So for example, that, let's say I have QMS for extraction, and I do this here because all this is a flat
border, it will do it. If I do it here, as you can see, it just grabs what we
recognize as a flat surface, and as you can see, it
behaves differently. Y. So basically, like I said,
many, many combinations, up here, the actions,
down here, the targets, and down here, we have
what's called modifiers. So modifiers will
be quite familiar. So let's say we have edge.
Let's go back to Edges. Let's go to insert. Okay? To remember insert
was inserting a loop. Okay? So if we right click here, a multiple edge loops because we want to
add more than one. If we click and
hold and move up, we will increase the amount. But we can also have
on the modifiers specified resolutions instead
of being interactive. Let's say we want only three, so we will click and instantly we will get
three subdivisions. So basically, it's
pretty simple to understand up here always is going to be the
action you're doing. On the middle, you
have the target that is going to be affected
by this action. Then if the action can be
tricked by any modifiers, you'll have the
options down here. Some of them, as you
can see, for example, masking doesn't have one, that depends on
the action again. So that's all the basic menu. Next thing we need to know, which is also very useful
for C model is that we have different ways of controlling depending if we're pressing
Shift, control, and ld. So let's go to points now, okay? Let's go and select,
well, it's move already. Okay. So for example, if I have the move vertex selected, it will move normally. If I have shift selected, it will move, but it will sorry. Move, then sift, sorry, Alt is in this case. Alt will move it, but in
the normal direction. And if I go with
Shift, you know, already that it's
basically smooth. So it's always good to try because as you can see,
there are many options. Sometimes it's hard to
remember what something does, but you end up
getting used to it. So when you move, just
try the Sift control, and Alt to see how it behaves and you will see that
you get different results. Which can be very
convenient sometimes. Okay, let's talk
also about masking. So in C modular, we can also do temporary
maskings by pressing Alt, and this will allow us to select a certain amount
of polygons if we want. And if we click and
target single poly, when we do actions like QMS, we'll see that this will
affect or selection, but to non other polygons. One thing that is worth
knowing about serum measure is the sub dip modeling
method that is very commonly known in other
softwares like Maya, blender, thrid Max,
which basically allows us to see or to
preview the geometry how it's prevailing and we
can enable or disable it. We can increase the number of subdivisions with
smooth subdivision, or if we don't want it to
subdivide in a smooth way, we can just do it with flat
subdivisions which will actually increase the geometry of the object without
rendering the corners. So then when we increase
the smooth subdivision, you will see that
the effect is less noticeable on the
smooth part because it has more subdivisions
near the edges. If I lower flapped subdivision, you'll see that it
actually gets rounder. Not because this
makes this rounder, but because it has
less polygons, so it will be a sharper
the more you increase it. Okay. So knowing this, we can go back to our
normal subdivision, and we can try a few tools. So let's go back
to QMS and Poly. Let's extract this. We have the Well, let's just go with let's just clean
the previous selection. Let's extrude a couple of
pass to do a few tests. And now when we go to
dynamic exhibitions, we'll see that we're actually
getting this kind of shape. We can still preview the low polymes as you
can see in here, and we can extrude and the
same way we can extrude that. We'll see that now
this is connected. If we go back to subdivision, we'll see that this happened. And why is this? Why would
you said this with QMS? So QMS is not exactly extrude. We actually have something
similar to extrude, which is called un
extrude, actually. This is the original extrude. QMS is a more polyvalent tool. We will be using for extruding, and we can also use it as some sort of
bridge between polygons. It will predict what
we want to do with it. So it's a kind of powerful tool. So yeah usually, I like to work with QMS
for a lot of things. So going back to this, if we would want to change
the shape of this, we can go to insert, sorry, on edge mode. Let's go to insert. Let's insert a polygon in here. So let's deactivate
this single ds loop. If we insert one loop in here, when we go back to subdivisions, we'll see that this
has stronger eds, so we can see it's harder
to do on the smooth mode. Actually, let me get closer. So here we have one. Yeah, quite tricky to do it with
the subdivision enable, so it's easier to just go here. Do it however it's
more convenient for you. We do it like this. We can try different
smooth amounts by the separation we
use within the edges. And now when we go
back to dynamic, we'll see different results,
as you can see in here. So yeah, basically, this is
the techniques that we're going to be using for the
modeling of the knife, sort of. But I think this is already a good overview to get started.
3. 02 Creating The Hp Top Blade: Right, let's clean this snap. We can actually
create new objects by going to initialize. We can create cubes, let's disable the subdivision. We can create cubes
here in Isolt. We can create Spheres, planes, which is what
we're going to be using. We can actually
increase the resolution of these planes and the size by tweaking
these values right here. So for now, let's just go
with four by four grid. Something like this
looks pretty good. And we're going to be using the see through tool
with the reference. Let's put the
reference full screen. We're going to use a
see through tool to be able to copy this and use
it as a reference guide. Actually, let's go
with two I two, like this is better. And we're going to do different approaches for this in case you guys want to do
it in a different way. We can either do it
with see through or we can actually load the
texture on the spotlight. So we would go to import
we select the knife image. And now we will have it here
to select for the Spotlight. We select the one we like. Click on at two Spotlight. Now it's currently died. And now we'll see that we can actually enable and
disable the spotlight. The shortcut for
this is sift set. And once we have it open, if we click Set, we'll open this wheel
that will allow us to do multiple options like rotate, scale, pin spotlight,
spotlight radius, opacity, et cetera, et cetera. You have many options here. This also allow us to
paint on top of the model, et cetera, et cetera. So in this case, we're
going to scale it up, move it a little bit ups, sorry. Move it a little bit
to center it with, I would say center of
the image, kind of. And now we're going
to hide the menu. We'll leave the play aside to
see if it's how we like it. And we actually are
going to be using a tool for having always a plane aligned with the blade
and being able to go back to that camera
fairly quick. So we're going to
go to preferences. We enable custom interface. Enable Customize is
actually called. We're going to go to document. We're going to be moving
custom one, custom two, and clear views and load views as well to here by
pressing Control, Alt and click, and then Wag. We do the same for
all those buttons. I will explain why are
they for in a little bit. Yeah, like this is kit. Right. We go back
to preferences, disable enable custom interface, and now it will be always there. For now, I'm going
to clear Albus. And what this is going to
allow us is in case I mess up, rotate the camera and
go somewhere else, and I want to go back
here and have the knife aligned to the millimeter, we need to have some
sort of saved camera. So for that, we're going
to be using Custom one, which is a custom camera. So fire rotator or whatever, and I click Custom one, it
will go back to that center. And this is obviously
very useful in case we strike from
the original camera. Right. Now that we have that, I'm going to also be saving another camera around in a similar perspective to
the other image we have. So the knife is a little
bit tilted like that. For now, I'm just going
to save it like this. Doesn't need to be It's nothing very important for
now because it's going to be a quick way to check the different angles
of the knife. All right. So now
let's get started. We're going to enable symmetry, as you can see now
if I move one side. Sorry, move. Let's make
this slightly bigger. If I move one side, the other
the other one will move. And at this point,
it's very easy. We're just going to try to replicate the shape
of the border. We don't need to have much
density at the moment. We're just going
to go like this. We're going to be doing
really simple extrude. So now we right
click on the edge. We're going to
select extrude move, for example, as you can see, very easy tool to use. We do that again.
It's very intuitive. You just have to click
drag and move to the side you want to get closer. And now we do that
one last time. And as you can see, we have
a pretty simple base that can be readable and easy to follow to keep adding
subdivisions and everything. What I'm going to do now is to insert to insert a
few subdivisions where I consider it's necessary, mostly to be able to adjust
the curve slightly better. But actually, we're
going to do that a little bit later on. We're just going to
add two main ones in here and maybe one in here, but we want to keep it low for now because
we're going to go to the other camera and give it a little bit
more, more depth. So we can see on the reference, this seems to be continuous
mostly in shape, except there are
different materials. And so this is what we're
going to try to achieve now, like a full object
without any gaps or cuts, and then we will slice this and separate it into
different pieces. Okay, so at this point, I think I want to
deactivate the Well, before deactivating the
spotlight, actually, let's define second border
let's move it to the side. Select move on the edge. And let's also select um Mm
mm mm. Not point action. Sorry. We don't
want to move one, so let's select the full thing. Well, actually, let's select all these
points on the center. Let's invert the selection. And now, if we go to the side, we can move it with move. Actually, I think I
want this one as well. Okay. Mm hmm. Alright. Probably Just taking a picture of the shape to make
sure I get this right. So this seems to go
upwards all the way till here to the center. So now I should mask
this, keep moving this. And probably about
this is correct. We're going to go mask
only these two vertices. This is very useful sometimes. Or even if we're
working with symmetry, very precise way to
move is by masking and move it with a
transpose tool as I was doing that you can
enable here by move, scale or rotate, or you
can do it with W A E, and R. But still
with one of them, you'll still get the
full githmo so you can rotate, scale or move. This is specifically useful
for stuff like this. You can align it
better like that. Okay. I'm kind of liking the
shape at the moment. Let's go back to our
camera to custom one, activate the spotlight again. Going to try the cuts now. So we're going to right
click on the edge, insert. We're going to sort
of place it here. Going to go right
click on the vertex, make sure I have it on
move and just go and move it to better match the
image that we have. Since it's not
exactly symmetric, it's not going to fit
perfectly both sides, but we need to kind of do
an average estimation. Since we have the subdivisions
we created before, we can actually nail this
down a little bit more, make it for a softer
curve like we are doing. To make Alright. Also, if you realize there are some shapes that are not as
noticeable on the concept, as, for example, well,
let me get here. As for example, these lines,
I'm going to be marking. So for example, from this point to this point is not
perfectly straight. It's like a curve like this. And both sides, here
we have, as well, like a small curve and seems
to go all the way to here. So it looks like the
blade, at least to me, it looks like it has some flow that we can see that continues. We have here some parallel
lines like one and two. Then all flows kind of
in the same direction. This seems to go
that way as well. So we're going to try
to represent also those shapes that we see
in here on the geometry. So that's why if I go
to Custom and trying to make this loop come from this point to this
point on the center. Also here, I'm going to
move it up a little bit. And again, just try to make it flow in a similar way to what we can appreciate
on the concept. But again, we don't need to do final positioning right now. We're just getting closer and closer to the
version that we like. This area is going to be a little bit more
tricky to achieve. So let me re struct this. Oh. Actually, now, there has been one thing that I realized that if I'm trying to move all
these points right here, it's very easy if I get closer. But if I do it from far
away, like I was doing, there is a chance that
I miss click and I select an edge
instead of a vertex. So I can go to Ed selection, and instead of having Insert, I can go and select do nothing. So if I select the nets, there will be no chance
of me miss clicking, and I can only select vertex. In this case. I'm going to
do the same four faces. So this way, I can only
select vertices and move them and and that's what
I'm going to be doing. Still going to get closer so
that it's easier like this. Okay. Now, I get back to Kusaon and I'm going to reorganize a
little bit these edges. If you see they are
snapping on the center, that's because I have
symmetry activated. Okay. That will be a little
bit more correct. The reason for this is
because we want to have a continuous flow
during the whole blade. So now let's say I
wanted to do an insert. This way, oops, sorry, this way. Here, insert, not inset. This way, if I click here, you will see that the loop
will go from the start to finish to the end part
and go all the way around. The other way I had it
going to go save knife, 01. The other way I had
it before, like this, if I was clicking here, you could see that
it was not going all around and that's
not convenient for us. So I go back and oh, Okay. Let's click right here. So this is the right
way we want to have it organized for now. Okay, I hide this again. Go back to this view
because, of course, we messed up this area while
we were working on that. So let's go and fix that. So I'm going to select
this, move them down. Make sure all these
are straight. We can invert the selection
by control clicking. But I guess that's cebrus basic. And lastly, I'm
going to move these two about here and these
two a little bit lower. Like that. Okay. Okay, okay. Right, this is better. Also going to fix the point of leve lad. What
happened there? Let's move first this one. To use the brush. Move this up. Oh. Okay, this is better. Actually, I think I want
to get rid of the points, so get your right click Delete and just
going to delete it. So now we have a cleaner
topology. We go back to move. Let's see if I can pick it up. Yeah, move it up. Move this one as well. For me, it's more comfortable
to mask and move this way, but feel free to use it. Sorry, move it using the CmdularTol about this, this is a closer shape. We're already seeing something. Obviously, it's very low poly, and we're going to end
up polishing this, but already starting to
look like the shape. Okay, we tweak back some of the points that we moved again, making sure they
are steel aligned. Now that I already adjusted
the overall shape, I'm going to go and insert a few more loops on the areas that I
consider it's required. Maybe here. I think
that's about it. Let's select do nothing
again on edges, and just relocate these
points that we use included. For now, I'm just
focusing on your side, trying to leave a
continuous curve, like a soft one, as you can see. We'll go back to custom camera. Now let's go and do the
same for the interior. But this is good. Let's go and fix this manually since this doesn't
really matter at the moment. I'm going to say,
make it a little bit pointy and proportional to
the position they are at. Keep in mind this point is structural, like
we can see here. We do not want to edit this one. So let's do a transition
from that one to the rest. I think all this looks
good to me, I would say. All that is going
to go out anyway. Oh, look, now I realize
looking from the side that I moved this up too much. There we go. Okay. I think blade, to be honest, it just needs a little bit of tricking in
here in this area, but it is about to be
ready for cleanup. But actually, we will do
cleanup of the shape. Sorry, of the blade first, and then we're going to
the rest of the knife. But usually, I think it's a good idea to block
out everything first. But just for the sake of
keep this interesting, I think we're going to go and
saw some clean stump first. Okay, let's say, for example, we want to have all these
polygons right here. Sorry, all these vertices right here aligned to the same height. Let me select them
in birth selection. If I scale them together, they will snap to
the same point. So let me select that
one as you can see. So that will be an option, and then other option is to move it manually
till we see it fits. So I'm just checking
out the blade, like all these poles
right here on the side. I want to make sure
it looks soft. Kind of like an inspection. Actually, I'm going to be doing a duplicate of this
subject, okay, in case I regret some
decisions moving forward. So, see if set for
this, custom camera. Oh. Okay. I think what is going on? One sec. Oh, yeah. I messed up a little
bit. That's okay. I basically move the spotlight.
I shouldn't have to. So I will have to
move it back again. Just a little bit till
until it fits. Okay. I'm going to be adding
a few more subdivisions before doing the separation. And after that, I
think we're good. Yeah, I think this one is good. I'm going to zoom the
spotlight a little bit. Actually, I will move
the center here, so it scales from that point. And I'm also going
to be scaling this. We can do this a volt, because I just want to, like, a clearest and closer
view of the curves here. Okay. I think This is about to be good
to go in just a sec. Let me a few more solutions. Okay. Alright. I'm actually going to go
ahead do this for now. Oh, I didn't want that
many subdivisions. We're going to be creating
a cylinder initialize. Actually, let's just roll
with this one. That's fine. Let's just open up
a new cylinder. Move down and scale
a little bit. Just to have a sense
of the handle. Doesn't need to be
anything very precise. This point, we just want to have some sort of
representation for it. So I'll just go and make this and now going to
insert a ring as well, rotate it 90 degrees, move it and scale it. Again, to give some sense of having the piece
working already. To make it as thick as it
looks on the reference, I'm going to inflate
it a little bit. So I underscal it first, so when I inflate
it looks similar. And okay, that's good
enough for me for now. This will be or
blockout for the knife. It's something
that's save again. Oops, not the image here. Okay, so quick sum up to
see what we did so far. We just create some
basic primitives. Of course, the blade is a little bit more complex
because there is no such primitive
looking similar to this except for some plane or
a box that we can adjust. We basically create a four
sorry, two by two plane, extrude the edges multiple times until we achieved a
proper defined curve, which now that I see, I'm going to be inserting
one more loop in here and one more loop in here. There so yes, increasing the amount of
extrusion till we were happy with the
shape we achieved. And now that we
are at that point. Let me check that. Okay.
Curve like this. I like this. We're just going to
do an overview from the site again to make sure
there is no weird shapes. We're going to go to geometry, activate dynamic, see how this is behaving. Looks pretty good. Nothing too crazy. Check in, these are
horizontally aligned, which they are, and I think
I'm happy to move forward. What we're going to be doing
now is we're going to be separating these two
geometries so that we have the blade on one
side and the rest, the interior part
and another piece. We're going to go to a PRF, check which of these
we don't want. We can actually use check it on the spotlight
now that I think so. Used to be taking
refs all the time. All right, so it's basically all these five
polygons, I think. I'm going to go to
polygons and delete. So I'm going to delete
first this and this, and I just have to
delete this right here. Okay, already getting closer. Okay. So to detach this, first thing we're going
to be doing is to create another insert in here
very close to the border. We don't know what to create, create a big gap. And secondly, we're
going to go to police delete let's go with Polyloop I think it is. Let's see. Yes. Polyp, it is. Now, we have two
separated pieces, but it's still same part of the same object and
same polygroup. So first thing, let's
go to geometry. Oh, sorry, two
polygroups outro groups. Well, let's make
it more obvious. Let's group masks. Um, here, they all come
in the same color. Let's use group visible now. I want them to have
very different colors. So yeah, let's go like this. Now it's more visible. There
are different polygroups. We can go to geometry,
group splits, sorry. To do done, let me close this do here Geometry, my phytopology, and Oh, my bad. Subtle split, yeah, group split. So now we will have this
in two different objects. We'll have, well, the blade
and the inside of the blade. So what we want to do now is to, we're actually going to
be polishing the blade. So for that, I'm going to
take a look at the reference. So for what it looks like, Well, before we do any super loops
and subdividing and yeah, making it look smooth, I would say that the blade is
symmetrical on both sides. It looks like so,
and on the center, it has a slight curve. So we're going to go for that. We're going to go here. We're going to deformation. We can do mirror and weld. But let's use mirror for now. Let's create a duplicate
of the zop tool. Deformation is probably
on the Y axis, sorry. Oh no, set axis. Yes. This one, it is. We're going to move
it down till we have sort of this way. I want to have some
thickness on the border. I don't want it to be,
like, completely sharp. So we're going to go this way. We're going to actually move
this one up a little bit. About here, and then
also move these two up and now we're actually
going to do that again. Late duplicate the
formation, mirror. There you go. Now we move this about a bit more. Yeah, something like this, I think it's good. At
least for my taste. You guys can do it as thick as you like or
as thin as you want. I think, this is the one
I'm going to go for. Still look sharp,
but not too much. Um, I want it to look like, yeah, a little bit more
stylish, less aggressive. So going to be merging
these two guys, merge down. Always okay. And now we're going to
be using also symmetry, but we're also going to be
using vertical symmetry. So we go to transform
symmetry on the set axis. So now if I move ups,
sorry, it's masked. If I'm moving this part
is I'm not moving. Why is it not moving? Okay. All right. Yeah,
now it's working. So now it should
work vertically. If not, I think I
mistakenly selected a different symmetry
going to try and see. Yeah, definitely, this is not the symmetry we
are looking for. So let's go back to transform. Maybe the axis of symmetries,
not the correct one. Um, Mm mm mm. Local symmetry is
right with that. Okay. All right. This is not the one I want. So it was symmetry. And now, there we go. Okay. We probably had the symmetry
axis on a different point. So we just had to activate local symmetry on the C
axis, and we're good to go. Okay, going to save now. Let's do a second
copy just in case. And now I'm going to
be doing some tricks. Actually, I'm going to
lower this a little bit to create a little bit of
contrast in here, maybe later. For now, I'm just going to focus on the blade,
deactivate this one. And I'm going to be bridging
both the top and the bottom. So for that, I go to
edges, to bridge. Oh, let's select Let's try now with two holes after this try and see how it works. Normal bridge works like this. I just have to
click on the edge. Sorry, on the upper edge, and then it asks me to
click a second edge. So you can do bottom top or
top bottom for all of them. So let me try two holes. Was two holes and click
second hole and drag. Okay, so I think I honestly. Okay. Okay, okay, okay, I see now how it works. So this one is more complete. Alright. Yeah, I'm not familiar with this
one, but it's cooler. So basically, the way
it works is it says Bridge to Hall so click second Hall and drag
Hall to resape. So there we go. Basically, it closes
the whole thing because it doesn't just go for one target, it goes
for the whole thing. So of course, that's
a lot faster. And now we have or basic
plate already achieved. At this point, since we're
going to start refining, going to just go and
do one more thing going to do the curve, the inside curve that we saw. So for that, I'm
going to go to move, well, actually, transpose
and slop complete. And we want to move
the full loop in here. Transpose is not
achieving what I want. So let's try with Move. I was checking if there is another tool that can
be useful for us, but to be honest, I think move is going to be the way here. Now bad moves not helping
because we cannot select MovaoRradis. Let's see. Yeah, but it's affecting the outside. We
do not want that. Um let's go with this one. Still grabbing the rest. It's grabbing the outside because we have this
connection here. Let's actually go and
delete these pools. Oh, single pool. Let's go ahead and try now. That's more in line
to what we wanted. Move out to radius. Okay. That's not
really what I'm after. So let's try Oh,
had that masked. Let's try one more thing. Okay. So what I want to do
is to mask all the edge. So let's go use with mask. Again, let's delete this
delete. Police, yes. All right. And now mask
the edge p complete. No, I invert it and, now it is how I want it to be. So since moved and the simular
didn't allow me for this, what I'm going to do is actually work with the symmetry enabled. I'm going to be
scaling this so that I can achieve the curve
I was looking for. Maybe this is too much is
going to down a little bit and same for this one. Okay, so this is kind of
the result I'm after, but I'm not convinced by
this vertice right here. So for that one, we're going
to go back to semdularOs. PCM. We're going to select Move. Okay. So basically, it went misaligned.
Something happened here. Let's delete that vertice. Let's actually delete
this bully as well. I think the problem is
that at some point, I moved the vertice
without symmetry, and that's the issue it was creating. But now it's all good. Bertie is in place,
perfectly symmetrical. We have the base for
our plate ready to go. Actually, let's go back
and bridge that again. Let's select the edges. Let's go back to bridge. Okay, let's select
this one and this one. Okay, two holes is
not working here, so let's go only with edges. There we go. Okay, one more trick to be
all good and ready. I want to move
these two vertices to this position so that
it's completely aligned. And completely vertical. Yeah. That looks
cleaner and nicer. Alright, I would say I'm happy with the overall
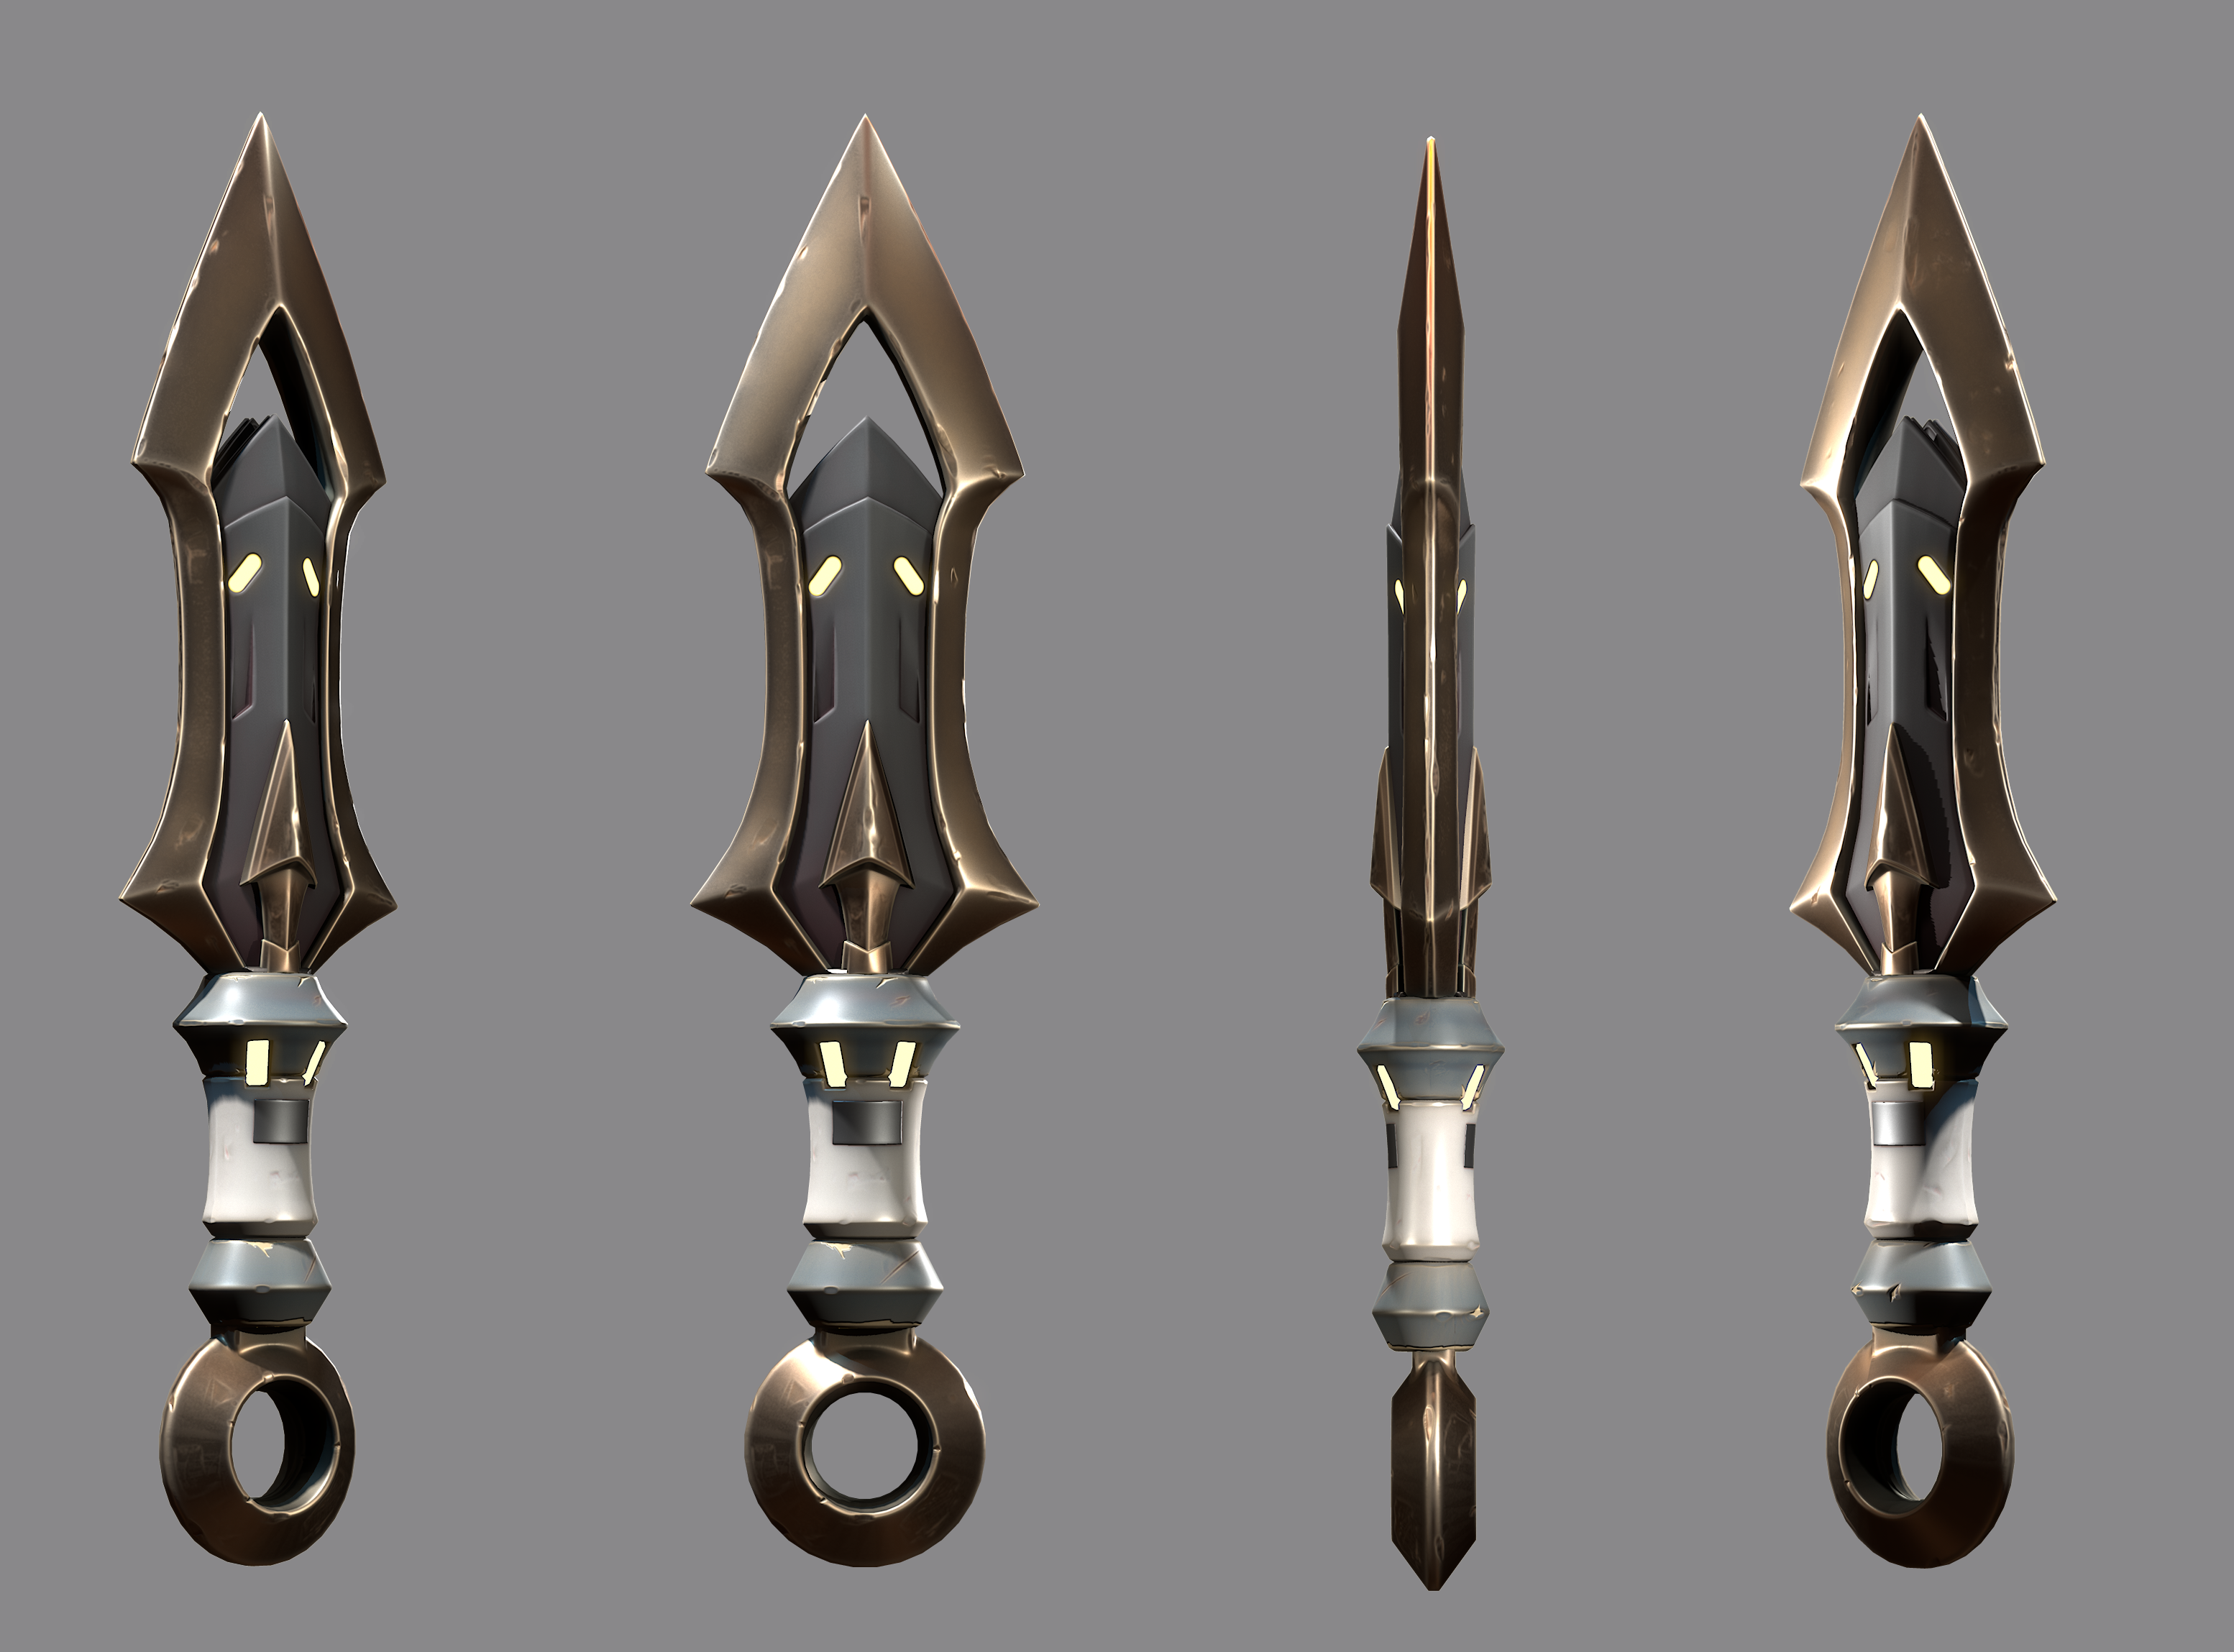
shape of the blade, which I would say this is
the hardest part to sieve. So it's good that we started
right ahead with this. Gonna save again. And
now we're actually going to be polishing
this up a little bit. So for sink we want to do, uh is to test and see how
it looks when we divide it. So we can go to geometry. We can go to dynamic
subdivision, activate dynamic. Since we don't have
any super loops, it all looks like this. So we're going to start
adding some super loops. Basically, we just need
to select the edges, click Insert and single
edge loop for now. We're going to put this one here really close to the border. What this does is
that the smoothing on that area stays very sharp,
which is what we want. And at this point, everything
is very straightforward. We just have to Oh, we just have to do
that on every edge. Actually, I'm going to
actually do nothing on polygon so that I don't delete
by accident, any polygons. And here I just need to go
and try how the blade looks. Since we want some sort of
stylized filling in here, that's what I'm going to go for. So keep the border like that. Same thing near the
edge of the center. We want some roundness, but we don't want it too sharp. So I'm going to add just a
couple of loops in there. This looks about right to me. Look sharp, but not too much. Uh, I always like
to add two edges, like one closer and one further. It helps slightly
the smooth result. Let me see if I can show you you see how it changes, so now
it's very sharp. Now it's kind of that
I want to like it. So yeah, like that is good. All right. So now we're going to keep doing that
near all the edges. So for example, here, we want it to be fairly
close to the edge. So when we smooth, it looks a little bit
smooth, but not too much. We want still to
be sharp in there. Okay, that's
definitely too sharp. So we're going to maybe place it here and here and check
again how it looks. Still too sharp. Maybe we
have actually enabled, let's try one thing.
Polygraps, ale groups. Yeah, we want all these
to be same polygrup now. Dimetry dynamic. Yeah.
It's still too sharp. I'm going to go back at
the groups like this. Dynamic again. Let's go and
put it in here and see. Okay, that's closer
to what I want. Maybe I'm not fully
convinced, to be honest, so I'm going to go back
and took it one last time. I'm going to put
it here and here. Going to select this and delete, and it's looked complete. And same thing for this one. And you see that I used added, let me go back to insert. I just added a few more loops. So basically, we have the contention edge
loop, the super loop, and then these two right here are within the
contention loop so that we have a more flat surface
after we smooth. This is starting to look cooler, but still we're missing the pointy angles on
the edges of the blade. These ones right here,
which are very unique. Oops, sorry. Then I accept the here. Actually, one step I missed, let's go back disable those
super loops that we did here. Now that we have
some idea about it, we want to create here
halfway on the blade, another subdivision
so that we can recreate those curvatures
we have right here. So, for example, in here, we're going to go with move. Oops, not that much like this. I want to have the blade
adjusted slightly. Like this. Also, I'm going to be deleting
this one right here. We don't want any on the
border to be affecting this. Both sides are good,
but those ones, we want to keep them away. So we basically adjust this till we're happy
with the result. Think So now, there is one thing I want to do. So since we have a
few subdivisions in here and I'm going to be
moving them from the top side, I change the depth of the target of move by
vertices to infinite depth. So basically, when now I'm going to go and
move all these, I'm moving all those instead of just the upper one
that I'm seeing. I'm changing this slightly, which might differ a little bit from the
reference. Not too much. We'll still keep the same feel, but I want to accentuate
some curves to make it work better in three D hops. There we go, and there we
go. Yeah, I would say so. And now I'm going to tweak
this one right here so that it has a little bit of
that flavor it has here. I think this has already
a good vibe. All right. To cocoa a few more tricks
to really refine this. H Mm hmm. All right. Um, dynamic. Okay, yeah, we definitely need to change
this a little bit to here. All right. I think that's good. Let's go back to insert, reduce the brush a little
bit so that it's not so big. Oh, insert. And again, go with the same super loops
that we did before. So I'm going to do one here. We have that one here, one right here, L's see. Okay, okay. I'm
liking some stuff, not liking so much these pinches
that we're getting here. It's probably due
to, that amount. Okay, we don't want
to mark that much. Okay. Let's go back a bit. Actually, I think I'm going
to chamfer this edge. Well, not chamfer but beveled, which basically does this. I think it's going
to look nicer. Going to go more into
the seti of the piece. I think you can actually
tell there is a bevel here, so let's go with it. I think about this is good. Yeah, definitely liking it. Let's go with insert again. Let's just go and
do this and this. And this hopefully
will look cool. Okay, that's cooler
and one more step. The pointee shapes right there, so we need to do this
and this one more here, ups, one more here. But this one requires
a little bit tricks, so we're going to be
moving the edge loop. So it's not straight, but it actually
follows the curves a little bit like this. Same thing with this. And this. Oh. Okay. Let's not do it
with outraradius. Let's do it with
infinite radius. So like this, like this. This one right here as well. Let's check how it's going. That's going a lot better. I mean, for sure, we
can improve some stuff, which we are going to be
doing now. But I'm liking it. I'm liking it. Okay,
let's move and move this. So what we're trying
to do here is to keep the keep the
loop continuous. So as you can see here, we have a little bit
of chaos going on because the separation between these two points is
smaller than this one. That's inevitable
when you create it, but we can actually improve it. So what we're going
to be doing is moving manually those points
that we have right here, to smooth out a little bit all the shapes and make it feel more natural like
I'm doing right now. You'll see in a moment
what I'm referring to. But basically, if we smooth out the structure
of the topology, it will feel less
pinchy on the geometry, and it will all look
more natural and nice. So we are in the
process of doing that. Remember, I have
enabled infinite depth, so I'm moving the vertices
I'm not seeing down here. Um going back to dynamic every
once in a while to check. Okay, that areas less
pinchy right now. Still some weird
things going on. Here, we don't want
this to be Oh, dang it. Okay. Hmm. Okay, let's actually you see, so these vertices have
not been moving with it, so we do not want that, so let's go back and
delete those edge loops. Oh, that's inconvenient. Okay, let's try fix it. Um, brush radius. And it's okay to do it manually like this
as far as you end up creating something that looks harmonic and is smooth enough. So for example, here, the transition needs to
look smooth and nice. The one I'm going to be
deleting is this one. I don't like it at
all, how it looks. Let's see. Okay,
that's a lot cleaner. That's very nice,
and it definitely looks quite closer to
what we are after. Okay, the s might be
too sharp, I think. Gonna be removing
a couple loops. So these go out. This stay
didn't change that much. Man to be removing these two as well. Okay, that's better. Oh, look. Did we use
create that or Okay, there is something
not welded in here. Alright. Let's delete
those polygons. These two actually live
this loop at us also. Um Polis now this one. Yeah. And now we should be able
to bridge correctly. To holes. Okay, let's
use it individually. Okay. And now let's again, create the edge right here. Okay, it's not working. Let's see if it's because of the polygroups groups,
which I don't think so. But yeah, no, it's not
because of the polygroups. There is something else in here. Okay. I think there's a
double g or something. So another leg is
in there. And now Okay, one and two. I'm doing it on both
sides because I disable symmetry just in
case it was because of that, which I don't think so, but
better safe than sorry. And now let's again try inserting ops
inserting the sloop. Yeah, now, it seems that
it's working very nicely. Let's again, groups. I like the blue.
Yeah, there we go. Let's save as 03 because we
did some progress in here. Let's go to geometry
and divide and see, not divide, sorry,
dynamic. There you go. Let's increase
smooth solutions to four. That looks cleaner. There is some work to be
done in here, which Yeah. I'm going to do after
a few minor notes on the rest of the knife, which are going to be inserting here two more loops and
see how does that work? That works Marvelous. And let's see now the
bottom side of the blade. Let's go with Oh. Let's go with this one.
A here and about here. Let's see. That looks perfect. Okay, so I'm mostly
happy with the blade, except for this area right here, which we're going
to revisit right now until this one is
perfectly polished. And then we will do the interior of the knife and the handle, and then we will do details and some manual sculpting so it doesn't look pristine and it
has some more work on it. Okay. So to fix this issue that we were
seeing here before, which basically if
it's hard to spot, the issue is that
the width here is different to the width
there and so on. So basically, it
doesn't feel solid, it doesn't feel clean. So for fixing that, we're going to go
back a few steps. We're going to
deactivate the dynamic. We're going to be removing some of these super
loops we have here. That's fine. I mean, those
are created fairly easily. So don't worry about those. And we want to adjust
this bevel right here. So if you realize here, this is sort of the let me adjust the size a
little bit more. So if you look here at
the width of these ds, it's about let's say this
is like 1 centimeter or so. So these are maybe 1 centimeter, but because it's
inclinated a little bit, it feels like it's thinner, so that is what we want to fix. So we're going to be moving those right here a little bit. So they feel more correct. As you can see, it's
not too difficult or use making sure we correct a little bit
of those deformations. Actually, we're going
to be deleting. Not deleting, but moving this one a little
bit high up as well. I think this should be it. So now it looks a
little bit cleaner. Let's see. Let's see
and check a few times. Okay, so still this is thicker. Let's make this less apparent. So let's move this one as well. This can go up. Let's see if I don't
miss the target. I realize these are a
little bit upwards. So, let me ask that right. I think I would say this
is the more tricky part, because we want to achieve
a very clean look, something that when
you look at it, it looks consistent,
looks solid, looks nice. And yeah, sometimes it can get a little
bit more difficult. But I think we almost have it. It is very subtile but it is just about some shapes in there. So I think this can go there. This goes there. All right. I just added a couple
more loops in there, and I think we should
have this now. Yeah, I think that looks clean. We're going to go try, see how it looks
with the super loops and see if it's finally ready, but it looks promising. So we have this insert. Let's do this, this, this and this and see. Okay, the Finlay
looks very nice. Let's activate perspective. There's a few things
I would still tweak. We can actually move with
the normal move from zebras, which is B V, and we will select it. And with that, we can
actually police some of the saves that we consider. So for me, it looks better now
after moving a few things. Still going to do
some moves in here. Sable dynamic. Okay. Let's do one more cleanup
after some shape policing. That's pretty standard to go back and forth when you're not entirely
happy with something. So let's just clean
again, those super loops. Take a look around. Okay? Mm. Dynamic. Yeah, there we go. Very nice. Okay. I'll say I'm happy with this. I'm going to go again and
add the insert loo
4. 03 Creaitng The Hp Handle: Mm. Let's put this in here. Yep. And there we go. We are ready. Let's compare the blade we have right now to
what we had before. Let's save a 04. Just
one more progress. It's never too little saves. Okay. Well, this is
maybe too early. It's load 03. Oh, yeah, but it's true that 03 was quite advanced already. Well, I guess there is
not that much difference, but this one is perfectly aligned with the
concept has the curves, everything clean,
very nice, very nice. Since this part right
here is going to be very similar, actually, I would rather
jump to the handle first and just take a look at it before we go any further. I think it will
add a nice touch. And also the handle
is pretty easy to do, so that's also going to be good. Alright, so for the handle, let's clear or views. Let's scale this
up a little bit, move it around here. And let's also go and
scale up or mesh. So we fit these Okay. So since the ring is a pretty quick part
of the handle to do, it's not going to
take much time. I'll say that we can just
jump right ahead into that and leave the handle for later because this is going to
be a really quick thing. First, I'm going to
don't scale this, sorry, center it with the image. We want to get the right
thickness for this. So I think we can have it. But still, I'm going to
scale it down a bit, go to the formation and inflate. Till it looks about it. I think this is
going to be cool. I'm just evolving it to what I think it's
going to look nice. To do this is pretty simple. As you can see on the reference, it's not like a cylinder. It used four sides,
one, two, three, four, with some bubbles. So very simple. Again, we're going to
go to Cmdler we're going to be deleting some loops. For that, I'm going to see to
go to similar perspective. We're going to leave that
loop, this one right here. We're going to leave
this loop right here, we remove this one, this one, this one, this one, this one. May 1 more, I think. Yes. Even one more, I would say. Oh, this no, one less. Then we have, maybe
it's five sides. I'm going to go for five sides. I think it's going
to look nicer. So we removed how many one, two, three, four, five. Okay. So one, two, three, four, five, and then h. Okay, so we have this
disc right here. Right now we just
want to do pebble, and we're going to do
something about not too much. I'm gonna call it
something similar to this, I think, which is the
amount of smooth we want. Let's see. Mm Oh, okay. This is too much. Just training the
different parameters to see what really makes it change. I think linear is the one. I like it better. Okay, so more maybe same in here
about this amount. And same thing. H And lastly, this one right here. I think for this one, I'm
going to move it as well. So do the disc like this and
then select the polyloup so mask and where is
polyloup here, polyloup. So this one I just want to go back to my
custom camera and scale it till I feel good
with the size it has. So this is good. And
same thing as before, if we go to dynamic, we will be able to
see how it displays. I say looks good.
About let's see, we still have the same size. Yeah, it actually
fits quite nice. I would say, slightly
bigger, we have it. Maybe I'm going to make it
also bigger, it's not aligned. I'm going to create a
new object, sphere, for example, to use as a
reference for the center. Okay, this one is not aligned with the
center of the sphere. So the center being
this line right here. Oh. It's this one right here. Okay. That explains why before our
symmetry was not working. And now, this should be aligned. This is not aligned either. Oh, there. Okay. So now I move it back with enough confidence of
it being perfectly aligned. Okay, now we activate
the handle again. Let's go and take a peek. Okay, it's not looking too bad. I like how it's looking so far. Okay, let's go to the handle
and start working on it. Okay, so the handle,
like we said, we're going to be sliding
it in three parts. So first one is going to
start off from a cylinder. Well, all three are going to
start off from a cylinder. We're going to
scale it same way, like a booling a little bit. The size a here, then with control, we
can create a copy, but we actually do not want
to create a copy inside the same subtol so we're
going to duplicate this one, move it here, scale it as well. Actually, I'm going to move the pot here so that
when I scale use scales, one side, and one last time, duplicate and do the same
thing back again here. Okay, now that we
have or three pieces, we're going to use something very similar to what
we did with the ring. We actually are going to be hiding them so that it's easier. And we're going to do the
basic shape for all of them. So this one is a little bit
subdivided, as we can see. Again, we go to Cmdeler, we go to the lead
and very easily, we remove most of the edges. We just want to
leave a couple of them like so, we go
back to our view. We mask, slip complete,
select this one. And now we scale it up to the point that we need based on the reference,
use like so. And actually, I'm
going to do something. I'm going to yes, I think I'm going
to be scaling Oh, scaling a little bit down
the extremes, the border. Sorry. Yeah. Like this,
then move this one up. And now that we have
this basic shape, it's a good idea to consider if the handle is going to
be a little bit flatter. We could do so like this, or if it's going to
be a cylindric shape. So for now, let's
keep it cylindric. That's fine. Let's quickly adjust the basic shape
for the second one, which is this one right here. Let's see how it looks. Okay, so one, two, three, I think we need
four subdivisions. So again, smdular we're going to be Oh, we
are in masking. So let's go back to the lid. As you can see, it's pretty
repetitive workflow. It's very simple.
We need to leave a few loops, and we're good. So in here, we select
this one, mask. Here, we scale it down. I remember that depending
on where we have or Piot, it will scale to one
direction or another. So we want to align
it a little bit, with the point that we
are going to be editing. Okay, so now I invert
the selection. I'm going to make this one go up here, then
mask these two. Mask these two and
move them here. And lastly, this
one, scale it down. Again, adjusting
the PO is useful. And like so, we move it here. We're going to stay pretty close to what we see on
the reference, okay? For now, we might do some
slight redesigns to create a more enjoyable
reading shape in TD but not major things, like just small tricks. And let's use the last one. Actually, we can
delete this one, duplicate from this one
which is already similar and scale it and we can start
to trick from here. So we mask that work good. Okay, so let's actually
duplicate this one. The formation mirror
on the Cxs. Yes. Let's actually take a quick
look at the blockout we have. This would be our current
stage. Of the object. Okay. It's not looking too bad. I mean, there are a few
things that I would for sure change in the volumes, because in here, to me, it has a different feel, but it's true that we still need to go
through some stuff to make this work nicely. So we're going to go ahead
and try and improve this. First of all, I'm
actually going to be grouping this Oops. Oh, hold on. It's sinking. New folder handle. We're going to move
all this here. And actually, I'm going to be Transpose set. Go to be trying to
make this like that. Let's see how it looks. I mean, I like it
better round it. Maybe not that much.
Like that is good. I think like that works. Not
too flat, not too rounded. It's a good middle point. We're going to roll
with this. You guys can do it however
you like, okay? It's actually just more about design choice rather
than anything else. And about these pieces, I'm going to be Oh, wait. Transposm Why am I still intranspose? Oh. Mm. Delete folder. Okay. Is the group still stuck? Okay, it's still
stuck. Hold on a sec. Okay, so the issue was that
I was I forgot I completely forgot to disable the
full stack transpose. So what I wanted to
do is to come to this view and move the
inwards a little bit. Same thing for this one. We all do it with symmetry once we have
reworked that piece. But yeah, this way we create a nice interest gap in
between both pieces, which I think is
going to look nice. And also, this will allow me
to scale this a bit more. Same thing with this piece. And lastly, I'm going to
scale this one as well. Not sure if it looks too flat now. Okay. I'm going to do a few blocks
more before I move forward, which is going to be a small box here. And a duplicate of this here. So with this, I only intend to create a transition piece
that we're going to be editing in a bit where everything goes
in. This included. I'll try to let's
go to C modeler. Yeah, so I'll create something here to make this work better. Uh, I think this is going
to make more sense. Okay. So now let's go and improve these pieces
a little bit more. So one thing that I've been seeing on the knife,
is the following. So here, we see some lines
that separate these pieces. And we actually can see from the dark gray piece to
the light gray piece, there is like a bubble in here. My intention is
to accentuate and create small bubbles
on all those areas, same as here, so
that they feel like more robust pieces instead of just like as floaty
as they look now. So we're going to go
ahead and do that. Also, we're going to be enabling the dynamics of
division on all of them, so we can take a good look. I'm going to start with
the lower one actually. So again, we look, in this case, we're going to select a Insert. Insert, sorry. And flat Iceland. So this one. All this one, we want to
create subdivision like this. Not sure if it's creating
it the right way. So let's just do
a different try. Okay, let's actually delete
that vertice over there. I'll move it here, see if
it's easier to target. Okay, let's lid flat
Island, all these. Another way to do the super loop we want to do is by
selecting the edge and selecting um close here. Oh. But instead of concave coal, we need to select convexl
and here on the options, we can select the
resolution we want. If it has a twist or anything, and also converse to center. Like this. Let's see if now when we do our
inset, it works good. It still does the same thing. Let's try and see if it works with a dynamics of division. But yeah, I'm afraid it's
doing something strange. Let's try do it the whole
way and see this. Okay. It's not bad. I thought
it was going to look bad, but maybe it's
just a visual bug, although it doesn't
look like a visual bug. Let me just do the closes
with subdivisions. I'll go with two
close like that, and then mask this one. It's slip complete, and
now I'll scale it up. Oh, remember to always align with a pivot
where you should. Otherwise, it's going to
scale a different place. Alright, so now
it's properly done. It doesn't have
any weird details. I'm going to actually
leave a big gap in here because I want
to bevel this still. So I'm going to be beveling
this and now I'm going to be using insert to
well, all this work. So first, I'm going to do
the same thing Bbling here. Actually, I should check if
the inset works good in here. Now, same issue. So delete close to then mask. And just pod, correct POD scale and leave it up to
here. Now, it's clean. Let's just make it all one polygroup and then let's go
to insert for the edges, activate dynamic subdivision
to be able to preview Oh. Wait, it's not. Oh,
yeah, it's insert. Be able to preview where we
are actually There we go. Where we are actually connect I think something
about this is good. It's always same procedure
for all the pieces. Super loops to grade the smooth
that you are looking for. You can see now it
looks more solid. Still, we need to have some a cohesive amount of
smooth on the edges in here. I'm going to go back and maybe move this
here and this here, and then just delete these ones. And see how it looks.
Yeah, now it's better. It's just like a small detail, but it makes it looks more cohesive with the
rest of the knife. Going to go ahead and
do something in here. So I'll delete all
these useless loops. I actually should have
created a simple box. Oh, yes, definitely should
have created a simple box. Actually, let's just do that
with symmetry, did issues. Mm hmm. Look here, we can just actually collapse. Hmm. Interesting. We can actually avoid all
this by creating, like, a proper simple box, but this way, we can
actually display more tools. So it's fine. Then bridge your Oh. We're going to be tampering
those using bevel on, Let's see on four rows. No, not four rows. Let's use the single row. But let's try and make
it all at the same time. Let's look complete. Yes. Like so. And now, same thing here. And now use a insert everywhere to make
it smooth and nice. We should be almost good to go. Let's see. Hey, that looks okay. We will be able to join
these two together later on because there is a cool welding detail
that we could do here. Just trying to figure out what size is
going to look nice. Think about this is good. I can actually come here, duplicate this piece use Scale it out. Let's activate the
dynamics of division. Let's just grab this off. Move it here because
if we ske it, we are actually going to be deforming the bevel shape,
and that's not what we want. So we move it like that. Same thing in here. Oh. And now it's like
this one, delete. Activate back the dynamic
subdivision on this one. We might have to adjust it because now it's on
a different area, and, yeah, it's more convenient
to have sharper yes. Okay. Okay, let's just finish. Um, I'm not convinced by
that piece, to be honest. For now, I think
I will just leave it and see where we
go with it later. Um, Yeah, I there. Let's just leave it out there. Let's also work. This one. This one looks like
it's more tuppered. It has, like, a
more rounded shape. So we are going to try to
recreate that on our piece. First, let's do a bible here. Something like that. Also,
let's do that in here as well. Maybe not as much on this one. Something about this is good. Yeah, maybe more like this. Okay. And let's go the
same way here. All right. Let's actually go to
insert and do the usual. So sorry. Let's select polls and do nothing so that
we don't miss click. Oh, insert. Appear here. Actually, here we're
going to add a few more so that we can do
the curvature nicer. Let's just go again and
mask that loop as well. Again, aligning the
Pivot so that it goes where it should
go and one more, which is this one. And same thing.
Let's skill it up. And actually, I'm going to add one more loop here and here. Let's just add the super loops. Insert. Oh, it's
masked. There you go. Same thing in here. And see the dynamic, looks great. Okay, we have two or three. This piece is going
to disappear for now. Not very convinced with it. Like, let's save again. Okay. Let's see how this one looks. I guess a little bit I think those are a
little bit smaller. No. And those we're going to see here. All right. So let's get
closer, hide the spotlight. Go do a couple tampers
here, and this one is done. Let's do an insert, Superoop
another one in here. I'm going to try add a
couple loops in here. Mask them. And try see if I can get decent curvature,
concave curvature, actually. Somewhere like this. Let's see. Let's see how it looks
with dynamics of division. Oh, without it, actually. Mm I mean, it has a point if we do
it with this curvature. Definitely, it's more in
line with the language. Yeah, okay, let's keep it. Um, not entirely convinced, to be honest, but
let's see how it goes. And for now, we're going
to keep it that way. Alright. So now let's go and add the super loops like we
usually do with insert and see if we can
let's see how it goes. Hm. Okay, maybe I'm going
to do a bevel here. Not entirely convinced
by the looks of it. Okay like that. And now I will actually
go and insert here. Let's see. One more insert. Actually, there there
there and there. I'm going to force the
curvature myself because I'm not happy with how it was
done by the algorithm. Ask this one. That looks cleaner for
sure. The same here. And now let's delete the dosages because the
curvature has changed. Go insert again here and there. Look. Okay? That looks smoother. Still not happy, to be honest. Let's try Let's try one here and force these two
and delete this one. This and this. Let's see. Okay, yeah, that's definitely more what I was looking for. All right. I think I'm going to do
one last week, actually, going to inflate it, which makes everything
more rounded and thicker, going to the same with
all these pieces. It gives everything a more
stylised look, which I like. Yeah. Starting to look clean, huh?
I like it. I like it. Okay.
5. 04 Creating The Hp Center Blade: Have the base of the handle. We have still a long
way to go because we still are missing
all these details like the cuts in
those two pieces, the lights, the floating plate. I can see some sort of thing in here might be just the
bright, from the concept. So we're missing those details, but I think it's time to get started in this
piece right here. So the way we're going
to do it is we're going to build a solid
block, the gray one, and then a floating
piece on top that will be this golden detail. So let's go and work on this
actually delete this one. And I'm going to lower this one a little
bit more, actually. I like this edge. And I'm going to move it till I find a balance that I like. So this is normal height, but this breaks
the blade a little bit too much. Okay. Now let's go back to seem move. We're going to be moving. Let's see if I can click it. I'm just going to be
realigning a little bit those vertices to be same distance to the sides because since we have edited the blade
after we splitted it, it clearly looks
slightly different. It ends on the start of here. So that will go there, I'll go there and
that will go there. Let's actually go
back to clear abuse. Align the blade again. And okay. I can tell that
during the changes, I did the curvature
more noticeable. Okay Okay. Good improvement in there. Oh. All right. And there we go back. Move and move. Alright. Use small twigs as I see them. Okay, I was just playing
with subdivision there. Alright, so I like this shape. Let's go and see
what do we have? So we have the gaps
for the lights. All the gaps for lights, we're going to be doing
them with wllansO maybe extrude or QMS,
but probably Bollans. That's the kind of detail
I like to do at the end. That way, we'll also be
seeing some Boolean work. Uh, the small creases, probably, we're going to be doing
them with Alphas or by doing some cuts once
the subdivision is higher. But that's a little
bit more destructive, so we will probably do it
with Alphas using layers. So the piece is quite simple. Just some round
details on the point. Okay. All right. And by the looks of it Okay, I would say it closes
on the center. So maybe this point
needs to go here. And we need to do
this more gradual. Let's see. The feel of this. Organic. This feels more rigid. Okay. Let's move it down
a little bit more. So we actually can we actually have it easier to merge both the upper
side and the lower side. I was just quickly
thinking how to do it. Um, I just doing small tricks, as I see them while I'm
rotating the object. I was just seeing that this it's actually quite good. Okay. Um, so let's try. Let's try. We're going to
add some thickness to this. Okay, yeah. That makes sense. We're going to do SmdllerGo it. Um, extrude all polygons and give some thickness. Actually, since when we
extrude towards the inwards, the normal space to that
point, as you can see, and actually, we would like to close this
gap that we see right here. We're going to extrude to
the outside because it gets sicker every time, wider. So we're going to extrude here, and now we are moving down. Yeah, like so. I think
this is a good point. This creates enough silhouette, and the gap inside
is not too much. Actually, I'm going
to be using here a box like object inside, so we don't have a
huge gap in there. I'll cup it till
here, I would say. Oh, there. Again. Than it. Well, since this
is just a filler, we're going to do
it in a quick way. Actually, let's go. Let's create a box, cube one by one. No. Let's use this one because we need to
create a first primitive to replace it for the
object that we're creating. Actually, that's the one
by one. There we go. Now, let's make it wide enough. Like so. Long enough. Like so too much. Like that is good. Yes. And now let's compact
it a little bit. Analysis go with similar insert, create one here,
one here, one here. I think that's enough. So now we mask this one, Skal it on that edge. Musk this one, sk it on this Oh. What? Okay. Let's
actually do it that way. Sometimes masking
doesn't work as desired. So it's easier this way. And now, lastly, this
end of the blade, and I think that will be it. For the filler. Let's also
go and bevel all those. Oh. And now let's create some
inserts here, here, ups here. Basically, so it'll preserve the sap when we smooth it out. This object is never
going to missing, so it's all good if
it doesn't look nice. Almost done. All right.
That should be it. And now geometry dynamic. All good. Perfect. Actually, now let's go back to this one. Okay, I think overall, this shape is good
for the piece. We're going to do
some cleanup now, like always creating
the super loops. So let's go right
ahead and do it. Okay. Okay, okay, okay. We just need some edges near
the pointy areas like so. And here, a very pointy one and one on the
base, very close to it. Let's see. That looks about it. I would say so. Let's see. Oops, this one and this one. Okay. So I'm seeing here that we
need some more in there. And let's use smooth tool to
extend it to the same point. Let's try to leave a
consistent distance between the double
loop and the border. Okay. I'm going to try like always to see how an inflate feels on it. Okay, so since we extruded it the other way around
when we inflate it, it goes on a negative value. So let's say positive. Mm Okay. Let's go back to geometry.
It's all dynamic. I think I'm going to add
one more loop here on the very as in here. Here on the base
and here, I think. Maybe a little bit
more pointy, I think. Let's see how it feels. Well, actually, let's try
with dynamic activated. Yeah, definitely feels good with a little bit
more pointiness. But actually, I'm
going to do one thing. I'm going to bevel the center. Let's see how that
feels on the blade. Here. It doesn't improve that much. Now, I'm not going
to be rolling it, but I think I'm going to be going to be
masking this loop. Mask this as well. And smooth this one out. Smooth, but maybe going to
move it down a little bit. Let's see how it feels now. Mm, doesn't look consistent. What I'm trying
to achieve is for a more rounded result
along the edge, but still keeping
a very pointy tip. So let's see how we can do that. Maybe I gonna try
deleting that edge. Let's all the way out here. Dt. Maybe Tilt Hmm, not sure how that would look. That's not what I'm after. I mean, it's just like
a very small thing. Let's just taste like that
before we made it more pointy. I think the roundness
overall works better. Okay. So now I'm going
to be painting this a little bit darker
color fill object with a darker gray selected to create
some different values. Going to duplicate
the formation. Oops. Mirror. There we go. We have two sides. Let's see how that works. It doesn't work too bad,
but I think I would rather see I would rather
have more thickness on it, so actually going to go ahead
and extrude everything. So C modular, select faces extrude and going to
select poly group. Oh. Let's see the values. No side polis. Gonna have to remove
a few things in here. Gonna delete this.
Oh, this this this. Gonna extrude again. Oh. And now I'm going to delete the two
as well so that the border looks flat and
not curved or anything. Go back and add all
those subdivisions. And let's see. Okay, that looks better. So this one can go to hell, delete duplicate this one
right before duplicating. I want to try sing, which is a champ for this No, not rates. Sorry. And reinforce that with some s in here
and another one in here and see that looks more in
line with aesthetic to me. All right? So now
we can actually duplicate it deformation mirror, and we're going to save eight. Let's do some progress. Here is a dagger from
before and from now. Things. I think there are some stuff
I'm going to trick back from the handle that now after
seeing how it works together, at least the first
cleanup stage. Yeah, I would like
to clean it up. And especially it's going to
be This piece right here, I think could be
thicker like so, yes. Let's do it right
from the center. This feels more balance. And also, let's make this wider. I'm going to do the
answer loops now. Okay, this is going
to look very nice. Very, very nice, very smooth. Few more in here, and we will have it
ready. Okay, let's see. Let's see how it looks. Alright. Awesome. Yeah,
that's finitely better. Okay. A few more policing steps. I just want to define more
of those nice bevels, make them clear to the view, and not mix them with the
rounded parts of the handle. Okay, okay. We
looking pretty good. Let's compare to an
earlier version. Maybe six. Oops. Yeah, definitely nicer,
especially the blade. The last adjustment we did in there was pretty
good, I think. Let's check the whole thing. Et's put that here
and crop this one. I'm sure there will
be small changes because we have done a
few tricks during the go, especially on some
of the proportions. But overall, keep in mind, it's not a symmetric
one. It's pretty good. Okay one scale up. Yeah, everything fits nicely. I would say, yeah, we elongated this area a little
bit, which can be fixed. It's not like a big deal. But to be honest, I like length the new length
that we have gone for. So it's not really
that important. Let's see how it
looks like that. Okay, it looks more
like aconi this way. Let's compare again to see if we messed up or we
improve something. Let's go for a more
glossy material to be able to see
pinchings better. Okay, I think we
actually improved. Yeah. And now it's
closer to the concept, so let's also fix this one. Gonna save over I'm using a very big brush
so that there is no, like, smaller deformation
small deformation sorry, because smaller deformations
usually cause pinchings. For example, if I try
to move like this, you'll see that now
all this is broken. Well, if I move it altogether, it still looks smooth. So, important to
keep that together. All right. Let's go back to
our basic material and use a few adjustments here on the paint so that it always
looks bright and shiny. We have that mirrored. All right. We have a
pretty solid base, and a safe and now next steps are going to be there's three more steps for the
hi poly to be completed. So four, actually,
we're going to be modeling the
golden part just now. Then we're going to be
doing the bullying work for the lights and the
floating plates. Then we're going to be merging
some objects like the ring and this box that we created that actually we could
adjust a little bit now. Like that. And we will
create a welding for this. And on that same stage, we're going to be modeling some dents and some small
details to the knife, so it looks more polished.
6. 05 Creating Small Hp Details Part1: Okay, so next thing
we're going to be doing is to go for the Booleans, soup and purial quick. That reason. There you go. Let's try to do
these gaps in here. I'll show how to do it with C modular first with
the poly and subtip method. And then we all do
it with Bollens. So it's fairly simple. We just have to go to the lower subdivision without
the dynamic subdivision. And with symmetry enable, mask with Alt like we saw the first at the
beginning of the video. Since it goes all the way down, probably it will be good
idea to select also these ones right here and then right click on the polygon, QMS single poly, and we're
going to extrude it inside. Like so I think a little
bit more depth like this. Okay. That should work. But actually, I think
I'm going to add one more loop here
and one more here. So it doesn't go all the way. Probably like this, it
will be more aesthetic. Like this. The thing is when we go back to
dynamics of division, it doesn't look
bad, but still it's very rounded for what
we want to achieve. So we're going to
do a few tricks. First, we're going to be
adding one more looping here, so the difference is. Is this one right here? We're going to do
the same here near the border. Around here is good. Same thing in here, same
thing in here, in here. So basically, we sharpen
that a little bit more. We're actually
going to be moving the loop a little bit now, but let's do it with mask. And also, let's loop complete. For this, I need to mask
also these ones right here. The reason for this is
because if you realize when I go and apply the
dynamics of the vision, you can tell there is like a defined edge in there
that we don't want. We just want it to be on
this area right here. So that's why we mask it. We musk also everything that's close to the extrude and this way when
we move it down, so we need to move
it on the edge, which is by pressing I control. I sit on sec. I'll let sexually move Edge We just want to follow
the curve around. Let's see how it looks now. Okay, now it's not that visible, and you can tell there is
something right there, so maybe we can go
and do the following. So let's do collapse. Let's collapse this one. Let's see how it looks in here. Okay. Okay. Like this. We just have to mask
the extruded area and then do the collapse
with polyp selected. Let's see if this
way looks good. Yeah, this way looks very good. We still can see some pinch, so let's try to solve
it in a different way. Let's also mask one more pool. Let's see how it looks now. Okay, that's more in line. Yeah. That's definitely
what we're after. We're keeping the
rigid border in here, but we are having a soft
runnes effect on the sides. Let's also do a bibl, maybe let's do the Bbel before we do the
segmentation here. Oh, here. Okay. Actually, this is interesting. Let's see how that works. I'm curious. Maybe
it looks nice. It definitely looks very cool. Let's see the ref. Yeah,
there is something similar. I think I'm actually
going to go for this. Kind of like more how it looks. Going to make it a
little bit cleaner, but enjoy that shape more. Got the mask, this to the bevel. Maybe these ones
as well. No those. Okay, now, let's do an insert
to define it a little bit more. That looks nice. Let's actually clean well, it's not going to be seen. So maybe we don't
care that much. Um, Mm Okay. Let's go back a few steps. One, because I forgot
symmetry in here, and we actually want
it to be symmetric. So let's do that and two, because I realized that I want to try different
way of approaching it. So let's go back a few steps. Yeah, this point is perfect. Okay. Oops. No bridge, but. Okay. So the symmetry is
not fully working, maybe because of local symmetry. Let's diselect all this
without symmetry because I think the issues that we masked before activating the symmetry and now it's having
issues with the mask. There you go. Let's go about it now. Is Muskin Well,
yes. For now, yes. Tree different bevel options. Actually, let's use
the one row single row because we want to
do some adjustments. Okay. I'm just trying to make it look clean because
of how round it is, it creates some distortion on the bevel, thickness
and position. So I'm just cleaning that
up a little bit. Hm. An orthographic is going to
be easier for some stuff. M Okay, that looks pretty clean. Now we want to go and do
the inserlops like always. That looks printed,
to be honest. I think that's what we
are going to be going for maybe let me try one more step. I think it can be done better, and we always should
try for better. Okay. We remove all the
super loops that we had. Gonna try do another
bevel in here. No, this is not what I'm after. Mm mm mm. Let's see which
options do we have? I don't think that
we actually can do much of what I wanted to do. Oh, by the way, slide
is the option I was referring to before
to move along the edge. Um, I think I'm
gonna try let's see if I can do it with Bbl
but use masking this No, but the result is not I'm trying to create something
more rounding here, which I'm not achieving
at the moment. I mean, it gets
rounded when I smooth, but I just want it
a little bit more. Gonna slide that in a bit
and see if that works. Not too convinced, to be honest. Um Okay. Thinking about fits Worth, keep going this way or maybe
doing it with Bullins. I mean, I like the result.
I like how it looks. And I would be happy with this. But again, I'm not
fully sure about it. So gonna do one thing, go to mask all these, gonna extrude it a little bit further. And then we'll add
the super loops. And see if I'm happy
with that. Let's see. This should go about
this then insert here. Let's call it like that. I think it looks cool. Works from far away,
goes with aesthetic. Going to actually go and
do the lights right now. Now it. Let's create
a 22 is good. Now let's put it in place. Actually, I'm going to try
adjust a little bit of shape. So it works better with the box, although we are not
going to go very far with that just a little bit. Oh, we forgot to do
one thing, actually. We need to mask this
this edge right here. Mask also this and
slide this one down. Up to here or so. And then mask this one. Actually, we can delete one of those. Okay. So basically, I
was just trying to leave the upper part
of the handle smooth. And now we are going
to be creating a small plate for the light. Although I actually like how it looks without it because we can see the little ridge here. So let's see, let's see if we
leave it or we take it out. H. I'm gonna paint with standard brush with MRTV. So it only paints
material and color. And now I'm going
to go back to you, it's true that when
we paint flat color, it doesn't paint any
material at all. So I'm gonna paint some
other one that's shiny. Yeah, maybe this one or some other one that
looks more shiny. A This one is good. This where we can
see some sort of iteration of the light before we go ahead and
have this textured. Okay, let's add some super
loops to this one, insert. Let's actually bebel first. I think we look nicer. And now the super loops around. That should be more than enough. Gonna hide the mid
handle so that I can and the lower
one so that I can better see the Yep. How the light. It's
clipping the a like some works good. A little bit more narrow and still kind of move
a little bit more. This piece right here.
They'll just sap little bit. Okay, that makes
more sense to me. Mm. Okay. Yeah, I think I'm convinced now. Going to go ahead and duplicate this deformation mirrors down. Duplicate deformation,
and I it this one? No. This one. There we go. Now we have four lights stones or however you want to
call them. Mrs down. Let's make all the visible
back again. All right. We can actually remove
this from the beginning, since we're not
using that anymore. And to be honest, I'm not
sure about this piece, but something is going to stay, I think, because it looks cool. But we will revisit it for sure. I think maybe like this works. And also let's go and
activate symmetry. And we're going to make
it more curved like this. Oh, I know it's not working. Okay. Let's go to similar. Let's add a few loops in here. Why is it not working? Why so? Also, let's activate the symmetry
on the Y axis. So it affects all the
heads of the piece. Let's see if that
works any better. Trying to create something round that works
out with a blade, but I don't want to have
anything that convince me. I just want to have
something that looks cool. And at the moment, it doesn't we're going to
go back a few steps. Let's see that. Maybe
maybe this could be it. This actually convinced me. Like a small rich in there.
Yeah, that looks cool. I think I'm going to
refine a little bit more, but I'm happy with this. Okay. Okay. Yeah. I like this. Let's make for a
more clean piece. We're gonna go Control
sift, click here, and we're going to be using the knife curve or
the trim curve. I always mix them up. It's not any of them. Oh, I think it's because of
the dynamics of division. Yes. This is it. All right. This one is like a
more dirty piece. We actually didn't do it
as clean as it could. But because it's barely seen and it's just a small
detail, that's okay. We could redo it cleaner. But let's just keep
it like that for now. And if we feel the need,
we will just clean it up. Just going to do some
cleanup with a clip curve, which basically slams
all the geometry from the side of the dark shade that you see on the
right to the left. So basically, it feels
like it's cutting, but it's actually
smashing geometry. So it never gets destroyed. It just gets smashed against some other
parts of the geometry. Now this is going to stay
like that. Looks cool. Okay. All right. So now that we have
this, let's save. So actually, let's just do the remaining gaps in
the middle piece of the handle or laying
tab right here. Then we're going to do same details of the light
in the black piece. And lastly, we will model the centerpiece,
this one right here. Okay, so there we
go. There we go. Okay. So far it's
looking good, I'm happy. Let's see. Let's do same
approach on this one. So we deactivate dynamic. We grab Cmdller. Actually, I'm going
to do an insert. Insert here. Since it goes almost halfway, so I think it should
arrive about this height. I'm going to go
and add one here, which is going to go like this. Sec. Let's actually go. Let's look complete.
Lekalt down like that. The reason for this is
because we're going to be tweaking and editing
the geometry in here. Now that I realize the plates are a little bit
flipped, so or twisted, so I'm going to go
and rotate them slightly to face better the direction of the
panels down here. And like this. Yeah, now it's more
properly aligned. Okay. Still missing
some rotation, I think. Yeah, like so. Now, let's add let's
do a mask for this. So about there. Let's see through with a
transparent mode and see, Okay. Maybe we don't need
to go that low. So let's go insert
and do one more here. Single insert, single
edge loop. A there. Now let's do mask. Now let's actually transpose. With transpose, we can just scale down the whole loop without having to
mask, actually. I don't know why you
masked. All right. So now let's just do
symmetry here on both sides. And now let's mask
this right here. Okay. Let's do the same thing
as we did before. Let's add one extra lube
in here for control. And before extruding, actually, let's do it better this time. Let's reorganize a
little bit more how these are placed with slide. Let's use a smaller brush. Otherwise, we might
grab multiple vertices. M. Okay, that looks more correct. Let's see. I think that looks good to me.
Let's see. Let's see. Maybe let's slide this loop
right here a bit more. A bit more. And now let's go with QMs
and see how it looks. Mm Okay. Let me take out the lights and
see everything as a whole. Let's actually Let's see without it. Is the test. Okay, so they go that low. Maybe we went too low with this. Let's move this up again. Oh, silly slide. Up to here. Let's actually delete
a few of the loops we have so that it gets
less complicated. We'll add those afterwards. Same thing with this one.
And now let's chimes. I think we're going to
clean this up, actually. So we're going to
delay the polygons and go by polygroupOO. Maybe poly group,
Iceland. There you go. And now let's reach
extra this a little bit. Uh, um, Oh, yeah. Throw off. Oh. Let's loop. Actually, let's move it less, and then let's move a top side
view to align these guys. And now let's do a bridge. We will clean this up in a
little bit, so don't worry. Let's slit this one. And these two as well. What we want to do is
to simplify this area. We're doing different
approaches on the top part and this one so that we can see how we
do it in different ways. Let's see. It's not allowing me to remove because
it's not symmetrical. But now I disabled symmetry, so I should be able to. Why is that Dp point? Yes. Okay. Okay. That's good. Oh, I have to remove this
again because I went back. Alright, now we clean that up. Now let's um Let's go to Each and delete for
this one, as well. Oh. Just add. Let's
bridge these two. Set bridge. What? Oh. And now let's Bridge this and this. And actually, this would collapse. Like this. Okay, now we need to organize this a
little bit better because well, I messed up. Um, actually going
to move that with slide and gonna get it
closer to the edges. Not that much, but a little bit. I'm gonna use move now. And now with slide, I'm
just going to go and police how the structure
is done so that it looks clean and it is clean. Okay. Okay. All right. That's starting to
look better. Okay. So things we have
been doing it with symmetry to avoid some issues that we were having with it, which can happen sometimes. So we're going to try
we're going to have to create a symmetry for the object, which
is not big deal. We are going to prove
this slightly more. Okay. All right. All right, right, right. Okay, I just wanted
to check something. Never mind. All right. A few more steps. We've got this Let's see it with a light. Okay. We can actually move this
aside a little bit more. Let's see now. Okay, we can change it more. Okay. So now before we move
forward, let's go. Control CIP click,
hide half of it, and the other half of quarter so that we only have
this quarter left. And now we go to geometry, WiFi topology, delete hidden. And now we can do
mirror and weld. Oh wealth or that axis not
working very good sec. That one worked slightly better. Let's actually scrap all of these and move it a little bit there so
that the mirror is better. Okay. Now let's do
same thing in here. Okay, it's grabbing
the other side, so let's it the other way. So duplicate deformation mirror. And now Okay. Actually, let's delete the copy. Unless unto the moving
part, otherwise, we will have
issues.Formation mirror. Okay, now are good. Let's
sew those together. It's down. Stitch. Hm. Actually, I think we can do it quicker with the
edge selection. So if we select stitch, It's not working on sec. Maybe I'm not clicking
on the red spot. Okay. Let's change for a sec, so that the action resets. So stitch now click Start Edge. Click the opposite edge. It's not doing anything.
Hold on one sec. Okay, maybe we should do it. Maybe we should do
it on bertie first with stitch and see if
then it works with edges. I'm going to deactivate
dynamics so that I can do smaller brush. Okay, not allowing
me to. All right. There we go. So now
let's try again. Stitch. There we go. Let's see if it's well
done or it's just one. Okay, it seems that everything
is stitched properly. Yes, it is. Alright. So now that everything is
perfectly symmetric again, let's just keep working on this. Save us. Let's save a copy, 12. Let's go with bevel like before. Let's go to move.
Let's go to slide. Remember that we are
just restructuring the vertices so that it
looks solid and clean. Let's move down. The vertices. It looks pretty clean
now, I would say. All right. Looks pretty good. Let's just go and do the super
loops like we usually do. When I said not going
all the way through? Oh, because how this is done. Okay, yeah. Makes sense. Gonna collapse here. It's not a clos, no, collapse. Sorry. Here. I don't want to do the full
thing, so use one edge. And now we are actually
doing polylop Okay. Let's see how it looks. Well, actually, we need
to re add the ones we had in here, here, here. And we're good. And
let's see geometry. Dynamics of division
looks pretty clean. Pretty nice, pretty nice. Okay. Lovely. Lovely, lovely. It looks continuous,
consistent, very cool. And now let's just go and
readjust this slightly. Let's also use inflate. So it looks more
rounded and nice. Scale one, again, more inflate. And is skilled down. L et's click Local
symmetry so we can modify them in the local axis. And I would say this is
about it for the lights. It all looks like it
fits very nicely very cleanly, like on the reference. Now let's see the
floating plate. Let's also save We're going to do the
floating plate in a less clean way to
show more options. So what we're going to do
is to grab one of the mask. So we're going to do um we're going to do the
square mask probably. We're going to, need to increase the subdivisions
for this method. But I don't want to I don't want to do
it on the object that we're working with sub dip. So we're going to apply
these subdivisions. And I created a copy so
that we have this version, which is the one we're
going to use for the tab. And then we're going
to do one more, we will keep the sub dip. So let's do this one. Thing like that is aligned. Let's try and avoid
these things. So let's do a few mask until we get something close to clean. So let's keep going
like this. Oh. That is good, I would say.
Now with control, I'll click. We can sharpen the mask
or with Control click, we can blur it out, but
we want to sharpen it. Okay. In there looks good. Um, what we are going to
be doing now is probably, we're going to rest the square. Oh, like this. We're going to try do
something more round. See how that works
with a circle. Oh With space, we can move the mask around. And when we release space,
we can keep scaling it. Oh, sorry, I forgot
to click Alt, so that it's actually, we can invert it and that's it. With Control, click on the
viewport, we invert the mask. Now, it's going to
look too pixelated. Let's actually just
do it a square, and then we will just
police the borders. So we're going to go to extract. We're going to
deactivate the smooth. We don't want it to
be smooth in any way, and we don't want
it to be double. So we're just going to adjust
the thickness a little bit, and let's see how it looks. Okay, that's too much, probably. But let's start with
a little bit less. That's too little.
That's again too much. That's about right.
I would say so. Now, from far away, it looks very thin. So let's delete this and let's increase again.
Let's go with this. Okay, so we can work over this. In the end, this is just
the extract of geometry. And as we can see, well, I'll just keep
the symmetry on. But as you can see, there's
some rounded corners already. So what we're going to be doing is to select polygons, delete, we're going to select
polyloup so that it removes a Wait,
let's remove first. This it's important for us
to see the orange line. We didn't need that till now. But if we're going to
select the polyup and the orange line is
facing that way, it's going to select
that one, and if it fits facing the right way, the sides is going
to delete that one, which is the one
we want to delete. Now we just have to do
the same thing here. And now we're going to delete
the Iceland, this one. Oh, let's see if there we go. So now we have the flap like we wanted with
rounded edges by default. And now we just want
to extrude the border. So we're going to
select extrude's face. Need to select an object, and select a loop
complete this one. Actually, let's make
all same polygroup and let's select
polygroup Island. Okay, so it's not working. Sometimes it happens
that depending on how you have done it,
it either works or not. So let's just go
to polygons, QMS, and let's go with
Extrude, all polygons. Like about this, this is good because
we're going to use Bebel which we are doing. Let's do a slip complete
polyop Like that. And now that we have this
one, let's go far away. Let's use a little
bit of inflate after we use the usual
super loops in here, and here, there, and there. Now let's see how it looks
with dynamics of division. Looks decent, but we want
it to look more round. I'm going to go with an inflate. Lo. I like how that feels. And now let's just make it
local home, actually. Align the pivot with
a piece a little bit better so that we
can move it closer. Actually, we could center on
the origin, move it, yeah, kind of there on the center, and then just by
scaling it down, it will automatically
align very nicely. Gonna move it up a little bit. What's deactivate local symmetry and activated back cases
not working properly. Okay. Let's leave it
out about that hate. Let's check the reference. Okay, maybe it should go up
here close to the lights. We need to til that.
Why is it not working? Get local symmetry. No, I know why. Okay. Okay. So now we will have
or flaps as well. I think I'm going to
go and do something. I'm going to
duplicate the object. Gonna move it there
a little bit. Scale it down and up. I just want to
create the sensation that there is like two layers. I so it feels more solid. Like this is nice, I would say. Otherwise, it was
too simplistic. Now we can actually
select this one. Let's increase a little bit. Yeah, let's put the dynamic
subdivision on both. Let's make this one have paint, so it looks more shiny, even if we don't select it. Yeah, it gives a
nice readable pop out in there, small detail.
7. 06 Creating Small Hp Details Part2: Okay, so we have the
dagger clean one. We just need to finish
this piece right here and model the golden heart in there. We're going to do these two
holes with Bullins, actually. But first, I want to do
some changes in this. So let's go here to
deactivate the dynamic. Go do C modeler, insert a couple edges
in here and I'm going to go and do a Kems which
is selected already. Mes on poly loop on
this one, like so. And going to go back
to insert edges. Make this really sharp and crispy by putting the
loops really close. There we go. There we go. One more. Let's
see how it looks. Okay, looks better. I mean, more interesting for sure, but I still want to
make this more pointy. I wasn't happy with
how it was looking, so let's make this. Yeah. No it looks better.
Comparison to the other side, the way, new way. So let's just grab
this, Subtool delete. Before we do the
duplicate again, we're going to grab and
duplicate this one. Same thing as we did with this, which now we can throw away. We're still keeping
our sub diversion. Now we're going to
apply or not apply, but we are going to keep
a copy of this one. We're going to model the
details right there. So we're going to be doing it looks like we
have something here, like I don't know, it looks like something in here, plus the Booleans and
also the small details. So we're going to try to do
that. See how that goes. So as you activate the subdi we have to check how tall those are. So it's midway between
the curve and this one, a little bit lower
between here and here, so around this one could be, and we are going to be
inserting an loop here. We're also going to be
sliding the vertice. Let's make this bigger. Okay. And now we're going to actually going to move this
lower a little bit more. Yeah. About something like
this, I would say. And we're going to do mesh, not all that on a single poly. Well, actually,
there's a quick mask. So it's a couple of
them. This goes there. Okay, about this. Should
be good. Like that. And now we are going to
select vertices and stitch. Stitch, this one to this
one, this one to this one. And lastly, well,
I think that one, we need to keep it, right?
Yeah, it looks like so. And we see this one as well. We're going to slide this one
right here a little bit up, so it's more gradual. Okay. Looks about right. But actually gonna think we could
move this down. So I'm gonna transpose this guy. Let's move the pivot
to the vertice. Make sure we're used
moving that one. Yes, we are. Now
let's make it deeper. Let's do same thing in here. Let's see how we
can mask this one. All right. It's good now. So about there, I
think looks good. Let's see how it looks with
the dynamics of division. Okay, looks decent,
but we need to, of course, clean it
up a little bit. Let's use insert for
this. Let's see now. Okay, that looks nicer. Let's do this as well. And this and see how it looks. That looks very nice.
And we need one more, which is going to be, this one right here and
this one right here. There we go. That
looks quite promising. Maybe we could make it deep. But to be honest,
it's not too bad. So for now, let's
keep it that way. Let's try go and do now this corner right
here. Gonna remove this. Yeah, this one, let's
see how that looks. So we actually can
get it fairly simple. Um hmm Okay, so that
is going to go here. I want to make this
loop more pointy, but because we have already
all these super loops for the hole we just
did all these details. So because we already have that, it's going to be a little
bit more complicated. So what I'm going to do is
go ahead a few steps back. Well, not back, actually. I'm just going to remove them manually by deleting the edges. That's all we need, really.
Removing those two. And now we're going to go
slide and go to make this more pointy Actually, you know what? I'm going to keep this one, and I'm going to do another one. I don't want to break
the flow of the blade. So I'm going to do one in here, and this one is the one
we're going to be editing. It's not that much. We're going to be
group invisible, well, not group invisible, but are actually going to go select the mask class of
selection with control. We open the mask menu. We're going to be polygrouping all these into one section, polyps group masked here, and then we are going
to be actually, sorry, let me mask this as well. Like that. And now we're
going to be missing this. How can we do this? Okay. Let's actually keep working. With this, I need to
add one more loop, so I'm going to go on slide. It's loop complete, but
let's mask all this. And let's move this here. Let's now add one more loop. The idea for this is that
instead of extruding it, I want to go and mask this
and transpose this loop Oh. Just like that. And I'll do the same thing
with this loop, Transpose. Okay, but I'm asking
this right here. Oh. I'm going to adjust also
this vertice right here. I'm going to transpose
this one as well. But masking this, of course. One more adjustment,
which is going to be sliding the vertice
a little bit down. And let's see how that feels. Let's see with the
dynamics of division. Okay. I think it requires more. So gonna go ahead and
make it more apparent. So transpose, ask all these. Okay. And Yeah, the masking is getting
a little bit tricky now that we have the
bottom side as well. Okay, let's transpose this one with all these
masked like always. And same thing with this one. We just want to create a smooth transition from one to another. That looks very nice. We're going to detail
this a little bit more with the usual some
insert loops in here. So we're going to
put one in here, one in here, one in there. And one in here. One more in there to make sure. Va. I would say this
looks about right except I'm going to try and
see how Beba looks here. So I'm going to peal this Oh. It looks a little bit
nicer, still too sharp. So, you know, go ahead and remove this loop and this loop, this loop, and this loop and insert a couple of
them, but farther away. Looks pretty solid,
looks pretty nice. Let's see with all together. That's wonderful. I love it. Nice details. I think it looks still very thin. I'm going to try a few
more things in here. Not fully convinced yet. So really, the issue, I think it's because the
overall result is very thin. So maybe if I delete
this main loop and this one, We're just move. Let's go with slide. Let's delete that
loop right there. Let's let this one. Let's do a bridge, sorry, a bevel, like a bigger bevel. And now let's use, again, insert loops to make
everything look nicer. And see how that
feels now. Okay. Yeah. That's definitely
more in line with the study we're going
for and looks very clean. So that is what
we're looking for. All right, I'm happy
with that piece already. Let's compare with
a few versions. Just to see the progress,
how it's looking. Load, maybe number nine. Yeah, that was before the
details with the details. Big improvement, I would say. Oops. Yeah. Very nice. Okay. At this point, we're
missing the Boolean part. We can actually try
and do it edit poly. But Bollans are not bad, so maybe we are going
to do them with those. Let's just try and show
one more C modeler tool, which is very, very nice. But for this, I'm going
to duplicate again. G to get rid of the one before. Delete. Okay, so for this, we need to turn off again,
the dynamic subdivisions. Okay, this is just
slightly above this. We're going to need one
extra loop for this. And we're going to slide
this vertice again. So it's kind of
positioned in a way that it's parallel
to the line of the cut we did before because that's what we need right now. And we are also going to try to make these two polygons
very similar in proportion. So about this, I
would say it's good. Making sure it still
works like this. Something happened there.
Oh, yeah, it's true. We're still missing
the super loops from before that we removed
to do the point thing. We're still going to
be keeping them away for this process
we're going to do, or actually, maybe it's even convenient for
us to have them. So let's just go and add them. Did we have one in here? I think so. Okay.
That looks right. I think we didn't have as many. But if it looks good, gonna try keep them. I'm going to do one thing to clean this up a little bit more. Okay, so we're going to
delete this loop slide. This vertices up here, so we get a cleaner
topology. Oops. I All right. And now we're going to go
back and insert one loop in there and one loop in here
and one loop in there. Let's see how that looks. Looks very nice. Okay. Promising. Okay. Let's save again just in case. Let's go for this right here. So what we're going to try do is place two edges about here. We're going to select the split. Let's see if we can
do this and this. With an edge split. Hmm. Maybe that's not the ideal way. It's going to require a
lot of topology changes. The plan was to get these two cut like this
and then join them, but that's going to
be a lot of work for what's really
worth of that detail. So I'm going to go ahead and like I said,
delete this one, duplicate, and we're going
to be a three dynamic. We're going to be applying the subdivisions and we're
going to model or model. We're actually going to be
inserting a cylinder rotated 90 degrees We're going to be doing a bubble
on this edge. Oh. Okay. Let's actually replace
it with a custom one. Oh. Cube cylinder. This is vertical rest, so for this, we use 11 Let's actually go back and
work from the base one. Do not complicate
ourselves too much. Let's hide this part of
the geometry, actually. Geometry, modified
topology, delete hidden. We're going to be deleting
all that. We don't need it. Actually, I'm going to display properties double so that I can see the object even if I'm on the other
side of the normals, and I'm going to be
umsing the edges. Let's see if polyloop
not in that way. Let's see how we can
do the full border. Sloop complete. Polygrablin maybe. No. Let's try with sloop
complete and see if that works. Nope. Okay. Let's
try one more thing. Oh, wait. Hmm. Yeah, polygraphs are not
working very nicely here. Well, well, sin's
going to be a boolean, let's actually um
subdivide it a few times. Well, it's in here, but before
we're going to do a bl. So let's do in here and in
here as well just in case. Let's do a few inserts. So what we're doing now is
prepare the boolean object. One we're going to be
resting to the other one. Although same both sides
and now we're going to be subdividing this Geometry, we're going to delete the
lower subdivision levels. We're going to make this
into a dynam subject. It is right now, you'll see that geometry changes drastically. And we're going to
grab half of it, which is with the square
selection, which is about this. We're going to pull it until
we have sort of this shape, I'd say, about this, and then we dynamise it again. This is the object
we're obtaining. We are going to rotate this
90 degrees, rotate it. I think it's sort of this angle. Let's move it here so that we can clearly see
where it goes. I want to align it with
this angle right here, the one we did here, so it kind of has some sense, and it goes just with this line. Well, slightly past that line, but it's a smaller one because it ends on the
end of the blade and starts barely on the same edge. So going to go and
scale it up like this. Reset the pivot
so it's vertical. Move it up and it
goes about here. Smooth it now here, rotate it, so it has the same amount
of geometry out than in. Well, not doesn't need
to be the same one, but you need to make contact at all points
at the same time. Otherwise, the volon
will look weird. So this is good. I'm going to hide the blade for a sec and the field object. I would say this is correct. Try with this amount. Now
we have to duplicate this, deformation, mirror,
select this object, do something,
delete, convert that into a dynamic subject with
more resolution, of course. Even more, I would say. That is acceptable. We can even smooth out
some edges now to make it look more round and nice. But actually, we will do that later because we will have to do another boolean pass
when we combine these two. So we merge these
two Bollian objects into one, move it up. We're going to put
the boolean mode in substract and let's say
just before the operation. And now that we have
the Bolans ready, the object that's
going to be doing the Bollens we just
have to grab this one, deactivate the
dynamics of division. Okay, Let me hide these two. Okay, deactivate
it from this one. Actually, I'm going to relocate a little bit the
edges right here. Going to get the sea modular slide and basically try to leave all these loops
fairly close to the object. No. It's not because we really need that but because it's going to limit the area where the cut of the bullion
is going to take place. Let's not put it
too close either, but we want it to go kind
of with the shape of I kind of like this. Let's move this up.
Well, must have it. Okay. That looks about right.
Now, very simple. We just have to go to render, activate Life bullion, and
we will have this working. We just have to make sure that the Bollans are in the correct place
because at the moment, it's touching the blade. We want to have only
above the boolean, the object that we want to be affected by, which is this one. And the boolean needs to
be on substract mode, which is this icon right here. Wait, let me get back. Okay. And now we are just going to orient these a little bit better so that
they are really dead center. Now it looks about that
center. I like so. And there we will have it. We have Bollens done with live bullion here
in render Bullins. And now if we
wanted to get this, Wait, let me move them
out a little bit. Oh, yeah, there we go. It was showing up some of the fill object that we
have here on the back. So now if we wanted to make
this mess, like final one, we will just have to
come here to subtol Bollan and make Bollan
mess so this will grab all or visible subtols and
make it into a new one. So gonna save 15 Okay. And I'm going to
delete this one. Just leave these two
visible right here so that we have or left
bullan working, and we're going to
select this subject, and we're going to click
on Make Bollan Mess. Now, this will take
a few seconds. And now, here, we should
have or new mess created. Let's see. Okay, it is always a good idea to subdivide
it before doing this because it kind of breaks the geometry
when doing the Boolean. So let's go ahead
and do a new try. So let's deactivate.
Well, let's actually apply the dynamic subdivision. Okay. Now we still are keeping
our subdivision levels, but we already have
our smooth object. At this will be good. And we have to click Make
Bull and mesh again. This will take a
little bit longer than before because it's
a heavier mesh, but shouldn't be too much. Okay. Now it's ready. So what we're going
to be doing is to convert this into
a dynamic mess. That way, we're
going to be able to smooth properly the
edges because otherwise, because of how booleans work, the topology around
them is not very good. So in order to be able
to smooth them right, we need to dynamise them before. I'm going to be playing with the subdivision to see which is the best result
without losing quality. The more number, the better, more subdivisions will have. And now we can see
that we actually have enough subdivisions
to smooth it properly. Now if I disable the paint, you can see that it looks a
lot nicer and more polished. We're also going to be applying smooth on different areas. So the inset that we
did before and some of the edges so that it looks more stylized instead of that much sharpness
on the edges, but we need to get
just right amount. Now, we're going to go to deformation and we're going
to try the smooth modifier, right here to try to get a more unified smoothing
throughout the whole piece. Since that it's not
doing the right thing. Hold on. We can smooth manually to
achieve a result in some areas. And now that we have
done the manual part, we're actually going to use
polish instead of smooth, which does a very similar thing. Takes a little bit, but
what it will do is we'll apply the same amount of oil smooth on every
feature of the model, which is good to do an
overall smoothing effect. Okay. I think I'm, I'm very
happy with the change. As you can see, all
features look a lot softer, which for a stylized
look is what we are after instead of so sharp, look All right. Now, we insert the piece back into
our knife to see how it looks altogether because we were working on a
separate soup tool. And overall, I would say I'll
say it looks pretty nice. Yeah. Yeah, I think I'm
happy with the result. All right. Let's
do the other side. Mirror. We need to delete the different
subdivisions so that we can apply the mirror
modifier, and there we go. That looks quite nice,
quite nice. Okay. Excuse me. All right. Can. Okay, yeah, sorry. I
was just making sure that I mirrored the right piece
because I think I did it. And yeah, I was
now just deleting the higher subdivisions
because we don't really need it for the amount of detail
that the piece has. So I think at this point we're good to jump into the new piece, the left one we have, which is going to be the centerpiece. And for now, it's feeling
pretty solid, I would say. Let's save again as a new version just to
keep the progress. M and actually, let's also go and do
another check back with the reference to see
that we are in line with all the proportions because it's very likely
that during the process, we strive a little bit away
from the correct proportions. So let's make sure
it all works still. Let's put the reference
bag in place. Okay. I think that will be in place. Okay, so although there are some proportions that
I would like to fix, but we will do that later on. For now, we're just going
to create the last piece. So the center pike
that we see there. We're going to append a plane, like we did before to
create the other shapes. Let's put it in place. Yeah, move it a
little bit front so that it's not intersecting
with a knife. Now, let's skill it up. Move it down slightly. There we go. Center
back the camera. No, tank. Okay, we need to reduce the amount of
density that the plane has. For now has too
many subdivisions, so we go key here to initialize. We set one, one, one for the resolution and
we click on grid. Now we need to relocate
the plane again, but we have the right
subdivisions, so I'll do it. Let's put the knife back in
place for the reference. And now we can actually
start moving with C modular. All the vertices. Let's create the
middle subdivision. And let's see if I click this. All right, there we go. Man, gonna activate do
nothing both on edges and polygons because it was being tricky to grab those vertices. Let's just put the
basics in place. So to create the
base of the pike. Trying to recreate
that shape that you see you can see the reference, which looks like an arrow
pointing down there. Then it looks like there is
another one pointing up, which we'll do in a second. Okay, now, go back to Extrude. Oh, the other one. Extrude move. Yeah, this one. So let's
move it a little bit, and then going to
move the center. Dang is being tricky
to grab those partses. Then just do one more, for the chains of hate on the piece. Gonna create one more
subdivision with insert in here so that I can properly, uh, one sec. Dang. Why is it working? Jesus. Okay. Let's move. I always
get confused with those. Alright, let's do
one more extrude, and I think we can get
the basic shapes ready. We're doing the same
thing as we did before with the main
blade of the knife. I to achieve a
correct loop flow, we're going to be upsetting a little bit the center vertex, but we will do it
with another extrude. Did I confuse this
again? Hold on. No, it's the right one. Jesus, this always annoys
me so much for some reason. Why is it not working? Um Okay, let's try. So it's not the angle
of the vertice. Okay. All right. Now it works for some weird
reason. Careless move. Like I said, we need to offset the center vertice so that we get the right loop
flow like we just did. This way, when we create
a connection throughout the center spine of the loops,
let's call it that way. I will connect the left
side to the right side in a continuous way instead
of both ending at the tip. Let's just slightly
adjust some of the vertices so that it matches better the right
shape of the pike. Okay. Let's insert and create the
internal flow so that we have better addition
to the shapes. So one loop that connects right side and left side
so that we can create the curvature of the center and then a few more
vertical subdivisions to also better
represent the shape. Okay. Let's see from the side and see, move it a little bit more. Can I try and see how
to place the plane so that it's in a cool position
to give it thickness. Let's first give
it some thickness and then see if we need to rotate it or
do something else. Okay. Oh, I don't want
to move the center. Let's actually mask it
first, just in case. Okay. Yeah, those are needed
for the mask Ops. Let's right now. No. I need to mask one
area. I think. Damn, this is tricky. Okay. Definitely not those. Hmm, I think masking this
one will be a better idea. Alright, I think now we're cool. This is what we wanted
to do. Alright. Let's put it in place. No. Jesus. This is being more
tedious than I thought. Yeah, sometimes
sometimes semdar can get tricky because of angles and
selection modes and stuff. But it's worth the time. Okay. Just trying to get
the right shape that we appreciate
from the reference, both from the side
and from the top. So just trying to move it on a horizontal edge so that we don't mess up the
top silhouette. Okay. Okay, I think this
is a cool start. I mean, at this point, mostly, I'm just trying to create
the basic shape for it. There are a lot of
things to twit still, but you guys see
where I'm going. Trying to improve
the edge work here. Uh, it's going back and
forth from the top, from the side and from
different angles to get to get the right feeling because sometimes working just from one side can
be very deceiving. And in reality, we
need to be checking every angle possible to make sure silhouette and
volumes are good. It gets easier with practice, but for me, pieces
like this one, which are difficult to
read from the reference, might be a little
bit more complex. Well, in the end, it is some interpretation
that we need to do. H. Okay, this is looking better, but still, there are
some small things that doesn't convince me. But the shape is
definitely better. Let's see how we're doing. Okay. All right. Mm mm mm. Yeah, let's
make the base straight. Yeah, like this. Okay, I'm liking what
I'm getting so far. Let's try to scale it up to create more depth to the piece, and then adjust some small stuff so that it feels more solid. Yes. Okay, I'm liking
what I see so far. Let's try to put it in place, do a quick test of how
it looks mirrored. Since already could feel like
a blockout of the piece. To me, honestly, it works. I think having a slight
rotation makes it feel more in line and sharp with
the edge of the blade. So let's duplicate it
and see how it feels. Yeah. Yeah. What do you guys reckon? I
think it looks cool. Yeah, let's just adjust
it and try some stuff. Okay. Let's delete one side and keep
working on the other one. Okay, let's save before continuing because we have
a pretty decent start. So let's go back to the ref. Take a quick look and see. Okay, let's try see every
angle we can of the piece. Alright. There are
some minor stuff. So far it's going good. Maybe Yeah, I think we need to widen
this out a little bit. Yeah. Yeah, to me, it looks
more correct now. Yeah, definitely. I like this. Let's also change the inside part.
Yeah, there we go. Easy, fasiFx. Yeah, right. Okay. Let's also move this
in a little bit to consolidate a little bit more. Let's use this to
make it straight, mask and move down. It kind of aligns
perfectly, so that's great. But let's also extrude
everything in. Not that. There we go. That way we
have already thickness, and we can call it not done, but we can already start working with
the thickness of it and make it feel more solid. Okay. Yeah, let's keep
adjusting this the piece. We're also going to be
adding super loops so that we can already start
giving it a more sharp look, but there are some
shapes still to refine. So let's go and do both. Okay. You adding edges on the main shapes to get that first
preview of how it looks. Very likely we're going to still need to adjust some stuff. But I want to see how
how it looks smooth. Alright. Just making this more consistent because
they're from the extrude, there are some areas that
don't look coherent. So I'm going to be
adjusting that as well. I might need to remove some
of those that I just created, so Okay. Oops. Alright, this is
looking better. Yes. Yes, I'm happier with it now. Et's go again and at the super loops and
see how it looks. Okay, let's set a little
bit more curvature here. Yeah. More air we like. I prefer this. Hmm. No, I was trying to see if
the silhouette looked better adjusting a little
bit more the shape, but I'm not too
convinced about that. But I'm also not very convinced with what we have
so far, either. So I think we need to do
some small adjustments, which I'm trying right now. Okay, taking a peek, comparing both to see if the height and everything
fits in correctly. There's this area I want to
change the one with the Asifs But overall, is to see if we are going in the
right direction. Here, I just
realized this is too thick, too white, sorry. And I need to adjust
both the shape of the curve and both
the width as well. So I'm going to be removing super loops so that I can do
the changes without issues. Okay. And this one as well. Okay, that looks more correct. There's some stuff still. I don't think it's right. But let's see. Yeah, that looks more
like the reference to me. Okay, let's now adjust the
booleans here so that since everything else is
looking quite on spot, let's select this. Yeah, this is the right one. And the Bullions
let's move them up. Let's rotate them to get
the same inclination. Let's put the reference back so that we can perfectly match it. Okay. All right. Oh, there is good, I think. Um, almost there. Okay. Okay. Yeah. Alright, so we adjust this, which was a little bit off. Also the point here, Yeah, there were some
small inconsistencies. Let's also move the centerpiece. We need to be careful
with this one, because it can easily break. Let's see. And now let's move the Bullins. C let's say that's
more on point. All right. Yeah. That's perfect. Oh, I actually miss click that. That is very nice. Okay. Obviously there are
some small differences, but that's almost noticeable, and to me, they look good, so let's keep them that way. Um, Okay. He's doing one more
adjustment than here. All right. All right. I'm quite pleased with this. H. Happy. Okay. Let's put back everything
into sub deep mode. Alright, I think I
messed up this one. Yeah. Yeah, you see
that the bullion is too deep so that it actually
displays the other side. Hm. Okay. We need
to fix this one. I rotated front. Yeah, that's better in there. Just change the depth
a little bit. Like so. Checking if there was
different smoothing on some areas because I feel like
I messed up a little bit. So just going back to check. Hmm. Yeah. Okay, so yeah, since I
messed up at some point, I want to re edit this
piece a little bit better. Okay. Taking back and forth and see how we can make this better. Okay. Let's do the move with a bigger brush
so that I create less deformation or at
least in a more smooth way. Let's check. Okay. I think about there is good. I mean, there's definitely
something there, but I think I can easily fix it. Yeah, that looks a lot better. Yeah, the issue is that
when I moved it down, I deformed that
complicated area. So it was creating like
a pinch or I don't know. I wasn't liking the
result, to be honest. But I think it looks good now, just checking from
different angles to see how it works. Things good. So let's go back to this one. All right. So in here, I'm still lacking some
improvement on the silhouette. So I'm going to go back, oops, go back and delete
what happened here. Oh. Okay. I think it got booked on sac. Let me fix it. Alright, so it's because it's
transparent or how is it? It's not that. Okay. Hmm. So the thing is happening
when it is on frame mode. Let's just go ahead and
keep deleting the edges. Okay. I think it's good.
Let's move this up. Actually, let's delete it. Right. Alright. Trying to sharpen out the main edges. And now we're going to
be seeing how it looks. Now, to faceted. Definitely, once I
want to improve that. So let's go and damn, I always miss click that. Okay, let's go whenever
it allows me. Okay. I want to clean this
corner right here. Sometimes when extruding or adding edges or just moving
from different angles, it will damage the
structure of our loops. So it's always good
to go back and check different angles to see
if it's still working. The reason I'm moving
this away is to be able to keep the sharp edge on the upper area of the pike, but still getting more softer
result on the lower area. So since the distance
within the loops is bigger, the smooth algorithm will be,
well, smoother, obviously. So that's why I'm just
moving them away. If we wanted to achieve
a more sharper look, we will need to
move them closer. But in this case, we're just
going the opposite way. Actually, I don't mind
that much about interior, so I'm just going to
leave it like that. And I'm going to make whoops. Why is it snapping.
Okay, hold on. Let's just do it with a
traditional move tool. So the thing is I want to get
correct curvature in there. So I need to tweak a little bit of vertex
position in here. That looks a lot more nice. All right, let's
see how it looks. All right, that's
slightly better. Okay, but that is not. So
let's go and fix that. That loop in there. Let's get
the right curvature first. Then I will very likely
remove the edge and put it back so that it respects
the exterior curvature. Okay. This is a patient's job, so I will take some time. Okay, I think this is going to look a lot nicer.
Let's go and see. Yeah. Okay, so the
upper part of the pike, I'm pre happy with it right
now. It looks smooth. It looks sharp at the same time. Everything looks very
intentional, so that's good. But I'm not liking, especially the lower part of it, so I'm going to be working
on it a little bit more. Mmm. Oops. Okay, sometimes when we have this issue that is not
deleting the full thing, um, we need to do
it individually. Damn. One sec. Okay, yeah. That will work. For some reason,
it books sometime. So, so yeah, it doesn't delete the full loop
and creates that issue. But as you could
see, snapping it, snapping the vertex back
to its position works. So all good. All right. This is
a little nicer now. Okay, let's go now and create the slide bebl that we
have here on the shape. We want to create a small
difference that apart, apart from it, reading in
a more interesting way. We also bring it closer
to the reference, which I think it has
something like that, or at least that's what
I imagine from it. We're going to be moving
this a little bit. I think this is not enough, but let's try and
see how it looks. Yeah, definitely not enough. Let's go back. We want to
make it more apparent. So yeah, Ops. I need to activate symmetry
and move the pivo there. Okay. Going to adjust
a few more things. I need to delay the insert loops before
doing more changes. I'm going to mask this and scale it down with the
pivot centered, actually. There I go. I want to make this
way more deep so that the reading is sharp. Yeah. That makes more sense to me. W to insert back
the super loops. Okay, shape shape
looks very nice. No. I think I'm happy with that. Let's save Okay, you're taking laser revision. Let's see how that looks. Okay. Gonna try make a bevil
here and see how it looks. I think it can look interesting. Oh. Damn, we have
this issue again. And now I cannot merge it. Okay. Yeah, now it works. Let's go
try and do the bevel again. Now that we have
cleaned up this. Realize I don't have symmetry. Okay, let's try again with the
Bble and see how it looks. My, that's I think
that might be enough. Let's put the super loops again to it so that
it looks more sharp. Quite close to the border. To be honest, I think
that will look better. Okay. That looks nice. Yeah. Quite happy with
it, to be honest. Just gonna try if that improves, adding that extra
super loop in there. I kind of like it,
but not sure if it works good on all the
parts of the pike. Let's try and inflate it a little bit so it
looks more stylized. Oh, yeah. No. Okay. I think I will need to
remove the under part so that it doesn't collide
when I inflate it. D All right. I need to flip the normals. And now I think I could
inflate it without any clipping after
removing the interior. Yeah, just like that. All right. I actually
really like this. Okay, looking promising. Okay, oops. I'm messed up. Okay, you're setting
everything with dynamics of division to make
it look nice and finished. And I'm going to also mirror the piece to
see how it looks. Oh, yeah. Okay, I
think we need to activate the bullion
in that piece. Mm mm mm. To move this up. Why it's not working
You see this please? Oh, yeah. Okay. Okay. That looks pretty
nice, to be honest. I'm pretty pleased with
the overall clean result. It's not finished
yet, of course, we still need to
unify some pieces. We're going to be saving
before moving into that. So yeah, like I was saying,
we need to unify some pieces, so we're going to be
connecting the end of the handle or the ring
thing we have going on. So we're going to be merging that together with
the handle itself, and then we're going to be
adding some more detail. Here we can see what we did. Last few steps at least,
looks pretty cool. And we will also be
adding some dents, scratches and details
on the high poly so that it makes our
texture work a lot easier because all
the detailed work that we do here will
transfer into the curvature, the normal map, and every channel used to create masking
inside soups and spinter. Let's just get some
screens
8. 07 Adding Small Damages In Our Hp: And these are the two pieces we're going to be
merging together, so we want to move them down
so that we have them handy. We make those two visible
and hold on a second. Actually, I'm trying to get the pieces to a
high level subdivision so that I can dynames
them together. I was delating the lower
subdivisions levels, and now I'm going to be
dynamesing them together. And now since they
are dynames together, I can smooth them together and it will look very
nice and smooth. Actually, I'm going to
activate the symmetry so that I can do the same pass on top and the bottom
at the same time. And now we're going to
be detailing the side, creating like a small
welding, like so. We can do it with clay buildup. In this case, I'm
using clay tubes. Not sure if I want to use the clay tubes that
I'm using right now, which it doesn't create
such a noticeable effect. So we can actually
combine this one with the default clay tubes. There are multiple variations. You can try the one you like. Just trying with the alpha
and see how it looks. I want it to be smooth, but at the same time to have some silhouette so that you can tell that it is a welding. Not entirely
convinced with this. Too straight, N. I think one by one might
be a better result. That is a better result. Yeah, I think I could
live with this. Okay, so also let's
go back a little bit, and we're actually going to
be doing all these detail and all the others using MRF
and layers also you know. So we're going to go
and use tren dynamic. But instead of
using it like that, we're going to be using MRF so that we can tok it the way
I'm going to serve you. First, I'll create a layer, then I'll create a morph. And basically, when
I paint here with tren dynamic or clay tubes or whatever tool I want to use, I can go back here and
tweak the Mf slider, which will give me more or less intensity on the strokes that I
did using that morph. And then I can also paint
with a morph brush to bring the mess back to the stage it was before I did
those brush strokes. It is not as smooth
as you can see. It is more like painting
back the detail we had and removing the detail we created while
using the morph. So with this, as you can see, you can have more control over
the brush strokes you do. So that's why for detailing every piece we ever work on,
we're going to be using. And as you can
see, using switch, we can switch back from the previous stage to
the current stage. Okay, so we delayed
it, create a new one. As for layers, it works similar. It is like layers in Photosap. You enable or disable the
details you have done in that layer and you can increase and decrease the intensity. So the way we work is we create a new layer, we
create a new morph, and then we're going
to be detailing this bit by bit to
make it feel more like crafted metal rather than something very
industrial and perfect. So we're going to put some dents and damages
all around the piece. Even if this looks like
it's doing nothing, it's actually, as you
can see, a little bit. It is damaging the
surface of the metal. I rather go and do much more intensity and damage
that I actually will be using later on
because the way we're going to be working
is exiting on detail and then bringing it
back with morph a little bit. So Excuse me. So yeah, we are over detailing this way more than I
would like it to be. And we will just tone it down back in just a
second with morph. Doing the other side. I'm also going to
add some details with them standard like
small scratches and stuff. If we tweak the focal sift, as you can see, we achieve
different results. So we want to go with something that doesn't
feel too soft, but doesn't feel too sharp, either to the point
that basically it looks like very raw metal. It needs to feel some sort
of softened by wear and use. Bringing back some
detail with the morph. This stage is more like trial
and error, as you will see. Basically, we use
pinba some detail, maybe we like it,
maybe we don't. So I'm just using control
set all the time. Here, I might just want to keep the full say but used
with less intensity. So try to do like
a pass like that, and I end up just
destroying the whole thing. But basically here,
what I'm looking for is not big big marks. Like I said, I just want
small details that feel more natural because it is not just
done with a ebrush brush. It is done by using first the brush and then removing some detail
with another brush. So in the end, it looks more
organic, in my opinion. But you see that I am just removing most of the
detail at this point. And I just want to leave small marks that when
you see from far, it doesn't read as perfect, but when you see from close, it doesn't either read
like super damage or anything because that's not what we are after in this case. Saving on sec.
Okay, there we go. Now we're just
going to keep doing the same thing over and
over again on every piece. Obviously, the
amount of damage and detail that I'm going
to be doing depends because we don't need to really add a lot of
detail on every piece. In reality, what
we need to do is to is to create an overall
unification of detail. So in this one, I might just at a
few brushstrokes. This one we're also going
to add some scratches. I think that will
give some interest, adding different detail
to the lower piece. Mm. Okay. That's looking better. One
step that we will do later on, it is to detail the
connection within the pieces. So for now, I'm just
adding detail as you can see on general areas
of each piece. But I'm not really doing any detail that goes from
one piece to another, and that usually brings together the piece very well
because it feels grounded, it feels that it is not
just random detail, it is something that
happened to the object. But we will do that
on a later stage. For now, we will just keep adding this kind of
detail to every piece, which mostly is going to
still be using same tools. So trend dynamic all the way, it's going to be down
standard all the way as well. Hold on a sec because I'm actually realizing that when tricking
proportions before, I actually messed
up with a border. I think it looks
like it's floating. You'll see now one sec. Yeah, you see that angle? We just needed to
move it slightly. Okay. Yeah, that was
it. Just a small twig. But I just wanted to make sure. Now, let's just go and add the proper subdivisions to the
piece before detailing it. And let's go and just morph. When the piece gets
black like this, disable the paint because it is a book that Cyrus has with
layers and poly paint. So yeah, just disable the
paint, and there we go. Wait. Why is it not painting? It's something masked. Did I apply the subdivisions? Okay, no. Yeah. That was it. Sorry. My bad. No, wait. Something's going
on here. Oh, yeah. Okay, so let me bake the layer and the morph
because without that, I don't think I can apply, and now we have it. Yeah. My bat. Sorry. Okay, we create
the layer back, we create the morph back, and
we're good to detail now. So yeah, let's put some
trend dynamic everywhere. I'm just trying to get, like I said before, some
small landmarks everywhere. Then I will just go
back and reduce. Okay, I think that's
looking pretty nice. Maybe I'm just overdoing
it, but like I said, all this is going to go out
fairly lazily in a bit, so I'll meute myself in this section and
just let it go. Because there is
nothing really much to add apart from just me. Training dynamic all the
way through the piece. So when I'm done with that
and I get back to Mrving, I'll comment a few things. It will be approximately
in case you guys want to set the two time speed
or something on the video. It will probably be
about 25 more minutes, 30 more minutes or so
entailing the whole thing. So basically, you guys can
speed up the video until then. I m. H Okay, so since before we actually readjusted the booleans
and everything, we have to redo this
smoothing pass. So nothing special. That's why we're going
back and doing this again because we
reworked this area. So yeah, so far as
you guys could see, basically, I've been used doing tren dynamic and dump standard throughout
the whole piece. And with more bringing
back some detail, but that's pretty much it. It's a very simple process. It's more about getting
the touch of it. So I would really recommend
to just go very aggressive, try different alphas, different brush intensities,
adjusting the fallo. And once you have played a little bit with trindynamic
dam standard and the morph, you will start to get
the touch out of it, and it is basically same kind of detailing
for everything. I not only use that in stylized, but I also use that
for every kind of, like, detail I could
add to something. So let's say, for example, I'm detailing an
armor, basically, I will just tren dynamic
the shed out of it. So basically apply it
through the whole surface, making it feel like the armor
has been hammered manually. And then with morph, maybe I would just reduce the intensity so that it
doesn't look so aggressive. I will do the same
if I'm applying skin alphas to a bust or
to any other surface. I will just apply
the alphas and maybe connecting one alpha
on the face with another alpha on the face
might be too aggressive, so I will morph back the borders to make
it blend smoother. So basically, same thing
I'm doing right now. You can see I smooth too much, so I'm bringing back some edge
sharpness with the morph. So it is a very powerful tool, and it can be used basically in anything you do inside Zebrs. So I really recommend
you guys get very used to it and
make it your own, make it daily tool because it's one of the more
useful things inside Zebrs I would say. All right. I think I'll just
finish what's left. I think like ten more minutes or 20 more minutes and we're good. And I will get some screenshots and we should have
the high poly ready. So let's continue and I will come back in
a bit with you guys. And I Okay. So last few steps on this, I've already dim down most
of the detail with MRF. I have used the tren dynamic and dam standard on
mostly every piece. I think right now,
what's left is used some small last touches to
make it feel more solid. But I'm pretty happy with it. As you can see, I decide to go without
the weldings in here. It felled to fake, I think, so I would rather to have
it smooth like that, and I'm about to take
some screenshots, I think, and call
the hi polydon. And the rest of the detail
that we will add to this will probably be already
inside substance painter. Since it's quite
hard surface piece, we're going to be doing low poly and US, sorry, not low poly, but the UVs are going to be
done in three D Max probably because both for
normals and UBS, I will have more control there. UVs can be done inside Zbrus, but to be honest, I would mostly recommend
only for organic stuff. For stuff like this, I would probably just try to go to
some other software for UBS, but that's really
up to you guys. Um, but we will be doing
the low poly in here. So we will have time to
see how those tools work. Good thing is that since we
did everything with sorry, with C modular up to this point, and we saved all the
versions of the knife, we're going to have a
pretty well structured base for low poly already done, and we're not going to have
to do manual topology. So we're just going
to be lowering down the subdivisions of
most of the pieces, adjusting in case we
modify the sap too much. And yeah, and removing
the super loop. So in reality, we're not
going to take that much time, and the process is going
to be fairly simple. I'll do something similar. I will just comment on a first
piece or maybe two pieces and then since everything is going to be very
repetitive at that point, you guys can decide whether
to watch the full thing or just speed that up to the
next part of the tutorial. But yeah, if you
guys are interested, I will just try to make it as interesting as possible
during the process. As for the captures,
as you can see, I was just talking,
but basically, I'm trying to show every
angle of the knife and just put a couple of them together
in an interesting pose. But these are not
really the shots that matter to me because we will get the cool
ones later on when we have a proper light
setup inside Marmoset. So this is used for entertaining and appreciating the work
we have done so far, which at this point, I
think it's more complete. Okay, yeah, I think
that should be enough. I'll just finish this up and
jump into the next section.
9. 08 Creating Our Low Poly: Okay. So for the low poly, what we're going to be
doing is first loading a previous version where we didn't merge the bottom
part, the one with ring. Not sure if this one.
And this one we have? Yes. So I think I already collapsed the
subdivision levels in here. We need to get to one where I didn't because we're going to start off the
yellow poly from that. So let me quickly check. Okay, let's just start
from this piece. So basically, simple process. We will just go down to the
lower subdivision level. We will deactivate
the dynamic preview, and we're going to try to get as close to the
subdivision amount required for the low poly. So we will either
decide one or two probably depending on how smooth we want the
low poly to look. So in this case, let me
get back to the tool, yes. In this case, I used append the high poly so
that I can adjust the low poly and see if it
if it still looks correct, because as you can remember
on the last person, we actually modified the border, and the one I'm using to do the lo pool is
the previous one. So yeah, little adjustment
required, but fairly simple. I'll just move those two down, and I'm checking
swapping from one to another to see if there
are any discrepancies, moving the tips, I'm going to be adjusting the curvature slightly because it differs a little bit. Okay. Um, yeah. I think this might
be the trickiest piece together with the ring. So we take our time in making sure everything
looks similar. We don't mind that much about small discrepancies
in the curvature of things because in the end, the high poly is going to be
baked into the low polyzoo. So all those curve effects will look more like
the high poly. But we actually care
about silhouette, so we need to make sure the silhouette is as
close as possible. At this point, I'm pretty happy, but there are some things that
we could improve for sure. Yeah, this goes out a little bit more Okay, that's a lot better. But that area, definitely at least the one that's
more off to me. Okay, we're going to be
doing this piece next. Same process. Okay. This one doesn't have
subdivision levels. Okay, so we will serums it so that we lower the
subdivision amount. We actually might need to reduce the target polygon count
because it is too dense. So yeah, we're going to be lowering this serumssing again. That's better. And now we are going to be doing
same thing with all this. Before jumping into the
cleanup of every piece, I'm just going to be yeah, lowering every piece to
the lower subdivision possible or the one that I consider best for
the low poly base. It's not going to stay
like that anyway because I'm going to be cleaning
that up with C modular, but it is important to
just get them low for now and get an overall
general low poly base. The same thing with
these centerpieces. I don't mind about the bullions because those are
going to be baked, so I can just remove
them for now. Actually, I also can remove the other side because it's
going to be symmetric. So the bottom side goes out. Yeah, this one will
be good like this. And so on and so on. A sharp edge that
we see right now or dense area will
be adjusted later. So for now, we don't mind it. But yeah, basically, if we
get something very sharp, we might need to add
a bevel later on. And if we see something that
is very dense, high density, we will just need to delete
some loops in there, but fairly easy job. Now I'm going for the ring area, so I'm opening a
previous version. Okay. Um This one's going to prove more tricky
because I think at some point, I used it as symmetry
of the piece, but the one I have ready
for Loop is not symmetric, yeah, as you can see. So I'm going to have to work
over that to make it work. Okay, let's just start reducing first the super loops
on the other pieces, since the other one is going to be a little bit more tedious. We just need to select the delete edge option with edge loop complete,
modifier selected, and we just click on all the edges until we keep the basic loops
for the main shape. And if necessary, we can just chamfer some of the edges
to achieve more resolution. Yeah, so let's champ for this. Yeah, that why will look more like a high poly if we compare
it to high pollen there. The idea is that it
doesn't feel very pointy or very low
poly in any case. So we're going to
do the same here. We're going to chant
for it a little bit and just delete the
super loops around. This area is a little bit
more tricky because there are different inserts and
extrudes, and basically, we have a round topology inside those insets and also symmetry
is not making it easier, so we probably are going
to disable it to work or way without symmetry. Hmm. Okay. All these areas are a little bit tricky because
of how they connect. So we might have to mask. For now, we're just
going to delete the ones that work at first try. And then these ones that
doesn't work as well, we might have to go and mask one by one and
see how we can fix it. Okay, so if I delete on the
right side of the edge, it actually collapsed nice. So we're doing that
on all of the edges. Depending on which side of the
edge you click and delete, it will act different. That's why it's important
to try both sides. But as you can see now,
we're getting good results. So, that looks about right. Okay, just going to try different options to see if it really changes
the silhouette. Okay, we'll keep that one
and do a vel in here, not a bridge, sorry, a vel. There we go to make
it rounder and nicer. Yeah. That's pretty good. Okay, those two pieces
are mostly complete, I would say, let's save. Okay, for this one, we're
just going to delete it. We will be baking that
because it doesn't have that much height or volume. So we just get rid of it
and it will be fully baked. These ones for now, since it's going to be more
distracting than anything, let's jump into these ones. Process is going
to be very simple, use the delete tool
to get rid of most of the loops and just leave the minimum possible to
represent properly the shape. So I'll just speed this up because it's going to be
a little bit repetitive. But the process is basically
that getting rid of these loops till we get
a very basic shape. And there we go. Something
like that will be nice. Use a few polygons to
represent the volumes, and it looks about the
same from far away. As for this piece, we are just going to be doing
exact same thing like straying out which pools we can get rid of without
destroying the silhouette. At first, it's always going
to be the basic ones, the ones that look
easier to remove. Just watch out for
the symmetries. And then once we get rid of these ones which
are easier to get, we will jump and try which ones are affecting
silhouette like I'm doing right now from the ones and then the ones
that seem to be on more complex
areas like this one. So here, as you can see, if I remove some of these, it just destroys the shape, so I need to be very careful
of which one I'm removing. I'm going to try different
options and see. Trying to see how to get rid of those without
really breaking it. Most of these issues
come from using symmetry and removing
quickly some loops. Then I don't realize if I deleted one that it was necessary and then all
this mess comes up. So I need to collapse some
of those so that then I can go and delete them without breaking the
edge of the silhouette. Actually, if I collapse
this manually, I should be good then to delete the loops I
needed to delete. You just need to make sure that all four sites
are well collapsed, which I think they
are right now. So basically, we are
going to be deleting now those polyloops that one
is not collapsed yet. That's your safe just in case. Okay, let's do same
approach in this. Hold on 1 second.
It's quick saving. Okay. So yeah, let's
do same approach. Let's go to a lower subdivision, collapse the subdivisions, and then let's just
delete all the loops that we don't require
first. Like always. Let's just do the ones that
don't affect the silhouette. I'm not removing the middle
one because it was really doing some silhouette in
the inside of the plate. So we are keeping that one, but we're getting
rid of the rest. It's good to go back and forth and see if it's
really affecting. I'm just leaving that one on
the middle for silhouette, and now I'm going to get
rid of a lot of this. Also going to speed
this up since it's basically same
process for every piece. So you can see, I'm just
going back and forth to try see which ones are really
affecting the silhouette. And I'm just really adjusting the small bits
that are not really tied to the surface because there might be
some discrepancies between the low poly
and the high poly, especially if we have been working over two
different versions. But those small dissonances are the ones we are going
to be adjusting now. We use with the Move tool, but so far, feels pretty
good, to be honest. Okay. You're still
leading the high poly. We got those ones ready. Oh, let's just do
the center arrow. Let's say first. And
now, same thing. We apply the subdivisions and we just start removing some of those
loops we don't really need. I think at this point,
it looks pretty good. Just basically left some extra in the center for more
roundness in there, but they were not really necessary on the
base of the pike. So we're keeping it that way. Just saving again and
we're going to go over the same process
on this centerpiece. We'll just need to be
careful to not destroy the center insets because the way we connected
the edges might be, you can see, might be
a little bit tricky. But if we are careful with that, the rest would be pretty fine. Well, another area that
might be tricky is this small ridges and extrudes that we have
on the upper part, but shouldn't be too difficult. We just need to be careful
of what we remove. Take a look around every time
we remove an edge to see if it's really destroying any
part of the silhouette, but so far, it looks good. Again, pretty much
the same steps. So again, I'll just go and
speed this up for you guys. Okay. I'm actually going
to be removing these polygons on the side. On both sides, actually, I have symmetry activated. And the reason for this is
that those are not visible, so it's geometry we're not
really going to be using. So it's basically a
waste of polygons. So I'm just removing
the sides first, but we're going to be
removing also some of the underp that is
not going to be seen. So for now, just making sure that the sides are all removed, which I think they are now
just going to get rid of, I need to disable polyloup just go for single poly and now select polygon
Island to select. Yeah, there we go. Now the piece is more optimized and since we will be
closing it later, we don't really need
those polygons. We got now this piece, I got this one, this
one, this one as well. All these are mostly done. The remaining one
is the ring one. Which is going to be the more
tricky one, I would say. Just going to alter
group everything so that it's all the
same polygroup. In this case, we need to group visible because it's
different objects. Okay, forget about this one. Let's just go ahead
and do the same. We're just going
to seri mess it. Actually, maybe we
can just go without serumesser because it's
already quite simple. Let's just get rid of all this. I Okay. So we have all of the
pieces except for this one, which looks like a ring. We're going to jump onto it now. Like always let's
quickly sav before. For this one, I'm just
going to be reducing first the knob that
goes inside the handle. Just same process.
Apply geometry. For this one, since
like we mentioned, we had small d symmetry. So we're going to try and make a low poly out of this
base that fits a high poly. So first, we're just
going to get rid of all the super loops so that we can work nicely. Okay. A couple more. No, just
realize I deleted that. Let's just quickly create
it and move it out. Okay. This looks close
to what we're after. And on this one, we just
need to scale it down a little bit, move it, scale. That's about right, a little
bit bigger, and there we go. I think that's pretty
much what we want. Let's check the other side. I need to scale up the center. Just try to make everything as tight as possible
to the high poly, but I would say we have it. And now we will need to connect both the knob
and the ring together. So let's make sure
the knob also fits. Getting rid of all the
super loops first. M. Okay. That's better. Okay, to get rid of all of this. All right. I think I can get
rid of the corners as well. Okay. Now, let's just
get everything out of the way and just leave both low polis
ready and aligned. Okay? That's good. And Okay. Okay, now that we saved, let's just join these two. So basically what we want to do is to make sure that we have enough polygons both
horizontally and vertically on both pieces so that they
can be aligned together. Let me show you. So first, let's make sure we have
everything in two polygroups I'm just going to be deleting these pieces
because we don't really need that since we're going to be sewing
those together. Leaving visible what
I need at the moment. Like, so All right. Okay, I just wanted to check
how the union between the two is looking on the high poly. All right, so we're going
to create a subdivision here at the same height
that we have the nub. We're going to be doing
the same down here. We try to get as
close as possible, but it doesn't need
to be millimetric. Let's just grab these
vertices and move them in. We will be cutting and
slicing that later on, so we don't really mind
if it clips like that. That gives us an
idea of where we need to realign
our vertices from the ring and where we need
to subdivide or nope. So we're going to
be creating one there that aligns with the exterior border
like you see here. Another two segments in here. So basically, we want to
create as many as we need to connect like a plug
and play device. Like we just need to create the same amount of
vertices and sockets. And now I'm just going to be moving with the slide
option so that I can move the the edges as close as possible on both sides and
then on the bottom as well. We're going to create another
mode loop in here and here so that we can
connect that as well. No, just sliding that. Oops. Realizing now, I need to slice this as well. So we will create
not one for each, but or maybe we create
one for each. Let's see. Okay, now we can
just move one by one sliding up to the vertice
so that it aligns nicely. Now, we're just going to
keep doing this process of subdividing and sliding every
vertice so that it fits. So I'll spit a little
bit the video, and I'll be back in a bit. Now that we have
aligned all of them, we just need to delete
the polygons that are being hidden by the piece. So we just check
which ones they are, and we get quickly rid of them. There are ones that
we actually need to delete one vertices so that it connects diagonally instead of just delete the whole polygon because
half of it is visible. Okay. Let's just select depertis
and delete, and there we go. We have half polygon. Just make sure you don't click
on something on the back. And now we have the
two pieces that are almost welded together. So I'm going to Oops. I went too far. I'm gonna
be stitching this together. We don't mind that the
geometries deform a little bit because then with bake is
barely going to be noticeable. I just click don't do nothing for polygons and
edges so that it's easier, there's actually
one quicker mode of welding all these together. If we go to geometry, modified topology, and we go
to weld points by distance. We tweak the distance
and there we'll go. We actually get most
of them sealed. As you can see, there
are a couple of them that didn't get
sealed properly. We're going to take
a look into those. Oh, it's basically because I didn't align this polygon
properly, my bad. So I just need to
slide this in No, not. Sorry. Slide. Okay, let's take a look. I think it should be right. I just went too far. Okay.
Let's see how we do this. Okay. All right. Okay, that's better. Let's do the same thing in here. All right. Okay. Now, we just need to go
and stitch those. Stitch. There you go. One, two, three, and four. And now we test. Okay.
Then there's one more. Hold on. Let's see now. Okay. That looks very nice. Very nice. Okay. Now let's
try and see if we can improve that edge around it and
optimize it a little bit more. Okay, yeah, that's good. Yep. Okay, let's mask these to delete the
loops because sometimes, you know, that we actually get more more deleted
that we actually want. All right. That's perfect. Going to try and
collapse a few polygons and see how it can be optimized. But at this point,
we're going back to the same procedure just
deleting some ideas, collapsing others, and just trying to reduce the geometry
as much as possible. So I'm going to speed
this up a little bit. Okay. So after some playing
and tricking around, that's the optimization
I have achieved, which is slightly more low
poly than it was before. But overall, pretty
much the same. I was just playing around with collapse and delete to see if I could get
something better.
10. 11 Texturing And Rendering Our Knife: So for now, we're just going to just a little bit the materials. We're going to create
the symmetry for the center plate and the
pike for the rendering. Let's create this sadocatcher, which will be creating the sados once I put
light like this one. And for the lighting scene, I actually like to pretty
simple, to be honest. Just trying different
different mockups. Not mockups, sorry,
different distributions of the knife to see which
presentation I like better. Let's quickly do
the symmetry here. All right. Okay. Normally, for
lighting setups, what I like to do
first is to find an HDRI that I feel
that works at first, then lower the brightness
almost to zero, just to keep the dark
areas barely lighted up. And then I will select around a flat background that I think that is going to go well with the textures that I
will be doing later on. In this case, slightly
bluish, like you see. And for now, I think I will roll with
something like this. We don't really need that much until we have some textures, but we can already
see a descent and cool result for the
knife, centering it. Yeah, basically, it used to display the geometry
a little bit for now. It's not going to be
final shots or anything, so I think it looks cool. I think we achieved pretty
cool looking shapes. Which I'm happy about. Let's try to create a copy
and put it on the ground. Maybe on the side. Let's see. Mm. I mean, it looks good, but
I think two will be enough. For the material, normally, I use like something very basic like white diffuse,
loading the normal, loading the ambient occlusion, and then the roughness halfway through to look
something like clay. And then for the camera,
I use a little bit of sharp and very small
amount of loom, if anything, a little bit of vignette to make it more vivy. And usually for the lenses, I like to go for something
more orthographic. So maybe, like, I
would put a like, sorry, 105 millimeters or so. But right now, I think,
like, this is good. We don't need that of an
orthographic view for this. And I like to create a turn
table so that I can use hit play and see a rotation
of the asset like this, which if they are tilted like they are right now, it
doesn't work so well. But if the knife is standing
up, it will look very cool. And for characters, it
also looks very nice. So that really depends. But I always like
to do this anyways. Okay. Let's also get the MSF pieces of the if including
MarmostF that, I'll be detaching every piece of the low poly so that we can assign different
materials to them. Although we just want to add a different material
to the MSF pieces, which are the ones
on the handles. And there is also MCF on the boolean work we did
on the centerpiece, but since that is baked, we will not be able
to assign it for now, and we will have
to do it through texture later on in
substance painter. Now, we select both parts. I'll call them knife lights, and let's get them exported. Same settings as always.
Let's report it. Okay, now we will just reassign the material we created
previously to everything. I will have to tilt it again. And now we're going to
Let's try this one sec. Maybe in vertical is going
to look better, I think. Also, the turn table
will work nicer. So now let's create here
another material with an MCV, assign it to the pieces that
are supposed to have light, put a glow to them of the color we want
to get for the MSF, and then you play with intensity
to the amount we like. Oh I'll have to increase the glow as
well on the min camera. Otherwise, it will not have
that shine effect around it. Yeah, by playing with the
brightness, the side, and the intensity, we can
achieve the result we want. Usually, setting a
very high intensity like 200 is advisable so that the glow is more visible on those areas than
the rest of the knife. And as you can see now
with the turntable, it looks pretty nice. Let's add a rim light and
see how it looks looks nice. Adjusting some values
of the background to get a more
interesting result. Another rim light on this side. This one is going
to be more visible. Left one is small detail. The right one is more
like a sidelight, more than an ambient light, and maybe we will go
for a bluish tone. I think that that's about everything I want
to do to the knife, really for the
bake presentation. Of course, now we're going
to be doing texturing, which will make it
look very cool. But I think for now,
this looks pretty nice. Just adjusting one last valley, which is going to
be the distance of the light because
I think it looks good for the light to have a vertical gradient and just be more visible
just on the top part. It's a detail that I like. There we go. I think
that's a knife. This last adjustment for it to pop up a little
bit more detail. I'm never too convinced to
be honest by depth of fill, so not sure if I'm
gonna keep it. Um, no, let's just
get rid of it. And there we go.
This is our ages. Looking pretty good so far. To be honest, I'm
happy with the result, the amount of detail
on the sculpt. It is not too much, but you can definitely
see some effect. We can enable the global
illumination here. Basically, we'll just create
a more realistic lighting, which looks good if
you have emissive. But, yeah, that's
really optional. Okay. Since we're mostly ready, we're about to head up
to Substance Painter. First thing we need to do is to check if everything on
the bakes is right, because in Marmoset
it looks right. But sometimes when you
get it into substance, because the tangent algorithm from three max and from
substance is slightly different. We might have some
triangulation issues. So we're going to be checking that first thing
once we load it. So we select the mess that we're going to
be working with. I'm going to set a
two k resolution, and we select all the
bakes that we just got Direct text for now, I think it's direct x. Depending if you bake the Y channel or green
channel inverted or not, you need to do it with
OpenGL or direct ex. But in this case, I think it's direct
text. We will see now. If it's OpenGL, the normal
will look very extrane. Okay, so I named the
material wrongly. It's called 02 default. We will change that later
in Max or maybe now. Yeah, let's select the object, collapse everything together.
Create a new material. Let's call it the same because our texture sets will
be named after this. So let's just quickly export
same settings as always. Yeah, 01 better. And now when we report, let's go to settings. Sorry, preconfiguration,
select the mess again. And now you'll have
duplicated names. We just have to get
rid of the old one, and we'll have knife
01 as texture set. We are going to load here on texture settings,
all the maps. As you can see, the normal
is completely broken, so that's because it's actually up in gel not DirecX.
That's my bat. Now, as you can
see, it gets fixed, but like we said, there
is a small shading issue. I don't know if you guys see it, but it's here on the
inserts that we did. So basically, this is what
we are going to be fixing, taking a quick look over
the rest of the knife to see if something else broke, but it seems pretty nice. So I think it's just that part. So we go to Max. We're going to connect in the direction
that feels correct. If we force the
triangulation that will avoid the issue
in set substance, I just realized I have a
floating vertex in there. So let's just remove it. Selected everything and
just click on remove isolated vertices so that
if there is any other, it will be removed. Any other vertex floating. So let's do that
connection as well. And this one. Let's see if that is
soft now inside painter. Okay, I just did it
the other way around. Now you see that it's
looking even worse. So it'll be this
way and this way. Let's see. I have to
do the other sides. Let's see. All right. That looks right. I think. Okay, now on
this side, I messed up. Okay, so I'm just doing it
wrongly on one of the sides. I'll have to figure
out which one. I think it's I think this is the front,
and this is the back. Okay. All right. So let's get this one sorted. And let's see. Okay, now it looks
right from both sides. Has a small weird shading
still, but that's normal. I mean, in the end, it really depends on
the tangent algorithm. So it can sometimes look weird
inside substance painter. The fix for that is to
triangulate everything before the bake and then yeah, work with that trangulated
version inside substance. But that's not really necessary since the end engine
we're going to be seeing it is Marmoset which works okay without
doing it this way. So just don't mind that shading while we're
working on substance. Let's load the ref. Okay, so let's
plan a little bit. Basically, we'll have
material number one, which is present on
these three sections, material number two,
which is the black one, material number three,
which is going to be the emissives and four is the
one we will have to guess. For a start, I always like
to create a base layer. I always call it base color normally since it's
going to be inside a group and that group is going to be the
name of the materials. In this case, we start
off with the gold. I do exact same structure
for the other materials. I'll just create multiple
base color layers for all the ones that I specified on the previous planning,
we have the black. We have the MSF. Let
me reorganize this. And we have the handle. Okay, so now we have
these four folders, which to differentiate
them better, we're going to be assigning
colors with right click and selecting the colors. Just to make every
group easier to spot. So now we have a
proper structure file, and now it's pretty simple. We're just going to be creating basic material definition
for everything for the gold. I'm going to start with yeah, like a yellow stone
on the base color. Just checking the reference to see to see how it looks closer. I'm actually going
to put always on top for the Pure ref and just get it on the corner so that I can take a quick
look continuously. Alright. There is good. Okay, so I
need to go more desaturated, more orange, I would say, we can pick the color here, but usually it doesn't
help out much because the concept usually
has different tones. So picking up the exact one
is a little bit tricky, so I would just go
manual about it. So I think about there is good. Let's just go first and
add metalness to it. That looks a little bit better. Now let's get the
roughness closer. And now let's go back to
just the color a little bit. One thing that's
important, actually, now that I remember
is we need to set up or environment
properly because sometimes the one that comes by default substance
painter is not the best one to treat color
or roughness or any setting, because it can have
color in the HDRI, so that will be
tinting or materials. So for now, I'm just quickly
going to adjust this, adjust this sorry, create the mask for
each of the groups. But at some point, I will
probably need to um, to change the HDRI. We can mask this
real easily with a mask by selection tool. I just did it with UV selection. Just tweaking a little bit more. At this point, we don't want to do more
detail or anything. We're just going to be changing the background to Tomoko first. Because like I
said, like I said, these environments
can have tints, and Tomoko is more like a studio light setup, and
it's black and white, so it's basically displaying very accurately the
colors and material. So here, it will help
me to get closer. I think this is pretty nice, to be honest. That's
quite on point. We're probably going to
be toking this later on, but for now, I think
this is pretty nice. Let's go and do the black. Black looks like a little
bit plasticy, I think, but not like a very
rough plastic, so more like sorry, not like a very shiny plastic,
more like a rough one. So just going to try to
get something more made. Same thing. Let's mask it
with the UB selection tool. On the areas that we
initially thought. I'm not really liking
the black handle, the upper black handle. So I think it's going to
be on the blade for now. It's okay to change
the design sometimes. I mean, if we're
doing the knife, and you personally like
small adjustment for whatever reason because
some materials work differently in three D than
concept, it's all good. I mean, in the end, what's important is that it
looks cool in three D, so so let's just leave it on the center part and
sign the DM sieves. You'll see me sometimes putting red color to
all the base layers. That's for me to be able to spot and see the masking better because if it's white and the base material from
substance is already white, sometimes it's
difficult to well, not difficult but impossible
to see what are you masking. So I usually go for
red since it's super visible and allows me
to work really easily. Okay, let's mask Let's
mask the bullions. I went to the UV view because it's a lot easier to paint
these details in there. And now that my masking is good, I'll just try to get it
looking on the reference. For that, I need to adhere
on texture settings, the Emissiv and activate
it on the layer. Otherwise, it will
not have emissiv. Mm. I think the color is
still a little bit off. It seems more yellowish
on the reference. It's true that ours is
a little bit yellow, but maybe we need
a little bit more, especially the part on the
blade looks very white. So maybe let's tweak that a little bit more on
the base color. I think that's more in line. Yeah, let's see when
it's not lighted up, maybe it's too yellow, so
I'm going to change that. I think that's good. Yeah, I think that's the color
we're looking after. Okay. I think that's better. Yeah, from faraway looks good. Maybe the black is too black, so let's tune it
down a little bit. Yeah, like so. I
think that's better. And now, let's go
for the handle. Not very sure about this area, so we're going to
do a few tests. Okay, a gray doesn't
look too bad, but it's a little bit boring. So let's try a little
bit more bluish. Okay, I think I like
that, to be honest. It's in line with the reference, I think, and works better. Yeah, because this area
is similar to the color, so I think we're
going to keep it. Let's just change
the name because the center is going to
be slightly different. Let's create a copy
for use the handle. Which not sure yet which
color is going to be. Maybe a light one
because the blue is already quite dark color.
But we need to see. Let's see with dark first, N lighter color works better. I think red, I really like it. But maybe it's too much red. I don't know. Let's see. Mm. Let's make it white
and put red on the label. I think I like white
on the handle. So let's create the
plate with red. We need to the
manual mask for this because we didn't
bake any ID maps. I think, yeah, we didn't
let's just paint it manually. As you can see, I paint
most of my mask with a paint modifier
over the black mask since that way I can just do simple edits on that one and stack multiple painting sorry, masking changes, but releases because I got used
to it this way, and it's a clean
way of doing it. Okay, let's mask also this side. I usually like to do
first the borders. Once they are cleaned up, I increase the brush size and do another round of
border painting. And then once I can just
go with less control, I just do a big brush and
quickly cover the rest. Alright, I think like this, I really like how it works, but to be honest,
I might want to try different
colors or material. So let's just quickly do that. I think I want to try
with metal maybe. Maybe a brush metal. Oh, yeah, I really like this. Maybe more rough, but
it looks pretty nice. I'm not fully
convinced. So my change during the process of texturing. But so far, I think we got a pretty decent
base of the knife, looks pretty similar to the
one we have on the reference. And as you see,
it's just basically just four layers with
basic material definition. We really didn't do
much apart from that. So usually that's how I like
to start all my texturing, use general base with
very basic work on it. And if anything, I was just trying pink on this because of the
rest of the character, but was not working for me. So yeah, if anything, I will just change
roughness, metal ness, and base color, but I don't
do any extra detail work now. That will come a
little bit later. But still, for stylised work, the detail, I keep
it very simple. I mostly use the bake maps
to generate that detail. So I will use
convexity, curvature, concavity, and ambient occlusion mostly to generate some mask. But this color is interesting. I don't know. I mean, I'm missing some red. I really like red
on these signs, but not sure if it's
really the color for this. Mm. So yeah, like I was saying, I will not use, like, Grungi maps or stuff like that, or at least not on a very, it will be very subtile, very simple if I use it because stylized
usually is very clean. So let's quickly export now that we have our
material definition and see how it looks inside Marmoset
because sometimes just having one HDRI and one rendering software as a
reference can be deceiving. So it's good that we try it in both places to
see how it looks. And also it will be useful
for us to set up better or light sin because right
now it works with a flat material and
use flat color, but you will see that
maybe it will be very dark if we assign
now or texture. So let's load that very
quickly and see how it looks, and then we will adjust the
light accordingly to that. And once we are happy
with the light, we will go back to substance
and continue the detailing. As you can see, the process I like to do is very
going back and forth, making sure it holds up
during the texturing phase. Because if you do all the texturing, well,
that's pretty dark. Yeah, probably the scene, like I said, it is quite dark. It was working with a
very white material, but with normal diffuse,
it looks very dark. So yes, I like to go
a lot back and forth to make sure that the common mistake of just
texturing all the way and then checking and seeing that
something is not working, to avoid that happening because
then you have to change a lot of layers and it takes
a lot more work to adjust. So I always like to check on my rendering
scene once I have, like, my basic material
definition done. And yeah, and that way, I can quickly compensate
for any mistake I. So now the idea is
to just light up the skin differently to make it work with
the current diffuse. Since we checked in
substance that is properly leveled in terms of diffuse brightness
and saturation. So yeah, we're going to do
some small adjustments. And once we have something
interesting going on, again, we will get back
to substance and continue the detailed work. So for now, I'll just
quickly save this Okay, sticking
quickly every light. I want to, like, basically start from the
ground back again. Just moving the saddle catcher to avoid any weird reflections. I'm going to select a
different environment for the new setup of lights. Just trying the basic presets
again to see how it looks. But I think I will
probably go with maybe museum or smash windows. I usually go with those. Let's
see which one works best. I think this one
doesn't look too bad. Let's go with this one, get
back to just the brightness, set up the back as a flat color. Maybe brighter,
darker. Let's see. I like to set up
my ware frame with a color that goes with the
color palette of the acid. So since it's mostly yellow is, it's going to be
either yellow or blue. So blue is cool because it kind of compensates for
all the yellow tones. But sometimes I like to go with the same
tone of the acid. Okay. That's just the
top light, sorry. I like to leave the sky
on a low brightness, just to keep the
dark areas like, not fully black, but
most of the light, I like it to create it
with different spotlights. I'm going to try a different
layer now with two knives, just rotated and
placed together, like two Kuni, which I think
that's going to look cooler. And I want to try that before setting up the new light because obviously if I set the
light for different pose, it might not work as good because light is especially
important in these sort of acets which have a lot of
reflections and metalness. Uh, basically because
all the rims and all the small accents of light in the object
come from the edge, DRI and the lighting. So if we set the light
points for specific pose, it will look very different than if we change the
object position. So I mean, you normally want to text through the object in a cool way that works
from all light angles. But if it's for presentation, you try to make it more
interesting, obviously. So that's why we're
first setting up kind of the layout
of the object, and then once we have that, which I think we
are close to it. Honestly, I like how
this is looking. So once we have that, we will get back to lighting
up the scene. Honestly, I don't want
to I don't want to commit 100% now with
a camera angle. So we're going to quickly
set up just a couple of them, that kind of work. Camera angle is
important, of course, but we can adjust that later on. It's not like the lighting. So so let's see. Yeah, I'm going to stay with stick to blue
for the background. I think it works better. I think maybe later, I will bright up the background because it doesn't
really work for me, but now it's going
to be easier to work with lighting if the
background is darker. So I think I'm going
to keep it that way. Honestly, I don't know if
I should go back to this. I mean, this is just trial and error to find what
we really like. So since I don't want
you guys to keep you, like, seeing me trying different things
because the process is not really
anything instructive. It's just, like, trying
my taste on this. I'm going to speed this up
until I decide on what I like, and then we will just continue. A Okay, so in the end, I decided to go for this
angle for the knife and just did a quick light pass very similar to
what we had before. So basically, couple rim lights, a top light, and, yeah,
that's pretty much it. Not because we're going to go for this
final presentation, but because for texturing, I think it's going to be better. And then we might do a different
presentation in the end. So yeah, basically just took
in some last few steps. But yeah, we're
going to go back to texturing in a second. Okay, so back in
Substance Painter, first thing we're
going to do is create details and noise based on
the bakes we created before. We're going to start
off with cavities. So first thing we do,
create a fill layer, call it cavities,
set the color to red so that it's more visible
while we trick the mask. We're going to
create a black mask, then a fill, and on fill, we're going to select cavities,
the bag we did before. And since it's not very visible, we will add levels
so that we can invert the mask and
tweak the intensity. So as you can see,
when we invert it, we see the mask applies to the cavities seen in color red. And now we are going to be tweaking the
colors, roughness, and metal ness of
this to make it look more like whatever we want. So I'm going to do as usual, so I'll see how metallic affects the roughness
than color normally. Because depending
on the material, you might want to achieve
a different results. So it's always good
to play and see how it looks from
different angles, export, check and yeah, same procedure as usual. Not very sure if I
want metallic on this, but we're going to check on the mask and depending
how it looks in there. All right, so yeah, maybe
since this is stylized, we can go for medium
intensity metallic. For the diffuse, we might
want something more rusty, so maybe like an orange or a dark brown, Okay. Let's see. Okay. I think
darker works better. Let's try maybe more saturated. No that's too much for sure. Let's play with different
roughness and metallic, values, even with the same
diffuse and see how it goes. Hmm. Maybe we need to agree
with more difference. Okay, yeah, so opacity
is set to zero. That's my bet. Alright, I
think this value is good. I mean, we want it to be
noticeable but not too much. Okay, maybe we
could improve this. I'm trying to tweak
the levels to see if the mask gets
better or worse. But I think this needs a blur. So let's go and create a filter, select the blur and play
with the intensity. I mean, since this is stylized, we don't want to have something very defined and noisy Well, define is good but
noisy is not good. A I'm going to play with a duplicate with
more blur and different tone, and let's see if that
creates a good effect. This is something more
like dust, rust dust. So it's going to be more
subtile but more present. And I think that
will high sorry, highlight some of the shapes. Together with the previous mask, which is more sharp
and more defined. And yeah, I think that helps with the
reading a little bit. Definitely takes down
the overall brightness. But let's check how it
looks inside Marmoset. All right. That's interesting. Maybe it is very
noticeable in some areas, but the overall feel,
I think is good. All right. Okay. So I'm going to play with the base
roughness again because, yeah, like I said, the new masks took down the brightness a lot. So we want to make sure
we're back to the value, even with the dust on top, the rest on top, sorry. Okay, so let's group this
up on a folder called cavities because we're
going to be duplicating this and call it convexity. What covexites. We're just going to do the
exact same thing. But we're going to be
changing at the mask. And So we're going to go into the mask until a fill, sorry. Instead of cavities, look
for convexity, select, and then we'll do
the same thing for both layers because
we duplicated the faded one and the sharp one. H took down the fading one. Let's just play with one
first and then duplicate. It's going to be easier. Okay, so let's also change this to something very visible. And let's took the
levels because I think this one needs
to be inverted again. All right. So as you can see, it is very visible on the borders. So yeah, the convexities. So we want to first make it more visible to see how it's behaving and then
just turn it back. With this, we don't
really want to create a very visible
effect like before. We just want to have,
small highlight to accentuate those edges. Gonna tweak the like
always metalness, roughness and diffuse
now to see how it looks. Alright, let's try
now the metallic. I mean, the color doesn't
really convince me, but it adds a small hint. Want to go might want to go to something
more desaturated. Let's try first metallic
and roughness and see how it looks in
marmoset. All right. Maybe less metallic. Okay. I mean, it is very soft, so maybe let's
make it more desaturated, like, more like a damaged edge. I mean, in the end, we want to accentuate the dents
in the high polis. So I mean, too soft still. So let's dig it up a little bit. Hmm. I mean, it is too
soft on most of the edges, but then it's very
accentuated on the dents. So let's try with a different color which
splends more with dents, but also make it
more bright and see. Okay. Interesting. Okay. Yeah. So it's good
to take from the back, as you can see it was redefined. That's probably
because the metallic is very different on the layer. I mean, very contrasted
with the rest of the metal. So maybe we want to
extend to it more the diffuse and just take down the metalness a little bit. Let's see. Still too strong. Let's take that value
down a little bit. Okay, so metallic needs to
be a little bit higher up, roughness more in line with the basic material with
the base material, sorry. And let's take the
mask a little bit. Alright, that's better.
Still too strong, though. So let's put up the metallic and roughness a
little bit more in line. Alright. Okay. More metallic. Um less roughness, I think. Let's see now. Okay, that's cool. I think
we're happier with this. Maybe it's not that noticeable
on non direct light. But maybe with the light
accents, it will pop up. So I think it's time to improve the lighting
for scene a little bit. Like I said, we're going back and forth
with this all the time, especially with metallic
objects presentation is key, and illumination is a
big part of this.'s going back a little
bit on the cavities to to create a better balance between that edgework
and the cavities. Okay. I think I'm
pretty pleased. Okay. So I think cavities and Cavexities
are looking pretty nice. Let's create a mask and take out the areas that we
might not like as much. So, for example, here,
we have a lot of rust. We want to take that out. It is too obvius I think. I'm also going to remove it
from the slight scratches on the flat surfaces because
those shouldn't be as rusted. I want them to be like
late marks on the blade. So all that goes out. Maybe I will lift just a few, but mostly all of
those are going out. Alright. Let's just create one
more field layer with a mask that's going
to be the curvature, which is kind of like vexies bar mixed with cavities as well, and on a more diffuse way, like, more blurred way, sorry, it is more
like a soft mask, and that includes all
that information. And I think that's going
to help us unify together a little bit, as well as yeah, like you said in the
piece a little bit and make it more yeah, like realistic, but yeah, in a stylized way. I don't know how
to describe that, but I like to play with
different masks like I said, to create a full, cohesive relationship
within all the masks. And I think I think it
add ups a little bit. I mean, it's just a small touch. Gonna create another one. This time might be I
think I'm in occlusion. Gonna go for MI occlusion. I go to trick the values and see what can I
achieve. All right. So I kind of like this gradient. Let's sob the values a little bit and see
what we can do with it. This was total improvised. I mean, I was not
planning on getting a gradient, but it
might look good, so let's try different
blending modes, colors. Okay, maybe orange. Yeah. Okay, that's too much. Let's change. Oh, yes,
yes, I'm liking this. Alright, I think we're
gonna go with this. Really brights up the parts
surrounding the handle. Is going to take this
lower part a little bit lower with less intensity. It was too much, but let's
see how it looks. Oh, yeah. Yeah, yeah, yeah,
yeah, yah I like that. It feels more magical, like, less realistic and boring. Yeah, that definitely makes
it bright up a lot more. Alright. Cal, let's go with the masks
on the black section now. Just going to get everything
duplicated and see how it looks, so Okay. So let's go layer by layer. Let's start off by
just setting red to the base of the curvature, like all the mask we do just took the values until we find
something interesting. Since this is more
like a plastic thing, I don't want to make
this as visible. So for the mask, yes, we're making it very visible, but the end result I
want it to be subtile. So like this would be good. And let's go to the next mask. That's pretty much it. I mean, if it looks good, we
don't need to do much. This one seems to work
decent some surf dust. So let's just go with that. Let's just make it
more like yellowish. Actually, in red
doesn't work too bad. So let's try to make it like a tint. Us very subtile thing. Yeah. Maybe I'm gonna
tune down some parts. Oops. Just the top and just leave it down
like the other gradient, which I think is
gonna work good. Alright. Yeah, read's good. Let's go with the next
one with the cavities and see if that works any good. Okay. So this one is pretty
similar to the first mask. So let's see what we
can do with this one. Mm doesn't really tell me much. Let's try tweaking the mask. Maybe we can use it just as a
reinforcement for the tint. Hmm. Doesn't really
convince me much, but let's try the others. Okay, so this can work. Let's just try different blurs and adjust the
level a little bit. Um hm. Okay, yes, maybe the blur
works better. Hmm. Now, let's just get rid
of everything, honestly. I think I just
like the gradient. So let's just keep this
and remove the rest. To be honest, it
works good to me. So I don't feel the
need to do more. So let's just go with next groups and duplicate the groups into every other section and
see how that works. First, I'm going to disable
and just go one by one. Let's go with this Let's disable all the layers
like we did before. I let's play with curvature. All right. So this one right off the
bat looks pretty good. Like, yeah, like metal
field, the edges, some sort of, like, damage that it suffered from using it. Like it lost the
pain or something. So let's play with
this a little bit. I think I'm keeping
the metallic. Just going to play with
the mask a little bit. Without metallic, it doesn't
look as interesting, but it doesn't look bad either. Yeah, maybe, like, this is
good. Something more subtle. Pops up a little bit of the detail without having
to be very intrusive. Let's go with a duplicate it just for the edges and make it metallic to reinforce
those details but still keep the gradient
we created with the base one. Keep the tone similar. Oh, yeah. This
looks pretty cool. It doesn't feel like metal, but it feels already
like some sort of damage and accentuates the reading of the details on the
border, so that's good. As you can see, the texturing of this is so far
being very simple. Like we just created
some base masks for the main group that we did, and then we're just copying them to the other groups
and seeing how they work and adjusting accordingly
to create a good reading. Sometimes it's
used accidentally, sometimes it's intentional. But as you can see, it's
pretty simple process. Okay. I'm pleased with
how this one looks. Let's go with the next mask. Okay? Hmm. Let's play with different changes in the masking and see if anything
really hits me and see. But so far, I'm not very convinced with this
one might go out. Mm. Let's paint and see. Maybe we can keep it some sort of like gradient near the edges, but it is not too interesting, really, so I don't know. Let's just play a little
bit more with it, and if not, we will
just get rid of it. Hmm. Okay. This is
interesting, actually. On a more, like, yellowish tone, like a bone color. Works really good
with the blues. So I think I'm going to keep it and just
go for the cavities now. I don't want them
to be very obvious, but I want them to have
some sort of depth. So let's just go for dark
colors and lower the opacity. Mm. I think a ready stone
works good with a blue. But I think I'm going to pin out some of
the details, so let's see. Now, definitely, metallic
doesn't work too good. I think the intensity is
too much, but let's see. I think I'll twigg a couple
more things and export. Um, What do you think? Um, let's try just
with this and see. And lastly, let's try
with the convexities. Maybe this will soften it out. Okay, I mean, it's a good start. If we look closely Okay, yeah. The bloom is not
working really good. If we look closely, we can see that it is not too apparent. And by too apparent, I mean, the scratches, they are not
too visible, so that's good. That's what we were looking for. And the color and the tint
on the edges works good. Just to see if
 FastTrackTutorials, Premium 3D Art Education