Transcripts
1. Class Trailer: Welcome to this
course on creating AR effects for TikTok
using effect house. My name is Nadia Cato. I am an XR designers. And if you've ever
wondered how to design this really cool
augmented reality effects that you see all over TikTok, then you are in the right place. In this course,
I'm going to teach you how to use effect house. The powerful ALL
creation tool from TikTok will affect how you can
create stunning AR effects that you can share with
everyone and make you and your video stand
out from the crowd and maybe even go viral. Whether you want
to add some makeup to your face at a cool, trippy, colorful
effect to your videos, or even a randomizer
to your head, affect house has all
the tools you need in order to bring your
creative vision into life. In this class, I'm going to
guide you through the process of creating two new
effects from scratch. You'll learn how to
use effect house, body and face Stryker used
visual scripting tools so you can add interaction without writing a single line of code. And how to publish
your effect on TikTok so the world
can see your creation. By the end of this class, you will have the skills
and the knowledge to create amazing AR effects on TikTok that will captivate and
entertain your audience. So let's get started and unlock your creativity
will affect house.
2. Project Overview: Before we dive in, let's talk about the project
for this class. The goal here is to
create and publish your first TikTok effect will be focusing on building
two new TikTok effects. And through this class, I'm going to teach you
all the skills you need in order to create them. To follow this class,
you have two options. You can either follow
my examples and use the assets that I'm going to leave on the resources section. Or you can either
create your own and show your
creativity through AR, either way works
and you can follow all the lessons
using either method. However, in order to
follow this class, you need to use effect. How's the powerful AR tool from TikTok that will allow us
to create these effects. By the end of this class,
you will have the skills to publish both effects
and many more. And to wrap up the class
will share the creation with everyone by posting the links on the project
section down below. This way we can all see
what we've created and maybe even gain a few
followers on TikTok. So get ready to dive in and create our first TikTok effect.
3. The Platfom: Tiktok & Effect House: First of all, let's start with a quick overview of the tool and the platform in case
you're not familiar with it. Tiktok is a social
media app that lets people take and share
your videos with others. You can actually have
it on your phone. This is just the
desktop version. Users can create and upload videos of themselves
doing various things, like dancing, singing,
showing stuff, or just sharing their life. Similar to other social media apps like Instagram
and Snapchat. Tiktok also has an
augmented reality elements that you can add to your videos that allows users to
create effects that can be enjoyed and
shared with anyone. And effect house is a tool that allows you to create
these effects. You can combine
different assets like 3D elements and you can create interactions to build virtual elements that are
applied to your face, to the body, or to
your environment. After creating your effects, you can quickly publish them and share them with everyone. The process to
create an effect on TikTok is extremely easy. Once you have the tool, you can use different features
to create the effect, which is what we'll
see in this class. Once you make sure it
passes the guidelines, it will be live in a few
days to use affect how the only thing we need
is an account with TikTok and to download the tool, which is what we're
going to do now. So let's do that. First of all, I'm going
to download effect house. Make sure you choose
the right one. You can have it for Windows
as well if you want. Now, I already have
an account with TikTok because I
use it quite a lot. But if you don't, you can sign up to
it using your phone, your Google account,
Facebook or Twitter. And I'm going to
open effect house. You can do it in your own time. You don't have to
do it live with me. But before you go
into the next video, you should have affect
how it's downloaded onto your laptop and an
account with TikTok. So once you have
your TikTok account and you've downloaded
effect house, you are ready to go onto the next step and have
a look into this app, which is what we'll
do on the next video.
4. The Tool: Effect House Overview: The first time you
open effect house, you will be asked to login to your TikTok account
because it will have to link these TikTok account with the effects that
you create basically. So you can do that right away. If you click on Login to TikTok, it will open the browser and
you can do that right away. Or you can do it with
the QR code on the app. I'm going to do it very quickly. And I suggest you do it
as well just so you're ready to start looking
into effect house. So that there you go. That's the view that you
should have before continuing. And this is the welcome
screen for effect house. You can see at the top
it has a carousel of the latest new things
that they keep adding. Here the left, you have the
classical options like home. You can see all the
template and you can see a view of all the
recent projects. You have the option to
create a new project or open a previous one
from your computer. And then here you have
some useful links. The first one will take you directly into the
effect tells website. You have a link to the learning resources in case
you need to check something or look into how to do a specific
thing you want to do. And then you have
an option to send feedback as well
in case you find a bug or you find an error and you just want to
inform the team. We're going to start
with a new canvas. I'm going to hit Create Project. There we go. Cool. So this is a fact house. This is mainly the tool that
we are going to be using. And if you've used similar
apps like Spark ER or lens to, you will see that this is
very, very, very similar. I would say it is
exactly the same. So here first at the top
we have the hierarchy. The hierarchy are a list of all the objects that
you have on the scene, which is this area here. By default, we have
just the camera and the light because we need
to have a point of view that will tell us
what is visible on the scene and then
we need a light to light those elements App Bot. These will always
be here by default. So just think that any
element that you are on the hierarchy will be
visible on the scene. Then here at the bottom we
have the asset section. And the assets is basically the library for all the
important assets that you add to your projects
or anything that you might want to add to your
scene will be added here, but that doesn't mean
that it's visible. It's just a way to organize all the things that you want to add in the main central area, we have the 3D workspace. This is a 3D visualization
of your effect. You can change it to
today if you are just working on a 2D space,
basically like phase. And it is not essential now, but it would be good for you to familiarize with the different
views because it might be tricky if you
have many elements on the scene to know
what's in there, It's also really useful
to know how to move, how to rotate, and just how
to move around the scene. Another thing that
is important about this 3D workspace is how
to move the objects. So let's say we want
to move this slide. You will see this gizmo
here that will allow you to move it on
different axes, but also to rotate it
and scale it on light. You won't see it on
a directional light. But if you had like a cube
or a sphere or something, you could see that it's scaling. You can also hit here
to reset the view. So if you just move a lot and you don't know where you're
going and you just lost. You can reset view and you'll
go back to the beginning. Here on the right we
have the previews. So this will show you how the effect looks
on a real person. You have different views here. You can change between men, different skin tones,
different hairs, which is really useful if
you're working with hair. And you can also check the effect on different
environments. So if you're doing something
on the environment, it's really useful to test
it on a table on the sky, just like different
environments for you to check. You can also have pets because now we can add affects the path, which is really, really good. The other thing is that
you can open the camera. This is me. And you can also
take a screenshot or a video if you
need to share it with clients or if you're
doing this project with anyone else, you
can just do that. But I'm gonna go
back to the preview because the quality is better. You can also have
full body and because you're doing something
with your full body, any I just have a
look and browse because these are
really, really cool. Here at the bottom, we
have the visual scripting, and this is visual coding. Basically, this will
allow us to create interactions and logic
without having to write code. You can just connect notes here. And it will basically do stuff depending on
what you connect, which is something that
we'll have a look later on when we do our second effect. And to finish here on the right, we have the inspector. The inspector shows
the properties of the element that you've
selected on the screen. So let's say we select this camera or this
slide actually, which is selected here
on our hierarchy, we can see the
different properties that these Lighthouse, you can change it, you can
modify it however you want. So imagine we want to change
the color of the light. You can change it, you can change the intensity. You can change anything
you want on here. Before we start
building on our effect, let's have a look
at the elements that you can add to the screen. I'm not gonna go into much
detail into all of these, but I suggest you just
pause the video or finish this lesson and have
looked by yourself so you are familiar with the
things that you can add. So first of all, we have some elements that
we can add to the scene, to the elements like
Canvas or images. This will be very useful
if you work on a 2D space, you can add 3D
elements like a cube. We also have AR tracking. So this will be really
useful because you can track your head. You can, you can track
an avatar that will move depending on how
you move on the scene. You then have a hand
tracker and airplane. And then some cool effects
that you can add to your face, to your pet. Some post effects, which
means that in simple terms, we'll add some sort
of filter onto the effect just at the
end of everything. So it's like post-processing at the end of the effect,
some segmentation. So you can add an effect
specifically to an area, generative effects
and some audio. So before moving on
to the next lesson, I suggest you just have a look, cover play with these
different objects. You add a few to the scene. I suggest you just feel
comfortable with the tool before we dive in into what will
be our first effect.
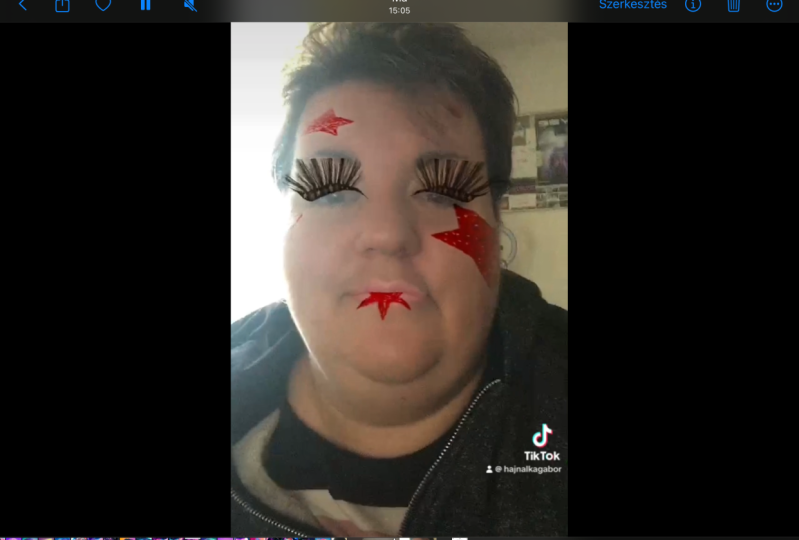
5. Make Up Effect: Eyelashes and Lipstick: This is the first
effect that we're going to learn to do
unaffected house. So you can see the difference. This is me without anything. This is me with this effect. What it has it as
a color overlay to the whole thing that adds
vibrance and saturation. It has some lipstick,
some eyelashes, and some external
textures that had freckles and lashed
to the whole thing. And this is what we
are going to do. So first thing, first, we need to create
a blank effects. So when you open effect house, you have to hit Create Project. No templates, not anything, just straight into
a blank project. We wait until it's done. Great. So would we want
to accomplish with this effect is to have some textures to wrap
around our face. They don't need to be 3D because
they are literally flat. And we just want
something that takes our face and just apply these textures
on different regions. So the lips, the eyelashes, and this area here to the
freckles and the blush. So to do that, we need
to add a face mask. Once you hit that, it will add a default texture that
affect house has by default. But we're going to start
with the eyelashes. So with your face mask selected, you go here on the Inspector and under the face mask component
and under phase region, instead of saying whole, you should choose eyelashes. There you go. I'm not
sure if you can see it, but it has added some eyelashes
onto this camera feed. I'm going to pump the
opacity 100 per cent so you can see them. That is quite a lot and
it looks like a lot. So we're going to lower it to nought 0.5. Yeah, that's better. So you can tweak any
of these elements. And this is how easy it
is to add some eyelashes. So for now we're going
to leave this like that. And then when we have
the whole effect, we're going to tweak
it a bit more. But let's go and do the lips. So same thing. We go on to add object
and we select face mask. Now you can see
that it has added a second face mask because we need to tackle a
different region. But something that I
really recommend you doing is renamed
all your layers. So if you right-click
and say Rename, we are going to say
eyelashes mask, and then we're going
to say lips mask. There you go. That's easier to differentiate
with lips mass selected, we are going to same thing, phase region, and instead of whole we're going to say lips. So we need to heat
capacity enable so we can control the
opacity and the color. And then under color we
can double-click here. And we can select any color that we want for our lipstick. And it is, that is,
you select a color. I'm going to go with
something a bit darker. And I'm going to
pump the opacity. That's it. Under blend mode, you can see that it is
by default as multiply. And I suggest you
leave it like that. But also I would encourage
you to try other blend modes because you'll see
different effects depending on what you choose. So if you go normal,
it will just apply the color on top
of your lip and it doesn't really look natural while multiply
takes the cameras, so takes the lips and the light of the leaves and
multiplies it with a texture that makes it look a
bit more natural and a bit more integrated with your
skin or with the effect. But yeah, feel free to try the different blend modes
and see how they feel. We have some eyelashes
and we have some leaves, and we're going to add now
some blush and some freckles. And to do that, we need
external textures.
6. Make Up Effect: Blush and Freckles: So external textures or something that you
create outside of effect house on
Photoshop or Affinity Designer or any tool
that you want to use. And then you import
them into effect house. And effect cows is
really good at doing that in a way that they give you the assets for you to
create these textures. So if you go to the
Effect House page, you can download this file. Now, this is Photoshop. This is the file that you
can download from them. And I'm going to leave
everything under the resources. And you can start literally
painting on top of here, exported and imported
into effect house. And that will apply
as a face mask. So if I were to export
these elements, now, those would important to effect
house or some eyelashes, some eye shadow and someday. So we can do that
really quickly. And actually I've
already done it. I've already painted some
blush and some freckles here. And I just created
a couple of layers. I just painted on top. And I've exported them as PNGs. So under the resources
for this class, you will find these textures
and the effect one. And you can see these
are PNGs that we can take into effect how
important and apply them. So it's super easy in case you want to create your
own face textures. This is the way to go. We're not going to do that now because it would
take too much time. But feel free to go on to the
effect how spades download these assets and just paint whatever you want
to change the colors. Add more staff,
add some stickers, some tattoos, whatever you want. It is that easy, but I'm
going to tell you how to import them
into effect house. So with my textures
exported as PNG, I'm going to go
back to our effect. And I'm going to
literally drag and drop. I'm a bit lazy, but
I'm going to drop them under the assets section. There you go. This will create a
folder called Textures. And under the textures, it will add these two images
that we just imported. So in order to apply them, we need to add a new object, which will have to be
another face mask. I'm going to rename
it as plus n. What do we have to do here
is leave the face region as a whole because we are
using the whole phase, not just the leaves,
not just the eyelashes. We are using the whole face, but we are applying a mask. We're playing a texture,
just that area. So the only area that we'll be painting will be the plush area. The rest will be transparent. So we want the whole phase
in order to apply it correctly to the correct
area under texture. We are going to
close this building textures and see our
folder called Textures. And I'm going to
select blush hit. Okay. And as you can see, it
has applied our blush. Cool. So I don't really
like how it looks. It really looks really wide, really pale, and it wouldn't
work for all skin tones. So I'm going to hit
multiply again. There you go. I'm going to pump the
opacity a bit more. You can even tweak
the color from here. So if you think this is too
pink or still too pale, you can tweak it and change
the color from here. I don't really like doing
this because I like selecting the color on
Photoshop and then applying it, but you can easily do it. So we have our eyelashes, we have our blush, and we have our lipstick. Now we need to add our freckles. And you already know
how to do this. Face mask. Jane's name and
their whole region. And then on texture, we're going to select freckles. I'm going to change
it back to multiply, and I'm going to
pump the opacity. There we go. We have
our makeup effects, we have our eyelashes, blush, freckles, and lipstick. That's it. This is how easy it is to create a makeup effect on effect house. The last thing that
I'm going to do, and I'm going to turn
the camera around so you can see the difference. I'm going to add
the color latch so the overlay colored
filter before that, I'm going to tweak this because I don't like how it
looks on my skin tone. Cool. Yeah, that's better.
7. Make Up Effect: Post Effects: So in order to create a filter, a color overlay, we
need to add a lot, which is like look-up table. And what this is is a
table of squared colors, gradients that will tell effect house and actually any
system because it's like, this is like a standard. How to interpret color, how to change color
based on that. So lookup table looks like this. This doesn't look like much, but when applied
to the camera fee, when applied to another photo, it will change the colors, it will change brightness,
contrast, saturation, and so many other things because the system interprets
this as the filter. The way to add it is
super-simple and I'm not going to get into
technicals with this, but I just wanted you to know. The way to do this is as
simple as adding the plus. So we've already done it. But instead of
adding a face mask, we need to add it as
a post-processor, so it needs to go
over everything, it needs to affect everything. So effect house has a
component for that, which is called post effect. In the same way we've
added a face mask. You go onto the scene, you select post effect
and you select filter. These has changed some
color because this is the default one by effect house. But we are going to add our own. Same way. We've
added our textures. We're going to take our
lot added to the project. And then under filter
and add the texture, we are going to select our own. There you go. This
looks like a lot. I'm going to turn it
down a little bit. There you go. Let's see the difference. Yeah, this is
without this width. So there you go. It's super-easy. It goes over everything,
over our makeup, over our background or phase, everything because
it's adding it after we've added our effects. So you can tweak it
however you want. You can even color
corrected. Now. I wouldn't touch it because because I think it
already looks good, but yeah, feel free
to play around with this color correction items. So this is how you create a face makeup effect
on effects house. You can use their
own components, the ones that they have. By default, you can add external textures that you
can use for certain areas. And you can even add a post-processor filter that
adds on top of everything. This effect doesn't
use any logic. It only uses the components and the object that affect
how it already has. But on the next effect, we're going to play a bit more with the visual scripting
and add a bit of interaction into our effect.
8. Randomiser Effect: Adding the Components: For the second effect, we'll use the visual scripting features on effect house to create
a randomizer effect, as well as some
interactions so you can decide what your next
destination will be. Same with the first effect, we're going to start
with a blank project, but there's something
that I want to bring your attention into. All of these effects that we are creating have their
own template. And the reason we are not using any template is
because I want you to build the things
from scratch and understand what the
logic is behind them. But I suggest that once you are feeling a
bit more comfortable, once you've built
these two effects, you have a look on this template because you will
be much quicker to create some of these effects in a much more clever
and efficient way. But first of all, I want you to understand
what it means to create these interactions and to add these elements onto the scene. So let's go ahead and
create a new project. For this one, we need to add
a bit of interaction using the visual scripting
features and some textures. So what I'm going to do first is add all the textures
that you need. I'm going to add
all the elements in the scene that we need. And then we're going to tackle the visual scripting. This way. We are doing things separately. We're understanding what
we're doing in each section. And when we tackle the actual
coding for this effect, will understand how
the different elements connect to one another. So let's go ahead first
with the textures. First of all, we need to
add a simple texture, which will be our title, that will say, Choose
your next vaccination. This is the title
that we are adding. Now, all these assets, I'm going to leave
them in the resources, but this is what we
are going to add. So let's add this
simple texture. I'm going to say Open, and it will add them here. Next up, what we need is an
animation sequence at one. And animation sequence is, is just a bunch of
images that we are putting altogether that
play one after the other. So we'll see it really quickly. We go under assets. I'm going to say import
texture sequence, this, the real name. And then I'm going to select all the images except
the title text. So all the images, and I'm going to say open. So what this creates is a
single texture that puts all the frames one after the other and
plays as an animation. So almost like a gift. It has 12 frames. In this case, it's 400 by 400, so it's square, and it just
plays like an animation. So these are the two
textures that we need. I'm going to rename this
one just to make it easier. So these are the two
things that we need. Next up, we're going to create the actual assets that
will go onto the scene. So the frames that will
go on top of our head. And to do that,
we're going to need to add an AR tracking, which is a head tracker. And what this does
is track our head. So whenever we add
under this structure, it will follow our head. As you'll see in a minute. We can get rid of this head. Because what this does is
add a 3D model of our head. So there can be
things behind it, but we don't really
need this now. So I'm going to delete it. And I'm going to add a plane because we just
need something flat, but that follows our
head and half-step. So we need a 3D element because it needs to
have that access, but it needs to be flat. So a plane we'll do, once we have it here, as you can see, if
this person moves, this plane is just
staying there. So what we need to do is at this plane under
the head tracker. And now this plane, as you can see,
to see it easier, this plane now follows
me Back up and down. Cool, but I want it
to have it here. So now I don't want it to
have it in front of my face. So I'm going to tweak the
position in the y-axis. I'm going to say ten, goes up. Cool. And because it goes
a bit backwards, I want it to have
it a bit forward. So I'm going to move the z-axis and I'm going to say maybe five. There we go. See,
it's in front of my head and it's
a bit higher up. Cool. Good To Go Back. Cool. So this one, I'm
going to call it destinations plane
or destinations. And I'm going to duplicate
it and say title. Cool. Now we need to apply these
textures that we added, the gif animation and the title. We need to add it onto our
plane that we've added to, that we need materials. So let's do that.
9. Randomiser Effect: Textures and Materials: We can go under assets,
create material, we can say unlit
because we don't need light to affect it. It just an image and we
can leave it like that. So I'm going to say unlit. I'm going to rename it title. I'm going to say texture on, so we can add the
texture on top of that. And let's select the texture. Now we've applied the
texture onto that material, but now we need to apply
that material onto a plane. So you have an element
on your scene, and that element
can be that plane. That plane needs a material, something that
tells the engine or the system how bad
plane will look like. A material can be anything. It can be like a metallic field. It can have like a
plastic kind of thing. The material in
very simple terms, is how light affects
that object. And the material doesn't have
to be an image or anything. But if we want the material
to look like something, we need to add a texture. So we have the object, the
object has a material, and that material has a texture. So those three elements
have to be connected. So let's go on to our plane. And under material, I'm going to select title material,
which is our own. And there you go. So we've had our plane, the material to that plane, and we've attached the
texture to that material. There we go. See the size now is a bit weird, so I'm going to quickly modify it so it's a
bit more stretched. I'm not being very
accurate with this, but just bear with me. There we go. Cool. So now we have to do the
same with the sequence. The only thing is that because
it's an image sequence, it needs a different components. So I'm going to
hide this for now. And let's create first and
foremost a new material. I'm late. I'm going to say
destinations material. It makes it really
simple if you are very strict with your
naming conventions, because imagine if you had
20 assets, 20 materials, 2,200 elements on your scene, it would make it very difficult
to organize everything. So I really encourage you to just be very careful
with naming. So on destinations,
I'm going to say texture on because we want a texture to be applied to that. And then under destinations, we can say it's a
destination to material. But because it's
an image sequence, we need to add that component. So with destination selected on the Inspector and
under component, we're going to say animation,
animation sequence. And that animation sequence,
that texture sequence. We need to select
the one we've added. Under texture binding,
we have to say albedo. And there we go. We have our image sequence. I'm going to unselect
autoplay for now. And underplay mode, I'm
going to say randomized, because once we get
into the actual logic, we don't want this to play the same way every single time. We wanted to have different
results every time. So I'm going to say randomize. So we have all the
elements in our scene. We have our title, we have our destinations loop, we have our materials
and textures. So let's add some logic.
10. Randomiser Effect: Logic and Interaction: First and foremost, let's start with the most basic stuff, which is that when you click
recording on the TikTok app, the title that what is your next destination
title disappears. Let's right-click on
the visual scripting. And let's add a node, which is going to say on record. So when it starts recording,
it does something. What does it do? It
sets the visibility. So I'm going to say
set visibility. So what this is saying is that onStart of the
video recording, we're going to set
the visibility, but we need to give it a target. So we need to say which
element is going to have the visibility off when the
video starts recording. And it is as simple as saying the title and getting the title. So there you go. First one done. So we can test it here, but bear with me and trust me, this is going to work. Great. So we want the same
thing to happen for the cities,
but the opposite. So on record, the
cities become feasible. We're going to replicate
the whole thing. I'm going to select this. I'm going to hit Command C, Command V, Same thing, habit. And then I'm going to
select destinations, get destinations connected with the target and say aren't. So basically, by default, the destinations will be off. And when we start recording, it will be on. Cool. Next week, which is the thing that makes the
effect what it is. So let's break it down into
something simple so we can understand how this randomizer works from logic point of view. When we start recording, we want the destination
animation sequence, the loop, that gift that keeps
playing to start playing. And after 4 s. So when
there's a delay after 4 s, we want it to stop. This is it, this is the
simplest way to express it. In fact, house has a component, a node within the
visual scripting that will help us do that. And that is the
animation controller. I'm going go ahead and added animation
sequence controller. Cool. This is a very interesting note because it gives us so many things that we can
do with our animation. We can play it, we can
stop it, pause, resume. We can select which
component that animation is. We can select to which frames
that animation will play. So we can control a few things. We need to connect our things. So we want to say
that on record, video record, we want something, our animation to start playing. So on record, we want that
animation to start playing. With animation, we need
to add our components. So we're going to go
into our destinations. We're going to go under
the animation sequence. We're going to hit here
get animation sequence. This is our component and
we're going to add it here. Perfect. What this is saying
that on video record, this animation start playing. One thing that we need
to tweak though is, if you can see here,
it says from two. And what this means is from
which frame to what frame. And it says zeros, zero, which means that if
we were to test it, we will only get
frame number one. So the first frame,
it wouldn't move. And we need to change this. We need to make sure the two expresses how
many friends we have, how these animation
sequence work is they start
counting from zero. So if we have 12 frames, we're going to add here 11 because it's counting
number one as zeros. So these are 12 frames. Cool. So the simplest way to do it
is if you have 65 frames, these two should say 64 is always one less and
make sure this is zero. So we have this cool. But we want to control
the pulse as well. Because we want that after 4 s, Let's say this stops. So we need a timer. And a timer will give us that
control of which seconds. So we can quickly
change this to 4 s. And when the timer is completed, not when it started. So if you say when
it started, it, as soon as the timer starts, We'll pause and we want when
the timer is completed. So once these 4 s have elapsed, we want the animation to pause. So once the timer is completed, we want this to pause, but we need something
to set the timer. What does make the timer starts? It's the video recording. So remember, we
press video record. We were at 4 s and then the
animation stops, right? So we need another video record. And we're going to add it here. So let's have a quick overview of all these before
we start testing. First and foremost,
we're setting the visibility
first of the title. So we are saying that by default the title
visibility is on. But when the video
starts recording, we are taking the
title component and we are putting
the visibility off. Yes, cool. So we've unchecked
this second one is we want the cities
to be off by default. And when we start recording, the visibility goes on. So on video record, we are setting the visibility
of this component as on. So this is checked
because this is the final result that we want. We want the visibility of the destination
sequence to be on. Wait. Next up, the actual animation of the sequence on video record. We want to play this
component here, which is our animation
sequence called destinations. To play from frame zero to frame 11 n. We want to
stop it after 8 s, which is controlled
by this timer here. The timer will start counting
as soon as we hit record. So when video starts recording, the timer will start. It will play for 4 s, and once it's completed, it will pass this animation. Cool. Let's test.
11. Randomiser Effect: Testing the Effect: So since we're here, let's go over the quickest
way to test here. The quickest way to do it
is to open your TikTok app. Go under profile. Go to this section at the
top and hit this canning. There you go. It is waiting for
something to scan. And unaffected house, we can
say here, Preview on TikTok, I'm going to refresh
just to make sure we have the latest. There you go. I'm going to hit
Preview on TikTok. So now wait for the
QR to generate. We scan it, you go, this is our effect
and we can test it. So let's see. We have the title
here or record. It should disappear. Our animation sequence
should appear. And for 4 s, it
should play until it stops onto a random destination. Let's try. Here you go. 34. There you go.
So there you go. This is the randomizer effect. You can tweak it. Obviously, you can add few
more frames. This is just 12. You can add as many as you want. You can make this
destination texture as large as you want. Just a couple of
things to remember. Make sure that if you create
another texture sequence, all the frames have
to be the same size. Otherwise, it won't look good. The second thing is to try
to make it not too large. I would say 400 by
400 pixels is enough. I would keep it square
because it's easier. But play around and see
what feels good for you. So the last thing
is left to do is to publish our two
effects onto TikTok. And this is what we're
going to the next.
12. Publishing your Effects: The last thing we have to do now is to publish our
effect to TikTok. And I'm going to do it with the last one we've done
with the randomizer, but you can go ahead and do the same thing with
the makeup one, the only thing we need to
do is go here at the top, refresh to make sure we
have the final size. And this is quite important
because TikTok doesn't allow. Effects are larger than 5 mb, so it is quite important to be efficient with our file size. And once we've done that, we can hit Submit. Make sure we named our effect. And we can give it a hint, which means that is
the instructions that the users will see when
they opened the effects. So in this case, for us, what's important is that
they start recording, otherwise, the
randomizer, one run. So we have to say
Start Recording. There you go. And before we hit Submit, we need to upload an icon
which is the thumbnail that the users will see
on that affect grid. So I'm going to
quickly add an icon that I made very quickly. Yeah, let's go with that. I'm going to say Apply. And I'm going to say Upload. We're going to wait
till that is gone. And it will automatically open the effect manager on the
effect House website. So here we can add a
few more information. So maybe we can say, we're going to say interactive. I'm going to say travel,
randomizer destinations. And that's it for now. On additional
comments, you can add whatever you want
about the effect. I'm going to say
maybe On challenge, this is something about getting featured
within challenges. We're not going to do that
now and upload them on video. You need to record yourself using the effect
and then uploaded. This video will be reviewed by the TikTok reviewers or
whoever reviews these effects, and they will accept it or deny it based on the
guidelines that they have. So this is quite important and this video has to really
show how the effect works. So I'm going to quickly add it. And there we go. And I'm
going to hit Submit. Once it is submitted,
you'll get your answer. Whether it goes live, are not within one to three days in order to see the
status of your effect, to see if it has been approved. If it hasn't, you have to go
onto the effect managers. So it's basically affect
house.tiktok.com. And there you will see the
status of your effects. Now, this one is under review because we have
just uploaded it. And then you can go
and do the same for makeup and fingers crossed
within one to three days, your effects will
be live on TikTok. If for some reason the
effects are not approved, they will give you
a reason to why you will be able to fix it and
resubmit it for it to go live. But don't worry, usually they approve them
and unless you've done something weird or
something is not working, I'm sure it will go live.
13. Conclusion: Congratulations on having
finished this class. If you follow these
lessons by now, you will have one or even
two TikTok effects that you can go right away and
publish on the platform. So it's time to see
them share the link to your effect down below
on the project tab. In order to finish this class. This way we can all
see what you've created and maybe
you can even gain a few followers on TikTok if
you've had any issues along the way with either the tool or following any of the lessons, let me know in the
discussion board, ask your question and I
will answer right away. For extra support, you will find the project that I've built and all the assets that I've used on the resources section. So you can see how everything
works if you don't feel comfortable with the
tool yet at this point, the only thing left is
to congratulate you again and thank you for
having followed this class. Remember, AR is a
technology that is available with everyone if he
just wants to get started. Effect house is the perfect tool to do so in order to bring your creative vision into life and share it with everyone.
 Nuria Quero, Experience Designer