Transcripts
1. Stock Photography Class Trailer: So a while back, I was out hiking and I came across a sign for rattlesnakes and if that was kind of interesting, so I took a picture of it with my thumb, that picture turned out terrible. The sign was a bit high up, so it's poorly framed. It doesn't tell a story and it's just objectively a bad picture. But I was like, you know what, I'm going to upload it to a stock photography site anyway. And then a couple of months is picture was already getting some attention and it got me thinking into the picture that I just took on a whim to get noticed and stock photography sites, imagine what I could do if I actually figured out a methodical approach to stock photography. And that's what I did in this class. I'll discuss my evergreen editorial approach to stock photography versus commercial or editorial event content. So we'll talk about what niches to get into. We'll discuss the major stock photography companies and the benefits of each one. We'll discuss how to isolate what kind of content is actually in demand. We'll talk about basic camera skills, framing, things like that. We'll talk about how to plan out a day of production, will go over basic Photoshop skills. We'll talk about how to go about uploading. And finally the crucial metadata and tagging process. So if you're curious about stock photography or think you might be interested, let's get started.
2. Class Overview: Alright, thanks for taking this course on how to make passive income through stock photography. I'm just gonna give you guys a brief overview real quick of everything that we'll be learning in this class. First off, we'll be talking about my approach to Evergreen editorial content versus commercial content or event editorial content. From there we'll be talking about what niche to get into, what niches, right for you. Very briefly, we'll talk about camera options. And when I say Camera options, you absolutely can use your cell phone. So we'll be getting into some attachable lenses to actually change the focal length of your cell phone or not gonna get into anything super native greedy. I just want you guys to be aware of what's out there. From there, we're gonna go into some very basic camera skills. And again, I'm not talking about the settings on your camera on talking about once you're there actually taking the picture. Yes, we're taking very standard, basic pictures, but we still want them to be interesting. We still want to make the most out of a very straightforward setup. So we're going to talk about certain angles that you can use and things like that to make the most out of your picture. There will also cover stock photography ethics. From there we'll get into the plan for the day. So the day you go out and actually take your stock photos, what you want to be doing, how you want to approach that. You don't want to go out and just take one photo of one object, you want to try to gather certain things that are in that geographic area. So we'll get into that from the the plane of the day, will go into the Photoshop and post-processing process. And again, very basic overview. We just want our pictures to look nice and standard. We're not getting into any nitty-gritty Photoshop stuff. From there, we'll talk about the upload process and the different sites that you can let your content live on. And then after the upload process, we'll do a little bit of kinda just miscellaneous wisdom. Things that I've learned over the years that I wish I had known when I was starting out. So that's kind of an overview of the course. So let's go ahead and jump into it.
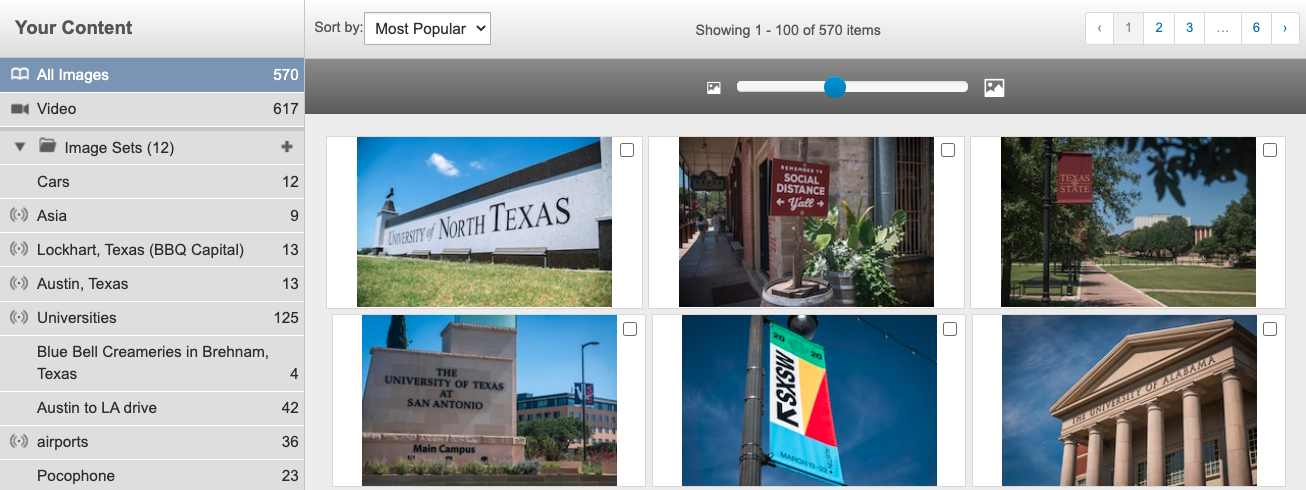
3. An Evergreen Editorial Approach: So here's basically my approach to stock photography. And this is probably one of the least artistic conversations about photography you might ever have. But I really approach it from a supply and demand sort of standpoint. Supply and demand coupled with my skill set. And so what I mean by that is that if I were to need a picture of a sunset, I'm writing some sort of travel blog, whatever. I don't have the picture myself. And I am going to search for a picture of a sunset. When I go on Shutterstock and I searched sunset, I'm seeing over 10 million pictures of sunsets here. When I scroll through them, I'm seeing a lot of these pictures are really cool. These people have spent a lot of time on Photoshop making these pictures beautiful and perfect and really nice pictures here. If I was to take a picture of a sunset one and probably wouldn't come out as good as, as some of these really good ones to the sales metadata of all these pictures, the top ones are the ones that are selling really well. And so I would get to the back of the line. Basically I'd be on page 100 thousand people or not, probably not going to go to page 100 thousand of the sunset pictures. And so it's just not worth my time and effort to do these sunset pictures. Now, conversely, if I know that, let's say Texas A&M is playing a football game. Next weekend, I searched Texas A&M University. I can't get a press pass to take pictures at the game, but I can take pictures of the campus. And so I see when I searched Texas A&M University, 254 pictures of texts and amp. I don't want to scroll through them. These are fine pictures. There's nothing crazy good about these pictures, these bad pictures, but very basic standard pictures. And in reality, some of these are mind is golden crest one right here is mine. That one's sold really well. And this basic water tower picture, there's nothing interesting about this picture that one has sold really well. And again, this is a supply and demand approach. 254 pictures to sort through versus 10 million. And basically, another thing to keep in mind with stock photography, when you do these pictures or videos, you always will classify them as either commercial content or editorial content. And my approach to stock photography is an editorial content approach. And there's a few reasons for that. One is the supply and demand. If I were to go out and try to take stock photos of business people in suits, shaking hands. There's so much of that out there that my pictures are not going to get to the top. And just to break down what the difference between commercial and editorial means, commercial content has much more widespread use. It's always going to be unlike completely unbranded content. So you couldn't get a picture of Nike shoes and have that as commercial contents. Because if you think about it, you know, Adidas would not be able to use those pictures in their commercials. And so commercial content, it's unbranded. Commercial content also requires a lot of forms and waivers from the actors if you have actors involved. So there's much more regulations and scrutiny around Commercial Content or as editorial content. It's designed to be newsworthy content. So something happened in the city and the local newspaper. It needs to write a story about it, but they don't have the time or money to hire a photographer and go out on the scene. And so they might look on the stock photography sites. So editorial content can have people's faces in it. Editorial content can't have brand logos in it. It's there to tell a story. And I, furthermore, ie, I approached the editorial content as I want to find evergreen editorial content and not necessarily events. Editorial content. And what I mean by that is, you know, a good example is these university photos and videos. The universities are always going to have some kind of sporting events. They're always going to have some sort of maybe a research, breakthrough or scientific study that's important. Or there's some kind of scandal going on or, or whatever. There's a lot of different possibilities for someone to write a story about the university. And then that to me is evergreen editorial content and then Events. Editorial content is something like Let's say that's the Governor of Texas is doing some speech. And so if I have a press pass and I'm able to be there, I could take pictures of that event. And those pictures might be very valuable in the next week or two while reporters are reporting on that event. However, in two months from now and a year from now, people are not going to be reporting about that event. However, if you do go to an event, you can, depending on how you frame things, you can take evergreen editorial content as well as events, editorial content. And what I mean by that is if Governor of Texas as speaking, if you get really wide pictures of the banner with the event name of everyone there and attendance. And you're really kind of telling the story about the events that is going to be more valuable in the near term, but less valuable in the long-term. But if I get in tight and just get a shot of the governor's face, then that content is more evergreen content in a year from now, there could be a story about him in two years from now there's a story about him. So you definitely want to think in terms of the long tail of sales versus just the skin cell for a week or two. So that's kinda basically my approach. Again, there's nothing sexy about it. It's really supply and demand. If you were to look at some of my catalogs and my pictures here, you know, some of these pictures are nice and artistic, but others are, are pictures of a, of a sign of a stadium. And some of these have sold very well. So again, these are basic pictures that really anybody could take with a phone or any kind of basic camera. And these have, have done very well. So again, supply and demand. There's nothing sexy about it. But when it comes to passive income is a really good approach.
4. Selecting a Niche: Alright, so let's talk about your niche. And when it comes to stock photography, a niches very less important than it would be in any kind of brand or commercial, or any kind of website or anything like that. But I do like to approach stock photography from a niche perspective because it's a good place to start. It helps orient you. And when you say Okay, next week I want to go out and take some pictures. You know, it's a good starting place of What do I want to take pictures of. And so when it comes to a niche, I, I really think there's two different important approaches. One is a network approach, one is a geographic location approach. And so what I mean by network is, and again, we're really approaching everything here from supply and demand. And so do I know a person who has access to a person, a place? Do I know someone who has access to something that most people don't? And so it's important to go through your contact list and think of who are these people that, you know, no important people or have access to important places that there will be again, editorial, newsworthy content of and hit them up and see if they'd be able to allow you access into those places. On top of a network approach, geographic location is also really important because are you going to be traveling around the US taking stock photos and video? I've done two or three trips where I did that. But most of my stock photography, I live here in Austin, Texas. You know, most of my stock photography is going to be within a two or three hour radius of Austin. So I have to rack my brain and think, Okay, what do I know of that is going to be newsworthy, evergreen editorial content within this, you know, couple a 100 mile radius. And another good way of finding a niche is just by looking at the different categories that these stock photography sites kinda limit U2. So if you're curious what you want your niche to be, oops. Or any of these categories are good options. Animals, wildlife, arts, background and textures. Building landmarks, business finance, education, food and drink, healthcare, medical holidays, industrial, nature, objects, people, Religion, Science, signs and symbols, sports and wreck, technology and transportation. So with an editorial approach, trying to combine editorial content with any of these niche categories is definitely a good place to start off. One thing to also note with geographic location stuff, and this is just kind of a side note. If you do get to the level we are making $500 a month in stock photography. You are able to write off trips if you're getting income from that trip. And so that's one of the beautiful things about stock photography, is if I want to go to Hawaii and take pictures of stuff that I think would sell in Hawaii. Then suddenly I'm writing off a plane ticket. I'm writing off hotel expenses. And so having this side business really opens up the world of travel, which is a huge benefit of stock photography. That's just kind of a side note. That's one thing I really like. But again, those are your options when you think of your niche. So, you know, sit there and go through your contact list, go through where you live and try and figure out what a good niche for you would be.
5. Stock Photography Ethics: Alright, so let's talk ethics about stock photography real quick. And when it comes to ethics with stock photography, for me, really, I think of two different categories. The first is using people in your photos. When we're doing editorial content, we don't need permission from people if they're in a public place to take their picture. Now, that can be a little dicey, right? People may not consent to us using their pictures, right? And I think I think this kind of varies based on the photographer and based on the person. For me. As you can see right here, I have a few pictures. I have a few pictures of Franklin BBQ. This is probably the most famous barbecue in the city of Austin. There's always this two or three hour line outside. And these pictures have done very well for me. But what's interesting about these pictures are they're full of people. These pictures tell a story, right? There's this picture of Franklin BBQ sign, which can be used for anything. This is a very informative picture. This is not a picture that tells the story, but these other two pictures show, hey, this is a very popular restaurant. This is a restaurant that people spend hours in line at. I think there's even people in chairs in this picture. And people spent hours and people in shared people spend hours just waiting for this barbecue. So this is a more interesting picture because it tells a bit of a story. But none of these people signed any sort of release. We're aware of this picture being taken, are even aware that it's currently online for sale now with editorial content. That is okay. For me personally. I think a picture like this is totally fine. I think if that if I had taken a tight picture of maybe just one or two people in line. To me that's a little bit more intrusive than this picture of a group in line for this barbecue restaurant. But again, everyone's line is different. This is a sort of gray area. Editorial content allows for it. Now commercial content, if we were trying to sell this as commercial content, you'd have to get a waiver filled out from every person in that picture. And the basic rule is if a person is able to identify themselves in a picture, you need a release from that person for commercial content. So it's not, you know, if you see a picture and you're like, well, no one can tell that it's this person. If that if that person themselves can tell that it's them, you need it. So the line is a little bit further than you would think. But again, for editorial content, this is ok. So that's the first area of ethics that need to be discussed with stock photography. The second area is probably not for a ton of you, but for the ones who are photographer or videographers who are watching this. If a client hires you for a gig and you go out and you film a bunch of stuff where you take pictures from, bunch of stuff. Are you allowed to use that and put it on stock photography websites? And again, this is a gray area, especially because the vast majority of gigs in this in this space, you're not filling out contracts. You're not talking about the specifics of the deliverables. There's a lot of gray area here. And now if I'm making a video for somebody, I'm giving them the video, right? I have not. They're not buying the raw footage from me. They're buying the video from me. So there's definitely a gray area. My personal stance on this is that I don't like to use any of the footage that has gone into the final product, right? I'm making a video on, let's say I'm making a video on BBQ restaurants. If I'm a have any of this footage from Franklin BBQ, if any of the footage makes it into the final product that I'm delivering to the client. I wouldn't use that in any of my stock photography, stock video stuff. However, you know, if I go out and if I make it a three-minute video, I probably have 45 minutes worth of footage that, you know, that is not in that video. And so clips that are left on the editing room floor, I think that they're OK. Again, I'm not signing any contract that says, you know, the the limitations of this footage. I'm not selling the raw footage to the client. I'm selling them the videos. So I think it's okay to use clips that are not included in the final product. However, if, you know, if this product involves a heavily featured subject, a person, an actor, or an interview subject, you know, I wouldn't include them in any of the stock photography, stock video stuff because that person has not signed off on that. And so that's where I would draw the line for me. I say that as long as the footage is not in the final product, as long as the footage does not feature prominently. A person who doesn't know what they're getting into. As long as those two things are okay for me, you know, I think it's fine to put on stock photography. Now for other people, they may think that that's not okay. They may think if a client hires you, you can't use any of it. And then for other people, they might think, well you can use all of it. So there's really kind of again, a gray area here that you just kind of have to think to yourself, what's right for you, what's legally right for you? And when you're not signing contracts and stuff, it's it's it's a gray area.
6. Making the Most of a Cell Phone Camera: Alright, so let's talk about camera options. And like I said from the get-go, I'm not expecting you guys to go out and buy expensive cameras or learn photography really in depth. You can absolutely use your phone for most of these pictures. But I just want you guys to know what's out there and know the price of things. And if you are interested in photography and want to get more in-depth into it, is at least a gateway and seeing what options are out there. So let's go ahead and start with if you are just using your phone, one thing that's important to note is that when you zoom in with your phone, if you use any sort of digital zoom, you actually degrading the quality of the pictures. That's why a lot of the more high-end phone these days have 23 cameras on them. They're zoomed in at different lengths. And so you can still get a perfect pristine picture at these different links. So if you don't have a camera with multiple lenses, it's definitely a good idea to buy one of those attachable lenses for your cameras. And they're really affordable, much more affordable than you would think if you look on Amazon right here for me today, it's priced at about $33. And that comes with a telephoto lens, a super wide lens, and a macro lens. And just real quick, telephoto means it's really zoomed in. So it's zoomed in. So you can take really good pictures of things that are far away. Super wide is pretty obvious. And in macro lens is for really close up pictures. So if you're taking pictures, ants or blades of grass or anything like need to get really tight on a Flowers, anything like that. That would be or the macro lens would come in handy. But like I said, 33 bucks for these three lenses to do all this really great option. But if you guys are interested in going out and actually buying a camera, you can actually get a Canon Power Shot for only about $200 these days. And these cameras are very great. Starter cameras have really great auto settings, but actually allow you to dive in deeper as well. And if you are interested in that. And the great thing about the price also at $200 with this stock photography, if you guys hit the ground running, this thing will pay for itself and just a few months. And so there's some motivation there to, to get that if you guys are looking for something a little bit more high-end, but don't want to go crazy. The Sony alpha a 6400 runs under a $1000 and this is merely a professional camera. This camera is very good, takes very high resolution photos, has a great kit lens as well. So this is a very popular prosumer kind of camera. And if you guys have the money to spend, if you wanna go crazy, I definitely recommend this Sony A7. The A7 Three is the current one. And this is a great camera that I've taken some of my photos and videos width, so it does run expensive is over $2 thousand. So this is a, you know, more professional-grade camera, but again, at this point, for me would pay for itself in about four months. So this is a great high-end camera if you guys are looking into that. But like I said, you're absolutely OK. Just using your phone with nothing on it. If you can frame properly, if you have the multiple lenses, that helps a whole lot. If not, I definitely recommend you guys getting these additional lenses or splurging couple 100 bucks for a Power Shot.
7. Basic Camera Skills - Framing & Angles: Okay, so now that we have selected what we want to take pictures of and we know what camera we're going to use to take pictures. Let's just talk about some very basic camera skills. And again, this is a passive income course, so I'm not going to get super in-depth into learning how to use a camera. I definitely do have other courses for that if you guys want to check that out. But I just want to give you guys kind of the minimum required to take a decent picture with everything we have going on. So I'm going to break this into three different sections. The first is a amateur and up type of section that talks about just basic framing and very basic camera skills. Then I'll talk about a kind of a hobby and up section very briefly. And then a pro section which just allows you guys to get the most out of your photos. So let's start with the just amateur and up section. So this is for people who are shooting on full auto mode. So whether this be on your phone or your camera, this is full auto mode. So I'm not going to get into any specifics on camera settings. But the important things to note for this full auto setting is when you go to take a picture, you're just really focusing on clarity. So let's say that I a few weeks ago I went out to Texas State University and I took some pictures on the university campus. So for me, clarity is so important. I am really focusing on Texas State logos, Texas State iconic buildings and things like that. So again, not here to make any sort of fine art or just here to make money. We want the subjects to be clear and understandable. Let's also talk about the difference between informative pictures and pictures with story. Both are good. And I think that you should definitely take both of these pictures when you are at a location. But knowing that there is a difference between a formative pictures and pictures that tell a story will help you guys to take better photos. So when I look here at my Texas State pictures, if you look at this second picture right here, it is just a picture of the Texas State sine. I would say that this really tells no story. This is just for if something happened at Texas State, this is kind of a blanket evergreen picture that if there's no picture for these specific incident that happened at the Texas State, people could absolutely use this picture and it gets the job done. So this is a informative picture. I think you could argue this first picture right here could tell a story. Now, I took this picture during the pandemic of 2020 when there was controversy on if people were going to go back to school in August and September. And so I took this picture, It has the Texas State logo in the top left, but it also has an empty campus in the bottom right. So this picture, I would argue, tells a story. Now, if you were selecting this picture, what's interesting about this picture is it kinda does both, right? If you had a story about Texas state that had nothing to do with the pandemic or going back to school. You absolutely could use his picture. It's a nice picture of campus and the sign. But if you were telling the story of an empty campus, this picture also works for you. So that's interesting that it kinda gets best of both worlds, which is really effective. I think it's also important to talk about landscape orientation versus portrait orientation. From what I have seen and heard, landscape or, you know, shooting width-wise cells a lot more than shooting vertical or portrait. Now, I have not really ran any experiments or tests or anything trying to figure this out. And I would say 98% of my pictures are landscape just because I've heard this before. And very few of mine are portrait. I have sold a couple portrait pictures. I had sold a portrait picture of a vanilla latte sweetener that's sold and that was Portrait. And so it does happen. But like I said, I've heard that landscape is the better way to go because most of these pictures are still going to be for newspapers or blogs or things like that that, you know, in the traditional medium are still a little bit more width than they are up and down. And I think I want to talk about as basic framing. And for this, I do a few tricks that are very easy and very easy to emulate what I like to do when I'm there on my location. Instead of taking a picture at eye level, I like to get a nice upward angle. So I sometimes I put the camera on the ground, tilted up. It's usually about a foot or so off the ground. And what that allows me to do is to get some pictures like this picture here of green and it's pronounced green. Strangely enough, this picture here of the green sign, that's actually, that sign is actually not very tall. I want to say that sign is maybe four feet tall. But when you look at it from this picture, a gives it a sense of importance and a bigger sense of a weight behind it. And so these upward angles make these signs feel a little bit more powerful and just more photogenic and more interesting. So instead of a straightforward picture on the sign that I could've taken, I got it at an upward angle. And when you do the upward angle, it's always a little nice to have it off of a 45-degree angle as well, like when you see this picture of North Texas there. So it's real close to the grass as you can see, it's upward, but it's also at a 45-degree angle. And if you are doing that at the 45-degree angle, I think it's also important to note what is the important part of your subject. And not to get too artsy, but what story are you trying to tell? And so I put the camera on the right side here so you can see that north Texas, the text North Texas is getting bigger. And if I had put the camera on the left side closer to the Texas University, it would say University big and then it will trail off and gets smaller, as it says North Texas. Now I chose to put the camera closer to North Texas because that is the part of the picture that is more important there, right? It's the University of North Texas. I'm I'm taking a picture for that university. I'm not taking a picture for universities in general. So for me, north Texas here is more important than the word university. So just something small to think of when you're picking what side, do that 45-degree angle. Let's also talk about product POV. This is a little trick I found that does really well in social. Is like you see this picture of this Bluebell ice cream. It's just a picture like, oh, you know, from your own point of view, holding a product. And that is, is a style of picture that, that's real popular right now, but also does really well on social. So really those two tricks on framing the upward angle to the side is really nice and the product POV. Those are two interesting ways of going about these pictures were taken very straightforward pictures here. So even if it's a picture like this Bluebell Kremer here, cream R3 here on the left. I know that that picture is sold fairly well and that is a very not great picture. It's taken at a time of day where the shadows are kinda gross. It's flat, it's a little at an angle, but not really anyone, anyone can take that picture. So that was just a product of, again, supply and demand. How many pictures on Shutterstock Are there a blue built the Bluebell factory, 430. So I'm I'm not competing against a lot. And when you scroll through these, you can see, you know, half of these pictures aren't even about this place. A lot of these pictures. So really, you know, I have one too. But yeah. So I have, you know, I don't know, a third or half of the top pictures here. So again, supply and demand really is king.
8. (optional) Intermediate Camera Skills: Those were the very basic camera skills that you guys need to know. The rest that I'm going to go into. I absolutely have other courses on if you are interested in learning more about a camera and actually getting into photography those classes I definitely recommend. Right now I'm going to try and some of those in-depth classes in just a few minutes. But these, these technical camera skills, you absolutely don't need to have to do this stock photography. So if you're not interested in that jumped in the next video, if you are interested, then then hang on. We'll get into it. But yeah, like I said, you actually don't need to know these in-depth camera stuff. Still have good passive income through stock photography. So real quick, okay, so cameras, the way the cameras work, this is a very basic crash course in the cameras, rope-like cameras basically captured light that exists in the world. The light goes through the camera, hits the camera sensor and registers that processes that as the picture. So basically you think of the lens is at the end of the camera. The light goes through the lens. The lens has a hole that it, it adjusts to let light in and can be large or it can be small. The light goes through that hole and it passes through the shutter that opens and closes. You think of the sound of camera makes, that's the shutter opening and closing. So the light goes through the aperture, through the shutter and then hits the sensor. And the sensor has a level of sensitivity that captures how bright and how dark the image is as well. So it's really those three things is the lens aperture, the shutter speed, and then the censor, the sensitivity of the camera. Those are really the three things that you're adjusting to create. The perfect harmony of light to create a picture. So real quick, let's go over all those. So the aperture is the hole that gets larger and smaller. The larger the whole is, the more light comes in, the smaller the hole is, the less light that comes in. That's pretty straight forward. With all three of these, these, these things, the aperture, the shutter speed, and the camera sensitivity. All of them adjust the light, but they all have a different side effect to the image itself. So what the aperture, the aperture side effect is, the larger that hole, the less that's in focus. So right now I'm filming on a fairly, fairly large aperture. So right now I'm in focus, but if I were to lean back here, I'm out of focus. And that's because I'm working with a large aperture. If I had a smaller aperture, more would be in focus and you would be able to get me in focus here as well as back on the couch or something like that. So one thing that's important and also about the aperture, the number that's associated with the aperture, and it gets a little complicated. The number that's associated with the aperture is actually a denominator number. And so it has an inverse relationship with the size of the aperture. So the larger the hole, the more light coming in, the larger the whole, the smaller that number is. So a very large aperture is like a 1.8 or a two or something like that. The smaller the hole, the smaller the hole, less light comes in. Smaller the whole, the larger the number is. So a, a very small aperture would be something like a 16 or 22 or something like that. So that's aperture for you. Moving on, we have shutter speed, so it's how fast the shutter moves. Intuitively, the slower the shutter speed, the less than, sorry. The slower the shutter speed, the more light comes through, the more time light has to come through, the faster the shutter speed, the less light comes through. The side effect here is that the slower the shutter speed is not really focus, but kinda like motion blur or kind of like a smearing of the image. So slow shutter speed is used to do night photography or something that you need a lot of time. And you think people would like sparklers and those pictures where they can write letters and words and stuff like that with little sparklers. That's because the shutter speed is so slow that that light kind of smears across the image and makes words and things like that. So that's really for a stylistic choice. Typically you want a shutter of a 100 or higher. So that's a faster speed that keeps everything sharp and in focus and doesn't have any of that smearing. So a, again, getting a little in depth, a good rule of thumb for shutter speed. Shutter speed should be twice the lens length. So if you're shooting on a full-frame camera, you don't need to know any of this photography skills. This is just if you're interested. Shooting on a 50 millimeter lens, you would want a shutter speed of a 100. Shooting on a, a 100 millimeter lens, a longer lens, you would want to shatter speed of 200 and so on. It's also important to note that with video, shutter should pretty much always be stuck at 50 or 60. That's just how our eyes are accustomed to seeing video. And so 50 or 60 to video is, is what you want to stick with. So we have the aperture, we have the shutter. Once the light hits the sensor, we need to set our sensitivity. So that's referred to as the ISO. So the ISO, the higher the ISO, the more sensitive our sensor is, the more light comes in. The lower the ISO, the less sensitive less light comes in. Now the byproduct of the ISO is how noisy and grainy our image looks. So it's pretty much a objectively true that people want the lowest ISO possible in an image. And that's because they don't want the noise kind of interjected into the picture. Some people do enjoy if you're going for a stylistic look, which is not for stock photography really. But if you're going for a stylistic look, you could have a high ISO or ASA if you're using a film camera. So you have a little bit of film noise, you know, smart pretentious people say that they liked the film noise but not the video noise. So you definitely can add some noise if you want stock photography, you shouldn't be doing that. So you basically always want the lowest ISO possible that still gives you proper exposure within the image. And then also, when it comes to video, Slow Motion is a good option. So that's something to think about with slow motion. You wanna put that shutter, I'm going to jump back to shutter up what? You want to put the shutter speed to twice the frame rate. So if the frame rate is typically about 2425, maybe 30, the shutters at that 50 or 60 that I was talking about. If you're doing slow-motion, if you're shooting 60 frames a second, then you want your shutter at 120. So for slow motion, the shutter in video is always twice the frame rate. So that is, is, is, is Crash Course camera a real quick, that was a lot of information. So if you guys are interested in, in really getting in depth of the camera, take one of the other courses because there's a lot more there at a, at a better pace too.
9. (optional) Advanced Camera Skills: And real quick, I'm going to go into some pro options, things that if you do know what you're talking about with cameras, these things help your images come out in a little bit better. And the first is foreground. So if you guys look at Texas State photo a little bit ago, this picture of Texas state here, this banner, real quick. I have something in the foreground here. And that basically because it's soft focus, it tricks your eye into thinking that this was taken with a higher-quality camera than it actually was. That's kind of what foreground does. Let's see if I can find any other examples of interesting foreground here. This, this hotel, Emma and San Antonio. I have some nice foreground with the tree, but I'm still seeing my subject to remember clarity is very important. I'm still seeing my subjects really well. So I would actually say that's a nice picture. I like that picture. I think it's good and artistic. And more than just a, a very boring basic stock photo picture. So foreground, it's always good to have something in the foreground If you can. Again, you don't want it to be distracting. But if you can frame your picture nicely, do that. And then one thing that's also nice is using an ND filter. Now this is, I guess they do exist for cell phones, but this is more kind of for traditional cameras and ND filter. What it does is it artificially low blocks, I guess not artificially actually a blocks light coming into the lens, so it's a filter in front of the lens. And the reason why you would want to block some of the light coming in from the lens, is that when you are taking video outside, your shutter is stuck at 50 or 60, your ISO is going to be as low as possible, 100 or 200. And there's so much light outside the sun is so bright that you're forced to close down your aperture a lot. So pretty much everything is in focus. Now. When everything's in focus, these digital cameras really don't look as good. And so when an ND filter is, is that it blocks some of the light coming into the camera. So you're allowed to open up your aperture more. And then you can have your foreground that's still in soft focus. If you look at this picture of green Hall right here, these flowers are nice, soft focus. And it looks really nice and pretty same with this picture in San Antonio that I say in the tree, leaves are out of focus, looks a lot nicer than if a foreground is sharp in-focus. Because again, it's all about clarity of your subject. And if you have so much in focus that your eye doesn't know what to look at. That's not great. So this picture Green Hall, you know, the, the historic Dance hall is more important than these flowers are. But the flowers gives a nice texture. And yes, this is a little artsy, whatever. But having an out-of-focus is more interesting than having them in-focus, and it allows our eye to focus on where it should be. So that was a whole lot of camera information packed into a little, little video. And so I definitely recommend if you guys are interested in learning more about photography, Take one of my other classes and, and, and dive deep into there. If you guys only took away the very first kind of hobby part. Those, those basic tips and tricks, absolutely awesome. There's a lot here that, that is not crucial to the stock photography process.
10. The Big Day: Alright, so we've decided what camera we're going to use. We've learned a few tips and tricks on how to use that camera. Now let's talk about planning for the day of stock photography. So for me, it really revolves around one hero location. And what I mean by that is I decide, you know, what is there that's in my a 100 mile radius. However far I want to drive, whatever that fits my niche, doesn't have to, but that's a good starting place to kind of figure out where you want to go. So let's say that I have decided I want to and take pictures of TCU, Texas Christian University out in Fort Worth, Texas. So that's my plan. That's my big day. Tcu is what I want to be doing. So the way that I'm going to approach that is I'm first going to, Well first I need to go on Shutterstock and see what images there are of TCU. And if I think that I can do better. So when I search for images of TCU, I'm seeing some horn frog mascots. Some of these images, these are this might be my image. My photography day at TCU, these pictures didn't turn out great. But they've sold again, supply and demand. So there's this nice that there is a logo here. I wish I had found that when I was on campus. So I think there's definitely room for improvement in these TCU pictures. So I would say TCU is a good subject. So you also want to search video because the deal is photocell more often, but video sells for more money. So you want to see what the options are. All photos, the videos. We had 93 photos, we have 53 videos. This is mine. I don't that might be mine. I don't know. There's only 54 videos of TCU. Look, all these are clouds. So doing video of Texas Christian in Fort Worth is a great idea. Okay, so another thing that I like to do before I get to the location is just do a simple Google search on where I'll be going to to see what pictures people have already posted to that place that they want to be showing off. So if there's any iconic location or anything like that that people definitely associate with location. It should be posted on Google here. So when I scroll through this, the things that I am seeing really, there's two things. One are these, this, these fountains, these little lily pad fountains I think is what these are supposed to be, so that it shows up a few times and then also the sign with the flags behind it as well. So that might be a little difficult because it's long. So it's not quite the, the dimensions that you might want for a picture. But when you see an image like this, this is a nice, nice image right there. So those two things, once I showed up to TCU campus, I would be looking for those two things to get a picture of it. And it's nice to people on Google here. I've kind of done some of this groundwork for you and you're just kinda really just kinda recreating some of these pictures yourself. There's always going to be sports at universities, there's always gonna be research, there's always going to be scandals from time to time, whatever. So TCU is what we wanna do. We've decided that's our hero location, TCU in Fort Worth. From there, we think, okay, we're going to Fort Worth. I always like to pick maybe three to four locations for a day and try to do it all in one day. Just pick a Saturday, pick a free day, you have it just kinda mega, mega Day out of it with you and a friend or just go by herself, whatever. So we're going to be in Fort Worth. So what I like to do is you want to just Google things to do in Fort Worth. Now we're dipping into a tourism niche here. We're trying to figure out what people like to do in Fort Worth. And we see that the stockyards have 5600 reviews here, 4.7, that's nice. Kimball Art Museum is a thing. That's great. Six lives over text as 24 thousand reviews, that's great. So you know, the sites that I like to see what's popular, TripAdvisor is great. Yelp is pretty good for restaurants. I do think it's worthwhile to cover restaurants that a epitomize a type of cuisine. So, you know, the Franklin BBQ sign for me in Austin has done very well because Texas barbecue is a thing. If I were to go to Louisiana and take pictures of really popular caging or Creole restaurants. I feel like that would do really well. I took a southern road trip in the winter last year and got some pictures of southern cuisine and southern restaurants. So really a, you know, I don't think a barbecue, a popular barbecue restaurant in Nevada, probably isn't gonna do well because Nevada is not known for their barbecue, right? But if you can take a cuisine that epitomize a region that's going to have more write-ups. But that being said, Google's great, TripAdvisor's degrade, Yelp is great. See what's popular, and then decide to cover those things. So Six Flags real popular AT and T stadium sports, there's always going to be sports being played even in a pandemic, things were started back up AT and T stadium. 24 thousand reviews for the x2. So pick a few of these and make a whole day out of it. And what I like to do, I'd like to go on Google My Maps and you can actually create custom maps so that way you can tell, okay, I need to start here, hit this one, this one, this one, and you know, so you're not backtracking a lot. But what I did on my fourth day, I covered TCU mu c. You are going to type in forward and see what I come up with here. Yeah. Okay. Billy Bob's was a day when Billy Bob's is the largest dance hall in Texas. It is absolutely massive. It it's quite a thing to see. It's yeah, as the biggest bar you've ever been into your life is really interesting. So I went and I uncovered Billy bombs. I covered Joe T Garcia's, which is a really popular Mexican place. And I cover the Fort Worth stockyards here as well. And I think these are my these are my images. And I think I got and I guess I guess I got more video I cover I covered Billy Buzz pretty well. Again, pick three or four different locations. You know, you're you're you're driving out somewhere, you're spending some time there. You don't want to go just for one single picture, one single-subject. I've, I've kind of realize at this point that every day I go out and cover maybe three locations every time that to me equates to about $5 a month. So at this point, I've probably done that a 100 times. That's why I'm out about $500 a month. But to me, each time I go out equates to about $505 a month, which again, does not seem like a lot of money. But then you're like, well, that is $60 a year for just going out one day on a Saturday. You know, you do that a few times here looking at sizeable money, if you really make a push at it, you know, you again, hundreds of dollars a month, it's really not that hard. And when you're looking at these pictures, you know, these aren't some videos. Some of these videos are nice, but these are very basic standard stuff. Again, it all comes down to supply and demand. Once you've kind of made your plan. Okay, i'm going forward. I'm hitting up the university. The restaurant had a Billy Bob's. I'm doing these things. Once you get there, spend more time than you think you will there, I mean, spend an hour or two at each location. Really cover the subjects and take photos and videos. Again, photos. I will sell maybe four to five photos a day, but I'll sell a video every week or so. So photos are a constant stream of, of not a lot of money. And videos are a little bit more well-paid videos. Some videos will sell for $15, some will sell for 60. It'll kinda depends on what the use is for them. So when you're at a place, it really takes no extra time. Snap the photo, changed the video, take a video and make sure the videos are at least six seconds long. That's kinda the minimum that some of these sites require, really just go for ten. And with video, you, again, don't need to be super fancy. It's always nice to start with maybe some kind of small transition. So if you're just like a slow tilt up and you sit there for ten seconds. Slow pan and you sit there for ten seconds. That's all you gotta do. Your really not do anything special there. And so always take photos and videos if you want. Take a horizontal picture as well as a vertical picture. Again, I don't think the vertical picture sell as well, but it's all about options. Another thing that's important is talking about covering a location. And what I mean by that is, when it comes to videos, you know, think about the people that are going to be buying these videos. Someone is doing some segment on something. Typically, they are not looking for just one single clip of the sign of the location or whatever. They want to get a feel for that for that location as well. And so if you get if you're at TCU, If you get six different clips of various buildings on campus, various logos, TC lowest, things that show off the campus. You know, an editor, a video editor is able to use all six of those clips. And suddenly you've made hundreds of dollars because you've sold more than just one clip. So for instance, a while back I so for instance a while back there was one single day, looks like November 23rd, 2019, where someone bought four clips that I had filmed at Texas A&M University. And because I had covered it so well with so many different shots and angles, I was able to make about 60 bucks just in that one day because the editor had bought four clips in mind, it's important for a single subject, get a tight, Get a wide. But also if you're at a location with more than one thing that's visually interesting. Definitely film as much as you can, take as many pictures as you can and really cover the place because that will really pay off.
11. Basic Photoshop Principles: Okay, so now that we've gone out and taken our pictures, we need to take them into the computer and make them look as good as possible before uploading. Again, we're not spinning a ton of time on this. This is passive income. This is not in depth photography skills. So we're just trying to do some quick fixes to make them look as good as possible. So I'm going to start off, I'm going to do this picture of the G O T Garcia's sign. This is in Fort Worth, Texas and the picture itself is very standard. I just took a picture of the sign. So we're going to adjust some of these settings to make it look as good as possible for uploading it. So I'm doing it in Photoshop. There are so many other free softwares out there that you can be using. So I'm really just going to teach you a few principles with contrast, exposure Highlights, Shadows, and it's not any software specific stuff. So feel free to use any software that you want. So first off, we're going to look at the white balance. It's as shot right now I can do an auto which looks worse. Daylight, which is where it was, which might be alright. Either daylight or as shot. They're both pretty good. I'm gonna go with As Shot as to me, I like the blue, that looks nice. This is kind of subjective wherever you think looks good, you do want to be going for a natural look. You're not going for anything really stylized or anything like that. Us want what's natural? The exposure seems alright, there's nothing too dark and I think too bright. It's always good to bump the contrast a little bit. And it's always good to bring the highlights down a little bit. Especially if you're shooting against the sky. Somewhere on there, the shadows in photos, it's good to raise the shadows just a little bit. In video, you either raise or lower, it's a little different. Whites, it's always good to go up a little bit. And then blacks, you want to just at the line there. You don't want that to turn red and right, there's good clarity, texture D. Hayes, always good to sharpen just a hair for clarity and saturation and vibrance. I like to take the saturation down and then take the vibrance up about four times. How much I've taken the saturation down. And that's pretty, pretty bright, unsaturated mill lower down a little bit. So here we go. This is all of our light stuff, all of our contrast stuff, which is really good and, and Photoshop. And the other tab I like to go to is this one right here and put on just a tiny little light vignette on there. So that was real fast. Real quick. Up the contrast, lower the highlights and shadows up the wide, slower the blacks, that's end up the clarity. That's really all we did. So that's kind of my basic, you know, broad stroke Photoshop and mix into a nice image. Again, this is all about supply and demand. You know, if this is a, if it is the only picture of Joe T. Garcia is on Shutterstock and that's where people are looking to download it. They will download it regardless of how much time and effort you put into postprocessing. So mega look nice, but don't spend too much time on it. And that's pretty much all we gotta do with photos. When it comes to videos, you just want to make sure you trim the video so it just captures the actual movement that you want. You don't want any distracting fumbles at the very beginning or at the very end. You just want to clip that, you know, five to ten, sorry, six to 10 second clip. And then once you have that, if you have any form of stabilization, that always helps a lot. But then I would use the exact same color principles here that we used in Photoshop on your video clips. And it's basically the same thing.
12. How to Upload an Image to Shutterstock: So if you guys are new to Shutterstock, I'm gonna give you guys a referral link. It is something that helps you guys out. It helps me out and allows me to create more videos like this and teach people how to make passive income through stock photography. Okay, so let me take you guys start to finish through, upload a photo into Shutterstock. So it's pretty easy. Once you have signed up for Shutterstock contributor and you go to the main contributor dashboard page. Upload images is pretty big. Appear on the top left. So you click on upload images and you can either drag and drop your files or you can select from your computer. So I'm gonna go ahead and put in this photo, you TSA. And for photos this really all you do, you just drag and drop and then you wait for it to upload. You can go to next. And it spits you out to your portfolio, submit content, and do keep in mind that there's a difference between the image page and the video page as well. So once you see your uploaded photos here, you can click on if you have multiple of them, you can change multiple of them as well, which is really nice. But once you click on it, then you come over here to the side and you do all your metadata work here. And we will learn about that a little bit later. But as you can see, the uploading process and show shock is very straightforward. Once you figure out all the metadata, you click, click, submit, and within a couple days, typically it is reviewed. Now it may not get approved. If one if you upload, if you forget to check the editorial box and you have some kind of copyrighted content, that's a big one. But also if your image has some kind of out of focus or dust or noise or anything like that. I typically if I do get rejected, I try to bring it into Photoshop and try to beautify it a bit, and then try and get it pre-approved. So that's the process to uploading photos on Shutterstock.
13. How to Upload an Image to Alamy: Oh yeah, let me show you guys start to finish how to upload an image to alchemy. And just so you guys know, alimony is definitely a little bit more geared towards a event editorial content and any kinda newsworthy content that is a little bit more timely. And so my evergreen editorial approach is not quite as valuable on alchemy. And because of that, I think I really only make about ten or $50 a month on alchemy and so I don't count on it as part of my passive income stream. It's for me, it's not as valuable as Shutterstock or pond five or anything like that. But I do I will make sales on it. And to me I kind of CD sales is icing on the cake. And so if you think that it's worth the time to do all the metadata tags on alchemy, or you have more time since DIV content might be a good choice for you. So let's get started. Once I go ahead and create an account, you can click on my account on the top right, and the image of plotter is just right here. And so I will click on that. And as you can see, it's a little bit different setup then Shutterstock would be. And so I go into a photograph and now I don't believe my account is even set up for live news. I believe you have to get approved for that. Same with reporting an archive there. So if I want to try and specify these, I can't even click on these. So it's only allowing me to do the photograph here, so I will click next. And as you can see, if you're doing any kind of vector work or any kind of graphics or anything like that. It's an FTP process, but we're just doing photographs, so we click Next and then from there we can upload our images or you can just drag and drop in the box. And so we will do that in real quick with a picture of you TSA, and then it will upload it. So my submission, I believe this is just for the batch name and not the actual image title. So I can just put you TSA photos. And now we sit and we wait for the uploaded finish. And once our upload is finished, we'll click Finish upload. And it takes a little while to process. I believe if I was signed up for these timely news events, it would not go through that processing process. But because I am not, it definitely does take a little while until I can jump in there and actually edit my photo because I can't on this photo right now. I'll jump to a couple other photos that I already have here. So I took a few photos and I'm a little surprised at these didn't do better on this site, to be honest. The music and tech and Film Festival South by Southwest happens in Austin every year. However, the 20-20 festival was cancelled because of the coronavirus. And I noticed the signs around town are still up even after they had canceled the festival. So I took a few pictures of those just to have those because the event didn't take place. And so I thought any news story about the event being canceled might pick up on these photos. And through Shutterstock, I believe I've made maybe 15 or $20 off of off of this footage or sorry, these photos. But through Alchemy, I have not seen anything. So once you have the image process that we saw earlier, you can come in and change the caption on the right here. I make it so it fits in editorial description. And then you have all your tags as well. The license type, you switch between rights managed or royalty free. Rights Managed is how you make money and then the image type you had that earlier. For your optional ones, you definitely have to fill in more content on alchemy, as you can see, I have it on sale, but because I had a completely filled in some of the things, it's not as discoverable as it possibly could be. And that could, that could explain my lack of sales. So number of people in the image, is there any property of the image TO signer, lease, location, date, et cetera, et cetera. But once you do that, then your photos are alive and you are ready to make money on alanine.
14. Uploading video through FTP or batch uploaders: Okay, so let's look at the start to finish the video upload process. This is a little bit different than the images because to make the most out of our time here, we actually want to have a batch up loader that sent it out to the various stock sites. So I really like x pics here. It is just really slick and easy and integrates everything very seamlessly. And so I have a video here. This is a video I took of the Old Republic of Texas flag. I have the description and title here. This is a commercial clip, even though it is a historic logo, because it is associated with a country and not a private company. You can sell it as commercial here. So I'm going to first thing I need to do before I upload is I have to save the metadata to the clip. And to do that, I click this box here for all the videos I want to do this for. And I click this Save right here. And again back up each file if I want. I've never had a problem with it. But it might be smart to do that. I'm going to hit Start export now. And depending on the size of the file, usually it's pretty quick like that. Not always, but typically. So once I've saved the metadata there, I'm going to start my upload. And so I have my stock sites here that I typically use on the left. And just to quickly go through for commercial content, I typically upload to Shutterstock upon five Adobe Stock and 1.2.3 RF. For editorial content. I will upload to Shutterstock upon five alchemy at 1-2-3 RF story blocks has been a little hit or miss lately they've gone through different changes to who they're allowing in the in the contributor process of who they aren't. So I've been staying away from that one lately. But right now, Adobe Stock is only for commercial content, not editorial. Alchemy is editorial not commercial. And 1.2.3 RF is tiny, tiny, tiny. But these are the two main players here. To do video uploading to black-box. It's a little bit different process. So these don't just auto-generate. I've filled these all out myself. And just to show you guys how to find the FTP structure to fill this out. For Shutterstock here. How do I upload content to FTPs? And this is just on their kind of contributors support here. And if you guys are doing other softwares, then X picks. You might have to type in this port 21. And some of this other information, Cyberduck is really popular FTP. But the main takeaway here is that your contributor, email or username is what you're using. For the username. And then your password is just going to be your Shutterstock passwords. So very easy and straight forward with Shutterstock here. And to test the connection on experts, you just click that and it runs it through and cool, it's working. So pawn five, once you have signed up for a profile on Pond five, you'd go to your dashboard and then your accounts right here. So in the account there's this FTP menu right here. And it shows you the server for uploads the username, which is my username. And then you can set a FTP password that's different than your account password. And then once you get all that and you hit send, you can come and check to make sure that connection is working there. And it is excellent for Adobe Stock. Once we've signed up for Adobe Stock and we click on Upload, were prompted with this screen right here. And keep in mind, Adobe Stock is pretty much only commercial content. Its images and videos. So both of those there. So once you get to here, import more files using your FTP, you want to learn more and boom, there's the host, the id, and the password there. So once you get all that information, you come back here, type all that in, and you test the connection. Beautiful. It's working. Like I said, skipping storybooks for the moment. Alchemy I typically upload directly with the images is just a little easier for me. And then 123 RF, we see here on their help page, your username for FTP is, is your username, password is your password. So pretty straightforward there. Let's test the connection. And excellent. So all of our connections are working since this is commercial content, I'm going to make it available on Adobe and 1.2.3 RF as well. And then from there I can look at my warning. Typically it's yes, something with the metadata here. And then I start my upload and I sit and I wait. And depending on the file size, it moves faster or slower. Okay, now we are all uploaded, That's great. Closes window out. And one thing I also like to do that I forgot to mention is it's nice to export CSV. A CSV is basically a spreadsheet that contains all your metadata for all your images. And when you do that, sometimes these sites have trouble connecting straight with to the metadata. And so using this always helps me slugging importance on either Shutterstock or paan five black box as well. So I'm just going to typically Shutterstock was the one that sometimes has issues pond five I've never had issues with, so I'm just going to export the CSV. We're gonna go to videos and look at that. It's right there. Now when we click on it, you notice on the right here the metadata has not translated. And I don't know why this is Shutterstock has is this issue, but when you export that CSV, it takes care of a lot of the time. Sometimes uploading the CSP works. Other times it does not. It's a little bit hit or miss. And if the CSV doesn't work, then when you can do is you can just come back here. Copy tags, click over. Easily, paste the keywords or tags there. Suddenly they've all populated commercial and then you do the same with the description and then you can fill up the categories as well. So between either using the CSV upload or doing a copy paste process, It's really not that tedious to move all the metadata over. So that's Shutterstock. Let's look at pond five. That are pond five dashboard. And what we want to go to is uploads. And as you can see right now, it is processing. But just to show you guys what you can do once it pops up here on the uploads tab, My Uploads. You can either click on this edit here and it jumps into the clip. What's nice about pond five as you can apply templates. And so if you have a whole batch of stuff, you can basically change all the pricing structure and things like that, the tags and things like that. Again, pawn five is nice because you can say you're on price. So let's check out Adobe Stock. And with Adobe Stock, we'll click on uploaded files here. And this new unpopular is right here. And as you can see, the name and the tags translated as well, that's really nice. So from there we can submit that. And that's how you upload videos to those different sites.
15. Metadata and Tags: So we've captured all over continent. We made it look as beautiful as possible. And now we need to upload it. And when it comes to stock photography and stock videos, there's a few players in the game, but Shutterstock is really the biggest one. Shutterstock has something like 70% of the market. But there's a few different sites that I will let you know about. Shutterstock is the definitely the biggest one. You definitely have to be on Shutterstock if you're doing stock photography. I would say second place, it may be distant. Second is pond five. What's great about pawn? Phi is 0.5 actually allows you to set your own prices. We Shutterstock does not do. Shutterstock is photos and videos. Pond five is just videos. But pawn Five is a great platform for videos. Black box is really interesting. Blackbox is a site for videos, and black box actually allows you to collaborate with other people. So if you'd like taking the video but you don't want to color, correct? You don't wanna do tag that you can that you can outsource it to other people who do that. It also allows you to easily split profit sharing between different people. So if you go out and you film some stock photography stuff with an actor, model, friend, you can actually give them 50% of the profits and you take 50% of the profits. And blackbox separates that out really easily. So blackbox is really great for videos. Black-box also blasts the content basically to all the different sites. So blackbox is kind of an exclusive thing. Meaning if you upload your content through black-box, you, you're not allowed to upload it to other places because block black-box does that for you. There's also Adobe Stock. Adobe Stock is one of the newer ones. But Adobe Stock, I believe at this point is only commercial content, so not editorial. So Adobe Stock is great for commercial, still pretty small. There's story blocks which I believe has stopped allowing new members. There's alchemy which is good for news, and then there's 1-2-3 RF. So these are the ones that I would recommend. I honestly, the vast majority of my profit comes from Shutterstock pond F5 and black box. When I have a sale from any of the other ones, it's always kind of an icing on the cake moment. I'm not relying on income for for any of these other ones. So you have photos and you have videos. The uploading process is a little bit different and we're going to focus on Shutterstock right now for photos. So to upload a picture on Shutterstock, we hit this big red upload in the top right. And then it asks us to drag and drop our files here or select multiple files. So that's it. That's, that's all you need for uploading photos. And once you upload a picture, you'll be asked to fill in some information about it. So let's go over that real quick. So first off is the usage, commercial or editorial. Like I've been pushing for most of this tutorial. I go with the editorial content, however, you can go with commercial as well. Now the description for editorial, there's a format to follow. It's the city, state or city comma country. Dash the date it was taken. And then you can go ahead with the description. So Atlanta, Georgia figures six, NRI, university level. You're going to categorize it. So Shutterstock gives you all these different categories and you have two categories definitely fill in both because it's just additional information and metadata they can use to find your content location, which is optional, which I go ahead and do, and then all your keywords. And I always follow the who, what, when, where, why approached keywords and Duke, even my keywords don't have to be single words. They can be phrases as well. So that's pretty much all it is. Four photos is very straightforward. And for video it's a little bit different. You have to go through an FTP server, but you can actually get an app that kind of automates things for you and you can upload to different sites all at the same time, which is really nice. So I really recommend this app called X picks. X picks is awesome. It allows you to tag everything there in that software and then it will upload to Shutterstock to pawn 5-2 black-box all at once. And allows you to do all these different things, which is really nice. So basically with X picks, what you do is you upload your footage here. I took some footage of the sign for the Austin FC soccer team. You put in your description and your title and at different sites depending on what they are, have a different what they want is different from between the title and description. I like to just kinda put the same thing on both of them here and then your keywords. So before we go any further, let's talk about tags and metadata, which is kind of an annoying part is stock photography, but is immensely important. If you have the best picture, best video in the world, but no one can find it. You're not gonna make any money off of it. So first off, your description. Now, in editorial content, there's a format to match and it is a city and state or country. Austin, Texas dash the date that it was taken, this was taken September 20th, and then colon, and then the description itself. Now with the description, you want to think of as many key terms that people will search for so they can easily find your content. So I've put austin FC soccer stadium and spring 2021 sign up on this one. Austin FC logo and MLS soccer stadium construction site. This one probably has the, the more searchable name there. And then from there I want to go to keywords and I want to list any and all keywords that people might search for when they want this image. Now, we don't want to put any extraneous keywords because that will actually filter this content out. So we only want to put stuff that people would be searching for here. So a good approach to this is just a who, what, when, where, why approach. So it's a picture of the soccer stadium under construction, right? Who? Okay. Soccer players team Austin fc. And the keywords don't have to be standalone words. So austin FC is a phrase, but it's still, it's still considered a keyword. So fc stands for football club. We can write down Football Club. Who, what, when, where, why, what? Mls soccer stadium construction, Major League Soccer, professional arena, stadium. Who what, when, when is not really important in this image? Where Austin, Texas. So just going through a very basic who, what, when, where, why approach. But then also understanding that keywords can be phrases and when they are phrases that are actually more direct into this image. So Football Club light Verdi is the, is the colour, the team color of Austin FC. So we go through our keywords, and once we've done all of our keywords and our descriptions in X picks, what we do is we check it here and then we have to save it. So we save the metadata to the file. And then once that happens, we click on upload here, and then upload here on the left-hand side, I have everything that I would upload to normally again, with editorial content, I only upload to Shutterstock and Pont five. Adobe Stock is with is with commercial content and the story locks alchemy and 1.2.3 RF. I really only use alchemy for photos and story blocks has pretty much closed up for business and 1.2.3 RF is kind of hit or miss. So the things on the left here, I had to create those myself. They didn't start out that way. So just to make sure you get the title, host, username, password. Alright, title for Shutterstock is really just for your own reference. So I put Shutterstock, the host is very important FTP dot Shutterstock.com. And then you use your username and password that you would use for Shutterstock. Just to test the connection, you can hit Test Connection, it turns green, that's good. Pawn five, pond five, tidal host, ftp dot phi.com. Your username is your pond five username and your password. And you can test connection as well. Now black boxes, something for a video that I do recommend, black boxes is really great to work with. However black-box, You have to sign up. It's kind of it's not super exclusive. You know, they, they allow a lot of people, but you do have to go through the Facebook group to sign up and then go to the website portal dot black-box dot Global. And then from there you can sign up and you have to upload through an FTP as well. But it's pretty straightforward. They have a user manual and everything like that, that, that shows you how to do all those steps.
16. Miscellaneous Tips: There's just a few things before we go that I'd like to tell you guys about. This is just kinda miscellaneous wisdom that I've learned throughout the years that has helped me out some. So first off, every time you hear that or do you think the phrase, never seen that before? Always take out your phone and take a picture of it. If you haven't seen something forward, chances are that there's very low supply of those pictures on Shutterstock. And like I said, it's all about supply and demand. So anytime you see them in unusual, out of the ordinary, Always take a picture of it. Also, you can expect probably about $5 a month for every time you go out and take these photos and videos. So the more you go out, the more pictures you take, the more videos you take, you'll slowly build something up where after just going out 20 times, that's a $100 a month. That's, that's pretty great. So that's kind of what you should expect as far as income goes. And it's also important to note that the stock photography sites have all the power here. If they want to change up their pricing structure or pull the rug, do anything like that. They totally have the power there because you're signing all these contracts and all this stuff. But it's important because of that to really diversify and disingenuous photos and videos out to basically every platform you can. Because when one thing goes under or one thing changes pricing structure, you still want to have other avenues of income you can rely on. And finally, some other good resources. There's YouTube are named Nicole Glass, who has a really good channel and stock photography. She lives in the DC area and she does a lot of event editorial work, which makes sense that a lot of political events and things like that up there. So she has some really good tips on stock photography, so I recommend checking her out. And then on skill share of Victoria Smith teaches a class on metadata and tagging kinda from the blackbox perspective. And so she's very good at that. So I definitely recommend taking that class as well.
 Marshall Rimmer, Filmmaker