Transcripts
1. Intro to Glitter Effects in Procreate: Hello and welcome to this class on making glitter effects in Procreate. My name's Helen Bradley and I'm a Skillshare top teacher. I have over 200 courses on Skillshare and over 86,000 student enrollments, but this is my first Procreate course on Skillshares, so I'm really excited. If you're using an iPad and if you've used Procreate, you'll know what a wonderful program this is. What we're going to do with it today is to create glitter effect. Along the way, you're going to learn how to do some symmetrical drawing. You're going to learn how to make your own brushes. We're going to make a glitter brush, and we're also going to make a sparkle brush. You'll learn how to import fonts into Procreate and use text effects and also how to make glitter, and we're going to make a glitter-filled heart and glitter-filled text. This class is filled with all wonderful sparkly things, that you can create in Procreate. I really hope that you enjoy it as much as I have enjoyed putting it all together for you. Let's cut to the chase. Let's go and crank up our iPads and get to work creating glitter effects in Procreate.
2. Pt 1 - Create a Heart Shape: To get started with our glitter effects, we are going to create our own brush. I'm going to tap the "Plus sign" to open a new document. The ideal size for a brush is 2,048 by 2,048, so I'll create that size document. Now I'm going to create a symmetrical hearts, so I'm going to get Procreate to help me do that. I'm going to the "Actions" icon, which is that gear shape icon. I'll tap "Canvas" and turn on the Drawing Guide. I'll tap to Edit the Drawing Guide. In the top row of options at the bottom of the screen, I'll tap on "Symmetry". Then I'll select the first of the symmetry options down the bottom, which is Vertical Symmetry. I'll make sure that Assisted Drawing is enabled. To finish the setup, I'll tap the "Done" option in the top right corner of the screen. Now I'm ready to create my heart shapes, so I'll go and select a black color. Now I have a black in my palette here. You can double-check to make sure that you have black color by selecting what you think might be black and go to the Value option. If the RG and B values are all zero, then you're working with black. I'm going to the brushes, and I'll go to Helen's favorite. Here I have a studio pen set up as a Monoline pen. Let's just test and see how thick it is. Well, it's a little bit too thick probably for my preference. This looks a little bit better. You can see that we have symmetrical drawing enabled, because drawing on one side of the Canvas just reflects it across the other side. When you're working in symmetrical drawing, you can draw on either side of the Canvas as it suits you. I'm going to start on the midline and drag out to create my heart shape. If don't let go, the Procreate is going to recognize that as an ellipse, and that's just fine for me. I like this elliptical shapes, so I'm just going to select that. Now I'll drag and drop black into my heart shape. I wanted to turn off this drawing in Canvas. I need to do that in two places. I'll go to the last palette. You can see that layer 1 is marked as assisted. I'll tap on the "Thumbnail" and tap on "Drawing Assist" to turn that off. I'll also come over here to the Actions menu. Again, that's that gear icon, and I'm going to turn Drawing Guide off. The heart-shaped can now be saved so it can be used as a brush. If you need to scale it up, just tap the "Transform tool" and just adjust its size. To save this, I'll go back to Actions, and this time I'll tap "Share". I'm going to save it as a JPEG image which is ideal for brushes. Then I'll tap "Save Image" to save it to my camera roll. Now that we've created this shape, we're ready to go and create it as a brush.
3. Pt 2 - Make the Heart Brush: Now to create our heart-shaped brush, I'm going to open up the last pallet and turn off the visibility of this "Layer" and I'll add a new blank layer that we can test the brush on. I'm going to bring my photo albums up alongside my Procreate screen.This is a Procreate album where I've saved the con shape that we created earlier. So now to create my brush inside procreate, I'm going to tap on the brush icon and I wanted to make sure that I'm looking at the "Brush Library". If you're actually in a brush setup, you'll want to press the backwards pointing arrow in the top corner of that setup, so that you can go back to the brush library. Then make sure that in the list on the left-hand side of this dialogue, that you have selected the group in which you want to save your brush and so I'm saving line into "Helen's favorites". I'll tap on the brush symbol to create a new brush and then tap on the name of the brush and I'm going to call it "Glitter Heart". The shape that I am going to use for the brush is the Heart shape. So I can just drag it out of the album and drop it into the box for the shape in the brushes panel. If you don't have an album of photos visible that you can drag and drop a photo out of. You can tap insert photo and then go and navigate to find the photo to use for this shape. Now the grain source at the bottom is going to be blank. So we need to tap Swap from Pro Library" and roll down to find the square black box that is called "Blank". It is here on the left of the screen. So I'll tap it to selected it. That just means that this brush is going to have no grain at all. So blank just applies no grain. I'm going to the stroke and I'm going to increase the spacing and you'll see immediately that there is a problem with this brush. It's painting the wrong way round. To change this, I'll go back to the source, then in the top of the dialogue where we have the big heart shape, I'm going to tap on "Invert Shape" and that will turn it around. It will invert it. Anything that is black becomes white and anything that was white becomes black and you can say at the very top of the screen. That the heart brushes going to paint the way we want it to. I'll go back to stroke. I'm going to increase the "Jitter", so that the brush is going to paint all over the place. I'll go to shape and I'm going to increase the "Scatter", so that the brushes going to rotate as it paints. I'm just going to test the brush and see how it looks when it's all a little bit tight at this stage, so let's go back to the brush and let's increase the jitter a little bit. Let's try that now. It's looking a bit better, but we will need to scale it down so that it's much smaller for a glitter effect.I think it's looking pretty good right now. I don't need my photos anymore, so I'll tuck them out of the way. I'm going to delete this layer and add a new blank layer, that will build up glitter effect on in the next video.
4. Pt 3 - Create the Glitter document: Before we start painting a glitter effect, we're going to create a palette of colors to use. I'm going into the colors area and I'm going to select palettes. Then I'll tap the plus symbol in the top right corner of the palettes dialogue to create a brand new palette. Then I'll go to the disk area so that we can select the colors to use. I'm going to use some purples, so I'm going to drag the big circle around into the purples area and then drag the little circle into the first of my purples, which is quite dark. Once I've selected the color, I'll tap inside the palette in the first square to add that color. Then I'll move my circle up a little bit closer to the left top corner of the circle. The inner circle took sample another color. Again, I'll tap in an empty space in the palette to add that to it. I'll do that again and I'll do it repeatedly. Took sample, successively lighter colors to use. The last color I want to be quiet, so I'll "double-tap" in the white area, and that just selects white. Now I'm going to select a slightly pinker color and I'm going to work back down creating some additional slightly pinker, purple colors. I don't need too many of these, they're just going to give me a bit of variety when I'm creating my glitter effect. I'm going to "Select" the first of the color, the darkest color, and I'll just "Tap" in the document. I'll check to see how my brushes looking well, it's just fine size-wise. Now I'll lay down a layer of these very small hearts. Having done that, I'll select the next color and I'll repeat that. I'll select the next color and again lie down more arts. I want to get a good coverage, but it doesn't matter if I don't cover the entire area because we're going to fill the background with black before we finish this. I'm just going to work through, select things successively lighter colors each time. Now if you're not sure whether you've already created the arts with a color that you have selected, just look in the top right corner of the palette, because when you select the color you'll see the color you had previously and the new color and provided they are different, you know that you've selected a different color this time. When you've got a lot of colors that are very close to each other, it can get a little bit confusing. I'm going to finish off this stage with a run of very white arts. Now we'll go to the additional colors that I kept back. The sort of pinker purples. I'm going to do a very thin layer of each of these colors, just to add some color variety. Now at this stage, I could increase the spacing on my brush if I wanted it to paint a little bit further apart, pass a little bit less intensively with these additional colors. Then I'll go back and finish with the two lightest colors. Now that I've created all the arts, let's go to the last palette and I'll add a brand new layer to the document, and then I'll press on it and just drag it beneath the glitter layer. I'm going to fill this with black, so let's go and get our black color. I'll go back to the last palette. I'll tap the thumbnail for this new blank layer and tap fill layer and then just fills it with the black color. This is now our glitter document. If we want to use it in other documents in future, we'll need to save it. I'll go back to the actions, "Options" and tap "Share", and then tap "JPEG". I'll tap to save the image to my camera roll where it'll be accessible to me.
5. Pt 4 - Make a Sparkle Brush: We're almost ready to use this glitter document to create some filled shapes. But before we do that, it would really help us to reinforce the fact that we're working with glitter, if we were to create our own spark or brush. I'm going to the last palette and I'm going to turn off visibility of the two layers that I've been working on. I'll tap the topmost layer to select it and then tap the plus symbol to add a new empty layer to the document. On this layer, we're going to assemble the piece that we're going to use to create a spark or brush. For this we're going back into the symmetry drawing options. I'm going back to the actions by tapping on the gear icon. I'll tap on Canvas and then tap to select the Drawing Guide. So that I can edit the drawing guide itself, I'll tap Edit Drawing Guide. Then I'll make sure that Symmetry over on the right, immediately under the document is selected. In this case, I want Quadrant Symmetry, and I also want Rotational Symmetry to be turned on. Just make sure that you have Assisted Drawing and Rotational Symmetry turned on, that you have Quadrant Symmetry selected. Now tap the Done option in the top right of the screen. I'll make sure that I'm again painting with this black color. You can always tap value just to double-check that you are working with black. For the brush, this time I'm going to select my mono line brush. Here's the Studio Pen that's just set it up as a mono line. It has no tapering on either end. I like using that kind of brush. Let's just test it's size. It is a little bit big this time, we need a much smaller brush for this particular shape. This time we're working with Quadrant Symmetry. We're working with symmetry in four areas. I'm going to start in the top middle part of this drawing and then draw a line that is very close to that vertical line. Going just over the center line and I'll let go. I'm going to do the exact same thing this time on the other side of that line. We're going to end up with effectively a four pointed star. If you just press and hold and wait until Procreate realizes that you're drawing a line and then just straightens up your line, everything's going to be a lot easier to create. Now drag the black color and just drop it into my drawing. I'll go to the last palette. I'm going to make a duplicate of this layer. I'm going to turn assisted off because I don't need that any longer. I'll tap the transform tool. I'll turn Uniform on and make sure that Magnetics in the second row is enabled. Then just drag down to make a smaller version of this star. I'm going to line it up pretty much over the top of the original star. Having done that, I'll tap Rotate 45 and then tap the transform tool again. I'll go back and create a duplicate of this shape. Again, go to the transform tool. I'll scale this down and then move it back centrally in the document. Then I'll rotate it. Now if you're having problems rotating it, just turn Magnetics off and then you'll be able to rotate it free form. Adjust its positioning, so you've got it pretty much where you want it to be. Finally, we'll make a duplicate of this last one. Turn on the transform tool and this time just rotate it 45 degrees. If you need to finesse your shape, you can select each layer in turn, tap the transform tool and then just move it into position should you need to do so. If you're having trouble with making moves, you can always just tap outside the selection and move it that way. If you tap to the immediate left, you'll pull a shape to the left. If you tap to the immediate right, then you'll pull it to the right. I'm not going to waste too much time doing this because the sparkle brush is going to be so small that you're not even going to be able to tell that it's slightly out if it is. I'm going to merge these four layers together and I can do that by selecting them and just pinching them together. I'll save this sparkle so I can use it as a brush. Go to the Actions menu tap Share and tap JPEG. Again, I'll save this to my camera roll. I'll come back into the last palette, turn off visibility of this layer, and turn a new layer on. I'll go back to the actions palette and Canvas and just turn off this drawing guide. To create our brush, I'm going to bring my photos back, so I can get access to the shape that I just saved. I'll tap to open the brush library. I'm going to put this in Helen's Favorites, so I have that selected. I'll tap the plus sign. I'll drag and drop the star shape into this shape area here. I'm going to call it Sparkle. We need a grain source, so I'm going to tap Swap from Pro Library and we're going back to select that black square. Now in the stroke area, when I increase the Spacing, you'll see that we've got the exact same problem with this brush as we had earlier. I'll go back to the source and invert this shape, so that the brush will paint correctly. I'll go back to the stroke area and just increase the spacing a little bit. If I want the brush to rotate as I use it, then I'll go to the shape area and just adjust the Scatter so that it will be rotated as I use it. Now we can just test and see what the brush looks like. This is going to be a perfect brush to use as a sparkle effect.
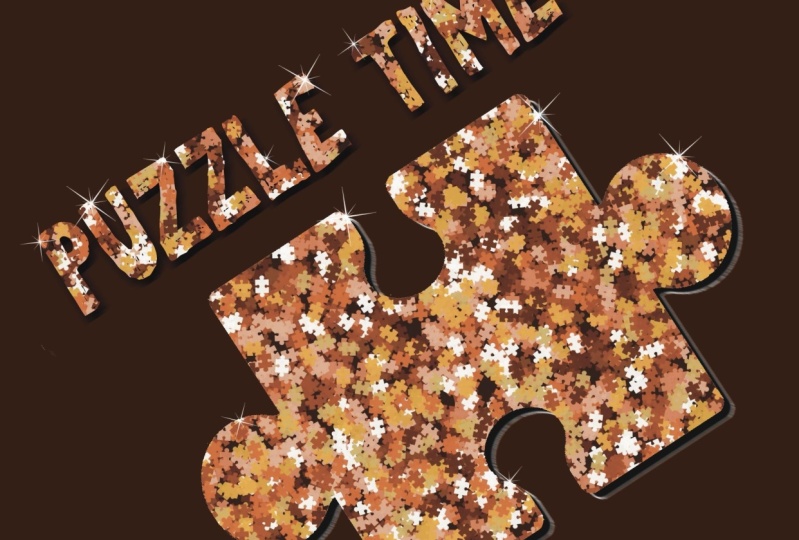
6. Pt 5 - Make a glitter filled heart: We're now ready to create a shape that's filled with our glitter. So let's start a brand new document. I'll tap to go back to the gallery, tap the plus sign and create another square document, 2,048 by 2,048. Now I need the glitter and the heart so I could tap on the Actions button, that's the gear icon and tap Add, and then select, Insert photo and do that twice, once for the glitter and once for the heart. If you're able to put your photos up alongside your document, you can do it by just dragging and dropping. I'll drag the glitter into the document, tap the Transform tool to stop the transformation process, and then do the same with the heart. Then close up the photos. Now in aid to size my heart down a little bit, so I'll tap on the transform icon and just size the heart down and position it pretty much where I want it to be. You'll see that the heart has a white border around it, and we need to get rid of that white border. So here's how we'll do it. We'll make sure that the heartland is selected because that's led that we need to work on. I'll tap the sort of ribbon shape icon here. Makes sure that automatic is selected in the panel immediately underneath the heart. Then tap on the white areas. I need to just tap that one's. Now it looks as if everything selected at this point, but in actual fact, only the white area is selected. I can also see a very vague outline of the heart, which you probably can't see at this stage. I'll tap on the last panel. I'll tap on the thumbnail for the heart layer and tap on clear, and that just removes whatever was selected. In this case, the white area was selected and that's removed. Now to fill my heart shaped with my glitter, I actually need these two layers the other way round. So I'll tap and press on the heart layer and just drag it beneath the glitter layer. You could go the other way round if that suits you better, doesn't really matter. I'll tap the glitter layer to select it. What we need to do is to create what's called a clipping mask that will clip the glitter layer to the shape of the heart underneath. To do this, I'll tap the thumbnail for the glitter layer and tap on clipping mask. The glitter layer has been clipped to the shape underneath. You'll see a little bent arrow to the left of the thumbnail for the glitter layer, indicating that this is a clipping mask. You'll also note that if I tap on the heart to select it and then tap the Transform tool that I can move the heart around, and the clipping mask is just updating automatically. I'd like to fill my background with a darker color. So I'll go back to the last pallet and tap on background color. I'm going to select one of these dark colors here. To finish off, to make this heart and look as if it actually is sparkly, we'll add some sparkles. I'll tap on the layers, select the topmost layer and the plus sign to add a brand new layer. I'll select white as my color. Then I'll go and select my sparkle brush, just making sure that I have that selected, which I do. Just testing the brush in terms of its size. I think it could be just a little bit bigger. Now I'll add it around the edge of the heart anywhere where there's a element that white just along the edge of the heart in the areas where I suspect that if there were light shining on the heart that we would get these little sparkles. You could also add a couple of sparkles inside the heart if you like. They'll be a little hard to see on the screen here, but you will notice them if you're looking at your own design.
7. Pt 6 - Fill Text with Glitter: It's also possible now to use text inside Procreate. If you have a nice font that you can use, then you could fill it with glitter. Now, I have my iPad browser open and I'm looking at 1001 fonts. I'm looking for bold script cursive fonts, the things that I could fill with glitter. I'm also making sure that the ones that I'm looking for are free for commercial use by just tapping this icon here to make sure it's green, and so am seeing fonts that are free for commercial use. I'll just scroll down these fonts and look for one that I haven't previously installed on my iPad. You will probably need to install your own font to use because the fonts that are on the iPad are relatively plain and there are not a lot of good script fonts for example, now I'm going to select yesteryear regular. I'll tap on download. At the very bottom of the screen, I'm prompted to download the zip file for this font, so I'll tap download. Then I'll tap open in. Now for zip files, you're going to need an unzip tool and we'll talk about that in just a minute. I have one already installed on my iPad and it's called Unzip. So I'll just tap on Unzip. I'll scroll down to find yesteryear an here it is at the very bottom. The files are in alphabetical order, so I'll just tap on that and it automatically unzips that file. If I go to the file folder, I'll see what comes with yesteryear. What I'm looking for is either the TTF or the OTF file, so you get either of them. In this case it's a TTF. I'll tap the i icon over here on the very right of the screen and I'll tap open in. Then I'll tap open in Procreate. That's how you install a font inside Procreate that you can use for any purpose inside procreate. It's just not available inside other applications on the iPad, but that's just fine. Let's have a look briefly at what you're going to look for if you don't have an unzip tool. I'm in the App Store, so I'm going to tap on search and you'll just type unzip. This first unzip application is the one that I have installed. It's free, so you can just tap to download it and then you can use it to unzip any files that come as zip files on your iPad. Let's go back to procreate. Let's create a brand new document. To create text inside Procreate, first of all, let's select a color to use. I'm going to use a darkish color. I'll go to the actions area and that's of course just tapping on this gear icon. I'll go to Add and I'll tap on Add Text. I'll type my word which is Glitter. Then I'll tap here on the top right on Edit Style. Now we can just roll down and choose the font to use. I have quite a few script fonts on this computer now, so you can say that I can just select the one I want to use. There are a few others that I've downloaded from a 1001 fonts and other places. Lemon Tuesday is another font which I really, really like, but because I had already installed, I wanted to show you how to install fonts. I'm going to increase the size here and just adjust its placement a little bit and tap Done. To fill our type with glitter we're going to need our glitter. I'll drag and drop my glitter image into the image that has the text in it. Of course, you could always tap the actions icon and tap to insert a photo and then go and navigate to find the photo yourself. Again, we're going to need to create a Clipping Mask and as I already have my glitter on top, I'll tap the thumbnail for the glitter image and tap Clipping Mask. That clips the glitter to the shape of the text. If I don't want white as my background, at this stage, I'll tap on Background Color and just select an alternative color to use. I'm going to go for a dark but not really, really dark purple because I've got another effect I want to show you in a few minutes. I'm going to add a new layer. Actually I've got a layer already sitting here, so let's just drag that up so we can use it. The only problem with this is that by dragging it up, it's also become a clipping mask and I don't want that to be the case because if I tried to brush on sparkles, they won't go unless it's over the text so they can't be placed outside the text. I want to disable this Clipping Mask, so I'll tap the layer thumbnail and de-select clipping mask so that allows me to paint on that layer. Let's go and get some white paint. Let's make sure that we've got our sparkle brush selected, which I do. I'm going to add a few sparkles to my text. You can use this Clipping Mask feature on text as well as shapes in Procreate.
8. Pt 7 - Add dimension to the text: Now in the last video, I hinted that there was something else I wanted to show you in respect of this glitter texts and that was how to add a bit of dimension to it. I'm going to tap the last pallet to open it. I'm going to make two copies of my text layer. The topmost copy I'm going to leave in place because that is the text layer that's creating the clipping mask effects so we don't want to lose that. I'm going to turn off the middle layer and I'm going to just select the bottom most layer. I'm going to tap on the transform tool. I'm just going to move the bottom most layer out a little bit. Now, it's very dark because we filled the text with that dark color. If you didn't do that at the time, lets see what you're going to do. You go to the last pallet, you'll tap the thumbnail for this bottom layer and tap Edit text. At this stage you can change the color of the text to whatever you want it to be. I just want it to be a really dark color and by moving that second copy of the text down and to the right a little bit, we've created a drop shadow effect for our text. Now if you want to soften that a little bit, you can. In this case, we're going to rasterize the textile, so tap the thumbnail for the text. I'm going to tap on Rasterize. That turns it from text into just a bitmap. The bitmap we can add a motion blurred too. I've got that layer selected. I'm going to the adjustments tab here, the little magic word selector. I'm going to tap on Motion Blur. All I need to do is to drag in the direction I want the blur to be and so I'm dragging slightly down and to the right to blur that shadow a little bit. I'll tap the adjustments again to turn that off and let's just scroll in a little bit, zoom in a little bit so that you can see that I've got this soft shadow around the edges of the word glitter. Now we had a second piece of text saved away here. I'm going to turn it on. I'm going to use the transform tool and I'm going to just move it up to the left. I'm going in and up and to the left direction. The opposite way to the way that the shadow went. I'll go back to this text layer, tap the thumbnail for the layer and choose edit text because this allows me to recolor that text. In this case I want it to be a light color, so I'm going to choose one of our lighter colors. I could also soften that layer if I wanted to. I just think I need a better position on it. Now if you want to just nudge your selection a little bit, just tap outside of it and that we'll just move it about one pixel at a time. There is our more dimensional glitter effect created using a couple of additional layers of ticks, making highlights and shadows that we can use to separate the glitter from its background.
9. Pt 8 - Add dimension to a shape: It's possible to do something similar in terms of dimension with the heart shape that we were working with earlier. Let's go back to that document. I'm going back to the last palette, I'm going to make two copies of our heart shape. Again, leaving the topmost copy untouched as it's forming the clipping mask, I'm going to just adjust the background color down a little bit to a more neutral purple, so it's not as dark as it was, so we'll be able to see this separation effect. Let's go back to the last palette. We'll turn off the middle heart for now. I'm going to focus on the bottom heart, which is very, very dark, so it's probably the color I want for a shadow. I'll tap the Transform tool. I'm just going to pull it over to the right and down. To add the motion blur to it, I'll go back to my adjustments and tap "Motion Blur", and then just drag towards the bottom right of the document. You can see the blur is being created as I do that. To back it off, I'm just going to head back up a little bit, just not letting go of my pencil until I've got the effect that I want. I'm just softening that shadow. Let's go back to the layers and let's select the middle heart. Now, this one we need to make a little bit lighter. At the moment, it's black. I'm going to tap on its thumbnail, and I'm going to turn on what's called Alpha Lock. When Alpha Lock has a little check mark beside it, Procreate is going to do is to limit me, so that I can't do anything with non-filled pixels. The only pixels that I can edit are the ones that are actually filled, and right now, they're filled with that dark color. But the color I have currently selected is very light, you can see it in the top right corner of the screen. What I can do now is to tap on "Fill Layer". Because the Alpha Lock is enabled, when I tap "Fill Layer", I'm going to fill just the pixels that already have color in them. You can see in the last pallet that my heart is now a very light purple. Well, so that I don't get in trouble here, I'm also going to turn Alpha Lock off before I do anything more because sometimes if you leave Alpha Lock turned on, you'll find that you go to do something else with the shape a little bit later on and nothing happens, and you think it's you and in actual fact, it's Alpha Lock is turned on. I'm just going to adjust this highlighting, so that it's on the top and to the left of the shape. Again, just tapping to fine tune its positioning. Now, if you're thinking that it's going too far all away around the shape, then you could come in here and turn Magnetics off, and you could adjust its size a little bit. Just make the lighter heart a little bit smaller, so it's only going to be visible around the top and the left side of your shape. You can also blur that. Go to Motion Blur, and this time, just drag upper-left to soften that glow if you want to do so. There, we have a dimensional effect. This time, it's been applied to a shape rather than text, but it's the same basic principle.
10. Pt 9 - Recolor the Glitter: Now if you have any image that you've created but you want it in a different color, let's have a look and see how we'll do that. I'm going to tap on Gallery, and I want to save this particular image the heart shape. I'm going to tap Select, I'm going to tap that image and I'm going to tap Duplicate. That gives me a spare 1 that I can use. I'm going to select the second one and we're going to work on that. I'm going to the last palette, I'm going to flatten all of these layers. I'm effectively flattening this image into a single layer. I do that by tapping on the thumbnail for a particular layer, and just merge it down. The first thing I'm going to merge down is my clipping mask so I don't lose that, and then let's just go from my little highlights. To change the color, I'm going to use hue saturation. I'm going to my adjustments, and I'll come down here to Hue Saturation Brightness. I can now drag on this hue slider. As I do, the colors in the heart are changing. I'm going to choose a blue color, turquoise blue. Having chosen the basic color, I can increase the saturation to brighten it or to intensify the colors, or go backwards to remove some of the color. I just want the colors a little bit more intense, so I'm going to increase the saturation and then also increase the brightness just to get some lighter colors here. If you want to adjust the contrast in the image, you can do that too. I'm going to tap on Adjustments and I'm going to Curves. I'm going to make sure that on the right, I have composite selected, so that means I'm adjusting the red, green, and blue channels. On this line here, I'm going to drag up very slightly on the right-hand side of the line, and on the left-hand side of the line, I'm and going to drag down. That adds contrast to the design, and that's going to work in curves in any application at all. This is what's called a shallow S curve. It's up on the right, down on the left, and it adds contrast. I'm going to tap preview, so that's the image as it was before, and this is the image as it is now with the curves applied to it. All I need to do now is to change my background color because I don't think the purple is working particularly well with the new colors I'm using. It's possible to re-color your glitter, either a finished glitter effect, or you could just recolor the original glitter document to give yourself other options to use glitter with.
11. Project and wrapup: We've now finished the formal video part of this class, now it's over to you. Your class project is going to be to create some glitter in Procreate yourself. Choose the colors that you want to use and then either fill a shape with glitter, it can be a heart shape or it can be any shape that you like, or fill some text with your glitter effect, and post the finished product as your class project. I hope that you've enjoyed this class, I hope that you've learned things about Procreate of which you were previously unaware. Now as you're watching these videos, you will have seen a prompt asking if you'd recommend this class to others. Please, if you are enjoying the class and learning from it, would you do two things for me? Firstly, answer yes, that you do recommend this class, and secondly, write in just a few words why you are enjoying the class. Recommendations like this help other students to see that this is the class that they too may enjoy and learn from. Now, if you see the Follow link on the screen, click it to keep up-to-date with my new classes as they're released. If you'd like to leave a comment or a question, please do so. I read and respond to all of your comments and questions. I look at and respond to all of your class projects. My name's Helen Bradley. Thank you so much for joining me for this episode of Procreate for Lunch and I look forward to seeing you in an upcoming class soon
 Helen Bradley, Graphic Design for Lunch™