Create Geometric Star Paper Ornaments for Festive, Party & Home Decor | Evgeniya & Dominic Righini-Brand | Skillshare

Playback Speed


1.0x


  • 0.5x
  • 0.75x
  • 1x (Normal)
  • 1.25x
  • 1.5x
  • 1.75x
  • 2x

Create Geometric Star Paper Ornaments for Festive, Party & Home Decor

teacher avatar Evgeniya & Dominic Righini-Brand, Graphic Design & Photography

Watch this class and thousands more

Get unlimited access to every class
Taught by industry leaders & working professionals
Topics include illustration, design, photography, and more

Watch this class and thousands more

Get unlimited access to every class
Taught by industry leaders & working professionals
Topics include illustration, design, photography, and more

Lessons in This Class

    • 1.

      Introduction

      1:24

    • 2.

      Your Class Project

      0:54

    • 3.

      Tools, Materials & Types of Paper

      2:53

    • 4.

      Choosing Ornament Size & Preparing Your Paper

      2:43

    • 5.

      Folding Your Paper

      2:45

    • 6.

      Creating Attachment Flaps

      2:14

    • 7.

      Constructing Your Ornament

      4:04

    • 8.

      Final Thoughts & Conclusion

      2:06

  • --
  • Beginner level
  • Intermediate level
  • Advanced level
  • All levels

Community Generated

The level is determined by a majority opinion of students who have reviewed this class. The teacher's recommendation is shown until at least 5 student responses are collected.

102

Students

5

Projects

About This Class

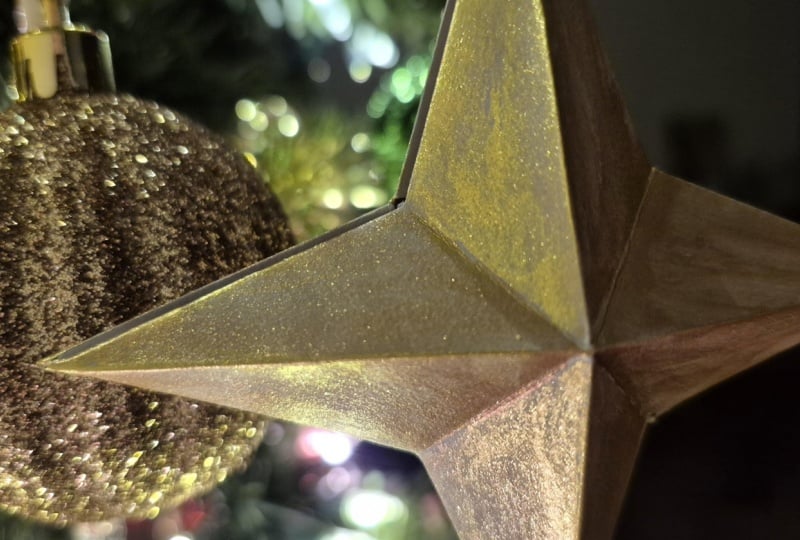
Let's get festive! Join me in this short & beginner-friendly class to create striking 3-dimensional star paper ornaments to use as Christmas tree decorations or tree toppers, hang them in your windows, or create garlands! Four-point star paper ornaments are pretty easy to fold and they don’t require any complex calculations, paper prep or any prior origami experience! And all you’ll need to create them are a few common tools and materials and some beautiful paper!

Despite their simplicity, these geometric star ornaments are super versatile and make awesome DIY festive, party or even everyday decorations! I love seeing how these ornaments take shape, and as a graphic designer, I am obsessed with their clean geometry, and I cannot wait to walk you through the process and share my special tips & tricks for getting the best results when creating this kind of ornaments!

In this class, you'll learn:

  • how to choose the right paper to create beautiful and sturdy ornaments;
  • how to prepare and fold your paper;
  • and how to construct your ornaments to keep them neat and durable.

You can easily create these star shapes in different sizes using standard paper formats such as A4, Letter or 9x12 — and I'll share a few tips for how to approach choosing your ornament's size and using paper to minimise wastage.

This class is beginner-friendly and designed for:

  • anyone looking for a fun & rewarding craft project;
  • DIY & craft enthusiasts;
  • papercraft artists;
  • interior & graphic designers creating decorations, shop window displays or party decor;
  • event & wedding designers;
  • party planners.

Сannot wait to see your star ornaments!

— Evgeniya


TOOLS & MATERIALS:

Essentials:

  • Ruler: 30 cm / 12 inches or longer;
  • Pencil: sharp graphite pencil or a thin mechanical pencil & white pencil or pen if working with dark paper;
  • Double-sided tape or strong paper glue;
  • Paper scissors;
  • Something to hang or attach your ornament, for example: cord, twine, thread, ribbon or wire;
  • Masking tape or cellotape (to attach your thread or wire inside your ornament to prevent it from slipping).

Optional, but highly recommended:

  • Craft knife or scalpel;
  • Cutting mat or something else to protect your table, e.g. mount board, card board or cover board;
  • Awl or an alternative tool for creating crease lines: a blunt side of a dinner knife or scalpel, tiny flathead screwdriver, manicure scissors, tweezers, a large needle stuck into a bottle cork;
  • Bone folder.


PAPER:

Required Paper Sizes:

  • A4, Letter or 9x12.

Recommended Paper Weight:

  • 110–140 gsm (~70–95 lb) — foldable paper or lightweight card.

Recommended Paper:

  • Any ~135 gsm drawing or cartridge paper — safe choice to get you started, can be used in your final ornaments in white colour or customised by painting, drawing or printing;
  • Coloured 120–135 gsm paper (e.g. 120 gsm Clairefontaine's Maya range).

    Check out your local art supply shops for drawing and cartridge paper pads, and to purchase designer or craft paper in smaller packs or as single sheets.

Recommended (Tried & Tested) Designer Papers:

  • Colorplan by G . F Smith (135 gsm, 55 colours in the range);
  • Extract by G . F Smith (130 gsm, 10 colours in the range);
  • Gmund Gold (specialist durable one-sided metallic papers, some colours are available in 110 or 130 gsm, for example, 110 gsm History used in the class demo);
  • Peregrina Majestic (120 gsm, 21 double-sided metallic papers);

    All of these are available in any quantity in the UK from the G . F Smith website. Check out G . F Smith International Stockists to find if and where you can purchase G . F Smith paper in your country.

Other Designer Papers to Try:

  • Arjowiggins Curious & Keaykolour ranges (distributed in North America by Mohawk);
  • Neenah (USA): Astrobrights (can be purchased on Amazon in multicolour packs).
  • Takeo (Japan): NT Rasha.

RELATED CLASSES:

Meet Your Teacher

Teacher Profile Image

Evgeniya & Dominic Righini-Brand

Graphic Design & Photography

Top Teacher

NEW CLASS: Source & Mix Botanical Illustrations with Typography to Create Timeless Designs in Adobe Photoshop

Turn beautiful botanical illustrations (vintage or your own) into refined, professional designs ready for print, digital sharing, or selling.

In this class, you'll learn a complete step-by-step workflow for transforming botanical illustrations into polished compositions suitable for greeting cards, posters, wedding stationery, packaging, branding elements, playlist or podcast covers, or social media graphics.

This class is perfect for:

graphic designers looking to elevate their work with vintage botanical elements and elegant typography; illustrators and artists who want to transform standalone botanical artworks into fini... See full profile

Level: Beginner

Class Ratings

Expectations Met?
    Exceeded!
  • 0%
  • Yes
  • 0%
  • Somewhat
  • 0%
  • Not really
  • 0%

Why Join Skillshare?

Take award-winning Skillshare Original Classes

Each class has short lessons, hands-on projects

Your membership supports Skillshare teachers

Learn From Anywhere

Take classes on the go with the Skillshare app. Stream or download to watch on the plane, the subway, or wherever you learn best.

Transcripts

1. Introduction: Hey, guys, I'm Jennie from Artists Creative. And in this class, I'm going to show you how you can create simple but striking and super versatile star paper ornaments, which make awesome festive party, and even everyday decorations. You can easily create these three dimensional star shape in different sizes and use them as hanging decorations around your interior as Christmas tree ornaments or tree toppers, or put a few of them into gallons. Four point star paper ornaments are pretty easy to fold without a lot of preparation or complex calculations, and they do not require any prior origami experience. And all you need to create them are a few common tools and materials and some beautiful paper. I love seeing how these ornaments take shape, and as a graphic designer, I am obsessed with the clean geometry, and I cannot wait to walk through the process and share my special tips and tricks for getting the best results when creating these kind of ornaments. So join me in this class, and let's make something awesome. 2. Your Class Project: Welcome to the class. For your class project, create a star paper ornament, photograph it, and share the results in the project and resources section for this class. You can create a single star to use as a hanging decoration in your interior as a Christmas tree ornament or as a tree topper. Or you can create a few ornaments and arrange them into a garland. I would be super excited to see what you create and how you're going to use it. If you're going to snap any work in progress photographs along the way, I would love to see those too. Your paper choice will make the biggest difference to the look and feel of your star ornaments. So let's get started by looking at what tools and materials you'll need for this class. 3. Tools, Materials & Types of Paper: To get the best results and create sturdy and beautiful ornaments, you will need to use lightweight card or heavy paper. Something around 130 GSM will work best. But generally, you'll be able to create decent ornaments with 110 to 140 GSM paper. Can see they're using some colored paper or textured paper or some specialist metallic paper. You can also use some drawing or cartridge paper, both to practice folding and to create ornaments which you can then spray paint anyway you want. There are a lot of great designer papers on the market, and I'll list a few options in the class description. Size wise, you don't need anything huge. I will be using paper in A four format, and if you are in North America, you can use the letter on nine by 12 formats instead. Apart from paper, you'll need a few basic tools and materials. First of all, you'll need a heavy duty ruler, which is a little longer than the paper you are using. Then you'll need a sharp pencil to mark your paper. If you are planning to work with dark paper, you'll also need a white pencil or a white or silver pen. You also need some good paper scissors for creating incisions in the paper and for cutting it. Although, ideally, I would recommend cutting your paper down to size using a craft knife or a scalpel and using a cutting met or something else to protect your table. If you are planning to work with heavy and not delicate paper, you also need anole to create crislines for folding. And if you don't have all, you can use some alternative, more common household objects or tools in this place and analyst them in the class description. For hanging your ornaments, you'll need some fread, decorative cord, twine, or ribbon. And if you want to use your ornament as a Christmas tree topper, you'll need some wire instead. You also need some double sided tape or strong paper glue to attach your paper together. And you'll need some sellotape or masking tape to attach your thread or wire inside the ornament. If by chance, you have a bone folder, it will make folding easier. But if you don't, you can always use your thumbnail or the handles of your scissors. Get some paper and tools ready and let's get started. 4. Choosing Ornament Size & Preparing Your Paper: To create your star ornament, you will need two equal square sheets of paper. Using standard paper formats like a four letter or nine bytwelve, you can easily create ornaments in three different sizes. To create smaller ornaments, divide your sheet of paper into four equal squares. This will allow you to create two ornaments. Smaller ornaments can be a little fiddly to put together, but they were great as hanging Christmas tree ornaments, and if you want to create a garland. And they also hold better shape when made from ta 110 to 120 GSM paper. To create medium ornaments, divide your paper into two squares. Medium size ornaments are the easiest to construct, so I would recommend starting with them. They will work best as tree toppers or decorations which you can use around the interior, but they are probably too large to be used as hanging Christmas tree decorations unless you have one gigantic tree. If you want to create large ornaments, you need two sheets of paper and cut equal squares from each of them. Large ornaments work well on their own, for example, hung in the window frame. But to hold shape, they will need to be made from heavy paper or card, something around 130 to hundred and 40 GSM, and they will need to be squared before folded. For demonstration, I will be creating a medium ornament and I will be using this beautiful paper which looks golden on one side and plain on the other side. If you're using paper with two different sides, start by flipping the boring side up, which will be on the inside of your ornament. Next, measure and mark squares on your sheet of paper. To be a little more precise and to be able to fit two squares onto a four sheet of paper, I will measure 214 by 14 centimeter squares. After marking your paper, carefully cut your squares out using a craft knife and a ruler. And if you're using scissors, consider drawing the pencil line along which you will need to cut first to help you cut in a straight line. With the two equals squares cut and ready. Next, it is time folding. 5. Folding Your Paper: After preparing y two squares, take one of them, and let's get on with folding. If you are working with some heavy paper or card, before you move on to folding, measure and mark the middle of each sheet like this. Then using an or some alternative tool, create Crislines on a diagonal from corner to corner both ways. First then proceed to creating crease lines along the marks, effectively dividing your paper into four squares. Aim to create light indentations in the paper, which should look like this and will make the folding process easier. If you're working with lighter or more delicate paper, for example, some metallic paper like my one here, do not add any crislines and move straight to the folding instead. To fold your paper, place it it's plain side up, and start by folding your paper diagonally. Make sure you align all of the corners perfectly, and gently press over the fold first like this. And when all of the corners look folded correctly, strengthen the fold using your thumbnail, a bon folder, or earring of your scissors. Then unfold your paper and repeat the process by folding it along the other diagonal like this. With the diagonal folds ready, unfold your paper and flip it the nice side up. Now fold your paper into this. Again, make sure the sides and corners line up perfectly, and then press over the fold with your fingers first and complete the process by strengthening the fold. Then again, unfold your paper and repeat the process by folding it another way like this. With the folds ready, now you can quickly fold your paper into a triangle like this and then press over the folds and particularly the top of the triangle, which will become the center of your star. This will help to make this fold more crisp in the final ornament. With your first square folded, repeat the process with your second sheet. And when ready, move on to the next step of creating the flaps for attaching the two parts of the star together. 6. Creating Attachment Flaps: To touch the two sides of the star together, you need to create the flaps. First, measure the length of your paper and divide it by six. If necessary, you can round it to the closest number, which will be easier to find on the ruler. For example, in my case, 14/6 equals 2.3 recurrent. I can round it to 2.3 or 2.4 centimeters. I will go with 2.3, and in this case, I would always recommend going for a smaller number. With the number worked out, mark the distance from the edge along the line going through the middle of each sheet on all four sides. By the end of it, your paper should look like this. Next, pick up your paper and carefully cut it with the scissors along the middle fold up to this mark like this. And then repeat the process to create cuts on all four sides of the paper. With the cuts ready, place your paper mark side up on the table, and the next step is to fold the flaps from the corners to the ends of the cuts. If you're working with heavy paper, be sure to carefully score your paper first, going from the 16 marks on the middle line to each of the closest corners. And if you are working with light or delicate paper, move on to folding and simply align your ruler between the end of the cut and the corner of the paper and carefully lift and fold a flap, running your thumbnail along the fold. Then remove the ruler and fully fold the flap and strengthen the fold, and then repeat the process to fold all of the flaps. W one part of the star ready, repeat the process for the second part. By the end of it, you should have two identical parts like this. Next, it is time to attach two parts together. 7. Constructing Your Ornament: With the both parts of your future ornament ready, now it is time to construct it. To attach the two parts of the ornament together, you can use some good paper glue or double sided tape. Glue will allow you to adjust the alignment of the sides in the process, but it can be quite messy and potentially quite slow, as you need to glue one point of the star at a time and wait for it to dry before you proceed to the next one. I prefer using the double sided tape and simply start by attaching it to each flap of one of the parts like this. If you are going to use tape as well, make sure not to attach it too close to the outside edges and avoid having any tape going over the inside edges to keep your ornament neater. And if you get some overhang like this, simply go and cut this bit of the tape. This is important to ensure that your flaps do not get stuck to something they're not supposed to inside the ornament and stop your ornament from becoming a free D shape. With all the tape attached, press it firmly onto the paper. This will help make your constructed ornament more durable. Next, before you proceed to touching the two parts of the star together, prepare your red, twine, ribbon, or wire. You will be using for hanging or attaching your ornament. Measure and cut the required length. Fold it into and make a knot in it. If you're using twine or ribbon, this should be enough to stop it from slipping between the folds. But if you're using some fin fred, you can consider attaching some beat to it to stop it from slipping through. Or simply use some masking tape or sellotape and attach your fread inside your ornament. Decide which fold you want your string or wire to come from. It can be the inside fold like this or the tip of the star. For example, I'm going to attach my twine here like this. With a string of Y ready, move on to connecting one of the flaps next to it to a flap on the second part of the star. Carefully line up two parts, it ties them together, and press over the area to secure them to each other. Make sure that this first connection and fold are as precise as possible. If you start with some lopsided attachment, your star will progressively get one key, and it will be very difficult to line up the final flaps. With the first flaps connected, move on to attaching the adjacent flap on the same point of the star like this. And then go around the whole star, attaching a pair of flaps at a time. After attaching each point, it is a good idea to quickly put your fingers inside the ornament and push it into ephridi shape to help form the future structure. This will also help to avoid parts getting stuck together if you are using glue. Keep on attaching the flaps together. And when you have the final point of the star left, make sure to push your star into ephridi shape like this and then finish attaching the last flaps whilst keeping the ornament somewhat free dimensional. When all of the flaps are attached and secure, simply push the points and inside corners of the star inward, and it will pop into a three dimensional shape. The ornament is now ready. 8. Final Thoughts & Conclusion: So this is how you can create fun three dimensional star ornaments. Once you have created your first ornament, be sure to try creating more ornaments in different sizes or using different kinds of paper or create a set of ornaments and put them together into a garland. I'll be super excited to see your ornaments and how you decorate with them. So be sure to post your project in the projects and resources section for this class and share photographs of your finished ornaments in situ and any work in progress snaps and information about the paper and other materials you have used And if you're going to share your created following this class on Instagram, please tag us at Attitude Creative so that we can easily discover your post and share your work with our Instagram community. If you want to explore creating other kinds of geometric paper ornaments, be sure to check out my class, create geometric origami paper ornaments for holiday party, and home decor. And do not hesitate to check out my class about creating Aigami boxes for gifts and trinkets. If you want to learn a super simple but a very useful technique and get your hands on some printable templates and patterns. So that's it for this class. I hope you have enjoyed it, and we'll create a few beautiful custom star ornaments to decorate with. If you have any questions, please leave a comment in the discussion tab for this class, and I'll happily answer and provide feedback. If you have found this class helpful, please leave a review in the reviews tub for this class. And be sure to follow us here on Skillshare to be the first to know about our new classes, updates, and announcements. Thank you for joining me in this class, and I hope to see you in our other classes. So