Transcripts
1. Intro: hello and welcome to create a coloring book in Power Point. I'm Rebecca Livermore, the office creative. In this course, I'm going to teach you how to work with Vector images and Power Point so you can turn images like this into this or like this into this. You can also take the individual components of those images and use them in multiple ways, and I'll show you exactly how to do that. I'll also show you how to take photographs and turn them into coloring images. Here are a couple of examples. I'll show you how merged shapes to create unique images, and you'll also learn how to fill shapes and letters with patterns. How to combine shapes and icons to create coloring pages and so much more. So what are we waiting for? Let's go ahead and die again.
2. Where to Find Images for Your Coloring Books: Now, before I get into the meat of this course, I wanted to give you some ideas of where to find illustrations to use in your coloring book . First are stock images. Now. The great news is that Power Point has a ton of images built in, especially if you have a Microsoft 3 65 account. Now, if you don't that's okay. I'm going to show you some other images that you can use. But I wanted to you to be aware of the options that are available in Microsoft 3 65 You'll find them under the pictures, drop down menu and then stock images, and you'll see they start off with the typical stock images that you would find on sites like deposit photos or any other image site. There are also cut out people Icahn's and I love using icons. I They are organized in different categories, and one thing that you could do with icons is you can often separate them into different components and use just part of it. So, for example, let's say that you want to just this barn and not the whole thing. You can separate that out and I'll show you how to do that. There are also stickers, and these could be really, really fun. Lots of really cute stickers. Now, one thing that you might be wondering is, how do these things work, like the stock images and the cut out people in the stickers? Because they're in color. But don't worry. I'm going to show you how to convert them anti images that will work in coloring books. And again, those are available if you have a Microsoft 3 65 account. Now, if you don't, you can still access online pictures in other versions of Power Point, and there's quite a bit available in here as well. And if I quick on them, you'll see that by default, creative comments, images or what are shown. And again, I will show you how to convert those into images that you can use in coloring books. Okay, so another option are wing dings Now. Wing dings are essentially ah font. So let's start off by putting in a text box here and then on the fonts drop down menu. You scroll down, you'll see that there are wing dings, winnings, winnings to winding three. So the way that wing dings works is you select a wing dings font, and you type in a letter, and I'll make this bigger so you can see and it puts in an image instead of like the letter A, B, C or D, And in addition to wing dings that are found within Power Point, you can also get them from other sites as well. And I'll share some of my favorite sites where I like to get wing dings. Another option is emojis. Now Emojis are part of not part of Power point, but part of Windows 10 and you use the touch keyboard to insert emojis. Now emojis act like a font, so you have to add in a text box. And then from the emojis menu, you pick an emoji, for example. Here's a Christmas tree, and I'm gonna make it bigger so we can see it. Let me quick out of here so you increase the font size until it's a size that you want. Now the nice thing about the Emojis is that if you right quick on them, you can also save them as a picture and pictures air, often easier to work with than the emojis that you put in from the keyboard. What I recommend doing is saving it as a picture and then inserting the picture onto the page that where you want to use it next or shapes. You get two shapes from the insert menu and from shapes, and then you'll notice there are tons of different shapes that you can use. For example, here's a son. I would change the outline to black and shape. Change the shape, feel to know Phil. And then there's other things that I could do. So shapes or another option from within power point. Now let's go to some other sites to get images. Okay, so one of the free image sites that I like to use is picks obey. When you go to pick Sabei, I recommend using vector graphics or illustrations. So first, let's look at some illustrations. I'm just going to type in coloring pages and you'll see that there are a lot of coloring pages that you can use coloring designs and the way that you would use these as you would just download them to your computer, and then you would insert them from the insert menu saying from this device and add them to the page. Another option is vector graphics. Now I mentioned Vector graphics before I'm just gonna type in flowers here, and I had mentioned to you how you can take vector graphics like this that are in color, and you can turn them into coloring images that are black and white and that you can use in various ways. And I'll get into details there. Now when I'm working on a paid projects such as a coloring book, I prefer to use either what's in Power Point or what I can get on paid image sites such as deposit photos, simply because there is so much more available. So, for example, let's go to illustrations, and if I type in coloring pages, you can see there's what's listed here is 1 to 100 out of 4668. So there are just a ton of different coloring images that are available now what you want to do. If you're going to use a stock images like this stock illustrations, I recommend combining them to make your own unique illustrations. And that's something that I will talk about in this course as well. Now that we have the basic foundation laid for what I'll cover in this course and where to find images, let's go ahead and get into the meat of this course.
3. Setting Up Custom Page Sizes with Margins: In the bulk of this training, I'm going to be using slides that are in the typical slide orientation. And the reason for that is simple. It works better with typical dimensions for a video. However, when you're creating a book, most coloring books are going to be flipped. They're going to be portrait rather than landscape. Also, a common size is 8.5 by 11. So I'm gonna show you how to change your slide orientation so that when you're working on your book, you'll be working in the right orientation. All right, so you go to design tab and then slide size and custom slide size. Now, there are a couple of ways you can do this. You can change the width here. TB 8.5 by 11. And if you quick on okay and insure fit, it will automatically flip it to that size. I'm gonna show you a different way as well, and that is to go to letter size, which is 8.5 by 11. Click on that and you'll see that the width is 7.5 by 10 and it says appear 8.5 by 11. Now the reason for that is that they're allowing room for the margin. You can see that this is seven a half. This is 8.5. So basically, what they're doing is they're putting in 1/2 inch margin all the way around. Now, the good thing about this is that under slight size you can select paper 8.5 by 11 and you can then work all the way to the edge. And no, you're not getting into the margins. Okay? So let's go ahead and do that and you'll see that the page has been adapted. I'm gonna just show you something to demonstrate how the margins are gonna insert a picture and just any random picture. It doesn't really matter. And we'll just do this one, these flowers here and let's go ahead. And I'm just gonna turn it because I basically want to fill up the slide with the picture to demonstrate something here. So I'm just gonna drag it. Okay, so you can see that I have filled up the slide with this image. Now, if I go back to design and I go to slide size here and I go to custom slide size and I actually put in 8.5 by 11. And click on OK, an inter fit. You'll see that this image that I put in that went all the way to the edges now has a nice margin around it. So what you can do is when you're designing your book, you can set it up in here to be letters. Paper 8.5 by 11. Work all the way to the edge. Don't worry at all about margins. And then when you're ready to print your book, you're ready to save the file as a pdf to upload to Amazon or wherever it is. Then you can go in and change the dimensions here to 8.5 by 11. Quick on. Okay, Ensure fit. And there you've got your beautiful book with margins. You don't have to change anything to make sure the margins air there. They're already built in. And by the way, usually I share this at the end of the course. But I'm since I'm in here. I'm just going to go ahead and share this now with when you're ready to print your coloring book, you ready to upload it to etc. Or toe Amazon or Lulu or whatever it ISS. You'll want to go to file, and then what you'll do is you'll select from this drop down menu the file type that you want to save it, as is a pdf. Okay, so just keep that in mind. When you're done designing, you'll save it. As a PdF, you'll still have the power point, which is awesome, because the Power Point file is what you can edit. But you'll be able to save it as a PdF and that will make it available wherever you want to use it, whether you're selling the item as a PdF or whether you're uploading it to Amazon or etc. Okay, now in the remainder of the training. Like I mentioned, I'm going to do the slide orientation, just the regular slide orientation, so that it'll show up better on video. But when you're creating your book, make sure that the one of the first things that you dio is when you open up your power point, go to the design tab slide size and then select the slide size that you want. You can put in custom dimensions here, or you can select one of the options from the drop down menu
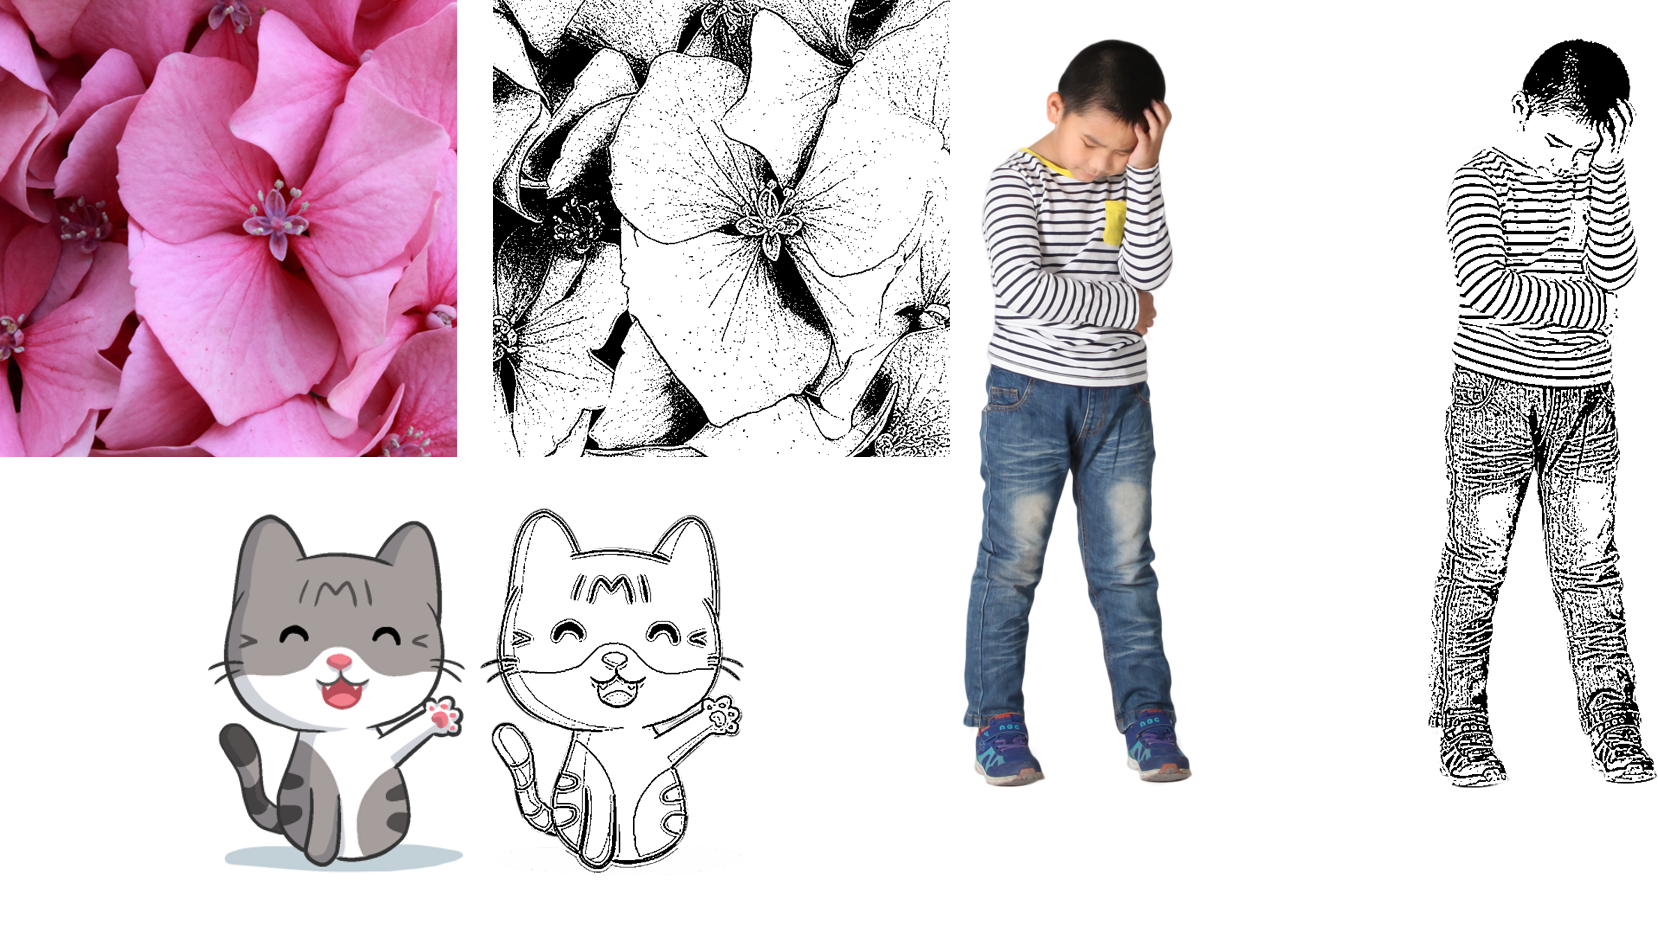
4. Working with Vector Images: Now I'm going to get into vector images. I mentioned earlier that when you go to image slides like picks, obey or deposit photos, you should select either illustrations or vectors. Both of those file types have a place, and I'm going to briefly explain how to spot them and the differences between them in terms of what you can do with them and how to work with vector images and power point. So common file extensions for illustrations R, J, Peg and P and G. So you'll see that at the end of the cat image, it says dot jp G. And at the end of the mandala it is dot PNG those air, both just regular illustrations. SPG is a common vector file type, so you can see that each of these images ends in dot s V G. Now let's get into some additional differences between J. Paige's and P and G's and vectors. Now, in this image, which is a PNG, I can't edit it in any way you can see I can move it around. I can crop it, but I can't actually change the image other than that type of thing. Other than moving it around and cropping it. Also, if you have a J peg or a P and G, that is low resolution and you try to make it bigger, it will get all pixelated. So you can see how, when I make this one that I have in a low resolution, bigger, it doesn't look good. The edges are all kind of bumpy. They're not clear. Okay, so that's another downside. If you don't have a new image, that's a high resolution, and you want to make it bigger and you want to use an imprint. It can look pixelated. Vectors differ from J. Pegs and P and G's and that you can edit them in various ways, which all demonstrate in just a minute there. Scalable. So that means that you can make even small pieces of them really big, and they still won't get pixelated. So I'm going to demonstrate now how to work with this vector image in Power Point. So I've clicked on it and I'm gonna right click, and you can see where there's group. I'm going toe on group this and you get a message that says this is an imported picture, not a group Do you want to convert it to a Microsoft drawing object? And you say yes and you continue that process of ungroomed ping until that option is no longer available. Now you end up with this huge what looks like a huge mess, right? It's all all of those little pieces are ungroomed. Now, I do want to say that if you haven't images that super complicated sometimes power Point has a hard time handling it and it might take a little bit of time. Okay, But let's see what we can do with this one. You can see that it's it's all on grouped. And so what I want to do is I'm wanting to convert this from a color image to a black and white image that I can use in a coloring book. So I'm going to change the shape, outline, toe black, and then I'm going to change the shape Phil to know Phil and we'll see what happens. Okay, Now I'm just gonna click outside of it, and you can see that it has now become ah, black and white image. So now I can do what I want to with this in a coloring book because it's black and white. Let's look at another example. Okay, this image is much more simple, but the process is going to be very much the same. We're going to on group it. I'm getting the message. This is an imported picture, not a group. Do you want to convert it to a Microsoft drawing? Object? Yes, and I'm going to continue to ungroomed pit and you can see now this doesn't have nearly as many pieces. Let let's see if I can un group it further and you can see that piece anyway. It's on grouped as far as it can. Let's see if I can and group this flower anymore. Nope. So it's ungroomed as far as it can be. Ungroomed. All right, so I'm going to go ahead and do that same process of shape. Outline black and shape. Phil. No, Phil. Okay, now I have these lovely little flowers that I can use in a coloring book. But now here's something very interesting. I want to show you how this flower has some individual pieces such as pedals. I can pull off the individual pieces because I have ungroomed it all the way down So if I wanted to, for some reason, use just this piece in a design. Maybe I just like that as an element. Maybe I'm not going to use the whole flower. I just want to use that piece of it I can. Or let's say that I want to use just this in an illustration or just this part in an illustration. I can definitely do that. I also mentioned how you can make thes big without losing the sharp lines. So let me just show this to you. I'm gonna just make this one big. And first of all, I'm I want to explain, like look how it's getting all weirdly shaped. To avoid that, I'll hold down the shift key, and it will maintain their proportions as I make it bigger Now. Obviously, I have a bunch of other things on my slide, so you may not be able to see it as well. But as I make it bigger and bigger, it still maintains the sharp images so you can see the power of working with vector images in Power Point
5. How to Turn Photos into Coloring Book Images: Now let's get into how to turn photographs into coloring images that you can use in your coloring book. All right, so I'm starting off with this picture of flowers and you can see that I have to un slight. And the only reason for that is that I want you to be able to compare the original photograph that I started with with what will end up being the drawing over here. So that's why have them side by side. Normally, if I was just doing this for myself, I would only have the one image on the slight. All right, so what we're wanting to do is we're wanting to turn this color photograph into a black and white image that will have space for people to color. All right, so I'm clicking on the photo, going up to format and then under corrections and sharpen and focus. I go all the way over to the edge here, sharpened 50% my click on that. Okay. And you can't really see much change when it first happens. But you'll it will become more obvious to you as we go on. Now. What we want to do is we want to apply that same effect four or five times. But Power Point won't let you just keep going in and doing the same thing over and over again. So what we're going to do is we're going to right click and cut the image, and then we're going to paste it back on and then keep doing the same process over and over again, all right. And when you paste it, you'll notice that under paste options, there's one that's a clipboard with letter, and there's one that's a clipboard with an image icon. You select the image icon paste option. Just paste it in writing that kind of overlap there. But don't worry about it. Will straighten it out in a bet. All right, so now we're going to again go to picture format, Same process. Hey, that was the second time we're going to do it four times. I don't know if you can tell, but it's becoming a little rougher looking than the original photo. Okay, that was number three, and we're going to do it for 1/4 time. All right, now what we're going to do is we're going to change the color. We're going toothy under picture format, the color drop down menu, and we'll choose this black and white 25%. And there you have it so you can see that it went from this color image to this black and white one. And obviously there is some dark areas that people wouldn't be able to color. But there's also some areas where they could. Okay, now I am using an image from cut out people that's under the insert menu. I've shown you this earlier, but under insert and pictures, their stock images and one of the stock image types is cut out people. But you could obviously do this from your own photograph. And in fact, what I want to encourage you to do is think about how you could use this with some of your own photos. So, for example, let's say you've taken a bunch of family photographs and you want to create a special coloring book that's just for your family. You can do that. Okay, so here is the original image. We're going to change this one, all right. We've done the one process. Now let's go ahead and change the color saturation to Black and white. And there you have a coloring image. I'm going to show you another cut out person, and you'll see why in a minute I want to demonstrate why some images don't work. So let's go through the same process again. Okay, now let's go to re color and we'll do the 25% again. And look what happens. The pants air still this solid black and I have noticed that on any image that has, like a solid black or a big swath of solid color that it will not make it where you can color in that part. So you can still choose to use some images that have a solid color like that are very solid , deep color if you want. But just be aware that that's what we'll end up happening. Okay, now let's go to a sticker. Sometimes I lose track of how many times I've done this, but I think that this is this will be the 4th 1 Okay, now we'll go ahead and go through the re color option again, and there you have it. Now you do notice that where there was the solid red you've got black, but you still have an image that you could work with? I'm gonna pick another sticker just so you can see the comparison between one and another. All right, now, let's re color it. Let me move it over first, Okay? And there you can notice that where there were the black eye lids, it's still a solid black. But you do have a picture that's pretty colorable, we'll call it. Okay, So earlier, I mentioned that if you didn't have office 3 65 you wouldn't have all of the free stock image options. However, you would have the option that is under pictures and online pictures. The next to that, I'm going to show you are from that. And so I just want to demonstrate that as well. Also, you can use images from another image site if you want. Or, like I said, your own personal photographs. By the way, you'll get to where you can look at an image ahead of time and anticipate some of the for lack of a better word issues that may occur and you'll notice in this one. There's a lot of solid black, so I anticipate that this one will have solid black there. They have done it two times so far. So the 3rd 1 and I don't know if you can tell, but it's getting a little rougher looking and that's what you want. And I think that I'm gonna try it at this point. If you if you try it and you think maybe it needs the process again, you conduce control Z and undo it and then add in another correction session. So let me just give this a try, okay? I actually kind of like the way that that looks. And I think it's fine for there to be some solid black areas because there's still the parts that people concolor an. Now I'm going to take this airplane picture and see how it turns out. So it looks kind of like a photograph, but kind of like a drawing. So I'm assuming this was some type of ah, computer generated type of image. So, again, picture format, I'm gonna call that good me, move it over here and again, going to color. Let's try this black and white 25% and I can see that it doesn't really have the edge outlined very well So I'm gonna go back to color, and I'm going to re color and do this option that is 50% rather than 25%. Okay? And I think I like the way that that looks a little bit better. So what I recommend that you do is just play around with this. Go into stock images, especially the free stock images that are available in Power Point, regardless of what version you have or other. You can also go to other free image sites and experiment with this process, and you'll start to get a feel for what type of images will work well and then, if you want, then you can go into a site like deposit photos and purchase images that you already know will be the types that will work well. And then you can use those photographs or stickers or whatever it is that you may come across illustrations that type of thing and turn them into images that you can use in your coloring books.
6. How to Merge Shapes to Create Coloring Pages: is. Sometimes no matter how hard you try, you can't find a new image That is exactly right for what you want to do. Not to mention that sometimes it's fun to just create something from scratch yourself. One way that you can do that is within power point. You can use shapes and merge them together in various ways to create your own unique images . So I'm going to go into the basics of how to do that here and then a little bit later, in this training, I'm going to show you some examples of what I've done. Let's start off by just doing two circles. I'm going to the insert and then the shapes menu to get the circles. I'm holding down the shift key. So I get perfect circles and then I'm clicking on it and doing controlled the to duplicate . So now I've got to. Now I'm gonna make one a different color. I'm gonna make one. Ah, why not read Okay. So that we can differentiate between the two of them and I'm selecting both of them. I'm going to remove the outline from both of them, so no outline. Okay. Now the way that this works is you overlap to shapes and you can do it in multiple ways. I am, and you'll see what I mean here in a minute, and you want to select both of them. And then when you go to shape format under merge shapes, you'll see that there's multiple examples. There's Union that puts two of them together combined fragment, and it's not really obvious. But at fragment, you have the part here in the middle. If I had done it, you could take it out. I'll show you that in a second intersect where you have just the part in the middle and subtract where it takes part of the shape away. So you can see from that those two circles that I started off with, There's 1234 up since not wanting to do it. There it goes, five different options right there. Okay, now there's something important to notice. You notice that I had the red shape and the blue shape, and when I was doing these merge, it was making them all red. And the reason for that is that whatever shape that you select first, that will be like the dominant color. And so if I had wanted to work with blue, I could start off with blue I'm clicking on blue And then I'm holding my shift key down and adding in the red one. And now you'll see that blue will be dominant. So see, there's blue and so on. Okay, now let's just play with this for just a minute. I'm gonna go ahead and duplicate this slide multiple times. And in fact, I encourage you to do that when you're working on this type of thing. Because that way, if you end up deciding later that you really wanted something different, you've got your original canvas, your original shapes to work with. So I'm on the slide over in the left side. So I'm not on here right now. I'm over in the pain where all of my slide show and I'm gonna do control d to duplicate, and that's going to do that a few times and it's duplicating it. All right, So let me go back to this one, and I'm gonna again select the blue and then the red and shape format, and I'm gonna emerge the shapes. OK, so that's union now you can see this is now one shape that has been merged together. I'm gonna put the outline back in now, so I'm gonna go up to shape outline, and I'm going to make it black. And I'm going to do the shape, Phil. No, Phil. So that's what you would end up with. Now you can adjust the shape outline to make it thicker. You can also adjust the shape outline to be sketched if you wanted a rougher, hand drawn option. And again that sketching may or may not be available, depending on the version of Power Point that you have, but no worries. There's plenty of other ones that you can work with. For example, there's thes round dots. Okay, so for right now, I'm just going to go back to just to the regular outline. Okay? So I am. I won't show that every single time, but that's basically what you want to do. Once you've merged, your shape is you can put the outline in. Okay, let's go ahead and do this next one. We'll go back up to shape format. It's already selected. Merge shapes were going to combine them. Now I kind of like this. I mean, this is just kind of a unique option and actually add light. I said I wasn't gonna put the outline back in, but let's go ahead and do that, okay? And that's what you come up with with that specific option when you put the outlines back in. Okay, let's go ahead and do this again. We're going to fragment now. Here's what's kind of cool. I told you Fragment. What fragment does is it gives you all of the separate pieces fragmented, and then you can use those to do other things. So let's say, for example, you wanted to use this shape in a design. You now have it separated out, and you can use this shape like I could see using this to create a flower duplicating at multiple times putting a circle in the middle. And there you have the start of a flower, or this might be just fun, random shape that you can put into other designs. Okay, let's go ahead and go to the next one. Intersect, Intersect leaves nothing but that center shape. It pulls in whatever was intersecting, whatever was overlapping, you're going to end up with that overlapped part when you do intersect, all right. Now subtract, subtract, takes off the part of the shape that overlapped. All right, so it subtracts that away. Now, I recommend just playing around with this because it can be a little bit tricky. At first, you're like, Oh, I can't remember exactly what union does or combine or whatever. And the best way to learn that is just to keep playing with it over and over again. I'm gonna show you a couple of ways to work with this. Go back to intersect. Okay, so we're going Teoh shape format and actually not intersect Fragment. And I've got the three different options here. Let me do shape. Outline. No outline or excuse me. Shape, outline Black and I've got these different pieces. Let's say that I wanted to take this and combine it. Ah, I'm just sort of making this up. You can tell, huh? But you can see that there. I have a unique shape. Let's remove the shape, Phil. And that's a unique design, a unique shape that was created by those two circles. So you can see how you can then take the components and combine them in different ways. Let me show you a couple of other examples. Okay. Now, in this one, I created a rectangle again, just going up to insert and shapes. And I chose a rectangle, and I made a bunch of circles. Now I'm just going to put them on here. The great news is you don't have to be perfect with how you're doing this, and I'll show you why here in just a second, Okay? Now there are tools within power point that will help you align all of the's. I'm gonna actually make this bigger just so I can see what I'm doing. Okay? And I'm quick ing on each one. I'm going to select each one. I'm holding down the shift key and then clicking on each one and then under shape format. I'm going to a lying and I'm going to distribute them horizontally and you'll see it kind of moved them. Now I'm going to go to a line and I'm going to align the bottom and that moved them down. So you can see now they are lined up properly. Even though when I put them on, they were not. So let's talk about how we can use this option combining the rectangle and the circles. I'm going back to shape format, and I'm going to merge the shapes I'm going to do union Now. Let's do a shape outline and let's remove the shape, Phil. And there you have kind of a scallop design. Gonna try this one and see how it works. Doing shape format again. Merge shapes. Tri Union. You can see I haven't positioned a little bit differently. Okay, I have them up a little bit higher this time and will put in the outline and no Phil, and with them positioned a little differently, it put in these little triangles, which kind of adds a different design element. But let's take it a little bit further, and I'm going to make the weight mawr. Let's try this and I'm going to add a dotted line and you can see that that makes kind of a cool scallop design that also has the element of the triangles in here that have been made into dots and so you can see how you could do this all the way across the page and that could be a border. So what I recommend is I recommend just playing around with us and you'll be amazed what you come up with when you combine shapes different ways when you use different borders and that type of thing, I'm going to show you some examples in just a bit of how I've used this process to create entire coloring pages with unique designs that nobody else has made because it's something that I made up, and by the way, this can be somewhat time consuming. But it's also to me it's very relaxing. So I'd like to do this if I'm watching TV or listening to a podcast or book on tape. I'm just playing with shapes and seeing what I can come up with while I'm listening. And, you know, it's like some people like to knit or crochet a or do some other type of needlework or something while they're listening to things. I get into power Point and I played with shapes to see what I can come up with. So you can definitely do this as part of your work day, but also consider it play and because sometimes when you just play around, you come up with some really amazing things
7. Filling Shapes and Letters: Now I'm going to show you how to fill shapes including letters or numbers or any other thing with images, illustrations, patterns. You can use almost anything to fill it with, and I'm gonna show you how to do that. Okay, so let's start off by just inserting a picture that we want to use as a fill. So I'm going to the insert tab pictures, and I'm going to select the picture from my computer. Okay, Now, you may recognize this that this is something that I had created from a vector image that was a color image. And in Power Point, I changed it to black and white, and then I saved it as an image. So that's what I'm working with here. So now, the easiest way by far to change this into a shape filled images to go to the crop menu and then crop to shape. And then let's pick a shape and you can see that it is now in a circle. So as easy as that. I change that from a square to a circle. If I want, I can go to picture format and I can add a border to it. I can change the weight of the border. I can also change it to, let's say dots, lines and so on. So that is the easiest way right there to get an image into a shape. Now, what I like doing with this type of thing is you can fill up an entire page with the shape that has the image in it. Or you could do like a grid like design and do multiple circles or squares or whatever shape that you're using. And Philip, a page that way. Now let's say that you put it into this shape and you changed your mind. You decided that you would rather have a triangle. Instead, you simply go over to crop to shape and you pick a different shape. And then there you have it in a triangle or again, you can just keep going back. You can do this multiple multiple shapes, whatever shape that you wanted to do. You can see there's tons of shapes here, an arrow or what have you Now what you might want to do when you're working with this is think about creating a whole library of images at one time, and so I'm doing controlled D to duplicate the slide. And so I'm going to I have the this shape. I'm going to change it on one slide over two pictures. I'm going to picture format. I'm gonna change this one to a circle, and then I'm going to change the same shape to Let's make it a heart. Why not? Okay. And so what you can do is while you're working, if you want to develop a whole image library using this particular background, you can create them really quickly, one after another and then, um, save your power point because you want to have the original file. But then you can also go in and save each of them as a picture. And you just I'm right clicking and then save his picture is how I would do that. And I could have this whole library of shapes that have this background and then pick and choose them whenever I want. Okay, that's all well and good. But what if you want to do on alphabet book? Let's say you'll notice here under crop to shape. There's not the alphabet, There's not numbers and so on. The good news is it's fairly easy to Dio, and I'm gonna show you how to do that now. So let's go ahead and start with a blank slide and I'm going to insert a text box and I'm going to put just the letter a in here, and I'm going to change the font to kind of a chunky font. Let's say, How about Ariel Black? That's just a basic font. Whips got a highlight. It gotta make sure or quick on the little dotted text box and make it solid. And then we change it to Ariel Black, and I'm just going to go ahead and make the fun really big up. There's a couple of ways to change the font size you can quick on the, um, up arrow on the front, and you just keep clicking until it's a size that you want. You can also put in a number. Let's say 300 here, all right, and make it whatever size that you want. Now I'm gonna make it a little smaller while I'm working on it just because it's a little easier to work with, and then I can make it whatever size I want. After I'm done, OK, Now, with shapes, you can fill the shape with an image with a design with whatever you want. However, you cannot feel letters other than with a different solid color. So, for example, you could make it red or whatever, but that's really not what we want, right? We want it to be a coloring image. So the way that we work around this is go to the insert tab and insert a shape, and we're gonna insert any shape. But a rectangle works well and then go outside of the shape and quick and drag to cover the shape you need to make sure to cover the whole part. So, for example, you can see that this little handle thing is up above, and so you have to make sure to cover that. Okay. And now we're going to use the merge shapes option to combine these. Okay, so I'm going to intersect, and I've intercepted the letter with the shape, okay? And you can see it turned the shape from red to blue because the rectangle that I used was blue. Okay, but now that shape doesn't that color doesn't matter. So don't worry What we're going to do now, though, now that this letter is officially a shape, it's no longer a font. It's a shape because I just merged it with the rectangle shape and I turned the font the letter into a shape. Okay, so you'll see that I actually no longer have the like these options. The font options will no longer work on that because it's no longer a font. It's a shape. Okay, so I know that might be a little bit confusing. But don't worry. This is a good thing, because shapes allow you to do a whole lot more. So let's go to shape format now that we're working with a shape and we're going to go to shape Phil and you'll notice one of these shape Phil options is a picture, and you can do from stock images from online from icons or from a file we're going to do from a file, and we're going to pick this floral graphic. Now you can see that the letter is filled with that floral design. Now, you can also go in and change the outline toe black, or you can remove the outline if you don't want an outline, so That is how you fill shapes, letters, numbers, really anything that you want with a design with any any image, it will work with any image.
8. Working with Icons: Now let's talk about working with icons. You find icons in the insert tab and then under pictures and stock images. And from there quick on Icahn's. The best way to find icons for your books are to do a search. So let's say that I want flower, and then I will bring up all of these different flower icons. Okay, let me just pick on That's actually a butterfly, but I'm going to just pick that one and click on insert. Let's make it bigger so you can see it better, and you'll see that there's not a whole lot that I can do with it from graphics fill. I can do things like no Phil. That just makes it disappear. But let me change the outline and put a black outline. And so that is one way that you can very easily convert an icon in Teoh on object that can be colored, but let's take this another level. Let's go ahead and insert the icon again, and actually, you can see there's another place where they are. If you quick on the insert tab, you'll also see there is a an icon for icons, so let's click that and I'm going to say flower, and I'll just for the heck of it picked this butterfly again. And now this time I am going to go over here and convert it to a shape. Now, at first glance is gonna be the exact same thing. However, what you can often do with the icons that you convert into a shape is you can ungroomed them. So now you see how it has all of these different pieces, and you can use these different pieces in various ways you can. Let's say that you wanted on Lee part of it, and I'm actually going to show you a little bit later that I use this part of the butterfly in one of my designs, and you would never guess that it comes from a butterfly. Now let's contrast that with this. Let's try him right clicking, and then when I go to group, it says, this is an imported picture, not a group. Do you want to convert it to a Microsoft drawing object and yes and then group and one group so you can go about it that way as well. So those air two ways to do it. Now consider how you could use pieces like this. I mentioned that I used this piece in one of my coloring pages. But this shape in and of itself is actually kind of a cool shape. And so think about how you could put that into a coloring page and use it in various ways you could also duplicated. I'm doing control D and put it together like that. And you could keep doing that and just make a design out of the pieces of the icons. So when you goto icons, you're not limited to just the icons as you see them. There's really a ton of different things that you can dio. Sometimes you can even combine a couple of the icons. So I'm gonna give you an example Here, let's do a telephone and I'm gonna do this one click on insert, and I am going to convert it to a shape and then ungroomed pit. Now the handle for the telephone is separate. Let me make this a little bigger so you can see it better. We'll regroup it for just a second, and then I'm right clicking and I'm going toe on group it again. Now think about how you could signify that the phone was ringing. What I would recommend is maybe lifting the receiver up just a teeny bet. I'm using the up arrow to move it up, and then I am just turning it just a little bit there, so that kind of gives you the idea. But I think a way to make it stand out even more is to combine it with another icon. So So you can see how this one has the sound waves. This has sound waves. So let's just go ahead and take this one, and we'll do the same thing where we un group it and on group it again. Now you have all these separate parts. I'm gonna move this receiver out of the way. I don't want these pieces, but I do want this. I'm gonna regroup that so I don't have to move all the little individual pieces and let's put it up here and then drag it to make it bigger. And what kind of position at maybe tilted just a little bit. Mudge it down and then you can see that gives the illusion kind of helped Teoh understand that the phone is ringing. We're going to select all of it just by dragging outside of it. And I'm going to go to shape outline, make the outline black shape film. No, Phil. And then I have an image of that signifies that the phone is ringing. And, of course, as always, I concil ect all parts of it, and I can play with the outline. I can add a weight to it toe where it's thicker. I can do a sketch defect if I want to go with more of a hand, wrong look and so on. Okay, let's do one more and let's say that you wanted to use this, but you wanted a stormy type of effect rather than a sunshine. So we're going to do the same old thing of converting the icon into a shape on grouping it . And let's get rid of this son and let's see if we can find a cloud instead. So I'm gonna go ahead and pick one that has the rain as part of it Rain and lightning and let's make it big. And let's see that I wanted to add some other elements to it. We duplicate this, and I'm gonna just kind of overlap it a little bit. So it looks more even. I'm gonna actually do this duplicate this part again. So I'm I quipped on both of them to highlight both of them holding down the shift key. And now I'm doing control D and I'm duplicating it again. And so I want to end up with the whole scene here. So let me grab everything so I can move it over doing control G to group. All right. Gonna do right quick ing and ungroomed ping so that I can manipulate things again and I can see that the edge of this is down just a little bit. So I mean it. Just use the arrow key and nudge it up a bit. And now that I have all of that on there, I think I want to put this cloud over here. And maybe I can add some form animals. So let me go to insert again icons, and I'm gonna put farm and you'll see that there's some animals they will do insert, and we'll put a couple of cows here, and I'm gonna duplicate them a couple of times and make this one smaller down just a little bit. And why don't we make this one to flip the other way? And then let's see, what else could we adhere? I wonder if we could add a fruit tree or something. Let's see. So I'm grouping it again, Control G and just gonna move it over a little bit. And now I'm right clicking and I'm going toe on group. So again I can work with the individual elements. And this time I'm going to duplicate this again. But I'm going to flip it around by going to arrange and rotate, and you can see rotate, right, doesn't do what we want. Rotate left, No vertical and horizontal. Horizontal is what we want And let's go ahead and duplicate. This is well and see what we can do with it. Okay, so those two are joined together now. All right, Now, how about if we find a fruit tree of some sort? Maybe we can find an apple tree or some other tree, so I'm just going to go into icons and I'm typing in tree and let's see is there is anything that would look right on the farm we don't have anything, really with apples. But this would work, will do this. I'm going to duplicate it and make it smaller this time. And so you can see that you could just continue adding different things on to make a scene . Now, what I'm gonna do is I'm going to group this entire thing. I'm selecting all of them just by dragging. And I'm going to do shape, outline black and so on. So you get the idea of how you can take multiple icons, mix and match them to make a scene. And obviously you could take your time. If you're actually doing this for publication and manipulate them in multiple ways, take more time with it to get it exactly in the shape that you want.
9. Working with Wingdings, Webdings and Dingbats: Okay. Now I want to show you some Web dings, wing dings and ding bats that are available in Power Point and elsewhere. So essentially, these are fonts that, rather than being letters of the alphabet or numbers, are images, So there are a few that are built into power point. So I'm just gonna click on this here because this is that this is a text box that I've put in and you'll see appear that the font is Web dings and I've made it 80. And so this is upper case. And then this is Web dings. Lower case. So this is like a B C. D. And so on another font that's available and Microsoft are wing dings. You can see wing dings up here That's wing dings, uppercase wing dings, lower case. And, as if winding Zehr not enough. There's wing dings to upper case and just let me just show you so you can see the fine you can see appear its wing dings to. That's uppercase. Here's lower case and I love these. These could be some really fun flourishes to put in your coloring book. And then there is wingding three and again you can see appear that that's when gangs three thistles, the upper case and this is the lower case. Now, in addition to what's built into Microsoft, here are a few of my favorite font sources. Most, if not all, of these have free options, some with commercial use, some for personal use and so on. But let's go ahead and take a look at them. First will look at 1000 and one free fonts dot com, and you'll notice in here that one of the font types is dingbats. Click on that, and then when you scroll down, you'll see lots of different ding bats. Now, whenever you go to one of these sites, you need to look at the usage restrictions. So, for example, the says free for personal, the used free, pro personal use you can donate to the designer. You can buy a commercial license and so on. Okay, so that's just something to be aware of is that some are absolutely free. So, for example, up here, free for personal use by commercial license, this one is just free, and this is kind of a fun one, because you can see it's just snowflakes So this would be fun for like a winter themed one , and you can see all of those different ones that are available for free. Now let's look at the next site. Now we're going to default dot com and you'll notice that they have a section for ding bats . Let's look at shapes just to see what they have available. Okay? And again, you see a lot of different shapes that you could use. Some say free for personal use, some say 100% free. But I want to show you what options there are. Don't necessarily give up on something. If it says free for personal use, you can click on it and you can see here that it says free for personal use for commercial licensing. Please write to me and it gives an email address now. I didn't write to the person, so I don't know what their terms are, but the point is that you can explore and you can see what types of restrictions they may have. They may just want you to ask for permission, and then they'll let you use it there. Some more fonts that are available also, if you find one that you really like, the overall style you could quick on the person's name to see if they have mawr fonts that are available. That might be fun. You can see some of these are regular finds and summer ones that could be better used in a coloring book or other low content books. OK, now let's look at font space dot com, and you can see it says 68,000 plus free fonts. I'm gonna do a search in here for Dingbats, and you can see that they have multiple dingbat fonts available, and some of them say free for personal use Summer 100% free. Okay, let's talk about how you use these wing dings and ding bats and all of those in coloring books, because obviously, this is a nice building, but it you couldn't color it in. So I'm gonna show you how to convert it into an image that could be used for coloring. This is a process that I've shown you before, but let me just remind you of how it works. You basically take a shape and cover up the font, and sometimes it's easier to work a little bit smaller. So down here on the bottom, I am making it smaller. You can also go to view, and you can see this zoom toe where you make it a lower percentage. So, for example, if this was 100% it would be much bigger and you could just use the down button or you can type in a number something that just put in 40% and click on. OK, all right. So now it's much easier for me to work with, because what I want to do is I'm going to group thes together. I'm going to select both of them and then go up to shape, format and merge shapes and intersect. All right, now that turned blue and the reason is because I had a blue shape on top of it. But what we want to do is we want to add a shape outline to it. We're gonna make it black and a shape fill of no Phil. And now we have a new image that could be colored. Now let me make it bigger. I want you to be able to see better will make it bigger. Now that is nice. It's a nice shape that you can work with. You could put it on a coloring page and maybe add some icons and things to it. But what's nice is you can also play with the outline a little bit so you can mess with weight, make it thicker. You can give it a hand drawn effect by making it a sketched outline and so on. So basically, that was a Microsoft Web being that I converted into an image that you can use on your coloring pages.
10. Creating Geometric Designs Part 1: in this video, I'm going to show you how to create geometric patterns starting with shapes. So, for example, I started with this shape duplicated at multiple times and ended up with this. So the best way for me to explain how to do this is to just demonstrate it multiple times. So we're going to start with a new slide and go to insert and shapes, and I'm going to start with this one, and I'm just dragging the shape to make it the size that I want. In this case, I was holding down the shift key, so it maintained the dimensions and didn't get all stretched out. Going to shape, outline black shape. Phil. No, Phil. Okay, then I'm duplicating at multiple times, so I'm just doing control D and I'm gonna try this about 15 times. Okay? Once you've duplicated it, you drag one over toothy side and you can see that the lines there will be red lines that appear dotted lines that kind of help you line it up and you don't have to worry about this too much because you'll see that I'm going to use an ally in tool. All right, so once that I have created the initial shape, added a black outline and removed the Phil and moved one over. Then what I want to do is I want to drag and cover all of them. So I'm just clicking on the outside here, holding down the cursor and dragging it across. All right, so now what I'm going to do is you can see I'm in the shape format tab. There's a line I'm going to distribute horizontally, and then I'm going to distribute middle, and you can see how that lined those up. One thing that's interesting is you can experiment with distributing it in different ways. So let me just undo that and under a range. I'm going to a line, and then I'm going to distribute center, and you can see it made this different type of effect than when I distributed across the middle or so I just encourage you to play around with that now. Another thing that you can do is once you've created a design like that is, highlight all of them, drag and cover all of them, and do control G to group them and then duplicate. And then you can flip it different ways again, going to arrange and rotate and then you can see like there I rotated right that wouldn't work too well. So let's again go to rotate Flip horizontal Extremely vertical horizontal. Right, All right, Now I like that, But I want to join them together, so I'm just gonna squish them together like so. And that's another way to create ah, unique shape. Another thing that you'll see that will impact how things look is the number of times that you duplicate the shape. So let's just go back to this slide and this one I duplicated 15 times. Let me delete five of them. So Alright, so I've deleted five. I'm moving one over and then I'm going to again arrange them by a line and distribute horizontally, and you'll see that there more spaced out. So if you duplicate it tons of times, I've even sometimes duplicated like 50 times. Then everything is really crushed together and your spaces in between the shapes or not as big. So that's something that you can just experiment with and play around with and see what you like. I can see how I can maybe stack the's on top of each other. So actually, let me go ahead and just duplicate this slide. And then I'm going to again group all of them together, duplicate and make this a little bit. Zoom out a little bit so you can see it better. And let's move one. And we conjoined those together by rotating and flipping vertical and then putting one on top of the other. Let me go way down here on the size so I can work with it easier. And I mean, group those together and then dragged them down. Now notice it's a little bit bigger than the slide. So what I would do is I'm just holding down the shift key and pulling it in to make it a little bit smaller so that it fits on the page. So another thing that you can do is you can combine the shapes in a couple of ways before you duplicate. That's what I did here. And I'm gonna show you that. So I'm starting with a blank slide and to take this kind of ah teardrop shape, okay. And I'm going to duplicate it. And this time I'm gonna just kind of manually with this little drag thing. Flip it around until I get it into the position that I want. I'm just gonna nudge it down a little bit, using the arrow key and just a teeny bit more. Okay, so you just kind of keep playing with it till you get it lined up the way that you want. So now I'm going to group those two together and duplicate them, okay? And you can see I have, ah, unique designed that way already. But let me go ahead and do the align, and then I will do the all of the alignments here like I've done before. I'm gonna distribute horizontally and I'm going to align middle and so see, that's a different type of design that I made from taking the shape, duplicating it and arranging it in a different way. Another thing that you can do is take the same shape and stretch it out different ways, and then try the duplicating process and see what happens. Okay, so what I did here is I just inserted this shape and I'm holding down the shift key now, and so it's coming out like this one. But if I wanted to make it longer. I'm not holding shift and I'm just dragging like this or if I wanted to make it go this way , I can hold like this. OK, so you can see that it's the same basic shape, but I've stretched it different ways. And so what I'm gonna do now and I haven't done this ahead of time. And this is actually part of the fun of this is you just experiment and see what will happen. So that's what we're gonna do. Okay, so what I'm gonna do is I'm just going to go cover all of these and then make them all black outline and no, Phil, and I'm gonna duplicate this slide a couple of times. So now we're going to start off with this one here, so we'll delete these two and let's duplicate this will duplicate them just for the sake of comparison will duplicate each of them 15 times. So, actually, 14 times. So we end up with 15. Okay. Have duplicated at 14 times. I'm gonna drive this over here, and we will do the align now. By the way, you don't have to necessarily align it to where everything is arranged in the middle or what have you let me just show you how that is. That's kind of a different effect with it being staggered. But let's go ahead and allying it to the middle. Okay, so that's how that one turned out with starting off with this type of shape. Now let's do this one and see if it looks different. Okay? Now, you basically have very similar design because you're using the same shape. The main difference is you can see that this one stretches across the entire slide, and then this one is a little bit more horizontal. Now let's do this last shape and see how it turns out. All right, so this one created almost mawr of the frame type effect. Now, I love this because you could put some type of coloring image in the center. I think what I would do is I would duplicate this less times because then I would most likely have a bigger space in the middle. So let's go ahead and give that a try. And I think it's already distributed in the middle. But we'll do that just in case. OK, so you can see you have a little bit more space. What I'd like to do is just going in and just experimenting.
11. Creating Geometric Designs Part 2: if you create something that you like. What I recommend doing is putting something in the notes. So down at the bottom of the slide, there is this little notes option and you can type in information. Here's the other thing that I do before I put the note in is sometimes off to the side. I will do this just to remind me of the shape that I started with. Okay, So before put notes in, I'll put that and then I know. Okay, I made this with the shape. So then I make a note removed shape Phil changed outline to black, duplicated, let's say 15 times. Whatever it was that you did aligned, distributed horizontally, then middle. So then later if I want to go back and I want to make that same shape again or something similar that same design, I'll remember how I did it. Now maybe you don't need those reminders, but I dio All right now I want to show you a couple of other possibilities and besides shapes, you can work with icons and you can also work with smart art. This I made was smart art, and I'm going to demonstrate how I did it. So let's start with the new slide and going to the insert tab. Do smart art and I use this. One can see that the outline is solid. You need to make sure and do that. And then over here, to the right, you can convert smart art to a shape. And the reason you want to do that is then you can manipulate them in different ways. So, for example, you can ungroomed pit. So what I'm first going to do is I'm first going to change it to a black outline and no, Phil. Now you'll notice that it put in here what would be a text box. And I don't want that in my design. But since I've converted it to a shape, I have more flexibility. And Aiken delete those and you see, in this case I didn't do the align and distribute and all that. I wanted it just as it waas. You can also stretch out the designs by just dragging without holding down the shift key. And that's going to give a different effect. When the try I consulates insert and icon, let's see if we can find an icon that we might want to use to make one of these geometric type shapes. I think that it would be best doing something that's pretty simple. Oh, actually, this one. I'm not going to do the exact same process, but this looks like it could be interesting. So let's go ahead and choose that one. And let's make this slide a little bit bigger so we can see it and this bigger Well, just stretch it out, okay? And I think what I'm even going to do is duplicate this and put one on top of the other. And by the way, I am just making this up as I go along. I haven't done it earlier. Let's group those together and duplicated again, and I think that in this case, I am going to go like so as I'm looking at that, I'm thinking that's going to end up being too complicated. But let's give it a try and just see what happens. Okay, so we're gonna do group, and then we'll duplicate this one just five times. So let's duplicate. Okay, now, see, I really don't like the way that that turned out, and that's going to happen is that as you experiment, you'll find that some things work and some don't. I mean, it's OK, but I'm not really too crazy about it. Let me pick another icon and we'll do the same thing. And by the way, what I'm going to do now is I am just going to do some playing with different shapes, different icons and things like that. I'm not going to talk you through it and I'll put it on faster speed. And I'm doing this, really just to demonstrate the process of playing and see what happens. And then also just to give you some ideas of the different effects that you'll have just based on what you're doing and how you arrange things. So let's get into high speed mode now, Okay, - so you get the idea of just getting in there and playing and seeing what you can come up with . I'm just going to page through some of the ones that I did just when I was playing around. You can see these two are essentially the same, but one is more and also the line is thicker. This one I used the sun shape, which is this here and of course, did the whole black outline and removing the Phil. And then I duplicated it 50 times and then aligned it. Obviously, it would look very different if I duplicated it only 20 times you would have bigger spaces . Okay. And again, that's the sun again. Okay, In this one, I duplicated the shapes. I went through the process and then I grouped it together, duplicated the group of shapes and then flipped It, flipped one around and then joined them together. So you can see that there's really an endless number of possibilities that you can go through when you're combining shapes in some cases icons. But the shapes seem to work better, and then also smart art. So I hope that you found that helpful, and I look forward to seeing what you come up with.
12. Combining shapes and icons: Okay. Now I want to show you how to create unique designs by combining shapes and icons. You could also throw wing dings into the mix as well. But in this demonstration, I'm just going to use shapes and icons that are part of power point. I'm gonna show you how to make this simple one, which you can see I duplicated multiple times to make a border. So I'm going to start by going to the insert menu and two shapes. And I am going to select this son, and I am holding down the shift key so that it is symmetrical show. All right, so now what I want to do is I want to give it a black outline and no shape ville. So no, Phil. All right, so the next thing that I did was you can see I added some circles to it, so I'm gonna do that. Now, again, I'm just going to the insert tab Two shapes and I'm going to take the circle, hold down the shift key, so it makes a perfect circle. This looks a little bit bigger than I want. You can see it's quite a bit bigger than that. So I'm gonna just kind of, like, shrink it down until it's at the size that I think I want. Okay, that looks good. Okay, So what I'm going to do is again black outline. No, Phil and I want to duplicate this so that I can put it in between each of the triangles and if I duplicate rather than creating a circle multiple times over and over again. There are a couple things that happened. First of all, it saves me time. And secondly, it make sure that all of the circles air the same size. So I'm doing control D, and you can see that duplicated it. Control de. And I'm just going to keep going around doing the same thing. And you can take some time to fiddle with it and make sure that it's all everything's lined up the way that you want. So for example, this one I think I didn't put quite low enough, so I'm gonna drag it around. This one is a little too close to one side, so I'm gonna move it and so on. Okay, so now you can see the next thing I did was I added a flower and that is an icon. So I'm going to go to insert Icahn's and I'm just going to do a search for a flower. And here's one that I used, So I'm inserting that. All right, so now what I want to do is I am going to select every part of it, and I'm doing controlled G. So that way, as I make it smaller or do anything with it, it automatically adjust everything you know. So it makes all parts of it the circles and the original son on the flower. It adjusts all of them at the same time because I've grouped them so you can see appear. What I did is I duplicated them and I joined them together. So again, I still have them all joined together. So and I still need to make this a little smaller for them to fit. I'm gonna do control D and I've got up here. I've got 512345 someone a duplicated four times Control. De. I think that was four. What's move one over here. We'll just kind of move them over, so I have room to work with them without them being all on top of each other. Okay, now I want to join these together at the triangle. Can I just scooch is went up a little bit doing. I'm using the up arrow, make it line up a little bit better, and we'll do the same thing here. Line it up. Same thing there. And they're now Aiken Group all of these together in control, selecting all of them and then control G and I can drag from the corner and make it larger . Make all of them larger at the same time. And then you have a nice border. I could Let's say that I let me get rid of this one here. So let's say that I wanted to put this at the top in the bottom of the page. I would do controlled the and then just drag the other one down to the bottom, and then I've got a nice border. Now, obviously, this is kind of cramp. If I was really going to use it on this size of page, I would probably make thes quite a bit smaller and put more across the top. Okay, Now I want to show you another design that I made and I started off with this lotus type flower. And I'm gonna show you that from an icon here. This is an icon and then flower. And you can see I took this one here, this lotus flower, and I'm inserting it. Now if I just insert it, there's there's really nothing I can do to edit it. However, if I quick on the outline of it so that it's selected, I can convert it to a shape and then I can right click and I cant ungroomed the shape. Now I have all of these individual little pieces that I can use in my design. And so that's what I did there. You can see that this me en group, this part this part right here is one of these you can see. I also use that inside. You can see that I use this shape right here. And what I did was I did shape outline, black shape, Phil. No, Phil. And then I made the outline thicker. But you can see right there that's what I did. So I just Addison circles there. This was a rectangle shape that I added, and what I want to show you right here. Is that. Remember how we had talked about merging shapes? And I merged a rectangle with some circles. I combined them. That's how I made that little scallop design. Okay, so I'm rather than just rebuilding it. I just wanted to show you and give you an example of what you can do by combining shapes, icons and that type of thing. Okay, so I wanted to take this design a step further, and I did so by creating this. Now what I did is I started off again with this design, and I combined them. You can see it's right there and right there and right there. And then once I got going, I was like, I wonder what else? Aiken Dio and I added, This little like curly Q kind of thing is another icon. And then I added a diamond shape. And then I put a heart inside of the diamond, and I just kind of kept going. Now here's what's something that is kind of fun, and I would like to challenge you. To do this is look at different icons or shapes either one, and think of how you could potentially use parts of them in a design as an example. I just want to kind of point this out and see if you can guess what it ISS. And so I'm just going to give you a second to see if you can guess what that was originally . Okay, Now I'm gonna show you. I'm going, Teoh, insert an icons again. And here's a butterfly. Okay, let's move this up here. So what I'm gonna do is I'm just going to shrink down this main design, combine it all. And then then we'll do the butterfly, and you can see how I deconstructed it, and then I was able to use it. So let's just make this tiny and let's put the butterfly back on here, and I'm gonna make this light big again so you can see it. Okay, So what I did was I turned, I went to graphics format, and I turned this butterfly into a shape right, clicked on it and ungroomed it. And then I had this little design here, and we'll go back in a minute and I'll show you again where it's at. And so what I did with this is. I gave it a black outline and I removed the fill. And then I had that design that was part of the butterfly. And now you can probably see I've got the butterfly, this part, this part of the butterfly there. And then I flipped it upside down and joined it there. So I give this as an example not to say copy this design, although you're certainly free to do that. But to say, look at all of the different shapes, icons and things like that, and play around with taking a piece of this and a piece of that and combining them together . Now what I did when I was working on this, I was just watching TV and I just kind of kept adding, I started with this flower and taking the shape and removing the and then just I just kept putting different pieces together. You can see here I have essentially this thing without the fill going this way. And then I flipped it and joined it that way. This one, I used a bigger piece of it. I added circles and so on, and I just kept going and going Now at this point, It feels like something should go in here. Maybe I would insert a flower icon or some other icon in here, and basically the bottom line is I just kept adding things to it. I had no idea what I was going to create when I started off, So I definitely recommend just playing around and seeing what you can come up with. And you'll end up with really, what's essentially an unlimited amount of options that you can create by just combining shapes and icons. And if you desire wing wing dings and ding beds and all of those things as well, and you can end up creating a design that is unique that nobody else has made, you can do it 100% for free with free tools within Power Point. So I want to give you one more example of this. I'm going to start with this wingding that I showed you earlier how to remove the Phil and I change the outline to more of a hand drawn effect and so on. So I'm gonna start with that and I'm gonna make the outline a bit sicker. I think I like that better. I'm gonna move it down and let's say that I wanted to create some type of a night scene. So I'm gonna go to insert and let's do an icon and I want to say maybe a moon. Let's see if there's any type of Okay, I like this one. I like the crescent moon with a couple of stars. I could put in thes planets. Anything else? But I'm gonna do that and actually, let me just go ahead and start with this one. I'm just gonna move it up here and make the outline thicker. Probably don't want quite that thick and then just kind of play with the sickness and see what I what I like. And then maybe I want to add some additional stars and make this just kind of a starry night kind of scene. Let's go up to again toe icons and I'm just going to type in star. And how about this one here? There's three that are different sizes already. I'm gonna put it up here. All right. Now I want to ungroomed this so that I have the stars individually and you'll see that it says this is an important picture not a group. Do you want to convert it to a Microsoft office drawing object? Yes. And then I'm going to and group it again. And now I have these stars individually. I could have also one group, this one and used these stars as well. So what I'm gonna do is I'm just going to duplicate thes and think I actually want to start off with him being smaller. So I'm gonna temporarily regroup them again and make them smaller. And now, while I'm group them again and I'm just going to randomly duplicated and spread these all over the sky. So I'm just doing control de over and over again. And I'm going to do that with each of the stars and just kind of move them all over the place. Okay, let's do it with this small one now, same thing. And now let's do with the bigger one. And again, I'm just randomly I'm not really giving any thought to this. If you wanted to, you could be real precise with how you do it. But I'm just being random right now. Now, here's a new, interesting way to speed this up. Once you have duplicated some of them and spread them out. You congrats up some of those and then duplicate it, so I just did. I just selected all of them and did control G. Now I'm doing controlled D and I'm going to move this. Oh, I don't know, like, here, and you can see that I very quickly added more stars. Maybe I want to take a little smaller section and do the same Something to do. Control G. And I've got a few there that I've duplicated. And Aiken, just a few that I had grouped. And then I could just kind of spread them out and so on. All right, so there you have it. There's just multiple ways that you can combine wing dings, we bad sting beings, whatever dingbats, wing dings, Web beings, whatever you want to call them, you know they're called different things. Different places. That's what that is here with icons. And you could do it with other images and so on. And then you end up creating a page that is unique
13. Your Project: congratulations on completing this course as your project for this course. I'd love it. If you create at least one coloring image and share it with the rest of us, you can create any type of image. For example, you can turn a photo into a coloring page, or you can use shapes, icons or dingbats to create an illustration. When you complete your illustration sharing in the project area of this course. By the way, feel free to share your project in installments. For instance, when I created this coloring page, I started with this image which morphed into this and finally into this. You may experience the same thing, and by all means don't wait until your masterpiece is 100% complete. Before sharing it, I'd love to see it in the various stages. If you have any questions for me or need help with anything, be sure to post in the discussions area of this class. And if you enjoy this class, I'd really appreciate it if you leave me a positive review. Thank you so much and happy creating
 Rebecca Livermore, Microsoft Office for Creatives