Transcripts
1. PROMO: Hi, my name is Marina Abramovic and I'm an
artist director and animator. In this course, I'm going
to teach you how to create cartoony characters out of,
in animated afterwards. I've had a long
career in animation, designing character and
illustrating books. I've learned one thing, that's the first steps
are the most important. Another thing I've learned
for us my career is that it is important for two characters to look
likable, appealing. Now, why in animated objects? To find a character
design is a job itself, but to have to deal
with anatomy on top of that is also another thing. Humans and animals have
very complex anatomy. That's why they're
really hard to draw. Drawing in animated objects can get rid of this
problem altogether. You can choose very
simple objects and turn them into
cartoony characters. In this course, I'm
going to show you step-by-step how to do that. It's going to be fun and
it's going to be easy. And I'm going to show you a very simple method of how
you can design any character. If you're a beginner
and you've never drawn anything is
this course for me, on this course is
precisely for you. Because the methods I'm
teaching is really, really simple and
anyone can do it. And you're not
gonna struggle with perspective where it's anatomy
and, or anything else. So let me show you how
you can design fun and interesting cartoon characters
out of inanimate objects. Follow me in this course. You won't regret it.
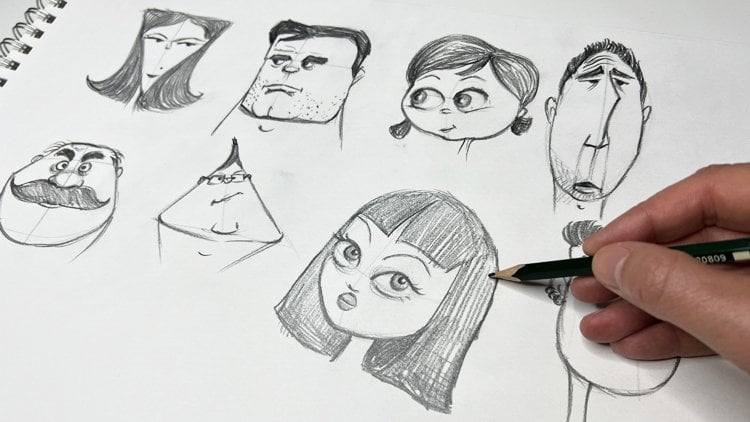
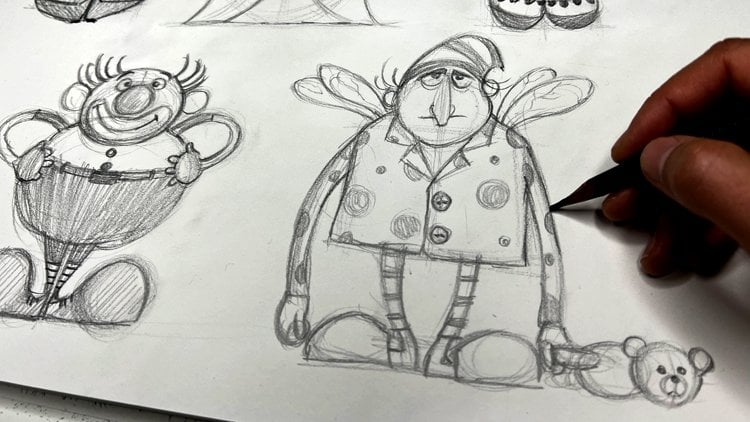
2. WarmUp: Hi there. Now before we start
drawing for real, Let's warm up a little bit. What do you need to
know here is that you have to sketch
with a loose hand. This is something that we
need to get into practice. And if you've taken
my other lectures, you know, what is
this all about? So this time instead
of only spheres, we're going to draft curves. We're going to work a lot
with curves and with spheres. So just drafts and
curves and work with several lines
at the same time. Don just make a curve like that. Just even though you
can do it right. Get used to, to draft
the shape first. We'll fund you arm
and draw freely from the from the wrist down and just draw random
curves like adult. So it creates an arc. We're going to work a lot with RX because cartoony characters, even though we draw something
that is not a curve, like a fork, for example, we're going to try
to put life into them by giving them a nice arc, but I'm going to talk about
that when we get to it. So draw some curves and now
also draw some spheres, embryos that have been
here before with me. You know how he draws fears. We go withdraw it from
the shoulders down, moving the whole together and just dropped a couple
of spheres like that. And you see how you
can build the shape. Or you can see the
shape coming along and you kind of draw
a clear sphere. So if you go on with a
thicker line on top of that, it will be easier for
you to draw a sphere. That is pretty much correct. So let's do a couple
of these exercises. You see that you
start with a scribble and then the more you draw the proper sphere
becomes again with loose arm. And again for those that are
new with me on this lecture, redraw with the blue
and the black pencil. And that is because if
you are a beginner, you want to draw perfect
drawing from the get-go. And if you start
with a black pencil, It's kind of feel like
you're drawing is complete. But before we find
a real drawing, the real shape of our character, we want to try it out. We want to sketch
in the beginning. If you draw with a blue pencil, you trick your mind to
believe that this is not, this is not a final drawing yet. I can, I can experiment here. I can find the shape. It doesn't have to be concrete, it doesn't have to be final. So you have more scope and you have more freedom to
experiment with your drawing. So this is basically just for your own sake to get
rid of this fear, doing it in the wrong way. So now you've had some
warm up and let's go ahead and start with
our real exercise.
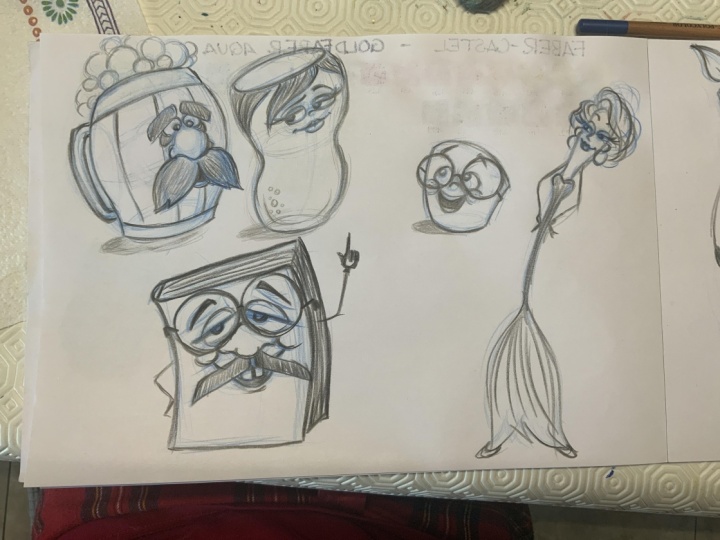
3. Fork and Spoon: Welcome to the
first fun lecture. We're going to design
in animated objects. And we're going to start
from a fork and spoon. So how can we make this into
fun, cartoony characters? Now, first, let's start
with designing an arc. Even though the fork
is straightforward, we want to have a character look like as if it has a spine, or spine is bent in
certain directions. So we're going to
start with designing a simple skeleton and a simple
structure for the fork. Let's start with
a line like that. And we're going to
have another line like that for the spoon. What kind of characteristics
we can find for spoon and the spoon and the fork. So let's have the fork
be a male and a female. What can we take
from these shapes to look like a male or female? Let's start with a fork here. Without a male character, we can have spikes here, a look like a hair. To draw the spikes, I'm going to rough out
something like a shape. So I'll just draw an egg shape. And again, and the way I
showed you, where loose hand. Here you'll see why
we have to draw the little sand just
to find the shape. So the fork will be contained
within this X shape. And we're going to design
something like a bottom. So we said like here is
going to be the Forex. Feet soldier saves. It's not gonna have feet apart. It's going to be the
surround thing of the fork, and we're going
to exaggerate it. The fork Wolpe turns with this shape up and we're going to do the other way
around with a spoon. We're going to the strand
to spawn web shaped down. Because we can do anything, It's good to me characters, we can design them
the way we want them. And you can see how
easy it is to create simple characters by just using animated objects that
you have at your home. So we'll design the
spoon here and we'll do the same shape for
the spoon over here. Something like the
ending of the sperm gonna make up a little
bit around egg shape, like this is enough
for us to start. We have the structure of
this character's a cell. Now let's decide
how they will look like while the forecasts
these spikes here. Let's design the spikes
within this egg shape. We can do that by splitting
approximately this shape in for sparse because we have the four spikes
are therefore Pk. One is going to be here, another one is going to
be here and draw roughly. You can see the
shading almost off the spikes and approximately, approximately design
and even shape of the fork like that. And this is also going to be
the face of our character. Here. This one is going to be like her dress the
dress up or characters. So we're going to
design the spawn. We're just going to
continue this form here. You see that the egg shape
is already given when you draw winds like that's a
rough lines like that. You can find the egg shape within these lines
and just scribbles. Here is going to be the
round shape of the spoon, like this one, but this is going to be the head corresponds. So you just thicken the lines that it's already given from this
egg-shaped forum. Continue on both of the both
ways of this spine here. Rough it out down. And you see that even though
the spoon is in animated, just adding this curvature to the character gives us
our character like moral. Living as if an
nonliving creature. As if the spoon is kind of
having fun bending towards the fort as if they are having
some kind of discussion. Now, let's continue with a fork and actually do
the other way around. So we're going to connect
the ending of this sides. The fork. This round shape here. Make it look as if this
fork is having it. Feet of here. That's what y is so easy to draw characters with an
animated objects because you don't have
to worry about anatomy. Human anatomy is
a complex thing. And when you try to find arms and legs and there is bones and muscles under it and it can get difficult very
easily if you're not familiar, if you're not used to rip and if you're
a beginner and drawn, drawing in animated objects
frees you from this problem. Now, we are going to have the face of respawn
being over here. And we said she's
going to be female. So we are going to design
cartoony eyes like spheres. And she's going to have big
eyes because they're going to match this shape
here like address. And she's going to
look at the fork. Let's design some lashes and her eyes is going to be slightly closed like she is nice female
and this curvature here, but it will also
signify eye lashes as if there is a kind of a Florida kind of
game between them. Will have her eyes looking here. So another sphere around here. Here we have female for
almost coming to wife. And she's going to have
her mouth over here. So draw another small sphere, or an ellipse, egg-shaped
ellipse for the mouth. And just draw two lines on both sides and continue the line insight
to draw her lips. And that's basically
all we need to do. Now let's design even
our male character. He is going to have
maybe his eyes here. He's going to be tough male. And we're going to use actually
this shape of the fork. Maybe design some stashes. So we're going to
continue this shape and continue down with
two other curves. And this one will continue. We'll have another curve up. And this is going to be
the males and starches. And now we're going to put on some eyes of these character. And he is looking at the female. And let's have him
have some eyebrows. Thick eyebrows, just two curves. If you draw them just loosely, you'll get the eyebrows
automatically. Now, let's shape the
spikes of his fork. So we see that it has some
kind of a triangular shape. We can just follow the
egg shape that we did or part of this life
that we quickly drew. And now you can
see how we can use dots because we
have so many lines. It suggests to us what
the shape is going to be. Draw these spikes as if
it is a character's hair. They're sharp. So it suggests
a small masculinity. He stuffed guy. And this one on here is female. She's nice and tender
female character. And just draw the rest of
the shapes better off. Now we have the spawn over here. What else can we do? We are going to give them arms. So the arms can be very simple, just the line and the
male is going to have his arm band on
his on his waist. And here we can decide that the waste is going
to be approximately here. This is just up to you to find the proportions
of this guy. So just rough out the curve with another curve tells
make some fingers. The other arm is going
to go like that. And if you don't know how
to pull certain things, just look yourself
in the mirror and see how your arm bands. When you do some posts, this will just help you
to draw your character. And we're not going to
do complex arms here just in those simple shapes. And it has some fingers
just signify them. Just like stick figure. The female character,
she'll be alike, just trying to play
hard to get all my, you can have a dialogue
for these characters in your head to help you find the gestures
of your character. So she's going to have
her hands bend on the other direction of
where she's spending. Kind of like put
her hands together. So just put some fingers
bringing in loosely like that. Just with as a stick figure. So now we have our characters already done and we
can see who they are. But let's go with
a black pencil and define the characters better. We can see how
they come to life. I'm gonna do that in
the next lecture.
4. Refining the Fork and Spoon: Well, welcome back. Now we have our
characters are already done with a rough sketch, and now we can go with
a black pencil and basically just go
over the lines that we like and ignore the lines, dots we don't like. Add some more features to make your characters
look even better. You can design a whole
movie like that. As you know, you've
seen the Disney movie, Beauty and the Beast
where the whole castle, they're older and all
the objects come to life and become
animated objects. They all have their
own personality. They have different
character traits. Now that I have this curve here, I make another
eyelash to give her more personality and signify
that this is not a mistake. This curve is not, therefore no reason at all, but it is to signify
that it's an eyelash. I can enhance it even more. Now. Can enhance the
eyes, the pupils here. So we just continue to
refined or characters. Discover who they also are. Define the features. Now we can have the
mouth here and make just a little bit of
bending for the upper limb. And continue to draw on top of the blue lines for the upper lip and
define their lower lip. It's the lower part of this spear or an
egg-shaped that we already designed and shaded a
little bit like a lipstick. Let's continue with the
upper part of the spoon. And now it's very easy because we have this blue
shapes underneath. Because we've drawn
my new lines. We can clearly see which one is fitting best
for our character. And we will have the spoon
be a little bit thinner. Here in the middle. Kind of a small waist. Dust. Think of what you can turn the features of each
in animated objects, how you can make it
more human-like. Because the characters, each character redraw
is actually ISA, is just a human. We recognize ourselves in everything we see is
basically we want to find the same
characteristics to be able to feel sympathy and
empathy for these characters. That's why you can design any cartoony character
from any kind of shape, as long as you put
human features to it. Human features are so different. And we can explore a different
archetypes of humans. Archetype is basically
certain traits for a certain character. That is more of a
general, general traits. We have female that is standard, that has small waist. Of course not all characters, not all feel miles alloc that. But we need to generalize
when we create a character and then when
we have generalized that, we can define the features
and more of our personality. Now we can just see how
the hand is like that. We can describe that. Just went live. Basically super simple shapes. You don't need more
than that to design a simple cartoony
character of a spoon. The female is done. Let's design even
the male character. Define the features on
top of the blue lines. And the eyes like that. So you can live a small white dot in
the middle of the eye and it looks as if
it's if it's glossy. If there is a light hitting the pupil and makes it more
alive, more human-like. And he immediately with
such a simple technique, he just keeps life
to your character. You can grab this character
later on and just put it in any program. In digital program and color it. Now actually, what
I'm seeing here, this character, I'm unclear. I'm going to make
this Stash kind of all even shape and
I'm going to use this part of the
character to have a lip, lower lip of the male character. And I'm even going to
design some kind of a chunk of hair on the mustache. Give it even more personality. What kind of thickness
this Mustache has? I'm going to shade it. So it's a dark, dark most stars like that. And now I'm going to finalize even the
forks character. Because remember we are
drawing actually fork. I mean, at some point
we might forget them because the character comes to live and it looks appealing. You can look nice. You don't thing it's a fork, but it has a fork. You can think of
what kind of day, what kind of habits
these forecasts, how would it woke? Maybe this character is just jumping in because it
doesn't have legs. It jumps and this
character might be just moves like that
because she's more tender, is feels like this is her dress. And hello our bodies. So it kind of like slides as if she's dancing while
this male character, let me just jumps. And justifying his body. You see how simple it is when
you use these basic shapes, you can just draw anything. Also, you train yourself in confidence because
if you dressed, Draw with the black pencil. You wouldn't know where
to put things and it will be very easy for you to fail or to think
that you fail. Because you don't have
a map on which to draw, because this blue lines, he's kind of r or characters map shows us where things are. It makes us explore
the characters. Here. Again, you can look
at your arm in the middle, how this shapes are going to be. So just make a silhouette,
just stick figure. And that's all you need to make your
character feel alive. And just decide which lines
here you want to thicken so that it looks good. You have a nice, nice curve and have this fingers
again like a curvy line. You'll see how much
help we get now, when we've practiced to draw a curvy line
in the beginning of the lectures because
everything can be described with this curvy line, with this arc, basically,
I'm like that. And now we have our two
characters talking to each other. These are the first in animated object of
a fork and spoon. And let's continue with some other fun designs
in the next lecture. See you there.
5. Designing a Teapot: Welcome back. Now, let's explore
some other designs and there are so many
in animated objects, so we have a huge choice. Why we started with
fork and spoon. Let's go with some kitchen
attributes as well. Let's design a teapot. One thing that we can
think about that we can, we can gather references of what kind of teapot
we want to have. But to start with, just try to simplify whatever
teapot you have done, draw too many details because we can focus on the
character instead. I'll start with a sphere, a little bit
egg-shaped, an ellipse. This is going to be the
body of our teapot. Again, teapot is rather round, so we can think of our design of a character type that would
have this round shape. We can add characteristics to
the objects we are drawing. We can add the middle line
or a spine on this teapot. So just draw a middle
align like that, a curve of wine. Now teapot is less curved spoon and the fork because
they have slender body, if we are to say that they're
that they're long shaped, they have is actually a body. And this one has a
rather chunky feature. So what kind of character
can we make up out of duct? We can associate a teapot
with some kind of old ladies, old round ladies
that like to bake. This can lead us into
designing a character out of a teapot that is
associated with that. So a teapot has also
something like a comp. Let's add this gap as maybe a
chunk of hair for the lady. Just rough it out before you know how you design
is going to be. You have to be pretty loose with your characteristics
because none of us now know how this
deep body's going to. Turned out. We have an intention of what kind of a design
may want to have, but we're trying it out. And now the tip
board has a handle. We can either make an
arm out of the handle, but that requires that
the teapot is going to be in this position
all the time. So if you are going to
animate this character, this arm is going to be bent. As soon as you try to do
something with a handle, the arm, the shape of the
T portable disappear. So let's design this
character without arms and use the shapes that it
has and see what we get. We've has a handle here. We have the spout here. We're going to design it
little bit like that. It can vary, just
try to imagine them, but also maybe you can
find some references. Sometimes if you have
too many references, you can get stuck in details. So it can find a
teapot that your wife, but then just try
to play around with the shape that you know, a cell. Now we have kind of a teapot like that and we can bend it a little bit in
this direction. And now we know that this
is not only a spine, but it's signifies the
middle of our character. And we can choose here where
the eyes are going to be. Are we gonna draw big
eyes, small lies? This is up to you, but we want this to appear a little
overweight older lady. When you want to have a
body of beer or bigger, you designed the
details smaller. I'm going to have the eyes of this lady to be
approximately here. And one, while I'm
drawing sphere, this is just the spot I want to have where the
eyes are going to be. You can signify and
have M51 help lines, whatever you want with spheres. So the eyes are going to be
here and then this fine here, our disk curvature will signify the middle line of
this Potts from which each side of the port
will be symmetrical too, as if it is a body
of this character. Now we're going to
have the eyes here and we're going to even
design and small nose. And we're going to have. Some small little mouth
and just draw a shape. And we're going
to have big lips. Just draw another sphere. Curvature that will
signify a smile. Now let's draw the
eyes of these lady. And if you have crossed, this is a signature for
the cartoony characters. Because cartoony characters are cute because they
remind us of babies. And even though we
draw an old lady, if you have a round
eyes and they're cute, the pupils are little bit
crossed the ICT, Danny, remind us of babies
and they look cute even though if we describe
and all the character, this is a no trick
that is discovered. Party all artists
at Walt Disney, that characters look cuter, the bigger eyes they have. Because our brain work
always with associations. What we associate
certain features and types of just like, let's make a game the
eyes with the eyelashes. It's going to be a proper Porsche little lady
drinking tea from a teapot. And maybe here we want to have, maybe she'll have double chin. Now that we are talking
about characters. And we'll have this double
chin a little bit here. And now we already have
oral character's design. Now, let's add up the details
here and route them up. And you see these shapes. This curvature and this
round shapes already suggests to us where this
handle is going to be. We are going to round
it up like that, maybe find some kind of ending. And they are ending
approximately on the same line. You can put it on the line here, but you can also
just have them just before the line and gives
them more perspective. And then it gives more volume to the character perspective. When you're designing
things in perspective, it makes the character
look three-dimensional, which contributes to how believable your
character look like. But of course, this is
also a style thing. If you design something
in perspective, you should just keep up
this style of fruit. But there are many other styles that you can use in your design. You can have decorative style, then you don't have to worry. So much about perspective. Quite the contrary, you
can twist the perspective. You can tweak it in
a way you want it. Now we follow this shape here that we designed,
this ellipse. And we see that
where the cup is. If you squint your eyes
and look at the shape, you will basically see that
these scribbles here of lines is actually suggesting or whether next shape
is going to be. One thing to find the shape is when you
do the like that and you're just a rough out your drawing and you
squint with your eyes. And even if your
drawing is not correct, you will see the shape. Try it out and see how it works. And now we have this teapot
already done almost. And here we have an
old lady as a teapot. Now, let's define it. This character with our black
pencil to see what we get. And we'll round out this shape a little
bit like that here. It can add more ornaments, you can add anything later on. Let's, let's make it clean, clean design like that because we can easily
see the character. Then we can, you can
add patterns as flowers or round adults because this is still an
animated objects. So you take the
characteristic of this object and turn it
into a character that also suggests something about how this object is used
in the daily life. And also make, make
your viewers or your readers or whatever
you want this design for to have a better feeling, embed a sense who
this character is. You see that I'm
just going on top of the blue lines and defining the BlueLine that
was already there. And we started with this just sphere here
and the scribbles here. But the more I advanced in my drawing and the more
I keep the lines loose. The better I can see
later on the shape. And these blue lines
are non disturbing me. One of the things that
the beginners wanted to have is they want to
have clean drawing. Don't want to have all
this mess around here. We have the event expression
down the color outside the lines will do color outside the lines if you
want to learn how to draw. Because in the process, you will learn to love this, scribbles and is mess. And it will look more appealing to you
than a clean drawing. You will see the process of thinking and the character
becomes more alive. Because our process, thinking, the creative process,
is an exciting thing. We want to see. What it looks like in the
kitchen of people we admire, whatever they are artists though their shirts, they're cooking. We want to see the mess out, how to do stuff, how something comes to life. That's the same
thing with drawing. You want to see your kitchen. You're drawing kitchen. So these lines is going to be more and more
exciting for you. The more you draw. Now we have the mouth and let
us give her some lipstick. She has tried. This old lady. You see justice little chain here is giving her this
old lady character. And maybe we will add
another line as a chin. And we can add some
kind of freckle. They have this modern freckles that they used to
do that before. And old ladies
sometimes still put it on because they
experienced that this was or best time when
they were young and pretty and delta times maybe they
added a freckle like that. On purpose. No, we are
trying to get rid of those. But sometimes before
there were modern. That's how time
changes and you can use these features
and everything that people do and create can be
contributing to your design. So be observant. Not about being judgmental of
how people do and say like, why did you do that or do dots. There are differences is
what makes us unique. As a character designer. This can make you great character design them
because you can add contributes like dots and
make your design even better. Now this is our teapot. And here we can add maybe as necklace and ornaments
of this old lady. So we'll add a
spheres like that. This can be a little
tricky because here for this ornaments, you have to find
the perspective. You have to follow
a line that is approximately similar
to this line, but slightly, slightly narrower. Because the perspective, perspective changes applies to how the ornaments are
applied to this character. Here, we can add some
spheres like that, and they go all around, so shade him a little bit as if they're
a different color. And if you're working
on a Photoshop or I'm taking it in
digital program. How are you color it? You can give different
color to this necklace. It hands us the look
of code is ladies. Here we have a nice cute
character as a teapot. And now that we said a teapot, mcons go without cup, a teacup. So let's do another
character next to her, which is a teacup.
6. Designing a Teacup: Let's do another character here, and it is going to be a cop. And it is a tea party. We said, let's start
with designing the cup. And again, we start with
a sphere OMA, egg shape. This is going to be the help lines or help shapes from where
or a cup is going to be. We can even put a
plate under the cup. So another x save. You see it's already
looks like a, like a plate because the plate has the same
round shape as the cup. But we will be designing
or characters in their best point of view so
we can see the silhouette. So I'll probably not design a
cup that we see from above. There's going to be
always be from the site. So we can clearly
see the silhouette. As a character designer. This is something you
have to think about, that you have to have
a clear silhouettes, which means that you design
your characters from them. Best angle for this character, that they look the best. This is some kind of like you're taking a picture for Instagram. You won't just put a picture
that you photograph yourself from top down and you're
trying to find the best angle. And this is basically
what silhouette is. We can see already that we can use this shape for the cup. And the cup is going to
end approximately here. And use even this
shape for the cup. Let's do the line to
see where the cups, so-called spinous
or a middle line. Again, the cup is not going to be banned as much as the fork, the spawn, because it's
also a little chunky. Will have these ladies
having tea party, teapot and a teacup. Here is another ellipse. This ellipse is going to be similar like the
ellipse of the plate, but it's going to be a little narrower because it
feels like we're looking at this gap from a litho slightly from an
angle from the top. Which means that the perspective suggests that the lower you get, The lower down we see
the warranties as ellipsis or shapes will
look like a sphere. And you know that if you
look at a cup from the top, it's a clear perfect sphere. This is a little bit
about perspective. So let us design this
garb being this way. And here we have a cup, and now we're going to have
a handle for this cup. Let's design another egg, egg-shaped but turned
in this direction. And here we have the
helpline, or Handel. Who is this character
going to be? It's going to be
maybe a younger lady. So let's have her
eyes being here. How can we have a younger lady? We can have maybe her eyes
being morph, not as round. So we perceive her as
somewhat more sophisticated. In our sophisticated is
kind of like you have this makeup that makes your
eyes look longer, wider. We can have this egg
shape spheres here. And you'll have the nice
eyebrows is a young lady. And we'll have the tender mouth. Again also a little bit
as our triangular shape. Here we have some help
lines with four dots. Now let's design the eye. Let's design her pupils. And let's see this egg-shaped. How does it lead us to
design a more longer ours? We take the upper lid, as this egg shape
or shape suggests, just elongated and
around it up and end it. If it's eyelash. Enhance the eyes. Let us do that too
for the other. Just take this shape, follow it. Elongated as if
it is an eyelash. Now we have a small nose. Let us say this lips add
small triangular shapes as the upper lip is a thinner
lips than this woman. Tender lower lip. It suggests more sophistication
for this character. She's not going to
have any arms as well. They're going to
be static objects. So if they move,
they will just jump. That's going to be enough. The thing is that when you create your world of characters, you have to be consequences. If you design these characters
not to have arms or legs. You'll have to find a
way for them to move, like jumping or glass
sliding forward from back. The viewer will not think
of this girl was like, oh well, this is
our characters that don't have legs or arms. They will think they will accept the world you're
introduced to them. The more believable and
confidence your world is that you were introduced
to your readers. If you do a children's book
illustration or a movie, animated movie, they
will accept that the characters in this
world move this way. So let's finalize or character and how do
we find the lower lid? It's going to be
slightly gentler. That's how women
have their makeup. This old-fashioned style. While the women in the
fifties and sixties, they have a very thick black
line on top and they had no makeup on the lower lid. That was the kind of
fashion they use. Then we're going to try
to make a lady like that as if these two ladies
are kind of similar, but from different generations. They're drinking tea. It's not some kind of a rocker or punk girl right
now that is drinking tea. Because we are associating certain behaviors to
certain type of people. This is a prejudice, of course, and of course that girls that listen to punk music
also drink tea. That's for sure. But we are working like that
with archetypes in design, where we can find
the best way to portray or character
and what they do. And if we find an activity that enhanced or
characters traits, it is, just simplifies
it for or viewers. And as time changes, of course this archetypes of
the archetype row changes. And when we introduce
a new character, a character traits
in a new role, we are breaking this
archetypes one-by-one. But right now, we are going
to introduce this character. Characters as ladies, lady, cop, and teapot drinking
nice English tea. Why not? You can think of different ways to
present your characters. You have to ask yourself
who my characters are. I want you to do
what do they like? Because when people like
certain stuff, they have idols. They have people they
admire and follow. Maybe they follow
their style of living, maybe they follow they
style of dressing. That's what's trends are for. Trends are adult. We have an idle and we follow their way of
dressing and living. As a county designer, this will help you to find who the character of
heroic character is. What kind of music
do they listen? What kind of things
they like to eat, what kind of parties
they want to go to. Then that's what
we'll suggest to you. How do they address how
they do their makeup, how they look or try to look? This is important because if you are doing a
book or a movie, you don't want to tell the
whole character story. I mean, the character
should stand alone. It should suggest who
this character is through design from the way you try to portray
this character. No matter if this is in animated object or if
this is a true character. And here we are using this in animated objects to
create a real people, actually real characters
with flesh and blood who has their interest
and who like certain things. So this is the cup. And because there may be set, let's design the spheres here. And the spheres is going to be this line here that
will describe where the perspective is
this going to be closer to this line
here and you see that they're almost the same
kind of shape because the perspective we are looking
at them from is the same. We are not looking from the top, looking from the bottom. So the lines that
pretty much the same. So if you know why you're looking at
your characters from, is going to be easy to follow a consequence perspective and to make it believable. I mean, if you just wrong with a millimeter and so it's
not really a big deal. We're not doing some
kind of a building here. We're designing characters. The most important here is this, how they look as characters
rather than if it's 5, 100% correct perspective. You don't have to think of design like doing it
wrong and you have to think of it as
experimenting and finding features that will make
your character look real. And here it is. Two characters, a tea pot
and a teacup having tea. And I hope you
enjoyed this lecture. Let's discover
some other ways of designing in
animated characters.
7. A Family of Glasses: Hello and welcome back
to this new section. Here we're going
to create a family out of an animated
objects using water. I've told you about, about how these objects are used and what kind of
associations we have with them. So we're going to create a
family of maybe glasses. And we're going to
have a beer glass that will be demand
figure the father. And we're going to
have this line here. Very bulky, father, beer drinking farther
from our beer glass. So how do we create a glass? Now, let's signifying
in our composition, while the father is going
to be create an NC shape, this is our beer glass. You would say, well, it cannot be while it can. What I'm going to show
you here is not only how to create a character
or be a glass, but how to make the character, the glass appear cartoony
and have a big beer belly. And how to support
these design of the glass with help
lines would spheres. We've talked about
already that we always will look at
the character from straightforward because this
is the best perspective and gives the best silhouette
for our character. In this way. The upper part is going
to be slightly smaller, the beer glass, and
it's going to be turned towards likely
in a bulk way. We want the stomach out the
beer glass to be chunkier. So we are going to create another sphere here
as the helpline. Even though we already have this egg shape here,
as you see that, it's already helping us where this stomach is going to be. We're going to have
the foot of the glass. We're going to go for another
ellipse shape like about. And here we'd have kind of
top, middle, and bottom. Now you're going to
connect this fierce and we're going to use
both these help lines and this egg-shaped
sphere so that we've drawn already to help us draw the B a glass as a bulky male beer
drinking character. The same time as we're
going to think of a glass. How does beer glass look like? You can find some references of how a beer glass
will look like path. I'm just going to use this
very general carnivora, a reference of beer
in class where fx is chunky sections
in the middle and really chunky handle,
big chunky handle. This is going to be or farther. And you see we only followed this help lines
that we've designed. So as soon as you learn how
to draw with the blue pencil and how to design this help lines and not
to be afraid to try out. Your job will become
so much easier. Now, we're on the face of the
Father to be around here. So doodled out like a
space kind of thing. Now and this is going
to be his stomach. And we're going to design then the handle on the back
of this character. So let's have the handout as
another accept thing shape. And this is going to be
this chunk key handle. Basically. I mean, we have this all
figured out already. Now, let's design maybe a little bit of how the beer
glass will look like. Also. They have this junkie
shape on the top. And we're going to design that. And you see this line
follows a little bit. This line, although
it gets a little narrower the closer
we get to the middle, because we're looking from
the glass from the front. So this is going to be this chunky part
of the beer glass. And then we're gonna
have this kind of section go down the way. And that's going to be
another chunky porch. Very roughly just
designs some kind of common beer glass that you remember that's if
they tell you Barry. That's what you want. Think about, they'll
bring your beer in very roughly and to
leave it like that. Now let's get the
phase shifts in Watts. Do this beer glass have how, what kind of characteristics or drinking father
have we wanted to have a father that is keratin, but you would have
maybe a big nose, a big nose forward. So let's design another
sphere for the nose. And you know, if you
drink a lot of beer, you guys a big red nose. So even comment design
a nostril here. Glass is termed a little
bit three-quarters. It means that it's
not face towards us, but a part of the face is hidden in the nose
is really big. This other nostril will
be approximately here and the bottom of
the nose sticks out. We'll cover it. If this is just sticking out. Where are the eyes of his
father is approximately here. And then remember what we said. If we want something
to appear bigger, we'll make other parts in
comparison being smaller like now we don't have
really a body for this character because it's
just an in animated objects. So we will have to invent how the body will look like and
where their body is gonna be. You can put even
this face over here. Over here, it's up to you how you want this
character to be. I'm going to put some ice over a year on this
father and now I'm gonna have him have this
bags under his eyes. And what else can we have? Now? You just see
a scribble around, but this is my thinking
process and I hope you follow me here in
this thinking process because that's how it goes. You just design everything
at the same time. Then you're referred out a
little more, a little more. And then when you have done, you just go up over the
black pencil and refine it. This father is going
to have big eyebrows, bushy bushy eyebrows. I'm going to get to have another chunk spheres
for the eyebrows here. And he's going to have
this big mustaches. I'll say, well, this mustaches or a garden
to be around this area. We have now just drawn sphere of sense with my
character out of that. What are the different,
The most routers, if this is the middle line of the character because this is the spine and this is the middle line,
approximately here. It's symmetrical with a spine. Now I've moved to the face
a little bit to this side because this could have been
the center of our image, but I've moved it a
little bit because I felt it's going to be more interesting if we see
the surround shape and the bulkiness will
look better if we have the stomach being over
here and he's like showing off in this way so the silhouette gets
better and you can do that. There are no rules of where
you should put the face. You can always put it
wherever you want it. But you have to keep the lines loose and
you have to try it out before you actually
find your character. So I'm going to design one mustache here and
another one here. I remember if I have the
middle line here that separates the face and two symmetrical parts
from that point on, you can easily can
find the symmetry. This part of the face
will be slightly smaller because there is a perspective
change going this way. This chunk of most thou
shall be slightly smaller than this one and just shake
it out as an egg shape. Now when we have that, we can end up there mustache here with a slight triangle and connected to this line of the sphere or egg shape ellipse. And the same one here
and this mustache, it will stick out a little
bit and maybe we'll have now he knows that
when you have mustaches, you can see a part of the lip underneath
those dashes over here. Now let's design the eye to give some life to this character. And you'll remember for
cartoony characters, even though a character
is a grown-up, just drawing around the eyes and giving them a little
bit of a crossed, I'll look, give them this
cartoony child is like, look, that challenge that
children would like though to
recognize themselves even in bulky junkie beer glass, because they look like they're, they look like kids. Now it's easy to
shave the features. Now follow this fear
and draw the nostril. And now we have, you'll see that this
fear is designing the nose is just given, whereas this sphere
is behind here. But what do we see? We see part of the nostril. So just draw out this
part of the nostril. Let's shave their mustaches. And they're just
given because we have just our homework before doubts. And now we can have
some element here, make a chunk of hair for demo stashes so they
become more alive. They become more cartoony. Now you are allowed
to give texture and graphic elements
to your character, like this chunk of hair
to symbolize that this is a really thick hair. And maybe we can
have the mouth open. Shade it a little bit further later on to help yourself see that his mouth is
open and this is lip. And all we did was
everything prepared at just what fears. And let's get this
handle some volume. So it's going to
be a thick handle. Just repeat this line
that is over here. Repeated a little
bit now or next to the glass body and
it disappears behind. It's going to be
on the other way around and it's
going to be behind. And again, this character
will not have hands.
8. A Dad from a Beer glass: We have our father character. Let's start polishing it. Where the black pencil
now is just party time. No, it's just gains. Because it's easy.
You don't have to wonder where things are, things Sarah, given to you. I'm repeating it over and over because that is so important. I've seen that even from
my previous lectures, some of my students, I'm very proud of
my students because you guys are amazing staffer. It's so encouraging to
see how you progress. But some of yours
still just afraid of doing this blue lines and afraid that you're
going to mess up. That's why I want you to see and to know that
each character, no matter where you
draw these blue lines, these fears, if you'll learn
to do them ever doubt fear. They'll help you
get your designer ready before you
even start doing it. You can explore
things like doubts, you can test it out. Don't be scared to do out. Well now this bushy eyes, I can do some chunks of hair, the same thing that
they did here. And I didn't even
have to have done download the BlueLine
because now I can explore the shapes they're
given to me and I can just add these features
and I'll shade in black. It's black bushy eyes. I go from one detail
to the other. Because processing is enjoyable. You should jump out from one detail to the other
because if you get stuck, only one detail, you
might lose the sense of proportion and most
to the character. So just leave one detail, go do something here
and do something there, and just go back to
more final details. Because our brain works this
way that you get stuck. If you just start
polishing one thing, your brain just follow, zooms in here it's like a photographic lens
starts enlarging things. This is also typical
if you start doing it from maybe starting designing character
from the eyes and then you just keep on
adding details here and you forget about the whole I start getting
bigger and bigger and you finally find
out that you don't have any place to put
the body and say, well, how does this happen? You know, I thought
I was in control. Now these bags under the eyes, you see how the father
gets chunk here. It gets mainly or you
know what I mean? Like we recognize these kind
of guys that drink beer, have mustaches and
goofy kind of guys. Comfortable, nice, goofy fathers that are
drinking beer and watching. Maybe I don't know, football. This is this archetype thing. Dots I'm talking about. It's just so easy to design
characters when you know, when you try to have an archetype in the
back of your mind. And the thing is
that if you have that for your book or something, you can break this
archetypes by giving a certain look of your
character and then surprising the viewer
where to having the character do
something completely different than what his or her archetype
will suggest like, for example, having this
father not watching films, actually loved watching
fashion shows. You wouldn't think that
the father will drink beer and watch fashion shows on TV. And thus will alert to your
viewers like wait a minute, who is the scale
that's interesting, and why is he acting this way? You give more depth
to your character by breaking this rose. Now we adjust shaping the real new message
object basically because we can forget that this is
not just the character, this is also a beer glass. That's what's so fun to make in animated objects as characters
because they're so simple. You don't have to
think about anatomy. For human body. You just have to design a cup. And you see now that we did
this bulky cup like dot, I mean, you'd come to see the
real cup, the real glass. I mean, you can't see the
real beer glass like that, but we designed it like that. Now it looks like
he is a chunky guy. Now, let's have some phone
B or form popping up. You can do it with
blue pencil again, just to rough it out
like small chunks of spheres like that. Because it's going to beat
us as symbolic phone. We're not going to draw
photorealistic formula. We draw every single
bubble popping out. We're going to look for
this shape over here, this sphere, this sphere, and maybe this via just a
bunch of spheres like that. And if you see the Hall of it, it will look like a beer foam, like a collective amount of bubbles and not just
one bubble at the time. There was a time when
I was a beginner. I didn't know which detail I would choose to bring forward. What kind of foam and how, what my character look better. You know how many
details I had to do for something to stick out as
a beer foam for example. This is something
that's this can, this lecture can be helpful. Whereas the balance, what do I need to do to produce
to look girth? So you don't have to do
the whole beer foam. This one is enough and just add some shading at the bottom. So to signify that this glass
is standing on the ground. This beer foam actually look
like the father's hair. This is also an element that can contribute to your design. Will shade the most stars
black mark if you're working on a program or in a digital program or shading or your coloring it later on. You can do that and
just fill it upwards, darker color and brown or black. And it's going to add some
contrast to the beer glass. Maybe you can have
some beer here, but because now we having
black and white drawing, it's going to be just messy
sun going to leave that out. But if you color it, maybe you add a
half of the glass, like a beer glass and
it's transparent. Here we have our male character. Now, let's design the mom and what kind of glass
is she going to be? Let's do that in
the next lecture.
9. A Mom from a Water glass: Let's design the
female character here. And we can have her be a wine
glass if this is a team, like a beer Dad than
the Hawaiian mom. This is one way of doing it, but I'm going to do a
water, a water glass. This is a graph that
I'm having here at home and ikea water glass. So I'm going to just design
the curvature of the spine. There. She's little
bit more band and Chu to stand next to him. So she'll be approximately here. Just signify that with a line. And now I'm going to do two spheres on top of each
other because this water glass is split into it has like a lower part has like our upper part kind of
like a time glass body, like female body with a waist. That's why I'm
choosing this class. There is some kind of
curvature in the middle. I can even show
the glass I meant, but of course I felt it
was chunkier here because I'm doing it from
my imagination. I'm going to maybe have this part of the
glass being around here and just have
another chunk. Like so it's like the female
body has some kind of waste. It's gonna look even better. Now let's design the alpha part. An egg shape, or
with an ellipse. And let's just make it clear this sphere here
that it ends up here. And this one starts
here and ends up here. So just let's make
another helpline. We are seeing already the
bodies of what I wanted to see. It's like to have
more helpful with this lines and try out
different positions. Make sure I pick
up the best one. I'm going to make a really, really bands character here. She's, she's not standing
straight, so to say. But that will enhance the
liveliness of my character. I'm going to round it up here
having a little smaller. This is the mom. Maybe I'll have her top be a little smaller and
she's not bent upwards, she's not so bulky
like this guy. So maybe we'll see a part of this class is tough over here. More of a tender kind of figure. And now we're just
following these shapes with even against sketchy lines. And she's maybe looking
at her husband. So I'm going to use this line to turn her face towards him
and you see them here. I can actually signify a clear head like that
and a body like that. So if it's an animation or
even if it's a drawing, I can turn the head slightly
differently than the body, because here it's
going to be hard to do that because it's one chunk. That's how you can play
even what shape would do. Designing. I had an, a part of the
body for a real characters. They're not really rules. There's just like
perception and you find the best way to
design your character. Now I'm going to have the
mom having this longer eyes, more tender, gentle eyes. She's going to have
a little nose. Maybe I'm going to give
her some kind of off chunk of hair on
this this glass. Why not? And here I'm going
to draw her lips. Again. Let's do just one curvy
line for her smile. Sphere or an egg shape
form for her lips. And let's have her, as we said, Look at him and she's
looking at him lovingly. So let us design the pupils. And let's have her eyes slanted, slightly closed, gentle
and closed like she is. Maybe she's not
agreeing with him, but she's smarter searches. Looking with him with some
kind of sarcasm and love. Maybe we'll have the eyebrows enhancing these facial
expression is slow. Come on darling. You know, this is not quite true. So this is an expression with one eyebrow is lower down and
the other one is higher up. And you see that we are using this area to design the face. Here we can follow
even this curvature, this curvature line to
design a nice profile. And the ending of the sphere
here of the ellipse to design even the other eyebrow and give us a nice silhouette, nice curvature, which makes
her character look appealing. Clear, people will understand
who these characters are. Dels sympathize with them. Even though it's
just a water glass. And asked enhance clips. And this is just technical work because we have or
mouth already there. And maybe we'll
have her lips have slight corners like
dots out of the mouth. And let's have the
chunk of hair follow even lower down. Again. This is the curvature will
drawn from the beginning. You see how helpful that is. And maybe we'll give her another chunk of
hair like that here. Maybe it's like a hair all over, like for all the glass
or even behind the head. Why not? It comes from here. This is a character will
design and we can experiment. What can we add to them? So this is the female character. Now, let's find her. We have this class, this ellipse here and squint and see which
lines fit better. Which lines suggest
to you that this is the shape you're looking for. You don't have to color it. You don't have to trace it
with just one line here. Just do a couple of lines as
well to find the right line. If you have to draw it for
the book or a character. This first maybe scanner
to do it in a PC or in a program and redraw it and
you can find the right line. Eventually. The more you continue
with the process. And now you see that this
glass is kind of more gentle. It has this sand clock shape. And it's more like a female
figure, female character. Yes, of course, you
could have used even wine glass for
death as a team. Now, there are a beer
glass and a water glass. Mommy's wise, she's
not drinking alcohol, she's drinking water and
keep her wits in place. She's contained, she's responsible while
while the dad is like, I love my beer and
he loves his beer. And that's why he brought his characteristics
to design this character. What would he be if he didn't like B or if he was spotty guy, it was like training. Maybe he wouldn't be a
beer glass or maybe we could make this
part of the body, the upper part bigger
so we could enlarge this part and this
one would be smaller. Took play with the
features that are the archetype for
the sporty guy. So you have to combine features of the human character
you are trying to portray the features of the animated
object that you have at hand and see like what kind of features you can
enhance in this object. To be able to portray this kind of archetype or character
you're trying to, to bring out in this character. It's a combination. And it is so much fun
because you can do anything you want without
nothing is stopping. You don't have to have the
limits of a real character, of a real theme, a
female or male body. To stop You Without. You can do whatever you want. Yeah, I hope you are
enjoying this lecture. Now. I'm also leaving some white
dots like that you see because this is
something that you do on your design when you
draw eyes on and character, this white dots
makes a character will look more
alive because it's signifiers as if it
light hits the eyes and leaves this shininess on
the real eyes and it gives, with so little thing, it gives just more life
to your character. Now let's have the
mom's hair darker. And maybe she has
this hair coats. It continues on the back
of the glass. Why notes? Here are two characters
and maybe she has, the glass is transparent, social has some water like that. So this ellipse here that
would signify the water, it will be almost the same one. This one slightly
narrower because the mom is not bulging
out like that. So her center or be around here and she's more like a
normal perspective than this guy with this guy alike bent the other direction
than what his face is, what we see from him. So we have this water, maybe we have some bubbles, seats, maybe sparkling water. It says here, every time she
moves, guess this bubble. So it's like tender
and you can add this in the animation
if you meant gets like, every time she moves, she's like make these sounds, sound effects like
sparkling water. Don't form. Just trying to act out
the character here, which you also can do. It will give you more
knowledge of who this character is
and whatever you're trying to design these
character for it. So we'll have some shading to put her in perspective and put her in
the room with this guy. And they have the same
kind of perspective here. So we'll add some
shading and make sure she's spending
formally on the ground. Here we have the
mom and dad family. Now, let's be
designed the kid and see what we can work with there. I'll see you in
the next lecture.
10. A Child from a Tequila glass: Welcome back. And now it's
time to design the kid. What kind of glass
we are going to choose here because
we established it's a family of glass
has maybe we'll have some kind of a small killer. The kilo glass is going
to be little insights. So we're looking for something
that is little in size. We cannot relate to the size as something younger or smaller
in size than these two guys. So it's not like the kid is
drinking tea kilo over time. We will unassociated
with doubt, right? But we're trying to bring
some kind of similarities. The design and not the type of an animated
objects we're doing. And it's something they
have to gather this guy. So beer and water,
what do you get? You get tequila, right? So let's design this kid here. The kid is going to be
turned towards the parents. What is characteristic of kids? It's playful, it's
small, it's fun. It's has big eyes. So when you have something
to have big eyes, it makes a body
look even smaller. Let's have this
particular graph here. So what do we do first? We find what a spine is, what is it looking this way? We find the position is, and approximately how big
the sizes of this character. Also, when you do composition, It's always important
to do that in the beginning to find the relationship
between the characters. Because if you start drawing, sometimes you draw one character you started from the eyes. You have planned this out. You had said, I'll draw one
that bear gloves one mom, water glass wanted to
kill a gloss as a kid. But it will start from the eyes. And you start and
you just do though, your way up and you end up
having the dads over here. We're having the mom over here. I use like, you don't
really have a composition. Composition is the relation between all the characters
in this paper space. They need to be
spaced out properly. Your composition when, when
someone is looking at it, they are in the middle
of the picture. They are in good
relation to each other and you can
notice their size and compared to each other
and says like this glass is this big and this one is
this peak and this statistic. When we have the family, this is also the work in
relation to one another. They stand in relation
to one another. So we'll have that a kilo glass and it's actually simple
triangular glass. So let's have this ellipse. And as you notice, the open and less of
this ellipse here is approximately the same
as this one and this one. So it's good to design everything
from this perspective. You don't have to wonder a lot. Now will have this
glass be more playful. He will follow this
sphere here and design the head, tilt backwards. The kid is playful and we'll
twist ending of this glass. It looks as the glass is really around rather than straight. But that's what you did
with those glasses. There were not that rounded. And see how easy it is
to design characters. You've put some curvature at them and they become more alive, more lively, and the
kids will be also turned with his heads upwards. This is also how
we can signify how the character behave
like play with his line and see bend forward or bent backwards
like this woman, she's, she's bent forward so we can see this part
of the glass here, but this one will
be bent backwards, so the upper part
of the glass will be looking the other way. Let's decide the face. Same thing here. Add a sphere inside this. Here is going to
be my kid's face. And now let's design the eyes. And we said is if a, a kid has bigger eyes, bigger, larger phase, then the grown-ups have designed the
bigger eyes here. He's going to look at his mom, have this connection here, the monthly thing
as the data that is looking at the kid and the kid is looking at his
mom because eventually, no matter what the kid wants, the mom decides he is smiling. So let's make this
big mouth here. What else the kids have? They have chicks and
glasses, don't have cheeks. So how would that
go with the design? Let's play without not gonna
make big cheeks like that. Which is also possible, I mean on top of the glass, but we are going to
make smaller cheeks. Next two DIs. To kill a glass. We're going to add
one curvature or one curve here and
another one here. So the kid is going to be
smiling and one nose here. So another sphere and small eyebrows here
is basically done. We're going to add
another curvature underneath the upper curve
here above the mouth. As if these are the
teeth of the kids and maybe even some small teeth on the lower part of the
kth is smiling a lot. He's going to get what it wants. That's for sure. Let's shape whatever
we have more before we go with a black pencil and kill a glove doesn't
have any handles, so we can deal with doubt it. And let's shake out or Ticulate glass
with a black pencil. Okay, so what do we have? We have big eyes. Again, I'm leaving
the white area that gives some kind of glossiness of the eye
and makes the lot D, I really more vivid, more alive. I shaved the eyes
which are much bigger. And you see
immediately how we get this kid's kid like Look. And the other one, again, I'm kind of like brushing on top of the blue lines
with the black pencil. I'm still discovering
this character. I'm not completely sure. I'm just letting my intuition, gut feeling lead me to
where do real design is. So these can change also. The discovery process is
throughout your first sketches. You can change that later
on if you are doing a book or a movie with
these characters, you can do just a
couple of designs. And then when you do
a couple of designs, you can pick up design. We can pick up one design and do a couple of drafts
with this design. Change the proportions
of, for example, this water glass, I mean, have it the way you saw it. I real glass was
maybe she's like she has her waist
lower down and he has this class or this middle
part here, like over here. Try out different features. This is not set in
stone until it's done. Until you run out
of time where you have a deadline or
you kind of say, well, this is my character has, sometimes you'll
see it right away. You say, well, this
is my character. Depending on what
do you want to do? What do you want to design? Do you own? Do you want a beer drinking dad onto
you almost sporty that. What kind of features
you want to find there? What kind of features
are spotty guy has? It doesn't have a beer stomach, it has upper chest up are bulky and muscle are
different thing there. And maybe you have a
champagne glass as the mom. She's fancy shall like spotty, she likes drinking champagne. Find different different
features and talk to you. Maybe in your minds or if
you were, if you were alone, maybe if you're not alone, I mean, artists
are little crazy. So people that know you
and they know who you are. An artist probably
already know that. So talk to your
outlawed and describe what kind of character you
are designing. A kids. Is it a boy or girl? What kind of features
this kid is gonna have? What are they? Happy kid said kids
are in-order tree, then it's an order to
these kids might be a gonna have large eyeglasses. Maybe it's not gonna
laugh like that. Somebody is gonna
have for freckles. That's another thing that is
associated with archetypes. We, when we see films, we see kids that are very smart has this large eyeglasses
and they have freckles. Obviously, because
according to the archetype, the prejudice, kids
that are smart and sit along time in front of the computer and don't
see a lot of sun. When they come out in the sun, they easily get frequency. That's basically, I guess the
theory behind this kind of archetype and description
of a nerdy kids and you kind of trust on this kind of kids that will
solve all the problems. So if we want or two kilo
glass to be nerdy kid, it might be, we'll add
some freckles here. Will have big
eyeglasses like that. Yeah, Let's do that to
see what will happen. Now that we've talked about it. Design. Nerdy kid, we've now
had a normal kid and now we're going
to have a nerdy, smart kids that knows
a lot studies allot. We will associate with nerd or bathroom
resell someone that knows a lot of stuff. So you just add
some eyeglasses on top of that and you get kind
of a completely new type. Our kids than what
you had before. With eyeglasses and tequila. Applause with eyeglasses? Yes. That's how you do it. You can combine different
features or different designs. Now you can just
add some shading. Just you integrate
this character within the same world as his parents and add to the
perspective and the lighting. So having the shading
this way signifies that there is a lighting coming
from this side and the object, the objects casts shadow on
the spot this side of them. And these are the
three characters, the family out of
in animated object. And you see that you've done, see them just as
in animated object as a couple of glasses. You see them as
characters and each of these characters have
their own personality. You can describe with words, you can say what
the Father does, the mother and the kid. I hope you enjoyed this lecture and you followed
me and now let's continue with the next
chapter. I'll see you there.
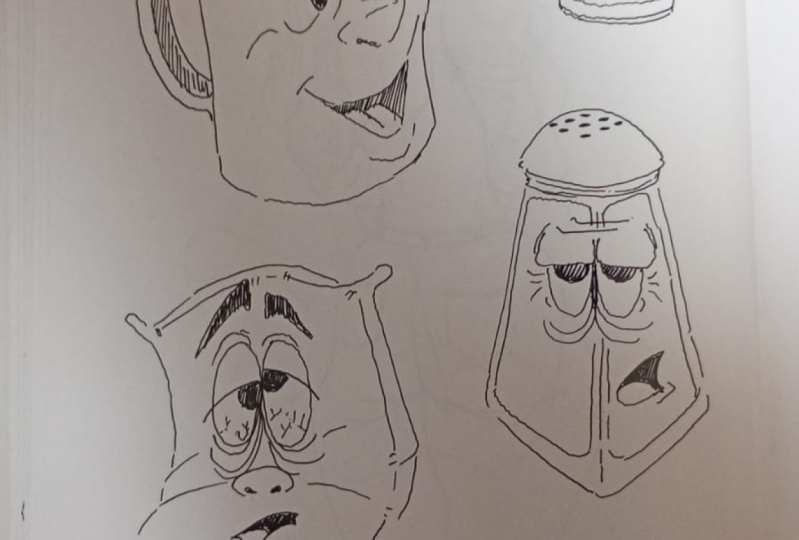
11. Drawing Expressions - Candle Design: Welcome back. In this lecture, I'm going to show you how to put emotions to your characters. And I'm going to use just one character so you
can see the difference in each motion and how you can convey this in animators object. For this purpose, I'm going to design a candle
holder with a candle. I'm going to start with finding DR. quarter spine
of this character. And I'm going to make one large example here
of the same character. And then I'm going to play around with different
emotions on this part. The other paper, candle holder will be
approximately this big. I'm just going to signify
it with just lines, just a shape here. And from this part on, this is going to be the
body or the candle. It's going to be
like two-part thing. And this part is going
to be something like the character's body or
lower part of the body. And I'm going to design a
very simple candle holder. Top. And then here I'm
going to design the bottom of the candle holder, another ellipse because
we are looking at the characters almost
at the same angle. All the ellipses you draw, it's going to be
approximately the same width or thickness. This is wider candle holder
world spending like that. And I'm going to just adjust this line because now
this is going to meet the middle of my candle holder. And here I'm going to find out if I want to have
some ornaments, I'm just going to connect this
part of the candle holder. Will the lower part of the
candle holder with a curve. These two is creating more life to the candle holder is a little bit and symmetrical. It's as if it has address or something
or something behind him. I'm going to make a
male character here because I didn't know delta
how it felt like that. Now maybe I can have little or no comment
here in the middle. Like a sphere. Just to make this a little
bit more interesting. Here we have a thicker part
of the holder on this side. So these are going
to be like lines. So I'm just going
to signify that. Here we're going
to have the candle and the candle has also a
little bit of perspective. I'm going to exaggerate it. Just draw two curvy lines on each side of this
spine or middle line, the one that signifies the
spine of our character. Here we're going to
have the lights of just the light make another ellipse again
with a loose hands. And now that you
have the ellipse, you can actually shape it. It's triangular on top and a little bit thicker
in the middle. And when you have this
handles, this sphere here, it's easier to just connect this shape and this shape
with a triangular shape. Here we have already just a candle and you can
readjusted the way you want it. And now let's have the
character shaped out. So we'll have this
middle part here, like something like a sphere or a white car ornaments.
40 scandal. And we're going to have
the face over here. The face of this candle is going to be looking
and this side. So even though we have the middle line here as the
spine of the character, we're going to have the
face approximately here. So it's going to be turned
a little bit on this side. And you see how quickly you can change whatever direction
you want the head to turn. And then I'm going to
make a middle line that goes parallelly
with this line, but it also cuts this fear into, I know where the eyes
are of this character. I'm going to make a male
characters say like a young guy, young guy full of life, because his posture
also signify that he's young and full of life and I'm
going to make a long nose. I'm going to make a nose with an ellipse and give
him some eyebrows. I'm going to make
the mouth over here. I'm going to make
another sphere. And I'm going to
make him smiling. So this line that signifies the middle
of the lip is going to be on the upper side of this
sphere here on the ellipse. I'm going to maintain
the upper lip over here and the lower
lip as if he's smiling. But I'm not gonna
make any lips here because I want the character
to be even more cartoony. Let's put the pupils so we get the character of our characters and see who the character is. And he's going to look
in this direction. Let's shaped some
TIF so we don't have this mouth
look like a really, really big lower lip. So just make a curvature to signify where the lips are
and where the teeth are. And now with a very
few brushstrokes, we see that this is a
character who is smiling. Give him some cheeks
against small spheres here. And the other one is
on the other side, so we don't see it. The characters, eyebrows. This is basically it. So now let's refine it
with or black pencil. And the character
is already given. You have to only
refine it at details. Here. Do you want to have
a straight line like that or do you want to
have maybe some bulges? I would suggest for now, keep keep the lines strike
because this is going to make your process easier later on when you are designing
the other shapes, the fewer shapes you have
to worry about later on, the better it is, the more you can focus on the character. And when you grasp this process, then you can add even more
elements like lines like that, maybe chunk of wax
falling down over here. But for now, just live
it out and add it later on when you have your character figured
out in different poses. The eyebrows here to
make him look happy. And I'm not going to draw
all the junk of cheek here. I'm just going to mark D
upper part of the cheek dot-dot is pushing
the lower eyelid up. So it makes the
character look like a cheek and the one that
is closer to the mouth, the corner of the mouth, which the mouth actually
puts it pushes up. So this is something
we want to care about. The rest is not important. Sphere was not there to
make a spherical chick. It's there to help us find
the CIC, the real cheek. As you've already noticed, how easy it is to actually have those help lines
with spheres and how these help you to actually find the real character without
any effort at all, as if you've been able
to draw your whole life. Isn't this amazing? I mean, you've been thinking
that you couldn't draw, and now you're having these lessons and you've
been shown doubt. You can just draw
with this spheres, with these lines and
spheres and find the shape. That all, that's all you
need to be able to find. Your characters. And you suddenly discover
wasn't that easy? Well, yes, it is that easy is just very structured
to everything. You can start to build a house without
having the structure, without first
having the drawings of how the house will look like. And you can start building
a house without having the basis of the house itself,
building the skeleton. You can just go in
and put the windows. When you don't have a house
to put the windows on. This is what I would explain
how I want to compare. Starting drawing
just the eyes and starting from the eyes up and down without having the skeleton of your character
to worry about. And that's why you fail. I mean, everyone who wants to
build the house and just as the windows before
the house is built will fail to build the house. This sounds ridiculous
because it makes no sense while anyone
would do that. It's obvious, but of course, if you have a sheet of paper, you're thinking that you can put the eyes
there and you can have your character just
fall on the paper by itself. One, it's not that every artist has to
go from this process. Here we have our main character. Now, let's put some
emotions to him.
12. Happy Candle: Let's take this character
and give him some emotions. Before we draw the
whole character, Let's work with the emotions
with just the curves. How would you describe
yourself if you're standing? When you are happy,
How are you standing? Your spine is upwards. You're kind of like
your chest are open. You're feeling like
overwhelms or you're open to everything
good in the world. So if you were describing happy with just a
curve, that will be, if your face is in
this direction, the curve will be like that. It's going to be, if you're looking
in this direction, it will be open up. You'll be exiled,
exaggerated open. Now, how would you describe when you said you
live forward to your shrink? You try to disappear. So you'll kind of be if
you phase is over here, you try to lean forward. Bend your band over, your spine will
look like a crook. Another pulse we can
have is being relaxed. How are you being relaxed? Well, being relaxed is some kind of the face is looking
now in this direction. It's kind of a more of
a curvature like that. Your your body is
going into directions. So kind of maybe like
a spine like that. These are like three extremes. The poster and the mood to each character or two stars
actually from the spine, from the spine out. Before we even put any
motions to her face or body language shows us
if we're sad or happy. If you start with delta
spine of your character, you will already give the, the character these emotions. So let's start by drafting all these shapes
for our character on this emotional curves. We started with a happy line. And here we'll have two somewhat
follow the proportions. How big is the lower body compared to the upper
body of the character? So it's kind of
like in the middle. It will try to match
it proportionally. So we have a sphere
or ellipse here, and we have a body here. We have the light here. This is the happy pulse, and we're trying to draw these
shapes along this curve. What about this one? While if we have the body here, so following the same principle, the body here and here it's
going to be upper part of the candle growing to the flame is going to
be here approximately. This one is the lower part of
the body will be like here, and the upper part of
the body will be in the opposite direction and
the flame will be here. You'll see that
it doesn't matter how big the characters is, they're not equally big. All these three poses
because I'm trying to use the space of this paper. But the proportions
on each character, on each posts are the same as the proportions of
the main character. This is also what you can
use these spheres for. The quick spheres
that you can use to help you draw your
character sound. Now let's work with the shapes. So let's find we
have one shape here. One shape where the
character is standing. And now we have this, this kind of shape, curvy line that connects the
whole shape of the holder. Now, we're still having
to design these holders, so we're going to use
the shapes that it has. But we're going to give more
space for this part here. And we can treat hard object in animated object as
if a clay objects in order to give them more life, in order to convey
emotions to our viewers. And in this one we want to have the emotion of the
character being proud. So it's going, it
opens up his chest. It's leaning backwards so
his face is over here. The light is going here. So we're just going
to make again these little triangular
thing shape. And then we have the
light like that. Now let's put this, this base here of the candle holder and
shape this pose up. We have some cleaner area around here before the
ornaments, the round ornament. And it continues this way. And now, not only do we
have to have the posts, the happy pulse, we have to match it with a
facial expression. So what we'll do is
just have the face looking up a little more and have the eyes
even more squinted. So we'll just gonna
draw eyelids like that. We're gonna have the
nose pointing up. So the sphere of adjust, the ellipse will just point up. And now let's have
even bigger smile than what we already have. It's a happy, happy candle. And the teeth, and the lower
teeth and the eyebrows. Here we have the heavy
candle and the eyes here. Let's curve the eyes a
little more like a laugh. Here we have a small detail, so I encourage you to
have a larger paper. Let's go ahead and draw it with, with a black pencil
and discover or pose for this happy
character here. Even wider mouth. You see how just wed
working with the curves. We can describe how the
character is feeling. Even though we have
just a candle holder. We're starting to get
to know this character already just by
drawing it here a couple of times
and trying to find out what the character
is feeling and who this character is and
drove the eyebrows. Now we'll have the
pupil basically almost invisible because it's
almost squinting. His eyes in laughter, in a smile is a very,
very happy candle. With a candle holder. We have the cheeks here. The farther away you
are from one drawing, the less details you can
answer your character. So that's why I'm saying
that it is important to have large block of paper unless
you don't drone on computer, then you can just zoom in. But I'm doing this by hand, old-fashion way because there
is a different feeling to, when you draw on paper. You are free to draw on paper in the digital program, you, you're not quite not yet comfortable to maybe lean a pencil like that or have the brush
strokes like that. You have to be careful not to touch the screen if
you're using an iPad. This limits you in a way
because this brush stroke, this hand movement is very
essential for you to get free. To set yourself free and actually being able
to make this mistake. Also, the digital program, there is the undo button. I know it is comfortable button, but we are working here
without an eraser. And y's dots is because we want to make all those mistakes. We want to get used to, to scribble around,
to make these shapes. I'm perfect, imperfect before we learn who this character is and we don't need
eraser right now. Maybe you've noticed that I
haven't had an eraser here. Oh, this is for this purpose, it's going to be easier for
you to learn how to draw. Without an eraser. Something I'm going to do
for this character actually. Growing. I'm going to add arms. I haven't added arms here, but I can do it now
because I want to show you one more way of just
posing your character. Here. He is going to
be like wonderings, I'm going to use a stick
figure like that and an arm willful just freely here. I'm, I need to
consider his anatomy. So he has an anatomy
of an object here. So if I put the arms, they'll have to
consider that he can't put his arms down and
go for this surface. I'm going to make a stick
figure like that and have his fingers be free. And here we are going
to have this pulse of explaining to someone. Let's draw it with
a black pencil. You can have different
arms, of course, but it is nice to have just a shape of an arm would
stick figure like that. Then you can make this thicker. You can add more
flesh to these bones. But we have our
character very gentle, very tiny, and
justice is enough. So what kind of arms I'm
going to add this character. Look how easy it is. Just to add this exaggerated
expression of an arms. Just opening up. Just opening up for the job. It's a happy character. Does how we behave. When we are happy, we open up or a body. And now this stick
figure C and just make some lines here and he used signify an arm and just
the shade for the palm. And you have your character. And then you can shape
it up a little better. But the emotion is there, the character is there, the joy is there. You have your character
done a happy candle. Now you're going to
go for the SAT POS. See how we can go about that.
13. Sad Candle: Welcome back. Now let's go for the sad posts. And here we can
start the same way, designing their lower body and where the
character is standing. But now we're going to change
the direction of the curve. And even we'll make this part, this part of the body longer as if he's leaning in this direction to
enhance the set pulse. So this part now is the one
that we've had here opened up and here opened up
is going to be smaller. This one is going
to get more space. In this assymetry. We are making the
character a little bit. I'll symmetrical as if this is a real candle
is going to fall down because it has this kind of proportions that
are symmetrical. But if, when we
design characters, we want to use everything we can to make the arc help or posts. Now we have this curve here being shorter and this one here. We're trying to follow
even this curvature here to create more emotions, but we can't escape from completely from the body,
the body structure. In animated object. We're just doing our best. And what else? Now, this is the line kind of following and this is
where the middle is getting. Now after we've drawn the
lower part of the body. Now let's try to follow this line and bring the
character down a little more. Just push it a little
more with a blue line. Now we can see a little bit on from the top of the candle. Here is going to
be a little wider. We can see more of
this upper part, an ellipse a little wider. And do we want to have the
flame being just down? It's going to be unnatural. So let's push the candle down by the flames still
going upwards. So it's like a chunk of hair. So the flame is
following the body. But this little
triangular shape is just pushing it upwards as
if there is a fire, a real fire and we can add some smoke maybe
when you're upset, you're also smoking
from your head. Now, let's define
the proportions. Adjust whatever we
think we've done wrong. And this is maybe it does
why I did this line here. I want to push the body a
little bit upwards because I see that it's a
millimetres really. But when you're, I get
used to the proportion. You'll see this thing
for now on Utah's do you best and explore the
process of training your eye. Now will have his
hands down, right? Of this one, they're going to just drop
down to the ground. Phase is going to be here. Or it said, said Kendall. And now we're going to have the eyebrows turned
in this direction. You see that if the phase
system here you can add another middle line that
goes through this sphere. Know where to put the ice. Let's put the eyes
here in-between on each side of
this middle line. And now the nose is down here. You can maybe already
see the shape. And the mouth is not a
happy mouth anymore. So the curve of the sad
mouth is pointing downwards and the mouth maybe
it's open and we'll have another
curve going downwards. And we'll see a part of
the chief like that. Locks are falling on top
of the ice in said pose. And let's have the pupil
half hidden from the sadness of oral little candle. And now we have basically
the main poster just by following this curve and just read, let's define it. Follow the blue lines, adjust. If you have two, whatever you have to
know about the mass. The most important thing for you is to practice, practice, practice these things,
these proportions. And the way you need to
decide how to change, how to shape the curve
and where to put this help lines the
spheres. This comes. We're bravery and practice. Because you've felt that usually just draw clean
drawings by until now. And now, I'm just telling
you exactly the opposite. It's gonna take some time for
you to get used to decide DEA and you try to put as
little help lines as possible. That's normal. I was there. Every beginner is there you try to keep your drawings clean. I remember my teacher. We had to draw like
50 drawings a day of people sitting in
a railway stations or Just coffee shops just to get used to
find the proportions, really, that was the whole
purpose of the exercise. But we were so afraid that
the people who didn't look like they were supposed to look. So we tried to make
them look nice. And my teacher was telling me the same thing
that I'm telling you. You can't really put eyes and mouth to a person that doesn't have the
right proportions. And to find the
right proportions, you need to train your
eye to see these things. So you need a lot of practice. Some you see how I just
added the hands, the hands, and the fingers as if this is the ground that's
laying on the ground. So they're basically floppy and reached the ground
all the way down and they are straight
lines because when you are said your
arms are really heavy, you have no power. And if you put the
arms like dots, like heavy chunks of, I didn't know sausages. You meant the
character look sad. You contribute with each
element of the body. Sadness of this character and the culture that
you want to convey. Shape, even the
eyes, the sad eyes. And the other one. Again, you have to pause your character in
the way that you can best convey the
idea of this pose. That's why I've
turned a character in three-quarters in
almost every post to see the silhouette. You don't want to
have this character looking from
straightforward because you're not going to see
this curve of sadness, this curve of dropping down of the whole body
of the character. You will, you will
lose that perception. You won't be able
to see how the arms fall down to the ground and how heavy this pulse contributes to the character
this and presenting these emotion in the
best possible light. As, as an artist, this is your responsibility to make it as clear as possible for your viewers what
your character is feeling and to convey the best, in the best way
they emotions that you want to convey
and to reach them. So this is basically
all said false. And let's add some shading to just add a little
bit more volume. The character, and integrated
within this world. And with that, we've finished the set bounds of our candle. Let's continue with
the next pulse. In the next lecture.
14. Relaxed Candle: Here we are again with
oral loved pulse for a candle is this casual pulse. You know what to do. And we find this shape here. We'll find the lower shape here. And now we twist this shape according to the scarf and follow
those grid of casual. Casual policy has turned in
a casual pulse yourself, you will notice that maybe
you're standing on the, on one leg inulin all
your body weight on one leg and you have the
other one kind of loose. That's what we're
trying to convey here. So we'll have this part
of the body as kind of the other leg
and this one part of the body of the
leg that is holding the weight of the candle
as if it was a person. And now we can add the
candle in this relaxed pose. And let's, we will
follow this curve here. Just draw another curvy line. On the sides of this curve. Find the top of the
candle like dots. And the character is already
shaping up as if this is the hips of the character and the
leg is standing here. You see how pretty quickly we're getting
this relax post now let's have the candle here. Just bought barn upwards. So I'm going to change the direction of the
scandal in this way. And he's going to
complete this curve, this nice curve here. I can do that because I'm drawing with a
blue pencil again. Now, let's have the face
being somewhere here. Let's add the arms. Now. This arm will lean
approximately here. So one line here, one line here, and our
hands on the hips. And we'll just see
the stick figure, hand leaning on the
characters hips. This one is just in the relaxed
balls alongside his body and just shade it and
have the thumb here. Now, you have to see
what the time is turned. So when you when the arm is
turned in this direction, time is on this side. Other fingers are here. Just do it as a shape. You will add the details later. All you need to do is just
this poster kind of thing. And now we have our character. Casual will have
his face over here, find the middle line of this
sphere approximately here. And we'll have one eyebrow down. And another one up. Is unsymmetric as if
he's just casual. Also, draw one line
across all are both eyes and find the pupils slightly looking towards us in
a kind of casual way. And we have the nose of the character and we
have a cheeky smile. And the cheeky smile will
be just m proportional. He will smile just with
one side of his mouth. You know how, when you cheeky, You just smile with half
of your mouth and saying, Well, what are you
talking about? I'm comfortable and
I am just relaxed. Now let's go with the black pencil and
see what we've got. Here. You know the process, you just follow the blue lines and the eyes with
a black pencil. And the other eyebrow. That's the thing you will
get better and better each time you drawing,
draw this character, those poses a couple
of times and you will see what difference
it makes just to, just to have done that, just to have drawn a
couple of times the same, the same exercise,
the same pulse. You will be just so much better. And here is the cheek and the other part of the mouth
goes somewhere behind. Very cheeky smile. Here is easy. Easy. We have our posts there. That's the thing. How do you discover
this emotions? Well, observe yourself
or you observe others? How do you stand? How do you stand? If you are relaxed? This pulse, just
photograph yourself in them in a relaxed pose
or look in the mirror. Just observe yourself
in the mirror. How do you stand
and try to push, for example, this shape
in the way you spending. Because it's allowed to draw these characters a little
bit like a clay figure. You can have some proportions not being the same
way as they are here. That's how you find
out how the poses, and that's how you
make a pose out of our object that has no body. Initially, is just
an animated objects. Now, we can just
add the fingers. Just likes to stick figure. I told you that you need to do is being able to draw a
stick figure to draw this. This in animated objects
orange to draw character. Because when you, when
you have a stick figure, as the basis of your drawing, you can easily find the shape. This has to do with
bravery really, it has nothing to do with YOU CAN new born
to draw. No, no. He's just a willingness
and bravery to discover insights
drawing process. Now, here is our relaxed, cheeky pose of this
candle, candle holder. Like that. It's integrated. And that's how you gave you. I hope you enjoyed
these lectures and you're having
fun drawing more.
 Maria Avramova, Illustrator/Animator/Filmmaker