Transcripts
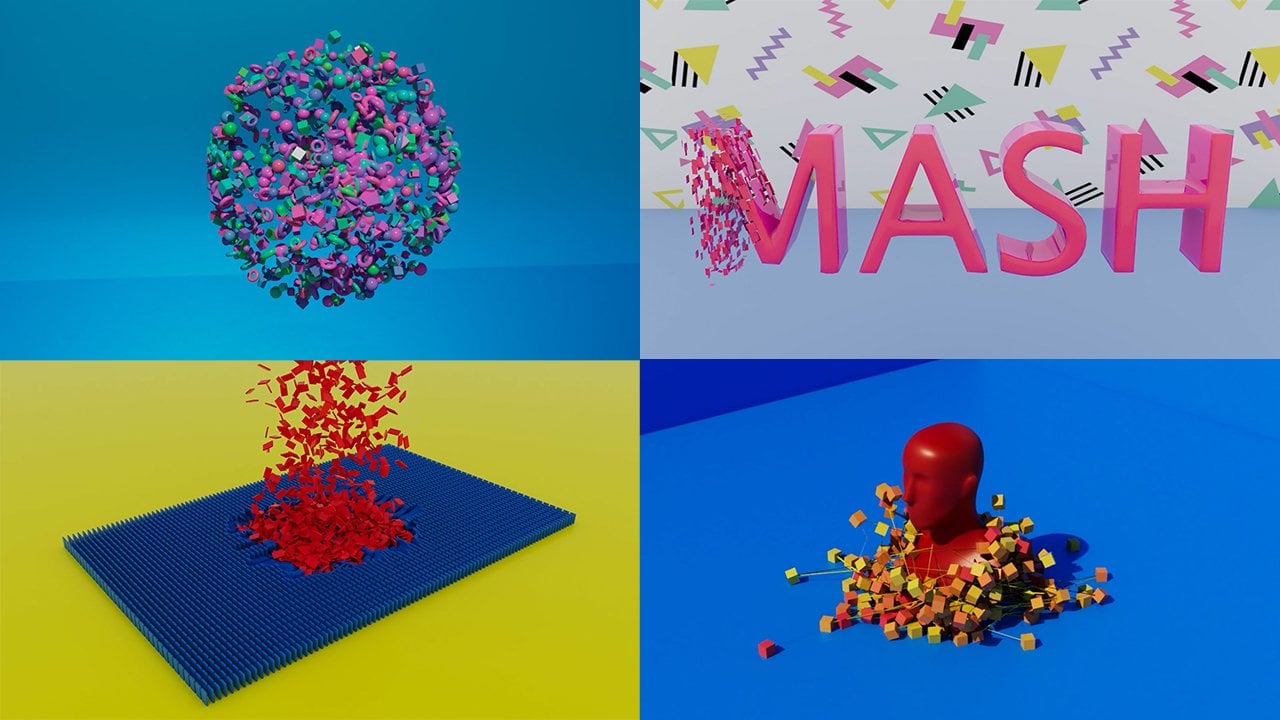
1. Course Promo: Hi guys, and welcome
to my second course on using mash inside of Maya. In this course, we're
going to be focused on creating some animated avatars. You may have seen them
in some music videos, such as the music video for
major laser, light it up. So we're going to be taken
three animated meshes and apply in some of
our mash techniques to those animated meshes. Now if you haven't checked out my previous course on
how to use mashed, then I'd recommend
checking that out first. But if you have prior
experience with mashed or you're comfortable enough just to
jump in with me in this course, then let's do it. By the end of this course, will have created a few
different animated avatars. And I'd love for you
to upload them so I can see them and give
you some feedback. Also, if you do any
other animated avatars, I would really love
to see them as well. So we'll be using
Arnold in this course. So if you have the
Arnold render engine, then he will set
F naught and you have another venue
engine. That's fine. You'll just have to
be used in that. So I'm really excited to
start this course with you. So what are we waiting for? Let's jump on in.
2. Lesson One – Accessing pre-rigged Material : Hi guys, welcome to the
first lesson of this course. Now what I want to start off by doing is I want to start off by showing you just a few of the things
we're going to create. And then I want to tell
you where you can get this animation resource from this animated mesh
which we're going to use to distribute GO onto. So this is one of the ones
that we're going to make a sort of quick look
at, I think number 7. Yeah, we'll probably
have a look at making something
similar to this. And I'll show you
where you can get the animation form as well. I'll show you that
in this video. We've got another one here. Can have with these nice
little trails which I really liked case can smooth
and curvy, they lock. And the last one will be this
one kinda got these lights, incandescent lights coming out. Okay, so what I wanna do is
I want to show you where you can get this from a
website called Mixamo.com. You'll need an Adobe login. If you don't have an
Adobe login as fine because we've got other stuff
in Maya that we can use. And so basically if you go into mixed-mode dot com login
and then go to animations. You even if you don't
have to search anything, but you can either just click animations and
have a look through. And if you click in
here, you've got a dance club textbox. So it kinda find some
saw dancing thing. I think this is the one
of the ones I used. And so you can kind of look
at this and then you can, if you increase the
range, for example, it's kind of how big
their movements are, the spaces, how big, how far I've DevOps, kinda move overdrive again, I don't really know. Yeah, he's just like how
competently and I have fast. So again, that's slow. And then you can give
yourself more frames. And yeah, so
something like this. You can, you can modify the
kind of movements as well, which is pretty cool. So the loads and loads
of things in here when we went into the dance genre. And luckily you've
got 4 plus pages, so it's good to the end page. Hip hop dance in shopping
cart on sinuous, quite cool. So this one, you've got stance. Um, so if you pull it down, you can kind of see what it does is basically look like how
how bend their knees were. Space, maybe their arms
or sway a bit more. If we turn this up, let's have
a look. I'll get that up. Okay, So so basically I can mirror it as well
if you wanted to. But what you'll want to do
once you've kind of got a movement which is kinda work in if you do use this route, we can just click download. You'll want to FBX, argue
for 24 frames per second. I keep the skin and
I'll click Download. And what you'll notice is your little FB actual
stuff downloaded here. It'll go to your
downloads folder. Okay? Well, you'll then want to do is you'll want to open
up soldier for you. I want to open up Maya. Okay? And what we're gonna do is we're going
to set our project. So when we set our project, we want to put that FBX
file in the Scenes folder. So you'll see I've got
projects mash setup. This folder will want to put
it in the Scenes folder. You can see I've got
booty hip hop dance, Brooklyn, up lock
and lumbar dancing. Okay, so that's where
you want to put your FBX if you downloaded one in order to set
up the project, just go File project
window and I'm Nicole, I'm gonna click New
and I'm going to call it mash avatars. Okay? And I'm going
to click Accept. And then we'll file. And then I'm going
to set my project. So I've created as
now going to set it to mash avatars and click Set. And I'm going to open
that up in Windows. And then it go back to projects. And let's open mash avatars
and open a new window. And then from my downloads, I'm going to drag in this drive in a sort of hip hop one which
I've downloaded. So drag it into the scenes
folder. There we go. So drag that into
the scenes folder and you will then
be ready to go. However, what you, what you can also do
if you don't have an Adobe account, that's fine. Because in here we've got a, we've got something called a content biota in
general editors. And you've got motion capture. So you've got a bunch of
motion captures here. So flip is one. We'll do this in a second video. And then you've
got regs as well. So you can have a
look at these people. So what you can do
is you can click this or double-click,
it'll import. And there we go. Let's also
go to motion capture, FBX. And let's go to,
let's go to flip. We will do this in the
second video again. But I'll just show you just in case you want
to follow along. The first one, we did have
a job and Adobe account. So we've got this rig. And if I open up, go to Windows and open
up the general editor, no, sorry, animation
editors and the Human IK. What you can do is
you can select, for example, different bet. So if I go and select that and I can now move it,
move it around. Cases are rigged character. We've also got this flip. So skeleton and if
we scrub through, you can kind of see that. Okay? So what you'll wanna do with your mesh selected NU Human IK, where it says source, you want to just go to flip one. And what you've now got if
you could actually get in, is you've got this whole kind of thing which is
being raped. Okay? So the first video, the next video in this
series will be, well, I'm importing an FBX, so let's just show you that the one which we just downloaded. So I'll delete that
stuff and File Import. And here it is,
booty hip hop dance. Okay, So I'm gonna import that. And again, you can see if we
just kind of like scrub foo. We've got that. Okay, So I'm going to
end this one here. This is what I'm
going to be using in the next video, okay, but if you need to
use something from the content browser
like I just showed you, then you use that all
you want is some sort of humanoid animated
mesh like so. And now in the next video, we are going to go ahead
and we are going to have a look at making,
let me just find it. We're going to have a look
at making this, okay? So OK, chips for tuning in. And I will see you
in the next video.
3. Lesson Two – Creating Voxels with Maya MASH: Okay, So we're
ready to get going. Now from the last lesson
is Human IK window. You can just kind of break this off and we don't need an animal. And the way I've got
my stuff setup folks, is I'll have the
attribute editor here I want to views
and my eyeliner. So this is how you
turn the outline on. And if you've only got
one view, for example, or four views just go to Panels, layouts, and two
panes side-by-side. You wanted them to
be the perspective and the other one can
just be anything. Now, we'll change that to our camera setup life tests so as we are going
to perspective. So what we've got with
this one in particular is we've got mesh and
then a mesh here. So we've got two meshes now. Okay? So what I wanna do is
I want to shift select both of these and go to Windows. So I go to Mesh, I'm in the modelling tools
that go to Mesh and combine. Okay, So now just go
back to the beginning and just check that
it does play through. If you always play in too fast, what you'll wanna do is
you maybe playback speed, maybe play every frame. And if that's the case, it kind of plays
really, really fast. So you just want to kind of, I alternate between the two. Just go to 24 frames times 1. Okay? And this is what we've got. Cool. So what I wanna do now
is I want to make a cube. And I want to go across to mash, and I want to create
a mash network, okay? So once I've done that, I want to go to my
mash distribute. And you've got
distribution type and I'm going to go down to mesh. It's then going to say why
there's no mesh connected. So this here, this
mesh of the person. I'm going to middle mouse
click and drag that. So let me get a backup. I'm going to middle mouse
drag edge to the input mesh. Okay? So middle mouse drag to input mesh and boil notices
I've got number of points, ten, so I've got a
few other cubes. There is actually ten of them. You've got a dotted
around somewhere. If I can pull these up and
pull it to say a 1000, you'll see that now what
we've got is we've got some sort of some cubes kind of dotted on there,
which is pretty cool. I'm saying her
because it looks like a soft feminine character
and family dance, but you know, her, him whatever. So why I want to do is
you've got method in here, scatter vertex, all
these random ones. I want voxel, okay? So I'm going to click voxel and have a look what happens here. So basically it's kinda gonna kinda scattered
everywhere and almost give it that kind of 8-bit luck and all that kind of. So, yeah, that's all game lock. And select the mesh control H, Just so we just see the voxels. Okay? So when I click mash
and go to voxel settings. So if for example we increase, kind of know if we
decrease the space in, this is what I mean
by kinda block is looks as if it's a low
poly game character. But I'm going to
kind of have mine, maybe one or SCO 1.5. Okay. It's a bit too spaced. I want a little bit of space
in but something like 1.4. Yeah, that's fine. I can always come back and
I can change this later. Okay. So I'm kinda,
Let's give this a quick, just a quick play and
see what happens. Okay, So this is what we've got as it obviously is
going a bit slower now. So cool, so light. Why I'm gonna do is I'm going to select these three
things as well. This is like all over again information and I'm
gonna hit Control H. It just hides the skeleton then. So I'm gonna go back to mash
and I'm going to go to mash, and I'm going to go to
random, the random node. I want to randomize and
click add random noise. I want to randomize
or less just to make it a little bit more
messy as to uniform for. So what I'm gonna do is
I'm going to probably bring these 2.5 each. So I don't want it to
do the position really. Maybe even 0.2 to point
to something like that. Yeah. Now in terms
of the rotation, I think I do want the rotation
to kind of be a bit mad. So I'm going to turn
the rotation for each access all the way up just so it's kinda
like rotated everywhere. And again, you don't have don't necessarily do
exactly what I'm doing. Kind of like have a
play around if you due to non uniform
scale for example. And if you do turn
on Uniform Scale, just do this x slider. You can have got
a little bit of, they've scaled up a bit, for example, they will have
random scales in that. So if I turn that up and get my original Q and
scale that down, you probably will see now, you will see some sort
of variation in size. So let's go back
to the random node and increase that variation. And maybe Gao poly cube
again and scale down. Or you have goes, you have
got some variation in there. I'm going to put the
scale of that cube back to what it
was, which was one. And I'm also going to go
into the random node. Now, marsh, one random. And I'm going to take the
scale all the way down. I'm not for this one, I don't fancy doing the scale. Or maybe maybe a well
and take it down. Or maybe we'll put a
terminal point for, for example, still a little bit. And maybe now I'll get a
cube and just scale it down. A touch is a slight
bit of randomness and I probably won't even
notice it, to be honest. Okay, that's it for this one. This is kinda block in
where I kind of want it. So what I'm gonna do is
I'm going to now go to mash and I'm going
to add a color note. I can't remember
what colors I have. I have a quick peek
at the colors I had. So kind of blues and purples. Cool, No problem. So let's get blues and purples. So go to color in mash connote. And I'm going to go and grab a blue and pull it
kind of roundabout. Close to the purple there. Something like that. It's
like a bluish purple. Because now what I can do
is I can randomize the hue. And okay, well I'm gonna do
now that I've randomized it. It's kind of look in, maybe
randomize it a bit more. And I'm going to
now pull us further across into the blue so it
gets more blues and purples. Excellent. And I'm going to bring the
saturation down a bit. Nice pastel colors. And you can always darken
them whatever you want. And you can also
randomize saturation. So you can have completely
random saturation and completely random values. Think of values,
brightness and darkness, but I'm lovingness. Okay? So what I wanna do
now is to be honest, I'm quite close to render. And what I'm gonna
do first of all, is set up my scene, and then in the next video
I'll do the rendering. Okay, so I'm going
to go ahead get a poly modeling ground plane and scale this all the way up. And tell you all, I'm gonna do this in the
next video because I want to sort of set up my camera
and stuff like that. And if I'm setting up my camera, I'm starting to look at
kind of like rendering. So what I'll do is I'll
finish this one here. Go ahead by all means but
floor plane in scaling up. But I'll stop this one here now and I'll see you
in the next video.
4. Lesson Three – Rendering our Avatar with Arnold: Okay, so welcome back. I had a bit of a thought. Actually, obviously we can play, the students can
see how it locks. What's interesting is we
could, if you wanted to, if you go to modeling
and animation playback and then click the
option box for play blast. You may want to play blast is just to see if it's
looking at you like. And what I would do is
just turn it to QuickTime, H.264, quality 100, scale one and play blast avatar. And I'm going to
click play blast. It's going to play through. And it's gonna kinda almost, almost from really record
the screen just to kind of see if it's kind of
what you want in. So this is what we've got
and it's low quality, but yeah, I'm happy
with the simulation. Okay, so you can
have a look at that. Anyway. Let's go back. So we've made our ground plane and I don't know
how big to make it. So that not depends on our
framing of our camera. So what I'm gonna do
is I'm gonna go to create cameras and camera. And in this view, I'm going to go Panels
perspective camera one. And that means I can start
kind of pull it out like this. And I know that we're
going to want a side on view because she
walks or he walks, or they walk from right to left. So what we wanna do is go
into the render settings. And it was quite big. I'm going to render settings because I want to
set up the resolutions. We can get an idea
of the maze while going through all of
the common tab now, so image format, I'm going
to be rendered out later as a tiff with no compression. This is going to be name underscore extension
and mavens go hashtag Extension extending
between frames one to 1, 17. Okay? The renderable camera
will be the camera one. And this is what
I really wanted. But HD, HD 1080. And we go, As I mean here, I'm going to change
my vendor device to GPU because I used
the GPU to render. And by default on
all the chapters up to like eight or something, give me a lot of samples. That's because my graphics card is a nice one and I
can deal with that. You may choose to be
rendering on CPU. And then you may just
want to kind of just put maybe up to whatever
your computer can deal with. Okay, so that's a lot
setup in this field. Now what I want to,
this is my camera one. I want to go to View and resolution gate because this is going to be the resolution
that actually renders in here. So what I wanna do is
I want to kind of pull through and think right, I can afford get closer. They don't go out. So it's kind of maybe
a little bit closer. Frame it up a little bit nicer. And a thing. Give it a quick play. Writer. Her hands went, I would slightly
that sub-command to bet back to the
beginning play. And yeah, I'm probably going
to be happy with that. But what we can see
from this is that this flow plane y we'll
do actually is locked. These cameras were happy
with the position that floor plane needs
to come over bet. And we can do in here, and possibly may
need to be scaled. So let's have a
look. There we go. And yes, kinda
need to be scaled. So let's just get the scale
and just scale out this way. Perfect, okay? And what I also wanted to
is in a perspective view. And I want to take
this back wall stucco, edge, click and hold
Shift double-click. And if you hit Control E
or Command D on a Mac, we can now just click and
drag and extrude this up. Now in my, in my one I call
it a patent, a patent back. So it's now time to start, like I said, kind of
texture and stuff. So let's go to object mode. For this, I am the vendor, I'm using it on old. Okay. I made I'll make that
clear when I record the one I put up all the
information about S. But yeah. So you'll
want to use Arnold. So right-click and
I'm going to go to assign new material. And let's go to Arnold
AI standard surface. And we're gonna do
is I'm going to go, I like the preset of plastics. I'm just going to go back
and let's have a quick look. My example, a common watercolors were ASL white floor has
just go for white oak tag. So I'm going to go
change this to white. And in the transmission or soy subsurface change
that to white as well. So we've got our sorted. What I wanna do is I want to select all the faces for this. And you want to go ahead and basically get any
pattern of your choice, or you can just keep it
as a white background. You don't have to do this. And I'll only do
this in this video, but assign new material and I'll go Arnold again,
standard surface. And I'm happy with it. Precesses they are. I'm just going to
go ahead and click this color because I want
to plug in a file here. So go and get a texture or something of your
choice if you want to or just leave it
as the color was, and then navigate
to where that is. And what you should
do is you should put it in the source images folder. So I know that it's in mash and is the source
images of this one. So let's just go for copy that. And I'm in a different
project setup now I'm in this one untie, so paste it into here, and there it is. So I can select this
and click Open. Now, let's turn on my textured view and you'll
notice yet it's not looking. All right, So select the faces. Let's go to modeling UV and automatic kind of fixed it really as
good a UV editor. And what you can do is you can make this window
smaller for you. You can right-click
and go to UV shell, select, select this one, just move it to the side. Select this one, and
so scale it down. If you're known to
be a bit bigger, whatever kind of look
you want to go for. I'm kind of happy with that. So we've got a texture
on here and on here. Now let's do, I'm going to show you what
happens if we render. So first of all, open Arnold RenderView
is not going to render anything by the way, because
we haven't got a light. So render, camera
one, refresh render. And if it's going
to pop up, It says Look no light in the scene. So the light that I'm going
to put in is going to be a Arnold's Light and I'm going to go for
sky dome, I think. Yes, guidance. So let's give it another
vendor and you'll see another issue which I'll
show you how to solve. So openness and right Camera 1. Let's give it a
vendor and a half. Some reason, even though you select Camera 1 and
does perspective, what I've found to
get rid of that is Cerda back to perspective, refresh the render again and
let it kind of go through. So it's like maybe 70 percent and then you just
change back again. I don't know why it does that. But cameras shape 1 now it
will show you the proper view. But the problem that would get in is this is coming
through gray. And the reason that is is
it's fine, it's manageable. We can deal with it. But the reason is doing
that is the color here is coming from the mash
node and it's not got, the mesh, hasn't gotten Arnold material on it
and needs non-material. But then you can't keep them
mash kind of random color. So I'll show you how
to overcome that. So this is the mesh. Right-click, assign
new material, Arnold, AI standard surface. And I like, like I said, I really like the
soft plastic one. And what I'm gonna
do is I'm just going to change the
color of this to white. But what I'm gonna do up
here, if the color is, I'm going to click
this file, this label. So what you're gonna
wanna do is go to Arnold by here
and type in data. And then AI, use at data color. Click that. And then here you want to type color set with a capital S. Okay? Now what you wanna do,
get your repro mesh. Go into mash, repro mesh shape, come down to Arnold and
say export vertex colors. All your vertex is in here. It's going to basically
log what color was there and bring it through
export vertex colors. And also just go into
mash 1 repro and make sure I've put
attribute color per vertex is ticked, it should be. So if you've done this,
you've done this. And in the material
attributes you've assigned an Arnold material and then the color you have typed in that. Because if we go
back to mash record, this is basically the
color set that's used in, would say in here somewhere. I can't remember
quite where it was, but this is the color
set that we're using. So let's, let's prove a point and go to Arnold render view. And let's now
refresh the Render. And you'll see that the colors
are now coming through. Okay, So that's kind of that. Now what I would
be doing in here, which I should have done is add an imager,
de-noise or optics. And let's just kind of
give that a refreshed now. And it'll just get rid of some
of that background noise. If yours isn't kinda lock
in high enough quality, what you can do
is you can go and increase the render settings. I'll get to that
in a quick second. So if we come in, we've got
some nice quality in there. I need to probably move
this backdrop over a touch. So let's just full screen again and yeah, we
can probably bring this. Oh, well we should
bring this over. So go to object mode
and boom, Perfect. Okay. Now if you render isn't
coming out quite well, well, if you use a GPU, you can
only do the camera AA. So just increase that. If you're rendering
with the CPU, you've got a camera
AA diffuse and specular transmission
subsurface scattering. The materials I've used, there's no subsurface
scattering so you can turn no, that is in the plastic and
there's no plastic one? Yeah. There's no transmissions. You can bring the
transmission down the fuel if you've done same
as me but using CPU. And then basically
you can kind of try and increase in each of
these incrementally. But like I said, I'm on GPU and I can only
do that one then. So what you would then do is, we've got this work in nice. I'm going to open my
normal render view. Just make sure that
you go render. And the camera one is selected. Because when you go to
render the sequence, it might start rendering
a different view. So just make sure that
this render view, this isn't the Arnold one. Just the let me just
wait for it to render. This is this one by here,
so just click there. Make sure that it's camera
one that's selected. And now what you can
do is go to rendering and vendor and render sequence. So let me just check
everything set up in here. So it's going to render,
render sequence. And what you'll notice, I'm not gonna do all of it
because I've already done it. But if you go to waive
set your projector. So I did mine in mash avatars
because the images folder, you'll start getting
an image sequence. So you'll see, there you go. I've got my first one. And then it'll start
doing an image sequence of each of your little things. Okay? So I really hope you learned
some stuff in that one. What I'm gonna do now is I'm
going to do I think thing as three more videos where I do slightly different things
to get different looks. I mean, to be honest, most
of it is playing around, but I'll show you
kind of each of the different what workflows
that I've used. So I really hope
you enjoyed that. I am going to hold Escape
to stop that render. Yeah, I hope you enjoyed that. I hope that was helpful and I look forward to seeing
you in the next video. Cheers guys.
5. Lesson Four - Mesh Distribution Techniques with Maya MASH: Hi folks. So in this session we're
going to be looking at a slightly different kind
of take on last time, but similar in some ways, but a slightly different take. Okay, so let's, let's
kinda jump on in. This time I'm not
going to be using a Mixamo download just
in case you know, you can't access Adobe. You can do it this
way for each one. So the starting point is
getting an animated meshes net. So what I'm gonna do is go to, I'm going to make
sure I've got my two panes side-by-side. There we go. I'm gonna go to Windows,
general editors, Content Browser, and unselect, I think I'm just
going to get that. Flip back. Double-click this. So it's in the animation motion
capture FBX double-click. And we'll notice now we've
got our flip reference there. It's a sort of m skeleton. So select it and maybe we'll see it's more or
less, yeah, cool. So if we scrub through,
this is what we've got. We also need to go and
get a rigged character. So click the Folder and I'm just going to get
this guy by here. So double-click and
he'll get imported. Okay, So let's jump
back in close this. I'm going to make
sure that I go to Windows animation Editors
and no open Human IK. Again, I did show
you this earlier, but don't, don't worry. What I'm gonna do
is select eric. I think his name is Alex vet. And basically I am so
so character is Eric. Okay, So make sure
access character. And for example, I can now
go and click if I wanted to, I can click this
guy the Move tool, and I can start moving it around so you can see it's
a fully rigged character. Okay, cool. So what I wanna do in this
Human IK window is just make sure that the source
is set to flip one. Okay? And what you'll notice, like we said, like
we saw earlier, is if we go back
to the beginning, this is what we've got, okay, you just flips over. So that's gonna be our
mesh awesome job done. So I'm gonna close the
Human IK window and go into these two things. This by here, I'm
going to hit Control H. This is our mesh. And I'm going to hit
Control H for this as well. Okay, arguably I'm
going to go down into here and this route,
and I hit Control H. So all we've got is this mesh. Okay, Pretty cool. Now, I've got that. So what I wanna do is
I want to start with my mash stuff because I know
that this kind of works. So, yeah, brilliant. Let's go and create a cube. Let's go ahead and go to mash. And with that selected, create a mash network. And you'll see then
I've got these cubes. We're gonna do very
similar to last time. What we wanna do is we want to distribute these on the match. So let's go to mash, distribute, and we want to go and
turn this to mash. And it's saying Please
connect a mesh. So this guy over here, middle mouse click the Import, the mesh to here. And you'll see that there's
gonna be some on him. Okay, there is ten. Good luck finding
them all. So we've got a few options now
on what we can do. Okay, I'll show you
one of them first. So first of all, in
the distribution type, you've got loads
of stuff on here. You've also got stuff in method. So scatter is the default one. So we can turn up the amount. And let's go to a 1000. Wallace go to maybe 3 thousand. And that's kinda what
we've got going on there. Now the problem is
it's clumping around these areas and probably his
hands and stuff like that. The reason being is because
there's so many faces there. So what we can do, and if I turn this off, you can see where the
high kind of counter. So what we can do in the Distribute node is
we can do use face area. And that will do a really even, It'll kinda look
at the whole thing and it'll do it really evenly. The problem is with this, which is why I don't like it, is a CAT scan, what I would call noisy. So if I play just the first few frames, That's what's happening. Because they're not pinned
to individual faces. As the animation kind of goes, it kinda boils around
because it's trying to get the average in each frame. And like in the animation
faces the form. So that's the resulting thing is it goes kind of very noisy, especially around higher areas. Like like kinda like his
hands here get really noisy. So I personally don't
like that, that method. So what I do and you know, ultimately what you
should try and do is try and get this mesh. And let's have a
look at the mesh. And you could try and do
some real topology to try and maybe get rid of
some of these faces to get, to get even phases all
the way around really. That can be harder. Again, you don't need
all this detail really. You know, you can
totally lose the nose, but that's, that's one of
the things you can do. I'm not doing, I'm not gonna do that in a series purely
because this is, the series is about mash is
not a buy wheat apologizing. And that'll be a long kind
of thing to go through. So I'll show you another way. Let's go to mash back in the
Distribute note in mesh. I'm going to go this
time and I'm going to go to random face center. Okay? And again, you'll see this
dark clump been around. Something you can do to help this is if you could have
face and edge settings, it'll still clump
to those places. While I'll probably do is, uh, may flood the mesh. Yeah, flood the national
give every face a square. You'll see it gets
very busy up here, which may be the lucky want. But what you can do
is enable scaling. And basically it'll
do for small faces, it'll do small cubes, big phases, they'll
do bigger cubes. Now, I think looks a bit busy at the moment
so you can get your original cube and
kind of scale down, okay, and do
something like that. Or you could do is go to
mash and go to Mesh one, and go ahead and
add an offset node. And in scale and maybe go
minus 0.5 and turn up to each. And actually, that's definitely not give
me the result I want. So let's open the mash
editor and let's get rid of the offset and do it the original
way towards being clever. And so get a cube and I'm just going to kind of
scale that down. Okay, so I think this is
looking kind of okay. And what we could do is we
could turn off flood mesh and you could input how
many kind of 1, G1. So let's say I'm gonna
go, I don't know, 5000, just draw a few less. Oh, not 500, 5000 instead of
flood in the mesh like this. What I also wanted to do then is I'm going to start adding
some randomness again. So I'm gonna go to mash. I'm gonna go to random, wherever randoms
gone to van down. There we go. And I'm probably just gonna do rotations and customer random
rotations going on there. Again, you could,
if you wanted to, you could do position, but you start to kind
of lose the former bet. You still have got
a bit of form. But for just put these
back to 0, for example. I prefer that you can randomize
the scale if you want to turn onto uniform scale
and can randomize that. But again, i'm, I don't wanna do that is just the rotation. One would do then is I'm gonna go back to mash
and I'm going to add a signal node because at
the moment if we play it, we've just got, I mean,
does a back flip and those kind of things are
just stay in there really. And that's kind of
all this happen. And so we're going to do
is add a signal node. And I'm going to take my
position to maybe five each. And that's just just play
and see what that does. So you can see that kind
of dancing around, okay? The position, I'm also, I definitely wanna do the
same with the rotation. And I'm going to turn
the rotation all the way up to the
rotation is going to be kind of randomized
and animated. Okay, so that's pretty cool. I'm like in that what
you can do if it, if it's go in, let it,
let it play through. And if that signal is going
kind of like too fast, what you can do is you can
turn down the timescale. If I turn that to point to and click back to the beginning, you'll see it's
happening a lot slower. Or if you kinda
bring it up to two, it's going to happen
obviously a lot faster. I'm happy with one. What you could do is you can turn on different noise type, so looping noise, curl noise, and you can see what
different effects you have. I'm not a fan of that. I do like this 4D noise now. Okay, So again,
have a play around. Finally, what I'm gonna do
is I'm going to go back to mash and I'm going to go
to color, add color node. And I can't remember now
what colors I was using. So let's have a quick look. Right? So sort of green, red, yellow, perfect as fine. And green, red, yellow. So let's go ahead
and click in here. And I'm going to click
Solve a yellowish green by here and select it. And now in a randomized my hue. And it's done this to me before. Weirdly. It's not showing me
the textures in there. It doesn't really matter. We can sort that out later. I think it's a bug because
it's done it to me before and it is
really, really weird. Don't worry if you can't
see it, It's all good. We'll be we'll sort
that out later. For now. I'm just going to get my comeback, I'm going
to get my color. And I'm just going
to turn a random hue maybe to point to. And I'm just going to
hope That's what I want. So like I said, when we get to render it like in the last one, we will, we will see
the colors anyway. So what we'll do
is we'll use the render view to
adjust the colors. So I'm going to do the
same as last time. Let's do the rendering part now. So, yeah, I'm going to go
ahead and create a camera. I'm going to turn this view to my camera view and start
kind of pull it out. And thought we
lost him and cool. Now I need to go to the
render settings to set up the resolution on a maze or
do the other stuff in there. So tiff, no compression, name underscore
hashtag dot extension. Because we'll be
doing frames 12120. I could pass along the animation
was renderable camera, we came a one, and here we go. Hd 1080. As I'm in here, change to GPU and chalk this up to eight
is my default setup. Cool. So let's go ahead and see, right, let's turn in here. The resolution gate on. I think we can get closer. Let's see the flip. So that's the highest he
goes his hands there. So we can definitely going
to push you in a bit. And let's try and send to him so that E move it up just a touch. Okay. Cool. Happy with that. So I'll lock the camera. Now what I'll do is I'll
make a ground plane again. I'm going to scale up
and bring it over, scale it that way. Z. And I'm going to
come into this view, but here I'm going
to select the edges. So click and then Shift, double-click and Control E or Command E to extrude
it up like so. And again, I can't remember
what colors I have in mind. So he was like pink, pink, and yellow for the floor. Cool African go
nice. Pastel colors. Nice one. Okay, so let's
right-click object mode, get the whole object,
assign new material. Arnold, let's go to
standard surface. I'm going to go
and select clades. That's quite a nice mat
material and get the color. And I'll start with a sort
of mild kind of yellow, something like that,
pastel yellow. Great. I'm going to get
these back faces now. And I'm going to select them. Right-click, assign
new material again. Arnold, Standard
Surface presets clay. And let's go ahead and
get a nice soft pastel, pink, something like that. As just check that there
is nothing, no subsurface. There is a subsurface, so let's select that as the
same color, pink. There's no coat now. And let's get back to decimals. Can select one of
these faces and go material attributes
as good under the subsurface color of this
one and set the same yellow. And there we go, cool by that. So this is looking,
let's look in Nice. We want to do the
same thing as we did last time now with this mesh. So right-click,
assign new material, Arnold, AI standard surface. Again, I loved the
plasticky lock. Level, the settings in that one, play around and get
some, takes an ansi, one less one when we go
ceramic, for example, okay, ceramic crowns, another
good one for the color. We want to click this. And then remember
we want to go to Arnold and type in data by here. And then AIE, user data color. And then we want
to type in color, set with a capital
S onset and get your repro mash victory
from S shape Arnold, and make sure export
vertex colors is ticked. And then mash 1 repro, just make sure it always will be probably about color per vertex. Okay, so now we're
at a point where we need to add a light
and we can render. So go to Arnold lights
and I'm going to go for Why don't I go
fall sky dome again? Yes. Well, cool. And let's go ahead and
open Arnold RenderView. That's the normal vendor view. Arnold render view. I want to make sure camera one shape you ask the ones checked. Let's go ahead and refresh the render and we can
judge those colors now. So just let that
kind of preview in. And I can already
see the colors. So on hold Escape to
cancel the render. Okay, So I want to, basically, I want to
switch those up a bit. Let's see if we can. And okay, so for the good to match spit nine units favorite
uveitis so many times. Let's kind of turn
this up to say 0.3. Do a quick as Turner render
settings down as well. Just as a quick as 203. Just wanna see the
colors. Let's do a quick refresh render. And okay, what I'm gonna do is get back
into mash 1 and I want to call it closer to the red
and maybe bring this up to point 45 and
refresh the render. We should be getting
some reds coming in. We've got some more
blues coming in. So basically you want to
kind of do it this way. So let's kind of go fine. Okay, Let's get this and
maybe let's bring it into the reds then more into the right or more
this way, maybe. Let's go and refresh the Render. And yeah, can you just, just kind of play around until we've got some
linear happy with. I'm kind of happy
enough with us. What happens if
we put it on red? Let's go and refresh
that render. Now we're getting
some red in there. Now, what I may bring this
down to 25 and randomness. And yeah, something
more than I'm liking. And what I may do is
you bring it down to two and perfect as bad. And I'm also going to
bring down the saturation, a touch like that. Oh, too much, far, too much. Backup. There we go. Cool. So let's break off
this render view. I'm going to bring up my
settings and tell you, well, first of all, I'm going to go to
that sky dome light just spits is a bit strong highlights from there
we can start to 0.8. And yes, fine. And let's go to my render
settings and chalk this up to eight and add a d
noise or optics, so it'll denoise it as well. What I'm kind of thinking
is I may be locking on this one to maybe turn up the
size of the cube slightly. So let's do a de-noise and
then we'll evaluate it again. A lot of this is playing
around and having fun and developing looks really. So this is what we've got. What I'd probably
do is I probably desaturate these two colors, and then I'll probably
add a few more things. So let's get face right-click
material attributes. Let's D saturate
that quite a bit. And face right-click material attributes D saturate
that quite a bit. Let's go ahead and go to mash. And I'm gonna go to distribute. And I think I'm gonna
go esco seven thousand, seven hundred and
seven thousand, five hundred, and maybe
even get the original cube. And you get the scale
tool and just scale it up slightly, gets
a little thicker. Okay, so let's open Arnold
render view back up. We're on one Arnold
RenderView backup. I'm going to do in
a little bit of a rerender now I didn't say the previous version
because I've got it on interactive render. But this is looking a lot
better than what it was. I'm still a fan of
this technique. What I would do is possibly be read topologies
and the metrics. You got a lot of
small ones in there. And it looks nice
color down here. Especially if I unlock
the camera and kind of maybe move this over as well that we go and just
it just didn't matter. And lock the camera again. Basically, if you kinda
look at faced by here, we still got a lot
of small ones. So what you could do is actually read topologies that mesh. But again, if you use the voxel way we did in the
first one, that was fine. I showed you a few
other ways area. Let's do a quick final
render of this just to kind of see what
we've got going on. It's already been doing
that for me early on. And yes, that's pretty cool. I'm liking that, I'm loving. These are more saturated
than that background. Lynn works quite nice, customized shadows
kind of on the floor. So what we wanna do then is just go Render, Render Sequence. What you'll want to make sure is that you open
this render view. Make sure it's set to
render camera one. And let it cannot do one sort of rendering and then do
when the sequence, because you might have times
I've done render sequence, even if the camera
wanna select in my render settings are just
ranges, the perspective. So you just ask
the weight that I found that you need
to do to overcome it. So what I'll do now is I'll quickly show you what we're gonna do it
in the next lesson. So let's open up this
image test eight. So this is quite a cool one. So what we've shown you this in the next session will be used in maybe a slightly different
distribution method and we'll be adding these. And this is a real fun
one to work on as well. Okay, Cool. My S1. So choose material in and I'll see you
in the next lesson.
6. Lesson 5 - Using the Trails utility in Maya MASH: Okay then folks, so
this is a fun one. I really love this one. So this is what we're going to
be making in this one, can be quite render intensive
or intensive on a computer. So just bear that in mind. But yeah, cool. Let's, let's
jump on in and do this. So first of all, I've got another thing
from Mixamo.com.com, but yeah, I'm mixing my
watch I showed you earlier. And I've got forgot a project, so I'll
just import it here. Actually, my, I'm
going to go to file, make sure you set
your project to the correct place from the
set mine to mash avatars. Click set. So now if I go to File Import, I've downloaded that and I
moved it to my scenes folder. It's called rumba
dancing. So click Import. And it'll set your, set it two hundred and forty, three hundred and fourteen
frames because that's how long the actual FBI axis. So let's have a quick look
at what we've got going on. Let's preview it and as play. So this is what we've got. Okay? Now, what I'm gonna do is
we've got two meshes against, I'm going to Shift
select both of them, go to modeling mesh and combine. Now we're not done this before. Sometimes it loses
the animation, so just give it a
quick go and give it a quick play and yet as fine. So I'll take all these
things but here, Control H to hide them. Okay, So what we
wanna do next is I would normally do this with spheres or I wanted
to do with spheres, but even my CPU was just
kinda like bargain. I was like no clavinet. So what you could
do swap at the end, but for now, I'm going
to click a tonic solid. So it's kind of like a sphere, but like a PlayStation
1 raise sphere. So cool. I'm going to make
sure this is selected and go to mash and make a new
network distribute node. You've guessed it,
we're gonna go to Mesh. Okay? And I want to go to union. It's the say and please
connect the mesh. So middle mouse-click the beater joints one which is
where it is to here. And you'll see it starts getting distributed over that mesh. And the method I want to go
to is random face center. Okay? And I also want
to flood the mesh. And this is why I'm
a stuccoed or too much not necessary
spread equally. So what I want to do
is I want to go to face edge settings
and enable scaling. And then what you can
do is if you wanted to, you can go into an app photonic down in terms of the size. So do kind of like that. If I turn the size
down a little bit, it may kind of like that
space in our backs, 0 to y. Nothing. I want to get rid of that space. And so I'm going to turn my
backup to like maybe no 0.9. Kind of have a Luck. Yes, Carl, little
bit of spacing. All escape 0.9 all the way
around actually uniformly. Well, if we go one, how much of a
difference did it make? Yeah, in a while, I'm going to stick with that. Obviously again,
harvest folks were experimenting with what
you kinda wanna do. But I'm going to
stick with that. I think I'm going to turn off this mesh so there's less food, so I kind of render and you won't see a secret
for you there then. Okay, cool. So what I wanna do is I
want to add a random node, so mash, mash, and
let's go random. And again, a lot of just random, randomizing
the rotation. Or two. Did I do that? And the other one
is have a quick, Let's have a quick look. Mesh and it's test eight. Let's have a quick pause. The thing, thing, I kind of
thing that kind of, again, it doesn't really
matter, but, uh, may randomize them and
we have got caps there. So let's take, just to
try and replicate it. I'm actually not going to
randomize it. For now. I'll turn the position down and maybe then I can randomize. It will kind of a
play around with me. And then I'm going
to get my initial platonic and I'm going to
scale it down slightly. And yes, a lot similar. That's probably
what I did earlier. But again, folks just play
around and have some fun. Unwillingly get color node. And for the life of me a
continent or colors I was using. Asked do nothing again, I need to turn, I
need to restart Maya. That normally solve the
actually Saussure we started my do is match test eight. What colors work was
a sort of a blue. Okay. So I'm gonna go and get a color. I'm going to go in the
middle of the blues, go up there and
randomize the hue by 0.15 and also the
saturation by about 0.5, because I want a
varied saturation in there and we'll have a look
at what that looks like. I'd probably just
need to restart Maya. It's so annoying
when it does this. By, yeah, cool. Okey-dokey, even if
you turn that on and see kind of just
doesn't, doesn't have it. So what we wanna do now this is the most important bit actually because we've done
the calendar before. What I want do is I
want to add an in fact, what I might do just to help it may turn the color node off. What I wanna do now is
I want to go to mash and I want to add trails. Okay. Well, you'll notice
when I add trails, Let's go to the
beginning actually, just to make sure as best we will notice
when I add trails, trails node, it doesn't pop up here because it's not
one that can be ordered. The rest of these ones can be
ordered like all these ones can be differed in their order,
but the utilities can't. So in order to see the
utility is just click this little thing
here and you can go to mash trails there. Okay, so what we've got here, Let's give it a little
bit of a plagues between trials on, and it may take a
little bit of a while. And let's stop it. You can see that we've
got these kind of trails. Okay. You can see
these trails coming in by hear the very low res. But we'll be doing
a few things now. I played around and I know
that 500100 trails is working. Let's just keep it a 150 at the moment that
something like that. And go back to the
beginning each time you can have
changed something, just make sure you back to the beginning to
play it through. Or you could do is you've got all these other things
you've got joining the dots. Okay, so let's have a quick
look of what that looks like. And that is totally bug and out it kind of tries to
join them altogether. I'm totally going to
click stop on that. What I may do is I may cause while and pause this
recording while my computer kind of tries to catch up on us back,
didn't need to do it. Okay, So I had a playground
area and I discovered that 500 trials was kind of
what was working for me. And I liked a trial nth 12. The longer you have
them all I have on screen are more distracted.
I might, they might be. So obviously trail length is how many frames they're
kind of trailing behind. And then trails scale. I liked a scale of five. And I think what we'll do is we'll leave it there for now. Let's have a quick preview. Yeah, let's have a
quick preview play. Okay, so we'll have
a look and ask them. Mental isn't a really bizarre. It's kinda keep on going. But these are the trails that
were getting at the moment. Problem is they're very
kind of like flat that basically planes and
that's not nice at all. So let, let's, let's
deal with it for now. I'm going to go to I don't
like that their planes, so we want to extrude them. So I'm going to go to curves
and surfaces and I'm gonna click nurbs circle because we want to use this nurbs
circle if we basically in here, so minus 2 and repro mesh
off and trails mesh. Basically we want to use
this and extrude it along. Okay. And extruded
along with trails. So I'm going to select it and
go to scale and type 0.131. It really small in
there for each of them. Okay. And what we can do now
is back in the trails mesh or mash 1 trials is, we can say right here's
a profile curve. Okay? Middle mouse click,
middle mouse. Under that, middle
mouse-click noob, circle one. Let's try that again. Middle mouse click nurbs, circle one into
this profile curve. Okay, and what that's
gonna do is it's going to extrude that circle along
each of those trials. Let's turn the trails
down for now is 250. And maybe the scale down to a, scaled down to about three. Just to kind of make my computer run a bit faster, perhaps. Go back to the beginning
and zoom out like this. Turn on the repro mash. Shift H, and I'm going to turn back on the
trails mentioned Shift H. Okay, so what I'm gonna
do is I'm going to play now just to kind of see
what we've got going on. And what I think
is going on here. If you get in, the
same issue is made, which is having area where you want to do is you want
to make sure you go into here and make sure play
every frame is selected. And now it's going to
be a lot less mental. So let's give it a
play through now. What should be a
lot less mental? Why I didn't do, they
didn't click Save. So Player B frame save. And now try again. Now it's going to do
every single frame and you'll see that a lot nicer. Okay, let's stop there. What you'll notice now is that
actually bits of geometry. So I think that's
probably big enough. What we can do is turn it
back up to five because I've got a feeling that's
the number I used area as player and yeah,
that's, that's fine. What you will
notice is snobbery, curvy, but it's
not quite curved, says two things we'll do. We'll turn on curves samples
up to 12, and that may help. So let's try again. And now it's not
helping too much. It's because on those frames, but they're the hand just move
so far within it. And so. What we'll be doing
later is we'll be actually apply in a
smooth mesh to that. So what I would suggest
at this point, folks, is to do a play blast to
see if it's kind of gotten, got the kind of look
that you're 110. And again, it will
be very low ways, but if you want to do that, just go to Windows,
animation playback, play blast, and kind of play blast trails and go
QuickTime H.264, quality 100 and
click Play blast. Okay, so I'll do that. And most gonna do is
it's going to play through each frame and then it's going to kind of record the screen like I said earlier. And yeah, what I'll do is I'll
pause this recording now. So you will see it once I unpause it,
you'll see the play blast. Okay, so here is my play blast. I'm like in what's going on. The only thing that I'm
let me repeat that. The only thing that I'm
not like in is there's so many located around the hands. It kinda does have a nice look to it or if it's
just run the hands, but you may not want that. The reason that's happening
is because there's so much GO around the hands. That's why it's happening. Maybe it's a GO there. Again, that's something
which mash can't necessarily overcome unless you read apologize or two dominant
cover in this series. But in the next video, and I'll show you the next app, animate the final
animated avatars. I will show you one
thing that we can do to kind of overcoming
a bit of a cheat. Okay? So what I'm gonna
do now is I'm going to set stuff up ready
for rendering, because there's a few
different things I want to do with the rendering. So I'm going to do is come
back into the mash editor. And I'm going to turn that
color back on that color node. So let's go ahead and create a new camera
just like before. Feel free to skip
a minute or two, but I will be doing it because
we've done this before, but I will be doing something
new in this one as well. So something like that. Let's go to Render Settings
and work our way down to if none name underscore
hashtag frames 100 to 114 because that's
how many we've got. Perspective can change to that. And then HD 1080 and
C important one, change the render at a GPU, and I'm gonna change this
to eight by default. And cool. Wanna do now is go ahead and view camera settings
resolution gate. Make sure now that this is a centralized and be the person
doesn't go out of frame. What you can do is turn
the trails mesh off command H to kind of
play it phobic quicker. Yeah, I'm, I'm
comfortable with that. It is kind of go in a bit slow, but I'm just going
to work with that for the sake of this tutorial. What I'm gonna do
is add a floor. And I'm going to
select the edges. So shift click and
Shift double-click, Control a, and bring it up. There we go. I think I had a rage, didn't I? So good. Object mode, assign new material and Arnold
AI standard surface. Let's go for plastics. My default changes to a
nice sort of red color. We may want to change, it
probably will want to change the colors layer because it's
a very strong right down. And now what I wanna do is
I want to get this mesh, assign new material, Arnold
AI standard surface. And let's go to presets and just gonna
go plastic it again. And turn subsurface down here, outlook that blue actually. Click here on the checkerboard. Go across to Arnold, make sure you've got the
data typed in there. And then AI userData color, typing in color with capital S. Go to the repro mash Arnold. Export vertex colors
and just make sure in mash repro that output attribute is ticked color by vertex. So I also want to do this time is get my trails
mesh, turn it on. And so Shift H. And what I wanna do is
come forward a few frames, just sweet and kind of see it. Okay? What I wanna do is assign new material to that because that's going
to need a material. Go to Arnold standard surface. And again, love the plastic. Just do that and change
these two bright white. Right? White. Yeah, cool. Then I'm going to go to rendering or didn't
have to actually, I'm gonna go to Arnold lights and this time I'm gonna
go for physical sky. Okay. Now let's go ahead and open up the render view and
you'll probably notice or you'll see one or two, not issues, but
were things that I don't really like and I'll show you what we need to
do to change them. So I'm going to
refresh that render. I'm loving other color turned
out on the actual avatar. So I'm going to hit
Escape per second. Ok, and I'm going to turn my render settings
down to like four. And right off the bat, I think the sky dome should
be turned up in intensity. So I'm gonna turn up to two. And I'm going to give it a
definitely Actually it's okay. What I like is the source
shadow we lived in. I don't like the shadow, but I like the kind of
light on her when you use a sky dome is really soft lighting which
gives you soft shadows, but really like
flat on the person. So I'm going to select
the background, color, material attributes,
and desaturate this. Why Tibet, something like that. And come and select
that there as well. And I'm also going to do is maybe play it for
a few more frames. We see more trials. I think we had a trail
of 12 and let's give it 12 frames or lines around 13. That's fine. Let's go wrong. Window openness. Let's give it a 3D renders. We've got more trails and hopefully less
saturated background. A lovely, small trials. Awesome. And the only
problem now is this shadow. So I'm gonna do for that
is in the AI sky dome, come to physical sky. And what we wanna
do is you want to turn that sudden size up. So I know that a value of
40 was working earlier. Basically what you're
looking for is a balance between
having like dark, darkness here, in
lightness there, and also a soft shadow. So as you turn that
off, let's say take a screenshot and we render. It'll be a little bit more
softer light and there will be a difference between
light and dark see shadows under
the neck with that. But this is a lot more
kind of soft. Okay. So that's kind of work
in wealth me there. I would probably orient the camera around a little
bit more like that. Let's just see if that
angle is what I want. Not I'm going to re-render. And again, BI, that gives me a little bit in
lysosomes perspective. And then what I will
be doing from here is probably increase in
my render settings. So I'll liked, but you
can see just the edge, but I wasn't too
great, so I'd be increasing my render settings. And then after doing a render, so that is that one. I'm just end up going
vendor and render sequence. And again, just make sure
that in this render view, the one you open up by here, just make sure that the right camera is
selected camera one. And I'm not going to
let it render it again. So hold escape, but then you'll want to just do render sequence. Okay, so as we
finish this one up, Let's have a look
at our final one, which will be given
in the next video. It is this one. So this one's pretty
cool. I love this. So yeah, that's what we'll be
doing in the next session. So I look forward to seeing
you in the next session, and I will also be set in
your task at the end of this. Cool cheers. See you later.
7. Lesson 6 - Using Incandescent shading with Maya MASH: Okay, welcome to
the final session. Quick reminder then
what we're making is still a funky kind of thing. Let's just call it a
thing. So what we wanna do is every project happy
to pains like this. I've gone and got a FBX monoline
and that website again, I'm gonna go to Import, and it's called booleq, that booty hip hop dance. Let's click Import. We've got the cell
animated mesh. Perfect. I'm going to get these
two meshes and go to Mesh and combine. I'm then gonna get everything
and shift select it. And I'm going to hit
Control a and G to group it and double-click. And I'm going to call
this distribution. Okay, let's just go
back to the beginning, make sure it still play
in a linked perfect. What I'll do is I'll
select it and don't hit Control D because
it won't be rigged. Hit Control C and then Control V. Or you
could do Command C, command V. And I'm going
to double-click and name this one visibility. Okay, so a little bit different. Just to make sure
that both working, I'm going to hit the top
one and do Control H. So hides it all. Go back to the
beginning and play. So the visibility
one is working. Hit Control H and Shift
H on the top one. And it looks like Let's
go back to the beginning. That one's still
work in an animated. Perfect. Okay, So what I'm
gonna do is keep mesh for distribution or
the distribution one, this one on first. I'm then going to go ahead
and what I'm gonna do, yeah, I'll do is
first, I'm going to go ahead and create a cube. And I'm going to bend a
vacuum when it's selected. I'm going to create a
mash network. Okay? So what we wanna do is
we want to distribute this cube over the mesh service. Could you distribute mode? And like always, we're
going to go this and I'm going to go to
random face center. Okay. And then turn it up to
like 2 $300 the last time. 250, different. And I'm going to zoom in. And there we go. Oh, we need to import
the mesh, don't we? So with this one, the mesh that I want to give, that we need to give
it an input mesh. I want to go and give it
the distribution one. So in the distribution group, go ahead and it's
this surface by here. Middle mouse click this
to the input mesh. Okay, so middle
mouse-click input mesh. Now the problem that we'll
have is a lot of them, again, a congregating around the hands because
a high polyuria. So there's a reason why I've got distribution
and visibility. What we're gonna
do in this mesh. Turn off, we promise
we can't see all the math cubes and turn off in distribution
these ones, so select them and Control H. So I'm just left with this mesh in
the distribution folder. And what I wanna do is I don't want any of
them on the hands. So I'm going to right-click
and I'm going to go face and I'm going
to delete the hands. So nothing is going
to be on the hands. Okay? And I'm also going to
go maybe few more frames. And I'm going to delete all of these crickets but
the arm as well as fine. And I'm also going to do the same feat
because it loads in the feet and we don't
want them kind of like stick into the floor. So I'm gonna just go yeah, cool. Delete. So that's that most of
it from here on out, mostly the same size, the smaller ones in
there obviously, but they're mostly
similar size to activate that you haven't
got tiny ones on the hands. So if I turn the repro
mesh back on shift h, you'll see that none
of that there were loads on the hands area and now we've got relatively
even spread of them. Arguably a few
more than the kind of joints by here and there, but it's not hearable. So basically that's the
reason we split these up. We needed to animated meshes, one of them for the
distribution only. Okay? And so with that, when we delete the hands
and this one will be you remember that was
a visible mesh in the preview that I showed you, there was actually a
visible mesh underneath. And you want to
see your hands so that one will be the
one for visibility. Okay? So that's kind of why
we did what we did. So I think maybe the amount because we
are going to be making them quite beggar thing. I'm going to keep it as it is. Which is what, two fifty, two, twenty, two hundred fifty. Okay? I want to add
a random node now. So random, random, random
and write its position. I want to take all the
way down, not fast on. Otherwise, they're
going to be off. If you check up, they're
gonna be off the mesh. All I wanna do is I want to
turn Uniform Scale off, okay? And I want to make sure that my scale for this is to
set all the way up, okay? It's just got randomness
between mole. Next I want to go back
to mash and I want to add a signal node. And I'm go into, again. If I, if I cannot give
this a bit of a play, you'll see that the position
is actually wiggle in a bit. I don't want that, so
let's 0 all of that out. So we're not so of wiggling
that I want to go to scale. And I think I used note you wanted to
in uniform scale off. Now it's just scaling the y. So I think 40 is what I used earlier,
something like that. So type that in and you'll see they're kind of
hard secrecy is moving. But if you focus on 11 of
the bars are gone ahead, you'll see that they are
pumping up randomly. Okay? So that's that. What we wanna do. What you can do is you can
play blast states like we did earlier to kinda
have a look at the speed. Or you can do is you've got timescale and here you
can speed it up so they move more fast or
the fastest better word. But I'm just going to
keep my time-scale at one as well happy with
what was going on. Awesome. So I want to start
adding stuff now. In the distribution,
we've still got this mesh with her hands and feet cut
off that still visible. So select that and hit Control H would just use
not for distribution. I mean, if you wanted to, you could go ahead
and you could kind of vendor that if you wanted to. But I want indivisibility now. I want in here drop-down. I want this visible. So just click visibility
and hit Shift H. All these Wigand things. I'm just going to
select these and do Control H to hide them. So we've now got a full mesh is nothing on their hands
and nothing on her feet. Okay. So I'm going to get this mesh. I'm going to start
applying my materials. So I'm going to right-click
assign new material. And for this, I want Arnold standard surface and the preset, I want car paint and
I'm going to replace. And I think I stuck with the
same color to be honest. And then I'm going to
get this repro mash, assign new material,
Arnold standard surface. And this time I'm gonna go for wherever the incandescent
bulb and replace. Okay. So what I'm gonna do now is I want to
add a backdrop, okay? And then I'm going to add a
light and we're going to see, I'm going to turn basically I know that unknown
and up-to-date in the submission up because I know it's not going to be
quite as much as I want. So let's go and
get poly modeling. Let's go and get one
of these four planes. But first what I wanna do is make a camera that
I've set all that up. So cameras, make sure you
tune is to camera view. Come out like so. Go changes to tiff. None. Name underscore hashtag. And it's how many frames 117. Camera one will be the
view that we render HD 1080 and change it to GPU. And Let's just put
it to five for now. Okay, so close that out. Let's go and get a view, camera settings
resolution gate. Right? So I'm gonna come
from side view, maybe something like that. Okay. So I can go into it further. Come out a bit into
the side and just, just keyframing up as offset
that, but they're cool. All right, so I'm
gonna move this over. I'm like That's fine. Lock this camera by the way. And then what I'm gonna
do is go to edge Shift, Control E and put up, go to object mode, right-click, assign
new material. And I'm going to go to Arnold, going to standard surface. And I'm just gonna pick a
color is going to be a bit of a sort of dark yellows
fine To be honest. So we'll have dark light in. So what I wanna do is go to Arnold and I think
the lighting ago 4s probably going to be maybe
a physical sky. I think. Light physical sky. And again, if you remember the shadows we
had in the last one, I'm just going to
turn that sun up to something like 40 again. So any shadows there shouldn't be many shadows,
a little bit dark, but just, just turn
up or actually, let's make them even
softer than they were last time it goes to 60. I want to go back to
the intensity because if I were to render this now,
well, let's have a look. Not this one, but this one. If I were to render now, then basically you've got some nice incandescent
like they're not enough. But you've got probably a
bit too much of a shadow. I haven't even got
the de-noised on. And also the yellow isn't coming through on
that background. So after a look
at that, so let's refresh that render
with the de-noising on. And again, I'm
probably getting too much of a shadow on and the shadows or ICT as a
contact shadow but soft. The, it's, it's too, it's too bright because we want these lights to
kind of power over. So I'm just going
to go to this and click assign existing material. And it was the first thing, it was the first node, the second surface with all, let's go and have a look. Let's just go to this
object, assign new material, Arnold standard surface, and we just changed it to yellow. And let's go to presets and
plagues as quite nice one. And change that to
yellow Matt thing and go to subsurface and also
change at the same yellow. And nothing in transmission. Nothing in any of the
others are color up here. I'll do it in the wrong one. There we go. Cool as nice. So let's go and give that a rerender refresh render queue as the color mastery
color as warranted. So basque kinda working well. But again, like I'm saying, it's too bright at the moment. So I think the
intensities probably unlike ones, Let's
bring it down to 0.2. So it's a fifth of what
it was, yes, only R. So let's go in their
intensity to point to see how that's working. Again, I think that's why
I used earlier refresh render year as kind
of Water want. Maybe push it to 0.25. But what we'll do first of
all turn up the emission. So let's just bring this down. That's kinda nice. What I'm gonna do though
is I'm going to go to the repro mash and
I'm going to go to the surface VAT in the emission and it'll
bring it up to like three. So open the vendor backup. Let's take a screenshot
and let's refresh. It's random, you
should be getting more bright lights out of that. And yeah, that's looking, I was looking kinda nice. London where we're
going with this. And so if we look at
what we had before, so that is kind of more like
community to join is F5. Wants to have sex. Why not? Let's give a rerender of that. When I did the renderer area, I think it was on three. Let's take screenshots
and refresh the vendor. I would've liked. It may, it looks
like it's done to light up the walls
by here as well. What you probably need to do
is you'd probably need to start turning up your
rendering settings. But let's have a look
where we've come from. There. The sea that just looks
like nothing there. Now we ask look in
as looking nice. So if we zoom in, for example, we do with
some more quality. So I would probably be for this point my settings
up to rainbow, maybe even 12 and
watches 2880 samples. Okay, what I'll do
is I'll pause it while I do a re-render again, just to kind of show you the
different cell it gives us. So I'll screenshot this. And now I'll do another re-render with the highest
settings just to see the, just show you the
increasing quality. Okay, So this is the re-render. And let's have a look at
the difference in quality. So you can see there is a nice little difference
in the quality, especially where it's
distributed in that light, but they're so that is kind
of nice and it is worth it. So it depends how much
time you've got mine, but you can see that
it is quite nice. Okay? So that concludes what you would want to do now is
just kind of render sequence. So in the rendering and go Arnold and no Sorry,
render, render sequence. But again, make
sure you pop into here and make sure that's the right camera that is
rendering just click Camera 1. I'm not gonna do it
because it can take ages to preview my name. And then you can
render sequence. So yeah, look, I really hope you learned some
stuff in this course. I hope you've enjoyed it. If you tune into the next video, I'm going to set you
a final task, okay? Just something that
I want you to kind of post up in the
project gallery. So join me in the next video
and we'll go through that.
8. Project Task (Assignment): All right then folks,
again, well done. You have made it till the end. So what I want you to do
for the project, right? I'm really, really
looking forward. Seen is obviously I did for different kind of
animated avatars in there and hopefully you
render each of them out. What I want you to do is I want you to find some
royalty free music. Just make sure the query
finds him royalty free music. Maybe do two or three more. And then what I want you to do is I want you to do
a little 88 of them. So maybe you've got five
or six of them together. Now if you want inspiration, if you go to major laser, light it up, I won't
play the song. But basically, this is, this is kind of where I got
the idea from, To be honest. It's got loads of these kind
of like animated avatars. Okay, so that's voxels
being used right there. So if you have ever
watched this with sort of, I think we did four
exercises from that. Yeah, I think it was four. So the ones that we did maybe kind of render them
each child maybe do two or three more of your own or just do two or
three of you own and then put them together
with some sort of all three music into
a nice little edit, even if he can't be a
hands-on royalty-free music, put them together in little
iodate and then upload that. Suddenly love to see, see them all and
have been so nice. If I get a bunch
of them in there, I could do an ADH of
everyone's together and I kind of look so cool. Awesome. So again, well
done for getting this far. Really hope you enjoy the
course If you did give it a thumbs up or whatever. But I've got another
couple match courses. Either they're now coming
out soon. So check them out. Chief tune-in, folks. Thanks for tuning in
and I'll see you again.
 Jonathon Parker, Passionate MoGraph and VFX Lectu