Transcripts
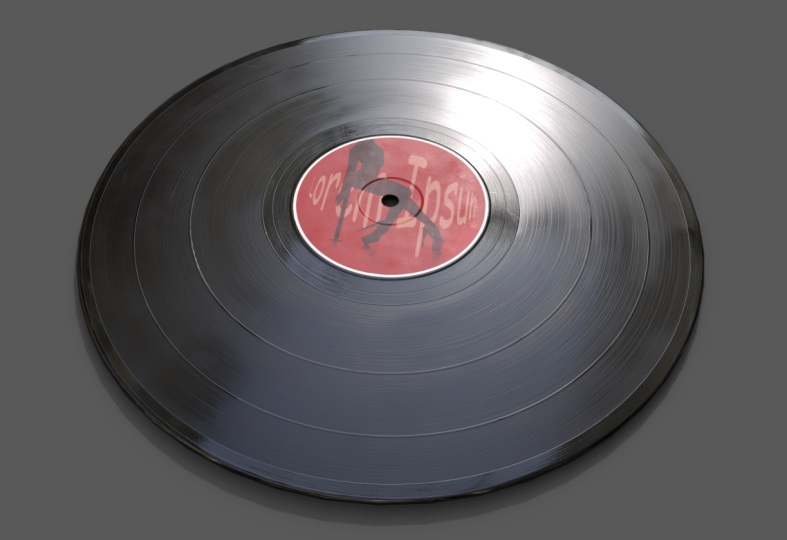
1. Introduction: Hello. I'm well, I'm a freelance treaty. Generalists from the UK and I live in Seville in Spain. I've been working in C G for over five years. I worked with Meyer after effects Unity three D substance painter On a whole bunch of other programs I've done work with visual effects with really modeling virtual reality or augmented reality motion graphics. Are there a lot of motion graphics motion designed to D on some three d animal to learning character animation in my spare time. Okay, so today I'm gonna show you how to model a vinyl record. Onda also how to texture it. I suppose this'd be a game asset Low, Polly. So all the details are baked in. You can see it has a lot of scratches and fingerprints because this is how my records look being a hip hop deejay, that this company flow from the late nineties mid nineties. So with that said, I'll show you how to make this basically. All right, let's get into it
2. References: Okay, so I'm gonna be using Meyer from the modeling phase. In fact, the first thing we need to do is find references, references, a key. If you have a few records of your own lying around, I would definitely recommend to check those first. But if you don't have any records, then I mean, what while you're trying to model a record, But if you don't have any records, then you can find a lot of references online. Try and find the real photos because you're gonna get better. A better feel for what? The natural surface of the 12 inch or whatever you want to call it the vinyl looks like. But mostly I do this from memory after a few times before. He is a good example. We're not actually going to be using a freighter from here. We're gonna be creating these from scratch so that it will interact with the life. But it's gonna be is physically, really, as we can possibly get it. Okay, so let's start modeling. I'll do that in the next video
3. Modelling: Okay, so I mean, Maya, No first thing we want to do when we're muddling is to create a cylinder. You can go up here to your polygon shelf. You can go to create only gone cylinder. Or you can be the fancy cool way that I like to do and go chipped right click the move to the left. You got polygon. Celinda, now a record is about 12 inches long, is 12 inches long. Um, it helps sometimes to do everything to scale. It's good to keep this in mind, because if you're using real time physics or if you're using in a game, it's gonna be to the same scale as the other objects in the game. And also, if you're working about your reality or rented reality scale really does matter on with cloth simulation, all this kind of stuff. So let's said it two inches, just to be certain what we're doing. So 12 inches. Well, that's actually the measure in diameter, so the radius of that is going to be six inches. That's all general shape. Keep it quite high resolution, but not too high. So I'm gonna put this up to 50. This go higher than that. But I'm just gonna keep it like that. We need to add a subdivision heights. So wondering his middle kicking on dragging. So you can Actually, if you have this element selected, you can my middle hold middle clicking and dragging. You can choose how many subdivisions you have in there. We're also gonna need a few caps, a few subdivisions on the cups. So let's put let's put a just to be safe. Okay? On how thick is is a record. Let's just say for one, INGE, this is say, let's just give it a try. See what? That's right. No one, maybe a little bit less seven. That feels right I like to do is work with anti Anything on everything looks a bit nice. It feels a bit nicer and intensive it a little bit more creative when you haven't got lots of blocky off lions happening everywhere. So you keep Okay, Next thing we know, your first thing, that's yeah. We're gonna be modeling kind of in symmetry, but not so. We just need to create 1/2 of the record and then we're going to duplicate it because the model is symmetrical from the from the vertical access. So I mean, it's like this base. Well, you know how to go to face. Hopefully so right. Thinking's like face. Click this first face, then hold on. Shift on. Double click. Now what's elects all the clothes around the edge? Um, pressing four or five to go. Teoh. Why a frame shaded mode. So then we just need to believe them, and then delete spot in line here. And then you got the top half of the record. That's a much quicker way than zooming in here. And that could take you forever. So little tricks like that really speed up the workflow. Okay, so now we only have to do 1 1/2 which is gonna make things a lot simpler so we can start with center hole, double edge. We contract in, we can get a feel for the proportion that they were going to talk to you. That space to switch between you. Pause. We put that to about there. Okay. Looks like a for now. We could go. Why? Frame Unshaded Never been away. See how maney, how many police were using and where everything is. I could never gonna start on the label. The actual proportion of what the actual size of the label is going to depend. Is this a sign? Wit? OK, do you want Okay? Okay. For the label, we need to make sure the labels the right size. You can get schematics off records and record labels on wits everywhere. If you do, it's Google. Such you can probably find it somewhere. Um, but just for simplicity. I'm gonna grab generic vinyl image 12 inch finals, but 12 inch vinyl from Google. Full inch record vinyl. And then hopefully we can find one with the right. Yeah, proportions that we're not going to be copying this, But we're gonna be using this as a scale reference. That's all so know Texas is going to be used on that. Just the just the measurements. So Okay, we're in top. You? Yeah. So, to import that picture, we're gonna important picture. So go here, do that again to image plane, and then find that image that we've just found. Where is that? Places Stuff on. What's it called? This one? Let's make this big. Do it fits so that we know that basically this line here. It's gonna be in line with that line. That and I'm a lot of records have a little bump for most of them. They tend to vary depending on whether they're NLP, your if there a single. But from my memory, most of my records have a little bump the car around about that way. Okay, Just like partly with reference about party from just knowing that, knowing what records looked like because I've spent half my life with records in my hands. Okay, we can hide after now. Actually, let's delete it. Let's be confident that we don't need that anymore. There's the center. Probably come in a little bit, okay? And then all right, click interface is a little detail that it makes a lot of difference on. DSI have been the same trick there. Click on the face, double click on the one next to it to select a ring melouk, and then I'm calling. Now shift right click and then extrude face and then let go on extreme face. And then you can lift that up. Sometimes you're the phone extrude worlds that we set to a ridiculously high number, which you don't need safe like, in my case it is. I'm just gonna put that one. They only need one division there remembering that the thing. If you want more control, it's just too. Go back to the transform Tool press W. And then you don't need to worry about the extrude feature for that. That's not a problem on this, uh, in this case. Really? So I'm gonna bring this agent of it double click, select, and then are to go to your scale tool scale in, um, fan bevel. Anything it needs a bevel Tries just moved it often edge, Do you how that looks. I'll tell you what I'm doing. It works. Yeah, Yeah, that saves a lot topology. And it's such a minor detail. No one's really gonna notice if you are polygons there. This is the smoothing missile. Actually smooth out the normal. So the direction of each polity will be affected depending on the location off each bird attacks, which is a whole different story, something it's helpful to be aware of when you're working with, Really, it's not all as you see it. On the surface, there's more going on under the under the hood as they like to say, Bring that out a bit too. No more. And then some doing this yet to smooth. I'm holding down shift. Right click. The director suffered edge bounced off a marriage, but the you can see that edge is is still hard. Okay, so next we need to delete these middle edges here, cause this is our This is where the spindle things gonna go depress at legalzoom. You know what? If you have selected and then just selling those with the least key Good night. Um cool. Any more details? I think the edges of a lot of records a lot of the cheaper we'll cheaply produced records have, um the edges are quite sharp. I mean, more expensive albums tend to be quite flat on the edges, but, you know, I like to keep it Riel ruling and me. Okay, that's the top surface. Then. That's pretty much outside Done. Can subdivide everyone. I think we were not gonna sit down by seven divided because it's gonna be a kind of game asset if we keep it like Polly. If we can keep it under 1000 door under 2000 police, that's a decent a decent number of police. That's a decent number off polygons for for using in real time renders like unity or unreal engine. So next thing we need todo mira geometry this tool here we don't want to cut geometry. You put on world access to why thats merge board edge threshold here. This is how far the courtesies have to be before it will join them together. So if we get this quite low low enough, and I do, you have it ready high, and it will just everything around that. So if I do one for example well, you won't even go higher than that. But it doesn't work that way. In this case is better. Keep it. No 0.1 that almost these edges here, but not these edges. It has one. Okay. And then that means thes edges. Should be. Yeah, So that joint Great. Um, if you don't join them much show you shake quickly because this matters. If you're trying to learn how toe use this, we switch yourself altogether 20 and you said my edge, it's not gonna be connected. So if you do come to subdividing, it's not gonna have the right fact, basically, Onda. And it's not one model. It's not one matches to meshes. So if we go back to nearer, we change that 2.1, Um, and then just back. Okay, that wasn't too boring, but I think these things are important. There's a lot of details you need to know. When it comes to the three d butler. It's like a language, but yeah, takes time, practice and persistence. Pain and persistent impulsivity. Right. Your model always. I did that without even showing us. It's become such an instinct. So, uh, what I've done here, Okay, we go. Yeah. Say, come back a few steps you can see. Um, all your actions are usually kept in the undo history here. Um, this actually builds up. It uses up your process so your ram and everything. So you need to get that when you finish this up when you got to a certain point in your modeling. So right now I'm gonna delete history. So you can either go to that It believed by type history. Oh, I would usually do Is rest Bolt shift. The map comes of it over. Reflects after a while. Um, no. Almost thing we need to do exist are actually quite finished. It select these two entities when he's a bill. This hole here, No. And shift right click bridge on. And these two wedges on rest G that we repeat the last two already abused. I put the engine first because sometimes you get a problem there. It doesn't know which edged to start with. It does in this case, but sometimes you do too like that. And it will if you select the wrong age to start. Well, okay, it seems to understand that causes quite flat surface. But usually I would do it that way. Just to be certain. Let's take these edges on soften news to us around. Yeah, a guy doesn't model off record. Hey, I hope that was useful, please, like and subscribe to a lot of my news. Okay, so that's modeling Down next, we're going to go into you be mapping, which is actually more fun than most people think it is when you know how to do it, because it's not as hard as you might think
4. UV Mapping: Okay, so we need to go to the UV editor, you re editor. Or you can click that I like to have this little bar here because it's much easier to access and it takes away a step and you have to find the right menu, and you have to go to which one modeling operates around one that happens a lot. But if there will on this, um, on the shelf here and it's just easier to access, and you can speed things up a lot. Next, we need to go play in our click on this little box here. It will get through the options for cleaner mapping. Right. This will create a UV set based on the angle I'm not gonna find Explain that I'm just going to show you. So click. So make sure you have bounding box. Why access, which is up and down access. Keep image with high because it's circular. It doesn't really matter. But usually I would keep this on because if you have an object with you know it's asymmetrical, then it will actually keep the same size. Um, that's difficult to explain, but if if I ever comes up in another video, I'll show you. Um OK, so apply. That's created one big UV map. There's two sides to this record, but this is one shell. This is one UV island, so this is all connected. What you ve mapping does, if you don't know, is basically unfolds everything you have on your flat surface so that you can text trip, which is what we're going to be doing after this one thing I forgot to put Waas join here, so I'm using the cut tool and then holding down control in the middle click. I don't get it right in the middle, and this one is already in the middle of it is quite sharp because sometimes you know if it's from a vinyl cutting before or something, they usually have quite sharp pitches. Anyway, Sometimes, normally modelers will tell you to bevel every edge, which is usually right. But in a case like this, where it has been cut quite raw, then it's best to keep it shop. Okay, and you say Polly corns as well. Next thing. So we need to cut these edges so select images that we want to cut in half. So holding down shift. Double click there. Here, shift. DoubleClick. Now we have all these edges elected. We got two polygons. You be editor and go cut you the edges. Then right click holding down, right. Click with the shell and move across. They have your two separate size. This one, this is in red you can do. You can see which direction the polygons are facing. If you click on this little box here, it will look different in different versions of my effort using 2017. So, yeah, that needs flipping. So to turn over, just like on this lip flip horizontal, your direction is up. Uh, okay, this is still they still have plain are mapping from one direct angle So way need to unfold . These there's more flat. So to do that, it's Pentagon unfold. It's hard to see, but it's actually taking these edges. But it's just these are just here in these two parts here is laid flat. As you can see, the closest together here you got to them it all here. But when you use the show for the guns unfold, they go. It lays it all out on one flat surface. You can check your ups by going onto this button Here, display chequered tiles. You could see how your parties have done since it is this pretty simple model. So it's hard to get it wrong with this, but it's good to know the principles. Okay, Now, what we want to do is click on this layout button. This will just automatically let leave them out where we put them. It could actually be better resolution that tohave this high res, it's possible to say, using the transform tools. Just make sure they're taking it much spaces. Uh, yeah, that's your UV show your labels here for better in mind. Okay. And then we got into text drink.
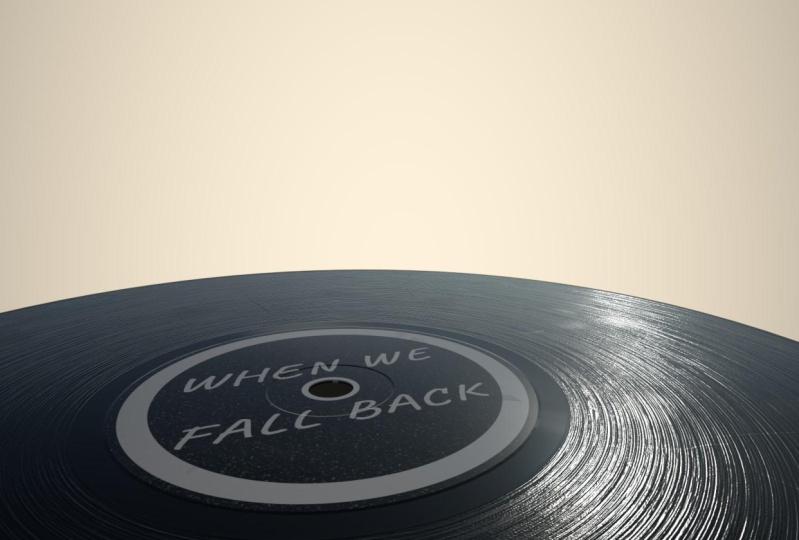
5. Textures in Photoshop: Okay, now we moved on to text ring. So first thing we need to do before we get into that is go to we need to export this image so we can use it as a reference guide for where all the textures and all the details are going to be. So we get two polygons, UV snapshot change the size biggest we can get without destroying. Ah, computer round praises. And then we call that and then called You say there's a PNG? Uh, yeah, that should dio. And then Okay, now we can go to photo shop. We can open that. You can. I'm doing it. You can do it too. Could you be one Go. And if you create a black solid there, you'll be able to see Will you be shells right there So we can use that protect string. Just gonna be unable in just the basic graphics that needed. There are some things you can do here that you can't do in them in substance painter. Well known diversion. I'm using. So, yeah, at the moment, this is the best option. What I'm gonna do is create a new um, and you canvas of 2048 by 2048 pixels. And then I'm gonna get rid of this background. We don't need that. I need to have something that's are you to get you started Color. It could be any cut way. Go to filter noise that noise rest. Arise. Um, from last time you said I think about 50% is the best level because it has a decent level of contracts and it's not too two out of work ready. And actually, uniform is better for this case. About 17. Okay. And then go to Filter Blur Gallery Spindler. And you might be able to see what we're gonna do here. This is going to create that onasa tropic texture. For the surface of the record, she kind of create a radio blood. You can use radio glad to, but spin bowler, it does pretty much the same thing. But it seems to work a bit faster and you can see you can see the results pretty very quickly. Teoh. It can be quite CPU intensive. This so I think 15 to be able to That's sick, you know. That looks nice. 25. Just yeah, just after add levels. Bring out the details. Not too high. Just a subtle kind of roughness that Okay, Next thing we need to in between each track, there's gonna be a blank space around here here, depending on how Maney attracts their on the record. So there's also a big, big white space in the middle to so using the circle tool, create a circle This, but yeah, big. Which line? Make sure it's allying to converse. Make sure that's right in the center. That's gonna be our shiny surface were using referenced. So black is shiny on. White is rough, Say, with people Texture Okay, on this is gonna have, let's say two tracks just to keep it simple. I'm sticking to the circle. Bring them here kind of film on change. The picks also about free. We don't want that dashed that sodded line. Make sure it's in the center. And then what we'll do is get rid of this edge lips. We'll see why later on, then control shifts. I the Libya just okay. There's, ah, final texture. We're gonna add more in a minute. But that's, um control E t o get that whole 21 one layer on Go copy. Paste it into a new there. It's a bit small. We shouldn't really be. Just think things this way. Green issues a big conference to start with to make sure just I'm boarding a bus in the center. All right. No. We need another line for the outside edge that is also shiny. Say no. The most efficient way of doing things. But it does the job. So that goes to the edge. Straight with what? Look so right there were relapsed too much because the bits on the outside that you're not gonna see anyway, So face, just copy and paste. So copy the layer. Just drag it into a new day, like and bring this down. Learning that, huh? With the edge. Cherokee's okay. It's I mean, roughness. Flash height map, which we're gonna be using later. Uh, what were less? Bring in the label. The center. Yeah. So open. I've got this label here. Right. And you layer paste that in there. Give it its edge. I had a hoody with this logo. One. Was it younger than I am now? Yeah, just a bit rough. That's what you're gonna be for a different man. That's gonna be for a label. And this is gonna be a roughness. Let's start with the roughness. Save this. PNG. So best quality. I did the same. Which the label while we're here. Thanks for whole.
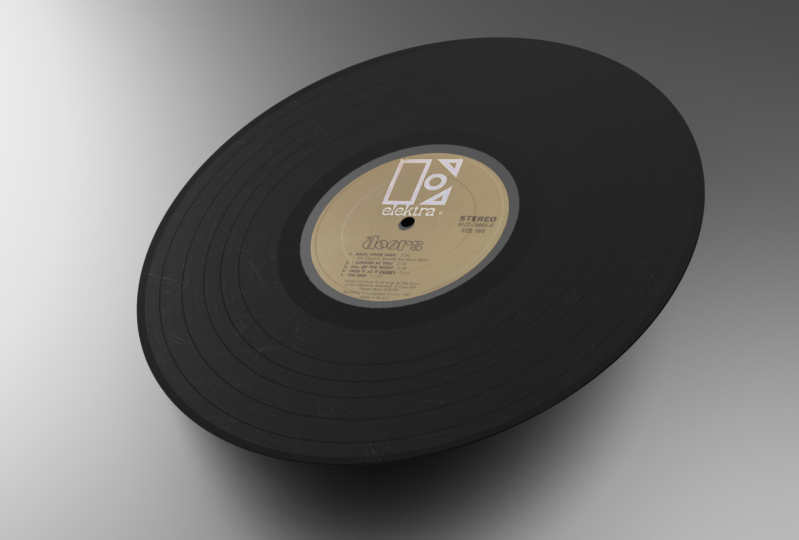
6. Substance Painter - Part 1: Okay, so now we're in substance Painter. One thing we need to do here is export our model from Maya. You have to go to file export selection and put it in your whichever folder over J or fbx are usually the best for this, but I tend to go with B X. But to be fair, over Jay's more universal. So I will use that for now. SE records Why no one exports and then bring it into segments. Painter, open a new file from your project. Select your MASH. We'll find one. Using PBR metallic recognises is physically based rendering. So it's the most really is best for real time rendering. Um, set that to 4096 resolution and click. OK, okay. You can see here you three d do here on the Judy you be you that I am going to import the taxes that I just created before they set those two to texture, we went into the project. Either one is fine imposed. It's great, and you feel we're going to create to different to different textures within this shader. So to start lets out a black mask, I'll make it invisible on import richness do there, Just give it to the mosque. Change the color toe near black, not quite back safe. When four they go. There is what we have done so far. Looks like something who we can change the reference values by going to right. Click at levels. Change the channel here to roughness, and you can change how shiny or will matter that your services have a little bit shiny without too much. Keep in line with the original surface way can create another. Another surface underneath. No todo recognises Bring up shiny this a bit too bit too shiny. Let's create a new film layer on. Use that for our defuse things. Cut creates a black mask. And then we're gonna use the poly fill tool to pick out the polygons that are going to be used for the label. She leads ones in the middle. Yeah, references. Okay for that to be a bit rough, but not too much. Still got a bit of a sheen on it on. If we want had some kind of grain to wait, we can do that. He's a five five, a texture that's fine of five minutes. Okay, I feel heights, freshness. What? One about what it is to get something that looks right. Change the value of that here. Roughness, that. It just gives it that extra a period. Look. Source. Yeah, more texturally feeling cool on change. The reference that yeah, we can change. Reflects that too Perfectly. Percent is okay. There you go. It's still a little bit A little bit too showing you there. So my reference value go. These are just do look a bit too sharp, I will admit, but okay, the label is a bit too bright, so that's to filter hs reduce the lightness blends in a bit more. Also, it looks a bit too clean. Okay, they go. There's a fresh, freshly pressed record. You could call that. We have to clean up the model a bit that make it a bit more round. But overall, you got you got you around basic texture there, just what we were looking for. We can always just the levels of it trying match a real record. Yeah, a little bit of green. That roughness is really helpful to bring it out. We can even add a built a shopping up a bit so weaken a bit too much. But keep everything settle. That's always a good technique. Was just to be safe. The more the more little subtleties you have going on, they will build up and they really kind of sell it in the end. That's a bit. That's when it's cloudy. Cool, cool, right, our records perfect. No, they have scratches on the get used. This is a fresh for me. Well, there's another thing we can do, which I didn't touch on. I'll try it. Sometimes it works, but not always. There's a website called Normal. A normal man Generator. More map online. I'll put a link in the description. You can convert Ah height map or black and white displacement map to a normal map on. You can actually create details with no polygons at all, so it will completely reduce the poly gown. But with the same detail has a really high poly model, which is really good for making games and real time rendering. And there's a new standard right? Roughness. Missing what? Andi, it's the plane. You can have a look at what the result is right. Click Switch off displacement. You don't need that And then, if you feel with these knobs a bit, you can get the effect that you might be looking for. Keep it quite low. String much, uh, it like if it doesn't always work with higher reds, textures it. It's usually better, but let's have a look anyway. That looks alright to me. Let's call that surface. Download founder to where, If you keep it that's important into substance. Just tracking drop usually come into the yeah into the shelf. On that is a textured. If I like the texture and import and there it is is usually selected. When you were just a few important Let's try that. Is it working? Will it work? It's quite heavy. It looks like something that's reduced the effect. We got a normal Andi produce. Give it that extra something. It does something to it a lot of back. It makes a difference. Brings out a little bit. Yeah, to me. Okay, Scratches, dust, fingerprints
7. Substance Painter - Part 2: Let's create another great fill in here. Right? Click and go to fill on. Switch off color heights. Metal normal. Gonna find a scratch, Mac here. Just kind of a grand trap that come with them. Substance painter. So you can keep it subtle. Oh, that's a good one, I think. Yeah, that's a nice one. It's been sitting around. I've had a few scuffs, some of the records lying on top of it, Um, increased the amount of sculptures or decrease. It s keep itself again, scaling up a bit. So that scratches on so big. Too noticeable. Uh, really. The best way to do this is create the new day rolled together. Gonna lay this these scratches on top off the other. Try that way instead. Metals, roughness. What we want Bit of trial and error. These things Usually you go e nice a bit more. Try some different lives. Yeah, son looks bad. Another's but you can't always something with PBR is built to look right in all environments. Se let's keep you late. Afternoon. You can always check later fingerprints. Is that something? The prince which it does have here fingerprint texture here, which is really helpful Really useful because it kind of smudges. It really doesn't it? So it's kind of a smudgy gonna be a little bit more of where that finger print is. There have been scratching these records off, then pretty much fade into the pretty much fade into the surface. After a while, it's quite quite subtle effect. And then once we have a few prints, they're probably being use a lot. Is the Stones for a record? Because it's being used a lot. Andi, let me go to at filter waken blur that to make it look more smudged. You go settle, but change the intensity of it. That's quite high. More noise. We've got full these colors on. We just need rightfully. So that's that. All right, very looks good. Close sub escape it if it looks good from a distance, that's great, too, because going for realism, which as we can with keeping in mind the CPI year
8. Rendering and Finalising: Okay. Who could do a test run That? That's it. Really? That's your model. So we go try and test Rendah. Is that nice? She said it to 10 minutes. We don't have to wait the whole 10 minutes, but it's usually set to 10 seconds, so it doesn't quite get very far with its progressive renders its operations. Uh, it's nice to have ground, but we can turn the ground off to this, however, is a clear color and what you're feeling like having above the cloud. I think I like that about her. Was it from the ground? Up a bit? Some shadows asking it clear. Bluish. They're grayish blue is always nice. Uh, cool. You just made that. Why did I pleaded as well? Nice prices. That's your model. Done. There's a lot. You can do it now. This is built for game engines. Really? Like, you know, realistic police and virtual reality augmented reality, that kind of thing. What you could do What? What you have done that you can just click save, they've render I'm gonna save it cause I'm quite happy with that. I'm gonna use my standard before solution that render for a minute on what I'm doing that I'm going to export these textures. PBR metal roof. What we're using on and folder for it. Pete are on. So could you just check? You got all the right ones? There is so submissive, but it's not gonna It's not gonna usually a message map because there's no emitted properties there when we can delete it. If it does, I have exports. Brilliant. You got your textures there. So you know I miss it. Andi, you could do whatever you want with it. Now I control you. I'll show you a few ways where you can view it in different places. There's unity three D and real engine sketch Fab is actually a really good place. Just reviewing your models and sharing them. There's a really good community there, and you can sell them if you want to try and make some cash out of it, too. V Ray in Myer is for offline. Rendering can be a bit tricky to get the workflow right from substance to my, uh, eso That's probably a different tutorial altogether. Did that render I start again? All right. I'll show you how to put it on sketchpad. You could make a three D model. Shouldn't have any trouble. Pres. Uploading your model Teoh a website. But you know this websites here, This is some of my models here in playing with a few ideas, mostly music related stuff. That's what I like doing. It was a bit of a Stone's very theme happening in MF Doom. It's on the strains for a label after it was in a lot of other bands. A lot of other labels on before was on a lot of labels. Two. And that's his face. So his face. But that's what he puts on his face a couple of other things because she's but their experiments all over. So I don't know why I put that there. That's not even a very good model and much going to get rid of that. It's awful, but I like this one from living in Spain. But when I first moved to Spain, you don't really get these in England. So I decided to make a model. I know for some reason you gave before your visit. All right, you can check my site. You can check that page if you want state half to you. Uh and I said
9. 9 Bonus: Okay, Another thing. Um, one thing you might want to do you might be thinking when you start doing this, if you want to get it is realistic as possible. And you might want to learn how to make a riel actual vinyl record. This is actually possible to dio I found this on this on this webpage on instructive walls dot com. This is from a few years ago. So what actually happened here is you could send any of your audio files into very high party. This is living, breathing surface that is actually playable. If you you have a three d printer, that is high resolution enough. This would actually play the audio that you tell it to play nice. Something pretty incredible. This is about 140 million polygons, 14 million polygons, which makes it pretty much impossible to work with. Unless you have a really fast CPU on GPU and about 128 gigabytes of RAM on your system. I can just about look at it. One thing I have been trying to do is to bake this as a normal man onto a onto a really into a clean surface like that. But unfortunately, whenever I try, uh, computer crashes. It's pretty intense, but that is a riel. Would you waive record? I know. Just thought you might find that interesting. I put a link in the description instructive als dot com by the three d printed record. Um, and it will walk you through some steps that you need to take. It's actually write down near the bottom stuff that you need to reach. Andi. Yeah, 10 stats. It's a bit fiddle. You don't need to do any coding, um, and expect it to work first time. But, you know, you might be lucky, and it might work, but from here, you couldn't get to hear you sent me about often our So that's how quick it can be done.
 William Forrest, 3D Generalist & Motion Designer