Transcripts
1. Class Introduction: Creating a printable
planner might seem intimidating
task to carry out, but it doesn't have
to be. In this class. I'm going to show
you step-by-step how to create both a simple and a more advanced version of a monthly planner using
Adobe Illustrator. Hi, I'm cardia. I'm an artist and
online teacher, and I'm based in Sicily, Italy. When we create the
simple planner, you will learn how to create
a grid in Adobe Illustrator. A trick to quickly align
the text for the days of the week and how to add the smallest
squares for the dates. And also to add drop shadows. When creating a more
complex planner page, you will learn how to
use the blend tool. How to round corners
on a rectangle. How to create a posted note look-alike element for
your planner page. How to create a wavy
text in a few seconds, and how to create a
squared paper effect. Finally, I will teach you how to add decorations and color on your planner page
and how to create a color group from your
decorative elements. By the end of this class,
you will have made a personalized planner page and you will have led skills in the use of Adobe Illustrator that will be useful
for the projects to this class is for intermediate students or
adventurous beginners. But I've included some
downloadable Illustrator files that you can use as a starting
point for your tracker. From the simple one to
the more complex ones. Okay, so if you're ready,
let's get started.
2. Class Project: The project for this class
is to create a planner page. You can create either
a simple planner or a more advanced one. You can create a planner
with decorations, a post-it note space
for a to-do list or anything else you would like to use to organize your wound. To get your downloads, you will need a password
and the password is be sure to share your project in
the project section, you just have to
click Create Project. And then upload a cover
image at the title. And maybe add another image. And just hit Publish. And if you have any questions, don't hesitate to ask here in the discussion section,
I'm here for you.
3. What You Are Going To Learn: We're going to make Festival, this simple monthly spread. So I will show you how to do the grid and how do
the little squares. And if you like how to
add the drop shadow. Then after we do this, which is the simplest one, we can move on to more
complicated layouts. And these actually
they look complicated, but they're not that bad. If you know how to do this
is actually quite simple. And I will show you how
to add your declarations, how to add your text. I'm spaces for the goals
and to-do list and so on. And then I can show you how to add something either like this, so little space to write
your notes and ideas. And I show you also to do this sort of
little post-it notes, which is quite cute. So we would do all of this. But first, we will
start with the simplest one so you can
see how everything works. And then we can
move on from that. Okay, so let's start with
this one in the next lesson.
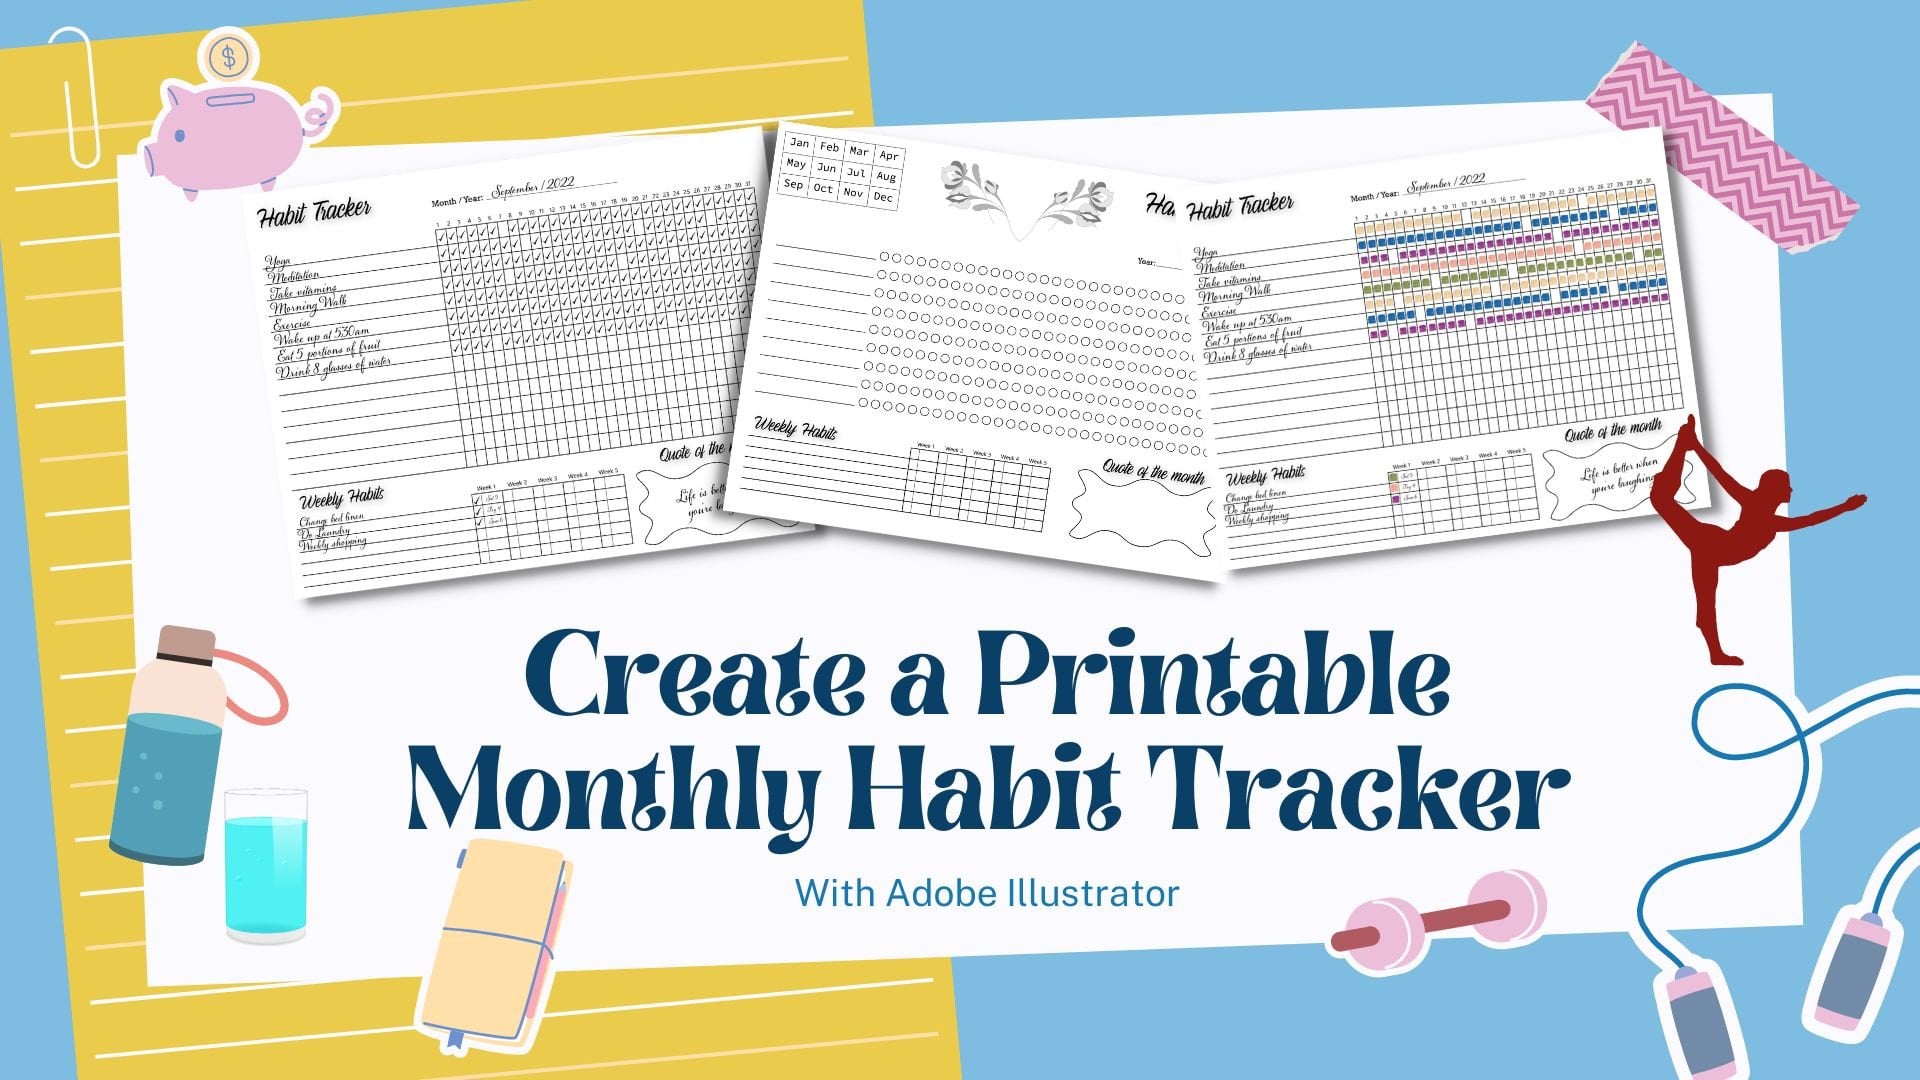
4. Create a Simple Planner: To make the simple plan, I'm going to create
a new document. So Create New. And
I'm going to use A4. You can use letter
sides if you prefer. I'm going to use the landscape and just leave everything
else as it is and create. Alright, so we have our board
here to create the planet. And we will need a rectangle. So you can either go
to the icon here, rectangle tool, or you can
press M on your keyboard. And I'm going to start
from around here and make a rectangle. And I give it a thinner stroke. And then we want to, with the rectangle selected, we want to go to Object
Path and split into grid. And we can put a preview here. So the rows are
usually put five, and the columns will be seven for the seven
days of the week. And, uh, okay, so that will give enough spaces for the days. And now we need to add the text here for the
days of the week. So I'm going to go to either, you can click here on
the Type tool or you can type T on the keyboard, and then click once and you
can add the name of the day. Okay, so I start with Wednesday because while
there is a reason why, because Wednesday is the day
that takes the most space, is the widest text. And to do this, next thing that I want to do, we want to use the widest text. So I'm not just going crazy and start with Wednesday, the week. So one thing that we need
to do is to check that this text is actually
aligned center. So let me go. And I showed this in my other class to do
the habit tracker. But I will explain it here as well just in case
you haven't done that class. What you need to do, you
want to align this text with a box because you could simply just use the alt key and Shift and then drag it to make
a Copy and then Control D. So it's not too bad, but sometimes it wouldn't
be aligned properly. So some of these are
not aligned correctly. So to make sure that
they do align correctly, I do this little trick here. So you click on the box, then click on the hold down the Shift key and
click on the text. And then let go of the Shift key and click
on the box again. And you will have this blue highlights here, this blue box. And then you go to Align, Horizontal, Align
Center, and click it. And it will align it
perfectly with your books. And actually,
before you do this, if you want to change the font, I'm not
going to change it, but if you want to
change the font, you should do that now, because otherwise you will
have to redo everything again. So now that we've done this, I'm going to click on
one of the boxes and check the width of the box because they're
not exactly square. So you copy this Control C, and we will need the number
when we move this across. So select the text, right-click and
transform and move. And in here we paste that number that we
copied in the horizontal, then vertical is 0. Then we copied.
And now we can do control D to repeat the days. And now we can change it to
the actual days of the week. All right, so we have today
is now and if you want, you can add a little line
here to separate the days. So we go to either here, the icon, and you have to click it and press it
for one or two seconds. And this will come up. And then you choose
the segment tool. So we just go, let's do it a bit bigger
and click and drag it up. And if you hold the Shift key, it will do a straight line. Okay, and now we can
click and drag it and hold down the Alt
key and the Shift key. And now we can do the control
D to repeat the action. And we have this
nice structure now. And the next thing we need
to add is the little square. If you want to add this
least squares for the day, you can just read today without the squares
if you prefer. But if you want,
I'm going to go to the rectangle tool or just
click M on your keyboard, or rather press M
on your keyboard. And if you hold
down the Shift key, it would make a perfect square. And I will align it here. And of course you
can put it, oops. You can put it on this
side if you prefer. I quite like it on this side. And then what I do
is I just click, hold down the Alt key and the
Shift key and make a Copy. And then Control D to make
copies on all across. And if you want to
add the drop shadow, make sure is the square
root as a filling. So as a fill of white. Because otherwise
the drop shadow, we're not work like I did here. Okay? And then if you hold
down the Shift key, you can select all of
the little squares. And then with Alt key
pressed and the shift, you click and drag
and then Control D. And there we go. We have the spaces for the
numbers now for the dates. And if you want to
add the drop shadow, you select your square. You go to Effect, Stylize and drop shadow. And as you can see, it's
already put something here. So you can play
with the settings. You can make it less
opaque or more opaque. You can move where
the shadow is. So you can put it on
this side or that side. And also if it's coming from
the top, from the bottom. And I'll blend it is so
you can make it really blurry or quite dark. And when you happy with it, you can just press Okay. And if you want to apply the
drop shadow to all of them, you can just select
all of the squares. I'm just going to select
these ones for now. And again, effect,
stylize, drop shadow. And it will keep the latest
settings that you used. So we just say, okay, and you have a drop
shadow on all of them. And this is basically
the simple planner page, the simplest version
that you can do. And the next one, we're going to do a little
bit more complicated version. So, but it's, it's actually
not difficult to do. So I will show you this
in the next lesson. See you there.
5. Create An Advanced Planner: In this lesson, I'm
going to show you how to do this type of planner. So what we need to do is have our new document. So Create New. And I'm going to use
again an A4 document. But again, you can use a
different size if you like. Then I'm going to
copy this and put it here to have it as a reference so you can
see what I'm going to do. First thing we want
to do is to make this type of element. And to do this, we
go here on the left. There's the rectangle
tool, the ellipse tool. And we press the
rounded rectangle tool. And if you press the Shift key, you will have a sort
of square. Like this. Maybe. Doesn't matter, decides
we going to change it? But if I find that, if
I do around this side, so around 40 maybe. Let's see, 37 millimeters,
more or less. It gives a good
spacing in-between. So hold down the Alt
key and click and drag this and hold down
the Shift key as well. And then we need to
select both of them. So either select
them like this or just click on one and then Shift key and
click on the other. And we go to Object,
Blend, Blend option. And we, sometimes, it usually
comes up as a smooth color. We want the specified steps and we want five because
we already have two. So we will have seven
of these altogether. And press, Okay. And it looks like
nothing happens, but we go to Object. So we have actually
set the options and now we tell it to
make the blend. And the next thing
you want to do is to go to object and expand. So now we can ungroup
it if we need to. And the next thing
we need to do is to create another four lines. So hold down the Alt
key and the Shift key, and we drag it down
and then Control D. So we have our squares
here for the calendar. And what we need to do is actually make it a
little bit smaller. And we can make it a bit
taller like this. Okay. We can always change
it afterwards. Alright, so we need
to add the days now. We need to have a text box and we can write
Monday for sample. And I'm going to send it
off centered already. And then this time
I can't really use that trick that we used before. But I'm going to do all the different editing
that I want to do. Change the font,
decide on the sides. And then I'm going
to copy it across. And if you have the
smart guides on, which is the pink lines
that you see here, it will help you when
you are aligning. C will tell you where
the center is when you're aligning the text. Or you can do control D.
And then I think it's actually quite worked quite well because this one was
aligned in the center. So you can do it this way. And then you can just change these to the actual
names of the day. And I usually start with Monday, but I know some people
prefer to start with a Sunday or Saturday. So this is the beauty of the planet when
you make it yourself, you can do it however you like. Okay, so we have the
squares for the days. Now we need to do the
little circles there. If you want to add something
to write the number, the date, you don't
have to, of course. And I'm going to go to the Ellipse Tool and
make a little circle. Maybe, let's say five
millimeters is fine. I'm going to give it. A white fill. And we can put it
somewhere around here. We need to give it
a stroke as well. Kay? To find, tune it, you can just move
it with the arrows. And that's how you do it. Maybe it could be a
bit bigger, actually. I'm going to make it
a little bit bigger. Something like that. Then what you can do is you
can select all of them and copying them down. Just hold down the Shift key
while you're selecting them. And then click and drag. And then Control D. And then you can check to
see if he needs adjusting, but I think it's
working out quite well. Okay. So we have the little circles for the numbers if you
want to add them. And now we can add, for example, the
month and the year. You can write it here. So for that, again, we need the text tool
and we can write month. And what I'm going to do is
I'm going to change this. And I have actually
both this font from, I think it was Creative Market, but you can use any other
font that is already available here with Illustrator. But I quite like this one. So I'm gonna make
it a bit bigger. And then I can do is
I can add a line. So you can write the month and give it a
little bit of stroke. And then we can group this. Actually, I'm going to
make a copy of this. And right in here. And make a copy of this as well. And then you can select the month and the
line and Control G. And here again, takes
the end line and control G. You can right-click
and choose Group. And the next thing, we can add a space for
your goals for the month. So to do this, we go to the rectangle tool. And we do a little
rectangle like that. Let's make it bigger. And then I'm gonna
give it a fill, like a light gray. And to make it with
the rounded edges, you need to do is
either press a on your keyboard or go to the
direct selection tool. And then you click. If you see this little
round dots here, you click there, you click
and drag, and you make it. Depending on how
much you drag it, you'll make it
completely round there. And it does it on both sides. So I'm going to show you again. Click and drag. You can live below that or you
can make it quite rounded. And then you just make a copy. So click and drag
with the Alt and then Control D to make a copy. And you can write here. So it takes to go goals for the month
and make it bigger. And for the to-do list, we just simply use
the line tool. So click and drag and use the Shift key to
make it completely straight and give it a
little bit of a stroke. So we have this thin line here. And then use the alt key and the Shift key
and click and drag. And then Control D to make
more copies than do like that. And then here we can write to do list just to do or whatever you wish
to write in there. And if you want to
add the little dots there, the little circle, you go to the Ellipse tool. You can just click, press
L on your keyboard. And this just a five millimeter. And of course we'd
give it a white fill. And we've put it
somewhere there. Oops. Try to stoke there and
then hold down the Alt. A key and then click and
drag and then Control D. So you have a little space where you
put your check mark. And then if you want to do
this little post-it note, you can simply go to
the rectangle tool and make a square like that. Some little bit smaller. Then we add a color. So actually if we, if you press the I on your
keyboard, you can give it. You can use a color
that is already in euro working space. And then we need another
rectangle for this bit here. So let's go closer and we
add another rectangle. And this one we make it a bit darker or you can make it
lighter if you prefer. If you double-click. Just show you if you go
on these swatches here, you double-click on the fill. You can change that color, make it a little bit darker. Now we can group it control G. And we can add the drop shadow. So like we did before, we go to Effect, Stylize
and drop shadow. I'm going to move it. Actually. Maybe we can move with this side and we can move
it to the bottom. Okay. And we have a little
posted there. And we can just make a
copy of this and write notes or important nodes or whatever it is that
you wish to add there. And there's one more thing
I wanted to show you to do something like this. So if you can see this, text here is not straight, like it would normally be. So I write here. If I make it bigger,
you can see that this is straight and this
is kind of wavy. And to do this,
it's quite simple. We need a shape. So
I'm going to take the rectangle tool and do
a rectangle like this. Then I'm going to make
this a bit bigger. What we need to do
is to make sure that this shape in
the layers panel. So if you go, if you
open the Layers panel, this shape needs to
be above this text. So if it's the other way, round is not going to work. So the shape needs
to be on top and the text needs to be below. To make these wavy, we go to effect, distort and transform and twist. And you can see, if you click on the preview, you will be able to
see how it changes. Sometimes you have
to click and unclick ones because otherwise
it won't show you. Okay, so when you're happy with the shape,
you click Okay. And then you go to Object,
Expand Appearance. And now we select both of these. We go to object,
envelope distort, make with top object, and you have a wavy text there. So let's make it a bit smaller. And then we can expand it
a little bit like that. And of course you can use
just the normal texts. You don't have to do this, but I thought it would
be nice to show you. Okay. Oh, I put some circles there as well so
you can just use this one. Make a copy of it, and then
maybe make it a bit bigger. So you have somewhere
there to check as well. So that's one option. And if you want to see how
to do this other option, it's basically the
same thing that we've been doing
with a bigger grids. So with this grid here, we make a rectangle. Alright, and then
give it a stroke. And then we go to Object
Path and split into grid. And what I do is I
put the preview on. And I will add some just
crawling with a mouse. When you select one of these
cells, you can scroll. And you will add more columns. So maybe something like that
or maybe one more cake. So it gives you this
effect over like a paper, like an exercise book paper. And if you want a thicker
outline around it, you can do another rectangle. Just align it and then give
it no fill but a stroke. And then we make the
stroke a bit thicker. So you have that effect there. Okay, So this is the more
advanced planner example. And then if you want, you can add some delay this. And I will show you how to
do this in the next lesson.
6. Let's Add Some Decorations: In this lesson, I'm
going to show you how to add some delay, this,
some decorations. And of course, if you
want to save running, you can add your declarations in black and white or otherwise, you can add dislike colorful flowers or whatever
it is that you like. To do that I have some
elements already saved. If you do Control Shift and P, you can place, you can
choose the image to place. So I'm going to choose this one. I'm going to put this tree
and then we'll see and place. And then you can just click
and drag and you will be able to add your image. Okay? And then what I'll do is I'll
just put them somewhere. Maybe do them a
little bit smaller. So somewhere like this. And I'm going to send
them at the back. So it's Control Shift and the left bracket to
send them at the back. And what I do is because at the moment they're
quite strong in color, so you might not be able
to see the text very well. So I'm going to select all
of them and bring down the opacity a little bit,
something like that. So the next thing
we want to do is to move this text for the moment. Then we need to
create a rectangle. I mean, if you want, you
can leave it like this. And if you save this
using the outward, it will cut where the roses
cross the outward light. But if you want to see
what it looks like, we can create a rectangle here. And basically this rectangle, it's aligned with the
top of the outward. Then we would the
rectangle selected. We do Control C and
Control V for the back. So we have another
rectangular the back. And the roses are sort of sandwiched between
the rectangles. Then you select everything. So the two rectangles
and the roses. And you right-click and
you make clipping mask. And that way you
will see exactly what it looks like
when you print it. If you want to change this, you can double-click
and you'll be able to move the roses and
maybe even make it, make them bigger or smaller. And then double-click
again outside. And we can add this. This looks like
it's at the back, so Control Shift, right bracket
to bring it at the front. This one as well. Then we can align them. And we have our decorated
planner. If you want. Instead of this block, you can add something. So if this is, it's
got colors already. You can add maybe something
here that is colorful. So let's, let's see. I'm going to use
my color palette because I liked the
colors from here. And I'm going to use maybe pink, so it's too dark. And then if you want, you can use this
panel here to make it more opaque and more pustule. So when you write here, you won't have problems and even printing it
won't be too bad. Then again, you can
color these as well. Maybe some code that looks
nice with a pink, nice green. And you can do it again
a bit later, like that. And you can add a fill
to these as well. So for somebody's Saturday
and Sunday can be, these are grouped, so
I need to group them. So these daisy I can be a different color
because it's the weekend. So we can give it
a no, Let's see. Orangey color. And DSO days can be
again a, another color. Or if you want, you can see
double-click here, control C, double-click away and control V. And let's put the opacity
as it was before, and then you can pick
colors from here. So for example, for the notes, if you press I on your keyboard
is the eyedropper tool. And you can add
colors from there. And then if it's too bright, you can always bring
the opacity down. So you can put a yellow, for example, and bring
the opacity down. So you can use the colors from your elements to color this. And this is actually an image. So it won't let you
do a color group. But if I show you quickly, we can image trace this. So if we use the 16 colors
and it will image trace this. So now if we say expand, we can actually use this to make a color group, a
new color group. There's probably going
to be loads of colors, but you go to swatches, swatches panel, and you press this new color
group, this little folder. You can give it a name there. And you say, okay,
and as you can see, you get all these colors, which are from the rows. As I said, they won't
work if it's a picture, but if you trace it
like like I just did, then it will give you the
option of using the colors. And then you can use these
colors to color your elements. And at the moment is
still 33% opacity. So it will give you this light colors and
you can use that. I hope you have
enjoyed this lesson and I really can't wait to
see your planner pages.
7. Final Thoughts: Congratulations on
completing the class. I enjoyed sharing my tips and tricks on how to create
a printable planner. And I hope you have learned some new skills which will
be useful to you in future. Your next step is to
complete the project for this class and post a picture
in the project section. I would really love to
see what you create. Please remember to hit
the Follow button here on Skillshare so that you can be notified straightaway
when I post a new class. And you can also check my
profile for more classes. And if you'd like
to keep in touch, you can find me on Instagram
at category anti-art. Or you can also check my website at casual
anti-art dot com. Thanks again for
taking the class and I'm looking forward to
see you in my next class. Bye.
 Katia Galante, Botanical Artist and Illustrator