Transcripts
1. Welcome: Hello, everyone, and
welcome to my class. I'm Mel Armstrong, and I am
thrilled to have you join me. For years, I have been
passionate about pattern design, and I've spent countless
hours exploring different techniques to create unique and captivating designs. I've worked with so
many clients over the years and license
patterns for fabric, stationery, home decor,
and much, much more. And now I'm excited to share
my knowledge with you. In this class, we'll be diving into the world of
floral pattern design. Using the elegant and
versatile OG template. You'll learn how to transform this classic shape into a
modern trailing floral pattern, all within Adobe Illustrator. Now, you might be wondering
why OG templates. Well, OG templates offer a beautiful blend of
structure and fluidity. They provide a strong
framework for your designs, ensuring symmetry and balance. While also allowing for organic and flowing
floral elements. Their classic appeal makes
them incredibly versatile, perfect for both traditional
and contemporary designs. As you can see, the OG creates a beautiful foundation for
a wide range of styles. So by the end of this class, you'll have created your own
stunning floral pattern. Ready to be used on a variety of products from fabric
to wallpaper. To get started, you'll
need Adobe Illustrator. This is our primary tool
for designing the pattern. We'll also be sketching
out our designs. You might want to have
some paper and pencils, or you can use your iPad
with the Procreate app, which is what I'll be doing. I've also included some links to some fantastic flower
reference photos in the class resources, which will help you
with your inspiration. We'll be walking through each
step of the process from sketching and
planning to creating a seamless repeat in
Adobe Illustrator. Share my tips and
tricks for creating beautiful and professional
looking patterns. I'm so excited to
see what you create, so let's get started.
2. Inspiration: Welcome to our first lesson. Now, before we dive into
the technical aspects, we need to gather inspiration. In this lesson, we'll
explore various sources to spark your creativity
for your floral pattern. So the inspiration
for my design today, I'm going to use
these books here that have some amazing
imagery of flowers. These ones in this book here have some beautiful
botanical drawings, and you can see some really
cool details in these. I think absolutely every sort of flower you can think
of is in here. I love this book because
it shows you up close and personal with some of the leaves and the flowers and the shapes. And then in this book here, the flower Guide is
another favorite of mine. In here, the flowers are
all categorized by color, which is really cool. But I like it because
it's the photographs. I can see the
shapes really well. So for my style of illustration, for this pattern design, I'm looking at other
interesting shapes that I can see in these photos. So in this one, for instance, I can see three petals and a
little circle in the center, and that's all I
would use from that. And then let's find
something else. Maybe in this, I can see
a cluster of flowers, so I might use that detail. I can see so I can see little white flowers
with little yellow dots. And that's all the detail that I am going to use from that. So basically, I'm just really simplifying the shapes
that I see here. Once again, this is one of my favorite flowers, the echinacea, and I know these I draw
these all the time, and I don't even really
need to look at the book. So basically, what I'm
going to do is just draw a circle and some petals
and make it really simple. And I might put some dots
in the top bit there. These are really good books for finding all of those wonderful
shapes that you can use. The style of illustration and
pattern design is all about simplicity and just creating the shapes and making
it really simple. Now, you can take some of the textures and
maybe play with them. Sometimes they will
take I will take the texture of one flower and
put it onto another flower. If I think that will
look really good. I'm not going for
anything realistic here. I just want them to look pretty and different and interesting. Also, you can obviously
use your own photos. I have a huge bank of photos in my Google Drive that I have
taken when I'm out and about. I also use Unsplash, which is a really good
website for finding royalty free imagery
that you can use. You can use these pretty much as they are without any
copyright issues. You could recreate
them if you wanted to, but they're also
good for finding some really cool
flower shapes as well. So I will put links
to all of these in the resources section so that you can go and check
them out for yourself. And another really good place to find some books is the library, obviously, but also
charity shops. I'm often in there looking
for old gardening magazines, and that's where I find some
really interesting flowers. So go check them out, as well. So now we've gathered
our inspiration, and our next lesson, we'll begin setting up our OG template in
Adobe Illustrator.
3. Ogee Template: In our previous lesson,
we gathered inspiration. Now we'll move on to Adobe Illustrator to
create our OG template, which will serve as the
foundation for our pattern. I'll guide you through
the process of creating a precise and
reusable template. Okay, so I have opened
up Adobe Illustrator, and I'm going to
create a new document that is 12 by 12 ". The first thing I need to
do is create a circle. So I'm going to use
the Ellipse tool, which is on the keyboard
and just click inside the artboard there and create
a 12 by 12 inch ellipse. And then let's center that
into the middle using the horizontal Align center and the vertical align center. And I am just going to fill
this with a light gray. Okay, making sure it's selected. Hold down the shift key. Then select the scissors tool, which you see on the keyboard. Then click on the top node, the right node, and
the bottom node, and that will cut it out. So now there are three pieces. So now I just want to
select the top piece, and I'll just zoom out a
bit here so you can see it. So I'm going to
select the top one, and I'm going to right click and then select Transform, move. And this one where we want
to move it zero horizontally and then 12 " to knock it
down, and then click Okay. And then with this one, we're just going to
do the opposite. So right, click, transform, move into zero for horizontal, and then -12 in the vertical, and then we'll put
it at the top, and then you can click Okay. And then we want to
join them together. So I'm just going to click
and drag select them, and then right,
click, and then join. And that has now created
this half OG shape. So now we want to
duplicate that. So to do that, I'm just
going to grab it in the layers panel and then drag
it down to the plus sign, and that will duplicate it
and create another copy. We then just want
to move it across. So I'm going to right click Transform move, and this time, I want to move it across
12 " and vertically zero. And then click Okay. And then we just want to
flip it so that it bumps it up against
the left side. So right, click, then
select transform, reflect, and you just want to make sure that
vertical is selected. And then click Okay. So now
we have this lovely OG shape. We just need to join it. So once again, click and
drag to select them both, right click and then click Join. And then lastly, we just
want to reduce the size. So that is the 12 by 12 inch. You can just go into
the Properties panel. And if you can't see
that, just go up to Window and then
select properties and then select the width and the height needs to be 12 by 12. And if you've got the log on, it will automatically do
the height there for you. And then once again, let's just center that in the
middle by clicking on the horizontal align center and vertical just to make
sure it's right there. Okay, so now we have a OG shape, and this is going to
be used as a template. So to save it as a template, I save it in the swatches panel. That way, I can use it four
patterns at anytime I want. So firstly, I'm going to remove all these colors that are here at the moment as we
don't need them. So I'm just going to click on the first one, which is white, and then hold down the Shift key and then select the last one. And then I can click on delete. And then confirm that. And then what you want to do is to create a new swatch group. So I'm going to click
on the folder there, and I'm going to
call this pattern templates so that I can add some others
to it if I want to. And then we just need to drag that OG shape onto the folder, and now it is in that folder, and now we need to save it. So click on the icon
here that is called Swatch Libraries menu and
then click on Save Swatches. And then it will default to the Swatches folder
for Adobe Illustrator. You can save it here or you
could save it somewhere else. Just be aware that you may lose these if you
upgrade Illustrator, or what I recommend is copying them over to a new version
when you do upgrade. But anyway, I'm not going
to save this one because I already have one here
called pattern templates, so I don't need another one. But for you, you might want to save it, and then later on, you can add some more templates as you learn how to create them. Alright, so I'm going
to cancel that. And let's delete that. Click on the Swatches Library, go to User to find and then
select the pattern templates. And then there it is, and
you can just click on the folder and add it
to your swatches panel. And then you can close that one. And then all I
need to do is drag that back on into the center, and then we can start
creating our pattern. Now, if you're going to sketch
on paper to begin with, you can print this out
and use it as a guide. I'm actually going to create
my sketch in Procreate, so I will just send that
as a PNG over to my iPad. So to do that, I'm going
to go to file export, exports, and then I'm going to save it as the OG template. And now I can send
that over to my iPad. I can do that using the
airdrop as I'm on a MacBook. Or if you want to, you could
just email it to yourself and then open it up on
your iPad in Procreate. And now you are ready to go. So now we have our OG template
set up and ready to go. In the next lesson, we'll start sketching our floral motifs.
4. Sketching: W with our OG template in place, it's time to bring
our floral ideas to life through sketching. Okay, so I have picked out a flower for my
flower color guide, and I've decided that I want to use this one here
called a flannel flower, and I'll just show you a
little bit closer up here. I've got this flower
with different shapes. It's facing different ways. So I'm going to roughly
sketch out each of these. I might actually take
some different leaves, but for this particular flower, I just love these shapes, so that is what I'm
going to begin with. Okay, so I'm going to create
a new canvas in Procreate. You can obviously do
your sketch on paper as well on your printed
out OG template. But for me, I'm going
to sketch in Procreate. I find it's a really good place to be a sketch and
move things around, resize them and make
them fit really nicely. It's just really great
for pattern design. So I'm going to create
a new canvas that is let's make it 3,000
by 3,000 pixels. I already have that
set up as a template, but you can just type those
in yourself, obviously. And then I want to bring
in my OG template, which I sent over from
Adobe Illustrator. So I'm going to go to the
wrench tool here Insert photo and select my OG template. And it's already expanded
to the edge of the canvas. But if it hadn't, I could
click on Fit to Canvas here, and that will just make it
the size of the canvas. Now, also, I have a
selection of these templates already set up as
a brush library in Procreate, if
you're interested. So if I go into my pattern
template library here, you can see I've got a bunch of different
templates that I use, also some layout suggestions, and I will put a link to
this that you can purchase from me to use for
your own designs. They come in really
handy in Procreate. Alright, so we've got
our base template here, and what I'm going
to do is just lower the opacity of that layer
just so it's just there, and I can see it, and then
I'll lock that layer, and let's just create
another layer. I'm then going to
select my pencil, 60 pencil, and
I'll just stick to a dark color here
to start sketching. So the first thing
I like to do is roughly map out where I'm
going to put those flowers. So I have got my
book here just in front of me to see
the shapes of them. But first, I just want to, like, plot them out. So maybe I want to
put one over here. I'm just going to
draw a circle there, maybe one down here. And sometimes I'll just
draw an oval because I want one that's kind of facing
that way, not face on. Maybe one up here.
You'll be in here. Maybe up here. And maybe
like a little bud here, maybe another bud in here. And then I might just
lower the opacity of that and then create
another layer on top. If you're doing on paper,
you could just rub it out. So it was just a little bit lighter or you could just
sketch over the top. So I'm going to start with
the facing forward flower, and I like to create just
really basic shapes. So nothing too complex. So I'm just going
to sketch this out. And I'm going to I'm
just looking at my book, create another one down here that's sort of
facing up that way. It doesn't matter if you
go off the edge slightly. We can adjust
everything later on in Illustrator. If
it does overlap. Sometimes overlapping is good. Maybe we'll put some
stems in here, too. I will put some leaves in too. I'm also going to try and link up all of these stems so that it becomes a trailing floral. You got to remember, too, that flowers aren't always
completely perfect, so don't worry too much if they look a bit wonky or different. That's just the nature
of petals they're never going to be absolutely perfect. Now, if you are hoping
to do a trailing floral, with the OG template, there is a way of connecting
the floral the stems. So the bottom left here in the middle is going
to connect with the top right there
in the middle. So this flower here, the stems going to go down, and then connect to here. And then the same
on the other side. So this one here is
going to go down. And connect into here. And I can already
see a problem here. I'm going to have to move that petal and then have this one connect down into there.
But that's not a problem. I'm going to fix that
in Adobe Illustrator. Okay, I'm just going to
turn off that layer where I plotted out my flowers and just have a
quick look at this. So here, I'm pretty
happy with this. It's quite rough, but that's all I need to take into Illustrator. I'm going to test this
out as a sketch in Illustrator to see how
the pattern looks before I commit to any coloring
because I do want to match up all these trailing branches to make it look very seamless. So I will do all of
that in Illustrator. So what I'm going to do is
I'm going to send this over, and I'm going to
share it and then just share it as a
JPEG and then airdrop it back to my computer
and then open it up in Adobe Illustrator. Okay, so I'm going to create a new file in Adobe Illustrator. And this file is gonna
be 12 by 12 inch. You could do yours
any size you like. My typical go to is a
ten by ten or 12 by 12, and 300 DPI. And the first thing I would
like to do is get rid of all these swatch colors
as I won't be using them, and they clog up my swatch. So to do that, you can go up
to Window and then actions, and then let's open up
the default actions. Let's just open this up so
you can see it a bit better. And then select delete
unused panel items and then hit the
little arrow here. And Willa, they are gone. Alright, so I'm going
to close that down. I'm also now going to
bring in my sketch, and I'm just going to drag
it onto the artboard. And as you can see,
it's enormous. So I'm just going to resize
that down to 12 by 12 inch. And then just center it using the horizontal align center and the vertical aligned center. And then let's
just zoom back in. So the first thing I want to
do is actually test this out to see if I need to
make any adjustments to make my trailing
florals lineup. If yours doesn't need to be a trailing floral
with any lineups, you could skip this bit, but I do recommend doing it just to make sure
that your repeat is going to work before you
commit to any coloring. The first thing I want to do
is actually image trace it. So I am going to go over to my image trace tool.
If you can't see that. If you can't see any panel
that I already have on here, basically, just go to Window
and select the panel. So for this one, it's
the image trace one. And for this, I'm just going to keep it as black and white. I'm going to click on
Advanced and click on Ignore Color as I don't want any of the white,
the background. And then click Trace. And most likely it's probably not going to bring
out all of the sketch, so to adjust that, I'm just going to move
this threshold up a bit. And you can see it's just
bringing out a little bit more. Doesn't have to be perfect. I'm not actually going to use
these in the final design. It's actually just my sketch. It's just a guide for
where I'm going to color. I know sometimes I do use
sketches in the final design. In that case, it would have been a very much neater sketch, and I would have this threshold at a decent level
to bring it out. But I'm happy with that. So
I'm going to hit Expand. And now we've got this shape. So what I'm going to do now
is just hide the image trace. I'm going to select
it. I'm going to go to object, pattern make. And then in here, I want to
change this to brick by row. And then if we type in the
width of the artboard, which is 12, and then
type for the width, and then type in
six for the height, and you can see it's
now placed it all neatly in a lovely pattern. And so now I can see I need
to match up some pieces. So this one here needs to join. I need to tuck
this in somewhere, so it looks like it's joining. And then this piece
here and here. So what I will do is I will
dim the outside copies. So all I can see is
the main repeat copy. And then I'm going to use the just the blob tool for this and make sure I've
got black selected. So I'm just going to mark that
there just to line it up. I'm going to do out a bit so
I can see what I'm doing. This bit down here
needs to be joined up. So this kind of needs
to come around to here. And then this bit
here is a problem. I want to connect the
top bit to the stem here and move this flower
over into this gap here. Now, in the pattern tool, it's actually a little
bit restricted, so I can't actually cut
that out and move it. So what I'm going to do
is I'm just going to draw a little arrow here to show that I want to
move that in there. I'm also going to just indicate where the
top of that stem is, and then later on, when
I can edit it properly, I can it connect it
up to that stem. I'm also going to get
rid of this bit here, so I'm just going to scribble over there to let me know that
I want to get rid of that. And then I'm going
to click Done. And that has now added
it to my swatch panel. So I'm going to just
drag that over there and pull that pattern on, and I want to convert
this to another artboard, and then we can continue editing it and getting it
ready for the color. So to convert it to an artboard, if I go into the layers panel and select the bottom
layer of that group, it selected the a bounding box. So I'm going to go to object Artboards, convert to artboards. And now we've got
this as an artboard. And then I just want to double click on all of it, the group, and remove all these
edge pieces that we no longer need as we're going to just work on
that middle part, which we now know is
lining up nicely, and we just need to
fix this bit in here. So firstly, I want to
move this over to there. So let's just remove that arrow. I don't need it anymore,
and then select this and use the eraser tool
just to slice that in half. So now you can see
it's been sliced. So now I can use the Easo tool to basically
just select this bit. And then if I hit
E on the keyboard, I can then rotate it and move
it into that section there. And then I'm just going to
use my blob tool again. You can use a pencil,
anything you like, really to then reconnect this up and maybe put
another one there, and maybe we could add
another leaf there. And then if we use
the eraser tool here, again, we can remove this bit here that I
wanted to take out. Okay. So now I know
that's going to repeat really well and
everything's going to line up. I am going to move
on to the color. We can actually also
before we do that, remove this original version
as we don't need it. So I'm going to click
out. We can remove that. We can also remove the artboard
as we no longer need it. So I'm just going to
hit delete on there, and now we just have
the new one left. So we've now sketched
our floral motifs and have a clear vision
for our pattern. In the next lesson, we'll begin to develop our color motif
5. Colour: Building on our sketches will now focus on developing
our color motifs. We'll explore color
palettes that complement our floral design
and learn how to apply color effectively
in Adobe Illustrator. Okay, so I'm all ready
to start coloring. I am going to show
you a few tips and tricks along the way of
how I use Illustrator. I don't use it the same
as every other person who creates patterns
in Adobe Illustrator. This is just the way I prefer, so it might be something different from what
you've done before. But anyway, let's jump in. The first thing I'm going to
do is grab my color palette. So I used a tool
he called coolers, and I managed to create
this color palette by basically starting
off with this color here called alloy orange. So I found this color. I love it. So I pull this
in. You can lock it. And then if you then hit the
space bat on your keyboard, it will rotate through
different colors. And when you see one you like, you can lock that and
then just do the rest. You'll like that one
and that one and then maybe change the
last one like that. And so that's how I came
up with my color palette. I'll put a link in the resources to show you how to do that. So I'm just going to
undo those so I can get back to my original and I just went too
far. That's it there. They do have an
export function here, so you can export as an ASE. So if I click Export, that has saved it to
my downloads folder, I can then go to my
swatches library menu here, go to other library. And locate that in
my downloads folder. And I'm just going to
drag all of those. So I clip the first one, and then the last one
with the shift key down. And I'm just going to drag them all onto
that folder there, and then just take
that black one out. I don't want
that one in there. Um, so that's created
a folder for them, and then I can save
them if I want to. Another thing I like to do is make sure the global
is turned on. So you can see in each
color swatch here, there's a little triangle
down the right hand corner. That is saying that
global is switched on. If you double click
into one of them, you can see here
the process color, and then it says
global underneath. So basically what that
does is that later on, this will come in really handy. Drag out, say four
little shapes here. And say later on, I decide that I want
everything that is this color should be
a different color. Instead of having
to go and click and find them all in
the document like that, all I need to do is actually
just change that color, so I could change it to that
color there or that color. And then it changes in
the palette as well, in this watch panel as well. So that's a really handy tool. So I'm just going to
get rid of those. Let's go back to our design, and now I'm going to start
drawing out my color layers. So I like to create grouped
layers according to color. So I'm going to start off with the branches because
I do want to test that they repeat
nicely and match up so that I create that nice
trailing floral effect. There's a lot of ways
you can do this. You could use the pencil tool, I personally don't
like that one. My favorite is the
Blob Brush tool, and that is Shift plus
B on the keyboard. And the reason I like this
is that you're able to then draw just as you do
on a piece of paper. So if I select this color here and use the right square bracket just to make it a
little bit bigger, I can easily just draw them out. You can also do this
with the pentel, but I personally
love to be able to draw it myself rather than
click it out with a mouse. I find this method much easier. So I'm just going
to go around and draw out these branches, and then I will move
on to the next step. Now, to do this, I am using
my iPad as a graphic tablet. You could use your pencil. You could use your mouse. I love the way the
Apple Pencil works. I find it really easy to use. I used to use a Wacom. My wacomm is now getting dusty in the corner
of my office. This is a really intuitive
way of doing it. The Apple pencil is so
intuitive and easy to use. So if you've got a
MacBook and Apple iPad, you can link these up using the Mrorin function
on your MacBook. And then use your Apple your iPad as the graphic
graphics drawing tablet. I have a bonus video
on how to do that and how to connect it up at
the end of the class. Okay, so I have drawn out
all of those branches. I'm just going to
turn off my sketch. And have a look.
And if I zoom in, you can see there's a few
little bumps everywhere. So I'm just going
to select them and then use the Smooth tool. I have set a shortcut on mine, it's Shift S. I think with
the standard TIM setup, Shift S does something
else, and at some point, I've switched it over because
I use this all the time. So I recommend doing that if you do use the
smooth tool all the time. So there's a couple
of options here. You get this little
scale thing here and you can drag it up and you can
see how it's smoothed out. Your branch, but you have
to be really careful. You don't want to go too far. So I only do that
really slightly, and then I just go
around and drag my pencil over the sections where I think it needs a
little bit of smoothing out. I just want it to be a subtle. I just don't want those bumps, but I don't want it to
look overly smooth. I still want it to
be quite natural. So I'm just going to go
around and smooth out these Another thing is, over time, you'll
find that you rely on those shortcuts rather than having to go into the
menu and find them. The shortcuts really do speed up your process and make
it a lot smoother. So I do recommend using
shortcuts as much as you can. You will find over time
that you'll just use them naturally and not
have to think about them, but it does take a
little bit of time. Okay, so my branches are all smoothed out and are
looking pretty good. Before I go on to the
leaves and the flowers, I want to make sure
that these are going to repeat
because remember, I want to make it look
like a trailing floral. So I want to make sure some of the tops and the bottoms
are all matching up. And so to do that, I'm
going to actually do it via the pattern tool and then make some adjustments and
then then continue on. So I'm going to go
up to actually, first to select them, go up to object pattern make and then I'm going
to go to Brick by Row. I'm going to change the width to 12 and the height to six. And now you can see these bits
where I need to just make some slight adjustments in order to make them
match up nicely. So this bit here is
actually that bit there. This bit here is
that bit over there, and then this bit here matches
up with that bit there. So pick which one you think is going to be the
easiest to smooth out. So for this one, I'm going
to go into this one here. I only needs a
slight adjustment. I'm going to use the
direct selection tool, which is A on the keyboard. And then with each of these
little nodules in here, I'm able to manipulate the branch to fit with
the one underneath it. So I'm just making the
slightest of adjustments. You can also use the Smooth
tool as well if you need to. Just if you do raise
you cannot undo, so keep that in mind.
You have to keep going. Otherwise, you just have to
go back out and start again. I'm hoping in future
editions of Illustrator, we might get a few
more options in here so we can do it on the fly. Alright, I'm happy
with that one. Let's go to the next one. Okay. That is
looking way better. Now we can see that
everything is lining up. So what I'm going to
do is click Done, and that has added it
to my swatches panel. And so now we're going to create another artboard and use
that to continue coloring. So I'm just going to
grab that swatch, drag it onto the space. Make sure that I'm on that
active layer. Drag that on. And then if I go
into that group, select that bottom layer only, go up to object Atboards
convert to artboards. And then we just need to
remove all those outer ones. So at the moment,
they're all grouped. If I double click in,
I can then select all the corner pieces
and remove them. We just need that
centerpiece and go out. Now, it's important
not to move these now, so you might want to
lock them so they don't get accidentally
moved because we now know that these are
matching up perfectly. So now we don't need
this artboard anymore, but first, I need to
copy over the sketch. So I'm just going to turn that
back on and unlock it and move that over to this artboard, just as best as you can align it back up
with your branches. And then what we can do is
go to the Artboards panel and delete the first
one, not the second one. And we don't need the branches, either, so we can remove them. So now we've got our
training branches that will match up
when we repeat them, and we can continue
on with coloring. Okay, so I might now
do the petals of the flowers back again
with my blob tool, and I'm just going to go
around and trace my sketch. Obviously, this
time it looks a lot smoother than the actual sketch. And then to fill that, let's just turn off the sketch
so you can see it better. If I select the direct
selection tool, which is A on the keyboard, and then just select the
inner part of that outline. You can see it's only
selected the inside. So then I hit delete
on my keyboard twice, it will remove it, and
we've got a filled flower. So I'm just going to continue on with that with the
rest of the flowers. Okay, all of the
flowers are now done. I am just going to check if they need any smoothing out. I can see a bump there. I don't want them
absolutely perfect, but I also don't
want any jaggedy edges that look a bit weird. H Okay, I'm happy with that. Now, I like to keep
everything organized, so I'm going to
group all of those. I'm going to select the top
one in the layers panel, hold down shift and
select the bottom one, and then command G to
group those together. Alright. Now I'm going to do
the centers of the flowers. Okay, now I just want
to add some details. So let's add some dots to
the center of the flowers, and I'm going to select
this darker color. And then let's just
see what size. Make those a bit bigger. So write square bracket
to increase the size. And then I can just dot them in And lastly, I want to add some detail, some little lines to the petals and to be able to define some
of those petals as well, but at the moment, look a bit funny and
also to the leaves. So I'm going to stick
with that color, and I'm going to decrease the size cause I
want it not so big. Zoom in, and I'm just
going to still too big. And that's okay. And I'm literally
just sort of, like, dabbing it on to make it
look like a broken line. You could do an unbroken line. This is just something
I like to do. Kind of makes it a bit
more scratchy, I guess. And then I need to define
this petal that's there. Okay. That looks pretty good. Let's group those. And I'm going to do some lines
for the leaves as well. So I'm going to use this
lighter color and then come in. This time, I'm sort of
going over the edge because I want it to go from
the top to the bottom, and then I will show
you how to quickly clip those so that they
are just on the leaf. Alright, that's all
the leaves done. Let's group those
marks on the leaf. And I'm just going to turn off some of these background
these other layers. Keep that one. Keep
that one that one off. Just so I can show you whoops. How to remove the overlaps. So if we grab both, we've both got the leaves
selected and the lines, my other favorite tool, other than the Blob tool
is the shape builder tool. Which is Shift plus M.
And if you can see when I'm dragging across,
they change, and you could theoretically just click and drag to join
those two together, and it creates one object,
but I don't want to do that. All I want to do is
actually just get rid of these end pieces here. So you can see when I hover
over it, it shows a plus. I want to change
that to a minus so that when I click
it, it disappears. So to do that, I'm
going to hold down option and then
just click on it. And you can see it
just disappears. And I can just go around and click on each of those pieces, making sure I've got the option down to get rid of all of them. There are other ways to do this. You can create a clipping mask. You can draw inside the leaf. But I find this one is relatively quick and easy to
do and probably my favorite. Alright, I think I've
done all of those. Whoops, not one more up here. And now I will turn back on
those layers and the stems. All right. That's
looking pretty good. Now, there is one
thing I want to do. I'm finding that the
contrast between this purple and the rest of the colors is
not popping enough for me. So I'm going to try and find a pinkish color that
I can use instead. So a bit more brighter so
that I could change that. So I had a bit of time
flipping through encore, and I found this color
here called plum, which I think gives a
little bit more contrast. So I'm just going
to try that out. So I'm going to
copy that hex code. Go back in here, and
now remember how I said you should
use global colors. Instead of having to pick all those colors,
all those flowers, I just need to change the color of this
purply mauve color. So I'm just going to paste in the hex code and click Okay, and there is my pink version, which I think looks better. So I'm going to stick with that, and you can see
that it's changed in the watches panel as well. With our colored motifs ready, we're now prepared to compose our pet within the OG template. In the next lesson,
we'll arrange our elements and create our
repeating pattern tile.
6. Pattern Composition: In our previous lesson, we developed our color motifs. Now we'll focus on arranging
these motifs within our OG template to create a cohesive and visually
appealing pattern. We'll also learn the techniques
to create a flawless, seamless repeat in
Adobe Illustrator. Okay, now we are ready to
transform this into a pattern. So what I'm going to do is first turn back on my branches layer, grab everything, go up to
object, pattern, make. Then we want to switch
that to brick by row, type 12 in the width, 12 ", and six in the height. And if you wanted to if you didn't want to
have any overlaps, you could go in and
adjust these slightly, but actually, I don't mind them. It gives it more depth, so I am going to keep those. I'm going to click Done. And that's put it into
my swatches panel. So let's first test that out and just see
what it looks like. I'm going to grab the
rectangular tool. I'm going to select
another layer, and then just drag that out and fill that with my pattern. And as you can see
at the moment, it doesn't have a background. So what we can do to test
out a background here, we can just grab that layer, duplicate it by dragging
it down to the plus. Select the bottom layer and
then give it a background. And that looks pretty good. Now, so far, I'm
happy with that, but I do want to go a step further and give it more depth. And if you've taken my class called master
pattern designs like a Pro, you'll see I have lots
of different methods for creating depth and
balance in your patterns. So what I'm going to do is I'm going to add some texture to the background to create
some lovely depth on this. So first of all, I'm going to actually Delete that
one and that one. And we are going to drag
out the actual palette repeat tile and turn
that into an artboard, and then I'm going to add
the background texture. So once again, to select
the bounding box, you can actually go in and sort of try and select it,
but that's a bit hard. So I'm going to go into the group and select
that bottom layer. I'm going to turn that
into an artboard, so go up to object artboards,
convert to artboards. I'm also going to create
a background layer. So I'm just going to create that using the rectangle tool, drag that out across. I'm going to go outside that
bounding artboard box and create a background layer and then drag it to the
bottom of that group. Now, if I was to
export that artboard, which is now the
second one as a tile, it would be a repeating pattern. But I do want to add my texture. So what I'm going to do, I'm going to create
another layer. On top, I'm going to lock that
layer, the original layer. I might lock the
other layer just so that we don't accidentally
do this on the wrong layer. So we've got another
separate layer altogether. I'm going to use my blob tool again and I'm going to
select a dark color. This is probably not the color
I'm going to end up with. I'm just going to start with
it so I can see it clearly. Let's increase the size. I'm just going to
do some dots to see the size of them
quite like them, so I'm going to
continue with that. And I'm basically just
going to actually know, I'm going to go a
little bit smaller, and I'm just going to
dab in all the way around and create some
texture in the background. This is going to create a
lovely effect to make it. The main elements
pop out at you. You see this done in
William Morris designs. You'll often see it in my
designs. I love this technique. And I actually find this quite meditative, just dotting around. You could create
brushes to do this, but I like doing it manually. All right, so I might speed this up, and I'll
see you at the end. One other thing also,
I'm not going to go outside the bounds of the
box, the bounding box. I'm going to keep it all
within unless it's the top, the top side or the left side, and then we can then
repeat those over. So it's just the
top and the left. I can go over, so
I can slightly go over up here if I want to, but not on the right
or the bottom. Alright, so I'm just
going to continue on, and I will see you when
I'm close to done. Okay. That is done. I'm going to select
all of those and just change the opacity down. So they are more subtle and that makes them look like they're
right in the background. I just realized I jotted
over there as well. I can then just turn off
the other pattern here, the rest of the pattern here, and I just want to grab anything that is crossed
over that top bit. And then I'm going to right
click Transform move. And we're going to type zero in the horizontal and
then 12 vertically, and then you can see them
jump down to the bottom, and then we want to
hit copy to copy them. We also then I can
see there's a couple here that might be overlapping, so I'm just going to go in here and just nudge
these a little bit, so they're not right
on top of each other. Okay, and then I
need to do the same for the left side to copy
them over to the right side. And this will ensure
that they all um repeat with the pattern.
So we're going to move. And this time, we're
going to go 12 across and zero
down. And then copy. And then we can turn on that
background layer again. And now we have the left side repeating on the right and
the top on the bottom. And I'm going to drag that
down into that layer below. So that will group together. On that one artboard. Okay. So now that is
our repeating tile. Okay, now I just want to see if this is going
to repeat nicely. So I do want to add it
to my swatch panel. So if I were to just grab
everything and pull it over, and then grab a rectangular
tool and then add it, you'll see that it hasn't
done it very well. So let's remove that. So I'm just going to create
another bounding box. I'm going to click
on the workspace there and create
a 12 by 12 inch. And this one needs to have
no fill and no stroke. So I'm going to
remove that fill, I'm going to center it both
vertically and horizontally, and then it needs to
go at the bottom. So now if we select
all of it and drag it on you can see it now
looks slightly different. Let's see if that has
now created pattern. I can select it, select
my rectangular tool, and then drag that out, and you can see that now is
repeating really nicely. It's got the trailing
floral effect, and it's looking pretty good. So you can then use
that artboard there, which is the second
artboard to export. Just make sure you
export as a artboard. So file export as
and then select Um, I'm going to say JPEG for
this and use the artboards and then the second
artboard and then Export. You also want to make sure that art optimized is on and that the quality is at the maximum and the Resolution 300
and then click Okay. So now we've
successfully composed our pattern and created
a seamless repeat. Now we'll explore how to create multiple color ways of design,
expanding versatility.
7. Colourways: Building on our
completed pattern will now explore the power
of color variations. We'll learn how to create multiple colorways
of our design, giving it a fresh
and diverse look. Creating multiple colorways for your pattern designs isn't
just a nice to have. It's a strategic move that significantly enhances
your designs potential. Think of it as
giving your pattern a wardrobe of different
personalities. So here's why you should embrace the power of
color variations. Firstly, it can broaden
your audience appeal. People have diverse
tastes and what resonates with one person
might not appeal to another. So by offering
multiple colorways, you cater to a wider
spectrum of preferences, increasing the likelihood of your design finding
its perfect match. Imagine a bright,
playful pattern. While it might be perfect for children's products,
a more muted, sophisticated version
could attract an entirely different demographic
interested in home decor. It can help by boosting
marketability and sales. So retailers often seek a variety to offer
their customers. Multiple colorways
make your designs more attractive to buyers, increasing the chances of your patterns being selected for production and
offering a range of color options can also
lead to increased sales. Offering a range
of color options can lead to increased sales. Customers might be drawn
to the same pattern in different color palettes
leading to multiple purchases. It can enhance
design versatility, so a single pattern can take
on a vastly different mood. Application simply by
changing its colors. A bold, vibrant color way might
be ideal for active wear, while a soft pastel
version could be perfect for nursery decor. Color ways allow you to explore the full potential
of your pattern, showcasing its adaptability and versatility across various
product categories. It's great for creating seasonal or trend
driven collections. So color trends
change regularly, and so by adapting
multiple colorways, you can quickly adapt
your designs to reflect current trends
or seasonal palettes. This agility allows you
to stay relevant and competitive in the ever
evolving design market. And lastly, client presentations when presenting
designs to clients, offering multiple
colorways allows the client to see
the full potential of the design and
allows them to make a color selection that
best fits their needs. So, in essence,
multiple colorways transform your patterns from singular creations
into adaptable assets, maximizing their
market potential and allowing you to connect
with a broader audience. So let's see how we can do
that in Adobe Illustrator. So the first thing I want to
do before I recolor this is to create a duplicate
of this repeating tile, so we only change
the duplicate copy. So I'm just going to this one is in a group at the moment. So all I need to do
is hold down Option, click and drag to duplicate it. And then I also want
to make sure this is on an artboard so that
if I do change colors, I can then export it
as a repeating tile. So within that group, I'm
just going to click on that bottom repeat
the bounding box, go up to object. Sorry, object Artboards
convert to artboards. Now, you might get
this. It says, basically that it can't create an artboard because
it's a clipping mask. So to get around that issue, what I need to do is
actually put this on a separate layer to what
the original one was on. So at the moment, it's on this layer three here. I'm just going to create
a new one on top. Then I'm going to
select this one here and just drag it
up into that new layer. And how it I lock
that other layer so we don't mess anything up. So now if I go into
this layer and I select that bottom
bounding box there, I should be able to go to object Artboards convert to artboards, and now it is a new artboard. We've got number three there, which is exactly what I wanted. Okay, so to recolor. So I'm going to select it all, go into this option here
called recolor artwork. And initially, it'll
give you this box here. The advanced options here, which is what I
normally go into. But this one here will
give you a few options. You can go into the color
library here and you can select a different library. So say you want to change it
to a sort of a pop art fiel, you could select that, and it's going to give you some
different colors. You can even move those around and adjust them
if you want some greens. And so forth. So I'm going to
undo all of that. And get back to where I was. And then I'm going to
click on Advanced Options because this is what
I normally use, and it gives you a
number of other options. So you can see it shows
your swatch group. So this is basically what is in your swatch
panel over here. You also can adjust the number of colors that you
want to reduce it to. So say you wanted
to reduce it to just two colors or three
colors, you could do that. And so now it's
automatically done that. And I'm just going
to put that back. You can also change it to
another built in color palette. So let's say, try
this prehistoric one, and that's what it's done. Now, just be mindful in
here there is no undo. So on the previous pop up, it did actually have an undo, but in the advanced, it doesn't. So if you decide you
don't like that, my suggestion is to
basically cancel, go back out and then go back in, so you don't lose what you had. You can also select
different colors. And here, so say I just
want to change this purply blue navy to a lighter
color, I could do that. Um and then I can use this randomly change color
order in order to apply it. And that's created quite a
nice little change, as well. If you keep clicking on there, it'll just keep randomly
changing the order, but still keeping
the same colors. So that can produce some
interesting effects. The next one over here just
changes the saturation and brightness of each of those colors that
you already had. And then I don't actually
use this last one at all, so I'm not going
to go into that. And also, use a custom palette. So maybe you can bring in one
that you've defined before. It's basically picked
the colors from this new palette that are the closest match to
what's there currently, which is quite a cool effect. So my favorite way is
just to run through the color order to create new combinations until I
find something that I like. And once you found
something that you like, if you click on Okay, that is going to add it to your swatch palette and I've just noticed that
it's added it there, but I can tell that
it's incorrect because it doesn't
have the bounding box. So what I can do is just
create that quickly. So I'm just going to use the rectangular
tool and I'm going to create a 12 by
12 inch rectangle. I don't want any fill
or stroke on that. And then I just want to
center it on that artboard, and I need to make sure
that it is on that layer, so we're just going
to drag it up there. So now I should be able
to grab all of that, drag it onto my artboard. And now I can tell
that it looks good. So I'm going to test it
out on my test one here. I just need to unlock it, and there is the other colorway. And now I'm going to
create another one. So I'm going to
create another layer. I'm going to grab all of that, hold down the
option key and drag and duplicate that and then just drag it
onto that new layer, and I'll lock that
previous layer. I'm going to grab
that bounding box at the bottom and duplicate it, and then grab the
bottom one and go to object artboards,
convert to artboards. I'm now going to
select all of that, go up to actually, now I'm going to bring
in a different palette. So I'm going to go to
user defined and bring in this new palette that I've created and add it
to my swatchboard. And then if I select it
all go to recolor artwork, go to Advanced Options. I can now see that new palette is now on
the swatch groups. I'm going to just
click on that group, and you'll see it automatically update the color palette
and then I'm going to use the randomly
change color order to see what happens. And I'm just going to
stick with that one. So I'm going to
click on Okay and then say yes to changing
the swatch group. And all that means is that
it's reordered them there. And then I'm going to just
drag that onto my palette, and you can see it's up there. So let's go test that out. I just need to unlock that
and apply that new pattern. So there's another completely
different look as well. And now I'm going to
create another one. So I'm going to
create another layer. I'm going to grab all of that, hold down the
option key and drag and duplicate that and then just drag it
onto that new layer, and I'll lock that
previous layer. I'm going to grab
that bounding box at the bottom and duplicate it, and then grab the
bottom one and go to object artboards,
convert to artboards. I'm now going to
select all of that, go up to actually, now I'm going to bring
in a different palette. So I'm going to go to
user defined and bring in this new palette that I've created and add it
to my swatchboard. And then if I select it
all go to recolor artwork, go to Advanced Options. I can now see that new palette is now on
the swatch groups. I'm going to just
click on that group, and you'll see it automatically update the color palette
and then I'm going to use the randomly
change color order to see what happens. And I'm just going to
stick with that one. So I'm going to click on Okay, and then say yes to
changing the swatch group. And all that means is that
it's re ordered them there. And then I'm going to just
drag that onto my palette, and you can see it's up there. So let's go test that out. I just need to unlock that
and apply that new pattern. So there's another completely
different look, as well. We've created multiple
colorways of our pattern, given it a wide range
of applications. In our final lesson, we'll learn how to
present our design in a realistic mockup
showing its potential.
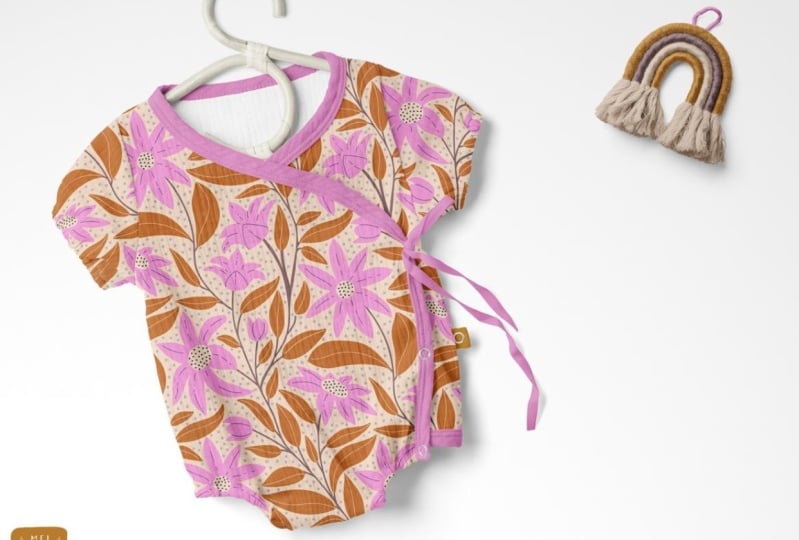
8. Mockups: In our final lesson, we'll take our completed pattern and create a realistic mockup. My preference is to use
Photoshop for mockups, but you can actually create
mockups in Adobe Illustrator. There are just a few
limitations to it. So in the new Adobe
Illustrator 2025, you can actually create
mockups automatically. So I'm going to use this design here to place onto a mock up. So if I just go up to
Window and then to mock up, you can see in here it's got a few different choices.
I've got apparel. Branding, graphics, digital
products and packaging. So if I select my pattern here and then click
onto this one here, which is a notebook, and then click on Preview
Mockup. It is placed on there. And obviously, we need to
manipulate that a bit. So I'm going to click
on Place on Canvas. Okay, so once it's
on the Canvas, we can just expand this out
to fit over the notebook. By just grabbing the anchor points here and
pulling them out. And to keep the dimensions, hold down the Shift key, then just drag it out until it expands outside the
edges of the notebook. And then you want to change
the blending mode so that the texture of the actual
notebook shows through. So in the properties panel, if you can't see that, go to Window and then
select properties. In there, I'm going to
change the opacity here. I'm going to click on the dropdown here and
select multiply. And there it is. Now, the functionality
of this is a bit wonky. You might notice that some of the insides of my
flowers are missing. And there's also this weird
gap up here in the corner. So, it also on the top,
it's kind of wrapped over. So it isn't the best of mockups. Sorry, I'm just getting that
back on the screen there. So, personally, I would prefer
to do this in Photoshop. So let's jump into Photoshop. So I've just opened up
my pattern repeat tile, and the first thing I
want to do is add it to my patterns swatchbard. So if you can't see
that, just go up to Window and select patterns. And then all I need to do
is click the plus sign, and then that will
add it on there, which means I can now
use that to apply it to any sort of
mockups I might have. So I'm going to use this mockup here that
I purchased from Cretz and I will leave a link for you to have a
look at their website. They probably have the best mockups that
you could purchase. I am a bit of a serial purchaser
when it comes to mocks, but they really do
make fantastic mockup. So I have this one. I
use it all the time. You might see it on my socials. So I have downloaded this,
and we're going to use this. I'm going to demonstrate how
to use this in Photoshop. So here is the
mockup in Photoshop. And what I want to do is
update the pattern on there to my new pattern that
we've just created. So in the layers panel, I'm just going to
scroll down until I get to the ones that say
design. So there's a few. They have one for each of
the sleeves and then each of the body pieces. So I'm going to start with
the front left piece, and it is all I need to
do is double click on it. It's a smart object, so it'll
take you into another file. When you first get it, you might not have this pattern
filled there. You'll just have this here
called sample design. So you can either just grab
your pattern and drag it on and then you don't even need it clipped at the moment, it's
clipped to that one. I'm just going to unclip it. You don't need that. You can
then double click on it, you change the scale. So I'm going to bump that down, and then just take
a note of what size I end up with because I will apply that to the
other ones as well. So then I can just
close that and save it. And it's applied
it to the pattern. And then I'm just going to do the same for the other pieces. And this time, I'm just going to update the one I've
got there already and change the scale to 40%
and the pattern as well. And then the sleeves. And then we can also update the color of the binding
and also the rainbow. So you just need to
find those layers. And so here's the binding, and I can just update that
color if I double click on it, and then I can select the
color from my pattern. And I'll do the ribbon, as well. And then I'm just going to
update the rainbow colors. And I'm just going to select
colors from my design. Okay, and the last
thing I'm going to do is turn on my logo here, which I already had
loaded and just update the color so that it
matches my design. And now this is ready for
social media or my portfolio. Now, if you're interested in
creating your own mockups, I do have a class on how to create realistic mockups
on skill share here. I will leave a link
in the download for you to have a look at
that if you are keen. We've now completed our
project and learned how to create stunning mockup of
our floral OG pattern.
9. Your Project: Now, let's dive into the
details of the project. Your main task is to design a
unique floral pattern using the OG template provided in the class resources or one that you have
created yourself, following along with my lesson. Now, you'll take this simple
shape and transform it into a vibrant, repeating
floral pattern. Utilize Adobe Illustrator
to design and refine your pattern and ensure your pattern tile creates
a seamless repeat. To complete this project, upload it to the
project gallery, you can upload a low res, a JPEG of your pattern. Just don't upload
the repeating tile, make it a snapshot of it. You could also upload a
mood board if you created one showing us your
inspiration and color palette. And finally, you could
upload a mockup of your design using my tips
for creating a mockup. So here are some tips to help you create a fantastic pattern. Look everywhere for inspiration. Nature, botanical gardens, vintage illustrations,
online design resources. The possibilities are endless. Don't jump straight
into Illustrator. Sketch your floral elements and pattern layouts on
paper or in Procreate, as I've shown in the lessons. This will help you refine your ideas and save you
a lot of time later on. Choose a limited color
palette to a cohesive look. I typically use
around five colors. Most importantly, let your
unique style shine through. Avoid copying existing designs and create something
that is truly your own. And to help you along the way, I have included some
helpful resources in the class materials. These include links to free stock photo websites
for flower inspiration, color palette generators to help you create
harmonious color schemes. These resources will give you a great starting
point for gathering inspiration and
building your design. I highly encourage you to share your work in the
project area this is a fantastic
opportunity to receive feedback from me and
your fellow students. We're all here to learn
and grow together. I can't wait to see
what you create. Remember, the most
important thing is to have fun and
enjoy the process.
10. Conclusion: And just like that, we've
reached the end of our class. I hope you've enjoyed
learning how to create your own modern
trailing floral pattern using the OG template
in Adobe Illustrator. But this is just the beginning. I encourage you to
take what you've learned and continue exploring. Experiment with
different floral motifs, try various color palettes, and even play around with different OG
template variations. The possibilities
really are endless. And don't be afraid to push the boundaries and discover
your own unique style. The more you practice, the more confident and creative
you'll become. Now, I'd love to see
what you've created, so please share
your floral pattern in the project gallery. This is a fantastic opportunity
to showcase your work see feedback from me and your fellow students
and inspire others. Building a creative
community is so important, and I believe that
sharing our work is a vital part of the
learning process. So please don't be shy. Share your creations, leave comments on other
students' projects, and engage with the
class community. Thank you so much for joining me on this creative journey. I've truly enjoyed sharing my passion for pattern
design with you. I hope you have been inspired to continue exploring
the world of floral patterns and create
designs that you love. Keep creating, keep learning, and I will see you in
my next class. See ya.
11. Bonus Lesson - Connecting iPad to MacBook: Okay, so I wanted to
show you how I connect my iPad to my computer so that
I can use it as a tablet. I used to use my Wacom, and then I bought an iPad and realized that the
iPad was just as good. To in order to do this, I have a MacBook Pro, which you can see
underneath there, and that is linked
up to a screen. You can obviously do this with your MacBook without
another screen, but I use a big monitor for
when I'm at home at my desk. So all you need to do is go up into you can either go into this icon here or this one here, which is the screen
Mirroring one. Um, and then you just
need to select your iPad. Now, if it doesn't
come up in that list, you can go to display setting, and then you can then add it. So you can go in
here and you can add it if it's not already on there. But mine's already there, so I'm just going to select iPad. And then you should see it
pop up onto my screen here. Now, if you're finding
that it keeps cutting out, I do have another cable here. This is a thunderbolt cable, and I plug that in. I most often use it with the cable as I find the
Bluetooth is a bit problematic, so it will disconnect a lot. So if I plug that in, I've plugged it
into my computer, and then I can plug it in. Well, this is a bit hard when you're trying
to film, as well, but play it into my iPad. And now I can now I know that it's not
going to disconnect. And so now I can use my pencil
and use that as a tablet, and I can also look at the
screen or I look at my iPad. And basically, you can use your pencil now like a drawing
tool as well as the mouse. So that's really handy for when I'm drawing
an Illustrator. You still need your
keyboard close by. I use all the shortcuts on my keyboard to be able to do all the stuff
that I do on my iPad. So yeah, that's why using the
shortcuts are really handy. Otherwise, you can
just use your mouse, as well to do all of that. Alright. I hope
that was helpful. Yeah, if you have any
questions, let me know.
 Mel Armstrong, Illustrator, Pattern Addict & Teacher