Transcripts
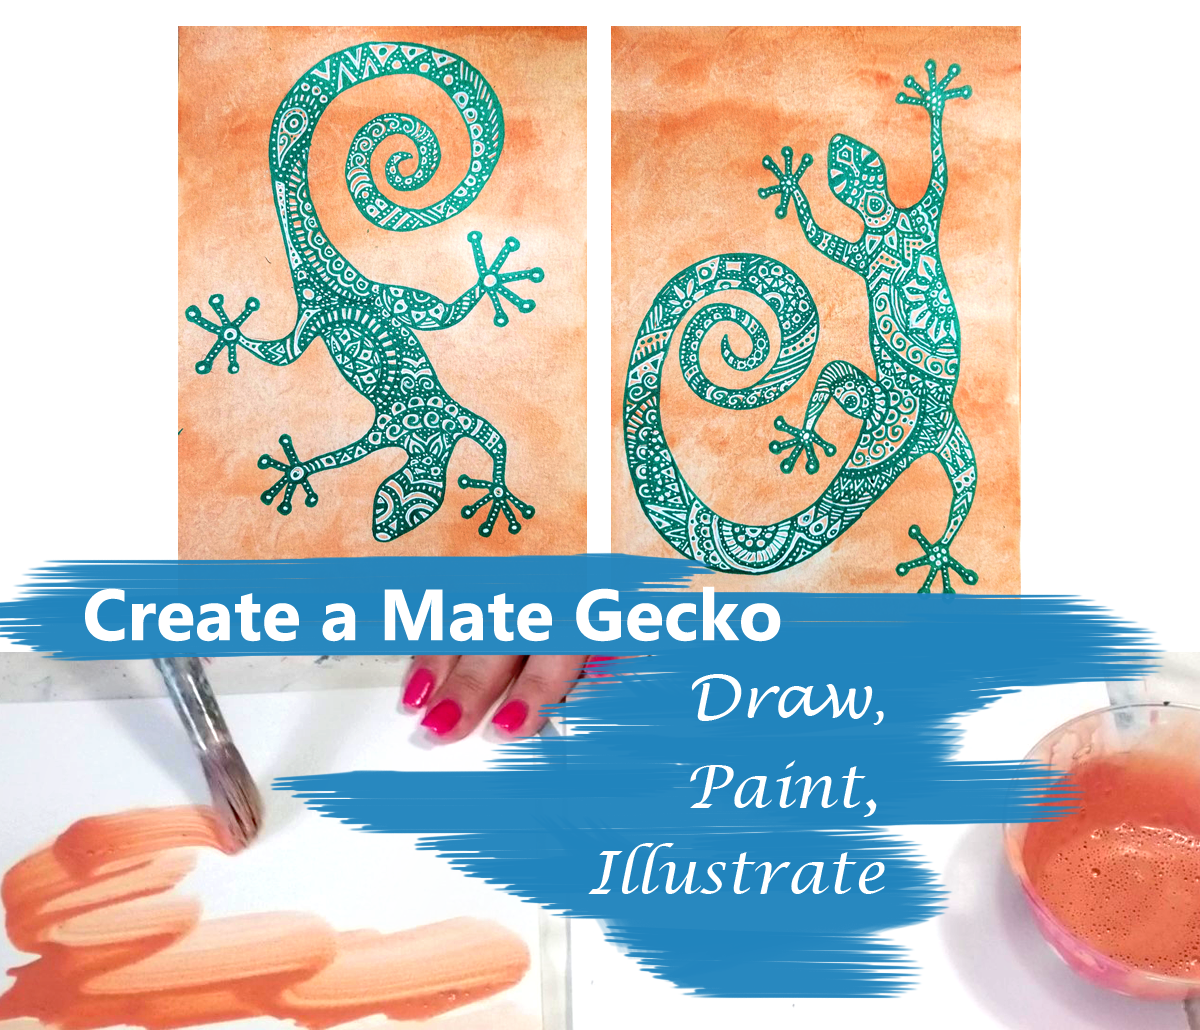
1. Introduction: Hey guys, about seeing him on here. I'm an international selling and published artist. I've been creating fine art for the home decor industry for over 15 years, supplying retailers all over the globe with my art, my mates and my collections. And this course is going to be focused on creating a maid. It's called Creative Mate Gecko. I'm gonna be teaching you how to create a pair of paintings that are meant to work together . They complement each other there to them on the wall together. And I just wanted to give you some insight because first of all this course, as for all levels beginner, intermediate and advanced, there are techniques in here that I think beginners will love. Also, I just want to give some insight to the intermediate and advanced artists that are looking to get into the publishing industry, because the number one thing that publishers are looking for is whether artists have the ability to create mate or collections. And I think this is great for all artists because it's a good way if you are interested in painting a particular subject and sometimes you get that inspirational block. This is a good way to start creating artwork and get your inspiration going, because you can create the same subject over and over just by changing things up again that we're creating small collections. So this course is really about creating two paintings that have a similar background, and we're just creating a different composition with subject matter on top, very similar to the two paintings behind me, my peacocks. So it's a great weight and an easy way to get started. I'll have many more courses to come that are gonna give you a little more intricacy on how you can create collections in other ways. So this one is really great for all levels. As I mentioned, we will be doing a full finish on the back. We will be doing a little bit of drawing. Don't get discouraged if you can't draw. I've supplied all the resources and tools for you. If you get stuck, I have I have print outs for you. I've got everything for you. Um, anyone can do this class. It's gonna be fantastic. We're going to do a little illustration, too, so we're going to be working with some paint and some oil pins. Oil paint pins. I'm really excited. I can't wait for you to join me and let's get started. You can move on to the next lesson and see what supplies for gonna need.
2. Supplies: thanks for joining me in my class Created mate Gecko. Here are the supplies Yoni for this class for these two paintings, I'm gonna be using watercolor paper. The one that I'm using today is the Krantz and barren brand. It's 11 by 15 and it's £140. You can use any brand that you want, and you can really use any size that you want. What I'm gonna do is I'm gonna tear one sheet out and we're gonna cut it in half so that we have two surfaces, one for each of our Gekko's. You just want to make sure that they're evenly cut. So just cut that paper in half. And the reason why I'm using watercolor for this particular project is because we're gonna be doing a heavy wash for the background. And we want to make sure that that paper can hold the moisture off that wet pain without tearing. We're gonna be using acrylic paints, and these are the two colors we're going to use. We're going to use our crushed coral. Ah, and the tiger lily orange. I'm sorry. There's three colors and our champagne gold. We're going to combine these three colors to create the terra cotta. You're also going to need a craft smart oil pin. This one is in green, and it is the finer tip. You can find these pens up my goals. You could probably get them online and Amazon as well. Next, you're definitely going to need this unit. Ball signal. White gel pen. The's white gel pens are fantastic for working over acrylic paint. I'm gonna leave the link to my website so you can get the Amazon link to purchase yours. And then you'll just need a pencil and an eraser and then a brush so that we can paint the background. And you'll also need a little container so that we can mix some paint in the wash for a background. And, of course, some water and that's it. We can get started on our project. Let's start creating
3. Painting the Background: in this lesson, we're going to be creating the background to our create a mate Gekko's, because we're creating two paintings with the exact same background. We're going to be able to do this at the same time, so make sure you have your supplies and we'll get the backgrounds prepped right away. You want to make sure you have your two pieces of watercolor paper ready and your three pains the crushed coral, the orange. I'm using the Tiger Lily Martha Stewart brand and your champagne gold. Go ahead and get a little container ready, and we're going to begin by mixing our terra cotta color for the terra cotta background. To do this, we will mix all three colors together, so we're going to get a little bit of the crushed coral in here, a little bit of the tiger lily and a little bit of your crush cold. I want to have all three colors. We will be adding a little bit of the water and mix thoroughly so that we can create a nice , pliable wash. If you've joined me in my other classes or courses, you will definitely know this process if you're new and you haven't done this before. You just want to make sure that that you're adding equal parts water to the pain that you've had. So it's not very much considering you're not using much pain, but you want the pain to be, um, pliable and runny. But you want some color in there and you'll see in a minute why we're just going. Teoh, start applying the paint to our watercolor paper. It really doesn't matter. You know which way you're put in the brush stroke on the paper, but you can see that there's a variation in the color so the color is not transparent, so we're not really watering it down like a watercolor. But you can see that there's darker areas and lighter areas on the paper, and we're gonna be using some paper towel to get a texture on their mimicking. You know, the old kind of terra cotta pots or a southwest stucco appeal. So what you want to do is just make sure that you cover the whole surfaces of the paper and you want the surface to remain wet, so make sure when you're applying the background that you're using enough pain, go ahead and be generous. You don't want to be frugal here. Okay, now that are surfaces completely covered and it's still wet. We're going to get a piece of paper towel, and we're just going to start dabbing up that access pain and you'll start seeing that stucco effect. It's gonna pull up some of that pain, and this is why you want to make sure that your paint remains wet, so it's a pretty quick process. But I'm sure you guys will grasp the hand him ping of it quickly, and that's it. Once you're done, one of the backgrounds just move on and start preparing the other background. What's great when you're creating pairs collections or mates, which is really a dip dick in the art world is you can create both backgrounds at the same time. If you're pairs, air maids are using the same backgrounds and why it's important to do this, especially when you're mixing pain, is just to make sure that you get the right tone. If you are creating a background for one of the paintings and then you know the next day you come and you want to create the second background You don't always have the same amount of one color paint, so you might find that your tone is off. So I would recommend just doing both backgrounds for all your paintings within the collection before you start going ahead and doing the image on top. So again, we're just dabbing up the pain here to get that stucco effect, and that's it for the background. You want to just wait until that dries And just, you know, don't be alarmed if your paper starts curling. This is what happens when you're working with watercolor paper. There are fibers in there, so paper does shrink and you can just just move it around a bit until you get it flat again and you can move on to the next lesson we're going to get started. On drawing are gecko's right on top of the surface, so make sure that your paper is very dry before you get to the next step. But I wanted to show you the texture. I hope you enjoyed this. This is a really nice technique. If you want to get that, um, stucco for terra cotta feel in your backgrounds
4. Drawing Gecko 1: in this lesson, I will be showing you how to draw your gecko. I'll be showing you how to draw gecko one. And in the next lesson, I'll be drawn gecko to. I'll be drawing the gecko for you all my slate so you guys can see better how it's created , and we're going to create this strong right onto the surface of our painted background. So you want to make sure you have that in front of you, and it's nice and dry. Make sure you have a pencil and try to draw fairly light, even though we will be going over in an oil paint pen. Just you don't wanna have too many pencil markings underneath the surface, so let's get started. You're going to begin by drawing three ovals, almost like a caterpillar. From there, we're going to create a stick figure, so we're gonna do a stick for the arms with little circle on the end and five fingers with a circle on each. We're gonna do the same thing for the legs, except we're going to do long oval shapes and, of course, a tale. Once you're done that, think of that as their skeleton we can start forming the body by just outlining the shapes that you did. You may pause this video at any time to get caught up and just move at your own pace. Once you're drawing is complete and you've outlined all the shapes. You can go ahead and erase all the little guides that we put like the ovals and the sticks . And once all those light lines are done, you've got the outline for your gecko. I really hope you take the time to try to draw your own gecko. I'm giving you simple ways that you can try to create your own images using the basics. Thes classes are meant for all levels, so I understand that there's some people that may have never drawn before. And don't fret. I'm going to provide my gecko image for you. You'll have this as a resort so you can print it off and create a template so that you can trace it. There will be some people that will enjoy trying to draw your own gecko, those air, the intermediate. And of course, if I have some advanced students, you could go ahead and draw your own gap. Go image without having to follow my guidelines. But that's gecko one. Congratulations. Let's move on to the next lesson where I'll show you how to draw gecko to.
5. Drawing Gecko 2: in this lesson, we will be drawing the meat, which is gecko to on our other prepared background. The composition is a little bit different in this meat, but we're using the same techniques as the previous gecko. You're just gonna begin by doing all of your little guides consisting of Opel's circles and lines. And then once that's done, we will follow along the outside to create the shape of the gecko. So go ahead and follow along. In this video, you're more than welcome to posit at any time to get caught up. And don't get discouraged if you're having a hard time. I do have a print. Oh, for those that are beginners for you to cut out, make a template just like the previous one. And if you're a little advance, you can go ahead and draw your own gecko outline on your prepared a background. Now that you're done with the lines, it can go ahead and erase the finer guides. And here is your print. Oh, sure to grab it if you need to use this template
6. Gecko Outline in Oil Pen: in this lesson, we're going to begin the process of getting all those really neat details within our gecko . We're going to begin by using one of the colored backgrounds that we did, and we created the outline drawing of our first gecko. So be sure you completed the last two lessons of getting that outline onto your background service before you move on to this stage. I also recommend doing both drawings before we begin with the pen. So this is the first layer to our design component, and we will be using our craft smart green oil pen. And I'm using the fine tip. The process is going to begin by simply outlining your gecko. This part should be fairly easy As you're just tracing the pencil lines that you put down. I'm just gonna speed up the video a little bit here, as I think that you understand the process and we're not getting any into anything too complicated. So I just want you to see how I outline the entire gecko. And once you're doesn't that you can move on and repeat the exact same process with your other gecko painting. Now that you're done, the outlines of the gecko, you're ready for the next lesson, where I give you a quick lesson on creating designs and shapes along lines.
7. Introduction to Line Design : in this lesson, I will be teaching you the basics of line design in preparation for creating all these amazing designs in our gecko. You will see in this video that I have a gecko that's already completed. But don't panic. We haven't gotten to that stage yet. I'm just gonna be showing you a tutorial on how to create all these designs using lines before we get Teoh creating them within our gecko. So just think of it as a Nadege inal designed tutorial. So what we're going to be doing is creating the designs within our lizard, and I want to just just go over a quick tutorial of how to do the designs. And it's very similar toe all my mandala work. Uh, so when you're creating, say, you've got I'm just going to kind of draw on organic shape because it doesn't matter what shape you have. And I'm just doing this in my sketchbook so you guys can see and I'm using a Sharpie when you're doing designs. Um, I kind of like to work within the shape. So if you've got a section sticking out like this like, say, this is the lizard's head we can start with a circle and we can just build off by doing scalloped edges, okay? And we can, like, build off that and just double up the lines. We could put dots within the lines, and you can double up these and put designs like stripes within them. Okay? And then you would just continue building off that you can build another shape going off this one. So if you don't want to continue, you know everything going in a circle, cause if you keep following this mine, you're going to get just all this designs moving in this direction. Then you can start building shapes off of it so you can start creating, you know, another kind of flower shape here with pedals and again just doing Streit's or circles within those gates. And then you can just start doubling up thes lines, okay? And you can build little swirls within the circles and then just kind of double up the lines this way and then, you know, do scallops along this line. So we're just building designs within, and then maybe you just want toe, you know, at some stripes here and do some triangles off it another straight beacon. Double it up like this and so on, and that's how we would would build designs. But what I want to do is just show you some simple designs on lines so that when you're creating a shape within your design, you'll know what kind of designs to, you know, do off these lines. Okay, so we're just gonna dio a simple line and you can practice along with me so that you can do this in your sketchbook, Teoh, and just practice so that when you get to your lizard, you know how to create the designs. So I'm just doing line here. A simple one to Dio is like a double line. And then you can do designs within the line. You can do like a zigzag little triangles. Okay, you can add another line to double up and you can do stripes, Okay. And what you can do to make things interesting is like put a dot between the stripes, so there's a number of ways that you can use. The strike is you can just use single stripes and leave it. You could put dots or you can even develop a pattern with stripes. So you're doing like a double and a single and a double and a single double single. There's so many different ways. And then you can dio, you know, maybe little circles between you can also add lines going horizontal along the vertical ones. One of my favorites that I use a lot is a scalloped edge. So they're just half circles along and then I like to put dots within them. You can also do stripes within them. You condone double these up to add more layers of design, and you can also fill these in. If you're using a thicker marker, you'll get thicker lines. Okay, so when we get you are lizard and I'll show you this one cause I already did it. But I'll give you a tutorial. I'm using a thicker marker, so I'm able to fill in sections and get lots of color. Okay, so that's an option. These these could be filled in. So I just wanted to kind of show you all these different designs. This is just I'm doing the lines so that you can know how to build built up on the line so it doesn't matter if the line is curved. You can still do all of these, so just double them up. Do triangles within them double it up again. You conduced stripes. You could do horizontal stripes on every other one. Within those you can do scallops, so it really doesn't matter what shape you're working along. You're just going to use this simple technique of using lines. You can also just do lines and do little circles along them like so. And then you can dio just a scallop line that's not connected. You can also dio zigzag lines that aren't connected and you can just shapes within the lines so you can draw triangles within the lines. So that's just a basic tutorial so that you guys understand how to do the designs along the lines because I know when you're looking at something like this and once I start working, it could get overwhelming to, you know, figure out where to put all your design. But you're just using these shapes and it doesn't matter what kind of marker that you're using. This was just a thin one. I could use, you know, a Sharpie here and do the same thing and what's nice about using thicker markers as you can get thicker color in there. Okay, so if I'm doing these kinds of shapes, I'm going to get more of the blue showing, Just like on here. We've got a lot of the green and then you can, you know, double up lines, but dots in you can build off here and do another, you know, kind of like a Mandela. And that's it. So I hope you guys are ready. If you want to do a little bit of practice before you get your lizard, you certainly can. And going to the next video, we are going to feel in our lizard drawing.
8. Designing Gecko 1: in this lesson, we're going to be designing Arc echoes with our green oil paint pen. So you already have your gecko's outlined and you did my tutorial or lesson on how to create line designs. Now we're going to begin by creating the dying designs within our line drawing because this is a gecko. We're going to begin by giving it some eyes, and we are just creating designs. But we're gonna begin with the eyes just to make sure we get that component and and we're also just going to begin by giving it a little nose. And we're gonna build off these designs and you're gonna follow the same concept as what I showed you in the previous Lawson. I'm just doubling up the lines and adding shapes. Within way, we're going to be creating designs within this entire gecko. It is quite a time consuming process. So what I recommend is just enjoy experiencing being creative, and I almost think of it as doodling. This is something you can take your time with and dio at your leisure. You can. You know, while you have your cup of coffee in the morning, you could do a little bit of the design work. Or, you know, if you enjoy a favorite program on TV or listening to music, this can be quite therapeutic, so just enjoy it. Take your time. You can always do a little bit and leave it come back, especially if you're comfortable with this process, and you don't have to do the exact designs that undoing. As long as you get designs with him, your gecko it's going to look fabulous. Another option that you can dio is a watch along in my video and you composite and mimic the strokes that I'm doing on my gecko just to help you out if you need a little more assistance, and then when you complete that component, you can watch how I do the next design and pause the video and repeat what I'm doing. I do have to Gecko's that we're gonna do. We will be doing the other gecko in the exact same, um, process. The designs will be a little bit different. So for the purpose of the video, I am going to speed up this process event. I won't speed it up too much so that you guys won't be able Teoh. You know, pause it and follow along. But I do want to speed it up a little bit so that you don't fall asleep on me.
9. Designing Gecko 2: this lesson is all about designing gecko to it's the same process of gecko one. So I'm just going to speed up the video for you guys so you can take a look at what kind of designs that I do for the second gecko again, you can pause the video at any time if you want to follow the same designs and lines as me or you're welcome to create your own designs. I just wanted to provide this time lapse for you so you can see how I create different designs on the other gecko. And here are two completed Gecko's. You can move along to the next lesson where we do final application with a white jump in.
10. Highlighting Geckos: Hi, everyone. We're in the last process of our gecko paintings, and I just wanted to show you how you can bring this painting to the next level by adding some amazing highlights with a white gel pen. If you haven't received your weight gel pen yet or you don't have one, you can visit my website at Yvette cinnamon dot com under art supplies. And I have a link to Amazon, where you can get these amazing pins for a lot cheaper than just going to your local art supply store. So, as you can see, I did complete one, and I want you to see the difference between the oil pen without the white highlights and the one with the white highlights. So I'm only doing a demonstration on one of the gecko's, and that's because you already will have your designs in both the gecko's. And this is simply just a tracing technique, so you will be just fine. Finishing up your last gecko on your own. This process is very easy. It's very similar to when we were just outlining or gecko. You are just going to go in and start outlining the terra cotta sections within your gecko , and this is just going to add some highlights and make that gecko pop parade off of your background. I'm very confident that you understand the process just by looking at this video and what I'm doing right now. So I'm going to speed up the video a little bit and make sure that if you feel you don't need to watch the video just gold near the end of the video because I do have another process where we're going to get some highlights on top of the green with some dots. So be sure to check that out before you move on and complete your art. Okay, so now that we're done putting all the highlights in the terra cotta, we're going to do one last staff and what we're gonna do is on the green areas with the oil paint. We are going to be applying little tiny white dots on top of it, and you will begin to see how this starts breaking up the color, and it'll just elevate it to the next level again. I'm just going to speed up the process a bit so you guys can see how it ends up in the end . I'm very confident that you'll be able to do this on your own as well. - Congratulations , everybody. You have completed your first gecko mains. I hope you enjoy this class. And I can't wait to see all your projects. Please post your gecko maids for the class to see and so that I can see and please leave a review. Let me know how you like this class and be sure to follow me so you can be in the loop on when my next classes air coming up.
 Yvette St. Amant, Published Artist