Transcripts
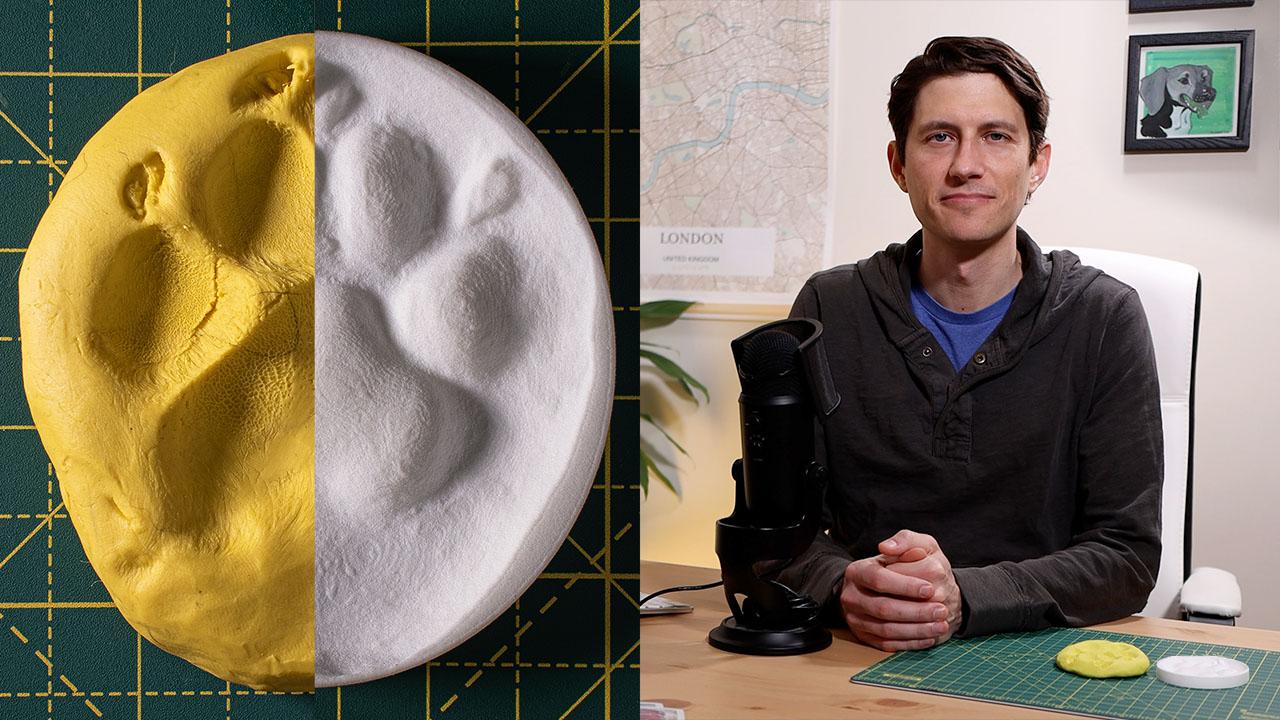
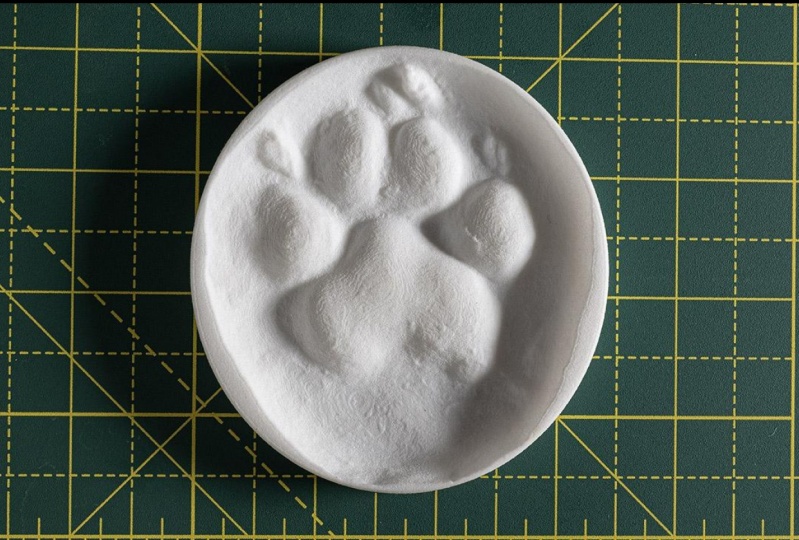
1. 3D Printing Course Overview: Welcome to this course, Crafting 3D printable gifts for beginners. Now, the first thing I should say is you don't need a 3D printer to take this course. We're going to use a service online we can upload our 3D objects to and they can print it for us. The techniques used in this course can be applied to any kind of gift that you want to turn into a 3D printed object. It's also a great way to forever preserve an item, because we're going to have a digital version of it. So even if your 3D printable one breaks sometime in the future, you can always reprint it. The example we're going to follow along with in this course is a gift I made for my wife when we unfortunately had to say goodbye to our pet, that I wanted to make his paw-print. I didn't want to leave it up to chance because, unfortunately, the last dog I had, the vet didn't make a paw-print for me and, even then, the one that my wife had of this dog, that actually broke. So this version you can print and reprint and you'll have for forever in it's digital format as a 3D object. But I also wanted to take it a step further because I wanted to have not just the mold of the paw but also the relief so that we could actually feel his paw as it was and at scale. What we're going to do is take a little bit of plasticine in this course, which you can get at a hobby store or online for fairly cheap, and we're going to take pictures of it to create a 3D object out of it, which is a little bit of magic and a little bit of software, but any beginner can follow along with. Then we're going to use another free software to create the relief of it and turn it into a 3D printable object that we can upload to an online site and use a printing service to ship us the 3D printable item. Believe me, it is a very fun and unique process and very rewarding to give someone a gift that's so unique and one of a kind. Thanks for following along in this course. I hope you enjoy it and I can't wait to see what you make. Thanks for watching.
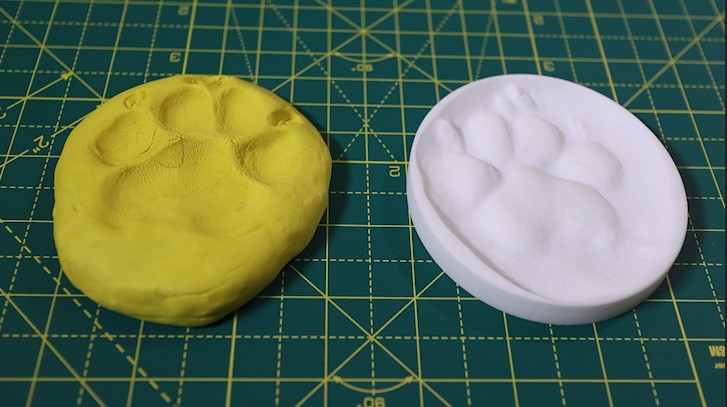
2. Make Gift (I use plasticine): In this lesson, we're going to jump right in to the method that I used to create the mold for his paw. Now, I use Plasticine, which is a unique material because it never hardens or dries out. If you were to use something like Play-Doh, that can change shape, and it can dry out, and become brittle. I really recommend using Plasticine. In this lesson, we're going to learn how to use it. The first thing we need to know is the fact that it can be quite hard as well. We want to make it a bit more moldable. The way I found to do that is to first get a generous helping. You always want to have a little bit more than you need if you're going to actually create a mold, because it's a lot easier to take stuff away from it than it is to add after the fact, after you've heated it up. Cut yourself off a generous helping of it that will cover the whole surface area of the mold you're trying to make. Then what I did was actually heat up some water and I put that in a glass. Then I placed the Plasticine in a plastic bag and then I dipped it in a water for a little period of time. Then I could work the Plasticine a little bit easier than it would actually be malleable enough to receive that imprint. Now, for this specific example, using a dog's paw, we had to cut a little bit of the hair away from the pad of his paw just so that it wouldn't get stuck to the Plasticine or interfere with the mold that's making itself. The great thing about these techniques we're going to learn for the rest of this course is you could create anything out of clay actually, and it should work with these techniques. Doesn't have to be as specific as creating a paw print out of clay. Get creative, you could use other materials like Super Sculpey. It's really nice alternative, which is even harder than Plasticine. You can carve into it a little bit better. Then we can use the same techniques to take pictures of it and turn it into a 3D object in the computer that we can save for forever. Don't have to worry about it getting smashed or broken. We can also 3D print it in a variety of materials, which is the other cool thing about 3D printing. Depending on your budget, you could create it in this, I think this was less than $40 maybe to print this. But when we upload it to the site, it'll give us the price per material that they offer. I could get this in gold if I wanted to, it's just be crazy expensive. That's the really fun thing about 3D printing as well, is the variety of materials that we can choose from and also how we could scale this down. I could put this on a ring if I wanted to. I could use this in a lot of different ways. But what I wanted to do in this class is to make a one-to-one representation. We had this actual paw size correct, and 3D printable for forever. In the next lesson, we're going to take photographs of this, so we can use in the software to make a 3D version. I'll see you there.
3. Take Pictures: In this lesson, we're going to take photographs of the mold so that we can put it into a software to create a 3D object of it. The general idea behind this step of the process is to get enough pictures to help describe this item for the software to interpret it as a 3D object. Basically how it does it, just behind the scenes is, it triangulates points from different photographs to place a point cloud of data from the photographs to triangulate where the surface of this item is. The general idea behind it is the fact that we want to take 360 degree view of this from at least two different angles. So we could spin around it at this height and go around. It doesn't really matter which direction you go, this way or that way, it doesn't matter, and take pictures around it, and then we could come up a little bit and shoot down and/or go lower. Generally, we want to have at least two layers of photos going around so that we can capture this item from different angles to make sure we're capturing all of it. If you have a different item, you might need to take a three-tier setup. Take one really low going around, take one medium, take one shooting straight down. The only disadvantage to taking too many photos is it's going to slow down the next step of the process of putting all the photos together in the software. What we're shooting for is maybe around 100 pictures to make sure that we have enough. More than that, it's just going to make it a bit slower. But the more we have, the more accurate it is. But there are still some other things to consider before we start taking photos to make sure that we get the most accurate representation of this item. The first thing to know is that noise is your enemy here. What we mean by noise, is that graininess that you can get in photographs if there's not enough light in the scene. You want to make sure that you have a very well lit. If anything, too bright. We don't want any noise, because what happens in the 3D making object stage of it, is that that noise gets interpreted as texture, so it will actually create a texture on the object that wasn't there. It's misinterpreting the noise in the image. So we want to get rid of noise. The first thing that we can do is to light it correctly. We want to get enough light on this thing that our camera can take a noiseless picture. Now, the second thing we can use to our advantage, is if you have an app on your phone that allows you to control the ISO, we want to get a low ISO. I have a camera, the Canon M6 Mark II, but it has a manual control on it. So what I can do is go in to the ISO and set it to 100 instead of auto. I want to make sure that the ISO settings are as low as they can be, and not leave it on auto. If you just have a cell phone, just make sure it's really well-lit so that it reduces the amount of noise. Just to give you a little bit of background on what ISO is, that just means how sensitive the sensor is, and we want to make it not very sensitive. A low number means the sensor isn't very sensitive. The higher numbers you go, 1,600, whatever it is, 6,400, means the sensor of the camera is very sensitive. It just hearkens back to when you had actual film cameras, you'd have to purchase film at a specific speed. If you were doing sports, you'd have a higher ISO so you could let more light in so the shutters could be faster, kind of a thing. But on digital cameras, they have a similar mechanism on the sensor that we can tune the sensitivity to it, and so when we make it less sensitive to light, we have less noise in the image. That's really the main thing to learn about the camera, and ISO, and how we can use it to our advantage to reduce the amount of noise in our images. Now, if you have a camera that's a DSLR and has an aperture on it, you can adjust. You also want to have it high enough that everything is in focus. We don't want to have a shallow depth of field and have the front of the item be sharp and crisp and in the back is blurry. We want the whole item in focus as much as we can. So if you're shooting with a DSLR, or even a camera like I have where I can adjust the aperture, I want to keep it at a higher number, maybe like f-stop of 11 or something like that. But again, if you're just using your cell phone, that's okay too, just make sure you're not getting too close to the item so that it's not creating a depth of field that we don't want. We want the whole item to be sharp, and so we want the camera at a good distance so that the whole thing is sharp. But not so far away that we're taking a picture and it's really small in frame. We want to also maximize the amount of space that the item is in our frame, because that way we just get more data per-pixel of the images that we're taking. One other tip to remember is the fact that if you have a reflective object, it's going to be more difficult for the software package to piece together how this is a 3D object when there's reflections changing in each image. If you do have a reflective object you're trying to take pictures of, it might be a good idea to, if you can, depending on the material that it is, or if you don't want to get it dirty, you can't do this, but putting a bit of baby powder on it or some kind of talcum powder so it will dust the surface and make it less reflective. So that it can more easily take pictures of it, and in the software can map where, and triangulate these points that don't have reflections on it anymore. Now, this clay itself worked pretty well for me. But the other alternative is if you're having problems later on and it's not piecing together as you would expect it to, you could take a magic marker or something and actually just put dots here, and give it tracking points to know where the surface is and take a set of pictures again. Those are the two things to look out for our reflections, and if the mold isn't, or whatever item you're photographing isn't turning out the way you would expect it to, in the next few lessons to revisit this, taking pictures and putting little light marks on this with a pencil or a pen to make sure that there are enough surface features on this that the software can recognize them as unique points to track. Now that we have all that out of the way, there's basically two ways that we can take pictures of this that make it easy. We could physically walk around this with our camera, our cell phone, or whatever it is, and move around and take pictures, or we could leave our camera stationary on a tripod, something like that, and then we would can spin the item, and take a picture every time we spin it. The one disadvantage of this method is the fact that you would need to crop everything out so that everything's moving all the time. Otherwise, you're going to have to go into Photoshop and get rid of the background. If you're worried about that, or you can't crop everything out so that the mat it's on or whatever it is you're spinning, isn't spinning all at the same time, just walk around in 360 degrees with your camera and make sure to take a picture at this level and then you want to go at a higher level, or a lower level. It's always better to have more pictures than less. Now, the other thing to consider when we're taking this that's going to be a huge advantage is using a mat like this that has actual delineations of measurements. So this will help us keep it at the correct scale when we're in 3D. If you don't have a mat like this, I think I picked this up for like 20 bucks on Amazon, you could just get a ruler or something that you know the measurements of, and just tape that right next to the item so that you have a point of reference in the 3D software to know this is an inch. I know exactly that that's an inch, and we're going to use that scale to scale it up to the proper proportions in the 3D software, to make sure that we get a one-to-one representation of that item so it's the exact same size. Those are all the considerations basically to take. Let's do a quick review of them before we get started and taking the pictures. In the next lesson, we're going to download the free software that we need to complete the rest of this course. See you there.
4. Download & Install Software: In this lesson, I'm going to introduce you to the two free softwares we're going to need to download and install, and the first one is Meshroom. We're going to need a Windows or Linux machine to be able to use this. If you're on a Mac, you might need to Boot Camp Windows to be able to use Meshroom. Meshroom is a photogrammetry software. What that means is it takes a bunch of pictures and it turns those pictures of an object into a 3D object for us from a point cloud data. Basically, this is the stage of the process that we're going to triangulate all these pictures to recreate the item in 3D. Now, once we have Meshroom, the next thing we need to download and install is Blender. Blender is a well-known open source 3D software, and it's really cool some some of the things you can do with it. In this course, we're going to take advantage of it for its modeling features and to export an actual 3D printable item, because what we get out of Meshroom isn't really 3D printable. We need to clean it up a little bit and we're going to use Blender to do that. So download that and install on your machine, you can do it on Windows or Mac. In the next lesson, we're getting started using Meshroom. Thanks for watching.
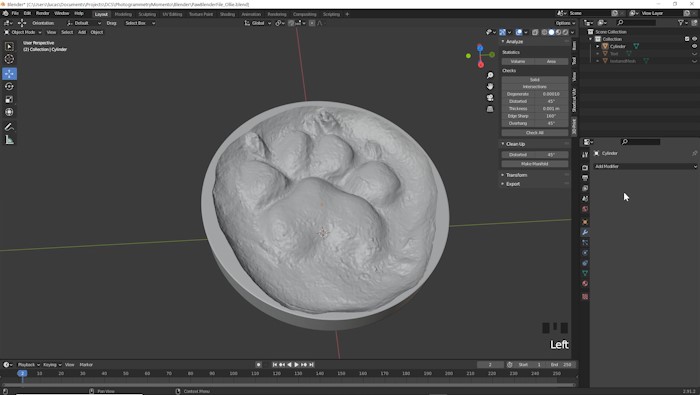
5. Meshroom: In this lesson, we'll take all the photos that we've captured for our item and we're going to take it into Meshroom. Let's open up Meshroom and get started. Real quickly before we jump into Meshroom, I wanted to discuss one other step I took, it's optional if you'd like to do the same, is just process the pictures in Lightroom. Lightroom is a really nice way to batch process a bunch of photos. I used to use it when I was a wedding photographer, and it's nice to add the same effect to a bunch of photos really quickly. What I did was just to adjust the saturation because I couldn't really tell with the saturation on, how much details were in the clay. Once I took the saturation off and I adjusted some of the values here to properly expose the clay, then I exported those as JPEGs to use in Meshroom. Now, if we also look in the top left preview here, you can see the plan I had here was actually rotating the mat. Now again, this works because the background isn't really visible. There's only a sliver of the table visible and it's a pretty solid color. Just make sure if you're using this method, that you can't see any static things in the background and you may need to use a piece of cardboard or something so that it's one solid color, so that the Meshroom software doesn't confuse that as something to try to track. You can get a sense of the pictures I took just by looking at the preview scrolling through here. I did two layers of photos, one at a medium height and then one higher, and that's what we're going to use inside of Meshroom now. I like to open up programs just by typing them in here in the search. Let's get Meshroom open and load these photos. I have about 60. Earlier, I mentioned we want about a hundred but I found that 60 was enough to describe the object I have. It depends on the object that you have as well. This might look pretty complicated at first, but there's only a couple windows here that we need to be concerned with. All this complicated stuff down here isn't super concerning to us, we're only going to deal with the end result. What we need to do is drag our images here. We're going to see previews of those there, and then in the far-right window, this will be the representation of the result of the point Cloud and the mesh that we're going to create. Now I just need to locate all the pictures I've taken and also the optional step of exporting and processing them out of Lightroom and shift select all of them and just click and drag them into the far-left window and it'll load our images here. Now that we have the images loaded, I just wanted to take a second to make sure you're aware that this step can take quite a long time. I usually try to run these overnight just because it takes a couple hours on my machine and so I know I'm not going to be doing anything else on my computer and I can just let it run and do its thing overnight. You might want to do that as well at this stage unless you need to go eat dinner or something and come back. But it could take quite a while, it could take all night. So just be aware. Depending on the hardware you have in your computer and how many photos you have, this step can take a while. If we try to hit "Start", it'll prompt us that we need to save the project. I'm going to hit "Save" and choose where I want to save it. I'll hit "Save" and now it will start processing. Because I've already ran these photos through Meshroom, it actually found the cache files that I've already processed. This again, will take a lot longer when you're doing it for the first time and just be aware that you can monitor the progress, on each step of this node, will turn green when it's done. If one of them gets stuck and appears not to be working, you can always go right click on one and hit "Compute", but if you hit "Start", they should run from left to right all the way through all of these, and it will take a long time and each one will turn green in succession until texturing. Then that is the last one. To inspect the point Cloud, we can left-click to tumble around, and most likely it won't be in the correct orientation and we can fix that later in Blender. Don't worry about how it's oriented currently. But you can basically see every photo I took, it mapped to the position of the camera. Even though we spun this around, it gives the presentation of the cameras where they are relative to the object itself. We can see the two layers and we, maybe, missed a couple of gaps there but this works well enough for my object to have 60 photos. You can also see some stray pieces that the mesh computing should've taken care of. Typically, what's supposed to happen is you're supposed to have a load mesh button here pop up when it's done, but I find there's a little bug in this program. So to load the actual mesh, we need to double click "Texturing". When I double click Texturing and let it load. We can see we have the pause button here. If you look in the little menu over here, you can see now we have the second object here. We can hide these. This is what we started with, the point Cloud, and now we brought in the actual textured object. We can see how well it did by left clicking, tumbling around, scrolling in to zoom in and then middle mouse button hold down to pan around. We can get a quick inspection to make sure the model is roughly accurate before we bring it into Blender. That looks pretty good to me. Now we can move on to the next step of processing this further and getting the relief, the actual print out of this. We're going to make sure that the paw actually extends out and isn't an impression, it's actually going to be a relief. We'll also optimize the model so we can get rid of everything else but what we want to print, and make sure we're being as efficient as possible so that we're not spending too much money on the material. We're also going to do this to scale which is why we had this mat or that you taped a ruler next to this or something there for scale. Now that we have our gift recreated in 3D, we need to clean it up so that it's 3D printable. In the next few lessons, we're going to take a look at Blender and how to do that. See you there.
6. Blender Start: Welcome to this class. We are going to jump into using Blender for the first time. Now, I'm typically a Maya user, which is a different 3D software program. I teach a lot of other classes using that because as a 3D animator, that's what I use every day at work. But using Blender, I needed to adapt a little bit to it. We're going to remap some of the hotkeys so that they're a little easier to use if you're a Maya user or I just think they're easier to use. Anyways, I'm biased though, because I'm coming from Maya. We're going to start this lesson remapping a few things, getting familiar with how to use any 3D software, really. We'll remap those couple of things so we can navigate around easily. We're going to turn on a few built in plugins that we're going to need to complete the rest of the course. Let's get started. We have two goals for this lesson. The first is to change some of the navigation controls, and the second is to turn on some of the plugins we're going to need to help process this model for 3D printing. This is what the interface for Blender looks like. This is the splash screen. We can just ignore that, and just click anywhere, and that will get rid of this splash screen. The first thing we want to do is to be able to move our camera view around this viewport. To do that, I want to change it a little bit so that it works with one modifier. What I mean by that is, every time I want to zoom, tumble, or pan around, I want to only have to hit one key key the keyboard, and then use my mouse. I don't want to use multiple things, which is the default settings for Blender. I want to change them to the Maya settings, which is another 3D software package that I teach, and we're going to change the interface to use those navigation controls. Let's go to Edit, Preferences, then let's go to Keymap, and what we can do is just search for rotate. There's a bunch of different contextual ways we can rotate stuff, and the one we're interested in is the 3D view. Which is what we're seeing here in the big screen. For 3D view, we want to change the rotate view command, and all we have to do is click here and hit Alt and use the left mouse. You might have to do that a couple times to make sure it's actually working instead of just hitting Alt, and then click again to make sure it's alt and left mouse. Once it's changed, it'll show an arrow. If you click that arrow, go back to the default value. If I just hit that one more time, it'll change that to rotate around. Now, if we go up to the search window, we can type in zoom, and again, we want to go down to the 3D View and to be able to mouse, we'll scroll down. I need to click in this window here, and now I can mouse wheel scroll down. We can see there's a bunch of different ways we can actually zoom. We just need to change one of these. I'm going to choose the one that has the mouse options here, and I'm going to choose the Alt again. I'm going to choose the right mouse button. I'm going to click here Alt Right Mouse button. Now we can go back up and choose the Pan tool. I'm going to click and then scroll down to the 3D view again. Now we see the Pan View, go to this, and now I'm going to choose the Alt Middle Mouse button. I'm going to click Alt Middle Mouse here. You have to left-click first and then Alt Middle Mouse. It might take a few tries to get that correct. But so those are the three main ones that we need to adjust. I'm going to X out of that because the next thing we're going to search for is the frame selected. If we hit this one button in our view changes, it'll zoom in on the thing we have selected. I like to have that to be F. So just click there and then hit F. It's a capital F, but I'm just hitting F on the keyboard. I'm not hitting shift and then F. We can X out of that. Then the last preferences you can adjust are how you want the Zoom Axis to work, vertical or horizontal. I like horizontal and you can also zoom to mouse position. That just means wherever your mouse is in the screen, it will zoom to that position. Let's test out these navigation controls real quick. All you have to do is just hit Alt and any one of the three mouse buttons and you're going to either zoom, pan, or rotate around the object or the view port area. Let me just actually turn on this fun little shortcut here, which is going to show what I'm actually clicking here. Now in the bottom right, you can see what I'm clicking. Alt left mouse button, alt middle mouse button, pans, and then alt and right mouse button. We'll zoom in and out. Then if we get our view somewhere, we don't want it to be and maybe we can't see our object or something, we can just hit F on the keyboard and it will focus on the object we have selected. The way we have this object selected is through this little outliner over here. We can select different things here and these three are standard. Whenever you open up a blank scene, you're going to have this camera here. You're going to have a cube, and you're going to have this light. None of those things are important for what we want to do, but just don't get confused that there's already things in the scene that's default for every scene that you open in Blender. Now let's enable the plugins that we need to enable for our next step in the lessons we're going to follow along with. Let's go back to Edit, Preferences. We can go down to the Add-ons here. Now click that and then just type in the search menu 3D. We can find the 3D-Print Toolbox. We can just check that on. Now we can search for measure. We can check this one on. These are already installed plugins, we just have to enable them. Now we have those done and that's all we needed to do in this lesson. Now we are prepared to import our model in the next lesson and get started processing it. Great. Now that we've done that, and we're a little bit more familiar with using Blender, in the next lesson, we're going to dive deeper, bring in our 3D object and clean it up in a way that makes it 3D printable. This is really the meat of the course. I can't wait to see you there.
7. Blender Scale Model: Welcome back. In this lesson, I'm going to jump back into Blender, import the item that we've created from Meshroom, and get to work making a 3D printable. Let's get started. To bring in our 3D object from Meshroom, we need to find where Meshroom saved that 3D object. Let's jump over to Meshroom real quick in that project file that we created. Now that we're in Meshroom, all we need to do is click on the "Texturing" tab and then scroll down to the bottom here where we can see Output Folder. If I right-click that, I can go Open Folder. Now this tells me where this mesh that we're seeing in the viewport here of Meshroom, where that's saved and also the textures that we're seeing here displayed of the mat and the object itself. It's created a material file here, but what we want is the OBJ or the object file. So all I need to do is just copy this file path here, and then let's jump over into Blender. Now back in Blender, all I need to do is go to File, Import, and because we know it's an OBJ file, we just go down to Wavefront obj. When I click that, now I can paste the file path here and hit "Enter." It will take me to where the object is. Now again, we can see the.material, we don't want that, we want the.OBJ. When I click that and hit "Import OBJ," we will get our object here in one second after it loads. This step may take some time because the mesh is going to be very dense, and have a lot of geometry. We can see the object has popped in here, we can also see it's in the outliner here. To make things easier, we can also delete these three things here just by selecting them and hitting "Delete." We can see our object here. I can select it and hit "F" to frame up on it. The first thing we need to do is to get this oriented to the world space that we see. Like this is the floor, but this thing is rotated in a weird way. So let's get that oriented correctly. First off, we need to get the pivot of this in the correct place. If we go over here to this little toolbar and click the Move tool, we can see that the move manipulator is actually at the world center here. This is 0,0,0 and X, Y and Z coordinates. We want to center this up so it makes moving and rotating this object around much easier. Because if we were to try to rotate this right now, it's going to rotate from this pivot, and that makes it a little bit more difficult. So it's just easier if we center the pivot here. All we need to do is go to Object, Set Origin, and then we can choose either Origin to Center of Mass, Surface or Volume. I'm going to choose Volume. Now we can see the manipulator has snapped to roughly the center of this object, and now we can rotate this from a pivot that makes a little bit more sense. To see how we can get this thing more flat, we can go to orthographic views, which means straight on from a front side or top position. To get into those views, all you need to do is click one of the axis here. I'm going to click "X," and it will snap into that position. Now, I have a better view to see how I can get this object a bit more flattened out. I'm just going to use the rotator manipulator here. Then I'm going to right-click this object once it's flat. I'm going to go Snap to Cursor. The cursor is that little candy cane circle here. If that isn't at your World Origin, I'm just going to hit "Alt" and left-click here, and middle mouse, and right-click, and reorient myself here. If that little cursor isn't in your World Origin, all you have to do is right-click anywhere and say Snap Cursor to World Origin and it will snap to the 0,0,0 coordinate there. We can also spin this from the top view to get that oriented straight on. Then I can check these other views again to make sure it's still roughly the right way. I switch over to this view, and we can see it's basically as flat as we can probably get it here. I'm going to choose the Move tool and just get everything centered up on the actual item itself. So roughly where the pie is, and what I'm using to figure out what the center is, is this red and green line which indicates the X and Y axis of the 3D world space. Now that we have this roughly centered up, we can move on to the next step. The next step for us is going to be to get this to be scaled correctly to the world scale. Let's jump over here and choose the Viewport Shading option here, and it will take a second to load, but that should load in the material and the textures that we saw in Meshroom. Now that we have that texture in here, it's a little easier to see what the measurements are on this board. What we're looking at is any measurement we want to pick. I'm just going to choose one inch, which is right here, and what we can do is go into Edit Mode here, so we can go on the top-left, go to Edit Mode, and this may take a second because as you can see, there's a lot of vertices here. If you're zoomed out too much, it's just going to look like a solid piece of orange. But as we zoom in, we can see these are actual points. What I want do is choose a point somewhere around the zero mark. So I'm going to left-click there. Now I can see that's selected. Now I'm going to move over here to where the 1 indicator is, and choose a vertex over here, and I shift click left-click that. Now I have added to my selection, I have two points selected. Now we can go to this menu over here. It might be collapsed down like this, and you can hit "N" on your keyboard or hit this little arrow here, which is hard to see right now so you might need to use the N shortcut. We need to go to the View tab, and then if we scroll down, we can see the MeasureIt tools that we enabled in the last lesson. What I can do now is to choose Segment and Show. If I scroll down here, I can see now I have this textured mesh pop-up. I want the units in inches because that's what we measure it as one inch. So I'm going to choose inches from the drop down. If you notice there's these little blue lines now. I'm going to switch back to my object mode, so it's a little easier to see the object itself, and then I'm going to zoom out. I can see that that represents 4.8 inches. We know that's incorrect based on the world scale that we want, we want this to be one inch. So I'm going to select the object, and then go over to my scale tool, which is this button right here. Now I can scale from the center, roughly about, and I'm just going to click anywhere in this white circle, that's going to scale everything evenly. If you're watching the blue measurement there, you can see it's changing as I'm moving this. So we're increasing it or decreasing it. We want to decrease it in this case until we get to one inch. I'm going to keep decreasing this, zooming in and keep going until I get to one inch. Now we're at one inch, and so now I know for sure that this is scaled properly based on the 3D world units here. I'm going to choose the Move tool and get this back into the center of the world here. Now that step of the process is done, we've scaled this object to the correct scale that we needed. We no longer need this Measure tool to be popped up, so we can just hide that for now, by clicking "Hide" and then hit "N" to collapse that menu down.
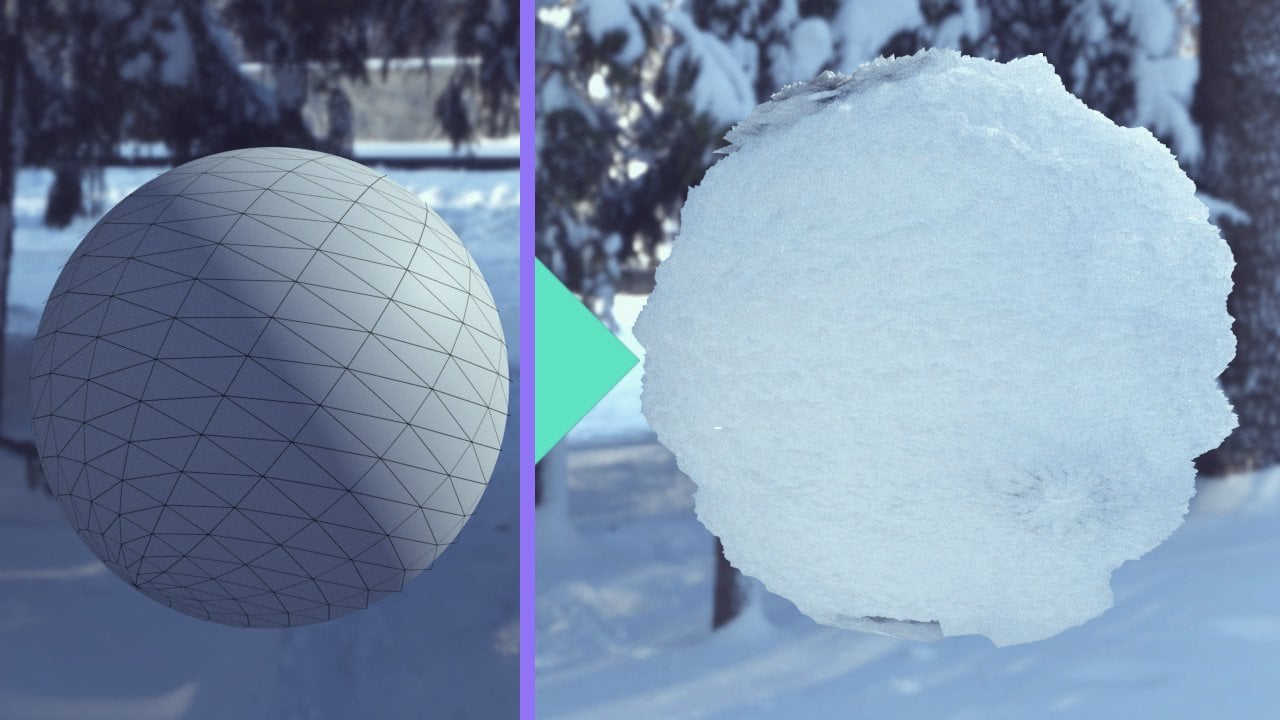
8. Blender Boolean: The next step of this process is to create the relief of this object and to get rid of everything that we don't want to 3D print. To do that, I want to create a cylinder because that's going to as closely approximate the shape of this object, because I don't want to choose a cube and have to print areas that are empty basically, that are just going to be flat and not have anything to do with the object itself. To be most efficient and cost-effective in actual 3D printing, I want to make sure that I'm pretty tight on this object with whatever shape I'm using. For this case and this shape of an object, I'm choosing a cylinder. The two ways to create an object are to go to the Add menu up here, go to Mesh and go down to Cylinder. The other way is if we choose Shift A and we get the same menu there, and then we can go to Cylinder. Now if we zoom out, we can see the cylinder is much bigger than what we need it to be. But before we scale it down, I also just want you to take notice of these faceted faces here. This cylinder isn't super smooth on this surface area. What we can do is go down to this little menu here and click the arrow to pull up this big menu here. What we get basically are the subdivisions of this object. What I want do is increase this quite a bit. As I pull this to the side, we can see it smooths out everything here and we might not even have to go to 500, might be a little extreme, we could do 400 and still be very smooth here. We got rid of that face, faceted low poly look there. That might be something you want to keep, but just keep in mind, it's good to do this at this stage before we move on. Now I have the scale tool selected here, and then I can just choose anywhere here inside the white circle to scale it uniformly. Then I can choose the blue scale to scale up and down because what we're going to do is basically you make sure that we are not wasting any space here. I'm going to keep scaling this down. I'm actually just going to use the constrained, the blue one here will just go and all axes except the vertical ones. I'm basically just using the manipulators here to adjust the cylinder to be exactly only the parts of the object that we want to keep. Once we get it in roughly a good shape, now that we have it occluded with itself, we can actually just go to the wireframe mode to see through the object to make sure that we're not clipping any area. It looks like we're getting a little close, so I might scale this up just a touch. Whoops, I'm on using the move tool, not the scale tool. I scale this up slightly because I want to have a little bit of a border here at the top and bottom. Because this is more oval shaped, I can just scrunch in using only the y-axis here on the sides. Then let's just go a little more, and then we can move this over. This doesn't have to be perfect but anywhere like this, it's going to cost us money. This is going to be material that isn't really helpful to the arch shape, so just be aware of why I'm trying to be really precise and accurate with what I want to print here. I'm going to also pull this up because I only want this to be about halfway where this doughnut shape of the clay itself starts to taper back in. I don't want to capture that, I want to get where it's rounded off to the most extreme point away from the center of itself. That's going to be somewhere in here. Now that I have this bottom edge here positioned correctly, what I could actually do is go back up to edit mode and then choose the edges instead of the vertices. Before we were choosing vertices here, and now I can select just the edges. What I can do is select one of the edges here, and then I can go to the Select menu, select a loops, and then select edge loops, and it'll select all the way around. Now I can go to the move tool and then just move this down pretty close to the top of this thing. The edge we're moving now is actually going to be the bottom of our object because we're getting the relief, we're getting the opposite of what we have made with the clay. Now that this has moved into a good position, I'm going to check the top one again, just to make sure that's roughly in a good spot. I think it is. Now we have our impression of what we want. The other thing to keep in mind is this is a really hard edge. Before we deselect this edge here, I want to also create a bevel because the edge here is really sharp. One way to create a bevel and blender is to choose it from this menu over here and click Bevel. Now we get this little new manipulator here. We can click and drag that to the right or left and we can see they we're actually beveling the edge here. Now before we let go with our left mouse, we can actually also increase the segmentation with our middle mouse wheel. If I scroll with my middle mouse wheel, you can see that we're actually smoothing out that bevel to be a lot more smooth. That's up to you how much you want to do that and to help round that edge off for 3D printing, so it's not so sharp. Now we can do that for the, what's going to be the top edge, and right now is the bottom edge. Let's go ahead and do that for the top edge here. I'm going to go back to the selection box here, and we're still in the edit edge mode here. We can see we're in edit mode with the edges, and I'm going to select one of these edges on the bottom, which is going to be the top. Go back to Select, Select loops and then Edge loops. Then I click Bevel again. I want to go to the top view to make sure that I'm not beveling this further in than the object itself. I think the closest edge is the one I'm going to watch, which is, I think over here. I'm going to click and drag this and make sure it doesn't go past that very much. Also, just keep in mind, mouse rolling up is the direction you want to go to add segments. In this case, if I had it over here, I wouldn't really be able to see how many segments I'm adding, so I'm just keeping my left mouse button held down while I add those segments to make sure they're being added correctly. Then I'm just going to bring this back so that we have a nice rounded edge to our print there so it's not very sharp. The next thing we're going to do is create the relief of this. I'm going to go back to object mode, and I want to get out of the wireframe. I'm going to select the Shaded, or if you want to see the texture of the object that we 3D printed, you can go that way. What I want to do is now select this object. I want to go down to the wrench icon, and that's going to be our modifier properties. We need to add a Boolean modifier. If we go to click Add Modifier, we can find Boolean from this list right here in the Generate. Once we select that, then we just need to let it know what we want to have a difference operation with, and that's going to be with this object here. There's a couple ways we can make sure it knows that's the object. Easiest way is just to use the eyedropper here and then select it. Now we have the Boolean operation completed. If we turn off the eye for the textured mesh and we move our camera around, we can see we've actually created the relief of that object, which is really cool. This is what we're basically going to be 3D printing. That's the big magic moment there, it's that Boolean operation. Now, if you had created something out of clay and you didn't want to do the relief, and instead you wanted to just get rid of the mat or everything else, the option that you would want to choose is the intersect option. If we select that, it's going to update here in one second and it's going to cut everything out except for what intersects the cylinder. Down that has updated and we can see if we turn off the textured mesh again, all we're left with is the area that the cylinder had intersected with the model. It's a great way to get a flat bottom. If you made something out of clay and you just wanted to extract that as a 3D printable sculpture that has a flat bottom, you'd want to choose the intersect option under this Boolean modifier. But for us, for this example, I want to make sure I choose the difference option. Now that we have this object in a difference mode from that Boolean operation, what we need to do now is to make sure that modifier has been applied correctly. Then we can actually move this object right-side-up. It's a good idea to save this project before you hit Apply in this next step, so that you can always come back to this version of the file in case you wanted to make any changes and you don't have to start over recreating the sphere and making the beveled edges and all that stuff. It's a good idea to save right now. Let's go up to File and go Save. Let's click this little drop-down menu here and choose Apply. Now this modifier has been applied, we can actually move this object around, so I'm going to rotate the right-side-up. I'm going to choose rotate and I'm going to constrain the rotation to the x or y-axis. As I rotate, I actually hold down control and it'll snap on even intervals so I can evenly rotate this thing. If we don't get it all the way around, we can just jump over to this icon here, which is the object properties and type in 180 to rotate it all the way back up. Now we have our object. The last step of this process is to make it 3D printable in the sense of how the 3D printers to perceive this digital file.
9. Blender Cleanup: One optional step we can do is actually adjust anything on the model at this stage that we want to adjust. One example could be that there are some weird anomalies in this object here. If we jump over to the shaded view, it's a little easier to see now that we're not in the texture view. One example that we might want to adjust or correct for or maybe some weird clay things that aren't accurate, maybe in the areas that don't include the pol, we want to smooth out those areas. One way we could do that is go to the Sculpting tab here. What we can do is jump in here and use any of these brushes to adjust any of these areas here. If you hover over these tools, you can see what each one is. The one we're looking for is basically the smooth option here. It's this first orange one in this version of blender. I'm going to click this Smooth option. As soon as I start clicking and dragging it, you can see we can smooth out the area that doesn't include the pol. Now, this is an optional step that I didn't do for the 3D print version that I had, just because I wanted to capture the whole relief of the clay itself. But if you wanted to make any adjustments to your model here, you can actually do that. In this case, we're doing it because, there's a lot of geometry that supports this. Again, if we go into wireframe mode, you can see, when I say geometry, I mean all these edges and vertices here. If we were to try to brush an area that doesn't have many, it's going to really distort the area. Something like this, if I try to smooth this out, it's going to really mess with it, because there's not a lot of geometry there. It's going to get really weird really quickly. I'm going to undo that. Just know that because we did photogrammetry, there should be a lot of geometry that should support these sculpting tools. Just be aware that you don't want to really mess with areas that don't have a ton of geometry like you can see that are pretty blank here. Just be aware that's basically how sculpting works. That would be a whole course in and of itself just to learn sculpting, but I wanted to make sure you're aware of these little tools that might be helpful in unique cases and also to give you more room to play, if you want to dive deeper into using Blender. I'm going to go back to the Layout menu, or the interface workspace, which is where we were. One optional last step I want to make you aware of as well, is we can actually add some imprinted text here. If I hit Shift A again, we can choose text. Now, I'll zoom out. We should see we have a little text option here. With that selected, all I need to do is go into Edit mode, and then I can start typing whatever I want. Our dog's name was Ollie, so I can type in his name, and other information I wanted. Then I can go back into object mode. Now that I have his name, I can actually go down to the text properties here and you could change whatever properties that you wanted to adjust here. We could create a bit of an offset, if we wanted. We could extrude it, which is actually something that we need to do. Go ahead and choose the Extrude and you can extrude it up, basically, however deep you want to inset this, the maximum amount, you would want to choose that now. Then what we can do is just convert this to a mesh by right-clicking, say Convert to Mesh, and then scale this down. Then, essentially, what we're going to hit F to zoom in here, we're going to use another Boolean option here. What I can do to get the opposite, because if we were to do a Boolean of this straight in, it's going to read backwards. You can either flip this around or you could just invert that text. I'm going to go to the Object Properties, and then in Scale x, I'm going to just choose a negative here. It's going to flip it around. Now I can move this into the center of the object, or wherever I want. Then what I can do is hop into one of the orthographic views again, and then just inset this object a little bit into our model. What I want to do is make sure I go to wireframe, because I don't want to intersect with any of the relief area here. I I see that I'm getting close right here, so I'm just going to move this, maybe rotate it and move it down real quick. Let's just rotate this. Hit Control, I can snap this at 90 degrees, and I can see on the right over here that I'm getting to 90. Then move this, re-center it again. I can just get this re-centered. Maybe let's move it down here where it's not going to intersect with any of the model itself. Then I can just inset this a little bit. Then with the main object selected, add a Boolean modifier, and then use this to select the text. It might be easier to select, if we escape out of that and go to shaded mode, you can just select it there. You can also click, drag the text in. Now we can just hide the text, and then confirm that that relief occurred. Now we have the name, and we've customized it. You could add the date, you could do whatever. It's basically just reapplying the knowledge you already have in a different way using text. Cool. Now, before we save this, we want to go through the process and say Apply this Boolean. The last step of this lesson is to make sure that this is cleaned up and 3D printable. That's why we enabled one of these other plug-ins. If you hit N on your keyboard, you will pull up that menu again, and we can drop down to this 3D print menu that we need to use now. The tool that we want to use in this menu is under cleanup. We can just drop that menu down. With our items selected, we can click "Make Manifold". Now, behind the scenes, what this is doing is just cleaning up any dirty geometry. If you hover over this, it tells you what it does. Non-manifold vertices and inverted normals, that basically means faces with no depth. Something that can't be 3D printed, like something that's literally less than paper thin. Just a single face in 3D space here isn't 3D printable. It needs some depth to it. That cleans up anything that has stray faces on it or weird things. That's what that button is doing for us. That's very helpful that we don't have to manually inspect the model for that to clean up manually. Now when we export this, we want to make sure that we go to the OBJ format, and go to scale and make sure the default is one. We want to make sure that this is 1,000. That's just the difference between, the units of measure in Blender versus what Shapeways is expecting. This may change in the future, that difference that you need to adjust for between Blender and Shapeways or any other websites you might upload this to. Then the big thing is we want to go to Selection-only, because Shapeways is expecting a file that's 64 megabytes or smaller, and we don't want to export everything else that we have in the scene, just what we have selected, which is the main print mesh there. I'm going to save this as a OBJ here. It's just red here because I already have a file saved by that name. Before, I had saved this out without Selection-only on, and it's almost half a gigabyte. When we save this out now, it should be under 64 megabytes. I'm going to export the OBJ, and then just double-check that in one second. Now double-checking this file, I'm looking at the 3D object, it's 36 megabytes. That's plenty good to upload to Shapeways. If your model for some reason is much bigger than that, you can use a modifier here to decimate the object more. What we can go with the objects selected, go to Add Modifier, and go to Decimate. Now, what we're trying to do is reduce the face count. We can type in a ratio here, and say 0.5. That should drop this number down by half. If we look at the wireframe, we should see less and less as we go further down. Let's go 0.25. Now, you can see the wireframe is getting more and more sparse. What this will do is reduce the resolution of the object. If we go back into shaded, we can see it's much more generalized now, but this will reduce the file size if you need help getting under 64 megabytes, which is a requirement of Shapeways.com. Nice. Now we have our 3D printable object. In the next lesson, we're going to take it and upload it to Shapeways, which is a printing service that we can use online. We can choose from different materials, make sure the scale is right, and get it shipped to our door. In the next lesson, let's upload our 3D printable object to Shapeways.
10. Shapeways 3D Printing: In this lesson, we're going to upload our three objects that Shapeways. It's an online printing service, that will ship the three printable object to us, and it's a great way if you don't invest in a 3D printer to use a 3D printing service like this so that you're not having to put up a bunch of money upfront to do something that you're not sure you're interested in for the long term or that you want to put that much money in. Shapeways is a pretty reasonably priced 3D printing service I've used in the past. I recommend it, and they can just ship it to your door once we get through this next stage of uploading it to their website, making sure that scale is correct, picking the materials, and make sure that it's 3D printable based on their standards. Let's get started. Here we are on Shapeways website and the first thing you need to do is to create an account, and once you create an account, you can upload your 3D models, and let's go ahead and upload the model that we've created. I have my file right here. It's a 3D object, is an OBJ file that we exported out. I'm just going to click and drag and drop it here, and it's going to upload the model, and then it will take a little time for them to process that as well because they do their own check to make sure there isn't any non manifold geometry, there's no holes in it. You will actually get an email after you upload it, whether or not it past all of their checks, whether it's 3D printable, or that there are errors that you need to fix. Expect to get an email after you upload this when it is ready to print, and whether it's past their checks or not. Now that this has finished uploading, it's giving me all the different materials I can choose from and how much that's going to cost. We can see the cheapest option over here is about $27, which is pretty reasonable. We can also click and drag here, and preview the model to make sure it looks correct, and everything is in there, including the inset name there and the print itself. One thing we want to make sure is that the scale is correct. I'm going to switch over to inches here, and I'm going to look at the 3.77 inches here, which they're probably calling x is this direction. We want to double-check the scale before we print. We need to jump back into Blender to do that. Now back in Blender, we need to use the same tool that we already have, it's over here, and you need to press N to pull it up and get the measured tools, and we need to select two vertices on that length. I'm going to go to object mode up here and choose edit mode, and then I'm going to make sure I have the vertex selected, and I'm going to select two of vertices on the longest edge here, the longest part of this. Anywhere down here, I'm going to select one, and then I'm going to go the length of this thing and shift-click one over here as well. Then I'm going to hit Segment and show and then scroll down here to make sure it's an inches, and then I can see that is 3.77 inches, and if we jump back into Shapeways, we can see that is indeed what they have as well in inches 3.77 , should be the longest edge of this thing or the longest length of it. If these prices are too expensive for you, you can adjust these and actually resize it on their website. I recommend doing it in Blender to make sure that the original file is how you want it to be. But they do offer some resizing options here you can explore. The other thing is also to keep an eye on the model volume because you're really paying for the volume, and that's why I chose a circle here, the cylinder rather than a cube because we would have this volume, these corners here that would just have no purpose really unless we want it to have a square shape, and that's money that we're spending on that volume. If you want to do some back and forth and adjust your model to reduce the amount of volume that should reduce the amount this costs. Once you choose a material, depending on the material that might have a finish you can choose from, and then you can just add that to your cart. If this is your first time printing on Shapeways, you can use the referral code P2NHK, and you'll get 15 percent off your first print. Now if you're also a student and you have a student email address, they actually have student accounts here. If you create an account through your student email address, they'll also give you 15 percent off for that. I don't think they'll do both. But either you can get 15 percent off because you're a student, or you can use my referral code P2NHK, and get 15 percent off your first print. Thanks for following along in this course in creating a 3D printable gift that is definitely going to be memorable and unique to whoever give it to, even if it's yourself. I'm always amazed by this technology and the things that we can do with it. Please share what you make. I'm always curious to see what people get up to, because these techniques can be applied in many different ways. I'd love to see what you do with it, and if you're interested in learning some other techniques like 3D or animation, I teach a bunch of other classes on that. Definitely take a look at those. Hopefully, I will see you there. Thanks for watching.
 Lucas Ridley, Professional Animator