Transcripts
1. Introduction: Have you ever wondered how
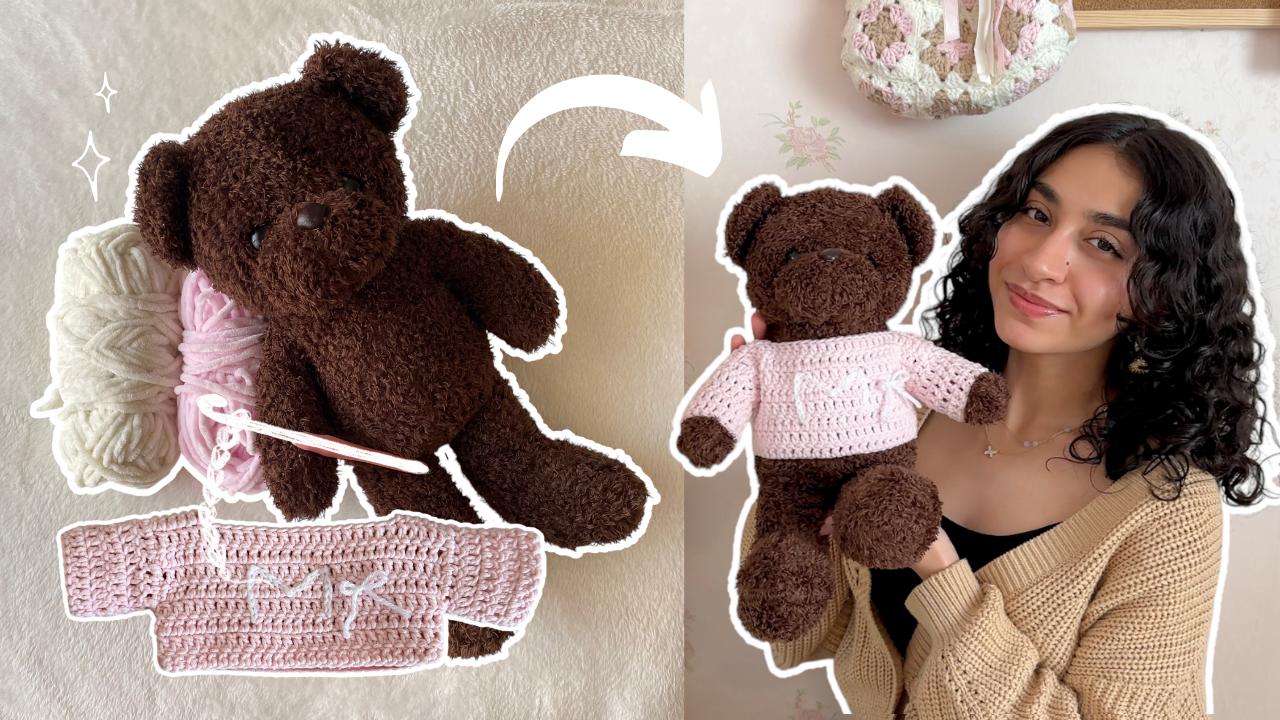
to crochet cozy accessories to dress up your plushies and stuffed animals? Hi, everyone. Welcome to my Skillsia class where I'll teach
you how to crochet a personalized sweater for a plushie or stuffed
animal of your choice? My and miss Maham
and I work full time as a crochet
content creator and educator sharing my love for the craft across my
social media platforms, as well as through my
tutorials on YouTube. I've hosted multiple
crochet clubs for beginners guiding them through the process of creating their first ever
crochet projects. You can usually
find me crocheting outdoors or in bed
with my crafty cats. My favorite thing about
crochet is that we can create customize and
design practical items to use in our daily
lives and that we can turn everyday objects into
something a little bit. Nothing compares to
the satisfaction of decorating your room with handmade pieces or wearing a bag you made from
scratch for a day out. In this class, I'll
walk you through each step from creating a
made to measure garment, sewing the different
pieces together, and designing it with
surface crochet. So go ahead and grab a plusre stuffed animal of your choice, and by the end of this
class, you will have it in a cute and cozy sweater.
2. Class Project: This class, you can
use any acrylic cotton or wool yarn that is dec
or medium worsted weight. You can pair the
yarn with a four, 4.5, or five millimeter hook. If you're unsure about the
size and weight of the yarn, you can check the label
for all the information. You'll also need a needle
that fits the yarn you're using for weaving in the
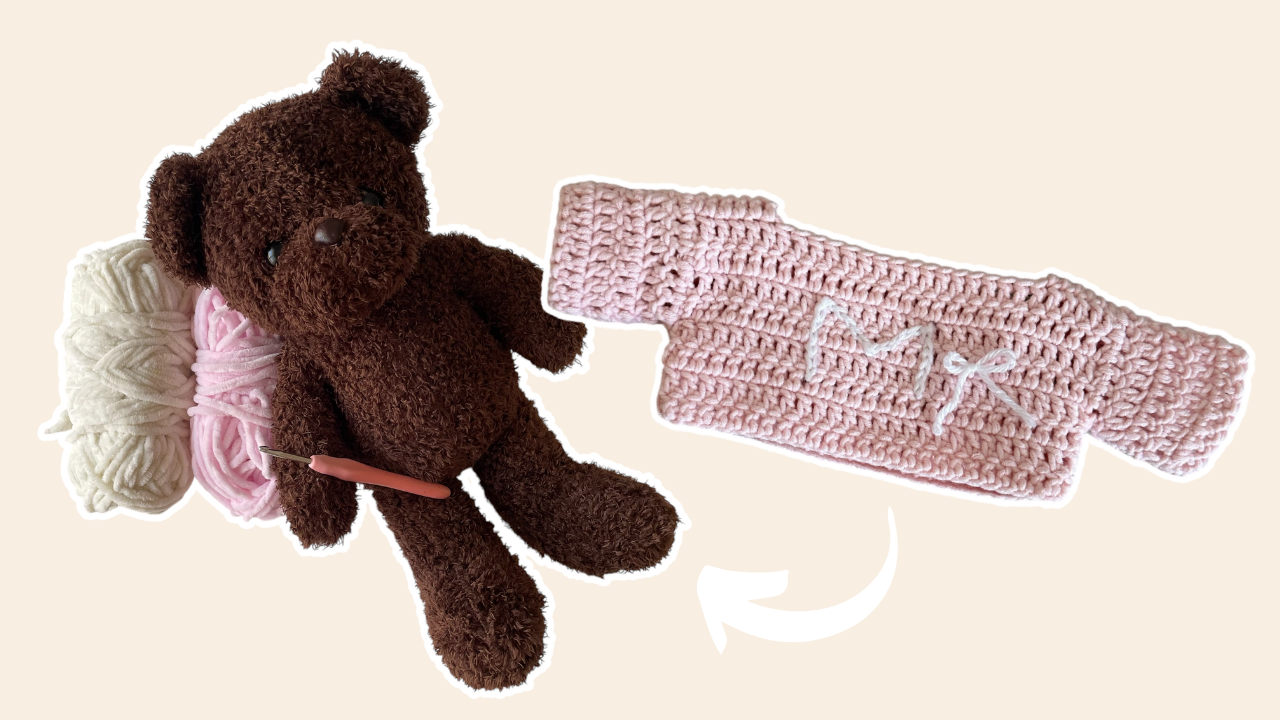
ends and a pair of scissors. For this butter over
here, I use yarn that is a cotton and acrylic blend
with a 4.5 millimeter hook. Before we start
crushing the sweater, let's take a moment
to understand all the different panels and
pieces that will make it. We're going to start by creating two panels for the front
and the back pieces. These will be exactly the
same measurements having the exact same number
of chains and stitches. Once we have both of
those two panels, we're going to sew them together at the top, near the shoulders. After that, we're
going to sew them together on the bottom sides, leaving a space open
for the arm holes. After that, we're
going to crochet the sleeves directly
around the arm holes, crocheting and rounds
to complete them until they're as long as the
desired length you want. After that, you can leave your
sweater as it is or design it with surface crochet with any different
design that you want. It can be your initial,
it can be a bow, a heart, or anything else. Now, let's dive into the
world of cozy crochet and get your plusher stuffed animal
ready for the cooler season.
3. Front and Back Panels: Start crocheting
the front panel. Go ahead and grab the
yarn you're using, as well as a size
appropriate crochet hook, and start by making a slip knot. Hold your yarn with the
tail facing towards you, and grab onto it
with your thumb, wrap the yarn around your
fingers, making an x, and then hold it in place
with your ring finger, insert your hook under
and grab the yarn, and pull it up to tighten
and make a slip knot. Now go ahead and chain until you have the desired width
for the sweater. Grab the yarn and pull it
through the loop on your hook. Make sure that your
chains are not too tight and not too loose, try to keep an even tension. Over here, I've crocheted
a total of 28 chains. To make sure that this
is a comfortable fit for your stuffed
animal or plushy, take the chain and hold it across the item's
shoulder like this. It should sit comfortably
across the top of the shoulders like that and
have a bit of extra room. Now we're going to
crochet rows of double crochet to build
some length for the panel. To do this, you're going to skip the very first two chains, one and two, and
you're going to insert your hook into the third
chain from your hook. So yarn over and insert your hook into that
third chain over there. Then you're going to yarn
over and pull up a loop. Then you yarn over and pull through two loops on your hook. And then yarn over and pull through the next two
loops on your hook, and that is going
to be your very first double crochet stitch. Now go ahead and yarn over, insert your hook
into the next chain. Yarn over and pull up a loop, yarn over and pull
through two loops and yarn over and pull
through two loops again. That is going to be your
second double crochet. Now we're going to
repeat these steps into all of the
chains down this row. Let's double crochet
together one more time, yarn over and insert your
hook into the chain. Yarn over and pull up a loop, yarn over and pull
through two loops, then yarn over and pull
through the last two loops, making a double crochet. Go ahead and repeat these
steps into every chain. So you're going to be inserting
one double crochet into every chain all the way down
to make your first row. Here's what the first
row will look like. Once that's done,
we're going to start our second row of
double crochets. To start a new row, you're going to chain one and turn your work
to the other side. Usually, we chain two, but because we want some
straighter edges, that's why we're only
going to chain one. Now, remember that
this chain one is only a turning chain. It doesn't count as a stitch, and you're not going to be inserting your hook through it. To start a new row
of double crochets, you're going to yarn
over and insert your hook into the
very first stitch. Like that. Then you're
going to double crochet. Now you've started
your second row. Yarn over and insert your
hook into the next stitch, making sure that you're grabbing onto both of the
loops like that. Then go ahead and complete the double crochet like before. Now, instead of inserting
your hook into the chains, you're inserting your
hook into every stitch. Go ahead and insert one
double crochet into every stitch all the way
down to make the next row. That's how you're
going to crochet rows of double crochet. Now go ahead and let's
start another new row. So to start a new row, chain one, and turn your rock. Repeat these steps every time you want to
start a new row. Remember that
you're not going to insert your hook
into the chain one. Yarn over, insert your hook into the very first stitch
and double crochet. Now go ahead and crochet rows of double crochet
until the panel is the desired length
or until it can comfortably fit your
stuffed animal or plushy. Make sure that you're
only inserting one double crochet into every stitch and continue crocheting all the way
down the end of this row. Then crochet another and
another and another. Once you have the desired
length for the sweater, we're going to crochet
two to three rows for the shoulder section. Now, it's up to
you to decide how wide you want the
shoulder section to be. I want it to be as
wide as six stitches. One, two, three, four, five, six over here, two extra rows of double crochets only
in these six stitches. First, I'll work on this side, and then I'll work
on the other side. Go ahead and start
the row like normal. Turn your work and
double crochet into the very first stitch. After that, go ahead
and double crochet into the stitches until you reach the desired width for
the shoulder section. When you're done
with the first row, we're going to start
the second row. So C chain one and
turn your work. Once again, double crochet into the first stitch
and not the chain. Then go ahead and double crochet until you reach the
very end of this row. If you want to make it
longer than two rows, you can go ahead
and do another row or even two more rows. It's completely up to you. Once you're done, we're going
to fasten off our rick, to go ahead and chain one, then I'm going to leave
a slightly long tail for sewing and pull and
tighten to secure. Now we're going to repeat
this on the other side. So go ahead and grab your yarn and make a little bit of
a loop with it like that. Then insert your hook into the very first stitch at the end of this row
right over here. Slide that loop through the
stitch to attach the yarn. And then go ahead and chain one to secure it and
start the first row. Now, once again, we're going to double crochet the
same number of stitches and the same number of rows that you did
on the other side. So go ahead and start with
your very first double crochet into the same stitch where
you attach your yarn, and then go ahead
and double crochet into the next few stitches. I'm going to do a total of six stitches because that's
what I did on the other side. As you're working, you can
even work on top of this yarn end over here so
that you don't have to hide it or ve it in later. Once you're done, you shall have two identical shoulder
sections on both sides. Let's fasten up for Rick. So chain one. And cut the
yarn leaving some or sewing. Pull and tighten to secure. Now that you're done
with the first panel, go ahead and repeat
the same steps to crochet another panel
for the back side. For the second panel,
don't crochet the steps for the shoulder
section instead, just leave it like this. So now you'll have
the back panel, and you'll have the front panel.
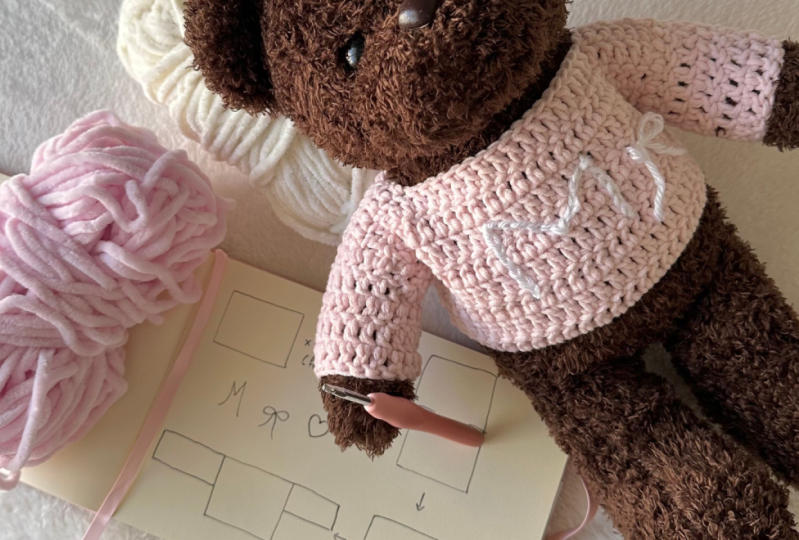
4. Designing with Surface Crochet: Fore we sew the panels together and start
making the sleeves, I'm going to show you
how to surface crochet, any design that you want
on the front panel. So go ahead and get the
yarn color that you want to design with
and grab your hook. Now, here's how to
surface crochet. First, take the yarn
that you want to use, wrap it around your fingers
and make a slip knot. Next, insert your hook from where you want your
design to start. I want to surface crochet and M right in the middle over here. So I'm going to insert my
hook over here in the corner. Now grab onto your
slip knot from the back and pull
it up like this. That is how we're going
to start your work. Next insert your hook into the space closest to where
your hook already is. I'm going to go
right over there. Turn your work to the
back. Grab the yarn, and you're going to
slide it through. Grab your hook, bring
it out and pull. Let's do this one more time. You're going to
insert your hook into the space closest to where
your hook already is. This can be through the
middle of the stitch or the space in
between your stitches. Turn your work to the
back, grab onto the yarn, and pull it h. You're going to pull it through the hole and
through the stitch as well. Now you're going to repeat this, go into the next space. Then grab the yarn from the back and slide it through
the space where you've inserted your hook and through the yarn on your hook
as well. Like that. Here's what your
should look like after you've done a
few more stitches. This is going to take a
while to get the hang off, especially because
it has a lot to do with how you're
controlling your hook. Let's do this one
more time. So when you want to change direction, you can turn your work to
the direction you want to go in and insert
your hook there. Grab onto your yarn, and then slide it through. Like that, and that's how you're going to make another stitch. Now, continue doing this
and create your design. You can play around with it, make hearts, make bows, write your initial
to personalize it, or if you're making
this for a friend, customize their initial. You're so many
different options, and you can also play around
with different colors, so you can make designs
with different colors. Set your hook into any space, grab onto your yarn and pull it through the space and through the loop
that's on your hook. And that is how you're
going to surface crochet. Now I'm going to continue
my all the way down. Once you're all done
with your design, here's how you're going
to fasten off your work. So just cut your yarn from
the back and pull it up, tie it into secure it, and then insert your
hook from the bottom, and then pull the extra yn so you can hide
it on the back side. And there you go.
That's how you're going to surface any design you want.
5. Assembly with Sewing: We're going to sew the
shoulder section to this part of the back panel and the same thing
on the other side to go ahead and grab
your plastic needle and attach the yarn to the
needle with a double knot. Now to sew it together
insert your needle into the very first stitch
in the corner and pull. Now, turn your work to
the back side over here. Like that, and now we're going to join the back sides together. First, you have to line up
each stitch to the stitch on the other side and
insert your needle through it and pull go into the same stitch and pull
to sew it together. Go through the stitches, make sure that you're grabbing
both of them and pull, do this all the way until you've joined both
sections together. Once you're done, you can
secure it with a knot, so insert your needle
through that same stitch. And tighten to secure in place. Here's what it should look like joined from the front side. Now go ahead and repeat the same steps on the
other side as well. Next, put the sweater on your bear and using
a stitch marker, just hold the bottom of
the sweater in place, and then mark the area where you want the arm hole to end. So it starts at the top from your shoulders and mark
where you'd like it to end, make sure it's comfortable
and that there's a little bit of space
left over here because, of course, we don't want
it to be too tight. Just take your stitch
marker and put it th holding it together like that and repeat on
the other side as well. Now go ahead and turn
your work inside out so that the wrong
side is facing you, and we're going to sew
this bottom part together. Make sure that your
work lines up and insert your needle through
the edges and pull. Then you can tie the ends into a double knot to
secure it in place. Once that's done, you're
going to sew from the bottom all the way up to
where your stitch marker is. Now, you have to make sure
that you're going through the loops on the side and not directly through the
stitches over here because that would make the
sewing part way too thick. So go ahead and grab
onto the loops very gently and sew all the way up until you reach
where your stitch marker is. Once you're done, pull
your yarn until there's a little bit of a loop
left insert your needle through it and pull to tighten and secure all
of your sewing together. Then go ahead and ave
the rest of the engine. So to ave in your ends, just insert your needle
through the loops randomly going up and down and up and down
all of the loops. And then once you've gone
through a few of them, you can just pull your
needle like that, and that's how you
can ave your engine. I'm just going to ave it
in a little bit more, and then we're going
to be all done.
6. Sleeves: Next, I'm going to show you
how to crochet the sleeve, so keep your work
turned inside out and find the bottom of
the armhole over here. Then go ahead and
insert your hook right into the bottom of
the armhole like that. Make a loop with the
color that you want for the sleeve and then
slide that loop through. Once it's through, you're
going to chain 21 and two. And that is going to
be the very starting of your first round
of double cliches. Now we're going to be working in rounds of double crochets around and around
and around until the sleeve is the
desired length. So go ahead, yarn
over and insert your hook into the
next space over here. And keep count making
sure that you remember how many double crochets you've
done all the way around. So that is going to be my
very first double crochet. You're and over insert your
hook through the edges. There's no specific place
where you have to insert your hook as long as it's as close to the edge as possible. And I'm going to do my
second double crochet. Now go ahead and
double crochet all the way around until you come
back to where you started. All the way until
you reach over here. Now I've reached the corner
all the way back around, and I did a total of
16 double crochets. Now here's how to end the round, insert your hook into the top of that chain two space like that, and you're going to slip stitch. And that's he you're
going to end around. Now to start a new round
you're going to chain two. Turn your ck to the
back over here, double crochet into
the very first stitch. So this one right over here. And that is going to be your first stitch of the next round. Now go ahead and
double crochet into every stitch all the way around
to make this next round. Make sure that you have
the same number of double crochets as you
did in the first round. Once you reach the
end of the round, here are the steps
that you're going to repeat to end every
single round. So you're going to find your chain one and
your chain two, and then you're going to
insert your hook into the chain two space
and slip stitch. That's going to end your round. Now to start a new round, you're going to chain
two and turn your work, then double crochet into
the very first stitch, the one that's after
your chain two, and that's going to
start your next round. Now to complete the next round, you're going to insert
one double crochet into every stitch
all the way around. Now go ahead and
crochet rounds of double crochets until the
sleeve is the desired length. Go ahead and put the sweater on your bear and make sure that the length is exactly what you want before you fasten off, so to fasten off,
just chain one. And then you can grab the
extra yarn and just cut it, pull and tighten to secure. Now that you're done
with the first sleeve, go ahead and repeat
the same exact step on the other side as well. Feel free to replay this
section of the class, and go ahead and crochet
the second sleeve.
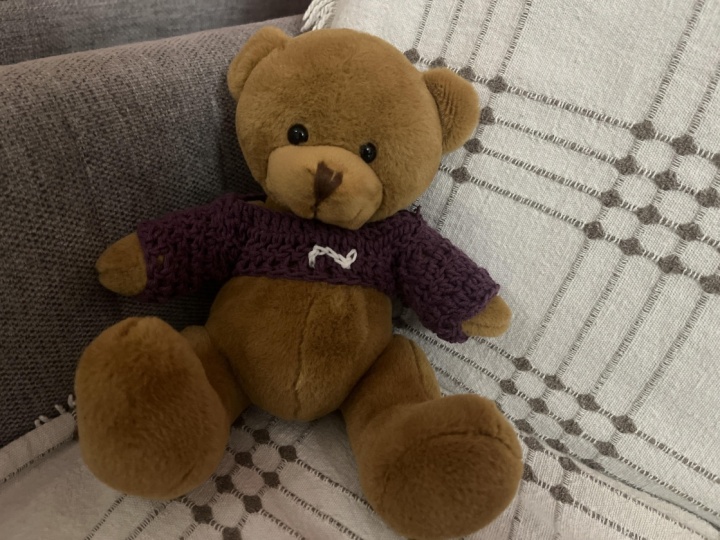
7. Final Thoughts: Today, I hope you love
the spater crochet. Now you can experiment
with different layouts, different sizes, maybe even
crochet sweater for yourself. If you have any questions,
please feel free to ask them in the discussion
section of this class, and I'll get back to
you as soon as I can. Thank you so so much for
crocheting with me today, and I hope you'll join me for lots of more
creative projects. So don't forget to follow
me here on Skillshare, as well as subscribe
to my YouTube channel, and follow my Instagram
on TikTok for daily inspiration and
more crochet ideas. Now, let's see your plushies
and the cozy speaters. You can alot a
picture of your work in the project section
of this class, or you can share your
work with me and my community by tagging me at Maham crochets or using my hashtag crochet with Maham
on Instagram and TikTok. And I'll see you guys next time. Happy crafting everyone.
 Mahum, Crochet Artist and Educator