Transcripts
1. Introduction: [MUSIC] Cooking is a fairly
enriching experience with an endless combination of flavors, ingredients,
and techniques. The class bails from the absolute basics,
like knife skills, understanding
ingredients, stocks, mastering techniques of
cooking eggs and chicken. My name is Shubranshu. I'm a professionally
trained Chef and baker trained from the
prestigious [inaudible]. I had the opportunity to work under some amazing
chefs in Australia, and I want to basically share all my knowledge with
you in this class. We start this class by
understanding about the different types of
knives and their functions, to guide you to
select the best ones by starting out on
your cooking journey. Then we move on to learning different French
cuts like batonnet, julienne, paysanne, brunoise, and many more
on different vegetables. I will be teaching you the cuts exactly how I learned
it in culinary school. We then learn how to make a
delicious vegetable stock, backed with amazing
flavor and umami. This is a great base
for soups and sauces, and a great way to use
leftover vegetables. After learning the stock, we move on to my favorite
part of cooking, which is learning
how to cook eggs. Now this will take
your breakfast skills to another level. We'll be learning
different techniques of cooking boiled eggs, fried eggs, and a soft and delicious
mushroom and cheese omelet, and a classic French omelet. Then we move on to our
final section of the class, learning how to de-bone
a whole chicken, understanding the different
parts of the chicken, and also the knife skills to
cut one like a professional. We will then move on to learning how to make
a chicken stock from scratch to prevent
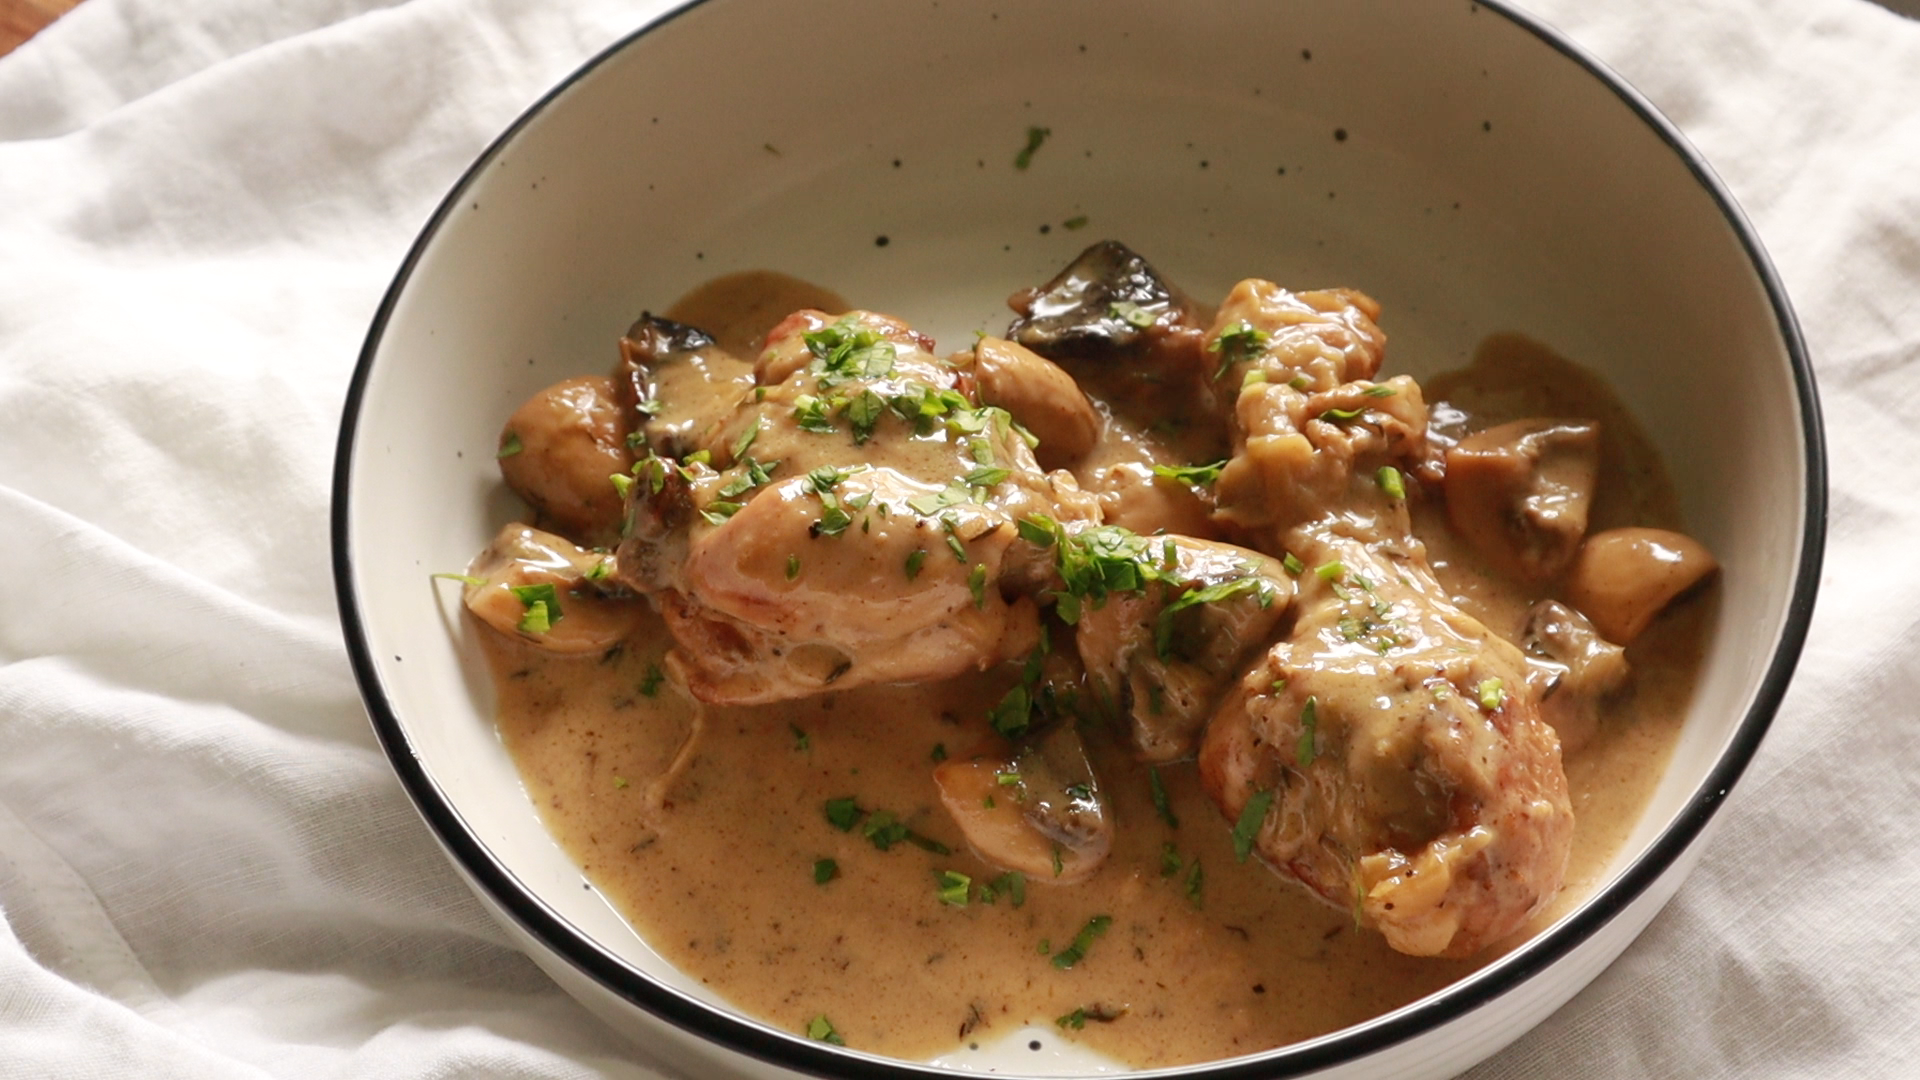
wastage of chicken bones. The final dish of this class is a rustic creamy mushroom and chickens too, called
chicken fricassee. This recipe is a
sure stopper and will impress your
friends and family. We will be learning
techniques like sorting, caramelizing, bracing, sharing, and many more. This class also comes with
detailed recipe notes, so you can master the
recipes easily at home. The goal of the class is not
just to learn the recipes, but to actually build a
strong foundation as a chef, so that you can take your cooking skills
to the next level. [MUSIC].
2. Class Project and Outline: Thank you for enrolling
in this class. In this lesson, I
basically want to go over the class outline
for this class, as well as the class
project and how you can download the
class resources. The outline of the
class is super easy. It's just divided
into three sections. The first section, we
go over knife skills, as well as how to make
a vegetable stock. The second section, we
learn how to cook eggs. Different types of eggs, like boiled eggs, omelets. The third section we go over
how to debone a chicken, how to make a chicken stock, and how to make a
chicken fricassee. We cover these three elements of cooking and basically cover
different techniques, as well as different skills
you can practice at home. Secondly, the class
project is for you to share any one picture of any dish we make in
the class so that I can help you out and I
can critique it as well. The third one is our
class resources. Let's have a look how you can download the class resources. Let's have a look how to
download the resources. So the resources are
in the fourth tab, which come under
projects and resources. If you click the fourth tab and you click on the
attachment file, the PDF file, and
let it download. When you open it, you will see
all the tips, the recipes, and all the information
on the class which will really help you and guide
you throughout the class.
3. Tools: Let's have a look at some
of the tools which will be really useful in your
cooking journey, as well as in the class when
we make different dishes. So the first one and
my favorite bile is a cast-iron pan
and a non-stick pan. Now, if you have both of these, like you can make so
many different things. And what I would advise is
that when you get these bands, make sure to get the
best quality product. Like the cast iron pan I
have here is from Lodge. This is an American
company and it's so amazing like I've had this
for maybe five years now. And it looks like new
legged works so well. You just have to take good
care of disgust and bands. Make sure the oil
lamp once in a while and don't keep water in
them for very long time. Even non-stick bands as well
like they're so useful, especially when you make
eggs or any egg base dishes, even if you are stir-frying. These are really nice because you don't
have to use a lot of oil in it and nothing
sticks to it. So I really like using
it if I'm making pancakes or crabs or any sort
of different types of eggs. These two, I would say, are really essential
for cocaine. That third one I really
like using is a Dutch oven. Now, this is about a
four liter Dutch oven. And I use this for
almost everything. Like if I'm making a steel or
if I'm blanching something, if I'm making poached eggs, if I'm even making bread, like I just use this Dutch oven. And this one as well just get
a good quality Dutch oven. And this will last you a
lifetime if you take care of it. These three, I would
say like a censured. The fourth one, which I like using as well as a
stainless steel pot. Now this is good if you just
want to heat up and make, make any sources or just
reduce like sauces as well. This is quite useful
in that case. The last one I wanted to
show you is a baking dish. Now baking dish is so if you want to just make
any sort of bacon, had a lasagna or a tower, any sort of big product. Like, I really like using
this one, this one, quite small and really
convenient to use. It's just like voi
in centimeters big. And I really like
using this as far. So all these products like just get the best
quality possible, is what I would advise, will be using almost all of them in our further lessons
when we learn cooking, make sure to get the best quality products when you assemble these
tools for your kitchen. Let's have a look at some
other utensils and which you might also find useful
in your cooking journey. So the first one, Let's start with a save. Now, I like to have to CVS. I is a big one, small one. So this is really nice if
you're selling a stock, if you're blanching vegetables. And if you make a customer
and if you just want to see if that even
for like flower, if you're baking says so
use for the smaller one is also really nice if you want to basically
save anything out, or if you want to
clean a stock as well. So both of them
are super useful. The next one is a risk. Now risk is essential
if we are basically emulsifying any
fat into a liquid. If you're making rationale, if you're making a sauce, even if you are making a
custard or any sort of moraine, this is really nice
if you want to areas in case if you
want to make an egg, this is so nice to use. In that case, the
next one are dong. Dong are like an extension
of your hand basically, especially when you are lifting hot objects from a
grill or from a band. And he sort of meet, this is really nice to use. I also like using this
fun blanching something. If I want to get something
out of hot water, It's quite nice to use
in that case as well. So Dong's are so essential
and professional kitchens, we always have them
whenever we're cooking. The next ones are spatulas. So I have two types
of spatulas here. They're both made of silicon. I like using silicon
because there's heat resistant and they do not get
spoiled even at high heat. Spatulas are essential to use
if you're mixing something. Also, if you are trying to
get something out of a bowl, like a sauce or even mirroring or any other liquid
element as well. You can actually scrub really nicely from
a silicone spatula. And I like having
both of these like it just helps if you have
a smaller one as well. The next one is a wooden spoon. Now, wooden spoons are also
really nice when you mix, when you make sauces as
well as when you make breast chicken or
any soups as well? I don't know. I really like using
wooden spoon. I just feel like sometimes
it gives a better flavor. The next one is a tweezer. Now, tweezers are
like really specific. You don't necessarily need
to have it in your toolkit, but really using it. Because if you want to play it a dish or you
want to put like flower petals or any sort of really delicate
element to ablate. These are quite nice even
when you're cooking, like we use tweezers
and kitchens. So this is optional, but if you want to get it, you can. It's great to use for. Finally, one is our
stock metal spoon. And this is really
nice if you're making a soup or a stock. Whenever I try to
clarify a stock, I just use this. I really like using it. And also when you want
to pour a stock as well. So it's really
nice in that case. Now, let's move on
to our mixing bowls. Mixing bowl is essential if you want to put dry
ingredients in them. Also for storing any
soups or sauces. You can just put it in as Cabela's and put
it in your fridge. Also for like mixing
any doors as well. Mixing goals are so
useful in that case. So definitely get
a few of these. It just helps you along
in your cooking journey. So these are some other tools which we'll need in this class. Now there might be
many more tools you might find on cooking. But these are like good
enough for this class. If you have this, you should definitely be fine with
all the recipes we cover.
4. Introduction to Chef's Knifes: In the first section
of the class, you'll be learning
about knife skills. Now as a chef, knife skills is one of the
most fundamental topics to learn if you want to
improve your cooking skill. What we'll do is
we'll start off by understanding different
types of knives and how they're made
so that you can basically select the knife
which is suitable to you. Then we'll learn different
French cuts for vegetables. I'll teach you exactly
how I learned in culinary school so
you can basically master these techniques as well. Make sure that your
knife is really sharp because if
your knife is blunt, you won't get cuts
which are precise. It will slow you down, and also it increases the
chance of injuring yourself. Let's begin with the lesson. In this lesson, we'll try to understand the different
types of knives which are available to us as chefs
so you can basically decide which one is suitable for you when you start cooking. Basically, there
are two types of knives based on the blade. The first one is
a Japanese knife. Now, this blade is
basically made with carbon steel and the second
one is a Western-style. This one is a
stainless steel blade. Most of the knives you will
find will be basically made with these two
different types of blades. The Japanese one is a
carbon steel blade. With the carbon steel
you have to basically maintain it really
well, otherwise, it can get rusted because the carbon steel actually
reacts with the environment. Also because of the material, it actually retains its edge. It retains the blade and
the sharpness really well, so you don't have to
sharpen it really often. But makes sure that it doesn't
basically stay in contact with water very long because that will
basically spoil the blade. It requires more maintenance, but I actually prefer to use Japanese blades because
they are quite sharp. The second side of blade
is our Western style. If you see this blade,
it's more shinier. With this material, it
actually doesn't require that much maintenance because it doesn't rust that easily. But at the same time, you'd have to sharpen
the edge really often because it tends
to blunt really easily. When you see the difference
between both the knives. Now, this is a nine-inch blade and this is a seven-inch blade. Also with Western knives, you'll find this curve here, which you won't find in the Japanese knives
because it's more flatter. When we actually cut, this is a more rocking motion. With the Japanese knives, it's a more flattened motion because of the blade structure. It's up to you
which one you like. I tend to prefer
the Japanese ones, but the Western ones
are also really nice. There's another type of blade
which I wanted to show you, which is a Santoku blade. Now, this is also
a Japanese blade, so it is carbon steel as well. But this is really
convenient for home use because it's
smaller and also it's quite sharp and
it's easy to cut things so it doesn't put basically
weight on your wrist. If you have like say chopping vegetables or just
like trimming meat, I really like using
this knife as well. Totally up to you. You can get this one as
well when you cook at home. The next one is a pairing knife. Now, a pairing knife is really useful if you're basically working with fruits or if you're working with
pastry as well, if you want to cut strawberries
or any different types of berries which
requires a little bit more of being delicate
with the knife. This one is really
good in that sense. Now after these knives, I'll show you some of the
other knives which I use, which I put in my kit. But for home use, even if you just have one chef knife and
one pairing knife, that will be more than enough. But still, I'll just show you some other knives as well
for more specific purposes. These are the second
set of knives which are more specific
to their functions. You'll find them
in a chef's kit. It's not necessary to have them, but I'll just explain you just in case you want
to purchase them. The first one is
a fileting knife. Now, this one is really
good to use with fish, if you're fileting a fish, if you are trimming
the scales as well, it's really nice. The basic feature of this knife is that it
can bend basically. Because when you filet the fish, you have to make sure
that the knife bends with the fish so you can
cut really cleanly. Also when you're scanning
the fish as well, you have to drag the skin with it so you can just
drag it like that. I really like using this. I mean, it's really easy
to filet fish with this, but it's totally up to you
if you want to purchase it. The second one is
a boning knife. Now, with the boning knife, you'll see that it
has a curve here. Now, this is basically just to get through the
bones when you cut, when you trim lamb or
chicken or any other meat. It just makes it really easy to sort through the motion when you're cutting
through the bone. Also when you hold this, you'll feel like it has
a slight edge here. It just makes it easy just
to cut the meat and trim it. When you use this, you hold it like
this and you just move it around in
a curve motion. Just make sure to do that
when you use this one. The third one is a bread knife. With bread knife,
you'll see that it has a serrated edge here. With this knife, be really
careful because it's really sharp and you don't want to
injure your hand with it. When we use this knife, we basically saw it. We don't go straight
in because we want the serrated edge to
cut through the bread. When you use it, just do it like this
through a bread. The next one is a cleaver. With a cleaver,
you'll see that it has a really thick blade. That is for the purpose
of cutting through bones when you're making stock. This one is
super-helpful because if you use your chef's
knife to cut through bones, it will dull the edge. Make sure to use a
cleaver when you cut through bones and
not your chef's knife. In professional kitchens,
we use this quite often. The final one is not
actually a blade, but I wanted to show you just
in case you want to use it. It's a honing steel. What this does is
that when you want to sharpen a knife just before
we're going to use it, we just basically do
the edge like this and we can just sharpen
the blade of the knife. It's super useful just before
if you're going to filet a fish or cut through
some meat, just use this. It will just give an edge to the knife and it'll
be easy to cut. I hope you could
understand about the different types of
knives we use as chefs. Whenever you choose a
knife for yourself, make sure you feel really
comfortable with it. Don't use a knife because
some other chef is using it. Use it because it just
suits you and your hand, as well as the blade should also suit you with the
way you cut things. Make sure to take your time and choose a blade which
suits your cooking.
5. Knife Skills: How to Hold a Knife: Before we learn how to
actually cut the vegetables, let's learn how you can
actually hold a knife. There are two ways to do this. The first one is you
hold it like this, to something like
a tennis racket. Then when you move it, you just move it in a locking
motion like this. [NOISE] You get it? A grip like this and
you move it like this. The second way to do this
is you can put your finger ahead here and grip
the knife from a half. But when you do this, make sure this doesn't go too deep, otherwise you'll hurt yourself. I like to use the first method because it gives me more
control with a knife, but you can use either one. Now, when you're actually
cutting something, we have to round
our fingers like this and the thumb
also goes inside. You just support the fingers, you support the knife
with your knuckles, and then it just keeps going in in a locking
motion like this. Make sure never to put your fingers like
this when you are cutting something because you will definitely injure yourself. Always make sure to
keep it rounded. It keeps your handle is safe. Perfect. Let's actually learn different types of French cuts.
6. Knife Skills: French Cuts for Carrots : In this lesson,
I'm going to show you different types
of knife cuts, and also show you how I
set up the knife station, and how I do these cuts. So the first thing,
what I'm going to do is show you the setup. So in this setup, what I like
doing is keeping two bowls. The first bowl is any
kitchen scrap we have, so I'll put this in
the compost bin. The second one is for any
vegetable scraps we have, which we can use. So you can use for stock or making juice or
any soup as well. The next one is how we set
up our chopping board. So when we place
the chopping board, make sure to put
either a mat under it, or you can even put a wet towel. Just spread out the wet towel so that the chopping
board doesn't move. Because when we
cut with a knife, because the knife
is quite sharp, we don't want the board to move, otherwise you injure your hand. So make sure to do this. Secondly, I always
make sure that I have all my equipment [inaudible]
as well as two towels here. So the first towel is
just to wipe the knife. The second one is to
wipe a chopping board. You can also take
another towel which you can put on your apron
totally up to you. So the first vegetable
we'll be cutting today is a carrot. Whenever we peel a carrot, makes sure to do
it away from you, and not towards you. Just to prevent getting
any cuts on your hand. [NOISE] Just take a peeler
[NOISE] and away from you. Really easy. [NOISE] Perfect. So you want to make sure
that everything is clean. [NOISE] Take all this crap, but it in a bowl [NOISE]. The first cut we'll do
is called a batonet. Now this is a slightly
longer stick. This is really nice
if you want to steam it or use it in a dip, so you can eat it raw as well. So let's learn how to do it. So first thing you
do is you've cut [NOISE] the top and the bottom. So whenever we cut anything, our knife, if it's sharp, the job will be really easy. But if it's blunt,
it'll be really hard, so make sure knife
is really sharp. Cut the carrot in two
[NOISE] and what I'll do is, I'll just cut one edge [NOISE], so this becomes flat. Now, this really helps
us cut any vegetable. So always make sure you cut
one edge so it becomes flat, so it doesn't roll it on
when we're cutting it. Make sure you cut the [NOISE] other edges as well [NOISE]. So we want to just cut it into a rectangle [NOISE], perfect. So you see how it's got this
nice edges, that's perfect. So I'm going to cut above
[NOISE] this thickness. So you see that thickness? That's really good for
the batonet [NOISE]. Perfect [NOISE]. Just
cut it into a half. This, you can either cut into threes or you can cut
it into twos as well. I'll just cut into
[NOISE] half as well. Cut this one into [NOISE] half, and this one as well [NOISE]. So if you want, you
can actually stack them up and just
cut it in one go. But initially I
just liked doing it individually because I
want you to get it right. So let's have a
look at this size. You see that size? Squared nice. It's really good
[NOISE]. Now you can eat this row with any dip. You can even steam it. You can even use it in
salads if you want. But I actually like using this as a base to cut a medium dice. When you want to cut
to a medium dice what you do [NOISE], just take like three of them and basically [NOISE] cut
it like this [NOISE]. Perfect. So you see, that's a medium dice. So try to make sure that
they're fairly equal in size, because that's really
a good knife skills. These are really good if
you want to use in soups, you want to stir-fry, just use it in any
sauces as well. These are really nice. So set this aside. Now, we'll move on to a cut
which is called paysanne. Now this is a really nice cut. It looks really beautiful. I actually quite like it. Now there are two
ways to do this. Either you can just
do it like this, [NOISE] like this shape, or you can even cut this into
a half [NOISE] and then cut it like that [NOISE]. I actually quite like this.
It looks so beautiful. This can be used for any
soups, sauces as well. If you're making any stews
as well, you can use this. Or you can even use this in a salad or in a garnish as well. This is done. Now let's
move on to the next one. Set that aside. So now I've peel
another carrot and I'll show you a julienne cut, which is a styling
more advanced cut. [NOISE] So I'll just
peel the carrot [NOISE]. When you do these cuts
at home [NOISE] just make sure to do it as
slowly as possible, because you want to get
it really nice and exact. [NOISE] Don't try to
speed the process. [NOISE] So cut the bottom
and the top [NOISE]. Perfect. I'll cut this
into half again [NOISE]. Now what I'm going to do is [NOISE] cut the
edges like I did, put it flat on the surface [NOISE] and make it
into a cube again. With julienne, it's
basically a French cut, [NOISE] which is
called a matchstick. When we cut a matchstick, you want to make sure that I
cut it very thin when we cut through it. Let's have a look. You see that thickness [NOISE]. Perfect. Do it slowly
initially [NOISE]. You want to get it
fairly nice and thin. [NOISE] Let's have a look. You see that thickness, see how thin that is. Compare this to the batonet
we had. This is quite thin. Now when you want
to cut julienne, I would say when you
start initially just take one and just go really
slow with it [NOISE], try to get a nice and thin
cut [NOISE], just like that. So you see how thin these are? You can even go
thinner than this, but this is quite nice. So you can use this
for [inaudible] rice, for just garnishing as well. Now, I'll show you even thinner. If I want to go even
thinner than this, so I would go in even
more [NOISE] finer. You see how that's even
smaller than that [NOISE]. It's even thinner. Perfect. You can do either
one, completely fine [NOISE]. If you want you
can stack them up. If you want to do it faster
[NOISE] just stack them up and [NOISE] you can
even go faster than that. Perfect. So that's my
julienne cut [NOISE]. So the next one is
called brunoise. Brunoise is basically
a fine dice. When [NOISE] you cut brunoise, first you need to go
julienne and then cut a really fine dice
with the julienne. I'll just take maybe
four or five of these, and I'll show it to
you how it's done. So just stack them up like that. Just go really slowly
with it initially, and then you can go
faster if you like. [NOISE] Perfect. Let's have
a look at this. You see how fine that is? These are really good if you
want to use for garnishing. In French cooking,
we usually use them just at the end
when we make a soup. We just put this
garnish it at the end. Also, if you're making any
meat filling say for example, in a dumpling or something, you can use this. It looks really nice
and it actually shows the skill of the chef. After this, I'll show you a slightly more easier
version of this dice. This is really small dice. I'll show you a slightly
bigger dice than this. The next dice before I start, I just clean [NOISE] my
chopping board a little bit. Perfect. Clean my knife as well. Then again, we do
the same thing. You want to cut the edges off, such as you can put it
and it's safer to cut. [NOISE] Perfect. Again, perfect. That's ready. Now
when I cut the slice, I'll make sure that
it's not too thin, but it's not too thick either. Somewhere in the middle
of a batonnet and a julienne. Something like that. You see that thickness,
something like that. Now when you practice,
you'll be able to know and you'll be able to get more consistency
with your thickness as well. But it just takes practice. Just do it slowly
initially and then you can increase your speed later. Perfect. Now again, I'm going to cut the same motion
as I got the julienne, but I'll make sure that
I don't get it as thin. Just go slow and
keep it consistent. Perfect. [NOISE] You see that? That's slightly bigger
than our julienne. This is something
you can approach as well if you're
just starting off. This is also a really nice cut. Let's have a look at
the difference as well. You see the julienne, you see the difference
between both. You see the thickness. This is slightly bigger and
this is thinner than that. Perfect. Now, let's cut a
dice with this as well. The same method, we just
stacked them together. We've got a slightly more
bigger dice this time. [NOISE] Perfect. You see that? It's
like old squares, and this is a
slightly bigger dice. This is also really
good for soups, if you're making a brunoise or if you're making any sauces. I really like cutting this dice. This is bigger than
our previous ones, but smaller than our medium
dice, which we got before. Perfect. Our next cut
is called a rondelle. That basically just
means a round. You just take a peeled
carrot like that. This time you don't
need to cut the sides. Because we actually want
the circle and we cut it. Such as, be really gentle with the carrot because it's going to move, so make sure to grip it tightly and just
cut these rounds. The thickness, you
can keep it as thick as you want or
as thin as you want, depending on how
you want to use it. You see how nice that looks like if you want to
use that in a salad, as a garnish as well, you can even put it in soups. I just really like
the shape of this. Perfect. It's quite
easy to cut it as well. The final one is
called a mirepoix. Let's show that as well. I'm going to use another carrot. [NOISE] Perfect. Set this aside. [NOISE] The mirepoix is actually the easiest one because we
just use them in stocks. This is called a rough cut. There's no definition of
how big this should be. You can keep it as
big as possible, but you don't want to keep
it small because since you are cooking the stock
for longer time, you want the cut
to be quite big. I'm just going to
cut this in half. Either you can just
cut this in half as well or you can
just keep it whole. It's totally up to you
how you want to do this. You can cut this in half
and just keep it like this [NOISE] to stocks of
these big pieces, and you want to keep it big. This is a mirepoix. If you want, you can also cut
it like this if you want. [NOISE] Something like this. You can even keep it this size. Completely depends on how
long you're going to stock. If you're making a beef
stock which you're going to cook for
maybe eight hours, you can keep it this size, if you're making
a chicken stock, you can keep it this size. It completely depends on how
long you going to cook it. Perfect. That's all our cuts. Let's revise and let's
have a look at it again. Let's revise all the
cuts we learned today. The first one was a batonnet. This is a thicker cut. Really nice if you are a beginner just to start
off using the knife, I would suggest that
off with this one. The second one is a dice. This is a larger dice which
we made from our batonnet. This is also really
nice for soups, for sauces as well. The third one was biasel. This is a nice cut because
it looks really beautiful. I really like using
this in garnishes, in salads as well. You can also use this in soups. The fourth one was a julienne. Julienne is one of the most
of trickiest cut to do. This really shows the
skill of the chef. This is quite thin and
it's like a matchstick. Try to practice
this because this will really help you
improve your knife skill. The fifth one was brunoise, which is a rarely fine dice, which we get from our julienne. The sixth one we did was a
slightly bigger version of a julienne because this one is more approachable when
you're starting off. From this we did
our medium dice. This is as quite nice
if you are using in making sauces
as well as soups. The next one we did was a rondelle This is
also a beautiful cut. You can use in salads, you can also use in
soups and sauces. The last one we did
is called a mirepoix. Mirepoix is one of the most
easiest cuts because it's a rough cut and we
use this and stocks. It's quite thick just like that. I hope you enjoyed
this lesson and I hope you practice
this at home as well. Make sure to keep it
really slow initially, and then you can as you
practice, increase your speed. Let's move on to the
next one now where I'll show you how to cut
eschalots and onions.
7. Knife Skills: French Cuts for Onion and Eschallots: The second vegetable
will be learning is onion and shallots. Now, when you've got
an onion or a shallot, you have to make sure
that you keep the base. It keeps everything together
and you just cut this side. You always keep this
side of the onion. It just keeps
everything together, and it's easy to cut. Perfect. Cut this in half
and just remove the skin. You can do this by hand, or you can also use a
paring knife to do this. I prefer to use a paring knife because that's a more
professional way of doing it. Basically, you just grab the
skin, and then you drag it. [NOISE] It should just come really easily
to just come off. Hold it from the corner
and drag it like that. Perfect. Put the skin
in your scrap board. Similarly, the other one as far from the corner and
just drag it like that. You can also do it
by hand if you want. If you find that easier, there is nothing wrong
to do it like this. If you don't feel
comfortable with the knife, just do it like this. First cut we'll be learning
is a really simple cut, is going to slice
it really thinly. For that, what we'll do is
we'll just take off the top of it because we don't actually want it to stay
together in this case. We just want to get
as thin as possible. [NOISE] You see how my motion
is slightly different. I'm trying to drag it like that instead of going like this. Because I find that you get a more thinner cut
when you do this. You see that. This is really
nice for that stuff thing. I really like this for maybe if you want to make
a sauce or something, if you want to saute onions, because these are quiet thin so they'll caramelize
really easily. Just set this aside. The next one you can
do is just a round. You just cut this into half and then you can just take
it off like that. You get this flower shape. You can also use
this in a stir-fry. It looks really nice. Let's take it off.
So you see that, it's really easy cut to do. The third one we're
going to do is a dice. Now for a dice, we want to keep the head on. We don't want to take it off because it holds it together. Now, this dice is not
a very fine dice, I'm just going to
do a medium dice. What you do is you just go
through it and you drag it. It just goes through the onion. Just like that. You see, I'm not keeping it too thin. I've got it quite thick. Now what we do is we just
keep it from the center. Just hold the top. Your hand shouldn't be here. Otherwise, you'd cut your hand. You don't want to
injure your hand. Just hold from the top and
just drag it below like that. You don't want to
drag it all the way. You just want to go just
till the end of it. Do it again from the top. Perfect. You see, you've got one cut like that
and two cuts horizontally. Now to dice it, I'm just going to do
it just check this. This is more of a medium dice. Very good if you're going
to say, make a sauce, or if you're making
a soup as well, this is really nice
to use in that case. Now the next one we're
going to do is a brunoise, which is a more finer dice, which be used in soups as
well so just set this aside. For a brunoise we're
going to cut it more thinner than we did
for the medium dice. The spaces between the cuts
will be lesser because we want the thickness, and the size to be quite small. You see I'm still dragging it, but at a slightly
lesser distance. Do it slowly initially, you don't need to
do it very fast. After you've got this, I'm going to go
again horizontally and this time I'm going to do it thrice instead of two times, so two and another one. Don't worry, if some
amount of onion comes out. Don't worry about it. Just
keep it aside. Now to cut it. Go through already thinly
less spaces again, because we want the
dice to be quite small. Perfect. The ends, you can take it off. You see the dice. That looks so beautiful. You see how small that is? Whenever we cut through onions, we never cut through
them again because that just takes out all the
juices and water out of it. Make sure to try to
do it in one go. But if you want to do it again, what you do is you just rock
it around it in this motion. Just like that. But I
wouldn't advise it because the onions lose a lot of water and you don't
want to lose that. You want to keep that inside. Perfect. Just set this aside. Now, next, I'll show you
how to cut the shallot. Before we cut the shallot, I want to make sure that I clean my workspace so that I
can work purely neatly. Take all your onion off cuts and always make a
habit of clean as you go so your workstation
remains really nice and tidy. With the shallot as well, we follow the same principles. We keep the head because
that holds it together. We cut off the tail. We cut it in half and then we use the paring
knife to take the skin away. This should come off more
easily because it's smaller. Perfect. You can also do
it with hand if you like. Just use your nail and you
can take it off like that. Perfect. With the shallot, if you want to cut rings, what you do is you
start from here. You've got small
rings like that. Keep it as thin as possible. This is really nice if
you want to fry them. In Asian cooking, we use
these rings to fry them. Also if you want to saute them because
they are already thin, so caramelize really nicely, just like the onions. Perfect. This aside.
The next one, again, is our petals. Similar to the onions we did, you can just take out
the petals like that. Really good for
sauteing as well. Keep this aside. Then I'm going to show
you the next cut, which is basically
a frying brunoise. What we do is we just take out the petals from the shallot. Individually, you take out all the petals and then you
got Julienne with this. What you do is you start
flattening this out like that, you can even cut it
in half if you like, and try to cut it as thin as possible in a line like that. [NOISE] You see how thin that
is, something like that. Get it aside and I'll do the
same for the rest as well. This one is really good for like salad dressings and stuff when you've got the
brunoise of this. Such a stack them together. You don't have to
be exactly precise, but just try to make it as
stacked together as possible. Then similar to the other
one we did for carrots. [NOISE] Perfect. You see that? That's a clearly fine
dice of shallots. This is what we do in
fine dining restaurants. Even in Michelin
star restaurant, this is the cut we use
for our salad dressings and this is fine
tuners. You see that? How fine that is.
It's beautiful. You've got a Julienne and
you've got a brunoise. The final one we're
going to learn is a slightly bigger dice. Similar to the onion, just do it like that. [NOISE] Just slice it once
and keep it slightly bigger. Just like that.
That's a big dice. This is really nice if
you want to stir fry it. This is quite nice in that. Let's go over all the cuts
we discuss in this lesson. The first one was slice. This is fairly
good for sauteing, really good for
caramelized onion as well. The next one is petals. This is really nice. If you want to make a skewer, even in salads, you can
saute this as well. I really like this cut. The next one is our medium dice. This is really good if you
want to use in sauces, if you just want to
reduce it down to sauteed and make sauces with it. The next one we go
with the fine dice. Fine dice is also really nice, if you want to make
a risotto or you can just saute this with risotto. We can also use this
in soups as well. These are cuts for our
onion and for our shallot, we have the slice cut
which you can fry as well. The next one was our petals, which was similar to
the onion petals. These are also really nice
for making a vegetable salad. You can sort this as well. After that we
learned how to make Julienne of shallots and
also preneurs of eschalots. These are slightly
more advanced cuts which you can practice and
improve your knife skill. The final one we learned
was medium dice. This is also really nice
if you want to just reduce down and sauces
as well as soups. These are our cuts for
onion and shallot. Practicing this is like a base in any kitchen
when you work as a chef, because onion is actually
one of those ingredients which is used in
almost all recipes. I hope you could learn a lot
from this lesson and I'm sure you practice practice this and learn
these cuts as well. After this, we're going to
move on to our next vegetable, which is a potato.
8. Knife Skills: French Cuts for Potato, Leeks and Garlic: In this lesson, I'll show
you how to cut potatoes, mince garlic, and
also cut leeks. Let's start with
the potatoes first. I'm just going to peel it. With potatoes, you can do
a lot of different cuts. I'll just show you
the most common ones. So after you've peeled it, you just get rid
of all the scraps. The first cut we'll
do is super easy. If I'm going to make
roast potatoes, we'll be using this cut. What we do is we just
basically cut it in half. Now you can cut
it in half or you can cut it in four
pieces as well. Always the flat side
goes on the base, so it doesn't move, like this. So this is really good for
roast potatoes, this cut. Next one is wedges. Wedges you can just
cut it like this and then you can also just cut
it into half like that. This one is wedges. If you want to just fry
it or even roast it, this is also quite good. Perfect. Next one, we'll
learn how to do a batonnet, which is a slightly
more advanced cut. For our batonnet,
just peel the potato. Cut the edge. You want to make this into a rectangle shape just like
we did with our carrots, and potatoes are quite easy to cut because they have
no resistance as such. Just goes really smoothly. Perfect. Just level the surface. You get this cube
shape like that. Perfect. Now, I'll
just cut it like that. Something like that
thickness is good. If you have bigger
potatoes, it's even better, the potato I was using
wasn't that big in size and just cut it like this. You get this batonnet
size, that thickness. Perfect. Now I cut
these as well. You can even go
thinner if you want. If you want to do
it like a julienne, what I would do is I
would just cut this thinner something like that. You see that thickness? That's really good for julienne. To cut the julienne, same thing we did
with the carrots. Perfect, and just keep it
thin and that's a julienne. These are also
really good for like frying or if you want to
use them in salads as well. Keep this aside and then I'll show you how to
cut a brunoise as well. This is just to practice
your knife skills. You probably won't be using these cuts that
much with potatoes. But just to practice it. Perfect. After cutting julienne, just keep it small size. You see that dice, let me show you again. See how they're like
equal-size cubes. They are really
nice. You see them? That's all equal
and really small. This is just to
practice your skill. Honestly I don't
think you really use these cuts that
much with potato. But compared to carrots, cutting a potato is easier. I would recommend just
start with a potato. Set this aside. I'm going to show you how to cut a medium dice with
the batonnet we got. Just take maybe four of them and just keep it
slightly larger in size. Perfect. That is our medium dice. You see how they're
accurately equal in shape and they're
these small cubes, that is what you want. Now these are really
good if you wanted to roast them or even fry them. They look really cool
and in a plated dish. Perfect. Now let's move on to learn how to cut
our garlic and leeks. To cut our leeks, we
just get rid of the top and the bottom part of it
and just cut this in half. And what I want to do is
cut this in half as well. Because I want to get
rid of the outer skin. Maybe two of the outer skin. Perfect. And here as well. Leek are actually really easy to cut if you want to practice
like julienne and on leeks. It's one of the most nicest
one to practice julienne. The first cut will do
is for our mirepoix, which be used in stock. Most easiest one. It's just a rough cut. You want to keep it
around that size. If you want to use
it in a stock. Perfect. Just set this aside. Next one we'll do
is a medium dice. To do a medium dice, what you can do is you
can actually find out these leaves so they
become really easy to cut. Maybe just take
about 5-6 of them at one time and just put it flat on the surface and all you
need to do is go like that. Just like that. Turn it around and you want
to keep it slightly bigger. So that is our median dice. Super easy to cut. Make sure that you're
not forgetting as well. Perfect. You see that. It's really good if
you want to saute them and just reducing
caramelized them as well. So set this aside. Now, we learn how to
cut our julienne. To cut julienne just take maybe 3-4 leaves and just
spread them out flat like that. This gets quite easy. Now if you want,
you can cut them a little bit more smaller as well. Just get rid of that. That fix it easier to cut. Now to practice you want to
keep it as thin as possible. See how easy that is to cut. Yet these nice julienne
cut like that, just like a matchstick. I find that leeks are the most easiest to cut when
you want a julienne. You can practice this as well. Now after you've
cut the julienne, I'm going to set them aside and the rest I'll just
cut into a brunoise. Same motion again. Perfect. You see, that's really small dice. Really good for our soups. As far as any fillings you make, it's really nice to
just fold them in. It looks really delicate, so it cooks really fast. The next cut we learn
is a more triangle cut. This is just for decoration. If you want to do it, just cut this in half and
what you do is you just cut it just like that so into a side
of a triangle shape. It looks quite nice. If
you want to sort it, it just looks quite
beautiful in a dish. Set this aside as
well and after this, we're going to learn how
to mince our garlic. I've just got about
three bulbs of garlic here, just separate them. Then you want to take
garlic out of the skin. What I like doing is
cutting the head, and what you do is
you just press it. Lightly bash it, so the skin should just
separate on its own, and it should come
off really easily without actually
destroying the garlic. That looks good. Now, with garlic, there are a
lot of ways you can cut it. It depends on what
you're using it for. The first one, I'll
just show you, is you just slice it really
thinly just like that. This is good if you want to
maybe make up oil infusion. If you're using in pasta
sauces or something like that, you can just use it. Perfect. Set this aside. The next one we can do
is similar to this, but we'd actually be fine
chopping it a little bit. Just cut it again similarly. Perfect. Once you
get these ones, what you do is you
just cut it thinly, just like a julienne. Just like that. Set this aside as well
and cut this as well. Now, you can just stack them together and fine
dice it in a way. [NOISE] Perfect. You see, that is like a brunoise dice. Set this aside as well. The next one we will do
is called mincing garlic. I'll show you how to do that. When we mince the garlic, you want to make sure that you fine chop the
garlic a little bit. [NOISE] Same for
that one as well. Perfect. Now, what you do is, you go in a rocking
motion when you do this, so something like this. [NOISE] You see how
my hand is moving. I have a little bit
of pressure here, but this part of the
hand is really loose. You just basically
rocking it like that. [NOISE] This is a
way to fine dicer. After you've done that, what we do is [NOISE]
we just take our knife, take the heel of the
knife and press it down. Squeeze it slightly,
just like that. That is mincing it. [NOISE] Just keep that motion. You can already see that the garlic is started
to release its juices. [NOISE] Again, the
rocking motion again, [NOISE] and then pressing
motion like that. Press the heel of the knife
[NOISE] just like that. [NOISE] That is going
to mince the garlic. [NOISE] This is
just for practice. It's not like you can
use a garlic mincer, so you don't really need
to mince it like this, but it's just to practice
your knife skills. [NOISE] I know some people even put some salt in it
when they're mincing it. It just makes it easier, so just like that [NOISE] You can see all the juices of the
garlic coming on, and you get these mince. Let's go through all the cuts we did with the potato
leeks and garlic. The first cut we did was
our roast potato cut, which basically cut
it in one-half, and then we cut
it into quarters. The second one was our wedges. This is basically to fry
or to roast as well. The third one we
did was a batonnet. These are quite like some
big pieces, big cuts. If you do a bigger potato, you can use the same shape
to do French fries as well. Because my potato
was a little bit smaller, so these are small. But if you use a bigger one, just the same cut
for French fries. The next one we did
was medium dice. It's just your batonnet, which you've cut into squares. After that, we learned
how to do a julienne. Basically, we cut the
potato quite thin and then just cut it really tenderly
into these matte sticks. After that, we cut
this into a brunoise. This also quite a beautiful cut, looks really nice equal squares. After that, we moved onto leeks. This was our mirepoix, which goes in stock
or sauces or soups. After that, we learn how
to cut these oblique cuts, which also look quite
nice for sorting. Then we learn how to
do a medium dice. This one as well you
can use for sorting, or in eggs or fried rice. After that, we learn how to
do a julienne or flakes. It's really beautiful,
these matte sticks. Then you got a brunoise. Just to check your skill, just to improve your
knife skills as well. After that, we
moved onto garlic, and we cut these rings. It's really thin, really good if you want to make
an oil infusion. After that, we cut this into small pieces and then chopped
it finally into a brunoise. Then we cut the brunoise. We basically minced it
into a garlic paste. This lesson basically
covers how you can improve your knife skills by practicing these different cuts. Now you might not use
these cuts in your dishes, but I would recommend
just to practice it, so you get more control
over your knife. This ends our knife
skills lesson. I'm pretty sure you would have learned a lot of
different concepts. This will help you
improve your knife skills because that is the basis
of becoming a good chef.
9. Vegetable Stock: Preparing The Ingredients: [NOISE] In this lesson, we will learn how to
make a vegetable stock. What is a vegetable
stock exactly? It is basically reduction of vegetable scraps,
herbs, and ******. We basically keep cooking
this in water and extract all the flavor
and nutrition from them. It's a great way to use vegetable scraps or any oil
vegetables you can't eat row. You just basically peel them, or just cut them and you
reduce it down in water. In fine dining restaurants, we always use stocks for cooking stew soups or sauces
even for cooking rice, because it adds
this complex flavor and makes the dishes
taste really nice. Also, it has a lot of
flavor, nutrition, and it's a really great
substitute for chicken stock. Some tips when you make
the stock is never to boil the stock vigorously because if we boil the stock, sometimes you get
really off-flavors and it also makes
it really cloudy. Make sure it's a rolling boil
and not a vigorous boil. The second tip I
can give you is to always season the
stock at the end, because if you season it at the beginning and we're
reducing the liquid, sometimes the liquid gets too salty and then we actually
cannot reduce the salt, so always season at the end. The third one is to
always skim the stock, especially at the beginning
when you're making the stock to remove all the
impurities from the top. Because sometimes
if you don't do it, the stock doesn't
taste that clean. We want to make a
really clean stock, so keep skimming it. Let's begin by learning how
to make this beautiful stock. Vegetarian stock
is really nice to learn because if you are vegan
or if you're vegetarian, you can't actually use any
meat when you make stock. This is a really good
base to make just for flavor and also to use
in different soups, as well as if you're making risottos or any
sauces you're making. It's really nice to
know how to make this. I'm going to be making a more
Western-style stock today, but you can also
adapt it based on any sort soups you're making. You can add lemongrass
or coriander seeds. It's totally up to you how
you want to adapt the recipe. Before we start
making the stock, let's have a look
at the ingredients. I'm going to be using
carrots for the sweetness, onions for the flavor, as well as a little
bit of leeks, celery, and mushrooms
for the umami flavor. For the aromatics today, we have some parsley stems, thyme, peppercorn, garlic, and bay leaf; just a couple of bay leaves. With aromatics, you
can experiment a lot. You can add different
coriander seeds, you can even add
coffee lime leaves. It's totally up to you what you want to adapt the stock towards. Now, when we make
vegetarian stock, there are basically two
methods to make it. The first method is that we cut the vegetables and
we sort it with oil, and then we add the water. Now, you can make it
like that as well. But I don't like making
it like that because sometimes the oil makes
the stock really cloudy. What we're going to
do is we're going to prepare the vegetables, cut the vegetables
and just put it in cold water and
start cooking that. Let's begin by preparing
our vegetables. The first one, let's
prepare the onion. What I like doing is
just removing the tail [NOISE] and the head as well [NOISE] and just
cutting it in half. Now, if you want, you
can keep the skin on. That's completely fine. Just give some more darker
color to the stock, so I'm just going
to leave it on. Just set this aside. These carrots are
a little bit old, that's why I'm peeling them. But if your carrots
are really fresh, you don't even need to peel
them when you make the stock. [NOISE] I know some people who even use the peels
in their stock. That's completely fine as well. This is a good excuse to use
any old vegetables you have, which are edible, but you
can't actually cook them. It's really nice, very
used them as well. [NOISE] Perfect. Set this aside. Now, we're going to
cut the carrots in a miracle that's basically
just these big cuts. [NOISE] Perfect. You want them to be about this size because they are going to be
cooking for like 1, 2 hours, so you want to
keep it bigger in size. Perfect. With the mushrooms, we'd just be keeping it
whole and not removing the stems because the stems
also have a lot of flavor. Perfect. The next one is celery. Whenever we use celery, make sure to wash it
nicely from here, because there is sometimes
a little mad here. Perfect. I've
already washed this. Now, this one as well, we just cut it similar
size to our carrots, which is this size. This big. [NOISE]
Perfect. That's great. Now all our veggies are ready. As you've seen,
I've just rough cut the vegetables because
I'm making a stock. That is why you want to
keep your vegetables a little bit bigger because they are going to
be cooking longer. Perfect. I'm just going to
put this in the pot and I'm going to put
the aromatics as well and cover it
with cold water.
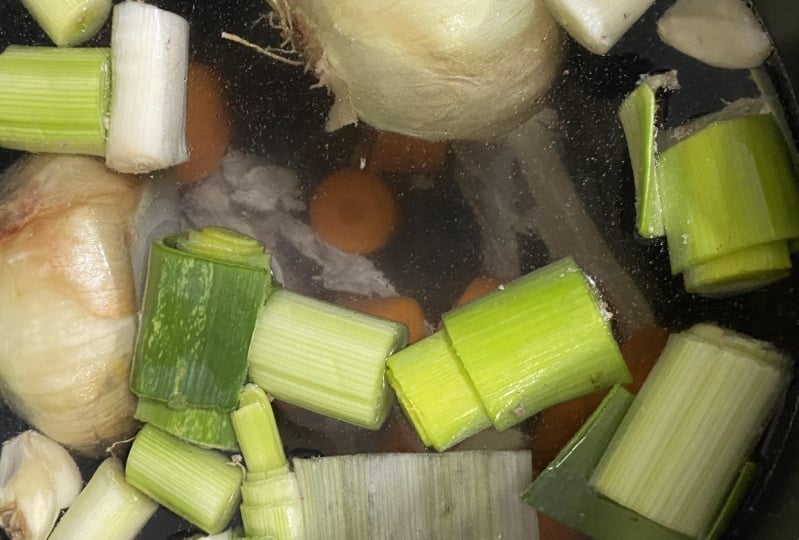
10. Vegetable Stock- Cooking The Stock: To make this stock
I'm going to be using a 3.5 liter Dutch oven, so this is quite dark
and quite big as well. If you're using a stock pot, make sure that it's big
in size and that you can at least put about
2-2.5 liters of water. Perfect. Just put
all the veggies in. [NOISE] Put the
aromatics in as well. [NOISE] I'm just going to
cover this with cold water. [NOISE] Perfect. Let's put this on heat
and start cooking it. I'm going to put the
gas on the highest heat possible because I want
this to come up to a boil. [NOISE] Also when I make the stock I always
make sure that I have a needle and a bowl so that if there's any impurities
coming on the top, I can skim it off. Now what I'm going
to do is just press all the mushrooms
down a little bit. Press the aromatics down as well so that they
completely submerge. Once the stock
comes up to a boil, you will start seeing
some amount of impurities on the top. That's really nice
and we start skimming that just to make
a peanut stock. The first step is to get
this stock to a boil, and then we'll reduce
the heat slightly, and then we want a rolling boil, not a really vigorous boil. I'll show you when this
comes to that stage, should take anywhere
between 10 or 15 minutes. When it comes to a boil I'll
show you how it looks like. [NOISE] It's been
about 15 minutes and now you can see that it started to boil really vigorously. What we'll do is we'll lower
the heat to a medium-low, and we just want a rolling boil. We don't want such
an aggressive boil. Next, we want to
extract the suite of flavors in our vegetables. If we do the early
aggressive boil, sometimes it can get
a little bit bitter. That is why we want a
slight more gentle boil. Just lower it to medium-low. [NOISE] You see how that's
boiling, that is perfect. It's not vigorous, but it's
still like a rolling boil. That is surely good to extract good flavors out
of the vegetables. Now what I'll do is
I'll set a timer for 30 minutes and
then I'll have a look and I'll skim the top as well and I'll show you how
this looks like as far. Let's have a look at
this after 30 minutes. Our stock has been cooking
for about 30 minutes now. It looks really nice and it
smells really nice as well. Let's skim this
stock on the top. If you see any sort, just want to get rid of that
just to make it cleaner. I don't see a lot in this compared to if I make
a chicken stock. But there is still little bit, if you see, just
get rid of that. Usually just around the corners
is where all the dirt is. I just want to press
it really gently. Just get as much as I can. Perfect. That looks good. This stock is really clean. It looks very nice. If you see the
color of the stock, it's getting this really
nice golden brown color. It looks really beautiful, that's because of
the onion skins as well as the mushrooms. I'm going to cook this for
maybe another one hour, so total of 1.5 hours. I'll show you how it looks
like after one hour now. Keep it at a rolling boil like this, nothing
more than that. Our stock has been
cooking for one one now, so a total of one
hour 30 minutes. You can see it's
reduced a little bit less than half. That's perfect. I actually want to get about
one liter from this batch. I think that looks really good. Also, I want to check the color and I want
to show it to you. You see that color? That is a beautiful
dark golden color. That is exactly what
I'm looking for. That has a lot of umami, it's because of the mushrooms and all the vegetables we put. Now what I'm going to do is, [NOISE] I've just got
a strainer and a bowl. I'm going to strain
liquid in the bowl. Switch off the gas [NOISE] and get a [inaudible] because the
handles are quite hot. Let's strain the stock. [NOISE] Just get as
much as you can. [NOISE] That's
nice, so delicious. Let's have a look at the
color of that stock. [NOISE] That looks
really beautiful. [NOISE] That is a
really beautiful stock. You notice we haven't seasoned
the stock yet and that is because what happens is that if we season the stock before, it tends to get really salty
when you're reducing it. As a rule, I always season
the stock right at the end so that I can actually
know how much salt I'm putting and it doesn't
get too salty. Let's season the stock
with a little bit of salt, and you can also add a
little bit of black pepper or white pepper,
anything you like. Just put a pinch of salt in it and then let's
paste the stock. [NOISE] Mix it together. Let's finally taste
the stock [NOISE]. That needs just a little bit
more salt. Mix it together. [NOISE] Perfect. Going to taste it again. That taste soo delicious. I can actually taste
so much umami from the mushrooms as well as
from the vegetables we used. When it comes to
storing the stock, what you can do is
you can put it in the fridge for up to 3-4 days, or you can actually even freeze
it for like three months. So whenever you want to use it, you just put it
on a pot from the frozen one and you can
just defrost it like that. Totally up to you how
you want to consume it. I hope you like this lesson and never throw away vegetables
that are getting spoiled, you can always use them
to make stock like this.
11. Fried Egg: French Style Fried Egg: In this section of the class, we'll be learning
how to cook eggs. Now, eggs are one of my favorite
things to make at home, even in the restaurant as well. They're really easy to cook, but they're usually hard
to cook really well, because they're so
simple, you know, if they're undercooked
or overcooked. We'll be learning
different techniques of cooking boiled eggs, fried eggs, as well as two different types
of omelets as well. You'll be learning a lot
of different techniques in this lesson and I'm
really excited to begin. In this lesson, we'll be learning how to make fried eggs. I'll be showing you
two ways to make it. The first one is a
French technique, which we usually make in
fine dining restaurants, and the second one is a more of an Asian technique of doing it. Making a fried egg
might seem easy, but it's tricky to
get a nice fried egg. I'll show you the
tools you'll need. Get a good non-stick pan, because it doesn't stick
to it and it cooks evenly. You can also use a galvanized
steel if you want, but I prefer using a non-stick. Secondly, I've got butter and I've got some vegetable oil. The oil I'm going to be using
in the Asian style egg, and butter is in the
French style eggs. [NOISE] Also, these
are free range eggs, so make sure that you use
good quality eggs which are fresh because they'll taste better and they'll be
more softer as well. Also get like these two plates, to put the egg in
after it's cooked. Let's begin cooking the egg, so I can show you the technique. To cook a French-style egg, I'm going to put the gas
on really low flame. [NOISE] I'm going to put some butter on
it just let it melt. [NOISE] Just about that much. It's about one teaspoon. You can also put less if
you want, but usually, in French cooking, we tend
to use a lot of butter. Let it melt gently
so that it coats the pan and gives a nice
texture to the egg. [NOISE] Once it starts
to coat the pan, you'll see the butter will
slightly start to sizzle. That's when we put the egg
and we lower the heat. I can see that the butter has
started to sizzle slightly. Now what I'll do is
I'll lower the heat, to like really low. Because you want to
cook it reality gently. You don't want any color on the egg and crack the
egg in the butter. Perfect. After you crack the egg and the butter is
still slightly sizzling. And you'll see the sides
of the white getting set. You'll just cover it with a lid. You want to basically
cook it with the steam of the lid so that the white sets really gently and the egg yolk still
remains really nice. This can take anywhere
between 20-30 seconds. Let's have a look at this after maybe 10 -15 seconds
to check how it looks like and make sure
the heat is really low. It's been about 15 seconds. Let's have a look
at the egg. You see how nicely it's set? Surely right, very beautiful. I can see that this needs to set just a little bit
more to the right. I'll give it about 10 seconds more and then
we'll take it off the heat. It's been about 10 seconds
and that's perfect. If you see, you can touch
the white and it should be nicely set and really delicate
and the yolk as well, shouldn't be cooked at all. This is ready to put on a plate. Now if you want, you
can season it on the pan or you can
season it on the plate. Let's take it off the gas. Gently, slide it on your plate. I'm going to season this with a little bit of salt and
a little bit of pepper. Season it with a little
bit of sea salt on top, just gentle a bit, not too much. If you want, you can
use white pepper, you can also use black pepper. [NOISE] Put a tiny bit
of black pepper on it. Not too much, just a little bit. Perfect. [NOISE] When
you look at the egg, you can see that the
white is really delicate, really soft and there isn't any color at the
bottom of the egg. It's still really gentle. You see how that's still white. So that's a typical French egg. The yolk, let's cut through it. You see how the eggs that
is still really delicate. This is perfect French egg. I actually like eating this. So if you cook a fried egg
without covering the egg, what happens is sometimes
the sides overcook. They become really crispy and if you'd like
that, that's good. But this method of cooking
the egg is also really nice. I'm going to taste this and
see how it tastes like. That is so delicious. I really like cooking
the egg like this. It just gives it such a
nice flavor of the butter and retains the texture
of the egg so well. Let's learn the second
style of the egg, which is a more Asian
style of fried egg.
12. Fried Egg: Asian Style Fried Egg: To make our second fried egg, which is basically an
Asian style fried egg, we'll be using the
exact opposite method of the French style. We'll be cooking at a really high heat and
actually a lot of oil. Let's put [NOISE] the heat
at the highest possible. What I'm going to do is put
about two tablespoons of oil. Just about that much. I know this looks
like a lot of oil, but if you put less oil, the egg actually absorbs more, so it's better to put more oil. We're also going to base
the egg with the spoon, so it's always
good to have more. Traditionally, this is
actually made on a wok, but we just got to make
it in a non-stick pan. While the oil is heating, I'm just going to
crack the egg in a bowl so that it'll be easier to pour it and basically
it won't splash on you. [NOISE] Set the egg
aside. Let's see. The oil needs to be just
a little bit more hot. But the oil shouldn't smoke, so don't make it
too hot as well. Once this feels a
little bit high, it's quite hot now. What I'm going to do is just going to hold the pan
with my right hand, pour the egg just in the
center [NOISE] just like that. You see, you want it
to bubble like that. What you do is you just get
a spoon and you pour it over the egg to get these
bubbles on the side. The cooking time for this egg shouldn't be more
than 30 seconds. You don't want to cook too much because you don't
want to sever the yolk. You see how that's filling
these bubbles at the top? Beautiful. Just keep basting
it until it get like this. Crisper is more like that. Perfect. The egg is ready. I'm just going to put it on a plate and just
switch off the gas. You're already [inaudible]. Just take the egg
with a spatula. Just a pour the rest of the oil, so the oil stays behind and you don't have a
lot of oil on the egg. Make sure you pour it out and you put the
egg on the plate. See how this has got
this nice sort of blisters and it's got a really
nice color on the bottom. Nice caramelization. I'm just going to season
it a little bit of salt. Just a pinch of salt. You can also put pepper if you want. I'm just going to check. I'm just going to show you
the texture of the yolk. That is so jammy, that's beautiful and
the skin of the egg, the whites, should
be super crispy. Can you hear that crispiness?
Hello, beautiful. This goes really good
if you're making fried rice or if you're
making any Asian dishes, you can put that on
top and it gives a really nice crispy texture. Let's taste this.
That is really nice. It's got a really nice
crispiness to it and compliments any Asian dish
you make really well. This is our second method
of making fried egg. You can make anything you like. Personally, if I'm
making Western dishes, I tend to make the first one, but if I want to make a fried rice or any
other Asian dishes, I make the second one.
13. Boiled Egg: Preparing and Boiling the Egg: Let's learn how to
make boiled eggs. There are a few techniques
to make boiled eggs. The first one is that
you take cold water in a pot and then basically put the eggs and get
them to temperature. Now I actually don't
like doing that because the eggs
don't cook evenly. I like starting from hot water, putting the eggs in
and actually putting a lid on so that it
cooks more evenly. When we cook the eggs today, we're going to make sure that we have a bowl of cold water with ice so that we can
directly take it from the water and put it in
ice so it stops cooking, also it makes it easier to peel. Make sure you do this. Also, I'm going to be
cooking five eggs today. I'll be cooking it for
different duration. The first one would
be five minutes, the second one would
be six minutes, then it'd be eight, 10, and 12. We will see the
different textures of the egg and we'll understand. Whichever you like, you
can select that one. Let's begin by cooking the eggs. Put the pot on the gas and I'm just going to switch
it on medium flame. Also, I have a kettle
with hot water. I just pour the hot water. Just cover it up. Perfect. We don't want the
water to boil exactly, but it should just be simmering
when we put the eggs. Because if you boil the water
it doesn't cook nicely, like the white set really fast, so you want to just
simmer it slowly. I just want to get this
to a boil then I lower the heat even more and
I'll put the eggs in. When you see these tiny
bubbles coming here, what I'm going to do is I'm
going to lower the heat too low because I want the
eggs to cook very gently. One-by-one, I'm just going to put the egg inside
very gently so it doesn't break, bend a sieve. You can also use your
hands to do this, but I prefer using
the sieve because it doesn't crack and
it just stays nice. Perfect, just picked one
more and just add the one. When I put them I'm
just going to cover them with a lid and
also set my timer. Perfect. You see these
bubbles coming up. It's not boiling vigorously, but it's just cooking
really evenly, and my heat is at the
lowest flame possible. After five minutes,
I'm going to take one egg out and put
it in the ice bag, that'll be a really
soft boiled egg. Just get the led out and take the egg very gently and
put it in ice water. [NOISE] Once the egg
gets slightly cool, what I'll do is I'll
slightly crack it, stir the water seeps
in and it gets easier to sort the egg. Our egg has been cooling
under 30 seconds now. Before I put the other egg I'll just show you
how to do this. [NOISE] Just crack it slightly. You get the set of cracks
and the water can go inside it and it gets
really easy to peel. Just set this aside and
you get the other egg now. After six minutes, let's get our second egg
and put it in water. Perfect. Set the lead again. Just put the second
egg in the ice water. This one, again, we're
going to do the same thing. We set this for 30
seconds and then we'll crack it so that
it's easier to peel. It's been eight minutes and
let's get the third egg. [NOISE] Now we have
two eggs left. The one I'll take out
after two minutes, and the other one
after four minutes. That's our 10-minute egg and our 12-minute egg.
Set this aside. It's been a total of 12 minutes, and let's take out,
I'll find the egg. Perfect. Set this aside
in the cold water. Perfect. Just crack it. [NOISE] Perfect. All our eggs are done now. I'm just going to
let them set for 5, 10 minutes and then I'll
start peeling them, and then I'll show you
the texture of the egg. Our eggs have been cooling
for about 10 minutes now, I'm going to start
peeling the eggs. When you peel the eggs make sure to keep using this water, so that the shell comes
out really nicely. The softer boiled egg, the harder it will
be to deshell it. Just be super gentle with it and then you'll
find this skin here. Can you see that skin? Once you see that skin, you can easily take the
shell out like that. Just make sure not to
disturb the white too much, especially when it comes
to the soft boiled egg. Perfect. Once you
get the skin it should just come
out really easily. Sometimes it's easier to do it, sometimes it comes
out in one go, sometimes it's a little bit
more trickier to do it. This is a soft one, I can feel it. Perfect. Now what I'll do is before I put
it on the plate, I just give it another rinse. If there's any shell
which comes out, we don't want any
shell and we solve it. Perfect, I set this aside. Repeat the same thing again. [NOISE] I just try
to get the skin off, it will just come
off really easily. See how easily that
is just coming off. The ones which are
boiled longer, they are easier to feel. Let's keep going sideways
and see how that falls off. Wash it again nicely, so all the shells go away. Perfect, I set this is right. Perfect. That's our final egg. Just wash it. Perfect. Now let's cut this and see how it
looks like from the inside.
14. Boiled Egg: Cutting the Egg and Textures: I'm going to cut the
eggs and show you the different consistencies of cooking. Let's have a look. Just go in one go, and cut it. This one is a hard-boiled one. Make sure you clean your knife and you've got a hard-boiled,
a semi-hard-boiled. Let's cut the next one. That looks so good,
that is beautiful. That's actually one
of my favorite ones. That's a soft-boiled one. You've got this jammy egg
yolk and really soft whites. Just set this aside here. Be super careful with this because it's just going to
fall if you're not careful. [NOISE] Clean the board. Let's try to cut
this one as well. Very gently, I can
see it's very soft. That must be the
five-minute one. That's five and then
that's six minutes. Because this I can see is even more delicate
than that one. Let's cut the last one, perfect. That's unjammy egg. That's the eight-minute one. You've got all the eggs now. I'm just going to
arrange it and then explain it to you really nicely. These are our final boiled eggs, and I'm super happy
with how they look. Let's go through it over again, so I can revise with
you how they look like. This one is our first one. This was about five minutes. What am I looking at here? If I lift it, firstly, it's super delicate. This one is also quite hard to peel as well because
it's so delicate. The yolk is completely jammy. This is super nice if you
want to use in salads, even if you want to put
on top of [inaudible]. I really like using this one. It's really delicate and that's usually tasty as well because I prefer this texture. This one was five minutes. The second one was six minutes. Now, this one is a
little bit more stable. The yolk is just
about slightly set, but this is still quite runny. If you prefer this one, this one is about six minutes. The next one was eight minutes. Now, the eight-minute
egg is quite jammy. If you see the center, the yolk is cooked and at the same time it's really jammy. If you want to make
it in sandwiches, you can use this one. The next one is
our 10-minute egg. Now, this is completely cooked. Your yolk is completely cooked. The white as well
is quite sturdy. This one as well, is quite nice if
you want to make sandwiches and if you'd like the completely
cooked texture. The final one was
a 12-minute egg. Now, I wanted to cook it for 12 minutes because
I wanted to show you what a slightly
overcooked egg looks like. Because I generally don't
like cooking it like this. Anything above 10 minutes, for me it's too overcooked. Because the texture isn't that nice and it just feels
a little bit hard. If you can see the
yolk is really hard. Also sometimes you can
see on the back here, a little bit of grayish color. It's not there in our egg, but you might see that
if you overcook the egg. I generally don't
prefer cooking it for more than 10 minutes since
this is a 12-minute egg. I would advise not to
make it for this one. If you want a fully cooked one, make it for about 10
minutes, perfect. Those are our final eggs. I hope you could learn
a lot from this. When you make this at
home, just experiment with different timings and also with different textures
of these eggs.
15. Mushroom Omelette: Preparing the Filling: In this lesson, we'll be
learning how to make omelete. Now omelete are actually one of my favorite things to
make and eat as well, because they're so delicious. We'll be covering two
techniques of making omelete. One is the country
style omelete, which is fully cooked. You have this nice brown
color on the outside. The second one is a
classic French omelet, which has to have
a rarely pale and rarely creamy
inside. Let's begin. The first one I'll
show you will be a mushroom country
style omelete. We'll be just cleaning
the mushroom, cutting this into small pieces, sorting the mushrooms, setting that aside and cooking the egg. Putting the mushroom in, putting some parsley
and just folding it. You can also add a little
bit of cheese as well, so we'll also add a little
bit of mozzarella in the egg. So let's begin by
preparing the mushroom, as well as whisking the eggs. To prepare the mushroom, we'll be using a wet towel to clean the outside
of the mushroom. You can also wash it, like I've seen some
people do that as well. But I prefer to do it
this way because it maintains the flavor
of the mushroom. [NOISE] I'm using a
Portobello mushroom, you can also use any
swiss brown or any regular mushrooms as well. Perfect. That looks clean. Now you can cut this
any way you like. What I'll do is, I'll just get rid of the
top, just like that, just to get a flat edge [NOISE] and then
another way like that. [NOISE] I want to
get a medium dice. Set this aside as well, perfect. Now we have a flat surface, [NOISE] go straight
in like that. [NOISE] Perfect [NOISE]
Set those aside as well. I'm just going to
stack them together, and get a rough medium
dice with this. Doesn't have to be exact because we are going to
be cooking it and it's going to be inside the egg. [NOISE] Perfect.
That looks good. [NOISE] Something
like that size. That looks [inaudible]. Let's set this aside in a bowl [NOISE] Just because
I'm using a Portobello, that's why I cut it
into three parts. If you're using a
regular mushroom, you might not need to do that. Because with
Portobello mushroom, if I just cut it
into small pieces, it would still be quite big. I can just cut it into, [NOISE] [inaudible],
and just line them up. [NOISE] into a medium dice. [NOISE] Perfect.
Something like that. The [inaudible] as well. [NOISE] Perfect. [NOISE] Our mushroom is ready and I'll just show
you this size again. This size should be good, because once you cook them, they will reduce in size. Just set this aside and
let's start cooking them. Let's cook the mushrooms now. I've got a non-stick pan, and I'm just going to
put this on medium heat. [NOISE] That's perfect. Just heat the pan
slightly and then we'll put the mushrooms
initially without the oil. This is a technique
which I learned when I was working in a
fine dining restaurant. I actually used to just
cook it with butter, but cooking it with this method, what it does is it draws out the moisture
in the mushroom, and once we cook it
only 15-20 seconds, then we'll add the butter in. The mushrooms get
better caramelization on them when you
cook it like this. Just get it a little
bit more hotter. The pan feels hot now, so I'm just going to go in with the mushrooms and
you'll hear this, like scissor, because the water has started to
evaporate from the mushrooms. [inaudible] for
like 10-15 seconds. [NOISE] After they've been cooking for about 10-15 seconds, I just go in with the butter. [NOISE] Just add about
half a teaspoon of butter, [NOISE] and then just take a spatula and just
spread the butter around. This cooks the mushrooms nicely. [NOISE] In this [inaudible] [NOISE]. Then all the mushrooms
will get nicely coated. [NOISE] Perfect. At this point I'm going to just season them a
little bit of salt, [NOISE] and a little bit of black pepper as well. [NOISE] Now I'm going to switch off the heat because
they're nicely cooked. [NOISE] I'm going to finish them with a
little bit of parsley. Put your parsley here. Parsley and mushrooms
goes so well together. [NOISE] They look beautiful. Our mushrooms are ready. Let's have a look at them. They are beautifully caramelized and they look quite
even and nice. Perfect. Just set this aside, and then you just crack the eggs and start cooking
the eggs this far. The reason why I like
cooking this before so that I have everything
in place when I'm actually assembling the egg. Just spread the
mushrooms in the bowl. Beautiful. Let's set this aside and let's [inaudible]
our eggs together.
16. Mushroom Omelette: Cooking the Omelette: For this recipe, I'm going
to be using two eggs. You can also use
three eggs as well, completely up to you. [NOISE] Let's crack the eggs. I'm going to add a
little bit of cream, roughly about one tablespoon. This gives a nice richness. I'll actually add
another tablespoon just to make it more tastier. Season it with a pinch of
salt and black pepper. [NOISE]. Just whisk it
together really well. [NOISE] When you see there's
no strands of any whites, and it's nicely combined, let's start cooking the egg. To cook the eggs, I'm
just going to put the pan on set of
medium-low heat. [NOISE] Just put a knob of butter up here by
half a tablespoon. Just let it melt and
once it starts sizzling, we'll put in the eggs. Just move the pan around and go to the sides
as well so it doesn't stick. You see it started
to sizzle now, so I'll go in with the eggs. Beautiful. [NOISE]
Now what I'll do is I'll take my spatula
and I'll just keep moving the egg around
so we get smaller curds. You don't need to move it
too vigorously as well, but just a little bit. Because you want the
curd to be really nice and to taste
really good as well. Similar to how we made scrambled eggs,
similarly like that. But once you see the curds
start to set, we'll stop. Just a little bit more. I can see that the curds
have started to set now. Perfect. At this
point, I'll just stop. What I'll do is that, whereas you can see there
are some raw egg here, because I've cooked here. I'll just take all the
raw egg to one side. I'll just hold the egg like this and take it to one side and put it towards the heat so this part cooks
more than this one. When I put my mushrooms, I'll be putting it around
here because I want this part to cook because I can see that it's not
cooked that much. Just let it set for
about 15-20 seconds, because you want the bottom
also to get nice color. You want the bottom
to be nice and brown. I can see it's
still quite light. I just want it to
get more color, so just let it sit there
that side towards the heat. You'll see slowly this
will start to cook more. Let's see the color. I can see some amount
of browning happening there, so I like that. Now I'm going to add mushrooms
as well as our cheese. [NOISE] Perfect, to set this. I'll go in with the
mozzarella cheese as well. It started to melt nicely and I'll just scrape this side to see it's coming
off the side really well. I just want to check
if it's brown enough. I think it can be a
little bit more brown, it's just slightly
more light now. Just set this aside for
about 10-15 seconds. To just give it a little
bit more browning, I'll just put some
butter on this side. Just put the butter and let
it go on the bottom here so it just comes off
easily and it also gives really good flavor
and a nice shine today. Beautiful. At this point, what I'll do is I'll
just take one corner really gently and just
flip it and seal the egg. Just take it from the bottom, and just like that. Beautiful. It's got a beautiful golden
color on the top here. I'm just going to cook it at
slightly low to medium heat so that the cheese and the mushroom just seal
themselves in the egg. [NOISE] Let's see the
color in the bottom. That looks beautiful. The cheese is nicely
melted as well. Now let's transfer
this to a plate and see the texture of the
egg from the inside. To transfer the egg, you just hold the pan like this, then you take it to one corner, put your plate like this, and just flip it nicely. You see it's got a beautiful golden
brown color on the top. That's exactly what
you're looking for when you're making
our country egg. It should be fully cooked on the top and slightly
custody from the bottom. Just finish it with a
little bit of parsley, it gives a really nice
color to the egg. You can also put some
Parmesan cheese on top if you like or any
other cheese will do. Perfect. Let's cut
through the egg and see. That feels so nice and soft, and the cheese is also so
nicely melted, so stretchy. It looks really
nice and beautiful. Let's see the inside. You see that really nice
layer of cheese and mushroom there and so
delicate and soft, it's not overcooked at all. Let's cut the inside and see. Wow, looks so beautiful, super delicate from the
inside. Let's taste it. That is so delicious. This egg is actually
also quite easy to make. Just make sure that
don't overcook the custards and keep stirring
it when you're making it. If you'd like, you can put
other filings as well. You can put spinach inside this. You can put tomatoes as well. You can experiment
with different cheeses as well to this egg. The technique is
just a template for you to experiment the
different fillings. After this, we're going to
move on to the next one, which is a slightly
more challenging one, which is a classic
French omelet.
17. Classic Herb French Omelette: Let's learn how to make
half French omelets. Just take two eggs. [NOISE] Perfect. I'm going to add about
two tablespoons of cream. I just like adding
one for each egg, and season it with salt and pepper [NOISE]. In this recipe,
I'm just going to add the parsley straightaway in the egg because it
gives really nice flavor. You can also add
chides if you like. You can add other herbs
as like tarragon, even basil if you like. It's totally up to you, which herbs you like. I like using parsley a lot, so I'm going to use that, and this gives a really nice and add the flavor to the egg. Just whisk it get
together [NOISE]. Perfect, and it's
nicely combined. Let's start cooking the egg. To cook the egg, I'm
just going to put the gas at medium-low heat, [NOISE] and add about one teaspoon of butter [NOISE]. Just about that much.
Just let it lead, and let it sizzle slightly
then we add the egg. As you can see the
butter is nicely melted, and the butter is starting
to sizzle as well. So at this point, I'll just lower
the heat slightly, and put in my eggs. With these eggs,
you have to store them lowly bald
because you don't want any color on the
outside [NOISE]. This goes in, and use your
spatula and keep stirring it. I also sometimes take
it away from the heat. Just like making a really
creamy scrambled eggs that I just thought
once it starts to set. So you want the cords to be
really small in the egg, and also no color on
the outside [NOISE] See how vigorously
I'm staring that. That's what's going to give
you a really nice codes. I can see that the code has just started to set just about. What I'll do is I just take
it to one corner [NOISE]. Just this corner
and this corner, I'll just leave it
as thin as possible. Once it sets, I'll start
rolling from this corner. Just set it for
maybe 10 seconds, and once you put
just a tiny bit of butter on this side here, it comes off easily
[NOISE] Perfect. Just see if it's coming
off, beautiful [NOISE]. You see the codes. Super delicate. You start folding from here, make sure it comes off from the sides really well as well. Beautiful. Just run it down
the side and fold it again. See that's completely white. That's what you want
when you're making a French style omelets let. You just give folding it. When you reach the
end, what you do is you take it to one corner, then you just for this here, and seal the egg,
just like that. [NOISE] Perfect. The egg is nicely sealed, and I'm just going to quickly
put it on a plate now. To put it on a plate, what you do is you just
hold it like this, and gently just
flip it over that. Perfect. You see this
is completely right, there should be no
color on the egg, and if you want to give it
a more cylindrical shape, you can just tighten
it slightly. Perfect. You can also
brush a little bit of butter on top just to
give it a nice shine. Just take your spatula and the butter should just melt because of the heat of the egg, and gives a really nice
shine on top of the egg. This is an optional step, totally up to you if
you want to do it, and finish it just a
little bit more parsley. Just a tiny bit. Just gives it a
really nice shine. That is a half fine French egg. This is a classic French omelet. Very delicate codes inside
and no color on the top. Let's get into the egg, and I want to show you
the codes inside [NOISE]. Beautiful. You see the
codes inside the egg, it's just oozing out like yeah. Wow, that's pretty nice. Lets cut another slice
then I'll show you. Let's see, from the center, you have these really
beautiful codes, just oozing out from here, and so delicate and nice. Lets taste [NOISE], it
should be really soft. It has such an amazing
taste [NOISE]. That is so delicious. It just this tastes so nice. It's little bit tricky to make. I'm glad it's so delicious. When you join a
professional kitchen, your chef will actually
ask you to make an omelets to test your
skill as a true chef. So if you can make this, you'll pass and you get the job, and if you can't make it, you won't get the job. It's funny, but it
just looks easy. But it's actually not that
easy to make a nice omelet. I hope you like this
lesson and send me pictures of your omelets
and tell me if you like it.
18. Knife Skills: Cutting a Whole Chicken: In this lesson,
we're going to be learning how to
debone a chicken. The first thing I'm
going to do is show you the setup to do this. Make sure that your
chopping board is stable, either with a mat or with a wet towel because you don't want the board to move when you're
cutting the chicken, otherwise you will
cut your hand. So you want to be safe. When we debone the chicken, make sure to be as
hygienic as possible. We will be using two
towels in that case. The first towel will
be just for my hands, then I wash it, I just
clean my hands with it. The second towel will be in
contact with the chicken, so we'll keep this separately. Let's have a look
at the equipment we'll need to cut the chicken. I'm going to be basically
using these four knives. [NOISE] You can just
use a chef's knife. You don't need this. But I'll just show you the ways you can do it with the
boning knife as well. Also make sure to have
these pair of scissors because they are really useful just to cut through the bone. I also have a small knife here just in case
you're using that. You can use either
of these knives. There isn't like you need
a specific knife for this. But in professional kitchens, we usually use the
boning knife to do this. Perfect. Set this aside. Let's get the chicken
on the board. First thing I'll do
is I'll just dry it so that it doesn't
slip on the board. Because if it's wet,
it just moves too much and you don't want
to injure your hand. Just dry it on the back as well. I just washed the chicken
when I took it out of the bucket just to get rid
of all the impurities, as well as if there's
any blood as well. Perfect. Also, I
have two bowls here. This is for the bones
and this is for the final pieces of the chicken. I'm going to take my
chef's knife first. [NOISE] Before I do that, I'll just explain to you
the parts of the chicken. If you look at the chicken, it's basically attached
through a wishbone here, which holds together
the chicken breast. If you look at the back, you have this backbone here and where the wings are
attached basically. As well, as you can see, the oyster, the
thigh, and the leg. We'll be cutting through here
to get the oyster as well. There are a lot of ways
to debone a chicken. I'll just show you the
way I like doing it. First, what I like doing is go through the incision here, then I cut the tie. You see this incision here, you just basically
cut it like that. [NOISE] Then you just
turn the chicken around. We want to go through this
line and get the oyster. I'm just following the
line, the fat line. Now, what you can do is
you can just flip it, and just do it like that. Just have gently guided
through the back. See how I'm moving my knife. I'm not going all
the way through, I'm just doing like this. I'm just going through the bone and just guiding
through the fat line, and get the oyster out of here. Perfect. You see this bone here, you just go through it, and you get your thigh. Similarly, for the
next one as well. You just go through this
line here at the back, and you go through the
oyster, [NOISE] this line. Then what you do is you just take the bone out like that, and just follow the bone and gently just cut it like that. You have the oyster here. This is your oyster, and that's your thigh,
and that's your leg. I'm just going to
set this aside. Next, what I'll do is I'll just clean my knife
a little bit. To take out the wings, what we do is we just
hold this cartilage here, so there is basically a gap. If you move the wing, it moves like this. Just below the cartilage, just take your knife like that, then you break it slightly. Then once it breaks, you
just follow the cartilage, and then it will just
come out clearly easily. Similar to this as well, you just go below the cartilage and just
take it off like that. That's your wings and your legs. Now, for the breast, [NOISE] just make sure that the skin just stays
intact and nice. Now there are two
ways to do this. First is to just cut through the backbone through scissor, or you can just gently guide
it with a knife as well. [NOISE] I'm just going to
cut it through a scissor. It's this quite easier. You see this fat line here, you just want to go along that. [NOISE] That is a line which will offer you
the least resistance. See how easily I
could cut through it. Similarly, you'll see
this fat line here, just go along the fat line and [NOISE] it should
come off quite easily. Perfect. I'm just going to
set this backbone aside, I'll clean it later, and we'll use it for stock. I don't want to
look at that now. What I want you to
look at is the breast. Just clean this as well. Now, some people, what they
do is they keep the bone in, like this bone which we
have here, they keep it in. But I'll just debone
it completely. You have this line along here, so just follow that and
make an incision like that. You see this line separating
the chicken breast. Now what I want you to do
is just follow through that line and just guide
your knife through. [NOISE] Just guide your
knife through inside. The meat should just fall off. Don't worry if there
is some meat left there, that's completely fine. Perfect. That's our
chicken breast. Then you'll have this
tenderloin as well, which will be attached to that. Basically you can take it out. That's your tenderloin,
that's your chicken breast. Just make sure to keep the
skin really nice and intact. Keep this aside. Now we'll
do the similar thing here. It's almost like when
you fillet a fish, you just go through the bone. You just let it guide and
see how my knife is going. I'm just being guided. [NOISE] Perfect. That's your back. Set this aside. Now you just want to
take the tenderloin out. Perfect. You might have some bone here
from the wishbone, so make sure to take that out as well just so that it
doesn't come out. That's the wishbone,
set this aside as well. [NOISE] That's your
chicken breast. You've got one breast here. That's your two tenderloins. That's the other
chicken breast as well. Make sure the skin is on nicely. Those are your wings, and those are your legs. Now re-cut the legs. What we'll do is we just go along the flat line,
and the joint. You this line here, super
easy if you do it correctly. If you just take out the skin, you'll see this
line of fat here. You just want to go along it. Just in one go, it shouldn't offer
any resistance. It should come out,
and this should be white and this should
be red when you cut it. Just set this aside. That's your leg,
that's your thigh. That's our final chicken. See how many pieces we
could get from one chicken. It's so economical as well. Because when you
get a full chicken, it's much cheaper than getting
these individual pieces. Once you practice it, it shouldn't take you
more than five-minutes to debone a whole chicken. Let's go through
again what we did. First, what we did was we deboned the
thigh and the leg, and we set that aside. Then we got the wings by taking the cartilage and just
going through the bone, and we separated the wings. Then we took out the back with the scissor and we
set that aside. Then we debone the
chicken breast by going through the center and just going
through the bone and just guided a knife throughout, so it comes out. Then we took out tenderloin from it and we kept the
chicken breast intact. This is our full chicken
which is deboned. Now, I'll be showing
you recipes of how to use these different parts
in different preparations. You know you have to cook them differently because the
chicken breasts cooks faster. These parts take more time. Tenderloin is the
fastest one to cook. This is for stir fries, this one you can use for
roasting, as well braising. These ones are slow
cook like for soups, for braising as well. This one I usually
tend to use in stocks. Or you can even make
like chicken wings, but you can try it as well. There are so many uses of
different parts of chicken. I hope you could learn
different techniques of how to debone a chicken
and I can't wait for you to try and apply these techniques when you get a chicken to cook next time.
19. Chicken Stock: Preparing the Ingredients: In this lesson we'll be learning how to make a chicken stock. After we learn how to
debone a chicken we are left with the chicken carcass
which we need to use, so chicken stock is an
amazing way to use that. Why do we make a
chicken stock at home? Chicken stock at home has a better mouthfeel,
it's more tastier, it has more nutrition, and it has a lot of
collagen as well which thickens the
sauces we make. Compared to stock cubes we get, they don't actually take in that much because they
don't have collagen naturally in them but when
we reduce bones at home, it has got that
thickness in it and it got a better
mouthfeel as well. In fine dining restaurants we always make chicken
stock from scratch, so whoever comes earliest in
the morning to the kitchen has to put a pot on the gas
and reduce the chicken stock. We use chicken stock in
almost everything: in soups, sauces, stews, pasta as well. There are basically
two kinds of stock, the first one is the brown stock and the
second one is a white stock. In a brown stock, we basically brown the bones and
the vegetables. We deglaze the pan and
then we reduce the stock, so it gives a more deeper flavor and a deeper color as well. The white stock which will
be learning in the lesson. We don't actually brown the
bones or the vegetables, we just basically
reduce them so it has a more cleaner flavor
as well as color. Some tips when you
make the stock is to always blanch the
bones when you make it. Blanching basically
removes all the impurities in the bones and it
makes it cleaner stock. The second one is to use aromatics when you
reduce the stock, so use bailey,
peppercorns, thyme, whichever you'd like because it just gives more
flavor to the stock. The third one is to keep
skimming the stock occasionally, maybe after every
15-20 minutes just to skim off all the impurities
which come at the top. The fourth one is to
never boil the stock vigorously because that
can make it cloudy, always keep it at
a rolling boil. These are some of the tips you should follow when
you make the stock. Let's begin and learn
how to make the stock. After deboning chicken, we'll be learning how to
make a chicken stock. I've got the back
and I've also got the carcass after removing
the chicken breast, and I've got both of the wings. If you want to make a
stronger chicken broth, you can also use the thigh
and the leg as well. Before I start
preparing the stock, what I'll do is I'll
just remove some of the fat from
the back portion. You see all this fat here, you don't want that
in your chicken stock so just get rid of it because it would make the
stock really cloudy. All the white bits are
just filling here, I'll just get rid of it, and also you see here this part of the back
you get rid of that as well which is the tail part of it because it's just
not really good, it just makes it too fatty. Perfect. Now this
is nicely trimmed. What I'll do is I'll
blanch the bones. What blanching
does is it removes all the impurities in
the chicken stock, so it really simple. What we do is we start
with cold water, but just the bones. We get it to a boil, boil it for maybe five minutes and then we strain the water, we wash all the
bones, we clean it, we scrub it nicely
then we start again with our aromatics and our vegetables when
we make the stock. Let's begin with
the blanching stage of our chicken stock. To blanch the bones I'm going
to take a four liter pot, so this is just a Dutch oven. Now you can use
any part you want, you can even use
stainless steel parts. Just add all your bones in it, [NOISE] the wings as well, and I'm just going to cover
this with cold water, make sure the water
is cold and not hot. [NOISE] Perfect. That's roughly about
three liters of water, and I just want all the bones
to submerge really nicely. Now what we'll do is
we'll get this to a boil and then we'll strain it. We're going to put the gas at really high heat because
we want to get the water to a boil and just put your pot with the bones
and the cold water. No aromatics at this
stage, just cold water. Let this come up to a boil, it might take like 5-10 minutes, and once it comes up to a boil I'll just show you
how it looks like. While the chicken bones
are coming to have boil, I'll just show you the
aromatics as well as the vegetables I like
to put in the stock. For the aromatics, I'm going
to use some peppercorns, the leaf, parsley
stems, and thyme. If you combine this
together and put it in a muslin cloth or a tea bag; it's in French, it's
called a bouquet garni. Bouquet garni
basically means it's just like a bouquet of herbs and ****** just to
flavor this stock. The next element to
flavor it is garlic, and garlic gives really nice
and already to the stock, so I really like putting it. The vegetables we'll
be using are carrots, celery, leeks, and onions. Now these are really classic
for a friend's style stock, but if you're making a
far or you're making any Asian style stock you
can also use lemongrass, you can also use
mushrooms so it's totally depends on what you
want to use the stock for. But this is a really nice
base recipe which you can use for a lot of different dishes like
risotto is for soups, so this is really amazing
if you can master this. Also we're using bones which otherwise you will
have just thrown in the bin, so it's just such a nice way to use the whole part of chicken. We're not wasting anything, that is why I really
like making the stock. You can also make this stock in advance, and just freeze it, and just use whenever you like, so it's super convenient. After understanding
the ingredients, let's start preparing
our vegetables and do a [[FOREIGN] which is a rough
cut which is used for stocks. The first one is leeks
so just cut the bottom, [NOISE] and now you
can do it many ways. I'll just do that
really like this, [NOISE] chunks of leaf, and just cut it in
half like that. Perfect. Set this aside, then let's do onion. Now with onions there
are two options, either you can peel it or you
can just let the peel on. If you let the peel
on you'll have a slightly more
browner colored stock with a more deeper flavor,
totally up to you. [NOISE] In my case what I'm going to do is
I'll just cut it into half and I'll keep the peel on because I
like doing it that way, but if you want you can remove the first peel just like that. If there's any dust
or something in it, it just comes off, and then you can keep the
peel which is inside. You can keep that peel on
because that's more cleaner. Perfect. For the
friend's style stock we generally use white onions, we don't tend to use red
onions for this one. For the celery, super easy. Just cut it into big pieces like that because we're going to
be cooking for quite a bit. With garlic as well I know some people who
just leave it whole, what I like doing is just
cutting the top off, and just to release the flavors of the garlic
we just give it up. Just let go. [NOISE]
Bang it like that, so all the flavor
has just released. If you want you can also just quickly take the cover off, it's totally up to you. I know some people who
leave it on as well, so just up to you how
you want to do it. [NOISE] The next one we're going
to use is carrots. Now, carrots, you can use old carrots as
well in the stock, it doesn't have to be completely fresh as long as they're
still quite form. This one is a
slightly older carrot which was lying in my fridge, so what I'm going to
do is peel it off. [NOISE] Peeling is optional. I know some people
who don't peel it, but I just tend to pill it. I prefer peeling it because sometimes
there can be a lot of impurities on the skin outside, so it's
totally up to you. I'll set this aside. [NOISE] Carrots give
so much sweetness to the stock so it's such an
amazing ingredient to put, and definitely it's essential
to put carrot in the stock. Again, we're going
to do a final part, so just keep cutting like this, big chunks like that, and this one as well. [NOISE] Preferably about
one inch cubes like that. Perfect. All our ingredients are now ready to
put in the stock, so these are all our vegetables. This will give
amazing flavor and amazing nutrition as
well to the stock. Let's check our bones now and see if they've
come to have boil.
20. Chicken Stock: Cooking the Stock: Our stock just came
up to a boil and I can see lot of
impurities on the top. That is quite nice because
you want all the impurities to come out so you get
a much cleaner stock. I'll just let this cook for another two minutes and then we'll take it off the gas and wash the bones off and then refill the
pot with fresh water. After three minutes of boiling, I'm just going to take
it off the gas now. I just wanted to show you
before I take it off. You see all the fat has
come on the top and all the impurities have
come on the top as well. Make sure you get to this stage before you start cooking it. Perfect. Then
switch off the gas, and let's wash this. After washing the
chicken really nicely, I fill it with water, it's about three
liters of water, and make sure it
comes to the top. Go in with your aromatics, just put all of
them straight in. Go in with all your
vegetables and [inaudible]. Put your onions and put
your leeks as well, and the rest of the carrots, and celery, and garlic. This looks really good. You want it to come till
here, just about here. You don't want it to
overflow as well. Now I'm going to put this
at really high heat. I want this to
come up to a boil. Then I'll reduce
the heat slightly, so that it's not boiling
too aggressively. But at the same time you have this rolling boil happening. Put this on high heat. [NOISE], and let's get
this up to a boil. After about 10
minutes of cooking, our stock is finally
come up to a boil. You can see it
looks really nice. What I'll do is, I'll
just reduce the heat slightly so it doesn't
boil really vigorously. Also, what I have here is
just to boil with a ladle, so whatever
impurities which come on top or any fat which comes, I just want to get that
basically out of the stock, so our stock is really clean and tastes
really light as well. You see how I'm just trying
to get just on the top. I'm not going really deep. I'm just going on
the top and getting all the impurities and
oily fats as well. Keep skimming this
throughout when you make the stock so you get a really
nice and flavorful stock. [NOISE] For me, this
level of boiling is good. You can see it's rolling boiled. It's not super hard boiled, but it's just a
rolling boil on this. When the stock comes
to a rolling boil, what I like doing is
putting a timer for two hours because usually I've seen the stock takes anywhere between 2-3
hours to be ready. We'll have a look at two hours
as well just to check if the taste is good and if it's lexer of nice texture as well. Every 15-20 minutes,
I'll just come and just give a quick skim through it
on the top with my ladle, just so that it's really clean and it's not really
oily as well. I just set this aside and we'll have a look after
maybe 30 minutes, and I'll show you how
the stock looks like. After 30 minutes of cooking, you can see that the stock
is reduced slightly, now it'll become a
little bit more thicker. Also you can see the
rolling boil here, you don't want any
higher than that. What I'm going to do
is just take my ladle, and just from the top, skim off all the fat I can get. Just press it and it should
come off on the ladle. [NOISE] You see that
fat floating there? Just get rid of that. Just search on the
sides as well. I just press it slightly on the side and it should
just come on your ladle. So perfect. Just feel it looks pretty good. I'll just let this go for another 30 minutes and then I'll show you
how it looks like. After 30 more minutes, so now we've been cooking
the stock for one hour. You can see that it's
almost reduced by 1/4. What I'll do is again, I'll just skim off the fat. Just take your ladle
and just get the fat from the corners so that
the stock becomes lighter. I'm just gently pressing them. Perfect. I'm going to set
this aside for one more hour, and then we'll have a look
at the stock and check if the flavor has
infused properly, and then we'll season
the stock as well. After two hours of
cooking the stock, the stock it is finally ready. It's reduced by a little
bit more than a 1/2. You want to basically
obtain roughly about 1-1.5 liters
out of the stock. Now, if you want basically to convert this stock into a broth, you can also add a stock cube that will also
give a really nice flavor. Sometimes at home I
actually add a little bit of stock cube if I'm
making a chicken soup. Now this is really good
to use for risottos. Even as a base for any soup, it's really nice to use this. I'm going to just
switch off the gas now, and I'll just get
my strainer ready, and strain the stock. Just take your Dutch oven and just pour it really
gently so everything just falls down nicely [NOISE]
Just strain it nicely, and that's our final stock. Just strain this stock nicely. Let's assess how the stock is. You can see really nice
color on the stock. It's slightly golden because we left the peels
on the onion on, and we've got some
nice color from that. If you see the stock
is really clean, it's got barely any fat
was built on top of it because we actually blanched the bones
before we made it. That is why it's really nice
and light when you eat it. Also, I can see some amount of collagen floating
on the water, which basically comes when
you reduce the bones, and we cook them really nicely, you get this thickening
on the stock, which is really good sign that
the stock was nicely made. Now at this point
what you can do is, either you can put
a stock cube in it, if you want to make a soup. You can also season
it right now, which is what I'm going to do. I'm just going to put
a little bit of salt. I like to do this right at the end and not at
the beginning because sometimes what happens is that if you reduce
this stock too much, it becomes too salty. It's always good to
add salt at the end. I'll just mix it
together nicely [NOISE], and see how good that
stock looks. Super clean. Amazing. When you want
to store this stock, you have to cool it down at room temperature for
about 1-2 hours, then you can just cover it
and put it in the fridge. You can also put it in
the freezer if you like, and just use it
whenever you want. I hope you make this at home and never throw away chicken
bones in the bin again. Always use them
because you want to use all parts of the chicken
when you're cooking.
21. Chicken Fricasse: Preparing the Ingredients: In this lesson,
we'll be learning how to make chicken fricassee. Chicken fricassee is a
really classic French stew which is made by braising chicken pieces in a
creamy mushroom sauce and also with half aromatics
and herbs as well. This is a really good dish
to learn because we cover different techniques such
as searing the chicken, also braising the chicken. We combine what we learned before by using chicken stock, and also reducing down
onions and mushrooms. It's a really good
base to learn a lot of techniques and also it's
a really delicious dish. Before we begin
with this lesson, I wanted to share with you some tips to make this
dish really nice. The first one is to caramelize
the onions really well. Now you want to do this really slow and you want
to do this really nicely because the onions will give a lot of
sweetness to the stew, and it just blends down in
the sauce as it reduces. Make sure to do
this really well. The second one is to use
good-quality chicken, preferably free-range
chicken because that will give the most
flavor to the dish. Third one is to use a good chicken stock when
you braise the chicken. The chicken stock
will give a lot of flavor as far as
mouthfeel to the dish. Preferably use homemade one, but you can also use
stock cubes if you like. The fourth one is to use aromatics when you
reduce the sauce. Aromatics like
thyme or bay leaf, they give such amazing
flavor to the dish. So definitely use that
when you make the dish. The last one is that when you use wine to deglaze the pot, make sure to use a neutral flavored
wine like Chardonnay, but don't use a sweet wine like Riesling wine because that
will literally ruin the dish. Make sure to use proper wine. You don't need to
use age wine at all. Any low priced wine would work
really well with the dish. Let's begin by learning how
to make this amazing dish. Before we start the recipe, let's have a look
at the ingredients, and I'll also
briefly explain you the process of making this dish. I'm going to be using a whole
chicken in this recipe. I'm also going to be
using chicken breast. Now in some traditional
French recipes we only use the chicken thigh
and the chicken leg, but I'm just going to use
a chicken breast as well because I wanted to
use the whole chicken. For the vegetables, we're going to be using
onions and mushrooms. Now both of them give
really nice flavor. Onion is for the sweetness, and mushrooms also give
a lot of umami flavor, so they taste delicious. When we cook onions today, we'll caramelize
them really well because that actually gives
a lot of flavor to the dish. Now for our aromatics, we are going to be
using thyme and garlic. I'm going to be chopping
this garlic finely, and I'm also going to be using thyme because its just when the dish braises the thyme
gives really good flavor. You can also add bay
leaf if you like, that also works really well. For the fats, we're going to be using butter as well as oil. I like using a combination of these because otherwise the
butter just tends to burn. But if you add a
little bit of oil, it doesn't tend to
burn that fast, and it stays quiet nice. I'm also going to be using
some cream and chicken stock. The chicken stock I'll be adding when I'm
cooking the braise, and the cream I'll
be adding right at the end just to reduce
it down a little bit. I'm also going to be using some white wine in this recipe. Now white wine gives
really nice flavor, especially when we
want to deglaze the pot after
cooking the chicken, and I really like using it. But if you want you can skip it. To thicken the sauce, I'm also going to be
adding a little bit of flour in the recipe. Flour is also optional. If you want to use it, you can, but you can make
it without it as well. But I want to just show you the traditional French
way of making it. That is why I'm using white
wine as well as flour. The first step,
what we'll do is, we'll just prep our vegetables. I'll show you how to
prep the mushrooms, onion, and garlic. After that, we'll start
prepping the chicken. Let's begin with the recipe. We prepare the mushrooms. We just cut them in quarters. [NOISE] We want to keep them just about this size because they're going to
be cooking for quite long, so we don't want to cut
them too small as well. [NOISE] Just cut all of them. I've also cleaned them
before I'm cutting them and remove the
bottom as well. [NOISE] Perfect. Let's set this aside, and let's move on to the onions. [NOISE] Just clean your
chopping board nicely. For the onions, we'll
keep it quite simple. We just cut the top
and the bottom, then we cut it in half. Just remove the skin. [NOISE] Cut the other one as well. After removing the skin, I'm just going to cut
into fine slices. [NOISE] Something like that. Just keep it finer
because we want to get caramelize the onion
and the finer they are, the more quickly
they caramelize. But if you keep it a little bit thicker, there's no problem. [NOISE] Perfect. I've cut all the onion
into thin slices. Just put it in a container
and set it aside. [NOISE] Just clean your workbench again, just clean your chopping board. Next, we'll prepare our garlic. We're going to fine chop the
garlic because we want to release its flavors and
cook really nicely as well. Just take about four
cloves of garlic. I'll just cut the head [NOISE] and just give it
a little bit of a smash. The skin should just
come off really easily. [NOISE] Perfect. Just remove the skin. Now to fine chop the garlic, what I'll do, I'll just cut
it into really thin pieces. [NOISE] Now what I'm going to do is use
a rocking motion, just go over it like that. [NOISE] Perfect. That should be good. Don't worry if it's slightly bigger as well
because it's going to be cooked down and
it's going to just reduce, don't worry about it. I'm just going to
set this aside. All our veg are prepared now, and now I'm going to start
preparing my chicken. Just put this. Perfect. [NOISE] Clean
the chopping board again. Let's prepare the chicken. To prepare the chicken, I'm just going to lay it
down on the chopping board. Basically what we want to do
is we just want to dry out all the juices in
the chicken because if there are too many juices
it just releases a lot of water and it doesn't taste nice, and it just doesn't
caramelize too fast as well. [NOISE] Let's just dry it so the skin gets nicely
caramelized and we cook it. The other side as well. If you don't like the skin, you can remove the skin as well. That's also completely fine. [NOISE] Perfect. I'm going to set this towel aside now and I'm
not going to use it because it's contaminated
with the chicken. Don't use this again. Now what I'll do is I'll season the chicken with
salt and pepper. Just season it generously because you want the salt to
be absorbed by the chicken. Put some pepper on it as well. [NOISE] Just turn the chicken and we'll season the
other side as well. [NOISE] After you've season the chicken, what I'll do is
I'll just set this aside because all our
ingredients are now ready. I'll put a Dutch
oven on the heat, and I'll start
melting the butter and the oil to sear the chicken.
22. Chicken Fricasse: Cooking and Braising the Chicken: We've already started
cooking the chicken. I just wanted to show
you, I'm going to use a Dutch oven to make this dish. Super delicious when
you make it in this. You can also make it in any
other source pot as well. But make sure that it's
quite deep when you use it. Put the flame on
medium-high [NOISE]. You want it to get a little bit hotter when we add oil
as well as butter. Butter has been heating
for about 30 seconds now. It feels quite hot. I'll go in with the oil
and the butter as well. I'm adding quite a lot
of butter at this stage because I'm going to be using
this fat for everything. I'm not going to be adding
additional fat to this. I know it seems a lot and you
can reduce it if you like. But this is French cooking and in French cooking we tend to use a lot of butter.
It's totally up to you. If you want to use it
you can make sure that it's spread around [NOISE]. At this point, I'm
going to go in with the chicken [NOISE]. Add chicken legs and the thighs. After we have seared
the red meat, which is your leg and the thigh, you're going to go in with a chicken breast and
sear that as well. This one, I sear three
minutes on each side. We just want it to have
a nice caramelizing on the top so it just seares the
juices inside the chicken. Let's go in with the
chicken breast as well. We're just going
to skin side down. Perfect. You want
a gentle scissor , not really aggressive. This is perfect [NOISE]. We'll be cooking this
as well for about two, three minutes on each side. You just want to get a
nice caramelization. After cooking the chicken
breast for about two, three minutes on each side, you should be able
to get a really nice light brown
color like that. It looks really
beautiful. I'm just going to set this aside as well. These are beautiful chicken
pieces and you can see it's got such a nice golden
color on the outside. Now with the chicken breast, you don't want to
cook it too long as well because otherwise
it will overcook. I just cooked it
for three minutes each side and the rest also
they look so beautiful. Now what we'll do is
we'll just set this aside and we'll move
on to cooking our veg. We will start caramelizing the onions then we'll
add the mushrooms, and then all the
aromatics as well. Let's begin with the next
step of the recipe [NOISE]. Add in all the onions. Just mix them
together really well. Perfect. Seasoned really
generously with salt. I've been caramelizing this
for about three minutes now. You can see it soaked
up all the oil. The salt actually really helps it break down a lot as well. But I want to cook this
a little bit more. I want this to become
more browner in color because that will give
more flavor to the dish. Just keep clicking
this and I'll show you the consistency
I'm after [NOISE]. I've been cooking
this for a total of six minutes now and can you
see the texture of the onion? They've become really soft. They've caramelized,
but they're not burnt. You want exactly that. You want them to reduce
really slowly and release all their juices
and caramelize and get this really
light brown color. It looks really nice. At this point, I'm going
to go in with my garlic, go in with all the
garlic as well as the mushrooms as well [NOISE]. I'm going to season
the mushrooms as well because you have to season all the
vegetables individually, so that they don't taste blunt. Add pepper as well [NOISE] and mix it
through really well. The mushrooms as well, you should cook until it
completely caramelizes, and becomes really
nice and soft. It should take about three, four minutes as well, and make sure that the gas is at medium low
and it's not too strong because you
don't want to burn the garlic and the onions. After three, four minutes, you can see that
the mushrooms are nicely caramelized as well. You see this font at the button, that's so much flavor. That's beautifully
flavor. At this point, I'm going to go in with
my [inaudible] and just start it through [NOISE]. It releases all its flavor. Now just take
everything to one side. I'm going to add in
the wine so I can get all this flavor
at the bottom. Beautiful [NOISE]. Scrape all that flavor. This is called deglazing the pot and the flavor is
called fond, F-O-N-D. It's basically French
for all the flavor, which is stuck at the bottom. You want that because that's
so delicious. Perfect. The line is completely reduced. Am going to add
the stock in now. Perfect. After
adding this stock, I'm just going to gently add all the chicken pieces as far. See you just want to make
sure that the chicken is submerged and its just slightly
coming above the liquid. That looks good and take all the liquids left over because you want
all chicken juice. Perfect. You want to basically
get this up to a boil. Once it gets up to a boil, you want to reduce the
heat to simmer and keeps simmering this for about
40 minutes in total. At the 20-minute mark, I'll just have a look at
the chicken breast because that cooks faster than
the chicken thighs. I might even take
that out before. I will show you the part
when it comes up to a boil. Then we will reduce the heat and get it up to a low simmer. Once this comes up to a boil, this one has skim
off all the top. All the impurities at the top, that you get a clean sauce. I'm going to lower
the heat slightly because I don't want it
to boil so vigorously. I'm going to cook this
for about 20 minutes. Then we'll have a look at the chicken breast just
to check if it's done. If you see that the liquid
has reduced too much, you can just drop it up with
a little bit more stock. That's completely fine. Our fricasse has been cooking
for about 20 minutes now. If you see the liquid is done such a
beautiful brown color. It looks so nice. It's got such amazing flavor of the onions and
mushrooms as well. At this point what I'll
do is I'll just take out the chicken breast and
check if it's cooked. Because you don't want
to cook it for too long because the
meat is quiet lean. But we'll leave
the other part of the chicken just to keep
cooking for 20 more minutes. Let's take out the
chicken breast. What I'm going to do is take a thermometer and put it right in the
center from the top. Just to check the temperature. That's perfect. Let me show it to you see if you
see that temperature. It's about 92 degrees Celsius. That's definitely way above the 75 degrees Celsius we're looking for on a chicken breast. That's perfect. This
is perfectly cooked. I'll take the other chicken
breast out as well. Perfect. Just set
this aside and let it rest and let's have a
look at our braids. The remaining chicken,
I'm going to cook for 20 more minutes because I want it to braise longer and just become really
soft and nice. Our fricasse has
been cooking for about 20 more minutes and
it's reduced really nicely. At this point, I'm going
to go in with my cream. The color will
become so beautiful and the flavor as
well. Mix it together. You should be able
to get a really nice golden brown color. That looks really nice. I'm just going to cook this with the cream for about
5, 10 minutes more. It just becomes a
little bit more thicker and then we'll
put it on a plate. After cooking this for
about five more minutes, what I'm going to do
is I'm just going to go in with the chicken
breast as well, just so that it absorbs all the flavor and she's got it nicely. Perfect. The sauce
is almost there. I just reduce it for
like five more minutes. Our dish is finally ready. You can see the beautiful sauce, the consistency of
the sauce as well. You can see that it's quite thick and that's exactly
what I'm looking for. What I'm going to do now
is just put it on a plate and just show you the texture
of the chicken as well. First, I'm going to go
in with a chicken thigh, just put it in the center. Then put the chicken
leg as well. Now what we'll do is put some mushrooms on top and put
a little bit of more sauce [NOISE] just on
the top like that. To finish it, I'm going to put a little bit of chopped
parsley on the top. That is really nice. You can also put in parsley
in the pot if you like. But I just like putting it on the top because it
looks more fresher. This is our final dish. Now, this goes really
well with bread. You can make some garlic bread. You can even serve
this with rice. That also goes
through really well. I'm just going to get a fork and cut this and show you
how it looks like. Let's cut the
chicken thigh first. That is super soft. It's braced so well, you can see the texture
of the chicken it just breaks so easily. Wow, that's so nice. Let's taste it. Put the sauce. Take a mushroom as well. Take a piece of chicken, dip it in the sauce. That is so delicious. The sauce is so well balanced and the chicken is
so tender and soft. The mushrooms and the parsley, as well as the time and the
onions which we cooked, they give such an amazing flavor that actually builds the sauce. You can taste just a little
bit of wine as well. It's delicious. You should
definitely make this at home. [NOISE]
23. Conclusion: We finally reached the
end of this class. I'm sure you've learned a lot
of different techniques and all these techniques will truly elevate your cooking
skills to the next level. Now, if you have any doubts, feel free to message
me and share pictures with me
because I really like seeing your work
and also follow me on Instagram and
YouTube as well. I hope to see you in my
other classes as well. Thank you again for
enrolling in this class.
 Shubranshu Bhandoh, Baker/Pastry Chef - Le Cordon Bleu