Transcripts
1. Introduction: are you a beginner? Want to long complete character creates and process in my ear for production? Hi, my name is Nalini Kanta Gina. I'm a treaty instructor. I've been working since 2008. I have worked as game artist in luxury. Is it'll on Through interactive gaming studios based in India? I've also thought that arena animism, jica on brilliance education As a treat instructor, I've also taught more than 30,000 students all around the world through my online courses. At the end of this course, you will be able to model, texture, rig, animate similar cloth on hair and render cartoon characters using my on substance Bente. In this course you will be longing cartoon character modeling in Myer Text Cering Substance Mentor Rigging on a mess in creating cloth and head using and clock rendering animation. I'll start the court with Meyer basics in case you have never used to my before. Dana Model the character in Meyer. After that, I'll unravel. You've is in Meyer and then I'll switch to self suspender and takes on the character there . Then I'll export text searching to Meyer onset of lights, materials and textures there. Then I'll drink the character, and then I'll animate the character and create a walk cycle after that, a lot on the cloth, so I'll use in cloth for both the cloth on the hair simulation. At the end, the arugula rendered the animus and sequence using a lot Discourse is 28 hours long, A real time tutorial, this course is step by step, and there's no fast forward and no escape. I have designed this course for picking of students who want to create characters for film sort films, but struggles to do it because the lack experience and lawless off all these topics needed to create a character. So if you are interested in, please enroll Lau and be able to clear your own characters for film on sort Fels to death.
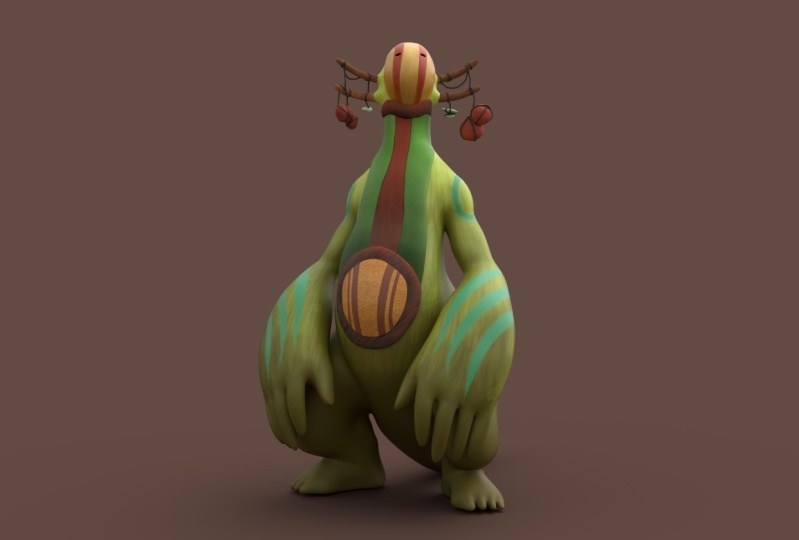
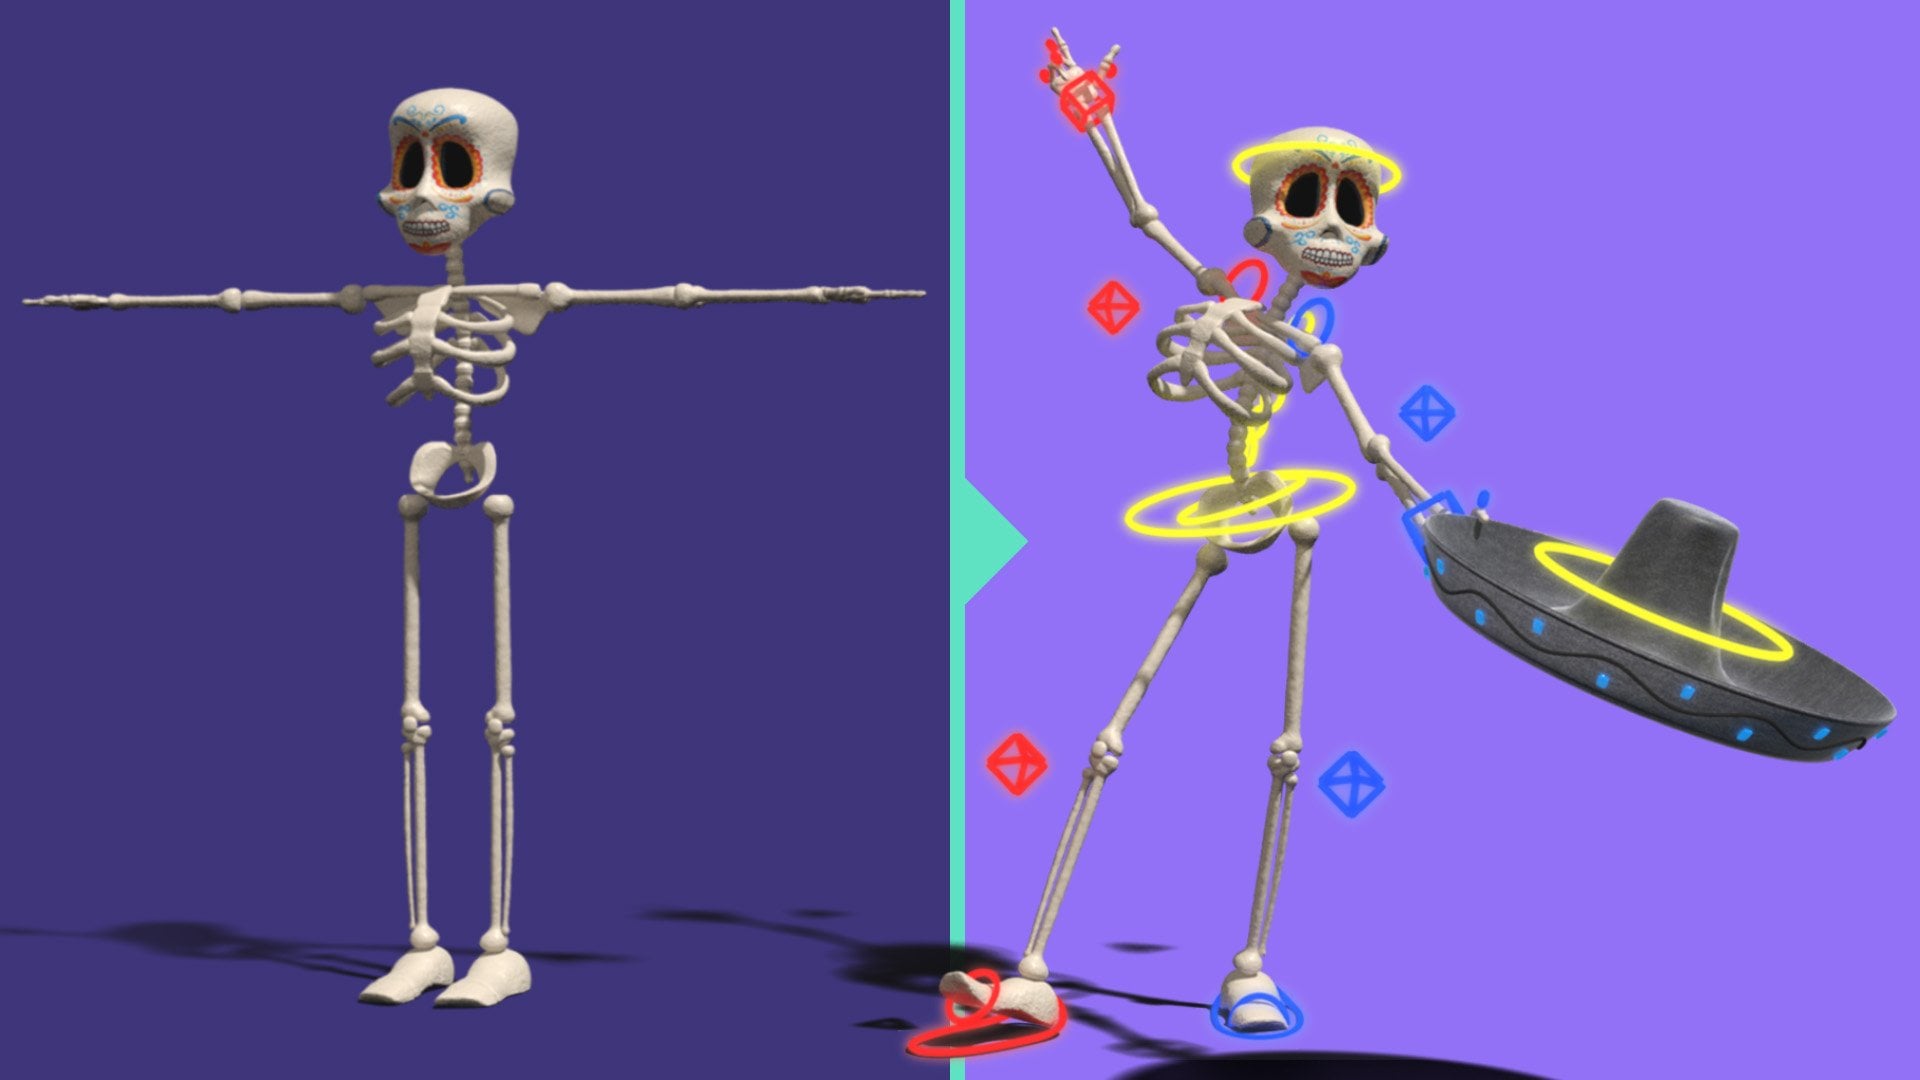
2. What are in Project Files Folder: I'm going to say at this exercise fights with the also. If you extractor excess file posit files will get this to foreigners here on inside. The reference polloi will get this images to model. So this is that the character image we're going to create this character on? We have the front and side emit. Okay. Now we have another image years which will help us in the animation states. We're going to create a walk cycle in the courts. So we're going to look at this image is at that time. Yes, we have. This dream is here on inside this character development project. This is my actual Meyer project Fuller. Inside this, you'll get a lot of things you can just look at this thing. These are my file, actually. So you can goto the scene. And inside the scene we have these my character Rick, file on Mike act of final render file. So these two files you can look at and compare your work? Maybe because sometimes I get students one this files just to compare their work on here inside the substance folder. I have my substance file on my text files, the textures be going to export from substance. Mentor this that those files. So you can you can look at those inside the social rights I have. Keep these two images because those are sourcing. Those are going to Maya, the inside the scene file. You get the my files. Okay, so we don't need this. Inside the measures folder, we have all these surrender images. The sequence images on. Instead, they ve actually have my exported every X files inside the gas A. I have the gas files, so you don't actually need it. But you have this to just look at it. But you are Colonnade. This tree. Definitely. So go ahead. Download. Oh, resources files the present files on We're going to start in the next lecture.
3. User Interface Overview: Hi. Welcome to this first lecture of this sexual on in this lecture. We're going to talk about the user interface off of you on. You can see when you open Meyer for the first time. By the way, I'm using my 2018 for this course. So when you install and open the softer for the first time, you you might see something like this. So here you can see a there's a floating window called What's New Highlight settings Here on you can see the green highlights if you look these off. Since these are these are having like, green boundaries. So that means there's a new absence released in this my 2018. Okay, if you go toe may new absence, it might see some absence being highlighter on. That's the new apps, um, released in this Mursal. So if you don't want to see this green highlights new absence, you can do on this off from here. Highlight. What's new Went on that off. Well, if you don't want this rooting window when you open Meyer so you can do on this off, you can call off this. So this art start of ups um, so that's done this to button off on, Let's say Okay. Okay. So here is my m. Meyer on again. I'm using my 2018. If you are using a lure person, Still, you can follow along because it's, like, same I'm not going to use in a specific off sons, but make sure, you know, install my 2018 if you if you can do that. So let's see what are there in the end if s on their names on some basic Constance. So here you can see my interface. You can see there are so many things, but you don't have to lawn everything to start. And by the way, we're not going to loan everything that are very different options, like for animism, for rigging, for rendering. So you don't have to lawn everything and then start, Okay, We're going to long, very basics. And then we're going to start our character project next sex and on in this excellent going toe covered on my basics. Okay, so here you can see on the screen. I have a big space here, and this is my workspace here. We're going toe clear the mortal animate the model. So again you can see I have minerals. Have some absence Here. I have some substance to the right of absence to the left and some at the bottom, so we're going to see quickly what stand them. So on the top, you can see it, says those subject person on it says on title, which is the scene name. So this is called Title, but on bottom toe that this is called Menu Bar, so in the middle. But we have all the minerals on bottom toe that this line is called Stratos Lane. On here you can see the menu selector we're going to change May new from here if I Now it's by default, said to modeling. If I think this to rigging just north, this menu here is going to change. According to the no menu select here. Whenever you change the menu, it's going to solve that specific menus here. Let's tends to modeling here on you can see in the started slain. We have some new open since Epps in undo redo options and some of the absence here for rendering as well on Dhere. At the end, we have some absence for this area. I'm going to come back here in a minute. On here, you can see the self. And now the poly modeling self is active so you can assess the old upon early morning primitives and then some absence if I select card surface against going to change and so specific tools are were options related to this on if I change so make sure you have selected the proper self. Let's them using something from here. So But you have said to some other self Make sure you are. You have said the proper cells there. Okay, to the left, you can see the toolbox on Dhere. We have some very common obstinance on some layouts substance here so we can move about at scale and select absence here on at the bottom. You can see this is the time slider. So this is something we're going to use in animus in on bottom toe that that's the rain slider here on again. It's to save the rains, for I know times later on. This is the common line and DeSisto feedback area here and is the command. Basically it's called the Common Line and now the bottom of the my eyes called Help line here whenever I put my mouse cursor on something against See, it's suing. The tapes are the name of the tool something like that. Or you can even see the tools to motive. Here. You can see when I put my mouse courts on a tool, it says that it's saying something about the tool and those that cut. Okay, to the right, you can assess the channel box on the Larry litter here. This area list kind of changing. It always so no depend on those selection here now said to Channel Box. And later, If I select this one, this is collective beauty editor. And if I see like this one, this is called Morning two. Okay, so we have five off since here on this. The Modeling toolkit. This is related to rigging, and this is that tribute editor. This system tool settings. So if you click it, it's going to give a floating window here, so let's close it on. Is the general box on here again? You can see all those absence stacking here, So there's the Channel box. Morning told Kate at River Editor on human. I carriages this up some. So make sure you have selected the right now to have toe the work here. So let's say I'm working on the channel box and you have selected something else. So you're not going to find that time Hobson makes your first. You have selected the proper tab. Yeah, here at the center is called Workspace. So this is the mind profess, and we're going to see how toe modify and how Toe said Different interface. Now this interface is called my classic, and you can see that from here. So this workspace is said to my classic Andi. If I click on this, I'll get a drop down on from this drop down. I can say the different interface. So let's say more links standard. If I selected, you might see some changes in this interface. On you can see that time slider translator are gone on the common line is their help line is gone. I think the help line is still there. Have lined and common line here is kind of a new design, I guess so that this is a kind of more drilling related interface. If when you're mourning you don't need the time slider hundreds later. That's why it's like No, not keeping that particular your wife with this interface so you can use this interface when you are modeling, but it doesn't matter. You can also model it this into fast. So let me go back to the modeling standard and you have some other of sincere modeling export. If you said this, you don't access to any know any of this two tools or time cider decide 10 bucks. So it's kind of for exports who uses most of the exports are using the marking mineral. So I'm going to come back to this thing's letter so they don't need these tools on the interface so you can use this. We knew that like an export are you? You're using Mac marking men realistically, so we have sculpting in affairs. We have even editing interface, so you have lot off different interface. Andi for this sex, and I'm going to use this my classic. So let's go back to my classic. So this is the vital fall interface, basically. Okay, let's say you have changed the interface again since the inter press, so let's see how toe change the interferes. So if I goto this, let's say this toolbox on. If I goto this dotted lines of the toolbox, I can hold left mouse and drag on DNA. Make it a floating window like this so I can keep it on my second monitor. Or I can keep this on the right side. There's this Lord for that can see so you can modify the interface. So let's say I want the cell for the bottom. I can bring that so I can basically customize to my like So I can Let's say so. Let's support the self here. I can modify it on, and you can save this interface as a new interface by going to hear can save current workspace. Ours can give it a name and save it as your own in defense on, Let's say you want to come back to the factory default more. Come back to the fact that the fold interface you can do that by going to hear another agency. My classic has a kind of star Mark because we have modified dissenter fest. That's why that's there. So let's go and recited from here so we can just set current workspace and it will come back to the factor default more. OK, so let me go back to the minnows here. So we have the menu selector makes you. You have selected the proper minnow when no toe assess a particular menu here. So let's set the modeling on. You can see some up, some some lines here. Let's say I'm using the substance and on your PC, it's It's not there like this. That means it go latched. You can see this this line and this letter triangles to that. That means there is something which is collapsed. So these are basically group group two different gotta What it's like these always snapping up since are in a group so I can click on this left line of that group toe collapse it like this on if I click, click on it again it's going to expand it. So that means if there is a triangle that mean something, some group is collapsed there. So if you don't found up since I'm using here, that means you have no accidentally cool off school left that thing. So let's click on that to expand. So here we have some collapsed absence. So again, see? Okay, then let's see how to hide or so some new elements manually. So you can do that. We're going to windows on Dhere. You can find something you elements you can just locally gone. This are double dotted line here and dear that off like this. And now you can see all the U elements listed here that I don't want The times later. I can turn this off on. I don't want the translator. We can turn this off. Okay? We can do this manually. All we can again to store all the way elements like this. So let me let me so you elements all you can do that all we can press control space key to maximize the full workspace on It's like going to hide everything else Control space, but again, toe come back toe Know everything. So whenever you're working on this workspace and you don't need these things for a while, you can just maximize by hitting controlled space. Andi, Now we are assessing a big screen so you can do this Agile on here can see I have a prospective view said toe This works best if I hate space. But all effect league on this layouts can see I have actually four views on now, this is the prospective You stop you from view side view. These are basically full different cameras on looking at the same place from different gamilas. So we're looking at the same place from top here, from front from side and from the perspective, which is a free from rooted camera on here. You can see every view Port Hardy, its own men on own icons can see they're identical. So we have identical menus for every Faneuil or everybody port. We can call these things people don't panel. You can call boat. Okay, so we have a nine identical absence. So if you go and do something, it's going to affect this view people. So, yeah, I'm stopping this lecture here in the next lecture. We're going to see how to navigate this viewed. So see you there
4. Viewpot Navigation: Hi. In this lecture you are going to Longview Port navigates and inside Meyer. We have four views here. You can see it's opens a model here so that we can see that clearly. So here I am, going to Windows on general editors. And here it can see something called Content Browser. So let's open that. Okay, Now I'm inside the content browser, and if I go to this morning and sculpting best messes So let's click on that and let's go to animals and you have no Baidu part best Mrs. We can use these businesses as a starting point for mortals. So let's go to animals. And here I'm going to drag something. So let's say I want to create this rector. So you just need to hold left mouse and drag to the prospective You here on Release the mouse year. Okay, so this is the way you can create all these models here? No, inside the view. So let's close this window. Okay? So now you can see only the feet because it's no big. The model is Toby compared to the great here. I'm calling this lines grade. Okay, so now I'm going to navigate this view so that we can see the full model So I can do that by holding Ault on right mouse drag. So if I hold all turkey on the right mouse button, then drag the mouse, I can zoom out like this. So again, hold old and right most dragged to June Jamaat like this on again Let me first to maximize this view. So now I can see the four view. I'm going to maximize this prospective you to this fool area so you can do that by hitting the space. But when my corsages on the view Yeah, so I want to maximize the prospective you. So the process is pulled the course on the view and then hit the space. But okay, so it maximizes the current view. If my core studies on a different view, it's going to maximize that view. So make sure the car studies on top. You don't have to select or click anything. Just put the mouse cursor on top and then hit the spaceman. So holding all time, right mouse is Ju Ming June Jamaat. Unless it's a Juman on, I want to ban to the head So I can do that by holding all than middle most drag. So hold Ault and then hold the middle mouse and drag the mouse. You can see I can pan like this. So it's like moving the camera up, down or left. Right, So you can burn two different idiots. Okay, so again, Jumanji, um out. Alright. Most drag old middle mouse for planning. Okay, two wrote it. Let's I want toe. No! See the hair from that. Say I can rotate by holding old and left most right So basically, with all all the three most button is going toe no use for navigation. So again, repeat all right mouse drag to zoom in Zoom out all to middle Most to pan old left mouth for rotating So these three of the men key navigate since off the people's If I let's say against hit space but toe glasses, all the four views Okay, Now you can see these views again in this views, the model is maximized are very close to the camera again we can holding all right mouse to zoom out in this view So you can do this but we cannot wrote it. All these views all these three views because these are terrific views on Does that no, probably constrained to particular access. And when I say access, that means direction. So we have three access you can see on this little colorful lines. So we have three axes are three direction on. Do you have no the Y axis, X axis and G excess. So, basically, why is the up down direction? Basically you can say this up down direction is called. Why access here on the left right here is the X axis on the front. Back here is the Z axis you can see when I wrote it. The view you can see it's aligning to the view, so just understand these access Pre axis again. Green. Colorful Why red color forex on blue color for G excess? No, Remember this color coding as well? So let's zoom out again. Remember that we cannot rotate this three view. We can only wrote at the perspective you because this is only for top again. It's going to constrain toe the way Access Onda for the front view is from the G Xs on the X, the side views from the X axis so you can navigate like this. Make sure you practice this before you move to the other nor next lecture. So So this is No. Three cabinet navigations, and it can maximize the views, just putting the mosque ulcerated, hitting the space. But to Maxim eight. So do these things, and we can also frame pure areas. Let's say you want to frame the face. Oh, let's so you have multiple objects, so let me create something. So let's go to this self for little morning self. Create a great a spear, so click on it. It's going to create a spear. You can see the Tinus Pierre here. So let's say I want O focused or frame this to the camera. We can select it like this again. I'm selecting using the selectable here. This is the vital fall selector tool here, So if I click it, it's going to select. And when it's highlighted grain that it's selector now if I hit F or if I goto view on Dhere, if I choose this frame selection, it's going to frame. That means the camera is going to close to that and framed object like this. So if you hit F select object will hit f toh framed of object in this view, and you can do that again here, in this view, agile by just putting the mouse Carson and hate this pillow sauerkraut F can do that. Or we can hit save deaf toh framed object in every view. You can see in this view thesis no bodies again on the way, so this body is on the way because it's the top view. So when it's June, this is on the West. That's why I can see it, but I'm going to solve you. Eliminate. OK, so these are a few options and let's see some display absence. So now the view port is said ed more is inserted more. That means you can see the saving of the object. So let me solve some different absence. If you go to this men setting men on. If you choose wear from now, you can see it said to smooth set all from this white circle. You concede that is Dobson selector on If I select the word from It's Going Toe saw the model like this is going to just saw the construction is lines of the character are off the object. You can see the spiritual like this. But again, you can see the saving in these views because again, in this views, the settings is different. So the settings that independent off different views So you can see I can set where prim in one view and said it in other views. So again, let's go to Centerview smooth at all. So for this to absence, we have some sort cards off forties. Where Freeman five. It said it. Let me press four full or from more and fight for ceremony again. Put the mouse courses in this view and hit four for our friend five for seven, 45 So basically, this to display mode is very, very important. And again, if I hit four here, you can see the spear, Andi from the top. Because now you can see the model in where frame and I can see through the model. Basically, So we have some other absence. Other absence as display morts. So let me so you few absence. So they jobson Kalua where Freeman said it. So that should be here inside. Yeah, in this manner vacancy were Kremen said it So let's turn that on. Now. You can see you can see the world frame on the city, so it's kind off. Good for like, if you want to see that a policy of the hits floor on the sitting on top of the sitting against Don this absalon. So all these off, since you're like sitting here, you have all these absence here, as is as a Nikon. So let's say you want to change the world frame you have. Dobson's here, so these air disclaimers. So this is some different categories. You can see from this lines so we can again collapse those things. So these are display modes where frame said it. So you can also use this. You can use Saad card can use days, or you can use the minerals. So we have were from Syria and we're Premont, said it. Then we have the lighting more on the texture. More so now I don't have any texture. So if I goto goto this setting and tone on this hardware picturing which is the texture more, I don't have any texture to. So let's say our character has some textures. Let me a sign a texture directs. Right, Whole right Moss on. Let me first maximus this view whole right mouse and object on. Let's go to material attributes. Okay, let's go to the material here. Now you can see Opens the attribute editor. Let's go to this brain one on If I goto this color and let's follow this checker off this color, let's click on that on. From here. I can assign in a texture by default texture. Let's say the checker. Let's assign that now you can see the texture because we're in this texture. Heart attacks during no more. So, in fact, on that off, even though we have picture, you cannot see, because now we can see only the said and more on again 44 were frame five. Sad card force aided more, six for texture. So six is the same for the substance against Press six to it on the substance on again. 576 protection. Okay, let's see the other absence and that is the lighting more and the lighting motors inside this lighting tap so you fight. They go here and use this all light absence. It's going toe be black because you can see we don't have any lights created for this character in the scene. So if I goto create mineral on Goodall Eitzmann on, If I create a light from this list, let's say the point light and now you can see the lights. So this is the light here again, I can use the move tool. From here on, Let's hold left most to move the light, and I can see the lighting again. We're from four. Say there 56 a structure seven is for lighting. So this poor more that there and again. Of course, they do more for where Freeman said it. So practice on this display morts and the navigates on Letterman. Delete this on Let's go to the setting more So let's look at five. Practice all this, no different morts and different Navigant sel and become Pamela with those absence. So before you move onto the next lecture, So in the next lecture, we're going to see how toe create different objects inside, Meyer
5. Creating Objects: Hi. Welcome to this lecture. In this lecture I'm going to talk about different ways to create objects. Onda how to use the imports so you can see I have selected the Poly modeling tab. Basically, this is the by default self have here on you can see I can create primitives from here. So this is the polyp primitives on. We have a different absence for surface. So basically we have two different ways even you can go to create and you can find north primitives and polygon primitives. Basically, we have two different types off object for modeling So one north, one polygon on and again we can also call the north's at surface. So again, the first ways you can go to the cell phone, click on the primitives to create it like this single click toe create it or you can go toe men the create menu And again it can go to polygon primitives to find a primitives. So Primitives is basically the basic very basic Sepp on you can use this saves as a starting point for any mortal. So again so this the spear again one way is can create it from self the other ways you can create it from mineral basically same thing again. You don't access toe all the polygon primitives here so you can see we have some limited absence on Dhere. We have some absence and there's a triangle. So if you right mouse, click and you'll find some other primitives here and there. Andi, if you don't find them derivatives, you can go to menu and find the primitives. From here, you can see all the least here. So this is one way. Let me delete the models. It can select it again. I'm using the selector. Just drag like this, holding your lip most like this to select Andi hit the delete key on your keyboard to deliver model. OK, so now let's see how toe get some primitives in a different way. So let me go to the mineral on bulletin primitives. Now, this time you can see there's Upson called Interactive Prison. So if you don't own that, its bite awful off. If you don't on their Dobson on now, you can see that obscenities turned on on. Now let's click on the spear again. Now again, See doesn't give you the spear immediately. when you click on it, says Drag to create. So now you can see we can create it by dragging the left mouse like this on. We can create with any scale like this if I create a cube. So this is the cue primitive on if I Know against it dragged the based on the grid, then pull up the height. So again, first Drug would be the best on day. Release the mouse on again, drag to the top to get the height I didn't see so again. This is because we have not corn on that Dobson, this interactive Pearson Upson It's allowing us toe clear, the Primitives Interactive Lee clergyman deleted. But most of the time I find no, I find the by develops and his good. So let's down this off so that when you click, it's going to give you your basic primitives with the basic skill. Is that one on scale? So these are some different ways to create primitives. So now next, let's see, let's create some North Korean div as well, so you can see I can create not relatives. So there's that basically two different model type, so let when Dilip Ticked. Let's go to the polygon modeling and let's create a spear and let's see how to modify this beard. So let's selected. And when you selected on you told this general box Hobson, you can see some absence here. Now you can see this. General books has the translate, rotate and scale value, Onda Translate wrote. It is said to Jiro on scale is said to one by default. You can translate from here to order it from here Scale from here. So if I goto this police pierre inputs, if I click on this, I'll get some absence. As as the inputs of this palace pier on. Now I can change the radius. If I click on it on, Let's say Just put two and press enter now I can see I can sense the scale of the spear. I can put some more divisions, these lines you can see. I can put more lines. Let's say 40. You can see more lines so you can also change this numbers by just selecting the name. Let's say the radius to select the name Andi, put the mouse cursor some head in this blank area and hold the middle mouse. So hold down the middle malsky on, then drag the mouse to change that value. You can also change the numbers by doing this selected on hold amid the malls and drive and say, I can interactive Lee increase or decrease that particular number that particular absence. So if it's a numerical number, then you can do this. Let's so again, these imports are dependent on the primitive Steiff. Let me deal. It is and let's bring a cube on. You can see the Q has a different imports it doesn't have a radius Institute has with height and depth. Because it's a cubit, it's not a circle. Are Spiric a lesane? So again we can go toe again, hear the name and we can hold the middle mouse down and then drag to increase the length in that particular axis. So we can. Basically, the X axis height is the why access on the depth is the G excess. Dixon, you can see like this. We can do this on control. Jeez on, do basically so we can do this, or we can put a number like just click and then put the number and press enter so dragging This is useful when you don't know what is the exact value need so you can go to the weight and middle Most rag and see interactive Lee. What is working? Basically. So let me go back to one here. So we have subdivision Weird height depth again. We can increase it manually like this by dragging the middle mouse. You can see like this practice this imports and again you're going to see different absence for different primitives. You just need to go and explode these things on by yourself. Just select the name on dragged the middle mouse to see what is that. And now you can see the cylinder has the radios and the height, so radios defines this. This week of the Circle on High defines this height this way. Why did accent like this and again subjects an Axis 20 that wins these lines, which defined the circle? We can increase or decrease this. If I go to subtitle height Now it's said to one so we don't have anything in the height. It's a single subdivisions. If I increase it, you can see we're getting more subdivisions in the high idea. I did Exxon. Basically on the subject gaps is this area you need to explore like this. Just select the name mill most drag and see what standing on. But I don't understand that. So practice no. Are digesting this imports practice creating different Polident primitives on North primitives again North Primitive has the same thing in ports. Can are just that on practice these things before you move into the next lecture. So in the next lecture, we're going to see how to save on open files in Meyer.
6. Saving and Opening Files: Hi in this later I'm going toe show you how to save on open file inside Meyer. So again, let's create something first so that we have something for saving. So let again Goto Windows and good general editors content browser on Let's bring something to this view. Let's bring this horse. So let's hold middle miles and dragged to this view on Let's close this. Okay, so this my model. And now I want to save this file so that I can continue working letter. So let's save this goto file Andi Safe sin again. We have to absence apes in and step synods. So because I have not saved this file, it says on titled Here, you can see on the Star Mark is that that means it's not saved on again. The name is anti tell. That means we have not saved it. Let's go to file save sin again. It doesn't matter because I'm going to say for the first time, even if you have a little sip on, do you want to save on top of that again? You can use the same person all if you want to save in it with a different name than you need to choose the safe. Seen as so because it's the first time, it doesn't matter. So let's clear conception. Okay, so no, this is the same as absence here. The safe's in absence. You need to browse where you want to save Andi. Let's say Go to my computer, go to the distance on Very want to save your file on Let's go toe. Let's create a full local project files on inside that folder. I'm going to give a name for this, My file. So let's say horse on licit So you can see now the title bodies suing the proper no destination and the name of the file here at the end So you can see the whole part and then the file them. That means this while is saved. When I changed this a little bit, you can see the Starmer comes again. Governments again, I have modified this sin, but I have not saved yet. So from the Star Mark, I can say if I have saved the file or not. Okay, now let's create a new scene so you can click on this icon already can hit on this new scene absence notes asking because those seen is stands. So it's asking you to save or don't save or cancel. So I'm going toe again. It depends on you if you want to save the file. On top of that, you might want o no se premiere in this because I'm going to don't save can. Now it give me a new file And now I'm going to open that file again. So again, I can open that from here. Or I can just click on the second icon on No. Okay, so this is the destiny is on here, and this is my file. You can I forgot to mention that we saved in the daughter, and we file on. That is for my Binali. So we have two options when you say my binary and my asking. So, basically, my Binetti is the men file format for Maya. So it's kind of the raw file format off Meyer, and my ask is kind of oldest reversal on. It's there for you. If you want to save on open with lower, Iverson might help with that. So But we're going toe No saving my Binetti because this is the A chilled raw file format on my bayoneted to start form is dot nb Okay, so here I'm going to select an open it on against asking to save or don't save this empty file to Let's do it. No. Okay, we can open. And then what? Let's say I modified the character or something. And now I want to save again. I can save on top of that file if I want to save on top of that file. Basically, I want to replace the file. You can press control s we can hit on this icon or you can go to file and steps in. If you want to save it with a different name as inclement Borssen or something or with a different borssen file, then you can choose this safe. Sina Dobson, If you hit Simpson is going to save on top of this file horse MB. So this is going to replace that file. So make sure if you want toe keep ever Sunday in two steps and hearts, so it's going to ask you again for a name, so you can say, let's say horse V two that stands for a person to on DNA Americans, you have to person one. So if I go to open and you can see I can go back to the liver person are the different person I can work on. Different worsens. So let's say I change something after the year on. I want to save this file on top of this harsh words and to I don't want toe make a different person. Then again, just save seen on it's going to again, up to debt up to date the file here. So these are the ways to save on open file. So in the next lecture, we're going to see how to select how to select objects on how to select different components. Basically, we're going to see different selection methods in the next lecture.
7. Selecting Objects and Components: her friends in this lecture, I'm going to talk about different ways to select components and objects. I'm going to start with selectable So this is one of the West way to select in components objects. So again, this is the top in the toolbox. Here this No, this white color yarrow kindof icon selectable and the Socrates Q. You can place any time cue to select that select tool on with this stool. You can select any object. Let me bring some multiple objects there on so that I can easily no select multiple things . Okay, now this is my small sop off different polygon primitives. Okay, so now let's select with the selector, although you can select with move tool But I'm not recommended to do this because if you do this sometimes the problem is students accidentally move the object When you, when they click to select excellent move the object a little bit on Blatter the see the object is being moved. Okay, so let's go to selectable on With this electoral, there's no chance to move because it cannot move. It can't It doesn't have that power, that superpower. So let's select to select. We can just left click to select any object. Yes, I want to select these two objects. I can do one thing. I can select it and then hold seat when I'm clicking on it so that it arts onto that. No selection I can keep doing it whole saved. No, but when I'm holding saved, I can just click, click, click, toe are toe the current selection to dis elect everything. I can click anywhere outside our in the empty idiot. Just click to select everything. Okay? Or let's say I select this three things by holding sipped and then I just want to do select this one. I can hold control and click to Dis Elect. You can see the iconic and see how the little minus ICANN is next to the Aero. Basically controlled toe sauce track from the selection on DSI to our to the selection in reality cities actual. No dieting. It's kind of actually reverse off, son. When you know, brag, let's selected in a different way. You get also drag to select multiple objects that raggedy is big on inside the drag area. There do objects, even if no, my drug boxes, not just touching the Torre's. I can still select it by doing this. Let's say I want to select this and I hold sit on drug like this. Andi, you can notice my drag is starting the cube as well. Andi, if I do this, you can see that in what it means. No, the selector is now dis elected. So basically saved actually are to the selection we knew. Click. But when you're drag, make sure you're not dragging on any selector object. It's going to reverse that on for these days and other absolutes is control saved and you can notice when I'm holding control city turns to. Plus, it can just notice this most karsa on now. If I drive even if I am dragging on the Q, it's still going to keep that selector. So actually, control is dis electing are no substrate ing from the selection on control suit is actually adding to the collection, and if you are holding, click and adding, then you can also use it. So these are some selection technique to select the objects, and again, you can also select component through this tool, and you can go to any component more fast than you can. I can click to select again. You can hold Sift the wild or it can hold control SIPTU are as well can hold. Let's say I have selected this one on I want to select this tree Let me rotate this view Now I can hold control Sift on drag like this to our toe The selection now have selected this vortex on I want to Are these three vortices to that selection? I can do that. If Isis whole seat on drug, I'm going to basically reverse that. So just know this difference. This is very helpful. Okay, so again select using selectable So again there's another person Let me go to a complex object which has no multiple parties. Is can now let's say I want to select no complex pattern here So I can do that using Lassus Electoral So lasso Select tool allows you to draw a complex area to select like this Andi It's unlike the selectable which gives you a square on you don't have the control toe. No, just that square sip on. Let's see. Let's go toe vortex world and drag like this. You cannot Let's say I just want to select this tree on all these things. I can't do that. I'm selecting these things that so basically it doesn't allow you to select complex up so you can go to last so you can draw on. You can see, like include these things. It's off to you. You can complex any vortices in between there. Okay, all any fares? Basically, old absence works with every component the same way. It's a lasso. It's sometimes very useful. Andi is very useful. Upson to select multiple objects. Let's say now, dragging to select this, too is very difficult because the Taurus is on the way on. I can easily no select those things with the last, so but it's a striking like this. So last days were useful. Sometimes on there's the pen selection tool, whose allows you to only select components. You cannot select objects. With this tool. You can select component. Let me go toe faced more on we dispense Lexan. This is kind of a brass on your painting to select the no to let the thing you can see and selecting vortices on. Here's the brush size, which is quite big. I can decrease or increase the ball breast size by just double clicking Linda Robson. Or you can again remember it is the tool sitting, or you can double click on any of the tool. Get the tool setting as well. Here. Inside this, you can go to this radius you, and you can decrease this to get the precise a small all. You can also hold Beaky before ball hold the biggie and lip. Most drag when, while you're holding the biggie to increase or decrease the breast size. So this is very important to us. Is the brush size to know select appropriately are properly? If it's a big brush size than it, it's going to select everything in between there or inside that radius. Basically, this tree off since the select a lesser Sillitoe on the pain selection tool at the where to select components and objects. Andi, make sure you practice all these things before you move onto the next lecture on. I'll see you in the next lecture where I'm going to so you how to use move wrote it and scale to move voted and scale objects
8. Using Move, Rotate and Scale Tool: Okay, let's start from where we left a class in the last lecture on here. I'm going to. So you how to use move, floated and skeletal, but to move the objects. Okay, toe transformed objects. So let's see if I want to move the object. Let's see. I want to move this spear and I want to bring this Peered on top of this, this cube to make a peeler Design something. So I need to move this and person it on top of the queue. For that, I need to use the move tool on the soccer for this tool is w Okay, you can hope over the tool. And you can see this tool, TIF, and you can see the shortcut. W for move to I can click here on day if you have selected, you can see, though minimally they're here on. You can see this. Three yarrow, red color and green and geek. Which of the blue access? This is the X axis. And this is the Y axis. Make sure you remember these colors really is X on blue. Easy access and bring is why access on to raise this place? I need to use this tree access, so let's hold the left mouse button when it's done yellow. You can see when I put the mouse cursor on top of the I. R O, it turns yellow. That means it's ready. Toe use now. Kansas. When it turns yellow, hold the left most on drug toe. Move it in that access. I can say I can move it like this on again. I can move in. Why excess? Agile toe? Move up, down. I can move it now. I cannot say if it's like sitting on top of the Cube are floating. I can only say that from the are terrific views. I can hit space, but toe get those views on from here. I can see the gap between Cubans fear, but it seems like it's touching the Cube. In this view. Don't forget, this is the perspective You on. You are looking at a little bit from the top angle. That's what it looks like. This perfume rotated properly. You can see. Actually, there are gaps. Most of the new begin of guys know, well confused. Here they treat the perspective. You like a fortress of file, something like two D and the thing that it's starting. But my sources on my address is just Jake that in different Orta graphic view basically in the side of front view, you can see that the gaps on now you can move to toss that made this cute. So this is the move tool. You can move this tree access on, which is I recommend to use, although there are some other off since to move, we can move from this centre as well. When I put my cost on this square turns yellow and I can hold left most and drag to move. This is kind of free for move. That means I'm moving in every access. Andi. I don't recommend to use this for Begin, especially don't use this. Let's say you use this to bring the spirit on top of this. Let's do that on you. Think it's comes there but letter. If you wrote it, The view you can see it's not at the center. Okay, because it's moving in every access you cannot control. You don't have the control toe control, a particle access. That's why it's better to use single access at a time on when you were a pro then you can do this still, you have to our existed from different no angle. If you use that on, you have some Plainview absence from this. No scratch. You can see if you hold this. It's kind of moving on on the plane, moving these to access at the same time on this moving dish to access at the same time. So basically, I recommend toe long practice this three access first and then a Jew. Be comfortably Meyer. Then you can explore the absence. This is move. Then let's see how the rotator skill Let me move on porches and that on the cube on. Let me use the views here to help me on. As you can see, I can easily move on partisan it on the Cubana. Okay, Now I want to make it small. It's too big for the Cube and I can select it on. Let's go to Skeletal. For this on the South court is our got a scale tool on you can scale from the center. Andi, this'd is important to scale from the center here to maintain the spear set, he fights scale from this letter y x is it's going toe like flatten. It is going toe kind of stretch in that particular access or squeezing that particle access Skilling in a single axis is like stretching or squeezing in that access. When you just want toe, make it a small or big one. Then you suit scale it from the center on, we know scale it from the center. It's going to scale from every access. Thats why its going toe no have that same Sepp. But now it's a little bit small one. So this is scale tool on again. You have no to access killing. Now. I'm Skilling in this to access So those type of options that there but again practice these things and then let's say I want to wrote it. Yes, I want to wrote it and I want to have this point down there and this side should be up, so I need to vote it for that. So let's go to rotate. Oh, this is the road it'll and the Socrates e so W E. R. And you'll find those out guard no close to each other on the keyboard. So let's rotate it now. The roti manna better is a little different now. We have carbs circles on. I can hold the left waas button when it's done yellow. I can see a no outside psychologists yellow, and I recommend not to use that. Use this against specific access to rotate. It's a G axis. I wrote that like this. Ah, loony wrote it. Make sure you use general box here that I want to vote. It won 80 degree. That means I want this point toe, this new poll toe down and this up on the person medically, so I need to rotate it 1 80 degrees. So let's wrote it it on in the G access. I can put 1 80 TV here 1 80 presenter, and you can see exactly rotated 1 80 dignity again. You can wrote it from here, which is free from Or you can put value toe know, get some specific degree load isn't so. These are some ways to move rooted and skill on in the next lecture. I'm going to talk about how to use layers on, and let's say that in the next lecture
9. Using Layers: Hi. In this lecture, you are going to learn how to use my lairs to know Iranians are toe manager models so you can see this layer a little is empty now, so let's create few objects first. So I'm going to pull a gun modeling here. Let's create a que blurs the cylinder move It actually disappeared. Moved that. So now I have few objects here in the scene and let me show you how to create layers and out portage object inside the layer so that we can easily atoned the visibility and we can easily man is the models. So let me get a layer for the Celinda. So let's select the cylinder first on. Then let's go and click on this last option. So I have four absence, so we have to absence for creating the layers. So one is for interior and one is for there to create a layer with the selection. Let's click on this, and now you can see I have a layer called layer one. Andi, I have a lump sum called V V for visibility. If I click on that is going to turn off the visibility of that. No object because that object is intake this layer and this layer is off. So again we can create another layer. So if you create a layer with this absolutely conceal, let's let me select this one on. If I click on this one, the lipped left of this last upson again, this one. If I click on this, it's going to create a layer. But if I turn off, the visibility can see it does nothing, because when you click on this, it always create a name tilea. So again, whether you have selected the object or no, it doesn't matter is going to create an empty layer, and then you need toe. Put that object inside that layer. Let's say I want to put this to objects inside that layer so I can select these two objects on. Then right mouse. Basically click the right. Most did miss selected first right mouse, and then Goto are selected object, and if I don't have the visibility now, you can see those two objects are inside this layer to and in this layer one, we have the cylinder. So again it's a good practice to rename or name these layers because It's very hard to know when you have multiple layers. So let's rename this lead for cylinder a cylinder and this layer as, let's say, the spear and Q. So let me double click on this layer when it definitely it's going to give you this added layer window where you can rename this. So let's say cylinder on, put the name and save. Now you can see this the way to rename. That's a spear que so so you can renamed like this on. There is a very quite interesting Bob since let's see if you want to see the object, but you don't want to select, you want to freeze this object again. You can use layers for that. So let's say I want to freeze this object so that I cannot select it accidentally so I can click on this empty box. Here you can see we have three box, so one is we. The 2nd 1 is B. I will tell you letter. What is this on? And you can see there's a box which is empty so you can click on that and it don't steet e for template more So now I can see it turns to gray were from, So it's now in template more. You cannot select its lockets freeze, but in a template were from manner. So let's say you want to see like this with saving more body. Want to freeze? So then you can click on that again. And now it said toe are our means reference. More so are for reference. T for template. So now again, this is freezed, but in setting more so you can see the model, but it cannot selected accidentally, it's freeze and safe. And again, if you want to select the object and move on work on this 10 you can again click on that. Now it turns the normal, so empty minutes normal. So again you can work. A selector known Drew your stuff so again, three cycles one click T second click are. Then again, card Click makes it the normal air on this B stands for a playback. When you play here, it's going to be there because of this. Be when you play the animus. Anyone's a few things to be hidden so you can do that by turning off this be. Let's I want to hide this cylinder when it play, so that my playback would be faster so I can do that by turning off this P And when a player is going to automatically here then and when they stop, it's going to come back. So it's a very good absence for optimize your heavy scene. When you play, the other unnecessary parts is going toe. No hidden. If you have those in a layer on different pawn this off. Let's see if I goto where three more You can see this blue and black lights because we have indifference more. Let me go back to normal. Now you can see everything is same on wheat, where three more I cannot tell what object is in quits layer. I cannot say that if I go and give it a color, then I can tell that so you can see there's a four tops and box. If I click on that, it no gives me that I didn't layer and you can see we have some color absence. I can say that color like the red. Let's sensitive and you can see immediately turns reading or play more. If I go to say, read more than know it same as the other objects. But if I goto where from more Because this layer has the red color is going to so you that color where Prem. So again, this is a very good way to give a particular where from color So that you know, let me give this one a color. Let's say the year local And now from this color coding, you can say OK, this object is inside this layer even though don't have name You can tell that easily with this color call. According so again, all those absence here inside this as well You can see all this display morts normal template reference T for temperate are for reference on Is the normal on hiding playback? Is this p Upson on? These are the color of certain This is the naming of some so practice using layers In the next lecture we're going to see how to use stopped selection on the symmetry So see you there
10. Soft Selection and Symmetry: Hi. Welcome to this lecture. In this lecture, I'm going toe soil. How to use soft selection on the symmetry of sun inside Meyer. So here I am no using my one of my model here on Let's see the soft selecting first. If you go to a particular component more, let's say the vortex. And if I select one vortex A. So you can see I'm just moving that single vortex. Unless I want to move this whole area softly on, we'd have fall up. So that time I'm going to use the South selection. So large double click on the move tool to get the tool settings of that tool on here. You can see we have some absence on If you go to this sort selection. Click on that to expand on. Here is the sort select on. You have this absent for select ALS move voted and scale tool. Basically, if I don't on here, it's going to also turn on with these things. Now, inside the selectable you can see it's got automatically turned on here. So basically this is the common option for no moved out its gallons elect. So let's go toe move to hear Andi. I turned on that. And now if I select one vortex, you can see this color coding now at the selected vortex area is yellow. Then it goes toe our ends and then it goes to black and you can see it saw the fall off. This bright the lawyer is the most no intensity I can see. If I moved that single vortex is going to move the whole area softly with her for love. Andi can see. Obviously I can go and decrease or increase this fall off by adjusting this fall off radios here I can are just from here you can see sometimes the fall of his too high. If you select one vortex, you can see the full year local. And if I moved that single vortex, it's moving the whole object because of the big fall off radius. So let's dictates the fall off. You can also increase or decrease the followed by holding the Beaky on. Hold the left mouse and drag by doing this again again. Inter actively changed the fall off radius on. Now let me and no let me in flag that big area. So I need a little bit more fall off. So let's increase it on. Let's see, let this vortex. Maybe that's full second, Pull that single vortex and you can see sup Liam adjusting that idea. So So this is the basic no salt selection. We have some other absence, but in this case you don't have to launder ful thing here. We don't have to go dif into it, so just know there's obsolete like this on the new press. Big it's stoned on are off. You can praise be to turn on on again. Presby toe. Turn this off. You don't have toe even come here you can interest selective or takes are you can select basically anything. You can select a face and turn on the South selection. You can select on the edge, or you can select multiple components. So this is socks election. And let's say I want toe No, in fact, that CGs So at the same time I want toe also are just decide. So that time I need toe down under now reflects on or the symmetry. So let's see how does down on that? So let's select this on in order to turn on the reflects on our the symmetry again, we can go to the move tool settings by double clicking on it. Aan den. Let's go to the symmetry settings on here. You can click on this little on or down triangle Andi, there being a drop down list. And from this you can choose object, X object, X y Z or Wall X y Z. So, basically, in this case, it doesn't matter if I choose Objector World because it's exactly at the centre. So if I choose, let's subject X. Now you can see this side no God automatically selected. And if I had just now, I'm are just in this side. What decide is also no reflecting, no existing. So we can do this on now. It says toe no object x. So let me. So the difference between this object on the wall Lexus symmetry, So let's bring something on. Let's put this object out of the center of the great of the world space. Basically, if I go to front view, this is my center of the world's best on this. No Wild X is going to work with this center. So here, if I use, let's say Wall exits going toe work. It's going to work because this model is exactly at the centre here on dis emit. Read this wall symmetries working. But this model is not at the center. And if I choose this world eggs, it's not going to work. You can see it's not going to select this one, because again, while exes no working with this center line, Andi can see the model severe the center line. So in this case, I can use the object X, and it's going to work with the object center nor the World Center. So it's going to look the object center, and it's going to choose the other side. So this is the difference. If you have the model at the center, then it doesn't matter whether you choose Object X or war legs. But if it's out of the center, you need to choose Object X because what Lex is not going to work. So, yeah. Oh, you can also don't on those emitted from here. If let's say you don't have this, open this window and we can don't underestimated. From here, you can see the objectives his exes on can turn this off from here, or we can not on that symmetry from their agile. So let's click here and on this on, so you don't have to go to the settings again. So, yes, this is sub selection and symmetry. Very useful makes you do practice this. And in the next lecture, we're going to see how toe hide unsourced different parts from the scene to work efficiently.
11. Hide and Show Objects: Hi. In this lecture, I'm going to. So you how toe hide and so different parts from the scene. Onda. Let's see how to do that. So here again, See again. I'm using that same file on you can obviously practice these things with anything with basic primitives as well, so we can hide and sore different parts by putting them in different layers. Obviously, we can do that. We have already covered that part, so let me solve some different ways to hide and so different parts. So let's say I'm working on the head on. I just want to alone hide the hair and so that I can see you see the skull here. Let's say there's the situation and I want to hide all these hairs so I have let up since obviously I can put these heads into a layer. Then I can go on the visible it off. Obviously we have that absence. Let's see the other way. So per select objects you want to hide on, then let's go to the displacement in here on inside that you have to some mineral hide. And so inside this hide you can see there's Jobson called hide selection. If I select it, it's going to hide the selection. Okay, So again, let's say I'm working and I want to hide the Oh no, the head for as well. So let me dislike these eyes and select only the headphone on. I want to know high the headphone here. So again I can do that or I can press Z key. So G is basically repeating the last excellent. So whatever you have used before, it's going to repeat that so you can press the geeky. So again it hide that no headphone. So now let's I want to bring the headphone back for some Dejan so I can go to display and the stem. So not the hide so and inside that we have some absence here. So again, in this case, I'm going to use so last hidden. So it's going to saw the last hidden part. So it's going to solve the headphone because that was the last hidden part. And if I want to solve the hair again, then I need to go toe display and so on. I can to so all to bring everything every here in part on, basically, do so every hidden parts. So again, the sort code is no controllers for hide. You can select and press control Edge toe hired the selected objects on Let's say the situation is I just want toe, keep the head and I want toe hide everything else. We can just select the head, which you want to keep on again. I can go to hide, and this time I'm not going to use hide selection. If I used it, it's going to hide the head in decisions, and I'm going to use hide on selected object. Who's is going to hide everything else? The selected object. So you can see it's with Egypt. You don't have to select a lot of parts. You just select the party. Want to keep on. Then you can hide on selected parts. Basically, it's the project of the height selection, so these are some off since year can see we have some absence to hide by types. You can see if you have light, you can hide those things. Let let's create some late, so I'm going to create maybe point light here and maybe some of the lights, maybe member spotlight on Let's say we have some cameras. So again we can hide by types by going to display hide and inside this again we have business types again. Just click on this lights. It's going to hide every lights from the scene, so it's very useful. You don't have to even select those. It's going to automatically hide all the lights from the scene. Okay? Again, You can hide the Gamma Jas so and can hide the cameras like this. So very useful. Absence No, go ahead and explode this absence again. We have a lot of options here. Obviously, I'm not going to cover all these things. So basically, this hide absence is going to help you in mourning a status when you more than you, Nitto, you cannot put everything in different different layers. So it's very use. Pull just to select and press control is to hide on again. Let's say I hired this on. I want to bring that back. I can press control sipped edge, which is the sad cut off so last hidden so control subjects to solve the last hidden and control is to hide the selected object all days. Toe hired on selected object compress all days. Toe hired on selected object. Okay, so practice. No, this sort cards. Andi. Yeah. I think I have covered the basics here. So in the next lecture, I'm going to introduce you without liner. We're going to see a new window to manage our sin.
12. Intro to Outliner: Hi. In this lecture, I'm going to talk about the outline, our window on how to use that. So here, again, emerging the last file on I'm going to open the out planner from Windows Mineral on our planet. So let's open that and it's going toe. No, come here at the Lipsyte. You can see it's called out liner and it's basically a list of you off your seen it contents everything you have in the scene on here. You can see we have all this cameras. So obviously you cannot see the cameras were inside the camera. We're looking from the camera, so obviously you cannot see the camera. But that's there. Andi, though, that you can see in gray color dark gray color that means those air here in so on. You can see these white letters those that's or sold basically on here you can see we have some lights again From this dark grey, I can say those are hidden on toe. Just know their color. According here, that light know why it is visible and dark grays hidden. So from the Outlander, we can do some basic stops here. The outlanders Mento, organize your scene. Andi From here, you can obviously select things. So let's go to this. Low Group can see. Obviously we have some different icons here as well. For camera, we have this kind of icon on for these groups. We have this icon on some plus to expand that when something is go left there, we can expand it. If I click on that, you can see the expand for Fuller here and now. We can see our models polygon object type from this. No, I can again say it is a polygon objects I can obviously click to select objects on. You can see it can select my object from here. And I think this is a better where to select, then no selecting from the view. Sometimes the model, if the model is very heavy, are the high poly. It's better to select from here than from the three D window. It's going to take a little bit time to select from the trader window. So again, against select multiple pieces by holding sipped tea like this Oregon Whole Control to select randomly like this so we can select multiple parts on. We can renamed objects like, say, Let's say this is the hair. I can just double click on board the name name here like this and press enter. We can bring them objects on. We can create groups like this. Let me show you how to create the groups. Now it's already in a group, so let's on group first select this group. Go to edit Onda. Click on this on Group on. Now you can see that group is gone, and every part of that group is now outside on again. We can create groups by selecting objects on by going to edit and group so you can see. Basically, group is something like we are putting everything into a folder. Are a box on you are selecting the folder on We can move the folder are can know are just a folder. So basically, group is something like that on from the Outlander again, we can so hide few things. Let's I want to saw the light. I can select those lights on press sipped egx, and it's going toe know. Make them visible, or you can select those and go toe displace so and so selection can use that. So again, ah, inside out Liner unit toe. Oh, no. Organize your seen by renaming those piles by putting those in groups on you cannot. It is different parts in groups. Eso This is basically very important when it comes to rigging. That time you need toe come here. And no artist the joints of the name the Giants. Andi, that is it. So Outlander is basically list view off your file on. Make sure you practice, you know, using our planet here. So I'll see you in the next lecture of where we're going to talk about the pilot point.
13. Using Pivot Point: Hi. In this lecture, I'm going to talk about five point on. This is a very important topic, so make sure you watch this carefully. Let's talk. So here I'm going to clear the model for us. Or let's create a spear. Normal spear, Andi By default. The pirate point is at the center of the object here you can see at the center of the Primitives. So basically, pilot point is something a physical point from where the object moves, wrote it and skills. Now you can see the move toe appears exactly at the centre, so the transform tools always come at the Piper Point. So now if I rotate the model or scale the model, you can see I'm Skilling, the model from the from that point to that side on this side again, if I wrote it, it's going to wrote it from that exact point. So the access is there. So most of the time unit to change the pilot point to a different location to achieve a particular result. So let's see how to change the piper point. So if I let's say, if I want to scale from the bottom up, so now if I scale, it's going to skill or down here as well. So let's say I wonder scale from here, toe upward so I can do that by changing the pirate point. So in order to change the piper Point, we can. If you hold down the deaky now you are in a by what? More on if you release the deice again, going to come back to the normal transform more. So hold on the dickey on, then moved the pilot point. Now I'm moving the piper point. You can see I'm not moving the object. It's just going to move the point on now. If I release the deaky, it's goingto be there. You can see now if I skill. I'm Skilling from that point, I'm rotating from that point, So basically this is very useful in a lot of time. When you model, you need to change five point frequently. So let me saw you some different. No different example where you might need to change the pilot point. So let's say we have the I. So let's say this is the face on and we have the I and you need to know, please die. Let's say this line is the center of the face on. You need to move this duplicate this eyeball to the other side so you can do that by tending the pipe. What point to this location on? Then we can duplicate and flip. So let me so you You can press d once on. Do you are in the pilot point now? I'm not holding the Dickie. I just praise the Dickie ones on now I'm inside the pilot more now I'm going to turn on the great snapped agreed absence so that I can snap this No Piper point to the center Great. And then turn this off. I need to press the DK again. Come back to the transport, Mort. Okay, now I can see my object by what is are the center Great. Now I can just duplicated by going to edit and duplicate. So now the model is duplicated. You can see Let me undo it. Okay, now this is duplicated. I can just go to scale X on put a minus number toe that existing value. So let's put minus one now you can see it Clips to the other side because of the spy but basically I scale it like this, so I just skill minus one value. So I did like this. So this is very useful to chase the Piper Point at many times, so make sure you practice this. A practice changing are no moving the Piper point again. We can move the Piper Point to a particular a no great point by snapping to the grade. Or we can change the Piper point, sometimes to capital a vortex. Let's say if I don't under snap two points, I can no snap the spiral to your vortex on Let me let me slam the spy vote toe this center point here on Let's press d again. So now you can see I just know Move that snap that by what? More into the vortex? CIA. Andi. It's very useful now. If if I Skillet, you can see it's scaling from that point down. What? And if I rotated, it's going to wrote it from that point. So again we can move the Bible point by holding down the deaky Andi. Then move the Piper Point again. Let me turn off this holding down the deaky and moved in. Release the d to say they're all we can just press d Andi don't know Hold a Dickie. Just press the dickey and you're in the pilot more than just moved up I would anybody want and then president again. So there are two ways to not use this just this piper point. Or you can goto this move tool settings by double clicking on it on. You can also edit the pilot from here can turn on the pilot it on that just a pie. Vote on, then Don't this off. Okay, so this is another way to edit the piper. So again we can also ate the rotation of the pie. What you can see now the manipulator comes like this. If I rotate this so on, you can see now Amanda Plater comes like this to sometimes it's very useful to rotate the private agile. So now if I off this on now, if I goto my scale tool now concedes in that angle on its working in that angle, sometimes you might need to rotate the piper point. So go ahead and let me also reset this can reset it toe by default from here on again, if I want to bring the private to the center of the mass or center of the object. I can go to modify on shoes the center piper from here so it automatically drinks the pilot to the object center of the mass so we can bring the pilot to the center of the mosque by using this more defense center Piper. So make sure you practice no changing the piper two different location and again bringing back toe the center because we're going to use this tending by what adjustment a lot in the modelling process. So in the next lecture, we're going to see how toe group on on growth on, we're going to talk about the group a little bit.
14. Group Objects: Highness Lecter. We're going to see how toe use group Onda. We're going to see how to do it. Okay, so here again, I'm using this file Toe demonstrate Onda. Let's see why we're goingto do groups. So basically let Mr like the phrase and about guys on. I think this is just too wise their combined. Okay, that's fine. So let's select do objects here on. Let's rotate the head. First of all, the pilot is here or get out. Find knife. I rotated. Now you can see the board Objects are rotating from their own private. That means now that the subject has the pilot here on the this to wise have their private here at the center. So again here you can see we're not getting the appropriate Reginald. I should be no connected to the face there. So to solve this, I can group I can put these two objects into a single group. So let me now you can see every every objects here inside a group, but again, inside a group, we can create another group. So let's see, like this to on. I can go to edit and group. So it's going to create a group and put this selector objects into that group. So Group is basically kind of a folder on now, inside this folder, we have no these two objects in a hierarchy. Okay, so now if I select this group instead of selecting these two objects and rotating on, you can see the result here. Instead of selecting this to individual objects, I'm going to select the group on. Then if I rotated now, you can see the group I what is here on? If I rotate it now, you can see there like stock with each other because Group has its own pirate point. It's not rotating these objects from their piper point. It's it's rotating these objects from the group, I would point So now, basically, whatever inside this group is like a temporarily having that no same private. Basically, the group I what is working with no every pieces? Every objects is rotating from that single pilot, So that's why they're stuck with each other so we can put objects into group for this region. So let's say you have created something on there, so many pieces, and if you wrote it, the whole object, it's going toe like wrote it from their own Piper points. So it's a good idea to put those individual objects into a group and then scale. The group voted the group so again to group you cannot suppress controlled Z. So controlled is the salt cod. Let's say you want to create a groove, no group of hair so we can select objects and press control. G. So it's the same as going a written group so we can press control G to put those hairs into a group. And again, you can call the group by double clicking on it. We can called or whatever we want. So let's say here. So now let's say I want to watch us the whole hair. I can just go to the group and I can move are, Let's say I want to center the pilot, so let's go to more defense into the private on now. I can easily are just the whole thing on by not existing. The group so group is very, very useful in modeling Andi rigging apart, so make sure you understand this on again. If you want on group something, you can select the group on then go to edit and on growth. You can do that. Let me undo it. If you want to select a group and let's say you don't have the Outlander opened So let me go to this poor view layout on. Now Let me turn this off. Found out Planner. So you can visibly dragged out Leonard and close it. So let's I don't have the outline open on. I want to select the group so I can do that by selecting one object on, then pressed OPR okie from on your keyboard. You can see like that, and it's going to select the group upper hierarchy, basically, so you don't have to go to our planner to select a group. You know, these things are in a group. You can select any of the model inside the groove on Just hit up a rookie. It's going to select the group. So again, a practice grouping on in the next lecture, we're going to see how to use marking menu, and we're going to see what is that
15. Using Marking Menu: Hi. Welcome to this lecture in this lecture, I'm going to So you how to use marking men. So what is marking men when you press right click are you You press down the right mouse button on any object. Let me select this object and hold the right most bottle and you will see this No minimum. And this is called marking mineral on. When you press, sit on right most button again you will see a different marking middle So that's a context sensitive marking middle. So again, let's hold on the right. Most button just right. Most button With this basic marking mineral, we can go to different components more. Let's say the vortex We cannot just the vortex again my sub selects and it's turned on. So I need to place the biggie to turn this off B for ball. Okay. So again I can hold down the right most Borten toe. Get this marking middle from where I can sense to different component more such as what Tex is fares on. I can again go go back to object more so obviously this is the basic function we all know use all the time on then we have some other absence. Here. You can see A can select a model or dis elect everything, or I can involved the selection like that on. We can use different absence. We can assign different materials. So there so many absence. Obviously, I cannot cover these options now. So this is the common marking men from where we're no existing. The component are selecting the components. Okay, if I hold the seat button and then the right most button, I'll get a new marking middle on. Now again, I mean object more, and this is very important. So when you have object more and their hold on, sit and write mouths will get a different middle. And then if you have in face more, you'll get a different middle. If you have is is more and you'll get a different mineral. So it's not based on the selection. It's called context sensitive, marking mental. So let's say I want to extreme extrude affairs so extra is a like a present so I can go toe face on, select the face I want to extra you on. Then I can hold down the sipped button on the right mouse button on. Then I'll get a marking minimum, which contends the face, uh, with the letter tools on Dhere will find extra or so all options are facing little tools on DNO accents you can eschew. And let's let mixture like this so we can do this. So again, if I want to, let's say beverages I can goto is and select they just by double clicking on visitors again , I'm holding the SIPC Ito are to the selection. So I selected all these ages here. Connery's is. Then I can hold the sip mouse on, then the right most on. Then I'll get a different no is related context sensitive marking men on here instead of extra fares. We have aced your age on Dhere. We have bevel edge. I can go on bevel days on here again. I'll get a small window to our jester Corrente person here, basically the Bayville here so I can add just a fraction. But I can put more segments to make it round it looking so weaken. You can see we have a lot of absence here on against sipped, right? Most button is kind of a magical sword card. Most combo again. I depends on the selection. Whether you have selected an object more, you will not get the Beverly's option and say, We don't have the baby lays up, son because we're not inside, there's Upson. So if you go toe is more on, then we'll find the bevel aids on. Make sure you have selected something. Now you can see if I I am inside. There is more, but I have not selected anything. And if I hold sit right, I'll get a primitive creates and marking Manu. Now you can see we can create primitives because we have not selected anything. That's why so you five select one is on. Then I'll get the actual market middle. So again, if you don't have selected anything, then by holding save right most, it's going toe. No, let you create different primitives because you have not selected anything. So it's again another marking manner. So we have the normal marking minimizes the right mouse select object holding down the right most is the normal marking mineral, which allows you toe move on sweets between components and object. More on if you. If you have select any component on, then you'll get the context sensitive marking men, which has all the tools related toe that particular component. When you don't have anything selected, then you'll get the primitive Pearson marking mineral so they have some no marking minerals , which are very useful on. We're going to use these things a large, so make sure you practice these. Make sure you practice of extruding from here again. You can extra from mental by going toe, no mess display forgotten that is inside this edit mess because I use all the time the marking mental so you can use extreme from here you can extra from here from the self on. I think using the marking menu is the fastest way to reach extreme. So this is no at the right, right there, close to your hand so you can easily select it on. When you practice these things a lot, you'll speed off because you know the extremities at the bottom. You can just hold. Sit on right, go right there and it will get text you. So make sure you practice this marking middle on. Just Norwich stools had square the main tools and practice these things on in the next lecture. We're going to see how to use hard box on. We're going to wrap up this sex and in the next lecture
16. Using Hotbox and Wrap Up: Hi. Welcome to the final lecture of this model on in this lecture. We're going to see how to use my heart box to speed up your work. So here, if you hold down the space bar, you'll get the hard box here. So we are saying this thing Hard box. Andi, if you release the space but it goes away again hold the space but down to get this. Okay, let me So you the heart box in detail so fast You can see we have a lot of minerals here on at the center. You can see the Maya Britain there. Andi can see all the men. Who here? The file. The common menace. Basically, Here on we have the panel menace. I mean this menace here on we have the recent common substance hotbox control absence on. We have separate specific menus like the modeling men was here on the animus and menus. Onda the dynamics minnows under lighting rendering minutes on. We have four lines here to this corner, it's It divides outside space into four reason on I'm going to sue those reasons. So basically the north and the south region eastern the west region So if you hold down the mouse left mouse button in the particular regional, it's in the east region somewhere here. If you hold down the left most, you'll get some absence here on. If you go to the North original and hold on the same left mouse button, it'll get some different options. So this is very interesting. So again, by pressing the left, ammo's on a different area will get different. Options at the north region is different. The West region is different on the South. Region is different, so let me know. Cover those things. So first I'm going from the center here on dfars. We can use this Meyer. If I hold on the let most there, it's going to give me again. And marking may know kind of thing on. From here. I can switch between views on again. All the exports are all the events. Guys used this thing to switch between views. They don't hit space, but and then go to a different view. So obviously we can do this. But I think this is the fastest way you can. Hold on space, were left most, and then go to the top. You now I'm interview. So basically sense that prospect of view in tow of you know, you can see instead of the perspective you I have the top you here. So if I hold that against based but and left most on if I choose, the right view I can see is the right view. If I goto perspective again so I can switch any panel two different views. So it's very, very useful, so you can just go toe golf. No prospective in front. If you remember the location of the particular view, it's very easy to sweet. It's a you know, the front view is at the bottom. So whenever we want toe Swiss to front, very can just go to the bottom. And it's going to fall and golf on perspective on right, right view, side view. So basically, it is a very no quick way to switch between view. Andi Here we have different absence hotbox control to resent Commons. You can go there and find some dissent. Recently used tools again. I don't use this thing much, so I use hot box to switch between views on. Sometimes I use toe no hide few you elements again. You can goto the east region and hold the left. Most. You'll find some, ah, you elements so high thing. Let's I want to hide the time cider so I can go here and just drug on. It's going to go away again. You can bring that back like this so it's very easy to hide. Things can see I can hide the common letting if you know the name name of the white ex Very Giotto's so high. So now if I want to being the times that the back I can being that back so I can being the rents like bad. So it's very easy to know. So, Heidi, we're elements from here, although you have some different ways to hide. But it's I think that is just where So this is the east region where you can so hide the U elements. Okay, with the West region, there are masking up since again, I'm not going toe go to them asking yet, so basically, you can mask different object types like polygon or nerves. So with the not region again, we can go toe go to a particular layouts. I can go to single perspective Now I can see it change the layout here. I can go to prospective graph editor, So basically, I have it differently out snow. So I had the perspective at the top on graph editor at the bottom. So this is a good lay out when you are and emitting something, but we're modeling now, so we're going to go to the perspective of this four view. So again from the north region, you can sense layouts or you can set different layouts again. You can bring the Outlander from here on. Let me let report that. So it's floating. Okay, So it can we can toggle doubt liner. So just maximize that view. Let me being being the Outlander back and we can stock it here that mean get that space to the left here, something like this. So once it's stuck again, we can go toe outline around, sweets on off any time from here. So I think this is just weight of being out liner. So again from the south region, we can switch or we can change the panel into a different panel. Let's say I want something. No, but rather than the top of you again. I can go to this on Go to the South Region and I can bring the outline er here. So now it says that panel to a different panel by using my South region on. If you do that from North, it's going to change the whole layout. So if there's a difference between these two things, so it's going to change the layouts that been said, clean new lords on, it's going to change the that particular panel into a different panel like this. So again, this is the heart box. Again, we have all the men lose again. If you don't want all these menus here, you can go too hard box controls on from here. You can again. You can hide all so it's going to hide everything. You can see just the resiana and these things. So if you don't use the menu where you can hide like this to get a minimal look off this hot box, you can do this or let's say you are a modeler and you just need the modeling morning minutes so you can go to hotbox controls on You can go toe so modeling on modeling only it's going to just so the morning men. So now the heart boxes very minimal, So it's very useful. So here we have completed this morning. So in this model you learn how to use my interface, how to navigate around the interface on how to use the move brought it and scale toe how to use the sort. Still excellent the symmetry, how to use the five point. And how do you prove how toe Use the market mental on many more things. So I hope you learned something from this model on You are now confident to move into the next modern. I'm very excited to move into the next more do in that model we're going to start our character project on. We're going to model the character So I think you are too excited. So So let's jump into that model on the start, creating our character
17. Creating a Project Folder: their friends. In this first lecture of this model, I'm going to So you how to create a project folder so that we can put our stuff inside. Those no self folders basically project for leverage. A normal folder which contents Know this kind of self folders? As you can see, there are so many folders on we can put protect related stuff such as the reference amaze the texture files for our model. We can pull those things in appropriate folders and we can organize the whole project. No, inside a single Master Project folder. So this is the project, Fuller, and I'm going to show you how to appear this folder. You don't have to create this. Poehler's manually. It's going toe. No, created automatically. So let's see that. So here I am inside my ASO to clear the project folder, So let's go to file menu on. Let's go to this project window. Okay, so here I'm going to give a name for the project. So let's click on this new I can on now. I'm going toe, give it a name. So let's say character development project or something you can you can give any name Or if you have a particular name, put a project that's good development project. Okay, so character development project on the location would be, Let's click on this. No yellow full of box on Let's create the folder here inside my courts on my records here on inside the project files. So in this folder, I'm going to create my project for languages Character development, Project Master Folder on Let's See, Like this path. So this will be the part here on inside this part. This will be the project folder on inside this Project folder. These are all those self folders, and it's going to create automatically. I don't have to do anything else. So just said the part and the project for the name except it, and it's a creative folder here, so let's go on, find it. So let me go to my after a great folder on Let's check. Okay, here you can see the character development project on inside that we have all these so folders I'm going to delete some of the Fuller's as I don't need those, but I I'm going to keep most of the four words we're going to use those to keep organized are no piles related to our project. So I guess that this is a project fuller. So in the next lecture, I'm going toe low. So you the reference emails I'm going to use for the character on. We're going to see how to set up that inside Meyer.
18. Reference Image Setup in Maya: Hi. Welcome back. So let's see your reference emails were going to use for the character, so you can see I'm going to use this reference myth. Andi. Unfortunately, I didn't find artist name on. If I find that it's name, I'll definitely give the credits. So here I have just do immense. One is the front one is the side view. Andi. I have chosen this image because it's a very basic cartoony characters. Andi know for beginners. I think they can easily follow this character and know they can easily create the character and we're going to animate and rig. We're going to basically see all the pipeline stuff for this character, So I'm going to copy these two images. So let's copy and put these amazes Insider Project folder. So inside our project folder Andi, specifically inside the source image is pulled, so there is a reason why I'm putting these images here. You can put those images in any fool us, but there's benefits to put this no mrs here because my eyes going to automatically look into this folder when we're going to import the texture of time. It's so I don't have to browse there. So that's the reason I know copied those things into this polar. So now let's go to Maya. So Okay, here I am inside Meyer. So the first thing I'm going to change the interface a little bit and then we're going to import the images. So here I am using the Maya Classic on I'm going to modify this my classic interferes or workspace a little bit. I don't want the times lighter and the translator, So I'm going to hide those two. Anyway, on day, we're going toe no important images. So the way I'm going to hide again, you have multiple ways so we can go toe windows and you elements, and then inside that you can turn off this time slider and translator, or we can hold down the space back and will get the hard box. And if you go to the Eastern regional, hold the left mouse there, you'll find the EU elements on easily can hide the times later under the insider from here . Okay, so this is the black space I'm going to use through are the modelling process. Let's save this workspace Now it's said to my classic, so I'm going to save cutting works best as my classic. Let's say mine so that I know this is the modified one. Okay, let's say OK, so this is the works was I'm going to use Okay, so let's see how to import the images. So here I'm going to the four view on I'm going to import the front image to this problem view on the side in Mr the Side View. So let's see how to import to important aim is we need to go to the appropriate no view may know here the view manner on Let's go to you, Miss Plan on important Mints as you can see it again, looking to that folder that source in its fullest. I don't have to browse in your is there So the select and let's open it. Okay, the funny raises their So when you import images, don't move or don't know Juman Jamaat other views. Sometimes it can scale them. It's so let's import offside emits. So let's go toe the view again. We can go toe the view and the mineral, or again, just like on this little Aiken. So this is again the sad card icon for that. Dobson. Let's click on that and side view, so I have front and side view here now. I can no German jamaat on here. You can see they have come to this origin area, so we need toe. Remove them backward. The first thing I'm going to do is no scaling this reference image to a proper real world scale. That means let's say this character in real world would be summer three fit. Let's say it's a child. And so let's say it's treated. So I'm going toe create a no que Let's click on a cube on again. Now the units, the no greed units number is once intermittent. So now I know we can see from one point to another point of the greatest one centimeter by default. So let's go and change that. Go to indoors on setting preference and preference. So I'm going toe this sitting category here on here. You can see it said, too sentimental by the fall inside mine. So now the it saws a great line at every one centimeter, so I don't want that. So let's change it to foot and let's a fit and save it now agency doesn't. So you at once interpreter. It's sewing degree line at one fit. I'm I just said that temporarily. I'm going to change that again. Now let's see like the queue. Let's go to the inputs and I'm going to put three here. So now I know when I put three, it's goingto be three feet because I have said the preference to fit. That means whatever number and putting that would be Know that even it. So now it's going toe three fit. Oh, sorry. I just pulled that at the subdivision. I'm going to put that in the height. Solicits three. Now this Q is no three feet tall, So I know that because I again no said that so fit on. Now this grid lines had, like at one fit. So now I'm going to select this to their friends, amaze to side one on the front one the holding the seat. So let's click wall and then hold the seat and click under the one. So now I'm going toe. Bring the scale tool, and I'm going to scale from the center, not from the y axis, because I'm not going to strange them. It's So let's scale from the center and I'm going toe reach that know that height approximately again. I don't have to be 100% perfect. I can see it. Let's see from this. No, I need to scale it down. It's maximize it. Let's move those. Some are here like this. Now you can see the cue. If I scale from here can see it's almost refit hide. So let's delete the Cube again. I don't need that anymore. So that was there just to know. Measure the character. And now I'm going to move these new images backwards. So let's select the front and move it in minus G toward the minus day direction. Which is the budget Dixon to this Cielo. So this blue Yarrow let's move it to the opposite direction and on, Let's like this and move it in opposite no X. I think now it's said to local or something. Let's select the Republican. Reset it. Okay, now let's select and move it in X axis. You are so backward. Okay, now it's set here. Let's select both of the amazes on. I'm going to do one more thing. So let's select and make look put the character on the grade here on the grid line. Maybe somewhere here, the hill ish touching here. So let's say this is the ground on the characters standing on the ground. So it's kind of no standing on this greed. Okay, so now the character is kind of really well scaled on. Now they're like our from each other. That means we can clear the model of the center, the characters standing on the great, so that's good. Next thing I'm going to put these things no in inside and left so that we cannot see like those accidentally so that would be frozen before that. I want to do one more thing, and that is I want to see the images here in the front and side view. But I don't want to see the images here inside prospective. So for that I can do one thing. So let's select the immense one by one. I'll go to the attribute editor here. So let's select this startups in here. So this is our tributary leader Now you can see the selected objects attribute on here. You can see I'm inside this image, been safe, nor on here you can see this display ups and said to in all of you and one that just select the looking through camera. So it's going to look through the no imported camera, which is the side view. So this is the front view. Sorry. So now you can see it. It doesn't appear in this number. You. So let's do the same thing with this one selected and do it now. I can see. I can see those images here, but I cannot see those in perspective. So that is the ideal here. If you want to see those in perspective than you don't have to do that. Okay, now, next thing, I'm going to select those to you. Mrs Andi, Immediate. Next thing I'm going to do is this. Front images should be at the center. Sometimes front of Mrs comes like this on, but I want to set the character at this area. So this line, this bold lines would be the center of the character. That's why the humans should be center. Let's move this image like this, left right, and said the aim is at the center. Let's say let's take the moors and leave as the guide. Let's say this approximate late doesn't have to be perfect against so exactly approximately at the center. Okay, then I'm going to pour these images into a layer. So let's go and create layer. So again, click on the fourth Upson. Now it's a layer. Let's double click on Give it the name. So let's say their friends. I'm going to say this display Taif to reference as well. So now let's save Now. You can see the humans is. I can again easily gone off around any time on because the lead is in reference more, you cannot select it accidentally. There isn't any fear off moving it by No, by Mr Glick. So it said they're safe, that frozen aan den. In the next lecture, we're going to start no more Ling, our character
19. Block Out The Torso: I will come to this lecture in this lecture. We're going toe do the block out of the torso part here on going. We're going to see how to use polygon primitives to startle photo. Do that. So you I'm going to use a cylinder because the torso is mostly no, it's cylindrical step, so I'm going to use a cylinder. But before that, I'm going to change the preference. In the last lecture, we change that, too frit because we wanted that profit. No measurement. So now I don't want a freak measurement here, so I don't want to see one grade line at every fit. I want a little bit more detail, great light. So let's change that. Go do in those and setting preference preference on go to settings and tends this toe may be sentimental again. Or inch maybe so. Let's since two centimeter Alexey safe. Now you can see I have a lot of grid lines with no, with every sentiment, I have a great line. So again changing those that to feed from feet to sentiment that are sentimental toe feed doesn't sends in its size. It doesn't change the side of the reference of the size of the modern. It just no putting the grid lines according to that. So when you said to feed it so the good line at every fit when I said that to sentimentality. So it's a great line toe every centimeter on also, it also depends. There are no input value. When you put that say, two in the imports, that means now it's two centimeter. When that said, toe feet, when we're putting the to value again, that is to fit. So they impose changes. Agile. Okay, so now I'm going to clear the cylinder again. I can see the Tennessee linger there, So let's move that cylinder here. I'm using the sort card to move the W e r. Mu floated skill. Okay, so here I'm going to the cylinder imports. Andi, I'm not going toe. Use the Rotech skill. Now I'm going to use the inputs, so I'm not going to use the scale and scale it and properly adjusted because sometimes when you use these things at the starting except the move on latter you go and no, increase this subdivisions. Sometimes you'll get very, you know, kind of air of result. I don't want that. So let's goto this radios and change the radius instead. Skilling I'm going toe are just the radius and changing the radius off the cylinder. You can see and selecting and using the middle mouse drag unless it says the height again. No. Instead, off scaling in. Why access? I'm using the height. So let's are just the height here. Let's so I'm looking at the front and the side view of the same time. Let's move it again. I can move it. No problem. So here I'm here. I want a height off. There's no solar line to somewhere. Maybe here maybe this side from this soldier line the base of the neck and to this north to the city. Okay, so this is the height of the cylinder and then I want a different divisions count. So let's go to subject. Relaxes on. Let's put let for 16 here. So again, 16 is a number here I'm taking and you can take any number. I have long addicts. Minimum. You don't need Lord off divisions at the blocking time. If you take a lot of divisions, it can be very hard to more defense. Create basic steps with a lot of vortices, so that's a very important thing. So when you block the model, don't take no too many parties is our subdivisions. So 16 is the maximum here on always taken number here, which will give you a center line. Let's say if you take 14 that would be bad choice because you don't get a center line here . You can see this is our center center of the character, and we don't have on is at the center. So that's bad, because when I'm going to delete have I don't have the center line. So it's very hard to do it. Have either I need to delete from here or from here. So that's why I'm taking 16 here. So it's giving me one is at the exact center a letter I can easily see, like, half of the first and deal it because you are going to basically do help of the character. Then we're going to use the meter tool to meter that the site because the character is basically symmetrical. So here I am, taking 16 sub Did Alexis Okay, then let's put some high divisions. So here again, I want very minimum. I don't want too many lines on. It would be very hard to are just on Get the basic torso set. So again started too low number. And then we can ard with insiders. Luke tools we can our days looks letter and then more feather sip if you want to. So here, I'm going to take this five number. I think five is fine. Not more than five. Okay, so subdued. Relaxes 16 subjects and hide. Fight on. I don't want anything in the gap there. So that's the one is Okay, So this is my basic no primitives here on. You can notice one thing when I wrote it. The view. It's kind of rotating from a different point in space so you can hit f toe frame the view, and it's going to rotate it around that now. So when you who voted the view and you feel some kind off no sitting when you wrote it like this, that means the center of the cameras off. Then you can press f two friend object. It's also center the camera, toe, that object. So now I'm going to modify the vortices and get the basic shape of the torso. So let's start with the side view. So I'm going to select toll and let's right click and go toe vortex more select all the stop vortex on this would be the best of the neck. It should be wide like this, so I'm going to use the scale to it are. So let's scale it from the center. So I'm scaling from the center. Andi, let's move it. Another agency. The base of the neck is not flat. It's kind off langan like this. The front is down, the back is off. So here I am going to rotate it like this. So let's protect like this. Andi pushes on it. You can see regard the base of the neck on DSO. Let's basically adjusted on. You can see it's very hard to see the back side known the back immense. I don't we need to go to the Web for more. We can do that with were from more So let's scale it. And I just didn't. Now you can see I just Galen this access because I know I want this week, but this I route would be a little less so Let's scale it like this. I'm here again. See, I'm trying to also get this off this car for the body because the torso is not straight 100 person straight cylinder. It's kind of no angle here and see the barely person is coming forward on. You can see the backs buying cars, so make sure you get this new guest er of the body on. You can see Let me go Toe said it more. We have other absence toe X ray, the model. So if you go to setting men one, there's the option called X ray. If it all on that, it's going to be half transparent, huh? You can say it were from and say that combined so you can see the model. No sitting. It's kind of a transport now. So again we can activate that here as well. So it's a good upset when you're addressing the model with the background reference of its . So now I'm going to the vortex mode again. I'm going to try to get the torso safe here, can see it's a stylist cartoon character on the dot, so topped also is narrower than this bottom. So let's select Andi, Let's select and scale these things to at the bottom here, make sure, Yes, no dragging and selecting all the lines throughout the lines there. Okay, so always again. Look at board decided on with the prospective agile. Next year you are moving, scaling every vortices. Make sure you don't miss any what it is like there's something. So if you do, this is going to know. Make it messy on you're going toe toe Find a hard time to aren't sisters So then here I think this is good. Now I'm going toe. No deal it hop. Let's delete her. So I'm going to delete this site on. We're going to delete this stopping. So let's drag on hold Control and Dr Toe de Select these things. So let's delete this. Let's do the same thing here, Okay? Solarz, do the bottom first here. I'm going to create kind off kind of a recep and not not a straight toe or isn't a line we want a visa up here on. There will be a connection here from the front to the back. So let's first get the visit. So I'm going toe move these, except these things I'm not selecting this one. So this is the center. I'm skipping one. Then I have selected everything. So let's move. Let's like these things and move. So to get this kind of visa, if here and now I'm going toe, select this two ways. This front one on Simpson at the back, one on here. I'm going to select the Bristol. So let's go to Ed Ignace on bridge. Okay, so now I want some divisions in between this breezy Riesa. Let's goto this divisions and let's increase it on here. You can see the leg room here, the leg opening. Andi, if I count, is just no. So let's say from starting from this 11234 Actually, Davide Upson to count, you don't have to manually count like this, so let's don't on that. So let's go to display on hits of display and poly count. Let's stone on that. When the talent that will get the numbers here on Let's say now you have some numbers here you can see the ages has three absence 10 400 or four and then Jiro, that means this is the whole scene. Number of days is on. This is the selector object number because you can see both. The numbers are saying because we have just this this model in the scene on this obscenities The selector is So now if I double click to select the hole Borer is they can see we have 10 is loops. So again I can keep tennis loops. I thing. Okay, so that's fine. So now I'm going to select this Is this of the vortices on? Let's move them down because I want around safe here. Now I can see it. Just imagine the body like this on. Let's look and don't make make it a little no smooth car. I think this is good. Let's let's move this up. Okay, Now, from this front view, you can see it's like coming straight so it shouldn't be like that again. The visa with that. So let's move these things, Andi. Now you can see let's move these things, that kind of no swimsuit kind off effect. So let's move it. So does something like this. I think we have come to a little down there. Maybe it should be a little up. The band is probably a on it to be something here. Okay, so let's do the hand of base here. So for that again I'm going toe are one is low fear and then we're going to extra that here . So to Arden is loop. I have one on no tools. Let's go toe May stools on in today's loop. So let's bring that tool. And with the stool, we can drag on the ears. Let's say this particle is if I dry, it's going to give me horizontal. Is loops like this on? Let me first go to the tools and reset it so that I can explain you some absence. So this is the by default tool. I'm using the new Adelaide's Lubitz. Going to just are there is look, but I want also are meant and the flow of the safe. Now you can see it doesn't mention the floor, just adding there is look. So if I meant in the floor, it should be a little smooth, Sepp. So let's go on down on this Upson insert with his floor apps. And so, whenever I'm going toe Arden, his look, it's going toe. Also, I just the same a little bit to maintain the floor. You can see now it doesn't look straight. It's kind of maintaining the flu a little bit better. So let me are days lips on my here. So the hand would be from here. You can see these days is at the arm pit area. That's good. This is is at the no clavicle bone area. The color bone area. That's good. So let me put that here somewhere. So why would be at the color bone area? One would be at the armpit Means the bottom of the arm on. Here it is. We're going toe extrude the soldier here that rapid. Just muscle. Basically close this. I'm going to extrude these two face from the side. Okay. This is the site. Yes. So I'm going to extrude it. But we want around Sepp. So I'm going to add one. Is Lubar the center? So let's say this is the This will be the no soldier, but we want one. Is Lucia at the center? So let's are one Is Lou part the center. Okay, that's good. And now I have four face instead of two on. We're going toe, create around set. So we can do that easily by selecting this four face on. If you hold, sit on right most. Then you'll get this marking men on. Then you can find this circle arise. Components off some seriously like that on its going toe automatically are just the border vortices to create a good circle. And now you can see we got a very weird circle here. We just need to rotate a little bit. So let's who worked it from this camera angle. Okay, so to align that Okay, that's good. And let's extra or this area now toe no toe get the packages of the solar. So let's go to edit myth on extra your So we have an option called extra years. Let's elect back on. When you click on that, it'll get this manipulator. And now I'm going toe No, basically dragged this g excess this blue yellow outside and it's going to create new polygons from that idea. Okay, so now this is this would be actually, my solder on the hand would be from here from the hand would be extruded from here down work and they should be the soldiers. I'm going toe with the vortex more on. The first thing I'm going to are just is this roundness? So let's definitely can select both. Both this side I here against have the move, tool said toe while access. So let's maximize this with you. So this move to elicit the war. Lexus. That's why it doesn't respect this angle. It's kind of respect this, this wall access so it's aligned to the wall access angle. So but here I want this angle so I can go to the move tool settings by double clicking on it on. Let's change this Axis audience and from world toe component. If I said to component all if I said to let's object so it doesn't give me the appropriate no angle I want. So let's dissect it. Let me show you other ways. So again we have selected days. Lopes. If I goto d, which is my own private more on Dhere, I can rotate it. So let's rotate this selects and Piper temporarily. A. Now let's press d again to say there, Logan, See dangle. So now let's move it down. So now you can see they're moving on this angle on. Let's kill those. So let's scale those so that so that I kind of get a rounder safe from every angle from this angle, from from this angle and from this front angle as well. So let's go to vortex more on move, move on, put diesel and create this kind off round. Sir, let's move these things. So basically, you don't have to worry. Two months on. This is the largest man. Just go ahead and create this kind off around itself. Okay, so now I'm going toe. Use this to face for the hand Again. To face is not enough for a cylindrical Sepp. We want at least four faith. So we're going toe. Divide it from this angle. So I'm going toe attorneys Look again. So let's goto my stools inside a slope and I'm going to art as look. One is love here, which should go this way. Okay, Once I add that it can see when we need to artist the poor Jason or the location of the bodies is you can see we have three loops here and there's a big gap then. So this is not not an ideal model. The model should have no even distribution off polygons or the borders or courageous. So it should be evenly distributed? No along the model of the on the model. So now I'm going toe select this as looks. I can move it, but there's a better way to slide it on the surface. Let's go toe goto. I believe that's interrogated. Mess are my stools? Yeah, it's inside. Minstrels. Slide it. Goto that, and now you can hold down the middle mouse on drag the mouse. It's going to slide on the surface so you don't have toe. Worry about changing the same, so it's going to slide on the surface. So it's good. Oh, okay, all If you want to move what it says, we can go toe the move to settings. And since this access or the incentive normal on again, normal will give you a sliding effect. You can move the vortex on the object. You can basically slide the vortex again. We can move it on. The normal directs an agile which is this end, and for normal, U and V will know or help you to slide the vortex on the modern. So just use this nor defend, move, absence Onda slightest tool so that solicited to get this no smooth Sepp. And now I'm going toe did this bottom for face so that we can clear the hand in the next lecture. So I'm stopping the video here in the next lecturer, going to create the hand looking.
20. Block Out The Arm: I in this lecture? We're going to do the arm blocking Andi. Before I do that, I'm going to finish this store. So because I can see this long faces, that means we need some more. It is this way. So let's take the incidents, Luke. Tune on with that s flops and turned on makes you that obstinate store known. So let's see that. Get inside. It is close on that. Good salutes are some is loops. Make sure we have square physicists. So if you see a kind of long rectangle faced, that means we have so many no ages going verticals than original. So in we need to have that same rescue. Okay, so it za good thing for animus in that department. Okay, so I think this is good on Dhere can see there's a gaffe. We can no modify. This is a little bit too are just that so we can select it and then it can move it down. Or we can are just these things just move on. You can do this. Are you going to use the no sculpting absence as well? If you go to sculpting mineral and there's a relaxed button here, this 3rd 1 you can select that Andi again. With this brush, you can just hold lip Mose and relaxed. You know, vortices. It's going to relax and can. She doesn't affect the border, but it's working on the inside. So let's select and relaxed the judges. Oregon manually. No. Move these things again. It's good for these areas. You can go back to a selector. Okay, that's good. Here. I need to move this man early. Let's move it. Okay, so once it done, then let's do the hair. So for the hand again, I'm going to use a cylinder. So let's go to Polygon modeling. Take a Celinda on, move it to the locus and here, and let's would rotate it again. You can rotate it. No problem. Move it. No problem. But you cannot scale. You can scale it, but sometimes it creates problems when you know are the reasons here. So I tend to use this inputs more at first. Okay, so let's increase the height to get the hand length there. So from the wrist toe this area on, you can see the model here. I need a little gap there because I I'm going toe breeze it to the body. So we need a gaffe of the breeze. Abri's polygons Let's rotate and get tangled. So I think this gap is good and the hand is at the pro Jason on Dhere. The main important thing is let's go to the side view, Okay? It's the right Lucas and local, etc. From the side, you can see the hand is somewhere here. It's kind of behind that. If I don't off that rock down off the X ray and see the hand is somewhere here. Ondas known Deltoid is here, so our delta needs to be a little backwards. So let's let's select the Delta it here, Harry, can you sort Celexa? Let's select this one and tall on the sub selection by going to the move tool. I don't know if it's going toe work. Let's try that. So let's go to self selection and turn on the sub select. Okay, now the radius is too low, so let's hold a biggie and left most drag to increase the radius. Okay, I think this is good. So let's increase it little bit. I think we need to select more vortices so Let's select this four faces instead of that single vortices. Let's Dragon. Yeah, it's working. So let's select this faces. Yeah, it's working. So let's select and moving a little bit backward on Let's rotate it something like this on . Then you can press beaky toe socks. Elects enough. Obviously, I'm going to add just these areas, so that's good. And I think this is fine for now. On the hand should be a little bit angle. So I think this Lucas and is fine. So now let's move it a little bit. So for the hell I don't want no this substance, this 20 subdivisions we have. Let's select the no border raise here. Now you can see we have a days at the border here, so we need eight year as well so that we can breeze it. So let's go toe some diesel access and let's say that toe eight so that we can raise. Make sure you do this. Make sure you have same number off Agencia. Same number of borders on subglacial access EDS so that we can praise letter. Okay, now I want some a This here on the height, alerts go to subversion height and increase it again. I want one is at the elbow. So I think five is good. One is at the billboard and one is at the bicep than two is in this for our media. So again, this is a good starting point again we can know. Ardent. We do instead has looked a selector. So I think this is good for the starting. So now the hand is totally straight. We're going to know voted the hair. So let's let's use this alone. Rotate this X axis rotation. So let's rotate this note straight. Let's wrote it to get this angle the first angle here and then we're going to move on, noted from the elbow forward. So I'm going to select the vortices year. So let's select all these vortices on that we're going to rotate again. If I wrote it now, you can see this kind off effect because the piper point of those selects in here. So we wonder private here. So let's go toe the piper more by holding their deaky again. Move it somewhere here on, then wrote it from there like this, you can see the plaque. Practical reason for law moving the pilot part. Now I can see the band of the hand. Okay, that's good. And then we weren't kind off a narrow are happening to our distressed salutes. Skilled on it, we're going to scale it in this access basically reached his kind off a rectangle safe here on Dhere. The hand is rounded here. It's kind of flow kindof blending tow us a single cell. So that's why I just scale in one single direction our lives. Let's scale this up a little bit so that it looks like the forearm on it should be a little bit narrow. Something like this. Basic law. Basic step of the heck. Then we're going to braise it with the body here on Let me Yeah, I think that is good. Let's delete all this faces. So deal it all these faces on now I'm going to braise. So if I try the breeze ups and now it's not going to work because these two are different separate objects. The first thing we need to combine these things on make a single object. So let's select boat on goto males and combined those. So by combining now against it a single object, but there isn't any connection, so we can do that by Bray's. So let's double click on this is to select the border loop on, do the same thing with this time I'm holding sipped tea because I want to argue with that selection. So now I have selected to borders loops on their less breeze. Okay, now you can see sometimes you'll get a or breeze kind of to stir breeze something like this . Let me show you that sometimes you will get this kind off effect when you do the breeze. If you get this, then come down to this breeze upset ups and put the mouse cursor on top on hold the left most on drug until you get a good it's going to basically to east it. Andi, when you get the straight connection, well, is it Okay, So let me move this again. I can bring all those moved on settings by holding the w key and the left most so this is again a marking mineral when you hold the W, which is the star cut off move tool. When you hold down the W key and left mouse will get the move to in settings on from here can change it toe while toe. Well, two different for the incentives as object component and no access Here. You can go to normal direction or you can even go toe component more by going here on, you can move it in normal direction. Let's are just this things okay? Obviously we weren't that. Relax, Upson agile. So let's go to sculpting and relax so that we can smooth these things a little bit. How we can use the smooth apps, an agile. The 2nd 1 is the smooth. So let's relax. These things basically relaxes like spreading there just out from each other and trying to get even distribution. Okay, now, if you pressed three on the keyboard so the basically trees the smooth review. Now you can see the smooth output before actually do this month. So actually, we have the smooth here, Miss Smooth. But this is kind of fairy present as an abductor. When you press one again, it's going to come back to the vital ful kids. Okay, so three by President three, you can see like like this kind of tensile line we need to are just these things. I made me toe move this outside can see this know inside What? This is there and it might help. You can see it helped a little bit. So So let's save the file for the first time. So I'm going to file safe sin. And now again, it's going to the appropriate folders. So let's go toe the scene fuller for saving on. Let's save it. It's sick. Anecdote, Dev Judo one. So I'm going to save it with this number. So let's safe. So yeah. So in the next lecture, we're going to do the legs you
21. Block Out The Leg: Hi. Let's do the leg as we did the hand here. So again, I'm going to take a polygons Cylinders. So let's go to Poly modeling staff on. That's great. A cylinder here. Okay, so let me just get here. It's gorgeous in it on here. I'm going to the inputs on Let's are just the height here, so let's increase the height on again. I wanted Gap between here. The leg on. I'm going to do the leg till here. I'm not going to do the feet because you are never going to see the feet because the Sioux is there. So we're going to do the leg here. And then there's so so I'm going toe. No, make this till here. I think this height is okay, so let's rotate it to a little bit. This angle here, you can see that kind off approach. It kind off. No angle here. Okay, so let's go to the side view and again. Decide View. It should be angered like this. So it's not straight. You can You can dawn on the x ray. We can do that from here as well. This double square safe get down on deck step from there. Okay, Now I'm going to are just the imports of divisions. So that's have tens of dozens here. Because you can remember we have 10 divisions here. Let's select the border is and you can see I have 10 divisions. If you don't have this list here, you can go toe display on there. You can go to heads up display and down on the poly count ups. And so now Agencia have Dennis Loops. So I want 10 subdivision here. So it matches with that, then I want some subdivisions in the height area. So let's increase. So in this case, I might need six here, so there be no one knew line. And then there's the tide and this is the God video. So then we're going toe scale this area, this tie area. So let's from scale it from the center. Something like this. And let's scale scale a little bit. Aunt here again, I'm going to scale this. The car Very eso. So now the move tool is said to something else. So let's double click and reset it. Yes, So make sure you said this and make sure get this new angle here. So let's something like this, something like this. And again see the stylist Sicily's. It's getting no ticker or wider towards the actual and no ankle. You can see the knees teen, and it's getting lighter here, So let's do that. So that's tried to get that style A system skilled out something like this. Maybe on this is the There's my knee. I believed this would scare little bit, So okay, so this is the basic laws, say, Pia on. Then we're going toe. Let's rotate this like this. Let's scale it like this. So yet again, I'm keeping a little bit gap there. So when I breeze, I'll get that law filled. So let's select all these faces by selecting this vortex on. If you press control F 11 then it's going toe. Convert it to the face or we can do the same thing by going to the menu here. So select the vortex center vortex and go to select converts. Election on. You can choose this two faces. You can see the control. If 11 said cut it, convert that single or text to the face on, then we can deal it it and then we're going to combine and then please. So let's elect boat and then combine and then I'm going toe. Please select. This is love. Andi, Looks like this is love. And then let's bridge. Okay, something like this. So definitely I need toe are existed. As you can see, I may need to scale it and make a little bit Take card like this and I want to. Our freeways lives in between. So let's go toe missed tools on bring the incidents loophole art wanted to his lips there. So again, this is style aged No legs. So I think this is fine on lead. Really? Just this is loops forward. Maybe a little blow whiter I think this is fine. So let's delete all this faces from the bottom again. We can not select this vortex. Hold the control key on then hold the right mouse Then you will get this No convert marking middle here can go toe to face on, then toe fast. So again, this is another way toe achieve that same thing. So let's dilated. Okay, so now the leg is dull on. I want to do a few more things here. You can see the model is looking screwed here, and then you can see the faceted polygons. So if you want to see the whole model like faceted Polident, then you can go toe mess display and then hard on it. So it because now some of the edges are suffering because of that. No base cylinder on some of is harden. So let's make it a total hard. So let's go to mistress Play on Hard Annette again. It doesn't matter, actually, so just a visual preference if you want. Oh, so under the thing I want to do is another duplicate special. So I want to see the other side on DSO that I know if my model is okay, No looking fine. So let's select the model and go to edit on Duplicate Special on Dhere. I'm going toe reset it first so that I I'm going to start from the basic by default. So now I'm going to choose instance so it will be instance object. If I do something toe this side, that side is going toe automatically our sister. So that's why I'm choosing instance. If you do this with copy, it's not going to affect her if you do something so this side, that side is not going toe to our sister. So that's why I'm using this instance on. Now I want to flip it. So I want to put miners to the appropriate scale. So here I want to freak to the X axis. So I need to put miners to the X box. So this is my X Y and G box. So this is X skilled. So here I need to put my let's run. So now the number of copies? One. It said two instance, minus one. Ready to go. Let's apply on. You can see this or lower thing here. It duplicated toe this side because of the pilot point, because the Piper Point is somewhere here on. It's always go to the opposite of the pilot point. So let's let's move the Piper Point toe this center. So let's press D on the stolen this snap viewed ups and a move to snap to this breed lines on Dhere. I have a center grid line, so let's press d again to settle there and stall of this or get noticed right against it. Worked for Freakley on. We can see the whole model on again. We have to object. It's not like meter. We have a mirror absolute, which is going to create the other side on it. It'll be like a single object if you use meter this time. We just use this duplicate special just to, uh, work one side. But we want to see the other side. So that's why it's kind of no duplicating, and it's kind of instance duplicate. If I do one thing to this say is going to know automatically register. So let me move this back side bitch. So this is the spine line it to be. Go in like this. Maybe this agile and I want to put a few more. A Jesse here you can see they had is going toe deform from this elbow area so we don't have much polygon. So let's are pure, more Polident. So let's bring the insiders low PDL on wherever it's going toe band or before you need to put closes loops on. Then let's do by this long physicists into quads simply something like this. These are quite faces, but it doesn't look like card on here. You can see I don't want that That obsolete inside insider's look colleges that is floor absence on a stone. On that, we'll get something like this. Yeah, this is done. So in the next lecture, we're going toe, Start working on the palm Idiot, the hand and the fingers.
22. Block Out The Hand: Okay, so let's do the hand. So I'm going to started the Cube for the par media. So let's start with Cuba and let's place that, Okay, I'm going to the imports and tending the height, including the height basically so the high don't be like from the raced to the No local Syria. So let's wrote it. It looks gorgeous in it. Here, let's go to this view. You can press if toe frame quickly. Okay, so let's adds is the weird casual So the study in this case, I think the death. So let's all just the depth get something like this. Poor Jason It again. So here I'm going toe again are some divisions. So let's goto the DEPT area are four divisions here for four fingers physically, So four fingers are going to come out from this area. Andi then won. The time would be here, so let's are in the high idea. So I'm going to our three here. The term would come out from this face, so OK, so this is the basic construction and now I'm going to get the best. Except so the palm is never straight or flat. So it's going to be kind of love band, so we're going to We can bend it by using the former, or we can just select few edges. So let's like the lasso tool and select all this. What? This is whole saved and select all these vortices on here. I'm going to move in this anger in this direction. Now you can see it doesn't allow me to do that. It's moving in this directions, so let's send this man a better direction. Toe component More so let's go to the smooth settings changed toe component. Now you can see we can move along that edge. So let's do it one by one. So select Move it, select this and move it something like this. And let's move this to his lips agile. So that's do it one by one. So from this angle, it should be something like this on from this angle. This along straight lines would be who bend. So let's go to this protects more than do this. So let's do it in object more. It would be good. So again here. I need this kind of girl, and this is one of the cough litmus leg. This and let's rotate it because it's not bending there. So let's like this things on quartet. Good dog. Let's kill down this area for the rift. So let's scale. So let's reset it on a scale. Okay, I think this is good. And now we can extreme all those fingers. So let's select all this for faces and then let's extrude good rated Miss Extra or on here . If I extruded easy access, you can see it extrude as a whole. But here we need to extrude separately. So for that I have been option here called Key Phases together. Now it's said to all I need to change it to off. So now every physicists not going to keep together So they are going toe extra individually like this. So let's extra here and then we can actually this single face, So let's extrude it. And when you extrude a single faced it doesn't matter. Let's extrude and pull that out. Click on the rotate symbol. We can rotate it like this so the top nail sides would be so be sort of the longer one, and this would be the starter. So it's sort of like this and this angle sort of there something like this. Andi, I need to do the same thing here as well. Before that, let's say like this place and make it a little bit narrower. Andi. Then I'm going toe have just this steps. You can see it's not square anymore, so we need a very good square for the round step. So now you can see it's not square. Let's selected and move it. But by doing this you can change this. You can make this person on Planet Magic unsee this tree vortex said that on a plane. And this no polygons is getting outside. So when you do this makes your tone on this snap to play Lampson. It's not to view plan, so it's going to move the vortex. But it's going toe. Alou's always have that plane. If you select this like and have that plan always. So let's select this and move this. Make sure you're moving from this. No access. Okay, I think this is good, Celeste. On that off. Let's select it. And moving dollar like this again will want this angle on. Then I'm going to say one finger. Then you need to do that with other fingers. I'm going to do that latter in between lessons. So let's see one finger here. I need to put two ways loops at two local Syria. So let's go. Toe mesh tools insiders loophole on Dhere. I need to put one is low on the one. So basically to locals area on, we're going to model the finger straight. I'm not going to make it banned because we're going to rig it so you can do a little bit band, but not drastic bending or any porting finger. So it's going to very normal finger. Okay, so here, Not this to local area. Then I need to put two more is lips. You're gonna get hold seeped right? Most button toe. Get all those some tools here and here. We'll get the inside has looked ill here. So this is the quickest way to get that tool here. I'm going to put to mores Loops. So, in between those knuckles, one is here again. One is here. So so Lego select visages and skill these things so you can see the local lady is wider. And then this is the narrow here and again it should be. It should go inside as well. So let let me hold W and left most. Let's goto com pull in more. Moved this in the normal direction. Let's move this. So basically, local is the highest area You can see Doc the balls out effect here on wherever there is a local, that bottom side is going to be inside. So this kind of opposite Onda again, this is one local. So I'm going toward our one is live here. So let's bring these loops. One is the pier and this would become out So basically, this is the structure here you can see if I smoothed by passing three and I'll get the finger. Look, you can see the tip of the finger. We get this beautiful angle Because of that, I am missile angle, we just and then you can see the local on that drop there. So you need to do this with every finger and also with the term. So go ahead and do that. I'm stopping this lecture here on in the next lecture. We're going toe, refine the hell and then we're going to Margit with the body
23. Define The Hand: I welcome back in this lecture we're going toe complete this hand blocking on you can see I have no have done with all those fingers. So basically again, I duplicated that finger and then most here we can go ahead and mannerly, no poo days loops and existed. So here I want to know modify this bomb underside of the bar media if I breast three against the fingers are looking good from this angle. Basically look looking like finger. So here in it some no volume salutes. Let's give some volume to this bottom side of the home here. So let's again said it toe component more and bring these things again. I'm changing this move, said things by holding the double icky left most on, then it can switch to wild. So it's two component, so let's give it a little volume. You can work with the three more as well, so let's don't on three more than than let's just it here. I want some volume. So let's give it some volume here. Something like this. I think this is good. So far, the blocking stairs. I think this is fine. The thumb can be a little wider on, I think. Then get up. The Tom is bad there. So let's select. Select this face and we can hold seeped on the turkey or the no greater than symbol. You can hit that toe, grow the selects, um, like this, Or you can select the face and go to select and grow from here as well grow so going places easy to repeat that. So let's rotate it and get the proper angle. You can see I think this is fine Bullet bit. I think this is fine. A little bit angled. And so yeah, I think the single is point. So then this finger needs to be a little wider, so select and make it a wide here history. I think this is now This is looking like Tom. Okay, so the next let's combine and breathes this with the hair and before they bees. If I go to this nor view, you can notice this know the harder in the reference is a little bigger than we have here. So let's scale the hand and get the proper proportion. Something like this, at least. Okay. And then let's look on mine and re so Let's delete all these bottom faces. Let's control F 11 to convert that to first deal it do the same thing here. So let's select all these faces. You can select one than hold the sift key and then double click at the end. It's going to select the in betweens. Then let's dilate on here. If I take, I have 16 here. That means a day's loops here, so it's so 16 because it's also calculating this, says Loops. So we have a day's loops. Andi. Then we have 10 here, so we need to decrease here so we can do that by I think we need to do case two ways. Looks basically so we can combine this. Okay, so now we need to keep this toe age. We need to bring this down to it. So here I can do one thing. So let's select this to Portis is on. Let's more here again. See, I'm using this, too. So this is my Tom side on. We're going to use these things. So let's go to edit mess and March. So now I can say I got a triangle here. That's good. We can not just that So let's do the same thing with decide as well. So basically, I'm going to march. No, this face, tortoises and the besides stewardesses here. So let's go to a treatments and march. So let's most here. So I got two triangles here. One is here and then one is here so we can fix that. Batting one is loop here. So let's do that. Go to my stools in today's little are one is live here and then scale it a little bit. So you can see now it looks like, you know, like a topology or extrusion that finds. And now I think I have eight years. Let's Bridget. So let's combine first for the mass combine and let's breathe so like, this is loop and this is looked and bridge Okay, sometimes you won't get a very clean is loops here, so we might need to adjust it. So let's select go to the component more than at justice vortices Something like this. Okay, now this is looking cool. So here you can see when I combine this with the hand duplicated space sell side is gone. So it's normal whenever you combined with a new piece duplicated one because that's instance that's going toe lower again. Deleted. So you need to create it again. So let's go to edit on Duplicate Special. So again, I need to are just I don't know how I think because it combined the pipe What is of the center service? Bring the pilot toe the center agree on. Let's Presti. Okay, then let's use this to look at special. Okay, on. The next thing I'm going to do is diluting. The history can see I have lot off imports here, which I don't need. So again, deleting history is a good practice to no light in the scene. So let's go toe eight on Goto, delayed by type and history is going to deal it. All those back history or the inputs on the scene is clear. I'm free from all those nor calculus. Um, so do this. Meanwhile, and in the next lecture, we're going to work on the face by going to block the face
24. Block Out The Face Eye Topology: okay in this lecture, I'm going to start working on the head so you can see I'm going to do the area in this lecture and then we're going to do the lip area so I might take three or four really is to complete the head. So let's say that so let's start from this ice. So I'm going to start from the eyeball and then the I look. So when we're going to do the face, make sure you follow exact steps off mine to get the loops, the top college of the face because of the animism. So here I'm going toe create a spear for the eyeballs. So let's create a spear and responses on that in the side view on getting podgy Senate here somewhere on Let's scale it so scared to the appropriate size. Here I am looking at this new car off the eyeball in the visible eyeball here, and I'm going toe try to mask that so roughly on, you can see the poor of the spear. If I goto the perspective and hit F to frame, you can see this poll here should be a someone in front, as if this is diaries are the law, though a part of die here, So I'm going to rotate the spear. So let's take the rotator and you can rotate it 90 degree the single So we can hold. They hold down the Jakey on, then protected No, down on the discreet Rotech. So let's sort it all You can do that. Also, inside this rotate tool. If you go to this step slap, you can say this is all we can turn on this as well. From here. Let's a absolute or relative stolen that and brought it 90 degree. So that's right. It should be something like this and then reset it. Okay, let's put this in this in the front view as well. So toe the area you can see here. So this is my eyeball on. Then I'm going to create the no surrounding skin, the overlapping skin. Here you can see this. I lied area which is overlapping on diable on the side. You can see they movie to conceal a group gone off the great for a minute. You can see this key. Mediate's like overlapping on top of diable on the top, agile. So let's create that skin. For that, I need to mass that. No polygons, new skin polygon on top of desirable. For that, I'm goingto make this object life. By going to this, I, Connery can go to modify and make it live as well from here. So select object and make life. So now this is a life object. Live object. So I can create on top of this object now. So I'm going toe use a new tool here. Let's go toe May stools on bring the create polygon tool. So if I use this tool now on top of this model I can create no polygons On top of this model, you can see I am creating vortices on top of this peer because this periods alive, object whatever I'm going to create it an interactive tool it's going to create on top of this. That's the reason why I did this. Make life for LeBron do Andi. Let's go toe blessed on this Make life ups And again this is the same I can for this for this make life So this click on that another spear is known life. Now I'm going to create the surrounding skin. Don off the extra money and I'm going to create the idea. So let's say this is the gardener of Die on. This is the top on the 90 degree point. And again this will be the next corner. So I'm going to put while in between. So one is here. Then the 45 degree point, then the 90 degree. And then again, the 45 then again, 90 anti. So this is the center cardinal of Die. Then I can do the same thing. Yeah. Okay, so basically 12345678 points. Okay. And now if I go to this view and if I go to the selector Andi, let's go to the weapon more or let's don off this little select this they can see if I I select this. I have creator polygon here and say this polygon single inside Republican. So now I'm going toe is more. Let's select. I think my sock selections is turned onto latched on that off by pressing wiki. Okay, so DoubleClick cilic done there is loop and then I'm going toe extremely so you can let me know Don, after isolate here on now the ages selected against C. Let me be in this where some more on Let's extremely this. So let's go to edit medicine Extra. So basically, let said, this is the I. You know I age I leaders and then we're going to extrude actual island. So let's extreme. So let's pull this in this wide direction on now against eats like extruding outside. And then let's go to this No click on this world I can and then move this with G access. So something like this I said, this is a chilled Eylea. Okay, so let me go toe no selectable to select everything And let's start off the make live Upson . We don't want that life thing. Animal. We have no creator this folly guns here Like where I select on we don't need this inside face. You can see So let's turn this off on then can see. See this known reverse normal effect. So we're going to miss display on reverse the first Except I can't see the direction is appropriate. Okay, lets again Donald I select So I'm going toe again is more and this time we're from more quickly. And then let's get a little bit So it should be It should be a little bit upset. Er I can see there's a little gap Now let's skill this as well. So this mileage and there should be some thickness. So I'm going to going to extrude this whole thing. So let's extremely this Select every face and goto treatments and extra on then with the G excess pulls this inside I need toe revolts it again So go to miss display in reverse So now against you we have a thickness. If I isolated Goto so I select you selected it will be the only thing which is visible now . Okay, so now you can see we have the thickness on We have also We don't need this back loop so select this face on hold saved and double click to the leg over fest You can see I see like whole look land bility We don't need this inside Collector faced on Now we have this I laid on Then the thickness of dilate on the skin is going on inside Eyeball on Dhere be diable So this is the idea. Andi, just make sure you d little this back face because this polygons is going toe goto the face here and I'm not going to a student thing here. So let's Donald isolate here and let's press three to see. We can see now it's intersecting a little bit so we can scale it. Let's center the piper, scale it a little bit so that it all the intersect and you can see not fridge properly. Okay, so now let's go to the side view and check the I say from the side, he concedes not good here. This idiots will come out if I select this Syria so I should look like from this angle it's or look like like it called here like this on now you can see it straight and not properly set absolutes Select something like this coming out and then let's see like this to its posted again can say I'm trying toe get that car that leads to the same thing with this thing from this Stop. It should be like this on this color. On the corner of that, I should go back from the side angle. It looked like a visit like this. So not express tree again to make sure it's matching now. I think this is OK. Okay, now I'm going toe extrude it. So let's select. This is loop on Extreme. This is that we can hold, sit and write most to get this marking minute on, because I have a little selected the absolute resource. The is the liquor absence and here's their students selected on Let's exchange with this blue access must move it on Dhere. Let's go to the front view on You can see I'm going to scale it until this eyebrow idea on this is my legs. I think I looks a little lighter so that skillet so there's no little can see in this area , So make sure this loop ease of that weight and this is this whole round loop. So here this round loop is very important for I animism. So if I go and put one more is it's going toe being this area. So I'm going to do that letter now. We're just blocking it. So with minimum is this. I'm trying to block the overall step, so let's select our reports and listings Stone on the X ray. I'm trying to get this around so we can see from the shadow here. I'm trying to mask this. Save their I'm from the side angle. You can see if I don't off the x ray this'll area with this continent of die, this position should be backward. So there isn't any straight line from the I like or not the face save of the faces like going backward and it's a slow kind of step. So now you can see we have a kind off raced kind off safe here from the cycle, so it should go back on the eye Color steps should go. Should be like a slope like this. It should go or destruction. Andi, let's pose this again. This ibo conductor. But they're under supposed this. So make sure you do this this side of die being the slope. So this pace So don't be a straight here. It should be in this angle. Okay, On this site is I think, fine. Okay. I think this sickness or they're going to take that letter. That's fine. Now then, I'm going to extrude this too. Is this to it on? We're going to extrude to us here, So let's execute again. Like an extra from the self. The cycle. Andi, they don't go to the move tool and move out that new extra on here. You can see this safe. We're going to straight it straight on it. We can do that by using the scale tool on. If I scale from this access to the center, you can see I can I can totally straighten it. Now it's straight. Now let's go to move to land. We're going to use the snapped. Agreed up some to snuff this line to this center. Great. Have strong this up. We can do that from the side view. Can say that safe should be somewhere here. So let's move it out. So I always work with the two of you. Don't forget, toe, not sacred out of you. So don't stop with one single view. Make sure you are. No, we're adjusting All these waters is poses on according to the two immense plain. The to reference let's was Senate here. So now concedes just on just above the gorge on this is the thing on the reeds knows breeze area. Okay. I think this is good on this part. I think should come out of it. spots come out. You can see this slope. This angle of the face here and this is this is the nose to it. It's a very wide knowns here against a Okay, so then we're going toe X street once more, going to extra the full Lupita. So I'm going to select it to let the whole loop on, except this to look, if I thought of the great, you can say I don't want this to it. That's so whole control and drag like this to dis elect can't see it's not selected anymore . So I have just elected from this is all the way through The says So now we're going toe extrude it once more to get another loop like this. So that's extra So whatever I am doing now, tow, not toe get the proper Is Lupu Jail. I'm not just creating safe now. I'm also thinking about the AIDS loops on. I'm thinking if it's going to work with Darla MSM so again you can see we have round loops around eyes on. Then we have this kind of spec bigger. No ice, big loops. Okay, so again spoke just on it. I always try to space. All these waters is evenly. So don't don't keep like this very close to each other. And there's no there's a big gaffe. Don't keep But this is like this. Try toe poor Those waters is even space on it will help you in smoothing and it will help you in proper smooth deferments and of the rigging An animal sometime I suppose you select again. I'm looking from the side view. Agile So beginners that tend to do this Mistake that 10 toe Stop it. One view and they extrude and do the whole top Alozie things in single view. And then they come to the side view aan den. It's very hard to are just not the whole a lot of vortices and adjust them to create a good separate way hard. So make sure you do this as you go. Don't keep this to the end. Make sure you do this and just every ex texture with the two views. Okay, so this is the I loop area we have created here A little press three to check. You can see you have a cute eyeball and the idea going on here. So I'm stopping this lecture here in the next lecture. We're going to see how to do the mouth area
25. Block Out The Face Mouth Topology: I welcome back to this first morning letter here and in this particular lecture are going to do the mouth topple Algeria. And in the last little you learn how to do this. I'd apology and I save here unless to the multi area. So again for the mouth, I'm going to use the create political tool. And now I'm not going to use any object as a live object. They're just going toe. No clear. The bodice is on on this space. So let's go to my stools. Bring the create polygon tool on. We're going to draw the mouth basically. So now I can see the images, a little picture letters so you cannot see the leap step clearly. But if you zoom out a little bit against you, it's a very small lip on very tightly Tinley partial. I'm going to just imagine and draw. Let's say, let's start from the center again. I'm going to do have 1/2 aan den. We're going toe meter to the other side. So here for I'm starting on this center on. Let's put the point here. Let me turn on the greater that I know the center. OK, that's fine. So then I'm going toe put the V safe here. So just imagine like this. A little bit V Yeah. Top bodice is on. Then let's put wall here. Basically one here on day in the corner. So basically, from this V top V on the corner, there is a one vortex In between Onda, we have 1234 for the top on. Let's do the same points here as well. At the bottom, you can see the shape of the lip here I have drawn. So this is the up a leaf out of outer raise. And this is the lower lip out the reds. Okay, then let's hit Hit the enter button to create the political. And now you can see it has created that polygon here. So first of all, I'm going to move it. So now if I go to move Tool, you can see the pilot is somewhere here, so I need to center the pilot. So let's go to modify and a center piper. So once the pipe it is here, we can easily move it through the lip area. Lucas in here. Let's put it somewhere at this corner on again. I think this is fine. So let's let's extrude this outrage again. Double clicks like the whole look de select This center is again on Just select all these is this and then extrude So here I am extruding together out of loop So let's go and extra okay, and then use this Why access to pull this extra out here can see on Let's go to the side view We need to push this like this The leap lips would look like this, like popping out are so had this angle from the side view on Let's delete this center first again We don't need this Onda we need toe obviously reverse the polygons So let's go toe makes display and reverse So here I have got this set and again you can see from the top on down angle It's totally straight Leave is actually a kind of around seven so we can just these vortices, so just leave the side color Andi Cilic always and pull out like this on again dis elect this line people in the control and drag and move it. Move these things So you should see like something like this Ahap half circle something like this on If I go to the side view this top side of the live the top lips would come out a little bit more than the bottom live. So this part, this stop our top part should be more forward than the early. Okay, so then I'm going toe select. This is look from here to here. So I did. I select this is and then go toe, hold the seat and go to the size and double click. So it's going to select in between his lips and then I'm going to extrude so extreme and use this blue access with the G access to extrude in their normal direction. I think this is good. So let's a select on again. I can hold the w go to competent more to move these days in that direction I can see roughly. I just did that leave but many papers Three. You can see very rough. Sepp the leave. Okay, If I go to the side view to Mads, it's not matching properly, but we're going towards just that. Consider this. This is the bottom. With this top live, I think we should forges on it correctly here. Yeah, I think this is fine. So again here I'm not defining just blocking the saves. Then we're going toe. Have a second pass off their detailing. We're going to see everything again on we're going to pull these loops and I just feel what I say is to get a good step on. Good looking set. Basically. So now I just need a top allergic there. So now I'm going to select this as loop again, selected whole safety and double click on the says that sort. Select this loops this parcel loop and then again, extra or so let's extrude and that's extra like this. So you can you can see the surround loop here so this loop is were important. Didn't go to side view on Post this on. Then you can see this suggested match here. The liberty is not matching so and going toe. Move these things okay, something like this. So again, don't just talk on this front view. Inside. View a less Jacob model in the prospective agile and see if it's working. If it's not working, then it's not working here. In this perspective, make sure you are just a vortices. Andi, make it working here. So let's see. Like this lip corner and pushed this inside. Andi, this area should come outside. So league understood gold the inside of the skin there So a little hard, but can try and you can get it slowly. So it's hard for the first time to get this look proper savior here can see getting the live here on. Then I'm going toe Mars the leap Plouffe here. So I needed another extraordinaire. Select the loop again on extrude. Lets the sun here. I'm going to going to select all this water states. Can I get down on the extra more? Okay, that's great. And here I'm going to Mars. So fasting I'm going to select both of the parts here. Consider their separator. So let's select vote on combined those crushed. So go to mates and combine to make a single object here. Now it's a single object. So now I can go ahead and more spewed things. I can go select these two goddesses on Mars these things into one goddesses. Let's go to edit Mess On March on Washington Center, let's march on select and pressed geeky to repeat the last accent Press G on here. I'm going to Mars this to again. So so you can see this. Stop Pelosi of of the Lever, the mouth starting from here on going. All that are like this. So if I go and duplicate this to this side, you can see so let go far skill. This center line. You can see it's not a straight line. So before I duplicate this part, so this side, I need to make sure it straight. So let's selected carefully. You can see you might see like this inside vortices like this. Make sure you have not selected any inside vortices, just the border here on Let's go to scale to land scale in this access all the way to straighten those on. Then the next degrees. Make sure you snap it. Now you can see there's a gap between this center and here, so make sure it's snap. So let's turn on the greed on Snap it against in mouths. Perfect on. Now let's turn that off. Good object More than could it duplicate? Special. Make sure this is said toe said toe. Instance. On day two, minus X minus scale one on the X axis, so minus one in the scale X. So now applied a. Now again, you can see a the problem. It kind of flips to this side. Means it's not purchased. Um, not the proper Lucas and two, let's under its because of the fiber point. So let's go toe The move to learn against the Piper Point is here on its killing from that Bible point. So that's why it's creating the object here. So we're going toe. Press the dickey on Don't under Great and move this Piper point toe this great line. Now press d again. Okay, so the Piper point is here now, So let's a play. No, I can't see. The topology is all the way. It's rounder top, Alousi. Here around the mouth. It's around a below Z here and around the eye. So these two loops are very important for I animism on mouth leap animism. Any dialogue, er, lip sinking animism. So we we should have this stop Alousi. Well, now let's breast three. When oppressed. Three. You might see this hard. Is it because it's the border is and it's not marched. It's just the duplicated part it's not more to hear with this part, so that's where we're getting this line. When we're dollar, decide completely, then we're going to mirror it instead of duplicate. And we knew meter. Let me show you when we're going to meet her it from mess and meter. It's going to mark the idea Dizzy area. And if you press three, you can see now it's perfect. So and against ism problem with the mirror. We're going to start that out letter. But now let me undo unless duplicated so you can press control C to D to duplicate. So now you can see with this my my recording. It's not working, So just go to a duplicate space also because my recording hearts and no a different sort with for control city. Okay, so don't worry about this center line, so just make sure you get these loops. This is very important. So now I'm going to extrude. This is Loof from here till here again on we're going toe extruded till here and then we're going to Mars. So this is loops would go like this. So let's select an extra on then. Let's scale Proposition eight on you can see this area is where there. So let's bring that back on like this, too. It's more of those something like this again. Don't forget to artist, you can see the same is not right. So makes sure the same is also good. It's always again are just the same as you go. Don't keep that toe the in don't say Okay, let's extrude and get that apology it. Then I'll come back and are just the vortices to get the same. That's not the proper way, because that way you land off with a lot of vortices are at the end. And then it's very hard to our just and get a smoke so very hard. So make sure you are existed with minimal mortis is as you go the next you're an artist and get the same. So make sure you do this. So that's that's what I'm doing right now. So I just ing Andi can see about just to me dis compliment more to move these vortices along their normal direction. The face, their direct like they're facing next on our multi dates in here. So again, trying to get over will save there shouldn't be perfect. Now we're blocking. But still the overall safe's would be correct. The proposal and overall set. We'll get so here. I'm going to extrude it again. So you have extruding again again This loop from here till here and again This loop should come like this. So let's extralegal on do something like this on. This is the last Luba of this area. Okay, Now I'm in this component more so. Let's goto world more again. If you are confusing when I'm changing this world toe, component it by placing w and litmus. And still, if you don't do this, you can do this. Then you can goto this move to land not changed this world toe component from here. Okay, so here I'm going to again more these two things again you can get the most overstepped right click on then. Most notices because I have selected this. What does his Then I'll get this Moore's vortex and modes for text to center. So it's quicker. Let's press tree to check the output. So now I can see you are getting their country. This Dench now in this jig, it s so we need to put one is loops, I think. Here. So we're going to defend that letter. So now we got the Stop Alozie here. If you go to this vortex purse more, you can see the topology in better wake and see how these loops are going. Watch the face, Pa. Legal size. Okay, so let's go to object more. Andi, I'm stopping this Lecter here in the next lecture. We're going to do this. Call part.
26. Block Out The Face Head Topology: I will come back to the first modeling here on in this lecture were going toe complete this call and the next part on Let's see that. So here I'm going toe extrude few ways is on the top of the ESA. Let's select This is this This is our letting this age. So from here I'm going to extrude on I'm goingto go all the way till here. So let's That's extra disease loves so extreme load and go to the move to land just to move from the center. So something like this on day do this again, I'll make sure I'm adjusting the same gradual not just extruding and getting the topology. It's also very important to our just on get the sip. Okay, so against it. This is my bro. And this should be student with the highest point, so it should go inside like this, so make sure your morning you're not just doing anything technical, so don't just create loops, so that's technical, but safe. Creating the safe is actual modeling. So make sure you do that. Okay? Something like this. Okay, so now this is the high stadia on. Then we're going to ask the skull. Okay. From the side room again. I'm making sure it's matching with the model you can. We're going to come back and rule the stop, but just makes you okay. Now let's extrude again. So select all these ages. It's already selector, So just extra, um So let's go to move Tool and just removed from the center. There's something like this. So I'm going to basically do the same thing extra again on then move something like this on . I'm not going to imagine this hairline. So the head would be a little bit less whiter unless thick than this hair like, Hey, it would be someone here on then this thicknesses from the here. So that's why I need toe pose. Thistle Bridge. Suppose this down a bit. Something like this. So I'm upsetting a little bit from this outside hairline, Then move this on someone here next year. Here it's a little straight. And make sure the stop loops are very smooth. Smoothly, Arends, Basically Okay, that's cool. And let's go to the W again next year. Smooth like this from the top of you again. It should be properly evenly spaced. It shouldn't be like. This one is very close to the door. And there's a big gap. Make sure it's very even. This prayer. Something like this organ now list extruded against or less extreme. You're and moved this backward. Position it again. I'm keeping a little bit upset there on here. I'm going to start rotating like this because this loop should suit rotating silver ticket . And it should be. This is loops would come to earth this year. So here I am, putting this here. So then I'll come back and put some in between his lips to make this step smoke. Now they're just going to block it. Let's move on again. Wrote it. This this access. Make sure this access or we can rotate from this outside collage. If you're doing this inside the side view can use that. Okay, so this POTUS image again, I'm going roughly here. So I need one in between Stare. Just doing it roughly. So. Senate on here against thieves. Wider. It should be scaled and narrower here. So scale it on, then move it. Because you can see this Gaffes. Just move to align it like this. I think here we need to do the same thing. Just scale a bit. Not like this Liberte Lis. Less scale. I guess you can see this Round City. Okay, that's good. And then we can go on Put one is love. So let's goto my stools Insiders loophole Upson box on Make sure this obstinate store known and then put his lips So it's going to automatically snap and created smooth shaped like this the door upto I've just to get a smoke set So there's no beauty of this Upson on again . Make sure it's so. Don't be like like this to Eastern effects of makes every move gorgeous on these things. The twisted effects would be less Okay, So now I think I like this. I like this. Then let's continue and create this neck. Let's move this to this jaw idea here. Obviously they're going to are just all these things. Okay, so let's smooth are just these things. Okay, so now I'm going to let me go to this view here. It's service on my here. I think this loop is okay, but I think that is fine. I just need to select this water season, move these things for the next district based on my here, and that's our just distance. But for something like this, and then we're going toe more this thing. So let's Margit like this. So we're going to Maybe more that year are let me under its most with this one someone is it? So I'm using this seat, right? Most and most most to center where you can go dated minutes on most of center like this and then I'm going toe No, select all these loops on extrude these things on. Let's go to scale, tool and scale This like this This would be able, Nick, move it like this And we need to access these things because you can see this rectangle kind of separate should be round. So this what assists would go somewhere here, you know, drives these things a little bit carefully and let's put this in each year somewhere so we can do this on now against extruded neck from there. Or you can go in and take a Celinda. We're committing this count. Is political count living in Greece that as well So we can do that. Let's count this 123456 says so basically 123456 and six decides its orbit wealth so we can take a cylinder off 12. So let's take a Celinda go to general box here on Let's put dual been the subject and access. So which is this thing is, loops begins at this particle is lips so 12 their position it so by By this way, the neck would be very smooth rounder. If you extrude that from here, it would be dependent on this this safe here you can see. And that is not proper around. That's why I think this this way is better. So this board descended here, skin this a little bit. So my here and again that that should be a little gap to blend it. And then we can forges on these things a little bit better. So let's purchase. And okay, now we can again take this cylinder, just delete. Hop on, delete the lure physicists and our professors as well. So again, all this physicists, the lure andare profess Dave those. So again, I have this hop spear have cylinder and then let's elect combine. Oh, I think I didn't do that properly. So let's go made its and combine when you combine it. A new piece, The duplicated special is going toe no de litter. So that's normal. We're going to again duplicate. So now let's select. This is loop and this is love. And then let's breeze it so it makes on bridge. Now I can see it blender from this strip to a very nice cylindrical said. By this way, Onda, we need to are just They said Yes, so I can use the sculpture in relaxed bus on with this. Let's hold the B and lived most drag toe our justice broadsides on Let's let's paint it here. You can see it can relax it. Okay, let's go back to select all and pressed three to see if I can see a very nice snake there. Let's selected and go to it. We get special again. The by what is in the wrong place on again? We have something here which is not a line. So let's select Scale it on. Snap it again. Leg will do the whole thing there Skill on snap can hold X key toe dawn on this great temporarily on. Then again Go to edit duplicate space here. Also there forget toe existence. By what? So press day to go to the pilot More. Hold on the X key. Toby in this snapped. Oh, great. More temporally. If you release decks key, it's going to turn off, hold tonal release to turn off the whole X key and then move it. So it's going to snap to every great line. Okay, then released a d There are Sorry. Release date X and press D to settle there on, then replicate special so you can see the neck and skull here. And obviously it's you looking a little bit odd now, but we're going to make it look beautiful. So Oh, I'm stopping this lecture here. So in the next lecture, we're going to see how toe more than that year.
27. Modeling The Ear: Hi. Welcome back in this video. I'm going to model the year. So Lister So I'm going to start with a cylinder. Are bite. Maybe so Let's started the pipe. So let's go toe. Create problem primitives on. We'll find the pipe primitives here so it's bring that move it. So the region I chose by because of this new round accepts. So I'm going Toe wrote it it. Let's this e on. I wrote it in G excess. Let's certain 90 TV. I'm going to scale it so scale make it appropriate size something like this on. I don't want this. There's so many polygons here. You can see these experiments. So if I select this model on Congress, is this here? I'll get something like, Let's you can count money early or you can go to display and hits up display and you can turn poorly. Count on long can see this man here and now if I select that is a single, as you can see, it said two ways, because this side is also selected because it's duplicates special, so in stand subject. So now if I double click and select all this border exists now here can see 22. That means it's 11 on Decide. 11 equals to 22. Okay, so now we need to have 11. Is this year so that we can Moore's letter What the model has toe have same number of edges so that we can breeze and connect those. But 11 is our number. So I'm going toe put. One is here somewhere so that it becomes 12 something and then I'll have 12 here. So let's quickly bring that is Loophole. But my stools and insider's look so yes, somewhere I'm going tow ARD. Let's see here. I'm gonna arrogance See, I need to adjust the same which still flat and we have on edge loop here. So it will keep this this step. No, it'll hold the several. Ismat it So I'm going toe going. Are this is Luke on? Then let's select it whole sipped on. Rightly. You get this marking 11 you'll find this. It is floor person. When you choose that, you can see it automatically. And just that is Aunt Kate that smooth floor. Okay, now we have 12. Adjusts here less double check it 24 minutes. 12 year and told the site. So now I'm going to have to absorb design access here. So if I select this primitive and go to this imports, I'll find this Miller. And let's are just a subdivision access to 12 so that it matches with this side. Okay, Now, this is the basic founder son on. Now we're going to start sipping the model here. It's just a cylinder. I'm going toe are just this thickness this pipe thickness to this area of this year. So I'm going to again come back. This imports analysts at just this thickness point geo fight. So I just it of holding control and lip most drag on the screen. You are just it roughly like this. Okay, now I'm going to adjust that year. So let's in tow first, uh, toady int it properly. So let's rotate it from the front view, something like this. So if you're siege from top view, it would be something like this. Not like this parallel on from the front. It also managed to rotate it like this way so that off something like this angle, maybe floor on the site. So I need to scale this side of it on this thickness of it, and I'm going to delete this side of the Parliament's will. Select one and hold sipped and double click will never face Andi. Now let's do it. So we got this ring of this year, and it's a very simple year. So, uh, it'll be easy to Martin. If it's a human realistic human year, you'll find delivered difficulty to get the set. But again, this is the way I also use when I we really stay here and it tends to know work. So here, I'm going to adjust this safe and fill the Syria So you can see the year this, uh, this safe here on. I need to also wrote it this way. Okay, so now I'm going to So let this tour to Cesar. Just try to get that by doing something like this and I'm using I think if I goto this move tool and the tool settings is it too component? You can use this all we can use this object more. So they did not. It exists, Amanda better in that particular direction. I couldn't see. The member is just component on. Now I'm going to feel this inside a desolate like this insider's look, I think it's a bit wary inside, so it's now I'm going to extremely, So let's go to edit Mess, Extra Allex. You're a little bit to move inside with this G excess, or you can just normal scale it very basic year. So let's switch to move to LA move a little bit forward. And then again, extreme cold can extra from here as well on Let's this time I'm going to switch toe the skeletal on after doing their student just scaling it inside. Okay, good And news two are just these idiots. You can hold W and left most to get the move toe tool settings Absence up from here, you can squeeze region object, more component moored on wall more. Yes, let's move this. And so it that's that will move the whole age loop inside something like this. Let's move these two. Live it back out inside, have another Select this and I'm going to extrude again. So is to skeletal scale move, understand? I'm going to move live it for I mean toward the face on inside as well. Okay. I think the your whole is bigger now if I pressed three toe, check the smoke review. You can see something like this Not so good little, but we cannot exist it from here. Okay, now I'm going toe goto this. Say this out. Out outside of the year on again. Extrude this to get the tip here first G story inside on move delivered back. Okay, so this will be the collection area with the head. So that selector selects first, actually combined this too. So that again, Morton breeze basically So let's so let boat on goto mess and combine. So when I combined with a new piece, this instance object, we'll get, you know, go away. So we need to duplicate it again. But I'm not worrying. I don't worry about that right now, so I just need to Margit a Bridget. So now, because we have the same number of ages 12 on 12 this is a very consulting make sure you have same number off exists at this border video, and now you can easily visit because it's basically identical numbers. So select boat there's lips by holding, sipped under with leading and then go to edit mess and breeds. Okay, so this breeze seems to working. But sometimes you'll get some kind of were a twister kind of effect that we saw you. When you click on this brace, sometimes it will give you something like this kind of effect, which is a twister can reflect those. Let's that this is is, uh, going toe getting braised with This is so it creates that north twister. So if it happens, come here to this touristy area on pushed it on DSI It tells you to know Get the stretch straight breeze again. Now if I pressed three to check the preview Okay, we got it, but we need to adjust it as the city. We don't want this defined area here. You should be blended with the fists. So now I can see this. Let's look, this is textbook component more on. Let's good weapon. Mortal again. Easily. See this heartaches? Okay, here we have this death here you can see so this this death is also here. We don't want that here so I can select this one and this one the stool vortex on Denmark's It will get a triangle and that's fine. So let's goto Eric mess on most of center. So now this dead is isn't here anymore, so it's and off collected. So I'm going to do the same thing here in this tour. Tex, when you do this kind of things, makes sure we were grabbing the right word is is. So just follow the A's and see the vortex here on this. Follow the agency, the vortex here on Let's Go to Edit Mess and most to center. So it's remarks those two words exist and move those two center Yes and no, We don't have that depth here. I'm also making sealed. What this is is no somewhere here so that I don't get a deep line there when I smooth it. Another agency. It's kind, off looking blender, but I think that magic I think I can most this, too, as a so let's like this, too. And it mess. Master center. You can also hold save right click to get this absence and go to Mars toe Maseratis to center of the great. So they say this thing snitched to wear just her. Okay, now in this company more. Let's go toe world, Mort. So I'm trying to get this close to the head. Something like this and this orders is is someone hears a less about a company. More of this on its I hope this as well. So we're getting this set up here on, and it's a kind of catatonic kind of year. It's not realistic. You can also go toe three more. Who's the smooth preview mode and then add just really what this is? But I don't do this very often. Sometimes, yes, but I try to avoid this because sometimes only one in the smooth review and you are just stated and I never toe the normal case moved the normal lives and more No, you'll see digs that kind off. What is is okay, Good. I think I need to just decide a bit this Okay, I didn't find for not I may come back. Letter toe. Define this. A safe, deliberate bird. Let's see. So in the next lecture, we're going to work on the North spot
28. Modeling The Nose: Hi. In this lecture, I'm going to work in the most brutal. So here you can see our model. And if I go to this four view layout now, you can see my difference. Images are kind of hidden. So does it. Not here in this is kind of a box. Sometimes the reference images don't saw off in the view. If it happens to you, then make sure you do this. So go to your layer on you need to refresh it. So it's a refreshed, kindof bog. So you need to select the view we want to difference. And then the stone after earlier, which I know it has those our ah, Francie medicine it. So let's start on it again. So let's do the same thing with this view. So that streak anywhere in the blank area of that view to make sure it's selected on. Then they start off on Tollan again, so it's kind of a refreshed issue. So now I'm going to block the nose. So if I go to this front view, we need a face here and you can see this around Top Alozie. This will be on top of the laws because after this topology, that apology is changing here. So we need to have a around a policy like this from the top of the laws. So I'm going to exist. This this is the water says here, so they no go to this area here and less progess on this on the side view. Make sure we had this at the base of the lose here on this line. Should be at the base of this nostril. Here on this Looks would be very a smooth around the tip. Something like this. Okay, so now I have that is Lou Fear on top of this nose. So now we wait, Need tohave It harmonies here at the bottom. So let's hard one is Look, toe one is look here at the bottom. So now we have one face here. So now I need to select. This is Luke on. Let's goto. This is flow everyday slow. So we'll get toe this May know by holding sipped on right click. And then let's click on this edit as flow socially adjusted those vortices to make that area. That's that safe. Smoke flowing. Okay, so make sure you do this anything you want on his loop or is okay. Now let's extrude this sort of this political. Can I let me just This is to decide here somewhere. And now let's after this face for the Lord's. So that's extruded Elissa existed. Okay, so when you extrude, you'll get and face here at the center. So we're making the nose. We're making half of the laws. So this is not the intent knows. So we don't need this center polygon, so make sure you delete this. This is a very important step. Don't forget to delete this center fist. Okay, so now let's go to front view, and I need to our justice aids to this deep round around staple DeLillo's Okay, Andi. God, just this. Okay, good. So this is this is news to be registered toe this lost role sepia looks with this back on. Now I'm going to extrude on do the nostril hole. So let's like this button face on next to you on. Let's go to skill by clicking on any of this box and then send scale from the center like this, so one extrude and skill that then I'm going to extrude it again toe go inside. So let's extra again by clicking here. Didn't move this extra inside like this. So this is the nostril hole. Andi, you can have this pissed. You can delete that. I like to have that crest. I don't want to have any hole in my model. So let's up that new crest three. You can see something like this. Okay, so no, let's, uh are there some basics? Appeared on base Accepts here. So this side is straight. We want tohave a circle around sepia So in orderto make it round safe We need to have one is lluvia We need one is look at the center So I'm going tow ard one is low So again let's go toe miss stools and again again used during today's looked all I want to So you another way toe have on Islamabad Exactly center So you need to select one? Is this is that this is Maybe this is so select This is on. Then let's hold control Rightly on Go to this is renewed Klytus at the seven o'clock purchase. Um so is ringing abilities on? Then you'll find this three Absalon Leicester's two ways of being and split So basically it's going toe convert This single its selection toe is ring on dense plate The holding So like this basically these things that ring and then to industry that so we'll get a nasal about the center on Then I'm going to select it and then again hold sit right leg and it s feel to make sure that hello, We're maintaining that car. Bijur It's not making that flood sip so as float So it's always, you know, getting that smoke nous Okay, so no, I'm going toe just this So makes you I just just decide because now I have This is toe Hold that Sepp So I can move this like this Andan moved this Okay, something like this and then I want to Arden is look here like this this way so that I can make this nostril from the bottom. You can see we have a kind of straight safe here. You need to have something like this. So I'm going toe are days. Look here against elected Control rightly is ring to his ring and straight something like this thing again. Hold sit Right Click on We'll go to it it s floor. Okay, so now from the side view, once we are, this is Look, we need to our sister nostril here as well, so I can see the national basis here, But our moral basis like this, so it needs to be pulls inside. Uh, you know what? To us. The face. So it gets this around safe here. Something like this. I'm from this bottle. We need to are just this. You need to create that safe here that say this like this. Like this one. This all on this whole be and I just doesn't make it like like this for a press three. You get a bit that I just divers in here and then Okay, now you can see we have so many polygons going this way compared to this way. So when it toe art is this decide as well so that we'll have kind of square. Seps parliaments are not like a rectangle type of polygons like this. We need to have this way, politicians. So the nose blocking is okay here, So I'm going to do the mouth inside part in the next lecture. See, there
29. Modeling Mouth Bag: But when this lecture, we're going to model the mouth bag. So the part inside this material So we need to have something inside the mouth because the model may be animated Lecter for the future, or maybe no, open its mouth. So it's better to have. But I have a close safe here inside this. So if you live this like this when the moral opens the mouth, the camera can see this back part of the head. So it is not a good thing. So let's do this mount bag. So let's select. This is on the whole sipped on. Then select this it so basically it will select the whole parcel is love till here. So select one, then hold, sit and double click on the our last days. Then it'll selecting between Islam's. Okay, Once it selects that, basically, this is the mouth part. The lip is moderate. Now I'm going to extrude this on the surmising. This is the leap here. The live is not a complete idiot. So we're going toe actually a move like this. So what I did there is a student then switched to the move tool by pressing w so it's still there. Stuart places that there. You just need to move it like this. So now, though, Levi's government late this year till here and look and see this sip. So I need to go to scale, tool and scale this way so that this this girl or decreases tonight almost lost to Let's straight length, not a straight line. It's less copped now. I need to extrude again. So before I start makes your that doesn't anything overlapping are crisscrossing like this ? Let's move, Andi, let's move this libit eso admittance that same gap, select on sit whole city and double click. This is finish to it again. You can also extolled by pressing control E, which is the default sad card for That's true. So now I'm going toe again. Move on from the side who I'm kind of imagining the mountainside parts of. This is the leap, the lipped address here. Then the league goes the base of the lip, and then the this ideas will become up on the lower lips who come down like this to make the room for the government it. So now I'm going to scale it. So go to scale to lunch skill. Why? So it'll kind off? No move. This is just our from each other this Syria on at this city I need to manually adjust. So basically what a what I'm trying toe Get your is this Politicians would come down after this lead based basically at the Syria So okay, and this is this would go up on this is the lip corner. You can say this is the live by double click Does the color is Who's suits day? Who's the dead? Straight here at the center. Okay, this should come up and then look at this from the side view in were from more again see something like this It's so go up, Go up. But there's something like this like this Then I'm going to extrude it again. So basically I'm going to keep extruding and ah read somewhere here So let's extra on. It can extruding Why access local I access So it's basically excluding those is in that direction So now you can see it's some kind off kind of balloon savior on the side view is to see something like this. It should go. So let's give extruding crazy to repeat, test you and keep extruding. So here I want to again come down a little bit. So let's go to scale toe skill way so you can move those vortices manually and again confront the top. You can see this carve again. I forget to straighten this this way. So at the center of this small bag, it should be straight from the top view. You can see if I under it was like this. And when I straighten it, it should be something like this. Okay, something. And then I'm going to extrude it again. Move. It's basically you don't need to do the the inside body part years. We need to cap it here. Okay, So I am may need to scale it a bit more on may be this look scary bit more. Make sure it's not kind of know very close to the city. It should know mental and Gaff. Here, get something like this. And now here I'm going to close this. How can you do that? Let's see. Select this one. This is love on extra or so Mr Once more skill. This like this No y axis. And again I wonder Extrude scale this from the centre. Anything from the center like this when it's scale from the center. This is is going this direction with who should be at the center always said this. EDS sir. Vehicle straight So I need to move it. Make sure this aids is at the center and should be again moved a quote. We don't want any flat safe here. Now you can see this service straight here. We don't want that to be Come back gradually, it should be capped. So now I'm going to going to do one thing. So let's select this, too, is we may be this, too. This too, on this twist. Then let's breeze those Go to Eric Mess on breeze. Okay, like this on. We need to No, I don't want anything so we can just feel this face. So now you can see once your visit there's a whole on which can be converted into a polygon face. So let's select DoubleClick, basically to select the border it's on. Then Goto Mess and Filho, so it will feel the whole basically creating a Mulligan on. Now you can see we kept that on depressed. Three. We'll get something like this. And when the God will open, its mouth can see the inside. And it didn't look like the vault inside part. Okay, so So this is Goldmark. Bag on. In the next lecture, we're going to walk away overall head on and we're going toe are few ways. Is toe create square kind of polygons. Now, the model is very rough because the pollen distribution is not correct. Now consider this long rectangle political. That means we have a lot off diseases compared toa diseases. So the rescue will be 50 peut same so that it creates square kind off polygons square polygons. That means the ratio distributional eyes correct. So that will help us to create a good looking, more smoke model. And that will also help in rigging stairs. Okay, so we're going toe Do that in the next lecture.
30. Adjusting The Head With Even Polygons: hi in this little going to work on the overall head and we're going to try toe, get the perfect Mulligan distribution. So now I'm going toe. Let's start adding fuses. So here you can see that there is a long gap. We can are this way. So let's select. This is I'm control, right Click and go to his ring on his ring and split. Do this and then you can see it doesn't add just to save their So you need to hold sit, right click and then goto this everyday flow up some because the law against it I just unclear that smooth god. Except so now you can see the better for living distribution. We can see somewhere close to square polygons square looking belligerents. Okay, so that's good. And then we're going toe are few. Is this here list? You can see the room to Arden is Lupita salutes Select days control likely split and again and it is floor. But don't defend two months on this every day's flow You still you need to adjust manually if it doesn't give you the exact riddle and need to do it manually. So sometimes sliders tool is also going to help you. If I select this is Look, you can see the small three years lips So, like this whole sit and double click this little select in between. Okay, Now I can use lighters to leisure so you can find that here inside this mess tool Zeman slide is tool. I'm the way you can use it is you can hold middle mouths and then drag the mouse while you're holding the middle mouse button down. It will slide. The is so it's a very good way to are just his lips without without changing the save a lot . Okay, so good on then. One other thing is the relaxed brush. You can see the vortices that everywhere put roughly Protestant roughly placed so we can use the sculpting tools sculpt and go to sculpting tab here on. Then I'll bring this Miller this absent the relaxed Russ who want to bring this relaxed plus. Then you can hold the Beaky B for ball and then I'll hold the left mouse and drag to increase the decree. Double size. So my boss, it was too big, and I was thinking, this small circle is the process, but actually the broth size was too big. So who will be? And if you try toe, increase it and you don't see anything. That means the broth size is actually bigger until you need to are, just decrease. It so will be and decrease the both sides. So now I'm Dick using it, and it's slowly bringing it down like this so you can after the first stage it holding the beyond holding the left mouse and drug. So once you are justice, then I'm going to relax. This belligerent slogan, si withholding left mouse and dragging on the model is relaxing. These waters is for this unit. You don't need to select any vortices. You just need Toby in the object more and then go to the sculpting mental and then bring this brass Relax bus. We don't need to select any vortices. It's going to work on the whole modern, and I can see it's relaxing on when it relaxes the vortices. It's actually trash toe. Keep your sape of the model while it's sliding the vortices and getting evenly spaced polygons. So there's a very good way toe create round loops. Now you can see and it's also moving those our from each other and trying to place those evenly. Okay against still unit toe manually existed. Hey, against heat. I think this is working, so it doesn't work on this border. So you need to manually adjust those border. Okay, that's good. Here, here, you need to have justice. Let's that this was my eyebrow and it's sending the petition. Then I'll not do this here at this idea. Let's hear it's good labs and you can see this kind off angle polygons to start kind of effect. So let's use that here agile to minimize that Mr Thing. A great bras and great tool toe get even distributed polygons on your model. Earlier in my career, I used to do this manually. Moving these bodice is one by one when I didn't know about this bursts and I think it was not dead at that time, so it gained latter in the next Few worsen. So I used to do this manually and it was taking a lot of time. You saw this in minutes. It used to take a lot more than minutes. Okay, so then let's go back to selector. Get out of this. Relax, Morris, and still I need to manually move vortices. So let's say I want to. We can have this as die, bro. This is so let's move this as the I broke all my boys. Now the model is kind off having a kind of surprise, Surprise Express, And it's not not in its little face x prison. So I Minute Lord, I brought a little bit so that it did. You look kind of having a natural Expressen on again. Select on. Now. If you use the move tool and move with this global access, it's not a good thing, because when let's say I want to bring this Portis is somewhere here, and I moved this and like this, it's actually moving and at changing the shape of the modeler, concede the bodice is inside there, but in this is just and I'm going to use the component mortal. Let's kowtow the tools sitting and then changed this to component. But that's not got the quickest ways holding the w key and left mouse and then go switch to component more so now against you. As soon as I squeeze to that more, the mandibular tens is, and it existed itself as the vortices normal direction. Now we'll have this angle so it doesn't affect the safe too much. But you can still slide the vortex and put that at the right Lucas. And so having the component more or in the normal access, more access and normal more is a great way to our gesture vortices without changing the shape of the model. So and see. So by this way you can also add ins polygons on. Just get a good distributor polygons. So let's move it in the normal direction. Here, you can see the safe is not right. It should come out. It's to come out like this. It's a call in a bit. Okay, so now I need to put a few more assists. Maybe one here somewhere. So let's select it on, split it. And then if it is floor okay, when I do this again, let's go to relax and relax. Andi evenly spares all those parliaments. Okay, I think we're ready to go. We need to put some agency urgency. So let's say you want to put more than one is so you can do that agile by going to that same thing is ring and split on. You need to go to the settings here. Split ring, I think. The top one. So this is the inputs history. So lets go displayed ring. And now we have one single Polident. So the two divisions basically divided that whole polygon toe to divisions one here. Onda uh, top one. Let's increase this. So now against you have six. But I cannot see the parliament, so we need to adjust this multi. So let's change this split. Type two multi from relative Logan. See, we can put more than one divisions like this. Okay, So once we had that, then let's again relax it because you can see it's not probably distributed, Okay, something like this, but they're good to go. It seems like I'm having a lot of polygons here compared to the world hit. So we can more here and there. So let's see. Like this is on. Let's collapse it. Good rated mess and collapse. This is so it's going to basically more's the two vortices and the is hard. This too, so presidency again. So I get now collapsed this whole lays ring so Let's select one whole control. Right click is ring again, and this time let's go to his ring and collapse. So it's going to switch to the his ring, selects and then collapse all those A's rings. Sorry, let's go do this. So I got a triangle here, but that's fine. Anything for now, I meant to do the same thing. Years. Let's collapse it first. If you don't call us, one is first and you do the collapses ring thing is going to call out the whole ring on and basically don't want that. Let's go Loves won its first, and then the ring is during stops here to this day it, Ah, mazing. And it stops here because it's a triangle now. Because I have selected days thing. I can do the collapse and it will local us Every is there on Logan. See our history. Their history inputs is like getting bigger and bigger. So let's delete those history. So it it thereby type on history. So the model is better than before. Still needs to be adjusted and still image toe are few polygons who are the no proper defining state. So we'll do that letter. So in the next letter were going toe more the body with the head
31. Conecting The Head With Body: how in this lecture we're going to Mars the head with the body. So let's do that. So the first thing I'm going to check is the Poly counts here. Damage to the same. So so that I can please those. So let's count does so I'm going to select this side of the polygon solar spurs. Deal it decide. So I'm going. Toe is more than select. This is and then hold seeped and double click. This is to select the indigent hole is look there and now let's go to display and heads up display poly count. So it'll saw me the exact selected polygon. It's so if we follow this ages and come to this end, you'll see the selected is if I did Selectric concert, said Esos Jiro. And if I select wallets was one. So let's select the whole thing. And now it's SOS eight a day This So let's like this on. Check it. No, you can see it has six edges. That means basically they're not matching. We can agrees those. So, in order to breeze, I have to have same Lamar phases. So either I need to make it eight. All right, I need to make down and and it delivers images and make it six. I think I'm going to make it date. Maybe I don't. We have somebody just on and I think we had a business. I don't know. I just love those here. Let's do that. So I'm going to our days looks So let's delete this aids with Chris the Triangle. And then Let's art is here. So select one split that on going Forget Tuller and it is floor. And then I'm going to collect this solution like this vortex and this vortex and then create a polygon is in between that. So let's go toe edit mess and collect. I believe that's here inside this middle. Yes. Oh, you can see it did miss and connect. You need to first select overdoses toe use that. Okay, so, no, it's seven minute toward one more is I think again. We have a triangle here so well, I can have the triangle. Let me see where can increase if I Arden A's Lubitsch will go all the way. So my here. So I think I don't want that. Let's see if I select this is on, Let's go toe bevel. So let's bevel this so long can see instead of that oneness I'm getting to with. But I'm getting this are thing here. So let's well, let's do something about digital. It's collapsed. This called Reddit Miss Collapse basically called us physically. A more three foetuses. So what I did here is selecting this tree vortices whole save right click and go to Mars vortices more about it. Mars vortices to center. You can also assess this here it makes most to sender Monster center. So again I had that triangle. I'll see if I can do something about that letter. So let's first breathe on. Connect this so I like toe delete this through so that I have room toe breeze yet. So for breathe. Make sure you first combined those. So there's that two different objects. We cannot raise those. It has to be a single object. So let's goto mess and combine. So now it's a single object against. If I select click in varied to left the whole thing, so that means it's combined and select a single object. I would simply guns here. Let's see eight on. It's also ate so that select. Make sure you have selected the corrected this and then go to edit meats and breads. Okay, good. So again we might need toe. Just relax disasters. So let's goto this relaxed bras in the object movement and relax something like this. So let's do are just these vortices border, but it's is mentally. Now I am in the normal more. Okay, this way you can breathe your head with the body in the next lecture. We're going to work on the mouth inside components, the teeth and the gun. So probably I'm going to do the gun in the next lecture. See that?
32. Conecting The Head With Body: how in this lecture we're going to Mars the head with the body. So let's do that. So the first thing I'm going to check is the Poly counts here. Damage to the same. So so that I can please those. So let's count does so I'm going to select this side of the polygon solar spurs. Deal it decide. So I'm going. Toe is more than select. This is and then hold seeped and double click. This is to select the indigent hole is look there and now let's go to display and heads up display poly count. So it'll saw me the exact selected polygon. It's so if we follow this ages and come to this end, you'll see the selected is if I did Selectric concert, said Esos Jiro. And if I select wallets was one. So let's select the whole thing. And now it's SOS eight a day This So let's like this on. Check it. No, you can see it has six edges. That means basically they're not matching. We can agrees those. So, in order to breeze, I have to have same Lamar phases. So either I need to make it eight. All right, I need to make down and and it delivers images and make it six. I think I'm going to make it date. Maybe I don't. We have somebody just on and I think we had a business. I don't know. I just love those here. Let's do that. So I'm going to our days looks So let's delete this aids with Chris the Triangle. And then Let's art is here. So select one split that on going Forget Tuller and it is floor. And then I'm going to collect this solution like this vortex and this vortex and then create a polygon is in between that. So let's go toe edit mess and collect. I believe that's here inside this middle. Yes. Oh, you can see it did miss and connect. You need to first select overdoses toe use that. Okay, so, no, it's seven minute toward one more is I think again. We have a triangle here so well, I can have the triangle. Let me see where can increase if I Arden A's Lubitsch will go all the way. So my here. So I think I don't want that. Let's see if I select this is on, Let's go toe bevel. So let's bevel this so long can see instead of that oneness I'm getting to with. But I'm getting this are thing here. So let's well, let's do something about digital. It's collapsed. This called Reddit Miss Collapse basically called us physically. A more three foetuses. So what I did here is selecting this tree vortices whole save right click and go to Mars vortices more about it. Mars vortices to center. You can also assess this here it makes most to sender Monster center. So again I had that triangle. I'll see if I can do something about that letter. So let's first breathe on. Connect this so I like toe delete this through so that I have room toe breeze yet. So for breathe. Make sure you first combined those. So there's that two different objects. We cannot raise those. It has to be a single object. So let's goto mess and combine. So now it's a single object against. If I select click in varied to left the whole thing, so that means it's combined and select a single object. I would simply guns here. Let's see eight on. It's also ate so that select. Make sure you have selected the corrected this and then go to edit meats and breads. Okay, good. So again we might need toe. Just relax disasters. So let's goto this relaxed bras in the object movement and relax something like this. So let's do are just these vortices border, but it's is mentally. Now I am in the normal more. Okay, this way you can breathe your head with the body in the next lecture. We're going to work on the mouth inside components, the teeth and the gun. So probably I'm going to do the gun in the next lecture. See that?
33. Modeling Gum: Hi in this. Listen, I'm going to welcome the mouth inside part and we're going to do the gun andan the teat. So let's first do the gun toe, hold the state. So again, it's a necessary thing to do because the again the moral character can open its mouth. So there should be some teeth and gun. So let's start the gun. And I don't have any real friends here right now. Basically, I'm going to do help, Arc, and then you're going toe make some room for the date. So I'm going to create pipe. So let's go to create Halligan Primitives and Bip here can see you won't get that here if you click, Here's a man in Let me do it. These things. If I right click here you can see this drop down list and you can choose pipe from here. Okay, so this is the pipe we want some kind of have to pay on. We want gonna want toe 345 Forgot this. 12345 feet at the center toe did here. So I think it's OK. Let's go to its inputs and its chance this thickness so that I don't have this much this tick some here. I'm going to deal it 1/2. Also, they diluted the wrong say is a friend of the actor, so that's still it to say. So there's this the gun on. I need to skill this way. Okay, so this single faces are one TT area. So I'm going toe are one is loof so that we can clear some kind of our Except here I'm going to select. This is an bring and spit basically can do this explicate. We need to do it manually when we want to select presses a repeat read Jackson. So I'm going to do once a and then we're going to duplicate for the sake. So let's move all these but vortices. So this is the center. It's from the phone view That's press F two frame of select on its select. Every alternative is And then let's go to move the move. Verses in normal more. How can two in a press? W you don't saw anything here? I expect to see the move to manipulator, but it doesn't so it's because the move to list set to normal right now. Andi, the selection is AIDS, so this normal only works on vortices. If I goto vortex more than selective vortex against it, so is that. But it is. It doesn't So So we need to change it Toe world raining at the time. At this time I I want this world. Let's move. It blew up to create skin of arc Sunday Made this, Andi, I don't want decide So I need toe select how on deal it. So once I'm done with this ill middle it So now I can also delete These are professors, so I don't need those. So Dragon hole control drag to dis elect this faces and then deal it. Where do this Make sure you are not debating in the and no backside politicians here, Just a top. And now, if a press three you can say something like this, then I can do wanting We can select this on the top of you and we can let's on the top of your list Actually moved these things close to each other like this. The man liberties not only intent that way, so I'm going toe money to do it. There's the one teeth areas hauntingly this. I think this needs to be scaled. Okay, good. And then I'm going toe hard. One is Look this way. So let's bring the insider's look tool. Mr Bolton's It is. Look on, let's drag here. We can make it a bit rounded of Kurt. Move a little bit. Labour's on it. Okay, so grit. We need toe middle it to the site. So let's goto mess and meter Click on that. It seems like the vortices of marching at the center idea. So I need to declare this more stress hold If it happens, so you need to decrease this value. Otherwise it's going toe. No, pull those. What is our from the center? So let's decrease it on. Put something like Point Jiro Jiro one, which is the lowest value on with this value. Only the snap vortices are going to be marched on. Make sure when after metering pressed three to take if it I think if everywhere this is a most properly so this is in the upper gum. So I need to move this. Do the face someone here. Let's place fto frame quickly, and we'll just in it minuto scale it. It's too small scaling. Make sure good sized. I also need to scale in. Why access? Let's move on. Skilled this idea. So it is. I'm stopping this lecture here in the next lecture. We're going to work in the lure gum. Andi, we're going to make some take.
34. Modeling Gum Part02: Hi. Welcome back in this video. I'm going toe. Continue work on this and gun and we're going to do the Logan. So let's I salute this. Were those so isolates electorates electorates that I don't see all those things. Okay, so off. First thing, I'm going to duplicate it as as we look calm. Okay, so let's duplicate it. Control de all. They can duplicate it from here. Replicate. Move it, Onda. I wanted toe be rotated so basically want to scale it to the opposite direction in y axis. Something like this. So you can skill like this on He didn't kind of involved. Okay, when you do this mature refreeze this of a lose because we have minor scales So it tends to know reverse the polygon normal direction So let's goto modify and freeze transformation. So do freed's. And when you do all these things always make sure you have no done off This two sided lighting off, some of which turned on the inside part of the polygon, is going to be late like this. So by this way you cannot see the actual side of the Polident. So if I turn this off then it makes that black. So the black side is the inner part of the actual parliaments. So the pole the polygon, is actually decide on this is the inner side. So when you scale it in minus direction and phrase, sometimes it can have flipped and you'll see the black color outside. That time you need to select it on goto much display and rivers. But this time let me show you. If it solves like this one who freed's if it's so is black on you had this sometime? No, down on and it's not going to soil. If it's off, then you can see the black all. So as soon as you see this black cloud that mental normalcy reversed. Emitter selected, Gordon makes display and reverse. Okay, so the Lord guns should relive it inside so that it locks like this and okay, on board needs to be scaler, which so it's not a perfect half circle. It's something like squeeze Hibbert, Squeeze circle have circum like this. And then I'm going to make this a front top two teeth livid, wider than other kids. So that me, I select you selector. So let me get on in the greed as well by clicking on this icon. So this is the center. We have one and two deaths. I'm going toe going to remove those a bit so that I'll get delivered wider did Here. I need to scale it this time. Deliberate carefully. Yes. I'm going to go to the Component board and then move in that particular direction. So that would have result Andi here. I don't need to do anything. So let's next do the teeth insert area. So I'm going to select this faces our next to so again I'm going to do maybe one side. Then we're going toe. Meet it. Select This first is fast this first. Oh, study this. So let this first. So I'm not selecting this this business right now because if I select everything on extra not gettin extrude here. Exactly. So let me show you what I'm what I mean. Extra Andi, then upset. You cannot said when you use these absence, make sure you hold control and then left most track. So it kind of artist said that value Very. It's a very tiny minutes. So it's a control over scale like this. So let's do the same thing EC steered. You can also scale from here for the skeletal and scale like this on business to be go inside. So I need to extrude again On this time I'm going to switch to the global more by clicking on this left likened Republican it the manipulator is goingto be our jested as the global icon direction Andi Now I'm going to move up like this. Basically, I'm making the room toe come out the teeth. So basically I'm going to do the same thing. Cute. Let's do undo on to this then we'll do that just real. This. So like this versus and day next to again Could a global more than then move up? Okay, when I pressed three, you can see something like this. Okay, now in in tow. Make the same thing here again. Let's steal it 1/2 select. Let's want it. And then leave wanted and then to look the other one. But this way I can minimize the repetition, can skill something like this. And then I'm going to do the same thing with this to did and the same scale. And then we're going to extrude everything everything. That's a single extreme, and then go to global more w I'll get something like this. Press tree toe check. Okay, so now is just need to meet it. Go to front view. Make sure this vortices have perfectly lined to this line. The center line. Andi Then we're going toe less. Let's meter one by one. So let go to mess Media. It always said toe X axis. Is this correct? And then I don't need this bigger value. More stressful value. It used to be the last number Point juju one Andi always after meter after more thing Crest three. To check these new border vortices Miss meter stressor upon Gero Gero one on Chris Tree again Sometimes if the line was not perfectly lined with this center line, Sometimes you'll get some somewhat is is not most we'll get. Some vortices are separated so you need toe Mannelly most those maybe Or before you meet a unit toe. No, align it. Let me show you what I'm exactly mean. So let's say one vortices is not online removed a live it and you're trying to meet it. Now you can see from the front view all these waters is a motor line. This this one is not aligned with the center line, so we don't write on media it. So let's go to Media Andi. Now I'm going to change this value for in Jeju one which is the lowest. Will you? We'll see something like this so that that vortex and not more these two vortex have not Morse. It's because they're our from meted out from the center. And this value is not enough to pull those on Mars does. So that time you might need to low increase developer individual three. Let's say still, this value is not enough for in judo one. Now you can see those two are most because this value a little bit bigger than it starts in a little bigger area toe pull and most those waters is so you don't do this. Oh, I like to actually first align everything. So that window before I'm much I like to align everything and then meter. So So I I makes you that I'm no more zing. Everybody say so. Let's select everything every Not this, but this is of course, so let's go to our prime More on carefully select this center for Texas the center full. 123453 And then we're going to align those by using the move to on developed legal move to Goto World more first. So this is very important. First, goto world more so that this man a better know exactly sauce, uh, the Lexus view. And then we need to turn off the return components placing ups. And so is that written components placing so you'll get that. We'll find that Upson inside this move snap sittings and we'll say this addicting components pacing what it does if it's turned on on your trying to snap it. So I'm going to snap to grid. So on this Absalon, the substance is snapped a great of something against select anything and snapped that to a great line. A great point. Andi, If I try to move all these five vortices and this obstinate stoned on on trying to snap this line, you can see tries to maintain that spacing of this components. So because of the substance. So if I turn this off and then try to snap this good line, everything will be are just read and snapped individually. So by this way, you just need to come toe this move. Tool said the world down on no greats, not to get upset and tone of the substance. By this way, you can align every vortices to the center line. I left with that. You get me toe without fear, fear of that no margin thing and trying to get that with the proper value. So you don't need to do that. You just need to put foreign Girija one value, which is the lowest value on because this what this is that exactly at the centre. It's going to Mars with that value. Okay, so this is the lure gum on the upper gun. Let me frame It Looks like who will be snapped. Great of some off turned on. Let's turn that off. So listen, I salute view selected off. Okay, so the next lecture, we're going to make the teeth
35. Modeling Teeth: in this video, I'm going toe model the teat. So let's start. So in the previous video you saw how toe do this gun inside on, Let me see Look first and then let's hide everything else so we can do that by holding old and H, or you can go to display hide and you can just this hide on selected object. So this is different than isolation, so you can see when you hide something from the scene it actually hearing from the Internet . Enter Myers in, so you cannot see the strings in any of you. But if you just isolate, if you do do that, if you go to this so I select you selected, it's only going to be hearing from that particular view. Ah, now concede that perspective you is in. I so let more have been the selected at visible and on selected things that invisible in this particular view. But you can still see those things those model in this in other cameras. So there's a difference between isolation and the hide apps, and so sometimes if I don't want to see the models in in camera, so I prefer toe do this. So select those things you want to keep on. Didn't go to display hide and hide on selected object. Okay, so I'm going to do the teeth. So let's first from in B, but our top, maybe top. Let's see. So we can start from these physicists you can extract is and then, uh likes to You can do that. I think these do that. So let's extract so goto treatments and extract for those faces and extract. And right now it's it's details from that object. I can see that, not there anymore. So let's select this thing on then. Extremely, I'm going toe global more and then extra, uh, down. So by this this way, it's already matching with this gum safe. If you If you do the teeth from scratch from, let's from a cube, then you need to manually. No are just a que properly toe mass, this gum in certain idea. So that's why I think this is a little bit quicker way. But we're getting this step, so it's not a big deal. We just need toe select. Everybody says here like this, and then go to scale more and skill. This ended No, it's McClure flat, fully lined in. Why access? And then I'm going to actually saved that it. So giving the proper set it should be no matter to us the bottom. Something like this. Maybe I can still see like this to one scale. Those on may be It will be very start here. So let's skill like this and I'm going to. Our one is low fear. So let's go to mess tools in Sunday's look are one is look here just to make the did a little bit just to give a little bit cough to the date a little bit. Okay, if I go to have three more that did minutes to be wider towards the bottom and the top next of a natural, so I'm going to scale it like this. I think this is fine. That's three. And check. Okay, you can see it's I think it's working. Okay, so I need toe do the same thing. I can duplicate this date, and then I didn't see here. What? I can do the same thing. Go ahead and extract and do the teeth manually one by one, so anything I can duplicate it. So the piper point is here because we extruded from this subject on this subject has its power point here. So this extracted object is still no obeying that piper point that by one point is at the same location. So we need to goto modify and center private in order to bring the private or the man a Betta toe this center, the center of this subject. Okay, Now I'm going to duplicate it and lets parents here and then once I do want happened, then I'll combine everyday it and then flipped to this side. So I'm going to duplicate God Reddit duplicate both on, don't it. Now you can see something very weird when I wrote it. This kind off, No changing its Let me see that here If I wanted it, we can see that I need your titty. See, this is carefully. You can see it. It's being stressed. That means it's actually attending in step. When I wrote it, this wouldn't be this way. So it's because if you goto our planner in those out plainer, you can see this object. It's still inside this pipe at this object Lord. So when I wrote it skin off. No, it has the transport Nord. It's still inside this in the main object group. So I need to put this outside from this group. So you need to select it. You can do one thing. Goto first deal. It history there. But I've history. Okay, So you don't have in history, But I don't think it's going toe. So they so you can still see That's happening. So you need toe. Pull this outside so you can do this by pressing Sit p or you can go toe it on parent. So now that's not a style of this main object. So now it's a beast. No, correct, I can see. Okay, so this is the way to solve this kind of issue. Okay, then I'm going toe going to switch to the four view layout on doubt. Lynn is still there. You can drag this like this and then close it. Okay, so I'm going toe, I rent it. Obviously, this statement to be smaller, so I'm going to scale down it. Okay. So skilled down, this'd be small and this wouldn't be in gap. So this will be title if it so I might need to go and skill these things a little bit so that it fits, fits well, can also work in cream word just to see if it's again. See the gaffe that's we're looking So we need to adjust it. I'm a minuto calm and no white This make this spider. Okay, So again, this area is nor matching we can and come and live it. Try to mask the city. These things air Liberte time taking. So I'm going a little bit rough. But make sure put that time and cut it these things and duplicate and move. And don't because this sides you can use the component more to get that decks and manipulate Select this as love Move slight Something like this. It's not attractive matching. So I'm going toe again. Move. This thing's okay, something like this. So here I'm going toe that why don't it So I'm going to do it manually again. So let's extract go to edit mess extract again. The manipulative, manipulative is still there. So I'm going toe Bring that back with center. By what? And the next you extra or global And then why? So this this will be the bigger wider did. That's good world, Mort. First get a little bit. So here I'm going Toe are one is Look, toe, hold this, Ip And then I can post this vortex in what? To get that kind of no effect. The card in effect. Obviously, it's a cartoon model toe. Hello. We don't need to be to too much conscience about the realism. Okay, so on these things are not going to be visible well as well. So we don't need to put a lot of time here. We can put that time in the main any other face and the visible parts. Okay, something like this on. Then I can combine all the state and make it just single object. So let's go to Mace and combine. You can If you want to keep those separated, it can do that for let's one once combine. I'm going to plead those things to this. Say so I need toe moved the spiral toe, this area, this line. So for that press D And when you praised the once, it switched to the private more. And then I'm going to start on the snap to grid up something that I can snap that Biwott. Only you can see the move. It just moved. That Bible doesn't affect the model, actually. So the pilot is here. I need toe praise the deaky again to settle there. So was the pilot is at the center. Then let's turn this off. Once the fiber is that center, then I can quickly flip it. So let's go to duplicate it, duplicate. And then I can go to its access and put minus one. So just put, minus to this day, I existing hallelujah. So I had one. That's why I put minus one. Let's say you have some other values. Maybe you have moved a little bit and you have about the values here, Uh, maybe said it is the skill. So if you have scare little bit on you have maybe different really like this, then you need toe put just a minus to this value, and it will exactly flip to that side. So sport minus one on the details decide. Okay, great. And then I'm going toe combined this miss combine and then let's make the bottom did so again duplicate control the duplicate, and now I don't need to be concerned about the spy, but so just skill. We can scale it, man. Milledgeville scale it on. Boose opposes. And those did. Of course, I don't want this bigoted, so I'm going to get rid of those. Maybe that's made the smaller. I don't want those who bigoted there. Smooth. This alluded to our justice gum according to the teeth. So let's look this Syria and move again. You can do one side and then no meter that the site that's it in this area, A little bit obsessed mint. Okay, so I'm going to delete this. Say express one till it make sure you don't have anything lipped here at the center like this. Dill it, Andi. Then let's check, if it's exactly know fits so he again see, doesn't sort so Let's J gift I so that you can see this eyes look more. It's on. So let's turn that off. I think everything is snapped properly, so let's tryto on middle Rich Gordo, Miss Meter Point Geo Geo. One value. Enter on trust tree again. Yes, I think it's OK. I just need toe deal it all the state as well. So let's separated first from a separate decided, and not just one side properly. This that's our just us properly trying to feed those into any move. I'm going it wrong direction. So that's he was just component more I would miss display. So they go to more defense into private, bring the paper back and forges on the teeth properly suppressed g to repeat that center by one thing office You my heart wanted here. I think somebody first in the paper or we can just make this a little bit. Why don't So when you are just these things you can turn on the sub selection by going to move to on self selection and tone on sub select. But it does. It creates a kind of for love effect on you can exist that with this full of radius, it said to fight this is too much. Unless he created, I can say this is too much because of discolored your local very local is the main affected . Yeah, you can see and the radius less and black is totally not affected idea. On this year low on you can see the Liberte rate here, so the affected idea is too much. So if I move it against he affects those. Be good idea. So the follow these bigger So let's under on decrease this full of radius. You can do that by using Beaky holding B and then let most drag and you cannot sister fall up Inter actively here Oregon adjustable a few agile So by adjusting the follow you can control your existed idea like this saluted dictators the follow up again holding Beaky before ball and then holding your left mouse and then drag So you gonna exist it And by this way you can move You can see I have just selected these vortexes have not selected I think I have selected this. You can praise be to turn off this and you can see your selected vortices and I effect on on it Beaky So be tone under subsection obsolete You can see how softly it's affecting the idea. Select. Okay, now I'm going to again call this doll again. I know there are delivered gap. I can do that in between lessons. So we're going to miss, combine and then let's goto you get also meter these things you can do the schedules of this meter and I can select everything and skill. Thank you. In a skill it's kind of giving me were results. I can good to miss certain modify, send up by vote and modify center by worked. So the book boat should have the same symptoms Paper A little bit skilled on Stay still gaps Solar. It's just it. Okay, I think it's plain. Okay, so let's hay eso everything which we literally had hidden. Let's go to display so and so last hidden So in the next lecture we're going toe Welcome the tongue Su there.
36. Modeling Tounge: I welcome back in this lecture, we're going to work on Tall, going to model the town. So let's stop. So Tony is a very simple objects so we can start from a cube. Let's take a cube on. It's almost a que on the front part of with no, we called. So I'm going to scared. So go to this imports and it's just high to it. This is the route and the X axis on the depth in the G excess on the height is the way excess. Let's just so I'm adjusting their selecting the name and then holding the middle mouse down and then dragging this view, I have just this value. You can also put numerical value here directly. So then I'm going to put you what? This is a few subdivisions, So let's go and divide Direct this X axis, which is the week. And whenever you put division straight Oh, try to keep one division of the center. Okay, then I'm going toe. Are few divisions decide which is the depth. So that's what few divisions here. Okay, thing this is okay. I may need one division here at the center. Selous would one here. So basically four to fight. Then I'm going toe. Start stepping this so I'm going to are just it With those sub selection. Let's select these things and press Beaky too tall in the subsection hold B and left Most track toe our sister ideas on dry. So I'm making the phone part So around you and see when a. I just did that fall off. I drive toe give this year low till here on the fall of is very low here, something like this. And let's it this prawn parts of Vanatter than the backward parts so we can scale the backpack Naifeh, skillets working like this, any toe increase the follow up of it, and I can select this age. Let's praise be to turn off the sub selection. Then I can scale this to make this side round it. Megan Skill this say to make that that's a grounder can isolate it. Click on this icon toe. I select where you can go to so isolate view selector control. One is the sub card for that Again. If you want to come, go back to the normal view, you can press control one again Okay, so now that and if I pressed three, you can see simple tongue. I can do one thing can see like this Post this tower. Of course I need to squeezed this. It's alleged Holland sub selection and scale it like this. So by now you should have a good understanding off the use of the sub selection. You cannot just distinct Zeman Really amazing Skeletal. No. Let's press three toe j smooth preview. Okay, this is good. I mean to let's see that stolen everything don't know dies of its Lexan Mort. So let's make the tongue Liburd longer so that we can't see the time to part. That's it, though. Not his opponent, the camera seven seed underneath them to part of the tongue. So I mean it toe extra movie Phyllis Lee, like this basis when you select multiple faces again, hold tap key and then just drag the bus to select it. It's kind of a painting effect can hold that you don't have to hold sipped anymore. Just told tavon paint dragger brought us you are to the selection on. Then let's extra again trio basically lengthening the strong there a bit something like this. When this kind of thing happens, let's say it looks smooth here on here. It looks jagged hardest. It's not a big deal again. It's not a problem. Actually. If you want to start in it, you can go to mess, display and suppleness. It will something, everything. Or you can go to mistress Plan Harness to to get this hard. It's setting, but But when you smoke it, it's going toe my devils. Mortal smooth. No, in spite of having this substance ordinance obstinate. Okay, so let me undo Latam. I'm going to smoke these things. So there's the tongue. It is better to deliver the histories. Go to it there. But I've history, the sidecar. It's all sit d. So let's save this model. But try to save in different increments Off Say was and tried toe seven different file. Different women don't save on a single file till Deion. You might grass the file. Audie might. The file may be corrupted and, uh, virus affected. If it happens, you lose your whole work because you have saved in a single file. So it's better to have incremental sip Vincent us saving in different name on putting a number to it to let's say the five number is corrupted and then you can start from the foot number. But if you save on a single file over again and again and you upload that file is disaffected or something, then lose your whole work. So do this. Almost seven in current. Like I said, I'm saving here. Let's say the two number said Okay, so in the next lecture, we're going toe model of basic feet without in finger, just toe. Have something inside those who see you there.
37. Blocking The Foot: Hi. Welcome back in this little We're going to model the throat on here. I'm not going to do with didn't detect, so I'm not going to do the finger. The tours. It would be just a basic block on kind of block tohave the soup inside. Okay, so I'm going to start with the Cube because the little step of the fruit is a cube. So I'm going to started to queue here on Let's moving to the position, partisan it and it's good. It's inputs. It's just in wit on din dipped death of a distant G access. So always with his X axis on death is G. Heidi is way. So let's go to height, skillet in my direction. So I'm taking this grid line as though, and the little mobile of it. We looked that maybe maybe here this corner of the store, so I'm not going to make the stool. So are the street like this this angle. So it's because of the prospective ity. So here we're working in or to repeal, so it should be straight. So the feed is following this corner of the fifth straight. Okay, so next we can argue subdivisions toe are just the basic step. Oh, I'm thinking it's lets out a few. So we're going to divide this x axis. There's a with again Let's have one of the center didn't and depth something like this and maybe one in the height high Jackson. So now I need to artistic That is the best, except that we should be kind off kind of angled down the doors so we can again use the salt selection. But here are going to use leftists so we can use that by going to deform on Bring the leftists. Yeah. Okay, so the lattices no selected and the lattice has three absence Institution sti on new divisions. No, you can see we have five in the PD visits, which is Duggan The height. So I don't need no much in this direction in this actors. So let's you can see in spite of having all those adjust on the model if I goto setting don't underwear promoter, I can see the moral where from is known also is in Pinkola. Now this green thing is the lettuce. If you diss elect accidentally, you can select it here. That's death like this When you select a lattice, the model don't spink The worker of the model turns pink on. If you find it difficult to select here you can goto our planner and select the leftists from here. When you select the lightest, you'll see all those officer just like this. And you said the substance. Okay, now I'm going to are just this slope this no downer angle of the street. So when you have selected this leftist right click anywhere outside on goto lattice point. Okay, Now we can see. Looks like vortex now against elected on and then we knew drag. You can see it existing the model on Dover model. So in spite of having all these tortoises, I don't have to adjust. All those were tex manually By using a latticed, I can overlaid system model. Okay, now it looks good slope again. We're not doing in the detail on it. Just the basic block. Something like this. Okay, then get rid of their lackeys. You cannot deliver the lightest statically. If you delete it, you lose its adjustment. Let's say you see, let the lattice and delete it. I can see you lose the assessment. It's under You cannot deliver the lattice directly, but you can delete the history of the model If you delete the history, the lattices no, in its history. So if you delete the history, the latticed will be gone. But the expected with there. So let's go toe deliver type of history of d object nor the latticed let the object and did the history. Now the lettuce is gone. Okay, The effect of the like This is still there. Now I'm going toe just the backside. Ignorant sub selects and you can not on under subsection from here If you call, get the shortcut. The secret is B B for ball. Okay, are against darling that from there and then we can increase or decrease the radius by horning Beaky and then holding the left mouse and then drag holding be and look most rack, they're going to leg over loudest here, So I need to put the pretty inside the so so that may still be outside. So there will be room toe model The soon so again I'm not what he about all these things that let's turn off the sub selection by pressing the BK again So by pressing the beer's going to activate and then basically struggles the sub selection enough. I don't live. This is so let's I think dealing this is I think we can ability. So when you're dealing days, don't days like this you select and then deal it from your cable? It looks like the is no de litter, but if you go to the vortex more, you can see the vortex are still there. I just deleted that is and lived all those war text there and this mix of bad model. Now you have inside the bulletins, which has a lot of business more than forages, So it is not a good thing. So let's undo never did like this so that waste of dilated with the text. So let's select the Holy is loved by double clicking on. Then you can go toe treatments and deal. It is, and vortex helps, and you can choose this option. Oregon to the start. Qatar's this control deal it absolutely on your keyboard, so let's diligent. So now you can see the vortex a lot. There it a clean daily. Never delete the is only by using your delete key from Cuba. Now I'm going to connect this with the street. So long shields count Days that will figure I have done on the political Dobson again. You can't on this day substance from here. Display heads up display in public count. Okay, so now the selectors love has damages here. So now let's select this full face and d lived so that I have on border have a border here so that I can reach tried, double click and select This border is here it captain so coincidentally right matters. But if if it doesn't in your kids then you need to have just let's stay here. You have eight days and here you have tennis. Then you might need toe put to hear or decays to here. But I would not like to decrease from here because no, it is going up here and I don't want to mess with the serious. So then I would like Toa put here. But in this case, luckily it's No it, Majesty. I don't want to do anything. I don't need to do anything I said to say Let's see leg removed this and a bit so that it looks rounded around cept so the times so good. So let's select. So select. This is love and select. This is Look, if you do this, you blew it on to please you. If you tried toe goto statements and reads, she'll get this kind often doesn't to our good multiple objects. If it happens, that means you have not combined your object, so never tried a breeze. Two separate object So you need to combine it first. Got a mess and combine makes it the single object. It's a single object then go to is more than double big and selective Border is then rich Okay, good. Everything looks OK, so I need to smooth these areas as well. I'm going to do that. Let's go do it. So this is a move it put again Here are not that concern of the religion of the fit Just a very, very basic block. So this is the poem Lydia The yes, the time media. So this spot should be go up. So this is this is not totally flat. This is kind of like Abdin area. Let's move these three or disease. We'll do this view. Is the healer Yes. Of their Soviet liberal car. Okay, good. Yes. We can select this vortex and hold sipped. And definitely on this to select the whole In between. Where does this? They're gonna pull those outside to get this guy off. Okay, Now, I can goto object more and then placed three to get the smoke preview and check the stolen the workroom you can go to again here stating province said it or you can turn off the cycle. So this was the problem. Said adoption. Okay, Looks good. So I need to put one or two is here. So because this is a kind of deformed idea, the street will be whatever from here, So there should be tolerance. So let's go to insiders. Looked Oh, on We can drag one by one like this, or you can go toe the option off the tool. So let's go to the absolute by clicking this box on here against use Multiple is loops. We can choose multiple numbers here and with a single click can add more to places in that idea. So here I might eliminate two or three like this. So then once you do this, our lists restated because by the full of doing one. Most of the time we want a single Islam, so I don't want to give this settings. So let's reset it toe, Go to the bicycle sitting then close. Okay, Good. And now I can take the sculpting gross, the smoke dress and against more delivered to smooth this steps because it does still that kind of square look so I don't want And that's what Right now it's moving this This cannot this overall corner to make it a bit Smoke, cough like this We can also relax this Let's go to the relaxed It is the smooth on this is the relaxed for us so relax. Only know most of Artois is sliced the vortices, I should say Andi, try to keep the same. No, it don't. Jesus save a lot. But smoked actually changed the step and make everything smooth so you can see how the just that kind of snow sliding to a stop because their room So it's kind of averaging everything . You I can see if I keep doing this. You Lovelace the whole area. Okay. I think this is This is OK for now. Okay. Averaging all these things. Okay, so let's go toe the object more. I like it. So let's more. Let's just a knee. And Kyra, I don't like the tide. It's too no team. That doesn't any definite sin on this media. So let's does that scare little bit forward scaled these area a little bit forward like this. So OK, I think this is the cafeteria. So maybe this way, it's reversed. Girl, that's you. This is the new. Okay, So visit rotated a little bit like this angle here and in the car muscle. I think I'm done with this lecture in the next lecture. We're going toe welcome the overall body and we're going toe defined. Few areas defined pure steps because its tail a bit blocking step. We have not focused on getting a particular Sipan Justin in particular safe. So we have just a beauty. Did the bots Irakli adjusted? So let's see that in the neck. Legs are
38. Defining The Lip: how In this Lichter, I'm going to define the face and over body of it. So the faces very only find the eyes step is not right. The mouth the Lord's. So I'm going to start with the leap. So let's see, what's problem with the lip? The parts will with live. Okay, So first thing, I'm going to duplicate this model to decide as an instance object so that I can see the world sing awful model. So I can do that by going to this duplicate space. Elofsson, So I can go to this box then I want as an instance of that when I select and do something this side, that side will be auto, medical, artistic, So you can do it with copy. That's I won't be affected. So let's choose instance, and I need to choose a minor scale. So I need to put minus one toe the vertical axis in this case X axis. Because this is the X axis. I want to flip cool. You need to put minus in the X axis. So physically this Vicks on just the way And Indy. So I need to put minus here. So now a play. It will leave, but no urgency. Kind of or drizzle. It lived here and still out here, so it's because the Bible is there. So the Bible should be at the center before I hit in. This applied to the Bible to be here, so that didn't play from here to this site. Okay, Now, to move the pilot, you can press D and then Donald that snapped a great Arvesen and then move. You can do all these things, so it's not card as well. Let me show you Press day on hold X key temporarily tall on this I can see I'm holding the X key. It's turned on early release. The X key dawned off. So hold X key and then move. And then it'll is it. So you don't need to actually turn on this off Suddenly if you use the sort cook. Now let's press d again to go back to move to You know, the pirate is at the center and now I'm going to apply. No, I couldn't see very good If I what should be at the center? They'll come here chosen starts and minus in the x axis. Close it So now the side is an instance of this Say that means if I do anything we did say it will solve the site will be affected physically. Okay, so I'm going to work on the leap first. Okay. The first thing ever going to relax these processes Goto I could relax and laughter a bit. Okay, good. And on this, the main thing is this lip corner the place. Look at the leaf from the side view Deliberate some her here on this This area of the leave the the side area of the livers to truth forward. So we cannot see the lip color from side on If you take them reference. Let me put this model. This whole model in the layers of the Reagan is a little off. So select everything and click on this last option Love against C. That model is inside that layer so I can, without selecting the model, I can hide it like this that I can check quickly. They can see the tapes. The silhouette steps are not correct. Can see how it's gonna carved out of it. I guess so. I'm going to adjust it now. You can see this as well. This state is not defined full of started. That should do all these basic saves. Look, before you are a lot of vortex and ages. If you do this letter, like at this stage, maybe, or maybe even laughter. They find it very difficult word zest properly because there are so many vortices and you need to precisely had just those swill dis of it back. It's too forward. Okay, Michigan, moving a bit backward from the from the down view should be around here. Okay, See that status? It's still aren't there to. Let's move. Now you can turn on the extra sitting, go to stating an extra so that you can see the referendum is understating up some with transparent look. So, you know, the morning on din? The reference. So it's easy way toe? No. Imagine her reference model something like this. The lives that will come out of it. This city is known matching Welcome. That quote. So the floors very smoke. Organize every three. We have a good definition here from this side. You can see it's only looking good. We have this carved in safe here, and we have this card out on safe here. So we have that. Solu it there. Looking at the leap from this angle, you can see the lip doesn't have the right Say up here. It's coming out here. Should we go inside? Go backward. This will be the big point of the lip. So this distant cross this line Solis, do some tinnitus. So I want to do the same thing with this three word text as well. Someone to move these vortices and spread those deliberate evenly. So I'm going toe the access more so got to move to tell this to blow Mark. When you move these things, this border or text might move a little bit from the center. That's okay. We can let her come and snap those this normal. Epsom is very helpful at this stays. Were you tryingto just the what? Exposure? Hopefully any wonder Slide the vortex on the surface. You want to change the surface must say much, so he'll has. I still have kind of a little bit noisy. What expeditions? So we can take Relax When you were using relaxed. Makes sure you have a very If you don't cling on the relax. Best here you have a very low strength. You can decrease the strength and then then try. Okay, that's good from the front view. We don't have it safe here. We don't define don't have that different sip. You can see this Gene did this little chin and then this carved in, say, pond. Then this big called out said so basically one, then cauldron on, Khobar said. We don't have that step. Sorry, we have a single cough outside till here to adorn that the lives moved to Syria and get that cough the instep. So I don't get to be normal direction, right? No. Celeste's changed to the component when I'm trying to move multiple vortexes more than one that drawn to use the normal direction. Awesome. So it will move all these vortexes in different directions. I don't want that. Just component more will move in an average Jackson. That's the reason. So here we need to get that called out step. It's still not matching the reflect mint again. You can use the life demonstrated study sitting exception again. No agency had that card in Carvin Sickle carved out. The Steelers silhouettes are very important. Okay, now, We can also turn on off the exit from here. This this one is the exception. Okay, Still, Now we should have that from the front view. So now you can see it kind of cardinal safe here at the center. It's because and these were things to pieces are not most here is a still separated and the test from here. So this the second was screwed without more zing. So don't worry about that. When we were going toe middle, it and deal decided meter this on, make a single piece. Then it will be smooth. No, against it. Still, I'm losing the volume here because you don't have most vortices here. So this just I need to pull this out a little bit when you check it with the one more against it is vortexes were our there. That's fine, because we don't have much belligerence here, I think. Okay, sometimes if you pressed to will get something like this, it's movement inside, and the hard case makes outside. So it's because of the two button you may accidentally praised or something. So if it happens, don't really just rest three or 121 Is this morning and to give you the smooth and the heart kids so that you can work on the hard kid and look at the smooth model at the same time. This is the future if you want to use okay, so you can see a little bit defined safe there. But I'm damaging the more that you can see. It doesn't look good. The city is not smooth at all, so we can do one thing. Let's use the smooth. Russ tried to smooth this idea on 10 plus three. No conceives, but do the stand thing here. But again, with the smooth broth mixture, it doesn't affect the model too much. If it does, then go come here and decrease the strength. Okay, so the 1st 3 heard smooth looking good. Define sips. Okay. And still, this area is a bit weird, so let's smooth deserve it. The liver's nor defined. So let's go. Defined the live which. Okay, maybe let me take it from the side. Few. No, not the exit Crest three. To check the small preview, turn off the model air and see the difference between you two are just few idea. Yes, we need to adjust it. I don't have any political, actually. So there's a big space here. We can move. This are one is lluvia who will give me this here. I'll get a lot off here. So I think we can move this a little bit on. Then I just this Hey, and don't on the extra. Okay, I think this is OK. Pull, pull. This knows best for something like this. This is going study. Okay, Now I'm going to define the leave by adding few. Is this Let me take the front seat 1st 3 Okay, great. No, it's too the lyrical actually going a little bit down there. You can see here. Maybe the overall lift should go down a bit so I can do one thing. So, like, this is I'm sorry, darlin. Sub selection The crest of pull off. I want toe affect this big area. Then again, just over a bitch. Something like this. Okay, now I'm going to hard one is look here to define the live because we don't have any volume here. So let's go to my stools in cities. Don off the sub selection justice we can Let's try the hissed Robson Yes. You use this pregnancy will immediately get that called if faked, which already helps me. So let's increase that effect a bit here to get the volume of the live here. So my oppa lifts tape is not right. The safe is not right. So I'm going toe moved these vortices So this idiots have been narrow It Okay, lets 33 Now I'm going to art. One is love here outside. So let's bring the insiders Reptile even bring this substance by holding stepped on Rightly in the is more so This is context sensitive marking men. That means it depends on which more you are in before you actually bring that. So if you hadn't vortex more and you hold secretly, you'll get different Dobson on when you were aged in his more on hold sieve, right, Like the same shortcut. You'll get different. Awesome. So let's being the object more than than wholesale right click to get there in So there's looked marking minutes and then I'm going to add one is look here outside to define the leap there. So leave that would define I can see my press three. Okay, now we can see the livers will define. Still, you can see a little bit kind of wobbliness going here because of this vortex. Soldiers like this weapons on move those in the component more little bit in their normal direction in one on Dennis E if you find it difficult guards at this kind of steps Ah, beginning turns to get all the this kind of no worldliness and uneven smooth on every nets in the morning. It's because of this vortex Protestants. You find it difficult to mannerly correct Finnegan. Use the sub bra's with law law intensity. Okay, studying the low Good. But I'm not still happy with the same. I think it's OK, So I'm dropping this lecture here in the next little we're going to define the Lord's su there.
39. Defining The Nose: Hi. In this lecture, I'm going to define the launch. So let's see how to define the nose and get the proper set. Now the nose looks very weird. So let's see how toe fix it and what to say. We're looking for here, so let me down off this more than you can see. We need to have a kind of use it here because you don't have right now. If I smelt it and you will have a kind of straight line here, we want some kind of you said And this this ideas would go up and that's what we kind of ball effect on. Then the nostril. It looks like a single safe here to is absolutely not unload safe. So let's see how to how to get that. So first thing I'm going to delete this little is this color is the extrude Connor replicants. You have these colleges because of that extra, so I'm going to delete this it. So let's hold control and deal it article hold sacred most, and it will get the context into the marking Miller for days and you can delete it from here two days and I'm going to continue from here this way. And then I'm going to continue from here. So now I get a kind of insider political. So I'm goingto bring the multi cut tool and then let's so they dis elected nutrients. We don't want to select anything, So let's go to multi cut. Um, it's it seems Look at me dry now. I need to go this way like this straight. So let me continue firing. This is so we need to put this is if you put on airs loop here, it will go all the way through the body whose they don't want. So I'm going to stop. This is somewhere here on the top school. Andi, let's make it a triangle here. So the triangle is point? Because that's a very hard area that's never going to deform like Legace Soft body. So that's hard scholar here, so we can have triangles here. Okay, so I'm going to again continue from this vortex. Still here so that I get a get to court face. Let's bring the multi cart again. You can see the sidecar. Disease control sipped Xscape. Okay, Now, from here on day somewhere here, dividing that is okay. You can write like toe. Get rid of that. Get out of that tool. No, we have square polygons. That Mulligan, that is Luke is going all the way to center here. So we need to have result all this. What? Expeditions on. Let's do that. First we can again use the relax bras here to relax. Those never use smooth. Presto, Do the relaxing. So when you want tohave result this a this and pulled those evenly spread, you need to use the relaxed Russ. Okay, so now I'm going to used this same this'll vortex. Basically. Let me down off. Don't select this. Maybe this still here. So I want this round, Sofia. So let's it will help us to create that for Bali. Okay, so, no, I'm going to move. This is this thing here. So this really create the lost role? Yes, it. So let's move it like this. So from the bottom, the most should look like this. No, it was like a whole half car for half circle is to do like this. So it should be something like this. So there's a ball here, and then this step nostrils on this thing should, so this would be wider. So from here, with me of this this will be the narrow or narrowbody divided here on. Then it's become wider still here life. I press three. You should see something and kind of this a little bit ball effect here and then the nostril is starting toe. Get the safe and from bottom, you can see it looks more kind of knows law, Because of this SEPs of the ball is here in the restaurant. OK, but still we don't have this. Is this lust rail line defined yet? So let's do that. So the extent Moody's turned on here so let down off this so you can see that this nostril state is no different here. So I'm going toe a little bit and just Adan's like like it Leggett a drawing of that. No nostril lane on this. This thing should go backward here. Now This this safe is defying the nostril. ST Pierre on on this line the Lining Glo connectors And after this life. So this should come down a little bit. Let's have come down a little bit so it will create that you effect that you can. If you could like this, this should go up. So again, see that ball effect? Maybe this lying. So this place three and check You can see it's better than before. Was better than before. Still administrative ones. Okay, so now I'm going to define this nostril side A few. If you see, it's kind of very melted looking right now. So if you see the luster line is the deployment so it can do wanting a little off this backward, so knows, is a very complex if so, if you don't get it. But across time, unless you're doing the character for the wave cost time, don't get discouraged by it. If you don't get the lowest proper, it will take some time to get Know the hand off the safe here. So I'm going toe define this nostril line by putting UNAIDS Lou Fear. So let's put on it is look instead aids here This loop is going all the way. This way I can do this are yes, we can do this, but we need to our sister city carefully address it to market a London safeya. So it should be no islands deliberate our from each other here on get the proper safe. So here I can just pull those out liberty so that it no, get this sip should be defined conceits defined properly. But here you can see that state is going all the way till here, which I don't. So it should come from somewhere here, so this lions will go here. It should kind of off the slopes of done these loops or tolls to us the city. So I can do one thing again. Delete these loose stools. So again, control Dilip or sit right like dill it Then I can do one thing. I can take the multi care and multi caught. Sorry, Multi Kartal. Then from here I can from here I can go like this. So let's start from here on here. I'm going to click. You can click and put a point in your around of place as well, so you can see it's kind of a floating right now, So I'm going to connected like this, like the end up looks like, actually like an extreme. And then so now I'm going to I don't know. Yeah, we need to let me Let's make it Rangel here. Let's see. So now let's bring the stool back. You can press why? To bring the last used tool back. So I click. And then again point quickly here and right click. We don't let this little it's so it Logan said It looks like an extra. You can see this in this, too, is it looks like an extra you can select. This will face extra and then you can continue to do that. So no rest three. You can see that that state is just plain that rounds it is defined. We cannot just this idea to get rid of that. No, God, dancer. The city is not properly. I just turn move of this Things here into this point is and sail there. I think how it looks okay for the top. You can see the safe is not right. It should go in and create that round set. So let's look at the model. Take your model from a different angle from top and bottom. Very important. Doing just luck, single angle and try to get that. So here I want to just slide. This is so you can use the slider stool called the sliders and hold me too abstract. It's late. Growth is what it's gonna do. It the normal Dixon begin. You can bring all these no tulips and by double clicking on the Moto on you can change those absence from here. Loman on. Then let's slide. This protects on the model and here I'm going to move these points in the normal direction so that it kind of, uh, don't move out in that direction. And they're facing direction so that that's it looks a little better. Define now you can see and I want to move this so you can see defining and getting the proper safe metrics. Elaborate time. So be presents, have some persons, and I get that. That thing is looking good, and I'm going to put some aid lives inside here on. Then let's let that whole Lazlo bon scale it like the skill and make it small. Kind of like this. So it'll make this nostril this area liberal ticker like this, you can see it's much, much better. Okay, so I think it's done. So in the next lecture we are doing the same thing. We're going to do the same defining thing, but with the I
40. Defining the Eye: I welcome back in this lecture, we're going to define the I. So now we can see the safe is very undefined and with the kind off would be looking so first thing. Let's defined the corner of my eye alert scanned affinity around itself looks set. I I need since, like the character, the character has some kind of expressing to it. I'm not sure, but the concept is like this show. I think it's a little bit no expressed character. Die Brew is up, so it's kind of a surprise Expressen, But let's let's try to get that set. But we knew model for animus in no tryto avoid any kind of express and having Expressen so we might know dictates expressively liberty, but still try toe, get the look of the character so I'm not going to change too much. So let's what defined the corner and the color is somewhere here and here. So let's stolen the saving extra Epsom. So now this this is kind off way, they're up. Let's go toe. Sometimes you may not see the move to a manipulator. I can. That's because if you have selected normal here on, you were trying to select any AIDS. It is never going to solve the man a Betta for AIDS. So if you go to a vortex now and select a vortex, it solves the Mela better. Because with this normal tool obsolete, it's only moved a vortex. So if you select the age with that absolute, that Manimal manipulator is never going toe so off here. So if it happens, then we'll go to the move tool and then recited Get it back! So move roof testing and bring that to the corner here on decides to come writing It's OK, I'm staying little don off the extra So this to are the corner on Let's defined off top bottom center here. So between this to we have to looks here we have to look here You have two loops here, but here we have one lives. So make sure you have you have same number of flips between these lines this Poland so that you can easily exist. The sip so I need one is lluvia. So let's drink days look Hobson and poured that here again. It's selected, so holds it right and use dies flops and okay, that's good so I can see with this corner on top. Bottom half we have same number of pollutants Now I just need toe move and get the proper safe here. So let's smooth these things. I know I have already extruded and say Let me deal it first. So now I pressed control. Want to isolate? You can see the mood here I select. So I'm going to deliver them inside face and then I'm going to do it again because I don't want to act Just those No inside vortex right now. So now I just need to move these things. Yes. Move on. Get poor doing. Put those What? This is there and then it's I can see You can slide as well. Hold Sit. Right leg and goto. Slider stool. Most directors Slade. So what I'm trying to do here? I'm tryingto evenly put all those evenly spaced. All those vortex on it. Just there. Let it light as to Okay, that's good from the side view. If you check the I liken it is here on. If I don't have this model there, you can see die is we're back there, so it should go back So go back like this. Something like this. The ball. Let me compress Control one again to get out of the isil. It more so that I can see the eyeball. Okay, that's good. And let's let this AIDS on. Scale it toe. Get a better, more tickle area here. Ticker. Best like this. The base base of that I lied was thin and posed this a bit so that you get this angle. The angle was not there before. Move this so that it first, I better try to freed the I league properly. Dybul like this, you can see Can these So let's check. Die from the side view Can see this ard sip smooth on the site like this. Same here, scenting maybe for a little bit. We're gonna have a press three. You can see it's a little bit better of fitting with that eyeball. So now I'm going toe extra that it's inside extra on. Let's go toe move toe the normal that I'm going to extrude and let's fill this area. Maybe maybe skilled our. So I want to have anything here so extra or we can Morse this. So now I have selected that is. Look, we can go to edit maize and most to center. You can leave this area blow empty and have a hole there. You can do that. Okay, so great. So let's see what else we need to do. You can see this Lawry Latest deliberate, defined Let me see so we can define Yes, we need to have some loops here for animation. So the led the I lied idea doesn't have any looping between you can see. So if the animator that we got wants toe closed, I we don't have anything here. Toe, Hold that sip. So let's say let's say the character Nitze closed eyes when it's in the movie electing. So let's look like this close. It's I Okay now. Now if I try to close it now, you can see if you try to close it, it will penetrate with the eyeball There. There you can see the eyeball is because we don't have anything here to hold that deliberate carbs. It So when the I is close, you can see deliberate carve safe because the eyelid 17 skin and it's on top of that eyeball, so you'll you'll not see extrude ling it didn't look like little cough sip. So we don't have anything. Toe do that. So let's under. So that's the reason we need to have, at least while not too is looking between this island s. So I'm going to do that exactly. So let's put one look, everyone, many wonder. So once we smooth, it will get Liberte more lives here. Something like this. And it will also help us to define that. Yes, I think it's working. Um, I might decree is this technique celebrity? Because after adding this loop, it looks Liburd more take and this is fine. So now if you closed, I you have at least one loop toe Get that car and when we are going to smooth it Finally, if you go to mates and smooth. So I'm going to do this at the end to now, we have Liberty Republicans here to get that smooth effect. So these are the deformity, a, uh, deformity. And so they're going to sense the same. So you need to have a lot of adjusts appropriate number of pages, at least so I'm going to add one is look here as well. So let's select go to con controllers and is in a straight select A whole control right click is ring on a string split You can do that. Toe put on his love here So here again can see Once I have this love all these things this area becomes, uh, because no, I started Let me under. Okay, I knew it. Yes, the city becomes a liver dense than these areas. So we need toe. You can relax, so relax this area to spread those excess. Or you can do these things manually. Edger, if you want to. I think sometimes you need to do it manually. So let me do it manually. So here, slider stool. I'm used to this marking Minoso. I'm doing the using these things. But again, I'm also swing the the area where it lips so you can find that year sly there stole hold, middle mouse and drag to use it basically again, trying toe space those evenly on the model again. Normal direction component James that moved to direct the setting toe component more. Are you considered to normal mode when you move on, slide these vortex Okay from top you you can see the model it. We're looking kind off. Kind of. No point pointed here. Some are. So it shouldn't be like this. So that means before going to move these things forward, maybe No, these things for a bit to get it up. That effect get maybe this thing, it should be a kind of smooth car, I guess. Something like this, maybe. Oh, this These. Okay, so the eyes define the Moses. Define on. Let's walk on the legal libretto. The leaf is kind off losing its value. I'm going to move this area a bit like this. Maybe libit take so this deliberate inside toe. Get that golf God, Vincent on here. The leap lines should move a little bit. Basically, this is the, uh this is the line after the lifeline here. This is this mainly outside line on. This is the supporting issue. So that's going a little bit in. No. Define that lip line a bit. I don't want this safe here, so let's move. This is inside a bit. Yes. No smoke. Okay, So in the next lecture, we're going to work on the year and overall world face
41. Defining The Head: again This video we're going toe check the whole head and we're going to fix a few things and define few areas. OK, so first thing if I look at the model from front, you can see the bigger mistake we are doing here is this area the year base area and sits for our here. So my here. But the head has some kind off no square safe here. So it our head has a kind of circle overall round sip. But this head has kind of a squared a straight safe here. And we don't have that set right here. So we need to move this year. Bear Syria you not some are here, so let me select these areas carefully this year. Radia, maybe all these vortex Okay, great for good. Fun view here and let's move and we can again use the excerpts and I can see this sort of the summer here. So it's way out there. I think this is okay. Let's start off extra. We can move these things as well. So So we need to have a kind of square straight say appear. And the year is not matching the reference as Well, so when it toe, lengthen it of it yet so again, you socks. Election, Presby, whole B and drag toe suddenly existed. Something like this. Very good tool toe. Just bigger idiots stopped. Fall off. Okay, now let's press three. Now. This year, death. This area is I think too much. This is blowing. Were insight here. Can do one thing we can more this the store texts. Let's see. So go to it, Miss. On March, most of center. Okay, this is going inside now. The overall safe, you can see we have that straight line here. The same. Let me down. Off on. We can still have just a year. Okay, Something like this. So the overall step is you cannot. We're losing some volume here, so let's pull this area Libit. This protects. Okay, now let's check this area here. We were not getting that separable. You concede this little cough here, this golf out seven. Then this. That's it is not there. So let's move this thing closer to the center lane here so that you can define that set there. So let's move it. Let's against light, as you also lets light slightly stool of it. OK, great. Then we're going to move these things out a little bit on this thing in a little bit to get that golf saved there. And so you know, that's it. I think that is good. We can pull these things out a little bit. We'll get something like this. Looks better. Plestan off a list, right to compare the model like this. Now the laws looks a little bit bigger to move, so we can make that the bit small. From this angle, you can see the news has a kind of very angled pointy look here can't if a triangle here, we don't have that set. Now we have a very good looking, surrounded, smoked stopped lords, which we don't want here, actually, so in it don't move this habit to get that No, to get that runs. I'll get to get that angle said Okay, and let's check it from here again. We don't have around said it's kind of straight, So creating that point look like consists better than before, matching with the defense, so we need to make that blows a bit small. So let's move these things in what clear the rounds of better, and then it should be over its available small. So I might select it with soft selection on when you drag like this from this front view and then moving makes sure you don't have anything selected behind here accidentally. So let's check that before you move. So let's make it small over. I think it's OK. I'll get the nose is small and tiny, and that's look good with the neg bases not matching the reference A Let's. So I'm going to delete this aides who is creates a triangle earlier. I think I don't need this air, so let's delete it. I'm going to move these things again with sub selection. Let's use the sub selection. You decide I don't want to move just maybe subjects and turned off of these things. Okay, so let's deal if you is this Maybe well, said this. Let's use the relax for us to relax few things, so I don't want tohave this strangle at this age because this is the deform area. So let's Alberto have triangles in this deformity elicited this neck, the hand elbow area. Here, let's avoid the triangles. It's okay to have triangles here on these hearts. Office areas like the skull on may be maybe, like of wells. Well, the skull and the forehead. It's OK to have triangles, but not in these areas where it's gonna deformed bend. So having quartz is going to give you best result. So let's continued the multi Cottle and let's go somewhere here. And then we can triangle somewhere here that it's safe to have it Rangel here than here. So let's dilated. Okay, now it's good. So again, let let me go to relax and relax this idea of it. So wear off the thing we need one is here. It looks a big area, but I don't have anything on Dhere. We have a lot of illness. So let me are, Don is look, when I heard one is Look what's going inside. And with that amount back and C is going all the way to here. So which I don't want obviously. Maybe if I continue in this line and clear that triangle Shqiptare Okay, so I created a triangle here, But this idea so we have in is here. If I delete this on and it's hard that triangle there I think I can delete it like this. But we're going to end up with an inside ID insider polygons, which has more than four adjust. You can see it's five exists so I can do one thing I can. Warden are here. One is look and then go to multicolored and connect here to here. So I can see you have to follow agent. So sometimes you have to have this skill toe modified the top Luzzi and ah no tackle these things sometimes in these areas, that's so don't afraid to do this. You have fine with having triangles. But prior avoid those on these area de familia so lose to rent things. You cannot have triangles, adult, but that's wrong. You can have triangles because But it shouldn't be in the deformed area. Andi actor and the triangle is going to be no converted into acquired when you smoked likes that this triangle. If I smoothed the model now the triangle is gone. You you don't see any flying a little more that's acquired. But you see it kind off. No were topples. You're going on there So this loop is going this way. The slope is going this way. So Dr Mendel Gin still not know That's the men, Dejan. Why? I said you don't need to. So that's the men, Dejan. Why? I said you don't. You shouldn't keep any triangles in the different media. So their unit Very smooth, straightforward Tbilisi. Well, it won't do so, but having a triangle year topples doesn't matter here. But here it matters. It's a smart straight Okay, I need to use the relax bus here. It's very jagged. That's great of this. We'll get there. So awesome. Let's check if we need something else. I think it's low cocaina from the front view. I don't know this headed a little bit inside. Okay? Here. As you also this it should go up. This kind of ivory lane absolutes moved this. Okay, here you can see Well, let's go to extra moan. The Mr Big go inside a bit. So here. Let me see to try to get this curve proper so you can see this car on here. We don't have that cough. All right, so let's can see we're outside the They're friends of Miss. Okay, I think this is good. Good to go. Looks much more much, much better than before. Well defined. But let's try to see from different angles on. But that is it. If I want to give you all is tried. Try adding the blend material to the model. So let me write like let me select. Yes, Goto favorite material and blend and gleaners is signing this to it so you can easily see if the model has some kind of weird lovely wobbliness wobbliness So you can see decided Lambert. It's mad, so you cannot see probe the sitting properly with the sign here. You can see we have something here a little bit. What's going on? So let's move from this bottom angle, that's check it. So go down. Which don't go backward a bit. Go back quite a bit forward a bit to try to smooth this area. Okay, lets go back toe. Go back to the existing mental Lambert. Okay, so here I am, stopping this video in the next lecture. We're going to look at the body on we're going toe. Defend that
42. Defining The Body: Hi. In this lecture, we're going to define the body. Andi, we're going to check if anything, we need to change. So let's see. The first thing I notice is the angle of the feet. Now the food is totally straight. And no, uh, totally straight. This in. Actually, this is not a proper relax, Buddhism. So the fit should be delivered angle towards outside, like something like this. So let's do that. And you can also see that from the reference as well. You can see the fit. Yes, I'm going toe select this row. Tex Elizabeth, Text from this ankle. Lydia! Andi! I'm going to again. No! Let's the let's go to the move. Told visited the world. Another pilot is here. If I wrote it from here, you can see something like this so I can do one thing to go toe view What is the deaky and move the private summer here. You can see this. No back part of the feet here is done Killed if you conceive here. So from here Now let's please d So basically I'm friendly. Moved a pirate off this selection. This is not the object by word that is the selection vortex. By what? Well, I temporarily the roof that No, let me something like this angle. Okay, Next Done. The next. Let's look at the knee. So here we don't have sufficient polygon toe so that it can deform properly. Smartly. So this is the new baby creature. So? So the needs adding this one. So we need to put or is this here one and two So central on is the new. So once they pulled that, we can slide it a little bit. So let's bring the slider stool. Most slide a little bit. The system new on again again. Also use This edit is flew off. It does for okay, here in it. Some polygons on about This idea looks livid. Weird. So they're smoke This. This is something that this this is the joint idea here. So here we have three. That's okay. I think we can slide this. I think we can ard oneness loop, So try to get square looking polygons. If you see some kind off rectangle looking polygons, that means you can divide that. So there's there's room, toe are done is look so trying to do this, it will get this kind of smooth even distributed polygons. Okay, Good. And I can use Relax bus a little too. We'll make those even spread out even respect. I think everything looks OK. That's J God, check every nor a joint like the elbow, the resto and this deltoid idea. The body Onda tie locals idiot and knee ankle. Make sure you have some prison polygons. Love for the rigging on who can see he moved that. But we end up with a little bit. Are looking safe here. I would say you can see this kind of two state effects or let's relax. You don't want anything like this. This kind of unnecessary twister kind of vortex purchase. Um So if you see that is the relaxed for us, Hermelin. They're just does even the split. Okay, that's good. What else? Okay, yes, let's check the hand. I think we can art. One is Look here. This idea, then I can again. Sorry. Relax. Something like this. And then we have here. That's OK. The studio. We want one more issue again. You can see the stew state effect. Okay, That's great. That's good. And he replaced. Smooth it again. see my hand loses a lot of volume here. It doesn't matter the reference. So we need to put few. Uh, I mean, we need to adjust the sepia right a little bit is the hand is very kind of Brockie. And so in two parts sisters, a little bit to the hand, has a kind of balance of here. So basically it's no have a very cough, are kind of sit. Now we have that say, but I think it can be vaccinated. It's very subtle right now, So we should have do that before. What? No, don't run Insel. It's do that right now. And of course, we don't have any polygons here, so I can not. Just that, because I'm planning toe smooth the model and when you smoke will get a lot of polygons here. That's the reason I'm not adding any more polygons here because if I aren't, it will go all the way through the body and you need to adjust it. But if you want to cannot, but you can see it's going all the way toe the fingers again. You need to adjust all these fingers about when you smooth it without adding that bulletin , Let's smooth. You'll get that center line you can see Get that. And it also, uh, make those things around for you so you don't need to do anything. That's why I am not adding any more polygons to the finger to make it. No, even the round table something. I think everything looks fine. Let's smooth one once and see if we are getting not getting much polygons here at this ideas, I may want to guard one love here. The new media is fine. The city is also looking fine. Everybody has good historias gold fingers are good. We cannot One is look here somewhere. Nick is good, very good and I has not Ah, close this year, Mouth has around uploaded this top. Alousi are very important for animus and fits al animism on here. You can see the triangle is gone and it's converted into a Quite the topology is a little bit kind of weird, but it's a hard surface idiot. Don't I need to do anything that so again you can see that triangle is gone and this tubular is fine here. But our this kind of thing in this area Let's said this elbow area, yes. So if you have this kind of things so you can see the problem is when the let's say, Let's imagine this is here in this elbow area and when the all boys will be banned from here this floating vortex, you can see it's acquired. But this is what Texas kind of a floating so it can be pop out like this so you will not get a smooth deformities in here if you have this kind off this kind of thing, Onder de Familia. But having here is fine because the model is never going to band from here because this is the skull. It's going to ban from here here. So I think it's good. So let's under so I'm not going toe smooth it now. So we're going toe, make the make its decide and bent in Latter listens. So then I may smoke it like So let's save it and I'll see you in the next video
43. Correcting The Pose For Rigging: how in this lecture we're going toe correct the pose for Reagan. So now the port is a little bit kind of flown bad for rigging because the hand and said the hand is very This hand is very close to the body here. It may create some problem with pregnant, so the hand should be lived away from the body so but that I'm going to select the hand using the lasso selectable. So do help us to selected his Eliza. Let's drag like this. Some goingto select something like this from the front view. Make sure you have selected everything. I think I have missed Wandera text there. Let's good again drug get select and we can selected here. Withholding control city you can are to the selection like this Andi Select, they said again, select like this. If you find it difficult to select this idea without electoral, these things, then you can also grow the selection from here. Let's say you select let's say leg till here safely, and we know the topology is simple and straightforward, so we can grow this selection by going toe the selective some years. So let's change it to modeling go to select on. You can grow the selection from here or you can hold, seeped and use the It was a period key to growing with sipped, so it's easy to select this complex area. Okay, now I'm going to rotate toe protected lists here. If I don't take against see, the result will toe move. This wrote it. I told to this partisan So we can do that by pressing the Dickie. Andi, just praise the decay. Don't hold, does the digging And enough from this square this yellow square carefully moved that here. So this governor and then president again. So the total is there now I'm going to rotate it like this. So now you can see when I do this the hand is going away from each other. So let's rotate, Don't move. Don't use move on and move like this. So we're going to rotate it like this. So the airport is good and said this sport, maybe you would safe site on Then let's press while here I need to move a little bit toe no smooth. Decide every just more And then I might need toe are just the Serie a bit So now this sport is good for Reagan Can see there's room. Uh, okay, good. So now I'm going toe. See if it's can see how this loop is going this way. Kind of stress. Kind of been twisted here, So I'm going to use the relax just to relax this a little bit, so don't have those kind of very to stay t exact kind off loops. Okay. Everything so relaxed and properly placed even now. It's good this thing snitch to pull out to create that value. Let's move. Okay, that's good. So that's it? We just need toe. Make sure the hand is away from the body. Not very close to the body on everything else is fine. So I'll see you in the next lecture where we're going to meet her. Brought up. So we're going to meet her this hard body. So we're going to do it This. So we're going to meet her this side of the body, to the side, and we're going to make it a single piss. See? There
44. Mirroring The Character: off the selects meter the body and let's make it a single piece. So let's press one so again before the meter makes your everything is snapped. Everything is aligned to a single lane. I can see somewhat except not the line. Probably like these things. So it's better toe. Make those Elaine first and then meter so that, you know, the center line is exactly at the centre on. You don't need to put any or value in the middle eso Lampson. But the point is that the one would be okay. So let's first in line those things. So I'm going toe select all over text here at the center vacancy so they usually to select , is just double figure on the border is here, so don't see like the whole border EDS And then I'm going to a convert this election toe protect selection. Once you have selected the border aids like this, they were going to convert this air selection toe heartaches So I can do that by going to select menu on Convert selects an option here. It can convert it toe anything other than its here concede tortoises in the Sokratis control F nine You can also use the sword cut. Let's convert it. I can't see instead of the days so it selects all those vortex motor cortex. So once you have selected these, then I'm going to snap those things and make those line. So I'm going to move to first. Onda, who said it? Make sure it's Reese. It said the while access on. Then I'm going toe this move. Snap up some on down off this written component spacing. We have already discussed this ups. Um so the stormed off on then in order to snap to the great, make sure the greedy zone. Okay, now you can see and I want to snap every individual vertex toe that center breadline. So that's the reason I turned off the written component spacing so that I can individualists nap. If it's on, it will be snapped as a whole. And as an average, every vertex don't be under gri list on this off on then turned agreed apps and on so that against snap then just move. You can see Hey, had these attacks are not line, but just move it like this from this access insistent drag to here you can see all the vortex are no, Let me undo. And so you see, if I could do, would you do you can see everything? It's getting snapped to that central line so that Britain's confident spacing is the Cheops in here. So make sure you turn that off inside the move tool. It should be off. And then everything so big snapped. Okay, so this absence would be on in order to snap. Okay, so now all of our techs are aligned and snapped to the center line. So I know everything is perfectly snapped. So now it's time to meet her for let's meter goto mess and meter again. We can reset the sitting here. We have some old setting anything. So let's set on meter. Okay, good. So when I meet her, make sure you said this Most wrestle the 0.1 which is the lowest value. I know I have already lined everything toe that line, so every vortex has snapped. So it it will Moore's every vertex here. So if this value is higher than you might end off more zing on wanted for text like it might more these what these toward Texas at the center. But it's not doing that here, so I think that's fine. For now, everything looks fine after Miller. Always check your model with three. So with one, you cannot see if it's most in or in the press. Three. You can see if it's Moore's because because of the smoke setting, If if you're vortexes, not Mars, you'll get some something kind of hard is Look, I'm make sure you check the leap very carefully. It might most these two more text like this. So if it happens, make sure you are no using that sold here 2.1 No bigger than that. But here it's fine. So that's good. So it's meter now I'm going to let Let's actually dictates that value Born Gero Gero one. Okay, with this lowest value, it sued. This vortex will be most because those are snapped. So now I'm going to increase the size of the inside mouth gum teeth. Those things is a very tiny right now. I think we need to increase it. So how can you say that? So if I opened the character mouth a little bit against safe that no, that's incorrect site, so I don't want to change this model, so I'm going to duplicate it. So let's duplicate so basically lets him move first so we don't moving before. No, make sure it's freeze. We don't have any. The vein, Olivia. It's very important because I'm going to come back to this position again by not putting Jiro here. So if you have any value here than you might not come back to this exact area, so make sure you freeze so it it will look the vigilantly in all this value here and then let's move. And then I'm going to duplicate one on, then pulled Jiro. This is the duplicated piece you can see this to. Wealth is they live in. Okay, so now I'm going to open the mouth of it should you are not selecting anything. Six roughly opened the multiyear so that we can see the inside part. So let's controlled right to dis elect. I only wanted for text and if I move open the mouth on let's press three for everything. You can see that little bit small. I'm there were behind there, so we need to move those bit forward so Let's scale those first. So if I skilled now, I can group it so that I can easily scale those as a whole thing. So let's go toe or I can combine as well. It's combined first skill Something like this on move service on my here. Maybe even skill. Oh, sorry. I move that in the wrong direction. Strike a pose is And it could like this something. I think it's looking good now maybe for I think this is looking gold. Let's off this a little backward now this body is visible. So I'm going to move that so we can move this with sub selection. Make sure the sub selects and radius is not too big. Toe affect northern areas some off. I think it's good the dollar is here. You can see it's video. Yeah, let's move this back. Self selection can be a little bigger here. Okay, that's good. So that did his fixed to say a face. So I'm going to delete this on. Bring this back. You can see how it was important toe freeze and said that Jiro So if you said for Jiro, it should come back to the previous position on the perfect size. So good. When the next lecture, we're going to work on the I. Then we're going to meet up that to that side. So see you in that letter.
45. Mirroring The Eye: Hi. Welcome to this I morning lecture here. So you might be surprised to know that dies, not just a spear. So we need to make a bit no stop here to in order to get the proper highlight and property shadowing to die. This people know Stop. So it's not just a spear there to create a good looking I we need toe have this this Sinus onda cero toe this idea Sadiyah. So in order to get those two things, we need to do it in a way that the ideas is going No. Inside, creating a carved in step on to get the spectacular outside this speculator, we need to have another layer off I and that ideas should come out creating a carve out sip So there be too safe. We'll come out when I under lead to that would be carved in step to create the idea. Settle. So let's see. What what? I mean, So this is the spear. Let's let's questions by this size. So someone lets it maybe maybe till here it's that this is the ideas is the closest area toe that set. Okay, First thing I'm going to do is duplicating. This selects real image. You can rename Here I Let's sit. I I just settle. And it certainly is the inner part. And then wannabe less duplicated control de to duplicate or it can duplicate from here duplicate. I want you to play get against you know it. So's the one name. So I decided I want to exchange the enemy too. Oh, I spectacular Highlight that. Just speculate anything just to know. Now this Save this speculator. Now against the we have to idea tribal on this back Love I eyeball will be totally transparent on you can only see the actual the idea Terrible. Here. We're going to take this. Andi, this idea Sadia should go in and creating a carved insects so that it so that it creates saddle effect in that idea, Syria And this will be totally transparent is there just to give us the speculator highlight there. So let's go back and live with Chris. This I will. Little it with the speculator are a little bit just And now we're going to select this vortex and then grow holds, seeped and hit on the patriarchy like this. And now I'm going toe I think we're going to make this as the ideas. No. So they sort of diet this line. This line. So I'm going to move this outside, Trigon, remember, As I said, this will create the Spackler highlight here. So this area should be that's again. So I de select this line basically, and then move. You know what I'm trying to do here? You can see how carved out the Syria from side view conceit like this. So now this area will cast the speculum highlight because this is the highest point here. This guy's the highlight easily like this, and we're going to make it transparent. So right, Soto, do that whole right most button and then go to favorite material is an favorite material. And choose from here You can give for you and see with fall. We're getting a very tight speculum like this, okay? Exactly at that idea, because that idea is cannot know popping out. So then we're going to the material here. I'm inside that tribute territory. If you don't see this thing, go to this icon here, Good activity editor, and click on this phone. And then we can increase this transparency full so that that layer that ball, he's totally transferring. But even though it's transparent, you can still see the highlight. That's the best thing. So this close, popular model go to Channel Box here against it. I speculate it's totally transparent, but still it soars. The speculum highlight. Okay, I'm going to hide this thing so that I can work in the inside guy. Control, it's too high. Okay, now this I idea that I received this should go inside. So let's let the vortex whole sip greater than or you can grow from here against elect and grow. Here, Go. Okay. If you don't remember the shortcut, you can also bring and the tools to the mental toe the self here so that we can easily hit that absolute twice and more than once. So we can create a self here so you don't have a self right now. You can go to costume merger. So let's a custom on goto select and you want this off. So hold control. Sit and click, and it will bring that tool of Bring that upside to the current self. So now you can see if you don't remember that you can just select and choose from here. Just remember, it's control sipped and you can bring any upson from any mineral to the current self beholding control sipped on click like this. If you don't want anything, then right, click and deal it like this. Okay, so now I'm going to move this outside, but study for that it should be moved inside because you have already done that. So now this is going inside lips again This select that will grow the selection. You can see I first move it until here. Then I left this and then move because I'm I want the kind off card in safe till at the center. Still the center so like this. So now if you are done, is here somewhere with me, something like this. You can see the saddle here certainly creates a different set earlier said this is there for this thing Now if I on higher that outer side speculating so let's go to display And so so here in last hidden Now I can see that highlight from that outside thing on the inside creates that itis sitting So this is the way to create a good eye ball and we can let me hide. Respect letting. Then we can make this black thing the center thing black. But let's see, this could be the people. By putting a material, you can just do that. So let's select this vortex and convert this vortex to face. So you'll see, like all these faces so you can do that again. We're going to select and converts Lexan, and this time I'm going to use the two faces off some. Okay, once it selected, I'm going to right click and then favorite material. And this time I'm going to use Officer. This is a flat center. It doesn't have any setting to it. It's a flat, single color material. If I goto here, you can go to the material and change the color here. I want this black thing. Okay, Can Krista size a bit if you want to buy, including that age. So let me on the height the last year in you can use the controls it it's sort card to do that Toe sold the last year, and now you can see the I. We're having that speculate. You can also go to the fall and no increase the speculative color toe white From here, you can see into that you can use this consent power. You can increase it toe, even tighten the speckle against it. Now it's very tight. Very signing. Looking Okay now, Once it's done, we need to group die. I'm not going to come back. We can combine, but I'm going toe group die so that it's still different and separated. Let's come group go to edit on group and there's a difference between group and combine the new group. Those individual pieces are still individual, but they are inside it full of law. If you goto our planner, you can see now they are inside this fuller. You can still select those individually, but when you combined, it's actually create a single object. Okay, so let's go and select the group. The group by what is here at the center. It's because there's up so called this group. I vote or reason. So you fit said to center. It might be here at the center of the overall pissed object here, but I would like to have this up some because it it would help me to move our duplicate this place to the site, so make sure it said tourism before the group. I think that's the nobody Full lips. And so let's duplicate now controlled the The group is duplicated here. Now I'm just going toe the channel box and then put minus to the x axis Skill ICS Just put minus one in the scale X axis minus one here and again, See, Desai makes you before you put minus one. Make sure the value is one. If it if it has something that then one. Then just put minus two that don't put minus one. Because you just need to put minus two the current number here of that group. So select that group put minus to the existing number. It will move that to the exact site because the pirate of that group was our daughters in. So the lie the eyes duplicated. So where Donald the body part here. So in the next lecture, we're going to start working on the clothing part. We're going to do that, he said, The plant, the Sioux. So in the next letter, we're going to do that, he said. So I'm going to do the hair and I bro letter after after I'm dollars clothing thing, seeing the next lecture
46. Modeling The T shirt: Hi. Welcome in this lecture. We're going to model the Teesside before I model the taste that I want to discuss about the cloud mourning process. So there are two ways to do. Look, lot. You can do the cloth on the model. And as if it's a single object with the model, Let's of the character. Um, no character wears a kind off tight fitting clothes. Then you can do that. We can model the cloth on top of this body, and it would be a single object. The body and the cloth would be a single continuous object. So you see that technique for games and you can rig the whole body with the clock. So and the other way to do the clauses For a cinematic character which has a more realistic and of cloth, Andi know it reacts to the body and create blue girls and regions is the safe according to the movement of the character. So in that situation you are going to model. You need to model the cloth separately from the body, so that would be a separate object on top of the body. Andi, you need to rig the body, but not the clot to just read the body, and then that cloud would be a dynamic club. So you need to put in cloud and of dynamic similares and on that plot. So we're going to follow the second method here because we're doing a capped off a cinematic are kind of substance and cutem uh, pin production. So if it's a game character than you can model the clot and the body will be a single object, and then you can greet the whole thing. But here, they're not following that thing we're following. The second mentor I took create the cloth realistic cloth, and it's a cinematic character, so we're going to model the cloth as a separate place. So let's start. So I'm going to model the cloth from the body. I'm going to duplicate few faces so you can do the cloth from scratch from from a primitive or something. But it's this is the best way toe do the club. So I'm going to face more and select few faces here. So now I can see the back collar is here till here and then it's abusive. I think so. I can select until here Let's select here and I'm going toe select on my let's change it to lasso selectable So to be easier for us. So I'm going toe select somewhere here, here against even leg dragged this with saved You can dislike these things I want to do select any selector pieces so I need to hold control sipped. So there's a different between just saved holding saved on drug like this on holding controlled sittin drug you can see the difference when you just hold seat and dragging like this you can see him also dragging in the selective physicists. Now it's going to switch So the onset professors are now selected. But the selector physicists are now on selector So basically seemed to reverse the selection Are Swedes the selection so controls It is actually for adding to the selection So here can see it's only our toe the selection it doesn't subtract anything. So here I'm going to select. Maybe it'll here another case that is still here but we can not duplicated till here because this look is more can a fairground straight ballon look letter. We're going to extrude that area, so make sure you have selected the correct of business. You can see I have selected maybe lessons to the selected actually really didn't like these things, So make sure the selection is right before you do anything on those selection. Okay? The Seligson is correct. Now I'm going to duplicate this faces from the body. So basically, I'm going to edit duplicate face duplicate. Don't extract this. There's an off some call extract here inside. It did miss extract. When you extract. It's actually a caught that idea from the body. Now the body that doesn't have that faces. So we need the body inside underneath it. So let me undo here. I'm going to duplicate so duplicate gives those places on the body and then duplicates as a new set of faceless yah. Now I'm going to move these this new cemetery in the access toe. Inflate this again. See? Let's see you accidentally miss it like this. But you have duplicate it. You can go to its imports or here against the police. Separate. Click on that and you can click on this little icon toe. Get the man, Prater. Okay, so let's say you miss it, Mr Manafort, Accidentally back taking somewhere I want to get back to that manipulator. You can select the new miss. I will go to this imports. And if you can see this fully cheap off something, select that on. Then select this to the sore man. Ever total click on that. Now you get that. Let's move. So if you move on in the Z direction, it influx that video that faces. So I need to inflate it. Make it live it ah, kind of loose cloth, loose disease. Let me check this area of fruits properly. Well, it's a little too much. So let's I think this is fine. We can move these things and make those a little bit better fitting. We're fit with this neck. Who worked? I think this this is fine. So now I'm going to extra this area, okay. And tour. Is that length there Something like this? Great. No. Here you can see penetration between this handed and the body. We don't want a new planet Reason in this case that are in clot in this club, any of this club, because it's going to be a dynamic object in clucked object. Let also this kind of penetration is not good for some. Listen, so I'm going to delete this. Look here. It's not a hand anymore, so we don't need Le Clos live here. So let's dilated. We can have loops here for no proper deformation, But still, this is too close here so we can do wanting again you can use. Relax, sculpting. Relax. Here. You can see if I do one side, I need to do the other side. But if I used the symmetry, I can do both sides, both sides at the same time. So I can go here into symmetry war, Lex, you can see we can welcome both. Say, relax of it. Specially in clothed model. This polygons would be properly distributed. Eso being villainous based so that the club can be have smoothly on deformed smoothly. Okay. And our penetrates on at any cost. I don't have no. Make sure you don't have any penetration between politics and eggs faces. Rachel, you will get error when it's going toe when it's similar. Okay, so let me bring the stool back by pressing Waikiki. It can bring any tool back my place in Waikiki. And there's a difference between Z and why So basically, D is the repeat. Excellent wise. Rip it at the tool. So let's say you have done extra than you can press, Zeev, because that's an accent. But if you are using a brush and that brush back to use and press, why? Because that brought is a tool. Okay, so make sure everything is evenly spaced again against I can't stress enough this thing, this thing this is very important. So let's skill this town. You know, I'm I'm starting to save it. So here you can see the visa up. Okay. So how can I do that? Visit? I can delete maybe a few years. Let me see. Should go until yearling. Let's move these things all we can to hunting. Let me undo. We can move that vortex and just everything I see. Did you goto access normal direction? Maybe move everything. Let me delete this looks so that it will be a little bit easier to our digestion. Get that Sepp letter I'm going toe are that Look back Once I gave that set, you can see it's a simple visa. So in in tow are just the things here. I'm using the wall X emitter here. You can see if sometimes the symmetry is not working properly. So don't go deep. We can work on one side and then I can flip this hop again if that happens. So let's start off on Welcome one side. It should be down this apes or become down. I think this is good. So now with me, move a little. So now I'm going to until it hap this site and make sure I have selected the correct physicists. Yes, let's deal it. So now I'm going to meet it, Miss Meter. So before I met her, actually, let's to another thing. So here you can see this this color kind off Syria. So we need a top floozy there. Select. Aren't that topology you can see when at the top? Alousi. It's not exactly a parallel toe, this line this border. So I'm not getting every eve in line with that border. So because the incidents looked all has a knob so called relative. So now the related obstinate said so if I go to those settings inside has looked all sitting and you can see it said to relative distance from exist. That means it's going to be related with this is and this border. It's the Putin both side is can see. It's becoming more closer to the closes. But here I want any qualities. So they said so if I drag from this is very close to that days, I'll get it policy Here you can see it's not changing the safe according to this line anymore, because I dragged in itself. Close to that is if I drag close to this is it's going to be like this parallel to this is so make sure your dragon, 50% of the side that said this is has the 50% mark your you know, to drive somewhere this side to get this girl days parallel to decide is, but so let me Dragon that would drive, gave the sip. It's not probably matching good. That's fine. Getting that and then I need to move these things a little bit. Okay, So once I did this, now it's time to middle. It's a list. Go and meet it. Okay? No, this most personal values two months. I can say that from here. It's like pulling everything and more zing here. So let's set born and your little one. With this value everything aligned to the center line center breadline should be marched but here can see once I put this value on switch to this electoral under selected breast three, everything looks fine except this area. Maybe Onda he had this idea on this is because this vortex are not most because they were not perfectly aligned to that line because I moved those a bit. So this is Dressel. These are very time very close to each other, about not aligned 100%. So that's why it didn't morse those things with this value. So now in this is just what I can do. Two things I Either I can manually most these things by selecting this to on the more selecting dish to march like that. All I can try different trestle were living a little bit in increasing this value. Boring geology to my big working on. No, it's not working Point Jo Jo five. Maybe now I can see it. Moses those vortex because this vortex that no within this range. So again, let's press three. Now we can see those are gone perfectly fine. Most okay and that's good. And what else? Again, let's take the relax and who's the symmetry to relax these areas, bitch. Okay, I don't want to move this discotheque so I can do here again. See another problem. I have a vortex left here somehow on Dhere. So there's a bad thing. Make sure you don't have these things. I don't know how I got those. Sometimes maybe let's delete those floated vortex against elect and still it It will do little those quoted vortex. Okay, good on. Now we're ready. We might need to add zest. A live it the Cepsa deliberate. Here. We're from the Syria again. I think there's still interesting going on. No, it's very close. It's not hand. So we don't want disip This, uh, deltoid round, Save some, Make it straight hand straight barlun hand So it don't in any of this definition here, So let's move. Make it a symbol. Par llopis Simple cylinder concept. Okay, Looks good. Maybe we can water One is study. We cannot. Annie's live here on. Here's the relaxed to relax these things. That's something like this. Good. What? Sorry. Move. Relax a bit. Okay. I think that's it. He said is getting ready. We can So here, not putting any details and no is and detailing all these no wrinkles and those things here . We don't want to model any wrinkles and falls. Those falls and wrinkles are going to come with from the actual symbolism. When the cattle will move, walk those wrinkles. It will deform on, create wrinkles. So this tea set model should be without endeavoring kill. And for a little bit, exactly a simple piece. That the men thing we just need to focus is having a good distributes and evenly spaced polygons so that when you are going to smoke it, we'll get very good even list creator parlance on I think this is good. Okay, so that is that is done in the next lecture. We're going to do the pant soon that Victor
47. Modeling The Pant: in this little we're going to model the plant with the same technique we used during the day. Selector. So I'm going to duplicate faces from the parent, our body idea from the plant, and then we're going to add just a set. So let's hide this day Said so control edge to hide. Or it can go toe again, display hide and hide selection and see the hide selects and its control edge. I don't selected Object is old it Hi. Selection. The selection was going to be here. Them Okay, so now I'm going toe select the body being the one more which is the normal case More two young going to select faces So first small And here I'm going to use the last little again It once symmetry Let's select So, uh, maybe it in here, That's that. And my ritual here control whole control city are through the selection film. Is anything okay, that's good. So now in this election, I'm going to duplicate the selection, go to edit mess on duplicate. So we want to duplicate on Then move this toe in flood that event. So here this this area will be fit with the body and they said they're being flatter. Someone going flat. Ah, like this. And then we can skill down these things toe fit with the body. Here. It looks weird. Let's see what happens there. I think I missed a few faces that let me undo. Yes. As you can see, I have not selected this tour. Caters to that again. Duplicate. Oh, King Flat like this. Then I'm going toe select. This is and we can turn on top selection so softly meant. No, just this vortex Presby wants toe down on the salt selection. Then hold Beaky and drag. So I just appall off. And then this kid scared from the center against still don't no Penetrate this with the body is very important. The club Our list should be outside delivered outside from the body. So the stress be again to tone of sub selection. Okay, Here you can see that it's a very loose band again. I can do the started like something that was be on. DSO, please. Candles. Okay. Just be again. Toe, Turn off the sub selection Here you can see this area is can a penetrating with each other itself. So I'm going toe corrected by deleting. This is I can monitor remove these vortex and I just everything all you can use the relax. It may help you, but, uh, you know it's helping us. What? I can do this it surgeon, straighten this thing. Maybe maybe deliver. This is, you know, I can easily see that thing down again. Are few is this year So let me just decisive Make it simple. Straight without any complex are just men. No, I'm going to Ah, refuges. While here you can see the Internet's looked will still has that sitting that absolute distance equal distance setting. So let's reset it toe relative in This is just related is good Is it trying to just put his lips? You can Now I'm going to relax the city edge So the geometry for the clubs will be very simple. There shouldn't be any complex as love is flow home It's a very smooth even distributed Okay, that's great. And I want to Our one is live here. Sorry. Let's left this area. That's where it here the safe is really weird So we can do wanting the say weise straight now I can see, it looks like the leg so we can do one thing. We can actually listen. Delete visits so it didn't make it straight. Look, So deal it is. I sort of do that before. Sorry for that. So let's delete it and make it straight. Didn't can just aren't is asserts a basic cylinder, nothing else. So we don't need to worry about it. Just move on. This thing should be straight. I can't even deal it. This is, I think, no. Yes, Dill it everything after duplicating delete everything here on day and make it didn't get overall sip from the side view from the front view and then our days lips That'll be better like this because it's a closet sort of hang like this. It's You don't have a sip to it, something like this. It's a very loose bent on here. You can see how it's kind of going up a bitch in town. So exactly don't have to exactly match because dismissed still has some kind of prospective ITI to it. You can see that leg from the front view. Let's assisted, get over match and get the feel. I think this is OK now. So let's art. Few is lips so I can go to incidents. Look, toe goto in Today's looked a little more inside my stools Incidents little upside box use multi his lips Multiple trips on increased this. So by this way, you can just click an art more than one is Look, So 16 is too much. Maybe age, I think still eighties too much because I'm getting rectangle pieces. Here's some every six and then six is okay. Oh, I'm not getting Yeah, There must be something. Okay, Not talking. I just don't know how. Right. So something like this Okay, it's because of the symmetry rating. So don off the symmetry. And when you use this tool here with this multi officer Yes, it was the symmetry when I tried to our with the symmetry with this multiple. Awesome. It was not working properly, So you can call it a bog or something. Okay, that's good. Nelly face moved the pent. It sort of have evenly distributed polygons square of elegance. So letter, we're going to smooth these things. So knowledge on higher the teaser. So let's go toe. So last hidden are the contrast controls it itch. I can see the certain bound in accent. Okay, so I think we need to scale the sad. Ah, bitch. I mean, we need to make it a bit. Lose here so you can do one thing. List Donald asymmetry for this. Let's make a little bit wider. Lose a hint against he. So my Here, here again, you can do the same thing to stretch and delete it. Just delete everything. When you delete everything you can see loses that no come and it makes it straight. Then again, art is Look, It also helps to artist are safe easily because you don't have anything in between begins. Just go and no move 12 vortex and you'll get the same Once you get to say you can are more is loose. I think this is good. So now Huguenard multiple loops Go Dobson Multiple. I think three or four will be surfacing for is too much three. When I add these loops and looking at the sape of the polygons because when you are more you can see the safe is becoming a rectangle. Every follicle faces rectangle cept that means a lot off his lips in this way then this way . So that's what we want to one kind of flesh You. So, Richard, same day incident like this. Because if you smoke it now, you get no even distribute. I'm I meant it to put one more. Maybe three. You can come here to the imports of that's littering and then put three here. So again it doesn't work with the symmetry Purple Issa, let's start off on do that again, this time with three. Uh, in today's looked all with three. Think tree was working three. I don't know what this It's working, but still for safe side, less drama I don't know. Reset it. Okay, this is good. Delayed the history. I have a practice. I have a kind of habit of deleting history men Heil So you might see no deleting on these things automatically Here I'm using the shortcut all safe to D. The military can go to edit, thereby type history so we don't delete the history. The scene becomes more lighter on it will be more if it's in tow world because it doesn't have toe. Ah, memories, everything. Keeping all those honest as to stop in memory. So That's the reason. If you don't need the history sometimes, then you can do it. Does. Okay, so I'm stopping the Lector in the next letter. Going to work on the soup.
48. Blocking The Shoe: Hi. Welcome to the lecture. In this lecture, we're going toe mortal the Sioux on I'm going to model a very simple so for this character . So I don't want to make this character liberal complex. So we're going to make a simple Sue, and that's who will be a single mess with connected with the body. So I'm not going to model that so separately. So if we do that, then that may cause some problem in the rigging states. So you should be very easy and straightforward if we have the Sioux on the body, a single connected mess. So I'm going to do that, Andi, we're going to bring some details in the texting stress. So I'm not going toe no moral. This wall details into the soup. So I'm going to model a very basic simple. So So I'm going to start from this fit on going to duplicate, and I think we can modify the fit and make that as a su So it's to that. And then this socks will be again. A single message says it will be a single continuum s. So I'm going to are just ah, leg. Okay, so, uh, So we're again going to work on hop one hop. So I'm going to deal it 1/2 still it so we'll deal it. Be careful. Ah, not to select the side faces from the center. Make sure you take that. You hear things you have not selected. Face the whole control. Stepped on drag to select for lose. Make sure you have the correct selection. Then take Axle on the selection. Whether it's dilator, something else. Okay, so now I'm going toe start walking in the soup. So let's modify the fit quickly. Make it does so. So through these things. So I don't this have anymore So just should be site and the strong side should be but owned it So let's move, Okay? It's until late this and then And in December flats I'm going toe select everything here to live this on the soil and then goto scale Toland scaling way like this. Then it's no a flight said Okay. No good. Let me move. This is a dollar so that no state at the center I can make This is straight toe. Get this. No, to get this line The soul, soul, top area and then I'm going to move this a rabbit off so that it looks straight. So here, the soldiers Liberal, white. So now I think we're ready. Okay. Good. No, again, Make decided. Withdrawn. Sip. Whose is what this is? I'm in order to get this soul separates through on line I'm going to put to his lips. And besides, this on this is so we can do by using those subs offset the stool. So go to my stools. Dinged up cities lips With this tool, you can add to his lips. If I wonder is loose both side of this is then I can drag on this side and you can see it. I cannot to his lips. So now I'm going toe scale this between his loves inwards so that it looks like this save is going inside and there's a kind of base or something. I got something like this. Okay, now, if I breast three a little doll of the green. So again, see the Severus, Elaine there So again are Mourners Looks, toe, hold the steps. Life They pressed three. You can see. No, it looks OK, but you can see it smooth time looking at this age so I can bring the is look in today's loop on Benign is suffering his loves to hold that safe when you smoke something like this . Ah, now I also want to hold the same of the soul, the bottom. But now it's kind of very smooth. We don't have this age, so I'm going to bring the insider's look to land and our oneness stuff here again. See, it's no smoke. If you want even more supper's, then you can let me move this worst didn't cannot move his lips to this site to decide of the sets, but it's difficult word. And I only is look here because you can see the loop Pain slope is going this way so the Islam is going that way. So I don't want that. So if I do that, I'll get hard is here. You can do this. We're looking is here because that is love is going all the way through the legs, so I don't want that. So in this type of situation where the first loop is going this way, we can do one thing we can scale the bottom part on off. Set it to get that is locked solid, so you go to face more. Hold tab, key toe. Select This faces quickly, like a pain selection once you select again, although it check if you have the correct selection you don't want. Any are unwanted faces behind the behind the body, and you'd love to see that letter. That's a problem. So once you have selected of erect fences than extra, so go to edit mess extra. I'm going to offset from your so hold control and then let promotes drag on this name upset so it's without holding the control. You can do this, but it's kind of flaw. It tends. Is this value rapidly, so it's very hard to control. Tiny put tiny Valya. So when you hold control under Andhra, it's going to put point values here. So the effective see here is very controllable, and you can adjust it with very tiny in number here. So now against you have a round loaf AEA all around my press tree. I'm getting a very SARB define its I get that good. So here I see some kind off again. An illness also is all kinda hard, hon is look because of this or text Adams went So it's nets away a little bit dollar and maybe this way, the ghost of Ron Sip. I think it's something like this. So he hear you on that one? Also border area and maybe Okay, then it's okay. No one that we needed to put that idea. So I'm going to use this as the suit Border little justice. This You can also use the access and normal to our justice. What? This is along the model. Okay, No, I'm going to are on is low fear to decide. And then let's no scale down there. So it looks like didn't goto world more So it looks like the Sioux death there. And then it in this city is the, uh, Sox idea. Just those things. But again, I'm going to put more as looks here toe Hold the step. So let me put while is live here. And now let's move. Let's select all these vortices, select one and then hold sit and select under never. But it's for text on that loop. So double click with select wall and then hold seeped And then definitely so it selects Tranter loop vortex. And now I'm going toe Swiss. The move toe the access sort of a click and you can't use it from here. Normal on our you can call W and then left Lost to get this mineral on from here, you can change it. So now I'm going to move all the selector vortex in their normal direction so that they move interfacing direction like this on. Then let's So is that a two world just reset the press three can see. I cannot look good. Looks like going inside the fit. So he had the savings reverts color here. So that's because of this is so it needs to be forwards over here. Let's select this vortex on with world and move. Okay, so the latest then it's moved This this we can just to move up these things on golf. So problem behind it to look like a card here. Okay, so now this is the Sox area, so we can again define that. My adding for us here will be here. Let's say this is the Sox line and then put one to scale that something like this skin this . Okay, let's do the same thing aren't one is. Look here and then pull that upward. So the save looks like it has a kind of carve your the thickness. So the safe is like going this way. I'm going in. What? And then the leg here, starting from here. So I'm going to put his loops toe hold the safe here. So there are days love here. Vacancy simples increases to take the model When you just those blow. Good idea how it's gonna look when we're going to smooth it, just temporarily checking the modern. I think this is school we cannot follow to mores, loops and, uh, clear some kind off, maybe wrinkles and folds if you want to. Just and for this model, we're not going so dif into that level. There are details. So I'm making a simple character for a movie, so Well, I'm gonna put all those details, but if you want and you can take this moral to Jibril's and then do the stuff and then big those details as a normal left to this morning or making globally again, so that's a little bit advanced by plane on. If we want to learn those things, then I have other courses for that. So this course is designed for very beginners? No, I have not adding dusting. So here, so little. This is the socks are one is low Fear not this way. I think I chose office. It has looked also in today's luv hard one kind of live it. I'm flattered that idea. I think it's good to go. So the next thing you need to know I have raised this thing. So this is just to be spaced evenly here. So let me slide. This is so select. This is hold Serve right. Click Then go to this minutes later or goto the mess tools mainland and bring the slightest hold Metal walls and slight Onda Strettle sport those evenly expressed even the spread. Okay, that good And I might want one head love here somewhere. And then that's light Those Why is this night is still of this sled evenly Well, I want to have one less life Years of this area doesn't have any so again here you can see I'm losing the round safe here. So when they are, this is and need toe used everyday schools that I get the car the segment in there and from here again. She okay, well, and say that this is now We have two ways very close to each other on De. So this is and this is so it might create a little bit hard safe here when you smoke. No, to get it up that then it's better to slide. This is slide this EDS. Uh, this way. And for that in surveying that. Happy that the middle Lydia. Also, let's select that just like this because I don't want to slide this Dismore, Tex, that should be in there. That's perfect video. Okay, Now, I frankly place to which is which shows the smooth mess and the hard case on the blue heart . Guests or less stressed three. I think this is OK. So now I'm saving this model. Let's stress control s save it. So we're done with this super. So the next lecture, we're going to walk on the hair
49. Creating Curves For Hair: Hi. In this lecture we're going to start working on the hair on. We're going to create the curves for the hair. So before I start working on the hair part, let's meet this model. Andi, make it the completeness. So here you can see I have left accidentally left a polygon from this side. So they say So you can see this kind of things can create a problem. Latter if you don't check these things. So now I'm going to meet it. Sure, let's go toe miss on meter. Let's click on that. The access it Dixon is good. X axis. Let me isolated so that they can see if which something wrong. That's all its views. Elector Crest three to check After pressing Triana Check. This center is on. Look for hard. It's kind of fluke. Kind of Look, if you see any hard, it's kind of look not not this materia. Then there might be some more. Text fees are not most so. If you don't see that, then that's fine. So here I don't see any hard is it? Looks very smooth. Blended connected that when some model is good, even check the multi inside and also look good. It's a little tricky toe look. Check that inside party. We need to go inside the mouth through this area So everything is looking good. That means the middle eyes perfect Here. If you see any again on most vortex, you can go on manually More stores once a me daddy Then before I create here carbs I need to smooth this model so that we get a very smooth model Here. Here can say we have Jagged said because it's the locally case model so we need to smooth it. And before I smoked, I need toe are few ages here. This idea is lacking living Chlor publican distribution can say that from this rectangle type fair statements we need to our so is this year because if I lived this like this, I'll smoke it I'm getting polygon but still you can see this area density and compared to the city intensity it's lacking here on when the rigging a drinking time is going toe bandit banned from this ball joint Then you might see some hard is look are no, not a smoke. Look let Mondo So when you when you were modeling you need to think about rigging as well. You need to think from where the model is going. Toe deformed. Bend that the ankle area. It's going tobe a gnat. The rigging time from here on from the knee area from this fire, this football Lydia from here and from the elbow, the wrist. You need to think about those areas because if you don't do that right now, at this days, it's going toe. Come back latter at the production in the production and you're going to fix it on then taken to the freaking thing. So it's better to fix at this time. So let's aren't one. It's so do this before actually meter. I forgot to do that. So let grow under the mirror. Gradual. Sorry for this. I just forgot that Lego under and I select it's hard one aids here against it. Rightly to get that incidents look to Lord will find that Upson here interest looked or or you can also use the oh ourself here on you can find that tool. With this multicultural, you can also use the multi cartoon. I think I have not covered that so you can use the multi court tool. It's a kind off, all rounder tool. How is this? You can create Oh or random or law create this kind of phases Article whole control to get on his look, So holding control will give you one is love. You can see Conard if you want that at the exact middle you can hold control on. Don't click the left mouse click. The middle mouse is going toe. I'd at the center and see if I click here. It's going to out of the center with middle click, so I'm going to adhere. So once I add again, I know it's not, uh, adjusting the sip, so I'm going to use and it floats. So hold sit, right click and it is cool. I don't know if you find that Upson are inside this middle. Here it is. It does flow. Let me use that. It miss It is flu. I always do that through my marking mill. So holding said right click in this object Lord on. I think we can hard won here. So again, let's bring the multi cart on day isn't any difference between using the insert look tool and multiple off course, there are difference. Ah, according the tools, those no multicolored is a kind off around stool, which has a lot of other absence. But in today's look tool is only two are his lips, Dr Difference. But adding, the is luv is same. Whether you are that is looked through multi card are doing sort has looked a little. There isn't any difference. So let's art. Well, let's look somewhere here and I'm going toe. Sorry. Let me under. I'm going to switch to select Oland and select the eggs. Slide it. They can see you have to his lips close to each other. Sorts good. Mestel Slater's middle most track A door can drag the left most. It's not gonna work so middle Mohs, hold middle. Most press that button Howland drag. And for my you need to have middle most button without with a mouse, you can adduce Meyer. So now you can see we have some good is loves going on here. We can even slide. This is love a little bit, something like this. So let miss like this memory love it. When you are going to smooth this letter, you're going to find good distribution here. You can see I love the needy. Others looking good. Their body is fine. Uh, the city we cannot One is Look somewhere here handed. Yeah. So let me heart. One is Look, my stools, multi card control control and medically to our that to the center. And again you can use the relax. Does this bus to slide these things on It will hold, be and then left. Most drug you are just a breed ius radius to its I just did. I think it's ok. Got a select Eligon rescue key toe switch to the selectable. I think everything else is looking fine. I don't I don't need to change anything. My mom I'm a hard one is looks on my here and I think we cannot I don't don't know. So this is financial. Let me check if I delete that face. Okay. Here you can see the distribution is bad. Lets is the relaxed Oh, this would be spread evenly even this best like this. Okay, that's good. Maybe. Okay, that's fine. I think that's fine. Well, now we're going to meet it. I hope I don't need to change anything else. So that's Mirror Miss Media on, Let's again switch to queue with the selectable and select object Press three and check again for that center age. Rich little smooth everywhere. That's fine. Okay, now it's looking cool. I can't off. I'm getting a hard is kind of look here in just because this So let me under. So it's because this is a now you're having. Thesis is close to This is so it's kind of holding that safe there. So this is should come here somewhere. The center. So again, Goto Mestel slides. I had the center, so don't don't on any other long, bad looking sepia. You can do that here as well. Little is blessed. Three. And check the save my father toe. Take that. That on you can see very are looking Push on, Dan kind off thing. That's because off this, this two way to vortex here can see from this angle. So let's switch to move to a double click and change it normal component on, then moving that normal direction. I love this place three and check. I think now it's looking fine and this is can we slide a little bit? Mr. Will slide It's okay. Now you don't see that hard is look on this day and is minimized if you go to dove. You I cannot justice it this thing a little bit. So Okay, that's think even close. This. So they set it on, then close. Okay. And there's a kind of dent. Look, I think that it's fine. You can also you smooth toe or to smooth that a little bit forgetting No forgetting that kind off. Still, I'm getting a little bit kind of dent. Look here. That witnessed component. Okay, that's fine. So let's mirror mess mirror geometry on breast three to check. Everything looks fine. The leap area there shouldn't be any Moore's between the stop protects and the bottom lip, So please check that. Okay, so everything looks fine. So let me law smoke this model. So before I smooth, I want to keep this reversal in case I need this to go back and tense. Few topology of maybe adding are some his lips. So I guess I need that. And it this object need this stays of this morning, so I'm going to keep it, keep wanting, and then I'm going to duplicate and on like another one. So I'm going to duplicate this piece. So let's say Let's rename it You can click here and say And boy kids case in the sense this is not smoked. Okay, now I'm going to duplicate it so controlled day or go to edit and duplicate. You know, it's duplicated from here. You can see it says boy kids one That means this is the duplicated one. So let's say this is the Smoot. So let's say smart. Oh, I smoked. Okay, so I'm going to see, like, the cage one. And actually, let's Logan see, it's a select the smoke one to go Hold sipped on drag like this with the selectable whole city in drag to investors. Lexan. Now that case eyes selected the boy case one I'm going toe Are that two layers? So please, on this last I can. Once you have selected it, click on it. Now you have this layer two and inside that lead that no boy cares moralists. So let's double trick and we can again renamed This is the case, the cage. So basically I'm kind off saving the case, though without smooth model, in case I needed letter. No, I have gone off the left, so I don't see it here now, the smoky selector. So we're going to smooth it, Miss smooth when I'm applying Smooth makes Your division is said to one not to be too dense . So at this stage is I just want to have one division level. Okay, so this is the model on, because I would need that lived one. I can hide this so even I can put this model in the new earlier on double click and you'll get this Eric clear. That's the name, this layer to smoke. So I know the small model is inside this layer, and the kids model is inside this layer because I need it. I'll come back to this model. Andi is the smart. Okay, then we're going to create her carves. So let's stabbed that. So I'm going to I'm going to select it and then make life so that I can create carves on top of this model so we can use, create and, uh, can use create not so primitive and the call for absence so we can use cough tools to create coughs. So basically, I'm going to create hair cards for the kind of game here's we can text of that cars those playing hair planes toe to make those kind of no toe make them look like a bunch of fair or maybe a clump of hair. So I'm going toe use that metal can also use X Gento create a realistic kind of heads. So for this character, obviously we're not looking for realistic kind of Here we're looking for something like something like this kind of hair having kind off no hair. Look at the end And but this the safe from the side is very slowly so we cannot achieve this kind of look through her planes. So we're going to use hair, create hair plans for this mountain model. So in order to create cards on top of this model and want to select it and make it life, so go to modify and make life. This object would be a life objects so we can create things on top of this object to make life. You can assess this Upson on the surface here on the interface on that absolutes here on this this taken wouldn't modify make life so Once you make live it, you cannot select the live object. And if you go to where from more toe? Four you can see not the green or friends. So it says this is the make life object. You cannot select it anymore, but it can create cards on objects on top of this. So now I'm going to bring the chortled the create and go to create menu and go to the scarf . Tools on Dhere will find different cough tools on. In this case, we're going to you. Civic or tool service turns for control vortex on a distant for every point. So basically, these two car tools is going toe. Help people creating guards so lets you civic upto on using civic until I'm going to create few carbs like, let's say, the head of floor. So we're going to create that. So let me let me arrange the view anywhere so that I can see multiple views like this at the stairs. I don't leave this detail, so Goto diss players of this day and turn off poly count. Okay, we don't want that, and I don't want the symmetry as well. So let's start off the symmetry from here. Click and off. Okay, so we have No, I'll make this object life. And then you have You were using this coughed or civic copter and I'm going to create cars . What you can see with left click you can create a point on that point is floating right now sliding on the model. I'm holding the lip most down on doing this. Finally, release the left mouse after clicking the point of it created there. You can see the point here Cannot see it here because that point is, I think liberty inside. Now if I click here, let's say middle Most Dragged will report its on that point and then click here. Now you have two points and one between lines. The curve is not it created. We need at least four point to create one spot off the cough to three point and four point . Now you can see the white cough that is the car. We need at least four point to create a spon. So now you can see that golf year. But here it's a little bit difficult to see again. You can goto from more on. I think we are in the eye solid, more doubts that is in We're not active low. We can see it's so let's go back toe. Deisler views liquor off mark and seat. Okay, so now I'm going to draw one by one. So you need to create a car for a chunk. Are for a clump of hair. Let's say this. This is a clump of hair. You need to create a single car for this. So we're going to clear. I know a lot. Of course. For one, we're going to create a car for one clump. So So let's say the car, the hair is kind of sticking out off the head here, but we cannot do that right now. Here, you can see that Points is coming here somewhere, Rondo. So again we can draw on the perspective. You other. We cannot bring this vortex outside. Right now, you need to switch to the selectable and then the car find, and then you can see it doesn't allow you toe drag this point outside the head, because again, this object is life. And that's the reason. So we're going to exist that letter, but you need to create cards so many coughs years. Let's again bring that tool. You can press the Waikiki toe being the last tool. The why is not the sort cut for the Civic are. But is this not good for the last tool? Whatever the tool was being used, that's going to bring that specific off dull again. Uh, I'm going to create. It's called Fear. So basically, I'm going to create coughs. Then I'm going to artist that letter, okay, Something like this. Maybe press enter toe, complete the cough. Americans, you have two cards I feel like this on. If you want toe little, maximize this. We're hitting the space button. You can see if I want to are just a cards. I need toe don of this Make life object off to go to more if and make not life Use that And now you can see the model isn't normal Modern on now against like the cars again. If you go on to select the object again again, No chance that layer to a reference more that said this smoothly And I know that this object is inside this layer and I have a lobster to change and make a day. Kind of kind of this template More or the reference more. Either way, you are not going to select the object. But this is not same as to make life ups. Um, this is just the latest lock on the object canvas selector. So now it's go to the template more. And then I just tonight we can go to control Vortex and then select this vortex Use the move tool, and then now you can bring those outside. So basically, let's create that hair style, the cloth. The Hester is gonna take a lot of a lot off time to create it, so we cannot. So we need at least have on our wall over for this. So again, here you can see I'm getting this clump here. You can see this club, so I'm imagining that clump on from the front view. We can also see the reference that he had long is actually coming outside. So this disappoint. So that's being that out. Something like that. It's never going to match perfectly. But, you know, I'm tryingto Majette. Okay, If you want more points to artist accord properly, you can are the points by first switch to the okay, you can Are the points by right clicking on Goto car for Let's say, uh I want to have a point. Some hair, maybe there where Maybe here I don't have a point right now. So whole right click and go to car Foreign Click on that area will get this kind of a low point and then go to cough on you Use the art point absence or let's use the insert nor Dobson So let's go toe here and click on this insult Not now. If you go to control Vertex, it can see that point That point may move a little bit. I don't know why events, but you can see this point. It was not there before you had this at this point. And now we have this point. We cannot assist it. Okay, so let me move from the side view. So I just a cough clump the head clump from the side and the front view. Okay, so we're going to basically do this. So in the next lecture, we're going to create few more carbs for the care. It's gonna take a liver time, So Well, let's say that in the next lecture
50. Creating Curves For Hair Part02: Hi. Let's continue working on the haircuts. So in the previous electorate, so how to clear caused by using the civic off tool and the make live Upson. So in this lecture, we're going to continue in that thing. So I'm going to clear film or cough. So let's don on the reference on again, Let's get let's make that object. Can we make this the normal normal led by clicking on this When you don't see anything here , then that's the object in the normal more so select on Let's make that live object you can click on here toe, make it alive, Object When the object is alive, object on you Goto this modify. You'll see this make make not live ups and eleventy. So now I'm going to bring the civic capital back and then create a few more carbs. Okay, so maybe, and with this one and again actually duplicate that cough and make this same looking hair there. So let's create few more hairs here at the center Idea fuel small hairs. That's it from here. Maybe. Maybe here just put a little bit closer because I'm going to continue adding Yeah, so I cannot click outside here right now. So it's still going toe most not those points here, and I don't want to pull those points. Decide of the head. Let me under. So what I'll do, I'll get half of that clump. Let's say I'm creating this clump off here, so I'm going to create help of that help of that love here till here. So if I put the points on my here on the object on the model head, it's going to put that point somewhere here. The center. I don't want that sort of create the hair in this sort here and now I'm going to actually let's start off the live object again. Make it the template more. And this Now what I'm going to do, we're going toe move this like this so you can actually get all the cars and then do this by adjusting these cars. Now I'm going to continue this car, so I want to continue creating the cardinal. Either I can go straight it and then pull up ur p points here The in between area What? I can actually continue this golf from this end because I have created the car from this side on Gwent decide I can continue this I by using a tool called our points till Goto carves you start point tool on here. I can see it can continue. No. And now you can see I am not in the life more so it's never going to snap. So now I can lengthen the hair club so you can use this method spectating Hap hap here. Then you can done of the McCleave and then continued the our point stool so you can see again if you don't need an important let's say you have a lot of points here, so important you don't need, and it's very hard to artist and get a sport car. You can also delete this point so you can press still it on your keyboard to deal points. So the ideal thing you don't need too much points that will be very hard to are just a car on clear, just the carbon. Create a smooth looking car on. You don't want to less points, so both have bad, so you need to have a kind off good amount of points with is good enough to create the car smoothly. and not, uh, no. Two months toe Make the cuffs of stepping. No work difficult, so you can see I'm looking at the car floor, So this will be the hair floor. You can also use soft selects unwto sabliere, just a car you can see I'll just select at this point. And if I press B B for ball or if I go to the move tool on, then go to self selection and call on the self selection you can see I'm softly just a called again holding B and dragging the lip mouse. Well, let me are just fall off radius. But I can easily are just a bigger idea. Smoothly hence, praise be to talk about the sub selection here. I'm going toe toe. Use this to taking either I'm going to duplicate existing hair cough and make it another. Make another clumps. Let me select it. I have selected the move tool, but I don't see the man of retirees because the manipulator is here by default. Every course man a better comes here at the center center of the Great. So you need to send a piper. I can see the private is here So let's go to modify. Click on center. Private. The Bible would come to the center of this scarf. No, I can easily duplicate it. Could wear a duplicate. I love this and create this clock, this small crop and from the front view, Let me We cannot gonna just this. Okay? This health club again followed this reference images, but no finalized The look here in this in this print perspective, you you can be in this arm or which is the difference more this morning cannot select the model accidentally, so that safe can welcome other things. So always finalized this hair Look here in this prospective you because their friends Mrs never going to match 100 person. So that would be very hard if you who Uncle Matt's 100 person and we don't about a little kind off exact looking hair club. So we need to artists Libbets of the circle. Maybe going backward there may be from the front view. It says it's going outside. So I I'm not sure. Let's see. I think it's ok. Okay. Something like this again, I can duplicate this hair in more defensive by world because the pilot is here or if I send a private control de to duplicate controlled D d for dog. Okay, so duplicate here. And I'm going to place that and get this clump. It's always actually, it's a bit righted to start from the center from this behind of the head with small clumps , and then I kind off do the second layer of the hair on top of that and then the third layer of the hair, so that would be actually a good way to create the hair. So I'm thinking off the opposite Drexel. But I recommended to do that. So, look, that would be easy, because we're creating the lure level Lord, layer off the hair first and upper left and upper. Let Denapoli. Okay, so I'm going toe our justice from this view. This view okay? These air. Okay. I think this is course of basically I'm going to duplicate again, So here it looks like there's kind of a spy going on. I don't know. It looks like this. This hair is also going here. And if they were coming here somewhere, and then if you kind of know flies over heads again, used the sub selection is a very good where you are just the overall safe smoothly. That's better toe better than the existing one by one. Sometimes I'll get something like this. You need actually Lord off here in order to know hide the Inter school to let me create few sort hair here if you want to have a small, low length hair than you can delete, die and vortex and the Contra Vertex regardless, if you want to move to cough, let's say if you want to move to in their car, you don't do this. If you select Everest, contradicts and then move the car. There's a difference between no moving, the carving, the object more and moving. All this cunt overtakes you would do this, and if you go to move to look and see the pilot, it's still there. You just moved all those vortex, and now the private is no in a different location. So that's what if you want, this dinner's fine, but if you just want to move the car off, then it's a better way to move the carving object mode and use the contra Vertex just to our sister Shape off the cuff. Something like this. So in between two cars, I'm adding one small car there so that no, it feels the total head. Let's duplicate it and no are one and be here for control. Vertex. So when you do this carbs and these heads, please know give much more attention to this hair floor on the hairstyle. So this hair flu is very important. That slider? No, the way I do, these guards are very important. It is a kind off coming to us, the center letting duplicate this and off this again. Look at the model from the front religions were not feeling this idea. So I'm planning to actually do 1/2 and then a meter of duplicate those and exactly to the other half, and then we can more file it. Oh, it's no, it's not a good idea to create the whole thing individually again, using the soft selection of a great way to are just this type of big area. Okay, so let's duplicate this one again and pull that there. No, I have an idea that has tiled there. So I'm kind of not exactly for looking the reference. We're trying to get that overlook. Okay, I don't know. Yes, I think that's fine. Control de to duplicate here on again Looking from the front view is crucial. Going live that alone, So be present. It's It's a time consuming task. So sorry. Sorry. If I'm kind of no boarding you, I just want toe not not. Keep any stiff in this tutorial. That's the reason. But please let me know if you want to One mintues keep these things in the next. Maybe I don't know. Okay, so against sub selection changing the radius holding Beaky and then I just I can see Let let me save the file. Control is it's a good practice to save in between. Sometimes the competent can cross and you lose your hard work. So So I think I think your name Let's do a few more hairs Control de duplicate. Put if you have here, I don't want this look. So let's go this side like this from the top. So try to get the hair volume. No, I think, yeah, control the duplicate. You can see I'm kind of not using that live and it can create new Of course I'm kind off. I'm not duplicating course because I have already. I just need to are just a safe, deliberate doctor. Be easy. Easier than no creating the card from the scratch. And then I've just everything. But it's up to you. You can again create new cars. On are just those if you want to. Okay, I think. Good. That's control D and move on. Put. So if you if we able to create one happen, we can just duplicate and get that the half okay. Thing I think would be this club trying to know intersect course entirely inside the head. And from the V handed concede this hair club is going probably controlled a duplicate for that. So I think I should stop the lecture here. So in the next lecture, we're still going to continue with the cough. Andi, I hope we can complete that in the next lecture soon. That like
51. Creating Curves For Hair Part03: Hi. Let's continue our king on the cubs off the head. So I'm going to duplicate few more cars to fill this area. Considers a low bar lady also were going toe, duplicate the head and then make sure you change the Sape save of those hair that they don't look like exactly. Duplicated thing on. Make sure the route is kind of intersecting on again. A district sub selection of your life saver. So who will be? Probably be kit. Call on this and who will be in drug God just are full off. Go out of this and try to get the style of that hair. But you need to move this to us. The center. So it's It's kind of nice bikes. Every hair club is going towards the centre. Some right here. Don't worry. We can add no carbs, the latter as well, so I can. Once we get the actual planes here planes, we can the picket doors and not cleared more carbs, more hair clubs. There's something like this. We need to feel this, but control de duplicate. Oh and Cidco. Some are here. Have some smaller one from here, maybe, and then it's a deal. It if your corns better to again close. Start creating carves here at this back a small lady and then with small cars and didn't go up and get another layer and then another earlier duplicate this. Okay, something like this. Maybe duplicate. Let's duplicate this one to create the bigger because one maybe deal it. It's not that big. So from this and bottom, the head is the head of kind of going up and gathering here. You can also not rooted and scale the cops. Okay? It's looking good. We can create feel more cars to fill this area. This? Yes. I think that is already good looking summits off days and cleared that sip. Okay, then let's do some up earlier in the day is hairs thing and it's controlled a duplicate. It was, isn't it? Here on drug. Did it? These things doesn't have to match exactly the refreshments if you get overlooked. That's fine on Les Patteson. No, I ordered you to do that. Maybe in a few instances, but most of the time it doesn't have to exactly imagine the concept moments. So you shouldn't waste your time to exactly mets everything what I do. I always tried to exactly Mads, because if I like the concept, er, I tried to get that look and feel exact. Okay, So you need to save again control lists. It's a lot of big nuts. No, forget to save. Meanwhile, so they lose most of the time. They're work because they work for a hour, two hours, and they forgot to save the file. And then something happened and they lose the file. So it creates for trust is, um, on beginners. The law work hard to get something, obviously then their experience, at least on when they lose the world. It's truly frustrating. And no, but a word that make sure you're saving the file in between. You know what? Maybe in every five minutes, every 10 minutes, at least on check this from the phone view here, you can see it's very kind of, you know, close to the has just called, so I'm kind of going outside. So let's move these and you can use the component Dixon. And if you have a lot of point, you can delete few points again. Stop selection. Is there again, Obviously is that and job you check? We have a big bolt and empty area here. Don't have anything there. So when it duplicate these things, put it here. I feed that idea. If this man a better size kind off, no related u onda you want to decrease the size, you can click the plots on minus button. You can see you cannot just the side of that manipulate. It doesn't affect the actual work. It does just know their display ting. You can use the minus button to minimum. And no, because the side of plus button to increase the size. Sometimes you need to do that because sometimes it no comes in the way of the adjustment. And no. So let me to placate few more carbs, maybe. Remember here, Megan, let's pull those points up. Units better toe through the lower layer. Fast. Stand up earlier. But I'm kind of going everywhere. Okay, I think this is good. The view. I need one to move here, just kind of going inside the body there. So let's pull that up. And I think no, we can We can kind off increase the length by using that same toe our point stool. Andi I can see. But in order to know work this you have to clear the hair from decide, then no go towards the side. If you have created the head from this side and when this side it's going toe, continue the car from this side because that's the ending point. So make sure you are creating the hair from this side, actually from the root of the head. Then you're going to us the deep of the hair. So that's the point, remember writes No, you might think quiet. Swing the site. Okay, let's say you have gate of the hair from the site. Then let me delete this. We don't want that if you have created the hair called from the side. And when this I then still let's hope you can reverse the cough. Actually, let's to change the direction. If I go to the car points, you can see this kind of square box which saw this is the starting point, and the's are You can see this kind of feel dot kind of look circle dot kind of look. And this is a square, and you can see that. So this is this is the starting point is the ending point so that our points tool is going to continue. From the ending point they say you have created the car from this side and went the side, so this will be the starting point, and then they sort of standing by. And when you click on this our point. But it's going to continue from here, which you doing one that time? You can actually, you don't have to do the card. One. Recreate the car can actually reverse the cough. Directs on starting point from this side to decide by using the reverse Karl Robeson so you can go to call on you can reverse the car River the dxl just the substance can t can reverse the reaction effect Legal that Now you can see my starting point would with this side. So let's say you have created the cover on your starting point decide on you are using the art point only can see its source to continue from this side not from the say so that in that situation you can actually select a card. Go to carve reverse the direction so that the starting point is this side and then actually used our point store. So yeah, I think that's good. Then let's create some under a minute. Let me have underneath left. So let me controlled. Duplicate this. Who did so kind of getting help. So that's this Will go down. Does a small one Let me duplicate this one. Which would be this small club Dill It We don't want that again. You can use up to Lixian like this is great. Of course. I need to put a little more time to get a few more hair and we're going to do Let me say this. I'm going to do this Big clumps here. So let me do those lawn or letter were going toe Stop this letter here in the next lecture . I'm going to actually put some more hairs in between the lecture so you don't need to see me doing the same thing you have. You seen this on a lot, So I'm going to do that in between the lessons and the next lecture. We're going toe, Theodore, actual hair sip hair cards out of these cars. See you in that lecture
52. Generating Geometry From Curves: Hi. In this lecture, we're going to see how toe create actual surface out of this cards. So I need the profile cough, and I'm going toe extrude their profile called along this part car. So we have all this part, all his hair carbs. We want to create another cough on that cover. Be the actual actual with off the cuff. So let me show you what I mean. I'm going to create a car. So Goto Kartal Civic. Otto. So we're going to create a profile of this card. So let's said this the flow is the path car on decide Said is the profile car. So I'm going toe create the car somewhere here. So let me let me create a car, something like Oh, okay. Something like this kind of fair hop cough can see Maybe maybe Underworld something like this. So just imagine, like you're looking at the top looking this car from the top view Onda, we have this car and this girl is goingto be extruded along this golf. Let me so you so select. We're going to use a tool called extra inside the surface mint. So we have two extra Robson so if you go toe treatments and you see this extrude, we used this tool a lot on the polygon objects. But here we are working on the car. Andi, this tool is not going to be useful. So we're going to use the surface extra. So we have two extra rated mess. Extremely. This is for Polygon Pius X chosen on this surface. Extreme would is for ah to extrude a cough along another car. So let me select this girl first. This is the profile card. So select the scarf and then select the path cough on which that carve is going toe slide and create a mess. So this election order is very, very important. Just keep it in mind. You need to select this first and then the path. So this guard, by that selection order computer is going to know. Okay, this is going to be excluded from the part on the two selection so far, Seligson is goingto be extruded on the second selection. So select the first election here on, then hold, sift and select this Go to surface on to this extra. When you click on that by default, you're going to see something very weird like this. So it's not useful Usable. So let me under when it actually are just the setting a bit. So let's go to the setting without clicking on it. Go to setting after select the cars in the particle order. This is a fast then steps like this. Okay, Here, you need to reset it in case you have messed up with all the sitting. So go to the default starting point, he said, And then chance, according to me. So you need to change this resolute position. You need to change this from our profile to our path. Okay. So that it creates the object actually, at the party on you need to change the pie vote from close sister in point toe component. So that this car, if I would be know exactly at the component of this. But so let me select this to obsolete on then Hittle apply. Okay? Still, you can see it's because of the pilot of this car. Because let me select again. I created the card here. Not at the center on the private is here Off this car. It doesn't matter of this car. This God by what is here. So there's kind of offset. So we need to send a pie. What it goto modifies and a fiver on. Then the pilot is here, so select now and then sips like this on hit. Apply now. You should see the exact result The proper result. So make no, remember toe said the pilot to the center of this car and then select and then choose this to absence here. Okay, so now you should see this thing. This no plane on the profile. It's coming from the set. Another history is connected. Statements. If I change this profile, let me tell you this card on you see the result here because still, it's in the imports. So this object is created because of this car on If the car viz meditator chance to say the output will be no would follow the gulf unless you delete the history of this piece this morning. Okay, so I don't want to do the history now because I want to change it. Taiwan to change more defender set first thing. I want a tapper kind of safe here. Okay, so I'm going toe tapper this through No adjusting the points. So if I go to court fines and justice points with the sub selection, I can scale down and clear something like this. So I don't want to tap it to a point because I want to so some some buns off head here. So if I point a scary too Oh, narrow. And then I'm not able to do that. So I need this end here. But overall, you can see the happiness, the narrowness. So now I kind of feel this week is too much. So I'm going toe scale this car because the input is connected. I can scale it on. You can see five scale because of the imported are adjusting this mess. Okay, now I'm going to select it and then then select this one and then repeated, basically so lets us use those extra on. You don't want to change the settings now because the setting is still there. Okay, so, no, let's say ah for this one night. You want the wittle live it wider on. If you scale it now, he's going to change both on for this. I don't want to change the week. So in that guess I'm going toe actually delete the history of this place so that when our justice called this piece on chance so you can select it and go to edit and delete history . Make sure you are dilating history of the object, not the car. So it deliberate dive history. Okay, Now I fighting just tends it and I can see it only are just this one. So here, let Miss Village so that it becomes a little bit wider so that it actually intersect here. And then I'm going toe again. Basically scale this points with the soft selection Donald on then skin and again, I'm not creating a point there. So now let me do it one by one. So on the start, from here on these areas, let's actual field is it s o here. I'm going to use this off selling large, so I'm goingto bring that to my in custom Selves. Let's go to custom and go to surface whole control safety and click on this holding controls it and clicking on this or bring this substantive active cell fear the open self So called control simply click. So this is Dexter, so I don't have to come here again and again to apply that. Now I can just hit on this on Get the peace, okay? And now So let's selected again and let me quickly do these things so I can selected. So here you can see it kind off. Give me reverse effect here. I think it's because of the called direction or something. So let me change the direction. Maybe. No, it's not because of the Jackson so we can deal in the history of these things. Let me actually scale down a bit too much. Okay? I think this is good. Now you can see this saves. I can rotate this and see if it works. Can see if I rooted this card here. Like in this way. This way you can see the adjustment here. You can actually bring it somewhere here so that we can easily selected. Let me actually undo this door. Let's do the history of this truth. Otherwise, if you move this golf to our stop, you can say something like this. So you need to delete the history of the output. Oh, go To edit the birthday of history. Let's move this somewhere close to here. so that we can easily selected and and look at it from close angle. But when you move it, make sure you freeze it that Murray five don't want any value here. Freeze the transformation. Um, of the car. Modify fridge. Yes. Okay, that's good. And knowledge. Select off. Selected, Selected Nick press G to repeat, select, select and press G can do this live days of this press g to repeat that, Axl. But I think we want Why the peace here? So that Dillard these things, I wrote it a bit on. I think I need to scale down a little bit on if this No, this garbage too much we can scale and make it flat. You can see like this. Let me decrease that Corvettes. It's something like this on raising to 16 is fine. We may need toe. You are just a call for those office itself. A bit in order to minimize that intersection. Something like this on. Let me skill down. Not too much. And you can decrease the dosage. Let me say the file. So basically, I'm going to do this thing. So let's select this and this a plight select this and this apply here. I wanted to Liberty writers are going to scale it on again. I want to change this or did the history of this tree. And again I can bring the history to the cell Fazal or Control sipped on and click on this other histories here. Click so you don't have to go to that mineral. Let's kill make it bigger so that it becomes a little bit wider on can see. If I wrote it, I can angle, said Rangel of this car like this. Still, I want toe skillet. Yes, well, a bit narrow it. Okay, that's good. And if you want to scale these things now doesn't affect that because the history is gone, so you'd have to manually do it. And I'm going to actually manually do a lot off. Artist went here like this. This no route should go inside actually lying properly. No call back. It's coming to forward their salutes. Hooked it back well off. Okay, you need toe. Just those things that will be careful carefully. And then Oh, I didn't Majette Saudi. Let's imagine that offense. Okay, so that's good. Let's continue doing that. So click click click. Let's create carves on surface Out of that on here. You can see this. No fleet kind off. Look, you need to rotate it, you know, to vote that I don't want the chance. Delete the history of the subject and then awarded it. You can see it doesn't work, so I can scale it like this way. Like the opposite way skin can scale it like this. Now my scale total has the off some turned on. So this Lemonis said it and steps not was Colonel. That was the reason why it was kind of snapping. Now if I scaled to the opposite you can say that fixes that flick. Okay, now I'm going Toe Skillet. Oh, sorry. I forgot to stall in the sub selection, so yeah, again Did the history Waas one here is complete. Done just to live the histories of that world Get affected letter. Okay, Okay, Now here. I want to change the angle Search engine Gangel So with one single cough, we're making all this plans so I might want toe reduce the size bitch for this and then scale down like this A negative history Gillet Basically same step again here. Consider Flee. Perfect. The curve is like this Always. You should see this. This carve this. Ah, no kind of help. Cough should come outside. Not like this. It's kind of going inside. So to fix it, we need to scale it to the opposite side. Like this. Don't skillet. Two months of the racial gators. Kind off. Very scale. Stretchy kind off. Look. Okay, that's good. And skill down. Mega day making nat'l. Where? Okay, good. These intersections are okay. Here. You can see these interest, except these are fine. Okay, so now I'm going toe selected and then do it here. I don't think I knew this girl. Let let's say last. So that's come from here to let undaunted in in order to change history, did it That Okay, something like this. Good. Did the history. Okay, so basically, I'm going toe do the same thing. So it's basically the repeat tasks, so I'm going to stop this, Like to hear on. I'm going to do all these things in return behind us in. So I think you don't have to know. See me doing this forever. It's a global time. Convenient stop on designated putative I'm going to stop this lecture here on. Let me know. Finish this thing and I'll see you in the next lecture where we're going, toe boo. Placate this to the other side and then we're going to do creates a mother of other clubs of the hand.
53. Generating Geometry from Curves Part02: Hi. Welcome back to the lecture on in this lecture. We're going to duplicate this half to this side and we're going to care some other clubs here. You can see I went ahead and did the same thing Using this card with this golf created all this our planes. So now the first thing I'm going to use deleting this car's here. Adoni. So let's hide the character so that you can easily see the cars. And here you can go to so on hide a nun so non study. So it tied everything. And then if you go to so and don't under only carve ups And so let me find the car for person. No scoff. You can only see the cars like this. Make sure before you select and delete all the scarves Before you do this. Make sure you deleted all the history of those cops off this mess. So let me So everything Select everything here on delete the histories so history click on that apart and long histories that bility No, I can go to so and none and then so go to town on the car display. You can do it. This way or there's another way can go toe. So all so life you select everything is being selected. And now if you come here the masking of some this idiot on if you don't on the mess absent this button it don't select won't allow you to select Guemez. So you end up selecting only the carbs. So make sure you have all these substance. If you don't see this, make sure this bottle is study. This button is clicked. If you see this kind of line and then a triangle, that means there is something hidden. If you click on that, it expands and you can see this. Must this Celexa were mass cops? And so none of this Polident plain and surface and playing up some and I can listen like and delete the car from your cable. Okay, Did all the scarves make sure you have did the history for after the rise, the cough is going to also deal. It'll minutes. If it's hello, get deleted. Okay, anyway, so let's dawn on the world. So we're going to against on on it so that we can select Mrs. So now I'm going to select everything here Then we can again duplicate all these things by creating a group. So first, let's group it go to edit and group a new group. You'll get a pirate at the center. Andi. It's now the group is selected. Now let me go toe eight on Duplicate Special. So here you are not going to meet her. It's only for polygon objects on. You are going to use this when you are actually creating help of the object. And then you want the other half and it's going toe. No, you want that toe continuous mess. But here we don't need that. And we can use the mirror here because if I click, he says, it's not the require active selection. Current selection doesn't matter. Required selection. That means it solves that because it's only for publican. So now I'm going toe could read it duplicate and let's duplicate. Now let's go to the scale of some scale X put minus. We're live minus one. You can see believed that selection that thing too, that the site, Of course, we don't want exact thing on the other side. They're going toe in the same and now you need to do it with the No. Uh, now, you No, you're going to are just a miss. So you could have also duplicated the cars without dating the history. And then you might you could have Actually, I just started through the car that a lobster, But I like toe are just a mess. It doesn't matter. You have already. God, the men ship and no, just needto know mortified. That little room look like a duplicate. A mess I can see It's almost no symmetrical except for your exceptional areas. Here I see this Spotswood go. And soft selection is here to help you with subsidies. And you can easily are just be a good idea. Just no break that symmetrical thing. Because we have to placate it, Of course, so we can modify a bit. You can see the center private is still there, so we can select everything. I'm hit those center pirate up sense of that. Every here has. It's by what? At the center off. It's all so that again is a list. Select and move here and there. Break that symmetrical look. Okay, now I'm going to do let me save it First we're going to clear this unique looking front hair clump. So let me create a cough and a new car civic off tool here we don't need toe told them that life of some here because you don't want to create an on top of that model on the head. It's going outside from the side view. I'm kind of getting that like this. Please enter again. Chris. Why to do this thing? So click toe are points and you can hold the lift. Wants to move the point. You can put closer points to know created, kind off tight corner. Enter. And that's why again, Oh, that's great. But now, because you have created this from the side view all three year kind of a line lined off like this. But that's not the case. Can see it's not lined up from the front so we can move one by one. Let's just first bring those Beiber point to the center. Select more defense into private. I dislike this, too, and let's move this to its locus and okay, and that's good can even work in this four view to see what's happening, actually dead. So let's move and we can see you can rotate this that the line off overall angle with the overall angle here. Like this. Just follow that route, Angan, because the hair is kind of going thistle bit so it's not perfectly line and straight, so it distorts selection. I can do that quickly. You can decrease it and then do it and doesn't have to match perfectly. Get the answer. Come this way from the side view from the front view. Sorry. Okay, let's select this and do the same thing. Exited the deep on. Move that to the correct location. Maybe is a kind of very stopped called there something like this. Would it? Now we're going to actually clear the surface again using this scarf. So let's start from this click on the surface X to the setting. Is there again? As I want to remind you, the setting reset the sitting are part component apply and make sure the pilot of this carve is at the center of that car Before you would do this. Okay, great. So let me check the wheat we're getting and she we're not getting the wit and the angle is wrong. So let me rotate it a bit. Let me look something like this. Maybe. And I need to scale it to get that. I know that base sweet. So I'm looking for the base with then I can tapper it by Skilling. I think that's fine. But here we need more kind off around, saved from the side. You can see the depth so we want a door on this leg. Mineral poor giri to the road isn't And let's deal it this spot. I want to change the profile of your a bit so something like this. So we want the kind off dead here on the side view. Let's say this is the center on. This is okay enough. Or maybe it's a little bit tilted. I don't know. I think it's a little bit tilted. It's not that something like this Maybe, let's see, maybe extreme cold and come get get the sip, got a tip and to scale it to the opposite saying and then wrote it. See what it and we're kind of getting a live it angled towards this side. So we see this death, something like this actually look and see Scale it They were actually here. You can see, it's kind off we're gathering, and here it's intersecting it itself. So I'm going to scale down it so that I don't see that. Then I can manually skill off this area. Okay, Let's glad the history of this object and then applied this this thing on, then sanding. Try to get that angle on dry toes. Kill it. I think that fine. So let's delete the history. Sorry. Here I get the wrong selection order. I don't know usually like this first, and then this. You do that, we'll see the results here. Okay, So select distant this and like this one, I think that's what for perfect here. Can see everything is looking fine. Except this black the lights because the we're looking at the plane from the wrong side from the opposite side Here, I need to go to the surface and reverse the direction. Okay. And if you're not going to see this black color, if you have this option tone on this two sided obsolete so makes if you're stoned on, you cannot actually say which is the inside part of the political who says the outside part of the political. So that's why I like to keep it down off so that I can see who say it is actually inside. We say this outside, so the polygon has not the side. You can see that the actual side and this is the inside, so a list will be inside. So here I'm going to scale these things. Who knew will select the scandal for text? You can see this market selection is very a kind of off. No year here. I just want to select this vortex. Andi, when I drag to select everything inside their box accidentally select other things, unwanted things. So here the last. So selection can be very useful. Let's elect. And here with this, you can actually draw, so it easily can select complex angle things. So here, Let miss let me Maxim ate the radios and just it poor this. Fine. Good. So here I wanted Nadal thing again. Last selection is a list select on Make it narrower. So I need to decrease the soft selection. Okay. Okay. These things that can distressed there we can adjust that when we're going to convert it to polygon. I'm living that right now. Let me rocketed. This'll a bit and skill. This this is too much. I don't want any or looking save like this. You can see it's kind of bottle in a kind of effect. So make sure looks smooth and dapper till the in Very pointed there. So doing the same thing. Let's does the lasso and then select carefully this decrease the radius. Anyway, I'm changing the radius by holding Beaky and then left most dragging while we were holding the B king before ball. Okay, so I'm not exactly happy with the step. I cannot just that letter when we're going to convert that toe polygon. So this is looking fine. We're going toe, put a few more hairs and complete this in the next lecture. So I'm stopping this here. So going to do the next final elector for the hair
54. Adjusting Hair Clumps: I will come back to this lecture in this lecture. We're going to continue working on the hair. Andi, I'm going to put some hair here. This area looks very empty, so and I'm going to also correct this hairline. No, I don't like the hairline is going Strains going here, but you can see that reference. Um, is there it doesn't match here. I'll tryto close roughly mass there. So on the here, here it looks that were behind that too. Does it come? Little report. So I'm going to move this hairs. You just no one pulled here. Can't it Doesn't mass there. Okay, maybe some of the head has the pilot here, So we again center the pilot from here this time pressing Z did to repeat on this clog needs toe again That sent a pilot it It's to move forward here. So I'm looking at the reference on the Monta. But you can goto every modern look at the reference there. This hair clones are never going to match 100% because we're creating plain and they're in the refrain. It looks like value. So what? I'm trying toe matter awfully as long as I have a good, low hair line here. That's fine. It doesn't have to match from the percent of the concept. So here the same thing. I'm goingto bring this forward a little bit. All right? It was looking like a ball and bottled area. So smooth forward here and I can see the hairline looks a bit okay on here. Can't You were missing these Solu it heads like this hair. So I'm going toe art Few asymmetrical hair. This hair is a symmetry. It doesn't matter at this age. So going to copy, head cloth control de move or to pour that and 10th of say believe it and it took oppose this hair club behind a bit Study it will penetrate here, Go to control text mode and move tool impressing beaky toe tall on the salt. Still excel so that I can softly default. That idea you can hold Beaky and left was drag to change the radius. What? You're holding the Beaky Andi holding the left mouse button. Chance the radius. Make sure it penetrate on the head Better on here. You need to put off Put some more help clump Maybe let's duplicate and try to modify it. This one I looked it again. Doesn't have to be 100% exact with the concept, it's a overall. Bring that same. I feel a lover look so that it looks like having so volume there and its control de to duplicate. And let's fill this area elevate looks very empty. - So here I am, trying to get that same here clump floor direction, bullets off this and try to get that with the flu him again toe pressing will be key to call off. The soft selection makes you these things have intersecting with the little head. That okay looks a bit, uh, here again can see the here. We need to put some more clothes to fill in that area. Lateral going toe. Create a kind of clear kind off a hair club who? Big hair filler So that we won't see the head because no gun. See, there's a media as we can see the head, the body park. So we're going to our a filler letter Reveal a textured that as they also fertile feel all those gaps We'll get something like this just I tried toe feeling tryto what is to put all the help comes a little bit evenly. Okay, Thing I think find now I think I need to put wall. Maybe maybe we can protect this a bit to get that follow. I think it's fine. Smoove again scale a bit so that it looks a bit bored white and it helps toe feel these gaps When I went to look at this silhouettes. So if I press seven on my keyboard Oh, it makes all everything black because we don't have any light. And seven is the light more so we can use this trick to see the silhouette toe check the silhouettes appall model on we can mats with the behind concept. But again, as I said, I'm not trying to match on the person with the concept. So So I'm not worried off matching everything 100% but we can do this for non present five again toe, Go back to the sacred more. Okay, I think I like this, but you can spend a little bit more time to refine this hair club's. So I'm stopping this lecture here and in the next lecture where going toe convert all these knobs hairs Now these all these pieces have nots. So we're going to convert this thing toe pa Legal. And we're going to create even loops on these heads, so I'm going to see that in the next lecture.
55. Converting Hair Into Polygons: Hi. Welcome back in this lecture. We're going to convert all these knobs here into polygons. We're also going toe. Uh, keep even distributional off. Is this to basically now you can see the first problem is we don't have even polygons. Morgan, See these long face? We have very minimal number off ice opponents here. So if I go on directly converted to Polygon, then I'll get no straight lines here. So if I put converted directly to publican So first I'm going toe lard some ages and they were going to come back to pull it in. But I'm going toe So you a tool. An obsolete which we can use toe know Basically, do those two things Let me show you what talking about here. So let's select one club just to saw you so select while large, Large surface So I'm going to surface Mineral on Denzel Obstacle rebuild So if I goto this obsolete box Andre, sit here and apply with the by default Sitting against see? You noticed the chains and they can see it. Rebuild the surface with new eyes opens. Let me undo on D do you can see the difference? It's assisting the makes a little bit here but you can see it's adding even polygons here. But what if I want toe are more races in this way? Ah, then this week. So if I goto this offseason here now, I can see you have to Absolute number, number of spawn in you direction and VD X And so it's hard to say which direction is the yuan. Which direction is the V but you can stick by just increasing one any of this number. So let's keep this four and make this 11 on apply and you can see it increased. This this Rex ELISA Palms is this So that means in this case, this is the video excell refined Cruise V. Then I'm going to get a lot more polygons in this way. So you need toe experiment. This thing to know his direction is the U on which to excellence the V. So let me under. So of course I want to look get more polygons along the car off a little the head So in this direction So is this V in this case? So I'm going to ard maybe, let's say and I think this is fine. They live in a tool is fine. Let's make it even Number 12 on. Let's make this maybe six on this chick, I can see No, the idol thing you want is square looking faces like this. And then this kind of rectangle face statements were getting no polygons in this way then this. So I think Ford Waas Fine. Okay, so I can see And almost quietly So let me undo So we're going toe do this toe create even looking Polident See even looking demoted But still it's ah, it's a north surface So here, if you go down here you can see our pro geometry Now it's said to laughs by default. If I select polygons, then we can also convert this north surface to pa Legal. So we can basically do these two things were attending the, uh no you one ve span and then converting toe follicle magic. So if I select this political No, the some of since no active. Now, if I click on this, apply on this type is certain triangles. If I see you're facing like nerves, I don't get all this substance there. They're nothing. So if I select PA Legal against now see their swimming absence. So now the strangle said, And if you are playing against him getting polygons Cemetery. But this is strangulated, So let me under. I don't want that. So I'm going to set coir, so I want to convert it toe Halligan. And then I want quads, not Rangel's. No. If I applied, it begins. He now it's almost quads, but it doesn't matter with this with the new loops. So now here can see there's some lines doesn't go all the way, so I don't want this kind off output. So it's because of the standard feed ups. And so I want this Just listen method to control points. So if I said these two absence with polygon toe, I select the polygons, then I since the time to quite know triangles on. Then I'm tending this test. Listen matter to control points what it does. It creates pa legal exactly on the self under nerves ice upon. So now effectively click on the supply and I can see it creates clean symmetry on it. Also convert this surface to poor legal on it, also create new loops. According to this setting. So basically, this change the number of span and you you on video axle. In this case, I just in case the really Rexall, which is the long along the have side. And then I intend to spa legal and then to observe the squad on control points on. The other thing you notice is this black color. It's because if I rotate this against it, this side looks OK. It's because the normal side is this side and this is the opposite of the normal. Say you can fix by this going toe makes this plan reports because now this is a political object. We can reverse the no mandate except can do this. So we're going to basically do this with all the hair clumps. Andi, you don't need to do this one by one. We can do it low at the time, so I'm going to delete it and we're going toe do it again with all the head clubs. Basically, I'm going to select everything and then use this settings on the on the clumps. So let me hide everything. So let's goto this channel box and hide the leads. So this is one of the useful uses off layers can easily select hide. So now I'm going to select everything. But you can see we have the cars and I don't want this scarves to be selected so I can do one thing. I can goto this masking of sun here in under status line. You can see this cattle body is called masking. Um, this these things helps us to select, and we can disable something which we don't want to select. A In this case, the cards we're going to tall off the scarves on large and see if I try to select this gulf . It wants allowing to select it because those Lexan Mosque is off the now I can easily drag like this, make sure I don't select this mouth and said, But so now I know I'm just selecting the north surfaces Once a selectors makes your delete the history because the history is connected. If I let me down on this, if I change the call, we can see some of the hairs that modifying. So let me select everything first go to it, thereby dive history, then all of the gulf so that I don't select it select everything? No, I just like this Surfaces now go to reveal surface on with dissenting with the ah settings here polygon and quad on Contra parents and rebuilding applying You can see I guard all those things. Let me close it. So here you can see we still have all those north surfaces there. So Angola deal. It does not surfaces on the cards. You don't need those things anymore So I'm going toe select the cards. So first I'm going to select the cars. I don't want to select this cemetery so I can call up this j motor sex in here. So now I can only select the cards If I goto where From where you can see now I have selected only the cars Just really those things I'm now let me down on the surface And now I just want to see let the large spots I don't want to select the polygons one so you can see we have to moral their oneness north. Another one is the political. So I don't want to see a couple Egon on so I can right click on this icon. And if it I clicked on that you can see I have some more absence inside, Dad. Absent so I can turn off the police or fists which they're doing to select. So let's start off it. No, If I drag, I only select those north surface. Now I'm going to deliver those from a keyboard law. I'm left with this Bournigal objects. So let's start off on then. Don't on again toe No, Go to the default on everything to now I have all those polygons. The North has no converted into polygons. But all this side reversed. So we're going to select everything. Let's hold control and drag toe dis elect a while. I don't want so this things on this this so I'm going toe miss display and reports. So let's make sure the normal Dixon is facing towards outside or towards the camera. Okay, that's fine. If you want to see the inside as well. So you can go toe lighting and used to side lighting. You can do that, but by turning this off, they allow us to see the normal side easily. So Okay, let me Yolanda. Leah! Now there's a polygons on. We have liberal clean deviltry on. We still need to put some is issue in there Like this area we can hard one is Sophia. I can goto my stools Incidents loop tool and ard one is up here Let meant all of the sub selection Repressing Beaky You can select all this vortex Goto Just listen Move this on Artistic You can also Bayville Bill that is to get this round loops again. Let's say select This is on If I goto bevel, you can see if I hold middle most on drug I contains the bevel Fraxel and now you can see we're getting that call Begin All all this money really are just that I think that's fine. I don't want hard anymore. So we're dollars the hair here, Andi closing this step on this lecture here in the next video we're going toe. Who blocking the the character I broke. We're going to clear to buy clothes there. No kind of missing the one. Sometimes the difference won't so up. So you can just turn off the layer and it reflects that you miss. We're going to do this to live row. So see you in that lecture
56. Making The Eyebrows: hi. In this electoral going toe mortal the I broke. So I'm going toe to duplicate the mess. Die, bro Maze from the body. You can start with a new poll Egan Cube or something. But we can also duplicate the mess. Let me make this layer normal left. Then I can select. So by this way that I brought automatically freed the call fear. So I'm going toe face more than select few Francis always have feel is is close to that idea. Maybe this look this to loop that get one is Look at the center Onda. Uh, it looks a bit no ticker. So I'm going toe just a saved. That's 11. Duplicate it to go to it, miss. And again, you can do both side at the same time. But I'm going to do once I and then I'm going to duplicate it toe That's what duplicate it to pick up the faces from the body. So go to it, Miss and duplicate. It's not the same control the duplicate. We're kind of duplicating few selector physicists. Not so in the object. Good day treatments on duplicate here. Now again See if I drag the Z axis against its duplicate it. It's not extracted. The the the body still has the mess. The face is there. No, this place is a duplicated. So I'm going toe off. Said this ivory liberate from the body so that it cannot flow floors there. And then I'm going to I'm going to are just the thickness it looks the cardinals are going toe move thes things on an adjusted again again. Follow the reference roughly there. Well, we could have done the eye, bro. On the Texas low in the texture. But again, it's a waste. You can do that. But having is emotive gave a little bit kind of depth there. Okay, so, no, we need toe gives, um thickness. So I can extrude the inter miss, but I think I'm going to extrude The entire border is so double click to select the is and then go to edit Miss and extreme on this time again extruding d excess and make sure it penetrates with the body and go inside the body. Something like this against smooth it. So let's try smoothing it, Miss smooth. We do some level one. We didn't do this, I think. Okay, like this. So I'm going to delete the history, go to it Dubai dive history, and then we're going to duplicate this. Say so. I have the by vote at the center who is his ideal at this situation. So the sin by what is here at the center on. I wanted to play get to this side, so I'm going to duplicate it so duplicate. So you have depleted in the intermodal. So now we have two objects there. Now I'm going toe put minus in the X axis minus one, basically on press because the pipe what was at the center now with minus one, it's kind of off sleeping that to the other side. Whenever you do this, make sure you freeze it. Now it's minus one for door one that I allude to be there, so we're going to freeze it so you can ask why this is important. It's kind off. No, a clean thing, because when we're going to rig it, then we don't want any measure. We want very clean thing here. So, in scale, we want 111 We don't want any minor. So in rigging, it may create some problem That's why it's a good habit to freeze minus values on one when you freeze it when you freeze it, sometimes it fleeced or no normal direction. So then, on this law, mais display reverse abstinence there to reverse the pollutants. This time it's fine going die, bro. No, the character looks a bit better. So I'm stopping this lecture here in the next lecture. We're going to look at the intermodal on we're going toe law or are some final tweak. We're going to take it and then where we're going to dollar with the modeling part of the off our character.
57. Creating The Hair Filler: how In this lecture we're going toe, create the hair filler part on. We're going to look at the entire object overall. Eso that makes your were kind of no cleaned off on. We're ready to go to the next chapter. So now I'm going toe forsee over Polident density. If I don't want this sitting where friends say that more you can see our body has lot more pollen than the dress on. If I place, let's slicked and press one, you can see the body is not smooth at all. It's very locally, which doesn't match in the body. So make sure you enter character has kind off overall. Even politicians even label of folly guns. I'm going to select the stupids on Goto mates and smooth to get rid more belligerence. And again make sure we're not adding a lot more polygons. So make sure Dover Mattis, with the boarded in city here again, see now the size of the polygons up. No, almost matching. That means we have same level of politicals. So we're fine now. No, let's see now I'm going toe are just a year the year safe here, penetrating here on day. I can see the yet save is not matching here. So I'm going to for text more. And this time I'm going to Tallinn The symmetry so that I can work on both sides so we can tell on the symmetry by going to the to Lampson. Then go to symmetry sitting. And here I'm going toe Don while Lex American see if I select one vortex and see the other side is also highlighted and selector. So I'm going to place Beaky too tall in the sub selection. So they can just that over a Lydia. Live it. Let Mr live this idea. Um, it's pull this year out of it. Maybe it rotate a bit so that I gave this line. Correct. Andi still, the head is generating. They're a bit so we can again move this hair again. The pilot is there, so go to more defense on the paperwork. Move a bit so that it won't see through here. So the same thing with the modified isn't a private on. Then let me stand by road and move. Okay? And now it looks fine. The next thing I'm going toe create the clear it is the hair filler I can see if I give it a material. So let's rightly go to ascend Favorite material on Let's Sane Lambert on Go to the lumber to and changing color. Give it a different color there again. See, you can see in the gaps here we can see the body to see the head. So we need some kind of feelers so that we won't see that head part from I would say so I'm going to one. Do it so I didn't do I'm going to select that idea. Those hair overall hair idiot. Go to lasso tool and go to face more. I'm going to select Overrule skull, period. Basically, Donald the sub selection repressing Beaky on dis elect on one interfaces that door on those visits. Okay, I think this is fine again this Harris on the way I could have flow higher. Those things Let me do this. It will promote here. I'm not going to get a clean blue because the loop is going kind of going this way. So that's fine. It's just a feeling Phillips said We can almost cleanup it. So now I'm going to duplicate this this Versace go to edit mess and duplicate. Let's pull this outside a bit so I don't want that to see it exactly on the on the head. So I want this to be a liberal offset from the head. OK? I can also go and give it a material so that I can easily see that here. So I'm going toe. Let's give it a bit bonus. Well, Miss color on here. I don't want to see this, so I'm going to move on its It's not symmetrical. So I went toe, I'm going with the symmetry. So let's move it Something like this just there to feel that integrity and we're going toe texted this part as here so that it kind off blamed with all those hair clumps. So then you won't see the long they're boarded the bear here, there and say this gaps Yeah, that is hope. Let's just select this. I think I still have that symmetry going until we get also tall of the symmetry here, Let's start off. I feel this idea. I think now it looks good. Okay, that's fine. If I go ahead and give that same material to the hairs can see actually it was Cilic. This just look dies. And if I go ahead and give that same, it'll go to assign existing material and lumber too. Which is me last created my trip. Now again. See? No, we can't see the body that now it's filled up, You know, in it. Bring this. Oh, and be move up a bit so that it will penetrate there. Yep. Yes. No. Looks good. I didn't save the file. Okay. Okay. Now let me hide the body and let's check the inside mouth part. So press control, it's to hide. And this part is also in cream. Or that Let me press one. No, we need to smooth these things. Let me separate these things for us. Now it's a combined mess. So let miss Separated by going toe messman one separate. So I want to combine the apart, eat on with the upper gum and then alerted with the Lord. Come. So basically. And this part is one. And then the lower part is one dog gets a break. So I'm going to do tack. Basically, this set up is very important for rigging because the upper moat will know, um, operate independently than the bottom back. So here I am goingto Oh, combine everything. I don't want the bottom tit. So makes you We have selected the top all and then I'm going to combine it. Combine on then I'm going to combine the rest the estate and go in the basically the bottom did come into one mess. So now and so we have one and 203 So basically three part here. So I'm going to select everything and then small does so that we won't press three anymore . So we have this smooth miss here I missed the stooping toe it so let's smooth those on then combined these things again Miss combine whenever you combine It creates some history to make sure we delete all this history So basically we don't want any history on our model So I'm going toe on hide The last hit and miss by control sipped h you can goto Oh goto display so and so last hidden. Basically I'm going to select everything and then go at it and did it by dive history. So I don't want any history. So my mom, my every piece, every model is history free We don't have in history, Onda. We can also go ahead and freeze these things. So go to modify And Fritz. So everything is freezed with clean value here we don't have in history on Make sure the normal said passing the right direction on. But now everything looks okay. Let me take the inside mouth. But okay, now it looks OK. So contracted AIDS is the key toe. So last hidden, everything looks fine. So I'm stopping this lecture here with this week. We're going. No, we have completed the modeling part, but still I have one more lecture in this chapter. Just toe clean up the outline thing. Now I can see the outline is a mess. So we're going to clean up this things. So seeing that in the next lecture
58. Final Check: how? In this final lecture, we're going to clean up the outline of it. So I'm going to open it. Go to Windows Outlander. The first thing I want to clean of is the empty empty north. Here You can see there's some group Norc which doesn't have anything inside. We don't have this. Plus I can. With this Aikens, that means we get all these things. When we combine stuff and we separate, we get all those. No, all these things lipped. So we're going to delete these things. I'm going to do it. So before you did it, make sure you did the history. So it'll one in history. Oh, so make sure we have deleted the histories of Let's deliver on these empty groups and one these things Okay, there's find the fasting is deleting all those empty north on. Then I want to rename stuff a bit, so that says, select this Now if I goto if you can see, let me isolate this goto. So I select you selected. So this is a single object. But we have that object. Insides know some Ah, your stuff here. So, boy case, I don't lower that these things. So let me selected and let's precip to be Or you can also go to edit a lone parent Really sipped be on parrot on parenting it, Langan See that on Benton and know that crows outside their growth. So this all And now if I deal in the history still have that Let me high on hide everything study Let me Donald the View selector on select the model and its very name it by double clicking It's a body. So make make sure every part, every object no has some kind off name Alexis like this press f two frame here in the same thing. So it's inside. Yeah, I think it's let me except recip p one parent and and give it the name. Maybe said to the same thing pursuit be so that it bring that outside of that grouping. Then there's a limit. So bodies bent. Okay, this this thing is a combined part so fine against the all these excuse are faced naming stuff here. These are the heads on and now again renamed these things to know one by one in the name these things. But I think Okay, I'm going to live those things. But you can rename, of course. So here, I'm going toe group it weapon by pressing control Z and then real image. Still here. So a day and I'm going to combine this hairs, but not now, because I'm going to unwrap the vase of it. So I'm not combined the stuff here. Okay, now this part, the hair feeler part. So I'm going to the name Fieler on its whole middle mouse and drag it to that group. Fair growth. So now that's a single part. I know. If I see this is the bottom, did parts of bottom gone? That's a bot, Teoh em. But, um, deet on this the upper t'd on then the dog again dollars inside some of your groups or sipped p. You and the not sure if I'm writing the spilling and correct, but, uh, yeah, okay. So long this two things living separate those sippy being Those are said and I brew find bruise lovable to copy and paste that. So these things are not no final before we a big it. We might change these things, but for now we have some name. That's good. Uh, me So here you can see we don't have anything that me. History Village. Make sure you don't have anything here. So did it. When you delete any group makes you don't deal it accidentally and in part of any object. Sometimes bigness students do that. That kind of mistake. This is delayed. The group's thinking that it's a It's an empty group, but letter the fine Some part of the model is missing on. There's no way toe Go back to that some ex. You don't do that. Mistake here is the eye again can put right eyes istea right by. And this is the lip Die off The character here is the empty go Everyone, you still select anything? Just just take if it's selective anything or if it highlights anything. If you don't highlight anything, then ah, it's nothing. Let me limit the live this entire thing emergency and selecting it and it won't highlight anything. Still it it okay on. No, I'm checking to make sure I don't delete anything. Accidentally, Any everything looks fine. So now you can see the outline is much more cleaner than before. So again, this is not final. And then we need to come back to this outline, er, before rigging it to make sure. No, we get everything right. Some. Now I'm going to close it. I'm going toe history Gillet again to make sure I don't have in history. So with this, I'm closing this morning after morning, chapter on in the next chapter, we're going to start on wrapping the U. V's of the character. So see you in that lecture.
59. UV Unwrapping Basics: Hi. Welcome to this lecture. In this lecture, we're going toe See some basics off fury, unwrapping. So before we actually unwrap our character, we need toe Understand what is evil napping on some basic basic stuff For for union wrapping, we're going to use a particular editor that is called the very turf You come here inside the CVM in or you'll get the avian litter here. This is a part window which helps us to unravel Levi's. You get the view here, which can again Jumanji amount by holding the alright. Most button drag you can hold ultimate almost a pan can do this stuff. You cannot, of course, rooted this view because it's a two D view on here. Is he there? There are so many like grid lines. And here you see, this is the X axis and way exists. And you get this box this black box. You get this TV space on this basis called 0 to 1 space here can see this is the Jiro space on. If you come here, it's the one toe Jiro toe one 101 and why desert one in X axis. So this save this space becomes the geo to one space where we're going to put out every us specifically. So this is a beautiful space. You can put in any other every space barge you need to say no. Specify that again. Letter. But this is a budget fall, George. One space. Basically, we are going to love the reason side here. Okay, Now we have some minnows here. It's has some tools to helps in even napping. Then here we have some absence. And then here we have the UV toolkit again. Some of WTOP sensei here, which are easy to find an agent to graft from the site. So I'm going to use this sex and much. Okay, so let me bring a normal bite. Awful model is a que on when you create a moral again. See, it had some movies here on the there, the beautiful Devi's. So you is basically things like the skin of the three D model has things like animal skin of this kind of stuff. A tiger, open skin, something like that. So if the skin of the three d model, which wraps around around the model toe no get the Texas because we don't have any texture Here is just a TV. No. If I select could right, click and face more. We have all these absence here and selective face. You can see this faces got highlighted And then when there is the same space and this area is if I do anything here, if I put any texture here that don't projected on this area Okay, so this is the by default Levy body. If I open my model, there will be a very messy V. So you need to unwrap it properly. Not This is a very clean model and I have not done anything toe to it. So now the vase. Fine. But if I start working on this s Cale it and to the stop now I need to inhabit properly. Now this you can see now in the three d view, this proportion doesn't matter Disproportion. That means if I do anything here that will get stressed here to feel this area because now the three D proportion and the two deeper person doesn't match. So now I need to own up it. I can come here against selected in the V more again go to every more on then I need to use the obstacle unfold. Evict. You can find that here. If you expand it, you can click. Click on it basically unfolded. I don't know. It doesn't on full unfold, maybe, and to select it. And then let's go to this Morley for maybe I think that's inside you. Modify on four. Let's find it. Yeah, this is it. So again, see, now it's not probably working here. I don't know why. Maybe there are some absences. Try just maybe to set it another ghencea. They said that upset. Now it's unfolded. If I see like this first, it's proportionally matting. Now you can see the weight and the height proportion is matching with the width and height proposal. That means the tester is not going to straight, sir. Squeeze. So this is one aspect off unwrapping the proportion suit mats almost met. Sometimes it's very difficult to mask their proportion, but it should be close. The justices one conceptual dress. Your texture will get stretch. I can't saw that little undo 1,000,000 due to the back. No, you face click on this icon, Hear it will activated ticker texture for this by full texture. Here you can just use it to Jake. Your texture, whether it's being stretched or squeezed against use being stressed. Of course, you can see the chicken texture is actually having black and white square perfect square, but here it's being stressed too much. That's because because of this on proportionate TV's. So if I unfolded, let me click on this icon, which kind off down the display off that textured here that I can easily see David, the first selected on unfolded. Now you can see because now it's unfolded, unwrapped. I can move on, Scale it now you can see the texture is being projected additives. Now the texture is at odds. It is being predicted here, so there's no stretching or squeezing. So this is one aspect off, even napping. Make sure that the texture doesn't being not squeezed, a stressed. When it's projected on, we learn it, but a very important tool which is unfold. Okay, so let me delete disease and create a only very three from water doesn't have you these. Then you cannot Dexter it. You need to have Erie's Andi. According to that, we can text of the model and it can be protected. So for this we took yet maps on it. So let's select it. And if you come here to this sex and create six and we have some maps here, if you come under this E V, we're also getting those tools here. So this create absence allow us to creativity is but was acting in different ways. So let's start from the automatic. So let's click on it. They can see automatic projects from six different direction now, from front, back phone and the sad lips of rates, a top and bottom is projecting and creating new vessels. Now let's at this face presenting from the X axis and see this face of the model it creates . Give yourself for that. So now I have six differently vessel, so these are called one you vessel. One connected pieces called the Visit no different from the by default TV off a cube. If I create another cube is to solve the by default TV again. See if I go to the E V a cell. It's a single connected the visa like a good skin, a tiger skin. So it's a single used. Of course, they're caught. Otherwise we're never going to make it flat and never going without cutting and never going toe open the skin. Okay, All you can cannot make it flat. So now for the U V. We need to again try toe. You need to have less seem going to create more connected TV set. Now here we're getting a lot of the vessel which can be connected now. If I go to is more and select, this is you can see another is is being highlighted because that's a single AIDS actually in the treaty in the model that's a single is but here in the two D, because it's being it has been caught from there. So we are seeing we're looking at two ways, but actually inability it's a singular isn't ready that the reason it's being highlighted if I select this that is is selected. So what I can do is I can connect it by using the suitable. If I come here cartons, you on click on the CEO of the moves you. I should click on the move onto because if I release you, it is going to be stressed on. The proportion is being destroyed. Let me move on to again see no were successful in combining this, too. We vessel into one by stating that seeing that so I can go ahead and do the same thing stitched together, said The movement's you together by street. It's also works like that. So kowtow state can just to repeat by pressing the geeky express Zeki on geek again. See, it's almost identical with that by default TV. So this is another aspect off, even rapping. Try to make it as as low as you visit. I mean, try to make minimum e vessels, try to connect it without destroying the Texas. Now I can see. Still, the texture is being stressed because again, the proportion is not there and we can select it on goto unfold on, then negate that proportion. And the texture is no no, no without in damage. So to unwrap any models. Evie don't have anything we need. Toe creativity is by using these maps again. We're going to see some of the maps while we're going to text on rubble character. So the first thing we need to create some movies, then the second thing we need to connect few stuff and make it minimum E vessels on, then on four things so that we don't get stressed are squeeze textures. So this is the bite. If all the basics of TV's so in character, we're going to see some of the tools. Of course, we're not going to look at H and every tools, but we're going to cover some very important goals. So see you in the next lecture. We're going to start unwrapping your character. Thank you.
60. Unwrapping Shirt UVs: Hi. In this lecture, we're going toe unwrap the sort. So I'm going to start with the sod. So the first thing I'm going to do is sitting of the proper workspace here. Now, my classic it said So I'm going to change it toe you re editing so that I gave the UV editor under UV tool kit here on the prospective You to the left site. By this way, it doesn't float. I kind off like this way. Okay, so I'm going to select it. No can see. The UV is messed, so we don't get a good TV here. So there's the by default one. I'm going to delete it first. And then we're going to map again on clear the previous So you can deliver TV's by selecting Davey. If you right, click and then go to E V. Then I can select everything and then he deal it on your keyboard and did this way. Or you can just select the object, an object more. And then you can deal it from this edit menu as well. So from here. So I still it it? No, we don't have any V for this place now I'm going to map. I look clear, Devis a new Evie's for this. So they're select this one on. You can go to this create here in the UK toolkit. You get some mapping techniques here, so I'm getting the cylindrical map. Spiritual mapping. We'll get all these absence here as well in this even mineral so he can see cylindrical clinical platter and spiritual mapping. So I'm going to use plan a mapping for this one. So I'm going to project from front direction, tow us this front of this desert on. We're going to project and create the interview V from this direction. So if I left click on this planner, it's gonna project from the top angle because of the settings inside the planet. But let me undo. But if I rightly gone it, then it's gonna project from the front access from the G excess. So this is a little secret with his hidden you can left click, and you can write like you hold your mouse. Here you can see you can read this dialog box and it says that you can right click to project from this G Xs can now the UV here we're getting is a continuous Is the single piece. Basically we don't have any seem anywhere. The single projection. So now I'm going to call this, he said, and make it flat verifies. Check the texture. Now, if I click on this checker I can hear. Are you gonna go to take shirt and down On this check of map, you can assign addiction. Basically, it's a good picture on. You can see how the chicken, how the texture is Goodyear. There's no stretching or squeezing here in this for India in the central area. But as you go to us, the side you can see the texture is being stressed here because of the V because of the way we project where we just project from this angle on these areas at the Bluhm perfect areas to preserve from that angle. But this Versace and now kind of squeezed. If you don't want to see this checkered remains here in this E v editor, you can call off this from here. It's left up some, but still you can see the checker here, so it's a little bit easier Way to work. The lug unsee that this side faces a kind of stressed here with squeeze. Yeah, so now in it, too. Oh, no. Create, um seems so that we can unfold it on and get rid of this squeezing and stretching. So now I'm going toe gives, um, seem so that basically seem is And the idea where we caught this TV and I'm going toe use auto auto Got So I'm going toe. Go to this Kordell Sue Saudi. Its auto seems you can directly click on it on. You can see different. None of this image you'll see it's automatically created. This seems for us, basically cuts from there. It's basically taking. The side is, and in this situation it's working for me because I wanted to court the taste from here. From this no side angles. Just thing like it's a ah, really, teach that it's a real cloth and these areas are the stitching area stitching points. So we got it. And now I'm going to also quoted from this side I need to monitor do this. So let's double click and select. This is love. Make sure there's the side one from here. Yes, there's the Seidel Now, once I select, this is Luke. I'm going to cut it by. You can cut it from this mineral god on. Now you can see from this bold white lines it can say that now it's the border. It's if you don't say this bold white line, then makes you this absurdist on on. Make sure this office Ernest undone if you I don't see the law, seems that make sure this absence tunnel Okay, so now we have to sail. Basically, if I goto the cell vessel on click and then let's bring the move. Tool and move basically have to sell. Now I'm going to unfold the story. So let's select boat and then we can on for unfold by going to modify Miller and unfold the easy way. It's holding sipped and right mouse button here in this every editor and you'll get this minute on from here. You can quickly go to unfold, and then we have three absence basically on full unfold along you and unfold a long V, so I'm going to use unfold. So now let me darlin the texture and let's see if it gets read up the stress taker you can see we don't have those straits Streett takers. Now the texture is okay, so this is the ideal. This is basically the goal off evil wrapping that we minimize the stating of squeezing of the actual texture. So now I'm going toe align this. Let's select the V by Don't looking and select the holy vessel. Then let them collapse it. Let's go toe line and snap and you know I'm going to the dress Parliament and they let's rotated 90 dig nickel to rotate area and here can say 90 degrees set. So here I want to rotated clockwise. So I'm going to click now it's Trent now. Once I gave this to you vessel on The texture is fine. Now I'm going to straighten this side. Who is this is not mandatory? A. This is not, ah, compulsory thing to do, but there's a good practice to straighten this and ive age so that it helps us texting states. So, basically, I want to select all the serious Let's says select this well on. Then hold seeped and double click on this one the and one on then the selected in between invests wanted selected. I want to straighten this a straight line so that it helps. It becomes easier to texture and put some pattern. So here I'm going to straighten this. Let's goto a line a line and snap on. Click on this on the left. Elaine here. Okay, now this area is kind off overlapping. We're going to unfold it again, so I don't have any warrior on that. Let's select this and got this right alignment and then the bottom. I want to straighten this as well. Basically, let's click on this bottom line. So again, this is not a compulsory thing to do. But we do this in production so that let's say you there's a kind off strap you want toe put in the texting streets here. Then it's easy. We'll interest rate David. If it's like this, then you need to paint or draw the straps like this. So that is it. Live it difficult to do, but again, you can do it. Now I want to unfold it, but I want to keep these lines at their producer. Five on full. The whole thing again. It's a whole safe right mouse on fallen before. Then again, I went back to the previous states with a door on I Want Deserve is to restrict. So in this situation I can be in deserve it. That select is is that's select and developing on this so it selects the whole in between events. Now I wonder Bean this so that it won't end this at the on full time. I can be seen again. You can go to this spinning tap here and then Cleveland Bean. It's so this blue color which indicates that those e visa pinned. Now I can select the whole thing. Andi then again, unfold again. You can see it didn't affect those being division. Rosa was stayed on their focus in on then this whole day, said Unfolded. According to those again, we don't see any a stress. You just take a basically, that's fine. So I'm going to do the same thing with this part that's select this all, so I'm going to speed up a bit. So let's line it on and lying to the right. That's Elaine to the bottom. So once it's Elector, I'm goingto select and hold sipped on double click, so this time it's lived this things the whole control and drag this select. Then let's being on, then unfold. You will see this on full apps. And here a gentle slickened on Fooled. Okay, so now I want to move the whole cell. But if I try to move it, you can see it doesn't allow me to move. Deserve it. So I need to underpin. Are I need to underpin all. Let's click on this on pin All. And now it was being a so I think it's fine. No, again. You can go ahead and do the same thing with the sleeps. We can straighten these things again to help us in the texting. Excellent. Straight. Let me align those lived all right alignment like those. And let's sit like this and to the same thing. Okay, then I'm going toe again. Being those things I should have done this before. I don't mean so let me do it against selected TV and then interested of this one. Basically, I'm selecting these e visto bean again so that it won't tens. So you can see whenever I straighten from movies, I'm unfolding the whole thing. Ex ex expect the those straight lines. Oh, make sure select these things. Okay, so peen. No. Let me select everything and then unfold. Okay, that's good. Can be all. I think that's fine. I think I should have straight and these things. I think it's OK. Sometimes you can also cord this hands from here. Andi, make this sleeve separate. But I think this case is fine. Toe know Stacy, together with the body. So now I'm going to select everything. And then it's hit the layer important so that it kind of goes to this 0 to 1 idea. So I'm going toe ardent and layout and then click on this layout button. I can see it's scaled down and then moved to and feed those to the vessel inside this 0 to 1 every area. So in this case, we're making a texture, a single texture for the sudden pan. So we need to feed that bad and the sudden in de 0 to 1 idea, because we're making a single texture for this two piece. So we need to feed those movies in this area. So I have this empty idea where I can put the pan. So we're going to another band in the next lecture. See you then
61. Unwrapping Pant UVs: Hi. Welcome back in this lecture. We're going to work on the plant. So in the last lecture, we see how we unwrap the sort long for you mapping techniques and, uh, cutting the scenes, creating the seams. So we're going to create the panty vis. Before I started working on the plan, I missed something in the previous lecture here. You can see if I go close to the C V. You can see this. Lions are kind off going apart here. This would be also kind of oval straight lines against. It is later kind of going straight so we can do one thing. We can select these areas. And whenever we straighten these things and we are unfold everything else at this border lines. So then you use this technique, select everything here like this. So now I want these. You wish to unfolded in this very excellent in this op down Drexel. So that in the V directs and this suit on for a little bit and kind of relaxed a little bit . So let's hold. Sit on, right Mouse, then Goto. Sorry. Sit right balls on fall. And then this time I'm not unfolding like this this way again. It will change the straight line he said don't want so I'm going toe unfolding the video Rexall So basically is gonna unfold and relax in Vevey means in this case, off down direction. Now you can see and relaxed this region this access so it won't end this in your direction so you can see em and keeping and undo and redo things that you can see. See the difference here to make sure you do this whenever you straighten the visa and then on full everything you must do this so that it relaxed in the videos, Excell. So I'm going to do the same thing here and again. I'm full in the video Xer he found full in you direction It's gonna change in this You left right direction which I don't want discuss so rejects alone. We can do these things here. They stayed in you, Dixon, because here you can see attending in this Texan can do that But I think that it's not necessary here. Okay, so now I'm going to start working on the spend. The first thing is here again. You can see this bad you is the first thing I want to mention is you don't have to delete Davis for creating new vis. If you create new reviews by using this maps, then this visual build placed, so there's no need to actually deliver service. But again, it's your choice if you want to delete and start from scratch than you can. But let me show you. In this case again, I can take the planet math. And I can exactly use that technique here on the Bent on Unfolded on Rapid. But I want to use a different map so that we can see that. So here, I'm going to use cylindrical map. Got it? Overall, the sape of the plant is cylindrical. As you can see, it's just kind of silly to cylinders. Here. It's that this leg is a cylinder, and this leg is a Celinda over bandits kind of cylinder. So I'm going to use a cylindrical map. Okay, so I can see the management of the cylindrical math here on the tech shirts on this area concedes hey, really stressed stretching that TV and squeezing some here. Okay, so once I get this rough e V than the first thing I want to do is taking the seam. Gave me all of the major so that I can say the E V c Now you can see I'm getting the same here. Ah, on this is I don't get any scene inside like this all on this site. So I think we one some kind of seem here so that it on full because now it's kind of a wrapped thing. The legs have kind of continuously wrapped. There's no way we can unfold it. It's a continuous piece in the C V. Now, if I tried to unfold it, then I'll get get something like this. We're looking UV. So I have to God here. So I'm going to again, uh, again, just double click and select the whole levy is here and then got it from you. I can do this, but I want to So another way to do it we can use a three D is Kartal. It can go to your remain new here. Then we'll find that here three d chord and see you every tool. If you bring that it can tactically double click on it. And now I can see we basically lived Rondo. I just want to do this and then this. Okay, I think no window Have to this. Okay, now it's already a zoo. Can see this bold white line says it's already a seam. Let me call Switch back to the selective. Now let's go to Devi on Unfolded. That's good on full. For all I can see, it's neatly unfold unfolded that whole levy. It's kind of connected here on this front. Idiots connected Is the front area on? We're getting the seam here on this back cyp again. No, it's kind of a it's unfolded, but their angle is very weird for Text Cering Purpose. Let's say you want in the straps going on here in the texting part, Then you have to kind of put the straps and destruction, which is kind of hard to work. So I need to straighten this. So let's actually I caught it from here than we'll try. Toe kind of collect it. So let's got from there. You can see now it's saws, different sale color. Because of this obscenity, we have some Upson's here. It's it is just aware from without in color and this absolute source that we have signed off several. David, this called sedative. It's resource the UV in different color. And we have this. We saw the destruction of the you ve if it's stressed, are kind of squeeze Thanet sores in red color. In this case, we don't have anything. So it's clean. Let me down off this. So I'm going to unfold again. Unless toe the same thing unfold. And then I went to root it. These things like this stripped in this basically Okay, that's good. I think we can give this seem here. We don't have to kind off stitch it. We can keep it like this again. We can use that same concept here. We can straighten this bottom movies. So I'm going to do that. Let's select everything here. Let's go to Elaine and a line to the bottom here. You can see that may isolate this model. So go to so I select the selector. I don't want the seal on this ARD is we can make this centuries as the same, so I can do wanting and to select. This is Lou. Okay. This is love on Dale s. Got it. Good. Then if you go to your vessel. We get this little every cell who is next to reconnected somewhere here. Maybe this say yes, It said So. Basically this We don't want this seem anymore. So let's select the same from this view till here. Then I'm going to stay. Is it? So let's go toe Goto states move and sue. So that's moved. And Sudhir that obviously we need toe unfolded. So again, let's and being these things and then unfold everything. I'm fall. Everything. Let's see. So now you can see the seam. Is they kind of center? Lucas in again? This is not a very important or compulsory thing, but it's good to have everything kind off planned and designed. So yeah, you can keep these things as two. Separate the vessel or we can ah, Steve's thes things and create Get it off. One seem if we want to, that's ah, let's deal it. And no, we cannot do this. It vigil kind off, wrapped it out. I cannot we cannot. It is those things. Those things again, I'm going toe straight in this stop video dot video of the parent here. Then go to a line and snap. This time I'm using this. I'll put in line Okay again, Bean. But most being already. So I'm going to again on full these things unfold years Let me check the picture and always look for square looking texture of everything Looks ok. No again Let me down Off this So I'm going toe unp in all alarm Looking for those kind off opportunity toe unfolding. You are P direction. If I see any squeezing of kind off we're looking us. I mean, used those. I mean, go ahead and select the savior, then unfolding V Jackson. Let's see, That helps a little bit, but I think I think we don't need those things. So now I'm going to let see unfolding you. Jackson. I think everything is fine. It's and full a new wit. Okay, so the stone off the isil it were selector. I see. Well, it's first Leo this so that it goes inside this Jared wanted Crispus. So let's click on this layer button. Okay? So as I say there live, we're making a single texture for the pattern. So this is what we're going to make a single texture on inside that they should. The search on the parents will be there. So I'm going to, ah, select boat and then stricken layout again so that it fits everything inside. This technology can see his. The texture is disproportionate. Here, you can see the Checker is it would be good than the pent. That means the band is taking much more area on. Then the Assad is taking here. This dude really respects, as does a north kind off scale, properly in this space. So we're giving more importance to the parent here than the set. They were giving less area off picture for the sudden. So I'm going toe kind off again. This is not a video messaging if it's a Liberte kind off off. But in this case, I think we're giving much more idea to the bent. So I'm going toe for skill. Those at same basically, on the same proportion of texture. We want to give the same proportion off areas here. So I'm going toe actually select any of the TV. Did you were to do that? We can go toe. We can go to this, I think transform. So then here you can see this texel density. So it's basically the kind of frigia listener proportion of this vessel. So I'm going to get it first. So I guard this proportion skilling of this sticker on. Then I'm going to select this to on set. So again, see, I get the exercise from here from the CERT on MySpace. Those Texas size here basically scaled down the pan TV's to master proportion. Now we get same size, Dexter. You can see it's almost same size texture. That means the Skilling of this sudden pant is fine. Now I'm going toe pull this mentally so that I can use this even space. Probably. So make sure it won't toss this border line, so it should be inside of it. And when you cleared this kind of you were packing, we call this thing you re packing. Make sure you were using you're using maximum textile idea. This did one respects. So don't do something like this. So if you take it, people there is like this. Then we're wasting a lot of the re space. That means we're giving low ritual Issel toe this texture to this pattern Saturday. So make sure you yet and of using maximum space of this but make sure you don't cross the U S Space city up, So give this in mind it's sued. Used the maximum media. We doubt kind of touching this border line in this case. I think this is fine, Onda. Another thing when you cleared this kind of you be packing is make sure the and off, um, alignment or the kind off protests anus. Okay, let's say you poor deceive you like this. This is a bad thing because if you go and take shirt, letter the Newton unit to work in order angle here. So let's say you are. You want to put some text here in this back, say, then you need to write the text kind of in a rotated manner, which is not easy to work. That's why it's better toe pull. The V's in in the world directs and basically up down direction. So I think yes, and again make sure the pant bottom is at the bottom part. You can see sometimes people do something like this where the plant part bottom is here on the top on were at the texting time. We'll get confused. You'll think this is the plan, but bottom So again, this is kind of a wrong are weird way to walk. So let's make our life et put everything straight forward. The bottom of the parent is again the line in a way so that it's stays at the bottom again . Okay, so that sudden the pan TV is done in the next lecture, we're going to move. It was the body, and we're going to unwrap the head, so we'll see you.
62. Unwrapping The Head UVs: I welcome back in this lecture, we're going to start working on the body. Andi, specifically, we're going to work on the head. We're going toe unwrap the head in this lecture. So I select the body here. They can see again. We get a kind of a very, very bad looking you. Three years I'm going to delete it so that I feel can affect clean to start. So I don't have any V now, so and I want to isolate it so that it it feels kind of cleaner. So go to so as let be selected. Okay, so now I want to unfold the head. So let's select the head and somewhere here till here. So basically this it's so I'm calling this upside the head and there's the neck, but I'm going to take the neck with the hard, so I'm not taking the neck with the head. So let's select the okay, select the head. This'll then did select these things will control and double click to the late Never face. I dislike the whole look Soling control and indolent like slicked London don't like so basically I want to take this little here float maybe. Maybe this. Look. Yeah. Who was this headed selector? I'm going to use again in new prediction called spiritual. I'm choosing this because the head is almost disappear. It looks like a spear. Andi Spirit ical map again will work on this. So let's click on this. And now you can see the head is here. I can go ahead and unfold ahead. So selected and then unfolded. Crude oil full unfold. Okay, look and see, we're getting good texture here. So the first thing a little town of this texture the first thing heats here. Consider this were seem, innit? Christie's it first. Ellis said it. This and steeds Goto, couldn't you Andi Seal? You can see the sort card as well. Just situs. Now that we're see Miss Kanda seem is clean till here. I think it's fine again. We can unfold the whole thing. Sometimes it can have rooted. The vessel is fine. It's line it or get the next thing I want to work. Is this inside? Mt. So you can see if I goto where from or we have a kind of mouth inside bag which is almost impossible to unfold in this way so there's no space here where it can on four. So you can do one thing we can got that inside mouth. Someone here maybe elected. This is Look can see this entire around his loop. So we're going toe caught it. So let's go to court and cut. I can see that is the same. And I'm going to use this sale and playing that that's what This we get this one again. This is kind of disappear. Spiritual safe again like an I caught it from siding. And this this it slipped. This is Andi. It's collected it. This look. So here I'm going to sit correctly, Cut, can do this, agile and then unfold the whole thing. Arrogance is no better. Can turn on the picture in the scale of this party's way is very small, so let's kill it. Scale up that again. See anything you need to cut. So I saw it in take part time. Not that's he disabled that So let's work on the rest of the face. Yeah, I think we need to unfold it again because we just got cut that out than this area is kind of a Mary Snow so that's unfolded and I can say it's better. It's much better than before. Okay, No, you fight on on this This color guide you can see with kind of seeing red cologne this year radio and in his nose area, so it's because it's because it's unfolded. But we don't have much space here, so it's kind of kind of a date. Yeah, but in in three D, it's kind of popping out. So if we caught this and separate, the here is gonna take a little more space to properly on four. But for this kind of cattle character, where we're not kind of creating very, very small, tiny texture detail, it's gonna almost be flat color. Are little bit city sitting here and there? So for this kind of shooting proposed, this is not the biggest soup. But if it's a kind of realistic character on you are going toe put a lot more detail in texture, small, poor details and small skin details. Then it's better to kind off core disease. That's a kind off god the whole year out. Andi, then kind of on full doors, can do this. Let's actually see stone off so got good TV and unfolded. Let me So it's unfolded and live it. But you can see now the rail is every less well, look, if I a bit you know, let's. But again you can see a stilted and some red color here Question can again court here and there. And you can create more semen so that it unfolds it better. But I think it's not the biggest who here, So we're not going toe so that we can Fearsome seemed like this. I can say this this year has lot more red color, so I'm going toe Got it. So let me Gordon's you. She's just cutting the C V. Ah picks a lot more, a lot off redness and I can see if I unfolded still help a bit better. Okay, now, once you called those. So just make it a rule that whenever you got areas out, you need to unfold both of the things. So, again, I cannot keep this like this so I don't fall it so that it has more space here. Now you can see so it's unfolded in the state of it. I think this is fine. I don't have to worry about it. So let's start off this. So the chicken has jocular good squared. The face is looking good. So let me Yeah. So now I'm going to put this inside the cells or let's click on this layout Butter Leo. Okay, so again, we're kidding. A texture for the entire body. So we're creating one texture for this too Pissed start and parent and one other Texan. Another test for the body and another texture for the head on last a surfer die. Basically, we're gonna create four takes up of four different things. So put the body. Every VC needs to be inside. This ive isn't every resale evey finished to be bad inside this gelato? Only respects so that we can create a single texture for this. So we're going to work on the body torso part. Let me show you. Oh, this But we're going to unwrap that in the next letter to you
63. Unwrapping The Torso UVs: So let's quickly on rab thought also part So here, less isolated, this so isolated view selector. So I'm going to select that are so part first. Then we're going to use some maps from here. Some projection maps again we can, you silly little map and plan a map. So I think I only use the plumber for this. So let me selective face first. So I'm going to roughly selector face face of the torso. Basically, I'm gonna select it. Or so till here till this line And despite did with the hand. But onda, uh, negative here on maybe this still here in this mystery this is so I'm going to first select roughly maybe, um, select roughly like this. I don't believe the first party selector we can easily dis elect the first part from the C V because we have already taken the V unwrap TV of the head. So, uh, I can go to face more than cold control and Drac here to display this versus so once you take the map off something than that's easy toe dis elect. And here I'm going to turn on the symmetry from here so that we can easily dislike both side at the same time. Let me drag like this can see we're working on both sides because this world x symmetry well control and then double click on the border the neighbor face to do select the whole loop. And you can also bring this lasso tool toe Draw this election like this. So I'm going to go back to select Oh, holding control and selecting one. Then double clicking on the site. Dis elect the whole loop. Okay, so this is what I called the torso part. So wanted selected. Make sure you don't anything Don't have anything selected from this face of the other digital again. Re map with the new body. So I'm going toe Use the planet mapping from front access So you can rightly give him here like this so wanted projected It's moved this outside here so that we can easily see this you know again See the seam We don't have anything. Ah, the particle kind of seems so We cannot unfold it If I try to unfold it It It's kind of a you can have wrapped around you ve My computer got hanged little bit so give me some time. Okay, let's repress it. TV If I try to unfold it goto unfold and I'm fully agency because it's kind of a RAB There's most seem so it's never gonna unfold it. So I'm going toe make this side Seems so Let slip This is till this length the whole line here I think this you can also try this are toasting Let's try to go to see emphasis on See if it helps us select on Goto Oppose him. Dinelli, It's card from this border. In this case, it's I think the same is right But we don't want anything like this. So I'm gonna undo it as you can see or totems It doesn't walk all the time, so we need to manually select. This is look which I want toe. I will make a seam length Let me down off this symmetry. Once it selected, I'm gonna caught it. So that's got make it to seem until I'm goingto unfold. Now it's actually to sell. It's connected somewhere here, so I need toe caught it from this bottle merger. Got a Now it's selected here. We need to cut it country from the store. Bungle. This followed. That is Loof. I think this one don't look till here like this one. Follow that loop. I think this one. Okay, now let's Scott. So basically, we've kind of court from the side. Make it to peace. Can right click here on this obsolete to see the vessel wanted Gardner Urgency is a separate color than this, so that means it's a differently visit older. So now I can go and separate those that went down off. So now I can see one is in blue color one is in regular. This is because this e v let me see. Okay, so this is kind of the inside part. We projected the whole thing from this G excess. Now, this place is that Okay, The fun ones. But this back faces are kind of projected in from the insight, which is the reverse side of the faces that I saw the regulars. That's fine. Let's unfold these things. It's suit cannot flip it, unfold it and I can see it's gonna the look clipping side and it's unfolded it. Now let me turn on the texture to check the textures. If there kind of okay, there looks fine. So now we can keep this like this again. This is the body inside part that decides, he said, will be on top of this. So, um, we don't need to worry about anything here, so I think everything looks fine. So now I'm shopping this electric here in the next little we're going to work on. The hands are going down, Aptos. See you there.
64. Unwrapping the Hand UVs: in this lecture, We're going to work on the hand. I'm goingto isolate. So go to so on Isola, Select View selector. Now I'm going to select the faces of this hand from here until this rest area. So I'm going to select faced somewhere here the center one single faced. Let me turn of this also like this one. So I don't want to Sicily see any colors to select one faced somewhere here and then hold. Sit and double click again. See, I'm using the symmetry years and make sure you with the symmetry to our with both sides. So now I'm going to grow the selection. So go to select and hit the grow ops in here. So it kind of grow the selection from both. And now I can see I have selected this center faced low first and now I got this to side face lifts. So I'm going to use the shortcut for that. So whole seeped and hit the PD a key to grow from both sides. So I'm going toe use that the ladies that idea so you can see it is the first line. No, I need to man a list like this. A whole seat and click full saved under click. Okay, so I got the un selected, so I didn't select up and the palm it here Now. So now I'm going to use the planner mapping for this part. So I'm going to create and hit the right mouse button on the planet Upson so that it projects from the G excess. Okay, now let's move this. Now I got the u V is, but we need toe caught it somewhere here in this way so that we can unfold the series now it's kind of continuous kind of TV. We can unfold it. So going to give a seam lines or let use this treaty chortled on going toe make this line is the same. So Doubletree going to say so it's like this and there is and make it a seem basically caught that tv from there. So now I'm going to again and unfolded. So let's select it and then unfold. Okay, Physically guard. The U V is now it's checking times. Let's start on the checker And to give the texture That's a car perfectly find they're not being stressed. Are squeezed. No, they look fine. There's no stretching of squeezing. So it's a good thing. Select dollar. So the arm parties don't know. I'm going to unwrap the hand. So for the head, I'm going to walk on one side and then I wouldn't receive how we can look. Take that. You visit without the site. So I'm going to walk on the sides in its stone after symmetry on for the the palm part. I'm going toe first or not, the fingers, then the center pack. So again for the fingers you can use a cylindrical mapping if you want to, because this fingers are basically a cylinder, so we can use that. But again, personally, I use planning mapping, But let me So you both Dobson. So for the cylindrical mapping unit two against Let the finger let me select that said this face. Look, select this face and hold seeped and definitely to say the look. And then I'm going to use the circuit whole seat and hit the period key to grow. As you can remember, the gropes on his here inside the select Miller Group we want has got the presence selected till here till the base of the finger. I can use the cylindrical mapping. Click on that. Now. Guard the cylindrical protection we need toe kind off now considered kind of 1/2 cylinder. We need to close it from this red box. If you hold the mouse and drag, you can close it like this. Now you got the full cylinder. Now, if you look at the Levi, it gives us it's not usable. It's kind of a weird here. It's gonna looped on here, so we need to actually line the cylinder according to the finger. Now the finger is going this way, and the cylinder girl are Metical. Access is going this way. We need to rotate that and align the projection. So in it toe, bring the total by clicking on this D acre. If you click on that, get the rooted manipulator. Click on this. You get the rooted here and then I'm going toe. No aligned that protection properly, Logan. See, it's giving no better cleaned. Ah, clean, kind off. Look, Organon, once I get basic, you've is no again unfolded. Still, I'm getting kind of weird sick Jack Sr So again, Let's, uh let's make this line the same so we can It's like this here again. See? Don't like it and then escorted Go to court and got from there. No, it'd separately result. We can sue that weaken states that this a So you can see that side is highlighters. Select this one so I can go toe move on shoe Now again, let's select the whole series and then on full again Going to stage it so it can hold Sit right on stage together like this said the movement's you absolute again unit to unfold It basically gave this absence here the whole sit right most are here. You can also use the return ticket here. So this way you can unfold the finger using this Linda card mapping, taking who's a personal don't like? I'm going to use my technique which is the planet mapping again I can buy that way I'm going to know Welcome all the fingers here on this three fingers Then I'll come back to that finger. I'm going to select this loops Let's like this faces Then let me grow it ruled the selection so that I reach here. So now I'm going to align the camera from this angle. That's a from the angle. I can see the fingers better now I'm going to click on this camera best. So it's basically plotter mapping, which works from the camera angle which projects from the camera angle. So let's click on that. So I got this three fingers, which is a single e vessel. Now we need to caught it from thes areas faster. Let's go bring the treaty courter Andrei, let's make this as the same. Don't click DoubleClick. Okay, now we have three fingers separated the vessel. You guys do this first. Now I need another seem in this way that I get on full this fingers now they're going to be robbed. Wrapped finger. Let me goto object. War on. Bring it again. Yes, you could duplicate its 10 affair, select the whole loop and then make it it seem, which I do want with the critical tool you actually drag it on Basili selectors like this. So in this case, I'm not kind of double clicking. I'm just holding the mouse and dragging select painting on days on and it's making that is the same line I'm going to do. Going to make this is this till the center here till here as the seam here. I don't want to make this side seem because this is outside. So I'm going toe. Make this as a scene. I don't want this again. Hold. You can hold control and drag toe. Remove it. Remove the state the same selected. So basically it's a great way. Toe Interactive Lee clear It seems now I can go and select everything unfold everything I can see. We've got our fingers really quickly. I'm going to use the same technique with this town. Let's let the best four faces So then grow the Celexa sipped on the patriarchy. Okay, once it is this baseline, I'm going to again align it So far, sir. Line the camera, then hit the camera based Upson. So if you have something like this and then click you get like that. So there were make sure the fingers perfectly visible. And then Cam Innovest Okay, Now I'm going to again use that through the court on in this situation, I'll make this center. Maybe we can make Yeah, let's make this at the same. Still here on good TV unfold. Okay, great. No, you need to unfold this Parmelee at the rest of the parts. I'm going toe. No, select that roughly like this. Then I went to dissect everything here, hold control and red credibly dis elect with I left him in this business, I'm going to again use the camera best for this of the single. So again, it's the rap thing. So I'm going to fearsome seem really core to So I want a seem in this way like this. And then let's make this as a seam. Maybe, maybe. Okay, so then I'm going to unfold this so the hand is done, We're going to love you. Check the checker. You can see the arm barred has bigger checker And here we have a small check check its texture here even smaller. So it's basically the proposal of the eaves are not same Not happening to the treaty. So they're kind of this finger is we're big here and this fingers That's why we're getting so many checkers here is make that checkers look smaller. So let me tell off this. I'm going to take the excellence it from the face and then a player on everything basically . So let's go last these things and go to transform. He will get the textile density. So let me select the faces of this on. Get the density on. Then I'm going to select everything except that face. Because we have already said that previously. So I want to select everything. Andi, let me check the Cheka faster that you can see the difference against the detector checker size here on. If I said it now so fast, I copied that Texel density from here. Then I select everything and then said that same Texel density to everything else. Now you can see we're getting same chick of safe. Which means Ari Visa now proportional to each other, properly scaled with each other to lead, went down off this. Of course. We need to kind off balance everything close to each other Removed Distance Mannelly, This is the bomb partner with the fingers with the help. So now I'm going to delete this side and we don't have any V. Let me select this basis Dis elect from here so that I just see like this bomb. So let me delete it on. Then. Let's select the palm here from this idea. Okay? I'm going to it missed on extract. So now you can see it's kind of separated from the body. Now there's a two different piece. No, I can we knew separate when you extract the pilot automatically said to this center artisan , which is a great thing now. Now I want to actually meet at it all. We can duplicate it as well. Let me meet at it. So let's go to mess on media. I can see we don't have the absence, said Proposition. It's going to miss on DMiller sittings will you said everything okay? In this case, we want to meet her in X axis. So let's say two x in minus wanders, fight minus tricks on their scored meter. Now we got this hand here, they say, and it's perfectly aligned with this part, because again, our model is basically it's symmetrical model. So now what? I'm going to do it again, combining everything. Let's go to mess. Combine everything, the two parts out becoming a single piece, but a vortex at none more state. So for mining is not the final thing. So again you can see it's a single object, but of what text that separated there. So we need toe martyrs thing. So let's select everything roughly like this and make sure the you cover those blood does seem area more text for select those and let's go toe it makes and markets. So let's go to edit mess and more. It's not the most center one the only Morrison. So with this lotus old value, this would be most because they're snapped. I can see I think that normal shit Yeah, there must. So again, you can also press three to check if their most can see it looks very smooth, continuous. That wins their most. Now you can see we have this idea v on the same Lucas in. If I Dorland uh, exited picture you can see we have ready with. That means we have actually overlapping of is there, So we need to go toe the vv sell on, select the side the vessels and then move everything outside. So this is where you can use in symmetrical model. You can walk on one side, then you can just know duplicated the under, say on, make sure once you when you do this make sure you sucked in the model mess display subbed in the IDs because sometimes it makes this connected is hardest. Okay, so I guess we're doing it, though. Hand you these for the world boredom. So the next lecture, we're going to walk on the legs. See you there.
65. Unwrapping The Leg UVs: in this lecture. We're going to walk on the leg. Andi hopefully will complete the body in this video, so I'm going to isolate it first. So let's go to Isil. Leadville selected. So again, I'm going to walk on one leg and they were going to actually meter, They say. So we're going to actually delete this site. So I'm going toe delete this and welcome. Let me select this for slogan Dilated then to live this side. Okay, so I'm going to unfold this part first till this ankle with the socks, but and then we're going to end up this Super Pac. So I'm going to select. Let's say this Look on, then grow from select grow Basically same technique we used for the arm and then for the bomb. So now I re still here and is the same line. I don't want to cross that. So I'm going to manually select uh, also this loop. So let two on sit on. Don't thing on this. So I'm going toe select in this leg part on from here. It's It's actually the Sox parts, and we're not going to take that now. Just like this on for this again, we can use the planet mapping, which is actually a quick way to unfold it. What? We can also take the cylinder, the mapping. Let's go to create and cylindrical mapping for this. No, it's files and close it. Move it. So that limit on off this checkup from here you can turn off this immense so that you see the picture here in this perspective, you. But you don't see this in this area editor. So here you can see again with the cylinder command you need toe in line it. Let's click on this little diegan on with the wrote It'll we need to align and see the V. Now here we are, getting wrap TV. Who is? There's no gold. So let's rotate it on. But also Saudi. Now you can see I accidentally hit under W the move tool. Andi, that man better is gone. If you feel this thing, then you can go back to this absent, which is the active tool idea here. So now I got that back again. So now I'm going to move it. So moved the cylinder got cylinder. Basically, let's move over a bit. Have been see. So with the cylindrical mapping unit to our exist, it a bit So that's why I don't like it. I don't use it personally. That's this is a good tool if you are existed. And then again, see, let me none of this. We got that TV. There's no wrap, the weeds kind of fun for lead. But the scene is not clear. It's kind of here we don't want. I don't I don't want to make that. It seems so. I want to make this center line as the same. So I'm going to take that three core tool and it's double click on directly than this land that I make that the seem line you can see selected here. Great. And then I'm going to you. This cell basically need to state it here. The side. So select This is this. So you first like this bottom is here on. Then let's go toe. Couldn't you move and sue? It's gonna issue somewhere here. Um so basically don't see like this. It's gonna see you with this one. I don't have that Devi. Still, it's can lactating were problems. Let's to select this. Is this his bottom is this Onda and this like the stop. Is this now going to sue it over and seal? Okay, Now we have a clean seem line. We just need to unfold it so that the stretching is gone against you We have stretch ing's squeezing going on here, Let's unfold. Arrogance is good, Good to go. So this part is done. Now I'm going to move to the Sox part. So let's select it. Let's let this look. She liked the space and then double clicking on this, then hit seeped and the key to go to selection. Uh, make sure I take the proper physicists. Okay, Till here did this fist on. Make sure it is the proper line here, can see. And that's good. And I'm going to use a plan working for this. So I'm going to right click on this planet mapping again. I got the pro six in here from this front. Access? No, I just want to make this the same. So let's bring that tool click. I can make this the Seymour. I can put the same behind here somewhere. Uh, depends on DA. She's just another thing. We can take this as the same. Okay, then I cannot fall it unfold like this Andan little jig that no again see the chickens size different It's because of the textile density and the overall proportion I call know it this leg and said The leg is the size and the socks, which is a little bit smaller in three D But here in new, it's bigger compared to the leg. That's why Soos a lot of chicken. Yeah, okay, that you were going to fix in few minutes up. Let me on wrap this thing. So for this I'm going to I'm going to against select everything here introduce view than whole control and this selector so know if I if I take you can see I have only the Sioux selector Now I'm going to on for I'm going to project it from this angle. If Gammon a beest selection like this so no, I I'm going to call it few Is is pure seem Lanza, let's use the critical First I'm going to separate the soul on the soul is gonna hear Consadole click. It will select the whole look on. It appears the different of a cell to let's could even sale and move that. That's fine. Now I'm going to court the seem line here, someone behind. So let's bring that tool and then doubled live in this lane. So it got it from here. We can do one thing. We can again separate the soul area from the body of the soup. We can do that or I can I can try on folding it. Nor I caught it here on Get selected, Unfolded. I think it's fine. So now let me check the texture. Everything looks great. Now we just need to know cleared the proposed scaling even Skilling. So again we can select the body. Take the Texel density from here. So let's good the way cells let any of the Visalia Let's say the body, because we have already said everything proportionately here, which is resistant toe copy the Texel density and then said here. So I'm going toe the transform in here. I'll get that inside the transformer Mineral pixel density. You need to get it from the selected Vissel, get the proposal on, then select everything here, the lake park, and then I'm going to say the proposal look and see its accordingly scale it Skill, Davies on the proportion, er perfectly messing with the three D. Now you can see the checkers are probably matching, so no one legs don't. We need to. We need toe, duplicate it to the side. So let me slip the faces because first we need to separate it. So let's go to edit minutes and extract. So we need to extrapolate it from the body so that the separate they become separate objects. Now the Bible, he the Bible is here at the center. I'm going to use the mirror to So let's meet it in X axis. Have been the selection tool. Everything is good. No, again more to this. So before I more so I can go to the movies sell here in this treaty view, select this idea vessel and we can move it out like this. All can keep them on top of each other. That if we're using a kind off overlapping texutil technique so we can do that or against a pretty okay like this, you feel if we do you Nick texted him something like that. We'll get now again, again more. Those things basically combined. So let's go to miss combined combine fact so that it becomes one object. Now it's a single object. But the vortex had not monster over Texted not Morgan. See? So we need to select this vortex like this. Make sure in the selection they're covered. There's electric and now you can t did something We, uh when we immediately it It's kind of got most here so let me mirror it again. So good mess mirror against See when you meet it It's kind off more zing here at the center So let me under Let's go to the office and not the meter Uh, this who lets recited with the X axis. Everything looks fine here Load. Let's mirror it. Okay, But here you can see that most wrestle value is very, very high Such 2.4, which is very high. So let's go toe Joe Point Jill drove one. Think so? Now we don't have anything most It's mirrored. Oh, now going toe. It's like both andan miss, combine okay and then we need to martyrs for textile. It's like this and go toe edit mess on most not most to center The only multi Upson again The test old valets will be very low Porn. Judo five His spine. Andi want you more? You can say still, they look like kind of. They're not most yet, but if you see their most, it's just because the that is is no, no hard is. That's why it looks like that if you press three, it's actually more smooth. Object Express one. We need to something this to fix it. Pigs. This is also let's select the model God Mase display on something that is so by this way, no, we have he raised for both and put the leg put the hell and that also on the body. So we're done with the body Here, let me bring back everything you can press control one. So I select on to get out of the isolated view. So now we're done with the body TV. So in the next lecture, we're going to unwrap the eyes and then eventually we're going to unwrap the hair. So see you in the next lecture
66. Unwrapping The Eye UVs: So in this lecture, we're going to walk on the eyes. So again, we're going to walk on while I Then we're going to duplicate it. So I'm going to delete one side. So let's leave the site on the same day. Don't drop it. So we have to layer of dies. So one is the speculator layer and then the inside layer. We don't have toe have any use for respect, just a material. So we don't have to unwrap the speculative layer here. So I'm going to hide it. Goto display hide and heights. Lexan. Basically, I'm hiding the outside layer which has the mitral. We're going to text her die here on this inside eyeball. We need tohave the risk for this. Let me I solid eight so that I get it still select meant that I press f keys so that it friends the camera. I can easily wrote it around it. And here we have put a material for this idea. Sadiyah, which is black. So I'm goingto kind off. We can actually separated if you want. No, it's kind of a single object, I guess if I see Yeah, I'm going toe select everything direct everything in object mode. Goto, create right Click on the plan of centered projects from the front access from this G excess record label Here on, I want toe kind off card table from here. Like this. Let's select that is loop on Got got here. So making to your vessel is the front one. So you're going to unfold this one unfold? Okay, that's good. It's unfolded. Winnetou texture this Syria this area with the highest in this part and then the eyeball, the white part And this part is the backside, but with never going to be visible even even if though I wrote it So you cannot see this part of this eyeball. So we just don't fold it. That's it. So we have to. But on let me go back from the isil of you get out of isil view. So we have the U V here, So very simple. Let me so the last hidden out a clear Now we just need toe duplicate this group of Thai to the same. Let me go toe the out liners that we can select. The group here can see we have a group which has the two part I this part in the speculator park. I'm going to select the group, the entire group and then duplicate and flip it to the side. The group has the pilot here at the center, which is the ideal situation. So I'm going to duplicate it so duplicate on you can see in this situation I'm not meeting it like the way we did with the hand and the leg, because ah di bullish to be separated both I will Snus to be separate and individual unique so that we can animate those independently if we meet it a middle makes the two things single object. So you cannot never both die independently. So that's why we're duplicating it. Because both die that separated. They're not kind of, um well, later most something but the hand is will live with the body and spotted. Basically, it's a single will let single continuous part. But here you can see it's a separate object. It's another separate object so that we're duplicating, not metering. So once you select the group, go to it on duplicate, um, just duplicate. So it duplicates there now going to the channel box so that we can flip it to the side. So I'm going toe Bring the 10 box here and I'm going to put minus in skill so minus in scale X put Putin minus here minus one Presenter is basically because the pilot by what is here the center, its skills in minus one directs inserts and a flip to the other side. So this technique agree I use most of the time to duplicate to the other side to the exactly castle of the other side. Okay, so no, we have the eyeball. So this is the actual outside. I can see we have the SIM No idea. So we're making it texture for only for the eyes. Or let me. But it means going back for your selecting guy ball outside. I please controllers to hide that I can see the inside part. You can see the inside but here we can sport that inside this box Let me select the vessel . Begin again. He was the layout of cento health. Do you? And see? It's kind of unpacked and backed everything inside the digital One knew this space. You can do this or if you want to keep those keep those stacked. Then you can do one thing. We can kind of delayed this duplicate I and then we can load it inside here and then duplicated. Listen like the group duplicate and bring the 10 box put minus one Here, Uh, don't. So this way we can easily unwrap the I Simple. When the next lecture we're going toe on rather heads.
67. Unwrapping the Hair UVs: Hi. In this lecture, we're going to unwrap the hair hair cards, so I'm going to So you few heads then I'm going to do the same thing in between lessons, because again, the technical with the same for every cards. So now let's select this card on Let me down on the sticker so that we can see the beautiful levy there can see. We have literate down off this here. So we have something here because it's basically nor explain. Then we converted to polygon. We have the nerves. Ive is here like this with its ideal. But we need to tweak it because the textures are kind of squeezing here. So the first thing I'm going to do is unfolding it in the U direction. No, it's stressed like this. So we're going to going to on full it now. Agency This stop part is this area here on the bottom parties. This basically it's kind of a narrow in treaty on Dhere kind of very weight. So we're going to unfold these things. I am leaving this line here, the left lane, selecting everything. Expect that and then I'm going toe unfold it in the utx and toe goto unfold here said You on Unfold along you Jackson click. So it's unfolded in the U Jackson. So this is the U direction. No, you can see it's much better. No, the proportion. It's much better this week. So now I'm going to straighten this. This is we don't want something like this because we're going to basically do a common hair texture for every car on the head. Ah, floor three straight. So here we want toe have straight bullets. So this and this is news to restrict. The four side is next to a straight here in the C V. I'm going to select this Israel whole seeped and double click on the TV. It was selected again like this or Liberace like this too. With the global going to straighten these events to the right, I'm gonna do in line and then click on this cycle so that all vehicles straight Okay, now you can see once a straighten those again. I'm getting squished texture here, so we need to on full everything In between this particle lines, I'm selecting carefully disease. So as you can see, I'm living both the border. I'm living this side on day, say, selecting everything in between and again on fooling them in the U Jackson just north this area. So it on fully long you, Logan see, it's much better let me undo that. You can see here. You can see we hard squeeze TV. So let me unfold again in the U drinks. And now you can see everything got spread out properly in between those two particle streetlight Another agency. We have some stretching going on here. So we need to select everything in this way every horizontal, even lines Here on again, I leave this top line on the bottom line. So before I was doing this selecting this vertical lines like this. Now I'm selecting this horizontal land again. I'm living the tough straight A's and the bottom straight is selecting everything in between. And now I'm going to unfold them in the V direction so that I get rid of this kind of stretches in this direction. We against its most better not so basically, you need to stretch in the boat side so and then unfold everything in the U on fall everything in the V so that they all kind of relaxed in between. There on. We got out here. You ve So we are going to do the same thing with every hair card toe. That's the reason I'm not going to. So you, for here, everything doing with doing the same thing with every Alcott's. I'm going to repeat it maybe 23 times. Then I'm going to do that in between lessons. So that s so This so the same taking again here. So I'm going toe TV and select everything here like this and then unfolding the your Reckson and then select this side border wholesale. DoubleClick. Make sure you select carefully these Give it on a line to write, then select everything in between. Vertical lens can see living this side and this side then unfold again in the U Jackson So that displayed in the U Jackson. Now I'm going toe select this land this horizontal it is again living the top line on the bottom line on this Terram unfolding in V Jackson. Look into before we hard stretching going on here, squeezing here. If you want full in the V. Jackson Now they're much better. Okay, Simple technique just unfold is in the U on full straighten, deliver the non full envy. So for you straight this UV can unfold in. I didn't guard those the vessel. It's like those carefully, then unfolding you again and then to let this visage unfolding. V. Dixon, I can see allowed those e visa Kyle offs living on top of Rezidor in the same area. That's fine. There's no problem with Dabiq. And we're going to make it common hair texture here. And then we're going to place disease. No, up to the fact we can leave here. That's not a problem. Let me show you again off you again. But before you do this, make sure this left line is the left idea here. So it's kind of the stuff Dublin is here like this. So the set of is like this now, going toe again, unfolding you. So let that revealed in whole sipped on double Click on this to select that in between Eavis and then straightening that too, right? Select everything carefully in between living this say and they say that was Check this carefully. Yes, again on for those in the you're excited to concede they got sprayed in this you Drexel relaxed and then I'm going to select the put it side, living the top line bottom line, flipping everything else on, then on falling in the V direction. They got straight in the video X and probably let me do the same thing. And this is the last had cuts. I'm going toe. Do hear someone toe unfolding. You select everything here and then on for us. A realigning too right? Select everything every vertical Yuri's here and for the new. Selecting these horizontal Levi's living the top on bottom on unfold those in Videx. So this three or four steps in it to defeat for every hair cuts. Yes, I'm stopping this lecture here. I'm going to do the things letter in between behind the camera. So then in the next lecture, we're going toe work for the mouth inside we're going toe unfold on Grab these things. So I was struggling here, See in the next lecture
68. Unwrapping Mouth UVs: Hi. In this lecture we're going to work for the inside mouth part, so I'm going to hide the body. So let's selected Goto display hide and hide Lexan and the sort code is control aids for this. Let's hide that. And you can see we have some by default Baddie visuals I'm going toe again. Delitos let me until it though Zeevi's okay, so I'm going toe separate is go home from the teeth. So now it's a combined single piece So I'm going to object more. Select this on Goto Miss and separate. Now the go man did have separated So we're going to do unwrapping for decided and then we're going toe klik it against I'm going to basically did this I'm goingto duplicate once I got TV is right here, so we're going to do the same thing for days, so let's good mess Separate does a little done off this And then let's do it this side. Okay, so there started the Gombe. So here I'm going to isolate it. The less I select that I can only see this part. Okay, I can see here Something is weird going on here in this side I have closed. And here we don't have any faces. I might have accidentally do this. I'm going toe relive the site. Sorry. Accidentally selected this whole control and dis elect. Make sure the selection is right before I deleted. Let's distill it and then I'm going to meet her. They say again, let's go to mess and meter here. I'm correcting the model, not started the viewer. So let's put a low value to the monstrous hold. Now you can see they're kind off kind of marching these despotic six to the center because of this line here. Ah, there's something weird going on. Maybe. Yeah, that's right. So I'm going to who this normal press hold values over to mess meter here. And let's decrease this value to porn Georgia one, which is the lowest value. Little, probably more STIs sent over texts. Let me press tree. So that makes you Yeah, you can see the borderline looks smooth and seamless. That means all those center vortex almost properly. Okay, so we connected our model. So now I'm going toe unwrap the V's before unwrap the V. I'm going to delete the history for this. Okay, so now going to take the planet? Nothing. Oh, like click on that. Now it's kind of protected from this G. Jackson. Okay, now, if I own full this in their thing, let me go toe unfold and unfold. I didn't say gorgeous. Andi, we can keep it like this if you want. Although you can put the same here and then kind of, uh, then kind off God, this even doing in tow to the vessel and having a seam here, we can do that. Agile. I think it's fine. I can give this like this something like this in the scale down so that it fits inside this Or you can just hit in the layout. Brutal. Here, let's go down and then loud and click on the layout ups. Um, okay, so let me get out of the I select more to the eve before this is done. We can do this, but as against its kind off, live it in our style. So it's not straight. If I want o kind of straighten this, I can begin guard this from the center line and make it seem so. Let's try that. Lets got it. Goto got our card that now we have to even sell like this. Well, it's unfold again. No, it's kind off giving us a very rounder TV. It's just very difficult protection. So I'm going toe I'm do this and let me stripped in the top you villain straight and Goodall ill and top and selecting everything and then unfold They didn t We got it kind of better looking straight TV's again I can go ahead and select this You ve still here on then aligned to the lipped and slip the this side And they learned to this late and because it is a stress Davey a forcefully and then aligned it We need to relax it in the u direction as against here getting long stressed fists in three D It's not true. So if I don on this texture agency we have kind of squeezed textile here so this is not good. We need to wherever I kind off a line Forcefully, units, Then I need to unfold. These were vision this direction this you direction that they got relaxed and even out here I'm going to unfold along you, Jackson and Ford. I can see those cuisine is gone another U V again off straight and clean. I think this is better. So I'm going to do the same thing again and a straighten this. Let's spread this too. This bottom, then selecting everything. Expect that line so that I can unfold these things so on for only unfold because you can see here we need to unfold this on, do the same thing aligned to the left in line to the right and select everything in between to relax, fold in the U direction. Yeah, like this. Okay, so something like this. Now let me like this site, which is the side. And then, yeah, no gonna select everything and then I didn't unload. What doesn't sell out on may be the scale at the scaling of this to e vessel a different law. A little copy, one little wrinkle laughs everything. Let's get the the get the textile intensity from one and then copy paste the there. So let's get the dentist from this and then select this e V and then set so that we got the right skilling. So it's gonna be a little bit smaller than this because this is the outer cough on this the inner core. So basically, I decided to be smaller than this. This big golf, that's fine. I got the proper skill. I'm going to do the same thing. But this And this time I'm going to let me down off this. That's isolated by pressing control One. Okay, you can go to isolate Were selected. Okay, Now I'm going to You can do the same thing for this. Let me go, laughs everything and then goto unfold asserted. Then let's go toe create. And hey, don't this planet mapping with rightly So I controlled sector here and then I'm going to Gordon Davis first before on full it. So have it kind of changing my way off, unfolding a little bit in a different manner to first cutting this year. So let's got it. Goto got guard duty, so if I said took the mapping and then I'm and of cutting, they've into to it yourself. Then let's go to your vessel and separate toes. And now I'm going to unfold these things. Let's unfold in the utx and first so I'm falling in the u Jackson and full in you. Okay, now you can see here They're kind off overlapping. If I select something like this, you can see from this color you can see they're overlapping going on so I can select everything like this living this line and now going toe on full now there unfolded again straight in the sea Visa Border line Strange TV selecting Straighten this to lift. Right? And again because you got this stretching every here. So we need to select in between everything living this line on this land. I'm going to run full in the U direction. Okay, let's do the same thing. Select everything, unfold along you first, then select everything. Expect the bottom line on unfold They were done folded and clean clean Here. I'm going to straight this. Straighten this to the left. Traded this. So you have selecting the select wall and then whole seeped and double click toe Get the parcel. No, you ve done veterinary selector So selectively one first. Then hold the sick key and then double click while you withholding at the last world. So it's gonna select in between these Now I'm going to align this right. Let's move it. That again needs a select this election and then I'm going to unfold in the U director. I can straighten this if I want to live it so you can also try still unfolding. V. You know we can do that. Make sure the ticker is own and everything looks nice. Let and be maybe. Okay, now we're going to hidden little buttons that they all are is in the 0 to 1 space left. I think the skilling is fine, but if you want again, you can go to e V. Go to transform on, get the think Texel density from one vessel to get it and then select another and said, That's a movie Dented jelly Re skill. No can see. Let me get out of the isolate mode by pressing control one. So the girls are done. Now it's time to do the teeth were going to select all the teeth here and we can and into the projection panel projections ago. Toe create planner. So select everything. Take the planet projects and from G access here from front by right clicking. No, you can go toe check more, select everything to select. I just want we want to go into isolate more. Now it's kind of a closed model When you took going off, Give it the seem. You're right thing. Let me go to you The vessel It's a single part Yeah, So I'm going toe the through the court and sue to double click on making this whole loof way Seem so I got to it yourself So they digital unfold I'm going to do the same thing for everything th here Just old ring on this medium line Make that it seem really quick. Once we're done with this state, then we can duplicate this date with the new movie to the other side. Okay, so now we got out. Seem to every cell for everything. Now we can select everything on unfold the nominal unfold. Okay, now they're kind off stacked on top of each other. You can go ahead and mine early on. Strike those like this. What? We can just hit the layer portal, and it's gonna do the do that for us. Select. Click on that little bottle. It's our pathetically on stack and islands those inside the V due to our new this base. Okay, so that's great. No, it's a better idea. Toe align the teeth as the world access like the the lower part of the Treaties towards downward and this party's apart now it's kind of rotated randomly. This is ideal situation here, as you can see dollar bodies here and the parties here. You can do this. I can look at it. We can also try this absence here. Inside this maybe parents Manto audience cells. You can do this, concedes automatically. Or he entered that cell. It might help us like this. Let's hurry in sale here. As you can see, it's kind of audience did and straighten that. But the but this part the top part of the take. No, here it's spine because they deserve that. Lord did not find that's ideal. Here are the Let's fine, Let's for the end it. We can actually select everything and odienne toes like this. So it's going toe. Woody entered those randomly, so you need to again. Now you can see it's only enter properly, but we want this so this but the side dollar, because in the real world it's kind of down it up, so it's logical, so I'm going to rotate it mentally. All we can go toe transform um, rotated 90 degree in clockwise. Well, can do this as well. So this roughly no checking this thing wasted. This one, I think this side is, but no, this is the top one. So I'm going to get also this wrote it ups and pull those like this. Yes, roughly. I'm looking at in something like this as well. Let's and we go to you this cell. It's a logical manner, basically. Let's I didn't everything. All the support it. So let's live this one. Fine. We'll get it up, back and forth. Ideas. There's fine. This is fine. It's no problem. So let's lay out again. I think this is good. So no one thing Gordo Zeevi's free thing began to placate those. Or let's go to duplicate it. Duplicate. Okay, on the pilot is here. The center, as you can see, So this duplicate. And then if you don't get the pilot here, let me under. If you don't get the selection private, he'll listen like this one. I'm getting the private here. If you don't get it, then you can do one thing. You can just make it a group. So let's, for example, the buy what is here? The selection pie. But it's not going to work, so you can do one thing. You can just go do it and hit this group up, sir, Once you click on that, it's automatically bring that private Ah, to hear and obviously make it The group put this. What objection. Side a group. And then there's the group. I You can do this. If you do a group and it won't change the pilot, then you need to select the sitting here before you hit on this group ups. And so let's go Dobson, I said, You can see a group under parent on group. I've already said Toe arisen, so make sure this group by what is said toe origin before the group it's so beautiful. It's said to origin now the Bible to see by what is here and the group is selector. Now I'm going to duplicate it, So let's duplicate now duplicate. Then I'm going to channel box by clicking on this absent destroyed, tied up, some being my general box gave me in floating Partington box. Now I'm going to put skill minus one in X axis so scale X minus one okay? No, you can see God. Are you these basically there can overlapping toe in it to the stature. One side and it's automatically used the texture for here, so and don't go. So I'm going to do the You're nothing for the gum. So I'm going to again use planning mapping for this. So let's left click on this. So this time I'm not using the right mouse on this because I'm going toe projected from the UAE excess. So it's the most visible lady from this top angle. If I click, if I hit right most, then it's going to projected from this anger. So I'm going to just hit the left wall so that it projects from why access? No, I'm going toe Korda TV here. Let's bring the treaty chortled on double big on this center line. For that, it kind of core Davies like this and create thes two Eavis sin. Now let's select everything unfold. Let me will do unfold TV and then let's get the layout where concerts or you can try on stacking ups and agile fear. The inside this ardent and layout upset that we call left everything islands and loads on on stack cells like this. So that brought the sales kind of unstuck from me to the Andi. Now let me islands everything inside this select everything kind of hit the layer button like this and you can take the picture. Chicken Saiz. Andi, you can see I'm kind of getting a little bit less evey area for this too. But the government's fine against him. I want to change this. So we're going to make a independent Dexter for this mild inside park. I'm going to rotate it. I can only in the cells like this again just manually rotate something like this and the note in the sale. It's going to go to the closest idea we can do this and we don't have kept space here. Let me undo, and I'll come back to this one. We actually finally back, Davis. So now I'm living this like this. So for this, it's done. So I'm going to walk on the backing. But in the next lecture for all the e vite for all the Texan are going to back those things back the V's and finalized a V backing here. Every layout here, let me on the height. The office goto so on height. So last year in Okay, let's save the file. And I'm stopping the video here in the next lecture. We're going toe back every V, every V a Let's see there.
69. Packing Uvs For The Cloth Texture: Hi. In this lecture, we're going to start packing the vase for different parts on in this particular video. We're going to work on the floating Evie layouts. So we're going to make an independent texture just for this two part for the desert and for the parent. So we're going to create a layout for this. The first thing I'm going to assign a new material. Just put these two things because it's going to be a single texture. So I'm going to select this and hold the right mouse and go to a sane favorite material on . I'm going to send a Lambert material. So is the Lambert metal. I'm going to again assigning color to this matrix or select this and choose any of this color from here. Let me tothis your local again. We're not excelling here. We're just assigning a material with the color so that we know it's a single texture on. That's the limit, agile. So I'm going toe really limit like clothes. So this this thing is very important assigning a material toe, a particular texture, so we know we're going to make a single texture maze. Um, for these two parts So we're going toe, Um, create a single picture unit to assign material to these two things. The same material so that it becomes kind of a group inside the substance painter while the texture impact So it becomes a jeer. It takes of states there. So do this. Who want picture give a single material. And now I'm going to create the property. Repacking are you really are both the same thing. So when it bagged, Davis makes your you don't waste t re space A texture space. You can say this Geo to one and Jared Wall in V is already very textual idea. The immensity of on the first point is you're using most of the space here from here. We're not kind of putting you your is too small here and wasting space. This pace are basically pixels. And if you just put your reviews like this and you're wasting lot off space means a lot of pixels, lots of originalism. So you are never going to get good Richarlyson here, So that's the first. While make sure you're using most of the U. S. Space on the second point is it's good to use no most add maximum Lee re space, but never never kind off overlap things like this. So make sure you're using enough space while you're kind of giving a little bit gap in between these things so safe safely pulled those things on again. Ah, dissident, kind off. Uh, does this border here? I student kind of scale those mentally. I need to go to the little Kate and go to transform copy the densities or get the density from here based it here for that. Basically, let's based on everything. Get us. No, Get it. Correct. Yes. So now I think everything looks fine for this. We can make it way can call it done. So again, in this lecture, we just put a single material toe the know Claude texture parts aunt, create the layer on discuss its greedy because we just have for your measles. And if for the body it would be a little complicated in the next lift chilled, we're going toe back the body Weise See that
70. Packing Uvs For The Body Texture: Hi. Welcome back in this lecture. We're going toe. Start packing the body. We're going to create a even layout for the body, so I'm going to select it on. As you can see, we have our TV's all over there. So I'm going to parents and loud and click on the Slayer, but so that it appears that can a beautiful loud first let me tall in this picture. Okay, So before I created off pilot layout for this, I'm going to do certain things here. I'm going to open the mouth a little bit. So this is the last chance to tweak and model tenseness going toe open incident of mouth inside part looks no visible a little bit more. So I'm going toe What takes more? Andi, I said this is the last chance for me to change an immortal steps because I'm going to change the visa according to that as well. Relax that. So I'm not going to change any model steps up to my final Levi's. So here is like this. Physicists litmus licked faces instead vortex here. So, basically what I'm trying to do it here is kind off luring the little leaf so that we can see the in pipe inside part a little bit better. So I selected this full faces. Let me maybe yeah, let's just this six faces here at the center. I'm going to turn on the sub selection. So the selector move tool on hit B B for ball so it's been have activated the sub selection . Andi emergency doesn't kind of put that overall sub selection toe this idea because if I go to my move, tool and self selection, so it's just double click on that. I can't to. We'll see the tool settings here, and you can see if I go to sub selection. I have this follow up more set to surface. If you said it, it said toe by default volume. So if I turn off the sub select, you can see I have selected just this six faces I have not selected. NFS is here on top on the stop Liberia. But if I told on this sort selection and try to move this, you can see let me radius change the radius, decrease that it just beholding Beaky and left most drag. You can change the fall off here. Roger so you can see it's kind off also pulling that law upper live because the full of his kind off now world in the world kindof access direction. It's got its Skelos spreading in every everywhere body fight. Is it to surface? It's red on the surface, so it don't get you Don't read. Still here. If I don't increase this fight country for increases for love, it's going off going there. But if I decrease it, I can just pull this dollar like this. So the surface off son is very important here. Make sure you changes to surface Now, upon the model bit. I can see we can see that teeth and the gum part little bit better. Okay, I think this is fine. You can also do the same thing for the couple mouth. Maybe we can try just moving up A model libit. Literally, UNC. I know which one looks better. Maybe maybe we can move a little bit. Okay. I think this is fine. So just a bit. Yeah. So finally we drink the model for the last time here and now I'm going to work on the V's because I change that part. We need to unfold it again. No, if I told them the texture as well you can see Let me I salute it again. See, the chicken are a little bit kind off rectangle. Sepp. It's not proper proper square. That means it's there are some kind of stretching going, going on a Libertes, treating so we can do one thing we can. Now it's a single evey cell. You can see it's a single Avisail who is makes it a little bit difficult toe properly unfold here so we can do one thing we can caught. Cut it into two e Vissel. Basically, we can call somewhere Here, let me get out of the isil it more by pressing control one, we can pull this same here in underneath the hair. It's never going to be visible. Begin to that. I'm going toe caught it. So let's this done of the sub selection by pressing biggie here, I'm going toe select a line which is kind off hidden at me. Maybe Maybe this line all Maybe this line this led would be safe here, which is he didn't underneath this hair cards, so select these lines on going toe caught it. Let's got okay. And then we need to court sauna here underneath this. Remember this line can make it to see him. Okay, But it's definitely here and here. Let's got it. You can tell on this to see when it's done in a different color. That means that we have We are successful in no treating to sell. So that's God. Now it's going to do that. Maybe. I think just right Click on that to change that. Now you can see we have to every cell Now we can unfold this face a little bit better actually, because there are a lot of space here. It's kind off. Ah, less complicated thing. Before it was a little bit complicated toe kind of fun full now against elected And then goto unfold on unfolded and see the checker at the same time I can see the rectangle checker here If I unfold it now again See? Got on full day delivered Better because of this No simplified the vessel. Now you can see all checkers are properly square. Sure it was important And then I cannot fool Decide Jewel found Fold it. It's kind off unfolded like this is just fine. No problem. Okay, so now the face of the body. In fact, the face is the most important in this whole model. So we need to give some more texture, space to the face than everything or anything else. So they get proportionally. These are fine, but sometimes we manually scale these things on. Give them a little bit more space for texture and propose like this because it is the important part. Here and again, you can do the same thing for the soup because Sue is also going to visible. And with this more lady, Yeah, we I think we will not get good address in here for this lace texas And for those stuff, so we can again skill those a little bit and give them mentally libit more space. More importance. So this is a conceptually toe going off in it to give you important street so we cannot give same clarity to everything. So there must be something which is more important than other things. So in this case, the faces are loose, very important and the most important part of the whole character. And this is something this part is something which is mostly visible closely to the camera in close up sorts. So it's better to have good texture to listen here. Then maybe feet. Or maybe it may be behind back side of the head or something, because those parts are never goingto be visible in many sins of the movie. The ah, no movie. It's not film, whatever we're doing. So the faces, the inference that I'm giving more space to the face. Now I'm going toe be click on the eve allowed portal and see what it does can. That's nice, gates kind of allergist for us everything. Now you can see the bodies less important here because of the no clothing, because it's kind off the bodies here and underneath the clothing. So that's why we can give it small like this. Okay, Andi, when you cannot back to you this these gaps is also important. Okay, If you don't see these gaps on you get very close. Devi will look, layout this on. You get kind off. Let's see. Kind of very Dai Davies. Maybe maybe something like this on you don't get enough space. So this is one option inside that the real ale Dobson to achieve that. So let's go toe layout. Let me undo and just put those here and there may be. And when you layer those right leg on this loud whole sip and left click to open this, leaving their adoption okay, so you can hold saved and left click to open any of the settings. If that Dobson has some settings, you can open that by that way, holding sit elliptic. Here you can see we have cell pairing and tile pairing. So this is what defines that gap between every sells cell pairing is the gaps between two evey sales on the style. Petting is the gap between this border TV. This is kind off border on Davey texture the vessels. So now it's set a full four. Maybe if I decided it said to Jiro Jiro, which is by default, I have kind off previously saved that And no, with this setting, if you can off back, those will not get a lump space there very close to each other on while taxing time. It's very hard to kind off select this carefully, and I kind of feel this Texas or whatever scale of Ah a little bit difficult that way, so there should be some gaps, so I'm kind of selecting everything on sipped left. Click on Goto the cell pairing Put four here for pixels here. Now the padding unit is said to pixels off its four pixels on. Then I'm going to also put food in tow. The tile padding, which kind of, uh, move disease for pixel from this border. So then Leo Devi's agency, the tile padding, said this distance from this border tile pairing on then sell padding is kind of between these two e vessels. So by this way, you can keep the gaps between two evey cells and keep gaps between the border and the border reversals. Okay, Now the body reload is done. In the next lecture, we're going toe back the mouth inside part, so see that
71. Packing UVs for the Mouth Texture: in this lecture, we're going to finalize the mouth. Picture the evil outs of the Multex. So we're almost done with that. Didn't hide this one. I've listened Control edge on. Now, if I select everything here on, you can see we have created this layered in the E V 11 multi vist lecture. So now it's almost done on just looking for the final Jake. A texture, if anything wrong with the stretching squeezing of the checker. Everything looks fine. I just want toe, give it a single material, select everything. It's going to be independent texture. So I'm going to assign in my field to go to a central written material. Lambert on that. Would it opens by default now, going toe this material here on let's name it their mouth. And, uh, so this is the material you can give any color if you want. Let's give you just any color just to recognize it. Onda. The layout is let me hide this little Bring the little kid, expand the size of it. So here I am, looking for the gap, so they should have this safe distance between two evey cell, which looks fine. But for blow to come from this. I'm going to lay out it against Let's select everything here on Goto our engine layout on hold seat and click on this layer Topol of the ups and box you can hold Sift gently gone any of this absence to open up sandbox and now and this is the layout of the results since and here I am going toe set everything on. Then I'm going to give some padding, sell pairing and tile pairing. Let's give full and four. So I said to pixel er, I'm giving four pixel gaps between two every cell. So celebrating is the gaps between two. Every cell, every Gabbidon's, every resells and the title padding is the gap between the border on the border. Reversal, this cap here, I'm going to confirm it. Do it for four and then apply and you can see it corrected. And now it gives me four pixels for tile padding on four pixels. No gap between every vessel. I feel excluded. Yeah, to confirm I'm going to manually move on, correct your on there. If I feel like it, they can go ahead and just move. And poor doesn't save distance. year conceive. Maybe. I think that is fine. Okay, so this is the finally the layout for this mouth texture. And we have a sign this independent material agile. This is done here. This mouth little hide the body by control sipped edge you can goto displace. So last hidden the previous in the previous. Later I forgot to assign a material to the body. So I'm going to assign it material for this. So I sent for regret. Really again, Lambert. And it's give it in name called body. And again you can give any color for that. We know we have a signed the core material to it. So this would be a single texture laugh and then body would be a single texture map, then the mountain side with map. So three textures and then one textual before die before Taysir on. Then one texture before the hair. So in total will have five texture for the sketcher. So I'm stopping this lecture here in the next lecture. We're going toe off. You can finalize the I even layers
72. Packing Uvs For The Eye Texture: Let's quickly finish the I every layouts. So I'm going to hide this up earlier. This speculator, I I'm going to hide those two parts by pressing control it on. This is the inner part. Who is we're going to take? Sir, we're not going to take that apart. Layer speculator, toe substance, mental for lecturing. So we're going to take these things only. So I'm going to select those on again against AIDS. There's nothing to do here so we can do one thing. We can scale this. Ah, this part, the every cells so that we can use maximum me with space here. So not going too well kindof wasting a lot of every space we can do. One thing that's the leg. Both of those eyeball. And then I went to UV cell. Andi. Then I'm going to going to see leg like dragging like this. You can see this, but is the front evey area. If I go to after Morgan C, we have one wrapped in this manner. So this part is this kind of 60% of Dybul. And then here the rare study of what the person of the back say. So this spot is very important. This part is not going to be reasonable, so we can do one thing. We can scale down it. So it's not going to rivet Jewel so results and is not a big important thing there. So let's decrease it and then let's let's place those in in this manner in cardinal manner so that we can usually use more space. So as against C, we used to concepts here, So we prioritized the texting. We know something is not visible. Something is not going to be visible, so we can manually give them less evey area. And then and the important part managed to get mood important more. Did you listen here? So you can see here and then we tend the placement. So why placing this in a cardinal manner were able to use most of the space here. So that's it. That's it for this thing. So this is our i ball relived. Now I'm going to assign a material to these eyeballs, so let's right to private material and again amusing. Lambert, Andi makes you rename this things appropriately. I okay. This name ings are going to be visible in sight. Substance mentor. So it's very important that you re name these things. So these are my I bought that black color is gone because we had kind of a sign the different material there. But that's going to be that's going to come from the actual picture, so I'm not going to put it here. Put that black color here. It's a single material Singley related for the Love boat of Dies. Eso the eye is done. I'm going to save the file here. So in the next lecture, we're going toe, take the evenly out for the hair, see that?
73. Packing Uvs For The Hair Texture: how in this literal going to finalize the evil ale for the hair part. So, as you can see, I went ahead and did the same. Even wrapping technique used the same technique to unwrap TV's for every hair. Colombia. So everything is done and placed here so we can do one thing. We can just they all of the hairs Let miss elect carefully Let every hair club here on there is the filler part we need toe under up that as your until that's not Lisa. Now I'm going toe on. Let this part here. So let me using mapping. So let's go toe may be planning, mapping and then unfold it so called toe unfold and unfold. And then I'm going to hit the layout important so that it backs and said that George, one box like this and make sure there's some gap from this outside line. Look at that. Is that is it anything? So we don't need to do anything for this for the placement of disease, so everything looks cool once we make the actual hair texture, then we can come back here, and then we can pull the U years, just like the previous here. Andi, just to get the random, takes it here. So we're going to make a kind of general hair texture like this on. And then we're going toe put the other just a TV is according to the texture, everyone. But for now, the U V for this drivel layout for this hairs is fine. Just put these texture and now you can see the visual overlapping. That's totally fine. In this case, we're not going toe scale down and pour dough. Zeevi's on that. No clear that layer are not going to do that. In this case, we're actually it can often reusing the texture, same texture on every clock if he had clump. So I think this is done for the hair. Now this I broke part is left. We're going to take this with the body against because it would be a single color. So I'm going toe let these two things. So let me let me unwrap those Maybe let's go toe create analyst IQ plan Mapping on unfold does let me You can go to Absalon deceived the layer, the kind of flaw I didn't that the factory default more than I'm going to again unfold and unfold us and then I'm gonna pull these things that would go to yourself here. Let's select That's it. Also selected the body so that I know they really I see they relate to that. I can pull this two things here again on because I'm taking this with the body. I'm going to ascend the same material on this part. So select this. I've rose and then right click this. I'm going toe a sane existing material, not favorite materia, because when you create a new material than unit toe goto dispirited major. But here I have the material already. I just want to re assign it to this part. I'm going to send existing material and then you can see you're going to look for the body . Yeah, because we hardly Nimet to the body. So let's assign No, it's we're going to take this Andi itt's. It would be a single texture for this body. And I've dropped andan against England Texas, for though clothes here, one texture for diebold, one Dexter for the head and then for the mouth. So in total Darabi five textures for this entire character on everything looks fine. So in the next lecture, we're goingto take the scene for the final time for the final. Taking cancer before we jump toe. No, no. So stand spent over picturing.
74. Clean Up And Exporting The Model: This is the final lecture for this even rapping sexual on in this particular lecture, we're going toe clean up the scene and then we're going to export the model for substance Mentor. So first thing, I'm going to clean up the scene here. So if you go toe out liner, we knows outlined there, you can see it's kind off. No, very messy. So the fasting I'm going to do is selecting everything Here, let me first all night that I outer eyeball. So goto display so on. So all you can see Guardo's back. So first thing I'm going to do is select everything here in this view by dragging and then I'm going to group it, so go to edit and group. So what I did is I kind off brought I kind off group everything into a single group. You can see this group has everything here now. So all these things are kind off cleaned off. Now we're going toe delete distinct on that. I'm going to also delete the unused materials. So if you right click and go to existing material, you can see there have someone used to mate rials here. Roger. So We can really did these things, of course, but there's a There's an absolute I want toe kind of mention here. Who's helps us to optimize the sing and cleaning these things. So Goto file and there's an obstacle. Optimize seen size. So what it does is if you go to Dobson Box. There are so many things we can clean go to edit and the set in this case, I'm not going to kind of tweak or change anything from here because the bite bite awful thing is going toe workforce. So now if you re sit here and then optimize, just notice not here, you can see it just kind off. No, um, asking for that. It's not a known deal accent, so that's fine. We cannot undo this accent. That's fine for missile. It's OK, so, as you can see, deleted those unnecessary group nodes. And if you go toe the existing material by right clicking, you can see it also debilitate those on one unnecessary on used materials. So it just lived all those used metals. It's not going to delete any of the used material sweets you are using on any of the object you just deleted the materials which we have created accidentally are we're not using on any of these objects. So it just deleted those on those stuff to it. Basically clean, cleaner scene here Now the outlandish is totally clean. We of course, we need to kind off islands these things. Now everything is inside the single group. We need toe kind off work on this. But now it's Clint on the Middlesex and escape Andi again, again. See if I go to existing until there's a material which is which doesn't have any kind of unique name. So I think the head doesn't have any name. So go to that material. So, like, goto existing mint said you go to metal activity. If you go to metre, activity can opens that activity Editor If you right click on this little yarrow, I can go to Lambert here. We don't have in name yourself going to rename it toe hair, so I don't want anything kind off, uh, lived on named? Well, he doesn't have any name Onigen. See again if you go to extreme It'll days and material Colome. But one that is the by default matter off mild. We servant in that on. We're not using that. Another model here, So that's fine On the phone material is being used on this op earlier eyeball, which I'm not going to take into substance spenders. So we're not going to take this into substance painters, and I don't I don't have anybody about that now. Going toe cannot quickly clean these things, and then we're going to export this. So first, every head needs to be a in a single group. So let me turn off. Also. Just select these things, and you can see now all the heads are selected. If I move, can see. Yeah, with that feeler thing. Okay. No, All those things are inside this group, so I can easily group those by it. Gruebel. Pressing, controlled. See? Now that's a group. It's enemy to help like that. Okay. And then then I'm going to Things are already known. They have the name. That's good. Everything is good. So we can rename this part warranty again. This thing is not necessary here. Cleaning these things and renaming these things, it's not necessary. But again, I'll usually use a kind off. Keep this habit off. Kind of arranging, mincing and cleaning this to stuff. So it's a plant and is the body can Is that the outside eyeball again? We can't group these things. Google. Actually, we should group this thing. So let me hide this. That's group this this part so controlled G and then left eye on decide needs to be right. I control G. All right, I so here. As you can see, I'm kind of using a space bad and street office pace. So I think we cannot keep this pace here. If you put a space, it automatically puts a on underscore there. So that's fine. Who is the tone that's needs to be can off? Ah, keep their individually. So now this this partners to be grouped the stop But with the top did with the top garnish to be near group press control G So this is the upper maybe teeth And then let's there's don't put the tongue in any group. So again there are two groups operated and then alerted to it. The Lord Gun press control G on this Terex Cloherty It did Okay, so it's a great here on, and I think everything is fine here As you can see, it's must cleaning now and then Let me high on hide the body so go to displace So on hide it also last hidden Okay, everything is much more Purina here. You can see okay And the mention of sexiness clean everything got It's named and everything looks fine. So now I'm going to exported. So I don't want to take this spectacular outers eyeball in tow. Substance mentors I'm going to hide those things. Control edge to hide. So I'm going to select everything, Andi. Then we're going to export this thing. So once you're kind of donor, the cleanup thing at me select everything on, then goto file exports election. So if you go to export selects an option box Who said it? You can choose a VX of there. So many options here and we're going to choose a BX. So I'm going toe exporting a Biggs export for March exports election. I'm going to export it toe to the every Project files development project on May be here, can create a new folder called a V X, and then said that I'm going to put the name here and just exporting a Biggs for March. So let's export. As you can see, I just need to export all the things as a single file. So now I'm going to switch back to Substance Mentor, and then we're going to open the file there and see if everything works if everything comes there properly. So I'm going toe kind of Don't on the substance Bender. Okay, so if you open the substance winter for the first time, you can see something like this. Welcome to self transplant. Don't disclose it. And now we're not getting the substance. When the chapters, I'm not going to cover any basics of those of Sumpter. Just follow me and I'm going to screw something. So that's why musicians have since mentor in this lecture. Just two upon the file to goto file on Dhere League On this new Hobson, we get this new project off sandbox here on the first thing. You choose that more that IBX model to import on the template. That template is said to be beer, which we're working on this thing. So previa rejection off way off material used this for game models. No fear. We need to select a mess. So Let's click on the select apps, Um, and then this and a browse where you save your file. Maybe it's under this project. If the X fuller character opened this, you can see on then the documentary Jellison is said to one K in this case again it says can be tens letter so it doesn't matter whatever you choose here. So I'm going toe. OK, choose. Okay, Just select the model and then click on. Ok, okay. So as you can see here, the right eyes missing. So the reason of this is if you go toe, go back to Maya. Andi, select this model on If you go to the channel books Hobson, you can see kind off minus skilled because the way would duplicate a die. Balto decide. So we just duplicated and then put minus in the access. So here you can see minus Skilling and some value here. So we need to freeze this thing. So if you go to modify that, the obstacle freeze transformation can praise it on all the value was said to buy different DNA. So this was the reason this is the actual region off kind off not suing the right eyeball. So now I need to again exported with the new eyeball here. So let's select and again exports. Alexa Will and it said V X export here. And let's exports Reckson. So I'm over writing. It says it's already exists. Um, overrating it and then go back to substance. Bender. This time we don't have to again go to new and create a new sin. The model is there that it's created. We can just edited. So Goto edit to a technical food isn't on here. You can see the miss here. We can edit the mess any time. So go to select on again. Choose that epics model on clicker. Okay, you can see now it soars up there and here inside the substance meant, if you can see the text said list the body, the plot everything is scale off separately because of those material inside Meyer. So it be X can hold all these material Littles And here the materials are helping us kind off to walk a separate objects here, even though we kindof imported this model as a whole as a single biggest file. But here we can still kind off work on individual parts because of those from my materials . And we're seeing those materials name here. So we're done with the sex on and this lecture in the next Excell. We're going to start exiting the character inside Soft and spender. See you there.
75. Creating a Project: how In this lecture we're going toe, start working in the substance painter on in this particular letter. I'm going toe clear the project. So when you opened substance Mentor for the first time, you may see this screen welcomes Quinto, let's close this on to create a project. I need to goto file Minnow on Click on this new absent pick on it. I will get this window. You can see I'm going to tweak few pew absence and then I'll kind of live there. Stuff those off, son and by default more so the first thing is this template and this said to be bare metal gruffness by default, which I'm also going to use So I'm not going toe change it. I'm going with the by default Well, here and I'm going to assigned a mess to this mess ups on here. So we're going to select a miss So browsed a big folder and here you can see our ibex, the Ibex One, which we can export it in the previous lecture. Let's open once the B X file is said here, then I'm kind of living everything else except this documents. And the result isn't now it's said toe one k. I want to say that too. Okay, again. Here you can see it's it can be changed any time in substance. Mentor. So with this, I want to click on OK, no, you can see our model is here in this view port. So this way we can clear the project. Then in the next lecture, we're going toe stacked over mingling DFS. So we're going to see our Pam being a liberal family within two fest to in that picture.
76. Interface Overview: how In this lecture, we're going to see the interface of substance painter so you can see here this big area where we're going to work. So this is the report here on in this people. Now it's said to treat the only view. So if you go to this Upson here on if you click here, you can see there are three absence. Now, that really only view said we can switch to two D view you can see here can see the UV on the texture. So it's kind off. No working like inside for two sub. We can do that as well. All you can switch to three D and two D view. So it splits toe three D and two d view so you can see the three d model here. You can don't around it. And here you can look at the two dif low UV and then the two detector. Most of the time I walk in through the only view, but sometimes this preview helps us. So let me go back to. So it's back to three. The only view. And as you can see that some sort credential well, let's click on three d Only then can see it there some minerals here and then some absence . So if you go to the left, here is the tool bar area. And then there's the tour absence, so it depends. The stool up some depends on the selection of the stools here, so you can see the brush to list select selectors. So that's why you are kind off getting all those options for the cross. If you switch to any other tools, you may see some different absence there. So this idea depends on the selection here from the toolbar. So, as you can see, if I select one ups in here, you get also season this year in this property area. Now the process selector. So, yeah, you're getting so absence here in this area on Do you are also getting absence here According to this election, fear if a select this absolute conceive changes. So this idiot kind off a broad, more detail area off this absence again. Seymour absence here than here. You'll get a lot of common absence here, and then we'll get all the absence for that selected tool here in this area. Okay, so there's the tool by on you're getting the ob selected tool absence here on Dhere, this property area, and then you can see if you go to the right area. You can see the texture set list on the layer and texture. Settle settings so you get a speed here. You can just hold the lift walls and drag to give yourself a better room there. So Texas said list. You can see these are all those materials we assigned inside Maya the body cloth I. So those are here as Texas said list. So then this is the layer area you can see this layer absence are dependent on the Texas that list. So you're getting if you create some layer fear, they're going to get that inside this body selected Texas said. If you switch to another person, let me So you So the body Texas said it selected. If I create a new folder here, that's anything. Let's click on this and create a new fuller. Now you can see if I switch to any other Texas that you are seeing something else so lucky . Take away from this point is these layers are actually said for every Texas set so you can create Lee as individual for the no independently for different texture sets. Okay, so then are to the side you can see some more tool absence. So who is hidden beginning klieg and will get dispersed sittings and service. It stinks. Then history and some log absence. So basically the view port and the stool idea then this area are more important then here to the bottom again See the self Epsom. Now, this self is kind of a browser. You choose the catalytic here and we'll get all those obsolete inside that full of here. So if I choose materials and get all the materials here he preaches Alfa, I'll get all those Alfa So it's kind of a browser kind of thinking itself. This absence are kind of saved with substance Mentor. So you don't need to down a Well, I don't need anything else Just in starts off, suspend tied. You will get all this absence of its substance spender. So this is the overview and you can also realize the interface a bit. You can drag and give more area to self can wherever you see this kind. If I can, you can drag there like this. You can also dear off some absence like if you want to kind of drag it outside and put it to the left. That slot for that. Although you can put that here as well to this bottom media. So you're getting a little bit more space by putting that here. You can do this. You can also click on this little icon which kind of tear off those things you can you can floor that may know basically And put it on the second monitor if you have. If you're using one gun float like this, then you can click on this little I can again toe kindof log that they're doing to face So you can do this. You can just drag from the name. It will kind of floor those men. So, like this, I accidentally deleted that. So let me show you how to reset the interface if you want. Oh, let's say you change it and now we want to go back toe the factor default more that default interface. You can do that by going toe indomitable and click on this is the set you white click on that it will reset the you I user interface to the default instruments and more. So there's a default interface, which I'm going to use throughout the scores. So this is it for this lecture. In the next lecture, we're going toe, just navigate around substance printers so that we're kind of little free, and then we're going to start the project. See you in the next lecture.
77. Navigating Viewport: Hi. In this lecture we're going toe dive a little bit deeper in the interface, and we're going to see how to navigate around it. So you can see this. This is a three D view port. So the way I'm rotating this view are kind of going around. The model were holding the all turkey and the left Most bottle. It's exactly like my so it can hold Art Mouse and then left most track too, and off down around our go around with the model rotor the view And then we can go Oh joon we can do Juman Jamaat by holding old and right Moss again Exactly like my asserts. Basically, if you are kind of in my user than it, you're already family with this. So holding all, let mouse allow us to turn around the model than hold right mouse track to German jamaat and then hold middle mouths track to pan the view So the three off sense of the key of sense toe navigate in the report So we can also do the same things with that rare to D view If you goto the two d view, let me go toe three d o D So is this split view. So here we can again use thes three absolutes on feel so I can hold all time right most to do mean Jamaat Oldham. It amounts to pan, but this is a two D views. So if I hold all turned left most it's not going toe be rotated as the three D view, but it you can see it's it. You can rotate the view like this, holding all lip marks, which allows us to rotate the three D view. It's also noted the two D view. So let's say you rotated it and it can off. You get this like this and now you want to strip this view so you can hold all turn again, left most then whole city. So it's gonna kind of snap it the whole old and then start rotating it, deliberate. Then hold sit. So it's gonna snap to a perfect 90 degree view. So this is the to the end three D view. You can navigate both of you using all than the three months button. So you needed three months three button mouse for this purpose. Let me go back to the three D or leave you. Okay, then, As you can see here, this view has some kind off of some kind off display ups. And here it's not settle material. So you're going to see the final Met reality. But you can see you can change the view toe basically hide roughness, metallic. Basically the maps. You can look at the maps. They can go to the normal, and now you can see kind of transparent symbol. That means you don't have any normally send. We don't have actually anything here, so Oh, it doesn't matter if you choose anything, you'll get this kind of thing. So photo material. But latter vacancies were useful going to say that. So if you goto this absolute, you can see it has to absence perspective, viewer or terrific view. So now this view is prospective you. But if you change to art a graphic view, you can see there's no prospective ity. This view is good for kind of stand sales are stamping type picturing matter. So now, because it doesn't have any prospective ity, you can kind of project things better, so I use this view in that time. But most of the time I use prospective you. Then he can see a some rotation of some freed artisanal constraint Artisan. Now this view is set of free reticent, which is the ideal one If you change toe. Sorry. If you change, your free rotates. And now this report is said to constrained artisan, whose is the ideal one. And if you change to freedom Destiny, it's kind off. I wrote it everywhere I like. I don't like this view. I don't like this sort isn't technique so it's kind off very hard toe. So because it's free, it's gonna rotate it in any angle in your angle like this. So if you like this, you can use it but usually use constraint or the sun rises the different park. So it constrained artisan kind of constrained or Otis in It doesn't go like crazy. So I used this. So makes you No, no. Take those two absence. I believe you'll also like the concerned citizen. And now this four Thompson is the rendering Upson. Now we're in the three d view. If you click on this icon, it goes to the idea of you put and it renders the view now surrendering. So we had in a complete, different interface here. Now we're in idea, which is the default render for self transplant. So if you are in this more by accidentally, do no buy anyway to speak. Don't this ups on this camera capsule off. We'll get back to that review. So we're going to use this latter. Once we were Donald that exiting So this foot of since that some good absence. Then you can see here in the tool body You're getting some yarrow kind of obsolete. That means there's some up since here in that safe for the broths. If you hold the left most there you can see there, too. Up some paint and physical paint just like I'm not going to been of. Tell you what? That Those different things. So dessert kind of introductory course. So we're not going toe Dr Tito Every tools. But you can see that house our absence. You need to know the node. It's thing. Excellent. The brush tool on. Let me go to the structures. At least here you can see. Let me get some room s so you can see we have body cloth. I have mouth the exact settle him. So basically the these air the mitral I d. We do? Yeah, we do. We have a signed in my basically, we assigned some material in my if you can remember eso the bodies of metal so those metal becomes texture Sit here announced exercise it are kind off in They're kind off Texas. So when we're don't room when we're going to dollar districts a ring and they were going to export the textures we're going to export access for this texture said, basically, we're going to get five different texture, five different texture map so un for this Texan math, you're getting independent, full destructor layer structure here. So if I go and work in this body textures here, I'll get independently of area for that and defenses to clot and get again differently. Idea. So, basically, this is a different texture we're going to make, and it is also going to help us in a kind of isolating the report. This I just want to see the body so I can solo id the body selected. I can click on solo. And now, as you can see, I can just to what? Look at this body. So again you can select anything in the solar more than you can see that. Or you can go all and hide other things. As you say, I don't want to see the hair. I want protection the no bare body bare head there. Then I contol of the hair. So by clicking on this little circle to the left of the name so I can don't know, it's kind off no kind of layer instead, Meyer. But again, it's these that independent Texas so we can use this texture set to help us in isolating Vieux Port or hide something. We can do that as well again. You need to understand this layer structure, so if I if I text of the body, I would go to the body, Texture said. And then I'll start creating layer and then paint the details on the layer. And then when I want, oh, do the texture for the tea, said, I'll go back to the cloth texture and then again in Quincy, I'll start creating layers for that. Statistically, this is the way we're going toe texture the model, and then once we dollar the texture than we can goto file men one than export the textures here. So it's gonna export all the texture. All these texts sets independently. So at the end, we're going to get five different textures experiments here. So I guess we had only this things on. Then in the next lecture, we're going to start lecturing the model. See there.
78. Adding Base Skin Color: hind this lecture, We're going to start working on the texting, character texting part he has can see. I have the reference emits, which I'm going to use on my second monitor. I'm going to put this on my second monitor so that I can look at this image while I'm texting here. Like I'll also used this image to sample some colors. So you can also do this. You can use this offensive Missed to do that. If you don't have a second monitor, you can put it here or you can just minimize and what? Then maximize and look at it and then minimize You need to do this back and forth. So I'm going to put this on my second monitor real quick. So here I'm going toe, we're going toe. Start adding flat colors to the character. The first thing I'm going to do is select the body. Let I'm going to start with the body. We can't start from anywhere. I'm going toe select the body Texas set here on Dhere. I have somebody for layers going on, so I'm going to delete it. So then we're going to start from scratch. So here want off feel a single colors. It's best flat skin color so that we can kind of a little quick stat and then we conard some details on that. So here I have to layer absence. So I have by default layer is simple commonly on then have, ah filler So there to let ups. And so in this case, let me so u boat If I created layer a normal common layer Andi then I can use this led to paint. So basically, if I want to peel a single color toe the inter body this is not ideal layer for that because if you take this layer, you need to manually feel using a broths and a color like this, you need to manually being like this. It's gonna take some time to do this. So in, instead of using this for this propose, I'm going to delete it and use a feeler so you can see that I can is different for both of those so freely and has kind of a bucket and applause. I can so let me click on that and get a filler. So feel there by the full automatically feel the in Texas it. So if I it seems the call, ever go to this property. Andi, I can see this best color now, said Gray. So click on it will get this color ups And here. So let's say which is rare here. You can see it's already feeling that entire body, if I salute you can see it's totally filled with that color by default of filler. Fieldston, Texas. It. So let me choose the body text body flatcars. I'm going to click here, and I'm going to use this color picker. Hold and drag. You can pick any color from the interface are from the monitor on. Then here I'm going to my second monitor and choose a little bit close color toe, front of face. Maybe for this a little bit kind off. Maybe this. So this is my plant based skin color. I'm going to rename it, so let's double click to rename. So I'm going to say who bought the best or something to recognize it letter. So the body best Americans see there's a problem. This color is also on the Sioux on the socks. Who is of this loo door? One. So in this case, we can use max mask technique. So now this layer is filling the entire thing because this is a continue peace, continue model, continuous object. And then we're using a singing material to this model. That's why it's kind of feeling this entire body texture said at the model here, we can use mosque, uh, not to fill this area. So let's see like this. And if you click on this officer here, the second Upson article right click on the layer itself and you can go to mosque here, I'm going to click on this left leg. On this we'll get some different kind of mask. White must Black mosque, basically mask is black and white. So in this case, you can use both so in this because I'm going to use a white mosque. So let's click on this. Now you can see there's a second a box to the color. So this is the mosque box on. If you go to this pew here, this material change the material toe mosque, you can see the mosque is said to look. It's white and its field, the whole object are basically you need to understand the concept of off mosque. So basically, Weidman's, it allows to slow love, see this texture there. So wherever the mosque has white color now there you can see this this layer texture wherever it has black color. You cannot see this texture. Basically, now it's it toe white the masks and tell you feel it white. That's why you are kind off allowed to say this color and deli. But if I put black color in these area in the mosque, then we cannot see this girl. So let's quickly filled with black alert to this area. I can do that by using this polygon feel of some here, the four tops and the subsoil. It basically said Toe bras. Then you can change toe polygon feel. By using this polygon field, we can feel a black and white color, the mosque area. So like into that now this mask boss boxes said. Now I can see Look at this blue outline. That means that mask it's selector. Make sure the mask facility and now even states the color layer. The selector. Let's click on the mask here on Goto polygons feel you can use this three absence. Now you can see It is a triangle of some You can click on this. It's kind of feeling that triangle basically feeling their black color. Here, people use any of this makes your are the color is said to the correct one in this case where we want to feel black to the mosque. Here, to this area. I can use this absence like this. I can see if I goto mosque. I'm actually feeling black to the mask. But if you are inside this material, then you're not seeing them. Blackwell, you're not seeing this girl. So it's kind of basically sowing nothing here. Local roundup. So if you go toe mosque, you can use this toe. I cannot feel this, but it's kind of time consuming. We can feel it in one click, but we can use this. You ve up, Sania, because it's a single measure cannot be used. This three absence efficiently. So let me go to the three d two d view and because I know I have two different silly vessel for the socks and for the Sioux so I can use the vessel to select. And Phil, I can go to this e v absolute toe feel and I am click here. You can see it's automatically feeling and those things I this we do you have some because I have those. Zeevi's a separate it from the body. So this is again and another reason to kind off keep different materials evey separately. So if I a kind of heart most this with the boarded and I couldn't have used this up some because my TV sells different kind off separately from the body. The socks is not attached to dope leg here in Davie, so I can easily use the V obsolete to feel quickly. So now if I goto Demetria because the black mask is here, if I go to material, so I'm not kind off, it's not letting discolor Toby there. This includes kind of masking it. So let me go back to the tree duel if you I'm going to go plus more. So now this way you can see and feel the particular layer on the morning. So in the next Lecter, we're going to start again, adding, basically with the different things here, see that
79. Adding Base Color: next are basically to the other stuff here. So I'm going to start with the plot. Someone did select it. The clot Dexter says that they can creatively attendant economic color. So again, I'm not going to use it Normal layer for this because I'm going to feel a color to the inter model years. I'm going to delete it and create a field there. So it just feel there. Let's select a color, I wonder. Sample local. So click on this base color box here. I'm going toe choose the picker color picker and then choose a color there. Okay, so now I chose this, uh, color. You can see we have kind of a strap going on here with two color. So I chose this color as the best car. Then we can art this sculler strap on top of that. So let me move this and you can see we're getting signing nous on the plot with I don't desire. So I'm going toe decrease the Sinus. You can do this by going to this roughness here here again. See, we're using this thes channels for this lot, so I'm not going to use height, so I'm going to turn this off. I don't use metal for this. It's not a metal, so there's no no reason to use that. So let's turn up the norm. Alleged. So you're using just a color and a rough roughness. So this is the best color and then the roughness. Now this roughness is kind of a black and white thing. So if you go to the left to the black, if their offense is said to black here, it's totally signing. There's no roughness if you go towards one, which is the white color. The one is totally kind off a math surface, which doesn't have any signing this. So if you stay a timid area, so that means you're getting some Sinus. So in this case, it's oclock, so we don't see not Sinus. I want toe enough stairs somewhere. 0.9 or something. Get a little bit a little bit Sinus. It's again almost met. Okay, so now again, this scholar is feels the plant as well. Please, I don't like that. So I'm going toe use the mosque again so we can use the mosque. So in this guest, let me rename it for So let's say, he said, Do you serve this well, This that's the best. So in this case, I'm not going to mask this independent layer. I'm going to create a fuller and mask that because if I mask it and then I'm going to add some Blitzer Patil toe this and other stuff, then I need to mask every layer. So he didn't lie. So I'm going to create a fuller by clicking on this folder. I can. So it's a full Or let's say, he said So this folder is dedicated, dedicated for the tea set. I'm going toe put all the pieces a texture inside this, and then I'll have another for low bridges for the pan. Then I'll put all the textures for the plant in type that follows. Let me drag left most hole and drag and drop on this puller. Now you can see this Fuller has kind. If I can here to open and close, you can click on that open and close. Now this a fuller on instead of folded my color layer. Is there my feel there is there, So instead off kind of masking it. I'm going to Master Fuller, so whatever I'm going toe put inside this polar and automatically you will use that mass, so I will not have to kind of create mosque for every layer I use. So this is the reason this is the reason why I'm using a fuller. So let's let the folder No, I don't want to see this color on the pants. I'm going toe master full night. So let's click on this and I'm going to use a black mask again. It feels to black and tell the black, so I don't see any color, any layer, I hear. So because it's totally black, I don't see anything, So I'm going to again. Damascus Electrics are going to use the polygon feel upset because this tea set and the pant and not continuous object, you can see there different objects. They're not kind of continued. There's nothing continuous on those things, so I can use this option. So this is the object mess, Pierre Upson. So I can, because this is a separateness and there's a separate miss, although there inside a single cloth, they so said, but its thing. I think that the independent mess I can just use this and click on any of this face to just feel that with, ah, white color. Now this colors said to black. So I need toe set it to white because the mask is entirely black on. I want to see this discolor here on the taste that so I need white colored in the mass. Kedia. Let's fill it. I can see if you go to the mosque. Can see the plant is black. The start is white. That means white SOS up this color and black don't so So. That means the white allows this color to be visible on the black doesn't So now let me go to Metra. Go back to the bus so you can see No, I have the mask on the folder on whatever I put inside this folder, it's going to respect that mosque. It's going to stay inside that mosque. Okay, then let's quickly feel a color for the pant. Agile to a little girl. Lobster collapsed a live here. I'm going to create a new Fuller said. This is going to be for the plant. I'm going to create a new feel there for the plant as well. So let me get the new feel. They're on their feel Learners go inside that plant layer. And I didn't see We have to layer. Let me bring down the pan to the bottom here So that visually I know the top one is the piece of the bottom one is the parent here? We can see that is the reason the top, basically you can put the fuller anywhere Doesn't matter. But Buswell it makes sense. So now inside apparently. Er this this nurse with the band base color, then best emergency. I'm reliving everything. So entire production you need toe be also kind off a good manager unit to Manus the pile in a good way. So now this is a pain Best parent Bastardi of here. I'm going toe change the color Solis musical pick and choose. It's kind of a all flight of kind off a little bit Bonus something like that. So again you don't have to use the mosque because again it's under there and that is that is evolved that layer the things that has the mosque. So basically we don't need a mask here as off now, so that's fine for now. Now going to feel a color to the hair. So let's go to the head, Texas said on really quick, we're going toe Or did this and create a filler. Put the head and I'm going to limit. Yeah, we're going to paint the hair texture, entire photos, a platter. But I can just justo biz realized the character I'm going toe do it here. I'm not going to take that the hair inside here inside substance mentor. I'm not that comfortable to get. So I'm going to use for yourself for that just to see visualize I'm going to put a plaid Kalata. Let's change the base color on and choose kind off brown that brown like that and the signing This is too much. So I'm going toe intern of the height metal normal and go to the roughness on Make it the better off they had may have deliberate Sinus. It doesn't have to be kind of a clot, so we can't see. You can expect deliberate Sinus from the hair. Maybe if you one sidedness just go lip towards black. And if you want Matt than go to us right towards white color, just something like that. Okay, so now I'm going to feel some color to the Sioux and socks. So let's I'm going toe. Go to the clot again. Sorry. Go to the body. Because those of you solo those parts belongs to the body. Here. Here, I'm going toe again. Create a layer filled layer one feel left for the Sox. So let me put the basic alert off the field, Lefty. Under because we had the masters, the mosque learners to we go up, Mr. Stay up. So that no, If you put this on top of that led the name, it's going over. Left that mask so we could have again created Fuller and then put the mosque there for the skin. That would have a better off some. But we have done that'll. I'm going to put this fox lead here. Okay, on, then. I mean to fill it with color. So let's choose the color here. I can't. It's something like this. It's kind of a white colors. I'm goingto goto us a bit white. Wait there. Have some straps going on there. You can see they look at it. That's, um, details. There were going to do that letter, so I'm going toe. Put the colors just a flat Colombia. Okay, this is the socks unit this Cullinan's toe assigned to this city only I think the Sioux on discolored. Same. But the here. I'm going toe Megan Lee. They're kind of soup, so we're not going toe, so we're not going toe. Get a su like this. I'm going to create a letter. Simple. So So I'm going to do that. That report this texture here for the Sox issue. Then I can quickly use a little letter material for the so. But I'm going to do that letter thing. So I guess this is it for this little it Me so all And then I didn't also do this, and I didn't want to do so. I'm going to do that letter in the next lecture. So in the next lecture we're going toe are some details of the scheme here, some color tone to the face of the skin on maybe par media. So stop. See that
80. Adding Skin Tone: how in this lecture are going to start adding a skin tone toe the skin. Now you can see we have a single flat color on. If you look at this reference in this year, it's definitely have some various into it. You can say some enough radius nous on the cheek area and leap and nose area. You can see every discolor on the year as well on the our media, so it's not just ready. Scholar Red color. They're also your local to the Syria. Always, our face has kind of year low to the forehead and then some red to this middle region on depend I the nose and the chick India and then the bottom part always have some kind of bluish color to it. So those color very subtle. But those are there, so we need to pull that color various into the face. Otherwise, it's not going to look alive. So let's do that and get that thing. Let me move this to the second monitor and you can see I wonder, started correcting the speculative, the Sinus on the body. So if I select this layer this body base color now it has deliberate kind of plastic. Look, I'm going to get all of the height. Mittal, Mama! So we don't want this generous. We just want color roughness. So here I'm one some kind of matter. I'm going to arts White Vacanti. Obviously, I don't want fully one fully map to skin has some kind of signing this. So again, I don't want full plastic. Look, so I'm kind off looking for a soft skin light. So here you can see the Sinus is a little bit down there. I continue the lighting of this view holding sit and holding the right most somewhere here in this view, blank area whole sit under and hold, right most and drug against. Who is the lighting? So it's the lighting. This lighting is coming from an environment. So let me set it towards front that I can see the model better and see the Sinus. I think this is good. So again you can hold, seeped and then hold right, mouse, and then drag anywhere in this empty idea to sense the light. Okay, Now the Sinuses, I think. OK, but I can go toe to live it rough. Maybe a little bit. Yeah, I think I think this is fine. Then I'm going toe put color to thy brew. So then we're going to put the skin tones, so I'm going to create a folder. Then let's say skin. I've put everything inside that folder. The skin things Guess skin skin best. Okay, so we need to have this mosque on this skin layer. That would be better. So I can do that. Let me start with this Eyebrows. I'm going Toe didn't fill their for that again. It feels everything. If you have going to change the colorful salutes switch of everything here, then choose the hair color and have ground. Then I don't want this months off signing is there. So let's go to our straw sculler. The hair and this color kind of different here. So I'm going toe to something similar. No, I don't like this anything. We can also change it later. So this is the eye, bro. I brew and again it feels the Internet model that's saluted fist intermodal here. So I'm going to use a mosque for this. So let's click here and let's take a black mass has hide that thing intelli. Then bring this like alone Die, bro. By using this absence or di mask a selector, let's go to this publican Philipson on Dhere because it's kind of a separate object. I can use this object. Kerrigan. See, I just clicking, this scholar said to white. We have a black mass and tear, but Black Mosque. Then I'm putting white to this address so that discolor visible got the visibility there. So let's go back to the paint on brush us and then So all I think this is good looks like a liver Blackwell. So whenever you're using a filler, it's easy to change the color azure who can go back to this color any time and then change the color. So this is again a very good reason to use filler instead off a normal layer. So with the normal that you cannot do that, you cannot just come there and then change the color and expecto see the difference. So that's not going to happen there. I'm going to change the hair collagen, so I want some kind off its same color. And this is to readies member something similar. Yeah, like this. Let's go back the body, then lives are that skin tone we're talking about in the RSA. Let's created earlier this time I'm going to create a normally so I'm not going to create a feel that because I'm going toe paint painted manually wherever I want with the free late doesn't allow him into the basically feels the entire thing. So I went toe gettinme Yulia Normal. Let's say the skin tool, basically the face has three defendable yellow, then made sex, and it's rare and this part of sex and his blue. Then we're going to use the capacity. He said that you would bring down the intensity of that call. So with this layer selected, I'm going to. And don't off all these things we just want again. I don't want the roughness agile for this. So that's the color on. You haven't going to start from this forehead Quakes. I'm going to shoes. Something kind of your local to it. Your local er on Dhere amusing a mouse and a pen tablet. So if you're using a pen tablet for painting something like this and I can see we're using a pin presser. So whoever I use, you can easily draw gentle draw size. The both sides were pressing the bracket. Kids open Becker and closed record. You can change it or you can just Jesus size from here. Roger. But the sudden kids can useful so you can see amusing It kind of a place A tablet. So you share using a print other than let me tense Make the size it a bit bigger so that I can put here so you can see it doesn't allow me to kind off have a sopped kind of setting Look, so let me change this place or to know Presser, you can click here So it was said to paint presser for Austin Since that with this weekend Just, uh no, it doesn't using that preserves So it's kind of fusing the broths softness there. So again is this I'm going to use the flu agile celestic Christoph floor. So basically again danced opacity on the floor of that girl. Let's put I blow on top off everything okay now I'm going to against it. This leads structure is also very important. New using masking basically So I'm going toe again. Select the skin tall So your local it all here on my really great year. Look at then. Let's Swedes, this color tend to sculler toe rare and have real color under North Berryessa. Let me bring down the sides. You can see. Let's so here I am looking at the model that the reference as well. Let us not in Telerate wit a little bit towards sore and a little bit still, it's almost ready. Go straight. I think this love is fine. So here you can see we have this release thing here in the Lords on the cheek. So here I'm going to use the symmetry, so I don't want to do both side separately. So there is a similar apps on here on this, the substance. So click on that. No, I just want to work on one. Say so. Let me put play with stopped red color. So obviously we're going to bring down the opacity letter so we're not going to keep this like this. Looks are so basically I'm kind off arning that skin various alone videos and treat vehicle to the year Idea like this knows the year and the bomb. You look at the texture here, you can see the bomb has also those red it is into it on. We're also getting some kind of various in here that so with this submitted or non, you just need to work on one side, and then we'll get that under the the side as well. Okay, fine. And guess again, this make this finger TV really were released. Agile. So it's a cartooning model, so everything is a liberating deserted, But again, this is very useful. Okay, so then, uh, we're going to our bluest into this bottom face. So let me send this to blue side. There's something like this This lose a little bit saturated, so I'm going to the truth can deliver it. This saturated blue. So not so so much of blue. Basically. So this colors kind off. Um, once it declares the opacity, this color looks like a liberal beard. Uh, those kind of stuff. So is the blue color on this? Should be a little less, I guess Glow are Let's said the floor limitless. And then it was this blue color here. Okay, fine. I guess then, maybe to this area, the under eye area has a little bit bluest Stint. You could let me undo. Go back a little bit. It's too much, I guess. Okay, Now we need to decrease the opacity. Obviously, we're not going to keep it like this list on of the symmetry and decrease the opacity and see if it's working. So let's decrease it. You can see it's working. We can declare the door a bit more. Maybe I'm keeping 30 to 40% something like that. Now you can see arts to that basic Alak. Now, if I don't off this'll arrogance. It was kind of a flat and then now darts to that face. Okay, so I'm stopping this lecture here in the next lecture. We're going toe work on the skin Flaws parts are basically the skin is never a very smooth pace. Here we were going to expect we expect some kind of flaw. So maybe pimple marks or spots on the face of stuff. They're also going to our, uh, call it to the league puzzle. So see, there
81. Adding Skin Flaws: In the previous lecture, we learn how to art skin tone to the fests to make it look a little more life. So in this little going to our some more flaws to the skin. So I'm going to start, uh, I'm going to start with adding a little bit more ready stone on that than urban do are those parts. I'm going to create a new normal Camilla on day. Let's say very skin something. Second, identify this. The Redskin I'm going toe shoes, red color again. It's not totally little bit all its red, maybe a little bit. Okay, again with this bras and with no pain Presser, I'm using my pain tablet here, so I'm using that if you're using mouse than your only to do this. So let me bring two more such a little cooler a little bit more toe. The Lord's people kind off this. Maybe here against am, using the broth open bracket and close racket to change the broth sites on again. Let's use the symmetry so that I can work both side. I don't have toe work again. My notable site. Let's put a little bit release here on the the Moon's and the year. The idea on the nosy DIA, the snow's center part is a bit rapists on here on this idea, I'm going to put Dad as well. So and live it reddest to this Connors carefully. I really school if you're on there. Maybe a little bit. Okay. I think this is is good. Then I'm going to put that red color on the Lieber's. Also, let me bring down the process eyes. Okay? This good little Minton voted this and pill the Syria. Okay, something like this. So this kind of painting thing, the common layer, the normal air is good. But if you're feeling a single color peeling a single material than the feel there is good for those propose. I think it's looking good. And then I'm going to also increase a little recklessness on the fingers. Okay. Maybe underneath the bomb, maybe behind that elbow, we cannot that videos on a bit on something like this. Okay, you do. If you don't like somewhere, you can visit by using the days brass on you can eat. Is that Leah? Something like this from there will be I think, anything that's looking cool. Let's go back to the Brussels. Let's are a little bit. Maybe we delivered low floor, so Yeah, As you can see, I don't want flood alerts everywhere. There needs to be. Have some medicine. You are. We are that skin tuned in. Let's art floors to the skins. I'm going to create a new layer for that skin. Florida. Okay, so here I'm going to add a few marks. A turning of the symmetry. Obviously these details Susan B symmetrical. So basically Hey, you need to avoid that. So the sports shouldn't be identical. Both side. So here. That's the reason I turned off the symmetry on I'm going to choose a little dark called the brown color. Something like that. Brown, maybe for the sports. Maybe a bit. Rijs Brown, something like that. Maybe on Dhere. We don't want anything here. Just a best color Onda. As you can see, we wanted different bras for this I mean different Alfa. So if I go to this brush here brought sitting So let me that we find an AL focal dot So if you go to this, Alfa will get some dirt Alfa here. If you can also type your dark. So it's going toe kind of declutter. And I saw it all those dart team is so now you can see this is the dark cloudy. I think I'm going to use that on darts sport as well so we can try various thing. I think this is good. You can do something like this with a little bit better floor maybe. Look, I don't like that, but really birtley explore with little blocks on Brossard E so you can experiment these things. So let me and go to the try different thing. We can use this dart Smalls, lawyer, intensity Lord floor and Sam slowly adding those stuff. Maybe don't cloudy. This is too much. Let's look from a little distance and then see if it looks are I think the flu owners to be were down there. This thing's initial very subtle. Then I'll come back and then put some very specific spot. Sport one side. It's specific. I can use this it of a small, small Leiker I can see. I'm kind of working manually here, creating some sport on the nose, their physical style eyes, pimple kind off effect, very low floor. You can see Now the skin has revealed flaws again. We can are few here and there, but various. Um, of course, there's some Maybe that is too much. So let's come back again. Something like this that is to, you know, I guessing sigh, That's a basically let's increase it. I pulled some more. He, uh, make it live. It look dirty. That is too much. There's de created so kind of breaking that flat color you can see I don't want the flood color be visible a day and so kind of breaking that flat, elegant and of staying in No keeping into minera I think this is fine. I like it so we can do the same thing on the hand and stop to this So Hannis deliberate more here, then the fair. So you can do that here in again, Pull which here also and then that This. Okay, so I like it. So on stopping this lecture here in the next lecture, we can work on the eye, so I'm going to art some texture to the eye. So that looks. I could see that
82. Eye Texturing: how In this lecture I'm going to start picturing the I. So let's Swiss though I switched to die texture set So selected So now it has by default layer here. So let me fill ical off us. Fill the white color. So let's dilute it and take a new feel there with the white colored. So let's don off this height metal normal. We don't need that with just a color and rough. I'm going to change the white here, so let's kind of ticket quite color here, Dybul. Okay, then I'm going to It says this is the I bawled white. Okay, now I'm going to are few various in various, um, to die ball here, So I'm going toe create a new normal left that I can paint on. I'm going to use this symmetry. So here again, we have that brought us that Alfa still active. So I'm going toe Don't off that. Maybe let's go to this basic something. Go back to the brush here. If you find the brush slurs, let me find broth subsume recess and the vital full well is this basic software. So I'm going toe shoes that Ross again with a little bit. Release color to it. Oh, that is too much. Going to use the floor. Start already, Scholar. So that's for you. I'm tryingto are deliberate and ingredient greedy into the site. You can see again that when precedent said, let's send this to no pisser so that I can kind off Are that it? Like a smalls defector? A sopped stroke, something like this. Something like this again, this is too much. So when I want to do is decrease that capacity of that layer. Have a little bit kind of various. Okay, something like this. Maybe a bit. Okay, so then I'm goingto do that inside ideas. I'm going to create a new life for that. So I want to take a field left with that. So let's take a feel that the reason I took a few lies the often it gives me to change the color latter. So if I using is normal layer and paint, then there's no way I can change the color letter. I have to repent it again. But it to feel that I can just come here and then change the base color of that idea. So that's the reason I'm taking this because the client maybe tell me to change the discolor liberate. So it's kind of a subjective thing. So that's why I'm kind off going and carefully here. So let's say Let's it I color or something. Andi, For this, I don't want height metal normal this stuff. So that's the basic all and roughness. Or here I'm going to use brown color for die as the base color the brown base color again. A little bit can off rough. Okay, so this color nish took come here in this Syria. Now it feels everything. So I'm going to use a mask again here, So I'm going to create a polar first and then mask it. So let's create a folder. I could have mask it because but I'm going to create a folder than mask that because I'm going to create some detail here than on that musket. Help us a little click here. Then that's I. Everything needs to go inside that So let's But that I dare I call it there. Everything basically goes inside. That I left on this, I learn, is to have that Okay, I know from mosque, but because I want this, I will white everywhere. Then I cannot take this to Seiler, so I need to put that separately like this. Okay, now I'm going toe mask this layer. Let's mosque and black mask and then I'm going toe paint white in that idea in the mosque. So basically, I'm goingto switch to mask here and see the ball is totally can afraid so I can do one thing. I can goto this polygon feel Then again to one thing. Let's use the submitted decima trees on. I'm going to accuse faces like this they can face or we can go toe 32 d view there. It's gonna help us to select. Basically, we can select like this just right, So this needs to be on this. Okay, that's good, Melican. See if I I think I need to cover that line as well. This line carefully, Dragon. Just to select that line, if you let's say kind off accidentally covered, the city can can. And just under If you cannot go or if you cannot undo that, then you can just go to black and then been black there, like that. Okay, once does it is white again go back to three d only and then changed to mitral so that we can see that list there. Okay, Now I'm going to create a nuclear just to paint that inside black pardoned in the I thought the struggle, the details here. So I'm going toe, do one thing. I'm going to clear the new layer, then black. It's in the black. But on Dhere, I'm going to choose a single black color for that. So again, just a single color black. You're black and I don't want any signing a roughness. Anything there? I can take the roughness. It needs to desperately flat on. Then here. I'm going to use the pain process so that I can paying the black over here at the center. And he can go to the two d view. I've been here. If you want at the center. If you want to see, check the center. Can she go to this polygon? Philipson can see. We can feel the Syria sickly again if you want. You can take a field there and feel that idea here. I'm kinda manually printing it, I guess. Yeah, maybe. Maybe that would have a better absolute to take a field there off a black color than you could have. Feel that. Okay, that's fine. I'm going to switch to the treaty only view. Make sure everything looks finally me. Been that black? A little bit. Okay, Thing that is fine. Again, I'm going to our feel more details to digest. So here, I'm going to get a new layer with that layer of going to choose. Let's turn off the roughness. I'm going to choose here light reversal of this color. So maybe it will. I kind of feel low, kind of brownish. You're looking off bright colors, something like this. Every little bit brown, something like this with no presser. So here I am, going to light in the center partier. Let's use a little low floor here so he can see what I'm trying to do. I'm trying to kind of light put it light Grady in there like this. And then I'm also going toe to deliver dark color. A bullet with kind of dark. Start to wonder maybe. And I column maybe. Oh, that was a feel less. I can't paint on that. Maybe I can take a new layer and then pulled that grade in movie underneath. I'm making this outside of it darker than the inside like this. Okay. Wants this thing stoned. Then I'm going to take a new lead. Then I'm going to take a little bright color and and create those tricks with the pain Presser. I'm going to art streaks here. So maybe in it's kind of a man really painting approach, we can decrease the intensity of it again. Again. I had a little bit other various and maybe dark alert. Maybe different light. All. So basically something like this Just simple line, back line and in light lines, maybe a little bit. And the more saturate, er bright color here. And there may be something like this. Okay on, then. I'm going toe. Have I'm not renamed these things yet. Maybe I need to put this on top of everything. Okay, It's outside there. So it needs to be come outside, agile, because this mask, it's kind of preventing us toe visible. So let me. So this I pulled white and the radiant calendars to be outside there, and then I can do some very Nigel so I can create a new layer and we took real color. I can create sort of been with the pain presser against Go ahead and well, that is too much. I'm gonna decrease the opacity of the color. Let's change of collage it a little bit low floor and I can That is too much can decrease the opacity and the flu again. I don't want that when presser look. So I'm going in the new place syrups and maybe maybe can help us. Yes, I think we can do this on. We can decrease the we can decrease the opacity. Something like this. Briny lines, maybe a stripe and pleasure. Yeah, Ben prisoners working You basically very certain details. I don't know this. So here's the eyeball. So I doing kind of like that Sinus there, So I'm going to declares it. That's I think, coming from that material color bullets. Okay, then I think that black alone let me Jane the block alert. Okay, So once the skin is John, I'm going to save the file for the first time so you can save it by going to file menu and then save that saved the file. So I'm going to save rich in our substance spent of four. So here I'm going to create a new folder Gold substance. Get substance, then here, I'm going to save it. Catic toe sectioning. So I want to save it in this dub darts SPP filed for Rachael. You can open this pile anytime and then continue torturing the character. So see you in the next lecture where we're going toe work on the tea set and in the plant.
83. Tshirt Texturing: how in this lecture we're going toe paint the Tisa, so I'm going to select the cloth, Textual said. Here, Andi. Then let's start putting those stripes. You can see that image. The character has a T search results strives. Here there are two colors. So I'm going toe feel this color as the base color, and then we're going to start discovers the base color this like brown color. And then I went toe No, make that round stripes on that. So I'm going to feel this color first, and then we're going to do the stripes with this color. So let me put this image on my second screen Second money to here, and I'm going to also big news color from the image. So here, as you can see, we have already a free layer with the color. So he says the dark. Unless I'm going to change this color. So see, like this layer. So this is the tea, said lier Ihad, so leery. If you can remember earlier we had created this group, Onda Parent and the Layer on. We had put these basic alerts. I'm goingto changes based color so they're selected and choose the color picker and then drag and choose this light color from tight image. Okay, so something like this, or maybe a little bit darker, then this I'm going to change, man. Really? A little bit. Something like this. So then we're going toe create those strives with that dark color. So I'm going to again create a feel there. So let's click on this. So then I'm going to change this color. I I don't need these Hyatt and metal and normal. So I'm going to turn off those just the color and the roughness needs to be rough because it's a cloth. So it doesn't have signing this. It shouldn't have Sinus. So something around 0.9 something, then I want to change this color. Basically kind of picking that color for my meds. Maybe a little bit. Livery darker. Okay, so then I'm going toe use a mask on this. Now it feels and tear object. We don't want that. I'm going toe use a mosque here, so let's use a kind of black mass. Basically, it's going to be hidden everywhere until we paint white on the mosque. Okay, so now the mosque is selected. If I paint white. As you can see, we're bringing that layer. Were making that area visible. So So I'm going to created those drives first, I'm going to change this. Brush us from a soft gross to a hard day's breath. I'm goingto Rossman here and then Swiss from Russ. Basic soft to basic hard. So now this bus has a kind of hard is concede the borders of Crispin heart. So with this bus, I'm going to squeeze the view toe the two D views. I'm going toe paint this wraps and manually you can use different methods to create some kind of pattern. I'll saw that letter, but let me paint it. So let's go Toe told it. Ready on here. We're going toe kind of pain like this, something like this. So I'm going to use straight line so I can do that by this clicking here. Let's click here, then hold sipped. Then if you go decide now you can see we can create straight line like this. So first key, click without safety, then whole sit and then click this side. So now I can see I had that thing here. Here you can see we have that this thing. So I'm going toe click here carefully so that it matches there and then hold seeped and kind of roughly matching with that plane. Who can see we had We have our first strife here that I'm going to do the same thing they understood from this view. So play here, then hold, sit and then click until like this. Then I'm going toe. Just do the same thing here. I'll keep repeating this against the the gaps between two stripes that kind of all living here. You can see there Liberte more gap than the backside. That's basically because of the TV. Thieving is not straight here, so that's why we're getting something like this. So I'm going to undo it. And then let's decrease the process delivered by using the bracket key. Then we can I feel a little bit create a liberal bend lane So it be consist rate lentil. Let me try this. We can create this dinner can change, of course. So let's do that. I think this looks cool. Okay, then let's do the third stripe here somewhere. So maybe again, you can see we're getting some kind off weird thing here because of those eaves. Those you, Bill Evie's are very tightly can unfold it there. So that's tradition. So we need to clean up that thing there. Let me do the top one first. Then we'll come back here. So it covers that color thing, Something like this. Maybe it's covered it cleanly. Okay. Their unit toe. Pull this. My here. Something like this. The list. Feel that backside off the hearing it took and off. Ah, Okay. We need to feel this backside that. Okay, now I'm going to kind of clean up those. Well, you're stop there. So I'm going toe going to make this clean fossil. So here, I need to paint black on black again to disappear. This color here. So you needed to do that? You can press X now. This my mask it set on. You can see we're painting white. If you go here were pending rascal white to the mosque. So it makes that little visible. If I press X, you can see it Kind of switch to Jiro on switch to blackmail. Basically. Now we're again hiding this with a small bras. I'm going toe. Hi. Did Again I'm changing the bras. Beijing The bracket open bracket and close bracket. So here we can let me undo. We can use the symmetry As also let me turn on the symmetry. Get down on the symmetry here again. Just kind of cleaning. This idea would hold this time impending black to the mosque again. Place X here I want Oh, bring back to this color here. So I'm painting mosque again. So it went on of them. Symmetry Here on. Just work this side again. You can also work on the model. Of course, because it's a three D model. We can paint radically so I can do this. Stolen this and small bus kind of a man nowhere. It gives us the control of the pattern. Okay, I can see now. And it took Lee, not the Siddle bit. We can use this, Lizzie. This turns up some and see it's kind of lady. Most engibous. It kind of stabilized the stroke and makes the stroke very smooth on and off clean So we can use this. Took it off manually when we have Manuela painting. Can you use that? I'm going toe caught it from here. So Let's this X Okay, let's turn this off. So delays the stroke. So sometimes you maybe say some kind off. No. Like like things. Therefore, Yeah, that's fine on hearing it to do this man early. Kind of cleaning those patches and you can use the distance. We can decrease the distance. I don't delete the strokes too much. I need to do this. Okay, So to see if then the hell the media, the backside, of course. Let's it's done off this two stones and do it manually. Then I'm going to again place XK, Or you can come here and change this to white and black, of course. So no white brings the layer makes the inevitable while black to the mosque kind of he didn't hide the color. So here we're going toe, bring that broadsides again and then hold sipped a press person in whole seven click again to feel that I can see here on Yeah, I'm getting this kind of gross most line. Here's a stroll of that line, and then we can bring the grass size small because the breast size and then tone on the radio station, you can, of course, clean this and took Linda city of it. So that's Swiss to black. And then kind off. It is the Syria. Okay, good. So it's a captain. Get Krystle. We're not kind of looking for realism here, so everything can be stylized and simplify it. Basically, we're doing this same thing here. We're kind of making simple textures and no simple things. So a little bit kind off weird thing is kind of forgiven. Okay, so everything looks fine. The literate gone off the symmetry. Yeah, the patricide looking okay. And we can give a little more time than clean those perfectly. Let me clean this back, Satchel. Let me down on the symmetry again with the black thing with with the distance we can do this is really clean line, Basically. Yeah. Okay, so with this pattern, I'm kind off for happy with disip sis. Okay, we need to do this collecting year, so there's a kind of pattern going on there, so I'm going to do that. So again, we need to create a new layer because that's a different color can see. That's kind of deliberate. White discolor. So I'm going to create a new pillar quickly with again turning these things off, making the Claude that liberal Ralph say on. Then let's choose the color again. It's kind of off year, Louis. Wider something. Let me find this clock at the school. So then we're going to again use the mosque. Black mask. Need to bring that to hear again, Rick. And manually paint. Of course, we can paint on the model here directly, or we can feel it to the We can feel this with this for legal. Think so. The mosque Larry selector with white. So we have black mosque we can paint. Why? To bring that layer color. So we can use this with this polygon fill ups. And we can feel this loop satchel. If you want. We can We can feel toe maybe two loops. Of course we can do this on. We can feel these loops and get that kind of loop neck look going on there. Okay. As the best I can do this, then I can just put the broad stroke here. Can see if you feel if you use this technique, you'll get this kind of pixelated Look, we can again use the broths on top of this Let me let me. So your and if the backside let him feel this, Okay, so now I can go to bus, and then I am paint again. So you here with the distance and then with the symmetry, I can do this quickly. I'm making a little bit more ticker and then the most small cleaner because I cannot leave it like this. But it looks too much too pixelated and literate. Sometimes it happens this place, if so, that it frame again. Okay, Now I'm going to do the same thing. Just kind of making delivered wider. I feel that area with my boss still against you were getting a little bit pixelated. That's because of the results. And we're kind of painting. Um, we're kind of creating, okay. And we're getting delivered. Small lady, a tow. This that The reason I think that's fine from a little distance that is. Okay, so it is. And this patterns have done. Let me turn off these things and then So it's back to three D Only on top of this, we can put it small. Takes a pattern to make it look a little bit interesting. No, it's is looking out of a little flat, say, so we can do that by again, creating in new layer or we can create smart. You can use materials on top of this basically so we can do that by Let's say, let's go toe mate rials here. If you go to materials and sorts fabric, that's pray. Let's sorts fabric your fabric. He'll get some materials per fabric so I can use any of this on top of this, let's say, let you something simple and noisy and we're off. You need to experiment it off, aligned really. You can just drag and drop on the model on. You can see it flees the entire object in there. Texas it so we can use this. Maybe conceived that material is outside our mask group that they said group. So I'm going to bring it to the T. Said make it put it on top. You can see now it's a little under Tisa data because up because our group has a mosque. Okay, now this material has some absence here you can see the color. So now if I on this middle also has this e v scaling things here so I can increase the SUV scale toe in a minute. Mated. Make this pattern smaller. Conceive. This scale is kind of law, and if it has low value again, see the patterns are bigger on if you scale it, then you're getting small patterns or under skated like this on then. I don't want this great color, so I'm going toe go to our delivered white side. Still, having this patterns on make Let's go to a deliver Twilight, say now concedes, can overlapping our color of colored Leah so I can do one thing I can make it. I can put the multiple apps in here if you go toe the layer. And if you see here, there's a kind of north, so they're kind of last styles. If you go here, will get a lot of layer styles choose multiply. So now it's kind off transparent. Make that white transparent. Now you see those patterns on top of that Texas. So OK, so the days that is done in the next letter are going to do the same thing with pan. The plant would be very simple because that's a single color. There's no pattern, nothing. We're just going toe put a simple pattern here. Small text, a pattern that's it to you. There
84. Pant Texturing: I Let's do the pan picturing you so you can see the plant is very simple in the concept. Can see it's a single Plattekill, a pan with deliberate dark on that. So we're going to again put the texture and then they're going to do this kind of dirty look. So let me put this here on again. We have a folder of the bank we to feel layer, which has a color flag color. So I'm going to put the texture on it. Fatherless. Me Don't at this height, metal and nor on make this pan a little bit rough. Most signing. If you keep this roughness towards the black, then it's become signing becomes assigning object. As you can see, a plot doesn't have signing this. Most of the clothes are kind of mapped, are very low signing it. So just are just the roughness of this base layer. And then I'm going to put a material on top of it like we did on this tea set to bring this kind of pattern. So again we can reuse that material. Or maybe you can use something else. We need to again experiment. I'm not sure who is Mitchell. I'm going to use on this. Maybe some kind off. It's a cotton band. Maybe someone of rough live it kind of cloth texture to it. So you can see I'm looking at the materials here. If you go to materials and search fabric here, please enter it kind of surplus those fabric materials and from those metals, you can choose one, maybe, maybe something every going to use their public rob blitz. Oh, drag can drag on top of the model or you can drag to this layer on. You can put exactly very wonder material there on. Now, you can see we have this material that I don't know if we're going toe use it. Let me change this color on. Let's see if it works. Now this car material has a blue color to it. I'm going to click here and change it to against something very light so that I can make this layer multiplayer and I can kind off get rid of this overall color. So this is weight, and then I must kind of scale this e v scale toe, get small patterns here. So let's increase this every skill to get small pattern and say something like this again. It's kind of captaining character, so keeping something which is visible from a little distance. So it was killed with a white, most closely white color. Okay, with this, I'm going to said this layer style to multiply again. So let's say this, Okay, with this, you can see we're getting this layer color on. On top of that, we're getting the texture from this material layer. We just existed the color and in the scale and then make this layer multiply. Give the lead in, multiply more. This is it. Then we're going to are some dot Look here. You can see there's a very slight dirt on top of it characters, little bit dirty. And so we're going to do that for that. I'm going to I didn't knew Leah. Okay, you can see I most covered that against if I don off my pant decks earlier that Larry IDs also coming here and see if I turn it off. This you can see it's also on the Tisa, which we don't want. It's because we don't have any mosque on this group, So the metal on with kind of applies on the whole, Dexter said. If you don't have a mask, Okay, so I'm going toe again. Use a mask on this to get rid of this over our double kind of texture on this desert who don't want this thing here so we can again mask this off This can let master group. So let's go and get the Black Mosque so high. It's everything. Then I'm going toe goto this pelican feel while this masking off sonny selector on. Then here I'm going to use this object metal object field mess pill because I know this plant is a single mess. It's not connected with the case said You can see there is no connection. So we can know Click began, Just click. And then it feels white on this mosque, so it makes this visible on that area. Now, if I switch back to the brush American see, it doesn't affect the desert animal, so just keep this thing. Um just remember this thing This is very important. When you were using the material you need to have mosque on the group are are on that particular material layer. Otherwise it's Ghaleb all over the place all over the Texas set. Okay, Now I'm going to create a dart layer. So put that I'm going. I'm going to create a dart land top off the Teesside. And it's basically commonly Commandant left Bopper. What of those? So I can create that on top off everything. I'm going to create a new layer, normally a So now we can again be shortening renamed these things for the time saying I'm not renaming are kind of putting that time to rename those top but toe no, create this heavy. Do you need to make this habit off? Giving name distinctive name to everything Okay, this dark. And for this dot I'm going toe come down here than the stall off everything expect color and rough. So I'm going to turn off everything Just the color and rough dot has no reflection on most Chinese. So it needs to be white, uh, one. So it's fully Rauff. Another colored off dart, basically is usually it's brown kind of color. So I'm going to goto color and then goto brown on maybe something like this, something like this. So I I usually use this as a dot maybe a little bit. Melo is something. Maybe this. No, I don't like this. Let's go to us a little bit. Brower. Okay, This is so here. I cannot do this. So we need toe. Have a bus, we can go toe. Can I can do this by declares this flow obsolete on the floor. We can also decrease the stroke capacity. We can decrease this So it's basically kind off. Not. It's now going to take very light colors. So it's not kind of feeling with a vehicle of now you can see something like this. I'm going to also change the broth sides. Let me bring this back. So now you can see we have a kind of by default Gruss. So if I goto Bross Andi, if I start dart here, I have some dark glasses. So it's basically on a default process so you don't need to download this thing. So it's kind of saved. Chip substance mentor. So now we have some drug Brussels. We can use experiment and civilly in a Mattis God practice with these, maybe, let's say dark patches. Now you can put like this something very distinctive dark patches or again also off the Christoph flow on no positive UNMIK very subtle dot It's too much. Let me bring back Can see and just clicking with my mouth So here I am using my tablet and my mouth I'm working on using both We can again see we can make it dirty by this this way can use different dot Brussels can experiment darts boards for a little bit Move can off look clear pats maybe dot Brust is a great brush again and do something like this again. Every brush has its own through and stroke capacities We need to change according to the brush with every breath you can see here began again Increase the bra size Klay got dragged The plus since the bottom part of this parent is a bit dirty, it looks like over it looks like a Grady and kind of thing. So I'm trying toe, get that thing again. We have this only layers. We can come here any time and decrease the passage as well, So that's not a big issue from distance. OK, that's fine. We also want some dot on the tea set, some goingto, maybe here and there just to break the perfection off it on em something. Beginners kind of tend to do this two months. So this makes sure you're not doing it two months, although is that looks kind of unnatural. Normally, nobody we has to Dirty Sock and Ben. So a little bit kind off dot Here and there on, they can have the layer. You can come here and you can click on this. I can decrease the opacity of the layer. It's basically like photos up. So here's the dark clear on. I'm finished with this thing. So in the next lecture, we're going to welcome the Sox year, so see that?
85. Socks Texturing: how In this lecture, we're going to work on the socks so you can see the maze. It's a Weichel talks, and it has two lines going on there. Two lines that there, then these were kind of flat color. So let's do this. I'm going to select the body. Texture said, because this part we lost the body here began. So, Lloyd, you can see you can I'm going to collapse everything we have. Just the skin. I'm going toe Go to the Sucks Here. I want to create a folder for it. So let's se socks. Okay, when the dragon dropped into that fuller Okay, we have this socks. Now I'm going to I don't know if everything basically the metal and there No, No more living this color. High drop whom to choose. The colors of the struggle. It's a white color, just a kind off off white and the put off listeners to be hired side and used to be mad. Say Okay, now I'm going to use him atrial to get the details of the socks. So here, if you go to the material, let me go. Dmitry else you can search for break. I'm going to use this calf pull material which has this kind off noon texture, less drug and drag and drop here. Okay, now it's going off coming on the whole part Here. Let me. So also, that it looks good. Okay, so now, as you can see this, this material is coming everywhere. You can see. It's also call me in the face. This is live. Do it. So we need to mask this group. You need to mask this group for its could the mask. Black mask. Okay. Now going to use this polygon feel you re upset because I know the sox TV is separated. They're independently visit. Okay? No, Let me go to the scrap. Full material along. Going to scale ivy to get small. Levy a small Texas pattern fillets in prison agency that detail something like this on. It's kind off a brown colors. We're going to change this, So basically, we don't need this layer. This field, they're getting the color from here. Getting basically everything from here's a little big this color. Maybe I can make it live. It kind of a local maybe live aerial aside. That is something like this again We don't need this metal. Chan Insula stoned this off and I'm going to clear those two. Line on. We don't need this. I think Get rid of that here. I'm going to use another new layer. Then we did the hard crust. We're going to draw those lines old. It's bring the hard drugs. Now we have this basic sub breast. If you go to this breast, we'll get the harbors just alongside that stopped roster. Select the hard for us, and I'm going to switch to the cartographic view whenever I'm kind off projecting a drab painting here. Something better to switch to the art. A graphic view. Although you can paint on the three d perspective you? No, I'm decreasing the broth side by using the open bracket and the close bracket. Okay, this is my layer. And then I'm going to choose a color. Low height, Basically nothing. Lord off on in normal. Nothing. Just a member roughness this day. This toughness. Okay, here I'm going to change the color again. A big brown brown side. Maybe something like this. Here again, we can just draw. So, in our terrific view have you received toe get the exact right side view. So here, I'm going to draw that. So there. Two lines I need to draw solace clipped and hold sipped. I don't think something like this. Okay, now I'm using. I'm not using the symmetry zuletzt on this on. Okay, Something like this, then This start from this phone view. Something like this, then. Okay, Something like this. And let's draw the second line. I'm going to do that every dinner. Okay? Now I'm going to switch back to the perspective. You until new off the symmetry and then the sucks. Bodies don't look a lot deliberate. Dart on top of that. I'm going to do that after I After I am done with this soup so we can go ahead and nard some Darden more the socks and the soup. I'm going to do that in the next lecture. See, there
86. Shoe Texturing: I will come back in this lecture. We're going toe. Start working in the soup, so I'm will create a full off. A data has created fold over the Sioux. No, it inside the skin for loyalists. Did that outside. Maybe so my here. So Okay, so first thing, we're going to put their basic love to it. That's created a filler on drag that into that Suli Sue Fuller. Maybe we can deliver it to best. We don't need height, metal, no month. We need co learned off nous the rough leads knish to relive it. It's not fully Matt. It's not fullest signing like this. So it it's kind of a letter so something so I can keep it kind of lights signing kind off amid maybe something like this on its a wide suits. I'm living that color toe white. So here I'm gonna create that brown sold even say the soul colors kind of brown color. Then we don't have these details. So we're goingto do something here so it can pull some kind of texture or logo or something like that. So let me create that Sue based ASU soul for So I'm going to create a feel there for that. Maybe may be sold or something again. The stone. Everything off Except this color and roughness. Coal industry brown. I'm gonna big those okay on bits everywhere so we can mosque it. Let's create a black mosque. It hides everything. Then we're going to bring that back by painting right into the mosque. So I'm going toe Swiss. To our terrific view here on, let's use the symmetry so that you don't have to work separately. I would say so. Here. I'm going to Swiss to the hard blast salads. I think you can keep it like days. Maybe no less success to the hard for us where my bosses just drive it. Yeah, the hard gross Iligan bent directly here. Or we can go to the Have you two d view not ready to d view. Then we can paint here as well use with have blow. Whatever Phil says you do. You. So I'm going toe use my stylists and then being tear movie. Yeah, I'm gonna pain directly here. Let's paint roughly. Then I'm going toe kind of clean that Make sure we feel this thing first. Okay, so now I'm going to squeeze back to the black look so I can do that by going here. Tag Little black. They're the small rose. I'm goingto click and hold sipped. Clear glitz. No, that's fine. We can also use this distance. We can try that. The distance is too much, Celeste. Because it you can do this Press X to come back to white. Then again, Good black. So here I'm kind off switching between white and black to reveal and hide this brown color . This idiot is delivered to a key, I think, because of that TV. Uh, okay. Espresso X again toe switch to white. So here you can see I'm painting white and black. So this mosque, if I want to reveal that brown color again impending white if we want to hide somewhere, then looking bench Phil Black. So here I'm going to paint on this three d view. Let's sales to black. You can see when I press X key can see my most coarser. It turns black and white. So they do. You know what? I'm painting here little bit carefully then, like an increase. This It's kind of giving in a different manner in the three d view on the to review. So intrigued review. I need to increase that bit. Doesn't need to be 100 personable. Pointless. Don't this off. I'm clean these things Be a bit. Okay. Get down. Let's was back toe three The only view and don this off on the symmetry off. So it's back to prospective you Okay, we got the suit, soul and the base right here. Then we're going to pull some texture details into it. So I'm going to pull the texture detail here. Let's say we have the logo, the name or something of the company, Something. So we're not going to use any complete meal, of course. But we can see the example of how we can create from text texture. So for that, I'm going to create a normal layer. So let's clear, created lier normal and not a filler. Just a normal there on. And then, with that, we can go to the Alpha six in here. If you go there, you will get a lot off texture, which is black and white. So you get all these things by defaulted. The doctor I'm going to use you can use any of this as the symbol or something I'm going to use. Let's say I light one. Maybe this one can use this so we can We can use that as a brush like this. Like a stamp or something. With live, we can use the stencil toe. Bring that. No, it's a white colors. I'm going to turn everything off. Except the more modern that thing. I'm going to make that a bit. Sign your so rough Finished with this? Say, that's black On the color Mary, we can use again a brown color something. Something like that can see it just a single click. We cleared that Alfa. Okay, we can use this like this all you can use tinsel to bring that me so that if you go toe this, I can hear against you. We have four absence here. The broth subsides. Then the 10 till upset. Now the 10 till Should goto this stand still here. You can drag this into that. And now you can see there's a kind of off projection going on here in the view. If you're holes s key and then just drag the left mouse, you can rotate it. You can drag the right loss while holding the s key is for Sue. They're against skilled stencil limits Can scale it like this Onda again. See you fight Donald doll for here. It's just a normal bras. I can Can a painted a contractual continue pain like this? We're doing one that we want a single piece here So we can bring something like this then to get rid of the 10 stencil, you can just close this if you get something. I mean, a predator can actually it is that today it is, Russ, something like this. Okay, we can do this board side. Okay, so then I'm going to use the letter text something here it's Find something you I can use maybe every danger or 80 s And the light that you can also clear toe your own texture. Your own Alfa. So I had created this inside Photos off this one. You can create it. We're going to photos of and make it make it black and White Square. Texas on the black part will be killed of transparent automatically here on the white bottle with the men so you can spend any cologne that maybe I'm going to use something that I can. So you some taking Mary Stop wasn't thing that's that May Swiss back to the brush first. Then we can bring that increase the brush size and then it's kind of working as a stamp. Something like that, maybe 10 journalists. And let's start on the symmetry. Align it properly. We can also go to our terrific view. So, Louis, so that nothing is on the way. So let's created okay, and that's fine. Let's go toe treaty only in perspective. You, as you can see, irrigated that texture. Now let me so you how you can create your own custom. I'll find safe photos up. So here I'm going to squeeze two photos up. So let me switch to four to certify off. Have the double again Say I have created this. You can do any of this. Things were going to file menu new and let's get a 52 or 5 12 pixels emits. You can go live off this. So now I'm going to get file here. Let me feel this with a black color. Doctors feel this is black colors by placing a bolt on backspace. This foreground color. I can use the bucket from here. Pain pocket with this foreground color. Just feel it. Then he I'm going to create a new layer by clicking on this cycle. On this, we can text, We can write something with white color. So this black background will be transparent in the white part will be actually the picture back. So here I can say it can write anything maybe. Sure. Okay, let's make it a bold text. No, let's increase the size of the text against select like this. And then you can goto here on drag this to scale the texture. So if you had not comfortable it photos up, please use the rightful textures there. So here I'm going to this custom safe, obsolete on. Then you can see I can go here. I have all these custom saves here in time for the subs. You can use any of these elected this I can and make it something like this. What? They were kind of a local. We can now let me save these ads for for defects. So let's save odds. I can save anywhere. Basically, let me serve on my next off. It's not a good idea, though. On saving on deck, Stubby might accidentally delete something letter, but let me save it. That's I'm using this as an example. So let's who such a big save it. I saved it as a J epic file. So let me close this. Okay? So here I'm going to eat. Is this and we're going to use our own MSO. Let me it Is this okay? Yeah, we're doing that's admittedly it's flipping that text. Okay, let's see how to import that. You can import that texter by going file. Miller, If you go to import resource is on, then you can Are that the sources? So let's art it goto the distance and I have saved it. Maybe this one. So open it again. Now it's open, but it's undefined. So let's define it clear here on defined it as Alfa so that substance, but don't know this is an alfa can. Now you need to import your resources to click here and to self So here I am importing this text as a new alfa toe the self Okay, so that textural way inside the self Alpha folder so imported. Now, if you go to this Alfa Fuller. You should find that that should be here inside this. Let me find that for dude. This one. Okay? So you can use that. Now look, Saudi, we have the broad selected is at the edge of silicates. Or let's select the cross on again. When I'm under stamping something or using the stencil, it's better to be in our terrific view rather than the perspective, because prospective you has Dolo debt and that can a Corvette, sir. So it's going to be projected in bad way. So let's user told everybody who is it doesn't have any kind of prospective iti to it. So it's gonna flat. We can now we can change this Alfa use the cell far as our tester sublets in line it Ah, beautiful logo here can see you can see Once I click it, it becomes a little bit kind off bloody. It's because of the Julissa and we're getting from the TV. We cannot do anything now that so I can do that on this side. So here I didn't use the symmetry. Otherwise the Sioux will be flipped to the project ways we don't like. We don't want. So let's see. Is this so this way you can use any logo text on the model. Okay, Now, I'm going to stop this list of year, and the next lecture we're going to are some dot to the character, the world character, and then will be kind of fine with the over kind of completed with the structure. Then we're going to do the mountainside part. Let me go to the prospective. You okay? I think that me society is a little Save this file for the file and see always saving different files with different file name and save some back off in case you kind of lose the men filed. So see you in the next lecture. We're going toe going to work on the dot layer.
87. Adding Dirt To The Shoes: how In this lecture, we're going to add some dot to the Sioux on the socks. You can see in the previous lecture, if somehow forgot. Toe feel the bottom part of the soup. So I'm going to do that first. So let's go toe the Sioux filler hearing it toe pain. The Masters let the mosque here. And then with the plus, I'm going to paint white to its threats. Bent white, Do it to press X key so that we do in the white color we can do this. Well, we can go toe the two d three d view and then again come here with the Bullingdon feel, use the visual and then just feel this every cell with that white color to the mosque, which kind of makes this color visible that but it is, do the same thing here. Okay, when I'm kind of trying to do this, it doesn't allow me to do this or something wrong there. So let's select. Let's see if this King Lear discovering that can see somehow I got the skin. Let on that on that too. And the skin layer, is it off this stacking order? So that's why, even though I have feel that thing this new no masking ups, um, but because of the skin layer and the skin layer has that part as well. So it's kind of evolved the stacking er, so it becomes special. So I'm going to the skin layer on going to the going to this mosque on Let's been black here because we don't want here. So let's place been black here. Basically, I removed this soup part from this body. Skin color Sometimes accidentally these things happened to You need to check that. If something kind off don't walk of something, you can check out the less. If it's going to evolve that something like that, we can. Now let's create a dart layer, so I'm going to create a dart layer, a bow, everything that's good in new layer normally, and then I'm going to turn everything off. Except this color and roughness on the color area, I'm going to use the brown color. We have already seen this. How toe create a dart layer. Okay, then the roughness part. I'm going to make it full it off so there won't be any Sinus, and now I'm going to use any dark brushes to paint it on the surface of Let's go to bus Andi. It said that. And we told this process we can be in the darts. You can again use this floor on the strokes. Let me use my being tablet years. I didn't do something that that was done on the symmetry. So the overall bottom part would be more here to the this bottle. Butler should be fully that. So I'm going to do that. So let's make a kind off smooth, dark pass and then we can come again and put some very clean and very crisp looking down basically again, Don't do Don't overdo this spread of the neck and of medium print I can see so dot here and there. Okay, something like this. And then you can come again with a clean, more precise dot baton. You can do something like this if you want. Maybe a lot. Let's we can do something like this. I don't like that. Okay. And this one seems good again. It a little bit decreased floor capacity. We can come again. No, something like this disproven partners to modernity. I mean, you can do this. There's no rule, but yeah, well, I think this is pretty dirty looking. No. Okay. From this side, we have some asymmetry colleges, and that's fine. Looking for into me anything. We can keep that. Okay, so I'm happy with this. We can go ahead and put some more dark, but I think I'm happy, so I'm going to stop here. So let's go back to three D View, and I'm stopping this elected here in the next lecture. We're going to work on the mouth fart. It can see you have some kind off. We're we're thing going on there can go toe mouth, solo it. You can see some teeth, have weight and something can degree. I'm going to see how to fix this, and then we're going toe spent it real quick. So see you in that lecture.
88. Mouth Texturing: Hi. Welcome back in this lecture. We're going to work on the mouth, so let me select the mouth texture, said Onda. Let's click on this solo so that we can just see this here can see there's a problem now. Help of the teeter looks white and then other up looked kind of dark gray, so it's kind of a weird thing. If you go behind that side, you can see it's kind off again. Approach it so it's because of the normal because of those miners value in Maya. So if you can remember, we had these teeth kind of duplicated in putting minus one value to the skill. So we need toe kind of correct that in my and then bring the this intermodal again into substance. Winter. The thing is, we can any time go my goto my and and tweak something. Let's say chance the UV or change the mortar or something. Then bring the model again with the new Viet, the off record model on then the text would be still on the morning, so we don't need toe here, the Texas again for that. So basically what I want to explain is we can change, the more they levy or change the mortal sip on, we can re bring that up some the model here and then the texture would be automatically projected into the new Miss that we saw that. So let's goto Maya on not my hiding place Control, itch a few clothes and select one of the date one of decided and opened the center box by clicking on the second you should see minus value. Here you can see we have some were living the rotate and some minus value in skill. So whenever the scale has some some kind of miners value, then it can create this kind off negative kind of basically flips the normal direction of the mess. So we need to correct that here, then exported against Let me select the teeth, decide from decide. Then we are going to freeze this. So let's go to modify and freeze to get rid of these values. So Freese transform ism. Now these are clean. Make sure you don't have anything there any negative value. So let me bring the body back again by control. Sip aids again. Press control stepped on each or I can go toe display. So on. So last hidden. Okay, so now those teeth are corrector normal security. And now I can export this thing again. Let's select the mess. Make sure we don't have that outer eye boulders find selected on. I'm going to export it again. So let's go to export selection. Um, it's find that polo is this often spent? Er a BX export. No, I have a six fold over that. Okay, so now this is the character based. I can overwrite it. Or I can get a new miss and tell in your file. I can do that. Let me do one thing. Let MK there to new mess character. New maybe on export. We wanted exported. I'm switching back toes often. Spender on Dhere. We need toe reimported. So we need to goto this treatment will not file. You shouldn't go to file and openers tried and create a new file is just need to go to edit project confidence and on Dhere our methods said here you can see this may expose it mess. We can click here on the select Upson on Browse It selector file And this guy's this character New fbx file I could have also override that. Okay, now I'm going to okay it. You can see I got all the steaks on the new miss. And if I click on this mouth, solo it again now tell everything. Looks fine here. So basically it waas a kind of normally. So the normals were in more tech. So we corrected that by fishing that thing. Okay, everything looks nice. So let's put some color. So here I'm going toe put some basic color. So let's so Lewit has put a color to the teeth and the gums created Mitchell for the gun. So I'm going toe, create a material via filled with the feel there on I'm going toe turn off the height metal normal of this layer on just the color and gruffness. And this can really break Sign here because it's inside the mouth of place part and it has no saliva on the most Sure. They're basically So let me make it a bit Sinje again. Nothing like a kind off glass or something. Assigning but still kind of a glasses. Any otherwise it to look like a metal of it. I think this looks OK then I'm going to say the color to have kind of a Fleiss of being kind off thing. So again we can tax it it again. Paint on various and here. But it's not going toe visible, so it's not a good thing. Toe. Spend your time. So I'm going toe, get a new feel there for the teat on December toe Say it may be did and against reaching off all this unnecessary channels here. Just a color roughness. I would do it. So here again, it's a sign. Anything I'm going to make it never signed glossy Sinje. So kind of staying somewhere here, going to or something. Andi, I'm going to make it kind of white, but kind of your loose white fillets. This make it There's something like this. Okay, so we can put this layer below, and then the game layer is on top of the teeth layer. American kind off. Put a mask on the gun there so that they don't live vegetable on this gun part. Let me put it. Put a black mosque first so it hides everything. Then I'm going to use the polygon. Philipson. Andi, choose the project searches the maze. Philipson click on it on Ben. Click on this. I can just feel it. We can also feel that saying, go to the tone. A pink color. I'm using the same material here. Okay, Simple. Basic. We just feel those color and we can go ahead and you can put some cavities kind of things. Let me being this the size down. Okay, So if I go to the teat on, let's put a dart layer on top of everything, so I'm going to create a new normal. They're not a feeler, Just a normal layer. And then again, I'm going to Sweets are everything except this color and roughness off mission is to be kind of met again. No, not mad as dot. So here we can put kind off. We can keep its little bit senior, but we're going to make a little bit dirty in this cavity areas on here. Going to choose something, maybe a little, little brown, dark. There's something like this with the law intensity. I'm going to use my pent up for this. And Letty, was the symmetry. Okay, Okay, good. So here I'm going toe going to decrease the floor down. Onda, Let's also decreased the stroke capacity so that I can kind of use my pain press on this on Dhere not going to use a toilet paper. So let's turn this off. So the floor needs to know Presser so that I get this kind of a poop again. Just put their kind of spare, bloody kind of stroke. I can see I can do that with the Pain Presser and the Pain tablet. It's kind of creating a stroke like effect. I don't want that. Let's make it move, Pacer. You can see I'm trying to create kind off a little bit kind of. I'm being a close on our darkness to these areas. It doesn't need to be too much so and to be careful here, So let's do this. Do the same treatment on a video. It basically I'm doing this so that it doesn't look like a flood color and, uh, very, very clean. So it should break that kind of even flat color and make it look more interesting and believable or something like this. Okay, I'm going to visible everything and let's see, I think everything is looking fine so we don't need to do anything else. Okay, so I'm going to delete this unnecessary layer on the bottom. Forget that's it. So I'm going toe done this mirror up, son. Off on. I'm going to call this down on. Then We're going to do the head exiting the next lecture, so see you there.
89. Hair Texture Painting: hi in this electoral going to paint the hair texture. So again we're going toe Create a kind of stylist here, here so I can see the reference image We have kind off a prime Niskanen off heads here. So we have already this dark brown color as the base cloak and see Let me so we have this dark brown coal as the base. Then on top of that, we're going to create some light problem headlines. So I'm going to do that here. So let me goto this material and let's make this. It's a just a Sinus of this hair. Maybe kind of a little bit kind of help way our 0.6 something. Not that signing here on day. I'm going to change this color. Let's get that color from the mess, OK? I'm going to create a new layer. So let's create a new layer here in normal layer on with this layer I'm going to are just ah, roofless first and then the color. So total friends naturally will sign your here. Let's see something like this. Maybe, maybe a little bit kind off roof. Yeah, something like this person is just a roughness then I'm going to just get their brown color light brown color. So with this color going toe, paint those hair lines. Let's decrease the broth Sides with chocolate bracket on the open close record. So on a decibel. Amusing. My pain tablet on the floor is said toe the pain presser on the stroke Capacity said to paint person. So now I can press harder to get more flu and I can press lighter to get low on sir planes . So let me decrease the floor, which so that I can control it better. Okay, so everything looks pine. Remember? Live it. Less flu. Okay, something like this. So I'm going to create some lines. Here's a Let's start with this. What tickle here, here, stick list. Increase the process a bit that I get a bit more ticker lines again. See, I'm adding the lines here, and I'm getting almost everywhere that because the e v inside my So if you can remember, we had all those hair clumped. TV's under same spot in the DVD Road one space. That's why I'm kind of painting one area and then because of the Z visa, every every had clumpy resort on the same sport, getting to see that texture everywhere, almost everywhere. So let's real quick. No, I get that hair feel and this is the basic. Yes. So this initial filled well on here. We stood at the T video. We should see some here lines kind of ending. And you can see when I'm gonna repeating the stroke. I'm getting a little more light or person. That's because of the florist Said toe a low number here. And as I kind of keep repeating the stroke, I'm getting more capacity. So it's gonna gives me that depth of field depths are adept in the head, not kept up with laptop Villager defending. Okay, so let's What's this technique is good for kind of stylized hair cards, Andi know, catatonic. But if we're kind of creating a realistic character, then ah, this technique might not give you realistic look, So you might need to use exchange for that or something. Something like that. Do I'm getting some of your stuff here. Do. OK, Okay. So in this letter, just going to give this hair texture and then the next lecture, we're going to create Alfa so that we get to see headlines here at the end in our rendering . So now, if you render will get this flat. Sepat, then this doesn't look like a real hair are. At least we start to see some kind off airlines there. So if you would render now, if I goto this camera and click on it, you can see it's still kind of hard safe. We're getting the texture inside that. But the saved outside the deep savers in her we're going to create the AL finalist later. So we see some kind of hair. Look here, everything looks OK. Now, ligament on this off on. I'm going toe. Increase the flow a little bit on capacity available so that I get a little bit more videos on here and there. One to light a stroke. Not going to art this too much. Something like this. Okay, so I'm happy with this on in the next lecturer going toe. See how to create that. Our far inside substance Bender. See that
90. Hair Alpha Painting: hi. In this lecture, we're going to kill the Alpha for the hair, So let's squeeze to the hair, Texture said. On the first thing, I'm going to create a positive channel. Get that al far transparency on the hair card. We need to get that channel so we don't have that channel here on any of this layer. So we need to create that by going to the texture sets settings. If you go there and create that generally can click on this plus channel Eichel on Let's create a new Capacity General Now the was it? It's alittle is in our project so we can create any layer and it will have that opacity Upson here, the Hopi Upson is for opacity. So I'm going to create a new layer on and let me soil the concept of the capacity map. So here I'm going to create a new field there. So with this layer, it again fills everything with the color and the roughness. Everything but this layer will were dedicated layer just for rapacity. So I'm going to turn everything except the opacity of awesome for this layer. So because we're getting the color from this layer getting those hairlines from this layer so under roughness as well. We don't need those things anymore, so we need just opacity absolute here for this layer opacity. Upson is said to one toe one minutes. If I goto this capacity visibility, you can see the positive here now it fully white because of this opacity. If I bring this, UNC notes said to black, So one white men's it's gonna visible make it's gonna be visible if I render it, you can see now the whole haircut on the thing we want is we want everything white. Except this area, they said, ended to be some kind off black hair lines, which we should make it kind off look like health's. So let me switch real quick. So if I paint on this layer now, it said toe white, it's a filler. It said the white fully filled with white capacity. So I'm I'm going toe paint black on this does the way I can paint on a feel that is padding holding the right mouse here on. Then goto our pent I can are pent to a filler. So this pain, this electric DNA on again from that friend I'm going toe de select everything except opacity on Dhere going to set it toe black. So basically, I'm painting on top of the feel that I'm over writing the feel that by using this paint up some on again, I dis elect everything from that paint up Some except opacity. A positive said to black. Now I can just paint like this on Let me quickly swill the effect you can see this white part is visible and black patent opacity makes this hair card transparent. So we're going toe Fernando were going toe use a small bras and clear those headlines here . So real quick I'm going to create some hairlines. Make sure you're using the floor 100% on the stroke of passage 100% and I'm going toe fearsome hairlines here seems like Okay, had we used the pain presser for the positive Egil I'm going to actually change this to black and then paint white for that makes sense. So let's goto 10 the base opacity to black and then the paint of positive white. So then we're going to feel everything white And then here some white airlines basically now it's totally disappears if you render is gonna disappear in the render because everything is black and capacity Now the paint is said toe once I can paint white so basically you can paint anything white and black on white or white and black doesn't matter . So I'm going toe get some hairline. This way I can actually bend that head. I'm going to add justice for you here like this I'm going to create some hair gloms But this tryingto create some hair plump, kind off effect. Once this city is important. Once I get this area right, then I cannot feel the bottom but and see, we're going to feel the bottom but entirely so doesn't matter Here. Quickly, I feel it again. We can do the same thing here in this area agile. But I think this is Dennis to field fully. So now we can see at this idea what kind of looking on has Okay, now I'm going toe use a bigger brush and paint everything here because we want to see that hair card clearly in this area. Andi. Then I'm going to stop somewhere here. Then I'm going to blame this area properly with the haircuts. I'm goingto put the most rocks so that it blends. It doesn't look like there's a border or something. Something like that. You can see no fire window. You can see the magic. I can see the magic here. So now this area is totally wide field with white. So we're kind of seeing everything here and then the city eyes, if I know looks like here, even though it's a kind of plan, it's a fully plant. And I do feel livid more here so that it looked liver evidence kind off. There's something like this. I'm going to do that same thing with everything here, basically as to the same thing here, creating somewhere plums first and then are going to feel it really quick. We don't even need toe paint this area so we can be close. I just feel it being were this day's end any they're not going to solve any visit Transparency here in this area. If you want, you can do it, but we don't have a lot of hair card, so it will cannot. The head will see through the Harris. If you make visitors transparent, you can see I'm gonna trying to blend that on to a nice strangest in here something like this, and then can render to see the effect. And see, it's already looking cool on these areas. Still looks like a style is here course. But again, again, you can say these airheads because of the end lines. Here, I'm going to paint this line. Its liver trick. You're on this kind of hair cards, which I can a band or something again on here. I'm not touching this borderline. Otherwise you look like Okay, enough card. There wasn't like that. So here again, a steak. A big plus I can saw some has a year Maybe if I want again. So some hair on the city as well. So up to you You can solve some help from this area movie. If you want that against please switched back to black and then repent. Let me undo it. Hey, here I can squeeze toe black on paint some black again. I can do this. I can't paint some black to get some help. Stand again here. I think I shouldn't do that. I'm getting those stuff here. Be now. You can see the cool effect here. Okay. Here. We're kind of seeing some bar illness. We can you can do wanting who need to paint this This part? I don't know. Let me render Don't get anything here. Totally black. I think I need to feel this area toe white. Well, the subject, that's our filler. Objects are in it to feel that, actually. Oh, I don't wonder White year. So, like men do. I'm getting that There may be I think everything is fine. So we're done it. This had picture here. I'm seeing some weird thing. Let me undo. Okay. And that's good. Then I want to. Somehow it's vertical because of that same aviator Weaken actually moved a TV that that part of the V Laden Maya. You can do that. That's not a big problem here. What? I'm going to do that inside Meyer. So Okay, I'm done with this in the next lecture of going toe. Do some hair, do some fingernails. The character on Then we're going to almost Don't this character see you in the next lecture?
91. Final Touch on Texturing: how in this lecture we're going to finish the lecturing part, are going to do the nails. So now the fingers doesn't have any nails on it. I went to select this somebody, Texas said. And then let's create a new earlier. I think this layer is for the dart. Are so Dart Player select you name It is a but and I'm going to create the new layoffs. I can again create a feeler or repent layer. Let's that's good to feel left with it. Okay, I'm going to turn off everything here. So still off height, metal, normal everything. Just a color and roughness. I'm going toe mask it. He was a black mosque. Okay, I'm going to then paint on it. Let's first just this color. Let me be very Louis kind off color. I kind of feel a whitey LoConte off color. And then the roughness is, I think pretty good. I'm going to paint on it. Paint on this. I went on this mask, Let toe kind off, reveal the layer. So let's reveal that layer. Andi creates a nail. See, I'm going to turn on the symmetry agile on here if you don't want to see the symmetry plane . If it feels accord to you, then you can turn that off by going to this absolute hide similar to plan. It hides the senator plan, but it's still kind of the submitted. Stoned all. It just tied that plan so that you don't feel individual platter. I'm going toe. Reveal those nails again. We don't have those nails on model, so I don't have any up some. I can go ahead and just quickly clear few nails here. Okay, Once we complete this thing, then we almost told me the text during that. We're going toe No render on day. We're going to export the textures into Maya. Okay, so now they're gonna for and popping out. I'm going to kindof de Cristo. Positively bit. We were a little bit so that it all Look. Yeah, I think this is fine. Okay, with this, we have completed the nails and almost everything, and we're going to switch their goingto stop this letter here. And in the next lecture we're going toe render. We're going to see how to render in substance, mentor how you can render and clear some mazes out of this. See that
92. Rendering In Substance Painter: Hi. In this lecture, we're going to see how can render images how it can render final beauty Mrs Out off substance painter so that you can say our online or you can put that in a portfolio. So here you can see we had inside the If you go to this mold were inside the spending more for the text during part. And then if you are ready with the texture and now you are, I want to render it. Then you can squeeze to rendering more. I can see it. Use this idea. So let's click on it. You can also click on this little camera icon to switch to the rendering. Go now you're in rendering more. Andi, you can see It's kind of already rendered a mess. It's kind of alive. You it's alive. You, Andi, there you have all these obstacles. Okay, so who go back to the painting more than you can just turn off the camera. You can go to this painting morning again. The same thing. Okay, so now you can see before I go to this idea, this area is basically either in four officers. So basically, it says the starters now, it says. Done. That means the rendering process has been completed. Now you can save this mitt on. This is the originalism who can see. Now it's calif up or Julissa. It's the view Portage Ellison, But let's say we want a picture, which is SD one, 190 20 years D 19201 Julia Jo physically. Then you need to come down here and then override this people originalism. Okay, so can come here and click on this little cycle on it will allow you toe set you customized were turn height. Let's say I want to render a one joy to raise demons so it's 1920 by one Gero Gero So I can over right the regionalism on the proportion of demons. Now you can see it's a wonder rejoices demons so you can override it by clicking here and now it's kind of you can see the undersized originalism with screen sizes. Basically, this Sadiyah don't do anything here. It risen. He is basically the samples level, and here it says, the rendering time. It said toe 10 seconds. Now here you can see max time. It's 8 to 10 seconds Okay, so this area too. So you the status whether the render has been donor, if you can see if I all drew did it, I can rotate the view. Yeah, they said pretty kind of real time. View on now it when Whenever you just change the camera out something, it again renders it against either statuses, rendering that when surrendering is being interactive, it's render another against it. It's done. Okay, so if you see some noise under image, if you see some lawyers, that's basically because of those samples here. Never can see. Now the samples are said. Toe mineral samples is said to five maximum samples. It said 2000. If I decree is it? You can see what it does. If I decrease the samples, you can see the rendering process is very quick now and now against its took almost, um, nothing. It didn't take any time. You can see it's kind of geology. Ruggiero on under stone on there. A lot of noise is it's because of this low samples. So some parts basically increase the quality and increase the time off during dinner. Agile, so be careful off. It don't just kind of drag it like infinity. It's gonna take a lot of time to render a visit will get a very prying image, but again, it's gonna take a lot of time. So now it's a to 10,000 and it took off 92nd which is good. But you can see even though we have 10,000 samples here, it didn't count that and see it's kind of toe stop at 2 29 out off 10,000. That means we're not using all these samples. It's still just used to 29. It's because we have also said the max time. So max time Is it too tense again? That means whatever you have here, it's cooler in the till 10 seconds now till 10 seconds. Just raise to 29 samples. So didn't any It didn't make sense. So let me come down to 1000. Andi, you didn't Do we have 1000? You can look at this, so we have 1000 max samples level. But you can look at here when it can have raised a tense again. It stopped there. So again, we are using to 31 samples. So even though we have a lot of simple settings here, but our rendering is not and off using all those samples because of this time cap. So what do you do you want to use? These are all the samples till 1000 and you need to give no time, basically was who don't give any time here, so make eijiro. And now you can see it's rendering. It's gonna reach 10 1000. Then it will stop there. Basically, Now it's gonna render all the symbols and obviously it will take more time and it will give a better result to minimize all these lawyers on it will give you a very clean the mess. How is it clear if you are getting noise and they met, just increase the sample are increase the time elevate instead of tens. I can give it a 32nd on 42nd mark, so it's it has time to use the symbols. I'll just make a geo and just use the samples. Either way, you are going to get a good image. So basically the samples is very important here against you. It's now a little better than before. Okay, so this is the call this is therefore quality on Dhere. You supported Gillison. Now, once you get this image, you're happy with diamond. Then you can come here and save the render. Then click here and save it anywhere on in typical or any other poor mark. Okay, I love saving yet, so let's cancel it. You got also directly say in tow. Ask Justin. Platform can do that. Agile. It's come down to here. Here, you can see. You can see we have the display sittings and the service sittings. So I'm not gonna cover everything. It's on everything. I'm gonna cover the basics and the important parts inside these displace it things we have three I can absolutely. Here. It's basically single men. No, but you can see we have this environment settings here on. Then. If you scroll down, we have the camera settings, which is this absurd. And if you scold out more, we'll get the view port settings. So basically, these three absence help you to school down is a little that particular part. So now this and moment sitting is ah for the environment. So inside substance mentor, we don't create any particular lights like we do in three disruptors like Meyer in this case, we're using on the environment to light the scene. So basically, it's like is dear lighting inside three disruptors. So we have it environment, even the Lord's kind of hidden because of this clear grey background. So I'm going to solve you that in a minute. So now the imam in math is said, do something here. So if I come down here Andi, I check off this color Clear color. Okay. Now you can see the background in moment from where the character gets the lighting. Now you can see I can hold the seat and the right Most Putin and drugs drive this thing a rooted this thing and you can see the lighting is kindof depending on that image. On that environment, another character is kind off. Kind of standing on that particular environment and getting that lighting from time moment . I didn't get good there. So now you can change this and moment if you want to kind of get a different lighting conditions so you can come here. Click here on you'll get someone moment here, then you can check one by one. If I suppose I choose this one you can see now the character is kind of a different lighting conditions again. You can see the whole seat and water. You can see it belongs to that place Just kind of getting that lighting on. If you don't want to see the background, you can come down And don't on this clear, clear color. I know the background is gonna pay a clear color, but still you get that same lighting from that environment. The lighting doesn't change on the character. Whether you use this or not is just to kind of use a flat background if you like. Per presenters and propose are you can also use not give this environment on the back down . So it doesn't matter. It doesn't change the lighting of the character that will the lighting The character gets the lighting from that environment. Okay, so you have a lot of absence here from choose, but the Jews, for you can see a soft lighting on and can see kind of like a little bit kind of greenness kind of environment light. Okay. Once you were happy with ah, particular lighting, then it can again either use the background or just use the clear color on with a clear color. You can choose any other color than great. If you want. You can come here and choose a B. Well, who is whatever you like. Okay, so then So you have a lot of ups and you have some studio kind off lighting ups, and that's a this one. Now it's gonna getting her white light there. Looks cool again. You have so going a back room. Late smoking. Take the name. It's has stopped one Andi to backlight. So one would be from the front and two behind the character. So it gives you this kind of dream light or the backlight defect. If I just come down and make it a bit darker, you can see it is really another character. Get over it back like that from from that moment? Yes. So you have a lot of off since year. Okay, let me tens distills. Lets it this one. I'm going toe. President Gray said okay. Something like this. Okay, Once you said these things, then you come down to here. So again, if you want a glossy kind of poor ground at the ground, you can come here, and I can give it a living color to the reflectivity. It's a little lighter, Callisto that you can see the reflection if you have pure black, the new we're not going to see any reflects on on the ground, so it's kind of a mat. Look, if you say you want to put the character on a glass or something, then you can just come here, give a liberal light colored toe the reflectivity, and then you can increase the glossy nous can see if I increase it to one. Now it looks like the character is standing on a kind of very, very reflective object. I guess something like this again, if you bring down the closeness, there's kind off diffuse that global gloss off that reflects that it's kind off blood. That deflection. Let's say I want to see the reflection, but it's a everybody to flex, and then I can kind of our justice closeness, and I'll get that on again here. You can see once I'm using this glossy nous, if they can, giving me some noise here because because of this bloody scattered nous, it's kind of scattering that image that reflection so you need to come here and use more samples to get a better remains with this and a flight effect. So now we have some noise. You can put more samples here. It's a 5000. The newly will get delivered. Better emits less noise with that. Okay. On chickens, Let me and of I don't want any reflection until it's put the black color to the reflectivity. So you know, the reflection is gone. Basically, you can see this lighting is giving me a very stopped share. Some of the lights is going to give you a hard kind of several. Let's say every this one. Yes, because of the lighting, the heavy sunlight. We're getting a very Chris Sadow. In this case, it can come here on. You can decrease the Sarah intent that if you want a very light kind of said, Oh, you can adjust the Cerro by using this officer. Okay, so then we come down to the camera sitting So it was in moment sitting before then we come to camera sitting here, you can see let's I want toe focus, this area on, then blood, other things. So basically I want a depth off feel kind off effect. Then I can use this absolutes. Basically, this a picture so I can increase. This was increasing it. Conceive increase it live it ties eight so that you can see that is it? I can see it's kind of blooding everything. Now let's I want to focus this face area. I need to are just a focus distance. But no, this is not good to kind of existed control and military conduct. So it's gonna focused that idea now that better is to muscle its bring in town. We who are very low. I got the full effect here and see now the city is for course visit. He has a little bit bloody. Okay, so it gives you that effect on Dhere. We have some kind off post effect. So if I activated posted pigments is kind of rendered it on, then added on top of that so I can come here. We have some absence here. Of course, you can come here and changed our just a color and brightness can make it a little bit colorful. More saturate er and this kind of stuff. You need to turn this on to see the effect. You can see I can make Italy situated black and white. Those stop agony. Usually just all this absence here. Okay, I have this or big net. Upson is the interesting of some years. Kind of gives you dark. Live raid. Say I can come here. Increase this. I can already see it. A deliberate black settle. So they made the left turn to the right side and C gives you this effect. I have isolated to one. Gifts can really read dept toe the Smit. Okay, so this is the big nit picked. There's someone picked. You can check those. They're not that popular. That kind off. I don't use those very often. It's thin. Yeah, I think I want to cover those stuff. So it is. You can just render it. And then finally, you're happy you can save the render on. No. Let me adjust it with my I don't want this lighting, So let me choose something else. Maybe something like this may be stopped again If I want to rotate the light Whole seat on rightly on Dragon rooted the light. I want toe support. The light from the fault. Okay, I like it Rendered related render before you click on the save Render Look at it here. If it says don, then go for the saving up some here. So I'm waiting. It will be completed. I think I like it. So I'm going to rent a safe there in that. You never says Don't. I can save the render now. So let's click here and lives. Let's pull the render in that substance full front. Let me save it in depict for months. Okay, again, again Take different side Render So going to save this amazing. And then you can wrap up this lecture in the next lecture we're going toe See how we can export the images. Export the textures from substance mentor so that we can use those inside Meyer They say you want to render the character inside Meyer. We want to league, and so do the other stuff in through the subjects. So you can take the textures from here, and then you can put there. We're going to see that. Now it's done. I want to save it. Let's say side save. Okay, so this way you can render the missus insides off. Since mentor very, very easy. You don't need to have a lot of lighting, no less. Those stuff is basically gives you a very pretty good results with very little time and very little time. So let's me let me turn this off on Let's switch back. Let's go to the next lecture. We're going to see how toe export all these textures out off self sense mentor.
93. Exporting Textures From Substance Painter: Hi. Welcome back in this lecture. We're going to see how toe export textures from substance Spender for miles. So I'm going toe file menu here. So we have completed all the Texas here, so it doesn't matter. Whatever you have select here, it doesn't matter. So just goto file menu and you have an off some called export text service here. So you have a salt cod agile control safety e. So let's click on it on they'll get this eunjo on Dhere. The fasting is on this. We have to basically exporting confidence and we're not going to look at this conference and it's going to let you manually create things which is a kind of our once I were not going toe Look at that. So let's use some presets years or go to export have here on Dhere. The fasting is kind of sitting the park to export here. It kind of using a vital part. You can use it or letting click here and choose or something else, or let me choose our part. Let's projects goto project here and maybe in said on substance bent of folder I'll have that picture. Maybe maybe we can do that. Let's do that. Create a new full of here. I'm going to get a new fuller. That's a pictures. Okay, so inside here, I'm going toe cleared all my texture. So I'm going to select this Fuller, the party's selector on now. If you look at it here, it allows you to choose the humans. Former now it said a PND which is okay for me on it's a to eight bit again, you can choose 16 bit. It kind of gives you a little better quality means, but increase the pile sides as well. So I'm going, going with the baby. That's fine. PND a beat on This is the part on then this gun figure is there are actually many pre sex. You can see there someone presets, But I'm going to use this Tocumen General plus normal with Alfa. So it basically gives you different, kind off textures with different naming Basically So if you now it said topi, bare metal graph on If you go to let's body it kind off. It's going to export based color roughness, metallic normal height and missive. All these absence? No, If I change it to something else? No, you can see the names, my agent, according to that subject. So it's going toe kind of use different naming for Martin Export Few images on Do Something like those. So it's basically presets. So I'm going to use by default DACA and Channel plus Animal plus A with Alfa. I'm choosing this because I we have and I'll for for the hair on it. This it'll give me a clean Alfa. So I'm using this upset. We tell pastor that there is also another Absalom Same up some. But with no Alfa here, um, aging the wheat hellfire one so choose Choose that on its going toe It's going to export all these images for some of those images I'm not going to use or we don't need, like the metallic Andi, maybe the one. We're not going to use those so we can deliver those letter. So let's exported. So, basically, I said the part Joe, stop no pile for months on end the beat. So it was basically by default. I didn't do anything there. Just said the part. Choose this conflict on. I chose this one little for one. Okay, and then I'm going to say the texture size so the body is to OK, that's fine with the claws. I'm going toe kind of use one came out for that on everything else. I'm going to take in one case again. You can get to give a guy if it's really necessary, but I don't think Is that most of necessary for a very small object? So one case is going to fine on because the body is a large subject that some kind of using it to get here. So once I said, this is a lesson for different texture said we're going toe export by clicking here. So let's export. It's gonna take some time. Maybe this isn't even more time. Yeah, it's finished. We're going. It's OK now on the export has been done. Now I'm stopping this letter Here, Let me show you before I stop. Stop it. Let me. So you on that pictures go to the trouble folder there to let me find that substance inside this structure. So here you can see we have all those images. I need to delete some of them because I don't need those. There's no you can look at the name. It says body base, color, body hide for the metallic for the normal. About the normal direct X aboard the softness. So we're getting kind of 60 minutes for one texture set, so I'm going to use body color. I don't want about the heights out to delete that for the metallic body Normal. So we're going to delete those as it is Does. So I'm going to keep this body best normal on the roughness. I going to do the same thing with the plots. One, the hide, maybe. Okay, we don't want that. So let's leave the height. Metallic Onda normal. I'm going to use this direct X normal. So I want to tell you this time So the basic color and the normal, the roughness same time and going to delete unused unnecessary images. Hello here, Heitor. Metallica Normal. Maybe he had No, we don't need hair normal for the hair part. Just the basic alert capacity under roughness. That's fine about base and thing here. Build everything on wanted. Donate Kissel, Basically based body base color. Normal roughness club base color. Normal roughness. I've s color on and I don't need this normal for die I race color. I love ness hair base color capacity. This is the Alfa map. Onda hair roughness. My best motive. Nous. So these are the textures are going to use. So a spy Until I'm stopping the elector here in the next lecture, we're going toe or switch back to Maya and they're going to see how we can import these images on assigned those images in different material to that.
94. Import And Assign Textures In Maya: Hi. Welcome back to Maya on Dhere. I'm using the previous my model we exported into Geo into substance painter. So this is the same model. So in this lecture, we're going to see how we can import those textures. We just exported forms of suspender in. The last lecture we're going to import goes on, we're going toe assigned materials and then use those textures in those materials. So here you can see we have all those materials. So I'm going toe put new materials for those I'm going to open hyper set. If you see this blue circle, you can click on that. It's going to open the iPod said here. Okay, this is the window. Helps toe helps you took and get seders insiders and yet sitting metro. Basically eso Yeah, I'm going to first a sign, a single material, everything. Let's say let's clean these things for So let's select everything on right click hold the right most Britain and then I'm going toe. The existing material is an interesting material. And Lambert one numbered one is the by default matter. What I did is I just used in saying the Lambert one material to everything so that all these materials becomes kind of unused. So I can go to it until it on used Lord. So it's going to deal it all those on used to materials because now the Lambert one is on the every object. No, all those materials were unused. So that's why I assigned the Lambert one to everything. To just to delete everything and just to start from a very clean seen here. So we don't see any other materials. We have the lambert one on. We have some kind of lords or seven village, this stuff. So we need to have this full stop. Now I'm going to ascend materials and bring those textures on. In this case, we're going to use our Lord to render. So I'm going to use our nor material. So if you come here, come down here. You have the old step. If you go to this Seder, take on that. You have all these unknown materials. I'm going to use the Arnold standard surface material ai standard surface. I'm going to use this material basically for everything. So let's click on it now We have You can see we get the material here on, We get open known here. Now let me see. Let the body let's start from the body. I'm going to select the body on then whole right mouse on it. Then we can assign this material to selection. We can do this, of course. Once you assign it, double click on the material so that it opens on this and in this attributed eater, so it will minimize it. Okay, Now, this material is kind of open here. I'm going toe import the body color, texture based color into this color best color. So you can see we have color in this base category. We have color in the speculative body, so make sure you are importing the base color into the best color tap. So if you kind of follow this color Ah, Jekyll box here, you can click there on choose a file because we're going to import that. That's a separate file. So click on this file. You get this ups in here, click on this year low folder box to browse and opened the texture. Now it's kind off going somewhere else. I'm going to browse browser things on its quota projects. Substance spent substance polar texture on here. I'm going to bring this body based color. Open it. Okay. Now you will see it. You need to play six to see the texture. Suppress. Six. Basically five is the center of more six. Is the texture more okay? Ones? You said that now you can see it's cannot to signing. We're goingto gonna just that. Let's first import all these textures, so let me maximize it. So this is one way to create materials and a sign that in other ways, if you don't have the high person open, let's say less closed. Let's say you don't have that open. We can still clear Material Island Sign it. Let's let's do the mitral setting for the cloud. Select both of those. Right Leak. Andi Goto New material is in new material and now it gives you that small window. Go to Ceta Annul Center. We have a centered surface syrup of my here I go to another city, a standard surface. Okay, now that's assigned. But this is another way to assign new Israel's. Now it's also pun here. I'm going to import the cloth basic color toe This best color area. Celeste basically do the same repetitive stuff. Goto the cloud base color open that. Okay, now everything is very signing Because of those material settings were going toe are just those in a minute. But first important Import all those textures. Okay, everything looks nice lit. Ah, do just do it for the hair. I'm going to select the all these head so let's put the weapon more By pressing four, we can look at the third cuts here. There must select everything on hold control and dis elect this stuff we don't want just the here on I don't want didn't think selector. Okay, that's place five Go to set it more looks six go to texture more than I'm going toe assigned in new material on again The symmetry So basically against see, I'm creating a material for protection No, the book who put the body We have an independent texture andan for the t certain depend. We have a separate texture on for the hair And for the I, we have separate textures. So for all the separate texture I'm creating one material. I created a mitral for the body and put that texted. They're like little metal for the plot and put the text in there. I'm kind of doing the same thing here on a better ways. You should rename the stuff so that, you know, letter. Let's say here. Okay, had present. Now I'm going to bring the color hair base color, hair based color. Okay. Long going for the I as through the same thing. Favorite material assaulted the new material said are I standard surface? Basically same stuff I've escalate. I think I should put the body material toe this because we end up if I can remember. We took this, he visit the bodies. So basically, it's a single texture. So I'm going to use the board emitter. But for the body, I didn't I guess I didn't rename it. Let's come back in a minute so that I know. Okay, let me select this too. Onda. Rightly this time I'm going to existing material. I'm not creating a new material because the material is already created. The body material going to the existing material. So it's gonna So you already created materials? No, I can just go and check the body. Okay. Right This way we can send everything. Let me hide the body. Hey, let me hide the body. Replacing control it. Okay, Now let's select everything here on creating material for this because we have a separate individual texture for this. So I'm going to create a new metro. For that, I'll sign a standard surface material name. It lets a mouth on base color click on a checker file, import the texture to mode base color. Okay, we're done. Express control. Seat edge. Which brings the He didn't but in an object. Okay, so we assigned every textures and created materials for every different parts. Now, in the next lecture, we're going toe set up basic lighting on. Then we're going to do it the materials and render using unknown. See you in that lecture.
95. Rendering Setup Using Arnold: Hi. In this last lecture of this excel, we're going to see how we can use my Arnold to render our character. So again, I'm not going to go into a very in depth surrendering techniques because this course is not about that. It's just covering everything in an introduction level. So here, I'm going to render it by using some Arnold lights, and we're going to tweak some materials and then render to get a no dissent Render minutes . Okay, so here, if I just rendered this by default inmates by defaulting, If I go to this second absolute here, this one, click on it on and you can see a lead. I did render that previously, just to check you get you get a blanks black screen basically, because now you can see the render very said to unload. We have different rendered render here download and overly set. That's good. Make sure it is the render, which is said otherwise, just come down and choose it on rendered Now again. See, it gives us a black screen. It's because we don't have any lights. We don't have any lights in the in the scene. So are no doesn't ring that if we don't have any lights. So now I'm going to create some unknown light. You have gotten yourself here for you. If you look at here, you have the unknown self open that Andi No, I'm going toe create area light. So Klingons fast passed late. You know, we called the light here. I'm going to scale it by pressing our kids and skilled scaling it. And then let's move it and purchase on it. So you can see this is the idea Light on days, A line perpendicular line. So this line this line saws us that this is the lighting facing direction to this side from the side. The light is going toe. Eliminate it. So this is the front idea. The light is the back area of the light. So this line should face, um, to ourselves character. So we're gonna giving this character kind of front light. You know, we have a single light. Let's render it that may frame it. Let's select the character press F so that it friends quickly. You know, I'm going to feel Dax M Burton again to render now we still get a black screen. It's because we have a light but we don't have some pissant, um, surface and intensity. So if you select the light and go to that village radiator, you will get all these upsets. There you have this intensive jobs and increase it increase now. 10. It needs a lot of values. I'm going to increase it to, let's say, maybe 1000 on, Let's render it And now you can see deliberate of the character. That means we need to increase it more. Let's sit and 1000. Okay, you start to kind of see it. I'm going to give adding value to it. Maybe 5000. Sorry is 50,000. Okay, so now it's visible. But the character looks very signing. So we need to are Just tweak the materials. Let's start from the bar dimensional selected goto this body material Step here or you can just rightly goto mitral active it. It will open up here in the attribute editor. Now, this morning Mittal has spectacular on Spectacular is speculator Roughness is too low. That means it's a very signing object now going to increase this roughness. Now we can look at this sample here. Now the speculate is very tight and crisp. If I increase it, you can't that area. It's going to defuse here. That means not signing, but it's kind of defused. It has diffuse endedness will also decrease the wet dick. Is the overall Sinus Okay? Physically roughness blood. That signing reflection. It's kind of make that bloody and the way it is kind of the opacity off that reflection. Now, if I come here on Brenda with this new absence, no concedes kind of bitter. Still, it's very kind of signing plastic. So I'm going to I'm going to maybe increased, make it a little more diffuse. Something like this. Maybe on rendered again. Okay, now it looks school. We need to see some liberate off, speculated E because it's skin, it's not. Not kind of a Bill Matt object. It's not a matter. Think it should have some kind of speculated, but that's will be very low, and it's very, very diffused it. So be like the I something. Okay, so the skin is stone and then I'm going to go for the listing. So now this club let me rename it Claude Nous to very, very mad, so it it shouldn't have speculated years. I'm going to decrease the wet and make ejido So gentleman's we don't have any speculate ity . Now let me end it again. So there's a back and forth technique. You need to are just one thing and then render and check. If it's now correct, just don't do all the stuff. London Come down here and finally render it. That's not gonna help you to understand. What if it's working or not. Now you can see it's looking better so I can take one more lighter. Let's move this light. Make it live. It can go angled. So this light is going from the characters left side. So I'm going to duplicate this control day to duplicate of it. And I'm going to rotate the light Rangan. So now this light is going from this site. So we're getting two lights from both sides. But now it should be more in a bright Andi illuminated. Let's see. Okay, so we have two lights. It's a little bit more bright. I'm going to make this manky light. The men more intense lights. I'm going toe put 10 every you should say 100,000 year. The Narragansetts more bright. Okay, that's good on here. Going toe set of a three point lightings. I'm going toe create a new light from the behind. I went to rotated, so this is kind of a back late. Let's see. Okay, so we're getting some lighting from this angle and be loop it back. Maybe I'm going to decrease the intensity for this one. Okay, Now, the hair looks very saying again. I'm going to change that select and whole right mouse go to MIT. Electable Topol of the material here in that tributary. Later on, I'm going toe Adjust the roughness off the speculate here I have speculative so that it kind of makes that every bloody okay and maybe witness weed decrees a little bit. Get me, Render it. Okay, now I can see we're getting sucked. Oh, nice looking expect. Let me close it. Close the fists. Okay, I can see that giving. See all those xers with a little bit Sinus to it. Okay, now I'm going toe used. All suffer the hair. As you can remember, we have helper Alfa now my hair some kind of who pick you see how we can assigned those all protections on. Get those hair details. OK, so I'm going to the material here on. I'm going to import the Alfa textures into this gym motor. Tabish, you come down here in this material, go to gym or to tap here. I'm going to this opacity on Bring that demands texture to this. A positive salutes goto file on. Let's choose the hair rapacity open that. Okay, now you can click on this icon to get back to the material. Okay, here. Concede that dexterous said toe opacity. Here on day, you can see we were getting that kind off texture. But it's still not that I bake. It's still OPEC. Basically, it's not working, so it's basically because this objects, all these objects have gonna go pick up some to it if you go to the safe Lord. So if you go to the safe nor really see this alone every object as I need to combine all all of this stuff, then you can do that. It's really let me combine first. So before I combine, I need to actually, yeah, let let me combine select everything yet goto from more just like everything you don't want . Okay, Now I'm going to combine everything and make it a single objects or goto mess. Combine. Okay, Not a single object, so we don't need to call go and do the settings for every piece of blockhead clump. Oh, I didn't let all this stuff again. Miss, come and make sure you have selected everything. Let me move So that Yeah. Uh, OK, now I'm going to this safe nor let me deliver his to go to edit deal it by type history so that we don't have anything in a history off it now selected. Go to the safe nor too look for the safe. Nor now this is This is the sip to it. So go to the Arlotto on days and Absalom called OPEC. Now it said toe opec. So that's the reason it kind of not obeying the Alfa. So let's turn this off So before, even though we hard alpha texture But still it was opaque because of this upset on it. It's in the seven or it's not in the material. Demetria. All eyes a different north. It really did you not get that up? Some here, so you need to stress selected, not the not. Don't go to the Metreon just selected and go to the attributed later and look for the safe Lord. So there needs to be safe. If you're in a middle of easily find it for Let's see here on. Now, If you go, you'll see this hair to sip. Okay? So just don't off this Opec. Now, let's check now. It should be a transparent. It's to Liu Bei that al protection. Okay, so you just need to a sandal for texture in the, um in this geometry opacity area, you need to assign that Alfa in the Syria on. Then you need to also go to the safe Northern tall off this OPEC officer So it should be done off. Gay nodal fights it. No, let me bring the outer side eyeball. So we had hidden those. So I'm going to display so and so also that we can see those. So if you can remember we hard created to outside layer for die, I'm going to get materials for those agile. So I'm going to create a new material and cedar Hey, standard surface, they'd say I speak. Okay, so now if you weigh need toe transplant these things. We need to make this look transparent so that we can look art the inside. I basically because now these a ro pic on diesel not transparent. We cannot see the inside image. So I'm going toe mate rial here. So let me go to the mitral attribute of these I new I speak material on Dhere. I'm going to make it transparency so I can do that by going to this transmission Absent on . Just increase the weight to one. Now it's transparent. If you can just surrender it on DSI, it's transferred, Okay? No, it's not transferring now. Yet It looks very ugly and like a coast because thy stone black It's because again these objects has that OPEC Absolute. If you go select object and go to the seven or I said no, you can see this pickup sel. Let's start off for both of those. Then let's see again transmits, um obsolete ledger. Make it make that transparent. On this subset helps us to make it transparent, even see no dies as a lot of speculative e Let me decays the speculative from this from this material but the material. So we're get we just need to get the speculative from the outer layer. So we don't need speculated for the inside. So I'm going toe, maybe decrease the weight on increase the roughness so that it can have blower that Sinus blows it. Okay, make that a little bit more bloody as being goes back by prison control. Sipped edge. I will bring back their last here and observe. So let me render again. Now you can see a very good looking I. So let me You can see that may render the full okay. You can see and gave that. Okay, So this is some Upson here in San our Lord, you can use the materials, we learn how to use the materials and how to reassign the Texas properly. And then we can also assign all those normal zmapp and the roughness. But those are not that kind off. Very prominent. So let me show you I'm going to this plot which has that normal. I'm going toe this geometry area on. We need to import to the bomb mapping. So let's click here. Go to the file on here. We have this use as bomb, but we're not using a bump maps were using a attendance based normal map to choose the tens and space normals and go to the file Upsell important picture. So I'm going looking for the cloth. Normal plot normal there, Tex, open that. Okay, As soon as you open that, you still see the normal here again, it's not gonna contribute to launch to the final dinner because it's very subtle, very with subtle detail. But again, we can import those. Okay? And then we can also import the roughness as well. So I can go to the material. I can import their offense to the spectacular and important that when we filed open, I'm good with the core clot base roughness. Okay. To the same thing for the head of the body speculator color. That's import the body roughness. Okay, It's kind of basically making that I think tour off. Let me that would indeed, Rensi? Yeah, I think it's fine. I can cruised off, were the bit on the body and see. Yeah, it looks nice. Really bit more so we can do this. We can bring the roughness maps under normal left like this. So we're Dollard This So with this, we have completed the text During sexual, we learned how to use substance spender to Texas, the cattle character, and then we on how to render it there and bring a how to render and get a final output. I will also see how we can export those textures into Maya, and then you can use those texture instead Meyer properly and render it with an old and get basically the same little. So in the next six l we're going to read this character and that that's gonna be very technical on going to do that in the next lecture, so hopefully see you in that lecture.
96. Organising The Scene For Rigging: Hi. Welcome to this news. Excel in this section. We are going to read the character. So in this first lecture, we're going to see how to organize the scene. How to organise a character, probably before we start reading. So I'm going toe use this out letter and the perspective. You here. I'm going to first every name and take everything here are going to create some Let's I'm going to start real quick. So So this is the body. I'm going to check everything. Basically, if it has name and everything, so is the body the thirties heir apparent? Everything looks fine. We had already and clean a lot of stuff here on This is our hair. That's good. Basically the right day left eye. Everything looks good here. I just want to kind of put everything outside this group. We don't want that group. So the select everything mill click and drag outside or you can just to wanting a select everything on she saved be which will bring out kind of bring out everything else too outside. So you can also do that by going to date and to Thisun parent Upset colors delivered this group Lord. So everything is outside, okay? Everything looks fine. I brew. Okay. I think I need to combine this stuff I need to combine the I brought with the body. So they're kind of single object here. I'm going to mess and combine. Let's go to it. Thereby type history. Whenever I can combine, I do the history delete apps. Um so to clear all those history to make it Hello, History free. Basically. Now this is the board is Well, it's Renee. Marriage. Let's enemy to body. Okay, um shake it Can. The body said clothes pant. Let me hide it. Control it. Okay, here I'm going toe Combine the up a party to this up a gun. I'm doing all these things by thinking the rigging. So I'm doing everything from the rigging point of view from the rigging. Need basically. So let's combine everything here. So not everything. Just the upper government apart. It makes combined. I'm going to do the same thing with the lower part going to combine the state wheat dough with the gun turrets combined. I'll give this strong separate Basically three part one, toe three. Select everything again Colder. But I've history I'm going to rename everything Appall teat. Let me turn my Cheops. Alof it is. The Lord did a little Teoh. So there's a doll. Hey, let me being bring that head back by prison controls a ditch. Okay? Everything looks nice there. Every Hanish to be combined. That's cool. That's a good thing. So it's combined, called hair. That's good. Now I don't want to see all these lights, so I'm going to select everything and press control Edge to hide. It is going to rig the character now, so they're not going to render it now. So they hired those stuff. I'm not deleting those topic that I'm going. I might need those letter, So let's keep those on. Let me check again. Hair tongue, sad. Apparently tried. I take body aborted Loaded. Basically, we don't I don't need this outline A clean up here, so I'm going toe create some layer now. So let's go to the journal editor and later. Sergeant Bocks, earlier editor here we have some less. I'm going to delete those first on. Then we're going to create from scratch, so rightly deal it. Okay, Now I want to create a layer for the body. So let's click on this right side up. So if you June here, you can see this. That I don't simply thistle. Absolutely. So the select the model and then hit on that. Absolute. So it's gonna put that inside the new Leah. No, this object is already inside this layer. I went to rename it by pressing double clicking it on. Then let's call it Mordy. And it might not take this name because we have already the name. Let me save it. Can see. I says we have already body. We cannot take this name. So let me can I put underscored layer something like this. Now we have a body. Let I can easily turn off this body by just clicking on this vehicle. Vehicle visibility. We can do that. I'm going to do the same thing for the clothes. Click on the right side. I call double clicking on it. That's a globe. Okay, I'm going to do the same thing. Maybe for the I put the I in earlier under here under mouth. Of course. Okay, we have the head. So I'm going to put that level so you can see I'm not giving space to a name. I'm just putting the underscore for debts or air layer. Ah, the mark Let me hide the body. The ones you have this layer you don't need toe kind of hide a single objects by pressing control lets you just come here and hit the labs and then hit it again to make it visible. I'm going to do the same thing moped, because at the reading states, we need to kind of higher. And so everything will frequently. So it's better to have all the stuff inside this layers. So we have basically everything in their appropriate let's hear. So we can easily come here and hide something if we don't want to see that for the time being. Okay. Remember, mild had everything is working on this outline is cleaned again. I'm going to select everything just to make sure no, nothing as history. So just go to deal by type and history. So we don't want any history at the beginning stage. Everything is to clear on. We can also freeze for you want Oh, I can select, go to modify and freeze and care something as value. Everything is clean here clean here and clean here. This fight is ready for the Regal. We're going to start the digging from the next Lex. Next lesson. See there.
97. Creating Leg Joints: Hi. Welcome back in this lecture. We're going to clear joints for our character on we're going toe specifically, create the leg joint in this lecture. So there be three men stages for the rigging here so fast it is grating joints. And the second states would be binding the joint with the model so that the model deforms with design. Then the third stage would be creating controllers and assigning different constraints so that those controllers can control all those joints. Women. Okay, so let's start creating the joints. I'm going to switch to reading menu here, make sure you have reading Minnow selected yesterday. Do you see the rigging menus here? So I'm going toe the skill terminal and create legal clear joints. Okay, Once I'm inside the joint case and tool, I can go to any or terrific beauty the side of the front, and then any zilliqa joints again. Alsop joins inside three D View year The perspective you, but it's not recommendable because it's a three D space and the joint is a point in space. It can be anywhere. It's very difficult to know where the point is, So that's why we can clear joint we suit cleared joint in on terrific Buell Excite in front . So I'm going toe create the legs aren't here to let's maximize decide view by placings us the space. But okay, now, before I cleared joints, I'm going to saving men. Want on this extra agents on because if accurate, joint politically join for us and I can pick click to create a joint getting press for to see it, we will promote. I can click like this on clear Joint 10 but that's inside the model, so it's very difficult to see from outside. No, if I cool concedes it's inside the model, it's very difficult to see from the outside so we can do one thing. We can go to the view the view and go to sitting mineral. And don't on this Upson extra joints so you can kind off let you see the joints in, even though it's inside the modern. Okay, let me delete it again so that we can create it properly. So let's go to skeleton cleared science again on this time I'm going toe. Let's stall off the board. Earlier, I started the clock clear. They can just look at the body and I'm going to create design from the heap so heap towards downward here. So this and this direction is very important. Dole joints from the bottom and go up. What? So because this joint saying system is very important, let me create it. So now I'm going to put joy into my here from where the label cannot protect somewhere here . Okay. And then I'm going to put the knee joint on. You will be so my here. There were three main joins, though. He joined me, John and I ankle joint and make sure they are not in a straight line. So it's very important for like, candles were going to use the leg. It's going to be bend towards back. It never You can never bend the leg from the knee towards front. It's not a natural movement. So the next to be in natural been like this so that I gandal works Probably I'm going toe put the new line somewhere like this. And then I killed someone like this. I creating this? No, a little bit. Kind of angle, suddenly strict. Okay. It should be a kind of being towards back like this a little bit. So then I'm going toe switch to selected to get out of this joint. So we create our first joint in. So it's called a chin. You can see we have this circle is designed on. If I click here, you can see I'm able to select kind of down This joint on DOB joint is not selected, so it's kind of a change. This joint is the parent of this joint on the joint is the whole kind of kind of the route turn of this joint in. This is the route, and then it's kind of going toe to tip. Okay, so this angle is very important here. Won't start the joint and go up again. It will be totally wrong. But we need this kind off joining system because if the tie goes off, this, uh, I care on the leg needs to follow. Hello. Okay, so now I'm going to the front view on now. You can see it's gonna at the centre. I'm going to move it. Let me Donald extra joined for this view. This absurd. That's you need to stated for different view. I'm going toe put it to my here. The leg is a little bit kind off in this angles. I'm going toe would end it. I'm not going to rotate it. So if actually resigned on, go to its attribute editor by placing control A it'll pull up, started a Twitter here you can see the select joint is selected. The rule joined the selector. Now, if you if you go to this joint sex on you have these joint Odeon Dobson I'm going to would end it in d excess whole control and left click drag in this box So it's going to interactive Leo di ent it. As you can see, it looks like, Ah, it's actually rotating it. But it's not technically rotation, because if you go toe the wrote it obscene here concedes we still have digital jobs and that means we have not rotated it. We just kind of the story inside of it. Okay, now it's fine. Now I'm going to kid of ah, ball joint. Okay, so let me actually move it, move back to the center. So that is true that the center, then late a little clear this joint and then we'll move those I'm going toe Scary Tuncay joints again on this. They are not going toe. Click on it and then start. I don't want to create a single joint until here. So what we'll do is I'm going to create a joint outside. Just great here. Then I'm going toe hold, Vicky, your whole Vicky, or you can come here. And don't this absolute on Milmo. Xdrive doesn't snap it somewhere there. And then I'm going toe. Put the ball joint somewhere here. What led me down This off Whether it will snap to something. Yes. Okay. Make sure Dawn that off on here. I'm going toe Put it it Boat, bulldozer, and needs to be in a straight line here from this point of view, the move it. Now let me move this. I need to wouldn't it again? So press control. A obedient. Okay, now going to going to snap it to this joint? I can do that by again, turning on this snap two point obsolete, and then kind of snap it to that joint and make sure it doesn't snap to the model that I never protection You can see didn't snap their properly. So let me stop it. So turning off the bodily. It is helpful here. I am going to again, wouldn't it? Let's orient it. I think it's straight from this view. I need toe oriented from this angle. Let me undo. I did it the wrong way. And it or dent in this angle movement. This view you can see Student is not working for me. Here's I'm going toe. Just rotate it. Let me go to saving Extra joined for this American. See, I'm kind off trying toe. Put the joined again at the center of the lake. This way. Now I'm going toe put proper, naming two designs. This very important. So I'm going to say Let only be left underscored, he joint. We're going to compete until C copy to select designs you don't want to select. The model accidentally can put this layer in the reference more. By clicking on this blank I can for you see this blank I can hear. You can just click there on its sweets to the tea with this template. More on. If you play again, it's Swiss toe are, which is difference More In this mode, it's kind of visible, but it it's not cannot select it accidentally. If you want to selected, then you can click again. That option is goes out where than can be selector. So basically I can click twice stories that are more okay now. I can easily select the joint so it don't accidentally selecting the body organ. I'm going to rename it real quick because the naming is very important here in production. So I'm going toe se left knee again. You can see I just didn't give the name. I also give the side. Which side is it? So that's very important Here. I'm going toe select the last sign here on again. Call it Uncle Joint. I may not kind of rename the whole joint system because of the time sec, but you must do it so I'm going toe against this joint is also the ankle joint. Basically, it's the common joint, but it's not a singular single. Joint 10 we can you can see my select this dude. It stops here on its a separate joint in. So this joint's is the ball going can Then this is the present. Get tau joint. That's great. And here go have the name of everything. So I'm stopping this lecture here. We have created the leg joints properly. In the next lecture, we're going toe. Ah, use I candle so that the leg can be properly been here on. We're going toe merely to the other side with di candles. And we're also going toe kind of connect this somehow it this giant as well. So see you in the next lecture.
98. Mirroring Leg Joints: In the last letter, we saw how well we can use the TRIA joint tool to clear joints lubricated. Our leg joins basically. And in this lecture, we're going toe cleared. I candle so that we can bend the leg from the knee on. Then we're going toe connected with this joint. So let's started. I Kendall, I'm going toe the skeleton mineral on clear I candle option box We re setted, So make sure you use the by default up Sonia recited on Make sure you are using rotate plain silver in this case and I also want to use a sticky I candle. But put this time for this time being, I'm not taking it. So let me use that letter. So with this by default settings, basically I'm going to click on the hip joint fast left, click on the hip joints on, then left click on the ankle joint. So this order is very important. Don't reverse it. Don't click it first and then click on here. Second, we'll get Die gandal here in this cave. In that guess what we want. I can deal here because this is the root of the leg and things the deep, so dis knish to be this needs to be stay at the place and this is going to move this order . You need to select here first, then here use. It'll click on the center. You're just kind of skipping the knee. So click here, then to the ankle. Second click. It's gonna create I candle. If I switch to outline, er can see clear that I can't in one. And if you go to the world from more, you can see there's something there, the street line and there's a kind of rooted Brower circle there. This is kind of the base of that rotor plan I candle here can see if I move it. It's kind of automatically bandit from the knee because it holds that that linked basically on this angle when we cleared to join. This angle is helping us to helping that I can tell to know who he said it needs to bend, so that's the reason you need to keep this angle while creating the joints. Okay, now I'm going toe permanent this joint because now it's not following with this. If I move my feet, this fitness to go with the ankle. It's connected. So now it's not. I'm going toe parent. Apparently route this one. So let's like this joint in this joint. And now I want to select this one and make it the parent. So basically, this is the child and distance to be parent in orderto or this to follow with this one. So this. If this joint moves, then this is going with that. The doctor isn't select the child first on Dan Select a parent. So this election is really important. The second selection always will be the parent, and the first electoral will be the child. If I select it first and then selected on hit P R. Hit this parent Upson, the second absolutely parents. So that's that will be wrong in this case like this one. Then this on hit Be Oregon Tuesday. Dobson. Good. Now I can see this is still independent, but if I select this joint, it's kind of selector automatically. If I select Die Candle on moved I candle because that joint is kind of going with that and this is the child's also going with that. So this kind of child parent relationship is very important here. When I want it done, I'm going to misery to the other side. You don't need to get recreate the joints from scratch for the decide is actually to meet early days and off. Some for that will select the route joint for this change. You can see this is the route for everything here. Okay, Now it's like this on now go to sell a skeleton Mineral on DMiller joint off sandbox. Reset it. In this case, I'm going to use y Z. You can see I go. I want this joint This I was basically G. This is the GE vixen on then. Up up is the wide decks. And so basically, this is the media. So why e g. Miller function is okay said to be able here, there's an interesting upson. It allows you to rename your existing joints now because I had renamed these joints like left hip joined. Let's say now if I made it, it can automatically the name it too right? He joined. If I say such for lipped underscore on the intends it right, Underscored. So basically I just give this idea sergeant and then change it to right? So when I meet her not just going to meet at the joint, you're also going to rename those. So let's click on Media Andi. Now we can see for selected. It's no right hip joint, so you don't even need to rename this manually. Few middling this stuff. So we have successfully meeting the joints. So I'm stopping this Lecter here in the next lecture. We're going to create the joints for the spine area, see that?
99. Creating Spine Joints: in this lecture, we're going to create the spine joints. In the previous lecture, we saw how you can clear those leg joints on Ben. We learn how we can meter those joints to the other side. Let me clear the spine. Dent's to kill the spire Spine joints purple. If I need to find the center of these two zones, I need to find that so that I can snap my new joint and then you can clear their spine from there. Soto. In order to get that center, I'm going to use located. So let's create a locator by going to this. Create Mineral. Look at that so we can look at this on. We can snap anything to this locator. So that's the plan. That's the idea off snapping the joint to this locator. So let's first find the center of this too joints. But first I'm going to select these two zones on. Then Simpson like this locator, and then I'm going to use a constraint culpan constraint. Go to constrain menu here. I'll find this point constraint here Go Dobson box. I'm going to reset it. Andi, I not changed anything here. Just like start ups and if so, snapped to the center. Let me go to the were from more By pressing the four key you can see the locator is at the center Now I can create any joints by snapping here, let me create designs by using the create joint stool on again. I'm going to the front view in this case to create destroyed. We created the legs joined from the side view and I'm creating this joint from the front. So let me go to the where from more than hold wiki Or you can just turn on this absolute snap Two points. So click on that and click on that Look it idea it So snapped that and then I'm going to pull this off. Then I need to clear the spine. I need to make that a straight line. I need to make that make all the joints in a straight line. So whole sit. I cannot create freeform way and make it kind off this. I don't want that to let me undo it. Okay. Hold sipped. They've been created again. I don't understand the points up. Soon click that then Don off will sit here. I'm going to create the West joint. So my Here, let me turn on the where Prem inserted by clicking on this little Upson. I want to put basically two designs in between the store. So idea so one would be the torso. The West joint whole sipped and clicks on my here. Maybe here and then I'm going to create the chest turn just below the chest. So this Tuesday, and then I'm going to create the best neck. Best friend. Direct. Ah, somewhere here again. I'm holding the sip key while I'm adding these and joints so makes you did in a straight line. Okay, let me go back to the selectable. This is our torso joined here. Okay, Now you can see the order. The direction of this joint. No, it's going towards up while these joints are going toe us downward. So this joint direction is very important. Don't create the joint from here to here, so that would be totally wrong. So this joint would be the men ruled off the whole regular. So this joint so you can select it on goto the channel box and increase the radius if you want. It's a visual thing doesn't matter. It doesn't change in performance or anything. It's just visually you can see. OK, this is the men joined. Now I'm going to create another small joint here. Toe control the pelvis or lip Elvis. I'm going to again front view. Bring the joint tool on. I'm going to create it outside. I'm not going toe click here and then continue going to create outside like this on hold. Sift on something like this. Small joint. Then I'm gonna move on. Snap it toe. Despite hold V, you can hold Vicky again against Snapple. I didn't do this. Are hold a Vicky. How? Snap to that joint. Okay, let me move this Liberty. Let me undo and don't off toe snapped a point. Okay, so this is a small joint here like this on here. I'm going to make this leg the style of discharge. So this is the pelvis joint here. We went to select this joint on. Then the giant hit B toe. Make the parents. I'll connection. So now the far selection becomes the child and the second selection becomes apparent. Now, if I select this ball, it starts to let the whole thing and now again do the same things. He let the child then selector, parent and hit B C. I'm not selecting the route joint here. I'm slipping this one this joint. So first like this one and then select this by holding, sipped and press Beaky to bad and it okay, love this joint needs to be the child of this child and I can see if we move this pelvis. It's kind of comedy, I should say, If I moved this route, then it should follow. Now I'm going to select the child first that this will be the child of the rules earned so selected then whole safety and selected press speaky. No, If I say let the rule joint it select basically everything. It's the men center of the whole chain here on. If I just want to swing the pill visa and have tilt the pelvis in the missile, I can just route it unlimited like this without changing the up option. Okay, so make sure you do this carefully and make sure you also rename this stuff. Let me the name quickly. So this will be the chased joint chase joint. This would be the West. Okay? And this would be the root giant off all the route Giant in a disjointed is the pelvis chant. Okay. Make sure using them everything. Every joint, sort of its old name, You nickname? A little joint. And yeah. So everything looks nice. I'm gonna diss lecture in the next lecture. We're going to create the head joint, so see you that
100. Creating The Head Joints: So in this lecture we're going to create the hair joints, the I and the judgments. Let me go toe the side view. I'm going to create this from the side view. So there's bring design tool. I'm going toe continue from this joint. So basically, I'm going to extend this joint 10. I'm not going to create outside and then snap it. Basically continue destroying by clicking on it That's selected. I'm going toe pulled my hair joint. That needs to be some had behind the year or this jaws are in somewhere here. Then let's put the end deep. Turned of the basically the skull giant something like this Please enter Cochlear designed . Okay, Now I'm going to clear my jaw joint. And though I joined and we're going to pan into this hair turned so that both of those joints transform with this her joints. Let's bring the gentle again. I'm going to clear the charge rent again. This would be a separate joint and then we're going toe child. It child off this headset here, you can see we did the same thing here. It could irritate separately. Then that indeed. So I'm going to do the same thing that's clicks on my here and on. Then put it somewhere here. Maybe every time I hear this center. So now initially snap to this. I'm going to snap it by holding Vicky are let's stone on the substance and then snapped this joint. Make sure it stopped to their joint because we deception you might snap to it protects. So makes your turn off this and steak you snap to their joint It's snapped toe that join. That's good. Now I'm going toe make it a style of this head joint. So let's see like this Join George Joint. Let me rename it Joe Giant. Okay, now let's see Like the hair joint on hit Be toe parent it. Okay, now this is the style of this headline. If I wrote at the head, the jobs should follow with it. Now I'm going to do the same thing for the I let me turn off this body layer so that I can see that I probably I'm going toe again. Use the same locator technique toe find the center of disciple So we have two pieces here. One is the inside I and the outside I So let me see. Let the group, instead of selecting any single object. So this group has its own pilot Now the pilot is at the origin. It's not a good thing here. The pilot needs to be at this center of this work. So let's goto our defense center private, do the same thing for this I more. If I center Piper, the piper needs to be at the center of this group. Okay, Now, once this by what is at the correct position, I'm goingto get locator. Goto create locator. We are going to delete these locators that with all of this, snapped a point snapping there. So we're going to deal it This locators, These are kind of temporary thing. So let me see. Like this left group left, I grouped and the locator again used the constant point constraint with the default setting that No, the The locator is at the private of that group. The ones I get that locator. I'm going to create the joint from the side view. So I have the located there can see this is the locator. Let's we're joined. Don't under snap two points. Absolute Click it so that it can have. It snaps to it. Don't this often on now? Whole sit and create a straight line. So there's a small joint from the center of Di to the deep. It's gonna help us to rotate Bible. I've all So now it. Once I've selected little rename it left on school. All right, Giant. Now, this would be the child of the hair joint selected dance like the hair joint, and then he'd be toe parent it. Now, this hair joint is the parent of this to the zone. Die. So once it's done Now let me see like this I joint on its moderate, go to skeletal and meter. We have a little Dobson said there, but still, that's the certain Why d I'm going toe search for left underscore. I'm going to replace it with the right i d s stick underscored a black So it's no meat out with the new name. Okay, Now, if I see like my head, I can turn around the eyeball and the joys followed. That's a good thing. Okay, Let Mr Lichter give it its name here. Giant. Okay, I'm done with the hair. Join in the next lecture. We're going to create the hand the arm turns with the fingers. See that
101. Creating Arm Joints: Hi. Welcome back in this lecture. We're going to create the arm zones on the Ping go giants. This arm is a little bit tricky because if I create the join from the foreign view and not be able to see those fingers on if I created from the side view usually created, like flat here showing this kind of situation, I'm going to use a nups in here. Let me make this layer normal. So so that I can select, object and selected. And this a lobster in here. Snap up. So loses snapped a projected center. If I turn it, it's going to project off. Snap to the center of the mess. So let's say I put a joint here. That joint would be I didn't somewhere in that center that miss. So let me soil orders goto the rigging skeleton clear joints because this upset is turned on. I can create this joint inside this prospective you. I'm going to create it. Let's create the solar design first. Maybe somewhere here. Okay, Now I'm going to put the elbows wine. It's a little bit difficult to see that elbow. Maybe some I hear. And now you can see the joints is inside that mess Exactly at the centre can. Now, let's create the of this joint. Okay? Conceives at the center. Okay, Now I'm going to create designed somewhere here on. Then the fingers will be there going to put someone may be maybe Okay. And I'm going to stop it. Press and terror. So is to select all and then I'm going toe create a finger joints. Let's bring design tool again. We're going to create a finger science here. Let's pull design. Yeah, I'm going to tall on the world Primanti Red mortar that I can see the geometry X clicked the weapon wanted it. So here doesn't joint than the first variant. Here is the base of the finger for Joan second joint and then the deep. Now you concede the joint is exactly at the centre. I'm going to do the same thing. It's just press. Why? By pressing why you can You can just complete that and create new one. And now it's okay, Chris. Why again? Absolute. That's that. Could key press y get this way again. Okay, illustrated the Come join here. I'm going to create one. Someone may be here, then one here on the one done the tip. Okay, So whenever you cleared this joint, make sure the protest in of those joints local rotates on our correct selected and then hold, saved and select. This joint began Select individual joins by holding city. And now, if I rotate those this sued rotating natural manner like this, sometimes they rotate individually and different and direction. And that's a problem I can see. Okay, everything looks fine. You're Let's check that. Come here of the find. So then we're going to connect all this finger joints at this joint so they see like this. This will be the child, and this will be the parents or his press. P R can do it by going to this parent, Upson Select Select Peace. I'm going to use the search. Katia, select the child first, then selected on P Select Age and select ISS be okay now. The arm joint is done. We're going to create. I can handle. I'm going to, like, handle tool. So let's go Toe skeletal I candle kredyt candles again. It should be devoted. Plan silver on and yeah, everything is fine here. Little click on the solar giant and then skipped available. Click on the wrist joint gives us like candle there to fall the hell something like this. I want to make sure we re name these things. So let's call it lived Solder joint. Let me copy to copy this former control, see to copy. And then I'm going toe paste it here than we're gonna change this middle area elbow. This will be the wrist. I think I'm not going to remember. All the stuff is gonna take some time. It can again come here. Say lipped, Index finger joint 123 Like that. Like that. I'm not going to do that for the time sick. So you're going to create the clavicle joint, and then we're going to meet up. So for that, I'm going to this front view on it's clear the clavicle, Jones that there's the joint here as well to rotate the soldier. Let's bring the joint tool on that joint. Be a tile of this chest designed. So that would be like this. I want to create the joint clavicle joint somewhere from here to here. So they're directionally from here. Toe the solar. So let's click one here, and I'm going to snap it to this joint. So let me turn off the model so that I can snap it. By who? Linda. Vicky. You can see if I hold a wiki the snap. The points is high later. So hold v and click here against Nabit. Or you can just turn on that and then snap it. Okay, let me see if it's at the right. Lucas in and snapped. Yeah, that's fine. This clavicle clavicle joint needs to be the child of this. So whenever we selected the whole chance of selected So now let me see, Like, this clavicle joint and in this chair strained. And he'd be to make this joint a child of this. So now if I see, like, the whole route it, sir, come till here. I couldn't see. Okay, Now, this joint needs to be the parent of this joint. That means if we select it on, do is the solar the arms or follow? Because it's a connected piece. So what I'm going to do is select the solar giant Andi, because it's gonna let the child it's gonna be the child of this joint. Okay, So select the solder joint and then select that small joint there you can make it. This is a little bit regard so that it seems to be a jury that that is the parent. The child is the small minutes resulting. Okay, so now let's see like this. First the solar Zenden's like this this joint the end of design. Then he'd be So Now if I select the route because now a vessel like that would it suit select everything? Because this solder joint is child of this day and joint here. So because this joint is selected Fulla take that. So now I'm going to on this. Joined will help us to rotate the clavicle, the rotator solder and I'm going toe cricket a meter this join to decide from here. So let's go to skeletal and meter joint on again. We're going to use the same thing. Same Hobson on I didn't rename it. Let me rename this first left left clavicle joint. Okay, now I'm going to meet it from meter it. We're going to use the same apps, son media you can now the joints of meat bird I candle is missing the side because we didn't mirror the route, joined the route. The base of that I candle by candle was created from here to here. So we didn't meet this this based joint here. So that's why I candle is not gonna come here. So it's a simple thing. We can clear like Kendall again. Okay, we can just created it just two clicks. Okay, so it goes like ended here. So by this time, we have four candles to for the two legs and two for the two arms. Let me dawn off the sitting where I'm sitting. Um everything looks nice if you can stilettos. I candle. Is that also the name These I candles. So let's say this is the left. Let me left leg like you handle Andi. Then let me for beautiful mountain pasted here on Say, right click I can handle. And then let's do the same thing for the are my candidates. So this is the lips are copy on. This is the right. So we have four candles on almost every joints. You have completed every joint, sergeant. So in the next lecture, we're going to start binding ger joints with the body so that it deforms with the join. Now you can see if I move our deformed these again is just The joints are deforming, but the model is not behaving anything. So we're going to bind these joints with the model so that the more electoral reforms So that's our in gold. So see you in the next lecture. We were going to do that.
102. Binding Skin With The Joints: Hi. In this lecture we're going to bind the joint with the skin with the modern so that the model deforms with design. So I'm going toe select the rule joy. So, in order to bind the whole joint system with the model you need to select the rule joint with is this one that can see if I select that it select the whole joint system joint hierarchy. So once you have selected the whole safety and select the model now I'm going to use the skin, bind up some go to skin men of buying skin, go to Dobson Box. But he said it so that I start from the scratch. Start from the by, Develops ALS. Now with this beautiful settings, everything is fine. We need toe. Look at here. Now. This is said to join the head of key, which is we want here in this case, so joined our case. Basically. Now the model is going to be buying with all those joints toe joint, had arguments, every joints. So that's I want here. So that's already set. And then everything is fine here. You can look at this Max influence. That's what something I want to decrease, because now what it does is lets it their joint has the influence on the area there. So now this maxim prince means it's gonna reach kind of distance vortex and pull that with that joint. That's I'm moving the hand. Maybe a leg vortex can pull there. So this distance are the influence needs to decrease. Let's set 1 32 Andi, Everything is fine with this settings. I can bind the skin now. Okay, As soon as I click on that, I can see this colorful joints had Akina. Now it does something off multiple colors. It saws that this joint is already binding with this subject. Now I can say that by moving any joint or any I can handle. It's a skillet, the left arm, my candle and move it. And now you can see the model is deforming you can see somewhat of. Actually, it's pulling the body part here. That's something we need to paint and correct the influence of this joint off. This joint's now that designed in France said Yeah, we need to paint and correct those stuff Letter in this letter, we're just going toe bind everything now the body is buying to the joints now, If I'd come here and routed the head, you can see the head is not coming with it. I'm going to It's saying that buying the head I want to see like this here on the join says he left the joint ahead, join and then select the hair here on I'm going toe the vine ups and again, this time we're going to use it. There were different apps on here buying to in this case. I don't toe buying to joint head Erkki. I don't want to buying the head toe the whole during system. I don't want to buy in the head with the head. So in this case, I'm going to use selector joints. So let's select. So no, I'm using. I'm binding this, but do the selector joint here to the hair joint and everything is fine by default. Mind skin. Okay, now, if I rotate the head, I should see that the head is coming with it. Okay, Now let's do the same to me. Dies because again, we don't have that bind there. So, for the eyes, I'm going to let me turn off the board earlier for a minute. Let me select the joint I joint and then we're going to select the I. But I'm not going to select it from here because the energy No, we have to. Why ball there? So I want to select the group here. So I'm going to select this joint from the view on Then come here and control Control Key and then click on the left I group. I'm binding this joint to the group. Let's again use the same absent by name to the particular joint, not the high that case elector joints vine and live to the same thing. Okay, this time the right eye. Okay? No, If I voted the hair, the hair and the eyes would follow along. Let's do the same thing with up inside mouth parts here is just need to remember one thing . The upper part up or gum part needs to be bind it with the hair giant while the lure partners to bind with this Josie because this lower body is shouldn't move with those are opening. If let's say the character is open, its mouth is opening its mouth. The Georgia lower part of the teeth suit commented. So we need to do that on this upper partners to be rotated with the head. So let's select it on DTI. Let the head joined and goto this buying skin again with the selector Joy Dobson let me check if it's working, working now let me see like this one. And this time I'm not binding it to the head on binding it to the job. Let me again go to buying skin, Logan. See if I doted the jaw you saw open its mouth like this. And now if I had wanted the head, let's it now you can see the the lower part of, But it is also going with it because again, it's a hybrid system that joy is going with it because the large or is the child of the head. That's the reason we know the character cannot pull its mouth there as well. Okay, so this is done and we can put this Oh, this stall with the Georgia to Let's pull the tongue. Mind it, mind the skin. So basically we buying everything. No. If I rotate the hair on bright, open its mouth now, I will not be able to open its mouth because of the again weight or influence of this. The joint now designed has in Prince. Oh, till here. So it's pulling all this vortex with it. So we need to find a we need to. Decrees are moment inference in this area of this joint. Oh, let me undo. Okay. Okay. So binding system is done. So in the next lecture, we're going to start painting and correcting these departments. Lee Soo can see if I moved on. Let's of the leg. You may see some kind of artefacts here. Can see some protects are not community stairs somewhat of facts. Here, let me maybe I think it's look okay. So there are some areas where we need to correct this stuff. Basically in the face area can see if I wrote it. Try to go to die. Bullets rooted in the whole face. This is known ritual. So we're going to start working on the stuff from the next lecture
103. Fixing Skin Deformation on Leg: in this video, we're going to start painting the wet. The influence of those joins on in this lecture. We're going to fix the lake leg, so I'm going to select the I can be a little late. Let's let the lip lick here. You don't need to walk or fix both side of the character. We can just work and fix 1/2 and then you can meet her appointment. Wait to the other side so we don't need toe work on both sides. So select the leg I can handle on. Let's take the problem first. I'm going toe. Move up. You can see this area is problematic here. Let me tall in the world for him. You can see. Is there not quite good here? I'm going toe you have going toe set some key for this. So let's say you move it and then paint and correct it, and then there's no way to undo. If you won't do. Are you alone? Do all those stuff, So there's a way you can fix this part is all of those I can handle by setting a key frame . So in the first frame here, this is the timeline. You'll get this timeline if you go to the display heads up display A Sorry. You can go to the windows, you elements and terrible finder times later. Okay, so if you don't have that, then you can go there and doing it. So here in the first for him in the first room, I'm going to set a key for the default pro Jessel of this I candle. So select Die candle in the first room. I'm going toe press sipped. W sit W well said, Key here can see if your whole seeped under blue it's gonna set key. Basically, in that frame, the push is on his lock. Then I'm going to move. Oh, Andi, Then do the stuff. And then if I click anywhere, any other frame is gonna come back to the pro Jason again. Let's selected. So I have a key on that default position, so I'm going toe. Get on so animated of it. If you want that you cannot do that, let's say after 10 or 15 friends, I can move it like this, Aun said. The key there so oppressive to w how you can just select They stopped by dragging the left mouse and then right click on Key Selected can also do that. So in that friend, this is the process unlocked so fast from There's the purchase, um, and then picked in print. So it's going toe blend in between those friends like this. So basically this is called the key frame animation, and this technique is going to help us in this testing face where we're going to fix the paint way. So now I'm going toe. Start painting the body of the influence of designs, so select the model goto our skin and pain skin uit toe. I went to Cleveland Dobson Box here can see what soon as you entered the tool, it's gonna swoop in black and white color on this view. Selected joint here it's destroying the hip joint again. See the influence in That is why it is the full influence vortex Andi. Then then the black is no influence at all, and then returns. It's going toe slowly decreased the influence. So why it is the full influence vortex. So here you can see there's overtakes with this join ministry inference, the next to pull. But there's no influence on those protects. So we're going toe paying these things and give give those texel bit influence. We can do that by it's going. You have some absence year Replace painter person, Replace our scale smoke so we can replace anywhere Tex influence to any number. Here you can see the value one now they said to replace. That means if I paint my brothers here on any vortex, then they will have full influenced because of this joint. So here, in this case, I'm going to let me drag You can hold left watts and drag that I'm going to see the new missile and see outstrip forming So we don't want influence here. The inference is too much. So I'm going toe here. The values one I can paint and our influence Or I can hold control So it will involve value , Ojito. So I'm minus ing influence so you can see assume as a leave assume as a take our the influence you can see the vortex are good. Here, let me just this thing on in this kind of ideas. 10 France nature very smooth. So I can switch to smooth and then smoothed his influence of the border areas can say, Does he get smooth like this on the middle place and put one live influence to this idea? The established toe have one prince. You can hold Beaky and then drag a lip most to decrease or increase the parasite in this area. I would like to smooth. You can hold safety and then smooth. So it'll get out, get rid off all those jigs, that kind of stuff. Make everything smooth in the serious. Okay, Now, if I switch back to the selectable, I can see is better than before. Of course, there's no jigs acting Now everything goes smooth out the influences Very smooth. Here it before it waas kind of full hard. Then there are some more. Texas has one influence. And then suddenly it was kind of Geo. This is the way toe, Ben and all those influence here. Just check and find some weird thing. And then we can corrected against you in the leg is going up. There's some vortexes. A different wrong. We're here so you can again go to the tool bench legs and tool on then. So the paint with toland then goto good at the joints here. You can see there somewhere. Texts. We don't have hot off influence, so I can give some inference here. So the concept is basic if you want. If you want the biotechs to move with the joint 100% then you need to paint one. And you need to give full implants to those vortex. If you don't want somewhere, text toe not to move with those giant than you can. Poor Jiro there make it black. So in this case, let's see, like this joint against you, like this joint from here on the G ways in the reporting need to right click on his own. Hold the right most. And there you have the select influence. Go to that child again, whole right mouse and go to select influence. So now that joint is selected. So I never come here and select adjourns or studious. It's a least view you need to start and try any particular joint. So the better ways just go there and hold the right most most on the joint. Then go to select influence. It will select that joint and saw the influence of that joint. So I'm going toe, see this joint. Okay, I'm going to see put one year. You can see here as soon as the leg is going off. This area is the kind of losing his volume, so I'm giving more weight to it. So let's go to the Let's bring the stool, select that joint, select a model, bring the tool and bench 100% year so that it keep their calf volume here used to be a little bit squeeze, because the leg is kind of who bending here. But still, we need to keep this William here. Then again, let's So this is the process in it to check and one to fix all this stuff against you. Now it's better when your fixed on this top. Then we can, of course, deal. It does those key frame and missing who wants We had Donald this this like Kendall and the this joint and this area basically. Then you can check this ball joint so it should be You can rotate it and now I can see for I said like this joint. Marie, the fed rotated. I can see if I wrote tenderfoot like this. This area is doesn't happen. Influence. So we can animate this gradual. You can animate this joint. So let's have a key on the rotation here. So see, like this, like this. Like like a selected in the first room. Always have a that by default position on the fast rip. Otherwise, you will not be able to come back to the default position on that lived in disposes. Um, says it makes your on the fast frame. You have the default position key, and then he can animate it all. He can just rotated and check perfect or make the painting. And then you can come back to the rostrum like this. Then you get back to the push is on. Okay, So make sure we have that key on the fast from that list you can. I'm going to little limit. Let's say the key here and you go to maybe put a key. That's that. There's a case. I'm not going toe key that again. So let's select it. Go depends paint readyto goto skin. Bento it on literacy. Like this joint right click, go to select in. Friends here can see it doesn't have on the person influence here. So in it, whose being the replaced and position is to started of alone is to view in one. Just give it full influence there. So that the leg bands from here it should be like this because this area I had no hard influence, but not one, not full influence. I need to keep run Prince here in this area, we can whole sit and smooth these things. So I just moved this Keller border area so that I don't see any weird thing. Okay, let's switch back to the selectable on now. If I go to the first position, can see Andhra Ted, this joint in synods better. Okay, better. We can select and check this again. Make sure you have a key. This shows key. My default position is set and then you can look at it. And this city is going off. We are. So let me says back to the tool and select this joint, maybe discharge and then distributes Smooth transition here can see tranches on his nurse smoke. So here I am, holding the city key and then depending those which making that evenly this it image toe have one influence. So this area of the feet needs to move rotated because of this child fully So here I am putting one infants look something like this. Their lead misreads back to this The little sit and make that transitional smoke against better than before And let's to lead the joint and again scrubbed this frame. They come back to the default Buddhism Now it should be We smoked Okay, Something like these on defense, Like this joint It's again smooth. Okay, Like like it Let's move it. And they were down in Italy. So that's check this idiot in the media and then the same calorie And this polity who wanted Don once the legs don I'm going toe deal eternity. So let's delete the candle key. I'm goingto select the left leg. Andi, select all this and then whole right click on Goto the brakes election go to reconnect centrally. So did it deal? It's those give him looks like the current And then she lived Rotech and do the same thing Very connection on let me do the same thing here recollection because now the leg is done. We just need to being all those spent two decide So now, because this side has all those. Maybe this side has all those problems against he. I'm going to select the model and then go to the skin and then go to meet Erskine Wet Upson box. They said everything and it said so easy. Everything is fine. Just click here and now it should be fine. It's leg, right? Right. Like on chick Logan. Sears look good to go. We can take it. So you just need to walk on one side and then we can meet her the paint weight to the other side. So in the next lecture, we're going to walk on the hand, going to see. Basically, I'm going to use the same thing, Same technique, But let's fix that in the next lecture.
104. Fixing Skin Deformation On Hand: Hi. In this lecture, we're going to fix the hand euphemism. I'm going to like candle and then we're going to say the key in this fast friend. I'm going to set a key on the translate right click it selected on then that we move so that we can I can see the city eyes in a weird So I'm going toe senate the model and then bring the paint lip pain skin were tool directly on this joint on the soldier joint on Go to the slipping Prince. You can see this giant this bone is influencing this areas Or did the tool settings here and I'm going to choose this replace. And with this value said toe one going to hold control and then removing the wit from this vortex so are in control is in wanting. Makes it judo against it To Gina London without all in control, you can paint and you moved in plants sole control and you move a little bit influence here . I want to live it influence in this city Avital distorted form area. I'm going to again to that bench electoral And here I'm going to solve this area using the sub a seat. Gruss aan den painting. Okay, something like this. Let's click on the first name again. I'll just crawl of it. Okay. And now if I chicken organ see, there's a nice to promise on there. Okay, Now let's trigger fingers. If I select the first base joint with this electoral and that whole saved, select this joint and then select this joint. Now, if I take the road, it'll on protect in this G axis. Now it's rotating all those joints on. You can see this finger is pulling for your text, Multex, from this finger. So I'm going to set a key here on the return. On the first room I could get selected in the first frame is the different Pospisil. Andi. Then I can What did it basically like this? Then let me bring the pencil pain skin with tour right click On this joint, you can see it's pool. It has some weight on this vortex. It's when you do to the replace with the really one whole control and paint river removing the weight from this vortex so you can see we don't have an influence from this. A giant on these vortex. But this were Texas still cannot. Pulling into the pulled is because you just like this joint. It might have those influence. Yes, So you need to check one by one. I would just start from the steep joint. That would be better toe deep. Turned his 11 influence here. That's a good thing. Then select this middle. Join it has. I'm going toe directores little quick. So go from the tip towards the best here again. See, I don't have any influence here, but still those were takes there, not coming to their position. It's big goods. I don't have an influence here and I have now that influence has been Swedes to that I'm going to remove it. These things happen when this joint has no influence on the vortex. So if this giant has no influence on those were text then here. If you change the influence, the neutral again come back. So those were texts or having friends. So let's goto this joint. You can see the vortex doesn't have an influence from the black alert and say I'm going to paint white here so that it got some influence there. Melican t take him back to their position to make sure this finger also has the influence on those vortex. Okay, now I'm going to remove his influence. Leads to the same thing. Select alert. Select With the selectable selecting with the move to Elizabeth, I would say the bad have been because sometimes it can move certain things accidentally. Ah, you may not notice that you may notice that letter that they that would be headache letter . So always use electoral toe. Let me kid first key all those protect and then I'm going toe. Yes, you can say I'm just king it on the first frame. Then I'm not getting it on any other frame. So now I'm going to the bent. We're Toolan. I'm going toe removed. Inference here from this turn on disjointed selector and it has some inference here. Okay, let's select this one. It has those imprints. Let's you know, I'll goto this joint here, and she it doesn't have any influence on that vortex. So I'm going toe Been that Oregon? Definitely. Go to the joint on. See if it has all those influence in that area. Everything looks OK here. If I see like this three joints on door did against notes. Fine on. Let miss little magic this okay? It hards nighter doesn't have any bad influence. So that's a good thing going to like this on chick. So now, if I don't take this finger bent this finger, it can see its deforming this Syria. I'm going to decays. Then Prince there. Okay, so with the replace, I'm going to decrease it, Okay? Something like this. So it don't influence that idea too much. Dip from that air too much. Okay, a little bit. Departments and rabbinate. You're also I gave that. And then let's check this finger will be the last finger. It's already perfect. So we told me to do anything here. Okay. So make sure you undo it because I didn't have any key on those joint on. Once this testing is done, I'm going to break this connection. So let's select all those joints mannerly and break the connections. I don't need those anymore. So he didn't have any key. So there's plane. So now the hand is John can see if I moved. I can l It looks so good in this area. And the fingers are good everything's said to you on. Then let's see this clavicle for Twister. Let me save my file here. Okay, So, uh, let me see. Check this clavicle. So I'm going to said a key again on the first frame. Beautiful position. Then let me take Dirty tool. And you can see there's a weird things going on. Strand is and is not smooth here. So I'm going toe to the point where tool and I'm going to this joint here. Let's check the next moment. There are some kind of transition is sure. So I'm going toe. I'm going toe this joint here. The chest train. It doesn't have any influence. Years will. I'm going to put him in, Prince. You can see it holds that sip holds that saved this. Okay, something like this. And then Okay. Here I can use the art of some instead of putting one will do their fillets great wearing from influence years that it holds that step. The test joined. Sometimes you need to experiment. I'm smoothing this thing so that I will get the exact kind of stuff sometimes unit tow experiment for areas because sometimes it may become a little confusing and I'm not not approving digging. So sometimes I also get confused. So here it replace tool here. I'm putting some to the soldiers, right. I think it's sort of have some influence, yet always deadness to be a smooth transition. Let's check this area. Now let's switch back to this busy little back and forth clock. So let me go back. I need a bit more small to understand Here, conceived to the there isn't any smooth 20 son, I'm going back. So let's goto this turned again and smelled it. So here I'm just working with this chase joint. And then this solar turned and trying to good this stopped or small twinges on there. Okay, maybe. Let's try. I think it's OK now, but you can see here it gives some or diplomats, um, that So I'm going to fix that. It didn't have that. I think the boots are put somewhere, Lou here. To this tears don't. I'm making it one so that it holds. That said basically so here again, I'm focusing on this side that we're going to copy meter to paint with so not a big deal. Let's see, I didn't see no It's just perfect. Not We're not going to meet this details to decide to select the model and go toe skin and middle skin wet again with this wisest things, Everything is Sit. Go on meter it on the sides would be mirrored properly Here. Still, we don't have that thing can beyond this joint, we don't have any. Let's do it manually. The site. So I don't know why didn't do the do that thing? The police. I'm going toe change the finger if they're right, okay? And these things are coupled problem a middle properly, But I didn't give that here, so I'm going to do it manually. So let me playing the fool. We need toe, give it the influence Destroying needs to have the influence. Okay. Can just look at this. I'm getting an idea there. No, que And then let's see if it helps. Okay? I'm going to set a key here on this. I can handle so that I actually don't miss poses on that. Let's said key. And then let's move on here on this, Okay? Okay. I don't have a small 20 sent here, so let's I can see it's better here We need 100 person influence from this. This joint. Sometimes you need toe tweet that outside like this. Sometimes the minute isn't work. Hopefully, well, no. Almost Take away all of the hard work does. Okay. And, uh okay. No, it's fine. You're hearing it to our justice. Need to smooth this. A rabbit. Okay, hopefully, Yeah. Lord, smoke with the hand and the fingers and the clavicle part is fixed. When the next lecture, we're going to fix the head of defamation problem. See you in that lecture.
105. Fixing Skin Deformation On Head: Hi. Welcome back in this Little are going to fix the head to formation problem by painting the skin would properly. So let's start from the hair joint. Let's start from the next time and a previous lecture. I forgot. Toe you can't break. The connection of this sort is joined. So it has all those keys or I'm going toe who break the collection. I think this was the reason which didn't get the middle. Probably that paint with media. Okay, make sure we don't have any tea lipped. Okay, Let me through. Great to collection. Okay, so now I'm going to start with the neck, so let's first save it. Let me key kid on the first room, o k selected. And then let's rotate it. Well, how you do all this key technique, make sure you don't have the Tookie of some gone on our Tookie obsolete. Get that ups. And if you go to windows, you're elements and tone in the rain slider. You don't open that. You can see this subsume. This is Dr Gibson. Make sure Sorry, Doctor Gibson is this one. So if you make it if it on that on, then let's say you keep it on the fast from in this area and then rotated. It'll automatically key this value again so you won't be ableto come back to the default position. Now you can see I'm tryingto come back to the default position by scrubbing of clicking anywhere. But it doesn't because our Toki again it up. If you rotate or move anything you do, then it automatic Aleke that pushes on again. So make sure this obstinate stormed off. When you use this technique, let me undo makes you that absolutely stone. Don't let them do it then is a very important point. Make sure it's turned off. And now let me said the key here. So this nor Toki. So I can again click here and go back to the postseason. Okay? No, I can see I have some weird issue here, so let's go back to the pen. Skin wet. I've been replaced with blue one against gear, but fail you that fixed on here can again giving entrance to the test test test. Vortis joined here And then let's move it by holding the safety. No, no. Then I'm going toe this neg. Boone on May be. It can decrease in France. Here this Move this area of it and bringing the volume back by painting full wet to the Syria. And we're smoothing everything in this. Yeah, so that I get a smooth departments in there. Okay, No orifices back on. Don't touch Spitter. Okay, now let's go to the heads. Aren't Onda hair joined? Let me wrote it and see if there's some problem. You can see if I wrote it the heads and let me kid first and me break the connection. I always forget it. So there's to it. And then I'm going to select this in the default position. I'm going to keep it on the first trim so that I can come back to this page is a letter. And now if I rotate the face side to side, it might pull this. No coolers damaged this vortex on the year. Let me fix it. Let me hide the hair. Let's so that there's nothing in between us. So now if I go to the pain skin wet and select the hair giant now I can see the head zone should have full influenced influenced to this area, but it doesn't look like that now it has less than one influence. So I'm going to put replace with one value and give this joint full influence that the year is deplaning. Because this is the reason the head doesn't have full and influence on the year. That mean something else has hub of the influence which keeps that vortex. So I'm going toe, give full influence to the heads. I'll so I want to give full influence. You can see if I rotate the hair again. See that in action? Let's hear. And I'm going toe depend skin right now. You can see if I give full influence. No, it's perfect. The year the school, these are going to only do form with head. So the heads are inish toe have full influence on those. Okay, so tell those call in It should have full influenced. And the top barge basically from the upper jaw. Andi, all around the Lord's call, no joint this hair joined should have full influence. So I'm going toe, give it, but it deserves. So I'm going to give all these areas full influenced again. The nose and the upper jaw. Everything should have full influence here, though. Hey, joints would have full influence on these idiots. Belligerent. Gone off the island s so that I won't miss in your takes inside there. Okay, that's a good thing. And I'm going to carefully with the small bras. I'm going to paint this inside leap That may hide the multi agile. So this a probably should go in the head Joined. They didn't see here on the lower lives of go it to live by the leap and the teen part to go in the jaw, the jaws of influence that it s so I'm going to influence this idea. This area is a bit tricky. Unit toe be person with it and go very close inside. Now I'm inside the mess looking at up on Libya, Go inside the myth and this I want to paint this part as well the inside back mode bag again. Say I'm going toe pain that half and they're going to put their half of that part. I used to go into hair join and then have I'll put it this something like this. And make sure you smooth all this transition area by holding sipped key, smoothing it in this area industry smooth as well. This 80 yards say, he adds, we'll see if dance will dizzy yet. Okay, so now I'm coming back to mindful Paddison and then lives Keat on DSI the model. I'm going to keep the root each year on the first room. Okay? And then I'm going toe a little bit. Open the mouth of it so that I can see this in between skin media. I can see there's some weird euphemism selected. Go to this here. I think because of these things, let me fix it First holding controlled, removing the influence. This part's would come with the job. So make sure and I can see the the Lord barley inside part. You need to go inside, amount on, see it and do it inside. Now decided. Looks very smooth. It has a smooth transition. No decide has some kind of hard thing, so I'm going to smooth it. Make that ranges and smoke again. I'm going to open it, Open the mouth using the job. It has the keys, so I'm going to move it. Libit Okay, something like this on then against ligaments, I'm going to fix few areas not This couple live on the lower lip. The in between area is stretching too much. We need to smooth decisions So that this polygons the polygons should be averaged now on windows Whole sipped. Aunt smoothed all these it yet so that the gym or finish to be average Nurcan. See, as I smoke these areas, the material averaging going to us. The center up results here, Joel them out my call nor a jewel here. We don't see a lip corner like this needs to be smooth. This is it An urge to this world that Dennis to violence it So in this area Nish tool. Smooth then like this Now it looks bitter on if I o these make the mouth visible, their concerned looks good on. Get me. Okay. Looks great. I don't get it. Looks good. And then let's make it open on here again. See, the Taj is busy with the tongue is combined with this joint. So we good to have a model that live it. Who could have pulled that down? A libit upside. So I'm going to fix that letter. Let me fixed that deform assignar You can see as they opened the jaw. There's some influence. Here it is Goes I'm going toe open the mouth of it. Go to this. Select your joint. Okay. The jaws was one having friends here, so that meant the hair doesn't have inference there. So I'm going to smoothie. Going to it gives an inference to the head. Or maybe to the next Nick husband. Prince. Let's make this area smooth whenever I get a bit confused. What to do? Thy smoothie. Dreidel. Get a smooth friend. Is, um there? Oh, yes, that is good. The's area should have full influence from the jaw. It enters toe, have full influence. This part can only be deformed because of the jaws. So has no Dejan toe. Give anything else the power to know those things. And of course, I'm going to smoothies area so it would look like hard safe there. Sen. Organic sip. So it should have Okay, logs much better. So I should give someone first with this area again on the Jordan is to have some inference here as you So let me under. If you don't want to give full 100 person influence, you can come here are on the Louisville. Americans continue adding a little bit off influence there A little bit of inference here so that you see, some kind of reform is in here. Okay, Na, just look, maybe a little bit more and we let me open it on. Bring the pens generate. I'm going to give it a bit more influence to the city. So when you paint when you do this work new paint all this week try to imagine the movement how things move. So that is 1,000,000,000. But I know that I do not get any idea what to do. So I wish the mouth opens the jointed somewhere here The bonus over here. So it should be fun night and see it's bitter and I'm going to open. We make the invisible the hair on. Let's check the I If I'm would want to die now some of the vortex from the Lord is being pulled. That's because if I said that the model go to the head joint, you can see when you paint the hairs on influence to all these areas. We missed a few areas inside the Lord's, so I'm going to give full influence. I'm changing to reflects with full one value on Minto kids. Okay, Now, if I don't get those, I there certainly any problem now? Yes. There are some problems Still, So I'm going to select it and then go to this and go to the I here. I'm going to flood black with it because I don't want this joint to influence any of the head for text is just their toe wrote a die. So this joint, you don't have any influence on the head or on the character. So I'm going toe replaced with value or said to Joe, and I'm going to hit the floor. I can't. So there's gonna feel the value everywhere for design. So now will be flooded. Sometimes it's very hard now. You can see if I select this joint. It has a little bit influence here. I wonder. Flooded so the flooded don't manually paint. It's gonna flood the whole thing for the oil. I'm going to do the same thing floor and floor. And now if I go to the hair joint, I'm going toe paint. This idiot one just makes you on def. Here. If I goto this inside party, you can see we miss a few things because I blew is a separate miss. We just have We have just got buying that we can only go to the selectable on Bloated. I know it'll be perfect. You can see there's no art do for mission. Oh, it looks good on Let's finally ticket. The head is fine. It targets fine Here. Okay. Are there so public you can see Here, Let me under it The stronger here so that we can see easily. Okay, Now make sure the hair turned has the key. Okay, good. Let me dont know can see we have some Your issue here. You voted the head. Go back. Let me to go to the head joint. Okay, now this neg zone has a lot of influence in these areas. It's just no good. I'm going to remove the influence from the leg at the head joint the neck. Don't make doing. I'm going toe removed. That influence Let's make everything smooth here. It's kind of influencing too much years. I'm going to remove some inference. Thank you. I'll make sure you smooth it properly with a little hair on the head. Knish to have influence in visited. Okay, now let's check the Georgia in. Hence wrote, the heads aren't through everything. Maybe the Joe has only recently shared with me. I smoke. You can remember. There's also has little job. One end, one that could be the region. Maybe. Yeah, soft that area. I think that is good Now. Okay, let us fight. Okay, so this we have computer, the spending paint with stuff on now, though, can model moves fine. So in the next lecture, we're going toe, start creating the controls for this joint for die candles so that the animator that doesn't have to calm and animate the joint by selecting it. Technically, Dennis Tree controls, who is stunning return itch to admit without touching this stuff. You know, this that the incident stop so in the next, Like they were going to start creating controls controllers. See that
106. Creating Global Control: Hi. In this lecture we're going toe start creating all those controllers. I'm going to start with the global controls which we're going to use toe transform the whole character scale, the character they're going to use that I'm going to create a north circle. Usually we use cars toe Karzai's controller. So I'm going toe, create many knots primitives. Then we can create a circle. Okay, so I'm going to duplicate it. Control de Let's so I duplicated because I want a deserve called. I don't want to go there again and again. So I reserved one piece at Duplicated. And so I have one lip there. But this would be our global controls if we move it, the whole characters of move. And if we scale it, the whole characters will be skilled from this golf from this controller. So the first thing I'm going to really limit Let's double think here. Andi, I'm typing your city a really for control on. Then this will be the global control city are in global. Okay, Who wants the rename is Don't. I'm going to freeze it. We don't want any value here for a controller so that we can Let's say we have someone do here on. You. Want to come back to the same person? That would be liver difficult the window. Freeze it. I'm going to do the steps for every controllers. We're going to scare it and then we're going to freeze and get rid of all these values from the center box. Okay, now the private is at the center. There's a good thing. Now let's see how we can assign different things into this car so that we can move this carbon. You can move the whole character. The first thing I'm going to make all those four I can handles. It's I love it. So I'm going to Cilic all those I candles here, left leg, right leg and the left arm like writer select all all of those four like handles. I'm going toe group it. Let's go to Edit Group or you can press control G to group it. Let's say it's a like is okay now if you like, it handles that in a group. Now I'm going toe put this group inside that golf inside this control global car. So if we move all these four i candles, you can see it's moving all those joins. I'm going to put this group. So hold Minnie Mouse on drag and drop into the control global year. So now those I candles are inside this, nor the cardinal. So you can see we can drag and drop things into the car. Now, if I see let the cards I am moving all those four i candles, but still the character is not moving. So we need to put this rood, join the whole joint 10 system into that car. So select the route joint, which is this one. Now you can see this is our rule joint. All the joints are inside this, so I'm going to move a millimeters drag and drop inside this control global. So basically die candle and the route joint. The whole joint system is going inside the car. Now, if I move, the whole characters would go on. If I skill, the whole character can be scaled so it can be used toe transformed the whole character to a different area of the scene. Or we can scale and feed the character with the particular scene. Okay. Make sure you do all the stuff before you've after you Freeze. Okay, Now don't put the body inside this group. So you put the body then there will be double transformation. So let me show you what I'm saying. Here, So received the body on If you're driving, drop that inside This group inside this Nord is not a group. This is a lower Gardner. Here you can see a poor that board a here and now if I moved a cough now there'll be double transformation like this because we're moving the route. We're moving the joint. And because of that joint, the body is moving because because the joint and the body is bind together. And now we're also moving the body alone. So there with double transformation Orefice. If I scale, you can see it's going out off those joints. So does the region. Never put the body inside inside this. So let me bring that out. Okay? Don't put the body. Does I Gandel group on the joint. Okay, fine. Now I'm going to get rid of all those locator. If you can remember, we used those locator to get other center points. So there's no need toe. Keep those that Still it does look it up. So this is our global control. Very simple. Just put the route inside that Nord inside the outline er on. Then put all those I candles into a group are put that group inside this control global car . After this, I'm going to create the torso controls for this. So we're going to see that in the next lecture?
107. Creating Torso Controls: Hi. In this video, we're going to create all those dots so controls. But there will be a test control on. Then there will be a west controls on then. Hey. Hey. If our pelvis and then the route control So there, before here. So I'm going to start from the test. So we need something here. Some control sweets can brought it this joint. Andi, get this done. You can see there are some painting is so still. We didn't walk on this joint, so we're goingto do do those stuff in between creating this controls. So I'm going to duplicate this car again, control de to duplicate and then move. So basically, I'm duplicating and have a reserve cough there. If you don't have that, then go ahead and get a call from here. So that's move it on this golf next to listen out to this joint here because this card with the chest controller on the chest joint on this by the court by what should we had the same locus and let me hide the bodies that we can We can snap to this joints. I can snap this cough toe this joint by holding the wiki. I can't go on on this Epsom. So then for the center, I can drag it with the left mouse. It will snap to it because of the substance. The substance let you snap to any points on this joint is also point literate on this off other Carvey's exactly at the centre, the joint by what? On the course by what are exactly at the same location. So this is very important because this card is going toe wrote it this joint, so they should have match. This would have the pilot at the same location toe walk it. And now, once this is at the locus, um, I'm going toe fridge it. I like the skill as well. I'm going to freeze it before I do anything with the cost. Now it's a single normal cough. I have not seen any constant. I'm going toe modify and freeze transformation. So I get rid off all these absence. This is very important because let's say you don't do this on you. Go ahead and use those constraints and stuff and you have Volusia. Then you will not be able to come back to the default position that animal sometime because you have no different value here. That that isn't so. Let's could modify. Freeze it! 45 Freeze it again. Yes, We want you got freezed. Then let's really limit city are there for control on is the chest control And I want this car WTO rooted this joint to basically I want this golf. When I wrote it this cough like this, the giants would well did it. I can do that by using Orient Constant. We have different constrained here in the constant mental. So I'm going to apply within Constant in between both of this thing. So for us, I need to you select the controllers, then six illegal joint. This order is very important. First, let the controller then select the joint and then goto constraint. This time I'm going to use or the in constant Odin Constant allow you to Orian things. The lettering. Good Dobson Bob's reset it with that by default settings. We need to turn on the Minton off set ups. And if we don't do that on a play, you can see the joint snap to look off. So the joint insists its location at me under and now I'm going toe Don't underwent an upset for this, and that's it. Just hit our now you can see if I say let the cough. These things don't spink. That means now there's a concern connection between them. Now, if I voted this golf, it should Woody in our rotate their joint from those same private and see it's working. So the inheritor is going toe Select this cough on on the reddit So the neuter doesn't have to come here and animate the joint. Okay? And if you see like the joint, you can see the rotate has a blue color to it. That means it has constrained getting a new adore this value here because this is really driven by another thing in this case, this car. Okay, so now we're going to do the same thing, the same controller for the West, so that we can bend the body from the west. I'm going to duplicate it, move it scale from the centre outer. Okay, Something like this that would turn this off on here. Let me just discover can see. Let's I want to our justice golf and center it like this. If I go to side view the call. These are not the center that may center the borders say, like this barred. By this way, the pilot is here. Let me first do one thing with me. Snap it to this joint. I don't understand. Two points dropped from the centre. Snappy. We can do this. Let me turn off. But let's say you want to align in such a way that the call viz exactly. Even the the character is at the center of the car. Let's say so. I'm going to move the cough Liberty for work so that the character is at the center or little. But the pilot is here, so this is a wrong thing. We cannot do this. I can keep the core fear, but I need to move the piper toe this joint position because it's going to rotate the joint from that purchasing. Otherwise it'll moved up. If I rotate the turn from this by but then it will move. The joint will removed and not orchid purple. So I'm going toe moved the pilot this time so you can basically pull the car anywhere. Doesn't matter as long as the pilot is at the origin? Or that the pilot of the joint the controllers by what should be there. And you can keep the core venue at their desert mental and again select the carbon Still voted from day and from that position. But in this case, I want to snap to it. Hey, like this. And then let me line it like this on this because I'm going to move it up. I've got to this position. I can do that by again, turning on that point of some snap to point up some understand? I'm going to move the pie vote. Only you can do that by pressing the Dickie. So if you place the dickey, you goto private more. And then because I have this substance turned on, I can move on. Snap the piper to that position on. Then I can praise the deaky again to settle there now. I mean moved toe. Let's turn off the snap. Two point because the work is done there. Now you can see the car is a little bit offset by the by. What is there? So once it's done, I'm going to freeze it again. Never forget to freeze a list. Freeze before you apply in the constant Now it's done. Let me limit Ctrl Underscore Wist Okay, now I'm going toe Apply Odeon constant again because I want to orient our rotate this joint with this So let's select the controller first, then sipped Select the join and then upload in constraint with mental knobs A turn on now If I rotate it, you can see Let me turn on the body on off the clock You can see it's rotating and there are some differences is who we need to paint the stuff. No, again See fight. I can switch back to the default person by pressing Jiro here because we frieze that before a pair this stuff that we hide it. Okay, now we need toe parent end these two things because if I let the character is bending from the west, the whole board they should come down now because this guard is keeping this joint. It's not allowing in toe caramel ality. So we need to make this car by the style of this cough. So this control, it should come with this one. So let's see, like this one and then six like this one, so the far selects honored with the child. Then seconds. Alexander will be the parent. So I'm going to hit P, or you can go to a return parent. So make sure you do this business of the child off this West control. Now, if I select the West Control, you can see that's absolving selected on. That's also gonna come with it like this. Okay, then I'm going to create pelvis control and the route control. So let's select it on duplicate hoof. I'm gonna go a little fast year because basically same thing. So I'm going to snap. So this joint here, skin done off. So here we took that to cough one. We'll handle the route, and then another will handle the pelvis. I'm going to duplicate control D and scale. Here. Let's make the root and average different looking. So I'm going toe controverted smoke. So, like this psycho point the side point skillet, something like this. And this set point on the front and back boil like this looks like a square. Okay, now, this next to be the pelvis, which gonna voted this joint, there's gonna get get us this kind of moment. So what I'm going to do is live this and then let's freeze everything. 45 freeze the five days exactly there. So that's fine. Select it. And I'm going to select this pelvis joint. I'm never going to apply audience construct because again, I want org in that joint with this, so he will help me get this kind of momentum. It's the character is walking. The pelvis is still while we walk. So this will help in that and you missing. And then I'm going to make this as the parent control the parent control move this joint and rooted this turn to Basically this controller will move under that boat until we had just assigning getting the rotation by using the Odeon control. But here the case is different. We want toe rotate this joint and move destroyed so we can get that using parent control, hurts elected and freeze it. Rename it Ctrl route. I think I forget to name this one c g r ill pelvis. Okay, now I'm going toe saying this golf on with this little joint and when I sent parent control , let's go to parent reset everything on make sure the Minton of cities on our now This thing should move that join the whole route and also rotate it. Now if I let Sid the character sitting from the root, this control should come with this. So this West control should be the direct style of this country. So from with this days, no connection. So this way this pelvis and the West don't make in parenting that so this West control should be the child of this. And then this should be the style of this. There have been no connection between this tour because we want this to be independent on Just filled. Oh, heave. If I make this a child and it's gonna rotate the whole thing, we don't want that. So I'm going to select this and make a child of the route control which is this one? I'm going to hit B to do that. Now again. See, if I select this everything is coming with me. Now let me do the same thing. Make this. It's I love this one's of selected and then select and then hit here. Come here. And here's the parent upset. No, First Oneto make the character sit. I can select it on. Then I can move from here like everything is coming with it. And if I want to, just to swing the heath against electorate to have the pelvis control and I can do that, we need to correct this deformity. So with this cultural is, I'm going to correct this deformity. So let's let's do that in the next lecture.
108. Fixing Torso Skin Diformation: Hi. In this lecture, we're going to fix the torso departments, and so I'm going to start with this. But this control here, you can see we have some kind of issue here and here. So let me select the model on Bring our paints. Lixian. Pent. Where do skin and paint? Wittle. Okay, now I'm going to first paying this leg. So let's go to the influence here. These legs should have some kind off this angle influence here. Consider this angle. This would have that this would have a radiant influence here. So this legs looks fine to me. And then let's check this leg. It also looks fine. I'm going to check this center, this pelvis joint. Now it has only a 10 year. It needs to be like a new year and say, Just imagine like, honey nut were, and these joints would have that kind off influence. Sip. I'm going toe paint the value yet. So let's goto the replace. Really one goingto draw that kind of safe. That's until Inc This that muse my Ben tap. And you can do this with mouse. You know I'm doing something like this on. Let's make sure the strangest and smoked. So we had the leg still So my here and then we have this. We'll be joined, discovers from here. And this is the common area for the leg and fill the part of pelvis. Okay, everything looks nice. Let's check this rule joint now. Rule joint needs to have a circle. It's cylindrical form here. So it is. You don't have any influence in misery. So I'm going toe take our the inference they're, if less to cover all this influence from here. So this rule joint should have a circle or salute all around influence here late there because these areas are taken care by these joints. Okay, let me smooth on. Make a good, smooth tranches. Um, these area beholding SIPC. I'm doing this. Okay? So let's take back and forth. If everything is at the place, you can see No, I need toe smooth this again. Make that to understand. We don't need any anything. Here's a little. Let me take away those stuff. Let's make it smooth. They said the strangest things would be very smoke. Andi, this is as well. Now I'm going to take this small. Joined the end tip joined of this pelvis. Join. Let's select that. It shouldn't have any influence at all here. So I'm going toe set it to Jiro with this replace. I'm going to Florida that it doesn't have an influence there because all these areas are covered by this thing, so they're going to deform. There's no region to give the urgency. Now I need to reassign that a little good art. And cannot this in prince here on my face. Like my leg legs should cover all these vortex. So from from this joint from this corner, decided not to be taken care by the legs. I'm going toe replace it. One. I'm goingto give that again. It's smooth transition. Let's check it. Maybe. And still, trend is, um, again, I'm going to check it. If it works, let's say Okay, almost Let me bring this town And chief. Okay, this area looks fine. Just this Syria is to fix, so maybe I'm going to select Kiss has check this one after we have a sopped trans ism kind of doing it back and food. Okay, now let's check. Oh, no. Now this shyness pulling all the stuff. So let me check this. I cannot. I need to give it delivered in Prince. Years are going toe are liberal influence at this area that it calls it saved. I'm just really does Here. I'm looking on this west joint. Let me increase the value. Me so here again, You don't have fooling friends from this area. So let's paint poorly white This area, it will have full influence. This is the nearest radia. That bull I'm. Then let's cleared that ranches. Um, they and the strong Jerson for this rule giant. Let me. So let this joint LA I need to give it Give it a little bit Influence here. This for the rule joint. It's circle I have loved. You know what Morgan C let me say to set it to zero. And then let's pull this route, Jake, if everything is trying, Okay. Well, now this is fixed. Let me check this body. The start. So upper part. You know, we need toe do something here against you know, it's kind of intersecting here. I need to walk here. Let's remove some of the inference from the chest like toe. That's been the replace and move. Move this influence of it up. And then I'm going to select this joint, and I'm going to smooth it. Let me get back to the default Buddhism. Check one by one. Let's see this. This is it's next to fix of it. No, if I see, Like, the chest said, Let this unit toe removal bit inference from here. Maybe. And then smooth it. Okay. And the steal of revert influence from here. Was he leaving it to this? Moved and plans a bit and then smoothed it. Okay, so let me go back for my human need a little bit. Practice toe fully. Get this. Where you going To do this? Of course. Around the back side and the fund, The chest, But looks nice now, But now here you can see some penetration. Maybe this Let this joint. We will need to smooth this bit. Everything is next to be smoke going back to the default. Let's bring the paint with too. Okay. Here, country hard trend is, um make it a bit stopped. We can remove some of the imprints from this child is holding all these what this is So let's remove the group. Jane Tous smooth. This stuff. Okay, and now I think it's fine. Oh, you need to smoke this a bit. Okay? No, I think I don't need to do anything else. That that small thing is fine. The backside again do the same thing. Just blending everything here, blending all designs, trying to get a smooth We're getting the tick tack, adjusts There's no ghost. I'm going to Let's give some. Well, you two. It lets it. I'm painting this road shined and giving, adding a little bit in province to this market area. His critics that that's fine. Okay, I think No, it's fine. I'm going to set it to Jiro adorned with this starts or deformities. And he saw Morgan. See, we can. It's smoke. There's no visually clutter straw fia. So in the next lecture, we're going to continue creating or controls for the head going toe. See that in the next letter
109. Creating Head Controls: Hi. In this lecture, we're going to create the hair controls. So I'm going to create the neck controls so that we can rotate this joint, and then we're going to get a head control to rotate the head from this chain on. Then we're going to clear the jaw to open the job. So they say that I want to start with the net controls. I'm going to again use this car control de to duplicate here on. Let me scare little bit. So I'm going to turn this off on, get stoned. This snap toe points up some on so that we can snap it to this joint. Hold. Uh, don't on this or hold Vicky, you can do either or so let's drug it. And once it's there and the scariest find, the overall size of the card is fine. I'm going toe fridge it so I don't need I don't want anything here. They went on this up. Let's go and freeze. It frees transformations on the card and then I'm gonna rename it. So let's say city a rail underscore neck. So this is the leg control toe oriented. Rotate the neck from here. Who was. This carve is exactly at this place. The pilot is there messing with the joint. I'm going toe. Apply the Odeon constant here again because we want to rotate this scarf. And as you don't write this car, we want this joint Toby rotator from there. So let's selected on DNC left. The giant selects alleged to be like this. Like the controls. Then select design. Andi, I'm going toe use constraint called Wouldn't constant unit mental upset are now I fly devoted this the heads of state and the card is rotating that joint. Okay, there's the legs, neck control. Then let's create the head control. Same thing That's control de duplicated Scale it this next to it A bit bigger to get out of this head idea. Okay, here can see this is a joint this golf next to rotate this child from here right next to a snap. There again, you can keep the card here, or you can keep the court about there and have the pilot there. It's up to you. If the car viz under way here and you feel it looks like clutter, it doesn't feel clean. Then again, put it somewhere here and then how you can have the Bible here that rates were until you know what? So let me think where I want it. Remember, you can put it over there. Maybe someone here. So I'm going toe select this car on. Let's change the pie vote and snap it to this joint. So as long as the private is at the joint Lucas and you can keep the car anywhere in the scene, whoever you find it easy to assess, issue to select and easy to understand, the animators would understand it. That this garb is the head wrote it called. So I'm going to select this on Let's go to the private more By pressing the Dickie, you can press the deaky D for dog. You can press that and he will be in the pilot more on going toe. Don't understand up two point so that I can snap this Vibert to the joint Here, let me hide everything here so that it's easy for the computer. Now I'm going toe drive from the center. Let's snapped up. I would now can see the carbs. Erin, calm. The pilot came here and snapped because of this absolutist on this off. And then I went toe press d again to say the piper dead By what? We're still in the pilot. More so to get out of the pipe. What more? I can praise the DK against a pressing D will take you to the pilot more than then pressing d again. We'll get out of that. Okay, so now this card is here. But the pilot is at the joint location, so it's gonna work. Fine. I'm going to freeze it again before I apply the constraint. This is the most important thing. I cannot repudiate it, though it is very important having it freezed and then also having a renamed to let me. I didn't limit as the head control 50 year Seattle is the sort for amusing for the control . Andi head Now, once the piper, it is there. The car scale is nice. It's raised. How Have a name here. I'm going toe a bladder or in constant. Select this and then select the head control on. Use the constant call Orient here. Now we can select this girl on. Wrote it our head from there. Okay. So you can do this. You get. If you want to move this cough latter, you can go to the control. But let's say you want to sculpt toe be liver down there. You can go to the control Vertex. Never move this cough by selecting this and using the move to like this So we'll have value here again. That is not good. So we don't need a new Bolivia. We can do one thing you can goto controller takes more and select every control vortex and then moved by This way you can move. Took off without changing anything. Here I can see you can do this as long as you don't have Don't get any value here. It should really clean. And now you can see Unlimited can easily grab it and animate this thing. Okay, Now this is the head control. Now let's do our final control, which is the joke control. I'm going to create a duplicate dark off again. This time I went to put that somewhere here so that a person can understand that this could be the jaw. I want to rotate it. So let's rotate in G eight and G 90 degree so that it first decide going to put it somewhere here so that one can guess. This can be This could be the controllers to open the mouth. I want to select it once the scale is fine. I'm going toe Freeze it! Modify phase transformations. That serene image city are then on score, Joe. Okay, Now I need to snap the piper toe. This individual, I want to rotate this joint, this jaw joint and then the call these here The pilot is here. It doesn't gonna work. So we need to go to the pilot more by placing their Daiki and then snapped. This snapped a point up, so move from the center. Drag it to the city. Oppress decay again. Toe. Get out of the pilot More Donald the snapped up. So now now the pilot is there. It's freeze, It has a name. Then I'm going to apply Dorian. Construct basically whenever Wherever you just want to rotate the joint. You will play Korean concern for that. With the mental upset on now you can easily selected on unlimited. See, the pilot is here. Still the by what is here. So we are rotating from here. That's why we need to change the controllers by Goto the haulage. The by word of the joint are the joint access point. So this is our Georgia. And so it did. The neck completed the lakehead and the joy in the next lecture. So for this in the next little we're going toe create the I controls. See that?
110. Creating Eye Controls: Hi. We're going to clear the I control in this lecture. For the start, I'm going toe duplicate the Carve again. So in this whole course, I'm using a simple car. But if you check a different Richt character will find a lot of from can see called steps. You can do that, but that's not a compulsory thing to do. So that's why I'm giving it very simple. But again, that's that's what you can do. I'm going to rotate this girl 90 degree in X axis so that I gave the car in facing this direction supported our front. Let's come back to the perspective. You I want this scarf exactly at the center of this I joint. Let me let me select this, I joint. I can do that by using the point constant, and then I can remove that constant. I can use cancer like this too first and then select this. This time I'm doing this what them pretty purple just to move this called Do exactly at the centre. So let's elect let's select the joint first year and then the golf I'm going toe use point constraint. So this is exactly what we deal with the locator. I would, Teoh we don't mention offset because I wanted to smell so without meant an upset with the point. Constant heart. Duncan. See, the curve is exactly at the center. No, What I can do, I can select the car off. Move outside In this Jax s still it's at the center. What? It's in g Exeter's, our from the high. So my heel so that the character is going to look at this. Andi, when you moved this cattle again rooted its eye to look at it. So the eyes are going to a less follow this card. We'll lose a data. It should be exactly at the centre. First, I'm from the foreign view. I'm going to scale it and make it literally unique. Looking different looking than the rest of the car. Fear. You can't do anything here, said selected Andi. I'm goingto it's a route. There's no need to move its pilot. The pilot can be here because it's not orienting. Are rotating any joints from its centre. It's kind of grabbing, attracting it towards it. We get me we're going to use a different constant for this. So first once I I'm happy with the sip on the pro Jason. On the scale of it on, don't freeze this against it. Now it has some constant because we have a plague upon constraint to those joint just to give that center area. So we're going toe delete that constant. You can go to do that by going to our planner Goto this upson here on DSA let the point conscience nor delete it from your keyboard. Now the connection is gone. There's no connection between those two joint on the car now now is the ideal time to freeze it. So let's freeze it. Give it its name under school. I Okay, now I'm going to use the constraint. So let's select the controllers on select this to joint from this origin by from where the eye is going to rotate it to select those two and selected. So let's do it one by one to selected and then select this. I'm going to do this first and then we're going to do the same thing with the other. So in this case, I'm going to use on aimed construct so called adoption box that said it on use the Minton offset Dobson are No. If I moved this golf s o c the eyes following this cough go back to the geo position so that we can do the same thing with this. I select the controllers and select this joint are not selecting this point joint that door the enjoyment I'm selecting this giant from here from the center of die So select Jakov, select this joint and then use the same constant Now if I move, let me turn off the display off all these joints so that we can enjoy it So let's go to so here you can turn off join display is just the display eating It's no high Don't hide the display now If I moved this now you can see the characters looking at it Now the character looks at life But this is the best part I enjoy While I think a lot of ruin digging That's true but I entered this but I feel like I'm approved at this death So anyway so the I is very easy Just take the controls control cough and apply the in country So let's score toe Jiro set up So I'm struggling this lecture here in the next lecture we're going to start creating the controllers for the arm. See that
111. Creating Clavicle And Wrist Controls: Hi. In this lecture we're going to create the clavicle control on the wrist control for the arm . Before I do that, I forgot something in the previous lecture and that is doing the child and parenting here. I'm gonna see if I routed the head from this Nick Control. There's a let make the cattle look down. You can see the head. Hey, Joe, it is still not rotating. Did because this controller is not committed. Aan den. If I loaded the head, protect the hair You can see the joy is not following that on. It's weird. So the jobs should follow the head. Great. Select the job and then slate this car. Then let's make it parent, make this car a parent of this. Now, if I don't take this hair, the joy is going to go to it. And Jo Jo itself is independent. Same thing. If I don't get the head from this snake area, you can see the head controls would go Did No, it's not. So I'm going to make this heard control a child of this neck control. So when I say like the neck control and then routed it, it should go that selected first and then to live this and then I'm going to do the parenting look at this job becomes the child of this. And then this becomes the tail of this, and I fight alerted the head of inherited. Both can see. The character is going fine. Find out at the neck only can see I didn't do that. Proposal was selected again like this Carbon. Make it a parent pedant in Logan. Tiered, provable. Okay, sellers, do the clavicle turned. I'm going to You can use this girl. I'm going to create a new cough for it. We're going toe just to placate this. First, I'm gonna rotate it in X axis. 90 degree 90 So that it faced to us. The front. Okay, something like this. You can use it like it is, but I'm going to get a new cough. Let me. So how we can do how you can draw your own style. This car. Let's go to create and then cough tools. There. Have some cough tool Upson's toe create carbs for you. I'm going to use this civic or tool with this tool against. Put click and you'll get one CV point. If you keep putting points on the fourth point, you start creating actual called here against yell Whoever you want a corner there need three points close on then can come like this. We can create a different kind. Of course, cards can place backspace to go back and delete points. So I'm going toe critic and a popcorn with a arrow kind of symbol can do it. I went toe dress it basically. So this stuff are not necessity, But you can do this stuff toe, make it a little more easy to understand that under control doors basically, So you can do this and then I'm going to You can see him putting the point and then holding the lift key and poor descending the point. Probably. Okay. And maybe he uh Let's make tip. Let me do it. This modify center private scared to quit. Okay, now that missile like this points, it looks on even. Okay. No little Miss leg. This points on go to scale total, and I'm going to scale in this access to make it live it to make it flood in this way. Axis. Okay. It doesn't have doing for fixed in just a control cars. That's it. Okay, so, no, I have my cough. I just need to put the pie vote here because we're going toe would He interrupted this joint on this clavicle for selected. And then I'm going to turn off this on the clot, go to the pilot more by pressing the deaky d for dog. And then I'm going to turn on the snap a point so that I can drag it from the center to this point and then turn this off pres de again to get out of the local private lore. So now the carve is there private is that I'm going to freeze it before I apply in constraint on this. So let's go to modify, freeze, transformation. So now this cult doesn't have any value here. And if I would have said, Let's rename it, let's say clavicle, I should put City of El underscored clavicle and now we need to put the side symbology decide is the left side of the character. So I put that in. So this is my clavicle controls, which is going to rotate this churn permits Piper that's selected and select design of it Before I do this, I need to duplicate it to the other side. So I said, don't forget that. So let me duplicated to the other side so I can do that. Let me first create the wrist control, and then they're going to duplicate it to the duplicate boto control cards to the other side. And then we're going toe. I play all this constant, so I'm going to He was a simple cough. Simple circle for the wrist. It's a snap to this giant you can hold wiki on as long as you're holding it. It's in the snap two points more. And if you release the vic, it's get out of it. Toe, hold the wiki and then drag it from the center. Okay? No, I need to align a mega perpendicular to this line. Something like this. Let me scare live liberty. So that becomes energy to select. Okay, this will be our raced controls. On this will be our clavicle Control. This thing is going toe moved this I Ganden like this on this is also going to rotate this giant like this so this golf is going toe control These two stuff, we'll see how we can do that. Let me first freeze. It will do more if I freeze. We don't want any value here. We need to rename it Ctrl on the school wrist under school l and for Lipsyte. No, we have to control cards. You have not assigned in constrain yet. Before I Ardan constrained. I need to duplicate it to the other side. So let me show you how I can duplicate to the other side. Let's let border controls and then I'm going to group those those two stuff. So if I groove, I'll get up. I put at the center the group by what would be at the center so I can easily fleet these two things. So let's group this too. Group Andi When a group the piper is here now the group is selected. I want to duplicate it so it duplicate You can press control D Now the duplicated group is there. I'm going to scale in minus direction. So go to scale X put minus one here. So it's going because the pilot waas at the center. It's going to flip it to the exact opposite side. Okay, once this is duplicated now I'm going toe select board the group inside out liner. And then let's on group those. We don't need those group anymore to the cars that no, outside of any group. Okay, Now, let miss let all the four cars, um, make sure let's freeze this thing, because when you duplicated in minus X, put by putting minus one in the skill, you can select the car and you will get this one agent again. Drifted way and then minus one. We need to face these things. These two are already fees. So, litmus like this too. I'm going to modify Fritz, so make sure you don't fall. Get toe frieze. This girls wants you duplicate to the other side before you are playing constant here. Now we can apply concerned. I'm going toe. Ah, Play Korean constant to this joint to select this Andi. Then this I'm going to switch to the rigging. May know Goto The constraint would in constraint what it meant and offset on art. Okay, love for selected. I can rotate this joint like this just to move this whole little bit on going to do the same thing. But before I do this, let me Name it as you can remember it. Waas named like it Hard insult fix. And you can see we have a wanted Let me really limit toe are decide is the right side of the character Let's rename this tool stuff so you might miss this kind of small stuff. Make sure you don't miss this, Steve Mr Things. Because if you miss this kind of small things, you may get a feedback from the client of human it to really work on this Stop. So make sure you don't miss in a small things as well. Now once let me do the same thing here. Dorian constrained with this joint 1,000,000,000 Australian on its suit. Yeah. Okay, then let's work on the wrist control Now here we want this guy called to move toe I candle to die gandal it to be moved by this car. I can do that by applying point constraint. Let's see like this control and selector. I get handle here. You can see I'm selecting the I can handle goto constraint on dpoint concern. As you may know, the point Constant helps us to move things with the controller. So now let me reset it. Make sure the mental upset his own are Okay. Good. Now it's moving it. Then we also want this controlled cars to rotate this. I mean, if I rotate this control car, the joint, the hand should be rotated like this. So I can do that by applying on Orient Constant with this child. So basically, we have to concern here. So one, the car we die candle upon constant and in the call with this joint, there will be an Orient Constant. Apply Orient Constant. Now, if I move, this car is going to move tie candle because of the point constraint on If I rotate the car , it's going toe. Rotate the palm because of Dorian Constant with this child. Okay, so let's do the same thing here. Point question would die. Candle on, then. Point Wouldn't constantly dull joint. Okay, let me check. Friend. So these were two men control guards for the arm. We need to still do the elbow controls on. We're going to do that in the next lecture. We're going to do the elbow control and the NIH control in the next elected. The boat are basically the same thing
112. Elbow And Knee Control: All right, let's do the elbow control and the NIH control. I went to duplicate that cough. I'm not going to do in a pentacle for this one is the simple circle on here as a starting gun Ever going to snap this to this joint? But I need to are just it. Because the concern I'm going to use in this case is and the poll victor and this will be the concern I'm gonna use. And this constant can routed this whole thing a little bit. So let's see. Let me so what? I mean, so let me let me go to this. Let's find the center of this joint and this joint to select this joint. And then this child there was like, this child, then this child and then the car. I'm going to use point constraint without living. Do without the minton upset so that it snaps aan den just to get the center. CenterPoint. Then it's rotated in X axis. Notre didn't x 90 so that it faced like this. The nurse at the center of this to joint on Dhere. We have the point constant inside that called this car. So I need to delete it really don't nearly it anymore. We just wanted to get the center of this to join. That's where we used that point. Constant. Justo snapped this to the center. So once we had at the center, I don't need that concern and mortars hostility on Dhere. We need toe check it. Let's say I'm going to put it somewhere here. Maybe maybe he doesn't have to be at the joint purchase in here. It's not going toe Do anything with to this joint. Basically, it's going toe. Oh, but as with this, I can handle on let me see what it's gonna do If you still dye candle and goto this attributes here in the Senate walks, you'll find an obstacle twist. And if I twist it, just do something like this. You need to are just some um um some wet on the skin. So But you can see it's moving that elbow, rotating that elbow that will do it. So we're kidding. This controls so that an emitter doesn't have to come to sell No, doesn't have to select Dika handles and then come here and animated that there be a physical thing here. Hey, can just move it to a new word that twist. So let me put this cups over here on. Then again, it doesn't have t to snap to anything here. Let's boot there, then go to modify. Freeze it. Let's move it brought back boots. I need to be behind the elbow. I'll get wonders. There may be behind. I want to freeze it. 45. Freed's Let's limit to City. Are there elbow lipped? Okay, the position is not final yet. I'm going to apply it and then see how much it's going to flip. Then I'm going to adjust it accordingly. So they're selected on then select the I candle and then he I'm going to use pull Victor, this constant it. It doesn't have many ups and here inside it, so there's nothing. There's no reason to come inside here, so that's applied. You can see a soon as they applied it kind of move and snapped the whole thing a little bit . If I only agency, it's nothing so I can move this, I undo. No, it doesn't have any for Nixon. Let me move here before I play moving with down here and there. Let's freeze it on day. Let's try. So it's kind of a trial. And later, sometimes it doesn't affect this thing mas. But sometimes it does. So it does indeed toe move it on, then reapply the concern. Paul, Victor and still snapping a living I don't expect and more snapping at all. But it's very settled in is fine. I want to praise it before I do it selected and then constraint, Paul Victor. Okay, I think Liberte snapping is fine. So I'm going to go it it let me undo on its duplicated toe the descent and then we're going to apply it again. So yet I have not applied it. I was just checking by applying it. And then I was doing Dondoux. So let me group it so that the pilot calls to the center. Now the private is here at a descent of the car. I'm going to group it by pressing control gear. You can come here and go. So in a group that private is here. I'm going to replicate it by present control D And then let's put minus one in the scale X because I want to go to the other side of Dykes Lounge. This is duplicated. We have two groups. Those Let's select those two. Group on group does. Okay, now I need to rename this L one as well rename it too. Right. Okay, on. Make sure you freeze this. I Let's freeze boat more duke of just to make sure we don't have any value there. I think I didn't click it properly, so let's go to modify freeze transformations. Okay? I don't have any value. Andi. Now I'm going toe. Apply this. First select the called density like handle constraint. Pull Victor, This is the final time after meals are not undo it so selected and then select like handle on constant pull vector These two controls little So what is going toe? Ba health us So let me move this. Let's say the rich on here. I want to our Justo el bullets. I want to Oh, put this away wherever Downer I can see like this Now this elbow controller and I can adjust the elbow. Sorry for this I can move it upward and down. Organ CMR just in the elbow position. So you let me move everything here, okay, and do Okay, it's working fine. We need to do the same. Poor victor stuff here for this knee. First, do it Quickly controlled the to duplicate here and owned. Snap it to here. Let's to pick it. Snap it rotated. Let me ask a little bit Rotating x axis 90 degrees so that it faced towards the front. Pull it outside again. We're doing it to control the new Like we I have no control for the elbow so that we can rotate or move the new sideways. Okay, You know, we have this Put it somewhere here and again. I don't know if it's gonna snap it too much. Tennessee Good. Let's more defend fleet. It first and they were selected Who go to die candle of this ankle. There's and I can handle and say this one. Select the car and then select I candle. Then let's select or used this bull vector. And when I click that I'm looking for the ah, put that snap. It's good to consume. Pull Victor. No, I didn't snap at all. So that's a good thing. So I'm going to duplicate it. Let me do it so that I can duplicate first Henry, we're going to again apply this before I duplicate. I need to rename it. Control underscored. Knee lipped. Okay, I'm going to use that same meth or by grouping it. Press control G group on. Then once the pilot is here, the group is group is selected by what is here. I'm going to press control de to duplicate and press minus one. Put minus one in the scale X access. Once a duplicate to the other side, I'm going on group this two group rename this and one toe are Andi makes your duty. You freeze this side because now we have 1 80 year minus one here. I don't want anything that's a modified preach. It doesn't have anything now. It's good to go. Andi, the pilot of this type of controls needs to be at the center of the control itself. The pilot certainty in Israel's recently had designed because it's not doing nothing to the door. And actually so there's no need tohave the piper there, you know, select it and click the like handles. Okay, careful is like that. And then he was spoiled. Victor Constraint. Pull Victor on, do the same thing. So basically the elbow London in control are basically same thing. Okay, now if while it's a move that I gandal and lived the feet Okay, that's a move toe fit. And now I want to control a move Disney outside our entire again. Do this. Okay, Undo. Everything is fine here and earlier we saw some kind of bent with our bent with problem there. So I'm going to fix that now. So let me. I can see if I moved the hand. There's a what? Texas pulling to us Because this joint that when we have some inference of these joints are going toe again, come back toe the skin paints conveyed. You can see this process is going to be with you till the end of the rigging process. Because no, unique at this kind of testing time, you may find something new on your many to fix Those Never select this joint here. There some in France, I'm going toe remove it, Go to the pool setting with the replace said toe one, holding control removed that influence again here. Don't want an influence. I don't know. Sometimes I also get confused. Sometimes it's gonna reversed. You feel like you have done it before, but still it comes again. It So is that kind of problem again? I don't know. It's a ball or something because, as I can remember I had fixed is for this joint. But I don't know it. Get those stuff now. It's fine. Let me put Jiro here. This is the region. Why we're freezing. I can just put Jiro and I know this was the starting point when I applied the constant. So because I hard freeze it so I can put Jiro and make sure at the starting point. Okay, let's check this Sirajul decide. Looks fine. So I'm gonna distant when the next lecture we're going toe walk for the fit. So we're going to create eventually are going to create the freed control here on for that we need toe, do some put more I candles here and then when we're going to create some more grouping stuff here. So we're going to see that in the next lecture
113. Creating Foot Ik Groups: hi. In this video, we're going to create some group and toe create some pie vote so that we can use those for our food controls. Now here you can see I'm using a different file where I have already done it. That's too so you the end result so that you can better understand it before you do it. Of course I'm going to do it in front of you, but it's a different file. I have done it just to so you so you can see I have a car, which is my feet control. And it has to go. If you take the Senate box. It has toe attribute here called Food Roland Total. And if you go tofu, troll and middle most drug, the value here can see the few tees and of bending from the ball of the fit, and the heat is going off. So as this value goes up towards five, it's totally been from the ball on the hill is up. And then, if I across this five month toe stain now the frit is at the top on the deep seated on the tour. No, I can see. And if I go divorce to us. The minus value. The feed is going this way. So this is called the foot fit role. Andi, He also had the to rule does the tour. But Okay, so we need to do this thing. We need to create these two attributes. And for that we need So my candles here and Newton piloting so that we can Let's say if I have this five Luna this I candle his going off. But that by what is here have this person. And then now the whole thing is going on a rotating up the private Asia. We're going to see that. So I'm going to change the seniesa. Let's open our scene. So this is all sin that way, Sprinter in the last literary completed this. Well, Victor, the knee and elbow controls on Let's start creating this and this foot control here. So you're going to create the grouping and get a private so that we can use those under fit control. The first thing I'm going to creating my candles on this design. Goto Gilly, turn on great eye candy lobster box. This time I'm going to use Singleton brother than rotor planes over Because here I'm going to clearly, like, angle between just 20 in their their room, being in between joins, like the head in the hand there was and in between joint the elbows. And so he created that from here to here. I had to have three zones. Basically. Now we everything we are using a single chain, that me select this aan den, this click on it, you can see we're using this I candle just to get a private point and make this joined. Stick to that idea so that we can rotate from the ball on. Then I'm going to do the same thing. Getting in a day a gander from here to here? No, we have one. I can get you here had mingled to the texture more. Bring I candle again and click here. Get that. Now we have three I candles in this three points here. 12 entry this to a single 10. And this is the rotor plants over. Okay, so once we create these I candles Yeah, I'm going toe group this stuff group these I candles. So let me go to the channel box. Started our plane on that first like this, I can hold one. Okay. This I candle. I want to have a private for this. I candle. The pilot needs to be here so that we can rotator, We can move. Rotate the candle from this point that the hell goes up. So this I can Dennis to the group because I don't toe change the pilot of that. I can If I group it group that I candle that will play safe. So that did opens here. Now this is the lips like I can handle. I'm going to group it group though I candle itself No, every group has its own. By what? Now that I candle is inside a group on the group I would is here. I want I need to move this Bible toe this joint idea auto this I can Bolivia plating deaky and then telling this own snap on this up Chris Dickey again to get out of the piper point against you. Now if I want o voted this I can handle from this point to make that he'll go up. I can't do that, but you can see if I try to do this, try to protect from that ball. Now it's totally moving because now these I candles are not sticky. Let's like this to selected Goto attribute editor by pressing control A On if I goto, I can handle attributes. The sickness is off. I could have. I don't own that when I used the like handle. But I forget to do that. So let's turn on the streaky for both of these I can handle on when these I candles are sticky, they're going to stick to their place. So let's say I select this group group here and then you can see now only the hill We'll go up on debts group this I candle group rename this I Kendall Group Sorry. Uh, let's limit to group. I'll give the group What in the name So that I know does not die Candle. It's the group of die candle. So group underscore ankles. So this is the ankle. Until I came maybe on lipped okay to a group and care like a leapt And then I got this by vote. I can now do the no. He'll partisan easily next. I'm going to select this I candle and do the same thing I'm going to group it so that I get I said that by what? Here I get selected and control g to group by what is here. I'm going to press the deaky and then hold V and snap to hear Press Jigen. So I did the same thing that's moving the pirate tothis ball joint. Now I can rotate this to it here like this. So we have took off this to, like handle No, we need to have a private here. The hill let me. So the whole fit needs to go up from the hill. So there's position we need to achieve for the animation so we can do that by again grouping these three things. So I'm going toe group this to group on with this I candle So select this group. I didn't rename it the less for us Rename it so group Let me keep the group Ward Gruebel Score! This is the toe toe to toe underscore. So I came every toe Ok, underscored lipped. I think I have to on school here maybe. Okay, now I need to select this toe like a group and then the group My ankle like this to group on. Ben, we don't have any group for this one. We don't need that sort of select this I candle. So three things like this. I Kendall groups like this I candle group on DNC like this I can handle. And then I'm going to group these three things again. Press control G on group. Now I have another opportunity to get a pilot and I'm going to press d move this man early . I'm going to put that behind the hill or exactly at the hill, back partisan at this internal, said the center on. If I pressed Dick again, that would be set there. We have a new group, this group on with this I candle. It's a single group by what is here so that we can easily devoted the whole fit like this from the hill. We can do this so this group needs to be renamed. Let's really limit the group on score. Feel he'll Biver and we Okay, well, by what lipped? Okay, Now we need to have another pilot to rotate the whole freed from the toe from the front, like like we just did from the back. We need to have a private here. So I'm going toe group this group again. This will be the last step. So for us we create dry candles here. And then we create a group here with that say, my candle then created a group here. This group I would is here and this group by what was said here on then we group these three things The two groups with Di Candle and said that group I work here now I'm grouping it again. I'm grouping this again on now. With this new by what? I'm going to set it here. Other front. This is the last group because I'm a here, maybe. Yeah. Praise Dickey. Now I can rotate the feet from the two Legace. Okay, so we have all those private on. We have created the group. Let's green image to groove Underscore toe by what I've got. And so we had it toe I can handle group on, Didn't have it to Private Cook can imitate anything. Doesn't matter. So we have all these groups here. We need to do the same thing on this side. Let me quickly do this and then we're going toe cleared actual controlling the next lecture . I'm going to do the same thing here. So let's goto the I can handle Skeletor like candle Upson box experience said to single chain Andi Sticky. I want to do that letter sometimes from here doesn't work, so I'm not going to turn that there. So I'm going to create Taken from here to here. One I candle this way to bring the stool again and click here till here. So we have to I can. And then I'm going toe Select this. I can deal here Sometimes it's hard to select from this view of a once you have selected it . Let me opened Outlander once Die Kendall its electoral going to group it group grouping it with itself. And then I'm going to said this by boat here at this ball joint. Christie, now this, I can tell, can be rotated from this point on. Makes your make sure group really limit group underscore on it would be ankle. I get the same name underscored fight. Okay, now this I candle needs to be sticky, so let's go toe activity to repressing a key. Stickiness said finish to sit too sticky. Same thing here sticky. Okay, so now it just no new group. I can handle our Let me see if it works. I need to make it again. Sometimes I don't know why doesn't reflect our debt. So that's why it's important to check everything. Okay, No two walks. But now I'm goingto do the sentiment, This door grouping it on, then sitting the pilot here at the ball. That's the dickey on renamed this group toe proven to school. This will be the tour, so I care underscored. And now I'm going to group this to like a group ankle Laiki Group on this like a So let's select the group from here. I can insulate the group in the view wrestling the group, so I k. Roof and then group. I think I like growth on then this I candle. So three things. Two groups and then one I can handle, creating a group again Control G. And then this group. I witnessed Roberto Hill, So maybe open the tenant box to make the board illegible. Let's make it visible. There's d moved by What of? It doesn't have to be exactly at the same Lucas, unlike the other feet. But it will be close. Okay. Sticky to know we have the hell. By what? From American rotate the hill rooted the fit. So let's rename it toe group underscore hell by a vote. Maybe divert under school art. Okay? And then I went to group this again until demand is the last group by witness to wear the toy de aza. Let's set it. So I want you looking at a side view to make sure that it's Landover. The best capers Dickie on. No, it's a reason thing like this. And then this groups have been named as group hell on this is the two by vote again. The name doesn't matter. Actually, you're naming it because you're going to use the same drinky letter to clear those kind off attribute here. So then we need to have these names that you can understand that. Okay, now we have this grouping set in their place, really to go. So in the next lecture, we're going toe, create actual controlled carves, and then we're going to assign it to the feet on. Then we're also going to create some attributes here. So see that in the next lecture
114. Creating The Foot Control With Costum Attributes: Hi. In this lecture, we're going to create the foot controls on Then we're going to our new attribute at the beards to that. So here I'm going to use this cough. Let's press control de duplicate it on. Don't miss scale it. So here I'm going to create a footstep over again. You can use a simple car, but let me create That's off him going to right click and then go to control Vertex attending excepto mast oval Sumisip on good object more and from the side view it's would be at the bottom here. It's a portents of let me being it down to the bottom. Okay, then again, go back on changing the same so that it met. Better get something like this. Maybe I'll get something like this. I said this will be my foot control cough and I expect to see some activities here. Toe toe Get those foot roll animism So pretty in the previous electoral recreated on groups so that we can animate the feet and defend ways. And I want those animation in this attributable I'm going to create some activity here who is really low me eventually toe animal Those fit room. So this is my foot control and let me tended spy vote to this ankle joint here. So this bible super here I went to turn off the model, but as Dickie to switch back to the private more and than pressing the wiki and then move until I snap it properly. Then I'm going to place de again. Toe said that cannot. This control has the pilot on the ankle joint area. Hey, I'm going to freeze it because I'm happy with the scale on the purchase on the by what is said and done, appraise it and then rename it Toe City model and fed and for the left foot Control. Okay, the controller is turned here. I'm going to create two new articles. One would be called football, and then the 2nd 1 would be called Total. So let's create few empty attributes. So for that, I'm going to the activity deter by pressing control A. Or you can click on this start ups and from the left. Okay, here. I mean, said that tribute editor, if you go to this attribute and go to our attributes, he will get this window which allow you to create blank attributes. So here, going toe, name it as feet the rule on. Then make sure this is said to cable. Make a tribute cable so that we can animated letter on. Then the minimum value would be minus 10. They're gonna get actual giving number here and the maximum is 10. The default is zero. That means you have an attribute called Foot Roll. And there we can drag it toe minus Stan and then you can drag positive Jackson 10. So this is the number here, Beautiful region. So we can declared it to my understand encourage it to 10. That's okay. Now you should see if you goto the channel box is you see an attribute called Futral and now it's set to deal because the different value a Jiro If I select it and made most drug in the view and say I can drag it to 10 Of course, this value now it doesn't do anything because we have not created in animals and fight. I'm not used a said driven key, which we're going to use in the next video. But in this video we're just creating a blank attribute which has this value and then we're going toe are animism to this value for gunnery does of my understand a minimum value maximum 10 on the different zero. Okay, so then I'm going to kill the total active ALTs. Same way with gratitude editor. And our attributes told room cable. And again, I understand 10 and Joe default value. So now we have to empty a tree roots in this control cars. Okay, so in the next video, we're going toe creates, um, we're going toe. You said driven key, which will allow us to keep this value it different rotates on with these groups so going, we're going to actually rotate by using those particular groups. Let's say, by using this group the store pilot groove, we can anonymity. It will be the football maximum 10 ups. Um, then again animate this help. I've erred. I want to make this. We're gonna want only with this ankle. Okay, We're going to see that in the next radio. Phyllis, you that
115. Creating Foot Roll And Toe Roll: how In this lecture, we're going to use the set Vincke technique to bring all those animism studios attributes so that we can animate those latter using those attributes. So here I'm going to first duplicate this control cards to the other side. So I select this Now this controller has the private here, so I'm going to group it so that I'll get a pilot here and then I'll duplicate that group. So let's group it. And the group has the pilot at the Arisen. So here I'm going to duplicated by control, De or you can again go to edit duplicate. Okay, Once I duplicated, then I need to put minus one into the X axis because in this case, I want toe switch our move to the other side of the X axis. So now the side. I got the control cup. Now I need to select those two group inside the Outlander and then let's on group those because we don't want any group here. We just grew did because we wanted to get the pilot there, and we didn't want to change the pilot of the actual controller. So that's the reason why we did a group. Okay, Now I'm going to rename this L one, which should be our for the right side. Now we have to control coughs. And there by what? Is that the only other ankle joint? Okay, now I'm going toe use a driven key s so that we can animate this. Stop. Now we have this football and tour. So let me do this for the left leg first, and then we're going toe Do the rightly. So here you will get the said during key inside the animism tap. So if I change it to animism model, then I'll get this minerals. So there's a medical key if I go to that. And then there's the said driven key. Yeah, I need to clear on the set up some. Okay. So make sure when you open it nothing is selected in the view, so everything should be dis elected on. Then I a pond it so I don't get anything here. Okay, so now I need to select a driver on the driven. The driver next with this carves this foot rule and tour of Let first do the foot rule. So select the car on you. I need toe lorded as as a driver. So let's click on the Lord driver. So this control carnage to be the driver on basically the control cards foot rule at the witness to be the driver on what It's going to drive. We're going to animate it. So I'm going toe the group stairs on the left group here. The group hope I vote and all those groups hero in it to select the top I foot, which will allow us to do this in the foot road. And then I need to also select the hill. By what? Help I What will allow us to do this? Stoppage it up. That the top I worked on Then we'll need this ankle toe. So I'm going to need these three absence this three group. Not that I like a group which allow us to and do this. We don't need this right now, so we need to select the Tour five. What the hell pirate and I think alike group these three groups. So let those three groups from dark liner on. Then we need toe lured those as driven. Okay, Now select everything here by pressing the city and we need to drive the protests in the eroticism started the ex voters. And in this case that select, you need to animate this X axis rotation. So that's the reason I'm going to choose. Wrote it, X So basically this control carbs put roll attribute is going to drive. The rocket takes off this thing. Okay, so in the let me see Let this governor, once I have loaded these driver and the driven, then I need to see like this car. Andi Now the food runners said to Geo here, once everything selected the foot rule is selected here and here you can see everything is selected on the road at exit selector. So at the foot roll is said to Jiro I want this POTUS allowed. If it basically normal doing nothing. The foot is doing nothing at this states on the foot. Truly Jiro, the food should be in this position. So that's why I'm setting a key here now to say Devon Key sits disposes of all of this prosthetics. A zero here. So let's press key here in support. Truly, Jiro, I'm pressing a key Now. The computer remembers that when the food role is said to Jiro the position of the feet Is this on? Now? If I'm, I'm tending this foot roll toe fight. Let's just go. Miley Stewart Minus are going to split five year. Okay. At the five States I want toe, I want the food to be rooted are going up from the ball. So in this case, I'm going to rotate the I can handle the ankle like and I want to really get it. So what I did, I put the foot roll at reboot on put the five number there, Then I'm changing it. Toe prepared se por producer in this case, let me and we say 40 Maybe. Gee, maybe maybe 45 something. Okay, so I want toe. I want this purchase Another five foot rule number. So here, I need to set key. So as you can see, I put a vin number there so that I can remember it. Reggie Nieto, type it somewhere so that you can put the exact opposite value here when you do the right leg. So you need to do this manual. You cannot meter this thing so that there is a beautiful It's a better off some that you write it down and so much I'm going to write it down on the Lord's Prayer so that I can remember it. So let's open the Lord Battier on. I'm going to write as let's say, it's bagged the attribute here, right, animating food rule and for troll. That's a good if yet when. And the food police said 25 Full troll said to five equals five. Then what happened the then a pack it five something which I understand very football went off. Little value is five. Then I want this group angle type the name group ankle like a Australia needs to be said to said 2 45 I want to write it Sunday night This So let's let's write it, Got beat there and went toe. Got it here. Okay, so So this is the case. So if I go to the football here and now, I can see if I change it to Jiro, It said toe back to that position because we had a key there, and now if I tended to five, if I tended to fight, we didn't do anything because I fall attractive, said Kid. So let's do it again. You're said the five key on here. I'm going to select the group particular group, which allow me to do that. Let's put 45 make sure you put the valuable, like the partisan click on the key upset so that it key with that football value. Now we have two key while at the judo. If a middle months drug you can see now my foot is being an animated signage, and now I'm going toe put. Then, at the 10 position, I want the food to be going off from the thief and it will be stripped. So here I'm going toe against anything can making Joe. We do want any said like that. So let's like the top I would on. I want this position on. This wasn't maybe 50. Let's put a vin number so that it becomes a J. So I want this at the 10 possession of the football, so I will look it physical unit to put a value at the foot roll and then go to the proper group on animated and said a key here. No, I said the key desolate me Swiss to when no Predator that I don't. I'm going toe right. It does Group on. This is my hell, I think. Toe by. What? That's animated this So five Odell business to be equal, as I guess. 50. Yeah, I think 50. It was 50. Let's elect 50. So there's not part will help me when I am when I'm going to do the other side So now you can see if I goto this foot roll and drag it with middle mouse I can animate this at triple the animator is going toe animal distinct. So if he wants this position of the physic again And they were deceptive about football, okay? And now I want to go to ask the miners value from Joe. So let's put minus five at the minus five state I want the food, so be rotated from the heel and the toes would go up. Okay, so here and toe, I think we just want a minus 10. Well, we don't want any minus five years, so let me select. I understand. And then I'm going to select the help I vote and then do this something, like maybe minus 40. Get in said the key. So I said, basically three key one at the judo football, where everything It was default. And then I had a key on five and then 10 and then minus so physical four key one at the Jiro, then at the 5 10 and then minus 10. And now I need toe again by doll. That's Ah Oh, I should write. I should change it to 10. When the food drug Lord said to 10 this is the animus in here. Let me got peach and arrested ship for Children for two, last minus 10. I didn't write that, Jiro because because there's Lorries and it didn't do anything. We just said take you with the beautiful stuff. So, yeah, I'm going to write it's group. He endeavoured the hell this time he'll five foot ill calls to I guess I forgot that Help. I would wasit to minus 40. So let's write it minus Oh, I thought it minus 40 minus 40. So this foot is done. The football is done. Basically couldn't see now you can And they went this stuff that said Kojiro. So we're going to do the same for the to. Okay, My Nam log Waas off when I'm going toe do the same thing for the tour. So let's close this and then disliked anything. Then reopen It said drinky set. Okay, I'm going to select again the control cards, Laura's driver. And this time I'm going to select or rule. And then here we're going to select a group. Basically the toll. So I came. Y que el Hamalawy Sophie, I'm goingto said it has driven and then routed Ex Codex. Okay, let's see, like the cough once the driver and driven is loaded here, going to come back to the cough and then with the loose it to Jiro in itto said the key here on I'm not regretting anything doing nothing. Just make sure the totally said to Jiro have a key here by default key. And then I'm going toe Set it 10 okay. And then do your stuff here. Once you put the number there, then I want to select the group which I want to deform. So let's say at the 10 person I want this Okay, a clear even number so that we can it really remember it. You know, the to purchase in at the four total when the total is said to 10th. This is the position. Okay, I need to keep it. Remember toe keel the residue. Lose that number. Then I went back to the car. I said My understanding Here you can see I'm just sitting three key when you put my understand again and come back to 34% and then I need toe. She left the group again. Told okay and then I'm going this way on again. Maybe minus oh, it's a positive. Came everybody to 44 days so that I can really remember it on. Let's get so now if I go to the total on making judo now this is the default normal purchase Another fit If I goto what Stand with my middle most dragon The view you can see it's going up, the toe is bending towards up and it minus value is going this year. Now this controls will help animated to animate the feet Probably so this fit role total is very important here said during key Allow us to do this Do this number with this animation . So we're goingto do the same thing, decides to let me close this I have a right. Did I do stop down? So I'm I think they I remembered the toe toe parts. I didn't write it, So it was 48 ng Oh, yeah, Let me go to dot Then I think it was 40. Yeah, I didn't write that dollar because I think I can remember it So they do the other side. Okay, so here I'm going to again the select everything goto Kisa driven key said So Lord discovers driver this time and I'm going to who are good at that group. So the right side group So let's hold septic clear, Click and click on it toe, pull it up. And now this is selected and went to do the same thing Toe Private help. I work on the ankle. This tree thinks needs to be an emitter here with the foot roll. Okay. Everything looks fine to loads slow driven like everything. Like the foot rule here. If you don't select it, you don't select anything. This key will not be activated. So not find it and I cannot click on it. So this these things needs to be selected in order to animate it. So let's rock it Click on the road at X Now it's got activator. Now make sure this has the zero value. When you stayed the first key, it's sort of Bean Joe. So that's kid. Okay, then I'm going to animate the things that sport five number do all the stuff here. I'm going toe shake my note better when it was five. We have 45 there. Okay, so let me see. Let the ankle fasting live on limiting him this time can. So it's a 45 year, not 740 pipes, just 45. Okay, so I'm going to keep it. Okay, then we go back to the control coughs, food, staying here. I don't know. I had to look. Okay. Sorry. Put 10. Here we are animating the food roll right now. Okay. Here. I'm need toe. Make the ankle and it to reset it to zero. We want a flat feet, and then it should be Go up from the to on. Let me selected It was 50. So let's put 50 here on Sadiki. So now we have Suki basically creaky Jiro. Five and 10. Then we need to go toe minus 10 and then animated the hell pilot! Help eyewitness to go up like this. Let's check the number minus party. So help eyewitness to minus 40 minus 40 on Siddiqui. So real quick we have we said key. Oldest off. Okay. And then I'm going to do the same thing with the tour and we know it was 40 for both the things. So let Seijiro first and that's close. Everything. Reopen it and selected a striver Doral on. In this case, I'm going toe Underwood. So I get I'd say driven Don't living here wrote Adex on Gwen. This is said to Total said to Jiro, this is the purchase A We are We want for the talk on. Then let me selected again When it said then Okay, I need to under Madonna toe It was putting minus 40 in this case key And then I'm going to my understand that I'm going Maybe I'm going a little bit speed. You can review it if you want it to understand it. It's low when it stick. When I said to my understand, I need to against licked the group on anywhere decide 40 said the key A little ticket once you because you may be miss clicking on the key Obsolete on human. Lose it. Okay, so now we have to activity at the rules here. We can animate this stuff. Now again, the next lecture we're going toe create the same driven key for the fingers were going to do. We're going to clear some attributes here in this control. So that animator can come here. Andi, they don't need toe Select the A joint one by one. Then anyway, instead of that, they can just come here and they will get all those fingers at tribute here, which they can use to unlimited. These fingers were going to do that in the next lecture.
116. Creating Finger Costume Attributes: Hi. In this lecture, we're going toe create the finger attributes so that we can animate those fingers easily. So in this case, I'm going to create fewer tree roots on this control cops, which is there for the rest. So you need to select it, and then we are going to clear some activity here on. Then we're going to use the same techniques, techniques with videos in the previous Lecter, which is the said drinky. Then there we can animate these joints with those attributes. OK, so let's select it and then go to Dr Built a liter by pressing the control a key. And then there I'm going to are the attributes. Okay, so here I'm going to create five that rewards for each fingers. So let's start from the index in Nick's and you cannot sold right, left, right. I think that it's not really one, because we're already selecting the left side so that just as I did as index on this case again, you can put number. Make sure this is to cable. In this case, I'm going toe again. Pork. My understand again you can use any number. Doesn't matter. Minimum is minus on maximum Miss Positive number and then default is gentle. Okay, here. I'm going to clear that on now. You should find it inside the channel box here, Index. Okay, so let's do those thing quickly, goingto hard one day one. So let's a middle middle. I'm anistan 10. You can press the tab key to sweets between these boxes on. Let's are, if you don't want to lose this box, then you need to click on the art. Otherwise, if you click on OK, obsolete, then it will close this window thinking that what don't we are done with distinct, So I'm not going to click And okay, I'm going to click on the air. So now I do concluded the ring finger thing on everything. Okay, My understand. 10 are on. Then it's a pinky. I can write a little. I understand. Then hard and in the Tom. Okay, let me a minus 10 10. And this is the last ones I can click on. OK, some. Let's check it. Now we have five fingers here by a tribute for five fingers. Then I need to animate the stuff we need to get the same attributes for the Sirajul. I think I can do this. Let's see if I can do that letter. So it's first animated this stuff and Leto's Let those afterwards animate these joints. I'm going to again disliked everything. Be inside this animus and model and goto Key said Driven Key said. And now you have the side said, Driven que window on. This is my driver. So let's let the control cough and click on the Lord driver absence so that it gets loaded again. Now I'm going to start with Index so selected on, then I'm going toe select this three joints. So here I mean, said the selector and he was in the selectable Select this joint and then hold sipped. Select this join. You need to select this manually, select just one and then drive a load it than this journal. 1,000,000,000. I want this trees or it's basically this one, this one and this one so selected whole sip to select this one. Hold on while you're holding Sediqqi said this one. So this three joints collude event You have three apps on here select everything holding safety And now this indexes selector on in this situation let me see the access in this case. I want toe routed these joints in d excess, which is my blue color of circle. So I'm going to select Rotech see? So the index's selector wrote. Did selector. Now I need to once the driver and driven a selector. I need to select and check this. Make sure you just said to Geo on, Have a key there. Okay, So when this activity said to Jiro, we don't have any universal Basically, it is the rightful position of the finger. Now I'm going to Let's ever started miners Applause. You can do anything. Let's say the minus. Will that minor stain for the index, the joint select everything here, the fingernails to go up. Let's say I want to get this partisan of the finger when I go to us, the miners value there. Okay, just look at your finger while you're doing it and see how far the finger can go the back, back, back. So look at that. It's a cattle character. It can be a little bit go backward than yours because you are realistic. Your rent and the cartoon characters are usually more flexible. It's OK. You can does something like this. Maybe they're gonna can put some value here. But I think doesn't matter. We can. We don't have to make those exactly identical. So I'm going, maybe 30. Maybe that's a 30 and said that. So this is my minus 10 index partisan for the finger. And I'm going to ask the positive maximum 10 on again when you put 10. There it comebacks to the default Jiro position. Then I need toe once you put the valley there than animistic so you can select three fingers like that on then. Anyway, it all you can go one by one. I mean, you can just select it and then do this and then select this on, then do this. So, basically, obtain partisan. We wanted to make a fist. So we want a Maxwell Ben person here. Something like this. So let's say make sure this three things of selector on said they keep their okay. I'm gonna check if it's working. So, 10 is this Joe? Is this and my understand Is this so I'm going to do this for every finger. So here again, I need toe send it, Change it to middle on the driver is the same or just send it to middle. Now we're working on the middle finger on this. Things needs to be changed. So in this case, let me select this tree joint on Lord Different. Okay? And now they got objective. Select. Now this rejoins here on. Then again, I guess this is the G of some. So let's select rooted so middle rotate and then go back to this. Make sure it's said to Jiro. Have a key there on. Then I'm going toe set. My understand? While you do this again, make this said this time I understand that we can have a reference there. Uh, no, I'm going toe. No, this is my understand. I need to select every finger and then rotate it again. Doesn't have to reserve units for 30. Same number said the key there. So I had my understand middle attributes setting the fingernails to come here and I'm going toe put 10 there again, do the same thing. Set it to 10 so that we can look at that. No, I need to see, like this joint wrote it it something like this. What did it under this'll? One okay. Something like this. No, I need to said the key there. Okay, then. Chick. Okay. Good. I faced Look both of the fingers by dragging the left mouse button. I can only wear like this. Do the same thing. No, I need to select this tree Lord driven. So they got abducted. Now I need to select a ring like this tree, Rotate G on again, make sure we have Joe have a key there. And then I need toe underweight. This stuff also, I need to change it to minus 10 and select all these three joints. I think they wouldn't thirties. I like to put 30 here. You can give a living. You are number. This wouldn't be matched with each of the Maybe we can do that. Let's G And then I'm going to what? The dipped in and then pauses on this finger. I want this trigger to be in that number, and then you can look at your finger at this person toe. Get from reference, Okay? No, I need to press key. It should be okay. Yeah, Let's do the same thing. I'm going to select this tree. Fingers joined driver drive different sorry on then. So it's to Pinky Select everything. Got a G on then I relive it. NGOs Who said Keep death then let's said minus 10 when the finger is going up, Mr. Go up. Maybe again. 30 said the key there. And then there's bet then a 10. I'm going toe Bendis thinks. Okay, Siddiqui. So we have done with this forefingers can see. Let's do the same thing for the time on everything selected silly This three joint No, Mr Event select everything Thomas elected in this case again. I'm going to under Mitt Note going that say that way. So I need to animate Think in three different direction against even a animal from this empty area Inside that circle Here you can look. Look at this place. You can see it's tending every number The rotate X y Z got abductor. That means if I go and anywhere the ge only the finger is going this way, which is not re industry. This should come here somewhere. So I'm going to animate something like this. Okay, so that's why, in this case I'm going to animate this tree tings for this time and select this three things again. The system people person. Let's selected the Thomas said Toe Jiro, this is the default. So have icky there on then let miss like this to minus 10 on. Now let's late all these joints and I'm looking at mine. Finger. It's going. This is going back somewhere like this. A little bit up have taken to select for you. It's a matter like this and I'm going to have a key there. Okay, From now you can see the Geo position minus 10 Pro Jason. Now let's put Tayna positive but positive person. I wanted to make a fist. So at this stairs, I'm going toe. Rotate it from here, I guess. No, he cannot it from here. So the selected on Let me drop dead a little bit like this. Maybe on then from here. I'm going to here. You can see him sometimes. I'm protecting from this empty area. A few from rheumatism on from here. I'm going toe. It should come on top off top of the finger relationship. Well, it served at this. Just have a good port. Take a time and make a good fierce There may be there's to be a little bit. I'll go something like this. Once it's done, let's sit key on it. Notes. Suit properly. Okay, I can go. Come ahead on here. Can. Let's close it. So this way I'm going to do the same thing for this hand again. You don't think you want Oh, seeming doing the same thing here as well. So big Physical. You have seen me doing the same thing for five times for five fingers and nothing. I'm going to do it in front of the screen here, so I'm going to do it in between the next lecture. So in the next lecture, we're going toe, I'll complete it there in the background on the next left, we're going to create some blamed steps for the fists. So I'm going to create some bland steps for the smile and for the closing of the eyes do stuff. So Sue in that lecture,
117. Creating An Eye Close Blendshape: Hi. In this lecture we're going to create the clothes I blend steps and this cause I'm going to create three billion steps, one with the clothes I And then the 2nd 1 will be the smile Expressen on. Then the 3rd 1 will be surprised Express. And so, of course, you can go and we can make many more expresses with this technique. So let me started to play getting our model. We need to duplicate it. The process is something like this. We need to duplicate the model and there were going to change the vortices there, make the pose, make text wrestle, and then you can use brain steps on target that save on this orginal mess. So let me first duplicate it. So I'm going toe Let's make this layer so that we can selected select this model that may hide this I first the outdoor I save. I don't need that. Let me hide it by pressing control. It's on. Let's see like this mountainside part board dies. Onda messed the body. Miss, I need this stuff. Actually, I wonder I need to change the morning message for thy but I need to have the idea so that I can just the safe According to that, let me duplicate it by present control D So now it's a duplicate it, But you cannot move it with the move tool because the move to is locked. We need to come here because it was bind may. So every transform ism are locked going to unlock it by whole right clicking and then go unlock selected. Now I'm going to move this stuff to the site here you can see I duplicated. I didn't unlock the orginal stop because it's buying we. If we are lucky, then the buying will be gone so it will not be react to design the animal. So make sure you don't know that just duplicate and then our luck it. And now we can see the cell model. I'm going toe duplicate it two more times for the two other expressing this control D and probably again. So now I'm going to hide this tooth for temp ready. I'll bring those back when I need those indoors. Let me select those control it. Okay, now let's make the clothes. I model here with this blend step technique. You need to remember a few things. Number one is never delete the histories. Andi never freeze the time for MSM. We need this value here. Never go and freeze this model. Never do this because if you come here and if you put Jiro here, it should come back to the original position on the rise. The blends it will not work. So never pres it. I never delivered the history. It is the fasting. And then the second thing you can only move the waters is you cannot extreme old, more faces you cannot is the what X order You cannot extremely cannot extract and do something on the males with tens. The vortex numbers basically you can do is moving, moving around the vortex and making. Except that's what I'm going to do. So let's first tall under symmetry from here to the object X So this morning is not at the center and you're so we cannot use wall ICS. So I'm going to use object X and make sure it's the senators working here. Continue. If I select this place, this is the side face is also being selected. That was the symmetry is working on. I'm going to start closing. Die Basically. So when he closed, I both dial. It doesn't go to the center, the opera islets of cover, so come down more than the lower eyelid. So basically, the pilots who would come some somebody here recovered at least 70% and then the scam cover 20%. So we're going to do that. So this will be the operatically and then the law. Really? So I'm going to select you were takes our face, do whatever to get the safe I want to see, like all this physicists and then bring the move, tool and praise be to salt tall on the South. Selection With this I can, although I have selected just for four faces. Still, no, all the physicists are kind of selected smoothly. And there's a color, Cory concedes, yellow to red and black. That means there's a subject effect, even though the vice he looked. One fares you drag. There's a soft movie effect to the border and then let me select a few faces. Maybe 1234567 from the center and then going toe move. This is like a nurse or to do something like this. Okay, then I can dis elect the Dis elect or decrease my selection to a small idea. Then continue dragging it. Maybe decrees more. Okay, I get not just the sub selection radius by holding the beaky and dragging my little mo's just a subsection fall off If I want to are just a small a day the I can have a small radius Small, small fall off that I'm going to praise be again to turn the sub selection off so that I can work in just two selected face Okay, here can see slowly We're closing. Die on now If you can see the is loops and olive in there Not kind of spread evenly So what I'm going to do? Of course I can come here and select what texture manually move on and try to make those evenly All I can come here to the sculpting tab and then use the third Upson which is the relaxed bus with this boss again You can hold Beaky and let most drag toe are just a radius . With this blows, we can slide the vortex on the surface and it doesn't change the same two months It just lives to miss the topology on the surface. Toe make even w z. I can see those now. It's very evenly spread. Let's go back toe the select tool. And here I'm going to select this. That's a little tease. The selected Maybe. Let's go to the side view. It went on on the soft selection. So that gun work smoothly, softly. Let's start off that and then justice safe. Okay. Something like this. Of course you can have. You can put a little more time to get a better result and mean, Let me drag this and not just a sip. Okay. School? No. I'm going to move the lower eyelid up a bit, so I'm going to select. That's the selectable to select off this and going to side view on. Then move Goodman. It used the radius of it. Forget something like this. Just select my selection. Just a medium made until selection. Maybe so you can see I'm just moving it. Only Dover text and trying to get accept. I can use sub selection. I can use any move tool off this kind of process. But I cannot extrude I can adduce those kind of stopped those kind of more link tools. I can use those. If I lose those, then I cannot use it as a blend, so it's not going to accept it here. You can see if you drag this vortex you max in the selected behind vortex. But here you can see that's not the guests. It's I'm not selecting any behind what x accidentally that because my move tool is said to portable apps, and that's an option if you come here to the move told by double clicking on it on. If you come here to this common selection options, he will find this obstacle automatic camera Best selection by before. Like I believe it's off. You need to come here and make it your unit to turn it on. So what it does, Basically, it's a camera based selection. If it's off and you come here and you drag this director, select this vortex on. You can see I have selected this vortex behind vortex accidentally, and if I'm gone this on and then drag on these three vortex doesn't select any individual vortexes. It's not visible to camera, basically could say, I want to select this tree vortex. Then make sure this three word text are visible to the camera. If it's like this on your draft, it's just going to sell it this to Lord Raglan because that was more visual. So the concept is this. So it helps us to select the front vortex very easily on it stops province to select this back behind vortex. Okay, remember it. This one tryingto get a good safe here at me. The dream being off for text down it. Okay from this could make sure we're getting a drone. Are. Except there. You can look at different express since off closing. Closed I and stuff. Okay, Almost tone. So let me see. Let this, um, close it. No. Maybe I need to move this officer that we can toss those on when you would move this laurel it. Make sure from the side Operalia lead sued. Come over a little bit on the Lord. I lied. He in here against, like, this stops down on the sub selection. Andi, when you use soft selection, it might also stop Elicit the upside because it's too close to this protects. And if if that happens, then go to the subsets enough tool move to lease Apart Off is a sub absence of this. No study the substance and is the sob son of the move tool. If you come here and go to the sub selection now this fall off Morris air to surface. If it's said to volume, then you just like this doll face against its moving like this dog is inside the follow up . It's because this is suitable immunity to come here. And it should be said to surface when it surfaced. Said to surf it the fall of sprayers on the surface, not as a volume. So this surfaces way back there. So it's going to if I increase, this follow is going to slowly increase on on the surface, it would come here. So if no, this technique helps us when few things are very close to each other. But not so first ways. They're not close, but volume wise. Yes, there close that time it can help us. Okay, Now I'm going toe use may relax, boss in these areas so that becoming a bit stopped, relaxed, spread it spread out evenly something like this. So let's go back to the selector we have. Ah, I closed. Maybe let's go to the side view. I may need to our justice bit. So in this case, if the joint is on the way, you can hide it. Let me hide the joint. It's under way. We can put it on a layer. Let me hide it. Let's control it. Yeah. Then I'm going to move this stuff again. We're in the camera base. Who may be I may not see like this because those are invisible to let me throw this can see like these four takes, basically trying to get that kind of both, you know, in flirted. Look. Okay, that's good. You can use it for the final time. Okay, so this is my closed. I Now let's create our Benson. Once it's done, I'm going to rename it as my close I close. Okay. Okay. Now I need to create the blends it so I can do that by selecting this one first, which is my step here and then soup selecting this one. Okay, once this selects in order, it is very important on this selection. Is John for select this. Then this. I'm going toe rigging on go to deform here plants. It can come here inside the substance box again. I'm not going to use anything at the different one. So that's create on it. Molly Fikes, select this model on. Go to the import. You'll find this plane, Sepp nor I've come here. You have this eye close off some. I didn't name this model before. I created that Blanchett because this name is going to be used here. If I lived the name as body one then I'll get the blend Upson year as body one. That's why I get I name it as my ex prism and it will get that here There's one off some called anvil a pond, Then tie clothes on If I come here and selective will attribute and middle most drug on the view you can see now my character can close no planets I So this is blend set. The animator can select it and come here and animate this attribute But this is not a very efficient way to do this. So we're going to see latter how we can connect a car off a controller with this attribute so that animals can animate this on the view here so we can do it. We're going to do that. I'm going to. So you that in letter videos. So in the next lecture, we're going to create our second blend step, which will be a smile. Expressen. So see you in that video.
118. Creating A Smile Blendshape: Let's create the second blends of which will be a smile. Expensive. So I'm going to all night the messes. So let's go toe display. So full lasts hidden maybe. No, that was not that I'm going to display. It doesn't. So here, So go to so all No, everything is visible, my light also vigil. Let me hide those again. Okay, now that's hard. This one and maybe this was understood. Make the scene. Is your here? So I had those. Okay, now this will be mine. Smile on. I'm going to and make sure again you have not freeze did not deter history. So I'm going to again use those self selection technique I made those mouth inside. Parts are going to undo. Let me undo everything that this place So so all then really, somehow I missed those those parts. I'm going to dis elected the live musical deal it does, and it can duplicate the stuff. Let me hide this stuff. And when I selected let's don't off that Absalom, Let's selected model here. Known to select again Die! Let him hide this tour outside. Yeah, she lived the I their first lead the inside, but to why? And then the body. She let this tell the stubborn, Then I'm going to duplicate it by prison control. D unlock this attributes. I'm looks Alexa would select it and then move to the site until d move. Okay, let's hide this one. We don't need it. And now go hide it. Okay, so here we are going to create that smile. Expressen again makes sure that the symmetry is tonal. Now it's said to object X, Let's go to the vortex word here on the smile this lip corner sued. Basically something like this. The lips lip cannot should be live it rounded like this so they can go up of it from the side view from the side view There something like this would also come. And this would go in one being back or basically like this. Basically, they're going up and then back. So obviously it's a very small mouth, so I'm going to straight is straight it somewhere. Here, let me clear the view, and we're going to do that. So let me select this corner next year again. The symmetries on on here going to see, like, this live gonna on with the soft selects and I have turned on the south selection by pressing the Beaky with this obsolete maybe with increased sub selection the live corners go backward, go backward and maybe from the four dangle it stood also wide up of it and go up Something like this can also maybe try or cutting it a bit. Get that scarf public off. It's already smiling so I think we need tothis are just his area. I'm going to this second bruscia. I'm inside this sculpting tap. So with the second rose, we can smooth these areas. So let me smooth Syria. You can hold c 12. We're doing it. Be careful when you do it might. Here's some worldliness there, so we'll saved to smooth the stuff. Okay, maybe Maybe we need to move Few. You were takes here. This is the live cannot. This should come out of these areas are inside. Let me have a very small small sub selects and radios and then just these things. Maybe the storm this off our just war tex, Let's go to the move tool settings and chances, access, audience and component so that I can move. These were tastes under normal direction just to know, Get the inflated look. A nothing serious just to get ready. Get smooth. Saved there. I guess it's fine. Not a problem. Yeah. Looks Fokina. No, he's smiling. Now. This is the lips of the Cornish to go back up from the front view and know everything a brick of compared to this. Okay, now you can come here and increase this The inflation off this TKT Because when you smile, this muscle is going going up and creating bulls depict here. The chick tends to inflate a little bit. I'm going to try to get that thing. So let's let one face on Dhere. It'll be good radius. Maybe I'm going to try toe, Move it in the X on the normal direction here. Something like this. Okay, This distance I want to see when his smile on. Then the I didn't toe and of close a little bit. When we do this every live it So we can do that. Maybe the radio system also has decreased It beholding the beak and left was dragged a little bit. 10 dis on the idea here on then. We can also make this under I save also tend to toe in Florida. A little bit basically happens when we smile. Look, there's something like this. So deserves mile experts. And of course, it's a very subtle smile. X person. You can go ahead and create more wide open mouth and a little bit more exaggerated expressions, but this very subtle. So I'm happy with this. So let's select this and make sure it has its proper expressing them. Now it's, I need to say a smile so that I'll get that name there. So let's like this and then select this on going toe deform blend. Step on. In this case, you can see if I do this, it will create another branch. I want to have the smile attribute here inside the already created blend, sir. Again. See, in the previous literally hard created the blend save for the eye closing agency that that is exist here on the mess on. We have a blend of one, nor which has this expressing. So I want to have the smile here. I don't want to create another blend step to express, sir. So I want all the extra son of my face needs to be here so that I can come here only and then have the express in here. So for that I cannot do this anymore. If I do this, I'll get Kate and new extra Nublense. Eppler. What I'm going to do is I'm going to art this new express into the existing grants. I can do that by now. You can see this plan. Tip comes under this create tab. If I come here down and there's an 80 tavern blends it, you can see we have to blend safe here. So one is under the age six and you come here. There's an awesome called art on. If I go inside this on recited on space down on the specified or so that I can say my put this X person inside this brands have no let's selected. Then we have only one brand steps, so that is already selected Prince of One. Now this expression is going to be created inside this plant up the existing one. So now I'm going to a plan. Close on, let's see selected. And if I come here inside the blend ship, I'll get die close one. I also get the smile on. Okay, I can see it. So if you want to just see the Expressen without selecting it, you can come here inside the attribute editor on Let's go to the If you come here to the focus idea, you may find ups and body and then we'll get the blend sit ups and here as well. That is my clothes. I know can t and also turn off the joints. Okay, I can see the morning without selecting it. You don't get the focus ups in here, then you wanting the selected inside the attributed later, select the model, then it will come here, then come here. And then if you did select and go to focus, you still find it here. So that means it's kind off need once you have selected it. No, you hard seen it here. So it doesn't so inside the focus, even though you have not selected the model again. So now the window focused. That is just going to blend. I can actually easily unlimited consider his smiling a bit. Okay. So in the next letter, we're going to create our surprise X person See you in their Lecter
119. Creating A Surprise Blendshape: Hi. In this lecture, we're going to create our last Express in, which is a surprise Expressen. So I'm going to own hide the theater only duplicated mess. So let's go to display. So last hidden. Okay, this is our model hidden model. So let's create the south fries, experts. And for this again, make sure that symmetry stoned on set toe object X. Okay, the jake you're submitted, its working. That's fine. So let's create the surprise express. Um, so in the surprise Expressen, no ice tends to kind of wide open. Now, this character already has a kind of suffrage express onto it by default. Dyes are rounded and I brew is up. So it has already surprised experts. Um, except this leave the smelt that does that is more kind of a normal one. But I say it is already surprised I'm going toe Exaggerate this a little bit. So I'm going to start to it. Maybe die, bro. So it should be something like this. Diab Rose to go up a bit on. Then I needs to be open a little bit more, and then we can open the mouth a bit more. Something like this. so. But I didn't do that. So I started. I blow onto selected Let's look everything here and double clicking on it because this is separate mess. He had combined it. So let's select. My sub selection is turned on. I'm selecting the Syria, these two faith and this face, and let's increase our selection. Subsection fall off that I can smoothly move this. Let me go to the side of your so go up. Which and this move it a bit. Maybe a little bit up. Well, you know, let's may guy of it open someone to select this. This move it. And as I said, it has already got the surprise expressing I'm just in and visiting it bit. Okay, Something like that. And then let's work on the mouth. And it opened the mouth. Bitch. Of course, we're not going to do anything with this state that needs to be open with the George Giant . We can get the actual live express, um, from the jaws giant. Yes. I'm just working on this on the mouth. ST Pierre, It looks answer. It looks like angry fist. What? Yeah, I think didn't undo the mouth. What? I didn't don't have to do anything in the mouth because you can just go Opened this with this George Wein. Who? It only needed something like this. We have already tomorrow expressing. So we're not going to do We don't need to do that. Let me Dido it. I guess so. I guard are expressing here, So I'm going toe. Really? Limit a surprise on then let's again makes Syria dawn freeze on their the history of it. Never do those two things that selected And then to let this one go to deform on again Him . I want to our this I want to create a new one. So I'm going here under this aided blends up on our So go to Dobson. Make sure I turn this on and then I planned close now it should have three Upson inside did blend said Lord, and see I close to three. So smile surprise With this I can open this mouth from here on Regard this exercise here. You can see one problem if I tried to open it. It's not deforming the mess anymore. So when you do this kind of bland said you might raise this problem here is because of the order of this things. Now those blend cities stop on top of the actual cluster skin cluster, which is actually the binding. So if you see like this model on right click and go toe imports on all imports, we'll find order here, and the skin clusters will be able everything that means on on the blend. SEPs on top of the blends of skin clusters, will be there. If the blend step is overriding the skin cluster, then you will not get the output of the skin cluster, which is the buying joined by anything. So here I'm going to drag with rain middle malls and drag and drop the brain set under the skin closer so that the skin closure is everywhere. Everything, then the blend. So this other is very important. So now the blends. It is not over writing the skin cluster, so it's your work. I'm going toe open its mouth. I can see it work. We'd experts in the Express and is also working. No, I can't see. It's it's working. I can go toe the activity Editor Goto focus Body pensive There ventured one on. We have this three Upson here? No, it's surprised she on then can smile. Obviously the mouth is open and it's smiling. So we're getting and a full year we're Look, I went close this on, not smiling. Quarter the blend steps. Get something like this. So the make sure that skin clusters develop everything in that order. Goto right. Click inputs inputs on all imports. And make sure the skin clit clusters will be about everything. Nine subsidence overrated. If it If it is, then the smell most drag and drop under the skin cluster. Okay, so, yeah, during the blend saves in the next. Listen, we're going to see how we can create control cards for this three x crescents so that we don't have toe select the model, come here and then animate here. So we're going to get some control cups and then animados to animate this express since see you in that next later
120. Connecting Control Curves With Blendshapes: hi. In this literal going toe create control calls to handle all those blends of expressing. So I'm going to create the I first toe closed I So let me duplicate this. Carve 1/2 years of control, De or can again come here, create and knobs Primitive. There you can create the circle. Okay, I'm going to put it and you can put it in your here close to the head. So that animated can guess that this is the option to close its i something. So let me rotated in X axis 90 the grip. I'm going to put it just beside die. You can keep it somewhere here. Or maybe kid total afis here to the say and putting it here close to die. Okay. This is my girl for thy Here. I can take the safe a bit if you want. That may select everything. Initially, the cough in the select toe asserted the scale tool and the move. I'm going to switch to the world, recited. We can do this. Okay, Andi, this is my I cough too close for when I move it. Then the owners to be close. So let me rephrase this girl Because this is my control car. I'm going to freeze it there. So it's freezed. Now let's rename it toe I Clues. City are ill school. I close. Okay, so this will be my car on. I'm going to limit its movement now. I just want to move it. One unit and then it should be stopped there, so I don't want to accidentally move it like this. So what I'm going to do is let's go to the attribute data press control a. And if you come here to the control I close nor known name of this object, he will find this limiting promise untapped. You will always find this on. Every kind of object here can see. We can limit any objects movement. She'll come here and go to the translate six. And on Dhere, we have this translate X limit while limits element in this because I want to limit it in X axis. I just wanted to be go up in one unit and then stop. So there's a limit tennis development. So here I'm going to disobey the my minimum current and maximum. The current is Jonah on here. Lived went on on the maximum. I'm working for this translate way. So this is it to one. Here is important business to be one. This is Joe Andi. I can see you can also limit its load moment by no turning this on on Click on here. Toe copied is well you two decide now you can see the minimum limit is general maximum current limited zero. We can only move open one units. I can see my movement is luck. So this is the zero position. And then if I go up on one I did one unit, then it stopped there. So it's not that important, but it's a very clean way. You can just come here and move it very roughly organs carelessly And you know it's going to stop there. There's element. So if you move it to the extreme last die fully close. So I'm going to go Once this limited said, I'm going toe collect this movement. This translate why movement with the I close blends up. Let's see how to do that. Once the controllers sit, it's freezed. No, it's freeze is got its name on. Then I limited movement. Then I'm going toe connected with the lens. If I can do that by going to the connection editor, if you come here windows on, go to the dinner later, you'll find the connection ready to hear again. Here we we can put the driver and driven. It's like said drinky, but again it just a connection and not king anything so I can select the scarf. This is my driver, So I'm going to select it and put it on the left side. Make sure you put the driver on the Lipsyte, so I'm going to re Lord leapt. Now this control carve is loaded on. Then the driven or be the models blamed seven or so that selected and selectively and seven or and then really all right. So this sort of either driven So now just a driver and the divinities Lord it. But I have not connected anything. So I want to collect this. This card's why excess movement with this weight of this land. So let's find the translate. Why? For the call for Let me find it, translate If you expanded by clicking on this little sport small icon, small plus a count. You will find this transit X y G. We need to select the way. Okay. Where we need we're going to connect the translate. Why it? The weight of the blends up. So if I goto blends it on, come here to the wit and you'll find three million chips I'm going to choose. I close. We can No, it turns italic. That means now those both those attributes are connected. Let me close it now. I don't need to come here and blend set to unlimited. Now, if you come here, you can see now it has a local to it. That means it has some connection. Now the driver is something else. In this case, this is the driver. I can come here. Move. Tool on. Move it. Toe closed. I so animated. Doesn't need to come there. Go there and unlimited uses need to animate this one. We're going to do the same thing for the other two ex presidents. Well, let's tear the corpse for those. Smiled one. I'm going to duplicate this car control de duplicate on gun. I'm goingto keep that. Put that just besides the mouth and it's up to you can put it anywhere. Let's rotate it in X axis 90 degree so that we can see the car from the front access easily . Okay. No, this is just beside that mouth. Something like this. Maybe So my Yeah, there is too close. Let's pull it out. OK, but this would be mine. Smile Control the selected. I'm happy with the scale and the police. And I don't want to change the safe. That's fine. I want to freeze it and then really limit city. Are l underscored in this case? Smile. Smile. Okay. Enter. Okay, Now let's do the same thing. Limit the trust LTD transfer MSM control E on dhere were inside that liver transplants. Um so translate why? But on this on its one on this one. Todo Okay, so Gero Gero one Now we can only move it up in one. We cannot move it down on its look. The moment is lock now You need to connect it. Let's go to the window there An editor, connection editor And there I'm going Toe Lord, this car was the driver to Let's re Lord left again. Remember, this lip side is always for driver. Right side is driven. So this is going to drive the blend steps. So this becomes the driver on this becomes the driven Selous selected. Make sure you don't assign the model. Actually, you actually need to select the blend step and then reload that. Okay, so I'm loading the blend set. So now let's find the translate. Why again for this one, France led way on In this case, I want toe go to the wit, find the sudden smiler study, close it. It should helpers in animating the smile conceive, I moved that it smiling. Move dollars and there's a lock so I can freely do this. I don't have toe. Think about it. I can just go up to the full smile, go down to the normal position, and I have die close, agile. Let's do the same thing for the surprise. Let's see. Liked it to forget it. And I can pull this. Maybe alongside I broke. Maybe because this is I'm going to be deform. I'm going to rotate this 90. Okay, now let's say this is fine. I'm going toe mortify Freese Transform ism Really limit city Are l on score third prize and be so prior Age. Yeah. Okay. Knowledge do the same. Limited some control a go to limiting for Mason on Translate Don onboard the translate, X, Y, E and G and it said, the one that is fine. I'm going toe sent it Toe Joe so I can go down. I can only go off in one units find Then let's connected. We lose generator connection editor, you know, leaped and then selected. Select the blend Self here from the imports selector blends Lord Rate. Find the France led y did y and then wet so price. So the three blend steps are connected with their control cops. I can easily come here and and you know it is expressed. Since off course, we're not going toe animate Faysal Express on this score starts out. That's out of the scope of this court, but again and this is very busy Greek as well. You can go ahead and get a lot of expressions for the face. And there also are wants straight TV and those kind of stuff. But this is a pretty good Greek for basic, an immense since on for beginner. I think this is a good starting step. Okay, so with this, we're almost done with the rigging in the next lecture on Defy final. Later we're going toe. Finally look at the control cards and then, you know you can see those are not properly parented with each other. Don't know if I move it. Nothing is coming with it. It's the whole characters would come with it. So now when it to actually look at the country cards, check the parents parent child relationships between those on. Then we're going to also limit few the woman, because if you come here and wrote it on open, its job can really It's basically it's so funny, but you can see it's theirs on limited movement, which is bad if you come here. You just want to close the lid mouth properly. It may intersect like this. We need to limit its transform ism on. We need toe tickle some basic stuff for this cop. So seeing that lecture
121. Final Tweak To All The Controlers: Hi. In this final drinking lecture, we're going toe wrap up the rigging. So I'm going to look at all the control carbs and take if all the parent elders and save is there so that it works properly. Now I can see if I move the global control, the whole characters who'd committed, But it doesn't, so I'm going to check it. So let's call the selectable on. Let's start from this road control. You can see if I selected this route. Control should be child of this First select this one and then select this global control. He'd be toe make this global control parent of this small facilities, the route is going with it. There's a good thing. And then here it stops. The neck controls would be it style of this chest control. So if I selected and then she left this chest control on press B. Now you can see if I select the global control. The whole thing is being selected. Now if I see let the route control the whole thing till the hair is selected. If I move it, everything is coming with it. That's a good thing. Okay, so that's done then conceive fight on my head. So I stays at this partisan. I'm going to put it, make it as it side of this head so that it doesn't stop there. So they're selected. She let the head control and press b to make make the first selects on the child of the 2nd 6 American. See if I turned the head, guys commit it? I guess so That and then I'm going to pulled all these express since with as the style of this head control so that it comes with the head. So select all the four and then select this one and then hit P. Now everything's would come with the head open t Doesn't matter if the face taunts this way , everything stays at their place. Let me undo. Okay? And then Okay. Long If I wrote it from this chest, this clavicle control should come with it. So that means this to next to be the style of this one. So that's like this This it be saying things like this one, this one and be so make those two child of this one something like this. So now if I select this level control everything in selector except this elbow and just off the knee injury knee controls. So I'm going toe select these four controls on DNA. Make those child of this global control. Make sure you don't put this here. So they're sort of go on, be a trial of this. Well, control. So she let all four all six and then to live this well and had be. Now, if I select this, everything is committed. If I move, you can see it happens. Because those cars here and no tip, not the title of this one. Soldier, select the food control. They're working here. We have forgotten toe. Do some stuff here. So let's say the group of this left fit, which is this group, Mistress. I love this. I'm going to put drug pulled that on this God. Just this one. Now you can see it's working. I'm going to do the same thing to this food group. Used to be a child, but I'm going to drag and drop on the cough of the right one on. Then I'm going to make this to cover child of this one serves to like this. So like this one? Heck p Same thing we can see first. Seligman Global control. Everything should commit it. I sued. I should be able to scale it without any problem. And then you can see I can move my feet by using this control car something like this. Okay, so everything is no perfect on then. Going to limit few carbs, transform ism. So let's set this one this oneness Toby stuff here. So I'm going to limit it to let's goto It's a tribute and in this case I'm going toe wrote it on Let's shake the access here. In this case it is the X axis, So limit X Now this is the default position. That's fine. And for the max I'm going to, I think, for the Mac Let's check. This is going minus towards minus. That is that is the minimum. So I'm going to turn that on. Make this judo as the minimum I can see it doesn't go that side because this minimum is Jiro. Beautiful position is Geo and the max is said to know 45. What is death at having that is too much. So I'm going to declare it. Let's first see here. Let's I want to open them out till here. Still here. And I can check this valuable. It's a 25 so we can make it 25. So 25 would be my max open link. So my jaw will open 25 degree max on, then. If I close it, it will close your it won't cross that leg. No, I cannot accidentally do weird stuff here. Yes, I'm going to do that. And then I went also higher fuel stop because this country is only there for rotating. So there's no reason to have all these things here, which is kind of clutter here because they're never going to do do anything with that. So if you keep those there, somebody can accidentally move that stuff and we can get some weird stuff here. So I'm going to select those translate skilled on visibility and in this case, also what? It until you don't want this kind of routers and I guess we can log these rotors until again. Just have the X. Let's say let's if I want those. Maybe maybe I need those. Maybe so. I'm keeping those so right click and I'm going toe lock and hide the stop. So let's school lock and height. So now those articles are locked on hidden. Now I can see I cannot being the move to let it. I cannot bring the scale toe. I can only bring the rotator land rotated something like this again. I can limit the why meant on dizzy moment if I want. I don't think we're going toe animate the G. So let me set it to Joe Taken. You can do that. What? I'm living it. So you have the LTD's and here just a moment and are going to do anything Which a meeting the day. So I'm goingto look and height. So this is again not compulsory thing to do, but it helps toe minimize the clutter and make it efficient to just come here and get stop on. Also, it prevents accidental moving our stuff. You can see I can log this movement because it's only going to work and why access so I can lock the Y in the X and D. I can log those even the you can have those that I can only law goes if I want to, so I cannot move those in thes direction accidentally. So to prevent those kind of accident, you can do this stuff. Of course. Can we'll have everything for this translate, rotate scale everything for this but nor fall. So the Zapotec a wrote it stuff I can a concave your debt and look and hide everything here . We're going to keep doing that. So let's translate it. Scale, work it. So the scale and visibility look and height because this is their only two. Wrote it the joint. There's no reason to heart does Logan height. Okay, so go ahead, do this stuff. I think I think it's OK to have things stuff. Maybe these are only there for transformations or notice in most killing again, we can Loken hired those, Let those local and hide. So now we can only move this stuff for this car If we want toe, move it and rotated So we'll have this put it. We can only look And I had this scale thing. You don't want that and, uh, musically does elsewhere it look and height do the same stuff. We want the translate and rotate for this wrist control. So now I'm going toe hide the scale thing look and height again for this one. We want to move, voted maybe. Let's hide this stuff. Look and hide Loken height so you can see it makes the life a little bit easier for here for this one. We just want to have the rotor since I'm going to hide everything except the road is, um Loken height. Okay, that's good on Bennett's done. This is done again. This is We just want that translation for this one. So I had everything broken height again. Same thing for this one. Loken. Hide everything again. Same thing for this one. This needs to be a little titted, so assorted. Let's look and height on. This is there for translate. I don't know if we voted. No, there's nothing happened. So again, again, hide this stuff. Enjoy. Sit. I sit on Almost everything is fine now. Maybe again. This one is there for Mom. Brought it. Okay, then we don't want to move it. Or some. Let's Hi. Does things? Stuff? Loken. Height. Okay. These Ah, don, I'm going to select the foot control. We want to move it. We can do about it it. So I'm going to keep the translator and the rotate. We're not going to We're never going to scale it so we can have these things hidden. So let's Loken height. I'm keeping the football total, Of course. So let's look on Hyatt. Okay. On for this global control. Well, we need to translate because they're going to move it around the scene. We're going to rotate it. We're going to scale it. So basically everything I'm gonna keep the give that like that and everything is looking fine. Okay, Now, the next thing I'm going to do is get some layer and put, um, stop there like the joint. It'll make the life injure. I'm goingto displayed. So it was here in Seoul height display. So all Okay, so the joints I'm here. Okay, I'm going to select the route joint on. Let's create a new earlier with that. So let's click on this four. Tycoon Onda will figure on it so that I can rename it. Sorry, not this one till top one. I'm going to call a joint on like a Maybe you can put I kids as well joined, I guess. Save it so I can easily hide the joint if I want to on. I'm also going to put die case inside that. So it went on after model so that I can select those I case Italy. She let this all these like it's basically okay, so look those so that this I case Okay, I'm going to right click on the layer on our selected objects. Now this layer has the joint and I guess inside it. So we can easily told on this if we want to see it or if we want to hide those for any reason we can do that easily. Okay, then I can also are the control cards in earlier. So I'm going to do that. Let's hide everything basically so that I only like the control cars again. I don't want this anymore. I'm don't need control cards Alleged related. That was my reservists and my result Cough can Now let's select everything on. Then let's create a new layer called controls control costs, Whatever. Save it on, then let me turn on everything looking Now we can also pull this blend sets in a layer. That would be great. So let's select everything. They never delete this. Models don't think that you have got all those animism here and you don't need those. This model is still sourcing these things. If you do it these, you lose all those landscapes, so don't delete that blend sips, Giblin sips. See, Even I can hide this with Warren. Okay, Somehow I'm not able to see like this the first time. So let's Are those okay? No, que lifts. I does. And this is the final model with all the starlet. We hired this thing again. We can put this as these in a layer as well. All right, I'm not going to do that. There's a model now. We can move it with this. Stop. Okay, this clot will be include dynamic close. So this we didn't rig this cloth with the model that cloth is going to be simulator by in cloth using include, so that is a dynamic topic. So just ignore that, except that we have regal character. You can move it again, skated from this we can rotate the whole cattle from this. Everything said Okay, so a donated we can just hired the joints. Andi, Canada least look at the model here. Something like this. Everything is done. Everything is working something like this. Let's put Jiro here forgets with the rigging chapter is finally a done. I'm going to move to the next chapter where we're going. Toe Unlimited. This character, basically we're going toe create a walk cycle. Nothing very dif or they are Vance basic work cycle so that you get to know the basic off animals and and the basic of character and medicine. And then we're going to create some sub body for the hair to get the hair waving kind off effect. When the character is going to walk, the hair can be living. Move on the team by using the salt sub boarding. Mentally, we're going to do that and then are going to a play include to our cloth so that it simulate with the character animism.
122. Animation Basics: Hi. Welcome to this Sex on in this excellent going to clear the basic work cycle. Animism. So, in this particular Lex, I'm going to talk about delivered basics of monuments in here, the technical stuff. So here I am using the my classic we're experts on. You can see I'm getting this time cider. So this is called the Time slider, which we're going to use while doing the animations. So here you can see these numbers. These are called frames. So now we're looking at from one toe 1 20 frames here. Onda below bodies, the rain slider. If you can define how much frames you want to see here against it said toe Oneto 1 20 So that's why you are looking at here. 121 20 frames The friends basically friends means a snap sort like stuff that every video has images. Some now, if you want to animate, we need to animated with these friends. Okay, you can call these also time it's a 24 frame can be called So on second for using the 24 FPs a fierce means frame per second. So we're going to use this one. You can set it here 24 frames per second. This is usually used for movie animus on and cinematic animism. So we're going to use this 1 24 frames per second on You can also click on this little icon , which will open the settings, the preference window on here. You can also go to the setting stab and then said the 24 frames per 2nd 24 FPs for Make sure you have said this substance well, that there is some other absence. But for animation, we're going to use this one. Okay, I'll make sure you save it. Okay, now tell Let's say it with me. So I'm not going to do anything that So there's the Times letter. We can adjust it. My running this thing here, I can look at low numbers that few numbers, few friends again, double organic toe. Expand it fully again. If I want more friends than I can increase it here, let's say until 1000 and I can see. Still, I'm looking at 200 because the translator said to 200 we can drag it on DNA. Now we're looking at 1000 frames here in this frame display Dia. This is called the Time slide, sir. Now let me come back to low number there. Okay, Now from here, you can play and see you. And listen, let me bring something, yell. It's being a spear. Let's try. Ron lamented the basic animus in Okay, And now we can see we can basically animate any attributes. Let's say again and you translate rotate scale, anything with this time. So I'm going to be in the first room against crop on this timeline by leapt miles dragging against raw scrub and jump to a different frame. No, let's be in the first room on that. I want this, Balto, let call this a ball on. I want this ball to move from a Toby Buddhism in this d excess. So that's that's a very simple aneurysm. So let me select this ball and on the fast stream, I'm going toe key. This translate G. I can select this attribute, right? Click and key selector. When a kid selector that meant you key all you lock that value on that frame. Now I'm going to switch to a different for him. It's a this ball will reach here at the bi partisan. After one second, it will take one second. So I'm going toe, go to the 24 friends and then moved the ball toe. That put isn't while I'm on that frame, I'm here on now. I'm going to keep already. Lose it. If I switch to a different room, you can see I came back to that person. Let me go back to the frame, then go to the postseason. Let's say this is the bi partisan and now I want to keep this value. They're so I loved that value. So in the first room we had different value transfer, gee value and then 24. I have something else. So now it's going to be blend from 1 to 24. The ball parties and the G value is going to blend from this value to this world against crab it on DSI, the animation. So basically from one key boards to second ports of basically we can call these pores post , oppose animus and now I can also play from here. Okay, now the playback is, I think, said toe play riff rim, which plays more than 24 frames per second. But we're creating 24 frames per second. So we can do that by taking here on the time slider. Then I can go to this place. Taxpayer. You can see it said to play every frame, so it's a free so it can play as many as friends. It can. So now I think it's might be playing 304 100 frames per second. So that's why it's very fast if I X wish to real time their time Is this 24 friend particular? It's going toe plate 24 frame will live Corsican, so it will be a slow down. Now you can see the real moment of the real Muslim. So this is the basic of aneurysm. You have going toe key, some attributes while staying on a particular frame, and then it's going toe blend between those friends with those value on. Obviously, this is a very simple thing, but we can make it more complicated. Beiring different Stop. Let's say no. I want this ball to go up and come down that I can t the Waikiki the first frame. I want to keep Jiro Okay at the 2nd 24 frame. I want to keep this adagio, but at the center somewhere, I want to no, make this ball go olive it up so I can and can kid. So this is one way to keep it. A glad troubled by right clicking on this channel area. And in case selector, this is one way but their self some other ways as well. Now you can see the ball is going up and then coming down a little bit more complicated and Emerson than the previous one. Okay, now you can also we have some sort code keys which allow us to key few particular trust. Let's just translate. You want to key all the three translate apps on here? Then you can press sit W Let's say being the first room you can hold sit W Then it will key all of the translate attribute ear. Then again, you can use it e for the wrote it on Sipped are for the scale, basically, is the seeped with the particular tool for the obscene year. That's the skill for scale. We physical use our for skill. You can press stepped on our toe, Keat. Okay, so this is another way we can keep particular attribute. Let's a translator today and skill if you want a singular table than you have to come here and then right click and kid is the way. Now this. I don't want to. Let's I want toe delete the keys or some something like that that I can come here and select that tribute. That's rooted. I don't want those wrote again. Selected right click on Choose Break Connection. It will break the connection on Did the kids? Yes, I don't have the key. I can break everything. Reckon Excell. There's something like that are Let sorry, Let me under. I can also owed wanting. If I want to delete the total of frame key, then I can hold seat and drag on the time slider. Then it's highlights, basically selecting those frame on in. That's Lexan. There's if key, so I can now, right click here on, then deal it from here. Roger. We can also do several things. You can move keys by selecting and dragging from the center. We can move the kids. I can't something like that. So there's some basics off the technical universal inside my Let me break all this Connick . Since Okay, So there's another key which allow us to keep everything here. You can press s for that by pressing. Yes, it's gonna key. Everything okay? So there's a G and faster way to key all that reverse with a single sort. God keep. So there's times lighter. This is translator, and then we have this or preference. Absolute. Now let me show you the art. Okay. Absent. This is our Tokyo Epsom. Let me key this translate Z. And now I have the key on the translate G. Let me actually key everything that transit the three times a Dobson by pressing sit w Okay , now I got the keys for the three. Translate up, son in the first frame. Now, if I let's say go to 20 frame and then move it and let's move it in this Jackson and I didn't I forgot toe kid on this frame. Then I lose that purchase. American C. I lost that purchaser. So even though I have I had on the frame before, I was in the frame before I know changing those Well, you are moving it. I missed it So you can do one thing you can turn it out, Tookie. So Tookie helps us toe automatically get killed if I change that value on that attribute has a key already on a different frame. So it has a key. Now we can go to any frame on, just change the at value. It's gonna kid, I can see I didn't keep this to manually. I got those keys from the cookie because it tells that river on. Let's say now I'm going to rotate it. I'll not get any key for that because we don't have a voted key in the cell. So in order in order to use it properly, you have to keep my family first and then I'm different. Ah, different frame again. Just change those protests in not Trance. Listen on. Then you'll get a key because I don't Okay, so these are some basics. So I'm stopping this video here in the next video. We're going toe start on emitting your character are going to make a basic walk cycle are not going to deep very deep into it. That's basic. Just a interrupt, some kind of thing. So let's do that in the left. Lecter
123. Correcting The Rig For Animation: Hi. In this lecture we're going toe correct our league for animism. So as I noticed, we had the joined at a wrong place. So if I goto my front view so we have this joint our soldiers on that here so it might create some problem. I reposed the hand to the body that say I moved the hand from this on put it close to the body Hagen seeds going really close to the body. It's basically intersecting the body there because we have this joint here on Let's go to the front view have this joint here and the hand is being rotating. I mean rotator from this point. So it should be somewhere here, but we had this problem. So let's see how we can fix this joint is the joint placement is who are these days where we have already created the Regan. We have already skin did with this model. So let's see how we can move this joint after this skinning. So if I just go and move it manually, leg, we really we do. So it's going to move the model because it's buying with the model. We cannot do that anymore. So let's see how I can move it with doubt. Deforming the model. Before I do that, I'm going to create two points to using my using two locator to Let's bring to locator here on Let's define what we want to move the joint. So I'm going to put this somewhere here maybe. All right, maybe maybe someone here at the center okay on. I'm going to duplicate to the other side, exact other side. So for that, I'm going to group it first so that I get up, I vote at the center. Then let's duplicated by pressing control D And now the group I would is there. It's duplicated. I'm going toe put minus one into the proper access you. And then we have the look attar in the site. Okay, Now let's see how we can move this joint without informing the model. You can do that by using Let me switch to drinking. No deal here. We can do that by goto this skin. And there's an ops, um called moved skin joint. Okay, to move the skin joints. So let me use this for their first elected Join this cause I want to move this. First we need to do it one by one. So let's go to skin move skin joint. And this obstinate allows us to just move the joint without deforming the model. You can see now I can just snap it to that locator. Let me. I don't know the bodily After that, it's clear. We can also turn up the green from here. You can see I can hold the Vicky or I can click on this. Absent it will allow us to slap to that point here. We need to also move this one to that same point Can Let's do it quickly. That will do it. Okay, move it. Move to that point. Okay. Good to go. Heal it. Money. So by this way we can move skin joints without deforming the model. So But make sure the model doesn't say that something else. You can accidentally change the model or something like that. Okay, so now it's a perfect place. Now let me take the influence, the wit, because it might be damaged there because we moved all joints can. Now, let me move this. Let me dawn off this snap. The point. It's OK. Who can smooth it a bit. Now let me select a model. Go to skin pain skin way too on. Let Mr let this joint. I think it's fine again the smooth A bit. What? Okay, let me do the same thing. This side just smoothing and blending it. Okay, let's move on. Jake, I think this is fine. The body. Okay, so this is done in the next lecture, we're going to start creating our work cycle animism. So for that, I'm going to use a particular reference. I'll So you that in the next lecture.
124. Creating The Contact Pose: how In this lecture, we're going to start creating a walk cycle. Where was it? Will start walking on it. So let me sort of the reference images I'm looking at here. So this is the image I'm going to use for us. Reference. I'm going toe said it with you. So here you can see we have men. Four possess, I can see this is the contact port which we're going to create in this lecture on. Then the downpours, the passing pick point and then the contact again is the reverse contact on here. You can see we're going to create a work cycle off 24 frame on. You can see on the first the first contact from where the right leg is back. Then the left leg is forward. That's our repeated repeated frame. That's the first frame on. Then it repeats from the 25 friends. Basically, the cycle ends are 24 frame, and then it starts again from 25 from. That's why this spores we're going to say this pours on the first round and the 25 from so again. This is the same fast frame again depicted on the 25 frames on the cycle against up. Okay, then this, uh, the fact inflame. We're going to see the involved. The divorce of this contact sports. You can see the right leg is back here. Can see the lip leg is back on. The right leg is forward and the hands are on again reversed. So the 13 frame pause will be not the reverse of this contact pose. So the cycles ends at 24 the 13 is the help way where we're almost reversed with the fit on the hand. Okay. No, in between those, we have three men poses. One is the downpours on, then passing and pick point. Okay, so after contact, you can see the first contact frame. We have the down at the four and then at the 16 agile because you can see the thought at the 13. We have this contactar oppose where the right leg is poor. Then we're going to get it down, post their agile on that will be the reverse of the involved effect of this. The rightly would before on the left leg will prepare. So for every port, you're goingto make twice on different frame on the frame name is mentioned here, the 7 19 These numbers at the frame number where we're going to say this port on in the passing pause at 7 19 on, then at the 10 and 22 frame are going to create this big point. So basically, this is the way to create post oppose animists and key frame animation. You can break down any aneurysm which you want to create. We can break down to some key projects where the character, the keyboard. Is that basically where it's kind of changing some attributes, changing some direction. Those key ideas at the men keep poses. You gonna break down your animation in tow, fewer key poses, and then you're going to start with those keepers the sun. Once you are done with those, then you can come in between and tweak it to economists. So we're going to clear the contact pose in this lecture, going to create the one and 25 then in the next life, they're going to reversed it on the 13 from, so that will do it first. So I'm going to put this inmate on the second screen. You can put it on your screen. Or you can use the software called Pure ref, which allow you to put your reference on a single desktop and put that on the display. But that is not the scope of this school, so I'm not going to cover it. You can just keep it on a deck. Different x trouble. You can just look at it a minimum, ate it and then look at it. So I'm goingto get disposal at the right like will be back lately will be forward and then the And should we oppose it up there? So let me move it. So far, we're goingto say the 25 frame years. I'm going toe. I want to see a lot of friends years. Let's presto put 25 year on this box. Okay, Now I can see we have 25. Let me put 25 here as well. Okay, now we're looking at 212 25 AM on. We're going to create this contact pose on the first room. Let's be in the first for him on I'm going toe living hide in the on next amounted stuff there. So in this case, I have already know Put all this stuff in particular layers of joint layers I want toe hide it or that it will not allow me to select stopping and say I just want to select all this control carves but it's not allowing me. So let me hide the joint and I k handle group basically against select all those I gandal and then joint Then put those in a layer can Now I'm going to select the controllers on the model is being selected Let me put all these layers in reference mortar that I cannot select those by accidentally. So I'm going to put it on reference more Okay now Canada Selector control coughs on When you see let make sure on the selectable you don't have this up some, so it should be turned off. So now if I don't really under select a lid opens the tool settings on the here can see the automatic camera based selects, Understand and make sure it off. Otherwise it will not select anything which is not visible from the camera angle, so make sure it's turned off. Okay, now let me see. Like all the cars, all the control cars on be on the fast room and I'm going to hit is to key. All that devotes. Okay, so on the faster him, I'm going to key everything. Now Every controller's every attribute his kid. Okay, now I'm going to start creating that boards, so I understand it. The route. The rudeness to be down a little bit so that it can spread this two leg out. I'm going to down, Make it the bitch. Put it there with downside there on when it will do this. Now make sure you have the Tokyo absent or non. That's why I keyed everything. First on, then I'm just expert expecting to move on. Do my stuff here and I'll get the gated. I'll get it, kid, because of door turkey. If it's off, then you have to calm and manual icky, so make sure it's on. When it's on, it becomes red here again, though I moved up root root control. It's moved the whole upper body down on in. Why access now against you? Look at the value here. It's minus 1.0 to 3 with every ornament. So unless try toe, use even number. So because we're going to used reused his numbers in latter friends, so it will be very difficult to remember. So let's use some even number. Let's say, instead of those tiny numbers we can use, minus one doesn't matter. No civilian, subtle gent. So we can keep a very even number like this. We just avoid on even a type of numbers. Just move first and then see the clothes number and use that. And I'm going to move the left click forward on what I do. This. I can be in different view that we switch to my side view. I can hold cept. Sorry, I can hold space, but on the left mouse button here on this Meyer and then I can switch to different view quickly. So whole space left most button and I can jump to left of you. Okay, In this way, we can look at it clearly from the side angle. So now this formed legs should have been. You can see overall, it's in this angle, but that's just delivered, banished, not foolish, stressed on fully straight, already straight. But there's a little bit pale and then you can see the hell is touching the ground the toys up there. So we have this angle. So let's do that. First, I'm going to select the cough. Andi, let me first to move. Get that pretty angle by using this foot rule selected on the first train. Make sure we're not on any different from Make sure you are on the first room. Here are a 1,000,000 miles dragging to get this. I'm getting this angle as soon as I get this angle. It also moves toe. No freedom, Bittle spirit this been I can move the leg a bit now for work. And this is the body. The leg is forward there. Okay, Something like this on then They're talk on the second leg. Here. Let me hear some uneven number here. The notes says to appoint 16 poor Instead of this, I can use 12. It doesn't make any difference here, But we have a clean Where Libya Now he stood up minus pi 0.1 I can use minus fight Doesn't matter very close. Now we have even the most easy to it. Easy to remember. Okay known. Let's walk in, though rightly, which is backward, The against you over. It's in angle on, then the toys on the ground and Healy Hill is able there. I'm going to get that the again. Using the foot roll trying to get this the toys on the ground hill. It's up on. Then let's make those wide. Maybe I can make it a bitch. Dollar, maybe minus 1.5 something so that I can spread this leg a little bit more. A wide walk again. We need toe use on even numbers of 13. Let's 14. Okay, 14. Fine. Then it should be minus 13. Okay, wide. Uh, walk there so no. From the front view against he the legs are wide apart, so it cannot be possible because original miss balance the bottle. The food should be under the body toe balance or two. Take the weight of it. So I'm going to move these two arts about toward the center of the body, So select a fit control on. Move it in this access in this x axis. In this case, I'm going to move minus two, maybe Andi, because it's what we have the turkey turned on. We were not king again. Agonal against automatically getting killed because you're putting numbers there. Now let's do the same thing. Every two, not the feet are closed for me today. Also, you need to see something like this. So that's that. This is the joint here. Instead of straight lines, we can look at something like this that the legs are going this way. Okay, so but I think this is fine. Llega, we have the legs for descend again. I'm looking at the images you can see to admit. Okay, King find then let's move to the other areas. The food here can see when this legs forward the forward leg side of the film business to be go up. So now the pelvis is straight from the photos of you can see it straight But when this leg is forward, that side knish to be rotated that tightness to become forward on this side Mississippi Go back so you can select this. You can select days. We can You can just move, move a little bit. I can move a little bit in this reaction again. See, now this idea is forward and decides back. Can I think I need to put a even number minus four? Maybe on the first frame. Um, I I'm going to use this card which will allow us to I voted the pelvis. I'm going to use it. So this features forwards. I'm goingto put it like this that this heap is going up and this is down. I'm going to put an even number again. Again. It would be very slight I before and as this leg will come forward, it's going to reverse, you know, for this leg. Just remember, the forward leg has dull that side needs to be go up in this idea on that side also should come forward toe When I rotated this this control coughs the route control coughs Sogard this. Now let's work on the hands. No, again, I'm going to live to view because the right leg is back. So we need to reverse it. The hand so rightly hand should be forward. I'm going to rotate this bomb here on you can look at the hand it really relaxed hanging from the body and can look at the solar zone and the elbowing in on bail boto the strangle . So this angle is very, very straight and have a little bit dangle. And then we have this angle. Some now I'm going toe from the firm view. It should be close to the body. Let's wrote it. The hand on from the left viewer can see again. Yeah, a little bit angle. Like this. Little, very straight. A little bit. And we have this angle electric and see. Let me look at this. Okay. Something like this. And then, of course, we can use this. This is Ah, elbow controls. That was fine. And then on the first frame, I'm going toe put some finger finger successor. So I'm going toe, select everything here, then been live it on. Then I'm going to bend this being giving us a bit more than others on then the ring. So, during leverage unevenness, you can see in the first for him on here. I'm not putting any vin numbers. I I'm just going with No, they use a large numbers. Can I can go ahead and do this because I'm not going to exactly duplicate that. We're used to the other side. The hand can be a little bit different. Okay, so now this hellish to go back, let's first move it to us. The body on its reported like this, I can see that it means the hand is and going back behind that body hanging on overall in district on here against you have been twisted effect. They'll vanish to go up, so to go back to get it up. That and I think you have stretch it to muscle its move it every time I relaxed a bit. Okay, let's move this. Just shoot on. Just do the same thing with these fingers. Elect everything here. Relax it on. I'm going to Theis. Think giving us under ring fingers a bit more. Maybe a 1,000,000 finish. Live it more. Something like this. Okay, that's looking good. Andi, let me work on the torso and against C. That also is not straight. It's in this angle. It's kind of tilting towards front here on getting this angle here and not it's not straight. It kind of in this angle. So I'm going toe, get that. Let's do one thing we can We can actually use the route on move everything there like this again a might e need toe just this yet that is looking great. So I think I'm done with this. You can go ahead and do a lot off subtle things. But we're not doing a very complex work cycle. We're making a very basic introduction level walk cycle. So I'm not going very deep and adjusting a free little there. So many stuff in transit. But I'm going with some very important stuff here. So this is our contact pose on in the next video we're going toe. Create our downpours. Basically. So you were going to create our second contact? Postage is at the center. Which is the divers off this contact pores. For once. This port is done with the on the one frame in the first room. I'm going to select everything on because we need this prime under 25th frame. So we're going to copy this, or we can just go to the 25 frame and hit s key there. And we got we got everything kid on that for Imagine. So now the first frame on the 25 frame are the same. Now, in the next video, we're going to create the 13 number contact from which is the reverse of this one. See you there
125. Creating The Middle Contact Pose: Hi. Welcome back in this lecture. We're going to kid our second contact towards Regent's at the center, which is the opposite of the contact poses just created in the previous lecture on the talking for him. So for that, I'm going to actually divorce all these values. Let's say now on the first contact frame, this is the Forward Lake on. We have different values here on the translate aches and translate Z. We have some in the foot rule. We need all those exact values on the 13 frame on the opposite Lee. So we need to basically look at the different lay and then pulled all those values. And for that, you can write these things down these attributes and then so that we can be in the frame and put put the value on this lady and then put this relax value on that leg Can I did down . But I have a different with We can agree upon my organ open another Meyer basically can use more than one my at the time so we can do that and opened this exact file on that Meyer. And then we can look at that there and we can do the stuff here, so I want to save this file year. Let's save it, saves in. So let's save it. And then I'm going toe open myself. It's click on this icon toe make the small window. So now we can be a existed toe. No use a small area. Then we will have the second mile here for Let's open my agan and this is a This is a very personal way Ah, again you can use nor pair to write those things Town can do that as well. So this is again are just right here. I'm going to upon the same pile. So basically, we're going to open the same pile on both my So let me use the same file. Open it. You can see it is the same file here. And just to clear confusion, I'm going to be enough seven more in this view so that I know this is the file which I'm going to look at and then put the arsenal finally basically the same file. Now I'm going to be on the third from touching frame. Then let's be in the first from here so that you can look at the value. So let's start from this. Maybe the route on the route has translate minus y here and 1.5 everything. The road is basically same. And then let's start with the left. Leg them. Now the left leg has transferred minus two on 14 here. So let me select the right leg in this case because we want to reverse you. Were that lip lick pause here on the light, right? Like no, I'm going toe the witness to being too. Because if I will put minus two, you didn't go in the wrong Dixon because that leg needs to become this way. But this legs would go up with it. So two is fine years. I'm not going to change that. Get the business to reporting that it comes forward. So I'm looking at here and copy their value via should the but to colored leg a selector. The divers like No, we have minus five years. I'm going to put minus five years, so it's very easy this week on. Then let's select this leg and that's select this little Just select the reverse legs on. Then here I'm going to put minus 13 and then 3.3 3.3. Okay. God, those very quickly check. Yeah, I think. Yes. Now we need to reverse this heap tilt, because now this leg is forward, so it needs to be a project. Now, we have 40 years, so I just need to come here and put minus four, which will flip it on. Now, this hippies up on this hip joint is down there. Okay? Everything is looking fine. Now we need to rotate this route as well, because now this site is the forward had missed to be rotated in. Why? Witness toe before? Just opposite andan the heads. So we need to adjust. And, uh, again we can copy different answer that. Select this hand. Let's put it one another. GNC here on the curtain trim. I don't have any key. Makes you select everything and said a key there so that we don't miss anything there. And then we have all this stuff. Make sure so that the place maybe from the front. Real? Yeah, I think that is fine. Okay, let's work on this right leg here now. In that hand, we have a lot of ups since Or maybe again, the Skopje here on based here. If I can do that, you know this That doesn't excited. It's going to move there, so we need a positive value here. That's too well put it side. Yeah. No, it's fine. So now this is translate. Why? So I can pull that as it is? I think, I guess. Yeah, has find. Then let's I copied the G. Jackson needs to be. No. Yeah, industry Add as it is at all. So that it go to that place, then I can copy this stuff here. Copy and best. So I'm using control C and control V Control. See toe Copy. Andan Control Veto. Based on in this case year, we need a guest positive number to be positive here on, I guess rotate It is the X axis. Maybe now that mission positively. I think that is fine. And if you see any weird thing, you can come here and are just It may be for 10 th I think looking same. Yeah, it looks a little bit different. Maybe because of this. Let's see, that has some value here, Lee Toe, Put that here under G excess. Selected What? So does this animal control See translators. G v to get the right angle. Yeah, got it. Okay, Now let me do the same thing with Descend. You can do this all again. Just mentally. Get that pose and tweak it. It doesn't have to be 100% exact opposite of that hand again. No, we can just copy this stuff. Copy on best. It moved it. I guess it needs to be positive on Native Lets it narrative. Now let's copy here and paste here. Could be best wrote it, control. See the I'm goingto see Control V. It needs to be revolts. So let's put minus there. Still, it looks weird. Maybe. No, I'm doing We're stubborn. Solid Rondo as to it manually. Then we'll get it. Yeah. Then I'm going to get that thing right. So let me. So we're working on the right leg, right? 10 years. Already selected on diff. You know, it's under by default position. Let me make gentle. Okay. So regard that where that turned as well. The leg is fine. You can see nodes base killed or put it fabled to the left of you. It should just live like this. That means we have done the right job here. The legs of the splitting, reversing and the hands and reversing everything is still. That means fine. Who had only this contract pose? We have three contact posts, one on 25 then at the talked in trim, which is at the center. So one cycle is still 20 for them from 25. It begins again. Now again. See house. It's slides between those friends you can play on while you play. Make sure the player experience said to real time on. We're working on 24 fears. I can see he's looking at left to right because of that. Root root isn't that's fine looking. The next time we're going to, we're going to work on that down pose for the four and the 16 frame on the down frame. We're going to see some changes are going to make some changes there. So see, in that lecture
126. Creating The Down Pose: So let's create the downpours. I can see this. Amazed now The body's going down. You can see from this great lines again. T know on this contact pores. The head was above the two number line. The second line on now you can see here. The hair is almost on that level on the two levels. It's went down here. Onda, We did. The whole body went down. The torso wants down there on now we can see this doctor or so on. The head pushes him. This goes down on if you look at the left leg. Previously the hell was starting the round door Waas on there. But here, concede the legs. Flattener, the fit is flat. Totally the way it is there. Another fittest totally flat on this leg is going up now I can see it. It was starting the ground with the toe. Now the two is almost up. Its kindly touching the point there. So these are men stopped. The Borden is to go down this fitness toe B flat on. Then this feed needs to be a little stressed. And then the toner. So go up. OK, do this top and then we need to do it on the four and 16 frame, so I'm going to move this in Malaysia. So let's switch the Ford number on May be school to my left of you. Okay, so I'm going to down first. So let's select the route here. A person like the root and I'm going to move down there like this. So on class lead, while it's let's put minus three, maybe even number. No, let's select the feet here on I'm going Toe said the food told Ruggiero so that we don't get any food role there just flat fit on. Then this lane is toe rotated. The football needs to go up like this and it should go back. So moving this country cars back there something like this. Okay, so maybe a little bit forward. So there is the pose year. The leg on the route went down, the whole center of the body went down with it and then also need to rotate and angle the border be tonight's even the tilted towards the front ground, not off her life's work with hell. Now the hand is almost at the previous position on the list. Needs to be Move. Trust this angle to create a full load through kind of look hanging Look on again. Business Spanish to be existed here and the business to be Louisville, which like this. Okay, so this is the fourth partisan. Let's show the front view, maybe. Yeah, I think that is fine. I lived for you. So if I scrawled my times later and two from first frame toe foot from the transition between those two frame now you can see the body is going down going down on, then the right leg. It's going kind of preparing to move up and passed the fit and see just four frames. Okay, so this is my downpours. And then we need to reverse this pose on the 16th number from So again, we need some clean where Luke and happily in value. Or I can just say vish and do use the same trick. So let me save it by pressing Control s on. Then let me open my other Meyer here. Okay, let me Okay. I didn't it like this. And then upon the same file on put my appeal and press five to be in the settlement, so that I don't get confused. Okay, Now I'm going to switch to the 16 frame here on. Then let's be me on the fourth frame here. Okay, let's switch the legs on the roots. Let's start from the root here. We have some absence. Let me just let the route here and I do it on the 16 frame again. Make sure you are on the correct frame before you do anything to the control. Coughs be in the four here and Cetinje until it the road. Here we have three and support minus three here that you went down to the same position. Now I can just copy. These are numbers. I don't want to dive those lips. Best those. I got the same tilt of that whole body and then it's copied. I know. Which one Is this Okay? No, we don't. I want to do anything that that's fine on. Let me. I know this finish to be flat, so I know that I don't That would take it. Everything looks fine with dad, Like, now let's look this leg. Copy this value. Translate, G. Okay, Now, look on, remember. So the agency I got confused. I selected the right leg. And again, I'm still on the right leg here. We need to reverse here. Let's pulled the value here on then. We have been here fully but old. Okay, that's fine. And then the handler to be reversed, does the reverse. But Northern the proper place. So was he lived the right hand and then select the left turn. Here. Well, that there are so many since the left wing copy. One by one. Best translate G. Okay, that's good On routed Ex minus signal degree. Me 60 60. Or it takes. Let's with that here. I don't know if it's going to work on this rotation. More. Know that all 52 maybe minus 52 could be used. Maybe. Yeah, the hiding that straight. Then let's check. This thesis is at the right place, I guess. Yeah, they respond. Then let's work on this Second, um right here. Left here. Right. I'm looking at here. Let's we have that and move. Copy this. Prestes here. Copy. This best. Okay, the tit. I didn't copy that. Probably let me basted here of this initiative. Divorced so less for many minor symbol from there. Okay, I guess we Guardo's exact thing that let me check this one 16 86 that lived with this right of sign. Now, if I go to my side view on switch to four on 16 I should see something like this. They're kind of swapping. There's no are things that they're matching with each other Just reversing on. Let me. I think we can just click on the new Don't save. We have the five year. Make sure you save it. Will you miss the file? Save it. Okay. No, I can plate on. Look at it. Let me play. We're already looking at the work cycle. Congrats. It isn't. It's a very basic walk cycle. We have Still we're going to still do this to pose. So I'm going to do the passing polls in the next video. Sue that
127. Creating The Passing Pose: hi. In this lecture, we're going to clear the passing pose on seven on 19 frame. So let's look at the minutes. Who can see expanded a bit on the passing frame. The right leg is the right later on the lip, later, basically on a lying and the right leg is passing the left click. It's up on tilted here like this. It's bloody here. But you can see the fit is something like this. And then the hand said, also hanging. So again, overlook actors. Very vertical. Everything is in a vertical line. So let's get this pose and we're going to do this on seven and 19 from. So I'm going quickly here and let's create that boards let you be in the seven flim I'm going to start. So this is our downpours on the fourth number frame. So in the seven, it should go up because now concede the leg very straight. So I'm going to started the route here. So let's move it up for this route. Control up. So the overall torso is now going up. You can see from down pose. The body is going up there. Now let's work on this leg here. Fitness to be. Let's move it. We don't need any role here. Food role here. So I'm going to I have 10 here so that it becomes straight on, then can voted it something like this and make sure Dr Keyes turned on so that the automatically captured the numbers. They're on the frame now. It's something like this. Let me go to the left of you. It's passing like this. We can who? Bring that left leg backward a bit. Now this lays passing that lick. Okay, so something like this on then you look at the hands. Their the right hand is almost straight on the littler left hand is if in in forward movement. So we're going toe do that. Let's make this hand of it straight according to that image. And then let's move this hand at the helm forward of it so that we can see that from this angle. And I'm going to switch to the right view so that we get that angle of the hand. We don't want any straight on like this. We wanted live it bend like this. Okay, I think it's perfect. No, if I check if I scrubbed my mom. If I scrub the times lighter from 4 to 7, consider bodies going up again. I know from first it's going down towards the four number friend, which is the down from then is going up again And the the word is on the left free tier can see this treaty is on the air. So the way it is here, that means we can see some till to decide. So the same should go up and then this side sort come down So we can do that by rotating the pelvis. Control something like this because this has the wet. It's weird the weird here, so I'm I can keep it clean number. Let's wait, Okay, Something like this. So I think this was just finds. I'm going to copy. I'm going to reverse this pose on the 19 4 19 frame, which is the opposite of this so we can do that again. By saving this file, it may save it. Final steps in on again. I'm going toe upon this file on a different Meyer for my file so that we can look at their on. We'll change the Livia's. I'm going to have a little open Meyer. And then let's open the same pirate. I'm working on this file. Let's open it. President, I saved the same file. Now I have upon the same filing. Two different my window. I'm working on the same fight. Okay, so let's go to the city of Motor that I know. I'm We're looking at this and then we're going toe copy. So first I'm going toe switch toe the frame and discuss the 19 frame. Andi, it's beyond the seven frame in this view, and I'm going to Fritsch. So is the values of let's start from the root. Should be seems that its see now it has this value on this trusted wise are going to compete and then selected. Put that the route is up Same as the seven number from on. Now when we have a protest in on the exact is I think that first them we don't need to do anything there. So let's let the left leg here and then the right leg here. So I'm going to bring those will you to this right leg? No, we have this value here on this translator. G m goingto copied by President Control. See, put this year, okay, and then the food role. That's carpet sport the foot drug on. Then Okay, lets see. And then I'm going to choose this and then the opposite one here on this copy everything. So let's copy. This will do. And if I look at it from the front view, I think we need to put minus here because it's going lower from the body. We don't want that. Should we close to the center? Fear on then the same. Really just a minus. And here it's positive on I'm going toe compete. It's going up. Copy everything Lord FedEx got be best and then it's 10. I want to do that here. Then it's American switched to the left of you and click on the several number frame on den under 19 frame will look at this. It should flip like this. That means we're ready with those stuff. And then I'm going to check this bill based stilt, which has age. There's I'm goingto put minus I guess so. Let's put minus eight because I want the reverse effect here. This field has the wet shirts would go up the divorce of this on the stream on the under 19 from Andi in the hands. So again we can copy those hand. Exactly. But that's not necessary. I guess. So. We can just go ahead and Oh, do it manually. I like this side straight. The passing side, you can see and should be relaxed. Okay, Something like this. And then this road got a little bit forward so that you can look at that fan. We can see that hand from this angle. I'm looking at this image. You can see the hand is visible from this angle. That descend is stripped. Okay. On the 19 frame. I think I'm done with that. Firms. I'm goingto save this file. Okay, I guess we had only disporting. Let me minimize this smile and maximize it. Okay, so I'm going to check it. If everything's fine, I can see the body is going down. Then going up on now. The leg is passing. Picking that so we have left with one more pores, which is the speak point Pause before the next the made contact ports. So yeah, we are still is still yet to do that. And I can play no How do you keep creating all those possess the animals in my blue Gilbert ? Snappy. Little bit rough. So we're going toe find Turn those let up using the graph editor But for now, that fine on? I'm looking looking at the feet here. So now it's a go like this. Okay, that's fine. Okay, so a dollar, this port in the next post going to create a peak point pause. See you there.
128. Creating The Peak Point Pose: hi in this literal going to do the last post visit the Peak Point Port. As you can see this body is not very different, are a very different than the contact polls. It's very similar, but you can see there's a subtle difference you can see on the leg. Not this leg is much more than the hill is way up there. But it's really close. Andi against it, the subtle so going toe do this. So we're going to do this on the 10 on the 22 from there is to it. So be on the 10 frame. I'm going to first create this fits. Got it. This is freed. Basically. Morgan seeds on a bending at this somewhere here at this on on the 13 frame. It should contact. No, I'm going toe ported on this frame. I'm going to make it make the football can on then. So here you can see from here it's keeping that man, will you There this is the peak point or it's gonna pick the point on it. Put the peat on third button from so it's basically the student whereto plan the fit when this Buick and see on the cutting from the leg is here. So some. And to put the fits of my here maybe so that it close and see something like this. And this ridge is I think this is fine. It is okay for now, Andi can look at the hands here, the hands, the live chan is way up, and this is kind of coming back from this. So let's move this. And maybe maybe someone here and this hand is to be which up, something like this. Maybe let's go to the right view. Yeah, I think that's fine. Okay, Now let me check. So this is our big point pause. I mean, Jake, by scrubbing. So if everything looks fine, you can see it's coming from the passing, then going to us, planting the fit and then on the touching frame it if into little Flander feet, you can t in between this 10 and the certain frame where it should, um, simply go and plant if it But here in between this again. See, we're getting this on the 11 and 12 frame so we can do wanting. It's because now you can see on this rim we have 10 on the patrol attribute, but here we have. We have something minus fivers and think so. It's kind of blending between that here. You just want to keep keep in this stain value till we ditch here. So I'm going to have a key here somewhere for this. We're so that we don't get this good. This thing if it's happened to you, sometimes it happen. Kind of lends like this. Some going to you have a key. It's on this frame on the 11 from on going toe put in here. Um, no, GNC. It's weird. It's gonna be adjusted. Went toe. And, you know, I just it into a singular test time. So in the 10 and then they live in, then I think we can let me tell it this man. Look, we can do this on the tool familiars on the 12. We can keep on just report the contract pose so that it works. Yeah, I can see it's not lending like that. No touching on this contact was in the top 10. So my fair play, you can see that lays fine. So this is on the 10 number, then we're going to do it on the 22 member. So again, everything else is fine. I'm going toe save this file. Let's save it again. Let's view upon this pylon and a doing dope. So so that we can copy. Let me, Of course, let's open that file. Okay, Now let's be on the 22 from here on, then. 10 trim here so that we can copy the 10. Premier the reverse. So again, I'm going toe. Let's start with this. Be the started. This fit the lift and then choose the right here. We have to. That's copied Israeli. It's different. Every window pulled that. Okay, then let's have this patrol at root and copy. Best here. Okay, Good. Then let's check this. All selected and then the left one on. I'm going to copy here. Copy. And and then we need to put minus years so that don't go away from the body. Yes, sir. Coming on. Then. Everything else would go at it is, and just copy and paste here minus you. Don't use this technique and then you can write those things down. Let's put 10 here. Write those things down on a note pad. Er I think that again. For those I can let to me go to the left of you just to make sure if those two frames are matching with each other Now, let's be in the I didn't have a key for that leg there. Select key. Everything there on then I just place is Tookie everything on that 10? From then on the 22 flame, there's two on. Keep everything again. So let's live on the 10. It's your sweets like this. If everything matches, then I can see something like this. Okay, now let me save this file. Save it onto less. I knew this at a little nude It anymore. I guess I'm going to close it. There's don't serve and want to save this blank file. So let's tone seven. Then I went to maximize it. So basically, we have created all those men key projects which were down passing pick point. And obviously the to contact poses. Andi, No, we have three blocked those protests. But now if you check the animation, it will be a riveting kind of snappy norm. Refined look again. Oh, I have also underrated the camera somehow. So let me select it. You can see for select this cycle, which is the camera angle. We have some care keys on the camera by extremely, I guess. Absolutely that. So let me select everything like this Arctic unjust. Select the camera. And if it happens to you, obviously others you don't need to do this on in this case is break collection. This will be on the first Reverend Brick connection. Okay, Now we can look at the animation that we frame it by pressing f G. But it's not that back a little bit snappy. We need to refine few things few animism, carbs in the next lecture by using graph editor So that Dan missile overall will look a little bit refined. But again, we're not going to go deep into it. It's a very deep topic. Anderson is No, that is unit toe loins. Practice a lot and unit to give love much more time and a lonely request toe get beautiful animism. But this course isn't attack is just going to introduce you. Okay. And the next lecture we're going to see how we can use graph Editor toe refined few things in our animism Soon that letter
129. Fine Tuning The Animation Using Graph Editor: Hi. In this lecture, we're going to see how we can use graph editor to refine our fine tune of animism cops. So here are in the pre visitor. I forgot to do one last thing we created that will frame where the kind off. If you look at this, the 12 from we hard id nooky. We had a key just to hold that. Mm. That been said just to ignore that being sip. So what? We didn't have that on the country. Four. So on this side, feet is fine, but the other side fit is kind of flipping like this before it. Contact that girl can say it's kind of bending there. So in the 20 under 24 from way to have that, that's select this on the tool friend. They can. I d upon the same file on this? Yes. So that we can exchange those value. Then they're selected on the 24 from before the contact from here on. The 12 was before the contact from here. So no, let me see of their let's copy on past yard here. It needs to be in minus. Okay. Now, let's copy. And paste is in the past. And this Let them stay in here. I never really same as the true all from and see. Okay, I find. So we're done. Then I'm going to save this file. Close it. We don't need it now. If I play my animation against this really good, we just need to look at the graph. Return on. You can see the hands of its nappy can see how they're kind of robotic. It's kind of jumped in movement here on this hand. And it's very jerky. Very snappy. Kind of. Look, the legs are still find what the hands already snappy here over body snaps a bit. So let's see how we can pick some up. Those is so by using Rafferty tip. So I'm going to switch to graph editor. If you are in a different workspace than animism, then you can go to Windows on Deracinated, a graph editor. But if you're using this animus and workspace, then you have this year. So we can this click here or it's beautiful. Actual comes. Expand it, but I hade collapsed that earlier. Now I can click your time editor are going toe exploded in this course but gravity there is here. And you can use this on this single monitor. Let me it remove it. Can you move it? Which every summer, After all, it takes a lot off space from this view. So what I'm going to do, we can again drag and make it a floating window like this on. Let's start off the times like that. I don't need that. You can have this like this. Dunnigan R is the sip in our district over the in step. Let me look at the graph it that you can see. You have the two d view here on now. It doesn't so anything because we have not selected anything. If I select any control carbs on, then it saws their animus in car. Basically this point of the key, these keys at those points on then if you look at this note from left to right on this horizontal manner, this is the time frame on. If you look at this from Joe to one to us, this particle way is the wet or the value value of those kids on those two things depend This cult now against select keys here moved those around and Delitos, we can do basically a lot of things here. Men proposal. This is fine tuning the aneurysm carbs. Now let's start with Let's start with this route. China Route Control cards. You can see there so many cars and a little bit confusing at first, so I'm going to select one by 11 attribute at the time on Look at their that call. You can see we don't have any universal and this translated X so the value is flat. Doesn't go up on down because we have seen were literally the whole and wrestle. Basically, we're doing nothing on this translate X while this route so that fine you can delete that would here under translate why you can look at the aneurysm carb. So this car business to ress moody, Let let it this got this point, the skis almost unnecessary for this. It doesn't do anything here. It's just good animus in a little bit kind off uneven, A rough you can see if I get it, get rid of this key Then I saw, so let me see where it is. We can move this later here on the 22 frame we have a key there, which seems kind of one necessity we can deal. It does key. And now the car, because very smooth. But beware that it might change Salomonsson. If it's a live it, then that's fine. It's good, actually smoothed oral aneurysm here. But you, of course, need to check it. Sometimes you cannot just come here and deal it blindly. It will change the aneurysm here. So if you don't see any jar got anything after deleting on Universal looks work. Now this is the translator. It is the open down movement on. I think this is fire before we had a little bit and a full jar. Kia. So this is basically the concept of fine tuning. You're going to look at the car on fasting You're going to look at on necessary tickets, which doesn't do anything. And of course, every kid does something. But it doesn't do drastic, Elise. No, it doesn't add anything. Drastically. Dunigan. Get rid off. It can again see. I don't know Why did Let's say we have this key on the 10th frame. We can delete it. Andi. Still, the animism may look good, but me, of course whenever I did it. I need to check it. Very important. You must check the aneurysm by playing it. Make sure the playback spirit is said to real time. Okay. I think that is fine. It becomes again, even smoother. You can select the keys on with the move tool selector. Then you can move those as well. Like this. You can select the tensions here, and I just attend. Tell of that cup to make it even more smooth. Something like this to make it smooth. But I think previous one is fine. Okay, I do. We really need it so we can delete that. Let's see. I think this is more smooth. Who better let Missy? It's going down then going up. These two things, naturally there is going down than going up and then kind of going down here. I'm going up again. Yeah. So we didn't need those in that key. So you don't have anything here again. You can see this. The rooted X of this route. Andi, I don't think we need this point this to pile. So this these things makes the animism liberty jerky are snappy. So by getting rid of those stuff. It makes it a smooth animism. But of course, you cannot delete the very important kids which contribute to the animism. So you cannot do that. So let's select other things now can see. Here we have. We're looking at this beautiful call. I don't think we need this. So by getting it up that the car becomes more smooth and stopped. Just get to your dude of those. Okay? Now the route is fine. Tune this control cough. This controls animation is verifying. Till now we can look at the root on its this the route and reason is basement. There's no jerky on the route, but we have still that came and went on the hand. Let me look at those. So let's some going one day one here, Leslie, select this hand with which small, jerky kind of against you were getting. We your moment here, so I'm going to see like this. Okay. Again, it's do it one by one. You are not able at the time. And now does that translate? Eggs, sweets, which is this reaction? Not more. So I'm going toe, deal it and make make it smooth and then you can just if you want to keep the key, you can keep it and are just attendant. To get a smooth car like this, you don't have to deal. It'll is. You can just add just attendant in the key and get a better golf way. Too smooth, smooth floor that that means basically this car was the value. So basically does value is going very smoothly. It's kind of blending properly that we're looking at a smooth and result from. Now let's check this translate. Why so translate wise dog down? It is a translate. Why is the up down Jackson there? So here you can see our hand is going up a little bit and going down, then going off. So basically again, let's see by deleting few things that's to live this. It's I don't live. This did this. I may need this key. Maybe LoConte. Oh, here, you can see it's kinda going again. Back. I don't know. Let me look, you know, cannot deliver like that. So let's see what it was doing there. I think you can delete this one, of course, and smooth this carb a bit. Existing attendant list. Look at different girls here. Andi, Let's I guess we can deal it this and see it's going against I'm going toe. So it's kind of going coming here. What is going down? The hand is going back and then for here is gonna hanging, then going off, cutting trimmed. Then it's cause again on the 16 member. So I'm going to, I guess, let's just this key. Yeah, it's kind of moving it again back. So I'm going to move it down. You can hold middle mouse while you are on this move to just hand it, but still, it's not that smooth. I'm going drastic. Your soul. It's smoothie on. Let's see what it does. Yeah, I can see there was out of the talks there. No, it's better. At least found this front forward. If here on this area that is smart. And now I can selected rooted X. Okay. Tingo, today you don't need this key. Doesn't do anything death and come back to the move. I'm going coming down, coming down translate years. Okay, that's fine. So fix again. I'm goingto get rid up that stuff. The roadway, the look. Let's look at it on districts. Um and just a standing make it smooth. So by doing this to all the attributes on making them little bit smoother than before, you'll end up getting a very smooth and metals. As you can see, I'm getting rid of this. So the carve is here. At this point, this key doesn't do anything there. So it's just kind of creating a liberty bumpy and missing there. So we don't need that. So by getting rid of this you and of getting also no, concede that Andi is, but that's still it's gonna snappy of it. But better than before against say we have this, it's kind of coming here. I didn't have a key here of the so this work on this hand on, let's do the same thing. Getting rid of this don't need those. I don't need to live this. You don't need this. So here condemn deleting those points. We doesn't change the carved drastically. BiDil it after deleting the curve is, um, almost the same as it was before, but it becomes a little bit smoother. No, it's Oh, sorry. Don't delete. And they're called with village dynamism and the smoke. Okay, that is fine with that hair against the hand stays there from 10 frame to 13 from. So that's where it feels kind of joke that no concede. So what you can do there under that is the G Xs, and it stays there. We don't want two stays like that. So maybe on the 10 trim and touching frame, every other 10 from we can move it with up so and moving. So nothing is permanent. You can come any time and not week. You can keep taking it almost for forever if you want. Oh, and we'll never satisfied with the results. You need to call it done. If it's okay now, I can see now the hand doesn't look. It's kind of going back. And then on this, I think doing live alone. Do we need to have that center t move it? Let's move these things, Okay. Something like this to get a very smooth carved there. So the hand doesn't stop there. You can see I can get rid of these two, I guess. Okay. On the four friend, then seven, then 10. And then here till Tatton it does something like this, which is a bit weird on the 10 from I can bring it down so that it hangs like this on, then goes up toe the certain frame, then to 16. And it should come hanging like this, something like this. And then on the 19th time again, it's go up like and said Looks better now. The 24 5 frame it's would go up. No, I didn't satisfy. Let's check. Yeah, so you can moved to handle bitch on the 25 frame. I'm going to Middle Mouse. Click here and then this is for that. So that I get that same here. Meghan. See, now this hand looks better than before. Of course, against the notes. Better than before. You can just come there and look at the hands on this and still looks a little bit. We are. So let me do the same thing as I did with that hand just checking from my flame. So in this frame, which there, then it's going back on, then going back and then coming forward on the tent. It's just move up like this. Okay, now I understand. I'm goingto bring it down, but I need to have some more room so that it goes upto the button. So on the 10 for him, I did this on the seven flim again, again key retaking back Brazil. It's going. Yeah, maybe on the Ford. It was there on the seven. It is here on the tend, it's there. So it's gonna coming, coming, coming here. And then here in this, them needs to forward like this yet So now I can see that is looking better. Yes, much better. So it's refined. Now let's look at the leg. I'm going to save the file in between with May class the file. Sometimes it's a good idea to save. Mean Heil. So now I'm going to look at the feet and over an innocent looks more not not that smooth, but better than before. Of course. I'm going toe. Check the feet here on debts again, see one by one. So this is the translate eggs off that feat, and we don't need keys here so we can get it off it. It was on the Florida area 10 and the translate eggs. It's going there and more why it's going there. Okay, that is fine. Let's check the translate. Why again? Getting rid of it. I don't need it. Okay, here we can. I didn't get rid of this point. I think it doesn't do anything there. So let me What could? This is the way. So here it's kind of going up and coming down. You can delete it. I think I don't need it. It's going down and And make sure you play and chick. Yeah, and that is fruit. That is fine. Let's shoot here. You can see this translate. G has lot off of loveliness and kind of snappy kind of wobbly cough, and we don't need those stuff. So for going in the Z axis can be very smooth. Can we do it? All this? All of all of this? Three car. That's a question. Here, let me us on. Let me check. No task. Okay, Now let's play. I think that it's fine. It's smooth on here. We can. This common are just a little bit so that golf on. Yeah, so they translate X that did this again. You can see a little joke that Let's select it. Milmo suggest so. These are very subtle changes. We cannot notice. Notice it unless you focus that area and then let's like this one again. Still in this. So I'm going to do it. This one and yeah, let's like this one again. This card is not smooth, so I can delete it. Can this this becomes smooth? Yep. So these were the stop, which makes Dover and the missile. Once you keep creating different projects, you cared those stop. So we need to correct those. There's no other way to turn off the vendors. You need to come attend and then find you in these things again. No, those stuff are done on may be the display. Interesting. This killed. So we have this order, JIA. We can again smooth it. Okay, Something like this. Okay, that's good. And I think they had Don't we have a look at all those animated control cops here? Because it's a basic character animus on we're doing here. We're not doing a very advance back cycle. A very detailed work cycle. So that's why I just know Went ahead with the stop but rise unit toe. Spend some more time to find to on. Of course, you can see let me either controls It's a It's a little bit refined. Okay, So we're don't little character walk cycle on in the next lecture. We're going toe move. We're going to make the scepter move forward. As you can see here is just working on that same place and we have repeating that they're kind of playing in a loop that right looks like it's and walking, walking and it's repeating. But if I increase that frame a study, it's not 2020 20 you can see once it's going across that 25 frame, it stops there. There's no ah cycle of that Sacre. So we need to. I'm thinking about making this gateau work until somewhere here and then stand. That would be our animation for discourse. Simple. Just skeletal walk till primate Toby and then there it's gonna start. So we're for that. We need to repeat this work cycle on. Then we need to move to character to the people. So we're going to see that in the next lecture
130. Making The Animation Cycle: how In this lecture we're going toe cycle, our animation. You can see we have just created one cycle off. Walk on it. It's kind of playing in the loop if I keep some more friends here. If I put more friends, you can definitely see we have just 25 frame an innocent. Then we don't have anything yet, But let's say all character is going forward and stop somewhere. We need to have more cycle of this animus in for that. We're going toe use graph editor We can select a key. Our study, Our control coughs. It's like everything is except this global control, because we don't have any Newsome there. Select here everything on. Then I'm going toe my graph editor via animus in graph editor So you can see we don't have any animals and it's not repeating so we can do one thing. Let me see. Let me show you how we can do that by going to this. Kaufman. Andi can do this by going to post infinity cycle, but if I click here, you cannot see anything. So in order to see that we can go to view and tall on infinity Now this solves the look. It's kind off suing the animism. Golf for for Evelyn, for a Muslim here in backward, I can go to post infinity. Don't own cycle. Now this offseason actually cycle on its forever agency. Now this animus in is being repeated here in aloof, and it's going on infinity for infinity. Basically, it's never going to stop and we can play this character and it's going to move thousands 1000 frames. But we don't want that. We want this character toe move from a to B and then stop there. Then that works agonist to be stopped there. So in order to do that, I need to beg this anniversary. Now I can do that by going toe Car Flynn on Big Channel. If I goto this option works, Let's they said it. In this case, let's say I want this character Togo from frustrating toe someone 90 from and then start there so I can save my start and then So let's start time put while and then any time would be 90 on. Then everything is fine. That's going on big. $20 is it's basically I just closed that graph a little it's severe pony agency. We have actual keys. It's not that effect. It's actually kids still here on We get kids for every frame. Now it looks on the animism for every candle corpse and its key on every frame. So we don't want that animals and again here So we can go toe keys, sir, Carbs and post infinity. Now I can click on Constant if I don't want that cycle anymore because now we have the animus until 90 frame I can see. So let's me goto constraint here. So now we don't have any We can turn off the infinite. This is just a display ting. It's actually not cycling. The cycling is coming from this absurd. I just love this close this No, we have animus until 90 frame and it's being cycled. Okay? No, our captain is to stop that. I'm going toe really animated quickly. So let's go to someone 95 maybe where I just want my character to stand there. So let's keep key everything on that frame by pressing s Then here I need toe. Let's geo everything. Let's put Jiro this fair. So here I am not doing a proper style and you listen Just stop the character there. You can see if I play so stop that. Let's go Toe 100. And maybe we can seep. Maybe, actually, we can do that in dark Forever. 95. We can put Geo here. Then on the 100 maybe can seep the character bit on Move this leg Maybe maybe the character standing like this with this hand because it looks over here like this kind of sliding it fit. So in between that fame, we need to have a frame where the foot is going up, and then it comes down again to Jiro. Maybe the sand can be close, relaxed. We can delete this center, TLC or looks okay. I think this is fine for our proposal in. Okay, I guess there's fine, so we can no move toe moving the character forward. Solis, don't under control cops. Another cracker doesn't go. And you're just working on that same splice, so I can do that by animating this global control. I need to delete everything here. I had some keys accidentally, so we just want one key on the first frame. Where this control corpses here. Then I'm going to 90 frame. Then let's move this car forward in GX is Let's see how it looks. I got that kid because off by my arto Keystone hold now I can see the Gator is going forward. It needs to move a little bit. I guess so, and you can go to a single. Keep them by clicking on this to Aiken. Just move it so that you won't feel like it's sliding. Still, it feels like livered sliding so we can move it now what? Start on the and you can see. It's kind of slow. It's not going much forward. It's not going forward at all. I start even though the feeder doing a job so we can do one thing. We can go to the graph editor. You can see the innocent Corvis looking like this here can see it's not going in the sea reaction. The Z values not going much here, so it's going with slow. We can select the standing with the move tool on middle most dragon let it move from the first frame like this, and then again, De created basically, So now it's going to go from the first fail quickly Onda against you. It's fine. Okay, Something like this. Thought This is our no no work cycle is going forward and it stays there. We need to create a before and us an agile means. We need a basic the supposed which was the Aprils before we cleared this. So we need to have that in a minus cream because you're going to start our work from first room and we have so we need perhaps off frame in order to settle the cloth. Because now the clock is not matching with the body here can see. And if they play cloth similares and it's going to fall down with the bodies outside. So now I'm going to minus premier. So let's minus 20. Get also animated minus prints. So now I'm going toe minus 20 and let me tell of fine cloth and I'm going toe key everything. And I'll have it by the four post there without in Rockport. So little select everything. Andi, I'm going toe key. That process goingto put Jiro toe every control cards with them animating here basically from 1 to 90 there be the work on before the wall with the settlement kind of previous to settle the clock. And here we need to pour. General, don't put Giron skill. Okay, then. That's for Jiro here as well. Basically don't need any pose here in this prayer. I'm living the finger. The finger looks cool like this. I'm not taking them to the default position now. Everything else is fine against like the whole country. Calls and see still have some value somewhere so we can open for Jiro. We have some locator. We don't need those where we can deal it. So now we have oppose. This is the actual port which we started animating to know. That's intoned minus 20 from where we're going to simulate our plot. Now it's going to the first privileges our first contact ports. So in between these two in between this 20 difference the blood will come and no simulate with the body and relaxed. Then it will commit the first room. So in the next X, and we're going to start creating, start working on our cloth suit
131. Making A Highpoly Version Of The Pant: how In this lecture, we're going to create a high political sell off the pants. So we're going to start from the parent and let me don't under clock layers that you can see those you can see. Our plot doesn't have any thickness to it, so it looks fake. It it looks like a very teen piece. So even Claude should have a liver tick nous on. Then we don't have any seem steeds line there. Basic things. I'm not going to do crazy stuff here. So we're going to create a Heiple Everson of this parent with will have thickness and then we'll have a live it seem going on on these sites. So let's do that and hide the tea set because I don't need it for now that press control, it's to hide that now this is my bad Ben. Lord, disagree the in clock plant and then going to apply that symbolism from this ban to the Heiple. So I'm going to rename it included so that I I know that this is my include piece of the low piece. You can. I said that. Okay, now I'm going to duplicate it like pressing control d it's got duplicated. Now let me change it. Toe VandeHei. Okay, So the idea behind this now having to object, one would be locally like this. And then another one will have thickness. And so stop to basically we're not going toe. Ah, plainclothes on the thickness object going toe. Make this teen piece as the include so it will be efficient for similar since. So let me smoothies to objective. We don't need this level a parliament. We're going to need labored more dense polygons for the proper similar sin Tau get smaller wrinkles on the plant. Even on this low model, we need toe smooth it. So let's go toe modeling here and let's go to mates and smoke it while it's not, make sure you have one division levels, because if you smooth it in to our motives and levels will get, a lot of politicians can now let me do the same thing. I could have do this first and then duplicate it, but I forgot to do that. So let's scoot. I would object, not they have same polygons and just a replicator one. Now this this would be our include mess, which doesn't have any thickness. I'm going to hide this one. Let's hide it on for now. I'm going to work on this high up there. So this is exactly the same. The duplicated myth of first thing I'm going toe Give it a thickness. So let's extrude the whole object. I'm going to extrude it so extremely complex control. Yeah, Jewel to him going to extremes inward. Who has, Uh, we have a lot of inside space there, so I can extremely Nord like this and the now it has a bit thickness. Now I can see Don's black because of my settings here. Of course, it's because of the low Mel's got reversed on because of my settings. It shows black if you come here in this lighting menu. I have said it to use default lighting and now it does black. Now let me go to miss display reversed a normal direction because whenever you a student not on it, it's kind of it gets reversed, so you need to reverse that. And once it's tall, I'm going to create fuel seem line. And for that I'm going toe use symmetry here for legs so that I don't have to work other side. Let me bring the in today's loophole on its art if you is here. I had two ways. Looks beside the center one. Then I'm going toe select the Vertex so like this wall and then select the whole sipped and double click on the never cortex is going to select. The whole loop on that is it's going to select the vortex on that loop on. Now I'm going toe my move tool, and then let's go to the settings by double clicking on it. Let's says it to normal so that I can move all the vortex in one in a single drag. So did we drive from this end? So in for normal you can drive. You can no move. All those were Texan defacing directs an outward are in what, In this case, I wanted toe go inward there like this, a little bit together with seem, I'm going to reset it. It's Let's have this tool here. I will need it so you can see we have that thing going on. Let's do the same thing. We can do it here, but I don't think we need to do that because the side will be on top. But let's say let's do it. So here we don't have a even Luke. Now this group is close year and got so idle here. So it isn't never going toe visual that so I'm not going to correct it. I just need to get that inside this locked door to this little again and let's make this one on it. Mrs To Select Tool. And I didn't do the same thing. It this move let me and go to the normal on what should be evenly take. You can see what is not going to visual. So you've been can avoid that or can. Now I'm going to do that sage going to switch to the left of you. But inside we want choose a language is at the center at least that close to the center. Maybe this lane we can bring the tool you can hold the seat right mouse button and then last as though his tools here and say I have the incidents looked all here. Let's pull there on here. I'm working with symmetry, so I just need to work one side. Let's select. So I'm going to select this for text and then this. But I hold seeped and double click on this vortex is going to select in between groups in between vortex. So now you concede. Choose this part, decide selection. Sometimes it happens so you can do one thing you can call me. Live it close. So it's always choose the clothes. This part on shows that then I can don't really on this too. But it's elect still here. Now let me move toes in their normal direction. Basic stopped toe Get those We can place three to that again See those lines? I should have moved toes a little bit more. Let's go to that selection again. I compose a literate most locate that that same prominent look, maybe you can see you got does seem you can even I two seam here inside that I think it's fine Notice that is. Okay, so this is This is my happily parent. I know it's not that I pally, but we have this scenes and it has thickness. Now if you press three that led looked like having a thickness. Now let me get all the history. Maybe said it. They said the move tool. Okay, on. I want to delete the history. I can do that by all. Sift d You can also go to edit and delete By history, this is the high poly pant. So we're not going to make this one o'clock. We're going to apply the intro seamless into our to our no globally and in local apiece. But once we got the proper seamless and then we're going to apply some d former, which will help us toe get that effect on the Heiple. So I'm going to save the file in the next video. We're going toe creator in clot face. Soc There.
132. Making the Low Poly Pant a Ncloth: how In this lecture we're going to create the include plant. I'm going to work with the locally one which doesn't have that thickness. I'm going to hide it. Had the hyperbole dispersed. Control edge, hide it Now selector in cloth Absolute again, which doesn't have the techniques we're going to create this there include, and then we're going to apply, Although include details on all the include similar some detail to the High Poly. We're going to see that walk through a biplane. So before we a play include on this this was hide this house work don't need it right now. So before I apply and clothes on this subject, I need to deal it all the history. We don't need any history on this model, so let's deal it all those history. You can do that by holding old saved and then present Dickie. So otherwise you can go to 80 10 terabyte type history. And now our model doesn't have any history ready to go again before I playing clot on it. We need toe attached, this model with the joint. So let me solder joints. Saw the joint here. Okay, this one. Okay. Here we need to select a model, and I'm going to bind this model with this change so that it moves with the model. Now I can see the paint doesn't move with the model. I want to select this model and then the root joint. And then let's switch to reeking model. Let's go the skin buying skin. I'm going to bind with the joint. So that's set. Choose select joints here buying to select giants. Andi, Maxine Cleanse. We don't need this months off influence here, so let's say it one, because we're influencing with single object here on everything can be my default. So let's click on buying skin. Allow. This model is buying to that joint like the other piece, like dies and the mouth. Now we can see it's moving with the model. That's what we want. People really are playing club. Did the history on deal it the bind Eso who? Buying with the giant Now don't delete history at this point because we need this history. If you delete the history now, it will disconnect from the joint, so don't delete after bind again. Now let's apply. Include on this object for that I need to switch to a fix. Mina, where I'll get the include Mina on here. You can see there's an obstacle creating clock. Let's click on it before it. We're gonna I want your eyes here. We're going toe. Get few north here. So let's click on this and cloud. You can see we get nucleus and include north on. You can also see those on the view port. Here is the nuclear snore. This is basically all it has all that reviews for the effects for the physics spot. If I press control a tow upon the tributary later on, now I have selected this nuclear snore. No can see. There are so many Upson's sweets, which defines the symbolism, the physics part of it, like the gravity on that we also get. This includes Sip and Club Nord Save Lord, which defines how that cloth needs to be. Let's say what would be the streets if it's a stretchy clothes or not again, there are so many options were not going to cover all those Upson's we're going toe work with Very minimum is a very important so you're going to get this to off some when you are playing club now if I play before I play actually, I need to say the playback spirit toe toe play. Every from here, you need to right click on the timeline on, then go to playback, Speed said to play every from If you are on this real time, then it's going never going to give you riel similares on a real physics. So let's go to play different so that it plays every frame and get that similares and done OK being that play every print. Now I'm going to play it and can see, even though that model is our test to the joint. Buy into the joint that doesn't come with it because it's now a cloth face and by fall it's going to come down because of the gravity. We need to do one thing. Let's select the model on the include Lord, Let's go to this so that I need toe huge apiece it before I do anything you can see there swimming absence. We can tweak to get a certain result, but they're quick ways to get good results and that is the present using presets Meyer, our forces different presets quickly going here I'm under include seven or there are so many presets for air bag on different absence for different cloud, like a bee denim Auntie said. So I'm going to use this preset as my by default starting point. Ah, vessel. I'm going to artist some absence even though I use this thing. So I'm going to use this so that soon I use it. You can see I get some absence are registered automatically now It should give me kind of tea set like effect or is that like behavior? But still, I need to increase a decrease. Few absence basically increased for your absence here, but this is the starting. But I want to I want you to follow. Just use a plea said as a starting point. There's no reason you stick to it. You can tend it, but I just don't think this is a good thing. Now I'm going to this Upson here. There's an obstacle input, Miss Attract. Now the first thing we want to do here is sticking the band with West area. That Western managed to be steak that but it doesn't right now, so we can do that by coming here and increasing this input, miss attract to one what it does. It's going toe. Actually, the respect, the input. Miss we the maze we converted to clot. Who is going toe attracted to that mess fully. Now it's said to one. Now I'm going to change this absolute Algerian. Put a track, meet our toe lock Values are one. Get one or get up. So this is going to work for us now. It suits. The whole club needs to stick to that input mess. If a player you can see it. Doesn't we have, like a clot anymore? It's a region piece. It looks like a digital bits because the input Mrs Like that. So what we can do? We just want it to attacks here in some ideas. Then it's a baby. Have like a clock. We can do one thing once you are existed, said these ups on these two apps on here. Let's select the model on go to include on good penned for text property. We're going to paint the input, Miss Tracks on value. Now it's said to everybody going toe painted input miss at input, attract lead on the substance box against the input attract is one on every vortex. But we don't want that. So what I'm going to do? Make sure the paint activities said to input attract before you paint anything. Let's change it to input. Attract. Okay, now I'm going to replace with negative Jiro value Basically, even though I have one here, I'm over writing here with Jovel so low input attract. Even though you have one here now this thing is spending is overriding that. No, what I'm going to do, I who made all the input attract from or every Vertex. So I'm going to do said to one on with the brother the small brush here that's used the reflection from the stroke so that you don't have to work both sides. Now let me hide the joints Agile. It's underway. We can also hide the control car so you don't need those. Ok, now I'm going to paint this. What text? Wait one input miss value. That means these areas I'm painting white are going to stick to the input mess. Andi, input Mrs also going with the joint. That means this area will go on and attached to this area. The joint on their liver Fall down from there. Let me undo. Let's actually covered three or four rows. Okay? Just feeling this white covering these four roads. Of course we don't want Let me undo. Let's do this. Okay, I'm going to I think my own do up Sonny stormed off so I can go to the setting and preference on Do and I can take that sometimes accidentally might do this against amount due is said to off that I cannot undo. So let's set underwent save. I don't know how I did that, but I missed that. So let's do it again. I am painting this now. Man is working. Okay, That's a good news. Outlets binned. Why to these areas. Okay, I obviously don't want any heart transaction or Grady s. And here we want a very smooth blending. So I'm going to smooth here, changing this painter prison to smooth and click on florida toe. Apply the smooth on everybody checks. So let's clinical Florida a few times to get a good, radiant effect here. I can see, but do any of smooth every or tex here. You might lose one value from this area. So what? I'm going to do again. Replace with one. Will you just painting again just to make sure that I have one and put attract And they said yes so that this area doesn't move or fold our I'll get out of that, he said. So this is a Danish to be stick fully. Okay, Andi, we have this radiant here, so that will not get any bad SAPIEN. So let's switch to selected once my painting is done. Now this club Mistral tasked with that area. So if I play here again, see, it's good. But again it penetrated the body because now the cloud doesn't recognize the body as on object there in order to a cloth collider tenure object. We need to make that object a passive collider. So let's one of the large from that little is selected and go to include and make the passive collider. So you need to do this if you want your cloth to collide with that object. So let's make it passable. I don, when you do, it will get a NorCal ended it. Okay, so now if I play, I should see. Okay, Now I can see. Even though I have made that a passive collector Still, the body I consider cloth is colliding with this leg. But it penetrates. Was there the reason being that? Because if I go to my necklace Lord on, let's go toe It's attributed eater. Okay, Now I can see if I come down here. I'm in the Nicolas node on If I come down to this time, attribute No, my new Pius Similares and starts from four stream. But our name isn't is starting from minus stone different. That means from minus 22 Jiro, the similar sin is not going, is not studying what is my animus and is moving forward there. If you can see it's very subtle is just a 20 frame. The leg is coming out because still, it doesn't reach one. The similar sin is not being started here. So what we are going to do is putting minus 20 here so that the symbolism also starts from my understanding. So the prime where our nemesis is starting. So now it should Gidget off that penetration, as you can see, because the border is starting from a single friend. Okay, Now I can see the club. BFF's very kind of is very stretchy, very squeezing, very much bouncing around. We need to adjust the clock. No, we need to Are just few things here a j This soft steps the solve our table's has some absence here the sop steps and the Max Collegian interest. We need to increase this to tell you these are going off the quality of similar Seuin. Now these are very low. The sub steps is the count. It's going toe calculate between frames or something like that. Basically the second quality things I'm going toe I'm going to increase those So let's make it. I'm gonna into four with this. Well, little I'm going to set it to 12 and then let's settle toe 16 It has increased this value so that my calculus and off my collision or be better on my overall close You, Melissa, will be better. Okay. On Dhere, I want toe Oh, explain a very important aspect when you do your cloth Similar son makes your model. Is Gil while scaled? That means if my more if I check my model size longan If I go to my setting preference on settings now, it's said to sent him there that mints. I'm getting a grid line each and every centimeter, so if I send it to fit, I'll get a great line every fit. Okay, now it's easy to check my sites with the food. That's why I chose the fit. But actually, it doesn't matter what sittings you have here. Now you can see my character is almost prove it height. I mean, it's like a kind of turtle or Children off 78 years old. So it's a real world scale object. If your model is like a very tiny piece, may be happy feet or maybe some into inside, then your plot would be very different. So if the handkerchief will be have differently than a big clot, if you're for creating every match your character, maybe an adult, then you need to create the character of six feet height or maybe 567 feet height so that the cloud will be realistic. Okay, so make sure you get your size right. Get your scale right before you go toe this clothing thing. If you don't have your model proper size, then scale it and then apply Claude seamless on it. Now I'm going toe cancel it. Okay, so I'm going to are just few stuff here to get a better result. Now what I notice is my cloth is ministry T very again. See, once I adjusted those soft step increase those sub steps and the Max College in it rates and value. I'm getting a good similar since good physics. But again, the clot itself is very stretchy. So we need to goto in club note and are just a club. Basically, we're working on nucleus north. We increase these two things on, said the start frame and nothing else. That's it on. Then I come to this inclusive, nor where we're using a teaser precept. But again, I'm going to increase straight resistance because I don't want my clothes toe be very stretchy and want it. So what I'm going to do, I'm increasing it again. Unit toe. I don't even know what we'll lose. Needs to be here. You need to put a value and then play and see. So I'm going toe put 1 50 years. So it's the straight resistance. If you increase this value, the cloud would be less pretty. It's not going to stretch anymore. The streets will be craziness will be real decreased. So it's the resistance on then compressed son resistance. The clock complex on a few clauses, were compressing very much on losing its volume. Then I'm going toe in credit, so increase this value as well. I'm going with 1 51 50 Okay, now I'm also including the band Resistance to maybe 10. Somewhere again is the band resistant? So if you included the cloud would be deliberate, rigid, less bendy and will look will not very kind of basically what I'm going trying to do is I'm tryingto make it a little bit. Tick club type. Okay, now these three obstinate said, I can come here. We can play and shake it first. So let's play on the first frame Now we know played even though we hadn't played expert play every frame. It's Liberte slow because it's calculating the physics. So by taking this way, it would be very hard. Can seed probably vehicle? It's very slow. You are not looking at it real time so you can play it like this. So let's played. It was very slow. Then unit to cast. This casts out this information into your memory. So I'm going toe to show you how we can do that. I can play and see if I feel I can see it's a little bit ballsy, Less treaty. Of course I can see it. It's lists stretchy. It's a liberal policy here. So I'm going toe Come to hear. You can increase the masters with masses the weight of the clock so you can increase it as well. So if you clot bounds too much like a very light clot, then again come here. Increase it on then I can also increase the dampening, which is, uh, if you're plots hybrid too much on Uh, yeah, it was similar Too much My breaks, bonds too much. Everything. You can increase this value to damp it toe decrease everything because every moment off it basically so dazzling is basically with time it should decrease. Okay, now, if I play, I should look at it. We're better result now I can see it's less treaty off course on it's stamping its not kind of vibrating too much. I guess I like it. Okay. I'm also also like all these wrinkles, so yeah, so these are few absence with a very important stress resistance, complacent, being resistance. So you need to increase this stuff and and then Mars and then the damping to damp your damn bill. Movement with time. Okay, so there's a few absence, which gives us a bit richer. Now I'm going toe cast this thing so that we can play in real time. So gassing means it's going toe. Get a file on that file will hold all the every frames about expedition on. Then we can once we beg that week. Once you cast that information into memory, then we can play from that file and then we can come here and we can stop the nuclear snow . Here, let me show you how we can cast these things. So let me select it on then. For that, let's go to end caps because an in n clock let's go toe end casts on goto create new cast an object. We can also use this technique if your playback is very slow and it cannot see anything, so if you can come here and it's fine, let's choose the distance. Um, let me go to my project here on my cast. Here I'm going toe I've created this folder can cleared any folder here. So you are also getting a folder by default. Casio we can come here land. Let's get a new facility mine. Okay, this is my full or open it. So that will be traditionalism on lives Choosing them. Understood. Law bank Low on. Choose one file here. So it's going to if you have this pile by people, you get this pile. So if you have this pile, then we'll get a lot. Every get a file for every frame which we don't want. Let's choose one file. So it will be kids created in a single file. That's let me. Didn't limit again. Okay? Everything is by default. Okay, that's good Again, It's going toe. Play the whole friend. So because it's time cider, we can do one thing we can say its start in and then we can choose what almost friends we want to kiss than in this case. Let's let's go with 1 10 maybe. Yet now it should play. And Okay, I forgot to mental one thing. This please escape. We should go it from minus 22 1 20 If I'm going to choose one country here. Let's sit 1 20 years of my tanks, letters said toe minus 22 1 20 They let's do that because otherwise it waas casting from one trim So would miss those rims that way. So let me do it again. Let's to stance later, because now my times letters said, Let's create on discos are another case and Blaine and replace existing cast. So I'm going to replace it and are going to blend, replace existing. Then we pause the video and I'll come back once it cast out. But now it's done. You can see now I can scroll through the times later because it's coming from that file. It's not simulating here in real time is coming from that from that file. That's why we can scrub. We can even go toe plate expert real time, and we can play these elite cleanly now in order to make sure that it's not coming from this physics from the nucleus. So let's go to nucleus and tone of tenable. Whenever you want toe temporarily stop the nuclear similares and when you play, just come here and turn off this Now if I play and set it to real time so that we can look at on the closing. Listen with the body, no can see. There's no slow down here. Its speed, its real time. We're getting a very good cloth, similar sin that I'm happy with the result here. Okay, something like this. So we're done with this thing. We learn how we can create a club, and then you can get this thing we can played that probably cast you want toe re simulated again, then unit to come here and then select the model and delayed the cast because now it's reading from the cast file. That's why it's very speed if I choose play. Every frame you can see is very fast. That's not simulating. That's why it's very fast. And it's getting the information of those cloth from that file, and we can also look at that file. If I go to my for five here rousing it, let's go toe the present files here and go toe gas my guests and here against you. Despite this is the guess file he has been created. You can see I can delete their file if I want to re simulated for any vision. Okay, but I am happy with it so we can go with that and maybe love. Now let's see place if look at it. If you have any been treason with anything, maybe hand or something, everything looks nice in describing and checking for yourself here. The what this is the saving is so I guess that's not a big deal. You can press three. I think it's the inside off that inside part off your piece here. If you don't like it, then you can obviously come and then deliver gas. And then once, once his D litter, come here and tell untenable and then play again to simulate it again. With the new settings, we can do it. If I want to do that, let me go toe selected. Sometimes it's happened. It's actually kind of a book, so let's go to in case and delete the gas. So now I can see the cast is deleted, so there is no information right now. We need to recently did so Let's goto nucleus here and don't under novel upset. So now we can plate again. Now it's simulating from stopping this video here in the next video we're going toe this humility it with 10. Some Europe's new sittings maybe are just your settings so that we won't get those kind of inter penetrates. Um, something like that. So see you there.
133. Transforing The Ncloth Simulation To The High Poly: how in this lecture we're going toe fix that self collision is so And then we're also going toe transfer the details star deformities and from this includes piece to the high polyp int. So this was fix that that problem in the previous literally just notice That's Ah, that's because of the self collegian. So now every plot has a self college indictments. How it's going toe self collide with itself. So now let me select it and go to the include safe Lord on here. There's an upside for that. So that is called self collided scale will find that under this collision tap Hey, you expand that and you goto this solver display. We can choose the self collision Take myth to visually see the actual thickness off every vortex collision Urgency Getting this beautiful Sepp at every vortex threats. Physically, every president is always saws the collide wit of the of everywhere text. That means any more text needs to com disclosed to collide. So it's going to prevent locating those for Texas very close to each other. It's going to prevent that, So the bigger hell you have here in the self collide skill, then the digit better chance to a word self religion. So let's include it from three toe four movie Logan. See now that those collision with has been increased. So let's off. Turn off this, it said, discrediting just to see a vigil. Is that thickness? Otherwise, this is the important attribute here. So this mixed actual difference. Well, now it should be Have better. Let's plate. Make sure there's no CASS, so I can just delete the cast. If you have any cast on, make sure you're nucleus is turned on now. Going to play. Okay. Oh, sorry. Yeah, I did find its play and see if we still have those kind of self college in Izu. I was getting some issue here. This idea. So let me see now. It seems better than before. Yeah, let's keep playing it toe. See if we have here something here. I think it's fine. No, I don't see any. And you have yourself college Genesis. Maybe there's a little bit left so we can increase it a little bit more. Make sure you don't include the two months that dries. It will prevents happening off those wrinkles, so it's going toe now. prevents those vortex toe come to each other. So it's but you're going to get less wrinkles. So I'm not going toe do that. Maybe five or 4.5 with health. OK, now I'm going to play with it. So let's see. I want to actually big it, so I know it would be better. So I'm going to bake it. Let's go toe in gas and goto ucas an object. Make sure we have let me go toe my cast polo. We're going to clear the gas inside here, maybe ever to let's let me first deal it killed all those stuff here. Have until it those then we're going to do it. So I'm going to my project. Fuller. I have some gas from the furious lecture, maybe alleged till it does selected and go toe and gas an object I Let's create those there you can actually create anywhere. Andi opened this part, so that is the Destiny Salon, and I'm going to say to the band Lo on one file, and this guy's we're goingto do it for one tone different that find Let's to it from pausing the video. I'll come back when it's done. OK, it's done. You can see we can scrub through times timeline. And if you can stroke strove ear and still get a nice raise up, that means it's cast on. And now it's using that cast file. So I can also confirm that by coming here to Nuclear's and turning off that nucleus, that means there's no physics. If I play my play, my timeline here, you can see within implants is turned off, and it's still behaving like a cloud. That means it's sourcing that gas fight. It's kind of looking at each friends information from that fight. So now it's cast. Now let's go on transport this to promise, um, to the hype Oliver, which we have going to render. Basically, that would be it actually filed. So now let me a soit. It was hidden salutes place sipped. It's to make it visible. Okay, in order to transport that global digitals didn't cloud similar sent to the high poly without actually making it hyperbole and not going to make this include we're going to use a D former called Wrapped a former. So let's first select the hi Billy first and then sipped select the locally in this together holding the control because I'm in the south liner. So if there will sell, this whole sainted will see live in betweens. So vassal it the high Politan called control And to like this one, the locally one. Then let's go toe modeling on here I'm going to use grabbed the former under the parliament Cleveland, AP The high political wrap around with the low police of this election orders but important silent type. Really fast Kendall include we can notify plea now The high police should behave exactly like dying cloth I can hide the are include conceal listless control. It's now you're looking at the High Poly, which has the thickness. I can press three I can see it looks good. It has the thickness I can plate is exactly conforming to that locally object globally in cloth on it zapped it on there to know I need once I got it, I ain't toe cast this model this hyperbole. Now it's getting those implements And because of the Raffin turned informer, we're going to clean everything. We're going to delete everything. So in order to do that, I'm going to cast this subject so it's not an include object, so I can't use the and gas on top of this. I cannot be used this one, so I'm going to use casts. There's another May know here, which is for other objects other than include object. So I'm going to cast this to collect this where texts purchase a whimper MSM into a file so that we can use that any time just to get the animation of the different ism. Okay, let's do that beyond the fast room and I'm going toe cast folder. Make sure you are on the plate with him. Okay, I want to cast D. Amato Cares and create new gas on Let's Go to That Fire Fighting were in that folder, okay, and that followed that school. I'm going to say it and hi or the one file. Everything else is looking. Find a let's created now it's going to be a little fast, so I think I don't have to posit, because again, it's getting that the other parent is getting the in person from the cast pile. It's also getting the person from the rap It's done. Now I'm going toe click on this icon to go back to the first frame here. Okay, That's great. No, we have casted. So I'm going to delete all the history for this off this object in order to get rid of the rap on anything here in the attribute here, you can see we have also got this plot. Nor from that I wasn't that have deformed. So I'm going to delete the history of this murder. But when you do this, make sure you were under first from here. Basically, we'll end up fast for him. Doesn't matter my Nestle actual faster. So let's do the history all sipped, de Now we can see there's no after former here. There's nothing on this subject now if you play, it will not move because we delete that wrapped it for more And the cast pie legend. Now I'm going toe important, Abdu Formally the gas pedal again. Now you can see if I select this model on now. Let's go Toe CASS Geometric case on import cast. There's my fight on can select it and thats open it. The Americans It moved and snapped this Okay, now this object doesn't have anything. I mean, this is defending because of the cast pile, not for the rap are included. Anything. There's no real, isn't it between those objectionable? So it's very fast. Now I can go toe with real time playback speed, and then I can play dizzily. It's never going to be slow down because because it's not Piziks. It's not wrapped in former. It's getting all the vortex information from that gas pipe. So I'm going to save that file. That gas pile on this is the end resurrected. So we're looking at the High Poly, which is deforming like a clock. But it's not a cloth. Actually, we got this. Information from the actual cloth is is this is a kind of low thickness nor thickness object on. We transport that through a reformer, and then we beg this object in order to get rid of the D. Former Roger. Now this subject doesn't have anything to it. It's a simple model on the gas pipe, so we're done with this process. We're going to do the same thing on the tea set, so we're going to see that in the next video. See that
134. Making A Highpoly Version Of The Tshirt: Okay. Now, if we're done with the include similar son and you have transferred this. The details to the High Poly and you have also big toe are casts the hyperbole. Then you can. If you don't need that, include, then it's fine. You can delete it. Did the previous include plan? But having this file may help you in future if you get an imperial back on it or something like that. But usually it happens at the end. When it's confirmed that symbolism is fine, then it happens. Then they go ahead and big to the high Polian to stop. So it's unusual to get free back at this stage. But still, it's a better thing to have this thing in a different file in case you want it. So I'm going to have this the pant actual, the actual cloth you can see. Actually, no part of his doesn't have any thickness. They're done so we can have it. But let's say I want to work with the T shirt and we don't want toe calculate this when we run the physics for the teeth that because it's done dependence done. So what we can do? We can come to this club. Lord, let's go to that vote began. Don off this level for the includes safe Not so that it doesn't count while the similares and it's running. So it's going to avert this object. Okay, we can do this. You know, my Nicholas noticed, turned off its nuclear snort is basically for the entire scene. So it's going to also work for Or is it? But they include Stepped in closer Ignore is specifically for this one. So let's turn that off on. I'm going toe start working on the T. Said in this lecture, we're going to create the high poly reversal of the taste that So let me I think I heard he didn't file to Let's go to display so freakin so all it also make other things. Visuals are going toe quickly. Hide those again. Okay. My auntie said is here. We need to smooth it before I do it here. I want to fix this morning a little bit. You can see I have a lot of, you know, empty space here. Lot of gap here. So I want to decrease it so that when I'll get the thickness, the thickness. Willow almost tossed the skin. So for that, I'm going to select this job. This EDS End it that I'm going to turn on my sub selection by pressing Beaky. Or you can go to the move to double click on it. Go to South selection tone on this, uh, but this I can decrease that. Increase this radius this pull off my holding Beaky lived most right. I can do this if I want to affect a subtle, very small Lydia. I can do that. If I want to be a good idea than again, hold Baky and drive my left mouse. Basically, I'm going to move it down and make sure it doesn't cause it this body, because we're going to comfort it to a clot on. We don't want any penetration that the first frame. Okay, so that's why I'm not going to come very close to the body. So let's move it. We don't want this kind of stuff. It will and stop the symbolism. Okay? I want something like this. This months of gap is fine. Make sure there's no Vertex with this kind of penetrating with the body that's really important on let me skill This live it so that we get this long gap decreased. Okay, I believe this is fine. So we can, on the self selection, repressing Beaky again. Do that and then And this is fine. We can now go ahead and let's make a small object that this would be our include I'm going toe smooth it so that we get liberal more polygons toe get small wrinkles If you convert this to a clock, it will never get it. Get small wrinkles now because you don't have any polygons for that. Let's select Go to modeling Mason smote again. Smooth wonder is a level just to get few divisions here you can see on this model is better than the previous one. I'm going toe Did any history? 1/2 So let's go trade it deal by type history. Okay, so let's also the enemy to set and clothes. Basically, we're going to do the same thing that's duplicate this control day to duplicate Andi. Let's hide the previous world control. Let's to hide. Okay, I'm going to rename this one toe high. It sounds high here. I'm going to give thickness and create some same so Let's go toe thickness can go to edit mess extrude the whole object while you are in the object more Could it miss extrude press control e two x True on here Going to use thickness This one's a whole control and drag this thing Or you can also use this man of letter Move the Z axis which is the blue yellow Move it inside when you move inside Mint Extremely Nord you involved the normal direction so I'm going to But he was this go to make display Diverse Stirnemann Dixon I get this black color when I know get my due in but I get my normal involved I get those black colors because I have said this lighting toe north decided lighting. So this have I kind of, uh I dislike this Upson here by the Follett's check. So you need toe de selected so that we can see the normal and it gets reversed because of those black colossal. Now this my he said here his has it taken is now I'm going to keep some seem here, maybe every to the side. So let's go to the save you and shoes, twos and endless that this is I'm going to turn on this wild X goto hit, Miss. Sorry. May stool incidents looked on is put to is loops the both side of their dates so that we can to select the center vortex and then move in What select Dad Vortex. And this one. So hold sit and double click. He does it sort select in between path. I'm going to my move tool on its total clinic and choose normal from you so that we can move all over text in Der Normal Dixon, when I do this and make sure that this this is going in north so that it will give me a little bit seem kind off effect. And Siri get you can press three to see it. Even better by pressing three the mortal get smooth. This clips internal. No. Okay, so I like it. And then we can go ahead and give some here. Roger. I'm going to bring the insurgents, looked all and put some is looks here. Then you can do the same thing to, like this, protects whole received and double click on that side vortex to get the whole vortex loop selector on Now let's go to move, Tool The sitting Is that the normal access That's moving the indirection inward so that I get that and give that Seemed that compressed three to see if I get that. Okay, that is good. Maybe I could have moved a little bit, so LeBron do Okay, I once it selected I can move this a little bit in What? Okay, I guess it's too. Right. Okay, that's fine. So you can do We can also put some seem here until this area you can make thes. I just see. Maybe let's actually do it. So I'm going to insider's look tool. I'm bringing the tool by holding sittin right mouse button. Let's choose a center it somewhere Here maybe maybe this one. So let's porch on its here like this then this one. But it now again states to let the other side part. So it's always select those Satish matter. I'm going to select this vortex again on let's let something like some here. Maybe so it gets the subtext part selected. Then I'm continuously double clicking here holding the SIPC. So now let's move. George, I'm not sure if I want this um let's see something really want Maybe we can keep it. Okay, so I'm happy with this. I'm going to I can maybe put one here. Let's do this. We can put one seem here, so scored a vortex. Select and holds it. We can do this all begins. A selector is low by double clicking on it on. Then you can go toe select convert selection Let me find the converse Alex Robson and you can convert this aids Look selects Unwto vortices Andi, This way you can also select whole vortex. Look, I'm going to move tool and then move it in. Right. Make sure they don't penetrate to the other side of the Taliban. So I don't want this may be a little bit and they're here. You can see we can move towards you know what? I'll just do this and then get a Technically cannot do that. No, I got that. Okay, I'm happy with this, So let's call it down. I'm going to delete the history. Let's go to read it. Thereby dive history was this who had allowed the High Poly decide here? So in the next lecture, we're going toe make the low abilities that on include object? Sure that
135. Making The Low Poly Shirt A Ncloth: Hi. In this video, we're going to work on the tea set. Let me hide my high believers in off it. Let's hide it on its select the globally one and and hide it by placing sipped. It's okay before I playing close on it, I make sure that I don't have any history. So if you have any student, go to edit and deliberate Taipei Street, delete the history on then then the second thing is binding. This he said to a joint so that it moves with the character. Now that he said, there's no moving with the character. Let me display my joints on its He lived the states that and then the joint. And then I'm going to rigging skin buying skin up some box on here going to choose selector joint. I'm binding to selector joined in this case the stairs joined on. Then I'm going to say this Max influence to one by and skin. Okay, now it's removing the character for something like this. Now it's a good time to make this convert dishcloth this object into a N clock, so they select this one on switch to affects mirror and Claude and I'm going to click on Create and Clock. Okay, now it's a in clock. Here, you can see we have this include to Lord, because we had and look Lord for the pants. So that was include one. And now we have this include two but the states that. But we didn't get any new new nucleus. Not so basically nucleus. Nor is a common. Nor we don't get for any objects for Let's say, we have a single nucleus, Lord which calculus or physics off your entire scene? So here you can see that means we have already said those nucleus absence year can see the sub steps is said basically this the same nuclear's note we are just before. So we have this substance said to 12 on Max collision. It is into 16 on my time attributes start from Mr to minus 20 so that it called rest of physics from this minus tone different. Okay, all these off since I said no, I just need to come to the include Nord so that I can not just few things. The first thing I'm going to just is making it using a place it let's use a precipitous that presented a starting point again. I'm going to do the exact thing on this. So the first thing once I used that, they said No, if I play, it's going toe. Fall down, makes your this is said to play a different right click on the timeline and then you get to hear and then play with him to play the similares and properly. Who can know this is falling, that is, that is falling. We need to come here, then put Miss Attract, increase it, set it to one and then input attack May 3rd knish to set to lock values so that it totally for lows the input mess. Now it's going to fall over completely, I think. No, my nucleus notice turned off. If I come here, can see that this stoned off. That's why it's not calculating any physics. So if you don't see any physics at all, the include is not behaving any no at all. Then check this new place nor make sure it's inedible so that it works. Okay, let me Okay. Everything looks nice. Let's rewind and play. Now you can see it's calculating the physics. Sometimes you need to do in and play. But now it's totally. Every vortex of this model is totally attracted to the input mess, so we need to paint it. Let's go to pain Vortex input attract upson box. Now you can see everywhere Tex has a value off one input attract question to spend a tribute to and put a track we're going to pain, then put attract. Now I am in this painter presented to replace Let's choose really new Geno, will you? Here and then click on floor toe. Make all the vortex lose, then protect. Actually, Luna can't even though we have input that tracks on one here. What is that? Input that track one. Here. It's over writing it now. No, none of this vortex has an input attract. That means it's going to fall down. It's not going to stop. Uh, stay there. So we're under the place with value one here where we're painting the city s. So we want this idiot toe we fix. And then the rest of the plot would be, if really uncleared wrinkles. I'm going toe. I have a small place here of last year. I'm going toe I'm using. This reflects on so that I don't need to work both sides. I'm going to select this having 34 roads. I repent this carefully and dental smoke did get a good grade Ian blend. Now I just wanted to finish feeling it again. Ah, we don't want any hard trenches on like this. Let's go. Toe seems to smooth and click on floor few tales in order to get a very good transition there. Okay, something like this. So we don't get any bad performance. And they're very smooth floor. Few times because I just mooted I lose the one will you here on the border. So let's switch to replace Andi with one. Well, I'm going to paint this border again. Just the border. We still want this Grady in here just to make sure that this border via text these were textile move or go anywhere on Do your stuff the business to stay that, as with the body, are stayed there just to make sure that you have this one with you. I depended. You can hold shaped and smoothed. Really? If you want. Oh, organ. Now it's done. I'm going toe switch to select all. Let me hide the joint and the control cost there on the ways holds. Hide those you know our model as that input miss spending. So let's play now. See if it's working. You should collided the body because the board days a passive collider, no concedes colliding in the body. But it's not colliding with the plant here, so we need to make this high Poly plant massive Kaleida. So let's select it and go toe and clot Passive collider. Now we're getting this band symbolism from that gas file, so it's not an plot anymore. It's a simple object which had that gas pile. Now, once it's got a possible I don't know. No, let's see and I can see it's colliding Indepent. Now it's a good time to check, Darty said. Symbolism, You know, I can get an idea that it's gonna bouncing around there so he can wanting that selected and go to the tribute here. Here, you can come here to the doubt, if the blood is bouncing and have been a poor springing. If it feels springing, it doesn't stop its Muslim in vibrate a lot, then you can come here, and in case this damp absurd on if it's ah good straight. See? Then you can increase this thing. But I don't see any straightness here. Let's see. Yeah, it looks fine. Okay, I'm going to in case the damn value. Yes, that's go to maybe from point A to movie tail off five or 10 something. This damn values control for spring in this. So your damp the Mosul kid. Let me now I'm going toe. Bake it. I'm going to cast this into memory so that we can play it freely. Now it's where this low, so I cannot see the movement. So let's gases are selected. Goodwin Case on Dhere. I'm going to create Nukus and object now this is my What's going? This is my gas finds others goto gas. Andi, Let's create a temporary folder here. So inside it I'm going to clear that gas pile to its star dessert law. One file. Okay. Here. Casting it for one tone differently. Create. It will stop the video and then I'll come back when it's done, you know it's done. Let's see. Let's check over Shima, listen. No! It's senior memories. We can scrub through a timeline. Let me play! Let me say this playback speed to real time so that you can see the real time Speed. Okay, Something like this. Maybe I can just come here and talk about the new place note so that we don't see any physics. It's purely okay. Something. So I don't see any straight Steenis there. Did you see any straightening is then again, of course, increased the Straits resistance and complacent registrants. But I can still see some deliberate of bounciness on that block. It's kind of sucking of it. I like it. I like Dove Earl overall. Look and feel. Getting good wrinkles. Okay. Oh, I like it. I just need toe increase the damn Really? A little bit on. I don't think I'm surprised that this value are working for this because these, well, you didn't work for the pan. But again, you can see it depends on the I don't know if it so somewhere you're stretching. It didn't come here. And then there's the stretchy resistance and compression resistance. Do the stop on may be blamed bend resistance on, But in this case, it's working fine, so there's no reason to increase those. I just need to damp it a little bit more so maybe every 20 so that I get a little bit less bond sick and off effect. Spring effect and everything is fine. So now let me simulated again. So in order to similar to that again, I need to delete the cast. First. Let's go to and cast because every player now it's going toe play from the gas fire on. And yeah, so let's just delete the gas. I'm going toe the first frame and then go to in case. Deal it. Casper him. So the deal it cast and want it, it's deleted. Then we can turn on our nucleus north so that it simulates the got on with this noon happening glue. I'm going toe the simulated and let's see how it's still not. So let me play it are never going to pause it. Oh, I just forgot toe tend to playback speed to play reframe. This is very important. Addressed, Similar Soon will not be right. Okay, so I'm going toe CASS it again. Let's go to in casts and create and create new gas. An object I'm going to replace the previous one to the place existing. So I'm going to pause the video here. I'll come back once it's done or get done. It's Jake also Melissa, with the new damn sittings. I'll explain the whole time. Honest ticket. Make sure my nucleus noticed. Turned off while I do this. Okay, I like it. It's better than people getting good wrinkles. And it's not that ST e bouncy, so I like it. So I'm going to call it down. And in the next lecture, we're going to transport this deferments. And what extra promise? Um, in tow hyperbole. He, however sun of the desert. So see you there, then.
136. Transforing the Ncloth Simulation to the High Poly: Hi. In this video we're going toe transport All those and caught. These are details to the high poly one. So let me on hide the hype Oliver Simpson selected press sipped age Or you can goto this place so on. So selection. We know both the high Polian globally one individual here. So let's select a hype really first and then hold control and let the locally one which doesn't have the thickness. So this election order is very important. Then let's go to modeling and use Rabbit. Former from this department. Okay, now it's a rapid and with the include object a bacon if I play no, no, it's department with the enclosed object I can hide the include Object has to make sure, but that's there. You can hide it. I know we're looking at the high poly one, which has Is that all those seeing the stop? Okay, now I can played It's working. So now I'm going toe cast this biological so that we get a cast pile of this hyperbole on so that we don't keep those abject for more on all those history. Because when we apply the rab diploma, get the enclosed shape note on this subject and wrap Deport module You can see giving everything on this subject as well. So what we're going to do is guessing this object. I'm not going to use the in CASS ups and from effects. Not this absolute. I'm going to use this gas upset for the subjective. Let's click on this on goto geometry casket. New guests choose the distance and where you wanted to save on in this case, I want this to save here. Let's upon it. It was if I limps out highs fine, okay. And one file. Everything looks find its click on create It's gas it quickly. Okay, lets Google the first from here to go to the first frame. Okay, great. Now if I scrub, I'm looking at that object and it's getting those in permission from the cast again. Say that if I Let's be in the first room on a selected said the high Polian, I'm going to delete the history to get rid off the wrap the former on those club node and everything so but make sure you're do you're doing it on the first time. So let's they're the history all siptu D Now you can see I don't have any rapidly for more animal. If I go to attribute, we don't have anything here in just a mortar on. You also lose those impermissible. It doesn't move the body because now we need to deliver history. It also disconnect that gas file. So we need to go. Come here, you can see is selected and we can imported. So let's go to Democrat casting podcasts on Goto sat high open air concerts in As they pulled added flips on it snaps to the position where it should be. You know, I'm getting the now I'm getting all those were Texan for MSM Pojistovna from information from that cast file, there's no Abdu Palmer. There's no and cloud nothing. I can go ahead now. I can deal it anything. Any include lord and thing. But I'll still get this effect because now this to object are getting their implements. Um, from those two gas pain. Okay, so that means it's speed. There's no similar sin in the scene, So at the rendering time there's no likeness. There would be no likeness, so it will be clean. So now I'm going toe stop this video here in the next video, we're going toe work on the end. Work on the hair. We're going to appear those as in hand in I'm going to use that input, Miss Attraction to get a little bit and off with the gonna spring feeling this top area in this DPD of those hair soon that like
137. Simulating Hair With Ncloth Part 01: how In this lecture, we're going to work on the hair. So first thing, I'm going to duplicate this basil selector hair. Let me make this layered, normal little Let's click on this art to turn that off. So this is my head again for this. I'm going to use the same process in by plane. I'm going toe, make it include and then they're going toe. Ah, bigot Orcas it. So I wanted to placate it for this. I'm not going to do any high police stop because these are haircuts are not going to extrude and get a thickness here. We don't want that because there's Alfa. So we want planes here. But I want to duplicate it and then so that we can deform or use the while rap to form and then cast that object. Look at the end. We're going to get a fight like this. I'm going toe select it. This sort of in my hair law off include Maybe that's include I want to duplicate it. So now it has skin, Kloster, everything. Those stuff again. As finds us duplicate it. No, this duplicated object would be my high. Our final say Okay, so there's hided and I'm going toe. Make this and close so there's no need to bind it again. So it's already bind with the hair joint. We can see the skin cluster here and it's moving with the world alleged, there's already buying. So I'm skipping that step here. Just moving toe effects and creator in clot creating clock here. Okay, soon as likely Create that. Include I'm a missed. I may lose that material again. This that's not a problem. We can reassign it. By the way, we're going to use the final Oneto, as is going to get the departments in from this. So let's selected and go to its including Lord, which is the include three North here because we have he had already to lord for one for dependent sort and then this one. So let's go to its attributed eater on here again. I'm going toe paint, been the and put attract. So let's go to input a tractor improvements attract made set it to wall And then that's choose this substance on here. It should fall down like this. My net list No is turned off right now, so make sure you you don't see anything, then come here and make sure it's turned on. And as you can see, it's falling down. It's coming because of the input data. So let's go and paint it being then put attract. In this case, I just want this deep idiot Toby free a little bit on. Everything needs to be Stick to the input, messed life as it is now. I just want when the cattle walk, the hell moves a wears a little bit so it doesn't feel like a rigid set. So I'm going to paint. Let's say I'm not going to paint black. It's fine. I want to paint black on top of this deep India. Okay, so we can Let's hit under with the liver brick bosom painting this idea black so that I get that depict movie effect here again, we may want to smooth this stuff, so let's see. I see what we're going to get. So I'm going toe penned black toe, one tool off my hair here, and I'm not going to do it for every hair club. I just wanted a on this idea on this area of the head. Other head Hope speak careful and the white area will be really regent, right? You want your whole hair club moves from the from this best. Then you can paint a little gray here. Or can being it or smoothing till here can do that. Why do on that? I just want my deep toe deformity. Vic. It is the deep. Keep adjusting your bra size. According to the hair club. Okay. Here, accidentally, my meter of sinister non reflex on. So let's talk this out because I don't have exactly symmetrical health clubs. That's why I was getting weird painting your tractor. So let me They don't use the reflection here. Okay? Here are holding the control key and then painting toe remove all those all wanted Stop there. Okay, All right away. No, it's fine. That's granted. Here. We'll get something like this. Just these had close with that, you know, sticking outside, which can be visible in the silhouettes are going to do that. Those tough. So I went toe. I hate this stuff here. Yeah, I guess something like this. Now, let's go to the smooth and blogger blend this thing. So let's click on the Florida some few times, so that I get a very critical if you don't want black, your address desire really move. Flock. So I'm going to have something like this. Very well. Blamed effect. Let's clip florid few times. Okay, something like this. Okay, lets so it's back to select all. Let's check it for a similar satisfied Go, let me undo. Make sure we're in this play every flame, not real time and can see it's not playing properly. So look at my hair. Club's closed, They're moving. I feel they're moving. So let's see is very slow up. Let me go back. Make sure we have, uh, against you. We have three different and cloth object as it so now everything is being similar to it. So let's see. Let the include Nordwall, which is my parent. Nor that stone that out that is turned off. This little include two adjustments Teacher, that's done this off so you don't want toe but experts something in the similares and process didn't can come here, and all of that particular include Lord on. If you totally stopped the symbolism for the whole thing, then you can put the nucleus and turn that off. But in disguise. I need the nuclear snore toe. Welcome this, but these things needs to be stopped. I guess something like this and maybe we can all sit on this and Regis steps as well because these are not going to collect it it So let's turn this out. That all calculate the stuff my agency is. This was the dude as well, so we had to end digit sit on the border than this one. Let's turn those off. Hello. You should see a little bit. No fast, Most movement again. We can reckon. See, it's losing out its attending step two months. I want the safe to hold. So we need to come to this and Klatten Lord and I just feel things here. So we need to are just this stuff straight resistance so that it all straight on complaints , complacent resistance so that it won't compress Narragansetts being compressed too much on losing acceptably. So I'm going to increase the stuff toe or too high number 1 50 when we want 50. Or to wonder something like that have been resistance. Well, let's see, I'm keeping that been resistance as you tehsil it. She was just with the strata is this chance and the complex and its distance increased now the same overall safe should hold on it. Shouldn't components to motor squeeze on still can't see it totally dependent the movement if the movement is fast and ah, you need to increase these things to a very high number. So let's go to maybe every 2 50 are 2 50 Something like that includes the pain, resistance as well. By including all this stuff, the plot said, will be a rigid go to answer it. Except so I'm going to also damp large vibrating to muscle its damp it goto damp. Here. We don't have any real live here, so let's for over 10. We aren't a little bit movement there, but I don't want any crazy 30 things there. I can see the moving, but they're also holding their own sip. They're not losing their value is a good thing. In order to see it properly, we need to CASS it because now still, it's slow can say it how it's going to look at the final. Maybe I'm looking at it. If I I think my dad Valley was a little bit too much So let's make it so that we see some movement there. Let's set it 05 on. Maybe 2 50 was to muscle its said 200. Well, that's it. And I'm looking. I'm looking at this city. I think it's fine. No. So let me Jake, by passing interest, gas it. First facility. This being the first room on, I'm going to end kassid with position in cloth Object. So create new casts, an object apps and books and choose your files here. I'm going to get inside my damn folder here. So these are temporary thing. That's I'm calling it. Tampa So sorry. This is just that a certain put the name here on one file. Everything's fine that's created imposing the video. I'll come back when it's done. OK, it's done. Now let me think on this to go to the first room. Now we have casted, so let's Scrabble time like I can go Toe said the place back speak to real time and played . I can also tell not a necklace, nor just to make sure that they were getting the information from the cast file. So let's playing plate and look at the hair closely because I do. And, Lord off moment, you can see it's still very springing. It looks very spring king. So obviously we need more dampening. Okay, we need more dampening, but there's very subtle movement. We need some more movement. I want those clowns to move a little bit more, but in a dampening fasten. So we don't want with the jerky kind of moment. So let me fixed, does it was selected. And here let me do one thing. Okay, I'm going to delete the cast file, So let's go toe and gas. Still, it casts that we can re simulated again. Fillets stolen the necklace as your okay. Here. I want to change few things to get the effect. So I'm going to increase the tempting. For sure it was to kind of spring is let's increase it with maybe 20 or something. What we can do, we can add some more input at tracks on here. I can basically decrease some more input attraction. I'm going to repent it. Let's go to vortex property and put a trap on Dhere. I want toe paint. Let's go to scale maybe campaigner, we can replace it and put some more hallelujah or you can go to scale on. Then it'll over Luke and Art to that. That dark color like I wanted it more on a dark colors here that did affect this idea. Edward Moore. There's until like this. Let's see. Let's see if it works. I'm give taking our weather and put a tax on the big more. Let's see with this. And then if it works, then you can come here and then depend fuel things. So I'm going to smoked yet floor few times and make sure I'm getting a bit darker toned. Then, before something like this, maybe at school on, Let's play okay, allow makes your people you played said to play every frame. We should see some more movements now because we have no concedes moving. Yeah, you can see it's moving better than before. Let's stop and go to this previous pushes away, but we need to gas it in order to see the full effect. But I guess we need to depend it it again. Let's go to this and input attract. I want this greedy in to come somewhere here. It kind of feels like stops here. We need that Grady int effect. So what I'm going to do is spending so go to replace our scale, maybe painting till here, and then we're going toe smoke it. So that will get that Grady in so vital here. Not just that very deep area. Because when you smooth, we're losing that radiant, actually. So I'm going to feel every more maybe how? Put then you can see something like this. Okay, Now I'm going to switch to smooth and float again along with the floor. Few times against it. Kind off came till the border of years, which we don't want. We want this idiot to be fully white, so I'm going to replace it with white and fraud again. So smooth Florida, Maybe floor on spend again. But this morning brought us Oh, I want toe be in the replace with white next year. We have a very smooth, smooth, bland branches in here. And then we do under great colored this base area. That here. Okay, let me go to smooth and fluid again. Maybe for the knowledge to see if it works. Let's go toe check if everything is fine, okay? Played again. Now the world health clubs to move a little bit. I live in C. Yes. So I'm going to pass it so that I can see the report, our ports that is selected goto and gas and discuss it and object. I'm going to play. Can replace that. You know it's Donald Chick. Go. Does this first women than don off the nucleus. Note, Analyst. Plate it here real time, please, expert. Okay. I'm looking at a few areas. I'm looking for spring. Use it behavior. If they're going to spring, this area looks nice. We can still increase their dampening a little bit because at the end you concede the kind of jumble of it when the character stops. So it I'm stopping this video here in the next lecture. We're going to continue fine tuning the Sim Ellison showed that
138. Simulating Hair With Ncloth Part 02: hi. And this lecture, We're going to continue working on the hair. So now you're getting all those in person from that gas file we did in the last lecture. I'm going to that you would editor and the include Lord on Debts increase this dampening. So because now I can see if I played are still getting you live it. Let me say toe real time, Live experience. Let's play. I'm still getting a little bit jump, but I like this at the end. I'm getting a little bit job that so I'm going toe increase the dampening to somewhere maybe 100 or something so that it come down on then I'm also going to spent few Let's go toe and clot pain vortex properties and put that track off so locks. So we need to paint this on of the other health clubs. I'm going toe. I was scared like a low value. I'm going to our I upload this scale. You can art create creedy in like this and she would live here. You can also use a pen tablet to get a good radiant effect. Amusingly my nausea and I'm going to use smooth to blend our get a good greedy int effect. So that's a I'm not that worried about that. Let's quickly get this on on different clubs. You don't have to do it on every club. But here lets me I don't feel these gloves as well and get a little bit darker. Tool? Yes, Until this. Okay, so let's do it on this Globe, Sergeant. We'll also do on these partum clubs. So let's bring this stuff here. I'm happy with the overall symbolism of the clock off this hair side thing. I'll bake it. Okay, real quick. And then I'm going toe smooth this thing. I think I'm covered. Almost there. Okay, Okay. Let's do this one that would this one. You know, I'm going to smooth everything from sewage to smooth and click on floor few times so that we get a good grade int effect that get something like this on and makes beware off this great and enriching. Did the toe this basic yet? Because we don't want this base idiot to move it on. Which is going to look we yard. So I'm going toe have one value. There's alerts, replace said the world on keeping these ideas so So that we don't see those thing here. I'm going toe hide this less of the Reagan seat has to make sure that we don't have any darker value. We need white here because I don't want this idiot to move at all. So here, you can see. Once I print those, I'm getting a I'm not getting a good creedy in. Mixtures are holding sipped and then smooth these areas manually while not looking in. You have to this base area. Okay, let's spend Weijia. I smoke these areas. One of holding sipped. Okay, lets you is to select all on. Let's start on a character. Okay, so let me also assign the hair material you can see when we apply the cloth nor to this subject. We lost that material. So looks kind of a great Galois. Doesn't look good. So let me goto existing mental, but I clicking on good existing. And then who is the head Mattel we already have in our scene. This will hear material. Okay, Now let me delete the cast high level so that we can re simulate it. Let's click and gas and delete the gas. We don't have any gas here, so I'm going to re simulate it. Makes your the and nucleus Lord is active, so make sure it's active. It is not going to calculate any physics. Now. I'm going toe play before I play again. Make sure that this playback spirits said to play reframe. Okay, Everything you said split again. Sometimes it's kind of a book that doesn't come here, so you need to rewind here and then play again. So now it a bigger dampening value. It's stood in Tampa. We've been mortared word, that kind of jerking movement. Now, looking a day you can again kassid toe see the effect I think I should do. That's a little go to the first frame. My cooking in this I can't. Then let's recast it. Goldwyn CASS and gave Nukus an object. Oh, okay. Now let me pause the video. I'll come back, Want it done. But now it's done. I can look at this. No, let's tone of the nucleus Lord again against glove. It said the playback speed to real time so that you can look at the real time. Also, organ again. See its way were dampened. No, there's no such Jacqui parents is still getting a little bit at the end when the character stops. But that is, I think, that that's what we can expect because now it's moving and it's stopping that. So this will be a Liberte papers. But it's way, way less than before on now. Overall, my head is moving. That's a good thing, and it's very is very, very calm. Okay, so I'm happy with the result here. So let's call it down. The similar sent party's over for me. I'm going toe trust for this similar Listen details to the Heiple, even not the Hyperloop one to the other hair, which we need to CASS again. So now I can see if I render this thing Let me and hide my lights by oppressing sipped it. I can now let me render it. No. After I converted to a clot, I lost that all far details, even though that texture is assigned to this material. But it's not coming, so we can avert this by again, applying this promise into my other duplicated one. So there we have that alpha, so you'll get the alpha details and then the deferments a larger on that. And then we're going toe cast that file as it. So we're going to do that in the next video. See that?
139. Transforing Hair Simulation To High Poly: Hi. In this lecture we're going to transfer all those enclosed hair Details to deform isn't to the high Not high one, but the one So I'm going toe all hide that So this is my hair final wants or expressive Tej night A night bolt here I'm going to select that one. And now my in good had include one is getting its information from the Castile I'm going to select the high Well, first of final one and then this will holding control key on Then let's use rapidly Former let's go to deform and wrapped apart Okay can now let me play. Let's make sure that we had in play every every more girls play Okay, now you can see if I hide the in cloth wall Now I'm looking at the high one The final one which is not actually Claude, but we're getting those deform isn't from the wrap the former because now that diplomas wrapping around that end club So now we're getting off those deform ism do this space which is not in blood. Okay, now it's timeto cast this object as well so that we can delete the rapidly for module so it totally get that diploma. We can keep this implement on this protection to promise and information in a file. So let's select it. And I'm going to pass it by using the normal casting Lord toe and quote one we have to gas up. So if you had inside this effect, you have this end case we're which we are using. Foreign plot took Castor in clothes object. But in this case, this is not and got objects. I'm going to cast this from here on goto geometry cast create new cast. And here I'm going Toe said my destiny is over. I want to save the cast file here. I'm I want that to be in this pile, this problem saving on all my certain plant caspit. So let's I just select that so that when the select opened that turns him into that pot and then it's would the name Here, let me call this hair Pinal on one file and I'm going toe simulated. That's click on create. Okay, As you can see it, stop some, uh, on the one general nine friend. Sometimes it happened. It's it gives happening with this help object. So it's kind of a bog, I guess. So what we can do? We can go on also down Meyer and then what it's doing. It's actually creating the cast file, but it's somehow hanging your mind. So I'm going to close down my, my, and then let's see if you have that file. So let me close it by forcing it to my tax manager here. And I were going toe and see my my eyes taking my a lot of CPU memory. So let's in the text or you can wait. But again, I have seen it. It creates that gasp, Albert. I don't know how it's gonna hang them. I know. So I'm going to check that file if we have that file here. Integrate Project Green Goto Chaos inside. Make my guests against you. We have that file that means it's it has created the cast file. But Maya was hanging. So I'm going toe de open my at Media open. Meyer So we can check that gas Well, if it's working, if it walks then find there's no problem. I can now let me open my file Stofile, We were working, okay, that that's the you don't do fight here. Say, don't step. Study organ Now this is my high. Well, that no could have the high while I'm going to on hide it, okay? And hide the high one. No, let's say let's hide this float. Well, okay, now this is my object. If I bring that thing now, it doesn't go with it If I bring that gas well to this more object. So let's go to cast your vote to cast in podcasts. Andi, in this guest, Let me blows the correct folder here. Final Open it against it. The cats has been created, but it was hanged. My was hanged, that I closed that. So if it happens, don't really it just kind of a book? No, I have the gas plants. No, I can do one thing. I can just go ahead, Dave, The history. I guess we don't have the lab people on this because I didn't save that file. That so fine. So what? This subject, We don't have any rapidly form alerting. If you have the right department and delete the history on when you delete the history, you will lose everything on that. More developments will also lose the cast file connection. So let me do this again. So let's let's say you have the lab, the former, and then you begged it, even if you begged it. That after from one is still that what we can do? We need to do it. The history. Let's do the history of this. I'm working on the high one. Have he didn't? That will include one. So once you hide the history, disconnect that cast by larger. So you need to again re import. Usually you need to import it once. Okay, so gas might guess. So if you have the make sure you don't have that rapidly promoted it. Now we don't have anything. This is a simple object. It's not in club. It has no appetite for Morata. Straight. Nothing. It's getting its deform. Isn't the vortex departments And from the Castile? No, it's behaving. I can see the hair clubs are moving smoothly. Okay, so now we have Dollard, the sort band and the plot here. Now, in the next lecture, we're going toe set a clean scene where we just need this model on the cast files. So we don't want any rigging. Any joints and anything you can see. Now we in this thing this thing has lot off things. No, this in her joints. I can handles Andi in cloth nucleus Nord. Basically, this is a working seen. So you cannot transport this scene to somebody who is going to render it. It's an naproxen. You are not going to render the file. Let's see what a animator you are modelling at IHS or whatever. So somebody else is going to light and render the scene. So you need toe giving this clean file. So who had the file just had the model andan the cast by letters to it, Nothing else. No reading, no animus and low named Claude. Nothing. So we're going to clear that file in the next lecture. You can still have this file. You can still save this file in case you need to come untended. The similar. It's in a bit. Let's say you don't want some wrinkles that you want to live a different behavior of the club, so it's a good idea to save this pile in a different name. Let's say it may save this file, actually save see nuts and I'm going to save this pilots a character character underscored a big and symbolism. Okay, finally, the character victimless and final. So this is whenever I want to come toe change something. I need to come to this fight. Let me save this right. Okay. And we're also going to save a pile on a different never goingto clean this Stop. Let's say that in the next life.
140. Creating A Clean Scene With Cache Data: Hi. In this video, we're going to cast off the object agile so that we can totally depend on the Cassin permission. So so that we can delete all those rigging and everything except the mortar and the gas. Right. So in this case, I'm still working in that in that file with it has everything. So by now we have some. You have cast this to cloth under here, but what about the body and eyes? Everything which is moving. Because if I go ahead and delete their key indeed the joints on my candles now then we'll lose this animation because the body is moving because of the joints. Okay, so will killer dill it yet? But I can again cast this moving off. We can basically casts a New York. Moving objects on about export vessel will be will be saved in that file. So let's select the body and I'm going to cast this as well. So let's go toe gas, the normal gas. It's not in place, so we can go to in gas or just the gas on June together and called about this upset again. I'm serving everything in there full the debt maybe gas my guests Open it. I can hear It's a body said Gaga. Bodies appears. Finally this low mid that safe one file. Everything looks nice. Let's created well, you know, it's completely completing. Can go to the first room and, well, look at this model. Now it If you go to the activity later on, right leg on this little triangle here can see that will be in cast solid. There's a big cast file to Body Castle and can see this model has using this Castile. That means we can now delete everything basically and delete the rigging again, the digital joints. Let me go to the global controls. We can basically deal it. Everything here control big, but I'm not going to delete it yet because I haven't cast his eyes. So let me cast its as your once A to complete everything. Then I'll deal. It does. So now I'm going to select desired of it. So we need to do it one day. One. Let's see. Now I have selected this outer sip. Let's go toe gas. Um, demon to guess, Get new guests on. Let's choose that folder. My gas and I'm going to say that this is just a part here. Let's say the right. Hi, Outer. The right eye. Outer, outer safe. Uh, let's created. Okay, don't. Very quick. So I'm gonna dates. I'm hiding it just to know that I am Don, It'd Well, then now let's select this on. Then do it again. Get new guests. Good night's mike as a right, I This is no doubt or so I'm going toe, Juanito. Maybe in that right, I enough for in or out cleared it. Basically casting every move, every object which is moving. So this is Don Now then we do for decide I out of safe. So let's do it. No kiss. This is my left eye. So this the character slipped. I left I out. Let's guess it. Okay? School back high. This one so that I can digital selector inside one on decks Cast this one again. I'm looking at my distance And if it's correct Yeah, that's correct. That's college dinner on this created You know the eyes are done. Let me hide the body or we can decide from the layer Let's do it again for this for these objects so say like this up while and I'm going toe, CASS. It so lets Gasset focus your gas ups and works. Make sure the party's right. This is my upper. Gone, our petite. Let's a teat about it. I can also copy it. Let's save it. I'm going to create it. Okay, Great. So now I'm going toe do the same thing with double or one. Okay? Opportunity. Is it our lawyer? It Gaedel? And then I guess this is the last one we need to do. So let's CASS it and we'll be done with gassing. So here is my it. Oh, Liz, Miss, take the spilling. If I'm doing this, forgive me here, so let's create Okay? No, I went on lied everything. So I had here in this out of side let me moto display So last hidden. That would be well so the last year. So this one's I need to go to display So all so that they have rigid and peace would be eligible to be on high on hidden Now I need to hide everything else. Okay. Now my whole complete model has gas files. So now let me say this while at this days and now I need to I need to created clean file. I can go ahead and deal it. Few things from this file. I can do that. All I can do. One thing we can copy, just the models to a different news in and dinner can import all those gas files to those models. We can do that. Oregon. Radically copy and paste these things with the Castile in a different Meyer files. I'm going to minimize it, and then it's very open. Myers, I'm having to my open here to my window. I'm from one. My I'm going to copy to the other one is my empty new my assassin. Okay, now I'm going toe switch to my Meyer here, which has this file. So let's have brought up those. And now I'm going to that hide everything. The controls and the joints. I'd though, stuff so that I can easily he's a list. Select Justin my just the models. So let's hide this one other that's high does on. I don't want those stuff. They hide everything, just the models. So you know what I do? Ok, Okay. Last time when I on hide everything, my locally ones are also there. So I'm going to select the high ones. Just this MOJ I said hi on that segment. Bound, high, so barren type and high. What are you? Plant height, this hole. And then my body, Of course. Let's let the body. Okay. We want these things. And then I know to select my hair again. The final one at the include one final on her final, and then the IEDs. So maybe can I see? Like those eyes from here you can select those group selector lie group on, then the mouth inside. Well, let me hide it. Let's select those. Basically, I have selected everything selected, every modern. Okay, Now I can do one thing. I can copy these by pressing control. See Picot Control. See to copy. And then you can come here and press control the This is not just way. Two copied stuff on here can see. So from the first frame, we Guardo's Now, this is said toe the first world starting premise it to one here. So we're not seeing this port. So we can against ST minus 20 here on minus 20 here. If they go back to that agency we have exactly that, you know, now it looks wide because we had enunciated more here in this view. So you can play six to be in this morning. And what this is like this? No, This way you can see it has this pasted kind of for prefixed to every name Bester prefix as we need to rename this stuff all we can do One thing now you can see all those in promise Inner. They're all those Garris information because this object has just gas smile still on them. We can do this way logically and file or we can just clean this pile. I don't know why it doesn't have The scholar can again go to the mitral attribute and check for it, I guess. Wear missing the color area. I think I missed that. And guess Yeah, maybe it could be a problem off. Maybe a few things. We can also copy this. Lights control C and control V here. Sip test on hide those step test on high. I can render and see if I'm getting those lights. Eyes My friend of your That's Maxim Aged friend up against. I'm getting those texture. But those are not visible here for some reason, so I can go ahead existing material and try assigning that material again. Can say it was a kind of bog because the material was on the model. But it was not visible in this view port, but it was visible in the render. That was not a problem, actually. But again, you can just try reassigning the material and see which solved the problem again. Now, in this beautiful do we have we have all the model on the text on the lights on the cast files so you don't have to reimport a cast spells. If you don't get those files then of course, you can goto select no object and gas goto here and important selected cast of the selector model. But when a copy from a different window like this then you also copied a materials The assigned gas files everything. So it is you, Ato clinically insane. Of course, This way Unit toe rename it if you want to know Of course, you can go ahead on rename This stuff can delete this prefix off this paste it those stuff . I think I should do that. Let's do it. And I prefer this way because sometimes if you clean the previous file, it's kind off, sometimes in rendered fearsome problem. So having a clean file here, it's a good way to go. It just double picking on it. And then a back spacing to delete all those Bester perfects that perfect there, which you were getting when a paste Okay, something like that. Let's again. This is just a cleaning off the scene thing. But these name doesn't do anything any, no, any bad to the sense that they're just just a new. But having a clue in file is very important in approximate pie plan. So make sure you Yeah, we have cleared names here, get strong, made all those names, study. You also get this prediction on the layer as it So let me stop here and make sure this is working. Okay? Not working. If I go to a channel layer box, also get those stuff I can rename here as well. Double click Andrea name. It is my body earlier. Save it just a plot safe and it's up to you. Whichever way you like to go, you can go. You can clean the previous file where you had all those reading and stop can clean those files while you can use distinct. So here we don't have this joint that the stuff the joint controls. So these layers are basically until yes, so we can deal it. Select all all of this lives on. Would you let here you can delete those Look good. Let's on the little new two layers. Okay, We have these things extremely here, So let's delete those actually donate those. And of course, we had this control call somehow in the scene, So that's still those other. So we have just the lights because this is my light group. These are my body. Everything has the old name. And now my scene is animated because off, No rigging on nothing. No, it's getting its animus on in permission from those cast spells. So make sure you don't delete those gas belts because if you accidentally delete those caps at gas files from those folder, then you lose thes animals. And okay, so this file will not be animated. Okay, now, this is great. Let's go toe playback sprayed real time on a plate. And now we're getting on new medicine? No, we have reached the point where it began saying this pile to a lighting a dish and then they can light a render the sin. Okay, so this is the way the walk in production let me because see, if you have rigs on by candles and joint, somebody might be accidentally done something bad to those on. Then the whole animus a will be destroyed. So that's the reason why they I prefer this process of this pipeline of this workflow off gassing. All those data toe file from that file we're getting the move or the deformation of the movement of the anti missile. Also here in this thing, there is no fear to accidentally do something wrong with designed. The candles are the include symbolism. So there's no fear off that. Now this is just models on. Then we're getting the aneurysm from the cast files. So just you need to remember one very important thing. You shouldn't deal it. This gas fights because law does model at browsing or d sourcing this gas wells here so used to never deal it it who's just need to pass on these gas files to the other guy in the production. So you need to say this gas files on the model file, so there would be happy. Okay, so we're done with this lecture in the next lecture. We're going toe set up a backdrop, and we're going to set up a camera so that we can render our animals and see that
141. Setting Up A Backdrop And Camera: hi. In this lecture we're going to create a backdrop and then we're going to set our camera for rendering. So let me started the camera. She'll we went toe well under in 1922 1 joy Jiro file size. So I'm going Toe said that fast in the render settings and then we're going toe said a camera for that. So I'm going to hear my gender setting us in here on. You can do that. Render size. Here in this common tab, I can see my understanding is said to our mold Render this common tab is a common thing. Doesn't matter which render you are using from here. But let's go to this common here. And he had become below to the immense size we can adjust aside here. But I'm actually not going to say this yet because we're going toe taste render for few times. So there want our everything set up is dawn. Then we can come here and sit our final originalism. But again, you can say the render images side here from here can choose this Pool one. Joe Obziler cannot to choose this. We're going to use this one, Wanjiru eijiro site. But for now we're going to use a smaller sides. But at the reason behind that is you hear rendering in a big side is going to take time. It's going toe. Take increase the render time. So our first when you are kind of testing lights and everything, you shouldn't use a big file size. So I'm happy with this 5 41 It is the vital fold one here. So this is the area where you need to set it on. Now let's create a camera. We can also use the prospective camera for it. But let's create a camera. We can do that by going create here and cameras Camera here. Okay, so this is a camera can move it. No, If we want to look through the camera so that and fix it, I can go to my view. And from here I can look through my camera. I stopped. So look for Gamma, writes Teoh, They're here. Let's look to select. I'm looking through my camera here. We can also rename my camera. That is fine camera while so I don't see the side of it, so I can don't on this absent originalism get ups and you can do that by here. Going here, toe. If human you are turning on the ritual is, um get maybe that is here. Get inside camera settings. Listen, get now, you can see it's going to render this kind of the lens you can say so instead, whatever inside here is going to be rendered going to be visible in that image, we need to adjust our view. Okay, Something like this. So now I'm using my physical Maya tumble and Rotech and spending. So this may came in a here can adjust my camera, Lockett and then let me go Toe port. So maybe something like this. We can also animator camera if you want to, but let's say we can't. Character will come from there and it will move on day in Just turn close to camera. So I love adjusted accordingly. Maybe. Maybe something. Something like this. Maybe Lord starting from here, I'll get something like this. That's it is my camera angle and we can lock the camera so that we won't move it or again again. Shoe of working dinner can switch to other camera. No, I'm inside that cabinet I can go to my perspective, Andi, switch to perspective view again. Now you can see that glamorize here on its constrained there you can also look to Canada. Okay, now well, the camera, I said. I'm going to create a backdrop. So let's create something with a knife if you can see if I render, I get a black screen there, a black view. Impure, basically. So there's nothing. So I'm going to create something which captures the light. So I'm going to create and Kartal Civic off toe. Let's goto the right view and here I am going to create a cough like this. I want to start so my here, let's now to the greed excludes and we can turn on this. Sorry, this one's not too great and snap it and on this off and I'm going toe creating a cough to create a surface letter. So hold sit and click in this direction. To create that cough, I'm creating point control vortex on basically creating a cough, which I'm going to use for a surface Chris. And now I'm going to clear something like this. You're going to understand it. Why? I'm doing it in a minute. So let's do something like this and should go up something like this. Okay. My price was my prospective. You. There's a call I created. Now let's move it to this. I this way on. Do you want to control day to duplicate this carbon? Move it to decide. Just imagine this office between these two lines to let select it. And then Simpson, like this one, I'm going to modeling here and then surface on click a lot. So this absolute law was to if I was to create a surface between this does to cough on and we got this surface, Ma, Now this normal direction is to decide I'm going to reverse it. So let's go to surface on reverse direction. The last upset. Okay, so now you can see if I come close. You We have something behind there. There's no the black peace. We're getting something here, okay? And yeah, if I and then she looked my camera and go toe go to camera. One view. Now, there's a little gap, so I cannot just my backdrop according to going camera angle, something like this. My friend didn't Now let me actually go back here and I should have a sister. My angle Here, you can see spend it rating years. I'm going to write. You should be back. That and I should have created a big it would Long said there. So let me actually created against alleged to decide Coven. Let me go to my side view and let's start from the first frame. I did the mistake off creating that safe while my character was somewhere here. So I didn't I realize it that the characters here I wanted wrong I want this scarf to be a little bit spread out like this arc big arc me that I don't get a line kind of dirty in there. It was smooth park here. Okay, Something like this. And now it's big piece. I'm going to duplicate it. Control the duplicate on day. Let's like this one and this one then surfaced lot get this time it didn't leave because I selected this one than this one. It doesn't matter if it plays. Didn't use the river genital. That's faint. No conceive. I have something on. If a who is to my camera angle is my camera angle. It's confirmed that There's no gap. Something like this. And let's play and make sure the character doesn't go outside the camera. Okay, now I like it. So in the next lecture are going toe, see how it we're going to render are finally mess sequence. Sure, there.
142. Adjusting Render Settings To Get Good Quality: hi. In this lecture, we're going to our system, render settings to get some good quality commits. So I'm going to start with my backdrop. I'm going to give it another dark hole. I'm going to give it a dark toe so that's selected and goto the material activites of it on here. I'm going toe. Dunning is down, making this town just diffuse up. So So let's have something like one point by 1.0.15 something so it kind off. It's not going toe with less. The future is not going toe bows the light month, so it's basically Don Stark. So let's render it on DSI. OK, continue. It's almost dark, and you can see this part is fully black and the several parts are fully black, so I don't want that. I want some kind off a little bit lighting in these dark ideas. So what we can do? We can create a kind of environment light, so I'm going to use it on a low light. It is called who come here are older lights that is called skydome light. So let's create it on. When you create that again, I'm inside my camera. One so we knew cleared that if I go to my perspective, you and see gives us a kind of spear, which is actually balls light effect. Now if I come back to my camera and render it you sort of see delivered late, step into instantly brighten off the whole limits. Of course, you can keep this if you weren't or you like this quality. But I would like kind of sport light effect. So I want those backgrounds toe darker. So I'm going to decrease the light of this guy door so that selected and come here to this intensity, I'm going to decrease it toe 0.1. So I want it to contribute very little to the scene. So let's render it now I'm getting my most of the lights from my actually really lights. And then, as you can see now, this background is not fully dark Black on the saddles are not fully black. Okay, so no, I like this. I like this Look on film, but it's up to you. We can your feel free were Frito, choose your state. Okay, Now I'm going to quality so you can see we're getting a lot of noise is now. The saddles are very noisy and you can see these shadows on over images has no IDs, so we can fix those by including samples, off lights and overall rendering render setting samples. So let's do it now. I'm going toe to the idea lights, my first look, media lights and people will do anything. Make sure the cameras lock. You may accidentally move the camera. Now you can see I like this kind of you, from from the late, my characters coming towards my right eye Like this view. I don't want to lose it so I can go to view and locked my camera. Now I cannot accidentally move my camera unless I wanted If I want to move, Then again tone that up. You can do that from here, agile, that the shortcut key Assad could icon. Okay, So to the real light on, let's the increased the sample. So if you can call here and increase the sample from one to allege 23 and when you increase it, be very cost us about wanting. And that is it's going to increase the rendering time. No, quite heavily. So you can see now I have in Criscito three. Let's open my interview. Andi, let me save this image in Maryland of you. I can do that just to compare. You can click on this icon just to save that file in that interview, the previous render now going to render it Manu setting the 31 Let's render it. Oh, I actually did one thing wrong. It is my friend, So let's do it again just to compel it. Lizza character. Come close to the camera and I'm going to sit one here just to no have a comparison. So let's render it on now with one sample of a single light. I'm working in a single light against a he and saved this render. Let's save it by clicking on here. Now I'm going to increase this to three on, then render again so it's suit. Improve the Cerro quality a little bit now. Agency visually can tell that it's a better quality. Now I can drag this slider just to go to the previous render on. Here can say it has it hard Lord of Noises. Now it's quite clean and again, I'm still have God. Those noises because this saddle is getting the saddles being castor from this side, like the left side light. So what I'm going to do, I'm going to actually increase the sample on every light, Selous, electrolyte and increasing toe into the tree that will define bullying Criscito heavily like day and 20. It's going toe know in case the render time. Hey, Bill, it's a list like this light as well. I'm not that light select from our planet. So I have three light here. Like if I good work prospective, you can symmetry Israel aides. These two are my front light and then And this is going back late. Okay, I have increased the samples on three of those lights. This was back to my camera on rendered the image pregnancy. This, um, is is quite clean, but you can also notice the render time has been increased. So dis images toe 12 seconds to complete, and here can see the previous image. It was help of that. Six second so again night to prove that you get a good quality minutes less noise, but again, you need to be ready to give some time to it. So Okay, still, we have a lot of noise under emits itself, and that's what we can fix my going to the scent settings of surrender render settings on. Then if you go to Arnold Render and there's the obstacle camera A. All these substances are for the samples for the whole immense. Now I'm going to increase it to lists double it six again. This is something which will increase the render time, so make sure you know that now I'm going toe, render it. Let first click on this image just toe upon the render view on and keep this image so that we have something to compare. Then I'm going to click on this to render the current settings. Kate should take a little more time, and it should give a little bit better results. You can see it's almost to put in nine seconds on the serious one. Took 12 seconds now concede also increased that time by three or something so overly made his vase look liken to you that no, quite a bit of less noise, and now it's good. We can also increase the skied of light because we're also getting lights from the SkyDome on. We can also increase the samples of that. So they're coming here. We have the SkyDome samples. I can create that toe 32 again, even a little bit smoother result. But again, we're giving more time to get a single render. Okay, so again, I can have changed it. And now I can just to render a few India just to just to see if we get a With the result, we don't have to render the whole limits just to see a settings. So let's drag it with this and then render. So it's going to It's the render region thing, so it's going to render this original only, but I think we're getting a good result here now. I'm going toe set my immense size. Now it's a small size. I'm going, Toe said that let's go to rendered settings again. So after sitting all these quality things, I'm going to common men on let's select my final render sides, which is due one generated Oh, that's 1 21 9 to 0 by one droid Genocides can. Now with this, we're going to render it render image here, so let's see. So it's going to take over times I'm going to pause the video. I'll come back when it's done. So here this is the final render we have rendered year took almost three minutes, something so you can see a hell Noticed. Few things we need to are just incorrect. So fast thing now this to clot pieces, not in a smooth mess floor. That means it still looks on off pixilated. And isn't the kids more? One case, Mort, let me go toe the perspective. You I can see it's not in three display more so I want to press tree on it. Make sure you have pressed Reno. Smooth, though Seems have no visible. Now I'm going to press three on medical, and we cannot suppress tree on these things to get better. Smooth result. Can I'm living the body against the body is fine. Okay, now these are fine. And then I have noticed another thing, and that is the hair other hair. Has a girl even speculated to do it? There's no unevenness, so I'm going to actually have a file roughness file which we created in substance meant I'm going to its mate rial and bringing that file to the color so it will kind of clear some various and in the speckles I'm going toe. That would be very subtle, but again, that would be very important. I'm going toe Honda takes a file, switches inter substance text or have roughness hair off ness PND open it. So again, No, If I goto my camera on my open, my name is we can drink or just a hair. I don't need to render everything. Actually, we can render toe holy men. So let's keep this image dismantle. Rendered the character with this cloth so that we can see the difference here. The end of this I'm pausing the video combat well, who? And it's done organ against see the difference Definitely here that he said, the pound looks better with this smooth falls on the hair looks little different Now it hade even speculate before. No, If I goto if I can. Just the windows of that again compared it with the previous render. So if I drag it here against previously we had a overall speculative, the hair which waas kind of giving me a kind of grace look. To the whole, I was not able to see the proper texture here country looking at the texture better. Andi can look at the cloth as well. So now. Previously it was like this because it wasn't the case more and because we pressed three. Now it's in sport mess, Morneau and against the definitely dead's a clean, smooth looking wrinkles. Okay, I'm happy with the result. Let me know what you think. I'm going to the next lecture, which would be most probably on last lecture video in the lecture, we're going to learn how we can render the whole animals and not just a single limit. Everyone, this image to say We can just right click here and go to file saving made. Let me do this. I can save anywhere. Let me save on my text up. I can choose the file for Mark. That's a jumping on. I'm going toe. Save it. So against render and save you meals like this, we'll let me. So that image here his they miss well, back to my make sure when you save the maids, go to Dobson Box and make sure it's said to this color Man estimates otherwise, it will get a darker, darker tone of the college gates something, something like this one. Let's say you're going to get something like this makes your before you save the image. Goto the file save emits Hobson box, set it Tokelo managed and then apply on. Then you can go to file and save Inmates can make sure that. Okay, so I'm going to the next video. And in that we were going to see how we can render the image sequence are you can see how we can rendered animism.
143. Rendering Sequence Images: Finally, Finally, we have come to the end of the courts. So this would be the last lecture video on in this lecture. You are going to learn how you can render animations, how we can render image sequences. So to render animation, we need to render immense sequence. So let me show you how we can do that. I'm going to my render settings here on and I need to make sure some settings are said before I click on my renders. Sequence up some to make sure my emphasizes said toe, but I want here in this case I want this one jury Jiro, my samples are said. My camera view said here So I'm going to set the men. There's some obsessive is very important for under settings renders sequence. So here you can see this frame. Aniston extends and I'm inside this common there. This is said to name dot exe on single frame. So this is for single frame render. We need to change it to something else. Here name dot number dot Extents allergies my prayer area. So these are for sequencing May surrender the name number extension. That means if you look at here now. So this is my file name Bridget's character Cast Final Something like this and then the file number and then extension exact. So in this case, you can return different events. So set this one. And when you activate this, you will get access to this thing. So I'm going to sit from I'm going to render till 1 20 Okay, so this is the area where you define how many friends you want to render from restrained to whisper from strutting, start from one toe, want on different. I want to render the sprints so from 1 to 1 20 from and then make sure this by frame is said to one of the ways it will ski friends. So I want every frame to be rendered from 1 to 1 20 my extension for Marty said here on my wonder you miss for march again in Maybe you can rendered INGE epic epic are basically live text list file size and the stuff if you want to complete it. Letter 80 day Mrs Letter than jumping is not a good idea because you're pig doesn't save a lot of data, so you can go for TIF Deif for that purpose. I'm going toe Use this TF Epsom Qatif on there. I'm going to everything said he missed for march. This thing okay, lets go for J Peg. I don't want to read it it again. So they pick is fine for me again. But in practice, in the don't usually use depict they use memory TIF or PNG No stop, but because I don't want to edit it like our topic is fine. Okay, so everything is fine here. I'm going toe close it and then let's go to render model here on Go to render may know where I'm going to find the render sequence absent. So here I'm going to this obscene books and let's see, the camera is very important here. Make sure the camera one is said Here are your particular camera which you're looking at the camera one in this case that is said here are the residual excellently rendered some other camera. That is a bad thing because you probably spend a lot of time and rendering hold those images and latterly find out that the camera waas wrong here. So that's a wrong, wrong, Very bad thing for makes you to take time to check it again. Now the camera is setting everything said. If you want toe, check your locus L. I can click here how it's going to render all off me mazes inside my project images for that. That is fine for me. But again, if you want to create somewhere else, you can change this part. You can browse and select the folder and select from here, but I think that is fine. Andi, everything is fine. I'm going to render it so it's going to take a lot of time, maybe 34 hours. I'm going to obviously stop the video. Let's render the sequence emit. Once you click on it, it's going to start rendering here. Inside. Meyer, you can see, is going to start rendering frame by frame from 1 to 1 20 Flynn, which is obviously now going to take maybe 3 to 4 hours. So I'm going to stop my video here. I'm going to use this time to thank you very much for enrolling to this court's believing in me on my course. I hope you have learned something out of this course, and I also hope to see you in a new course. So, Meriem Future. So again. Thank you very much for enrolling. Take care and see you in the new course. Till then, my back.
144. Conclusion: Hi. Welcome to the final video of this course. You can see I'm inside my project folder. And if I go to my images for LA here we have all those sequence images. I stopped my maid's Orender at 11 fight so I can you can do that by pressing the escape key on your keyboard while you're rendering. You can stop in who? So I didn't think I needed those last five friends because there was no unusual at all. So here are all those consummate is if you want to play these images, Maya gives us in such simple software for that If you go toe and sort if tick, let this if chick and it's up, it saves with Maya. So I'm going to close that. So here inside if Jake I'm going toe on the file. So let's view upon it. Goto f check here. Okay, here we need toe goto file open animation on Let's browed your folder. Go on browser for learn. She let the first number from you can see the image which has tough number one so it's going toe automatically import everything because you are opening as in as an animation. So let's open it on here, concedes imported on its playing in 24 from Boots again. Now it's not playing 24 frames per second because it importing one by one once it's done there is going to play with bountiful frame. Now it's being played in 24 frames. Parts again. Okay, something like this on. I think this is are not full screams. A. Let's go full regionalism on here. You can see it's again in putting all those images. You can see it's importing and it's playing in seven from now. Once every images are imported, then it's going to play in real time. Now it's being played in real time, so of course you can use this up. Deception. My I don't need to install it separately, comes with Meyer. You feel started. You'll find it on, then can open the animus in and select the first Roman import. Every Madjeski I can see the animation if you find something but wrong didn't can go ahead and do this. I like the clot effect and over I like it. I like the guy. So again, thank you very much for enrolling to my course. hope this course teaches you something. Hope you have learned something from the scores. I hope to see you in a new course toe. Tell them take care. And by
 Nalin Jena, Motivational Speaker