Transcripts
1. Presentation: In this course, I'm going to teach you how you can create a very funny illustration with Clip Studio Paint and your iPad. This technique and also work if you use Clip Studio Paint on your computer. That is course, as it is shown on an iPad, you can follow step-by-step every tips I'm giving you during this course, specifically on an iPad. In this course I'm going to teach you three very simple step to create a fun illustration. This illustration represent a character. First we're going to start with a sketch. Then we're going to draw the inking. And to complete it, we're going to add some colors. Every steps are shown from the beginning to the end. And you will see even you, you can create easily that illustration. I'm going to explain you every step. I will show you. And you will see that after the course, you will be able to do it or so. Even if you don't have a very good drawing skill, according to you, you will see that in the end, you will be able to do it. If you have any difficulties, you can try again and again and again. But this character is very simple. The forums, the colors, and the technique I'm teaching you are very simple and can be done by anybody. Of course, if you have any difficulties, you can still send me a message and share with me your work if you need additional tips and advices, welcome in this course and have fun in drawing this funny character.
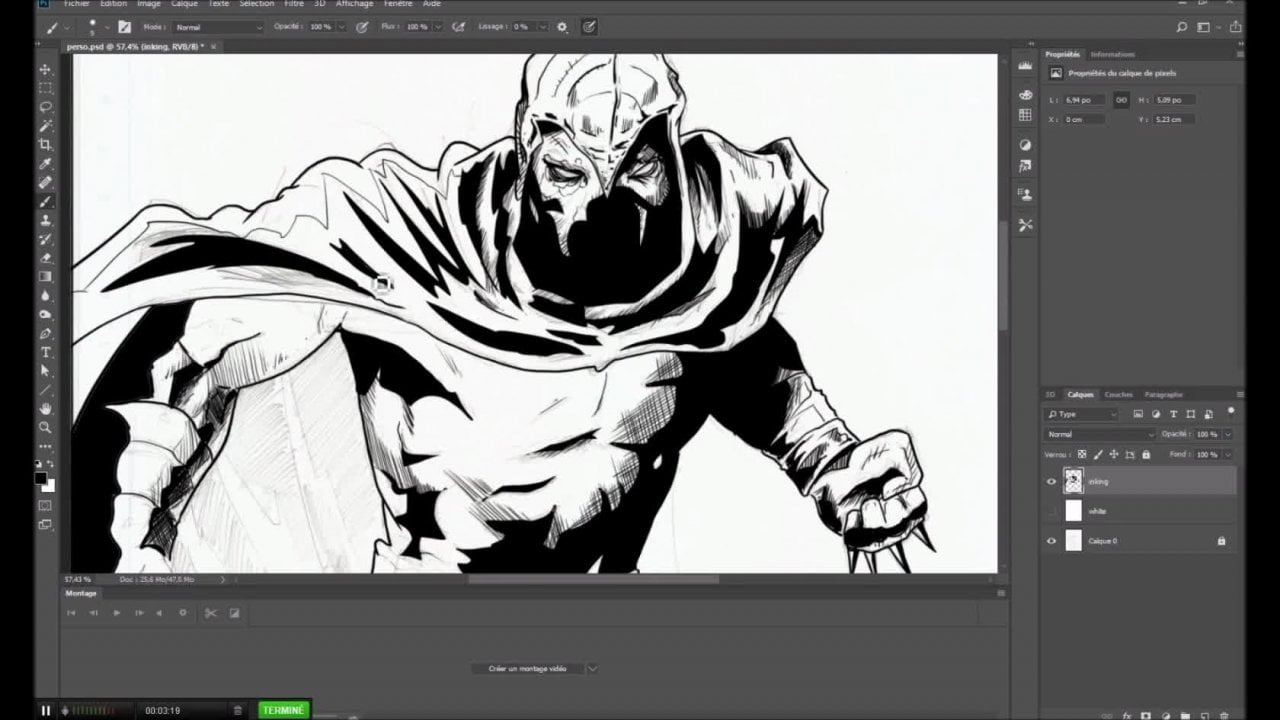
2. Introduction to the interface: Welcome In this video's about drawing. Funny characters will please trivial pains. So this software is going to be very useful for you for any kind of drawing. No matter if you are trying to draw comic book characters, manga characters are funny characters like the ones we're going to draw right now. In this couple of videos, I'm going to give you very simple tricks to draw easily and rapidly some funny characters. So when you open your software, you have a couple of thumbnails here. You just have to click on File New, and you will get couple of options to decide what kind of file you want to create. So don't pay attention right now to all the oceans proposed because amounts, all the options propose here. You can set up many things like if you want to create a coming book are a full illustrated book or just a very simple drawing, our full animation as a clip you paint also Purple's the emissions creation. But this is not business one to do right now. We just want to draw a very simple illustration. So the couple of options here, another Me too, I'm not going to be seen during this course. We're just going to talk about this little options with the flowers, which is called illustration. So you can decide that the format you want use depends of the country where you are located. A four, this is in France. The usual format for friends. Maybe you will have to take another one if you want. If you're in US are I don't know for the other countries, I would just if for this is the more known farmer for me. So you have the 21 by 29. And the resolution is very important because if you want to print your drawing, you will have to, to write at late 300 percent. 300, sorry, is 300 for resolution. If you do less, you could have some troubles when you will print your, your drawing with a very poor quality. If you want for internet publishing, only, you can downgrade this to 150. Not less, because even for internet it's going to be very low. So you have the possibility to change the background color of your page, but I will just keep the white color. And then you can also change the unit point, pixels, inch, millimeters, centimeters. I would just get centimeters. And I call AIG then. Okay. Your working space is prison to like this. This is your walking whitespace. And as I'm presenting you this course on an iPad, I can use my two fingers to zoom in and zoom out. And also to rotate at, just keep pushing my fingers on the screen and playing with these two. So this is very easy to move. And it could also be much more easier than if you are using a normal graphic tablet where you can have some troubles to rotate your working space. Adjust, readjust this. All right. Then on the different options are going to have here I'm going to select this brush. And here I'm going to take the plum J, which is the best tool that can imagine for drawing cartoons and coming book characters. My technique is very simple. First, I'm going to take the blue color. The blue car is going to be used for drawing the catch. And I'm also playing with the different layers. We're going to have layers for this sketch. Then one layer from the inking, which means that the black outlines of your drawing and the final one for the color. Let's take the layers for the sketch. I'm going to decrease little bit the side of the brush. And drawing a first sketch.
3. The sketch: From now, you can, if you wish, follow every steps with your own iPad or tablet or you can even falling with your graphing tablet and computer. And you can, for every step and giving you, it's going to give you a step-by-step course if you want to do yourself this technique. So I'm drawing the first oval then, although here, and another one here, another one here. So we can already see that the characters appearing. Then. Another one for the neck, another one here, upper side of the chest. And the range is going to be the upper part of the body, lower parts, shoulders, and chest. And for the legs, I'm going to draw two object like this. So we ever style been drawing geometrical forms. To get it simple for anybody to draw this character. Then this form and this form. So it makes sure that you have a line, a straight line here, and that your character is, well, sits on this line. Otherwise, if the fit is one of the foot is too high or too low is going to be unreal. Even if you are drawing a very funny character, we still have to respect some kind of reality. Now, this part of the arm, and we have this parts. And another one wishes the hand. And this arm is going to be a behind this part of the body. So we can draw something like this. Now I can add something here is going to be here. And I can zoom in. Maybe I can change also the color and get something darker. And I can work out your sketch, which is now more detail. And you can see what it looks like when it will be over. I'm also playing with the thick lines when they are outside and the thin lines inside a character. All right, we can see that now. Now we'll work on the black outlines. I will follow the darker blue used to draw my character. And I will draw a kind of cute.
4. The inking: To get the line thicker and not always playing with the size of the brush and just drawing again on the same line. He's a little bit fats. And drawing the hand. And I think depends going to be like this with some details showing that it's built to launch dependence 200, 100. And Yoda fits. I will get some blur on the fit. Not going to draw very complex shoes. And we have this hand behind. There are simple forms of falling hand. All right, so in couple of lines you can already see that we have done a very simple character. Now, let's go to the next layer, which is the one for the black inking. What I'm doing going to do is to get this layer less visible. I'm decreasing the opacity you can find up here. Now, I'm jumping on the signal layer and selecting the black color. I'm zooming and I'm working on the outlines being slowing down my use of the brush to make sure that the lines of very clean don't go fast and the y's is going to have, it could create some very bad drawing on the outlines. You have to do something very clean. So take the time to do so. And then I can draw the details of the cloth is a, you can see I'm doing plenty of details like this to really give the feeling that the code is surrounding the belly of the character. In fact, delay of the character here. And the hand behind that hint to depend. So you can see that with this kind of drawing style, it can be very fast and drawing.
5. Coloring: And then we have this two. And we're done with the black inking. Now let's go to the last layer. We're going to add the color. Now, this sketch layer is useless. I can hide it. I don't delete it because I could have some utility if I want to display again some details. It could be useful too. I only hiding it by clicking on the eyes, on the eye. And now I'm going on the color layer, which is the last one. I'm not going to keep the normal mode. Let's show you what it's going to be. The normal mode, I would select skin color. And if I drawn it in a normal modal layer is just hiding the layers below. So I'm clicking on normal and click on Multiply. And you can see that the multiply mode is just giving you a transparency mode. I'm just selecting this, canceling this. And now you can play on selecting to black and white using the magic hands, selecting inside. Then you have a selection. Jumping back on the coloring and filling with this tool. And we do this for all your body parts. Edit, fell are using. And the previous tool. Here, then I change the color. Let's say a blue coat. Back on the coloring Edit Fill. Going back on the black and white. Selecting this. Going back on this Edit Fill. You can save a lot of time. Instead of just trying to get a brush and coloring like this, you can do this, but E2 take much more time if you have a lot of details. My using for, to use this technique, you just have to make sure that do surrounding is totally closed. You don't have to have a hole in the outlines of the water, is going to be selecting everything. Let's say a brown pens. And this. And I can just color. If I want to take the skin color adjust present with my finger on the screen, living my, my, my finger on the screen. And you can see you have a kind of options appearing. It means that it will become the color I'm clicking with my finger. Then I can go back here and we'll just color. Then decreasing side of the brush. Just for our hand is just take much more time. So I will take this back into black and white, selecting the hand here, Edit, Fill, That's it. Okay, and the same for the shoes. And like this, let's say a very normal black shoes. Okay? S1. Alright, this is over for the color. And of course for this, we can add a little bit more details. And I can like with magic hands, this skin color. I can select a darker skin color and with a larger brush. Trying to draw again of shadow in one of the side and the left or on the right? Not both. Like if there was more lights on the right. You can do this. If you think this is too much, you can just take the skin color and come back to erase this. Man can do this. All right? And I can do this to this. So a gene, the original green and just selecting a darker one, and so on. So here isn't a couple of minutes. You created a very funny character with clips Dupain that could be used for draws, for coming books and even animations. You want to create some emissions. That's it for this course. I hope you enjoyed the de-couple of 10, 7. Just give you feel free to ask me any questions or send me your artwork. Heat will be a real pleasure to give you some commands and more advice based on the words willing to send me. Have fun and keep creating.
 Damien Barban