Transcripts
1. Welcome to Claude AI: The AI Assistant You’ll Actually Use: Hello, and welcome to
the course on Claude AI. An AI assistant so intuitive, it feels like working with
a seasoned professional who already knows your
industry and needs inside out. Are you working
professional looking for a smarter way to tackle
your daily tasks? An entrepreneur balancing
too many heads and in need of an efficient
assistant or simply curious about exploring
the potential of AI and wondering how it could help you work
smarter, not harder. If you said yes to
any of the above, I created this course for you. My name is Anna, and I'll be your instructor
and mentor for the course. I'm line instructor with my other courses available
here on the platform, focusing on product
management and generative AI. By joining this course, you will get access to over
3 hours of HD video content. Step by step tutorials
and activities, highlighting real world
practical applications of Claude generative AI tools, PDF summaries for reviewing the key insights from the
course and much, much more. We will kick off the
course by learning what Claude is capable of how to communicate with
Claude and structure your requests and how to make
Claude work best for you. We'll go through a series
of practical scenarios such as brainstorming ideas for
your next project, drafting, marketing emails, summarizing
long form content, creating mermaid diagrams for visual process descriptions, and even creating simple games without
technical knowledge, all with Claude as
your assistant we also learn some advanced
techniques for solving complex
problems with Claude, how to spot incorrect
responses from AI, and most importantly,
how to prevent them. And here is the exciting part. You don't need to
be a tech wizard or AI expert to use Claude AI. It's intuitive interface makes it simple for anyone to get started and see results in minutes without prior
experience in AI, generative AI or programming. So let's begin the course
by covering what Claude is, its main capabilities, and
how people are achieving more with Claude Alca
in the next medium.
2. Claude’s overview and main use cases: <v ->Hello, everybody.</v> Ever wished for a colleague who's available 24/7, never gets tired and actually enjoys explaining things? Well, meet Claude. Today we are exploring what Claude is, it's main capabilities and how people are putting this tireless assistant to work. Let's dive in. So what exactly is Claude AI? Claude is a family of large language models, LLMs for short, developed by a company called Anthropic. The name Claude honours Claude Shannon, a pioneering scientist whose work was fundamental to the development of artificial intelligence and information theory. What does a language model mean in simple terms? A language model is a type of artificial intelligence that's trained to understand and generate human language. Think of it as a highly sophisticated computer programm that can process and respond to text in ways that feel natural and helpful. Unlike traditional software that follows rigid rules, Claude can understand context, engage in natural conversations, and adapt to your needs. What makes Claude special is its ability to communicate in a way that feels natural and genuinely helpful. By the way, if you would like to explore more about what AI is and generative AI in particular, don't forget to check the deep dive section in the course where we talk about these topics. Now let's look at Claude's main capabilities. First, Claude excels at understanding and working with language. It can help you write an edit text from emails to articles to creative stories. It's like having a writing partner who offers suggestions, refines your ideas, and catches potential improvements. Second, Claude is remarkable at analysis and problem solving. It can break down complex problems into manageable steps, analyse data, and explain difficult concepts in simple terms. Whether you are studying mathematics, trying to understand scientific concepts or analysing business data, Claude can guide you through the process. Third, Claude is highly capable of assisting with programming and codes and tasks. It can write code in various programming languages, help debug existing code, explain programming concepts, and even assist in building entire applications. Whether you are a beginner learning to code or an experienced developer tackling complex programming challenges, Claude can provide valuable support. Fourth, Claude has impressive research and learning capabilities. It can help you gather and synthesise information, explain complex topics, and answer questions across a wide range of subjects. Think of it as having access to a knowledgeable tutor who can explain things in ways that match your learning style. Okay, and finally, let's talk about how people use Claude in real life. Anthropic, the company behind Claude has developed a system called Clio, a privacy reserving analysis tool that helps understand how people use Claude while keeping their conversations private and secure. It is similar to how Google trends shows what people are searching for without revealing individual searches. Based on Clio's analysis of one million real conversations, web and mobile app development is the most popular use, accounting for 10.4% of all conversations. Content creation and communication follow at 9.2%. Academic research and writing represent 7.2% of usage while education and career development come close behind at 7.1%. Advanced AI machine learning applications account for 6% of all conversations. The data also shows significant use for business strategy and operations, language translation, DevOps and cloud infrastructure, digital marketing and CO and data analysis and visualisation. Looking at these numbers, one thing becomes clear. Claude isn't just language model. It is becoming one of the world's most resourceful colleague and it never needs a coffee break. Alright, let's recap the key points we've covered here. (soft music)
3. Claude family overview. Creating an account and first interaction with Claude.: <v ->Welcome, everyone.</v> In this lecture, let's learn what models are available within the Claude family of large language models and how to get access to them. The Claude family launched with three models, each named after different types of poems, Haiku, Sonnet, and Opus. Just like poems, each has its own characteristics and best uses. Let's break them down one by one. First we have Claude Haiku. This is like the sprinter of the family, fast and efficient. It's perfect for quick, everyday tasks like drafting emails, answering questions, or helping with simple analysis. If you need rapid responses and don't require deep, complex thinking, Haiku is your go-to choice. It's also the most cost-effective option, making it ideal for businesses that needs to process many requests quickly. Next up is Claude Sonnet, which sits in the middle of the family. Think of Sonnet as the all-rounder. It strikes a nice balance between speed and capability. Lastly, there is Claude Opus, which is like having a seasoned expert on your team. While it might be a bit slower and more expensive than its siblings, it's the one you want for tasks that require deep analysis, sophisticated problem-solving, or creative writing projects. Now, with this knowledge in mind, let's jump straight to the subscription options. Currently, Claude comes with the following four plans. You can start completely free of charge, see what Claude is capable of, and then upgrade to one of the premium plans. The Free plan comes with access to one of the latest models only. This model access is subject to usage limits that ensure fair usage across all users. Usage limits refer to the maximum number of messages you can send, which depends on many factors, including message length, the lengths of files you attach to the conversation, the lengths of the current conversation, and Claude's current capacity. The definition of usage limits may be a bit confusing at this stage since we are just getting started with Claude. However, you will understand the idea behind usage limits as soon as you start working with Claude. We'll also discuss how to optimise usage limits and get the most out of your subscription plan. For now, remember that usage limits vary from one subscription plan to another, with the free service offering the minimum usage and the Pro plan providing at least 5x the usage compared to the free service. Alright, let's create an account with Claude. To sign up, open Claude at claude.ai. Next, provide your email. Click on Continue with email. Claude says that you have to check your email for the verification code. This is a bit confusing since, in fact, instead of a verification code, Claude will send you a link you should click to continue your registration process. Let me copy the link, come back to my browser I used for this demo, and copy the link here. And next, you provide your phone number, your date of birth. And to register an account with Claude, you have to agree to Anthropic's consumer terms and usage policy. Next, let's hit on Send Verification Code. And now the code will be sent as an SMS to the mobile number that you indicated on the previous screen. Let's hit Verify & Create an Account. I already used my mobile phone to register my main account, so I cannot proceed further with the same number. However, in your case, you will be successfully registered with Claude. And next, you will see the Claude main screen. The interface is intentionally minimal and clean, designed to feel like a natural conversation. Think of it as opening a fresh notebook, simple, uncluttered, and ready for your input. On the left side of your screen, you will see your conversation history. Each past chat is neatly organised here, similar to how email threads are arranged in your inbox. You can easily click on any previous conversation to revisit it. The main chat area takes up most of your screen. This is where the magic happens, where you and Claude interact. You will see a simple message box where you can type your questions or requests. You can choose a model you'd like to use for these conversations. If you'd like to start a new chat, go to the left-hand side menu and click on start new chat, and from here, type in your message. Okay, and that's it for this video. We are almost set to start communicating with Claude, but this lecture would not be complete without a brief summary of what we've just covered. (rhythmic music)
4. Getting started with Claude: Section Intro: <v ->Welcome to the new section on Claude Ai.</v> In this part of the course, we are diving into the exciting world of prompting, the art of effectively communicating with Claude to get the best results. We will start by breaking down the basics. What is a prompt? What is a prompting? And how does prompt engineering fit into all this? Plus, we'll touch on concepts like chat prompting and enterprise prompting, so you will know how to tailor your approach for different contexts. Next, I will share a simple prompting formula to help you talk to Claude in a way that's clear and effective. From there, we will explore iterative prompting, building on Claude's responses to refine and get even better results. We will also learn how to make Claude work best for you by setting up profile preferences and adjusting conversation styles to match your needs. And because practise makes perfect, I've included a few follow-along exercises where you will brainstorm with Claude, fine tune prompts, and even create a marketing campaign together. We will also cover essential skills like sharing content with Claude, using examples to guide it, and formative output to meet your goals. And by the end of this section, you will feel confident and ready to use Claude Ai for work or personal tasks. So let's get started.
5. What is prompt, prompting, prompt engineering, chat, and enterprise prompting.: <v ->Hey, everyone.</v> Think of the last time you asked someone a question. The way you phrased that question likely influenced the answer you received. That's exactly what we are seeing today in the world of AI. We will start by breaking down three key terms that are essential to communicating with AI systems. What exactly is a prompt? What do we mean by prompting? And how does prompt engineering tie it all together? We will also explore the distinction between chat and enterprise prompting. Let's get started. A prompt is the actual text or instruction you write to code or any AI model. It's like a message or query. The specific input you provide. Think of it as the what, the actual content of your request. Prompting is the act of writing these prompts. It's the general activity of interacting with and giving instructions to AI models. This is the how, the process of communicating with the model. Prompt engineering is a more specialised and systematic approach to creating and refining prompts. It may involve understanding how the model works, testing and iterating on prompts, considering edge cases, and more. Think of it like cooking. A prompt is like a single recipe. Prompting is like cooking in general, and prompt engineering is like being a professional chef who systematically develops and tests recipes while considering ingredients, equipment, user preferences, and so on. Now, there are two main types of prompting you need to be aware of. Enterprise prompting and chat prompting. Enterprise prompting refers to design and prompts for business applications where the prompts will be used repeatedly at scale. These prompts are engineered to handle diverse user inputs, maintain consistency, and operate reliably within specific business constraints and requirements. They typically power customer facing applications or internal business tools. For example, a company may have a customer service assistant chatbot designed to provide immediate 24/7 support for customers on the company's website and app. The assistant may handle common technical issues, basic product inquiries, and routine tasks like processing returns or refunds. Enterprise prompting will be used to customise how the assistant must reply to a customer depending on their request. Such prompts will be used many times. 1 million, 10 million, or even hundreds of millions of times. So they need to be very reliable and consistent, account for real user behaviour, typos, unclear requests, and so on, and handle a wide range of user inputs and edge cases. Chat prompting on the other hand refers to direct conversational interactions between humans and AI models in chat interfaces for immediate specific tasks. This type of prompting is typically more flexible and informal, allowing for real time interaction and clarification through dialogue. It doesn't need to handle as many edge cases as enterprise prompting and can be refined through conversation. For example, using Claude.ai to help write an email or analyse a document would be chat prompting. Chat prompting is fundamentally different from enterprise prompting. And in this course, we are going to cover chat prompting using Claude.ai. Why do we talk so much about this distinction between enterprise and chat prompting? Well, because as we just discussed, the way we structure and refine prompts will be different depending on whether we plan to use the prompt for enterprise or chat settings. If you research additional materials on prompting and prompt engineering, including those from Anthropic, you may come across quite a lot of resources covering how to structure enterprise prompts. However, if you plan to use Claude mainly through the chat interface, this information is not something you can benefit from. So keep this distinction in mind and don't spend time diving deep into enterprise prompting if your primary use case is chat-based interactions. All right, and now that we are on the same page with the terminology, let's dive straight into the nitty gritty of chat prompting. I'll see you in the next lecture.
6. How to talk to Claude: Prompting formula: <v ->Hi everyone.</v> Welcome to our first lecture on chat prompting. Here you will learn how to approach creating and refining prompts that can be used in the Claude AI chat interface as well as with others similar models. Let's get started. When chatting with a friend, you don't use rigid templates or formal structures. You have a natural flowing conversation. The same principle applies to chat prompting with AI models. However, there are times when a bit of structure can help us get better results and make one prompt more effective than another. So let's cover the key ingredients of an effective prompt. The central part of every prompt is the core intent or task. This can take the form of instructions such as write a five paragraph email to introduce a new productivity app to small business owners, focusing on its time saving features. Think of instructions as the task you want the model to perform. Another form the intent can take is a question such as, "What steps should I follow to create a compelling LinkedIn profile?" "How do I structure a business plan for a startup idea?" When writing a task, your goal is to be clear and specific about what you'd like to achieve. Writing something like, "Help me with a presentation," won't be enough to get a high quality document you can confidently present to your boss, colleagues, or investors. As a rule of thumb, remember that anyone without specific knowledge of your subject should be able to understand your prompt and execute on it. If they would be confused about how to follow your instructions, quote will be confused as well. Don't assume Claude has any contextual information about your task, such as how the results will be used, who the intended audience is, what successful task completion looks like, or a list of points you want covered. You need to provide this context or task details yourself. For example, if you want to create a presentation, include information about the number of slides, the purpose of the presentation, the key topics to be covered. Here is an example of a well-crafted prompt. "Create a seven slide presentation on the topic of personal branding. Include what it is, why it matters, key components and steps to develop your brand." Another example, "Explain how to write a compelling email in five easiest steps. The instructions should cover crafting an engaging subject line, structure in the email clearly, and using the professional tone. Make the process simple enough for anyone to follow, even without prior experience in formal writing." You can provide context not just for the task itself, but also for the tone you would like Claude to use. For instance, use a conversational tone that balances professionalism with accessibility. You can also specify rules or constraints Claude should follow. For example, in the email writing guide prompt above, you might add, "Here are some important rules for writing the explanation. Keep each step explanation between two to four sentences. Provide at least one do and one don't example for each step. Incorporate formatting tips like spacing, paragraphs, bullet points. Avoid technical jargon or complex business terminology." Another way to enhance your prompt is to assign Claude a specific role when performing a task. This is also known as role prompting. Role playing helps AI models adopt the nuances of specific perspectives, improving the relevance and quality of the responses. For example, "Act as a seasoned executive assistant with over 15 years of experience, managing high level business correspondence." Or, "Pretend to be a professional writer turned email writing consultant." I also came across a clever recommendation to introduce a role as being the world's leading expert in whatever I'm about to ask you about. While this can improve performance, I've personally found that specifying a well defined role tends to get better results. I encourage you to test this prompt yourself and share your results in the Q&A section for this video. You can take a role prompting a step further by providing audience context in addition to the role. For instance, "As a senior executive assistant with 15 plus years of experience managing high level business correspondents, create a guide for software engineers and other technical people looking to improve their business email communication skills." Notice how Claude changes the examples for do's and don'ts to make them relatable for technical professionals. It's pretty amazing. If you are feeling overwhelmed by the idea of crafting such detailed prompts, don't worry. The beauty of working in a chat interface is that you don't need to design a perfectly thought out prompt to begin the conversation. You start with a broad question or task and refine it through dialogue with the AI model. This iterative approach allows you to clarify your needs and improve the response you receive over time. We'll talk more about the iterative prompting in our next video. And for now, let's sum up what we talked about in this lecture. The central part of every prompt is the core intent or task, which can be expressed as an instruction or equation. Providing context, tone and rules ensures that prompts are clear and specific, making it easier for AI to generate accurate responses. Role prompting involves assigning the AI a specific role to adopt, improving the quality and relevance of its outputs. Including audience context helps tailor the AI's responses to the need of a specific group or demographic. Chat interface allow for iterative prompting, helping users to refine tasks and responses through ongoing dialogue. And that's it for this video. I'll see you in the next one.
7. Building on Claude’s responses: Iterative prompting: <v ->Hi, everyone. Welcome back.</v> If after watching the previous lecture, you feel like creating a good prompt is an arduous task and that you need to turn into a prompt engineer to succeed in this job, here is a secret the experts use. Think of prompting as a conversation or a multi-step process, not a one-time question. Just like you might clarify directions in a new city with a local, you can refine your prompts based on close responses. Let's walk through a real-world example of iterative prompting to see how it works. Let's say we would like Claude to help us create a business proposal for a mobile dog grooming service. Step one, the initial prompt may be quite broad like, "Create an outline for a business proposal for a mobile dog grooming service." (soft music) In the second step, we narrow down or refine our initial request by asking Claude something like, "Take the outline you created and expand the market analysis section. Focus on demographic data and competition in urban areas." (soft music continues) On the third step, we ask for specific details, for instance, "Now develop the financial projection section. Include startup costs, monthly operating expenses, and revenue forecasts for the first year." We can repeat step two and three several times, depending on how satisfied we are with the responses. (soft music continues) Please note that just like as a skilled project manager builds on previous discussions and decisions, Claude maintains context throughout your conversation, allowing you to reference and expand on earlier points in your interaction. This is a technique called memory referencing. So you might ask something like, "Remember the marketing strategy we discussed earlier? Let's build on that, but focus on suburban families in areas with limited grooming options." (soft music continues) Of course, if you feel that your conversation is not going in the right direction, you always have the option to start over and reframe the very first question. The final step of the iterative process usually involves asking Claude to polish the response. "Review the entire proposal and enhance the executive summary to highlight our unique value proposition and market opportunity." Alternatively, you can ask Claude to provide feedback on the entire piece of content, in this case, the business proposal focusing on how it can be further improved. Then you can include those changes in the final version of the document. (soft music continues) This step-by-step approach allows you to review and refine the output at each stage, make adjustments based on intermediate results, maintain control over the final product, and build complexity gradually. Think of it like sculpting. You start with the basic shape and gradually refine the details until you achieve exactly what you want. And that's it for this video. Let's sum up the key points that we've just covered. (soft music continues) (soft music continues)
8. Making Claude work best for you: Profile preferences and conversation styles: <v ->Hello and welcome to the new video.</v> We are going to explore how to make Claude truly yours by using two powerful customization features, profile preferences, and conversation styles. Whether you are a student, professional or casual user, understanding these features will help you get the most out of your interactions. Let's start with profile preferences. When you set up your Claude account, you can customise various settings that affect how Claude interacts with you. Think of it like setting up your smartphone. The settings you choose will create your ideal working environment. To open profile settings, click on your username at the bottom of the left hand bar menu, and from here, choose "Settings". Here you can first set your name, specify how Claude should address you, and indicate the field you are working in. Next, you'll see a section for setting up personal preferences. There are several things you can configure here. First is contextual preferences. Information about your background and needs, including your role, your area of expertise, common tasks you work on, approaches or methodologies you like to use, your audience or who you work with, your goals for using Claude. Second is behavioural preferences, so how you want Claude to respond. This includes such things as communication style and tone you prefer, output, format preferences, level of detail needed, language preferences, and how you want information presented. For instance, this is the description I have in my profile preferences. I first said that I'm a product builder and online instructor. I said that I frequently create educational content and lecture scripts on software product management, AI, and generative AI. Next, I specified my target audience saying that typically it includes business people, product managers, and non-technical stakeholders. And I next specify how I use Claude AI, namely for research, brainstorming and writing lecture scripts for my courses. And next you'll see a list of my behavioural preferences, which is quite extensive. And here I specified such things as I prefer breaking down complex technical concepts into simple, understandable language. I prefer using real world examples and case studies to explain abstract concepts. I also prefer focusing on practical applications rather than theoretical details and so on. You are welcome to go through this list and take some preferences that you feel are applicable to you as well. Now let's talk about styles. Style selection is available at the bottom of the chat field. Styles are like different personalities you can switch between depending on your current task. For example, if you are working on an academic paper, you might select a more formal style. If you are brainstorming creative ideas, you could switch to a more casual style. The beauty of styles is that you can change them anytime during your conversation with clot. Let's see how it works. (funky upbeat music) (funky upbeat music) (funky upbeat music) (funky upbeat music) (funky upbeat music) (funky upbeat music) (funky upbeat music) (funky upbeat music) (funky upbeat music) (funky upbeat music) (funky upbeat music) Practically speaking, given that the majority of the work you will do with Claude will belong to a certain domain like educational content creation in my case, you will use the same style most of the time. I found myself using the normal style more often than others and it is selected by default when opening a new chat. And if I need to tweak the style before a specific chat, I would rather include specific instructions in the prompt than modify the style itself. But this is my work routine, which may not necessarily work for you. So definitely check out the styles to find those suitable for your needs. Perhaps you have already noticed that you can also customise your own style, a feature that helps reproduce your unique writing voice and style. Since we are just beginning our experiments with Claude, I would not recommend customising your own style just yet. Instead, focus on experimenting with models and default styles and notice which ones work or don't work for your projects. Once you are familiar with Claude standard style settings, you are welcome to join me at the lecture dedicated to creating custom styles, which will come in the subsequent sections of the course. And that's it about profile preferences and conversation styles. I'll meet you in the next video.
9. Follow-along: Brainstorming with Claude: (upbeat music) <v Instructor>Let's begin our experiment</v> by using a very short prompt, like, "Give me some ideas for a side hustle project." We see that even with this short prompt, I've been able to get some initial ideas that are relevant to my professional domain. This is because I filled in my profile preferences with information about my background and what I do on a daily basis. Some of the ideas are really great. These are projects I would seriously consider if I decided to run a side hustle for real, but let's revisit our prompt and see what we can do to improve it. I'm definitely missing some context for the task I want Claude to do. I would add more details about the types of projects I'd like to work on. First, I would specify that I want them to focus on my core expertise, product management. This is to ensure Claude does not include projects from unrelated domains. I would also mention that I have limited time to dedicate to this project since it is just a side hustle. Lastly, I would specify that I want the project to be profitable and I would include my target earnings. Why I mention all this? Because these details are relevant to the project ideas I'm researching, and I believe given Claude this context, we'll get better results. Lastly, let's also add details by highlighting a list of topics. I want to be covered in the response. For starting a new sentence on a fresh line, press Shift and Return if you are on a Mac and Shift and Enter if you are on Windows. These details provide specific parameters for the brainstorming session, including the number of ideas, their implementation steps, and possible monetization strategies. This results in a more structured and useful output. Let's submit this prompt and see if we get better results. Actually, let me open a new chat to ensure that results from the previous conversation do not interfere with the new prompt. So I'll copy this text and paste it to a new chat. And let's hit Enter. Here are the results pretty good. They are definitely more detailed and well thought out than those from the first iteration, and in case if you are not satisfied with the list of ideas, you can ask Claude to propose 10 additional ideas. I've noticed that sometimes when you are brainstorming and not getting creative interesting ideas, it can help to ask Claude for new variations, not just once, but three, four, or even five times. Occasionally, you will receive brilliant suggestions through these iterations that you wouldn't have gotten otherwise. Let's try to do this. Okay, great, we've got 30 different ideas we can choose from. But before we proceed, let's also include a role for Claude to play in the beginning of our prompt, I'll copy my original prompt, open a new chat, and I would add this role at the very beginning of the prompt. You are an expert in brainstorming techniques with over 15 years of experience. I haven't changed any other details of our previous prompt, so let's hit Enter and see the results. (upbeat music) All right, great. I see several ideas that I really like, and I can take them as a side hustle, like this one, product management productivity tools. But before we go ahead, researching more on these ideas, let's do one more experiment and substitute this role description with another one. So I'll copy the prompt, opening new chat. Let's remove the asterisk. And instead of this role description, I'll include another one. You are the world's leading expert in whatever I'm about to ask you about. Yes, it's a funny role description, but nevertheless, let's test if it can get us better results. Great suggestions as well. But frankly, I don't see any significant changes if we compare these results with our previous iteration. So you can experiment with including this role description for your prompts, and see if it can make a difference for your use case.
10. Follow-along: Ask Claude to improve your prompt!: <v Anna>Everyone, welcome back.</v> Before you start practising brainstorming with Claude, let me show you a quick technique you can use to enhance your prompt, especially at the beginning of your experiments with Claude when you're just learning prompting techniques. You can ask Claude to help you improve your prompt. To do this, open a new chat, type in your request, followed by the prompt description. I include the prompt text in quotes to indicate where the prompt begins and ends. Let's press Enter and see what Claude's response is. We've received quite a detailed enhanced version of the prompt. Of course, you don't have to include all the details from these original suggestion. For instance, some parts might not be relevant to the project ideas I'm brainstorming. Use this prompt as a general guideline for what to include, but be sure to adjust it for your specific use case. Alright, so let's make modifications to the prompt that Claude suggested to us. And the easiest way to make changes in this prompt is to first copy the entire text from the conversation by pressing Copy. Then you can open a new document. For me, it is a Google Drive document. I copy-paste the text here. You see that we have the prompt plus some additional text with Claude's information on the changes and the improvements that he made to the prompt. So I'll delete all the parts that do not belong to the prompt. Okay, and now we can make all the changes that we'd like. So I just made one small change by adding risks to the opportunity description, and I think I'm fine with all other details, so let me copy this text and paste it to a new chat with Claude. All great, and let's hit Enter. Okay, pretty nice job. I found that this new information can definitely be helpful when developing these ideas further. However, I cannot find the information about project challenges and risks, even though I have requested this information from Claude. So let me ask Claude to provide this information for each of the three ideas. Great insights so far. And I found that this new information about project challenges and risks, something I hadn't thought of before, is very helpful for assessing the viability of site hustle projects. And what is interesting here is that apart from providing direct response to my question, Claude also gives us suggestions about common risks across all opportunities. Of course, I can continue talking to Claude and ask any additional questions regarding the three opportunities that we just saw, or perhaps I can ask Claude to give me other ideas I can consider. And that's it for this quick tutorial. I hope you like this technique of asking Claude to improve your prompt and you will start using it for your projects, and I'll see in the next video.
11. How to share content with Claude: <v ->Everyone, welcome back.</v> In the previous lectures on prompt engineering with Claude, we talked a lot about how to frame your instructions and what information to include. However, apart from the instructions themselves, oftentimes you may also need to submit certain documents that need reviewing and analysis. Let's see how it works. You can submit the information from the documents you want Claude to act on directly in the prompt field, or you can attach the entire document to your chat. The first option works well when you need to work on a specific textual fragment of your document. For instance, if I want Claude's suggestions on a particular part of my resume and not the entire document, I would opt for submitting this fragment directly to the chat, like this. However, oftentimes you need Claude to work with the entire text document, or you may have a PDF file or Excel spreadsheet you need help analysing. For these cases, you can upload a document into your chat. Claude can work with many different types of files, including PDFs, Word documents, Excel spreadsheets, CSV files, and plain text files. Uploading the file is straightforward. You can choose from three different options. You can upload a file from your local drive, or you can take a screenshot, or you can upload a file from your Google Drive. If you don't see Google Drive here, activate it first. Go to Customise, then Connectors, and from here choose Google Drive. Click on Connect, or you can also click on View Details to learn more about how this connection will work, and then connect Google Drive directly from this screen. Let me do this. Next, you have to choose your Google account. Let's hit Continue here. On that screen, you need to grant the required permissions. Please note that you will need to select both options for the integration to work, which is quite an extensive list. We will go deeper into when to use this connector later but the short version is this. Use it if you frequently need Claude to work with your Drive files, you are comfortable with full read access. Skip it if your usage is occasional, you have sensitive files, or the level of access feels like too much. I will continue with customising this integration for the purpose of our demo. So I'll hit on Continue. So now when you go back to Add Files, you will see Add from Google Drive as one of the options. And of course, you can just drag and drop document to the chat section. Once the document is uploaded, you will see the file appear in your chat. Now here is something important to remember. Claude can see the entire content of your file, just like you can. This means you don't need to copy and paste the content. Claude already has access to it. However, you do need to tell Claude what you want it to do with the file. For example, if you've uploaded a spreadsheet, you might say something like, can you analyse the sales data in this file and tell me the top performing months? Or if you've uploaded a research paper, you don't want to read yourself, but want an executive summary, you could ask something like, could you summarise the main points from pages three to five of this PDF? Notice how specific I was in my request. I didn't say something generic like, what do you think about this file? The more specific you are, the better Claude can help you. All right, let's talk about working with multiple files. Yes, you can upload several files in one chat. Claude can compare documents, cross reference information, or work with related files together. For example, you might upload two versions of the same document and ask Claude to identify the differences between them. Oftentimes, you need to tell Claude which file you're referring to. Think of it like having several documents on your desk. You need to point to the specific one you want to discuss. The simplest way to reference a file is to use its exact file name. For example, if you have uploaded two CSV files, you could say something like this. Please compare the first quarter sales in sales 2023 CSV with those in sales 2024 CSV. When working with three or more files, you might want to number your requests. Let's say that we need a comprehensive software development lifecycle analysis across our project documentation. The goal is to track software requirements from initial specification, through implementation, to testing, identifying any gaps, discrepancies, or quality issues in our process. This analysis will help ensure our software meets all specified requirements and quality standards before deployment. We can attach the following three files into the chat, and ask Claude to analyse them in this order. First, read the requirements from specifications.doc. Then, check if these requirements are met in implementation.pdf. And finally, list any discrepancies in comparison with testing_results.csv. And by the way, if you are going to reference the same files multiple times in your conversation, you can establish short nicknames at the beginning. Just say something like, I will refer to Q1_forecast_2021.csv as the forecast file and Q1_actual_2024 as the actuals file throughout our conversation. Lastly, please remember that while Claude can read your files, it cannot modify them directly. Instead, it will provide you with suggestions, analysis, or new content that you can use to update your files yourself. Okay, and that's it for the lecture. Let's briefly sum up what we've learned here. Claude accepts common file formats, including PDFs, Word documents, CSVs, text files, and others. File are easily uploaded using the upload button in your chat interface. You need to give Claude clear instructions about what you wanted to do with the files. Being specific with your requests leads to better results. You can upload multiple files and ask Claude to work with them together. While Claude can read and analyse files, it cannot modify them directly. All right, that's it for this lecture and I'll see you in the next one.
12. Using examples when prompting: <v ->Hey, everyone, and welcome back to the new lecture</v> where we continue talking about how to communicate with Claude and what to include in your prompt description. So far we've covered several components that can be included in the prompt, a task or what you'd like to achieve, followed by specific details or context and rules necessary to perform the task or answer a question. Next is a role context, a specific role that Claude will be playing when performing a task. Optionally, you can also introduce the intended audience for your task. Lastly, we mentioned that you can share additional content with Claude by attaching documents to your conversation or by including the text as input data directly in the chat. And regarding the ordering of components in your prompt, the ordering matters for some elements, but not for others. For instance, it is recommended to include role context earlier in the prompt while input data may not be necessary depending on the task, and its ordering is also flexible. But in general, if you stick to the ordering shown in the course presentation slides, it'll be a great start to an effective prompt. Okay, let's introduce another prompt element. Examples, also known as shots, act as demonstrations that guide the generative AI model on what kind of output you are looking for, including the answer format and what you want to avoid. Perhaps you've heard of terms like one shot or a few shot prompting. These refer to using one or several examples in your prompt description. For chat prompting, examples typically demonstrate tone, like formal versus informal, serious versus casual, empathetic versus matter of fact, and style, such as sentence length, format patterns, bullet points versus paragraphs, technical details level, basic or advanced terminology and so on. Let's go over some concrete examples. (bright music) So in the scenarios you just saw, we used examples to demonstrate both style and tone for the desired response from Claude. Remember our previous lecture example of an email writing guide? We asked the AI model to use conversational language that balances professionalism with accessibility. It turns out you can achieve similar results by using different prompting techniques. If it is easier to provide an example of the output you are looking for rather than giving a detailed description, by all means, do so. All right, apart from one or a few shot prompting, there is another technique, using interactive examples. Interactive examples differ from regular examples in that they can create a dynamic back and forth learning experience where each example builds upon previous understanding or feedback. While regular examples are static demonstrations, interactive examples involve active participation and iteration. Here is how interactive examples work. You provide an initial version example. (gentle music) The AI gives specific feedback and suggestions. (gentle music) You create an improved version based on that feedback. (gentle music) The AI analyses the improvements and suggests further refinements. (gentle music) You iterate again if needed. The key is that each iteration builds on the feedback from the previous version, creating a collaborative improvement process. Okay, great. And that's it for this video. Let's quickly cover what we've just learned here. (gentle music)
13. Output formatting: <v ->Hey everyone, we are almost done covering</v> the key ingredients of a good prompt. There is yet another component you may find worth including in your prompt. Information on what format you want Claude's response to take. Let's talk about this now. Remember that in our first lecture on prompting, we said it's important to include information regarding the basic outline or list of points, you won't cover it as context for your task to Claude. It turns out you can also specify your formatting preferences for Claude's response, which can help organise information more effectively. This information may not be necessary, depending on the task, but if you include it, adding it toward the end of the prompt is better than at the beginning. Let's go through some examples of formatting you can request. You can ask for specific formatting styles. For example, if you need a business report, you might say, "Please format this as a professional report with headers, subheaders, and short clear paragraphs." Claude will structure the information accordingly, making it ready for professional use. When working with data or analysis, you can request tables or specific layouts. Instead of a wall of text, you might say, present the comparison of these three products in a clear table format with features in the left column. This makes complex information easier to understand and use. You can request specific markdown formatting. Claude can use bold text, italics, headers, and bullet points as needed. Just ask for key points in bold or important terms in italics, and Claude will do its job. You can organise your tips using bullet points for clarity. Main tip, supporting detail, and another detail. Lastly, remember that you can always ask Claude to reformat its response if the first version isn't quite what you needed. It's perfectly fine to say, "Could you reorganise this information as a number at least?" Or "Please break these into shorter paragraphs for better readability." Okay, and that's it for this brief lecture. Let's recap the key points we've just covered. (soft music)
14. Follow-along: Creating marketing campaign emails (part 1): <v ->Hi everyone.</v> Welcome to the new follow along lecture. Here we are going to explore a use case, I believe is one of Claude's strongest. We will create marketing materials, specifically a marketing email sequence, which will be used to spread the word about a new product among prospective customers and invite them to try its trial version. This was the first scenario I used Claude for, and I was impressed by the quality of the results, so I decided that I definitely want to have Clause AI among my generative AI tools. Here is some information I prepared for the tutorial. The company name is, Narrative Systems. It is a forward-thinking AI software startup headquartered in Austin, Texas. The company specialises in developing enterprise grade generative AI solutions that help businesses automate and enhance their creative processes. The product that Narrative Systems is about to launch is called, "Slide Symphony." It is an innovative presentation generation platform that transforms text documents and verbal descriptions into polished, professional presentations. The system understands context, hierarchy, and narrative flow, automatically creating visually engaging slides with appropriate layouts, graphics, and data visualisations. In addition, here is the current version of the email pitch created by one of the company's software engineers. The purpose of the email is to share information about their product and its value, and to invite prospective users to join the trial version. Usually such emails are prepared by the marketing team, but Narrative Systems is still a small startup with just a handful of team members working on launching their first product. As a result, there is no dedicated marketing professional on their team. Unfortunately, after sending this email to its list of contacts, the company did not receive enough attention. Just a few people clicked on the trial offer and only one actually signed up for it. Let's see if Claude can help us improve the situation. So I just opened a new chat and here is my first request to Claude. I said that I want to get a feedback on the email pitch for my new product. I explained the problem that I currently have with that email, and I ask Claude to provide his opinion on possible issues with my current email. Next, I said that I will submit the text of the email and I expect Claude to provide feedback. Notice that here I'm using a technique often called, "Task Framing" or, "Two-step Prompting." The first message that you see here on the screen sets the stage for what I'd like to do. Explains the context and requirements of the task and confirms Claude's, understanding of what is required, and I'm going to submit the text of the email pitch in my next message. This approach typically leads to more thorough and target feedback, compared to providing everything at once. Let's hit, "Enter" and see what Claude replies. Great, so Claude acknowledges our request and is looking forward to work with my email. Let's copy this text and paste it into the chat. I don't need to provide any details here. As I already stated my request in the first message. I'll hit enter one more time. We see that Claude performs an analysis of my current email saying that it has several issues, including the fact that the subject line is too generic, that it's now has a lot of technical details, which is, yes, in fact true since, as you remember, this email was created by software engineer and Claude also says that the email is too feature focused. Completely agree with this, and it is missing an emotional appeal. And here is the suggested structure of a new email. Let's reply to Claude. Here I'm using interactive confirmation by saying to Claude that the revised email looks awesome. Doing so helps Claude calibrate its responses. For example, if you say, yes, that's right, but I am especially interested in X, Claude can adjust its focus accordingly. Alternatively, if you say something like, the revised email doesn't look quite right, I'm actually looking for a technical accuracy review more than marketing effectiveness, this would completely reshape Claude's approach to reviewing your email. After saying that, I like the first email that Claude provided, I also asked Claude to create the extended marketing package, which will include several options for an email sequence. I specifically asked for three emails in each sequence and I said that I will use those emails to AB test the sequences to see what works best. All right, Claude replied that it created three distinct email sequences, each with a different focus. Sequence A focuses on describing problem and solution. For sequence B, we have a focus on feature and benefits, and for the sequence C, we have a time saving focus. Seeing these variations of sequences that take different psychological approaches and provide fresh insights for those not familiar with various marketing strategies that can be used to evoke a certain feelings in people and nudge them to try out your product. I would definitely consider the sequences for the marketing campaign we are working on now. Let's also ask Claude to create a second variation for all the emails. (mellow groovy music) I really like that Claude adds some emojis, icons, and symbols, and I think this is a really great addition to the text. All right, the new versions of emails look great. To decide how to proceed next, we need to review them carefully, probably together with other team members. Let me share my experience, which might be useful for some of you. When I received similar emails from Claude for the product I was about to launch, I realised that the text in the emails was still quite shallow and didn't explain the problem the product solves or its value proposition clearly enough to attract the right users. It wasn't because Claude didn't do the right job. Claude's email suggestions were in fact great. The issue we faced back then was that we hand formulated the problem, the solution, and how our product could address that problem before starting to prepare the marketing emails. It was a missing part. The insights we needed to generate first before attempting to create a great marketing email sequence. Here is what we did. We got together as a team and formulated all the key messages regarding the problem, the solution, and our products value proposition. Then we took the emails quote created similar to the one that you currently see on the right hand side of the screen. We modified those emails by adding that extra information from our brainstorming sessions, and then we gave the revised emails back to Claude for feedback and further improvement. In the second part of this tutorial, I'll show you how to ask Claude for feedback and generate the remaining emails in the sequence. We'll also practise brainstorming catchy subject lines for the emails, so I'll see you in the second part.
15. Follow-along: Creating marketing campaign emails (part 2): <v Instructor>Everyone and welcome</v> to the second part of the tutorial where we look at an example of using Claude for marketing, specifically for preparing marketing email sequences for prospective clients, informing them about new product launch and inviting them to join the product's free trial. Here is an example of a new email that I created based on the first variation provided by Claude. Here I expanded a bit on the problem that my clients might face, as well as solution that I suggest. Now, let's come back to Claude. I'm in the same conversation that we created in the first tutorial. So, let's continue talking to Claude here. And now I'll ask, "I rewrote some of my emails and now want your feedback on these new variations. Are you fine with this?" I again use the task framing technique that we already covered in the first tutorial for this demo. Next, I'll copy the version 2 email pitch and paste it into Claude chat. And by the way, I often get questions about how important it is to write prompts with correct grammar? Overall, Claude can understand messages with imperfect grammar. So, in case I need to get something done quickly, I can just rush to type my prompt without caring much about grammar. That said, clear and grammatically correct instructions, do help ensure more accurate responses. However, it's not as critical as being clear about your intent. So, describing clearly what you want Claude to do is far more important. Now, let me press Enter and see what Claude feedback is going to be. As always, Claude gives us feedback and a new version of the email, which we can review, modify if needed and then ask for Claude's feedback again. This is a great instance of using interactive examples when instead of asking for improvement once, you go back and forth with Claude, refining your work more and more. And since we are creating an email sequence, let's ask Claude to create the second and third emails. So, for the second email, I would like to focus specifically on the quality of my product and I give this information to Claude. I also submit several paragraphs of text describing the product's quality. (upbeat music) Right and since our sequence consists of three emails, let's ask Claude to create the third email. Here is how my instructions look like. Again, I'm using a two-step prompting technique, which I really like as you may guess from this demo. Let's see if Claude acknowledges my request. And I'm submitting the client's testimonials. So, my idea for the third email is that I want Claude to take the testimonials from some of my clients and create the third email in the sequence, ensuring that my past clients use the product and think it is of a great quality and value. So, I copy and pasted the testimonials into the chat and let me press Enter. (upbeat music) Right, cool, I think we've got some great ideas from Claude on how we can structure our email in the sequence. And now, I suggest that we move on with this demo. And the last thing that we can do here to complete the marketing email preparation is to ask Claude to suggest the best subject lines for the emails. Let me ask the following. I think that I'll continue speaking with Claude in the same conversation in case it might need a context about the company and all other details that we discussed before. Next, let's submit an email text. Let's take the email from the third sequence, let's say this one. (upbeat music) And here is the Claude's response. If you want to get more suggestions, we can ask. (upbeat music) And if we don't like these alternatives either, we can ask something like, (upbeat music) I found that if you are brainstorming ideas and don't get good options from the first iterations, it might be helpful to repeat the process a few times. Occasionally, you can get great suggestions. Let's do a few more iterations. So, here I give Claude specific feedback on what part of my product offering I'd like to focus on in the subject line. (upbeat music) All right, I think you got some great examples for how you can brainstorm a subject line for your email or other piece of content that you may want to create with Claude. And that's it for this demo. I hope you had a chance to notice the value Claude can bring as your AI marketing assistant. Whether you are coming up with fresh ideas, tweaking your copy or just need a helping hand, Claude's got your back. Give it a shot and see how it can take some of the workload off your plate. And as always, I'll see you in the next video.
16. Understanding Claude's artifacts and projects: Section Intro: <v ->Welcome to the new section of the course</v> where we will explore some of Claude's most powerful features. Artifacts and projects. First, we'll explore artifacts, what they are, and how Claude uses them. You will also learn how to maximise your Claude usage limit with the help of artifacts. To put theory into practise, we will have a follow-along exercise where you will create a process flow diagram step-by-step. This will give you hands-on experience in creating and modifying artifacts in the form of visual content. Next, we'll explore publishing and remixing artifacts, and even remix a Tetris game, no coding involved. And finally, we'll cover projects, including how they keep content organised and how they complement artifacts. Are you ready to start? Let's jump in.
17. Artifacts: Definition and how Claude uses them: <v ->Welcome, everyone.</v> In the first lecture of this section, we are going to talk about Claude's Artifacts, but don't worry, no ancient pyramids here, just powerful tools to help organise and structure your conversations with Claude. While you have already come across these Artifacts in our previous section and maybe created some yourself, we are now going to formally introduce what they are and how they can transform your workflow. Let's start with what Artifacts actually are. Imagine you are working with a designer. Instead of sketching directly in your notebook while you talk, they use a separate canvas to create their designs. This separate canvas allows them to focus on the artwork while maintaining a clear conversation with you. That's exactly what Artifacts are for Claude. They are separate spaces where Claude can create and organise specific types of content while keeping your main conversation clear and focused. Why were Artifacts created? Before Artifacts, all of Claude's outputs, whether it was codes, stories, or analyses appeared directly in the chat. If someone was working on Claude for a website, remember, web development is the number one Claude use case. They had to copy paste the code into a separate file and then open this file in a browser just to visualise the design Claude created. This back and forth process obviously took a lot of time until one of Claude's team members came up with the idea of side by side interface where you can see the code or text on one part of the screen and the visualisation on the other. That's how Artifacts began. Apart from code, Artifacts are handy for generating substantial piece of content, like long stories or detailed analysis, mermaid diagrams, vector graphics, or even simple games. Artifacts appear next to your chat, letting you see, iterate and build on your creations in real time whenever you need them. The great news is that Artifacts are available on all Claude plans. To enable Artifacts, navigate to your profile settings by clicking on your initials in the lower left corner and select Settings. From the profile page, turn the enable Artifacts to go on. Now let's go through an example of creating and modifying an Artifact. I'm playing in the relocation to Melbourne at the moment of recording this tutorial, so here is the real world example of my conversation with Claude, which involved creating Artifacts. I first provided some context on the task I wanted Claude to perform. I need help researching secondary schools and renting options in Melbourne, Australia. Then I stated the task. I needed the following information. For every school, provide the name of the district where it is located, and the minimum and average renting prices for a house with three to four bedrooms and two bathrooms. I also submitted a list of schools as a file attachment. It turned out that there was an issue with this file, which Claude identified. So I resubmitted the list of schools in my second message. And here is the output in the form of an Artifact. Claude organised the schools by geographic regions and provided rental estimates for each areas. As the next step, we might want to ask about additional details to include in the Melbourne schools and housing analysis. So I asked Claude for additional details, such as typical commute times to the CBD, school zone boundaries, local amenities, and whether there is a park nearby. Notice that here, I'm using an interactive confirmation technique we talked about earlier, acknowledging that I'm satisfied with the response Claude provided. Claude and update an existing Artifact in response to your message. The Artifact window will update to show you the latest content. This edits however, one, change Claude's memory of the original artifact content, and you can switch between versions using the version selector at the bottom left of the Artifact. However, in my case, we see that a new Artifact was created because I requested major changes affecting most of the content. By the way, you can open and view multiple Artifacts in one conversation using the chat controls. To access this, click on the slider icon in the upper right corner, select the artifact you'd like to reference, and then continue where you last left off. Finally, you can make targeted updates when small changes to specific sections of an artifact are needed. In this scenario, Claude can update just the portion of the Artifact while leaving the rest unchanged. To make targeted changes, select a sentence or a phrase where you want modifications to be made. And then click on Improve. Describe what you would like Claude to do, such as include five coffee shops in the list, and click on Update. And here are the changes. Pretty nice job of Claude. Now let's say we want details about several coffee shops from this list. So let's highlight one of them and click on Explain. Claude will provide a detailed breakdown of the information on the selected place, including its venue and space information, information about menu, location benefits, and so on. That was very quick and convenient. Alright, we are all set with this tutorial and I'll see you in the next lecture where we will talk about how to maximise your Claude usage limits using Artifacts. I'll see you there.
18. How to maximize your usage limits using artifacts: <v ->Hi, everyone, and welcome back.</v> At the beginning of our course, we mentioned that we would discuss how to optimise usage limits and get the most out of your subscription plan. This is where using artifacts can be especially helpful. Let me explain. As we said earlier, your usage limits are based on the total length of your conversation, combined with the number of messages you send. Every time you send a message in the chat, Claude needs to re-read the entire conversation. So, the longer your conversation becomes, the more work Claude needs to do to continue the conversation. But here is a trick. If you have a long conversation with multiple artifacts created and want to continue modifying an artifact or part of it, instead of doing this in that exact long chat, you can download the artifact to your local drive and then begin a new conversation with that file as your starting point. This improves Claude's performance by giving it direct access to just the relevant artifact you want to work with without requiring it to process the entire previous conversation context. By the way, Claude will also respond faster in shorter conversations. Let's see how it works. All right, here is the Melbourne schools analysis we worked on in the previous lecture. This content was created as an artifact, meaning I can download it as a separate file and refer to it later in any of my future conversations with Claude. To download the file, click on Download to File. The file will be saved to your local drive. Now, let's say you want to return to working on that schools analysis. What you can do is to start a new conversation, upload the .md file with the previous analysis, and specify what changes or refinements you'd like to make to that artifact. For example, this is my request, "I'd like to rank the schools based on the following criteria, schools that are known for their achievements in math and science." I also added the information that top performing schools should go first. Let's click on Enter. Claude starts working with the original artifact directly, making the requested modifications while maintaining all the original structure and functionality. Okay, I hope you love this little trick for working with artifacts and start implementing it for your work. And while we are here on the topic of performance improvement, let me also give you two additional recommendations that work whether or not you are using artifacts. Ask multiple questions at once, especially when working with a long conversation. Since Claude has to re-read the conversation each time you send a new message, asking questions in individual messages uses up your limit faster than a single message containing multiple questions. Avoid re-uploading the same file multiple times to the same conversation. Claude already sees the entire context from your conversation. You only need to re-upload a file when starting a new conversation with Claude. Okay, and that's it for this lecture. Let's recap the key points. (soft ambient music)
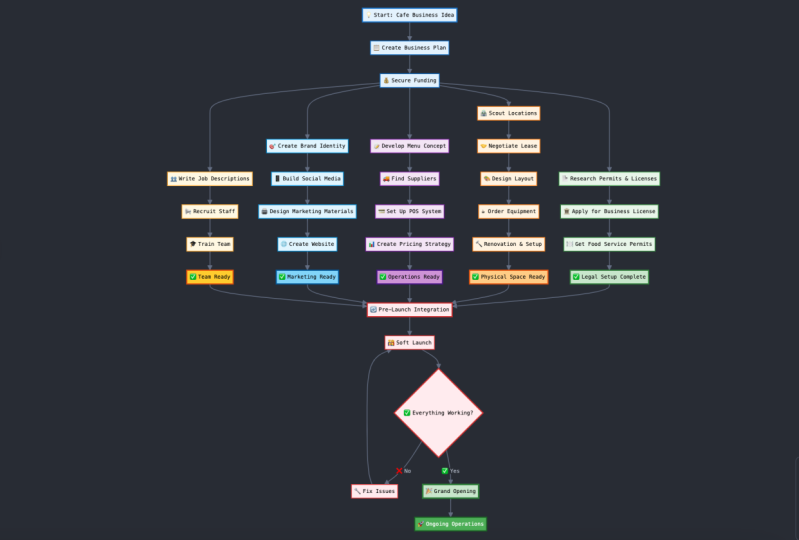
19. Follow-along: Creating visuals with Claude – process flow diagram (part 1): (upbeat music) <v Anna>For this demo,</v> I prepared a description for our fictional company, called "Mosaic Mind," which is building an AI-powered collaborative storytelling platform. The company has recently raised Series A funding and is planning to actively hire new team members, so they require a clear procedure for onboarding new employees. What truly sets the company apart is it's "Remote-First" culture. Currently, they already have a 30% team spanning 12 countries and five time zones. They don't rely on the traditional 9-5 workday, favouring a so-called hours of overlap model. Teams need to be available for synchronous work for four hours only with the rest of their schedule fully flexible. Frankly, I would love to work in that kind of company. Let's look at what process Claude will suggest for this remote-first organisation. So for this, let me open Claude and begin the conversation. The first thing we do here, is we attach the file with the company description. You have several options. You can choose a file from your local drive, or you can make a screenshot, or you can select a file from your Google Drive. My company description is on my local drive, so I will just drag and drop the PDF to the chat. In terms of the prompt, I don't want to give detailed instructions just yet. I'd like to see what Claude suggests first and then modify the diagram. So I will ask, "Please create a new employee onboarding process flow for Mosaic Mind Startup." And let's press enter. Claude starts creating an artifact in the form of a mermaid diagram. A mermaid diagram uses markdown style syntax to create various types of diagrams using text. The key advantage of Mermaid is that you can create complex diagrams without needing specialised diagramming software. Just write the description in text and you get a visual diagram like we see here. Many platforms like Notion or the Mermaid Live Editor support mermaid diagrams. The beauty of creating mermaid diagrams with Claude is that it can generate the entire text description for us, and all diagram modifications can be made through text instructions. Notice that Claude also provide a description of the key components of this onboarding process, which is really helpful. We see that the process consists of five steps including pre-onboarding phase, first day focus or integration elements step, even though this is not probably a separate step of the process, but let me check this later. Next, we have first week milestone, followed by first month's goals. Claude also suggests what sub-steps each step could include. Claude picked up nicely on the remote-first company culture. So you see steps like shipping home office equipment, meeting with other colleagues through virtual tools like Office Pod, and we even have step completing the training related to the asynchronous work culture. Of course, not all of these steps will be relevant for us, and remember that we did not provide Claude with any specific expectations or requirements for the onboarding process. You can add new steps, remove existing ones, change the order of steps, add or modify decision points, change the text of any step, or adjust colors and styles. So you have a lot of flexibility to customise the diagram. Let's make some modifications to the process. The first change that I'm going to do is I'd like to reorganise the steps in the pre-onboarding phase. So I'll write the following. So I asked Claude to reorganise the pre-onboarding phase, and I included the correct sub-steps that I want Claude to include instead of the current one. Let's see if Claude makes the job right. Let's hit enter and we see that Claude starts creating the second version of the artifact. Let me enlarge the diagram by pressing on the plus sign. The issue here is that I don't want the steps to be sequential, so I want everything happen in parallel. Let me ask Claude to change this. Yes, that's exactly what I wanted to have. Now, we have a pre onboarding phase followed by three steps happening in parallel. Let me also make some other changes to the first day of onboarding. All right, so what I asked Claude to do here is to move the assigned onboarding body under the virtual office in introduction, and I also want to change the name for this phase. "First Month's Milestone," replaced with "First Month's Deep Integration." Let's hit enter and see how Claude will reflect those changes in the process flow. All right, let's do one more change to the process flow here. I've included quite a lot of changes. I first asked for a decision point and then explained what steps should follow depending on whether the review is positive or negative. I also asked Claude to change the color of the key components of the diagram. Let's see if it incorporates all the requests. Notice that I'm using simple conversational language like I would do with a colleague or assistant if they were showing this process flow to me and I wanted them to make those modifications. As always, I'll press enter and let's look what happened with the process flow. Okay, as for the color schema, it's definitely not what I wanted, so I need to clarify my instructions, but let's check what happened with the decision block. Yeah, this loop seems to be correct. So now, let me make modifications to the color schema. (upbeat music) All right. After making a lot of changes to the color schema of this process flow, I think we got great results. We see that Claude incorporated the changes that we requested. Every time we make a modification Claude creates a new version of the artifact. We can scroll through the versions to review changes made in previous iterations and continue modifying that version by typing in our instructions into the chat. What I recommend is grouping several modification requests into one message instead of sending them one-by-one. Even though we didn't see this in this specific demo, but based on my previous tests, I know that Claude might sometimes redraw steps incorrectly by mistake even without asking to modify those steps. So to avoid such behavior, try to send your requests in bulk. All right, this tutorial is becoming quite lengthy, so let's take a break here and meet again in the second part of the tutorial. I'll see you there.
20. Follow-along: Creating visuals with Claude – process flow diagram (part 2): <v Instructor>Hey everyone.</v> Welcome back to the second part of the tutorial, where we work on our process flow for a new employee onboarding process for a startup called Mosaic Mind. If you missed the first part of this tutorial, please watch it first before starting this video. After making a few modifications to the process flow, our chat can become quite lengthy. So as we discussed earlier, to improve Claude's performance, you can download an artifact to your local drive or save it to your cloud storage and then continue modifying it in a new chat. Before downloading an artifact, make sure that the correct version is selected. For this demo, I'll choose the last version and click on download to file. Now let's say that I want to make modifications to that artifact. I'll start a new chat, attach my artifact to the input data for this conversation, and then type in my instructions. I don't remember the exact name of the step where I want to replace Notion for Confluence, but let's see if Claude will be able to pick it up. And here are the changes. We see that the process flow has been updated by replacing Notion to Confluence in the grant access to documentation software. It's great that Claude maintained all other elements of the onboarding flow without changes. Apart from making modifications to the process flow, you can ask Claude to create more detailed guides or templates for any part of the process. For instance, I can ask the following. Please remember that since this is a new chat, Claude does not have knowledge about Mosaic Mind, which we provided in the form of a PDF file in the first chat. You can avoid re-uploading the documents by using Claude's project functionality, which we'll cover very soon. But for now, let's reupload all the files Claude will need to design the template. Our document is here in the chat and I can press enter. And here we go. Here is a template we can use as is or we can make changes to align it with our workflow. Notice that Claude has created the second artifact for the same chat, and in case if you have several artifacts created in your conversation, you can easily choose the one you'd like to work with by clicking on chat controls. And from here, choose an artifact you'd like to modify. Alright, our tutorial won't be complete unless we cover how to quickly export the diagram of the process flow to include it in the relevant documentation. I'll show you how to export it in Notion collaboration tool for note taking, knowledge management and data management, as well as project and task management. However, if you don't use Notion in your workflow, you are welcome to use other tools including Mermaid Live Editor, or any text editor with Mermaid Support. Here is a new document I created in Notion for this demo. Begin by clicking slash and from here select Claude. Let me just type it, and in this window choose Mermaid. It's already selected for me. Now come back to Claude, find your artifact with the flow diagram, click on code and then click copy content. Next, return to Notion and paste the code in this window. Let's click on review. And now we have our diagram exported in Notion, how cool is this? You can work on this document by including any text to your diagram. Let's type something here. In case you want to modify the diagram again, you can always return to Claude and continue the editing process through the chat. In case you are not using Notion, you can easily explore the diagram as an image in JPEG or PNG format. For this, open the Mermaid Live Editor and replace the default code with the one generated in Claude. You will see the visual representation of the process flow on the right hand side of the screen. All good here. To download the file, go to actions and choose the format you want the diagram to be saved in. Let me choose an SVG from here and we see that the diagram has been saved to my local drive. Now we can open a file and continue it in any software where we prefer to keep our project documentation. Alright, I hope you enjoy working on creating visuals with Claude and explore this functionality for your work processes. I would recommend doing some practise right after this tutorial as trying things out right away is the best way to get the hang of it. And I'll see you in the next video.
21. Publishing and remixing artifacts: <v ->Everyone and welcome back.</v> Let's continue learning about Claude's artifacts. Apart from creating and modifying artifacts, you can also make artifacts available to other Claude's users, and you can remix artifacts created by others. Let's see how it works. Publishing an artifact allows others to view and remix your work. To publish an artifact, find the one you want to publish, and if that artifact has several versions, find the version that you want to make public. Next, click on the "Publish" button at the bottom right side of the artifact. Let's click on "Publish & Copy Link" here and now you have a link that you can share with your friends or colleagues so that they can work with your artifact as well. Of course, before you publish an artifact, double check all the content included to ensure that it doesn't contain any private or confidential information. Please note that only the artifact itself is published without the surrounding conversation and other context from your chat. If you realise you made a mistake and don't want the artifact to be publicly available, you can always unpublish the artifact. To do this, click on "Publish" first and on the popup screen that will appear, click on "Unpublish" button. However, you won't be able to republish that artifact again, so you'll have to create a new one. Now let's talk about remixing artifacts. You can remix only published artifacts. Claude's documentation states that all published artifacts will be viewable on a separate public facing website. However, at the time of recording this tutorial, this website is not available yet. So how do you find the published artifacts that you can remix? Well, several third party websites have emerged with collections of such artifacts. Here is a website with the collection of code based artifacts. Another one presents artifacts from various categories, not only in programming, but also creative fields, lifestyle, education, gaming, and others. Let's use this platform to browse through the published artifacts and remix something we find useful. To start, go to claudeartifacts.com. From here, select a category. For my example, I would like to remix a game. Browse through the list of games. Here I see Tetris. Let's view this artifact and think if you would like to remix it. (playful music) (playful music) Wow, this is exactly the same variation of Tetris I played for the very first time. It's so nostalgic to play it after so many years, I feel like I could play it endlessly. (playful music) Let's definitely remix this game by operating the "Remix Artifact" button. Claude starts remixing the artifact. (playful music) (playful music) (playful music) Yes, all good, and we see that the game has been remixed perfectly. We also see that Claude gives us some ideas for modifications we can make to the original game, which is super helpful. Let's ask Claude to implement two standard Tetris features. Next Piece Queue and Hold Piece. This would add strategic depth and planning to the gameplay. I'll add the following instructions. So I asked Claude to add next piece queue and hold piece and I also explain how those features supposed to work. It is so scary to see how the blocks randomly fall down, but I'll try to ignore this for now and fully concentrate on my conversation with Claude. So let's hit "Enter". And we see that Claude starts creating the third artifact to incorporate the changes we just requested. (playful music) (playful music) (playful music) (playful music) (playful music) All right, so the hold piece seemed to be working very nice, but I don't see the queue of three blocks over here, so let's ask Claude to fix it. (playful music) (playful music) (playful music) (playful music) (playful music) All right, I like how our game is shaping up. You can also review the suggestions from Claude in terms of the features that can be included into the game, and ask Claude to add any of these. Now in case you want to share the game, you can publish the artifact and then share its link with your colleagues or friends. If you want this game to be available on a separate website, you may need some programming knowledge to export the game from Claude. I tried several, no-code options for exporting the game that Claude suggested, but I didn't find any easier solution for this. All the options were quite convoluted and still required some technical knowledge. I'll update the tutorial as soon as I find the straightforward no code solution. Alright, that's it for this video. Now it's your turn to get to work. What I suggest is that you browse through the Claude Artifacts Showcase website and remix one or two artifacts. Also look through the artifacts you already have and decide if you are ready to publish something so that other users can see and remix your creation. You can go even further and submit your artifact to the Artifacts Showcase website by clicking on the "Submit Artifact" button. I hope you enjoyed this practical work and I'll see you in the next video.
22. Projects: Definition and how Claude uses them: <v ->Hello, everyone.</v> Now that you know what artifacts are and how to create, modify, publish, and remix them, let's learn about another useful feature of Claude: Projects, which can help you organise your work with Claude. So what exactly is a Project in Claude? Think of a Project as a dedicated workspace or folder where you can organise related conversations with Claude. Just like how you might create different folders on your computer for various clients or tasks, Projects help you keep your AI interactions neatly organised. Creating a Project is simple. When you are in Claude's interface, look for the Project icon in the left-hand sidebar, click it, give your Project a name and description, and you are ready to go. For example, if you are working on a marketing campaign, you might create a Project called Q1 Marketing Campaign to keep all related conversations in one place. Now, let's figure out the benefits of creating a Project. One key benefit is Project knowledge, the ability to provide context for your chats with Claude. You can upload a relevant documents, text, quote, or other files to a Project's knowledge base, which Claude will use to better understand the context and a background for your individual chats within that Project. In addition to Project knowledge, you can define Project instructions for each Project to further tailor Claude's responses. For example, you might instruct Claude to use a more formal tone or answer questions from the perspective of a specific role or industry. These Project instructions will work alongside user preferences we set earlier in the profile settings, as well as the selected style in the chat. The third useful aspect of Projects is context sharing. When you're working within a Project, Claude remembers important information from previous conversations in that Project. For instance, imagine you are developing a new product feature. In your first conversation, you describe the feature requirements, and in your next conversation within the same Project, Claude already knows these requirements, so you don't have to repeat them. Projects also make it easier to collaborate and keep track of your work. Each Project maintains its own history of conversations, which you can easily reference later. This is particularly useful when you are working on long-term tasks or needs to revisit previous discussions. So when does it make sense to create Projects instead of standalone chats? Basically, you can create a Project to organise any tasks, both work or personal, that can benefit from shared context. At the same time, avoid creating Projects for one-off tasks where using an individual chat will be more efficient. For instance, if you are a marketing manager, you might have one Project for blog posts, another for social content, and a third one for email newsletters. This separation helps you stay focused and makes it easier to find specific conversations later. And if you are in educational content creation like me, you could have one Project for research and themes and topics for your next course based on research papers, industry reports, and other available information. You could also have a Project for planning and drafting the educational content, including lesson plans, lecture notes, exercise problem sets, and quiz questions. Projects can also be helpful for organising personal tasks. For instance, as mentioned earlier, while recording this course, I was planning a relocation to Melbourne, Australia. So I set up a dedicated project in Claude to help me plan the entire move, from deciding which residential area best suits my family's lifestyle and selecting a school for my daughter, to creating a to-do list for tasks after arriving at the new location. Now think about which parts of your tasks can be organised via Projects. And while you are thinking about the Projects use cases, let's sum up this lecture. (fascinating music) (fascinating music continues)
23. Make Claude Yours: Skills for Creators: <v ->Hello and welcome to this new section on Claude skills.</v> Here we will cover first what are skills and how they're different from custom instructions and projects. Second, we will explore creating simple skills using written instructions. This is perfect for things like brand voice, writing style, or straightforward workflows. You will see a demo where we create a LinkedIn post skill that captures a specific personal brand voice. Then we will go through complex skills where you collaborate with Claude to build them. You will see how to create a professional presentation skill that uses your company brand assets and generates data-driven presentations. And finally, we will cover best practises, when to create a skill, when not to, and how to troubleshoot common issues. By the end of this section, you will be able to create your own skills that save you hours of repetitive work. But before we dive into building skills, let's make sure we are all on the same page about what skills actually are and how they are different from other Claude capabilities. So, what exactly are skills? A skill is a reusable set of instructions, templates, and resources that teaches Claude how to perform a specific task in a repeatable way. That's may be complicated definition. So, think of it like this. Instead of explaining the same thing to Claude every single time through your prompt instructions, you create a skill once and Claude remembers how to do it. For example, you could create a skill for writing social media posts in your brand voice, generate monthly reports with your company's template, or create a case study presentations with your specific structure. You build the skill once, then you activate it whenever you need it. Claude follows your instructions consistently every time. Now, before, we have already covered custom instructions and projects. So, how skills are different? Custom instructions live in your profile settings. You only get one set per account and they apply to every conversation you have with Claude all the time. Use these for broad preferences like your role, your communication style, or a general context about you. For example, I'm a project manager or always use a conversational tone. Projects are workspaces where you organise related conversations and knowledge. You can have multiple projects, one for each major initiative or area of work. Projects let you upload relevant files and documents that Claude can reference during conversations within that project. It's important to remember that project knowledge stays in that project. Skills work differently. Skills are task-specific capabilities you can activate in any project, in any conversation. You create them once and they travel with you everywhere. Imagine you are a marketing manager running multiple campaigns. You might have Project 1: Spring Product Launch with campaign briefs, competitor research, and budget files, Project 2: Holiday Campaign with seasonal messaging docs and media plans, and Project 3: Brand Refresh with new brand guidelines and asset libraries. Now, let's say in all three campaigns, you need Claude to write social media posts in your company's brand voice. Without a skill, you would explain your brand voice separately in each project. That's repetitive. With a skill called Company Social Media Voice, you created once, then you activate it in the Spring Launch project, the Holiday Campaign project, and the Brand Refresh project. Same skill works everywhere. All right, and now that you understand what skills are and how they fit into Claude's ecosystem, let's go ahead and create your first skill. I'll see in the next video.
24. Working with Built-in Skills: Creating Documents: <v ->In this tutorial, we are going to explore</v> two types of skills in Claude. Default skills. These work automatically in the background. You don't need to turn them on or activate them. Claude uses them whenever you ask for documents, presentations, spreadsheets, or PDFs. They're always ready to go. Example skills. These are optional capabilities you can activate when you need them. Things like Canvas Design for creating visual art or Theme Factory for styling your documents. You choose when to turn these on. The key difference, default skills are invisible and automatic, example skills need to be activated. Let me show you how to set this up. Before we start, let's make sure we have the right features enabled. Let's go to Settings. And from here, let's open Capabilities. First, make sure that Code execution and file creation is on. This enables Claude to actually create files. Second. Let's open example skills and activate canvas-design, skill-creator, and theme-factory. That's it. The document creation skills, Word, PowerPoint, Excel, PDF, are already active by default. You don't see them in the Skills list because they work automatically in the background. Let's begin with creating documents. I'm going to create a press release for a product launch. Imagine we are launching StudyBuddy, an AI agent that helps university students manage coursework, deadlines, and provides AI tutoring. Instead of writing the press release from scratch, I'm going to give Claude this product brief and ask it to create a professional press release for me. Now, let's return to Claude and ask it to create the press release. So here is the prompt that I'm going to use. I first said that I included a StudyBuddy AI product brief document together with my prompt, and then I also specified the exact structure that I expect Claude to include in the press release. So let's include the document here. Everything looks great. Let's hit Enter. Notice what happening, Claude is reading product brief document, extracting the key information, and transforming it into press release format. It is using the built-in docx skill to create a Word document. Claude created the press release document. I would love to change the formatting and add some more spaces at the header, but the first version looks pretty great. Now, you have two options for working with this file. Option one is direct download. You click on Download button, and then you save the file to your local drive. You can continue working with that file on your computer or you can download it to your Google Drive. And the second option is to use Google Drive connector. This automatically uploads files to your Google Drive, but it requires quite broad permissions. To open a file in Google Drive, click on the Google Drive icon. If you're doing this for the first time, you have to provide permissions. Let's click Authenticate. Here, I'm choosing Google account that I want Claude to work with. Google will allow Claude for Google Drive to access this info about myself, my email address. All right, I'm fine with this, so I'll click Continue. And here, we need to select what Claude for Google Drive can access. So it can see and download all your Google Drive files. And it can also see, edit, create, and delete only the specific Google Drive files you use with this app. The second permission looks quite logical to me, and the first one seems to be quite broad. So when should you use the Google Drive connector? Use it when you regularly need Claude to access or modify drive files, you trust Anthropic's security measures, and you clearly understand and agree Claude will be able to read all your drive content. Don't use it if you are just doing occasional work, you have sensitive files in your Google Drive, and you are not comfortable with the level of access. Claude is asking you for. My recommendation for all the AI capabilities you are about to use, start with the minimum permissions needed and only expand if you have a clear reason. For this demo, we are going to use direct download. It's simpler and safer. And in the second and third parts of this tutorial, we'll explore how to create a PDF document, as well as a visual poster, all with Claude prebuilt skills. I'll see you in the next part.
25. Creating Polished PDFs with Built-in Skills: <v ->Welcome to the second part of the tutorial.</v> Now let's create a different type of document, a PDF final report. But first, I need to explain something that can be confusing. There are actually two ways to get PDFs from Claude and they are very different. When you create an artefact in Claude, you have an option to download it as PDF. Your web browser converts that text to PDF on your computer. You get basic text formatting, but that's it. And when you ask Claude to create a PDF using the PDF skill, Claude writes Python code, executes that code, and generates a native PDF with professional features like custom headers and footers, page numbers, tables with borders and styling, images and logos, precise layout control, cover pages. Think of it like the difference between printing a webpage to PDF versus creating a PDF in Adobe. One is quick and basic and the other is professional and polished. For this demo, I'm going to ask Claude to create a final report summarising StudyBuddy AI's beta testing phase. This is the kind of document you would present to stakeholders or investors. Let's open Claude to see how it works. Here is the prompt that I'm going to use for creating the final report. So this is the task that I give to Claude. I provide detailed specifications on what needs to be included in there and I ask to create a polished professional PDF report with proper formatting sections and visual hierarchy. Watch what's happening. Claude is using the PDF skill to write Python code that will generate this report. It's not just converting text. It's creating a structured document with a proper cover page, section headers with consistent styling tables for the statistics, page numbers and headers, professional layouts and spacing. This is the kind of report you could send to stakeholders without any additional formatting. It should look like it came from a professional design tool, not from an AI assistant. But let's see what Claude will actually create. Great. Here is our beta testing report. Looks awesome. We see here cover page. We see page numbers. We see proper formatting with nicely done sections. We have here tables. This layout is professional and it is ready for executive presentation. Let me download it and compare this file with the initial one that we downloaded from Claude artefact. So on the left-hand side, we have artefact PDF. We see here our basic text, simple formatting. So it's basically our webpage printed to PDF. And on the right-hand side, we have a real PDF created with Claude skill. Both files are PDFs, but they serve different purposes. Use artefacts for quick notes or for simple documents and use the PDF creation skill from Claude when you need professional quality reports. All right, and I'll see you in the next tutorial where we are going to create something visual. I'll meet you there.
26. Creating Visual Content with Example Skills: <v ->Welcome back.</v> Now let's switch gears and use a different type of skill: Canvas Design. As we can guess from its name, this skill creates visual content like posters, graphics, and designs. And unlike the document creation skills, which are always active, Canvas Design is an example skill that we need to enable first. So please check your settings and turn toggle on for Canvas Design skill if you haven't done this yet. Now, let's test this skill. I will ask Claude to create a poster announcing a 24-hour innovation hackathon. Notice I didn't specify any design details, no colours, no fonts, no layout instructions. I'm trusting the Canvas Design skill from Claude to make good decisions here. Look at what Claude created here. It made a design choices about colour palette, typography, layout, and spacing, as well as visual hierarchy. This is the power of skills. They contain expertise. I didn't need to be a graphic designer to create this poster. Now let's see how the skill recognises different design directions. I will ask for a minimalist version. So I'll add this instruction about creating a minimalist-style poster and all other details remain unchanged. Here is what we've got, completely different aesthetic, lots of white spaces, clean typography, restrained design. Same content but different interpretation. Frankly, I definitely prefer the first design, but let's try another variation. This time I'm gonna add bold, energetic to explain what kind of poster I would like to get. And as always, I would leave all other details without change. Let's see what Claude creates. And now we have this bold, energetic version, dynamic layout, vibrant colours, high impact. I like this last option best, but let me know in the comments for this video which one of three you prefer. These three posters show you something important. You don't need to micromanage AI. When you say minimalist or bold, the Claude Skill knows what that means in the design terms. You state what you want, not how to build it. And that's it for this tutorial. Before you go to the next video, please take some time to practise working with these building skills. Create documents, generate PDFs, design visuals, get comfortable with the basics. And once you are ready, let's meet in the next video.
27. Creating Custom Brand Themes by Extending Existing Skills: <v ->Welcome back.</v> In the next series of videos, we are going to explore one of Claude's most powerful features, custom skills. Up to this point, you have been working with Claude's built in capabilities, but what if you could teach Claude to work in a way that's specific to your needs, your brand voice, your company templates, your specific workflows? That's exactly what custom skills allow you to do. There are four ways to create custom skills in Claude. First, you can extend existing skills by creating custom variations that match your specific needs. Second option is to create a skill from scratch by writing skill instructions for simple, straightforward skills. Third option is to create a new skill with Claude for more complex skills where you collaborate with Claude to build them together. And finally, you can upload a skill for advanced users who want to import prebuilt skills. In this course, we'll focus on the first three methods, which cover 99% of what you will need. Let's start with extending Claude's existing skills. As you know from the previous tutorial, we are launching an AI agent called StudyBuddy. It helps university students manage coursework, deadlines, and provides AI tutoring. I need to present our Q1 roadmap to stakeholders. I will first create a presentation with Claude's existing skill, theme-factory, and then I will extend that skill to fit our brand design. I created this project that we are going to use for this demo, and this is the first prompt that I will use. As always, I refer to a product brief for StudyBuddy AI. Let me attach it to the prompt. Here we go. I ask Claude to read this document and create the professional PowerPoint presentation with the following title and with the following slide structure. Please note that I specifically asked Claude, "Do not apply any theme yet." Let's see what we're gonna get. Notice that Claude is using PowerPoint skill to create this file. And now we have our Q1 roadmap presentation. We have not only content but also quite nice-looking design applied by Claude, even though, as you remember, I asked Claude, "Do not apply any specific theme yet." Now let's see if the theme-factory skill can transform this into something that looks even better designed. The skill comes with 10 professionally designed themes. Each theme includes carefully selected colour scheme and font pairings. Let me ask Claude to show us examples. Here are all 10 themes that we have available in the theme-factory skill, but I actually want Claude to include some examples because it's quite difficult for me to select a theme based on text description. So let's ask Claude about it. Yes, that's exactly what I wanted to see. For our StudyBuddy AI presentation, I'm thinking either Tech Innovation because we are building an AI product. Botanical Garden also look fresh and energetic, appealing to students. And I also like Modern Minimalist for a clean, student-friendly look. Notice, we didn't have to design this ourselves. The skill contains the design expertise already. So let's apply Tech Innovation theme to our presentation. So I'm choosing Tech Innovation because it fits well our product positioning. Look at this transformation. Same roadmap content, but now it looks like something from a tech company. The colours work together, there is strong contrast for readability, and it has a visual impact. I really like this design. Now, what if we want to match StudyBuddy's actual brand colours? Let's say our marketing team already defined our brand identity. The skill can generate a custom theme that incorporates our brand. This is my prompt. So I specified our brand colours, including primary colour, secondary colour, accent colour. I also give details in terms of look and feel I want the presentations to be. And finally, I included target audience, university students and education decision-makers. Let's see what Claude creates. And here is the theme specification. Claude created variations of our brand colours, selected appropriate fonts, and even described when this theme works best. It's thinking like a brand designer would. Now let's ask Claude to apply that theme to our presentation. Claude has told me that it created the presentation. However, I cannot see anything in the preview field. So I asked Claude to fix it. You see the saying that it failed to load the document. All right, preview is still not available for me. But what if I would try to download this file? Let me click on Download. And let's open. Here is our new presentation. And now, our roadmap presentation has our actual brand identity. This is what we would use in real stakeholder presentations, professionally designed with our brand guidelines built in. Let me return to Claude. What I would like to do is to ask it to save this skill of creating presentation so that I can use it in my future projects. That's the prompt that I prepared for next step. Let's hit Enter. Excellent. Claude has created the new skill. And let's click Copy to your skills, so that we can reuse it in the future projects. If I return to Claude skills, and this is our new skill available for us and already active by default. Anytime I'm in any project, any conversation, I can use this studybuddy-presentation skill, just like I would use the theme-factory skill with 10 pre-built themes we started with. Now, let's say, I would like to create a different document. Let me create a new chat in the same project that we used for creating our original Q1 roadmap presentation. And this is my new prompt. I'm asking Claude to create a PDF document, StudyBuddy AI feature Specification. And as always, I provide a structure of the document that I would like to get from Claude. Notice that I haven't mentioned specifically that I want Claude to use our new skill here. Let's see if it can apply it by default. And this is our document. Claude tells us that it applied our StudyBuddy AI brand colours, vibrant purple, when creating this document. Of course, it needs further editing. You see some issues here with the table, but it's a pretty good draught to begin with. So notice that I was creating a completely different document, a feature spec, not the presentation, but Claude still picked up the StudyBuddy brand theme. And one more thing before we finish this tutorial. Claude skills are available across all your Claude projects. Let me demonstrate. Remember that we started in the Claude Skills Demo project. Now, let's switch projects. I'll choose this one. And here, I would ask Claude to list all my skills available. You see here, the studybuddy-presentation skill is here in this completely different project. So skills are portable. Once you create them, they follow you everywhere in your Claude workspace. Okay, great. And that's it for this tutorial, and I'll see ya in the next one.
28. Creating Custom Skills with Written Instructions: <v ->Welcome to the new tutorial on Claude skills.</v> Now let's explore the second option, creating a custom skill by writing skill instructions. Imagine you regularly ask Claude to help you write LinkedIn posts, and you want every post to follow your personal brand voice. Instead of explaining your preferences every single time, let's create a skill. First, I will navigate to the Skills section. Now I will click on Add new skill. For this tutorial, we are gonna choose Write skill instructions. I will fill in Skill name, Description, and Instructions. In the Instruction sections, I have included quite a lot of details in terms of what kind of LinkedIn posts I would like to create. I tried to explain my personal style, including tone, structure of the posts, length, and I also included a section for things that I don't want Claude to do. Now I will click on Create, and here we have the second skill included into the your skills section. I can deactivate it or I can enable it and test it right away. Let's first try to create a LinkedIn post without this skill active. So I will switch it off and create a new chat. You see here that Claude includes this auto message suggesting me to try the skill right away, but that is not what I'm going to do. Let me remove this prompt and include this one. So I want Claude to write a LinkedIn post about the importance of continuous learning in the tech industry. See what we got? This is Claude's default approach. This post is good, but I would say it's quite generic and it doesn't sound like me. Let's return to the Settings and activate our new skill. Let's start a new chat. Again, I got this default prompt to try out the new skill. Let's remove it for now and use the exact same prompt that I used for the first time. This post looks a bit better than the previous one, but you know what? I'm not quite sure that Claude has applied the new skill. For instance, I don't see the hashtags here, which as you remember, I asked Claude to include. So let me do the following. I will return to my new skill. And what I can do here, I'll click on this three-dot icon, and from here I choose Try in chat. Here I see this default prompt again, and since I don't want Claude to create just something amazing, I have one specific thing to create a new LinkedIn post. I'll just modify this part of the prompt. "Can you write a LinkedIn post about the importance of continuous learning in the tech industry with my 'linkedin-personal-brand-voice' skill?" So I left this part where I specifically say to Claude which skill I would like to use. Let's try it out. And here we go. You see that this time, Claude actually reads the instructions written in the LinkedIn personal brand voice skill, and then it tries to apply those instructions to the post and look at the difference. Same topic, but how it follows my specific voice structure and style preferences. The tone is more conversational, paragraphs are short, and the post ends with engagement and with several relevant hashtags. This is the power of simple skill instructions. You set your preferences once, and Claude applies them consistently every time without you repeating the instructions in every chat. All right, and that's it for this quick tutorial. And I'll see you in the next one.
29. Skills Best Practices: When to Build and When to Skip: <v ->All right, you've seen how to create</v> both simple and complex skills. Now, let's talk about when you should build a skill and when you shouldn't. Create a skill when you meet two criteria. First, repetition. You're doing the same task more than three or four times. For example, writing weekly status updates, creating monthly reports, generating customer case studies, or drafting similar emails or proposals. Second, consistency matters. The output needs to follow specific rules, formats, or brand standards every time. For instance, your company's brand voice, specific document templates require data formats or compliance and legal language. If the task is completely different each time, a skill won't help much. Don't waste time building skills for one-off tasks. Special projects that won't repeat, unique exploratory work or experimental and creative brainstorming. Don't build skills for simple tasks that don't need consistency, general questions, quick research, casual conversations, or tasks where variation is actually good. Skip skills for highly variable work, when every project is completely different, when requirements change dramatically each time, or creative work where you want Claude to improvise. And don't build skills for complex workflows you don't fully understand yet. You are still figuring out the process, requirements aren't clear, or you are experimenting with different approaches. Here is the rule. If you cannot clearly explain the task to a new team member, you are not ready to create a skill for it. Figure out your workflow first and then build a skill. Now, let's also cover the three most common issues you may run into when using skills. Issue number one, Claude isn't using your skill. This may happen when your skill description is too vague, your prompt does not match the skill's triggers, or the skill is disabled in settings. Here is a quick fix. Make your skill description very specific about when it should be used. Explicitly mention the skill by name in your prompt and check settings to verify the skill is enabled. Issue number two, the output does not match your template. This may happen due to template structure issues, as we saw earlier in the demo. Another reason is that skill instructions aren't explicit enough or your template file is corrupted or too complex. To fix this, first test your template. Ask Claude to create a simple document using the template but without the skill activated. If that works fine, the problem is your skill instructions. Go back and be more explicit. Tell Claude to match the template's colours, forms, and layout style. And if Claude struggles with the template even without the skill, your template needs better placeholder structure. Issue number three, results are inconsistent. This may happen because your instructions are too open-ended. You are not giving Claude enough examples, or your task actually is too variable for a skill. Here is the quick fix for you. Add two to three concrete examples to your skill instructions. Be more prescriptive, like always do X, never do Y. If it is still inconsistent, maybe this task does not need a skill. And one more thing, your first skill probably won't be perfect and that's completely normal. Build it, test it, refine it. Expect to iterate three or four times before it's really solid. But once it works, it saves you minutes or hours every single time you use it. So here is what I want you to do right now. Think of one task you do repeatedly at work. Just one. Open Claude, create a simple skill for it, and test it out. Don't aim for perfect, aim for useful. And let me know how it went in the Q & A for this video.
30. Building Complex Skills with Claude (part 1): <v ->All right, let's look at something more advanced,</v> creating a professional case study presentations. This is where the third method of custom skill creation, Create with Claude, really shines. Instead of trying to write out all the instructions yourself, you collaborate with Claude to build the skill together. But before we start building this, let me show you what skill actually consists of. Understanding these components will help you create better skills. A Claude skill has three main components. First, the SKILL.md file. This is the heart of your skill. It contains all the instructions that tell Claude how to behave when the skill is active. Think of it as the rule book. Second, a resource folder. This is optional, but it is where you can include supporting files. Things like templates, PowerPoint, word, Excel, brand guidelines, style guidelines, custom fonts, example files, really any reference material Claude might need to pick up a skill you are creating. And third, everything gets packed as a zip file. When you upload a skill, these components are bundled together. Claude unpacks them and uses everything inside. Now, when you use Create with Claude, like we are about to do, Claude helps you build these components through conversation. You don't need to worry about the technical structure. Claude handles handles that for you. All right, now that you understand what makes up a skill, let's build one together with Claude. For this demo, I want to create a skill that helps me generate professional-looking case study presentations for projects I have worked on. Think design, agency, quality, clean, modern with consistent branding, something I can get featured in my LinkedIn profile. I have three assets I want to include, my custom brand fonts, presentation template with my colour scheme, and specific case study structure that I use. Let's build this skill together with Claude. Let's come back to the skills settings. And from here, we see the Skills section you already familiar with. Let's click Add. And in the new pop-up window, let's choose Create with Claude. This opens a conversation where Claude helps me build the skill. This is my reply to Claude. I say that I want to create a skill for generating professional case study presentations. And next, I explain my requirements. So I say about the purpose why I need this presentation. I describe the visual style, structure, followed by branding. I mentioned that I have my own fonts, as well as the theme template that I would like to upload. And I'm asking Claude if it can help me create this skill. It's quite interesting that Claude is using its own skill-creator skill to help us create our new skill. Claude is saying that it created the SKILL.md file with information about the presentation structure. It also created design themes for the presentation. And it suggested me to include my own colour theme, as well as my own fonts. That is exactly what I mentioned in my first prompt, that I would like to submit my own assets. So let's do this right now. So I submitted my font. I would like to use CircularStd. You see here, TTF files. And I also uploaded a case study example. This is the format that I would like to use for this type of the presentation. And I asked Claude to update the skill accordingly. All right, before we finalise working on this new skill, let me review what Claude has created. We see that SKILL.md file includes clear instructions for case study structure. Next, Claude highlighted design standards, details about theme selection, followed by workflow for using that new skill. Everything looks very good, so let's save this skill and test it out. Here, I will choose Copy to your skills. Now let me open the Skills section. And here we go, we have this new case-study-presentations skill. Now let's test this skill with the real project. Since we are on this page, I will click on three dots icon and then choose Try in chat. Here, I will remove this prompt and include my own. I provided details about my client, project type, duration, what was the challenge that I helped to solve with the solution, as well as specific results that I achieved. I also included key learnings. So let's check if, first of all, Claude will be able to pick up the new skill. And second, how it'll handle creating the presentation according to the instructions we included in the skill description. You see that Claude has successfully identified that it needs to use the new case-study-presentations skill. This is because I use the keywords, case study presentation, in my prompt. So in case, if you created a new skill, but when you would like to test it, you see that Claude does not pick it up, please check that you are using relevant keywords in your prompt. And there we go. Claude has created a complete case study presentation using our template, following our structure, and incorporating the details. However, if we compare this file created by Claude with the original presentation, we see that they are quite different. And here is a real challenge that you might encounter. I created this template using Gamma App, which is an AI tool for designing presentations. It looks beautiful in Gamma, but when I exported it to a PowerPoint format and uploaded here to Claude, here is what happened. Claude has picked up individual design elements, like colour scheme, some design elements, but not the overall template structure. This is because Gamma App does not export templates in a way that Claude can properly interpret as a reusable theme. This is an important lesson. Not all design tool export in formats that work well with Claude's skill. In this case, you use Claude to analyse that beautiful presentation and extract the design principles, the typography rules, the colour relationships, the layout philosophy. And then Claude uses those principles to create new presentation from scratch.
31. Building Complex Skills with Claude (part 2: <v Anna>So I'm going to open a fresh conversation</v> with Claude and upload my Gamma presentation here. And here is my prompt. I first said that here is the presentation that I love to be used as a reference. So I'm asking Claude to analyse this presentation and describe typography, colour palette, layout principles, overall visual aesthetic, and what makes this design feel modern and professional. I'm asking to format the response as instructions so that I can include them in this skill.md file. Now, Claude is analysing the presentation for me. Look at this, Claude has broken down exactly what makes this design work. It also created a list of key design DNA principles, including such things as generous breathing room, strict monochrome palette, two-font system, dark minimalist aesthetic. This is perfect. So I don't need to be a designer to describe what I want. Claude just did that work for me. I'm going to copy these analysis. I have skill settings open. Here, I find case study presentations skill that I would like to edit. I click on three dot icon, and here I choose edit with Claude. Let's click enter here. So Claude is asking me what changes I would like to make. Let me provide my description. I said that I would like to update the skill with more detailed design instructions, and I referenced the file with those instructions that I just copied from our previous conversation with Claude. And I also uploaded my case study example PPTX file and said that I would like to use it as a visual inspiration. And look at this, Claude is updating the skill for me. It is adding the visual design requirements section, uploading the reference file to resources, and modifying the instructions. Claude confirms that the skill has been updated with the new design guidelines. And now let's test this updated skill. I'll start a fresh conversation and I'm going to use the same TechStart case study example here. Claude has created the presentation for us. Let me download it and open it so that we can take a look. And here is what Claude generated. It's professional. The colours are right, the typography's clean, but if you compare it to my original file, you can see we lost some of the visual sophistication. The original presentation has this beautiful geometric boxes, this tree-like structure, and the overall very polished layout. And this version is simpler. It's still good, but not quite capturing that exact aesthetic. So I went back to the skill editing conversation that we started a bit earlier in the tutorial, and I asked Claude to refine the design instructions based on what I was seeing. And here is my second attempt. Actually it became worse. Text is overlapping. The layout is broken. Sometimes when you add more instructions, things get messier rather than cleaner. And this is my third iteration. Now we are getting somewhere. It's not identical to my Gamma original presentation, but it's much closer to that sophisticated feel. Look at this final slide. This has that design energy I was going for. So using Claude to analyse design and generate presentations based on design principles works, but it requires iterations. You might need two, three, or five rounds of refinement to get Claude to capture the similar aesthetic you want. And each iteration takes time and uses credits. So here is my recommendation. If you have a very specific, highly polished design that you absolutely must replicate, like a presentation you created in Gamma or Canva, that's already perfect. Sometimes the smartest move is to just keep using that tool for that specific use case. But if you want consistent professional presentations that capture a general aesthetic and can be generated on demand for multiple projects, this skill building approach is incredibly powerful. You get 80, 90% of the way there, and you can generate dozens of presentations without starting from scratch each time. For me, this iteration number three is good enough. It's professional, it's on brand, and I can generate case status whenever I need them. To recap, here is the complete workflow for creating a custom presentation skill with Claude. Step one, create or find a presentation you love. Could be from Gamma, Canva, PowerPoint, whatever inspires you. Step two, create your initial skill using Create with Claude. Provide your instructions, purpose, structure, output format, and upload any assets you have. Fonts, example presentations, brand guidelines. Step three, test the skill with real content. Generate a sample presentation to see how Claude interprets your instructions and assets. Step four, analyse what's missing. If Claude didn't capture the design aesthetic you wanted, open a separate conversation and ask Claude to analyse your reference presentation. Say, describe the design principles that make this work. Step five, update your skill. Go back to your skills creation conversation and ask Claude to add those detailed design instructions. Paste what Claude gave you and let it update the skill. Step six, test again and iterate. Generate another presentation with the updated skill. If it's still not quite right, refine the instructions further. The key lesson here is expect to iterate several times. The first version rarely captures everything perfectly. This is normal and part of the skill building process, each iteration gets you closer to the results you want. Alright, and that's it for this tutorial. And as always, I'll see you in the next one.
32. Expanding your prompt engineering skills even further: Section Intro: Welcome to this section on Advanced Frampton
Techniques in Cloud AI. We are going to kick things off with step by step thinking, also known as chain
of thought Frampton. This approach helps you
guide Cloude through complex tasks in a
structured and logical way. Then we'll cover a
very important topic. Minimizing AI hallucinations, while Cloude is powerful,
it's not perfect, and I'll share
practical strategies to keep its responses
grounded and reliable. Be hands on practice is key, we'll have a follow along
exercise where you will learn how to summarize
long form content with clade step by step. By the end of this section, you will feel even more
confident in crafting prompts that get accurate actionable
results. Let's dive in
33. Thinking step by step or chain-of-thought (CoT) prompting (part 1): One and welcome to
the new lecture. Let's explore another
powerful prompting technique for working with EI
assistant like Claude. The thing, step
by step approach, also called
chain-of-thought prompting. Imagine you're teaching a child how to solve a
complex math problem. Would you just want their final answer or would
you want to see their work? Just like watching
a students thought process helps us understand
their reasoning. Chain-of-thought
prompting helps us get better more reliable
results from AI models. In this video, we will cover what chain-of-thought
prompting is, why it matters, and how to
implement it effectively. Let's get started. So what exactly is
chain-of-thought prompting? At its simplest, it's
asking AI model to explain its reasoning step by step rather than just giving
you the final answer. It's like having a conversation with an expert consultant. You don't just want
their conclusion. You want to understand
how they reached it. Research has consistently shown that when AI models
explain their reasoning, they perform better at
complex tasks. But why? Well, have you ever
noticed how explaining something to someone else helps you understand
it better yourself? Same with the AI model. By asking the model to break
down its thinking process, we give it more space to work
through complex problems. Now let's look at how to implement
chain-of-thought prompting. The easiest thing
you can do is to add a thing step by step request
at the end of your prompt. This is so called basic
chain-of-thought prompting that is quick to implement and
that works for simple tasks. However, the downside of this basic technique is that you don't tell
Claude how to think, which is especially
useful if a task is very specific to
a certain use case, business process
or organization. So the best practice will be instead of just
saying things step by step to outline the actual steps you want the AI model to
take or think through. This technique is known as structured
chain-of-thought prompting. By asking a model to
generate a chain of thought or a series of
intermediate reasoning steps, we can significantly improve the model's ability to
perform complex reasoning. Let me share an example that illustrates
chain-of-thought prompting. Imagine you are asking AI to help you choose between
two business strategies. Here is how the same question could get very
different results. Here is a basic prompt. The model might simply
respond with a preference, but you won't know how it
reached that conclusion. Now let's look at a
chain-of-thought prompting. This structured approach forces the model to show its work, making its recommendation more
valuable and trustworthy. A Please note that chain-of-thought
prompting is not just about getting
better answers. It's about getting more reliable
and verifiable answers. When you can see the
model's reasoning, you can spot potential errors
or biases more easily. And that's it for this introductory lecture on
chain-of-thought prompting. In our next lecture, we will discuss several
advanced techniques for chain-of-thought prompting. But before that, let's
sum up this lecture.
34. Thinking step by step or chain-of-thought (CoT) prompting (part 2): Everyone and welcome to our second lecture on
chain-of-thought prompting. As promised, let's talk about more advanced techniques for
chain-of-thought prompting. One powerful approach is to
combine it with role playing, which we already covered
earlier in the course. For instance, you
might ask the model to think through a problem as
different stakeholders. This multi perspective
thinking often reveals insights
that a single chain of thought might miss Now, let's talk about
another technique, fuse shot chain-of-thought
prompting. In this approach, we include
several worked examples of how to solve similar problems step by step within the prompt. These examples act as a guide, teaching the model how to
reason through the task. Let's look at an example. Notice that problems in examples one and two
are different as if you shot chain-of-thought
prompting isn't about showing examples
that are identical, but about teaching a
generalizable thinking framework. The examples demonstrate
how to think, not just what to do. Even if the context changes, the model learns to break
down the task logically, assess relevant factors and
reach a reasoned conclusion. By seeing this pattern
in multiple context, the model can
generalize and apply the framework to new
unseen problems. Similarly to few shot prompting, there is one shot chain-of-thought
prompting where you provide just a single example to guide the model's reasoning. This technique may come in handy when your task
is straightforward, but still benefits from
structured reasoning. Finally, before we
finish this lecture, let's explore some
common pitfalls people make with chain-of-thought
prompting and how to avoid them. Pitfall number one, not
verifying the reasoning. Remember, just because
the model shows its work does not automatically make its
conclusions correct. Always review the
logic in each step with fall number two,
overcomplicating the structure. While structure is important, too many steps can actually
confuse the model. Aim for about three
to five main steps in your thinking process. That's it for the chain-of-thought
prompting technique. So next time you ask AI
model a complex question, don't just ask for the answer, ask it to think step by step
and show its reasoning, pay attention to
how this changes the quality and reliability
of the responses you receive. Finally, as always, let's sum up the key points
of this lecture.
35. Keeping it real: Practical strategies to minimize AI hallucinations: One. Imagine asking
an AI assistant about a recent news event and it confidently cites
a detailed article that does not actually exist or asking it about
public figures and getting responses that mix real facts with completely
made up details. These aren't bugs or glitches. They are what we call
hallucinations in AI, and they are one of the biggest challenges
when working with language models
like Claude let's explore why these
hallucinations happen, how to spot them and
most importantly, practical techniques you can use right away to get more accurate, reliable responses from Cloude. Let's start by understanding why AI models
sometimes hallucinate. Here is what happened. Language models are trained to recognize and complete
patterns in text. Sometimes they will
extend these patterns in ways that seem logical
but aren't factual. Models like Claude
are trained to be helpful and to provide
complete answers. Sometimes this
helpfulness instinct overrides the ability
to say, I don't know. When asked about topics
beyond its knowledge, it might try to extrapolate
based on what it does know. Now that we understand why
hallucinations happen, let's explore how to
spot them in practice. Think of this as developing
your AI fact checking skills. Once you know the warning signs, they become much
easier to catch. Here are the key warning
signs to watch for. Overly specific details. When Claude provides
very specific details, especially about recent
events or statistics, this should trigger
extra scrutiny. Perfect sound in citations,
examples or statistics. If you notice an answer
that sounds too perfect, that's a good reason to
double check the information. And believe me, the
more experience you become working with clothes
and similar AI tools, the better you will be at spotting these two good
to be true moments. You will develop an instinct for recognizing when something feels off or overly polished and that's
your cue to dig deeper, verify facts, or cross check
sources, trust but verify. That's the golden rule
when working with AI generated content,
inconsistent answers. If you ask the same
question multiple times and get different
specific details each time, that is a strong indicator
of hallucination. Overly definitive statements. When Claude makes very
definitive statements about topics that should
have some uncertainty, especially regarding
future events or complex topics, be cautious. Knowing why
hallucinations happen and how to spot them
is a great start. But how do we actively
prevent them? Let's go over four
useful strategies that will help you
get more reliable, accurate responses from
Claude every time. Strategy number one, be
explicit about uncertainty. For instance,
instead of writing, what were the key findings of the Johnson's report
from 2024, try this. If you are familiar with the
Johnson report from 2024, please share its key findings. If you are not certain
about any details, please let me know. Or instead of list all the companies using
this technology, try this. Can you list some
verified examples of companies that we are
using this technology? Please indicate if you are
uncertain about any examples. Instead of what's
the market size for AI chat booard in 2025? Try this. Can you provide market size estimates for AI chat boards from
reliable sources? Please specify the time period
for any numbers you share. Notice how each revised
prompt explicitly gives clod permission to acknowledge uncertainty
and limitations. This simple change
can dramatically improve the reliability
of responses. Strategy two, request
citations and reasoning. When working with
documents or data, ask Claude to cite specific sections or
explain its reasoning. This is like asking your research assistant
to show their work. It helps you verify the information and catch
potential hallucinations. Let's look at the example. As you analyze this document, please quote specific sections that support your conclusions. If you make any interpretations
or extrapolations, explicitly label them as such. Strategy three, use
structured output formats. Requesting structured
outputs can help minimize hallucinations by
forcing Claude to organize information
more systematically. For instance, please analyze these sales data using
the following structure, verified data points, direct
numbers from the document. Calculated metrics show your calculations,
interpretations, clearly labeled as
interpretations, uncertainties, areas where
data is unclear or missing. Strategy four, Implement
verification steps. Include verification steps
directly into your prompts to enhance the accuracy and
reliability of Cloud responses. For example, you
can ask Clouds to list any assumptions it
made during its analysis. Highlight areas where it has lower confidence
or certain them. Recommend additional
information that could help validate
its conclusions. This approach ensures a more thorough and
transparent output, making it easier to assess
the quality of the responses. All right, now that you have all the information
on AI hallucinations, take a moment to review one
of your recent prompts. How could you modify it using the strategies
we've just covered? And remember, the goal is not to eliminate
hallucinations completely, but to create a
workflow where they are less likely to
impact your results. Please share your original
and revised prompt under the Q&A section
for this video. And as always, let's briefly recap the key points
of this lecture.
36. Follow-along: Summarizing long-form content: One. Welcome to
our new tutorial. Here we are going to work on summarizing long form
content with Claude. Here is what I'd like to do. I have an interview
with Dario Amade, CEO of anthropic, the
company behind Claude, where he talks
about many topics, including artificial
general intelligence and the future of
AI and humanity. The interview is quite lengthy, it may be challenging to find the time to listen to
everything thoughtfully. So I'm going to ask
Claude to prepare a detailed summary
analysis of the interview, including strategic takeaways on industry trends identified
and leadership insights. I also want Claude to prepare a reference section
with all books, articles, and resources
mentioned in the interview. I think this task is perfect for a chain-of-thought
prompting, as it's quite complex and requires multiple
steps of analysis. And since Claude does
not transcribe videos, I have copied this
video transcript. For ex interviews, he usually includes video transcripts
on his website. So I copy them to
a separate file. So I'm going to use this file in my
conversation with Claude. Alternatively, you can copy paste the script
for a YouTube video directly by first clicking
on view all four chapters. Next, you will see
a video transcript, which you can copy to Claude. All right, we are all set
with the preparation. Let's start by asking
Claude to divide the transcript into
sections or topics. Let me also attach my transcript one more time since I just
started a new chat. All good. And I press Enter. Large unstructured
content can overwhelm the AI model leading to
scattered or incomplete results. By identifying the
main sections, Claude creates a clear
roadmap for the analysis, ensuring that no key
areas are overlooked. We see that Claude has divided the transcript into ten
different sections, providing time codes for
each of the section, and it also included brief information
on the key topics discussed in every section. Now, let's focus
on one section at a time to extract
detail insights. Let's begin with
the Section one. Focusing on one piece of
content at a time provides depth and clarity for each
part of the transcript. By isolating
individual sections, Claude can dive into specifics without being distracted by
the rest of the content. Here we see quite detailed
summary of the first section. And let's do the
same exercise for the remaining nine sections that Claude identified in
its previous response. After analyzing all sections, let's ask Claude to synthesize insights into actionable themes. Combining data from
individual sections helps generate a cohesive summary
of actionable takeaways. This step ensures
the final output reflects broader trends
and over arching lessons. Please also notice that each chain-of-thought
prompting builds on the previous information from our conversation
with Claude, right. Here are the strategic
takeaways from the interview. Here we see core principles,
emerging industry trends, followed by leadership insights, product development
methodologies, and team collaboration
approaches. Now let's focus on
resources and references. This step will make
the output more comprehensive and
useful for follow up. All right, we've got a list of resources mentioned
in the interview, and as an optional final step, we can ask Claude to produce
a polished final summary. Okay. So from this demo, we've seen how the structured approach
of chain-of-thought prompting enhances the AI's reasoning capabilities
and output quality. I hope you start implementing this technique in
your daily work. As practice is the best
way to retain information, please go ahead and summarize
a video or another piece of loan content just after
you finish this lecture, and that's it for this demo, and I'll see you
in the next one.
37. Prototyping with Claude Artifacts: Introduction: Hello, and welcome to the prototype section
of this course. Before we begin, let's
answer the questions. Why prototypes
meter in business, what they are and
what they are not? When you create a
prototype with Claude, here is what you actually have a proof of concept that
shows your vision works. A specification clarifying
how the app should function. A demo tool you can show
to customers, teammates, or broader stakeholders to
get feedback on your idea. A developer brief that
eliminates guest work when you hand it off that's
already incredibly valuable. But let's also be clear
about what it is not. It is not production
ready software. It does not have user accounts or integration with
third party systems. It won't scale to
thousands of users. Think of it like an
architectural blueprint. The blueprint shows
what you want to build, but you cannot live
in a blueprint. Prototype is not something
you build and forget. After you receive feedback
from customers, teammates, stakeholders, you
come back to clot, update your prototype
and test again. This loop prototype
feedback changes is what helps you refine
your idea without wasting time or money on developing something
that no one needs or wants most successful businesses pivot many times before
landing on the right idea. Prototyping lets you
pivot fast and cheap. That's the role of prototypes. They are blueprints, validation tools, and
iteration engines. In the next lecture, we will talk in more detail about prototyping with Claude, what kind of prototypes
you can build with it. What are the limits and what's already happening
in the real world. Ilsa in the next lecture.
38. What you can prototype with Claude: Everybody, and welcome
back to the lecture. In the last lecture, we looked at
prototypes in general. Why they meter and how they
help validate your ideas. Now, let's talk about
clot specifically. The following tools available
in Cloud for prototyping, clod artifacts and cloud code. The tool we will focus on in this course is cloud artifacts. Artifacts let anyone
without coding skills. Prototype, lightweight, apps, layouts, and interactive demos. You describe what you
want in plain language. Claude writes the code and you instantly see the results
in a live preview. People are creating games, educational tools, dashboards,
and workflow managers. These apps are instantly
sharable with the link and the usage counts against
the viewer, not the creator. For instance, here is the
reminder app built by someone who did not like
his phones reminders app, so he created his
own with Claude. It had three tabs, brain damps, nodes, reminders,
search, and timestamps. He did it all through
conversation. No coding required. Now for people with
programming skills, there is another
tool, Cloud code, a command line tool that works directly with
your whole code base. For instance, an Google
VP used it to set up a full AWS system
in just 48 hours, work that would normally
take three weeks. He called it like
being a carpenter with awesome power tools
to reiterate what we talked about in the previous
video. Let's be clear. Cloud won't replace apps
like Uber or Shopify. What you are creating
are prototypes, mockups and proofs of concept. Now, to put all this
theory into practice, we are going to build our own prototype together in
this section of the course. We will create a business
card generator app. The idea behind the app is not just design one
pretty business card. What we are really prototyping
here is the app itself, the kind of tool that
could let anyone design and customize
their own business cards. In the next lecture, we will take the
very first step, turning our business
card app idea into a product requirements
document or PRD ALCa there.
39. From Idea to Product Requirements Document (PRD): Everyone, welcome back. Before we jump straight
into building, we need a simple plan. That plan is what in
the product world, we call PRD or product requirement
document. Don't worry. It's not as scary as it sounds. It is basically just writing
down what are we building? Why are we building it, and what features are absolutely necessary
versus just nice to have. You might be asking now, why write a PRD first?
Here's the thing. When you try to build
something without a plan, it's super easy to get lost. You might add too many features or forget something important. A PRD keeps you
focused on building a small functional
version of your idea, which is called an MVP or
minimum viable product. And the best part, Claude
can actually help us write this PRD from scratch so you don't have to know
the right structure. We will ask Claude
to help us here. Here is what we will do. First, I'll create
a new project, as it will be easier to keep all prototype related
conversations in one place. If you are not on
the Cloud paid plan, you won't have
access to projects, but you can follow
along by typing in prompts in the
regular chat session. I will type in a
prompt like this. Claude will then generate a PRD with sections like
executive summary, product vision, target users, core features, and others. Here is how to get
the best results when asking Cloude
to write your PRD. Be specific about your vision. Instead of Omega
business card app, try, create a business
card designer app for freelance consultants
that feels modern and professional with easy
customization options. Include your constraints. The app should be
simple enough for non technical users and focus on clean
minimalist designs. Mention your success criteria. Success means someone can create a professional looking
business card in under 5 minutes without
any design experience. This level of detail
helps Claude create PRD that truly
matches your vision. Now when Claude gives
us that draft pard, it is not just text on a page. It is a roadmap we can use in the next steps
to tell Claude. Okay, now, build me the
first version of this app. Based on this perdi
that way Claude stays aligned with the vision we wrote down instead of going off track. The key lesson here is
don't skip this step. Writing down your
ideas as a PRD, even if it is just a half page
summary gives you claridm. And by having Claude to do most of the structuring for you, it takes minutes, not hours. This is how you start
turning a vague idea like I want business card app into something concrete you
can actually build. In the next lecture, we will take this pard and
use it to ask Claude to build the first working version
of our business card app. This is where the
magic really starts happening and Alca
in that lecture.
40. Follow-along: Building your first App Prototype with Artifacts: All right, now that we have
our PRD written with Claude, it is time for the
fun part actually building our first
working version of the business card app. But before we jump straight
into the generating code, let's make sure Claude
has the right context. Even though Claude remembers
our chat right now, it is always a good habit to fed the PRD back into the prompt, so it is crystal clear. Here's what I'll do. If you work in a
standalone chat, which is not part
of clods project, copy the PRD we just created
in the last lecture. Just the main sections,
summary product vision, users core features, technical requirements, user
interface requirements. I'll also copy success metrics, and that's it I'll press
Control C or Command C next, paste the text into clods chat. You see the text here
in the attachment, and next you can say, here is the PRD for
my business card app. Please keep this as the
reference for the next steps. This way, Cloud is
anchored to our blueprint. I won't be pressing Enter
here because I would like to demonstrate you what to do in case if you work
within the project. Let me remove this prompt. I will remove this
attachment here. If you work in a
project like me, click on Copy two Project so that the PRD text is copied to the project
knowledge base. Let me show you this. You see this PRD appears in the knowledge base as
the business card. So this way, PRD becomes
visible to cloud in any of the chats that we are creating within
that project. It's very convenient. Now, I will follow up
with the clear request based on that PRD.
Here is my prompt. Please create a simple
first version of the business card app
described in the PRD. It should include a
placeholder logo, name, job title,
contact details. Keep it inside the card shaped box with a clean and
professional layout. Clot will generate the
code and you will see our business card preview
appear in the artifact window. Here we go. Usually, the
first version looks simple. At this stage, we're
just making sure that basic structure
matches the PRD. For instance, that the
right sections are there and the layout
looks balanced. Notice how we did not just say, Make a business card. We gave Claude the
PRD as a reference. That is what ensures the output is aligned with our
vision for this app. This is a key lesson
in II prototyping. The better the context you give, the better the results you get. However, even with
great prompts you might occasionally run into technical issues or
unexpected results. In the resources
section for this video, I will attach a quick
troubleshooting guide for the case if you run into
issues while prototyping. In the next tutorial, we'll
take this simple version and start customizing it with
our own brand assets, adding a logo, brand
colors and fonts. That is where your card
will really start to fill personal Asia in
the next tutorial.
41. Follow-along: Iterating on the Prototype with your own brand assets: One. Welcome back. In
the previous tutorial, we built the first version
of our business card app, a simple card with the
placeholder for text, as well as logo. Now comes the fun
part, customizing it with your own brand assets. This is where your
business card stops being a demo and
starts becoming yours. Let's start with the logo. I will upload my logo. And I will give the
following instructions to Cloe Claude now is making updates. So let's see what we'll get. This is definitely not the logo that I was expecting to see. So let's see if Claude
can fix the issue. O. All right, Claude tells
me that I can use this logo image upload feature
to upload my logo file. Let me try to do this. I'll choose my file, click Open. Yes, it works perfectly. Feel like magic to me. Here are some tips for the logo image size and resolution to get
the best results. Next, let's apply
your brand colors. Say your brand color is navy
blue with an accent of gold. Just tell Claude the following. Update the business card to use a navy blue background
white text, and add a thin gold accent
line at the bottom. Claude is rewriting
the code now, so let's see what we will get. Looks interesting. Now
I have to re upload my logo for this new version of an artifact. Let's do this. Notice that I can choose from various templates,
modern classic. Creative doesn't look good. I'll stick to the modern one. I like it best so far. Please notice that I used
simple English to describe my requirements towards
background color as well as text color. However, in case if you have a specific hex code or codes, you want clade to
replicate in here, please feel free to insert them into the
prompt description. Now let's change
the name job title as well as contact details. You see that Claude already
provided me with this form. Let's type in my name. Yeah, it is changing. This is my current role. Okay, I leave phone without
changes for this demo. Let's change email as well. You see that by uploading
my logo, changing colors, and adding my personal details, we've been able to turn
a generic prototype into a personal business card
asset in just a few prompts. And that's the big value here. You don't need design
skills or coding knowledge. You just describe what you want and Clade handles
the technical side. And what I forgot to do
is to change our phones. Phones also play a big role in how professional
your card looks like. So you can tell Clote
something along those lines. Please change the name and job title to use a bold,
modern SanserFont. Keep the contact details
in a smaller lighter font. What's a bit inconvenient
here is that I have to re upload my logo as well as change the name and other details about me every time Cloth recreates
this artifact. But that's okay. I'll do this quickly. Right. Awesome. I like this
new font, and again, you can be as
specific or as simple as you want with
font description. For instance, you can name
Google font like Manset or just say modern San Serif and let Claude pick
something suitable. And that's it for this tutorial. In the next one, we
will make this app interactive by edging controls. Things like resizing, rotating and layering your
logo as well as text. That's when your business
card tool becomes truly fun to play with
Alca in the next tutorial.
42. Follow-along: Adding Interactivity (Rotation, Scaling, Layer Control) - part 1: One. Welcome back. So far, we've built a working business
card app and customized it with your own logo,
colors and fonts. That's already powerful. But what if we could make
this app interactive? Letting you move things
around, resize them, rotate them, and even control
which elements sit on top. That is exactly what we
are going to do now. Adding interactivity is
what makes the tool feels less like a fixed template and more like a
mini design studio. Here is the kind of prompt
I would give to Claude. Please update the business
card app to include interactive controls for
resizing the logo and text, rotating the logo,
changing the layer order, send to front or back. Also, use simple
sliders or buttons for these controls so I can adjust them directly
in the preview. Claude is now updating the code to handle
the interactions. Mom. Below under the business
card review section, we see interactive controls. These include slider to
change the size for the logo, a slider to change the rotation so you can
spin the log around. We also have buttons like bring front and send
back for logo layering. Let's test how it works. Rotation definitely works. I will now upload my logo. Let's try to enlarge it. I think it became bigger, but I'm not quite sure. Let me move this slider
all the way to the right. Yeah, I see some changes here. What will happen if I
would just minimize it? Yeah, definitely working. So let me move it to here. I will return rotation
to zero because I don't want the logo to
rotate in the moment. What I also want to
add here is my photo, not just the company logo. So let's ask Claude to add this feature for us. No. I don't see a photo placeholder
on the card preview, so I will ask Claude
to edit No, no, no. No, no, no, no. Alright, I still don't see
the photo place holder, but let me try to
upload something in here and see how it works. Yeah, I definitely don't see the photo on the card preview, so I'm asking
Cloude to fix this. Mom, Dom. No, no, no, no, no, no, no. No, no, no, no, no. Okay. Let's pause here as I want to unpack what's going on. I asked Claude to add a
placeholder for a second image, a headshot photo to
the business card. You saw that Claude
kept creating one artifact after another
without much success. Even though this task should have been very
straightforward. We already had a
logo placeholder. I was curious to see
how many iterations it would take Claude to
implement the change. But I gave up around
artifact version 15. Yes, 50. At that point, I realized
it just didn't make sense to continue working
in that same chat. So what I did next was
copy the artifact where I wanted the changes to be made into the
project knowledge. And then I started my
request all over again. This is the recommendation
I want to give you. If after many attempts, you still cannot get Claude
to produce what you want, try starting fresh
in a new chat. Just don't forget to resubmit
all the required context, since Claude won't have access to the earlier
conversations. And by the way, if you
decide not to create projects but instead work
in a standalone chat, you can copy the artifact to your local drive and then attach it as context in
your new conversation. Okay, let's move to the second
part of the demo to see if Claude could make the required changes
in the artifact.
43. Follow-along: Adding Interactivity (Rotation, Scaling, Layer Control) - part 2: O. No, no. No, no, no, no. We were finally able to add
both photos to the card, and we also now
have possibility to control logo as well as photo
by changing photo size, rotation, as well as position. Let's make some
final changes here. No Notice that I just provide the description
of a behavior that I want Claude to implement and
the text is quite broad. I didn't use a
specific feature names like drag to move
or coronary size. However, Claude was able to
understand what I'm looking for and hopefully will now implement all
of those changes. Let's wait and see how the
final results will look like. O. Awesome. We now have this
interactivity implemented. Let me add a photo as well as a logo so that our business
card has a polished look. That's amazing. I
will just try to minimize the logo for
a bit, move it here. And, that's awesome. I really like this
interactivity, and now I can just easily
enlarge or minimize the photo and move it to
various parts of the screen. I'll also add my name. And as the final step, I want Claude to do two more changes to the
business card review. So I asked Claude to add a color picture so I can change
the background instantly. I also want to have a possibility
to change the shape of a photo and the possibility. No, no, no, Oh, no. All right. What I have
noticed here is that we could not change
the layer order, even though I
definitely remember that we included
this functionality. Perhaps it was lost when I was working on including
the second photo. So I will ask Claude to include the layering in
this version of the app. Mm. Mom, Dom. All right, we've made
some significant progress with our app. As you see, we added a lot
of controls for Photo, as well as for the logo. We can resize them and
change their position. We also added layering, which is very convenient
functionality so that I can now move one layer
on top of another. I also included the color
picker functionality. Here we can include
the color code, or we can choose a color
from this palette. Or we can select one of the preset colors that we have on the app dashboard.
All right, cool. In the next tutorial, we will
explore layout experiments. Asking Claude to generate multiple design variations
of your business card, so you can compare
styles that way, you will leave not just with
one design but with options. I'll see you in
the next tutorial.
44. Follow-along: Iterating on the Prototype by adding a Style Presets Dashboard - part 1: Everyone, welcome back to the final tutorial of
the prototyping series. Let's recap what
we've done so far. We started with an idea, creating a business
card generator app for freelance consultants, and we wanted to build a prototype to get
initial user feedback. Here are the steps
we went through. Step one, we created a product
requirement document or PRD for our idea to outline
the problem statement, product vision, target audience, success metrics,
and key features. Step two, then we used that PRD to build the first version of the app with clod artifacts. Step three, we iterated and improved on that
initial version, adding customization
with your own assets, and interactivity
features like rotating, scaling and layer control. In this tutorial, we
are going to experiment with adding another
feature to our prototype, a style preset dashboard, a simple panel where
users can quickly apply predefined styles to their
business card designs. Let's go back to
Clote before we begin let's copy the last
version of the artifact we created in the
previous tutorial to the project knowledge
base so that Claude can refer to that latest version in any new chat that we
are going to create. As you see here, we have
two files attached. The first one, MD file, it is the PRD that we created as the first
step of our project, and the TSX file, TSX here refers to code
written in typescript. This is the artifact that we copied to the
project earlier. As right now we have a new
version of the artifact. Let me remove this old version. Next, I'll return to the
chat that we worked before. Here is the latest
artifact version. We are at version 29. Let's double check
that's the latest one. Yeah, I see all the changes. Everything is moving here, good. I'll click Copy.
Copy to project. So now we have the new version
in the knowledge base. I'm going to type in my prompt. I asked Claude to add a professional style dashboard
with these categories. Next, I described several styles that I want to have
on that dashboard, including classic business, creative industry,
industry specific presets. As well as trendy modern styles. Finally, I included very important instruction
that each preset should instantly
transform the entire card while keeping the same content. What I would expect here from Claude is that it will apply those instructions to
the latest version of the artifact that Claude has
here in the knowledge base. Let's see if my
understanding is correct. I'll hit Enter so that Claude can start
generating the dashboard. Claude just reported that
it completed the work. However, I don't see
any visualization on the right hand
side, just code. So I'll ask Claude to fix it. All right, we finally got the dashboard ready.
Let's take a look. Now we have here the possibility to choose
from different presides. Let's try something out here. Currently, I'm at
executive premium. Let's try startup dynamic. I really like this
color gradient. Looks very stylish. And how about tech
software? Also interesting. I like the combination of colors in the healthcare preset.
45. Follow-along: Iterating on the Prototype by adding a Style Presets Dashboard - part 2: H you see that Claude has applied those changes to the previous version
of the artifact, the one that we submitted to
the project knowledge base. However, what I don't
see here is some of the features that we added
to that last version. Right now, I'm not able
to enlarge the images, and I could not do
any layering here. I don't see any
controls for this. Let's try to fix this. O. I explained to Claude what features did we have in the previous
version of the artifact, the one attached to
the knowledge base. And I asked to add
those features to this current
version. Let's check. Claude acknowledges
the mistake that it needs to add back
the layering control and the dreg to
recise functionality. And he tells me that he's now restoring those
important features. No. Let's check
what we have now. The dashboard is still in
place, which is great. Here is the business
card mockup, customization form for names and personal details,
element control. Now we have layering,
which is great. Photo shape, let me
quickly try to enlarge. I think we are good.
Sounds perfect. And just quickly test
layering, bring to front. Awesome. And I'll set up
my favorite style preset, which is startup dynamic. Let me customize this card with my details so that we
have the final look. O. Here is the final
look of the card, in case if we'd like
to change the style, we can quickly do
this by selecting one of the presets from
the dashboard. All right. Let's stop our
business card app prototyping here as we've already developed quite
sophisticated functionality. The next step would be to show the prototype to your
teammates, stakeholders, or users, gather feedback, and then come back to Cloude
to make the next iteration. In this course, we
are not covering the details of how to collect
feedback on your solution. But if you want to dig
deeper into this topic, check the bonus section
of this course. There is a product
management course that covers exactly
this and more. My final takeaways, would I use Claude to prepare
design sketches if I wanted to create a
business card for myself or any similar
design asset. Initially, I thought it might be a good idea and I even
considered building tutorials around showing you how to prepare design mockups. But after I started doing
actual work with Claude, I quickly realized it is not the right tool for
this type of tasks. There are plenty of other
apps where you can do exactly this without
needing any design skills. What I would use clothe for
and what we've been doing in the previous tutorials is creating prototypes
for a product idea. In our case, the business
card designer app. This way, we can
quickly validate whether there is
a need and demand for such a product among our target users as we discussed at the beginning
of this section, with clothed artifacts,
we can build simple apps. But since any designer app
is complex, by definition, once we've completed
the initial validation, we need to switch to a professional prototyping tool to build a fully
interactive prototype. And that's it for this
series of lectures. I hope that you enjoyed
these tutorials. And please let me know
in the Q&A section for this video regarding what kind of app have you
built with Claude? You can share your links. I would take a look at everything and
provide my feedback, and as always Alca in
the next lectures.
 Anna Kolenkina, Product Builder, Entrepreneur