Transcripts
1. Introduction: I have this little, pretty pool. Nobody got hurt. We're all good. Camera's rolling. Hi. My name is Zach Mulligan, I'm a cinematographer working in film television. You may know some of my work from HBO's The Outsider, or from my Sundance film, We the Animals, which was there in 2018. Cinematography, really, is all about lighting. Today I'd like to really break down how I like to think about lighting, and how I like to approach it onset. I like to think of lighting in terms of its basic elements. We'll be doing seven lessons, one for each element of lighting. After each lesson there'll be a brief exercise. We have the direction of the light, shape of the light, color, intensity, quality, texture, and movement. I'd also like to say with all these elements, with direction, with any one of these elements, I really don't believe in there being any rules. I think that, you should approach each element, completely on your own. I encourage you to play with each one of these elements. Play with the direction of the lighting. The conventional wisdom is often wrong for the story we're trying to tell. For each lesson we'll demonstrate how I use these elements in my own work. I will be showing a lot of examples from the film, We the Animals. At the end of the course, I'd like to do a final project, where we synthesize everything we've learned, by shooting a short haiku. I call it a video haiku. We found the structure of a real haiku cam, we take three shots, and each shot synthesizes what we've learned about lighting. But we're trying to combine them to tell a bigger story. One other quick note, I designed this course during the COVID-19 pandemic. With that in mind, everything you need for this course should be laying around your house. You can just use your iPhone, household light bulbs, things that you already have. Please stay inside and stay safe. I'm so excited to bring you long for this journey. Let's get started.
2. Tools & Materials: [MUSIC] I've designed this class to be really easy to do with stuff you have lying around the house. You could use a candle, light bulb, an iPad, or your iPhone or your Android phone. Really, I want to stress that you should just use whatever you have lying around the house. There's this old saying that the best camera is the one you have on you. I think that's really important. Just one more note on tools, guys, I'm using an app called FiLMiC Pro here to film all this stuff. It gives me full manual control over all my camera settings. You need to use an app, similar to FiLMiC Pro, if it isn't FiLMiC Pro, that gives you full manual control. If you use a camera that just has automatic settings, it will automatically adjust exposure while you're doing some of these exercises. The exercises will not work. Each one of these exercises, I'll walk you through the best way to shoot. Some of these you can shoot during the day with the sun. Some of them you could shoot in a closet or in a bathroom. But really, everything should be able to be done from your apartment or your house. As you're doing these exercises, I'd also like you to watch out for just things that inspire you or that are interesting to you and feel free to shoot a little extra. At the end of the course, we'll be doing a video haiku, and you might be able to use some of that footage. Now we've covered the stuff you need. Before we move into each element, on the next video, I'd like to talk about story and really what all these concepts are in service of.
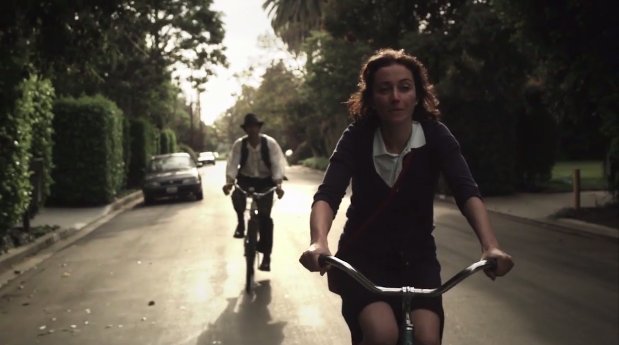
3. Story and Lighting: Whether you're making motion picture content or still photography, story is really important. Images have narrative and have meaning attached to them. So everything we do, every decision we make should go back to story and the narrative that we're trying to tell. So how we approach lighting imparts information. We should link this information up to the story, to our scripts, to the narrative that we're trying to tell. If it's a dark and stormy night and you're shooting a horror film, you probably might not shoot that on a bright sunlit day. If somebody is sad and lonely, maybe the image is a little underexposed and cool and blue. If somebody's happy, maybe the image is brighter and sunnier. There are so many simple ways to marry up lighting concepts to emotion into story. So whenever I read a script and think about the story and how to approach it, I really try to use all the tools in my tool kit. That's, obviously, there's a lot to cinematography, there's lenses and camera choice, color and all that, but lighting is the single biggest element in my tool kit. Each element of lighting can impart some sort of information, some emotion, or even some little information. For examples of each one of these elements, I'll be showing clips from a film I shot called We The Animals. The story centers around Jonah as he comes of age in a very masculine family. As he progresses and learns things about his own sexuality, the story develops always from his perspective. So for me it was very important to keep the camera always at his eye level, always from his point of view. The lighting had to be very grounded and very naturalistic. But also at times we get emotional and we really get inside of Jonah's head. For these moments, we explored a magical realist kind of imagery. I was able to get a little more creative with some of the lighting. But, again, it was appropriate and tied to the story. I think it'd be great to watch the trailer right now so you can kind of see stylistically where we're going with this. You feel that? [inaudible] I remember your heart inside me tickling like a bomb. Promise me you will stay in line forever. How? Simple. You're not ten, you're nine plus one. Look at us. When we were brothers, we wanted more. How come you don't swim? You don't know how to swim either. You go down and [inaudible]. See, you can swim. You can't even defend your family. [inaudible] , what's wrong with you? Okay, I'll try. I need you to be good quite around your mom. It's my birthday tomorrow. Happy birthday, old man. Do you think father will ever come back? He will always come back. God, starving. Ring, ring. Hello? My man. How come you don't answer the phone when I call you? Cause you sound so ugly. Hello. Hello. What are we going to do? We could go anywhere. But I need you to tell me what to do. You supposed to find us. Why did you find us? We got your back, back, back, back, back, back, back, back, back, back, back, back, back, back, back. Look at us, growing up, who will we be? So as we approach each element of lighting, think of each one as a tool in your tool kit. You don't necessarily have to think deeply about story just yet. But do start, do try to keep in mind how each element might affect emotion or story. Let's dive into the first element of light I'd like to talk about which is direction.
4. Element I: Direction : The first element of light I want to talk about is direction and by direction, I really mean just the direction of the light. Which way is it coming from? Now, usually this is in relation to your camera. You can think of it in terms of where's your lens? Where's your camera? Where's the direction of the light? If there's a single light bulb, is it coming from the side? Is it coming from the front? From below? It's really simple. That's all it is, just the direction of the light. What's less simple is thinking about how that affects the mood or might emote something. It might emote a feeling or it might impart an idea, whether it's subjective or literal. The direction of light can be very emotive. Think about something that's like back-lit like silhouette. There's a mystery to that. There's something quite beautiful about the mystery of what a silhouette can do. Two people in profile in silhouette. Are they talking? Are they going to kiss? Are they going to fight? You can't see their eyes, so you're doing something there with the photography in the lighting that really can only come from the lighting. There's also some other very common things we see with lighting direction. Sometimes in up light is a cliche horror movie thing. It has this sinister quality to it. You can also play the opposite of that and use it in a non sinister way of course. But these are all the choices that we make. A front light is usually something that's considered more flattering for an actor or an actress. The choice in lighting direction can have big implications for the story you're trying to tell. I'd also like to say with all of these elements, with direction, with any one of these elements, I really don't believe there being any rules. I think that you should approach each element completely on your own. I encourage you to play with each one of these elements, play with the direction of the lighting. The conventional wisdom is often wrong for the story we're trying to tell. You don't need three-point lighting, you don't need a light here, a light here, and then a fill light there. To me, that is the antithesis of creative storytelling with lighting. While these elements of lighting aren't in any particular order, there's certainly not any order of importance, direction is often one of the first things we think about. It's very elemental, like the camera goes here, where do we put the light? I think that's one of the important things to talk about first. When I'm talking about lighting direction, I'm talking about where the light is in space in relation to both the camera and the subject. It's really those three elements you need to know. Where does the camera go? Where's the subject that you're lighting? Where's the light? For example, my camera is right there, I'm right here. If I have a light right here that's to the side, this would be to the back, below, high, the other side. It's 360 space and you can put your light anywhere you want. Why don't we take a look at every direction possible and we'll break it down into its basic elements. Let's talk a little bit about how this light might affect your story or mighty emote something or help you get into its objective nature of what a character is feeling. Like I mentioned before, this front light can feel very stark. It's also quite flattering often. It's commonly used for beauty work. Fills in the face nicely, it reduces contours and fine lines, it reduces wrinkles, things like that. This can be very flattering light. It also can use probably see nice little ping on my eye as well. You can also feel stark and perhaps, maybe it's a little boring at times. Again, it depends on the kind of story you're trying to tell. Now if I go really overhead here, you're going to start to see really deep shadows under my eyes. This is interesting and you can also play with how much to do? When do you start to see the eyes? Deciding whether or not to show an actor size is really important and usually when I have a reason not to show the eyes. Here you can see I'm creating a mystery. If I can't see the actor's eyes, I don't necessary know what they're thinking or what they're feeling. As I said, the eyes are the window to the soul. You'd also do things that actor can play with the light to and lookup into it. You might reveal the eyes in a moment. Now if I go low, we have that cliche, scary movie light can be quite menacing it's a weird it's definitely a harsh looking angle for a lot of people. But I think there's a lot of interesting ways to play with it. I've often played with bouncing sunlight off the ground and had to come from this direction. Can look very natural and interesting. I'll go with a sidelight, This is a very typical direction for a light. In a lot of narrative work. Again, you can have your actor opened up to it and maybe they're looking that way, can act as an eye light then provides a nice shape to the face. You can just nudge this around and can be anywhere In that 360. Here's a little more three-quarter frontal and here's a little more three-quarter behind. Again, you might have multiple lights going, so you might have one light here at a three-quarter frontal and another light back here, giving you a bit of a definition on this darker side of the face up to you and how you want to tell your story. Last we have this here we're getting into the silhouette or a harsh back-light. Again here is a mystery, maybe it's a little easier to see if I go and profile here. You can really see the definition someone's face, but you don't know what they're thinking or you can't see their eyes. It would be very mysterious lighting direction. Now we've talked a bit about direction. Let's take a look at a clip from We the Animals. In that clip we start off, Jonah is actually under his bed, writing in his journals. You'll notice the flashlight is bouncing off the ground, is hitting from low. We know it creates a very dramatic lighting effect. We talked before about that being a horror cliche, but it totally works in the scenario too for somebody who's really hiding in their own private world under their bed. It creates this envelops them in the sense of privacy and space. Jonah comes up from out of the bed and then you have this very soft toppy light that's coming through a window that looks very early morning. Again this is just maybe a nice contrast to get out from under this world where he's been hiding in his own world, working on his journals. Then him and his brothers walk out into the hallway after hearing a sound and this plays out in silhouette. Again this creates a sense of mystery like we don't know who the sound is coming from or what it is. Then we see that it's their mother and she's gotten home from work and she's very tired. Again, we've cut this sense of mystery and we're discovering the world with the boys. You can see very simply how there's a few different lighting directions going on there, but each one is really married up to what's going on with Jonah and his internal world. Now we've talked about direction. I'd like you to grab a light. It can be any source, it can be a lighter, a flashlight, a household bulb, go into a dark room with your camera. Again, you could do a video camera or a still camera, hold it into the mirror, and just hold it in a single fixed position and move that light around. As you're moving the light around, think about what emotions it evokes or how it makes you feel. You can choose to either do a video or a still photograph. Still photographs can be interesting because you could actually really easily compare the different directions and how they feel. Let's go ahead and post those videos on the class site and we could all talk about different directions and how we think that they might affect story. Great. Now that we've talked about direction, let's go to the next video and talk about shape.
5. Element II: Shape: The next element of lighting I want to talk about is shape. Shaping quite simply is really just blocking light from hitting certain areas. Imagine you're sitting inside your house on a bright sunny day and you have the sun coming in through a window. Now that hard sun could actually project the shape of the window onto your wall or the floor. That's what I mean by shaping the light. The light is actually cut by the walls of your house. All right. Let's talk about how we might shape the light. For this exercise, I've got this normal light bulb that we've been using for everything. Got the shed cleared out here, so you see these two walls have a light coming from the front of the camera. So it's a little bit flat, a little stark. Kind of boring. There's not much mystery or shadow to it. What I want to do is I want to actually cut light and shape it up. Normally, to do this on set, I'd use something like a black flag or a black wrap or barn doors on our lighting unit. But you can use anything that will stop the transmission of light. I'm just using these baths out here. You can also use garbage bag or [inaudible] queen or anything you have laying around, a T-Shirt. What I'm doing here is I've just shape the light. I blocked it off this back wall. Now I've created this nice deep shadow, and that really let's me play with directing the viewer's eye where I wanted to go. Right now I'm standing in the light, the viewer is going to look right towards me. But if I already put somebody in the shadow, we probably wouldn't see them very well. We're not going to really be looking at them. This is a great way just to impart information or hide information. Where do we want someone to look? We don't or we want them to look. Do we want to create a mystery by having something in the shadow? This is just such a powerful tool for anyone's work, and I encourage you all to explore it. Okay. Let's take a look at this clip from [inaudible] animals. Take special note of how the sun projects the shadow of Jonah onto the wall. Okay, did you notice what the sun was doing with Jonah's shadow on the wall? We have Jonah himself in the far right of frame and the shadows cast on the wall on the far left of frame, with a bit of headroom. It's got this unsettling off framing that emphasizes the shadow and Jonah. I thought this was very effective emotionally as Jonah is watching his father leave. For this next exercise, grab a motion picture or still camera, and go around the house and just try to find interesting shaped light. This could be light that comes through a window from the sun or a street light. It could also be maybe just a light bulb on in a closet that creates an interesting shaft of light. I want you to find three examples and go ahead and post them to the group. Now that we've talked about shape, let's move on to color.
6. Element III: Color: The next element I want to talk about is color. Naturally, there are many different colors that light can be. Thinking about a sunset and how warm and orange it can be. Or sometimes a cool purple sunrise. The midday sun is very neutral white sun. But late in the afternoon it might get a little bit warmer, a little bit oranger. Or you can also think about the lights we have in our homes. Normal tungsten light bulb, like just a regular old light bulb, is a lot warmer than the sun typically is. The light coming off of your computer screen is pretty blue. I think that there's a lot of great examples of color and how it exist in our normal everyday life. One little side note here is like, if you would like to dive more into color, I really urge you to just do some Google searches, some YouTube searches on color theory. You could look at Josef Albers books where he explores different color combinations. This is all great stuff to know, but don't worry about that just yet. If you don't have a background in color theory, don't worry. We're going to make this very simple and straight forward and is not technical as possible. Another concept to think about when thinking about color is saturation. By saturation, I really just mean like how bright and poppy a color is. It's also related somewhat to contrast. What is like more contrast typically makes a brighter and popular saturation and less contrast as does the reverse. I think an easy way to think about it is imagining, a bright sunny day, and how bright in green grass or trees can be under a really bright harsh sun. Now, imagine that same trees and grass if it was a rainy overcast day and how it might feel a little more muted, a little less saturated. If you don't have access to professional RGB lights or colored gels, how do you change the color of light at home? Well, I think that there's a few different ways you can do this. One is if you want to try stylize color, you can buy RGB light bulbs on Amazon or at Home Depot. These are grade. They come with little remote controls and you can dial up any color on the spectrum. You can also put them into paper lanterns and they make really good lighting units that are very versatile. You can also do things like just wait for the light to change. You can shoot something at sunset versus midday. Another option is to actually find a colored surface to bounce light off of. If you're outside and you're shooting during the sunny day, you'll notice that the sun actually bounces off the grass and creates a very green light. You might not want that. You might want to put something down or to control that. But it's a great thing to notice and you can use it to your advantage. Perhaps you have some colored paper. You can bounce the light off that. Perhaps you have somebody's yellow T-shirt, you can bounce the light off that. Literally anything you can bounce the light off of, and it'll also the color. I think what's interesting about color, is that it has the potential to be something that the audience really notices. In this way, it can be a very effective tool to communicate your ideas. But you also have to be careful because it is a very noticeable tool, it could very easily be overdone. Since it's a really powerful tool and any photographer or cinematographers toolkit, people really remember things like the Red Jacket from Schindler's List or the color palette of drive. These are things that really stick in people's heads. Now that we've talked a little bit about color, watch these two clips from We the Animals. Come on. In one of the clips, you'll notice that I've stylized the color. I've used really intense monochromatic, red, green, and blue images to really show the sub textual layering of what's going on inside Jonas head. In the other image. I've used color in a different way, so much more naturalistic way, but you'll still notice that there's color contrast going on. There's a warm light from inside the house that sets against the kids faces. While the background is a very cool blue sky. You can really use coloring in either way. We talked about color and seen a couple of clips. Let's go look at how we might actually do this in real life. We talked about how color might affect the mood and feeling of your work. Let's look at a couple of real-world examples. Here I have just a normal light bulb that you'd find in any house. You'll notice that it's a little bit warm, little bit like orange or yellow. Then I have this little bit of daylight coming through here off to my right side. You see it on my face, it's a little bit cool and blue. This is what I would consider a very naturalistic use of color. These are normal colors we see in everyday life that exists. We see them on film and television all the time. It's an interesting dynamic color contrasts between this warm and this cool. They're complimentary colors. It really can create a nice effect. You can also choose to push them further apart, knowing cooler with that and warmer with that, edging it towards more stylized. Where you can also choose to bring those towns together and make them a little more neutral and less stylized. Just cool is when down a little bit, you can warm that up a little bit. Now, let's go talk a little bit more about how we might stylize color. Right here I'm holding just a light bulb I bought on Amazon, got delivered in a couple of days. It's a RGBW LED lights. Because its RGBW, which means red, green, blue. W stands for white. It actually has diodes that you can mix any color you want. I have a little remote. This is the lo-fi G, powerful version of this. They're very expensive versions. You see this on any films set these days. But it's great. You can just hit some buttons and really cycle through a lot of different colors. These light bulbs are great. They're very easy to find in a great way to let you play with color. Let's talk a little bit about how color might affect the mood of the scene. Yes, we have read. I mean, red is great. Often it can be associated with anger. It's also associated with passion or love. I always think of love movies scene that takes place in a dark room where we have the red light, we can use. It also very flattering light on the skin. It really gets rid of any blemishes or unevenness in skin tonalities. Think about ways you could use red. This is more of a tungsten neutral light color. Then we get into something that's a little more green. Probably not a very flattering light on my face. Always keep cycling through more green. Now, it's going to get a little more blue. I mean, this blue's a little stylized, but you can see now it's starting to look more like the daylight coming in. Then if you think about how this can match up with intensity, we have a very bright blue light and do a demo on. Again, you can think of direction. Now, is it sinister to be the red light under. In the spirit of using items you might have laying around my house, I found a few objects you can also use to create a lightwave. Assuming you just have a flashlight or a better bulb, you can really use anything, anything that you can bounce the light off of or push the light through can really change the color of the light. Here you'll see I have this red light. It's just a saucer sled that's in my shed. Any number of things can create life or you can change the color. For this next exercise, I'd like you to find three or four different intensely colored objects around your house. This can be a jacket, a piece of paper, whatever you have laying around that just has a really bright intense color to it. Take that object with your video camera or your so camera, and find a hard piece of light coming through a window or whatever, and then put that object in that light. Now, that light is going to bounce off that object. I want you to hold up a white sheet of paper or a paper towel or just something that's white in color, so it's neutral. Then switch between the different colored objects. You'll see that that white object will change colors. For a next element would be looking at intensity.
7. Element IV: Intensity: Okay, so what is intensity? It's really very simple. It's the brightness of a light. Now, there's many ways you can change the brightness of a light. You can simply move the light closer or take it further away from the subject, and it'll get brighter or darker. You could also use something like a dimmer and dim up or down to change the intensity. You could swap out a different size light bulb. If you have a 75 watt light bulb, that you're using and you want it to be darker, you could use a 40 watt light bulb. So by intensity, I really just mean, the brightness of a light. Okay, so how do you link up the concept of intensity to story? Well, it's very simple. Usually it has to do with contrast. You can have one scene that's very bright and that goes against the scene that's very dark. You don't really have a dark scene, until it's compared to a bright scene. There's also things that are just appropriate for time of day or for story. If you have a scene that's at night in a bedroom, it might be a lot darker than a day exterior scene. Okay, so let's watch this clip now from "We the Animals". Take note of how the different shots have different intensities. Did you notice the difference in intensity between different shots? So you can see how it can be used for story. The kids are in bed, it's night. The intensity should be a little bit dimmer, a little bit darker, and then we go into the factory setting, where Ma is, and then we go to Pap's work as well and they're brighter, the light's a little bit harder, more intensity. You could also imagine a daytime scene, where it be would very bright. You can even use this to effect. You can have a character, perhaps, waking up from a coma or something, and the light is really washed out and very intense, very bright. Okay, so now that we've introduced the concept of intensity and seen that clip from "We the animals", let's go for a quick demonstration and see how this might work. Okay, so intensity is just the output of the light. It's how bright or dark the light is. Couple of ways to really easily control that. One is to use something like a household dimmer with a light bulb. This is just from Amazon or Home Depot or your local hardware store. You can just dim down. You'll see it getting really dark until it goes off, and then I'm going to dim up slowly. Then you'll see at some point, my skin starts to get overexposed and it's too bright, technically, unless you want that. Now, go back here in the middle somewhere. Then the other way is just simply to change the distance of the light from the subject. Very simply, just move this light further away from my face. You see, even though I'm not changing direction, the intensity is changing quite a bit. It's getting much dimmer. Now let me move it closer, and you'll see the intensity increases until my skin gets overexposed and I'm way too bright. So again, that's not changing the direction of light, really just changing the intensity there with dimming, or moving it further away and closer. So for this next exercise, it's really important that you have a manual camera. I use the FiLMiC Pro app. You can also use any variety of still photography apps that allow for manual control on your iPhone. Android should have the same apps as well. If you don't use a manual control camera, as the light intensity changes, you have a chance of auto exposing, and then you won't really see much difference in the light intensity because the camera will be compensating for it. That's it for intensity. The next video is about quality.
8. Element V: Quality: We talked about the quantity or intensity of light. Now as I'm talking about quality, what do we mean by quality? Usually we talk about quality in terms of hardness and softness. I think the best way to think about it is an overcast day versus a sunny day. On a bright sunny day, the sun beams down and creates really intense sharp shadows. If you stand outside, you can look at your own shadow and see your form traced out on the ground. Where the shadow is very dark and where the sun hits is very bright. Now if you go on a walk on a rainy day when the sun's not out, it's very overcast, you won't be able to see your own shadow. The light wraps around everything and envelops it. This is a much softer and desaturated light. I think if you look at the video right now, you'll notice that it's a very soft quality of light. There's actually several windows around, but all the walls are way and a bit of sun that is coming in is bouncing off those white walls. It's a very soft rapey light. You don't really see a lot of hard light with deep shadows. It's important to remember that hard to soft light actually works on a spectrum, on a continuum. There's not only hard light and only soft light, but there's everything in between. Now, we can create this light and in many different ways. We can bounce it off of a wall which will scatter and spread the light, making the source bigger, which will then wrap it around and make it softer. Or you can point the light source directly at the subject, which will tend to make it harder. Then there's everything in between. You could put their light through some diffusion. A diffusion is a a translucent material that would tend to scatter the light and spread it a little bit. There's different densities of that diffusion from very dense will make a very soft light to not very dense, where it would still be a relatively hard light. On a professional film set, we carry a whole range of these diffusion gels that allow us to control the hardness and the softness of light. But around the house you can find different materials that would do that as well. For example, you could use a t-shirt or a bed sheet to bounce something off over, even destroy the light through. That would definitely change the quality of light. Maybe there's other things you could think of that would change the quality. Let's think about quality as we watch this clip. Notice how it starts off with a soft flight, but then when we get into the bathroom, the light gets much harsher. For me, I thought it was appropriate for the story because it's really talking about how this couple met and the gritty, harsh reality of that and that hard I just felt appropriate for that. Let me show you a quick demo with a few items that have laying around my house. Next I want to talk about the quality of light. Quality of light is really related closely to the size of your light source. If you imagine the sun, even though it's a really big object, may times the size of the Earth. It's very far away, so it becomes a very small object in the sky. Because that size of that sun is relatively small, it creates a very harsh, hard light with hard shadows on a clear day. Much like this light bulb is, I put a paper lantern on and this is just a cheap paper lantern you can get off Amazon. You can see that this becomes the size of the light source. What I'll do is I'll switch to a bigger paper lantern in a moment to show you the difference in quality once we get to a bigger light source. But one of the thing to keep in mind is that the distance of your light source to your subject does affect the quality of light. It's really easy if you just think about it in terms of relative size. When I bring this closer to me, this looks really big, but when I pull it further away, it looks much smaller. What happens is obviously you see a difference in the quantity of light, like we spoke about before. But the quality of light is also going to change as you move the light towards your subject or away. What you'll see is as light gets smaller relative to me it gets a little harder, as the light gets closer relative to me, it'll get softer and it starts to wrap around a little more of the shadows are a little bit softer, but pull away, it's going to get darker. But you also can perhaps see that the shadows get a little deeper and sharper. Let me show you a bigger line source and how that would look. I think right away you can see that it's a much softer light. The light wraps a lot more around my face. It's going to be a lot more flattering on my face, less deep shadows. Again, the size of this is what is doing that. The size of this is much bigger relative to me, the subject. The light itself is wrapping more around subject. Now if I take it further away, you should be able to see the light gets a little bit harder. It'll get darker, of course, because the quantity changes, but the quality will also change. Now if I bring it much closer, I think you'll see it start to wrap a lot more and be much softer. Another note about these paper lanterns are a really good thing to have in your lighting kit. They're super affordable, they're super versatile, and easy to use. Even on my biggest budget shoots, I still have these paper lanterns onset and I still use them sometimes. This with a light bulb really makes a great, nice little soft light. It's also a great light. You can hang it above frame and get a nice, like imagine, people sitting around the dinner table. It's a great light for that. Just to really versatile, very affordable lighting tree. That paper lanterns and example of pushing a light through some diffusion. A diffusion catches the light, spreads it and creates a bigger source. In doing so it changes the quality of light because it is a bigger source. There's also other ways to make light softer. The biggest way to do that would be bouncing the light off something. Bouncing the light again, it scatters the light and creates a much bigger source relative to the subject. What you see right now is I have this light bulb, which is a very small source and it's right on my face, so it's pretty harsh light. But if I just take this, it's just a white garbage bag and if I bounce this light into it, you see that the lights really starts to wrap around my face a lot more, becomes a much bigger, softer source. Now one thing to keep in mind is that bouncing the light does also change the output of the light or the quantity of light because it's scattering the light speed, the light itself is working less efficiently. Again look at a direct light, how hard it is and then now if I just point this light here becomes much bigger source, much softer source, more rapid. Again, this is just using a kitchen garbage bag from my house. I'm not even really using proper grip equipment here. You can really use anything. It can be anything. It could be a white bed sheet or anything you want, and it could be a different color bed sheet, if you want to change the color. Lot of options. Let's talk about the next exercise. For this, you're going to need a flashlight. Your till camera or video camera and you'll need an object, something that photograph. What I want you to do is find a wall, just a plain white wall, and take that flashlight and bounce it into the wall to light up your subject. Now take a photograph of that or a video of that. Then just turn on that flashlight and point it directly at the subject. Now again, take a video or a still of that. Just compare those two. You can really see the difference in the quality. Now that we've done quality, let's talk more about texture.
9. Element VI: Texture: Next I'm going to talk about texture, which is one of my favorite things to play with on set. Texture is just what it sounds like, it's the texture of the light. We often speak of it in terms like broken or cut. Imagine venetian blinds have slashes of light that come through and hits somebody's face. Imagine a bright sunlight filtering through some trees and you can see the trees move and the leaves. You can even find a lot of texture bouncing off of water. It's just something that if you start looking around a daily life you can really see a lot of natural texture going on. I think another way to think about it is a mixture of hard and soft light. If you take a hard light but have elements of softness mixed in different ways and different levels, that creates a texture, is a contrast within a single light itself. Now, I think we're going to do a point where we talk about texture, it's hard to separate it out from other elements. Because texture is still mixed with hardness or softness. It's has to do with intensity, it has to do with color. It's everything you could have texture and color, you could have texture and the quality. What it really is, I think simply is a contrast within a single light. Now let's have a look at how texture affects the look of this clip from, With the Animals. Just this. Did you notice in that clip from, With the Animals, that I textured the light by putting it through a tree. The broken life from the leaves textured and fragmented the scene in a way that felt to me like a childhood memory. Let's take a look at a few examples that I shot around my house. In this example, I have just a mason jar that had laying around the house and that same light bulb. What I want to do is just show you what happens when you texture a light. Now look as I'm shining this through the mason jar, the mason jar glass is distorting and warping the way the light is. You see that weird textured shadow cast. That's what I'm talking about with texture. We take away the mason jar and you look at the light that's hitting the ground, they even take that light out of frame. You see that way is just a pretty broad, hard light. There's no real breakup or texture to it. But then I can bring in this mason jar and I just hold that in front and you see how spinning it, it's casing some different interesting textures and patterns on the ground. I can even put the light in the mason jar like this, and you can see it creates a little texture pattern. That's really what I mean by texture. Let's take a look at another object and see how that might work. Okay guys, in this example I just have this house plant and my trusty light here. Again, you'll see by shining this light through that plant, creates all interesting patterns and textures against the wall there. Those patterns and textures can change depending on how the light is going through that plant, where it's hitting. Now imagine if this is just sitting there. Look how that just breaks up that light nicely, creates a little interest. A little different than if the light is just there without texture of fully different feeling. For this last example, I have this fly swatter and my light bulb. This fly swatter just looked interesting me, it's got these bridges that I think would make an interesting pattern. Let's see what I can do with it. It makes those interesting lines on the ground there. Now watch if I move it, you get the combined effect of texture and movement, it start to get really interesting. Now you get this more on frame you can really see those lines and figure the light further away. You see that like it's harder further away and those lines become more defined. Now if I bring the light closer, you see that it's softer and those lines fuzz out to the point you can't even see the lines if I have the light ball really close to it. The quality of light you can see really can affect your texture. A softer light like this, which is closer to the texture, doesn't give you as pronouncing effect as if you move the light away and then you can't really see those shadows in that texture. I encourage you to go find some interesting objects around the house to play with and shoot some interesting textures to show everyone. Thanks. For this next exercise you'll need your camera, video or still is fine and a flashlight. What I want you to do is take that flashlight and shine it through different objects in your house to find different textures. What we can do is just look around and see what's available. It could be a paper towel or a bed sheet. It could be your window blinds. It could be a glass bottle or a broken mirror. Any number of items that you could shine that light into and see what textures that can put out. Now that we've talked about texture, let's move on to our last element, movement.
10. Element VII: Movement: The last element I might talk about is movement or dynamic lighting, and this is really where we add the element of time to our lighting. Now, when we think about moving lights, it can encompass so much. It can be strobe lights at a dance party, it could be the sun bouncing off of the lake or a pond. Lights can sweep over a cars as we drive through a tunnel. There's just so many examples of moving light in life. Also in cinema, we do a lot of special effects lighting or dynamic lighting. Things like TVs or fire might not actually be created by an actual TV or an actual fire, but recreated by a dynamic lighting element. Let's watch this clip from weaving animals, can you pick out how many different types of light movement you see? There's two different types of moving light in that clip. One when we have the element of water. The water is really warping and bending and moving out light. Whether we're looking up towards the sun and you can see the beams dancing around or down at John as he sinks lower the light sweeps and wraps around him. Then we cut to the car ride and of course, it's a car at night, and you see these different streetlights sweeping over their faces and moving over the car. Let's take a look at a few clips that I shot around the house. Let's talk about the movement of light. Movement or dynamic lighting can really add an extra element of energy to your images. In this movement can be starlized, it can be naturalistic, you can really get creative with it. Here's just simply swinging this light bulb I have. You can see how it looks pretty interesting moving across my face, across my body, through the space, through my shed that I'm shooting in right now. This is similar to what you might see with a car driving through a tunnel at night or something. In addition to moving to create movement, the light can also be intermittent. It can flicker, it can pulse. Think about a strobe in a party, it can go different speeds to create different effects, different feelings. You can even just manually turn the light on and off, and you can also do both, you could move the light while it's working intermittently. One other thing to look out for dynamic lighting is just something simple like a lighter and a candle. You can see how that light flickers across my face. You can also imagine this intermittent lighting, how the lighter can light up and then darken. Again, I'd like to encourage you all to think about how this could create a mood for you. How could you use this creatively to show sub-text in your work? For this exercise, I want you to wait until it's dark outside. Go ahead and turn your TV on, but don't look at the TV, look at the light that the TV is casting. See how it dances across your wall, how it flickers on your couch, how the color and intensity change on the light. You're going to need a video camera for this one to really record it. It's the only exercise that's like that though. That covers off seven elements of lighting, or at least the way I like to think about letting. Let's go ahead and talk about how we want to wrap up this course with our final project.
11. The Final Project: For this final project, I want us to create video haikus. Using the seven elements of lighting, let's create three different shots. Will take these three shots and add them together. What I want you do is explore lighting, but also explore how these different lighting techniques can be a motive. We don't necessarily need to tell a story, it can be a little more poetic or lyrical than that. But what I'm going to do is focus on how lighting can make you feel. I'd like you to create three stories that explore different emotions. Let's try to make sure that each shot is a different emotion so we can explore a range of ideas. It's less important to focus on a specific story and more important to use the seven elements of lighting to explore different and motive ideas. So for this example, you can create your own light or you can find your own light. You could photograph the sun coming through the window or you could use a flashlight or any light you have laying around the house. You can either do video or stills and cut them together. If you do still as you can make a triptych, or you can add them together as video or you can just do a single video with three edits. For each, I'd like you to choose at least two elements of lighting to focus on. You can play with texture, movement, hard or soft light, whatever you want. Just just try to think about how the quality of that light matches up to the emotion you're trying to go for. This visual haiku is all about intentionality. Just think about everything you're doing, every choice you make, how the lighting relates to the emotion you're trying to explore. So for my visual haiku, I explored the idea of isolation. So for me that meant finding frames that felt lonely and somehow empty. Lighting wise that meant kind of softer light, moodier light, is looking for things that were evocative to me of the idea of emptiness or isolation. So one other thing to note is my use of music and sound design. I encourage you all to play with music and sound in your visual haikus. Obviously this can be very evocative along with the images. So it's really good to think about emotionally how you might imagine images and sound matching up together. I really hope you enjoyed this project and I'm really looking forward to seeing all the haikus.
12. Conclusion: Congrats on finishing the course. I hope you learned a few things about how lighting can be emotive, and can enhance your story. Let's upload our high coos, and also please feel free to upload any exercises that you enjoy doing. Thanks, again, everyone for taking the course, and I'm really excited to see what you guys come up with.