Transcripts
1. Welcome: Excited to learn how to draw adorable stylized
faces, I got you. Welcome to character
drawing Made Easy. In this course,
I'll guide you step by step through drawing
a cute female character. Here's a look at what's inside. F video lessons where you'll
learn how to draw eyes, the nose, the mouth, and more. Techniques for adding shading and blending to your characters, bringing them to life, and additional resources
that will help you draw amazing
character portraits. Drawing characters
is not only fun, but a relaxing way to unwind and explore
your creative side. This course is perfect
for beginners, so don't feel intimidated. No experience is needed. If you join right now,
in about 30 minutes, you'll be looking at a
really cute character hand drawn by you and ready to share. If we haven't met yet, hi. I'm Gabrielle Bricky and I'm an online educator with over ten years experience teaching. Helping artists like
you learn how to draw cute female characters is one
of my very favorite topics, and I can't wait to help you
enhance your skills today. You'll leave with a drawing you can be proud of.
I'll see you inside.
2. Materials: Well, hello and welcome. I'm so excited you've joined me in character
drawing made easy. Let's not waste too much time. If you haven't already, go ahead and grab your drawing tools. And real quick, here are the
materials I'll be using. And just FYI, I'll have all
these links down below. You'll see, I like to
use mechanical pencils, but any pencil will do. I use a three H pencil
for my light line work. I love the brand Pentel because it's super
soft and smooth. And then for my dark line work, I use four B Pentl lead in
this mechanical pencil. I like having two pencil grades like this, but it's
not essential. You can get both
light and dark values by varying the pressure
you put down on your hand. So light pressure for
lighter lines and hard pressure down on your
pencil for darker lines. Here I have a dirty
blending stump. I love using this for subtle
shading and blending. And if you don't have
a blending stump, go ahead and grab a cotton swab, like a tip and use that
because believe it or not, it works great for blending. This is a UNABL
Cigna white gelpin. I like to use it on my
characters when I want to add a little highlight and give a little extra
sparkle and shine. And then here are a
couple of erasers. I occasionally will use
an electric eraser. It works nicely for erasing,
like hairs and things, but I really love
a needy eraser, and I find I use it all the
time for subtle erasing. Another Eeraser you might
want to have on hand is one like the
pink pearl eraser. I like this for erasing
big mistakes in my sketch. Okay, materials out of the
way. Let's get into it.
3. Drawing the Eyes: For this character, we're actually going to
start with the eyes. Sometimes I start
with the head shape, but for now, let's start
with the shapes of the eyes. So go ahead and draw
two squished ovals. You can even tilt them
a little bit so that the outer edges are tilted
ever so slightly upwards. And before you go any
further than this, stop and ask yourself, could you fit about
the length of one more eye in between
the two you just drew? If not, erase the weaker one or the one you like
less and draw it again. This time, making
sure you have about the space of a third
eye right in between. You don't want the eyes on your character to be too close, and you don't want them to get too far apart for this style. So take a minute and
get the placement in a good place before
moving forward. So much of making beautiful art comes down to shape
design and spacing. So things like proportions. This foundation
is what will make the difference in the look
of your finished piece. So don't get into adding details until you feel
like this is right, and that would be
about the space of one more eye in
between, approximately. Okay, I'm liking this placement, so I'm ready to add detail. So what I like to think
about when drawing cute character eyes actually
is two pumpkin seed shapes. So I keep that in the back
of my head while drawing. So now with my three H pencil, I'm using a bit harder pressure to darken up the top lash line. And you'll notice I'm
using some angles. I'm not just using one
smooth arcing line. I'm breaking it up into angles. So it kind of goes up and then this part goes
longer like that. And let me just erase this
little line right here. And now, thinking about
that pumpkin seed shape or maybe you could
even think of, like, a lemon shape. I'm lately refining
the edges of the eye. It looks kind of like
a squished lemon. And you can see that these
aren't perfectly symmetrical, but I'm not going to
beat myself up over it. I'm just going to work
back and forth between the eyes until I can
find the symmetry. Alright, so now I'm
grabbing my fob pencil, and we're gonna draw a simple
triangular shape like this. This will become the
cat like eyeliner. And this will look really
pretty on our character. So you just draw straight
line out from here, bring it back down
like this, bring it around, and colour ended. This might take a
little practice. So if you want to start with
the light line work first, and then once you see that
the shape is looking good and the placement's looking
good, fill it in darker. Alright, so now I
have a dirty stump, and I'm actually just
going to draw with it. If you don't have a
stump, don't fret. Just use your pencil to draw this shape and colour
it in lightly. When it comes to
drawing the iris, which is the colored
part of the eye, the main thing to think
about is make sure that the top lid overlaps the circular shape
of that iris a bit. So take a look at your eyes
and a mirror if you want to. Your top lids will likely cover the very tops of your irises. Is a pretty essential thing to do on your characters, too, because if you draw
the whole circle of the iris, basically, the whole thing's exposed, your character is gonna
look instantly shocked. And we're going
for a more subtle, peaceful look for
this character. So make sure you can't
see the full circles of the irises on your drawing. That top lids got to
overlap it a little bit. Alright, so now I've
got my three H, and I'm just going to
define the edge of that circular iris shape a
bit using curving lines. And you'll see I'm not
slowly drawing one line, like, with a really
steady slow hand. I'm using multiple lighter
lines to kind of find my way. Now with my three H still, I'm going to refine
the lower lash line. I'm sketching a
little bit to create sort of a chunky shape there to show the form
of the lower lid. And since I'm here, let me
just darken up right here. This will make a
cast shadow from the top lid onto the eyeball. And I'm not going too wild. I'm just adding a little bit of shading to give a
bit more dimension. Now with my stump, I'm
just going to blend that out of it,
soften it up some. I really like the art
alternatives brand for stumps. But like I said, if you
don't have one of these, try QTip, it really works great. And I use that sometimes, too. Alright, now I've got
my kneaded eraser and my apologies
that you can't see, but I'm just using a molded
point of the Kady eraser to lightly pick up some of the pencil from the lower
left sides of the irises. So this will start to give the look of light
hitting the eyes. Now I'm using my
darker four B pencil to darken up the top
of this eye here. This will receive
a cast shadow in most lighting scenarios
from the upper lid. So I want to make sure
I darken that up. So now I'm going to use
my kneaded eraser again, and I got a little too
dark in what's often called the whites of
the eyes or the scala. So I'm just lighting that up. Now I've got my four B
pencil and I'm just going to refine the edges of these
shapes a little bit more. Now I'm grabbing my
three H pencil to hint at the crease
here at the upper lid. I'm just sort of mimicking the arc I've already
created before. This curve is a little
bit smoother, though. Alright, let's draw some lashes. One of the keys to drawing
lashes is confidence. So if you want, practice this movement on a scrap
piece of paper first, but it's basically
a flicking motion you'll make as you
draw the lashes, pressing harder at
the very beginning of the stroke and lighter as you flick to the
end of the eyelash. I find it takes a
certain speed, too, so not too slow where you're
shaky and not too fast, where your eyelashes are going
to end up looking rushed. But the speed is
somewhere in between. The lashes are also longer along the outer edges of the eyes and then shorter as
they come inward. So keep this length
in mind, too. Along the bottom lash line, I like to think of the
bottom lashes as forming little triangles where the
ends of the lashes touch. So try grouping some of these little curve
triangular shapes and leave a couple others
as standalone lashes. Alright, let's draw
the pupils now. With my four B, I'm drawing
these circular shapes, but we can't just leave them like this or she'll
look hypnotized. So we'll have to
do a little bit of subtle shading and blending. So grab your stump or
your tip and bring that up into the top lid
into that case shadow. Softening this up will help
avoid that hypnotized look. Now I'm using my electric
eraser to lift up a little bit of
the pencil tone on the bottom left of
the irises again. You can also use a
needed eraser for this, though, or even a
regular eraser. With the erasers,
though, just be sure you're using a clean
part of the eraser. If you use a dirty part, it can leave behind
some ugly marks. So just be careful
and make sure that you're using a clean part of the eraser before you use it. Time for the eyebrows. So start by drawing the
eyebrows with light pressure. This will help you find
the placement of them. I like to arc this part up
here with some sketchy lines. Then I bring the arc back down. Then over here again, I arc
it up with a sketchy tone. And I bring it back down. Now I'll grab my handy dandy
stump and smooth it out. I find drawing good brows
is less about drawing hairs and more about getting
the shape and angles down. So make sure you have
decent symmetry and good shape before thinking
about adding any hairs. Now that I'm feeling
good about the shape, I'm going to add a couple
hairs angled this way here and then back down. And again, for this brow, doing a few lines up here
and then back down here. Are you having fun
drawing your character? I hope you are. I am. Okay, now with my
kneaded eraser, I'm just erasing right at
the start of the brow a bit. Sometimes the hairs there
can go a little lighter, so I'm just hinting at that and drawing in a
couple sparse hairs. Okay, now for one of my favorite parts,
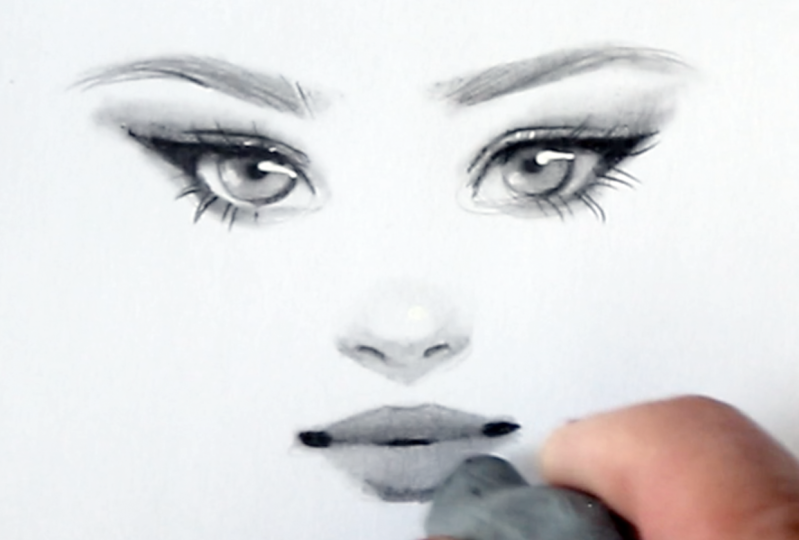
the eye highlights. Grab a white gelpen if
you have it and add a little dot right here
off center from the pupil. Then I'm actually going
to pull it across, too. Eye highlights are fun, and with stylized character sketches, you can really be
experimental with them. But isn't that fun? It makes
them look instantly shiny. Now I'm just going to darken up these outer triangular
eyeliner shapes here to make the eyes pop
with even more contrast. And I'm going to
blend that right into the upper lid, almost
like eyeshadow. Then I'm just going
to define that upper lid crease again with
my four B pencil. Something else you can
do with a white gel pen is add a couple little
dots on the upper lid. This can make it look like
shimmery eyeshadow or, like, glitter flex,
which is kind of fun. I'm just softening up
this bottom part here. And right, are you ready to draw the nose? I'll see you
in the next lesson.
4. Drawing the Nose: Alright, let's talk
about placing this nose. Don't follow these marks yet.
I just want to show you. So sometimes people place
the nose too high like this, and that's fine,
but it's a little too high, so I'm
going to erase that. And then now, this is too low, and that's not quite
right, either. So let me show you a
measurement that will help you place the nose with visually
appealing proportions. See this measurement
of the eye here. Take that measurement and drop it straight down from
the corner of the eye. Right about there is where
you're going to place a wide upside down triangle. And you can add hatch lines to the triangle to make it a
little darker in value. This is a really
visually pleasing way to add simplified shading
to your character. And I do want to
make a quick note about the shape of this
upside down triangle. See how it's not a perfect
equilateral triangle where all the sides
are equal in length. You can see that the
top part here is actually a bit longer in length compared
to those two sides, making it look like a more
squashed upside down triangle. That's more like the
type of triangle you want to draw for a
cute female character. So not this and not this,
but a little more like this. And keep in mind,
you're always free to experiment with
this as you please. At the end of the day,
there's no right or wrong. Now I'm taking a dirty stump, and I'm just wrapping around
the nose with a soft touch, thinking about the
ball of the nose. Doing this we'll give that
cute button nose look. And don't use too hard a pressure here or
it'll look too harsh. Keep it light on the pressure. Also, if you don't have a
stump, try that cute tip. Reserve a little
bit of the inside here to be the
white of the paper. That'll really give
that ball like look. So now, think about
the shape of a comma. That's what we're going to draw when we draw the nostrils. So just a slightly arcing shape
similar to a comma shape. And I'm just using
my three H pencil for this because I don't
want it to get too dark. If you draw the
nostrils too dark, they'll start to look flared. And now I'm just going to
lightly hint at the edges of the wings of the nose
here, the outer edges. And honestly, it's kind of similar to that
comma shape, too. It's just lighter in value. So I use a light
touch. Now I'm just ever so slightly going to hint at the edge of
the ball of the nose, but just a little bit. So I'm using a very light
touch so I don't go too dark. Now that I'm feeling more
confident with the placement, I'm going to darken
up the nostrils just a bit with
my for Be pencil. Let me try and blend this
a bit with my stump. I think the line got
a little too dark, so I'm just going to lightly
dab it with my Katy eraser. Key erasers are great for
subtle acing like this. So I'm just kind of dabbing it, taking away some of that detail so I can make it look
a little more subtle. I find with these
characters and my style, less is often better. So it's a balance, but you get to decide what you
like to look of. So I love a little
white highlight just at the tip of the nose. So with my white gelpin, I'm just going to place
a simple circle. I'm going to match it up
with the eye highlight so I'm placing it just
right from center. And that's a little much. So if you can catch
it quick enough, you can dab it with your
finger before it dries, just to bring it down a bit. Now with my three H,
I'm just defining ever so slightly the connection
between the nostrils. And it's just a
simple arcing line. Okay, ready to draw the
mouth? Let's do it.
5. Drawing the Mouth: So there are a few ways you can approach drawing a simple mouth, but I'm going to show you one of my favorite ways for characters, and it's simpler than you think. But before we begin, let's consider the placement
of the mouth. So measure about
the distance here from the brow to the
bottom of the nose, and repeat that same distance, and you'll get about where
the bottom of the chin lands. So brow to bottom of nose, bottom of nose to bottom of chin are about
equal measurements. So I just draw a light line to indicate where about
the chin will land. And you can use a ruler
here if you need to. And the reason we do this is because finding the bottom of the chin will help us find
where the mouth will land, because you can break up
this section into thirds. So three equal sections. And at the bottom
of the first third, you'll get whereabout
the part of the lips will land
in a closed mouth. And keep in mind, this
is all in a straight on view with no tilting
of the head up or down. So right at the bottom
of that first third, you can draw a little line there because that's where the
part of the lips will be. So where the top and
bottom lips separate. So I'm making a little
line to note that. And then I'm going
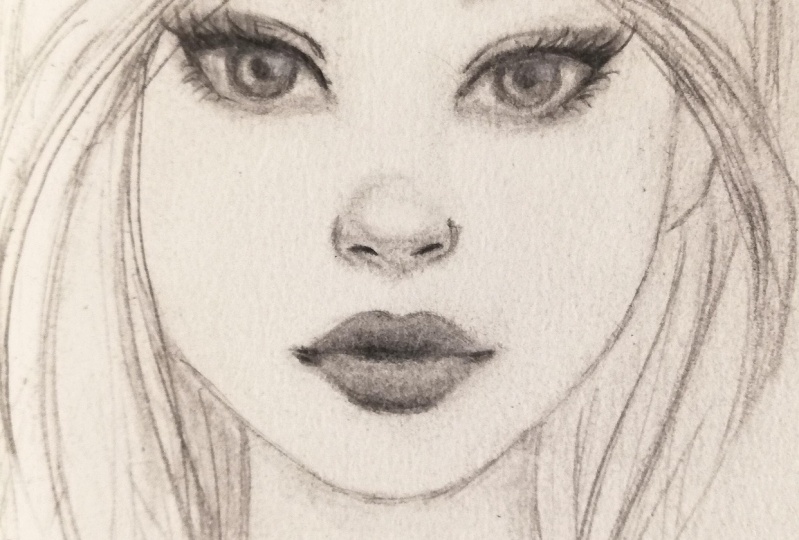
right into drawing a blob of tone. Yes, a blob. We're going to refine it later, for now, it's just a blob. And I'm not drawing super dark. I'm keeping the tone on the
lighter side. Just a blob. Alright, now grab
your cotton swab or grab your stump and
let's soften it up. I'm just going back and
forth to smooth it out. Now grab your pencil.
I'm using my four B. And let's draw in two
small dark accents at the corners of the blob. They're like, little dark,
squashed ovals almost, okay? And now draw a dark center line right around in the middle here. You don't need to make all
these dark marks connect yet. Now I'm going to grab my
lighter three H pencil, and I'm just going to define the cupid's bow right here.
And I'm not going too dark. And I'm going to
connect the marks here, defining the edge just a bit. And then I'm just going
to lightly connect all of this and bring
the shading up a bit. In this simple lighting
scenario I'm going for, the top lip will be slightly darker than the bottom lip,
so I'm going for that here. Then I'm going to grab
my stump and do a bit of blending, smooth it out. Smooth out these dark accents
so they don't look harsh, but the edges look soft. And then I'm just gonna
bring in my kneaded eraser and refine a little
bit along the edge. Not too much, tightening
up the edges a little bit. This is what's nice
about kneaded erasers. They're subtle and you can mold them into the perfect eraser. And then I'm just
going to dab to lighten up this
bottom lip and value. And value is just how light or dark a color is, if
that term's new to you. Alright, how are you doing? Snap a photo of your progress. It's always nice to see
work in progress photos. Then head into the next lesson, and we'll wrap
this character up.
6. Finishing Touches: Alright, let's wrap
this character up. So at this point,
I'm thinking all around the face and
how I can refine. So I'm thinking, I
just want to define the wings of her nose
a little bit more, so I'm just going to
darken that a tad. Just darkening these
nostrils a bit. And then I just want to bring back a little bit of
that ball of the nose, so I'm using super light
pressure on my pencil. And then I'm just
going to darken this case shadow
under her bottom lip here just to find
that a bit more. And I'm using my stump now to
blend a bit and smooth out. And let's start thinking
about her hairstyle. I'm thinking about doing just
a little flowing hairstyle where the pieces flow
to frame her face. You can have a ton fine
with hair, though, and it can really help tell
the character's story. So it's worth exploring more on your next
character drawing. But let's start by adding two
lines up here for the part. And if you're wondering where exactly to start those lines, remember that
measurement from before. Well, we're going to use
that measurement here again. So take that same
measurement and go from the brow line up, and that'll land you at about the start of the
forehead. Give or take. And I'm just going to sweep
some little hairs in here, and what really helps
me in drawing hair, no matter what the style of hair from super
curly to straight, is to think in terms of
S curves and C curves. So lines that look like an
S and ones that look like a C. Et's sweep these
hairs this way. Maybe like they're getting
tucked behind an ear. And speaking of ears,
in a straight on view, ears will be placed
approximately between the brow line and
the bottom of the nose. This will change if the
person looks up or down, but this is about where they'll land in a straight on view. And then with the face shape, it's almost like something
between a U and a V shape. And you don't want this turn to go too far close to the lips, and you don't want it to go
too far off from the lips. So draw with a really light
touch and a light pencil if you can to find
the best placement for the edge of the jaw line. Try your best to mimic
it along the other side. Alright. Now I've got
my electric eraser, and I'm just going to erase
out where this hair would be. This makes it feel
like that hair's actually in front of her face. And now I'm going to draw
this line of the neck. And here I'm going to do a couple more pieces
falling down. There are many
approaches you can take to drawing stylized faces. You can start with
the eyes like we are here or you can start
with the head shape. I teach both methods in
my character classes so that you can experiment and find what works
best for you. But know that there's no
right or wrong process. At the end of the
day, with drawing, it's about how much you enjoy the process and how much
you enjoy the end results, not one of those things alone. So again, with the hair, think in terms of flowing
S curves and S curves. And I suppose really
straight hair, you can think in terms
of straight lines, too, but even then, it's
usually just a really, really, really big scurve. But using S curves and C curves will help
you find flow in the hair and will also help you find flow in your
entire composition. Also, with this type
of stylized character, don't think about drawing
hundreds of individual hairs. This could make the
piece look overly busy. So instead, think in terms of clumps of hair or
big groups of hair, sections of hair and how they form a larger shape
of hair together. This will keep the
hair looking stylized. If you start adding details and a bunch of individual hairs, you might lose the
simplicity of the sketch. And this can take away from
the composition as a whole. With the shape of a
cute character's head, I tend to think of them like
an upside down egg shape. So I'm considering that idea as I hint at the top
of her head here. As we wrap up, I
just want to take a moment to thank you
for joining me in class. It's been such a joy to share this process of character
drawing with you. And now, I love
to see your work. So share your version of this character in the projects and resources section of class. Sharing your work is
such a great way to celebrate your progress and
to inspire others, too. So be sure to upload your
character here on Skillshare. I can't wait to see
what you create. And I know your classmates will love seeing your work, too.
7. Next Steps: You so much for joining me in character drawing made easy. I hope you had a blast sketching
your character with me. Now that you've
finished this class, you might be wondering,
what's the best next step? Well, I have two
great paths for you, depending on your
artistic journey. So if you love drawing
with pencils and you want to keep building
your pencil skills, then I have the perfect
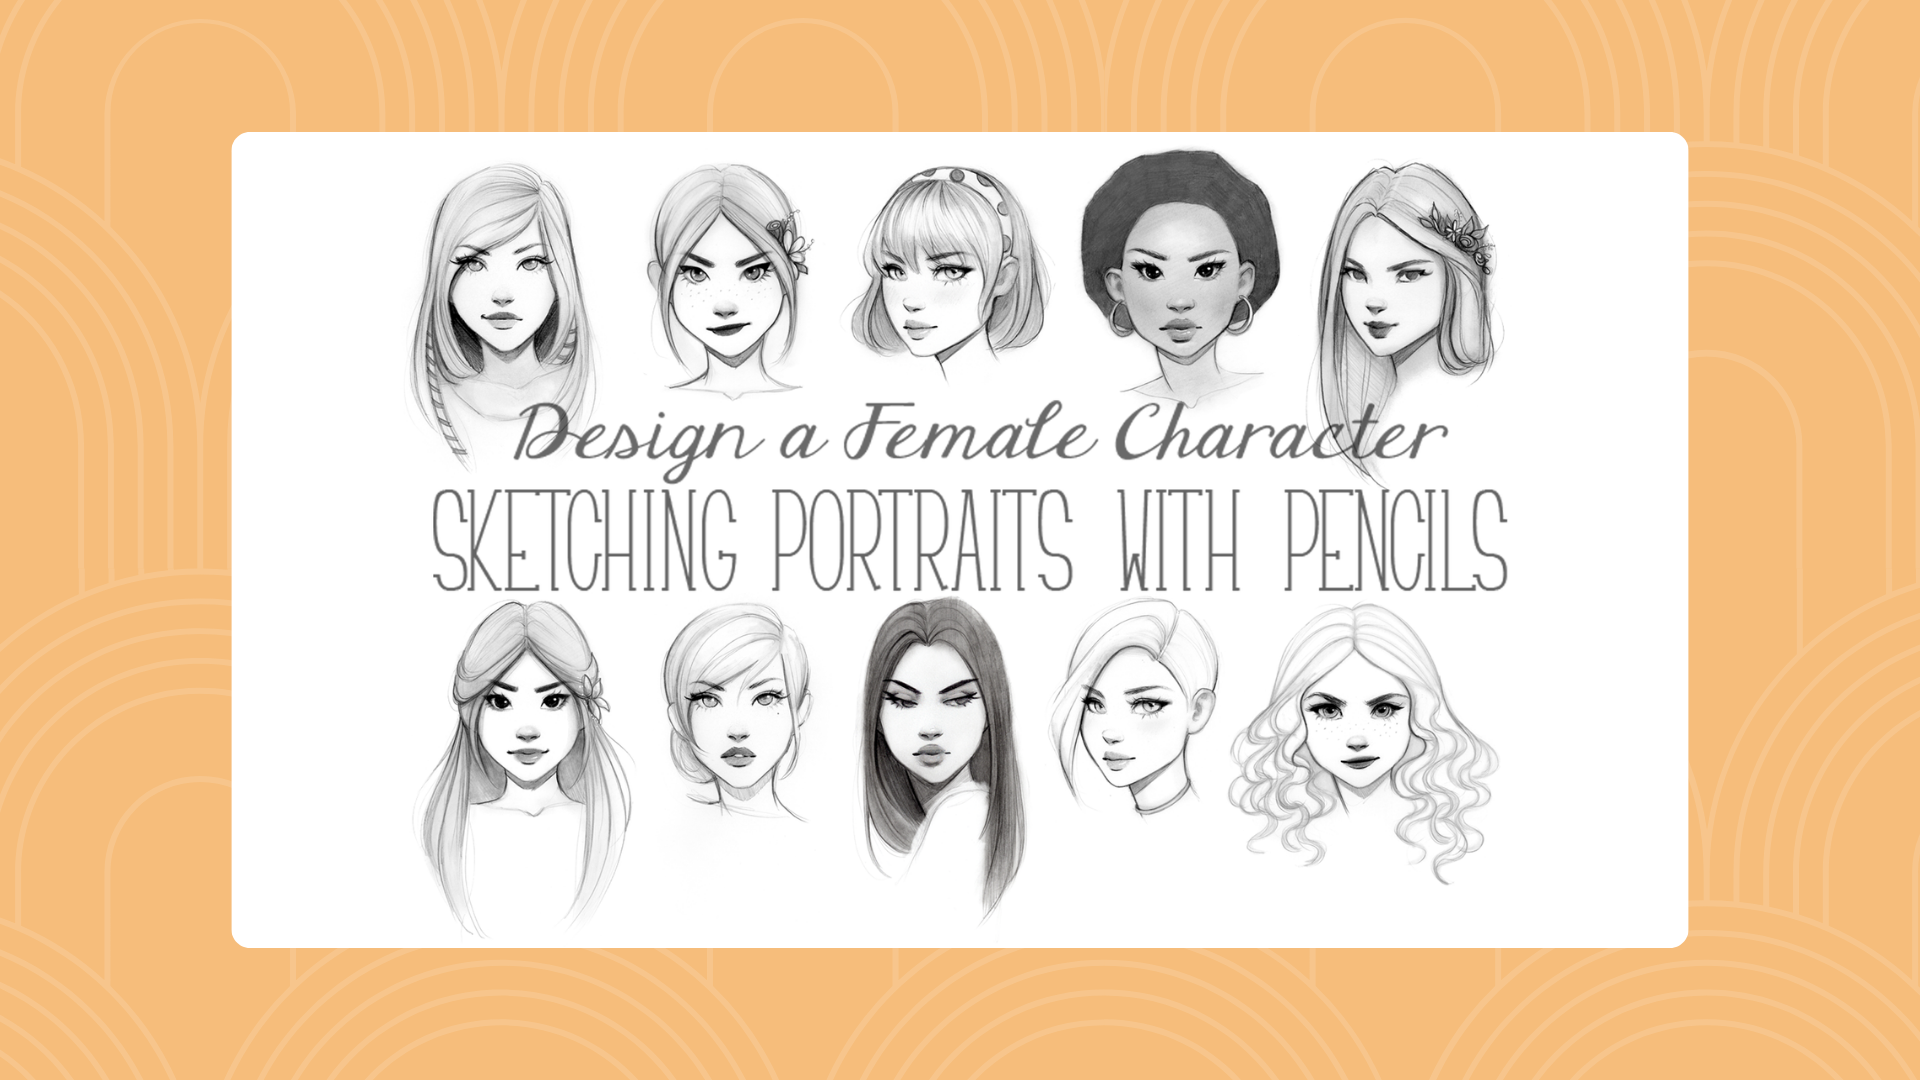
next step for you. Check out my class here on Skillshare called Design
a female character, sketching portraits
with pencils. It's a natural follow
up to this class. In that class we'll
go even deeper into drawing cues stylize
female characters. If that sounds fun, just check the link below,
and I'll see you there. Maybe you're thinking,
I love drawing, but I really want to
get into digital art. If that's you,
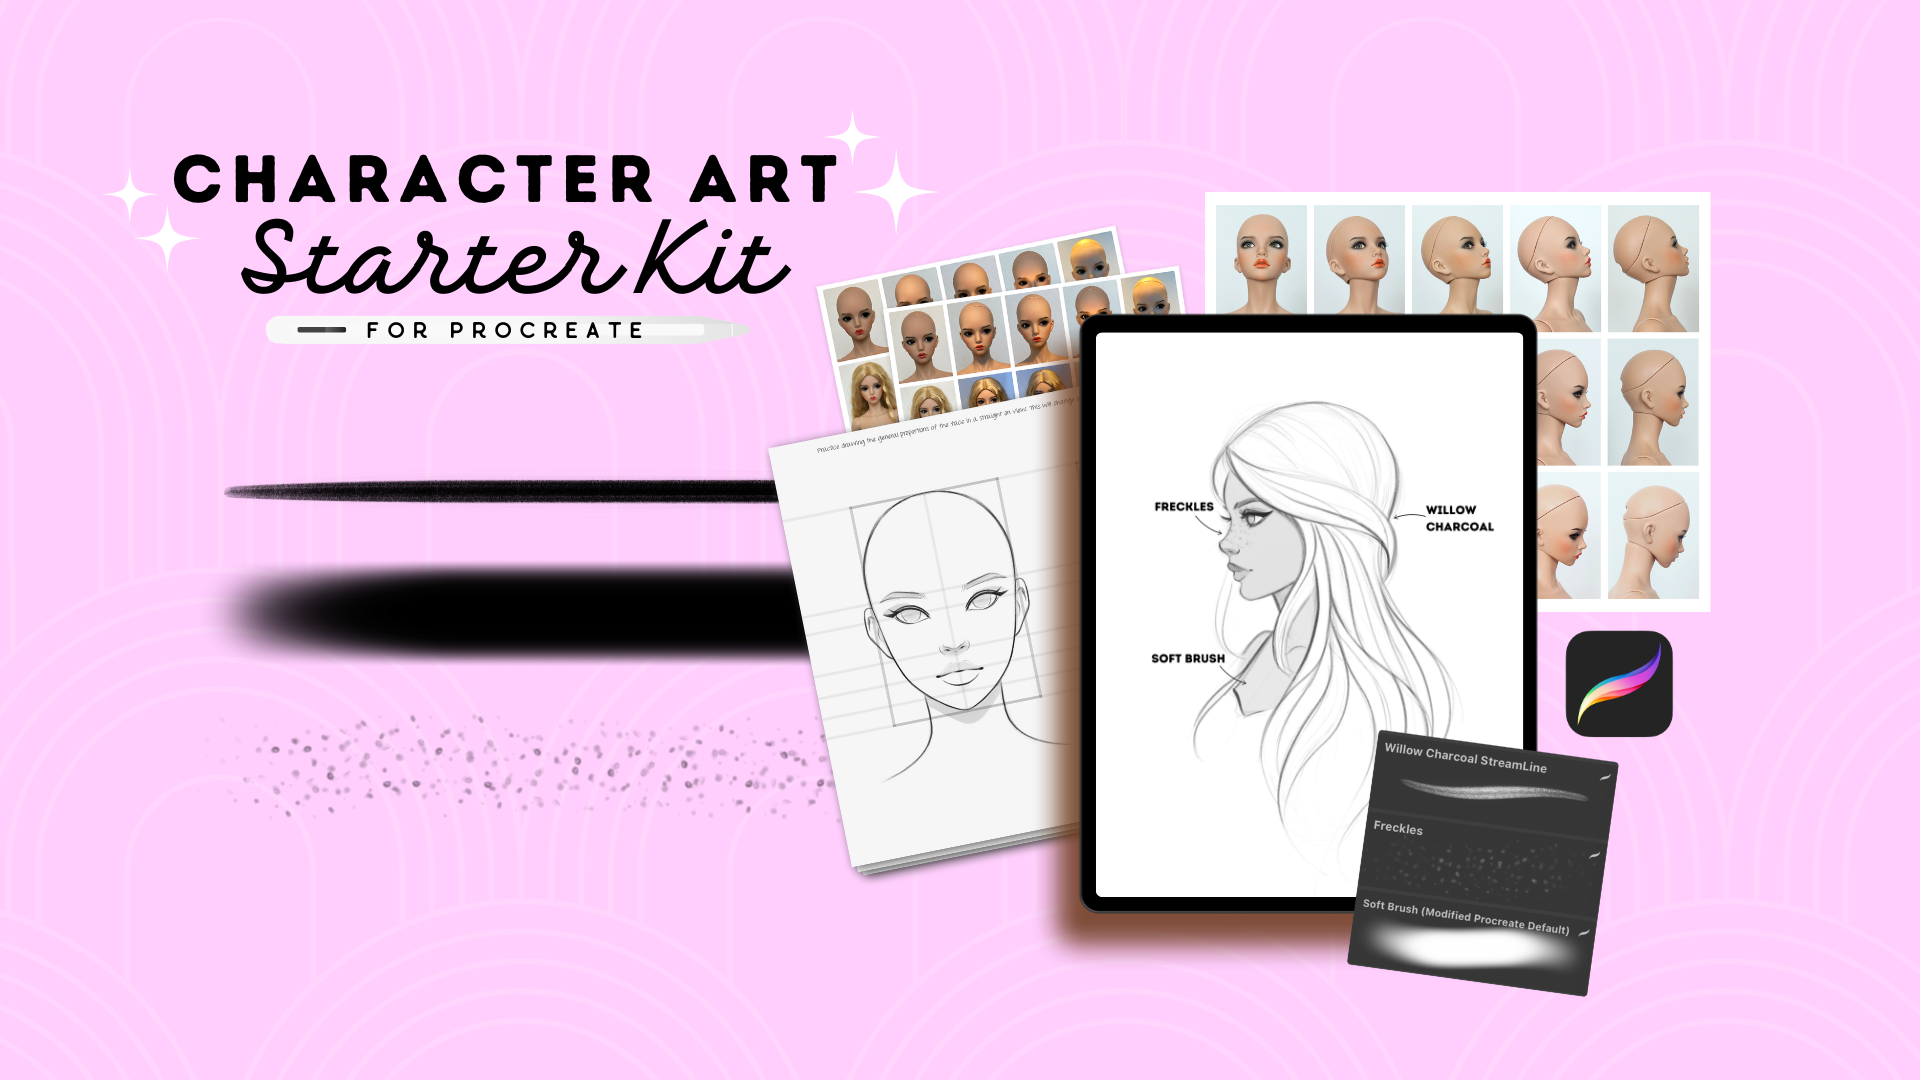
I've got something special to help you make
the jump into Procreate. I created a free character art
starter kit for Procreate. And this is your
shortcut to sketching stylized character portraits in Procreate with confidence. Inside this free kit, you'll get a mini
Procreate brush set, a quickstart character
reference pack for instant inspiration, a facial proportions
guide to keep your characters looking
balanced and a step by step sketching demo to
take your drawing from rough to polished and
a lot more surprises. More guesswork or
feeling overwhelmed, simple tools and
guidance to make character drawing and
Procreate fun and easy. If you're excited to dive
into digital character art, you can grab the character
art starter kit right now, check the link below and start sketching with
me and Procreate. So whether you want to keep
refining your pencil skills or jump in to Procreate,
there's a path for you. Whatever you choose,
I hope you'll keep creating characters and
having fun with your art. And if you enjoyed this class
and you had fun drawing, I would love to
see what you made. So don't forget to share your work in the project section. Thank you so much again for
joining me in class today. Until next time, Happy Creating.
 Gabrielle Brickey, Portrait Artist - ArtworkbyGabrielle.com