Transcripts
1. Introduction: Ceramics can be so
much more than I cut, dipped in a single glaze. It is literally backed up
with unlimited potential from illustrations and
screen printing and into painting in watercolor. This class in
ceramics is going to open up doors that you
never thought possible. My name is Kim and I'm a full-time ceramic
artists based on an Idaho in screen printing on ceramics has opened up
so many doors for me. I've been able to use
repeating patterns that are usually found on fabrics or textiles and
put them onto ceramics. This repeating patterns is allow me to collaborate
with other brands and businesses and
literally pushed my ceramics out of
the traditional mode. While collaborations
with other brands and businesses have
pushed my work and my business was my
initial desire to share my observations of the natural
world through ceramics. I'm a scientist and educator by training and spent many
years of my life in the field doing drawings
and sketches of the natural world is when I figured out how to do the
screen printing technique, watercolor on top of it, I knew I had found
a way that I wanted to share my work with the world. So you'll see my
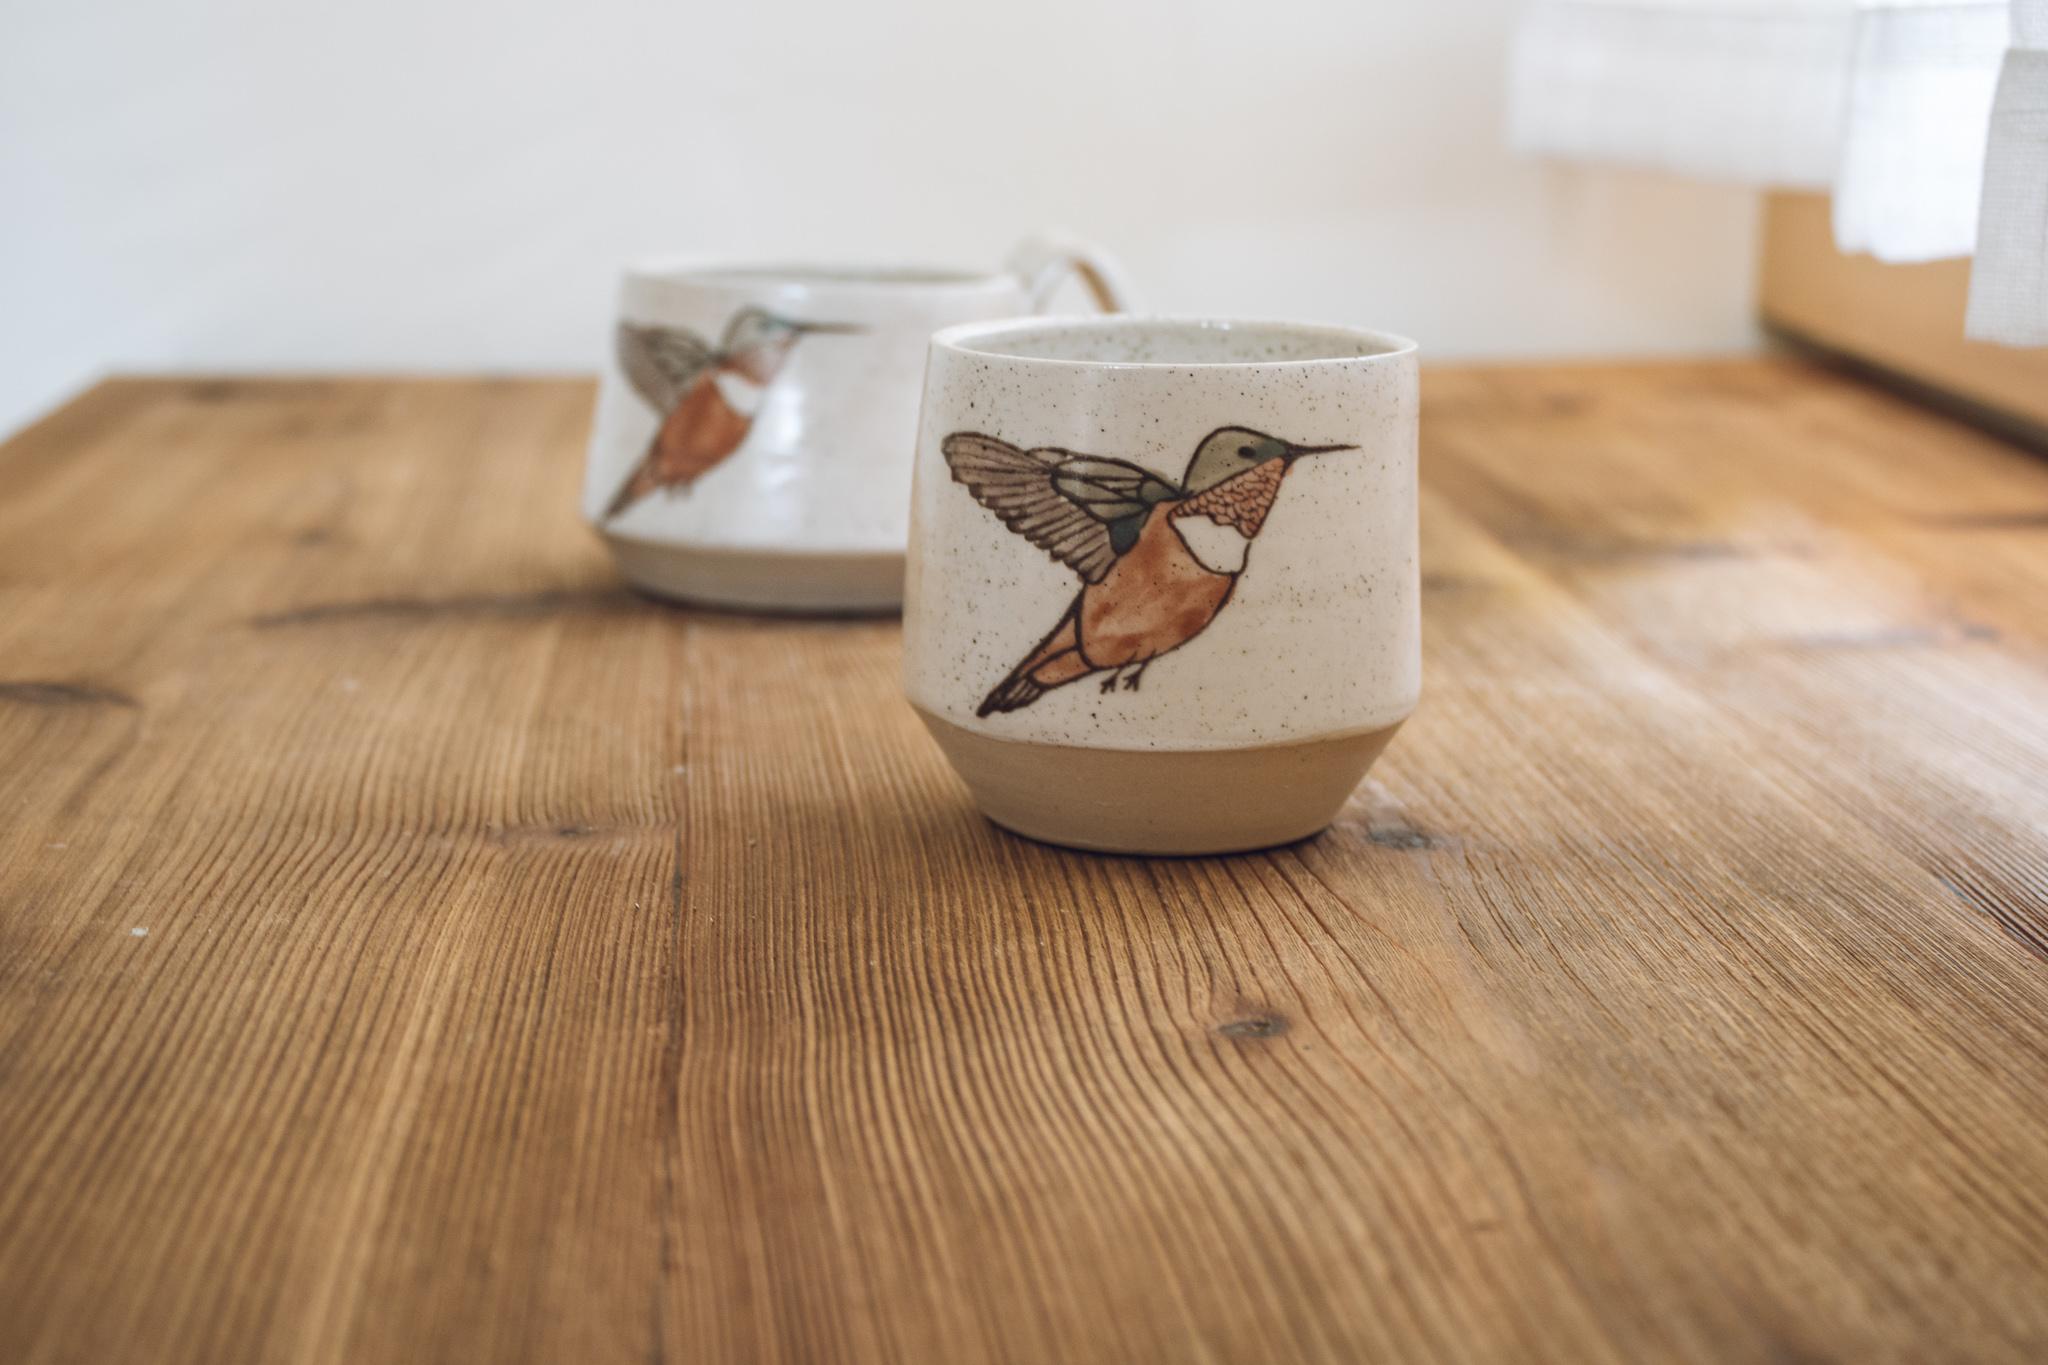
main line of work is a flora and fauna of
the Rocky Mountain West. So birds and plants that
you'll find in my own area. This is truly a processes
is near and dear to my heart and the bread and
butter at my business. And I'm so excited to share this process with you and
to see what you make. This class is broken
down into three parts. We're gonna be talking
about ceramics in traditional form
and had actually make a specific ceramic piece. We're gonna be looking
at screen printing and illustrated process and how
to actually make a screen. And the final part of
this is going to be adding color through
watercolor onto our ceramics. This class is three for what are ceramics are screen protein
and our watercolor. Now, if you are an artist and
any one of those mediums, I know that this
class is going to fill you with something new. So being able to push the work that you're
already doing or finding new technique and medium into the process
that you were working with. If you're a beginner artists,
that's totally okay. I'm going to walk you through
the steps one by one. So you can go from
the beginning to the end of me by making
a ceramic piece, a screen, as well as watercolor
ink onto ceramic piece. I'm so excited to show you this process and also
to see what you make.
2. Class Orientation: Your class project
will incorporate two different service
design techniques, both silk screening as well
as watercolor onto ceramics. Now I'm gonna go
through the whole steps of creating a ceramic piece, how to make a silk screen, and then how to
add watercolor on top of that silkscreen
on your ceramic piece. But there's gonna be a lot of areas that you dip in and duck out to fit your needs and your desires and what
you wanna do as well. This process is totally
beginner friendly. No matter if you are new to art completely or if you are a
seasoned ceramic artists, silk screener or
watercolor artists, I know that you're going to find something new and exciting and hopefully push your artwork
in a new direction. If you are new, I'm
going to walk you step-by-step through
the process. And if you are a silk screener, a ceramic artist, and, or watercolor artists,
I really truly hope that you start
thinking about your medium in new ways. There are three major
chunks of this class. The ceramic portion,
where I talk about form, function and go through the
step-by-step how to create my symbol T or
winding whiskey cup. The next process will be the illustration and
silk screening process, where we talk about your own style and go ahead and make your
first silkscreen. The final part of this
is using the silk screen and then watercolor onto
the ceramic piece as well. So if you are seasoned in one of those and feel
like you want to skip ahead to something that
is new and exciting to you by all means, go for it. But I challenge you
to stick around for the whole thing
because I think that you'll find something
new and exciting no matter your background, I'm super excited to see how you integrate an art form that
you've already developed. Or how you take on
something brand new, push boundaries and start something exciting in your life.
3. Materials and Supplies: To be successful in this class, there are gonna be some basics and the essentials
that you will need. Let's go step-by-step as I will introduce
them in the class. First, you're going to need
some type of ceramic piece. You can choose to go out and purchase a pre-made
ceramic piece. It just needs to be in
a big square status. And if you're
unfamiliar with that, leave me a question
in the discussion. I'm happy to answer that. If you are willing and able to hop on the wheel
or make a piece, I challenge you to do that. It's kinda fun to see the
process from start to finish. For the next chunk of the class, you're going to need
your illustrations as well as how you're going
to create your screen. I use easy screens. I will have a discount
code for you guys both in the discussion as well
as on my website. I find them really easy to use. And they're a great company
that can ship all over. Last piece that you're going
to need is your paints. And now these are going
to be under glazes. So something that can go
through and kill them beefier. They are different than
watercolor or traditional paint. And I'll go through those
when we get to that class. So big picture, you're going
to need your ceramic piece. You're going to need your silk screen and
then you're going to need your paint or under
glaze in this case. In this class is going to be
showing you guys what I use. These are not the
end-all be-all. If you have access to
resources that are slightly different or
something that is local, by all means, use the
stuff that you can either get or that you are
comfortable with using. I'm just showing you this stuff that I've found successful in my own work and being
able to pass that on to you. In the resource tab,
I'm going to have links to all the things
that I use as well as you'll find these on my
website where you can go ahead and purchase everything just as I'll be
using in the class.
4. Creating a Ceramic Piece: In this lesson, I'm going to
be going over the basics of ceramics and showing you guys how I make my simple teacup. This lesson can be skipped
either if you're buying a pre-made piece or if you're a ceramic artists already and
have a piece ready to go. Some things to
think about though, when you're choosing a piece to be able to screen print on it, It's really nice to
have some flat edges. You'll see in this
cup that it has nice flat sides and then
kind of a nice angle in water cups you'll find have a big old kind of
why belly to it. This is going to be very
difficult to screen print on, at least for your first time, when you get the hang
of it by all means, try it on different forms. I just find it easy, especially with your first
time to have some type of flat surface to be
able to screen print on. If you're purchasing
a big square piece, that means it's been fired once, but can still go through
it's glazed firing. Here are the other
supplies you'll need if you are going to be thrown
on the wheel with me. First step is to
measure out and clay. I'm weighing mind to 450 g, which is a nice way to start with if you're a
beginner thrower. The next process is
wedging our clay. You'll see that I
am doing what's called a ram's head technique. This is the same
way a lot of people need bread if you're
a breadmaker. And so the idea here is
that you're pushing in from both sides and you'll
get this kind of tongue. Then you put it into shape
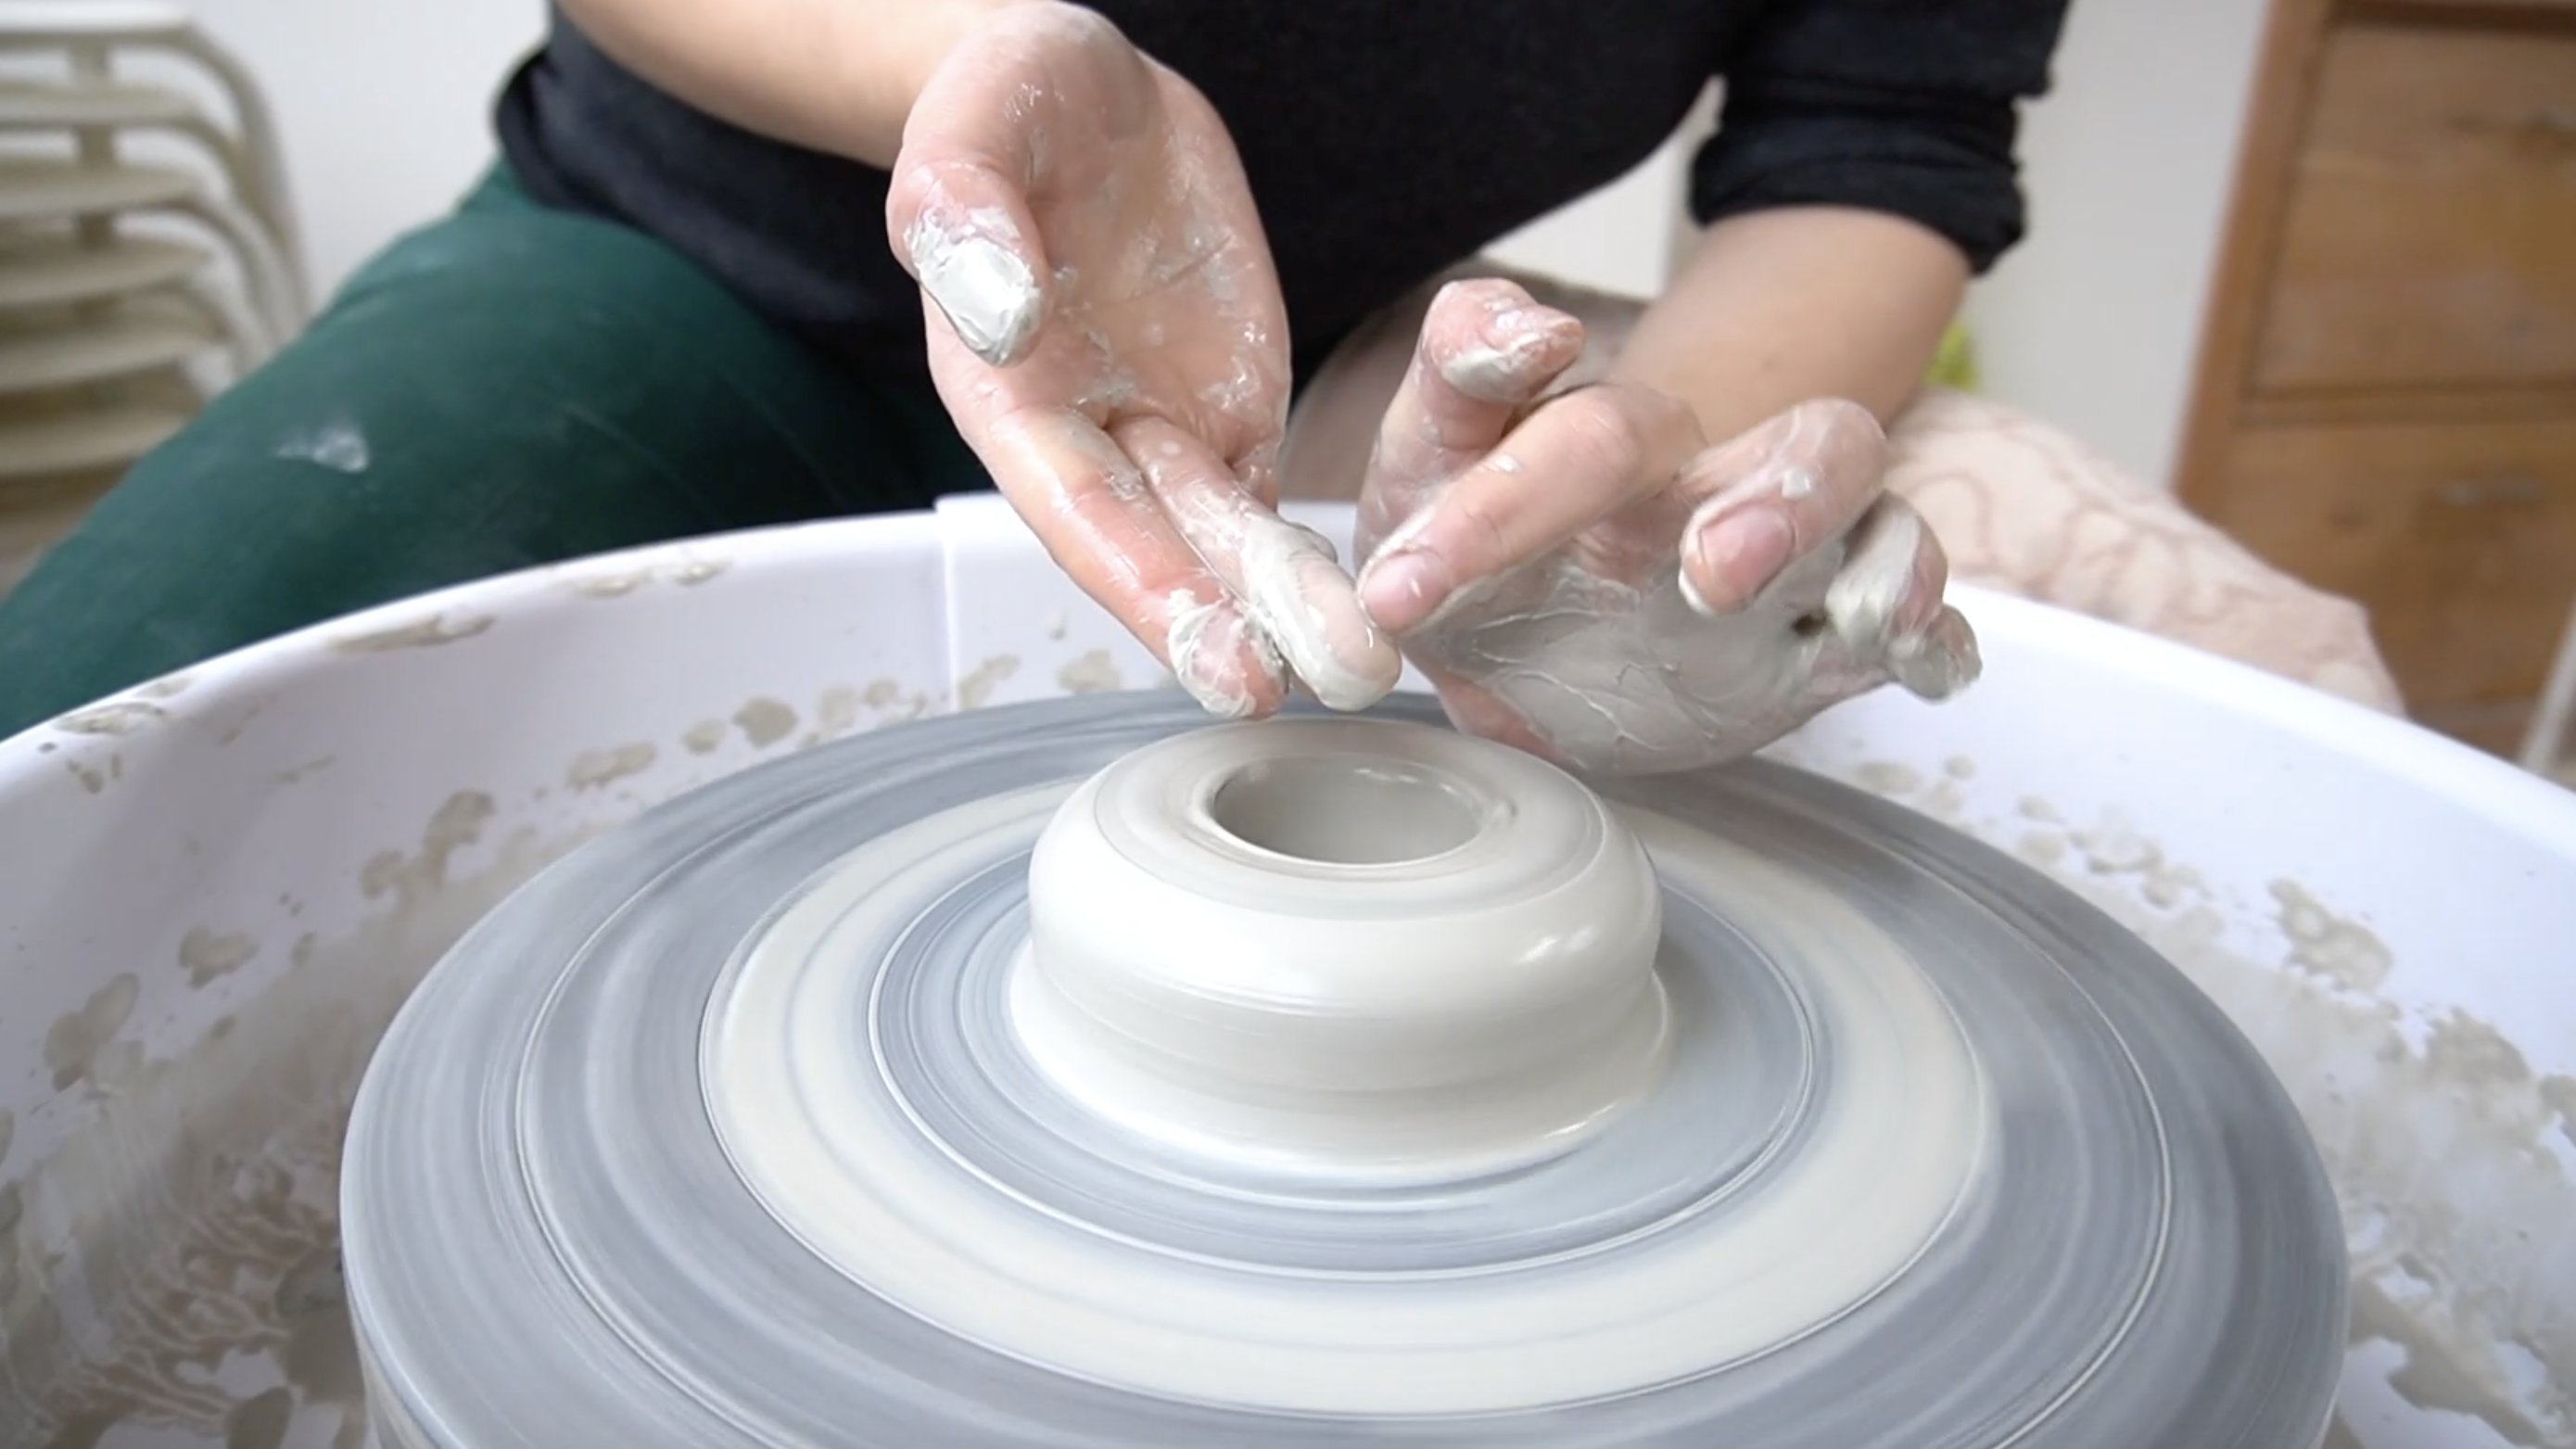
and you're good to go. Once on the wheel,
There's a few steps. Step one, slam it down. You want to make sure that
it's a purely on the wheel. From there with our pinky
is pressed down low. You want to create a seal
with the clay onto the wheel. So pressing down on
the top and then allowing your lower part of your hand and pinky
to form a seal. Once that seal is created, then you start to
actually center the clay. And this is done
with using water, not too much or too little. You want just enough to
have a clay malleable. And you're gonna be bringing in your lower left-hand as you press down steadily
onto the top? My left arm is
wedged into my thigh to allow for a steady
pressure with that hand. Once the clay is centered, then you want to
take off the excess. I'm using a rib to remove any excess clay and then
cleaning off my wheel. You see I put a little
bit of water on, but not too much. This last process,
I'm moving out any kind of bumps to
create a nice smooth hump. Once the hump is created, you want to find the
center point of your clay. You want to push down
into the clay itself, leaving about a quarter inch at the base so you don't
puncture the bottom, but you have enough
to treat with. Once you've gone down, you start pulling out
at a steady rate. I use both my hands to
guide as I do this. Once it's pulled out, you don't want to go further
than the base itself, but you compress
the bottom and can slowly start pulling up. Now, this is very important to do steadily
with both hands. I like to use a sponge. This allows for the clay to stay nice and moist but not too wet. Some people only use their
fingers for this process. A needle point tool
can be used to remove any excess clay or
in this case, a mistake. So I've restarted at the
bottom, compressing, putting some water
in the middle, and then starting at the base, pulling up steadily, keeping an even pressure with
both fingers and clay. Just like compressing the base. We also want to compress
the lip of the cup. Both of us allows for the
piece to be steady and not cracking while it
dries and its process. Each time I pull up, I both compress the bottom
as well as the ram itself. Putting a bit of water in. Again, pulling from the base, I will pull harder at the bottom and kind of
lighten up as I go, allowing for an even thickness
throughout the piece. A goal would be, especially
for smaller piece like this, to only need to pull up roughly
three, maybe four times. Then you'll want to remove
excess clay from the base. And then using a rib or some other tool that you
have around your house. Go ahead and make a nice flat
surface of your cylinder. This will allow by
pushing out against it to create a nice even cylinder
cross the whole thing. This is a footing
tool which allows for my wire cutter to move smoothly across the
base of the piece. You want to wet your sponge and squeeze out water
directly onto the bat, or we'll head and
then cut the base of the ceramic piece
using a wire cutter. And then we dry hands. You want to lift
the ceramic piece from the lowest point possible
that you can grab it. Here I'll be showing
you guys how I trim one of my tea cups. Use a pencil to draw
out how much I want to trim off both from the base
as well as from the side. Once the piece has dried. So it's what is called
an a leather hard state, but soft leather hard, which means that piece
is still malleable, but not too malleable. This is going to
be something that you just learned over time. At this point,
we're able to trim the piece without crushing it, but it not being bone dry
and unable to actually trim. You're going to want to
take your time with this. Don't go fast and take off
too much clay at once. This process can seem tedious, but it's gonna be well worth it. So your piece as well waited and fits
nicely in your hand. I'm using what's called a
pear-shaped trimming tool, a pencil, and then
a few ribs as well. Eventually I'm able to create a nice almost 45-degree angle. Once it's at the desired
thickness and angle, I use a soft rib
plastic to smooth out any extra and take off any remaining clay
that's on the edges. This allows for a nice
soft feel in the hands. Then a stamp Maker's
Mark of love. Now is your turn. If you haven't already to
go ahead and either pick your piece or go ahead and make a ceramic
piece for us to. So screen on.
5. Inspiration and Sketching Illustrations: The next step in this class is making our illustrations
for our screens. This is a super exciting
part because this is where your voice
really gets hurt. So start thinking about
what inspires you. Are you inspired
by the ANA doors? Are you inspired by people? Are you inspired by an urban
landscape, geometric shapes? Your first thing is to start thinking about what
inspires you and start gathering materials that help engage that inspiration. Use can be magazine clippings
or images from online. I will say if you're excited
about using it from nature, go ahead and spend time outside. And this is the same with urban landscapes or with people. And take photos, take a lot of photos and they could be silly little photos,
it doesn't matter. But that one, when
you come back into the studio or back into
your space to work, you have a 2D version
that is much easier to go off of for illustrations
than looking out outside, especially if you're not a seasoned Illustrator
to begin with, I will say for your
guises first screen, for screen printing
out ceramics. Keep it simple. Later on you can add
layers are a bunch of different features and
smaller techniques, but you will find
the most success early on with simple designs. This is why some of my
very first designs that are still extremely
popular are very simple. They are broad flowers
with not a ton of detail. I've been working on a new
line of work that includes bird species and
moving away from just plants and flowers. And I wanted to show you how my sketches and my illustrations turn directly in to the
screen prints that I use. So I have a field journal
here with an image, and that image directly became my screen for using
on my ceramics. Because I'm a scientist. I have all my field
journals and I also have my
naturalists books and I referenced these
to give me ideas of what I want to be doing
for my screen printing. And sometimes those
images become the actual screen and sometimes
their reference points. So using books, using journals, using your own observations. But also don't shy away from stuff on the Internet as well. Especially if you're
thinking about urban landscapes and
geometric shapes. There's a ton of
resources out there. My suggestion is just to start gathering the things
that inspire you. For my illustration, I've chosen a middle Lark to expand
on that bird series. And I'm doing my
drawing in Procreate. I'm not going to teach you guys here how to use Procreate
because there's some incredible
classes on Skillshare that go through in-depth
how to use Procreate. But I like to use a
digital drawing such as this one for my
actual silk screen. That way I can make edits to it, resize it and use it for many different purposes
down the road. I'm also using an
image for reference. So I found an image online, but I'm then making
the drawing my own. I am erasing things,
I'm changing things. I'm creating a species off
of the reference point, but I'm actually using my own creativity and my own illustration
style to make it mine. And this is totally okay. This image will become the actual illustration that
I'll use for my screen. And so this is the exact process and it will turn
into our screen. Once we're done. Once you have finished
your illustration, it's time to actually get it
onto the transparency paper. There's two ways of doing this. You can either print
it directly onto the transparency
paper or you can use your illustrations
as a reference and then trace over it
with a permanent marker. You'll see here that
I went on to do to other drawings of a crane
and also a king fisher. Our screens are
big enough to hold many different
images depending on the size of your illustration. And highly suggest making use of that whole space so you're not wasting any of your screen, but that way you also have different screens to be
working off of as well. In this lesson, we talked
about what inspires you and ultimately how that can
create a voice for your work. We then created our first
illustration for our screen. And that illustration
was designed, made, and then transferred onto transfer paper to be the next step to actually
make our screen.
6. Making the Screen: In this lesson, we're
gonna be taking your illustrations and
making your screen. The awesome thing
about this is that you can reuse your screens
over and over again, as well as your transparencies. If you need to remake a screen and you can use your screen and a bunch
of different mediums. It doesn't have to be
just with ceramics, the paper, or fabric. As you're creating
something that can be reused again and again, which is super fun and exciting. For this lesson, I'll be using an easy screen to
create our screen. You can order these online and they shipped
just about anywhere. And you can get the
beginner packet that has everything that you will
need from the screen itself, transparency paper, and then the board that you'll sandwich
everything in-between. You'll also be able to get a discount code on my website as well as on the
resources page. So we start off with
our illustrations. So we've already made
our transparency. And then we're now gonna get ready to actually
use our screen. Now it's really important to
have everything set up and ready to go before
you get going, because the screen is a light-sensitive and there's
a time sensitivity, you want to make sure everything is set up and ready to go. I'm using a dimly lit room. I have my board with the
plexiglass and the backing. I have my clips and I have my
actual image already to go. Because my screen is going
to be smaller because I'm only gonna do three birds not going to take up the whole page. I've actually already
cut my screen to be able to have a smaller piece
and not waste some of it. First step, get my
board ready to go. Second, get the screen out. Once again, you want to
move quickly with this. The screen has a plastic backing that you'll need to remove. The screen should go down first, followed by your transparency. That way, your transparency actually makes the
image onto the screen. Sandwich it between the
plexiglass and the backboard, and then use clips to
actually secure it in place. You'll see that I'm moving
fairly quick. That way. I can know that my
screen is not getting overexposed due to any
sunlight in the room. Now, we go outside and expose
it to direct sun for 1 min. Once back in, we can go ahead and begin
the soaking process. And this is super cool
because you can see your image come to
life fairly quickly. So you'll soak it
for roughly 15 min. And this can be in a sink or you can see here
in a Tupperware. After 15 min, you'll want
to rinse off your screen. Now it's super-important
to gently rinse it off. If you brush it or
try to scrub it, you're going to end up
ruining the screen and having places that are not
as crisp as you want it. So after rinsing, you then can set it back out in
the sun for roughly 10 min, but it can be for a longer
period of time than that. And you can then let
it dry completely. Once the screen has dried completely and is
now able to use, you want to make sure
that you can see light pass through the image. Anywhere where you have
light come through is where the under glaze is
going to be able to actually make it
through the screen. They use so much
guys for sticking with me and making
your first screen. And I can't wait to see how this illustration is
turned into your screen. Really the process is simple. Once you get the hang of it, you sandwich
everything together. You expose it to the sun. You then let it soak. You, let it set back
out in the sun, let it dry, and then
you're able to use it. That's why I love
these easy screens, is because it's truly
beginner friendly. But even professionals can be using them to make
incredible work. If you haven't already, make sure to actually go
and make your screen. So we can put those screens
to use in our next lesson, where I'll be showing
you how to transfer those images onto
ceramic pieces.
7. Using the Screen: Here's where the process
gets really fun. We start to take one medium, screen printing and transfer
it onto the ceramics. This process is super exciting. One because we start to
melt two different mediums, but also because we get to
have a repeating design. What I mean by this is if
I have ten different cups, I can easily and quickly create the same image again and again. This process is extremely satisfying to watch
come to life. In this lesson, I'm going to be going through how to actually transfer the screen designs
onto your ceramic pieces, but also how to prep them. So how do we create a space on the ceramic piece that
is perfect for printing, had a proper under glaze
and how to just have success with the screen
printing process overall. For this lesson, we're going
to need some under glazes. First scene is
white under glaze, I use as my base to allow
for the piece to really pop. And then I go ahead and use a black for my screen printing. And then the colored
on a glaze is what we'll be using
for the watercolor. Under glazes are different than traditional paints and as
well as traditional glazes. Under glazes have
to be sealed with a clear coat to be
able to be food safe. And they're different
than regular paints because they can be fired to high temperatures
and are ready and able to use with ceramics. So make sure you're
purchasing an under glaze and not
traditional paints. In addition to the under glazes, you're also going to need your
screen, your jelly plate, the plastic piece that
helps load the screen, some type of spatula
or spreader. And then ultimately
your painter's palette. And this will come in
and your final part of the lesson that we'll see next. From here, once you have
all your materials ready, you can start getting ready. I use a white clay body, but I still use a white
under glaze to whitewash or just to kind of create
a nice even service across the whole piece. I find that this
is a nice way to just create a base for
my screen printing. So whitewash or put under
glaze across the whole piece. Once I've done that,
then I'll be using my screens to actually
screen prints. So I have my three
screens that I've created all on that bird series. And to set up the
actual screen printing, I put a towel down
and this helps protect the piece because this ceramic piece is still
very fragile at this phase. So I have a towel
that I place down. I then put my jelly
plate on top of that. Then I started gathering
other materials. Here we have just
some water, a sponge, I have my brush, There's my spatula for
loading the screen. Baby powder actually
helps the under glaze stay put and
not kinda beat up. Special a secondary one. I just like having multiple
options available. Then here is my undergoes that I'll be using for
my screen printing. Now, note that this is
actually pretty thick. So this under glaze
can't just be your normal in-degrees
straight out of the jar. It has to be thickened and I use may cause screen
printing a thickener. This allows under glaze
to thicken up and it needs to be what I'll call kind of like frosting thickness. And you'll find a thickness
that works best for you, but it just can't be running. So I've laid down
the baby powder. I then want to get my screen and put it right
onto the jelly plate. There is a correct
way to do this. You want the smooth side. Down. From here, you'll
see I use my first spatula to put the actual under glaze onto
this plastic piece. While I'm using
this plastic piece, note that I'm just spreading it evenly across the whole screen. I'm not pressing down straight. I'm at an angle almost
at a 45-degree angle. So evenly having that under
glaze across the whole piece. And then once it's
been pressed down, I go ahead and
remove the excess. So this is where I
scraped under glaze and can reveal my actual design. I'll clean up the edges because any of that can
end up on my piece. So anything I don't want
on my ceramic piece, I go ahead and remove
from the jelly plate. From here, I go ahead and
get my ceramic piece. So in this case my cup and figuring out how do
I want to roll it right? So this bird, how's it going
to fit the angle on it? And each of our
patterns are different. And so you'll figure it out
the way that works for you. And this is my first test run. And note that it's not
quite where I want it. So this is the fun thing about this process is that you can have mistakes and
then start over. So what you can do
in that case is you can rinse it off and redo that white
under glaze and go ahead and reprint it and
totally use that piece again. So test run two of this
little bird print. I go through that whole
process of loading the screen, cleaning the jelly plate, and then figuring out how I want the bird placed on my
cup. And there we go. Go ahead and have
a better success. Big picture. We have prompt or ceramic piece
using a whitewash. If you've chosen to do that, you've prepped,
you're under glaze for the actual screen printing. And then you have
used your screen on your ceramic piece scene, actually come to life, which is super exciting. If you haven't
done this already, make sure you finish
this lesson before going on to our next where we're gonna be adding one at color. So grab your supplies, prep, you're under glaze, get your piece ready, and then go ahead and
screen print your design.
8. Watercoloring on Ceramics: In this lesson, we're
gonna be adding that pop of color to
our ceramic pieces. Are ceramics already have our screen printed
design on them, and they're ready to go with adding just a bit of watercolor. In this lesson, I'll be talking about what is
similar and what is different with watercolor
in, onto ceramic pieces. If your watercolor artists, you're going to
feel right at home. If you're not familiar with
painting, That's okay. I'll go through the whole steps in the process that
we go through. We'll be prepping are under
glaze and also getting all the colors kind of organized and ready for actual printing. In the previous lesson, we
printed our first design. And so I have my metal arc
here that I'll be painting, as well as a few other
of my bird designs. For our supplies, we're
going to need paintbrush, sponge, water, or
painter's palette. And then are under
glazes that we're gonna be using for our actual paint. And so this is gonna
be dependent on the type of painting that you'll do in the
colors you'll need. And also remember that
you're under glazes are different than your paints that you'd use on regular paper. This allows for the paint to go through the firing
and not just burn off. And you also want to note, I fire my pieces to amid fire. You want to make sure
you're under glazes can handle the heat that
you'll be firing too. You can buy pre-made
under glazes with colors, or you can actually
make your own by mixing different types of under glazes to get the colors that you want. But I would start
with just a type of under glaze that's
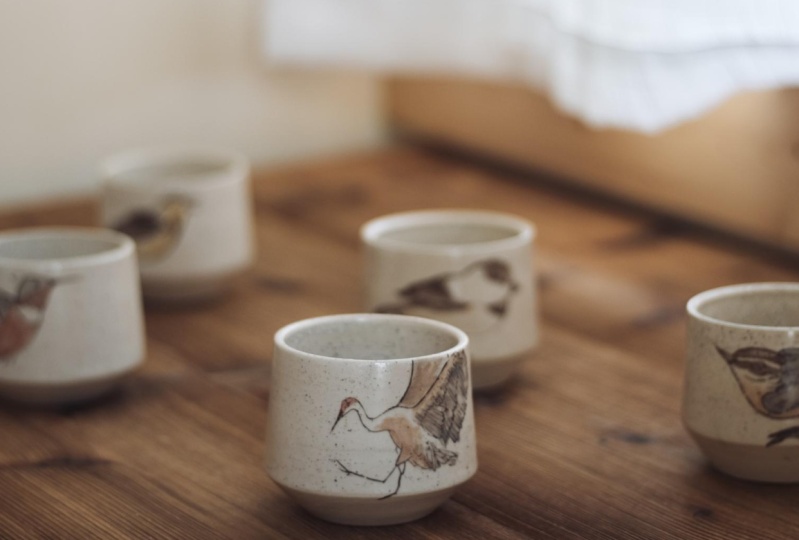
already colored. For this first design. I'm using my crane
and this is just another one of my
bird prints that I did as part of this process. I'm using a tile that
way it's easy to see versus a curved cup, but it's the same process
that you'll use on your car. The first thing that
we need to do is mix up our under
glaze with water. So it's at a consistency.
That is right. This might be a little
bit of trial and error, especially with your
type of under glaze. Sometimes if we water down
the under glaze too much, it will burn off in the firing. So I would suggest starting with less water and then as you
get more familiar with it, you can water it down more. As I'm painting, just like I would be watercolor
and on paper I want to start with my lighter
colors and then add to that. So I'm using my
light gray first. And then I'm gonna be
adding black accents for the cranes feathers with
water coloring onto ceramics. We also think about layers. So you can start with one thin layer and then go
back and add more layers. There is a rule of thumb, depending on how thinned
out your glaze is, that you're going to want
to add three layers. I don't tend to do this. I tend to keep my
paint a bit thicker. And so I might do two
layers potentially, but oftentimes I just do one. With this crane. I hadn't the gray I had a little bit of mixed beige for the belly and then
the red for their head. And all of this is the same that you would
do with painting, of mixing up your colors with water and adding
it to your piece, in this case a ceramic piece. So the same process with my
metal arc is with my crane. I'm adding the yellow
for its little belly. And then I'll be
adding a kind of a more oranges color to
allow for some accents. The nice thing
about this is that it is a repetitive process, meaning you can mix up a bunch of this under glaze and paint and do a series of these
all at the same time, allowing for efficiency
in your process. Once your pieces printed,
congratulations, you have finished the hard part, but the weighting must begin. The next steps. Your piece needs to be
fired through Bisk, firing, glazed, and then
you speak least fired. This process can feel
long and tedious. And as a ceramic artist, is what exciting to see it
come out of a glazed firing. But it's also painstaking because you want it to
be done right away. So just know of your
ceramic artists. Go ahead, finish up
as you usually would. But in my next lesson, I'll be going through how I
fire and glaze these pieces. If you're using a studio, than they will often have
resources for you as well.
9. Glazing and Using a Kiln: Often one of the most
mysterious and can be intimidating Parts of ceramics
is glazing and firing. Firing is a super
essential to your piece. It allows it to be usable. So your piece will
have to go through both the best fire
and glazed firing. In this lesson, I'll go through
my steps and what I use. Please note that if
you are in a studio, oftentimes there's tons of
resources available for you. I will also say there's a lot of ceramic artists just out there willing to help and
share knowledge. When I began, I did
not have a kill him. I didn't have a studio. I live in a very rural area, so I had to rely on other ceramic artists
to help teach me, as well as to use
their resources. This process allowed me to learn how to use account
and how to glaze, but also allow me to share that knowledge once I gained it. Glazing and of itself, especially clear glaze
can be really tricky. Expect to make mistakes, and that is okay. Trial and error is
gonna be your key. Take notes, lots of notes. What worked well, what
didn't work well? How thick Was the glaze? How long did you let it sit in the glaze before
you pulled it down or what temperature was
it that when you fired it? Makes sure that you are
taking notes as you go. You're beautiful
piece that you've spent tons of tons and time on. It might not make it
through the kiln firing. And that's okay
because it gives you an ambition to do another piece. As you become more familiar with glazes and finery and schedules, you'll have more and
more success as you go. While I challenge you
in this class to push herself and to learn
how to use a kilohm, how to glaze, and every
other piece of this puzzle. If you have a studio
available for you, ask them to help
you and might be your first step being there
with them as they do it. This is a great way to
learn, but once again, makes sure to take
notes so you can do it on your own later
down the road. Before you glaze your pieces, they must be Bisk fired. This allows the pieces to absorb the glaze before they go
through their final firing. Before firing your piece, it's important to understand the type of clay that you have. Each clay body will either
need to be fired to a low, medium or high fire. Make sure to do your research on the type of clay that you have so you can fire it to
the right temperatures. If you have any questions
about this process, please feel free to ask a
question in the chat or send me an email at Kim at Katie
mountain studio.com. The first step for glazing after the pieces have gone
through the Bisk fire for me is putting a little
bit of added black under glaze onto my logo
and this just helps it pop. It's just a style thing
for me because I've pressed my stamp into the
bottom, there's a indent. And I will go over those
logos with some black under glaze and then clean it up so we don't have any of
that black residue left. After I have let the pieces dry from putting a
little bit of black, I go ahead and wax the bottom. I use what's called a potter's wax or reads wax is
the actual brand. What this is doing is it causes the glaze not to stick
where the wax is. And this is really
important to understand because if you put the wax accidentally somewhere
else on the cup, the glaze will not go there. The nice thing about
using wax is that when you use glaze and
dip it into the glaze, you'll see here in a minute that the glaze won't stick at all. And so it's really
easy to clean. And the bottoms of your pieces can't have any glaze on
them because it will stick to the kiln shelf and
ruin your piece because you won't be able
to actually get the piece off the count shelf. And you'll have to break the piece to build to get it off. Once the pieces have been waxed, I then go on to
the actual glazing and I use a dip method. So the first thing to do is
mix up Barclay's super well, I use a big five-gallon bucket and a paint mixer
attached to a drill. After mixing your
glaze consistently, you can then start actually
glazing your pieces. And clear glaze can be a bit finicky depending
on the thickness of it. So once again, this is good for trial and error
and taking notes. I did mine in only
for a few seconds, but I want to make sure a
whole piece has glaze over it. And you'll see the bottoms
of the pieces doesn't allow. The glaze is stick and it
just comes off very nicely. I'll go through this
process of dipping each of my pieces in for a few seconds
and then setting them off. And then I want the glaze to drive all the way through
before putting in the account. And this actually
happens very quickly. You can almost see the glaze drying as soon as I pull
it out of the bucket. Once the pieces are ready, I'm able to load them in for our final firing in
the glaze, kill him. And this is where I'll
get to full temperature, in my case, just
over 2000 degrees. Good morning, guys. It is the next morning and
the kiln has finished firing. And this is the point that I get super excited about,
is unloading glazed, firing it seriously
like Christmas, It's like your birthday. Every single time. One, you don't really
know how it's gonna turn out because that's
kind of the process. Sometimes you'll have
different firings of glazes will
react differently. But every single time, it's super exciting and I actually haven't
picked up one of these pieces yet that
we've been working on. So I wanted to have a reaction
with you guys, but first, just kinda being
about this whole process that we've done, right? So we've made a piece
or chosen a piece. We've done our illustrations and created a screen
off of those. We've used the screens
on our ceramics, we've added color, we've glazed, we fired, and here we
are in this moment. And so this is the time that I get really excited to
just show you guys and see what our pieces
to know like. Okay. This is our little
will see until crane. And you can see that the
colors are not super vibrant. And I'm okay with that. This is a, I had some grays that red still
popped out really nicely. In future runs. I'll probably add a
little bit more of my colors just to make sure that they're
popping a bit more. But I'm still super excited
about how that turned out. And this is the metal arc. And so that yellow is
coming out very nicely. And so you can
tell them, I mean, we painted over that screen and you're still
getting that color. The tone is kinda
come in very nicely. And so yellow, orange in here. And then I had just a
little bit of coloring on the feathers alert
worked out very nicely.
10. Conclusion: Thank you guys so much for going through this
process with me. This was an amazing class. If you think about
everything that you've done, we started with talking
about ceramic forums. So certain shapes that work
well for this process, you either chosen one or you went ahead and
made one with me. From there, we talked about illustration and
what inspires us and creating an actual illustration for being able to use
with our screen printing. We created a screen, we then used it on
our ceramic pieces and then we added watercolor. And that process is amazing and I can't wait to see what you've
created with it. And I think just
taking that chance and being open to be inspired
or try something new, I get out of your comfort zone. That's huge. I truly hope that you are
inspired to push your art work. No matter if you're
a ceramic artists, think you knew about how
to do service design. If you're a watercolor
artists or screen printer, thinking about new mediums, this class truly was
meant to think about all different artists
as well as beginners. And I really do hope that
you guys share photos either on the
Skillshare website, on the discussion through this class or through
my Instagram. If you guys share your photos
on Instagram and tag me, then I will reshare them because I want this
to be a community, I think being an artist. And one of the great things
about this process is that we get to build a community and
share it with the world. So once again, please, please, please upload photos
and share them with me so I can see
what you guys have done. If you have any questions, please reach out as well, either through the
discussion on this page or through Instagram
or my website. My website is also a
great place to find other resources or just get inspired from the work
that I've been doing. That is I QT
mountain studio.com. Also on my website, I will have some discount codes, and those will be both for
Skillshare membership as well as for the easy screens that actual screens to make
our screen protein. I just want to thank you one
last time for you guys to be inspired to challenge yourself to be a part of this community. I think that is a
huge thing for you to step out of your comfort
zone and try something new. And so I just want to
thank you for being part of this this
process with me. Awesome. I can't wait to see
you guys create.
 Kim Thompson, Potter, Painter, and Naturalist