Transcripts
1. Class 5 Introduction: so much delicious food can be grown in small spaces. Here's how you can do it yourself. Welcome to backyard abundance. Whoa! It's the fifth and final class here on skill share. Fifth class of backyard abundance. Welcome, everybody. We've got a lot to celebrate, right, because if you've been following along in the classes, you've achieved incredible harvest. The end of this class is full of all the bonus footage from our own 80 90 100 day celebrations that we headed our place. It's totally happy dance time. If he was energized about gardening as I am, you'll be looking for ways in today's class and how to keep on gardening through the seasons, where you live and how to set goals. So you can keep on doing that if that's what you really want to dio. So let's jump into the class. Let's make the most of every part of the year to garden as much as we can and celebrate together what we've accomplished. Way to go
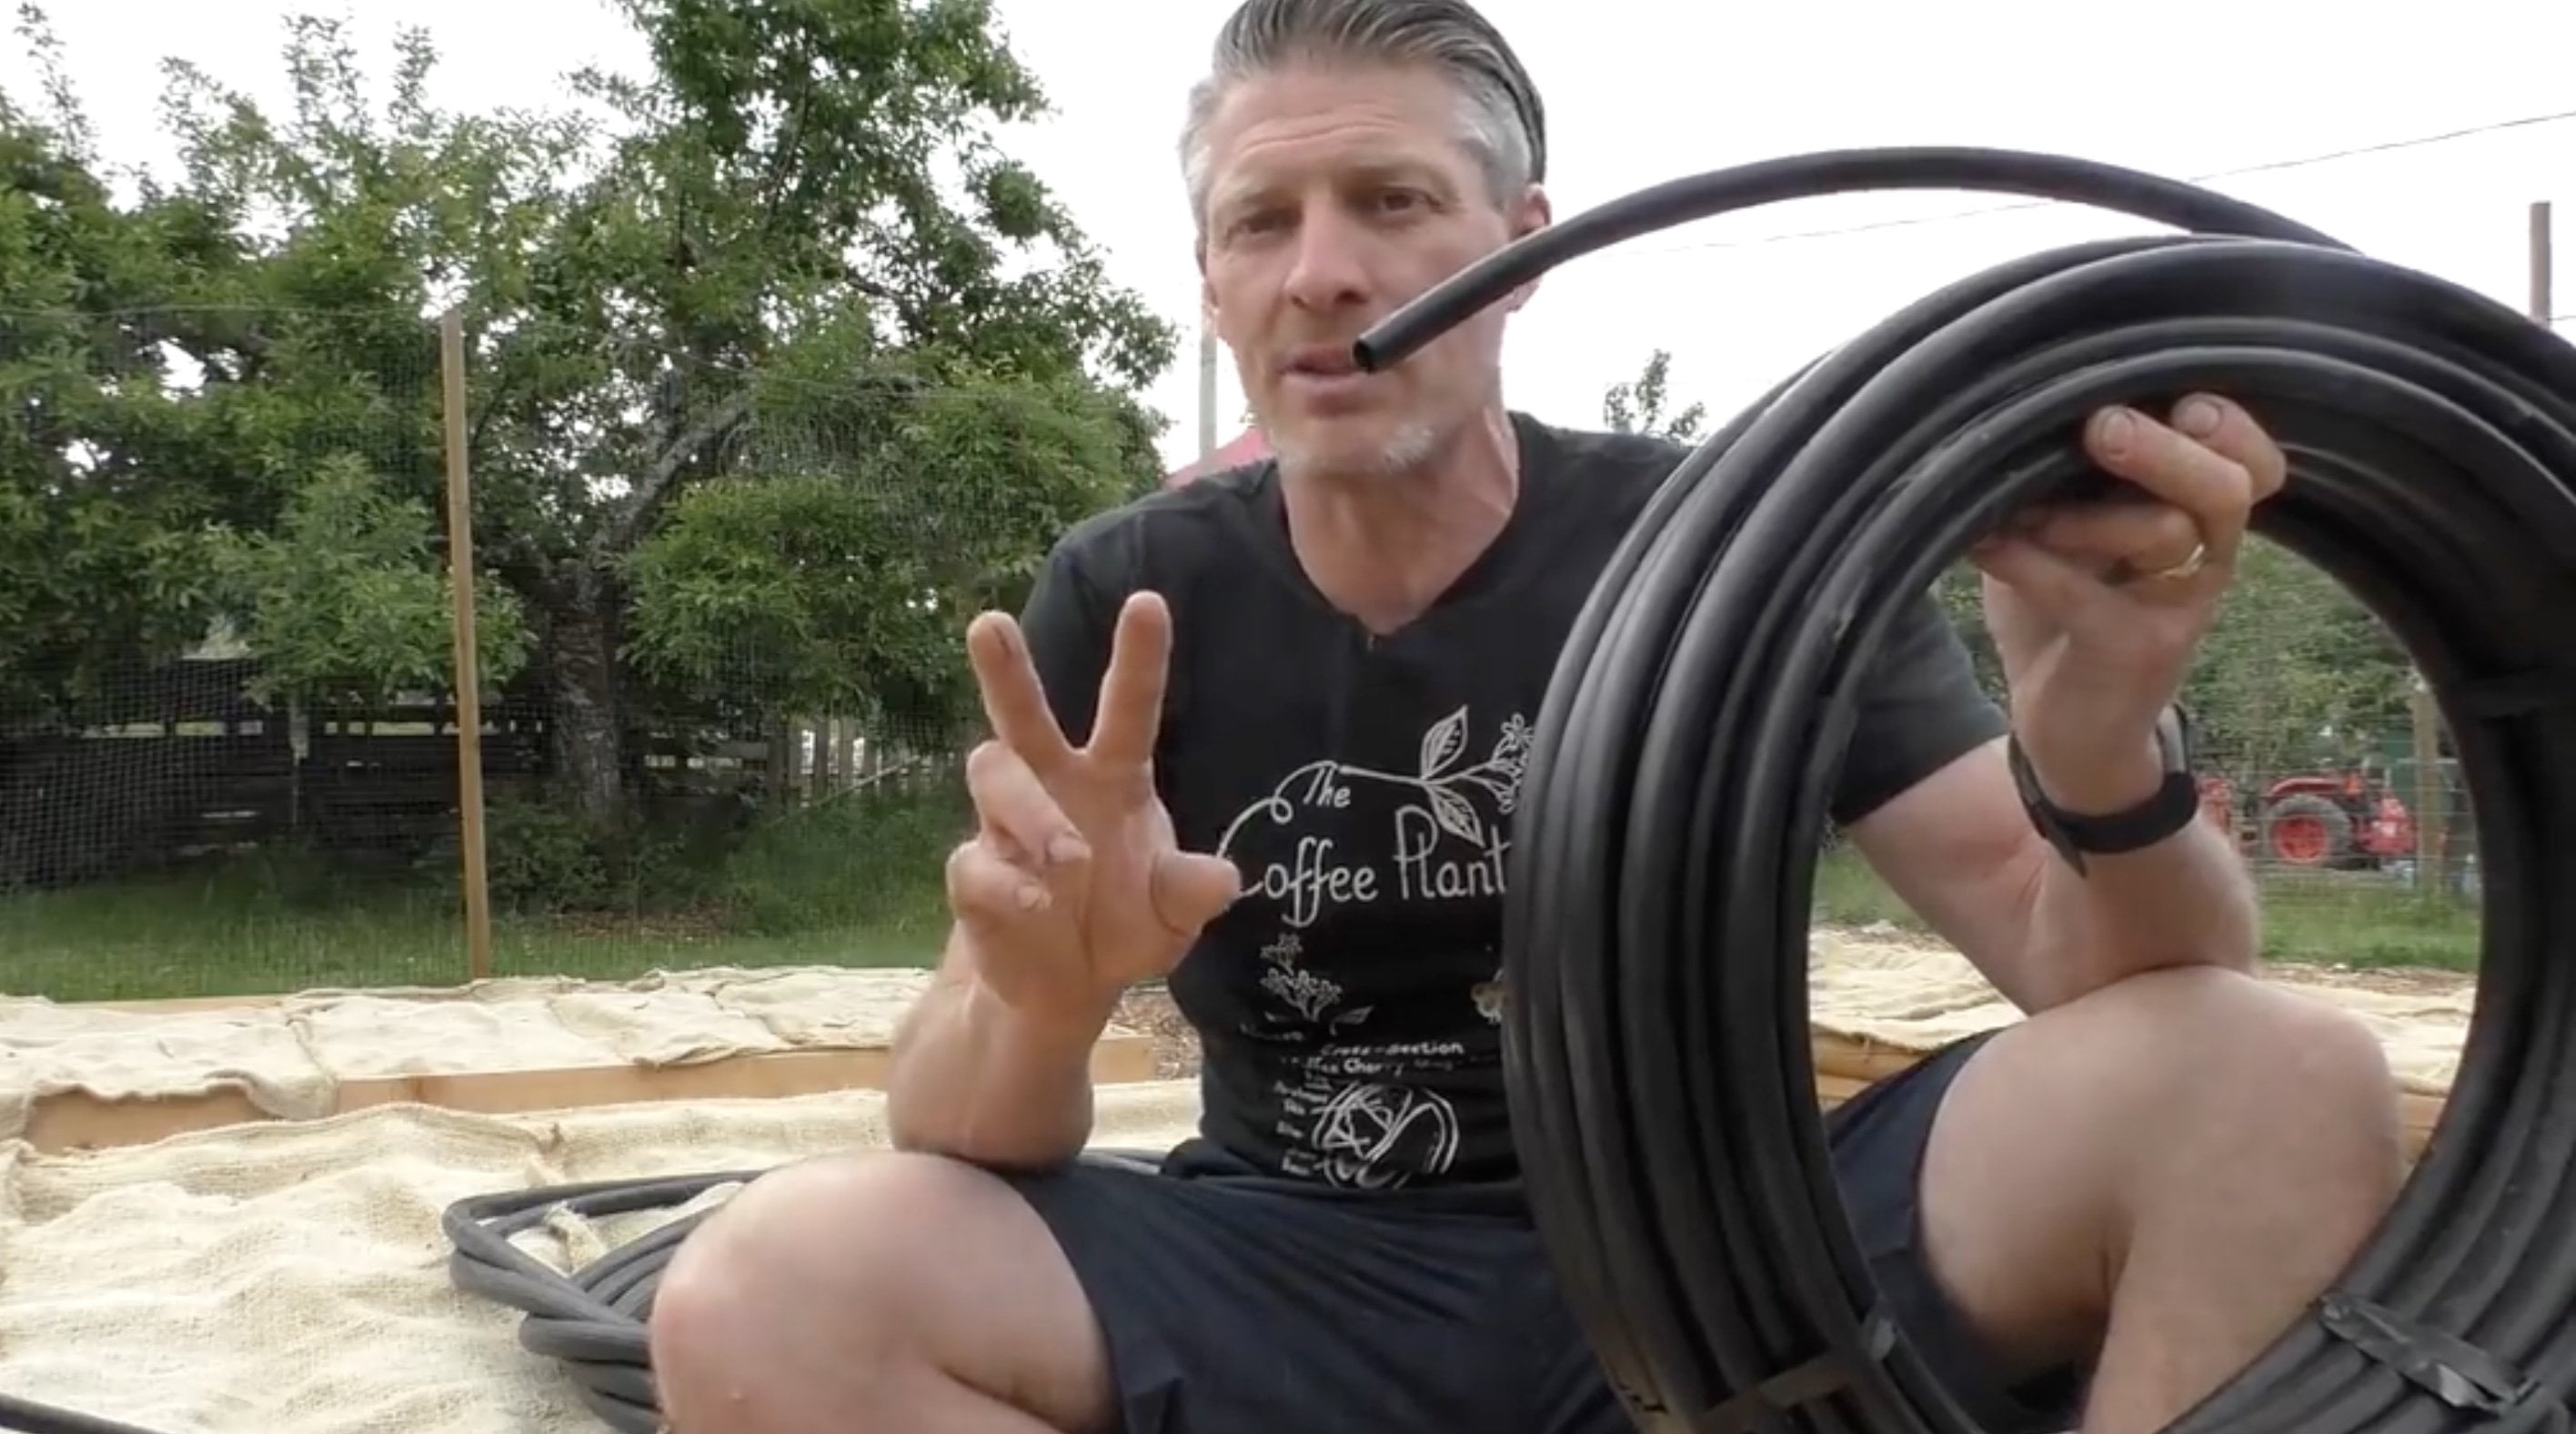
2. Chapter 13 Renovating for Winter: a sunny day in late October is a rare thing where I live. We've been having heavy frosts and mostly lots of days of rain. It's been more than a month since I put this row cover on, and it's definitely time to check on it. I haven't looked at it or peaked. I wanted to share it with you. And it's time to work on the bed behind me to my rights that we can take out the last of the tomatoes which were getting frost now and plant garlic. There is, we'd promised. So I'm just gonna pause the camera for a second. We're gonna take this off and take a look at what's here. And we're just gonna talk briefly about winterizing the garden, getting ready for winter, and then we'll look at planting the garlic. Here we go. OK, I guess I'm just gonna talk. Well, I do this and take the pipes off on each side that have been holding down the road cover. I just want to note that we've had very strong winds and the row cover has held. Nothing has come off. Holies can actually feel a pulse of warm air coming out of here as I uncover this because the road covers doing what it's supposed to, which is contained. Warmth. This is incredible, guys, as it seems, everything that's happened on backyard abundance has been incredible. I want to just take right there one leaf of kale and help you see the size of that. All of the kale plants are absolutely gigantic. The cabbage heads air forming and the beats Well, there's a leaf on one of the beats. You can see how much growth has been happening. The marigolds air fading fast. And then I'm just gonna come around here. We'll see how Ah, you can spot what's going on in the foreground. Here. The leaks have sized up significantly. The onions have bulbs. I'm just gonna take the camera down here so you can see the lettuce as well. But I just want you to see that. Look at that, Kale. I've got smoothies and greens for the winter. Now, this is good. We know that some of our lettuce did not survive. But look at that. Three of the lettuce did not succumb to the little nasties that we're growing here. So we've got some lettuce coming on here and again. The size of the kale cabbage has been eating a little bit, but it's forming heads. The kale's just incredible. There's a beautiful harvest going on. The key in all of this right is that we've kept the soil covered anywhere, that it's not growing anything. And, ah, she's going to show you one or two other little things to make sure that you're doing as you get ready to winterize your garden beds. Another key thing with winterize, your garden is going to your drip irrigation where your filter is and keep in mind. This is the one place in the irrigation system where water can pool, which means if it's gonna freeze where you live over winter, this is the part that can break. All I do in winter is take these two pieces and put them inside. I leave all of this intact as is, and in spring I'll turn this on a little bit of water, purge it, and then in spring, when we're past frost, I'll put these two items back on. But for winterizing, all I do is take those off, and now water rice could move around inside the pipes and they'll be fine as long as this has taken off the water or the ice can escape. So that's another necessary winterizing for drip irrigation. Take off your filter. So we've been amazed by pulling back the road cover and seeing the size of the kale. The lettuces survived. Beats were coming on, and now I'm going to clean out this bed. We've also noted to take out the filter from the drip irrigation. I thought I'd pick the last two my tomatoes here a week or two ago, and I'll just show you a photo there right now on the screen of this massive Bola tomatoes I picked a couple weeks ago, we've have had frost down to minus four, minus five the last couple nights and then intermittently, lots of rain as well. But I just picked a few more beats and a few more tomatoes from this bed. And now to finish off this bed, all I'm gonna do is take a little pruning saw and Orson pruning shears and cut all these plants off right at the soil level where the roots and the soil meat. I don't wanna uproot anything. I want to let those roots push nutrition as they rot and decay back into the soil. And then we're gonna get this already for garlic. So I'm just gonna hack away at this, pull it all out. This will become good compost, and then we'll get ready to cover all the soil, except for right where the drip lines are, which will be for spring and plant some garlic down both sides. The drip line in this bed. And we will be ready to put this garden to bed for winter. Backyard abundance will be done. Okay, I'm just gonna start pulling this apart.
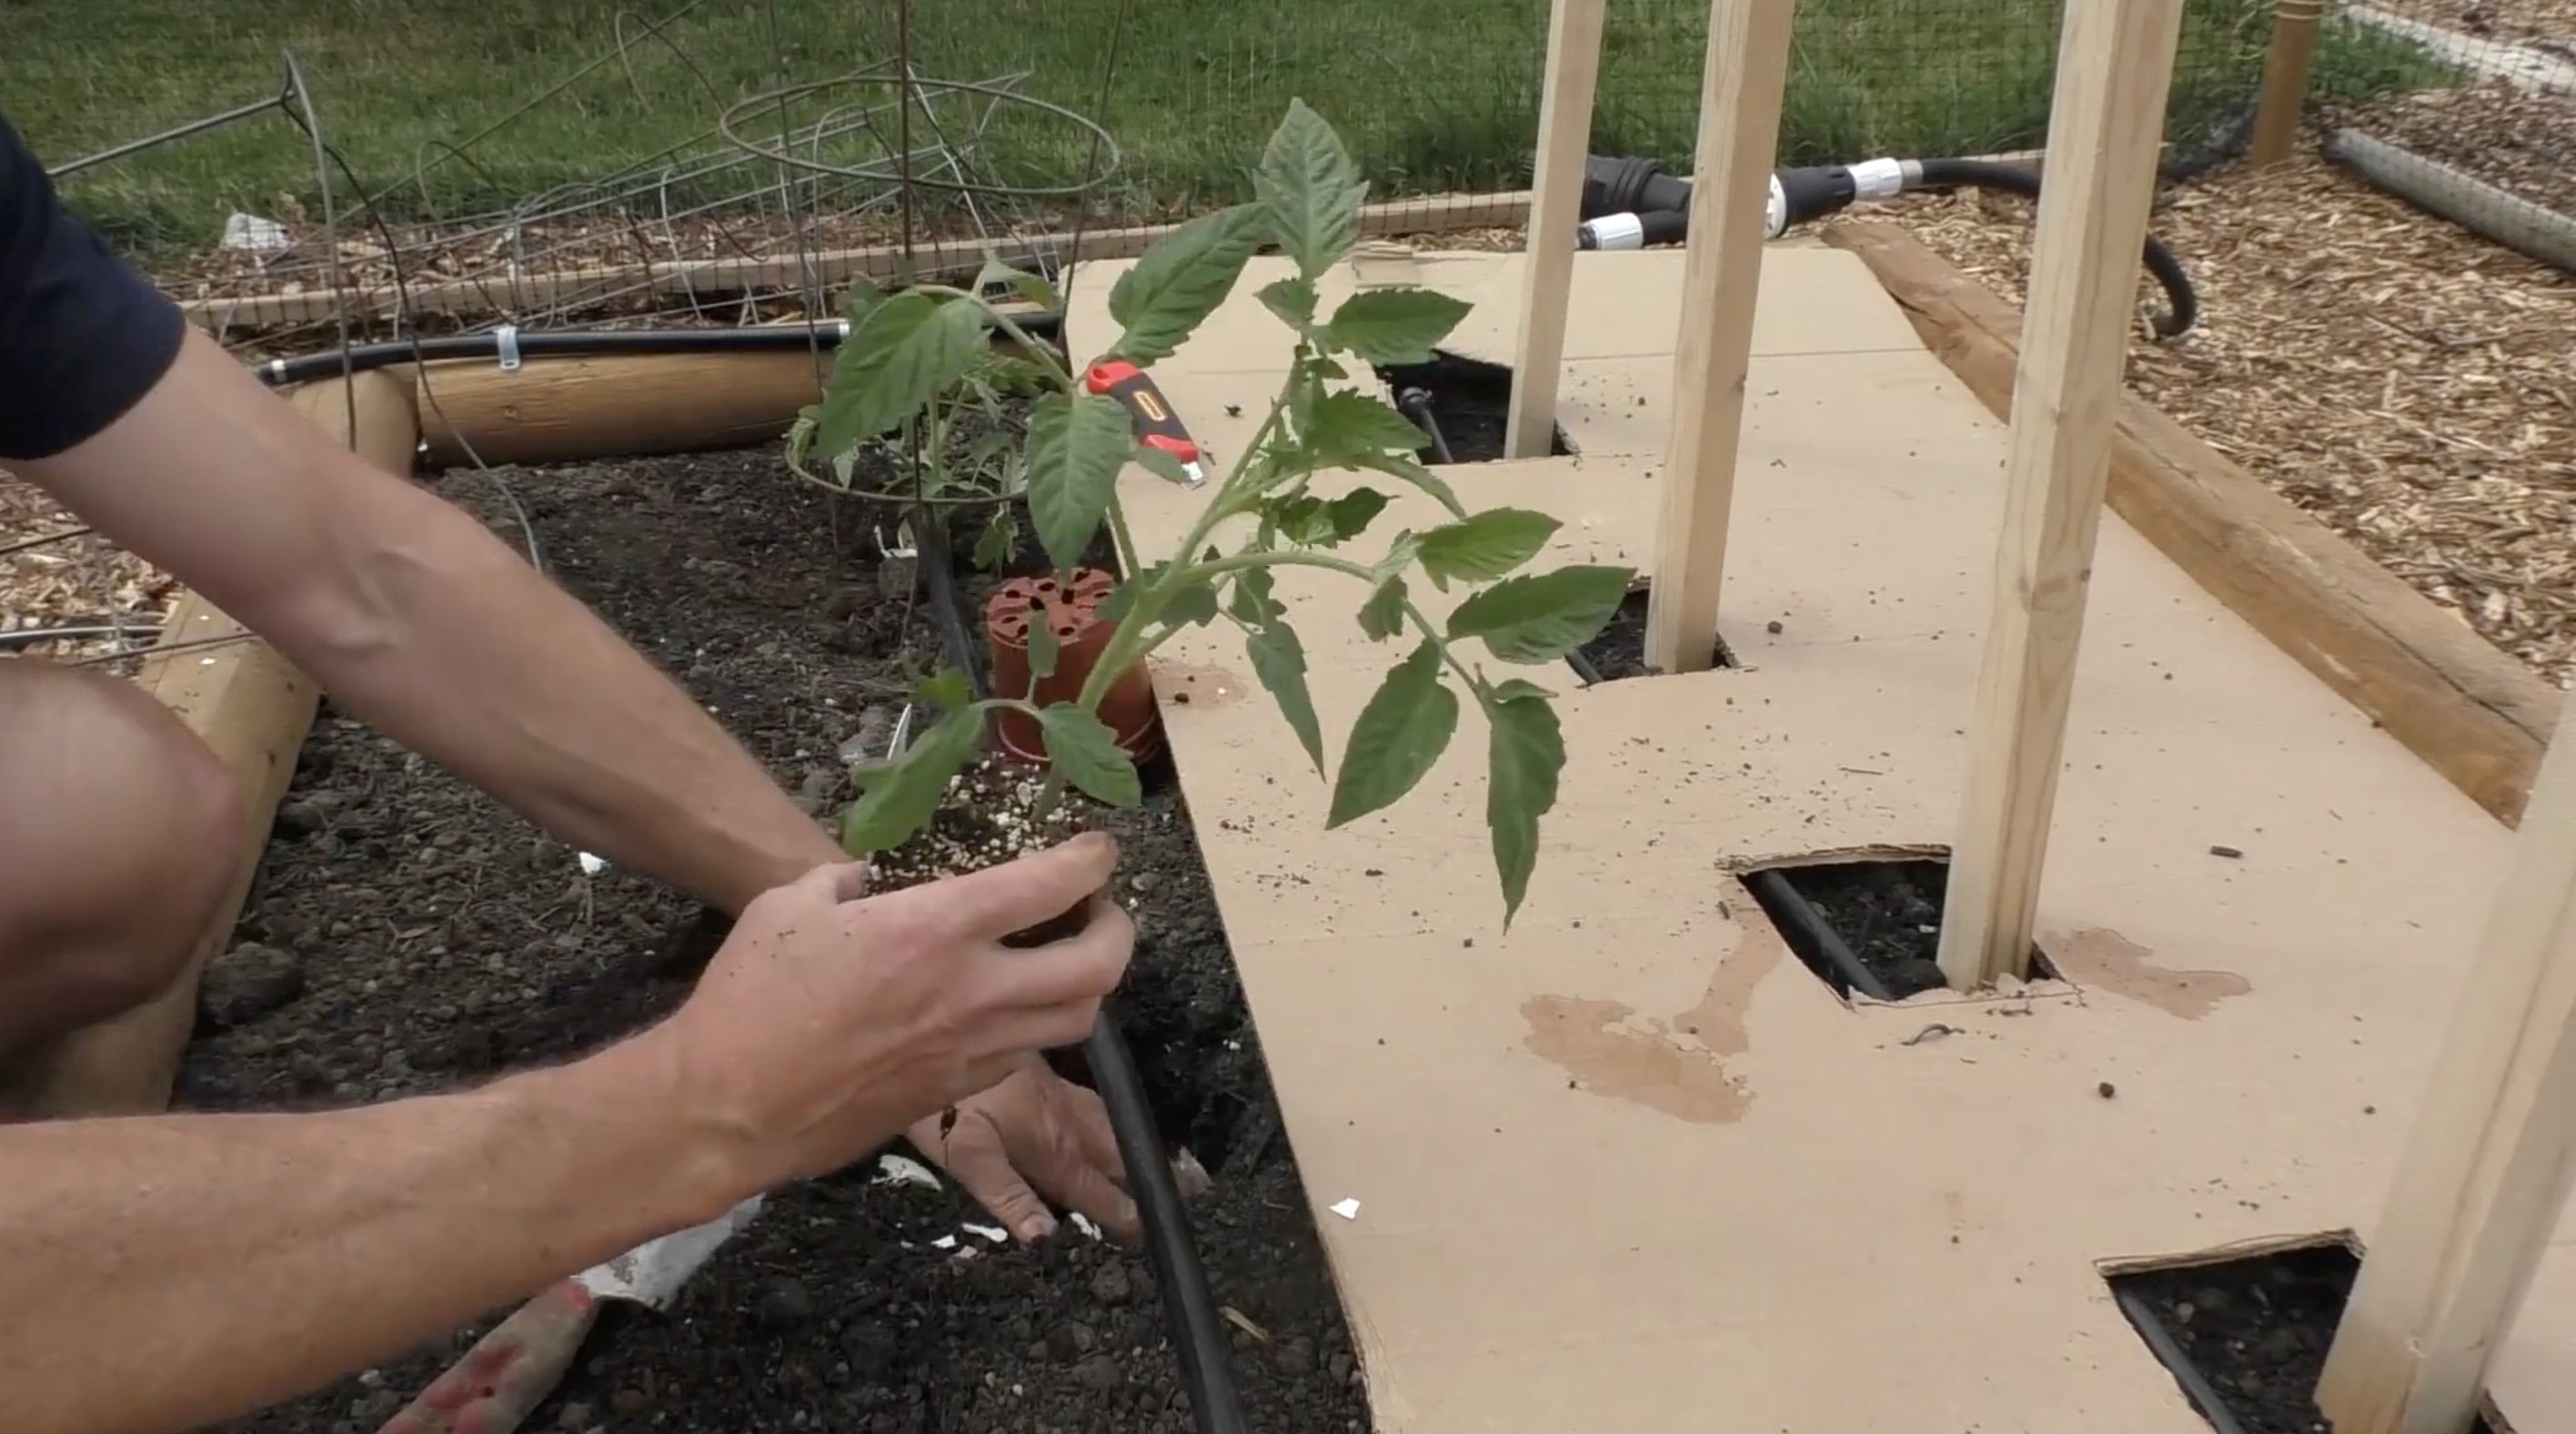
3. Chapter 14 Planting Garlic - Year Round Gardening!: who this is. The finale of the finale is guys. It was yesterday that I was sitting here and I was gonna hack away at this bed behind me. The tomatoes and the pole beans and the beats were all gonna come out and all that's harvested and removed for composting. And today I've put on my fancy shirt and I'm ready to plant garlic with you, and this will be the end of the whole backyard abundance project. I've got a container of hard neck garlic, and I've got a container of soft neck garlic and I've busted up into cloves and I've prepped the bed, so I'm just going to reorient the camera. So it's looking down the rows and we're gonna talk a little bit about this. It's been almost to the day five months since we first planted this whole garden. So around 150 days we've got our winter beds rocking and our winter herbs, things like chard and kale and cabbage. They're still doing great, and they will, and this will be our garlic bed, and we're gonna wrap it up and sign it off. So let's talk garlic before we say goodbye. Okay, so this is the prepped bed you can see behind me. The winter bed with the row cover we talked about. And this until yesterday was pole beans here. This was tomatoes and beets, the sax on this side. And the sacks on this side of the actual ones that have been through the entire growing season of 150 days. And what I did is removed all the stems and stocks above the soil. And I brought in some cardboard and coffee sacks to put down the center cause I'm trying to protect the soil as much as possible. I'm gonna show you a little Ah, little trick here. That's really cool. See this massive piece of cardboard? A few moments ago, it was a huge sheet of cardboard, and all I've done is let it sit out in the rain. And when it sets out in the rain and becomes pliable, you can bend it into any shape or any row, cover thickness you want. And then, by setting it down like that and putting a sack on top of it, you create amazing soil cover, totally protect the soil and all the little micro organisms and good things. You want to do well and flourish underground, and you Onley expose the very smallest amount of soil that's gonna be needed for your sprouts of new plants or seeds to get going. So we're trying to reduce as little exposure of soil as possible. And I've got one container of hard neck garlic that's gonna go down this road and one container of soft neck garlic that's gonna go down this road. I'm just gonna bring it in a little closer to you. So these are all busted up and you can see the size of the soft net cloves When you plant the sprout, Ian's gonna go up and the Rudy end the root end is gonna go down. So it was all like this a moment ago, and I've broken it apart into lots of pieces. This is the soft neck garlic, and when I break up soft neck garlic, my experience with my stuff is I get about 10 to 13 cloves out of one head. So if you want ah 100 close to plant, you use the need about 10 heads of garlic. I don't get quite as many cloves out of a hard neck head. Ah, hard knock head from usually has eight or nine cloves, but they are gigantic. Look at the size of them. So beautiful. This is a reddish purplish variety Russian red of hard neck garlic. So I'm getting about eight or nine clothes out of the hard neck. So I've broken this up, and when we plant, we're gonna put it down both sides of the drip line. And for the most part of my growing season, it's gonna be moist or wet all fall, all winter and into the spring. It'll be 7 to 8 months until I harvest the garlic here, and in that time I may not even have to, ah, water it or turn on the trippers at all. But this way it gives me a relatively straight line. And if I do need water, I could just turn on the trippers in spring when things were a bit dry. So that's where we are for the garlic. We've prepped the soil. We've got as much of it covered as possible on we're ready to put it in. Now. I just want to give you one other thought regarding garlic when you're harvesting it, come the good time. A season. Usually for me, it's May, June, maybe July. I get many different size heads of garlic. The little list heads. I separate them all into three different categories or sizes. Small, medium and large. My largest start for planting because you always want to save your best seed for planting my medium size ones. I sell on my smallest ones I keep for ourselves and even our smallest heads. They're still bigger than a golf ball. They're nice. Good size and so, smalls for me, mediums to sell largest to plant and you might want to. If you're not planning to sell anything, just grow for yourself to enjoy for yourself. Just divided into two categories your biggest ones you're gonna plant and everything else you're gonna eat. You just got to figure out how much and garlic you need over the course of a year between fresh out of the garden and stored over the winter. So let's get down to planting. I'm gonna lower the camera and a little bit we'll get right into the soil here. Now, I have just finished planting the side here with the soft neck. Not gonna do the hard neck. And remember, this is a four meter bed. Wow, Look at this worm that just came up to say hello. This is a four meter long bed, and in that bed, I just got 58 cloves planted, So that will be 58 heads of garlic coming up, And I'm just going to show you what I do. This isn't a perfectly straight line, but I'm not gonna let the line to find where I go exactly. So you can see where am All I'm doing is taking the end. That's gonna have the route to the bottom. Then it's gonna have a sprout to go to the top, and I'm planting them, pretending and knowing that they're going to become the size of large golf ball Small baseball's. So I'm trying to create enough space for basically a fist decent size fists to go between the clothes so that as the cloves size up to become heads, they're gonna have enough room to become adults. I want to get them there full depth into the soil so that they have lots of room to grow and they'll be nicely covered up in the coldness of the winter when things start to free. So impressing them right into the soil. So I've already got 2468 10 12 cloves planted just like that. So I'm just gonna cruise along here and do this Well, the camera runs and you can see what happens. Doesn't have to be a perfectly straight line. And then once I've got all the clothes in, then I'll just cover them up with a bit more soil. Making sure, you know, they're nicely nestled in for the winter. It's really simple, isn't at planting garlic like this is gonna take me because I did the prep before I turned on the camera. This is gonna take me less than 10 minutes to plant over 100 head of garlic. It doesn't take much to go and say to your friends, Hey, I just planted 100 head of garlic today and I go, Oh, my goodness, that means that for your family, you have two heads of garlic every week of the year with 100 heads, so that might be enough to keep your family in garlic for the whole season, and you can plant it in two rows in a four meter bed. I'll give you another reason for why I'm doing two varieties. The soft neck and the hard neck. There's always a chance when you're growing anything, and you've probably already learned this, that not everything will succeed to the same degree. So why not just increase your odds of success by finding two great strains of seed in this case? Ah, hard neck and a soft neck variety and planting both your chances of success, I think will be improved. It's basically a risk management decision that you're making to grow two varieties without when I put in upside down that it turned you around, baby. And these heads air so big that Ah, it's incredibly easy to get kids to help just pushing heads of garlic into the ground like this. We're just going to finish up here. We're almost done. I'm like getting turned around on that, and then we're gonna count how many. We have things quite exciting because it takes so little time to have this amazing promise . I've never had garlic fail. Sometimes it'll get rust as it comes close to ripening time. That doesn't usually destroy the harvest in any way. Always remember, as person of my other sustainable stays videos that you can harvest scapes before it's time to harvest the cloves. And that will give you something like a garlic flavored green onion to enjoy in like late spring. Early summer. Okay, we're down to our last two cloves right here. This end, and I'm gonna count quickly. What We have 2468 10 12 14 16 18 2022 24 26 28 30 32 468 40 42 44 46 48 50 52 54 56 58 60 62 62. And I got 58 there. So 120 cloves of garlic, which will be 100 and 20 heads of garlic hip, hip Hooray! That's it. I just tucked in the garlic, covered up the tops of the tips of the clothes so that they're ready to grow and get going before the winter hits. It was about a year ago I thought of this idea of backyard abundance, and it's been about eight months pulling it all together with the videos that I've shared with you through this whole process. Hundreds of little video clips, probably about 400 of them to pull together all the steps and stages from deciding where you're going to get this to parking spaces worth of area. Determining your exposure to the sun. Getting a past proof exterior perimeter to keep oh, deers and other things that could prey upon your garden. We've built the raised garden beds three different varieties for three different budgets. We've done Lozada lasagna, layer soil. We set up the drip irrigation into all the beds, and we took about 30 different types of veg and herbs, and we laid them all up with a thoughtful plan and orientation to the sun and synergistic relationships. We decided which would be seeds and which would be starts, and we planted them all out. And then every 10 days or so, we've done updates up to both the day 120 point and backyard abundance really has been abundant. And here we are. It's the end of a growing season. We've put our garlic and and that's a rob. It's been such a joy to have you along for the journey. I've always had big gardens. Up until now, this micro garden has been mind blowing in every best possible way I can imagine, because I've learned so much potential can be experienced in such a little space. I hope that you have incredible success, just like I've had in this, and I wish you every blessing that's hopeful, helpful and healthy for the future. Welcome to the finish line of backyard abundance. You did it well done. Imagine all the things you've learned when you look back. Over the last few months, the 14 different chapters recovered in the different bonus celebration material we covered with the every 10 day check ins. Think of all the things you've learned and all the things you've accomplished. And if you've been in your kitchen like I've been in my kitchen, you've been enjoying a lot of incredible rewards from reaping what you've sown. Well done. Thank you very much for taking me along on the journey. I really appreciate getting to be part of it. No matter what you do, keep growing
4. 90 Day Celebration Part 1: Okay, everybody Welcome today. 90 The update 90 days in from when we started with all the seeds and starts in the backyard abundance project. Ah, it's an amazing day because it's kind of that merging of seasons where we've got the fallen winter veggie started, we're still harvesting from what was productive in summer, their seeds to save. There's just so many places to look. So just to start off, I've been harvesting more pole beans, the beans that air up here behind the tomatoes, and we've been regularly picking beans every second or third day for about 30 days. Now these are the ones that I would say our overripe or they were let just grow too long. So they're not gonna taste super awesome. But I find that the ones between about this size and about this size they're wonderful to eat. So picking between those sizes works out really well. Depends on the bean's. So we still got lots of beans coming on, picked probably what will be the last green pepper of the season from the green pepper plants. So there she is, and I think it's the last of the cucumbers as well. I just picked these cucumbers today and there's another six in there from the long English plant. It's well past 35 cucumbers provided so far this season, and I think we're gonna uproot that plant. Now chop it off at the roots on. Just let the soil start to rest there before we plant for winter. But what I really wanted to do with you today was harvesting tomatoes and some beats right here and just show you what we've got going on. So I'm just gonna pull the camera in a little closer. We'll get some harvesting going on right here. I'm not gonna complain on a sunny day that it's hard to see. So these were some of the smaller varieties of tomatoes coming off, and these were just the first ones we've had so far. And then I just want to take you over and show some of the bigger tomatoes in a second. I'll just move this Been out of the way, because remember, under these tomatoes have been growing beets and many of them, you know, they didn't start just size up until we thin the tomato leaves. But see, now we've got beets that are looking like this. I'll just pull a few so that you realize this isn't a one off. There's plenty of beets that have sized up nicely that are coming out of here. They're looking great, and as we thin a few more, I think they're gonna keep on growing and sizing up better. Here's another nice one, so lots of beat options coming on. Oh, and there's many more here still but Harvest. But just to give you a sense of those ones there, there's some beauties that we're gonna clean up and get ready in the harvest bull as well. And now we'll just move down a little bit. You know, while we're here, let's look at these purple tomatoes. Check these out. So the side that's been facing the sun is like dark, dark purple, and the backside is starting to turn orange and ripens. So there are really cool tomato that I've never grown before, and I'm just gonna grab another one here. See, It's orange on the shades side and deep, deep purple on the sun side. I'm just gonna cut one open and see what we get inside. It's actually dripping with juice. Oh, my goodness there, Right? I didn't realize they were. So I've got some purple and red tomatoes to harvest. A swell good news. We'll just move on to some of the big ones. So just shifting over just a little bit in the garden here, some tomatoes that air the bigger size that have been coming on really nicely. You can see the size of those. And, ah, there's a few more here. And this is always a beautiful thing, because when many of the crops are starting to wind down, the tomatoes were just coming on. If you haven't harvested tomatoes before, just keep in mind. You can harvest the tomato when it's starting to turn. Colors will give you an example of this one. It doesn't look fully ripe or red next to the one that I just picked before it. But if this is just put in a warm place, maybe on a kitchen counter, within a few days it'll ripen up and have full flavour. So there's plenty of tomatoes coming on here now as well, and we'll put a few more of the purple ones in the bull. So in this bed we've got cucumbers beans, a pepper and lots of beets and tomatoes. And this bed probably still has another 20 days of productive ity in the tomatoes and then the beans department. We're going to turn around now and look at what we've planted for the fall bed between Day 80 and now. So cue the rooster. If you've been watching the video since Day 80 you know that I did a little bit of work in this garden. Used to be potatoes here and carrots there. We alternately planted where the carrots were cabbage and kale, which are coming on beautifully. They've doubled in size in the first week they've been planted. Then we put a double row down this drip line of lettuces and things in the onion family, bunching onions, leeks closer to the camera and some wallawalla onions, which will over winter and grow. The concern we had previously in this bed is the soil. Definitely had wire were minute, which was affecting the potatoes a bit and completely obliterating previous shots that growing lettuce. So this led us here. I was very concerned about wire worm taking it out, So we did a little experiment. Remember, we used these little markers, and we put a piece of sliced up potato on it to try to see if we could lure any wire worms . Well, since I've planted these in the last 56 days, I've come back and checked all the wire worm potato bates three times. I haven't found a single wire worm and all the lettuce is looking really good as well. So I'm not sure entirely. Why, other than having mixed up the soil a bit and putting the made in may be the onions that air in here But all the lettuces air looking good and hopefully good, they're gonna keep on rocking. I had mentioned to you in the previous video that we'd be having being soon on these beans , and they are starting. And I'll just pick a premature one to show you how small these bush beans are right now. They're They're that big, right? So I probably have another week before him harvesting the bush beans, but they're coming great. And once they're done, will gently remove them and keep the beats that air in that row growing. So this bed is pounding. Now we're gonna move over one more bed and take a look at zucchini and melon the greens there and also look at some seeds. If you recall, A couple weeks ago, this zucchini plant looked so sick with powdery mildew, it was something I was considering ripping up. I think that was about 15 20 days ago. Well, it's basically completely recovered with a few treatments, mostly just removing the mostly dead or nasty looking leaves. I just harvest to these three zucchini in the last couple of minutes. There were well past 30 zucchini off this bush and keep in mind, even though I'm doing these updates every 10 days out of this garden, almost every day, I'm picking food for our family and giving it away to friends. There's greens, there's herbs, beats and all these other things coming out of the garden every day that I'm not documenting it as well. So this zucchini plant is nearing the end of its life, but it's very healthy, and it keeps on producing. So I'm proud of you, little guy. We're going to just flip around behind and look at how the melon plant is doing so in walking around the zucchini plant to come to the melon plant had previously shown you three zucchini that I just harvested, but it's a big zucchini plant. Walk here on the other side. I found three more. So six more zucchini just today were at the Mellon plant. There's total of 10 melons on it, and on a gamble. I just grabbed the biggest of them and ran a knife through it. It's perfectly ripe dripping with juice. It's ideal, and I want you to just note that in growing this melon plant, I bought one start one plant that cost to 99 which is probably less than the price of buying one cantaloupe at the store. But that one plant has gone given me 10 cantaloupe with the store, for It's definitely giving up its life to do it. But wow, a 10 times ing right? That's like a crazy, crazy return on investment. Talk about backyard abundance, right? Cantaloupe
5. 90 Day Celebration Part 2: So now we're around the other side of the melon and zucchini bad looking at the greens that grew here and remember that we had had tatsoi and charred in a row really tight to the edge of this Ah, brick concrete bed. The tats always gone to seed. What started out his beautiful flowers has become little rattles. And I want to just bring them up close to you. See what they're looking like Because these air now, some of them at least ready to harvest just to give you an example, There's flowers. We'll just show you have three stages of getting ready to harvest. Okay, so the tatsoi started out to flower. Kale and chard and broccoli all do this. They start to flower. Then, as the flowers finish up, they turn into seedpods. The seed pods start out green and their moist and mushy, and the seeds are starting to form inside. You can actually still see a flower on the end of that. Then the seed pods mature, so just try to put them all up there in front of you together the flour, the starting to mature and the maturity. If you listen, there's a bit of a rattle sound, which means that inside here now, our seeds that have totally formed and they're so tiny they're hard to show. But they're they're on my palm little tiny seeds that have come from the tatsoi plant. So all you do to save seeds now, at this point, once they're rattling and dry, is get a bag. And in this case, I use paper bags, which keep things dry, and I just write on it tatsoi. If you know the variety of the thing that you're saving, you might want to put the variety on. If you want to put the year you harvested it or the year you wanna plant it next year's date, that would be good. But all I'm doing then is wanting to make sure that I don't lose these awesome seeds. So I clip off with scissors, these little seed pods, and I put them straight in the bag. And once they're in the bag, start giving him a shake. Squish the bag about and all the seed pods shatter inside, and the result of that is that all the mature, ripe seeds fall into it. The other thing you could do is you could take a baking tray or a cookie sheet and put all your seed pods on there and mush them and break them and then just pour them off the corner of the baking sheet into a bag for saving. So with those three little branches, I just snipped in here. I've now got hundreds of pods and thousands of seeds. I can go to a seed swap in winter, and having already set aside the seeds I'm going to use, I can share seeds with others who wanted ro tatsoi. So next year's tatsoi planting is for sure, my seeds air free. And I know there from a plant that did really well and was vigorous in my garden. It's gonna do well in my area again next year so that saving seeds, I just want to take you into one other side of that just toe, expand your mind a little bit on other things you could save seeds on. Okay, so I just went into one of my other gardens and I gotta beat. That's going to see now. This is a beat I didn't harvest last year, so the beets that are growing in my garden right now, I can't harvest seeds from, but this is a stock, one of the many stocks that came off of a beat that I grew last year. It's a variety of beat that's shaped like a cylinder, so it's called Solyndra. So that's a Celinda Ria beat seed. And again, I can take all of these different little stocks. Snip them off like that. And just so you see, if you run your fingers along, they come off and those air beet seeds and that right there in my hand 20 beet seeds that will grow 20 beats. It's amazing, right? That's all it takes. Just let things like root vegetables like beets grow over a year, and you've got seeds. Now just one other take on it. Dot dot Dah, dah, some charred. One of my favorite garden veggies. Easiest to grow, super nutritious plant. I just uprooted one charred from last year, and it's right here. Just let me bring him in. Okay, so this is one charred plant that's gone to seed. It's 1.5 to 2 meters tall, and you can see how many parts and pieces on it and all of these are seeds that are ripe and ready, these ones here, or even browner and dryer that I've got in the viewfinder now. So this one charred plant would have tens of thousands of seeds on it again. I've got the little bag that says Green chart on it and into their I can put my seeds for chart and then I have lots to plant and lots to share for next year. It's that simple guys with beats with tatsoi behind me. Here I have a lettuce point that's going to see you see this lettuce plant, and it's just starting to head out right now. So if I let that go to seed, I'll be able to save the seeds off of that and have led us to grow next year when you start saving your own seeds. Once you've built your beds and got your irrigation in for backyard abundance, you can actually plant for free every spring. Share with a few other people to get a bigger variety of seeds each year. Pretty ridiculous need to try to show you one other thing. People, and it's this sunflower during behind the pole beans I've got a bunch of varieties, a sunflower, but this one, you just got to meet him. Look at the size of his head. Two of my hand spends across, so I think it's about 45 centimeters. There's so much food on their for the birds this coming winter, and I'm definitely saving seeds from this variety to plant. Next year. It's called a Russian mammoth. Who? Your big Okay, so that's about a wrap on our Day 90 update. What an incredible experience. We've got a nice serving of tomatoes of different varieties coming in, some to ripen and some ready to go. We got our last pepper of the season and some green beans. We've got our last six cucumbers of the season. Just started the beat harvests. I got five nice beats today and keep in mind those were very densely planted against the tomatoes. Most people probably wouldn't have planted anything by the tomatoes, and so it's been a slow harvest and grow time for the beats. But, hey, they're still coming out as a whole nother crop next to the beats next to the tomatoes rather, And then we got to harvest a melon that's perfect. And there's another nine harvest. So we've got some beautiful cantaloupe melons coming off of it, and I'm showing you now a little bit on just saving some seeds from the tatsoi. And we also did a bit of beats and charred because those air also items growing in this garden. One thing I do just to make sure that no one harvests a plant that I'm wanting to save the seeds from is on the plant itself or next to it on a little bamboo stick. I just tie a surveyor's tape or a flag or a ribbon, something that tells and reminds me and my family don't plant. Don't harvest this beautiful plant. Let it keep growing so weak and harvest the seeds. The flag means we're gonna wait. Harvest the seeds. So Day 90 look at where we're at. By day 100 which is our next update would have been pulling up food out of here for about 50 days straight, and there's gonna be a bit more transition a lot to celebrate, so it just keeps on going. See you next time
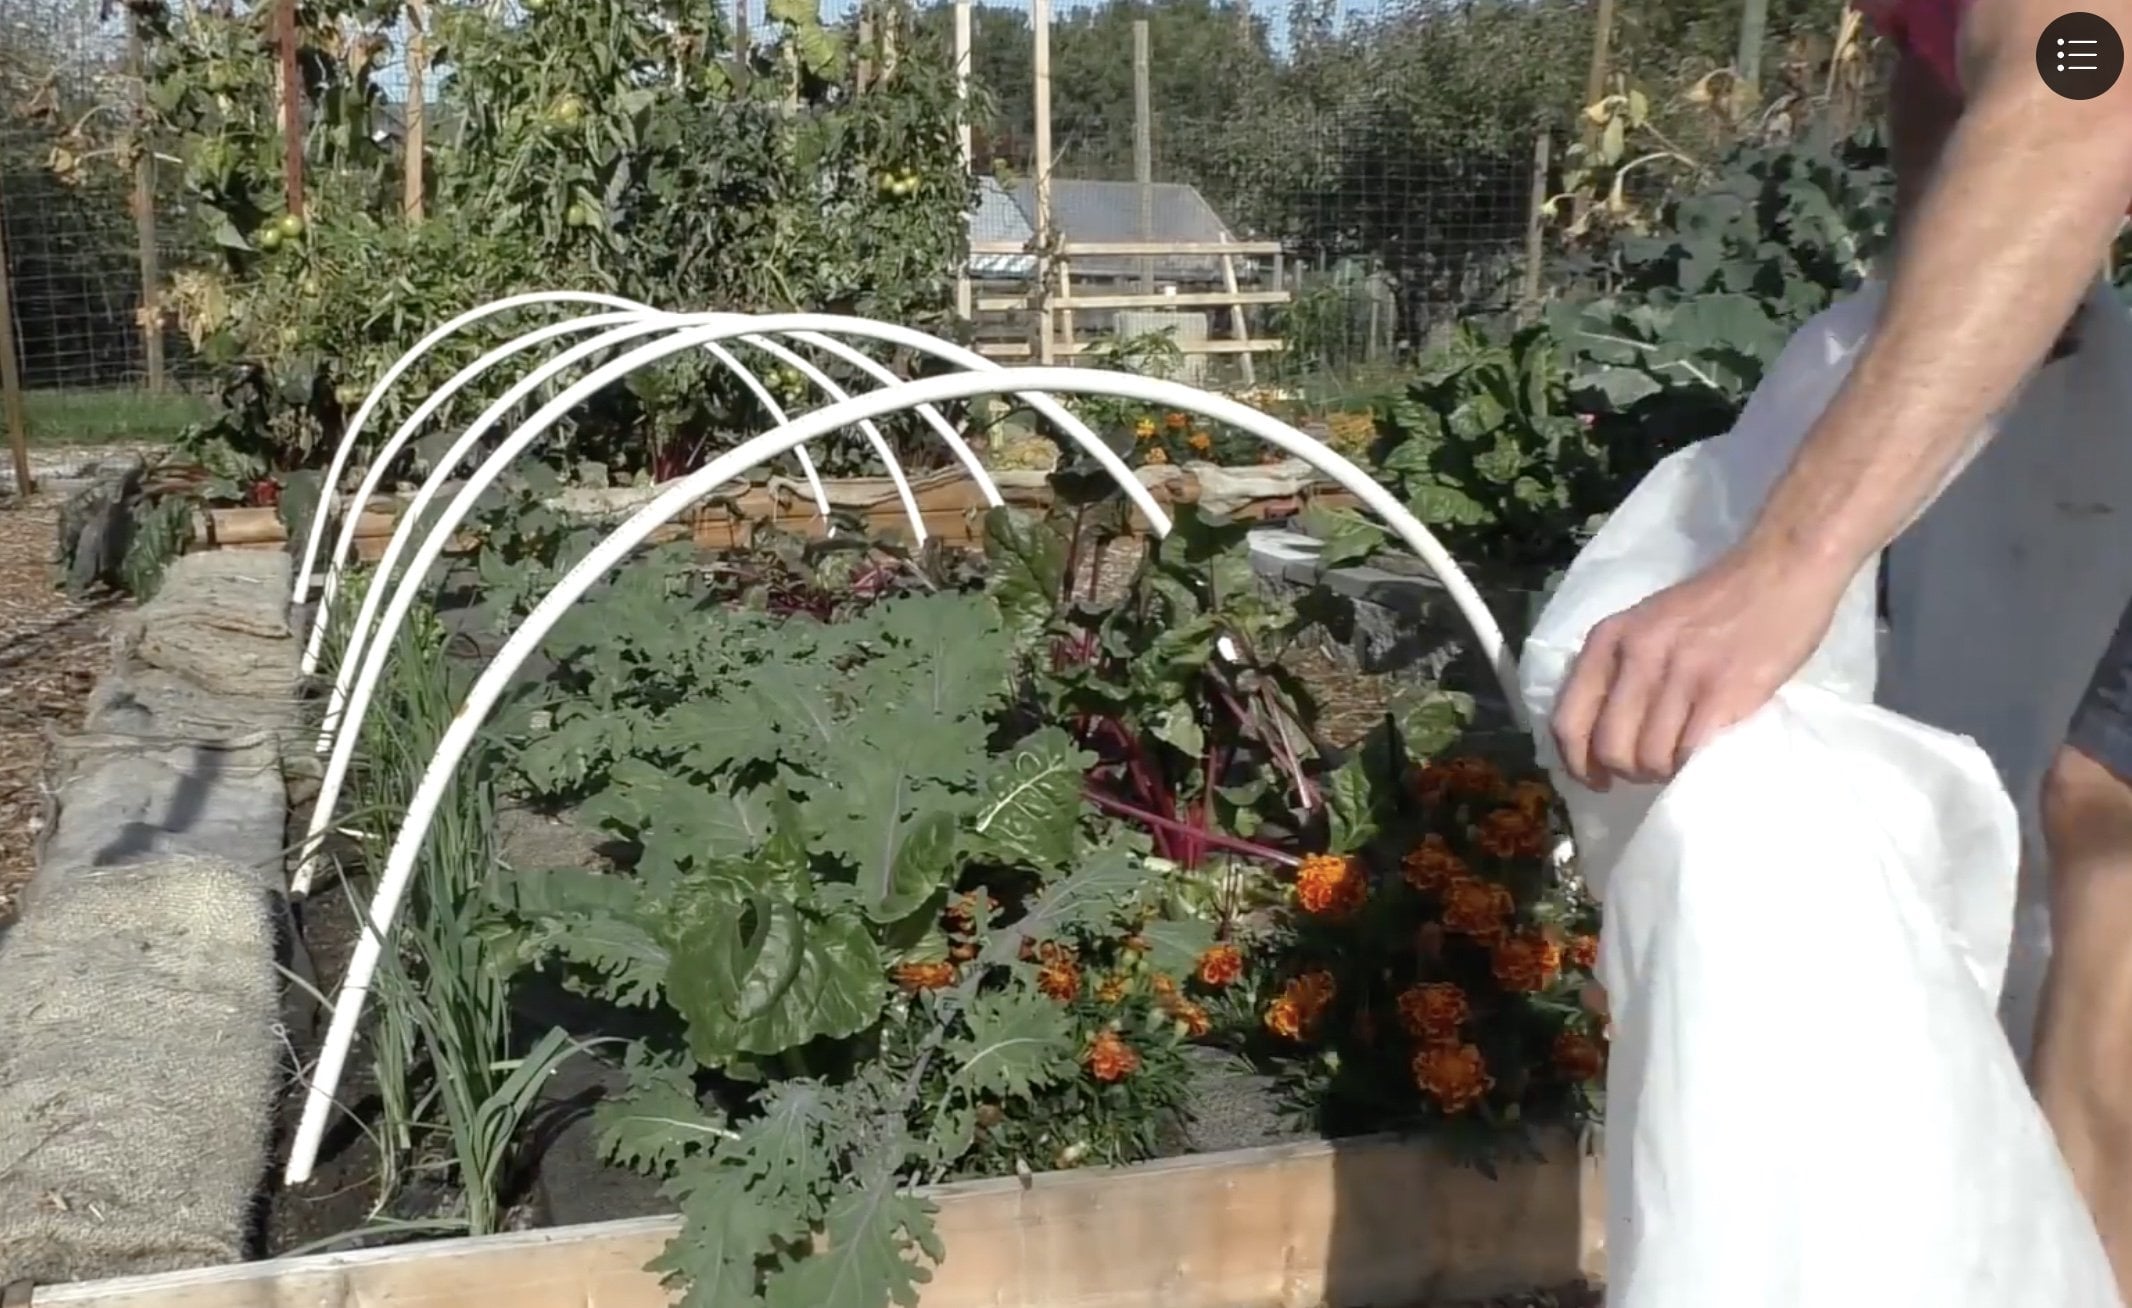
6. 100 Day Celebration: Okay, guys. Welcome to Backyard Abundance Day 100 in a wind storm Last night, my giant Russian mammoth sunflower blew down SOMO. Most of the sunflowers were the seeds were fairly rifle, just bringing up close. You can see these ones that are black. They're actually ready to go, I think. Yeah, help operate out so you can see that Russian mammoth seeds here look at the size of that. Incredible. So lots of bird feed and lots of planting seed for the next season. Where A day. 100. It's the 10th update since we planted seeds and starts. So I just wanted to take you through the garden beds. 123 However you want a number of them, just show you where things are at and where things were going. As you know, this bed has had beats in the foreground, which are still doing great, and I'm harvesting some. I've pulled out the cucumber that was over on this side because that sucker and given and given and given and it's done the Kentucky wonder pole beans that are back behind the tomatoes. Kentucky Wonder pole beans. Many of the beans that got overripe on purpose are this big they'll have. You can feel the bumps about eight seeds in each. And I'm purposely putting these overripe seeds after they've totally dried out on the vine into a bag. Gonna let them dry out further and shuck them, And that is an heirloom variety. So I'm gonna plant them next year. That will be my seed. So great way to go The tomatoes. There'll be a few photos. Hopefully coming up on the screen right now is I just speak to tomatoes, which are very obvious. Still behind me, these beauties that air ripening purple Just see you conceive these again if you haven't looked them in the previous videos, they ripen up purple and red. Very gorgeous, very flavorful. I've still been getting many containers of tomatoes every second or third day. I grabbed the ones that are just starting to turn in color and they ripen up in the kitchen counter. I've got several four leader ice cream pails of tomatoes that are ripening up right now. So that's kind of where this bed is at the sunflowers or breaking off because they're so heavy. The tomatoes, they're still being harvested. The pole beans. I'm pulling for seeds, the cucumbers been uprooted, and that's about what's here. Just to understand what's coming down, because I'm just starting to get frost at night or day. 100. The growing season is shortening, but it's still very warm during the day. Is that within the next 20 days, 30 days, everything behind me will be harvested and gone, and this is gonna be a garlic bed for winter. So we're gonna plant soft neck and hard neck garlic in here in the next month and thats what it will go into winter ass. It's not. We're just gonna take a look at the other two beds and see where they're at. Here we go. Okay, so we've switched over to this bed and this corner of the bed in addition to the cabbage family stuff behind me and the melon that's done over there, and the herbs that are on this side. We've got this gigantic Yukon Gold zucchini, and if you look inside it, it's full of flowers and all the flowers are male. We've covered male and female flowers before. It's not gonna produce any more fruit, so I've got all these flowers But again, they're all male. The remaining fruit that's on here is so tiny, I'll just show you an example of what it's producing. And these the last of the season. They're just little tiny guys like this and this plants done. It's got great solar panels. It overcame the mildew we powdery fungus that it had. But it's not gonna produce any more food. It's just taking up space and preventing the cabbage family neighbors from growing. So I'm just gonna take off these couple remaining little babies bikinis. We're gonna take this out and you'll just get to see how much space is vacant with this gun . So just give me a second a hack and play. I'm not gonna uproot it. I'm gonna cut it off with Root and let the roots decay into the soul to provide more nourishment for next season's growing. Okay, so that really were two or three tiny remaining zucchinis. I cut this plant up into three pieces, and all these hollow stems in there were just gushing out water. So you just pull this out in these three pieces. I cut it into give you a sense of how much plant matter there is. There's another tiny little guy. This is huge So much. Do you think of that as a compost product? Just how much material that's gonna give for next season's growth as it decays. Take out a few more here, and that in Athens is where the bikini was. Okay, so you can see the size of the gap that's created here now. And all of these giant spreading broccoli's and cabbages that are growing in here have way more light and access. The coffee Zac is still down. That was here from when I planted it 100 days ago, and now there's one less plant that's taking up moisture and nutrition. It wasn't producing any more food, so we got 100 days of growth off of that start, I think 30 to 40 decent size, the keys and then many of these little tiny fingerlings near the end, and it's time for the cabbage family to move in. So that's a big vacant spot. Thirds on the other side are going like gangbusters. We're picking oregano, green onions, time and all that just beautifully. I took the deal and saved a few seeds. I can plant deal next year from the seeds I harvested this year. The charge still doing great. And I'm picking chart every day for my morning greens. So I think we're gonna step away from this bed now. I should just mention, what are we going to do with this bed for winter? You know what? At this point, just about nothing. The charge is gonna keep growing through the winter and producing the cabbage guys. We're going to keep on going as well. The herbs air probably gonna keep producing quite well for a while anyway. And then the time in the Ragano will die off. The green onions would probably keep on firing. So this bed has got great coverage. I'm just gonna put a bit more mulch and straw and under here to protect the soil, preserve the moisture and let the plants just keep on pumping it out. So it's tall, right? It's a meter tall, these plants, and so it's very hard to cover them over. But I think they're going to flourish. What they don't continue to produce in spring. I think they'll fire up or Syrian fall. I think the fire been producing spring So now let's turn our attention to the remaining bed in the garden on day 100. Okay, so in this final bed, we've got the three rows, the beats and the beans air over here, the beans were doing great. I just picked a bowl of beans from this bed. They're not huge star performers like the Kentucky Wonder Pole beans, but they're still beautiful and tasty and very good for us. I just pulled the first beat out of that, wrote a check on it, and that's how big that beat was. So it's coming along nicely, and soon I'll harvest the beans and the beats will just shoot up with no more competition. We planted some kale and some cabbage alternately in this row, and in some cases the cabbages huge already like the plants have grown up to 30 centimeters tall. They're coming along great, and they're filling out and again as we pull up the beans shortly, they're gonna come on. And then this road nearest to me and the camera we did in mostly onion family products and in lettuce. Remember, we were concerned about the wire worm. So we put in these flags with potatoes. Well, the wire worm, I think, is getting the best of us. Two of the six lettuce plants have succumbed. I find little remnants like this lying around. It's the end of a lettuce plant. These guys were still alive. Wire worm Haven't taken them yet, But on the same day, I plan to these I planted. Let us in. Another garden with that doesn't have wire worm. And those lettuces are up this tall. So I know this is not great, and somehow the wire worm is taking a toll on it. So that's Day 100. That's our update. Other than lettuce, everything has thrived and been abundant in the garden. So the garden that has the pole, beans and the tomatoes as we harvest out, as I suggested, that's gonna go into garlic, the garden bed that has mostly cabbage family and Swiss chard in it, that we've pulled the melon and pull that the zucchini from that's gonna be as is for the winter and this garden. Once we've harvested the beans, we're gonna do a bit of a hoop house over top of it, and it will be a bit more winterized. A bit more protected, and that will enable the plants to just grow well through the winter and take off again in the spring when the warmer weather hits. So that's day 100 update done. We won't need to come back every 10 days now because we really just have to come back to clean out the beds, plant the garlic and put a who post over this. That'll happen over the next month, probably in two installments around 115 and 130 as the days and we'll be done for the season. So thanks again for coming along for the ride on this video, and I hope that your fall garden is prospering like this one is boom until next time.
 Sustainable Stace, hopeful, helpful, healthy