Transcripts
1. Why you need this course!: Editing courses will overwhelm you with features that
you'll never use. But what if you can master the key elements of video editing in just a short period
of time and start creating YouTube
worthy videos easily? Well, that's exactly
what this cab cut video editing training is designed to do to get you
up to speed editing fast. So in this training, I'm
going to take you through the process on both
desktop and mobile. You can choose your
preferred device or you can master both. And in this training, I'm
going to use the free version of Capcard so you can
easily follow along. Now, this isn't
for people who are aiming to go and
work in Hollywood. This is for content
creators, for entrepreneurs, for YouTubers who want to create great looking videos without throwing hundreds of
hours into training. That, we haven't met before.
My name is Justin Brown, and I run a YouTube channel
with my brother Mike, which we've now grown to over
1.7 million subscribers. After years in professional
video production as well, and training our
own editing team, we've distilled all
the important stuff that you need to know for effective and efficient editing into a simple proven process. So in this training, I'm
going to take you through our streamlined video
editing process that's going to save you hours
and hours of wasted time. You got to get a clear step by step system that you
can use to edit, complete YouTube videos easily. By the end of this training,
you're going to have completed a YouTube ready video. You're going to have
a repeatable process for all your future videos, and you're also going to
have the confidence to edit videos that actually
engage your audience. This is the same
training that we use to train our editing team all strip down to just
the essential stuff that you need to get results. So if you're ready
to stop looking like a beginner and start creating professional
looking videos, I'll see you in the next video.
2. Kicking Off: Massive welcome to
this Cap Cut training. So my goal for this training is to help get you up to speed and using Capcut creating some amazing looking
videos fast. Cap Cut is an absolute
beast of a program, and there is a lot in there. So this course is definitely
not going to cover off on every little
detail that's in there. This is not an advanced course. This is, though, designed to
get you up to speed fast, taking you through
the fundamentals and all the key
stuff that you need to know to have success with
this as fast as possible. So in this training, we're
going to get you up to speed editing a YouTube ready video, using Capcut the free version. We're going to be
applying essential editing techniques to transform raw footage to a completed
final YouTube video. So by the end of
this, you will have edited and be ready to share a short video on
a topic of your choice. Also, feel free to use
the sample footage that we've provided to follow
along with the class. Or if you prefer you can
use your own video footage. But if you are new
to video editing, then I'd suggest that you
focus on something simple, such as a personal introduction or a brief tutorial first. So for extra Context, CapcAt is an amazing
video editing tool. It's fast and it's easy to use, and allows you to create
amazing looking videos, whether you're on your
smartphone or your computer. Because it's one of the
few apps out there that actually works across
different devices, including Mac, Windows,
IOS and Android. So I'm a big fan of
Capcut for a few reasons, but the first one, probably
the most important one, is that it is easy to use. It's got a really
intuitive interface. So for someone who was
never edited before, this is going to allow you to
jump in to get up to speed, to start editing your
videos down easily without the overwhelm that
you would have in a lot more complex applications. It's also got a ton of extra more advanced stuff
in there as well, making it great for
someone who is at that intermediate to
advanced level two. Some of those more
advanced features include things like AI
background removal, advanced key framing
and animation, smooth slow motion, and
green screen effects. I also love how easy
it is in Cap cut to repurpose your content
into different formats so that you can easily
maximize the time that you're spending creating
your content and essentially create
multiple versions of your videos for different
platforms or different formats. Example, if you're
starting off with a 16 by nine or a
widescreen video, it's really easy to
repurpose or to recreate a portrait version for TikTok or shorts from that original
inside of Capcut. And again, all of this is
really straightforward, really intuitive,
and really simple. Now while there is a free
version of Capcut available, there are some limits now
with how many videos you can export or save out without a
watermark or without brand. Free. So if you do want to
remove this limitation and also unlock all the features
and all the functionality, all the effects, then
that's where you will need to be on the paid
version of Capcut. Regardless, though,
the free version is a great place to start, and that's what I'm using
in this training, too. But I also want to
note that Capcut is constantly evolving and
changing and updating. And I absolutely love
this about them. There is no other app or tool
that I've seen that rolls out updates and new features
as frequently as Capcut. They've got a big
focus on helping people make videos easier, so they're building out a
ton of cool AI functionality that's all included in CAP
help with that goal, too. But what I've noticed now
from using Cap cart for years is that a lot of features
tend to be released as free, first off, and then over time, they move a lot of
that extra stuff, the more pro level stuff
into the paid version. So even if you're
seeing something that looks a little bit
different to me, that you can still keep
pressing forward and understanding how
all of this stuff works and how it
all fits together. Overall, I think CapcAT is the best all rounder video editing tool
out there right now. It's great for
absolute beginners, right through to people
who are more advanced, but are looking for a
fast, effective workflow. And finally, as we go through any related links or resources for the video
that you're watching, they're all now under the
projects and resources area. So if you hear me
say things like links are in the
description or there's more information linked below,
that's where they now are. So let's get started.
3. The differences: CapCut Mobile Vs Desktop Vs Web: Okay, so for those of
you who aren't aware, there's actually
different versions of Capcut out there in
the wild right now. There is a version which
is very similar on desktop and on mobile devices. Those two are very,
very similar. And then there is a
web based version, and that is a totally
different thing. Even though it's branded Capcut, even though it's called
a Capcut video editor, the web based version, the one that you access through
their website is actually a totally different thing to what we're covering off
in the training here, which is the Capcut or the cap cut video
editing software. The web version is
heavily cut down. There is nowhere near as much control or features and tools
and things in there. You can still do some very
basic edits in there, but it is nothing in comparison
compared to what you get access to in the mobile
version or the desktop app. So I want to just stress
this point home early on in this training to
make sure that you are using the right version. Want to download and install the software on your computer, on your Mac or Windows computer, or you want to download install the app on your IOS
or Android device. That is what this training
is centered around, not the online web
based version. Maybe one day, they'll
be able to bring all the features and the
functionality from the app and from the desktop
version over to the web so that we don't even
need to install anything. But for right now, you just need to know that they're
totally different and that the web based version
is really nothing in comparison to what
you get access to on the desktop
and the smartphone.
4. The Ultimate CapCut Video Editing Process: There's a lot of
people out there that don't enjoy video editing. It's that necessary
evil for you to create effective
good looking videos is the whole editing thing. Don't worry. I'm here
to make this process much, much easier for you. But the biggest place that I see a lot of people get
stuck when they approach video editing is that they just jump straight in, they add on a few effects. Color grades to try and make
their footage look good, make it look pretty
straight up front. And by adding these effects and color grades
and stuff upfront, you can also slow down your computer performance
or your phone performance, making the whole thing even more painful to
edit in, as well. So the answer to this is
the fastest and easiest way to edit your footage down is by following an
effective process, a step by step process what to do when in
a structured order, for best efficiency,
but also for best results and performance
on the way through. So I'm going to quickly
run through what the steps are in
the order that you should ideally be performing
these for optimum results. And then you'll also
find that we've structured a lot of
the content here in this training to help you edit and follow along
in the same way. So instead of just starting
your editing project, jumping in, adding in a
bunch of effects and stuff, the first thing that
you should do is to make sure that your project
is set up correctly first, make sure that
you've got the right framework, the right resolution. Make sure that you've got
everything set up the way that you need before you even
bring in your footage. From there is when we're
going to import our footage. Now what I'd suggest that
you're doing here is bringing in your
primary footage first. What is the core footage, the core story that
you want to edit down. Let's bring that in first, and then we're going
to base edit that. So we're going to remove all the bad takes, all the mistakes. Anything that you don't want to have in the finished video, going to remove all of
that stuff up front. Again, we're not focusing
on making it look pretty. We want to make sure
that we actually have everything to tell the
story that we want to tell before we waste any
more time in case we don't have something that we need or there's been an issue with
the footage that we've shot. This allows us to check all
of that as we go through. Now, editing this way is also an iterative process
in that we're constantly refining and tweaking our edit every time we
play through it, or work. Once we've gone through,
we've done this base edit, our first pass, removing
all the bad stuff, all the stuff that we're
definitely not going to use. The next step then is
to bring in any B roll or overlay footage
onto our timeline. So this could be any other
shots that you want to show, any other graphics or animations that you
want to bring in, we're going to add that next
layer there at that point. We're also, as we're doing
that, doing another pass. So we're tweaking up
some of our cuts, tweaking up some of our edits. Again, refining this as we go. Once we've got our
primary footage in, we've got our B roll or our
overlay footage in as well, this is where we can start
to make some adjustments to the clips themselves. So we could zoom in, we
could crop, we could scale, we could rotate our
clips to start to get them closer to how we
want in the finished product. Next, we're going to
go through and add in any text and graphics into our video followed by adding any transitions or effects
to make our story flow. Once we're happy
with that is when we dive deeper into the effects, and we look at adjusting
the speed of your clips. We look at stabilizing
your clips, adding any animations, doing
your background removal. All of that stuff then
happens at this stage. From there, the
next step is to add any music and sound effects. Once those are in and
we've got them in place, we're then going to
go through and adjust all of our volume levels across all of our clips so that everything is
set how we'd like it. And then one of the
last things that we do is we make it look good. This is where we can
go through apply different color grades, different looks,
different filters. This is where we make it look the way that we want it to look. Again, this is something
where a lot of people dive into this stuff
right up front. You want to do it
right towards the end. And then the last
step is export. This is where we're saving
out our video masterpiece. We'll then preview
it and play it back, make sure everything
is all good. Obviously, if we need to make
any changes at that point, we dive back in, make those
changes and re export. But we want to preview
our video and play it back before we post it and
share it on the Internet. But we want to make sure
that we are playing back or previewing our video, making sure that it looks
exactly how we like it. Ideally, you're doing this on
different devices as well. So if you can play
it back on a phone, play it back on a TV, or
on a computer screen, then you know that
you're happy with how it looks on some
different devices, and then at that point,
when you're happy, then your video is
ready to share. So that is the step by step
video editing process. And again, what I'm
going to take you through in the rest
of this training.
5. Mobile - Downloading and installing CapCut: It's time to download and
install Capcut on your device. I'm going to be showing
you this on an iPhone, but the process is pretty much exactly the
same on Android. You want to go to the app store, you want to go to the
Playstore and open that up. Then you want to go ahead
and search for Capcut. I've got to go down the
bottom right hand corner here to search on here, and then we can type in
Capcut, select on that. We got an ad that's shown
to us at the top here, we want to scroll down until
we see the cap cut app. This is the logo that
you're looking for. You can also verify that this is the right app because it says it was created by ByteDance, which is the company
that also makes TikTok, so that's the one that
we're after here. We're going to press the
little download button to download and install that. It'll then go ahead
and do its thing, and then the app is then
installed on your device. We can see that's done
now. It just says open. We can either open it
directly from here or we can come across to
our app draw here. We can then go ahead
and find Capcut. There it is up the top here. We can press on that
to open the app.
6. Mobile - Getting to know the CapCut interface: Going to take a look at
the cab cart interface. If you've never opened
the app before, then this is what you will
first see when you open it. You'll need to hit the agree and continue button
down the bottom. It's likely they going to
pop up like it is here and ask you for different
permissions for notifications, access to camera and microphone, so you can go ahead
and accept those. Once that's done, we're now
inside the cab card app. You can see this is
broken down into different tabs down the bottom here starting off
with the edit tab. This is the main area that we're going to play in in terms of creating and managing our projects and all of that stuff. There are some templates
and things that you can use in here as well. There's also a dedicated
tutorial section in here now for extra support and tutorials that Capcut themselves have
created for their user. Also an inbox area and also
access to your account. For these, it's asking
you here to log in. While you can create a free Capcut account,
you don't need to. You can still access a
lot of the functionality without even needing to
create a free account. Let's jump back to
the Edit page here and continue our tour
of the interface. We do have a settings button up the top
right hand corner. Here this is where
we can customize up some of our app
specific settings. We can go back out of this
with the X in the corner. We've got now access
to some cap cut tools. Now this is an area
that is changing fast. Already, I swear the last
few times that I've opened this new tools and things
that are showing up in here. That's that menu bar
across the top there. If we expand, we're
able to see more of these new features and more of these tools
being rolled out. It's likely while
you're watching this, there's probably some other
tools in here now as well. You've got things
like the camera, they're built in teleprompter. There's a bunch of AI tools and photo retouching tools
in here as well. Let's go ahead and dive into the editing interface so I can show you what
that looks like. So we're going to
hit New Project, and D will have a
dedicated video on taking you through
setting up your project. I'm just going to
select a video file here just so that we can get
to the editing interface. I'm going to choose
Add, and this is our main video editing area
here inside of Capcut. We can see we've got our
big preview window here, so we can preview and play back our video
editing masterpiece. There's a button over
here on the left, and you see if a
tap on that, it's going to make our
video full screen. This is good if you want
to preview what you're making a little bit
bigger on your screen. We can hit that same
button down the bottom right now to return
that back to normal. We've got our playback
controls in the middle, so we've got our play pause right in the center
of the screen. Over on the side, we've got
our undo and redo buttons. So if you're playing around and you're testing out different
effects and things, you can easily remove them and go backwards if you need to. But this main area
down the bottom here, this is your editing timeline. This is where the magic
is going to happen. Where we can see we've got
our video clip down here. We can just tap to swipe across. We can two finger pinch to
zoom in and out on this area, and then down below that in
the bottom menu bar here, we've got access to all of our effects and tools and
titles and everything. This is where we access
all of that stuff. Being that we're using
this on a smaller device, we can actually tap
and swipe across here as well so that we
can access everything. If you're looking
for something in particular and you
can't find it, then just remember that you
can tap and swipe along. This menu bar across the
bottom here does change update as you're doing different tasks in
the app here as well. For instance, if I tap on our video clip here
in our timeline, then the tools and
things that we've got access to down the bottom here, this is now changed to all
the different effects and transitions and
everything that we can apply to that specific clip. You can see we've got a
lot more options in there. Up in the top right
hand corner where it says ten ADP, up here, we can easily see and select and change our video
export settings. I'm currently set to ten ADP, but we can easily up
that to two K, four K, or even go lower to
720 P if we needed to. In here, we can control
the resolution, the frame rate, your bit rate or code rate, as
they call it here. That's the quality of the
videos that you're saving out. We can also turn on or
off Smart HDR as well. We also now have the
ability in here as well to save out gifts
or Jits as well. So if we go back now,
the button next to that, the up arrow is our share
or our export button. That's how we can
save out our video. At any time if we
want to go back to our main project area to switch between maybe
different edits that we're working on, we can press the X in the
top left hand corner, and that's going to take us
back to that main screen.
7. Mobile - Project Setup: Configuring project settings: We're going to get our
video editing projects set up inside of Cap Card and adjust
all of our settings so they're good to go so
then we can get to editing. I'm back here in Capcard, I am over on that edit page, and right now I'm not signed
in to the Capcut account. Now, you don't need
to be signed in, you don't need to
create a free account. But when we're
looking up setting up our projects and things here, there actually are some
benefits to having a free Capcut account
in terms of backups, so we can actually back our
projects up to the Cloud. If something happened
to your device, you haven't lost the projects
you've been working on, but also you have the ability to now transfer them between devices or between your desktop
and your phone as well. For that, you will need to
have a free account created. I'm going to go ahead
and sign in now. So we can either come across
to the little M icon down the bottom and we can create an account or we can
sign in that way. Or if we're back
on the edit page, you can just press on
the Cloud button there as if we're wanting to upload
our project to the Cloud, and that's going to
prompt us to sign in. So we can sign in with
the TikTok account, Google, or any of the
other options there. I'm going to go ahead
and sign in now. That's done. We are signed
in on a free account. This isn't a paid account. But now when we
create our projects, we have the option to back
them up to the Cloud as well, and I'll show you that
a little later in this video. Create a project. We just want to hit
the big button there that says new project
is then going to prompt us to choose a video file so that we can
get our project set up. Now what I recommend
you do here is choose your primary
camera footage. The thing that's going
to make up the bulk of the video that
you're creating. You want to select
that clip first because Catcuts then going
to analyze that clip and it's going to update your
project settings to match that we do have the ability here to go through and
select multiple clips, so we can just tap on the
little circle here and pick all the clips that
we want to use in our video editing project. But I suggest that you
don't do that yet. Let's just pick the
main camera footage here to make sure that our
project is set up correctly. We can come back and import extra footage a
little bit later. We've got our primary
footage selected there. I'm going to choose Add
down the bottom corner. We can see that that clip is
now here in our timeline. We can then either make sure
our project settings are correct or we can change
them up if we need to. The first place you want
to look for this is in that top corner there
where it says ten ADP. We want to make sure
that that matches the video that we are creating. The footage I just
imported here is ten ADP, so that matches already. It's also 30 frames per second. That's all we need to
validate at this point. But now if we come down
the bottom here to where we've got all these
options across the bottom, we can actually choose here the format of the video
that we want to create. The default here is matched
what it is that we shot. It's a wide screen
video 16 by nine. But let's say the video
we want to actually create in is
something different. We can come down
here to ratio down the bottom and we can choose
the format of our videos. You can see we could
choose nine by 16, so a TikTok style or Instagram
reel or YouTube short. We've got a one by one,
so a square style video. You can see that there's a
bunch of different formats and sizes for videos that
you can create in here. It's much easier to get this setup right at the
start of your project, but this is something
that you can come back and change later. In the case of this video here, it's a regular 16 by nine video that we would
upload to YouTube. I'm going to make
sure that that is specified maybe a little later, once we're
finished this video, I want to come back and create a Tik Tok version or a
YouTube short of this video, we can come back and we can resize everything
afterwards as well. I'm going to leave this
here at 16 by nine. We're going to hit the
tick to apply that. Then there's one last thing that we want to do to make sure that our project is
set up correctly. Let's hit the X in the top
left hand corner to close out of this project and we
can see now under projects, we have our video
projects sitting it's been given the project
name one, one, two, two. We can rename that so it's
easier for us to find later, but also to manage
if we're working on lots of different projects
at the same time. We can press the
three little dots over to the side
of that and we can choose rename and let's give our video a name. So now video. That's the video
we're going to be editing down in this training. Let's go o and that name
has now been applied. The other thing we can do at any time here is that we
can press again those three little dots and
we have the option here to back to
the Cloud as well. Now that you have
a free account, there is some free
included Cloud storage. If you want to back
up your project to the Cloud as you go through and as you've done
more work on the project, then you can definitely come in here and back that
up at any time. From here, we can tap on that project there
to open it back up, then we can start editing.
8. Mobile - Project Setup: Importing video assets: Now it's time to
import your footage into your video
editing project here. This is where we're
going to bring in all the different video files, different video assets that
we want to use in our video. Now, back when we created
our video editing project, Capcut actually makes us
select one clip at least to immediately import
into our project as part of creating
that project. We also have the
ability to bring in extra files into our
project at any time. I want to stress here
that you don't need to have every single file that you're going to use here in
your timeline immediately. What I prefer to do is to
bring things in as you need them so that
you're building this thing out over time. Instead of just
having everything in your timeline and trying
to juggle everything, it's much easier to
bring stuff in as you. Right now we've got one clip
added to our timeline here, which was the one that was added when we created our project. Because we only have one
clip imported at this point, it's sitting on our
primary video layer. This is really where
you'll be building out your edit with this
primary video layer, and then on top of that is
where you can add any B roll, any graphics, any
things that you want to show on top of your
primary footage. I'm going to show you
how you can import different clips onto either
your primary timeline or also to bring them in on top
of the primary timeline so they're added as B
roll or overlay footage. But it is worth noting at this point that you need to have at least one clip always
in your timeline. If we select our one clip here and then we go down
to the delete button, it tells us we need to keep at least one clip in there,
something to be aware of. We've got our first clip
in the timeline here. Let's tap and swipe
all the way across to the end of our video and
let's bring in another clip. What we're seeing on the screen here at the end of our clip, I'll just pinch to
zoom to Zoom in here. Our first clip finishes,
which is this one here. But there's also this
blank area here, which is a title
here from Capcut. Now, this is on by default, that this card or this title is automatically added at
the end of your video. But don't worry, you can
delete it here right now so that it's gone for
the rest of your editing. We've got that selected
now and just tapped on it. You can see down the bottom,
we've got the delete button. If we press on that,
that clip is gone. A lot of people forget that. We want to do that
here before we get too far into the edit so that
it doesn't get forgotten, but know that you can
definitely remove. Okay, so at the end of
our video here now, let's bring in another clip. All we have to do is press the plus button here on
the right hand side, and that's going
to take us back to that import window
where we can go and find the clips or graphics
that we want to import. This page here is broken down
into the categories videos. We've also got
photos and we've got live photos if those
are on your device. Let's go back to videos
here at the top, you can actually
change the categories or the sorting of these. Right now, this is
showing recent files that have been
used on my device. If I press on could change the category or the
grouping to recently added. We could just show videos, live photos, ones from
the Insta 360 app. A different camera
that I have videos or photos that have been sent to
me through WhatsApp, even. There's different ways
that we can categorize or go through and find our
content at this point too. I'm going to tap back
on recent to go back. The next one across though, where it says in at the
top, if we press on that, this is if we are
using CapcATs Cloud, then we can import
files from here. If there's files
that you want to use on the desktop version and on your mobile version or on an iPad or
something as well, we can synchronize them
here using CAPCuTsCloud, and we can import them into
our projects from here too. There's also an option at the
top here for stock videos. Yes, Capcut does
give you access to stock graphics and Broll and
things that you can use. I'd be very mindful about using these in my videos in terms of potential copyright issues that you might have though
they're in here, using these and using the stock music that's
included as well, you could be opening yourself up to potential copyright claims or strikes from using these if you don't have the
correct permission. For me, personally,
I'd much rather use other services like
story blocks or motion array to find
these graphics and files because I know then that I'm totally compliant
with the licensing. Let's come across to recent let's select another video file. Going to choose this clip up here in the top
left hand corner. Now there's two ways
that we can select this. I can tap on it in the little circle there and then we get the little
number one up here. This is if we want to
select multiple clips. I could then select another
clip and another clip and you can see those
line up down the bottom. These are going to import in that order into our timeline. I can deselect them by pressing the little minus on
them down the bottom, or I can just tap on that little circle again and they're going
to be deselected. If you want to import
multiple clips, then that's how you do it. But let's deselect
this first one here instead of
tapping in the circle, let's tap on the actual
video clip itself. That's going to open
it up to preview it. If we want to check that
this is actually the clip that we want to import,
we can do that here. We also have the ability though, to trim this down so we can make some minor edits to this so that we're not
importing the whole file. If there's only a small section of this clip that
we want to use, then we can just bring
in that small section. Down the bottom
left hand corner, there's a button that says
trim if we press on that, then we can adjust
the start time and the end time of this video just by adjusting
these yellow handles or start and finish T markers. Let's say that we only wanted this small section
of the clip here, then we could just hit the
tick down the bottom right and that small section is going to be imported into our project. Then we just hit Add
and that file now that small section
of that file has been added to the
end of our project. You can see that this
has added this clip right next to our
primary video footage. This is on the main
editing timeline, the main editing layer as well. It's not been added to show above that clip at this point. You want to go through
and select all of your primary video footage. It could be that you've got
multiple clips built out. It could be that you recorded your main video footage in smaller chunks
or separate files. You want to import
all of those now. Once they're in there,
you can actually long press on the clips, and you can pick them up
and move them around. Let's say that we wanted this other clip here at the start, we can just pick it
up, we can adjust it. If we scroll back
to the start now, we can see that that small clip is now at the start
of our video. We want to move it back,
we can long press on it, and let's move it to the end and it's back
there at the end. So it's really easy
to add and reposition your clips or
essentially your chunks of footage here this way. Because we've already got
our primary footage in here, this extra clip here, we wouldn't normally add
to the end like this. If we wanted to show
this while I'm talking, then we instead want to
add it as overlay footage. We want to position it over the top of our primary footage. We can either convert or promote
our clips here to become overlay footage or we can import our footage directly
as overlay footage. Let's say this clip here, this second clip here
in our timeline, we want to promote
that so that it's not just sitting next to our
clips and playing after it. It's actually playing
at the same time or on top of it.
We can select it. We can come down the bottom here and we want to go
through and we want to find where it says overlay
and you can see that it's moved our clip now onto
a separate video layer. It's no longer on
our primary track, it's now on its own layer. That clip we can tap
and hold and we can reposition it wherever we
want it in our timeline here. Then when we scrub
through this now, you can see that I'm
talking, but at that point, this other clip is going to play while the original is still
playing underneath it. Even though it's layered that this overlay clip is
actually underneath it, it's actually on top of it
in a video editing sense. That's how we can
promote our clips to become B roll and
overlay footage. Or if I deselect this now, let's hit the back
arrow down the bottom. Instead of hitting
that plus button over to the side to
import our footage, we could just hit the overlay
button down the bottom. Then come down to Add overlay, we could then go through find the clips that we want to use as our overlay footage
or the stuff that we want to show on top of
our primary footage. Let's pick this clip here. Let's choose Add. You can now see we've got
three clips there. We've got our primary
footage here. We've got our first clip
that we promoted to become Broll or as an overlay and we've got this
third clip here, which we just imported as
overlay footage as well. Now with each of these clips, we can tap on them, we can hold them, we
can pick them up, we can move them around,
and we can trim them down and edit
regular footage too. One last thing to note
here when you're working with overlay footage
is that when we're in overlay mode like we are now where it says
overlay down the bottom, then this is where we can see these clips lay it up like this. If we hit the back arrow, then you can see that the
view changes and we're still always seeing our
primary footage here, but the overlay clips are
actually now compressed. We get instead these
little indicators or icons here showing us that
there is some B roll, there is some overlay
clips added at that point, but we don't necessarily know at a quick
glance like this, how complex or how
many layers we've actually got stacked
up at that we can easily jump back into overlay mode at any time by pressing overlay
down the bottom, and that's going to bring
us back to that view. It's all about saving
this screen space, the screen real
estate so that we can see at a quick glance, yes, there are some clips
and things added there, but we don't need to
see them all the time, because it can get
pretty overwhelming the more complex your
video edits become. That's how easy it is
to add and to import your video assets here
into your editing project. I'm going to go ahead now,
I'm going to hit overlay. I'm going to select those
two clips that we add. I'm going to remove them because the workflow that I suggest
that you're working through first is let's get that primary footage cut down
first to where we want it. Let's build out that story
and then we can go ahead and add B roll and graphics and animations and
things afterwards.
9. Mobile - Editing: Cutting down your videos: Time for us to cut
down our videos. Now there's a few different
ways you can do this as with most video editing
software and apps. So I'm going to take
you through the different methods that are available to you so that then
you know which you can use, in which circumstances for
fastest editing all round. Because there are times where
it will make more sense to use one of these
methods over another. Now if I just pinch to zoom out down the bottom area here, we can zoom out on our
clip so that we're able to scrub through
it here really quickly. Again, at this point,
we've just got our primary footage
here in our timeline. First way that we can
start to trim this down is we just want to tap
on the clip itself, and that's going to bring
up these white bars on the start and the
finish of our clip. If we go across to the
end, you can see there's this thicker white
bar on there too. These are essentially handles
that we can swipe across to adjust the start or the end time of an
individual clip. Let's say that we wanted this clip to start
a little bit later. We can drag it through here to where we want
the clip to start, which is likely
just before I start talking here about here. When I let go, I lift my
finger up at that point, the clip is now going to start
from then we hit play now? We have the world's best video, but if no one clicks on it. That's now the
start of our video. Likewise, if we want to
trim the end of our clip, so you can see if I just
tap to swipe across here, that I stop talking about here, and then there's all
these extra footage at the end that we
can get rid of. I can press and hold on
that white line there, the thick white line at the end, and we can drag back to the left to the point where
we want the video to stop. So around here that now is
the endpoint of that clip. Now to navigate
through our footage, we could hit play and play through to find the areas
that we want to remove or we can tap and swipe across and you can see that
white line in the middle. That's our playback
indicator that shows you exactly that frame that you're previewing there in the top. Let's come across to
the piece here where I stopped talking about here, let's say that we
want to add a cut in our timeline at that point. We're happy with
everything from the start right through till then.
We can tap on that. Then down the bottom,
we've got split, and it's cut out clip in two so essentially now we've got a clip on the left and a
clip on the right, and for each one of these, we've now got those handles. Let's say that there
is a gap here, which there is before I start talking again
somewhere around here, we can grab that left handle of the second clip and drag
it up to that point there, and we've now removed that section where
I wasn't talking. Now, for more granular
control or for a higher level of
accuracy, we can zoom in. Let's pinch to zoom on this. Now when we tap on a clip and we're making these
minor adjustments, you can see that it is at a
much finer level of detail. Idea here is that we're
working through our video, whether start to finish or end back to the start and we're removing all
of the bad takes, all of the mistakes, all
of the things that we don't want to have in
our finished video. We're doing a first pass to remove all of that
stuff upfront. Here's another section
here where I've just finished talking
at this section. After this, there's
a little bit of a pause because the way
that I film videos, I'm doing it in chunks. We want to remove this gap here. Let's again, find
the place where I just finished
talking about here. Let's select on our let's add a split in it so that
we're cutting it in half at that point and
we could just grab that left handle and swipe
across as we've done before. But we could also
just come across to where I start talking
again around here, and we could add another
split at this point. That means that this
clip here in the middle is something that we don't need, something
that we don't want. We can just select it and we
can come down the bottom to delete and that clip is now
removed from our project. It really is about here using
these tools that you've got access to swipe through or
play through your footage, find the areas that
you want to remove. Cut or split your clip, delete to remove that content, or you can use those handles to adjust the start and end
times of those clips too. Let's just play
this section here. You could have the
world's best video, but if no one clicks on it, no one's going to see it. You need to get your
content clicked on, and that's when your thumbnail
strategy is so important. To help you with this, so even though I started
talking then at that point, there's a double up or
I'm starting again, we want to trim this
down to about here so we can play through
this next section now is so important. To help you with this,
you need to make sure that your
thumbnail images are attention grabbing that
they stand out on YouTube. A, the pause, we want to
finish this at that point. They stand out on YouTube. So we can cut this
here, tap on it, press split, help you with this, you need to help you with this. Now if we keep coming across, it looks like I've started
to say this again. So to help you with this,
you help you with this. All right, so I started this
actually two more times. We want to work
out exactly where that is here around here. Let's split that. This
clip on the left is no longer needed because it was
all bad takes and mistakes. So we're going to press Delete
and let's play this now. It. Help you with this. You need to Okay, so I've actually trimmed too
much off this one. If we play this again now,
it's a bit too quick. Help you with this. Let's
select on that and we can actually bring back
some of that footage, too. So if we drag to the left, that's going to
bring it back in. So when we delete something,
it's not totally gone. This is non destructive
editing as they call it. So we can trim stuff down, but we can also bring
it back if needed. Let's play this section now. Important. So to
help you with this, you need to make sure
that your thumbnail images Okay, so that's working. I want to go through
now we want to cut down this clip to remove
all the bad takes, all the double ups,
all the mistakes so that we're just left
with the core content. Once that's done and you
can see we have a lot of little clips in the
timeline here now, the clips themselves
are actually movable. So if we need to pick something
up and move it around, we can just tap and long
press on it and we can adjust the positioning of these clips really,
really easily.
10. Mobile - Editing: Adding B-Roll & overlay videos: This video, I'm going
to show you how to add in B role or overlay footage, graphics, images
into your videos. So really quickly,
your A role in a video project like this
is your primary footage. So in our case, that's
the stuff that we've edited down first here
with me on camera. Your B role, then, is any footage that will
sit on top of that. So it's supplementary footage. So what we're doing here
is we're going to be overlaying that on top of our Aroll footage
so that we're still able to hear what's
happening in that a role, but we're now showing
B roll on top of it, which will be on
screen instead of it. If I've lost you here already, it's going to make
sense as we go through. So what we're going to do
now is make sure we've got no clips selected
here on the timeline, and we're going to
come down the bottom to where it says overlay. We're going to then
choose Add overlay, and that's going to bring
up our import box, agamma. We can navigate through
and find our media. So we're going to go ahead
and select this clip here and I'm going to choose Add depending on the
file that you select, sometimes it goes through
and processes the clip, which is what it's
doing right now for me. But once that's done, that clip is going to
show up in your time. Can see we've got that
clip imported now. So if we swipe across
our footage here to scrub through it, you
can see I'm talking, and at this point, the Broll the overlay clip
is now shown on screen. But the original footage is
still playing underneath it. So I've gone ahead
and I've brought in one big clip that
actually contains all the small snippets
that we'll actually want to use for this
video that we're editing, but you could definitely import multiple smaller clips
into your project as well. The very first thing that you'll want to do here next, though, is you'll want to scale up that clip because if
you notice at the top, this Broll clip isn't filling
the frame completely. We can just make sure
that that clip is selected by tapping on
it down the bottom, and then we can just
pinch to zoom on that clip up the top
to scale that up, and it's going to snap into place once it fills
that full screen. Now that it's the right size and it fills the full screen, this is when we can
start to trim this down. So these overlay
clips, they're treated exactly the same
as a regular clip. We can pick it up, we
can move it around. When we tap on it, we
get those handles on either side so that we can adjust the start and end point. We can add splits in the clip to cut it up
to make it shorter. And that same process
that we've used for cutting down our clips
is what we're going to follow here to find the sections of this B
roll that we want to use. To position it where we want it. So I'm just going to
hit play on the video here to work out what's
been said so then we can go and find the
appropriate shot as B roll to bring
up over the top. You could have the
world's best video, but if no one clicks on it,
no one's going to see it. So you need to get your
content clicked on, and that's when your thumbnail
strategy is so important. All right, so we need a
shot here from this B roll, maybe of one of our thumbnail images that we could then add some animation or
something to it like someone's clicking. Let's
just scrub through here. Let's see what's actually in
this clip that we could use. Okay, so maybe this section
here that's just static. So we can add a cut
in the timeline here. Let's select that clip.
Let's choose split. Let's come across to where
we want this to end, maybe just before it zooms
out. So probably about here. And let's add another split. Now, this smaller
chunk here that we've just trimmed out,
let's pick this up. So let's press and hold on it, and let's drag it
across to the left, so it's at the
start of our clip. Now, I'm just going to
pick up our main Bro clip here. Press and hold on it. I'm just going to drag
it over to the right, just so it's out of
the way a little bit. Okay, so let's line
this up now to where we want this
clip to be shown. You could have the
world's best video, but if no one clicks on it, no one's going to see it. So you need to get your
content clicked on. Okay, so we probably
don't want to bring it up until about here. So
let's shorten that down. Let's tap on it. Let's drag
that left edge across, and let's see what
this looks like here. No one clicks on it, no
one's going to see it. So you need to get your
content clicked on, and that's when your thumbnail
strategy is so important. Okay, let's zoom in on this, and let's trim the end
of this off so that it finishes right when
that clip finishes. I was going to grab
that end handle and slide it back to the left. Alright, that's not bad so far. And again, we're going
to add some sort of animation to this a little bit later so that it's more engaging
for the viewers. But let's go ahead and find the next clip that we want to add. So let's play this
next section here. Help you with this. You
need to make sure that your thumbnail images are grabbing people's attention,
that they stand out. Okay. So for grabbing people's attention
and standing out, I kind of want to use a shot here for scrubbing through
here looking for B roll. Where we're just scrolling
down on YouTube. Maybe we could start
it about here. Let's select our B roll. Let's add a split. Now, let's keep
scrolling across here. Okay, that's probably enough. Let's add another split here, and we're again going to grab this chunk here.
We've just cut out. Let's move it across down to
this section around here. So let's play this
little section now. You need to make sure that
your thumbnail images are grabbing people's attention, that they stand out on whatever platform you're posting them on. Thumbnail image. Alright, so that's not
looking too bad so far. Again, we want to be
mindful of our B roll that we've bought in here
just to get clips from. We want to make sure that
we're moving it along or removing the bits of it that we don't actually want
to use as we go. Now, this is the workflow that I usually use in this scenario, where I've got this temporary clip here that
we're editing from. But if say, that's
a really long clip, or you find that it's getting too clunky or too cumbersome to move around everything
on the timeline with that temporary
clip in there, you could just go
ahead and delete. Like we have here so
that it's removed. And then when you
want to bring in more clips or find
the next piece, we can then choose overlay down the bottom and import
the clip again. So we choose Add overlay. We go and find the clip. We tap on it as if
we're going to add it. But before we hit Add, we can actually hit trim. So if we know the type
of thing we're looking for here in this
piece of footage, we could actually go through and find it and essentially just mark out the piece that we
want here using those handles. So we set the start time,
we set the end time, then when we hit the
tick to import it, we're only bringing in
that piece of the footage. So either one of those workflows is going
to work fine for you. So you want to go
through now and add in any B roll or overlay
footage into your project. And to round this section out, it's also worth
noting that once you get out of this overlay mode, where you're adding
in overlay clips, the view does change
a little bit. So if we hit the little
back arrow here now to go back to our main
editing timeline, our main interface here
with nothing selected. So out of overlay mode, then you'll notice
here that we don't see our overlay clips here
in the timeline anymore. But what we can see is this
little bubble and red line indicating that
there is actually overlay footage shown
there at that point, and we can see it there on the timeline as we scrub
through or play through. We can see that the
clips are being shown in that preview window, but we're essentially seeing a compressed or a
flattened version of that timeline so that
it's not so overwhelming. If you've got layers upon layers of B roll and overlay
footage and things, this is still giving you
a clean view to see all of that and to navigate
around while you're editing. So if at anytime you
want to make changes to your B roll footage
and move clips around, we can either just tap up on that little
circle icon there. So we're tapping on
the clip itself, and that brings us straight
back to this overlay view. Or we can just go ahead
down the bottom again to overlay as if we're going to add in some more
overlay footage, and that's going to open up
that overlay mode for us. And you can see we've got
our clips here already. Okay, I just wanted to jump
in here really quick to say, if you're finding this
training valuable, can you please take a moment to leave us a review on here. It makes a world of
difference to help people find this on Skill Share. So if you're liking this so far, I'd really appreciate it. Also, feel free to share any of your top takeaways
along the way.
11. Mobile - Editing: Scaling zooming and rotating clips: We're going to take a
look at some simple adjustments that you can make to your clips in your timeline
in terms of scaling, zooming and rotating your clips. Now, these are things that
you can easily apply to regular footage in your timeline and also B roll and
overlay clips, as well. So I'm going to hit
play on our video now so we can see where it's at, and then you can see how
we can easily transform it by applying some of
these simple things. You could have the
world's best video, but if no one clicks on it,
no one's going to see it. So you need to get your
content clicked on, and that's when your thumbnail
strategy is so important. Okay. So it's a pretty
static shot here. We're also talking about
a thumbnail image, but it's also pretty small
on the screen there. So we can easily scale this up. I can zoom in on this clip, and it's going to make
it more engaging. We can then go through later and add in extra stickers and graphics and animations
and things on top of that to make
it more engaging. But let's start out by
helping the viewer focus on the thing that
we're talking about here because there's a lot
going on in that shot, but what we're talking about
is the thumbnail image. So I'm going to tap on our overlay clip here so
that we can bring that up. And then there's a couple of different ways that
we can approach this in terms of zooming,
scaling, and rotating. We can just pinch to zoom on the clip there in
the preview window, and that will allow us
to zoom that clip in. If we want to adjust the
position of that clip, then we can tap on it
with one finger and we can move that clip
around to where we'd like. Let's put it more towards
the center focus here. So again, it's clear
to our viewers that that is the piece that we want them to look
at or focus on. So generally, I find that that's the quickest
way to do it, especially if you're
working on your phone here. And in terms of rotation, we can just two finger tap and rotate up in that top area, and we're able to
rotate our clip too. So we could position it in a
way that it looks like this, so there on screen, and we've added
something a little bit more dynamic, I
guess, to this shot. I'm going to undo
that last rotation. So we're going to press
the Undo button here. Let's go undo again. To we get it back before that
rotation happened? Because the other way
that we can do this is with that clip selected
down the bottom here, we can scroll across
until we see Basic. So with Basic here,
we can then have direct access to a slider here for things
like your position, so we can adjust the X
and Y position here. And this is in
really fine detail. So if you're finding just
tapping on the screens, not giving you enough control, then you'll get so much more control here with these sliders. Likewise, with the Y axis, we can move this up and down. If we jump across to scale, that's our zoom in and out. So we've got that
control here, too. And the last one across
the top here is rotation. That's where we can
access that as well. When we're done, we
just want to hit the tick down the
bottom to apply that, and those settings have now
been applied to that clip. Let's jump across to the
next B roll or overlay clip here to make sure that
your thumbnail images are grabbing people's attention, that they stand out on whatever platform
you're posting them. So again, with
this one, we could probably zoom in on it a little bit more to remove that
static area down the left, the menu bar on YouTube. Let's try to make
this more engaging. Let's add some more movement to this without the static area. So maybe we can zoom in
on it to crop it out. So I'm going to
select on that clip, and I'm just going to pinch to zoom in up the top area here, and let's move it across a bit. Maybe we'll zoom back
out a little bit. It might have come in
too far, maybe something like this, center it up. Maybe we'll even pull
it down a little bit, see what that looks
like maybe around here. So let's see what
that looks like now. To make sure that
your thumbnail images are grabbing people's attention, that they stand out on whatever platform
you're posting them on. Your thumbnail image.
Alright, so pretty simple. Now, depending on how you've
captured your footage, depending on the quality
that it was recorded at, there is the potential
for you to be losing some quality if you
zoom in too far. With the examples that
I've shown you here, yes, we would be losing a little bit of quality with that
screen recording, but it's not going to make much of a difference to
the viewer watching. So the benefit of zooming in and having a much more focused, engaging piece of
content shown is worth the trade off in a slight
loss in quality in this case. That's how easy it is to scale to zoom and to
rotate your clips.
12. Mobile - Effects: Adding text and stickers: This video, we are
going to add text and stickers into our edit here. So we're going to hit
play, and let's just see what's happening at
the start of this video, and then we're going to add
in some text or titles, first off, to match
what's been said, and then we'll add in
some stickers after that. So let's play this
now. You could have the world's best video, but if no one clicks on it, no one's going to see it. So you need to get your content. Okay. So we could bring
up some text here, World's Best video and bring up those three words as I say them. So we want to make sure
we've got no clips selected here in the timeline. We want to come down the
bottom here to where it says text and then in here, we've got a few
different options and a few different ways
that we can make text. We can create something
totally custom, as in we've got full control
over things like the font, the size, the color,
the style of it. And that's the basic text here. But you can see over
a little further, we've also got text
templates in here as well, and I'll show you
both of these so that you can work out which
is the best one for you. So the first one here
we choose Add Text. We can then type in
what we would like. So let's go W and we can see that's
updated there already. And if we scroll
down, there's lots of different fonts and things
that we can choose from. There are some free
and some paid, you can see the pro ones there. You will need to have a pro or a paid account for Cap cut
to use those specific ones. There's lots of free
ones in here as well. Let's keep scrolling down. Let's take a look
for something bold, maybe something like that one. And you can also see
at the top here, we've got an era here
for brand fonts. So these are things that if
we want to save presets, so fonts that we use a lot, we can add a font
as a brand font, but you also have
the ability in here to add your own font as well. I'm just going to
come back to English. We're going to leave
it as this font here. And then we've got
this other menu across here where we can
customize this up further. If we press over on style, you can see that there are
some preset styles in here or different looks that you
can just tap on and select, and you can customize
them up further, or we can use all of these
different settings and things down the bottom here to dial
something in from scratch. Let's just go
something basic here. Maybe we'll make it
a little bit bigger. So I'm just grabbing that
size slider down the bottom. Now we can also make the text bigger or smaller up the top. We can pinch to
Zoom on the text. So two fingers on screen. We can also one finger tap
and press to move around. And there's also a rotate
area here as well, if we want to rotate the text. So all the styling and
everything's in there. If we come across to
effects, then again, there are some presets
here that we can use. And just by tapping on them, we can preview what they're
going to look like. And if you scroll down, there is a lot in here to choose from. Some of them free,
some of them paid. I'm going to come back
up the top here and let's press none when
it comes to effects. We're going to go
something basic here. If we want to animate our text, we can come across
here to animation. Tapping on these,
you can see how these animations
are going to look. And just the same for this one, I'm going to leave it basic. We're going to hit
none. But once I'm done customizing this up, I just want to hit the
little tick button up there, and you can see that
we've now got that text that is added here to
our video project, but it's added as its
own video layout. And just the same as with other video layers
here in Cap cart, we can press and hold on it to pick it up, to
move it around. We've got those handles here
on either side so we can adjust the start and the end time of how long we
want the clip on screen. We can even split the clip
in two if we need to. Let's put this where we want it. Let's try and put this
close to where we want it. Let's play this section again. Best video. But if not. Okay, so we want it
earlier. We want it to appear when I say worlds. So maybe we'll zoom in
a bit on this as well. Let's play this
again. World's Best. Okay, a little bit
further forward. The World's Best video. Okay, so that's pretty
close for the first one. Now, instead of creating the
next one again from scratch, we can actually duplicate
our layer here, our text. So if I press on it, then we come down the bottom
here, let's swipe across, and let's go to copy, and you can see we've now got two versions of that on here. So I can just double tap
on that new clip there, and that's going to open
up the text editor here. We can write best. Let's
hit the tick to apply that. We can then pick this up and maybe move it down a little bit. We've got World's Best. Let's pick this clip
up and move it down a little bit and move
it across a little bit, and try and get
this timing right. Let's play this.
World's Best video. Okay, so it's a
little bit close. Trying to get the words
to appear as I say them. World's Best video. Maybe so a little bit quick, move it down a
little bit further. World's Best video.
Okay, pretty good. So we're going to do
the same thing again. We're going to tap
on our bottom clip, we are going to come
across two copies, so we've got a third
version of it. Again, we're going to double tap down the bottom
there on the clip. Let's change the text to video, and then we'll move it down, and let's move it across
to try and line it up. Yes, around here,
let's try this. World's best video, but
if no one clicks on it, no one's going to see it. Okay, very simple.
Looks pretty good. Now, these text layers
actually behave very, very similar to an overlay clip. Whereas if we back out of
our text edit mode here, so let's press the back
arrow down the bottom left, so we're back in
regular timeline mode. Now, we can see we've still
got the text there on screen, but it's actually compressed. We just see an orange
line across the top. That shows us that there
is some text there. But if we want to get back in to manage the text or to modify it, we can just press the text
button down the bottom, and all of our text
layers are then visible. So that's how to
add simple text. Side cap cut, you can also add more advanced animated
text, as well. So again, you want to
make sure that you are on that text mode. So press text down the bottom. Then we can come across
to text template. And just scrolling through here, you can start to see the types of things that you get to use. And again, this is fully
customizable in here. We can adjust the text. We can adjust the colors on
some of these as well. And you can see that a lot
of these are fully animated. There's also, again, a lot of free ones that you
can use in here, but there are quite a few
pro or paid ones, too. They're also broken down
into those categories. You can see we're just on
the trending ones here now. But you can scroll across for the different types of
titles you could add. Let's just say that
we wanted to add in this one press to see it. So you need to get your content. You can see that's now
appeared up the top. We can resize the whole thing using those controls at the top. If we want to change the text, we can just double tap on it. No one's going to see it. So you need to get your content, and we can just type
in our new text. So now we've still says 0.1, but we've got Justin
Brown in there. Let's say we want
to edit the 0.1, we can just double tap
where it says 0.1, and we can change that as well. Now, in this case,
with this title, there's also this
little unlink button up there in the top
preview as well. If we press on that,
then we can actually move these different
text elements around. Let's say that we want
to move this text here Justin Brown over to the
left. Let's pick that up. Let's move it over
to around here. And now when we
play through these, we've now got primal video, then Justin Brown
showing up like that. And you can see it's
actually split them off into two separate layers down
the bottom here as well. So maybe we might not
even want the top one. We can select it, press
the delete button, and we're just left with
the bottom piece here. So I love how
customizable this is. So let's go ahead
and add a sticker to help our viewer understand
what we're talking about, but also to make the
video more engaging. Again, we want to
come down here to text and then we're going
to choose stickers. Now, there's everything
in here from emojis, different types of gifts
and animations as well. And again, there's a good
mix of free and paid. So just scrolling
down here, I kind of like this arrow here, the finger touching piece. We're talking about
tapping or clicking on a thumbnail image, so
this can work well. So if we just tap on
that, select on that, you'll see that it appears
straight away at the top. We can resize it. We can pick it up, we can
move it around. Let's make it obvious
that we're talking about tapping on one of our
thumbnail images here. So maybe something like this. Let's hit the tick
to apply that. And again, we'll see this as its own video layer
here in our timeline. We can see here that this
only plays through once. So it moves and then it taps or clicks, and
then that's it. So what we could do
here is we could actually shorten this clip down. Let's grab the end
of it. Let's make it much shorter here. So we just left with
the animation piece, probably something like this. And then what we can
do is let's have it repeat. Let's duplicate this. So we're going to press on
that clip, so it's selected, down the bottom here,
we'll go to copy, and we've now got a
second version of it. So let's move this across so that when one
of them finishes, the next one plays as well. We could do this a few times
if we wanted this to repeat. So maybe in this
case, we'll do it one more time. Let's press Copy. Pick it up and move it across. You can also see here
that these are stacking. There's different layers here. The layering doesn't
really matter. They don't need to be on
top of each other here, but for all purposes
here, let's put them all on the one layer
just so it's neater. So now if we look
at this, we've got that effect happening
three times.
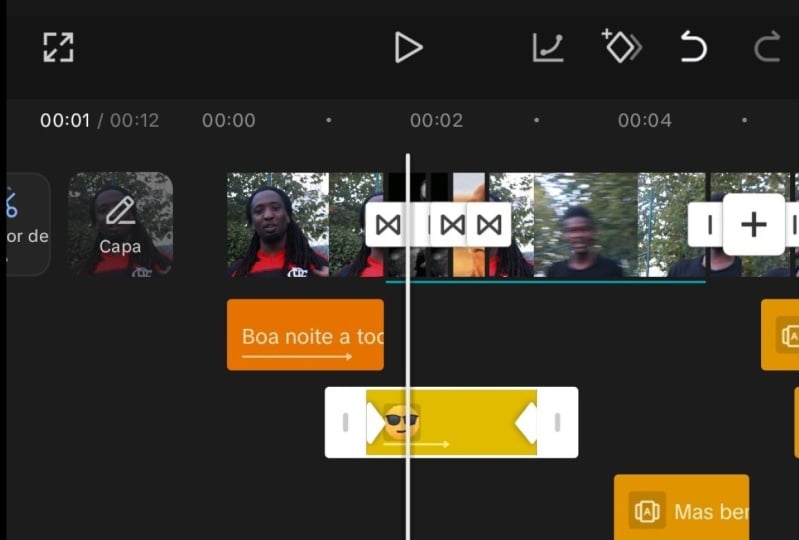
13. Mobile - Effects: Applying transitions between clips: Video transitions or
transition effects can be a great way to take your viewer
from one clip to another, to transition them from
one clip to another. This is something that's
built into most video editing software and apps. And while it is very easy
to apply these things, I want to stress that you
want to use these sparingly. You don't want to go overboard
and add in a bunch of transitions and
things because you can make your videos
look very cheap. If we have a look on our video
editing timeline here now and we've got these main clips here in our primary timeline. This is only going
to apply to regular footage here in your timeline, you can see that we've got
this little white icon between the two clips. All we need to do is
to press on that, and then this is going
to allow us to add a transition between those two. So this can happen
at the join or the intersection of any main
clips on your timeline. So if we scroll through these
now, you can see, again, they're broken down
into trending, overlay, movement, blur, basic. There's lots of different
categories across the top here. And then inside
of each category, we've got a lot of
different options. Some of them free, some of them only available
on the pro plan. But if we want to preview to
see what this looks like, we just need to tap on one, and it's going to play a
little preview for us. So you can see it plays a
little bit of that overlap between the two clips with
this effect now applied. Maybe we'll look at some of these pro ones as
well to take a look. Scrolling back across. We've got some with
a lot more movement. So hopefully, you can
see you can easily go overboard with this
stuff and just add too many of these
things in there. But once you've picked the transition that
you want to add, we can also adjust here the length of time that's
going to play back over. So the short amount
of time we can have this is 0.1 seconds, so very, very quick,
right up to 1.2 seconds. So I'm just going to
play that slower. Now, I'd say, most of the
time when I am adding a transition like
this into my project, I'm normally staying
away from the ones that are overly animated
or over the top. And generally, the ones
I'm using are just found here under this
overlay category, and that's things like
maybe a black fade. Or a fade to black. Or if we keep coming over,
we've got things like a white flash or even
just a dissolve, a cross fade between
the two clips. Those are the main
ones I'm looking for. And I normally make the
transition time fairly short. So probably around half a second to maybe just under a second, depending on the
pacing of the video. So once you've got that peak, you have the choice here
either to apply to all, which is every cut in your timeline to have
that automatically applied for you or just hitting the tick down the
bottom right hand corner, it's going to apply
it just to that cut. So we can see now
in our timeline, we actually have that
effect here applied. Even though we can
add a transition like we have here between
these two clips, when the camera angle is the
same, the shot is the same. It's not really something
that I would do. So if I want to remove this, let's just press on
that join there again. Let's come across here to none up the top
left hand corner, and then hit the
tick to apply that. So we've now removed
that transition. What I would do instead, if it's footage like this where it's almost
exactly the same between each cut to make the
shots look a little bit different and to make it less
jarring for your viewer, would simply just zoom
in on one of the shots, either the before or the after. Someone's going to pick the
second one here in this case, and then I'm going
to come up the top here and I'm going to pinch to zoom in a little bit on this to make it a
little bit bigger. Now, in order to really
sell this effect and make it less jarring
for your viewers and make it feel like
almost like a zoomed in shot or a second camera
angle want to try to make sure that the
eye position is very similar or very close to
matching between the two shots. So let's see what
this looks like now. So we've got our
wide shot here we get to this point,
and it jumps in. Okay? So the eye position, it's close. It's not perfect. Let's move it across a little bit more now, maybe
something like this. Let's see what this looks
like. Okay, much closer. So before, after it's
a lot less jarring, a lot more subtle
for the viewers than having some of
those transitions. So you can either go
through now and add in a bunch of these transitions
where you need them in your videos or you
can even zoom in on some of your shots to
essentially do the same thing.
14. Mobile - Effects: Adding special effects & clip Animations: Now, there's a few different
ways that we can add effects and animations
inside of cap cut. So that's what we're
looking at in this video. So making sure we got nothing
selected on our timeline. Here, we want to come down
the bottom to effects. And then in here we can
open up video effects. Once again, we've got
our categories across the top for the different types of effects and things in here. You can see we've got
categories for Christmas, for TV, for glitch effects. And there's a mix
of free and pro. To preview what these
effects look like, we just want to tap on
them and it's going to play back a little
preview for us. So maybe we'll choose this
one here chromo Zoom. Okay, so kind of a glitching
effect at the start. Maybe we'll try this one here. Jump. Maybe we'll try
this other distort one. Maybe we'll take a look at
some of the others. Let's go. Nature. And let's
take a look at fog. Okay, smog. Okay. Even rain. I mean, that looks pretty good. Okay, so let's say
that we wanted to add this rain effect
here into our video. Now that we've selected it, we can actually make
further adjustments to it. You can see now that the icon for it has changed to adjust. So let's press on adjust. Now obviously, what you'd
actually get to control is going to come down to
each individual effect, but you can see we have
some sort of atmosphere. But maybe let's lower this
and see what happens. Okay, so maybe it's less
rain it looks like. It's not the speed of the rain. We can adjust that, but also
maybe the amount of rain. Now, to apply this,
we just want to hit the tick up the top
right hand corner there, and you can see
that this effect is now on its own video layer. And as we play through
this section here, and that rain is
being applied to the clips that are
underneath it, normally, or on top
of, in this case. But the only clips that are affected are the ones that are on screen while that
effect is visible. So we can adjust the time of that. We can grab the end here. We can drag it out if
we want to extend how long that effect is playing
for. Maybe we'll zoom out. We can also pick that effect and move it around if we want it somewhere else in our timeline. If we wanted to duplicate it, we could tap on it,
we could press copy. We've now got two
versions of it. So we could have one
throughout that section. We could move one down
later in our video as well. I absolutely love that you have this ability to add effects
to their own layer. Essentially their own
little clip here. This gives you so
much creative control over what you can do
with these clips. So that's the first way
that you can add effects or movement into your clips. I'm going to go ahead
and delete these. Now, select on it, press Delete, select on the next
one, press Delete. If we go back to our
main timeline here, so we've got no clips selected, let's zoom in on our time. Let's select this clip here. Let's say that we want
to add an effect or some animation to
this specific clip. With that clip selected,
down the bottom here now, we've got the ability
to press animation. And in here, we
can have I guess, these are more
simplified animations. These are more like transitions, but these we can apply to three different
areas of the clip. You can see here we've
got an option for in out and for combo. So I will apply some
sort of animation, whichever animation we pick here to the first part of our video. Out is going to be
the end of the video. And combo is something
that can play throughout the middle
part of the video. So a clip on your
timeline can have an in and out and a
combo effect applied. So scrolling across here, we can start to see the types of things that we can
get access to. Lots of pro ones up
here at the start, let's go across until we get
some free ones here as well. So we'll go everything
here from a basic fade in, which is that first one there. We can adjust the
length of time. There's currently half a second. Maybe we'll make
that a bit longer. So you can see how that works. Maybe we'll try
another one here. That was very quick.
Slow that down. So we can add a little bit of movement at the
start of this clip. Let's see what else
we got. Shake three. That goes very
quick. Slow it down. See, I don't mind now. Does add a little
bit more movement, a little bit of interest to the clip. Maybe we try this one. Here, swing bottom,
slow it down. Yeah, probably not as good. Maybe we'll slow it right down. Not bad. There's
some movement there. So that's the in animation. And you can actually
see that blue area that is drawn out
across our timeline. So we could again shorten
that if we needed to, but I don't mind that one long. Now, we don't need to
apply all three effects. If we just wanted
it in animation, we can hit the tick, and that's now applied to the
start of this clip. And you can see
that motion here as we cut from this first
clip here to this one, there's that movement
there that's happening, and then the clip would play as it normally would after that. But let's just select
this clip here. Let's go to animation. So again, all of these are
the in animations and there's lots in
here to choose from. But if we come over
here to out animations, then we've got quite a
few in here as well. That doesn't seem
anywhere near as many, but a lot of the
similar style things like a slide up, a flip. And if we come over
here to combo, then we've got
these other effects here just to add
some movement to your shots that's separate from the in and
the out animation. So maybe we press
this one here, Zoom. So it added that slow Zoom out, that pull out there
for that clip. And we're going to
adjust the length of the animation
down here as well? Sure So I don't mind that. It actually added
a slow zoom out or movement to that clip just to make it a little
bit more engaging. So once we're happy that we
hit the tick to apply that, and that's now
applied to our clip.
15. Mobile - Effects: Speed adjustments (speed up slow down): There's likely going
to be times when you're video editing
that you'd like to speed up or slow
down your video files. That's what we're
going to show you how to do in this video. So I've just added this extra snowboarding clip
here to the end of our video just so I can show you how this
speed control works. Now, this is just a
stock footage clip from within the Capcut app. So let's just play through
this clip so you can see what happens and at what
speed we press Play, it looks like it's
real time speed. And the person who comes past the camera does a
couple of turns. Okay, so in order to
adjust the speed for this, we want to select the clip, and then down the bottom here, we've got a speed
adjustment here. So we press speed. Then
we've got two options. We've got normal
speed adjustments, or we can have the more
advanced speed adjustments, which is the curve adjustment. So I'm going to press on normal, and then we've just
got this slider here. And this will let us
adjust our speed, everything from 0.1 times speed right through
to 100 times speed. With real time speed or normal speed being
one time or one X. So if we want to
speed up the clip, we want to increase it
anything above one. If we want to slow it down,
we want to go below one. So let's say that we want
to speed up the clip. Maybe we will make
it five times. We'll drag this
up to five times. And you can see that adjustment has already made
in our timeline. The clip is now much shorter because it's going to
play for less time. Now, we can actually
tap and swipe back through here to be able
to play this as well. So we can preview
it to dial this in before we actually apply
it. So let's hit Play now. Okay, so much quicker. Maybe we'll slow it down
to two times. Hit play. Okay, you get the idea. Now, when it comes to slowing
it down, though, as I said, you got to go below one, then we do get some extra
adjustments in here as well. So let's slow this right
down as far as we can, 0.1. Now, you normally wouldn't
go this far unless your footage was already
recorded in slow motion. But let's scrub through this, and let's see what
this looks like. Maybe around here where the
person comes past camera. Hit play, you can see
it's very stilted. All right? So it's
barely usable. There is an option now in Cap cut where it says here,
make it smoother. So if we press on this,
we've got two options. There's faster processing
and there's better quality. I'm going to choose
here faster process, and we'll see if we
play through this now. It shouldn't be perfect
because it hasn't really gone through it
and rendered it out yet, but it should have improved. So let's hit play. Okay, so it's kind of added in
these extra frames, so it's not so
stilted and jumpy, it's a little bit smoother. And now if we remove this and try the other option,
better quality, I think we're still going to get a preview here if I hit Play, it's a little bit better again. And this is worst case scenario. I would recommend that you don't slow down your clips this far. But you can already
see just with this preview here
without even doing that full render or processing that effect to the
best of its ability, it's actually improved
it quite a lot. But let's say that we speed
this up a little bit. So it's not putting too
much pressure on this. 0.4 speed. Still
at better quality. Let's see what this
looks like now. So so much smoother, and it's still slow motion. Let's turn off that make
it smoother option. Yeah, it's still very
stilted, still very jittery. So it's awesome that
they've got that make hit smoother
option in there. So when we're happy with the speed and the
adjustments in here, we want to hit the
tick to apply that, and that has now been
applied to our clip. Now, the other way
to do this with more advanced controls, let's select on our clip.
Let's choose speed. But this time, we're
going to go with curve. Then in here, we've got
some presets that we can use for different
speed controls. So we've got things like
montage, hero, bullet. And you can see those
graphs or those lines. That's an indication of what the speed is doing
at those times. So this one need,
for example, jump. Starting out at a lower speed, it's then ramping up to a peak, really fast speed, and
then it's coming back down to its slow motion phase. And if we just press on these, then that's going to apply. So we're starting
slow speeding up. Hit that top little whip bit, and then it's slowing back down. So we can either use these
presets that are here, we can edit them up to
customize them up further, or we can come across
here to custom and we can create something totally custom ourselves. So we press custom. Let's press Edit again, and
we're given this little graph here that we can manipulate to speed up and slow down
our clip as we need to. So that yellow line where it is right now across the middle, that is one time, so
regular playback speed. If we want to increase some of the clips maybe have it
play faster at the start, we can increase this
one here for the start. And you can see as
it plays through, this little timeline
indicator here is showing you what piece of
the clip you're affecting. So this first bit here is fast. Maybe this next bit here, we will speed up as well. And then about here, we could slow this down. So we're going to slow down
for this section here. Then, yeah, maybe we'll slowly bring it back up to full speed. Let's hit play on this and
see what this looks like. And again, we've got
that option down the bottom here to
make it smoother. Once we're done, we want to hit the tick to apply
that tick again, and our speed adjustment
has been made. Now, if you do want to reverse a clip or play a clip backwards, that's actually in
a separate area. So you still need to have
the clip selected there. You then want to come across
here until you see reverse, which is down here,
we press on that. It's then going to go through
and analyze your clip, reverse it all for you. And this clip now is
now the opposite. So it's now playing backwards.
16. Mobile - Effects: Background removal: Say that you want to remove the background from your video. You don't need to
use a green screen or a blue screen these days. Capcut has an amazing
built in effect, which will help you do it
really, really easily. Obviously, you can use a green screen and a blue
screen, as well. I'm going to show you both
methods in this video. So to start off, I'm
just going to duplicate our last clip here
where I'm talking. So I'm going to select
the clip I'm going to come across to copy. So you can see we've
got a new version of that clip here in our
timeline at the end. These last two clips
are exactly the same. To remove the
background from it, we just need to select on it. We come across here to
where it says cut out. Then we just choose
remove background. It's gone through,
and it's really, really quickly
analyzed our clip, and the background
has been removed. So you can see already that it's just a plain black
background now. And it's actually transparent, so we could put whatever we want as the background
behind that. Or it also means that we
could move this layer up and put it on top of some
of our other footage. So I'm going to
press back here now. I'm just going to select
on the clip again, and I'm just going
to press overlay. And this is going to
transition this clip from our main primary timeline
up to be an overlay clip. So if we press on this,
you can see it now shows up as a regular
overlay clip. And if we pick this
clip up and put it on top of our other
video layer there, you can see that that
background has been removed. Now, if we look at
this, you can see that I am cut out
from the background, and I'm now on top of the computer screen
that I'm showing. So with this clip,
though, if we select it, we can tap and pick it up. We can reposition it. We can scale it up and
down if we needed to. All of this super,
super fast and easy. And one thing to note
with the way that I just did this then by
duplicating the clip, we actually duplicated
the audio as well. So I want to make sure
that on this bottom clip, this new one, the overlay one, I want to hear volume, and I just want to drop this down to zero so that we're only
hearing this audio play once. Too much text or
too much happening. Your viewers are going to
click on something else. Pretty easy to do, right?
Now, just as easily, we could have gone and imported
a totally new background. So just going to press
the plus button here. We're going to come over to
stock videos at the top, so we're going to access
CapcuTs stock footage Library. And I'm going to search here for background, see what comes up. Okay, this one here
looks pretty good. Let's import that. Tit ad. So we've now got this
background clip here. We could then pick up
our overlay clip and let's drag it over
the top of this clip. And you can see what
it looks like here with this different background. Again, we could scale
it up a bit more, maybe move me across,
something like this. Lots of different options. Now I'm going to go ahead
and just remove these now select on that
clip, press Delete. Let's delete the
background well, let's say that you've got
some footage that was filmed on a green
or a blue screen. How would you remove
the background then? I'm going to come
across here to import, so we're going to hit
that plus button. Again, let's go to stock videos, and let's just search
for green screen, we've got some examples
here that we could use, maybe this person
here on their phone. Let's press on this. Let's
add this to our timeline. So if we want to remove
the green from this, we can select on the clip. We can come across
here to cut out again. Now, you could just
use the AI tool that we just used, the
background removal. Or there is a dedicated
Chroma key function here, which will remove a specific
color, green, in this case. So we can press here Chroma key. It then says, drag to
start picking a color. So we want this green here. We then come down
the bottom here to where it says intensity, and we increase this slider
until the green is gone. So somewhere around here till most of that
border is gone. Likewise, we do want to increase the shadow a little
bit in most cases, just for a better,
sharper result. Probably around here, let's
hit the ticket to apply that background now has
been removed for that clip. So again, if we want to then put this on top of some
of our other footage, we do need to
promote this clip or transition it into
an overlay clip. So with it selected, we
want to press on overlay, and then we can pick it up and move it where we would like it. So here, in this case.
17. Mobile - Effects: Stabilizing shaky video: You've got handheld or shaky video footage that you
want to stabilize, Capcut has an amazing built in stabilization effect that you can easily apply to your clips. So I've got this extra clip
here in the timeline now, and if I just play
this, you'll see that it's not too stable. It's a little bit shaky, it's a little bit jittery.
We're going to fix that. Let's play it first. There's
a little bit shake there. The overall panning
around or looking around, it's not that fluid.
It's not bad. It's definitely a
little bit shaky there, as well, right
through to the end. So, I mean, it's usable. It's not terrible, but
it's not fantastic either. So we can make this look so much better by stabilizing it. So we want to press on
the clip to select it. We can then come
across to where it says stabilize down
the bottom here. Now, here we've got this
slider from no stabilization, which is the default
setting here, we've then got one here
for minimal cropping, recommended and most stable. So let's just put it here on recommended. Let's see
what that looks like. The way that this works,
it's analyzing your shot and it's picking up all
the shake in it, and it's then got to zoom
in on the shot so that the new stabilized shot isn't bouncing around
out of the frame. It's actually
reframing the shot, zooming in on it so that it all fits and so
that it looks good. So our three options here, minimal recommended
and most stable, these are really
different degrees of how much we're going to be cropping in or zooming
in on those shots as well. Okay, so let's play
through this now. Yeah, already,
that little jitter at the start is
pretty much gone. Even the panning around, it just looks so
much more fluid. There's still a little
bit of movement, but nothing like how it
was. That last bit there. There was a bit of shake there
before, which is gone now. So it looks so much better. And just to show
you, let's move this here to most stable. And you can see that it zoomed
in just a little bit more. It's not too drastic here. Obviously, if you've got footage that's really, really shaky, it might want to zoom
in quite a lot for you to be able to stabilize
that and do a good job. Let's play through this now. Yeah, there's really no
movement at all now. But it is a little bit tighter. It's a little bit zoomed
in. Much smoother. Yeah, even that section there, there was really no
movement at all. So to apply this,
I'm happy with that. We want to hit the
tick down the bottom, and that clip has
now been stabilized.
18. Mobile - Effects: Adding music and sound effects: We're going to take
a look at adding music and sound effects
to your videos. Now, while CAPCA does include a music and sound effects and stock footage,
for that matter, library of stuff that you
can use in your projects, you want to be mindful of the copyright issues that
could arise if you're posting videos made using those things outside of Tik Tok. A lot of the licensing
and everything is okay if you're
posting to TikTok. Outside of that is
where you could have copyright issues,
copyright claims. And at that point,
it's really not worth messing that's where
for stock footage, we use places like story
blocks for stock music, we use art list and
epidemic sound so that we know that the licensing
piece is all taken care of. For the purposes of
this video, though, I'm just going to
import some footage from the Cap cut music library because we're not going
to be exporting this and saving it out
with this included. But I will also show
you how you can bring in your own music files or ones that you source
from other places like the ones that I suggested. I'll show you how you can add
those in and use them too. To add music from Capcut itself, we want to come down the
bottom to where it says audio. And then in here,
we've got sounds. This is where if we
tap on this that we get access to Capcuts
music library. And you can see
right at the top, we've got the options
to pick sounds, which is pretty much everything. And then if we
select commercial, this is where it's only going to filter the sounds there that are licensed for commercial use
on Capcut and on TikTok. Again, there's no mention of use anywhere else
outside of that, but from here, we
can either start to search with the search
box at the top. We could also swipe
through and see what it's suggesting or what's
trending here right now. And if we scroll down, then it's going to
start recommending some individual tracks for us. So coming back up here,
let's have a look at maybe hopeful or
something uplifting. And let's say that we
want this first track here that summer feeling. We're going to hit
that little download button there over to the right. And then if we find that that's the track that
we're going to use, then we just hit
the Plus button. That's going to add it then
into our editing project, and it shows up along the bottom there as its own clip.
We can tap on it. We can adjust the start
and the end times. We can add cuts and splits
and everything in it. We can edit it as if
it was a video file. Now, let's just go
back for a second, and let's come back
down to audio. So we added sounds then. That was the music. We want
to add in sound effects, and then we can
come over here to effects and very much the same. We can then search for what we're looking for
in the search box. We can go through preview
the sound effects, and we can hit the
download button to add them to our timeline. I'm just going to hit the
tick to go back out of here. Now, we also have
the option in here to record our own voiceover. So if you're creating a video where you want to
add some narration, then in here, we've also got
Voiceover down the bottom. If you've got music files
or sound effects that you've already got
saved on your device, so you want to
navigate through and find the track that
you want to import. I'm on an iPhone, so
I've got the track here. I just want to tap
on it to open it up. I can then press Share, and then I can come down
here and press Capcut. So we want to share
this track or open with on Android,
open with Capcut. We then get prompted
with this box. Import audio to Capcut. And we can see now
right down the bottom, we've got our other music
track added here as well. So that's how easy it is to add music tracks from Capcut itself, but also if you've got
other music tracks from other places that
you want to add into. I'm just going to
go ahead and delete our Epidemic Sound
one once all of those are in and you've done that extra pass on your editing
and tweaked and adjusted, everything, got everything
the way that you want it, only then is it time to start adjusting your volume levels to get everything the
way that you want it. Now, I strongly recommend
that when you are adjusting your volume levels
that you're doing it with a set of headphones
on, if possible, so that you're getting a good
representation of what this is actually sounding like for people listening
with headphones, as well as with their
computer speakers or TV speakers, too. But the first area that we
want to get set correctly, first, is any spoken piece, any voiceover, any narration. Like, in this case, it's
a video of me speaking. We want to make sure that that
volume level is set right first as the priority because
that's the important piece. After that, we'll then
adjust the volume levels of the music and sound effects
and things to our liking. Again, I want you to remember that this is a creative thing. There is no right or wrong. We want to make sure that our
sounds and music aren't too loud so that they're
overpowering and sounding really, really bad. Also want to make sure
that they're not too quiet and people aren't needing to
turn their volume levels up. But beyond that, it really
is personal preference, and it really is
a creative thing. So when you're adjusting
your volume levels, now that you've
got everything in, and now that you've
got everything placed where you want it, it's a good idea to go
through and just to mute your music and
your sound effects so that we're only
going to hear, in this case, the spoken piece so we can get that
dialed in first. And then we'll do the music and the sound
effects afterwards. So I'm just going to
select the music track here and I'm going to go to volume I'm just
going to drop that right down to zero so
that we don't hear it. Likewise, we'll be
doing that with any other audio clips
in our timeline, too. Then I'm just going
to select our first clip in our timeline here, and we're going to get this one set right correctly first, and then we can
apply those settings to the rest of our clips. So I'm going to
scroll across here until we get to volume. And then in here, we've got our volume
slider adjustments. If we move it to the left, that's going to
lower the volume. If we move it to the right, it's going to increase the volume. Now, generally, what I find with Capcut is that it actually does a pretty good job of adjusting the volume levels
for you by itself. So unless your clip was way
too loud or way too quiet, app normally does a
pretty good job of adjusting that and making
it to where it needs to be. Again, for most clips, it's going to be
okay where it is. But let's say that
we needed to make a volume level adjustment to 95. When we select that,
it's going to preview. It's going to start playing
your clip so you can hear it. But just below that
volume slider there's a little button here said
Loudness adjustment. If we then want to apply that volume level to the
remaining clips in our timeline, we can just press that button
and it's going to adjust the other clips to match
that volume level. So if you're using
video clips recorded on different cameras or
different microphones, this does an amazing
job of setting all of those clips the same level with this loudness
adjustment setting. Once you're done,
you just want to hit the tick to apply that. And now all of our primary
clips have been set correctly. Now, a little pro tip, you're always better off
going a little bit under than a little bit over when it comes
to volume levels. So once we've got
our volume level sorted on our primary footage, then we can look at
music and sound effects and also our B roll and overlay footage if some of those clips have sound
included with them, too. I'm going to do music
next. I'm going to select our music track. I'm going to come
across here to volume. So we had this turned
right down to zero. This is where we're
going to bring this back up to get it
to where we want. Again, ideally,
with headphones on, so we're getting a real
representation of this. But what we normally
find is anywhere around 30 to 35 is around
the volume levels. That's a good starting
point to adjust from there. So I'm just going to
set this here to 30. It's going to start to play
you could have the world. And for copyright
reasons and stuff, I'm not going to
continue playing that, but we want to then make
adjustments from that point. So if that sounded like it was a little loud for
what you're after, then we could drop that
a little bit lower. So maybe we'll go 25.
You could have the. When you're happy with
that, you want to hit the tick to apply that, and that's going to apply
to that entire clip. Now, likewise, as I said, with your be roll or
your overlay footage, if we come back, let's
hit back arrow down the bottom left hand corner.
Let's go to overlay. Let's scroll across here
till we can see our clips. If we press on the clips, then we do have a volume
adjustment for these two. Now, these clips, if they did have sound
included with them, and I think some of them
had some background noise. So we could grab that
slide, take it all the way to zero, hit the tick, and that clip has no sound associated if you're looking for more advanced control over your volume levels and you
want some sections quiet, and then maybe a little
bit into your track, you want it a bit louder
and then back down again. If you want to do
something like that, that's where you can
do it with keyframes, but we cover that in a separate, more advanced video showing
you how keyframes work. But the last thing I
want to mention here in regards to music, sound, and volume levels
is that you can actually apply some
different filters and effects in here as well
if you're needing to try and improve the
quality of your sound. So, let's come back over here to the very first clip
in our timeline. Let's select that these
options down the bottom here. You can see that we've
got an option down here for noise reduction
to reduce noise. So if we did have say, an air conditioner on or a fan or there was
some background noise, we can press on this, and
then we can toggle this on. If no one clicks on it,
going to go through. It's going to process our audio, and it's going to do its best to remove some of that
background noise for us. And in my experience, this actually does
a really good job. So I'm going to turn
that back off now, but that's how easy
it is to add music, add sound effects, adjust all of your volume levels to get everything the way
that you'd like it. Okay, I just wanted to jump
in here really quick to say, if you're finding this
training valuable, can you please take a moment to leave us a review on here. It makes a world of
difference to help people find this on Skill Share. So if you're liking this so far, I'd really appreciate it. Also, feel free to share any of your top takeaways
along the way.
19. Mobile - Effects: Fixing colors (color correction & filters): Take a look at fixing the
colors in your videos or color grading or color
correcting your clips. Now, there's two main ways that we can do this here in Cap cut. I'm going to take you
through both methods. The first method
is using filters, so built in presets. The second one is using
manual adjustments. But it's good to get an
understanding of both of these, because sometimes it might make sense to use one or the other. Other times, you could
use a combination. So I want to come back
to the first clip in our timeline here, our primary video footage. We want to make sure that
that's looking good first, and then we can apply
these same looks and effects and things to other
clips in our timeline. So with that clip selected, we can come across here
and we can choose filters. So I guess you could
think of filters almost like an Instagram filter, a preset look or a set
of adjustments that you could just tap on and
apply it to your videos. So if we go through here, you
can see that there's lot in here to choose from all different styles,
all different looks. And if we just tap on them, is going to apply a
preview of that for us. So obviously, at this point,
if you're going through and you find something that
you like the look of, you could run with that with
no further adjustments. You can see you also
have a strength slider down the bottom here. So if you like it, but maybe it's too intense, you could dial back the intensity or the
strength of it there. So, I mean, even that
doesn't look too bad. So look at some of
these other ones. One doesn't look good.
Not really my thing. Okay, that's not too bad. It might be a
little bit intense. We could dial it back a
little bit. That's not bad. So if we wanted to apply that, we could just hit the tick
down the bottom right, or if we wanted to apply this to all of the clips
in our timeline, if that was the
look that we liked, then we could hit Apply to
all down the bottom left. So if we go back, then this was the filters area
that we tapped on. For more advanced
features and controls, and really if you want
to color grade or make adjustments
yourself from scratch, that's where instead of filters, you want to open up
the adjust area. And if we have a look now that
we're in the adjust area, there's really three
little video tabs here. We've got filters, which is
back where we were filters. There's also adjust, and then the last one here
is video quality. So going back to the
adjust panel here, we can start from
scratch from here and just apply the settings that we want, make the
changes that we want. Or we could even go through. We could find the look
that we like to look of. So this one here, this filter, we could then with
this selected, come across to adjust and make
further adjustments to it. So the two don't have
to work separately. To go back to
filters. I'm going to hit the little cross on this to remove the filter so that we're starting
from scratch here. And we're going to come
back to the adjust tab here and I'm going to take you through the key settings in here and kind of the process
that you would follow if you want to make adjustments to your clips and make sure
that they are correct. So the first thing
you want to make sure is correct or looking
the way that you want is the overall shot
brightness and exposure. Now, again, I want
you to remember that this is a creative thing. There is no right or wrong
here. This is an art form. You get to choose what you
want your video to look. So I'm going to lower the brightness a little
bit on this one. I think that looks pretty good. And then from there,
I'm going to swipe across until I find the
one here temperature. This is where we can correct the white balance if it
was wrong in our camera. Sometimes you might have a shot that might look a little bit too blue or a little bit too yellow or orange,
a bit too warm. We can adjust here to
compensate for that. So if I swipe to the left, we're removing the
yellow or the orange, and we're making
our shot cooler. We're adding more blue. Go the other way, we're
going to have the opposite. We're adding more
warmth to our shot. So I might have this around
here. Looks pretty good. And then I'm going to come
back towards the start here, and then I'm going to play
with the contrast slider. So I'm going to
press on contrast. And you see if we increase this, the black areas are
getting darker. We're adding more
contrast to our shot. If we go the other way, then we can take some of
that out, as well. But I kind of like this a little bit more contrasting,
maybe something like this. From there, I go
to the saturation. So this is the amount of color or the strength of the
colors that are in our shot. So if we amplify this,
you can see that we are really making
the colors intense. That's probably way too much. But, likewise, if we
go the other way, we're able to take
the colors out. So if you're after a gray scale, black and white video, then you can do that
here with saturation. But maybe I will
increase the colors here a little bit without
going too overboard, maybe something like this. And those are the main
settings that I'm playing. See, there's lots of
other ones in here, so you really can dial things in to a much greater
degree if you'd like. But there's really no
need to for most videos. If you're just wanting
to tweak and adjust and maybe fix some issues
with your coloring, then those tools I've just shown you is really
all you'll need. And then at this point here, we can hit the tick
to apply it to just this shot or we
can hit Applied to A, to apply it to all of our shots. You want to quickly preview
your before and after, if you just tap and hold on your screen in that
playback area, we can see that this
was the original, and then if I lift
my finger up now, this is what it looks like
with those adjustments made. I'm just going to
scrub across here to find another clip here. So this one's
ungraded. I haven't applied our settings
to this clip yet. But there is something else
that I want to call out here, which I do think is
pretty powerful. It's an effect that's only on the pro plan here of Capcut. But you can see here
we've got auto adjust. Normally, in video
editing tools and apps, the auto adjustments
aren't that good. But the cap cut one is
actually surprisingly good. So if you are on the pro plan or you're looking to upgrade
the auto adjustment here. Let me just press it. Let's see what it does
here with this shot. I mean, it does a
pretty good job without us needing to dive into
the settings and things. And obviously, here
we can adjust this. We could then tweak things
further if we needed to, but I'm pretty impressed that the auto adjustment is
actually something that's quite helpful and quite
usable and pretty good compared to most other tools and apps
that are out there. Now I'm going to hit Undo
to remove that effect, so it's not going to ask us to pay for that at the end of this. I will do is go back to
our adjusted clip here, and I will hit Apply to all, so that all of our clips here have those same
settings applied. Gonna hit the tick. So
that's applying filters or adjustments to
an individual clip. But we can also add
them to our timeline, so we can apply them to
multiple clips as well. So let's go back out of this. So we have no clips
selected here in our timeline, and
then down the bottom, we've got the
ability to press on filters and adjust straight
from the main timeline. So let's just press adjust. Let's just for the sake
of me showing you this, I'm going to just grab exposure and I'm going to
turn it right up. We would never normally do this, but I want to show
you how this works. Let's hit the tick
to apply that. You can then see in our timeline we have this adjustment layer, and that has that exposure, that brightness
setting applied to it. So then just like any of our other effects that we're applying to the timeline level, it's only going to apply where
this clip is highlighted. So you can see that now that
we've dragged this out, it's also applying to
the next clip as well. If we shorten this down, then it's no longer
applied to that next clip. So depending on your workflow, you might find it easier in
some cases to apply things to a clip level other times
to a timeline level, where you can just
drag it out maybe across the entire timeline and have those effects
or those filters applied to every
clip underneath it.
20. Mobile - Effects: Using Keyframes for greater control: Inside a cap cart, there is a more advanced way that we can control and adjust and manipulate things
like the effects, different controls
that we have on our clips and things like
volume levels on our music. We can control these
at a greater level of detail using keyframes. So that's what this
video is all about. I'm going to show you what
keyframes are, how they work, and how you can find
them so that you know which things you can adjust
and control. In more detail. So I'm back over in our
editing project now. For this example, I'm
going to show you how keyframes will work using
volume level adjustment. But again, these
keyframes are going to behave exactly the same
for other things as well. So I'm going to select our music track in the timeline here. I'm going to come
down the bottom to where it says volume. And we've got our standard
volume slider here. So if we move this to the left, it's going
to lower the volume. If we move it to the right, it's going to increase the volume. But what we can do here for more control is we can
add some keyframes in. That's where this little icon
is up near the play button. Now, let's just
say, for instance, that at the start of our video, we want the music playing back louder and then it's going
to reach a certain point. It's going to then slowly turn down or fade down to
a lower volume level. We're then going to
keep that volume level for most of our video, but then towards the
end of the video, we're going to start to bring
that volume level back up. That's something we
can do really, really easily with key frames. So let's come across to the
start of our video here, and we can see the
current volume level. We're currently set at
around 28, 25 to 28. Let's increase this. Let's make this around 50 now
for the start. So right now we've just adjusted the entire clip to be
around 50 volume level. So let's say that
we wanted it at 50 volume level
until around here, and then we want that volume
level to start to drop off. I'm going to add a
keyframe at this point. I'm then going to come
across a little further to where we want the volume
at its lowest point. So maybe we'll make
it about here. Let's add another keyframe. But at this keyframe, I want
to lower the volume down. So let's take it
back to maybe 25. So two keyframes, we've set two volume levels
at this point. Let's have a look at
what this looks like. So if we just swipe
back across here, we can see our volume level
here is at that higher point. So around 50, we hit this keyframe here and we can see that slides
start to move. It's lowering our volume
between those two markers, between those two keyframes so much so that when
we hit this next one, it's now set the volume
level at that point, and it'll stay at that point until we add another keyframe. So let's say that we want about here towards
the end of our video, that the volume starts to come back up a bit, maybe about here. Let's add a keyframe here. So we're going to keep
our volume level at that point until it
hits that keyframe. Now, let's say that we
want it to increase its volume level
until about here. Let's add a new keyframe. Let's increase the volume
of it at this point. So at this keyframe, the volume level is now 50, and it's going to stay 50
for the rest of our video. We can see what that
looks like here. We're still at the lower volume, the 25 and then it's going
to slowly increase between these two keyframes
here until it hits this point and then it's going to stay at the new volume level. So you can think of
a keyframe as saving information related
to a clip and effect, and its properties at
that point in time. So at this point in
time, the volume level is 50, at this point in time, the volume level is 25, but it transitions or
fades between the two. So we're going to hit
the tick to apply that, and that is now done. Now, I'll give you another
example with keyframes. Let's come across to
this overlay shot here where we are typing
something into the YouTube search bar there. And maybe we'll add a
slow zoom in on this. So I'm going to tap overlay here to open up our
overlay effects. This is our clip here that we
want to add this effect to. And I'm going to
come back over here to the start of this clip, and we're going to
add in a keyframe. So I'm going to press the keyframe button
at the top there, and I'm not going
to make any changes to this clip at that point. But let's scroll across towards the end of this clip,
probably about here. Let's add in another keyframe. But at this keyframe, we're going to change
some properties. We're going to zoom in
a little bit on it, so let's pinch to
zoom at this point. And maybe we'll adjust the clip downwards as well,
something like this. And now when we
play through this, we can see that it is zooming
in throughout that period. So keyframes, as I said, super powerful way
to help you animate, to help you get more
advanced controls and functionality out of the things that you've got
access to in Cabcut.
21. Mobile - Repurposing: Reformatting videos for different platforms: The reasons I absolutely
love Capcut is how easy they make it to switch between
different video formats. So let's say that you
started out with a widescreen 16 by nine video that you were making
to post on YouTube. But then you wanted to
reformat it or repurpose it as a TikTok or as an Instagram reel or
maybe a YouTube short. Cabcut makes that
process so easy. So that's what I'm going
to show you in this video, how you can easily switch
between the different formats. So we've got our 16 by
nine widescreen video here that we've been editing down throughout this training, and we're going to convert
this to a portrait video. So the first thing I
want to do, though, is let's make a backup of this, so we're not going to override
and make changes to this. So we're going to
hit the X to go back to our main
project window here. And then we've got our video
here, thumbnail video. I want to hit the three
little dots on and I want to choose duplicate so that we've then got
a backup of it. Now, our backup is now
the one at the top. Let's rename this
and let's call it thumbnail video
portrait. Let's go Okay. Let's open up our new one here,
thumbnail video portrait. So with no clip selected. We want to come down
the bottom here in our menu bar to
where it says ratio. Now in here, this is where we
can change our clip format. So you can see already we've got nine by 16 selected here. If we wanted to make a
one by one for, say, Instagram, we can do that
a nine by 16, so portrait. We've got that in here as well. There's lots of
different formats that you can choose from here. So we're going to go to
Portrait nine by 16, and we're going to hit
the tick to apply that. And already, if we just
scrub through this, we can see that we've
still got all our text, we've still got B roll and animations and
stickers and things. Everything's still there, but nothing really fits anymore. This is also where we've got some creative options
here on how we can make this still look
good and still fit and still work for
this different format. Now, from here,
though, we can come down the bottom to where it says Canvas and we can maybe add in a background
color if we'd like to. So we can choose color. Let's
pick a color like this. Very similar to the
primal video blue. So we could run with this. Let's hit the tick, so we can
see then that we've now got some color in the
background before we scale things up and
resize everything. So if you've seen those videos
before where they've got the video and they've got the text on screen
down the bottom, then you could definitely
create that look here. We've also got the ability
to choose a background blur. So this will use your
primary footage, but it'll be blurred out
at different levels. So let's hit play on this so
you can see's best video, but if no one clicks
on it, no one. Okay, this was really easy to create that look
in here as well. But we can also
obviously scale up our clips and reformat
everything as well. So if we select on our clip, then we can just pinch to Zoom on it and we can scale it up. Now, you might want to still
see some of the blur behind. That's totally up to you, or you could keep scaling
this up until it was scaled up to fit
perfectly in that size. We can also then move
across to the left or to the right to center things up
the way that we want them. So let's just hit play on
this and see how this looks. You could have the
world's best video, but if no one clicks
on Okay, not bad. You can see already
how fast this can be just to pick things up, to scale them up,
to change the look, add a background color or
a blur if you need to. And it's just about going through and making
adjustments to these things to look how you want them to look
in this new format. So let's come across to
this next clip here. This is where we've got
some B roll on screen. But obviously, I'm also talking
in the background there. We might choose to show both. So I could select
the clip here of me, move it to the top, and maybe we scale it up a little bit,
something like this. And then if we tap on
our overlay footage, just come down here to overlay. There's our overlay clip there. We could scale that up down the bottom to where we want it, maybe something like this so that we're actually
seeing both on screen. Or we might just want to
do what we had done before and just scale this up.
Fly, something like this. So you need to help
you with this, you need to make sure that
your thumbnail images are grabbing people's attention. So it's just a matter
of going through and selecting your clips, scaling them up,
repositioning them to where you want them so that it
looks the way that you want. Now, if you do have
a lot of different clips here in your timeline, if you are on the pro
version of Capcut, there is a new auto
reframe feature. So let's just select a clip here and let's just come
across to where it says, auto reframe so we can see
that it's a pro feature here. If we press on this, we can
then choose out nine by 16. And let's hit the
tick to apply this. It's then gone
through this clip, and it's going to move it
round to adjust this for us based on what it thinks
is happening in the scene. So you can see it's added
some extra movement in there following the
movement of my hands. So it's pretty cool they've got this feature built
in, but right now, I think it's almost
just as quick to quickly tap on each
clip pinch to Zoom, position it where you want
it, move on to the next one. Let's come back to
the start here. Now, another thing
you can easily add in here at this point is adding captions on
screen or your subtitles. So let's come down the
bottom here to text, and let's choose auto captions. And this is going to
automatically generate here for us from video. So it's going to listen to
what's been said in the video. It's going to transcribe it, type it all out, and turn
them into titles for us. We can also choose
some templates and things in here as well. I'm just going to leave
this as none for now so we get basic titles because you can add your templates
and things afterwards. I'm going to choose start.
It's going through. It's creating our
captions for us. And then gives us a preview here where we can go through and we can make adjustments to this. We can correct any
typos or any mistakes. I'm just going to hit the
tech to apply this right now. And then if we
scroll through here, we can see that we now
have that text on screen. So I'm not actually seeing
them down the bottom yet, but if I swipe up on
this bottom area, then we can see that we
actually have a title card here for each one
of these titles. Let's just say that I
don't need this first one because we've already got
World's Best video on screen, so I could press
Delete on that one. Likewise, for this one, we
probably don't need that one, but maybe we'll have the text
start around this point. No one's going to see it. So let's press on one of these, and we can see what level
of customization we get. We can adjust the style. Again, there's some
free and paid templates and presets and things
in here we can use. Maybe this one here
looks pretty good. Let's hit this one.
Okay, not bad. Maybe we'll add a background on these so that we can
see them on any screen. Let's choose style. I'm going to come
across here to style, and let's go to background
down the bottom here, and let's add in a background. Maybe we'll make it a blue and maybe we'll move
these up just a little bit. Now, we can also add more
animation to these, as well. If we keep coming across
here, we've got animation, and maybe we want these words to feather in or come
in line by line. Or just fade in, or
just rapid fire in. So you can see lots of different options to customize this up. I'm just going to remove the animation there, so
we go back to how it was. And back to the start here, we can also adjust our text here so that it's big
and bold and stands out. So let's choose here worlds. We can hit Edit. Let's scale
this up to a specific size. Okay, so maybe 34, likewise, with the last one, 34, and maybe we will just
move these up a little bit, as well. Maybe
something like this. So once you're
done going through and reformatting
all of your clips, then you can save that
out as its own new video. But still knowing
that you've got your original there fully
intact, as well.
22. Mobile - Saving: Exporting videos: You've done editing down
your video masterpiece as time to export or to
save out your video. And in Cap cut on
the mobile app, they make this
very, very simple. You want to do a last
quick sanity check of your settings here to make sure that everything is
how you want it. So at the top here, we've got ten ADP, we want
to press on that. So in here, again, we can make adjustments to our
video resolution. So even though we've
been editing in a ten ADP timeline here, if we needed to export a
lower quality version, so maybe a 720 P version, we could make that adjustment. Leave that at 1080. The frame rate, I would
suggest that you're leaving this one alone unless you specifically need to convert your frame rate
to a different one. But the setting here that
you might want to make adjustments to is the code rate, they call it, or the bit rate, the quality of the video
that you're saving out. So the lower the quality, the smaller the file size, the higher the quality,
the higher the file size. You can see this recommended
setting there most people, especially for web based videos, you might find that the
recommended setting there is all you'll need. But if you do want to export
the highest quality video, then that's where
you want to bump this one here up to high. But it will mean that you got a larger file that
you're saving out. Personally, I turn off this
last setting, Smart HDR. I don't want to
convert my videos to a high dynamic range video. Just a regular video is what most people should be leaving
this on. But I love it. They've included this text down the bottom estimated file
size, 95.1 megabytes. If you are needing to
get a smaller file size, you're not just
really guessing here, low recommended or
high is giving you a ballpark number,
ballpark reading there. So if we move this from
high to recommended, it's saying that our
estimated file size is now about 76 megabytes. So I'm going to leave
this here back on high, and then all we
need to do is press the share button up in the
top right hand corner. Instantly, it's going to start saving out
our video for us. That was crazy quick.
Once that's complete, it's then got this share
window that pops up. If you want to directly share
from here to Instagram, WhatsApp, Facebook,
other places, as well, we can do that. But that file is actually
now saved on our device. So it'll be saved in your photos instead of directly
sharing from here, I normally just hit Done, so that we are closing that out. I then go and open the file, which we can see in my
photo gallery here, and we could tap on it
and play it from here. And then if
everything's all good, then we can share
it out where it needs to go from this point. But it is a good idea
to play it back, to check ideally you're listening to it
with headphones on, so you're getting a
good representation of what it sounds like. If you can play it back on some different devices
before you post it, as well. And then when everything is
the way that you want it, then you can share that
out with the world. Okay, I just want to jump in
here really quick to say, if you're finding this
training valuable, can you please take a moment to leave us a review on here. It makes a world of
difference to help people find this on skill share. So if you're liking this so far, I'd really appreciate it. Also, feel free to share any of your top takeaways
along the way.
23. Desktop - Downloading and installing CapCut: Now we're going to download and install CAPCut on our computer. I'm going to take you
through the process first on Mac and then on Windows. But once it's installed, the process of using it is
pretty much exactly the same, whether you're on
Mac or Windows. On Mac, you want to head
over to capcut.com. It's going to be a
button here straightaway that says download for MAC. You want to make
sure here that we're definitely downloading
this software onto our computer and not using the web based version of Capcut, the two are very different. We're going to choose
download for Mac. It's going to ask us where
we want to save this. I'm just going to save it
under downloads. Hit Save. If we then go ahead and open
up our download folder. Come down the bottom
here to this menu bar. We're going to right click on Downloads and we're going
to choose open downloads. We can see we've got our file. I'm just going to double click on it to run
and install that. We'll have the app
then pop up like this. We can double click
to run this file. We want to choose open
and that's going to go ahead and install it
for us on our Mac. Once it reaches 100% here, it's going to ask us to
choose our language, so we're going to choose
English, we'll hit Save. Then in most cases,
it's actually going to open up the app for
you once that's done. We can see it's opened
it up for us here. But we can also now find it down here under our applications, and then we've got
access in here too. That's the process
for installing on a Mac over on Windows, the process is pretty
much exactly the same. We want to open up
our web browser going ahead to the
website, capcut.com. Again, you'll have a button
here to download for Windows. We're going to press
on that. That's going to start the download for us. We can see at the top
here. When that's done, we can open that up. We'll have to select yes
to start the Install and it's going to go
ahead and download and install CapcuTF us. It's going to then ask us what
our preferred language is. I'm going to select English.
I'm going to hit Save. In this case, it's going
to run a quick check to gauge the performance
of your computer to see what features and things you
can have access to and how well CAPCuts actually going
to perform on your system. It says here, your computer
can run cap cut smoothly. We want to confirm
that and then it's automatically opened
up Capcut for us. Now at any time, if we want to find cap cut to
open it manually, we can just hit Start
and we can start to type in Capcut in the
search box at the top here, and here is our Cap cut app that we can launch
from there as well.
24. Desktop - Getting to know the CapCut interface: Going to take a look at the
cap cut interface to help you navigate your way
around and find everything. Now, while I'm showing
you this on a MAC, everything is laid
out exactly the same on a PC on Windows as well. This is what you'll see when
you first open up CapcuT. If you're not signed
in, you'll have the option up here to do that. Now, you don't actually need
to have a Capcut account. You can create a free account and that can help
you with backups, backing up your
files to the Cloud and those sorts of things,
but it's not required. You'll see I'm not
currently signed. Below that, we've
got two buttons. One is the home button.
That's going to take us back to this main
home screen here. The second one will open up some templates and
things that we can use and customize up to make videos
based on those templates. Now, this really isn't
something that I tend to use, but it could be a way
that you are able to replicate some of the
videos from these templates, really quickly for yourself. Let's go back to
the home area here. The top right hand
corner, there is a little settings button in here where we can access a lot of the app specific settings. And we'll dive into
this in another video, but this is how we can
access it from here. You can also access a
lot of these things from the app menu across
the top here as well. Now, one area that Capcut is actively building
out and it's changing all the time is this tools area
across the top here. You'll see that we're now seeing an option here, script to video. This on the mobile version, they are building out
and adding so many apps, and we're starting
to see those come across to the desktop apps too. So it's likely that
when you've opened the app here that you are
seeing some more tools and apps in here as
personally think that's awesome with how fast these guys are rolling
out new features, new tools or to help us
make better videos faster. Right now, in my
current version, we've got script to video, which is an AI tool to help you script and
write your videos. Let's go ahead and
check out the rest of the cap cut interface. To do this. We're going to
create a new project up here, and this is then going to launch the main Capcut
editing interface. You can see straightaway
it's broken down into these separate
areas and we have the ability to change
the sizing of these to best maximize your workflow, your screen size for what it is you're actually
doing at that time. Maybe if you're adding in a
bunch of effects and things, you might want to
make this effect area larger so that you can see
all the different options. If you're working heavily on the timeline area
down the bottom here, then you might want
to stretch this up so that it's bigger and
easier for you to work in. Now, one other thing
I do want to note before we dive into each
one of these areas in a bit more detail
is that if you are using a computer with
multiple monitors, then you can actually enable multiple monitor mode with this little button
up the top here. If we press on this, we can
choose the default layout, which is single screen. That's what you're
seeing here right now. But we can also enable
a media first player first adjustment first
or timeline first mode. First is really
meaning the priority. If we're going to do a lot
of work with our timeline, then maybe we will enable
timeline first, again, if we're using multiple
screens and in this case has moved the timeline over
to our second display so that that is maximized
and we're left here on our main screen with all the options and menu
bars and tools and things. I love that you can
customize this. Go ahead and turn
that back here to single screen mode
or default layout. But up here in the
top left hand corner, this is where we can access
things like our media. All of our video assets that we're using in
our editing project, we can import them here,
we can manage them, see them all, access
them all from here. We've got access to
cap cuts, built in, music and sound effects here,
text, stickers, effects, transitions, filters,
adjustments, and templates, all of that stuff we can
quickly access up the top here. The player, this next area here, this is where we'll be
previewing back and playing back the video masterpiece
that we are creating. This is your video player. This next one across here, this is currently
showing us details related to our editing project. It's showing us things like
where the project is saved, the frame rate,
the aspect ratio, we've got some settings
and things in there too. There's a modify
button here for us to modify our project settings. Again, I'll cover this
in a dedicated video around setting up your project. While this is showing
details right now, as you go through the
editing workflow, you're going to see different
things appear in here. If you've got a specific
video file selected, then you're going to
find settings and details around that video
file up in this area too. Down the bottom here, this is the main editing tool in here. This is your video
editing timeline. This is where we're
actually going to be editing, trimming,
adding effects, all of that fun stuff, the magic happens in this bottom
area down here. There's different
tools and things that we can access here too. We can zoom in and out with this slide we can
change the way that our clips and the
timeline behave together with some of the tools
and features across here. We have the ability
to record audio, record voiceovers directly
into our project, into our timeline here
with this next button, and then over on
the left side here, this is where we can access
a lot of our editing tools. So for instance, if we hit this little drop
down arrow here, you can see that we can change
between a selection tool, the regular mouse cursor
and a split tool. We've got different
ways that we can select and modify and edit and
trim down our clips. That's this area
of the interface. Also got your undo and
redo buttons here as well. Then going back to the top
right hand corner here, we've got direct access to open up our keyboard shortcuts. This is one way
that we can speed up our editing workflow, instead of diving into
menus and finding different buttons and clicking on those buttons constantly, we can actually create a
more streamlined workflow by just pressing a
keyboard shortcut, a button on the keyboard that's going to perform
a specific task. This isn't something
that you need to learn or master right away, but there are some
really powerful keyboard shortcuts
that will speed up your workflow and you can even customize these up for
your liking as well. Next to that, we've
got our share button. This will allow us
to directly upload and share our video files
to places like YouTube, Tik Tok, and others, our Export button here
will let us save out our video and save
it to our computer. That's a run through of
the Capcut interface.
25. Desktop - Important CapCut settings: You dive into Cap
cart, start editing. It's a really good idea
to run through some of the cap cart settings to
make sure that everything is set up on your computer
for the best performance, but also for peace of mind with things like
automatic backups. You want to dive in to
the settings area first. And you can access that
by coming up the top here to cap cut
down to settings. There's also a
button over here on the right that says settings.
We can open it that way. Or if you're on Windows,
there is a menu button at the you can select on that
and then choose settings. We're going to go
ahead and open that up now and you can see that the settings area is broken down into different categories
or different tabs. We've got project, edit,
performance, and language. We'll start off first
with the project one. In here, we can choose
where our video projects are actually going to be
saved on our computer. A lot of cases, you
might find that just leaving this as default is okay, but this can take up some
storage space over time. You might need to move this to an external drive if you're running out
of hard drive space. We can actually
specify the folder here if we press on a
little folder icon. We can then go through and
pick a folder or an area on our computer where we want all of our projects to be saved. I'm just going to leave
that here as default. We can also specify our media
download folder as well. Catcad has a bunch of
media effects and things in there that you can download and use from your computer, but they need to
save them somewhere. That's where we can
specify this as well. Again, we can press the folder, we can choose where
we want to keep the ached files, these
temporary files. Usually, again, I
just leave these as default unless I really
have to move them. I'm going to hear
cancel. Then we've got some settings in here
around our ached files. Downloaded files
that are related to a project and need to be there when you're
working on a project, but they really are
just temporary files that afterwards can be removed. So you actually have options in here to automatically
delete and to clear out your cached files
every 30 days is the default. Now we can actually change
this if we'd like to. Or we can again,
leave it as default, which would be my
suggestion here. Don't delete the cached
files because you have the ability to come in here at any time and clear
out that cache, delete those files just by pressing the little
trash can icon here. This way, you're in
control and things aren't being removed without
you knowing about it. I'd much rather leave
these as default here and you come in and
clear it out when you need. I think it's really
important you know how that works where these files are saved and where you can clear them out
because over time, if you're not clearing this out, it could actually
take up a big chunk of your hard drive
space on your computer. That's the project tab. If we move over to edit. This is where we
can customize up the editing interface and how editing actually
happens in Capcut. Again, for a lot of people, these specific settings
here are good to know about so that you
can come in and customize things up as
you get more advanced, but you're likely going
to want to leave these as default unless you specifically need to change them right now. We've got the ability in
here to customize up how many frames we're
able to step forward or jump forward or jump back as a default amount of frames if we're moving
around our timeline. The default here is set to ten. Likewise, the default is set to ten for our settings
adjustments as well, but we can get more
granular with this. If you'd like that
chunk to be bigger, we can make it
larger or smaller, we can make it smaller in here. That I really think
people should be aware of is this image duration. If you're creating videos
that do have a bunch of photos and graphics
and images in there, like maybe an image slideshow, you can actually set
the default duration of how long that image is
going to be played for, how long it's going to
be on screen upfront. So you can make that adjustment
here in your settings, and that's then
going to be applied to every image you bring in. That can save you a
huge amount of time. The default here for
that is 5 seconds. But if we wanted to
drop that to 3 seconds, we can just make that
adjustment here. 1 second you should
really make sure is correct here is your frame rate. If you're creating videos where your camera is recording
at 30 frames per second, then we want the default
here to match that for the primary footage or for the bulk of the footage,
we're going to be editing. We want the two to match. Likewise, if you're
creating videos and your camera is recording
in another frame rate, 25 frames per second or
60 frames per second. We want to specify that here, so again, that it all matches. For the best quality videos, our camera settings need to
match our editing settings, need to match our export
settings so that we're not losing quality or changing
stuff on the way through. If we jump over here
to performance, these are some settings you
want to make sure are enabled if they are supported on
your specific computer. Having these settings
here for using hardware encoding and
hardware decoding mean that you're going to have the
next level of performance using your computer hardware
to speed things up. It's also worth noting if you aren't using a really
powerful computer, so it's an older computer, then you might
need to turn these off for better performance. You can see I've
got my mouse over this area here now and it says, unselect this or
turn it off to avoid exporting issues caused
by incompatible drivers. Best case scenario, you're leaving this on for
extra performance, but if you are having issues, especially around
exporting, then you want to uncheck this
to fix those problems. Will mean that
you'll likely lose some performance
at that point too. Now we can also
specify here if we are going to be using proxy files, lower quality versions
of our regular footage to take the load
off our computer to make everything
run a bit faster. We can actually specify where those temporary proxy files
are actually being saved. Again, just like the caching, we can clear that out here too. Now this is another one
where for most people, you can just leave
this as default unless you're specifically
wanting to use a proxy based workflow to again speed up your performance
on an older computer. Last one here is language
very self explanatory. You can change up the
language of the interface, the menus, and everything
if you need to. But you also selected this
at the time of install, this one should be
already correct. Once you're done
making your changes, you definitely want
to hit Save to make sure that everything is applied,
and then you're good to.
26. Desktop - Project Setup: Configuring project settings: It's time to create
a new project and to get everything set up
ready for editing. Now while I've said in an earlier video
that you don't need to create a cap cut
account and sign in, there are some
benefits if you do. There's some good
cloud backup options. There's the ability to transfer your projects between devices. I personally think
it is a good idea to sign in and to
create a free account. Even if that means that
you're not going to upgrade to the paid account,
that's not a problem. We're still getting access
to more features and more controls just from signing in with a
free account too. I'm going to do that first.
To come up here to sign in. Then we've got some
options to either sign in with a TikTok account if you've got one or there's some other ways on
screen here too. I'm going to sign in
with my Google account and that is done now. We can see that we're
logged in here up the top. Then we'll go ahead and
create a new project. We want to make sure that
we're on this home screen here and then we're going
to hit this big button on the top here, new project. But we want to make sure
that it's set up correctly. We want to do things like
give it a name and specify the video format so it'll be good to go in every
step we take from. Or over on the site here we
can see our project details. We want to come down here to modify so that we can
make changes to these. If we've got name here, we're going to give
this project a name. We're going to create a video
around thumbnail images. We then get to choose here.
Do we want to keep our media, the video files and music and stuff that
we're going to use. Do we want to keep them in their original place
wherever they were originally saved
on our computer? Or do we want to copy
all of our files that we're using over into
the project itself? For me, personally, I
like to leave them in place because I've likely got
them filed away somewhere, which is a logical place for me to come back and
find them later. I'm going to keep them
in the original place. We then get to choose
the aspect ratio or the type of video that
we're going to make. In this drop down
here, you can see, is it a 16 by nine to
regular widescreen video? Is it a nine by 16 so a portrait video is it a one by one square video for
something like Instagram? We can select all
of this upfront, but know that you can come back and change
it later as well. If you do want to start out with a wide screen version
of a video for YouTube and then you want to repurpose it as a short
or as a TikTok video, you can change this
later as well. The other option you've got
here is to leave this set as original and that's
going to analyze the first video file
that you import, and it's going to adjust your settings accordingly
to match that video. So if your first video that you import is a wide screen video, 16 by nine, then
Capcard is going to set our project up to
match that for us. But in this case, I'm
going to select 16 by nine because that is
what we actually want here. We can then specify
our video resolution. Again, the default setting here adapted is going to
be taken from or adapted from our
first video file that we import into our project. So in a lot of cases, as long as that first video file that you're importing into your project is
what you actually want to use when you're
saving out your video, then you can leave these
first two here as default. But we can also go ahead and
choose customized in here and we can specify the size of the video
that we're creating. So is it ten ADP? Is it four K? We can adjust all of that here. So we can leave this
here as 1920 by 1080 because that's the wide screen
aspect ratio for ten ADP. From here, we can
make changes to our frame rate if we need to. If you've gone through
a previous video, went through the app settings, then this should already
be set to be correct for. Know that on a project
by project basis, you can actually customize
these up as well. Again options everything
from 24 frames per second, right up to 60
frames per second. Ideally here, this is matching what your primary footage was. What settings did you
have in your camera, what frame rate were
you recording at? We want to match
that in our editing as well for best results. We're going to leave this
at 30 frames per second. For most videos, this color
space setting is going to be correct unless specifically
you've recorded HDR content, high dynamic range content. An option on more
professional cameras and even some of the
latest iPhones and things, you can record HDR footage. If you have shot HDR footage and you're going to be
editing HDR footage, then you can specify here the type of HDR
footage you've got. Again, your project files are matching your
camera settings. With that all set up, we can hit Save and our project then is setup ready for us to import footage and
to start editing.
27. Desktop - Project Setup: Importing video assets: At your video
editing, you'll want to import your video assets. So for this, you want to
make sure that you are over here on this media tab,
and then you can see, because we have no
media already imported, there is a button here for us to import videos,
audios, and photos. So we can just press on
this and then we can navigate through and find our
files that we want to add. So I've got a folder
here on my desktop, and I've got two video files in here which you
guys can download to follow along
with this video I'm going to be making so
I can select those. I can choose Import and those two files are now
added into our project. Now, if I just undo
this by hitting Undo, or if I select them
and choose delete, we also have the ability to drag and drop our files in as well. This will again work on
both Mac and Windows. You want to open up
a finder window or an explorer window with the clips that you
want to import, we can then just select
them and drag them here into our project and we
can import that way too. What we're seeing
here right now is our local files that
we've imported here. There's a little drop
down here, local, that's currently
what we're seeing, things that are actually
stored on our computer. There's other categories
or groups here as well. We've got here spaces. Spaces are where we
are signed in with a cap cut account paid or free. We can actually have access to our cloud based files as well. If we're working on a project and we back it up to the Cloud, we've got some video
assets that we want to use in a lot of
different projects. We can save them
into our Cap cut cloud space and we can access
those files from here too. Next one down here,
library in here, there are some video
assets that CAPCut gives you access to
use in your projects. If you scroll down here now, you can see the types of
things that are in here, different graphics, some green
screen effects and things. While it's nice
that they include these in here for you to use, I would be very mindful or very careful using these
because you are opening yourself up
to some potential copyright issues
if you don't have the correct licensing on some
of the different platforms you might be posting
this wherever possible. I want to know that
I'm compliant and that I own the
license instead of relying on things
that might have come through a video editing
tool or application. In terms of other video
assets like this, that's where story blocks
is a great option. Motion array is
another good option. Video Hive, place it. A lot of those will have a
lot of different video assets that you can download and
use in your projects, knowing that you own the license, you're
going to be compliant. But the next one below here,
brand asset where we can add images and videos that are going to be used in
multiple videos. So if we've got files or media that we use in lots of
different projects, then we can have them all
saved here so that we can easily access them between the different projects as well. Let's come back
up here to local. We've got our two files here that we have
imported already. We can actually change
the view on this too. So we're just on the grid
view here at the moment, we could change this to a list. Can also adjust the sorting
here as well if you need to. Obviously, this applies more when you've got a bunch
of footage in there, and we can also adjust
the filtering here. Right now we're
showing everything, but if we only wanted to
show the video files, we could select that from
the drop down here too. We also have the ability to
search for a specific file. Again, when you've got
a lot of stuff in here, it's going to be
easier to navigate through and find stuff
with these options. I'm going to switch
this one back here to Grid view.
That is my preference. These two clips that
we have imported. Now we can also click in the video here in
different areas to again bring up our preview of that point so we
can play through, we can scrub through,
and work out if this is the clip that
we actually want to use. But in order to
start working with these files and to start
building out our video, we won't just want our files
imported into our project, we actually need
them imported into our timeline down the bottom
here and it even says here, drag material here
and start to create. Let's grab this first clip here. Let's click and drag this down here into our
timeline area. Can then see that
we have a preview of our timeline up here. We can also see that
with this clip selected, we're now getting other controls and things that have
shown up so we can make adjustments to that
clip and we can add as many of these clips to
the timeline as we'd like. Let's say we want this one
here down here as well, playing after our main clip, then we can just drag
that down afterwards. With these clips, we
can pick them up, we can move them around, so we can change the order on them. Maybe we'll change that. We can also layer them up on top
of each other as well. Let's say that this
extra shot here, this clip of scrolling
through YouTube, let's say that we
wanted to have that playing on top of our
main footage here. We can just click
and drag that up and position it above that clip. Now if we were playing
through this clip here, we're now going to still hear what's happening
underneath it, but we're now seeing
this clip over the top. It's almost like these
little lego blocks or tetras blocks
that we can pick up, move around, and manipulate to get the look or
create the video, create the story
that we're after. If I go ahead and
remove this clip now, I want to select on it, I can press Delete on the
keyboard and it's gone. There's also a little trash can icon here we can
press to remove it. But let's say that
instead of bringing down this entire clip, let's say that I only wanted to bring down a small piece of it. Let's just select on this clip. Again, it's going
to start playing so we can pause that here. But what we have
up the top here is these little handles that appear on either side of this clip. So we have the option to bring down the entire
thing as we did, or we can actually
draw out or map out a section of that video
by using these handles. We can grab the one
on the left side here and we can choose
a new start time. Let's say we want to
start around here and we can also adjust the end time
or trim off the end here. We can do that up here,
we can drag this back, let's say to about here
now when we click and drag this down to our timeline or we press the little
plus button here, it's going to add
this to our project, but it's just that section
that we mapped out, not the entire clip. Now, my suggestion
here is to focus on adding in your primary
video footage first, get all of that into
the main timeline area. Once we've then gone
through the process of removing all the bad
takes, the mistakes, and building out the
story of the edit, that's when we want to go
through and add in your B roll, your overlay and graphics.
28. Desktop - Editing: Cutting down your videos: Okay, now it's time for
us to start editing, to start cutting
down our videos. The goal here is to go through, remove all the bad takes, all the mistakes, anything that you don't want to have
in the finished video. This is the core
of video editing. What you'll find with Capcut and most other video editing
tools is that there's actually a few different
ways for you to do things. I'm going to take you through
the different methods that you've got to cut
down or to trim down your videos so that
you understand the tools that you've
got access to in here because sometimes
it's going to make sense to do things one way and other times it's
going to be much faster to do things another. At this point, we've got
our main video footage here on the timeline. Again, you can download
these resources to follow along if you'd like. But you can see with
the preview that we're given here with our video clip, you can see the video piece at the top and then
underneath that, we've actually got
our audio wave forms. That little graph thing
across the bottom here, this is the visual
representation of what's been said or the
audio in our video. We can actually use this to our advantage if you're
cutting down a video like this because it's easy
to see then where I'm speaking or where
there's content. We can easily see the areas
where nothing is happening, that we can quickly
remove those. I also want to quickly draw your attention to some
of the settings up here because these will be critical for this
section as well. By default, with most of the
editing that I do in Capcut, I leave my settings
enabled like this. I have on here this first one the track magnet
that is enabled. The next one here, auto
snapping is also enabled, and we can tell that
they're enabled because they are a
blue color here. I also have linkage
enabled as well. Now we'll explain what these
do, but for right now, you want to make sure that those are all enabled
exactly the same, or you might start to see things that are a
little bit different happening in your timeline
versus what I'm doing here. It's also worth
pointing out while we're over here that this slider bar here we can use to zoom in and out on our timeline. And the closer we are
zoomed in, the more detail, the more granular we can get when it comes to us
positioning our cuts, but also to see what's going
on with the audio as well. We get a lot more level of detail the more we're zoomed in. Lastly, before we get
to these editing tools, I want to stress
here that again, Capcut is ever evolving, more so than any other tool that I have used before. That's
a really good thing. But it does mean that
sometimes things move from where they
were previously. Right now, the location of some of these buttons and
things that I'm going to show this is where they
currently are right now. But you might find
over time that cap cutters move these
around a little bit, I'd say they're likely going
to be in a similar area. They're very unlikely
to remove features. You know that this
stuff I'm showing you, you'll still be able
to find in there. But already for me, some
of these icons and some of these features here
have changed as recently as in the last week. The functionality
is all still there, but some of these options here that I'm going
to run through, to be hidden here under this
little drop down arrow, whereas now they're out here, so much easier to access. The last thing to note
is this white line here, this is known as our playback
bar or playback indicator. If we just hit play on our
clip now Wilds best video, but you can see that that moves along as we
play the video. That shows us at any point
where we're currently at, what we're previewing
from our video. Or we can actually click and
drag across this bar area here to skim through or
scrub through our footage, jumping to different
areas faster. I'm just going to
scroll back across now to the start of our video. Here, let's hit play,
and let's see what we're working with so we
can start to trim it down. All right, we are recording. Let's check the microphone. One, two, one, two, test. Let's pause it there already
this stuff at the start, we're likely not
going to want to use this in the end
of our project. We can start to see I'm running some checks and things here. I'm running some more checks
here and it looks like the content doesn't start until over here where I'm
talking consistently. This is what we're
talking about using these audio waveforms. We can either just play
through this until we get to that point
or we can speed things up a little bit by
grabbing this playback head and let's put it just before
there now let's hit play. Let's confirm that that's actually where we want
the video to start. Can have the world's best video, but if no one clicks on it,
no one's going to see it. That sounds like that's
the start of our video. We can remove
everything that happens before that piece
here on this video. There's a few different
ways for us to do this. If we click on our clip here, then over on the side here, we now have handles, which we can grab
and we can adjust our start and end time
of each of these clips. With this clip selected, let's come across to the
left side of it. You'll see our
cursor changes from an arrow to this
other icon here. If we click and drag
back to the right here, then we're adjusting where
we want this clip to start. So let's put it to around
here before I start talking. Let's release the mouse button. We've now trimmed
that section off. Now if we come back and play
the very start of our video, you can have the
world's best video. Right, we're starting at the start of the video.
I'm going to undo that. Now, there's undo buttons
up here or you can use Control Z or Command Z on
the keyboard to undo that. We're back with our
original footage here now. Let's say that we want to again start our video
clip at this point. Another way that we
can do this is we move this playback head or
this playback indicator to where we want
our clip to start. We want to make sure that we
have our clip selected here, so we need to click
on then we can come up here to this
little icon here. This is our split clip button. If I press on this and you
can see the keyboard shortcut for it is Command B or Control
B if you're on Windows. If we press on this, it's going
to split our clip in two. You can see now we've
got two separate clips here on the timeline. We can just select
that first clip. We can then press
Delete or backspace on the keyboard or there's also
a delete icon here as well. If we press one of those, it's going to remove that
clip for us and delete it. If we come across now
and play our video, you can have the
world's best video, but if no one clicks, it's now starting from
exactly that point too. That's the second
way that we can start to trim down our footage. Let me go ahead and undo
this again and again, we have no cuts in our clip. We can actually speed
up that cutting or slicing of clips two. There is functionality
in here where we can switch between the select mode, which is the arrow
mode that we're on here now to select
different clips. We can come up here and we
can switch to the split tool. This is also known
as the blade tool. You can see the keyboard
shortcut here for it is B to switch between the blade and
A for the regular arrow. If we click on this and we
enable this split mode, you can see how cursor has
changed and all we need to do here is go through and every time that we
click now on this clip, we're adding cuts
to our timeline. This is another fast
way that we can go through and add cuts
around our timeline, around the areas that
we want to remove. And then when we switch back to the arrow Select tool by pressing A on the keyboard
or selecting here, we can then go select the
clips that we want to delete. Delete, maybe this
one here as well, and we're able to remove
those quickly too. I'm going to go back
here and undo this again because there's still a few more methods that I want to show you. Let's go undo, undo, undo, undo, undo,
undo, lots of undos. We're back just our
original clip here now. Again, we want our video clip to start around this point here. We could do any of the methods that I've just shown
you here already. We could trim, we
could click and drag. We could use the split tool or press Command B on the keyboard
to add a cut and delete. Or there's actually a
really powerful tool here, which is next to split that
does all of those things with one mouse button press or with one keyboard shortcut press. The options we have here are delete left and delete right. If we're looking at
our timeline here, we've got this playback marker here where we want the clip to start and we want to remove everything to
the left of that. With one button press, we can click Delete left
and it's going to remove everything back to
the previous clip from wherever that white
playback marker was. Now, cool thing about
this is it actually works back the
other way as well. Let's just say that we had
a cut in our timeline here. So we can press Command B or Control B to split
our clip at that point. Let's say that we're
back here trimming down this section of it. But we've realized
that we actually don't want anything in
here and we want to jump straight from
the end of this clip here to this next clip. Again, we could add a split, we could select the clip,
we could delete it, or we can press this other
button here, delete right, and it's going to do all of that for us instantly super fast. You can most certainly use these all in
combination as well. There'll be some times
where it's just easier to click and drag to
shorten a clip, there'll be other
times where you'll need to add a cut and maybe trim to the right or delete to the right or
delete to the left. The idea here is again, knowing
what tools you got access to so that you know
then which is the best one for you to
edit this down quickly. But I want to quickly
mention these other tools up the top here so that you can see how they can impact these tools that
I've just shown you. Snapping is the first one
I'm going to show you. That's the icon
here in the middle. We can turn auto
snapping on or off. By default, I leave it
on most of the time. But we can see what happens with this playback indicator here. As we move it close to the cut or the join
between these two, it's going to snap into place. We got close and it just
jumps across for us. That's what snapping is. Let's move this
playback head over to here and let's try to
trim down this clip a little bit and let's move it
across and we're snapping a nab it's going to snap
to that point for us. If we turn off snapping, so it's not on at all now
as we do the same thing, say we're trimming back to get close to that, it's
not snapping at all. It's not jumping
across there for us. If you need more control
without it automatically jumping to wherever
that playback head is or snapping to the next clip, the next cut, then you can
turn that on or off there. Now I'm going to undo these
changes that we've made and I'm going to turn
snapping back on now. The next one that
you really need to understand is this magnet here. So right now we have
the magnet enabled, which means that it's
automatically going to close up gaps in our timeline for us. For example, if I grab this clip here and I
try to move it over to the right and just to have it sitting there so
it was a bit of a gap. Maybe we need to move
some clips down, we're not quite
working on them yet. But if I do this with the magnet enabled and I let go now, it's going to suck it back
to our previous clip. So there is no way that
we can add gaps in our timeline with
this magnet enabled. So if we disable that now, so we turn off the magnet. Now if I pick up a clip, I can actually put
it wherever I like. So we've got some clips on here that we may, may not need, but we just want them out
of the way for right now, then we can pick them
up and we can move them further back
or out of the way. But this magnet also
comes into play when we're actually editing
down our footage, too. Let's just come over
here and let's add a split in our timeline
at this point. We can cut it here and let's come across and add
another cut about here. We've now got three clips here. Let's delete the middle one with the magnet not enabled
to magnets not on. I'm going to press delete
here to delete that. You can see that the magnet hasn't sucked all the
clips back together. It hasn't removed
the gaps for us. There are definitely times
where you will want the magnet on and there are times when
you want the magnet off. Likewise, with snapping. What you'll likely find is for this trimming
down of your footage, you'll usually
want to have those on because it's going
to make the process faster for you because it's going to close up
all of those gaps. Go ahead and turn this on
now magnet and you can see, it's now sucked all of our clips back so there's no more gaps. At this point, you
now understand the different ways you can
trim down your footage, then we can start editing. I want to go through
now we want to cut down this clip to remove
all the bad takes, all the double ups,
all the mistakes so that we're just left
with the core content.
29. Desktop - Editing: Adding B-Roll & overlay videos: Time for us to add
in any B role or overlay footage onto
our video project. At this point, we've
already gone through. We've got our primary
footage down here. This is known as your A role. Now we're going
to add in B role, which is the overlay footage, the stuff that sits
on top of this. It's not that we're
going to replace our clips here in our timeline, we're going to overlay some clips on top of it so
that we're still able to hear the clips
underneath and easily switch between them
essentially as we build this. The first thing you
want to do here is come up to this media area here, make sure that is selected. You want to go ahead
and either import the clips into your project
that you want to use. We can again hit this
inport button here, navigate through find out clips. I'm going to be using the
screen recording file here, which I have already
imported into our project. Now, there's a
couple of different ways that we can approach this. I could literally bring
this whole clip down into our project here just by
clicking and dragging this down. We can see it's much longer than our project and I can
drop it here on top. Of our video. It's on
its own separate layer. Right now, it hasn't replaced
this footage underneath it, it's sitting on top of
it, meaning that this is now B roll or overlay footage. Even if we scrub through or
played through this now, you would still hear what's
happening down here, but what we're seeing on screen is this other clip on top. This B roll clip
that's been imported, it's treated the same as
any other clip so you can see that we can
still easily trim it down with it selected, we can add cuts or
splits into it. We can pick up the chunks
of footage and we can move them around as if there
was regular footage. We also don't need to import the whole video
like I have here. If I select on this and
delete it and I'll delete this clip Instead of just clicking and dragging
this entire clip down, we do have the ability here just to use the handles here on the sides of the
clip to draw out or to select out an area
that we do want to use. Let's say we only wanted a small section of the
clip here in the middle, we can then click and
drag that section down and we're only going
to import that piece. Again, there's lots of
different ways that you can essentially do the same
thing with video editing. Another way that we can
map out a section here. Let's just stretch
this back out, it's in the entire
full clip here. We can also play through
our footage here. Because this is
selected, this is now previewing this clip
instead of our timeline. We can switch between it if
we click down the bottom. That's now our edited video here. Let's come back up here. Let's select our Broll
clip and we can play through or click through here to find the area that
we actually want. Let's say that we wanted our
clip to start about here. Let's pause this
here at that point. We could then try
to grab this handle and drag it across to
that point so that it matches perfectly or we
can actually press I on the keyboard and that's
going to mark an point for us, where we want this
clip to start. You can see then it's
automatically started playing this clip here as well. Let's just say we're going to jump forward a little bit here. Let's long a bit further. Let's play it from here to work out where
we want it to stop. Let's just say that
we wanted it to stop about here.
Let's hit pause. We can then press
O on the keyboard. I for in O for out, we've marked out
in and out points, we've selected our section here. We can then click and drag that down to the
timeline from there. I'm going to go ahead
and delete this here. So what we're going
to do now is start to bring in some of this B roll footage
so that it lines up with what we're talking
about in the video. I'm going to build
this out in real time so you can see how I
would approach it. I'm going to leave this
first clip here for now. In that first clip, I
likely want to bring up some titles and things to
create some engagement. Maybe we will want
some B roll there too, but I'm going to leave that
first little chunk here, the first 10 seconds
here for now. Let's jump to this second clip. Let's play through this and
let's hear what's been said. To help you with this, you
need to make sure that your thumbnail images are
grabbing people's attention, that they stand out on whatever platform you're posting
them on. Your thumbnail. Okay. So we need some
footage here that indicates that there's maybe a lot of options
on the platform. We need to make our
thumbnail image stand out. So let's come up
here to this clip and let's stretch out
our selection here. We could just click through to find the area that we want. We could again hit play and
play through the entire clip. But what I like to
do with this to be able to scrub through it quicker is to click and drag
this and let's just put it down a little bit
further in our project. Let's just drop it down here. Now, if we go across here, then if we click and
drag across the top, you can see that we have
so much more control over previewing the clips. There's not much happening
at the start of this here. We're now scrolling YouTube. Again, this clip could fit. We probably don't want to
show the shorts here as much. Maybe we could start
this clip after we've shown the shorts
maybe around here. Let's start it here. Let's scrub through here and
see what happens. I actually stops at that point. That's probably not a good piece for us to use. We
want some movement. We start scrolling
again here now, maybe just before that happens, let's see what happens here. Let's play through.
We're scrolling down. We're seeing all the
thumbnail options. I think we will show
something like this. Again, maybe not the
start of it because it scrolls down a little
bit and stops. Maybe when it starts again. Let's start it here before
it starts to scroll. So we'll do all of this. We're showing a lot of
different thumbnail images, maybe about here.
Let's cut that. We can press Command B
or Control B or we can come up here to the slice
or split button here. We've now got this
little chunk of footage. Let's come across here to
where we want to put that now. Maybe we could
have it so that it snaps directly on that
clip like it is now, or if we actually have
it show just before it, in some cases, that can
actually feel better. I can flow better for the viewer. Let's
just sample this now. This is all about trial and error here to work
out what's going to fit the best to create a good experience
for your viewers. It is so important. To help you with this, you
need to make sure that your thumbnail images are
grabbing people's attention, that they stand out on whatever platform
you're posting them on. Maybe we'll actually drag this down a little bit
towards the end of this. So to help you with this,
you need to make sure that your thumbnail images are
grabbing people's attention, that they stand out on whatever platform you're posting them on. Okay, so
that's not bad. So we're going to do a first
pass in filling in some of these gaps and making
this video more engaging, and then we can do another
pass where we're refining it. So it's going to be a little
bit of back and forth, a little bit of
tweaking and adjusting. What's the next piece
here? The thumbnail image also needs to be related
to your video content. So best case scenario, if someone sees your
thumbnail image, they can work out exactly
what your video is about and if it's for the just from looking at that
thumbnail image. This is where you
could add some big A, we still got the remainder
here that we haven't used. So let's come back over to here. Let's scrub through here. Let's see if we've got anything
that's really going to fit. That stuff
there could work. Let's come across a bit more, see what else we've
got to work with here. I guess that's for
the look good small. We've made the thumbnail
images smaller. This static section
here we could use for when we're showing the text
or talking about the text. Maybe we'll have this
search piece here before I start
typing, about here. Video editing, Mac, we run
the search that comes up. We're in the top spots here. We scroll down a little bit. Let's add a cut here and
let's bring this piece back. Let's just see how
this goes here. They stand out on whatever platform
you're posting them on. Your thumbnail image
also needs to be related to your video content. Best case scenario, if someone
sees your thumbnail image, they can work out exactly what your video is about
and if it's for them, just from looking at
that thumbnail image. I like the start of it here where we're showing
these examples, but I don't know that it
needs to start scrolling. So maybe we'll stop it just
before it starts scrolling. Then we could
potentially slow down this clip so that it's
on screen for longer. Maybe we could even zoom in on the different thumbnails here on screen, make them bigger. But I'm not going to do that
in this first pass here. I just want to drop some clips in, see where the gaps are, find out if we need to go and record more B roll or overlay footage or use
stock footage sites to find other clips that
are going to fit here. We're doing our first pass. Okay, I just wanted to jump
in here really quick to say, If you're finding this
training valuable, can you please take a moment to leave us a review on here? It makes a world of
difference to help people find this on Skill Share. So if you're liking this so far, I'd really appreciate it. Also, feel free to share any of your top takeaways
along the way.
30. Desktop - Editing: Scaling/zooming and rotating clips: Take a look at how we can adjust the clips that are
in the timeline. We're going to pick
one of our clips here. Let's pick our B roll clip here at the start and
this could be clip. What happens is on the
right hand side here, we get a bunch of other
options that show up. You can see here
that these options are broken down into video, audio, speed, animation,
tracking, and adjustment. What we're going to
look at in this video is the video ones here, specifically the ones
that are related to scaling, the position, zooming, rotating, making some basic
adjustments to our clips. Now these are more
advanced features and controls that are in
this section as well. We will be covering
off in later videos. But you've got
things in here like cutout mask and
enhance here as well. Now that you know
where to find then we're going to come back here to basic what we're going to do is let's make sure that
our playback head, this playback indicator is above the clip that
we have selected. Otherwise, we're back here,
we're making adjustments. We're actually not
going to see a preview of what it is that
we're adjusting. You want to make sure
that playback head is somewhere on the clip
that you have selected. Let's say that for
this clip here, we want to zoom in on it to make it a bit bigger. We've
got it selected. We can come over here
to scale and let's just drag this across to increase
it maybe about here. With scaling, the
default setting here is to do it in proportion. We're scaling it up and it's
still going to look right, it's still going to look normal. We're not stretching
it at this point, but there might be
times where you do want to stretch something up. We can unselect this
uniform scale here and then we can scale the height
and the width separately. I'm going to undo that last
change here by pressing undo and let's turn
back on uniform scale. At anytime with the
adjustments you've made, if you want to reset them, you can just press this
little circle here, redo and that will redo or reset any of the adjustments
you've made in that section. You can see here we've
got position and size. That's the area that
we made changes in. If we scroll down,
we've got blend, we've got to stabilize
motion blur. If we just want to reset
the position and size area, we can press this little
button here and all of those settings are going
to go back to default. But let's scale this up again. Maybe somewhere around
here. We can then use the X and Y settings here to adjust the X and
Y position of this. You can see as we
hold this down, we're moving it over in very small increments
to the right. Likewise, if we press the down arrow or we
lower this number, we're going to move to the
left in small increments. The Y works exactly the same. We can adjust the Y position on the Y axis with these
values here as well. But what you can also
do is you can click and drag on this preview window when you're in this mode and
you can just click and drag to adjust the position. Maybe we'll position
it so that it's more centered here, maybe
something like this. Let's play through
this now. To see it. You need to get your
content clicked on and that's when your thumbnail
strategy is so important. Maybe we'll even make this one a little bit bigger
because again, we're going to add
some click animation on there a little bit later. Let's zoom in on
this one a bit more. It is important to
note that we are digitally zooming in on this, depending on your
project settings, depending on how high quality you actually
recorded your clips, you do have the potential
to lose quality at this point if you're
zooming in too far. But for right now, this
is still looking okay. Let's zoom in a little
bit more and let's position this around here. Let's come across
this next clip here. Maybe we don't need this
static section here, this menu bar on the left. We can zoom in on
this one as well. Again, we want to click
on it, so it's selected. We want to make sure that
our playback indicator here, playback head is over the
top of this clip somewhere, and maybe we can
zoom this in a bit. Let's move it across. Et's go up a little bit more so we can actually
center it there. We've got that snapping on, so it's snapping
to the side there. We can either turn that off
so that we're able to get more granular adjustment or we can use these X
and Y coordinates. Let's just use these to
get it pretty close. I've centered this up now
and let's preview this clip. I grabbing people's attention, but they stand out on whatever platform
you're posting them on. Let's play this next clip here. Email image also needs to be related to your video content. Best case scenario. Maybe what we could
do with this one is we can zoom in a little bit, so we're seeing this
text or this typing happening bigger and then we can have a cut where
it zooms back out. Let's work out where we
want to have that cut. Maybe about here. Let's split our
clip at this point. Let's click that first one
again and let's zoom in and let's bring it down and across a little bit. Maybe
something like this. Let's preview this now. Image also needs to be related
to your video content. Best case scenario, if someone
sees your thumbnail image, they work out exactly. That's pretty good. Now
you also have the ability in here to rotate
your footage as well. Let's just say that we
wanted to rotate this clip. It's not something I would
normally do in this case. But with that clip
selected, again, we also have the
option here to rotate. Again, you can
either manually do this here using the
up and down arrows. You could also type in a
number if you wanted to, or you do have this little
circle graphic here. If we click and hold with this, then as we move
the mouse around, I clip here is rotate. Let's say that we did want to
include some rotation here. You can see that we can
actually see the background, the layer below this is
appearing on this area now because it no longer fits
the size of our video here. What we could do
to hide that is we could zoom this in to make
it bigger or scale it up. We could grab scale here. Let's zoom this up here. To make sure that
we're covering off on all the corners here, so we've now got this
clip on an angle, but we're not seeing
the video clip underneath it or behind it. Now for this clip
again, that was just demonstration purposes. I am going to reset that here, so we'll hit with this clip selected up here,
position and size. Let's reset that to go back to the original to undo
that setting change.
31. Desktop - Effects: Adding text and stickers: Take a look at adding text
and stickers into our video. So we've got video here that we've been editing down here, and I want to add some text at the very start of it to
help hook our viewers in. So let's just play this again. You could have the
world's best video, but if no one clicks on it, no one's going to see it. Okay, so what I'm thinking is we add World's Best video as three big bold pieces of text to help grab the
viewers attention at the start of this video. I want to come up here to text, and there's lots of
different ways that we can actually create
text in here. The standard way. The default way is with one of these default text boxes here. We can click and drag this
down to our timeline, and we can see that
we have text show up here as if it was a
piece of footage. With this text, obviously, we can customize it all up. But with the little icon
here on our timeline, we can pick this up.
We can move it around. We could add cuts in it, we can make it longer or shorter, depending
on what we want to do. It's treated the same as a regular piece of
video footage here. But with one main distinction is that it is classed as text, so we can't actually integrate it with the rest
of our timeline here. You can see that
it's on its own text based layer and that just helps separate it from your
regular footage. With our basic
default text here, if we want to edit the text, we can make sure
that it's selected, we can come up the top here and we can type in
something else. Let's just choose Justin Brown. So I've got my name in here. We can then run through
all the different settings and things in here like font. We can change the fonts. We've got all your
regular adjustments here for bold underline
capitalization. We can adjust the color here. If we scroll down a bit, there are different presets
as well that we can use. You can see by
clicking on these, it's changing up that style, and there's quite a few
different options in here. You can hit this down arrow to expand out and see some more. But this is still very basic compared to
where we can take. Going down further,
we've got your position and size so we can
scale this up. We can control the position
here using these sliders or these values here
to have a lot of precision with how we're
moving things around. Or we can just click
over here and drag, move this to where we want it. We can rotate, we can resize
and everything from here. We scroll down, we've got
things like the stroke. If you want to have
a border or not, we can enable that here. We can also change the color of that stroke and
even the thickness. Let's go ahead and
turn this one off. You've also got settings in
here for adding a background. If you'd like to have a
background very similar to our regular YouTube
video text that we use, then we could customize that up and there's also
settings for adding a glow, adding a shadow and a
curve here as well. That's a very basic
default style title that you can create
here in Cab cut. I'm going to select
on this and I'm going to press Delete.
We're going to remove it. Let's come down here because
down here under effects, there are some pre built looks or effects presets, really, of different types of texts
that you can easily add to your timeline that you can
then customize up further. If you scroll down
here, you can see just how many different looks and styles and things there are. Again, these aren't
even the animated text. These are still pretty simple. The idea is that you can
scroll through find something that you like the look of
maybe something like this, we can click and drag that
down into our timeline, and then we can
customize it up again. We've still got
the same abilities here in terms of scaling, positioning, rotating,
all of that stuff. Now, there's also
some different styles of texts that we can
create here as well. With our text selected and this will work for the
default text as well, we can also come
over here to bubble. If we start to click
through some of these, you can see the different styles and things that you can create. So different types
of text boxes. But there's also the
more professional text that you can add
in here as well. I'm going to select
on this. We're going to press Delete, so it's gone. Let's scroll down further, past effects here, let's
go to text templates. So we can already see here that these titles look next level. If we just hover over them, we can see that they have
some basic animation, that this one here
is just wiggling a little bit, appearing. Lots of different options here. If we want to see what it
looks like as a preview, then we can actually
click on one of them. No one's going to see it. So you and it's going to play back a small portion of
your video so that you can see that animation or that text playing back
on your timeline. Click on it, no one's
going to see it. You need to on it, no one's going to see it. You need to on it, no
one's going to see it. Again, if we scroll down here, you'll see that there's a
lot of options in here. Now, there is some
filtering that you can go through to help you
narrow down this list. You'll see that as
you scroll down, there are different
categories that you hit from time to time like
this one here, vlog. We can actually access
those quicker if we select over here
on text template, you've got direct access
to these categories here as the text that I want
to use in this video, I'm just going to come
back up here to Effects. Let's find something
that stands out. I'm just going to
grab this one here. Let's drag this down into our timeline and let's
customize this up. First word that we
wanted was worlds. Well, depostrophe S. Let's
change the font here. Let's use Oswald, which
is our primal video font. Let's maybe make
this a bit bigger. Maybe something
like this for now. Maybe we'll make this bold as. Got our first word done. Now we're going to
select this clip. Let's right click on
it and we can copy it. We can then paste it so we can right click
and choose paste. We've got a second one now
and let's paste it again. We've got three of
them. We got worlds, let's move this
across a little bit. Let's customize this
one here, best, and let's double
click on this one here to edit this one, video. Now we want to position these so that we can see them
all on screen at once. Maybe we'll move
this down world's best and let's adjust video. I'm clicking and dragging. We need to lengthen
this out too. So that we can see all three
of them on screen at once. We'll adjust this timing
now, shorten this one up. Let's just play this
and maybe we'll zoom in a bit first to
work on this timing. We want them to appear
as I say the words. We have the world's
best video, but if no. So it's much too short.
That one's pretty good. Best starts here, let's
extend this back. World's best video. I'm starting to save video,
what're doing about there? The world's best video. This is a very simple effect, having these three
appear at this time. There's no transitions, there's no effects or
anything at this point. Let's just play this now. You could have the
world's best video, but if no one
clicks on it, maybe we'll have them
disappear at this point. Let's shorten these back. The world's best video, but if no one clicks on it, no one's going to see it. I think what we add here for this next piece is a sticker. Let's come over here to sticker. These are little graphics
that you can use. Think of Instagram, Snapchat, little gifts, little graphics
that you can add on. Again, if we hit the
little drop down here, there's lots of different ones. Maybe we'll go
Emoji and let's go a thumb down or a sad face
or something like that. The piece where we say,
no one's going to see it. What about this one
here? We can click and drag this down
onto our timeline. We can see now that
this has created, again, its own style of layer. We've got our text
layers here with the T, and we now have our stickers
layer here as well. We could move this up just to keep it neat so
that we're grouping or keeping all the different
types of footage stickers, titles, and things together. But in terms of where
it actually is, it doesn't make any difference to the actual video itself. I'm going to move it
back up to the top. Let's work out
where we want it to appear timing wise.
Let's play this. No one's going to see it. Okay, that's not
too bad. I didn't want it on straightaway, but there is a quick
little gap there. Now let's resize this. With it selected up in
this transform area here, you can see we've got scale. We can scale this down a bit. Maybe we'll cover my face with it at this point, actually. We want to adjust this end
time here so there's not going over our next clip so that it finishes about the same time. We're going to drag that back
until it snaps into place. Let's just play this now. But if no one clicks on it, no one's going to see it. You need to get your content,
bit of fun, bit of engage. For this next piece here
where it says you need to focus on getting your
thumbnail image clicked. You need to get your
content clicked on and that's when your thumbnail
strategy is so important. For here, there's probably
some sticker that we could use in regards to
clicking or tapping. I'm thinking maybe icons. Actually, it's probably
going to be emphasis where we're going to be pointing
to something here we go. It's a tap and it
looks like a click or a mouse click few different
options we've got here. I think I like the
ones back towards the start here, maybe this one. Let's drag this down here
again onto our sticker layer. Let's get the timing right,
then we'll resize it. See it. You need to get your
content clicked on, and that's when your thumbnail
strategy is so it actually only plays that animation there once and then it just
stays like that. You need to get your
content clicked on. Let's get it right, and then we will repeat that animation. Let's select this clip
here, scale it down. I think it's a bit big, but we still want it pretty big and maybe we will move it
off to the side here, so it's tapping on my
face. That's not too bad. So after that animation
is finished there, then let's cut this clip. Et's shorten it back to that point and then let's copy
and paste it a few times. It's going to play through
that animation a little bit. We're going to copy it, can right click and choose Copy. We can then paste it. We can just right click
and choose paste. We can come across to the end of that clip and we
can paste it again, right click paste, and we keep going for as long as we want that animation to be happening. So let's just see
what this looks like. So you need to get your
content clicked on, and that's when your thumb. Okay, so maybe we'll
do a couple more. See it. You need to get
your content clicked on, and that's when your
thumbnail strategy. Then that's probably enough
of this shot on screen. It's dragging out
a little bit now. Maybe we'll trim this
clip back so that it just pops back to me on
screen. Let's play this. You could have the
world's best video, but if no one clicks on it,
no one's going to see it. You need to get your
content clicked on, and that's when your thumbnail
strategy is so important. I'm going to go through now and add text and graphics into the remainder of this video,
but that's how easy it is.
32. Desktop - Effects: Applying transitions between clips: Look at adding transitions
into your videos. A transition is
essentially an effect that sits between
two video files on your timeline that
effect that you apply will transition or segue
between those two clips. You don't just have
to have a hard cut. In some cases, it might
make sense to get a little bit more fancy and apply some of these transition effects. Fair warning with these,
this is one way that if you overdo this and
add too many effects, too many transitions,
you can make your videos look very cheap and
very unprofessional. Use them sparingly, use them if they're going
to add to the video, but definitely
don't go overboard. We want to come up
the top here where it says transitions, and let's hit this
little drop down arrow here because there's
so many in here. Once again, they've actually broken them down into
different categories for us. We've got our trending
category here. This one's obviously going
to change over time as different effects and
transitions and things change. But you can see we've got all these other
categories here as well, overlay movement, blurb, basic to preview what
these actually look like, we just put our mouse cursor over them and it's going to play a little animation or a little version of what
this is going to look like. Scroll down, maybe look at
some of these light effects, bubble blur, so many in
here to choose from. Let's say that we find
the one that we want to use spin clockwise
here in this example, to add it, we just
need to click and drag this down
onto our timeline. And we can add it at
the joining marker between any two clips. We can't add it at
the start of a clip, we can't add it at the end. We can only add it at
the transition point. Now, this will work
for overlay footage. This will also work for footage in your primary timeline as well anywhere where there is
a join between two clips. I'm just going to add it up here between these two
clips and I will let the mouse button go and
that has applied there now. Now if we just play this
little section here, you'll see this transition
in full effect. This If there's
too much going on. Let's play it again.
Mobile devices. If there's too much going on, so it added that spin effect in this case, between those two. Now, just to show you what
it was like before with that selected here press
delete and just play devices, if there's too much going on in your nothing really happened. It was just a hard cut
between the two clips. Let's add an effect back
on here because I want to show you that you can
actually customize these up. This time, I've grabbed
another one here, we're going to drop it again on the transition point or the split between
those two clips, then you'll see at
the top here, we can actually choose how long this transition or this effect will actually play for
the duration of it. If we want that effect
to happen slower, we can increase the amount
of time that that's going to we also have the ability to make adjustments to this down
the bottom here as well. You can see if we put our mouse cursor over either end here, then we can drag this
out or shorten it down to speed it up
or slow it down too. With this now set to the
maximum amount of time, let's just play
this section here. All screens, mobile devices. If there's too much going
on in your thumbnail, just break up your
shots a little bit. Now, for most professional
videos that I've ever made, we've never really
added too many of these transitions and effects on because as I said earlier, it can make your videos
look unprofessional. But if I am adding them, then this is where
I'm going to stick to the basic ones which are up
here actually under overlay. I would be either
a fade to black, a fade to white, like a white flash,
a dissolve or just a simple cross fade
to blend the two clips. That's generally
all I would use. Now let's come back over here in our timeline where
we've got a cut here between two of our clips and these clips here are
pretty much identical, same camera, same angle. If we play this is so important. So to help you you'll see
it was just a hard cut. So we've got no
transition on there. We could go ahead and
add in an effect here, a transition and
drag it down between our two clips and play this.
So to help you with this. But no matter which transition we're actually
going to pick here, it never really looks
that good because we're transitioning between two shots that are essentially the same. We just cut a little
bit of the audio. They're essentially the same. Instead, what I would do here instead of adding a
transition effect is that I would just
zoom in on one of the clips to make it look
like it was a different shot. Let's make sure that our
second clip here is selected. We could scale this
up, maybe about 12%. Again, depending on
how you've shot this, whether you shot in four K, 1080, and the quality
of your project, it is possible that you might
be losing a little bit of quality here so you don't
want to zoom in too much, but generally up
to around 15% or 115 here on this scale should be okay for what
we're talking about. With no further adjustments, let's just play
this clip here now. Important. So to
help you with this, you can see, it's now looking
a little bit different. It's punched in zoomed in
a little bit at that cut. But in order to really
sell this effect, if you've got a person in
the shot like we do here, if you're able to
line up their eyes, then it's going to be far
less jarring for the viewer. So maybe we'll bring this
shot down a little bit here. So let's come to
the wide position and we can lower this
to bring it down. We could also just click
and drag down as well, and let's go back and see what the eye position
was like before. Okay, so it's not perfect, but it's much better. So if we were to play
this now, so important. So to help you with
this, you need to make sure it's such a simple little
transition or effect that you can add here
that's going to keep your viewers more engaged with your viewers because
things are changing up, but it's without going
over the top and adding all these fancy
transitions and effects.
33. Desktop - Effects: Adding special effects & clip animations: Video, I'm going to show
you how easy it is to add different effects and
animations to your videos. Now this is one of
the big advantages of using Capcut in that there is so many different effects
and things built in here that you can easily
add to your videos. Now here in Capcut effects and animations are actually
two different things. I'm going to show
you effects first, and then I will show
you animations. There's a lot of overlap,
but the two are different. To access the effects, we
want to come up the top here, click on effects, and as with
anything else in cap card, there's a lot of different
options in here. Again, they're broken down into these different categories
here on the left, starting off with trending. You can see if we scroll
down here further, we've got things like glitch
effects as well and we can preview what
these look like just by putting our cursor over them. You can see that's adding that
little glitch effect there or maybe something more subtle
here with color glitch. Maybe we got cut here. Chromatic. Then when we find the effects
that we want to use, we can literally just
drag and drop them down onto our timeline
onto one of our clips. It can either be one of our
B roll or overlay clips, or it could be your
primary footage here too. I'm going to drop it here
just on the primary footage so we can see what
this looks like. We can see that
it's now overlaid this blue area here
onto our clip for us. We've also got some controls up the top here to
further dial this in. But let's just hit play
on this at the start so that we can see that this
effect has been applied. Could have the
world's best video, but if no one clicks on. You can see that
we've now got this glitch effect that's happening. As for how much control
you'll have over the effect, we'll come down to the
individual effect itself. But you can see up here we
can adjust the strength, we can adjust the speed, and also we've got lateral chromatic aberration
here as well. We can increase this and you can see it just changes
the effect here. Maybe we'll even increase the speed and now
let's play this. Could have the world's best. I totally changed that effect. Down the bottom here,
in the timeline, we also get to choose how long that effect is actually
on our clip for. The default here because
we dragged it onto an entire clip is to
fill the entire clip. But you can see if we
put our mouse over these little handles here
on the edge of that effect, we can shorten that section too. If we only want it happening
for the first little piece, then we can just shorten
it down to that part. If we play this now, you could have the world's best video. You can see we have
that glitch effect happening at the
start of the clip. Now you notice that when
we click off the clip that effect actually disappears
from our timeline here. We're not actually
going to see it, it's actually now included
inside of that clip. If we want to find it again to make adjustments to
it or to remove it, we just need to click on
the actual clip itself, and then over here under video, you can see we now have a
category here for effects, and we can see under effects, we have one effect here applied, which is that chromatic effect. We can hit Edit here to make changes to that and you
can see at that point, we can see it down here
in the timeline again. Or if I go back and select
the clip here again, we also have the ability
to delete the clip from here as well by
pressing the little trash. One clip here in
your timeline can also have multiple
effects applied to it. Et's just show you
what that looks like. We'll grab a cut effect here. Maybe we'll pick a
Christmas one in this case, sparkle, let's drag
that down as well. Then if we deselect the clip, just click
on something else. Let's click on our clip again. Then up here under effects, then we can see
that we've now got two effects that are applied to. Go ahead and remove
both of these. That's how you can apply effects directly to a clip
here in your timeline. But you can also apply them
to the timeline itself. This is a really
powerful feature. Let's just grab this
one here snowing. We could just drag
it onto a clip. But instead, you see if we put our cursor here
over the timeline, we can actually
have it be inserted as its own clip in the timeline. Let's just drop this
here somewhere. You can see as we
have our own layers here for titles
and for stickers, we actually have our own layers
for effects here as well. We can pick this up,
so it's up the top to make it easier for grouping
these things as well. But then just like
any other clip, we can stretch it out. We can make it longer,
we can make it shorter. We could split it
in half by hitting the split button here
and maybe we adjust it. We're going to have this effect happening here at the start. You could have the
world's best video. We've got snow happening here, and then for this
next piece here, we don't have any snow, but then back up here,
the snow starts again. Are grabbing people's
attention that they stand out. If you do have an
effect that you want to apply across your entire video, this is how you do it instead of adding it on a clip
by clip basis. So I'm going to go
ahead and delete these from our project here. I'm just going to
select on the clip, press Delete on the keyboard, select the next
one, press delete. So that's effects
here in Capcut. But animations is something similar but a little
bit different. In effect, we can
apply to the clip itself or have it treated as its own clip in the timeline to affect
everything underneath that. But an animation can only be applied to an
individual clip itself. So let's take one of our
clips here on the timeline, let's pick this first one here. Let's move this
playback indicator, so it's on our clip
so that we know that we're looking at the
right thing here. Then this time, instead of accessing our effects and
things from up the top, what we want to do is come
over to the other side here and come over to animation. Again, these settings and
everything here are all related to the clip that we have selected
in the timeline. Let's come over here to
animation straightaway you can see at the top here we have an in animation we have out animation
and we have combo. These work in very much the same way as a transition
on your clips. A transition in
Capcut was an effect that could only be applied
between two clips, whereas an animation here can be applied to either
the start of a clip, the end of the clip, in or out, or combo, which means
the entire clip itself. Let's take a look at
some of these examples. We've got it selected
here for in, let's just put our mouse over these and we can start to
see what they look like. We've got a fade
in. We've got rock, we've got shake here. Swing. If you want to apply
one of these to our video, then we just need to select it. Let's pick this one here,
Zoom one. You could have. I actually plays back
the start of our clip there with this effect applied.
Let's pick another one. You could have Shape
too, maybe swing right. You could have them.
You can also see that this is happening
pretty quick. We could also adjust the
duration of that here. The default right now
is half a second, 0.5. We can either type in the length of time we want this to go for. We could use the
up and down arrows here to adjust that as well, or we can actually grab
this little slider bar here to extend this out
or to shorten it up. Let's go 2.5 seconds
in this case. Have the world's best
video, but if not. We can see that that effect now is happening over a
longer period of time. Now, this hasn't made
any other adjustments to the rest of our clip. You can see we've actually
got this little white line across the bottom
here now that shows us that we do have
some animation applied to that
start of that clip. The rest of the clip
right now is untouched. It's going to playback
as it normally would. But let's say we wanted to add an out animation on the
end of our video here. We want to finish the
video with some animation. We can select the clip come
up here and let's choose out, and then we've got
some different animations we can add on here. There's a Zoom out,
I can zoom in. Maybe we'll just do a fade out. Let's press on that one. Can see the preview there,
the end of the video, it's going to fade to black. Again, we could adjust the time on that if we want
to go a little longer, let's make it 1
second, nothing else. Then that can fade
out from there. Now when you're going through
and you're playing with these and you're picking
the different effects, if there's something
that you don't want to have on there or you
want to turn this off, you just need to come up
here and select none, and that's going to remove
that animation from that clip. That's adding an in and
adding an out animation. What about a combo animation? Let's pick this clip here
because it's a short clip. Let's put our playback
head here over that clip so that we're actually again
looking at the same clip. Then let's come
over here to combo. Let's click on one of these
and see what it looks. Or even some related
images or graphics. Okay. Do you see
that movement there? That wasn't there
before. Let's hit none, so we're able to preview
it with nothing. Let's hit play on this one. Or even some related
images or graphics. Let's try another one
here, maybe pendulum two or even some related
images or graphics. You just add some
movement there for us. This is awesome having
this built in to keyframe this or to animate
this yourself manually, normally would be a lot of work. If we scroll down, you see we got lots of different
options in here, or even some related
images or graphics, or even some related
images or graphics. Or even some related
images or graphics. It's just a matter
of going through, finding the animation or the movement that
you like to look of, then again, you can
adjust the length of time here for that
animation to happen. Then again, to remove
this animation, you just want to make sure
you've got none selected. It's going to mean that
there's no animation happening at that time.
34. Desktop - Effects: Speed adjustments (speed up slow down): To make speed adjustments
to your video clips. You want to speed them up,
you want to slow them down. It's really easy to
do here in Cap cat. I'm going to go ahead
and import a clip here that would make
more sense to speed up or to slow down because in a video like the one that
we've been editing down here, it's not normally an effect or something that I
would usually do. Let's come over here to media. Let's go down here to library. I'm just going to
search here for ski. We can get shot
with some movement, maybe something
like this one here. I'm just going to
click and drag this down onto our timeline here, but let's just put
it towards the end. It's going to be
a temporary clip. Again, I just want to mention
that even though Cap card does give you access to some stock footage
like this, personally, it's not something that
I would be using or comfortable using
without knowing that I own the full correct copyright and license
agreements for that footage. Where we go for stock
footage is places like story blocks, places
like Artlist. But depending on
where you're going to be releasing your videos, this stock footage
could be okay. We've got a clip down
here in the timeline. Let's hit Play to
see what happens. Snowboarder comes
past the camera here, a couple little turns. Let's say that we want
to make some speed adjustments to this clip. We want to make sure that
that clip is selected, so we want to click on can
then come up here to speed. Now, there's two ways
you can do this. There is a simple way, and then there is a
more advanced way. The simple ways that we can
literally just come up here, grab this slider here
where it says times, we can drag it to the
left to slow it down. You can see that our speed instead of being one
time speed or real time, that we're actually
lowering that 0.9 0.8. 0.5 is half speed. If we just hit play on this now, it's now going half the speed, we could go even slower. Go 0.2. Now, depending on
how this footage was shot and the frame
rates and things, the slower you go, you
might start to bring in some weird motion
or jittery playback. But let's see how we go
here with this clip. You can see it's
definitely slowed it down and it is a little bit
jittery, but it's not too bad. Likewise, if we wanted
to speed the clip up, we could go above one times
or above real time speed, and it's going to
speed that up for us. Let's go maybe three speed here. Let's hit play. Pretty
straightforward. Another way that we can
control this isn't based off this times indicator. It's actually based off
the duration of the clips. You can see here that
as we make this faster, the clip actually
gets shorter here in the timeline or the
duration is less. We could also make
adjustments here if there is a set time that
we want to make this, we can actually
adjust that here. Let's say that we wanted this
clip to go for 3.5 seconds, it's going to then
essentially calculate for us the percentage number
here or the ratio. Before we move to the more
advanced curve setting here, which will give you much further granular control over this, there is another setting here
which is relatively new to Capcut which will help you smooth out slow motion footage. If we're slowing our
clip down again, let's go to 0.2. This is where we
had a little bit of jitter there in the motion. This new feature
is down the bottom here, smooth slow mow. If we select this, you can see that's processing
our footage here now, what it's essentially
doing is going to create extra frames or extra information to fill in those gaps to make
the motion fluid. Let's hit play on this now. You can see it is
already a lot smoother. It's not perfect, but
it is a lot smoother. Now, this is just with
the first setting here, the default setting,
frame blending. But what I found will get you much better results if you do want to use this is switching
it to optical flow. It does say that this will
have a longer processing time, but it is better quality. You can see switching to that, the processing time is
going to be much longer. But just so I can show
you what this looks like, let's turn off that effect. I'm going to trim down our clip here to add a split
in our timeline. And let's apply it to
a much shorter clip, because if it's a shorter clip, there's less processing
that needs to happen. Let's choose smooth slow mo
here for this small section, and we're going to choose
that optical flow. We can see that processing is happening much
faster. That's done. Let's take a look at how
that looks now to play. Even the motion in the
trees looks a lot better. Not as good as having
recorded this in slow motion, but that does look
so much better. That's the basic or the quick
way to adjust the speed. Now if we look at the
more professional way, that's using the
curves setting here. I'm just going to set our clips here back to one time speed, and let's reset our
clip here so it is back with no speed
adjustments made. Let's again come
up here to speed. But this time we're
going to pick on curve. Then in here, there's some
presets that we can use or we can create our own
customization in here too. We have to look at the
little images here that are showing us where the
line is in the middle, that's normal speed where it
goes above the middle then that's speeding it
up where it goes below the middle,
that's slowing it down. We can gauge already just
looking at these presets, what's going to happen if
we apply these presets. This one here, for
instance, hero time. It's going to start
out at normal speed. It's going to speed
up to a point. It's then going to drop
to full slow motion, and then it's going to
come back up to faster than normal speed and
then slow back down. Let's click on this
and that's going to apply it to our clip and let's
see what that looks like. We can see here what's
happening with this as well throughout our video.
Let's play that again. It's the fast bit, slowing down. This is the slowest point
and then it speeds back. All of these little points
here, these are adjustable, so we can make adjustments to this preset right here on here. Let's just say that
we actually wanted it faster at the beginning. Then we can grab this
start marker here. Let's drag it up. We're going
at a much faster speed at the start and then it slows
down before coming back up. We can customize
things up from here. Or for full customization, we can come over
here to customized. Now I'm going to go
none first so we don't have any speed
controls applied to this. We're going to pick
customized and you can see here we've got
a blank canvas. It's all set to
100% or one speed, so normal speed, and
then we can make adjustments in here by dragging these little
markers around. You see as you click and
drag through this area here, we're able to scrub
through our clip here to get more precise to where we want to start this speeding
up or slowing down. But then it's just a matter of adjusting these points here, or these keyframes
here to get the look that we're after to speed
things down or slow them up. Let's say that we want to
slow it down at this point. We can drag down both of these little markers here
to where we want them. Right now, we've got it
starting full speed, but it's starting to
slow down at that point, but then it's going
straight back also grab this next one here. Let's pull this
one down as well. Then let's make an adjustment here so that it's playing at full speed until it gets
to around this point. We can come over
here because there isn't a marker for us to move, we can hit the little
plus button here. That's going to add one for us. Let's now speed
this one back up. We're now playing
back at real time, full speed until this point, then it slows down. We're now playing in slow motion for this flat period here. And then maybe at
this point here, we'll want to bring it back up. We can move this one
here over as well, let's go ahead and play this now so you can see
what we've done. Full speed to here,
we slow down a bit. We're now playing at a slower
speed for all of this. Then we ramp back up to our full speed for the
remainder of the clip. In here as well, if you
are using slow motion, then you do have
the option here to enable that smooth
slow mo mode as well.
35. Desktop - Effects: Background removal: That makes it really
easy to help you remove the background
from your videos. You don't even need to be using a green screen or a blue screen, but I'm going to show you
how you do it in this video. Let's just say that
we want to remove me from the background here. We can come down here,
select the clip. We can then come over
here to cut out. We've then got two options here. The first one, Chroma key is if we are using
a green screen or a blue screen or
we want to remove a specific color. I'll
show you that next. But the other option here,
autocuto is where we're using Capcuts AI functionality
to automatically remove. It says here a human figure
from the background. Et's tick that box here now
for this specific clip. It's going through,
it's processing that for us, and when it's done, the background has been removed, and it's done a pretty damn
good job and really quickly. You can see now that there
is no background on here. So what we can do then is we
could add in a background. For this, I'm just going to
come over here to media. I'm going to come
down here to library. We're going to use
some stock footage that Capcut gives us access to. Let's come down here
to backgrounds. Let's scroll down and
see what we've got. There's some backgrounds here. Let's grab this one and let's drag this down
into our timeline. We'll just use this as our
background clip for now. Now because we've removed the background from
this clip here, so it's currently transparent, normally what we would
need to do is to put this clip down underneath it so that we're seeing through this
clip onto our background. Let's select these
two clips here. We can just draw a box around them or we can select on one. We can hold down Command or Control and click on the
other, they're both selected. Let's just move them one layer. We can then bring our background
in down underneath it. We can then stretch
our background out so that it covers our
entire clip here. Then what we can
do here is because our background doesn't
quite fit here, we can scale this up or stretch it up so that
our background now fits. We've used a still image here, but this same process
will work if you've got a video clip or a
moving background that you want to
put in here too. That's usually how
you would do it, but there is another
feature here inside of Capcut
which does actually make this a little bit easier as well and save you moving
your layers around. We can see now if we
scrub through this, we're seeing our B roll here at this point we're then
seeing me on camera, but I'm cut out and I've got this other background behind it. Now with this clip here now, we could scale this clip up
to make me bigger or smaller. Again we could come over here to position and size or we can grab these handles so
we can stretch this up, maybe move it down a bit,
maybe off to the side. This is where you could
bring up some text or something like this, too. But you can see how easy the background removal
process is for this. Now, because we've
moved our clip here off the primary footage layer and up onto a new layer
on top of that, there's one other setting
we now have access to as well to help
with this effect. So if we scrub back across here, you'll see that this footage here is behaving how
you would expect. It's totally covering up what's
happening underneath it. But if we click on this and we come over here to video
and we scroll down, you can see that we now
have this layer option. So if we switch this from
layer two to layer one, then you can see it's
actually allowing us to bring that effect through over the
top of this clip as well. This is something
that might be handy, it's not as intuitive or
straightforward as stacking your layers up how you normally would or how you would
think that they would be. But in this case, it's a great
easy way for us to bring this shot of me on top of
our B roll footage here. Also have it with a
separate background when that B roll is
not on screen as well. That's how easy it is to quickly remove the background
from your videos using CapcuT AI features without needing to use a green
screen or a blue screen. But what if you are using a green screen or a blue screen? I'm going to show you
how to do that now. For green screen, we're
going to need to bring in a clip has something green or blue on it so we can make that green
or blue transparent. Let's come back up here to our media areas come
down to library. We're again looking at
Cap cuts stock footage. Let's choose green screen, and there are a bunch
of clips in here we can use to show you
how this effect works. Essentially, what
we're doing here is we're going to remove the green element to
make it transparent. Maybe we'll start with
this one here first. You can see that it's
a video file that is peeling open this paper,
ripping hole on this paper. Let's drag this down
onto our timeline here on the layer above
our primary footage. If we just play
this through now, it's going to look
exactly the same. We're not seeing the
video file underneath it. Let's select this clip. Let's come up here
to cut out instead of using AutoCut this time
we're going to use Chroma key. We then need to pick the
color that we want to remove. That's why this will
work for both green and blue or really
any other color. Going to use this color picker.
We want to click on this. We then want to select the
color that we want to remove. We see we've got the
green here now selected, then we just need to
make adjustments to these two slides,
strength and shadow. As we increase this, you can see that it
removes the green. We want to increase this to the point where
the green is gone. Somewhere around
here, and we can also increase the shadow here to get a little
bit better result. But if we click
through this now in place your viewers are going
to click on something else. Then it's actually
remove that green for us and created a
transparent video. I'll give you one more example. Let's scroll down here
and find another clip. Maybe this one here
with Santa on it. Let's click and drag that
down onto our timeline. Let's put it to the end. Let's get rid of this
other clip here. We'll press Delete and let's move this one in
place of that one. At this point, we've got
Santa here on screen, but we're still seeing
all of the green. We're going to follow
the same process. We're going to select that
clip, come up here to cut out. Let's select Chroma key. Let's use our color
picker to pick the green. Let's
pick around here. We're going to increase the strength until
the green is gone. Now, you can see
here we've still got a bit of a green outline. You really want
to adjust both of these sliders until
that is gone, probably around here and you can see that we're now seeing
through to the background. From here, we can
then come back to basic because we've still
got this clip selected, and we could maybe
scale this down. We could pick it up and move
it off to the side here. We've now used that
green screen effect here to remove the background
on this clip too. Pretty simple.
36. Desktop - Effects: Stabilizing shaky video: Find when you're editing
your videos that you've got some shaky footage
that really doesn't look that good that
you need to stabilize. Then Cap card has a built in stabilization feature that actually works
really, really well. I've got this extra clip
on the end of our timeline here and I'm just
going to play through it to show you the
shake that's in there, and then I'll show you
how to take it out. You can apply this
effect to any shot that does have some shake in it. But if it's something crazy
where there's so much motion, then you're probably not
going to get great results. You are always better off
trying to fix it at the time of filming and try to shoot
stabilize footage then. But this effect could help save some footage if it
wasn't too bad to begin. Let's check this out a bit
of shake there at the start. It's just not a smooth video. It's jumping or jittering. That's the clip. All we need
to do is select on the clip. We then come up here
to our video tools. Just on this basic tab. If we scroll down,
then we've got the option here to stabilize. The first step is we
need to check this box. It's going to go through
and analyze our clip, which it does really,
really quickly, and it's going to apply
its recommended level of adjustment here to
stabilize this clip. Let's go ahead and
give this a play. Already, it's taken
that initial shake out and even the motion here, it's much smoother.
It's less jarring. So already at that level using its recommended
setting here, the default setting, it's
actually done such a good job. But if you needed to, if you
wanted to take things one step further and maybe
it removes some shake, but not all of it,
then you could try out here most stable
from the drop down. But you'll see what
happens straightaway. When we switch between
the recommended, it's a wider shot and
we go to most stable, it's actually zooming in
on your shot more because it's going to use that
extra information to help stabilize it. It does mean that the
more you process this, the more it is going to zoom
in or crop in on your shot. But let's go ahead and
give this a play now. It is a much tighter shot. It is probably a
little bit smoother. I'm not sure if that's
coming through for the screen recording
for you guys. It is smoother, but personally, I thought that the recommended
setting was better. Let's go back here
to recommended and let's just play that
one more time to show you. Yeah, I definitely
prefer this one. Then just for contrast, again, let's turn this off
back to the original, you can see this is wider again, this is the original footage. We've got that shake
and that jitter here that happens at the start. Then the overall panning motion, it's really not that good. By selecting this box here and using this
stabilized feature, that's how you can easily
stabilize your footage.
38. Desktop - Effects: Using Keyframes for greater control: Those of you that
want to really dial stuff in and have more
control over things like your effects over your transitions and
over your volume levels, that's when you
can use keyframes here inside of Capcut
to help you do that. I'm going to show you
how keyframes work. I'm going to be showing
you by manually adjusting volume levels throughout different sections
of an audio clip. But the principles behind keyframing and what I'm
going to show you here, you can apply to other
areas like your effects and transitions and other areas
too here inside of Cap. Come down the bottom here,
select on our music clip, and then up the top corner here, we can see all the things we can control in relation
to that clip. Obviously, that changes with the different clips and types
of clips that you click on. But coming back to our music, you can see that we can adjust our volume levels up here
across the entire clip. This slider adjustment,
it's applying to the entire clip down here. But if we wanted more granular
control over this and we wanted to increase the
volume in some parts, lower it in others,
that becomes very clunky to do if we're
not using keyframes. Let's say, for instance, that throughout this section
of the video here, we wanted our volume level for the music even lower
than it was before. Let's move our
playback head here to where we want the volume
to start dropping. We're going to come up here
and we're going to add in a keyframe at that point. A keyframe is
essentially a marker saving the settings that
you've made at that point. We're going to hit
on this button here and then down in
our timeline here, you can see that we've got a keyframe added at that point. But you'll see how this
works as we go through. Now, let's come across a
little bit further here in our project and let's come up here and add
in another keyframe. And no other adjustments
have been made yet. Right now, if we
played this through, it would be the
consistent volume level across that section. But because we've added a
keyframe here at this point, we can now make adjustments to the volume in this
case, at that point. If I lower the volume here now, you can see what's
happening in the timeline. Our volume level is
consistent from the start of the video right through until we've hit the first keyframe. Then we've said at
the next keyframe, the volume level should
be at this level, and that volume level then has adjusted between
those two keyframes. Let me zoom in on this and
make it a bit easier to. Our volume level at this
point is at -5.3 until we hit that keyframe and then between this keyframe
and this keyframe, the volume is lowering until it hits the point that we set. As we scrub through this now, you can see it's
dropping until we hit that keyframe where it's
negative 22.9 in this case. If we keep scrubbing through
here now, it stays at that. That's now the new normal at that point from that
keyframe onwards. Now, let's say that we
wanted the volume level at that point until we get to about here and
then we want it to start coming back up to
where it was before. We go ahead and add a
keyframe here in this case, it's almost like the
end point of where we want the volume to be
at this lower level. Let's come across a little bit further and say, at this point, we want it to be back where it was before or back at
a higher volume level. We'll add in another keyframe here and we will
increase the volume. Now, we could do it
again with this slider. We could also come
down here and we can adjust it from here too. Let's say that we wanted this
at minus six at this point. Then you can see from this point on that's now the
new volume level. If we were to play
through this now, the music level would be
louder at this point, I would then turn
down for all of this section and then
be turning back up until it hits this
keyframe and then it's at that new volume level for
the remainder of the video. We can go ahead and add in as
many keyframes as we want. We could be moving the volume
up in different sections, down in other sections. That's the level of control
that keyframes will. As I said earlier, this
doesn't just apply to music and to volume levels. This applies to most effects and controls that you
have here in Capcut. For instance, let's pick this title here where
it says related. If we just start looking
at the options up here they have the
keyframe next to them, these are things that we can
animate or change over time. We can change the
color of our text. We can change the
size and scale, we can change the
position, the rotation. Maybe we'll change
the position here. Let's come back to the
start of our clip here, this text layer, and
let's move our text here. Position, let's move it across
to the left a little bit. Maybe you could
start about here. Now, let's add a keyframe for position at that point because that's what
we're going to animate. We've got a keyframe here
that's saying, at that point, make the settings for position exactly as
we've set them here. Now let's come across a little
later on this same clip, maybe towards the
end of and let's make an adjustment and let's
make another keyframe. Let's adjust the
position of this so that the clip moves from one side
of that box to the other. We've set a position
for this keyframe, we've set a position
for this keyframe. Now if we play related
to your video content, we've now got that
text animating or transitioning between
those two values, between those two
keyframes that we've set. A setting that has a keyframe
option here on the side, this is something
that we can add some manual control
or adjustment over.
39. Desktop - Effects: Fixing colors (color correction & filters): Comes to color correcting, color grading or
applying different looks to our video footage here in Capcard as with everything else, there's a few different
ways that we can do this. I want to run through
those options now whether you're looking
for a simple fix or whether you're someone
that wants to dive into some more advanced features
and controls in here. We want to select the first clip here in our timeline and move our playback indicator
head here to a place where we can preview that and
it's much easier to apply everything to the first clip and then we can add it to the
other clips after that. With that first clip selected, there is a couple of different ways that
we can approach this. The first way is by adding
filters to your video. Think of these like
Instagram filters or preset looks that we can add to change the look
and feel of our videos. With that clip
selected, if we come up the top here to filters, then you can see that we
have a lot in here to choose from just by clicking
on no one's going to see it. You need to get
your content, it's going to preview your clip and show you what it looks
like with this filter applied. No one's going to see it. You need to get your
content no one's going to maybe we'll move the playback head here back
to the start of the clip. And let's try this. We could
have the world's best video, but if no one clicks, you
could have the world's best. You could have the world's,
that's not very good. You could have the world's
Okay, that's not bad. If we look at this as this
is with this effect applied, candy cane in this case, if we look at what it
looked like before, this is the original footage. Let's apply that again.
I could have the world. It's a big difference already. The idea here is that
you want to go through and maybe check out
some of these filters and see if there
is something that fits close to what it
is you're looking for. By all means, if
there's something that you find that you
like to look of, then your color grading here
is as simple as hitting the plus or dragging this
down onto your clip, and that effect is now applied. With this clip selected here, we can come over here to
video and under basics, we're now seeing that filter
that has been applied. We've got here candy cane. If we want to remove
it, we can press the trash can there and
that will take it off. But we can also adjust the
strength of this filter. If we want to dial it
back a little bit, then we can just click and drag and lower the strength
of the intensity of it. That to me is actually
looking pretty good. We want to quickly
preview before and after, then we can enable that
filter on or off here. That's the original and that's
where the filter applied. Now, if we want to dial
this in even further or we wanted to color grade or color correct without
applying a filter, then that's where we
want to jump over to this adjustment area here. Agama got a clip selected. We come over here
to adjustments and there's a bunch of
color tools in here. Some of these tools are actually really professional and stuff that you would find on pro
grade video editing software. I'm going to do first is come
back over here to video. I'm going to delete this
candy cane effect here. We're starting from scratch. This is our raw footage. I'm going to show you the
tools to look at first off for adjusting the colors
and making sure that everything is how
you want it to look. Again on our first clip. We'll come up here
to adjustments, and then this is broken
down into three areas, basic HSL and curves. HSL and curves, we are not going to be covering
off in this training. Those are more advanced tools. But by all means, if that's
something that you're into, then feel free to jump in
and have a play around. You can see the level of
control and adjustments you can make in here at a
really granular level. Let's go ahead and undo that. If we come back over here to basic and then we
start to scroll down, these are your primary color grading adjustments
that I'll be looking at. You can see as we scroll
down, you've got things like your color temperature,
the saturation, so the amount of
color in your shot, brightness, contrast,
shadow control. We can adjust the
sharpness in here as well. Where I'd recommend that you start with this is, first off, we want to make sure
that our exposure is set correctly so that our shot is as bright as it needs to be. The first adjustment
I'll be making here is with this
brightness slider. I'd be grabbing this
adjustment and I'd be increasing it if I needed
to make the shot brighter, I'd be decreasing it if
the shot was already too. If we want some more
granular adjustments here, then we can just use the
up and down arrows here. Maybe I'll take this
down a little bit. After I've got the
brightness set right, I want to make sure that I
have the white balance or the color temperature set
the way that I'd like it. Again, this is a creative thing. There is no right or wrong. Making adjustments
here can change the vibe or the feel
of your videos too. Color temperature
here is the next one. If we drag this slide
to left is going to make our shot cooler
or add more blue. If we go the other way, it's
going to add more yellow, orange, make our
shot feel warmer. Maybe we'll add just a little bit more warmth
here in this case. Now, if your shots looking a little green or a little pink, maybe because of the
lights that you've used in your scene or maybe because
if your camera settings, we can adjust that here. You can see if we want
to add more green, we can move this to the left. Likewise, with the pink, we can add it by
dragging to the right. In a lot of cases,
you might find that this setting is fine
without adjusting that. Now, from there, the
setting I adjust next is the contrast. So you can see if
we want to make our shot more contrasty, so darken the dark areas of the shot and bring
out some more color, then we want to
increase the contrast. But you see you don't want to
go too overboard with this. It's all about making these
minor adjustments here, maybe somewhere around here. After I've done the contrast, this is where I would look
at the saturation here, the amount of color
that's in our shot. If we want to amplify
or boost the colors, then we will increase
this here if we want to remove some colors and
even go in black and white. We could go the other
extreme here as well. Maybe I'll increase
these a little bit, maybe seven or eight and those are the main settings that I'm going to be playing. Obviously there's some
others in here as well if you'd like to tweak
things further, but normally, those
are the critical ones. For a quick preview
before and after, we can turn off this
adjustment here. That's going to unapply those settings or
changes we've made. That's currently
disabled to this is as it was in its original form, and this is with the
adjustments that we've made. Now, what I like here is that
there's two extra buttons. One of them here is applied to all and that will go
through and apply this look or these changes to the other clips in
our timeline here. That's this button here.
The other one will add it to our brand kit and
essentially save this as a preset us to use later or for us to manually apply
on a clip by clip basis. If I go here, add to brand kit, we can give this a name. Someone's going to call
it JB test adjustment, and you can see it's
going to add it into our cap cut space. To use this feature, you
will need to be signed in even with a free account,
which is what I have here. But this will save
this preset and these settings to your
account for you to use later. I'm going to choose. Now that's now saved to our brand kit now, we'll show you how
you can find and apply those very, very soon. But generally, what I
would do here is just hit Apply to all so that
these adjustments applied to the remaining clips here in the time you
have the ability to jump in on a clip by clip basis and make
further adjustments. If you've got some B roll
here that you want to make an adjustment to,
click on that clip, come over here to
adjustments and you can dial in settings for
that specific clip too. Now there's one other way
that we can actually apply these color adjustments
to our projects too. This is using adjustment layers. If we come up here to adjustment
and we select here on custom adjustment and we drag this down
into our timeline, this shows up exactly
the same as we could for an effect,
for a title, for essentially a
video clip as well and we can make adjustments
to this clip area. But any adjustments
or changes that we apply to this adjustment area, this clip here will
actually apply to any of the clips that
are underneath this. With this adjustment
layer here selected, just to show you how this
works, let's make it blue. So we click through our video, now everything under this now has that same
look applied to it. But if we go beyond that, then we're back to normal. This is a clip as well that
we could copy and paste. We could duplicate. So
maybe we will copy this. Let's click, let's choose copy. Let's come down the end of our project here and
let's right click and choose paste and let's just have it cover the end of
our project here. So that look or these
effects are applied just to this last section
of that it's about knowing the tools that you have access to in here
because sometimes it's going to make sense to apply things to a
clip by clip basis. Other times, it might
be much quicker for you to add these adjustments to an adjustment layer
and drag it out across the length
of the clip that you want that effect
associated with. Now, in terms of applying
those presets that we saved those brand
kits that we saved, this is how we do that too. We can come up here to
adjustments and then we've got presets in here and we've got our saved presets
in this area. Let's go ahead and remove these adjustment layers that
we added in this video. Let's say that this is the adjustment that
we want to apply, we can just drag that down. And it's already got our
settings from earlier when we created this preset
bought in onto this clip.
40. Desktop - Saving: Exporting videos: We've finished editing
down our video, it's time to save it out. It's a good idea to play
through your video first and make sure that everything
is how you want it. Then you want to come up
the top right hand corner here to where it says Export. We want to click
on that. In here, we can give our video a name. Thumbnail images was the content that we've got here
in this video. Maybe we'll put V one. This is version one of get to choose where we're going
to save our file out to. In this case, just the
desktop is going to be fine. Then from here, if we'd set
up our project correctly, then all of these settings
here should be good to go in that we shouldn't need to make any further
adjustments to them. Our project here was set to ten ADP and that's the file
that we're going to save out. Our footage was 30 frames per second and that's what
we're saving out here too. But we can customize
this stuff up here if we need to so if you wanted
to change the resolution, you can hit this
drop down and you can pick a different size here. For best results, ideally you're matching whatever footage
you shot in your camera, whatever your camera
settings were, should have matched
your editing project, your editing timeline, should match what you're
going to be exporting. That's a general rule. But obviously, if you
need something specific, a lower quality version, then you can pick that in
here. Leave this as ten ADP. The bit rate though, this is the quality of the video that
you're going to be saving. We've got options
in here for lower, recommended, higher
and customized. Now, usually
recommended or higher is where I would recommend
that you leave this on. But obviously, if you
do need something that is a specific file size, and you can customize this up
if we hit here customized, we can adjust the quality here. A lower number is a
smaller file size, but it's also a smaller file. I'm going to switch
this back here to high we can see down
the bottom here, it's giving us an estimated
file size for this as well. It's estimating that our
video here is going to be 176 megabytes at this setting. If we did switch
this to recommended, you can see it's
dropped a little bit. If we set it to lower, then it's much lower, but obviously it's lower
quality at that point. But this could be
useful if you are using a customized bit rate or quality setting and
you'd like to estimate how big that file is let's
leave this here at higher. We also have the ability here to change up the video codec. H264, again, is the default. That's where I'd imagine most people are going to
want to leave this. But if for whatever
reason, you want to switch over to an HEVC codec, a high efficiency video
codec, you can do that here, or if you want to export at the highest quality possible
here out of Capcut, then that's where you're likely going to be using
one of these PRs files if it's supported on
your device or computer. But generally, with these, the file sizes will
be much bigger. For me, I usually
leave this on h264. I leave the format at P four. Your frame rate should
already be set, but obviously if we
need to change that, we can change it
at this point too. But we also have
the ability here to not just export the video, if we wanted to save out an MP three as well or an audio file, then we can check
this box here to export audio and we can choose the type of
audio file we want. Now, this is in addition to, this isn't in place
you're still going to get the video file if you've
got this selected. But likewise, if you only
want to export an audio file, you could uncheck video here, check export audio and you
would only get an audio file. Case, we just want the video, I'm going to uncheck this. There is also an
option here to run a copyright check if
you are using some of Capcuts stock footage or stock music or sound
effects in your edit, then it's probably a good idea to run this copyright check. But it does say here,
it's only going to flag potential issues if you're
going to be posting on Capcut. From there, though, we just
need to hit Export down the bottom and that's
going to export here. That's going to save out
a video. I was instant. It is super quick for
exporting videos. But it will then prompt
you, do you want to share this video
directly from Cap card here to places
like TikTok or to YouTube? Now, while you can do
that from the app here, what I'd recommend that
you're doing instead is just going and finding that video that you just saved out, playing it back, making sure
that it is how you want it first before you go ahead and upload it
to those platforms. What I would recommend in
this place is that we're just hitting cancel out
of this last step of sharing once we've verified
that it's how we want it and that we're happy I just wanted to jump in
here really quick to say, if you're finding this
training valuable, can you please take a moment to leave us a review on here. It makes a world of
difference to help people find this on Skill Share. So if you're liking this so far, I'd really appreciate it. Also, feel free to share any of your top takeaways
along the way.
41. Desktop - Repurposing: Reformatting videos for different platforms: This video, I'm going
to show you how easy it is here inside of Capcut to reformat or repurpose your content for
other platforms. We've got our 16 by nine
or wide screen video here that we've
created for YouTube. I'm going to show you
how we can repurpose this video for something like TikTok for Instagram reels
or for YouTube shorts. The first thing I'd
say that you want to make sure you've got is a backup of your original project here so that any
changes we make, we could come back to
this one if we needed to. Let's come up to the top
here to where it says Capcut and we want to
choose back to homepage. So we want to go back
to that initial screen opens up when you open up. What we want to do is
duplicate that project so that we have a backup of it.
This is our project here. I'm going to hit the
three little dots and I'm going to
choose duplicate. This is it here now,
we can see that it's got the word copy
at the end of it. Now we can rename this. We can hit the three little dots again. Let's choose rename and let's
just call this portrait. We'll end up with a
widescreen version of it, which was the original, and we'll create a portrait
version of this. Now let's go ahead and open
up the new version and let's quickly verify that it does say the right project
name at the top here. But then in terms of actually changing the format of this, we want to come down
here where it says here, for me, cast now for you, it could say original, it could say 16 by nine. It could say any of
these formats here. But you want to click
here in this area because this is where we
can change up our format. I'm going to switch it
here from customized, which was 16 by nine, and I'm going to now choose a portrait resolution
here, nine by 16. We can see that that's changed our project here for us and it's automatically scaled our footage here so that it fits
within that frame. That's the easiest way to do it. You can also come over
here to modify and you can change the aspect ratio
here, again, 169-916. It's essentially the
exact same setting there. But what you'll have
more control over in here is the resolution, so the quality of that. The default here is adapted and that's where I'd
recommend that you leave it. But if you did need to dial up the quality or change to
a specific resolution, then that's where you
can hit customized and you can type in the
resolution that you need. I'm going to leave
this back here as adapted and I'm going
to close out of this. Once that's done,
essentially what we're going to do next is go through and resize or reframe everything so that it looks good
on this new format. Mobile version of Capcut, there is an auto
reframe feature now, so we'll automatically
adjust this for you and scale every clip up and make
it look good automatically. At the time of filming
this, that feature is not available on desktop yet, but hopefully it
will be out soon. From here, we're now going to go through and scale
everything up and position our clips so that it looks good in this new format. Because if we click through
a few of them here, you'll see that
our formatting and everything is now
not where we want. I'm going to go ahead
and I'm going to select all of our
primary footage here, and then we can come up here to scale and we can scale this up. We want to make sure that
it fits the entire frame. We don't want any black
bars on the top or the bottom, just around there, and then we can adjust the
X and Y position here if we need to or we can click and
drag to reposition the clips. This is now applied that to all of our clips
here that we selected. But then it's a good idea
to go through each clip here quickly and just see if you need to make any
minor adjustments. This first clip here, I'm
a little bit off center. I'm going to select on this clip and I'm
just going to click and drag across a little
bit so it's how I want it. Let's take a look
at the next clip. This one's actually lower. Maybe we zoomed in even
further on this one. Let's position this up here
and let's zoom in further on this one so that it breaks up our shot from the previous clip. Help you with this if you
need to make it go through, make adjustments to your
primary footage here. Maybe this one here will move across a little bit as well, and this last one is good. Next, we're going to do the
B roll or overlay footage, exactly the same. Let's
select all of that. Let's move this playback
head to where we can see it and let's
scale this up as well. Then I'll go through
on a clip by clip basis and
move stuff around. This one here for some
reason, is much lower. Let's pick this up here
and let's play that clip. You need to get your
content clicked on, and that's when your thumbnail
strategy is so important. This one here, we want to show
an actual thumbnail image. Let's make this a
bit bigger then, maybe something like that. Let's take a look at
our next clip here, it's scrolling down, but it's chopped off at the
top. Let's select this. Let's make the
adjustment to that. Maybe we'll show the first
line of thumbnails here. I are grabbing
people's attention. These same for the next one. Let's click on this
and let's move it to what we want to
show here on screen. Image also needs to be related
to your video content. Best this one here we're
going to move across. Once your B roll is done,
then we'll move through and adjust the text and the
stickers after that. With all of our text here, maybe we want to make
all of it bigger. Again, we could select
all of our text here and let's scale
it all up in one go. Something like this
looks okay for that one. Let's check how it
looks for the next one. This one's probably too big. Let's make thumbnail strategy
a little bit smaller. Let's take a look
at the next one, grabbing people's attention
and look good small. Let's select all three of these and let's move
them all over a little bit and maybe make
these ones a little bit smaller as well, maybe
something like this. Then obviously, we adjust
our stickers as well. Let's scale this one up. No one's going to see it. You need to get
your. Let's select all of these to do
it all in one go. Let's point to this
thumbnail image and maybe we'll make the finger
pointing even bigger. Let's play this now. You need to get your content clicked on, and that's when
your so obviously we go through and we make the
rest of those adjustments. Now, if you want to add captions
to your videos as well, Cap cut makes that super easy because for this
type of content, you'd normally have
captions or text on screen. Let's come up here to
text and then down here, we've got here auto captions. Let's click on that.
We're going to select our language here.
Let's choose Create. It's going to go through analyze what's been said in the video, and it's going to automatically
create captions for us. If we scroll through this now, you can see that we have
those captions on screen. Obviously they're going to
need some customization here so that we can see them. Maybe they need to
be a lot bigger. There'll be some
areas of our video like this one here
where we don't need to have the captions
on screen because we've added our own
titles at this point. Let's just pick an area here
in the middle where we can see some of our titles and
let's select one of them, and then we can
start to customize this up because whatever changes we make here to one of
these titles or captions, it's going to apply to all of so let's make
the font bigger, maybe something like this. Maybe we will adjust the
position a little higher. We've got our color here
that we can adjust our font. We can change the styles
of them here as well. Maybe we'll add in a background. Let's just take a quick
look at this now. We've now got text that's
easy to read across the entire video and
we might need to reposition some things that are going to be covered
up by that text. But the idea here
is that we've got the bulk of this text
here looking good. To small, definitely needs
to be up higher now. So we'll select those
and let's just move it up higher so that
it's shown on screen. Without our captions
covering it up. At the start here, where we've
already got our own text, maybe we will select
this first one, press delete to
remove the first one, potentially a second one here as well. Let's remove that one. Our video is now going
to start like this. I have the world's best video, but if no one clicks on it,
no one's going to see it. You need to get your
content clicked on. All right, so this is
looking pretty good. Now, you can also add animations to the
text here as well. Let's just pick again,
one of our titles here. We can come up here to our
settings and controls, and in here, we've got some
templates that you can use. Let's click on this one here. Now you'll see that it's
actually highlighting green or animating the text so that
your viewers can follow along with what's
actually been said at that time. There's some other looks and
effects up here as well. These are some
bubble effects if we actually come over here
to effects themselves. Again, we're able
to customize this up in a great level of detail. To undo these last few
changes that we made here. If we come up here to animation, then this is how
we can choose how this text is animated
onto the screen. Instead of just appearing, we could say have it fly
on screen like this one. I want to make
children. Or slide up. I want to make
children. Or pop up. I want to make children
make sure that's how easy it is to
quickly reformat and repurpose your content for different platforms and
for different formats.
42. CapCut App: Mobile tools (and how to use this section!): The area that I've
seen changed the most over time with Capcart is the main tools area on the homepage when you
first open up the app. At the top of that
screen, they're progressively rolling
out new tools, new features, new
AI functionality to help you take your video
creation to the next level. And yes, this is something
that is changing fast. So at the time of
shooting this video, here's what we currently
have access to. And yes, you'll likely see
this change over time. The first one is
script to video. Meaning that we can either
type in our own script here or we can use
their AI writer, as they call it to
write a script for us. Now, when we've got
a script in there, whether it's one that we've
written or whether it's one that AI has
generated for us, we can then use that to
help us create our video. We can either use it with
Capcuts built in teleprompter, so it's going to help us shoot our videos because
we're going to have our text or our script written there on
our screen or we can actually process
that script in Cabcut and it'll go ahead and it will create a video for us. So let's just say, for instance, we choose here tech info, and the example I've got here is top reasons to use Capcut. Create a video that
is around 1 minute. Let's hit Generate script
down the bottom here, it's going to go ahead and
create us a video script. Here we go. That's done,
really, really quickly. And there's three versions of this script that we
could choose from. We can obviously modify it, make changes and things too. Let's hit Generate video. And then we'll go the
choice of Smart Generation, which is where it's going to
use Capcuts Media Library to add stock photos and videos and things into an edit for us. Or we can actually go
through and we can locate files on our device. I'm going to choose
Smart generation here says, This may
take some time. In my experience, this has been crazy fast. So that's done. Let's just hit Play and
see what it's made. Welcome to our Cap
Cut discussion. Capcut is a powerful and user
friendly video editing app that lets you create
stunning videos with Ease. Today, we're going to highlight the top. So it's
written the script. It's created a voiceover
for us from that script. It's put the text on screen. It's gone through and
found some stock photos from Cap Card's library. I mean, hey, it's created a
faceless video for us here. So we can make basic
changes to it here on this screen or we can come
up the top to edit more, and that's going to transfer
this project here over to the main Capcut interface
where we can edit it further. I'm going to hit the
cross at the top left to get back out of this. So
that's script to video. That one's pretty is also
now a built in photo editor. There's also an AI
image generator, this text to image in here. Let's just tap on this one. And the example here is a pink car poster in the
style of minimalism, side view of the
car, filmic texture, low contrast film INS style. And you can see the images
here that is generated. Got another example here down the bottom macro photography, photo realistic no People. Let's just hit Generate on this and see what comes
up from this prompt. And obviously, we can
type in our own prompt here to generate images
that we're looking for. And this is what's come back, and you saw
that in real time. Like, this is pretty quick. It's back out of
this now, so there's an image generator
in here as well. There's also AutoCut. So think of this template
based video editing if we press on AutoCut now, is going to prompt us to select a few clips and things
from our device, and then it's going to
automatically edit those for us. Now, personally, I stay away from these templates and things, and the fact that you're here on this training means
that you're at a more advanced
level than most of the people that are probably
using these templates. But going back here,
the last one here I am a big fan of the
camera app here, built in to Capcut
in a lot of cases, it's going to give
you more controls, more features and things than the built in camera
app on your device. But it can also
help you streamline your video creation process because it's got things like
a built in teleprompter. But also because it's directly the same app that
you're going to be editing your
videos in as well. So you can shoot
and edit really, really fast here without needing to go through multiple apps. So straightaway down the bottom, you can see that
we get the choice of multiple clips or one shot. So one shot would be more like a traditional camera where
we can just hit record, and it's going to record
for as long as we'd like. Multiple clips is more
like you would have on Instagram or on TikTok, where you can create
your videos in chunks. Up the top right,
though, this is where we can access your Teleprompter. You can see we've
got the text here on screen that we could
read out when we're recording so we can
see what our notes are to help us record
our videos quicker. We can pick this up.
We can move it around. We can adjust font size, all of that stuff
in here as well. And obviously, there's
direct access here, too to that AI script generator. So if you need help
writing your script, then all of this
here ties together. We can press the X to
close out of that because speed control there is filters and looks and things that
we can apply on here, too. I'd recommend that you adding those afterwards
in your editing, but you've got the ability
to add them on here, too. And we've also got some
control over the quality here. So you can see that we
can go down to 576p. Now we've got 1080 P and we've
got 720 P in here as well. So I do think that's
a cool addition, especially if you
just need a couple of quick pickup shots. You're actually editing
down your videos, if you forgot to
say something or you need a quick
grab of something, then having that as a built
in function is pretty cool, especially with that
teleprompter built in. So again, these apps and tools and things will be
changing constantly. And I think Capcut uses
this as almost like a testing ground for
new features and things before they bring
them into the app, into the actual editing place. So I think it's cool
that we can jump in, we can test these things out. And so far, there's
quite a few things that have made it from here and are now core functionality
built into CapcuD itself.
43. CapCut Cloud: Working with teams and sharing projects: Whether you're looking to work
with remote video editors, remote teams to help you
make videos or maybe you're looking to transfer your projects between
different devices, this is where CAPCATs cloud based workflow can
really help out. Now, this is something
that they are actively building and is still
relatively new right now. But even in its current state, it works really well.
So let's take a look. This will work on both
mobile and desktop, and you will need to
go ahead and create a free cap cut account so that you've got access
to this functionality. So we can see straight
away that I'm signed in. If you're not seeing this, then there'll be a sign in button up here where you can go ahead
and create a free account. But then what we're
seeing here now is not just our projects area, we're also seeing
this spaces area. Space is really
where we can access this cloud based workflow,
this cloud storage. So we can go ahead
and create one here by pressing create or join. So we can create a space.
We can give it a name. So Temp space. In this case, let's choose Create
and invite members. We're then given a unique
link here that we can send out to team if we want them to come and join this space
and be able to access our files and presets and everything that we
put in this space. And then we can see that
space here over on the left. This then gives us the ability here where we can upload media, so any of our files or assets or anything that we
want to use in videos, but also we can upload
our projects as well. And we also have
the ability here to turn on automatically upload our projects
here as a backup even. So even if you're
not looking for a collaborative workflow, you can have your projects
automatically back up here, meaning that you can access them on different
devices as well. So you can start and
edit on your phone, finish it on your
desktop, and vice versa. Now, this free account that
we've got access to here, it does give you 1 gigabyte
of storage right now. So to increase that
amount of storage, that's where you need
to upgrade or jump on the pro plan t. But I've got another folder here that's already set up and working. And in here, I've had a few
different test projects that I've transferred
between different devices. I've transferred
between Mac and PC. I've transferred
between iPhone and Android and also from
phone to desktop two. And we can quickly see here that this project here is
already on this computer. These other three here aren't on this computer.
They're up in the Cloud. They're in this space here, and we can just hit the
download button here for them to download to the computer so that
we can open them up, make changes, and then send projects back to the
Cloud when we're done. The other thing
that's worth noting, if we come back to
our home area here, we can transfer our
existing projects up to the Cloud as well, to our space for collaboration, for backup for transferring
to different devices. All we need to do is press
the three little dots here, and we choose upload, and that's going to
go ahead and upload that project for
us to CAPCATsClo. Then on any of our devices where we're logged in
to this account or we're on a different
account that has access to a shared space here, then we can see, we can
view, we can download, we can open, we can edit
those projects from there. The last point that I
think is worth noting, especially if you
are going to have a collaborative
workflow is that when you open up a project
from the Cloud, it's actually downloading a
temporary version of that, or a unique version of
whatever changes you make, you can choose whether
you want to push those back to the cloud and
overwrite the original. You could push your
project back with your changes as a
separate project, so not to overwrite
the original as well. But it's not true
collaboration in the sense of multiple people working on the same project
at the same time. It's collaborative in a
sense that it's easy to transfer these projects
between different systems, but it's still
limited to one person using a project at a time.
44. Mobile App & Desktop: Using AI avatars & voices: Looking to add in AI voiceovers into your projects or
even an AI avatar, an AI character to
read out your scripts, Capcut makes that so easy, that's what we're looking
at in this video. Now, this process will work
on both mobile and desktop. I'm showing you on desktop. So we've got a new project
here that's been created. We just want to come up
the top here to text, and then we're going
to grab one of these default text boxes here and just drag it down
into our timeline. Whatever we type into this
box here is what the AI is going to use to generate a
voiceover or a character. I'm going to go ahead and
just paste in some text. It's a small piece of a
much longer video script. And we can see that
with that in here, we don't need to worry
about formatting or how this text looked. We can actually hide the
text here if we'd like to. We don't need to see it, but I'm going to leave
it here for now. We then want to come over
here to text to speech. And in here, there are so many different voices
that we can use, and when we click on them,
it's going to give us a preview of that voice. When we were first creating
primal Video accelerator, Mike and IrifTs kind of
sounds like the TikTok voice. Let's keep going Good guy. When we were first creating
primal Video accelerator? Let's keep going down. Maybe we would choose
confident male. When we were first creating
primal Video Accelerator, Mike and I reflected on the most valuable courses and programs that
we've been involved. Sounds like an
Australian accent. Energetic male. When we were first creating
primal video accelerator, Mike and I reflected on the most valuable courses and
programs. Energetic female. When we were first creating primal video accelerator,
Mike and I reflect. How about narrative female? When we were first creating
Primal Video accelerator, Mike and I reflected on the most valuable
courses and programs. So you get the idea. There's
some amazing voices in here. Now, there are some that are, I guess, a bit more quirky. This one here is
actually called quirky. There's also some that
are singing, as well. So we got, like, a kid vocalist. When we were fortreting
Prime movie. Okay. Uh I don't need to
say any more on that one. Did you get the idea? Now,
when we want to apply this, let's go back to confident mail. We then just want
to hit this start button down here and that's going to go ahead
and that's going to process our script here, and it's going to generate that into an audio file for us. So we can now delete
this if we needed to hide it because
it's no longer needed. We've then got this audio
file here that we can then edit and add extra footage and B roll and everything, too. So I'll just play this quickly. We were first creating
primal video accelerator. Mike and I reflected on the most valuable course.
So pretty powerful. Now we can take this
one step further. This is generating audio, so just the voice. But they now have
included in cap cut AI avatar or
character as well. So let's go ahead
and delete this. Let's come back up
here to our text. Let's select on that. Again, we can type in whatever
text we want here. But instead of coming
to text or speech, let's go to AI characters. And then if we
scroll through here, there's so many different
AI avatars or characters that we can pick
here to read out our script and be the
host of our video. I'm going to pick a couple
of random ones here. Hey, good to see you. Hey. Good to see you. Even with say, this
character here, there's a few different looks or outfits or poses
from this person. Hey, good to see you. Hey. Good to see you. So this way, I guess,
if you're creating multiple videos with one
of these characters, they don't all need to
look exactly the same. We've got a younger
guy up here as well, hey, good to see you. Click this one. Hey,
good to see you. Okay. Walking alone. Hey, good to see you. I like that the hands and
everything are moving as well. Okay, maybe we'll
go with this guy. Yeah. Good to see you. So once we've picked out our
person here, we just hit Ad. That's going to go ahead.
It's going to generate the speech first off
for us in that voice. And then it's going
to go through, and it's applying or animating
that character for us. So we can see that's
the second level here that's happening.
Okay, that's done. I'm going to go ahead and
just hide this top layer. Just pressed a little
eyeball here to hide that track so we're
not seeing the text. And we've got here our
video, our character. Let's give this quick play. When we were first creating
primal Video Accelerator, Mike and I reflected on the most valuable
courses and program. Pretty damn amazing. Okay, now, this is as well, this
is transparent video, so we can scale this up. We could move it around
if we needed to. We could even go
ahead and add in a background for this, as well. So we can add this on top of our existing video or we can add in a
background below it. I'm just going to come up here
to media down to library. Let's just grab a clip from Capcuts Media Library
here, scroll down. Maybe we will search for a city. And let's see what this one looks like. Okay,
this could work. So we'll drag this one here
down into our timeline. We're going to drag it down
below our primary layer. And we can now see that
we've got our character here on top of our background. We were first creating
primal video accelerator, Mike and I reflected on maybe the walking doesn't
work for this one, so we could go back
and we could generate a character without the walking, but you get the idea that we now have this character
that's presenting our content for us
and we have a lot of creative control over
what we can do with this. We could scale it
down. I could be a much smaller
version down here. There is so much we
can do with this. Now, this is something that is evolving fast and it's already changed so much in the few weeks leading up to
me shooting this training. So yeah, I'm pumped to
see where they take it.
45. AI Transcription Based Editing: So it's a cool new
feature in Cap cart, which is AI based text editing. So we've got a clip in
the timeline here now. And what we're going
to do is run through, and we're going
to transcribe it. So we're going to get the AI to listen to what's being
said to write it all out, and then we can edit from text. Now, this is something
that they originally rolled out as free, but it's now just moved
as a pro feature, but I'm going to show
you how it works. So we want to select here
with our clip selected this little button here,
remove filler words. Get this window here pop up. So it's already
gone through. It's transcribed, is that quick. And it's suggesting some edits
or some cuts here for us. So you can see
these areas here if you're just looking at
the audio waveform. So the times that I'm speaking, it's got these empty spaces here that it's pulled
out that we can remove. So we can see here that there's
a pause for 2.6 seconds. There's another pause
here, another pause here. And if we select on these, we can see where
they actually are. Over on the side
here, we can also see everything that
has been said. So we can see at the
start, I said, Alright, we are recording. We
can get rid of this. Let's just check that
box here to remove it. Let's check the microphone,
one, two, one, two. Let's get rid of all of this.
Even the testing one, too, all of this sort of filler
stuff at the start, we can just select
this here to remove. Obviously, we can edit
the normal way as well. But this process here
can remove pauses. Anything that's been repeated. So if I'm changing what I've said or I'm doing another
take or another attempt, it's going to do a good job
of detecting those here. Also any filler words like Um, so it can detect and
remove those as well. So if you come over
here to repeats, these are all the areas here it thinks that I have repeated, and you can see
that it's already suggesting that we remove those. Now, the beauty of this
is we could just use it to remove the pauses. So if we just wanted
the pauses here, so any of the dead space here, then we could just select all of the and go ahead and delete, and it's going to
do that for us. So we don't have to use
all of these three things. But what I do think
is really powerful is the way that I
shoot my videos. I try to make the last take, the last attempt when I'm saying something the best one, the
one that I want to use. So this repeats will detect
that in a lot of cases and remove the first few
attempts and leave the last one. And likewise, with filler words, things like Um so I can
remove those here, too. So it's a matter of
selecting here what you would like, pressing delete. And we can see it's
gone through and remove all of those
sections here and cut our primary video footage down here automatically for us. This can save you a ton of time. On mobile, you can
do this as well, you just want to
select your clip, and then come down the
bottom here to where it says transcript based editing. If we press on that,
is going to go through and transcribe
our text for us? And we have a very similar
interface once that's done. So we can see here
that there was a 1.1 second pause
here at the start. We can just tap on it.
We can press Delete. And that piece has already
been edited out for us. So we can actually do
more in the mobile app right now without
needing the Pro account. And we literally just go
through our transcript here, select the text
that we don't want, which is obviously corresponding to what's happening
in the video. But when we delete
the text here, it's actually deleting that
section of the video as well. Now, if you want to access
the automatic removal, you can see we've got here
remove filler words Pro. If we press on that, that's
going to go through. It's going to
analyze our clip to the sections that it
thinks we should remove, and then we have the option to delete that down the bottom. If we back out of this
now by hitting that tick, you can see that
we have a cut in our timeline here where
we remove that section.
46. Wrapping Up: Wrapping up this
cap cut training, a couple of quick things. If you found this
training valuable, we would really
appreciate you taking the 30 seconds to leave
us a quick review. It can make a huge difference on helping others find
this training, too. You can also share any of your top takeaways
and things that you've learned to help others going through
this training as well. There's also an area,
if you would like to, where you can share any
projects that you've made off the back of the
training for others to see, as well, totally your call. And if you want to see
other master classes and courses that we have
here on Skillshare, you can find them all
listed under our profile. Thank you very much, and I'll
see you in the next one.
 Justin Brown, Primal Video