Transcripts
1. CapCut Video Editing Bootcamp: CapCut from Basic to Advanced Editing Techniques: If you want to quickly and easily edit your
high quality videos, you can now use CAPCOT. It's free, user friendly,
and easy to learn. You will learn to
edit quickly, easily, and efficiently while enjoying
the creative process. Hi, I, a season video
editor with years of experience in transforming row footage into
captivating content. I've designed this course to be your ultimate guide through every step of the video
editing process in CAP Cut. You will start by understanding the concept of the interface, exploring controls
and shortcuts. Then we'll move on to
importing your footage, working in the timeline,
adding transitions, in and out animations,
perfecting your colors, and applying stunning filters
and dramatic effects. We will work with texts and captions to give your videos
a professional touch. We'll focus on audio from
basic enhancement to voice changers and
vocal isolation to ensure your videos sound
as good as they look. Finally, I will show
you how to export and share your masterpiece
with the whole world. I provided you with
video clips that you can do so you can have
hands on experience, follow along, and
practice as you learn. Then goal is for you to acquire all the practical
skills to create videos that not only look
and sound amazing but also attract
likes and followers. So enroll now, and
join me to unlock your full video
editing potential with CPCts. Back.
2. Getting Started with Capcut: Download, Install, and Sign In: H i there. I will show
you how to download, install, and sign in
to CPCAT desktop. We are going to use
the desktop version of CAPCd for the first
part of the course. If you have never signed
in to CPCAT before, you didn't use it online, then by writing cct com, you will come to this page. If you have ever used it before and signed
in or anything, then you will come
to the edit page. This is the online
editing page of CCAT. To be able to download, what you should do is just
go to sign out from here. And come back to cp cd.com. You can download
for Windows or Mac, depending on your
operating system. And if you click on download, the first thing it does is
to download an installer, and you can go to your
download and just open it. The downloader, of course, for windows is a bit
different, but it's the same, you have the downloader,
you double click on it, and it will start downloading. Now, the download might take some time because it's
around 1 gigabyte, depending on your
Internet connection. The installer has completed, and actually PCT will open. Now, I already have
a version on my PC, so obviously, it picked all
what I've been working on. To sign in, you come over here. I'm going to sign out to show
you. Now I'm signed out. I can sign in again, and it will ask whatever
you want to sign in with. There is no e mail or password. You can sign in with
TikTok account. If you have any or Facebook, I will sign in with Google. From here, I will
choose an account, and I will click and Continue. The sign in has been successful. I can close now the browser, and I'm ready to work with my signed in account. Why
you need to sign in? When you sign in, you will get some other options that
you can use within CAPCAT. This is the home
screen of CAPCAT. Remember that. We will continue in the next
video with the interface.
3. Exploring the Capcut Interface: A Comprehensive Beginners Guide: Hi there. In this video, we are going to have a
look and I will explain to you how to work with
the CPCAT interface. Within the home, you have a new project and you have
auto reframe and create image. I'm sure they're going
to put some more. I will go for new
project for now, and this is actually the
interface of CP cut. It's very easy to use. You have four parts only. The left one, this
is about adding. The middle one, this is the player, it's
about previewing. The right one, this
is contextual. It means it will change, and it's all about
adjusting and enhancing. Down here, you
have the timeline. This is where you're going to
stack your videos one after the other to have a
complete video later on. On the left side where
you have the ad, you notice you can add media, you can add audio,
you can add text, stickers, effects, transitions,
filters, and adjustment. But better yet, when
you select the media, for example, you
have other options on the left column here. For example, if you
select library, this is a library of
videos where you have many options for all the videos you can just use if you want to. That is beside your own videos. For example, if you
come to scenery, you will notice you
have so many videos, infinite number of
videos that you can use in your projects. If you come to Audio, you will notice that you have
more options here, for example, the music, you can go to Vg, tail, beats, whatever you like. Text, the same, you have
more options on the left. In the middle here,
this is the preview, like we said, This is media, and I'm in library, some videos, I want to use, for example, I can
click on them. It's downloading now, and
I can preview the video. If I want to use the
video in my timeline, all I have to do is to
click on the plus here, and it will add it
wherever the playhead, this is the playhead
is as simple as this. The left side is about adding. The right side now, it depends
on what you have selected. So if I select nothing, this is the project now. I have information
about the project. If I click on a video
in the timeline, now I have certain adjustment and enhancement that I
can do to the video, such as the video,
the basic here, the speed, the animation,
and the adjustment. If you select video, you have more tabs here that you can use. But the concept is
about enhancing or modifying changing for
whatever is selected. If I go to audio here, and I go to music, this is the music
here, and I say, I need a pop music. I want to listen to this one. If I want to add it
to the timeline, I just click Plus, and it'll add it
on the playhead. This is the Playhead here. You can click and drag
and drop it here. It's important for us is
when you select the audio, you will notice that the
right side here has changed, is relevant only to the audio. So you have the basic and you have many options
that you can change. You have the voice changers,
you have the speed. Now, if you take,
for example, text, if I add just the default text, just like this, I'll click
and drag and drop it here. Now I have a text layer. You will notice now I have text, I have tracking, I
have text to speech. Each one of them also has
more options down there. It's very well organized. You know very well
whatever you select, you can change and modify
on the right side. If I select anything
from this side, this is not going
to appear here. You cannot adjust or modify
anything in the left side. You have to put it
in the timeline, and then select it
in the timeline, and this is a video, you can
change whatever you like. The concept is very easy. One window for adding or
one panel for adding, one for previewing
in the middle, one for enhancement
and adjustment, and the timeline where
you are going to assemble your video as simple as
this. Thank you very much. You notice this is very easy, and I will see you
in the next video.
4. Mastering CapCut Shortcuts: Customize Your Workflow Efficiently: Hi there. In this video, we are going to deal a bit with the shortcuts for those of
you who love shortcuts. Now, in CAPCuT, you have the shortcut for the
shortcut just over here. You click on it and it opens a documentation about
all the shortcuts. You have timeline
shortcuts, player, basic and others such
as sptions, and so on. Within any tab, you can
change any shortcut you want. For example, I will
select the grouping here, I want to change it from command G to G simple
G. If there is a G, it will have given me an alert. For example, let's go for, and you notice here
shortcut conflict. I'm going to cancel,
it goes back to G. Over here, I want to change
it for example to shift G. So you can change any shortcut
according to what you want. I already said that. There
is something even better. You notice here you have selection mode is
A, split mode is B. This is like DaVinci resolve, not all of them,
but some of them. But if you come over to shortcut one and you
select shortcut two, you will notice it's V and
C. This is like Premier Pro. I'm not saying all the
shortcuts are premier pro, but it's like Premier Pro. You can clearly see select
mode is V, premier. Split mode is C, also premier. Now, you can change
any shortcut you want, here we have changed
it, and you can save. Now I'm working on shortcut one, but I made some changes
with the group and group. If I want to return to
shortcut one default, I just restore default, and here you have control G and control shift G. By the way, the scroll here means
the scroll mouse. If you are in the
mac, it's going to go up and down left and right. If you are on windows, of course, you're not
going to see this, you're going to see command and shift and control for
the windows here, not as it is in the mac. This is about shortcut. Come over. Check the
shortcuts that you like. Within the course, I might or
might not use the shortcuts depending on what I'm showing you and what
I'm demonstrating. I'm going to cancel here, and
we go on to the next video.
5. Navigating the Capcut Timeline: Adding Clips and Managing Views: Let's add some clips to
the timeline on the left and right and zoom in and
zoom out and zoom to fit. Now, if I take the playhead, for example, to bring it
to the left of this clip. Because the playhead is on the left of this clip
towards the end point. If I add a clip, it will come on the left of the clip, where
the playhead was. If now I add another clip, notice how it's going to add to the left of this
clip. Here you are. If I come over to the end
here towards the right, and add another clip, it will add to the
right of this clip. If I add one more clip, notice it's going to add it
to the right of the clip where the playhead is and not
at the end of the timeline. This is how to add clips on the left or right
of a certain clip. Now my timeline has
become very long. I can scroll through
using my mouse. I'm using a M here. I'm
going left or right. Also, I can select the
playhead, click on it, and click and drag, and I can preview my
timeline somehow, but this is not convenient. I can also zoom
in using the Zoom out over here and the
zoom in over here. Zoom out will zoom
out until it's very small and Zoom in will
zoom in on the clip. Notice it's always zooming
in towards the playhead. Here you are. Now I can
see a frame at the time. But now I want to see all
the clips in my timeline. I can use the Zoom to fit. The shortcut Shift Z. I usually
never use the shortcut. I just click here and
I am Zoom to fit. Zoom to fit means
show me all my clips. If my timeline is
very long, of course, the clips are going
to be very small. You can also use
command or Control plus to zoom in completely or command and control minus
on the main keyboard or the numeric keyboard to zoom
out the way you would like. Less zoom to fit. We have seen how to add the clips to the
timeline on the right or left of a clip and how
to zoom in and zoom out.
6. Mastering Capcut Timeline Tools: Magnet, Snapping, and Linkage: Hi there, in this lecture, I will show you how to work with the magnet for the main track. There is a switch here. It says turn off
main track magnet. The main track is this track here where you have the copy. All other tracks are
not main track simple. If the magnet is off
and I delete a clip. You will notice that the
clip has been deleted, but now I have a space. It's called a black space
or a gap, if you like. To delete this gap, in
Caput, it is not possible. What you can do is
to click and drag your clips that are on
the right to the left. That is not convenient at all. Now, let's put the magnet on for the main track and select
this clip and delete. You will notice that it
has deleted the clip and everything on the
right ripple to the left. Let me do it for this clip, and when I deleted, you will notice that all the
clips on the right will be rippled or brought forward
to the left. Here you are. You notice that's
very convenient. It's much better
than having a gap, and then having to drag
all the clips to the left. I will undo. Now, let's
imagine this clip here. I want to insert it in
between these two clips. If my magnet is off
and I click and drag and try to drop it on top, notice the green line here, just on top of the main truck, this means I cannot insert
this clip in this truck. If I release, it will go on top. This is when the magnet
is off. Not what I want. What I want is to put the
magnet on and click on the clip and drag a drag drag it and notice what's happened
when I bring it in. It's just showing me
with the darker gray, this is where the
clip is going to be. And I release it. I have done a lift and insert. I inserted this clip
in between two clips, and that is very convenient. You can do it all the time
and you rearrange your clips. Let's do a bit more.
If I come over here, that is to the left
at the beginning, I put the magnet off and
try to insert a clip. I'm going to insert this clip. Notice that the clip
has been inserted where the playhead is
on the track above. It did not inserted on the main track. This
is not what I want. I will undo, put my magnet
on and insert the same clip. Notice where my playhead is. It is towards the left. It's going to come to
the left of the clip, and it pushed everything, including the lower
tracks to the right, so it has done a ripple. Magnet is very important, and you should always keep it on mainly when you delete clips. Now I'm going to
show you something a bit advanced, but
you will get it. Let's take this clip over here. You notice when you come
towards the outpoint. The outpoint is the
last frame of the clip. You can click and trim the clip. My magnet is on, and everything is rippling, which is fantastic here. I'm just seeing what is the last frame, and
I'm okay with that. Then I can trim it
from the point, the first frame, click and drag, and notice nothing is
being dragged yet, but when I release, everything
will drag to the left, and it has done a ripple. Going to undo this
too, and I will show you without the
magnet, what happens. If without the magnet, I can trim, I have
a blank space. I can trim again, I
have a blank space. Of course, if this
happens to you, you can select all these clips
here and just drag them. Also there are other tools that you can use,
select forward, select rightward, to
rearrange your timeline. I'm going to undo
this. From now on, we are going to
put the magnet on. L et's go to the turn
on and off snapping. The snapping notice how the
playhead is going to snap. You notice it's snapping.
It's very important. Otherwise, if it
is not snapping, I actually cannot get to the
impound or the first frame. And I'm missing something, I'm missing the
first frame here, and it's going to make a lot of problems because
you will have a frame or two if you cut that
are not very good at all. This is the snapping and
the playhead will snap. But also, the snapping
goes like this. You notice the green line, the vertical green line
that is appearing. This is a snapping green line, I'm going to insert
it here, for example. The snapping will help
you a lot to snap clips when you're moving them
or to snap the playhead. Now, there is here one very
nice one is turn off linkage. This has to do with audio. I'm going to take a
clip that has audio. It is this one. You can see the audio line
just over here. Well, we want to see the
audio like this song here. I'll right click, and I
know it's a piecemeal here, but nevertheless, I need
to give you the example. I'm going to extract the audio. Extract Audio, I can see
the audio of the clip here. Now, if I click and
drag this clip, it will drag with
the audio wherever. That is on the main track. But if I click and drag and
go above the main track, let's say over here, yes, it has dragged the clip, but
it will not do it anymore. If I click on the video now, the video has detached
from the clip. You can reattach it, and now you can put it back on the main track here and snap it. Now they are together again. Of course, you can
select the audio here and delete it
if you want to. The linkage is about linking
the clip to its audio. Now, notice eva select the first clip because
there is audio under it, it is linked to this audio. Sometimes it's very
annoying like now. If you want to unlink
it or move it, you just remove the link
and do something like this. For example, I will undo that. These are the link. There
is one annoying option. It is this option,
turn on preview. If you put it on, you
might like it very much. Wherever the mouse pointer is, it will show you in the preview. So it's showing you exactly
in the preview here. If it is off, you
will have to click and drag the
playhead to preview. I am not into turn
on preview here. I don't like it when moving with my mouse. I don't
like that at all. I prefer to use
the playhead here. This was about the magnet, the snapping, and the
linkage for the audio.
7. Splitting and Trimming Fast - Timeline Editing: In this video, we are
going to take care of some of the tools that
are on the left here. Notice when you don't
select anything, you have some tools, when you select the clip, you
have more tools. We are going to see them in
this video and the next one. The first one that gets your attention is
this arrow here. This is the selection mode. If you click on the arrow
down arrow next to it, you can choose others. But of course, you don't want to come here
to change tools. You want to know the shortcut B, right square bracket and
left square bracket. I'll show you what they
do. The selection tool is obvious, you select. If you take the split
tool that is B, I can type B, and I
have the split tool. For example, from here, there is a portion I don't want. So here I can split the clip. So I click where
the playhead is or anywhere I want, I
can split the clip. Now, it's much
better always to put your playhead wherever
you want to split, and then split, of course. You want to see where
you're splitting. I'm going to split
over here also. Let's say that
this portion here, I don't want it. I
want to remove it. I will go for the selection
tool and remember, it's A, now selection tool. I will select I will
use the delete or the backspace to delete
the portion I split. So the split really
is used that way, but you can also use it
in another way while you split over here and
you split over here, you select this
portion, you remove it, select this portion,
and this is a long way. But you can do it. There
are other options here. I will delete to the left
and delete to the right. This is something you
really want to remember. This is Q, and this
is W. How it goes, let's come to this clip
here to change views. Let's say I don't want anything from the beginning up to here. I want to delete
from the playhead to the first frame of this clip or to the beginning
of this clip. All I have to do is to use this command which
is Q. I prefer that. I will use the shortcut Q. I deleted everything from where the playhead was to
the first frame. Let's say, I don't want anything from this point to
the end of the clip. I will adjust my playhead, let's say, from the playhead to the end of the clip,
I want to remove it. That will be W. It's
very easy to remember, if you look at your keyboard, you have Q on the
left, W on the right. Q will cut to the left, W will cut to the right. This is a very important, very good editing technique. If you select a clip, you will have the delete. Obviously, and you
have the marker. If you don't select anything
and you click on the marker, it will add a marker
on the timeline. You can right click on the
marker, say Edit marker, and say, cut here, for example, whatever you like. And you can change its colors to whatever you want.
Then, it's over here. You can right click
and delete the marker. Now, if you select a clip
and put your playhead here, say, over here, I'm
going to add a marker. Notice the marker has
been added to the clip. You can right click
and say Edit marker, and say a text. For example, two, remind you or something
like this. Is okay. Let's right click on this
marker and delete the marker. Now, there is the other
option here is to freeze. Come over here,
anywhere you want. Let's say you want to freeze
for three, four, 5 seconds. All you have to do is
to click on the freeze. It has split your
clip left and right, and in the middle, you
have freeze frames, meaning frames that do not move. Notice it's not moving,
they are frozen. The time here is 3
seconds, but of course, you can make it longer,
you can make it shorter, and that will be useful. I leave it to your imagination. Here you are stops,
freezes and continues. That will be nice for
brake dancing, no. Another tool that's very
nice is the reverse tool. Let's say we come to over here. I want to reverse the
first portion here. I don't want to reverse
the whole thing. I will just come over here
and click on the split, that's easier than going for
B and coming over to click. It's just over here, I split. I will select this guy here. I come over it. I
will say reverse it. Here you are. Now the
reverse is complete. Sometimes it might
take some time is you because I already done this
and they are in my cache. I notice how the video is
going from left to right. You notice this one is
going to the right. In this video now, it's going from right to is
going in the first part, it has been reversed and is
going from right to left, and then you go back like this. You know that you're
doing a brake dance, for example, and you go forward
and backward and so on, you can cut your clips
the way you would like and play with the reverse
as much as you want. I remind you again
there is no reset. For you to do that, you
need to undo if it is possible or come back
and reverse again. And it will work. Now, I
cannot get rid of the cut. The way I will do it
is to remove my link, delete this one, and
just extend the clip. I'll go back to what I had before the split
and the reverse. Not to make it long,
in the next video, we will tackle the other
three, which are very nice.
8. Capcut's Flip, Rotate, and Crop Tools for Creative Editing: The next in line, I
will select a clip, and you have the
flip or the mirror. The mirror will mirror it vertically on a vertical
ax in the middle. If you click on mirror, you will notice it has mirrored it, and I will mirror it again
and again and again. So this is the mirror. I can't remember how it was, but I think it was like this. This is the mirroring
it's very easy to use. Then you have the rotate. If you click here, it will
rotate at 90 degrees. You click again 90 and you notice that it's continuing
the value over here. It's going to show
a value over here. It will never go back to zero, just increase and increase. It's really fun. So I'm going to get it back to the way it was. Notice here, this is a mirror
but horizontal mirror. The image is upside down. Now, in the basic here,
you can go back and say, get it back to zero, and you are back to
original over here. Yet you can use this guy here also to rotate to
any angle you want. I'll get it back to zero. The rotation sometimes
very useful when using some sticker,
stories like this. It works also for
texts and stickers. Of course, you cannot
rotate the audio. Now you have a very
interesting command here, which is the crop ratio. I will click on it, and
it opens a new window. In this window, I have
rotation with a crop ratio. Now my ratio is free, so I don't have a set ratio. If I rotate you will notice it is rotating and
zooming in and out to always fit the
video inside the frame. Whatever you have here
now is the frame, the big one, like
you see outside, and it's always
trying to fit it. That's very interesting and very powerful when
doing certain videos, you can zoom in and rotate, but you will not have the black corners and
stories like this. To get it back, I will
put it back to zero. That is rotate
keeping the ratio. If you come to crop ratio, I am in the free crop, which means I can crop
it the way I would like. In fact, I want to reset this, confirm, I want to
go to this clip. Yes, I will select this. I
will go back to cropping. They are in the free crop. Free crop meaning
I can crop it the way I would like,
just like this. But notice this is a crop ratio. If I crop it, This
is not what I'm going to have a small
clip in the middle here. If I say confirm, you notice I scaled
it up is trying to keep the ratio of 16 by nine. This is the ratio of
our timeline here. I can make it smaller. I scaled it down to 56%. I can make it bigger
if I like to. I can also reset
it back to 100%. This has been cropped
to a free ratio. I'll go back to the crop
here and reset the crop. And come back to free here and instead of free, for example, I can use the nine by 16, which is very much
on social media, including TikTok and YouTube. I'm going to crop
it to nine by 16. Now, whatever cropic I do, it's going to keep
it nine by 16. If I make it smaller, notice how, I made it smaller. It will keep nine by 16. If I confirm here, yes, it is nine by 16. It's trying to keep up with
the frame of the timeline. I can change the frame of
the timeline to nine by 16, and here we are, you
have a vertical video. Cool. I'll go back
to 16 by nine. L et's go back to the
crop now and reset the crop and go to
other crops now, you can use Steel
16 by 94 by three, and the one by one
that you might use for Instagram,
you can adjust it. I'm going to make it square. Steel square is one by one, confirmed, and it's one by one. I'm trying to cope with the
19 by six of the timeline. Let's select this clip again, and let's go to crop and
reset it and confirm, we leave it like this and we'll play other
tricks later on.
9. Practical Guide to Mastering Capcut: The Importance of Hands-On Practice: Mastering PCAT or
any other software is all about practice. With each practice session, you will move closer to becoming an expert with anything
you have been learning. Please. In this course, when you complete
a section, stop, put me off and start practicing what you have
learned. That is very important. Otherwise, the information you got will get lost
here and there. Your assignment for this
section is to choose a theme. For example, I chose something
simple like mountains, and you want to
create a timeline of short clips using videos
from the library. Add, trim, cut, reverse, crop, and play and
have a lot of fun. This is for you to train on all the tools and
editing in the timeline. Try to use or play
with all the tools. They are simple and
easy if you practice.
10. Setting Up Your Capcut Project: A Step-by-Step Guide: However, starting
from this video, we are going to work
on a series project. We are going to create a
new project, set it up, and also bring our media and start video editing and
creating a beautiful timeline. L et's start with
setting a new project. I'll click on it, and it will
open for you a new project. Now we want to set the
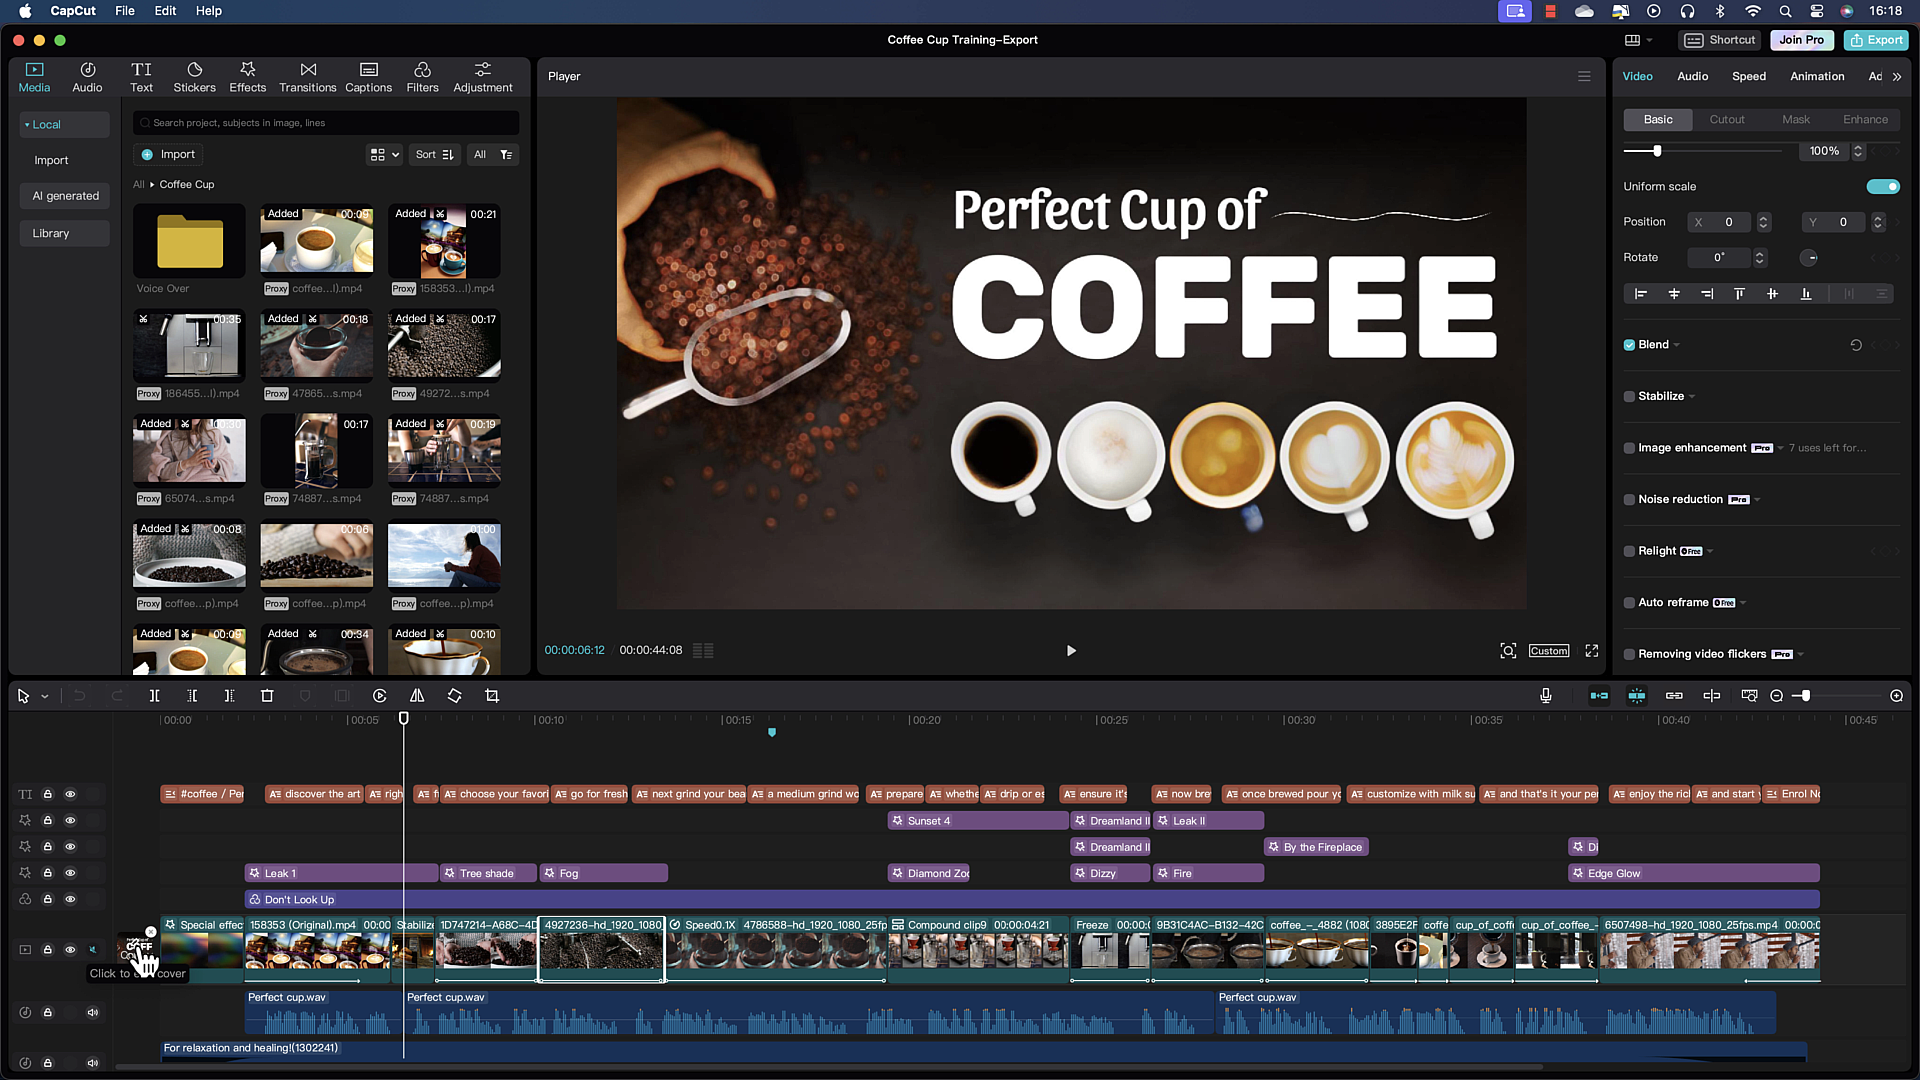
details for the project, like you can see
the name is a 330. It's saved somewhere,
the ratio and so on. We want to change
these settings to have a project that's good for
the work you're doing. So you want to modify these details before you
start importing and working. Now, you have two tabs here, the details and performance. Let's start with the details. First of all, the
name of the project. It's a serial number. You can add a name, for
example, coffee cup training. CCAT will save a draft
of your project. You notice there is
no save in CCAT. You just exit is always saved. And this draft is
under this folder, which is quite big
users, movies, CCAT, user data
projects, and so on. You notice that the
name is still 330, and you will stay 330 until
you exit and you re open. Import material. You can copy them to where
the project is, or you can keep them
in original place. Of course, if you keep them
in the original place, at least you know
where they are. Now when it comes to ratio, remember we talked about
this when we're cropping. It's much better
to set the ratio. If you don't set the ratio, then it will take the ratio of the first video you are going
to drop in the timeline. So better yet to
go steam by nine. I'm creating here a video
for YouTube, for example. And the resolution I
don't want it adapted. If you leave it to adapted, it will be the resolution of the first video that you
dropped in the timeline. So I'm going to change
it to customize and here in 1920 by 1080,
I'm very happy with that. This is the size of most
of the videos I have. Now, frame rate is 30 frames per second. That's very good. You can keep it like this,
but ensure your videos are 30 frames per second plus
or minus one. It's okay. But I'm going to change
it to 24 frames per second because I know the
clips I'm going to use are 24, 25, and 30, 24 will be excellent and I can speed up
and slow down these clips. For the color space, SDR rec
79 is excellent for the web. That's very good here, and it will do a good
job in streaming. Then let's go to performance. In performance,
always enable proxy. Proxy will reduce the preview
resolution of the videos. When you're playing,
it's going to be quite fast or quite smooth. You can set it to 720 or 540. We can keep it 720. My PC can take it. It converts the material
above the proxy resolution. That if you have 2k4k, it will reduce and 720, so you can preview very fast. So we have done the details and the performance
and we click safe. Now, you notice here,
I still have 0330. That's no problem
because when I exit, I come back here, it
will give me the name, I set it up, so don't
worry about it. So setting up the
project before you start importing your media and
playing around and editing, it is very important
in my opinion. In the next video,
we are going to import some videos and
maybe start video editing.
11. How to Import Media into Capcut in a Structured Method: Hi there. In this video, we are going to
learn how to import, actually it's very easy. If you come to media and
local, you have import here. I'm sure you've already seen it. Click on the import here. It will take you to
your file manager or whatever your
navigation system is, and you can select a folder,
select the subfolder. Select few videos from here, or all of them if you want. I select all of them if
you want, just like this. I'm using the shift and click, and you can import them
all together. That's fine. But also you can come to import, you go select a few
videos from here, just like this and
say, Okay, import. You can do something else, I'm playing, but
you get the Mpoint. You can select few
videos from here, click and drag and
drop them there. That's what I always do. Another way to
import is to go to your file finder and select
whatever videos you want, and then click and
drag and drop them in. Be careful, this is outside pCT. I'm going to select
them all and delete. CPCt can import
the same structure that you have on
your saving devices. For example, your Hard disk
or USB, whatever you like, if I click on Import here, I can select a main folder
and click on Import. You notice imported the folder. I double click imported the
two folders that were inside. I double click, I have
my videos here clip, and I still have a
folder inside here. And this is the
last of the queue. Then you can navigate over here, you go up coffee cup up and it's pretty easy
to import ICP cp. What I want to do
now is to select the main folder here and deleted and import for the course, some files that we
are going to use. I will come to coffee cup and this is exactly what I want. Actually, I'm going to
import this guy here, double click, and I
have everything I need. I am now in the grid. I can go to list and see a
piece of the videos here, what are their contents, something like this. I
can go to voice over. I can see the waves
of the audio file. I'll go back to coffee cup. About the proxies,
you notice very well that in the grid here view, the proxy is enabled for all my video that
I imported here. This is because you remember
the proxy, we turned it on, and this is pretty
important for you to work very smoothly in CPC. After importing our videos, we're going to drop
them in the timeline. We'll do that in the next video.
12. How to edit Source/Timeline Clips and Change Content: In this video, we are going to start populating
our timeline. We are in the process of
creating our final video. Now the way we are going to
work in this project is add the voice over to the timeline
and above the voice over, we are going to add
the relevant clips. Depending on what is said, we are going to add
the relevant clips. Simply. Let's go to the voice over folder.
I will double click it. If you click on the audio, of brewing the perfect cup
of coffee. Write it home. Now, you can listen
to it till the end to understand exactly what
the project is all about, but I know it and we are
going to go through it. I will select the
clip and the glass, and here it is in the timeline. Then I'm going to zoom
to fit and a bit more. Okay, so we can see the waves. Notice how you can see the
waves of the audio over here. Notice that the audio comes under the video.
That's very important. Let's go back to coffee cup and now we want to add the B roll. It's a be roll for the audio. I'll select the first
clip and this is the clip I want to add
just in the beginning. Prepare your coffee cup. One way to add the
clip to the timeline, you can just click on the plus and come over in
the timeline here, trim it on the right and
trim it on the left. I'm going to have to trim it
on the right and the left. Trimming from the left
and right will leave some unused frames
on both sides. These unused frames will be
used by the transitions, and they are called handles. It's very important to have
handles for every clip in case you want to add transitions or do
some certain effects. Now, I'm okay with that. You can do this method here, but I will show you another
method that I prefer. I'm going to use it all along. I will select the clip here. If you come to the left
and the right here, you have these handles. You can click and trim
the clip over here. So I'm adjusting the point. I'm going to adjust
the outpoint also. And notice you have
a scissor here, it means this clip
has been trimmed. I'm going to add
it to the timeline and then come back and
adjust it even more. So this method is better
because sometimes you will add very long clips and you barely can find the right side. This is okay for
me if I play it. Discover the art of brewing
the perfect cup of coffee. I know this clip is
very high resolution, so I can scale it up or
resize it to fill the frame. The black here is the frame. To do this, I can just zoom
in or zoom out in fact, and then use one of the corners here and just scale it up.
Something like this. This will work, then
I can adjust it. The way I would like. All I
did is to click and drag. That's one way to do it. I'm
going to undo this to and go back to full
size. Or full view. And then in the basic here,
you can use the scale. Click on the scale and
scale it up as much as you want or as much as it is
needed. This is fine. You could use the position
here to take your clip up, but I will click and drag to adjust it exactly
where I want, making sure there is no black around the
corners or the site. So I have my clip in place now. I will play And
there is Rt at home. Right at home. So I have
this clip for right at home. And what I want is maybe 2 seconds while she's
stirring the cup here. I will trim it left
and trim it right, so I need a very small piece, but I want it to be stirring, and I will add to the timeline. It's very long. That's okay, so we can trim it
just over here. Now, I'm sure I have handles on the left and on the right, and use frames for my
transitions. I want to play it. And notice hand is not moving. It looks like a picture here. I want to change that. We can fiddle with the
in and out point. We'll work half hour, but I want to show you a
method how to change the content of the clip without changing its duration
on the timeline. I'll right click and
go to Trim clip. In the trim clip here, you have a section here. This section represents
whatever is displayed on the timeline in
terms of duration. You can click on it
and drag it right, so it goes to the left, so you're going towards the
point. I'm going to drag it. You can click on it
and drag it right, so you're going
towards the outpoint. Now I want to choose
the portion where it's moving. Where is it? We're getting there.
Then I can play it. No, I want a bit more. I play it again. Come here. Yes. Here, it's moving the hand, it's stirring, so I
will replace the clip. See if you have the
good o started. That's a very good job
now because there is some animations not a
picture. Let's get started. Right clicking and trimming the clip is called a slip edit, so you slip it around started. I don't want this, Let's get started. So I'm
going to edit it. I will cut it from here. Come back to the beginning. Let's say from here, select
the one I want to cut. And of course, I'm going to use the W or delete on the right. I'm going to press
Delete on the right. Now, it will not ripple meaning. It will not close the gap. I have to click and bring it in, and it will snap, make
sure your snapping is on. Let's play again. First, choose your favorite coffee beans
for the best flavor. Go for freshly roasted beans. Choose your coffee beans. I will have this clip. This is the one I want to use. I'm going to trim it left. Notice here I can adjust it because it's
really long clip. It's 8 seconds in fact. I will start from here and
make sure that I will trim it on the right in case I
need to add any transition. I'm going to trim it just like this and add it to the timeline. Here it is, but it's short. I'm going to bring
it just over here. I'm row it under is your
favorite coffee beans. That's care for me. If I want to change this
content, of course, I right click trim clip, and then try to play with the content from over
here. I will cancel this. Then there is another
clip. Est here. Go for freshly roasted beans. I have the freshly
roasted beans. I can just trim it
left and right, something like this and just
put it on the timeline. It's very long, and then I'm
going to just put it here. Next. That's very good. Now I have these clips on the timeline. What
have we learned? We have learned how to
trim on the timeline, how to trim in the source, and also how to
change the content of a clip through
trim clip here. In the next video,
we are going to play more and we
are going to use the speed to delay a clip
and make things working.
13. How to use speed variation to extend/shorten a clip: If you listen to the
second part here, grind your beans to
the right coarseness. A medium grind works best
for most brewing methods. It will be interesting to have two clips, but I know have. I can use this one
and play some tricks to animate it a bit because
it shows the granulation. But I prefer to use
this clip over here. This is a really complicated
clip because it continues and so it's 18 seconds.
I need to trim it. The way I want it is just after the jump, there
is a jump here. I'm going to put it after the
jump. I'm trying my best. Then trim it here
as much as I can, something like
this. That's fine. I'm going to add
to the timeline. Then I'm going to
adjust the timeline. Actually, the first
frame is okay. No plane here the last
frame is not okay. To get on the right
frame I want, I can use the left
and right cursors to move one frame at a time. I'm going to use it on
the left on the right, so I will get to this frame and this is
where I want to trim. Now I want this clip
to cover up to here. Let's add a timeline marker. I'm going to put it
here, I d selected, and I will add a timeline marker to show me exactly
where it's going to be. I will select the clip, how
I'm going to extend it. Of course, I cannot trim it. On the right, it will add more
frames that I don't want. The best way here, in this
case is to use the speed. Come to video and come to speed. Not as you have here the speed, it's times, and if
you go to the right, you will increase the speed, which will make
the clip a bit sh, much shorter, in fact. But it's very fast now. No is very fast. You can go to the left, so you decrease the speed. Now it's 70% of the speed, can decrease it up
to 3%, for example. I'm going to go back to 2%, I did not reach where I want. I'm going to put it
to one times one. This is 10% of the speed. Now it's much longer. It's
okay. I will trim it. Let's play it and see exactly how the jump writing course. That's because the clip is, for example, 24
frames per second. When it's played now, it's
missing some frames and somehow is duplicating or
jumping frames in this case. So I need to smooth
the slow motion. You have the option
just over here. You click on it, and
it will start working processing the slow motion
for frame blending. So it's trying to blend the frames so you can
have more frames, and when it completes 100%, we can play it and
see the result. So it completed. Notice
that it did not do the frame blending for
this portion of the clip. It did it for the whole
duration of the clip. So if you trim it
on the right now, you will notice that the
frame blending will work. Now, with frame blending, if you play it is not still jumping and works best
for most brewing methods. Now we're going to go back to the beginning and instead
of frame blending, you can click on it and
go to optical flow. O optical flow in any software
is the best blending to be able to slow down a clip where you don't have enough
frames per second. I select optical flow. Actually mine is already
rendered at 10%. Usually, it will take
you one or 2 minutes to complete the rendering. If I play now, notice the
mis to the right coarseness. A medium grind works best
for most brewing methods. Y your coffee. Notice I'm using a proxy here. When I'm doing my last
video is going to remove the proxy and use the exact clip and it
will be even better. One thing I would like
to show you here is that I have the preview
quality on quality. The quality is the priority. I can go to performance. That's about the
speed of the preview. If I look at it, it's
going to look good, but not that good me because I have the proxy and
my PC is quite good, I can use here quality
priority. Let's play. Next, grind your beans
to the right coarseness. A medium grind works
best for. Amazing. W Amazing. Now the next thing is to do
some color correction here, and it will be an amazing clip. Thank you very much
for listening. And the next video, I'll
show you some stacking, some stories that you can
use in all your videos.
14. Creating a Multi-Clip Layout in Capcut: Aligning Video Clips: Hi there. In this video, we are going to achieve this, having three clips, one
next to each other, well aligned, exactly
the same size, and with a background. Now, the trick here is to use a very practical method
to achieve this. Go. Let's start. Our first
clip here a coffee maker. Whether it's a French press
drip or espresso machine. I'm going to go a
French press drip and espresso machines. So the French press will
be this clip over here. And it's quite a nice clip, so I'm going to trim
it on the left a bit, trim it on the right before there is anything
maybe over here, and drop it in the timeline. Now, I don't know until
when it has to go, but I think it is
Ensure it's clip. Ensure. Okay, just over here. So I'm going to extend
it. Look at it. Prepare your coffee maker. Whether it's a French press drip or espresso machine. Cool. So this is one of the third. How I'm going to
make it a third? Well, I can use masks, but it's going to
give me problems because masks are
free transform. The best way is to crop it. So I'm going to go to crop it. Then of course, we can
play around with this, but that will not do the trick. What we want is to
go to nine by 16, nine by 16, and then adjust
it the way you would like, more of the handle
and less of the hand. Then confirm, that's all I want. Then I'm going to
put it on the right. That's pretty cool. The next one is going to be the drip just over
here at the bottom. I will trim it on the left, a bit on the right,
not to a bit. A lot. I want to
just that will do. I'm going to add it
to the timeline. Of course, it added over here, so I can click and drag
it up and release. When I release, it will create a truck that is above
the original truck. Now, I have this clip here. I'm going to extend
it just like this. Clip is true, it's
a vertical clip, but you know it is smaller
than the other one. I don't know it's ratio exactly. To fix it, I will go to crop
again and go by nine by 16. Now I have the nine by 16. When I adjust it,
whatever I do here, it will stay nine by 16. We have seen that before. Actually, this is pretty
cool, just like this. I will confirm. Of course, I have enough
resolution not to lose the resolution here and
the clip will stay sharp. If I play it now,
prepare. Call that. Whether it's a French
press drip or apres. I wanted to drip here, so I'm going to make it shorter, trim it even more up to here, and come to speed. I have the clip selected, I'm going to go over it and
decrease the speed a bit, release, decrease, and release. Yes, actually, it's
pretty good now. Now by decreasing the speed, I made the cli clip longer really My content
is pretty cool. Of course, I can come back
here and do the blending. Let's go to optical flow. It will take some times,
I will leave it to work. It will be okay, then you'll
give me the right one. Now, this clip here,
I come back to video. I want to center,
which is centered now. Let's go and find our expresso
machine, for example, this one, I will trim
it on the right, I will trim it on the left. Actually, I don't want
to see anything inside. Few frames if I
have a transition, and then that's cool. That's not bad. I a bit less. I'm going to drop it,
not comes over here. Click and drag and put it on top and it will create
a track for me. Here you are. Now, if I play Here your coffee
maker. It's wither. I'm going to use the same trick because I don't care
about these guys. I will select it and come to speed and reduce the
speed just like this. That's fine. And I think
it's okay because image. Now I need to crop it and I will go exactly
for nine by 16. I have one third here. I'm going to do it
just like this. I think this is cool. I think we have too
much here. Yeah. Okay, I will confirm, and I need to put
it on the right, so this is on the right here. If I come back to this
clip and go to speed, it has finished
his optical flow. If I play now, make
sure this is here. Well aligned, and this
is well aligned. Yes. And then play Prepare
your coffee make. I have French press drift. But now I want to do more.
Now there is something here. I want to add the background. This is the black one, and
this is on the corner. I don't like it very much. I want to add the background like a border and in between. I will select the first clip. Press command and
select the second one and command and
select the last one. If you are on the windows, it's going to be
control and click. Notice now I have one
binding box here. I can now play with the
scale of the binding box. I can play it from
here, make it smaller. That's not working fine. I'm going to use this guy
here and make it smaller. Notice the difference here, if you use the scale is scaling the three of
them, each video. But if I click and drag
from the binding box here, I'm really using it is
one video, one frame. Notice the difference here.
I'm going to go like this. I like this one. Maybe we can adjust it a
bit more, but that's fine. Now I need a
background here color. What I can do is to go
and find something blue, green, red, but that's
not the way to do it. The way to do it is
to select the clip that is on the main
track just over here. Within basic, if you go to the bottom here, you have Canva. If you select the one
above the main track, anyone that is not
on the main track, you will not have Va. You
have the order of the layers, which one is on top and
the same for this one. Only the main track has Va. If you select the Va and then click ann and you go to color, now you have the choice to add a background color to this
clip on the main track. For example, I want a dark gray. This is gray, this is black. I will go for dark gray. Come back to the color picker here and adjust
my color to dark. That is nice. I will click
out and maybe we play. Prepare your coffee maker. Whether it's a French
player I notice now this guy here on the main track has the color of the background. If I select these two clips, using command here and
press V to put them off, you will notice that it is only this guy that
has the background, which is on the main track. Will undo this. Now
we have our clip. Nice nice. If I want to adjust the clopping on this one, I'll
come back here. Maybe I'll do something
like this, confirm, stay in the same place, and you can align them
the way you would like. Now, I put them one, two, three according to the voice
over. We have our clip. We will proceed whether
it's French press, drip or
15. How to use freeze frame to create a still clip: So now we have three trucks
that we are working with. This is three video tracks. And the tracks are
just over here. You can lock a truck,
you can hide the truck, so you don't see it anymore, and you can mute the
audio for this truck. So you're mouting the audio for all the clips in the truck. And of course, we know the
V. V will make it off or on. You can find all this
in the shortcuts also. If you right click here, you will notice that you
have deactivate clip, that is the V I been
using here. Cool. So let's add a bit more. Here we have clean
and ready to go. So I want it very clean. I'm going to use this clip. But actually, when it plays, you start putting coffee. I want to use the first
frame from this clip. I'm going to trim it
as much as I can. That's the maximum, and
put it in the timeline. I'm going to zoom in and you notice the playhead
is on the first frame. So I will now go for freeze, and it will create
a freeze frame. That is almost an image now. You can even export
it as an image, and then you can remove
the one we don't want playing So we are
just over here. Now, if you play it fine. Nothing is happening. Of course, we are going to make
it more interesting. Let's zoom in first, and make it as big as possible, and move it to the center.
Something like this. Later on, we are going
to add some animations, some transitions,
whatever you like. But for now, I'm going to cheat a bit and show you
about the stickers. If you come to stickers
and I am in details here. You can use here that
you can add to the clip. Something like
this, for example. And let's move it to the side. We can have two of them. Going to copy that
control commend C, and then control
commend V to pace. Put it on top, for example, and put this guy here,
one here, one there. And with a nice transition, we will see the glitter. Let me deselect You can see the glitter,
squeezy Cool guys. We are going to
remove the sticker and don't tell anybody
I cheated here, because we want to go
one step at a time. In the next video, we'll
take care of the rest.
16. Complete the Project Timeline: Let's continue with
our clips here. We want to add them all
to the timeline and remove the odio that
we don't coffee. Now brew your coffee, let's go for a nice clip here. I think this one will do.
I already trimmed it. I'm going to add
to the timeline. It's too long, so let's make
it shorter and look at it. Now, brew your coffee. I can right click on it and say trim clip and choose
maybe something better. T from here is awesome. I will replace the clip. There is some dialogue here, I don't want to a great cup. Is the right ratio. So this is not really necessary.
I don't like it even. I'm going to cut it from here, come back and just
select the right clip, press W to cut the right, and then bring this
one and just match it. And make sure that I
have my stepping on. So let's what you have. Once brewed, pour your coffee
into your favorite mug. We can add a bit of this
because it's one brewed and then get the cup
of coffee which I already trimmed here and
added to the timeline. And we do like this,
the sea Once spre. Pour your coffee into
your favorite mug. Customize with So
customize with milk. This is the clip for the milk. I already trimmed
it. I'm going to add it to the timeline.
It's very long. Let's do something like this. A with milk milk. I'm
going to stop here. Let's right click, trim clip, and see exactly
inside want to start putting the milk. This will do. Now, for the sugar, we have a special clip. It is this clip here.
I already trimmed it. I'm going to add
it to the timeline and play or enjoy it black. So O enjoy it Black, so I'm going to bring it here. This is the one for jod Black. I'm going to add it
to the timeline. And I think it's okay. Black. And that's it. You're perfect My
perfect cup of coffee, it is very nice one. This one, I'm going to
put it in the timeline, trim it as much as possible. But now I want to do
something else here. Maybe I will crop
it to 16 by nine, and then make it smaller a bit. Put it here in the center. Y. That looks good. Confirmed. That's bat Your perfect
cup of coffee is ready. Now, for the next the rich
flavors in the Roman. Okay. You have this clip that
you can play with, you can add it, or you have
the other clip. What is it? This one, but I don't
want the lady down there. I want this guy drinking. I'm going to add
it the timeline, and of course, it's very long, so I'm going to make it shorter. And we're done. Let's come
back to the beginning. And see our work. Discover the art of brewing
the perfect cup of coffee. Right at home. First, choose
your favorite coffee beans. For the best flavor, go
for freshly roasted beans. Next, grind your beans
to the right coarseness. A medium grind works best
for most brewing methods. Prepare your coffee maker. Whether it's a French press, drip or espresso machine, ensure it's clean
and ready to go. Now, brew your coffee. Once brewed, pour your coffee
into your favorite mug. Customize with milk,
sugar, or enjoy it. Customize with milk, sugar, or enjoy at black. And I think the milk
should be shorter. So we bring in sugar. With milk, sugar,
or enjoy at black. Even the sugar rear
should be a bit shorter. And that's it. That's writ again.
Customize with milk, sugar, or enjoy at Black. And that's it. Your perfect
cup of coffee is ready. Enjoy the rich food
I'm gonna extend it. I think we have
done a great job. West next is color correction, stabilization, and lots of stories that we can see
in the next videos.
17. How to Extract, Remove and Adjust Audio - Music with Fades: Hi there. In this video
and a couple more, we are going to work
with the audio. Audio is very simple, and there are some
awesome effects, if you like, that
you can use in CPC. Now, the first thing I do for my audio is to select
all my clips here. These are roll clips, they're not supposed
to have any audio. But sometimes as you can see, this clip has some audio
and it could be some noise, something that you
don't want to hear. When I select all of them, I right click, and
go to extract audio. When you extract the audio, all the clips will
show their audio here. Now, usually you don't
want this audio, so you're going to make a lasso around them and delete them. In the audio over
here, you have music. You can select the music that you want to
add to your videos. You have sound effects that's very right. You have copyright. I find it very important
is we'll check if your music here has any
infringement on any copy right, but only for TikTok, not YouTube, not Facebook,
or all the others. And then you have
the extracted audio, which we haven't done yet. You have TikTok when
you log in here and you're using some
music, I think so. I will show you more
audio over here. Let's go back to
music and we open it, and for example, you can
select the theme love. There is a I don't know, some nice music we can listen to add it to your video
the way we'd like. I'm going to go for spring. I nice for me for this
video. It's calm. I'm going to click and drag
and drop it in the timeline. Notice is not snapping to the beginning because this is not a main truck, of course. In this audio clip,
you can see some red. Red means that it
is over peeking. The volume is higher and
is breaking your speakers. So you don't want to
have any red over here. To adjust the loudness, you can decrease the loudness just from the basic
for the audio. So because I've
selected the audio, I have the audio panel here, and you can select your volume and take it down as
much as you want. Something like this will do. Now, the fed in
fade out are quite important because when
you're starting a video, just like this, discover
the earth of brewing. You don't want the
volume to start high. You want the volume to
start at zero and increase slowly slowly according to a
certain time that you need. For that, you use the fa in. I I take the fat
in to 3 seconds, That means my audio on this
track is going to start zero, no volume at all, and
increase the volume, and it will get back
to the right volume or the set volume in 3 seconds. Come to the end over
here and cut this clip. I can do the same
for the FD out here. I'm going to set it at 3
seconds or whatever you like. When you come to
the track itself, you have the circle. This circle is the fade out now. You can adjust it
manually from here. Usually, you will use this
one to listen to the fading. So it's not a number. It
depends now on what you want. The rich flavors in the aromas
and start your day right. You notice how it faded out. It's pretty nice, and over here, I wanted to fade in slowly. Discover the art of brewing the perfect cup of
coffee. R at home. And now the volume is at 100%
according to what I said. Now, you have the
loudness normalization. I'm going to put it to zero again and normalize
the loudness. It means it's going
to balance the volume so there is no excess
loudness, something like this. We select this one, is
going to work a bit. Notice here, it has
-23 LUFS loves. That means this is very good for TikTok and Tube, -23 here. If I play now, You'll
notice there is no high peaks that can hurt the ears or
something like this. Enhanced voice and nose
reduction and the rest. We will see them in
different examples in the next videos.
18. Enhance Voice, Voice Changer/Filters/Characters/Speed and more: Let's play more with the audio. I will select this clip. I'm going to put
the song off or the music off so we can hear
here what's happening 100%. So we have the same stories
of fade in fade out. For voice over, you really don't want to fade
in or fade out. That would not be
nice. But sometimes the fade out is cool
if you want to. Of course, you want to go for
the loudness normalization, but in this case here,
I wouldn't do that. It's very well done, and I will remove it. Now, you can enhance the audio. So let's listen to
it before enhancing. Pour your coffee into
your favorite mug. Customize Now, you can notice that the audio
here is almost perfect, but nevertheless,
you can enhance it. Once brood, pour your coffee
into your favorite mug. There is a slight
difference here. Yet it's perfect, but
you can try it with your own voice and later
on when we record, we are going to
enhance it even more. You can go up to 100%. Usually it will render it
0-100% for enhanced voice. But since I've done it
before, it's in Mcache. Let's play it now
with the enhanced. Once brute. Pour your coffee
into your favorite mug. Without the enhanced. Once brood, pour your coffee
into your favorite mug. You notice there is
quite a difference. And actually, with
the enhanced voice, it's better at 100%. Coffee into your favorite. Taking consideration,
this is for this audio. So if you have different audios, things are gonna change a bit. You enjoy a black. That I'm going to remove
enhanced voice, make it normal. 100%. I come to voice changer. Now, this is really
awesome. I love it. Here, you have
several effects you can use. Let's go for the mic. Pour your coffee into
your favorite much. And increase the room size. Okay, something like this. Notice the odio now. Customize with milk,
sugar or enjoy it black. So it's like a guy talking
in a very empty room. You can make it strong. Some of them have
the settings here. Fe. It's very awesome.
You can use the echo. Pour your coffee your favorite coffee customize
with milk, sugar. Well, if you're into scary
movie or whatever you like, you're doing a tik tok. Now, this is very interesting. You have a lot of them
that you can use. Pour your coffee into
your favorite mug. One bd. Pour your coffee
into your favorite ug. That's my favorite one.
It reminds me of a movie, the soap for example. Let's put it to original and go back to voice character here. Now you can change
the character. If you select trickster for
example, it's loading now. Once bred. Pour your coffee
into your favorite mug. Customize That's awesome.
You have the egg. F. Pour your coffee
into your favorite mug. I have these options. You might have more or
less of these options. Let's go to Jesse. I like Jessi March. Once bred. Pour your coffee
into your favorite mug. Customize with milk, sugar, or enjoy it black. That's it. Let's go to speech to song. Now, I have only
one option here. You might have
very many options, even you might not have
the speech to song. It depends on the
version you are using and what
country you are in. If you add the fork
here, That's bote. Pour your coffee into
your favorite mug. Customize Actually, it has taken the voice and turn
it into a song. It's quite cool because
I'm using Jesse here. So if I use Trickster, the other one speech to
song is still there. So it's working on Trickster. It's working also on speech
to song is going to finalize. What's bot? Pour your
coffee into your super Mug. Customize with milk. I can come back to basic here
and normalize the loudness. Sugar enjoy it black. In it, your perfect cup
of coffee is ready. Enjoy the rich flavor. Do you notice it's
extremely awesome, how you can play with
audio within cup cut. So I'm going to put.
Let's go to speed. I always faced
problems with speed when you increase the
speed of a speech. You know, everything
else increases and it look always
like a chip bunk. But in cup cut, it's much more interesting. Of course, don't go
increasing the speed to 60, it's going to sound ridiculous. But if you increase
the speed a bit, let's say at 30%
increase, so it's 1.3. With milk, sugar,
or enjoy it black. And that's it. Your perfect
cup of coffee is ready. That's really
awesome to increase the speed without
having a tone change. If you put the tone change on, this is exactly like
other software. Where now is going to
solve your coffee into your favorite mug Customize
with Just like a chip uk, and you don't want that.
You want this off. Well, depending on what
you're doing also, let's say you can go to 1.5. I will not go higher
than this. Once bred. Pour your coffee into
your favorite mug. It's not, okay? I
think 20% is the best. That's what I will
do for this clip. Maybe you will have
another audio clip where you speak in nicely, and you can spit coffee
into your favorite mug. Customize with milk,
sugar, or enjoyment. Remember, you can go back to the voice changer,
change something, change the character,
for example, stick the sticker. It
will keep the speed. Once sped. Pour your coffee
into your favorite mug. Customize with milk,
sugar, or enjoy. Very nice. These are the
tricks that you can play. Pour your coffee
into your favorite. We are returning to Basic. I'm going to go back to Basic and enhance the voice, maybe. Now we have three clips
that we want to work on. You can select all
of them, by the way. Let's go back to this guy here and put the volume at zero. They are all similar now. I can select all of
them and add the audio, for example, add the volume
to five, something like this. Then you'll notice all
have the same audio. We remove loudness from here, so they are all identical. Then you can select all
of them, for example, and then loudness
normalization for all of them. That's pretty cool. It
will save you a lot of time when you have
several cuts over here. And the enhanced voice, notice it's a minus. It means not all of them
have enhanced voice. I'm going to check
it and they will all have the enhanced voice. You can work on multiple
clips at the same time, and this is very practical. Remember these things don't
go one clip after the other. Discover the art of brewing
the perfect cup of coffee. Write at home. We cover the lot, and the next video, I'm
going to show you more.
19. Separate Music and Vocals from Songs: There is an option that I
really love and I use for my own videos and for
clients videos also. It is the vocal isolation here. I need to add another clip here. I will come to my
file funder and select this clip and drag
and drop it inside here. I'm going to put this clip in the timeline. This is a song. Friend. So it's a very nice
song that I love very much. It's an old song. So the audio
is connected to the clip. I'm going to right click
and extract the audio. So I have the audio
set aside here. Of course, you have the
volume and stories and so on. Let's go to vocal isolation. You notice here that we have
the voice and the music? Awesome. So let's select it. You have two options here. Keep the vocals or
remove the vocals. Friend me. I'm gonna go for remove vocals. And you notice her
voice disappeared, and it's really pretty well
done. I have to admit that. I don't understand why
there is keep vocal, but maybe you want to alternate. From one to the other. So
this is remove vocals. This is very useful if
you want only the music, or you're creating I don't know, some karaoke, whatever you like. I have used the song here. And if I come over to do, I have here the copyright. I can check if I can
upload this to TikTok. It will check all the
clips. I will check it. Running the copyright, I have
music, I have my own audio, I have the exa song here, and it's going to
analyze everything. It says, sound
Copyright check past. You can uppload this to TikTok. But make sure guys that you
are also safe for YouTube. So don't use full songs. For education purpose, we
can always get away with it, but for some commercial videos, you might not get away with it. Cool, guys. Thank you very much. This is voice isolation
and checking, and t's see you in
the next video.
20. How to Import only Audio from any Video: There is an option that is awesome, that you can
use all the time, mainly if you're taking some audio from other
videos if you want to, and then you add your own video. This option, you
will find it under audio here under extract audios. You can import a video. Actually, you're not going
to import the video. I'm going to take
a video from here, and that's the video. I want only the audio. Usually what we do,
you come to media, you go to bring in
the video here, drop it in the timeline. Extract the audio here. Of course, your chaining is off, that is audio and video. You delete the video. That's very fine.
It's a long way. But there is better
that you can do. Come to Audio, come to
extract audio and say import, and I'm going to
select this one. Now. Since I already did a trial on this one is going
to be pretty fast, maybe you will need to wait a few seconds for it
to extract the audio. I will say import. It
did not import my video. That's the old
video. It imported only my audio from
the installation. The first thing and
you can put it in the timeline and start working on it the
way you would like. That is awesome. Yet there
is a better way to do it. If I select this, I'm
going to delete it. Then I'm going to come to media and make sure I
don't have it here. I will come back to audio and
I have extract audio here. I'm going to go
to my fit finder, select the video I want and
drop it just over here. Actually, you are not
importing the video itself. You have imported
only the audio. You can do it again if
you like for another one. Let's say this one we
didn't use, and import, is going to take a
few seconds and it has imported only after inion, the first thing you
want to do Hi there. In this video, So you can use this in the timeline now
the way you would like. Here you are. So if I zoom
out, you can see them both. They are very long
clips. Cool, guys. So this is how to extract
the udo and this is very useful and try to
remember these shortcuts. I will delete this from
here. We don't need them.
21. How to record your Voice Over and Narration: H i there. In CCAT, you can record your own
voice over if you want to. We come to the record over here, and you click on it. You have several options. First of all, you can
choose your input device. I've chosen the best one I have. You can set the volume
for the recording. 100 seems to do very well. You can take it for
example to 150. Actually, it will depend on the voice and how loud
you are speaking. There is echo
reduction that's very important if you're sitting in a room that has certain echo, you can enable this option. I will disable it for me.
I don't have an echo. I want to do any work. You can mute the
project, so obviously, you will not be recording anything as audio
within your project. I think this is very important. You can enhance the voice
directly from here or you can wait until you enhance
it from the audio panel. That's all the settings
that you have to do. You can come over
now and click on the red button here to start recording,
and I will do that. It will give me three, two, one header, and we are
now recording in CP cut. The recording will come
out quite nice as a dio, and my voice will sound awesome. I will stop the recording
now, though I recorded that. I can continue
recording if I want to or just close
the window here, and let's come over and
listen to our recording. Hi there, and we are now
recording in CP cut. The recording will
come out quite nice as a nodo my voice
will sound awesome. Of course, we are
going to cut this. You notice it's re
enhancing the voice. It's there, and we are
now recording in Cp Cut. The recording will come
out quite nice as a nodio, and my voice will sound awesome. I'm not saying this is a
100% professional recorder, but the voice over is
quite good over here. Nevertheless, we
still have the file, and you can come
to voice changer and apply anything
that you want. I will delete this
from here and I come over and this
one from here, and this is about
recording in Cp cut.
22. How to Add and Style default text: Let's take care of texts, which will allow you to have titles, lower thirds, captions, whatever you like, and even have text track to certain faces
or something like this. Now, there are many ways to
add texts within CAPCOt. The first one is to add text, that is the default text, and if you have any preset. The second one is to
add it from effects, so you select an effect here, and simply you add the text. The third one is to add
from the text templates. For example, the trending,
the social media, you select a template and
drop it into the timeline. Let's start with
the default text, and this is the
default text simple. I will add it to the timeline, just bring it over here. Now, I muted everything so
we can see what's happening. The first clip here, I
came to the blending, as you can see, and reduce the opacity so we
can see the text. Remind me to put it back. So you have your default text, and the first thing
you notice is a binding box that would allow you somehow to format the
text within the binding box. Usually, if I want to centered, I will do something like this. Having the text selected, the panel four text is open. Let's make this one smaller, this one a bit bigger. From here, you can
choose the fund. But also you have funds
provided by CAPCOT that you can use and they are very safe
to use on TikTok, of course. On YouTube or Facebook, maybe somebody will tell
you, hey, this is my fund. But I don't think
so. You can use these funds very safely
everywhere you want. I will leave it to system. Of course, you have
the font size. Notice when I increase
the font size, the binding box remain the same. It is not the binding
box that I'm increasing. I can just stretch it
up and down from here. And you have the style bolt
on the line and so on. You have the case
here, upper case, lower case, or the other case. That is the sentence
case or the title case. Unfortunately, as
soon as you use this, you lost your default text
whatever you type there. Now it is exactly like title. If you want to go back
and change the t, you have to go and do it again. There is no undo for these guys. The color is obvious. You have the character spacing and you have
the line spacing. Let's add, for example, the perfect, and then I'll
add another line coffee cup. Let's go back to character
spacing at zero. You have the line spacing now and you can take
it up and down, and then you can
make it negative. You put them on top of
each other if you want to. Of course, you have all the
alignments that you want, even you can put a vertical and all other ways
that you like. Now you have some presets
that you can use. Of course, if you
decide to use this one, don't go like, I'm
going to use this one. It's perfect. It's
very nice somehow, but you need to adjust it. You need to customize it
according to your choice. Don't use just like this. Some of them are very nice. To remove the style, that's it. Of course, you have the
position and the scare, but not now I'm
scaling the whole box, not only the text
inside the box, and if you want, you can have x yes, so this is X, and this
is why, there is no Z. Now, make sure before you
uncheck this one because it stays the same and
shows you only 104 and whatever you do, it will stay, make
sure they have the same value that is 104%. Then you remove it, so you
have a perfect text here. Then you have the
alignment of the box. I'm going to put it on
the left, on the right, or on top, whatever you play with it the
way you would like. The blending here, you have
only the opacity of the text. If you want to, you
have the stroke, you can add a stroke, black, whatever white, whatever you think is good for your video. You have a background,
and this is interesting. I'm going to choose a
color that is white, no yellow or red,
red will do well. Pink. You notice how the background is a
simple rectangle. You can change it to cover
only the characters. If I remove the covering only the characters or it's
only under the character. You have its opacity
around it now, not so surrounding,
if I do like this, you not s more the roundness. I think that's important. You have the height
of the background. And the width of the background. I'm undoing every time,
and you can have set it. I don't know why, but
it can look very good. If you have two
texts, it might look good here. You play your things. You can glow your text, and you can choose the color for the text and the glow intensity, the range of the glow,
how far you're going, I'm going to put it
off, turn it up, and you have a nice shadow here that you can
add, very nice, in fact, and you can
change its opacity. I always like them very dark. Cool. I'm going to
remove the shadow. Now you have the curve, and curve will not work if
there is a background. I'm going to remove
the background first and then come
back to curve, and pret cool here, you can curve it the
way you would like. Notice this is the curve. You can make it a whole circle, adjust it the way you would
like, something like this. This is how you format the
default text from here, and remember that you have
the preset that you can use. Now there are other things that you can do with
the default text, which we'll go through
in the next video.
23. How to Style with Effects and Animate Text - Saving presets : Using the default text, you can also add some
effects which are very nice and also
add some animation, and you can make
it the way you'd like and exaggerate or
make it very subtle. Let's start. Here, you will
add your default text, and then I'm going to make it longer and change the text
to perfect coffee cup, and I want it on two lines, I'll edit it from
here on two lines. That's perfect for me for now. I will leave alone the
basic and go to effects. So here you have so many
effects that you can use. For example, this green one, which is not our theme, the red one, just click on it, and it will show you
what effect you have. Actually, it will set it up. So I'm going to
use this guy here. I like it very much, but
I alone like the font. So let's go back to basic. And from the font, I'm
going to take Tada. I like this font, by
the way, that's good. I could change the color
from basic for this preset. I'm going to change the
color here to make it very reddish. Something
like this will do. Now, you notice that
for certain effects, there are some basics
that you cannot change. For example, here, the stroke, I cannot add the stroke because the stroke is
within the effect. Some of them, you can
change everything. Of course, here, I could add
a background if I want to. I will go back to
effect and it's up to you to choose the effect
that you like most. Let's go to animation now. In animation, you have
the in animation, you have the out animation, and the loop animation, which is between the
in and out animation. Let's zoom in on the timeline. To add an in animation is as easy as clicking on the
animation you want. You can see a bit of the
animation over here, but feel free to click
and the animation appear. That's not bad. Some of
them are really very nice, and you can choose
the animation and set it and that's it
as simple as this. For me here, I'm going
to be very conservative. I'm going to use the Zoom
in, which is quite nice. It's conservatives. Now you notice there is a lie, a very thin line
here above the clip. If you can see it, this
is the white line here. This is the duration
of the animation. So now it's set
at half a second. I can increase the
time of the animation. So the animation will
take longer to complete. It will take 1 second. Simply. I could make
it the whole thing. So notice it's still zooming in. That will be very
useful sometimes, but I will return it
to 1 second here. Simple. Now we'll come
to the out animation. We have set the in animation. We have set its
timing to 1 second. The out animation now
if you select one, notice comes on the right side, and it has its duration
of half a second. You can decide what
duration you want. Of course, you can
play with all of them, see what you like, make
sure they fit your theme. I'm going to go for zoom in because I'm not
seeing zoom out. Nevertheless, this is good.
So I'm going to play it. It zooms in and then zooms
in again and disappear. Now, but it sticks out
to my theme very humble. I'm going to make
it also 1 second. Now, the practicality here, you notice I can
change the timing from here for the in animation and the out animation.
Now let's go to loop. Loop is the animation in
between the in and out. After you finish
the in animation, the loop will play, and then
you have the out animation. You can select this one, for
example, if you want to, you can select something like this depending
on your theme, and this is an awesome one, which is very nice, by the way. I don't think I want
a loop animation. My subjects is a bit serious, so I will just remove
the loop animation. Let's do an experience it. If I remove the in animation, so I remove the in animation, I remove the out animation. I'm going to go to the loop
and add this animation. That's now it's working for the whole duration of the clip, and that is very interesting
and actually very practical. So if I select this one, the characters will be
there and the will be jumping up and down according
to the loop animation. I will undo and keep my in
animation and out animation. So I have my in animation
and out animation. It's perfect for you to do some very nice animation
with the text, and with the use of the effect, it's also quite impressive. Over here, you have
save as preset, and that's something
you want to use. Let's say you want
to repeat this during this video
or other videos. You save as a preset, text preset saved to my space, you come to preset,
and it's uploading. And it's over here. Now we can come over and actually don't
apply this preset, you just add the text over here. Now we added another one. But you notice that it has
removed certain things. It has removed the color
change that I've done here, and also it has
removed the animation. The extent of the preset,
whereever you save it, even if you save it over here, not going to save the color. That's another pset. This is our second one here. If I add it, it's going to be identical to
the previous one. It means it will not
save your animation. It will not save the
change of colors. It will save only the
effect and the font itself, which is quite cool
and still very useful. I will right click here
and delete this one. I don't want this preset. I want to have only
one pre set here. Now, the way to replicate with exactly all the changes that
you have done is very easy. You select your clip, you
press the option or art key, and you click and drug,
and here you are. You have an identical one, so it's not a big deal. Unfortunately, for
another project, you will not be able to do this option here
of click and Drug. Thank you, guys. I'll see
you in the next video.
24. How to Directly Add Text with Preset Effects: Remember, we mentioned
that you can also add texts from
effects over here. If you click and
open the effects, then you can see they are
grouped in categories. These effects here under their
categories are similar to the effects that you get
after adding a default text. If you come over here, you
will find that they are the same effects but
grouped under categories. They operate differently.
For example, if you select effect from here, it is not added to the timeline, you have to click on the plus
to add it to the timeline. Once added, you cannot change
the effect just from here. You have to come
to these effects, you select the layer and change the effect from here,
as simple as this. Actually, this is shortcut, instead of adding a
default text then coming to effects and
choosing the effect, you can immediately
add the effect here according to certain
categories, as simple as this. If I come over here, I decide
to change these texts, well, if I added to the timeline You will notice that now I have two texts in the
timeline on two tracks. These are the effects here, which is a shortcut to
adding the default text and coming to the effects over
here and changing the effect.
25. How to Add/Adjust/Style Text Templates: Remember, we said that you can add text also through templates. If you come to templates here, you will notice you have
very many categories, very many categories. In each category, you have so many templates
that you can use. Now templates are
very interesting and most of the time
they are animated. For example, if I
take Assam here, I click on it, I
can see it here. Awesomely animated
not bad at all. You can click on the
plus and add it to the timeline and see the
animation not by at all. I will delete this one. Now, due to the number of templates
that you have here, I advise you to always put your template in your
favor. That's very easy. Come to the star
here, click on it, and when it goes yellow, it is in your favor here, as you can see, I added some. You can come over
and remove it from your favori by clicking on
the star and it's come. Let's add a template
on the timeline. I will take this street
interview for CPC. I will click on the plus and
it's added to the timeline. The first thing you
notice, you have paragraph one and paragraph two. To be able to edit at piece, make sure that this
arrow is pointing down, so it's not expended
just like this. Make sure it's pointing down, so you can see the paragraphs. The most important
after you hide the detail is a
position in size. This position and size here
is for the whole template, so you can scale it down. I can use the scale
down here to scale it. Now I have its binding box. I can scale it up and down, the way I would like and
move it around the way I would and you can center it, put it on the side,
put it on the right, whatever you like, you
can adjust it here. When you come to paragraph one, you notice a half cup cut. This is where you
change the text. I'm going to write coffee. It's not because paragraph
one, it has to be on top. It's in fact on bottom here. Street interview, I'm going
to change it to perfect cup of I'm going to add the
line. I have my text here. There is more I can work. If I come to the arrow
here, I expand. There is here the formatting
or the design for coffee. It's for coffee over here. You can bold it, you
can underline it, you can do whatever you like. And you notice here,
I have the case, per case, it is upper case. Lower case, it doesn't work, and sentence case,
it doesn't work. That's because it's built
in in the template. There are things
such as the color, you cannot change and the formatting maybe
you cannot change here. But in all cases, you can
change the preset style. So you can choose
another style here. I will click out to the select. I will change the style here. Now, the problem here, if you come back and you
say no style at all, then it goes back
to no style at all, and I lost the style
of the template. I need to undo to
regain the style here. So be careful about that. Notice I have the style
of the template here. If you change style,
you cannot go back to the style of
the template sometimes. Of course, you have the
blending, the stroke, the background, and so on to
do the design that you want. Sometimes you can add,
sometimes you cannot add. I will troll it down, so I will go to
the paragraph now. That's paragraph two.
I can do everything. Be careful about changing the font here, you
change the font, and somehow if you want to increase the size or
decrease the size, it's not going to
work perfectly. But it works from time to time, you might change and depending on the template, of course. If you come over to templates, and you notice here, I have these dotted rectangles. This is the binding
box of paragraph two. Then I have another
dotted rectangle here. This is the binding box of paragraph one, which is coffee. If I decide to change
the template here, make sure that you
have a two liner also or two paragraphs. If I go for this guy here, happy new year, but it
didn't come happy new year, it came perfect cup of coffee. So it does not change your text. You have to go back to basic and change the text if you want. I find that changing templates sometimes is very
hard to cope with, and you really have to
do a lot of changes, better to bring in a new
template and work on it. So I will undo this. You can change certain
effects, of course. The way to do that is to
come to basic and select the paragraph by clicking
inside the paragraph here, and this is the
paragraph that you are going to change
the effect for. Now I clicked inside paragraph
two, I come to effect, and you notice if I click, I will change the effect
inside the paragraph two. Of course, paragraph
one, I go to one, come to the effect
here and change the effect in paragraph
one, which is coffee. If you decide to cancel the
effect, that's very fine. It goes back to normal
no effect at all, and it doesn't come back to
the effect of the template. You have to undo using control or command Z
if that is possible. So we are back here, and this
is the way to add effects. Now, if you change the effect, sometimes you can
save as a preset, Let's choose this effect here. No. This one, for example, you can save as a preset, and it will come
here in the preset. I'm already in my
text with the preset here. And here it is. I can add it now
to the timeline, and I have it as a preset. I'm going to undo that and actually undo even
from here, if I can. Yes, I like this one very much. This is about templates, and it has some animations. But there is more.
In the next video, I will show you how to
separate a template and animate the way you would
like, and it's very easy.
26. How to Separate Templates and Create Custom Animations: In this video, we are
going to take a template, break it apart, separate
all the tracks, and then re animate it. I will show you how easy it is. With this method, you will have your own titles, lower thirds, and I will be
customized according to what you like. Let's start. Let's go to my favor right here, and I will take Brazil
because it has many tracks, and I will add it
to the timeline. Now, coming over here, we can see the animation
is not bad at all. And we can see that we have
three paragraphs here. I'm going to take
this clip here, right click on it
and go to separate. Not all templates
can be separated, but this one you can separate. Text and plate separated. Now I have four
tracks over here. The first one is the
text amazing places in. Then I have a vector image. It's an image here. You
can see vector image, and you can add some animations. For the image, you can
scale it up and down, you can position
it or rotate it. You have a text again, that is the number ten,
and you have Brazil. The way I want to animate it. First of all, I
want to start with the vector image. I
will leave it there. Then I want amazing to come
in. Then the number ten. Maybe after amazing, and
then Brazil will come in. They will all end
at the same time, but they start at
different time. I will select amazing
and go to animation. In the animation here, I will
choose a nice animation. For example, The
wave in, I like it. I'm going to select wave in
and it is half a second. Then the vector image, I have different
animations here. I want to bring
it from the left, so it's slide right, and we
will leave it half a second. The number ten, I'm trying
to have something nice, for example, something like
this will do. I guess so. 10 will appear. If
I come over here, I can play and see my animation. I think it's quite cool. The vector image is too early, so I'm going to pull
everything here. I'm adjusting it the way I want, and I think this
will do it well. There is nothing
to it. Just make sure they're not starting
at the same time, one after the
other, and then you add the animation that you
want for each one of them. Simple and magnetic. Here you are. I'm having
problems with my player, but it's working
fine. Here you are. Of course, you can come
over in the basic formated, do whatever you want, the
styles that you want. Now, in case the amazing place comes under the vector,
just click on it. This is a bug, I guess, and amazing place will come in the beginning or on
top of everything. I play now. Here you are
very nice animation. We cannot make it a
template added to our favorite because it
has many tracks here, so I can select all of them, right click and say group. Now, the grouping is useful. When you select one of them, you can select all of them and move them
around if you want. I will undo the grouping. Another way to do it is to right click and create
a compound clip. A compound clip will take all the tracks and put
them in the same clip, and then they will
act as a video. You notice this is a video now. You can even animate this one. You can put it on the
video track here. And you have your template, and it will play quite nice. To get it faster, you can right click and say pre process, meaning it is going to render it before it's going to play it. If I click pre process here, I notice it's pre processing, when it finishes, it will
run it smoothly and fast. I hope you enjoyed
this. I hope I gave you a lot of ideas here
for you to break up the templates and create your own and make them quite amazing.
27. How to Convert Text to Speech and Style the Audio: Text to speech in Cup cut. We're going to take some
texts that we will type, and then we will turn it into a speech or even a
song. Let's start. To do that, you need some text, I'll add de four text and
come edit the text over here. I will paste some text
I have from outside. So look at this few. I love it. It's
relaxing and cam. Of course, you can write
whatever you like. As long as you like, you
can make it two pages. You select the text. It doesn't matter how long is the text. Actually, we are going
to delete it later on. And having the text selected, you come to text to speech. Now, over here, you
are going to choose the voices that you want and the way it's going to be said. Look at this view. I love it. It's relaxing and calm. And the Queen. Look at this view. I love it. It's relaxing and Calm. I like the charming lady. Look at this view. I love it. It's relaxing and Calm. After selecting the
voice that you want, simply you go to start reading. And it will do its job here. It doesn't take long, and it create an audio
from the text. Now I can take the text,
even I can delete it. It's not necessarily anymore. I can at this view. I love it. It's
relaxing and calm. Very nice. It's really, very
nice, and very practical. Now we can select the
audio or the voice over from here and come to
voice filters here. You can change it to Echo. Look at this view. O to this view. Or to whatever you like. You have the voice
character again. You can change it back
to Jesse. I love it. It's relaxing and calm. L et's go back to
filters. We don't want. Look at this view. I love it. It's relaxing and Calm. You have BT. Look at this view. I love it. It's relaxing and calm. For Spitz Song, you need to be longer. This
is very short. If I select the fork, you tell me between 5
seconds and 60 seconds, I really have less than that. But nevertheless,
you can do that. So the concept is very easy. You add the default text, and then you add the
text that you want here. You can type it out and so
on, as long as you want. Then as simply as this, you go to text to speech and choose the voice
that you want, and it will create an audio file for you
that you can use. By the way, you can export this audio file and use it
somewhere else if needs be.
28. How to Create Captions from Voice Over or Narration: And welcome to captions. In CPCAt, you can create some awesome captions and you can style them
the way you want. You can add all kind of presets. Let's start. First of all, we know very well that we have some English
here voice over, and we make sure that the
audio is on because CPCAT needs the audio on to read whatever is inside
the voice over. If you come to text, you can
go to captions over here. You have auto caption. You have auto lyrics
when you have a song. And you have local captions, meaning you can upload
your script as a RT file, and then you create
captions here. We are going to focus
on auto captions. The first thing is
the spoken language. It's asking you which language is spoken in your voice over. Of course, you want to
select the language like English or whatever language you are speaking
in the voice over, or simply detect language. There is an option here,
clear current captions. It's always good to have it checked because it will delete the previous captions
that you have created and you
generate new ones. If you're changing the captions, you are editing them, this is an option to keep
on all the time. All you have to do to
generate your captions now is click on
Generate Awesome. It will work pretty
fast, by the way, I haven't seen times where it's really lagging and it takes
you an hour to do them, I will do them very fast. Here are your captions. If you play now, So
we have our captions. I'm going to put
the audio off now. I don't need it anymore. I want to see the captions. The first thing you can do
is to style your captions, and notice this
here apply to all. Meaning, if you deselect and
select only one caption, and then you change
here the styling, it will change to all of them with the apply to all check. So if I change the font here
to Monera will do well, You will notice that
the other captions also have become the same font. If you uncheck it, you can come to a
single caption here, for example, and make
it a different color, for example, red or black
or something like this. I'm going to make it red. The previous one did not change. Only this one has changed. I'm going to undo and make
sure apply to all is selected. Yet you can play a
loss of tricks by styling each of the
captions or some of them. Of course, you have all
the things that you want, you can add the
style that you want and go back to the default.
That's the default. Besides styling, I think it's much nicer to
use the templates. Now you have some
awesome templates here and even
animated templates. I'm going to take one
that's not animated, like this one here,
if I point at it, you notice nothing is happening. The one next to it,
things are happening, I'll show you that in a second. I'm going to take this
template and here you are. All my captions have changed to this templates because apply to all is checked and now I have much better captions without
even doing any effort. If I select another one, this is blinking,
I will select it. And I I play a bit,
let's see what happens. It has an animation
on the opacity here. It's pretty nice, pretty cool. Now there are better
captions. Let me show you. If you come over to the Quick Brown Fox,
this is how it's moving. Many are moving also,
they have an animation. What happens when you select one like this? I will
select this one. It's a bit small here. I'm going to come back to basic and take the font if it bigger. Wow, this thing is jumping. So five will do. If I will do. If I play now, is going to play the
captions and make them dance and change here. That will be awesome
for Karaoke. The guy doesn't know
which word to say first, since they're moving
up and down and they are really nice animation. It's really nice. It's
easy to read also. I think so. Let's go back to template and select
another template, which is somehow
the same format, but they're not dancing around. On word at a time. You notice this template
is one word at a time. You have a lot to
play with here. I'll go back to the
beginning, something I know. That's very nice. It's just making one line after the other. Now I can say no
captions at all, and I'm back to the standard. These are the games you can
play with the captions and nearly you can have
very nice captions. I think I like this
one. It's a bit small, let's go back to basic. Let's make it a bit bigger. It's going to dance.
Yeah, it's dancing. Of course, you can put
your captions in bubbles, if you want to, it's going to be stressful
for the reader. For example, this
one, if you like to, you can add the effect. Instead of putting templates, you can add an effect
for the art here. Let's take this one. The effect, and then all of them because
I have applied to all on. All of them have changed, and it's very nice, by the way. The two liners have
two different colors. I will take it out from here
and stick to my template. I want to go to this template, and one word at a time. You better read fast guys. This is about captions. In the next video,
I will show you how to translate captions.
29. How to Apply and Customize Transitions: There are hundreds
of transitions that you can use in CP cut. First of all, what
is a transition? A transition is an animation between the video on the left
and a video on the right. In between these two videos, you have a cut, so it's the
cut in between the videos, and you apply transition in between to create a
certain animation, and sometimes it's very
beautiful and very necessary. For example, if I want
to apply a transition just over here because I
completed the subject. Here, I talked about whom, I'm going to start talking about how to grind your coffee
or something like this. Then I can apply a transition
on the cut just over here. This is the cut in between. This is the cut in between the video on the left and
the video on the right. Before you start
applying transitions, you need the clips
to have handles. What are handles? If
I take this clip up, remember we trimmed on
the right just over here, and we trimmed it on the left. Handles are necessary to be able to make a mix between
the two videos, the one on the left, and
the one on the right. It will use this unused
handles in the timeline. In our case, going to be
these unused handles here, it's going to use them, I will trim it back and
this unused handles here. To see it exactly, you can
right click and say trim clip, And you notice on the left,
you have the dark side, this is unused handles here that will be used by the
transition and on the right, you have unused handles that
the transition will use. If you put the clip
in between two clips, you can apply a
transition on the cut. CCAT will apply transitions
only on the cut. You cannot apply a transition
in the beginning of a clip. Now, there are very
many transitions here, and you should use
them with caution, depending on the
subject of the video. It's funky, fun. You can use moto graphics, for example, or the split
or whatever you like here. I'm going to go
only for overlays. These are very serious
transitions and very much used. There is the mix
here that will mix the clip on the left with
the clip on the right. There is black feed
that is deep to black, and the white flash
that is deep to white. And there are more here except
the smoke, I won't use it. I'm going to go for the mix. To apply a transition, you simply come near the cut where you want to
apply a transition, and simply you
click on the plus. It will apply the transition to the nearst cut
to the playhead. The playhead was near left, it will apply the
transition here. Can come over and
play your transition. Let's say I want to apply a
transition on the right here, I will just click the plus, and you will go to the
neatest cut to the playhead, and I have my transitions,
which is awesome. If you decide that this is
not the transition you want, it's not about selecting it, it's about positioning the
playhead wherever it is, and then changing
the transition. You click on the plus. This is the one that has been changed, and this is the white
flash widely used. With some transition, you
need to reduce the time. If you select a transition here, you can reduce time. Let's say something like this. Then if I play, the
white flash works fast. Of course, every transition
has its own tricks and tips, and it depends on
your project on the seriousness of your project
or how fun you want it. Remember, to change
the transition is not enough to select it. If you select this one
and change it like this, it's selecting the
one on the playhead. Cool, I'm going to
undo all this and have my two transitions
just like this. This is the mix over here. Now, if you come over,
you will notice that you can make the transition longer. You can also come over
here and make it longer. It hits to 0.6 here. Then if I add another
one just over here, for example, I'm going
to take the mix again, I can make it a bit longer. This one went to 1.3 seconds. You might wonder why
this 11.3 and this one, the maximum is 0.6. While it depends
on the number of handles you have on
the left and right, it works is magic and tells you, this is appropriate 1.3 or
0.6. Now, let's zoom out. So if I like this transition, and I want this transition to be on all the cuts over here. I can simply select the
transition and apply to all, and it will apply it on all the cuts where it's
possible to apply a transition, meaning where there are handles. Notice that, you cannot
apply just like this here. You can't apply a
transition over here. It's not possible because
it's the beginning of a clip. It needs a cut and not the beginning of a
clip, unfortunately. Now, after you apply
to all, unfortunately, if you don't want, you have to delete each one of
them just like this. Now, I can change
this transition. I can select this
one, come over here and change it to black
smoke, for example. Now I can apply it to all. It will change all
the transitions, if you notice, they are
all now black smoke. Now, in theory, you will use two maximum three types of transitions
within your project. Don't go ahead and add every single transition
on your cuts here. I will not look beautiful. Two or three will
look very fine and choose wisely according to
the subject of your video.
30. How to Add Video Animations: When you talk about
transitions, in Cupcat, you immediately think
about animations, which in Cupcat
are really awesome and can help you create
some awesome videos. What are animations?
You can select a clip in the timeline and
the next video, you have animation here. If you selected, you have the in animation out
animation and combo. This is out, this is combo. Let's go to the in animation
and select one that is nice. I actually don't like the one that will show you
some black here. I like the one that are just
showing you the whole video. You can click and add the in
animation as simple as this. If you play Of course, you don't need any handles. Nothing is playing on the
frames within the timeline. You can select it again, go to out and add
an out animation, for example, this guy
here. Yeah, I like this. Unfortunately, I don't know why they're not equal to the in, but I think they
will get around it. And this is our
animation, very nice. Now you have the combo one. The combo is usually used without the in and
out animation. But let's say you have
the in and out animation, you can add another combo, which is an in animation playing in between
an out animation. If I select this one,
I'm not going to look good because I have
two in animation. You notice, and then I
have the out animation. This is not cool. The way to use the combo is to come to
the in and remove it, come to the out and remove it
and come to the combo here. Now my combo is over here. I'm going to adjust
its duration. I'm going to take it to the
beginning and till the end. A very nice one just coming in, and then it will zoom out. It's very cool animation. S out. You can apply it anywhere
by the way to any clip, unlike transitions that
you cannot apply on an independent clip on the
timeline here, on a track. You can apply it
another SY sway. Something else about animations
you cannot apply to all. You can select one clip
and apply the animation. If you select two clips using
the command or control, for example, you notice that you don't have
any animation. One more thing
about steel images. Remember here we
have a steel image, what you can do is selected
and go to animation, and you have the
combo and choose a nice combo that
fits the image. For example, this one. Now
you don't have a steel image. You have something
that's quite animated. Go ahead, guys, come over
to CPCAT and play bit, download some videos, and add some animations and
find your best style.
31. How to Track video and Attach Graphic and Text: There, I'm very excited to show you the tracking within Cupcut. It is simple and easy but
not extremely precise. In Cupcut, you can track a text, that's one, and also
you can track stickers. We'll see both of them now. I will start with text here, so I will add the default text
and come over to bubbles. There is a big
chance that you are going to start tracking bubbles. Bubbles is very easy to use, just added, and this is the bubble here,
it's just an effect here. You can change the bubble
and do what you want. I'm going to take this
bubble and come back to basic and change
the text to lovely. The guy is seeing a
lovely view here. Then in basic here, you
can play with the font. Most of the time this
font doesn't work is very stuck to the bubble itself. I'm going to make it smaller
here and put it behind. The guy thinking,
this is lovely. Usually you put it
in front or on top, but you cannot rotate it here because it rotate also the text. But this will do for
now as an example. Having the bubble
in the timeline, I'm going to bring it
to the beginning and take it as long as the video. Now if you play the
video, of course, the guy will move and
lovely is stable. Let's track it. I'll select the text from here
and come to tracking. Here, you notice the
option of tracking. If you select the
tracking from here, you have this
rectangle that can you position to what
you want to track. And you can track according
to both directions. The directions are
about the timeline. This is backward, going to the left and this is
forward going to the right. I prefer always to start
from the beginning, so I can adjust it
very nicely here. Now, you can track the scale, meaning if the object gets
smaller within the video, the text that you're
tracking will get smaller. This is tracking with the scale. Tracking with the distance
is the distance between this little cross here and the center of the text
here, whatever it is. This distance will remain fixed. It will move according to
the person within the video. I'm going to start
here and you'll not to see the rectangle is
on top of his head. This is the tracking area, and the cross is
the tracking point. I'm going to go ahead
and start the tracking. Notice how the box has grown, it's trying to find
the whole person, not only the head
or a certain point, it's trying to find the
whole person and track according to the person that
is appearing in the video. You notice the distance
is trying to be somehow constant and
scaling down now, and in our case,
scaling down was not right because the text now is very small, we
can't even see it. It's not like every time you track is going to be
exactly the same. From time to time,
it's totally different depending where you put
your rectangle here. The tracking is done, I will
deselect from here and play. You'll notice that
our lovely text is moving with the
guy, even up and down, is moving according to his
body movement and so on, and it's pretty cool, but now it's becoming very small and it's not
tracking very well. Mainly, the scale
tracking is not right. The scale tracking
being not right, I'm going to select it again, go to tracking and
remove the scale. Do not track the scaling. If the subject becomes smaller or bigger
within the video, do not scale up
and down the text. I'm going to rest the tracking. Notice now it has changed, it has taken the full
person from the beginning, and it is tracking pretty fast. My computer is lagging
because also I'm recording. Now, it's keeping the
distance, as you notice, from the center of the
text to the cross here, and the whole rectangle
is moving around. Now, this is better tracking
without the scaling. The tracking has completed. If I play it here,
I di selected, let's deselect, I'm
going to play it. Well, it's not bad at all, it's moving with the
guy at 100% left right and up and down.
Didn't get smaller. We removed the scale, if
you remember, from here, we removed the scale, and we have very good tracking. If you are used to other
software where you can adjust it a bit and come back and
retra this doesn't happen. Notice here it didn't even
move because it's tracked, I'm going to go back I will come over here
and try to say, Okay, put it over here. Now, I put it over here
for the whole track. Is not going to go and
adjust it and you cannot adjust the position and track forward so you can make it 100%. No, The tracking doesn't
work like this in CAPCAT. The only thing that happens is keeps this distance
here at 100%. I'm going to play it now. And notice I increase
the distance, but it is constant now
with the tracking. I'm going to show you
a nice strick here. I come over here and
cut the text and come over here and cut
again and cut again. I cut it in four pieces. Notice the tracking is still
working though you have cut the clip because we
have tracked before we cut. Now here I'm going to
make it lovely and here, for example, he says, Wow. He likes the view so. Here, he's going to say, impressive, if I can
write impressive. Well, it came as two words, I'm going to come over here. I noticed the front
site will not do much. I can make the characters
closer, not bad. The last one says, I love it, or love it. Now you have the same text, which is tracked four times. I'm going to adjust it
to be near the ad here. Come back to tracking.
I don't need to retrack. I still grade out. I play, and if we select, you have four texts. Of course, very nice,
you can select this one, come back to bubble here and change
completely the bubble. For example, let's
take this one here. We have it on white. Let's go and change it to black. So you have four clips that have been tracked at once,
and they can change. So this is very useful
for your videos. You can do whatever you like. Now, there is another
tracking that you can do is for the stickers. The stickers are awesome, you can use them, some of
them are animated and so on. I'm going to show you
one that you will really use is inside the cover up here, and you have this guy
which is animated and this guy's a
cover up the face. So I'm going to take
this one and drop it just above here and align it. It's going to be everywhere. Let's come here
in the beginning. Make it smaller. We don't
need it as big as this. Just put it on his face. Make sure it's
tracking his face. I'm going to come to tracking. So now we are in stickers, which shows one sticker. Come over and play with the
stickers. They're very nice. There is nothing
special about them. You can animate
them, you can track. It's fun. I'm going to go to the tracker and notice
my tracking is here, I'm going to put it over his
head, something like this, or maybe we make it bigger, and put it just over here. And I will start tracking and
I want the scale this time. Hopefully, it will work
well, and I will track. Now, of course, the tracking is not the same for every video. It depends on the
camera movement, it depends on the shot, it depends on the
different of colors, and so on but in general,
this is the tracking. Of course, this is not Da vinci resolve tracking or
after effect tracking. It's just for short
videos, quick and done. Trust the face here completely, and it's doing some other
some funny job somewhere. Mainly, it lost it here because
it couldn't see the face, it couldn't recognize
anymore where is the face of the subject or where is
the subject in its totality. But that will give you a
good idea of what you can track and what you
cannot track in C cut. So we did the tracking
on a sticker and we did the tracking on text
here and we cut it out. So this is how to do
tracking in CP cut, and it's pretty easy. I'll see you in the next video.
32. Removing Backgrounds - Cutout your subject: Here. In this video, I will show you
how to do cutout, meaning removing the background
when you have a subject. This subject has to be a person
with a face and anybody. This is what CCAT
recognize the most. First of all, let's go
and get a background. I'm going to take
this background, which has 35 seconds. Then let's go back to
Local and let's try out with this lady
here. It's very nice. I'll put it in the timeline, and we want to remove
the background here. The background of course, is uniform color here. To remove the background, you come to cut out, and
you have two options, Auto cut out, that's what
we are going to use, and chroma keying, Chroma king
is removing green screen. I'm going to go
for auto cut out, and it will do this job. Now it's doing it very
fast with me because I've already done this
and it is in my cache. So if you play now, you
notice is quite cool. We lost her piece of hair, but not bad at all, and you might have some
problems like just over here. You notice her
face is eating up. Now, if you take the other guy, this guy over here and
drop it in the timeline, select it, and then come
to cut out and say, Auto cut out, it
is almost perfect. We can take him down a
bit, take him bigger. Something like
this. If I play it, you will notice it is very
well, there is no problem. The guy is not even moving.
He's standing there. Now, let's take this guy over here who is walking
around and so on. It's going to be quite
difficult when there is similarity of color between the subject and the background. I will drop it in
the timeline here, reduce the timeline a bit, come over and auto cut out. And it has cut it
out not bad at all, but we will have
certain problems when the colors are almost
mixed with the background. No bad, in fact, no
bad is very cool. Of course, you might want to
choose a better background, and the guy now is
floating on the water. That's very cool. If you select your subject
here and in the cutout, you can add some lines or
contour around the subject. You have different
contours that you can add. It is nice, actually. If you're doing
something personal, you're putting yourself there, you can reduce the size, you can make it a bit opacity. I find it very cool. What's really cool about it is that you can do it
without any problem. You don't have a
learning curve that's very steep to do all this. This is about cutting out the background and
the next video, we will continue
cutting out everything.
33. Removing Green Screen: If you have videos
with green screen, it's very easy to remove them in cup cut. Let me show you how. For example, I have a video here that you will
find in your download, I will drop it in
the timeline here, and I want to remove
the green screen. Obviously, you're
going to come to cut out and instead of auto cut out, you are going to
use a chroma key. Me Mind you that auto cut out here might work
quite nice, in fact. I will undo it, cancel it, and come to chroma keying. And you have the color picker. The color picker is picking the color that
you want to remove, and it has to be
some green thing. Let's first of all, let's put
it here, so I can show you. I will pick it and come over and decide
where is the color. If you go over here, of course, you remove the lady, you
removed her shirt now. You want to remove a color that will give you
the maximum green. I'm going to return it above the background. I
did a great job. You can increase the strengths, meaning you are going to
remove even more green. And now she is
almost transparent. You can see the
beach behind her. That could be cool
if you want that. I'm going to give it a strength. I think I will stop here. I don't have anything
transparent. I will play it. It's
almost 100% perfect. Let's do another example here. If you come to library, you can come to Green Screen, most of them are photos, but this one is interesting because I want to show you something
else later on. I will click and drack and
drop it in the timeline. In fact, let's remove this
guy and just work on this. Now what I would like to do is to remove the green screen. I will select it,
come to cut out, and this is a chroma key. I will pick it and
just come over here, pick it again. That's fine. You notice if you put
the background under, you are not going to see
how the green is coming up. What you want to do
is to move it out, work on a black background
or even white background, and you notice I can
see more green here. To remove them, you can
increase the strengths. It's removing to the maximum.
I think that's cool. We're going to add some shallow. Let's go back to the strengths. Some shallow here.
I think it's cool. Fine. Let's put it up here. And you can see the
background here. Actually pretty cool
because it zooms in and you can see more
of the background. This is about removing
the green screen, and it's quite easy
and you can use it with all kind of
pictures and images, maybe, and they give you very
good results without having to learn for 3 hours how
to remove green screen. I'm going to show you something
else in the next video is how to track a background
behind a green screen.
34. Green Screen - Tracking and Replacement: We are b on removing the green screen from
the TV over here. You'll notice that the
video is not really great. The TV is coming up, but the video inside
here is not cool. What should happen here is that this background should be small, just like this, covering
a certain area, and it should be
tracked to the TV. If you come over here and
select the bottom one, you don't have tracking. So actually, you are going
to track the one above. That's what we did before. You are tracking the
foreground video to the background video, and this will not work as you start tracking
the small tree here. What has to happen is
that this one should be above and this one
should be down for now. You are tracking, you
notice you have tracking. You are tracking the
small one to the big one. Actually, the concept
is like this. The track above will
follow the movement and the scaling of the truck
below as simple as this. I will click on track
here and adjust the area. That's important.
I wanted to track the big TV here,
as simple as this. This is the big TV is
going to be tracked. We're tracking the
whole screen of the TV. That will look good like this. We make it a bit bigger. I will scale. I want of course to scale up
and I want the distance. I will start tracking here
Now the tracking is complete. Of course, it doesn't make
sense what you have done. We can see that the
background video is really scaling
up with the TV. Now we need to adjust them. I will select the
bottom one and lift it up and then just
inverse the old. Not now, it's very nice. Now going to go faster and is growing with the
TV. It's very awesome. This is a small trick
I want to show you, which I think is
very important that you get to know
how to track what. Thank you very much, and I will see you in the next video.
35. Color Adjustments/Correction: In this video, I will show
you how to make your video pop up with nice colors
and nice contrast. In every video, you select, you remember we had videos, speed, animation,
and adjustment. This is about color
correction or color adjustment.
Let's make it simple. In CAPCOT is
adjusting the colors. You select your
video, of course, don't go like this and
select the other video. Make sure that you are
on top of the video, you're seeing the video
that is selected. There are three adjustments that you can do here, the basic, the hue saturation and
brightness, and the curves. Let's start with basic. The first adjustment that
you have is the lot. This is lookup tables. This is to change
the mood in a video, and this is represented here by filters that we'll see later
on. We'll leave it aside. Adjustments. You have all kind of adjustment to do on colors. The first one are temperature,
U, and saturation. So actually, you're trying
to change the colors, you give them more
temperature if you want. So this video went towards the reddish and yellow
and towards the blue, which becomes a bit
impersonal or a bit cold. You have the hue, so you changing the colors
towards the purple, notice, and you're changing
them towards the green. In between, you have
the other colors. There is a saturation
where you add the colors, mainly the red in this video or no color at all when
the saturation is -50. So you have now a
black and white video. The most important is
the lightness over here. You can adjust the colors for your videos and really
mi them pop out. You can play with the brightness contrast and so on and so on. I advise you to start
with the contrast. But before you start
with the contrast, try to open the
color ooscopes here. I'm going to turn
it on. Don't be intimidated by this chart here. It's about the colors. It's very easy to use. On the left is the
left of the video. These are the colors on
the left of the video. On the right is the colors
on the right of the video. You going left to right
and left to right. Whatever is the spreads
are the colors. You have the luma,
that's the white one. You have the red,
green and blue. You can care less
about all this. What you care about is on the
upper side are the whites. On the lower sides
are the blacks. You can interpret
this by saying on the upper side is the lighter
red or green or blue. On the lower side is the
darker red, green and blue. You can interpret that.
But let's go for whites on top and blacks on
bottom, as simple as that. Now, I advise you to always
start with the contrast and not the brightness because the contrast will
open your colors. Notice how I'm taking the
whites up and the blacks down. That's the business
of the contrast. The whites went up,
the blacks went down. What I want to
achieve is to have the whites as high as possible, but not crushed and the blacks as low as
possible, but not crushed. If I go too much with
the contrast, notice, now I'm crushing the blacks here and the whites are not good. Obviously, the
image is not good. I'm going to stop around maybe 20 Then you have the highlights. The highlights is about the
whites on the upper side. Notice what it's going to do
if I take the highlights up. In some videos, you
need to take it down, but here I'm going to take
it up. That's cool for me. Then you have the shadows, the shadows, is the blacks here. I'm going to take down the shadows. Usually,
that's what you do. If you go up with the shadows, you're going to
have a faded image. There will be no
contrast and no blocks. And then here, you take
them down, just like this. That's awesome. For the
whites, now I have the whites. This is the pure
whites on top here. I'm going to take
them up just a bit. Notice this is crushing.
Okay? You don't crush. You don't do that. So
I take them up a bit. Actually here we did well with the contrast
and the highlights. We don't need to
touch the whites. But maybe one,
two, Yeah, enough. You have the blacks? I want to take the blacks a bit down. I'm going to go for
the number 01 chose, so I'm looking over here, they hit the bottom. That's very good. Then you have the elimination,
not this elimination. For a positive value, it takes all the colors
towards the whites, and a negative value will give you the colors
towards the black. This is like you are e clibrating the colors
if you want to. For this case, I
think we are cool to be at zero. Yeah, I guess so. At zero. Now you have
adjusted the colors. Remember, you start
with contrast. Now you can come back and
play with the brightness. If you want to make
it more bright, you crushed all the colors, make it black, very black. O the brightness, you
can play with it now. Decide exactly if you need
any adjustment with it. I will go just a bit. L et's test. This is before, and this is after,
quite a difference, and it's really awesome. Now you put off your ooscopes. I'm going to put them off,
and I have a perfect image. This is after. This is
before, quite an enhancement. Now I'm going to put it
off so I can show you SSL. SSL is saturation
and brightness. You select a range of
colors, for example, the red, and you can increase
them or decrease them. We're not having
much difference here because the colors are very
calibrated in this video. Now his beard is purple. Then you can take
the saturation, increase the amount
of color inside, make them a bit more
darker if you want. And then saturation,
you can take it down, remove a bit of the colors. The brightness you can go up, it brightens the reds. We selected only the reds, and then the brightness
to take down, and we take down the reds. You can select another range
of colors, for example, the orange colors and then
do the same increase. The guy now has yellow fever, decrease or something like this. This is the saturation. Well, it's some work
in SSL rarely used, but sometimes it can fix
your colors at 100%. Most importantly, I'm going to reset this guy and go to curves. Curves are the go
to, if you like. If you don't want to spend
time in the basic going up and down with this,
you can come to curves. The first curve is the luma. This is the brightness,
if you want and the contrast
all put together. You have the bar over here. Notice how it's diagonal, I can click on its top and
take it to the left now. I have a lot of
brightness everywhere. I can take it down, and I have a lot of blackness everywhere. Same I can do on the top one. This is no colors at
all or very dark, and this is very bright,
as easy as this. To make it simple here, all you want to do is
to create a point, you come over when it's plus, you create a point here, and you create a point here. Over here are the dark colors, and over here are
the white colors. To do it right, you can take the white colors up and you
take the dark colors down. And it's almost
done. You notice. I'm trying to choose
the colors here, and this is the
contrast, in fact. That's the contrast. This is the brightness here,
and you can adjust it. You can play with the graph, you can add more
points and mess it up, make it nice and so really, you can do whatever you like, depending on what
you want. Cool. I'm going to remove
these points. That's it. If I remove before and after
I already adjusted at 90%. Now I'm going to reset this
guy and come to the red. Remember here we used the
brightness or the luma. We work with general colors in terms of brightness
and darkness. In the red, we are
going to do the same. We are going to use
the red colors only. You can go left and only red go down and
you can see no red, it went towards the Con. If you use this guy, you go Con, and then this guy go red. Actually, you want to
create another S here. Don't break your brains,
do color correction, and you want to create
something just like this. It works sometimes
only with the red. No I'm adjusting the red. Not very practical, but
for really good videos, you could use that and you have the green
which is the same. Actually, if you want to
have really popping colors, you come to basic
and adjustment on, you start with the
contrast and here you are. You have a lot of
brightness here. I'm going to reduce it a bit. I'm going to take it
down here minus one, two, three. That's cool. Well, I did very well.
I was talking to you. Now, of course, hopefully, your monitor is a bit
calibrated for colors, so you're not
looking at green and it's really reality. It is red. Try to calibrate your colors, and the rec 79, if you remember,
this is the rec 79. My screen is set to rec 709, so I'm seeing almost
perfect colors. I hope the recording is showing
you also perfect colors. After doing adjustment
for a video, you can save it as a preset. You can use this preset
for other similar videos. It is uploading now in
adjustment presets. No, I'm in adjustment,
I am in preset. Now I can take this adjustment and put it in the timeline. In this case, now I
have two adjustments. It doesn't look good at all. I will select the video and remove the adjustment
from here and only work with the
adjustment clip here that is on the track. It is adjusting the video. I can put it off, and the adjustment will
disappear, put it on. The adjustment here will
adjust all the videos under. That could be very useful
from time to time if you shut all your videos in the same environment with the same camera surely
with the same camera. If you don't like it, you
can just delete it and make sure that you put back
your adjustment here. Thank you, guys. This is
about color correction or adjustment of
colors in cp color.
36. Create a special mood and look for your videos: They are mods and filters and they are
very important to create some awesome videos or some very original and
very abnormal videos. Also. In CPCAT, you have the
ability to do color grading. That is changing the mood, changing the look
of your videos. Now we have very simple looks here that are not
really interesting. They are just simple. You can come to filters and you have hundreds of filters
that you can apply. Each filter will change the mood and the look
of all your videos. Usually, you don't
put that on a video. You'll put it on the
timeline and expend it to all or most
of your videos, depending on the games
you want to play and depending on the impression
that you want to give. Some movies will
apply the grading or the filters during day. The bright colors and
sun during night, it's very darkish and sun. If they want to represent
another country, that will make it
a bit greenish, a bit grayish, for example. They change the mood and
the looks of their videos. You have very many filters
that you can apply to your timeline
or to your videos. Some of them are very nice. Note the tan here,
if I click on it, it's going to tan my video. Now it's more mysterious
and something like this. You can play with this a lot. To apply the filter, you can click and drag and
drop it on a video, and that will be very bad
because it's stuck to the video and actually you cannot even adjust it or do
anything about it. I'm going to undo. I will click and drag and drop it in the timeline
just anywhere here. You notice has
created a new track, and this is the
filter truck here. Now, the next thing to
do is to extend it for all your timeline or to
extend it to a piece, and then maybe you add
another filter here depending on what you're
doing up to here, and then add another
filter at the end. Now, I don't know the results, but just to show you let's see. Over here, we have the
tan and it looks good. This is with the time,
this is without the tan. I changed completely,
the mood is darker and more red
and stories like this. Over here, you can
see even the greens, the brown, and this
is without it it. Let's go to holiday. Here, the mood has
changed completely. I I put it off and on, you notice the colors are
brighter, the mood has changed. This is more
exciting, more life. The umber, I'm going to
remove it and put it back, it's really quite nice. I could run my video
just like this, changing from one
filter to another. Or I can have one video on
my timeline on all my clips. This is the way to
do it. Now we can add more filters if
you want on this one. I doubt you will have an effect, not much because they
will clash merely. This is the way to
add your filters and change the mood
of your video. Let me show you, for example, I'm going to go to style here. And these styles are very
interesting, very nice. If you're doing a funky
video, something exciting, or you're telling a story, and let's try one of them. I'm going to click and
drag and drop it here, extended to certain
number of videos. And everything is Teal
or Can yeah, I think so. I can take another one and
change the colors here. Now I'm playing because I love these things and extend it. I moved from the day
where I tell a not so sad story to something very
impersonal story here. It's getting very
cold with the blue. Let's make it warm. We're going to stop here and
take something very warm, for example, this guy
and drop it here. And here you are, you went
from very cold to very warm. You know, I'm sure you've
seen movies like this. The only parameter that you
have here is the strengths. For example, for
this pumpkin here, you can reduce the strengths. It's not applied at 100%, is applied, for example, at
50%. This is your choice. The filters here,
there is no rule. It is not about color correction
and getting it perfect. It's about creating a mood and you want the mood of your video. In my case, I'm
doing coffee cup. It's not much of a mood, but still I can work and
I give it a lifetile one. For example, I don't
know one of these, in fact, the ten has
worked very well. I'm going to put
it here, put off the lower one and
actually extend it. I find it quite
good for my video. It's very nice, and the videos
work very nice not to see. This was about filters
about creating mood, about creating a certain look, and it's up to you now to
come over and go through the hundreds of
filters that you have here and put the best
for your videos.
37. Video Effects : Style and Enhance your Videos: When you're doing
videos in CPCut, you want to use the effects, and they are very
beautiful and very nice, and they only exist in CPCut. You are not going
to find them in this abundance in other
software. I promise you. If you come over to effects, this effects here, you have video effects and you
have body effects. For now, we're looking
at video effects. You can select any
category, for example, the retro, the love one.
I like the love one. They're very nice, and
you can drop a timeline, just click and drag or click on the plus or drop
it inside the video. If you drop it inside the video, it is going to be
inside the video here. If you deselect,
you can select it, you not a special effect here, you click on it, it has
selected the effect. Actually you can trim the effect not to be the whole video. You can do something like this, and then you can play it, so the hearts will appear
here and then stop. There not showing hearts
here, but somehow. Now you can select
another effect and also drop it
on the video here. Now you have two
effects on this video. If I click out and
click on the effect, it will ask me which
one you want to edit. I say, I want to
edit this one here, and this is the short one, and I can come to
its parameters here, it's details, change the
atmosphere, for example. Change the filters, change
the speed if I want to. I'm going to make it as big. Then I can also click again
and select the Girls secret. That's the hearts here. I
can play bit with it also. I think this is the heart, yes. Here you are. You
have your effects. Now, I do not like to
add the effects over here because I might want to use them for
other videos also. I select an effect and delete. As simple as this, you click. You have your effects selected, you press delete, it goes away. A better way is just to click and drag and drop
it on the timeline. That's my favorite way. Then I can see the
effect over real. I'm not looking for
it inside the videos. This is the effect
on top of the video. I can take another effect, for example, the rainbow
and drop it also. I have two effects now that
I can see very clearly. You have this effect
radiating hard. This is the pixeled one and
you have the other one here. Now, effects don't have to be for the whole
timeline, not at all. You can select them
and shorten them and put them as long as you want for the
context you're in. Obviously, I'm making coffee
and these s don't work, so I'm going to delete
this and try to find, for example, light
effects or retro, Retro will work cool with me. Now, notice the representation in Cup cut is very interesting. If you select this guy here, for example, it's framing. It's not to be used with coffee. Maybe you'll use it
for something else. I have another one here, which has some glitches stories. You have the distortion effects, and you can play all the
time with this effects. That's an interesting one. I don't know where
you would use it. Then you have the opening
and closing effects. You have the diamond, so it
opens, and here you are. I'm going to drop it
in and do like this. In fact, I'm going
to do like this. Notice this is going
to be pretty nice, notice how it went down. Very nice effect, actually. You can play with it with
its parameters here. You can increase the horizontal, increase or increase
the strength, rotate it and size
it if you want to. That's pretty nice, by the
way, and you can speed it up. I'm going to go for this speed. Then I'm using it as an
intro, very nice effect. Cool, guys. This is about
effects. Come over. Go to FX and try to go through
the hundreds of thousands of effects that are here and decide which one you want
to use for which video. It's very interesting
and really, you can find only this in CC.
38. Body Effects: Style and Enhance your Videos: L et's go through
the body effects. I'm just showing you here. I'm sure you can do
that by yourself, but they're really amazing. I'm going to take one of them, which is in trending and just click and I see the
effects in the monitor. I can add it to the timeline. Of course, you notice
these effects, you will add them to a video. You can put them inside
the video if you want to or put them
on the timeline. I will go always
for the timeline. This is the distorting whatever. And really, it cut out the background and now it's
rotating the background. Of course, for each video, they will have a different
kind of effect here. Your choices are to put it on the video or on the timeline. I like very much
the funny faces. No, not this one.
The background. The background here
are really amazing. I'm going to take
it and drop it on the timeline and test
it on three videos, and it's looking quite nice. Change the background at this. We know now she is in a disco, and this guy is looking at
her you have the superpowers. Actually, the superpowers
are very nice. Let's apply some on this guy. Let's make him glow, for example, I'm going
to put it just here. Now he's glowing from his eyes, from everywhere, his
body is glowing. These are the body
effects and you apply them exactly like
the video effects.
39. How to create a Cover/Thumbnail with a Video Frame: Before you start
exporting your videos, you want to create a
tub nail within Cupcat. In CPCt, a ub nail
is called a cover, and then you will find it on the left of the main track
you have here cover. You click on the cover and you can start creating
it in three ways. The first one is to select a frame from your video,
for example, this one, or go local, meaning you will upload a thub nail over here, or you select a new and you
start with a blank CVA. If you want to select
from the video, it's better to remove
at least the captions. For example, I'm
going to go cancel, put off the captions, and all the rest, I'm
going to put them off because I want
only the video. I'll go back to cover, and here I have nothing now. I can work with the raw
video. That is cool. For example, if you
decide on this frame, this is going to be your
thub nail or your cover. You can just select it. You can use the arrows left and right to determine the
right frame that you want. I'm going to select edit now. The cover design
will open and you have your image as
a layer over here. You have a background and you
have the image as a layer. Of course, you're
going to add many layers for text and so on. Now, when you select
this image, immediately, you have the filters, and you can select the
filters that you like. For example, N. You can come to effects
and add some effects. Some of them are very nice
like this bubble here. Or you can add the mirror, so nobody sees your video, then we are going
to put at none. You can remove the background. If you have a person here,
now that will be nice. Of course, it's an image,
I will do a good job. In our case, it's useless to remove the background
because we'll have the cups here and we have something here that will
not work very well. But you can go ahead and try it and remove
the background. Now when it comes to adjust, that's awesome provided here, because here you have
the color adjustment for your background image here. You can change the colors
the way you would like. And then of course
you have opacity. Now opacity doesn't
make much sense now because we have
only two layers. But later on, if you
have many layers, it might make sense on
some of the layers. Of course, you have to arrange, so you put them on top, left, which one is forward or backward,
you can play with that. Now, when it comes to
the background here, I can select the background, and you notice have
the background button. I can click on it, I can change the color of the
background the way I like. For example, let's pick this one and we come over to the layer, the image, we go to
opacity, we can reduce it, and we have our background here, which is somehow cool. Now, this is the
image. It's true. We put that background image, but you can still change it. Come over to replace and
you have the choice, you replace it from the
video or your computer. I'm going to select
from the video and change it to
whatever I want. I'm going to cancel to
keep the same image here. You can also crop it,
you can duplicate it and you have a menu here that
tells you what you can do. Locking it is pretty cool. Now you have your
background image, you want to go to the templates or the design and all the rest, so you can add some text. Now, usually, I like to add
my text from the template. I select a template, for example, this template here. You will notice my background
image is still here. It has been cropped, and I
have some texts and so on. If I don't like this one, I
just click somewhere else, and I have this template. Now I notice I'm not getting the background image
of this template. I'm just getting the style. If I come over here, I have apply theme only. Let's take this example. Apply theme only. It will apply the theme, meaning it has changed the font and the
color of the font. If I come over to
the three dots here, let's take something
this one, for example. If I climb to the three dots, that will be a menu,
I will open it. Now, I can select the theme for the text and the
theme for the font. Let's change the fonts here. Let's change the colors. Change the bit, or I can use the template
and here you are. You can change it
now the way you would like. I don't
like it at all. I'm going to do and do again, and let's apply this one. That seems nice. Here you
have what we call a frame. That is a frame, a mask that
you put on the video here. I'm going to undo again, go back to my original
remove this text from here. Now, after you're happy from
your background template, you can also lock it. I'm going to lock it, and
you can go to design. Later on, I will show you a bit more how to work
with this template. You can come to design. The design here is very simple. It's suggesting to you a color
scheme and a font scheme. You can click on it, and it will apply a title subtitle embody. Actually, these are different. And then I can select
the title here, put it over here, the subtitle, put it over here,
and the text here. Now, of course,
whatever I selected now does not work with
my background image. I'm better off using some other ones that
are cool for me, for example, not the
green. This one will work. I have a title with
a certain font. I have a subtitle
and a body text, so you can write whatever
you want from here. The main concept
here is to select a color scheme and
a font scheme. You have a text
here, you can go to the basics here and change
the text the way you want. We already went through that. You also have some presets that you can use. The
not all of them here. Some of them are here, but
this is already a start. You can change
that. Now I'm going to select them and just delete. Now, of course, you
can have a theme only for the fonts and a theme
only for the colors. You set up your text and you change the themes
the way you would like. In the next video,
I'm going to show you how to work with templates.
40. How to create a Cover/Thumbnail from a Templates: Previously, we started by selecting a frame
from the video. Now I'm going to show
you something else. In fact, I deleted the other
one. I'm going to new. New will open a
totally blank Canva, and this is very interesting. Now within the Canva here, if you select a template,
this one, for example, it will not only give you the text and the
fonts and the colors, but also will give you
the background image. I find that very interesting because I have an image here, and hopefully nobody in the world ever used
the same image. Of course, you can replace it, I will not do that because
if you select from video, it will always keep that
frame from your video. Now, you can decide to go
for certain categories here. You have the recommended,
you have food. If it well down this arrow, you will see you have other categories that
you can work with. I'm going to go for
food. This is our theme. Now if I click on
another template, it will also give
me the background. So let's say you
like this template, you like the background, but you don't like the
kind of font you have. You prefer, for example,
this font here. If you click on the
applied theme only, that's the kind
of drawing story. If you click on it, it will
not change the background, but it will change
the font over here. I will not do that and
take the three dots here. You notice here you have a
color theme and a text style. It's going to style
my text again. I will apply it and the text
style, but not so much. I will apply the colors now. Here my colors have changed. If I like that, I
can go for that. Nevertheless, here you have a stroke that you can adjust
the way you would like. For example, take
it back to zero. This one also the stroke, we can take it back to zero, if you don't want the stroke. The shadow and so
on, will remain. If I don't like all
this, all I have to do is to select another one. Sometimes the image will
not clod immediately. It takes time for
it to download. Be patient a bit.
Now that is awesome, including the guy is awesome. If I was doing something here, I will just change
the name instead of recipe for pizza recipe
for a coffee cup. But that doesn't work,
but it's awesome. I'm going now to go
for my coffee theme. Let's find something
interesting. Before the coffee, let me try this one because I
haven't seen it before, and I will wait for the
image. This is amazing. Amazing food preparation.
Really nice. All you have to do is put
yourself here not this guy. I will be awesome. I will
continue looking for coffee. I found the first
one that I like. I'll click on it,
and here you are hopefully it will download the image before we go to sleep. It's taking very
long. Let's move on and take black coffee here. This is very nice. And really, this is my theme. I'm done, but I don't
want black coffee. But there are nicer ones, for example, this one here, is downloading pretty fast. Actually, this is my theme. I'm going to select
the background. I like it very much, and there is an effect that's
very nice here, which is called bubbles. If you add it, it will
take whatever there is light and create some
circle around the light. You can come over to the
effect and adjust it, for example, reduce the size. This is too much, and something
like this, I think we do. I like this one very much. Instead of delices, I will be writing perfect cup of coffee. Of course, I can
adjust it the way I want. L et's come back here. You go and this one we
want to make it smaller. Something like this, possible. Yes, take it down, and
that's pretty cool. I can simply save. And this is your cover. Now, when I export the video, this is the Tub net that will appear on YouTube, on TikTok, and even on my drive
here, if I click on it, this is what's going to appear, and this is very convenient. Now there are several
options that I want to show you
within the cover, and we'll tackle this
in the next video.
41. More about Cover/Thumbnail froma a Templates: You can edit back your tub nail or your cover by clicking on it, simply, it will open
the cover design. You can start working again, you have everything as before. I want to show you, for example, the shape. That's
very interesting. You can add all kind
of shapes if you add a rectangle here in it to the corner and just
stretch it just like this. You can give it a color
white, for example. You can come to the stroke
style and add the stroke. You can come over
to the fill color, and don't put a fill. You have a border
here that is black, and I will go back to stroke
and change it to white. Now you have this
fancy fancy border if you like these things. You can come back
to the stroke stile and give it some corner. Now notice the layers here. This is my coffee
layer. This is perfect. This is the rectangle. I can just select
it, right click and say delete. I
removed it here. And you have your stickers here. You can add any kind of sticker, for example, the bottle here. You can add it here,
make it bigger. This is vodka. Let's remove it. And then you have your frames. Now, the frames are
very interesting. I like them very much. From all these, the
irregular shapes, if you selected, you can
take any shape from here. For example, a corner shape. I will click and drag
and just drop it here, and then make it bigger, something like this,
snapping, even bigger. This is a frame and it
will act as a mask. I can come back and select an image that I will
add inside the frame. So select from video, I will come to this frame, that cool, save it, and here it is, this
close this guy. Here it is, you have your
image inside the frame. So that's very interesting and very much used on
YouTube and TikTok. Of course, you have to be more creative than what
I've done now, so you can create
something awesome. I will delete it. I have
to delete it again. I will come to the layer
right click and delete. You have the collage. Now, the collage is
a whole story here, and it's very interesting
if you want to do that. I have seen many
collage like four. Let's add a two because
it's a long work. I'm going to add
the collage here. In the collage, you
have the style, you have the tight, medium, loose and more custom and you can make the separation
in between the collage. Of course, if you
had four of them, there will be also a
vertical separation here. Now, how to work
with the collage. Unfortunately, you
have to look at this blue line because I'm
going to select inside it. I know I selected inside it. I selected this piece. There is here the
plus for an image. I can go select from
video, for example, I'll select this one
and save it here and you notice this is my
collage just over here. I can select the second one
and go to the plus here. Select from video and go select, for example, this one. And save. Now I have both of them, and it's looking
very complicated, of course, because we
have also a background. I will select the collage, which is over here and deleted. Come over and create
a nonesome thub nail. You notice that has
become very easy game now to create your thub
nails using the templates. You can borrow
from a template or use the whole template
like I've done here.
42. Checking for Pro Options before export: Let's say you are working
on the free version, so you don't have any pro
options available for you. You want to export your
video and you are not sure if you have used
any pro versions. Don't worry, there
is a workaround of this and it's very simple. What I've done here is
to log out completely. That will be using
the free version. If you come to export now to export your video
and you click on it, since I'm working on
the free version, it tells me you are using the following pro
features and material. I have pro features,
enhanced voice, I have also pro material, that is the formatting
of the captions here. First of all, in
the pro features and in the pro material, if you have the free here,
it will work for you. Not for long, later on,
they will remove it, but you can still export with
a pro feature that is free. If you want to remove the pro
feature, that's very easy. You come to check
and editor here. You click on it,
and it'll show you the clip where you have
used the pro feature. Over here, you can
see it very well. It's enhanced voice, it's
free, I can keep it, or I can simply so I
remove this pro feature. I will come back to export, select the second one, and
also do the same, remove it, come back to export, and select this one and
also remove it area. I'll go back to export and
I have here a pro template. This is for the captions. I'm going to click on
the check in editor. Let me show you one of them. I know I've used
the pro template. You can change it, for example, to this one, if you like or
any other one that you like. Now we removed it and
we have applied to all, and then we go back to export, and here you are, you
are ready to export. In the next video, I
will explain to you everything about
the export options.
43. How to export a high quality video: Now that you have finalized all the editing and you
created a nice cover, you can export your video. Let's come to the Expode, which is on the top right here. You click on it. The first
thing you see is edit cover. Are you sure from discover? Is a fine. Discover is okay. I worked on it, and you
want to have a title here. This title is mainly for you, how it's going to be saved. Make sure it's relevant to you. You can select the folder
where you want to export. And I'm happy with CPC training just over here. I
will click Open. Now, you remember how we set the details
within the project. These are the same
details that we set here. We say ourselves some
work and we work systematically and with
conformity of what we wanted. Yet you can come over to the resolution and
change the resolution. Never go two k and four k if
you worked on 1920 by 1080, because it will
pixelate your videos. The Brate, leave it to
recommended because all of them, all the social media
will play with this one, so the trimming is perfect. The Codec h264 is very good. That will give you a compact
video with a lot of clarity. HEVC is meant for mobile, give you a very
compressed video, but somehow the clarity will
be very good on mobiles. Now you have the
Apple Pres here. This is mainly for me,
if you are on windows, maybe you have AVI and
stories like this. These are a bit
high quality with very much high space for
uploading and streaming. Now you can export your audio. So we have video exporting.
And export audio. When you check export audio, it will export an audio file for you next to your video file. You can select MP
three, Wave AC. Wave is very good if you want to use the audio
somewhere else. If it is to send it to
your friend or family, MP three will be okay, but, of course, is not
as good quality as wave. MP three is fine. Now, run a copyright check. Yes, you run the
copyright check. Unfortunately, we don't
have a minute here. We should be more than
1 minute to do it. I will go for
export and it takes some seconds here to bring me to the second
screen of Export. Actually, it has
already exported my video and is showing
me my video over here. But then there is the
option here to have a vertical video
from your video. This is not about
changing the size only, but also it moves the camera, so the subject or subjects are always in the center
of the view here. You wait for it to complete and then you can select this option. This option, you can
use it to approach to TikTok or YouTube later on. It will be saved in my location
that's on my hard drive. Let's open our folder and see
exactly what it has done. In the folder here,
it has created a folder CCAP training export. That is the name of my video. Inside here, you
have three files. One is the cover,
do GPE. Of course. If you want, you can open it in photoshop,
start working on it. I'm joking. You can
just edit it from here. And you have the MP three, so you can play
with the MP three, use it in other videos, and you have the MP four
that you are going to use to export if
you did not share. If I double click
here, it will open it. You will not it will start with my cover.
This is the cover. And then when I press play, it will start playing. Maybe are we completed
and we exported. If you decide to share it, then you will add
the title here. You will add the visibility
that you start with private, then later on, you
can make it public. Maybe you can enable command, do it, and stitching,
whatever you like. You can do that, and then
you will click on the share. It will go to TikTok in this case because
it was selected, you log in, and it
will alod, very easy. Fine. I will cancel here, and I will tell you,
thank you very much. I hope you like this project, and I hope we did a
good job together.
44. ***** Assignment - Create Cover and Export: Your final practice is
to create a tab nail. Or design a perfect cover. Make sure you do a better
job than I have done. If the theme is coffee, fine, but you can do
your own theme, then, of course, you
want to export and applaud your social
media, your favorite one. You can piss the link somewhere in the Q&A or
something like this. I can have a look at the video
and give you what I think. I will critic your video, and all the people enrolled
in this course will also have a chance to look at your
work and admire it. So go ahead, please
create the cover export, and then applaud
to social media.
 Louay Zambarakji, Video Editing / Motion Graphics / Visual Effects