Transcripts
1. Introduction: And welcome back to another awesome class
with me, Ken visa. It's always a pleasure having
you here today outcome with a brand new awesome
class just for you. I've been teaching
elementary for the last 1.5 years right
here on Skillshare. And today outcome with a very special class for
anyone who wants to build an e-commerce store or an
online shop using WordPress, I have several classes teaching students how to
use elementary to build webpages and fully
working websites from scratch. This class is a little bit
different because unlike in the other classes where
I teach you how to design web pages and
websites from scratch. I'll be showing you
how to save time by using pre-made templates. That's right. You heard me. Beautiful pre-made templates
that have already been designed by very
skilled designers. And all you need
to do is replace the placeholder content
with your own content. So that allows you to
save time when you don't want to start building
your website from scratch. If you create, build
or manufacturer physical products and you
have a physical store, It's time now to
move your store to the online space where you
can reach more customers. So you can run your
physical store while at the same
time running it online and selling to people who love buying stuff online. So this class will show
you how to do that. And I'm very excited
to bring it to you. So that's the website
will be designing today. And by the time we
finish the class, you will have a fully
working e-commerce store built with WooCommerce. If you're as excited as
I am, Let's get started.
2. Install Astra Theme: Here we are on the dashboard. As you can see, this is a brand new
installation of WordPress, WordPress 5.9 to the first thing we need to do easy
install the Astra Theme. So let's go to
Appearance Themes. Of course, we have the
default teams that come with every new
installation of WordPress, but we're not interested
in list three, if we want to go to add new, will be redirected to the
WordPress theme repository. And right here we have
many third-party themes that you can install and
start using immediately. But the one we're interested
in as mentioned, is Astra. So I'll click Install. Alright, so now that it's
installed, let's activate it. Now the new theme is activated. It's the active theme
on our website. And you'll notice that up
here we have this pop-up. We have this notification here that says thank you for
installing Astra deed. You know, aster comes
with thousands of ready to use started templates. And in this class
we'll be installing this plug-in called a
starter templates plugin, because we will be exploring
different types of templates that are available
to make our work easier. If you're the kind of person who wants to learn how to build websites or web pages with
Elementor from scratch, from a blank slate. You can go ahead
and watch any of my other elemental classes
right here on Skillshare. I have quite a number of them showing you how to
build a landing page from scratch by adding element by element until you
have a full-page. But in this instance or for
this class we'll be using, we'll be looking at how
to make our work easier by using free
pre-made templates. They're awesome and
you'll see why now that we have our Astra
Theme installed. In the next lesson, we'll see how to install this plugin and how to
start using the templates. I'll see you shortly.
3. Install the Starter Templates Plugin: We're back. Now. Astra is the active theme and
we want to get started installing started
templates plugging in order to be able to start
using the starter template. So Let's click Get Started will be redirected
to a setup wizard, which will help us
set up everything as we wanted to write. So you can take a
moment and watch this video to hear
from this guy, from The Astor team. But I'll go ahead
and click build your website now so we can
get started immediately. As you can see, we have three different
types of builders, three different
drag-and-drop builders here. But the one we're
interested in is elemental. So I'll choose Elementor. By clicking Elementor
will be shown the templates that we
can edit with Elementor. So as you can see, they are grouped into different categories
here depending on what you want to build. But of course,
we're interested in an e-commerce store or
on e-commerce shop. So I'll click any of
these categories here. For example, sports store will be presented with different types of
e-commerce stores. Sports wear store brands
store, recycled shoe store. Quite a number of
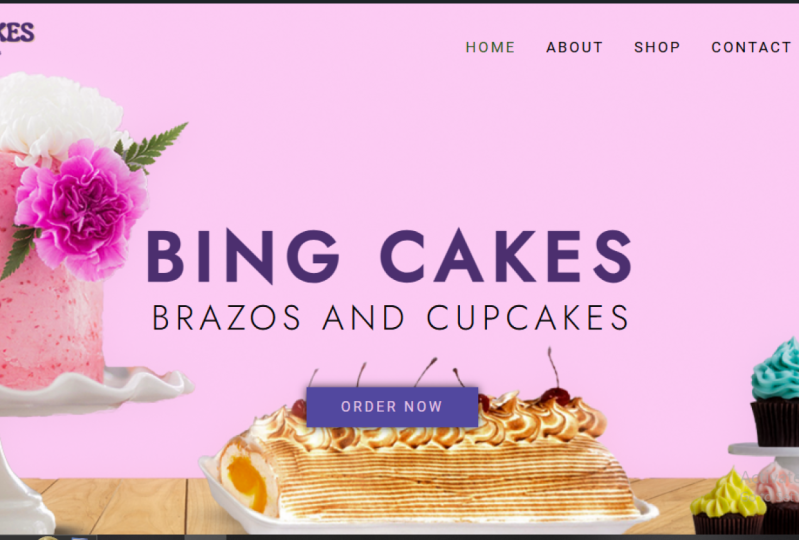
templates that we can use. But in the example I showed you in the
introduction of the class, I use this template right
here, the cosmetics store. So I'll click that to choose it. The next step we need
to take here is to add a logo for our website. Choose a logo for your website. You can update it
anytime later and I'll show you how to
update the logo later. So let's go ahead and
click Upload File here. Let's upload files. So I'll select my logo
from my computer. As you can see, I have a number
of logos appear, My name. Of course you will use
your own company logo. I'll click that and say Open. I'll say Select. And as you can see, the logo
is already showing up here. The colors do not really
match the background. And that's very
deliberate because I wanted to show you in
an upcoming lesson how to change this logo to a different logo that
matches the background. So let's leave that
there and say Continue. Here, we can choose the
colors that we want the team to have in general. Or, and of course we can
update them anytime later. So by default, these
are the chosen colors. I'll leave them at default
because as I've mentioned, we can change them later and
we'll see how to do that. And our default
font is monitoring. I'll leave it at that
and say Continue. Basically, this is
a sign-up forum by the asterisk team
where you cannot seem to be receiving
newsletters about the latest that's happening
with the Astra Theme. From the Astra Theme. So I'll go ahead and
fill up my name. So Ken, my email, I am a expert, but of course you
will sign up maybe as a beginner or
something of that sort. I'll say expert because I'm an expert building a
website for myself. I don't want to check
this because I already signed up to the
newsletter sometime back. If you want to share
nonsensitive data with the Astra Theme, you can leave that checked, but you need to import the demo content that you
saw on the template itself. So leave these others. Chat. I'll say submit
and build my website. It'll take a few
minutes to build. Congratulations, the template
is now installed and ready to be customized to look exactly the
way you wanted to. You can go ahead
and watch this guy and listen to what
he has to say. The next thing we need to do, we can click view your
website and you'll be redirected to a new tab where you can see your
WordPress website. There we have it. That's
how the website looks. Of course, we will be looking
at how to customize it. To leave this place, will click this Exit to Dashboard button up
here at the right, at the top right
corner. Click that. Now here we are
on the dashboard. Guys are asking us to
give them a rating, but I already rated them, so I'll just remove that. Jumping over to the tab where
we had opened the website. Here we are. Let me just scroll and show
you what we have. This is how the template looks. We'll see how to customize
everything to add your own content and make
it your own website. In other words, we'll see how to personalize the website
to your liking. Open up the sharp page. We are. The other pages are
all working properly. In the next lesson, Let's see how to
start customizing the website to work exactly
the way you want it to.
4. Installing WooCommerce: Welcome back. Now that we have our
WordPress team is told and we've already selected the template we
want to work with. It's time to install means
of payment for our website. Every single e-commerce store
built with WordPress uses a plugin to accept
payments on the website. And there are several
payment logins on the WooCommerce platform. And one of the best in
the world is WooCommerce. You must have heard about. So let's go ahead and install WooCommerce on a
website and integrate payments so we can
allow customers to make payments on our
website and by-products. Going inside the dashboard, I'll go to plugins. We already have
WooCommerce installed. It's one of the plugins that was installed
while we weren't installing the template
and it's already active. So if we click
WooCommerce does will be redirected to this
setup wizard where we can now connect our
WooCommerce to the website. So let's go ahead and input our address and
all these details. I'm going to uncheck this
because I don't want to be receiving
this information. Go ahead and select your
country. I mean Kenya. Nairobi. Nairobi County in Kenya. So I'll go ahead
and say Continue. No thanks. And of course, in which industry
does the store operate? Health and beauty. Continue? Yes, I sell
physical products. I'll say continue. How many products
reliably selling? Maybe 11,100. And my selling anywhere
else currently? No. I'm not setting up a
store for our clients, so I'll say Continue. Here we have additional
free extensions that you can optionally
choose to install. I don't want to
choose any of these, so I'm just going to uncheck
them and say Continue. We already have this
Astra Theme installed, so I'll click continue
with my active theme. These are the themes
come with WooCommerce. They are provided
by WooCommerce, but I wanted to continue
with the Astra Theme. So continuum will be redirected to the
WooCommerce homepage inside our dashboard, as you can see right
here on the left. And of course, here's a quick tool tip to
tell us a little bit more about what to
expect from WooCommerce. I'll just click Next or
maybe just close that. Let's go ahead and
set up payments. Additional payment gateways. We need PayPal payments
to be able to allow customers to pay with
PayPal cells setup. Right now we're installing
the PayPal payments plugin that people are
payments extension. And it's not debated. Next, let's configure the
PayPal payments account. Let's set up. Alright, so now as you can see, under WooCommerce,
we're inside settings. That's where we've
been redirected to. We were here, now we've
been taken to this place. And of course by default, we've already enabled PayPal
payments and we can now securely accept all
major credit and debit cards on the strength
of the PayPal Network. So the next thing we need
to do is activate PayPal. In other words, we
need to connect these PayPal plugin to
our PayPal account. So you will need to have a PayPal account
to connect to in order for the money to be
sent to that PayPal account. And that's where you can
grow your money from. So I need to sign in. I'll go ahead and
input my password. Allow PayPal to connect your
account with WooCommerce. Developers. Agree and connect. Thanks for signing up. You now have an
account and you've successfully integrated PayPal with WooCommerce
developers. So in other words, people can make payment on
our e-commerce store and the money will be sent to paper from where we
can withdraw it. So let's go back to
WooCommerce developers. That's in our dashboard. As you can see, those
actions have been able to retrieve all these
information from paper. In the old days, I used to
go inside paper and get these IDs and keys inside paper and come
and paste them in here. But as you can see, they've
improved the process. It's only a few clicks and the information automatically
shows up right here. Now that that's done, let's go ahead and
say Save Changes. Now let us say enable
the PayPal gateway. And of course there are
several other settings right here that you can edit, but I'm not going
to change them. So let's go back inside
the General tab. Right here we can set our address lines and
shipping details. Selling locations. So do you sell to all
countries shipping locations? Where do you ship
to such details? And what's your currency
right now it's showing Kenya shillings
because I mean Kenya. And if you change
anything here, you can, if you want to enable
taxes and calculations, you can go ahead and do that, then click Save changes. But of course I've
not changed anything, so I'm not going to update that. And you can go ahead and check
out more tutorials on how to set up WooCommerce on
any WordPress website. There are tons of tutorials on YouTube that shows you
exactly how to do that. If we were to do that right now, it would make this class too lengthy and we don't want to do that because as you can see, we have many other settings
right here to set up. Let's go ahead and
click payments. Now as you can see, we have a list of different
ways we can accept money. And because we finish setting
up the PayPal extension, it's now enabled, that means
you've set it up correctly. So go ahead and make
sure it's enabled. And if we want to
make changes to it, you can always click Manage. You'll be taken to this page
that we already looked at. So now that we've
set up WooCommerce, it's time for us to start customizing the
websites appearance using the various
customized as we have and the Elementor
page builder.
5. Customize the Header: Right, So now it's time
to start customizing our landing page and
the rest of the pages. So to begin with, let's start
with the Navbar right here. The first thing we
want to do is change this logo because as
you can see right now, this is not visible. So I'll go ahead and
click Customize. This is one of the
areas where we can customize the landing page. So let's go ahead
and edit the header. This is the header where the logo and the
navbar are located. So to do that, we'll go inside header builder
or we can go directly and click on any element here
when this icon appears. But I'll go inside
header builders. You'll notice we have
this representation of the design down here. So the site title
logo, here's a logo. The primary menu, here it is. And the cart icon or
card functionality, which is right here. So you will notice that this
image runs all the way to the top behind the
navbar and the local. That means this header
is transparent. If it had a background color, we would not see this image
go all the way up to the top. So you'll notice right here we have customized
transparent header option. And if we read this notice here, the header on this page is set from this transparent header. Because if I could just
jump to another page, you will notice that
the header here has a dark logo because it
has a white background. This is not a
transparent background. So some parts of
the website will need to have a dark logo in part on the landing page or on any page where the image
runs all the way to the top. It has a transparent header. And that means we need
to have a bright local, like white logo
life. In this case. Right here we can edit
the image on this page, the logo on these white
background pages. And if we wanted
to edit the logo on the transparent background, we have to click this option. So we'll get back
to this shortly. First I want to go inside by customized transparent
header option. So in here we can choose
on what screens we want these settings
to have an effect. So we can choose desktop, mobile or desktop and
mobile at the same time. So as you can see, we have two options of the logo. Logo and written a logo. And let's see what
happens when we change the retinal logo. I have a white logo
somewhere here. Choose Image. Now you will notice
that the logo is still the dark
logo that we had. And this basically tells us that the logo that's
displaying right here, currently on our website is the normal local
they're written a logo is just the same exact
logo as the normal logo, but it's twice the size
of the normal logo. So if this is a, a
100 by a 100 pixels, this should be 200
by 200 pixels, and it's usually twice the size of the normal logo because
it's the option that displays on high-end devices such as the MacBook
Pros and iPhones. That's just how
WordPress has set it up. Now, to change this to white, we need to change the normal
logo to white as well. I'll click that. But remember we've said the retina logo should be twice the size of
the normal logo, but for illustration purposes, I'll use the same logo. There we have it. We can go ahead and
adjust the width of the logo by pulling
this bar right here. Let me make it slightly bigger. 384. And I'll say Publish. Now it looks much better. Let's go inside the design tab and see what we can change. So we can change the
background on this area here. By clicking that. As you can see, it's now
no longer transparent, but we want to leave
it as transparent. So let's not change
their publish that. Now, I want to go
inside this area and reload this page, refresh. You'll notice that the
logo's still remains as the dark logo because the only logo we changed was the logo inside the
transparent header. So if we click Site
Title and logo here. You'll notice that the logo
here is still this logo. We have our normal logo, but we've not changed
our retina logo. So if someone views our website on a Mac Pro or an iPhone, they will see these
cosmetics logo. So we need to change these to twice the size of the
normal logo we've used. But for illustration purposes, I'll still use the same logo. There we have it. So
let me click Publish, and I wanted to show you
something very quickly. If we can switch to this page, let me refresh that. Our logo works. Alright, so that's how to
change the website logo from the default to a
new personalized logo. Of course, in here we
can edit the cart icon. If we click car, we can go inside design. We can also decide if you want
to display the cart total. Now it shows the cart total. You can also display
the card title. Just like that. We can also
edit the primary menu, which is our menu. We can click here to
configure the menu. Clicking that we can choose
which menu we want to show. So currently we have
three different menus. But we wanted to
display the main menu. Of course. Let me see what this
other menu looks like. That's a Contact Menu,
quick link menu. So let's go back
to the main menu. Now that we're satisfied
with our changes, I'll go ahead and
keep published. Let me close the
customizer so we can see our we can see our new
landing page header. That's how it looks. I think I like how it looks. So the next thing we want to do is edit the rest of the page with Elementor because we have two ways of
editing this page. Using the customizer
and using Elementor because different parts of
the landing page has been created using either the
Astra Theme Settings or the Elementor builder. So we were editing
the header inside the customizer
because it's created using the asterisk PM settings. But the inner parts
of the main body of the webpage are created
using Elementor. So in the next lesson, we'll see how to edit the elements on this
page with Elementor. So I'll see you in
the next lesson.
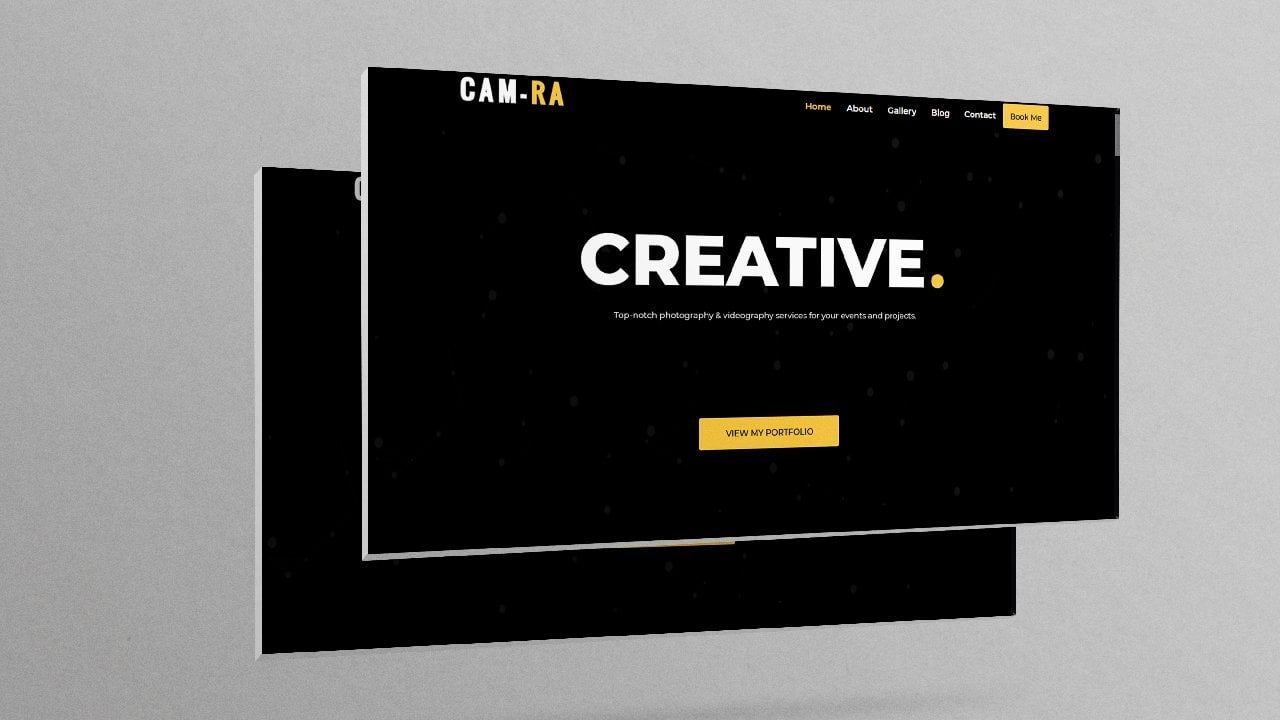
6. Customize the Hero Section: We're back. It's time now to edit this page. And of course, as I mentioned
in the previous lesson, different parts of
the page are built using different
tools or settings. And we've just seen how to edit the header using the customizer because that's what was
used to build the header. But the rest of the body here was created
using Elementor. So to edit it, we will need to edit
it with elemental. So I'll go up here and
click edit with Elementor. Alright, so here we are. I'll get rid of this navigator. And we'll start by looking
at the first section here. What if we want to change
the background image? What we need to do is select the section that's
holding the image, because this image is
used as a background, we could have a color for
background instead of an image. Once you've selected
this section, this area changes to bring up the settings of this
specific section. You can tell by the word
edit section right here. So going inside style, you'll notice we have under
the background tab here. If we expand it, you'll notice under
the background we have the image,
background type image. I had already uploaded
these two images as other possible backgrounds. Let's see if we can
work with this. I'll select that and
say Insert media. Immediately, it changes to that new background
of so of course, you need to prepare
a nice image for your background just
in case you want to use a different image. And I suggest you make
it 1920 by 1080 pixels. So let us go back
here and look at the size 1920 by 1080 pixels. In other words, make it HD. Right? So now that's that
we can go ahead and collapse the
background and we can play around with the background
overlay the darkness of the overlay that is
on top of the image. And let me show you
how that looks. Let me show you the intensity. You can make it
darker or lighter. We can also go in here and
change the color itself. So if you wanted to have some reddish color or
bluish look through it, instead of black, we can always give it
that blue overlay. That's that. Let me
collapse the background. And I think that's okay. So let me update. And then let's preview the page. So that's how the
page looks right now. Of course it's not the
best looking page, but as you can see, we have a lot of
flexibility in what we can do to improve on it. You'll notice that when
we start scrolling, the image stays in one place. If you wanted to scroll together with everything else
on that section, all we need to do is go inside here in the background,
in the background. Under attachment. Right now he'd said to fixed, we can change it to scroll. When we scroll now it goes up together with the
rest of the section. Update that. Let's
preview the changes. Right? So the next thing we
want to do is edit this button just
in case you want to edit the color of the button. Select the button itself, and this will change
to edit button. And these are the
settings for the button. Let's go inside style. We can change the background
color to any color we want, or this is the text color. Let's change it back to white. We want to change
the background type. As you can see, the
background has changed. You can give it a, say, a red color for example. On hover, let's
give it something like let's leave it
at whites on hover. Update that. Now what was
still editing the button? It needs to point
to a specific page. We need to give it a link. So we add that under
the button tab. The link can give it something like Now anytime someone
clicks that button, there'll be taken to, as you can see down here, when I hover over that, there will be taken
to my website.com, the same URL that showing up. If we wanted to open
up in a new tab. Let me update that
and show you very fiddly little bit changes. Here we go. So when we hover
over the button, you'll notice that the URL that points to appear down here. If we click that, it'll start opening up. It will open up the
link in the same page. Let me just go back. What if we wanted to open
up in a new tab instead? What we can do ease wellness
button is still selected. Mx, the link we
have this cogwheel, click that and say
open in new window. Then update that. Let's preview the changes. Now anytime someone
clicks this button, it'll open up in a new tab
and this page will remain intact so you can continue
browsing the respite page. So let's click that. And now we've opened
up a new tab, our pages still there. Of course, we can also
edit this text up here by selecting anywhere
inside this element. Let's go inside style. Let's collapse that. Expand the content. The title color can be changed to any color we want.
Let's say you read. Of course remember I'm
insisting that this is not the best looking website by this is for
illustration purposes. Let's say we want to make
it light-blue like that. We want to change the color
of the description font. You can change it to
any color we want. Just leave it at yellow, white. Let's update that. Anytime we wanted to change or edit any element on the webpage, just click inside of it. So if we wanted to
change or edit this, let's click inside it. And now it's what
we're editing here. To change the appearance itself, we need to go inside
the style tab. There, we can change
the text color. May be say, a yellow. Now let's preview the changes. Like that. We can always adjust the height
of the hero section. So while it's still selected, we can go inside layout. Under layout, let me
collapse that under layout, we have this minimum height. And you'll notice that
the lower bar here goes up and down as he
move these around. We can set the minimum height. I like to set it maybe
to something like 60 so that it fills
up the whole screen, even if you have a tall screen. But I want to leave it at 60. Let me update that. Let's preview the changes. If I scroll. Notice that part of the
hero section goes all the way down beyond our screen size. And of course, there are very
many settings you can tweak to adjust how the
hero section looks. We've just touched a few, but you can go ahead and play around with all these
other settings to personalize the hero section and make it look exactly
how you wanted to. So it's up to you to
get to understand how each setting affects
the hero section. As I mentioned, if you
want to learn how to go deeper into all
these settings, you can watch any of
my classes where I show you how to design
a landing page or a webpage or a website
with Elementor from scratch from a blank
slate right here. Remember we're just customizing a pre-made template to
make things easier for us. We're now done with
editing the hero section. Next thing we want to do is
edit this inner body area. And that's what we'll be
doing in the next lesson. I'll see you shortly.
7. Customizing the Body Section: We're back. I've gone ahead and
made a few changes on the hero section. I've changed this
font color to white. And this as well, and change the background
overlay to black just to improve the general appearance
of the hero section. But of course, I believe
you've already worked out what colors you want to use and you've applied them
on your hero section. So the next thing we
want to do is let's jump right inside our editor
and have a look at these. As you can see, we have
two rows of products. And when you click
on the product, it leads you to the
product description or that specific product. Let's jump inside our
Elementor editor. You'll notice that we don't have any product
showing up here. Yet. On the actual page. The products are showing up. What's happening. We're using something called a short code. Wordpress uses
shortcodes to pull data from different
parts of the website. So if I click this box, although it's empty, it
actually has content. It's just pulling that
content dynamically from the WooCommerce stored that
we have in our dashboard. Because we've clicked
this specific element, this area has changed to edit shortcut because
it's a short code. We're now editing
the short code. And inside here it says, Enter your short code. This is how the
short code looks. So here's how it goes. Once you've created
your products using WooCommerce in the
back-end in the dashboard. Woocommerce provides
you with a way to display those products
on your page. If I remove this and
just leave the products. That's a short code. That's why now the
products are showing up right here on our editor. And if I update that
preview changes, the products are there,
of course, Definitely. But now the reason why we have, we have these extra
details here, because WooCommerce provides
things we call attributes. These are just ways to be more specific about what
you want to display. So here what we're doing is
basically if I remove those, were telling
Elementor to display the products we
have created with WooCommerce with
this short code. That's what we're saying. And then by adding
these attributes, we want to say show
eight products. So that's the limit
with an equal sign. Then the number of
products you want to show. That's why we're
displaying only eight. And number of columns is four. That's why we have four
columns is so let me change this to three columns so
we can see what happens. Now it's showing three columns. That means we'll have
an extra row with two products down here because
we still have a products. But if we save six
products as the limit, then we would have two
rows of three columns. Just like that because we
have exactly six products. Let me update that. Let's preview the changes. Scrolling downwards. Now we're showing three
columns of six products. We can play around with
these numbers as we please. We can also say, hey, we can say just one product and will only
display one product. Don't worry, I'll show
you how to create WooCommerce products from
scratch in the back-end, in the dashboard
in a later lesson. So right now we're just looking
at how to display them. You will learn how to
create your products. Because of course,
you can't build your business with these
made-up products here. I had already gone
ahead and opened up the official WooCommerce
documentation on short codes. So here we are. How to use shortcodes. You can go ahead and
read more about how to use WooCommerce shortcodes. But what I wanted to
show you right now is this part right here, the products short code. The products short
code is one of our most robust
shortcodes within which can replace
various other strings used in earlier versions
of Google Commerce. Here are the display attributes. Hours talking about. The limits shows the number
of products to display, and that's what we
have right here. Limit seeks. Then let's see columns, the number of columns to
display defaults to four. So right now we're
showing three columns. And as you can see, these two are not the only
attributes we can use to be very specific about the products we want to
display on our page. So take some time and study
how to use these attributes. If you want to have
more control over what shows up on your page. But that's basically
how to do it. That's the gist of it. The next thing, of course, is to edit these texts by
selecting these texts. These automatically changes to edit heading because
this is a heading. And we're able to
change what it says. Best products in town. And of course, if we
want this to be a link, we can add link URL right here. So I'll just add a
placeholder instead. If you want the link to
open up in a new tab, just click that cogwheel
and check open in new tab. And now when someone
hovers over it, it changes to that link symbol. Of course, if we want
to change how it looks, we go inside the style and we
can make the changes here. So let's say we change it
to something like this, reach pinkish, reddish color. The same applies
to this element. By selecting it. We can change what it says in the title and description. Amazing. You can also go ahead
and change that. So this is the title
and the description. And we can add a link as well. Going inside style, we
can change how it looks. So collapsing that image because they don't have
an image for this, if we add an image, it will be on top of these products that we
don't want to do that, but we might want to change
the color right now. For the title. Can change it maybe to some grayish color
instead of dark black. Change the typography
if we want. So I might want to change these to REO exchanged, exchange about two months. Now it's back to Montserrat. Update that. So
scrolling downwards. First of all, let us save
and preview the changes. That's how it looks. The next thing we
want to look at ease, this section. Let's scroll downwards. The section is divided
into two columns. This column with the image and this column
with the textblock. And a quick tip I forgot to
show you is when you hover over these edit icons right here on the
corners or the columns. Or even this icon up here. Supposed to bring up
some extra settings without clicking anywhere. That comes in. Very handy way to bring that up is go inside this burger menu, go inside preferences,
user preferences, and check editing handles. Now, when we hover over that, it will bring up
these extra settings switch help you do
your work much faster. Now if we want to duplicate
a column or we need to do is click that column rather
than them right-clicking. Let me, and going
inside, duplicate. Let me just remove that. Update that basically
editing this section is still the same as
what we've been doing with these
texts blocks up here. From the hero section
going down the texts, He's still the same element. It's a heading. Just like these heading. If you want to replicate what we've already done
to save us time, we can just right-click Copy. Go to the same type of element
which is still a Heading. Right-click and paste style. And it will copy all the
styles we applied to this other similar
elements onto this new, onto these other
similar elements. Because this is.
8. Customize the CTA Section: So here we are just
about to see how to create a form in the
back-end using WP forms, wasting any time, let's
jump inside the dashboard. And of course, you'll notice
that one of the features we have here is WP forms. This is one of the
plugins that were installed while we were installing the
pre-made templates. So if I click WP
forms or all forms, let me just click WP forms. So by default we have
these two forms. You'll notice that we have
a short code column here, and every form has a short code. This is the short code
that represents this form. So whenever the short code appears anywhere
in the front end, this short code is
telling WordPress hey, display, the sign-up form. The same case applies
to this form here. So we can add a new form, will be taken through the
process of adding a new form. But I have one single problem with this specific form plugin. That is, most of the features
that you will need in order to be able to benefit
from a foreign plug-in, our premium, you have to pay for the plugin in order to
enjoy those features, but I'll show you an option. So let's exit from here and I want to show you
what exactly I mean. So let's edit the sign-up form. Currently this is the WP forms ideate Going to the front-end
and selecting this. That's exactly this form. It's a sign-up form. All right. Let's go to Edit. I can show you exactly what I mean and then give
you a solution. This is the form we have. This is the field we
have on the form and enter your email address and
then the subscribe button. That's exactly
what we have here. The problem I was talking
about E. So for example, if you want to go to marketing, we only have the
option to connect to, to marketing tools on this area. And to use these others, we need to be in the paid
version of this plugin to connect this form to Mailchimp so that
when people sign up, they are sent to our
Mailchimp account, MailChimp mailing list. We need to be in the
pro version in order to be able to accept
payments using our form, we need to upgrade
to a paid version. That's what I meant by most
of the features that you would like to have in order to benefit from a form Plug-in. Our premium here. There's a very nice
free plugin that has all those features
offered for free. So what we need to do
is go inside plugins, installed plugins will remove WP forms, the activate that. Then I'll just delete it. Alright, so let's go to Add New. And now inside the
plugins repository, let's look for forming nature has more than 200 thousand
active installations and if developed by a very renowned WordPress
company called WP and MU Dev. I liked these guys and I like recommending products
that I've enjoyed using. I have no affiliation
to these guys. I just like their products. So let's install
for me nature right now. Let's activate it. All right, so now we
have it as one of the Installed plugins
and scrolling downwards. For me, neither
should be towards the bottom of this list here. So we'll go inside. I just clicked for me later. This is our dashboard. Let me close this advertisement
here because we're not looking for the
premium version of it. And of course, here, here will be a summary of
all your forms of mentions, all the number of
submissions that people have completed on the forums you have on your page pulls up mentions increase
submissions because we have, because this plugin
allows you to create forms, polls, and quizzes. So let's go to create
a form and will be presented with this list
of pre-made templates. What we need is a
newsletter sign-up. Let's continue. Let's
give it a name. Sign-up form, and click Create. Here we are. These are the fields that are
available to us. Firstname an email address, and then we have the
subscribe button, and we have the insert fields. In here, if we click that, we can have the option
to add more fields. And you'll notice that we have a stripe option and
PayPal option here. Basically we're able to add payment to our forum for free. Remember in the other plug-in, we had to have the premium
membership in order to use to be able to have
payment on our form. This is just an example of what's possible
with this plugin. But I'm not going to add
any, any field here. Because what we're doing
is a sign-up form, not a payment for him. So I want to remove
the first name because That's not
a field we need. We just need an email
address. So delete that. And now let's preview
the form itself. So that's how it looks. Email address, subscribe button. Let's close that and
let's publish it. Now that the form is ready, we're given the short
code to display it. So let's go ahead and copy that. It's been copied successfully. Another way to copy this
short code is to go, let me close that is to go up here to the name of the form. Click this cogwheel and
copy the short code. And it's been copied successfully
going in the front-end. Highlight that. Remove the WP Forms shortcodes, and paste the new formulate
a form short code. Immediately this will change to the new form
that we've created. Let's update that and
let's preview the changes. Scrolling downwards. There we have it. Nice, simple form created with a
nice powerful lugging. Remember I mentioned
some other features that you have to pay for. In the other form, plugin is integrating to third party mailing list
services like Mailchimp. Or if you want to do your
marketing campaigns through a mailing list in
order for that form to submit the people
who's setting up your mailing lists in
a third-party service, you have to pay for that. But with formulator,
you don't need to. Now that we've
created this form, if we go inside integrations, you'll notice that you can send these forms data to any of the connected
third-party apps, connect to more apps on
the integrations page. So for now we're not connected
to any third party apps. But if we click integrations page or go directly to these
integrations area because that's where
we'll be lead. Now that's where we are. Formulated integrates with your favorite third-party apps. You can connect the
available apps via the API here and activate
them to collect data in the integration
step of your phones. So look at all these
options we have here. We had to pay to
be able to connect our form to MailChimp
on the other plug-in. But right here, you can go
ahead and connect the API, and this is all free. We can connect to
HubSpot, Slack, Trello, active campaign,
Google Sheets. All this is provided
to us for free. We can even connect
to zap here for free. That's why I love for me later. I use this plug-in to
create my forms in all the websites that I build because they say
if it's working, it doesn't need fixing. So for me this is working. I don't need to look for
other foreign plugins, which we'll need me to have
a premium membership to access the services that are
very crucial to any form. So that's just my take on it. Feel free to pay for any plug-in that you feel
has everything you need. But if you're looking for something that's
free but powerful, this is the way to go. If you want to learn
more about forming and how beneficial it
will be to you, especially as a beginner. Go ahead and look for a
nice tutorial on YouTube. I recommend you go to
the WP MU Dev Channel, the WPA MU dev, the developers of the plugin. So I recommend you go there
and look for formulated. For now. That's how to create
a form and display it in the call to action
section on your landing page. In the next lesson, Let's see how to
edit the footer. I'll see you shortly.
9. Customize the Footer: Welcome back. So now it's time to
customize the footer. Customizing the footer
is going to happen inside the Customize area of our settings because the
footer is created using the Astra settings,
not Elementor builder. That's the same case
with the header. Remember we used the
Customize area to customize our header because it was created using the
asterisk settings. Going inside customize, scrolling downwards all
the way to the Footer. You'll notice that
one of the menu items here is for the builder. So let's go ahead
and click that. That immediately brings up a representation of the footer. So you'll notice that we
have this widget right here. That's this widget,
the logo widget, that's this one right here. And these quick links widget, then we have the
social icons here, and then the copyright area. So first of all, let's say you don't need
the social media icons. The bottom here, you don't
even need them on your photo. You can just go ahead
and remove them. And then now we're
left with two columns. And we want to have
just one column and have these in the middle. We can go ahead and
click this cogwheel. Then choose one column. Clicking copyright. Can go ahead and select
alignment there, center, and that pushes
everything to the middle. Let's publish that. I liked the way it looks. And of course,
while we were still editing the copyright texts, we can of course change
that to let me drag that. You can basically
type whatever you want if you don't want
to use a short code. So if I, for example, cat that you can just say
copyright, try need 25. That's what will appear. Or if you want to
use the short codes. This will automatically
be pulling the year for you without you necessarily
having to change it manually. And it's also pulling your site title automatically
from the system files. So in case you change your
website name in the dashboard, the site name on the photo
will change automatically, so you won't have to do
that manually or yourself. But if you don't mind
doing that yourself, you can always come here
and remove these and just typing my website.com. And that's not the
spelling of website. Alright, so that's that. And of course now to
edit any widget here, you just need to
click the widget itself and its
settings will pop up. Welcome to this. All right, guarded. We can go ahead and
change these details. And the select menu
options here is this specific menu
you want to pull from your list of menus. So going back inside the
dashboard, appearance menus. In the menus area
of our dashboard, we have a list of menus and you'll notice
that we have contact, primary menu and
quick link menu. Those are the three menus
we have at the moment. And we can create a new menu. But before we do that, if we go back here, you'll notice that this
has the same items, contact, main menu
and quick link. This here is the
Quick Links menu. This is the Contact Menu. And up here we have
the main menu. Because those are the
three menus we have. Let's say we wanted to display
a different menu here. All we need to do is
create a new menu. Let's give it a name. Footer Menu. Let's make
it a secondary menu. Let's make it a footer menu. Let's create menu. Now we have it as a menu. And what we need to do is add menu items from the
column on the left. Here we can add any items
we want to that column. So let's say we want to
add a link to the cart, a link to my account, and a link to the shop. Let's add them to the menu. And now we have those
three menu items. Let's save the menu. The footer menu has been
updated going inside this area. First of all, let's
publish the changes we had made before we refresh the page. Now it's published. Let
me refresh this page. Let's scroll downwards. Now, going inside
the footer builder. Remember we have
this widget here. So by clicking that, if I click that and select menu, we now have the footer menu
as it is one of the options. So click Footer Menu. Now that changes to the
new items we just created. And of course we can change
the title of these two, something like special menu. That's it. So published that override. So you can do the
same with this menu. When it comes to the logo, we can click that
cogwheel there or just click this Edit item
appearing here. Can go ahead and change,
replace this image. Scrolling downwards
to look for the logo. Add two widget and the logo will change
to the logo it added. And if you want this logo to lead somewhere when
someone clicks it, you can always add a link here. But I'll just put a placeholder right there and publish that. That's how to edit the footer of the landing page and essentially the footer
of the entire website. Now I think we're done
with the landing page. The next thing I
wanted to show you is now that we've seen how
to display the products. How do we create a product using WooCommerce
in the backend. Let's see how to do that
in the next lesson.
10. Create a New Product with WooCommerce Plugin: Welcome back. Now,
he started to create a product or a few products
using the WooCommerce plugin. So we're here inside the
dashboard because we already installed
WooCommerce while we were installing the
pre-made template. We have it here. Below
WooCommerce, we have products. This is part of the
WooCommerce plugin. Let's click products. So these are the products
we currently have. These are, of course,
the placeholders that came with the pre-made template. What we want to do is
add a new product. So click Add New. And let's give our
product a name. Products, product one. Let's give it a description. Let me just grab some description very
quickly from one of these products, Lorem Ipsum. So notice that the PayPal payment option is showing up here
because we already sorted out the PayPal
WooCommerce integration. Let's paste that
description in there. Now, this description here
is what shows up down here. Then this description is what
we need to paste in here. So let me just add a word, summary so we can distinguish them when we
have our product ready. So very quickly before we
make any other changes, I want to publish that. What we wanted to do next
is add a product image. I'll go to upload
files, select files. Go inside my downloads page. I had downloaded two
products that we can use as sample
products. So here we are. Let me just change that
name for a second. Name1, name2. Let me upload those
two products. Right, so now that we
have this image selected, I'll go ahead and
add to gallery. Now our product image is set. Let's go and say Update. Let's preview changes. Wait, where is our
product image? Away? We said the
product gallery, who are supposed to
set the product image. So this gallery is
just in case you have different images
of the same product. Maybe if you've taken photos
of the same product from different angles
and you want to be able to show all those
different angles. You can add as many images
as you want, the gallery. But we want to set the
product image, right? So I'll go ahead and
pick that quickly. There we have it. So
let's update that. And then let's
preview the changes. There is our products. Remember, this summary here
is what we added down here, product short description, and then the full description of the product goes up here
right below the product name. That's what appears down here. So they've left a
lot of room here, so you can add as much
information as you want, even if it means five paragraphs describing
what the product is all about. Because we've added
an image gallery, and we only have one
image in the gallery. It's only showing
that one image, but let us assume, for example. This is also one of the
images in the gallery. Add it to the gallery. Now we have two product
gallery images. Update that. Let's
preview the changes. Right? So there we are. We can go, we can scroll
through the images as we want. And we can also view an
isolated version of the image. Let me close down this part. And now notice we don't have any pricing or
payment options here. And that's because that's the
next thing we need to do. Going back inside our dashboard. First of all, we can't have our product in the
uncategorized category. So let's give it a category. Let's say, for example, eats a face cream. Let's give it a price. Regular price is maybe 249, but we now have a special
price discounted. Let's say he's now it's now 130. Of course it's not
a virtual product and it's not downloadable. Inventory. Of course the
product is in stock. Shipping. You can go ahead and set your weight dimensions. Linked products. So just in case we have other products that we
want to display here, we can go ahead and add them. So for example, let me
just go to the shop page. And if we have products
that are related to that, they will show up when that
product is in display. So for example, cocoa body oil and daily moisturizer
as an example. So I'll type cocoa
and daily app sales. So cocoa is searching. Say we want to cross-sale
daily moisturizer. Let me just save that
for a second so we can see what's actually
happening in the front end. Alright, so let's
preview the changes. Now we have pricing. With a discount. We have an add to cart option. We can also choose the quantity of these products that we want. Let's say we want units
or these products. Now, you may also like
the cocoa body oil. This is an app sale
or related products, which is not necessarily the
same as these products here. We can cross-sale that. Another thing we need
to do is remove. As you notice now we have in the gallery we have
this image repeated. So because it's already
featured image, we can go ahead and remove
that so that it's not repeated because the product image
itself will be in the gallery. So if I update that, having removed these
repeated image here, previewing changes. Now we have just one instance of that image and you can add as many other
variations as you want. Basically that's how
to create a product. So this marks the
end of the lesson. We've learned how to create
a product using WooCommerce. The next coming
lessons we'll just basically be using Elementor to edit these pages because they are created
using Elementor. So I'll see you in
the next lesson.
11. Help Me Teach Elementor to 10,000 Students: Hello my friend. First of all, I just want to say thank you very
much for joining me in this class and
choosing to learn from me. And also want to
say congratulations for coming this far
into the class. The fact that you've
come this far into the class means you're
gaining value from the class. And so I really appreciate you and I hope you are
enjoying the class itself. That being said,
I need your help. I'm on a mission to teach at least 10 thousand
entrepreneurs like you to use elementary to build
their own websites or landing pages to
sell their products. And here's how you can help. You see when a new
student joins a class on Skillshare and then likes that
class and leave a review. It helps other students know what to expect
from the class. And when a class is getting a lot of reviews from students, Skillshare says,
Hey, you know what? This class is getting
a lot of engagement and a lot of reviews
from students. So it must be helpful. So it must be useful. And so let's push it upwards in the library to make it more
discoverable by new students. So the Skillshare
algorithm pushes that class upwards and
makes it more visible, more discoverable
to new students. Because it's been receiving
positive reviews. And that's where you come in. Please join me in this
mission and helped me teach at least 10 thousand
students how to use Elementor, how to build beautiful
landing pages, functioning websites
by leaving a review in this class and letting them know what to expect
from this class. It'll only take you about
two minutes and you're done. But your review will go a long way in helping
new students, prospective students, know
what to expect from the class. Class meet your expectations. Did it exceed your expectations? If you have any
questions, remember, you can always drop them
in the discussion area below this video and I will
be able to help you out. I always respond to
every single question or comments that students
leave in any of my classes. And with that being said, I just want to say
enjoy the class and I'll see you in the next lesson. Peace.
12. The Shop Page: Welcome back. In this lesson, I want to
talk about the shop page. All our products are displayed
here for the customer. So we need to have a little talk about the page. Right now. We're looking at the
default sorting, but we have a drop-down menu
that has a few options. Starting from sort
by popularity. How many times the
product has been bought from the most popular
to the least popular. So the next is sort
by average rating. So of course, the, the highest rated
product will come first. Then we have sort by latest, and that's the latest
products you've added. And of course, as you can see, the two products we just created have shown up
first before the rest. And you'll notice we've
created these first and then this was the
last one we created. And that's why it's
showing up as the last, as the first product. We have sort by price from high, from low to high, and from high to low. Of course, that's
self-explanatory. So that's all about
the shop page. Of course, there's really not much more to say about the page. The next thing we
want to do is look at these three pages. And these pages are
created using Elementor. So we will need to edit
them with Elementor. Let's see how to do that
in the next lesson.
13. The Testimonials Page: Let's now look at
these Elementor pages. Of course, here we are. So this is the
testimonials page. So you'll notice that
because we've opened it, we now have the option
to edit with Elementor. So first of all, let's scroll downwards all the
way to the bottom, and that's how it looks. So you'll notice here
we had a call to action sign-up form because we got rid of the other plug-in. It's now not showing up. So that means we need to replace this with the formulator
form we created. Let's click edit with
Elementor. Here we are. So of course this is like the hero section we edited
on the landing page. If you select this section, we have the same settings. We can increase the height, leave it at the default size. We can select these testimonial. This is a heading, so of course we can add a link if we wanted to
lead anywhere else, but I don't think we would
want it to lead anywhere else because we are already here
on the testimonials page. And of course we can
change what it says. Welcome. We can change the color. Basically everything we did on the hero section and
on the landing page, we can do right here. So remember this
is a testimonial and we already saw how
to edit a testimonial. By selecting this, we bring up the testimonials settings and we can add a title
to the testimonial. So this person is in the
marketing department. That's not how to write
that, but no problem. We can add a link. We can open it in a new tab. It says open in new window, but this actually means opening a new tab within
the same browser. So don't worry about that. And of course,
going inside style, we can change every aspect of the testimonial elements,
like the title. We can change the text
color maybe to something like niche, greenish color. We're just playing around
with the settings. We're not trying to make
these websites amazing, but of course I count
on you to apply your creativity and make your website as
appealing as possible. Remember, we can always change
this background overlay, selecting the section going
inside background overlay, change that to black color. There are several
other settings here that you can experiment with. The seed, the best
thing you can get. And of course I forgot
to mention that you can always change the
background like we did with the hero section. I don't have an image
I can use here, but of course, you know, you can always have,
of course, you know, you can always use
any image we have. Like that now. Looks much better. Actually. Update that. Let's preview the changes. That's how these
page looks smell. Go ahead and now that you
already know how to play around with the
testimonials element. If you can go ahead and
make the necessary changes. So all your testimonials. Then in here, of course, what we need to do is
select this short code. Now that it's appearing,
Let's delete that. Let's go back inside our
formulate the forms. Remember we created
the sign-up form. So click this cogwheel
and copy shortcut. The shortcut has been
copied successfully. Let's go back in here. And let's paste it in here. Now it's showing up. Let's update that. Let's preview the changes. Scroll downwards. Now our sign-up form ys
appearing, it's visible. Now you might be wondering
what if I wanted to change the color of this button? That's something I forgot
to mention when we were creating the form itself. So going back inside
our dashboard, sign-up form, Let's edit. While we will create
it in this form, we only use the Fields tab. There are several
other tabs below here. And these are the tabs
we have to go through whenever we're creating any
form all the way to the end. And you'll notice
that these fields, then Appearance,
then behavior is the same thing that
we will follow here. So once we're done
creating the form, adding the fields, the next thing to do is
change the appearance. So when you click that, now we're in the Appearance tab. And here we can
say, for example, we want it to be flat
without the borders. If we go to colors, we can choose costume, and that brings up more options. One of the options here
is the Submit button. Here we can change the color to maybe some sort of
read, for example. But of course, feel free to choose any other color you want. That set to that. Let's preview it before saving. Alright. Let's update that. You can also change
the hover effects. So on the submit button and the colors submit button hover. We want it to be maybe black. On focus. We also want it to be black. Update that. Once we've updated the changes, we can go in here and
reload this page. Now when we hover, it's black. That's how to make changes to the appearance of all
your forms in formulated. That's all about these
testimonials page. And of course, if we
open the about page, It's pretty much the same thing. Using elementary, you can repeat the same
steps with used by now you must have learned how to play around with
all these elements. We already saw how to work with all these different elements
on the landing page. So let's go inside
the contact page. Inside the contact page, we're supposed to
have a WP forms form. Remember we had two forms
before we deleted that plugin. And the other foremost,
a contact form. Now that we no longer
have that plug-in, what we need to do is come
inside terminator forms. I pink, we should do
that in the next lesson. So I'll see you shortly.
14. Contact Us Page: Welcome back. So here we are inside the formulator forms were
in the forums field. We are looking at the list of the forms we've added in by now, we only have one. So if you have ten forms you've
created with formulator, there'll be listed here. What we want to do is
create a new form for our contact page.
Let's go there. Let me just close this down. When the contact page
and we want to create a form to replace
these WP forms width. So let's go ahead
and click Create. And now this time we want to
create a Contact Us form. So select that and continue. Contact form, let's say Create. By default, it's already pre-populated with the
fields that we will need. So for now, I don't think we
need to telephone number, but if you do, you can
always leave it there. So I'll remove that. Delete. Remember if you delete any field and
change your mind, you can always insert
it from inserted field. Let me close that.
So here we are. You started field phone number. Here's the phone number. You can always add
it back, insert. By default, it brings up
the settings for the phone, a field that we've just added. What I'll close that. And here's a phone you
can drag and place it where it was. You can also have
them side-by-side. When that blue line appears right there
on the right side, or anywhere you hover. You can place any field
anywhere you want. If you don't want to use this, you can also use this
option in certain fields. Weeds the same, but
I want to get rid of the phone number as
I had already done. Now we have the e-mail address, first name, so let's
switch them up like that. And then the message
field text area. Let's preview that
before we publish it. That's how it looks. If we have them stacked
on top of each other. Let's preview that. That's how it looks. Now that we'd like how it
looks, Let's publish it. Now it's published. Let's pick the formulator
form short code, copied successfully. It's going say that
contact page and edit with Elementor because
we had not clicked that yet. Edit with Elementor. Right, so let's
scroll downwards. This point. Let's delete that
short code there and pastes my new shortcut
we just created. Here we are a very nice
looking sign-up form. Let's update the changes
and preview the page. Scrolling downwards. That's how our
contact form looks. Going back in here. Let me close that down and we can go to the Appearance tab. Make it flat. You can change the
submit button color to that red. On hover. Let's make it black, unfocused. Let's also make it black. Let's update that. Let's preview the changes again. Scrolling downwards.
There we go. Here we also have a map and
we can zoom in and out. Just in case we have a physical location that we
want to direct people to. And the way to do that
is let's scroll downward right here by selecting these elements that's
holding the map. Let's select this element. Just right-click here
and edit Google Maps. Now all you need to do
is provide a location by doing a quick Google
search of your place. Then you can set the
default zoom level. And these other parts are straightforward and
easy to edit for you. I'll go ahead and click Update. This is a social media element. When we click it to edit it,
it's pretty straightforward. You can remove any
that you don't want. You can go inside the style
tab to edit the colors. If you want them to. It's sort of orange.
There we have it. Can also choose to have
their official colors. So if it's Facebook,
Instagram, and Twitter. But we'll go with costume. See what you can do with
all these settings. You can also change
the hover color. So right now when you hover, it's black, secondary color. Let's see what about red? That's a background color. So let's click these two clear. Then let's change these
two, maybe a red. And now the only the icon will
change the color to read. Write, update that. Let's preview the changes. Scrolling downwards. Our contact page. Now complete. Every part of our website is now complete and customized
to our liking. Course. Take some time to do
everything in your power to personalize your website until you're satisfied
with how it looks.
15. Final Thoughts: This marks the end of our class. I really hope you learned
something about how to create websites using
WordPress and more specifically, you learned how to build an e-commerce store or
shop with WordPress. Now the next thing I
would recommend you learn is SEO, search
engine optimization. And that's basically how to
make your website visible to search engines and visible
to your intended users. When people go out to
search engines like Google to search for the
products you're selling. You would love your
website to be amongst the first results in
the results pages. So how do you become visible
to the search engine so that they show your website when people search for the
products you're selling. I already published a class on search engine optimization, specifically for WordPress
uses how to optimize your WordPress website to make it more visible
to search engines. Go ahead and open up my
profile on Skillshare. One of the classes there is
WordPress SEO simplified. Watch that it's only
16 minutes long and learn how to make
your website visible. Learn how to optimize your
website for search engines. Otherwise, it was a pleasure
teaching you how to build an e-commerce
store with WordPress. And I hope to see you in the
next class in the future. My name is Ken visa. See you in the next one piece.
 Ken Mbesa, Web Designer | 3D Artist