Transcripts
1. Welcome!: Creating art is absolutely my biggest passion in life. I always love to explore a different art techniques and see what it can do. I work with different forms of art. I make abstract acrylic paintings. I do watercolors, mandalas, botanical ink illustrations, and digital illustrations. Hi, my name is Antea and I'm an artist and constant creator from Italy. For this class, I choose to share with you all how to make a mandala. We are going to be making a botanical mandala and getting inspired by our beautiful mother nature. We will start with finding inspirational outdoors. I'll show you as well how to find good reference photos using Pinterest or websites like ownsplash or pixels, which have lots of great images you can use to get inspired. We are going to go over how to find the right material, how to sketch some basic botanical doodle, and how to create our Mandala step-by-step. This class is suitable for all levels, so, whether you are an experienced artist or just a beginner, you don't have to worry if it's your first time joining a Mandala. At the end of this class you are going to have a botanical Mandala that you can frame or just use it as a card or you can even use it to the decorate your journal or notebook. I'm so excited to see you hear and I can wait to get you through the span and relaxing journey. So let's get started.
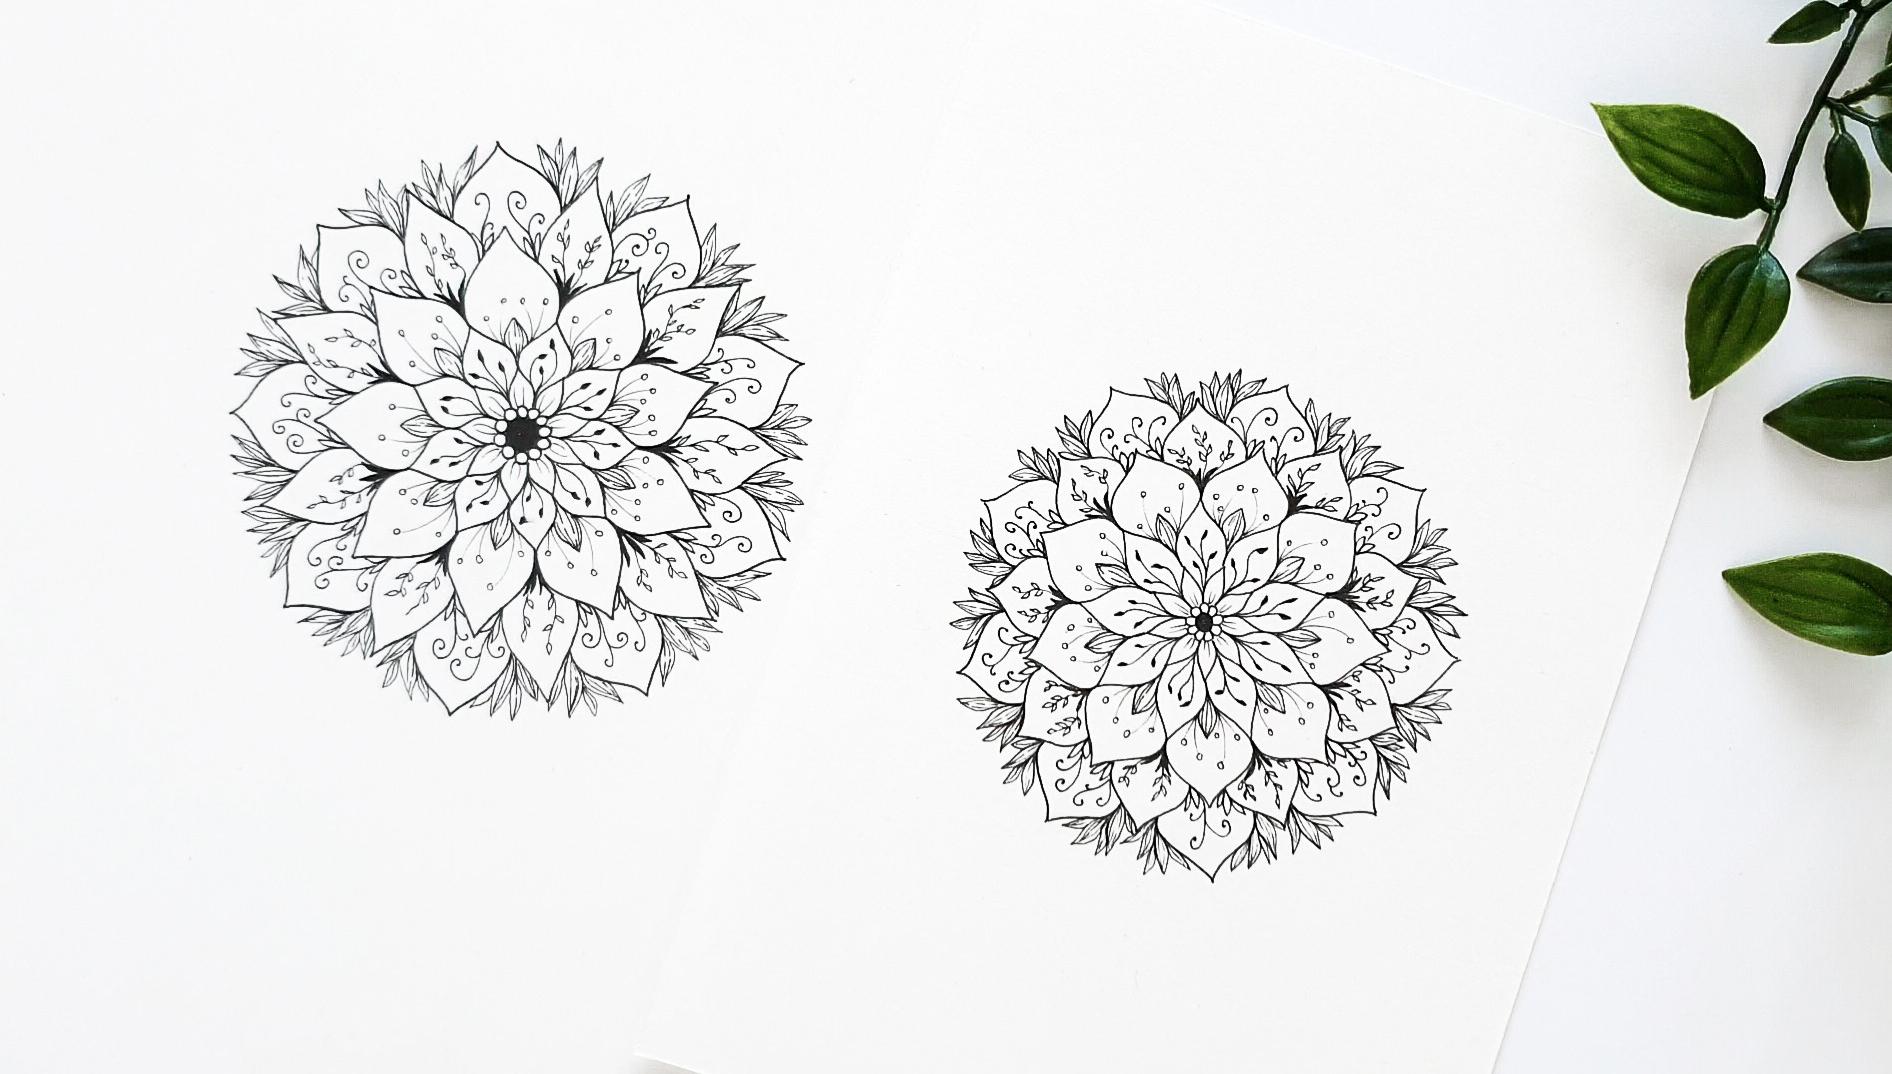
2. Our Class Project: Thank you so much for enrolling in this class and choosing to spend your time with me. I'm super excited to share with you , all the knowledge i gained through the years in making mandalas. They hold a very special meaning to me because when I discovered this intricate designs and started to draw them, I actually found out about my art skills. For this class we are going to be making a mandala inspired by nature. I'm a nature lover and having the idea of including it in my mandalas, I think it was just great. It gives to the draw a fresh and contemporary look. These are some of the examples I have created, just to give you a clear idea of what the final result will be. Don't let details intimidate you because I remind you that this class is totally beginner friendly. I'll guide you step-by-step through the entire process. In the next lessons, we are going to be addressing how to find inspiration in nature and what can actually make us feel creative. I'll show you how to take good reference photos outdoors and how to find great pictures on the Internet. Next, we will be learning how to draw some botanical litho. I'll show you how to sketch flowers and plants that we will use later on to adorn our mandala. Lastly, we will be making our mandala and adding details to it. There's going to be a bonus class where I'll show you how to make mandala patterns. Building a pattern library can be extremely helpful to get new ideas when we lack of inspiration. Before we get started, I suggest you to check in the class description all the material we will need. See you in the next lesson.
3. How to Feel Inspired and Find Ideas: In this class we are going to talk about inspiration and how to get creative. So what's inspiration? Inspiration is the process of being mentally stimulated to do or feel something, especially to do something creative. So it's that feeling that makes you want to take action and do something. Ideas can come from experiences, interactions with people, knowledge gained from reading a certain book, memories from the past, a picture, or just a place we like to visit. Anything that makes you happy can truly inspire you, so keep that in mind. As I already told you, I love being in nature and my main source of inspiration comes from it. It's just a place where I feel at peace, I can rest my mind, and just feel creative. When I go out for a walk, I always make sure I take reference photos I can use for my artwork. But everybody is different, so you might feel inspired by listening to some music or just talking to a person you look up to. For this class, we are going to find inspiration in nature because we need botanical elements we can include in our mandala. So I highly suggest you to start paying attention to things around you and start being curious. For example, when you're outdoors, observe how flowers and plants are made. Look at each detail and try to take photos. I suggest you to take more than one picture, one or two to the entire subject and if you can get one detail, makes sure your subject is facing the sunlight, so this way you don't get some heavy shades that won't let you see the flowers or the plants details. If you're looking for inspiration without going outside, no worries. There are plenty of websites where you can find stunning pictures from the natural world. Let's start with Pinterest. You may already know this one. Pinterest is a social media network where you can find pictures that are from different websites. You can pin the pictures you like and putting them into a board. You can create different boards. For example, here are my Pinterest. I have this one called botanical doodle and anytime I see a plant doodle I love, I make sure it goes into this board. Pinterest really helped me stay organized and not having like pictures from different art techniques all over the places. I tend to use Pinterest to look for other artists art work or just to find some illustrations I can use to get inspired. In our case, Pinterest can be useful to look for botanical doodle or like some botanical shapes. To find images you are looking for, all you have to do is just typing a few key words, so one or two is usually enough. I usually find that the first results are the best and if we look for more, I click on the image I like and see related results. Make sure to pin what you love so later on you can have a pretty good amount of inspiration from your Pinterest. Moving on, if you're looking for great images, you can also check out the websites like Splash or Paxos. They are pretty similar. I really like Paxos. I use it a lot and I can always find great pictures. So I'll be showing you this one, but it's really easy. As you can see, this is the homepage and if we scroll down, we can already find nice pictures. But for this class, we need nature related pictures. So we're just going to type a few key words into the search bar, or we can look through Paxos categories, but I always prefer to do my own research. So if we type the word nature, Paxos will display various pictures. So it's best to be a little bit more specific, because we need to find botanical detail and plants and flowers. We don't need landscapes, so we can try using the word flower, leaf or botanic. As you can see, there are so many beautiful pictures. When I go on Paxos, I can really get indecisive on the picture I have to choose as a reference photo for my artwork. So when you find pictures you like, I suggest you to create a new folder on your laptop, where you'll save pictures for your artwork. For example, this is the folder where I keep pictures that can help me getting new ideas. These are all nature related pictures I used to create my botanical mandalas. I like to have my ideas and inspiration in one place so I can always find something. Inspiration comes and goes, so one day you can have more than one idea and the other day no ideas at all and by keeping a library of pictures you really like, and pictures that emotion you, you always have something handy.
4. Materials: I hope you're all happy and inspired after the previous class. So now let's quickly go over what you will need for this class. Let's start with basic stationary. We will need a sheet of paper. You can use any kind of paper but I highly suggest you to use a thicker one as we will be using the compass and it's very easy to get the hole where we will use it. Additionally, I find that the ink of the fineliner pens works much better and I just love to feel and see my illustration on a thicker paper. I usually work on a 200 grams white paper but as I said, any kind of paper works good. Another tip that I want to give it to you on paper is to use a smooth paper a couple of times I tried to work on a rough paper but I find that the lines that I was drawing didn't come up as I wanted. So on a smoother surface, the lines look much better they look clean and neat. Next items we will need are a pencil and an eraser. I suggest you to use a HB pencil because it has a soft lead and you can easily erase the sketch, whereas if you use a hard pencil the sketch won't came off so easily. My favorite pencil is the mechanical one. You never have to sharpen the point and the weight draw is just so nice. Don't worry if you don't have a mechanical pencil because you can use a regular one. For our circle grid, we will use some specific tools. We will need a compass, a protractor, and a ruler. For our inking part, you're going to need a felt tip pen. I always use fine tips drawing pens but you can use whatever you have available. So it can be a normal pen, a sharpie pen or a gel pen. To get a more precise look, I highly suggest you to use fineliner pens. Now we're going to see some of the brands I like the most. This one come in a multipack. You can have different sizes I love this one but you have to be careful when you go over with the eraser. The ink tends to get lighter if you press to much. Next we have the STA pigment liner which is just a cheaper version of this Staedtler. It's much cheaper and performing exactly the same as the Staedtler. Last one I have a Micron. I just bought a single pen because I wanted to try a new brand. I like this one but it's very easy to get a smudge on the paper. So I'm just using it to make some botanical doodle and something less intricate than a Mandala.
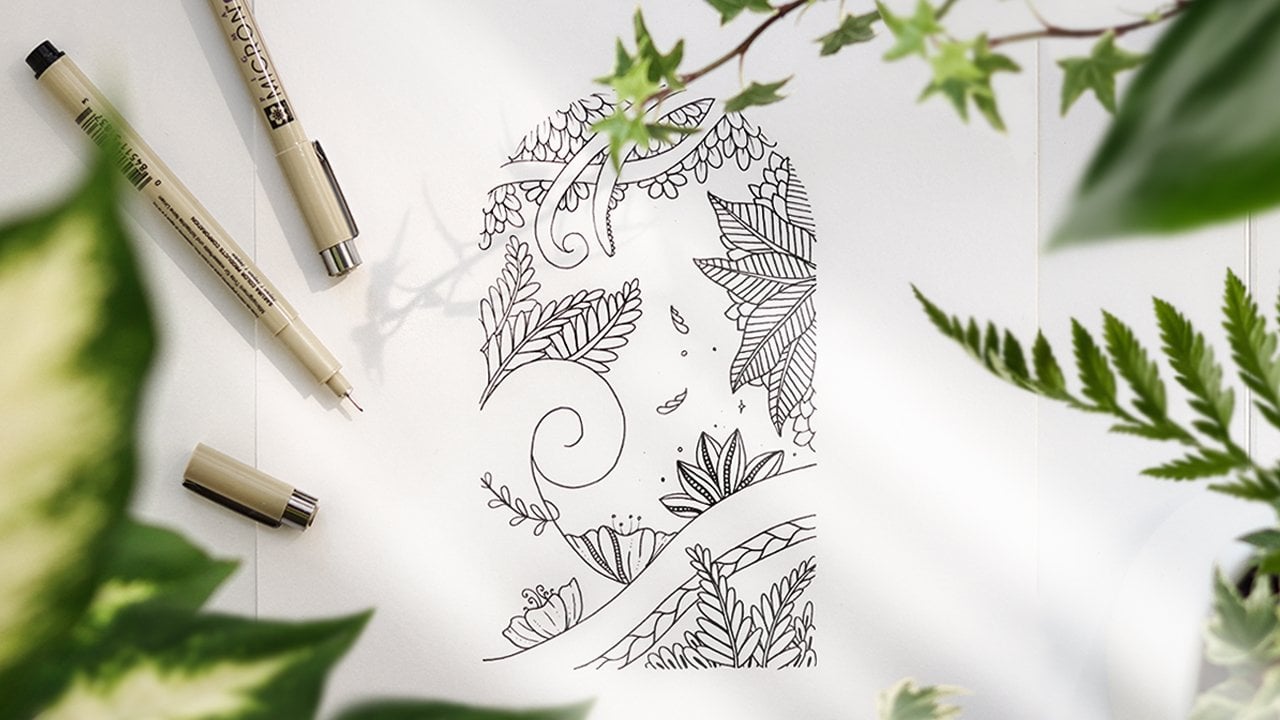
5. Botanical Doodles: In this class we are going to learn how to draw easy botanical doodles. First, I'll explain to you how I get the details from the pictures and how I draw it onto the paper. You can either use this process that I'm about to explain it to you to draw your own botanical details, or you can follow along with me by drawing the plant doodles you find on the worksheet. Before starting to draw the mandala, I always sketch the botanical details first. I'm just going to open the folder here my laptop where I keep all the pictures I have downloaded from Pexels or photos I took outdoors. I go through them and when I see a plant detail I like, I draw it. For the drawing, I use my own artistic interpretation and it doesn't need to be an accurate drawing, and I always try to keep it easy. I just want to show you through some examples. This process of getting botanical details onto paper. As you can see, shapes are really easy and basic. Every time I just try to get the essence of the detail I want to include in my mandala. Now we're going to use the worksheet you'll find in the rest of the section. If you cannot print it, no worries. All you need is a sheet of paper where you can draw. For our botanical doodle, you can use a felt-tip pen, or if you have fineliner pens, I suggest you to use them. For tiny drawings I always use fineliner pens from size 0.1 until 0.3. Right now I'm using the 0.3 for this first shapes. Let's start by making some leaves. You can start by making the main line first, this way, and then drawing the outer leaf. Or you can start by making the outer shape of the leaf first and then drawing the line in the middle. Moving on to the second leaf, this one is a little bit larger and the central line goes up till the middle of the leaf. Keep your hand really light towards the end. Third leaf. This one is similar to the first one, but it's a little bit more rounded and we are going to fill the shape with some lines. I highly suggest you to alternate continuous lines with broken lines. It looks more realistic. I really like this shape and I use it a lot in my mandalas. I just want to show you again what was the reference picture. Now we are going to draw some petals. Let's start by making the outer shape and then we're going to draw two lines starting from the bottom. Again, keep your hand really light when you're drawing these two lines. Moving on to the second petal. This one is really easy. The shape looks like a drop. Same thing for the third petal, which is like a reverse drop. One thing I forgot to mention is that I'm using the fineliner pen just so you can really see what I'm doing, but of course you can do everything in pencil first. Right now, I'm going to switch pen. I'm going to use the 0.2. I prefer to keep the tip of my pen smaller. It's going to be much easier drawing tiny shapes. When I have to draw branches, I usually start from the bottom and I make a stem, then I draw the leaves, then I go back and, from the same point, I draw another stem, another one or two stems, and then making the leaves again. Same thing with this second branch, but we're not going to ink the leaves. We're just going to leave them empty. As you can see, the shape of these leaves it's like an oval. Now we are going to draw a straight line on the top of it. We are going to draw the outer shape of a leaf and then from this main stem, we can draw two more branches. This one is very fun to draw. Starting from the bottom, we're going to draw a line that is going to end like a semi spiral. You just have to draw a little curl. You can make the spiral start from anywhere you want. For the next one, we are going to draw two stems starting from the bottom and then we're going to make some rounded leaves. You can do as many branches or leaves as you want. Sometimes I use my own imagination to draw botanical doodles like this one. I just imagine a bunch of branches and instead of drawing a normal leaf, I am just drawing a dot. Flowers. The easiest thing to do is start it from the central shape. Start at the base, come up and loop around, making a zigzag shape and back down. Right next to it, we're going to draw two more petals on both sides. We are going to do exactly the same thing for this one. The only difference is that the upper part has a rounded shape. One last variant of this flower. Let's draw the central petal. You can always vary with the shape of the petals. If you want to, just on one side, let's make one more petal. Next, we have some tiny flowers, made by three petals. I made this worksheet, so this way you could get confidence in drawing botanical doodles, and also it's a good way to warm up your hand and getting used to the motion of drawing. It might sound weird, but I promise you that when we will be drawing our mandala, we will be more precise and feel much more comfortable drawing. We have one last flower. Let's just draw a regular cycle for our center and then you can draw as many petals as you want. I suggest you to draw on the upper part of this petal a little wave. Now we can add a couple of lines in, just to add some texture. Now that we have completed this worksheet, we're going to start creating our mandala and later on, we will use some of these shapes to adorn our mandala.
6. How to Make your Grid: We're going to tackle how to make the structure of our Mandala when I first started drawing Mandala, I had no idea I needed a circular grid to make it look more precise. I wanted to show you how my first Mandala looked like. Here, I didn't use any grid, any measure tools. I really didn't know where to put my hands, as you can see. By doing this, I wanted to show you how essential it is to have something underneath where you can structure your Mandala. Also, it is much easier to draw when you have a framework. Okay, so let's start building the structure of our Mandala. Step one, find the center of your sheet and trace two crossed lines to indicate the center. I'm going to do this very quickly so we can move on to the second step. Now we need a protractor. Place it on the paper. For each degree, make a benchmark. Now we are going to connect each benchmark by drawing a line. By making a grid where we can build on our Mandala, we will be able to draw equal proportions. We will be more precise. I think it's less intimidating when we have a grid and it gives us a starting point, depending on how detailed you want the design to be, you can create a range of grids that vary. Third step, now we need a compass. I really want to keep things easy, so all you have to do is, placing the point off your compass in the center and start drawing circles. You can start making circle from the center which is what I usually do. I have no idea why I started by making the last circle here. Either way, it's fine. Keep around one centimeter distance between the circles and I suggest you to keep even less than one centimeter when you are towards the center. If you feel more comfortable, you can measure it. I never do that. Each time I draw a new circle, I try to keep an equal distance. We can always go back and add circles, any time. Don't stress too much about it. Don't put too much pressure when you draw this circles because we will erase everything we are doing in pencil. We're almost done with this first step of creating our Mandala. In the next class, we will start making the outer shape of the Mandala. I'll see you there.
7. Mandala Pencil Sketch: Are you guys ready to sketch our mandala? All we need is a pencil and an eraser. The first circle will be inked in the next class. We're going to start from the second one. We're going to fill this space by making tiny circles. It might take you a little bit of practice. If you feel more comfortable, you can always keep a sheet of paper next to you and sketch all the shapes we will be drawing. Now we're going to draw petals, I count four squares for each petal. This way I can divide the space and for each side, I draw the outer shape of the petal. I hope that by showing it to you, you can have a better understanding of what I'm saying. These very first circles are the hardest to fill in, because we have to work in a tiny space but I guarantee you that everything will get easier and easier. Now, starting from the end of each petal, we're going to draw two more petals by connecting the two lines. Don't be afraid if when connecting the two lines your petal doesn't look perfect because when you'll have an overall overview of your mandala, everything will look good together. You won't perceive imperfections as you might do now. We will continue by drawing petal shapes, and you can vary the size and the height. Just consider that we need to complete five circles, so we need five layers of petals. As you can see for this next petal, I'm not drawing the two lines starting from the previous petal, but I moved a little bit toward the inside. I hope that makes sense. This will give the mandala more depth and a little bit of movement. It's always good to do that. I want my fifth petal, which is the last one to end around that point. Otherwise, if I draw the line up to the last cycle, my shape will look too big and a little bit too high, so I'm just adding an extra circle in between. As I was saying before, you can draw your mandala as you want with bigger petals or smaller ones, it's totally up to you. mandalas can have many shapes, but for our class, I chose to structure the mandala by making petal shapes. I just wanted to give the idea of a big flower. Our next step will be inking this sketch and filling each petal with botanical details. For this last step, we'll need the finer pens.
8. Ink and Details pt.1: [MUSIC] Finally, we get to use our felt-pens or fine liner pen, depending on what you will be using. We can start inking our mandala. When I draw the outline of my mandala, I always use the 0.3. I find this size perfect for this part. While when I draw details, I want the tip of my fine liner pen to be a little bit more thinner. I generally use pens from size 0.05 until 0.2. Before we get started, always be aware that your fine liner pens could mismatch. Just be aware when you're using them. We're going to start from the center of our design. Let's fill this cycle first.[MUSIC] Now let's go over each pencil marks. During this process of creation, I always put a song I really love and free my mind from all the negative thoughts and just try to relax and enjoy what I'm doing. You can do this or you can listen to me while I'll be telling you a little bit more about how I started to draw mandalas. As I told you in the previous classes, that through making mandalas, I discovered my art skills. Growing up, I always loved engaging in creative activities, but I never had a support from my family when it came to making art, so I never thought about pursuing a life path in art. I just knew they wouldn't be so happy with it. After I graduated, I felt so lost and struggled with what to do with my life. I was frustrated with myself because I couldn't figure out what I wanted to do in life. During my college days, I remember that one night I was googling random stuff and an image of a mandala popped out. I just felt the need of drawing it. This is pretty much how I found out about this intricate designs. Starting to draw mandalas has really helped me process my emotions and find sort of inner peace and I slowly found my way. Every time I draw a mandala it's like a meditation for me. I really hope you can feel the same. You can feel inspired, at peace and you can feel relaxed.[MUSIC] Now it's time to draw details and give to our mandala the botanical look. I'm going to switch my pen to size 0.1. Which has a thinner tip and this way, I'll be able to make tiny shapes and drawing more precisely. But first let's erase all the pencil marks. We're just going to leave the outer cycle because we need a defined area when we will be drawing the last shape. Be gentle when erasing, depending on the pens you're using. The ink could come off and get a little bit lighter. It's always best to use a light hand. I'm going to keep the worksheet next to me. This way I can show you which doodle we will be using. Let's start by making the two lines in the first section of petals. The two lines we use for this flower. If you don't feel comfortable going over with the pen, you can use a pencil or you can keep a sheet of paper next to you and try out the details we will be making. I remind you that you can either follow along and draw the shapes I already picked or you can feel through to adorn your mandala with the botanical doodles used to cast out before or with different details you picked from your own reference photos. Our next detail is this branch with the inked leaves. I'm going to draw it starting from the bottom of the petal.[MUSIC] Now we're going to draw a tiny leaf here in the middle and once we have completed the cycle, we're going to make the lines inside our leaf.[MUSIC] This will be our next detail.[MUSIC] For this class this is the last detail we're drawing and we will continue in the next one.[MUSIC]
9. Ink and Details pt.2: Welcome to part two of this ink and details class. For this next detail, I just imagined some grass growing out of my Mandala. I'm going to make it black just to add some dark part to my design. From the grass, I am going to draw branches with some tiny leaves. I didn't pick one of the worksheet branches, but you can feel free to draw anything you find on it. I thought it was a great idea to show you one more botanical detail. Now I'm going to draw some tiny leaves, the shape can be really similar to the graphs we drew before. Now, do you remember the curly branches? Because we are going to draw them now. Our Mandala is almost completed. I'm going to show you how to draw the last detail, which I use pretty often. I just love it. The shape is pretty similar to this one. It's just a little bit more irregular and each leaf can have different proportions and can be different to the other one. Now you can see how the last cycle we didn't erase will be useful to us. It represent a limit. And if you want to give to your Mandala a regular cycle shape, I highly suggest you not to draw over that cycle made with a compass. We can erase the remaining pencil marks because the lines we will be drawing to complete our final detail are going to be really light and delicate. So we don't want to go over them with the eraser. Now, we are drawing the lines and I'll be using the same pen, but I'll keep my hand really light to make them look thin. If it comes easier, you can use a 0.05 pen. It has a small tip and it is super easy to draw thin lines. In the next class, I'll be showing you how to build your own pattern library. I'll be giving you some tips and you don't need to draw it if you don't feel like it, you can just listen to the class. Our Mandala is now completed. I really hope you enjoyed the entire process of creation and you are super satisfied with your design.
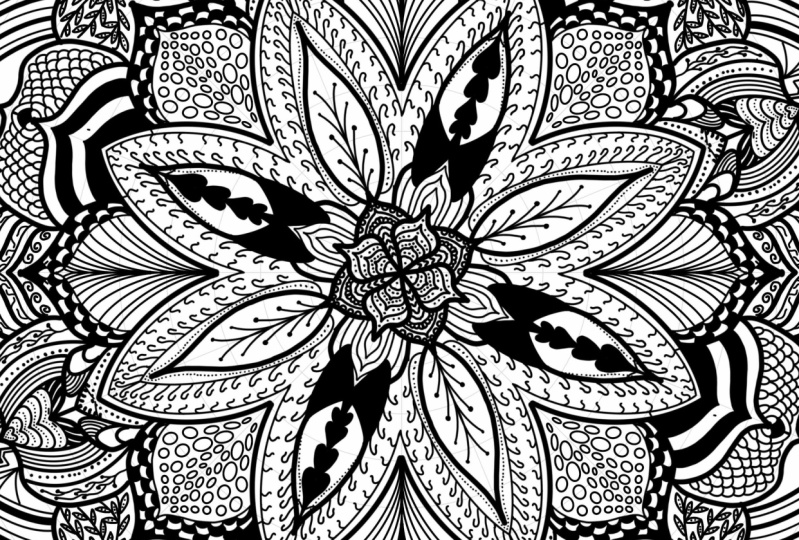
10. Mandala Patterns: In this class I'll be talking about Mandala patterns, while I'll be drawing, so you can see how I make them, and I'll be giving you some tips along the way. Having a pattern library can be extremely helpful to get new ideas when we lack of inspiration. This is the most important reason why you should start building your own pattern library. Making a couple of patterns before starting to draw Mandala is a good way to get started and warm up your hand like we did with the botanical doodles. You'll also get a closer understanding of what your Mandala will look like. So by previously drawing the patterns, you can already start imagine your Mandala. By combining different patterns, you can see how they look closer to each other. I like to keep a book where I draw patterns and anytime I spot a new one on Pinterest, for example, I make sure to add it on my list. When I don't feel creative or if I lack of inspiration, I always take a look to this book that I keep and somehow it always triggers my creativity and it gives me new ideas. One more reason to start building your own pattern library is that it can be a great tool to exercise and train your hands to become more steady. If you keep practicing on patterns, you'll stimulate your creativity. You'll also improve your drawing skills, allowing yourself to get confident and be able to draw a neat Mandala. If you feel like you have zero ideas on starting to draw patterns, I want to remind you that Pinterest is always a great place where you can find useful material for your art. Don't forget to make a pattern board where you can pin everything you collect from it. If you feel like botanic and nature doesn't represent you, I highly suggest you to try to explore new topics and create patterns inspired by your passions. Start asking yourself, what am I interested in, and what am I passionate about? So if we pick a new theme, for example, the universe, and want to build a pattern library, we can start including stars, planets, and we can fill shapes with dots, we can start using more ink and darkening up our Mandala. Before I started to focusing on botanics and nature, I explored as well different shapes and styles, so now you're seeing a Mandala I made a while ago, and this was inspired by the universe. As you can see, I tried to include some moon phases, there was the sun in the center, there are planets and stars. So if you are passionate about something, I highly suggest you to try and explore new shapes and make a unique Mandala. I really wanted to share with you guys all these tips and knowledge I gained through the years in making Mandalas and patterns and I really hope this was interesting for you and somehow helpful and maybe you want to try keeping exploring Mandala designs. I can't wait to see what you all came up with but we'll talk about this in the next class.
11. Final Thoughts : Thank you so much for taking this class. I really hope you enjoyed it and you had fun. We went through inspiration, reference photos, resources where to get ideas, material, botanical doodles, how to build a circular grid, how to sketch the mandala, and how to draw details. Lastly, we saw the importance of building a pattern library. Now, you have all the skills to make a botanical mandala and if you like this class, please leave a feedback, it will be so much appreciated. Also, feel free to follow my account if you want to get updates on my future classes. I would love to see your work, so be sure to upload it into the class projects section when you're done and you can also share it on Instagram, but be sure tag me so I can see your work. Thank you again and I'll see you next time.