Transcripts
1. Introduction: Hi, I'm Shaika, a watercolor
artist and teacher, and I'm super excited to welcome you to the
Skillshare class, boats and Reflections
in watercolor. In this class, we will explore the calm atmospheric world of boats and the
reflections they cast, whether it being
a still water or gently moving water
from moody monochrome, eerie sunset hue,
you'll learn how to paint structure and softness, balance, and light
all in watercolor. We will work through four
different class projects, each designed to build confidence and strengthen your
techniques in watercolors. If you have taken my earlier
class watercolor techniques, how to achieve eye catching
ripples and reflections, you will find this class
to be a natural next step. If you haven't to revisit this class to learn
the techniques, to paint the ripples
in watercolors. We will apply those
articular techniques here, combining them with
different vote formats and pulls composition. Class is ideal for beginners and intermediate watercolor
artists looking to strengthen their
watercolor story telling. Grab your paints and brushes
and let's sail together. I'll see you in the class.
2. Materials: H. Let's look at the materials that we
require for this class. Starting with the paper. I will be using Archie's
100% cotton, 300 GSM paper. I have this paper pad with me, and what I've just done is I've cut the paper
into two parts, and this is what I'll use to paint each of the
class projects. Next, for the brushes, I've used a large size brush from the brand silver velvet, a medium size brush, again, from the same brand,
and a detailing brush from the brand Princeton. You can use any large size, medium size, and a detailed
brush that you have. As we will be painting
wet on wet to make the application
of water easier, I've used this Haque
brush from silver velvet. You can use your large
size brush as well to apply an even a
water onto your paper. Moving on to the colors, I've used mix of
artists create colors, be it from PWC, white knights, Magill Mission. You can use any
colors that you have. Then we would need
two jars of water, one to rinse off your brush, and the other one to apply
even a water to your paper. I will be using a board to tape down my paper onto a surface. This is the board
that I will use, and I'll use this masking tape to tape down the paper
onto this board. Next, we'll use tissue paper or a rough cloth to
wipe off your brushes. I will be using these two
ceramic plates, as you can see, it's all dirty,
but I'll be using these two ceramic plates
to apply the colors. Next, we will use masking fluid. If you do not have any
masking fluid, don't worry. You can still paint around avoiding the areas of the boat. To apply this masking fluid, I'll be using this old brush that I have, so that's for this. That's all that you would
need for this class. Gather all the
materials that you have and I'll see you
in the first class.
3. Monochrome Misty Morning: Hi, everyone. This is the class project that we
will be painting in today. Okay, so I have my paper here
and with the masking tape, I'll tape down the
paper onto this board. Okay. My paper is ready. I was just rating
my fingers across the edges of the tape
so Dad you know, there's no gap between
the tape and the paper. And now we'll start
with the sketch. This painting is a
monochrome painting. It has group of boats, say this is one boat. M It could have
reflection like this. Then say there are
few boats this side. Another one goes like this. Then there is one
which goes like this. I say there's a
pole over here and all of these boards are
attached to this pole. Reflection for this boat
would be like this. It's a very still water. So you will have identical
reflection of the boots. Now, just using my eraser, I'll erase off this. So basically, that boot is
hidden with this boat right? Using my kneelding eraser now, I'll just tap off to
lighten the graphite marks. The color for this painting is neutral tint or paints gray. It's a monochrome, so I'll just take it
out onto my palette. And now we will start
with the painting. Using my large size hake brush, I'll just apply even coat of
water throughout the paper. You can use any large
size brush that you have and take time on this step. You would ideally want to wet
the paper very thoroughly. All the threads of
the paper should be wet that will allow
more time for you to work on wet or wet. Mm. I think this is enough. Using this tissue, I'll just dab off all the excess
water from the corners. Now, using my large size
brush and paint gray, we will start with the painting. I'll start from bottom to
top because as we go up, the tone of the color reduces. I'm specifically trying
to avoid the boats. Similarly here as well. Whenever you pick your color, start from the top
and then move down. This is called as
a gradient effect. You bottom and your top has
a higher tone of color, whereas if you see
in the middle, it's very, very light. That's what we're
trying to achieve. I'm just trying to
get a seamless blend. The graphite marks are
not very much visible, but that's okay because
the sketch was very light. We're able to paint
the boat even without the graphite marks, so
that should be okay. You see I'm just running my brush from top
to bottom or from bottom to top to
make sure there is a smooth blend
between the layers. And Okay. So now let's wait
for this to dry and then we will
paint out the boats. Meanwhile, using
the same tissue, I'll just tab off all the
excess water from the corners. Okay. The painting
has now all dried using my medium size
brush and paint scray, we will paint in the boats
and the reflections. So starting with the diluted
version of pains gray, I'm just trying to add
in the boat color first. And I want this to be
a little more lighter. So just adding in a little more water
to dilute the color. Before applying the
colour to the paper, make sure to dab off all the
extra water from the tissue. Okay, so that's the boat. I'll just add in
the torso of a man. It is very far from the shore, so we won't be able
to see the details. But adding this makes it evident that there is
someone sitting on the boat. Okay, so this is the boat. Now, again, taking in paint scrape and painting
the first boat over here. So as you come
near to the shore, the darkness of the
boat color increases. Okay. And then we have
the third one over here, the darkest one, which
would come like this. So I'm not painting the
second boat here yet. As the first one is still wet, the colors would spread and the two boats won't be evident. For this boat, I'm just adding some darker
tones towards the left, and as the area is wet,
it is spreading out. So I'll just clean my
brush and blend this out. This will help to give a
dimension to the boat. Now for the reflection, taking in diluted
tone of pain screen, and as the water is still, the reflection would be
a mirror reflection. Just adding that over here. With a very diluted tone, just ting this out. We have this also over here. This is the reflection
of the first board. Now, before we move on to the reflection of the
other boards over here, there is one board that
we had painted here, which is actually a
very diluted tone. It is mostly white, but it has some tones, adding that as a very
diluted tone of pain screen. Meanwhile, this nearest
one that we have, it will have a reflection
like this, adding that out. This one would have
reflection over here, which will go till the time we get the
other boat coming in, so it will still here. For this light tone boat, reflection would be
something like this. Mm hmm. Okay, so these are the
boats and the reflections. Let's just wait for this to dry and then we'll just add in some minor details to just close onto the boat and
the reflections. Meanwhile, that
dries using, again, a very dark tone
of paint scrape. Here say you have a wooden pole and you have your boats
basically tied up to that hole. Okay? Here would be the reflection of the pole. I just add in some broken lines between these two to separate out the
boards that we have. So there is also some
line on the board, which can be separated out
in the reflection as well. Okay. So that's the end
of the class project. This was a very simple and
an easy one, just one color. We tried to create a monogramatic
and a still lake view. We have a boat which say
somewhere in the far, so you styluted in color. You have three boards
near to yourself, so you have them in
some darker tones. Of the masking tape now. Okay, so this is the final
look of the painting. So I liked how
using just paints, gray and working with
different tones of the color, we were able to
achieve this look. Thank you for joining
for this class project. We'll meet you again for another
one. Till then, bye bye.
4. Soothing Sunset Lake : This is the painting for today. Okay. Let's start with
the class project. I have paper here, and I have my board. Using the masking tape, we will tape down the
paper onto the board. Okay, so the paper is ready. I'm just running down
my fingers across the masking tape to make sure that there is no gap between
the tape and the paper. Now let's start with the sketch. One third is the sky, so somewhere here
is the horizon. We have our sun over here and the reflection of the
sea somewhere over here. Now, moving on to the boat, the boat is somewhere like this. You have this section. You might not get the sketch
perfect at the first dry, but take your time and try
to sketch out the boat. This here is the
bottom of the boat. You have your planks coming in here and this coming in here. I will just rework on the boat. It has not quietly turned
out the way I wanted. And your boat will come like
this. This looks better. Now your reflection would be as it's almost a still water, not completely, but
still little wavy. You will have your reflections
coming in like this. Okay. So your boat is tight with the rope. Okay. Okay. Now, what I'll do is using
my kneelding eraser, I'll just lighten
the graphite marks. Okay. Now let's start
with the painting. Using my big parquet brush, I'll apply even coater
water throughout the paper. Take your time on this step and make sure that your paper
is thoroughly wet. More time you spend on this, more time you will get to
work on your background. The background for this one is a very soft tone background. So that's why I'm applying water over the top
of the boat as well because the
boat would be in a darker tone versus what
we have in the background. Okay, so the paper is
now wet using my tissue, I'll just dab off all the excess water from
the corners so that once the paper starts
to dry water from the paper would not seep
in into your painting. Now, taking in my large size
brush and yellow orange, dabbing off all
the excess water, I'll start with a very light
tone of orange at the top. This is the sun, we'll have little darker tones
of orange towards the sun and as we move up, the tone becomes lighter. Now using let and dabbing
of all the excess water, I'll add in that shade as
well towards the bottom. Now, using my medium
size brush and wallet, mix of wallet and
indigo as well, I'll add in some
trees like strokes. Towards the corners
somewhere over here, you have some trees as
well onto the banks. Trying to get that feel. Dabbing off all
the excess water, picking up more of violet and adding that
towards the horizon. And thinning up my brush and this sun that we
had created, right? So I'll just maintain
the whiteness of that. By using, again, my medium
size brush and orange, dabbing off all
the excess water. I'll just add in
some orange strokes towards the bottom side. Just depicting that
the sun is setting and you have some darker tones of orange towards the
bottom of the sky. And as you go up, the tone of the
orange decreases. The sky is okay. Now again, using my
large size brush, we'll try to paint the bottom. Again, your orange
would somewhere be in the middle and just
apply some orange tone. And using clean water, we'll just apply a
little bit more water over here just to
rewet the paper. We have some orange over here. And then we will have some
of the violet as well. The reflection of the
trees and all we will have some of the violet
coming in here as well. As we're painting a reflection, so I'm just having
my stroke this way, top to bottom to give it
the reflection of effect. Taking a little bit
of indigo as well because we have that tone
towards the corners, and then with indigo, sorry, with violet, just
dropping in more colors. Taning up my brush again, tapping off all the excess
water using yellow orange, just trying to blend this out. Towards the bank area as well, I'll add a little bit of let Again, taking a little
bit more of orange, dabbing off all
the excess water, we had our sun over here, right? So near the sun, we had a little bit little of darker tones of orange,
right in the sky. So that's what we also
try to depict over here. Okay. This blends
out with the violet. And with indigo, add some of the bluish tones
towards the bag area. Okay. Now again, moving to wild and adding a
little bit more tones of Wold it. Okay. Now, what we'll do is I'll
just take up my clean tissue and dab off all the
excess water from the corners to make sure that
these do not see back in. And using my medium size brush, I will just try to get that whiteness back
to show the sun. Just add a little bit of darker
blue towards the corner. I think we should be good now. Let's just wait for
this to dry now, and then we will
work onto the boat. Till this dries off, right? I'll just try to make
this sun area white. Along with that, I'll also lift some color from
this horizon line. This will give a missed
feel to a painting, just cleaning up brush, dabbing off all
the excess water, and just picking up
color from some places. Okay. I think we should be good. Now, let's wait for this to dry, and then we will paint our boat. Okay, so the painting
has not dried. I'll take a little bit of
burned sienna onto my palette. We will use that
to paint the boat. Now, using my medium
size brush and indigo, a very diluted tone of indigo, we will start painting the boat. So I'll start with the
first layer right now. Similarly here as well. Well not paint onto
this box that we have. We will add it with
another shade. But other than that, we
can paint this side. Now, very, very diluted
tone on this side. Okay. Now, taking a little bit of darker tone and
towards this corner, I'll just drop it off. Similarly towards
this side as well. The bottom section
of the board will be a little bit darker
than the others, right, because you will
have the shadow, and now just cleaning up my brush and blending
all of this out. Just dropping a
little bit more of Tarkat to get that smooth blend. Now, using a very
diluted tone of burnt sienna will
add in over here, the inside of the boot, being very careful near the
section where the brown and the blue will meet because we've just right now painted the blue. I've just left some gap
over there for now. Okay. I using my
small size brush, basically the detail brush and mix of indigo
and pain scrap, dabbing off all the excess
water on the fared background, I'll just add in
these two stripes. Let me take a little
bit more color, tabbing of all the excess water, and I'll just add in
these two stripes. For now, it will spread, but then once the
spackround dries, we add this again, then it will become
more prominent. Using this small brush
itself and burn Sienna, I'll just add in some
color over here. The boat that we will paint is very detailed, so
just take some time Again, taking more of
neutral tint or paints gray and just add in
some details over here. Meanwhile, the other
thing dries off, we will just add in
some details over here. Mm. Now, taking a little bit more darker
tone of burn sienna, dabbing off all
the excess water, and we will just
apply it over here. Over here, and this side. Now, cleaning up my brush, dabbing off all
the excess water, and we will just blend this out. Taking a little bit
more of burn sienna and just chopping off some
color at the edges. Now again, cleaning
up the brush, dabbing off excess water, and just blending this out. This hair like strokes that we see we will just blend
all of this out. Now taking in my
detail brush and pinscrave trying to add in some details to
this side of the boat. Being very careful with
a very steady hair, just trying to build this. You could also use your
black one liner pen if you are not comfortable
into painting this. Now, with some mix of
indigo and pain scrap, this side, just trying to add in little darker streaks over here. As this is an old boat, right, you would have some rust
streaks here and there and also because this side
would have the shadow of the planks or in the
side of the boat, right. So this would be
a little darker. So just adding that
darkish tones, okay? With sepia, basically
your paints gray and burnt sienna,
which is sepia, dabbing off all the excess water before I add those
dry brush strokes, we just add this wooden pane. These lines depict the
wooden pane of the boat. And now with paints gray and dry brush streaks,
we'll just add in. This gives the
effect of this being the surface of the boat and
also it be little rustic. Okay. Now, using the sepia, basically your burn sienna
and pain scray mix. There are these wooden plants
where people sit right. We'll just chart it out. We'll add in more details, but for now just making them a little bit
more structured. Again, taking indigo on
my small size brush, dabbing off all
the excess water. We'll just add in some
wooden lines over here. Taking in more indigo, dabbing off excess water, and adding it towards
this side as well. Now, taking in burn Siena, dabbing of excess
water and adding some lines and tone
over here as well. Mixing this with pains grey to get a darker tone or sepia. I'll just add that over here to give a little bit
more of dimension. Similarly taking in burn Siena, dabbing of excess water, and dropping them some
streaks on this side as well. And dabbing off all
the excess water, making these dry brush
strokes on the bench. Now, taking in paints gray, dabbing off all
the excess water, we will add in some
more final details. Now, taking in my
medium size brush, indigo, dabbing off
all the excess water will paint on the shadow. Say starting from here as the
water is slightly moving, so we will have wavy
reflection, making those marks. The darkest tone would be where your boat
touches the water. Similarly, the side as well. This would be the darkest, adding in a tinge of paint gray thinning up my brush, taking a little bit of indigo, and just blending this out. Using the detailed brush, taking in mix of pain
screy and indico, adding in some darker tones at the corners of
the reflection. Being very careful to make sure we maintain
the way we look. Okay, now let's wait for this to dry before we add in
some more details. Okay, this all has not right. Just adding in the final
touches to the painting using paincray and
smallest size brush, adding of all the excess water. I'll just add in the rope
details to the boat. So the boat is tied with the rope right while
we had sketched out. So I'm just adding that and this would also
have a reflection. Taking in again indigo, dabbing of all the excess water, and just adding
that in over here. Now, bring in again the pains gray dabbing
of excess water. We'll just add in few
birds to the sky. Okay. Now using again the paints
gray and the same brush, we'll just add on some
final details to the boat. And now I using my
white chil pen. I'll just add in
some final details with white, some highlight. Oh That's it. I think we're done
with the painting now. This looks beautiful, right? Peeling off the masking tape. And this is the final
look of the painting. We'll meet you tomorrow
with another class project. Till then, bye bye.
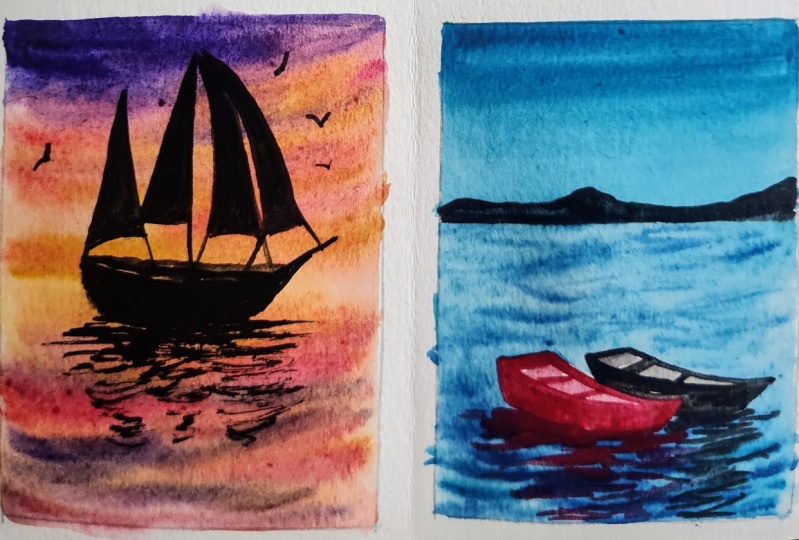
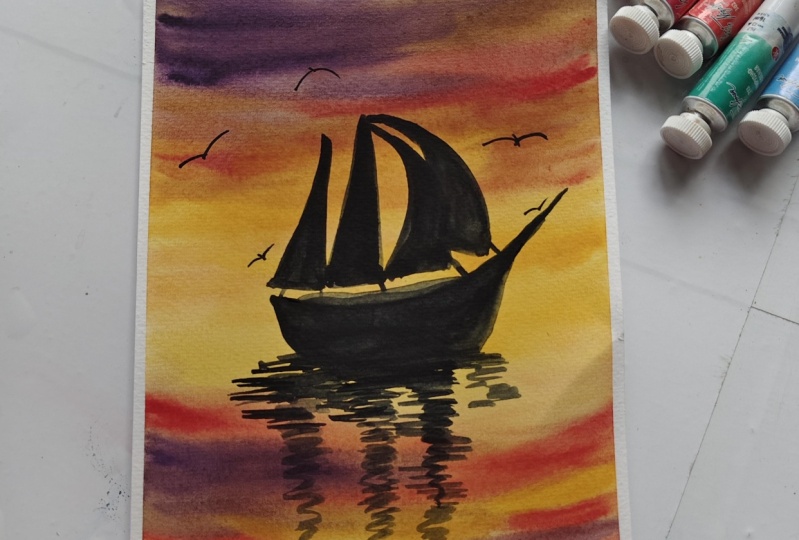
5. Fiery Sunset : Hi, everyone. This is the class project that we
will be working on today. I have a paper here on the board and using
the masking tape, I'll just tape down this
paper onto the board. Running my fingers
across to make sure that there is no gap
between the tape and the paper. Now, starting with the
sketch for this one. So this is the horizon
line that we have. We are going to paint
a sailing boat today. So say, this is how it goes. H And this is where the first flag comes in. Here's the second one. So some strings attached. You have the fourth
one coming in here. This looks better.
We will be painting a sunset view so we don't need too many details over here, but it's good to know what
all we're going to paint. So it gives us a view of how we can have that done
while we work on it. I'll just clean this up a bit. I think we're good. Okay,
let's start with the painting, taking my large size
brush and water. I'll apply even coat
throughout the paper. Take some time on this step and make sure that the
paper is thoroughly wet. Move your brush
across the paper so that there are no corners
that gets left out. And also, there are no puddles
of water at any one place. Okay. What I'll just do
is using my tissue paper, I'll just tab off all the
excess water from the corners. Okay. Now using my large size
brush and cellular yellow, we'll start painting the sky. So we also paint out the water reflections
because those are the same colors
that we have onto the sky would be also
reflected on the water. That's it for yellow. Now
taking in permanent orange, we will add that to the
sky as well as the water. I am purposefully keeping
the top of the sky blank. You will know why
in few minutes. Now taking in vermilion. You can see I am just playing
around with the color and applying horizontal strokes to the sky, as well as the water. Okay. And at the top, we'll add in the violet. Voilet when mixed with yellow or orange
gives a muddy color. So making sure we
don't mix them a lot, and this is the reason we didn't start with yellow or
orange from the top. Okay. So that's the first
layer that we have. Okay. Now using my medium
size brush and yellow, taping of excess water, we'll try to clean
up the sky and add more tones to the sky as well
as the water reflections. Okay. Next, going
ahead with orange, tabbing of all the excess water, adding this tinge of
orange near the horizon, and then trying to lay
it around in the sky. Similarly on the waters as well. Okay, now taking in vermilion, tabbing of all the excess water, just trying to add in some clouds or
streaks onto the sky. Okay? Okay. And similarly, we'll also
add some reflection as well. Okay. And using the oiled
tabling of excess water, adding some darker
tones and clouds. Okay. Similarly, just adding a very slight tone on the
reflection side as well. Okay, what I'll do is using the yellow dabbing
of all the excess water, we just try to blend
all of this out. So yellow is the base that
we have in the water, and orange, red are
all the reflections. So I'm just trying to blend everything out with the
yellow that we have. Okay. And towards the
bottom of the reflection, this is more on the red side, just adding in more
of the red tones. Okay. Let me just dab off the excess
waters from the corners. Mm. I'm pretty much happy with the way
this has turned out. Let's wait for this
to dry and then we'll see in case we want
to add another layer. Okay, so the paper
has now dried. Now using my medium size brush
and paint gray or black, we will paint in the bowl. So I've taken in my paints gray, and starting with
this corner for now, we'll just add in the shade. Being very careful near the corner areas. Okay. Okay. Now taking in a
little bit of a darker tone and just dropping it
out at some places. Now, cleaning my brush, dabbing of excess water, and just blending
all of this out. Now, similarly, taking in again diluted form and we
will paint out the black. I've just added some
colour onto the corners, cleaning up my brush, and we will just try to
blend this out and get a lighter tone somewhere
in the middle. Be very careful while
painting all of this. You can use your
small size brush to get that cleaned up look. I'm switching onto
my small size brush, taking in the color, and just being very
careful on the black. Again, taking a
medium size brush, taking in the shade, and just adding that over here. Similarly, for this one as well. Being very careful on the
corners and the edges. There is a small line
here which I'll add at the bottom of the flag,
leaving slide tap. This is what is your pole, I'm just taking in my
detailed brush and being very careful For this one as well, adding in a thin line
to depict the whole. And here too, we
have a short line. Okay. Now again, taking in my medium sized fresh
dilute tone of black or pain gray and we'll
paint out this flag. Whenever you take in more color, dab off excess water and then apply the
brush on the paper. Okay, so this is the first one. So it's cleaning this up. Okay. And the second one, I know it overlaps, but because it's not seen, we can just paint
this out this way. Okay. Now again, moving on to
using my small size brush, we'll just add in the strings that we have of
these flags, okay? A very diluted tone of paints gray using a
small size brush, we will just add some
tones to this section. We'll just leave
out the window area that we had sketched here. Okay, so this is done. The darker tone will add
this part of the boat. Now using a tone slightly darker versus what we used
to paint this section, we'll add that to the corners. This will give an effect of the sun behind the cabin area, the gradient of lighter
tone to a darker tone. Okay. Now again, using
my small size brush, taking in faint gray or black, we have the railings. We just add some
highlights to this. See this is another small
top of Twist that's darker. And we will just blent
all of this out. Okay. Okay. Now,
once this dries, we'll add some people
and all those things. Now what I'll do is using
indigo and paint scram mix, add some tone onto the windows. Okay. You don't want
it to be very precise. I just want to make it a little bit different versus what
we already have, right? The black and pinscrey. Okay. Now for the reflections, I'll shift to my
medium size brush, and using paints gray, dabbing of all the excess water will paint in the reflections. Okay. So this would
be as is, okay. And then you can start having these wavy strokes
depicting the reflections. So you have this
over here, right? You will have reflection
of this thing. When you are very
near to the object, right, which is, for example, the boat is the
object over here, your reflection in the
water would be very thick. But when you start
moving away from it, it becomes hiller, okay? Okay. Now say for this one, the reflection starts somewhere here because it's a
little longer, right? So the reflection
would also go a little longer versus
the first one. Then you have here
two reflections. It would be a little thicker. You see the strokes
that I'm making. I'm just making wavy strokes
to depict the reflections. And at the top, it is almost the same, right? So it becomes
tharer and thinner. Okay. This I'll make
a little bit more thicker because you have
the flags together, and then it starts
to split away. Now, what I'll do is using
the small size brush, add heaer strokes
towards the end. Also, the corners of the reflection that
we have over here, right, due to the waves, we would have broken streaks. So using the detail
brush, we will add those. Okay. Now again,
using the same brush, dabbing off all the excess
water. This is dried, right. So I'll just say add in some people standing over here near the railing,
some over this side. And we will close it with
some birds flying in the sky. Just adding two or
three. No more. Yeah, I think that's all. I will just clean
up my brush and using very diluted
tone of paints gray, add some shade over here and also add strings and
all that you have, right? We'll just add that as well. Okay. I think that's
all for the painting. Let's wait for this to dry, and then we will peel
off the masking tape. Okay, so the painting
has all now dried. Let me peel off
the masking tape. This is the final
look of the painting. Hope you enjoyed
this class project. We meet you again
for the next one. Till then Bye bye.
6. Blue Waters: Hi, everyone. This is the class project that
we will paint today. I have my paper here ready. Using the masking tape, we'll tape down the
paper onto the board. Make sure to run your fingers
onto the masking tape. This is to make
sure that there are no gaps between the
tape and the paper. Okay. Starting with the
sketch for this one. So here we have
our horizon line, we'll have some far
away mountains. Our boards are over here. There are two boards
just sketching the same. This is one and say the other one is same shape is here and
it's in this side, Both of these boats are in the
water and it has this boy. Now, what I'll do the
reflection for this boat, it's a wavy water. So you will have the reflection,
something like this. And similarly for
this one as well. For this bow also, you
will have some reflection, similarly this side as well. Okay. Now for this one, what we'll do is I'll
use a masking fluid and add that onto the
boat and the bove and also some of the
reflection area because the water is going to be darker versus the color of the boat. So just to preserve that
whiteness of the paper, I'll use a masking fluid. I'll be using the one with
anilar and using an old brush, what I usually do is I dip
the brush onto the water. I have a bar of soap, so I just add a layer
of soap onto the brush. And then I pick up some
of the masking fluid, add it onto my plate. This is basically a lid which I use for my masking fluids. So I just add it. I I'll add very little water, and now, I'll just apply the same to the
boat and the vow area. And also will
preserve, as I said, the whiteness of the paper
for the reflections too. The boat and the reflection
of the boat as well. I just realized did not sketch out some of the reflections. So I'm just directly adding some lines of the masking fluid. Okay. Let me take a little
bit more of masking fluid. And this is how the
reflection would be. Look at where we broken lines. I'll just add it. Then we'll also add
it to the boat. What will happen is when we
remove the masking fluid, the sketch that we have made specifically the internal
details would go away. But as it's an easier sketch, we'll be able to make it again after we remove
the masking fluid. Now here as well. I'll just add some wavy lines to support
this boat as well. I think we are good
with the masking fluid, making sure noneother
area is left. Okay, so we'll leave
this to dry now. I'll clean up my brush,
change the water. And while this dries, we
can paint the sky area. But let's clean the
water first because the water has your
masking fluid particles. Okay, so for the sky, we'll be using the
serene blue shade. I'll just use my
large size brush and apply some water at the top. Doesn't have to be a wet on wet splash, just little water. And with erleinblue that I
already have onto my palette, it's going to be
a gradient wash, so I'll just add the
darkest shade at the top and we'll just bring down
the breast with the bottom, and we'll apply
some water as well. Okay. Be very careful
with the horizon line. Again, we brush top to bottom. Just add a little
bit more color at the top and getting
it at the bottom. A very simple sky.
The sky is easy because the focus of this
painting is your water ripples. So let's wait for this to dry, let's wait for your
masking fluid to dry, and then we will
paint on the water, the ripples, et cetera. I'm just dabbing off
all the excess water from the corners so that the color do not see back
in while the paper dries. Okay, so the paper
has not dried, masking fluid has dried, and now using my
large size brush, the hake brush that I have, I'll generously apply a coat of water onto the water
and the ripple section. Take your time on
this step and make sure that your paper
is thoroughly wet. Being careful
around the horizon, you can see I'm moving
my brush to and fro and making sure that every inch and collar of the paper is wet. And this will help
keep your paper wet for a longer duration. And when your paper is wet
for a longer duration, you will have longer time
to work on your background. Okay. I just take my tissue paper and wipe off all the excess water
from the corners. And now using my medium
size brush and cobalt blue, we will start with the water. Okay. I've taken
in the koba blue, dabbing off all
the excess water, I just add in the strokes. It will be darker near
us, near this area. And as we move
towards the horizon, the water will become lighter. Once again, taking
in cobalt blue, a slightly higher tone, and we'll just start adding
in the water ripples. The ripples are thicker and
dense near to our eyes, and as we move further, they become lighter and thinner. Okay. So as of now, whenever I'm picking my color, I'm trying to make
the strokes near the eyes so that the darker
tone gets applied over there, and with the latter
tone and thin strokes, we will just paint the
ripples towards the horizon. As you can see, my
strokes are all similar throughout the
tone of the color changes. Mm. Now, I'll just take indigo, mix some with cobalt blue, that will basically give us a
darker tone of cobalt blue, dabbing off all
the excess water, and I'll apply that tone
to some of the ripples. And as I move towards the boat, the strokes become
little thinner. Dabbing of all the excess water and with a very light hand, just applying some tone
over onto the horizon. What I'll do is I'll
just clean off my brush, dab off all the excess water, and try to lift some color
from between these ripples. I'm just taking up some color and dabbing off onto my paper. Specifically this area, we were getting the haline structures. Now taking an indigo, again, dabbing off all the excess water and applying this darkest tone. Now, near the boat as well, you will have some darker tones because of the shadow effect, so I'm applying the dark
stone over there as well. But as I move towards
the upper section, what I'll do is I'll
take my detailing brush, take a very diluted tone
of indigo, and apply that. This will give me
very thin ripples. Again, taking in some of
the cobalt blue as well and just trying to add in very
thin strokes for the ripple. These are generally
very, very light. Okay, now with the
medium size brush, tap off all the excess water, and I just try to
blend all of this out. Make the tones a little lighter. And the hairline
strokes that we have, those will also get reduced. Okay, so the waves and ripples
are not very prominent, but they are there
this side as well. So I'm just trying to maintain some whiteness of the paper, and I'll also try to remove the hairline strokes.
Now, this looks good. What I'll do is
using the tissue, I'll just remove
the water droplets and the color from
the masking fluids. If it's easier,
then we'll remove. Otherwise, we will let it be. This one is too prominent. Let me just blend this out. And if your paper
has started to dry, do not add any more color,
and let's just stop. Okay? Because if you
add in more water, it will give a cauliflower
effect and your ripples, whatever you have
painted till now, would all get disturbed. Okay. So now let's
wait for this to dry, and then we will remove
the masking fluid and paint the boats. Okay? The paper has not dried. The waves have come
out beautiful, right? Now, what I'll do is using
my medium size brush and a very lightish tone of neutral tint or paint
gray on the horizon, I'll just add some hills These are far away and
not very easily visible. So this will also give you an opportunity to clean
up your horizon line. So I'm just adding some zigzags. And so this is where it ends. Now, just filling the gaps. That's it. This is
what we have at the horizon now let us
remove the masking tape. With my fingers, I'm just
peeling off the tape. See, as I mentioned before, the sketch that we had drawn,
that's all gone, right? Because the masking
tape is pulling out all the graphite
marks as well. Not to worry, we
will get that again. Here it is all masking
fluid removed. Now again, just
sketching out the boat. A very rough sketch because
we will anyways paint out Now, taking in my medium brush, we'll paint the
first pot in milion, so I'm just taking vermilion. I already have it
onto my palette. Just taking in a generous amount and we'll start with
this pot first. Okay. And just adding some
onto this bench as well. While this rise using senilar yellow will
paint in the bow. I'm starting from here. This is the first bow. Say, this is the
smaller 1 second. And you can also actually add in the water
reflections as well. Similarly here too. Just adding it some reflections. Okay. Now, taking in a very diluted
tone of vermilion, tabbing off all
the excess water, I just add that shade to
the interior of the boot. Similarly, the side as well, and we'll add more shades
to it sometime later. Now, the other board will paint in the shade of dark blue. So I'm taking a
mix of indigo and paints gray and dropping
that tone over here. Be very careful of the
bot that we had painted. What I'll do is
I'll just clean up my brush a little and just
pull the color from there. Now again, taking in a darker tone and
similar to this sport, we'll add in the
shade here as well. While this darker boat dries, the orange boat has dried up. So what I'll do is I'll mix a very small tinge of paint gray to this orange to
get a very rusty tone. So you can see this is a very rusty tone that
I've got over here. And using this, I'll add in some of the
details to the boat. Remember, we had sketched
a line over here, right? So we will just highlight
that with this tone. Okay? Besides these darker colors. I've just added in
the pains gray. Now again, with
that darker tone, I'll add in some
shadows over here. With the darkest tone, just some highlights
here and there. Okay, so that's the boat. And with this darker tone, the last thing that
you want to add is add some stripes to this boat. So it's a wooden boat. So it would have
some wooden stripes. I'll just clean up and
blend this all out. I've just taken clean water and I'm just blending
all of this out. Now again, using a medium
size brush and lion, we'll add in the reflection. This is where the
reflection starts. I'm purposefully leaving
out some white caps because we'll add in the
ripples of blue colour as well, the water ripple shade. We had painted them wet on wet, but we will also add in some
wet on dry strokes as well. You can see I'm also adding some additional oranges as well. Okay. Now with the other one, I'll take a very
dark tone of indigo, add in little pains
grave needed, and that would be the reflection
that we have over here. It's called a block reflection. If your orange has not dried, be very careful because the
orange has not yet dried. Otherwise, let's wait
for the orange to dry and then you can
add these reflections. I'll add some
overlapping reflections once this orange has dried off. Meanwhile, we are yet to paint the interior
of the second road. I'm just taking a very
diluted tone of indigo, dabbing off all the excess water and just adding on that shade. Now while the other
things are drying, I'll just use my paint
screen and paint out thread that's tying
the boat to the bow. This will also have some reflection and
that's how this will go. Okay? Again, this side as well. And then this is the reflection. Okay? Now, using indigo and my small size brush, the detail brush, I'll add in some ripples
effect onto this. What? Just adding some waves. Wherever you have
these white spaces, and they don't need to be
exactly covering up your white, it can be overlapping
your orange as well. I'm just adding some darker
tone of the ripples. Okay. In a very diluted tone and add some this side as well. Diluting it more. This orange one, what I'll do is I'll take a little
bit more of orange. This has to be
absolutely orange, I'll just cover this up and add a little more
reflections of orange. Basically trying to
cover up the whites. Similarly, using the pain scray will add in more
reflections to the boot. The orange was wet
before, right. So now using pain scray, we will add some overlapping
reflections as well. And now with detailed brush
and paincray I just add, again, some tails to the boot. This looks good. And
the other thing, the last thing that
I'll do is I'll just use my white pen and add in some highlights on the spot specifically because
it's just too dark, right. So I'll just add some
highlights to this spot. And we also add it here as well. They would always be some white highlights
on the ripples as well, Just adding at some places
to give that effect. Okay. I think that's it. Let's wait for this to dry
and then we'll peel off the masking day.
This all has dried. What I'll just do is
using very darkish tone, like when the reflection
happens, right? The point where your water touches your boat,
it's very dark. Just added pain scrape. And using my medium size brush, I will just blend this out. So the harsh lines
won't be visible. Or what you can also do is use your vermilion
and using that, just try to blend this out. Okay, we're done
with the painting. This was the only thing
that I wanted to add. Let's wait for just this
section more to dry, and then we will peel
off the masking tape. This is all now dried. Let us remove the masking tape. This is the final
look of the painting. Is is
7. Conclusion: Thank you so much for
joining me in this class. I hope you enjoyed painting these peaceful scenes
as much as I did. We explore a range of
moods and techniques from misty monochromes
to glowing sunset, all while learning how to bring both and their reflections
to life on paper. If you work through all the
four projects, amazing. And if you're still working through them at your own pace, that's perfectly fine, too. Watercolor is as much about patience and presents as
it is about technique. Don't forget to upload your class projects in
the project section. I would love to see
your creations, and it's always inspiring
for other students, too. Whether it is just one
painting or all four, feel free to express your thoughts and feedback
in the review section. And if you enjoyed this class, you might also like
my earlier one, watercolor techniques,
how to achieve eye catching ripples
and reflections. It's a great companion
class focused just on water texture
and ripple effects. Thank you again for
painting with me, and I hope this class has
brought you confidence, calm, and creative joy. Until next time, happy
painting. Bye bye.
 Shalika Gupta, Watercolor Artist