Transcripts
1. Intro: Hello everyone. Welcome to the blender basics, tools and interface course. This is a beginner level course and it's designed for those who have never opened mentor before. In this course, you will learn about vendors interface and basic tools and shortcuts. Adding materials, renderings are seen. And so much more. I have divided all the lectures in this course in small bite-sized lessons. So this course is perfect for you if you have a busy schedule or if you just have a short attention span. If you don't have blender, you can go to vendor.org and download it from here. It's free by the way. As for the class projects, it's best if you first watch the course and then repeat what you have learned by yourself. And finally submit your first rendered image so that everyone can see your progress. And if you forget something or you have some doubt, you can always come back and watch that lecture again. And with that said, I hope to see you in my class.
2. Interface: After opening blender for the first time, this is the screen you'll see. And this here is called the splash screen. From here you can load in a new file. You can see all these different options here. But for now, we'll explore the general one. So click on the general or click anywhere outside. It'll work the same. So now this in front of you is the blenders default user interface. And this user interface is basically made up of different editors. And if we click on this button here on the top left, you also have the option to change the editor to a different month. However, in this course, you really don't need to worry about the different editors because we'll do most of our work in just these three editors. Now the biggest editor in the default interface is the 3D viewport editor, which has a camera, a cube, and a light source. And wherever we have here in the screen, can also be known. If you take a look in the outliner here.
3. Orbiting: Now to move in the viewport or orbiting the scene, you'll have to hold down your middle mouse button and then drag around in the scene. And you can see you are now rotating around the viewport. Now, if you don't have a three button mouse or you're using a laptop or something, then just go to edit preferences and put, and just turn on this option. Now if you hold down the Alt key and drag with the left mouse button, you can orbit around in the viewport. Or you can also use this gizmo thing to orbit around the scene. Just click with the left mouse button and drag.
4. Panning: Now let's learn about panning the scene. Now to pan arsine, hold the Shift key and then drag with the middle mouse button. And if you don't have the middle mouse button, then just hold down the Shift key plus all ski and drag with the left-click. Or you can simply just click on this. And I can click and drag to band around the same.
5. Zoom In/Out: Now let's learn how to zoom in or out of phosphine to zoom in or out, hold the control key and then also hold down middle mouse button and drag your mouse up and down to zoom in or out. And as for those without the middle mouse button, hold down control and old key also hold down the left click and drag the mouse up and down to zoom in or out. You can also click on this magnifying glass icon here and then hold and drag to zoom in or out. Or you can also zoom in or out by simply just scrolling the mouse wheel button up and down.
6. Perspective and Orthographic Views: Now n blender, the viewport has two kinds of views, which is perspective and orthographic views. Currently we are in the perspective view, as you can see here. But we're getting total between these views with this great icon. And the shortcut for this is five on the NUM pad. And as for those without unimpaired, go to Edit preference input. And then turn on emulate NUM pad. And now you can also use five from the number o. But what is the difference between the two US, UMass. Well, in perspective, the objects farther from us in smaller, just as in real life, but an orthographic view, that's not the case. That distance here does not matter.
7. Viewpoints: Now, every once in a while you might want to see your model from a specific direction. For example, top or bottom, left or right, front or back. We can do that by using some keys on the NUM pad. So if you press one-on-one NUM pad, it will take you to the front view, then three for the right side view, and seven for the top view. And if you want to switch to the opposite of these views, just press nine on the NUM pad. And it will take you to the opposite of the current view. If you want to go directly to the back, left or Boston views, you can hold down Control key and press 137 respectively to go to the views. Now, I know that sometimes is what keys might be overwhelming. But trust me, if you learn these hot keys, your workflow will be much faster. Since you are a beginner, I assume if you forget the viewpoint hotkeys, you can also click on view, view port. You can see all these views with their respective hold piece.
8. Selecting in Viewport: Now we'll see how to select and interact with an object NRC. To select an object, simply left click on it and it will get selected. But by doing this, we can only select one object at a time. So if you want multiple objects to be selected, you'll have to hold down Shift key and then select with the left mouse button. And to de-select shift and left-click on that object. Again. You get also book select them by clicking left mouse button and dragging over the objects. Now if you want all the objects to get selected in the scene at once, you can press a and to de-select all t plus a.
9. Selecting in Outliner: Now you might have noticed that when we select an object, they also get selected in the outliner here. But to select multiple objects in the outliner, shifts detection would not work here. Instead, you'll have to hold Control key and then select with a left-click.
10. Hiding Objects: Now that we're looking at outliner, let's talk about this I symbols here. So if we click on this symbol, it get closed. And as you can see, it makes us elected object disappear or headed. So if you click on it again, there back. There is also a keyboard shortcut for this. So if you press H on the keyboard, it will hide the selected object and all its H will annihilate it.
11. Deleting and Adding Objects: To delete an object, you will have to first selected objects. Then click on the right mouse button and select delete. Let's undo that by pressing control zed. Another quicker way to delete an object would be to just select an object and press the delete key on the keyboard. Now that we have learned how to delete the objects, let's learn how to add different objects in the scene. To add an object, press Shift plus a. And then this menu will pop up. Here you can see we have several variety of objects to add. And under this mesh option, you have bunch of primitive options to choose from. So let's add a plane here. As you can see.
12. 3D Cursor: In the previous lecture, you learned how to add objects in the scene. Now, let's add some other objects to see what happens. I will add, I will add a cylinder here and a cone. Now you might have noticed that whenever we add a new object, it always starts from the same region. And it's no because for x and y axis meet at this point, it's bigger. 3d cursor is located there. Now if we want our objects to start from some other place, will have tours place the 3D cursor to that place. So to do that, hold Shift key and by clicking the right mouse button, you can change the 3D cursor position. Now when we add a new objects, let's add a plane here. You can see it will start from where the cursor is placed. You can also select the 3D cursor from the toolbar here, and press left-click to place the 3D cursor. There.
13. Move tool: Now let's talk about the move to. With this move tool active, you can move the objects if you left-click on the blue line and drag while still holding the left mouse button, you can move the object in the Z axis. In the same way. The rest tend for x-axis and green for the Y axis. You can also use shortcuts to move the objects. Press g to move, and then left-click to confirm, and to move in a certain axis. Press X, y, and z to constrain it to that axis.
14. Rotating Objects: Now, next on the list, is there rotate to here. And if we left-click on the green circle and drag while still holding the left mouse button, you can rotate the object in the y-axis. In the same way, the red, the red stands for x axis and the blue for zed axis. You can use, you can also use shortcuts to rotate your objects. Press R to rotate and then left-click to confirm and to rotate in a certain axis. Press X, Y, or Z. Two constraint it to that axis.
15. Scaling Objects: Next is the scale tool here. And if you left-click on the red line and drag while still holding the left mouse button. You can scale the object in the x axis. In the same way. Green stand for Y-axis, and blue for Z axis. You can also use shortcuts to scale the objects. Press. So on the keyboard to scale and left-click to confirm. And to scale in a certain axis, press x, y, and zed. Two constraint it to that specific axis.
16. Transform Tool & Edit Mode: Next on the list is that transform tool. Here. Here the Move Tool, Scale Tool, and the rotate tool are combined together. Arrows for moving, circles, for rotating, and the cubes for scaling. Ten. Now you have worked in the object mode. It has some limitations. Like you can't do anything with the edges, vertices, and faces of the mesh. But now you will learn about the Edit mode where you can do all of those things. You can access it by going over here and selecting Edit mode. You can also use the tab key on the keyboard to toggle between objects and edit mode quickly. It is however important to note that if are selected the light source or the camera, you cannot go to the Edit mode. So if we select the Cube and go to the edit mode by pressing Tab, The first thing you might notice is that we now have some extra tools on the left side. We won't go over each of them in this course, but I'll show you some of the basic ones in the coming lecture.
17. Selecting/Moving Faces, Edges, Vertices: Now let's look at these icons here. The first one here is for vertex selection. Then there's edge selection and Face Selection. That vertex selection activity. You can select the vertices or pure mesh. Then when the edge selection, you can select the edges. And with the face selection, you can select the faces. And if you hold Shift key and select, you can also enable multi selection at once. Now, if you're selects a face with left-click in edit mode or you can use the whole t's g to move it, to rotate it, and S to scale it.
18. Extrude Tool: With this Extrude tool active, if you click on this yellow plus button and drag while still holding the left mouse button, you can extrude the selected face. And the shortcut for using this tool is the letter E on your keyboard. So let's select an edge this time. And if you press E, it will get extruded. Then left-click to confirm explanation. Let's extrude again, but this time, cancel it. Right mouse button or the escape key. Now you might think that the extrusion is canceled, but it's not, as you can see here. So be careful while using this tool, only the movement gets cancelled, not the extrusion.
19. Inset Tool: Next is the inset too, with the face selected. If you left-click on the yellow button and drag it inside, while still holding the left mouse button, you can inset the selected face. The shortcut to use this tool is I on the keyboard.
20. Bevel Tool: Next on the list is this Bevel tool. With the Bevel tool active, if you left-click on the yellow button and drag while still holding the left-most button. You can bevel the selected face. Then in the operator dependent, you can control the offset segments or change the profile to invert or outputs. The shortcuts you use. This Bevel tool is Control B on the keyboard. And then use the mouse wheel to adjust the number of segments by scrolling it up or down. Then left-click to confirm.
21. Loop Cut tool: Now let's look at the loop cut 2d. After selecting it, you can see a yellow preview edge loop. If you take the cursor to a vertical edge, a horizontal loop appears. And if you take the cursor to a horizontal edge, a vertical loop appears. These loop divides its in half. As you can see here. Left clicking will confirm it. And after doing so, you can also add more loop current. Then in the operator panel you can increase or decrease the number of cuts. Like so. And with the factor value, you can slide the loop as well.
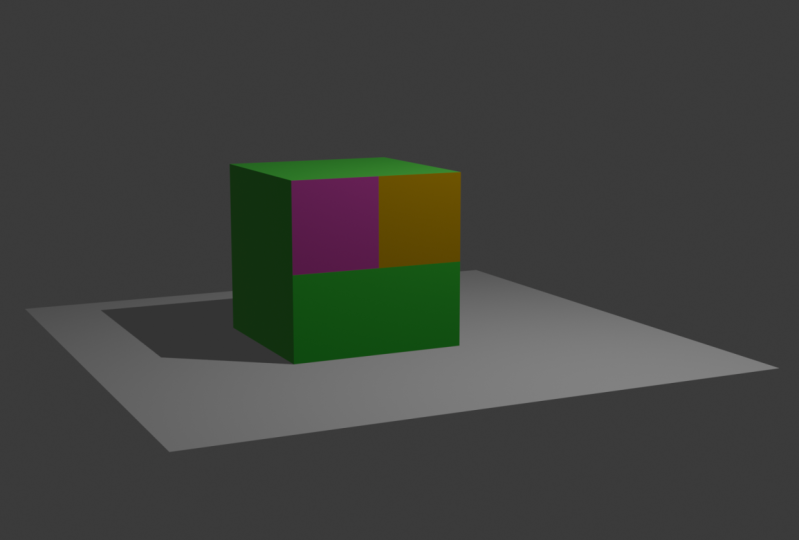
22. Coloring the Object (Adding Materials): Now you may want to add color to your objects. So to add materials to your object, you have to go to here to material properties. And if you select, you can see the base color here. And if you click on it and selects any colour, you can also adjust the brightness by this slider here, by Tibet adding this color, we don't see, we don't see any here. That's because we are in solid more right now. We have to switch over to the material preview mode to see the colors. Sometimes you may want to assign different colours to different phases of the objects. You can do that by first going to edit mode, press three for phase selection, then selects a face. Now in the material properties, click on this plus icon and click on new. Now selects your color and click assign. And as you can see, we have our color assigned here.
23. Built in HDRIs: Now, this material preview mode does not take the scene lights into account. Instead, the lighting is done by some built-in HDR eyes, which you can change by clicking on this drop-down icon here, and then clicking the world space. You can choose different worlds pairs here. You also have some more controls down here. As you can see. Well, wherever you see here won't be in your final rendering.
24. Lamps: So now go to render mode. Here. Here the lamp present in their view port is lighting the scene. As you can see, if a selected and new property tab appears with a bulb icon. It's the light properties. We can increase or decrease the power. From here. We can also move the light source by pressing g. Just like how we did with the meshes.
25. Cameras: Now let's see how we can capture this image. To do that, you'll need a camera, which we already have here. As you can see. To enter the camera view, you'd have to click on this camera icon here. Click on it again to exit. In the camera view you can zoom in or out. But when you try to orbit, you will exit out of the camera. If you don't want this to happen. Then open the sidebar here. Go to the View Panel and check. Lock camera to view. Now when you enter the camera mode, you can orbit inside the camera.
26. Rendering/Saving Image: Now in order to render this image, we will have to go to Render menu at the top here, and click on Render image. You can also use the hotkey F2 to render this image. So now let's render it by pressing f dwell on the keyboard. And after the renderings done, click on the image menu here, and click on Save As you can save this image wherever you want. Then click on Save As image.
27. Saving Project & Final Thoughts: Now you may want to save this project file to, to do that, go to File. Save As. Now choose a folder where you want the projects to be saved. Then click Save as. And that's about it for this course, guys. I hope you enjoyed it. And if you did, make sure to leave a review and follow me on sculpture for more courses like this. And I'll see you next time.
 Jatin Grover, Gamer, Animator & Video Editor