Transcripts
1. Introduction: Hi, this is Hong. So
welcome to Animate Fun. Social media reels
in after Effects. I have been using Adobe after Effects for almost
ten years now. The clients I worked
for include Adidas, Paypal, Walmart,
711 and many more. In this class, I'll
teach you how to animate a fun and exciting
social media real in, after effects from scratch. I'll peel back the curtain
and show you what it's like to work on a real
world social media project. This class is a complete and
comprehensive introduction to social media animation to help you get started with after effects and start
making animation right away. During this class, you will
be learning all aspects of after effects with
real world practices. We'll go over from first, receiving the brief
from the client, how to put together a
project estimate and how much to charge for a social
media project like this. After the budget is approved, we'll go on to talk
about the storyboard and how to create
your own storyboards. If they're not provided, then we'll cover the
file preparation, best practices in
Photoshop as well as professional after
effects project set up, how to source and edit
music for social media, how to take full control
of your animation and bring life to your movements
like a professional. We'll cover how to apply
special effects to animation and graphics and
give it a stylized look. How to animate transitions. How to animate fast and
efficiently in after effects. How to easily animate typography to make it
look fun and exciting. How to make simple animation look more complex and appealing. How to utilize
third party assets to take your animation
to the next level. Some animation principles. Tons of keyboard shortcuts, workflow tips and tricks that you can start using right away. Everything we cover
in this class is applicable to any kind
of animation project. And you will be able to
apply the principles and techniques we teach here right away with your own projects. This course is comprehensive and not easy if you're someone who's interested in getting
into motion design and want to learn how
after effects works, and be able to take on social
media animation projects. This class is for you. This class is for beginners, but it's fast paced. Therefore, a basic understanding of Adobe software
is recommended. In order to keep up
with this class, you don't have to know how to animate in order to
take this class. But I won't be going
into the details of what each tool does
in after effects. If you're new to
the Adobe software and find it hard to keep up, I would recommend you to watch
one of my beginner classes first in order to get a basic understanding
of the software. Before you take this one, I've covered a ton
of information here. So it will give you a
comprehensive understanding and overview of how a real world social media
project is done. This class is for
those of you who are serious about
learning animation and want to get into
social media animation. By the end of the
course, you will have a complete understanding of how social media
animation works. And you will have all the
tools and knowledge you need to get started with any social media
animation right away. And be confident about the
process and your ability to execute and animate To
follow along with the class, you can download the
artwork that I'm working with in the
resource section, so you don't have to worry about the design part of the process. You will be using the assets
that the clients have already created and start
animating right away. If you have any question
going through the class, don't hesitate to reach out
and I'll be here to help you. So are you pumped up
and excited to get started with an awesome looking
social media animation? I can't wait to
see you in class.
2. New Gig Alert: Hey, welcome to this
class. You know what? We just got an animation brief
from a beverage start up. They're looking to
create a social media animation to
promote their brand. The name of their
brand is called Juice. Through the social
media campaign, they would like to
raise awareness of their new brands and also
promote their new flavors. Here is a brief introduction
to their brand. They are a start up
in Vancouver, Canada. They discover this
new formula for innovative energy drink where
it provides creativity. After drinking their product, it will give you more
creative ideas and sparks and help you with
your brainstorming sessions. It's backed by
scientific research. The drink will stimulate your
brain's right hemisphere, which is responsible for many of the functions that contribute
to creative thinking. It makes the right
hemisphere more active and work harder to come up
with creative solutions. This drink itself is
completely made of natural ingredients
which promotes not only your mental health, but physical health as well. They're now introducing
the two new flavors, apple and pineapple. They provided us a storyboard and they're looking to create a ten to 12 second
social media animation to raise awareness of
their new flavors. In terms of the tone of voice, they're looking to
create something fun and delightful that matches with
the visual they provided. The brand is vibrant
and exciting, and it's targeting young
adults who are just out of school and start working
in their respective field. People who want to become
more creative and achieve a more balanced lifestyle
with this new energy drink, they'll get more opportunities
for creative thinking and add more creativity in their
lives and decision making. It is super helpful
for IT professionals or anyone who only depends
on logical thinking. Here are the files that
send us with this e mail. We got the storyboard,
their logo, and some illustrations that
used for the storyboard. Overall. After
review everything, I think that branding
and packaging is looking really strong. I love the vibrant colors and the illustrations they
did for the storyboard. This project is going
to be a lot of fun and it's time for us to
bring the brand to life. And make sure we're grabbing viewers attention
with great animation. Now I just need to put
together a quote for this job. If you search on Google, the average freelance motion
designer earns $40 an hour. If you're confident
with your skills, I would recommend you to charge at least $50 an hour in the US. So let's say that's
the hourly rate that we have for this project. Estimating three days work for
delivering this animation, including feedback
and revisions. So here, the project estimate we put together for this
particular project, depending on how complex the storyboard is and also
depends on your market, you should give them a rough
estimate of the project. It doesn't have to
be the final cost, but it gives the client an idea of the rough
production cost. I'll send the
estimate to them and wait for their reply and
their final go ahead. After a day of waiting, we got this budget approved
e mail and now we can get started working
on this animation with the files that provided. Let's go to the next video and we can get started
on the fun part.
3. Class Project: Before we start on anything
I want to talk about the class project,
practice makes perfect. I would recommend you to
download the resource of this class and start working
on this project with me. This way we can do it together
and animate together. For the class project, it's
pretty straightforward. We already have the
storyboard built out for you. And throughout the course
I'm going to show you how to animate step by step
based on the storyboard. And how we go from
storyboard all the way to the final render
of the animation. Just follow our
class and you can animate either same as how
we teach in the class, or you can come up with your
own movement or animation. Remember to make
it fun, exciting, and make sure your animation in the end is
representing the brand. As you can see
here, our brand is really fun, vibrant, exciting. And you need to let
your animation convey those messages to the viewer so that when they look
at your animation, they're going to remember
your brand and they're going to be interested in knowing
more of your brand. So that's the whole point
of having animation is to convey a stronger message and then leave a
stronger impression. Put it simply, just take our storyboard and animate
the way that we teach in the class and make sure
to have some fun with the animation and also with our beautiful design storyboard. We also provided some elements inside the branding folder. If you open the design
elements I file, these are the little
elements that we use inside the storyboard. It's either on the
bottle itself or it's inside the different
scene that you see. However, you can take these elements and maybe
mix and match them, change the color
however you like, and even find different
bottles and come up with your own flavor if you'd
like, your own layout. Essentially, our
storyboard is made up with all these fine elements and
also different flavors, different illustrations
on the bottle. So in this case, you can even come up with your
own bottle based on our design direction and using those elements to come up
with your own storyboard. Maybe bring in
some other colors, maybe an orange color
or purple color, introducing some new
flavors However you like. This is a fun part
because we want you to be created while having fun with your own design
and animation. At the end of the day, it's
a really good practice and it's something that you can
showcase your skill set, not only about animation, but also about design and
customizing your own design. Well, that's it with
the class project. I hope you have some fun with the storyboard and the animation that
we're about to teach. Good luck and I'll see
you in the next video.
4. Build Winning Storyboard: In this video, I
want to talk about the storyboard and some
of the resources that you can have in order to create a storyboard similar
to what we have here. As you can see, this is our
storyboard for this project. There are normally two scenarios when it comes to a storyboard. One is that when you are
working on a project, you are given a storyboard by
art director or the client. In that case, you don't have to create the storyboard
by yourself. You have someone who are more specialized in
creating this kind of storyboard that convey emotions or convey their brand values. And I think that's 80
to 90% of the cases if you're working with a
agency or a studio. Because there's
always someone on your team that's either
a illustrator or a designer who are better than you to create this
kind of storyboard. And as a motion designer, your job is to
bring everything to life once we have this
kind of fun storyboard. And the other scenario is where you have to create
something by yourself. Well, that scenario mostly happens if you are
freelancing for a client. And they don't know any designer who can work on the storyboard. So the client would come to
you to create this kind of storyboard and also the whole animation for their
social media post. Well, the first scenario
is pre history board. Once you have the storyboard, you can just start
get to it right away. You can disse the Photoshop file and then see how you
can bring it to life. But we want to talk about the second scenario
in this class here, because most cases, if
you're freelancing, you won't have a storyboard. So you won't need some
resources in order to help you to build up a
storyboard like this. Whenever I need to
create a storyboard, other than getting all the
essential information about the client's brand and
their tone of voice, their previous work,
some references. I always go on pinches
to find my inspirations. There's so many
different styles on Pinterest and you just
need to choose the Ac or a similar brand
style that fits your client's need to promote their products
or businesses. And you can see all
these different colors. I like this yellow, pink, and blue tone of voice. It's really refreshing and it's modern and they got
these type treatments. This could be one of
the direction that you can take for
your storyboard. And there are also some
other like this is more of a vintage look or a collage style storyboard
that you can take. If you are working for some
brand that fit this style, you can probably
reference this one. The good thing about pinches is that whenever you
click on something, it's going to show you all the similar designs underneath. And just you can get more
and more specific on your styles or specific on the visual that
you're looking for. And get a bunch of
great references. So later on you can put them together as your own storyboard. This is more like a collage
style that we are looking at. And we have beautiful
colors, great color palette. I like this purple green and
blue color palette as well. Now you can see
on this page with all these cell animation or like liquid effects,
great patterns. So these are all grid
style references for you in order to create a
great looking storyboard. And pinches is
essentially where I go. For inspiration, I'll just
paint some boards and put them together in order to
help me build a storyboard. However, other than
the style of design, we still need a color palette. So I would go to cooler 0
to get my color palette. In this project, I did some color explorations
within cooler. If you go to the tools
you can select on this palette
generator over here, it's going to generate
some great colors. For example, this one
looks pretty cool. For the one that I have,
I did some variations. These are the different colors that I generated
for this project. They all look similar because once you have a couple
color selected, you can just have
it locked here and then keep generating
the last two color. Let's say if we like this orange color and we
like this color here, we like this maybe blue color. And if we want to keep generating these two
colors within the palette, we just hit on the space bar. And then it's just going
to keep switching to different colors until it
has something that we like. Let's say if I like
this pink color, however, I don't like
this color anymore. I can just unlock it and
keep clicking the Spacebar to generate a good color
palette that I can use. Let's say this one
looks pretty cool. It's got this pastel doesn't
have a lot of contrast, but it looks pretty chill, almost like a beach feel. It could be a pretty
good color palette. If I go back to Pinterest, I might see something similar
like even this one looks like the pink and the green
could be the dominant color. It just got so many beautiful designs that you can reference. This is where I got
inspiration and then coolers is where I
got the color palette. Once I have it, I'll just
take a screenshot and save it for the storyboard if you
want to do some product. Social media, let's say
social media products, it could be promoting
a bottle of juice or promoting some product. This one here looks
pretty cool if you need some
supporting elements, let's say all these fruits
here flying around, or even these illustrations
where I go is I go to free Pick.com and then you
can just search for fruits. This website is actually free if you are using it
for educational purposes. If you are using it
for clients work, you either need to pay for the monthly subscription or you have to give
them a shout out. Just say like these elements
are coming from free Pick.com so you need a credit
at the end of your work. These are different elements
that we could choose for building up our storyboard. And there's a ton of elements that you can use from free pick. There's vector images or
PSD files or like photos, let's say click on Photos. It's got those
real fruits that I can pick with my storyboard. And combining these
three sources together, it's a great way to, you have a lot of control
over your storyboard. You don't have to come up
with anything from scratch. One thing I always do is that I never come up with my
own color from scratch. I always look at the references
I like and then make sure I'm grabbing the
emotions of the work. And then I would use like a color palette generation tool to build out the
color that I like. I never just start from scratch, from a piece of paper
and then draw out like what you need from scratch
without any references. And I don't think
any of the grid designers do that as well, because they all take
references from the Internet. Because there are so many
grid designs out there, all you need is just to have an eye to look for
it and, you know, appreciate and take them
and take the good part. And combine them to have something that's looking
amazing for your own work. And the last resource I
want to introduce is Motion Ray.com Once we're here,
we can go to Template. And then let's click
on Motion Graphics. Over here I can search
for a splash element. See there's a ton of different splashes and we're going to use one of those
within our projects. It's one of those extra
elements that's really hard to do if you're
doing it on your own. However, it's
really good to have this resources available to
you so that you can download and then just add them
on top of the video to add some flare to the animation
that you already have. We've got some splashes here. There's a ton of
different motion graphic accents
that you can use. Some of them are interesting, they're all four
different occasions. But as long as you can
find a good one for your own work, you
can download it. This one requires a
monthly subscription as well in order to use it. If you're a motion
designer who just started and if you're
freelancing and earning money, I think it's worth the price
to have a subscription. So that it can really
give some flavor to your work and really
push your work beyond. These are the four
resources that I want to talk about
in this video. After that, it just depending on how you want to build out the
storyboard with the color, the references, and also the elements that you
use from free pick. And it also depends on
the type of client and the product and service
they are trying to promote. That's it with the storyboard. In the next video, I'll
show you how to prepare your Photoshop storyboard
for animation.
5. File Prep Best Practices: All right, in this video, let's see how we can prepare our Photoshop file
for animation. We already have this
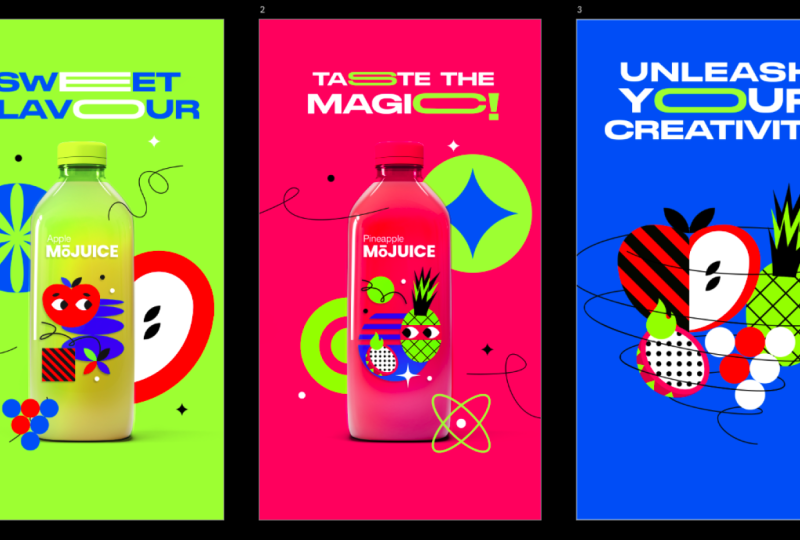
Photoshop document open. This is our design. We've got three panels. This is our storyboard. The first panel, we have this greenish color introducing our apple flavor
juice, sweet flavors. And then the second panel is our pineapple plus dragon
fruit drink taste of magic. And then the third panel
is our ending panel. It says unleash your creativity. And then we have these
fruits coming up in a spiral and
then just shoot up, almost like the
game fruit ninja. In this phase, we need
to make sure that all these layers that we
see on the storyboard, all these different elements, are on its own layer. So that when we bring them
inside after effects, we're able to manipulate each layer individually and
animate them individually. We need to go inside
each R board. As you can tell, we've
got 1233 or boards. Let's open, let me make
this panel bigger. Let's go inside the first board. The first layer we see is
the circle element here. That's good. That's
on its own layer. And then we've got
these three lines. When we're importing folder from Photoshop inside after effects it's going to become
a composition. And then we still keep all
these three different layers separated inside this
lines composition. And then we have
this bottle here, which is good because we don't want to animate
anything on the bottle. These designs are a part of
the packaging on the bottle. We need to make sure this
bottle is on its own layer. Right now it is, it's good. Then we have the shadow here. If I zoom in, you
can see my shadow. However, over here,
we have a layer mask on this shadow layer
inside Photoshop. Normally, layer mask does not translate well inside
after effects. What we need to do is we
need to convert this one, this whole thing
into a smart object. Once we see the layer mask, we just need to go
over here layer and then smart object convert
to smart objects. Now you can see we have
this shadow smart object. If I turn off the bottle here, this is our shadow layer. After the shadow we
got this folder. If I turn the eye icon, you can see a lot of
things disappear on the storyboard
inside the folder. We got this main
text, this is good. And then we have all
these little dots and stars as secondary elements. And then we've got
this circle elements here inside a folder, and we've got this half apple. All these are inside this
layer called elements. I think these are
good to go because all these individual elements are separated on its own layer. And they will continue
to be separated on its own layer once I bring
them inside after effects, as long as I don't see a layer
mask, it should be fine. And then we have the
background over here, that's a green background
in the first artboard. Then let's go on to
the second board. It's essentially the same thing. We've got all these little dots and stars as secondary elements. And then we have the
shape here, the lines. And then we've got
the bottle here. And you see over here
we've got the shadow, again having a layer mask. In this case, we convert this
one into a smart object. Just go to layer, smart objects convert to a smart object, and this is going to
be our shadow layer. It's not going to cause any
problem once we convert it into a smart object and
we've got the shape here, we can probably recreate this
one inside after effects, but that's fine to
stay there like that. And then we get the shape two, some element inside elements, we only have the copy
here on the top. And then we have a backgrounds that's good for the
second R board. Let's go on to the third board. Over here, we have
the tornado top. We might need to recreate the
shape inside after effects, but just like I said, we can't have any layer mask. We have the layer mask,
it's not going to translate well inside
after effects. So we need to go
to smart object, convert to smart object, and then this is good. We got this one
little circles here. We've got the dragon fruit.
We've got the apple. We've got the
pineapple. That's good. They're all on its own layer. And then we have the back behind the back tornado spirals. And then we have this copy. Let's delete this one, we
don't need it anymore. And then the
background. That's it for our Photoshop file. Most of the time we're going to receive some
storyboard like this from a illustrator or from
the client or our director. So before we do any
animation for social media, we need to make sure
that the Photoshop file is well prepared for
animation, right? So this is what we need
to do in terms of how to prepare Photoshop file for
animation and after effects. Now that you see, we
have all of our layers and elements organized
on its own layer. So the next thing we
need to do is to export these three different R boards onto its own Photoshop file. It's pretty easy just select the three boards over
here in the layer panel and then go to file
Export R boards to file. Now we just need to browse to
our storyboard folder over here and then click on Open
Export selected boards. Click on Run. Wait a little bit. It's running the script to save each R board individually. Click on. Okay, let's
go back to the folder. Now you can see we have
this main Photoshop file that was provided to us from the art director or Illustrator. And then we also have three separated boards so that
later on when we animate, we can export each one
individually inside after effects. That's it with this lesson, let's go on to the next one.
6. Pro AE Project Setup: Welcome back. In this video, let's get started
with after effects. First, let's create
a new project, and then we can import our
artwork inside After Effects. I already have my
after effects open. Let's just click on
this new composition. This is how we create
a new project. Normally, I would always name my composition name
to be main comp. This is a working
area of my project. In this case, we have
a social media 0, which is a vertical
format video. So we're going to go
with 1080 by 1920, it's going to be square
pixels for the frame rate. We can do 24, 25, or 30 in this case. Let's do 30 frames per second, full resolution, and then
we're going to cut it. I'm thinking the duration of the project is going
to be 15 seconds. Let's just put in 15 here. The background color
can be a black. And then click on, Okay, now we have our after effects
project to start working on this social media
real you can see we selected black
color as a background. However, it's showing me this transparency grid is because we have this Togo transparency
grid turned on. If I turn this one off, you can see the background color is actually a black color. However, it doesn't mean
we have any background, it just shows as black. We don't have any
layer at this point, so if we put in something
and then render it out, the background is supposed
to be transparent. Let's turn this one off so that we have a black background. Next thing I need to do, I
want to make sure we all have the same panel
or same layout. So we're going to go to Windows
and then go to workplace. Over here you can
actually set up different layouts
for different jobs, and then for now I just want
to use the default one. I'll just reset default
to save layout. It should be the after
effect default layout. If you select that one, I think we should have
the exact same panel. And if it's your first
time using after effects, you can see over
here in the center, we have this main composition, which is our preview window. And then on the left hand
side, we have two panels. One is called Project. This is where we
import our files. It's either a Illustrator file, or Photoshop file,
or images or videos. This is where we import. And then if I click on this
effects control panel, this is where we control the settings of our
special effects. On the right hand
side, you can see the effects and precess panel. Over here we can search
for different effects like the drop shadow and
then different ones, you can search the name of it. There's a ton of them. You don't have to get to know all of them. I only know like maybe
20% of them over here. This is where most
of the panels are. We've got the info,
the audio preview library's character.
This is very useful. You can change the font color, different type faces, and then all these different
settings for your character. We have the paragraph and then the Align panel
is pretty useful. We can align different
objects together. So this is going
to be our default set up of after effects. And over here at the bottom
we have our main composition, which is the main working area that we created to
create the project. And then we have this layers
panel and our time line. It's pretty straightforward. If it's your first time,
don't get intimidated, because I'm going to
show you how to animate the social media
real step by step. It's going to be fun. Other than all these different
panels on the top here, we also have many tools that we can select and use over here. The first one will be
the selection tool, where you need to select
different objects and move them. Or we have this like rectangle
tool to draw rectangles. And you can see one,
I draw the rectangle, we have a layer that's
called shape layer one, and then we have a
corresponding timeline. So this is where we find some of our tools when we are
working on the project. After all these
panels and tools, let's get started with
importing our artwork. Let's go to the project
panel over here. A quick way to
import the artwork is double click on
the empty panel here. It's going to open our window and then let's just
navigate to our storyboard. Remember we have all these
three different storyboard. Let's first open the first one under here where
it says Import as. We need to make sure it imports as composition
retain layer sizes. And then you also
need to make sure this Photoshop sequence
is not checked. It has to be unchecked because
once you check this one, it's going to mess up with
your layers later on. So make sure you select
Composition, Retain Layer Sizes, And check this photo shop
sequence. Click on Open. Now another window pop
up in after effects. It's essentially the same
thing, just click on. Okay, now we have our first composition called
Storyboard Juice One. And then we have a folder here. If I open the folder, these are all the layers that you can find from that Photoshop file. However, what we need
is this composition. If I double click on this
composition, we got one. This is the board, and then double click on that. These are the different
layers that we organized inside after effects earlier
in the previous video. So that when we import, these are all separated on its own layer so that
we can manipulate or change or rotate or like animate individual items,
individual elements. To make the animation more fun, exciting or interesting,
let's go ahead and import all three
different storyboards. Double click on the empty area. Again, let's click on
Modus storyboard two. Make sure you select
Composition, Retain Their Sizes. Don't check this
photo shop sequence. Leave it unchecked.
Click on Open. Okay. And then let's do the same thing for the
third one. Click on. Okay. Now we have all three
storyboards imported. And then we have three
different folders imported. First thing first, we need to organize our project
panel a little bit so that later on when we have a lot of different
layers and folders, it's easier to find and it's going to be saving us a
lot of time later on, especially when we're working on a really big project, this
is what we want to do. We want to keep the
project panel organized. Let's go create a new folder. This folder, normally
I would call this 00, Underscore render, So
after I put in 00, it will always stay on
the top of the list. And this render folder should contain this
main composition. And this is the only
composition that I'll render later on once
I finish the project. This is my working composition. Next thing I need to create
a folder called Assets. And then we can draw up
all these folders that we imported from Photoshop
inside this Asset folder. And that asset should
contain these folders here. Next thing we can create
a pre comps folder, and then we can draw up the
three different compositions inside the pre comps folder. Another thing we need is music. It could be music and audio. I'll just put music here
since we don't have voiceover or audio
in this project. That's about all the
folders we need for now, before it grow too big. Once we have more layers or different objects that we
imported from different places, we can organize them later
on to different folders. But for now, I think
these four folders are good enough for
us to get started. That's it with this
video, and there you go. That's how you get started with a after effects
project from scratch. And how to import your
artwork inside after effects and make it organized
inside the project panel. Let's go on to the next video.
7. Easiest Way to Edit Music: In this video, we're going
to talk about music. Before we get into animation, we need to make sure
we have a great piece of music that goes
with this animation. And sometimes client or our director will select
the music for us, but sometimes you got to
select your own music. Once you see the storyboard of this beautiful design piece, you get an idea of how this
animation should work. So for me, when I'm looking
at this storyboard, I'm thinking the bottle
might just like shoot in from the right hand side
and then bounce a little bit. And then we got all these beautiful stretchy
texts coming in. We got these lines drawing on, and then these different apples like different elements
popping onto the screen. So this, this whole piece here based on the
design, the visual, I think the tone
of voice should be fun, exciting, playful, bright. It should give people
a very happy feeling. And then we need to convey this message through
music as well. So that's what I'm thinking of when I'm looking
for a piece of music that's matching with this animation that
I have in mind. So to find some stock Music The website I use is Epidemic. Sound There's other website
that you can try out as well, but the one I use is Epidemic. Sound They have like a
variety of different choices. You can even search
for sound effects, different style like pop, hip hop, classical, all
these different styles. I think in general all these different stock sites are pretty much the same thing, it just based on
your preference. I've been using
Epidemic Sound for a while and it's been pretty good, so I'm sticking with it. I think music is really
important to the animation. Some people say music is almost like 50%
of the animation. If you don't have a good music, your impact will be reduced by 50% So I think music is really, really important in motion
graphics and animation. It's something that we
need to keep improving on to be able to select better and better music
for our animation. And then to add that 50% of more impact once the animation and music really sync together. After some search, I
found these two Music here and then I think these two fit pretty well with the
animation that I have in mind. We can take a listen, that's the first one. The second one
might be a bit too jumpy or like too kiddish, I would say, At least
to me a bit kiddish. So I wanted to feel more
fun at the same time, not that car is what I'm saying. I think I prefer
the first one bets, give it a try for the first one. Right now it's lasting for
2 minutes and 18 seconds, so it's too long for us. I think all we need
is around 15 seconds. So we need to trim this
music down to 15 second. Some of the music side, they have those trim
down version for you. And it'll be easier
if you can find like a 15 second track that you can use for a 15 second
social media real. However, that's not
always the case, so we need to know how
to trim the music down. Right, let's bring up our
audit, Adobe Audition. Let's go to files and
then double click. Let's strike our music inside
the Adobe Audition open. This is the wave form of our music that's
lasting for 2 minutes. By all means, I'm
not really good at Adobe Audition and I
only know how to cut it. Other than cutting the music, I have no idea how to
use this software. But most of the time,
all I need is just do a simple cut to make the
music fit to the animation. So now we need to
listen to the music and cut the section that we need and make sure
it's going smoothly. Let's go from the
beginning here. I want to see how it
sounds at the end, since our animation
is only 15 second, I think I'll need
this at the end here. I'm just using my track pad on the laptop to
zoom in and out. I think I'll need this last
beat here to make sure our music is ending
at 15 second. Normally, I'll just
go inside here and then see where the
biggest spike is. This indicate the last notes
of the music and then I'll just select the ones right
before that highest. Peak and select
everything behind it. This will be the last part of the music, which
is the last beat. And then we can do a
command C for copy for now. I don't even think I need
all these middle parts, so I can probably do a delete. I just want to see
where I want it to stop before I insert
that last beat. You know what? I think
I found something here before 20 seconds, there's a really high beats that's transitioning
from the first section of the music to
the next section. Basically around here,
around 18 seconds, there's a note that's pretty
obvious, you hear that? I think that's the
perfect place where I can insert the last
beat of the music. I'll just cut everything
that's behind that note there and then
make sure I paste it in. The last bit that we
copied before previously, command V. Let's hear
what it sounds like. I think it sounds pretty
smooth and natural. Let's hear it again. Yeah, I think that works
for the last beds. However, it's still
lasting around 20 seconds. So I need to cut something else. Let's hear from the start. Well, I think this
is an easy choice because right now
within the 22nd, there's a pattern that's
repeating itself for two times. What I need to do is I just
need to cut the first pattern because I like the starting
beats of the music. It's got like this
drum coming in F. If I play it from the start, maybe like 1 second
or two second, I really like that part, so I'll keep that part
and then maybe cut the first pattern until the
second pattern kick in. And then I think
I should be good. Let's hear the first second
again. You hear that? I just need to cut
that from here. I think it's from here. Yeah. Yes, from
here all the way to all the way to
here. I think after nine second from this part all the way to after
nine second over here. Let's cut that and then let's
hear what it sounds like. Okay, There's a bed that's repeating two times.
That's not good. We need to cut it.
I think it's one. You see the wave form? They're almost identical, so these two should be
the same pattern. I just need to cut
down one of these. Let's try cut this one. I think there's still a
little bit that's off. Let me cut this one
here. You know what? I think we might need to cut down this
whole thing here as well. Let me cut this part here. I think this is extra.
Now, let's hear this. Okay, now I think it's perfect. We just need to cut out the extra part that
we don't need. And now we have this
starting portion, which is good, leading
into this section. And then it goes to
a different beat. And then the last set
that we copy from the end of the music kicks in, which makes this whole piece
end add around 15 seconds. This is going to be our music that we use for the animation. I'm pretty happy with it. We can now just go to file
and then export file. Make sure we save
it. Under the music Put 15 seconds and then save. Okay, that's it with this
lesson for the music. In the next video, we
can start animating.
8. Start The Animation: Welcome back. In this video, let's get started
with animation. In the previous video,
we did cut our music, so I need to drop that music
inside my after effects. Just double click on the
project panel over here. Let's navigate to
our music folder, and then we can choose
this 15 second music here. Click on Open, we can drop this one inside
our music folder. Let's drag this music inside
our main composition, which is where we're going
to animate for the Pres. Let's this, you know what? Let's double click
on this juice one. And then go inside this
number one composition. We need to copy all these
layers command C and then go back to the main
composition command V. Paste everything outside. We're getting the layers
from this precomposition. And then paste them under the main composition where we're going to
animate everything. This is basically our
animation working composition. I can use command minus or command plus to zoom in and out. I can hold down Spacebar to pan around to look at
the preview panel. First, let's animate
the bottle here. We have the bottle layer here. If you toggle the icon, we can switch it on and off. Since we're animating
the bottle, I can turn off the icon for the other layers so that
they're not distracting me. Hit command R on the keyboard
to pull out the ruler. Let me drag the ruler down, make sure we have a
ground level here. I can also go on to this
to grade and guide option, turn on the title Action safe. Then we have a grid over here and I know exactly
where the center is. First of all, I want the bottle to shoot from the
right hand side to the left hand side just
coming in with some rotation. And then do a little springing
around to settle in place. To do that, I need to pull out my position property
P on the keyboard. I only need to
animate the position, which is the
horizontal position. So I need to click
Separate Dimension. I only need to animate
the position here. But before we add any key frame, we need to make sure
that our anchor points, right now, it's in the center, is over here at the
bottom of the bottle. Let me zoom in to
make sure I have this anchor point at the edge
of this bottle over here. That's when I do the
rotation property. Shift R on the keyboard. If I change the
rotation property, you can see I can have this bottle springing
around like this, almost as if it's
coming in too fast. And then it just goes over
a little bit and then bounces a couple times
before it settles down. That's the animation I want. Once we have the anchor point changed to this
bottom corner here, all of the property that
we change is going to go around based on
this anchor point, the place of this anchor point. If I have the anchor point
all the way at the cap here, if I rotate, it's going to
rotate based on this cap. But that's not what
we want in this case. We just need the anchor
point at the bottom here. And then let's change
it back to zero. Let's say the stopwatch
on the exposition. This is our final state
of the animation. We can go forward
a couple frames. Let's go forward 12 frames. Command shift right arrow,
that's for ten frames. And then command right arrow
for another two frames. You can see over here
in the frame setting, it tells you we are
12 frames ahead. Let's strike this final key
frame to the 12th frame, and then let's go
back to 0 seconds. At 0 seconds, I want the bottle
to be outside the frame. The bottle just comes in
like that. You know what? I think the music might
be a bit too distracting. I can turn off the
music for now. Once we need to listen to
it, I'll turn it back on. The bottle comes in like this. However, it's pretty
flat and boring. That's a good animation. That's not what we want. We need to select
the two keyframe, Red click, go to
keyframe assistant. Easy ease the key frame. Now our key frame
has more energy. It's got easing in
and easing out to it, which is good for now. However, I also want to
make it more exaggerated. I want to go inside
the graph editor, select the two keyframe, go to this graph editor
view and then let's hit on this fit all
graph two view. Let's make sure we're
in the value graph. There are two graphs you
can have in this view. One is a speed graph and the
other one is a value graph. Make sure you're inside
the value graph. I want to manipulate this curve here to make sure I have
this extreme easing curve. The way to look at
this graph is you can see the slope of this curve. The steeper the curve is, the faster the speed is. Basically, if I manipulate
this curve down here, this is the steepest curve. It means that the
bottle is coming in fast and then slowly, slowly slowing down and
settle into position. That's how we read this graph. If I play the preview here, you can see the bottle comes in pretty fast and
slowly settling down. Now it's got more energy. That's good. But now we need
to add some bound to it. The way I want to do it is I wanted to go over which
is the overshoot. This is one of the
animation principles that we want to apply here. I want the bottle to overshoots, to go over the final states and then slowly recoil back
to its final state, which is the center
of the frame. To do that, let's go
forward six frames. Command right arrow, 123456, and then hold down command. And click on the mouse
to add a keyframe. And then go forward four frames. 1234, hold down command, click on it, add another one, and then go maybe three frames. 123, hold down command, and add another key frame. Now I've got all
these key frames I want this bottle to go over. So I'll drag this curve
down a little bit, and then I'll drag this
curve back up a little bit. And drag this curve
down a little bit and slowly settling
down to the final position. If I hit z and then
drag this area, it's going to zoom in onto
this curve that I have. I just want to make
sure it's not too much. I need to make these closer. This is a curve that
we have, like this. Let's play this animation
and see what we got here. I like the recoil, but
it's not fun enough. I think it's too
gentle, the curve. So we need to pull
this curve even more. Give it a bit more curve so
that it's not as gentle. Yeah, it's got some energy. We need a spring animation, almost like a springing bottle, something like that.
I think that works. Just make sure I drag this individual key
frame and then drag them up like this to
give it more curve. Yeah, that's good. I think my curve is
looking good right now. This is the springing bottle
that I was talking about. And then let's go back
to the timeline view. This is how it looks
like in the time line. Now we just need to
add some rotation. Hit the stopwatch for
the rotation over here. I want this spot to move over maybe like
negative ten degrees. And then once it comes back, it could be positive four. Then once it goes over again, it could be negative three. Then the final state would
be zero. It settles down. A re click Keyframe
assistant. Easy ease. Let's go to the curve
in the value graph. And I just need
to somehow match, almost like similar
energy that we had in the position property
that we animated just now. I can drag these handle to make sure these curves are smoother. Let's see what it looks like. Yeah, I think that works. Yeah. We got the springy bottle. The next thing we have the
shadow here right now. The shadow should follow
the bottle right now. I just need to
shadow to take over the position property
of this bottle. It's coming in with the bottle. However it's not
rotating in this case. I'll turn on the
icon, the shadow. And then let's
copy the position. Let's go to zero second
and then paste it onto the shadow layer command V. Now we should have
the same animation. It's not matching up,
so I need to select all the position properly and
move them all altogether, over a little bit so that it's right underneath
the bottle. That looks good. This
is our animation. However, our shadow is
missing some pieces here. It doesn't look too realistic. We need to modify the
shadow a little bit. Right now it doesn't
look so realistic. Let's go to Layer
New and then add a solid layer we can change
the color to a black color. Click Okay, and then let's
go to the ellipse tool. Turn off the icon. I just need to drag a oval shape like this. Let's turn it on. This is a black shadow that we should have for the bottle. Let's move it
underneath the bottle and then we can it
on the transparency, make it less transparent, maybe 50% However, we
also want to make the edge blurry since we added a
mask it M on the keyboard, we can go down to this
mask and then change the mask feather to 50 pixels, or 25 pixels, or ten pixels. I think ten pixels works. Now I just needed to travel
with the shadow layer, use the pick whip icon, drag it to parent
it to the shadow. Now this black shadow shape is going to follow
the same position as the shadow layer here, they're going to go together. Before we do anything else, just make sure we
save the project. He command shift for
saving the project. And then let's rename
this one to Moje Socio. Click on Safe. Now we
have two shadow layers. We can maybe group
them together. Select two layers and then command shift C to
make a precomposition. Let's name this one shadow hit. Okay, now we have this
shadow layer here. Let's zoom out and
see our animation. So far. That's it with
the bottle animation. And let's go to
the next video to work on the other elements
in the first scene.
9. Frame One Elements: In this video, let's animate the other elements
in the first scene. In the previous video,
we talked about how to animate this
bottle coming in. Now let's go ahead with the other elements
in the first scene. Let's come to this first
circle element and turn it on. Let's keep this one simple. Let's turn on the size
property on the keyboard. Turn on the scale
from zero second. I wanted to start from
0% and then go forward. Six frames. Command
right arrow, 123456. We're at six frames right now. And then I'll change the
scale to 100% However, I don't want it to be boring. I still want to do
the overshoot that we had for the bottle as well, but we're going to
add overshoot on the scale property in this case. I'll go forward another, let's say three frames. Command right arrow 123. And then I'll add one
more key frame here. In the second key frame, I'll change it to
110% This thing goes 0-110% which
is the overshoot, and it's going over 10% and then coming back
down to 100% in size. If I play this and zoom in, you can see there's almost
a bounce at the end. However, it's not
very noticeable. I need to give you some easing, right click Keyframe assistant. Go to Easy ease and then let's
turn on the graph editor. Let's go to the value graph and then fit the graph to view. I just need to drag
these curves to make sure they are more extreme. I'm going to drag these
handles here, right? It's more like a curve. After we have a curve like that, let's go play this
animation again. It just popping in precisely and then gives more
energy to this animation. After the scale change, I also want to animate
the rotation shift R to pull up the
rotation property. Just add a keyframe at zero
second at the six frame. I'm going to drag this
keyframe over here. Then I'm going to
go to zero second, make it negative 60 degrees. This thing is going to rotate, coming in and then
landing at zero degrees. Rotating from 60 degrees when it's coming in and then
back to zero degrees. And this is the animation. It just have a slight
rotation to it when it comes in. That's good. If I want to add more energy, I can go to red click
keyframe assistant easy, and then go to the graph editor. Let's just drag this
curve to be more like a S curve and that'll be our animation
for this thing here. After this one comes in, I also want to duplicate
this layer here. Command give it a duplication. And then I want to
move it up over here. Hit you on the keyboard
to show the key frames. I want to keep the
same animation. However, I want to make
this thing bigger. In order to do that, I need
to have a null object. Because if I change the size, it's going to change
all these keyframes. I need to go to layers
and then null object, click on the circle two, click on this Pick
Whip button and then parent it to the null
object over here. However, before I do that,
let's go back and Z, I need to make sure
this null object is at the center
of this element. Now, if I parent it again, if I change the size
of the null object, I can also change the size of the circle that I duplicate
it, which is circle two. This way I'm not
going to mess up with my key frame
that I already have. Once I'm done with
the adjustment, I can just delete
this null to have this new shape or a new
element at this new size. For now what I want to do is
R on the keyboard rotation. I want to give it a rotation
something like this, 60 degrees so that it's have a different orientation
to this one. There's some variation to
my elements in the scene. Another thing I want to do, I want to maybe change the
animation on this a bit more. Because right now
I feel like these two are having
similar animation, which is not interesting
my eyes right now. I want to give this animation
some variations as well. Not only the size variation, but also some
different feel to it. Let's delete this
null object as I already have this
one bigger now. I just want this circle two to be at 100%
at the beginning. Okay, that's too small.
Let's change it to maybe 200% Just cut it in. Then after six frames, I'm going to have to be
growing to 320% Okay, that's too big. Maybe 280. 260. Okay, that's pretty big, 100-260 Then maybe I wanted to stay there
for 260 or 250. And then after six frames, kick command red arrow, 123456, it will
be 0% at the end. This is our animation here. From 200% it cuts in
and then grows bigger. Stay there for a second
for a couple of frames and then become
smaller, disappearing. This is the animation
that we have. If I select all the key frames, go to graph editor and then hit this button to
fit the graph to view. You can see this are the S curve that we
have on this animation. This curve is similar to the one that we had before
to the first circle. We just need to
drag these handles outside a bit more to
form this S curve. So that our animation is
going to have more energy because the steepness of the curve equals to the
speed of the animation. You can see over here, the steeper the curve is, the faster the animation is. Then once we have a
S curve like this, there's more speed
variation to our animation. It goes from really slow, then the speed picks
up over here in the center where my mouse
cursor is, it's the fastest. And then goes slowly, slowly easing into position, that's the animation
that we want. If we go back to zero second, it's got a lot more pop to our animation or the bounciness. That's the feeling that
we want to convey. I think I'm good
with the animation of the circle right now. Let's go to the next element. The next element we
could do is this, turn on this whole thing here. This is the elements
composition. Let's double click inside. We have this text animation. And then we have this
circle over here. Let's pull this one
command X to cut it, and then go back to
the main composition. If I click on this flow charts, it gives me the
option to go back to the previous composition,
which is this map. You can see there's
this blue line that's leading to this
main composition. That means I came from this main composition previously.
I just need to go back. Just click on this
one, It's going to lead us back to the
main composition. Now in this here, I just need to paste in
that circle command V, paste it in, and then I'll just do the animation
for this one. First of all, I want to move the anchor point to the center. Let's grab this
pen behind to move the anchor point to the
center of this element here. For this one, I want to
keep it simple as well. I just want to do a same scale animation to
the first circle. I just wanted to go
from 0% all the way to 100% with a overshoots
right before it lands. So I can copy the
three key frames. Command C and then go
to this circle here. Make sure my timeline
indicator is at zero. Second command V it in. And then hit you
on the keyboard to show the keyframe.
Let's play this one. If I solo this layer, let's just solo,
hit this button. Beside the icon, I
can solow this layer. I can also solow the background. And now we're only seeing the
background and the layer, so it's not distracting to
see all the other layers. This way I can
focus on this one. This is the kind
animation we have. I actually like it a lot because it's got this
pop to it, right? It's also been consistent with the other animation that we had with the previous element. In this case, I don't
even need to redo the same scale animation again, I just copy the keyframe. Other than this, I
just need to add another rotation to
this element shift R. Since it's a circle, I just want the circle to rotating continuously
in one direction. In order to do
that, I need to add a very easy expression to
this rotation property. Hold down option
on the keyboard. And then hit the stopwatch. It's going to give us this
expression window here and you can put in the
expression that you want. In this case, we just need
to put in very simple, one time times 20. Then after we have this, let's click off, we
have this expression. Now if I play this, we just have the circle rotating continuously
20 degrees per second. I would say if I change
the number here to 60, it's going to rotate faster. The larger the number is, the faster the rotation is. For now, we just want
to keep it at 20. That's the kind of
speed that we like. Okay, turn off the
Solo button and then turn off the Solar button
for this background. Now we have most of
our elements ready. The other things we need to do, let's go inside the
elements composition. We have a couple of these
little stars and extra things. I want to copy one command X, cut this one and then go back to the main composition
from this flow chart. Make sure the timeline
indicator is at zero second. And then command V, paste it in. These are the four
layers that we have. And then we can go to
this label color here. Let's change it to
yellow so it's easier to identify these little
color over here. The orange ones are
the little dots and little stars that I have. These animations are going
to be straightforward. I just need to copy
the three key frames that I had for this
circle as well, command C, and then paste it
onto all these four layers. Command V hit you on the
keyboard to show the key frames. It's basically got
the same animation. However, the problem I have is I forgot to
change the anchor point. Right now, all these
four little dots are coming in from the center,
which is not what I want. Let's go back command Z. Let's make sure the anchor point for each element is
right in the center. I just need to click
on the pen behind too, and then track the anchor
point to the center. However, there's a easier
way to do it if you click on the second
one, which is this one. The fastest way to center the anchor point to
the object is if you hold down command key and then double click on
this pen behind tool. You can see it goes to the center of the
element right away. Let's do it again. Hit
this element here. And then you can
see the center of the anchor point right in
the center of the frame. If I hold down command
on the keyboard and double click on
this pen behind tool, it goes right to the
center of the object. Same thing to this
one. Double click. Now we have the anchor
point right in the center. So we can paste in
the key frame command V. Let's zoom out. We have these little
dots coming in. It's pretty subtle right now
because I haven't arranged the layers yet because everything right now is
coming in at zero second. Later on, once we have
all the animation, we're going to arrange
the layers so that they're not coming up
all at the same time. The last thing we want to do for this first scene is we're missing the apple
on the side here. Let's go to the apple layer, let's turn the icon
for the apple. I can do a reveal
with this shape. Meaning if I select
this apple layer, let's go to Effects
and Presets panel. If you don't have it,
you can find it under Window Effects and Presets. Let's do a wipe effect. After I have the
radio wipe effect, we can change the wipe center. Click on this center to be the
center of this apple here. Then if we drag the
transition completion, you can see it's
wiping the apple away. However, if I drag
it the other way, it's revealing the apple, I think the wipe
rotation is wrong. Instead of using clock wise, we need to change it
to counter clockwise. And then let's go
back to zero second. At first, I just want
to set a key frame to 100% so we don't
see the apple yet. And then maybe after 12 frames, command shift arrow
for ten frames. And then 1212 frames change the completion to 0%
Now we have the full apple. If I solo the apple
and the background, let's see the animation. First of all, I
want to use a mask. Go to Rectangle too. And then draw the mask
over here to make sure we cut out the part
that is not looking good. And now we have like
a straight line here. We can see this is the
way we review the apple. It might be too fast. I want to change the keyframes.
Maybe drag them apart. Give it more time. Yeah, I
think that speed looks good. We can also select the two Reck keyframe
assistant. Easy ease. And then let's go
to the graph editor to drag the handle
to more A S curve, give it more energy. As command save the project, make sure you always keep saving your project because you don't want to lose any of the work. That's our animation
here. That's good. Turn off the solo button. Now we have the animation for
the first scene, half done. The last thing we want to
do in this video is to re arrange the layer a little bit so that
they're not coming up. At the same time, let's hit command A to
select all of them. And then hit shift
tilta key to collapse all the layers so
that they are all clean and it's hiding
all the key frames. Now I just need to make sure I know which
one comes in first. I think the bottle
should come in first, and then the circle
should come in as well. And then I'll drag the circle to maybe a couple
of frames later. This one comes in, the circle comes in, and then
the circle two comes in. Then, maybe the battle should
come in like a tad later. Now, we would have these four different
circles coming in, all not at the same time. Stagger them out a little bit. So they're not coming
in. At the same time. For this elements, we
haven't animated yet. So we can leave it
there for blue circle. I want it to come in after
the bottle lands over here. When the bottom landing, I want the apple come in, strike the apple layer. We can even move it up as long
as underneath the bottle. It should be fine when the bottle settles
down. Like here. I want the apple to review, or maybe after
everything settles, I will have these four
little starts coming in. Yeah, I think that looks fine. That's the way we want
to arrange our layers. Let's see, the animation. You know what, I forgot to change the shadow
with the bottle. The shadow comes in first. I need to direct the shadow here to make sure it
aligns with the bottle. Yeah, I think it looks pretty good to command
S for saving the project. Let's turn on the music and see what it sounds
like with the music. Yeah, I think that works.
Let's sit with this video. Let's go to the next one and keep animating the first scene.
10. Secondary Animation: All right, in this video, let's finish up animating
the first scene. We already have most of
the elements animated. Now let's go ahead and
animate these lines. If I turn on the icon
for these lines, we got three different lines. If I move this one up, one here, one here,
and one there, So these are going to
be interesting just as secondary elements
giving the whole scene more life and then making it
more interesting to look at. Let's double click
this line composition. Let's hit this to Transparency
Grid button here, so that we can see
the lines clearly. First of all, I need to draw these lines inside
after effects. This is going to be
my first line here. I'll move it over here. And then go to the Pin tool. Just draw this line
here from the end here, and then go here, here. And then maybe go
from here to here. It doesn't have to be exact, I just want to draw a line here. Something like that. I
think that should work. And then I need to turn off
the fill hold down option, triple click the
fill color here, 123 to turn the fill color off. And then we can change the
stroll color to a black color. Change the width
to three pixels. This is going to be similar
to my line two here. That looks good. And then let's
draw the other two lines. Okay, I can turn all
three lines off, and now we have the
three lines here. First, let's animate
the first line. Let's go inside the layer. And then we can add a trim pass, go inside the trim path. This is my line three here. If I toggle the percentage, you can see if it's
at 50% my line is cut off at 50% Basically, we can use this percentage
of the trim path to control the
completion of the line. In order to animate this, we want the zero second, the start and end
to be 0% And then go forward maybe ten
frames or 12 frames. Let's do 12 frames
and then change it to 100% Now we just need to select all of them and then go to
keyframe assistant. Easy. Go to the graph editor. Let's drag the handle here, give it more of a curve. And then just move these two key frames of
the end property over. So we have a offset key frames. Now let's see what the
animation looks like. It's a draw. Draw off. We have the line
drawing on and then staying there for a second
and then drawing off. That's the animation we like. That's good. Now
we need to do is command C to copy these two key frames and then
go to the other two layers, command V, paste it in. Let's see, the animation
for the other ones. I think layer two works.
This one works fine. Now they all have this
drawing on and off animation. You see that? Yeah,
that looks good. Next thing I want
to stagger these, I want to stagger these
by five frames, 12345, I want this one coming
first and then this one coming in second after I have the timeline
indicator here, I can use the shortcut left square bracket to
cut the layer over here. It starts from five frames and then go forward five
frames again, 12345. And then the third one
starts at ten frames. Now I can cut all
three layers here. Let's group them.
Command shift C, this is going to be lines. I can cut the layer option, right square bracket
to cut it here. Now I just need to
duplicate it, command D, and then move it over using left square bracket
and command D again. Move this one over again to give it a
continuous animation. I'm just playing the same
animation four times. This is going to be our
animation for the lines here, for saving the project. Let's go back to the main composition and see
what it looks like. I just want the line to come in. Maybe after everything
settles also, I forgot to move this one over to the left so that it's
bleeding off the screen. It still looks pretty big. I want to move it
down a little bit, maybe make smaller,
that's better, so it's not colliding
with the other elements. Yeah, I think that
looks pretty good. Just something extra to look at. Before we move on to
the text animation, I want to add some wiggle effect to the apple and the starts. Let's go to the apple here. We just need to go to Effects
and precess panel here. Let's go to Add wiggle. And let's choose wiggle
position, double click. It's going to be
added to the apple. For the wiggle speed, let's put it to maybe
one and the amount, let's change it to 20 pixels. Let's see what it looks like. I think the speed is too slow. Let's change it
to four and then, let's see, that's too crazy.
Let's change it to two. And then, yeah, I like it. The moving speed is two
wiggles per second, and then the wiggle
amount is 20 pixels. The apple is constantly
moving over there. I think I want to add these wiggle effects
to the stars as well. Let's go inside. This is the four star. Let's
select all four. And then command V pasting
those wiggle effects, we have these four
stars moving as well. All right, that's
it with this video. Let's finish up
the first scene in the next video with
the text animation.
11. Fun Stretched Text : All right, in this
video, let's start animating this text on the top. Over here, let's go navigate to this text composition,
which is this one. That's called the Elements. Let's double click on this one. And this is where we
can animate our text. Here. You can see over here, we only have the Photoshop
layer inside our composition. We need to animate this one. What we need to do
is, first of all, let's duplicate
this layer command, leave one as reference. We can turn off the icon and
then go to the second one. Click create, Convert
to edible text. We need to convert
it to edible text, so that now you can see there's this text layer
that's been converted. We can change to
anything we like, but we just want to delete the extra E and the
extra inside there. Now another thing we
need to do is we need to convert this text
into a shape layer. Let's click again,
Create Shapes from Text. Now you can see one
extra layer is created. That's a shape layer. Inside the shape layer, if I toggle this icon here, you can see all these
different letters that's inside the shape layer. That's good, this is what
we're going to animate. We're going to use the
shape layer to animate the shape layer to
stretch them out, and then animate
them in and out. First of all, we want to access the path property of
these shape layer. Select the shape layer
itself and go to the search bar
here, type in path. Now you can see all
the path properties are visible underneath
this layer. I just need to
select all of these. But before I do that, I
also need to make sure my end position is going to be something similar
to my storyboard. This is going to be my
reference for the storyboard. Let's drag out some rulers here. Command R to turn on the guide, and then we can drag out
some guide to make sure we know where each letter is. I just want to make sure
I know where this is stretched out and then where
this is stretched out, I just want to put some guys
here just for reference. And then the E is
going to stretch out between these
two guides here. And then the 0 is stretched out between these two guys gear. That's good. I can
turn it off now and then turn on
the shape layer. Now I just need to make sure everything is aligned
with my storyboard. Let's go inside
the path property, then select one of the
path click on that. After we click on the past, our mouse cursor is
going to turn white. And then in this
case, if I zoom in, we can actually drag our mouths to select the anchor point. I just want to select the
anchor point right now with the and part of the E
on the left hand side. So that I can drag
this out around here. The E is going to
be around here. And then I'll drag
the anchor point for everything on the
right hand side and stretch out the E again. And this is going to be my
final position of this letter. Then for the 0, I just
want to make sure I select everything right
before the center of the 0. Then now I can drag, You see I think I missed one of the anchor point over here. So I need to really zoom
in and make sure I select all the anchor point that I
needed to stretch out the 0. Now you can see I have
the stretched out. I'll just align the 0 with this guideline here that I drew before so that I know the exact position
that I need for the 0. Then I'll drag the right inside. Aligning with this line here. I think that's about
the right position. And the amount of stretches
for these two letters. Now I have all these past
values for these letters. I can just go inside
the shape layer again and then select all the path properties
of each letter. I'm holding down shift
key to make sure I'm selecting all the different
paths for the letters. Then I'm going to add a
keyframe. Let's go back again. I just want to make sure I'm
selecting all the pass click on this layer and then
search path property. Now you can see all
these ones have a keyframe on the stopwatch,
It's been activated. I think I got everything.
All the letters. That's good. These
are going to be the final position of my path
once everything comes in. This is what it's going
to look like at the end, when it settles in place. That's good. Since
it's a final position, I need to put it maybe
around 20 frames. I just want this
animation to stop there. Maybe around 20 frames. So I'm going to go
forward 20 frames. Command shift right arrow two times for 20 frames,
you can see over here. And then I'll drag
everything to make sure it stops at 20th frame
with this layout here. And then for the start
of the animation, I just want to first line, we can turn off the guide. Now since we don't need it, I'll just use a
shortcut command. Semicolon to turn off the guide, or turn on the guide
command semicolon. Again, click on one of the past property and
then you can drag and select the first line. Move everything out to the left. And then drag and
select the second line. Move everything
out to the right. Now you can see we've added a key frame as zero second
for all our letter. Because the value of the path is changed and it's automatically adding
in a key frame. That's good. Let's
say after ten frames, command shift, red arrow. I think I need the guide again. Command semicolon,
around tenth frame. I want these letters to come
in already in position. This is the final position. And then I want these letters on the second line also come in to be able to stay in position so that the E
and 0 are stretched out. That's about the
path value that I want to give a tenth frame that we have this
frame here with the E and stretched out as a part
of the animated scene. However, in this case, I also want to add keyframe on the other letters that
doesn't have a keyframe right now because I only modified some of the past
property for let's say the T and the stretched out and also the first
group of the second line. However, I didn't change
anything for the other letters. I need to make sure everything
is anchored so that they're not moving around. Later on to mess up with our animation over here you
can see the first letter S, and it's missing
some key frames. I just need to add
keyframe here as well. To make sure I'm anchoring
all these letters to let them stay at the exact position
as they are right now. For those ones that
doesn't have a keyframe, I just need to
click on the start here to add in a key frame. Now, I should have
a keyframe for all the letters. That's good. And then we're going
to move forward maybe three frames, right? 01233 times for three frames. Sorry. You know what? Let's
move forward five frames. 345, that's five frames. We're at 15th frames right now. In this position, I think
I want the first batch in the first line to maybe
overshoot inside a little bit. And then I want the second line to coming in overshoot
a little bit. I just want to give
an impression that the animation is
too fast so that before it lands in position it actually went over
the final state. I think the final
state for the 0 is this line here
where my mouse is. But then it's going over to the second line over here,
where it is right now. Just give it a little bounce at the end before it settles. Same thing, I want to add in key frames to the
other letters that doesn't have a keyframe
at this point. To make sure we're
anchoring all the letters, all the past properties. That's good for this frame. And then we need to go
forward another three frames. Command red arrow, 123. In this case, we're
just going to do a slight overshoot again
in the other direction. In the opposite direction
that it bounces a little bit. We're just going to overshoot it slightly over the final
guideline that we have. If you look at the E, this is
position where my mouse is, is the end position of the E. So we're only shooting
a little bit. And then for the same thing, we're only overshooting a
little bit so that there's a little bounce at the end
when it settles in place. That's good. I still need
to add in the keyframe to the other letters
that doesn't have a keyframe right now to
anchor their position. That should be good if I
preview the animation. Let's see what it
looks like. Now you can see the bounce that
I was talking about. It's got the slight bounce. It went over and
then recoil back, and then settle in
position it looks pretty flexible and it's
very interesting to look at. However, we haven't added any
influence to our animation, so we need to do that next. Let's select all the key frames. Right click. Go to the bottom of the menu.
Keyframe Assistant. Easy ease. And then let's
go to the graph editor. Hit on the second button here, make sure we're editing
the speed graph. I can fit the graph
to view here. If I drag the handle, you can see there says
influence 48% I want to give it more influence so
that it's coming in fast and there's more
variation in the speed. I think the influence I'm
trying to get is around 80% I'm just
dragging the handle. As long as I see around
80% of influence, I think that would be
good for this case here. I'm just trying to get
80% of influence for all these animations here,
dragging the handle. You also don't want to give it too much influence because I'll make the animation
to mechanical. However, 80% influence will
give just enough variation to the speed that it looks very natural and very
interesting to the eyes. This is a type of curve that
we get with 80% influence. Let's go back to
the graph editor. Let's see what our
animation looks like now. It's more elastic. It gives
more of a stretching feeling. I think it looks pretty good.
Now that's what I like. The last thing I
want to do is to stagger out the key frames. Meaning just want to
do a offset so that these two lines are not
coming in at the same time. I want to find the
here, this is the, just want to select everything after the F and then maybe move the key frame a couple of frames forward to
give it an offset. Yeah, so that they're coming
in one after another. That looks good.
That's our animation. Let's go back to the
main composition. Let's take a look here and see what it looks like with
the main composition. Let's see if we can add more interesting factor
by manipulating maybe the scale property of this whole composition as on the keyboard. Once I have this one settle in, let's unlink the scale property. Make sure the anchor point is right in the center
of the composition. And then for the scale property of this whole composition, let's had a keyframe here. When it comes in, I wanted to, she like this, it's like this. Then maybe six frames, 123456, after it's going to go back
to its original state. I just want to manipulate
the key frame a little bit to see what kind of
animation I can get from here. If I select all the key frames, go to keyframe velocity. Let's change it to
66% of influence. It's pretty interesting to
have something like this. We got the text coming in at 100% and then all of
a sudden we give it a little stretch from
the x and y scale and then it's going
to stay there for a couple frames and then
goes back to 100% again. So this is the kind
of animation we got. There you go. That's
how we animated the text animation
in the first scene. In the next video, let's do the transition from the first
scene to the second scene.
12. Liquid Transition: Welcome back. In
the previous video, we finished the animation
for the first scene, and this is what it looks like. Now we just need to
add in the transition. And then we can animate the
bottle for the second scene. So we want to have
this liquid element in the animation
to enhance that. This is kind of juice
that you want to drink. It's a motion juice or like a creative juice where it gives you creativity and sparks. It's something that's really
hard to do if you don't know how to hand or do
cell animation. So in terms of liquid
animation or transitions, the easiest way or
the best way is to get some stock footage or the stock elements from a third party website or
a stock footage site. So we have for this project, I got this splash elements from motion array and it's basically got all
these splash elements, hand drawn effects to it. It's also got some sound
effect, I can turn them off. So basically you can use all these different hand
drawn splash elements in your video or animation to add some extra
spark to it, right? It's not something that we
can easily do within after effects if you don't know how
to draw a cell animation. This is a website
of motion array. They have different kind
of subscription where you can get access to all
these different elements. There's after effects elements
or different templates, a lot of extra stuff that you can add onto your
video to make it better. That's what I use
in this project. Things is for
educational purposes, so you guys can all use
it to do your assignment. However, this is not something that you
should be using for your client work or paid work because you won't have
the license to it. I have all these
different elements within my after effects composition. So let's go back to my original after effects
jus animation file. I just need to import that after effect file within my
working file here. Just double click on the empty
area in the project panel. Then let's go to our folder. Let's get this
after effect file. Just select this, AEP After
effects project, hit on Open. Now it's going to import
all the splashes. Put this folder inside
our assets folder. And then let's put this
shadow inside our pre comps that we always keep our project panel
clean over here. This is the final
comp I should have, all these different splashes. The one that I want
to use is this one. This number nine here
looks pretty good to me. Let's drag this splash number
nine onto our working area. Let's turn off the sound here and then let's see
what it looks like. Now, I just need to
flip it for rotation. Let's flip it 90 degrees. Yeah, I think as soon
as we flip this, it looks pretty liquid and
it looks very organic. Yeah, I like it. This is the
transition that we have. However, for the second scene, let's drag the
second scene here. Let's move it after
the transition. Put it underneath
the transition. We have a different
color. We need to change the transition to
a different color. Let's go to Effects and Process. Let's search for Phil. Double click and then let's add the same pink color
for the transition, it goes from the center
and then transition out something like this. That's good, that's
our transition. Then the next thing
we need to do, I need to go inside
the mo juice number two and then copy
all these layers. Command C, go back to
the main composition. Delete this composition
number two and then add them over here. If I change the color to all these pink layers
are my second frames. Let's put the splash transition underneath the pink layers. We have first scene and
then transition over here. I want the bottle to come in. Let's go to the bottle
here. This is our bottle. I remember we still have the bottle animation for the first scene here
and the shadow. Let's copy both command
C and then go back to the second frame bottle command V. Let's move it to
the same position. Select all three layers
P on the keyboard. I think for now let me, first of all, I need to change
the anchor point, right? I need to make sure
the anchor point is at the same position. If I turn off the first bottle, the anchor point should be
at the corner over here. Now the shadow should be
underneath the bottle. We can recycle and use the
same shadow for the bottle. We just need to parent this bottle to the previous one or we can
just copy the key frames. Let's try to copy
all these keyframes. Let's hit you on the
keyboard to show the key frame of the first
frame, bottle animation. Let's copy all these keyframes. This is a bottle for the
first frame command see. And then we need to make sure when we paste in the key frame, we need to make sure the
timeline indicator is right in the start
of this layer. And then click on this second bottle command V to pit it in. Let's see what it
looks like now. I think it looks pretty good. It's got the exact same
keyframes at the first bottle. Now I can delete it,
let's see from the start. Yeah, I like this
transition here. It goes all over the places
to hide the first scene, and now we have the bottle
comes in. Well, that's nice. There we go for the
transition animation and the battle coming in. In the next video, we can keep animating the second scene.
13. Become Motion Insiders: Before we continue, I want to share with you an exciting news. Motion design courses just became more affordable
at motion circles. With our motion
insider membership for as low as $7 a month, you will get unlimited access to our top tier motion
design courses, trusted by over 50,000
students worldwide. Time to elevate your
motion design skills to become the best
animators you can be. As an insider, you
will also receive complimentary project
files from all of our Motion Circles
YouTube tutorials. And enjoy an exclusive
25% discount on all the other incredible
animation projects from other artists in
our project file shop. Don't miss out on this
opportunity to level up your animation skills while becoming part of our
vibrant community. Join us today at motion circles.com and unleash
your creative potential.
14. Animate 2nd Scene Efficiently: Let's keep animating
the second scene here. We already have the bottle
animation coming in, which is the same as
the first scene bottle. Now we just need to deal with all these different elements
in the second scene. First, let's animate this
element at the corner, at the bottom here, which
is called the shape three. I think the way I
want to animate it is going to be the same
as the first scene. I want to find some key
frames for maybe the circle. Let's hit you on the keyboard. Let's copy these scale
property keyframes, command C, and then we can drop them onto this shape layer, shape three. Let's command V, paste it in
and hit you on the keyboard. Let's see the animation. It just goes up. And I think the
overshoot is too subtle. In this case, I want it to be more exaggerated
for the overshoot, maybe 115% and then
when it settles down, maybe it can take four frames. This is going to be
my animation here. However, since it's
a very unique shape, I want to add a
rotation property, shift R. To add a rotation property it,
the stopwatch here. Let's rotate it maybe
like 180 degrees. I think this animation
looks fine to me. Let's duplicate this
layer command D then for the rotation
of this one. Let's you on the keyboard. Let's do a full
rotation of one round, which is 360 degrees. We're going to have
one shape coming in really fast,
rotating really fast. And then the other one
rotates really slowly. Now another thing
I want to do is let's change the color
of the second one. Select the second layer, go to effects, and presets,
find full effects. Let's change this one
to a blue color here. Yeah, I think I like
what it looks like now. Now we have this little
shape here, animated. We want to animate this
bigger circle here. For the bigger
circle, I want to do the same thing for
the first scene. Let's find that
circle, this one here. Let's see you on the keyboard. Copy the scale property. Let's go back to
the second frame. Find this shape two. And then make sure the timeline indicator is at the beginning of this layer for pasting
in the scale property. Now we have this
popping in animation. And then I want to pull
out the rotation property. Shift R, hold down
option on the keyboard. Click on the stopwatch to add in a time times 20 expression
like the other one. Now we have this coming in, rotating just like the
first scene you can see. Now we're going really fast
because all these keyframes, we don't have to do it again. We have all these keyframes
already in the first scene. We just need to copy and paste onto a similar element so we
don't have to do it again. Right? It's going
to be efficient. And time saver. Remember we have
these animations for the little stars and dots. We can use those animation as
well for the second scene. Just make sure we have the
anchor point in the center. And the trick we had
before is to select the layer and then
hold down command, double click on this
pen behind tool to have the anchor point set to
the center of the object. That's good and now we
can select the four. Go back to the beginning
of the layer command V, pasting in all these
scale key frames. Now we have these.
Then the last one would be this shape over here. It's called shape on E, Y. For shape one, let's
try to do a radio wipe effects the same as the
apple in the first scene. Let's adding a radio wipe. Let's solo this layer. We can probably, let's
change the center first, make sure it's in
the absolute center of this half circle. Let's do a counterclockwise. Hit the key frame, go
forward 12 frames. And then hit you
on the keyboard. Put a key frame down there. This is going to be
the final position as zero second at the
beginning of the layer, we need to change it back to
100% It's fully invisible. This is our animation here. Let's click Keyframe
Velocity, change it to 66. That's good. Maybe we need
to give it more time. Direct the key frame
further apart. I also want these two shapes to come in at different speeds. Let's duplicate
this one command D, and then we can use our
pentool to draw a mask. This is going to be the inner. And then I want to draw
another mask for the outer. For this mask, I
just need to turn the mask option to subtract. We have both the inner
and outer shape. Five would be the inner, let's rename it to inner, then this one would
be the outer. I just need to stagger these alibis so they're not
coming in at the same time. Yeah, just to give it
more variation, right. Since we are using co
effects in the scene, I'm wondering if we can still do the co effect for
this layer here. We can probably duplicate
these two command D and then change the
label color to blue. And then also go to the
effects and precess panel, search for fill,
double click on it, change the color to blue. Now we would have a blue
layer, red layer second. However slightly delayed
we have the blue coming in first and then
green color coming in second. You just need to adjust the outer and inner a little bit so that we have the blue outer coming in and then
green outer coming in, and then blue inner coming in, and then green inner coming in. To add more variation
to this animation, I think that looks pretty good. Now we just need to
adjust the layers to make sure they're not
coming in at the same time. Right, Just like the
first we have the bottle, we can delete the
shadow now because we have the shadow
from the first scene. We can have this one bottle
comes in, circle, comes in. And then once the
bottle almost settles, I think we should have the
shape here coming first. And then we have these coming in pretty late here. This one coming in later. This one comes in first. We have this shape coming first, and then this shape
maybe coming in here. Now we have all
these little stars and circles coming
in one at a time. Stagger around, just making
sure we are offsetting all these layers so that they're coming in in different times. Yeah, I think it works. There we go, for
the second scene. We're going to
finish up the second scene in the next video.
15. Finishing Up 2nd Scene: In this video, let's keep animating the second
scene and finish it up. Now we already animated a bunch of elements
in the second scene. Next thing we want to do is the trim path effect on
these little curved lines. Let's go to find
these two lines here. It's under the
lines composition. I can double click and go
inside this composition here. Let's turn on the
transparency grid so that we can see
these two lines. It's going to be
the same way that we animated previous lines. We can use the same keyframe that we use in the first scene. However, we still need to draw the lines within after effects. To do that, let's
go on top here to the pen tool and then
let's draw this line here. Just want to adjust the
curve so that it's smoother. I think that that's the first line I can
turn off this one. Then for the second one,
let's go back to the pentool. Again, it doesn't
have to be exact. I think that should
work. Let's turn off the line one as well. We can delete these
two if we don't want. Now we just need to copy the key frame from
our first scene. Let's go back from
this flow chart to the main composition, and let's navigate
to the first scene. Where is our animated lines? Let's go inside
this folder here. And then go inside
this composition. Hit U on the keyboard. Remember we animated
the trim path effects, both the start and
end percentage. We can copy these
four keyframes. Command C. Let's go back to the previous lines we
have, which is this one. Let's select the two
layers, go back to zero. Second command V to paste it in. Hit you on the keyboard
to show the keyframe. Let's play the animation
and see what it looks like. Both of these are going
from right to left, which is the direction
that I like. I can just stagger or offset the layer a little bit so that they're not
coming on at the same time. I want this first
line coming in first, and then after maybe
a couple of frames, drag it back a little bit,
the second line comes in. Yeah, that works.
Let's select both. And then command shift C, let's rename it to line two. Then we can cut this layer
option rest square bracket. Cut it here, and then
duplicate it, command D. And then just keep
duplicating it. And then repeating it
so that it's animating, repeating for a couple of times, and that's what it looks like. I'm just using the
same animation and repeating it for
a couple of times. Let's go back to the
main composition. After the bottle
***s or settles, we have these lines drawing in to add a bit of
secondary animation. I feel like these
lines are still coming up almost at the same time. I want to maybe go inside again to drag these or
offset these a bit more. Let's go back and see
what it looks like. Yeah, I like command
S save the project. Before I do the text animation, I just want to add a
bit of wiggle effect on these little stars and circles
like the previous scene. Let's go back to the
first scene here, and then these are the element that we had, the wiggle effect. Let's copy the wiggle
effect command C under this effects control. And then let's go back to the four layers in the
second scene command V, paste it in so that
they all wiggle around. If I zoom in and play it, it's got a subtle wiggle to
it to add a bit more fun to the second scene as well and make it consistent
with the first scene. The last thing we need to do for the second scene is to
animate this text here. Let's find this composition
in our time line. It's actually this
elements composition here. Let's double click to go
inside this composition. Remember how we did the text animation in the first scene? We're just going to
do the same thing as we animated the first scene. First of all, let's
duplicate this layer command D. Just save one layer for reference and then
for the second layer, let's right click Creates and then convert to edible text. Now we just need to delete the extra here, the extra C here. And this is how our
text is going to be. Let's re click this
text layer and then create shapes from text. Now we have the shape
layer of these letters. Next thing, we just
need to manipulate the shape layer in order to animate these texts coming in. However, since we saved
one layer as a reference, I just want this one to be a
reference for my position. This layer is just going to be our reference for the position of the S and C. Let's
strike out some guys. Hickman, R, for ruler, and then let's strike out
some vertical guys here. I want to know the position of the S and then the
position of the C here, and also the edge of
this whole thing here. That's roughly our position. And then I can turn this one off, and then turn this one on. Hit this one layer,
and then search for path on the search bar. If I select one of them, it's going to give
me this mouse cursor which is in white color. Ask me to select the anchor
point from these letters. Now I just need to
drag out the S to match with the original
style of that title. Right? To do that, let's command plus sign. I just need to drag
all these key frames right before the
center of this letter. Then if I move out
this anchor point, I'm going to drag out this here. Remember this is a line
for the edge of the. I need to align the left edge
of the S to this line here. And then I need to align the right edge
here to this line. I just want to zoom in
and then align this here. This is going to be our final. Then, same thing for the magic, let me click on the path, and then I can select the anchor point for all
these different letters. Drag out the C here, This is the left
edge of the C. And then I need to drag out all
these ones here as well, to align the C with
this edge here. After that, I think this is roughly the same as
our original style. If I turn on the reference, it's mostly similar.
So that's good. This is going to be our
final position of the title. Now we're just going to
deal with this one layer. First of all, we need
to select the layer, and then let's search
for the path property. Now I just need to select
all the path property of every single
letter in this title. Let's click on the
stopwatch for one of them. And then it will add keyframe
to all these letters. Now we know these keyframes are the final position
of these paths. Let's say if we
want this animation to take around 20 frames, let's go forward 20 frames. Command shift right arrow. Command shift right arrow. Again, you can see
here is 20 frames. I just need to move
the key frames to the 20th frame so that
this is a final position. And then let's go
back to zero second. In this case, I just need
to move everything out. I want the first
line to come in from the left and then
the second line to come in from the right. I just need to hit on
one path property. And then selecting all these
letters in the first line, move everything to the left. This is going to be our
first initial position of the first line. And then let's select
everything on the second line. Move everything to the right, which is the initial position of the second line after we positioned them
outside the frame. You can see all these
different key frames are added automatically. Because we change
the path, right? We change the path for
all these letters. If I play the
animation right now, they're just going to
linearly coming in from the initial position
that they have and then coming in to settle
to the end position. That's our initial
animation for now. However, what we want to do is we want to add
some stretches. Let's go forward, ten
frames from zero. Second command shift,
red arrow at ten frames. I want this to
stretch out already. Let's hit the past
property for one of them. And then let's select all
these different anchor points and tell this middle part
where the S is stretched out. I want everything coming in a tenth frame already
with the stretched out. Same as the second line. I want to have everything coming in like this with
the C stretched out. Now we just need to add the keyframe to everything
that doesn't have a keyframe. Here you can see these
letters are left out. I just want to make sure we have a keyframe for
all these letters here to make sure we have a anchor throughout
our animation. If I play this one, let's see what it looks like. It's going to stretch out and
then coming in like that. Then after the tenth frame, I want to do a overshoot. When it lands or when everything settles, I
want to go forward. Let's say command right arrow five times for five
frames, 12345. Let's see what we can
do for this one here. At this point, I want
this letter to go over. And then for the second
frame I want to go over. These are the overshoot
that we're thinking about. I want the S to become smaller before it settles in position. I want to maybe
bounce a little bit. Let's go forward
maybe three frames. 123. I want this to go
over a bit more like this. The C go over a bit more
like this and then settles. Let's see what it looks like
once we had that adjustment. It's just more like a bounce, where at the tenth frame we have everything
stretched out. And then after five frames, the S is shooting over. It went over from
the final position, which is supposed to
be this line here. It, we too much. And
then it goes over. And then after three
frames it came back up. However, it came over
a little bit and then at the 20th frame, settles down in position aligning with this
guide layer here. Same with the C here, that's our entire animation. If I scroll down,
you can see some of the letter doesn't
have a keyframe. So we need to add keyframe to those letters that does not
have a keyframe right now. Just need to add these keyframes to anchor them so that they're not randomly going to places that we don't
expect them to go. Just adding key frames. Now everything is aligned, we have all these
different key frames. Let's select all the key
frames and then let's go right click keyframe assistant
at the end. Easy ease. Let's go to the graph editor. Remember the influence
that we had? We had a 80% of influence
for this kind of animation. Let's go inside the speed graph. It was supposed to be the
speed graph that we are animating in edit speed graph. And then select these keypoints. Drag the handle until you see their influences around 80%
It should be good enough. Let's drag it out
to around 80% for all these handles, that's good. Let's go back to the timeline. Let's see what it looks like. I think we got the
energy that we want. Let's go back to the man composition and see
what it looks like. Yeah, I think I
like the animation overall now that I'm thinking I should delete the extra animation in
the first scene here. I don't think it looks
well put together. It just, it seems
like something extra. Let's hit you on the keyboard. Let's delete this
scale property change from the first text animation if I played the whole thing. There you go. That's
our animation for the first two scenes.
16. Spiral Animation: In this video, let's put the transition between the
second and third scene, and then let's start animating
for the third scene here. First, let's put
in the transition, let's navigate to
this number nine, command D, and then let's put them all the way to the
top with the shortcuts. Hit left square bracket to move it to where the
timeline indicator is. For the third scene, I think we have a blue color. Let's go inside the
Mo number three. Let's copy these layers. And then command C, go back to the main comp as paste it in command V. And then let's
use left scrip bracket to move everything to where
our timeline indicator is. Now I just need to change the
color for the splash here. Let's go to the effects
control panel on the left top, change color to this
blue color over here. Once we have the
second scene settles, we'll have this blue
color liquid transition. Then we can delete this
background, which we don't need. We have this text here
that we need to animate the same way that we animated
it in the second scene. Then we have this
tornado animation here. Let's go inside this
tornado composition to animate these
different elements here, let's turn on the transparency grid so that I can see them. First of all, let's
animate the spiral here. We can turn off these elements. We got a spiral top and
then a spiral bottom. Let's go animate
this spiral bottom here in order to do
a draw on effect. Since this shape here is
looking pretty complex. And then I wanted to follow a certain order from the bottom. Just go and draw it on
all the way to the top. I want to use a stroke effect
to animate this scene here. Let's go to the effects
and precess panel. Let's search for
stroke and then double click on the stroke to
put it on this here. Then another thing
we need to do, we need to draw a mask. If I turn off the stroke, what I need to do is I need to have the tornado
bottom selected. And then go to the
pen tool to draw a mask over this tornado path. Basically, I need to draw mask similar to
this tornado path. It doesn't have to be exact. I just need to draw it
almost covering the line. Draw this pass here, I can adjust it later on. I just need to use
this pass to animate this spiral shape to
have it right on. Now I'm just drawing this shape here to match with
this spiral shape. Now you can see we have this
orange pass overlaying on top of this spiral shape
that we have. That's good. And then inside the stroke
effects, let's turn it on. Let's use all masks as a stroke effect on
this shape layer here. And then we need to go to the bottom here and says
Review original Image. Now you can see
everything disappears. However, if I change the
end percentage here, you can see our
animation zoom out. If I change the end percentage, you can see we're drawing
on the spiral shape here. That's how we animate
this whole thing. Let's hit the stopwatch
on the end property. And then go forward
ten or 20 frames. And then let's put 100% here. Hit you on the keyboard. Let's see what it looks like. That's pretty fast. I
think it's too fast. Maybe like strike it out. Space out the keyframes, you can see there's a
little problem over here. Whenever it crosses, I need
to maybe adjust the brush set smaller so that there's
no other parts revealing. When it cross a different line, I adjust it to 2.6 then I
think it's looking better. Now, I like how
this one animates. I think that's good. Now we have the animated
tornado bottom. I just need to
command duplicate it and put it over here
all the way to the top. These are the
spiral shape that's going in front of these
different elements that we have. The fruits, I need
to use this one as a mat for the tornado
bottom layer. I need to drop this
tornado bottom two underneath the Tornado top. And then let's go
to the track mats. Use this one as a track mat. Select tornado top one. Then if I turn off the
tornado top bottom, let's see what it looks like. Essentially, I'm
using this top to be the mask for this
bottom animation. This way, we can only show this animation wherever
this top layer is visible. In this case, if I turn on
the bottom and these layers, it would make more sense here. Now you can see we have
this tornado shape here. We have the part that's covering
in front of the fruits. If I don't have this layer here, if I turn it off,
all these fruits will be going outside
of the tornado. Because the tornado
is going at the back. Only these four lines
is going in the front. Okay, I think that looks good. That's how we animate the spiral shape in the third scene, which is used the stroke effect, and using the mask to animate
it in the next video. Let's keep on going
for the third scene, and then let's animate
the fruits coming in.
17. Fruit Ninja: Welcome back. In this video, let's animate the
fruits coming in. First of all, I need to
move the anchor point of these layers to the
center of the fruit. Let's select the first one. This one already have
the anchor point in the center, which is good. And then the dragon fruit already have it in the
center. Let's zoom it in. Yeah, it looks like
it's in the center. Let's move it down a little
bit more for the apple, let's drag this anchor point. I'm just using the pan behind Tool to move the anchor point. Then for the pineapple, I'll drag it over
here to make sure it's in the center. That's good. Now I just need to
select all four layers on the keyboard for
position at a key frame. Let's go back to 0
seconds, at zero second. I want these fruits. First of all, let's lock the tornado animation that we did so that we're not
accidentally dragging them. Now, for these different things, I just want them to
go down at 0 seconds. I just wanted to be
outside of the frame. And then maybe after ten frames, I want everything to
shoot up like this. Shoot up, maybe like this. Then after maybe
another ten frames, I just wanted to settle
down in position. This is going to
be our animation shooting up and then settle in. However, it's not looking
as nice because we haven't added any curve adjustment
or speed changes yet. Select all the key frame relic. Let's go to keyframe
assistant easy. And then let's go to
the graph editor. This is going to be
the speed graph edit. Speed graph that
we're working in. I think when it comes in it
should have a lot of speed. And then when it reached
the top position, I think it should hang there. It's lost most of
the speed over here. It's the slowest speed, should be almost zero. And then at the end here,
it should speed up. Then we should do like a
couple bounces over here. If I go back to the timeline, I'll just strike these
frames over a little bit, and then I'll make sure it's got a couple of bounces maybe
let me copy these frames. And then let's strike
the white position down a little bit so that
it's got some bounces to it. Let's go back to
the curves editor. Just curve something like that. Let's see
how it looks like. Yeah, I think it looks
much more natural. Now we got to hang over
here at the highest point. It's losing all the speed
in the speed graph. You can see this is the speed is zero pi pixels per second. That's when the speed
is becoming zero. For a brief second,
that's how you see the hang in the air and
it's coming in pretty fast. You can see the speed here is almost 116 pixels per second. And then we added
one overshoots. It went over the
final position and then recoil back to
its final state. That's one overshoot,
one bounce. I think that looks pretty good. I'm happy with that.
Now, I just need to do some rotation property
on these four layers. Hit shift R and then hit
the stopwatch on rotation. I want this to be
the final rotation. And then over here, I just
need to maybe have a coming in negative, positive 30. Negative 30, positive 30.
Let's see what it looks like. Yeah, I think it looks
subtle, but it's okay. Another thing I want to do,
I want to add more fun. I want to duplicate
these four layers, command D, and then maybe
have these elements. Let's change the label
color to yellow. Hit you on the keyboard, I want this one coming first. Then maybe just like fruit ja, where it just going outside. Instead of landing,
I need to delete all these layers in
the position property. Instead of having these
fruits landing inside, I just want them
to be thrown out, maybe 12345, after five frames. I just want this one
to go down from here. This one go outside from here. This one go outside from here. This one go from here. If I select the key frames and then check the
curves editor. Where I have to drop
in, hang there, then I want this parts
to be speeding up, hang there, and then speeding up going outside of the frame. These are the first
element that came in. However, I don't want them to
be coming at the same time. The first thing I want to
do is maybe stagger them, offset the key
frame a little bit, and I also don't want
them to be the same size. At the second batch, I
need to change the size, shift on the keyboard,
make them smaller. Maybe like 30% Okay, the apple is over here. That's good. And
then I'm going to move the second
batch. I'll set it. Let's see what it looks like. Only with the first batch. Okay, I think the
hang is too much, it's going away too quick. So let me just adjust
the curve one more time. I think this anchor point
should be right in the center. So let's see, 12345677 frames. It reached the top, and then let me select
all these key frames. Let's go to the graph editor, just giving it less
influence then this part. Let's see if this
curve is right. I think I need to adjust the curve a little better to make sure this
is the highest point. I need to have this
point to be the highest I need to make
sure it's not going over. And then I should need to change the curve to make sure these
are dropping like this. The curve should look like this. Let's see if that works. Yeah, I think that works better. I need to make my dragon fruits
separated from my apple. And then I want the apple
to be a bit bigger. Apple is too small,
maybe like this big. Then the pineapple
need to be bigger. Let's try 50% We have the
pineapple coming in first, and then the apple
coming in second. And this one comes
in first, third. And then we have
this motion here. Once we have these coming out, we'll have the second
batch coming in. This, let's see
what it looks like. I still want these to go higher. I think it's not high
enough for this one. Make sure my timeline indicator
is at this keyframe here. I just want this keyframe
to go higher like this. Maybe starting with
a different position doesn't have to be the same. I wanted to throw from this
side here. That's good. Then for this one, the dragon
fruit, I want to go higher. And then I wanted to start
from this position over here. I think that's good. Yeah, and then the apple can
go a bit lower. However, it should be
thrown from this side. And then the pineapple should go from the left hand side
thrown to the right. Yeah, I think that works, just adding some randomness
to the animation. Okay, that's our animation here. Let's turn off the
transparency grid and then let's go back
to the main composition and see what this
animation looked like. Let's turn off the
text from six second. I think it came into early. Let's strike this layer behind. We need to add a background, it's good. Move it back a bit more then. I'll just start the
spiral a bit later. Let's strike the spiral,
maybe over here. And let's go back to
the main composition. Yeah, I think that looks good. All right, that's how we animate the fruit coming in
for the third scene.
18. Stretched Text 2: This video. Let's animate the text animation
in the third scene. Let's go to this
leisure creativity. I might want this text
coming around here when the fruits drop so that it's not overlapping with the
element that's flying up in the scene over here. I just want to do a
composition command C. And then let's name
this one text three. Let's double click
to go inside here. This composition is
too small command K to make this one the same
size as the outside, which is 1080 by 1920. Click Okay, that's good. We're going to move
it on the top here. Remember how we did
the previous one. We're going to go
quick this time. First of all, we
need a reference. Save this one command D, duplicate another one. Create Editable text. And then we just need to
delete one of the 0 here. Then click Create
Shapes from Text. We need the reference to
make sure where the 0 is, this is the 0, and then
where the outside edge is. I just want to pull out
some guides to align them. Then I just need to
unhide this one. And then go to the first
layer search path property. Hit on one of them and then make sure we're dragging
out the 0 here. Dragging out these layers here. This is a final state of the 0. Now I just need to select
all the path here. I'm holding down command
to select all the path. Hit the stopwatch, make
sure it's settles. After 20 frames, I need to move the final state
to the 20th frame and then go back to zero. Make sure I have the first
line going to the left. The second line should be
coming in from the right. Third line could be
from the left as well when it comes in like
this and then go forward. Ten frames can shift. Red arrow hit on the path. I want this one to come in already like this with
the old stretched out. Then since I only have key frames on some
of these letters, once I drag that, I
need to make sure I have keyframe on
all these letters. Just adding key frames at this point where my
timeline indicator is, it's a ten frames
in the timeline. I'm adding keyframes on all
these letters and then go forward five frames,
command 12345. At this point, I want
these letters to come in, go over maybe here, that's good. And then I need to
make sure these are all anchored with a key frame. I'm just adding key frame
on all the other letters. And then go forward maybe another two frames
or three frames. 123, let's do three frames. And then at this point, I want this one to come
back up like this. I'm adding key frames again to anchor all
the other letters. Anchor these, make sure they're staying where
they are right now. Then the last position is
where the 0 stretch in. And then once I have dots, I'll just select
all the key frames. Everything go. Click Keyframe
Assistant at the end. As then let's go click
Keyframe Velocity. Remember we want to set the
influence to 80% We can do it the same way as before
with the curves editor. Or we can do it this way with the keyframe velocity option, change it to 80% Click on okay. And let's see what
it looks like. I think it's going in
too much at this point. I think this or this three lighters are
coming in too much. I need to maybe give it more
like somewhere around here. Let's see what it looks like. Yeah, I think we like the
bounce on the second line, but we didn't like
the bounce for the first and third
line in this case. I think I'll just delete
all the in between key frames for the
first and third line. Let's see what is the first lighter for the third
line, which is here. Let's go back to
find the C here. This is, I want to delete
all the middle layers, middle key frames For the C, from the C, I want to delete
the middle key frames. And then let this one settle
in ten frames over here. Yeah, I think that works. And then for the first line, let's go back to
the first letter U, all the way to the
H. Let's delete all these middle key
frames until the H. And then let this
settle around ten frames. We only have the stretch animation on the
second line here. Then the third line, I can delay these animation by
a couple of frames, maybe over here, 123. And then I can also delay the animation
for the middle line here just to offset it so that they are coming
in line after line. Yeah, I think that looks good. There's a little bounce
for the second line. I think we're good
with that. And then let's go back to see
what it looks like. I wanted to come in around here. Coming in around here. So it's coming in right right
after the apple fall down. Yeah, I think that looks good. Okay, I like how it is now. That's our animation
for the text here. Okay, that's how we animate
the text in the third scene. Let's go on to the next video.
19. Liquid Logo Reveal: All right, welcome back. Let's work on the final scene of the video which is our logo. So I wanted to add a
logo at the end of the animation using our splash and liquid asset that we found. That way we can not only stress the importance of our
brand and also give it more fluid feeling
just to complement the idea that we have a creative juice that
we're promoting. In that case, we just
need to over here, after we have the third frame, we wanted to transition to our logo and then show
the brand a bit more. Also show the fun of the brand. To do that, first of all, we need to transition
these elements out. And maybe here let me listen to the music and see where the logo
should be coming in. Like the strong beat is around nine second and 20
frames. It's wrong here. This is where the speed
is the strongest, right around 10 seconds. I know the logo should be
revealing around ten second. I just need to reveal the logo. Maybe around 8.5 second over here on this third
scene settles, I'll just transition
everything out. In this case I'll have
this text animation goes away on the keyboard. And then add a position
property shift, red arrow, and then let's
make it go out like that. And then right click
keyframe velocity. Let's change it to
66% of influence. See what it looks like, it
just goes away from the top. And then for the tornado
scene, same thing. Let's hit on the keyboard. Let's do a zooming out. However, once I zoom out, you can see the other fruits
that we throw away at first. So I need to go inside,
make sure I cut those. They were thrown out. I'll
just cut these layers. Select all four layers. Option rest, square bracket. Cut the layer so that
they're not visible anymore. Let's go back again over here. If I zoom out, you can see
it's not visible anymore. I'll do the same influence,
click keyframe, velocity, change everything to 66, click Okay, that's good. Then I'll just
bring in our logo. Go back to Project. Double
click on the panel here. Navigate to our branding, and then go to this
logo here. Click okay. I can drag this folder
to the asset folder, and then the logo
to the precomps. And then let's drag the logo in. The color is a bit different, so I just need to go inside. Delete the background.
Delete this layer here. Let's go inside. We have this text here, let's go inside and click
Create Edible Text. That's good. Then let's delete. Let's draw a rectangle the
same shape at this one. That's good. We can
delete the rectangle. I want to use an outline
of this logo here. Let's select the
editable text here, and then go to character. We can flip these two
colors and make sure I have whites as the stroke
color of this text here. And then for this one, I'll have the stroke in
white color as well. This is going to
be our logo here. Now we have a outline logo. Let's go back to the
main composition. We just want to review this outline logo with
one of the splashes. Let's go back to the asset, and then in this
case, let's use four. Let's drag it down here. And then move it all the way
to our timeline indicator. Use left square brackets. And then over here I
just want to cover this for half of it and then go duplicate it as on the keyboard. Unlink the size property
and then flip this one on the y axis so that it's
flipped upside down. And then once we have
this one goes out, we'll have the
splashes coming in. This one goes out, splash
comes in right around here. I'll just make the
logo a bit smaller. Yeah, it's revealing
this outline logo here. We have this one goes out and then we have the
liquid coming in, revealing the logo. That's good. Juice, rebuilding the logo. And then we want
another two splashes. We want to splash number five
here, let's drag it down. Let's turn off the sound
effect for now. Move it back. This is what it looks like for number five, it
just goes around. In this case, I
wanted to go inside the logo to fill in the outline so that it
becomes a solid color logo. First of all, let's change
the rotation of it. R on the keyboard, let's change rotation and then let's make it smaller like this. I wanted to go inside the logo just as if it's
filling up the logo. I think that works over there. Maybe I move it up a little
bit more. Okay, that works. And then I also want to
duplicate it and then make it bigger, then change. Let's make it all the
way big, like 200, big like 200% And then
unlink the scale property. Let's flip this one, negative 200 that is
coming in the other side. And then I can move this
one away around here, it's going to a
different direction, adding more interesting
fluid on the scene. Now we've got two
same liquid splashes, but they're going different directions
with different sizes. Just give it some variations so that it's more
interesting to look at. I think we're good
with the scene here. We just need to fill the
logo with that liquid here. Then to do that, first
of all I need to use the Splash Five command C and then let's go
inside the logo. I think this is where the
animation should happen. I need to command bring this one here with
the shortcut and then I need to make sure
and see where it is. First of all, you need to
make sure the direction is correct so I need to
flip this one again. I think hit shift, make possibly 200, so it's
going from right to left. And then I need to give
it a good angle this way. Something like that. It's going over to fill the logo, right? It's going through the
logo from right to left and then it's
filling the logo. I think something
like this should work and now we just need
to make sure it fills with in order to fill the
splashes inside the logo. First of all, we need to use
this logo as a track mats. We just need to
bring it outside. Then I need to make sure, instead of outline,
I need to make sure it's a fill color for both. This one here, I need to fill
it in with a white color. Then I need to
select two layers. Command shift C. This
one is called logo fill. Now we have the logo fill
and then we need to use the logo fill as the
track mat for the Sp 05. Just select the
layer and then go to track mats, select logo fill. In this case, if I
toggle the time line, you can see this is
the animation we got. I think I'm not very happy with the shape inside the logo here. I need to maybe, let me turn off the track mat, make sure I need to adjust
this one a bit more so it's like thinner, maybe like this
when it comes in. I just want to make sure it's good looking when
the splash is coming in. Yeah, I think that works. I'll do the track mat again. Go to this track mat
option logo fill. Yeah, I think that just fine tune the rotation property
and the scale property. Yeah, I think that
works. Then since the splash left the logo, we need to still
fill it over here. We still need to
do one more thing. We need to have at least
a white layer go to layer new solid and then let's
create a white layer. Okay, And then we need to use the white layer to fill the logo right after
the liquid pass by. I need to go for the position when the
liquid comes in like this. I want this position to
be here at a key frame. And then when it goes away, maybe like a couple
of frames, 13 frames. I want this white layer
to fill the logo. Then let's go click
Keyframe Velocity. Let's do 66, we're
using white solids. Select the track mat
logo, fill number one. As if this liquid is dragging this white solid mat to
fill the whole thing. Let's see what it
looks like, the whole animation at the beginning. I think it's peaking in. I need to move it
all the way out. It might be too fast. I need to give it
some wiggle room. I need to move this
back a little bit. I want to see all these different
trails before it fills. Yeah, I think that looks
fine here like that. Let's go back to the main composition and see
what it looks like. I need to time this
one correctly. As soon as the tip of
the splash reach the E, I need to have that
animation coming in. I need to time it around here. Yeah, it starts right here.
And then let's go back. I also need to make sure the small splashes is not
going over the logo here. I need to add one more track mat around here and then
I will use this. Go to five, make sure this
one white solid should be the alphath showing only where this white solid is to be the alpha
mat of this one. I need to the splash five, Taking white solid two
layer number two at the alphamat see
what it looks like. Let's see the
animation over here. I'm not liking the edge of the white solid color over
here. This white here. Can I rotate a little
bit like this? Yeah, with the rotation,
it might look better. There you go. I think we're good with this animation
of the logo here. It serves the purpose. Yeah, I think I like how it
looks like. There you go. That's how we animate the
last scene for the logo.
20. Final Touch: In this video, we
just need to add a couple extra things to
finish up this project. First of all, I
want to make sure that our music is
synching up with our animation after
taking a look at it. I think right now it's
synching up pretty well, especially with the
last beat here. I want to make sure when
that last beat come in, it's revealing our
logo at the end. It's called the
last final impact, where the liquid comes in to
the logo to reveal the logo. So I think that works
with the music right now. The other thing I need
to do is I need to go down here to
the audio levels. If the music is too loud, normally I would put it
at negative ten sabel. And then for the end, let's say if our
animation is 12 second, I'll just add a
keyframe at the end and then maybe drag it
forward half a second. And then for the end just maybe negative 30 to slowly
easing out the music. Same with the beginning. I'll add a keyframe
at the beginning and then drag it half
a second forward. And then from the
start, let's do negative 30 to ease
the music in as well, so that our music
is not very abrupt. It's got some gradual
increase in volume. If you hear closely, you can
tell it's actually easing out at the end and slowly
decreasing in volume. That's what I like. That's good. Another thing I want to do
to add a bit extra elements. I want to have a camera poll on these elements so that
they are constantly, maybe zooming in a little
bit. Let's try that. First of all, let me
group the first scene and second scene and third
scene together so that we have a cleaner
working space here. I just want to grab
all the elements for the first scene right
before splash transition. If I select later 28, all the way down
to the background, Let's do a precompose command, shift C and then let's do
this one as frame one. Click. Okay, now we
got a frame one group, and then let's leave
the transition there. Let's do a group
for the frame two from layer 11 all
the way down to 26. And then command shift
C to precompose. Let's call this frame two. Click Ok. I also want to make sure I know the start of the frame two
maybe around here. This is the earliest point
when the layer come in. I need to use this point as the cutting point
for layer two with my timeline indicator staying
here at three second frame. And then let's go back
to main composition. Make sure I cut this layer here. Option left square
bracket to cut it here. I know this second
frame is coming at this point here, that's good. And then the third frame
would be this one. I think the third frame would be everything with the
logo and the splashes, all these layers,
everything that's left, command shift C to precompose, name it to frame
three like that. And then I need to
make sure I know where that endpoint
is, is right here. Let's go back to
main composition. Cut it right here. Now we got a much cleaner
working space. So we got frame one transition and then frame two transition
and frame three. That'll be our
final working space that we cleaned up everything. I want to turn off
the sound effect for the last frame and then let's
see what it looks like. Now, I hope I didn't mess up with anything when
I'm grouping the layers. Yes, I think it
works. That's good. Now, I just need to make sure
within the project panel, I'm selecting frame
one to frame three. And then drop them underneath the precomps folder so that we keep our render folder clean with only one main composition
for saving the project. And now I just need to add
maybe a camera movement. Instead of using a camera, we can just use to animate the scale property of the frame. Hit on the keyboard, and then let's add
a keyframe here. Maybe right here before
the second frame shows, I want this to maybe zoom in a little from 100% to maybe 105% so that we have a constant
camera pulling in effect. Let's see what it looks like. It's pretty subtle.
It's not very visible. Let's try 115. 100% to 115, yeah. Now we have this
constantly pulling up, getting closer to
the camera view so that our scene is
constantly moving. It's adding another
dimension to our animation. I think it might be too
much. Let's try 110. Yeah, I think I like that. We'll do the same
thing for frame two. Hit on the keyboard. Let's do 100% to 110. And then for the last frame, same thing, hit on the keyboard. Let's do 100% to 110, all the way until the
end of the animation. So let's see what it looks like now with our camera pulling in, I think the last frame
is really subtle. So I want to give it a little
bit more poll at the end. Let's try 115 for
the third frame. Yeah, I think that
works. It's subtle, but you can still feel that
it's constantly moving. It's coming towards you, it's got a little bit of impact. I think that complete
our animation part and this is a video that's
ready to be exploited. In the next video,
I'll show you how to render the thing out into a amp four video and then it's ready to be shared
on the Internet.
21. Render: In this video I'm going
to show you how to export our animation into
an MP four video. There are two ways
you can do it. One is to render it
inside after effects, and the other one
you can render it inside Adobe Media Encoder. The reason that we have
two ways is because sometimes if we only render
inside of after effects, we cannot do any work while
we're rendering a video. So that caused a lot of problem
and wastes a lot of time. Some video are very long
and very hard to render. It takes hours to render, so if you're rendering
inside after effect, it's really hard for you to work on anything when
you're rendering. That's why normally,
like 90% of the time, we render our video inside the other program that's
called Adobe Media Encoder. But in this video, since our
project is not that big, and I'll show you
how to do both. Before we do the
render, we need to make sure the area where we want to render out
and we can use the keyboard shortcut
and end to control that. If I only want to render from
five second to ten second, I'll go to five
second and hit on the keyboard and then
go to ten second. Hit N on the keyboard, that means the beginning
and ending of my render. So if I want to do
from zero second, I'll just go back to zero with my timeline indicator
And hit B on the keyboard to move the render range all the way
back to zero second. And then for the ending,
I'll just go at 12 second. Hit on the keyboard to let it render all the
way to the 12 second. That's a range that I need
to render out my video. Let's go back to
the top menu here, go click on Composition Add
to Render Que over here. For the render setting, we
don't need to change anything. And then click on
this high quality over here in the format, we can change it to H 264, which is a standard format
for our MP four video. And then Quick Time would
be a Quicktime video. Normally we would do H 264. Click on Okay, and then we
can choose the output folder. Click on that. Let's go inside our folder and then choose
this render folder here. Let's rename our project to Mo. That's good. Let's say one. And then click on
Save on Render. Now you can see it's rendering. After a brief moment,
we got our video rendered out inside
the red folder. Let's play and take a look. Yeah, I think it
looks pretty good. That's how we render the
video from after effects. And the second way is to render using Adobe Media encoder. Let's go to Composition and then add to Adobe Media Encoder. In this case, my
project is going to be added inside Adobe
Media encoder. And over here, we don't
need to change anything. It's already selecting
the 64 as a default. We just want to choose
the Apu folder here. Make sure we're selecting
the render folder, rename it to two. Click on Safe. Click on this Render button
here on the corner. All right, after a brief moment, we'll have this video rendered out in Adobe Media encoder. It's essentially
the same thing as we render it in after effects. Here's our mode
juice number two. So those are the two ways you
can render out your video. And now this animation is ready to be uploaded
to the Internet. That's it with this video.
Let's go to the next one.
22. Congrats: Congrats on finishing
this class. It's not an easy project, But I'm glad you stick
to the end, I hope. Now you have an overview of how a social media
animation projects done from the planning stage. I have now taken you from
the first e mail brief, all the way to the end
of the final animation. If you're working
with me step by step on this project,
that's great. Take some time to finish it and upload it to the
project page so you can share with your fellow
students and get feedback from me if you have
anything that's not clear. When you're going
through the class, don't hesitate to ask me.
I'm here to help you. This class is packed with
tons of information, workflow tips and tricks, shortcuts, and things
that I personally use every single day while
doing professional work. Don't worry if you can't
remember all these right now. With practice, you will
get there one day. Meanwhile, you can
always go back and check on the part to
refresh your memories. Once you're done with this
class and finish your project, I'm sure you'll be a
confident animator to take on any similar social media animation projects
going forward. If you're interested in learning more after effects animation, make sure to check out my
other classes in other topics. However, if you're
serious about learning motion design and want to get paid doing motion design work, I will recommend
you to check out this class as called
Animation Principle, Emotion Design, Secrets
of Great motion graphics. In there, I'll take you through various projects and teach you the secrets that lie
between an amateur animator, professional animator,
how you can make the breakthrough
that most animators dream of within a
couple of weeks. And take your animation
skill to the next level. It will make you a
confident animator and be able to charge
higher hourly rates, up to 60, 70, 80 an hour in the US. I put the link in the description if you
want to check it out. Thank you so much for
taking this class. If you're still here,
it will be really appreciated and
mean a lot to me. If you can leave a
review under this class. And it will help
this class to reach more students who want
to learn motion design. Just like you hope you
enjoyed this class, I'm looking forward
to your class project and we'll see you
in the next one.
 Hongshu Guo, Motion Designer