Transcripts
1. Introduction: Welcome to beginner to advanced Premier Pro. This is a two-day course. There has been divided into sections for easier digestion. In this class, you'll learn how to edit, Foster, and Premier Pro while learning all necessary tools to produce something remarkable using your creativity, minor responding. And I manage a digital agency. I'm a graphic designer and video at it up based in the UK with over Asia, has experience working with clients nationally and around Europe. In this course, you'll learn tips, tools, and editing workflow to be more efficient and progress into being an advanced editor is what you will learn workflow and how to get started. How to work with speed and duration, motion, audio soundtracks, improving sound, multi-camera Video Effects, Color Grading, compositing, graphics and captions. So anyone who's already slightly familiar to the basics of Premiere Pro and would like to learn how to use advanced tools to create stunning videos. This is the course for you to join us and let's get out and be creative.
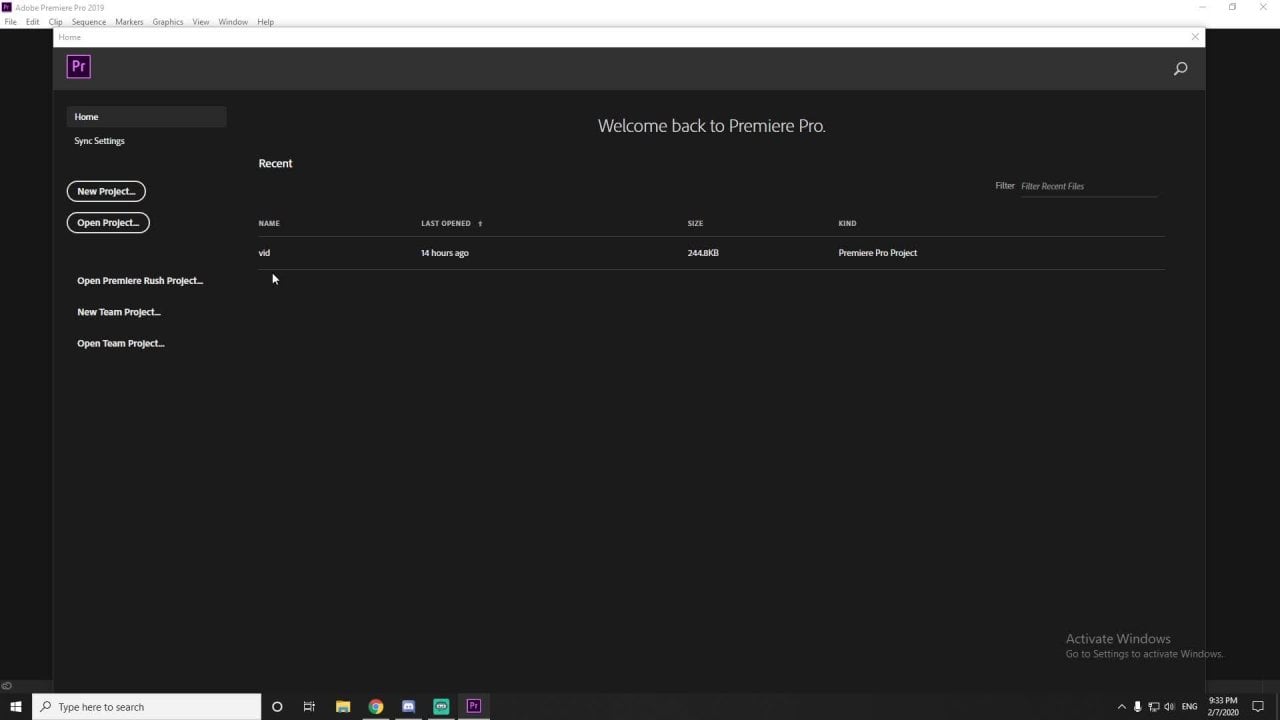
2. Getting Started: Good morning. Here we are on the first morning of the first day of our two-day course in Premier Pro advanced. So my plan for today is to work through our exercise files in order. And we're going to focus on the speed of playback in different ways with certain clips. We should be looking at a few special effects, motion effects, getting things to move and pan around, maybe spin. And visual effects this morning. Before moving on to looking in some depth at working with audio. And then to use the audio tools to improve, sweeten the sound of our clips in various ways and various tools that are going to hidden behind the surface. And then we'll try and do is if there's time at the end of the day, finish off with fundamental exercise of multi-camera editing. So if you had multiple cameras set up to record, say, a performance or a lecture or a talk. How to bring in all of that, all the footage from all those cameras and get them into sync and then re-edit them. See your cutting between the different views. And it will say how we go. Let's start off with the first one. Let's do it from within Premiere Pro. Would you make sure you bro, Premiere Pro on screen? Happily running. Here we go. Menus, click on File and choose Open Project here instead, either way you'll end up with the open project window. Could you please navigate your way to where you have put you've downloaded and extracted the exercise files. I've put them on my desktop. You may have put them somewhere else. So find where they go into wherever they are. And finds that first folded 01 speed. And of course here you have to choose, you can choose which project file to open. They are identical. Remember, the one called speed exercises is, has been saved for if you're using the latest version of Premiere Pro. Okay, you'll soon know if you're, if you don't have the latest version, you'll try that, open it up and it'll tell you if you're using a previous, earlier version, you can use the downgraded one instead. I'm going to open up speed exercises by double-clicking on it. If you have an extra step which says this needs to be updated, you just follow that through to update your project file. Give it a couple of moments. It should make relinking connections back. Because within the project folder setup. So it knows where to find the media. And also we have a handful of timelines ready to go and really some sequences for our timeline. So I'm just blurring your extra time to make sure that he's setting up nicely. So I'm gonna assume, yeah, here we go. You are in Premier Pro. It may or may not look like this on your Premiere Pro because you've been using it awhile. Whereas mine is just showing the basic editing workspace. Ready to, okay, As if you're falling behind or something went wrong, give me a shout and I'll bring you back. Now here on my screen, I'm in the normal editing, the basic editing, everyday workspace. Now you'll remember workspaces. You can access either from the window menu up here, Window menu workspaces, and you can choose which one you can see I'm in the editing workspace. If you want. If you're not in the editing workspace or yours looks different from mine. Why don't we all choose the same workspace and we see mostly the same panels. So be on the same level. But since we're at an advanced stage, this is an advanced course. Feel free to change things as you wish. So I'm in the editing workspace. I also have workspaces panel at the top. Here they go. I can see the same workspaces running across the top. So if you're seeing this, yeah, you can click on editing. You can click on the Menu button next to editing to get more options. So if you like, if you've made any customization of the panels on screen, you can choose this command reset to saved layout. And it may change a couple of things. It may not. Under the other way of doing that is to double-click on the name of a workspace. That should also reset your workspace back to its original default. Now mine's popping up a little confirmation dialog. If yours isn't, that's possibly because at some point you found this very annoying and you untamed the option. Always ask, which is why you don't see it anymore. That's fine. I guess. Yeah, definitely want to update it. Now we should be seeing something pretty much the same. Now we'll take this slow as you can see and we'll, you know, we'll build up the speed as we go along. Once you get the hang of this online training, working with your screen and my screen, your screen and my screen. And we're gonna take some, start off with an easy exercise. Another easy exercise, we'll build up the drama as we work along down at the bottom left of my screen. And I'm going to assume perhaps at the bottom left of your screen, you have your project window, your project panel here it is. Speed exercise is down the bottom left. And you should be seeing what am I looking at? I've set up for sequences. And if you need to scroll up and down, you'll see that there are a couple of bins. There's one for audio files. I think there's just one audio file in there. And I've set up a bin containing the video files. For this. Just makes all familiar with what we're looking at. Remember, the original files are just sitting in a folder. Loose. What we have in our project panel is how I prefer to arrange it. I've created bins and so on, reorganize things in different ways. Now can you find the sequence? So I've got four sequences here you can see the sequence symbol. The sequence icon looks like this. Can you find the one called 014? Double-click on its icon that should load the sequence into the timeline panel to the right. Now, doing online remote courses with video is always a little odd because what I see on my screen or playback perfectly well. But he'll seeing a lower frame rate over the Internet. So what you see on my sharing screen will jerky, I promise you it isn't. But for your own theorem purposes, would you play through this sequence? It isn't very long. I just want you to see what it is. So you can play by, in the usual ways. You can click on the Play button, obviously, in your program monitor on the right, we can just tap your space bar. So I'm keeping quantity as you're watching your video, mine's playing. And whether or not mine looks jerky or my screen, you all should look reasonably smooth. So it's a very short. Just, so 26 seconds is a very short sequence containing series Eclipse with no audio. Nice and quiet. Kill wondering why there's no sand. Now, if that was playback was jerky for you, That's simply a matter of premier spending a year, he's taking a little bit longer to try and load the preview of your video into memory. And I'm sure if you tried to play it back again, it will play back more smoothly. Now, in the, to get a better focus on this, to see what we're looking at. Would you please zoom in or zoom out of your timeline so you can see the whole timeline in one go. Do you remember the keyboard shortcut zooming in or out to make sure your sequence, the timeline window, it was caused your backslash key. So that's the left leaning slash key. Will fit your sequence into that timeline. Now here's my plan that normal, normally when I'm inserting, I'm adding more clips to my sequence to make it longer and complex. I will be using overwrite, I'll be using Insert, I'll be using drag and drop and various other methods. So taking the example of, let's say, I want to get another clip into this sequence. I'm just going back what we already know. Let's set up in a baby if I wanted to add another clip and I'm just trying to think, oh yeah, let's get another clip. So in your project panel down the bottom left corner, would you, if necessary, scroll or drill down or whichever way you'd normally prefer to do it. Can you find there is a clip, that video clip and MP4 file called Laura. Laura full double-click on its icon to load it into your source monitor. At the top left. Would you jump to any gamete you should be able to see in the source monitor whether you want to scrub left and right, feel free. But already we have an in-market and an ELT market. You can see that's already been set in, in market. And now Parker, you remember how these were done. You set the play head to a certain position and then you click on the marker and another position, the out marker or use the keyboard shortcuts I or O. And the idea is when we add this clip in, insert, overwrite, whatever, it just inserts that trimmed area, leaves the rest out. So would you jump your playhead to the marker? Now there's a button to do that. Of course there's a button jumped to the in-market, go to the in-market right here. The cosine has a keyboard shortcut, doesn't it? Shift I. So it doesn't matter where your play head is. It could be at the end of the beginning anyway, shift, I will always jumped to the in-market. That's the first frame. Shift. O course we'll jump to the hour mark of L be the last frame of what we want to shift. I is where I want to be. Play that through and stop. Okay. So I've gone a little bit beyond. But again, there's no sound. By now, you should have noticed something special about these videos. They appear to be in slow motion because the timing is different. Normally, I would expect to set up a sequence that has a conventional timing, frames per seconds setup, such as 25 frames per second, 24. And these seem to be set at 96. Why? It's very smooth the plane back to this hospital. But normally if I wanted to get this clip into somewhere, let's say between the first two clips in my sequence, I would use the usual things. I can use. The insert, I can use overwrite and so on. And this is normally known as, so I can click and drag, obviously I can get it in here, couldn't I? So I've just clicked and dragged and it pushes in. I'll just undo that. What I wanted to do was what if, what if I wanted to insert this this little trim, the area into my sequence. But the area I'm trying to get it in is not the same gap. Now, we often talk about three-point editing. So three-point editing you say, Oh yeah, I've, I've a drin section, I have an int pointer now points and I know where I want it to go into my timeline 123, but what if I had four points? Yeah, I have my trimmed clip. I want to add in and out. And now I have also designated I want to designate an in and out point for where I would like the clip to go. And this is a bit different and it does something slightly differently as well. So could you go into your timeline? So go into your sequence down here, and we're going to send some in and out markers for where we want this to go. So try this. Take your play head. You can do this in your, you can do this straight away in a sequence in the timeline window or you can do it in the program monitor. And would you screw it back and forward a bit? Back and forward a bit. But I was thinking, if you get to about who I was thinking, Well, tell me what. I've decided. I wanted I want the clip that we're going to add to be exactly after the first clip and exactly before the next clip. So how do I get to exactly that? How can I jumped precisely between those two clips on I know this is an advanced course. I'm just testing you here. Do you know the methods? So if I press my arrow keys, yep. Arrow keys up or down, it will jump to the points between each clip, up or down, okay, jump to the beginning, jumping, jump back. If you're dragging and dropping or, sorry, not dragging, dropping but dragging on the play head. How can I get to precisely between two clips by dragging? What's the keyboard modifier? Hold down your shift key. The Shift key to keep the shift key held down. And as you drag, you should find your play head will snap to those positions between or at the end of the clips in the timeline. So that's holding the Shift key down while dragging. So that's another method, righty, So position you'll Your play head. Between the first second clips, would you please add an end marker in your sequence? So to do that, you can use the mark in button if you like. But hey, I'm just going to use the keyboard shortcut. I shall type I or in. They again, are set in, in market and you can see a big swathe of gray. You can see it in the sequence, and you can see it at the bottom of your program monitor. Okay, now I'm gonna do this by eye and it's going to be very rough. I'm going to carry on dragging and I'm going to take this to about another couple of seconds further down the line. So I think my in-market was around eight seconds into the into this and I'm going to set them out, out market to be about 10 seconds. So you can make exactly 10. You can make it 10 and a few frames. What have I got? What have I got? My, my time codes like $0.10. I can swell frames. You can choose that if you like. I'm just picking an area where I would like to have the outer marker. So to add market as the out point, you can click on the marker, just hear that button there, or just tap out, which is easier. And now I have a nice designated trim area where I would like it to go. Okay. Let's get it in. Now. I would like to get this in not by dragging and dropping, not necessarily, but by inserting. Now, you'll know that normally when I use the insert command, so here I am in my source monitor. I have my in and out markers setup, and I have a couple of buttons. I have insert and overwrite, complete with a shortcuts, you must be aware overwrite is a full stop and insert is a comma. So it takes my trimmed area and it'll insert it where it would insert it at the play head in my sequence. But if I've set up an in and out mark in my sequence, it'll ignore the playhead and just insert within that little that little kind of area I've designated there. So what I want this, I don't want to insert it. I want to make the sequence any longer. I just want to connect, add the slow motion of the woman's face at this point. So instead, I'm going to click on the Overwrite button or press full stop. So this button here, either click on this for overwrite or use the shortcut full stop. And it doesn't immediately work. What it does is it pulls up a window and says, Okay, I'm not quite sure what to do with this. And it tells you why. The dialog window says, okay. This is not a case of you saying, oh, he's a trimmed area inserted this point and artial just to readjust everything else. It's not like that. It's saying look, you've got a clip that seconds long and you're trying to insert it into a section that is only two seconds long. And that's not quite going to work. So it gives you choices. In fact, you have five choices which you can read through. So what do I do or don't lie? Going to speed it up, we're going to slow it down. What is it I'm gonna do? Well, here's what I would like you to do. Remember I said these were high frame per second. These high-speed cameras taking these, that's why they appear in slow motion, played back at 24 frames per second. They're actually originally 96 frames when there were shot. So to the, well, let's do this. Let's change the clip speed. So essentially crush it in. So she will play back faster within this little area. So choose Change, clip speed, fit to fill and click. Okay. What that's done here is it's taken that trimmed clip from the source monitor. It isn't inserted. It inserted it I should say, is overwritten it just in that little section here that we can see that we marked up with our in and out points. If you want to scrub through it or if you prefer, play it and see how it differs. So what we've done is we've taken some high-speed camera footage and it plays back. You can see with set everything to be 24 frames to the second a is so it comes across a slow motion because it's the original shot at 96 frames per second. But that doesn't mean we can't squeeze something. So using what we call this full point editing. So I have an in and out marker. For my source material and I set an in and out marker, my destination. I could actually speed up or slow down the video to fit. And it can be such a tiny difference. No one would ever know the difference. I wouldn't want to be left with a gap or for it to overwrite too much. Okay, I chose these examples because it makes it very obvious what's happening. So this would be the setup. I told you it would be slow to start with. Just wanna get us in the mood. It's one little feature. I thought we would just get us warmed up properly. Now if I'm just go back one step, I'm going to go back one step and repeat, I've just pressed undo before I leave this and move on on the theme that when we get this dialog window that pops up the fit clip, by trying to overwrite. In that little area, you get your four choices. Change, clip speed, Ignore source, and so on. So ignore source in point is just, that. Just means that Premiere Pro will ignore the source clips in point convert. You're ready back to a three-point Edit. And you can see it'll just ignore the out point. It'll just try and eating what it can from what it sees. And you can say, Oh, no sequence in points whose only, and so on. So you can see suddenly the top one change clip speed, them, concentrating on here. I chose any of the others. He would not have speeded up the clip. It would have done something a bit different and probably ignored my intended training anyway. So it was changed clip speed that worked here. That would you save. Let's do something else. Let's, let's stay on this theme about speed and playback speed and see if we can do something with this. So staying here. In fact, no, I think I'll, let's go to the, have another sequence that will show this better. Again, back to your project window down the bottom left, where mine is. Can you scroll back or whichever way you go back to where you can see the sequences I prepared, Let's go to the second one. So double-click on that sequence to load it into your timeline. Let me just, There we go. It's not much of a sequence. It's effectively one clip. It's just one click the lower one clip. Play it back so you can see what it does. So I repeat again, it was part of the same series of shots. It was filmed on a professional camera and it was shot at 96 frames per second. But the video clip itself has been configured to play back at 24 frames per second. As a result, it looks like she's in slow motion. Okay, Let's have a look at a couple of ways of changing the speed of playback. Would you please select the clip in the timeline, law in the snow? Would you just click on it? Unless I tell you otherwise, I'm always going to be using the selection tool to arrow tool here. So just click and let go on to select that click. And let's find that particular clip in our project. Now, we could take a note of its name and then go looking in my project panel. Couldn't that we can do that. Not that much, much of a challenge is it. But you know, I can jump straight to it from here and try this right-click on the clip in the timeline in the sequence. And then near the button or you get this big pop-up menu, but near the bottom, you have a couple of reveal choices. One is revealed in Explorer or Finder. So that would find the actual video file on your computer that can be really handy at times if you're not quite sure where the original is. But I would like you to choose this command near the bottom. Reveal in project, what that does is it highlights, it, selects it in your project window. So here it's selected it down here. That's what it's done because I wanted to work with it directly here. That was the plan. So now that it's selected, laura, one in my project panel. Let's see how I go about interpreting or re-interpreting 96 frames per second video as a 24 or backwards. Okay, so with that selected, I can either go to the clip menu at the top of the screen and choose Modify. Alternatively, if you're feeling funky, you don't have to go up to the top. You can do what I just did earlier. You can right-click. So right-click on the Laura one file in your project window. And then you'll get a pop-up menu. But it's a massive pop-up menu. But you should still find. Somewhere in there, modify command I was after. So either right-click on an organ to the Clip menu, choose, Modify and choose this command, Interpret Footage, Interpret Footage. And you get a big dialog window. Don't worry, we're not going to hack through this big dialog window. And it just tells Premiere Pro how, you know what to do with this, how to treat it by default. And obviously we can change it if we want to do something else with it. So at the top of your modified clip window, there it is. Little peek at one thing. So at the top you have a series of tabs. You should have Interpret Footage in time code available. We're looking at Interpret Footage and looking at the frame rate at the top. And it says here use frame rate from the file. So the sequence was set up to be 24 frames per seconds. So that's why it's interpreting that way. Let's change that. Let's assume a different frame rate. Now one frame per seconds can be a little dull, isn't it? But click on the radio button next to assume this frame rate. And let's type in the actual frame rate that I know. The footage was taken in 96 96 FPS frames per second. That's all. And all I'm doing is telling Premier something different. Now at the bottom of the window, if your screen is big enough, you'll have an Okay button. My screen's not big enough so you can't see it. So instead I'm going to tap the return key on my keyboard. Now look in your sequence. Something has changed. You'll start to see some diagonal lines. Don't, don't, don't don't don't across across the clip in the sequence, the diagonal lines are there. Just to shout out at you that you set up the clip to have this duration. But now you've changed. It's how it's interpreted. It no longer has this duration. Jump to the beginning of your sequence and play it back and you'll see what I mean. So I'm going to go into my Laura in the snow, jump to the beginning and I shall play it back. Now if you're playing it that you'll have noticed that she looks quite jerky at first. And then when it The rest of it plays back and it's just solid black. It's just confirming what we already knew. So it's it's playing it back in real time. The reason it looks a bit jerky is because so many frames per seconds, so I'm capturing a lot of the detail that might, might've been smoothed out by slow frame rate, but also because it was a handheld camera and it wasn't holding it very carefully. So obviously it real-time, it look jerky, lovely and smooth. So this back into the slow motion. Okay, let's add the same clip again to the same sequence, and we'll treat it differently. So back in your project window, your project panel on the left find that Laura, one that we've just changed. But notice what we did. We didn't edit to Laura one in the timeline. We edited it its original back here in the project window, and then it updated our timeline. Watch what I'm gonna do. I'm gonna click and hold and drag and drop, not immediately next to the previous instance of that video. But I'm going to leave a gap just so you can see the difference. So it's the same clip onto that sequence twice. And already you can see the difference. You can see the two versions side-by-side. And if you want to play the other one, just take your your play head. Yeah, it plays through correctly. And every time we add that into a sequence is always going to be treated that way. It knows it's, it was originally 96 frames per second and is treated in that way. So now you know how you could change that back if you wanted to. You could just reinterpret it again. I could click back on Laura one gun back to modify interpret footage, and then I could switch it back to assume a frame rate from the file or assume a different frame rate. So this might be one way of making something speed up, slow down. I have plenty frames to work with. I will show you other ways of changing the speed. Even if you don't have a high FPS setting just to play with light we have here. Okay. Would you say that you have
3. Speed and Duration: Let's stay on that theme. Let's look at other ways of changing the speed of a clip or the duration of a clip to stretch it out to speed it up. If you're ready, we're going to open up a different sequence, is a bank to your project panel window. Can you find the sequence that's called number 3, speed duration. Speed, duration. Would you open that up into your timeline window, please. Okay. Apologists for this, one of the many files supply to me with the help of Adobe. Is this walking Eagle? I include I was going to find something else for you. But then this walking eagle is such a small file size of I've got to use it. Lasing you wanted to be doing is downloading huge amounts of megabytes. Just for this little bit, just would you play play a walking Eagle? He's cute. Okay, So any last few seconds, don't worry about it. So we might want to slow down, my might want to speed them up. Let's see what we can do with them. Okay, in the sequence in your timeline window, would you select that clip eagle walk? So I don't mind you if you're zoomed in or zoomed and does matter, that's selected. Let's go to the menus at the top of the screen. Would you click on clip again and then choose speed duration. Now you could alternatively, if you're billing for risky, you can ignore all that stuff at the top and right-click member right-click will always give you a contextual menu that brings in Menu Commands, small different, different menus. You don't have to remember, I'll have to go to clip. You can just right-click and choose the appropriate command. The commands you see will always be relevant to whatever your right-click on. And you should find a speed duration there as well. It's either way either from the clip menu at the top or by right-clicking choose speed duration. And you'll have a little window and it goes right, Okay, Speed Duration. You wanna change the speed. You want to slow down. You want to speed them up quite easily set by a percentage, the speed. So if you set a lower percentage, he will slow down. High percentage, he should speed up. Before we do change that, just point something out. We'll play with this. The speed as a percentage and the duration of the whole clip should normally be connected. So if I slow him down, the duration of the clip will get longer. That makes sense, doesn't it? If I speed them up, the duration will get shorter. That's why they linked. It is possible to break that link. You can break the link by clicking on that little chain button. Now it looks like a brute was supposed to look like a broken link, which means I can change the speed but keep its original. In this case, five seconds duration unless I change it. For the moment though, could you make sure it is linked? So if you have unlinked, click back on that button so it's properly linked. We'll see how that works first. Okay. Would you change the speed to 50 percent? Now you can change the speed either by hovering your mouse over the speed number, you'll get a little pointy finger symbol that allows you to click and drag left or drag right. Interactively to change the percentage. Or you can just click on the number and type 500 was probably be quicker. And then click OK or hit the return key on your keyboard. So by linking those, I've said, yeah, I want to get a 50 percent. Let's see how that works. Jumpy way to the beginning of the clip and playing back. So we said 50 percent half speed. The original clip was five seconds long. It has extended that ten seconds long. He takes twice as long to the ghetto that so this can be done on a clip by clip basis quite easily all selected clip basis to slow things down, speed them up. It's not the only thing we can do in there. Would you open up that speed duration dialog window again? So make sure that clip is still selected. Go to the clip menu or right-click on the clip itself and choose speed, duration. If you're doing this a lot, take note of the keyboard shortcut should be Control R on Windows or Command R on the Mac. Speed duration, as well as the speed and the duration. Did you notice you have some other little fun things to do now won't worry about all the rest. But can you see we can make him walk backwards. So where you see Reverse Speed. Take that click. Okay. Jump to the beginning and play it back. So we're still in slow motion. But he's going backwards. Blessing. So it might be more backwards and forwards a little bit. That's another way of altering speed. So we've seen a couple of ways. We'll see in a few ways here now, haven't we? We've seen I can go to the original video file in my project panel, and I can adjust how the footage is interpreted. Assume so many frames per second. I can use that as a method of speeding up or slowing down a clip. Here was another one. I can do it straight directly in the timeline, directly in my sequence, and choosing that speed duration. So there's two ways that we're going to add. A third way. Let's open up the last sequence of our little set down here. So back to your project panel, please. The project panel window, can you find forth sequence IDE set-up a number for Rate Stretch. Would you open that up by double-clicking on it or clicking dragging into your seat? Double-click. Yeah. So it's in your timeline. Now, this might seem a little Hami. Can I suggest you just play this sequence back to see what it is? There are big gaps in it. They're intentional, Sorry about the music. If there is any. Now the music's not massively important here. If you're hearing the music, great. If you're not hearing the music, it will be because I have let me just double check. Yeah, It's pixel haven't linked it correctly. It doesn't matter. It's not important for here. If you are hearing the music great is very loud, very noisy. But the idea was, the video clips were kind of see some professional scenery and actors. It's from some, another great drama. We might see some of these clips again a bit later on. So I have, the first clip is a Geiger knew coming in from the beginning again, there's another one after it. Okay. But otherwise they're sort of in real time. Yeah. So I'm quite glad the audio is not playing. You can always mute the audio if you are hearing it. My needs rendering properly, then knowing is what we're gonna do. Instead of reinterpreting the footage on, instead of using the duration and speed, we're going to use another method. We're going to use the Rate Stretch tool. And apologies if you've used this already and wonder what it was for. It's a bit like your ripple tool and all those other tools. So you go to your tools panel, your tools panel, and Jorgen to choose the stretch tool. And it's hidden underneath your ripple edit tool. So if you click and hold, so you have your little tools fly out of ripple, edit, rolling edit that we might use between adjacent clips within, within a sequence. The last one, the rate stretch tool we're going to use. So choose that rate stretch tool. This is the one looks like this Rate Stretch tool. Hover your mouse on the right-hand age of the first clip. Now if he's not quite clear what's going on, zoom in. Because there are a couple of clips quite close to each other, aren't they? So I'm zooming in into my timeline using a keyboard shortcut. I'm tapping my equals key because the equals key on my keyboard has a plus above it. So I'm pressing equals 0 plus to zoom in or minus to zoom out. So I actually have two clips it and I, I fades out and I've got this thing under there. And it doesn't matter where your play head is, hovered your your stretch tool between the first clip in a second clip, now, you may have to zoom in and you also might help if you make the video rank taller. So you can see what I did there. I just clicked on that gray edge at the top of the video one track click drag upwards to make it taller. The reason I'm making a tool that is when I'm using this tool, I don't want it to get confused by the dip to black and effect transition effect. That's there. I need to make sure I have I've got between those two. So I would like to drag the right edge of the first clip back towards the left and just make it a little bit shorter still. Oops, let me just undo that and I'll think of just accidentally. There we go. You can see what I mean is the mistake I just might Dennis, I clicked and dragged on the transition effect that dip to black and he got confused. So I had to undo and try again. And let's see what this does. I'm going to go back to the beginning and play back. I don't know if you noticed that, but by shortening that clip, by dragging in from the left, he's playing faster. All it's doing is reaching for his, threatening me, shouting something, but this is quite fast. So if I stretch it back out to where it was, so snapping to the beginning of the second clip and play it back. He's at normal speed again. So just using this to the stretch tool, I can increase the duration of a clip and thereby make it slower or faster. So longer the clip, I'm slowing it down. Shorter the clip. Small speeded up. It'll be now if you need to zoom out, zoom out. Could you do the same for this second clip which you hover, you have your stretch two on the right-hand edge of the second clip, click hold and extend it if you can. Whoops, I'm just going to undo that and again and redo. So I need to be here. There we go. Selected at the clip, extended carefully until it snaps to the beginning of the third clip. So that second clip will be super slow. And we have the third clip, but I think there are any other clips are there doesn't matter in which order they come in. We can move them around and have play around, but it doesn't matter. Funny feeling this guy pointing, this got the end. A funny feeling you would be pointing at a different point. This anyway. You can see how this is. Would you select the third clip? Hover over it's right edge. Click, drag until it snaps to the end of the audio, which I can't hear, thankfully. And if you jump all the way to the beginning, just play it through. Can see using this method with It's just a tool. So it goes into super slow motion if I stretch it out too far. So I'm going to see we made that work. You were able to make that work. Now, this isn't over the top example where I think this might be useful. Most of all is if you have setup good sequence of clips. And you've made further edits and further edits and further edits. And you've ended up somewhere with one click That's just a little bit too short. And I don't mean by 10 seconds, by 2.5th or a second or anything. Funny. I could just make it lost a little bit longer, but there's no more renewable frames to untrimmed. You could use this use this tool just to fill out those few extra frames and no one would really know. Now that said, if you have stretched out quite a bit, we will know where they are. And one of your clips here looks, I don't know which order you have the main, but I've got this guy here. Let me just get him walking and you probably looks worse on yours. But he's well slope and he's going click, click, click, click, frame, frame, frame, frame. What we can do is if E1 is the case, unless you don't want to keep that as a really nice special effect to them might really be quite nice, is you can then get Premiere Pro to try and fill the gaps, to try and look at the frames that are there and interpellate additional frames to smooth it out. Let's do that now and then we'll take a break. So to do that, could you change tools back to your selection tool? So back to the selection tool, please. The pointy arrow tool. Could you select one of those clips, the one that you think is the jerky is looking one that you stretched out. It doesn't matter which one. Whichever one you think he's the luckiest, I'm going to choose this one. So that was the biggest one for me. And then well, stick without right-click technique for getting to all the menu commands we want to easily would you right click on that, that clip. And I'm, the command I'm looking for is time interpolation. Here it is time interpolation. And although it's not immediately obvious that what we want, the command, I want you to optical flow. So think what that means. Look at the speed is looking very jerky. Try and interpolates to make it optically superior so it flows. So right-click on it. Time Interpolation, optical flow. And what we should be seeing is if you've chosen that, is you should have a red strip across the top of your sequence and the timeline window. What does the red strip mean? It means you're asking for a special effect which needs to be rendered. So you're not just applying a filter or something like this. It's actually going to have to add frames or move pixels or do something speckle. And it's holding off from doing it until later. So while you have something sitting there waiting to be rendered, you can just carry on working. And then it'll render, it'll re-render that clip, make extra frames. The point where you export your media, the end. If you would like to see it now, at anytime you can render any of those little red sections in a, in a sequence by tapping which key? You're tapping the return key on your keyboard. So make sure your timeline window is targeted. Tax return and anything that's waiting to be rent rendered, any of those little red strips will then start to process. Now, depending upon the speed of your computer in the memory you have, this may take a minute, shouldn't take any bowl. You'll get a progress bar or to say analyzes it. Now when it has finished, it will start playing. And the red strip of the tuple go green. To remind you, this was rendered. This was a new piece. This is a thing that was done. Now if you just been doing that now, it's probably just about finished. Just check for yourself. I've yet to do this and get a bad result. I find Premiere Pro makes it dang good job of interpolating.
4. Motion: Part 1: Now we're gonna move on to something else. I want to look at some special effects, but hands-on effects, effects such as motion and rotation. And then we'll push on from that to other types of visual effects. So I have a project setup for that I trust with all downloaded and extracted it, it's it's my number two group of files for our exercise files. So from here in Premier Pro, Would you click on Open Project? In your open project window? Could you navigate please to wherever you have downloaded and extracted the exercise files. And it's this slot 0 to motion. It's the second of your downloads extracted. This folder contains a load of video, audio, and other component files, including to project files. As usual, if you're using the latest version of Premier Pro, so that's Premier Pro 2020. You can open up the project file called motion exercises. Should be okay. If we're using an earlier version, you may find it easier to open up the alternative version. I have a motion exercises downgraded. Okay. Open that up. You'll get a prompt saying all of this needs to be saved, just resave it with a different name. And then we should be same point. So I'm going to open up motion exercises. You open up the one that's appropriate for the version of Premiere that you're working on. And we are here. Now you'll have to excuse me for this. I wanted to keep the file size is down for your download. So I have got possibly the rubbish just video clip in the whole world ever. And we are going to see it. In your timeline. You should be seeing, you should be seeing the sequence called floating is called floating if it's not already open, Could you open up the floating sequence here? Bring your play head to the beginning and play it back, and play it back. I did warn you. It's just a flapping bird. But hey, it makes a really small video file for you to download. The whole point of the flapping bird was of course, the fact that if I scrub through it now, It's a motion video, obviously. So it's in motion. The bird is flapping even though it's spinning rand. It's not my finest down in terms of effect, but I wanted you to see how this was set up. Then we'll go and create something of our own that uses this type of motion effect. So the kind of effects, kind of transformations you might like to call them, are things that I can obviously make something bigger and smaller. You can see this gets bigger. As I progress through. I can rotate it. I can rotate it, but I can also move it around, as well as rotating. It's kind of spinning into place and then moving into place. And what it spins on, it could spin on a corner or its center or something. So these are the kind of things we can play with. Right? Let's go and do it. Let's see how that was done with your selection tool. So they ordinary Selection Tool. Could you select the clip in your sequence, the GL clip? Have it selected. And I need access to some different, some different panels. I want to see the effects panels. Now. I could open them up. The Effect Controls panel is sitting actually up here. I don't know if you have the same thing but sharing the same space as my source monitor, which is currently empty. I have a panel called Effect Controls. Now you can switch to it if you can't see it by going to the Window menu. Remember, the Window menu is mostly a list of all the panels in the program. And even if you can't see it, if it's ticked, it's supposed to be on screen. Okay. But even if you can't find it and it's ticked, you can choose it anyway. And that panel will come to the front panel or come to the front. Now you may be a little bit more savvy about this. There is in fact, an Effects workspace. I'm going to come back to the Effects workspace later when we have more difficult things to do because it opens up additional panels I don't need just yet. If you prefer to work in the Effects workspace as fine too. Okay, but for the moment are quite like my screen arrangement. And the fact that the Effect Controls panel here is nice and big rather than scrunched up somewhere. So I'm going to keep in mind this for the moment. And then when I'm ready to change to the Effects workspace, I'll let you know. So with the gulp picture selected, I have my Effect Controls panel open. And I have some effects listed underneath. And I can see a couple here. It makes reference to the clip file, so goal MP4 file, there it is. And then the kind of effects is this, right? I've got video effects. It's not showing me Audio Effects because this doesn't have an audio track on it. I have motion opacity and time remapping all sounds really cool. Let's have a look at the motion. So you can see little chevron button to the left of where it says FX motion. I've heard this called a disclosure triangle are quite like that. Just the fact that it sent this to many syllables. So this little button here, click on this and it'll expand the motion settings that you can see in the effects controls window, Effect Controls panel. Now, if you have opened that up now, just have a little look back at my screen for a second before we change things. What we see in the effect controls panel may not be exactly what you see on my screen. I want you to be sure that you understand what's happening on my Effect Controls panel I has some various things in our position scale rotation. But over on the right-hand side, up here, I have this strange tall area, which is like a mini preview of the effect. Now if you're not seeing that, your screen probably looks like this. In which case, go to the top right corner of your effect controls panel and you should see what it's supposed to be, a grayish or a little dotted triangle. Click on that. And it opens up this little bit at the side. And if you're seeing it aside and you want to close it, click on this little arrow pointing in the other direction. But I want to be able to see this because it gives you a kind of a graphic representation of what's happening. It also gives you another play head, which I can scrub through back and forth. And it also shows me what are called key frames. Now, keyframes for this type of faked refers to significant points in a clip or possibly in a sequence where something changes, something happens, something begins, something ends, It's appoint a fixed point in time. We can go right, change something, start rotating, stop rotating. It's known as a key frame. And depending upon the type of transformation, whether it's the size or rotate or something like this at different types of keyframe, have different icons. I won't go through them all, but we have some starting keyframes that look like little triangles just here. And we have other key-frames like eaten apples. I've got just left core or something like this. And they all have different shapes. I'm not gonna go through them now, but these little blobs here are key-frames where things are happening. Anyway, looking in your effect controls panel now you can look at your own skin screen to see how this works. Looking down the motion effects. You have one called position, one called scale. You may see one called scale width of my screen that's grayed out. And you may see one called rotation. Now, each of these will have their own little values in blue. Notice that next to their names, position, scale, rotation. There's a tiny little icon or button if you like, that looks like Plomin. What's the word? A half we've gotten Yeah. For a time, I think a stopwatch, lime you have got through it. So it looks like a little stopwatch. If it's blue, it means this transition effect, this motion effect has been enabled. If it's just ordinary gray or whatever. It's still there, it's available but it's not actually doing anything. Okay, So dragging your play head left and right. You can do that anywhere in the timeline. You can do it in your program monitor. You can do it here in the effect controls just to make that run forward and back. And notice those keyframes, the beginning, everything's hunky-dory. That's like a starting point. And as I progress through, you can see there's a lonely little keyframe where the rotation ends. So can you see the numbers change? Say Hey, I'll have rotation value. And the little blue number representing the degree of rotation. And that starts at 90 degrees. I can see there's a 90 degree rotation at the very beginning. As I progress through, it rotates. And at this keyframe, it hits 0. And then goes no further. So the keyframes is stop rotating. And then the other things that change if I progress further along the clip of the position and scale are changing as I move along. Don't worry, we won't spend any more time with this silly flapping bird. Let's switch of each of these effects one by one to see the effect that has. So tell you what first of all I would do. Let's switch off the, the, the moving position for example. So on the left, on that stopwatch, next to where it says Position, click and let go on the stopwatch. What it does is it switches off that particular effect. Now you will get a message saying, well, if you're gonna switch it off, I'm going to throw away the key frames for that particular effect won't throw away any of the others. So click okay. And if you scrub through, it still rotates, it's still enlarges but it doesn't move if you remember before it moved from the left, the middle here, you just starts in the middle and rotates into place. Let's turn off the scale. So click on the blue stopwatch next to scale. And then say, Yeah, it's gonna get rid of keyframes except that and scrub through and it just rotates. It starts off sideways, rotates. That's all. And finally switch off the rotation. Click on the blue stopwatch, except that you're going to lose the key frames. Click. Okay. And now you have a perfectly thoroughly dull flapping bird that doesn't do anything. And I'm only using that as a demonstration of how to switch it off. We're going to create our own. We're going to recreate some of that using a different video, but wanted to keep it simple to start with. Rights. Would you go to your project panel, your project panel down the bottom left. Let's open up a different sequence. So I have a sequence called the number 2 motion. Would you double-click on the icon for OT motion to load that sequenced into the timeline panel is just one clip, but it's better than a flapping bird. Feel free to play through the clip. There's no audio. How matter is that someone using a film camera to film a film camera. So we can see, so it's about is not just a flat picture. We're going to we're going to play with that. The reason your your play head probably didn't stop at the end of the clip is this was extracted from a longer video and I didn't have time to tidy it up. So it thinks the end of the sequence is much further down the line than this one clip. So don't let that distract you. Great at what we're gonna do is because we're going to rotate and move this camera. This is video clip. I want you to be able to see the edges if I make it smaller and bigger and I don't want anything cut off. So it might be worthwhile doing this. Now you will know this already, but in your program monitor, your program monitor up here. You have some other options to play with about how something is shown. And towards the bottom right corner of your program monitor, you have a couple of useful buttons just next to where the exit time code is. So you have one looks like a spanner. That's your Settings button. By the way, you realize when you click on the span and you get a massive menu of options and settings for how you want things to work and be shown here will have a reason to use this a bit later on. But next to it, you have a pop-up of how you want to see the preview of your sequence in that program monitor. And very rarely is it actually ever showing you full size if you if you go to full futures, full from this drop-down, and it could then play through. It could be depending upon the size of your window and what have you. You may end up only seeing part of the video. I don't know. If you go to half I'm sorry, I'm clicking on the wrong one. I'm going mad. Sorry. Absolutely mad at what I'm showing is the playback resolution. Sorry, I got sidetracked because a little message popped up on my other screen while I was trying to switch off notifications. So I'll be the one on the left. Why am I talking about the one on the left? Is one talking about you can see where it says fit. It's fitting the video within the program monitor of course, on this and change to a different percentage. If I go to 100%, for example, in the drop-down here, I'll have to edit that, enter my video recording. Might I choose 100%? You'll be seeing that clip at actual size pixel for pixel. So one pixel in the video, one pixel on your screen, and obviously you can't see the whole thing. And if you scrub through it again, well, I can only see a certain bit of it and it's very, very difficult, which is why your program monitor is always was a preview. Usually have it sent to fit. So you get to see the whole thing, but it's shrunk down. What I want you to do is to shrink it further. Now, depending upon whether you have a high Resolution display or a low one. So today I'm using a relatively low resolution display. You may find you can go to 50 percent and it zooms out a bit. Now my case, it gets the wrong way, so I'm going to zoom out further. I'm going to go to 25 percent. So this is more obvious. I've zoomed out of my my clip, my sequence, and I'm seeing a lot of space all around. We will need that space. That's what I want you to zoom out a bit. So either to 50 or 25 percent from here down the bottom left, not the bottom right. What was I thinking of? Okay. Now we can see that less change some of those settings for that clip. Would you select the clip in your timeline? So select the clip in the timeline window in your sequence. Select an eclipse will show the effect controls for that clip. Here where we are all default just for this clip. Also, if you click only because you have a little header here, little tab header of a, I'm just for this particular clip. If you click up here. Oh sorry, I just clicked on the wrong one. If you click up here and you go right, I'm going to, I'm going to work on this one here. To 0 to motion is the name of my my sequence is the name of the file. And here's what I want to change. So I'm not going to click on the stopwatch is yet. I'm going to click on the theme name. So can you see the effect I want to get is a motion effect on, uh, move it. Click on that word motion. The motion should then be highlighted. So nice gray highlight or whatever. So it's highlighted here. But also have a look what's happening in your program window, your, your program monitor, your clip is surrounded by bounding box. Now banding box with handles tells me, yeah, we can click and drag on the various handles and so on. Could you, before we do any clicking and dragging, could you look very closely at that video in your program monitor, especially the center of it, is possibly not very clear, but dead center is a kind of a little crosshair type circle right in the middle, just here. And what this is, it's it's it's like an access point. It's like I can choose to rotate on something or scale from a certain point. And by default it starts off in the center. We can move that by dragging it, but I don't want to drag it just yet. So click anywhere on that clip in your program window, anywhere but the center please. Anyway with the center and click and drag it up a bit, left, a bit down, right, whatever it is, you get a feel of what this does. If you can see that crosshair little bit better if I drag into outside the viewable area. So don't get a completely lost yeah. As you drag it around, look at the effect of that it has in your effect controls panel, your position setting is moving. It's moving all over the place. Now I'd like to position the clip so that it's centered as best you can buy at the top left of the screen. So I want that center circle dots sort of matching as best you can. The top-left of our viewable area can see how that's. I've set this up like this. So I've done that by eye. I can also let go of my mouse and nudge it up and down, left and right with my arrow keys. Left, right, up, down. Nudging a pixel at a time. Yeah. And better still if Absolutely. What did it perfectly centered on that top corner. Go to your effects controls window. So here's my position. I've been looking at this position. I could set these two 000 could night. I could say yet, let's have this. Whatever the numbers are, 0 tab to the next 10 again, tab again or click away. And now this item is absolutely bang on centered. So I could do this quite precisely as well. Now let's just quickly reset this. I'm not going to start there, just want to see how we can play with it first and then we'll do something proper. Back into your effect controls here. Let's reset it back so that the, the position is back where it should be. Now, I could have typed numbers in here. I set it to 0. To the right, you have a reset button. Each item has a reset button, looks like a curly arrow with a flat line under it. Would you click on the Reset button next to position? And it should move the video clip back to its original location. Let's rotate it. Let's see how that works. Well, the easiest way to rotate is to go to your effect controls, find the rotation setting is that is the default. Rotation is 0, hover your mouse over the blue number, just hover your mouse over it. Then you should be able to click and drag left to rotate counterclockwise, right to rotate, clockwise, to have it rotating. So we have a combination of approaches here. We can click and drag certain things. We can enter numbers for it to go to a specific place. We can hover over the blue numbers and click and drag left and right to make the changes there as well. If you play with that for a bit, would you reset it by clicking on its reset button over on the right? Right. Let's put some of this into some more practical use. The fewer spinning birds, the better. But I'm sure we can find an acceptable useful purpose in doing this sort of thing. So to that end I have another sequence setup, but with small clips in. So back to your project window, please find the next sequence in turn, number 3, montage. Would you open up the montage sequence, please? Montage. Now the sequence you can see has several tracks, I suggest in your timeline window, zooming out to see the whole thing. So I'm going to tap backslash, That's my keyboard shortcut to fit it nicely. Several tracks now, some of the tracks are special effects tracks. Can you see the ones highlighted in pink? So I have a bit of text sitting in a graphic track and gradient map, which is an image and an adjustment layer, will do adjustment layers later in this course. You can't see any of those. Why can't I see any of those? I mean, I can see that bright pink, but then not sharing, they're not showing because there have been set to be hidden. So clicking on the little eye, the visibility button, these are non-visible tracks at the moment. We make it to turn them on it later. Otherwise, you have caplet video tracks underneath. Now, if you need to give this most space on him, I do. Just adjust. So you can see a little bit more of your of your timeline window. Because we have actually a third, an extra video track as well. So I have a background image plus everything else. Would you jump to the beginning of the sequence and just play it through so you know what it is. There's no audio, so it's just clipped the click, click, click. Now you've been using Premiere for a while now. And you're looking at this thinking this is the draft is setup. You've got to seeing why would you knowing what you know, which is when you overlay video tracks, the higher video tracks. So in our case, starting from the top from V6 all the way down to V1, AIA tracks will overlap any tracks below. So looking at the two video tracks, video to video 3, these two tracks here is make any sense. Most of what we see on the video to track the V2 track will be seen because they are obscured by videos. On top of them is apart from that little bit at the end. We're going to use that. Don't worry. It's it's done deliberately. Would you position your play head at the beginning of everything and tell it well, in the program monitor window, would you change the zoom? So that's down the bottom left corner. Who told you otherwise? I can't imagine. Would you change it back to its default setting, which is automatically to fit according to the size of the panel. And we can see that. And then what I like to do is select the first video clip on track V3. It's actually the first visible, visible track is this one, the guy opening the book. Okay. So if I told you what the video file was called, It's called 718 triple 0801 b. Yeah, it's this one right here. I've selected. So select that. So it's controls appear in the Effect Controls window at the top left. Now in the effect controls panel, I would like you to toggle on the animation. Stopwatch button, the animation. So I'm going to think, okay, so what am I going to do here? I need what am I looking for? I'm looking for the animation button. So they I'm talking about the stopwatch here for am I going to move it? I'm gonna move it. So I'm going to zoom in here. Can you see I'm looking for position. So make sure you've expanded the motion settings. And we played with position. But if I click on the stopwatch now, I'm going to switch it on and it will add a keyframe right at the beginning. Say can you see I've clicked and let go. Next position is gone blue. I've activated this, so nothing's changed. But what it has done is added a keyframe. I can see a tiny little triangles. All right, I'm going to start from here. This is my starting position. Now that it's enabled. This position. When you change the setting at any particular key frame. Premiere Pro will update what happens at that current keyframe automatically. So anyway, position has two numbers, doesn't it? Horizontal position, its vertical position. It's currently set at, on my screen anyway, at least it's set at 640 pixels, 360 pixels. So that's the dead center of the moment. That's as I understand it. So if I set it to be minus 640, so that's the horizontal position. Where's it gonna go? Well, let's find out. Click on 640 for position and insert a little minus in front of it, minus 640. And then either click away or press the tab key or hit Return or something. I'm going to click to one side. Where's it gone? If I zoom out here and say, where's it gone? This is made more sense. So I could have dragged it to the left given time. I could have done that, but I'm just trying to show off. So I've actually moved the position of the clip. So it's not visible. It's actually off whatever you want to call it, in the middle of nowhere in the ether, on the pasteboard, It's outside our viewing area. What is it I'm looking at behind, I'm seeing the bottom most track. I'm seeing this track called map. It's a fixed JPEG image that's just been given the duration of the whole sequence. So I'm seeing that behind. So all I've done is moved it off to the left, revealing what's behind. Okay, Now I'd like you to move the play head. Now feel free to do it in the program monitor or your timeline window, or indeed in the effect controls panel. It's the same play head. I want to progress this on and I want to get it to the last frame of this clip. Drag law drank feel that, well though this is an easy way, isn't that just press or I could click and drag in here and hold the Shift key down. That's another way I could, you know, multiple ways. I wanted to get to the end, the very last frame of the clip and ready for the first frame of the next clip. So I could have just dragged it from left to right at the top of the effect controls panel. That would have been good enough. And I'm going to change the x-axis again for my position. Sit back into your effect controls back to the position. It currently says 640. Okay, I'm going to click on that 640. I'm going to type 1921 9 to 0. And then either hit Return or Tab key or click somewhere else. Where has it gone this time? But actually it's, it's flown off in another direction, is gone all the way over to the right and I can't see it. You can test that, can't you? Just scrub back and forth and see where it goes. So we have set up now we could have dragged, but I wanted to be quite precise. So I entered numbers instead of dragging the item itself. So we set up a simple motion where it just passes across. So it starts outside the viewing area, passes across the viewing area and then exits and on the right. So if you want to play it in real time, just play it. Now I would like that to continue. It be nice if all of the clips did that. So for the duration of the clip itself, it comes in from the left to departs on the right. And then the next one comes in, in departs and comes in and departs and comes in in departs. We're finding that there was a way of reusing it. If only I could have a nice light, if I could copy and paste that motion effect that the day. Well, this is what we're gonna do. So could you select that clip we've just been working on? So make sure the clip that you just animated is selected and copy it to the clipboard in the usual way, either edit menu copy or Control C for Windows obviously, or Command C on a Mac copy that copies the video and all its attributes and everything to your computer's clipboard temporarily ready for pasting? Yeah. What's what I'm gonna do? I'm going to select all the other video clips in the sequence. So to do that, I can either select one of the others and then progressively, sorry, Shift-click the others one-by-one. Or I could click in an empty part of a track, hold my left mouse button down, and drag across the others. Essentially, I want all the other five clips selected, not the original one that we copied, but the other five. And we're going to paste to them, but careful we're not going to paste over the top of them. We're gonna do this, go to your Edit menu and choose this not paste, paste, insert that this command paste attributes. So ignores the actual video content that the animation effect is one of the attributes. So Paste Attributes, this window pops up, says, Okay, what attributes do you want to paste to apply across? And you can see what's Tate Yeah, The motion ones and some other effects. Maybe there was some opacity to make something fade in or have you ever leave it ticked, make sure motion is taken as a matter of anything else is takes us. We didn't change it. At the audio attributes are grayed out. This is the new audio track on this click. Okay. Now each and every one of your video clips have a little fx icon attached to them saying, Yep, All of these are doing something dying to know what's going to look like. So in your timeline, jump to the beginning of your sequence, plays and play it through and see what it does. Excuse me, I'll just have been drinking tea. I don't know how noisy That was. Okay. So it's a little clumsy and the little overlaps, but you can see what's happening is something moves across. And as it moves across, I can then see video track V2 underneath. That's what the V2 track is four. So is the other thing is a passing across. I can see the other ones behind in the gaps. Special interesting one at a time. It's another way of presenting this other thing. Oh, sorry, MR. you've crashed. Sorry to hear that. That is going to send you behind. Goodness. So if you've had a crash, as long as it's just premier That's crashed. Let it crash. Camps to three, come down. And then relaunch premia on just premium. It'll take a little bit longer maybe to relaunch its. But that's because it's trying to salvage things, heal itself, get rid of any corrupt preference files. And then what you can do is if you're led to the home screen, you can re-open what we're working on. Otherwise, you can do File menu. I had been recent and pick up the latest one. I should exercises, and it should pick out your latest saved version or the latest auto site version. Now while you're doing that, I'll just slowly press ahead a little bit. Since. So what we did was we selected one clip. We applied the transition effect. So special effect, a position motion event. So it's just the one we copied it. I could have used the old fashion keyboard shortcut Control C. Then I selected the remaining videos and choose this command, paste attributes. And it was a way of only having to do that position effect once. And then being able to think. Service the others. Let's add a rotation to a clip. Not one of the video ones, one of the one that's hidden in your timeline window, if your sequence would you reveal so unhide. The V6 track is the one with the graphic. It says graphic. It's actually a piece of text, text graphics, the same thing. So reveal that click on the blue button in the, in the track header. It should reveal some text behind the scenes. Behind the scenes. So it's a simple title graphic created directly in the program. Come to texts tomorrow. Okay, Would you move your play head to the very start? Let's do the very start. Back now, move into the stance of the graphic clip. Otherwise I can't see it necessarily. So get it right to this dance, the graphic lip, I can try my up or down arrow keys, or I'm simply going to hold my Shift key down, drag until it quite snapping. Okay. Account called it, get it there. Let me just try the up and down. Up, up, down. Got it there. On your get there in the end. So the beginning of the graphic clip, please. And select the graphic clip. So you can now see it's settings in the Effect Controls window. Now because this is a text, it's essentially a vector graphic. What I mean by that is it's not immediately pixel-based, it's Fontenelle tanks. They have smooth curves and shapes. And if I make the text bigger or smaller, it's, it's not gonna get chunky and brittle. It will keep its smooth. So as we rotate it, it'll maintain its quality to a certain extent here. So we should be able to play with certain things here without making the text look terrible. So here's my plan. Would you, looking in your effects window up here, can you see because it's vector text, we should have some vector, specifically vector motion effects available. So if you see vector motion at the top here, would you, if necessary, expand those by clicking on the quote, disclosure triangle. And you've got the same thing, position, scale, rotation. So it's not just motion, its vector motion. Right here. I've just clicked on it vector motion, and we'll get better results from it. Now again, notice the position of the anchor point sitting in the middle of your, your selected vector text. This cross hair with a circle, this circle with a cross air inside it. It's that center point around which we can make other effects happen. It always starts off in the middle. So let's adjust our rotation property and see the effect it might have. So back in the effect controls next to rotation. Next the rotation. Would you change the rotation number to 90? So it's going to over at right angles. So I've clicked in the rotation value here, 90, and I'll just click to one side. And you can see how this is rotated in your program window. Now, undo this, please Control Z or Command Z. Just want you to do to see how that worked. But if we move that crosshair in the middle, that anchor point, then we can choose where it's going to rotate. So this is going to be a little difficult to see on my screen. So I'll just show you quickly now and then you can do it on your own. Hover your mouse over that anchor point, this circle with a cross hair. Deliberately click and hold on it and you'll be fine that you can drag it to a new position so you can drag it somewhere else. I would like you to drag it. So it's sort of sits on the top left corner of the capital letter B of the word behind. So I want to hear, can you see where I've put it? Doesn't have to be exact but nearest damage. So that's the pivot point around. It will then rotate. So now you've moved the anchor point. You may see back here the position numbers have changed a bit because that's what the anchor point was referring to. So that's what the numbers refer to, the position of the anchor point. Okay, Let's do the same thing as before. Let's change the rotation angle. Now, change it to 90. It's rotated, but it's rotated this time on the corner of that letter B. That was the plan. So that's the starting point. That's where this how the text looks at the beginning when it first appears, we see a sideways is behind. There you go. We're going to set another point where it's going to rotate too. So that's our starting point. Now just to make sure it's an active starting point, I'm going to make sure that I have clicked on the stopwatch symbol next to rotation to make sure it adds a starting point keyframe. Now that that's established, it means I can choose another point in that clip where it will, where we can have another keyframe that does something else. Or having said that keyframe, could you use your play head to scrub along and take it to about take it to roughly six seconds in a. If you want to be exactly six seconds in, you can do that roughly is good enough for me. Otherwise, go to your program. In a click in your program window. Tap 600, type the return key and it will jump, you know, it is not but the return key of course going do that. Let me just fix that is Stop trying to show off now or you can click and drag across it and get it to six here, but it's only roughly six if you want to exactly 68 could do that. And we'll change that rotation set at exactly six seconds in. Let's change that rotation value, which is currently 90. Change it back to 0. So clicking their time 0. The very fact that you've changed at that point has added a new keyframe automatically at that point. Now, run back to the beginning of your sequence and play it again. Imagine you could add additional keyframes that could have it then moved to one side or shrink away or rotate back out again. So you can see how we can do this. I can rotate, move, shift, whatever, anything alike. But if I wanted to move and then stop, or start and stop or suddenly change, I might need to add keyframes. In which case I need to the first key frame, a starting point by getting that stopwatch press down. And then every time I make changes land, it'll plot new keyframes as I go along, and I'll keep it simple now, you can see how that works. You'll be able to take that further. Yeah. Dr. Do anything else on this? Just to get us started with that. Which you save this. Any questions on this? I mean, there are quite a few of these effect controls that we can play with them later on, we'll play with a lot more of them. This is just to get you familiar with what they looked like, like and how they work. And later on we'll apply something a little bit more complex and it won't seem so little artsy quiet. So what we do, what I'd like to do now is jump into a few other little exercises that are not immediately related but thinking in terms of scaling. So we've been, we've used position scale rotation here. Now, I might have another reason to scale a clip. It might simply be too big and I need to scale it down so it fits. So it's almost related to what we did before when I have a video clip has too high or lower frame rate and I need to make an adjustment. So it looks correct within my sequence, I might have video content that's very high resolution and some that is pretty poor resolution. But across the sequence I need to manage it all so it fits. That's what we're gonna do next. Could you go to your project window, your project panel window at the bottom left, could you open up the next sequence in my list, which is number 4, scale. So we're talking about the scale.
5. Motion: Part 2: Window, your project panel window at the bottom left, could you open up the next sequence in my list, which is number 4, scale. So we're talking about the scale, the size of of clips. Now just press Backslash to see bit more to this. We have three clips. There isn't an adjustment layer on top, it's hidden, it's not showing you can keep it hidden for the moment. Now, these clips might be a bit January to start with. Okay, Would you move your play head to the beginning and see if you can play them. Don't be surprised if they stop and start or a bit jittery. Okay. If he played through yeah, it's okay. It's fine. If it stopped and started, it's because some of the videos here are very high resolution. Now by scrub back and forth. So it's making me feel cold looking at all of this. The scrub back and forth and move the timeline play head so it's over the last clip in the sequence, The Snow 3 clip. Now you can select this node 3 clip. I'm not going to use the Effect Controls. That wasn't my plan. If there's still showing, ignore them. If you find the Effect Controls window at the top-left, distracting. Click on the source monitor and it's still distracting, is looking at the wrong video, but just ignore those for the moment. Let's concentrate down here in the timeline window please. So select the clip. Would you right click on the clip in your sequence? And the command you're looking for is scale to frame size. Scale to frame size. And I'm pretty sure I'll just press Escape. That should be under the clip menu as well as Newton. Now it's nice under the sequence menu, I can never remember exactly because I can never remember where all the commands are. Right-click is a great place to get started. So I can always find what I'm after without having to hunt for it. So scale to frame size. If you choose that. The clip and wait a second. Something a little odd happens to that clip. What you're actually seeing now is a high resolution clips in its entirety. So previously, if I press unscathed undo. I was looking at these trees, but actually the trees is only one small part of this high resolution clip. So I'll just press. So what I did was I right-clicked and chose scale to frame size. And now I can see what actually the content of that particular clip, it's made everything smaller so it fits in. So you can right-click on it. Having set to scale to frame size, can you see there is a tick next to it? So you haven't actually changed. You haven't converted anything. It's just a view setting. So you can untick scale to frame size to switch it back how it was before. Now then, perhaps I could use those effects in the Effect Controls when Windows do a scaling that would fit this in. So basically I've got some super high D camera and I'm trying to squish it into an ordinary HD sequence. So go back to your effect controls panel. So if you need to go to the Window menu and choose Effect Controls if you'd come out. Yeah, let's use the scaling of this. That would make some sort of sense, wouldn't it? So in the motion, effects were not moving it. But why don't you change the scale currently set at 100%. Hover over the a 100 percent. Just here. Click and drag leftwards and scale it out until you see more. I mean, you can go too far, can't you? But I written somewhere around 32, 33 percent would be good. Now, why have I done it this way? What was wrong with the previous method? Well, I'll show you if you look at my screen temporarily, I'm going to undo what I've just done. I'm going to go back here. The previous method was to scale to frame size. That seemed to work absolutely fine. But the problem is, I don't know if you can see this on your screen. But I've been letterbox at the bottom and the top of my frames, I've got black strips. So this was taken, this clip was taking a particular aspect ratio that isn't the same as my sequence. So it's not in fitting with my other videos. My other clips do not have these letter boxing. That's why I decided that's a bad idea. I'm not gonna do that and I'm going to do it manually instead in the effect controls. So what did I say? It was about 33 percent 33, 34. 33 or 34. Just to make sure there is no letter boxing note, black strips sitting in the wrong place. And that can I make sense? So now if I play this back, it's going to be a little slow. It's sorted that particular little problem out. Would you move your play head anywhere over the first login it to the just over the first frame of the second clip, this one here. So right at the beginning of the second clip, Snow 2. Let's do this one. So if you've positioned that right, by my reckoning, I've just looked at the time code is exactly five seconds in. That was well, well done. Now this particular clip is very high resolution. It's ultra HD UHD, which of course, as you know, is 3,840 pixels by 2160. Now, luckily that essentially the same aspect ratio, width to height as other forms of HD was just ultra HD. That's all. So we don't have the letter boxing, it shouldn't go, it gives a problem. So tell me what select the clip Snow 2. And look in your effect controls panel. Just confirm that the scale setting is 100%. And now this one should work fine. Right-click on the clip in your sequence and choose that command before scale to frame size. Sorry, not scale to frame size, set to frame size. Set to frame size. Now when you choose Set to Frame Size, premier resizes the clip using the scale setting so that it fits just enough, so it fits inside the frame. Within the settings of this particular sequence. See, you don't have to do the calculation or guesswork here. So it pays to scale down because it's got the same aspect ratio. It's good, you say is condemned by thirds. So it's exactly the scale is exactly a 3.3rd, 33%. Let's come down. And it will tell you what. Let's use that. Let's have an effective zooming in. Since we have a high resolution clip, perhaps we could use that to zoom in. So let's apply an animation to that. Now. If you have like me positioned your play head at the very beginning of the clip. Let's add that as a starting point. Let's add a keyframe for the scale effect. So in your effect controls, would you click on the stopwatch for scale? And it should give us a starting keyframe. So again, this is the scale thirty-three point three percent. That's how we begin. Now position the play head a little further down the track. If I move it all the way to the last frame of this particular clip and drag it all the way across or repositioning whichever way you would normally want to do it. And let's reset it back to 100%. Now I could type 100% back in the effect controls for scale. But another way of doing it is to click on the Reset button, isn't it that resets it back to its original value. So click on the Reset button. And instead resetting all thing. Remember the clicking on the stopwatch, turns it on and off. The reset, just resets the number values. So that is added. A second keyframe. At the end of the year, end of the clip. Scrub through. If you can't see what that does, you may need to give it a couple of seconds for Premiere Pro to update, but try playing that through and you get this Zoom in effect. So it's still a bit glitchy, still a bit jerky on my screen. It's still trying to think about it. But as you zoom in, it's not losing quality. This is just simply zooming into the pixels that were already there. Wait for me to tell you when to save. Just say when everything goes right. At one last thing. Just to finish this off, I mentioned there was another video track where we have an adjustment layer. As I said, we'll be having a quick look at adjustment layers tomorrow. It's currently hidden, so it's not visible. Could you click on its visibility button here? At all? It is, is a special effects layer that, that the saturates everything. So everything appears in black and white. So if you weren't cold already looking all the snow, you will be now try running all the way to the beginning and you'll play the whole thing. And it's completely in black and white only. And we're done. Would you save, which I have. Now as part of this exercise, you can see I have some other sequences, but these are much, much quicker. I think I would like to save those for after lunch. And I think we've we've been looking at some very small things to click on an entering small numbers, and it's quite hard work. I would like to take lunch break. Now, after lunch break, we'll finish this particular exercise set quite quickly. I wanted to show you some other special effects that we can play with. So I'll just show you another motion effect and then some other little special effects. Then we'll be done. We'll move on. So for now though, could I trouble you to save obviously, but also close this project? Just a good practice. Whenever I have lunch or something, I step away from my computer, I most terrified the cat's going to walk over my keyboard, is actually sat on my keyboard and have come back and all sorts of strange things have happened. So this would be good practice to save and close and we'll reopen it when we come back. Also with this in mind, can I just check that? If you have a slow Internet connection? Now lunchtime is a good time to make sure you are downloading those other exercise files. So the zip files number 3, audio for sweetest sound, five camera, multi-camera. We may not get all through all of these today, but if you could set them to download over lunch if you haven't already, that would be brilliant. Any questions just on what we did for the moment. Otherwise, if you have questions over lunch, they occur to you while you're munching away. Bring them. At the beginning when we come back after 40 minutes, I'm going to set a timer for 40 minutes. You know where we are. Or you can type them into the chat window. If you want me to speed up or slow down, let me know as well. It's very difficult to get your feedback and I'm just talking into space like this. So here's, let's have 40 minutes. I'm gonna set the timer off now. That means we'll be back at quarter past one. Otherwise, have a good lunch. See you later. I'll do hope lunch was okay for you. We used to have just 30 minutes for lunch, but our family a little bit too short. I couldn't when you add on the microwaving time, I was just wasn't enough for me. Hey, you feel okay? Let's press on. Let's finish off what we were doing before. Let's finish off with the same project file we were working on earlier. So if like me, you are looking at your home screen, could you reopen the motion exercises with a single click? Otherwise you can of course go to the File menu, choose Open Recent, and the same list of recently worked on files will be here as well. So motion exercises project that we're nearly finished. And what I wanna do is try and finish off what we were doing because I had a couple of other things to throw in as well. Okay. So I'm just could you Jenna, I think I would like to do something else with this this scale exercise, just to add another little effect to it that are thought to be a little bit too much to do before lunch, let's do it now. So in this one, if you remember, the second clip in this sequence, Snow 2, is high resolution and we use that. As a way of demonstrating, hey, we can change the size, the scale, setting in our affects, our effect controls panel as ways of zooming in. Sustain with this, Could you do like me? You can hover, you, you can offer your play head anyway on that second clip, could you select the second clip by clicking in it in your sequence to reveal the settings again, in the effect controls panel. Actually, no, let's do something with the last clip. I think our full better of this. Would you have a loosely the second one a lie. Would you hover your mouse, your playhead over the third clip, this last one, the one that used to have let borders at the top and bottom, because we manually scale this one as well, but it doesn't have an animation on it. Remember, we just set the scale to whatever it was, 33, 34 percent so that there was no more black bars at the top and bottom. But what if it was this weekend? We could animate perhaps the clip size. But we'll see where this leads us anyway, this is what my plan was to play with something on this one. Yeah. So I'm just going through my notes for a second and amps, I'm still not sure whether Russia do the first of the second clip. And I'll go back to my original idea. What a terrible state I'm in. Today's. Ever since I got I got the wrong side of how to change the fitting in the program monitor sent me completely bananas and lunchtime didn't help, sorry. Yeah. Can we go back to where we were so could you please select the second clip? I do apologize. Let's work with this one. Since we have a couple of keyframes already in there, it makes sense we should work with this one. So the snow to clip have that selected. Now, in your effect controls panel, Let's work with the rotation and scale. Their scales already said, because you have a, We're going from one scale to another. Now it doesn't matter where your play head, the play head is quite at the moment. But would you with the could you go to where you've switched on the scale? So the just underneath motion here, would you click on the so-called disclosure, disclosure triangle to expand and see a bit more. Because some of these settings have even more settings are hiding behind them. And it should reveal this horizontal line where this little dot, this little circle in the middle ages, It's a slider. But doing so as another effect, looking over on the right-hand side, essentially expanded and tried to describe or present the transition effect. So this zooming in effective scaling as this diagonal line. It's a way of representing visually kind of graph style of what that transition is. Starting from whatever it was 33 percent and growing outwards. Now not to be overwhelmed by all the numbers in the buttons all over the place. I'm sure we can survive. But what I'd like to do is take your mouse, would you hover over the first scale keyframe? So here we are in this funny little diagram area. Here's my row for scale. This is your key frame, this little triangle on the left. This is the first keyframe. Could you hover your mouse over it and right-click, you should get a little pop-up mini menu just for that keyframe. Here. And I have a couple of options down at the bottom called ease in, ease out. Ease in, ease out. I'm not sure if you've come across these expressions. They come from motion graphics generally. And the idea is if you have some sort of motion, some sort of animation, and it starts and stops abruptly. So I start from this point and just move across in a linear motion and stop. But we've mentioned that was a car constant work that way, do they they they start from a standing still and then they start off slow and accelerate. And then they go up to the proper speed. That would be easing in. And then when they park, the car doesn't suddenly stop, it slows down. That would be easing out. So easing, easing out, it's a very common thing to have in motion graphics and animations. And here in our effects. So maybe I don't want the zoom to be linear. I would like it to start slow, increase in speed, and then slow down as it finishes the Zoom. So we're going to use that now so far are opening keyframe. Could you choose the opening keyframe? Would you choose Email tonight? It sounds counter-intuitive perhaps, but look at the effect it has on that diagonal line. It's actually curved it the transition and is add a little blue handles will work with that and a tick. It is also converted the appearance of your keyframe above. That was right-clicking on the little keyframe and choosing ease out, would you now right-click on the last keyframe? So the ending key-frame over on this side, right-click on that and choose the other one, which would be easy. And it completes that sort of curve. Now I don't know if you can see much difference. Would you play through that particular clip and you'll see that it's not a linear Zoom. The Zoom speeds up and then slows down towards the end. Now because that transition, for this case a scale, this zoom effect, because you've chosen easy and is converted this diagonal line to represent into this curve. I mean, if anything, I would say it's a very gentle S-shape. So it's getting more horizontal then curving upwards and then coming back to our horizontal again. Okay. So if you're not seeing the curve, Chris, I'll just go through that again. I'll undo, undo. If I can. Basically, you need to right-click and ease in, in on the first keyframe. Right-click your B, sorry, right-click and ease out at the beginning. Ease In for the second one. And if the curve is very gentle, it may be very small. But if you can see the little blue handle sticking out here, if ever you've worked with any other graphics package that had Vector Graphics, an illustration package, such as Illustrator or chorale draw or anything like that. You may be familiar with this concept of handles, which you can pull and rotate to adjust the direction of a curve. And I'm going to do that now. I'm going to click on the end of this little blue bar that has a little kind of squarish handle at the end. And I can click and drag up or down, and it makes it curved in a different way. And I can accentuate the curve with a little gentle clicking and dragging. And that should affect how that particular Zoom works. So I've actually zoomed out and zoomed back in. And it's the reason it's zooming out and zooming back in is because I did the curve down. So down means a smaller scale. Up means a higher scale. So now I have a curve where it's going to zoom in and zoom out a little. So it zooms in and zooms back a bit. So any of those can have this. It's a matter of if you just set it in easy ease out or ease out, ease in. It turns the straight line into an adaptable curve and then you can fine tune it. And this was a simple example, is I could come up with a scale because you know what scales going to, David's going to zoom in. But you could apply that to motion so you could have something It's moving across, instead of just sliding across. It could gradually get faster and faster and then slow down when it gets to the other side, something like that. Similarly with a rotation, as you've guessed, you don't wanna go overboard with some of these settings. Now if you've seen that, good, I'm gonna leave it there. It's an example. If we have time for other examples, I'll leave until tomorrow. Could we instead zip it reasonable speed through these other exercises I had in mind that move on from what we've seen so far is deprivation scale. Yeah, we'll see those again as we go across the course. But something else I want to say, there are some additional effects I want to play with. Could you please go back to your project window, your project panel down here. Would you please open up the next sequence, which is called enhance? Enhance. Let that load in. Now. Apologies to those of you who have attended yesterday and the day before for the introductory classes, aren't I? I'm deliberately trying to use a similar, familiar looking video clips over and over again. Would you go to the beginning of this particular sequence? Again, there's no audio or less tried to keep it simple. I'm going to focus on the video. So that's the sequence is cut, cut, cut, cut. And sitting in front of the whole thing is I have a video track that contains text. So this was text, a title that was added on within Premiere Pro. Don't necessarily want to move it around. I might move it around. I'm, I still move it around and decided yet, but I wanted to apply different effects. And if you've not looked at the effects, let me show you this as a quick introduction where you can throw a few effects on, you can see how they work. Good You. Now looking at this, I'll just press my backslash key so I can see this more clearly. Would you select your V3? So the third video track, V3, the one that contains the journey to New York and move your play heads somewhere over it. So at least you can be reminded what it looks like, doesn't matter whereabouts. But as long as you can see that journey to New York. Now, I'm not going to tweak the Effect Controls. What I want is the Effects panel. Now could call up the effects panel. I want some ready-made special effects. We can apply and make a change. Now, could have been up the other panel, the effects panel, I can go to the Window menu and choose effects. It is sitting there, but you know what I'm gonna do? I'm going to reset the workspace that the effects editing mode. So go into my workspace is at the top. Either if you've got your workspace is at the top, would you click on effects? That'll switch to the Effects workspace. If you have already been playing in the Effects workspace, you can always double-click on it to reset it. If it needs resetting shouldn't make any difference. If you're in the Effects workspace. And if it's anything like the one I have, it's put the effects panel over on the right. Can you see the effects panel over on the right of my screen and is given it the full height of the screen, because it contains multiple bins, containing multiple sub bins of lists of effects. So I need a tool panel. Makes sense for me. Let's browse through some of these. So in the effects panel, we have the various spins and the ones I'm looking for, our video effects. Can you find the video effects bin? And would you expand it that see what's inside by clicking on the little chevron, the little disclosure triangle there to see the list of Suburbans. And let's try one. So we're in Video Effects. Let's have a look inside. We find the bin inside this called Perspective expand that can see what's happening each time I'm expanding and expanding and expanding. And within there, I have one called Drop Shadow. Most people know what a drop shadow is. It takes the shape of whatever the graphic is. And it creates the same shape that filled with transparent darkness of it looks like a shadow of the same shape, a drop shadow that sits behind or slightly to one side. So they go I knew where it was. Well, I had to remind myself I have to work my way through. So it was in the effects panel. I expanded video effects, I expanded perspective. And then choose drop shadow because that's where I know it is. To apply effect and see what it looks like. You drag and drop it onto, onto a clip in your timeline. In your, in your timeline, just hear your sequence. So click hold your mouse button down on Drop Shadow please. So click hold the left mouse button down and drag and drop it onto the clip in your sequence journey to New York. Now, quite possibly you can't see any difference at all. But what it's done is it's probably added a very, very slight drop shadow behind the text. But I'm not quite seeing what I need to see. I really need to fine tune this. How do I find two unit? I need the Effect Controls panel. So the Effect Controls one we've been using most of the morning, effect controls. So if you find it, click on it. If you can't find it, it's there, you just need to call it to the front. You can go to the Window menu and choose Effect Controls. Effect Controls. Now because you've applied a special effect, if you look in your effects controls panel, take a moment because it's text, it's the vector graphics. So you're seeing vector motion effects you could apply and other things you may have to scroll through to see all the effects. But you should have a new section labeled drop shadow because you just added as effect to this clip. So scroll through until you can find the drop shadow settings, make sure they expanded, that you can see what they are. And we'll we'll just change a couple of them. I don't know what the settings are by default on yours. So for example, you have a setting called distance. Distance. Let's increase the distance so it's how far it drops minus currently set to five. Would you increase it to four as you increase it, have a look in your program, your program monitor to see where that drop shadow is. So I'm going to increase in all that much. And increase it to about anyway of 15 to 2015 is actually 50, is more than enough. Let's you could kinda play with some other settings. I'm going to, I might just increase the opacity. The opacity setting is given as a percentage opacity. It's the opposite of transparency. So the higher the opacity, the more opaque it is, the lower the opacity, the more see-through it is. So if you want a darker shadow, one way is to increase the opacity. So mine is currently set to about 50 percent or might make it a bit darker, take it about 60, 65. I might even go a bit further, might take it up to 75 or thereabouts. Yeah. That's a darker shadow. Yeah, that suits me. Now. You should now be able to see the drop shadow in your program monitor. You can see the drop shadows behind the lettering. Now, in my case, it's taken a default light source. The light source by default is at the top left, isn't it casting a shadow towards the bottom right? If you don't like that direction, you can change it. So back in your effect controls panel, along with all the other settings passed in, so on you have a direction, expand a little direction settings, expand that. And you can either change the angle in degrees or what I tend to do is I click on that little round too early pot. And I can just click and drag in a circular motion. And I'm just like I'm moving a lamp around. I can choose the direction, the light source and cast the shadow in another direction. Now one last thing I will do is at the edges of my drop shadow, quite hard edged. Sometimes that can create quite a nice surreal type effect. But I've decided to soften them. So further down you have a softness setting, softness. Let's increase that. Mine is set to 0. I'm going to increase that to about 20 ish. Anyway, anywhere between 2025. And if you have a look closely at your shadow, it now has soft edges. Now if you've done that running back to the beginning and just see how they held these effects. Look. Now, let's throw another one on for good measure. So I can say at least I've been through this now shown you where it is. The point of a drop shadow we need to be careful is part of a drop shadow is not to create a 3D effect. No one's gonna go, ooh, that, that title journey to New York, it's rising. I have to do video is going to hit me in the face. It's not as it. And the more pronounced that drop shadow, the worse it's going to look. And bearing in mind that 3D effects are a little out of fashion at the moment when I say 3D, I mean, you know, raised bevel type effects, drop shadow effects. The moment in graphics, the flat look is in. So use this can affect mindfully, why would I want to use a drop shadow effect that risks making me look very old-fashioned. Don't use it as a shadow. You're using it as a means of allowing the graphic, in this case, text lift off the video. So it's not just stuck on. It feels like it's, it feels clearer, crisper edges, more pronounced as the video moves behind it. So it has that kind of purpose. I'm trying to aid legibility here. Not maple, make people think it's a 3D special effect. So have a reason for it. Don't just do it because it's here. Another kind of potentially out a date effect you could apply to achieve a similar thing is to offset it, add a bevel effect. Now, again, you want to be quite careful when you do this because it can look very natural very quickly. Let's stay with this. Let's stay with the same journey to New York clip. Let's add a bevel effect. So going back to our Effects panel over on the right-hand side, it's only a couple of effects away from where the drop shadow was. Could you choose Bevel Alpha level alpha? So select bevel Alpha, click and hold the left mouse button down and drag and drop it onto your journey to New York clip. Now the initial battle is very gentle and you may or may not have seen what it's done. We're going to increase, if you like, the intensity that the thickness, the edge of that bevel so you can see it a little bit better. So remember, same as the drop shadow. Now that you've added another effect to your clip, that effect and its settings are shown in your effect controls panel. Here we go. We've now have a bevel Alpha. List of settings. So find those in the bevel edge thickness setting the edge thickness, setting. Whatever the number is, could you make it a bit bigger? I think if you take it up to about 10, that's probably more than enough. Say roughly 10, bang on ten. If you've changed it to 10. Look more closely at your text in your program monitor. Hopefully now you can see this artificial Bevel effect is even as little shiny corners instead. So we've done both Bevel and a drop shadow. And again, use it sparingly for purposes like this. I want it to lift and I want it to be legible. I want to make sure the edges are clear. Don't give it a whacking, great. Bevel. Evan will go, oh my goodness, it looks like MySpace and the 1990s. Okay. I've shown you where they are. So you were working in the effect controls. The Effect Controls panel on its own gives you straight away special effect areas where we can change scaling and rotation and motion and so on. And then from the Effects panel, you can add individual additional effects by dragging and dropping onto the clip. And then the effect controls panel shows the settings for them. So it's dancing between those two. Another little quick one. If that was okay, Would you go back to your project panel is probably tucked away in a small window down the bottom left-hand corner. Now, I'd like you to open up. The next sequence is called Number 6, motion and trans membrane space there. Just get that bit bigger. Motion and transform. Would you open that up, please? Motion and transform. A couple little things here. Would you jump to the beginning? So I need something I want to show you and play these two clips. Now if I hadn't been spinning it, it would have been okay. What would we what we have is if you click on if you go sites, the first one, you can see you have, we have two videos, one in front of another. So we have two video tracks, V1, V2. Remember the one which is highest is the one that overlaps the other. So the top track, V2, containing the medieval villain, he's a picture-in-picture effect. The fact these spinning is to distract you. But if you wanted a picture in picture affect what you already know how to do it. You would apply, just as you see here, you would apply a scaling to it and a different position. Straightforward is that the fact that he's is actually rotating and moving is another matter. But if you need picture in picture, you already know how to do it. Straight here in the effect controls. The reason I thought I'd show you this is the same thing twice, isn't it? If I just run this back and forth, it's picture, picture. I've rotated it. I've rotated it just to show you the drop shadow. What's the difference between the drop shadow in the first hair clips and the second pair of clips. Scrub through those. What's the difference? The shadow looks bigger in a second. That's effect. Now, I'll set to use the drop shadow unless you really, really have to. Unless you're trying to anticipate the fashion coming round again, maybe flares will come back. It's the direction of the drop. Think of a light source. So the second pair eclipse, the light source is definitely at the top left corner, isn't it? But if I go to the first clip, It's as if the light source is spinning along with the video. So the light source moves. So it's like the light source is underneath and then it's to the right and then it's on top. So there's no logic to, so that's a drop shadow effect in the first one. Was, the second one was a bit bigger, but it's consistent. And it's all in those settings. It's a strange thing. So if you were to click on the first medieval villain clip, so in the first pair, the V2 track and look at its settings in the effect controls. And you know how we got this effect. But the light source isn't realistic because it's, it's moving. With the shadow doesn't make sense. So look at the effects applied in effect controls, especially the motion effect and the drop shadow effect. So if you need to scroll through this, make sure you can see all the settings that you need to set. So we need to be mindful of our direction of our drop, for example, and how it is animated with the rotation. So rotation. And to compare with how that's treated in the first, the first clip and the second version of the clip, how those same things, the rotation and so on. It's a different approach to the rotation down here in the transform area rather than the motion area, for example. All I'll say is be mindful. There are so many numbers, so many things listed here. If you starting to use some of those funds, special effects, that would be wild by them because I can assure you no one else will be. They are here, the Benin, most of them have been in Premiere for years and there's no reason to take them away, but those are often, often asked about. There is one more can I just show you not gonna do anything? One more sequence on that theme before move on, go back to your project panel down the bottom left, there's one more sequence called basic 3D. Just so you can see this, open that up, play this through. You can scrub that back and forth. So this is the picture in picture, but this is being floated in a kind of virtual 3D space. And to enhance the impression, there's a fake kind of light reflecting off the surface. If you want to see how that was done, click on the clip and bad, evil villain. And what kind of effects do we have? Yeah, we got the motion. And so on. And then you can scroll through and someone's applied an effect called basic 3D, which is applying AI is there's a swivel which I can expand the settings for, and there's a tilt the settings for. So I can play with swivel and tilt. And because it's gradually moving rather than fixed, is being given key frames at the beginning and the end. So you add a keyframe by positioning your play head, clicking on the stopwatch. And then you're off phantom zone? Yes. That did occur to me then I thought know if I mentioned that shows my agent what is was general salt know, I've done it. It's too late. It's gone, right. I get it. I'm going to leave it there. Basic 3D, if that was something he thought that might be fun. It's sitting in the same place as the others. I've kept them together. You got your bevels, you drop shadows, you basic 3D. All under the perspective heading. I would call it in perspective brackets. So retro. But people do, do ask about these things. So that's why we mentioned them here. But look at all the other settings we could learn. Now we will look at several of these before the end of the course tomorrow. But that was a little taste of view to play with. It was to make you work with the effect controls as well as the effects panel. Because we'll be using the Effect Controls again later on. For now though. If you've had a little bit of fun with that, if we had more time, I would say, Hey, rotate him and the other way and that we need to press on. Unless you have any questions on that. I suggest one last save and close this project.
6. Audio and Soundtracks: So again, try and stay consistent away. You are expanding our exercise file downloads. I'm going to start working on the exercise files that were in the download number 3 audio. So if you could please extract that. If you haven't already, may well have done it already. Has extracted. And let me just try that again. Hey, are you there? Yeah. It's going to extract it and it puts on the other screen. Let me just throw that out there. You and I shall put that in my yeah, I should just add that to my others. Again, it's just a folder with a load of falls in. Now while I'm here, I also downloaded the others. So tell me what 45, I'm going to expand those as well. I'm going to unzip those, get those sorted and you go, Yeah, they are unzipping. Shall bring them on screen for you. Whoops. Again. Here we go, abroad them onto the correct display. So I have one called sweetest sound on called five multi-camera. Not sure we'll get to that one today. We'll do it tomorrow. So I've got them all sitting together in one place. I don't mind if they're in one place and loose in a folder somewhere. Loose on your desktop, loosen your documents as long as you know where they are. That's what matters. You can't say that losing. So I'm going to work through these. Again. If I just show you, you don't have to look here. The audio number 3 audio is just a folder for the files. That's all. I haven't organized them. There is just a folder. Let's open up the project file from within Premiere. So here I am in Premiere. Would you click on Open Project or go to the File menu and choose Open Project. Then navigate your way back to where your exercise files were, like the enclosing folder and into folder number 3 audio, please. Folder number 3 audio. As before, I've given you two versions of the project file. Standard audio exercises. That's four. That's for you. If you have the latest version of Premiere Pro. The other one, the downgraded version is for any previous version, 2019, 2018, 2017. Either way, even if I open up the one that's downgraded, I mean, I can try that now. I've ended up all that happens is it says, okay, this needs to be updated. Would you give it another name? I should just give it another name and work on it. Anyway, it doesn't matter which version I'm in, but you know which version or in which one to open. A half just typed up the wrong one. There we go. Let's just try that again. And we get audio exercises. This is the one. And give it a moment. So although the older files were loose, spent a few moments sorting them out into bins in my project file. Now my project, my project window, my project panel, then it feels a bit squeezed up. That's because I'm still in my Effects workspace. Let's go back to our editing workspace. So I feel more comfortable. I spent a lot of time in the editing workspace and I go, Yeah, I know what this is on our I am here. I can adjust this. Have a look in the project window and you should find full bins. This one called desert footage, another one called master sequences. U6 got one file in it and theft unexpected if you were here earlier in the week with me, it will recognize The guy that you're seeing now, theft unexpected. Now we will stay with this guy. I do believe this has opened up. So theft unexpected is the sequence that is appearing in your timeline. It's this guy. Now, whether you with me earlier in the week or not, they should only take a half a minute. Could you play through this sequence C you get is just a short section of a sort of slightly comedic drama. So it's throwing stuff, isn't it? You, Mr. bit, just before the that the dancing claims come in and then the explosions go off. But there you go. We just saw the preamble. So these are actors and they're playing the path. I've just press Backslash key so that I can say the whole sequence within my timeline. Now we're actually not going to focus on. Clips themselves. We want to think about the audio file components, the audio competitive each. Now before we go into our audio editing workspace, Just to confirm, every time I select one of these clips, I'm selecting not just the just the video-based, selecting the audio and the video. So each of these clips that connected on there. So I click on anything and I'm selecting both. And usually what happens if I want to get a preview, a particular clip, whether I'm in my project window or I'm in my timeline window, I can double-click on Eclipse. Double-clicking on a clip will always want to preview it in the source monitor on the left. So you'll program on it on the right of courses for your to preview the whole sequence source, just the individual clips. Okay? But that's what will happen. It'll show you this but underneath, just to reminder, under these looking at to this guy countable, John says, excuse me, is to see taken. You have a couple of little buttons. You can choose whether you actually want to preview the video as it plays, or the little button next to it. You want to look at the audio component. And you can play this through. So instead of seeing the movement, you're seeing the audio compiled, it is fine. If you want to see the whole thing. You'd couple of things you can do. Down at the bottom. The audio file doesn't completely fit on my screen. So I can use this gray bar, the bottom with little circles. I can click and drag on the circles left or right. So left will zoom out and show me more of the audio or the rights of drag inwards as it were. And it goes straight in. Double-click on that Bob between the two circles and it will fit the whole audio track in. From start to finish. You must have seen this kind of thing before, even if you're not used to directly here in Premier Pro, maybe Meno, maybe you have, but you can see how when there is distinct audio, distinct noise is shown graphically as these waveforms. And also looking in your source monitor here. And you see a part of the of that video component, that video track, as it were, is highlighted. It's bright. Well, it matches your in an ounce markers. So it says write this is the bit that's actually was trimmed and it's being used down here in the sequence. Everything else was trimmed out. So this is the bit that we can close that again. There we go. So you can drag and drop within the area to move the play head. And you get this indication of where it is. Now compare this to. I mean, I can do this with any audio track or just an audio file. I can see this wave form that appears here. But compare this to its appearance in the timeline. If you look in the timeline, here's my ear, the same audio tracks, but what the waveform looks completely different. This one. I mean, if you need to make your audio tracks taller in the timeline, so you can see this, this looks like a histogram. This looks like some sort of histogram chart. So the base level is here and it goes up and down. Quite different from the way it's represented here. So this is a different, a different way of representing audio visually. Now you might have a preference one way or another, and it is possible to change from one to another. So you could try this if you like, in your, in your timeline panel down here next to the name of the current sequence, which is theft unexpected. Would you click on this little panel menu button, that little hamburger button just here to see what options we have. And one of the things we can do is this command. It says rectified audio waveform. I think I had that one summer. Rectified audio waveforms is currently ticked on tickets. And the timeline now represents audio wave forms similar to how we are seeing them in the source monitor. You might prefer that it doesn't make any difference to the horizontal line. If remember the horizontal line going straight across, ease our rubber band, that's our audio volume, will come to that in a tick if you've not seen that before. Yeah. So you can choose, you can have that. This style. But the default style, if you just go back again, is rectified. Audio waveforms. Now be good dying for a metal band, I think rectified audio waveforms. So it goes up and down here. Writing, we might come back to this particular, this particular sequence a bit later, but I had some other sequences I wanted to play with. Back to your project window down the bottom left, which you have a look in the master sequences sensory pasta that master sequences bin and see what else is in there. So there are other things we could play with. His what I wanted to try and tell you what before we get onto ahead one, something in mind with the Desert montage. But I think before I go on, I wanted to show you something else that you can do with audio that might be a little unexpected token which lets stay where we are with the theft unexpected sequence. And would you zoom in to your sequence a bit? Could you focus on that? Take your time, your play head, and move it. So it's it's slimy. Sorry, let me just come back out. So I press the completely wrong K and I went full screen, which you snap two between the last two flips. So the last clip and the penultimate clips. So that's between mid suited me John. And then zoom in. Use your keyboard shortcut for zooming in so that equals or plus key. Now the reason I move the play head there was, well, I use this keyboard shortcut plus 0 equals to zoom in. It keeps the play head central and it doesn't zoom into their own area. Zoom in a bit. So you see this a little bit more clearly. And bring your playhead back near the beginning of the mid suit. Clip. And play it. And I want you to listen carefully when it jumps from that mid suit clip to the mid John clip. What do you hear? There's a slight difference in the quality of the audio. Now I've gone quiet so you can listen to it. It's very small, but it's now there's a slight difference in the background ambient, if you like, going from one to another. Now I could spend ages trying to merge these together. But the problem, the big problem is that although it's a tiny audio difference from one clip to another, the very fact that it changes at exactly the same point that the cut, the video cuts takes place, obviously can make it seem worse. So with that in mind, watch it again, look and listen. Okay, so it may not be a major problem, but it feels fake as if they were recorded on separate days or something. And that can be off putting to a certain type of viewer or audience. There is a little trick you can do to get rid of this. And it's known as a j cut. A j cut. And all it does is you offset the cut point of the audio compared with the video. So if the audio changes just before or just after the video changes, people notice it less apparently, Let's try, uh, Jacob. And we're gonna do it this way. We're going to use one of our tools. Go to your tools panel, find that tools panel. We've been using the selection tool. I would like you to find the rolling edit tool. Do you know where the rolling edit tool is? It's hidden behind this tool. So go down here, ripple, edit, click and hold. Let me call that up liquid melt and find this the rolling edit tool, the rolling edit tool, this one. Now if you remember, the rolling edit tool is normally for adjusting to the immediately adjacent clips to make one longer. And the other one will then get shorter to match without changing the overall duration of the whole sequence. So knowing that undo is your friend, just remind yourself how this goes. If I was to hover my mouse between these two clips using this tool. And I do a Rolling Edit, click and drag to the left. Basically each shortens. It shortens the clip on the left and lengthens the one on the right. So it's not extending it. All it's doing is it's trimming more frames away from the one on the left and revealing more frames on the one on the right. If there are no trim, you know, if if there had been no trend out frames, I can't do this. Rolling edit. If I go in the opposite direction, I'll make the first clip longer and the second clip shorter. That's what Rolling Edit does remember. Okay, If you've just done that with me, undo. So it goes back to where it was. I want to do a rolling edit on the audio-only. To make that work hover your mouse. Normally outgo between the video tracks, but let's hover between the two clips of audio. Now if I didn't do it here, The same thing will happen, but the difference is I want you to hold down the Alt key or the Alt key, ALT on Windows. And the equivalent key if you're on a Mac is the option key. If you hold that key down and use the rolling edit tool and click and drag a little bit to the left. Keep the key held down, but let go of the mouse. What you've done is a rolling edit. The only applies to the audio. Now since these two clips, neither of the two gentlemen is speaking. It shouldn't matter. I'm not going to lose any dialogue. But see what effect it has when you play those two bank. Now it's a kind of illusion, an audio illusion, but that sudden change in background ambient Russell in is just sounds like movements in the room because it wasn't aligned with a sudden cutter the video. So people just think it's part of normal noise and then it becomes less noticeable. And I think you can guess why it's called a j cut. So I have these clips. I have woops of the vertical part of the J, horizontal part of the j. It's, uh, Jacob goes down there. That's how it's done. Use that rolling edit tool carefully. Because remember if you're using rolling edit on video, you'll removing frames from one of the clips, same with the audio. You're removing audio for one of the clips. So someone's speaking. And Joe doing a rolling edit tool, just chop them off in his prime. So be careful with that. And L cut is the same, just works in the other direction. Any questions on that? Do Save. We're going to try something else now we'll go to the Desert montage, the Desert montage sequence. So down in your project window, your project panel here in the master sequence has been can you find the Desert montage planes? Open that up into the timeline panel? And this does go on for a minute. Feel free to scrub back and forth, but, you know, play a part of it and so you can see what it does. Okay, So it's a sequence of some almost static clips or someone on a desert, on a, on a rather unpleasant overcast day, which is a bit of a shame with some tinkling music in the background that's been applied separately. Now, depending on how you can see this on your screen, Could you make sure you can see some of that? The audio track. So your audio track A1, here it is. Did you make sure this track is tall enough so that you can see some of those waveforms. And if you haven't already, now's a good time to change tool back to the Selection Tool, because I don't want to do any accidental rolling it. It's anymore. Okay, So back to the selection tool please. Now first a little reminder of something you know already, but just to reinforce this in case it is the first time you've seen it on that audio track. As that clip for progresses, you have what we call the rubber band. So I have a horizontal line that starts at the bottom, goes up, goes horizontally, goes down again. This line exists on a low audio. You can adjust it by hovering your mouse over any part of the line and clicking and dragging upwards or downwards. And you can adjust the audio volume. Is the rubber band. If it has little handles on it like this one, you can click on the handles and move them left and right as well as up and down. So dragging downwards makes the overall volume at that point quieter. Dragging upwards makes it louder. To add more points on the so-called rubber band, you hover. Anywhere on the rubber band, hold down your control key. Or if you're on the Mac, the command key, so they don't mouse cursor becomes this little plus symbol. And then you can click, click Go. And then you have a new handle on the rubber band, which you can then adjust in a different way. Note that those handles on the rubber band can be selected, de-selected. So when I selected, they become filled in. So here's a selected handle, is a de-selected handle. When a handle is filled in, you can get rid of it. You can delete it by pressing the backspace key or the delete key if you end up with too many of them. Okay, so there's your basic rubber band if you started off with a horizontal line as most audio clips do, you can now add anchor points, handled points, and then have it kind of easing in and easing out visually. So it comes in quietly and so good for a music track here. But there's enough. There are other ways of working with a rubber band that might seem a little math. There are some other tools which you may or may not have used yet. Let's have a look. So back to your tools panel. Looking through the tools. Can you see I have a tool that looks like. So I should rephrase that there is a tool that my screen here that looks like the name of a fountain pen. Would you click and hold on it. Because behind that, nope, it's not the right one. Yeah. That that is the one. I have some shapes. If we get to do a more graphic shapes, I'll get to those. But it's the pen tool itself. Um, after the pen tool, the Pentel, we can use directly within an audio track across the clip to draw the rubber band, if you like. So tell me, well, go a bit crazy. Click on the rubber band several times. So you don't really need the pen tool, do you? I could have just held down that Control K or Command K, but this is a dedicated to just for this, for adding lots of additional anchor points on that rubber band. And then I can hover directly over one of the handles, click and drag it directly. And then I can, if you want to have a little play with this, I've just added a whole bunch of pointless but amusing little handles. And now it's zigzagging up and down and all over the place. So if you are doing a lot of fine tuning on that audio up and down, up and down. You're looking closely at that wave form. Yeah, you might want to switch to the pen tool so you can add lots and lots more points than if you try and play it back. I think your audio on this kind of thing will go up and down, up and down. Anyway enough of that. Now, these little kind of anchor points, these little handles on the rubber band, well, effectively, effectively their keyframes on the keyframe. From here, this keyframe to this keyframe get quieter. From this one here, get louder. And because the keyframes, you can right-click on keyframes and get more control over them. So hover over a, one of these little handles, these two keyframes. Right-click and see what kind of options we have. Now the popup window I have when I right-click on one of these little keyframes, these little handles on my rubber band for the audio, isn't his the default action linear? So I'm getting straight line segments between. So it's going to increase and decrease, increase, decrease or stay the same? Well, I could change that. I could add easing, easing, easing out. It kind of makes it a curved gets louder and get quieter again. So you can try that. I can might try and ease in and it just converts it to a more curved result. So instead of a straight line segments, it acts in a different manner, the curve. And you could do that for any or all of your keyframes. So, so busy. If you convert to Bezier, what it does is it adds tiny little blue handles, which you should be able to hover over. And then tweak if you've worked with other graphics packages. You'll find these funny blue handles. These busy handles make perfect sense. If you're new to that sort of thing, they make no sense at all. So this particular video, I have enough, no particular reason to do this, but you might have an audio track that you would just like to keep running and then fine tune what's heard, what's not heard. So you can add some smoothing in this way. Now, that's quite a challenge. And yet Muhammad, I agree it is quite tall when I, you know, it's there. You probably thought movements for drawing, drawing shapes and stuff which it is, but you can apply it here, which you can again, yeah, could use I could use any size, may have it and remember, keep both things, hold it. Now there is another way of drawing a complex rubber band, the inner more interactive, real-time way. So let's have a look how that might work. Let's let's switch workspace too. The audio workspace. Here we go. I have an audio workspace. So if you've got the audio workspace, click on it otherwise, of course, you can go to the Window menu workspaces and choose it here, audio workspace. And if necessary, double-click on it again to reset it. So it'll move things around again, but it will give us quicker access to some of those audio features. So if you carry on playing through your sequence, you still have your program monitor its bit smaller. In my case, you have a constant audio monitors on the right of your timeline window. Course it never moves. And AOL have also access to clip mixer and so on Track Mixer. So here's something you might like to try is in your timeline, I'm just gonna go back to my selection tool. Don't want to draw anymore keyframes. So I can just select things. And again, make sure, you know whatever you've done here, you can leave it exactly as it is. I'm going to focus on this audio track, so have it selected. Okay, oh, by the way, many of the panels, including this one, have a settings button. It looks like a spanner. I'm sure you clicked on a spanner from time to time. Amongst the various take options here. Can you see you have options such as click markers and so on and show audio keyframes. These are the things we're working on. So if you untyped show audio keyframes, you wouldn't be able to see that rubber band. So if anytime you open something up, I've been up someone else's project and you can use the rubber band on it, play with it. Just know that it's cool to show audio keyframes. It needs to be switched on. Okay, make sure now that you've selected that. That's an audio clip in the panel above. Make sure you have the audio clip mixer available for that. Thank clip. So we know what this does. And if I just play through it again, obviously the, the only the only active audio track is audio track 1 around it. There is no audio track two or three, they're empty. Okay. So it's only audio one that I'm focused on. Now there are some buttons. It within the audit trail. I could swing the bias to the left or to the right while playing. I can mute it. Sada have to hear it anymore, and I can switch it into solo mode and so on. But I don't know if you wanted to, but this little button was clicked on this button, it looks like a tiny, tiny hexagonal my screen. Click on that. If you hover over, keep still, you should get a tool tip that describes what it's for that puts the audio clip, mix it into keyframe writing mode. So basically, while I play back, I can click and drag on the volume slider up and down, up and down, up and down. And it will plot lots and lots of audio keyframes on that rubber band. So let's try that. Bring your play head back to the beginning. Stop playing your sequence, and then jump into the audio mixer and go crazy with that audio slider up and down, up and down and up and down. And see what happens. And then stop when you've had enough. And then look at the crazy mess that is taking place in your timeline window. Oops, wrong place. So this is what I did. I went up, down, up, down, up, down in the audio clip mixer and it's plotted all these things. So it's one thing to get. Well, yeah, I can I can use a pen tool and I can use the other tools and I can rubber band and it's very hands-on. But if you're listening to something while it's playing, you might prefer just, you know, just what, I've got my finger on that volume button. And I'll go up and down and up and down. Like I'm manually ducking the audio. At certain points, couldn't sit and key points in the, in the sequence or that clip anyway. So you could do it manually as well to draw them. Now what do you use that fader control to the add keyframes in this way, you do get an awful lot of keyframes have to say, I mean, look at this masses, I don't know how many, what yours looks like, mine looks like I'm playing accountability and you can customize the default preference for how, how close they are. You can ask for fewer per millisecond or something like that. If you are interested in the program Settings, if you're on a Windows computer today, to get to your preferences, you click on edit and it should be at the bottom of your edit menu at home on a Mac today. So it's under my Premier Pro menu, go to preferences and I'm looking for audio. So go to audio. So Premiere Pro Preferences Audio doesn't matter if you choose the wrong one. Even if you choose the wrong one. You'll end up in the same window and you can just choose Audio again if necessary. And then we should have, or am I looking 100 of w? Okay, so down here where it says automation, keyframe, optimization, where do they get this? Another heavy metal band, isn't it? And have couple settings. And then I can say actually, let's change, let's customize the minimum time interval, thinning. That's great. Okay, So if you take that, you can then enter a value. So let's say whatever value is there, my defaults is 20, but I could set that to 500. So that's more milliseconds between each keyframe that will be dropped when I play in that way. Click Okay. And next time I try this little exercise, I'll just pick it up from him to stop playing again. And you can see it's had a very different effect. I've forcing it to space out when I play with this. So I don't get kind of crazy, crazy amounts of keyframes. So just to remind you that was in the program preferences. So preferences just go into the preferences whichever way you like. So it's Control, Semicolon or Command, semicolon or Mac, and then choose Audio. And about halfway down you have setting automation, automation, keyframe optimization. I take the minimum time interval thinning. Maybe it's to get the actual reduce the number of milliseconds, make it two hundred, one hundred. It's set here with a safe. And I'm sure you've already worked with audio in a particular way and you've probably used the audio clip mix a lot of the times before or may not still doesn't matter, but it was just to show the extra bit. Oh, what was that button for? What does this do? They slide decks, this laboratory in case you come across that later. If you've switched on anything like that. It's always a good idea too. I'm toggle those things again afterwards, just in case. So if you're working on a file and you're working in a team and they then get your project file, opened it up. And they start experimenting a little with the volume slider, and then they end up with caterpillar. So click that back on Soviets. Onset again at one last Save. Let's close this. I think that's all I wanted to do on this particular exercise and we okay though, are there any questions on what we did there? What we're gonna do next is to look at finding audio clips which need tidying up. Some with background noise. How can I get rid of background noise? Background hum, that chameleon sweetening, making the sound brighter, closer, getting rid of reverb and so on. I'm gonna do that next week. Okay. Oh, we're good. And that case, would you close that projects? And cross fingers by now? I trust you have the next exercise set of exercise files ready to go. I'm going to make this assumption.
7. Sweeter Sound: Let's open them up now. We'll have a little look. We'll take a break and then we'll finish it off off this, open up the project leads. The one I'm after is called Number 4. Sweetest sound. Sweetest sound. As I've lead to falls in the, don't worry about it. Pick the most appropriate project file. They are identical. Do you know which one by now? And let that load in. Now, I should have had this setup. So I have again, I have multiple sequences with clips ready loaded to save us time. And your timeline should already have the first one loaded. It's called the 01 effects. And if I just click into the timeline and do that is just two clips. Perhaps you could spend just under a minute and listening to those two audio files to see what they contain. Okay. I'm going to stop you on the on the music track. Okay. Is it just carries on in the same vein for a lot longer. So we have to audio clips, one recording of a man reading from a script tag, an actor reading from scripts to make us laugh. And then someone is just plugged into their amplitude is practicing. In the same way that we can apply. Video Effects and graphic effects, such as drop shadows and beveled effects and some of the adjustment layer effects we'll see tomorrow. We can drag and drop effects on to audio files as well. So I thought we would start with that and see how, what kind of effects we could, the results we could come from that without trying too hard, try and keep it to the to the minimum. So the offense, the audio effects that I'm looking for are going to be in the effects panel that my Effects panel is sitting over on the left. Sitting over on the left here it is my Effects panel. Now if you can't find it properly, you can always go to the Window menu and choose Effects. And it will jump in front here. It's jumped to the top here. So top-left now was down the bottom effects panel. Now the effects panel again, I wanted a nice tool panel area because it has, it's full of bins. And in each bin, they will extend downwards. Could you expand Audio Effects? Audio Effects? And maybe we can play with some of these. I'm not sure which ones we can do first. Hadn't completely thought which ones we could play with. Let's try. Let's try one. So for example, let's get, let's try the spoken, spoken voice. So this actor saying, Hey, you're first on your block or something like this. And let's apply effects. And you know, maybe we can make him sound bigger. Say in the Audio Effects bins. Would you find what I'm looking for? I'm looking for would you find Would you open up the reverb and just learn to nothing? Yeah. Let's choose a yeah, would you drag and drop a studio Reverb? So click on it, hold it and drag and drop it onto the audio track of the man speaking. And then play it and see what effect it has. So it creates an artificial island. It wasn't a great recording to start with, but it creates an artificial effect of that. There is some sort of background echo going on. And you may find you can fine tune that even further by looking in the Effect Controls panel. And if you know where your effect controls panel Is, it should be up around here somewhere. But as I've had to open it up, go to the Window menu and choose Effect Controls. And as long as you clip is selected, the audio effects you applied should be listed. Here we go, studio Reverb, and if there are any settings for it, you would be able to play with them here. Now later on, we will be looking at bit more at some of these settings. Don't dive in just yet I want to do to get started with this. What would happen if we applied a studio reverb to the guy strumming the guitar. So just remind yourself what the guitar sounds like. Let's get a studio Reverb on the guitar. How does that change the guitar? So it sounds different? If you like undo. And let's try, let's try surround reverb on the guitar. What does that sound like? Which actually pushed it right down. So maybe I'll undo that as well. Is really only a chance to see how this works in terms of applying dragging and dropping effects. What I might do is I think I might find it fun to add an echo. So there is a delay and ACO setting. And I want to add this trend analogue delay on the guitar was not going to send like now I'm getting some sort of fifties rockabilly effect. And then I could further fine tune it. And this is a say, this is something we will do next. So we'll be doing is we'll be adding effects and then fine tuning them in the effect controls and doing a bunch of other things as well. Okay, For the moment, in which case, save what you have. You can leave it open. I would like to take a break. After the break, I'll show you a series of mini-projects we can work through for correcting things such as loudness, brightness, background hum is that kind of thing. And I'll show you some of the other tools which you can visualize the quality of your audio in different ways. Okay? Right. I'm going to put the timer up on screen here it is 15 minutes. Let's take a 15 minute break. And I'll see you afterwards. So I've lost tea break of the day. Let's crack on and get through all of the rest I have here for the working with the sound. So just before we took the break, I said yet, we've opened up this this other project file. We had a couple of audio clips here. We're just, this is one way of working instantly. What I mentioned earlier on about searching or a hunting for things. If you know there is an audio effect. And this applies with video effects as well. And you cannot, well, whatever you do, you can all find it in this long list, AECOM looking for everyone. No, it's called something. Well, you don't have to hunt through it this way. There is a search field at the top. So if you notice, Oh, someone set up, there's a there's a parametric equalizer where a paramedic ignore that what it's called Book just trying to equalize. Start typing what you think the name is of and you will, it will filter through anything that matches. I found the graphic equalizer and the parametric equalizer. That's another old effect. So if you know it's there, you type part of its name in, it will filter it through them. Feel you have to hunt through the bins manually. We may get to use that again, if I forget where something is, again, let's use the essential sound panel, but not for browsing Adobe Stock for something else. First off, Can't you find your project window? So your project panel, it may have jumped to the very top left of your screen, but you know how you can get to it. You can go straight to your Window menu and choose projects, and choose your project window. It should reappear. If you've lost it, I just find it this way. Let's try the second sequence along number 2, loudness. Number 2, loudness. Now would you like to play through some of this to get familiar with it? It's someone with speaking in the background were very shorts about moving to New York. Let's see. Okay, you've played through it the eye, you can see what it is. So there's a woman has rated a backing track and it's been chopped up into little clips. And sorry if you were here with me earlier in the week, you will recognize this, but we're gonna do something different with it. So don't worry, I'm not going to read it. So one of the small problems is with the balance of the volume on talking track. And show we can guess which one it is. Look in your sequence, look in the timeline window is clearly audio track 1, A1 is where she is speaking. So down here. And to make this clearer, would you make that audio track taller? Now I don't know if you did this keyboard shortcut before, but I'm let me call my keyboard shortcuts backup. If you hold down the Alt key for Windows or the Option key for Mac and tap plus. So that's Alt or Option plus. It will make your audio tracks taller in the timeline. If you hold down your control key or command key with plus, it makes your video tracks taller and shorter. Just wanted to make sure your audio tracks were tall enough for you to see what's going on. Looking across those little trimmed snippets, you can see at a glance, the first audio clip is quite quiet compared with the ones that follow. Yeah, that first one. So she sends quiet and by the time he got to the third clip, she feels like she's really lead into the microphone and maybe that's what she did is fine. Now, there are ways of adjusting this and rebalancing it and show up. And I thought I would show you this way. So again, this does depend on you having the essential sound panel. Over on the right. In the essential sound panel we were looking at browns that helps us browse Adobe stock. But there is a button called Edit, click on edit, and it gives us some editing functions. What we're gonna do is we're going to select all those spoken audio clips. And we're going to use the essential sound panel to try and rebalance and improve the result. Could you please select all those spoken audio clips? I'm gonna do it by hovering my mouse in an empty part of my track here, click hold, drag across those. So I don't want the music or just one, the women speaking in audio, A1, A1 track. And then let go. And this selected, once they selected the essential sound panel on the right should come to life. And it's offering to give us some ways of fixing, correcting, tuning up audio, and to help us with that, It's it's saying, Could you tell me what type of audio is it? Is it music is a special effect. Is it some ambient sound or is it, which I'm sure we know the answer here is a dialogue. Yes, it's the spoken voice. So click on dialogue and we've assigned absorbed, just seen for maybe a heads up, I select all the audio. Let me do that again. So down in my sequence here, I have a couple of options for selecting audio. I could click on one audio clip to select it, and then hold down my shift key and click on another one, and then another one and another one until they're all selected. However, what I did is I hovered my mouse in an empty part of the trunk or anywhere else in the timeline nearby, click and hold my left mouse button down and drag and it draws a marquee selection area. And I dragged across those little audio clips. I want to let go. They are all selected. That's how it did it. Say. If you may need to zoom in or zoom out or something so you can get easy access to them. You're welcome. Okay. Yeah. So what I did was in the essential sound panel. Now that I've selected those, it said white, what is this music is a dialogue box and click on dialogue. And what you'll have in the essential sound panel is a whole load of options for fine tuning. Something that's to tune up specially for the spoken voice. Now you may have to scroll up and down to see everything. This panel gets filled up very, very quickly. Now, the particular problem I was hoping to correct here with the fact that some of the clips were quiet and some work nice and bright and loud. And basically how I like to I would like them to have the same loudness all across. And you can do this by normalizing, changing the gain across all of them. You might have done this weirdly early with me this week. And now I've got the essential sound. Maybe that's something I can, I can fix straight off. So looking Essential Sound, I'm thinking, yeah, it's, it's the volume that the overall loudness of everything I'm after. Well, you should have a loudness setting. Now it may not show anything. It's waiting for you to click on it. So click on that name, loudness. And it expands a little and gives you a couple of buttons. That gives you one button, says match, match. We'll click on the auto match. Now you may not have noticed it actually did something. It looked at each clip and analyze them and applied a gain and audio gain to try and match a consistent level that would be suitable for only for broadcast. So if you would like to play that little sequence again and listen to the audio, it should all be of a similar volume. Every trust me, take it from me if you deselect those and look more closely at the waveforms in your sequence. They look more balanced than they. Remember the first one was very low, third one seemed quite high. Now the role of a similar loudness. So this was an even easier way of doing it. I'll just select them and just write. And it's not just balancing them to make them even. It's actually setting them all to what would be an appropriate level, the spoken word. According to broadcasting conventions. It's not that easy, but you have to know, is that okay, let's look about look at fixing things or if there's something wrong with an audio track that we want to fix. And I'm thinking, can't read a hums, he sees and other things like that. So save what you have when you open up the next sequence from your project window. Sequence number three, noise reduction. Noise reduction. That's the same sort of thing. But instead of the woman's narration being clip by clip, it's the original is the original recording. All this audio clip play through. Have a listen. So not quite sure if the intention was to record the overdub while having the microwave or something, but there's an electrical hum in the background. And it is quite a nice, consistent hmm. And I think it could probably be eradicated quite easily because of its consistency, but it's a simple example. We'll see where that leads. So having heard it and you can, you heard that HM. Would you select the clip? So select the audio clip itself. So click on it. It's now selected. Now, it should already have been designated as dialogue. Did that already. So if your essential sound panel is asking you, is this music, is it dialog? Click on dialogue. By, I'm going to assume that salt that's already been done and you've been thrown straight in the Navy. It's what we saw before, loudness and so on. Okay. Loudness isn't quite the one I wanted though, is it? So if you look down, look down, look down. You may have to scroll down who knows? And I'm looking for something that would remove a Hm. Well, I'm going to have to scroll down. I'll find it eventually. It must be there somewhere. What am I looking for? So I don't want loudness. So I'm going to collapse that clarity note, not for the moment. We'll am I looking for where's my DIY home setting? I'm I going mad. Oh, I know where it is. And I where it is. It's in repair. And say Click on repair. Yes. Thank you for the prompt. What are they, this little search, a little filters at the top on your saw the other day, the hum. I have to say whatever. See this expression d Hmm, I was thinking of, yes, Professor de hub and from the University of Rotterdam. Let's try the D hmm tick, DM, the HMD dam, dam. So give it a tick. All you get is a little slider, but ticking is enabled something. And it seems to be set at a couple of defaults. Mine is set to 7.1, but more importantly, it's trying to pick out the frequency of that audio hum, is if 50 is 60, so it's an electrical Hmm, that's what it's looking for. One I wonder if it's worked. Place some of your sequence bank. Well, it seems to remove the ham. She sends a bit tinny as a result, but depending on which part of the world you, you're in, the electrical HM, could be at a different frequency. And if it doesn't work, you can always click on 50 hertz and see if that makes any difference. Now, this was definitely an American one, so let's go for 60 hertz. Yeah, That's the one. Okay. So if there is a consistent background hum, you don't think you can hear it when you're in the room or in the studio. But it could be some mike friends to need a cable or something like that you never know. And it just gets picked up in the recording even though you didn't think you could hear it? That was an easy one, but I had to remember it was under repair and save. Let's do another one. I have another sequence. So back to your project window because you open up the next sequence is called number for auto noise and reverb. So we have unwanted reverb, reverb. Think of it as that tight echo that you get when it's an echo, we know an echo is, but reverb is. You have flat surfaces and the noise is echoing off it. And when you're in that room or that studio, you can't hear the reverb, your brain removes it. You don't think you can hear it, but it's all orderable on on your mic. So open that up, give it a moment. Some of these files are little baby might need a kicking in. It's a little coupled few acting sequences taken in a studio. So I apologize in advance for the quality of the acting and the script. I want you to concentrate on background noise, echo, reverb. I trust I've given you plenty of time to experience the finest the Royal Shakespeare Company can offer. But it was the, they're in a studio. You're going to get some sort of background noise. They're not wearing mikes, the mikes being pointed at the amount of shot and it's picking up some reverb and also on the first track. And if you notice, there was changed there was changing background hum it could have been a bus going by. It could have been a generator or some sort of machinery that was there and then went away. I reckon if you go to on that first that first clip, if you go to around 15, can you hear it and eventually it goes away. So it's not even consistent background noise. So we have a simple things going on. Let's see if we can get Essential Sound to tidy it up. Which you select that first in the sequence, the big tip, the first clip, should already have been designated as dialogue. If it hasn't, pick on dialogue. And now that everyone's helped me with this, I'm going to concentrate on the repair section of the essential sound. And let's see what we can tweak it. Start with the Reduce Noise option. Would you tick Reduce Noise? Now the default would be about halfway across intensity of five. Now try and play back that clip to see if that's helped. Well, I hope you agree straight away as much a pretty good job of getting rid of that loud rumble, that cake tin off to most it between about 10 seconds in and then goes away at about 25 seconds in. But again, you may wish you, for other clips you may wish to experiment. You can drag that slider to the left, so it's a less intense Reduce Noise filter. Or to the right, more intense. He tries harder. So a bit of trial and error will be required. You can try if you increase reduce noise all the way up to around eight or nine. See what that does? Not sure if I can see if it was any better or worse. To reset any of these sliders back to the defaults. In this case, five, double-click on its little handle, just double-click on it, it'll jump back to its default position five. So you can do that. Now as I've a part of the challenge with this, trying to get rid of the background noise and so on, is get rid of some of the low-frequency, low-frequency background noise close to the speech, which is hardest is not background noise. It's associated with well, reverb and other things. Now if we can get a better view on it, let's see what we can do. So as well as the hum, a, D, hmm, this is also something known as D noise. We have ds and so on. And these different concepts here. But as soon as you've started the Reduce Noise slider option, it applies a special effect. So, uh, de-noise effect to the clip. Where is it? It's in your effects controls panel, which should have leptin as soon as you clicked on the clip. So here are my, my Effect Controls panel. If he's not showing, go to the Window menu and choose Effect Controls to bring it to the front. Have a look on the left-hand side. So I'm not interested in video motion. I'm going to go to the audio settings and sure enough, as well as the usual things, volume and the volume. This new effect is appeared a de-noise. And he said, Okay, I'm not quite sure what D noises, hum but de-noise. But let's see what it does. Now. Next two. Now this has changed slightly different versions of Premiere Pro, but you should have an edit button. My edit button is next to where it says custom setup. It should be the same for you. But if there's something slightly different, but don't worry, there's an edit button. If you click on the Edit button there, it'll open up a special window. This is so I cannot just Debian. It's a special window called the clip effects editor. The window is resizable, but it doesn't resize the content. Never understood that. And there you go. So you can organize that as necessary. And what this does is it will give you a preview, a visual preview of the sound. So bring your play head back to the beginning and play through that clip. So if I just go back to the beginning again, even when they weren't speaking, we can visually see something was going on this that track even when they're not speaking. Now you don't have to play it in real time. You can scrub back and forth by clicking and dragging on your play head and freeze at any point to see what's going on here. So it's a visual, is Dino is a, is a visual idea of where the waveforms are, are sitting and how they're applying here. So the left end of the graph shows low frequencies, APMs, and the right shows high frequencies. So there's not too much. That's a great way to start, is to concentrate on those areas of the audio clip where they're supposed to be no sand. So between the dialogue, if there's still lots of dancing around, it means there's still something that we can get rid of. There's definitely a continued rumble in the low frequencies. So over here, it seems to be consistent even when they're not talking. Now, we can try and get rid of them using a variety of methods we can choose. We can start tweaking with ease, but it's kinda quite hard work and it'll take a bit longer. So here's a couple of things you can try. And whether it makes a great deal of sense, Sorry, can't explain. But for the moment, looking in this window, underneath the graph area, we have something called processing focus. Processing focus. So by default and we have different shape, little kind of shaped forms here. And what this is, is by default it, the de-noise effect applies to the whole clip. So the full frequency range of a clip. So it applies equally to low, medium and high tone sounds. But if we change the processing focus, it was not just a flat line for everything. So these little shapes here represent member on the left is low-frequency, on the right is high frequency. You would have changed the shape of the emphasis of what it wants to get over. And what I was thinking is could you click on the button that represents focus on lower frequencies? And it should be the second one along. But if you like, hover over it, you should get a tool tip that confirms yes, focus on lower frequencies. Use that click on that button and maybe play from the beginning of that clip again. Now, it did help a little bit. Those less of the rumble sitting in the low frequencies. I can't necessarily hear it, but maybe your dogs will. There's no harm in trying to fix it. So let's adjust it further. So underneath where we've clicked on these, on this little focus on the on the left-hand edge. Let's increase the amount it set a default 50 percent, drag the slider up to about 80 percent ish or exactly you want 80 percent. Does that make a difference? Play the clip from the beginning again. What if I set it to 100%? Does that help? So even setting the effect of full, you know, should allow the speech to be audible but the rumble, okay, still there. I mean, we're living in a world and the world's turning is always a rumble, isn't there, but it's very much decreased. So how did we get here? We chose the Reduce Noise we take to reduce noise in Essential Sound. And then we turned to the Effect Controls, where it added a de-noise effect. We clicked on edit and it produced further controls. And then we, for now, I would think maybe 100% on my, I hate to max things out and take that amount slider back down to around 80 percent. I think around 80 percent would be splendid. That's good enough for me. And yeah, I think that'll be good. You can close this window now. Close that window. Those settings will be remembered. You haven't lost them. There's no Save button. So those gaps definitely send very quiet to me. Hope it worked for you. Jump to the second clip in the sequence, just to remind yourself what the background sound is like. It's not so much a background harm or noise. It's more of the echoey feeling the reverb on the voice. And a stack and I just jump in and then it, wherever we've changed the settings on that first clip on the right-hand side in essential sound panel, I've now got a yellow warning arrow next. Yucky, noisy. Yep. Yep. So if you hover over it, you'll get a tooltip. So it's it is a warning symbol, isn't it? So it's a, it's a yellow triangle with an exclamation that is definitely a warning. What it is really spiky, really should be a little eye in a circle. It's for information. It's not telling you done something wrong. It's supposed to be there as a reminder saying you haven't just dragged the Reduce Noise slider. You haven't just enabled this particular setting. You have also made additional changes in the Effect Controls window. That's what it's trying to tell you. It's, I think it's a bad choice of icon. It should be information, something to note. So it's not a mistake. It's a reminder. That's all. I have been asked. If I could just click it and it would take me straight to the effect controls and open up that window, that would be even better. Let's not quite and quite there yet. Yeah. So I was thinking for the second the second clip just has, you know, if she's studio, but if there were pretending to be outdoors, you don't get that kind of indoor sound. So would you select that second clip? Let's see if we can reduce the reverb on that. So with that selected, again, it's all been setup is we'd already been designated as dialogue. So on the right-hand side in the essential sound, what we're going to look for, let's choose. Again in the repair section. Yeah, There's one cool to reduce reverb. Reduce reverb. Take that and jump to the beginning of the track and play it again. Now it's not perfect, but this is a big change there. Instead of have that background and the reverb, I'm getting the impression that it almost feels as if they are closer to their microphones and they're being picked up better. Because it's is shaving off some of that reverb. Now again, we can drag the slider for reduce reverb further to the right and see if that makes any difference. Now the further I push it, it does feel more like she's in a room with me rather than recorded in a studio. But the further I do push that does start to kind of it's like I'm speaking to someone on Skype. It starts to make a electronic changes to the sound of a voice that don't sound quite right. So what I'm gonna do in my reduce reverb is I'm going to double-click on the slider control here, that'll jump it back to its default position. What I'm going to do for this track is do the same as what I did before. I'm going to go to my Effect Controls panel. By enabling reduce reverb. I have a would you believe in effect called the reverb? I'm sure I have some of these hits in the seventies, the reverb. And again, for custom setup, there's an edit button. Click on that, and we open up one of those effects editors. So I should just move to one side so I can get to my play head. So you can play through and watch the wave forms for this. Now the colors are different, but it feels a bit more spread over to the right. There's something else happening of the right. So the, the higher frequencies seemed to be the plan you feel good. So when you're reducing reverb, but it is quite likely that it's going to reduce the overall level. The audio generally, it's one of those things. Now, there isn't auto gain option at the top right. That compensates for that. If you untick auto gain and try and play it back, the whole thing might come across as a bit quieter. Okay, maybe you noticed or maybe you don't TBA. I'm going to come along. I'll leave it take to actually yeah, I'll leave that enabled. I'm not gonna make any changes here. I just wanted you to see that animated graph again. Now there are two more clips in the sequence you could experiment with, but I'm looking at my watch and I think we need to press on with something else. So do feel free in your own time later on, come back, keep experimenting with those, but you have two more clips where we have similar problems. Try and go through this process again, seeing if you can try and get rid of reverb vacua, but the reverb and other effects that are somewhat unwanted. So I've just had a message and Beverly saying she can't hear me. Can anyone else hear me? It's back. Okay, cool. Okay. I have had that happened the other day was the other day or the other week, someone had to put messages saying, now you've completely gone overdoses. I got you. Got you. It's just one of those things. As long as I am back. If it happens again, do give me a shout. Just say, you know, when we're all using and lots of video conferencing software like this. We're using go-to training, but there's Skype and Zoom and Microsoft Teams and so on, that they would like to grab your microphone and your webcam and they will not let them go. They grab hold of them unevenly. If you quit the program, they will not let them do it. So I had a few glitches. The answer is unplug it and plug it back in again. It crowd solution always works. So do let me know, right, we're back. Would you save this? Let's do let's do another one. Would you go back to your project window? I have another sequence. This one's called number 5, Clarity. Clarity. Would you open up the clarity sequence now this has to virtually identical sections. Would you listen to each one, please? So this is a reminder. If nothing else, it's the same thing twice. You'll recognize it straightaway. And the second version was the original one with a hum in the background, is now being the first of these two short sequences on the same place it, the first one has been D hummed, okay? But it's kind of up and down and having the hummed it. And now I want to make it brighter. I want to increase, I could perhaps I want to increase the clarity. So try this. I'll just zoom in a little bit. Would you select the audio track onto the first set of clips? And then over in the essential sound panel. Expand the clarity options. So what I'm gonna do is I'm going to close up the repair options by clicking on repair. So they should all collapse upwards. And then I'm going to click on clarity. So they dropped downwards. So I have a couple of first, slider settings for clarity, which you tick. Dynamics that will enable Dynamics. And just for yourself, experiment a little with the slider to see what kind of change that makes to the quality of the sound. Now you can actually drag on that dynamic slider while listening. I have to stop it, change the slider, restart it. You can do it at the same time. It should, it should update. So dynamic should bring it even closer at cleaner and feel brighter. If you try dynamics you got okay. That may have worked. Switch it off. So untick dynamics, Let's try the other alternative, EQ. So there's an EQ setting underneath, would you tick next to EQ? Now, AQ is probably best worked with presets. So most people are familiar with EQ in the sense of how our audio is played back for music. Click on the preset drop-down just on the way you've ticked EQ. And basically when you apply a preset, it changes the shape. On the left you've got the loud sounds on the right, you've got the highest sense. And you can choose whichever. So let's choose what could I choose? Well, it's not really a background voices it, but it might be fun if we chose, if you choose on the telephone. And then play it again. So it sounds kind of slightly tinea in a locked in the trunk. That always makes me love that one. But yeah, podcast voice, one of those people who are speaking like that. And then you have an intensity slider underneath where you could go Santa bit more like that or sand a little less like that. So that's something else you can try is plot apply one of those EQ presets. Try on the second clip, the one with the hum. And in fact, it Yeah, For the second clip, select the second clip, the one with the hum. And for this one, in the clarity section of the essential sound panel, Let's see if I can figure. So underneath EQ, if you keep looking down further down, oh, this sounds like a magic trick. Doesn't enhance speech. Enhance speech if I just take that, is it you're just going to magically make it better. Well, this ticket and find out ticket and play. So to see it best is to play it and then take an uptake in Hans speech. And it has its own little magic formula, doesn't it? To kind of try and get rid of the hm, make the voice sound brighter. Hasn't completely eradicated the hum, but it's, if you had less of a Hm, this would be like a one tick solution perhaps. Now below the clarity section, you have, you should have a creative section. So I won't go through all this now. But if I just collapse clarity by clicking on clarity, there is a creative section underneath. We could have even more fun. So it really only has one adjustment reverb. So this can be similar to adding a reverb rather than removing it. And that can have its own amusing effect so I could apply it and go, Yeah, let's have a reverb in such a way, not choose a preset. It sounds like in church. What will this sound like? Since I she's in the bottom of the well, actually that and you get doctor in a trunk now the bottom of the well, stuff you can do at one last thing with that, with this creative section. So if you've had a play with reverb, found it very amusing and made a note to use it later for another, for another purpose that look further down on others bit of a gap. But there is a little section at the bottom called clip volume. The volume. What this does is it lets you adjust the volume level for clips in a sequence. So it applies an automated loudness adjustment. And it's sitting down here at the bottom. Now if you think our CS, another way of adjusting loudness, we've done this already. This fact there's a dedicated loudness setting we've already used. At the reason this last one here at the bottom is clip volume, is you can adjust the loudness setting so you can make everything louder. But the one thing it doesn't do is it refrains from distorting the audio. It's just a funny thing. You can set that loudness quite high and it never quite distorts. You can try that just now, if you would mind, I'll have a better, a better one you can try on. So could you go back to your project window? Could you open up the next sequence called level number 6? Level I open that up. So here's your, the same audio file again, but without the hump. So that's the sequence number 6 level. It's just the audio track. No harm in the background. Would you select it? It's already been set to be dialogue. You know what it sounds like. And then down at the bottom of your Essential Sound under the Creative section, you have your clip volume. Use the clip volume. So. Adjustment to increase and decrease the playback level. So no matter how you adjust that, how much you increase the level of the audio, it won't distort. That's, it's one great feature of doing it this way as opposed to all the many, many other ways. Okay, We're going to rattle through these. These are great. I want you to definitely want you to experiment with these, getting ahead. So I'm putting pointers saying is this, is that Do try this again, so you'll know where to look. Are we okay to go onto the next one. So back to your project window. Would you go to the next the next sequence number seven, full parametric EQ. I mentioned that earlier on, didn't I? Full parametric EQ. Would you open that up into your timeline window and play a little bit of it to get a feel of what it is. I think I've had enough. So yeah, it's singing. Then it goes up, down and it's singing. But it'll be great one because quite long to experiment with a couple of other things in something called the parametric equalizer. Now, parametric equalizer, where was that? I showed it to you earlier on. Can you remember where it was? It was in the effects panel. It was one of those drag-and-drop effects and I used it as an example of something I was searching for using the filter bar across the top. That's where it was. Do you remember where it was now? It's in audio effects but I can't remember. So I'm going to type, I'm going to click into that search field at the top left in the Effects window. And type trick is found. Parametric equalizer is also fairly simple. Parametric Equalizer. It's fan them both. Well, let's choose the parametric equalizer effect. Now, make sure your clip is selected in your timeline. And when you drag and drop the parametric equalizer onto that audio clip. In your timeline. Once you've done that, what it does is it adds the parametric equalizer to your effect controls panel. Here it is, I can see Parametric Equalizer. It's been added here. Now what all these settings I has one of those things, custom setup, edit, Always good. Why don't we try that? So click on edit. It opens up one of those big friendly windows, but it looks slightly different again. So the paramount, if you've used an EQ setting, you know, you're dragging things up and down, up and down setting, but this is more like a rubber band. So we have this horizontal line with preset, spaced out keyframes or handles, if you like, at those locations. Now first off, just have a little play of the audio just to remind yourself what's going on. And you can stop there and go. Yep. Okay. I understand what that is. It's the horizontal axis of this graphic control area indicates frequency. The vertical axis is amplitude. So how loud? At the low or high frequency of what we can hear, there's a blue line across the middle, just represents any adjustments you want to make. So the moment this is not doing anything, it's quite flat. What you can do is take commands, pointer, and drag on these little control points. Now, each control points go to a letter or a number. Can you see they're referenced as l 12345 and h. Exactly the same as what they call down here, l 12345 and h. So the numbers you can see the bottom of these little columns refer to where these control points are. So grab that, grab a click on Control Point number one, and drag it quite a fair bit downwards. And I go not too far,
8. Multi Camera: Welcome back. So here we are in the morning of day two of our two-day advanced course in Premier Pro. So do make sure you are running premier. You've launched it, It's running happily. And you have the various exercise files. Exercise files are ready to go sitting in a location where you know where you've put them. And in the multi-camera folder which you open up the appropriate project, the file PU for your version of premium. So open that up, give it a moment. If you're being prompted to re-save it as usual, just you can choose a different name or accept the default name. I'll give you an extra couple of moments to sort that out and I shall carry on talking. Here is the scenario. Now so far, we've been using for EMEA for the usual things. We have video clips. We can trim video clips and build them up into a longer sequence for variety of reasons. Now there is a type of project that might involve filming something. So it could typically an event, an interview. It could be an acted sequence for a drama performance, something like that. And you would like to use more than one camera, gets very Samy on the same camera. So let's say a speech. It's lasting half an hour or more. You probably want different camera angles and you would set up a number of people to film at the same time, maybe one from the front, from the side who knows someone on the balcony zooming in that kind of thing. And at the end you want to use Premiere Pro to bring all that together and get it into sync. At the same time, if you thought about this in advance, you would probably want to make sure someone somewhere, one of your team is making a very high-quality recording of the audio. Because we can also sink an audio-only file to the rest of the video afterwards. So this is the scenario. I don't want you to see how it works. This won't be terribly challenging because it's been optimized for this. So now you've opened this project file up. Would you make sure you're in the editing workspace? The editing workspace, this will be easiest for us to get started with. Find your project panel, typically down the bottom left corner, which should contain nothing but a, a bin labeled multi-camera media. Now I'm going to drill down into that by holding down my control key for Windows or Command key for Mac and double-clicking on the bin icon that drills in without creating a new panel tab. And you can see it contains what? It contains 1, 2, 3, 4, 5 video tracks or 50 video files, and one audio file, which you load up. The video file called C1 master. You can see the beam. We had five cameras for this. So we've called them C1, C2, C3, C4, C5. Okay, so open up the C1 master into your source monitor. Now these are reasonably high-quality videos. So once we start working with multiple cameras, camera tracks, as it were at the same time. Don't be to put off by the fact you may drop a few frames from time to time. But tell me what just at any point, play a couple of seconds of this video just to see what's going on. Okay, and I'll stop you there. It sounds odd. It sounds weird. What's happening is it's a performance. So there is a young fella with his guitar. And he's not my timing. He's actually singing along with a backing track. And the idea was he was going to be filmed performing his song. But the final version of the edited video will be obsolete the film with him singing a song. But what you would hear is the prerecorded studio recorded version of his, of his tune and is being captured at different angles. Try loading up one of the other videos. I'm going to load up just a few seconds of that time. Have a little look at C3, C4, and C5. Okay, I'm going to button now. I'm sure you're having a good look at those. So it's a single performance captured from five different camera angles. Some of the cameras are zooming in, zooming out and moving around from his face to his guitar and back and so on. And imagine your, you've seen this enough in films or on telly. You imagine you're in that live control room while this would be going out on the live broadcast. And you have all the monitors facing you and you're saying, Okay, go from camera to camera three. From three to two. A camera 524 and back to one. And you'd be doing in real time. Here. We're going to do it in Premier Pro. It's equivalent. Now there's a simple process with this relatively simple, you just need to know how to approach it. Now the key thing you think the biggest thing, the biggest problem is actually sinking up the video, as you may well have looked, if you bring your playhead to the beginning of each, each video, it starts with a preamble. You get the woman with the clapper board. And on some of the videos, I've added a little green marker of added, added a little green marker just here is a little marking within premium. Maybe you've seen it that doesn't do anything. It's just a marker which kind of indicates at the point where it goes clack. Because quite often allowed Planck noise is a great way of setting a marker. Because evermore here that crack on all the video, on the video recordings as well. And then we can use that clack. We can line things up. So remember, if, say, I'm in my, my source monitor here, and I'm going to click on my button here that shows just the audio. Perhaps I could zoom in and check that clack occurs and line everything up from here. Now, Premiere can also do that. It can look for significant sounds in the video component of all your sorrow, in the audio component, all the videos, and try and use that as a means of aligning. Last thing though is could you load up the MP3 file? So 0, 5, that summarize the name of the song. Double-click on that, it load into the source monitor. And if it hasn't already put the pop your playback a slider all the way to the beginning and just play, this is the studio recording that you'd be listening to. It begins with beeps. And I'll stop it there. Now because the guys sort of mining, sort of singing back to his own recording, those beeps can be heard not just in this MP3 file, but they can also be heard in each, at the beginning or near the beginning of each of the videos. They're the same. Premiere Pro will use those as a, as a code, as something to align on sync everything. So even though some of the videos begin, there's a whole minute before he starts singing, and some of them just half a minute or few seconds before we start singing. In each video, we can hear those pips, beep, beep, beep, beep. And Premier Pro will automatically lock into those. Sync up all the videos. At that point. It knows how to do that because we're going to tell it which media file to sync up on. And we're gonna say, could you sink on the audio file? Now it could be we have another, another video track that we're going to have that has a perfectly good audio on it and we can take no, no sync up with his video file that has the audio. But this is the plan. Here's what we're going to do. So let's do it. We shouldn't take too long and it would be sort of amusing as we go along. Would you select all the files that are in that multimedia been sharing in your in your project window. So all five video files and MP3 audio file. So everything in there, you could have just press Control a or Command a on your keyboard to that would've selected everything there. Right-click on any one of them. Oh, instantly instead of right-clicking, I've just got into this habit. I tend to right-click things because I know that I'm probably going to find the command I'm after. If you'd like, you can go to the clip menu. You can do that as well as an alternative because what I'm looking for is this command, create multi-camera source sequence. Create multi-camera source sequence. So that's either under the clip menu or by right-clicking. Choose that command. And you'll have a nice told dialog window with a number of settings. We're going to go through a few of these now. So if you have that dialogue up, no need to look at my screen. I'll just talk you through it. You can concentrate on your own one. Now obviously at the top, we could give it a different name on it or leave it. It's multi-camera. No reason to change that. Underneath where it says, synchronized point is the bit I just mentioned. I want to help Premiere Pro decide where we should sync, synchronize all these video files, even if they have different starting points. Okay? And at this point I could say, Look, maybe I've set up in and out points already. Maybe I've manually done that in the source monitor. Okay. I've not done that. Maybe I am using multi-camera system while it was being filmed that had a common time code on all of them. In which case, I can find the correct time code and say use this code. It will apply to everything off not done that I could also say, oh, I've got a clip marker, I've got a particular sound I want you to look for and so on. I'm gonna make it reasonably easy because as I said, I have this studio recorded music track that begins with big P, that's already beeps or pips that can be heard in all the videos as well. So that's what I've done here. So where it says audio, the audio is selected for our synchronized point. And since it's saying, Okay, which audio track will it be? A1, a2, a3, a4? Well, we only have one audio track. Let's say it's going to be like track one. So I'm going to leave that set track 18. And if it doesn't work, I can just try this again. Under the sequence preset. If you click on that drop-down, it should currently be set to automatic. By default. You have a variety of other presets which are good up to different systems and the way it might have been captured and what you intend to do with it and so on. I'm going to leave it as automatic because there is there is consistency between all the videos already. But this might let me take some supplied lots of video from that were taken with an old-fashioned DV camera and someone else has a professional camera. Someone else sitting in the front who's using their mobile phone, and they're all using different setup. I might go really, I need to optimize them all for a particular single thing that I intend to use for our than a broadcast or a certain standard banner. Leave it at automatic. We'll keep it simplified there. And what else do we have? I think I'm going to leave most of this as it is, is defaults. Okay, So I'm not gonna make any changes, are not going to offset the audio by any frames. There's a tick option that says Move source clips to processed clips been yeah, I might just leave that ticked. Why not? And underneath for the audio it says right, sequence settings, audio channels preset. So for the sequence settings, if you see what I have a choice of camera on all cameras, switch audio. Well, doesn't matter too much. Which one I choose. It needs to pick out one particular all cameras or whatever. I'm going to leave that as it is. Leaving it as camera. One thing that I'll do fine. And what else? All the audio channels present again, you have a load presets automatic monastery. Again, automatic will be good enough for us. And down at the bottom, we have a choice, an opportunity to rename each of those video files. But boy, helpfully, because in real life, video files tend not to have nice names. Maybe you haven't got around to changing their names in your project that might just have alpha numerics and the difficult to work out. So you have the opportunity yet under camera names, Premiere Pro, my offer to say Look, I'll rename those video files, camera 1, camera to camera three so you can identify them better. Now, that's already been done to remember, our video files are already called C1, C2, C3. So that'll be good enough for me. So I'm going to use the clip names exactly as they are. And I won't make any other difference here. Would you click Okay. Click Okay. And Processing those. And part of that processing was the synchronization. So we'd set out and look at the audio file and see if you can get the audio for all of the other videos to sync up, and that would make that work. What it's done then is just as I asked, it's taken all those files and put them in a bin. So look in your project window down the bottom left is put them into being called processed clips. So you know, they've been included and it's created a special little file down here, which is a multi-camera file, which is called C1 master. That first camera one as the first thing to look at, which you select that C1 master. This multi-camera file. So it's a special type of sequence, but I need to create to, need to turn it or rapid into a conventional sequence. So would you select it? Right-click on it. And would you choose the command and new sequence from clip? New Sequence From Clip. An alternative way of doing that. But the way it is, I could drag and drop it onto the drag and drop it onto this can create new thing button that would also do the same thing, but I'm so used to right-clicking now I'm going to do that. So New Sequence From Clip, and so it's going to create a sequence and it loaded up into your timeline. And it looks like a single clip. But what it is is a special wrapped up multi-camera clip. Now if you, if you go to your timeline and you select that clip that's now sitting in your timeline. Try it. Let's just try right-clicking on it again. If you right-click on it and see the options that you have here, you have an option that's become available. That should say multi-camera should be about halfway down. And I don't change anything here. I just want you to see this. So this clip is a multi-camera clip and it contains five video media files. C1, master, C2, C3, C4, C5. Make sure enable is ticked. Okay, Don't choose flatten. Enable is take this should be ticked. So it's only listing those five. We weren't making any change there. So if it is correct, you can just tap the Escape key on your keyboard to come back out. As for the sixth vol, the audio file, well, that's what we can see here down at the bottom. This is our video file. So at this point I suggest you save because that was the first bit done well. So what we did was we selected multiple files. We use the clip menu or right-click menu to say right. Let's turn this into a multi, multi camera Group. And we had some settings which actually I left all at their defaults in this particular case, clicked Okay. And it'll be a pro. Did the analysis, worked out where the sync point should be, and then gave us this multi-camera file, which then turned into a new sequence. And here it is. Now to make this work, Here's what we're gonna do. Would you just check a couple of things that go to your program monitor. So the big one at the top right to the program monitor. And would you click on its settings menu? So remember the settings menu in panels in Premiere are the ones that do like a spanner. So I find that spanner at the bottom right there. If your program monitor, just pop that open and I just want to be sure we are going to choose multi-camera, so it should be near the top. Can you see we have the default composite video, but I would like you to choose multi-camera. What it should do is load up those five camera shots. Now it could well be your only seen one or two. That's only because you're looking at the very first frame of all of them. And I think the very first frame of some of these is actually just black. Take your play head and move it along. And then you'll see. So move it along a bit and then you'll see what's going on in your program monitor could be showing you. You'll find videos playing in sync. And next to it, a larger preview of the currently active video at that time. So you can click on each of these tiny little thumbnail versions of each of the videos and whichever one is active. So literally whichever one has that. My case, a yellow border around it is the one that is currently showing over on the right. Okay. So the principal Yeah. Yes. Sorry, I missed the very first step on how to see all of them cross tag making night. Oh right. How do you use multi camera a project? So in your program monitor, go to the Settings menu button, the one that looks like a spanner. Down the bottom right corner. Click on that and near the top, you have the option to switch to multi-camera mode. Invented yet, but later on we'll be looking at comparison view as well. But to multi-camera mode, it's supposed to load everything up. So you'll see little thumbnails of each of the cameras on the left and a preview, which is the currently active one. If they all look dark or black, just move the play head to later on into the video and you'll see all the little thumbnails. So if you want to just play and you can see how this is working now what we're gonna do is act out that part of the, of the guy in the in that studio room sake, right. Switch from camera to camera two and all of that, That's what we'll do next. The process of that isn't lot easier than it sounds. Basically what you're gonna do is you're going to play the whole video back from the beginning. And then you are literally going to do what I've just done is you're gonna either click on which view you want to be active, and you just click, click, click between the five views. And indeed you can use keyboard shortcuts for this as well. So before we start this, just try this. You've you've moved the play head to a certain position. I don't know. I don't have to play it live. But if you stick to the number keys at the top of your keyboard, you should find pressing one will go to the camera, one, pressing two will go to camera two. Pressing three will go to camera three for and you'll never guess what, five dozen. So that probably won't work if you use your numeric keypad, if you have one. So if you have a numeric keypad on the right of your keyboard, that way may well not work, but certainly it may do something else, but the number keys at the top of your keyboard. So that might be easier, you're playing back instead of have to click on something. You could just let go of your mouse and just type 1, 3, 5, 2, 4 to jump from one camera to another. So that's the plan a, but working in this poxy, it's forth epoxy, silly word I should have used our pokey windows. No good. Let's maximize our program monitor so we have more space. So to fill the screen, you can either double-click on the program on a tab that will open up or find that little kind of backwards apostrophe or graph key, sometimes with a tilde over the top of it. So we can go full screen with our program monitor. Now, appreciate again on, depending upon how much memory and how much processing power you have on your computer. My computer is nothing special about the way some of this might seem a little jerky. Here's what I want you to do. Would you put the play head back to the beginning? Right back to the beginning. And it doesn't really matter which cameras active you can choose whenever we're probably trip what we're going to trim this off the beginning bit. Watch I want you to do is to stop playing so you could tap your space bar. And for the next minute or so, just watch the video and use either click on the different views, the different cameras, or use your keyboard typing 1234 or five and back again for a minute or so. And then pause the video. You can press Space-bar again or just stop the video. Don't need you to do all four minutes. So in your own time, but for the next minute or so? Yeah. If you've paused to just to say I've paused, I haven't crashed. Can see there's a question from, how did you maximize the program window? Your choices either use the keyboard shortcut, which is on your keyboard, find either the Tilda. It might also be shared with what I call it backwards apostrophe. It's an accent graph key, or tilda key. It's in different places on different keyboards. Or you can double-click on the tab name of your program monitors or double-clicking on the tab of any panel in Premier Pro fills the screen and then repeating that minimizes. So hopefully I can be heard over the noise of this guy singing and that like me, you have paused. I've done a minute or so. I don't need to do it all in one go. It's not necessary. I can stop and start whenever I like. I have paused because I'm getting tired. I want another cup of tea or a hero. Well, somebody interrupted me and someone rang the doorbell. It's not a problem. So I've paused in what am I? I'm not even two minutes in, but I did a bit of it and I think what I did was okay. But I want to review what I've done so far. So at the moment I have my program monitor maximized. Would you minimize it again by repeating either the keyboard shortcuts. So that's your graph key or, or, or tilta key, or as I mentioned just a moment ago, you can double-click on the program monitors tab name. That'll put it back in its place, a double-click. And what we're looking at now here is yes, we're back here in our editing mode, but look in your timeline. Your sequence clearly has now been chopped up between the different camera views. For what I'll do is I'll, I'll click into my timeline window and press my backslash key to make that clearer. And I'm going to hold down my Control or Command key and tap Plus a couple of times to make my video tracks taller. Which means if I zoom in further with just the plus or equals key, I can see at a glance right from the beginning, I'm getting different. So I'm going to pick maybe from a certain point and just play back a few seconds. How do I get carried away? So purely by playing it back and changing which camera view want in real time. All of that's been chopped up for you and added ad. Even if I've paused, I only post about a minute or so into the song. I can pick it up at any point, do the same thing. You can go full screen or not full screen. It's completely up to you. It doesn't matter but working, playing it back in the program window while you're in multi-camera mode. We'll remember what you do from that point. So if you do nothing, if you just play it back, nothing will change. But while you're playing it back, if you start changing cameras, it will update our sequence. So you can go back over a bit you did earlier that perhaps you fluffed it a bit. You can just play back and then change it in real-time as you play it back. If you took a pause like we did, you can have a break. Come back to it. Get your timeline anyway, you like, watch how far you got and then pick up the work from there and continue on to the end of the track. So with that in mind. It was kind of fun in his own way. What do you know if there was a section you didn't like? You know, you can use your timeline to scrub through, try and find that section. Begin playback again and change the camera angles you wanted. And then when you've finished making correcting that one problem, then you can pause because anything after that will be correct again, went it. So for the next Can we say five minutes or so? Do that, correct. Any bits you've done in this, It's ODF, three or four minute song and continue through to the end of the song. So yeah, it's about 10, 14. Let's say I give you five minutes or so, five to ten minutes to see what kind of job you can make of this. I'm going do the same thing, but I'm going to switch off my mike. Any questions in the meantime, put them in the chat window and I'll respond to you in the chat window. Right. So yes. So I'm going to interrupt. So I'm going to assume you are done. Some of you. Thank you, Emma. Yeah. Easy to change bits that don't look so good yet. And there are other methods I'm, you don't have to change it all in real time, although that's still fun. I just liked the fact that you can pause, do something else, come back to it. You don't have to do it in one big crest around and then go home and then do it all over again. You can just punch in and punch out just like you might in the recording studio and do it right here. There is another way instantly, because this is a piece of music, There's a certain rhythm to it and you get into that field of yes, they do this, don't they? They switch camera angle. For each line of the song or significant points in the song, you get into that rhythm. These quite easy when you're doing this is that you switch camera to a different angle correctly, but you chose the wrong angles, so the timing was right, but the camera you chose was wrong. It is possible to redo that, to change the camera angle without having to redo the whole section. What you can do is go to your timeline, zoom into your timeline. I'm pressing my and I'm hovering over the wrong the wrong panel. So if you go to your timeline and zoom in a bit and it could be say, you're happy with it. So I'm unmuted myself because I was making too much noise. You know, you might you might be happy with the timing of the cutting from one angle to another. But you feel that you chose the wrong camera angle, which you can do is zoom in to the sequence you've got. Select select the camera angle that you chose, but it was the wrong one. Let's say you can right-click on it. And because you're in kind of multi-camera, multi-camera mode, you can go to that multi-camera sub-menu there. And here you can send, didn't mean to use this camera angle. I meant to use this camera angle C. You can actually pick out one of the other streams, soccer, change it to this camera angle and it'll just update. And so you keep the timing of the clip to clip to clip of the different angle, but you just choose a different camera. And you can do that on individual mistakes. You don't have to run through it and go through this process again, even in a way. So that might be helpful too. I don't know if you experienced any can afflict rate problems and performance issues. That's not an unusual. So don't worry too much about that. Yes, we all would love more powerful computers. So you wouldn't have that kind of thing. But if you're having a big, big challenge, it is possible to do something called flattening out. Don't recommend it, but I'll point it out to you anyway. You know, if you've now done all these cuts and you've got right, I want to watch it back. So you go to your timeline, you play the sequence in the beginning and it's still jerky and you can really get a good, you can't evaluate it properly. Dropping too many frames, you can flatten it. So it basically creates a single video clip, the whole thing, which will then play back correctly flattening. That's what it does. Okay, so to flatten it, you can right-click on any clip, go to go to multi-camera. And then you have that flattened option. Now I'm not going to choose it as a flattened option. Basically it just rewrite the whole thing as a brand new video just plays that. The reason I'm not doing it for the moment is a bit of a one-way trip. Okay? So flatten, you'll get a video and it might play back better. You can't and flatten. Once it's gone, it's gone. You can undo, you could do Edit menu and do battle, get you back. But you have to make sure you don't do too many things or close it, or quit the program. You can't and flatten a flattened video. Otherwise, you can leave it in this form and export it just like any other sequence. And of course, before you do that, you'd want to trim it, wouldn't you cut off the bits at the beginning with the clapper board and the bits at the end. When he's faded out, you might want to add another fade-out transition. Well, save what you have. So I, although this was it was a backing track that was exceptionally clear with pips. And the backing track was playing in the background of all the videos as well. So Premier Pro was never going to have any trouble trouble sinking that up automatically. But I do recommend if you're when we're allowed to meet up into at live events, again, it's something worth considering is if you've ever filmed something, even if it's someone delivering a talk the last five minutes. And you said, Oh yeah, we're going to record it and put it on our website or presented. There's no harm in saying, Look, it's everyone else gonna come with a camera and bring a tripod and just record the whole thing and speak to I was in charge of the audio visual stuff and say, Look, can I get a high-quality recording of the guys speaking into the microphone rather than me having to record it elsewhere. And then you're getting all these components of people send your OI videoed it from here and I videoed it from there. And I've got a high-quality audio recording as well. I'm burying them together to this multi-camera mode. And not, you know, and you can pick a, a sync point before with guy starts speaking. And I'm just walk up to the microphone and clap your hands. There's there's your sink point, a sudden bang. Any questions on that? Not sure I'll be able to answer anymore than it was fun. So one last Save and Close.
9. Video Effetcs: Let's work on next, next bit. So we finished the multi-camera. I'm going to work on some Video Effects. We're going to turn to this. So it's going to be a little different. But it's harking on from our audio effects from yesterday. So I am going to assume that you have by now, if not already been able to download the exercise files for today. So there's five ZIP files called Six video effects, sudden color 8 competently ends Entente on, Okay, and that you've extracted them and put them into a certain location, hopefully within the same overall folder as your other folders as well, just like this. That's my assumption, that's what you've done. So in Premiere, would you click on Open Project or go to the File menu and choose Open Project. And navigate your way please, to where you've put all those exercise files. And find folder number 6 and Video Effects. Open this up. And this is one of the just going to point out this is one of the project files that we're working on today that may well make reference to some of the video false. We'd already downloaded and used yesterday. So if you've moved to some of your folders around, it shouldn't be a massive problem. But I want to show you what could happen if he can't quite find the right files. So what I'm gonna do is you don't have to do this. I'll just demonstrate it for you. I'm going to move some of my files elsewhere to try and provoke a pop-up that says, I can't find all the component files I want to use. So anyway, I'm going to open up my video effects exercises project file. And this is the kind of thing I wasn't sure whether this would happen on automatically. I've tried to promote this because as part of the files I want to use in this project file, there were a couple that we had yesterday and now I've moved them into a different place. He can't find them. Maybe you're seeing this message anyway. This is quite normal. We have a link Media window, usually opens up very large. And it says bright last place, I found or looked at these files, they were at this location. It gives you an out of date folder path. Now you may have a couple of files. You could have hundreds of files in this list. All you need to do here is look down the bottom corner. There is a locate button. Click on locate. And then, unlike some other programs that do this, instead of saying right, I have to find that particular file. So in my case, the file is called Laura too. I don't have to know where it is. We'll have to do is know roughly where it is. I don't have to find its precise folder. All I have to do is point to a folder where I think it might be. So in my case I go, Well, you know, I I I think I put things on my on my desktop somewhere. I'm I'm not quite sure where and I can kind of scroll through and have a look in order to put it here and was it somewhere else? Was in this place, was in that place. And if I kind of go through I put mine on my desktop. So we have ellipse on my desktop and it was in this folder called Premier Pro exam exercises. But beyond that, I don't remember. So as long as I point to a location within which the file might be somewhere in a nested in some further sub-folders. We'll have to do is find some top-level one. And down the bottom, click on the Search button. Premiere Pro will look in that folder and look through any subfolders within there until it's found the file. Now if he can't find it, it can't find it. But had look and essentially found it somewhere else and he goes, Yeah, I've got a copy of it in this location. So wherever you've perhaps moved it two or somewhere else, you may find another version, which case I can get. Yeah. Okay. Click Okay. And if it's found any other files in the same location, it will send you through. If he's still looking for other files again, it might prompt you again, oh, look for a location and find it. And a backward was. Now that may have been the case for you, or it may have just opened up automatically. Now I'm going to save and cheek really close. You don't have to do this. I'm going to move my files again to try and confuse Premiere Pro again because I've moved some of those files all over again. What's going to happen when I try and reopen my video effects? It's phantom anyway. Or if he hadn't found them. It would prompt me and say link media, could you show me where they've gone? So Premier Pro is quite good at finding files that have gone walking. If someone's changed the folder name, moved it to a different location, whatever, you don't have to find the precise folder that is in. You just find you, you could select o is on this hard disk somewhere. Click Search and let Premiere Pro find them. So if you see this again through the course of today, because some of my project files are referring to some of those files that were using yesterday. Just follow it through. Point to wherever wherever it is you have put your exercise files, desktop, your documents folder or something like that. And use that search button. And then let Premiere Pro do the work. Okay, by now, I'm hoping that we have got to the stage where you are able to open up the project file. Looking down in your project panel, down the bottom left, you have a list of sequences. So i happen down here, 0001 browse, multiple effects, master clip affects the number. That's the order in which we're going to go through them. And I've put all the other files in a bin called footage. Right. So would you open 001 Brown's the 001 browse sequence is just one clip. Just one clip. Here. It is supposed to be an exciting clip as part of another thing. But would you jump to the beginning of the ion tronic get mine keyboard to react it with. Could you jump to the beginning of the clip? Just play it back so you recognize what it is? Okay. If she's trying to escape from someone, she doesn't look like she's in much of a hurry, but agar is just a woman running around, running past and then climbing up a ladder. That's all. So you recognize what it is. We're going to work with some video effects. So just like we did with audio, we might find it easier to change workspace. So in the workspaces, would you change to the effects workspace? The effects workspace. And we did briefly see this yesterday, but hey, Effects workspace, so it reorganizes things on screen just a little bit. It gives us less room for our project panel down the bottom left, but it does open up a nice tall effects panel on the right. I can browse through. Now. Do you remember with when you have folders of effects, whether their audio effects or in this case, video effects or transitions or whatever. They're all in folders and sub folders and sub folders. And here on an a look at the video effects subfolder. And there's a whole load in here. And if you know what you're looking for, you know where it is, it's great just to remind you that if you don't know where it is, he can't remember there is a search filter at the top. So if I have a rough idea of what something's called a visual effect, I can type part of its name at the top, and it will filter down the list. And then I can apply it there. So we'll be doing a bit of that, finding appropriate effects to apply. One thing before we just start playing with this. And I kind of breezed over this, perhaps I should have mentioned this in audio as well. Is at the bottom of your effects panel here, towards the bottom. Okay, you have a couple of buttons. One looks like a bin. I think we can guess what that does. And there's one that looks like a folder, which ironically here we refer to as a bin. So I've got a rubbish bin and a folder bin, got two bins. What this does is it lets you create a custom folder into which you can drag and drop or copy your favorite video effects. So if you use a certain number of them over and over and over again, you can click on that little folder button. At the bottom. It'll create a custom been. Ok, and it will call itself custom bin. You'll sit down here at the bottom custom bin, which you can then double-click on its name and I can rename it. I can call it my favorite effects. And every time I find an effect to that, oh yeah, that would be really good. So such as, you know, I really like to use the levels affect just chosen one completely at random here the levels affect a cat. Yeah, absolutely loved that. I can click hold and drag and drop it onto my custom bin. And then my custom bin, which I've called my favorite effects, contains that fact, but he doesn't have not moved the effect. What I have is a shortcut to the effect which is still sitting in its original location. So most people do end up using the same things over and over again within a project or multiple projects that need similar effects applying instead of hunting for them over and over again. Yeah, create a favor. Create a custom bin. You could name it after the project you're working on. And this will stay here in Premier Pro won't just be linked to the current project file you're working on. You'll be able to reuse it again. So keep that in mind if you want to use that as well. Do that. For now though. Let's before we take a break this morning, we still have 510 minutes or so. Let's just quickly apply a couple of effects just to get into the mood for that. So at the top of your effects panel, I'm going to look for an effect that will render the whole clip black and white. Okay, so it's called Black and White. And I'm looking at this like a note, I'll give up. I don't know. I'm going to use the filter at the top. So I'm going to type the word black. Lots of things have got black in. I'll just press backspace a few times. What if I type the word white? That narrowed down my filter? So I don't have to type in the beginning of the name of filter, just any part of it. Mathias has just asked, can you kinda just show you that again? What I did previously was at the bottom of the effects panel. You have a folder button for creating a custom bin. I clicked on it. It created a custom bin. Double-click on the name to rename it. And whenever I have found an effect I want to use. So now, oh yes, I've typed white in the filter. At the top. I found the black and white effect I want to use or do use it often. What I can do is click hold and drag and drop it onto my Custom Bin. And then wherever, whenever I want, I can go into my Custom Bin. And there it is. I have my own set. So even if I go back up to the top and clear my filter, which I should just clear the filter. My custom bin always contains a shortcut to my favorite effects. So I can treat these as if they were the actual filter effects. I can drag and drop them, apply them in whichever way. So whichever way you have found that either if you've done like me, you've added it to bin or you found the original. This is the way that we've done it so far. Click and hold on the name of the effects and drag and drop onto the video track in your timeline and let go. Try playing the track back again. She's in black and white. Now to see that the fine details of how that filter worked, end. Hi, toggle it on or off. Where would I go? Think of what we did with the audio yesterday? We go to a panel called the Effect Controls. Oops, sorry about that. Jump Effect Controls. It should be hiding in the same set of panels. So my behind your source monitor on the left, top left Effect Controls as ever, if you can't find it, go to the Window menu and you find the effect controls here. It should have a keyboard shortcut. If you keep losing it. Taken out of the keyboard shortcut on my screen here it says Shift F5. And you'll be able to get to it quickly that way. So as long as your clip is now selected in your timeline and you Sequence, Effect Controls will give you information about that particular clip, including now that we've applied an effect, that specific effect. So you remember from yesterday we were talking about motion and opacity and all this kinda stuff we played with or keep looking down, looking down or within your video settings, ignore the audio settings to them and say Video Settings. I'll just collapse capacity. And yes, I have a special event called black and white. That's the one I just dragged and dropped on it. And next to it There's little fx telling you this is a special effect. Now the FX Symbol here is actually a button. Okay? So if you click on the little fx next to black and white, it becomes an FX with a line struck through it. Can you see little FX line through? You've toggled it off. So that clip is now back in color to toggle it straight back on again. Click back on the little fx with a line through, reenabled the effect. So it's like having a visibility button, switch it on, switch it off before, after, before, after, bottle glass. But the blas, if you would like to remove an effect. Again, go into the Effect Controls panel. Click on the name of the effect you want to get rid of. So I've literally clicked on its name, black and white, and it's become highlighted. I click on, it becomes highlighted and on the keyboard, press backspace or delete key. It will remove the effect from that selected clip. There's not just hidden it, it's removed it. If I wanted to be black and white again, I'll either have to undo or apply the effect all over again. Let's try a different way of of applying an effect. Can we find a video effect that's called directional blur? Directional blur. Now I'm probably could find it, but I'm too lazy, so I'm going to click into the filter box at the top and I'll write the word direction. That should be enough to filter down the list and show me the directional blur. And I would like to try, this should work. But if you've already selected that, you want to apply it to, instead of dragging and dropping, just go to the Effect named directional blur and double-click on it. So double-clicking on an effect should apply to whichever clip is selected. You don't have to drag and drop precariously across the screen if you don't like doing that. Now, if you've applied it, you probably won't see any difference at all because directional blur applies at a default of 0, which means you won't see anything. So you will need to go to your effect controls. Here we go direct effect controls for your video and find the directional blur effect you've just applied. And you'll see it's all set to 0. So there is no blur. It's only when you give it an actual value, it's gonna do something. Would you change the direction number? You can type it in or you can click and drag left and right, change the direction to 75, that's in degrees, and change the blur length. This is the thing that matters. Otherwise there is no blur. Change that to, let's say 45. Now we've got a blur, Wu. And if you would like to scrub back and forth, It's great when she runs past you sort of recognize what it is. And if we go back here, if you hadn't seen the video before, you might think, Oh, I can't tell what's going on. So maybe I've gone a little bit too far. Maybe I should tone that blur length back down a bit. And which case go back to your effect controls. Leave the number as it is, as the moment can you see to the left of the blur length? So ignore the stopwatch for the moment. Leave that alone. But there's one of those little chevron buttons. The disclosure triangle is they say click on that to see another way of playing with it. You can adjust by dragging on a slider, which is bigger and friendlier in his own way to remove or reduce the length of streakiness of that blur until it gets back to something recognizable. It's not a great effect to apply to this particular clip that you get to see how it works. Again, if you want to see before and after, go back to your effect controls panel find the directional blur heading. Click on the little fx icon next to it that will temporarily hide the blur. Click on that little FX again to show the blur. To remove an effect, you just select its name and backspace. But knowing you can just switch things off, you can apply multiple effects. And then just switch off the ones you want. You don't want, you don't have to delete them. You don't have to remove them. Just switch them off. Because you might change your mind later. Might want to switch them back on. Now if you had multiple effects. So if I started saying, yeah, I'll have that effect and I'll go, I'll just clear the filter at the top. Maybe I wanted to fly. Yes, the black and white to change your mind, I'm going to drag and drop. I'll make it black and white as well. And this levels affect hadn't really know what I'm doing. I'm, and I'm dragging and dropping or applying multiple effects and I can see them all stacking up in the effect controls panel. Some are switched on, some are switched off. I've got to a stage maybe darker of a complete mess of this. I would like to clear the decks and start again. I've applied all these effects. I have to go round and delete them one by one and I'm frightened of deleting the wrong thing. That's something you can do is go to the Effects panel tab, click on its menu button, that hamburger button as they say, to see what options you have. And you should have a remove effects command, a halfway down remove effects. Now I won't get rid of them straightaway. You'll get a dialog window that pops up and it will list the effects that have been applied to the currently selected clip. And then you can selectively tick or untick. Do you take the ones you want removing, untick the ones you want to keep, so forth. Standard things such as motion, position, a pasty, that kind of thing. You can't remove them, you can just reset them that be similar to clicking on the little reset buttons on the right. But if you've applied effects that can be removed. So I'm going to leave them all and click Okay. Sorry, sorry, I dropped my pen. It's a lovely quick way of resetting eclipse back to how it was before you started. Without having to do it bit by bit. Yeah, absolutely. Okay. It's a started. Just remind us where we are. I'm quite sure you try to play with Effects before. I'm just reminding you of what we could do. What we're gonna do now is we're gonna take a break. After the break, I want to progress and show other ways of applying effects instead of directly to clips across multiple clips using an adjustment layer. And then show other ways of applying effects to multiple clips simultaneously. Working with keyframes, applying effects that apply in different ways. And we'll finish off with a few commonly requested effects to correct common problems. For now though. Would you save? Not that we've done anything but save anyway, it's good practice. Would you close your, your project? Come back here, the Video Effects project. And we'll take a break. Let me put the timer up as ever. If you have any questions that pop into your head during the break, put them in the chat window and see them when I get back after making my fresh cup of tea. And you'll see my theme mug of the day when we do that. It's like 15 minutes. See you off to all righty. Morning break is over. We're going to push on and carry on looking at video effects. Would you reopen that project file we were working on. So either from your home screen, a single click on the video effect exercises or whatever you called, it will open it up. Otherwise, of course, you can go to the File menu, choose Open Recent. It'll always be the one at the top of the list. Either way to reopen that project file, give it a couple of seconds to pull in. So this was the last thing we looked at was the woman running around a corner. We were playing with effects and I was thinking, I just remember I showed you a couple of other ways. Couple of ways of applying these effects, dragging and dropping here that worked. There was another one where you select the clip, you want to apply it to find a video effect. And then double-click on the video effect that will then apply it to the currently selected clip. There is another way actually, you could go to your effect. Select an effect and copy it to your clipboard and paste it onto the clip. So with an effect selected, I could go to the Edit menu and choose. Let me just get that right. So I'm just going to copy this and paste it in. So I should be able to do that. That way. I haven't been able to make it work just at the moment, saw forgotten something. But still there are lots of other ways and if I can try and member others that actually worked properly without making a mess of it. I will show you some others as we go along. If I remember. Here's what I wanna do now is let's move on to a different sequence to down in the bottom left corner of your screen, I'm going to assume you can see this. Go to the sequence called number two multiple effects. Would you double-click on that to load it into your timeline, please. Now, this is this goes on for about a minute and a half and it's of a hero, the stagey drama where people dressed out that like something from Game of Thrones. And if you would like to drag to the beginning, have a little look at this. Just run through a few clips worth and then stop polio and you're in a tick. Okay. So I you see what this was. Sorry, I was just having a few audio problems, I think come back properly now. So yeah, it's what it is. I won't get too upset about the quality of the acting. But you can play it through. Now. One of the things that makes this look so weird in stages, the fact that they may be dressed up in closer quite clearly been filmed somewhere to Sunny to be a traditional Europe maybe. But you know, that being filmed with decent cameras have decent lenses and they look like two actors dressed up in close. That's the way it is that it lacks that cinematic. Quality. So we're going to apply some of the couple of filter effects that might compensate for that. Let's see if we can do something about that here. Now because I want to apply an effect not just over one clip, but lots of clips. This would take time if I wanted applied across the whole lot. So what we're gonna do is we're going to create an adjustment layer 2, which we can apply an effect. And then we can run that adjustment layer and it sits in its own track across as many clips as we like. So we'll get started. So with that open, would you go back to your project window down the bottom left corner? Now, my project window on my screen is really shrunk up into a tiny little, a tiny little bit in the corner. I don't suppose you could make it a bit wider. I'm going to hover on the right-hand edge of my project panel here. And until my mass becomes a double arrow and I'm going to try and make it a bit bigger. The reason I want to make it bigger was partly I wanted to see the scroll bar, but also I want to see the buttons along the bottom. So I'm going to keep going until I see all the buttons and need to see. And we go all the way till I can see the delete button, the create new thing button, the bin button and so on. Could you do that now? Make your project window a bit wider if necessary. So you can see all the buttons along the bottom. Because what I wanna do is create an adjustment layer. So would you hover your mouse now over that button, one that looks like a square with a corner turned up for creating new things. So we've used it already to create a new sequence. Click on it. Now, I would like you to create, whew, this one adjustment layer, new adjustment layer. Now what it does is it'll pop open and ask you to confirm something. What's the what's the width and height and aspect ratio of this video? What's the time base frames per second? And I won't go into why we should choose to have square pixels. Historically, you can have pixels in video that are not square. They go on an Aleve. This is because this information has been pulled straight out of the current sequence. So if I leave it as it is, we're going to get exactly that right, width and height and time-based for this sequence. So I'm going to leave it densities. Click, Okay. And that adjustment layer dialog window, it does not put it in the timeline. What it does is it creates the adjustment layer and puts it back in your project. And it's probably cooled adjustment layer. Here it is, back in my project window. You will need to add it to your, your sequence. So would you find it in your project window? Click and hold and drag and drop it into the V2 track. So the V2 track, so that's the second video track, the one just above the V1 track where everything else is. Now it comes through at a default duration. So quite likely it looks like a tiny little box or square. Now make sure you it the whole sequence into your timeline window. So I tapped my backslash key so I can see it, or would you then click and drag on the left edge if necessary, and drag to the beginning and click on the right edge and drank towards the end, so it snaps to the end. See you now you have an adjustment layer that runs across the whole sequence. Instantly. You don't have to do this. You can have an adjustment layer that just runs over two or three or four clips. If you wanted. If it was only to run over one clip, you may not need an adjustment layer, you just apply the effect to that clip. This is a way of applying one effect across multiple clips. Okay? First off, let's, because it was taken with a nice camera. Let's blur the video a bit. Let's apply a gentle blur, or maybe a serious blur to see if we can get that more kind of projected film effect. Now we were working with blurs before we had a directional blur. I think I would like to use a blur called a Gaussian blur. To know, I'm going to click into the filter at the top of the effects panel on the top right. And I'll just type blur. How many blurs are there? Well, there is quite a log. The blur I'm looking for in particular is the one called Gaussian blur. Gau WAS Gauss in blue. So choose the Gaussian blur. And I'd like you to apply it to your adjustment layer. We'll go to the usual one. We know what we're doing. Click and hold on the Gaussian blurred drag and drop it onto the Adjustment Layer. And then if you haven't already at the top left, could you make sure you can see your effect controls panel? Your effect controls panel, which would then give you information about this. Gaussian blur you've just applied. Now to help you along the way to try and judge how good or bad, how serious, whatever what we're about to do is what I suggest is you do like I have done, is scrubbed through your sequence until you can find something that is good to focus on. So in this case, it's a dialogue between two people. So I would say can you scrub through to, you can see like their faces, one or either of their faces in some clarity rather than some long shot where you can't really see anything. And I think I picked, picked a point where this guy and where am I in? I'm about I don't know, anywhere from about 26 seconds onwards where I have the guy sitting down there we go that do. And he's looking at, you know, speaking to the other characters standing up. And I think that'll, that'll do for me, that's a good one to focus on. I can see it reasonably clearly. So when we apply effects, I'll see what the differences. So where am I my time code on or about 35 seconds in there. So I'm going to focus on that in the program window when I apply the Gaussian blur. Now the Gaussian blur has been applied to the adjustment layer, just like our directional blur that we had earlier on. 0. Okay, default setting is 0. So let's change the blurriness, that value. That blurriness value. Would you increase the blurriness value? You don't have to go very far before it blows out completely. Take it reasonably high, anywhere between 25 and 30. I would consider in this case. So is measured in pixels by the way. So that it does look quite blurred. This, you know, you're looking at this unique losses. One of the funny little side effects of a Gaussian blur, the way we've applied is basically it looks every pixel and it looks at the surrounding pixels to do a blur. And by increasing the blurriness, what we're doing is increasing the radius of pixels around each pixels with which to blur, okay? And what that does it, you can have a funny effect along the edges and the corners of your video. And you may have noticed just subtly the corners. It's like you've got a kind of a vignette effect is gone a bit darker around the edges. So to get rid of that, I don't want that back in your effect controls panel. Little bit underneath where you set the size of the blurriness, you should have a tick option. Repeat edge pixels basically ignore the edge, continue blurring beyond the edge. Tick that and it should clean out to sharpen the edge of your frame. Should fix that. Now, I'm going to leave the blurriness at this extreme level. And I know it looks wrong. But I going to compound it with another effect, which will then in combination with a blurred created another effect. Again, I'm going to apply a blend mode. Now if you've used Photoshop, you may have come across blend modes. Blends are a way of combining the pixels of something in front with the pixels of whatever is behind it. So if you could think of a blend of, if I had a yellow pixel in front of a blue pixel, I could blend it in such a way that it produces green, for example. But there are different types of blend modes that combine overlapping, overlaid composite images in different ways. So let's do this. Make sure the adjustment layer is still selected in your sequence, in your timeline window. Then go back to your effect controls as ever. And can you find your opacity? Controls should be near the top with an FX next to them. Opacity, which you if necessary, click on the little disclosure triangle Chevron just next to it there to see the opacity settings. And amongst the opacity settings is an opacity or transparency blend mode currently set to normal. So there's nothing special. Let's change it until it's different. Click on that normal drop-down. And you have a whole load of these transparency blending options. Just try a couple tried dissolve. That thing that makes a difference. Try darken oh, yeah. Documents when he looked me looks almost like a cartoon. Tried multiply who was very dark. And the results you get from transparency blending modes. Whether we're in Premier Pro photoshop or indeed, some of these are in Illustrator and InDesign as well, is it's difficult to predict sometimes because it does depend on what's in front of, what's behind, how bright or dark, what the colors used, etc. So but normally throw something like a burn makes it darker, a dodge makes it brighter, and so on. At the blend mode on was thinking of these, can you find one called soft light? Soft light? Choose soft light. And it seems to magically tamed the blur somewhat. After you've chosen soft light, go back to your effect controls panel just above. When you've changed the blending mode, you have percentage of how strongly this capacity is set. Would you reduce the opacity setting from its 100% down to, let's say, around 75 percent. Now if you've done that and you go, okay, so I've done all this. What difference does it make? It was a way of applying a consistent combination of effects across the whole sequence. If you want to get a preview of what we've done before and after, go down to your timeline panel. Look at your sequence, go to the timeline header. And for the header next to your adjustment layer, click on the visibility button, the little eye that'll hide the adjustment layer and show you the video before I switch it back on. It shows you after. So before. Yep. It's been videoed. After. Has a bit more of that kind of classic cinematic look. That's the idea. Try and play some of the video and see how it looks. And if it's an old trick, It's a way of making look a bit filmy rather than video ear. Which is too crisp, makes things warmer and what have you. But this isn't a way of applying several effects across multiple clips. This the idea of using an adjustment layer. And again, you can switch everything in the adjustment layer on or off. You can have multiple adjustment layers if you want. Now, one last note on that. If you do use Photoshop, adjustment layer might mean something slightly different to you. An adjustment layer in Photoshop would be a way of applying certain color adjustments and effects in a non-destructive way. To think about in Premier Pro when you apply effects and so on, then non-destructive anyway. So the idea of an adjustment layers not just to make it non-destructive, so temporary, but so that you can apply effects across multiple clips here and applying it to one clip. You don't need an adjustment layer, just do it to the clip. Okay, here's another way of applying effects that you might find useful. If you're using the same clip repeatedly in a sequence. At you may go well, so I'm using a different trim, maybe megabit, a long clip. I've trimmed it in different ways and added different parts of that trim to my, to my sequence. And now I want to apply a certain effect to those. But I don't want to apply it to other clips in the sequence that can get rather fiddly. Well, he's a way around. If doing this, you can actually apply the effect not directly to the sequence, but to the source files in your project window. So let's have a look at that next. Your project panel window down here at the bottom left. Let's move on. Would you go to the next sequence in turn? So the sequence I'd like to open up is the one called master clip effects. Master clip Effects. Open that up, please. You may recognize a couple of these clips from yesterday. Oh, you may not. I don't know. Would you? Not long. Long. Know. Shouldn't be too long. Yes, it is a bit long. Benefit. Just play it through. So we have some slow-motion clips. Remember them. Does that will take a bit of a time trying scrubbing through. So I have a slow motion clip of the woman sitting in front of a big sundial and sitting on a bench in the snowshoe must be freezing. And then I have another clip looking like this. And then I'm back to the woman freezing in the snow. And then I have another clip looks like this. And then I'm back to the woman freezing in the snow. Seeing someone on a rooftop. Back to the woman in the snow and feeling cold now. Cat. And then she's back in the snow again. So if you haven't guessed it, a try. Zoom in, you can make the video track taller, but confirm to yourself that woman sitting on the bench in the snow. It's the same clip over and over again, isn't it? You can see the file, should be able to see if you zoom in enough, you should be able to see the file name, Laura to Laura to over and over again, it's the same clip is actually the same trim of the same clip over and over again. To make it obvious. But imagine it was like a really long clip and 2D trimmed it in different places to insert into a sequence. This is the idea. And I thought I wanted to change something just on the freezing cold woman in the snow over and over again. It would be time-consuming whichever way. So instead, what we're gonna do is we're going to apply it to the original source media file, sitting in the project file. So first off, I need to find Laura too, in my project window. Now if I know where it is, I can find it. If I don't know where it is. Here's how can go look for it in your sequence. Select one of the lore eclipse. So click on it. Let go. Select one of those Laura clips. It does not matter which one. Right-click on it. You get a big right-click menu. But towards the bottom, you have a couple of things you may find useful. You'll have a commander reveal in Explorer, Windows Explorer, or reveal in finder that will show you where the original source file is on your computer. Now I don't want that one. Not today, but it's handy, want to know, but next to it you should have a command, reveal in project. Choose Reveal in project. I, Premier Pro will jump the focus of the program over to your project window. And it will highlight that specific media file. So that's the quick way of locating where it is in your project. Because we needed to find it and we need to have it selected just as we have done now, it needs to be highlighted and selected. Would you in fact double-click on it now? So I want you, this is very important to double-click on it here in the project file. And of course that what does that do? It loads it up into the source monitor at the top-left. So this is important what I've, what I've done here. So over on the right, I've got the program monitor that's showing me the clip that's in the sequence. That's fair enough. But on the source monitor is specifically previewing the flight, the master version. Okay, over on the right-hand side of your screen, we should still have the effects panel open. There was a certain type of effect I plan to use that was called the Sydney space 100. Sounds fun, doesn't it? Click into the filter at the top of the effects panel and just type 100100 because it's called Cyndi space a 100, I should be able to find it. It is Cyndi space 100. Now, so far, we have been applying effects, we'd been dragging and dropping into clips on the timeline. Don't do that. What I'd like you to do is to apply it to the master. Easy way to do this is to, in the effects panel, click and hold on that affect Cyndi space 100, and then drag and drop onto the source monitor on the left. So now onto the clip, not into the timeline, but directly into the source monitor. Now the immediate impression is that I've applied it everywhere. What's happened is that you've applied that Cyndi space 100 effects is a visual effect of a certain type to the source media file. The original media fall here. And that means everywhere that you are using this media file or any trimmed part of it. We'll also look like that. And that's why the program monitor has also updated. And if you want to through every instance of that Laura to that appears in let me just bring that down. That appears in your sequence has now, has that effect. Now is known as this particular effect with applied Cyndi space 100. It's known as a Lumetri effect. We'll see more about this Lumetri Color business later. But what we've done is different from what we've done before. I mean, if you're looking at the thumbnails of our clips down in your sequence, the thumbnails haven't changed. And that's because the clips. Here in the sequence, they've not changed. If you were to double-click on one of the clips in the sequence, you know, yeah, you'll get something like that. They'll look the same. But if you have double-clicked or double-clicked or selected one of those clips in the sequence. Go back to your source monitor and then click on effect controls at the top here, Effect Controls. So looking at the effect controls for the currently selected clip, it just gives me the same old stuff. So looking under there, what effects do I have? A motion? Yeah, it's nothing strange there. Where's the cinematic 100? Well, the thing is cinematic 100 isn't on this clip, it's on the master. So if I'm looking up here, it says this isn't just laura two, it's based on our master clip effect. And you may see to the left, top-left, you actually says Master Laura to if you click on that.
10. Colour Grading & Corrections: Now what we're gonna do is we're gonna move on to fine tuning color. And you might talk about color correction or color grading is a pedantic difference between the two. But let's see where that takes us. And then we'll move on to compositing and then working with graphics and text towards the end. For now though in your home screen. Could you click on Open Project? Alternatively, go to the File menu, choose Open Project. Navigate your way to fold the number seven, please. Color folder seven, color. And within there you should have, as usual, a couple of project files. Choose the one that's appropriate view whether you have the latest version of Premiere or previous version of Premiere. When you open it up, if you are seeing a prompt asking you to relink media, I will link media. Would you go through the process I outlined earlier on, which is click on the Search button or allow Premier Pro to find or point to Premier Pro a container folder where you think the missing linked files should be even if they're in the sub folders, click Search and Premier Pro should be able to find them. Then you can say Yep, Click. Okay. And if there are any more that are missing, all other process through again, because we may be reusing some of the pictures. Okay. And as we settled down, we should have something that looks a bit like this. Now we're going to work with color. So I would like if possible, we could change to the color workspace, that color workspace. So just up here, the color workspace, I'm going to double-click on it to set it and update it, and we go to the Color workspace. Now if you don't have a color workspace, we can always go to the different panels. Now what we're going to look at now is going to be quite focused on recent versions of Premier Pro. So I do excuse me. If you're using a much earlier version. So what we see here will definitely be fined for Premiere Pro 2020. Also version 2019. But not everything we're looking at here will be straight away immediately available in this way, in versions 2018 or previously. So hopefully you're not using too much of an older version. If you're really struggling, give me a shout and I think I should have some rough equivalence. But there's good stuff in here. So the primary thing if you're using one of the recent versions of Premiere Pro is when you go to the Color workspace, it opens up a panel called Lumetri color. Lumetri color. There we go over on the right. And Lumetri Color is a collection of tools and functions and features that enable you to correct color, but also open up and meters to analyze color. That's what we're going to look at for the next section. We'll take an example. I do believe this will have opened up a sequence into the timeline window that looks like a woman with a hat on acting in part of something. We'll come back to her in a TIG. Would you go to your project panel down the bottom left-hand corner? Would you expand all look inside the bin cooled sequences. And could you open up the first sequence, the one called 01, Julie's garden, 001, Jolie's garden. Now there's no Audi on this. You can just scrub back and forth. It's not important. A couple of actors doing stuff and so on and so forth. I just wanted to have something to look at. So perhaps hover your mouse. So I have your play head somewhere along the first clip in the sequence, for example, to get an idea. Over on the right-hand side of your screen, Could you go to your Lumetri Color panel at the top right there? And can you find the Creative section? So this is a bit like when we were working with the Essential Audio panel, is that these various words that you see here, these are little slabs and when you click on the name they expanded show you themed tools. Would you click on the one called creative? And one of the fun things with creative is part from everything else we could play with various sliders for sharpening and so on. Or we don't have time to go through absolutely everything, honestly, we really don't. But as ever, what I quite enjoy about Adobe programs, Premiere Pro included is they do like to give you some presets to get you started. Now, majorly underway, you've clicked creative, you should see a little drop-down menu labeled look. Currently it says none. But if you click on that, You actually have a long list of presets with some interesting names, very evocative names, and you can try them out. Now what I'm actually going to do is instead contact miss this, this a little preview, a little thumbnail preview of the current frame where you've put your play head. And I'm sure you can see this on the left and right of this little thumbnail, you have little pointy arrows. Click on each one in turn. I'm, I'm clicking on the right arrow and the right arrow and the right arrow again, right arrow over and over again. And what it does is it, It's giving you a tiny preview of each of those presets, and it's giving me his name at the bottom, the name of the preset, one after another. So you can have a look to see what they do. So click, click, click through to an interesting preset. And you think, Oh, I wonder what that looks like. Then click directly into the middle of the little preview thumbnail. What it does is then it applies that preset. So it saves me having to click on this drop-down go. I have no idea what all this stuff is. Okay. I can ignore all that and just just clicked in the wrong place. I can just click through the various toe. That was an interesting one. Yeah. So I can get a little visual indicator of what it looks like and then click in the middle and get them. Yeah, that's interesting. And it's immediately applied to the whole clip. Now to not really fine tune it, but to adjust that further, any of these preset looks can be adjusted. There's a slider underneath called intensity, where you can whatever affects, combination of color effects have been made. You can accentuate them by dragging to the right or turn them down. If you drag all the way to 0, if the intensity is equivalent of not applying it at all. To bring it back to its default value. Double-click on the little circle in the middle of the slider. So that's a great way of getting started on tobacco. Yeah, so just try and see an effect again. There's interesting. Click on the thumbnail and it's applied. Now associated with that, when you apply these lumetri color type effects, then they become to a certain extent editable within our effect controls. So let's see that next. Would you switch back to the other sequence we were looking at a moment ago, the one that was called lady walking. It was already opened when I opened up my project file. So it may already be here, but otherwise, find it, find the sequence in your project panel window, opened it up there. And you could play this if you'd like. There is audio, It's all very dramatic. Just run it through and just familiarize what this clip does. Okay, if you've played through that now, because you can hear the audio, the audio is not important. The audio is you can hear the director and the people shuffling around and so on. So that will change that the replace it with music and other dramatic things going on. So if you find the audio distracting, you can mute it. We wouldn't, we wouldn't want it anyway. What I'm gonna do is focus on the video aspects of the clip. Now it's her walking down the street. She's looking nervous because she thinks she's being followed. Tell you what, a script through left and right until you get to a frame where she looks relatively, relatively still and reasonably in focus. So you have something on screen to look at rather than nothing at all before we play with this. So having positions your play head. Can you find a panel called Lumetri Scopes? So yet we're working with Lumetri Color. But can you find the panel called Lumetri Scopes? It should be hiding in the same place as your source monitor. So I can see it concedes little tab Lumetri Scopes. But of course you know that even if you can't see it, you can always go to the Window menu. Find Lumetri Scopes, and choose it here. Lumetri Scopes. Now Lumetri Scopes may or may not look like how you see it on my screen. If you've not looked at these before, it's quite likely you're seeing several little kilometers all at once. Now to choose which ones to look at. Before we choose which one to focus on. What you can do is. The bottom right of the Lumetri Scopes panel itself. Find it Settings button. If you remember, in Premiere, all settings buttons look like a spanner. Click on the Settings menu button pops open. And here at the top I have a list of the special color scopes, color meters I can look at, and the ones that are tick to the ones that are showing. So if there are any that are not ticked, and in my case, only one of them is ticked. Tick the another one. Get back to the Spanner settings button and take another one and do this repeatedly as many times as you need until all five of them are showing. Now once the wrong, use your playhead to scrub left or right, back and forth. So the idea is they are kilometers that show you in real time frame by frame what you can see now, thinking what we did yesterday in the afternoon, it's almost similar. Instead of having meters, that gives you a graphic display of what you're hearing to help you hone in on background noise and how to insert and frequencies. Now we have something visual to help us understand what it is we're seeing. So after these scopes, one thing I was going to suggest was if you click on that spanner one more time, span out one more time. So that's the Settings menu for the Lumetri Scopes. Panel. Choose Presets, and let's choose a preset called premiere for scope. Why you the premiere for scope, YUV. And it just chooses a range of, of these meters, these scopes to look at. So you don't have to have the mall on. I can have some presets just to show some or others or otherwise. Also in that settings many. I'll just show you one more thing. Click on the spinner one more time. If you go down to Color Space. Color space now are absolutely do not have time to discuss or explain this. But if you're preparing a sequence that is destined to be broadcast, one of the many things within the broadcasting industry they have are standards. And so in the same way that there'll be standards for your audio quality. There were also maybe standards for interpretation, color, and color management. And you may be asked to set a color space for the work you're on. Now, at the moment, the default is to just interpret color is best. It can be in Premier Pro depending upon how I've calibrated my my computer monitor. But if you're asked to use a specific color space and they give you a number, it's likely to be one of these that you see here. So someone said to you, oh yeah, we need to be in one of these broadcast numbers. Choose it. If someone says, I need you to use a broadcast color space, but they don't give you the number. Just choose 709, that's probably your best bet. It's reasonable. So Rec 709, nothing's going to change screen dramatically, but it helps the Lumetri Scopes understand what it is you want to do. Okay? You can also, instead of clicking on the spanner. And if you notice this, you can right-click anywhere within the Lumetri Scopes panel and bring up that same menu, saves you having to go down to the spanner. Would you go to the presets? The presets, Let's just choose one of them. Would you choose waveform RGB? Waveform RGB is a quick way of turning off the other scopes. So choose waveform RGB. So we just see this one. And again, you can just see what this is doing. Now what this represents is which it represents a represents brightness and color saturation within the visual data that you're seeing. So the brighter the color of a pixel, the higher it will appear in the scope. So obviously the background around the woman's head is brighter than the dark areas of her hat and her jacket. So the areas to the left and the right of what we're seeing are shown in the limit. Oops, here it has higher. The darker areas are kind of pushed down a bit. So her hat, he's actually quite low down in the middle there. This is what it's trying to show. So 0 at the bottom of the scale represents no luminance at all, no brightness at all, or no color intensity. At the very top, marked as a 100. At the top-left there is a pixel that's fully bright. So if this was an RGB pixel, it would be 255 of red and green and blue. Okay, Sandra little bit. Engineer II, but the idea was to give you a visual idea of what you're seeing, the problem that you may face. Not going to reproduce the Xist difficult is when you make changes, you make color changes and apply effects. At two seconds later. You can't remember what it looked like before and you're constantly trying to do a before and after. So a bit like when we were looking at the kilometer sorry, the audio meters to try and determine, is there still a background hum? Is this still a reverb? By looking visually at it, these Lumetri Scopes might help you identify how dark or bright and images without your brain fooling you into thinking is absolutely okay. It's just another way of helping you interpret what you're doing. So if I run this back and forth, visually, I get a good idea that there's nothing in this clip that is fully black or fully white. Everything seems to be dancing around everywhere else. Now let's reset the WaveformDisplay, which you right-click. In your Lumetri Scopes window, go down to wave form type and choose YC, no chroma. And I've just represents it in a simpler way again. So the smoky parts on either side of the woman's are shown could have even more contrast as it were. So you can see them even more clearly. As we'll make a little tweak and see what we see the difference over on the right-hand side of your screen. So where your Lumetri Color panel is over on the right, will make a gentle change. Would you expand the section labeled near the top labeled basic correction. So click on Basic Correction to expand those sliders. And you know, you have looked down, you have number sliders under the tone area, exposure contrast highlights over here on the right. And I try and tweak some of those. But notice how it's not just changing in your program monitor, but you're getting a very immediate to view of where you're pushing the colors. Remember, the higher you see in that scope is pushing towards white. So I might go very bright and like, oh well that's nice. But I can see straight away, I've clipped my, my image. I've pushed beyond white and now I'm bleaching things out. Even if I've convinced myself, It looks great. So all these type of things are there to help you. So yeah, Lumetri Color panel, I can make adjustments. Don't need to go through these. You can experiment with them. But the scopes, the Lumetri Scopes panel will help you interpret what it is you're seeing as an example. Now there are other scopes. Honestly don't have time to go through them all. But this one's a good one. What am I looking at? I'm looking at, I went to presets and I chose just the waveform RGB. It's a good place to start and then you can work your way through the others. Depending upon how good you feel with this one, you can try some of the others as well. Just needed to show you where they were. Here's something else you could do with color, trying to interpret color, and trying to get things looking right. Would you return to our first sequence, which was the Japanese garden? What you did to start with is you had applied some creative looks using the Creative section of the Lumetri Color panel over on the right. Something else we can do with trying to get the color balance. Having applied a look, if I continue on through some other clips in this sequence. And they are quite similar, so they've been lit in the same way with some filtered lights and so on. But that doesn't mean that they're always going to be. So what I mean is if I look at the penultimate clip, yep. So I can see what they've done there. And then I go to the final clip. Now is it's the final clip is better lit or is it differently lit? Their faces see much brighter and clean and don't quite have the same qualities they do in say, the first clip. So what we're gonna do is we're going to get a side-by-side comparison if we can, using a comparison view. So would you then we're gonna do this now, would you hover your playhead somewhere over the final clip? There we go. That's good. Somewhere near the beginning is good. So I can see both their faces. So hover over the final clip, last clip in the sequence. Now over on the right-hand side in the Lumetri Color panel. Can you, if necessary, scroll down or find whichever way that there's a little section labeled color wheels and match. Color wheels and match. If you have that, click on that to to reveal that. And then there's a little button which you can click on comparison view. Comparison view. Now Comparison View. If I just click on it now, what it does is it shows me a comparison between two different clips. So the one I've played with earlier that appear on the left and the one I'm looking at right now. Now the incidentally clicking on comparison view. If I click on it again, it comes back out again. You can change the comparison view yourself at anytime without the Lumetri color. If you want to compare two clips side-by-side in your program monitor. Say in the program also look at the buttons along the bottom edge, look towards the right edge. And there is a button that looks like to a sprocket films on top of each other. That will also take you to comparison view. But just clicking on the button that Comparison View toggles that on and off as well. I'll just totally off back here. Anyway. So comparison view yet on Brilliant. Now obviously the comparison on the right is where my play head is currently sitting. The reference frame on the left. You can choose which reference strain to use. The reason it's showing the first clip is because what we see underneath the reference frame here is a slider. And this is showing the entire sequence. So I can scrub through the entire sequence and choose which frame or which clip I want to make a comparison against. So I would like you to progress through their until you get to I think it's the penultimate clip was the one I was thinking about where the two of them are standing at the wall and there we go. Maybe they're facing. Oop, gone too far. Let's just go little bit further. There we go, something like that. That's what I want to see the comparison. And although they're both fine, I can see now looking at the two clips, I go right. Okay. The one on the right doesn't, you know, I can see it's the same actors, but it doesn't have the same look, doesn't have the same skin tones. There's something quite different about these jarring. Well, go back to your Lumetri Color panel over on the right, just underneath where the comparison view button is. There is an apply match view. And because I've already ticked face detection, it will favor matching up the color values on what? Premiere Pro Caesar's faces clip, click on, Apply match. Way to couple of seconds. So it takes the left-hand thumbnail frame as your reference frame and tries to match that so that it's applied to the clip where your play head is city. And usually makes a good job of it. But you can of course, continue fine tuning it using the color wheels underneath. So you can enhance kind of midtones gently in touch that but once we don't have time for all of the controls. But just that comparison view. Yep. Apply the match. Usually works extremely well. Nice time-saver. Okay, Let's come at a comparison view. So either click on the comparison view button in the Lumetri Color panel or toggle it off using that sprocket button at the bottom corner of your program panel just here, either way is good. Now there is so much more than that Lumetri Color panel would love to show you, but so many other things we have to cover today, so that should get you started. Maybe I'll pick one or two other ones. As we go along. Now to jump in, I think I would like to I would like to run through a series of common color correction issues which may crop up that people often bring up in classes. And I have a I have a sequence just for that. Would you go to your your project panel down the bottom left corner, find the sequences. Would you open up sequence number for color work? Number four, color work. Now this is a meaningless sequence. Just have a series of unrelated clips, each of them with a color issue that we want to correct. So fit them into your timeline window, have a little scrub through, so you'll recognize the first one. It's the woman looking nervous, walking down the streets, followed by up man having a sip of tea, followed by 0. Same man, but he looks a bit dark. Same man, overexposed. Woman standing by the window in New York. I'm sure been to the hotel module. Everything looks brown in New York. And same again, but, oops, someone has set the incorrect white point on their camera. Who happens to me all the time? How can we fix those? So hopefully we'll have time for all of these. Let's fix them in turn. Would you set your play head over the first clip and find a point where you can see the woman's face. So you've got something to concentrate on. Right? So the environment is quiet, smoky. So in the Lumetri Color panel over on the right-hand side. Okay, I'm done with the color wheels and match and moments. I'm going to collapse those backup. Would you click on the Basic Correction Settings near the top, the basic correction settings to display this section. And then look down. Keep looking down. And can we use the exposure and contrast settings to make an adjustment? If I increase exposure, she will go brighter. And if you still have your Lumetri Scopes panel showing, you'll see, we saw this a little earlier on. And if you increase the contrast, you can see that has a different effect again. Well, if I'm going to increase one, I better increase the other. Which you set your exposure as a gentle increase just at TNC increase to maybe 0.5.6. So you're dragging ever so slightly to the right, to the Exposure Slider. And as for your contrast slider, so here we are, over here are your contrast slider. Let's get that little further up. Would you drag that up to say We can go fair amount, which is drag it up to about, wanna go mad to about 60. Snap too much. Around 60. I'm going to keep everything in sight. Now here's the issue. Of course, I'm trying to get around this. Your I very quickly adjusts, doesn't it? Now you thinking would looks fine. Why did I bother the making the correction? So if you wanted to see a little before and after quickly, what have I just done before and after? Go back to your Lumetri Color panel. So here we are. We've changed the sliders for brightness and contrast. But look, we're in the basic correction setting. And to the right of where it says basic correction, you have a tick option. You can temporarily hide the correction by unchecking it, and then show afterwards by retaking it, he wouldn't have lost the settings. So that's how you do a little before and after. Little taken you get oh, yeah. Yeah. It did look murky before. I didn't think about it until now. Okay, With that in mind, let's go onto the next one. Let's, let's work with, let's work with an underexposed image and see how we can work with that. This might be helpful if we temporarily switch to a different workspace. We're currently in the word Color workspace. To ask you to change over to the right. Let's go to the Effects workspace. The effects workspace here. Just want to get to the effects in the easy way. And would you pop the play head over the second clip? This guy. So he's taken it in a room and the lights but sort of to the side behind him. So he's probably realistic, but it's not very easy to see. Let me slightly underexposed. Let's fix that. Now, although we've come into the effects workspace, we should still be able to open up the Lumetri Scopes. In fact, it may still be there. Lumetri Scopes at the top-left. So find it, click on it to show those scopes again, otherwise you know where to find them. Because again, I want to analyze what I see. So you can see that whereas most of the visual information, well, it's all low down, isn't it? It's all at the bottom. There was a lot of murky, dark, non bright, non colored pixels sitting at the bottom of the scope. That tells me there's plenty more scope for this to be improved. So today what let's apply an effect to fix this. So you have your effects panel at the top right. Can you locate your brightness and contrast affect brightness and contrast effect. Would you apply that effect to this clip? Now, here's something we can do. I would love to be able to see the program monitor and the Lumetri Scopes and the effect controls all at once. So we're going to have to rearrange a few things on screen if this is okay. Say, I don't know how how often you've tried to do this in Premier Pro on to reorganize, rearrange. Panels appear on screen. What I'm gonna do is I'm going to click and hold my left mouse button down on the tab name for Lumetri Scopes. I'm going to drag it until I get to this little dividing line just to the left of the program monitor and to the left of whatever I see here. And it should give me an upright colored beam that tells me where I'm going to insert it. So I'm going to give it a go. So I'm going to click and drag and drag and drag, drag and drag until I kinda get it in the middle than on them. Just try again. Can I get it in the middle here? Now? I've just our there we go. Finally got it. So I'm using a trackpad today which is a little different from our house, isn't it? Now, if it's landed in the wrong place, you can't you can't undo that. You just pick it up and drag it to a new place. So I still need to tidy it up a little bit. Let's give it a bit more space. Are still need to see the program monitor. But I want to see enough of the Lumetri Scopes which have just landed in this space here. And I don't know what you're looking at the top-left, but could you make sure you're seeing the effect controls? So what I want is effect controls on the left. Then the Lumetri Scopes, and then the program monitor. This will make it a little bit easier. Looking in your effect controls. Could you use your brightness control? So find your brightness and contrast effect in the effect controls panel. You all saw Emma, you're saying yours weren't drop at all. Tell you a 100 and put mine back again. If you've used other Adobe programs in, it looks and works a little differently. So if you watch my screen, what I'm gonna do, I'm gonna have my Lumetri Scopes tab name at the top. I'm going to click and hold on it. And I'm going to drag, drag, drag, drag, drag. And I'm gonna drag towards the program monitor, but I'm not going to drop. But can you see the program monitor has acquired what looks like a picture frame. And if I hover towards the top, the middle, or the bottom edge, and so on, different edges get highlighted. So could you drag so the left edge of your program monitor is highlighted. And then that should, let go. Say works in a bit of a different way compared with say, other no Photoshop. So try that waiting at. So we're also saying, yeah, I have the clip selected. Go to your effect controls, find the brightness and contrast effect. Find your brightness, brightness and contrast controls here, and increase the brightness. Okay? And then you can increase the contrast. Now, if I'm just looking at the picture, it's very easy to end up doing this and go, oh yeah, it looks great there. But a cursory glance at by scopes, my Lumetri Scopes is world danger. Robinson's. You have clipped this, you've pushed the light pixels, the web right through the roof and the blacks of descended into the basement. You've gone too far. So even though it might look nice, I have effectively lost color information. So I need to be mindful. Scopes will help me adjust just enough. So I'm not losing everything. And as ever, I can do a before and after by clicking on the little fx icon next to brightness and contrast, onwards and upwards. Let's do another one. Let's see if we can do something in a different way. We're gonna go all the way. So go to the third clip and then see if you could just repeat what I did. So now this is a seriously underexposed. I believe it already has a brightness and contrast effect already applied for you just to save you time, it has some settings. Can you push it even further? I'm sorry, just undo. Undo. So I have the wrong clip selected. Now it doesn't to apply the brightness and contrast effects to it. So this is the third clip in the sequence, very dark. Can you salvage it in a sensible manner? How far can we go with this? We have plenty of opportunity to experiment. But don't you feel it now that you're doing this, the Lumetri Scopes panel, it's actually really helpful. It really helps you adjust. Incidentally when something is overexposed or underexposed, you are essentially losing a color information. You can't magically has switching back we can try and do is compensate as best as possible. Excuse me as I press on. Let's have a look at an example of that. So the next clip along, seriously blown out and looking at the Lumetri Scopes panel, you can see words, everything, practically everything is shut up to the very top. The shadows in the shop, you know, already about halfway down. Then go anyway near the bottom. Well, let's try a different effect. So let's have this clip active. Let's try. Let's try a different approach. Let's call back our Lumetri Scopes panel, sorry, our Lumetri Color panel. Now you should find it in the same stack as your effects. So over on the right-hand side, yeah, We've got the effects, but if you look down, we should have it there, lumetri color. Otherwise, if you can't find it, you'll find it under Window menu Lumetri, Color. And let's see if there's a way we can compensate for it here. Can you find if you scroll through, what am I looking for? I'm looking for I should have an area called curves as part of the Lumetri Color panel to find curves. And we get this curves may need to scroll up a bit to see a bit more of them. And this might be using the, if you can find the artefact, use the RGB curves. It's the one at the top, is the easiest one. See if you can use that to improve the contrast range. If you've used Photoshop, this may be some. This might remind you of something, but I've clicked halfway along that diagonal line and I'm dragging towards the bottom right. And can you see it's pushing stuff down. If I go the other way on bleaching it out completely. So it's another approach you can click on either end and try and drag this left or right or up and down. So up makes it brighter, down, darker. And I might go for the upper point at the top though I'm losing. Contrast that way. But what I'm gonna do is keep clicking and dragging different points. Is this something I can do to help salvage this picture? There are obviously limits of what I can do. My suggestion when something is overexposed, these kind of almost an inverted S kind of curvy shape. But because there's very little color information, very little pixel information beyond white, there's nothing I can get back from one side of his face. There is no information there to get back and it's just solid white. But what I can do is bring some of the rest of the picture back in a small way. Let me just take the edge off that by dragging the top corner down. So it looks perhaps a little bit more acceptable as ever. You can try a little before and after, before and after. So above those curves area where I'd been clicking and dragging downwards next to RGB curves and curves. New tech options that you can untick. See before. Tick, after an a, probably thinking, Hey, that wasn't so bad after all. There's only so much you can do. Okay, let's see if we can do a color balance using the Lumetri Color Wheels again. So probably could just move your play head over to the next clip in the sequence. So the woman looking out the window in New York. So this is probably what I would say k. So it's a little dark, we can brighten it up, but it is essentially correct. Now, with that in mind, move on to the last one so you can see how dramatically differences is, because it has the wrong color balance, because the wrong white point was set when this was photographed. In the Lumetri Color panel over on the right, would you expand your basic correction setting? And what am I looking for? Underneath the initial set of sliders that you can see, there is an auto button eight, there's no harm in trying auto button. Click on auto, save it. It'll automatically adjust the levels. Well, the adjustment is microscopically different. It's adjusted things like brightness and contrast maybe, but it hasn't fixed. What I can see the actual problem is the problem's not with a range of contrast, it's the actual colors are used. So here's another way we can look at the picture. In your Lumetri Scopes panel. Would you change to a different scope? Would you right-click in the middle of the panel? And could you choose the one that you can see here? I've chosen vector scope, YUV, vector scope. Why you choose that? And right-click again and switch off the waveform on, take the waveform. So I'm just seeing this thing. So what this tries to tells me is there is a reasonable range of colors in the shot. But there's a strong bias towards, and you may have to lean into your monitor, lean into your display and see what this is trying to show. Can you see you have a kind of an octagonal shape, but they're all labeled with colors. So I have red, yellow, green, cyan, blue. And this smoky effect indicates of where the bias of colors is and there's a clear bias towards the blues. I can see that it's the blue area. I'm in a photo. If I zoom in, you know, it says, yes, you got the blues here, and this is where most of the pixels seemed to be biased. So if I couldn't tell by looking at the picture, can certainly tell what the problem is here. So that informs me when I go back to my Lumetri Color panel over on the right, how I might go about making a correction. Try simple 1 first. So in your basic correction area, why don't we try adjusting the temperature. So choose the temperature slider. I'm pushing it towards the orange. Keep pushing. And as you do, look in your program monitor and look in your Lumetri Scopes, can see we're pushing it towards the orange, away from the blue. But because the color shift was so very, very strong to that, blew it up, hit the full extent of the temperature slider and I can go no further. So it was okay, but it could be it could be better. So let's try something else. Further down the Lumetri Color panel. Let's go back to those color wheels to remember Color Wheels and Match. Color Wheels and Match. Let's expand the color wheels. And these are split into three. So shadows, dark areas, highlights, bright areas, mid tones between the two. Well, let's try. Let's start on the shadows area. So for the shadows area, use the color wheel to try and pull the color towards the red. So hover your mouse pointer in the middle of the Shadows. Color wheel. Now you should see a little crosshair. So can you see the little cross hair? Now this may be a solid circle or a ring. It depends which version of the program you're using, but this a little crosshair and drag it gently towards angle. I'm funny and trouble to move towards the top left. And as you do so, you're going to make a subtle difference in the color. Try that with the highlights will also, again towards the red and the yellows, maybe could try the mid-tones. Let's bring that there as well. If I think I went the wrong way with the highlights, I'm going to drag the highlights color wheel. The center that maybe towards the blue to keep the highlights is day-lighting as possible while adjusting the wrist. If you want to see it before and after, untick Color Wheels and Match, retake it. So if you're worried that you haven't done enough, confirm that you are as you work. Making good. So before. Yeah, that is quite blue. After. Yeah, that's a lot better. And I belly belly got started with the Lumetri Color. Barely got started, but it gives you a starting point for you to experiment more with her. Do recommend you, see what can be done. Remember all of this is non-destructive. You can experiment, try things out. Remember, when you apply any of these changes in the Lumetri Color panel over on the right. To your selected clip, it will show up in the effect controls panel as Lumetri color. So again, the whole thing can be switched on and off. It can be selected and removed with the backspace key or the leaky. So it's all non-destructive. So you can experiment to your heart's content, fixing things. And I just love it, how people can be very proud, what they do in Photoshop. But we've just applied it to a moving image, not just a still image, making these color corrections. So I'm quite pleased because this was before, blind me. She was blue. Have you ever had it blue? And this is after, this is to achieve with the help of Lumetri Scopes as well, to show us where the color biases on. Okay, one more little quickie and we'll finish the color correction section. Something else you might like to try back in your project panel down the bottom left corner, I had one other sequence called yellow flower. This is just take a couple of moments. Would you open up the yellow flower? I'll pay nothing to get excited about that. You might have seen this before. It's from a different set of videos that we were playing with the other day. So I ended up position your time line playhead over somewhere in the first clip and over in the Lumetri Color panel on the right. I'd like you to expand section labeled HSL secondary, that stands for hue, saturation, lightness or luminance or whatever. Hsl secondary. Expand that. Scroll up if you need to. There's a scroll bar should help you see some of those settings. Don't go too far, but just to near the top of the HSL hue, saturation, lightness, secondary sanction. We have a key area where it's labeled setColor. Would you click on the first of those three eye droppers? Look like little puppets. Click on that. First of the three I drop is to select it, then click somewhere in the yellow petals of the flower. What it does is identifies that position in the three sliders below for hue, IE, generally the color it is, saturation, the intensity of the color and lightness, how light or dark color it is. What you could then do is drag the various color range slide is to make an adjustment that point. So if I click and drag, you know,
11. Compositing: So from your home screen or from the file menu, could you choose Open Project? Navigate your way back to where all your project folders are. We're gonna go into Project 8, compositing. Compositing, would you open up the appropriate exercise project file? If you asked to resave? Resave, if you're prompted to relink any pictures or videos or audio or whatever, could you please follow through the process of searching for the link to media until that's all found. While you're doing that, let me explain to you what we're about today, what compositing is. And you may see on my screen as a, as a suggestion is about overlaying multiple video tracks, especially so that you can see what's behind. So it's a matter of layering if you'd like to produce a different effect. And a lot of it based around this concept of what's known as an alpha channel. Now normally when talking about color and talking about channels, color channels, so visible ones, red, green, or blue, classically and broadcast have YUV and so on. But if I stick with red, green, and blue, most people are familiar with those primary colors of light visible to the human eye. That's how most cameras work. That's how your display you're looking at works. You have pixels which show red, green, and blue pixels that are red, green and blue light hits the back of your retina and so on. And the rods and cones in the back of your retina. So the cones, as you remember from school, detect red or green or blue, and the rods detect intensity. Am I boring you yet? Must try harder. I could talk. I could bore for the Olympics talking about color theory. What an alpha channel is, not a visible channel. It doesn't designate the color or intensity of a pixel. It designates how opaque or transparent to that pixel is. So people talk about transparency and opacity. It's essentially the opposites of the same thing. How see-through is something. So the guy you can see here, he's not dancing, he's putting a coat on. The background of him is transparent. It's had an opacity mask, an alpha channel mask applied. So we start with this guy. Let's see what we can do with him. Do we understand what we see? Photo October? Go back to your editing, your editing workspace, please. This will be clearer. So go back to your editing workspace. So you can see more of him. Look into your timeline panel, looking at sequence. If you need to make the video tracks taller, Can you see you have two video tracks. There's a background image called desert scene. And there's a guy in front who's clearly, if you look down in the timeline on a green screen, he's in front of a green screen. If you want to scrub this back and forth, you can see here is smiling. He's looking at himself. He's irresistible, putting it on. But he's just standing in front of a green screen. Which is little exercise we will do in a tick or maybe just after the break. Something if you've seen this thing before, new views, green screen before, that's fine. I just want to show you this thing when we were working with audio, do you remember? We have when we look in the tracks, when we look in the timeline for a sequence, we had a rubber band, could drag it up and down to designate the volume, the Audio Gain or otherwise. Well, we can do the same thing for video. Tracks, have a rubber band and set it so it changes the opacity of pixels. Which would be interesting. Let's give it a go. Let's see if we can get this to work. So first thing, we need to be able to see the rubber band, so we're going to switch it on. So in your timeline panel, in your timeline panel, can you find its settings button? Remember the Settings button everywhere is always the spanner. So here's my timeline. Here's the spanner. Click on the spanner. We have some settings. Now, we did do this earlier on when we're working with audio, we made sure I call it a rubber band. It's known as keyframes. And we did this show audio keyframes. That's fine. I want the one above it. Now the top Show Video Keyframes. What that'll do is it'll add a rubber band across your video track. Rubber band across a video tracks. Uh, you know the way this works with your selection tool, hovering over that rubber band horizontally. Just get into the right position and click and drag downwards a little bit. Then let go. Have you seen the difference in the program monitor? You've made him slightly transparent to drag him down a little bit further, and he's even more transparent, you'll eventually vanish. So is turn off, turn them into a ghost. But anything we could do with the rubber band before with audio, we can do here as well. So if you wanted to add keyframes to the rubber band to remember how we do this, you can hold down your Command key for Mac or control key for Windows. Click somewhere on the rubber band and you've added a keyframe. So you remember how this worked? Hopefully, I've lost my Zoom In thing. Let me see if I can just doesn't want to play. Okay. Can't zoom in for the moment and that's okay. But if you Control click or Command click to add some control points, you can adjust this rubber band into different settings. And I can set it like this so that I start the video where he appears at a Nowhere, puts on his code and then vanishes again. Side, there are things we can do. So this is playing with transparency. Or we could say with key framing, opacity. Back, don't have to see that all the time. So you know how to switch them on or off, click on the spanner. So that's the setting window. You can show or hide video keyframes by clicking on that tick. That we can also use this compositing method of alpha channels to work with classic use actually in videos that he titling will come to green screen again in a tick approximately after the break. But let's say, Well, I have a title track, the name of something, and I want to see the background, but the title is being offered to me. Not, I haven't typed it in as text directly into Premiere. Instead, it's been supplied as a graphic well, offset. Okay. Could you make sure you supply it to me in say, Photoshop format so that it has a transparent background. Don't give it to me as a JPEG or something like this. There are certain file formats that support alpha channel transparency. So ping PNG, classic one we would use on a website that supports transparent backgrounds as well. So let's see if we can apply one in your project window. Down the bottom left, we have a bin called sequences. Would you have a little peek inside? Could you open up the sequence called theft unexpected. So that's two left unexpected. Open that up and it's this sequence guy comes in, sits down and has septa and it stops. Okay, so scrub through that. But you can see on the V2 track video to track there is a little title. This is Steph, unexpected. So position the play head, so it's over there. Clearly has a transparent background. It's not the one I wanted. I had another one in mind. I've decided I would like to replace that graphic sitting there in the V2 track with an alternative. Now because it's a still image, this is really easy to do. Maybe you've done this before. Let me remind you. What we have to do is find the replacement graphic and then we can drag and drop it over from the project window onto the existing clip. So let's do that. In your project panel. Down the bottom left, there is a bin called graphics. Could you look in the graphics bin? And what I'm looking for is, sorry, my file names a little truncated. I'm looking for a file in the graphics bin called theft unexpected, layered. And it's a Photoshop file, dot PSD Photoshop document. What I'm gonna do is I'm going to click and hold my left mouse button down on it. And drag and drop it directly on top of that existing graphic that's that was there before theft unexpected. It may not be immediately obvious was happened, but if I drag and drop it directly on top of it, it will replace what was there before. Saves me having to delete it and then add it. Okay, I won't make any comment about the quality of this particular graphic, but they go, there it is. So we have a new title in the same position that maybe I would like to apply a blend mode in terms of transparency as well as the Alpha channel that's gone all around the graphic. Can you open up your effect controls panel? And would you select that graphic clip in the video in the V2 channel, in the V2 track, sorry, in the timeline. So you've clicked on it to select it in your effect controls. It confirms, Yeah, I've got a list. I can account zoom in at the moment, but if you look through the video settings, they have motion opacity. Make sure capacity is expanded so you can see inside and can you see, well, I could make it pay law could reduce the opacity and it will fade away. You already know how to do that, but can you see you have a blend mode currently set to normal? Of course. We've done this already. Try a different blend mode. Hey, maybe some of them will make no difference at all. Some of them make some crazy difference. Different blend modes. And most of them are terrible. But I reckon, because everything is quite dark in this picture. So mostly the jacket and someone's quite dark. Maybe we should brighten it up or can you find a blend mode? Sorry. Okay. So MS. So I've just noticed you asked a minute ago how do I change the position of the graphic? So the graphic is basically designed to be in that position. So if I said, Could someone with copy Photoshop do me a titling graphic, what they've done is they would have created a new Photoshop document of the correct. What I've asked her basically is the correct width and height of my video. So I've given them the dimensions and I say, could you make sure it's quite low down? Is what I would've done. If you otherwise, if you wanted to keep moving into a new direction, basically you select it. And then you would want to reposition it. See you would alter its positions. So we could we could give it kind of motion section of your effect controls. You could change its position. You could pick it up that way. Bit like we did yesterday. But anyway, could you choose what I've chosen there? Could you choose Lighten, I think lightened, Sachen sort of partly see-through it and it remains can, partly accepted. Hey, we can do all sorts of this. We can invert it. But again, just to give you a little taste of what we can do, looking at the time 1434, I'd love to do the green screen with you before we take a break. Is that okay? I'm think was still awake. Let's do that. And we'll be fine for this section of the course. And to save what you have, please. Let's, let's create a new sequence from scratch and you'll see how this is built up. In your project panel. Down the bottom left, would you look inside? There's a bin called green screen, where I've put two files. There's a video file called timekeeping and there is a videophone continent board. It is. And we'll see it have to be reminded. So the timekeeping, if you want to be reminded or find out what it is, double-click on it. It'll load up into your little do nothing. It'll load up into your source monitor. And if you want to scrub back and forth, it's a guy standing in front of a green screen. Now the green screen itself is a screen. In fact, I can see bits of black on the left and the right. It doesn't actually fill the full frame of the video, but he's just standing in front of the screen. You might be able to see as a slight shadow that's being cast onto the screen that's behind it. I was seeing lots of green screens done badly on video conferencing and so on. But if I was going to save to make it work best, if you're going to try this technique, the compositing. So we're going to remove the green screen. Is the flatter the color, the better. So It's partially green and partially orange is going to be really hard, yeah. Or partially green, partly blue. It makes it more complex. If the green screen is reflecting back on the subject matter in front, That's going to be a problem because where green is reflected onto someone's face than their face will disappear. And thirdly, I'm sure the foot there, you've already thought of this. If using a green screen, please ask the person in front of it not to have where green shirt or to have green earrings or anything. Obviously green in front because then that's a problem that will also vanish. Which case go for a blue screen or something like that. Okay, So with those in mind, we have fairly consistent flat green here. This should work. Let's turn this video into a new sequence. Remember, we could do this in several ways. What I'm gonna do is in my project window, I'm going to click on its, on its icon. So timekeeping dot move. And I'm going to drag and drop it onto the create new thing button. So that's the button at the bottom right of the project window. Looks like a square with a corner turned up. Remember what that does? It creates a new sequence based on the width and height and frame rate of that particular video. So now we have a brand new. Brand new sequencing of timekeeping. Now if for some reason I wasn't really paying attention, it seems to have added lots of audio tracks, but I'm going to ignore the audio tracks. So if a brand new piece in here, now, because I want him in front of a background, I might as well do this now. Let's move him back out of, he's currently on a video track 1. There's neither V1 track, that's the default starting point. Would you click and hold on the timekeeping, move here and drag it up one. So he's now sitting on the V2 track. Now, what about you? I'm finding the auto know is pulled across multiple audio tracks and funny, extremely off-putting. I would like to get rid of those. We'll tell you what I'm gonna do. I'm going to right-click on my my video track. And I get a big pop-up menu. The halfway down can you find there is an unlink command, unlink commander. That's the link between the video and the audio. So now I can edit them separately, then all linked together. And what I'm gonna do is I'm going to select those for audio tracks that are empty, that I don't want an Ay going to delete them by pressing Backspace. That was very, very annoying. Now having done that, I'm going to increase the height of that video track. So I get at least a little preview of the guy and he's green screen. What I want to do now is get a still image behind him. I had one. So if you go down to the bin in your project window is called shots. There's had been called shots. And I have a picture this called Seattle skyline. Seattle skyline still in fact, it's called It's in the shop's bin. Find that. Would you drag and drop it into track, the video track 1. So it is just a still image. So once it's in, click and drag on the right age and extended all the way to the back. So you'll still image Seattle skyline now is the same duration as the video about it. Last thing we'll do just before we press on is when we create it, this new sequence, it took the name of the video to create a new secrets with that name, timekeeping. Why it's no good to me. Can we find the timekeeping sequence? The timekeeping sequence, you'll find it in the green screen area. So make sure you found the timekeeping sequence against on account. Zoom in just at the moment. Would you rename it by double-clicking on its name, timekeeping. And what should we call it? Let's call it. Let's call it. But it's just cool. It Seattle skyline. So I've just renamed it Seattle skyline. And I'm going to drag and drop it into my sequence has been my sequences to be in one bin. And I would like my graphics to be in another bin. And I would like my and cetera, et cetera. But I'm just saying I'm like to be organized. So I've renamed my sequence, Seattle skyline. I moved it to a place where I can use it. Purely. Next step, safe before we move on. Honestly, it's only take a couple of minutes. Let's keep going. Before the break. Could you go to your Effects? You'll Effects workspace briefly. Effects workspace briefly. You can reset the effects workspace if you like, just to give us more space. Although what is the effects over on the right to the effect I'm looking for is called ultra key. Ultra key. So when people talk about the key shelter or keying that talking about green screen effect is I pick a color and remove it. Apply an alpha transparency to it. So go to your Effects workspace. Find the ultra key effect. And I'd like you to apply the ultra key effect to the timekeeping clip, the guy on the green screen. So on an adult by the usual click hold, drag onto the clip, the timekeeping clip in. So now this has setting applied. Now, would you find your effect controls panel, please don't need to show you where it is. You must know where it is by now. So with that video clip, the time sleeping clip in your in your sequence selected, go to the Effect Controls panel and find the ultra key settings, the ultra key settings. Now can you see in your ultra key settings they should be expanded. That is an item labeled key color. We need to tell Premiere which color to remove. It's currently looking, probably looking for black. So ignore that. Can you see there is an eyedropper little pipette button next to it. Would you please click on the pipette? Once? And then nasa is quite important. Could you hold down your control key for Windows or your command key for Mac? And click somewhere on the green area around the guy in the background. It should be fairly instantaneous if we've done this properly. And just check inside your effect controls panel, the key color is definitely the green. It should have removed the outer area. Now if that has worked, there are a couple of more things I would like to do to fine tune it. But I'm looking at the clock now and I'm thinking we're probably starting to weigh in at this point. Say, if you have been able to apply the ultra key effect to that video clip, you've selected the video clip, you go to your effect controls panel. You found the ultra key settings. You clicked on the pipette next a key color, and then held down the control key for Windows, Command key for Mac, and clicked on the green screen behind the guy. It should have removed it. It's not a perfect result. We're going to fine tune it, but we'll do it after the break. So with that in mind, would you save what you have? I don't mind if you leave it open. We'll come back to this after the break. I'm going to set a countdown timer for 15 minutes. Tea break, if that's okay. And if you have any questions in the meantime, put them in the chat window. Otherwise, I'll see you in a quarter of an hour. Putting right quick break time over. We're going to finish off this, this ultra key effect, this green-screen effect. And then we'll push on and look at graphics of a different type. Okay, where were we? We were here. So what you've just done before the break was you do used hate on now be able to zoom in and in the effects controls penalty gone to the ultra key area. And you'd chosen the key color and you'd set it accordingly. Brilliant. We've removed that background. Now what fine tune? What we have here, because I'm not sure it's quite right. This kind of bits of shadows around his face and other No. Is there another way that we can check how he appears? Well, let's use the Effect Controls panel and see if there are things we can switch on or off that to make a difference. So for the ultra key area, amongst the other settings, you have a, you have a setting called funnily enough setting. Okay? And where it says Default. And above that you have on called output and it says composite. Click on the composite. And would you choose Alpha channel? Now we're actually seeing in, in visual terms what the Alpha channel represents. The idea is anything that's black in the alpha channel is punching through and making transparent. Anything that's white will be opaque. And anything that's gray in between black and white or be partially see-through, partially transparent. But it helps us get a better view what we've achieved. And here I can see some fuzzy edges. I'm not sure it's pretty good initial key, but maybe I could tighten that up. Also notice if you hadn't thought about this until now, remember I said he's standing in front of a green screen. The green screen did not completely fill the frame of the image. And I've got these big areas on the left and the right. I also need to get rid of, and we will get rid of those later. And I'll show you how. First off though, in the effects control panel setting menu for the ultra key effect, or might just tweak that up. And instead of default for setting, I'll click on that drop-down here and choose who I am I feeling. How about if viewed glasses, I'm going to go for aggressive. Aggressive. And if you chose aggressive and you were looking at the program monitor at that point, you might have seen a small change, but it will have eaten in a little bit more around the edges of that key. Should be enough. But you'd want to experiment depending upon what you'd achieved. If your green screen image was otherwise anyway, changed the output back from Alpha channel to composite. And I reckon you've got a better result there. I think it is removed the shadow that was behind his face as it were. And eaten into other parts that were distracting. And I write my can probably, yeah, much better preview of what we've got here. Yeah, quite like that, but good. So good. I'm going to save right. I need to actually sort out that black edges on the left and the right of the frame. We're going to use a mask for that. We're going to mask for that. So again, I'm going to have my time-keeping clip selected so that I can see it's controls in the effect controls panel. Now what I'm gonna do is I'm going to temporarily disable the ultra key effect. Okay, how do I do that? Remember how we temporarily switch off an effect. We find its name and we click on the little fx button next to it. It puts a little line through effects. It's temporarily disabled so I can see what it looked like before. This allows me to see where the green area of the picture is. Now still staying in the effect controls panel. Could you look further up and find the opacity, video settings, opacity. And make sure they're expanded so you can see what's inside. And oh, look, remember this creating masks. We've got this ellipse shape and a square shape and UPENN. Well, let's choose the middle one. Now. It's not called square is called create four-point polygon mask, they go, No, you know what it's called? Okay. Would you click on that button, please? And what should happen is pretty much what's happened on my screen. It's drawn a sample mask, so it's quite small outside which you can't see anything. Yeah. And it's centered in the middle. So it gets us started, but it has a bounding box around it. And the bounding box is editable because it has little handles. So here's what I'd like to do. Carefully take your mouse pointer, hover over the corner handles. Now you can see why it wasn't called a rectangle. It's a four-point polygon. And you can drag these handles out. Now what my intention is is I would like to concentrate on just the bloke and he's green screen. But leave out the other bits. Now because I haven't quite, I can't quite get to the edge and beyond here, I'm going to zoom out. So I've zoomed out to about 25 percent using this little drop down at the bottom left of the program. But you may only need 50 percent, but I have to go out to 25 percent for zoom out. I want you to do is I want you to extend the mask beyond the edges of the frame. So I need to be able to see beyond the edges of the frame. But I also need to be aware of what I'm masking. All I'm trying to do is get rid of the black bars that were the left and the right of the frame. But you will need to probably check that if he walks up and down, left and right to his arm flies out, make sure you're not being too aggressive with this masking. Said Don't chop off a hand, but I don't want to extending so far as to include the black area. So you can be fairly generous. Don't need to be to fine tune the accurate on the edge of the black areas. We want to get rid of it, Just make sure they will not creep in. And he will not walk out of this masked area. And note that it doesn't have to be perfectly rectangular. So you've manually resize that mask so that it doesn't include the black areas that gives enough of the green screen area to count. Once you've done that, you can reset your program, monitor it, zoom to fit. Now go back to your effect controls panel. We finished working with the mask. Go back to your ultra key effect and toggle it back on by clicking on the little fx button that you are disabled. And then you can de-select the clip. So I'm going to click somewhere else in my timeline, for example, to de-select that mask. And now I have ultra key, the guy, so green screened him. And if I say if there were bits outside the green screen area of mosque them off, it looks like it's falling asleep there. So I'd say yet result, we all want to do that in green screen and then had to find two unit within the Effect Controls panel. So remember you've got your ultra key area, you set what green it is by using the key color setting. And I can fine tune it with the setting control to make it more aggressive or choose another setting there. And, and I, in the output drop-down, I can switch between the Alpha channel sharing or composite showing if it helps. And in the end, finished it off by adding an opacity mask to cut out the other areas. So if that worked for you and you're just finishing off, please save and when you're ready, close the project.
12. Graphics and Captions: Shame we didn't have more time. Let's have a look at graphics. So if you're ready, you saved close that previous project, which you now open up the next project, please. Could you navigate your way to fold and other nine graphics. Now in here I have two sets of project files. I have one just for captions and one just for graphics. Can we open up the graphics exercises first? So choose which one of those graphics or graphics downgraded. If you're prompted to relink media, follow through the instructions, go search for the missing bits. There'll be found The any media it can't find the needs relinking will be one of the files sitting with your exercise files. So wherever they are, just point to the overriding folder there, and Premier Pro will find them for you if you click Search. Anyway while you're sorting out, let me explain this. I'm not gonna go through all of these. It was partly a reminder and partly point out a couple of things with reference to graphics and text in particular. And again, this has changed in the most recent version of Premiere. So if you're using, say, 2019 or 2020, you should be hunky-dory. They switched the approach to working with text previously. It used it another method. So I'm going to try and focus on this latest if I can, because we have a type tool and so on. And also we have a graphics workspace. We can work in 2D. What let's work in the graphics workspace. Can you find your graphics workspace in the top here? Or and graphics, I'll just reset that the S. Okay, Let's just reset the graphics workspace. And now I will point out a couple of things here before we try something. First of all, it adds a panel over on the right called Essential Graphics. Now you remember when we had the panel essential sounds, and the question came up, was, this allows me to browse a library of sounds and library of music. And essentially you are browsing Adobe's stock library and you can choose things to download and buy them. Here in the Essential Graphics panel on the right, you have a browse tab which is currently active of templates, things such as titles and credits. And you can scroll through this and choose them and use them. Okay, so you've got test cards and stuff. So if you want to do, just take the easy way out, download one of these templates and try and work with those. So they are a bit formatted. So you won't be the only people in the world using these, but just point those out there. Excuse me. They are, they are, they can take some effort. And otherwise, at the top of your essential graphics panel, there is an edit tab. That's one we're probably will focus on. Doula, show us options for whatever it is we want to work with. Looking in your program monitor. Yep, I've got some clouds and some texts in front. This is Cloud-scale. Feel free to scrub back and forth. So the clouds is a video and the title temporarily peers across the top Sky News, something like that. Okay. So clearly looking at the timeline, we're already familiar what's happening here. So it's a composite, isn't it? So we have clouds video playing, and in a video track above it, we have to all intents and purposes is a still image. Your still graphic containing the text. Now the texts could be live text. I wonder if it is live text. A wonder if we can find our type tool and find out if it's possible to click into this text. So here's one thing we can do. Let's find our tools panel, which I can see is moved up here. Can you find the Type Tool, little letter T. Click on the Type tool to make it the active tool. Can you click into that text to let cloud scape? Now if you're using one of the most recent versions of Premiere Pro, yes, you can. You have a type tool and you'll be able to click into the text and you'll be able to select the text by clicking and dragging across it. And suddenly your essential graphics panel has exploded into life. You may need to scroll through the options. But if you scroll down, you'll find an area where you can change the font and the font style and the alignment document left, right, and so on and various other settings which don't really have a great deal of time to go through. Now, this little reminder of what we have here, we can also change the color of selected text. So go to the Appearance setting near the bottom. To change the color of type, you change its color, fill. That's how it's referenced. This text is clearly white. To change its color, click on that little rectangle. It should open up. So it's opened up on my other screen, a color picker window that may well look like this. So this is a kind of a photoshop style color picker window. And by default, the color picker uses a hue saturation and brightness approach. They'll Bonsell system. And what I mean by that is you have a vertical spectrum bar. When you choose your hue. Hue. Is it red? Is it green? Is it blue? Is it pink? You pick a color, a hue. And then how intense the color is, is it is a wishy washy color or is a really strong, intense color saturation. And that's represented by horizontally across the square. So this square is filled with the hue that you chose horizontally to the left, I can have a pale version of that color. To the right, I can have a saturated version of the color. And the third item B for brightness. That's the vertical axis. So at the top I have a dark version, color and the bottom, bright version. So hue, saturation and brightness. If you're happy working in that way, brilliant to have some options. If you know about color, you can switch to red, green, blue. So you could click on RGB or B to get to red, green, blue version. And it's a different approach or hue, saturation and lightness. It's almost the same. Or YUV. Already working in the broadcast is industry that will make more sense to you as well. Okay, so I can choose a color. If I want to. Quick way of getting to black, you can just click into a top corner to get black or white top, bottom left corner. And last thing I will point out is this. If you notice this, there's a hash symbol with a number in it, alpha numerics. What's that? That's your hashCode or hex code is known. So if you're, if you're working with branded colors and you have a website that uses branded colors. And you've been given the information of this one, the branded color is the website will have a hex code for you. And you can put the hex code in here and you'll have the same color in your text and your video is, you have for the rest of the website. Otherwise you can pick up other colors from elsewhere on screen. Did you see there's another of those little Eyedropper tools. So you can click on that and I can get all that. Do you know that's a nice read. Clicked on the red border and I've picked out the red and that strip module for color, the text read, I won't be able to read it. So perhaps I'll just make it white again. Or maybe I'll make it a kind of a shade of yellow. There we go. I'll go for a lemon color. Click, Okay, and my selected text is now yellow. Now the way this works is can you make gradients? Sorry, I can't make gradients, not in this course. Have time. If you wanted some special effects, such as a very concentrated gradient fill color, especially if he's going through multiple colors, I would probably want to commission that. Someone could use. Some are produced that for me in either Photoshop as a still graphic, which I can bring in, or I might consider sending it out to After Effects and getting it added there. Now straight away from here, we're just within Essential Graphics is no quick way of doing it. I'm sure I can find you away, but don't just have time quite at the moment. Okay, so you can add more text by taking your type tool and clicking somewhere else. And I can start typing. And it remembers the same font and the same color and the same settings that were just using. I'll just undo that. Because as well as just clicking and adding text, you can also click, can hold the left mouse button down and drag and it draws a rectangle. And what that does is it draws you an area in which you can type if you'd like a paragraph like text. And if I want to move it or change it, I can use my selection tool. So that's the arrow tool. That means I can move it around, but I can also adjust its bounding box to make it narrower. And look what happens to the text is I changed its width. The text I should have typed in some real words. Sorry about that. It will wrap around. It'll push words from line to line and paragraph style. Okay, This was very kind of rough introduction. If you've not used these before. Can I I'm not proud of what I've just done there, so I'll just leave it there. What I was gonna say was, let's add a new, a new type layer and create something just a little bit newer. If that's okay. So let me just check. Why don't we Hi there. Let's just add as just trying to think, if we add something on all create something new. I'll tell you what can we find on? Let's just extend it and do it. A second one that we want to tell you what the inputs are afraid to indecisive at the end of the day, isn't it terrible. Could you go to enter your timeline panel? Okay. And can you hide your V2 track? Let's just hide that. This keep it out of the way and we'll just pop a new one in. Shall we see how something simple might be created? Go to your and type tool. Type tool, and let's click and let go. Somewhere in the program monitor that because I had no longer selected the V2 tracts of E2 Trek is hidden, is effectively locked. I can't do anything with it. I deselected that, that particular clip, that graphic clip, it needs to create a new one. And where my play head is at the moment. It wouldn't be able to stick it before or after. So it puts it onto the next video layer above. Here where I've just clicked, I'm going to type the words aloud. Cloud scape campaign. So it remembers that was active the last type size and all the other settings including color. Would you still are having typed cloud scape is a bit small. Good you do this. Would you select the text? Let's change if you type settings and see what we can change. So you've talked with Cloud-scale, look in the essential graphics panel on the right and scroll down as necessary. First things first, go to your text area. Let's change. The type of decided is a bit too bold for me. So if it's Arial Bold, my favorite washing powder that change it back to something like Arial regular. So I want skinnier letters. If it was any other font. In fact, if you have a favorite font, feel free to click on the drop-down menu for, and it'll show you a list of all the fonts you have on your computer. But I'm gonna keep it simple. Everyone has UDID. Just undo what I just did there. So I'll keep it Arial regular. Second thing is I'm going to change the size, but I don't want to get the text is bigger. From the left to the right. I would like the text to get bigger. I would like it to grow out from the center. So what I'm gonna do is just underneath the font, I'm going to click on its alignment button here. So left-aligned, right-aligned paragraphs here. So click on the Centered button. There we go. It is now centered. Now the text has the impression of jumping to one side, but that's okay. I'm going to use the selection tool to move it. Oops, I didn't mean to do that. Move it back into the middle, roughly into the middle of the screen, into the middle of the frame. Then back to the type tool, select the text again. Let's make it bigger. So I'm going to use the slider and the text area to make it bigger. I could have clicked and dragged on the handles when I use these, when I was using the selection tool, that would also have helped me make it bigger. Oh, sorry. Let me just speak enough. Just seen an EMI was trying to attract my attention, shouting at me and I couldn't hear a thing. Give me a moment. I'm just going to unplug my earphones and plug them in again. My audio should be working. Again, sorry about that. I can see a message. You have the test error is not created a new era on my timeline. Okay. Have it now. Yeah. Okay. So it was to do with it. If you have a graphic clip selected in your timeline, you can add more graphics into that clip. You don't have to create hundreds and hundreds of overlapping video layers. But when it's de-selected and you create a new graphic, it will want to create a new graphic clip. And it would overwrite. They're the ones who will sit on the next, on the next track above. So I've made it a bit bigger. I've decided to make it all caps. Well, you can see all the settings for this is a button in the type area of the text area for all caps. There it is all caps. Okay. So it's all capitals. And I was a bit too big. I'm going to make that a bit smaller. I don't like the yellow, so I'm going to set the fill color to be white again. So all of this we've done at foul make it even smaller. So I've taken it down to about a 130. And I'm going to add another little feature. I want the text to be really gappy. Let's make gappy text. I want spaces between all the characters. You do not have to type spaces between the characters. There is a setting for that is called tracking. Can you see underneath where I changed the type alignment, I have two little items labeled Va. Va. Well, the one on my left here, it looks like VA with a double arrow underneath is tracking that's uniform into character spacing. So if you send that to be increased, it Sound are the letters and spreads them out to add spaces between them. So you don't actually have to click between each character and tap the space bar and things like that. So I've spaced them out. Yeah. Which is quite nice. And so on and so forth. And so it goes on. Okay, so I've just got this thing says cloud scape yet. Why not? If I wanted to add some more text, I have some choices. I could click again. And it'll add more text into the same clip. What I'm gonna do though, is I'm going to click my with the type tool at the end of the text, cloudsql. So I've just clicked at the end, and I'm going to hit the return key that's added a second line. So if the second line, I'll type a subheading, which shall be a new land. He says, looking at the clouds, It's all come out, all capitals. And that's okay. It's just continuing the same font and the color and the settings that we saw before, differences. I'm going to select that text. I've just typed a new land by clicking, dragging across. And I'm going to make it smaller. Much smaller, becomes a little sub subheading. And maybe it's a bit too smaller. Okay. Give it a better size. What's that going to make it 70. It's a bit too close to the text above. Quite tight. So yet Do I have to add an empty line now in the same way that we use to tracking, to spread out the characters, to add space between them, we're going to use a feature called Letting, which is line spacing to increase the space between the lines. So select that text. Here was tracking his letting it looks like to capitalize on separate lines with a double arrow going up and down, increase that value. And you'll push the two lines apart. You don't have to add an empty line or two. You can just push it down as a setting. Now I think I have them look alike. I can now just go back to my selection tool and move it around and get it to a position where I think everything's looking fine. Click away to hide the bounding box. Click back on it to bring the banding box back again. While I'm thinking of it, when you're adding things like this in front of the text to be read, that you might have heard of this concept of safe areas, this existing print as well. If you're printing something, if you're designing out of business cards and you contact your local printer or one of those on-line printers and say what business cards that will give you a template that says, Could you make sure you don't put any text within certain number of millimeters from the edge. Justin Casey gets trimmed off when we run it through the guillotine. So don't put things too close to the edges. Stay away from the H, as Bono says, no, navigate sell-off. Okay. So we have something similar with broadcast TVs. They say if you've got captions and headings and stuff, and people have got their TV setup wrong. This really does come back from the old days of CRT monitors. But you don't want the text to get cut off. So there is still such a thing as a safe title margin, and usually it's around 10 percent around the edge. If you'd like to get an on-screen guide to this, it is possible. You can go to your settings menu in your source or program, monitor, areas, settings menu. What was that? That's of course, the spanner. So click on a spanner in your program window, in your program monitor, sorry, find overlay settings should be near the bottom. Overlay settings. Overlay settings. And what am I looking for are two settings. And we can choose what kind of overlay we might want to have and pick one out and so on. So these are kind of where I might want to set it up for all the settings for overlays. But if I just want to switch it on, just want to switch it on. Let me just cancel this back out. You'd want to click on that Spanner. And then look for the safe margins. Safe margins, where am I looking for safe margins? Safe margins. Very safe margins. Okay, I'll do it, find it eventually. Safe Margins. And what he does, he shows you a couple of rectangles. So classically, they're saying anything beyond the outer rectangle. We have absolutely no guarantee anyone will ever see it. So to be absolutely safe, Could you make sure anything such as text, something that needs to be read is within the inner rectangle. Okay, so this is a classic setup. So you say, Well, I'm. I'm losing a good 20 percent around the edge. Now these days, modern broadcast, modern TV's really don't work this way. They don't chop out all this much. Okay. So actually be much closer. So that was why I was saying, if you want to fine tune it for digital, you can go to your overlay settings and go in and change them here. So down at the bottom, can you see I've just done this pretty quickly. Sorry, I should have done it more slowly, but you have in action and title safe area. And you can choose that percentage instead of a 20 percent title safe area. You could give it a different demand to space and the action safe area, you can lower those percentages and it pushes towards the edge. So if you find that helpful to be switched on when you're working with subtitling or titling or credits and so on. Great, you can do that anyway. I'm going to switch that off. So I'm going to untick safe margins that you're safe margins is grayed out. Okay. Do you have met me? Just see if I can make a great app. Now. Can I make it grayed out? Why would it not be grayed out? You haven't selected? Okay. Let me think. Why would it be grayed out? Okay. Let me think on that. Msr, there's question ever put in the chat window wise, safe margins grayed out. I'm not sure. Okay. It'll come to me and it takes so I'll have a think and we'll come back to that. Sorry. Now, in talking about titles, you might, you know, you want to add some titling at the end and you might want them to scroll at the end. Now, as you'll know, when there are no more clips, if I keep going, everything is black. Okay. So everything is black beyond where there are no more clips. So you don't have to set up a special clip to be filled with black in order for you to have visible titles that go after. So here's what I'm gonna do and you can do the same thing. Why don't you bring your play head to the very end of the sequence. Okay, It's just clouds. Bring it to the end. I was holding Shift key as I drag the play head so it's snapped and neatly to the end so that your program monitor displays a black screen. Use your type tool. So go to your type tool. And somewhere in your program monitor, would you click somewhere to create the text that I remind you again, it's remembered size, color, other settings including tracking, line spacing, everything. Okay. So let's say I want some scrolling credits. So I'll say, I'll just type the word director. So my text is left aligned and it's gapped out and everything to do, I'm just going to select that text. I quickly pressed Command a. You can press Control a. It's selected the text I've already typed. I'm going to tidy it up before I type anything else. So I clicked and let go with the type tool. Type the word director because I want to have a credit. But the text is all wrong. Let's fix it first before it's too late to down in my type settings in the essential graphics panel. I'm going to change font. Now. I don't know what fonts you have, but most people have times like font. So I'm going to scroll down and find a font that I know I do have that isn't Japanese. There we go. Okay, so everyone's got times but find a font that is a serif type font. So Rockwell school books something, but everyone's got times. There we go. Looks at different type of font. I'm going to have times regular. Let's make the text considerably smaller, but also make it centered. So I'm gonna make it centered. And I'm going to make it smaller. So I'm gonna make it nice and small. And I'm going to remove the tracking. Find your tracking. I'll set that back to 00 return. I'm going to make it upper and lowercase by removing the all caps setting. And I don't yet know what's going to happen to the line spacing. I shall see that in a tick. And I've made my text a little bit too small, so let's make it a bit bigger. So you could have undone what I did before. Sorry, it's an excuse to make you work with that central graphics panel. I'm going to click after director, add another line and I'll put my own name down. So I'll say Alister is spelled correctly. Is the name of the director. The line spacing is wrong. Type size, my name is not nearly big enough so that it should be because I'm really famous. So I'll increase the size a bit bigger and I'm going to decrease the line spacing. The lending is bring that down here. Great. That's more like it. That's what I want. Now what I'm gonna do is I'm going to select the text I've gone. I'm going to copy, edit, copy or Control-C, Command-C. Then if I click after here, tap the return key couple of times, and then I'm going to and, and so on. So maybe I'll just paste a few of these in. I can use my keyboard shortcuts, but I want you to see what's happening and I'm going to keep going. Now if it helps, I might want to zoom out a bit. I can just keep going. And if I keep going, I'll run out of space, in which case I'll switch to the I'll switch to the Selection tool so I'll give myself more space and then back into the Type Tool and carry on. And so obviously not everyone's going to be a director. So this is a little fiddly, understand, but you're setting up a continuous strip of text. So I might just go and the producer was and I do use is, oops, to me to do that was my mom. And so I'll talk about this scrolling is the credits. So it doesn't have to go from very long, just throw it together. Have a few of those only to see how it goes. So you'll type enough text to more than fill the screen vertically. Say you may find it helpful to zoom out a little bit so you can manage it. So having formatted your text, let's just pump that text roughly way you think it's going to be. So you could go to identified and then click to one side or another in the program monitor. So you've deselected the active text. And in the essential graphics panel over on the right, you're no longer seeing the fine tuning text editing controls, but you're seeing some different controls. And what we are seeing is a bunch of transform controls. And can you see it's looking very small. Down at the bottom. There is a role effect. Could you take it to enable it? That's a role effect. You just tick it. And now some default settings come in. Now look firstly, in your program monitor, it's acquired a scroll bar so you can scroll through your credits. So it's default action is Alistair, I didn't see how you got the transform bit, sorry. So what I did okay, so what it did was I've been editing text. So I was in the type tool, our selecting text, and I was moving it up and down and so on. So seizing the type tool and the selection tool, what I did was click somewhere else. I've clicked away so that I'm no longer inside the text or the bounding box by de-selecting the text. But I still have the clip selected in my timeline. Obviously, all the type settings vanished and left me just with the settings here on the right. And the, at the bottom. It's quite quietly sitting here saying role. That was all. Click that. And it's applied at a default. Thank you. Scrolling effect. You're welcome. You're welcome. So the length of a scrolling or crawling depends upon well, depends upon what depends upon the duration of the clip. So if you want to slow down, you can change the duration, so make the role quicker and have some blackness left after. And I won't go through all the settings, but you may recognize some of their names. You can ease it in, an ease it out so you can have a role that starts slow and that gets faster and faster and faster and then get slow again at the end. Just go to the beginning and play through and see what it looks like. Gosh, that's fast. Maybe I need to extend loops off just yet. We'll slow it down. Yes. Okay. I saw that I my back again, I should be back. Yes. I just looked to one side. Look-back. Loss sound and I could see for whatever reason I think it was connected with my my sound issue with my FNs earlier on. So I just quickly unplugged and plug them back in again. It happens. Don't worry, I wasn't saying anything interesting. I think we're done with this particular exercise, would you? I'll just show you one more thing with graphics. If this helps. Over in your project window, there is a sequence called number 4, logo 0 for logo down here. And when you double-click on it to open it, It's something similar to what we've already seen. A little alternative method of bringing graphics in. Normally. When we've been doing this, I've said, yeah, What you do is you bring everything into your project window in the normal way and they'd use it. Actually, you can still bring additional items directly in as you work. So with this sequence, and it's effectively the same sort of thing as we saw before. I've decided as well as the texts cloud scape over on the right. I'm sorry. So the test was asking how do you make the credits roll? Slower? Again, nice easy way is to make the clip longer. If you make the clip longer and you've accepted the default settings, which says start at the beginning and at the end. The longer the clip, the slower they will roll. Otherwise, if you wanted to keep the clip the same way, you can make other adjustments for when it starts and when it finishes. It's literally click in the timeline, click on the clip, click and drag on the left or the right age back the right age because you want to extend it that way, make it last longer. It'll rolled slower. Okay. So what was I saying here? Yeah. So I've got this clamp scape thing and I thought, Oh yeah, I've got little graphic I wanted to add and it's not here. You can still import is never too late. Yeah, select the the graphic track clip here is called add a logo to remind me what I had to do this particular exercise. So in the timeline in your sequence here, select the graphic layer. And in the essential graphics panel. Just below, Who am I looking for? What I'm looking for? Oh yes, it's always hidden away if you don't really look at four. So just near the top, you may have noticed that we do have a couple of buttons over on the right. Okay. There's one looks like a folder bin, and this one looks like a create a new object bin. If you hover over the create new object bin, what it does is it offers to add a new layer, click on that button, and choose from file. So this will be the same as me clicking into a graphic and then adding more text and something else. It all sits within the same clip. Here, I'm going to bring in an external file. So I'll choose from file. And I shall now go look for it. Now, I do believe in this graphics folder of exercises, I brought something along called logo dot and Adobe Illustrator graphic of a, of a on-off button. That's all. So it's called logo AI. Find that, select it, click Import. It should then add it into your project window is listed there. You can move it into the assets bin if you want. But it should just plunk itself in, in the middle of your frame in the program monitor, you should be able to click and drag it into another position. And as you can see, it has a bounding box on it, which means you can also click and drag on handles to change its size to make it bigger or smaller. Because it's an Adobe Illustrator graphic, it's resolution independent. So it's a vector graphic, has no background. See, you might want to position it there and go. Yeah, there we go. So I've brought in another graphic and it all sits within that same graphics clip. So has it I get there. I selected the graphics clip in the timeline, I went to the Essential Graphics panel and I went for it here, this button, little square with a corner turned up, clicked on it and chose from file. So yeah, it brings it in. But it brings it in and makes it part of the same graphic clip. So I don't end up with hundreds of funny little bitty bits of indifferent video layers. So they can be managed together. Would you close this project, please save and close and come back here. Now I'm going to give you a quick introduction to working with captions should be enough to take you further. Could open up, please. Click and choose the captions exercise. The captions exercise. Now, just having to save it with a different name, just let you finish that now, you can scrub through this. If you go to your timeline fitted in screen, it's some sort of promotional video. Debt advice. I think we all need some of that. Okay. I don't want to add some closed captions to this. Closed Captions is a whole world of this. So what's the difference between a closed caption and an open caption? Have you heard of these expressions before? So the idea is a closed caption, text caption of those that you can call up or dismiss that closed. This is a built-in to the stream that delivered through whichever broadcast medium you can switch them on and off or off. So you could have multiple captions. They could be for death, for hearing impaired people. They can be for indifferent languages and so on. Now, they're often you can, you can produce them in a text editor, a word processor. So they could be supplied to you in a format in which case someone's done it and you can bring them in. So we'll have a go with that. We shall bring in someone's captioned file that they've supplied. But I'll show you then how you can customize and edit them or do your own. So if we're at this stage, could you just check where we are? We've got the project up and running. We've seen through what this is. You've got the sequence open, the one that's called NSW CAPSA. Great. We've seen that. Let's bring this in. Could you go to your file menu and choose Import File menu, import in your browser when it saw in your file browser window, can you, you should be already looking at the correct folder where the exercise files for this project. I've included a folder called closed captions. And then if you expand that all drill down into it, the couple of files in there, these are all texts columns. Well, but there is a closed caption file, the cc file. So someone's preparing multi-language, multi-language captions that will normally be supplying it in one of these formats. So XML, STL, MCC, and here we have an SCC file. So select the UN FCC PSA SCC file. And click Import. And it should add this to your project panel down the left, which I'm just going to come out to that and say, Yeah, so C is a list view, so this is a caption file. So it's additive benefit was any other video clip. So let's get this into our timeline. Let's add it as another track above your existing track. So it's sitting on a V2 track. So it's just sitting at the top. Of course I can't see them, but we need to enable them. So in the program monitor. So I better just come back into my program monitor and fit it in a program monitor. Could you click on the Settings button, the one that was like a spanner? And can you choose closed captions display? So where are we closed captions display enable. Now that should be enough. On I've a quick check. They're not appearing just yet. Let me just check. Did I do that right? So I wanna make sure that enabled. Now there are different caption types. Closed captions is now enabled. I'll just go to the settings. There are different caption types. So come back here again, reopen that click on that spanner again, go to Closed Captions, Display and choose settings. I want to be sure they display correctly. So here in the closed caption display settings, there are different types. And whatever the standardized or stream is, we're just going to customize this. So for standard, I don't know what it was setting mindset tele text. Surprised me. Could you choose? Yeah, I'll go for CEA 6086082. Yes. Cia 68. Now if you're working with captioning, you will normally be working towards a particular standard or guidelines. And this is the kind of thing you would be told. But this one I do believe is in 608. So 2608. You can probably leave the stream. I think we'll be okay with that one click OK. Is that can be enough to show them. Yeah, there we go. Okay, so the wrong setting applied. So these are now the appearances partly set or determined by the system that's going to display the caption, so the broadcast system itself. So these are white on a black background. It's that particular format. How do we edit these? Well, select that clip in the in the in the timeline. And let's open up the captions panel and see if we're going to get them. See the captions panel law. Whether or not, I mean the graphics graphics workspace or not, we can still open up panels that aren't sharing by the captions panel. Captions. Now there we go, captions panel and click into any of the captions. Now if you want to make it clear, make the V2 track taller. See you have some view of what's going on. But can you see each item within the timeline that's marked off is determined, is shown here. So I can click through them. Or what I can do is I can scroll through them within the captions panel. So what we see here is kind of a graphic view and a proper TextView. So what we have in the timeline in our sequence, if I try and click in here and zoom in a bit, is each caption. So it has a little preview of some of the texts that caption, but it has a starting point and an ending point. You can adjust is starting point by clicking and dragging on the start or the end point. So you can have the caption taking up kind of angled. Let me just get that Woof. Less space or more space so that they'll be a little gap without a caption. Or you can have them butting up. So you can do that manually by clicking and dragging on these kind of chisel shaped bookends. Or you can do it in the captions panel where you can give it specific time codes. Now normally if someone's creating captions file for you, they've been given the time codes and they're all built-in, which is where these came from. The text, you just click into the text. If I have heavy got caption of selected a caption so you can see highlighted, you don't need to select it. And it says, Oh, well, that's just an estimate. The little lady will, I can click into my captions panel and type something else. Now, the fact that it's all in capitals is just expectation. But I can type a completely different caption in is. So I've typed in outright us on that too quickly. So upset. Oh, I have no idea what you're talking about. And into the next one. So I can still jump through just wondering why that didn't update. Now. I'm just going to have to hit a return. What you are talking about. There we go. I had to do a manual return. So this way you can import. So we did fall important captions file you've been provided with. You can still find tune the in and out points for each caption. You can still edit the text. Belt and braces approach. You can do it in the timeline. You can do it with time codes. In the captions panel. Alternatively, now we are coming to the end now so you don't have time for the expertise stuff. We'll catch up another time on that. You can create your own captions from scratch. So let's hide the V2 layer by poking it in the eye. So let's pretend we're just going to hide it for the moment. So it doesn't show. Would you go back to your project window? So if you can't find your project will tell you what. Let's go, let's change our RAM. I'll Workspaces go back to the editing workspace or might have a bit more space to play with. There we go. Find your project panel window. You can click on the new object, the new thing button, that little square with a corner turned up and say Right, I want some new captions, please. It'll create a captions object. And all little doodles ask you what type of captioned it is. So again, if you have an idea of what it's going to be, these closed captioning, you will know which standard to choose. So 6082 is the most common, 1708, definitely for digital broadcast tele texts, goodness me, well, that's had its day, but there may still be used in certain countries. And so on. We can subtitling. It creates regular subtitles automatically visible, that need to be enabled by the viewer. And open captions are captions that are effectively burnt into the frames than not captions that you can turn off. Okay, then at once that you hide or show, depending on which language you want, they are actually fixed in completely. So if you're creating lots of social media videos, you might want to have open captions that are always on. People can watch your videos silently and still get the dialogue. Anyway, I'm just going to choose 708 just for this second. All the other settings should be picked up from the timeline already. So click OK. Whoa, match the sequence. We now have a new caption. That's great. I can rename it. I've double-clicked on its name in the project window and I'll call this my captions. So I'll give that a new name and I'm going to drag and drop it into the V3. Let me just fix that into v3. I'll just extend it. So it starts from here. There we go. So only occupies a tiny little space and it occupies one
 Momo FX, Creative Professional