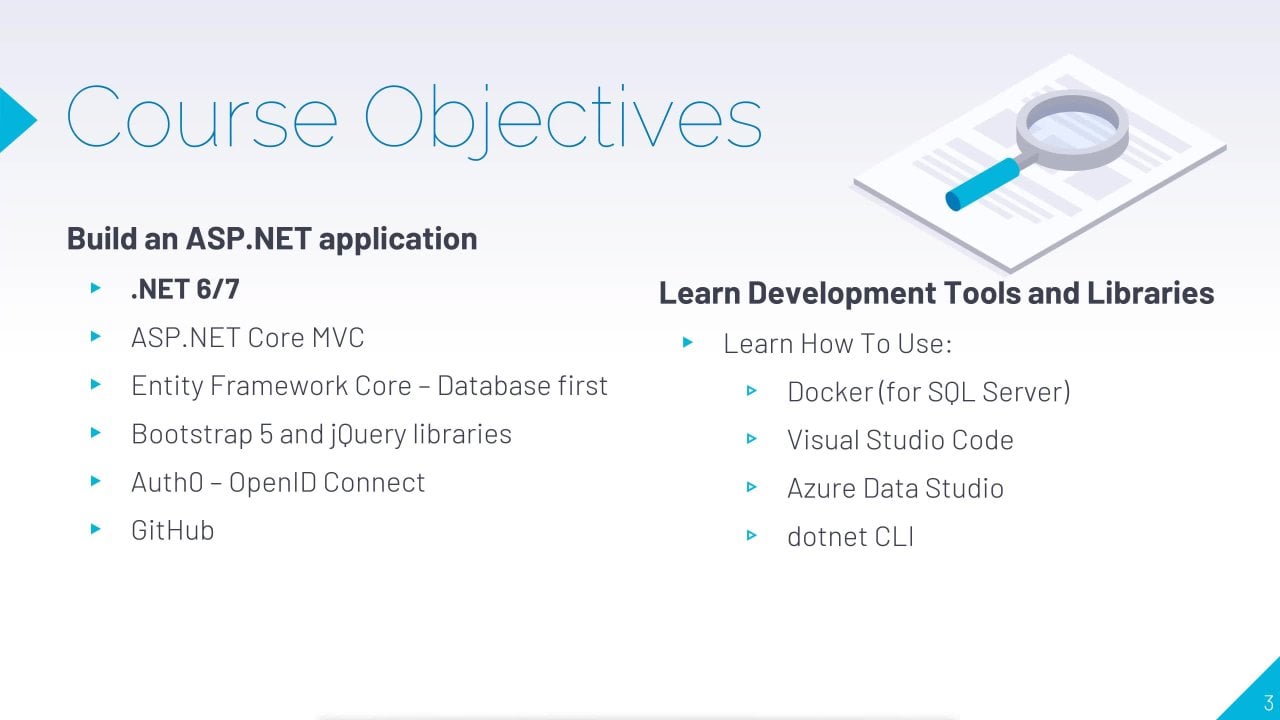
Transcripts
1. Introduction: Hello and welcome
to my new course as your DevOps, getting started. I'm your instructor
for Vaughan Williams and I'm a software
engineer and lecturer. In this course, we're
going to be exploring the fundamental concepts behind Azure and DevOps principles. So we're going to be
looking at how to set up an Azure DevOps organization, set up Git repositories
for our team, manage work items
on the sprints. We will also look at
different technologies like get for source
control management, hold to build pipelines for building and releasing
and look at other tools and dashboards that are
available to us know Azure DevOps has a rich tool set which provides developers, project managers, business on Vireo stakeholders in a project, access to a central dashboard where they can
collaborate towards developing and producing a
product for any business. In this course, we're
going to be looking at some of the key features like Azure Boards where we deploy our setup brother or work items. We're going to be looking
at building pipelines. We went to look at repositories
on different policies that we can implement our own or repositories whole weekend, implement test plans
to make sure that we are properly and
thoroughly seeing all the bugs and reporting
them and as your artifacts as the whole weekend manage all of the assets being used
in our projects. With all of that said, welcome to the course
and let's get started.
2. Waterfall vs Agile: All right guys,
so in this lesson we're going to be discussing the differences between
Agile and Waterfall. So I did a mini swot analysis. This doesn't capture
the full picture of either methodology. However, it will give you a broad understanding if it's the first time
you're hearing about them or you never truly understood what the mean
differences between the two. Let's start off with Waterfall. Waterfall for years has been the traditional method
for delivering projects, delivering software in general. With waterfall,
everything is planned. Research is done
in detail before the project starts and
timelines and cost estimates, all of those things
are usually put in place to see that this is
how the project will flow. Most floor should flow. These are the resources needed. This is a much
everything will cost. Everything is
handled upfront and ready before the project starts. Know one of the
opportunities with this is that when the budget does start, you being a resource
or everybody involved in the project knows their role and nose watch
should be carried out. And we'd usually
act accordingly. Know one of the weaknesses
with this system is that you cannot plan for
every single failure. It kind of plan for a certain of deviations
from the plan. And then waterfall
is usually rigid. So anything that's not
going according to plan just was not foreseen. So while you may be able to
plan for a certain things, there are other
things that may come up that you did
not call him four. Then one of the threats to a project being done by
a waterfall is that you can end up having
cost over on an on budgeted and
unforeseen circumstances, pushing the project
beyond the delivery date. With waterfall predicts me have maybe software that needs to
be delivered in two years. You may end up taking five. And the downside is that until the fifth year or until
that is finished, the stakeholders do not
yet have our product. So an example of what is used to plan waterfall projects
would be a Gantt chart. You also have pert charts, but usually the
schedule, everything. So task one should
take two weeks by the middle of week
two to week six, we should be doing this on walking around
simultaneously, etc. Like I said, everything
is plan to the t. So when something happens and the leaves maybe one of
these dependencies. So maybe task one in week one
got deleted 23 weeks that in task to really
cannot start since it is dependent on task one anyway. So those are the things
that have made waterfall. I'm going to say unreliable
over the years it has worked, but people have
moved away from it in pursuit of probably more
reliable delivery methods. That's brings us the Agile. In Agile delivery. Multiple teams working
on smaller pieces and that can contribute
to quicker release time. So instead of trying to
release everything at once, with agile methodology
actually releasing chunks, instead of saying task one and
task two, then toss three, you have deliverable one, deliverable to
deliverables three, the stakeholders
can actually start using what we'll call a minimal, Minimum viable project
or prototype brother. That is, the minimum
set off delivery, the minimum delivery for a
system that stakeholder user needs to start working
and then you can incrementally
rollouts the wrist. So one of the opportunities
with Agile is that business development teams, development, business
development teams worked side-by-side. So one doesn't usually know something
though that doesn't. They're all in the same space. They have to collaborate
to make sure that everything is coordinated
with each release. Once again, you can deliver more value to the
organization more quickly. One of the weaknesses though, is that if requirements
gathering is not done properly, which based on the nature
of it is very possible, then you might end up having
multiple iterations over the same deliverable
over a period. And that can lead to costs
over ON and delays also. So you can see that it's not necessarily that one is
better than the other. One fixes one thing
that delta hard wrong. But then I project is a project. And if you have ever being a project manager
or spoken to one, you know what that
time is money. So all of these, all of these factors
contribute to whether or not you have successfully
delivered a system in due time. Roadmap for an Agile project
looks more like this. So you have deliverables,
you have milestones, you have Maslow and one
milestone to milestone three, they're usually
dependent on the other, but usually you can get
one holds of the way then start working on to
while one is in production. Probability fix bugs on one while you're
still working on too, which can inform things
that you need to do in delivery to etc. So one delivery will
inform the other and it's just that kind of daisy chain
until the road is finished. Like we said, we are going to be looking at Azure DevOps in this course and in this
module we will be looking at how we can firstly
setup where our cones. And then we will get to
understand how each of these tools helps
us in our quest to deliver a project
on time with as little agitation as possible
and while working in a team. So stay tuned.
3. Create Azure DevOps Account: Hey guys, In this lesson we're
going to be signing up for Azure DevOps know to
get to this website, the easiest way for me would
be to type in dev.azure.com. That will actually lead
you to this page where it's really
ASOR.Microsoft.com slash your code for your
language services slash DevOps. There
are a number of ways. The easiest way probably is a Google search
for Azure DevOps, and then you follow the
link that of course, looks at the most
legitimate ones here you can start free, which would lead
you down the path of creating a brand new, uh, cones, probably
a live account. If you already have one, then you can always
just sign in and you can always get started
with your GitHub a cone. So I'm going to sign
into Azure DevOps, as I already have a live account that
I'm going to be using. This is the one that I
use for my Visual Studio and every other Microsoft
service that I use. No-one's here. You can see some of the projects that
I've worked on. Once you're logged in, you may not see a dashboard
like this if it's your first account
or if you've never used it before,
that's no problem. But what you'll notice is
that you have an organization probably in the same name as your accountant
or your level cones. Know an organization pretty much represents a collection of
projects for an entity. So you can see here
that I have a number of organizations tied to
my single account. And I can actually
switch between them as I am demonstrating here. And with each one you would see a different set of a cone. So this Travolta
is actually that may personal testing
a cone that I do. I've done a lot of
experiments, projects on. And then I have
tro for Williams, where I have further mixture of personal and academic projects. To start a new organization, you just need to click
new organization. And you actually would have
probably gone through all of this before getting to the
screen that I just showed you. So you would have to
silicate which directory. So if you didn't, you know that they
use Active Directory or they have their own
version of Active Directory. You can actually switch
between directories, especially for
organizational accounts. But here I'm using my
personal account and then they can give it a
name for the organization. So for this one, I went to give it the name for the course, Continuous
Delivery course. That's what I'm calling it. I can choose a region that
would be best for me. And when I'm usually
using Azure, choose East US based
on where I am, but I went to go ahead
with Central US as the best option in
this situation. And then of course we
go through our capture. And once we've done all of that, it will take some
time to go ahead and spin up that organization
and then Read Derek. And the end results of that will ask us to create our
project to get started. So I'm going to create a
school management system. That's what we're going
to be working on. Or at least that's the project
example that we will be using as we go along showing how Continuous Delivery works. School management
system, no description. And I'll be using Git for version control and all
Azure DevOps supports tool versions of two technologies
for version control, get, which is standard
Vanilla, get. This very similar
experience to what you would've gotten through GitHub if you've ever used GitHub. But if you are familiar
with kids in general, it is a very similar experience when you use get
through as your DevOps. The other one would be Team
Foundation Version Control, which is a web version
off they're very popular Team Foundation Server that hasn't been their flagship. Whereas uncontrolled
engine for years. The difference between the two, well technology one is
centralized management system, which is TFS, the other is
distributed, which is get. And since a lot
of industries are showing preference for
the distributed version, I'm sure that's
why Microsoft has made sure to give
us that offering. Also, we can go ahead
and proceed with Git. Then you can choose your
work item process based on your natural flora as a project team and went
to continue with basic. And then we can just go
ahead and create project so that all of those settings
are unique to the project. It's not that the
organization is going to be fixed to those settings. It's just whatever
the project requires. That is what will
be presented to us. Once we've done
all of that setup, we have our project created. We are led to the screen. If for whatever reason, you had a different
experience and you are in your organization and you want to create a new project, then you could go
to New Project. I was going to ask the same
questions and then allow us to proceed and be able to
view the project here. So once you are looking at
the organization dashboard, you can see all
of your projects. So let me just go back to one where there are
multiple projects. With each one you'd be able
to see all the resources, all the work items, the code, everything relating to
that particular project. However, like I said
for this course, we will be proceeding with
this new organization. And when we come back, we will take general tour
of the tools that are afforded to us through our
new Azure DevOps dashboard.
4. Manage Organization: All right guys, welcome back. So the last time we were
here, we created our columns. We set up our first project
in our new organization. And we really wanted to
start looking at the tools. But before we do that, I want us to look
at the organization and briefly discuss how having this organizational
construct helps us to accomplish our
DevOps ambitions. So the total is named
as your DevOps, which means that it
is a tool that is designed to facilitate DevOps. Devops is more than just
technology because yes, buzzword and the
Newton knowledge is, and we started hearing
are both Docker and serverless and also itself automated this and
continuous dot. Before I get into
all of those things, Let's look at the
fundamentals of DevOps. Devops is a way of thinking. It is not just a bunch
of technologies, developers doing
different things. It's way of thinking. And that way of thinking
has to permeate in the organization that it
is being implemented in. Before no, or before DevOps was really a thing or what led
to DevOps being a thing, was a fox that everybody worked in their silos
in an organization. So somebody would say, Oh, I need this new feature. Somebody else would approve it and then deposit, don't IT? And IT just comes
under pressure because they're seeing, you
know, where is it, why contact gets its
whereas IT is trying to fend for themselves
strength to write code, to manage infrastructure, trying to probably to some other resource
requirements, gathering, etc. So nobody really understands
what IT is going through. An IT probability didn't
really understand the reason for the request. Devops is different or brings a different way of thinking
because it's going to have everybody involved, everybody has a part to play in the delivery of this request. So we have resources from
different departments, all collaborating and seeing the progress on understanding each of those
struggles and helping to alleviate what they can, where they can as
quickly as possible. That is the concept
of DevOps within the organization that we
have setup in this new tool, we can actually go ahead
and invite other people. All right, so here it
shows that this is the name of the organization. We can give it a description. We can set up our time zone, the chosen organization owner and the organization
can be deleted. I can look at all
the projects that they're involved and creates
a new project if needed. I can manage my users
so I can add users. And these users of course, would be different stakeholders, even different developers, anybody who needs access the, the organization or the projects in the organization, etc. All of those persons
can be added here. So I can actually
add a basic user, a stakeholder or Visual
Studio subscriber. Here's where we kind of
take a step back and discuss costs and obligations. So this is the cloud hosted
version of Azure DevOps, there is a version of it
that you can actually have hosted locally in your
enterprise if you set up. And it would be, well, I mean, whatever licensing agreement
you have for that, you would go run it by itself. This is the cis version of it. So I can't use it
for my personal use. And this organization is really just a representation of what our company
could look like. A company would be
able to subscribe to it and use it accordingly
at which point, based on their size, they would definitely
have certain restrictions or allowances that you probably won't have on
the personal level. When it comes to adding users. We cannot have basic
user and we can get up to five users and
they will have access to features that source
control version control, tools for Agile and build
release the stakeholders. Those would be able to
work with that a backlog, items and queries
there probably won't be able to get into the code
and all of those things. But other than
pipelines and so on. But they can come in
and see work items and interact with progress reports, speak, I make new requests. And it will have Visual
Studio subscribers who basically get
the whole shebang. But obviously those are more enterprise-level
subscribers. So they have access to
all the things that as your test plans and
some other features that the basic users won't get right now where
acting on community, we're doing to have
those features, at least not in this
particular course or a trench of the lesson. But it's good to appreciate
what allowances and restrictions there are based
on how you add your users. We can also go through building. We can set the global
notifications. We can view auditing to
see who has done what. We can manage your
Azure Active Directory. We can set up a custom agents
for pipelines and pools. We can set the deployment
boosts their number of things that we can do at
an organizational level. So that when persons come in to the organization
or join a project, each project will just
adhere to the settings here. Those are the things that we can do with our organization. When we come back, we'll look at start looking at the different tools afforded
to us in the dashboard. When we have our
project open running.
5. Manage Project: All right, So when he
comes onto the project, we can go to some
global settings here. So I can go to manage services. So here I can go to the different aspects which
are also fallen to the side. So we will go through those
in detail one by one. But if I just go to manage
your services behind here, I can manage things
about the project. I can manage the name, I can put in a description. Let's continue scrolling. We can change the administrator
or AD administrators. So this project, we
can turn on and off the different Azure
DevOps Services that we may or may not want. And we can ultimately delete. If you look through,
you'll see that you can also manage Teams. You can manage the permissions for the persons inside
of this project. So we would have added persons at the organizational level. Then we can actually
manage who can watch within this
particular project. We can manage our notifications, we can call make to our GitHub. We can actually leak commits
to our GitHub repository. Let's say GitHub is
where you're doing the actual source
control management. It is not that you
have to migrate the repository to DevOps, but you could use DevOps as the management for
your GitHub projects. So it's very easy to clinic
your Azure DevOps to GitHub. You can set up different
configurations. I'm not going to sit
here and go through each 11 by one because some of
them you may interact with, some of them you may never
have to interact with. But the point is
that you have all of those options
available to you. So I can just go back
to the dashboard and if I ever need
to revisit it, let us say this style looks
differently by the time we start checking in and doing
all sorts of amazing things. You just go down here to project settings when you want to modify those settings and you
can always collapse that sidebar or
expanded as needed.
6. Azure DevOps Boards: All right guys, welcome back. In this lesson, we are going
to be looking at boards. Know before we move
on on my screen, you would notice that I have the original school management system project that we created, and I have another one with the appended text
that says Scrum. One, you can always go to New Project and
create a new project. Now the reason I created this
one called Scrum is one. The way I created
this one called Scrum is that I
gave it the name, the description, and
then on the Advanced, instead of choosing the basic
work item process I choose, chose this chrome work item, a process so you can actually
click through each one. I recommend that you create
projects with each one. And then you can see
the difference between the Agile versus the basic
versus a CMMI versus Chrome. I wanted to show you the
difference between the basic, which is the first one that
we created on the scrum. Since most, most teams that
I've interacted with at least use the Scrum methodology
for their projects. You can go through and see
the differences if you wish. But I'm going to focus
on basic versus Scrum. So if we click on the
school management that I'm just clicking to open each
in its own top right. So here's a basic school
management projects tend to remember that we had
set up some stuff where I added some members. If I go to boards and we're
here to look up boards, I had created a task, I work item, right? So if I wanted to create a new work item
out three options. An epoch which basically
represents a huge body of work. We have an SEO which
represents like, well, something is
wrong, please fix it. And then we have a
task which just says, okay, these are the,
this is the breakdown. This is the individual
thing to do, which would probably be like the more granular
representation of all the work that is
involved in an epic. Alright? Then of course as we go
along, issues come up. No, we can look at them
in the list like this. So to create a new one
equal to new work, I assume you choose
your template. If I wanted a new epic, I just say that I
give you the title. Let's say parent portal
could be an epic. You assign it to the user. Accordingly. You can see the priority. You can set the start
date and a target. Indeed, both of which have
Callender pickers they can use so that you make sure you get valleys
are accurate. All right, then you can
add links to other items. So here I can add a new item. I can't add a task and then disclose
streets at a backlog. The backlog represents the items that needs to be done
within a sprint. Of course, you'd want to
put in a description. So maybe or businesses all your product
owner or whoever is requesting this new epic
would put you in enough that somebody reading the task could get a general
idea of what's needed. You can have a discussion, you can tag members, you can add links to other work items that might
be related to this one, etc. So when you're doing all
of that, you click Save. You also have the
notion of a history bar so you can see who was
interrupted. It will create that. It will maybe added a comment. All the activity across this particular task or work
item can be trucked here. You can add a link to a new item or an existing
item, of course, sorry, earlier when I said he
couldn't add a new item is because we needed to
save. Always save. And then you can start
adding new items. Then you can add attachments. So if you have supporting
documents or anything, you can always attach
them accordingly. When you want to add link, this will be serving with
the epic is the entire idea. So your new item
here would probably be more like a child task. He could also be an issue. While working on this
big body of work. You have the bone off, what needs to be done. You also have maybe issues
along the way, Right? So a task for a parent portal
could be design interface. Using Bootstrap for
argument's sake. They click Okay, and then you flush it told
you I had a description. And you'll notice
that the layout, the form is generally the same. What might differ would be
in the planning section. So the planning for
the whole epic, if you have a start on indeed, will be different from
a particular task where you would just
have the activity. So here the activity
will be like design. And the remaining work
would probably be like tin. And these remaining work is
usually calculated in hours or I guess whatever
units of time your team agrees upon would be, what do you use there? When I do this, I can know
see if it's to do well, I'm adding it for
the first time. I'm assigning it to
somebody on my team. And I can save and close and notice we can still
view a history and view linked work items as well as Pluto and attachment. So it's generally. The same, but you just have different planning parameters so I can save and close that. And I went, I'm
looking at the epic. I can see the tasks associated with that
bigger body of work. Once it is created,
I can change it, no. So if I know that I'm starting to work on
it, No, I can't see. Okay. I know it's in
the doing I'm doing it. You know, just give me a little color-code to state
what stands and seeing. If I change it to Don, I think that changes the green. There we go. It's completed. There you go. You can actually use that
to truck as you go along. No, that is the That's
the work items list. If I go over to boards, I can't get that little. I'm going to say
Trello, look, let me, let me go back and change
one of my task to do. All right, it's reactivated. So if I go to boards, I can from here look
at issues or epics. All right. So if I I didn't
put in any easiest, but if I look at the epic snow, it will bring up the
epochs that I created and I can see them in that
little task view, right? So here this epic is to do. I can actually change
the state to doing our I can just drag it over to done. If I have a child task, let me just add a
quick child task. You're testing tasks. All right. Click OK, Save and Close of two tasks to do
underneath that particular one. Alright, so from this view, I'm not even seeing
the tasks listed. Once again, this is the basic
template that we're using. I think this is cool for you. Just want to track
what you're doing, where you are with each task. And he can go between your
states with relative ease, not as simple, it's a backlogs. Backlogs usually represent
tasks that needs to be addressed during
a particular sprint. So from here, once again, I can view either the
issues or the epics. Here are the backlog items. And I can assign a work item to a sprint
either from the edit screen. So here I can see that
the iteration I want this particular one in
would be like springs one. I can see if UNCLOS and then I know that when I
look in sprint one, I'm not seeing my tasks that I just assigned
to the sprint. For the sprint again
sets up the Detroit. I can say that I
wanted to sprint to last from XD to y dy dt. I can give it a name. And of course I
can put on options for word details are planning. I can also put on
query our filters for the types of tasks
who they're assigned to, what I wanted to see
when you can't sprint. Know, one of the
reasons I'm not seeing the items are the epochs as I just assigned
to this sprint. When I click on new work item, notice it once it
creates a new issue, It's only fixating on ECO
in this particular view. This is the base sequence again, so I'm not entirely sure
what's going on here. It might just be bulk in
the representation on, but I have only
experienced this. The basic template once again, if we go to queries, whereas with the lowest
to filter or add additional filters
to our work items. So we can have the favorites, we can look at all that, whereas sent to me
all the work items of thumb activity following
I can run the query. I can, even when
creating the work items, I can add tags. These tags can actually
help with the filtering. So I could just filter on all tasks that have a
particular tag that could help. So it would be good that when your business,
another store, your product will know
whoever it is putting in these tasks into the
senior developer that you add the tags so that
if you ever need to query all related work items, I could actually just
bought a new query and then actually fill in
the different fields. So here I can say I want all
those in a particular state. I can choose that. I want those with particular
tags, that title, etc. So that's a very powerful
mechanism they can make use of. Then we have the concept
of a delivery plan, uniquely new plan you would
actually put in a plan name, putting a description,
you can choose the project that
we're dealing with. And then you can
choose which backlogs. Then you can add a team. I mean, each time you
can add the project, who is working on
the project, etc. You can limit the
work items that appear in that particular
delivery plans. So for this delivery
that is planned, we need these work items. So he started on this
project by this team. And there are epics are there
of issues being fixed, etc. Those are all, not all. Those are some of the
things we can do know, I keep on stressing that
this is the basic templates. If I jump over to the
Scrum templates, right? And then we go to boards. You'll notice that
the menu items are pretty much the same. So you'll almost always get the same access to
the same features regardless of the template that you chose for your project. However, when I go
to new work item, look at our options. I have more options here than
I did with the basic no, I can identify something as a bulb. This needs to be fixed. This was identified,
please fix it. We still have the
concept of an epoch. We also have the concept
of a new feature. We have an impediment, so it might not be a bug, but it might be something
that is stopping the natural flow of progress
in the application, the product backlog items. So we already looked at
what the backlog items are. And then we have
the task, right? So you'd usually create a task
added to our backlog item. And then a backlog item
could be assigned to either a feature
or an epic boxes. I usually use those as
standalone because, you know, when something is a
bug needs to be fixed, it's something that
needs to be addressed. And then maybe kind of
tasks assigned to books. I usually use task as a child to any one of the above really, or at least the product
backlog and bug in front of backlog could be the child
to anything, really. We also have test cases, so this would be good for your
testing team to be able to itemize what is being tested and keep truck
off those results. Those are the work
items that you have access to in the Scrum board. If I go to backlogs, it will be a similar experience. I can see all my backlogs and have more
sprints filled out. Up front. Here I can look at
Spring to one and I have this setup project solution as scientists print
one already, right? It's the same concepts. All I did was, was skipped a little
board, sorry. So if I look at the epic, I can see that it's
in iteration sprint one or whichever sprint
it's supposed to be in. Also, the form looks slightly
different because now I can see what the
acceptance criteria is. Here is what makes me accept that the work has been
done successfully. I can set start on target dates. Once again, this is
looking at an epic. I can settle the efforts, the predicted effort, the business value
time criticality. So like I said, that this whole Agile
and DevOps floor and worse NOW with
the Scrum template is actually kind of involving
more things than just a developer trying to
itemize what he has to do, which is probably what basic
would bring to the table. Here. The business has a say, so I can see that the
business value is x and the time criticality is y, and the value area is
architectural or business. So as a developer, I have more appreciation
for the level of urgency with which this task
needs to be carried out. And the business has more
C in what I need to do. And I can give a little more pushback because I
have more information. So it's a different
way of thinking. So here you see that you have different states also you have new way of In Progress
done are removed. But generally speaking, we
still have the same tabs. You can look at history, we can look at links, we
can look at attachments. If I go to the boards, No, I have more states, so it's new versus approved versus committed
versus dawns new. That's self-explanatory. Approved means that somebody
may have put it in, but it's not approved
to start yet. When it's approved, it
means somebody do to work. Then whoever it was assigned
to comes and sees that. Okay. There's something that's approved and assigned to me. Alright, I am committed
to finishing it. And then while I'm working
on it, it stays there. But then when I'm
done, it's done. All right, so those are the
stages that are available to you in the Scrum templates. Then we can look
at the backlogs. We were already kind of
skipped ahead to here. So let me just don't
pull it to the sprint. If I look at the
sprint in this view, I can see the backlog items
and add new ones if needs be. They're usually going
to be backlog items are bugs that are assigned
to a particular sprint. Queries. Pretty much just see him window. I can just do a new query. I can save the query and
query against different. Data points and
the delivery plan is pretty much the same. Another key or useful
feature would be analytics. For the analytics, we can look at the average work in progress. I can view a full report. So you want to see who's
working our What's the burn time versus the
effort being put out. You could see that
in so many days, we got so many done. You can look at
different swimlanes. We bouquet on the concept
of swimlanes later on. Another thing that could
be used is the velocity. So in the backlogs
screen for planning, you can actually turn on and off certain options so you can
look at the appearance. So I wanted to see what is, what has up here in this
backlog item has no appearance. So I would probably want to
attach it to an epic, right? So I could add link existing item and then
see what is the type, whether it is child, let's say it is a child or no, sorry, What time on both
the link is appearance. And then I could just click here and see all the appearance. So let us see, since a project
solution would be test epochs before human
sick. And then click OK. So no, This backlog
item has appearance and see if UNCLOS
once I do that, if I refresh this page, no, you're going to see that
the appearance is the epic. We have the backlog
item and then we have all the tasks
associated with that. Let's say you get that
hierarchy going dome. You can also view the analytics. Oh sorry, I was supposed
to show you sorry. That we can put in if we
jump back over to backlogs, if I turn off periods than
forecasting becomes available. So why appearance are shown? He couldn't see the forecasting. So for costing would
actually help you to gauge that based on
a certain work rate. Then this is hole the
sprint might end up. So you can see it's VS
on a velocity of ten, you could increase
that to maybe 30. It depends on how your team works on however you
image at a time, of course already
or project manager than you would
address that value. Accordingly. You can also view the
in-progress items are turned them off. You don't want to see
what's in progress. You want to see only
what's completed versus only in progress. And skip both what's completed. You can change this to mapping versus
planning versus off. And unlike the basic where we
only have issues on tasks, we have features
on backlog items. Here. I don't have any features, feature really at
the tasks created. But it would be the same kind of dynamic where you can
just add features as work items and then you can
assign them to the sprint. So that's an overview
of the Boards section. So going forward, I'm going to continue with the Scrum layout. I think it's a bit
more involved, It's a bit more robust, it has more features. Maybe those features are
unique to the board. You can test them
both OTA and compare. Like I said, between the different I'm templates
and see what's missing from one and
what's useful for one situation and see if
you're alone developer, he just wanted to
track your tasks. Maybe it just won't
be a C. However, if you're working in a team with multi-faceted individuals
who are not just developers, not just business analysis, not just a program
or project manager, then you probably want to use the Scrum template
to get through it.
7. Azure DevOps Repositories: All right guys, so in this
lesson we are going to be looking at the re-post top. So the stone Pulitzer repos. And from here you
can see that I don't have any repositories
out of nothing. It's telling me that one I
can clone to my computer. If you've ever used GitHub, then you know that these options are pretty much what you
would see on GitHub anyway. I can clone to my computer, meaning I probably already
have files up here. Or I just want my computer
to create a space that would synchronize with a repository that is up here on the code. I can also clone using Visual Studio Code or
any of these tools that have excellent plug-ins
for Git integration. Note not for Azure DevOps
integration, but for a gift. So as their DevOps is just providing regular
Git services that we would know unload from
GitHub and other get providers. Any of these tools that support gifts including
Visual Studio, visual Studio Code, could be used to facilitate that clone. Otherwise, you can use your command line
if you so desire. Or you can import our
repository from somewhere else. And if we were to explore
that import option, then you would see
that you could choose which repository type it is
that you want to import. So that's a Git
repository or a TF, VC, or TFS if that's the
expression you're used to Team Foundation and
you just choose which one. If it's get, I could
actually just put in like a Git Hub URL right here and it would just import
it from GitHub for me. Otherwise, I can go ahead and initialize a main branch
here on the Cloud. I can add a read
me and I can also choose which kind of
gitignore file I would want. So based on the type
of project that's on my boat to work on
the gitignore file. If you're not familiar with, it, basically tells gets that when you are pushing
and pulling, when you are checking in
or are updating files, ignore these particular files. So you would usually
want to use that for certain configuration files. When you're working in a team, maybe are using
different connections. Strings are different
connection values. You don't necessarily
want that miss where I'm checking in my
connection values. And then you can't
ruin end and you have to be attendant back-and-forth. Where are you going to using Visual Studio for our project, we can just choose
the Visual Studio gets ignore template, and then I'll just click
Initialize to get it started. So hold off the box. I get this README file and I get this gitignore
file to get to ignore file. Like I said, we'll specify
certain types of files here. It knows that any thing with these extensions, ignore those. And as you scroll,
you'll see although ones you can go
through them and see what exactly it's seeing
it should ignore for the different project
types that might be coming from a Visual Studio
based project. One thing to note is that with gifts you have all sorts
of things you can do. He can do, he can clone, you can fork, you
can create branches. You can do pull requests. And if all of those
sounds foreign to you, don't worry, we are going
to be going through them. This is just an overview
of what's available to us. So from here, I can actually
create other repositories. I can create a new repository
in the same project. So I could say that this
is maybe see em dash test, whereas school management
system dash test. I can do the same thing
with the gifts ignore. Then I can create know I have multiple repositories inside
off the same projects, logical project in Azure DevOps. And I can switch between
them relatively easily. So you see I could do
that from here also, I could create a new repository, imports one or manage, meaning I can go ahead and say, Okay, I no longer want SCM test. Let me just delete that one. And then just to make
sure that you're sure they give you a very
deliberate activity to retype the name and then it can be removed because they don't
want you to make any mistakes. So they wanted to make sure that you're sure that's
what you want to. I can just switch to the default school
management system. Scroll. While I'm here, let's
make some edits. I just wanted to
show you a whole. It helps you to keep truck off what is happening
on your project, right? So if I go to the read me
file and let us see I edit, I hadn't I can do certain edits. I can do basically
any file once I'm in the repos tub
looking at the file, I can always edit. So if I wanted to add another
dash maybe to see Google, whatever it is, then
this supports Markdown. So if you are familiar with
Marketo and then you realize that the hashtag here
represents an each one target, pretty much the dive, the hyphen represents a
bullet points, right? So if you're familiar with Mark, don't, then you'll
feel it right, That's home with
this https colon slash slash W W.google.com. All right, I did that new URL. And then I can just say commit. With each commit you on to include a comment that
gives us guidance as to what changes you made
or what is different about the code that
you are contributing. So you want to put in a comment. You can also specify our branch. So the branch is generally
mean promoter or creating, instead create a main
branch there it is again, in the past, this used
to be called Master. So if you see Master, it's pretty much a seam
concept doesn't mean. And then I can
associate this with any work item so that
way I can keep truck off the work that has been contributed even by
a particular user or team member relative to the actual task
that is being done. So if I said testing tasks, probably the work addresses
more than one tasks also. So that's fine. I
can just commit. You see here it is committed. So if I click on that commit, it will show me what was
different about this version of the code or dispersion of the file that was
actually committed. And who did it change, right? So Trevor Williams committed. Just know, I can look
at the details and say, this is who authored it's
committed, it pushed it. I can look at the appearance. Where is it coming from. I can look at the
associated work items with it and I can even browse all the files that would have been in that
particular commit. So when I look at all
the files at this point, I can see that this
one was updated just know with that
commit by that person. Once again, history would show a graph of all the commits, any branching that might've
happened along the way. And all of those things
that are generally going to happen during Lisa team exercise off building
our project. You can use this graph to see every single commit and
change that was made. We also can enforce that
branching strategies, branching policies in
force, pull requests. We be looking at those
things later on though. If we continue with the
tube's Lucy commits, we just saw to
commit graph, right? So this is just a
dedicated graph for the commits for that repository
will see all the pushes. The difference
between a commit and push is that I can
commit the code, but pushing actually puts it
into the source code, right? So you could have like a policy is to say that you
can't just meet comments. Are you have to meet certain criteria on
before it can be pushed into the main branch, orient to whatever branch. So you could, That's the difference between
a commit and push. Pretty much. We can look at the branches. So here I can set up our branch. I can create a new
branch if I need to. I can go to new branch
on generally speaking, able to undo, create a new
branch for new pieces of work, that new features, right? So if I'm developing a new feature for the School
of Management System, I wouldn't want to
create it directly into the main branch because my new feature might have
some breaking changes, schema changes that
were not quite ready to have in the
main source code. And you also want to vet it before you put
everything together. So you would create
a feature branch. Appear in portal would
be a feature branch. And then you could say, okay, it seems sorry, no space. Then you could say it's based
on mean so that you could base it on other
branches if needs be. We'll leave it on mean
and then equal to set associated with a
particular work items. So then you say Create. On what our branch
does this make a copy? It makes a copy of whatever
brand you base that on. Whatever the source
code looked like in that original branch is going to take a copy of that and
put it in its own copy. I know you can work against this copy off the mean branch. In this case, you can have as many branches
as you need to. Four features, of course, you're a scrum master and your, your seniors would
determine hold up branching strategy
works in the long run. Let us work through this branch. So we created this
branch parent portal. I'm just going to create
a quick edit here. So I'm just going to click on the Read Me it and let's see. I am just going to
put the text on here. Hashtag. For hashtag satisfy each for working on the parent portal. So let's say that this
is what I'm doing. I would commit did appearance,
appearance, portal work. I did all of that. I could assign it to
a task once again. So I'll just put test
in tasks and commit. Once we've committed, we get the option to
do a pull request. So I'll pull requests would
be like quarter view, right. So TFS, actually our t of VC would actually
call it a code review where it would send my copy of the work to whomever, to the team, whatever
the policy is, bullet whomever would be
doing the checks before merging the code that they
would get the pull request. So I went to create a pull
request and then I can put in the title description and
the other features I want. I could request a review from that particular user or users. And then I can just go ahead and create that pull request. Then it's going to check to make sure that there
are no merge conflicts. Merge conflicts would
usually occur like if maybe the firelight edited, it would have I would have tea and something that he's
on a particular file. And by the time I'm
doing this pull request, it's different in the mean. So that means the mean went
left and I have gone right. So there's obviously going
to be a merged conflicts. So it would highlight to
me that hey, you know, based on the files in
this pool request, the edits in this pool requests, they would conflict with the files from the origin
out branch at this point. Please make sure that
there's no issue. Usually happens if
two persons edit the same lane into
different versions. In this case, I've
made my changes and it sees it as
just that change. There's nothing there
that's conflicting with it. And at that point, I can just go ahead and
I can add new reviewers, so I could add another
optional reviewer or somebody who is required. At any rate, I can,
as a reviewer, I approve or prove width logicians say that
I'm waiting recent etc. Or I can just complete
abandoned or market as drafts so abundant would be like canceling the whole thing. Maybe I realized oh, snap, I didn't do this. Let me cancel. Completing those would be
requesting for an emerge so I can choose
different Merge options. Emerge. It will preserve all the commits so
you'd be able to see all the branches on
every beat tough word that was done against a branch
on till it merged into me. And because I cannot
multiple commits on my particular branch without
doing the pool request, the pull request is when I'm seeing I'm done with my branch. Please accept. All right, we can squash, so it will only do one
commit on the graph history. And then you have
rebase and phospholipid and semi linear merge. Not want to get into the details of those two, at least not yet. Let us just complete merge. So when we are completing, we can say complete
the associated work items off the emerging. So this would be
used to indicate that the piece of work that's being merged addresses
these work items. I can also remove the
branch afterwards because then that
would signify that this feature is a
voltage be implemented. I don't need to work
on a separate copy. And I can customize the merge
commit message if I want. That on the timeline, you can see whatever I want to see in addition to the default. If I complete merge, you'll see this change
and it will show you that it was completed and you can
go back and cherry pick. This would almost
be like picking this specific version
off the merge. And pretty much that's it. So if I go back to branches, then you see I only
have one branch. And then you see that
just know there was a commit and this commit was adding my new stuff that I
did in the merge request. And you'll see here
that the comment is letting you know
that it was merged. It was related to those
particular work items. If I go back to my graph, then you will see here
where it veered off to merge two graph is
going to look slightly different with each option
off the merge type. If we go back up to boards, yes, we're done with boards,
but look at this now you'll notice
that one is missing. So if I jump over to repos, go to pull requests. And then from here I can
see that I have requested ended up in progress if
it's abundant or completed. So if I go to completed, I can see the
related work items. So just for context, if I click on that task, I can actually see all of the commits and merges and
whatever has happened, our own despite
particular work item. So I can have the
complete history of the development work
that has been done. I can also add link manually to branch if I need to write. So there are no branches
in this repository, so I can just add it to mean there has to be a branch and
then I can associate them. While we are in repose this, take a look at
branches quickly so I can enforce branching
policies, right? So Branch policies that
can also enforce security. If I go to a branch
policies from here, I can turn on and off
certain settings. For instance, if we have a maker checker or what
they call the four ice principle reviewer for I should always look at the
code before it gets put in. The mean brunch, Then I can require a minimum
number of reviewers, will require approval from a specific number of
reviewers on Blue requests, I can just turn that on. I can say Tour reviewers
or one reviewer. You can read through those
other options that you can please on that policy. I can also check for
linked work items so you can't be checking
something in. We vote me knowing what this piece of work
is associated with. You can check for
comments resolution. So all comments have been
resolved on poor requests. If I can limit the number
of the merged types. So that means, remember we had the different
kind of merged, the one that squashes it's all
into one-to-one that shows all the history based
on your policy. You may want to see
one I'm not CDL there. It's not necessarily to see
or this one is recommended or not that depends on your team and how you are
running your project. So these are some things
that you can look into when you are determining how you want to
run your project, what kind of standards
you intend to or pool. Of course, you don't
want to put in anything that's going to
frustrate the process, put too much work on you. You have to reviewing
your ability to think. But once again, that's up to you and the way that you're
running your project. Certain things with Git
would be different with the TFS engine
because if we were to create a new repository
and make it a TFA, TEA FVC, then you would notice that there are
certain things different, like for our repos only
have changed sets and sets. A change sets would be, yes, this is what they've
checked in and shows that it would be like
a temporary area. So I'm not quite ready
to check my work in yet. So I keep on saying chickens because I
started off with TFS. So that's why I keep on saying
chicken in TV VCR, TFS. You check in your work. However, in git, commit
your work, right? So when I tried to
come it with kids, we just saw that you
can do the pull, pull, request workflow. With TFS. You can do Show sets. So these are like copies of your work while you are
completing your task. And then the chin city
would be what you get after you've checked in to the mean. The difference between t
and t FVC once again and get is that T of
VC is centralized. So every time you have to be communicating with this
one project space. Whereas get actually facilitates a more distributed
approach where each team member can
have their own copy and work in their own silo and
have their own environment. And then when they're ready, they just merged two
amine get environment. However, everybody can be
autonomous in their own world. Like quick and dirty tour of the whole repos work on the different things that we
can get to as we move along, we'll be creating a project
that natural our project. And while it's not a
development course, we will be putting
in certain things and looking at the workflow and analyzed in
different scenarios as the project evolves.
8. Troubleshooting Git Repo Connectivity Issues: All right guys, so
forth, this lesson, we're going to be
looking at pipeline. So when we talk about pipelines, we're talking about
building, right? So I am going to open the folder remote when we coolant Turing
machine would have, we would have had to
clue into a folder. I have it here, but
if you don't want to have it there as an example, you can just open a local folder and you will navigate through it and then you select that folder. One, SIR, you'll only see are two files and you
should see padlocks on them to signify that they are they have not been edited, at least not locally since
the last time you got latest. You'll also see that
you are connected to that particular Git repository through the icons into
bottom right from here, there's not much I can do. I can only add file, whatever. So what I went to do
is just go to File, New File, New Project. And we're going to
keep it simple. We'll just do a.net Core Web up. I wanted to call it
school management system. Choose a location here as OAA School of
Management Scrum folder and create new solution fine. On the solution
name will be that. So I'm going to name
the project dot web. Since our project board, the solution will be
schooled Management System. And then I'll just click Next. And I'll work with dotnet six, choose norm authentication
and that's fine. We'll just create. All right, so after
all of that is done, you'll notice that now
we have some plus signs beside the solution and
everything that was created. Maybe you'll see some padlocks, but don't worry
about the padlock Sousa generally just
on the folders, but the files are all I did. The fact is that it got
added into a Git repository. So that's whole folder
was prepared for Git integration by virtue
of that Git folder gift, which is kind of hidden. So I have on View Hidden files, which is what I'm
seeing it clearly. But you'll notice
that you still have all the other files that
were there originally. They get ignore and the README. And then we have
our new folder with our new project
files on solution. That is typically what is going to look like when
you add a project. Let us say we wanted to push this project so I can
go to get changes. It's going to list out all
of the stuff being added. And then I'll see it.
I did web project, that is my little message. And then you have a
few options here. You can one Fitch. So fetching means between the last time I got the project or a copy of
the repository and no, then things might have changed. So fetching would see what
are the commits that I've gone in to the branch. Notice I'm going straight
to the main branch, right? Based on the branch I'm on, I can fetch all the
pending changes are all the commits
that have gone in. If I wanted to pull, then pulling means
I went to update our eaten TVC that we've
been what I get latest, whatever the latest code
is, pulled it down. If there are conflicts, then they will show me how to
merge conflicts and so on. Otherwise, it will just
update all my files for me. Then when I push, then that is how I
send the files up. It's always recommended
that you do a pull. Make sure you have
the latest version of the code before you do a push because
you don't want it to be overwriting anybody's. Other changes are a theorem
seeing that I have an error, saying that they get pool
of field and you know me, I'm not going to hide errors. So it says cannot determine the organization name
for that remote URL. So that remote URL
pretty much represents the location of the Git
repository right here, it's saying div delta zeros slash Continuous
Delivery course. And think that the way that URL is written is what
is giving up problem because it's saying it should
be Argh meme at Azure.com. If you, whoever gets that or you see anything
that you want to modify, you want to change the
remote URL or anything. He can always go to get changes ellipsis and
go to manager modes. From management promotes know, usually the default remote that is going to get
created is called origins. So once again, they're remote. Is the URL that is going to link your local repository to
remote went on the Internet. So origin is just the
label that remote Git. So here it's saying that
when you are pitching, use that URL which
fits the description of the the div.azure.com. I can always click it, click Edit, and I can
change that if need be. Under General, you wanted to make sure that the email address that you have matches the email
address that you're using for that communication. So just know my e-mail
address here was incorrect. I've updated that and let me
try this operation again. That's still didn't work. Let's work through the Soul. I think that there's something bigger at play
because like I said, the wrong email
address was there for me wrong in the sense that I was my address that I use
for GitHub as opposed to, as opposed to the address
that I'm using for Visual Studio Online or
Azure DevOps, right? There is a Git Credential
Manager which Microsoft encourages you to install your insulted by installing
get full Windows. So let's just go
ahead and download that and run the installer
just to make sure. And then you want to only shown, you want to antique only show new options just to
make sure that we see the option to enable
the Git Credential Manager. So I'm just going to read
it through most of these. We can add that check
daily for updates. So we can just click Next. If you wanted to
change your editor, you can get decided
on the branch name. And most of these
are pretty harmless. At the points where it
says Get Credential, then you can see more
information if you want. I bought what it's
for, but that's fine. Click Next, Next. And I'll just let it install. You can see here I was
a few versions behind because I was on
2.28 notes on 2.35. So make sure that you're on
the latest get at this point. And it needs the neck
and just click finish. I don't need to see
the release notes, so let us go back to Visual Studio and try that
again and look at that. Their repositories
already up to date, no changes to pull it connected. Okay. So if you encounter
any of those issues, make sure you're running
the latest version of Git. As I'm sure those were
both Microsoft and their team would have identified and knocked the kinks out off. If you already have the
latest version of Git, then probably you
haven't experienced anything that I did
and that's fine. After we've done all of that, remember that we
wanted to pull to get the latest at all times. Let us go ahead and English. So pushing would
send our code up. You can also do a
commit all and sync. So this would actually
do the commit, do the push or due to
poor push automatically. So the same way I
clicked pull and push, you could have just
said commit all and sink and it would pull and push. And if it had any conflicts, it would have stopped
the operation until nuclear conflicts
and then it would proceed. So let's comment all and sink. And when that is done, you'll notice that you have padlocks on all of your files. Now, if you refresh
your repository, then you're going to have your files that were just added. Alright? So now you could actually
start real work. So no, you could tell
your team members, hey, go and flown. So even when the world trying to look through just setting
up the repos and so on. If you were to click on it
at that point Z or machine, you probably would have
had problems because of that same Git
Credential Manager. So once again, if you
encountered that, then that's your fixed. And I hope everything
is good to go for you. When we come back, we
will look at pipelines. So now that we have
a solution appear, it's a web projects,
nice and simple. We haven't put
anything in it yet. But we look at how we
set up, build pipelines.
9. Azure DevOps Build Pipelines: One of the foundations
of DevOps is found in the concept of
continuous integration, and others found in the concept
of continuous deployment. So you'll see those
two phrases or CI slash CD mentioned a lot by every
practitioner resource that you look at once It's
talking about DevOps, the concept of
continuous integration and deployment will
always come up. Continuous integration has to do with the ability to
always integrate new code and have a solid foundation or
floor for your code base. So what we looked at that
with the repository, so that's where a source
control comes in. When we talk about
continuous deployment, know we're talking
on both always being able to deploy these
changes without messing up the
system and creating a platform so that we can roll back should
something happen. So you want to meet deployment
as seamless as possible. You shouldn't be
something that's scary. So that is why Azure
DevOps as a tool, has this feature
called pipelines. The pipeline is going
to allow you to set up the rules by which any
application one gets built. Alright, so build
meaning compiled and it creates what we
call an artifact. And then this artifact, which is the compiled version of this application or this
version of the code, then can be deployed. And then we also get to set
up the rules for deployment. So which server it should go to, what kind of environment
it will be going into. So that takes a lot of the
manual work out of having to update a website or any
kind of application. Pretty much lets us look at
creating our first pipeline. So we had gone
through setting up a new dotnet Core
application in our project. So when I go over to pipelines, I'm in the repository. I can actually set up a
build from right here. Sitting up the build would actually bring me over
to the pipelines. It will be the same thing. If I go directly to pipelines, I can click Create pipeline. Then they will ask me, okay, where do you want the source? Where should the code
be coming from that I'm about to create
a pipeline for. Obviously if I went
through going directly to the central build
from the project, it already knows that
it's a local project. Use the local project. However, from this perspective, even if I didn't have
anything in the repository, I could actually
tell it to look at a repository that might not have been in this
particular project. I could tell it go to bucket, I could go to GitHub and Git repository subversion or Team
Foundation Version Control. I'm just showing you that
it's not necessarily tied to having everything wholesaler and the source code
Holstein hosted here. You might already have
your Active Project being hosted in a
third-party solution. Any other Git repository, you could actually just
go ahead and set up a pipeline for the code at
that third party location. The rules, of course, will be
different based on how you connect or where
you're connecting to. Rather, you can
either select one of these or you can go to
the classic editor. So the classic editor kind
of brings you through a different menu selection. So you choose a project
repository of the branch. And generally speaking,
you don't want to build on the main branch. And they can click Continue, and then you can choose what
kind of template you want. So here you see all
of these templates. You can start off
with a YAML file, which is really just
a configuration file where all the steps
are outlined. Or you can choose one
of these other options. And you see it's not
limited to dotnet. Core is not limited to dotnet because I can
build an Android. I can do docker stuff, I can do me even Python, I could even do Node JS stuff. So it supports a number of
templates or out of the box. And it supports some third party to integration like for
griddle and Jenkins. I'm going to choose
the easy way though. The easier way would just be
to follow the, the project. So if I'm in the project, I'm just going to
say setup, build. And then it's going
to say, Okay, what kind of project
am I working with? And went to say, Okay,
I'm working with an ASP.net Core project. And then here's the YAML file. So it's going to build or
create this YAML file which basically has certain variables, uncertain configuration, stuff. And then we go into the
steps which basically say step number one
called NuGet and gets all of the
packages and then do a build to make sure that
it compiles its successful. And then if you
have any testing, you can put that in there. And then based on
your environment, you could put other steps into this YAML file
or the variables, other pools, etc, and
modify it as you need to. All right, so if I do
save and run that, it's going to say
commit message sets of CI with Azure Pipelines is committing because
it's about to add this new file to
the entire project. Then I could create a new branch for this particular commit. Or I can just do it directly
to the main branch. We kind of already explained why you may or
may not want to do that. We can do Save and Run. Know what you would've
seen would be the, what is now red X would
actually be blue and spinning. So you're probably
seen that already, especially if you're on your organizations
as your DevOps, or are you actually have
a paid subscription with enterprise or so on. But on the free tier, the hafta assign agencies. So this field then the error here is saying
no hosted parallelism, parallelism has been purchased, are granted to
request a free agent. Please go through that form. So actually brought
up the farm here. And it's that the
university could take two to three business days to proceed with their requests. So I would advise you if
you're getting this error, go ahead and signed up
and then leave it alone for two to three business
days and weekend, revisit it. But in the meanwhile, let us read up on what this is. They said, learn how to estimate how many
parallel jobs you may need or need to buy
for your organization. And then they're seeing here that we have
temporarily disabled the fragrant off
parallel jobs for public projects and for
some private projects. However, you can request
this grant that's actually in newer organizations. So because we're just
creating this organization, chances are you are going
to go through this. And if you read up on Microsoft hosted
versus self-hosted, you'll see here that for the Microsoft hosts
that parallel jobs, you can get up to
ten free ones that can run up to six
hours at each time. For public projects, when you create a new
Azure DevOps organization, you are not given
this by default. Like I said, go
ahead and fill out the form and then
give it some time. Later on, we will be
looking at creating self-hosted jobs where we can register any number
of self-worth their jobs. And you would get charged based on number
of jobs you want to run at a time as opposed
to the number of agents. So there are no time
limits on self-hosted. For public projects
that are self hosted, you have unlimited
parallel jobs. You can have unlimited
parallel jobs running. All right, guys, so
some things that you want to change or you
may want to change. Firstly, let's go to our
organization settings. We can change the visibility
by going into policies. And you can allow
public projects. In our case, for educational purposes,
you can enable that. Of course, if you're doing this in an organizational setting, you don't necessarily want
that kind of public exposure. Another thing though, is
at the project level, you can always go to Project Settings and
you can always change the visibility from public
to private and vice versa. So if it's private
and he wanted to make it public once again for
educational purposes, you can always make it public. Then you can also look
at the parallel jobs. When you come to parallel jobs, you see here for
private projects, there are 0 jobs
associated with that. And one self-hosted Berlin. If you look at what's false, that means it means
jobs that run on machines that you manage. So that is why we wouldn't
have it in the cloud offering. And then jobs that
thrown on a pool of machines hosted by Microsoft, which is what we would want
for the cloud offering. And then you can always
go ahead and make a purchase if you so desire. Then for public
projects we still have 0 jobs and then we can have unlimited parallel
jobs if we want. After you've been
granted approval, when you refresh this cAMP edge, you wouldn't see that you
have one parallel job in the free tier and
you're given up to 1800 minutes per month, which is more than enough for a private project or for demo
purposes, both of course, in a corporate setting,
you'd want to go ahead and purchase so that you don't want to have those limitations. Know, I'm going to remove the existing pipeline
and I'm going to start that whole
process over. So you'll see here
that there are always making sure
that your shore and deliberate when
you are removing stuff. All right,
so let's go again. So what we're going to
do is create by playing this time I'm using
the pipelines screen. I'll create pipeline. And then we can just
choose the Azure Repos, get to where they discussed all the options that you
have available to you. So I'll choose that one
choose or repository. And then we have the YAML file. This YAML file is designed to run with the type of
project that you have, right? So if you are using a
dotnet five project, it would automatically
be able to decipher that you're using
a dotnet F5 project, and that is the type
of building should do. All the steps are outlined relative to a dotnet
five project node. At this time of recording, the dotnet seeks SDK is not fully supported
by Azure DevOps, meaning the default steps
would not work with my dotnet. Six repositories actually
had to go through and modify this YAML file and
then put in steps. So it wouldn't know that
each using the dotnet six SDK and not defaulting
to dotnet five SDK. If you're using a
dotnet six project, then you will want to do what I'm about to
do if you are not, if you're using
dot in at 5.93.1, it would automatically
support that by virtue of what is supported. So first of all, we look at the trigger. So you can actually
always modify this file. You can introduce variables, you can turn them off things. I'm just going to take
you step-by-step. And when you're at this point, you can just modify
it as we go along, or you can clear
out the entire file and just replicate
what they have. Firstly, back in the
day you told us to call the main branch master
node is called mean. Sorry, get to use to do
that is called mean. I'm seeing here that triggered this Build whenever there's
a check-in on mean, you can actually have
different builds against the different branches because it could be that you
have a QA branch, Dev branch, and a
production branch mean would generally be like
your production branch. But you want a different build
our set of build steps for the production branch than you do for the Dev branch, etc. So that is why you would have that trigger and you would
give it the branch name. So I'm seeing me in
branch pool VM image, I'm using Windows hyphen 2022. Then for the variables, you probably already
have the variables, so you probably don't
need to change those, but you can if you need to. And then we can move
on to the steps. The first step is
to choose the SDK. And if I hover over the task, it will actually tell
the US.net Core, it acquires a
specific version of the dotnet Core SDK from the Internet or local
cache and adds it to path. I'm saying go ahead and
meet that acquisition. Display name is what the step appears as during
the whole process. So when we look at the logs, you'll see that you would
have seen a preview of it, but nowhere putting
on our own steps, you will become more clear
to you what is happening. So basically this is just
for human readability. This is what is happening at this task. Just to
give you ten name. And then for the inputs, I'm saying that
the package type, and the thing is as you type, you'd notice that you
actually get hinting, right? So for each type of task, you can put in
different kinds of inputs based on what
you need to do. So pocket type is SDK
and aversion is 6 x. It will support
builds in-between. Then we go on to
say add a command, command line to go ahead and check against all the dotnet
SDKs that are in there. So at least we can see a
visual representation. And once again, you
could also give it a display name on top one here, but you could if you wanted to. There is no NuGet install
actions carried out. So the task is there, but then the task for
the NuGet command, we just restore the solution. And then we have the VS build. Then you can go through
all of that and VS test. If you have tests than you would have a bit more happening
under here for the unit tests. I don't have any
test, so I don't have to prioritize that. No. I have added some
of this, a YAML file. So GitHub, just so just a quick way to store
a single files. You can use the link
that you see here. Get us go to my
profile and look for that file accordingly
if you so desire. That is where you can
get that pipeline. You can copy and paste
if you really don't want to write its old manually
like I'm doing here. Either way, once you
have that file in, you can go ahead and
click, Save and Run. And remember that we're going against the
main branch there any commit to the main branch is supposed to
trigger the build. So just by adding this
file to the branch, it is going to save the changes, do the commit, and then it's
going to trigger the build. So coupled with our newly
created parallel job and our refined pipeline, we can give this a few seconds. You can actually
sit and watch as the steps get filled
out and completed. So like I said, each step here, if you give it a display name, you would be able to do the human readable
version of what is happening at that particular
step versus step name, where it's just going to
give you the default name. If you want to again, go back and add your own display names, you can always modify that
YAML file as you need to. Just give it a few seconds
analytic go through the steps. And all green ticks is
what we wanted to see. So every step of this operation was
completed successfully. So if we go back up door repos would be able to see that we had a successful build
from the pipeline. Like I said, any change that is made will trigger a build. Let us say that we made
a modification here. I'm just going to edit
and I'm going to see I did build pipeline. That's all. Then I went to commit. Once I do notice that you can always
ideal work items here. I think I would have
mentioned that before. So let's just go ahead
and do that commit. What you'll notice is that if you go over to the pipelines, it is no queuing up another job. All right. So it's an all seeing that. Okay. There's another change. Let me go ahead and
do another bill. That's how you can protect
your source code to make sure that code that wouldn't compile isn't being
introduced to your branch. Because there are times
when as developers, we might inadvertently
add a line of code that really didn't build or we didn't build and then we made a change. And then we didn't
build again locally, so we tried to check it in. Well, this is going to try to compile everything
and make sure that it works before it even commits
it into the source code. That's the basic set of steps toward sitting
on a build pipeline. It may have taken a few more steps than you would expect it
to because we had to go ahead and apply for overbuild agent and be
able to run the job. But that's just a part
of it being free. When we come back, we will
know start looking at release pipelines
and environments. And it will just take a look at the other options available to us under the pipeline section.
10. Azure DevOps Release Pipelines: All right, so we're here, we're looking at pipelines and we sort of successful build
pipeline for our projects. Now let's look at the
Release Pipeline. Click on releases. We can add a new pipeline or Release Pipeline
pretty much would hook onto the build
pipeline and allow you to deploy your app
to an environment. So Azure DevOps tool would already know that
based on the type of app, based on the type
of environment. These are the things I will
need to do to compile it so that it can be production
ready already for you. So what you would notice is that they have a bunch of templates, just like with the build. Where you have a bunch of
templates that allow you to select what kind of up
you are working with art. You can just do an empty job and start off with
your own steps. Once again, that would
allow you to go stage one, stage two, stage
three if necessary. First of all, I
need an artifact. An artifact would be the
compiled version of the website. So I can click, Add an
artifact that is going to say, okay, where am I getting
this artifact from? I can say I wanted
from this project and the source would be from
the build pipeline. So in other words, anytime
you complete a build, you are supposed to produce
an artifact and then you are supposed to use
that for the release. Now look here, no version
is available for this are the latest version
has no artifacts to publish these
disorders pipeline. That is non-problem. So that means I
have to go back to my original pipeline and make sure that it is
producing an artifacts. So if I click onto
pipeline or I can just use the three dots,
go into edit. I will see my YAML
file and what I did not do at the end
of these steps, task one, task two, etc, is publish an artifact. I did not do that. I'm going to go
ahead and do that. So earlier I didn't put untold or bringing
too much attention to the fact that you
actually have the tasks outlined to the right-hand side. If you don't want to type everything manually
and you might not be familiar with the YAML syntax and that is completely
understandable, then they have the
tasks to the right. If I wanted to add
the task to publish, the artifact, I could
just search for Publish. And then you'll see here that
I have a number of options. But the one that
I really want for this particular situation
would be to publish the pipeline artifacts just by clicking that clicking in the document where I want
it and then clicking it, it will introduce
a new task with the name publish pipeline
artifacts at sign one. So that's basically the
version of it, right? It will publish or
upload a file or directory as a named
artifacts on the run. Then it takes the inputs and it will set up
everything for you. I think the only thing
you have to put in is the name of the
app that you want. I think once you click it, let me just refresh myself, right? Published
pipeline artifacts. You can leave
everything as default. Will you just give
it an artifact name? So you could call it a web app, you could call it up I called mine school management
app accordingly. After that, you can save it and then you can
run the pipeline. Again. It will recompile
and then at the end of it, whatever it has compiled, it will publish an artifact
or compiled version of it. When we go back to the
releases and say new pipeline, we can, let me just
click off the templates. If I go to add artifact, I will not be able to see
that build once again. And then the message
will say that the artifacts published by each version will be available. The latest successful build off that project published the following artifacts
by that name. So I can add that artifact. You can also set up a schedule. You can schedule. It starts off as disabled, but you could schedule releases. So this is what we
call the continuous integration or having a
daily or weekly build. So, you know,
developers might be introducing new things every so often you want to keep a particular
environment up-to-date with whatever it is the development team may
be doing on a daily basis. You can actually schedule
that three AM every morning. The release pipeline will run, even if there is no building
to necessarily trigger it. It will run automatically
and it will deploy whatever the latest build is to whatever
environment you want. You can actually do that. Alright? So I'm going to disable
that for nodal. And what I'll do
is at the stage, so I can add at this stage tool, so first the artifacts and
then we set up the stage. So what template do I
want for the release? Well, at this point, I mean, this is on based on what
environment I am going to arc and just set up the empty
job and build it up myself. If I wanted to be
deploying to say, an Azure Web App Service, I can just select
this deployment. It will know how to
compile and how to set up and do everything that is needed to get it into Azure. So here you can see that the
stage three has one job, but what if I had multiple
places I wanted to send it to at the same
stage, I could add. Other steps, I could see. What it does is create
different stages each time I click Add stage. And that's how you get
that pipeline effects. So if it's a case where
you have dependencies that this one must be
in the environment before that one
isn't environment. Let's take for instance, if you had suite of services and you know
that your API must be in the environment and deployed
successfully before you try to deploy the web
apps that depend on the API, this is how you could automate
that the entire process. First deploy the web API, then deploy the web service, and then deploy whatever
else might realize. You can set up that
particular order of events accordingly. Knowing that example
of having say the API and the
Web App and so on, chances are they would all be in different projects on
their own Git repo. So guess what? You can have multiple artifacts. It doesn't have to be one
artifact on one part pipeline. It could be that this
entire release has multiple artifacts so I can add all the artifacts if
I had other projects. So could just see which
projects, which source pipeline. And let's just say
this was another one, so I'm just going to
give it another name to get rid of this error, I could add that
artifacts there. If it is that this
stage should have si, simultaneous Archean have
simultaneous actions being carried out after
this stage is done. So it doesn't have to be one
tool three equal to one. And then after one is done, I could have another task that is going to be
carried out accordingly. I'm just showing you that
when we talk about pipeline, it is literally a pipeline
is a workflow that you are creating to show
that this is hole. Each step should flow known by clicking on these
icons to the sides, we can access different options. So if I click on the
lightning bolt here, I can see that this artifact will trigger the
build build disabled. So do you want to continuous
deployment trigger? This enables the
trigger to create a new release every time
a new build is available. So do you want that? This is how you get that
continuous integration. As soon as I check in or commit, then the build is successful, then trigger a release. Is that what do you want? It could be for maybe your
prototype branch, right? Sorry, approved the
typing environment where anything experimental
as you put it in, You wanted to see it
in the environment that might be different
from the div, where everybody's
working together. That might be different or let's go into be
different for QA and production and
pre-production. They suddenly different
environments you would want to enable or disable the different
options accordingly. You can also view other options here
for the actual stage. So you can see
select this trigger. The trigger that was
starting to deployment at this stage,
automatically release. Is it after stage, whatever it is, how do
you want this to happen? You can put on artefact filters. You can see which artifact
should be used at which stage. You can set up the schedule. We looked at that already. You can loop pull
requests deployment, which would have the dependency
on the pool request. I'm actually being enabled or the pool request trigger being
enabled on the artifacts. So unless you have that
enabled on an artifact, the continuity at this stage,
which is understandable. We also have
pre-deployment approvals, so we can actually see that you cannot do a release until
it has been approved. Now we've talked about
that maker checker or for a spring sport where somebody is doing
how somebody to approve. And then you can see
that you can have different policies around that. You can also set up gates. So I get would be like a rule or a set of rules
that you can setup to make sure that these
are in place before any deployment toppings or trigger this action for the
deployment to take, please. So you could set
there'll be even like alerts to make sure that the environment meet
certain criteria before any deployment can
help any given set of compliance on your Azure
for this situation, because I'm seeing
as your web service, the gates might be different
if you're doing it on an IIS server
or a 0 server or whatever kind of release you're doing into
whatever kind of environment they have
preconfigured gates that can help you to control. Watch the environment
should be like prior to the actual deployment. So you have that and you can also set up the
queuing so you can have the number of parallel jobs you
want for the release. And you can deploy in
sequence or deploy latest. You can do a number of things. If we sat down and explored
every single permutation, discourse wouldn't get finished. But the fact is that you will always do what's best
for your situation. And different projects
require different strategies. So it's not necessarily
a one-size-fits-all. It's a boat seeing the options and choosing
the options that are best. For this particular solution, for that particular setting. Let us look at the task. If we jump over to the tasks, you can see here that
for my release or my pending release to
the Azure firstly, wants to know my subscriptions. I do have an Azure subscription. If you do too, you
could also choose that. And then you would
have to authorize and make sure that you set up the rules and such between
your account and Azure DevOps. And then you'd also
need to provide the Azure service with a name. So those are little things
that you would have to make sure are in place. You could also do this. I'll just leave. You could also set up
a pipeline that would deploy to an IS
deployment or setup. So I can search for IS and then you'll see here he can
just do a web deployment. You can do a number of
variations of that. You could do it to
Azure Virtual Machines. Like I said, based
on the template, it will pre-configured all
of these things for you. If I choose. I slip site deployment, That's my stage one. And I will just
add the artifact. We already know that. And here are other types that I probably didn't mention before, but you do have those options. So you could actually get
artifacts directly from GitHub. So you could do a
release pipeline for something that is actually on GitHub without actually having a source code in Azure DevOps, it's very, very helpful
and very integrated. So I'll just do the build. And you could also
change the version, specify the version at
the time of release. So this is another control, the version that is
actually being released, just work with the
latest at that. Then if I look at these tasks, you can see that one, I can change the stage name. Sure. I can create our
update the website. I will give you
the website name. So default websites is always the website,
but in this case, I'll probably want to call
it like school website, School of Management website,
something like that. All right. And you just have the different settings in
this particular course, go through every single setting. But with the IS deployment, what it will do is
give you an agent that you install on your
machine and give you a few commands that you will definitely need to run in order to establish the
communication between the Azure DevOps and
the particular server. You see here that I have this red line here
for deployment group. So before I can proceed, I have to have deployment groups existing or deployment
group exists. So when I click on that gear is going to bring up another tab, bring me don't
deployment groups. And then I can add
a Deployment Group. Let's see, SEM Web machine. You could specify div. Create that. Here is where you get that command that you would
run on the target machine. So it's good to see what
kind of machinery targeting. Then in order to
facilitate that, you can just go ahead and use, you can use a
personal access token in the script for
authentication. You'll modify it
as script a bit. You copy this to the clipboard, you go over to the machine
it through PowerShell. And it will do its
thing to establish the connectivity
between your machine, whether it's your laptop that you're using to do
this course right now, or a server or an
Azure Virtual Machine, you can go ahead and do that. Now once this deployment
group exists, I can now specify that that
is the deployment group. Or to sit off rules, are that connectivity
that I wanted to leverage when I am deploying
to an IS setup. And once I have
that pipeline done, I can create sorry, I can save, and then I
can create a release. No, I have this release. When you say Create release, it's actually going to
trigger the stages. So it's actually going
to trigger the pipeline. So let's go through that again. If I go back to pipelines, let's say it was
clicked on releases. What it's showing me would
be the ability to create a release against that
particular pipeline that is already set up. If I want a new pipeline or if I wanted to modify
this pipeline. First of all, I can
always click Edit. It will bring me back to here. I can look at the tasks, variables, retention,
policy, all of those, right, so this is how you
get to roll back to a previous releases
because retention means that I will
retain every release up to whatever threshold
was defined here. If I wanted additional releases, I could just click
New and I could say I want a new release pipeline, which would bring me back to this particular screen where I can give it a
better name so I know exactly what this
release pipeline is four and follow through
on similar steps. All right. So releases, I didn't
set up any deployment. I'm not sitting on my
machine for all of that. You can experiment and
do that one on your own. Then let me know
what the outcome is. No environments, these are
low you to sort of add some more control tool where your deployments goals so I
can create an environment, let's call it demo. I can choose more resources. I can choose to add an
Kubernetes cluster, or I can use virtual
machines for the Kubernetes cluster
that would clinic to Azur and allow
me to use the AKS, which is a service on a 0. I could also use virtual machines which
would require me to do some registration and
some additional setup. There are a number of
options that you have for normal is going to
choose none and create. What you can also do with
the environment is set up certain controls over whole. These deployments would happen in that particular environment. After we've created that we can add the resource
afterwards if we wanted to add the Kubernetes
as virtual machines. I can also go to Security, manage who can do
whatever the permissions. Sure. We can actually do
that with everything the pipelines under releases. But I wanted to
go to approve was and checks so I can see who has the ability to grant the approval for our
deployment at any given point. And I can set up the ILO approvals to
approve their own runs. I can set up control options
that after this point, the approval is no longer valid. I can setup branch controls
so I can see which branches a load for deployment tool, this
particular environment. And I can sit branch protection. I can also set up what business hours are
valid for deployment. So if you have a
production deployment, you don't want to be doing that in the middle of the d, right? So you'll want to set up the
limitations around that. And do you have other starts off control as a notice that
some of these kind of looked like the controls that
were available in the release is section
off the options. Those are things that
you can do to kind of tighten up the environment. What branch goal is to we're, what artifact gets published, what steps are involved like what kind of setup
needs to be there? As you can see, I've
tons of options. But once again,
this is more like an overview and the
decisions you make are relative to what your
environment needs at the time.
11. Azure DevOps Test Plans: All right guys,
this is going to be looking at the Test Plans. So if you are on the
free tier like I am, then you do not have
direct access to this, but they do offer a 30-day
trial that you can take advantage of to at least learn about it while you're
doing this course. So you would want to go back
to your organization level, goes to the ******,
organization settings, go down to billing. And from building,
you can actually attach your Azure subscription
if you have one tool, your Azure DevOps or corn to
make building more easier between your Azure resources under Conte and
your Azure DevOps, but if not, that's fine. That's not a requirement. It just makes it
easier to purchase your parallel jobs
accordingly, however, we are here to enable the
basic plus test plans package, which offers a 30 day trial. So that wouldn't be a button
that when you click it, it asks you, Are you sure
you want to do this? And then he can say yes, and then it will let you
know that your trial will expire in X number of days. Once you have
enabled all of that, then you can go ahead and
jump back to your project. If you didn't have to do all of that, then that's no problem. We can get right into it. So when you jump down
to the Test Plans tab, you might see a
page that is more promotional than anything
advertising hole you can get started with test
plans and there's even an extension that they
suggest that you install. So I recommend that you install it because that's extension is a great statistic aid
for you using Azure, DevOps, and test cases. And it will install
your browser and allow you to record a testing session, take screenshots and
annotate your progress. Because really and
truly as a developer, sometimes you don't
understand what the tests are experienced
and test there sometimes have a hard time relating what went wrong
to the developers. So at least with this tool, it can provide
irrefutable evidence for both parties to be able to
efficiently move forward. You can go ahead and sit up. After you set up all
of that, of course, you wanted to start
doing some tests. While we were away. I was
doing some development and I, I did some more features to the School of
Management System. I'm just going to walk
you through what I did. First of all, I got rid
of the first project that was built and I
built another one. This time I enabled
authentication. The end of the day,
you can probably remove if you were
building a project, you can remove that
previous swept project and putting a new one that has the authentication
enabled so that it's easier to just start wiring up the database
and such, right? What I did also set
up the database, but we'll see that
as we go along. That's not the focal
point of this course. It's not a development
course once again, but I'm going to put in
a test case to say that the registration feature should work by enabling identity. The registration on login
feature is already there. I already run my
update database, so it would run at least
the create identity schema. You can add other
tables if you want, if you don't want to write no, that's fine. You can minimum. Go ahead re-create a project. I'd authentication, update the database so that
at least that is wired up. What we're going
to do is simulate a test case against or website. I'm going to go
over to the boards. And because by previous task
or Backlog Work item was to set up project solution and then our two tasks at
the web projects database. So I can take those
off and move them to viewing it as a board. I can move it over
and it's done. That's Alt. No work items would
be empty so I can do a new product backlog item
and C setup registration. Of course, assigning
it to somebody. I'll add it to our sprint that we're working
with under description would be a low users to
register on website. Then for our related work, for us off to save. Then after I've saved, I can add tasks. So I'm going to add a
child task that basically would say address
distribution form. And then we can click Okay and
leave that save and close. I'm not going to give
you much more detail. So once again, when you
are doing these tasks, you want to give yourself as much details in the description to make sure that when you see, do you remember what's necessary based on whole
year team operates, you can put in your
units of time for remaining work and
state activity. So this would be a
development activity. And if it's blocked, well, in this case it's not. So I just save and
close the boards. We have a new task. I remember most from new to approve the business
or product on, everybody would agree that this is something that
needs to be done. And then it's committed once
it's assigned or somebody has accepted responsibility
for completing it. Now from here, I can
also add a test. So by clicking the
ellipsis here, I can move to a
different Sprint. I can edit the title, I can add another
task right here, or I can add a test. I can even do
exploratory testing. This will be more like I see this work item.
I'm just going to Record a session where
I'm just running tests. But I'm going to add
test here to see make sure registration
works for user. That is artist case. No, once I've added
that just gives you see that little what's that vial or beaker gets added. At least to get these
physical visual cues as to what is happening here. I can always edit it. I can run the test,
I can remove it. But by adding that test, if I go back to work items, you to see that no,
I have a test case. Remember when you're
creating a new work item, you could actually just
create a test case, right? And then associated with
the product backlog item. Here, if I click on this, you'll see that this is actually just a work item
and it is related, it is related to that task. If I click on that task, it would show him that it has
a related test case item. So at least everything shows how incarnate interconnected
these items are. With this test case, I can actually set up the steps so I can start off
by saying Goto. And here I can actually
put in variables, right? So if you scroll down a bit, you would see down here, you have parameter variables
there you can setup. So in the step I can
say go to Add sign URL, and it becomes a
variable down here. Alright, so I can
fill in that value. I am maybe the chief tester. I'm just trying to think
of rules that are in our project team and show you how everybody has
a role to play. The chief test or lead test, lead whatever the job that would be the one to outline
first go to this URL. This is where our offset is. So they expected result is
that the website loads. Then click on Register button. I'm giving you the steps because really testing
is about doing this, then this, then that and
having expected results. Registration form loads
that's the expected results. And then fill out form. You don't always have to
put that unexpected result because filling out
the form and then register and click register, then the expected results, it could be that you
are redirected to the login page and maybe
get a confirmation email. Get confirmation email. Alright. So that is our test
case to make sure that registration works for user
step one through four. And then for the URL, we can put in the
URL of the website. So for my project, I can always go and get the URL. And once again, this will be relative to whatever
environment you're in. I'm running in depth, so
I'm just going to use that URL that's annoys wound to be used anytime Visual Studio runs. But once again, this is where relative to where your
website is being hosted. I can save this. Now this test case
is ready to be used. And if I go to Test Plans, then you're going to see what
we'll call a test suite. So I had a test before, it was setup user
or distribution. And I have another one here
that says setup registration. Don't mind 17. Let's pay attention to 23. Know when I look here, I can see that this is the exact test keys according
to what the work item is. Under thinking is
that a suite can have multiple test cases. So the more tests that
you add to the work item, it will actually
automatically kind of sort them for
you here and show you what belongs to and
what's the relationship. If I go back, it's
just going to bring me back to all of the
test suites that I probably have or I
can pay attention to the ones that are
associated with me. So I can look at all
of them versus mine. When I click on mine, I'm going to go here and I went to see the
ones that have been assigned to me for that
particular scenario. And when I click on it, say that no test
results have been phoned, that's
double-clicking, sorry. So I can actually run for
web application or run for desktop application or
on with custom options. I know I'm dealing
with a web up. I'm going to run for web
application here you can also see pass this field is blocked test or
not applicable. So I can actually just decide to set a status
on that test, right? No. I'm Dr. King Rowan forward
application we're going to get is pop-up to the side
that is showing us. This is courtesy of the tool
that we installed, right? So it's going to show
a step one, step two, step three, and the
lowest interact. So here is the URL. So I'm going to take that URL. And Firstly, I have to make sure I'm running
the application. All right, So once
I go to the URL, the expected result is that
it loads, it did load. So I can take that, say yes, they expected
results was met. Click on Register button. Click on that. Well, once again, expected result is that the
registration form loads. Yes, it is a distribution form. So I can take that
fill out the form. So I'll put in admin cm.com. I'll just work with the default
parser being suggested. And then I'll click Register. Know after clicking register, the form to create
just read directed to the login page and get
a confirmation e-mail. No, I am not. Everything here is null
and I got this exception. So I'm going to have to fill this part of the
test and I'm going to see God error message. That was an error message. Of course that's
vague because this is probably the worst thing that any developer wants to hear. Got an error message. Of course not every tester might be inclined
to know that they should identify the parts of their message
within their comments. So that is why the tool
is useful where it allows me to take a picture
or a snapshot. So I can take a snapshot
of what is on the screen. I'm getting an error. Let's try that again. Okay, So I could've been
recording my actions. All right. So here I can record the
actions. I can stop that. Once it stopped that
action recording is attached to the test
result. Let's try it. A screenshot. If I
take a screenshot, that okay, there we go. So I can actually draw on the entire area
that has the error. Then once I'm satisfied
with that or I can draw an arrow if
I'm not satisfied. And see here's one. Here's arrow tool, you
know, stuff like that. I've not taught
tester by profession. I've never been in that role to be as detailed as testing. There is an art statistic
on Error Reporting. I'm just showing you
that this tool is setup there and available
to help you as a tester be as
efficient as possible. Once I'm done with all of this. In this case, five got
created for whatever reason, I'll just take it
off and I will click save or I can save and close. So I'll save and close and
that's it for the test. Know when to jump back over
to Azure DevOps, here, you'll see that it No
got a failed status. And if I wanted to interact
with this test afterwards, I can view the test results. And that will bring me
to the runs history. So it's showing me all the
runs that this test hard. I can actually create a bulb attached to these test results so
we know that it failed. And we have all of
the attachments of the iteration field that we can see at what step it failed, what resources available to justify the failure,
so to speak. If I create a bug, then it will know that there's a defect associated with this. I can assign the bulk or
just create the Bogan, let the developer,
the developers, sorry, that's out
among themselves. I can put in as much information or more information here. If I can associate while it will come associated with the test, at least there'll
be able to go and look at the test result and see the attached resources. So here you'll see that
there is the bulb. If I go into the work items, there is no a bug
associated with it. Everybody knows what the
current situation is. If we're looking at the boards, you'll see here
there's a new bug. It can be approved
as a bug because sometimes testers didn't
follow the instruction. So it's prudent off the dev
team just to make sure that whatever is being reported
is actually a thing. And do their best to sort
the thoughts and move it across the columns as possible. You'll also see
here that you have some visual cues to
show you that you have a failed test associated with that particular
backlog item. That's really the whole
test plans work and you have other metrics
that you can use. You can look at
progress reports. So how many tests
blends are there? How many were run
home anywhere past. So you can use that to
see how your project is trending is a dev team sorting
or the bulks fast enough, or the testers
testing enough, etc. You can look at the runes we already looked at
the ruins earlier, and you can have those
exploratory sessions. Once again, we just go in and
you just click around and see if you can miss things
up or if it's foolproof. And we'll load test is
actually no longer in use, so you can just ignore
that one anyway. So that's a quick
overview of how disciplines can be used to make your efforts in development
a bit cleaner and faster.
12. Azure DevOps Artifacts: Welcome back guys.
In this lesson we're discussing artifacts. Know what? An artifact pretty much
is a fancy word or expression for our pocket that would be used in a project. Examples of these packages would be like our
Entity Framework, Core or ultimate bird, different third party libraries that we would usually
integrates into our projects. Though the reason for
artifacts would be that there are
times when you have a dev team working on the same project and everybody would be
going off on getting whatever veered version of the same library which might not necessarily
be compatible. And you wanted to
standardize the version, standardize which
library your team uses. You would implement artifacts. Let us say we wanted to
create a feed and all feed basically refers to
source off packages. For context, if I bring up
our project in Visual Studio, if you go to Tools, Options, and then if I look for packages
in the options package, there we go, pocket sources. On the NuGet package manager, we can actually go
to pocket sources. And this would allow us to state where you want
to get packages from when we are trying
to do an install or just look for some
third-party library. From here, I could actually add a new source and state that
I wanted from this URL, give it a name, etc. So my artifacts feature here in DevOps would allow me to one create a feed and I
can give it a name. Let's call it continuous
delivery demo. Then who is it visible to? The members of this are
only specific person's. I'll leave it as
the members include is from public sources example, you'll get an MPM that we can leave that and then we can use this feed for just this project versus the entire
organization, right? So you can actually
have multiple feeds. So you could have one specific
to the project versus one for the entire organization
where you would see it, okay, everybody, you can
subscribe to this feed and use only these packages
in effort project. For this one, I'll
just leave it at the project level and create. Know once that is created, I can actually connect
to another feeds. So I can say the new getfield, the dotnet feed, or any of these other package
managers, right? So each platform has its own
type of package manager. And since I'm using dotnet, new Git is one of the
most popular ones, if not the most popular one for any dotnet
related development. But just for context, if you're using npm, that will be for your
JavaScript related stuff, you can do it for
Python, for Java, etc. So I'll use NuGet. And here I have to go
and get the tools. You see here. They're letting you
know that if it's the first time
you're sitting atop on this machine
and get the tools, ensure that you have the latest version of
this credential provider installed and some other instructions as to how
this needs to work. Let's go ahead and
get the tools. As instructed here. We have to get the latest
and you get and then we have to install the
credential provider. So I'll just go ahead and click
on both URLs just to make sure let me get the latest
new get package manager. Once that's completed,
Let's jump back over to the credential provider, which brings us to this
GitHub Documentation. And we can just use the polar scripts,
the partial scripts. So it just by clicking
that it will bring you over to the PowerShell script, which you can either
download or you can just copy and open up in
your local partial. So I opened up my Polish
Windows PowerShell ISE as administrator run it. And here you can see the
log of what it has done. And it would have installed the credential
provider successfully. That's step is done. Let's go back. Now. After it says you make sure you have
installed all of that. They said I had a NuGet dot
config file to your project. So I'm going to copy this. Jump over to Visual Studio. And inside of this project. So it said audits at
the same level as your solution or the CS
project or solution file. I'm going to add it
in the solution. I'm just gonna direct
it the solution. Click Add, say I
want a new item. And I went to call it. You get dot config. And then I'm going to insert the contents there that's added. Next up we need to run this
command to restore packages. So I would have to run this command in my
project directory, but before I can even do that. I will need to register NuGet dot EXE as one
of my Path commands. So if you have a Windows
machine like I do, then you can just hit
the Start menu type in part and launch the system properties go to Advanced and UC
environment variables. So if you typed in this window should
pop up quite quickly. Environment variables. What I'm going to do is look for the path instead of
system variables edit. And then I'm just
going to hit New. And I'm going to give it
the path of NuGet dot EXE. Oh, actually sorry. Then I'm going to brush
tool the folder where no please the executable.
Then click Okay. And then it is not
apart of my Cmd paths. Let's bring up command prompt. I'll suggest a bringing it
up in administrator mode. And you navigate to the
directory where your project is. So you can always just
right-click on the project in Visual Studio if that
is what you're using, get the file path or
the project boss, you'll see the navigate to it. Otherwise, you can use the
same instructions really. Then we can run our NuGet
dot EXE restore command. And here I am getting an error seeing that this
does not contain the expected root element called configuration for that path. Okay? The reason for
that is when we copied, for whatever reason they
totally copy the key, it didn't copy the entire XML. So we need all of this. Ironically, when we
click Copy to Clipboard, it didn't copy all of that,
so let me try that again. So let me copy all of this
and update this file. And then let us try
that command again. Right there it is, punching through a
connection between our project and our feed. All right? No, its knows that
it should be using this feed as per our
DevOps allowance. Enlarge the command
prompt window so we can see a bit better. And I've run a new command and I went to walk
you through it. What I want to do is
install some pockets. I chose autumn upper, right. It could be any package. So the fact is that you could even go to NuGet
package manager, look for a package, and you
can just go ahead and see new git install
the package name, and then we're
specifying the source and I mistyped it
tends to source needs to be the name off the feed that we configured
in Azure DevOps. So here I've got it right. Nuget install ultimate source
continuous delivery demo, that was the name of the
feed and they need acidity. You know that the feed
used is according to our URL that we had
put in the config. And then it's installing
the package tool I needed specifies the project. And it's seeing that the
auto build version is that. And it's going through
and then though the credentials providers
asking me to login, so I'm going to go
through that process. And then after providing the credentials appear,
but nonetheless, it was successful and it went through and it's
letting me know it retrieved the package from or custom feed and
they'll just stop. And then it went ahead and it executed all the commands
within a few seconds. And if I go back to our continuous delivery
demo page and refresh, or let me just click on the top because refreshing
my share of the CMP. So if I click on artifacts again and then make sure I'm in the continuous delivery demo
or whatever it is that you set up near lend to see your
ultimate perversion here. So he's going to let you
know that the source, yes, it's the NuGet gallery. When it's, you know, how many downloads, so many
users are subscribed to it. And I can choose to
download it myself. I can promote it, I can unlist it and I
can delete the latest. So there are a number of
things I can do here. One very important thing to note about this whole process, because you're probably
wondering, okay, so what's the point of it? Why not go directly to
you and get, So for one, we have but took control over which version
we're doing right? Because here I can see who
added this to the project. I can see some of the
metadata bowl tool created the project or
this library in general, I can look at the version
that is currently installed, which by default will
be the latest version. I can of course this side
to delete this version. But then they
expense of me having to run this command and
specify the version I want. And if I try to read
install the same version, well, I would have to remove
that folder accordingly. There are a number of
things that you can do. Once again, this is
better for controlling which version is used in your, in your project as a team. And it's not only
NuGet packages, it could be that
you have some of your own custom libraries that you've built a new
or maintaining, and you have DLLs that
other applications rely on. You could add them here as arctic fox and allow
the team to subscribe here and make
reference to the DLLs through that kind of
feed system Artifacts. Feed system in a team setting, in a div setting where lots of third party
tools are being used. And you want to maintain a standard for what versions are being used
in which projects. This is an excellent
tool to be put to use.
13. Section Overview: All right guys, so that's it for the overview of Azure DevOps, in this module, we
were able to create an organization look at what it took to create a Scrum project. Look at some of the
differences between the Scrum project and
the basic project. And I hope you explored
the other project types. We also looked at
basic Git integration, whole branching works, whole pipelines work how
we can use test plans for or integration
between our teammates. As developers and testers
and business analysts, we also looked at artifacts
and hold those can be used to manage the version of libraries that are being
used in development. So as we go along,
we'll be looking at more concepts more in depth. In the next module,
we'll start looking at whole GET versus TFS works as source control
management systems, different branching strategies
and how everything comes together towards creating a continuous
integration workflow.
14. Conclusion: Well guys, we've come to
the end of this course. In this course we would have
reviewed as your DevOps. So we set up an organization. We can set the project's
whole weekend, sets up a whole
space so that all of the stakeholders of the
project can come here, get various statistics, see various activities and
actually get involved. We also discussed the
fact that is there a DevOps is not a
tool for developers. It's a tool that helps
developers to help the business and helps the
business to help developers. Because a lot of the times there is a disconnect between
the business and the IT and the business wants one thing and IT thinks
it's another thing, and then there's a disconnect. So using a tool
like Azure DevOps, breaks, don't those virus. And it helps project managers to involve the business owners and business owners can
communicate with the development team
more effectively. We can see bulbs and work that
is being done and by whom, all the tests the testing team can get involved all my gosh. I'm sorry. Just reviewing all of what is possible with this tool
is just getting me excited. I can't wait to see how you improve your
operations with this tool, how you integrate it into your current workflow with
your bigger projects. You setup your release pipelines and your build pipeline
so you protect them, how you implement
proper best practice, get branching strategies, and
operate with your dev team. With all of that said and done. Thank you for joining
me on this journey. And once again, Have fun.
 Trevoir Williams, Jamaican Software Engineer