Transcripts
1. Introduction - Updated: Hey everyone. So let me start off with a
rhetorical question, which is, why should I take the time to
learn Excel macros or VBA, which is just the name
of the programming language that
macros are written. For. Very quick background on myself, I've worked over 11 years
making custom software tools, but the place where
I worked in 2021, I became a full-time
freelance developer, creating tools to help
automate and improve efficiency for a bunch of
different types of businesses, which is still what I'm
doing professionally now. In addition to excel in VBA, I have a lot of experience and other programming
languages like Python, C-Sharp, Java, and even some experience
in web development. So for example, JavaScript. But by far, I spent most of
my time in Excel and VBA. And that's because it's one
of the most universal tools used in nearly every
business from big to small. And the reality is when I'm
looking for freelance work, it's where a lot of jobs are. You probably clicked
on this video because you're at least a little
familiar with Excel. Because it's used by
so many businesses, that usually means
that it requires nearly no setup for both
developers and for users. So as long as you
have Excel installed, you're usually good to go. The macro automation tools and VBA development environment
are built right into it. Getting a project off
the ground is usually as easy as sharing a
file with somebody. For a lot of people, the
basics of how to click around that file will already
be familiar with them. At your job, you and your
coworkers might even already be working in
Excel every single day. So to build an automation on top of your processes that you
have now is pretty seamless. And you can of
course, still make completely new tools
completely from scratch. But when the person
goes to use it, they'll already have that
base level familiarity that makes it a lot
easier for them to get used to the new tool and
to reduce the amount of training they need to get comfortable with
the new process. Vba is also much more powerful of a tool that
most people may think. It doesn't just automate Excel, which is what we
mostly know if four, but it can also have control and automate almost any
aspect of your computer. So a lot of that you'll
see in this class. Now if I've been able
to keep your attention, let me describe the
class a little bit. I first grade this course specifically for people that had never written a
macro or single line of code in their life. That's still in here because that's where the lessons
we'll start off. But I've decided to continue
to add to this class. So there's content ranging from absolute beginner
to intermediate, all the way up through
highly advanced. So I'm going to try to
make this a living class, meaning that I'll
continuously add content and videos
to keep improving on the class and improving it as a course that
will take you from absolute beginner all the way to professional level
advanced VBA programming. And if you're just interested in programming and maybe you want to get into other things
other than macros and BBA. I think this is a great
introduction to bring in a lot of the concepts that
are transferable to other programming languages. If that's the road that
you want to continue on, I'll have to admit that some
of the recordings on here are the first ones I
ever recorded of myself. So some of them are from over
a year ago at this point. Hopefully you'll see
that the sound and video quality gets a little
bit better as you go. So forgive me for
the rough ones. If you come across
any in-between. Also, the class is set up in a way that you should
feel free to jump around from video to video depending on
what's best for you. The general structure
of the class is that the early
videos will demonstrate specific concepts
that will become the building blocks for the fully functional
processes later. So those are more focused
on specific topics. Then the later videos, we'll have you follow along
as I build, for example, projects that you might find useful at your business or as a great demonstration of the building block concepts
that we showed earlier. For example, the project
and releasing right now is a application
that can automate a bunch of aspects of the quoting process for almost any business
that does quoting, it's important to me that I
show every single step of the process without any
kind of infomercial style, constant fast-forward a
couple of hours ahead, leaving you just
kinda confused as to what happened in
that gap of time. I'm going to show
every detail here. And you can just use the
fast forward if you want, which is nice and easy
with this video format. Even from here, I'd recommend that you
jump around through the videos that just kinda take a glance at the content on here. So as you go farther down
through to the projects, you can get a hint
of the type of content we'll be covering. And then you can
decide from there, where do you want to start or if you want to jump around to different spots
and work your way up to those more
advanced videos. Especially if maybe
you're coming into this and you already have a little background and the early videos are a
little too simple for you. You can jump ahead
to what will be more advanced projects
towards the end. And with that, I really hope
you enjoy these tutorials. Feel free to leave
me any messages or comments or reviews. I really appreciate your
time to watch these videos. Or if you don't watch them,
I appreciate the time you took to even get
this far in the intro. So thank you and enjoy.
2. 1.1 Showing Developer Tab: As you start to fall along with this tutorial and pull up Excel on your own computer. You might notice that you don't have a Developer tab here, like I'm showing on my screen. That's because by default the developer tab is hidden. In order to unhide the Developer tab. Go to file, down here to options in the bottom-left, Customize Ribbon. And then over here on the right, you want to check the Developer tab if it's unchecked, and then click OK. And then you should now see your developer tab, which will show you all these tools that you're going to use to create your macros.
3. 1.2 Recording Macros: I wanna show you guys how to use the Record Macro function. And this is built into excel and it's something I used a lot when I first started working with macros. So if you come up here to the top left, you'll see this record macro button. You can click that. And then this forum pops up and it asks you the provide a name for the macro you're recording. We're going to call it example macro and click OK. And you see that this button on the top left change to stop recording, which implies that you're recording right now. And that's exactly what's going on. Whatever I do in my spreadsheet here is being recorded, including clicking these random cells. You'll see that that's actually being recorded and you'd be played back later. I'm going to create something really simple here. So let's say I just do something like highlight these cells and I want to write a high message. And then what I just did here was all recorded. So if I go back to my Developer tab, it still has the Stop Recording button, which means that we're recording still, I can click stop. So if I come over here, I highlight these cells. I'm going to undo what I did here because we're going to play the recording back. If I go to my Developer tab, I click macros. That shows me the list of macros I have available. And so example macro being the one we record it, I'm going to click run. And there you go. You see that it just played back the actions that we recorded. There's a really simple example of just how you can take a list of actions and play them back and perform them in a click of a button. And in this case not actually a button, but I can show you how to do that too. So I can come up here to Insert list. Here I have a bunch of components for forms. And the one I'm going to use here is the button control. And I'll click that. And I can just drag and drop a button here. If asking me which macro I wanna run with this button, I'm creating a quick example macro. Click OK. I can change the text here. And then if I clear this again, click, say hi. You can see it runs the macro. And I'll just do this again. We're going to record another macro that clears this out so I don't have to keep manually doing that will just leave this as macro for we're recording. I stopped recording. I go to insert, create another button, drag it, have it run macro for. And there, yeah, now you have two buttons. One that says hi and a second one that clears IT.
4. 1.3 Saving XLSM file type: I made this basic macro here where you click the say hi button and it shades in all these cells, so it gives you a high message. And then when you click Clear greeting, it'll just clear that out for you. So you can use this back and forth. And then now I have my file and I want to save this file. If I go up here to the top left and click the save button, I see this message here. And it basically tells me that I'm saving this file as an XLS file type. And so that's the default for an Excel file. You can see that up here into header. It's basically telling me that this is a macro free workbook file type, which means that if you save it like this, the macro that I created isn't going to be saved If I click Yes here, next time I open up this file, the macro that I created is going to be gone. So I'm not gonna do that. I'm going to come over here. I'm gonna click No. So it's going to bring me here to the save as menu. So if I come over here to this drop down, I can click this and select an excel macro Enabled Workbook or an XLS file type. I'll click save. I don't get that error message. And this is a file type that when I bring this file back up, or macros will still be in here.
5. 1.4 Viewing Your Code: In the last video, we went over using the Record Macro function up here on the top left, you might be wondering where the code go that we've recorded. How can I make an edit to that if I wanted to. And so that way we can view that macro is, and go up here to macros. You can see example macro is what we recorded. If you click edit, that brings you to the code editor so you can see what we recorded here. I clicked into the K4 cell. I changed the background color of that cell to black. I started copying and pasting that cell till I made this high message over here. So another way I could have gone to the code is just coming over here to Visual Basic that also opens this code editor. And then I can navigate through here once I get here. And then the third way I typically get to my macro code is if you highlight a button and a trick here is if I click this button, I'm not going to just highlight the button. I'm going to run the macro. And since I don't want to run the macro, I just want to highlight the button. I'll right-click this and then click out of this context menu. And then now the buttons highlighted without running the macro. Once this button's highlighted, I can come over here to view code. And that's going to take me directly to the code that the button was going to run. And here you are at example macro. And I'll show you again if I go to clear greeting, Go to View Code. That button was going to run macro for. And so there's a couple of ways where you can get directly to the code of your macro.
6. 1.5 VBA Editor Message Box: Now that we are looking directly at the code editor for our Macros, I can show you that the structure for each macro is written into these subroutines. So if I use an apostrophe character, I can leave a comment here. Macro code goes here. It highlights green showing you that it's a comment and it's not code that will actually run when you play this code that's written in here is in the language called Visual Basic for applications. And you can see up here this Windows called Microsoft Visual Basic for applications, typically people refer to it as VBA for short, VBA. So if there's something that you don't know how to do, the easiest way to do it is to just go to Google. And I do this all the time, even for things that I've done a 100 times. And you start by typing and VBA, and then whatever is you want to do. And so if I type in VBA message box, you can always try the first link. And you'll see you can easily find the code notation for whatever you wanna do. Some things take a little bit longer to find the answer to. But for simple tasks like this, I Google solutions all the time just because I don't memorize the notation of every single command in here. So here we want to look up how to make a message box. You see this notation is right here. We're just going to trust it will go over back here, type this. And if I wanted to run this macro, I can do so by coming up here to this Play button and clicking it. You go, you have the message box. I'll click OK. I'll highlight this. I'll make another line. Change this two. Here's another message box. And another thing you can do is instead of coming up here and pressing play, I can run this one line at a time and I can do that with the FAA button. And so if I press F8, you see this yellow arrow pop-up that tells me to line that's about to run. As I run that this first message box will pop up. I'll click OK here, it takes me back and then I can run the next message box. And then next step, the macro be complete. Something else I wanted to go over here is you might notice that the example macro is written in this notation where it says sub example macro, open and close parentheses, and then n sub. And that's the notation here because every macro is essentially a subroutine. And this editor will automatically handle that for you in some ways. So if I wanted to create another macro and I type sub example macro to, if I just hit Enter. You can see it automatically created the notation for you to be able to code and other macro right in here.
7. 1.6 Cell Referencing: As we create macros, we're going to want it to interact with our spreadsheet. So what you might have is a basic form. Let's say it looks something like this. We're going to want our macro code to be able to interact with this spreadsheet. And so if I come over here, I have this message box. I can change what that message box says. If I run it, it's going to say whatever I have written in here, I click OK. I'm gonna wanna put my name Steve over here in the message box. So the question is, how do I do that? I can use this ampersand sign to combine two strings together. And so I have the text, My name is on the left, and I want to get the value of this cell over here, and this cell is in between. Then I can do that by using the range function. And the range object is basically a cell or group of cells. And here in the parentheses is the name of the range. And you're gonna see here, after I type the range, I can hit period. And then this shows me this menu of all the different properties that the range object has. And there's a ton of them in here. And the one I want to use is value and you see it jumps down to that. And so that shows me that value is a valid property that exists. If I tab out of that here, we've updated our message box. So it'll take the value of the cell B2. If I run this. There you go. It says my name is Steve. One other thing I should show you is when I click this Play button, it's going to run the macro that my cursor is highlighted in. So if I click out of this subroutine and then click Play, you can see it asks me which macro I wanna run. Right now we only have one, but if I had a list of a 100 macros, it can't figure out which one we wanted to run because our cursor was not sitting in a specific one.
8. 1.7 Naming a Cell: Here over on the right, we have this basic macro that we created. It's just going to display a message box that says my name is. And then it references the cell named B ten. And that's over here. And click play. And there's the message box. So one thing I want to show you guys, and this is something that I wish I knew way back when I first started making macros because it would make my code much better and much easier to update, is the ability to give ourselves a specific name other than its default btn. And the problem with leaving the cell as referencing BY ten is that as you keep developing this file, this cell can move all over the place. And so for example, if I added some cells here and add a new row, this is now BY 13, but my code over here still says B ten. And so if I run this, it's not going to work anymore. And so how do I solve that problem? How can solve that is by giving this cell a name. The quickest way for me to do that is to select a cell. It's called be 13. Right now, I can come up here in the top left and just change it. I'm changing this cell to be called name. I hit Enter, it just registered. And if I click in the cell now you see instead of saying be 13, it says name. These other cells that don't have names, they still say their original address. But now if I go over here to my code and I changed my range name to be called name. I know I'm making this as confusing as possible right now. I can run this code. It's going to know the cell reference. But then if this cell moves around and I grabbed some rows, I delete them, I'm going to run this. And there you go, it still works. And that's because if I come back to this cell, when I deleted those rows, it knew that this cell is called name and it moves around with its reference. And I can see all these named cells. If I go over here at the formulas, I'll make this bigger for you and go to a name manager. I can see all the ranges that I've named in this spreadsheet. And so here you can see, again, as confusing as possible, The name of this cell is name. And it says right here that it refers to Sheet one, cell B21. And right now we only have one. But if you have many different cells that were given names, you'd see them all listed here.
9. 1.8 Create a Folder: I'm going to show you guys how to use a macro to create a folder. And I think this is a great example of how you may think of macros as something that automates your spreadsheet. But by using a macro, you can do things that you wouldn't otherwise do within Excel. Something like going through your file explorer and creating a folder. So I'm gonna come over here to my code editor on the right, I'm going to start a new subroutine. And I can type my macro name here. If you hit Enter, it'll automatically create an end to your subroutine. I can name this create folder. And now I want to add a line of code to be able to create a folder. And the create folder function is MKDIR. And you can see here as I open the parentheses, it's showing me first that it recognizes this function, which is a good thing. So that means that actually exists. And it's telling me that what it accepts within its parameters, within the parentheses after the function is a string and that string is the path. And so that's basically the address of the folder that we want to create. So the first thing I wanna do is just test out this function. And I already created a folder here. It's in the C Drive. It's called C Drive example, and that's where we want to create art. As I click back into the code editor here, it's just popping up this error telling me that this is not a valid line of code. Of course it isn't. It's because we left the window with the line of code half written. I'll click OK. I'll come back to it. It's a string, so we're gonna put it in quotations. We're gonna write C Drive example. That's where we want our folder and our new folder name we're going to call test, will close that quotation, close the parentheses. And we'll try this out. Hit play. And there you go, you see a new folder that was created called test. Next we're going to combine a concept from our previous video where we can create a folder based on the content that's in our spreadsheet. So over here back in our spreadsheet, I had already written this. I have this cell. It's called folder names. In here. It says Folder one. I can name this cell folder one. If I come over here to this string, I can use an ampersand to combine a string together. And I'm going to want to add range folder one dot value. And so now when I create a folder path, the path is going to be this all combined together. So C Drive example, and then the value of range folder one, which right now just says folder. And so if I go over here, I click into this macro, I run the code. I come back to my example folder and they go, we have another folder called Folder one. You see there is a space here which is the content of this cell.
10. 1.9 Error Debugging: In our other video, we threw together this quick macro where if I run this over on the right, it's going to create a folder based on whatever I have written in this cell over here, which is called Folder one. I want to show you guys what happens if there's an error in the macro. And what I know is going to happen here. If I run this again, there's going to be an error because it's going to try to create a folder in the path C Drive example folder one end because we ran this macro already. I know that there's already a folder there with that name. And so we're going to have a problem where it's not going to want to make another folder with the same name because it can't overwrite it. And so I'm going to run play. And you see this error message popped up. And it's telling you the error we have is path file access error, runtime error 75. I happen to know what this means and we already knew this was gonna happen. And the axis error is because it's unable to create the folder due to one already existing. Now if you guys didn't know what this meant, if it was a different era and you weren't sure what was going on, you could always take this runtime error code. I'll just grab this, I'll type it into Google and I'll put the phrase VBA until the beginning of the statement. And you'll usually find some sort of discussion or results about what the cause of this error might be. And then next, if you come back to the error itself, you have two buttons here really that you're going to use. If you hit end, it's just going to stop when it's trying to do. But if you hit Debug, it's going to bring you over to the line of code that caused the error. And this one's nice and easy because there's only one line of code. And so we obviously knew that this was the cause of the error. But if you had a macro with hundreds of lines of code, this would take you directly to the line that caused the error and highlighted yellow. Another good thing to know here, and I'll make this bigger is if you come to this screen, you'll see that this says break, and that means this is in Run mode when you have a yellow arrow here, that means that this is live and it's trying to run a macro or it's in the process of trying to run it. If you click play is going to continue down your macro from where the yellow arrow is. So if I click Play, this is going to continue to run. It still has an error here and I'll hit end. And so you see that break went away, and that means it's no longer trying to run a macro right now. So I can better illustrate that. I'm going to put debug print message here, one. And then on the other side of the statement, I'm going to grab this unquote message here too. And if I click run, we get the error again. I hit debug. And you can see we're on this line here where the error is. When I type debug print in a message. You can see it shows up down here when it runs that line of code in what's called your immediate window. And so if I hit stop and then run this again, it's gonna do the exact same thing again, is going to run this first line of code, gets stuck on the second line of code and there's your message. If I fix this problem, however, I can come over here. I'm going to take this folder, I'm gonna delete it. Now. If I continue running, I'm going to continue running from this line. We're not going to see message one here. The folder is going to successfully create and then we're just gonna see message two. And there you go. And these messages just the pen to the bottom. So you saw a message to show up here. We didn't get the error because there was no longer conflict and existing folders. And there's folder one again.
11. 1.10 Writing Data to Cell: Alright, so in another video, I showed you guys how to take text from your spreadsheet and use it in your macro. The opposite side of that, that I want to show you guys is how to use your macro and then write something back into your spreadsheet. So I can do that. If I take a range and I can take anything, I'll call it range be ten. And say dot value equals put text in btn. And I'll put that in quotation marks. And I run this. There you go. It's as simple as that to write taxed with your macro into your spreadsheet and combining some concepts together again, you can grab a cell. I showed this in another video. You can call it, let's call this phone. And then if I come over here, I can actually change range to phone. And if I run this, there you go. And place the value into your phone reference cell.
12. 1.11 Variables: What I've showed you guys before is how to reference information from the spreadsheet. So right here I have this example macro. When I click it, it shows me a message box and it takes the value of cell B1 from in here. Next thing I want to show you our variables that you can use directly in your VBA code. Because sometimes you don't want to pull information from your spreadsheet. There's information that you want to handle only in your code. So I'll come over here, creates a new lines. We'll clean that up. Denotation to create a variable is dim, variable one. As we're going to make this, a string type is string is basically text. And so now that I've declared this variable, I can now use it. And I can type variable one equals different text here. And it's now anywhere I use this variable, one will be referencing the string that we declared it over here. So I'll come over here to our message box. I can change this reference that is right now referencing directly to our spreadsheet, the cell B1. I'm going to change that to variable one. And if I run this, the other message box pops up with the value of our variable.
13. 1.12.1 Basic Math Integers: And our other video we showed you that you can create a variable. I first declaring it with this DEM variable as string. And then you can assign a value to that variable, and then you can use that variable. In this case, we put it in a text box. And so if we run this variable, one is different text here. Another variable type other than a string that you'll use very often are numbers. Very often you'll be using integers, which are numbers without decimal points. So we can change this to an integer. And since we've declared variable one is an integer here where we assign it some text that's not going to work. And so if we run this, you see we have an error. It's a type mismatch. And that's because we are assigning a string, a variable that is an integer type. And hit debug, it shows you the line that went wrong. We're just going to stop running this here. I'm gonna change variable one value to one. I'm going to create a new integer. And that's called result. And we can do some extremely basic math here. Result equals Variable one plus variable one. The result is the result. We'll run this. And there we go. We created a variable, assign it a number, did some math. And here's the result.
14. 1.12.2 Integer vs Long: This should be a quick video. And this one I just want to show you the difference between the variable types integer and what I'm more
often used now, which is the difference between the variable type integer
and a variable type. I'll set the new
one here as long. In the last video,
we introduced to the very basic ideas of variables and doing
something with them. And I used an integer. But a lot of times you'll see me use a similar idea
to the integer, but instead, I'm going to
use the long variable type. And this is something that's
very specific to VBA. If you get into other
programming languages or you already have some
familiarity with them, you'll know that integers
extremely common. And it's used all the time. It's basically a whole number. But a quirk about
integers in VBA is that they can only
be values between, here's the exact numbers, but basically
negative 32 thousand to positive 32 thousand. So I'm just going to demonstrate
that here really quick. If I make this cell over here, 32 thousand, I'm
missing a 0 here. And then I have this
very basic code where I'm setting
i as an integer and then setting I as the
value inside cell A1. We set i and then we
print it out here. Now that works fine. But if I come over here, just make this 33 thousand, which is pushing it outside
of our range over here. And I run this, I get
this overflow error. And that is telling
us that the value of 33 thousand can't go
into the variable I. So I won't get into the
computer science of it all. Basically, if you
are interested, you can read about it. It has to do with an integer
being a 32-bit storage type. That's probably not what you
want to get into right now. All you need to know
is integer types have this limitation within this range of numbers
it can accept. Now, meanwhile, along is
the same exact thing. Only it can handle
higher values. So if I change
this to j instead, which is the long
variable that we created. Now, J became 33
thousand really easily, and it did our debug print here. So we're able to use
these larger values when we use the long
variable type over integer. So when you see me use this probably fairly
often in the future, you'll know that it's basically the same thing as an integer. Only without this limitation.
15. 1.13 If Statements: Now we're gonna go over if statements. This is where we're actually adding some intelligence to our code, where the code is able to make a decision for us. What I wanna do is I want to have our code reviewed the number that's in this cell here, and then tell me if that number is greater than ten or not. And this is something that you can do with a formula. But I just wanted to show this as an example that you can do also through a macro. And with the macro you can build this up to become much more complicated than you can typically with a formula. So to ceiling is way higher. So I'm going to come to my macro. I'm gonna create a variable to hold our input value over here. I'm going to write dim input value as integer. Input value equals range B7 dot value. And now for our if statement, we're gonna type if and then notation for an if statement is if parentheses condition goes here. I'll come back and fix that. Then it doesn't like that because of course this isn't a real condition. And if, and so if we create our condition here, input value is greater than ten. Now we've created a conditional statement where we're only going to run the code that's in between the if and the end if, when this condition is met. And if we meet that condition, will give the result in cell B8 equals yes. And I'll step through this code. I'm going to use the FH shortcut. Where you go, we'll run this first line. We declare the input variable. We check the if statement, and we did not meet the condition here. And so we skipped over this line of code. Now, let's try a different number in here. We'll say 11. And if I run this again, and right there you can see since this condition is met, now we're in this statement and we're going to run this line of code. But we're going to have a problem here. And so if I come back here, but the number three and I run this again, they actually ran a random split seconds, so you might not be able to tell. But when we fall along, what we know happened is that the value three did not meet the statement. And so all it did is leave this value in here. We didn't add another yes, but you can't tell. So I'm just gonna put a message box here so you can see that it actually ran and nothing happened. And so we don't want yes. To stay in here. That's from the last time we ran this when the input was 11. What we're gonna do is we're gonna create an if else statement. With this else statement, the code that goes in here is going to be what happens if you don't meet the conditions of the if statement up here. And so if we don't meet that, we're gonna do the same thing. Equals no. And we'll run this again, complete. And you can see now when we don't meet the greater than ten condition, it runs this line of code, the else statement. And so if we go back to 11, run this again, it'll switch back and forth.
16. 1.14 For Loop: In this video, I want to show you guys for loops. And these were the automation really happens where you can accomplish a ton of actions automatically. And so first, I want to show you an extremely basic four loop. We don't even need any content that's over on our spreadsheet on the left. The for-loop notation is four. And then you need a variable which is essentially your counter. Typical notation is to just use the letter i equals 123, let's say. And then next I. And so I'm going to create a message box here that displays the value of i. And when we run this, the first time we go through this code I is going to start at one here. This is going to display a one. And then when you get to this bottom of the for statement, is going to increment the variable i by one. And then so it will come back to the top of the loop and it will run with i equals two. And it'll do that all the way until i equals three. And then it'll be the last time that this runs. And it will know to leave the loop after you reach this criteria over here. And so let me run this. Here you have your message box of i equals 123. And then we're done. Now I want to show you how you might be able to use something like this to interact with your spreadsheet. So here I have three messages. So I'm gonna create a heading for this list here, bolded control be control u. And here I have three messages, and I'm going to call this message list. Right now this cell here is named the message list. So I'm going to use that as a reference point. For now. I'm going to comment this out. And I can comment this out by putting these apostrophes over here. And that turns these green. It makes them comments so they're not going to run. If I press play again, there's basically no codes and nothing happened. Something I haven't showed you yet is that if I reference this cell message list, which again is sell eight over here, I can use this function that's part of a range called offset. And you see it gives you a row offset or column offset. And so from the cell that you're referencing message list here, I can give it a number which is my row offset, which tells it that you want to offset this cell by one, which will bring me down here to message one. Message popped up again and again because I left this line when it wasn't a valid line of code. I'll come back to it here. I don't want to move my column at all because we're still in the same column. If I typed one, we will be moving one cell over to the right. We'll leave that as 0 value. And if I'll wrap this in a message box again, so we get the CD output. I'll run this. And because we're at message list, we go down one row offset. Here we see message1. Now comment this out and we can use the same idea in a loop. I'll come down here. And the other thing I'll show you really quick as I'm typing in these apostrophes. A faster way is if I go to view toolbar and edit, this gives me this floating toolbar over here. I can drag this up top and this button right here, we'll comment or the one to the right of it. We'll uncomment a whole block of code. But so how can I use this offset that we just demoed in our loop? So in our message box, we know the value of i is going to run three times with i equals 12. And then three, we're going to add a cell reference just like above here, message list. And instead of putting one here like we did above, we're going to use the variable i that changes every time the loop runs. So I change this and make this an I. And so each time this loop runs through, the value in this statement is going to change. And so I'll run this here. First loop message 1, second loop message 2, third loop message three. And so as we take this idea and apply it to more complicated macros, you can start to see how these loops can be used to perform repetitive tasks.
17. 1.15 For Loops Continued Automation!: In another one of our videos, I showed you how you could use the macro to create a folder. I want to combine these two to show you how useful the for loop can be. And so I just created this example where if I run it, it's going to loop through the messages in each one of these three cells. As it goes through this for loop three times. I'm, I come over here. I'm gonna change this to folder list, folder one, folder to folder three. This is called message list. I want to delete this reference here and change this to be called folder list just for accuracy. I showed you in another video you can come to formulas may manager in this spreadsheet, here's all the named cells that I've created. Here is message list. I can delete this reference here. Yes. And you can see this cell name has gone back to its original a eight addressed. And so now I'm going to name this two folder list. I'll go back to my split-screen view. And now we can take the same concept before we had this message box. I'm gonna change this to make directory from our other video, you may remember that this is how you create a folder in our system. And the input to the make directory function is the path where you want the folder to be created. And so I made a folder already called C Drive example. That's the folder we want our new folders to be created. And this use the ampersand, combine our strings together. We need to change this to folder list. And when we're looping before, what we're showing is that every time this loop runs three times is gonna go 123. And these cells over here. And so now it's gonna do the same thing only instead of showing a message box is going to be appending those folder names to the path that's used in our make directory function. So let's give this a try. There you go. It looks like nothing happened, but that's probably because it ran so fast. It all just happen and we didn't hit any errors. If we come over to our example folder, there we have it fold or 123. And so I'll delete these. And so you can see this run in real time. If I run this, there's are three folders based on these names. And if we wanted to get really crazy, I'm gonna come here. If I grab this bottom right corner, I can drag this down. You see Excel knows that I'm trying to increment the number there, or at least it's guessing. I can have ten folders. I want to run this loop ten times. Will show the folder here. Hit run. And there's your ten folders. And now we're really getting going on the automation.
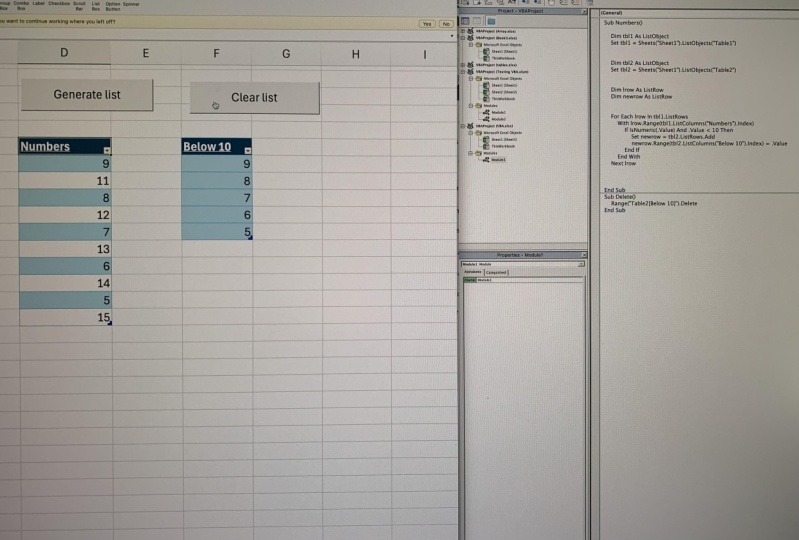
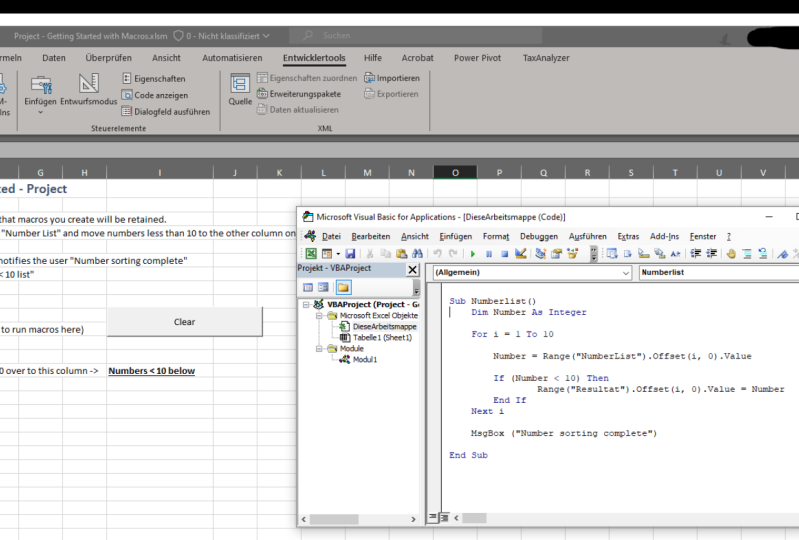
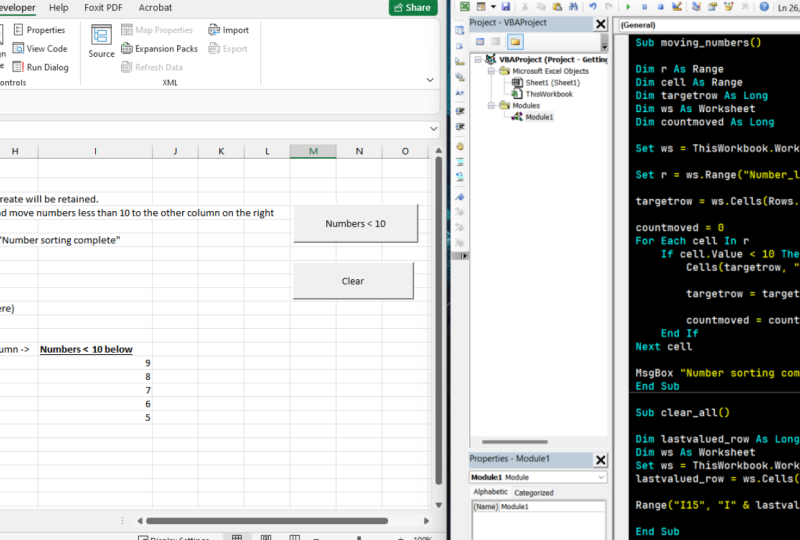
18. 1.A Class Project 01 Description and Tutorial: Hi everyone. If you've made it this far to this video, that means you've completed all the videos I've posted so far for this class of what I consider the introduction to Excel macros and getting started from having never worked on them before. I came up with this project which will incorporate many of the concepts that we went over in the other videos for this class. And so the project that I'd like to give to you guys is that I have a list of numbers over here. And with this list of numbers, I'd like you guys to write a macro that takes this list and transposes these numbers over here on the right. But to only bring the numbers on the right that have a value that is greater than ten. And in here you'll also have some other things, such as starting with the fact that this is an XLS file type. And you can go over the instructions at the top to give you some goals to go by and some hints as to what to do. I'll also ask you to create some buttons to run your macro to perform the task. And the also clear the list so you can run the task again. And then when the macros done running to pop up a message box that will let you know that the macro is complete. So that's the project for you guys. I'll attach this file to the class, and so good luck with it and leave any comments and the conversation for the class if you have any issues or questions along the way. And so what I was going to do is I was going to complete this assignment so I can post it as the answers for you guys if you need to follow along or need to cross-check. And I figured that I just film it while I complete this project. So if you guys don't want to cheat, you can stop this video now and go straight to the project. So now we'll go ahead and try to accomplish this project. I'm gonna come over to the Developer tab, go to Visual Basic. There's no module in here yet. And so in the class We actually had a module created from recording our first macro. Without that, I can right-click, go to Insert, go to Modules. And here you go, we have our code editor, which you guys, you've recognized them, the classes. I'm going to create a subroutine. I'm going to call it sort list. There's the subroutine. And so I want to reference this list. And I don't have a name for this cell, as we mentioned in our classes, we can reference this cell is just before teen, but I actually want to give it a name to give it a more decisive reference. So I'm going to call this number list. Just to prove that that works, I'm going to type value here. I like to use this message box that's just, just to check on my code. If I run this, there you go. We have number list, but we don't actually want to use that cell. We want to loop through each value of these cells over here. And so I'm gonna type offset. I'm just going to type one for now. And I'll run this again. And here we go. We have number nine, which is the first item in our list, because we are one down from the number list cell. Now I know that I'm going to want to loop through this list here because I'm going to want to check each value to see if I should move it over to the list on the right. So for i equals and I want to see how many times I need to run this loop. If I highlight this, there's a little Excel trick here. If you highlight this on the bottom, it gives you some basic facts about what you've highlighted. So the count is ten, so I'm going to want to run this ten times. I equals one to ten. So I'm setting up a loop that's going to increment i ten times. I'll tab this out and I will set an endpoint for the loop next, ie. And let's try this out. Nine. So I see the mistake I made here is showing a message box showing nine over and over. And I think this is going to run ten times because that's how many times the loop is going to run. So let's click through this. And that's because I left. This offset is one. And really I want this to be i. And so the value of i will change every time this loop increments the variable I. And so if I run this again, here's 9118 and they go, I can hit enter here. And you see we incremented a loop that goes through each one of these cells. Next, we know that we want to put our results over here. And so just like with the number list, I want to create an absolute reference for this cell. I want to give this cell a name. And so I'm going to call it results. And so just like we were able to use the offset function to reference these cells going down. We can do the same thing with our results list over here. Let me get a little more room here so we can view our code better. And so I can reference this cell right here, for example, by referencing range results. That offset in just like over here where we use the variable i to increment the list downwards, I can use I again, dot value. And so now we're talking about the value of this cell here. And on the second time the loop runs, i will be two and we'll be talking about this cell down here. And so just an example will make the value of the cell i. And so what I expect to happen is every time this loop runs, i is going to go from 1234. And that will also offset the rose down. So you'll have one through ten down this list, right? So we're going to open this up a little bit. Then let's test out this code here. And so we're going to hit Run. And there you go. You see that as this loop increments, it is placing the value of i as it goes through the loop into this list over here, because we are offsetting from the results cell, which is the top of this list. Now, we don't actually want these numbers in here. What we wanna do is be moving these numbers from this list over to this right list if the value is greater than ten. So let me create a little bit more room here. And so as a stepping stone, I'm not going to bother trying to figure out whether the number is greater than ten. Let's just add this code and we'll update it so that we just move these numbers over to the right list. We won't bother checking whether it's greater than ten. As I mentioned in my classes, I like to test the logic app a little bit at a time rather than just going straight for the final product. And so here we know we are setting the value of the list on the right, instead of setting it as just I, we know we're getting the value. We got an error there because this is not a valid line of code. We know where giving a message box where we have the value of the number list over here on the left. Here we're setting the value of the list on the right. And so if I combine these two, there we go. Now, the list on the right will just match the list on the left over here. And we're not going to bother showing this in the message box anymore. So I'm just going to comment that out. I can delete it later. And so let's try running this and see what happens. Alright, so you guys might be able to see the problem I'm having just as I'm sharing these windows left and right, my icons are disappearing up here. And that's just because I'm trying to see everything on the left and I'm scrunching everything up on the right. So what I'm gonna do is I'm actually going to delete these columns over here. And we'll just go from memory because we know what we're trying to do here so that I can show you guys everything on the same screen. So here I make this window wider. I see your play button again. Let's run this. And there we go as we loop through each row or simply placing the value of this cell into the cell on the right, and it goes down this list back and forth. And now we want to combine the if statement. So we have this code executing, which brings values from the left to the right, but we only wanna do that under certain conditions. And so I can create an if statement. Where. And again, I'm getting error messages because I'm leaving incomplete lines of code here. I can grab this, which is the value of the item on the left. And say, if we're grabbing this, I'm going to copy and paste it up here. And we want to say if the value of this number on the left is less than ten, close the condition. Then we're going to perform a line of code which is moving the number over to the list on the right. And we're going to end that with an endif. And so will clear that we'll try running this. And there you go. It looks like we have a successful macro here. But one thing we wanna do to clean this up, this is fairly long. And so I'm writing this statement twice here. And you don't really need to do this, but to practice one of the concepts we learned in our class. We can create a variable to hold this value. And then we can use that in these two places instead of the full statement of the range, offset and value. And so we'll declare a variable dimension. We'll call that variable number. And we'll call that an integer because none of these have decimal points. We'll call number equals. And we'll go to range, offset and value. Which is the number that's in each of these cells. And actually one thing I can do here, because this loop is going to run ten times. I don't want to declare this variable ten times. I only need to declare once. And so I can move it outside of the loop here. And now numbers declared only once, but each time this loop runs, the value of number will be reassigned to each item on this list as i increments through the list. And so these references here is the same as this. So instead of writing the full range reference, I can just write the variable number. And I can change that in these two places over here. And so let me clear this list. I hit play. And there you go. You see the same code worked only we simplified it with the use of this variable, the variable name, number. So that basically completes our macro. And so now we'll just tidy up with the other bullet points on this project. So we want to save this from an XLS file type, which is the default Excel file type. And we want to make that a Macro Enabled Workbook. And so we're gonna go to Save, Save As. And we'll change this to a Macro Enabled Workbook. And there you go. And now when I press Save, I don't get an error message telling me that my macro is going to be lost because of the file type. Next bullet is generating the macro. That's what we've already completed. We want to create a button that run this macro so that we don't have to keep going. The code editor and hitting play. In other way we could run this macro is clicking macros in running our sort list macro. But to make it even simpler than that is, we want to go to Insert, we're going to add a button here. We're gonna create that button. The macro we're gonna run is sort lists. But actually I want to show you guys, I can click OK here and that's going to make this button run the sort list macro. But if I want to change that, I can right-click this button, go to assign macro, and then I can change it anytime two will go to sort lists, click OK. We can change the text of the button to sort lists. And we'll try this out. I'll clear this, highlight the leet sort list, and there you go. Now we're running the macro from a button. And then the last bullet we want to do is to create a clear button. And so I have a little typo over here. I'll change that. We're going to add another button, will go to Insert button here. And this is why I showed you before that you could assign the macro later. We do not have a clear list macro yet. So I'm just going to click Cancel. It still creates the button but doesn't assign any macro. I can click this and it doesn't do anything. Will change this text to clear. And we still need a macro that's going to clear this list. And so we could go into the code editor and type out a new subroutine here. But what do we really quick and easy is if we just record a macro. So I'll come up here, I'll click the Record Macro button. It defaults to being named macro one, but I can change this to clear list as our new macro name. I'll click OK. I can take this list, highlight it, hit delete, which clears a list. Will stop recording. Now if we go to this Clear button, I right-click this, go to assign macro. Here we have our new recorded macro named clear list. I'll click OK and that'll assign the button to the macro. And if I run this again, there's our sorted list. It clear. And now the list is cleared. Sort list. Clear the list. Alright guys, so there you have it. There's the tutorial on how to complete our project. Hope you guys enjoyed this class. Please leave any comments and the conversation. Let me know any questions you guys might have as you're going through the class. Or any excel or Excel macro questions that you guys might have on any other topics. And I'd be happy to answer them. And it'll give me new ideas for more classes to create. Thanks a lot. Appreciate you guys taking the time.
19. 1.16 Esc Key to Stop Macro: In this video, I just
want to show you a couple of things
that might help you as you're programming and making mistakes and
troubleshooting, which is how to stop the code
in the middle of running. So what I set up here
is a very basic loop. It has our index and
it's going to count I from one to 100 thousand. And if I run this, what we're going to see is
that it takes a while to run. And you might set
up a situation like this intentionally or not. But you might do something
where your macros running for a really long time and you've changed your mind. We've done something wrong and we want to stop
what we're doing. So in fact, I'm going to
bump this up to 1 million. So it's really going
to take a long time. I'm gonna hit Play here. Then we can see that this is going to take a very long time. And so we want to stop. I just hit the Escape key. Actually. This is a decent example
because it did not work. You see how this kind of became unresponsive
in terms of windows, you can see you probably recognize this from just
using your computer, that everything's
frozen out right now. Basically, it's
trying so hard to run that it's taken
over your computer and now we can't
actually run anything. What I was trying to
show you is that if you hit escape while
the code is running, then you're going to stop
the macro in theory. But we do hit these situations where everything's frozen
up and it's unresponsive. It's not even
taking any commands when you press keys
on your keyboard. It's just not receiving them. In this case, we're kind
of stuck, to be honest. I'm gonna leave this
demonstration in the video, even though it's
not what I planned. And I think in this case, because it's so simple, it's
still trying to do the work. So now it's just stuck in this really long
process where it's doing stuff for a
very long time. And eventually it's
either going to crash the Excel program or
it's going to just keep working on this and eventually it's actually going to
count to a million. And then we'll
probably see that over here in our immediates window. In this situation,
we're kind of stuck. We could wait it out or
we could do Control Alt, Delete and end the task. And basically forcing
Excel to close. The problem with those
situations, of course, is if you did not save
recently than you might lose the changes
you've recently been making. So I'm actually going to
go ahead and end this. Let's close out Excel here. You can see Excel is using up all the CPU because it's still
running this crazy loop. So this is a good
demonstration of the situations that
could happen if you accidentally create
really long processes or write code that's
not very efficient, gets into these loops,
installs everything out. Now I'll show you what I actually originally
wanted to show you, which is that as
we run this loop, then if you catch a quick
enough before it takes over your computer and stops
receiving commands, that you can actually stop a macro that is
currently running. And you can do that by
hitting the Escape key. So it seems like if we
let this run too long, it's going to take
over my computer. But as I hit play, I can hit escape really
quick if I realize it. And you see Excel was
responsive at the time, and it's telling me that
I interrupted process. And here I can hit End, which is just going
to stop everything. Or if I hit the bug, it's going to stop right on the line of code
that it was running. What we saw here is
there's actually a line in these
situations that goes too far and then the system could make Excel unresponsive, and then this
shortcut won't work. But it's basically
the escape key. Now another little
situation that I think is worth showing is if I do a message box
here and I hit run, I tried to click, Okay, if I hit Escape here, it's not exiting the code. Instead it's just
exiting the message box. And I'm kind of stuck in
this message box loop. In situations like this, I just hold down the escape key and just press it and hold it. And basically it's sending the Escape key however
many times per second. And then it's catching
the escape right in-between when the window is closing and the next
one is popping up. So in-between that time, it's actually getting
the escape command that we wanted Excel to receive. Meanwhile, while the
message box was open, it was thinking when
we press Escape, it was just trying to
close the message box. So you can also hold down
escape if you end up in a weird scenario like this
with a recurrent pop up. That's all I wanted to
show you for this video.
20. 1.17.1 Do While Loop Intro: One of the previous lessons I showed you a four index loop, which we already
have a video on. And this is the most
common type of loop, which is you have
a for statement, you have a index counter
which is typically called I. And then you go from,
in this case 123, and it's going to loop and increment upwards one at a time. So if I run this with F8, you see we go through this loop. I equals one. When
we say next I, that's going to
increment I by one, so it's going to be 23. Then that is the
end of the loop. Because I is going
from one to three. We already know that you can
change it to ten over here. And I'm just gonna go ahead
and run it all at once. And it goes from one to ten. In this video, I
want to show you that there are different
types of loops. There's more than just what I'm going to show you in this video. But honestly, I don't use a
lot of the other variations. But the other major one
is the do-while loop, which doesn't have
the word for in it. So that's just so it's
different in that way. And I'll show you what's
different about it. There's another one I
use which will shoot another video about
called the for each loop. But here I'll show you
that do-while loop. And so it has a similar syntax where you have these statements
that wrap your loop. And then in your indentation
between those statements, what we're going to
execute in that loop. But in this case, you see it's a little different that
we still declare I. But here I set I equals one. Basically what's going
to happen is instead of saying I is from one to ten, I'm actually just going
to push this out. So it's not a distraction. We have a condition in here, and this loop is going to run
if this condition is true. So this is more of a
true false statement as compared to our for-loop, which doesn't have a
true false statement. It has a counter that goes from something to
something else. In this case, we're
going to recreate what we showed in
our four index loop, where we have a condition
where we're going to run I is less than three. That'd be similar to overhear. But what you'll notice
is in this loop itself, it's going to run until
I is less than three. But it does not say
outright what I starts as, as part of this loop statement. So what I have to do is outside of our loop
statement over here, I'm telling it that I starts as one before I even say
anything about the loop. So it's outside of
our code for loop, what the condition
is being set up as. Now, if I hit F8, you'll
see that i equals one. If I is less than three, we're gonna go into our loop. We are less than
three right now. So we're printing it out. And then here I have to
tell it to increment. Over here. We saw that I would increase by one whenever we hit
this line of code. And instead, that's not going to automatically
happen here. We have to write our own line of code to increment I by one. You see here as we
loop through three. And then now as we go
through I equals three, sorry, I equals three when we last did the debug
print over here. And then we add one more to I, making it for at this
point in the code. And then it's going to jump back up to check this condition. See that it is not true. Then jump out of our loop. Then with this setup, we can do the same
thing we did before, which is change this to ten
just as a demonstration. And if I hit Play, there we go. One through ten. Just got mixed up just because I had inflammation
in there already. But if I hit play, we
go one through ten, just like we did with our four
index style loop up here. But you can see in the
way that it's written, the setup is a
little bit different and what we have to do is
a little bit different. Now there are specific use cases where the do-while loop is really useful instead of the
four index loop up here, which I can show later. But what I'll show you now is a reason that I
generally default to using a for-loop over the
do-while loop most of the time. And the big reason for that
is because this is going to loop until this
condition is false. So it's going to keep running. Whatever this is true. I have a line of code here
where I incremented i. But I want to show you
if I come over here and forgot to type that line
of code and I hit F8. So I equals one here and I'm
stepping through the code, I is less than ten and
we print out here. We're going to check
whether I is less than ten, which it is, because
it's still one. We print out here. If I just keep
looping through here, you see every single
time I is equal to one, we're looping as long
as it's less than ten. So this condition is
going to go forever. I never changes. And the true or false condition over here is based
on the value of I. So this is going to
be an endless loop. I can hit F8 forever. So the do-while
loop has this issue that's vulnerable to this
endless loop over here. So you might wonder
what happens if I hit play instead of hitting FAA. So let's go ahead and run this. You see this is blinking the
number one here because it's basically just showing an
endless column of ones. And now my computer
is freezing up. Excel's freezing up. I can't click anything here. And this is well on
its way to crashing. I won't even bother waiting this out and see what happens. But this will go as long as you're willing
to wait basically. And eventually Excel's just
going to crash and tell you that there's a problem like what happens when
Windows stalls out. So that might happen
on its own or you might wait five
minutes like this, but it's going to go forever. The way out is the classic
control alt delete. And then we're going
to have to force shutdown Excel for
this to actually stop. Or just wait forever really. This is the file that
we were working in. I have this stuff set up for different demonstration later, but that is a big reason that
I avoid the do while loop. If I don't have to use it where there's not
especially a good reason to use it because it's
really vulnerable to setting up a condition where you accidentally have
an infinite loop. And if I use it, I have to make sure that
you set up a condition that will actually change
whether or not you get out of the loop
eventually or not. Now that we have
are increment of I in here correctly and our
loops running like it should. Again, there's one little
variation that I'll show you, which is that right now we
have this statement over here, which means it's checking the condition before
the loop starts. So if I said
something like this, meaning we're going to run if I is less than or equal to 0. And we know that AI is
going to be one up here. So if I hit F8, I equals one in this condition
is false right away, one is not less than 0. So you see it skips out of loop and just nothing
happened at all. Another variation of this is I can take this
while statement. I'll cut it and
paste it down here. And even though this statement isn't met at any
point in the code, it's going to run our loop
because it's not going to check this condition until
we get to the bottom here. So if I hit F8, I equals one. And then we're going
to perform this task and print out one. Even though I is not less
than 0 until we get here. And then it's going to skip app. And basically whether or not you put this condition at
the top or bottom, it tells the code when
to check the condition. And the main reason
to set it up this way is because you want this
code to run at least once, no matter what the condition is, even if it's obvious, like what are simple
setup has here, that the condition
will never be met. So this code will always
run at least one time before it stops and it doesn't
end up actually looping. So that's the very
first introduction to this different loop style that is called a do-while loop
for obvious reasons here. And next is a little follow-up video where I'll
show you the use cases, why you might want to
use this specific style.
21. 1.17.2 Do While Loop Use Case: In the last video, I showed
you the basic concept of a do-while loop instead
of R for index loop, which we had an
earlier video on. Here, I want to
show you a use case example that will show why you might want to use a do-while
loop for certain processes. In this case, I have
a little bit of example data on our
sheet over here. And what I'm setting up is a basic subroutine
that's going to count how many rows are in here and tell us the number
of rows in our data. So I've set up
already a subroutine here that uses are
for index loop, which brings I from one to ten. Then it is taking our range A3, so overhear and then
checking using our index, I gotta go down each cell and check whether there's content. And it's gonna go down. And then when it finds a cell
that doesn't have content, it is going to say that the
last row is one above that. So in this case
it's gonna go 1234. See that there's nothing
here and stop and say, my last row count must
be four minus one. And the answer is three. So that's what we're
gonna do here. I'm going to hit F8 to slowly
go through this at first. You see I equals one. I'm going to set this
variable called test text as our offset value. So we have a three and then
since I equals one to start, we're on this cell right now. And then it's telling
us the text here is 162020, since it's a date. And then it's checking
whether or not that they were that cell over
here is blank, which isn't. So now it's going to continue
to loop in step down. And then it goes down to
the next one, which is 123. So it's not blank. It doesn't enter
this if statement. The third one, same thing. And now what we know from
here is we're on I equals for our text here
doesn't show anything. And so we enter
our if statement. The last row is I minus one. So three, we're using
this exit for statement, which means we're
going to escape our loop even though we
didn't get from one to ten. Because we met
this line of code. We're going to jump
out of our for-loop. And it says there
are three rows here. So now if I stop and
I hit Play again, it just happens really quick. There's three rows. If I did something like just
add another value in here, I can hit play again. And you can see it says
there's four rows. So that's the system here. Now, if I go over to this
other sheet that I have, there's a lot more rows
of information here. It's not so obvious,
like we saw before, that there were three rows that we could just count ourselves. This is much more likely
because if there's three rows, we don't need a subroutine
to automatically count. I know that we could scroll all the way down and
count it through Excel, but a lot of times we
might embed a function like this right into
our automation. So this might be one
sliver of code here in pages of automation that needs to figure out
the rows dynamically. So over here, you can
imagine this isn't going to work anymore because our
for-loop goes one to ten. And if I hit Play here, you can see it says
there's 0 rows. And that's because we're
going from one to ten. So 123456, all the way to ten. And we never hit a scenario
where the text is blank. Then so by the time
this loop is done, we've never hit the scenario where the text is
blank in the cell. And so last row just never gets set as
anything other than 0, which is its original
default value. You can have this situation. And the big thing
here is we don't know how many rows
this goes down. And so we have this loop
That's forcing us to tell us how many
times we can loop. There's a benefit of the
for-loop because we don't have these infinite loops that we
created in the last video, because there's always
an end to this loop. You basically always
have to tell it where it starts
and where it ends. So now we could do
something like a thousand and we'll
try to run it. So we just pick a huge number to check how many rows
and we still get 0. And that's because there's
more than 1 thousand rows in this table into the same
problem that happened at ten is happening at a thousand. So what we could do is just
make this some giant number. We'll call it 99 thousand. It's running. And we're
at 1290 rows here. And we come down here. 1293 is our Excel row. So that is the right answer. But we had this problem
where we didn't know what the end cap of this for
index loop needs to go to. And we don't want to always
just make up a number, although that's a completely
fine way to do it. You actually see at some points in videos I've
already recorded that might be farther in this class that I use
this method over here. Because it works fine if
you know that you're never going to hit over 99
thousand rows here, this is a fine way to do it. And then I still
avoid that problem. I showed you in
the last video of accidentally making
an infinite loop. The reason to use
a do-while loop, which I have set
up here already, is because I don't have to make up a number of
how far this will go. This loop will
happen indefinitely, and I don't have
to put an end cap of when to stop searching. So when you don't know when
you want the loop to stop, the do-while loop is just
going to keep checking. And so I set up this algorithm. Well the FAA through, which is doing the same exact
thing with a do-while loop. And I'm doing this
while my test text, which is checking
the information in our cell, is not blank. And so it's going to keep
looping while it's not blank. And then as soon as it finds
a blank, it's going to stop. One little thing I had
to do here is start. The test text has a start. And that way we actually would meet this
condition down here. Another way I could do this is to move this down to the bottom, just like I showed in
the previous video. So of course, there's a bunch of different ways to set
up these algorithms. This is going to keep looping. It's doing basically
the exact same thing, which is going down each cell. In here. We have to have a line of code that increments
i ourselves. But it's going to
keep checking these. And if I hit the play
button over here, it's running all
the way to 1290, which again, is
the right answer. So this is the most
common use case, at least for myself, that we
want to use a do-while loop. That's if we don't know how many times we
want to loop at all. And we can avoid needing to have this situation where we need to come up
with a huge number. And we just have
to pull one out of thin air and make it
up to assume that this is when we do assume that
we need to stop and then we need to jump out of the for loop when we meet a condition. Because if we don't have exit for which is going
to jump out of loop, this thing is going to go to
99 thousand no matter what. Because we don't
have any code that's going to cut the loop short. So if I come in here and click, you'll see there's no
more texts young here. And that's because it's still continuing to loop in debug, print out blank cells all
the way up to 99 thousand. And in fact, this is going
to last a long time. And so this ends up having its own susceptibility
to mess up looping. And in some ways,
the do-while loop here becomes the
cleaner solution. And in fact, you see right here, out of habit, I wrote exit do, which is the same notation as the exit for only
this is a do statement. So this will also
jump out of the loop. But now that I'm explaining
what I just did, I don't need the exit do while loop because by the
time we hit this, the next time it comes around, then we're already
going to test for this condition in
jump out of the loop. So for example, if I hit
F9 here and hit Play, it's going through
all of ourselves. If found our last
row, which is 1290, and then I hit F8, you'll see that we have up here
to test the text. In that condition is false
and we jump out of the loop. So in this scenario, I didn't have to put a line
of code to automatically jump out of the loop because this
condition was already met. Meanwhile up here, in order for me to leave
this loop early, because we have this ceiling that the loop already
thinks it needs to go to. We need to have this exit for wrapped
up in an if condition. So that only in a
specific condition, we exit the for loop
early. That's it for now. That's the basic demonstration
of the do-while loop and the most basic cases of
why you might need to use it.
22. 1.17.3 For Each Loop Intro: In this lesson, I
want to go over the four each style loop. So you see we have a loop
here that says for each. In the previous lessons, we've gone over the
normal FOR loops, which is the most standard
where you declare a variable that's an
integer. Or along. In this case, we usually
use I as an index, but we use other letters
or variables to. And as you go through each
iteration of the loop, then our variable increases one with the first value all the
way up to the last value. So if we step through
this code here, I is one, and then the next
loop, it is 234, all the way up to 100 here. And in this really
quick example, I'm using our index
variable to get the value of the cell that's
in row I and column one, which you can see over here, is going to be these values. So when I equals one, we have cell value
one, then 234. And that's because
our row number is the variable that's changing through each iteration of. This is something
we've already gone over in the past lessons. I'll just hit F5
and run this all the way through and we loop
through all these variables. I'll clear this out now. There's this other type of
loop that I use very often. It is called the for each loop, it's not used as commonly, so I'll explain it and show
you the use case for it here. And here I already
have a written where you have a object
that's a range. Basically the for each loop, instead of having
a index variable that counts from a lower
number to a higher number. It takes in something over here on the right
side of the statement, which is a bunch of objects. And then for each is taking a single object to get
some real-world analogy. It might be something like
if you have a brick wall, you might say something like for each break in wall of bricks. And then you have next
brick is our notation here. And it's basically going
to iterate through every unit in a group of units. Hopefully that makes some sense. I think this one up on the fly. What I have here is I
have a range of cells. So cell A1 through a 100 is going to be all of our cells that
have values here, which we already saw
in our previous loop. And we created a object
variable for a range here, which arrange is a cell
or group of cells. So this expression right here, for each range, in this range, a one to 100 is
basically saying for each cell in the range of
cells A1 through a 100. And then we take this range and we're going to debug,
print out the value. So if I hit F8 here, value one, and then the next time we
go over to this range, we're basically in cell two over here because we're just
gonna go through each thing. In this group of things. You see value2, value3, value four, and so forth, as
I've looked through here. Now run this all the
way through and you can see we go all the way to 100 because we've gone through every unit in this
group of units, which is A1 through 100. I can even add here,
maybe add some clarity is our range has all these
different properties with it. I can say something like debug, print out our address. If I clear this out
and hit F8 again, here's our value one, and you can see the range
address is A1, A2, A3. Because we're going
through each cell in this group of cells. The difference here,
as you can see, that there is no index. And I'm not telling this loop when it needs to start and
when it needs to stop. Like here, we need
to say from one to 100 and we need to know is
called our lower bound. Upper bound. But here the loop is
just figuring out how many units are in our
group of units over here. And if I did something
like A1 through B10, 100 for example, I can do this. And let me stop this so
we can start it again. Figure this out down here. We have value one
and our dresses A1. Now we have a blank
in our dress is b1. So let's come over here. A2, B2, B3, B3. And you see that this thing is making the
decision on its own. A1 through 100 is this
all the way down to 100? And as it's going through, each cell in this group of cells is going
from here to here, to here to here and so forth. And it's figuring out what cells are in
this group of cells. That's this range. We can run this. So that is the main idea of a foreach loop does just
a quick introduction. You take your group
of things and it's going to go through each thing. And then you can
use this variable inside your loop is typically the reason
you want to do this. And you don't have
to worry about these numerical index numbers
that we're using over here. It figures out this unit
breakdown for you with the loop. Another use case here that I've prepared is just the same thing. I'm gonna do a index-based loop, which is the more common style. And another use case
for the, for each loop. So here, if I come over here, you see I have these
sheets, 12345 over here. I'm using my index. And if I hit F8 here, I made a typo over here. This is next, I see our next is always the
thing our loop is based on. So since we're doing a for loop down here, I
have to say next, I, if you come up here
for each range, when I am ending my loop, I say go to the next
range. Over here. Over here, this is going to
run from I equals one to the count of worksheets
in this workbook, the worksheets and then
the number of worksheets, which we see over here
is one through five. So if I run this, I equals 1234 and you see it's selecting these sheets for five and it's activating these
down here at the bottom. And then the same
concept with the cells and the range of cells
that we did before. Instead, I can do this
other notation where I have a worksheet object here. And then we're saying for each worksheet in our
group of worksheets. So this over here means all the worksheets
in our workbook. Then I can use this
worksheet object here. And through each iteration is going to go through
each sheet over here. And then when I say activate, it's going to activate
that worksheet. So if I write here, Activate sheet one which is
already activated now 2345. So that's it. That's just a basic introduction
to the, for each loop. The magic of it is that it
takes a group of things and figures out how many of the
single unit is in there. And it comes out
with that for you, much like our example up here, all we have to do is change our object over here on the
right side of the foreach. And the loop itself
would figure out how many subunits are in this
group of units over here. So hopefully that
made some sense. We'll add more to our explanation of
for-each loops as we go. But this is a basic
introduction of what it is.
23. 1.17.4 Variant Variable Type: In this lesson, I want
to introduce you to the variable type in
VBA called a variant. And to do that, I'm gonna do a couple of demonstrations with just what can go on with
different variable types. You've already seen us
use integers and strings, which is really common for variable types and every
programming language really. So I've created a couple
of them over here, two integers, and then this
string variable over here. Then we have these variants
which will set aside for now. You can see down here
that I'm going to set our integer i1 equals the
value of what's in range A1, which is one over here. So you see our integer one
going to become range A1. And that works fine. You see I'm hovering over here
and it says I1 equals one, just like we would expect from this cell over on the left. Now I'm going to take
our text variable, which is our string. And I'm going to say
equals cell A1 also. So if I hover over texts, you can see it also
worked correctly. It is showing you
that text equals one. But there's a difference here
where you see over text, there's these quotation
marks because it's a string. That's because a string
can accept any characters, letters, numbers,
special characters. And so there's a quotation
mark showing that. Meanwhile, if I
come back up to i1, There's no quotation marks indicating that this is
just a numeric value. Which makes sense because I want is an integer,
not a string. Now we have I2, which is a integer up here. And we're going to set
that to be the value of cell A2 over here. And we expect that not to work. So as I hit F8, you see
we have a type mismatch. That's because i2 needs
to be an integer. But over here the
cell is the letter a, so the value here and the
variable type is incompatible. And so we get this
type mismatch. So this comes up all the time. Then we would have to
figure something out. Either this was a real use case. Either the wrong value is over here in cell A2 and we don't
want that value there, or we didn't create
this variable correctly and we should turn this into
a string or something else. So that's this type mismatch. This is all set up to
demonstrate these variants. So I created two variables
that are variant types here. So v1 and v2. I'm just going to skip over this type mismatch
line we have over here and jump over to v1. And they're both variant types. So you see I'm gonna do
something with V1 and V2 here. And I'm going to set this
V1 to equal the cell A1, which is the value
one over here. I run that. And if you hover over V1, you see it became one. And it doesn't have
quotation marks. So that tells you that
it is not a string. So this is very
similar to hovering over here to i1,
That's an integer. Now on V2, we're gonna
get the letter a here. So if I hit F8, you
see how this works. And this is the letter
a with quotation marks. So it seems like
this is a string, just like our TXT
variable over here. So that's kind of interesting. You see this doesn't have
quotation marks or V1. And then this does have
quotation marks for V2. And both of these variables
are a variant type. And now I'm going to debug, print out this message here. And this type named command
is something built into VBA that tells you the type name of the variable
inside of its parentheses. So as I hit this, I'll actually just
realized that I had left this debug print out. So if you saw that, that was a spoiler for what I'm
about to show you. So if I run this, you see V1 down here is
a variable type double. And then down here, the v2 variable
type is a string. So that's interesting
because we declared them up here, both as variance. What variants are, is
an open-ended variable, which will become
the variable type when you first use it. Basically, when
you declare this, it's saying that you don't know what variable type V1 or V2 is. And then the first time you
use it over here or here, it's going to try to figure out what variable
type you want it to be. It's going to give its best
guess in the side it for you. This is a workaround
so that we don't have to know our variable
type before we use it. That's what a variant is. It's open-ended. And then on your first
use of the variable, it's going to try its best to
declare that variable type. And you see after we
ran these two lines, then it became a double
end string respectively. So if I come over here
and I try this again, Let's comment out this
line that creates a type mismatch.
Let's try this again. I'm going to run through,
I'll clear this out. And you see the type here is empty because there is
no type in empty again. Now as soon as you use
these variables V1 and V2, in this case, it becomes
a double and a string. And that's because when it
sees this one over here, it's guessing that
it's a number. Interestingly, you
see it's making it a double rather than an integer. And so it's just
making its best guess. And this is one of
the reasons we don't always use variance
for everything, even though it seems nice and it avoids our type mismatch error, it's going to make
its best guess, which isn't always
what you want. So when it sees one here, it's assuming that
it's a double, meaning that it's
going to be able to potentially have
decimal points, even though there is no
decimal points over here. And then it correctly figures
out that for the letter a, it needs to be a string
because it can't be any of these other
number variable types. Now, if I did something like redeclare these,
Let's try this again. So do this one more time and we'll follow it
through its code. Let's swap these. So we're gonna do B and
then two over here. And then we'll swap
these two, A4 and A5. So you see we're kinda
switching things is first-time v1 is a number, and then this next time V1
is going to become a letter. So let's see what it does with its best guess at
the variable types. Come back here and we
have our empty, empty. We set them as a, as one and a over here. So it becomes double and string. And then now we're going
to set them as B and two. And then string in double. See they switched. And that shows you
that a variant, once we declare it,
it remains adaptive, even though we set it over here and the variant automatically
guessed it's variable type. We can then switch that. It's not going to create a type mismatch like
it does when we set a strict variable type up here for our standard variables. Now one more thing I want to
test is I want to come over here and let's see how it
adapts to excel over here. So right over here you
see this is a number. If I type a, it's
over to the left. I've got one, it's
over to the right. That's because our
cells are also trying to figure out what
type of value this is. Numbers end up automatically default to being justified
to the right of the cell. Now, if we come over
here and we change this to a text cell type, you see our number one automatically justifies
over to the left, just like the letter a would be, because text automatically
justifies to the left. So now let's go back here and clear this out again.
We'll run this. We have our empties. And now v1 comes over here and you can see
there's no quotation marks. So we can already guess that our V1 type is still a double. So that shows you
that it doesn't necessarily adapt
to the fact that the spreadsheet over here
knows that as a string or a text and is
justifying it to the left by the cell type up here. Vba kind of work
separate from that. So it sees the one over here, it's still making its
best guess that a one by itself is a
double and not a string. Which makes sense why
it would think that. Now if you did something like
turn this into one, e.g. we would expect that the
a, that's part of it. You see, we're getting this
error actually because this integer can't accept one. Let's just jump over here. And sorry, I'm doing a terrible job
with these messages here. V1 is a string because
one is not a real number. So that's it. That's how variants work. We don't overuse them because of this issue here where
it's not very rigid. And that can make your code a little bit more unpredictable, which can cause some problems. Just like how you might expect the number one to be
an integer or a long. And it's automatically
guessing that it's a double. It makes things a little bit
less explicitly controlled. So it's not necessarily
something we want to overuse, but it has its use cases indefinitely in certain cases will make your
life a lot easier. And we'll show some of those
examples in the future.
24. 1.17.5 For Each Loop using Variant: The last couple of lessons, I purposely went over the for each loop and also the
variant variable type. That's because I wanted to
do this quick demo here, which combines these
two concepts together. So right here I have
the same demo that I made in the for
each loop lesson, which is that we have a
for each loop here and we have a sheet variable
that is a worksheet. Notice that there's no S here, it's a singular worksheet. And we're going to say
for each worksheet in all the worksheets
in this workbook, you'll notice that worksheets here it has the S for plural. And just like our lessons,
we can step through here and you can see we're activating each tab as we
go through because this SH, object is incrementing.
Keep running. This here is incrementing as we loop and so on the next loop
it goes to the next sheet, the next worksheet, into
the next worksheet. What we can do here is
purposely mess things up. So I'm going to change this
variable to be a range. Just like the example before arrange is a cell
or group of cells. And what we expect
to happen here is that VBA is
gonna get confused because worksheets plural is made out of many
individual worksheets. It's not made up of
many individual ranges, at least not directly. And so we know that this plural worksheets has a bunch of different
single worksheets in it. It doesn't have a
bunch of ranges in it. And so we have a type mismatch,
which we have right here. Now I'm going to stop
this completely. And then of course,
if we go back in our group of worksheets, we do have single worksheets. So if we have our singular
worksheet over here, this is how it was working
in our first example. We're back to working correctly. Of course, like we started. Now with our variant
variable type. We went over that variance, we'll call dimension
V as a variant. Here is a undeclared
variable type that will just become the variable type
on its first usage. Not actually its first
usage on any usage, because we saw that it adapts
even after you use it once. So if I take our
variant variable here, v, Let's do this. And you see we got through
here without an error and it's working just like when we
had our worksheets variable. If I came over here and
did it debug print four, we'll do our type name here, which we use in our last lesson. And we're going to check out
what variable type V is. As we go through this loop, you can see we're
activating the sheet. And again, I've left
these messages up here. You can see that our
VIE variable has become a worksheet object
because the last time it was used was with
this for each loop. And so VBA is again
taking its best guess at figuring out what type of
variable that v should be. And in this case, we're
seeing that it can even figure out that
it's an object variable, not just a integer or a string or a double or
anything like that. It is using it. And realizing that in the context of what
it's being used as, it needs to become a
worksheet object variable. And so you see this
keeps working. So this is useful because in some cases you might
write a for each loop and you might know the object variable
here that we're using, which is a group of things. But you don't know the
singular object variable that this is made out of. In this example that I have,
It's really straightforward. We have worksheets
with S as a plural. And of course, in that is a bunch of singular worksheets
without the S over here. So this one isn't really needed, but you will come across other object variables
which are also plural, is a group of things
that isn't so obvious. And in those cases, we can use
a variant like we do here. Or if we want to
be more explicit, you can even write
a demo like I did, figure out that the
object type is worksheet. And then come back up here and rewrite
your code to be more explicit and specific in your call and create
your worksheet variable. Now that we know that the
object that we're looking for in our foreach loop is a singular worksheet or
whatever it happens to be. That's it. I just wanted to put these
two concepts together because I see them
both as related. So these are two concepts that are both figuring
out something for you that
typically we're more used to having to
figure out ourselves.
25. 1.18.1 Object Variables - Set - Intro: In this video, I
want to introduce the idea of object variables. But we worked with before
is typical variables. So I'm going to
create an example, one that we've seen before, which is just a string that I'm going to
say dimension text as string, text equals Steve. We even do something and
we'll place this into a one. Value equals to dx, dy. Let's run this. I'll hit F8, will step
through dX t equals t. And then here I'm sending it over to
our worksheet in cell A1. So this is a normal
variable that we declare. Then it can hold
some information in this case because we call
it a string type variable. Then it holds some
text information. And then we can do stuff
with this variable. Something we haven't covered
yet is object variables. Object variables are a little
bit different and it can be a very advanced topic and we can talk about it for a long
time and all its details. But I'm just going to stick to a very high level right
now in the context that we will use it as you're starting out doing
automation, VBA. If we remove this, I'm just gonna clear
this out here. And then we create a new
variable called a range. And we'll say as range. This looks a lot like how we declared our string variable. And this is a range, and
we worked with ranges. Ranges are a single cell
or a group of cells. On our spreadsheet. We say range equals range A1. Let's say. And then I go to
run this. I hit F8. We have text, and then
we have our range. We see object variable or
with block variable not set. And we'll see this
all the time when we mess up our
declarations like this. And that is because
we cannot just say that this orangey variable is our range A1 because it is an object variable and not
a standard data variable. When you have a object variable, you need to use this word
set at the beginning. And that's the only
difference we have when we're declaring this right now, for our example so
far, I click this. We see we pass this line and we don't get
an error just by using the word set at the
beginning here, and we're done. So what does this mean? And why are these two types of variables different
from each other? So we saw that we
can do something with our text variable here. We can debug print
and send it to our immediates window so we
can see what that looks like. So now we have our text variable and we
can do stuff with it. This very simple
tasks like sending it over to our
immediates window. Now, what can we do with
this range object variable? You can see when I
type this object variable range and put
the period sign there, you see all these
options pop up. There are different things we can do with it and different properties that exist for it. So I can do something
very simple, like backup here so that we can see our options like
I'm going to select. So we set our range to be A1, and then we can select it, which we're not gonna
see anything because we're already in a one. But if I click out
of here and move this cursor back up and
run this line again. Here we're selecting the range. This range object variable
has all these properties and methods that we can run
against this object. Meanwhile, if we come back
to our text variable, we put a period here. We see that we don't get a drop-down for all the
different options we have. Because these normal
data variables, their main function
is just to hold some information so that
you can use it again later. Meanwhile, these object
variables are a reference to an object that has all these definitions built
into the background already. And then all those
definitions of properties and processes you can get to by
doing these extra commands. And that's it for this video. I just wanted to be an
extremely basic introduction to these object variables when we have to
use the word set. And then we'll
continue to build on this as we go forward.
26. 1.18.2 Object Vars - Declare + Read All Files in Folder: In this video, I want to go over kind of two
separate things. First, I was going to
make a demonstration that not only can we
create files and folders, which I showed you
in previous lessons. But I want to give
you an example of a function here where we can take a folder and read all the file names that
are in that folder. As I was trying to remind
myself of how that code works, I just typed it into Google, basically typing in
something like VBA, reading file names
from a folder path. And I got code that
looked like this. And if I run this here, I feed it a folder path
that I have in here. And then if I hit run, it looks up all the file names
that are in that folder. So if I come over here, you can see it is
pulling the files out of this folder and placing
them into Excel here. So you might find that useful for a bunch of
different reasons. And this is just the start
of getting the filenames. Another common thing
you might need to do is open up every file in, do some automation that
does something with all the files in that folder or some of the files
in that folder. So that's what I'm showing here. You can look this up. And I'm not gonna go too deep into this function
here that did this. You can also pause this
and look at the code for reference and see
how each line works. When I did this, it actually reminded me something
I wanted to explain for the
object variables, which was in the previous video. When I found this
code off a website, maybe StackOverflow are
another common website. What they have here, and
you'll see this very often, is we're creating this variable. It's an object variable and literally it's as object here. And so this is just telling
you it's an object, but not specifically what
type of object it is. In the past video, we showed objects such as a workbook or a
worksheet or a range. And we will continue
to have that object is this broader category
saying it's an object, then you can get more specific. And then in the very next line, we set this object into the specific object
that it needs to be. So in this case, we
are working with a file system object since we're going to read from our
file explorer here. And you see we set our FSL object into create object scripting
file system object. This lets us do things here. At the next time we see o fs o for our file system object, we're doing dot get folder. So that's what I showed
you, happens when you use object variables is they have all these parameters and functions and
methods built into them. And so now we're
using that here. In the previous video, I went over this other notation. I didn't do this where we're
setting the variable as a nondescript object
and then using this create object line
instead in the previous video, we did something like
I'm just going to make basically our FSL object. I'm going to make this
variable different just in this notation, but we'll
do the same thing. And instead of doing object, you can see this says scripting that file
system object here, five type script name. Nothing shows up here. That's because just like
our previous video, we are missing our
file system object in our reference library. So I wanted to tools
and references. And if I come in here
and scroll down to Microsoft scripting
runtime here, and I add this, click the check box and click. Okay. Now just like before, I can do scripting and
this showed up now, even though it
wasn't there before. And I hit tab, and
as I hit period, I have File System Object. Now at this point, I am already doing the same thing that
these two lines do. In this line, I create the
general object and then I call it a file system object
from the scripting library. Here. I'm doing the exact same thing. I now have a object
variable that is a scripting dot
file system object. Now the benefit of
doing it this way, which is what I showed
in the previous lesson, is that because this knows what this object is and we
added this reference library. Now, our code editor knows different things
that they can do with this object variable. Because now it has
the whole library about what the file
system object can do. I can say things
like get folder here and then you see it's showing up its list and auto-filling. I need a parentheses
and it tells me I need to receive a folder
path in here. And we're basically
recreating this line. So let me move this down here. Actually, I'll just
start over here. Get folder equals o FSL got. And then we have
our folder path. So these two lines, now, this line and this line
do the same thing. And the big difference here
is that first I needed to add the scripting library when we go to Tools
and references. So it takes a little more
work to get started, is that I need to do
that here in our editor. But once I do that, the benefit is that when I type dot FSL for here and hit period, I have all these features
built-in already. Now, if I use the original, use this notation
for our FSL object, which was created like this. Now if I hit period, you see it doesn't know
any of the functions. Methods are parameters that
are part of this object. And that's because when we are declaring this
object variable, it has no idea what type of
object variable this is. Then this setting to the scripting file system object doesn't happen until
the code runs. So in this case, our editor, it doesn't know what
type of object is actually is until it runs, and then it becomes the
scripting file system object. In this notation, we added
our reference library and now our code editor itself knows what
this object can do. And then we get this
option built-in. It ends up actually being
the exact same thing. Only I like to do it this way because it makes it easier to write our code and do
this editor and in this way makes it so you
don't have to go to Tools, references, and add the
library to make it work. So this is easier for that little bit of
setup at the beginning. I want to make sure
to cover this. Because if you are
looking at code online, a lot of the times you will
see users use this method. And now you know the
difference is when you see the two notations that
they mean the same thing. But you'll see this
a lot when you are getting code from the Internet, people post it because it's easy to copy and paste and
you don't have to explain to people that they
have to add that library. And then once you get past
that declaration part, the code itself ends up
working exactly the same.
27. 1.19.1 Workbook Object: Now that we've done an
introduction to object variables, I wanted to shoot a lesson to go over some of the
most common objects, variables that we're going
to work with in Excel. And you're going to
recognize them right away. The most common ones
will probably work with is workbooks,
worksheets, ranges. I remember rages are
essentially cells. So of course you
recognize this as I say them out loud
and type them that are workbooks are
our Excel files or worksheets or our tabs here
at the bottom and our ranges. So anybody who's worked with Excel has experienced
working with these only we haven't
really thought of them as object
variables before. So let's start by declaring
a object variable, and we'll say WB for
workbook as workload. So what I have here is
the file that we're working in is called main. That XLS file name that we're
working in is called main. So if I say something
like this, actually, don't even worry about this
line that I added so far. I'd say Debug for it. And I say this workbook. And if I hit Control Space, you can see it's giving me
these options to autocomplete the word, this workbook name. And I'm going to print that out. And so if I hit F8, we only
have one line of code here. And the name of this workbook
that we're working in here, and the code is main
dot XLS m. Now we're going to come back
here and we have this workbook object
that I declared here, like we saw in our last lesson. If I type this in, say WB object is this workbook. And run through this, we
hit an error right there because this is an
object variable and we need to put where it's set
at the beginning to create this cross-reference between WB, referencing this workbook. Now that I have that, we get through this line. And then when I look
at the WB object name, here it is, it is main.xml SM. So it's the same thing
when I typed WB is basically a shortcut to
writing this workbook. And that's because I've bind that those two things
together right here. Run that again and
we see it is made. Something else I've done
is over in this folder, I've created two
other files here. I've just called
it other file one and other file to Excel files. One thing you could take
a note of right here is that these two are just
regular Excel files. They're not excel ASM
files to allow macros. They could be if we wanted to. But what we're going
over is commonly used for you to use
one Excel file, which is where all
your code that does all the fancy stuff is. And then you might be opening up other Excel files that exist already and interacting with them or getting info
from the other files. Maybe the other file
belongs to somebody else or another department and you're trying to pull data from there. And so you're just opening
that file and then pulling stuff into
your main file. So over here I can declare
some other variables. Say I mentioned WB
to as actually I'm going to call it the
workbook, WB. Wb. What? We want to set this as our
other file, one over here. In fact, I'm going to call
this though the other one. Just so we don't get
confused with the name. I'm mixing this up over here. I'm actually going to
call this WB main. Call this WE mean equals
this workbook and then WB, other one equals. And then how do we
connect these two here? We use this workbook over here, which is a built-in
function in VBA. Here. Instead I'm going to
type workbooks open. And then I need the path
of this file over here, and that's what I place an open. I'm going to show you. I'm not sure if we actually
need to put in the full path. Instead, we're
just going to take this file name over here. And it may be able
to detect that this Excel file name is in the same folder as
our current workbook. So let's see how that goes
and run through this. We're just going to set
this aside right here. And you see, we
didn't have to put our full path over here, just putting the filename
made the first thing that it would check is the current
folder that our main files in. Since these are all
in the same folder, we could just put the file name and you see it opened this up. Now, if we come over here
and say print w main, dot name, we have our
main and we have the UV, other one, got name. And we'll check
both of these out. What's interesting here is
this file is already open. So let's see if this works. I have a typo over here. We have this command
that opens the workbook. The Workbooks already open. So you can see it actually doesn't have a
problem right here. There's a chance in
some other instances that it'll throw an error
because it'll say you can't open the workbook and run that command because
it's already open. But VBA has that
handled already, it realizes already open. And it's still going to set
these two object variables as the correct files and connect WB other one with this
other file, one Excel file. And let's check this out here. Here's our main, and then here's our other file as
we come through here. Now, let's just add another one. So we have more work with
will do other workbook to we'll set other q
equals workflow stuff. Open. Another file, one. So S x has to be two over here. And let's run this and run
it line by line again. W Main is this one other. You see it just blinked here
because it's connecting our WB other one
object, WB other two. Now it gets opened. You can see your
file names up here. So we have three
files open right now. And let's print out our names
just to show you that they are now active objects of
this started all over again. And we can print. Our immediate
window is getting a little cluttered there,
so let's clear it out. And we have all three
of these files open. Right now. All we've done is
print their names. But while this macro
is still active, you see we haven't ended yet. So I can drag this arrow around. You continue running code. I can do things like activate. Our May workbook here. Other one that activate,
that activate. And so now I have
these three variables here that represent
all three excel files. I'm activating our
main file one here. And then other FiO2. Now we have these objects that represent three different files. And you can start to
imagine how we can interact with all
three of these files. And at the workbook level, essentially an Excel file, you can do all sorts
of different things. But what I'll show
you really quick is just an example of the sorts of things you can do that you might do with a
normal Excel file, but now you have control
of through the code. So now that I've got down here, we have objects
for all of these. We can activate them. And then if you just
type one of these, since they're all three
workbook objects, they'll have the
same properties, which basically means they
have the same properties and the same processes
that are attached to them. Routines and methods that exist for these
types of objects, which is a workbook
in this case. So as I type here you see
all this stuff comes up. And I can do save, which basically means
if I run this command, then it will be the equivalent
of saving that file. You can do a Save As, and I can close them. So for example, I'll go
ahead and close this. So imagine we do something
with these files, we interact with data. I know these are all
blank right now, but if you had
data in all three, you could start to get data from one and move it to the other. And then when we're
done some stuff, now we can go ahead and close the other file and then
close the other file. So you see, we have
a lot of control after we create these
workbook objects, where we can use these objects almost like we have them in our hand and perform
different commands with them. Another thing we can
do is instead of opening a file that
already exist, we can just kind of
comment all of this out. Let's start all over here. We can say Workbook,
new workbook. And instead of opening
an existing workbook, which we did by
file name before, we can say set WD nu
equals workforce. Add. Simply doing this. Workbooks, that ad is going
to create a new workbook, essentially an Excel file, and then set it to be
our WB new object. So you see we have
a new workbook that just opened when we
ran that line of code. And not only did it
create a new file here, we can say WB, new name. And as you expect, this
is going to be book one, which is the name of this file, just as if you started a new workbook. So
here's book one. Now we can start putting
information in here. And we'll just kinda
touch on the sheath, which we're gonna do
in our next lesson. You can say sheets. One dot range, A2,
value equals hello. Here's our new workbook. We're going to use
that and we can start to call out
this new workbook, recreate it, or use a one that we opened and
start to interact with it. And then when we're
done with this, we can even say WB
knew that save. And we have just saved
this file over here. It's probably in
our default folder wherever that might
be named book one. And so we can pass it
even more properties. Save As you can see, if we do a Save As
we start to get other properties
like our file name. This example. Let's just say we can
run this line by line. We actually create a
brand new workbook here because we're
running this again. We place Hello in cell A2, and then we save this as
this is an example file.
28. 1.19.2 Worksheet Object: Similar to what we just did
for the workbook lesson, we can also work
with worksheets. So you have your
larger Excel file that is essentially
your container. And then within there you
have multiple sheets. So I just added a new one manually here and you
have Sheet1 and G2. We can set a new sheet object, which I'm going to
call SH as worksheet. Very similar to
the workbooks and continuing to show how
our object variables, where I have to use
the word set here. And I can say set
sheet equals WB, which again is this
workbook sheets. There's two different
call-outs here. I can say heat too. And then now I have
this worksheet and I can call it activate. And so now I've set SH as sheet two and then
I can activate it. So if I run this
xi2 and then as I activate it, we've activated G2. Here. I have different options that I can call in these
parentheses here is I can call it sheet to buy the
name or I can use an index. So if you see here,
it says index, which whenever you see this, it usually means that you
can use a number to call out the index sheet to here is
actually sheet two over here, because it's just a
number index that this is one and then this is two
in sequential order. So if I'm over here, let's say I run this again, we activate sheet two. And in this case, it doesn't actually matter if I change the name over here because I'm not writing
the name of the sheet, I'm writing the index number. So I come over here now. And new sheet to it's
still this other tab when I activate it because it is the second sheet
in the workbook. Now, if I switch this
over here, for example, now this Sheet1 name
is our second index. And so as I declare
SH as that sheet, you're gonna see, I'll
create a third one here. We're gonna go back to Sheet1 because one is actually
index number two. And then so once
we've done this, we've created this object
which buys these together. And then just like workbook, I have different things I
can do with this sheet. So now with this sheet, I have my range just
like we saw before. I can say Hello. I can also have all these other things
that you would manually do with the worksheet when
you're clicking through Excel. So for example, I can say
visible equals hidden. And then just to undo that, I'm going to say
visible equals visible. So now I have this sheet object and I can do different
things with it. Just like we did for
our workbook objects. We can create many different references to different sheets, and that's how we're going to
reference them in the code. So we can grab stuff from sheet two and move it to
Sheet1 and vice versa, and create this web
of processes as we're interacting with both
multiple workbooks and multiple sheets. So I'll show you here SH is xi2. We added some texts to cell A2. We can hide sheet two and then making that visible
equals visible. And we're gonna show it again. This might be the first exposure I can't remember from
the past lessons. I'm going to show you
something else here. Is if you're familiar with
highest sheets manually, you would come over here and
you can hide this sheet. And then sheet to, or
actually I think it was Sheet1 is hidden here. If you go to unhide here, Sheet1, you can unhide it. One thing as I was just typing out this example that I realized is I can also make this
sheet visible equals. And then you see
it's auto populating three options that I have here, hidden and visible, which
we've used and tested already. You saw that's what
was visible here. There's actually a third
option which is very hidden. So let's see what that does. If we go to very
hidden and run that, you see it did the same
thing as hiding the sheet. But now if I come
over here to unhide, there is no unhide button. And if there were other
hidden worksheets, and I showed this here, Let's say I hide
sheet three also. I can come over here
and go to unhide. And now in our list
we have two sheets, hidden, sheet one, sheet three. But I can't see Sheet
one on this list. And so a user who's
clicking around on this interface that doesn't
have access to the VBA code, doesn't even realize
there's a sheet here, and that's what
very hidden does. The only way I can show it again is running
this line of code in VBA and I can't get to it through our user interface
in normal Excel here. So as I run this line, we're going to bring
sheet one back. It was always there, but
just invisible to us. And the really interesting
part here, I think, is that through VBA
here in the background, you actually not only can
automate what a person would do manually clicking
through the Excel interface. But you're getting access to extra properties and functions that a regular user might not even have
available to them. So when you're diving
into this code, we have a long list of
properties and this is just one example of
functions that you could not even do
manually unless you knew how to come
in the background here and write the code in
VBA for your functions.
29. 1.20 Reference Libraries Word Object Intro: In the previous videos, I showed that not only
can Excel macros and VBA code that we've been writing control the Excel
application itself. But it can also do things
like create folders. So those were demonstrations
that even though we are coding inside
Microsoft Excel, that the code over
here in our VBA can do things outside of Excel
and control our computer. To continue adding to that, I want to show
another example of this controlling
another application and an application that
often makes lot of sense for is for Microsoft Word. And Microsoft Word has its own VBA Editor and macros that you can work
directly in Microsoft Word. But I want to show
an example of how we can work from Excel, where we often do something like create a button over here. And we can make Excel itself
control Microsoft Word. And then if you're
working in a spreadsheet, you can make these programs
interact fairly seamlessly. So I've gone ahead and
started this test subroutine. The only thing here is test. And I want to show you a
really simple example. I'm gonna come over
here to the subroutine and I'm going to create
a new object variable. We'll call that w, The doc
or Microsoft Word document. We'll set that as an then if I type word right here,
nothing comes up. That is because
our VBA code over here doesn't have this command to work with Microsoft Word. And I'll show you
how we can make some new options show up here when we're
working in our VBA. We can do that by coming
up here to tools. We'll go to references. And then in this is a giant
list of reference libraries. Basically, they're almost like supporting extensions for VBA. So you see all sorts
of stuff here. And the example we're gonna go to is if you scroll
all the way down, it's an alphabetical order. We can land here on Microsoft
Word object library. So these are extra tools that will allow us to
have new features in our VBA that isn't
out of the box. So if we click this, it's
pretty close to out of the box. They'll all you have to do
is click this checkbox. And if I click Okay, you can see we can
continue typing here. And now if I type word
than this exists, which wasn't here before, we say work period. And then in this case, I'm going to say document. So now our object variable, Word doc or a Word
document object. And then now this is
going to come with all sorts of properties and methods that we could call and use as part of the
document object. Just like what we went over in our short lesson on
object variables. And now that I have
this Word document and let's set it as something, say set equals
Word documents at. So basically we have our
Microsoft Word application. Then we have our documents, and we're going
to add a document in our document is
essentially a file. So we are going to set our Word document as a new
file that gets created. So I'll go ahead and
run this. I'll hit F8. We're over here on this line. I hit F8 and it froze for a second there
and nothing happened. I'm going to show you something else that's interesting here. I'm going to explain
it first and then we'll show that
that's what is happening, is that this did open a Word document,
but it's invisible. So what we're
seeing is that when you work with another
application through code, it is different than clicking around on
the user interface like we're used to in
working with our computers. Instead, I just open
a Word document, but it is hidden
in the background. And you can't actually see because I wasn't
showing my Start menu, but here's my start menu. There's no Microsoft Word
application over here. And we can prove that because
if I come over here and type in Word that application, that visible equals true, this is going to make the Microsoft Word
application become true. And as I run that, you'll
see Microsoft Word pops up. And here's a document that was sitting open in the background. Just to show you
again, I'll run this. Sometimes there's an error box. I just ran it again and
you saw it went away. I'm not going to get
into those details until we need to in
the future lessons. You see we opened
a Word document. I'm running this again. So there's actually
two documents. Now, let's make our
Word Application true. And you see there's two
documents open here. So what happened is we
opened the document, we opened another document, and they're both existing in the background and we
can do things with them. We could add text to them and start to format it
like a Word document. And they're all
invisible until I tell the program to make
the application true. And then now if I do
something like word, that application, a
bowl is true over here. This is going to make the dock, make the word Application true. Let's do something very basic. What the document, which
is to just save it. And you see we have the
save as to command. I think the two is just
because it's a second version. So this is your generic
Save As command. You can see the
parameter it wants to take in is the filename. So we need to create
a file name in there to pass it
in as a parameter. Let's say DEM file name as
a string, filename equals. And I had queued up
this folder over here, which is just a generic
place where I've been putting some tutorial files. And we will say dot doc
x is our file name. And we'll do the same as at our file name
variable over here. And I will hit F5 for run. It's opening up a document
here, test that doc. And then here is our test
that document over here, showing a demonstration
of how from Excel we can automate
Microsoft Word. And so I'm going to
connect this button over to our test
subroutine over here. Let's close this all out. I just do a little
bit of clean up here, will delete this document
that we created. I'll come over here,
I'll click this button. See, this is the era
that showed up before. We won't get into
the details of this, but it has to do with managing the Microsoft Word application that's open in the background. But we'll ignore that. And a lot of times
this would just go away when you try again. There's ways to
officially deal with it, but we just won't go for
that level of detail here. This is just a proof of concept. So I click this button,
Microsoft Word opens, it saves as test dot doc. And here it is in
our folder again, all happening from Excel. And if we come back
over here to our tools, we won't go over
all of this stuff. There's endless amounts
of information to go over here with just automation
of Microsoft Word, which we will do
future videos on. You also have all these
other applications that you can work with in VBA, a far majority which
I haven't had to use. But you just see that
they are available here. And another one, and I'm
sure we're going to use as Microsoft Outlook so we can
start to automate emails. You'll see a library from
Microsoft Outlook in here also. That's it for this one, we'll use these concepts
in future videos.
30. 1.21.1 Calling Sub From Another Sub: Up until now, we've
been making macros with what is one subroutine. So when we use this
word seb here, that stands for subroutine. And mostly we've been
putting our code inside our subroutine
and then running it, whether we attach it to a button or just run it
straight from here. What I threw together here is a simple macro here that counts from I equals one to five and puts a 1 second wait
time in-between that. When I run this, I
don't click Run here. You can see it counts
from one through five and puts it over
on our spreadsheet, and it's just a counter
from one through five. What I want to show
in this video is how we can use calls to subroutines in order to reuse code without actually
retyping the code. If I wanted to do
something in this case, like count one through five
and do the same thing, but I want to do it twice. What I'd like to do is come over here and just do
a copy and paste. So now this is going
to run through twice, and I'm just going to
put a message box. So we see a stop here once. And I'll even put
another one down here. Saying, I'm running twice. If I run this here, we can see we have our counter
of one through five. We have our pop-up. And then we start to run this exact
same code again that we copy and paste that and
we're done running twice. The problem here, even
though this works fine, is that we have the same
exact code in two places. And that's not a very
big deal right now. But what if we wanted
to do something twice and it was hundreds
of lines of code, then we would have copied
and pasted hundreds of lines of code in two different places that we now need to maintain. Our code is also much longer and that if
we want to update it, we have to remember to do
that in more than one place. And some procedures. You don't just
need to run twice, you need to run many
different times throughout your application. So what we can do here is
create another subroutine. We'll call this subroutine
sub count to five. Instead of copying
and pasting this, I'm going to copy and paste
this into our subroutine. So I am going to
copy and paste it. Then I'm going to delete this. And what we haven't gone over yet is that these subroutines, not only can it be run directly from our
spreadsheet with say, a button click or
something like that. But it can be called
by another subroutine. So now that we've created the subroutine called
count to five, I can click this. Actually, I forgot to move this dimensioning
of I over here. So we need to declare our
eye up in a subroutine. And then now I'm just going to comment this out so we can
see what's going on here. I'm kinda be inside the
my macro subroutine. And when I hit F8 and run it, this count to five is
going to know that this is a reference to
this other subroutine. So as I hit F8 and step through, you see it jumps up to our
other subroutine here. And then now it's
going to start to perform our count
to five subroutine. So I'm gonna go ahead and hit play and let this
continue counting. So what you can see here is
this is counting the five. I can even put, let's say Message Box
about to start here. And then if I am in
my macro subroutine, I'm going to click Play. It pops up my message box, and then it's running
our count to five. You can see it's
happening over here. We're calling this subroutine from inside another subroutine. And then you can just kinda
run crazy with this and start to use these
all over the place. So I could actually make yet another subroutine that
calls the mind macro. And so you can kind of nesting
these things together, which will save for
another video for now, I just want to introduce you to this idea of how you
can call subroutines. Then now if we want to
go back to our original, I can take this and
I don't have to copy all this code,
which isn't much here. But again, this would
work if this was a much larger subroutine
with a lot of code in here, instead of having to copy
and paste that more than one time throughout your
code and make your code much longer and more
difficult to maintain. I can just call this twice. So if I come over here
and run my macro, I have about to start counting of five, which
we're running here. We're done running once. And then it'll run the
count to five again.
31. 1.21.2 Call Sub with a Parameter: In the last video, I
showed you how you can call one subroutine from
inside another one. So we have this basic
counter over here where we have about to start. Now we're jumping up to
our count to five here. Done running once,
and then we're running our count to five again. One little detail I wanted to
add to this is that you can pass parameters into
the subroutine also, so that I can reuse this code. But I can also change variables within that code so
that I can reuse it, but also adjust the
way I use it slightly. And I think that'll
make more sense when I show you this example. So we have this
called count to five, and we're always counting the
five each time we run this. Instead, maybe I want to
count to a different number. And so how do I do that? If I wanted to
count the five and then I wanted to count to ten. The straightforward way, but less efficient way
is to make something like this and say count to ten. Now, I'm going to make this loop from I equals one to ten. And then I have to change this. So let's say if we run this, we have an issue
here, count to ten. And that's because
I used the word here. Instead of number. We continue running. We
have about to start. We're going to count the five and then we're going
to count the ten. But we just recreate
the same problem we tried to solve
in the last video, which is repeated code. So how can we make it so
that we reuse this concept? We reuse the code in here. But we also have
the ability to make an adjustment of what
number we count up to. So I'm going to undo this. We're going to set this
aside, so we'll just make this count to five again. So what makes it count up to five is this
number right here. That is where our for-loop
is going to run up to. I'm gonna make a new variable. I'm going to call it stop. And we'll call this along also because we're going to make this a number to change what value goes here
based on what we want. So we're going to say stop at, then instead of counting to five every time looping
from one to five, we're going to say boot from
one until the stop value. And we have a total
of what value. We call this count to five, but we don't really
want it to stop there. We want to take, stop at
whatever the user wants it to, or at least what we want to when we're
calling this macro, count to the number. And we'll just call it that
and keep it nondescript. And then so how do we from this routine tell
it where to stop? So we're going to
change these from count to five to
count the number. We need to set stop. What I don't want to do
is have to say stop at T equals five or stop at equals ten up here because
that will make any sense. Now, we still haven't
made the decision. We'd have to change
the code here inside this subroutine that we're calling if we want to
change the number. So instead what we're gonna do is up here in the parentheses, you may have noticed in
the past that whenever we make our basic
subroutines so far, we always have parentheses here, even though we've
always left them blank. Instead. We can say stop at as long here. It actually, I made a
mistake here because we say stop at equals long, we're declaring the
variable up here. We don't need to declare
the variable here. So I didn't need to type
that in there earlier. I'll just remove that
we declared in here. And what that means is whenever we're calling
count the number, we actually need to
put parentheses here. You see as I type the
open parentheses, it tells me that I need to have a variable here
called stop at. That's because it
knows that this is referencing this subroutine. And then here is saying
that we're going to use a variable called stop
at and it's a lawn. So I can put a number in here. I'll say five in here. And then now, when we get
to this line of code, we saw in our previous video
that it jumps up over here. But then it's also
going to take this five and the parentheses and set the variable that is an
input parameter as five. So these are the input
parameters that will go into the subroutine
and stop at, will equal what we put in this parentheses when
we're doing the call. Let me do the same thing here. And we'll run this demo. And in this case we
want it to run ten. So now I can change this
at ten and I'm going to step this with FAA, this macro. You see we have our message box. Now we're jumping up here. We pass the five through
this parentheses. You see stop at
equals five because this matches this up here. Now, when we're running
through our loop, you can highlight this value
and see that it's five. So we'll let this
run. I just hit F5. It's counting to five
and then it stopped. And then now it's
doing the same thing. We should expect that
the count to ten, because when we call it
this time down here, we're actually passing
the ten up through the parentheses when we
run it the second time. So we'll just run that
one more time so we can see that the first
time we're using five, and then the second
time we're using ten, because we are
passing the value of the parameter through
this parentheses when we're calling the subroutine. Just to show you, because I
have this up here where it is expecting a value to be sent along with our
call to a subroutine. If I remove the five here, it throws an error right away, even when I'm not
running the code yet, it knows that this count, the number subroutine expects
us to pass a parameter in. We call it. So right away and knows
that I'm missing something here and you see that
it's giving me an error, then that error goes away when
I pass something in here. And if I pass, let's say
a comma is our separator. So if I pass it two things, it also knows that it
doesn't expect to. One last thing I can show
you here is when we have the subroutine that has a
parameter that's an input, the same way that we had
an error when we try to call it without passing a parameter in through
these parentheses. Since this subroutine needs to know what the value of
stop at is supposed to be. If I come up here also, let me fix this really quick. If I come up to this
subroutine and then hit play, you can see that it
doesn't run and it pops up this window to let me choose which macro
I want to run. And in here it's not
showing count the number. It's only showing my macro because I can only
run this macro if I'm telling it what the value of the
input parameter is. And since this one has
an input parameter, it knows that I can't run it without passing
something through there. So it knows that I can't run count the number
without specifically calling it from
another subroutine or calling it from the
code of another macro because I need this
parentheses notation to pass in the value of
the input parameter. So you see I can no
longer run count the number by just
hitting play or doing anything other than
calling it from another macro so that I can pass in the
input parameter here.
32. 1.21.3 Call Sub with Multiple Parameters: Since we've gone over calling subroutines with a parameter, Let's try making more
than one parameter. So we have this stop at input parameter over here on our count the
number of function. Let's add a second parameter. In case we don't want
to start at number one, we can choose the range of
the starting number also. Let's add a new
parameter and we'll call it start at as long. And we separate
them with a comma. So now there's two parameters
that we can use here. And instead of the one that we were always
starting at before, Let's change that to start at. So now when we call
counting number, we can have a starting number
and a stopping number. So let's go down here
and update this. So let's say we want to do the same thing and
do one through five. And we get an error here. Let's backup here. You'll see when I
open the parentheses, it does know that it needs
to input parameters here. So it's in bold shown we
need a start and a stop at. So why does it throw
an error here? This is a quirk about VBA and I can't explain all the details here from
the computer science level. But what we have here is when you have more
than one parameter, we don't need these parentheses. So the notation has two options. Either we can leave the parentheses off of this
to pass two parameters, and this will do what
we expect it to do. Or what I prefer to
do is you can use this keyword call at the beginning when we're
calling this other subroutine. And then if you use the
keyword call at the beginning, now we can use our parentheses the way you would
expect from before. So there's a little bit of a difference here when you have one input parameter
versus two parameters, when you are calling
a subroutine. I actually prefer to use call because I like
to use this anyways, it lets us know that we are using a subroutine that
we made ourselves. And it kinda makes it jumped out that you're doing a
cross-reference right here. And then I think the parentheses make it a little easier to read what we're doing as opposed to not using
the parentheses, but they both work and
we'll do the same thing. So let's try this out now. Let's change this and
then we'll have a break, and then we'll do
something like 11. And we'll go to 15 over here
on the second time we run. I'll start by doing FH. So we stepped through
line-by-line. About to start. We'll jump over to count. And you'll see start
at is taking the one from the first
input parameter, and then it's
respectively taking the second parameter here
and populating stop at. And this would actually be the exact same process and we had a third, fourth,
fifth parameter. So you can keep going here
with the number of parameters that the subroutine
will take as inputs. And then as we
continue to run here, I'm just going to go ahead and press F5 and continue running. We see we count one through
five and running once. So on this row of code
here, we hit, Okay, we continue 11 through 15 and
we're done running twice. So the main thing to show here is that you can do
more than one parameter, but the notation changes a
little bit when you're calling it on meeting this
call keyword here, or which is demonstrated here, not having to parentheses when you're passing more
than one parameter. So now here you see
it doesn't even want the call keyword when I'm
not using the parentheses. And then so we'll run this
one's about to start. We have one through five here. And then we jump up to
11 through 15 here. As we've seen in our
examples so far. And what I mentioned
earlier is that as we're passing these
parameters through, when we're calling the
subroutine, it goes in order. So this one here
is this parameter. And then the second
is this over here. And if we had a
third, just say this. As long. If I put a comment here,
this will be a third. So you can see it goes in their respective order that
the parameters are listed. I'm going to delete this here, but it doesn't have
to be this way. So another way we could do this if we didn't want to
call them in order. And it's not typically
a big deal if you only have two parameters, but if you end up
having a lot of possible parameters to pass
through to a subroutine, then you might not want
to call them in order. And instead, you see we have start on the left and
stop on the right. We'd have this other
notation where we type stop colon equals. Actually, I forgot
stop at colon equals. And you see as soon as I
type that colon equals, it bolds the second parameter, because since we are
matching the name of the parameter that it, let's us call this or the
clarity out of sequence. We can say five equals here. And then as I do the comma, now, neither of them are
bold because I've kind of gone out of order here. So it doesn't know
until I typed. And then it knows now
by name that I'm using the right name start at is going to be this parameter up here. So we can do this
in any sequence. And of course, if there's
more than two parameters, we can call out one of the many up here and declare
them out of sequence. And this will be useful
in other ways later as we'll probably see
in future videos. So now I have this and this is going to do the
exact same thing. Only I was able to call
them out of sequence. So we're counting from
one to five here. And then we jump over here
as usual and have 11 to 15. Just like what we
demonstrated before. I can use the keyword call here. And then as soon as I do that, it's the same thing, but now I'll need to
use parentheses. And this is more often
what I would do is use the parentheses
and the call keyword. This is a notation that you
might see if you do something like record a macro and
then do things in Excel. And then look at the code that was recorded from the macro, which we did in earlier lessons. A lot of times you'll
see the recording will use this notation with the colon and the equal signs to
declare the parameters. Something important
here is just that this colon Gordon symbol here. So if I remove this, this isn't actually
going to work, which might be a simple mistake to make a first if
you're just typing, this is thinking that
this would work. But you see it throws
an error here. So in specifically this feature where you are calling a
subroutine or function, which we'll go over in
the future and passing parameters through it uses
colon equals sign notation.
33. 1.21.4 Sub with Optional Parameter: Now that we've gone over
the basics of passing through parameters to
a subroutine call. I want to show the idea
of an optional parameter. So what we've created so far, we have these two parameters
that we're passing in, the start seconds and the ending seconds that we're
going to run this timer. Something we can
do with parameters is also to make them optional. So all I do is type this keyword optional before
my parameter up here. And now I don't have
to call these both. Instead, when I
make this call to my count to number subroutine
and I open the parentheses. You see we have a
start at parameter, which is just like
we saw before. But now our stop at Perimeter
is in the square brackets. And that square brackets
tells us that's optional. So we'll say start
at one as usual, and then we won't type our
second parameter in here. And we showed this in
the previous video. But if I did something like
this and just did one, I go to run this, you see, we have this message that pops up and it says the
argument is not optional. It's throwing this
error because it expects two parameters
to be passed in per our declaration of
this subroutine up here, but we're only passing one in. Now instead, if I type Optional
on this second parameter, will run this again.
And I'll do F8. As we step through here,
we get our message, and then now we jump up here and start out as one
like we would expect. And then we have this
optional parameter. And we did not tell our call what we want the second
stop at variable to be. And so it is 0 right now
we highlight over it, which is the same thing
that it would be at if we declared a variable and
didn't set a value, just like we have our
demise as long as I is 0 because we only declared
it and didn't do anything. It's just at its default
state, which is 0. Now stop at 0 because it didn't force us to pass
it as a parameter. It was optional. And so it's
just at its default value. Now if I hit F8, you see it's running the loop
from I is one to 0, which actually
doesn't make sense because it only
knows to go forward. So the loop doesn't
run at all because 0 is not higher than one and it's trying to increment
by one upward. Now we're back over here.
I'm just going to stop this. So this is how we can have a optional parameter in
our subroutine design. Something I'll show you here. If I make both of these
options, I can do that. Now, if I go here and
open two parentheses, start at and stop at are both optional parameters and
I don't have to call them. And just like you would expect, in this case, the
parentheses actually goes away because I
have nothing in there. But both of them would
be at the value of 0. Now something to show you is
if we did the opposite here, and I remove optional
from our second, this is throwing an error. It's saying expected, the second parameter
should be optional. And that's because
it's confused by the idea that our first
perimeter is optional, but our second isn't because
it's so often that we call parameters in here in a
sequence that they're listed. If I do something like this, It's very confused
now because this one typically would mean
our first parameter, but that's optional. And so it doesn't know that this one would
possibly mean stop at. So you can just see there's
like a logical issue here. And the programming knows that this is irregular and it
creates a mix-up situation. And it's setting this flag where your mandatory parameters are always on the left and then your optional ones need
to be on the right. So now that we've
shown this concept, let's show how we might use
it for something like that. And there's a lot of different
uses for it, of course, but we'll show it how it could
work for our timer here. So maybe we don't want our
stop at to be optional. But instead, we have
this timer that goes from one number to another. And we can do stop at as long and then start at is
the optional parameter. So I need to switch the
sequences that make start on the right so that it can be optional for the
reasons that I just showed. Now, we could have something like we only pass in our timer. As let's say, we'll leave it
at five seconds over here. But we could say from
three to five seconds. Actually, sorry, I've
switched these around. I'm mixing things up here where we're stopping
on the first value. So this would be stopping at five seconds
is starting at three. I'm just going to comment
these out for now. So we'll comment
these out for now. And then if I run this, I hit F5 and we see running
345 is how we're doing this. We can make it do something
like since start as optional. If I don't have this, then this is actually going
to run and we're going to start at 0 as our
start at value. We can run this
just to show that. So start at 0. And so we're going to see
0 up here, 0 through five. As we run this. We could do something like this. Since we know that
if we don't pass in a parameter that this
variable will start at 0, then we could make
it say something like start at equals 0. Then we'll say start
at I equals one. And that basically
means if we're not passing in a parameter here, like we're not saying
three to 5345. And we don't have to say
what number to start at. And you can just pass
one parameter and it will detect that nothing
was passed in, so it's 0. It's going to start at one. You see it started
at one over here. So this creates a
custom server team where you can have the
option to pass something in, but you're not forced
to make a decision. And there is a default
handling of a situation if we choose not to pass in a
specific value for a parameter.
34. 1.22 Functions Intro: Now that we have a few
videos on subroutines, how to call them from
other subroutines, and how to use parameters. I want to introduce the
idea of a function. So instead of sub here, something else we can do is
use the keyword function. And we would declare
it very similarly, and we'll just call it
my function for now. Do parentheses here. With my function. I can also call that from another subroutine
or another function. So basically within the
code of a container, I can call this other type of container called a function
instead of a subroutine. Now if I do this, I'm going
to put in a message box here. I'll just put a
random message box to see what happens here. And we'll run my macro. We get our pop-up. Now we hop into my function. You see here it's starting
to look like it runs exactly like what
we've gone over with subroutines in that
when we call it, we jump over to this container of code
and it starts to run. The main difference between
functions is that you can declare this a lot
like how you declare a variable and how we've
shown that in the past. You can declare your
function also as a datatype. And so we can say as string. And that means that this can also be used
like a variable. Now, if I say my
function equals Steve, let's see what happens
here about the Start. Hello. And then my function
equals Steve. And we haven't done
anything with this, but if you now
highlight over this, you see the value of
my function is Steve. That example, we haven't really done anything with
this function yet. So let's turn this into
something really basic. This is like a classic
example of a function. We'll say add two numbers and we'll have this thing taken parameters
and the parameters. I won't shoot separate lessons on how to use parameters
for these functions, because at its basic level, it works exactly like it
did for the subroutines. We can say value one as long I will say
value two as well. So this takes in two parameters, value one and value two, will have the result
also be a number. So we'll make that a long also. And then here we'll say my
function changes to the name, add two numbers, and this
equals value1, value2. I suddenly have space
here, which I shouldn't. Now when we call my function, not actually going to call it, I'm going to use this,
like I'm using a variable. It's not my function anymore. Now let's call it
add two numbers, and let's do a debug print. Now there's an issue here where light from our subroutine
with parameters lessons, we need to send it
in our two numbers. So let's send in our
value one equals two, and then our second value
will just make three. So we'll expect the
result of five here. And I forgot to close
that parentheses. And then we'll run this. Now we hop up here, we have 23 as our parameters that are
placed into this function. And then here we're going
to add it together. And then our function name, add two numbers equals five. You see we didn't
have to declare it, like we declare our
variables up here, because this creation
of the function is essentially declaring
add two numbers as a datatype here as a long. So now this ran, the result of this
ends up being five. And so when we ran
this debug print line, five came out here. Now the important part is that in order to have
this output be five, we need to set the
name, add two numbers. So whatever we have as our function name is what we
need to set as the value. So if we did something
like this and said, As long as result equals
value one, value two. And I'm just going to
comment this out for now. You can imagine that
result equals five, but we haven't done anything to tell it that the result
that's coming out of this function that we named add two numbers is going
to be the result. When we hop over here, you see we have 0
for our output. And I'll run this. I'm just hitting F5 here. We're going to run this thing. We see 0 comes out and that's because we're calling
add two numbers. And there's nothing that's
making the result pass through into the value of
add two numbers over here. If we wanted to do it this
way and didn't want to directly do all our
work in this function. We can say add two
numbers equals result. So now we have
five and then five becomes the output
of this function. And then here's the five
that shows up again.
35. 1.23 With Statement: In this video, I'm
going to go over some quick coding notation. That's pretty simple,
but we just need to go over it because we're definitely going to
use it in the future. And I want to make sure you
recognize it when you see it. So we're gonna go over the width statement demonstration
I'm going to give is if I say range A15
value equals past, we've done something
like this all the time. So I hit F8 and I run this and we've put the word
test into range A1. Then maybe you want to
do some more stuff with range A1 will say Range A1, that font, that all equals true. And then we wanted to do
something else with it. Font, italic equals true. And then we want to say
that that interior, that color equals red. So now if I come over
here and I hit F8, and we run this, we have
tasks that was already there. Bold becomes true,
italic becomes true. The background apparently
becomes black. That's because I use WD read
when really I'm in Excel, so I should be using excel red. Let's try that out.
Again. I hit F5 here, and there we go. So this isn't what's important. Why I wanted to show you
here is that we wrote range A1 over and over again
four times here. And potentially if we wanted to change ten more things weird, right at 14 times, this isn't the biggest deal, but the lines could get longer and this beginning tag
and get longer also. So let's say we have sheet
two and instead we want to say sheets to that range. Now this is getting even longer. Let's say we
specifically wanted to call out this workbook. And now this is all
going to work the same except if we have multiple
workbooks open will be explicitly saying which workbook we're in and then
which sheet we're in, G2, not to be confused with
Sheet1 and our range A1. So now if I hit play here, you'll see it knew to come
over here to sheet two. And the same thing has
been added the sheet to. The annoying thing
here is that we type all of this out over
and over again. And if we have more lines, we need to do it even more and it's just redundant information. And if we wanted to
change ourselves to B2, for example, we need to do
it in four different places. Here is the with
statement notation. So if I type width and then all of this
information over here, I'm going to copy for now. And then say n width. Then what's in-between
these two statements? The start of our width and
then the end of our width. A lot like a if statement which we've used
plenty of times. I'm going to tap this out so
everything is more readable. And then I remove
this over here. This width statement is saying we're going to use this
as the start of the line. And then whenever you
see a period over here that is going to tell it to pend this onto whatever we have for our width
statement over here. That basically means that this is equivalent
to this right here. I'm going to go
ahead and copy this down just so we have
it for reference. And go ahead and delete
all of these over here. So these two things, this, in this mean the
exact same code. There's no difference between this code except that
this is a lot shorter. And if I want to change
this over to say B2 here, run sheet two over here. I can step through
this code and I didn't have to change this four times. Instead, we're
working with cell B2. And you see as we
stepped through, it's behaving as if these are just full lines of
code with this period appending to this on the
left. I'm going to stop here. That's really it. This is a basic width statement. I use it all the time. Saves you a lot of typing, saves you a lot of
updating in the future. And you'll also see
that sometimes when you record macros and do
different actions on your Excel file and then view the code that was generated
by your recording that the court had macro will also use this notation
extremely often. One more thing I forgot to prove here is if you
don't use a period, I can still come in
here and say Range below that value
equals something. You see here we're using B2, but because I don't
have a period here, then Excel doesn't append this to what my width
statement is about. So only if you start off
the line of code with a period which you
almost never do for any reason other than
this width statement, is it going to take this period line and append
it to our width statement. So if I come over here, I'm going to copy paste
just to erase this here and run this line. Let's see, we're doing
the same thing with B2. And then when we get to
this line, it still works. It doesn't throw some error
because it thinks it's doing something goofy
like doing this. It is specifically looking for these lines that start
with a period and anything else just acts normally as it would if it was
outside the with statement.
36. 1.24.1 Error Catching - Intro - On Error: Okay, now I want to show you a basic introduction
to error handling. In our past videos so far you've seen errors come up in our code. And these are called
runtime errors, which is basically when something goes wrong in the
code doesn't make sense. And so it tells you that an issue as occurred
and stops running. And I'll make a
very basic example. We'll say dimension,
my number as a long, and this is a number value. If I say my number equals
ten out my number. Let's run this. I'll hit F5 and you see
here's ten down here. Now if I come over here and change my number to be
Steve, I'll hit F8. So we run through this. We've seen this sort
of thing happened. It's a type mismatch error. And it is because this variable
can't accept the string, but I'm making it tried to
equal a string over here. We hit Debug and we
aired out over here. If I hit F8 to try to continue, we just run into this
error over and over again. And we have to handle this. Typically when we get
an error like this, this means our code is doing something that we
don't want it to do. And so we have to come in
here and change our code. That is still going to
be mostly the case. But what we have the ability
to do is to have our code recognized that the arrows
are going to come up rather than hit
while we hit now, which is everything just come to a grinding halt on
this line of code. So I'm gonna hit stop again. And I'll show you
what I mean by that. What we don't see going on
in the background is that there's actually a variable
called ARR for error. And you see how
when I typed this, we have all of our
properties and methods for the ARR object. I'm just going to call it the error object moving forward. And it's sitting here
in the background. And I can say debug
print that number. And let's hit F8. And we'd run this and you see, this came up, error
number was 0. I can do something else
like error description. And I'll move this up one
and I'll hit F8 again. And you see nothing
came up here. That is because this
object is sitting in the background and there's no errors in our code
up to this point, we know that we're going to have an error on this line of code, but we haven't run it yet. Now I'm going to type
something here called on R. Now I'm going to
type something here. I'm going to type on error. So what I'm saying is
if there is an error, then we're gonna do something. You could change
what happens here. But in this case I'm going
to write resume next, which basically means
if there's an error, then just continue
going forward. So I'm actually going
to stop this and then I'm going to copy this. Let's just look at
all this stuff here. We're going to say on air. And then we'll go back
to our number here. We remembered that there's, the error number up here is 0. In fact, I'll put even
more debug messages to make it all as
clear as we can. I step through
this code, we have this error object which
we never declared. It's just in the background
of VBA when it's running. The number is 0.
The description is nothing on every resume next, and this is where we
expect to hit an error where that runtime error
dialog was popping up before. And now if I hit F8, you see it went
through it and then even pop up the error. So, so far we don't
even know that something incorrect happened
that we hit an error. Even though we already know that this can't possibly be
Steve, this variable here. If I hover over it, you
see it's still says 0, which is its default
state when we declare it. And then now we have
an error number of 13. And then when we
hit my number is 0. So if I hit F5, you see it ran again and
there's just no error. Let's make this more clear. Number description right here, every number, and we'll even do errorDescription
again down here. And that is all because of this line right here where we're saying
if there's an error, then we're going to resume next. And that is why we can continue. And even though we hit an error, you see this error
object on this side of the statement reads the
error that happened. It's an error 13 and
a type mismatch. While before the error happened, this error object was
containing nothing because at this point there
was no error that occurred. Do something like just
comment out this line. You'll see if I hit F5, we're right back to
where we were before, which is that we hit this line. We have runtime error 13. So you can see this
is the error number that happened down after our error occurred
and it's a type mismatch. So the main idea here is there's this error object that is
hanging in the background. And when an error occurs, the properties of
this object change to what error occurred. And most of the time when
everything's running correctly, the
error number is 0, the description is
blank and there's other tags that just show this error object at no
errors have occurred. Now a common error handling
situation you might find is you're going to
say onError, resume next. And we don't actually want this to just continue and do nothing. Some people might do this, but there's considered really bad practice because something went wrong and you don't want
the code to just ignore it. Because if we have
hundreds of lines of code, all this stuff down here, if there was much more logic, we don't want to
just continue and run even though
something went wrong. That means R code that runs later might have something
that goes wrong. And we want to actually know that something
bad has happened. So a lot of times you
have this resume next, and then we'll have
something like if that number is not
0, then a condition. And then in here,
just for example, Let's pop up a message box
and we'll say ever occurred. And we'll say our
number or distributor. What we have here is
if I continue here, I'll actually have
to start all over. So I hit F8 on our resume next, and then we hit our error here. And nothing has stopped
us, we're continuing. But now we have this
if statement that says if the error
number is not 0, that means our system
detected in there. And then now I had
a message box. And if this macro was
running from the user, you see we're getting
a message box telling us that the
error occurred. And the benefit to doing
something like this, even just a pop-up
message box is now I can continue
running my code. I could do other things or fork the code
in different ways. So that one thing occurs
if there is an error, and another thing happens
if there is not an error. And we can notify
the user without that dialog box popping up. That might be
confusing to the user. Now we can control our
message of what the user sees rather than getting
the default pop up. That happens when VBA
detects an error. Now if we make it so
there isn't an error. So let's say my
number equals one, which should be a
completely valid line of code we had on our resume. Next, if our number is not 0, then it's going
to enter in here. But because this
doesn't cause an error, we just skip over this
and no error occurred. And you see down here, we're
still at error number 0. So let's step
through this again. We'll see even though we have this line so we're ready
to handle an error. We don't use it. So error number is still 0 here and we never have to jump
into this if statement. And we'll just go right back
to what we were before. And you can see now
with this code here, we can detect any problems
that might occur on this line. So in this example, we're specifically trying to
target this line of code because we think
that there may or may not be an error that
occurs on this line of code. So a lot of times you'll
use this method just around the code where you think it's likely
to have an error. What you shouldn't do, or maybe not likely
to have an error, but there's a decent chance
that you might have an error. And then complicated code, there can be all
sorts of variables that are combining together. And so it won't be
as obvious as us purposely creating an error
here in a single line. Of course. A main idea here
though, is typically, you see this notation
wrapped around a very specific line or
small chunk of code. What you wanna do, have hundreds of lines of code down and have this
on our resume next, around all of your code. It might be tempting to
do that in certain cases, but it's considered bad
practice because you don't want to ignore
all your problems and then have all sorts of downstream negative
effects in your code without escalating
that and letting you or the users see that
something went wrong. So that's just the basic
introduction here. As we go, we're
going to build up much more detailed ways that we can use
this error handler. But this is the basic concept
of this keyword of onError. And then the different
things you can do with this error object as you are handling the errors that
might occur in your code.
37. 1.24.2 GoTo - Code Bookmark: Okay, if you just watched the last lesson on an
introduction to error handling, I still have just
the basic version of that code up on my screen. But I want to introduce another small topic before we
continue on error handling. And that is the naming of
different sections of the code, basically bookmarking the code, and then being able to
jump to that bookmark. And in VBA, that is called
the go-to function. Basically. Let me show you
what I mean here. Now and at the
bottom of our code, I'm going to use this
notation where I'm going to call this section two. It needs to be a single
word without spaces. So I'm using this underscore. I do colon here. When I hit Enter,
you see the line automatically jumped
over to the left. If I tap this, you see, as I change the line, it's still wants to
move over to the left. And that's because
this is a bookmark. Now type something like
section view stuff. Actually tested this out
right before I hit record. So I already have this
message down here. And the only line here
is a debug print. Now, if I run this, well, we actually
still have our code from the previous video. But I had this error message that occurred were
debug printing. So we're just running
the code and you see, now we didn't run
this line of code. This is against the left wall, and it is just the
notation because of this colon that
it is a bookmark. So you see it never
ran that line of code. It just skipped over it. And now it runs this line of code and we ran everything
all the way to the end. Now what this bookmark means is it just marks this line of code. It marks actually
this line of code and it is a jump to
everything underneath it. You can jump to the bookmarks, something as writing go-to. Section two here, you see
goto is a keyword over here, and it automatically formatted and change colors here to
show you that's a keyword. And then we have our
section two here. So if I run this code,
I'm hitting F eight. And on this line it
says go to section two, you see a jump down to
this section to bookmark. And now we're running
the code over here. And we skipped all
of this stuff here. And that's because this
line of code just tells you to jump to wherever
the bookmark is. Now if I do something like
jump to section three, let's see what happens
because there is no section three
and you see I hit F8 and this immediately popped up telling you that
it's not defined. Even before we start running, the code is compiling. And realizing that there is an issue here that
we're going to have a go-to line that doesn't
have an existing bookmark. But you saw before that
putting the bookmark here, it doesn't cause any issues. If we're not using that tag doesn't actually
cause a problem, even though we don't jump to it. But you can't jump to
something that doesn't exist. In the next lesson
where I continue working on the error
handling details, you'll see why I'm
showing you this here, because this Goto function is commonly used for
basic error handling. One thing I will say is that
this ability to Section two over here typically is something that's often pointed
out as a problem in VBA, which is to say that a
lot of programmers who do more modern languages don't like to use this or overuse it. One of the main reasons I use it will be the error handling. Then I'm going to
show you later. But it's common for this to be brought up as one
of the reasons that VBA can cause some code to be really hard to follow
and hard to maintain. Because all of this just
jumping around and skipping, which is just hard to follow. If I left this code here
for whatever reason, you can see it doesn't
make any sense. And that's because all the code in here will never be run. If I just left this like
this for whatever reason, this was a function
that was being used in something I created. It's not obvious now that we see what this goto and
this bookmarking does, we know that this
code itself will just never be run and it doesn't even make any
sense that it's here. But you see it's not flagging us that this
is poorly written code. In the worst-case is
you'll see bad code where it has tons of these
goto is all over the place. Typically how the code runs, which we've been
doing so far and will continue to do is
of course top-down that we just run one line
of code as we go one by one from the top down is
the easiest to follow. But once we start to get crazy using too many of
these Goto statements, you can see that the code won't just be going top to bottom. We can be jumping
all over the place. And if there's hundreds or
thousands of lines of code across different subroutines and functions jumping
all over the place. We can get really
confusing really quick. And so even though this is a really simple function to
use for a lot of programmers, it's considered bad practice. You'll find people
complaining about this sort of thing and
calling it spaghetti code because the code is
so tangled that it's very hard to follow where each
process path is going. That's it. There's a basic introduction to this Goto function here
that we're going to use. But keep in mind that it's not something that you want
to go overboard on using.
38. 1.24.3 On Error Goto Bookmark: Now, let's tie the
last two lessons that I record it together, which is the introduction to
error handling with this on error statement and this
goto section over here, where we're able to
jump to a bookmark. Right now, we have this example that really
doesn't do anything. We have a variable
called my number. And then we might create
an error over here, which we're catching with
our if statement over here. And then we're not doing
anything interesting over here. We're just outputting the error. Now instead, let's
do something with the code just to give
you a use case example, where we have our number
and we can say answer as, let's call it also. And we'll say answer equals
my number plus minus. Say, debug, print. Answer. Our answer here. So if all things go well
with the Coby have here, I'm going to make my
number equals five, which we don't expect to cause any errors because the
variable is a number. Actually, you see
from the last video, I just left this here, and this makes no sense. This is a great demonstration of what I mentioned in
the last lesson, which is that this code just
skips over all of our code here and there's no
reason for it to exist in the way
we had left this. So I'm gonna delete
that goto statement and just kinda set
it aside for now. Now on our resume that
there is no error here. So we skip over our message box because
the error number is 0. Now we have our answer which is five plus five equals ten. And as expected,
our answer is ten. And then we do section two, which is just from
the last lesson. Okay, so that's great. We have our function here which seems to be the goal of
adding a number together. And let's create some problems. Now. Let's create our
problem right here. And from two lessons ago
we have our error handler. So we should get an
error over here, but instead we have this. If there's an error,
just resume next. So we're just
continuing forward. And then we have
our if statement, which detects that an error was detected with
our error object. Now we hit our message box, which has an error occurred. We can click, Okay, then
things didn't come to a halt. This was a message
box we purposely put up in the code still
continuing to run. Now we have our
answer, which is 0, because this line didn't
actually set our numbers anything and it's still 0 from
our original declaration. This is a great example of why you don't want to just
continue running. Why you'd need to
elevate errors. Because if somebody
who was running this, I know this function
doesn't have much of a purpose right now, but you see our answers 0. And so if we were doing
something important, it could just
continue on its way. Spit out an answer,
in this case 0, and the user will
think they receive the answer of the software once. But what we know
happened is an error occurred in 0 isn't
what we actually want. It's just some default that
happens if things go wrong. We don't want that to happen. Instead, what we might do is if we had some important stuff going on in section
two, which we don't. But let's pretend that this is some code
that we want to run. We might say, go to section two. Now, we're gonna
do the same thing. We have our error. We're notified that there is an error with this message box. And then we jump
over the section two and we didn't prompt out and answer over here because this error we knew would
cause a bad answer. So we don't want to
give an answer knowing that something went wrong
with this section of code. And so now we're just jumping ahead to continue in
our code over here. Again, like the last
lesson where I mentioned, we don't want to get crazy with this because it
can get confusing. Now we have another situation where we skipped some code here. And if this was important
to the code down here, then everything is getting tangled up in hard
to follow again. So again, we don't want
to go crazy with this, but this is just an example
of what you might do. Something much more
common that you'll see is maybe we'll do something
like this where we say go-to error handler. And then over here at this time, you say go to our handler. And then over here, we can say if error number. Actually, before
I show you this, let me, let me back up here. I'm going to lose this
entire middle where we say, where we have an if statement that is checking
our error number. Instead of saying resume
next. Bring it back here. This resume next
basically just says, even though there's an error, just go onto the
next line of code. Instead of doing that, we can replace this
with the go to. And just like we had the goto
statement for section two, we can say go-to error handler. And what this does is
if there's an error, it will just jump
over to our bookmark, just like this goto statement. And so it jumps over
to our bookmark here. Now, if we give it a
real number on error, go to the error handler down
here. There was no error. So we just continue our line of code as usual because
there is no error. With this case. You can see that we don't need that statement that catches it anymore because if
there's an error, we are just going to jump
down to our bookmark, which is our error handling than what you
typically might see. And this is really
common notation. Is then down here, you can say if our
number is not 0, then you're going to
handle stuff here. And we'll say again error
number, error description. And we'll just do a message box, although we could do
anything we want down here. Now instead of section two, we've compartmentalize
the end of the code being our bit of code
to handle errors. And in this case we're
just making a message box. So now we have an error. We jumped down to
our error handler. And if the error number
down here is not 0, meaning there is
actually an error. Now we get our message box and we skipped our
function over here. That isn't going to give
us the right answer. Then if we give some inputs that make sense
and we don't expect an error, you see we have this code. One thing to mention here is
you can see that this code, I actually run something
visibly like nothing. Notice that we happens
when you run this code. It just sets the
standard for what's going to happen as we
continue to run the code. I'll explain that in
a minute when I go back and create the error again. But you see, let me start
from the beginning. We don't expect an error here. So now we run right through. We get our answer being
five plus five equals ten. Now we're in our error
handler section. We basically jumped
down to our bookmark. But because we have
this if statement, nothing went wrong,
we're going to skip over this message and we don't
get this message box. So now we've created some
basic error handling that avoids the
potential pitfalls, which is when everything goes
correctly runs as usual, our error handling is down here and it does not run
if there was no error. If we come over here and
create an error situation. This is what I meant before,
where this line of code, even though we know
there's an error here, it doesn't actually do anything. It just sets the situation as if there's errors that
happened below it, then it's going to use
this situation. Now. It's going to jump down
here and throw our error. And it did not run this code which we did not want
to continue running. If an error was detected.
39. 1.24.4 On Error - Persistence and Reset: Now continuing with
this setup we had in our previous lesson,
let me stop here. We'll actually
create a situation where there are no errors. We spit out our answer
and everything works. Now after our answer over here, Let's do some other stuff. I'm just going put a comment
here, do more stuff. Let's say we're doing
something else that's somewhat unrelated to the
code we have over here. And we say dimension, other number as long. And then we say
other number equals. Steve? Now if I run this, we have, if there's an error, we're going to go to our
error handler and jumped down here on this line we've been focusing on
there is no error. So here we go, We're continuing. And now on this line,
we jumped down. This was a bad example actually, because this was going
to be the line of code. Anyways, this is going
to be in the next line. Let's say debug, print out other number for whatever reason.
Let's try this again. We go through all the
way here and we created a situation where we expect an error to
happen right here. And you see it jumps down over
here to our error handler. And so what we're noticing
here is that this line of code that we created in our previous examples to capture if there's an error
on this line of code, this line of code was, didn't just apply to this. It's set the state of our code, meaning everything
that runs after this line runs is going to perform the same function for every one of these lines
of code underneath it. It's checking if
there's an error, go to error handler, which is why on
this line of code, this statement is still apply. And if there was hundreds of
lines of code in-between, In-between here and here. Setting this state over here
is still going to make it so that if you run into an
error all the way down here, whether it's this line
or something else, you can see there's
a type mismatch. Even when you hover
over the number. It still is applying this if there's an error, go
through error handler. So that's an important thing
to note here because I might create a situation that is
trying to be more specific. So now I'm going to undo
this whole go-to situation. Let's do this again
just like before. And I have to remove this. Let's say section two. And we're gonna say section one. So we're going to call
this section one stuff. And maybe we're doing some
other somewhat unrelated stuff going on here in section two. So I might do something like
this, section one error. So let's follow our
logic over here. And everything crashed. I don't really know why
everything crashed right here. You're going to see a quick
jump to this right now, I'm going to leave in that
Excel crash that you just saw, I still don't know
what happened, but I'm going to leave
this in so you can get the full experience of what can go wrong when you're
doing development. I don't like to
cut this stuff out and paint a rosy picture. So I don't know why
Excel crashed in that previous video in
the middle of typing, but this is a good reason to
save your work frequently. I had to come back here and retype the code we had been
doing up to that point. So hopefully everything
looks seamless. And what we have here is where I left off before
everything crashed. What I was showing you
is that we can have this section one
and section two, which might have some
other unrelated stuff. And let's push this up slightly. It will just say other
number down here. And where I was leaving off is that we might have something like this where we're
saying on our resume next. And then we can say section one error occurred here
as our message box. And so if I hit F8
and run through this, I'll show you what
this is trying to do. We just saying on
our resume next, it runs this without any issue. Debug print answer, and then we have our answer number two. Now, meanwhile, if I come over
here and create this error again, create an error. We detect that the
error isn't 0, so there is an issue. And we have our message box a
section one error occurred. Now, if we come down here, we have this other
line that's going to cause an error in our
section two of code. And it's just continued
on through this line. And we're deep bug printing
our other number as 0, even though this line
caused the problem. Again, we don't want this to happen because an error
occurred right here. And we don't want
the user to think that 0 is the correct number. And this issue is happening
because our onResume next. Still applying to everything
under here in section two is encapsulated in
that this line of code is still applying
to our code down here. We don't want that because
we wrote this section in this manner only to catch
our section one error. So there's a couple of
things we can do here. We could come over here. And similarly to what
we have up here, we want to say Section two. So now we still have this
onResume equals an axis. We're catching our
section one error. Then catching our section
two error over here. So basically we're using this
very common if statement checking our error number to create more specific
error catching. But we haven't another
situation that might come up, which is maybe I
don't want error handling to happen here
for whatever reason. I don't want to continue. If we have an error here, I want the normal debugger. And so what I can do is
after I handle this issue, I can say on air go to 0, which basically means resumed the normal error handling
that we had before. So I can remove this, meaning before we
ever talk about the error handling with
this onResume statement. Now, for this line of code, we continue on and we use our error handling
if statement there. But now when we run
this line of code, we say onError go to 0. That basically means resumed the default thing that
occurs for VB editor. Which means here, now
that we hit this issue, we're back to our normal
VBA debugger with our Continue and in
debug options over here. So this goto 0 specifically
means that it means basically undo your onError statements that you may have had before
and go back to default. You remember that go-to means, means to jump to our bookmark. So if we said something like
Section three over here, Section Three South down here, we could also say, on your next error, go to section three. This code is pretty confusing because
we're saying up here, go to section three. We're going to run
into the error down here and you see it
jumps to section three because everything
under this umbrella is saying any issues going
forward jump to section three. So this notation would
be pretty confusing because this is all the way up here and it's
running down here. There might be, in this
case, it's really easy, but there might be
hundreds of lines of code making these two
things very separated, which isn't a best practice. But you can see
what's going on here. And why I wanted to show
you is basically this goto, which makes more sense
to jump to a bookmark. But going to 0 basically just means
resumed your normal thing. It doesn't say something like section or bookmark
0 doesn't exist. This basically means reset is 0. And now we are catching
this error as usual here, even though we haven't
error handler up here. So that's how you can reset and section off
your error handler. Alright, and I'm turning
on the recorder for a third time just
to follow up that as I was editing that video, I realized that I think
the reason for that crash in the middle is because
I was in run mode. And you can see if you were one back to
that section where Excel crashed up
here on the top. It's at our header here. It says break in brackets. That is because we are in run
mode and I was cutting and pasting and moving code all over the place while
we were in run mode, while it was in the middle of thinking that it
was going to run code. I think that's what
caused the crash. That won't always happen, but I believe that's the reason that it just broke in
the middle of typing. So you have to be careful
when you are in run mode and you notice run mode when
you are at the top here, I think my mouse pointer
sometimes disappears, but up here there is
a break in brackets. And so changing
code when you're in run mode can make the
system somewhat fragile. That's it. Want to make sure I tag
that on here at the end.
40. 1.C.1 Automate Creating Txt Files: Okay. I wanted to put, I wanted to put together a basic series of
lessons showing you some automation of our
Windows file system over here, which we've already
done some basic demos of creating folders, something I already did, but I backtrack here
that I'll have you follow along with is I go into Google and I typed VBA
create text files. And then we have this link to an official
Microsoft website. Actually, we have this code that we can take here
for creating a file. So I'm going to come over here, copy this code,
paste this in here. And if I go ahead
and run this and hit F8, I hit a compile error. It says variable not defined. That is because right
away we're using these FS and a here
as object variables. We know there are
object variables because we're using
the word set here. And of course we
have create object. We just sold us
from that website. So we see that they set up some stuff that isn't
working for us. The reason for that
is because I have Option Explicit up
here as my default. If I remove Option Explicit, you can see we're good here. I'm actually going to backup. Instead of running this
which would have worked, I am going to add
Option Explicit plaque in which I have a past
lesson, why I keep that? And we're just going to
declare these objects are so dimension FS as object in a object so that they're declared
and then we can use them. And you can see we're
running through here. Now. I see that we're creating
a file system object here. And then we're setting this a variable which isn't
very the script. But maybe I'll call this as a TXT file to be
more descriptive. Set a as change that to
be a text file over here. And then we say we're creating
a text file which were used to opening a notepad which you're probably
familiar with. It's just going to put
this into C drive. And I don't actually want to do that and have my
C drive up here. Instead, I have this
subfolder for all my lessons where I've created a
folder called demo files. So here's my folder over here
that I have on the left. And we have the full
path over here. It looks like I wrote
something incorrectly. So I'm just going to fix
up my path here and I have my C drive through my tunnel of folders for Skillshare demos and
then our test file here. So you see we have this
create text file command, which then takes a path that
includes our notepad path, test file.txt equals true. And then as we run that
line of code here, you can see we have
our text file. We're going to say right line, this is a test with
our text file. And we're gonna do close. So now if we come back over here and see anything show up, which I expect it to. So let me come over here and do a refresh and nothing
is still there. So I must have
made some mistake. I come back over here and
I'm checking my path. We're in Skillshare demos. And what I delete it before was just that I
messed up my pattern. I must have dragged us. If you have rewind it and you'll probably see
what I did wrong, but I did something and
mess up my path here. So I don't have my
subfolder of demo files. Now if I hit F8,
right line, close, and here we are,
We have our test file.txt from our
full path over here. And when we double-click it, we can see it says
This is a test. And that is because we wrote this line to the text
file. This is a test. Now this is a bit long
and hard to read, so I'm just gonna make it a
little bit more efficient. So I'm going to say
border path as a string. And we'll say folder path equals escape there just to
exit that out for a second. And I'm going to give my
full folder path here. I'm going to cut that actually. We're just going to
split these things up. So there's my folder path. Let's do file name as string. We'll do it with filename
equals test file that TXT. And then we'll say, actually I shouldn't have this over
here and make a typo there. It will send dimension, full path as string, and we'll say full path
equals our border path. And combining that with
our filename here, if you want to check, we'll
do a debug print here. We'll say full path
just so we can see it. And then in this giant blob
of text that we have above, we can type our poll. That way. We just
split things up. It'll be easier to manage
as we go through this. Let's try this out. I'll hit F8 folder
path, filename, and then our full path is
combining it both together. We have our full path
over here, TXT file. We actually might
have a problem here because we already have
a file called that. And it didn't seem to care. So that's interesting. But if we delete this,
will run this again. And here we see our
test file show up. And just to show
you, if I type two into our filename here,
when we run this, again, here's our
second test file. So here in this first video, we've just taken the code from our basic
Google search from the official Microsoft
documents and adapted it a bit so that we are creating
a text file with some code. Now, similar to what I've showed you before that we
can do with folders. Let's do something
pretty simple here. Let's take our file name. I'm going to cut this and move our filename
declaration down here. And the reason I'm doing that, and I'm just going
to comment this out. The reason I moved
this down here is so that it's separated. And I can wrap this in a loop. And I can say for I
equals one to ten, indent this next pi. And since we're using I here, I have to declare it, will
declare high as along. And then I'm going
to take this number. And in our file name, I'm going to use our variable I here as it
goes from one to ten. And now if I play this out, in fact, I'll clear this first. We'll hit play. We have path not found. That's because I move
this file name down here and I didn't read
declare our full path. I'm going to cut
our full path here. So each time we
change the file name, we need to change our full path also because it
uses our filename. So I'm going to stop. We'll hit play again. And here we see one through
ten automatically get created as we increment through this loop,
one through ten. So that's it for this one. We'll keep building on
this, on the next one.
41. 1.C.2 Automate Rename Files Fix: For this next lesson, now that we've created
some files over here, some basic text files, I'm going to show you
how VBA can rename a file and automate
renaming a bunch of files. So what I've prepared here
already is the notation for renaming a file is
writing the word name, then the old file path, the word As, and then
the new file path. And so just like down here, our filename is all the
way on the right and a full path is our filename plus our folder path over here. I already have this
pre-written to keep these videos
a little quicker. But of course you
could pause and view all this code line by line if you wanted to
actually use it with our line of code that
will change a name. You see I've already prepared our variables with
this content up here. And then the actual
command that will change the file name is
name our variable, which is our full path current
as that are full path new. Here I'm constructing
it and we'll hit F8. So we step through this code. We have our main folder path, which is the one I
had in our last video here that has these text
files that we created. I'm taking our filename current, which is testfile one, which is this file here, filename new, which
is what I want to change our file name to. I have declared these
variables for clarity, where one is the full
path of the current file, which is this one that exists. And then what I want
it to change too, because I want to be able to use these variables in our single line command
that we have over here. So now that we have our filename current and our filename new, we can create our
two variables for the full path current
and full path new. And then run our one
line of code here. That is actually what
creates the function. The reality is if
you look this up, you can write the entire
full path string here, and then the entire new
name that you want here. And do everything I did here
in a single line of code. But this is more clear
and it's going to set us up for our next step that
I'll show you in a minute. I'll hit F to run this. I think it takes a second
to refresh and you'll see our filename
here just changed. So now in addition
to creating folders, the last video I
showed you how you can create text files. And now you can see how
we're changing filenames. And in this example, this line of code will
work for any type of file. It doesn't just have
to be for text files. In our last lesson where we are creating these text files. This doesn't necessarily work
for more complicated files, like if you have other Excel
files or Word documents. But just to show you, when I come over here, I'm just going to create
a new Word document. In fact, I'll just take
this entire file name here, including the DOC ex. Just remember that the file path does include our
extension names here. You might not have
these extension names on your computer here. The way your Windows
is set up by default. I always show them. And if you come over here
in your folder options, I'm just saying to select this checkmark where you're showing the file
name extensions. But your file paths
actually do need to include your full name and how Windows handles files and just
usually hides it from you. So coming back here, you
can see our current file. Let's make it this Word document that we just created and we'll do new name dot doc x here. So now as we step through again, we're doing the same thing. Current path should be the full path for our Word
document we just created. And we'll change the name there. It takes a second to refresh. And you see now we have our new file name changed automatically over
here for our Word document. Something else to note is
that since your extension is a key part of the file
and your extension in Windows tells you
your file name type. If I went and did
something like this, say you name one and I'll say new name to that
text over here. So we're going to take
this Word document and we're going to
change its name. I'm going to hit play here and just run it
all the way through. We've changed this file's
name to new name one texts. And so we actually changed
the file type here, which isn't actually
what we want to do, because that could potentially
make you lose data. Just for example, this text
file says, this is a test. If I came over here and
changed our filename, let's change it back to a
Word document dot x hit F5. So we're actually
keeping the same name, but I've now changed
it back into a Doc X among mixed up here. But if I double-click this, you see our text is gone because as you
change the file types, you can really mess
things up a bit. So we'll take our
doc x when we change it to an Excel file,
for example, play. By changing the extension
along with the filename. We're inherently changing the
file type at the same time. And you see now we're even
getting an error because it realizes that something
has gone terribly wrong. This file isn't supposed to be an Excel file that
didn't even open. That file that just
popped up was actually another file that I have over here where I'm
writing my code in. But it's not willing to open
up this file anymore because in the background it
knows that this thing isn't meant to be an Excel file. We just forced it by changing the extension on the file when we're messing around
with the filename. So that's kind of
a tangent on here, but just something
to be aware of. The next thing I
wanted to show you here is we'll do
some automation. Let's clear all these files
from our previous lesson. We have this
subroutine we use to create all these files with
a loop, one through ten. That's even beef this
thing up a little bit. We'll make it 20,
so it will fill up the screen and look fancy here, does macros have been disabled? So let me try
re-opening this file over here really quick
because I needed to click Enable content up
here so I can run our macros, come back to our
folder that we are working in. We're module one. So here we had our subroutine
from the last lesson where we create all these text files and we changed our loop to 20. And right away
Here's 20 text files that automatically got created. Now, we have our subroutine
for renaming files. We're just going over, Let's do the same thing we did at
the end of the last video, where we're going to cut our
declaration of filenames. And we're going to
move them down here. Then we use these filenames
to create our full path. And that's buried in a loop
where we go dimension I as a long equals I equals
one to 20, indent this. Next i. So we finish our
loop notation here. And instead of these names here, we can do a test file, one that TXT equals new name, one, that Px Py. And I really wanted to
come back here and replace one with i variable. I'm going to copy and paste
this over here so that each iteration of the loop we are going to be changing
our filename. So textFile one. And then the next loop test
about 2345 through 20. And we have our new
name for them too. And we run this code
over and over again. Where do you see as I hit F8, we have our old and
new file paths here. We run this line,
file not found. So let's go back here. Let's see what our
current path is. If I come over here to take
this variable and debug, print out our file path current. It says we don't have this file, test file one dot TXT. That's because I wrote text file when really it's test
file right here. So let's drag this back up. In fact, I'll stop and
start running again. Now as I hit this line, we just changed our test
file one to new name one. We loop through
declare on new paths, which really the only
thing that's changing is one becomes a two. And there's new name two
for the second file. And I'm just gonna hit F5 and run this all the way
through one through 20. Since its 20th pride. Take a second for it to run. And there it is. It has renamed all of our files, all 20 files, with a
click of a button. This is how you can
rename a file and a use case that you might
actually have is for example, you might have a giant
folder full of files is, let's say our current
file is called newName, which is what they
actually are right now. And then for example, my new file name might be something like filename current. And I'm going to just, I'll type my initials over here, dash. So now I'm actually just using the same variable is
my current filename, and my new filename is using the current file name
plus something else. So you can manipulate the current filename to
create your new one. So now if I hit F5
and run this off, it looks like I just
have a typo over here. I hit F5 and run the cell now. And now I've appended S T to the beginning
of all these files. In some situations,
you might be needing to make an update to
many different files. And you saw this ran
really quickly for 20 and this would work if you have thousands of files in here. You can deal with it. You
can do all of this with some code that isn't actually a very complicated or long hair. And then run this all
with a click of a button.
42. 2.1 Moving Data - Create Form Record Macro: Since we're going to do a tutorial on moving data, I want to create a simple use case for a template on a reason that we're going to need to move data around. So what I'm going to create here is a purchase form. So I'm just going to draft up something to start with and then we're going to start to evolve it through the course of this project. So first I'm going to create a very basic form here. Will create item, quantity and price for now until we think of more things to add to it. We're going to give it the look of a form here. I'm hitting Control C to copy control V to paste. If I hold Control, you can select multiple cells at a time. Wherever you click. And then I'm going to create a border here. Now let's create a little data table for this data to go. And I like to use the default formatting out of Excel just to make this look a little better, but not have to worry too much about making selections here. And so now we have a basic user form. Let's start to fill it out. So let's say we have one pencil here. We're going to order ten pieces of them. And for a price of $1. We'll turn this into a dollar sign here. And so here now we just have the framework for the template. We're going to start out with. The first thing I wanted to do is just to show you the basics of recording a macro, which we went over in our last lesson. But we can use this Developer tab. Go to Record Macro, will click Record Macro here. We'll just leave it as the default name. And now we are recording whatever we do on the screen. So I'm going to click into the item cell, do Control C, paste control V. And I'll just do this for each of these fields. And we have moved data from our form into our table, won't even call this the purchase table. Now, if we go to stop recording, we have a macro-level coordinate background. To view the macro we just recorded. We can click this Visual Basic button. And module 1 is the default module that was created for the recording. And then here's macro one. I just show you another way you can get to this is you can click this macro buttons, which shows you all the macros that are in the Excel application that's open right now. You can run the macro or you can click Edit. And if you click Edit, it'll take you to the code here. Let's take a look at this macro that we created. Let's try running it. And so I'm just going to split these screens up so we can see them a little better. I'll just clear out this data here. Without even looking at the source code. We can go to Macros and we have macro one and let's click Run. And you can see all the data from the form went into our table over here. So let's clear this out. Now that we have our code pulled up here, you can hit F8 to step through each line of code one-by-one. And so if I'm highlighted, my cursor is in this macro. I hit F8, and then I can step through each line and we can see what's going on here. We're going to select range A5. So that's the cell address, a five over here. We're going to copy it. We're going to select I3 over here. And then we're going to paste it. And then it's just going to do that over and over again for each of the three fields. And then you can see it even recorded when I typed in the header of the table purchase table here. And so one thing is we just go through this tutorial. I'm gonna make this a little more convenient to test out. I'm going to add a button over here to our form. Well actually I'm assigning the macro here, so I'm going to assign it to macro one for now will have to change that later as we change the names of our macros, we're going to assign it to macro one. And we'll call this submit. And now if I clear the data out and hit Submit, you can see our macro runs.
43. 2.2 Moving Data - Name the Ranges: I mentioned in an earlier lesson that I don't like to use cell addresses when making macros. And by that, I mean how this macro, when we recorded it, used cell addresses like a five and C5 here, and it pastes them to i3 and J3. And the reason I don't like that is for many different reasons. But the most obvious one is if I do something like cut and paste this table somewhere else or reposition it. And then I run this macro again. You can see that it still uses these absolute cell addresses in here and nothing works anymore, or at least doesn't work correctly. We have to go into this macro and we update the cell addresses again. And the problem is then we could just move the table again and we're constantly evolving these tools as we're going. And so this requires constant maintenance and updates. So what we're gonna do here is we're going to clean this up a little bit and then change this. So we're not using the cell addresses and instead giving names to the range that will move around with these cells. And that'll make more sense as we go through this example. So one thing I'm going to do now is just remove this part where we create the table name because we accidentally record that we didn't really mean to. And so we're going to still stick with this concept for now. We're going to just keep growing on this concept and changing it to become more advanced as we go. So we have cell A5 here, and I don't want to use a five because of the problem we mentioned. Instead, I'm going to give this cell a name and you'll remember this if you watch through our earlier lessons here, I'm going to call this cell, actually I'll call it form item. And then quantity. I'll just keep the same idea. And I can just type it in this top-left address field here. And actually I want this to be formed quantity and form price. And you can confirm that this worked correctly is when you click over these fields, you can see the name of the cell doesn't say A5, C5 anymore. It gives the name the range. And I can confirm this even further by going to Formulas Name Manager, and you'll see the names I created for each of these fields. And so I can just show that this now works for our form even though we haven't handled the table yet. So if I did something like cut and paste is move these down. I'll just copy these formats to fix that. Then this original macro says A5. Actually don't want this to say A5 anymore. I want this to say form. Pencil. Again, C5 here is now foreign quantity 8, which was our price, is formed price. And so let's run this. We have an error here probably because I made a typo somewhere. Range form, pencil select. And this is called Forum item. If you're watching and following along, you may have noticed that as I was typing this and we'll run this. And you see it was able to find our source data over here in our form even though we had moved it. And you can see we can move it right back to where it was up here. It's actually one row higher. And we can run this again. And the macro confined source data because we gave it a name and this name moves around with our cut and paste. It'll also move around if we do something like insert a row, you can see the formats duplicating here. I'm just copying and pasting these generic cells to fix it. And I'm copying and pasting blank cells over here to clear those out and hit submit. And you can see it's working again. One other small thing you might notice as a side note is that the format of the source cells, because we're using a control C copy and paste when we record the macro is bringing over the formatting, which includes the borders of the cells also. And so let's do this for the table also. So we stop pasting our data up here in our original recording. This is going to be a little trickier. The more obvious thing that we could do here is to just name each of these destination cells in the table. But that's going to cause us to have a lot of names. So imagine this was a 20 column table, or the rows are going to keep going farther down as we gather data. You don't want to give names to all of those things. So I'm going to do something a little different here. Instead, I'm going to choose the top left field. Usually I choose the first column and then take the header of that as the top-left, what I call the anchor point. And I'm going to give that a name instead. So I'm going to call this table purchases. And so now this cell here is called table purchases and this is an anchor. And I can reference these other cells based on this anchor as long as this table is always moving around with this anchor cell. I'll show you what I mean here. Here where our item is going into cell I3. In this case, we really wanted to move that this part of the table and the table is down here. Now, we did create a name for our anchor cell table purchases. So instead of I3, which is where the information is ending up when we recorded our macro, we're going to choose our anchor cell, which is table purchases. And then we're going to use this offset function, which we also covered in our earlier tutorials, where I can tell you the row and column that I want to be offset by the cell. So if I say are real offset is one, that means it's this cell and then one cell down, and then our column offset, if it was one, it would be one cell to the right. But instead, we're gonna go right below it since we're working on item and our offset is select here. So our offset is our anchor cell down one row and write 0 columns. And we're going to select that. And just like our recording, we'll leave this for now where we paste or item. And then for quantity, our selection instead of J3 will replace this. And you can probably see where we're going with this. Our column is just going to be over one to the right. So add one there. And then k3, which is up here. We want to move that down to this cell. And again, we're going to use the anchor. So we're just gonna go over to the right two columns and down one row instead. Now we have the selection of i1. That's just when we created the table heading. And so we don't need that anymore. We're just going to delete this here. And so if we did this correctly, what we should do is take the values from each of these three cells and then paste them in each of these cells based on the anchor of the table. So let's run this. And so you see that worked. Let's try this again. So I'm going to cut and paste and move this table even farther down here, you can see our anchor cell moves with it, table purchases. And so I can clear this again now and try this again. And our data continues to move with our named ranges. And then I'm just gonna go ahead and clear this out.
44. 2.3 Moving Data - Simplify Recorded Code: Now that we've updated our tool, so we have named ranges and we can move our data around and feel confident that the logic is still going to work out. What I wanna do is just clean up the basic functionality here. When we record macros, it's a bit inefficient because it recorded every action that we do. But since we're working with the source code directly, we can actually cut out some of the steps that we do when we're manually working with Excel. And so for example, when we're selecting the form item cell, which is over here and then copying it. You can see we're first selecting it and then I hit Control C and do the copy of the selection. I can actually cut this out and make these into one where I don't have to click into the cell since I can refer to the form item cell, I can just copy it directly in one line without selecting it and then saying, I want to copy whatever I have selected. And so we can cut these out. And the same thing happens for our destination, where we're going to select this cell, which is what this line says. And then in our active sheet we're going to paste in whatever So we have selected. I should be able to actually come in here and just type paste. I'm not sure if pace is actually going to work the same. So I'm just going to comment this out and check if this update works for this one item field. Let's clear this out and then we'll hit submit. And you can see paced actually did not work quite as well. Now that we've realized that for now, I'm just going to hit Undo and then leave the pasting here for now we're going to come back to this. I'd like to leave in these little tests that I'm doing in the tutorial. So you get to see the full process here. For the copy. We saw that that work and it only had a problem with the pasting. So let's run this again just to see if that fixed it. So you see this reference where we chose the form item directly ended a copy that work and we cut out some of the inefficiencies of selecting the cell first. So let's do the same thing here. So form quantity. We'll come over here. Instead of selecting it, would just say dot copy. And then we can delete this over here for the form price, we can remove the select with just the range and copy. We're just going to leave this in here. I'm not sure if we need this right now, we'll test that out. But this is the equivalent of hitting Escape when you hit copy. So you see how we have the moving dotted lines here. This is hitting Escape. So that's what got recorded here automatically when we're recording our macro. So let's try this out. Now you see we have an error here and it's saying we have an error when we're trying to pace. I'm realizing the reason for that is because we don't have anything in our copy clipboard right now. If you went back and looked at how we rearrange these lines of code when I made it more efficient, is the copy line was actually here. This is where the old copy line was with selection, that copy. And we move this and you see because this one, sorry, I didn't like that. This isn't a valid line of code here because this line is the equivalent to hitting Escape. That was similar to clicking this field hitting Control Copy, hitting Escape, and then trying to paste in here because it had escaped with this line of code, then there's nothing in the clipboard. And so what I really need to do is let's see if we even need this. So let's try this out. We can run this step-by-step so we can see what's going on here. You see we're copying or pasting copying here we see the dotted line and we hit the active sheet and we paste. We're going to hit the same problem here and you'll see what I mean. Here we have the price and the clipboard. And then when we run this line, it deselects the copy from the clipboard. And so we're going to run into an error right there, right here actually when we try to paste. And so we'll go back here. You can actually drag this arrow up to go back to where we were before. Now we have price in the clipboard again. And I think we can actually remove this because we inherently unselect our copy when we copy something else. So you don't have to do the equivalent of hitting Escape to take something out of your clipboard. We can just skip that line completely. And then we have something working here. What we're actually seeing is because we don't have that line of code that deselects our clipboard. You can see this is still active even though our macros completely finished. So if I hit undo here, we'll clean this up. We'll actually just move this till the end. And now we'll run this step-by-step just so you can actually follow along now that we're editing code manually. Now rather than just using the pre-recorded macros, you can see this custom code that we created, how it runs step-by-step. And so now I'll hit F8. We step through it, we copy item, we paste it into our cell, and we do the same thing for three fields. And then now that we're done, we hit Escape to clear out our clipboard.
45. 2.4 Moving Data - Paste Values Only: Another small thing I want to go over is just because we're using a copy and paste here. You saw before that we're moving the borders over to our fields here. And that doesn't really matter to us because it looks okay in this format, but it's not always something we want. In fact, very often you're only going to want the values and not all the formatting of the source fields. So what we wanna do is do the equivalent of pasting just the values. Just to show you what could go wrong here, I'm just going to clear these cells out, including the formatting and show you that if I did something like have this cell is highlighted. When we run this macro, the entire formatting of the cell moves over here because it's the equivalent of doing a copy and paste. So I'm going to clear this out. Let's clear these again. I'll bring this back to white. What I wanna do now is basically just make this the equivalent of a copy. And then paste right-click and then paste special. There's these shortcuts here. If you've got to pay special, you'll see it actually written out and paste values. If this was highlighted. You'll see that if we did this and went to paste special and values, that only the value and not the formatting of the cell moves over. And that way we can control the formatting of this table without getting overwritten by the formatting of our source data. How are we going to do that is updating these lines of code for pasting into what is the equivalent of a pays value, rather just a typical copy and paste. I don't actually have that notation memorized. So like in my earlier tutorials, I don't want to just look that up and have a notepad over here and type it in. Instead, I want to show you the process that you can use to find information if you don't know it. And I don't show it in these tutorials. So what I'm going to do is just go over here to Google and I'm going to type VBA, paste special values only. And so if I go over here, you can find notation and these websites, I'm just browsing quickly to our answer. You can see you can take a range and then it says Paste Special and then Paste Values. And this seems to be a property of a range. So let's try this code out. This is our range over here. We have an offset on that range, but this is still considered a range. So we're going to remove this select and do a paste specials. We have an extra period here. And then with this, we could actually comment out this line because I don't think we need it anymore. So let's try this out. In fact, I'll paste it in here because that's where we have our highlighted quantity cell. And let's just try this out. I'll clear this, It's submit. And there you go. You see we paste values in here and the formatting of the highlighted cell did not get moved over. And I'll do this for the last cell here, just for the price. Actually don't have this in my clipboard anymore, so I'll copy from this other line above it. And then we can just clear these lines out. And here now you see as we're doing manual updates, our code is getting more and more efficient, which is best practice that we want to do. When we recorded the macro. It had a lot of extra steps. The more we can simplify the code itself, the easier it's going to be to maintain our code in the future. So we'll test this out one more time now that we have all our updates, you see the self self-appraisal price still has our formatting here. So I'll clear that out completely. What submit. And now we have just the values being moved in here. Price, we still want to be in dollar notation so we can make this field itself and accounting field. And it's going to maintain that formatting in the future as we add different values to it. So even if we change this to a dollar 50, we can hit Submit and you'll see it updates in it retains its accounting cell type.
46. 2.5 Moving Data - Without Copy and Paste: Up until now, what we've been doing is starting with our baseline where we recorded a macro and did a copy and paste into these cells. Even this is slightly inefficient. We're recording macros, basically we're doing it the way a regular user or person sitting in front of their computer would move data around. Because we have access to the code directly in VBA. We actually don't have to run things the way humans sitting in front of the computer clicking with the mouse and keyboard would run things. So in this example, I'll show you what I mean by that. So our process here is basically copying each field in our form and then pasting it to our table. We don't actually need to do that. We don't need to do a copy and paste. And then what we've done before with a paste specials to retain our formatting. Instead, because we have access to these variables directly. We have this field over here being table purchases with the offset. Because we have this reference of this field, we can actually forget the copy and paste. This cell has a property called value, and we can just set this equal to something. And so if I set this equal to Steve here, we'll run this now. And you can see we just place the, this line of code, just place the IV directly into the cell. And I have my source data here, which is what we did a Control C copy from. We don't have to do a copy. Instead, I'll just take this source cell, which is over here. And instead of the text that I just typed right here, I'll put the value of that. And so basically what this line of code is saying, and we don't need this anymore, is that this cell over here, which is referenced to the left side of this line of code, will equal the value of this cell over here. And so this is basically the equivalent of a copy and paste only. It'll be even more efficient. So let's try to run this and you can see that the macro still works the same and the item pencil has moved over to our table. So let's do this for the rest of the code. We don't need this line anymore. Value equals the value of our source. And we can do the same thing over here. We'll cut value equals form price stop value. And this where we clear the Copy clipboard doesn't matter anymore either. And you can see we're getting much more efficient here. So you can see where the shortcomings are of recording a macro and how much more efficient working with the code directly if you know what you're doing can be. So let's show this whole thing. We'll clear this out. Hit submit. And here we have the same result as before, and now we're only down to three lines of code. And you can see the same thing still applies. The highlighted cell, the formatting did not move of this table. We're just moving the data we want. And one thing that this simple example isn't showing is as your macros get much longer, they can become pages and hundreds and thousands of lines of code. This is much more efficient. And so this could be the difference between your macro running for thirty-seconds or even multiple minutes. Or it running much more efficiently and being done within a split second or a matter of seconds.
47. 2.6 Moving Data - Writing to Next Row: Now we've created a very clean macro here with just three lines of code that moves three pieces of data into this table. Next problem that you might be thinking of already is that our macro just keeps moving information from this form into the exact same fields over and over again. So to make this an actual transfer of data into a table, we're going to want to append a new row every single time we hit Submit so that we get another row of data each time we submit a new line item here through our form. There's many different ways to do this. So I'm just going to show you one way that you can do this for now. The first thing I wanna do is figure out what my next line is. And because this might fill up with data over here. And we might have more lines, we need to go through this table and figure out where our next row is going to be. How I'm going to do this is I'm going to use this anchor table. And in our earlier lessons, we went through loops. So that's what we're going to utilize to figure that out. I'm going to figure out what our next row is before we even do anything. So I'm going to start to draft up some code before these lines where we're adding our three fields at a table. One thing I'm going to utilize here is this named range, which is our anchor for the table over here. What I'm going to do is start at this cell and then work my way down this table. I'm going to do a for-loop, which we went over before. I'm going to start with just some numbers I'm going to make up here. I is 1, 2, I'm just going to say 99 thousand, just a gigantic number that I don't think our table will reach, at least not in the foreseeable future of this demo. So I'm going to say next, I, this is our notation for our for-loop. And then I'm going to choose this range or anchor for the table purchases. And I'm going to say offset i 0, that value. And so I haven't actually finished this line of code yet. I just want to show you that what I'm referencing is only our first loop, I is going to equal one. And so just like we used over here, if offset is one, that means one row down from this cell and 0 columns to the right. So we're talking about this cell over here. And then the next time this loop goes, I is going to become two. And then we're going to be talking about this cell here. And you're probably starting to get an idea of what I'm gonna do. So I'm going to wrap this in an if statement. I'm going to say if offset 1 equals blank, then I'm going to end this if statement here. But basically I'm going to put some code in here that says at end of table. And so when I equals one, there's going to be something here. And so we're not going to meet this if statement. We're just going to move on to our next loop. So we're going to skip out of this if statement. And we're gonna go to the next loop. When I equals two, we're going to be over here and then the value will be blank. And then we're going to end up inside this if statement. And then this next blank is going to be our first row. We're going to create a new variable here, and we'll call it DEM. Next index as integer. And so when I shows us an index that brings us to a blank row, we're going to say next index equals i. Now we don't need to keep running this loop because we've already hit the bottom and we don't need to run this loop 99 thousand more times. So we're just going to exit the for statement right here. Now when we're done this for loop on next index is going to be two in this case, which is really the location of our next row. And so where are we? We're always adding data at just one row down from our anchor point. We're going to use this variable next index for how many rows down from our anchor, we want to go and add the next data. And so if we change this here, now, we're just one row down, we're going to be a two when we run this. At least that's what I expect. And then we're going to be setting these values to these form values again, because it's hard to see everything. I'm just going to shrink this down a little bit. Because we create these named ranges. I can do what I just did and everything's working correctly. And so you can see this is one of the key benefits to working with these named ranges. Because it's the first time we're going to run it. I'm actually going to use F8 and step through this code and hopefully the concept works just as I described it. And so we're going through the loop here. I equals 1. We can highlight over these variables just to see their value. The value of one row down from the anchor is not blank. So you see we jumped out of this if statement. We did not enter into it. And then we're gonna go through the next loop where I equals 2. We're talking about this cell here, and the value is blank and silver in next index equals two. We leave the for loop. And now our next index is two. And now we're going to set the value of our anchored down to rows. And it looks like it worked great. Just to prove it. We're going to change this up a little bit. I know these example prices might not make any sense. So bear with me if you're thinking to yourself that this isn't what a pencil costs. Hit submit. And you see are updated. Macro works great and we can keep adding information to this table here.
48. 2.7 Moving Data - Add Timestamp: There's one feature that I want to add, this tool that we're creating, just because it's a very basic feature that would typically be part of a form to database tool like this. And that is a timestamp on when we are adding this information. And we have this functionality we built up already where we can keep adding lines in this table. And I want to stamp each record with the time that we added this row to the table. That information isn't in the purchase form and we don't want to ask a user to type in the date and time every single time they are submitting a new line. We don't want them to do that themselves. And so we'll just do this right in the code over here. We can use the same concept that we have over here, where we have our anchor. We have our index for how many rows to go down to find our next row. But our column is now our third column over from our index. So 123 is our timestamp. And instead of taking the value of a named range from our form, which we already have over here. We can just use a VBA function and we'll use the function now, which is a timestamp. And so let's add a row here. You'll see we have a timestamp value that's now shown up. We'll make this a little bit bigger just so we can view it. Actually, we can make this quantity much smaller also to give us some room here. And you can see as we are adding these rows, we now have a timestamp in here also.
49. 2.8 Moving Data - Writing to Different Sheet: Next thing I wanna do is split this information up. And that's gonna give us a chance to see how we can move data between two different sheets. So I'm going to create a new sheet here because very often we wouldn't have a user-friendly form like this right next to the data table itself. So instead, these might be in two different locations. So I'm going to cut and paste our table, and I'm going to paste it over here into another sheet. You can see because I use Control X for cut and paste, our named range actually moves with it. And so you see over here, where would have been our anchor cell? That name moved with it over here to this new sheet that we created on that alone. Let's see if this works. So I'm going to change the quantity here. I'll change this to paperclip. I hit Submit. So you can see here that we didn't need to do anything because we had named our ranges and table purchases moved over here. This sheet actually knew the table purchases was on a different sheet and was able to find it even though we had moved it. One thing we can do here is we're going to write form. And over here we'll call it table data. And we can keep adding information over this table and you can see it continues to work and we have our new timestamps. And even though this work, I just want to show you that it's always better to be more explicit in how you're writing your code. Just because in different situations we just haven't hit it yet. But this code could get confused because we have two different sheets and it might not know what information we're trying to reference. This isn't a problem yet, but something to be more explicit could be adding a sheep call out. And we'll say from table data, range table purchases. So now we're telling R code that the range table purchases is very specifically in the sheets called table data. And we could do this for all the rest of them. I'm not gonna do it right now, but this would be more explicit. So you're telling the code exactly what's going on. And we can try this again just to make sure that it's still working. So you see in this case, this information right here, it wasn't needed, but adding it doesn't hurt. So in different situations, this may work better and even be needed for everything to work correctly. While we're on that topic, I actually want to just come up with an example to show you when the Shi call-outs need to be specified. The way I'm going to do that is to take this data right here. I'm going to clear this out. I'm going to comment out this line. And instead of writing our item, we're going to fix this all back later. But just as this demo, instead of writing our item over to the next row of our item column, I'm just going to put this in cell A1. And you're going to see that we're writing a one. And we ended up changing our purchasing form over here to say paperclip, because this form does not know that A1 means table data. In fact, I didn't even bring that up when I change this code. And so you can see A1 is on different worksheets. And if I make a new worksheet and I want to write to a one on sheet 1. I'm going to have to specify directly. And so I'm going to change this back to purchase form just to fix the mistake we made over here. And then if I want to write two sheets called Sheet 3, that range A1, that's what I need to call out specifically in order to move that data over here to sheet 3.
50. 2.9 Moving Data - Tidy Up: Hi everyone. So I realized that it's been
a long time since I posted my last video over six months ago and
never follow up again. So I want to pick up
where I left off and just continue the Excel
automation lessons. So we'll dive right
into it hopefully seamlessly from where
the last video left off. For this video, what
I wanna do is just clean up what we created before. So where we left off is when
I click the Submit button, we should be adding a new line over to this page over here. And you see the new date compared to where
I last left off. Let's change one of
the values here. Just make sure
everything's working correctly and hit Submit. We're going to
come back to this. One thing is after I
click the Submit button, I don't know if anything
successfully happened. So I'm gonna come over
here and see that our new line that we
added is showing up successfully with
now the new price of $15.1 thing I didn't like about that was that
when I click this button, I could not tell if
anything happened. So let's change this again. Hit submit and you see we just don't know that anything
successfully happened. So let's add a
simple function to give a pop-up message
to indicate to us the user or anybody
else who's using this that the code
successfully executed. So we're gonna go over
here, back to our module. We left it as macro one here. So we'll come back
and fix that also. So just as a bit
of user feedback, we're going to just
say line has been. So let's go back.
We'll run this again. And we see line has been added. Now we actually know
that something happened and we got a bit of
feedback from program. Now as we come back to our code, we can take a look
here and see that it says that our subroutine name
is still called macro one. So that's not a very
descriptive name here. Let's change that into
something more official here. So we're going to say add lime from now because we changed
that subroutine name. When we go to click this button, we see that we cannot
find macro one. And that's because this
button is still attached to a macro named macro one which
doesn't exist anymore. We change that name. So let's reassign this
to the one macro. This is nice and easy to find because there's only one so far. To add line from form. Now when we click this, the same routine runs. We continue to have
our lines add up here. I'm just going to
clean this table out. Just so it doesn't grow so tall right now that we have
to scroll to see it. As we add another line, we see our subroutines
still works. Now that we have this data
table on the other tab, we don't need this one anymore. So this was from our
earlier lessons. We can go ahead and
clear this out. And one sheet that I
like to use to clear out content is if I highlight
here and hit Delete, you see all this content
still stays here. All this formatting
is still here. I'm going to undo it just so you see that I can do from here is I just grab a blank cell,
completely, copy it, and paste it over here I was doing control C and
then highlight and control V. And I hit Escape to stop the
copy and paste mode. And now all of this has
returned to normal blank cells. And that's because I copied a normal starting blank cell and pasted it over top of
the stuff I wanted to clear. There's other ways
to do it, but that's just a really quick
and easy way. I usually do that. Now I'm just gonna go ahead and clean this up a little bit. I don't really like
the way this looks. So let's change the
appearance of this form. One thing I'd like to do for forms is to get rid
of these grid lines. You see the spreadsheet
has these lines here, which is normal to
all spreadsheets. But we want this to look more like a form and less
like a spreadsheet. And this is just for
visual appearances. I'm just going to
remove gridlines and you can see all
those lines go away. And this looks a little
bit more like a forum. Now I'm just going
to clean things up and make this look a
little bit better. I'm going to move the button
out of the way for now. Let's change this font. Let's put this back
to normal and we're just going to make
this bold for now. We have this gray background
that I set up before and I'm just going to
undo that, say no fill. So we're back to
the default here. Let's rearrange this also. We have this random form setup. Instead, let's start to align
these things up vertically. What I mean by that is
I can take quantity, I'm gonna do cut and
paste or Control X. I'm going to paste quantity
over here and price. And I want the labels
for the fields to be over in this first column. And then in the second column, I'm going to put
the actual field. You see, we had named this
earlier as the Forum item. From our earlier lessons. You know that if I
do a cut and paste, this name will travel
with the cell. So if I do a cut and paste, you see, even though I move
this from here to here, the name form item has still
traveled with this cell. I can do the same thing
for these other ones. I'm doing a Control X, Control V for cut and paste. I have these setup like this. Now, I'm going to right-click
and delete these. And let's just make this
stand out a bit more. I'm gonna make this black here. It will make the font white. Move this back over here. I'm just going to put
some Colin's here. Now we have a much
simpler, I think, cleaner looking for that we're
just starting with and we can continue to add
information here as we go. And then before we move
on to the next video, we'll just test this out
and see if it still works. So let's change
these numbers a bit. Call it a binder. You click it, line has
been added and let's make sure that they made it over
here to this other page. And you see, here's the
new line, we just add it.
51. 2.10 Moving Data - Validation Before Process: In the last video, we just cleaned up our user
interface a bit and added some very basic functions to
catch up on this project. Now, we have this submit
button still works. It gives us some
feedback messages there. We've added this line. Now I want to add a
little bit of validation to make sure that the user is
using this form correctly. For example, if I did
something like delete the item from this field here from Forum item
and hit submit. Our process still
runs over here. You see it added this line, but we don't have anything
listed as the item. In a lot of cases, we don't want the user to make this mistake. We don't want this
action happen. We want to tell the
user that something's wrong before they
submit it to the table. And then they can fix it so
they can submit it again. Let's go back to
our code over here. Go back to our module. We have our add line to form. This. What we wrote
already is what adds the information to
the data table on the other tab where we want
to put our validation is at the top of this subroutine. So that we checked to make sure certain conditions are met. Before we run this process
of actually adding the line. I'll put a comment
here. I'm gonna just say add to the table. And then I'm going
to prepare up here, which is where we're
going to add more code. And I'm just going to
call it validation. This is where we're going
to validate the process. In this exact scenario
that we just tested. What I wanna do is
make sure that there is something entered in
this form item field. Over here. We see
that the form item is called out here to be
placed into the data table. One thing we can do is take
the same call-out over here, which is where we are getting the value of this
range, one item. We're gonna put that
in an if statement. So we're going to say if
the range Forum item that value equals and then just
two quotation marks blank. Then we're going to
perform whatever happens inside
this if statement. So basically we're going to
add a message box here to say that item field is blank. So let's test this thing out. Before we do that. You might notice that if we
enter this if statement, meaning form item is blank, we're gonna come over
here, we're going to pop up message box. But then after that
message box pops up, it's going to continue on its way down the rest
of the code over here. So to stop that, if
this condition is met, which is that the
Forum item is blank, we're also going to
end the entire macro. So we're just going to
cut off the macro here. Another way we could
write this is Exit Sub. Instead of doing an end here, which would exit
this subroutine, we won't get into the reasons why I'm going to use end here. But exit subroutine could
possibly just leave this subroutine that
we've written and continue through another one if you have a bunch
in the process. And it's just going to stop this entire macro cold
wherever it's at. Let's try this out. Item is still blank. We're going hit Submit. It says item field is blank. And so let's change
our number over here. You'll notice it did not say
it was successfully added. Item field is blank
and it doesn't give us the message that shows that the process
has been completed. So if we go over here, we see that our line
has not been added. But if we go over here, we add an item so
that it isn't blank, we can continue this process. Now that we see that that works, we can come over here and let's add the rest of our validation. I'm going to just split these windows up over here so we can see what we're doing. And let's think about how we can make this validation
a little easier, because we want to check for
all three of these fields. So something you might be
thinking already is to do something like
this form item. And then here's
our form quantity. Then now we're calling
this cell over here and seeing if
it's blank and we're just doing the same thing
for this other field. We can call this
quantity field is blank. And you can imagine if
we leave quantity field is going to skip over this one. I'm going to hit F8 to step
through this code here, you'll see that
it checks whether Forum item is blank,
which it isn't. So it skips over this statement. It comes over here,
form quantity is blank and so it gives
us the message box now. And then when we hit this, it ends and the macro stops. And we never want,
you might notice, is if we follow this pattern, we're gonna put formed
price over here. We could say something
like price field is blank. However, if we run this again, we're going to hit
forum quantity. Get this message box,
and then we just end. If we have a situation like this where quantity
and price is blank, then as you step
through this code, we're going to get our message box and
the macro right here, and we're not getting
our error message, that price is blank and that
needs to be filled in also. That's not really
a big deal here, but as things get
more complicated, you might want a better
system than this that ends up having a
decent amount of code. So we're going to write it
in a way that's shorter, but also we'll run through all the validation so it
can show you all at once, rather than just stopping partway through like
we do in this method. So I'm going to show
you a really common way that I like to do this. And I use this same
setup all the time. I'm going to make
a new variable. I'm going to call
an error message. And that is a string, so it's basically a text. Then with this exact situation, if the item is blank, I'm not going to
put a message box and just end the
macro right here. Instead, I'm going to
say something like error message equals item is, item, field is blank. So let's see what happens if
I do something like this. Now, when we have our
blank item over here, we have very little info here. Now we have no info really. If I step through this code, you'll see we see
that item is blank. We add this text to the
variable error message, and then we don't do anything, we don't stop, and this
will continue forward. Now this is just our
old process here. And so the question is, when we run through here, since we're not
stopping the macro, what's going to keep us from running this ad line process. And how I'm gonna do that
is right underneath here. We're just going to set
this aside for now. We're not going to
worry about this. We are going to say, IF error message is not blank, if we're running this
validation to make sure that this field
is filled out and otherwise we're going
to stop everything. This condition will put text into the error
message variable. And then at the bottom
here, underneath that, if there's anything
for an error message, then that means we need to stop. We're going to say issues. And then I'm going to append. We've got purposely
make a mistake here, but I'll just put this here. And I say issues the
template colon space. And then we're going to
add the error message. And then we're gonna
do an end here. So let's run this.
I'm going to continue to run this line by line. So we hit F8, you see items blank. We populate the error message
variable with a message. And then over here, we see that error message
has some content. This symbol does
not equal blank. The error message isn't blank, which means we do have
issues. The issues detected. We get our pop-up
issues detected. Item field is
blank, then we end. Now if you play this out, I won't actually
do it right now. But if there was actually
something in form item, then it will skip over
this if statement. And then by the
time you get here, error message is blank because we never
called it anything. We could actually be
more clear up here by just saying error message
starts off as blank before. Does this if statement. But when you declare, it
starts off his blank anyway, so it was implied that
it starts off as blank. And then when we get here,
it will just skip over and then continue down
and run our processes. For just one validation. It doesn't matter too much. But now let's solve the
problem that we had before, which is that with three
different scenarios, three fields we're checking for. We would stop at the first one that it hits and then not check
the rest of the messages. So instead, let's come up
here and we're going to move this statement up here. We're going to say if
quantity equals blank. Then we're gonna do error
message equals quantity field. Right? So I'm going to purposely show you what's wrong
with what I did. So we're going to work
our way through this. I'm just gonna go
ahead and delete these two that we had before. And so here's our new stuff. We have our error message, and here's the first
situation we check for, which is item and here's the
second which is quantity. And then we check for whether or not any of
those conditions were met. So if I walk through here, you're gonna see
error message equals. We meet our second condition, which is the quantity is blank. Now we have an error message. So we show our message which
has quantity field is blank. And we'll end it and
then the process stops. Our problem here is
that our first message was overwritten by
our second message. So in order to make our
first message persist, we need to say
that error message here equals error message. And the second
message over here. So let's just see
how this looks. Here's our first error message. Id field is blank. Now we're going to say
item field is blank. And the new message combined
becomes our error message. So as we go through this,
we hit our message. You see item field is
blank and we appended on top of that because we said equals error message
plus something else. So it's adding to itself that
quantity field is blank. And then we end our process. And you'll notice the formatting
did not look very good. So something we can
do here that add in-between is a VB LLF, which is visual basic line feed, which basically means
starting a new line. So I'm gonna say, and here. And we'll see our new message
as we run through this. As I step through this,
We get that message. Now, this just
creates a new line. And here's our new format. It pushed the next
bullet to a new line. Let's keep out the
details I think you could follow what
I'm gonna do here. I'm going to put a line break in-between the issues
detected and the bullets. So actually I'll just
go ahead and run this. Now used to seeing it's starting to look like this where there's a new line in-between issues
detected in our bullets. One thing I can do is
instead of putting it here, I can just put those new line behind each of the bullets here. If I run this, you can see there's
an extra blank line, but it's not something
you really notice. So it's just an easy thing
to put this at the end of every bullet point so that the next bullet point
will start on a new line. Something I like to do is to
just place this over here. So this has error message equals error message
and appending, even though in this
case it's always going to be blank by the
time you get here. It's just an easy practice to always be appending new
bullet points to the message. So I do this even though
we know that this is going to be blank in any situation where
this line of code runs. Because now if I wanted
to, for whatever reason, I can do a cut and paste and
swap the sequence of these. And when I hit Run, I was
hitting F5 for r1 here. Both of them still work
with the same formatting. Only we're checking
the quantity field. Before we're checking
the item field. I'm just going to move this
back so that the messages are the same order as
shown on the form. And then our last one over here, I'm going to do a copy. Paste. In our last field
was formed price. So let's just watch how this
works. As I hit Submit. We're entering each of these statements and appending a bullet point to the message, and we have a new line to make
the formatting look nice. So now we have issues detected and listing each
field that is blank, that's preventing us
from moving forward. If we want it to be
even more clear, we can say something
like issues detected, process, canceled. So let's try this out. We hit Submit, we have all
three fields are blank here. We can try different sequences. We can say item, paperclip. Now, only quantity and
price field are blank. If we enter the price, $50, I know this paperclip is getting more and
more expensive. The only field is
blank is quantity. And we'll enter our
quantity of a 100. And the line has been added, which is that we passed
all the validation and the process that the buttons attached to
officially completed. And here's our $50 paperclip.
52. 2.11 Named Table Object (List Object): For this next video,
I wanted to jump to a different topic, which is a different
way to work with table data than most of us are used to when we
first start off with Excel, we've been working with
this data table here. And this is just in
the format of a table. And this is how we very
often use spreadsheets, is we just kinda start on the top-left and
we start to make tables of information as
we type into the cells. Something that not
that many people use, especially when they're
starting with Excel, is the fact that Excel
can make table objects. So similar to how there
are worksheets and cells. And that is the base thing that we're all familiar
with in Excel. You can turn this range right here into an
official data table. And you might be asking
yourself, what does that mean? Because this already
looks like a data table. But if I come over here
and I say Format as Table, I can choose a couple of
different formats here. A really common one is this one. I'm going to select this. And you see it asked me, what's the range of
my table already automatically filled out
what I have selected. I could change this range by
selecting other things here. But because this was
already selected when I chose this Format
as Table button, that it already has my range selected, I'm gonna hit Enter. I'm going to say my
table has headers, which means in this
range that I select it, I have headers, which we do here that we
already made blue. And I'm going to click Okay. And what you may
have noticed if you rewind ten seconds to
before I ran that, is that when I'm clicked
in this table now, this has Table Design up here. And that's because this is
a fish or a table object. Similar to how we
named cells over here, where our item isn't a cell range and we
named it Forum item. This table is now
this range over here. If we click Table Design, we can see the information
about this table object. And we have a table name. This is called Table
one. Right now. We can even do something like change our table
name and we're going to call it table purchases. You see it popped up
that message saying that I cannot name that table. Table purchases. That is because we have
this one cell up here, that is the anchor. And we named our cell
table purchases and it's not letting me reuse that same name instead of have to come up with
something different. So I'm just going to call
this table purchase lines. And I hit Enter. And then now when I click out, we don't see our
table ribbon up here. When I come back over here, we are in our table design. So this is all the
properties of the table. I can change my themes here. You see how this is still blue. That's because we manually set this to blue a few videos ago. If we come over here and change ourselves
style back to normal. Normal isn't actually
a cell style. You may think that it means
there's a white background, but it really just means to leave it to whatever
Excel's default is. Because this is a table. It's going to take the style of however we style
the table over here. So now we can see even
the header because we did not specify a
specific background color. It's just going to
accept whatever formatting we choose
from our table style. We're going to use this in our automation and our VBA code. Even before we get into
that in our next video, you can see that there's
some benefits to this being an official
table and that it is a known object with a bunch of settings
that we won't get into all the details on here. But for justice starters, you can see how we can
format everything. You may have noticed how
there's automatically these sorting functions
at the top of each column that often
you'd have to manually add. And then one really cool
thing that you would see here is that if I manually
add information to the table, even if we're not using any
macros or VBA for automation, you can start to add
lines here and you see it automatically new to extend this table as I add
it, question here. This table has a lot of logic and intelligence
built into it. Now that Excel knows that
this is an official table, rather than just a
bunch of content in random cells throughout
the spreadsheet. And then I can even come in here and do something
like Delete. And now I have,
when I right-click, I have these new options, Delete columns or delete a row. So we're going to leverage
this table object now that Excel knows that
this is an actual table.
53. 2.11.1 ListObjects (Table) - VBA Intro: In the last lesson, I introduced you to this idea of a name table which we have here, which we've converted our data
into an actual name table. In Excel recognizes this. There's a lot more information
we could go over on name tables just here in Excel without getting into the VBA. But we'll save that for
another time right now, let's dive into how
to work with this for VBA Macros and
see what some of the benefits are of having
an actual name table rather than working with
all the raw data in the spreadsheet cells. Let's dive into
the VBA code here. I'm going to open up our editor. We just have this
on both sides here. And let's just make a module. So I'm going to
kind of set aside the project that we've been
working on and instead, just have this lesson on the
different things you can do. Now that we have a name table
here on the spreadsheet. So let's create a new module. I'm going to do
right-click Insert Module. And I'm just going to
call this name able. So I'm going to call it testing. We're just going to use
this to execute random code to demonstrate
some of the things you can do with this name table. In VBA. These name tables are actually called
list objects. So first I'm going
to declare a TBL. There's a table variable as, and we're going to
call it a list object. So you have these options here. I'm going to choose list object. And then I need to
set this variable to be the table that we
see here on the screen, which you remember
from the last video. I'll expand this so we
can see the name here. We call it table purchase lines. So we're going to
remember that name here. So we're going to
say set PBL equals. And then we're going to
call our sheets able data. And that's the name of
the sheet right here. So we have to tell it the name
of the worksheet that the tables in that list objects, table purchase lines. So we're calling this a lot
like we usually do a range, but instead of a range, which is one or many cells
were saying a list object, which is the tables on here. So if there was more than
one table on the sheet, there'll be multiple list
objects on this worksheet. So we're telling it of all
the tables on this sheet. We're going to choose the
table purchase lines object. Doesn't matter right now
because there's only one. But if there was
more than one table, it is telling it which table
to declare for our variable. So now something simple I would like to do is just say table. And you have all these
properties of the table object, of the list object. I apologize, I'll probably be using these words
interchangeably, table object and list object. Save range, which again we
know is a group of cells. I'm just going to say select. So let's walk through this
F8 to step through the code. Here. Tables nothing. Now the table becomes table purchase lines, which is this object right here. And then the range is
the cells in this table. And when I click Select, you'll see it knows
that here is our table. One of the benefits you might
see right away just from this example is that a lot of times you have data
anywhere on a spreadsheet. These spreadsheets are gigantic. They can be hundreds
and thousands of rows and however
many columns over. And you see in this case, the data isn't perfectly to the top left or
anything like that, which some spreadsheets are. But your data can be
floating in the spreadsheet. And so right here, you
can see we already this benefit where when we're declaring this
name table object, we know exactly
where our data is. Now that we have a table object, this list object has a bunch of properties that
are part of it. It has tons of properties. There's no way we
could go over at all, especially in one lesson here. But I just want to
show you some of the very basic properties of this table we now have
access to really easily. So I'm going to say table. And then you can see
all the options here. I'm going to say
Data body range. So this is a range. And then you see it has select
just like our range has, select this as the
date of body range. Now, if I step through, we selected the range and
here's the data body range. And you see all did
is basically remove the headers because this
is our data in any table. And right now we have a
very small data table, but this could be thousands of rows down and dozens of
columns to the right. And it would know your body is basically your table
minus the headers. And we can add more things
here. We're going to do. Let me back up here. We can do hetero
rings that select. I'm going to drag
this yellow arrow up just so we can run
this line of code. And you see it knows
the header row range. The top over here. So now you're starting to see
some of the things we did in the past videos where we have an anchor cell on the top left. And we're doing things like
trying to find the next row. We have access to the properties of the table and we don't
have to do as much work to find out information
like where is the top row and where is the
bottom row of this table? Tables have a bunch
of rows to them. And a lot of times when we're
working with data tables, we know that we're
trying to go through the different rows of information whenever
we're working with data, that's a really
common theme is that you're trying to either find a specific row or loop through all the rows
of information. Tables. Have these
lists row objects, which is each row of
data in the table. And so same thing here. See I have lists rows here. I actually have to
backup and if I started parentheses,
it'll give me an index. So if I say my index is two, my list row has a range property and I can do select it again. We'll move this arrow out one. You see I'm selecting the
second row of my table. And of course if I
change this to five, again, we jump over
to the fifth row. And then if I go
outside of the range, you may expect this already. We're going to throw
an error here and it says subscript out
of range because rho tenth doesn't exist
with our list row. Let's go back to three here. You can see as I back up to our list object and
just put the period, we have these different
things we can do. The range is what
we're familiar with, which is interacting with
the cells of the row. But then you have
these other things, like we have delete right here. Let's try this out. If we run this line of
code which has lists, row three beliefs, you can
imagine what will happen next. So if I run this, row
three is now deleted. And now you're starting
to see that we have a lot of control here. Things that we were
doing in the past, like even before
using the variable I to index how far we
are from the top-left. We're doing a lot of work to figure out how we're
working with the data. And now that we've put this into a list object and have
an actual name to table, we can interact with this table much more seamlessly
and intuitively than when we're trying to keep
track of the indexes and where we are on the
page with cell counts. I'll keep showing you
some of the other really common properties
you'll use here, which is that there's
a list column object just like we have list of rows. And so we can do the same thing. We can say list column, index to that range that's on that just to
show you what this is. And this is our second list
column here we have quantity. Something really cool
about lists columns. And this is one of
my main reasons that I like to work with
these lists objects when we're in VBA for automation is when you
have lots of data. The methods we've done before and what a lot of people use is keeping track of
either your column names, which is ABC and the
letters all the way down, or keeping track of the
number where each column is. So prices column three,
timestamps, column four. But when the data
gets really large, you start to keep
track of column count. And it gets really difficult, especially if you're going to change your table around
and delete or add columns, then column number 27
becomes something different. And if your code relied on
using column 27 for something, you have to go and find
all these places in your code to update the
column index number. So one of the best
parts about using a list object here in
VBA for automation is I can take this two and replace it with
the word quantity. And this is going to know the column name based on knowing that this
is our headers. And it's going to know
which column does is if I run this,
it's still quantity. If I change this to price, then it's going to know
the column titled price. And then if I do something like insert a new row here we have column one. I can run this. It knows that I'm looking
for the price column, which is now over here instead of in column D on
the spreadsheet. And this is a really common
mistake that a lot of developers or people working
with Excel will make, which is not utilizing this and using a number count or even
the spreadsheet addresses. And when they changed something, then all their code
won't work anymore. This is very common to
the very first videos I had on named ranges
earlier in this class. So that's it for this one. In the next video,
I'll get into some of the more details
about what we can functionally do now that we have our data in a list object.
54. 2.11.2 ListObjects - ListRows and Looping: And the last lesson we
introduced to some of the very basic properties
we have now that our data is in a list object. In this one, I want to
give some examples of how we can actually
utilize this list object. Do some very basic
tasks will make up. So first thing I'm gonna do
is just amplify this data. And so I'm just copying this and just
repeating this data. So we have more
information here. As I showed you before. You can see that as I add data to the bottom
of this table, the formatting is not
just moving along, it's not moving this alternating formatting because of
the copy and paste. You can see from this little
triangle here on the bottom right that it realizes that
the table itself is growing. And so again, this name table is helping us with a lot of
the work we do for data. And it's detecting
what the range of this data is as we
continue expanding it. We can prove that because we
have this code on the right. And as we run
through it, you can see as we select our table, that it realizes that data is now all the
way down on row 29, and not just the first few
rows that we have before. We can delete this column one that I added in the last demo. If you right-click here, I can do to bleed table columns. And now we're back to our
original columns here. And so we had these
different properties that I was showing you before. And I want to show you now
that we have our list of rows. And before we are showing you how we could select
a specific route. So if I don't select
a specific row, even our list row's
object without a specific row has a couple of things we
can do with it here. One of the ones
that I use all the time is this count property. So this is going to
tell us the number of rows in our table. I don't think we can
actually run this because this is a value. So it is not a action that
this line of code will run. And so you see it's
throwing an error here. Instead, I can say debug print, because this is
going to be a value. So we're just going to take this value and we're
going to print it out to our immediate
window down here. So if I run this, you can see it's printing out the number of lists
rows in this table, which is telling us is 25. So we come down here just
to verify if I highlight these cells, expand this out. You can see the count is 25. So this is something I use
all the time just to know how many rows there
are in our data table. And again, the really helpful
thing it's doing for us here is it's not doing something like
including our header, this information over here. So when our data is not
up against the top, it can be difficult
for us to know how many rows there
are very quickly. And so now we have an easy
way to figure that out. Now with this information, just like before, where we use a loop and we use I as an index. We can say I equals one to n before we just
put a large number here and we would escape out when we detect
the end of the list. We don't need to do
that anymore because instead of needing to detect
where the table ends, our table object
already tells us that if we're looping
through the rows here, I is going to be the counter
that goes through each row. And we can say it goes from
one to the number of rows. So I'm going to say table that
lists rows, that account. So in this exact example, our row count is 25, so it's
gonna be I equals one to 25. And then we can use our I, our index counter to loop
through each of these rows. And we don't have
to like before, tried to do detection
of when the data ends. Because we know when
the data ends, it ends. When we get to the last
row of the row count. I hear something I'm not
sure if I've talked about in the past lessons is that I have this option
Explicit up at the top. What that means when
you see it is that I can't use a variable
before I declare it. So if I do something like
just saying print I. So you can see it's going
to go through this loop and go from one to 25 here. And I tried to run this. It says variable not defined. That's because I have
Option Explicit up here. If I remove this, it basically means
that I can use variables without
declaring them first. So even though I'm
using I and I don't declare the variable is going
to let me run this code. Some people including myself, like to use Option Explicit
because it makes sure that you're keeping track of
your variables correctly. So I have to declare, I give as a integer up here. I'm actually going
to call this a long, which is just basically a integer that can
hold more content. I won't get into
that in this video. But i is basically just like
an integer. It's a number. So as I run this, you can see we're
looping through each row here and
we're going through the counter and it
should stop at 25. So you see it stopped at 25 here because it knows how many
rows are in our table. Now we can take this
index and actually do something with it rather
than print out the index. So we can do something
like take our table. We have our list of rows. If you remember, we had our index where we can
choose a specific row. And we're just going to say, I don't have to select property. Instead, we need to be a
range before we select. Now, if we look through here, we're getting to here
and we have row one. And then as we loop,
I becomes two. And now we're looping
through all of our rows. And we did something
similar to this. But again, we don't
have to detect the end of the table here. It just knows that the
data ends after row 25.
55. 2.11.3 ListObjects - ListColumns and Row Values: Now that we see we
can loop through all the rows of this data, a lot of times we want to get the specific data in the columns as we go
through each row. So looping through each row entirely usually isn't
what we want to get to. Typically we want to
evaluate the data inside the table as we're
looping through the rows. How we can do that is as
we go through each row, we also need to look at the column that we're
trying to look at. We'll look at the data in a specific column as we
loop through those rows. Let's run this again. We see here that
we have row one, and so this is row one. And then we're just
for the demonstration, looking at the range
and selecting it so we can see which row
we're working with. If you take this range, you can actually
do a similar thing where if you put a
parentheses here, and let's type the
letter three here, we're putting an index
inside the range. So this is an entire
row of information. And when I put
three in the range, let's see what happens there. You see what it's
doing is it's taking this as the row of information and then the range is
three, meaning 123. So we're coming over
to the third column, and now we're starting to
look at data specifically inside a column as we
go through the row. So just to give an idea how
we can look at the data here, let's put a debug
print and again, range three dot value. Here we're selecting it.
We don't really need this. It's just for a visual
demonstration of what's happening. But let's leave that in here. And then we're
going to print out the value that's in row, which is what we're
looping through. And then we're just
going to print out the value of range three, which is really
the column three. So you see we have
this value 20 here. Let me clear this out here. Here's 20. It's highlighting the
cell first, so 50. So now we expect to see
50 here because we're on this row and now we're getting the third
element of that row. So we're at 501116. So just as we expect, and as we look through here, we get all the way to the
bottom and we have 115020. And now we're really looking at the data in specific as we
move through this table. Widen this a little bit
so it's easier to read. But we have this problem
that I mentioned before, which is that I
don't really like using this three over here. Because if I'm trying to do something to look at the price, and then I add a
new column here. We have this problem where
price is not three anymore. Now it's count for. And then if we wrote
a lot of code, we have to come back
here and change this three to a four or a bunch of things are not going to
work correctly and we might not realize until
an error happens. So now I'm going
to delete this and show you another property
we can use to solve this. I know things are getting
a bit complicated here. If you can bear with me, This can just be a proof-of-concept and not
something I would necessarily expect you to completely absorbed at this
level in our class. If I come over here and before
we even get into our loop, we're going to look at our table and look at our list columns. And if you remember, we
can call out our price. And let's just pause over here. I run this. We get here, we select
our price column. In our price column, we're going to
debug print a lot, like how we have
this list of rows. Giving me an error
because I'm leaving this parentheses
before the lines done. A lot like we have this property of the count of the list rows. We can take our
table list columns, the price column, which
is this right here. And then say index. As we come back up here, just like count returns a value for the
count of lists rows. If I say the index of the price column,
It's giving me three. We can't see it because I
need to clear this out. If I run this, you can see the index of the price
column is three. Now that we're doing this, if I insert a column
over here and run this exact line of code
again, I'll hit F eight. Now, it knows that the index
of our price column is four. So basically we're
taking our call out of the specific column by the column name and then
finding the index of it. So if we take this
entire statement over here, I'm going to copy it. And where there was a three, I'm pasting this statement
which right now is four. Let's try to run this. I'm going to clear
this out so we can see it again, but that was 16. Let's run this again. You see this is three, so it's still selecting the
wrong thing here. Selecting our third column. I can do the same thing here. Replace this three with this entire statement
that we have up here, which is giving us the
number of the price column. So we expect it to be for inside that same parentheses where
I've replaced the three. Now we're over here, 16202050. And the magic of
this is now if I do something like
delete this column, now price is the third index. And I continue running this. Here we are again and everything
is working correctly. It knows where the
price columnist. And I know as we start nesting
these statements together, things get a little more
difficult to follow. A lot of times I'll
write it like this just to save lines of code. But just as an example. But this really is doing is basically saying price column. So I'll make a new
variable here. More obvious what's
going on here. I'm going to use along and
say price index equals. And then take this
statement over here, which is figuring out
what index number the price column is. Then instead of having
this nested statement with all these periods
and properties in here, the range we want is
the price column index. So this might be an easier
way to think about it, whether or not you want
to use this variable as a middleman or you want to combine two statements
together right away. And we're replacing
the column number with a variable and then detecting it based on the
actual name of the column. So just to show you
that this will still work, prices column three. The price column index is three. And now as we go
through each row, we're gonna look at the
third item inside that row. Looking at this 5011202050.
56. 2.11.4 Excercise - Delete Certain Rows: Now, with the information we learned from the
last couple of videos, I wanna do an actual
exercise here. So let's start to take an actual action and
see if we can do something with this database on the concepts we learned
about the list object. What I'm going to come
up with is we're going to loop through these
rows and we're going to be rows where
price is either 1146. So we have this data
that I copied here. It's a lot of the same
data, but we have these values that are
1611 throughout the data. Let's use the
concepts that we've learned to perform this task. So let's take a look
our code over here and clean up some of it. So this is some
stuff we don't need. In fact, let's just start from scratch and start with
declaring our table. So that is the very
basic thing we need. We have our table object here and we're not
doing anything with it. For our previous videos, we can remember that we want
to loop through each row and then we're going to analyze each row as we loop through it. I'm going to say I equals one. Table that lists
rows, dot count. Go to the next I. This is basically a recap here we're gonna
do our list rows, our index I, which is
changing for each loop. Let's just select them to
recap on our previous lessons. We'll go through here. And
then we're going to look through each row here. I'm just going to
stop this here. So we know how to do that. Now, we want to look
at our price column. So I'm going to do this with the middleman variable just
to make us more obvious, since I know this is
a training class, we're going to say price index, like we showed in
the last video. And we're going to
call that a long, which again is just very
similar to an integer. But I just generally use a long whenever I'm
using a number. Say Christ, call
equals our table, and then our list column, and then its price index. In this case, it's just going
to return the number three because price is the third
column in our table. And then now we don't want
to select the entire row. We want to look at specifically
the price column index. So after range here
we're just gonna look at a specific cell in the row
and not the entire row. So let's run through this again. And now you see what we're
looking at our price here. Click through here. I'm going to stop this again. Now let's take this
exact same thing, but instead of selecting
it like we do here, we're gonna debug print. We're gonna, it's gonna grab
this left side and again, selecting it, we're
just doing it. So for our benefit of
visualizing it over on the left, when you're actually
running a lot of code, you don't have to select
each cell over here. I'll show you that in a second. And instead of selecting it, I grabbed everything before the select statement over here. And I'm just going
to type value. And we wrap this in
our debug print. So we should be
sending this stuff down over here to our
immediates window. We see 1620. We're mostly just recapping what we did in our last video. Just to show you what
I was mentioning is if I comment out this row so that we are not selecting each cell on
the user interface, then this is still going to work because this entire statement isn't saying something like show us the value of the
cell that's selected. And this is a very common
thing that people do when they first start with Excel and macros is that
they think that everything you do needs to be occurring on the user interface. So you might do
something like select the cell and then show me the
value of the selected cell. We don't actually
need to do that here. Because we're not looking for the value of the
cell that's selected. We don't actually need
to select anything on the user interface
and it will still work. So come over here and
you see we're still just leaving our selected
cell up and a one. It really doesn't matter where. And our code is still
running over here, 501116. So it looks like
we're over here. I'm going to make this
even larger just so it's easier for us to see
more of the code here. Now, let's work on
our actual exercise. If we want to just delete
the prices that are 1611, we need an if condition. We need to check for a
certain condition here. We know we have the price. In fact, I'm going to
make this more explicit. I don't always do this, but the more variables
we create here, it'll create the
kind of middleman stepping stones to make
it easier to understand. I think we're going to
say price as double. Double isn't just a number. It's a number that
allows decimals. So that's why I'm
using a double here. Because price, we're not
using them right now. Everything is 0 sense. But if we had actual sense in these prices than it would allow for decimals to be
stored in this variable. Now we're going to say. Instead of just
printing out the price, where I say that
the price equals. And then we'll pick the same thing that
we're printing out, which is just a
price in that row. Then we're going to
say if price equals, let's just do 11 first. Then. And let's
actually do this. We're going to print
out the message. Price is flagged. Let's even take this message. We're going to
append the index I, which is again our counter,
which row we're on. We're going to loop
through all the prices. And whenever the price is 11, we're going to send
this extra message over here into our
immediates window. In the meantime, I'm
just going to turn off this other message so we
don't get too confused here. And just for our purposes, I'm going to select
a cell again so we see which row
we're working with. It gave me a message here. If thought that there's
a problem here. And that's really just because I didn't remember
the foot, the end. If right here I've got the word. If. I loop through here, we're looking at the first row. The price isn't 11, so you see it skips right through to the end
of the statement. Execute this line. Work our way down. Okay, now
we're on cell over here, which is going to be 11. So as we check our
price, it's 11. We entered a statement, price is flagged and we see
Rome row 512345. Because we copy this data, it's actually in a
pattern of bits. So I think this is
gonna be row ten. And now we're at a price of 11, would jump in, and
now we're at row ten. Now you're starting
to see how we're gonna be able to do this. Now in our if
statement will say, or price equals 16. And in fact, I'm just going to run this all the way through. I'm going to hit F5, which is the same as clicking
this Play button here. And we're going to run
through this entire thing. Which rows have we flagged? We flagged 5610111516. That looks like it's
gonna be right. So we have five and then
right afterwards is 16. And then this pattern
is going to repeat itself over and over again. You see, we're doing the detection logic that
we're looking for, which is, we're finding out
every single row that the price is 11 or 16, and we're given the
index of that row here. I'm going to purposely
make a mistake here, which I've made when I first
started doing this process. Something very similar,
which is cleaning rows. Now that we've flagged the row, we want to take this row that
we found, which is row I. Once we flag it, I'm going to say table
that lists rows I. And what we want to
do is delete it. There's no detection here. That's because I made a typo. I'm missing T over here. So now that I've typed
the right object, which is list row, now
I get these options of what I can do with
it, which is delete. So let's see what goes on here. I don t think this is
going to work correctly. Actually let me clear this out. I think something happened
there, I didn't really notice. So let's start this again. We're looking at row one. We skipped over. Two, we skip over. It looks like I deleted a row, I think because I had the previous code
running in progress. But let's just follow
up where we are here. 50. That's not it. Now we're at price 11. Now I think we're going to
enter our if statement. Because I delete a row,
everything's shifted. So now we're on row four. And then we're going to delete
this row since it's 11. And when I delete it,
this row is gone. And the problem I see here, and you may notice this
already is we are on row four. But as we go over here to row five, everything shifted up. And since everything's
shifted up, the row over here, that's $16 is now row four
because everything shifted up. Now when I run to
check the next price, we're on 20 and our price of 16 for row four isn't
getting evaluated. This should be deleted also. But since we deleted
row for this moves up and then we already
moved on to row five. We've skipping
over this one row. So every time we delete a row, we essentially skip a
line of information. Now this is leaving a 16 and it's really
showing itself here, which is good that
it's exposing. The problem is because we're supposed to delete
two lines in a row. And so since we're
always skipping the line after we delete one, that it's showing that the rule is not executing correctly. So we're gonna do the
same thing again here, where we're looking at row a. Row eight gets deleted. 16 moves to row eight. And then on the next loop, we're going to already
be on row nine. And so this 16 is never going to get evaluated since
it moves up one. So that's our problem. A very simple way we can solve that is after we delete a line, we can just say I
equals I minus one. So what that basically means
is we're going to delete. In this case, we
delete row eight, but then we're gonna move i back to become the
value of seven. Then when we come down through this line and we increment i1, we're on row eight again. So when we delete a row, we know that all the data
that we still need to evaluate is going to
decrease one row. And we're going to
basically back up one step. And then we'll evaluate row eight again,
which would be 16. So let's see if that works. I'm going to stop
this whole thing. Let's add our 11 back in here just to kinda rewind
our information. I'm not adding this data here. So I'm just gonna
put 11 here for our purposes, just
for this test. So we're backing up here, we have 1116 all at once. So let's try this out. I'm going to loop through here. We're finally on 11. We're going to delete 11. This is four and the problem is we're jumping up
the five next time, we're going to backup
our index value I, one. So I is now three. As it goes to the next
loop, it becomes four. Now we're back here on 16. And then we call it 16
and we're deleting it. So we flagged for, and then for again, because 11 was row four and then 16 was also a row four and
they've both got deleted. Now we're still on four because every time
we delete a row, we're backing up one index. And the big thing
here is really, we're getting into the topic of a more complicated algorithm. And this is really going to be where the growth is
when we are learning automation and
programming and coding in general is a lot of the tutorial so far in this class is learning the different functions
that we can do. The very specific lines of code. But the complicated
part and where the real power comes from
is how we can come up with algorithms on
how to sequence the actions of this code together to perform
what we want. So let's run all of this. We're going to
finish running this. And here's another problem. We successfully deleted
all the prices of 1116 here, but we hit an error. So let's see what that error is. Even though it looks like we completed everything correctly. We have an error
because I is 16, so we're looking for row 16. But if we highlight
all of these here, we can see that we
only have 15 rows. That's because we're running this loop up until the
end of the row count, which was 25, if you remember
from our last video. But since we're deleting rows, the count of the
rows is going down. But this thing is still
thinks that's supposed to run this loop from one to 25. And as we delete rows, this table shrinks and shrinks. And then where these
pads meat and causes an error is it thinks it needs
to run the 25, it hits 16. But we've deleted so many
rows that there is no row 16. So now let's just stop
this and we're gonna do this actually
a different way. So this was the
solution to solve the row indexing problem. And this was achieved solution. I'm gonna show you how
I usually do this. Just so I don't have to
mess with this data. I'm going to change this rule. We're going to delete the
prices where the price is 20 will fit to this data up later so we can
do other exercises. But for now, I'm going to change this to delete equals the leap. Prices that are 20. Now there are tests is a
little bit smaller here. We're going to keep
looking at the data. Then the code at the same time. Instead of incrementing
backwards, we're going to solve this
problem in a simple, more elegant way here. And it's going to also
solve all problems where we're looping
through all the rows, but the row count is decreasing. Instead of going from one to
the count of all the rows. Basically going from one
and going down the list, we're going to reverse this. We can actually start with I
equals the highest number. So in this case,
we have 15 rows. If we run this again, the count of rows
is gonna be 15. I'm actually going to take this and put it at the beginning. So I equals 15 in this case to one because we're going to count backwards 15 down the one. We can't actually do this and
this will cause an error, I believe Let's try to run this. You see, we just skipped all the way to the end,
none of this ramp. That is because we need to explicitly say how
we're gonna do steps. So as part of these for
loops with the index, we can add step minus one. And that tells it
that each loop, we're going to step backwards. We're going to step
backwards the value of one. Now we'll run this and
we start at row 15. And then we're
going to select it. So now we start all the way down here and we're gonna do
the exact same thing. We're going to test the row
and then we're gonna delete. So we need to change our
role here where price is pointing just because we
don't have the same data. And we see we skip over here. Now our price is 20, since we're going
from bottom to top, we enter here, we
flagged route 14. Now the nice part about this where we're selling
both of these problems at once is when I delete this, 50 is going to move up, but we already
checked out this row. And we know that it's not one of the rows we want to flag. And so when I delete
this, this is real 14. We have no problem that the data underneath the line we
deleted moved upwards. And so as we increment
through from row 14, we don't have to
check rail 14 again. Instead, we need to go to 13. Basically, this
adjustment we made to solve that problem
isn't needed anymore. Now when we go through
the next loop, row 14, we go up to row 13. And we're going to
check that again. And we see that it's 20. And then it's going
to delete this row. But then when it
goes from 13 to 12, we're going to be up
here and we're still checking our rows
in the sequence, despite the data
underneath moving around, since we're moving
from bottom to top, we're not affected
by the fact that the data underneath the deleted
rows are moving around. This up 2020. And then since we're
going backwards, we're going to stop at one. And again, we're not
gonna go downwards where stuff's changing
and giving us problems. Instead, we're going upwards where the data is solid
until we delete it. And so now this will continue to work and it's
not going to run into a problem where as we
cycle through all the data, that we hit an error
because our row count, let's change that
and we delete that. And now we're down to
this very simple list of just our leftover
rows in that ran, we've got all the way
through without any errors.
57. 2.11.5 Excercise - Delete Certain Rows Lvl2: Now that we saw how we
can clean up the rows, I want to just give
a demo here of how complicated we can
really start to use these rules as we
lay them together. Again, I think we're getting
very complicated based on where I expect you to be at
our lessons at this point. But I want to use this as
a video where I just kinda demonstrate how powerful this automation
can start to get. So don't worry about
following along too much. It's more of a proof of concept. So I took this data here
and I added more data here. Just put some random stuff, some numbers for us
to try to clean up and put some complicated
rules against. Something I wanna
do here is I just want to take a
look and we're not actually going to use
this in our data. A lot of times we won't
have that our dataset. But let's do something like take our price and we're going to multiply it by our
quantity over here. And I'm putting this
over here just for our reference before we
start this exercise. If I drag this cell down here, we're going to see
for all these lines, I'm specifically not making it part of the table
because it's just for reference that we're taking
our quantity times our price, and we end up with all
these numbers over here. Now with our numbers over here, Let's make up an
exercise for us to do. We're going to say delete
rows where quantity, price is a multiple, five. So we have this. So let's take a
look at the things that would be multiples of five. Basically, that means if you
divide the number by five, that you get a whole number. So I'm gonna change
this over here and not a decimal
point like this. If we come over here, we can go through and
we see if it's not, let's see, we're
gonna delete rows that are a multiple of five. How about we delete rows that
are not a multiple of five? Not a multiple of five. So that means this one here will highlight this
just for reference. So we're seeing these rows over here are not multiples of five. So I'm not going to
continue doing this. But we just sort of see that if it is not a
multiple of five, when you multiply
quantity and price that those are the rows
we want to get rid of. So I'm going to just
hide these right now. We might not look at them again. I just wanted to give you an idea of what's
going to happen, which is gonna be invisible to us here on the user interface. But that's the rule
we're going to make. We'll come back over
here to our VBA code. We already have the code we
wrote in the last lesson, which is the leading,
our price flag of 20. So instead, we're going to
add some more logic here. I'm going to say price. We're gonna say quantity equals. We have to declare
our variable here, dim quantity, as we could
call it long or a double. Whether it's a decimal or not, we haven't used any decimals, but just in case we
call it a double, we're going to need
to know the index of our quantity column if we're following the logic
that we used before. So we're going to say them
quantity column index equals. We can just take from this row below it table
that lists columns. Quantity, actually
the whole word out. So that's because I
asked him when he wrote the word dim here. So we're just declaring yet. We're not declaring it here. Sorry, we're just
setting a value or not declaring it here. So quantity column
index should be to, price should be three. When you use that information here, where quantity equals. And we're going to take
this information over here. And then instead of the
price column index, we're just going to be looking
for quantity counts index. So we're gonna get
the price, we're going to get the quantity. And then we're going to look
for we just call it product, which is the
multiplication of the two. We'll call that a double. Also. You may notice
that I can declare multiple variables on one line. So that's what I'm doing here. You can separate it with
cava and I don't need to use the dim call out anymore. And I can declare multiple
variables with one line. So that's what you're
seeing me do here. So product is a double. I'm going to say product
equals price times quantity. So now what we were looking
at when we were describing earlier is not the
price or the quantity. We want to see if the product, which is the
multiplication of the two, is divisible by five. You can search this. This is actually
a different term, which is mod five, which is checking whether or
not it's a multiple of five, basically doing the
same thing that we were doing manually before. Which is seeing that
if you divide it, Is there any remainder equals 0. So this is getting
the remainder. When you divide the thing on the left by the
value on the right. So as we go through this,
Let's try this out. We highlight the
first few rows so we can take a look and see if our expectations lineup
variable is not defined here. That's because I did not
declare this variable. So I'll come over here. And so now we have our
price column index and our quantity column convex. Let's run this and see
if it goes smoothly. Our first try here, oh, I forgot we're going
from bottom to top. Which basically
means it's gonna be hard for us to see
what's going on here. So let's do our
rule really quick. Just so we can see from
the other direction, from bottom to top which
rows are going to. Let's just grab a couple here. So we want multiples of
five are going to stay. So all of these rows are
going to get deleted. And then we expect
these rows to also get deleted since they
are not multiples of 5335 thousand are. So let's take a look at
this product mod 549. We're seeing this 49 over here as we look at our products. So that's working correctly. And then we skip over it. Actually wrote this in reverse. Mod five equals 0 is
saying enter here. If it is a multiple, we wanted to delete ones that
are not a multiple of five. So let's change it from
equals two is not. Let's start all over here.
I'm going to stop this. Let's run this. We're back here at seven
times seven is 49. Product mod five is not
a multiple of five. And so now we're in here. We flagged row 36, and then
we're going to delete it. Or product again, 76,
delete, delete, delete. And then now we're hitting
our first row that we expect our product is a
multiple of 533 here. And then we skip out. So we're skipping
through these rows here, hanging another route
and we're deleting it. And I'm just going to hit play and run through all of this. See, we've deleted our
rows where the product of the quantity and price is
not a multiple of five. I just wanted to show this as a demo of how you can layer
these rules together. And of course, the
processes we can program can get much more complicated
than this as we need to.
58. 2.12 Moving Data Add Row w ListObject: In our last few videos, we went over our name
tables and our list object. So this was a bit of a detour from what we are
creating before, which is this purchase form, which moves data from an input form to a
data table over here. So now that we've gotten
familiar with how to interact with
this list object, Let's build this back into our purchase form and
see how we can make sure that our purchase form
will still add data from this tab over to our
data table over here. First thing, let's clean this up and make it a
little bit smaller, just so we can see
the data easier. I'll right-click
here, delete rows, and we just make a smaller table so we don't have to see
all of that at once. Now we'll come back here. Let's change some numbers here, just so we have something
else to look at and see if we can add it to the other tab. Line has been added. We come over here
and we see the code that we wrote before for that button is
still working here. So that's interesting
because let's go back to our code for the button. I'm clicking the button,
Developer and View Code. This is the code that runs
when we click that button. And we have not updated
this subroutine at all. Based on all the updates we've made regarding
our list object. We have our validation
from the previous videos, and we have our add line logic
from the previous videos. If you watch those, you'll remember that
the way this works is not using the list object that we've gone over in
the last few lessons. But we are using a top left cell of the data called table purchases and using
that as an anchor, anchor this so that we can
see both sides at once. Here. We're using that as an anchor. We're counting down
just a huge number over here for our loop because we don't know
how big this data is. And as we saw with
our list object, we no longer need to do that
if we use the list object. And we count all the way down until we see
our next blank, which is right here. And when we see our next blank, then we marked that
as our next new row. And then we add our information
into the next new row. So all the logic that we had
before is still working, but it's the old logic. It's not using any
of the benefits of this new list object
that we've created, this name table on
the Excel sheet. And we're still using this
anchor and counting down, finding the next new row and
then adding the information. One thing I want to
show you is if we had created this list
object misnamed table. To start with, we would not have this anchor cell
called table purchases. And we wouldn't be
doing this process where we're counting
down the rows. And if we're working
with columns, counting the columns
over to the right, all based off of this anchor. So if we come over here to formulas and then Name Manager, we see we have table purchases and that's
this named range here. Here is our named cable, our list object over here. Let's delete this because
a lot of cases we would have started
off using this name, the table, instead of using
this top-left anchor process. Now that we know
this better method, we'll come over here
and we'll delete this. Yes. Now when we click
into this cell, you see it's no longer
named table purchases. Now, we're going to
expect this process won't work anymore
because as we just saw, it relies on the use
of this named range. So when we click this, I think
it's not going to be able to figure out what this is now that doesn't
exist anymore. So we see that
happened right there. And now our submit button to add to the data
no longer works. So our previous logic, which relied on that
here, no longer applies. So let's look at what
we need to do to make this work with our
list object over here. So we can just take all
this code over here, and let's just
start from scratch. So we'll delete all this and we need new logic now
that we're using this list object from
our previous exercise, will remember that we
want to call it a table. And we want to declare
the variable that stands for this table
object over here. So we'll say table
as list object. Then we'll set equals. We need to call out
our worksheet sheets. Objects in the name of our name table over here is TBL purchased wise. I believe. We can come back here and confirm that by
highlighting this, going to our table settings. And people purchase
lines and confirm that. Now that we have our table here, instead of that for
loop that was scrolling all the way down each cell and finding the next blank row. And you saw that if you
have thousands of rows, you would scroll
down thousands of rows and find the
next blank cell. And we have put a
placeholder of 99 thousand, just as a huge number there. Instead, I can do something. Like this table that lists rows. So let's try this out. This one line of code is
just going to know where the next new row is and
add a new row there. And I haven't told it what
content goes in there. But because we have
formatting on this table, I think you're going
to see that the table expands one new row showing up in the
formatting of the table, even though we
didn't tell it what content to put in there. So I'm going to put a line break right here
because we're gonna be focusing on this code a lot so that when
we're testing this, I'm just going to run
it and it's going to jump over here to our new code. So we added a new row with
a simple thing like this. And this replaces our
entire four-loop, that whole process
that we had of scrolling down and checking
for a new row and marketing. What number our new row is. The next thing we wanna do is
figure out how to actually put content in there
from this form. So now that we have a new row, I'm going to create
another object. And we have a list row object. I'm going to call it
L rho, Lists row. And you see just
like list object and all these other variables have a variable type or object type. There is a list row object. And so now when I create is just because I'm in
break mode over here. So I'll stop the
macro and process. So we want to take this thing
and this list row object, we want to become the
new row that we add. So I'm going to say set L rho equals the new row
that gets created. So this is going to execute
and create a new row. And while it is doing it, as soon as it creates
that new row, it's going to set that new
row to be this object, the row variable that
we just created. We'll see how this works. Because if I say L
rho now arranged, got select, I'm
going to run this. You see we create a new
row after that line, and here we are with a new row. And then if I run this
which is L rho select, you see L rho, R object is now this new
row that we created. Now we can start to do
something with that row. And you say range, just like we did from our
last exercise when we were checking the values of
specific cells in that route. If I said range one
dot value equals, I'm putting info
into this table now. And this is how
we can reference, just like in our last lessons, the values of each
cell in a row. Only instead of just
reading the value. And last time we were
doing some cleaning of the data by
reading the value. We can also use this same concept to put
data into that cell. So if this logic, you can start
to see how we can combine these concepts and
move the data from our form into the new
row that we create. So let's start that process
when I say dimension item. And I'm just gonna
go ahead and create variables for each of the
fields on the form here, we'll call quantity
along a double. I forgot the word as here. We'll declare these
variables over here. Using our range names. That value. Our quantity is quantity. That value. Let me just make sure I
have the right name there. That's going to be formed price. I'm just guessing here, but
if we name things correctly, it will follow that
pattern for a price. And then now as we saw, we can then place content into the row using this range index. So if I take this and we put
items in our first column, quantity in a second and
price and our third, it will look like this, 23. And over here, I'm not
going to pass it a string. Instead we're going to
pass it the variables that we used as middlemen here, quantity, price. And then we have a
timestamp over here, which we don't get
from the user form. We get the timestamp from
just our VBA code itself. So we'll say VBA, which is a built-in VBA function that'll get us our timestamp of the moment this code runs. So let's try this out. I'm
going to hit F5 to run. As an error there because I
made a typo at F5 to run, we jumped down to where
we put our breakpoint and I'm going to use F8
to step through the code. So now we're declaring
our variables. Item, quantity is five, prices eight, or
adding a new row. We don't really need this, but we're selecting the row
that we use for that demo. And then our first spot
in that row is the item, quantity than price,
than timestamp. And the line has been added. So we don't need this, which was just selecting
it for us to see. Let's see, I'll finish running this line and then let's
test out our button again. We hit Submit. I still
have my break point here, so it's stopping
over at this line. So I'm going to turn
that off by hitting F9. I could have clicked
over here also to toggle on the
breakpoint on and off. I have to finish
running over here. And it says the line
has been added. This up again. Just to see that
something changed. Here. You see we're able
to add a new row to our data using
this list object without as complicated
of a process as before that we were doing
without the list object. Another thing from our
previous lesson that I mentioned was that
I don't really like to use these
numbers right here. Because the problem,
as we saw before, is if I add another column here, this isn't going to work either. So I'm gonna hit F5
and just run this. A new line has been added and you see everything's
misaligned. Now, my price went into third column and my timestamp
went into my fourth column. But this isn't working
correctly anymore. So to solve that
problem, we'll do the same thing we did
in the last lessons, but we'll just build
it into our form here. I'm gonna show you the long
way that we did last time. And then we'll build this
right into the code. But let's say dementia as well. Quantity index as well as long timestamp column index. So we're going to
use these variables. That's just a
stepping stone to get to the final result here. When I say, I don't
call index equals. And then we have our table and we're using our list pounds, and we can call
these out by name. And the list of columns by
name has a index number. So now we can use this
process to figure out which column we're working
with based on the actual name. So we'll do quantity
that incorrectly. We'll do quantity,
price timestamp. And we want to match this with the actual call out
on our table here. So that's item quantity. We have price in timestamp. And then now, instead of
putting this number here, 1234, we can line these
up item called index. So now we're actually figuring out which column we're
trying to work with here. Without having to type
in the number directly. The code itself is
going to figure out where the column
is based on the name. We pass it for the column. So let's run this through here. And you see our item
column here is one. Quantity columns
to price column is four because we have this
junk column we added, and then the timestamp
columns five. Now these numbers
aren't hard-coded. That our process here
is figuring out where each column is while
it's doing the process. And now you see everything
is working correctly again. And it adjusted for
that new column that we added without having to come
back and update the code. You see here. The benefit of this
is if I come over here and I delete that column, we don't have to
update and change the column indexes anymore. We can run this and we still have a new row that
gets added right here. What I often do is to save time and not do all of this with these variables storing
the index number. You can put this information directly in these parentheses. And it makes the line of code a little bit more
difficult to look at because we have these
really complicated lines with a lot of
nested information. After a while, you just kind of get used to looking at that. And there's some ways to make
this a little bit simpler, but this saves the time that we took to create
these variables. Here. We're just doing the
exact same thing only we're not using these in the middle to
pass the values downwards. I'm just going to
use these commands directly where I
want to use them. Try this out. Hit submit an 11, and
there's our new line.
59. 3.1 Quoting Tool Project - Intro: Hi everyone. So I wanted to
change the project that we're working on
here in our examples. The project we were working on before it was a
basic purchase warm. And then I want to change
it over into something that I have a lot of familiarity about and that we could
build out all sorts of different features as we
go through our lessons. I want to change
this to a creator. And then we can create a lot of different processes
off of this idea of a tool that helps a
business create quotes. To do that, I just
wanted to shoot this one video on framing out the very beginning
before we get into any of the actual
VBA automation code. So let's print them out what a quick crater might look like. And I'm going to start from
complete scratch here. So you see we have book one
with an empty Excel sheet. And we'll go from there
and we're just going to fly through some
of the things we covered in our past
tutorials here. So we're going to
save this and we know we're gonna have
macros in there. So let's go ahead and save this file wherever
we're gonna save it. And we want to save
this as an XLS, a Macro Enabled Workbook because we know we're
gonna put macros in it. We'll put a label at the top. And let's just sort of envision what inputs somebody would have while they're
creating a quote. So you might have
something like a customer. Something else we might
have is jack name with a person that we are talking with who requested the quote. Typically, you might do
something like receive an e-mail from somebody as a
request for quote, then might have something like the line items that are being
purchased on the quote. So we'll have line items here. And you'll have
your line number. And you'll have
your item number. And you'll have a description. Quantity. Unit price will say unit price. And we'll have your
extended price, which is the total
price for that line. And so this is going
to be more of a table. And for one quote, you can get more than one line item purchased
per the quote. So up here, we can add
a quote number also, because we'll say the
number is our first quote. And you're buying
something like product a. Product B, you're buying
five of these, ten of these. So we learned before. Then we can turn this
into a name table. So we're going to
format this as a table. Another shortcut you
could do is Control T. We'll also create a
table out of here. And you can say my table has
headers and I click, Okay, and you see it created our lines table into an actual
name table here, our list object that we're
going to use in our VBA code. Let's improve the looks
of this a little bit. So let's stick to the
basic theme I had before. So I don't have to think so
hard about the colors here. We'll just do black and
white here for our fields. Will stick to this
theme for the table. So we'll make black headers. And nice part about these tables is you can just choose
different colors. And it'll theme it for you. Let's make this
form look a little better and we'll remove
the grid lines here. I'm going to create
some borders over here, which is kinda leave
it looking like this. And now we have something
that looks like a basic form similar to
the purchase form we were working on before what
we're going to frame out this new project for
creating a quote. So I'm just going to stop this here and we'll continue
on in the next video.
60. 3.2.1 Quote Tool - Create Folder: Okay, Now that we have a basic quote form over
here that we framed out, let's imagine what might
happen when a business receives a request for quote
from one of their customers. They might get a request for
a quote through an email, and then it comes with
all these extra files. Or you might want to just save that email itself that might come from something
like Microsoft Outlook. What kind of stick to
the Microsoft products here for our demos. So we enter Quote number one. Let's say we're keeping track of our quotes with a
quote number here. And we might wanna do something
like create a folder. So right here we have our co-creator file that
I'm working at now. And you might have
something like files. We'll create a new folder here. And we'll say quote 000001. And we receive our
first requests when the system starts up. And we might want to drag our request for quote files
and drop them in here, whatever our customer sends us, that is information about the
quote they're requesting. The first feature I want
to try to build here is a way to automatically
create these folders. Will do something
where, for example, if we type in Quote
number two here, we're on our second quote. And then we'll make a
Create Folder button so that we don't need to manually create these folders here in this folder system. So let's get started on
that will come in here. We'll make a button and we'll
call this button Create. So now if we come over
to our macros here, we don't have anything
because this is a clean workbook that we just
started in the last video. So we don't have any
modules or macros recorded. Let's insert a new macro or
rather insert a new module, which is a section for us
to create some macros. And we'll categorize this. We will call this file
management as our module name. Let's start on a new
subroutine here. And we'll save that for a minute and describe
what this does. To store files. This is just a good practice, is to put a comment
to describe in detail what each subroutine
or function might do, especially if it's not
something as intuitive. So I just want to show that, although this name is
pretty descriptive. So at first I just do
something like say creating. And let's attach this button to this macro that
we just created. And so because we
create this subroutine, we have this great quote folder. And now I've assigned this button to work
with this subroutine, and we pop up this message and we're not doing
anything else yet. So we're going to create
our quote folder, in this case using
this number over here. So let's create a variable
that's going to store this quote number.
Call it quote No. As. And we'll say
as a long for now. And let's get this
from the interface. So now that we've
declared that variable, you can say equals range. And we need to get
this cell over here. So this cell is before, but may remember from our previous lessons that
this is not a good practice. We could do this. But then if we move things
around or insert rows, the quote number field
might not be B4 anymore. So we're going to
call this quote No. Now when you hover
over this cell, you can see that it is a named range, called
Quote number. So we can do this, but
let's just rearrange this. We're going to build
this thing in steps. So I can keep demonstrating
each concept as we go. I'll change this a little bit
so that we can see more of the code green quote
folder for quote. And I'm just putting
the string together to improve our message so
we can see what's going on. So now when I click this, we have created a
folder and I made a typo there I meant to
type for Quote number. And so when I run
this fur coat number two and you see where successfully pulling the value
from our interface here. Now, we want to create a folder in the directory
right over here. In this case, there's
different things we can do to make this a little
more intelligent. But I'm going to start
with something more basic as we build up
our concepts here. So let's say we want
to create a variable for what the path of the folder is that we want
to create the new folder. So this isn't a new folder yet. We want to tell it
where we want to create this folder,
which is in here. Similar to knowing where you want to start here before you do a right-click and
start a new folder. If we were to do it this way. So we want to get
this path right here. Say folder path as string. And then we'll declare
this folder path. And for now, I'm just
going to hard code, which we might
change this later. And I'm just going to copy
and paste this here that I copied from this path up here. Now we have our folder path. We want to figure out what
our new folder name is. So we're doing all the things that we need to do manually. We know what folder we
need to start in now and we need to figure out what
the name of our folder is. So if it was two, for example, we want this notation, but of course there's one
would just change to it too. So we can say folder name. We can say new folder name, be more descriptive string. And I will say new
folder name equals. And then our notation here
that we see on the left is Quote number and then 00000, we're using six digits
here and then two. Of course this isn't what
we're actually going to do. We need this to be a variable. So we might want to do
something like this. We know we have our
quote number up here. But we have this
problem that when we get up to our quote
number of being ten, then we're going to
have an extra 0 here. So how can we make this six digit number adjust as we get more
digits in our quote number. Even though this will work
for now up until we get till ten, Let's
just test this out. And so we'll deal
with this later. Will again move our
message box farther down, creating new folder. And we'll say our
new folder name here just to test it out. And I'm going to run it. We'll see creating quote folder. We have our zeros here. And that is because
we left this blank. So let's assume we're
supposed to do to here. And if I click this
quote number two. So now we've created
our folder name, but we do have this problem
that if this was ten, we're not adjusting correctly. We wanted a six
digit number and now we've pushed this to
become seven digits. So what we can do is remove this and we just want to append
the quote number here. If we run this, we see ten. And we need to force this
to become six digits. So we can use this
format function. A lot of times. These are built-in
functions as part of VBA. And so if I type VBA, and then period, you see I get a lot of
built-in functions that are just part of VBA. One of them is format here. And as I do format, we see that we have our
expression, which is our number, and then the second parameter, which is in brackets here, we have the option to
force the formula. So if I put in six zeros here, is going to know that
the format I want is a number with six digits, whatever is in here. So for example, I can show you down here in the
previous window, I'll do a debug print
and say 123123. So we'll do six digits here. I'm missing my format function. So I want to type format here. And then as I hit Enter, you see this has
taken the one over here and then made it in
the sixth digit format. And then the big difference
here is when I type ten, and then if I click Enter
or press Enter here, we have the number ten, but again forced to the
sixth digit format. So now we can do this. And the same thing we just demonstrated here
applies where we have Quote number and we have ten
in the sixth digit format. And then if we were at two, we would still have this
six digit format here. So now that we have our new folder name and our folder path where we're going to create that new folder. You might remember from
our previous video, we have this make
directory command, which is going to
create a new folder. And then we opened this and this is the path that we need. So let's construct this new
variable before we use this. So we have our new folder name, but let's make a new one just to make everything really clear. New folder. If I was making this tool, I might not have all of these stepping stone variables to slowly build everything up. I might combine this stuff
with fewer lines of code, but because we're doing
a learning lesson here, it's more clear to create all these stepping stone
so we see what's going on. We want our new
folder path here to equal our folder path and combine that
with our new folder. And I already know that
there's an issue here. So let's show that I'm purposely leaving
something out here. So if we do a debug print at
the end of this, in fact, we can even use our message box would keep moving
this thing down. Creating quote folder. And we'll make this
the new folder path. I'll put a new colon here. And if we run this, you see as creating
our new quote folder, we have our new variable, that's the folder path on the left, combined with a new
folder we're creating. And what we noticed is we are missing a backslash over here. So if we came in here to quote folder one which we
created manually, we have this backslash
that's missing. And that is because when I create a folder path over here, I did not include a backslash. And then now that we
have this backslash, we have our folder name
that doesn't have it. We could have had
two options here. We can either leave
it like this and put the backslash over here because we're going to
append these together. Or the option, I think
it's a little more clear as putting the backslash
on the part on the left, but we have both
options here as long as the final result
has the backslash. So when I click this,
we have what looks like now the new path of the folder that
we want to create. Now that we have that, we can use our command
make directory. And we want to use
this new phone or full path string
that we've created in, it should make a new directory by this full path
that we've just created here with
our code above. So let's create a new folder. Create a new folder here. We'll click Okay, and
then say anything. But if we back up here, we see we now have quote
folder number two. Just for clarity, we might say Message Box folder
has been created. We'll do the same thing. New folder, full path. And we can even
remove this message. So we'll press this button. Let's say we have
Quote number three. We'll click Create Folder. New folder has been created. Here's our message box
confirming that it was all done. And here's our new folder again. We'll just touch
one thing up here. Just a bit of clean up. I'm going to add a
VB ELF character, which is a line feed. And that would just make
this pop-up message you look a little bit cleaner. So we'll actually deal with
this in the next lesson. I'm hitting an error because
it's trying to create a folder for quote three, but that folder already exists. We're going to handle
that in the next lesson. For now, let's just go to
quote For will run this. And we have our pop-up message that looks a little bit better now with our folder
for quote, for
61. 3.2.2 Quote Tool - Check and Open Folder: In our last video, we
created this button with a function that
creates a new folder based on our quote number. So if I say Quote number five here and click Create folder. You can see it says the
folder has been created. We click Okay, and we go check
on our folder over here. When I open this folder up, we see we have a folder
for quote five here. The problem we saw at
the end of last video. If I click this again, we have this error here. This is saying access
error for a fire or path. But this is being thrown because the folder
already exists. So I'm going to click stop here. This is a very similar error that if you did this manually, if I created a new folder
here and said quote 000005, then the folder already exists and windows itself is going
to throw this error here. So I'll go ahead
and delete this. But VBA is essentially
trying to perform this action and it's getting
an error of its own. So let's update this so that
we handled that situation. We have this line of code
from the last video, which is the line of code
that creates a new folder. So before we create
a new folder, but we wanna do is
essentially check to make sure this folder
doesn't exist yet. The way we can do that is with a function built into VBA here
called DIR for directory. And we have our path name. So we want to enter the path
that we're checking here, which in our case is held in this variable called
new folder full path. And as we use this
directory command, we're going to use
the second parameter, which is the type
of file or path. And we're going to
use VB directory since we're checking
whether a folder exists. And what we're going to
say is if it equals blank, if the result of checking
this path is blank, that means the folder
does not exist. So if it's this, then I'm just going
to say folder does not exist as a common here. This isn't code,
but I'm just kinda marketing our sequence
of actions here. And otherwise,
holder does exist. So we have this situation. And if the folder
does not exist, then we can go ahead and we can go ahead and
make the new folder. Otherwise. For now, let's just put up
this message box that says folder already exists
at the following path. We'll do a vb line feed
just like we did before. And we'll use the
new folder path here and tell the user that
we're not going to create the new folder
because of this problem. So now let's try it. I'm gonna hit F9 just so we stop here and then we can
step through the code. So as I hit F5, we'll stop here. We have our new folder path. Everything is constructed. Then. Now you see, because
the folder does exist, we have Folder five, which is the one
we've already hit the error on an
salted it exists. And now we're going to get this message box saying
the folder already exists. Then if we change this to six, Let's run this again. I'll hit F5. So we run this
code down to the break point, and then now the
folder does not exist. And we're going to go ahead
and make this new directory. And so at this point, the new folder should
already be made. And here's quote six. And then as we run it, we get our normal message box
that we want to come up when this runs without us
stepping through the code. If I hit this button, it
says we're on break mode because we're still in this execution mode where
we're stepping through. I'll stop the macro and now
we can use this button again. Folder already exists at
the path for quote six. You can see we actually
doubled up this message. So let's just show you this
sequence that I didn't fix is we hit this notification telling you that the
folder already exists. But then it continues
through our procedure here, and then it tells us the folder has been successfully created. So we only want to
notify the user that the folder has been successfully created if we are
creating a new folder. So now we'll stop this, will remove this and
we can try this again. It tells us the folder
already exists. Then now when we
change this to seven, it's going to say that we've created a new folder seven here. I'm just gonna go ahead and
clear all these folders out. We're creating a lot
of junk folders here. So we'll start with one again, and we'll create a new folder. And the folder for
quote one now exists. One more feature we
can add is instead of just notifying us that the folder already
exists and that we won't be able to create a new one
because we don't have to. We can then open the
folder if it exists. I'm forgetting what the command
is to open a new folder. So I'm going to open
up my browser here, and I'm going to
type something like VBA, Open Folder Path. We'll come over here,
look at the answer. And we have our code right here that is calling
our shelves. So let's take this code and we're going to
open the folder here. And so we use our Explore. Explore is our folder
window over here. This in Windows is called
our file explorer. And then here is the path
we're trying to open. And from our example
they had this path. But we really want to
remove this and we can use new folder full path here. So let's see if this works. Let's step through
our code again, F5, and then we'll step through the folder does exist
because we just created it. Then we have our message box
saying it already exists. And it runs that line
and you see it opened up our folder path that we
had constructed before, which is for quote
one shown here. So we can backup one and we
see we opened up this folder. And we can set up
this situation. Not only will it open the folder if the
folder already exists, but since we're
creating the folder, why don't we open it up anyways, right after we
create the folder, because presumably
you're going to use it right after you
create the new one. Let's test this out. We're
going to hit Create folder. The folder already exists. Then it pops up the folder. Then if we do a
quote number two, which is a number that
doesn't have a folder yet. The folder has been created. And then here it automatically pops up the folder
after it gets created. And when we come back
here, we see that we have our folders
for Quote number 12. Now, just to clean this up, because we've created
this function where we are also opening the folder if we create
it or even if it exists, we'll change this button to
say create slash open folder. It will make this
button a little bit wider just so we can
read the full command. And this way the user
can see that we're both creating or opening a folder.
62. 3.3.1 Quote Tool - Add Line UI Setup: Looking at our quoting tool, the next feature I want
to create is a way for us to add and manage line
items on this quote. So you have one quote, you can have Quote number two. And then on this quote, you could be buying
one or more things, and those would be line items. So here for example, we're
showing that we would be buying product a and product B. So there's one quote would
have more than one line item. What will create here?
Before we get to the automation is
just setting up what this user interface
might look like. So we'll call this add lines. This is managing our line items. And then here we'll
call this mine. This is taking the formatting because it sees this column. Excel thinks it knows
what format and we want. But let's just make
this normal for now. In fact, here we'll make a
cell style normal so that we don't have Excel automatically
change this for us. We'll say item and
we'll say quantity. And these are the things
we need to add a line, but we're basically just
making a user form that is going to add rows to
this table below here. So even say unit
price for example, I will add more as
we think of them. I can take this format here
and I'm just going to copy this down so that we
have this similar input. And we'll create a
new button here. And we will call it. I'll just hit cancel
here so we don't have a macro that's
attached to it yet, since we didn't create
that macro yet. But we're going to call
this button Add Item. So when we fill this out and in-between our
first video on this one, I decided that we're
going to start to sell ice cream at our shop here. And we'll say we're
going to do vanilla. Add a new row here. We'll say units is gallons. Will sell one gallon
of vanilla ice cream here are unit price is $10. Let's say. We'll turn this into
currency format. Then when we click
this Add Item button, we want to take this information and add a new row
to our table here. We're setting up the form for this function that
we're going to have. And this is going to need to detect our next row and add a new row here with
the supporting information. So we'll essentially
click this button. It'll have to know that
this is line three. Item we're adding is
vanilla ice cream. The description will
be vanilla ice cream. Actually maybe we'll change
it to something like this, where our item number is one. Now that we just assign our items sequential
numbers here, one through whatever we come up with in our item will be one. Vanilla. Vanilla ice cream or
quantity will be one. The units will be gallons, or unit price will be ten in our extended price in this
case will also be ten. But if we had a quantity
of two, for example, then our extended price
is our total line price, our unit price multiplied
by quantity being $20. In the following lessons, we'll design the code to make this button perform
this action here.
63. 3.3.2 Quote Tool - Add Line New List Row Part 1: Following up from
our previous video where we were setting up
the form here too, now, eventually have this
functionality where we're going to enter information about the line we want to add to our line grid and click
this Add Item button. Let's build that up. So we have our modules here, one for file management
where we put our code related to opening
and creating folders. But let's separate things out. So we'll create a
new module here, and we'll call this
line management. So keep with that theme. But we're going to
have other things here related to managing
this lines grid here, we'll keep our code
altogether in this module. So let's set up a new
subroutine and we'll call it. Line-item. Will frame this out. And we'll say this is going to add line item two lines table. From our previous video. We know we want to take this
information and then add it to a new row of
information here, there's a bunch of
ways to do this, but the way we're
gonna wanna do this is to make this a name table. And we're going to
use the concepts that you might have watched in the previous section that
I titled moving data. So that's another group of lessons for moving data around. And we want to use
a list object, which is going to call
this a name table. And we're going to use a
lot of the properties of this being a name
table to manage our, its rows and to add new rows and do other functions we're going to eventually use. If you're not sure
what I mean here, you can go back and look
at the lessons titled in the moving data
section tagged with the list objects, video names. So what we're setting up
here is knowing we need to add this information
down into our grid. We need to get this information into our code so we
can work with it. So let's create some variables
to hold this information. So we're going to need a
variable called item number. That's gonna be a string. We're going to need
a quantity. For now. We'll say that is a long, which is basically
a whole number. And then our units is a string. I forgot to add a space there. It looks like it
added it for me. Then I have unit price, which is dollars and cents. So we're going to
make that a double. So basically a number
that can hold decimals. Now that we have these
four variables setup, we need to get these
from the interface, just like we did before
with a quote number, say item number equals, and then our range, which in this case is B9. But since we don't want to type the cell address
and work with that, we want to give
these cells names so that they are defined even
if we change things around. So we'll call this
cell item number. We'll call this
one item quantity. We'll call this one item units. We'll call this one
item unit price. So now we've created a bit of
a naming theme where stuff in this section starts
with the word item. And it's fairly
descriptive names here. So item number is item number. That value, quantity
equals range. Item quantity. Units
equals range item units. And unit price
equals range item. Unit price. Not value. I believe we got these right. I made a typo here in Price and I'm just going
to run this one's even though we're not actually
doing anything other than setting these
variable values, it'll tell me if
something went wrong. And so that's just a quick check to show that it didn't tell me. It didn't throw an
error to tell me that these names
weren't recognized. So that's a good sign to
start with, at least. Now what we wanna do is add this information to
be a row down here. Again, if you look back
to those past videos, I won't go over it
again in detail here, but we can use this here, which is a name, the table. And we're gonna call
this table lines. Now this table a name
called Table lines. And we can use this
list object to add rows and do different
things that you would do it with a table of data. This is to avoid another
way that we could do this, but which is a little
more challenging, where we'd have to scroll down, maybe using a loop to detect what the bottom
row is so that we know where our Excel
spreadsheet row number is to add our next row. So we can avoid that by using this name table function that
we now call it table lines. So the way I can use
this table is similar to how we declare a
range with a variable. We can say table lines
as a list object. Which is the VBA object for named tables on
the spreadsheet. We're going to say
set cable lines equals and we have
this sheet one here. Really what we could
type is Sheets, Sheet1, that list objects. And then say tabled lines, which is the name of our table. So this should work
just to show you, I'm going to do table lines
and we'll check this. I'm going to say
range that select. So we have our table here. We're gonna do the
range and then select it just to see if
we get the right thing. And as this runs, you see
the very last line of code found this table
in selected it. Another thing I don't
really like though, is that this says sheet one and we have a
direct call out here. And Sheet1 isn't a great
name as we're making a robust tool that this is
not a descriptive tab name. So maybe I'm going to
change this to main. And that way we
don't have something so generic like Sheet1. And so now that we have made,
we'll see if this works. I'm going to run this again. And you see it is getting this name table and
selecting a correctly. So we know our table lines. List object is the
table down here. Now, just to show you,
I can say table lines, that list of rows, that ad. And when this line of code runs, I'm going to create a
break here and run it. If I hit F8, when we
run this line of code, it knows where the
bottom of the table is and it adds a new row. So now I'm going to backup here. To make things a
little bit easier, I'm going to create a list
of row object, list of rho. So this is a new object here. And I'm going to set this list row and combine this together with
what I just demonstrated. So essentially this code right here is going to add a new row. But then at the exact same time, it's going to set this list row object variable as the new
row that I create. Now I have this
situation where I can say lists row, select. And this is just for
demonstration again, where I'm going to create
a break here, run. This line, creates a new row and creates that
cross-reference where L rho stands for the new
row that was created. So now when I select it, you run this line of code. You see our L rho object
right here is this row. So now I'm going
to stop this here. And now that we
have an object that stands for the new row
that we just created. We're going to use
this to populate the information into the
new row that we create. So here we can say
L rho that range. And again, if you
watch the past lesson, I go into this in more details. But basically, I want my item number up here to
go into our second column, which would work if I say
this equals item number, which is our variable
we declared up here. So we're going to
create a new row. And then we're going to
say the second index. Which of this row, the second index or the
second cell is here. We're going to place
the item number. So let's just run this. You see, we stored
item number in our variable and then created a new row in place to
end the second index. So now I don't want to
use this to, and instead, I want to figure
out the column by name for reasons stated
in our previous video. And I'm going to
say, instead of two, I'm going to say tabled
lines that list column item, because item is the name
of this column over here. And this column has a
index parameter which will return the column count of
the column titled item. So this is the same
thing as saying too. But the benefit is that if I added a new column in here
and it got shifted around, this would return the
new location of items. So it wouldn't always say to, it will dynamically be figuring out where the item column is. Let's test this out actually, and we'll run this and you see the same thing worked here. I'm just going to
delete these rows so we don't end up
going off the screen. And we'll continue
building this up. Now that we saw this is an
easy way to add the item. Maybe not so easy, but it's a way to add the item. We can move on to
the other fields that we already have,
such as quantity. We're taking this
in placing it here. And this is our column name. And we can continue this
trend where we're going to say units and unit price. So here we have units. Take this, place it here
we'll get the value of units. We'll take the unit price, which we have to scroll
over before unit price. And now when we run this, we've taken all this
information, stored it, create our new row, and then placed it into here. So 1234 elements here. And I'm just going to make
this aligned in the center, so it looks a little bit better. Maybe I'll even do
it to the left here. Then. Now we have this
other information here that we didn't
fill out yet. So let's work through
each of these one-by-one. Our extended price isn't
from the input field. At least it isn't yet. But maybe we can do that. So let's add a new row here. I'm just going to
make some space and we'll say extended price. So we can see this live. I'm going to just
make this a copy for the sake of formatting and getting those cell borders. But then this is
going to be a formula in our extended price, is our quantity times
our unit price. And we'll make this a currency. And so this is $20. So if we make this five, then this will be
multiplied out. Something I'd like to do here is whenever I have a
formula in a cell, I like to make it gray. So the user can
obviously see that they shouldn't type into this cell that is going to be calculated. One little thing you
might notice here is when you create Named cells, like we did earlier
in the video, that instead of saying sell, it uses the names
we gave it here. Now we have another
cell and we can call this item extended price. We can do the same thing
here, but we'll create a new, a new variable called extended
price as double setup. Same thing equals range, item, ended price. That value. We can create a
another reference as we're passing this
information into the new row, we create extended prices here. And our column name for
extended price comes from here. And this is where we
put our column name. So let's run this. We see
vanilla, all this stuff. And we have our extended
price of $50 in this case. It actually, I'll save it
for the next separate video where I'll go over how we can create some of the
supporting information. Because we want to take some of the info and make it so the user doesn't
have to type it in. We can start to
create something like a lookup where the
description in, for example, the units is a lookup
based on which item we select so that the user doesn't have to type
it in themselves.
64. 3.3.3 Quote Tool - Item Data Lookup: Now in the last video, we created a new row and
put the information from our add lines form down
into that new row. But then we noticed that we're still missing some
pieces of information. So we have our extended price, which we did at the
end of our last video, but we still have
description and line number. And another field
that I mentioned was the units which
is in gallons. So something we wanna do here is not make the person type in gallons and we don't have a description the
place in there yet. So let's deal with these. What I wanna do is make it so that when a person
chooses their item, that something like
the description and the units for each item
are always consistent. And so since there's
a direct relation that when I choose, for example, my vanilla item, it's always going to be the
same written description. Then I don't want the user
to have to deal with that. So for example, I might
put a row in here. We call it a description. And the straightforward
way is to just do the same thing we did
with these other fields. But then the user is stuck needing to type in
the description. They can be inconsistent and it's just extra
clerical work for them. So what we're going
to make this do is make it so that when
you choose the item, that information that can
be directly related to that item will automatically
get filled out. So the way I'm gonna do this is typically I'll create
an extra tab here. And I call it underscore data. And it's just going to hold
supporting information. So I'm going to say supporting
information up here. And we'll make a table. I'll make it up here
and we'll call it item. Will say item number one. Item description. I just used the word
description here and we'll say, what I'm setting up here is a DataTable where I can
say something like this. Where the number we used
before, which was vanilla, will have a description
saying ice cream. Like down here, I'm pretty
sure ice creams to words. And then we have our
units, which is in gowns. And just as an example, we could put
something else here, which is to say, maybe we'll have another item we'll call to, we'll call it spoon, where we might sell
plastic spoons that go along with
our ice cream, let's say plastic spoon. And we're going to say, this is sold in whatever
units these are pieces. Now we have a table, and
as we showed before, I like to use these named table. So I'm going to hit
Control and tea, which sets the range I had highlighted to
become a name table. So I'm going to say my
table has headers because we do have headers in the
range that I highlighted. And now we have this table here. And I'm going to call
this April items. Now that I have this, what I can do is take my items and make it so
that the items that we choose in this field can pull from our
items that are here. So this isn't really a
macro or automation thing. This is a Excel feature that we have that you
may have seen before. And if I come over here,
let me back up here. If I go to the Data tab, I'm highlighting this cell. And then over here I have
this data validation field. So I'm gonna click this. There's a bunch of
different ways you can validate the information
in this cell. And I'm going to choose list. And I use this all the time. And this is going to
create a drop-down list. So there's a few ways I can
put information in here. I can do something like
say Yes, Common know. And this is a comma
separated list. And as soon as I do this, you see we get a drop-down, which lets me choose yes or no. But we don't actually want
this to say yes or no. What we want this to be
is if I highlight this, I'm gonna come over here
and highlight these two. And you see it shows our range
that I just highlighted. This is the way that most people have used this in the past. If you've utilized
this tool in Excel, where we have vanilla and
item to our spoon here. We're actually going to
change this a little bit because this is a
bit of a tangent. But one problem that
we're going to have here is if we add another item, chocolate ice cream
comes in gallons, then you'll notice that
this field did not expand. And that's because we selected
this range over here, which is just these two
cells that I highlighted. So a lot of times you'll
see people do something like highlight all of this. Just so as we add more rows
to our data over here, like let's say we add four, add four, strawberry here. We'll work our way up. We have this field, but you do still have this problem
where we ended somewhere. So you could highlight
all the way down. But this isn't the best way
to do it, in my opinion. Instead, we can use this
other notation here, where instead of
having this range, which we had to
select a range here, I'm going to say indirect. Then I can use the
names that we gave, the table and the column. So if I say in the rec, I could say TBL items, which is the name of the table, this name table
that we set here. Then in these brackets, I can put the column name. I have the arrow
in this kind of, this formula acts
a little goofy. If you hit the arrow keys, it will select another range. But I can say the
column is item number. So an indirect, I have my table name here and then the name of my
specific column. And then this will know that I'm talking about this range of information which is in the table and then
the specific column. So I'll click Okay. Then you'll see this is still working the
same way it was before. All we, we didn't need to put a specific range and I can do something like add five here. Let's see, let's come
up with another one. Would put it in such
butter pecan here. And then now we have
our other selection. So this is more of
an Excel trick than an automation tricks so far. But now we're going to add
some more formulas here. Now, we can use an
x lookup formula. And in the earlier
sections of this class, we should have more videos
on these different topics. Specifically, now
we're just utilizing them for this actual
project here. And so we can use an x lookup where we're going to
look up our item. We're going to look that up
in our item number column. And then in our third parameter, what we're going to return
is our description column. And then if there's
no match here, we're going to say not found. And one cool thing is
that when we're using an X lookup against
our named tables, instead of having a bunch
of ranges which are hard to read like our cell coordinates. Instead you see that it realizes
that we're talking about our table and the column
of that specific table. So these are
continued benefits of using named ranges and named
tables instead of just using cell coordinates like A1 through C ten or
something like that. As I showed you
before, I'd like to make any cells that have a formula gray so
that people know that you shouldn't type
over this formula. At the end of a
project like this, you can always
protect the cells, but this is just the
notation I like to keep everything very visible. And then now as we
change our item, then it is doing a lookup
in the table here. And you see here we
have found a hit, but it's blank, so
it's showing 0. So we can add some
descriptions here. Make this a little wider. And then we can do
the same thing, although I typed in gallons
here for our previous video, we can make this a lookup also. In fact, I can even take
this formula we have here. And it's the exact same thing. Only instead of returning
our description, we want to return
units and you see it even knows what
columns are in here. So because we're
using a name table, it knows what our
columns are and it's trying to help us
auto populate those. So here's our units. And if I come over here
and we go to the spoon, which is the only one
with different units. You see the units
changes to pieces. And then in addition to units, the next thing we
can do is the price, because we're not going to know the price or make it
up as we add line. Instead, the price is something
I forgot to put in here where we can just kind of, I think we're meant
these numbers here and then half the price
we'll look up also. And of course I'm completely
making up numbers over here. We'll put some prices in here and we will do the
exact same thing. We'll take our lookup,
will get our price. And then instead of
returning our units, you can see it now
the texts that we had a price column
that I just added. The same thing here. And then now we've
really reduced the clerical work that the
user needs to do to select an item so they don't need to know this information
that's in the gray that is all getting
looked up from our, essentially our database, which is just an another
Excel tab right now. Then if somebody is maintaining this
information correctly, then it's always going to
pull the same information. So go back here. You have nella, we have chocolate and our information
is updating as we go. So we'll pause the video here, and in the next video, we'll move on to updating
our Add Item macro that is going to use this new
information and add a new row. And we'll also have to deal with the line number count
and make sure that we populate this to incremental
line number as we add rows.
65. 3.3.4 Quote Tool - Finish Basic Add Line: Where we left off
in the last video, we had created this lookup where when we populate
our item here, that it looks up this extra
supporting information so that we can add it to what we need for our new
row of our lines table. Now we need to update
our Add Item macro, which I believe this button
isn't even attached to yet. So that it deals with
these new pieces of information that we've
now pulled for the item. So first thing we can do
is let's right-click and assign this button to our
macro of AD line item. Now if you remember
where we left off, I'll click Add line item in
here we have our new line, but we don't have
information like our description and
our line number. Yep. So let's deal with
the easy 1 first, I'm going to delete a
couple of lines here. Just so we can see
the table easier. And we need to pull
in our description, which we now have
with this field here, and we haven't named it yet. So if we stick with our
naming from before, we call it item description, and I'm just going to leave
description short here. Grab that a new
variable over here. We'll say description
as a string. Put it over here. Description equals range,
item description, that value. And then same thing we did
for these other fields. We're going to place
our description into the description column. So we have our column here, which comes from
this column header. We're going to paste that there. And then description up here is what we placed into
the value of that cell. Now we'll run this. Here we go. Now we have our description,
which is again, looked up from our Data tab without needing to
do anything when the user selects the item. Now the last thing
we need to deal with is the line number. So let's say we have 234. We could make an assumption that the last line here is
the highest number, but that's going to
have problems later. For now, why don't
we do that and then we'll deal with
any problems later. So that is the easiest
thing is we'll just look at the current
lines here and make it look at the last number of the row at the
bottom of the table, and then add one to it. Let's start with that. Let's come over here.
We're going to figure out our line number here after
we get all the easy stuff, which is here just pulled
right from the user interface, will say line number as say it is a long, has
a whole number again. So actually we need our
table to be able to do it. So the code we're going
to use, the Find, it is going to be down here because we need our table
object already declared. So here we declare our
table, which is here. And here we're
adding our new row. So let's do it in-between here. So we have our table
that we can work with, but we haven't added
our new route yet. Let me move this down here just to keep everything together. We'll say latest
line number as long. And let's figure out what the latest line number is first. That is on the last
row of our table. So how can we get the
last row of our table? Backup here actually? So if we have our table, which is Table lines, and we have our
list of rows here. We can select our list
of rows like this. So that range not select. I'm going to put a
break here and hit F5. And then if I hit F8, you'll see this
selected row one. And then if I place a
two in here and hit F8, the selected row two. So this is row four here. But we need to put
a number here, but we don't have
to hardcode it. Instead, we can say cable lines
that list and rose again. And instead we have a
property called count, which is the number of rows
that are in the table, is going to return the number
of rows, which is four. And that is also going
to be the last row, as we say, we want
to return row four, which is the total
count of rows. You can see here, as I
drag this up and hit F8, we're selecting the last row,
and that's going to work. Well, we have another row, say five rows next. That this is going to
return that there are five rows and it will
get us the fifth row. And then from here, right now, we're just selecting it. And instead, we can pull the first index here
instead of the entire row. And if I come back
up here again, I'll turn off this
line break and hit F8. We're selecting the first
cell of that last row. So if we combine this together, we can say our
latest line number is the value of that cell, rather than just selecting it. And we could go even farther. I know of this line of code is getting really
long and change this one to use the
same thing we showed before where we're looking
for the list column, index of the line number column. But I'll just leave
it as one here. A lot of times I might
only leave it for this one when it's
the first column because it's so unlikely that this is going to be anything
but the first column, we're not going to
insert new cells here or new column here. That's going to push this
over to the right anymore. Now we supposedly have
our latest line here. So then our line number, we can even call it
new line number. Let's see where break mode
here, so I'll stop everything. So it's easier to edit our code. We'll call this new line number. And then here we'll
put a new line number equals number of plus one. So I'll go ahead and
try this out here. Let's hit F9, F5 here,
accidentally hit F5. And so you see we
added a new row here, but we haven't used
this new number. So if I hit F8, here, we see our latest line number 0. I mess things up because I accidentally added this new row. This is one of our flaws with the system
we're using here, although we're going
to run with it for now until we improve it. But if this last row
accidentally as blank, if things are latest
line number is 0, rather than realizing
there's a four here and this is supposed to be five and our
new lines going to be six. So that's the problem I just
accidentally created here. So if I'm here and
I delete this row, I run this, I stop
here and hit F8. And you see the latest
line number is four. And our new line number is five. So I'm going to stop this now
before we make any changes. And then we're going
to add a new row. And then the one
thing we're missing here is I come over here
to our line number. And we're gonna make this. I'm just going to
copy and paste it from here so you can
see where it's coming from also from our column
number on our spreadsheet. This is our line number, and then this is going to be the variable we created
a new line on it. So I'll remove this break and
we will run this in here. We get our latest number five. And we'll change this. And now we get our
latest number six. So this will work for now. But as we saw already, in a situation I
accidentally created this has a lot of holes in
it that can cause problems. And we'll tune this up as we go through this project to make
the lawn can't work better.
66. 3.3.5 Quote Tool - Delete Line - Refresh Count: At the end of our last video, we finished updating
our add line button, which I'll just move over here. And we came up with what our next line number would
be when we add a number. So we figured out that we get the incremental next number. And right away, I'm realizing that we're going to
hit the problem right away as I even tried to begin to work with this lines table. So I think we're going to
have to deal with this now that if I wanted to clean up this table and just
make this data smaller, I'm going to delete these rows. And my lines are immediately
out of sequence here. And so that's a problem. Now, I'd have to manually go in here and change these 212. Let me change the formatting
here a little bit. And we'll move all this
stuff over to the left. We just kinda clean
this up a little bit. I'm going to change some
numbers every year. That's not important,
but it will drive me crazy if I don't fix
it up a little bit, just a little bit OCD there. And we have this problem
where the line numbers are only working when we have this perfect situation where
we're adding a new line. And then as I need to adjust, my information is not changing. So let's deal with this. That I'm going to make
a function that's going to delete the line also. So instead of just
having a button, when we add an item, we want to create
a user interface. So the user doesn't have to
do what I've been doing, which is right-click the row and delete the row
to get rid of it. Let's make it as part of what we're essentially
mimicking here, which is a full application. And we'll build this right
into our user interface. Just like we have. Add item will make a
button called delete item. And we'll get into
how to build this. And we can make this really user-friendly by just making it so that it'll delete the
item that is selected. So we'll say delete
selected item. And this is a really
simple function. This button is going to just do this function of Right-click
and deleting the row. But there's a lot of concepts
that we'll build into here. So I think it's worth doing just from a training
standpoint of seeing all the interesting
concepts involved with making this
simple function, or at least what is
simple on the surface. So let's split this up again
so we can see everything. And the way we're gonna do this is to delete our
selected item here. So let's create a new
subroutine to handle this. And that's what
we're going to end up attaching to the button. So we're going to say
delete selected item. We'll describe it as
delete the selected row from line staple of the
cell that is active. So if the person
comes over here, let's say we have
three items and we highlight this second row. We're going to click
Delete selected item, and this is the row that's
going to disappear. And then the problem
we're solving here also is that we're
going to recalculate our line numbers so that
people don't have to manually delete that rows and then have this problem with
our line numbers. So first thing we
need to do is see what are selected cell is. So we can do that
with active cell. If we say active
cell that select, that's kind of redundant because the active cell
is already selected. But let's say something else. Let's say debug active
cell dot address. So let's do that instead. Let's assign this button to our new subroutine here
and delete selected item. And when we click
this, we should see our debug print says E6. And that is because we
have cell E6 selected. So if I click over here, we have C 20, which is the cell
we have selected. So that's how we can
use this act of self, which end that's built into VBA. Imagine we can even do row here. So whenever you have a range, active cell is a range object. We also have our row property. So if I run this, you can see we're on Route 20. Now the easiest way
to delete a row is if we're using our list object
from my list row table. So let's actually declare
our lists row object again, just like we did up here. And so now we have this
list object to work on. So if we're on Route 20
here on the spreadsheet, we showed in our last video
that we can actually do this and say list of rows
to Dot select that range. And if we did
something like this, this is our second row. But when we're using
our active cell, we have our active rail being 20 on the
spreadsheet itself. So we need to
translate row 20 to becoming route to because we
have this built-in function, but we want to get the
number two out of it. In this case when we're
on this route 20, something we could do is taking our active cell dot row and
then subtracting difference. So if we subtract
at 18 from here, for example, just using the
info we've already gathered. This would be 20.
You'd subtract 18, and then you'd be on row two. Then if you're on row 21
here on the spreadsheet, and then you subtract 18, you'd have three, and then
you'd be on list row three. So it's basically just
taking the difference between here to here. So you can translate
your worksheet row to the list row of
this actual table. So this is an okay idea, except for the fact that
if we add any rows here, which we probably will through
this project that's gonna push things around and then this won't work
correctly anymore. So instead, we don't
want to hard-code 18. This is a lot like
our list column idea. We don't want to hard-code 18. Instead, we can get the
row which is 18 here, which is how many rows are the difference
between the start of our first row with
this other function. So I'm going to comment
this out really quick. And we can say table lines, dot. And our list object has a property that is called
a header row rage. And then if I select this, you'll see that it knows
what row are heterozygous. So we'll do the same thing here. If we have row, then that
is going to return which row that range is on. So it finds our header of our table and then
returns the rows. Can I press this? We have too much stuff in here, so I'll create this out
and we have 18 over here. So what I've shown you is if
I've replaced this 18 with something that's
dynamically coming up with where the hetero is. Now we're doing
that same concept of figuring out
the offset between the spreadsheet and the list object row
only it's dynamic. So if I hit F5 here, you can see that we are selecting this third
row over here, and I can highlight the
second row of our table. And it is now realizing that this is the list row
object that I was on. Now, we're just selecting a row. I'm going to make this
a little wider here. But instead, we can
take this range now that we know
that we're selecting the correct row and
just say delete. So now if I'm over
here and I click this, you can see it knew that was the row what we're
selecting before. Instead we're running the
delete command against it. We can add a new item here. And we can delete these rows. You see we still
have our problem because we haven't
addressed it yet. But at least now we're
doing the deletion of a row through some code here. And that's gonna
give us some control of what we can do as
part of the procedure. Now what happens if we click up here and click
Delete Selected? We hit an error here. And that's because as
we do all this math, you'll see that there
is no list row. It's gonna be something like
16 minus 18 is negative two. And then this won't
make any sense anymore. So it's important
for this function, the work that we are selecting a cell within this table range. We want to be careful here
because we're deleting stuff. Anytime we're deleting things, we can accidentally mess
up our spreadsheet. But I know that even if
we click in this header, it's not going to work
because that's going to be 18 minus 18 equals 0. And so there is
no list of row 0. So we'll stop here. So before we tried
to delete a row, Let's error check for this. We need to make sure
that the cell that we have selected even
below here, it won't work. We need to make sure
that the cell we have selected is within this range. Over here. It's specifically within the data of the table. So our list object again, in addition to having
our hetero range, we have our data body range. And I'm just going to use select again so that you can
see what's going on. I'm going to create
a breakpoint, hit F5 and an F faith run, just this line and you see it's selected that hold
data body range. If I come up here and hit F8, it knows where the
data of our table is. Now we need a function
that is going to figure out whether or not our
active cell is within here. So I actually know
this function, but you could go to
Google for example. And I would type in
something like VBA. Herman, if active cell is within certain range
or something like that. And you should get the result for the command here
that I'm going to use. It's a bit of a
non-intuitive command. So we're going to say, if not, intersect active cell
comma and our range, which is Table lines that
David body with age. Nothing. So actually, I
don't want to say no. I actually, I'm going to remove
that intersect is nothing than cell body of the lungs. So this basically
returns a value. It returns a range if this range and this other parameter
range are overlapping. So if there's an overlap, this will return the range that is overlapping is nothing, is saying that the
returns nothing. So if This function that is finding the overlap returns nothing, then that means
there is no overlap. So if there is no overlap, Let's send a message box. The user saying active cell
is not in the table data. Select cell. And then what we
need to do is stop because we'll actually for now, we're just
going to leave this. We don't want this line to
run if we hit the situation. So instead we're
going to say else. A few different ways to do this. Another way I might
do it is just end the whole process here
if we hit this situation. But instead, I'm just
gonna do it in house here. So if we're not overlapping, it sends this message. Then if we are overlapping, then we can continue and
run our delete command. You see if I'm outside of here, I can't execute
them break modes, I'm going to stop so we
can start over here. Active cell is not
in the table data. Please select the
cell. Now if we come back here again,
now it's working. And now the part that
originally made us create this function is we need
to handle these rows here. So whenever we delete a row, we should reevaluate
what our lines are. So let's create some code here,
re-evaluate line numbers. So we could try to look at
this and figure this out. But instead I think
the thing to do is to just clear out our line
numbers and replace them, and we'll just create
them from scratch. It's a pretty simple
thing to count, just one and upwards. So let's do that. Let's loop through our rows. So we're gonna say for I equals 12 and then our number of
rows, lines, thoughtless rows. Now, we're going to use
our table property. We haven't declared IN variable. So we're going to
say I as long i. So we've created this
loop that's going to loop through one to the
number of rows. There are just
two. In this case. We're going to say
Table lines, this rows. And then again this is
the row in the table. And we can use our counter ion. So it's going to be one and then row two and then row three. And then we'll say range. So the first thing
of the range is always gonna be the
line number all the way on the left because it's
the first cell in the row. That value equals I. So I is gonna go 123 and then it's going
to label the rows. So let's run this. In fact, I'm going
to separate this out into a separate subroutine, which we had in our
earlier videos that we can call a subroutine from
another subroutine. Let's say Refresh line numbers, will create a new
subroutine there. We're just going to
take this entire thing here, cut and paste. The only catch here is that our table lines list
object isn't declared. So we have to declare it again in this separate sub routine. And so let's run this again. And now we can run this
refreshing the line numbers without running the
deletion of a line. So you see it just
recalculated this here. Hit this again. If I add another line here,
123, that's working. If I clear this all out, then we are refreshing
our line numbers. And then when we delete
a selected item, we still have this problem here. But then we can call this
separate subroutine, which is going to refresh
the line numbers at the very end of our
deletion process. So we can add a line item. Here is something interesting, I'm just realizing is
we messed up our lines. We added a line is going, hey, most recent one is three, so your next one must be four. So something we
can do is since we made this a subroutine,
good thing we did. We can reuse this yet again, even when we're
adding a line item. So here's our add line item. And at the very
end, Let's refresh the numbers again just to
make sure they're correct, since this is a very
small bit of code to run. Now when I add a line item, it even re-evaluated everything, even if we mess something
up manually and it is recalculate our line numbers
so that they are correct. Then if I want to go
to delete some lines, then I can select these. And it is re-calculating
each time. And you'll see here, even if we add vanilla
as our fourth row, we're going to delete
this and you can actually see that this is the
row being deleted. But the line numbers
are now correct again. Okay. One last thing I
want to show you as I was reviewing the recording
earlier in this video, is that another way that
would have been simpler? Back at the beginning
of the video, you might have thought, why don't we just right-click
and delete the row? In which case we
would avoid all of that logic that we needed
to do to determine the specific list row object
of the table when we could delete the entire row of
the spreadsheet like this. Instead of going in the list rough specifically in
the leading 0 here. This is another
magical part about the named table
that we have here, or the list row
object is that when we work with the list
row or the list object, it's specifically knows that we're talking about this row. And that's something you can do, is have this separation between even this
same exact row here, where if we delete
this on a spreadsheet, of course this is
going to go away. But meanwhile, if we work with the list object of this table in the list
row, specifically, excel is really good with being able to figure out
that we are only working with our data within
this range rather than working with either the rows or columns of the
entire spreadsheet. So that's one of the
reasons that we're working with our list object
and our name table is because Excel is doing a
really good job realizing that this specifically is
our data over here. And we don't want to
go out of our way to affect things that
are outside of it. So that's it. I just
wanted to add this in at the end of the video as
a further explanation. There.
67. 3.4.1 Quote Tool - Excel Output Template: Okay, Now that we've
finished up our functions where we can create our
quote and we can add lines, and we can delete
selected lines and set up the basic information
for our quote here. Let's move on to some
real automation. I'm sure we're missing a
bunch of details here, but we'll add that later. Let's go ahead and
get into our step where we add a new
button that is going to create our
actual quote cancel here because we don't
have a macro yet. I'll add this new
button, will say create. There's a bunch of different
ways we can make a quote. But just for starters, because we're doing mostly
automation in Excel right now, let's make our quote form as another Excel file will have
the option later to update this and make it a
Microsoft Word file or PDF and all these
different ways that we can automatically
generate documents. But to build on what
we've gone over so far, we'll make our quote output
in Excel file for now. Let's set up this quote so
we need a customer here. We'll say ice ice cream wholesale ink as
our customer name. And our contact name
will be something. We can do. A quick name here. And let's grab
clay O'Neill here. So our contact name
will be clay on Neil at ice cream wholesale
think now there's a couple of ways that
we could do this, even though we've chosen to make our output template in
Excel or output quote, can either be generated from a completely from
scratch Excel file. So we could create
a new workbook here and create a new
quote template here, completely from scratch
and have our code build what a quote might look
at, might look like. So it will start to say
here and actually type stuff and we'd have to rearrange all of our cells and everything. Another way we could do this is not have the code
make a lot of details, but instead we'll set up a quote form as a
standalone Excel file, and then we'll open that up and essentially
fill in the blanks. So the information we
have from our quote here, the only stuff that
changes is basically our content at our header
and then our lines. And so we can make a
whole template that looks a certain way already in
this saved Excel file. And our Macros just
going to open up the template and then put the information in
the right place. To start. That second option
sounds a lot easier. So let's go ahead and
start to build that idea. So I'm actually
going to close this. We'll come over to
our quote files here. This is where our
main Excel file is. And maybe I'll just
put it over here in this folder and we will
create a new Excel file. And we'll call that. I'll use an underscore here
just to avoid a space. We'll open this up. And this is a brand
new blank Excel file. And we'll make this
our quote template. I'm not going to make a very
good one because that's not necessarily the idea
of these tutorials. So I'm going to make a
pretty crude one here. Let's say quotation will make this kind of
similarity here. We'll say, maybe we'll put
our quote number here. We'll say customer contact. And then we'll have some
information over here about our quote will make
ourselves style over here, we'll format this as a table. Why don't we go with green, I guess maybe we'll go
with a green theme here. If our grid lines in your
quote number can go over here, instead, make this font a
little bit bigger here, create some borders
over here. I'm here. Okay, well, just start
with this for now. I'll save this
template and we need to set this template
up so that it is relatively easy for us to put information
in these areas. So same concept I've talked
about plenty of times here. We don't want to just
place it in cell B3, although we could, we can
even on this output template, create named ranges so that we can work with
these fields more easily to your customer Contact. And we'll name this table. Table lines were actually
reusing his name table lines. I don't know if
that's a great idea, but it's actually a
different file completely. So you'll see how we can
get away with having the same name and
we'll work with that. Despite being a name that we used in our other Excel file, it might be a better idea
to say table output lines, but we'll leave it like this and you'll see how that's
dealt with in the code later. And up here is a field also. And we'll make this number. Okay, let's run
with this for now.
68. 3.4.2 Quote Tool - Excel Output Header Transfer: Okay, let's run
with this for now. I'll save this. And now we have this
cool button over here. Let's go over to our code. And we'll split our code up
over here as we usually do. And we have this
button click F5. I think this was generated
when I created the button. Let's actually make this a
different subroutine name. And we'll call this Generate. And we'll change this
module one Name. Generate Documents. Again, just to bend everything together
in a descriptive way to generate actionable,
say with Excel. Okay, so we have our separate Excel
file that we just created as a template over here. And so we need to open
up that file to start. So let's set a workbook
object that's going to stand for this Excel
file that we opened up. Because then we're
going to have to interact with this workbook. We're going to say workbook, quote as this workbook object. So this is actually a object variable for
an Excel workbook, essentially an Excel file. And we're going to
say set wb equals. And then we're going
to open a workload, which I think it's workbooks. You can actually see I'll
pick control space here. And it added an S automatically because that's the only
keyword, will say open. And then we need the path of our quote template over here. So let's go ahead and create
that dimension as string. What this needs to be the
full path of our quote. What that means is
here, our folder path. And then backslash, our
file name over here. And I'll add this
file name over here. And this is the full
path of that file. An easier way to get that. There's Windows 11 here. You can use copy as path. And this is also the full path. So that really just put
the same thing over there, but that's a quicker way
to get the full path of any Excel file when you're navigating in your
File Explorer. So now the workbook
we're going to open is our quote template. And then as we open it, we are going to set this WB quote as the
workbook that we're opening. And we can go ahead
and try this out. Let's hit Play. And you see our template just
opened up over here. As an example, we can
say WB, quote close, since this object
stands for our file, and you can see if I hit F9, so we stop here, I'll hit F5. So this runs and
this is open now. And then if I hit F8 and run this closed line,
that workbook closes. So you see now we have
this workbook object, which is going to be that
file and we can work with it. Now before we close
that workshop, we wanted to do
something with it. We want to move all
this information over. And actually we don't even
want to close the workbook, so let's comment
that out for now. I don't know if we'll
use that later, but we'll get there. Now, let's go ahead
and run this. And we have this workbook open. And now we can think
about the information we need to populate here. So we see we have
our quote number, we have our customer and contact name. So
let's start with that. Basically the three pieces of
information right up there, let's say number as String, customer, as gray, and contact. So let's fetch this stuff
from our user interface. Over here on the left is
the value of our range. Quote number. Over here. We have these two cells which
we haven't given names yet. So we can come up here and
call that customer name. And we'll say contacting. Good old clay O'Neill over here. And we'll have a
customer equals range. Customer name dot value, and our contact name equals
rein, contact the value. One thing I mentioned here is I'm just calling
this range out. But something that can get
a little bit confusing. And I think we're okay for now, but it can certainly
get the program itself mixed up is that
we have two workbooks. And so when I say
something like range, Quote number, we're going to see the same problem
with our table name. We have Quote number over here, but we also have Quote
number over here. Also. It can be easy for us and
even the program to get confused as to which range
we're talking about. Now that we have two workbooks, especially when they have named ranges that
are overlapping. In this case, our code
exists inside this quote, greater Excel file
over here on the left. And so I think it's going to know where to get
the information. I can go ahead and create a break point and run
this just to test it. If I hit F8. Actually, I was wrong there
you see it doesn't know. You see this quote
number is blank. That is because it is defaulting to the
file that is active. In the active file in this case is the last
one we've worked with, meaning we opened this file. This file is the thing
that it's looking at. And now it's getting
the quote number value, which is blank from this file. So we're seeing a problem
directly about how the code is getting confused
as to the named ranges. And with that logic, this file is what
we're looking at. And it's not even going to
know what the customer name ranges because there is no range by that
name in this file. So if I hit F a,
we have an error. Meanwhile, if I just activate this original Excel file where
we do have customer name, you see we no longer
have a problem. The term for this is
that we're not being explicit in our use of
these calls over here, meaning we're not
stating the details. So this thing is trying
to guess what we mean and running into errors. So to clarify that
we're not working with named ranges by these names
in our quote template. We're going to write this work, which is just another
workbook object, but it means the Excel file
that this code lives in. This is explicitly going to tell it that when we
use these names ranges, we mean in this workbook. So let's go ahead and do
that for each of these. So there's no confusion. So let's not, let's
run this again. We actually have this problem that the workbook is
just a workbook level, the file level, and the workbooks don't actually
have ranges in them. Instead the workbooks have worksheets and then the
worksheets have ranges in them. So I have to clarify, that actually mean this main
sheet inside our workbook. So I can add this to
that. We've added this. Now we're very explicitly telling the code
where our ranges are. So we hit another area here where I forgot
to put in the S. It's sheets, not cheap singular. So let's try this again.
Maybe I'll get it right. And then we hit F8. Then we hover over these, we can see quote numbers to
customer and contact name. And we're getting the
information correctly. And now you can put a
comment here. Information. And now we can use this explicit reference where we tell it specifically
which workbook we're in, which is WB quote
that we set up here. When we open the
template, we say sheets. We can say Sheet one here. Or we could say one, which means the first sheet, which is the only sheet
in this template, will just change
this tap, say quote. That's the easier
way. And that way, again, we're not using
these generic names. So we're gonna say
is quote that range. And then on our quote template, the range is also Quote number, value equals quote number. Let's just test this one
to make sure it works. Now, if I FAA, that's even step through this, we open up our file, WB quote sheet, quote, and then I'll quote
number value. We'll run this and you see it placed our
number over here. Will change how this
looks a little bit. I'll do a Control X to
cut and paste over here. And then the nice part
about named ranges, as you see are named reference moved along with
our cut and paste. And then I can
right-click and pay special formatting just to match the formatting over
here. So I'll clear this out. I'll hit Save and
let's finish this up. Stop our run mode. And we'll repeat the
same process for Quote number and then two
customer to contract. And then here we
want our customer, which we can copy and
paste and contact name. This set over here.
Now when we run this, you see this information travels
onto our quote template. And we'll make this format
and change a little bit here. I'll just change this formatting
over here to the left.
69. 3.4.3 Quote Tool - Excel Output Lines Transfer: Now we need to
populate our lines. As we compare these, we can see that our information
and our two tables comparatively is basically
the same description, quantity, unit price. So I forgotten a column here. We can do an insert
columns to the left, and we'll say units, unit price and line total. So very similar thing here. In fact, just for practice, let me remove this units
that I've just added. We're going to
delete this column. And for quantity
will combine this together just to see how things don't have to
be exactly the same. We can do some processing
as we move stuff over, so we can add our units
directly to our quantity. I'll just show you that they don't have to be a one-to-one, that we can manipulate the
data as we add it over here. Now that we've moved
this data over, let's make another
section and we'll say line and for now, we'll create objects that
stand for our source table. And then we'll make
another one that stands for our output over here. I'm going to call
them the source of our information and
our destination, which is where the
information is going to land. So how I can do that is I'm going to create
these lists objects that we've worked with before. And I'm going to call it table lines, source, list object. And then Table
lines destination. Now the set them,
I'm going to say set cable lines source. If you remember. These names, tables in our Excel files
have the same name. But we can do
something like say, this workbook that she made. Then just like before, we can say our list objects
and by name is cable lines. Meanwhile, we're going to set
our table lines destination equals not this workbook is
going to be WB quote sheets. So you see, even though we have our same table names here, because we're working
in two files. We can be very explicit in
which files were working with so that the code
knows which one is which. And now in our code we
have two different tables. One that's the source and then one that is the destination. So we're going to move
all the information from this source table into
our destination table. So we're going to
have to loop through every row in our source table. So let's go ahead and do that. For I equals one to Table
lines, source dot count. Now to make things easier, we're going to work
one row at a time. So let's create objects
even for the rows. So in the same way that we
did the tables will do L rho, which is our list row for our source information as list route and
we'll say L route, destination of this row also. You'll see how we
use that over here. As we set our source, as we loop through each table, we're gonna say L rho. So our source row, as we go through each
row is going to be table lines source
that list the rows. So as we go through row one, we have our source row. We're going to look at this. And then our destination row is gonna be this first
row over here. And then as we look
at row two here, we're gonna create a
new row over here. It's something I
showed you before, is Excel is smart enough that as I add new rows of this table, is going to know the
push this text down. So even if we have one
line or a 100 lines, it's going to know that
push all the information downward as we work with
this table over here. So as we look through here, we're going to set our row. And then we're going
to create a new row. Set L rho destination equals
cable lines destination, that list goes down, which is something we use when we were creating
the ad line fund can the Add Item
function for this table. And how we can line this up. Actually, I'm going to create some extra variables here just to make things more clear. There's gonna be more code, but it'll make what's
happening more clear is we're going to create
all of these variables. Line number is a
string, item as string. In fact, since it's
just an output, will just make everything
strings to keep it simple. I know that the sum
of these are numbers, but we'll just make them
all strings for now. See if we can simplify
things that way. As keyword over here, I can say quantity as ring, unit, price and extended price. So let's set all of these. Now that we have our
source row of information, we want to take this information and place it into our variables. So let's say my number equals Here's our row here. Row source. We could say 12345 as we've
gone over a few times now, we don't actually want to use our numbers in case
our columns change. So we're going to use
this method where we have our cable lines source. We're going to find
out the index of our list column when you
supply the list column name. So that if these indexes for our columns
move around and we insert or delete columns that will figure this out
dynamically on the fly. And so we're going to
say line number index, which is essentially saying one. We're going to get that
index value of our row. So this is going to return one. So it's essentially the
first cell of our row. And then as we type
in this next one, it'll be more clear that
we're saying item equals, and we can take
this entire row of information and change this to be our column
header over here line, sorry, our column header item. And this is going to return to for being our second column. And we'll get the second
column of that row. And we'll keep
copying this over. In fact, I'll copy
this line over here. And we'll say description
quantity units, price and extended price. Description quantity units,
price, extended price. And we have to
update our column. So our description comes from our column header
of description. I'm just going to keep moving the information with copying
and pasting like this. Even though it might
be easy to type, it's going to make
it clear to you where I'm getting
these values from. Units comes from this header. Price header goes into
the unit price variable. And then our extended price
is this forward extended, goes into our equity
price variable name. And now we have everything for this row in these variables. And we've added this new row
to our destination table, should be able to look
at this over here. And then for our
destination table, we're going to do
essentially the opposite. Just like we're
getting information from a cell in the
row over here. We're actually going
to put information in our L rho destination. We have our range, we have our column name
called line number. Then we're going
to set this value. All of this code basically
means this cell over here. And we're going to
set that we are in line number that we got
from our source up here. And then we do the same thing
for our item description. Quantity units, which actually won't
be units because we combine those two
fields together, unit price and extended price. And we actually have
one less column in this output because we combined quantity in units together where we're
planning to do that. So let's copy this over here, which is item I'm just
going to type this out. I'm getting this from
these column headers, but without messing around with all my window sizes,
will say description, quantity, unit price. And price. We use the word line price here instead of extended price. Oh, actually we use
line total price. And then it looks
like I accidentally moved over an extra row. So over here we
have 1234567 lines. And then over here,
since we combine them, we have six months. So this looks about right. And then on our output we
have line number here. We have item over here. Description as our
variable quantity. Now this is where we are
combining our quantity in units. So we're going to say
quantity and an empty space. And then we're gonna put our
units and you'll see how that will come together
into a combined string. And then we have our
unit price over here. And then we have our
extended price over here. So there's a lot of code here, but I think there's a little bit more clear what's happening. Even though it took us longer, we were getting
all the info from our source row and then putting it into our
new destination row. And then this is going to
loop through all the rows. Let's actually run through this. So this is the best
I can do over here. Let's try to run
this and I'll use F8 so they can work our way
through this line by line. So we opened our file, we've set our table references,
source and destination. And immediately we run into an issue with looping
through our rows here. And that's because I have
this count parameter, but I forgot to write that. What we are counting is
our list rows dot count. So I just forgot the
list Rosenberg here. I'll continue saying F8. Now we have our row over here. We're getting our number one
over here, our line items. So now we're getting the
info from this one row. Now we added a new row of
information over here. We actually had one
blank row over here. The clear that out. And we're adding the information
into this grid. Now, it's saying we have a problem with this
row of information. Let's check our line
total price over here. And our problem here is
that it's saying that we don't have a column
called line total price, even though we see
one over here. And that's because over
here we're working with our destination table. And I forgot to change this
to our destination table. So it's looking for
a column called Line Total price in
our source table. So there's a lot
of little details to get mixed up on here. Let's go ahead and
fix all of this up. So I'll actually take this whole word so
I can double-click in and update all of these to be talking about
our destination table. So I'm going to
make this bigger. Something we forgot
to do as we come over here is there was
already a blank row. So before we do this, we need to clear out
this table completely. So we want to ensure this
table has no info in it. I'll go ahead and delete all
of these rows over here. The kind of strange
thing about these tables is even when there's no rows, it looks like there's one row. So you can't actually
visually see the difference between a table with
one row and 0 rows. Anyways, let's go
back over here. Let's run this step
through our code. Now you see that information
is showing up over here. You see here we've, we've
successfully combine the information together so that our quantity in
units are together, in our unit price is
showing up blank. And I'm not sure why that is. And you see it's that
there's no units price here. I think it's unit price. Yeah, I accidentally
had a s there. And so if I come up
here and I click this, now, it was just a
typo in the variable. Unit price wasn't
populated correctly. And then now we should
be looping through to the next row is getting
from our source. Then now it's putting
this information into our destination
table with another row. You see the main difference
here is we're on line two and we have ten
gallons instead of five, which we can double-check
over here on our source that we're
at ten gallons. I'm going to hit play just to run this all
the way through. And you see now that we have all of our information
from our source table, moved over here to our
destination table.
70. 3.4.4 Quote Tool - Excel Output Save File: Now that we have this, and now we've essentially
populate our template. This is a very simple quote. There would be more than
this on a normal quote, but we'll just use
this for the demo. And what we need to do is just save this file as our output. Let's say WB quote. And we can say Save As because we don't
want to save this over top of our template. We took our template which
should start as blank, and we're going to save
this as a new name. So where we can save this, we actually created
a quote folder. So in this case we're
working on quote number two. We should probably save our quote in this
folder for quote to. Instead of having to deal with
all of this from scratch. Remember that we
created this tool that's going to construct a
path of our quote folder. So we have our folder path, which is the folder where all
the quote folders are in. Then we have this
logic over here, actually including
our quote number, to get our quote number. Then to construct
our sub folder name and create our new
folder full path. So let's actually copy that. And I did a Control
C there will come back over here to generate docs. And we need to create
our new variable. So we'll say save to respective. I'm going to paste
this over here. We're getting our quote number, which we actually already have, so we don't need that anymore. We have our folder path, which is right here. We have our new folder name. So actually called. Recall, her name is update this variable,
we have to work quote. We have our quote
number pushed into six digit format and we
append those together. And then our full path is our folder path plus
our quote folder name. And we can call this
our folder full path. Now we have a folder full path. We can see that the save as function takes
in our filename, which will be our quote
folder full path. One more thing we're
missing is our filename. So this is actually
just a folder path. We haven't come up with
our new file name. We're going to save this as will actually change this
to a file full path. Let's add in our
quote filename here, and we'll call it quote. We'll call this actually, let's reuse our folder name, which is going to be two
with six digits here. And we'll call it a folder
named output dot XLSX, since this is an Excel file. So that was a lot that we've
done here without checking. Let's see if this works. The last thing I need to
update this file full path, this quote fire full path to be what we're saving as instead
of the folder full path, which is the
variable we changed. This was a lot. So if you're following along, you can step through
this code line by line. Lets clear our template out, delete our rows, and will delete all of our
content over here. And let's see if we happen to make this work on
this first try here. And before we do that, let's
open up the quote template. Just to confirm that this quote template is blank
right now, we'll close it. Come over here to our code. And actually one more
thing will add here is a message box that says
file has been saved. We'll do another vb line feed. And let's output
our full file path over here to our user. So it confirms that
we successfully saved the file if
this works correctly. So I'll go ahead and
we'll press Save here, where we'll hit play rather. You see this is all populating. File has been saved at
this path over here. It's all looking good so far. And if we go over to
our quote to subfolder, here, we have our output file. If we open it up, just found
was actually already open. So let's close it. Basically never closed
after regenerated it. So now we open it up. We see that we have
our quotation here. If we come back over
here to our template, we see that it's still blank. Let's actually create a quote
number three over here. Let's delete one of these lines and we'll add
another line over here. Let's add some strawberry, shake it up a little bit. We'll add another line item. And let's create our
quote over here. We actually never
attached this button to the subroutine
that we create it. So let's attach it to create. Generate quote is
our subroutine. We'll click that
template pops up. We actually have an issue
over here for Save As. And I'm immediately
realizing why we have a saving issue over
here for quote three. So let's close this over here. That is because
it's going to try to save in the
quote three folder, but we don't have a
quote three folder yet. So let's open this template up. It's still blank. We need to hit Create folder. So now we actually have
a quote three folder. Now that we have a
quote three folder, let's create our quote. This info got populated
file has been saved. Here we are with our
quote three folder, double-click it, and
there is our output file. We saw one small issue there, which is if we go to four, then we didn't have
a folder in it, tried to save and
ran into an error. So let's close this
up really quick. Let's go to our subroutine
for generating the quote. Before we even generate
the quote error. Check for that just to make sure that we have
a quote folder. Let's see. So we need to check
for that folder with all of this
information over here. So let's actually bring this stuff up to
the top because we want to do it before we even start
degenerating the quote, because we don't want
to make the file and then not be able to save it. So let's go over here, quote file, full path. We actually want a stepping
stone where we'd have just our quote folder because that's what
we want to check for. We want to see if
this folder exists. So if we do four, we want to basically check if four exists. So let's separate this out. We'll say folder,
full path, string. Folder, full path is just this without our filename at the end. So it's essentially this. And then our quote file, full path, hands are filename. So now we use our
quote folder for math. And then we append our
file name over here. And we didn't need
this extra ampersand. So if you follow along
to what we just did, we basically just split
this into two steps. So we have another
variable that holds our folder full path
before we construct the full thing that is going to output our full path
with our filename. Just to show you, this
is a bit confusing, especially with all these long
variable names I created. Let's just output these. So here's the output
for the folder. Here's the output for the file. Let's step through
this line by line. Is saying we have a
duplicate declaration here. That's because I'm using the
quote number variable a pop, and I haven't declared it yet. So let's say Quote number
as string up here. We'll step through. Here's our quote folder. This is saying our
quote number is 0. So why is that? That is because we get our
quote number right here, which is down below all this
code where we're using it. So again, we have to move
this stuff outbreak, so we're rearranging. So now we get our quote
number first thing so that we construct
our paths first. Let's kinda able to construct
file folder saving. Open to it. I can start to populate data. I know this is getting
a bit confusing, but we're going to
make sure that we have our sequence correct here. Now, let's stop. We'll hit
F8 again and step through. Now our quote numbers,
actually something. And then when we construct our folder full path,
Let's clear this out. Here is our folder path. Here's our file path here
with our filename there. And then the reason we created this is so that we can
use something that we used in our create an Open Folder sub-routine
where we're going to say if directory folder path, whole path actually db
directory equals blank, then sub folder does not exist. Now let's throw
our error message. Generate. The file does not exist. Error will occur. Even at process
will be canceled. Then we're just going to
use this end keyword, which is just going to
stop the entire macro in its tracks when it hits this line is going to stop everything and not
continue downward. So in theory, we have
this all figured out. We've rearranged things
where we're figuring out all the folder names
and file names up top so that we can check to make sure the subfolder exists
before we continue forward. And if everything works there, we're going to go
through everything of opening a template, populating the information,
and then saving our file. So we have a pretty built
up subroutine over here. You can see our tool is getting pretty intelligent
and complicated. Along with that,
Let's create quote, actually will step up to four, where we do not have
a sub folder yet. So let's make sure that we
are catching this situation. We hit Create quote,
cannot generate file, sub folder does not exist. Let's make this even better. Cannot generate file some
folder does not exist. Let's say the following
subfolder does not exist. We'll put a colon here, put a line feed, we'll put in what
we're checking for, which is a float
folder full path here. We're going to use this
underscore character space. Underscore will let us continue
over to the next line. And this makes the
second line of continuation of this same
line of code over here. That's what this underscore
character will do, is tell you to continue
on the next line. We're going to say ampersand
and another line feed will say process will be cancelled. So let's see how this looks. And we'll see how this looks. I'm actually going to
create two line feeds here. So you'll see the gap
when we run this. Now if I say create quote, the following folder
doesn't exist. It tells us the folder
that it's looking for. And then it says process
will be cancelled. And this is why we
have two spaces here. Now. We create our quote for folder. Now we can create
our quote runs. This template file has
been saved. In here. We see quote for has an output. Then the final
touch we can put on this is closed this file. So since we're saving the file while we go ahead and close it, so it doesn't need
to be left open. And now we'll emphasize one
more time. We'll say five. Create the quote. The folder doesn't exist. Let's create the folder. Create the quote. Five here. Just tells us the file has
been saved. It closes. Then here's our output
Excel file for quote five.
71. 3.5 Quote Tool - Auto Outlook Email: Now where we're
leaving off is that we have this button where we
can click Create quote, and it's going to open up
our Excel template and generate a quote output as a separate Excel
file and then save it into its respective
quote folder. We want to move on
to our next step. So now that you generated
in Excel quote, we typically are going to want
to send that to somebody. We want to send it
back to the person who've requested our
quote for our store here. So I'm going to create
a new button over here. I cancel so that we
don't have to select the macro and say
create new map. So let's use that. Let's hop over to
our code over here, we'll open up our VBA
editor and let's see, we have Generate Documents
file management. We'll just put it in
generate documents. So let's put this together with our code before just sharing
the same module here. So we don't have too
many modules and we'll say sub generate email. Then pin this over here, and we have our general
e-mail button over here. Let's attach our generate
e-mail button to our generate emails
subroutine we just created, which doesn't have
any code right now. I'm just gonna put
a message box that says about to generate email. I click my button and we say
about the generate e-mail. So now we're ready to
write some code in here from an earlier lesson
for intro topics, we went over adding
a reference library. So we're going to make this
pop-up and Microsoft Outlook. So we're going to go up to
Tools here, references. And we want to add our object library so that we can control
Microsoft Outlook. So if I scroll down here to Microsoft in
alphabetical order. So we're looking for
Microsoft Outlook. Here. We see our outlook
16 object library, that is the latest one and
the only one in this case, if there's more than one, I always choose the
highest number. So our outlook 16
object library, we check it and click, Okay, it's going to reset our project because
I was in run mode. So that's okay. Then if I come over here and I'm going to create
an Outlook message. So we want to do
the equivalent of creating a new email
in Microsoft Outlook. I'm gonna say dimension
O L for Outlook. And I'll say message is the name of our object
variable that I'm grading. It will say outlook. And this only exists
because we added that object library where I
went to Tools and references. But since we did that, we
have this outlook object. And then in our outlook
object library, we can say Outlook Mail item. Male item is a message. Now that we've declared
our Outlook message, we need to set it as an
actual Outlook message. As we always do with
object variables, we declare it and then we
need to set it as an object. We'll say O L, O
L message equals Outlook application
dot create item. We're going to create
an Outlook Mail item. So this is declaring
our variable type. And then now we are setting our new variable as
a new message item. So this is kinda similar, reminds me if you do a
new workbook object, then you say dimension
Workbook, Workbook, and then you say set workbook
equals workbooks that add. This that we've seen before. This is the equivalent
of workbooks not add. This is creating a
new outlook message, but at the same time, setting it to the
Outlook item object that we've created so
that we can work with it. So I remove this. And just to show
this, we can say Outlook message dot display,
and we'll do this to start. I'm gonna go ahead and remove this message box
because we'll see that a bunch of times
as we test this. Okay, now we'll test this out. So I hit F8, we create our message
object and we run the display line and you see an email automatically
pops up over here. So it was that simple. We now have a button that
when you click Create email, it automatically pops up Outlook and creates a
message here for you. Now that's not saving
us too much time yet. So let's add some more
functions to this. So we have our display
message and we can start to type some things
like object message. That subject equals
is the subject. We can say, oh, well message that body equals. What we should
actually do here is use a width statement
because you can already tell that we're gonna be calling our object a bunch
of different times. So we're going to go into
save that repetition here by wrapping this
in a width statement. And then we don't have to write a message over
and over again. So our body is kept here. And we'll just start with this. Now, if I hit play here, you can see it was that easy. Now, we are sending
our email here, our subject line tax
in our body text. Into these properties
about the email. So since we are doing
something with our quote here, we can start to frame this
out where we're going to say our quote number as string. As we've done in the
previous videos. We'll say our quote number is
a quote number named range. And then we can
say Quote number. And we'll say probe now
here as our subject and in our body we
might say something like here is quote, unquote number
your requests for, thank you for your interests. So we create our message there. Have some error here. I'm probably messing up, yep, ampersands and quotation marks. Usually when I'm combining
strings like this, we run this with F5 and we see now we're creating a
real automated e-mail here. And just like our
quote template, we're keeping this pretty crude. The goal of this class isn't to show you how to
write good emails, but to automate this
e-mail process. Now the main thing
we're missing is that we are missing
our attachments. So how we can add attachments
is the same thing. We can say. Attachments. Remember this is the same
as typing OL message dot attachments, that ad. And then our source
is our file path. So we're going to leave
that blank for now. We'll come up here and
we'll create a new variable called attachment as string. We'll have attachment path
equals something over here. Now we go over to
our quote files. Let's say we were in
quote folder five here. And if you remember, I
showed you the shortcut. If you right-click and say
copy as path in Windows 11, then we have the full
path of that file. And we can say our
attachment path is this, and it includes the quotation marks when we use that
Windows function. So this is the path of
our file for quote five, I just chose a random
one right now. And of course we're
going to have to make that adjustable. But now we can take
our attachment path, pass it as a parameter into
our add attachments command. And let's hit F5
to try this. Out. There we go. We have a quote file
attached to our email here. Now the issue is if
we were sending quote for we don't want to have quote
five hardcoded over here. So now we need to construct
this dynamically. And then if we do that, then we can replace that
variable in these two places. So let's go ahead and do that. Well, we call it we'll
call it full name. And our quote, full
name notation is quote. And as you may remember
from before it, we're going to take
our number format. I'm going to take
our quote number, enforce it in the sixth
digit format here. So this should be our
quote, full name. And we're going to take that and replace these two spots with it. Ampersand. This is always a bit
of a brain teaser here to just work with these combined strings here and make sure we get
our sequence right. But I think I just
got it right there. Of course, will have an
error if it doesn't work. So we can always come back and
fix it and we'll run this. And now Quote number four. And we've attached coat
number four over here because our file path for
our attachment has changed. Here's our quote
is quote for that we generated from
our previous video. And we have this as a
create e-mail button. And you see this automatically
pops up. Over here. You see we don't have an automated e-mail of
who has send it to, so you can return it to the person by typing
their name automatically. The nice part about
popping this up in Outlook is it's
going to show up in your sent e-mail box and you're using all these features
that are built into Outlook. So you can kind of
pick up where this macro left off and
add people to CC. It knows your address book and everything like that afterwards, rather than having to code
all of that into your macro. But what we're missing
here is a contact e-mail. So let's say we put
our contact e-mail and here I'm just copying and
pasting this format here. We had play at IC W.com here. Now we can name this
cell as contact e-mail. And then we can come over
here to our code again. We'll create a new
variable here for contact e-mail as
spring will pull our contact e-mail as our range of that email
that we just named. And then I'll put it in the order that we
generally send or type up our emails in two
equals an email. And I'll clean this
up really quick. And so now if we come back
here and hit Create email, we even have our e-mail
address over here. That's it. That's a basic e-mail for now. We can add a lot of
different functions here. There's different ways
that we can make this a very customized e-mail with tables and all the
information that you would ever want
in an e-mail body. And we can control all
that automatically too. But here's just a basic
proof of concept.
72. 3.6 Quote Tool - Customer Lookup Table: So in our last video where
we left off was that we create this function where
we have a e-mail button. When we click it, it automatically generated
this email with the subject body text and the attachment of the
generated Excel output file. And we automated our
contact e-mail address from our contact e-mail over here
to good old clay on Neil. This video is going to have
much automation in it. We're just gonna do
a quick touch-up of this tool where we're going to do the same thing for the customers that we
did for items over here. So right now we're set up where we need the NR contact name. And we took that from a random name generator and our contact e-mail,
which we also made up. Of course we're going to
continue making up information. But what we could do is
similar to our items. We can make a little
DataTable of our customers. Customer information here,
it will say customer name. We can say contact name. And we're making the
assumption here for now that there's one contact per customer will say contact e-mail will turn
this into a table. So Control T. Again, my table has headers. We can take this information, this our first-line
clay on Neil here. We have clay at ice
cream wholesale.com. I CW. I'm sure this is probably a real website or something like that. So sorry, if this is u. And now add a couple
of extra lines here. So this will be the fun part. And so we'll have our Customer
Name be Connie's cones, LLC and our contact name, I guess it needs to be Connie. We'll leave that blank for now. We'll go back to work
random name generator and a little bit at
another one here. It'll be ice cream. And then we need
some contact names. So let's go over to our trusty name generator over here is the
one we used before. We'll grab a name over here. So let's see. We got Clarissa Vargas and
we'll say Connie Mack drums. Connie at CCl.com. Again, sorry if I'm taking
your website name here and marissa at ICR view.com. Alright, now we have our
customer information. We can do the same thing we
did for our items over here, which is that we just
used a VLookup formula. So over here at
our contact name. Actually, before
we do that, we'll come up to our customer and I forgot to give
this table and name. So we're going to have to make our customer name a drop-down. So we'll say table
customers over here. If you remember from before we made this a data validation, went to list and then we can say indirect and actually
use our names. So cable customers. And then over here
in our brackets, I'm being careful not to
use our arrow keys here because in this
specific formula bar, using our arrow keys
left or right is accidentally going to
choose all these ranges. In fact, I'll do it just
as a reminder of what will happen is instead of
moving our cursor over, it starts to select cells. So click in here and we
write our column name, which is customer name. I believe. If it's wrong, it'll throw
an error, which it isn't. So now we have our dropdown. And then for our
supporting information like contact name and email, we used an extra lookup. So let's say X lookup, the value that we're looking at. The column that
we're looking at, the info in, the column that we want to return
information in. And then if it's not found, we're gonna say not. We make this gray
since it is a formula and we want the user to know
that it auto populates, will take this formula and just repeat it for
contact e-mail over here. We'll update contact name
to the return array, which is our contact email. And now we can select our different customers and have this information auto populate. And if I come over here
and create our email, we can see that our automated
e-mail is going to Connie. While we're here,
why don't we touch up a couple of small
little things. I'm gonna come over here and fix up these buttons a little bit. I can go to Shape Format. And since I highlighted
all these buttons while holding control, just a little trick over here, we have these lines. You have this aligned function
where we can align middle. So they're all lined and then
distribute horizontally, which is going to equally
space out these buttons. Okay, so that's it
for this video. We'll keep going
in the next one.
73. 3.7 Quote Tool - Check Attachment Exists: Well, we are creating
our email function here, where we click Create email and automatically pop up
this outlook e-mail. An issue that I realized we need to address
here really quick, is that if we go to quote number six and click Create e-mail, then we get this error that
says path does not exist. And that's because
we did not generate a quote for Quote
number six yet. So they're either
is now folder or of course is now Excel file
or a mix of both usually. So if we come over
to our folder here, quote files, and we see we don't have a folder
for quote six. When it's going to look for the path that we're going
to attach the Excel file. It can't find it, and that's the error that we're
running into here. This is simple fix. We're going to use what we've
used in the previous video, which is just error catch at the beginning of
our subroutine and throw an error if the file isn't found where it expects
to find the attachment. So this is a really
common theme, which is at the beginning
of subroutines is where you want to catch
all the issues and notify the user if something's missing and the process isn't going to
complete successfully. So as usual, it will come up to the top of our
subroutine and will start to type in
some code to detect errors and let the user know if it happens and
stop the process. In order to do that, we actually need the attachment path. So I'm going to backup here
and actually come down here to check the
attachment path after we've come up with it. You may remember the code
here is if then DIR, which is going to check whether
a file or folder exists. In this case, we are looking for a file that's going
to be the attachment. So we're gonna say
attachment path. And before I believe we used VB directory because we're checking whether
the folder exists. Now instead, since
what's a file? We're just going
to say VB normal, which is what we use
for a standard file. And then if it's blank,
parentheses here, then that means attachment
file does not exist. So now we'll throw
a message saying file is not found the
following a path. We'll say VB line feed. And then we'll display
the path of the user just so they can investigate
that they wanted to. So anytime I'm doing
something with paths, I lead to display the path
to the user and the message. So that way they can navigate to that specific folder and confirm for themselves
what the problem is. And then just like before, I accidentally hit Enter there, so I'll hit Undo and it comes
back attachment path space. So the problem is
I'm in break mode, so that's why this
keeps popping up. So I'm going to hit stop. You go to our next
line here with that underscore
and we'll say have another BB line feed
and another leaf vb line feed will say process. Then to make sure
we actually stop the process and don't continue with generating our e-mail. We're going to hit end here. And one thing I wanna do is this set Outlook message
to being a new message. Because we do our
validation over here. I don't want to create
our Outlook message even if it's hanging in the background because
as we saw before, it doesn't actually
pop up until we run this display line of code here. I don't want to create a message if we're going to run into this issue and stop
everything abruptly. So instead, I'm going to take this line and move it down here. So we're basically going
to say validation. If I was going to
be really explicit, I'll actually say data up here. We have our validation here. And then create
e-mail is down here. So we broke it into these
different sections here. So if we have a
validation error, we're not going to have started our process at all
and end up with possibly some processes or
an Outlook message that's hanging in the background.
Let's try this out. I'll hit Create email. You see the quote file is not found at the following path. Process will be stopped. Now, if we create the quote, Let's see, we have
an issue here. It says I is not defined. And honestly, I noticed this way back when we
record this video. So that was a few videos ago where I noticed that even though we have
Option Explicit here, it didn't make us declare i. So that was a weird scenario
that I just kinda put off. But the problem here is we did not declare
the variable I. So we're going to
call that a long, which I think should
handle that problem. I'm in break mode, I believe. So. I hit stop here. It create quote. And we're doing the
same thing here where it's catching an error. So at least we're not
hitting VBA errors. The user, in this case,
we know what's going on, but if it was another user who wasn't familiar
with the code, they're getting good arrows here that's telling them what's going wrong and
stopping the process. So it's telling us
that there's no subfolder for quote six. Cyclic create Open Folder. Now we've actually created
the folder for quotes six. I hit Create email. We still have this problem where the output doesn't exist. So now we need to
create the quote, which is generated here. File has been saved. We click Okay, it
saved automatically. Now we finally click Create
email for quote six, and we have everything ready. So the email successfully
auto-generated.
74. 3.8 Quote Tool - Add Total Price: One little thing I wanted
to add with this video, which hopefully should
be pretty quick, is that I forgot that I wanted
to add our total price. So we have our extended price for each of our
lines on the quote. But typically for quote, we are going to want
to tell the customer a final price over
here, total price. And that is the sum of
these lines over here. So we're just going to
use an Excel formula. Again, make this gray. And now what we need to do is add this onto
a quote template. So if I come over here, we'll change this to
coat number seven. I can't create the quote because I don't
have a folder yet. So let's create our folder with our nice button that
automates that process. Then we click Create quote, and we generate our file. And it actually closed
with our automation here. So we'll open up the
template and see that we don't have our
final price anywhere. Let's go ahead and add that. I think we need to set
this up in a template. So in our spreadsheet over here, I put final price at the top, just so it's easily visible. But typically for an output, I think a more
typical place to put the total price be here at
the bottom of the table. So this is our
quote seven output. This isn't the actual
template that we used from previous videos
to start to quote. So this is an active
what we're gonna do, but I just want to draft
up how this might look. So basically, we want this
to say 310 over here. When it's done generating. And we'll do some little things like you're probably noticing that this is not in
the format over here. So we can fix that. Now
that I'm realizing it, we can do the same
thing over here. We want our quotes to
look something like this, just to clean it up a
little bit more and add this important piece
of information here. Let's close this. What we really want
to be working with is our quote template. So this is what we start with
when we generate a quote. So let's take a
look at this here. The first problem we had here is that we're maybe
not the first problem, but the easiest problem to solve is that we
hadn't numbers here. And we're gonna put this
in accounting format. And now if I go over here and
I accidentally added a row, if I come over here
and I delete our rows, and then I type in here
and add a new one. You see that are named
table here actually retains our formatting these cells even when the
table's cleared out, when we start adding
rows back in, it retains the formatting
notation that we have. So all we have to do is make
this the accounting format. And it's going to stay
there when we populate it. And in fact, I'm going to right-click and make
sure we delete our rows. And then try this
again. Let's see, I'll save this template
and we'll try to scan. And we actually are
hitting an error here. You can see that the file
actually did save correctly. And we have our formatting
that we want here. I'm going to close this. We still have this
problem that we hit this error over here. In another video, maybe I'll
show the details of that. But what I think is actually happening because it
correctly prompted me to ask if I wanted to save over the file and I hit Yes, and everything looked
like it worked correctly. What I think happened
is this is erroring out because I'm just storing all
my files on my OneDrive, which is a Cloud Sync folder. That's a whole other topic. But we're creating some problems with our OneDrive clouds
sinking of files, making the system
think that there's kind of file management
conflicts going on. Anyways, we'll continue what
we originally wanted to do, which is continue working on our template. We have
our total price. Now, what I wanna do
is come down here. When I say total price. We'll worry about the
formatting too much here. We'll create a name for this range so we can place
the information there. Let's make sure that it is this accounting formatting type. Clear that out. And then the
interesting part here, I believe, is because we're working with
our name table here. When we insert rows, the way we wrote this
code originally, it's going to add
rows this table, but it should know to not
overwrite this row over here. Again, this is the
continued benefits of using a name table. We aren't actually typing into these cells and
overriding this stuff, just like we don't override
this note over here. If we had, if we add at
ten lines this quote, it's going to know that this range is pushing
everything under downwards. And again, just as
a stepping stone, Let's actually try
this thing out. We're going to make yet
a new quote over here. I'll keep making new ones. And then we also won't
run into that kind of OneDrive file error message
that was popping up. And we can just avoid that, will create a new
quote here for quote. And you can see that popped up and even from
our screen over here. We can open it up so it
stays on the screen. It pushed the final price down. While we're working on this, Let's go to our code over
here for creating the quote. And we can even comment out this line that is closing
out the quote file. Because we're gonna
be working on this. We can just manually close
it out when we want to and when we released this for
a user to potentially use, you can make these
automation features, but you can add
these little quality of life features that
saves them a click. But for us we want to
see as much as we can so we won't close that file since we're working
with a template. Now what we need to
do is actually come back to this formula
that we had up. And we want to make sure
when we're generating the quote that we're
bringing in the total price. So over here, we should have some information of
where we're bringing in our information from our source file over to our
destination file. So here we can add total
price as a double. In fact, again, we'll
do it as a string so we don't have to
worry about types is just a visual output. So I think this
will work. It will change it if we need to. Take total price
equals this work. Got sheets that may
range and total price. And so this is getting the information from this
cell right over here. One thing to just touch
up since we're here, is we have this written three times as we've gone over
in our other lesson, that we can use a width
statement over here. We don't need this period here. We'll end with statement. And then to make sure we have
our formatting readable. And I clear this out, and this is the same thing. We don't have to type this
information over and over. I know it was actually
more work in this case to fix it because we
didn't do it at first. But this just makes
everything a lot cleaner. Well, we don't have
duplicate information. We can even do the
same thing over here. So I'll cut this, say with that, replaces this information with indent out. And that's
cleaned up a bit. We don't have to do it
absolutely everywhere, but I just want to get
used to that habit of doing that when it
makes sense for us to. So here we're taking
our information and we add a total price right here. We want to add that
now to our output. We wanted to range, we named the same thing, coal price here, value equals. Now, let's go back
to our co-creator. We can make yet another quote here. We'll
create our folder. File has been created, or folder has been created. Rather. I create my quote, pops up. Formatting is fixed. We have our total price field, which is now
automatically populated. It pushed everything down in the formatting output is
just like what we wanted. We close this and you see
that worked commenting out the line that would close the file worked and it
stayed open this time. And here's our file in
our respective folder.
75. 3.9.1 Quote Tool - History Log - Start: Now that we have a nice
decent quote generator over here that includes the functions from
quickly filling out a quote with some basic inputs. Thrown some butter pecan
here, haven't used that yet. We add our item and we
can create folders. We can create a quote. This is building up over here. We have our butter become line, and we can even
create our email. I want to move this
to the next step. So the next big feature that a business that might
use a tool like this may want is to go from something
that's just generating the quote and the
e-mails to send out to actually logging
all of this information. So after you send
out many quotes, say over the course of
a quarter or a year, you have all the info about the quotes that went
out so that you can review the information and kind of have more data
about your business. And then we can
start to get into things like data analytics of figuring out how many quotes
went out to which customers. Eventually even your
win rate of how often they turn into orders
and things like that. So for the next series, we'll move on to building a database that will
automatically take this information which
we've already filled out and submitting that to a data table that we can keep records of
everything. Review later. I'm going to slowly
work our way up. So we have a bunch of different options of how we can do this. The first one I'm
going to do next is storing this information just
in the same Excel sheet. And of course we can
then work our way up to different types of databases. But we won't get into that now. We're going to slowly
build the robustness of this thing as we go and
take the slow steps so that we get all the
training involved as we build upon a tool like this and handle more and
more complex processes with better and
better automation. So to get started,
let's make a new tab. So for example, I'm going to
just call this quote log. Now we come back here
and let's look at the information we
want on our quote log. We have things like
our quote number or customer or contact. That seems like all important
information or total price. So let's kind of
plan this table out. So we'll call this,
our quote log at the top will have something
like our quote number. We'll have our customer name, we'll have our contact name. In fact, for now, I'm not even going to
have our contact name. Let's just keep this data
as minimal as possible. We can add that later. But as we get into the idea of databases and
data structures, we're going to start
to see the idea of not repeating data. So if we have coat number
one here and we have our customer name
as wholesale ink. I think it was if we started
to store data like this, we actually have a cross-reference
where our ice cream wholesale ink customer only has one contact and
that's clay O'Neill. And so as we store this data, we actually don't need to store the contact name
necessarily right here. We could if there's a good
reason to save that time. But we could always
do a lookup of our customer name against this data assuming that
it stays stagnant. So we might want to
change this later. But for now, this is kind of redundant
information because it's always this
one-to-one relationship. If we have our customer name, we can always look
up our contacts. Our total price here. If we have this information
in our total price, we don't need this
information because it's just a tool for us to
add lines to here. And then you might want to store what lines
you have on here. But we don't actually
want to make a crazy column like this. You can kind of look
at this and try to think through
our data structure. And imagine that
it's going to be difficult to come up
with how we can place all the information about
these lines into here, which has a single row of
information for a single quote. We have quote too and some
more information here. So let's set that aside for now. For a quote, We just need
something like this. So I hit Control T. So we
can declare this a table. And we have a basic table here. When you get into more
common software systems that mid-size the
larger businesses use, such as an ERP system, which you might be
familiar with that term, which is enterprise
resource planning. A common idea here is we have these lines
where we need to store this info and we
have this header info, what I'm calling
the header info, which is that when
we have quote ten, we have some stuff that
fits on one row of data, just like we created over here. Then we also have this other information that's related to quote number ten, where we need more than
one row of information. So for example, over
here we have quote one. But then I'll create
a new tab over here, and we'll call this lines long quote lines log
here for the header. If you say Quote number, and let's say we're
on quote one here. In fact, we're
looking at corp ten. So why don't I just
changed this really quick. So it's the one that we actually have on our Main
tab at the moment. So we have quote ten, and then we have this
information over here. I'm just going to copy this from an e-mail and I'll
paste this over here. You can see we have
our line number, item, description, quantity, units, unit, price,
standard price. That each of these lines all corresponds to
quote number ten. Let me turn this into a table format here we'll
do Control T again, set this up like this. And you can see we
have two tables in the two tables combined hold the information we want for Quote number
ten in this case, where we have one
thing where there's only one row of information
for the quote number. And we can even put
our total price here for reference, so 375. But then we don't want to
repeat our lines in here. Then we're kind of mixing and
matching our information. You can see the columns
won't line up for us to put our lines in a table
that's set up like this. But then we have a separate table that has
our line level information, which is information that needs multiple rows of
data for R1 record, which in this case our record being our quote number of ten. This is a really
common data structure you'll see across businesses. And the terminology
that I usually see in that I use myself is that this is considered the header level and then this is
considered the quote level. And this actually reflects a lot of your quote formats,
which I'll open up here. You see our naming is because our header level is up here and then our
lines level for quote, often very similar for
invoices and purchase orders. That you have. A
table at the middle, which is your line information, which can be one line or much more than one line in
relation to this record, but your header is
just one piece of information in relation
to the record. So hopefully that makes sense. Maybe you've had some
exposure to this idea already through your
business or job, and maybe you haven't, but when you come across it, you'll start to recognize this same setup of
header in lines. So we have essentially
created two tables here because we want to
keep track of our lines. Also, it might be the case
that you don't care about your lines and you just want
this total of the quote. So that's possible too. But I wanted to address this
and we'll set up both of these at the same time because they'll use
similar concepts. If we came over here and
actually clean this up, just like we did
for our quote logs, we do have some
redundant information, which is that our description
is always the same. If we know our item. This is actually a
redundant column which I can delete here, because if we need to know
the description of this line, we can always take our
item and do a lookup which has a one-to-one
relation between your item number and
your description. If we come back over to data, actually, we'll see
that units is the same. So this is just more
redundant information that we don't really need to keep track of frightened now, unless we have a
good reason later and we can always
add that back in. Now we have our unit price. I'm actually going
to leave this. This is more information, not necessarily
about automation, but how businesses might run, but I think it's worth
getting into anyways, I'm going to leave
the unit price, even though using
logic we had before, I think we have our unit price
right here, which we do. But there's a chance that
unit price might change. So a lot of times some of this other stuff is
unlikely to change, but your pricing might
get updated fairly often. And then we want to be capturing the actual
price we quoted at. And then if we go in
here and we change from our master table the price
of one of these items. We don't want our quote lines, which is more of a
historical log to change. We want it to remember the
price that it was quoted at. And then we have our
extended price over here, which we actually don't
need because we can always calculate that with our
quantity in unit price. So the important
thing here, I think, is that I wanted to cover when
it comes to storing data, especially data that could potentially become
lots and lots of data. The historical log like this might become hundreds
or thousands, or for huge businesses, even millions of
rows of information. You can do things like this to keep it more
efficient and not store information that you could figure out
when you need it. Because otherwise,
we would have had for extra rows here
that we might not need. And if you ended up with
hundreds of thousands of rows of information
over time, that's going to be a
huge difference in the memory it takes to
store this information. We have some borders over here just from my copy and paste. So I'm actually going to highlight this will
go to Cell Style, make it normal, which is
actually just going to make it match the auto
formatting of the table. We can come over here. We'll make unit
price in dollars, total price also in dollars
per half the formatting. And we've kind of set up these
two tabs as our database, that's going to be
our history logging are quotes as we send them out. So that's just the
framing here of what we're going to use to
store our information. In the next videos, we'll get into the actual code that's going to manage
this information.
76. 3.9.2 Quote Tool - Log Header Info: Now that we've set
up the framing on our Excel sheet
of how we are going to store some basic information about the quotes
that gets sent out. So we have our header
information here, in our lines information here. Let's get started
in thinking about the process of how this
will functionally work. So let's say we're
working with 11. We create a new one here. And I create my folder. This is our workflow here. By the way,
eventually we can tie this all together
if we wanted to, we won't bother right now,
but we could make it. So when you create quote, it will also check if
there is no folder, it will create the
folder for you. So you even have to
click less buttons than the three we need
to click here to quickly create a folder
and then a quote. We could combine them. We're going to deal
with that for now. You then create a quote
after you set everything up, we'll just kinda leave
things as is for now. Then you hit Create e-mail
that will pop up the email. The catch here is that this email doesn't go
out until I hit Send. It's actually
really easy to make this e-mail
automatically send out. But I typically haven't done that because most users
aren't comfortable with emails just flying out in their name without them
reading it over first. And a lot of times
you might want to add more information to it, edit a few little things, or add somebody else that CC. So it's nice to just pop up. And if you'd like
everything, you click Send Yourself. Actually
really quickly. Just show you if you come
over to create email, where we type in display here, we can actually replace
that with send in. This command will make the
email just go out without popping up and displaying first. So we're not gonna do that. We're going to leave
it as display. But the catch here
is that we want to log this information
into our history after we know that it went out to our customer
and we've moved on because we have to click the Send button and
outlook for it to go out. We can't detect that the user has clicked the
send button in Outlook. So if a person creates
the e-mail like this, then realizes they
made a typo or something like that or that they don't like
the way this is setup. And then they close
out the email. They might not be done. And maybe they walk away
from their computer for the end of the
day and then they come back tomorrow to finish working on
this quote 11 here. We're not ready to log
this into our history. What we wanna do is logged the finalized quote
when we're done. So we don't want to log one. We're not sure is complete. So instead of time does
to our create email, we don't know whether the
person created an email just to check it out and it's
going to change some things. So instead, at least for now, we're just going to make
a whole new button. Ce, mark as complete. This button marked as complete
is the button that for now a user would just press at the end of their
process to say, Hey, I'm completely done here. And that is what's going to move this information from here into our log for our
header and our lines. Now we're explaining our
workflow and how it'll work. Let's start writing up the
code that's gonna do this. Let's create a new module over
here for this information, we'll do Insert Module. One thing you might notice
here is we actually have these files hanging open
in memory right now. Even though over here in
Excel, they're not open. That's something we could
address in another video. Or maybe I'll put it
earlier in our class, but we'll just set
that aside for now. That's not important. We're going to create
this module over here. And we'll call it database. For now. Maybe we'll rename it, but it's just going to handle
database related stuff. So let's set this up
as log record history. Now what we can do is look
at the information we need. We'll start with
our header, which is going to be really easy here because we just have
three pieces of information. Using some of the concepts
we've already shown, you can probably imagine
how we can do this. We just need to grab
the information from here and then add a new route to the
state of table and put that information
into that new row. There's only three
pieces of information. So this shouldn't
be too bad at all. Even on this tool, what we've covered already, this will be a lot like
the Add Item process. So let's go over here. Let's
set this up as usual and split up our code in
our user interface. And we need boat number, customer name, a string, and total price. As. Again, we'll just make
that a string for now because we're not
doing any math with it. It's not a big deal that we're
using numbers as strings. Now if we were gonna do
some math with that number, then we want to be more
specific and probably call it a double quote number. And we've done this a bunch
of time at this point, is range number. If we want it to
be more explicit, we can make sure
that we are working in our sheets called name. We use a width statement here. Then if we put the
period over here, we'll know that we're explicitly saying we're using the range from our main sheet value. Then we can say that
the customer needs. Equals range, that
customer name, that value, and our total price equals our range called
total, total cost. Now, if I hit F8 and we'll step through this just to make sure I didn't
make mistakes. We have 11 customer
name and total price. So let's continue building this. I'll put a comment
here and say add new route to quote
log in popular. So we need to address this
table over here as an object. And then we'll add a new row just like we have in the past. And as I'm saying
that, I'm realizing that I forgot to
give these a name. So let's call this table, table at our log. And while we're at it,
let's name our lines table over here. Table. Now that we have a good
name for our table here, we'll create an object
or list objects, so we'll call it table
header as a list object. Set table header equals. Now we're in a different sheet, so we're going to
say our sheets. What log? Which is what we named
our sheet down here. We'll say list objects. And it was tabled quote at our log as the
name of our table. Now we'll prepare our
lists row object. So we'll declare it up
here as a list row. And then we'll set this list
object as a new row that we create a table header as our list object,
that list grows. So creating a new
row here and then declaring it as r l row
variable while we do it. And now that we have
our row variable, I'm gonna do it this
way before I fix it, which we've done
before also in say, on that row, the first element
is our boat number 23. So our second element, and then our third
element over here, is going to respectively be our customer name
and our total price. So we're going to have
our new row and then 123. And that was just
as a demonstration. If you've watched
the other videos, you'll know that I
don't want to do this. I actually want to say
table header, that list, column, Quote
number, that index. Use this notation over here. That's using our column name. Instead of hard-coding
the column number over here that way. But my accidentally
deleted this, so I'll do a Control
Z. In that way. If we move our columns
around or add new columns, then we won't have to
change our numbers here. And over here, we
have our total price. So let's try this out. We'll put a message box at
the end here and say header info added
exclamation point. Now let's tie our button to
our new macro over here, which is log record to history. We'll click this. We have some error here. Let's take a look at that and has a problem
with this line. And right away I'm
noticing that I forgot the S over here on list objects. So this needs to be plural
because there's a bump. There could potentially
be multiple list objects. And then we're
telling it which one we want, which is here. I'll hit Play to continue
header info added to log. In. Here we have our new information
added to this table. Just to make things
look a little cleaner, I'll remove the grid lines since we already have this
table over here. Now we can try it again. And what we're gonna
notice I think, is that we'll deal
with this later, but we probably don't want the person to be able to do this and add the record more than once and then have kind
of duplicate information. So we'll probably add
some sort of error catching in some way
to handle that later. So I'll break up the video
here, and in the next one, we'll move on to
adding our line items to our history log for lines.
77. 3.9.3 Quote Tool - Log Lines Info: Now that we have our
function that can log the header information for the quote over here
to our header table, despite letting us add
duplicate records here. Let's do our lines next. We'll do this in
same formula because of course we don't
have two buttons here that's going to say log your lines and then
log your headers. This is all going
to happen at once. So we'll keep building
this over here. And new row to add or
log, just to clarify. And then we'll break up
our code a little bit. We'll say add rows to vote
Wien's law and populate. That's what we're
going to have over here in order to set that up, just like we have a object for our header
table over here. Now we're going to
need to do same thing for our lines table. And so we're talking about
this table over here. So we'll say cable
lines as list object. We already have L row. I'm kinda looking up
here as I'm typing. So we can reuse that will
set enable lines as where actually equals, equals sheets. Well, Wien's law, I believe that's what
we call this worksheet, which it is that list
objects back table, lines blog, I believe was
the name of our table. Now to add our information
here, that stuff, let me make this
bigger here comes from this table over here. So in order to transfer
the information, let's create an object for this table so that we can loop
through every row in here. This is a lot like
when we were creating our Excel output template. We're going to loop
through all this row. We're going to loop
through all these rows and then move that
information over here. It's a little bit less
information in this case because we narrowed down the columns that we want to keep track of. That just five here, really for, because this
one's a really easy one. Let's come back over here. We need to set up
our source table. So what we call it table source lines as this object also, we can set that as a source
lines equals sheets. And that's our main tab. And it's in our list
objects, table lines. We can come over here
and double-check that we have Table
lines every year. And of course it would
throw an error if I made a typo or wrote the
wrong name there. Now that we have this, we are going to loop through all the rows in our source
information right here. So for I equals 12 tables Source Lines
that this rose that count. We're going to loop
through with I as our index for each row here. Now, just like we did for
our quote output file, Let's set our L rho equals. And then from our source stable or source
lines that Miss Rose. And this is going to loop
through each row and then set our L rho object as
this information over here. We need to declare our variable since we're
using it as a long. Then just to separate our rows, we're going to come in here
and we're going to add a new row here for
every row over here. So instead of just reusing the
same list object or L rho, and that may be
getting confusing. Let's say new l rho as
another literal object. So now we can say set new
l rho equals table lines. And you know what? Just to make things a little more clear, I'll change the name of
this to destination lines. So table destination lines, that list of rows that we
have our source over here. This is our destination. So we're going to
set our new row in our destination as we
create a new row there. So in this case we're
going to loop through six, actually five rows here. So we're going to run
this loop five times. Each time we're
gonna get info from our source and create
a new row over here. We're going to split
this up where in this section we need to
store our information. So let's say dimension, line number as string, Item number as string. Let's remember what
columns we had over here because it
wasn't all of them. So we have lines, item, quantity in unit
price and unit price. And let's get this
information from over here. I'm gonna do the same
way that I did before, which is start off with
just reading our indexes before we update to
use our column names. So we can say line number
equals our source row range, one, in this case that value. And then our item number equals L rho range
to that value. Our quantity actually skips one because we're skipping over
description, which is three. And we're going to column four. And unit price, which I believe is also going
to skip over our units. So skipping over five
and going to range six, that value, and then typing that just for
clarity at first, we can actually come up here
and use the same concept. We're going to say
Table source lines. So the table that
we're looking at and say our list columns, we'll type in our name, which in this case I
think is line number. Index is going to replace
the one in this case. So line number. And then I can copy this. Let me just put this
information in here for now. And then the second
line is item. Next one is quantity. As I'm copying these
headers over here. And then our last one is then now that all this information is
stored into these variables. We're going to throw this
back into our new row. Since this notation is kinda long, I'm just going to copy it. So we're not talking
about our L route. We're now talking about
our new l rho that we pushed into this
table over here. Our range isn't from
our source lines. Visit information. This
is the mistake we made. These I made in a few
videos ago where I forgot to make this change
of our table reference. Line number is still
the same thing for our column name and we can change that if it was different. And now we are not getting
information from here, but instead we're going to set that information with
the line number. One thing I'm forgetting is
information that we're not moving from the table is our first column
here, Quote number. So we're going to take
this coat number column. We're going to set that
as our quote number, which we already used once
for header information. So that variable was already
prepared for us to use. Now we can take this and we need to go from line number two, item than quantity,
then unit price. So now I have to
update these here for item, quantity and price. And then we'll
update our variables were used, were using over here, which was item number,
quantity, and price. Which is just mirroring the variables we prepared
up here from our source. And that's going to run
through the loop for each row creating all
these new rows over here. So if we're lucky,
let's see if this works. We'll come over here. We'll say mark as complete, you have a subscript
out of range. And it has a problem
with line number. Over here. We have
our destination, our list columns, line number. This says Lines number plural. I believe it should be
singular to match over here. And to make more sense really. So we have this
half broken code. We're actually still
in the middle of it, so I'll hit Run and we
can continue on our way. And here is our five rows from the front page moved
over to our lines log. And then we have yet another
duplicate over here. Let's go ahead and delete these
rows for Quote number 11. And we'll change
our message boxes, say quote info added
to history lock. So now let's try again. Mark as complete quote info
added the history log, and we come over and we see our header information
is added here. And also our five lines
of line information, or add it over here.
78. 3.A.1 Automate Get Data From Many Files Intro: In the last video, we finished adding a function
that logs information about each quote into a data table
as we complete each quote. So when we click the
Mark Complete Button, we move the lines data, for example, and
the header data on another tab into here. So we sent ten and as
we've marked a complete, we move all the lines
into this table. And then 11. And then when we do 121314, we're going to create
this giant database of all the information
in this table, keeping track of the history of quotes that went out in
which lines are on there. This sets us up for a
bit of a tangent here. This sets us up for
a bit of a tangent. But it also gives a chance for me to show you
something that's really common need in all
sorts of different scenarios. And we're going to run
into it right here. Which is that because we added this function with quote ten, we have a bunch of quotes that we sent out earlier
and just these demos of one through nine that
is not in this data table. And so what we really wanna
do is get all this history all the way back to the
beginning from our first quote. We wanna do something
like coming to quote one, which actually doesn't
have a file in it. We probably just made the
Excel files and output. You go into quote to
open it up and you want to do something like
grab this information. I'm just gonna put it
down here for now, place it like this. And then we're going to
need to come back here. Go to quote three, open this file, grab
this information, and you can see
it will basically have to keep doing this. So this was quote to an N3. And then we're going
to do four all the way up to nine for us to fill in our history of these quotes that were before
we added this feature. And that's a way to
catch up our database. So we don't have this gap where we don't have our
earlier quotes. And I could continue
this process because we only
have nine so far. But this gives us a
great chance to show you how to automate
something like this, because in a lot of cases
we won't have nine. We'd add a function like this, and we'll realize we need data from all the quote history, which could be hundreds or
thousands of different quotes. And there's no way that
you want to open up every file the way I just
showed you for these 2.5 to do all that
cut and pasting of the data into our database. So this gives us a chance
to go through this process. But you might also use
this process in a ton of other ways where basically
you need to open many, many different Excel
files to fetch data, in some cases hundreds
or thousands, and put it all into one place. And we want to
automate that process.
79. 3.A.2 Loop through List of IDs: All right. Starting
off to create a tool, I'm going to separate out this tool that we're
going to create for this process of opening all these Excel files and
pulling the data out of them. So I'm just going to do it right in our creator right here. I could start a new Excel file, but there's not really
a need to do that. We'll create a new tab, and I'll just call it tools just so we can add
miscellaneous functions. It's not officially part of our quote creator
that we've been working on in the
previous lessons, but it is a standalone
feature that you could use. And so, for example, it might have some button that says something
like get data. And what we want to do in
our specific case is we have these folders over here and we want to get the
lines data from, quote, one through
nine because we only have the data for ten
and 11 and going forward. And again, it's only
nine right now, but it could be hundreds
in another scenario, which is why we
want to make sure we know how to automate
something like this. So let's start by making
a list of quotes. So which ones that
we want to open? We don't need ten and 11. So let's go with our
folder names right now. We need quote one. We'll keep with this
notation over here. And we need up to nine. Right now, we're going
to do it this way. And you see, it's
this easy to do. Nine And if we had a lot more, you could drag this list down, especially since they're
sequentially named like this. There is another method that maybe we'll get into
in a future lesson, which is how to loop through a bunch of files and
folders if there's not a consistent name and there's just thousands
of files in a folder, how to loop through every
single file or folder in a specific sub folder without having to
know the names. So that's another
option you have, but we won't get
into that right now. Now that we have
our list of quotes, what you're going to
imagine we're going to do is loop through this. So let's start a
macro over here. I'm going to come over here, over in our co-creator. Let's just keep both of
these open as usual. Over here, I'm going to
create a new module. We'll call this tools just to match our
tap name over here. We can call it sub. Get this three lines. So what we need to do
is go through each of these and we're going to need
to go into each sub folder. So we're going to
need to know the path of each Excel file over here. In fact, just to
keep this simple, let's forget quote one,
just to keep it simpler. So I'm going to right
click and delete this because there's no
Excel file in there. Let's just do two through nine and keep things as simple as possible
to start at least. So we know our Excel file
is in this path over here. So here's the folder
that the Excel files in. If I right click over here, I actually can do this copy
as path in for example, is going to make a
comment right here. This is an example full path of that Excel file and we know the thing that changes
is this string. So we have a folder
that changes and our file name that changes between quotes and it's just
going to go two, three, four or five,
six and so forth. So let's keep this
in mind over here. I'm going to move this over and let's start to write something. We know that we're going to need a loop to go through
each one of these. So in this case, we're going to have to run it nine times. One, two, three, four, five. So as we've done before, we can make this a table of
table four, quote numbers. Let's just say let's create our table both numbers
as this object. We're going to set
this table list object our object
variables here as sheets tools that list
object as plural, it will pull number, right? So now we just have
this really basic thing and sometimes I
like to just break here and stop and run even the very small
snippets of code that I've written so I
can make sure it works. And so now we have acknowledgment
of this table here. We've created this list object
that is this table here, and then we can create
a list row object. So we've done this in
our past lessons as list row and we're going to loop through each one of
these so we can say something like for each list, throw in table number,
numbers, stock list, rows, row, and then
if I say all row, that range, that's
select for example, let's see, I can delete
this and if we stop over here and then I hit
run and we had eight, you see we're selecting each
row as we come down here. So we already have a loop
that's coming through here now. Now we have this
loop that's going to execute one loop
for every row in here and we're
going to construct a path we need to
open the Excel file, because what we
want to do is take this path and open
an Excel file. Right? We can even do it outside of the loop at first
just to show you. So I'm going to
say dim file path, a string set of file path equals let's do this
exact file up here. I accidentally click
the help button. I think I'll click okay. I accidentally pressed
f one is what happened, which sends me to help
page on the browser. So here is our file path for
the quote two Excel file and we're going to
do something like dim workbook as a workbook
because this is an Excel file. We can use this workbook
object and we can say, Set the workbook
equals workbook, start open and file path. So this is going to open the Excel workbook
by the file path, which in this case is
going to be for quote two to access it f eight
and see if this works. So you see to get the data, we need to open the file. So here we open the file and
then I closed it over here. We can actually take this. We're going to open
the file path, but then we need to construct
our file path here. So if I take this cut
that actually and place it in here so you can see here we
don't need this anymore, but we're going to
loop through each row and it's our L route here. But what we need
as we loop through each row is instead
of saying, quote, to. In these two locations. We need it to be the
value of the cells. So it goes from 2 to 3
to 4 to 5 and so forth. So now we can add a variable that's going
to be what changes. So I'm going to say,
quote, number as string. And for example, if
we said quote number, which is hard to add
something here for now, we're going to say quote, one, two, three, four, five. And I think it's a six
digit quote number. Now, I can use this variable so I can replace this quote
number two here. And we're going to
combine this string together and then
same thing over here. Instead of this, we are going to combine the string
together here. Now, if we say debug
print file path. So we're just going
to check the file path before we open it. I'll hit play. So we have some sort of
issue here and safety bug. I should have deleted
this because I moved it down and
there's no file path right here since I moved the file path
declaration down here. So now file path is blank and is trying to open a workbook blank. Now we're hopping down ahead f eight and you see as
we hit file path, we have the exact same thing. This is our file
path for quote two, but it is using a
variable now instead. So if i change the three, I quote number over here now quote number is three and then this file path is constructed
using this variable. And now when I hit
the print again, let me clear this actually, I'll move this back up
and show debug print. And you see the file path
is four quotes, three now. So you're starting to
see how we can construct this and change this
with every loop. So what we really
want this to be over here isn't a
hardcoded number, but we want it to be our row, which is what's cycled through each loop, iteration, our range. And since there's
only one column, we're just going
to type one here. So that is saying
the first column of this row and there's
only one column. So it's nice and easy and
it's the value of that. So now I'm going to stop. I'll hit play again and we'll just jump down to this loop
so we can step through it. You'll see a quote number. We are going to be on
the first row here, even though it
doesn't select it. That's because the macro here, the Vico doesn't bother
to select the cell. It can work with it without
selecting the cell. It's going to say, quote,
number two over here, it constructs a file path. In fact, I'm going
to comment out opening this workbook for now. Now, you see on the next loop, quote three on the next loop, it's quote four and so forth. And I commented out
opening the workbook, but now that I'm going
to turn it back on, it's going to do
quote two and then open the workbook
and then three, open the workbook again. And so this is going to cycle
through all of these rows. And each time it's going to
run this line of code which takes the constructed path
and opens the workbook. So let's go ahead
and try that out. We'll get crazy
and even take off this break and just hit play and go for it. There's one. And you see all
these workbooks are opening and now we have a bunch of workbooks that are open from quote to looks
like it's out of order. Quote two, three, four or five all the way
through in nine. And this is how we
are going to use this loop and cycle
through all of these workbooks and
see how quick it was to open up nine workbooks. This is where the automation could really start
to take place. And if you have
hundreds of files or even thousands,
although with thousands, you might want to walk away from your computer and get a cup of coffee or something like that. It will take at least a
few minutes or longer, depending on how
many files you have. But we're creating a loop that is going to open
all of these files. So this is a good stopping
point in in the next lesson, we'll move forward
with what we can do as we open all these files and have this automation
process where we only need to write the
code inside this loop, and then this loop is going
to cycle that code through. However long this list is, in our case, are
equal numbers here.
80. 3.A.3 Loop Open Files and Get Data: Now that in the last video, we created this loop where we're going to cycle through all these quote numbers and
open each Excel file. We don't want to get left
with all these Excel files open that I've already
manually closed, but we don't want to have to deal with manually closing done. So now as we open the workbook, we can close the workbook
after we're done with it. And since we have this
workbook object WB, I can just say WB DOC flows
and that will close the work. And then of course we don't want to just open and close it. We just haven't gotten
to the real code here, which is get information
and place it into a. So this is just a
comment right here, but we're basically going
to put code here that does, which is get the information
out of each file. And then when we're done with getting the info
out of the file, we'll close the file
before we get to that, you can just see how this works. That this is going to open the workbooks and
enclose it right away. Cycle through this list of
eight workbooks over here. So let's hit Play. You can see it opens,
closes over and over again. And we just don't
have any code to do something while it's open. And that's what we're
going to write next. And now we don't have
all these Excel files hanging open anymore. Let's start with quote
to open it up here. And let's open both
of these up here. And we want to pull information
from our quote lines log. So what we want to do is get our history of quote
two through nine. We want to get this data that we got from Canada 11 and all
the quotes going forward. But we're going to
populate our history. And we only want these columns for this data table because
that's all we needed. It looks like we have more
columns in our actual quotes, but we have decided in
those previous videos, we don't need all that data. We need these five over here. So what I'm gonna
do is copy this. I'm going to paste
this over here. Let's turn this into
an actual table. So I'm going to highlight
this and even one blank row and hit Control T
to format it as a table will say my
table has headers because it's just
convenient to keep working with this
as a list object. I'm going to say table and make this a name table called table. Hold lines theta, right? So these aren't great names. I'm just coming up
with something. Again, this is just
a single use case for us the whole history. And so this isn't the
kind of thing that people are gonna be
interacting with every day. I have the table pulled
lines data here. And that's where we're basically going to take all of this. And we're in this
case for quote two, we're going to write to looks
like we have four lines here and lines items. We're basically
going to do this, but inside our loop so that it'll automatically
cycle through each file and do all eight
of them automatically. I'm going to clear these rows because we don't actually
want them over here. We're gonna do this
automatically, but I was just doing it as a demo of how to do it manually. And we need to pull
this information. So what I think
we're going to do, the easiest way to do it, since we have our name tables, is to cycle through
each row in here. And as I go through each
row in this Excel file, I'm going to add a
new row over here, move this data into it, and then go down
to my second row and then add a second row. So we're going to do it row by row is looking at this file and moving each row over
from right to left. There's other ways to do this, especially if you don't
have name tables, the way that we're using
named tables here. So a lot of times
the data might not have these named tables
and using list objects. So maybe we'll come back to that at the end of this lesson. But the way I set this up using named tables and list objects is going to make it
a lot easier for us. And that's the way
we're gonna do it here, because it's the
most straightforward using what we've already set up. Now let's go back to
our VBA code over here. And this is where we want to
have our CO2 move that data. So what we have over here is a table over
here on the right, and we want to get
this data and move it over here to the
file on the left. So they get that
data. Let's look at the data we need to
move for each row. And let's just create some
place with variables, like we've done in the past. You don't always need these, but it makes it more clear, especially since
we're learning here. So you can say our quote
number, which we already have. While we say Quote number, only, because this actually
shouldn't say our full quote number
is just going to say 2345 because that's
our notation over here. So we actually need to take
the number off of here. So figure that out. And we'll call that a lot
because it's gonna be an actual number and not have the word quote or any of the string
characters in there, then we're going to
need a line number. We can go ahead and call that
as a string item as String. Want to yesterday. So just like we did
in the past lessons, you could turn these into doubles or more specific
variable types. But for our case, I think it's easy enough to
make him a string for now until we find a
good reason to not. And that just makes
it nice and simple. So now that we have
our Excel file open over here on
the other side, we need to loop
through this table. And so the easiest
way to loop through this table is to
create a list object, object variable over here and our VBA code to be associated
with this table over here. That way we can
loop over the rows. Let's make another table. Let's call it table. I'm going to call
it source because this is the source of our
information over here. So that's the list object. We need it to be
this table in here. So it needs to be
the table that's inside of our open Excel file. We can declare it up
here because we don't even have an opened
Excel file yet. At least not an open
source excel file, which is where we're
getting our data from. We open that source file down here with our
workbook object. So if we want to get
this table over here, we need this workbook
which we opened down here. And the name of our
table is table lines. So if you say source
equals workbook, which means specifically this
right excel file that we opened to say this
sheets quote over here. So we can say sheets quote by name because they're all
going to have the same tag. You could also say sheets, one without the quotation marks, and that means the first
sheet of the Excel file. Either of those would work. In this case, you'd have to
adapt it to your situation. And then now we have a bunch
of list objects again, which is our name table, which is Table lines. And that comes from this name table over
here for our lines. Now that we have our table, we want to loop through these. Also. We move
through these rows. We need to say for each row
in tables source that list. So this is going to
loop through each row of our source table over here. But one thing we
have a problem with is L rho is already
used in this loop. So we use L rho to loop
through each row in here. And then while we're doing that, we need to remember
another row object and we can't use
the same row twice. So why don't we add another
variable yet again, we'll call it L row. Source has a here because we're already using
the L rho object here. We will say for
each o real source, we're going to call this each
row of our source table. We'll move this back over here. It'll split it up like this. Now what we need is our line number equals and I'm just couple of
blanks here for now. We need an item equals quantity
equals the unit price. And we need to extract
this from each row of information in
this table over here. So our line number is
going to be our L rho, and specifically our source because that's the looping
through this table over here. Not to be confused
with our other Elvira that we use for
our quote numbers, that range, and then
our line number is one. And I'm going to do this
in the lazy way actually, in the past lessons, you'll
see every time I do this, I come back and add
our code in here to figure out the column
indexed by the column name. So we want to figure out item, but instead I'm just
saying column two. And our quantity is
column four in this case, since this isn't the type of thing that will be
used all the time. I'm just going to be lazy and
leave these numbers here. You see in the past videos
how we can change this so that it goes by column
name instead of numbers, which would be
more consistent if you added and move
columns around. But we're just going
to be lazy and make this column for column
five over here. Actually, we want
come on like this. And then now that I have
this row of information, basically I have this row. I need to move it back over
to this file over here. So now we need to get our table over here so
we can add a row to it. And we don't have a list
object for this either. Let's come back up here. Let's make a table destination because you have your source where the data's coming from, and then your destination
where the data's going to say that they list out. But also it needs to
be outside the loop because this is going to loop
through every Excel file. We can even say that Excel file over here and then this other loop or
something else. This is for each row of
lines data in Excel file. And so there's only
one destination table. So we don't need to declare it over and over again
in these loops. We just need to do at once, which is why I'm all
the way up here in our, outside of our loops. And then we're going to have the same problem where we want a specific list route
if we can help it. So let's make a l row
just for this table, because we keep working
with these rows. We essentially have
three tables we're working with now,
each with rows. So we're going to
call it L route destination to this row. This is just an object variable we're going to use to manage the rows in this table
underscore destination. Now let's set this
table equals sheets, tools, list objects, and whatever we call this
name table over here. I'll even come over here
and I'll just copy and pasted table pulled lines theta. So now we have
this table object, table destination, which
stands for this one over here. We've gotten our information
from our source. Table are green table over on the right, one relevant fell. Now we're ready to add
it to our destination. So we can say set L rho, destination equals and then table destination
not list rows, dot add. So basically we're going to add a new row to this
table over here. And then we're
going to call that new row that just got added. L wrote destination. Now we can say L
rho destination, that range, column
one equals something. We'll just leave that
as a placeholder. We have five
columns, 1234512345. So 23, 45, and our line number
goes in our second column. Item goes in our third quantity and fourth unit price in fifth. And then we haven't
figured out our quote number yet actually. So we'll come back to that. So now we're going
to loop through each row of our source, and then we're going to
create a new row over here on the left and
our destination, and then move the data
into the new row. And then we'll just keep doing
that process until we run out of rows over
here on this table. Sorry, we got, we're going
back-and-forth here. And then when we're done
looping through each row, then we close our workbook, and then we do it all again. Let's see if I can make
this smaller and maybe we can see more than one
file pop up at once. And let's go ahead and
try to run this thing. And let's see how
it works. In fact, I'll hit F8 so we can
continue all this up. It gave me an error. That is because I
say next L rho here, but our loop is
using L row source. So we actually have to say
next L row source over here. I'm going to close this file. So we're starting
from the beginning. And now I'll hit F8. And let's see if we
got things right. I'm not usually this lucky
to not have made us small error or at least the typo somewhere. Well, let's
see how it goes. And when we got here, this is a quirk of VBA as
you step through code, sometimes when you
work through a loop, you hit a line of code. I think it might
be this one where you open the workbook where it stopped stepping through
the lines one-by-one with F8, it hits a line of
code and some lines of code would just
get everything moving again and running all the way through without
pausing line-by-line. And so that's what
just happened here. Somewhat unexpectedly, you actually see all of
this data pulled in. This data, it looks
crazy because it pulled the formatting from the header because there was
no data in here. So if I just come over
here and highlight all this data and do cells normal, It's going to use the
default formatting of the table again before it was inheriting the formatting from the row above, which
was the header. And we actually
have all this data, and I don't actually
know if it is correct, but it looks all right.
It's got all this data. I don't know if this is actually from all nine quotes or not. But I'm going to use this
as a stopping point. And for our next lesson, we'll dive into polishing
this whole thing up and we need to clean
our quote numbers from here into just the number value so that we can populate
this quote number. And then we can double-check
whether or not this data's correct and see which lines
correspond to which quote. Once we get this
column populated.
81. 3.A.4 Convert Tag Format and Test: So leaving off where we
were in our last video, we had done our first test run
of our function over here. And it pulled all this data, but we don't have
a quote numbers, so we don't have a way to
know whether or not we got all the data from these eight
files correctly or not. We need to take
our quote number, which we're getting
from here and parse out just the number itself because
that's how we want our data to come
through on this row. The match how we had our data table over
here for our history. Let's do that. I had already set up this variable quote number
only to be our quote number with just the value of
the number instead of this full name, the
word quote in it. So let's go ahead
and set this up. We're going to have to do it
in our loop because we are going to be looping
through each row here. So here's where we
have our quote number with the word quote minute. One thing I can do is
say Quote number only. This is a long So it
is just the number. Let's actually change that. Let's change that to a string. There's a few ways
we can do this, but I'm gonna do this so that
we can see all the steps. And since it's a string, we're going to manipulate
our quote number here, the one over here, and slowly through
a couple of steps, reduce it down to
just the number. And since it's a string,
we'll be able to do that and not get all these errors
about it not being a number. So by doing that, we can
take our quote number here and we can do a BBA. Replace. The Replace
function, takes this string, we're going to replace
the word quote, and we're going to replace
that with nothing. So what this does is basically takes a string like this,
I'll show it up here. It's going to look for anywhere. We have the word quote and it's going to replace
that with something. But in this case, since we have an empty quotation
mark in here, then it's going to
replace it with nothing. So down here, we're
going to end up with just the number string
on the right side. And it's going to have
all the leading zeros. So let's try this out. I'm going to hit F5 to run. We jumped down here already. I hit F8. And if I hover over here, you can see it's stripped away the word quote and we're left with number only it has
all its leading zeros. So it's not exactly
what we want yet. But now we're just going to use the same exact string over here. And I'm going to take
what it is currently, which is the number two with
all these leading zeros. See if I can make it show up. I can make it show right now. It's not hovering because
of some situation here. But basically I'm going to take itself which has
the leading zeros, and I'm going to
convert it to a long. So you can see this expression
over here actually, where if I type C LNG, C is four convert, I think maybe it doesn't
stand for convert, but it is a common
notation in VBA. And it's going to
convert whatever's in the parentheses to a long. This is going to
take it zeros and convert it to the actual number. So if I come over here,
I run this again. You see this is the two
with the leading zeros. But once I do this, it's only the two
itself because it converted to a number which
removes all the zeros. There's a common
convergent thing. If you convert
something to a string, it's CFTR for C string or
C I and T for C integer. Or see EBL four
convert to double. So this notation, it's common for variable
type conversions. Now we have the number only when we're down
here for each row. This is where we're
looping through each row of information
as it gets added. But we don't have to change
the quote number because when we're unquote to all of these
lines are going to be two. It's going to say
two to 22 here. You see this is from quote three probably because
our line numbers start all over again over
here where we left it blank. We can say number only. And that's going to
find the quote number that we are getting
from up here. So let's stop this.
Let's turn this off. And then I'm going to
delete all these lines because balance from
our first test. So let's run this again
and see how it goes. It opens to quote,
to quote three. You see there's kind of
patches over here on the left. That's because it's
running so fast that the screen isn't
updating quick enough. So you see it all magically
shows up at the end. That's just the screen
catching up with how fast everything is
running in the background. You see two here, three here, a lot of this stuff the same because if you play
back those videos, I was leaving the same
information in there. So let's test this out
to see if a poll to write data, we had a quote form. Let's check quote two over here. And our lines over here are
the nella vanilla spoon, 51015105101500 pieces. We have our unit
price of 1010101. And you see that works. And then let's just pull a
random one to see, let's check quote eight. So we're not going
to check off these and record that video. But if we check another
random one in the middle, then that'll be a
good tale here. A lot of times what I'll do
when I have a lot of data to check if we're pulling
hundreds of files, for example, we're not going to double-check them all that
loses the entire point. But I'll do something
like check the first one, the last file, and then any
random file in the middle. And that's a good
way to check with three data points to make sure that things were working at the beginning, middle, and end. Now we're unquote eight. So we're taking this
information over here. And we have spoon and
strawberry has 34. We got spoon and
strawberry here, 5101055 gallons, ten gallons, 100 pieces and five. So we feel pretty
good that we got the right information
here and here we have successfully pulled our history from our past files
automatically. And now if we want to do something like
actually I'll come back here that's inserted
into our history. I'm going to scroll
all the way down here that was using Shift Control and the down arrow to bring me from here
all the way down. I can see down here that
we have 32 cells here. And what I might actually
do is I'm just going to insert a ton of rows in
here more than I need. Grab this information here. I'm going to do a Control
C copy, control V paste. Here's all my info and then I have these blank lines that I just added a lot more than
I needed and delete them. And now I have my history rolled into
our full data table. And then since we
added this function, as we work on new quotes, say 1213, the information is
going to keep adding here. We pulled this information. You can see we
actually pulled in our units over here
in the quantity which is an inconsistent format. So we can change this. Maybe I'll shoot
a lesson on that, but I think that's
pretty straightforward. This is just the amount of
detail we need to deal with. But the main idea
here is that we see how we could automatically write some code that's
going to open up many Excel files and pull data
to bring it altogether in. This will work for, in our case, eight different files
at a click of a button. And it would work
for a 100 files in a 1000 files in more. In certain cases, this can save you an enormous
amount of time.
82. 3.10.1 Quote Tool Clear Form Button: Now coming back to our
main quote form over here, we're going to add
a really simple function in this lesson. So this is just a formality to make this more user-friendly. What we're gonna do is
create a quick button to clear out all of
our fields here, because we made quote 11 and we might want
to start a new one. And we could come over here and clear all these
fields out manually. But let's just create a button for it to make things easy. So the fields we want
to clear out or all of these white fields here
that I'm clicking through. And our table, our gray fields here are
based on these formulas. And so we don't
want to clear out our formulas because
our formulas will adjust automatically as
we change our selections. So let's start by
creating a clear button. We're getting a lot
of buttons on here, so I'm just going to
put it up here for now. We'll figure out
where it goes later. I hit cancel to not assign a macro because we
don't have one yet. And we'll call this
button clear all. Now I'm going to
right-click here and go to our code
behind this sheet. And let's create
one called clear. Here's a subroutine
called Clear all. I'll just go ahead and
attach this button to this macro over here. So if we come over here, we
can write a message box that says all cleared or
something like that. We can have a better message, but we'll deal with that later. And if I click this,
it says all cleared, which isn't true because we
haven't done anything yet. I'm going to push
this stuff down, this message box down. And up here we're
gonna put the code to clear all fields in. We'll create our main tab. So this is gonna be
pretty straightforward. We're not going to go over
many new concepts here. So just to get this function, we want to take our range, which is in our sheet here. We want to say
range Quote number, in this case, that
value equals blank. So there's a couple of
things we can do here. If you look at a range and
we get a whole number, for example, I'm not gonna go over all of these,
but there's clear. And then there's clear, just
the word clear Comments, their contents, clear formats. So all of these do
different things. We could try these
out or you could try them out and
see what they do. But the easiest
thing that I usually do is just do a
value equals blank. Because if you do something
like, for example, just the word clear
and we just ran this subroutine over
here against the range. It might do something I can't remember off
the top my head, but it might clear the borders, for example, and really changed the cell
more than we want. What we really want is the
desk kind of cleared out over here like this and keep all
the formatting the same. In fact, I can even show you,
Let's go ahead and test it. Even though I said
I didn't want to. Down here, that's around this in our immediates window and we'll type clear and see what happens. So exactly like what
I was worried about, we lost our borders now. And that's why I
do something like value equals blank instead, it's still remembers that
this range is Quote number. So what I need to do is
just add our border back, ran clear out our value, and then we need to do it for these other fields right here. I'm just going to copy
this and it looks like we have three other
fields over here. We can indent this. Over here is customer name. Let me split this
up here so we can see both at once customer name, we have our item number, and we have our
quantity over here. And each of these is just going to set the
value to be blank. Let's go ahead and try
this. Click Clear. And you see a clear
these out over here. And these are not found
because we have our formulas. They're doing lookups
based on what we fill in here, which
of course is blank. But if I start to fill this out with random
information again, then our formula start to work and they pull the data that we designed for earlier
in the lessons. And then the last thing
we need to do here is clear our table out. One thing I forgot to mention is here I haven't explicitly, haven't explicitly
called out our sheets. So I could say sheets main here, that range to specifically
let us know that this range is on
this main tab here. But we don't have to
because I'm putting my code behind this sheet. So it's not in one of
the modules down here. Instead it's behind a sheet. And so this thing
inherently knows that when I call arrange without
telling it which it's in, it knows to check this sheet that the code is behind first. So that's why I'm
able to leave out the explicit call and not worried that
something's gonna go wrong. Because I know that
this thing is going to default to know and
good sheet we're talking about when
I use this range, a table down here
is a list object. So if I come back to
Table Design will remember that's
called TBL lines. So for example, here I
can call out our sheet, will say sheets main, and then we'll say
that list objects. You'll remember from our past
lessons in its table lines. And from our earlier lessons, you might remember that because we're
calling it this way. I'm not getting these
auto-fill options, what's called
intellisense options, which is telling me what
features I have here. I happen to know that this is data body range about the elite. And as I jumped out of a line, you can see it automatically formatted what I've typed here. It may capitalizations and the right spots capitalize
the word delete. And that tells me that I
type something correct, that when I give it
these instructions, it knows what they are. But it didn't give me
an autofill option. And that's because of the
way that I'm calling us out. I'm not using an
object variable. Meanwhile, we can
do the same thing. Could clarify this. I can say table launch as a list object, I can say set table line equals. And this is our reference
to this table down here. And then now that I have
table lines as a list object, as an object variable here. Now, our code's going to know what properties and subroutines
we have for this object, for this list object, and then we have Theta
body range about delete. And I just knew that because I had memorized it down here. So this code and this code
mean the exact same thing, although you might get thrown off when you use this notation, it's not auto-filling or giving autofill
suggestions for you. I'll just go ahead
and clear this out. Since I already wrote this, this is the more clear
notation I think. So we're gonna take
our data body range, which is all the content
down here, delete it. So let's go ahead and run this. All clear. Now we can come up
for our 12th quote, will make some selections here. We'll add the item, but we have subscript out of
range for some reason. So let's hit the bug. I must have broken something before. So let's see what this is about. Okay, So this is unrelated to our function that we just
created to clear the form. But I see what's going on here. I'm actually going
to stop this video and then we'll pick this up as generic troubleshooting
when we go into the next video, and
I'll talk through this.
83. 3.10.2 Quote Tool Table Zero Rows Debug: At the end of our last video, I tried to add a line item and we're hitting
this error here. And it says subscript
out of range. And here's the line that
we're hitting an error on. I think I know
what's going on here and let me walk
through what happened. We have this subroutine
here that's adding a line item and we have
an issue with this line, which is latest line number. If you go back to the
last videos where we created this function and
added these lines of code. This is all related to
finding our next line number. So we want to find the latest so that we can add one to
it for our next number. That basically means we find our latest number in
this case, which is one. And then we want to figure out
while we're adding a line, what our next number is. So if we added a
line, we want to find out our latest was one, our next number is two. And then add our new
line item over here. Then if we did it again,
we'll have three. So if I run this
and hit Add Item, there's three because we find our latest line number which
was two, and then increment. What we'd never tested since then is now that we
create this clear button. And everything's cleared, we're
going to add a line item. And while it's
trying to figure out what the latest line number is, it's failing because there are no because there are
no lines at all. This is something I
mentioned before. I forget if I
actually showed it, but if I take Table
lines over here, so for example, let
me step down here. You have a type
mismatch also here. Oh, that's because of
all this stuff's blank. So let me fill this
out really quick. We have some stuff
we need to fix here that make this
more user-friendly. We want to catch
all these errors. So we're going to start
to clean this up. If I step through this code, I'm stepping through
here just so I can get this table lines object here. So now that we're
halfway running through our code and we've declared
our table lines object. We can type instantaneous code here in this window down here. So for example, by
type table lines, range dot select, I'm
selecting my table. One thing that can be
really misleading here is this table looks like
it has a blank row. That is only for
appearances though. Because if I come down
here and type cable lines, a list of rows that count. And actually I can't just run this because this is
going to return a number. I need to print this
out in a debug print. So if I run this to try to figure out how many
rows are in my table, you see the answer is 0, even though it does
look like there's one row in here, even
though it's blank. This can be really
misleading because if I come over here
and I hit Spacebar, so I have something here,
I can run this again. And you see we now have one row. That's because it looks blank until we add
some content here. And even though
there's blanks here, this is officially one
row of information. So a space character here is the same as if I actually
type something in here. And now it realizes
there's one row. If I right-click
and do delete row, you see the contents gone, but it's still
keeps the borders. And that's just because I
think it would look funny. If there were no
borders over here. It wouldn't look like a table anymore with just the headings. So that is definitely
something to keep in mind about list objects and named tables in our Excel sheet is that there are
actually 0 rows here, which can look identical to
one row of blank information. Now why did I go over that? That's because we find
our latest line number by figuring out the content
in our bottom-most row, we are hitting an error because as this command over here, He's looking for your
bottom-most row of the table. There is no row, so that thing just
doesn't exist. That's usually what subscript
out of range means. It means that the thing you're
looking for doesn't exist. It's like if you
have five things in your hand and then
somebody asked you, what is the name of the
seventh thing you're holding. It says, Hey, we're
out of range. We don't have a seventh thing, we only have five things. So that's what's going
on here as we're looking for what
the last row is, it's telling us that
there is no last row. There are no rows in general. How we can handle that is putting an if statement here and saying if Table lines
that listeners, just like we have in our immediate window
during our demo here, we say dot count, it was 0. Then we're gonna do something. Otherwise, we're going to do
what we were doing before. And so basically we're going
to say if there's 0 rows, then our latest line
number equals 0. Otherwise, if there was a line here that says like
one for example, then it will run
our typical thing. Our latest line is one, our next line is two. But if I came over here
and deleted this row, We're just drag this
right back up here. Now, if there's no rows because I just deleted the only
rather it was here, then the latest line
number is actually 0. And then when we add one to it, our new line number is one. And then we add on new
row information here. Because that was just something
we overlooked because we had never cleared the
entire table before. Our logic that was looking for the next line number
was working fine. But when we use our
nuclear all function and we are starting
from scratch, we now run into this problem, which we have now fixed.
84. 3.10.3 Quote Tool Add Line Validation: Now before I forget, let's go to our next problem that
we ran into earlier, which is that we had this being blank and I believe
I clicked Add item. And now we have a
type mismatch here. Here we're running our
subroutine to add a line. And it's saying we
have a type mismatch here for our unit price. And that is because
when we go to our item unit price over here, we have a value of not found. Here's our unit price
over here on the left, which says not found because we don't have
any info entered. Meanwhile, our unit price is a variable over
here, that's a double. This is indirectly flagging a problem that isn't
the root cause. The problem that VBA is flagging here is that unit price is
supposed to be a double, but we're trying to put in
the value not found into it. So that is a problem, but that's not the real
root of our problem. The real root of our
problem, of course, is that we don't have any
information about the line. And so what we're trying to add this line down to
the table down here, it doesn't make any sense. We probably don't want to use or to even be able to do this. So what we should do first, add some validation up here before we start to
run this code at all that's trying to get these values and push it
down to our grid over here. So what I usually do is run something like create some
code for validation up here, we'll say mentioned
error message, string. And I've showed you
this concept before, the same pattern that I use
for flagging error messages. So we'll do it again here. And we'll say if our
item field over here, which is our range item number, we can say Keats main ir
dot range item number, dot value equals blank. Then we're going to
say our error message. We're going to append something
to our error message. Error message equals item. Over here. Then underneath, for example, to end our
validation, we can say, and then we can add a
little break over here, just a comment to break
up our code which says validation
cleared, had item. And then up here we
need to close out our validation logic,
which basically says, if there's anything
in our error message, meaning it's not blank
in our error message. Then we want to end the process and we're going
to type issues detected. We're going to create
a new line here. And then we're going to show
the user or error message. Then I'm even going to
create two new line breaks. You'll see how this
looks in a second. And add, cannot add
line as a new comment. So let's stop this and run this again. I'm going to hit F8. So you can follow
the logic here, because item number is blank. Over here on the left, it adds item is blank to
our error message string. And then over here for
our final check, it says, if error message is not blank, that means we found
an error up here. It says issues detected item
is blank, cannot add line. Now we can take the same
exact code over here. And instead of item number, this is item
quantity can change. This quantity will change this
to item quantity is blank. I'm going to show you
something I'm missing here. What you're going to see, we
append our item is blank. We append our item
quantity is blank. So we have two different
bulleted issues here. And we see this. And what I forgot to do is put a line break between these. And so you see the message
doesn't look that great. So I'm going to put a new
VB line feed over here. And I'm gonna do the same
thing after each bullet. It's going to automatically
have a new line. And if I do this again, we add first bullet,
the second bullet. And we have item is blank, item quantity is blank,
cannot add line. Then we hit this end, which stops the whole macro. And we don't run into are
problems where it's trying to work with this data which
is invalid to begin with. So we can go ahead and try this. And now we add the
line and we don't meet any of these if statements
that we've added here. So we don't have any
error messages to show and we can continue
with our process. So there's our basic fixed for
two different issues here. I'm sure we're going to
find more as we go and we'll patch them up as
we come across them.
85. 4.1.1 UserForm Search Tool - Intro: Hi. So from one of the
comments that was asked, if I could do a demo of showing a pop-up user form
that can be used to search through data
in the spreadsheet. That's what I'm gonna
draft through right here. As usual, like my other videos, I'm going to start
from scratch and just walk you
through everything. It's going to start off
a very rough sketch, f first, and then we'll polish it up through
the different videos. This is a concept that
I use all the time and have many different variations
and implementations. So let's get started. We'll talk through some of
that as the videos go on. So let's start with example
data that we can have here. So maybe I'll just say
something like users, I'm going to do Control
T here to make a table. My table has headers. It just defaults to
having a table name here. We'll just call this
table users, let's say. And this could be any dataset. We're just making a name table because in our other
videos you see how I use these named tables often for the benefits
I've showed before. So I'm just going
to say person one. And we'll just drag this down. Let's just have a
bunch of people. So there's a large list. What would be common is
you have tons of data here that you could even
make this even more so much. You can imagine this
being hundreds of names that it would be difficult
to scroll around and search. So maybe this is why
we want to build a pop-up form to make it easy to search through
large amounts of data. Now starting from here, we don't have anything,
we just have the sheet. What we wanna do is
make a pop-up form, which is called a user form. So if I come over here to the Developer and go
to View code here. Now we don't have anything. What we can make is if you
right-click anywhere in this project explorer over here, you can go to Insert user form. And we have user form one here. So this is just the
form in the background. I don't remember if I've used this in any of
my other videos yet. So this might be an
introduction to it. Let's start with this. If you click here and come
down to the Properties, then you can see it's
name is user form one. We could change that name, but I'm going to leave
it like that for now. You have your
caption right here, user form up top. We'll call this search. We'll just call it search. And you see this word up
here, change the search. It's called user form one. Let's make this pop up. Now that we just have
this user form here, I know it doesn't
have anything yet. So if we come back here, let's make it pop
up with a button. So we'll insert a button. There's no macro, so we'll
just hit cancel here. I'll come back to our
macro form and we want to create a module
to hold our VBA code. So let's insert a module. We'll say, we'll say launched. Since we have that search form, you can see if I just type, use and hit Control Space to see what the IDE here recommends, you can see it says user form
one that exists right here. Then if I hit dot,
you can say Show. And now let's attach this button to that macro,
launch search form. When I click it, we
show our search form. So that's this basic
idea of a user form, which is this pop-up form that we can use for
different functions. We create this very basic button to just make it show
up right there. So let's go back to
our search form. When we do a search form, what I'd usually
start with and what you might be used
to is at the top, we have a text-box. So there's this toolbox
where you can put these elements onto
the user form. This is a textbox that
you could type into. I'm gonna make a
little taller here. We'll fix this up later. I'm just going to put some stuff on here
to show the concept. And then the next thing
I'm going to use is this list box over here. And what this will show is a list of lines that
you can select from. So this is just like a text box that you might be familiar with. This won't look that great,
but we'll just leave it here. And so we have a text
box and a list box. Come over here and click
the button and you see we have a pop-up over here. We can type down here. We have a list box, but that
doesn't do anything yet. So the first thing
you might imagine is we might want to click
this button and we want to have a list in
here of all of our users. And we can take the users
from this data table over here where we have
100 or so names, however many, whatever
your dataset really is. How can we populate
that info into this list box that isn't
doing anything right now. So when you have a user form, it has code behind a user form. So if you right-click and
say use, let me go back. So if you right-click
and go to View Code, this is the code
behind the form, is what is usually called. You can also right-click
the form here and goes to go to View code over here. And this says user form clip. There's some stuff that
actually this is like a default subroutine it
has they're going to have names that VB
I just recognizes as basically the events that can happen when you do
stuff with the form. And so this is,
this is one that's already here, user form click. So if I say Message
Box high, e.g. then this should run
when it says user form, click, that means the user form. And then when it's
clicked, so it's kind of self-explanatory there. Let's try it out. If I click button to, it pops up and then you click on the
form and it says high. We come back here. We'll journey back over
to where our code is, right-click and view
code for the form. So we have this,
we actually don't need this subroutine right here. You'll see that user forums, it's kind of older technology and it's got some quirks to it. This just shows up here. Maybe I don't want to use it. Maybe I don't want
to coat around just when you click
anywhere in the form, which I usually don't. So I'm just going to
leave this here for now. I might delete it later
to clean things up. The one I want to use is you see this user form object just
like we have user form. Click. If you leave
this as the user form. And then here's the actions. Like if you select
click or double-click, you see it creates
this subroutine as if you double-click
the user form. And it has this kind of
default stuff with it. I don't want that. What I want
is user form over here on the left and initialize
over here on the right. What this is going
to do is it's going to run every time the
user form is initialized. So if I click here and
click this button, you see before it even
initializes, it pops that up. So there's our box and that little subroutines
that we had before. Let me go back to
our code editor. Every time you come back
to the code editor, it comes back to the form. So this is a little cork tear that you always
have to go back to the code, user form initialize. It runs this code here. This is where we can put stuff. That happens right when
the user form pops up. And this is where we're
going to start by pulling in the information from
that table of users. If we come back to a user form e.g. or you can click here. And you see this is
called text box one. We can rename these, but I'm not going to bother right now. This is called List box one. So we can use that. Let's come back
to the code here. And if I start typing list
box and hit Control Space, it says list box one. This has properties like add item is what
we're going to use. So if I just say add item and I say item here, e.g.
in quotations. Now let's go back. That code's going to run when
we initialize this form in our first item
here is item here. So we'll come back over
to this code again. It keeps resetting here and
you can do more than once. So this is the concept here where we're going to add items. And now we have two items. Notice it's not going
to add the item again. Every time I close the
box, it starts over. So I close it and
they're all gone. And then it runs those two lines of code and it's going to say item here and item two. And it's not saying
here and then 21.2 every single time because
every time I close this form and then click this, it's starting a brand new form every single time that pops up. Now we have this
table over here. I renamed it the table Users. And we're going to
use a concept that we have done in our other videos. So let's dimension this
table as a list object. Create a list object. And we're basically
going to take that user table and cycle
through all of the rows. So all of those person 123
that I've put in there. Now we're going to set the table as that table over there. So set table equals, let's say she's
one list objects. We're going to take that
table name we have over here. You click over here,
it's table users just copying and pasting it lets you see where I'm
getting this from. Then we're going to loop through
each cell in that table. In this case, we're
going to be, in this case we're going
to loop through each row of that table. So we're going to say
for each list row, which is our L rho object
in cable dot listeners. Next L rho. And maybe we'll create
a variable here. We'll say dim user. And we'll say user
equals L rho dot range. If we did one, that
would be the first cell. So we have a row and the
first cell of that row, which is really the only
cell, is the value. So it's gonna go
through each row and take the first cell of each row. If I said range to here, they'll try to take the
second cell and it probably error out or maybe do something
we don't want it to do. So we've gone over this
in the other videos. That's what I'm gonna do here, just as a shortcut for now. So we have each user is going to go through
every single row, set the user, and let's add
that user to our list box. So we can actually
take this up here. And we'll change
this text I manually typed to user becoming
this variable. Now I can clear this out. And when we launched this thing, it's going to loop
through every row of that table and add an
item to the list box. We'll click this button. There we go. We have our pop-up with
every row on here. And you can see, you
can click through here. We have all that data from our table now in this list box. So actually I'm
going to stop here. And then in the next step, we're going to build a
basic search function where you can narrow down
this data by typing text.
86. 4.1.2 UserForm Search Tool - Basic Filter: Picking up where we left off, we have this button
here that pops up the search form that
now has this list of items that shows all of the data in our name table over here on our spreadsheet. So up to a person 127 here. So you can see it's
loading everybody in all the way down to
the bottom of this table. The most important function of this thing is that we
want to be able to type text up here and then have this information
filtered down. And what we'll probably do is
make it so that you want to select one of these items in here with the help of this filtering function and put this data somewhere
else on your spreadsheet. So that's probably what
we're going to end up doing. Now let's start to frame out how that search function
is going to work. Again, I'm really making an unpolished form here for now because I want to demo
the functions relate. So what we're going to do is
go back to our code here. And this is the information that shows all of the stuff in the table because we're
looping through every row. Let's make a another function that's going to
refresh that data. When we have something
in our search box. And now we have to get away from this subroutine that runs
just when the form loads, because it only loads once, then we need to
interact with the form. The way we can do that
at least for now, is I'm going to come back
to this form and I'm going to add a button over
here, a command button. Let's add this button
has some text in here. Let's just call it search. Now if we take this button, it's called command button one. It's kind of running
this long button, so let's rename it. Btn search is how it usually
name a button like this. And then now if I
double-click this button, it automatically frames
out this subroutine for us so that you're seeing
there's different ways you can create the subroutines
in past videos, I'm sure you've seen
me type them out. Here. The user form
is trying to create the titles of the subroutines that correlate to the actions. We usually call events
an event handler. So by double-clicking
that button, it realized I probably want
to be coding a subroutine. That is when this
object button search, since we just renamed
it, is clicked. So underscore click and it created this subroutine for us. Just like before. I'll create this message
box just to show us here. Forgotten this parentheses. If we come back to
our form can click button and click
Search is going to run that subroutine.
So click this. Let's go back to
our code over here. Back on the form because it
can happen all the time. Every time you do something, you come back and you're not at the code. I'm back
to the code here. So searching. Instead what I wanna do
is take the same idea. We use this code when we
initialize the forum to bring in all of that information
that is from the table. So let's do that again. We know that it's just gonna do the same thing when
it initializes. But actually I'll show you
something really quick. If you come over here. We have all of our
people one through 127. I'm going to click
search and it's going to run the same thing. It looks like nothing happened. But we're at one 27th
and it starts again. And that's because that
code just adds to the list. And then you run it again and it'll add to the list. Again. We're not clearing out
any of that information. So if I click this again, we yet have another 127 as it loops through
our table here for the third time. Let's
come back here. I can even double-click
this and it'll bring me over to the same
function over here. Because instead of creating
this new subroutine, which would be a
duplicated that point and those that bring
you back over here. So before I do this, I'm going to say list box, just like we use
this item over here. List Box dot that clear. So every time we run this, it's going to clear everything
before adding all of these items back in
from our table data. And the important
part here is we don't want to add all of our
information back in. We want to filter it down by that textbox that we
add it to the top. So let's create a
new variable here. We'll call it search. Call it a string. And what we want to search by. Search equals our text box at the top control space again. So text-box one was the
name of that text box. Just to remind you,
if you click here, it is this word right here is where the name of this textbox
object is coming from. If we change this to TXT search, then that's what we're
going to want it to be. So if we come back to the code, textbox one actually wanted
to make sense anymore. If I do control space, you see it actually won't even recommend text box one anymore because
it doesn't exist. Instead I can say text search. Since I renamed that
text box object. Then I can say Valley. So search becomes what we enter in that
text box at the top. Here is where we're adding
all of those users. So instead of going through
this loop, so again, this is going to loop
through every single row of our spreadsheet table. We don't want to add every single row that it goes through. Instead, as we go
through each row, we want to see if that data
matches what our searches. So if the user contains what
we have in our search box, the string itself, you'll see what I
mean as I write this. So what I'm going
to say is as we go through every single
user one-by-one, we're going to say in string, which I believe I've probably used this in my other videos, which is basically
saying inside the user. So in the information in this table over here for
person one through whatever, let's say Person 12. Does it contain a
substring of search, which is whatever we write inside our text box at the top. So I'll slow that down
again so we can see it. And if it's greater than zero, which means if there's
any result at all, then that's our if statement. You skipped ahead here I'm going to slow
down and just kind of remind us how this
string function works. And then only if this
condition is met, then we're going to
add this user to list. Again, we've cleared out
the entire list box, and so it's gonna be blank. And then when we're
re-added users, there's gonna be
this new criteria. The user has to meet what
we have in the search box. So let's see if this works.
Let's come back here. One-click button. If we click Search with a blank,
Nothing's happening. Really, something is happening. It's clearing out the
entire search box and adding everything again. But it looks like
nothing's happening. But now if I say type
two and click Search, you can see everything
has narrowed down here and I'm using letters
because I used the same name. You can imagine if this was
hundreds of different names, this would be a much
more detailed search, but the only thing different
between all these numbers, which is why I'm
using numbers here. And then if I did
three, there you go. And we're filtering
everything down. If I type one NO3,
there's person 103. I'm going to slow this
down really quick. If I come back here,
I'm going to just put a breakpoint right
here so then we can stop and just look
how that function works. Just to clarify here. So as I click this, I'm going to type two
and then click search. You'll see the value
of our searches. What's in that text
box at the top, which is two as I
hover over here. So search is two. This is just for the first time going through the first
row of the table. So we're actually on person one. What this string is doing is
saying within this string, person one, where is the
location of the substring? To? Within person one,
this string is looking for the stream to and it's
not going to find it. And so the answer to this
is going to be zero. Now, use this
question mark here. I may have shown a debug
print in the past. If you do a question mark,
that's the same as just showing me what the
result of this is, what comes after
the question mark. And so the answer
that this is zero. And so this saying if
the answer to this is greater than zero,
then add the user. So as I hit, this gets skipped. Now it's going to
loop through again. The user is now
person to it saying, where is the search string to? Can you find this
within this substring? The answer is gonna
be greater than zero. The answer is eight. Because the string, the search string two is the eighth character
in the user. Since we pass this criteria, we're going to add
the user here. You might even be able
to see it happen live. Yeah, so you can see
it happen over here. Let's see. It looks like it's not shown
that well, as I split this, what you should see here, it's skipping everybody and then probably see Ron user six. When we get to user 12, we should see it
show up 11 or 12. And now we're in here again
and we're adding the user. So that's what's
happening at scale here you can see it
happens lightning fast and basically instantaneous for this search result here. And this is how we are
getting a filter down search. Type 11, click Search. And you can see with this data, you know there's a bunch of
different implementations, but you can have a
humongous amount data and it shouldn't
happen pretty fast. So this is where
you're starting to get hundreds of thousands
of lines of information where a
person doesn't want to scroll to look for a name, e.g. or whatever the data might be. And if you just type 32 and search, here's
all the results. If I type 321 right there,
there's our option.
87. 4.1.3 UserForm Search Tool - Select Item: Okay, so building on
our previous video, where we have a
basic search here, and this filters down all these results from our
spreadsheet over here. The last important
step for this, and again, this is
very unpolished. But the last step of this, just from a general standpoint, is that we want to
be able to select one of the items
from this list box. So if we filter everything down and now we can more easily find our choice. We want to be able to
select this record and probably fill it in somewhere
on our spreadsheet. So that's what we'll do next. So we're just going
to choose a place. Let's choose any cell
here was to sell H5. Just pick a random
one over here in the blank space and we
can even rename this. We'll call this user selected. Oh, actually, sorry. What I meant to do is type
user's selected here. And we'll just use this
cell over here on the side. And we'll give this a border
so it looks like a field. And I'll change the name here. User selected here
with no spaces. It didn't have the
right formatting as I was typing this sort
of thing in the name. So now this cell is
called user selected. And when we hit the search, I'll even change this
name right here. We'll get our pop-up
and then we want to select one of our
selections here that we're able to filter
down and have it populate into that
cell over there. Now, when we go
over to our code, let's see, let me just
get to our editor here. I'll go to Developer View code. There's a dozen different
ways to get to this editor. I do it differently every time we come back
to our user forum. And we need to select one of our items
and then submit it. So just for something
easy right now, let's put another
button on here. And we'll call this button. Select. It might be okay or
anything you come up with. So I'm just making it up here. We'll have this button
that says Select. Now over here we have
command button one-click. So that's what happens
when we click that button. Actually, since we named
this button search. While we come back to this form, and I will rename this body. So it's not command by
the one which is pretty long, will say button. Now, if we double-click this, we create this new. The method over here,
the buttons select. This one is still over here, which actually will never
get triggered since this button doesn't
exist right now. We can just delete that.
Again. We'll test it. Selected. I always just like to do this as just a demo that the
events work right? If you come over here,
you click Search, quickselect, and
it says selected, which of course isn't actually
doing anything right now. So now we come back to the form. Let's get back to our code. And we need to loop through our list box and figure
out what is selected. So this is a one-way or
there might be better ways, but this is a simple way
that I've done before. And actually there's some
syntax and I'm going to forget. So just like before,
I think I might just hop into a
browser and Google the result and do it in this recording
here so we can see it. But I think we're going
to loop through all of the items in our list box and figure out which
one is selected. That's probably the
best way to do it is loop through each
item one by one and basically just check when you get to the one
that's selected. So let me go ahead and
try this out over here. So we'll come over
to Google and we'll say VBA from this box selected. So of course I like before, I like to record these
into the videos, how I might do a search if
I forget something here, I'm just forgetting the syntax. You see, I'm just
browsing over here. And just like I suspected, they are doing a loop. So they're looping
through the list box. In this case, going through
each item of the list box, list box count is how many
items are in the list box. And then when they get to
an item that is selected. So x is going to go from
01234567 and so forth. If say, item number
six is selected, then this statement
is going to be true. List box one selected
six will be true. And then we'll know that
that one is selected. So that's what they're
showing here in this example. So let's do that. Let's create a counter. In our example, they were
using x in the past. I've just used I as
our normal index. Let's do for I equals
zero to this box one. I forget if it was item
count, list count. I think. Let's come back. Let's count over
here and minus one. I believe in my other videos
I've gone over how arrays, it depends on the object. I know intuitively, if you haven't done a
lot of programming, usually count from
1123 and so forth. But for arrays, in a lot of programming objects,
they start at zero. So the first thing is
zero and then one, which is why we're
going from zero to list count minus one. So e.g. if the list
box has three items, this is actually
going to say three, like we would intuitively think. But then a counter in the object is going
to go item zero, item one, and item two
to get your three items. So that's why this
notation is here. And they're gonna go, if this box one that's selected, I equals true, then this is
whatever this number is. If I say one, then
it's going to be, is item one selected
true or zero? Since we start at zero, and if the first item is selected, then this will return true. Otherwise it will return false. So that's the example that
they're showing us from that. That was actually the
Microsoft website. So bring this back to I. And then what they
were just shown here is they're just doing a message saying item number. I'm just making a message
here for demo selected. And again, remember
I is going to be one backwards because
zero is the first item. We will see in our
example over here. Let's try this out. Let's click our first item
and we'll click Select. Item number zero is selected. Item number one is selected. So you see how that's
working right there. It is detecting which thing is selected as we loop through. One thing I like to do here is after we find what is selected. Really quick, you see,
I'm trying to type in here and it's not letting me, I'm hitting Enter and all that. That's because while this
user form is popped up, I can't do anything in
Excel, including the editor. So I have to close this and then now I can come back and
do stuff with Excel. It's not frozen anymore. We'll come back here. I like to exit the loop. Exit for here once we find
what we're looking for, since we're going
to loop through all thousand rows basically, once we find the one
that's selected. In this case, since we expect only one thing to be selected, then we can just stop looping. So if we find that item
three is selected, we don't have to loop
through 1,000 more rows. That's unnecessary. So now we have i. What we can do is instead of showing the
item number i is selected, I think we can create
a variable here just to make it more obvious
when I say user string. And when we find the
item that is selected, we can get the value
of the item that's selected by saying this box. One. Actually let me come back here
and we'll just check this. You see it says list box list x. So I believe that is the
notation that is going to we were using I instead of x. That's gonna get
us our username. So in this same message, faster, we'll put the user, say item. User is selected, instead of just showing
the number of the row. So let's come back here
and see if this works. Person to, we click Select and user person two is selected. I know this message box
doesn't make that much sense. We'll come all the way down. If we change this filter and we do search here, click Select. And we have this.
We're detecting the value of the item in the
list box that's selected. Now, as you can see, we're getting all the
information we need. Let's come back
here to our code. Now we don't really
need this message box. I just commented this out right here with
this apostrophe. I have a hockey to do it. Actually set up a custom thing. But really you can
come up here and quick comment or uncommon. Now that we have our value that we're
looking for end-user, all we have to do after
sheets, one range. And we're going to just say where we want to
put this the value. And we've done this tons of times in our other lessons here, we're gonna take
the value of user in place it back into the sheet. Here we named this
one user selected. If I said I five or
whatever this is, whatever the cell address is, that's where this data would go. I'm just going to say,
Hey, this cell over here, user place that value there. And then we're going to exit
the loop, and that'll be it. I'm going to come
over here, select something, click Select. And you see person five
ends up in that cell. I can close this.
You're probably already thinking that we
didn't close that user form. So that's the last thing
we can do. After the loop. We can. There's a couple of
different ways to do this. Some intuitive way
you might think is a user form one dot hide. And that'll close the form. But that's actually only superficially hiding the
form to make it disappear, but it might still be
active in the background. If you come back to this
website, you'll say, you'll see that they write, unload me, which is
interesting notation. You might think
that's kinda funny. Luckily that sends
me right here. This is actually the same as
saying unload user form one, which is what we've been
referencing our user form. Only this notation of saying me, because this is the code
behind the user form. The term me is actually used
here to refer to itself. And so that way you
could use this notation regardless the name
of our user form. So this actually will close out the user form and erase it from memory for the time
being and everything, unless you relaunch a new one. So now we can click here. We can type 100 it search, find what we're looking for. Hit Select. And now this field
says 100% 100. And of course this
would work if you had more realistic data or
whatever data source you had. In this case, it could
be a specific range. Also doesn't have to
be this name table, although I'd like to
use these named tables. And there's all sorts of other functions
you can build in. But I think at the end of this, this is your bare
minimum concept to demonstrate how this would work and will continue to add little cleanup features
before we tie this thing out.
 Steve Tran, Freelance Software Developer