Transcripts
1. Introduction: Hello and welcome to the conference fundamentals for beginners course. If the work you are doing is in any way related to information technology, you must have heard about to grade products from eclampsia, confluence and Jira. Certainly Jairus getting more spotlight and it has a broader usage. But the usage of confidence you speaking up because of many ways, it compliments JIRA. In this course. I will walk you through conferences, main features and concepts. And I will also show you how to connect confidence with Jira to enable them to work together. This course is the beginner level course. However, if you use conflict so little would like to get a broader understanding of that great product. You will still find value in this course. After completing the course, you will fully understand what confidence is, what it does and how to enhance team efficiency by using a confidence. We will start with a brief overview of confluence and step-by-step instructions on how to get completely free access to confidence in JIRA. Then we will move on to the basics of creating pages and editing content, including formatting text and using macros to create great looking pages. You will also learn about the publishing workflow, how pages are managed internally by conflicts. We will wrap up this section by studying, creating pages from dozens of great looking templates provided by confluence and also how to delete a page safely. Sharing and collaboration is a significant factor in making conference a great product. You will learn how to share content, use comments to collaborate with other team members on specific content and how to keep an eye on the content you're interested in and get notified when that content changes. After that, you will learn about the concept of spaces that confidence uses to manage and organize content. Preconfigured functionality relevant to a specific usage. We will use documentation space as an example. We will create one and then analyze it in detail by looking into components created by that blueprint. Then we will study another more complex space type project space, which also includes integration with Jira. You will get step-by-step instructions on connecting confidence with Jira and how to get the best out of them working together. We will continue learning more about integrations by reviewing that last year marketplace, where you can find hundreds of apps and plugins that allow for additional confidence features and integrations with other software products. In the last lesson, you will learn how to install an app from marketplace. We will install and configure the Google Drive connector, which enables the inclusion of content from Google Drive in confidence pages. And finally, there is a quiz you can take if you wish to test the knowledge you gain from the course, I hope you will decide to register and take this course. And if you do so, if you, during the next hour, you will find valuable content that will help you start using Confluence right away. Enjoy the course.
2. What Is Confluence ?: Confidence is a software platform used to manage online contents such as reference documentation, knowledge base, which is meeting minutes, reports or similar. It efficiently enables multiple users to collaborate and contribute to the same content. And it provides full version control and access control. Conference is often used in conjunction with Jira, which is a different software platform used for organizing work in teams around the task set projects. Both confidence in JIRA, our products from the same company, Atlassian. Jira, do not need each other to do all the things I just mentioned. However, we've connected, they could do much more and they tremendously improved the efficiency of the teams working on projects. For instance, someone viewing a project reporting confidence can have real-time information about the progress of project tasks managed in JIRA. It goes the other way as well. Someone working on a development task in JIRA can view a solution design document created and managed the confluence without switching between two applications. Similar how a jury is using issuers are building blocks for everything. Confidence is using pages or smallest unit of functionality. Confidence users create and read content that is created and organized it pages. Users creating content have at their disposal, full-featured text formatting tools, including different styles, colors, font sizes, et cetera. Images can be imbedded, sized, and aligned. A large number of macros are available to do many different things, including creating a table of contents, image galleries, charts, embedding documents from other applications, and many more. Confidence pages fully support multiple users working concurrently or the same content. They provide a reliable publishing workflow with fully functional versioning, allowing content creators complete control of what is being published and the ability to revert any changes quickly. Pages can be created starting from a blank page or from numerous templates such as beauty note, business plan, employee handbook, and many more. Confidence comes with more than 80 templates. And customers can also be created. Users collaborate during content creation with contextual comments imbedded in the text and by getting alerts when get continent, continent is changed. Users who are reading documents in Confluence can find the content they needed several ways. If they know where content is located, they can browse through it through a customizable site structure. If they don't know where to look, they can rely on browsing content by topic of interests defined by label content. For example, looking through all marketing documents or all finance documents. Or they can rely on advanced search functionality, which will scan through a defined set of documents and look for specific search terms. A confluence organizes pages. It's something called spaces, which can be perceived as a file cabinets or drawers, where a related content is stored in the same dollar. Weed control the access of who can read it, who can edit those documents. Examples of spaces or documentation for a specific project or a help desk knowledge base. Species can be created for predefined blueprints which grow the set of templates, but also some helpful pages are created with spaces created. For example, knowledge-based space, have documentation space, come with different homepages e-tron optimized for their specific purpose. While project space comes with already created integration with Jira, it provides a direct view of the JIRA tickets. In the next hour, we will cover almost every feature measured in this overview. This is a hands-on course and you will learn all these features by trying them yourself. Therefore, you will need access to the conference instance. And in the next lesson, I will show you how to get that.
3. Getting Free Access to Confluence: It is rare that software with worldwide recognition is offered in a three package with no time limits and limited functionality. And this is exactly what that last year is offering. It. It's free Jira confluence package. You can get access to both of these applications with full functionality at no time constraints. Absolutely. 3. You will start from the URL that you see on the screen. Enter it in your browser, and you will end up on this page. Let's hold on for a moment to confirm the deal you're getting from it last year. The free plan you are subscribing to allows you to have up to 10 users and two gigabytes of storage. Also, no need to provide a credit card at this time. So you don't have to worry if some changes will unexpectedly appear in a few weeks. And last but not least, you're getting access to two products, not one conference is already selected and I recommend select JIRA as well. Click Next and you're asked to select how you would like to sign in. Again, you have two options to choose from. Use your Google account authentication or go with an e-mail passwords combination. If you opt for the latter, you will be asked to provide an e-mail address, create a password, and provider FirstName, LastName. That would become one more set of credentials to remember. So I will opt for a Google account and select that option. If you decide to follow the same path, which I recommend, you would also be asked to login to Google. I will do that now. And if I did it right, I would arrive on the screen where my full name is confirmed and I'm asked to consent to receive newsletters from Atlassian. You can opt out, but I recommend checking the box and opting in because the content being sent is usually good quality and immensely useful. I will check the box to provide consent and I will click on the Create Account button. The provisioning of your eclampsia and accounts starts at this point, and it can take a bit of time to complete, but it should be finished within 30 seconds. Once it completes, I'm asked to provide my site's name, which should actually becomes a sub-domain of Atlassian dotnet. Together, that will become your site's URL. You can use almost anything. We'd only one constraint. It cannot be already used by someone else. If that is the case, you will be warned and asked to use a different name. In general, you want to use something familiar to you. Or if you will be using this confidence instance for business purposes. Something that resembles your company name. When done, click on Continue and provisioning of your Jira and countless instances. We'll start. That process can take a couple of minutes and I will stop the recording and continue, continue when it completes. Now your products are almost ready and you are asked to answer a couple of profiling questions that will help Confluence do the initial setup to better suit your team's needs. Don't worry too much about what you're answering. It is only marginally affecting the initial setup. You will do all configuration later on. In the last question, you are asked to provide a name for the initial teeth. Space. Spaces are covered later in the course. For now, just enter my team space. In the last step, you are offered to invite your team members to join as well. Remember that the free package allows you to have up to ten users. So don't worry about extra charges. If you consider sending couple of invites, you can always send these invites later. So I will skip the software for now. You will get many pop-ups with information about various tutorials. The content of these pop-ups can vary based on your responses to profiling questions. You can browse and see what is being offered. Or you can just ignore them. Regardless, at this point, provisioning of JIRA confluence is completed and you can start using them using the Application menu in the top left corner, you can easily switch between JIRA Confluence, your site administration, where you can manage users and your Atlassian subscriptions and billing. At that is all. You can navigate back to JIRA confluence and start using them to create great things.
4. Creating Confluence Space: In this section, you will learn how to create a confluence page and edit page content. But before you do any of that, you have to create a conference space. Now you might wonder water spaces in y, you must have one before creating a page. And here's why. Confidence uses spaces to organize all documents. Therefore, each document must belong to one space. You can think of space like a drawer or that contains similar documents and can be locked with full control of who has a key to open it. We will cover spaces in much more detail later in the course. And at this point, we will just create one simple empty space. So let's go and do that. First, go to the spaces screen by clicking on the View all spaces menu item under the spaces item in the navigation bar. Once the page is loaded, click on the create space button here, you will see a pop-up which several types of spaces to select from. As I said a moment ago, you will later learn about each one of them in much greater detail. But now let's choose blank space and click the Next button. On the next screen, you will be asked to provide a name for this space. And the key for the Space key is a sort of space ID. Enter creating and editing contents in the name field at the key field will pre-populate with CEC, which you can leave unchanged. Click on the Create button. It shortly you're new space will be created as you will be taken to its homepage. In the next section, we will create a page which we will use to learn how to edit content in conference.
5. Creating Confluence Page: Now, after you have created a confluence face, creating a page is actually very simple and you will learn how to do that in the next few minutes. But while we are creating our first page, we should also put some content in it. This is the content we will use to learn and practice a number of formatting editing features in the remaining lessons of this section. So before we create a new page, please pause the video and download the files attached to this lesson and store them nearby in their own folder. I suppose you have downloaded lesson files without problems. One of the files is named confidence basics dot TXT. Open that file in any text editor, select all content and copy it into your clipboard. In most editors, you can accomplish that using Command a followed by command C on Mac, or Control a and Control C on Windows. Once you have copied file content into your clipboard, click on the Create button at the top of the page, right here. Shortly you will see an empty new page. And when it loads, enter confluence basics in the page title area. After you have entered the page title, click anywhere below it, and paste content from your clipboard using command V on Mac or Control V on Windows. Once the role content is pasted, click on the Publish button here and your new page is created. It does not look very nice as we did not do any formatting and styling, but that will come in the following lessons. Let's create one more page. This time we will use different content. So look for the file named confidence spaces dot TXT. Follow the same steps as with the first file, or put it in a text editor. Select all content and copy it. Make sure you're on the homepage of your space. If not, click on the overview link, left sidebar. Create a new page using the create button. Enter conference spaces in the page title field, and paste copied content into the page. Click on the Publish button and you're done. If it all went well, you should see your two new pages in the navigation bar on the left side of the screen. Both of these pages were created at a top level of the current space. You can also create a page that is a child of an existing page. And there are two ways to do that. The first option is very similar to what you just did for the two pages you created. Except that before you click on the Create button, you should navigate to a page that you want to be the parent page of the New page. So to create a child page of the conference Basics page, I would navigate to that page and then create a new page using the create button. Give it the title more about confluence. Publish it. And here is the new child page into Navigation sidebar. The second option is even simpler. Hover over the link to the parent page in the navigation bar. Notice the plus icon that shows up here. Click on it. And the child pages created. It needs a title more about spaces, and it needs publishing, and it becomes a child page of confidence, space page. One more thing to be aware of when creating pages. If you worked with the content editing software that runs on a laptop or desktop, you might get used to a document the created Only when you save it for the first time. If you quit editing before saving, content would be lost. This is not the case with a confluence and most other online content management applications. A new document is created and saved somewhere in the cloud. The moment you have clicked that Create button at the top of the page, anything you do with a document is saved in the background without you knowing it. When you click on the Publish button, that does not mean you are saying the page. It actually means that you have decided to make your document visible to other people who are using the same instance of confidence. So the right way to work on the new content is to create a page, work on its content while keeping it in the draft status and publish it only when it is complete and you feel it is ready to be consumed. To demonstrate what I was talking about, I'm going to create one page. And then I'm going to enter some text and I will not click on Publish. And look what is going on in the bottom right corner. As soon as I pause typing for a couple of seconds, conference decided to save my changes. I will then go back to our space homepage and then have a look at the draft Pages section under the recent menu item. Here is my test page, and if I click on it, the text I have entered this here safely saved. If I continue to make changes, good, some more texts and changes are getting saved. And then I leave the page. And then I get back to the page. And the new text is also saved. I don't need these page anymore, so I'm going to delete it by coming back to it. And then selecting Delete and published page from the page menu here. In the next lesson, we will learn more about editing conference pages.
6. Editing a Page: Unless you are just a consumer of content, manage the conference. You will spend a good chunk of your time here at UT pages. Confluence makes editing there easy, so you can focus on creating the content rather than making it look good. Let's open up the first page we created in the previous lesson. While on the space homepage, look for the confluence basics link in the left navigation, and click on it. Once the page loads underneath the page title, right about here, you can see some basic information about the document, such as who created it and when the document was last updated. To switch into the edit mode, click on the pencil icon up here. You are now in the edit mode and you can tell it follows the usual standards for content editing applications. There is a toolbar at the top with all formatting and styling functions. If there is a content underneath it, to the right, there are a couple of action buttons to publish the page or to close it without publishing the resource. So pop-up menu of it, few additional publishing options which we will cover in the publishing section. In the pop-up, there is a link to preview how the page will look when it is published, and the link to view changes made since the last time page has been published. We will talk about these a bit later in this lesson. Let's make some changes to the page and watch what happens. You don't need to do this yourself. Just keep an eye on what is going on on my screen. I will make a small change in one of the headings. And while I'm doing that, what's the little label at the bottom right corner? The one that says all changes saved. Notice how it disappears as soon as I start typing and how it changes to a saving message, what I briefly pause typing. You have just seen conflicts working in the background to save changes you're making and ensure no changes are lost because you forgot to save them or the application crashed or any other scenario happened that ends up in Los content. Content editing is an iterative process and you are guaranteed to come back to the page you are working on many times and make some edits each time. Sometimes it is hard to keep track of all changes you have made to the page. There is a convenient feature, it labeled very explicitly view changes, spiritual matters here. If you click on it, you will see content that has been added or removed or modified since the last time page was published. Green represents new content, red indicates removed content, and blue is used to designate formatting changes. You can see here in green content that I added after I open the page. When you are done with editing, but still not ready to publish your page, you can close it with a close button here. As mentioned a few times in the last two lessons, your content is safely saved. It there is no need to panic and looking for a save button that does not exist. After all the stock our pages still not looking any better. And we concluded earlier that he does not look good at all. Starting from the following lesson, we will cover several formatting features that can make pages look significantly more enjoyable.
7. Formatting Text: Let's do some formatting in this lesson and start making our pages look more professional. If you did any content editing in Microsoft Word or Google Docs or max pages, you are probably quite familiar with the way that works. You would select a fragment of the text and then you would click on one of the icons you the toolbar to make the text bold or changing color, or apply some other sorts of styling to it. It doesn't matter if it is a client application running on your laptop or cloud service. Formatting concept remains the same. We will start with the conference Basics page. Click on the link to the page it a left navigation. If go to the edit mode by clicking on the pencil icon. Now we can make changes, and let's start with applying some styles. To the left of the toolbar is the styles drop-down. Confidence comes with seven predefined styles, one for standard texts, and six styles for different heading levels. Each style is accessible by selecting it from the drop-down or using a key combination indicated to the right of the style name. We will try both of those. We want to have two headings on our page about confidence over here and hosting options here. Styles are applied to the whole paragraph so it is sufficient to place the cursor anywhere we did a paragraph and then select the style. Let's apply those steps to the about conflicts heading. Place the cursor anywhere in the paragraph and select Heading 1 from the styles drop-down. The whole paragraph is changed to adhere to the new style. Let's use the key combination to apply the same style of hosting options. Please the cursory the paragraph and hit Command Option one back or control option 1 or Windows. We've got another good-looking heading. Using the keyboard to apply spouses undoubtedly faster. It is just that it might take some time to remember all the key Congress. However, there is nothing wrong with using the drop-down if that works better for you. Often we want to emphasize some important words into text, and they usually do that by making the bolt. Let's say we want to highlight some key conflicts. Terms in the first paragraph. Turns dynamic pages and spaces should stand out. As you're probably expecting. You should select words you want to make bold, and then click on the toolbars bold icon. Let's do the same thing for the word spaces at the page is already starting to look better. Now, I want to use italicized characters here where the benefits of dynamic pages are listed. The same principle applies. Highlight the text, and select the formatting feature from the toolbar. Of course, you could use the keyboard to accomplish this as well. And the good news is that the standard key combos are available. Command B for bold style, if COVID I form italic of those, you would use the control key instead of the command key. All formatting options work in a compound matter. You can apply them on top of each other. So if I want the world to work conflicts here to be bold and italic, I will apply both formats. Additional styling options that are available from the pop-up here. You can underline fragments of text, make it strikethrough or subscript or superscript. One option which is not usually standard, but it is very useful, is the code style, which is the name applies, should be used for four-bit code snippets. As it is using the water space and light gray background, it makes the code more readable. The next item in the toolbar is another standard one you'll likely use before. It's paragraph alignment. By default, all paragraphs are left aligned. But I want the second paragraph to be centered. And I can accomplish that by placing the cursor anywhere in the paragraph and selecting central alignment from here. If you need a paragraph to be right-aligned, you will do it from the same drop-down. But I don't need it now, so I will put it back. To the right, is the colors drop-down and it should be no surprises there as well. Let's make the first part of the second paragraph threaded bolt. Just highlighted text fragment from the Color drop-down, select a red color and click on the toolbar is bold icon. The last section in the formatting toolbar is the one for creating bulleted or numbered lists. You will apply a bulleted list to the list of things that team will accomplish with confluence. In the third paragraph, highlight the three lines here, and click on the bulleted list icon in the toolbar. The creation of a numbered list is very similar. We will apply that to the three plans offered by Confluence Cloud. Highlight these three rows and Click on the numbered list icon. In the next lesson, you will learn about macros and see a couple of examples of how macros can impact the functionality and look over confidence page.
8. Using Page Macros: Using macros extends the capabilities of confidence pages. It allows for adding extra functionality or including dynamic content. For example, live search macro embeds a search box into your conference page to show search results as you type. While children display macro lists, all pages children and they are descended pages. Getting any macro to work on the conflicts page is a two-step process. And in most cases it is very simple. The first step is adding a backward to the page, and the second one is configuring the edit microbe. While Macro heading is a standard process, configuring parameters is different for each macro. The list of macros included with the conflict is quite long, and it would take more than one hall and dedicated course to cover it all. In this lesson, we will cover the implementation AT features of three macros and you should later explored the remaining ones by yourself. Let's start with info panel. It is a very simple macro we can use when we want a paragraph to visually stand out from the rest of the page so that it is more likely to catch user attention. Please, your cursor, anywhere in the paragraph on which you want to apply this macro, click on the Insert drop-down and select the info panel from the list. Changes takes place right away. See how much more that paragraph stands out. You have several options to select from the way in four panel looks. The default one is what you see now, brew background and literally phonation icon here. You can pick another option from the toolbar. And besides info Luke, you can choose from dot, which gives it the purple background at different icon. Success with green black background and a checkmark, warning with the yellow background at warning icon, and error with a red background and red critical icon. There are no firm rules on when to use which option. You should decide which one is the most appropriate for the specific intent. The next one is the expanded macro. It is used when a page has a piece of content that does not have to be visible all the time. And it should appear all you whether user decides to see it. This time we will use the slash command to assert macro. Please the cursory, the spot where you want to add macro and press the slash character key. A pop-up will show with suggestions for all macros. Continue typing the word expand. And eventually the list of suggestions will narrow down. Select the macro from the list editors show up on the page. The configuration step is straightforward. Here is the place holder where you will enter the text that will be visible at which the user needs to click to toggle the unnoticeable content. This area will only accept plain texts and no formatting is possible. Just below is the area for contact on demand, so to say. Here you can enter any content, including macros at all, formatting features or functional. After the page is published, the macro is fully functional. Ad clicks are the top heading section toggle the coated below it. The third and the last macro that will be covered is the light search, which provides search functionality, which suggestions imbedded anywhere on the page. We will use the insert pop up again. But this time we will have to browse deeper to find this macro as it is not in the primary lists like it for panel. Quick overview more here at the macro Catalog opens up later when you explore the remaining backwards by yourself, use this screen to browse backers. Because here you can see some descriptions which do not exist in the other alternatives for edit macros that we have seen. Type live search in the Find box and edit the macro to the page. Configuration window comes up. And you probably notice that this macro has many more options than the previous two. You can limit searches to a specific confidence space or to a particular Content-Type. You can also choose what will be displayed in the results. Add few more. Leave all options with default values except for the additional information field where you should select page excerpt. You can preview how the macro will work with the current configuration and when you are satisfied, save it and publish the page. Now, I have a fully functional search box with results and quartet sample coming up as I'm typing the search term. This is just a small subset of all macros, but now you know enough to try out other macros and become aware of their features so that you can see like the right one when needed.
9. Deleting a Page: Deleting a page, it confidence is quite simple. However, it is also an action that can be irreversible and it can result in permanent loss of information. Therefore, it should not be taken lightly in the full context of deletions should be understood. So let's walk through what happens to a page when it is deleted. Where the delete command is issued on a page, the page will be moved to the correct spaces thresh. It will not be actually deleted. However, it will not be visible in all the links will stop working. At the 3D page can be restored by the administrator or the space that the page belongs to. But after his face is trashes purchased by the space administrator, all previously deleted pages cannot be restored and they're lost forever. You might wonder what happens with the page version history when a page is deleted? The answer is straightforward. It is deleted with the pitch. But if the page is restored, its version histories restored as well. When the trash is purged and the page is permanently deleted, the version history is also gone. There are three scenarios for deviating a page, deleting a page with no child pages, deleting a page with child pages, and deleting an unpublished page. We will cover all of them. And let's start with the first one. We will create a new page to using these lessons, practice, navigate to the spaces homepage at once their grid, create a new page, give it some title and subtext and publish it. So now we have a published page with no child pages. To delete this page, you would go to the Page Actions drop-down and select the delete command from there. You will be given a warning message with a summary of consequences due to page deletion like the number of broken links or similar. And when you are ready to proceed, click Okay, at the page will be deleted. Let's work through the scenario. When a page has a child page starts from the space homepage and then create a new page. Give it a title, and publish it. Then create another page as a child page. Give it a title, and publish that one. Go back to the first page. And once they're opened the Page, Actions drop-down and select Delete. You will get a similar warning to the one when you were deleting the previous page, but now it includes a warning that child pages will be adopted by the deleted pages, parents page. Hit Okay. And the current page is deleted at the child page has been moved up one level. The last scenario is the deletion of a page that was never published. In this case, you will actually have to request the delete command while in the edit mode since the page that was never published does not have you bought. This is how it works. So start from the homepage again. Create a page, give it a title. Now, go to Page Actions and select Delete are published page option. Once you do that, the page has been deleted. You should now know how to delete any page. The main point to remember is to be very cautious about delete pages, even though there is a way to restore them up to a certain point.
10. Creating Page From Template: There are likely to aspects of work where confidence is most beneficial, content creation and deep collaboration. For effective usage, it is critical that content styling and structure are standardized as much as possible. That is very hard to accomplish even if one person is the only content creator consumer. At much more difficult as more people contribute to the content. This is where templates come to rescue. Templates are essentially forms where the user only needs to fill in the information and not worry about styles and layouts. They are all predefined and ready-to-use. Confluence of a cloud comes with almost a 100 defined templates and the number is growing. It provides extensive coverage going from project documents such as such as project status report to HR documents like job posting. It does not make much sense to try to list them all. As the list is continually growing. To have a peek at the correct set, you can browse through all templates on your own and this conference page. If that is not enough, you can create your own templates and publish them only for your confidence users. This lesson, we'll cover how to create a new page from the existing template. As soon as you click on the Create button to create a new page or the right-hand side of the screen, you are offered a wide choice of templates you can use. You can scroll through them, read short inscriptions to find out more about what they do. And if you hover over it, you can also see the preview of the whole template. As you scroll down. You can filter templates by category. You can also do a text search. Let's say I want to use the product requirements template. So I will start typing the word requirements. The results will quickly narrow down to what I'm looking for. How we'll first have a quick preview to make sure that this is the template. Tidied. It once I'm happy with it, I will click on it to create a page. After a few seconds, the page comes up with a lot of elements already formatted. All headings are, there are several tables. Roadmap planner macro is embedded at status microwave keypad it as well. What is left for me to do is to fill in the placeholders with the content specific to the require the entire working on, let's say user authentication. I will brief you a couple of sections and then I will stop the recording while doing that. We do meaningful content by page already looks much better. I will create one more requirements page, this time for user profile management. I will follow the same steps to create a new page. I will use the same template and I will again pause the recording while adding the rest of the content. Now, let's suppose you are someone who is given these two documents to use them to create a solution designed for both of these requirements. Would your job easier if you have received these two documents I just created created starting from the same template. Or if you received these two documents with identical content as the other two, but created by two different people, starting from a blank page, the answer is obvious. You can see the benefits of using templates.
11. Sharing Content: Any Confluence page can be shared with other people using the share feature. Sharing, a straightforward. After clicking on the Share icon, you just need to enter people you want to share the page width. As you type, you will get suggestions and you can select from the list. You can also include an external email address, which of course will not come up in the suggestions list. Once you are done, adding people to the list, optionally provide an accompanying message. And he'd sent everybody from the list will receive an e-mail similar to this, with an invitation to access the page it has been shared. In addition to email users or the conference mobile app will receive a notification in the app itself. There is another slide to the rudimentary option. It is a simple sharing of the link to the page. Click on the Copy link icon will place the page URL in the clipboard. And now it can be pasted in an e-mail or a text message or anything else you can use to send someone a message. Sharing content with existing confidence users could not be more straightforward. Sharing content with external users comes with a couple of caveats. When the page is shared with someone outside conference, there will be sent an email inviting them to join that conference site. And if they don't have an Atlassian account, they will be prompted to create one before they can access shared content. Another thing to keep in mind when you invite an external user is that you are granting them access to the conference instance, not just to the shared page. User will be added to the default for other group, which can trigger additional cost for the new user if the total number of users goes over the limit. There are also a couple of scenarios when an invitation is for and sent to a site administrator for approval. This happens in two cases. The first situation is if the conference site does not allow existing users to invite others to join. And another scenario is if the recipient's email address domain, like gmail.com is not on your sites list of approved domains. If an admin declines the request, you will be notified by email and the external recipient will not be notified at all. That is actually all there is regarding content sharing. In the next lesson, we will talk about creating comments.
12. Creating Comments: Comments are probably the best way to collaborate on the conference page. Comments enable users to add important information, ask questions, or put to remark relevant to the page content. Comments can be added at the bottom of any page. Even better, an in-line comment can be added by highlighting specific text on the page and entering a comment in that particular context. Let's review each one of those scenarios and we will start with the page comments. If the intention is to post a comment regarding the whole page, then the page comments option should be used. Scroll to the bottom of the page. It you will find the comment section with a placeholder to write comments. As soon as you click on it, a rich text editor opens up. You will write your comment here. Do all sorts of formatting, even including some macros and images. And when done, you would click Save to save the comment. Note is that the watch this page option is ticked when you create a comment. This means you'll start receiving notifications about a page. And if you don't want that, just to check it, was the comment is posted. Other users can reply in like your comment. Also. You or a space administrator can edit your comments at anytime. If your comments pertained to a specific part of the page content, then inline comments or the right option. Start with highlighting the text you want to comment on, and then click on the Add Comment button that will appear above the highlighted text. Enter the comment and click Save. The text you highlighted. We will have a yellow highlight indicating that there is a related in my comment. Clicking on the yellow highlights will display the associated comments. Just like the page comments other users can reply or like your inline comments. You will be notified of any such action. Inline comments can be resolved, which means that the communist is no longer needed and it should not clutter the right side of the page. Keep in mind that comment is not deleted when it is resolved. And it can be brought back by reopening using the Page Actions menu. Here are a few more tips that apply to both page and inline comments. Similar to when editing page content, you can create a reference to any user using at symbol. And you can embed a macro using slash character. If you need to link the record to a specific comment, you could do so by using a URL, you can get from the comment timestamp. Right-click on the timestamp. And that allows you to get comment URL in the clip art. From there, you can paste a link into any page. And last but not least, each comment can be liked. And unlike. Before we wrap up the lesson, notes that creating, editing and deleting comments is subject to permission settings. It might be restricted if you're using your company conference instance. If you're using free cloud conference, you should not have any problems with any other functionality explained in this lesson.
13. Watching Content: Watching content in confidence means being notified about changes in the content that is being monitored. A watch can be set on the conference page level or space level. Confidence you will then send a notification email whenever anything is modified in the watched content, email notifications are sent for page edits except Wendy authored, unchecks the notify watchers, checkbox deletions, attachments including new versions or deletions or an existing attachment. Comments, including new comments or deletion of existing comments. By default, confidence will assign a user as a water of any page that the user has created or edited. Immediate emails are sent for important notifications like mentions a new pages. However, when lots of changes are being made at the same time, then a single e-mail with all changes is sent. I mentioned in the beginning that watches can be sent on multiple levels. So let's review how to do that. While on the page, look for the watch icon in the top left corner. When the icon is clicked, our popup opens and you can turn on and off the watch on that page. And also on the whole space that the page belongs to. Depending on your permissions. You might also see a link to manage watchers. Clicking the link opens up another pop up where you will see everyone who is currently watching that page. Here. You can also add more watchers. I will switch on watching on both of these pages and the whole space. And let's see what happens when someone makes a change. Another user made a change to a page I am watching and I have received this e-mail informing me about the change. The e-mail contains some brief information about who made the change and what was changed. Email is not the only channel where watched notifications are sent. In the toolbar over here, there is an indicator that there are new notifications for me to read. Once I open it, I will see that the alert is about the same change as in the email I received earlier. There is one more place where a user can control all its notifications from one single spot. All users watches are consolidated in the watches section of users settings. And you can get there by clicking on your avatar in the top right corner. Every watch you hear created or was created for you will be included in this list. And you can turn off any ones that you don't want to receive notifications for anymore.
14. Understanding Spaces: Spaces are critical component of confidence since each document created in Confluence must belong to one of the conference spaces. In this lesson, we will review and learn what spaces are and what they're used for. Spaces or conferences way of organizing documents into meaningful groups. Think oh, spaces as having different drivers into which you can put your files to start organizing the documents. You probably want related documents grouped in the same drawer to be found faster and used more efficiently. Most likely, some of these documents should be shared with some people in your organization, but at the same time, they should not be accessible by other people. You would want each drawer to have a lock and have several keys to give to people. You want to access the documents. But then even though you are okay with these people to have the key to open the drawer and access documents. You only want some of them to be able to change the document. Confluence spaces provide the functionality to accomplish all of that. Related documents are grouped together and permissions can be easily set on the space level. Spaces come in two main types. Sight spaces can be found in the space directory, and they're used for sharing content and collaboration between team members. Sometimes they're referred to as global spaces. Personal spaces are tied to accomplish user. If they're fully controlled by each user, they should be used to keep contact private, or selectively made public by each user. These spaces are listed in the people directory and also present other personal profile sites. Spaces can be further segment. It S, team spaces that are used by specific teams, such as finance or marketing. Each theme fully controls the space and its content. Project spaces that are containing information related to a specific project. These spaces can be integrated with Jira and include jira information in confidence pages. Documentation spaces which contain a set of documents related to each other by a specific topic. Examples would be knowledge base or process documentation. You have seen in one of the previous lessons, how spaces are created. Here is a quick recap. When you start creating new space from the space is page. You are offered a set of predefined space types to choose from. They're actually predefined blueprints that include templates and some helpful pages. All created with the new space is created. For example, knowledge-based space and documentation space come with different homepages optimized for their specific purpose. In contrast, project space comes with already created integration with Jira. It provides a direct view of the JIRA tickets. In the next lesson, we will create and review documentation space, and you will experience firsthand several concepts of confidence space.
15. Using Documentation Space: At the beginning of the course, you already created one Confluence space, but it was a blank space which does not come with any templates or pages we just talked about in the previous lesson. In this lesson, we're going to create a new space using the documentation space blueprint, and review all the features it brings along. Once you're ready, click on the spaces item in the navigation bar, and the drop-down menu opens up, click on View all spaces at the bottom. Look for the create space button in the top right corner and click on it. When a pop-up comes up, select the documentation space option. Click on the Next button, and you will be asked to provide a couple of attributes for the space you are creating. Enter documentation space is the space name field. And once you do that, the space key fields, we should pre-populate with the S. In the description field. Enter a few words to describe the space you are creating. Let's say, documentation for internal processes and procedures. Leave the space permissions field with a default permissions options selected, and click the Create button. After a few seconds, your new documentation space will be created and you'll be taken to its homepage. Notice that confidence has created a couple of pages and included several functional blocks on the homepage. The welcome message is displayed here. A fully functional search box is underneath it. A block with links to recently updated pages is on the right side, and the block with featured pages is on the left. We will review these blocks in more details shortly. Two pages have been automatically created, Getting Started and making a template, each with some default content. These pages can be deleted, can be kept as they are, or they can be modified. It is up to you what you want to do with them, but let's not do anything right now. Let's add one more page to the space. Click on the Create button and name this page. Release Management. Enter any text in the page content and publish the page. Then go over to spaces homepage and look for the recently updated block. The page you just created is listed there at the top. What you see here is actually Conference macro network documentation space blueprint has created, recently updated macro and placed it on the space homepage. From now on, whenever a page is created or updated, it will be included in this list until, of course, it is pushed down by newer pages. Let's create one more page, a name this one project management. Again, any texted page content will do. And when done, publish the page. We also want to add a label to this page, which is really a free form tag that you can create on your own and apply to your pages. Scroll down to the bottom and look for the little tag icon into bottom right corner. Click on it and then type the word featured with popup, opens, click, Add and close. Note that this label might already exist. And if, if, if it was created earlier, and in that case, just select from the label, pop up and add it. Then go back to the space homepage. The chapter featured section. The page you just created is listed there. Again, as a component of the documentation space blueprint. The content by label macro has been added and configured. While viewing the space homepage in the edit mode, I can check the configuration of this macro and I can see that it is configured to list all pages belonging to this space in having the featured label. So anytime you want to promote a page in this section, just label it as featured editor to be included in this list. I will leave the edit mode and let's have a look at the remaining components of the homepage. At the top is the info panel background with some hints on how to use this space. Notice that it includes information on how to use the featured label. You can add is the content of this section to include any other information that you think would be helpful to the team members using this space? Pretty much the same goes for the info panel at the bottom of the page, except that, that one has less visibility and information included here should be of less criticality. And there is a search box here, which is actually another macro. Let's switch to edit mode again to check the configuration of this macro. It is configured to search the content of the space and to include only space name in the search results. I'm going to change that to include page, excerpt and save and publish. I will then search for the term management. And notice that as I'm typing, both pages I just created are coming up because they include the word management in the title. But I can also see a bit of a content from each page because I've modified the configuration of this macro Greek ego, the search result will, as expected low to the selected page. We have seen in this lesson how the blueprint for documentation space provided functionality to see recently updated pages, to promote pages using the feature section and how to search for content and Preview Results. Other types of spaces have different blueprints, but the concept is the same as you have seen photo documentation space. You're encouraged to explore those remaining types of spaces. And in the next lesson, you will learn about project space in all features it provides, including integration with Jira.
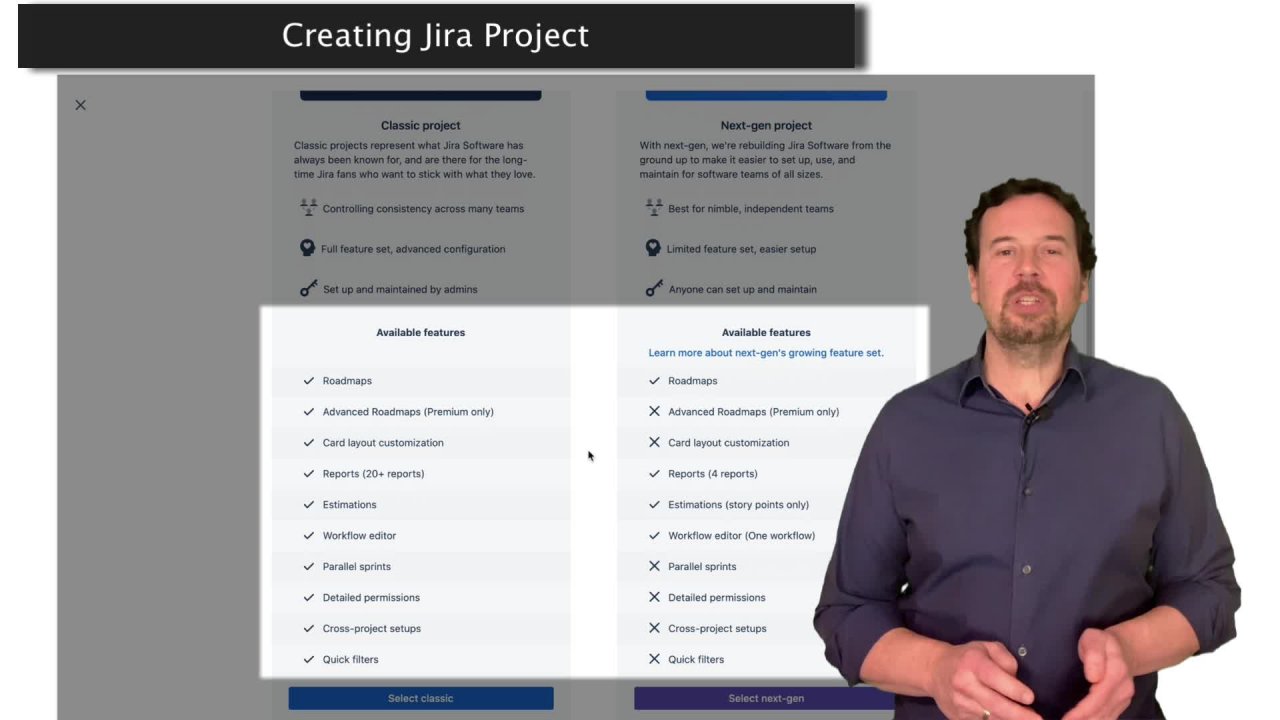
16. Integration with Jira and Using Project Space: At the start of the course, I mentioned that integration between Confluence Jira can be set from either JIRA or conference, and that it can be customized to best suit your particular needs. Therefore, there is no single way of how it should be done. Here are a couple of common examples to demonstrate the concepts and they can be modified for a specific case. You should be able to follow along if you opt in to get access to Jira, you're getting your free conference access in lesson 3. If not, it is still fine, as I will demonstrate each configuration step. Jira provides a place in the left side navigation to connect to a conference space. Connecting is quite simple. I click on the Connect button, brings up the pop-up to select confluence space to connect to. Once connected, a full structure of connected space is displayed in this juror screen. It pages can be browsed while new pages can be created. Users can also search across both Jira and Confluence and see in search results both pathless pages and JIRA issues that match search terms. One thing to note is that this connection is a one-way connection from JIRA Confluence. This does not create a confidence to Jira connection. And we will create that one in a few moments. For additional convenience, Jira and Confluence shared the same user authentication system. This allows users to transfer between screens from two different applications seamlessly. An example of when this integration is beneficial is when confluence is used to create and manage project documentation such as solution design or functional requirements for a project manager. In JIRA. Users who spent the most time working from JIRA tasks don't have to leave JIRA to access the solution design, or functional requirements. This is how information stored in Confluence can be viewed from JIRA or the opposite side. It is quite common to include general reports or specific sets of JIRA issues. For example, top priority tasks in Confluence page. This is easily achieved using macros that carried conference. I will start by opening the macro catalog, searching for all Jira macros. I want to include a juror filter into Confluence page. So I will select this Jira macro because it allows embedding filters. I am asked to specify what report or filter I wanted to include. I will specify my high priority filter which I created previously. And in no time up-to-date information originating in JIRA becomes available to users who work in costless. Once the connection is established on the corporate side, it becomes possible to create JIRA issues directly from conflicts. While viewing the conflicts page, highlight the text that you want to include in the Jira issue and click on the Create issue that comes up. You're then asked to specify the Jira project. We are a new issue will be created and issue type, is it a story or a task or a bug? You can also type in more details if you wish, and click on the Create button to create a new issue in the selected Jira project. But there is also a more straightforward way to create connection. And that is the creation of project space. Let's create one and see how that is different. During the setup of a project space, a Jira project must be specified that will initiate NP-complete the creation of all necessary connections between that project. If the cofilin space be created. Once the new project space is created, it's homepage contains a list of tasks from JIRA right away. But JIRA connection is not all that project spaces providing five pages have been created during the space setup. Let's have a look at what they are. The fiery stage allows for uploading files and sharing them through this page. The product requirements page allows for creating and managing product requirements with a heavy reliance on the requirements template. Meeting notes does a similar thing, but for meeting notes. And the same goes for retrospectives at decision lock. This is probably enough project staff to hit the ground running. Of course, you don't have to use all created pages and you can customize the ones you will be using.
17. Atlassian Marketplace: In the previous lesson, we reviewed integration between confidence in JIRA and older use wood things. It provides. You notice that all components required for disintegration to work were already present, which is kind of expected since both confidence in JIRA, our products from the same company. Therefore, there was no need to add anything external from Atlassian. But that is not where integration stop. Confluence. Jira can integrate with dozens of more applications through hundreds of apps. In all of them, you can find in the one spot a class here at Marketplace. The Atlassian marketplace is a platform for Atlassian customers to discover, try and buy apps for costless JIRA and other Atlassian products. These apps are plugins, which is another name for them, enhance default product functionality and enable integration between different products. The UPS offered in the marketplace are developed by both Atlassian and third-party developers. You can reach marketplace if you go to the URL you see on your screen or from setting screen in confidence. When you get there, you can browse the marketplace and install apps in your application, all without leaving your Atlassian product. There are a couple of ways to find the apps that you need. If you do know something about what you are looking for, you can use the search box, just type the search term, hit Enter, and you will see a list of apps that matched review provided. If you prefer to browse. There are several global categories, such as top rated, top selling, newest, and so on. The next two groupings are very useful. You can browse apps by a specific Atlassian product. So here are called subs. Notice that categories on the left behave like compound filters. Top rated label is still selected. So I'm now actually looking into top rated conference apps. If I click on the cloud in the hosting section, I see top rated coffers apps for the Cloud. There are still watts for the self-hosted addition of costless. The next set of the authors or usage categories, it all the way down. There are a few more very important filters. The first one is vendor supported. And you would use that if you are interested only in apps with active technical support, it might sound awkward, but not all apps in the marketplace come with active support. The next one is the free filter. It obviously you will use it if you want to limit the search. Only two free apps. There is no standard cost structure for apps. Some are free, some are free trials with limited time or functionality, and some require a fee to be paid. The last one is. Beta version, which would only show beta versions of apps. There is a word of caution, when do you live with the apps from the marketplace? As said earlier, these apps significantly improved the functionality of Atlassian products. But in order to accomplish that, they are very powerful if they can change the behavior of almost any part of the Atlassian applications, you must trust an app before you install it. Even though apps are designed to enhance your product, there can be unintended effects. When you use or install apps, you do so at your own risk is third party apps are supported by Atlassian. Always be aware of where and who and up comes from. The marketplace. Cells, apps written by both eclampsia and third-party developers. You can even write one yourself. The best way to stay safe is to check the source, the number of installs, the number of reviews, and the number of stars for any apps that you consider installing. You can see all this info on each app's card, but they're also more details of the app screen, which we will review shortly. Apps are installed into your Atlassian products by the system administrator. Apps can also be remotely contained web applications that integrate into cloud sites. You can enable or disable, install and uninstall apps anytime from your Atlassian products administration pages. Let's say I need to integrate conflicts with Google Drive. And to do that, I will need some Google Drive up. I will type Google Drive if the search box at several results will show. Now the problem is how to pick the right one. As I said earlier, you should check the information in the cart with the focus on description, a number of installs and reviews. This app claims it is official. It has to, it has by far the most installs over 10000. If the decent number of stars, I want to find out more information. So I will click on the cart and once the app page loads, I will see that the app is provided by Atlassian. It is supported, works in the Cloud. It has more than 10000 installs, 77 reviews with 2.5 stars, average entities free. There are also some screenshots at descriptions of the app. The only concern based on these numbers would be the number of stars, which is not bad, but it is also not great either. I would like to actually see individual reviews and what other people experienced when using this app. That information is available for me to check the reviews, tap. The support tab has information about technical support. A diversion staff has some details about the correct version. The last step, installation has the installation instructions. I have decided that I like to give this upper shot. And in the next lesson, I will install this up if collect my call Thrace instance with my Google Drive.
18. Integration with Google Drive: In the previous lesson, I decided which up I want to install to connect to Google Drive. In this lesson, I will install that up and integrate it to a confluence page, several documents from my Google Drive. On the app page in marketplace, there is the Get it now button. Click on that button and you will get this screen with the login link. If you already have a session going on in your browser, you will just skip through and you will see a list of confidence instances to which you have access. Otherwise, you will be prompted to log into compliance. Select the site where you want to install the app and click the Install button. You will be transferred to the confluence settings section of your site and ask for one more conformation. The installation will start. Its status will show in the bottom left corner, and you'll be notified when the installation is complete. Let's have a quick look at my Google Drive at the documents that I want to bring in complex. There are three of them, one for each type. Here is one Google Docs, google Sheets, and Google slides. I also have the simple Confluence page ready, and it has a title for each of the three documents I need to bring in. I'm going to start with the Google Doc first. When an app from a class year marketplaces installed, it will add one or more backwards to the catalog. Therefore, I will open the macros catalog and search for anything related to Google. There are three new macros in the catalog, one for each document type. I need Google Docs now. And when I select it, I prompted with a very simple macro configuration screen. There are only three parameters. It to already have some default values. The key parameter is the Google Docs URL. So I will flip over to Google Drive to get its value. I will right-click on the document that I want to integrate. Select, Get link from the pop-up menu. And before copying going, I will verify the prohibitions that will be included with the link. I do want this document to be editable from confluence. So the editor permission works well for my need. Once I copy the link and close the pop-up, I will switch back to confluence and paste the URL. It is field. The document will shortly appear in the preview mode, and macro can be asserted in the page. The page can be published. There will be a couple of refreshes along the way, but eventually the page with a lot with Google Doc URL was copied. It was set to provide editing privileges. Let's check if and how can I edit embedded document? I have now viewing this Confluence page and apparently I can edit the text, but there is no formatting toolbar or anything else that will allow me to do any kind of formatting. However, if I switch to full screen mode using this icon here, I do see the full formatting toolbar and it is completely functional for applying various formatting to the text. The next document to add is the Google Sheet. This time, I will use the slash character to add the macro with the list comes up, I will select Google Sheet. Again, URL is required and I have to get it from Google Drive. It is pretty much the same set of steps as the last time. The only difference is that now I will set the link provisions on Viewer, which will prevent editing of this sheet when it is displayed on a confluence page, I will copy the link and switch back to conference. Then I will paste the link in the macro and Google sheet. We'll come up with a preview mode. I will insert the macro and I will publish the page. What's the page renders the spreadsheet is there, but I could not make any changes since the URL has been set for viewing, only. One more document is left to embed at. That is a Google slide. As expected, it is again, the same set of steps needed to complete that task. Find the macro. This time Google Slides, switch to Google Drive to get the URL. This time it will be the editorial link so that slides can be edited from conference. Copy the URL, paste it in the macro called Fermi the preview. Finally, insert a page and then publish the page. Once the page is reloaded, slides are displayed. I can view and browse slides, use pointer and a few other things. But I can also open the editor that brings me to Google Slides editing screen with all editing features as if I have opened a document from Google Drive. Just a few minutes I was able to fully integrate these three document type sudo Confluence page. It is very simple and very quick to do. There are countless scenarios where this kind of feature is extremely useful. One of them being that if you have legacy documents in Google Drive and you are switching to Confluence, you don't need to recreate all the documents which would be, which could be thousands of them before they are accessible to confidence users. Another scenario is if one team is using Google Drive and plans to continue to use it, but at the same time, these documents need to be shared with another team who is using Confluence, not Google Drive. This absorbs that problem in no time. This is certainly not the only Google Drive integration up that can do all these wonderful things. But the concept is the same for other apps. Therefore, you now have enough knowledge to experiment with more apps, not just for Google Drive and find out which ones work best for your needs.
19. Course Roundup: Congratulations on completing this course. You went through a lot of content and you're now familiar with all confidence fundamentals. Therefore, you should feel confident to start using Confluence for real things. It does not matter if you are a software developer or a project manager or engineer, or a financial analyst, or you are in a trait. If your work requires creating, managing, and sharing content with other people, confidence can help you a lot. And now after going through 80 something mediates of the course, you have the knowledge and the means to do so. Here's a quick summary of what you achieved by going through this course. You have full access to confidence in JIRA in the cloud. You know, all about pages and spaces, and you have already created a few of them. You are familiar with creating appealing pages using macros and templates. You'll learn how to collaborate with your teammates by sharing content and commenting efficiently. You can stay informed about content changes because you know how to configure notifications. Integration with Jira is no secret to you. You are fully aware of how integration with other application works. That is a lot of stuff that you learned and now you know how to do. So go ahead, start working on your ideas and use what you've learned in this course to utilize confidence to help you with your work. I hope that you like the course and found it useful. I would be happy and appreciate to hear back from you about the experience through this course and any suggestions you might have, how to make it better. All the best.
 Vlajko Knezic, Technologist and Methodologist