Transcripts
1. Elephant Watercolor Introduction: Hey, friends, how are you here? We are back for another fund lesson. I can't wait to share this with you. It's one of my favorites. Before we get started, let's go over the supplies and the materials that you will need for this lesson. The first thing is a piece of watercolor paper. It's a thick paper that holds water really, really well. The next thing that you will need are some watercolor paints. You will need a Sharpie marker or a marker that is permanent. Ah, marker that will not spread when water is applied to it. You will also need some crayons I am already choosing to use to bright colors. Um, I guess I should say light colors that would be yellow and white. You can use whatever color you like that as long as it's pretty light. Like this would be cool right here, this color pink or this bright orange that would be neat or this bright blue right here. So you get to decide on that. We will also need some water in a paintbrush, and then we will need a paper towel for quick cleanup
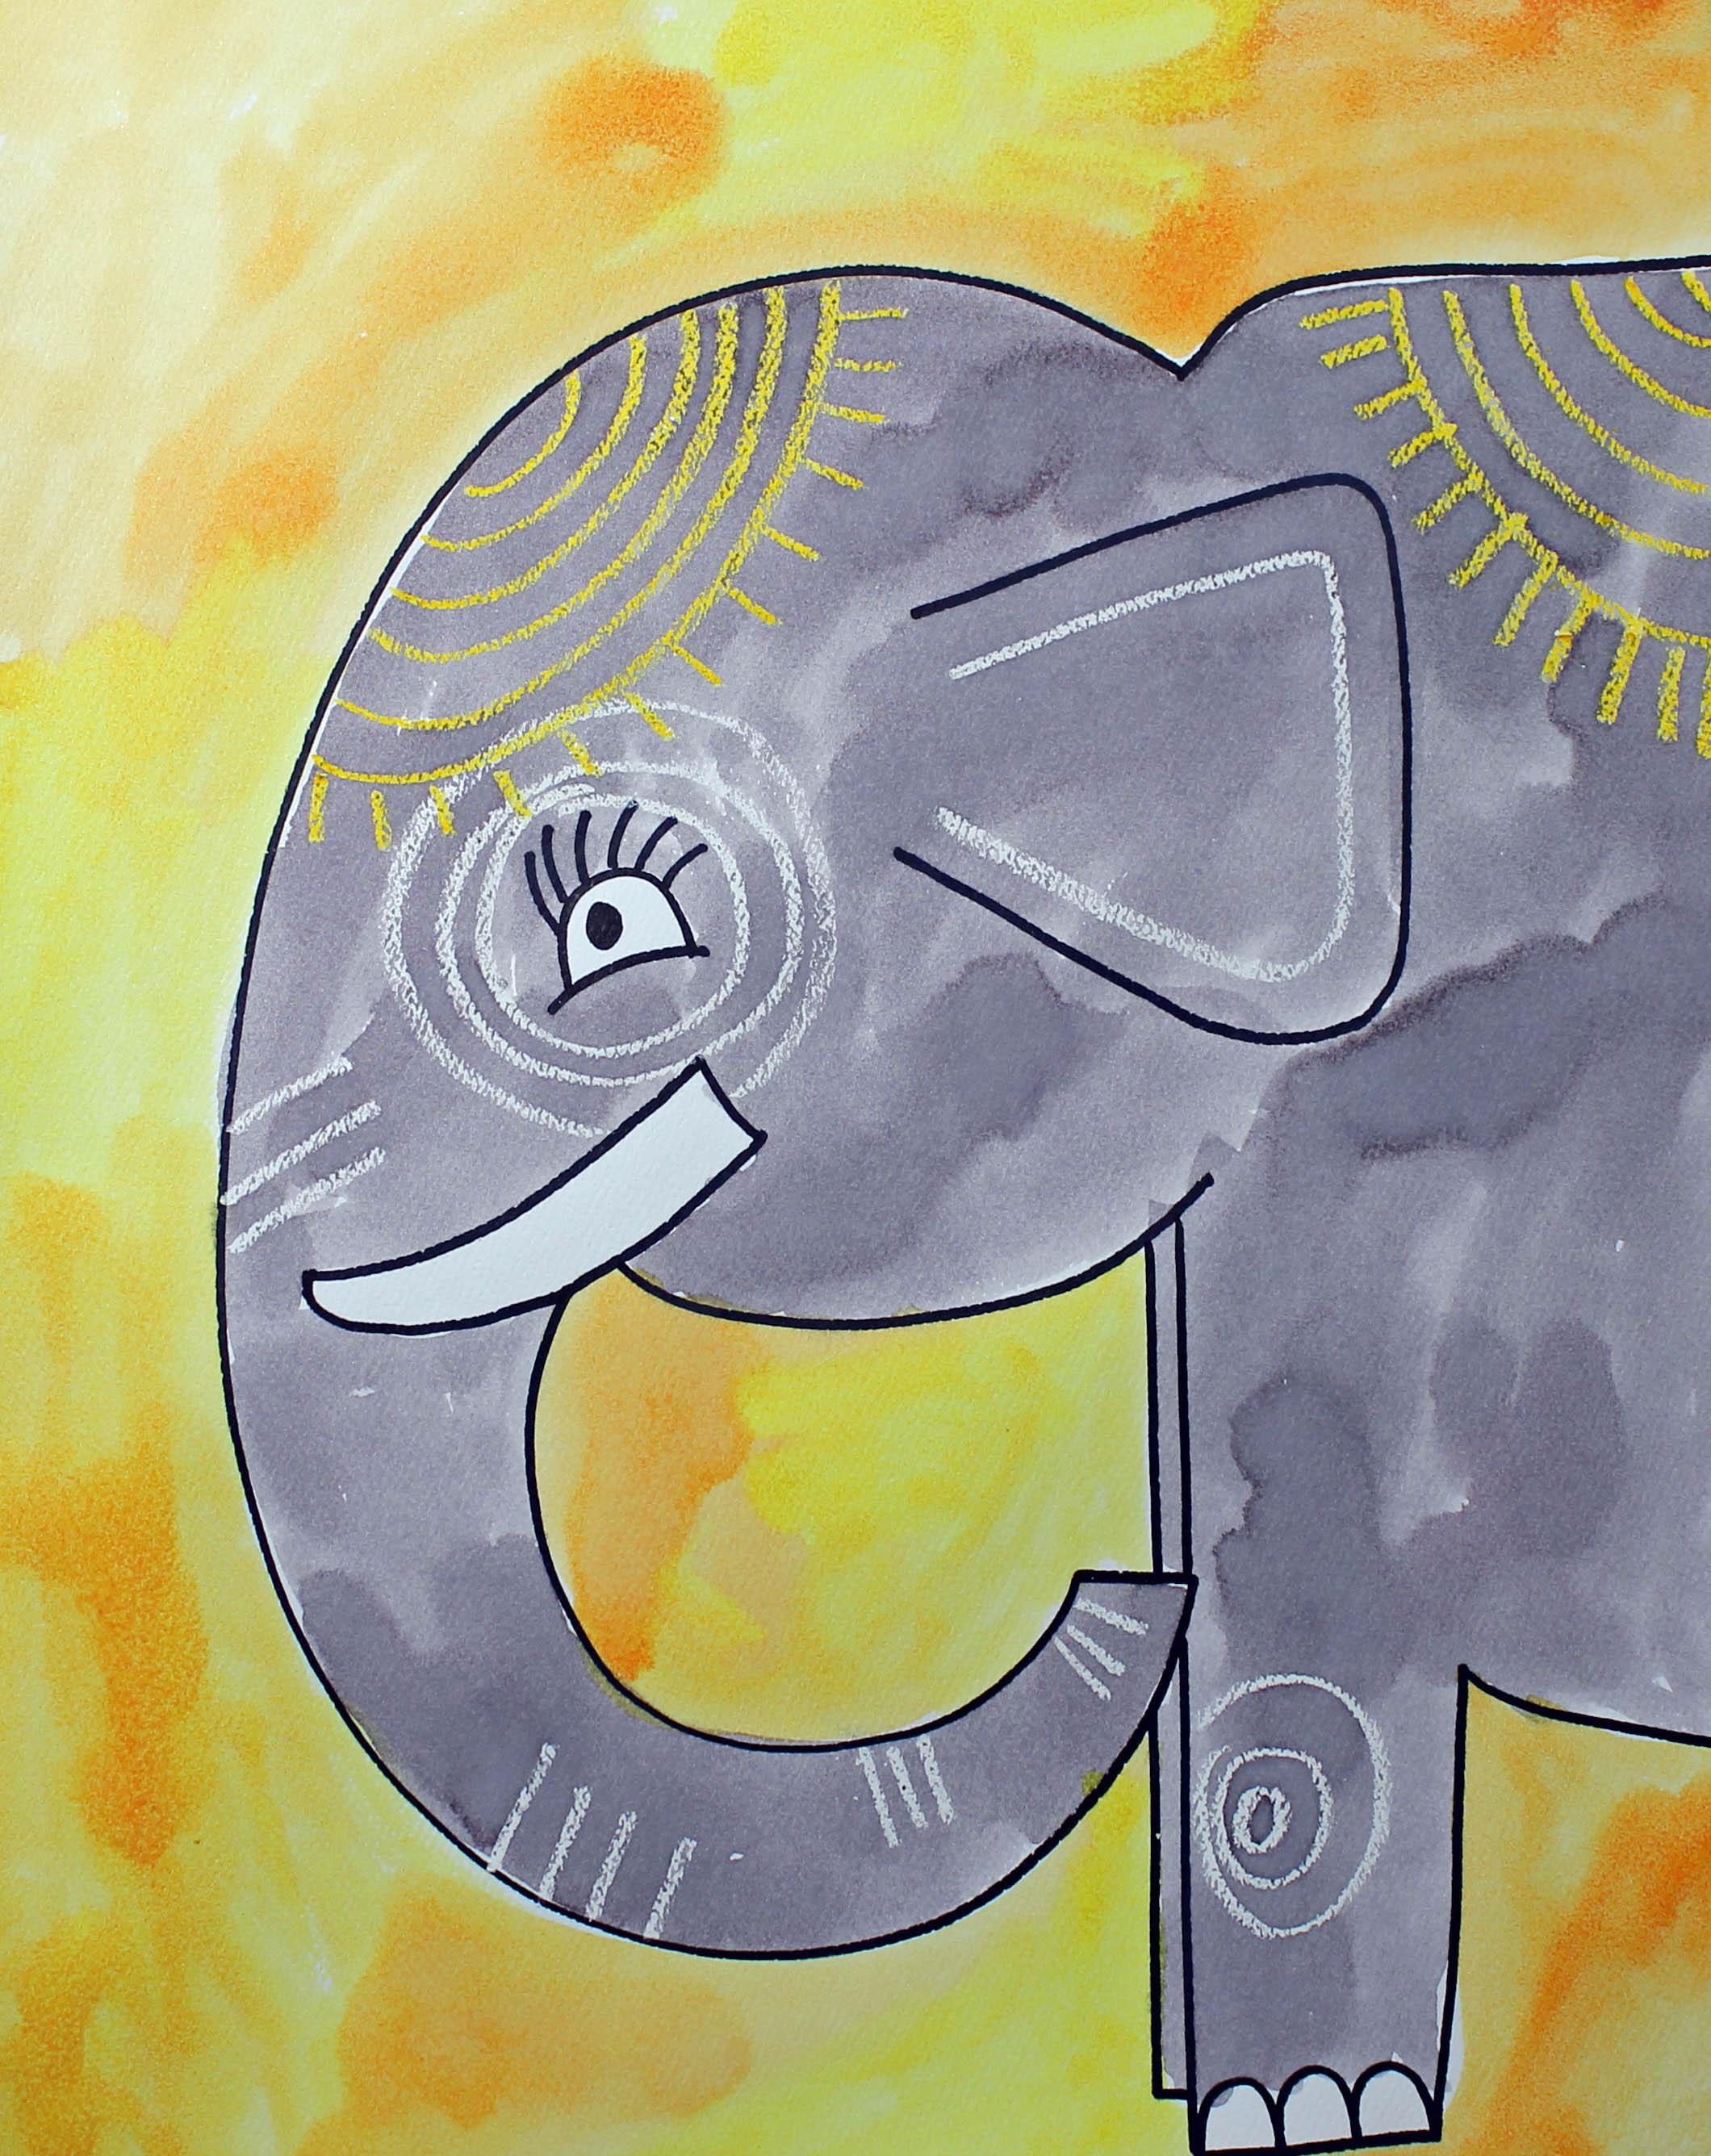
2. Step 1: Drawing an Elephant: So let's get started going to actually move all this stuff aside so I can make sure that I have enough room to create. All right. The first thing that I'm going to do is take a look at my paper. It's pretty large years might not be quite this large, but I am going to make ah, large letter C and I'm not gonna let it touch the bottom or the top or the sides. But what I am going to do is make it large. If I make it small, then I will have a tiny elephant, which would be cute. But for this project, we're going to make try to make him nice and big. All right, So I'm going to start out about right here, and I'm going to create a large letter C. I wonder if you could tell what part of the elephant this is already. This is going to be the top of his head and his trunk. So the next thing that we're going to do is go back up to the top and we're going to create a small V and then go straighten it out, and that's going to be the elephants back from here. We're going to close up the bottom of his trunk, and then we are going to follow this, see around, and it's going to be a little bit wider. As we go up to the top, we're going to make a tusk right here. And so I guess I'd like to start, maybe about right here like this, And the tip is going to be a little bit roundish. The next thing that I'm going to do is I'm going to make his the bottom of his head, and I'm going to make it come out a little bit past the bottom of the trunk. Then next thing that I'm going to do is make his ear. So his ears going to be kind of a trying Euler shape on Lee, it's not going to close. Let me show you what I mean. So we have a slanted line, rounded angle and slanted line coming back up just like that. Now I'm going to create some legs for him so the legs are gonna go almost to the bottom, but not quite. So what we're going to do is we're going to start here. Come down. Stop about right there. Did you see what I did right here in this area? I got to the trunk. I picked up my marker and then I started again. I didn't go through the through the trunk. I wanted it to appear like the leg is behind the trunk. Okay, then what I'm going to do is I'm going to create another life, and this leg is going to be behind the 1st 1 So it's going to be another straight line that follows the first straight line just like that. But look what I did. I didn't go all the way to the bottom. I'm going to stop that, like right there, because it's a little bit further away from us. All right, then. Next thing that I'm going to dio is I'm going to make a straight line going across and then up, and then here is going to be his tummy heart of his tummy. Because, as you can see, this is just the front part of the elephant. The rest of his body is behind and we can't see it. Actually, I should say it's off the paper so we can't see the rest of his body. Okay, Now I really like the way that this is looking. We need to put just a little bit of detail on him. So what we're going to do is finish out his toenails with some upside down use that are connected together. Let's make an eye, his eyes pretty low. I'm going to make a curved line with an upside down u the people inside. Then I'm going to make some long eyelashes all so cute. All right, so the next thing that we're going to do is we are going to put a little bit of crayon on here, and you might be saying, Wait a minute. I thought we were going to paint this. Well, we are going to paint it after we put the crown on, and it's going to create a special effect. We're going to be doing a process and technique called Korean resist. And what will happen ISS when we put the ground down, then we put the paint on top. The cran will resist. It'll push away the paint so that so that you will see the grand very clearly. I'm going to show you what I mean now when you are using your Kranz. Like I said, you some light color. Kranz, you need to press really, really hard for this to work. If you don't press firmly that it might not work quite as well. So sometimes I have to warn you, if you are pressing super hard with grants, sometimes they do break. If they break no problem. Just peel the paper away a little bit and start over grands air. Not the strongest things in. It's no problem if they break alright. What I'm going to do is I'm going to start with some lines with my right crayon pressing firmly around my elephants eyes, and you are not even going to be able to see the lines at this point, I can see them a little bit, but really not very clearly. So I put some white lines around here and I pressed really, really hard that you know how elephants have little wrinkles in their knows. I'm going to use white pressing very hard, and I'm going to put some lines, and I know it's hard to see are impossible to see, but there are little lines going in Siris of three or four all the way down his strong. Okay, then I'm going to put his me and his knees going to be a Siris of circles getting bigger and bigger. So I have a small circle. Um, it's a circle in a large circle. So I think that that's all that I'm going to do for his the white crayon using the white crown. I want to leave this right here. This tusk. I'd like to leave it white. So when I am painting it, I am not going to go over that with paint. Just so you know. Now I'm going to take my yellow and I'm going to create some decoration up here and you'll be able to see this a little bit better because it is a yellow Oh, I'm pressing really, really hard. I'm using all the power that I have in my fingers to create some really dark lines. And remember what I said. You don't have to use white and yellow. You couldn't use any color that you like. So here I'm going to create some more lines like a little blanket on his back. Like this again. I'm pressing really, really hard If you do not press hard enough. Then your paint will go right over this and the grand will not be able to resist. Okay, I forgot one thing with the white. I'm going to put a little bit of a line following the original airline inside here. So you might be thinking. Wow, there's not very much detail on here. However, once we start painting, you will see that the colors will start popping out. All right, So the next lesson is going to pee part two of this elephant, Petey, and I look forward to seeing you back. Okay? See, in a mini by.
3. Step 2: Painting an Elephant: Hey, friends, welcome back to this lesson. I'm excited to see you again. The first thing that we're going to want to do before we start painting our elephants is we're going to want to wake up our paints. We're going to do that by putting a small drop of water in each color that we feel that we might use. And what that will do is prepare the paint. So when we're ready to come in dipper paintbrush in, then it will be ready for us. The paint will be ready for us. So take a look at your picture and decide what color you would like to paint your elephant and the background. So what I'm going to do is I am going to choose Gray now, As you can see, I don't have grey in my colors. So I'm making some gray. And the way that I make gray is just by using a bunch, got black and even more water because I want to make sure that this elephant is light enough for us to see details. But I also do want him to be grey. So let's take a look. I'm going to test this out right here. Yeah, that looks really good. So here we go. Now, watch what happens when I go over the crayon. Look at that. It's almost like magic. Almost like magic. Do you see how the Korean is resisting the watercolor paints? It's standing out. If you can't see it on mine. I'm hoping that you can see it on yours. So I'm just going to paint this whole guy Gray, which is really black. I think I'm gonna keep his toenails quite. Look at that. Do you see that right there? How that's popping out. Oh, this is so before. I'm really happy with that. All right, I have this body painted. Now I'm going to go ahead, paint his ear. You remember that? Little bit of grand I put on is here. It's a really standing out. Now, remember, when your water color painting, we don't go over the same area over and over, over, over, over the same area. Because if we do that, then for one, it will break the paper down. But for two, if you are doing a crayon, resist right now, it will wear that wax down in the crayon and then you won't be able to see it as well. So just go over at one time. I really like how he's looking at this point. And I'm hoping that you can see on the video how the white crayon is really standing out at this point. Remember I said I was going to leave that tusk white just gonna paint right around that little guy. And I also left his eye. White is well okay. Down to the trunk. This is really a Quicken easy project, and I hope you were having fun with it. You know what? I'm a teacher, and I've also done this project with kids in my class and what they like to do sometimes is they like to put decorations are around the elephant as well. You can do anything. You can do patterns or flowers. So if you want to do that, you can stop painting right now. Put some more decorations around with some bright color Kranz, and then you can start using your watercolor paints again. That would be such a cool idea. So just sum's just something that you can think about. So what I'm going to do is I'm just going to use my orange And I'm also going to use a little bit of yellow mixed in there. And I'm just going to go around this little guy to make him nice and bright. See, I'm just kind of going back and forth with my colors back and forth with my colors. And as I said, this is a pretty quick lesson. You know, you just get this alone at almost finish. You can use any color that you want on the background and you can use any color that you want on the elephant. It is up to you. This is your artwork and it's important you are doing art that you do what you want to dio get creative with it. Look at that. I am almost finished more down here at the bottom. And then I want to make sure that I get the paint on the inside of this area right here. Just polite this. Remember the more water that you use, the softer the colors will be. The less water you use, the stronger the colors will be. Hey, what do you think? I think it looks pretty cool. I really like him or it could be a her. I hope you like this lesson. Please come back to see the next lesson I am excited about. Be your art teacher. Take care. Bye.
 Em Winn, Teacher, Art Instructor, Artist